


FormNo.3440-230RevC
Flex-ForcePowerSystem™41cm(16in)60VMAX
Chainsaw
51850,51850T
Motosierra60VMAXde41cm(16")conFlex-Force
PowerSystem™
51850,51850T
TronçonneuseFlex-ForcePowerSystem™41cm(16
po)60VMAX
51850,51850T
www.T oro.com.
*3440-230*


FormNo.3438-313RevC
Flex-ForcePowerSystem
(41cm)60VMAXChainsaw
ModelNo.51850—SerialNo.320000001andUp
ModelNo.51850T—SerialNo.320000001andUp
™
16in
Registeratwww.T oro.com.
OriginalInstructions(EN)
*3438-313*

Forassistance,pleasesee
www.Toro.com/support
forinstructionalvideos
orcontact1-888-384-9939
beforereturningthis
product.
WARNING
CALIFORNIA
Proposition65Warning
Thepowercordonthisproductcontains
lead,achemicalknowntotheState
ofCaliforniatocausebirthdefects
orotherreproductiveharm.Wash
handsafterhandling.
Useofthisproductmaycauseexposure
tochemicalsknowntotheStateof
Californiatocausecancer,birthdefects,
orotherreproductiveharm.
DealerorToroCustomerServiceandhavethemodel
andserialnumbersofyourproductready.Figure1
identiesthelocationofthemodelandserialnumbers
ontheproduct.Writethenumbersinthespace
provided.
Introduction
Thischainsawisdesignedforcuttingtreebranches,
logs,andwoodenbeamsofadiameternolongerthan
thecuttinglengthoftheguidebar.Itistobeused
onlybyadults.ItisdesignedtouseToroFlex-Force
lithium-ionbatterypackModels88625(includedwith
51850),88620,88640,88650,88660,or88675.
Thesebatterypacksaredesignedtobecharged
onlybybatterychargerModels88602(provided
withModel51850),88605,or88610.Usingthese
productsforpurposesotherthantheirintendeduse
couldprovedangeroustoyouandbystanders.Using
theseproductsforpurposesotherthantheirintended
usecouldprovedangeroustoyouandbystanders.
Model51850Tdoesnotincludeabatteryora
charger.
Readthisinformationcarefullytolearnhowtooperate
andmaintainyourproductproperlyandtoavoid
injuryandproductdamage.Youareresponsiblefor
operatingtheproductproperlyandsafely.
Visitwww.T oro.comformoreinformation,including
safetytips,trainingmaterials,accessoryinformation,
helpndingadealer,ortoregisteryourproduct.
Wheneveryouneedservice,genuineT oroparts,or
additionalinformation,contactanAuthorizedService
©2021—TheToro®Company
8111LyndaleAvenueSouth
Bloomington,MN55420
Contactusatwww.T oro.com.
2
PrintedinChina
AllRightsReserved

Important:Withyourmobiledevice,youcan
scantheQRcode(ifequipped)ontheserial
numberplatetoaccesswarranty,parts,andother
productinformation.
Figure1
1.Modelandserialnumberlocation.
ModelNo.
SerialNo.
Thismanualidentiespotentialhazardsandhas
safetymessagesidentiedbythesafety-alertsymbol
(Figure2),whichsignalsahazardthatmaycause
seriousinjuryordeathifyoudonotfollowthe
recommendedprecautions.
Figure2
Safety-alertsymbol
Contents
Safety.......................................................................4
PersonalProtectiveEquipment..........................6
SafetyandInstructionalDecals..........................7
Setup........................................................................9
MountingtheBatteryCharger(Optional).............9
FillingtheChainSawwithBarandChain
Oil...................................................................9
ProductOverview.....................................................9
Specications..................................................10
Attachments/Accessories.................................10
Operation................................................................10
BeforeUsingtheChainSaw.............................10
StartingtheChainSaw......................................11
ShuttingOfftheChainSaw................................11
CuttingwiththeChainSaw...............................12
PruningaTree..................................................13
g315697
sa-black
FellingaTree....................................................13
LimbingaFallenTree.......................................15
BuckingaLog...................................................16
InstallingtheBatteryPack................................17
RemovingtheBatteryPack..............................17
ChargingtheBatteryPack................................18
Maintenance...........................................................19
RecommendedMaintenanceSchedule(s)...........19
CheckingtheOilLevelandAddingBarand
ChainOil.......................................................19
CheckingtheChainBrake................................20
CheckingtheFlowofBarandChain
Oil.................................................................20
AdjustingtheChainT ension.............................21
ServicingtheGuideBar,Chain,andDrive
Sprocket........................................................22
InstallingtheGuideBarandChain....................23
SharpeningtheChain.......................................23
Service.............................................................23
Storage...................................................................24
PreparingtheBatteryPackfor
Recycling......................................................24
Troubleshooting......................................................25
Thismanualuses2wordstohighlightinformation.
Importantcallsattentiontospecialmechanical
informationandNoteemphasizesgeneralinformation
worthyofspecialattention.
3

Safety
WARNING
Readallsafetywarningsandallinstructions.
Failuretofollowthewarningsandinstructions
mayresultinelectricshock,reand/orserious
injury.
Saveallwarningsandinstructionsforfuture
reference.
Theterm“powertool”inallthewarningsrefers
toyourmains-operated(corded)powertoolor
battery-operated(cordless)powertool.
IMPORTANTSAFETY
INSTRUCTIONS
I.Workareasafety
1.Keepworkareacleanandwelllit.Cluttered
ordarkareasinviteaccidents.
2.Donotoperatepowertoolsinexplosive
atmospheres,suchasinthepresenceof
ammableliquids,gasses,ordust.Power
toolscreatesparks,whichmayignitethedust
orfumes.
3.Keepchildrenandbystandersawaywhile
operatingapowertool.Distractionscancause
youtolosecontrol.
II.Personalsafety
1.Stayalert,watchwhatyouaredoing,and
usecommonsensewhenoperatingapower
tool.Donotuseapowertoolwhileyouare
tiredorundertheinuenceofdrugs,alcohol,
ormedication.Amomentofinattentionwhile
operatingpowertoolscouldresultinserious
personalinjury .
2.Usepersonalprotectiveequipment.Always
weareyeprotection.Protectiveequipment
suchasadustmask,non-skidsafetyshoes,
hardhat,orhearingprotectionusedfor
appropriateconditionsreducespersonalinjuries.
3.Preventunintentionalstarting.Ensure
theswitchisintheOFF-positionbefore
connectingtopowersourceand/orbattery
pack,pickinguporcarryingthetool.Carrying
powertoolswithyourngerontheswitchor
energizingpowertoolsthathavetheswitchon
invitesaccidents.
4.Removeanyadjustingkeyorwrenchbefore
turningthepowertoolon.Awrenchorakey
leftattachedtoarotatingpartofthepowertool
mayresultinpersonalinjury .
5.Donotoverreach.Keepproperfootingand
balanceatalltimes.Thisenablesbettercontrol
ofthepowertoolinunexpectedsituations.
6.Dressproperly.Donotwearlooseclothing
orjewelry .Keepyourhair,clothing,and
glovesawayfrommovingparts.Loose
clothes,jewelry,orlonghaircangetcaughtin
movingparts.
7.Ifdevicesareprovidedfortheconnection
ofdustextractionandcollectionfacilities,
ensurethattheseareconnectedand
properlyused.Useofdustcollectioncan
reducedust-relatedhazards.
III.Powertooluseandcare
1.Donotforcethepowertool.Usethecorrect
powertoolforyourapplication.Thecorrect
powertoolwilldothejobbetterandsaferatthe
rateforwhichitwasdesigned.
2.Donotusethepowertooliftheswitch
doesnotturnitonandoff.Anypowertool
thatcannotbecontrolledwiththeswitchis
dangerousandmustberepaired.
3.Disconnecttheplugfromthepowersource
and/orthebatterypackfromthepowertool
beforemakinganyadjustments,changing
accessories,orstoringpowertools.Such
preventivesafetymeasuresreducetheriskof
startingthepowertoolaccidentally.
4.Storeidlepowertoolsoutofthereachof
children,anddonotallowpersonsunfamiliar
withthepowertoolortheseinstructions
tooperatethepowertool.Powertoolsare
dangerousinthehandsofuntrainedusers.
5.Maintainpowertools.Checkfor
misalignmentorbindingofmovingparts,
breakageofparts,andanyothercondition
thatmayaffectthepowertool’soperation.
Ifdamaged,havethepowertoolrepaired
beforeuse.Manyaccidentsarecausedby
poorlymaintainedpowertools.
6.Keepcuttingtoolssharpandclean.Properly
maintainedcuttingtoolswithsharpcuttingedges
arelesslikelytobindandareeasiertocontrol.
7.Usethepowertool,accessories,andtoolbits
etc.inaccordancewiththeseinstructions,
takingintoaccounttheworkingconditions
andtheworktobeperformed.Useofthe
powertoolforoperationsdifferentfromthose
intendedcouldresultinahazardoussituation.
4

IV.Batterytooluseandcare
VI.Chainsawsafety
1.Rechargeonlywiththechargerspeciedby
themanufacturer.Achargerthatissuitablefor
onetypeofbatterypackmaycreateariskofre
whenusedwithanotherbatterypack.
2.Usepowertoolsonlywithspecically
designatedbatterypacks.Useofanyother
batterypacksmaycreateariskofinjuryandre.
3.Whenbatterypackisnotinuse,keepitaway
fromothermetalobjects,likepaperclips,
coins,keys,nails,screwsorothersmall
metalobjects,thatcanmakeaconnection
fromoneterminaltoanother.Shortingthe
batteryterminalstogethermaycauseburnsor
are.
4.Underabusiveconditions,liquidmaybe
ejectedfromthebattery;avoidcontact.If
contactaccidentallyoccurs,ushwithwater.
Ifliquidcontactseyes,additionallyseek
medicalhelp.Liquidejectedfromthebattery
maycauseirritationorburns.
5.Donotuseabatterypackortoolthatis
damagedormodied.Damagedormodied
batteriesmayexhibitunpredictablebehaviour
resultinginre,explosionorriskofinjury .
6.Donotexposeabatterypackortooltore
orexcessivetemperature.Exposuretoreor
temperatureabove130°C(265°F)maycause
explosion.
7.Donotexposeabatterypackortooltorain
orwetconditions.Waterenteringapowertool
willincreasetheriskofelectricshock.
8.Followallcharginginstructionsanddo
notchargethebatterypackortooloutside
thetemperaturerangespeciedinthe
instructions.Chargingimproperlyorat
temperaturesoutsidethespeciedrangemay
damagethebatteryandincreasetheriskofre.
V.Service
1.Haveyourpowertoolservicedbya
qualiedrepairpersonusingonlyidentical
replacementparts.Thisensuresthatthesafety
ofthepowertoolismaintained.
2.Neverservicedamagedbatterypacks.
Serviceofbatterypacksshouldonlybe
performedbythemanufacturerorauthorized
serviceproviders.
1.Keepallpartsofthebodyawayfromthe
sawchainwhenthechainsawisoperating.
Beforeyoustartthechainsaw,makesure
thesawchainisnotcontactinganything.
Amomentofinattentionwhileoperatingchain
sawsmaycauseentanglementofyourclothing
orbodywiththesawchain.
2.Alwaysholdthechainsawwithyourright
handontherearhandleandyourlefthand
onthefronthandle.Holdingthechainsawwith
areversedhandcongurationincreasestherisk
ofpersonalinjuryandshouldneverbedone.
3.Holdthepowertoolbyinsulatedgripping
surfacesonly,becausethesawchainmay
contacthiddenwiring.Sawchainscontacting
a″live″wiremaymakeexposedmetalpartsof
thepowertool″live″andcouldgivetheoperator
anelectricshock.
4.Wearsafetyglassesandhearingprotection.
Furtherprotectiveequipmentforhead,
hands,legs,andfeetisrecommended.
Adequateprotectiveclothingwillreduce
personalinjurybyyingdebrisoraccidental
contactwiththesawchain.
5.Donotoperateachainsawinatree.
Operationofachainsawwhileupinatreemay
resultinpersonalinjury.
6.Alwayskeepproperfootingandoperate
thechainsawonlywhenstandingonxed,
secureandlevelsurface.Slipperyorunstable
surfacessuchasladdersmaycausealossof
balanceorcontrolofthechainsaw.
7.Whencuttingalimbthatisundertensionbe
alertforspringback.Whenthetensioninthe
woodbresisreleasedthespringloadedlimb
maystriketheoperatorand/orthrowthechain
sawoutofcontrol.
8.Useextremecautionwhencuttingbrushand
saplings.Theslendermaterialmaycatchthe
sawchainandbewhippedtowardyouorpull
youoffbalance.
9.Carrythechainsawbythefronthandlewith
thechainsawswitchedoffandawayfrom
yourbody.Whentransportingorstoringthe
chainsawalwaysttheguidebarcoverand
removethebattery.Properhandlingofthe
chainsawwillreducethelikelihoodofaccidental
contactwiththemovingsawchain.
10.Followinstructionsforlubricating,chain
tensioning,andchangingaccessories.
Improperlytensionedorlubricatedchainmay
eitherbreakorincreasethechanceforkickback.
5

11.Keephandlesdry,clean,andfreefromoil
andgrease.Greasy,oilyhandlesareslippery
causinglossofcontrol.
12.Cutwoodonly.Donotusechainsawfor
purposesnotintended.Forexample:donot
usechainsawforcuttingplastic,masonry
ornon-woodbuildingmaterials.Useofthe
chainsawforoperationsdifferentthanintended
couldresultinahazardoussituation.
13.Avoidkickback.Kickbackmayoccurwhenthe
noseortipoftheguidebartouchesanobject,or
whenthewoodclosesinandpinchesthesaw
chaininthecut.
Tipcontactinsomecasesmaycauseasudden
reversereaction,kickingtheguidebarupand
backtowardyou.
Pinchingthesawchainalongthetopofthe
guidebarmaypushtheguidebarrapidlyback
towardyou.
Eitherofthesereactionsmaycauseyoutolose
controlofthesaw,whichcouldresultinserious
personalinjury.Donotrelyexclusivelyuponthe
safetydevicesbuiltintoyoursaw.Asachain
sawuser,youshouldtakeseveralstepstokeep
yourcuttingjobsfreefromaccidentorinjury.
PersonalProtective
Equipment
Kickbackistheresultoftoolmisuseand/or
incorrectoperatingproceduresorconditionsand
canbeavoidedbytakingproperprecautionsas
givenbelow:
•Maintainarmgrip,withthumbsand
ngersencirclingthechainsawhandles,
withbothhandsonthesawandposition
yourbodyandarmtoallowyoutoresist
kickbackforces.Kickbackforcescan
becontrolledbytheoperator,ifproper
precautionsaretaken.Donotletgoofthe
chainsaw.
•Donotoverreachanddonotcutabove
shoulderheight.Thishelpsprevent
unintendedtipcontactandenablesbetter
controlofthechainsawinunexpected
situations.
•Onlyusereplacementbarsandchains
speciedbythemanufacturer.Incorrect
replacementbarsandchainsmaycause
chainbreakageand/orkickback.
•Followthemanufacturer’ssharpening
andmaintenanceinstructionsforthesaw
chain.Decreasingthedepthgaugeheight
canleadtoincreasedkickback..
Figure3
1.Wearahardhatin
situationswheredebris
maycontactthehead.
2.Wearhearingprotection5.Wearprotectivepantsor
3.Wearsafetyglasses
and/orafaceshield
4.Weargloves
chaps
6.Wearsubstantial,
slip-resistantfootwear
g316566
SAVETHESE
INSTRUCTIONS
6

SafetyandInstructionalDecals
Safetydecalsandinstructionsareeasilyvisibletotheoperatorandarelocatednearanyarea
ofpotentialdanger.Replaceanydecalthatisdamagedormissing.
140-2162
1.ReadtheOperator’sManual.6.Stayawayfrommovingparts.
2.Wearhearingprotection.7.Keepallguardsandshieldsinplace.
3.Weareyeprotection.8.Donotcontactobjectswiththeguidebartip;tipcontactcan
causeseriouspersonalinjury.
4.Donotexposetorain.9.Alwaysuse2handswhenoperatingthechainsaw .
5.Cuttinghazardofhand.
decal140-2162
decal140-2163
140-2163
decal140-2167
140-2167
decal137-9454
137-9454
1.ReadtheOperator’s
Manual.
2.Call2Recycle
®
battery
recyclingprogram
decal140-2166
3.Keepawayfromopenre
orames.
4.Donotexposetorain.
140-2166
7

1.Thebatterypackischarging.
2.Thebatterypackisfullycharged.
3.Thebatterypackisoverorundertheappropriatetemperaturerange.
4.Batterypackchargingfault
decal137-9461
137-9461
decal137-9462
137-9462
decal137-9463
137-9463
1.Batterychargestatus
8

Setup
Important:Thebatterypackisnotfullycharged
whenitispurchased.Beforeusingthemachine
forthersttime,refertoChargingtheBattery
Pack(page18).
MountingtheBattery
Charger(Optional)
Ifdesired,mountthebatterychargersecurelyona
wallusingthewall-mountkeyholesonthebackof
thecharger.
ProductOverview
g315699
Figure5
Leftsideshown
Mountitindoors(suchasagarageorotherdryplace),
nearapoweroutlet,andoutofthereachofchildren.
RefertoFigure1forassistanceinmountingthe
charger.
Slidethechargerovertheappropriatelypositioned
hardwaretosecurethechargerinplace(hardware
notincluded).
Figure4
FillingtheChainSawwith
BarandChainOil
Important:Useonlybarandchainoil(sold
separately).
1.Chain
2.Guidebar
3.Oilwindow
4.Oilcap
5.Fronthandle10.Buckingteeth
g290534
Rightsideshown
1.Chainbrake4.Multitool(locatedbeneath
2.Sidecover5.Chaintensioningscrew
3.Captivecovernut6.Guidebarcover
6.Batterypack
7.Buttonlatch
8.Triggerlock
9.Trigger
g315700
Figure6
rearhandle)
Fillthechainsawwithbarandchainoil;referto
CheckingtheOilLevelandAddingBarandChain
Oil(page19).
1.BatterychargerModel
9
88620(includedwith
Model51850)
g355813
Figure7
2.BatterypackModel88625
(includedwithModel
51850)

Specications
Model
BarLength(with88613and
88614equipped)
ChainGauge(with88613
and88614equipped)
ChainPitch(with88613and
88614equipped)
ChainLength(with88613
and88614equipped)
RatedVoltage
Weight(withoutabattery)4.35kg(9.59lb)
ChargerType
BatteryType
AppropriateT emperatureRanges
Charge/storethebatterypack
at
Usethebatterypackat
Usethetoolat
51850/51850T
40.6cm(16inches)
0.043inches
3/8inch
56links
60VDCmaximum,54VDC
nominalusage
88602
88620,88625(includedwith
51850),88640,88650,88660,
or88675
5°C(41°F)to40°C(104°F)*
-30°C(-22°F)to49°C(120°F)*
0°C(32°F)to49°C(120°F)*
Operation
BeforeUsingtheChainSaw
Beforeusingthechainsaw,dothefollowing:
•Checkthechaintension;refertoAdjustingthe
ChainTension(page21).
•Cleanthechainsawcomponents,inspectthemfor
excessivewearordamage,andreplacethemas
needed;refertoServicingtheGuideBar,Chain,
andDriveSprocket(page22).
•Checkthechainforsharpnessanddamage,and
sharpenorreplaceasneeded;refertoSharpening
theChain(page23).
•Checktheoillevel;refertoCheckingtheOilLevel
andAddingBarandChainOil(page19).
•Checkthechainbrake;refertoCheckingthe
ChainBrake(page20).
•Checkthechainsawfordamage,general
appearance,andperformance;ensurethatthe
switchesmovefreely,theventsandhandlesare
clean,andthebarisnotbentordamaged.
*Chargingtimewillincreaseifyoudonotchargethe
batterywithinthisrange.
Storethetool,batterypack,andbatterychargerinan
enclosedclean,dryarea.
Attachments/Accessories
AselectionofToroapprovedattachmentsand
accessoriesmaybeavailableforusewiththemachine
toenhanceandexpanditscapabilities.Contact
yourAuthorizedServiceDealerorauthorizedT oro
distributororgotowww.T oro.comforalistofall
approvedattachmentsandaccessories.
Toensureoptimumperformanceandcontinuedsafety
certicationofthemachine,useonlygenuineToro
replacementpartsandaccessories.Replacement
partsandaccessoriesmadebyothermanufacturers
couldbedangerous,andsuchusecouldvoidthe
productwarranty .
10

StartingtheChainSaw
1.Ensurethattheventsonthechainsawarefree
fromdustanddebris(Figure8).
g315703
Figure10
Figure8
1.Sidevent
2.Bottomvent
2.Setthechainsawdownonalevelsurface.
3.Alignthetongueofthebatterypackwiththe
batterycavityinthechainsaw(Figure9).
1.Chainbrake(OPERATING
position)
g315701
7.Withyourlefthandonthefronthandleandyour
2.Chainbrake(STOP
position)
righthandontherearhandle,pressthetrigger
lock,thensqueezethetrigger(Figure11).
g315704
Figure11
1.Fronthandle4.Trigger
2.Chainbrake
3.Triggerlock
5.Rearhandle
Figure9
4.Pushthebatterypackintothebatterycavityuntil
thebatterypacklocksintoplace.
5.Removetheprotectivecoverfromthechain.
6.EnsurethatthechainbrakeisintheOPERATING
position(Figure10).
g315702
ShuttingOfftheChainSaw
Toshutoffthechainsaw,releasethetrigger.
Wheneveryouarenotusingthesaworare
transportingthesawtoorfromtheworkarea,move
thechainbraketotheSTOPposition(Figure10)and
removethebatterypack.
11
CuttingwiththeChainSaw
WARNING
Operatingachainsawimproperlycancause
seriouspersonalinjuryordeath.
Readandfollowalloperatinginstructions
carefullytoavoidpossiblepersonalinjury.
WARNING
Kickbackcancauseseriousorfatalinjuryto
you.
Alwaysensurethatthechainbrakesystem
isworkingproperlybeforeyouoperatethe
chainsaw.
Avoidtouchingobjectstobecutwiththe
noseofthechainsawguidebar.
Thereare2typesofkickback:
•Afastupwardmotionofthechainsawthatresults
whenthechainatthenoseortopofthebar
contactsanobject
•Afastbackwardmotionofthechainsawthat
resultswhenthechainatthenoseortopofthebar
ispinchedbytheobjectbeingcut
Figure12showstheareaofthebartoavoid
contactinganobjecttopreventkickback.
g025213
Figure13
2.Standonsolid,evengroundinfrontofthewood
tobecut.
3.Standtotheleftsideofthechainsaw,notin
linewiththechain,andpositionyourselffor
balanced,stablefootingwhilecutting.
Important:Donotstandonthewoodthat
youarecutting.
4.Ensurethatyouonlycutthewoodthatyou
intendtocut;donotallowthesawchainto
contacttheearth,otherlogs,oranyother
objectswhencutting.
5.Ensurethatthesawchainisrotatingatfull
speedbeforestartingacut.
6.Cutwiththewoodneartherearoftheguidebar,
closetothebuckingteeth;pressthechainsaw
lightlyagainstthewoodandallowtheweightof
thechainsawtodrivethecutting.
Figure12
1.Kickbackarea(nose,top
ofthebar)
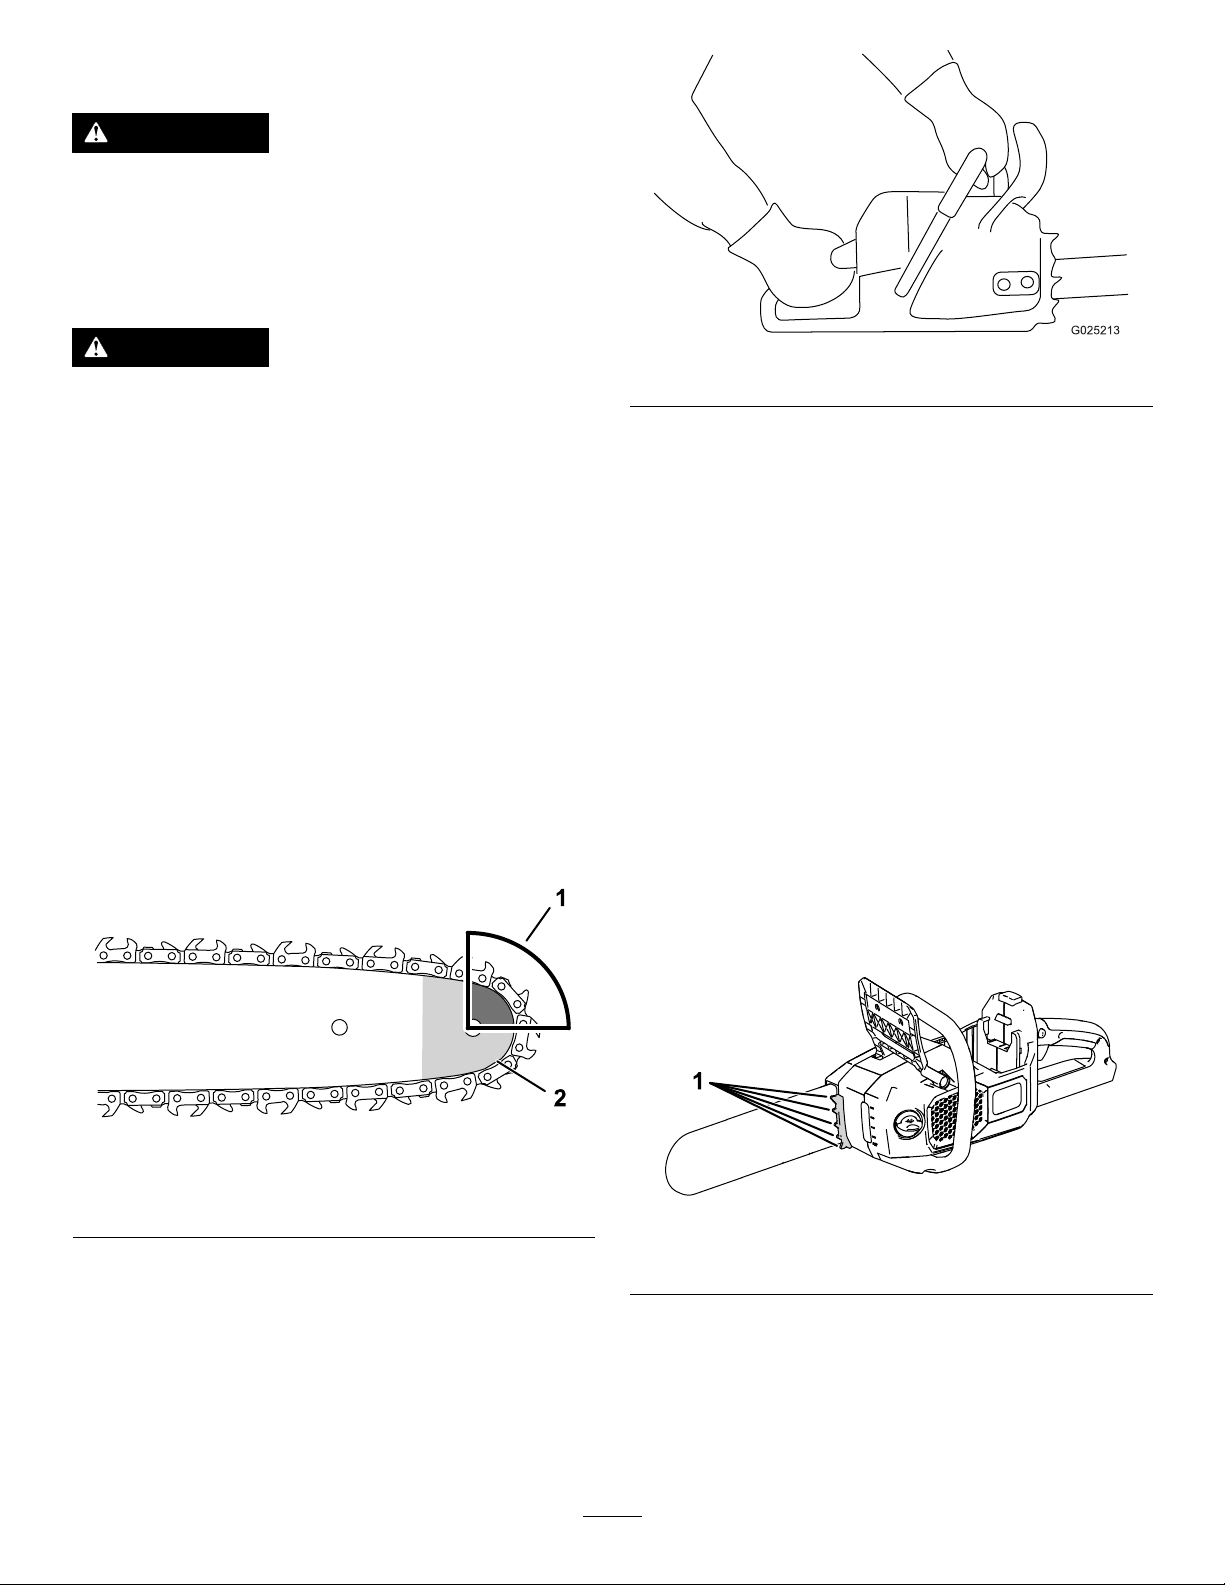
1.Gripthechainsawwith2hands,withyourleft
handonthefronthandleandyourrighthandon
therearhandleasshowninFigure13.
2.Nose
Important:Keepyourleftarmstraightwith
yourelbowlockedtohelpreducekickback.
Note:Y oucanusethebuckingteeth(Figure
14)toapplylightpressure.
g318677
g315747
Figure14
1.Buckingteeth
7.Keepsteadypressureonthechainsaw,cutting
inastraightline,andreleasepressureonlynear
theendofthecut.
12

PruningaTree
WARNING
Cuttinghigherlimbsfromatreeofftheground
canputyouinanunstablepositionthatcould
beunsafeforyouwhilehandlingachainsaw,
resultinginpossibleseriouspersonalinjury
ordeathtoyouorbystanders.
Whencuttinglimbsfromastandingtree,use
thefollowingpractices:
•Donotclimbonlimbsorbrancheswitha
chainsaw.
•Donotoverreach,andcutwithbothhands
onthechainsaw.
•Ensurethatallbystandersareawayfrom
theareawherebranchesmayfall.
1.GripthechainsawasshowninFigure13.
2.Whilecuttingsmallbranches,applylight
pressuretothebranchtobecut.
Figure15
1.Firstreliefundercut
2.Secondthroughcut4.Branchcollar(wherethe
3.Finalpruningcutto
removethelimbstub
trunktransitionstothe
limb)
g316577
3.Whilecuttinglargerbranches,makeashallow
undercutandthencompletethecutfromthe
topsideofthebranch.
A.Cutfromtheundersideofthelimbabout15
cm(6inches)fromthetrunk.Cutathirdof
thewaythroughthelimb.
B.Cut5.0to10.0cm(2to4inches)farther
outonthelimbandfromabove.Cutthe
limbuntilitfalls.
C.Cutthelimbstubatthebranchcollar
(Figure15).
Important:Donotcutthelimbpastthe
collar,ushtothetrunk,orleavealarge
limbstub;thisdamagesthetree.
FellingaTree
WARNING
Cuttingstandingtreesrequiresexpertiseand
poseshazards.
•Beforeattemptingtocutabigtree,practice
cuttingafewbranches,limbs,orsmalllogs
tofamiliarizeyourselfwiththechainsaw.
•Donotusethischainsawtofelllargetrees
withadiameterlargerthanthelengthof
theguidebar.
DANGER
Looseortangledlimbsaboveyoumaybe
dislodgedbyvibrationfromcutting,causing
severeinjuryordeath.
Alwayslookoverheadforlooseandtangled
limbsbeforecutting;ifyouseeanyloose
limbsorbranches,removethembefore
cutting.
Theproperoperatorstanceforfellingatreeisshown
inFigure16.
13

Note:Makingthiscutpreventsthechainsaw
frombeingpinchedwhilemakingthenextcut.
Figure18
g228707
Figure16
1.Determinethedirectionthatthetreewillfall.
Takethefollowingvariablesintoconsideration:
•Winddirection
•Heavierlimbson1sideofthetree
•Naturaltiltofthetree(ifany)
2.Determineaclear,saferetreatpathawayfrom
thedangerarea;refertoFigure17.
g195831
1.Firstcut3.Hinge
2.Secondcut
4.Backcut
5.Makeasecondcuttoformanotch,startingthe
cutatleast5cm(2inches)aboveandaway
fromtherstcut(Figure18).
Important:Ensurethattherstcutandthe
secondcutmeetatthesamepoint,forming
acleannotch.
6.Makethebackcutfromtheoppositesideofthe
notchandabout5cm(2inches)higherthanthe
bottomofthenotchasshowninFigure18.
Important:Stopthethirdcut2.5to5.0cm
(1to2inches)fromthenotchtoformahinge
betweenthecuts(Figure18),whichkeeps
thetreefromfallinginthewrongdirection
ortwistingasitfalls.
Note:Asthebackcutnearsthehinge(Figure
18),thetreeshouldbegintofall.
7.Whenthetreebeginstofall,removethechain
saw,shutitoff,putitdown,andretreatalongthe
pathyoudeterminedinstep2.
Figure17
1.Retreatpath(ata45°
angleoppositefromthe
planneddirectionoffall)
2.Planneddirectionoffall
3.Dangerarea
3.Gripthechainsawasshownin(Figure13).
4.Maketherstcutathirdofthewaythroughthe
treediameteronthesidewhereyouwantthe
treetofall(Figure18).
g024800
Important:Ifthetreebeginstofallinan
undesireddirection,immediatelystopthe
cut,shutoffthechainsaw,putthechainsaw
down,anduseanon-metallicwedgetoopen
thebackcutandpushthetreeinthedesired
direction.
14

LimbingaFallenTree
1.GripthechainsawasshowninFigure13.
2.Movingfromthebaseofthetreeup,cutoffthesmallerlimbsfromthetreethatarenotsupportingits
weightofftheground(Figure19).
3.Cutthelargerlimbsthatsupporttheweightofthetreefromthebottomupwardsothatthelimbsdo
notpinchthesawblade(Figure20).
Figure19
g316601
Figure20
15
g315751

BuckingaLog
Whenbuckingalog,notewherethelogissupported
andwherethereisaloadonthelog.Cutthelogso
thatwhentheendsfall,yourguidebarwillnotbe
pinchedbetweenthem.
Important:Ifthechainsawbindsinthecut,do
notattempttofreeitbyrunningthemotor.Shut
offthesaw,thenuseawedgetopryopenthecut
andreleasethesaw.
Ifyouarecuttingbranchesfromafallentreeorcutting
alogintolengths,supportthelogofftheground
(preferablyonasawbuck).
•Ifthelogissupportedonbothends,butnotinthe
middle,theloadisonthecenterofthelog.
–Startfromthetopandcutaboutathirdofthe
waythroughthelog(Figure21A).
–Makeasecondcutfromtheundersidetomeet
therstcut(Figure21B).Thiskeepsthelog
frompinchingthesaw.
g315767
Figure22
1.Directionofslope
•Ifthewholelengthofthelogissupportedonat,
levelground,cutathirdofthediameterfromthe
top,thenrollthelogoverandmakeanothercutto
meettherstcut(Figure23).
Figure21
•Ifthelogissupportedonasingleend,theloadis
onthefreeendofthelog.
–Startfromtheundersideandcutaboutathird
ofthewaythroughthelog.
–Makeasecondcutfromthetoptomeettherst
cut.Thiskeepsthelogfrompinchingthesaw.
•Ifthelogissupportedoffthegroundalongitsentire
length,withoutaheavyloadonthelogatany
point,cutallthewaythroughthelogfromthetop.
•Ifthelogisonahill,alwaysstandontheuphill
sideofthelog(Figure22).
g315765
g315766
Figure23
16

InstallingtheBatteryPack
RemovingtheBatteryPack
Important:Usethebatterypackonlyin
temperaturesthatarewithintheappropriate
range;refertoSpecications(page10).
1.Setthechainsawdownonalevelsurface.
2.Alignthetongueofthebatterypackwiththe
batterycavityinthechainsaw(Figure24).
1.Placethechainsawonaatsurface.
2.Pressdownonthelatchandremovethebattery
packfromthecavity.
g315763
Figure25
1.Latch
Figure24
3.Pushthebatterypackintothebatterycavityuntil
thebatterypacklocksintoplace.
g315702
17

ChargingtheBatteryPack
Important:Thebatterypackisnotfullycharged
whenyoupurchaseit.Beforeusingthetoolfor
thersttime,placethebatterypackinthecharger
andchargeituntiltheLEDdisplayindicatesthe
batterypackisfullycharged.Readallsafety
precautions.
Important:Chargethebatterypackonlyin
temperaturesthatarewithintheappropriate
range;refertoSpecications(page10).
Note:Atanytime,pressthebattery-charge-indicator
buttononthebatterypacktodisplaythecurrent
charge(LEDindicators).
1.Ensurethattheventsonthebatteryandcharger
areclearofanydustanddebris.
Green
Red
Red
blinking
Batterypackischarged
Batterypackand/orbatterychargerisoverorunder
theappropriatetemperaturerange
Batterypackchargingfault*
*RefertoTroubleshooting(page25)formore
information.
Important:Thebatterycanbeleftonthecharger
forshortperiodsbetweenuses.
Ifthebatterywillnotbeusedforlongerperiods,
removethebatteryfromthecharger;referto
Storage(page24).
g290533
Figure26
1.Batterypackcavity
2.Batterypackventingareas6.Handle
3.Batterypackterminals
4.Battery-charge-indicator
button
5.LEDindicators(current
charge)
7.ChargerLEDindicator
light
8.Chargerventingareas
2.Lineupthecavityinthebatterypack(Figure26)
withthetongueonthecharger.
3.Slidethebatterypackintothechargeruntilitis
fullyseated(Figure26).
4.T oremovethebatterypack,slidethebattery
backwardoutofthecharger.
5.RefertothefollowingtabletointerprettheLED
indicatorlightonthebatterycharger.
Indicator
light
Off
Green
blinking
Indicates
Nobatterypackinserted
Batterypackischarging
18

Maintenance
RecommendedMaintenanceSchedule(s)
MaintenanceService
Interval
Beforeeachuseordaily
Aftereachbatterydrain
cycle
Yearlyorbeforestorage
MaintenanceProcedure
•Checktheoillevelandaddbarandchainoilifnecessary.
•Checkthechainbrake.
•Checkthatoilisowingtothechain.
•Checkthechaintensionandadjustitifnecessary.
•Ensurethatthebarisstraightandundamaged
•Checkthechainforsharpness;contactanAuthorizedServiceDealertohavethe
chainsharpenedorreplaced.
•Checktheoillevelandaddbarandchainoilifnecessary.
•Checkthechainbrake.
•Checkthechaintensionandadjustitifnecessary.
•Servicetheguidebar,chain,anddrivesprocket.
•Checkthechainforsharpness;contactanAuthorizedServiceDealertohavethe
chainsharpenedorreplaced.
CheckingtheOilLeveland
AddingBarandChainOil
ServiceInterval:Beforeeachuseordaily
Aftereachbatterydraincycle
3.Placethechainsawonaatsurfacewiththe
oilcapfacingup.
4.Cleantheareaaroundtheoilcap(Figure27).
Note:Ensurethatyoudonotallowdebris/wood
chipstoentertheoiltank.
Important:Useonlybarandchainoil(sold
separately).
1.Shutoffthechainsawandremovethebattery
pack;refertoRemovingtheBatteryPack(page
17).
2.Checktheoillevelinthewindow.Iftheoildoes
notllthewindow,addbarandchainoilas
needed(Figure27).
Figure27
5.Unfoldthewing-nuttabontheoilcaptab,
removethecap,andpourbarandchainoilinto
thechainsawuntiltheoilllsthetank(Figure
27).
Important:Donotllthechainsawhigher
thanthebottomofthellneck.
6.Cleanupanyspilledoil,securetheoilcap,and
foldthewing-nuttabdown.
7.Ensurethatoilisowingtothechain;referto
CheckingtheFlowofBarandChainOil(page
20).
g315841
1.Oilwindow2.Oilcap
19

CheckingtheChainBrake
CheckingtheFlowofBar
ServiceInterval:Beforeeachuseordaily
Aftereachbatterydraincycle
1.Placethechainsawonaatsurfaceand
removethebatterypack;refertoRemovingthe
BatteryPack(page17).
2.Engagethechainbrakebymovingthechain
brakeforwardtotheSTOPposition(Figure28).
Figure28
1.Chainbrake(OPERATING
position)
2.Chainbrake(STOP
position)
andChainOil
ServiceInterval:Beforeeachuseordaily
1.Preparetousethechainsaw;refertoBefore
UsingtheChainSaw(page10).
2.T oensurethatoilisowingtothechain,point
thenoseofthechainsawafewinchesfroma
surface(e.g.paper,cardboard,astump)and
runthechainsaw;youshouldbeabletoseea
lightsprayofoilonthesurface(Figure29).
g315840
3.Gripthechainwithaglovedhandandattempt
topullitaroundtheguidebar;thechainshould
notmovearoundtheguidebar.Ifitdoes,take
thechainsawtoanAuthorizedServiceDealer
forrepair.
4.Disengagethechainbrakebymovingthe
chainbrakerearwardtotheOPERATINGposition
(Figure28).
5.Gripthechainwithaglovedhandandattempt
topullitaroundtheguidebar;thechainshould
movearoundtheguidebar.Ifitdoesnot,take
thechainsawtoanAuthorizedServiceDealer
forrepair.
Figure29
1.Runthechainsawafew
inchesfromasurface.
2.Iftheoilisowing,itwill
sprayoffthechainand
accumulate.
3.Ifoilisnotowing,ensurethatthereisoilinthe
tankandthattheareaunderthesidecoveris
clean;refertoCheckingtheOilLevelandAdding
BarandChainOil(page19)andServicingthe
GuideBar,Chain,andDriveSprocket(page22).
g317663
20

AdjustingtheChain
Tension
ServiceInterval:Beforeeachuseordaily
Aftereachbatterydraincycle
Ensurethatthechainisproperlytensioned.
Aloosechainshortensthelifeofthedrivesprocket
andtheguidebarandmaycausethechaintofalloff.
Anovertightenedchainoverheatstheguidebarand
chain,causingrapidwear,andmayburnoutthemotor
orbreakthechain.
Thechaintensioniscorrectwhenyouareabletouse
aglovedhandtopullthechainsmoothlyaroundthe
guidebar.Thechainshouldremainincontactwith
thebottomedgeoftheguidebar.
Also,checkthechaintensionofanewchainaftera
fewcuts;anewchainusuallystretchesandrequires
adjustmentafterafewcuts.
DANGER
Contactwiththechainsawteethcancause
seriouspersonalinjury.
•Removethebatterypackbeforeadjusting
ormaintainingthechainsaw.
•Alwaysweargloveswhenadjustingor
maintainingthechainsaw.
6.Holdupthetipoftheguidebar(Figure30).
g315842
Figure30
7.Usingtheonboardmultitool,adjustthechain
tension,andthensecurethesidecovertothe
chainsawbytighteningthecaptivenuts(Figure
31).
•Totightenthechain,turnthechain
tensioningscrewclockwise(Figure30).
•Toloosenthechain,turnthechain
tensioningscrewcounterclockwise
Adjustthechaintensionuntilthechaintouches
thebottomedgeoftheguidebar,thenpullthe
chainawayfromthebottomedgeoftheguide
bar;aproperlyadjustedchaincanonlybepulled
3.2to6.4mm(1/8to1/4inch)awayfromthe
guidebar,andsnapsbackonrelease.
1.Placethechainsawonalevelsurfaceand
removethebatterypack;refertoRemovingthe
BatteryPack(page17).
2.Allowthesawchaintocool.
Important:Donottensionahotchain;it
maycontractasitcools,resultinginan
overtightenedchain.
3.Inspecttheguidebarforbendsordamage,
replaceifnecessary.
4.EnsurethatthechainbrakeisintheOPERATING
position(Figure28).
5.Usingtheonboardmultitool,loosenthecaptive
nutsonthesidecover,butdonotremoveit
(Figure31).
Ifthechainisnotproperlytensioned,loosenthe
sidecoverandrepeatsteps5through7.
8.Useaglovedhandtopullthechainaroundthe
guidebar.Aproperlytensionedchainshould
movesmoothlyandremainincontactwiththe
bottomedgeoftheguidebar.
9.Checkthechaintensionagainandrepeatthis
procedureifnecessary.
21

ServicingtheGuideBar,
Chain,andDriveSprocket
Yearlyorbeforestorage
DANGER
Contactwiththechainsawteethcancause
seriouspersonalinjury.
•Removethebatterypackbeforeadjusting
ormaintainingthechainsaw.
•Alwaysweargloveswhenadjustingor
maintainingthechainsaw.
1.Placethechainsawonaatsurfaceand
removethebatterypack;refertoRemovingthe
BatteryPack(page17).
2.Removethesidecoverbylooseningthe2
captivenutsthatsecurethecover(Figure31).
Note:Thecaptivenutsdonotseparatefrom
thesidecover;loosenthemuntilthecovercan
beremoved.
Figure32
1.Drivesprocket
2.Clip
3.Oiloutlet
10.Cleantheguidebarandchain;useawireora
smallat-headscrewdrivertoremovedirtand
debrisfromthegroovealongtheedgeofthe
guidebar,startingfromthesprocketonthefront
endandmovingrearward.
g315855
Figure31
1.Cover3.Chaintensioningscrew
2.Captivenut
4.Multitool
3.Loosenthechainbyturningthechain-tightening
screwcounterclockwise(Figure31).
4.Separatethechainfromtheguidebarandset
themaside.
5.Removetheclipanddrivesprocketfromthe
chainsaw(Figure32).
6.Cleananydebrisfromtheareaundertheside
cover.
7.Inspectthedrivesprocket;ifitisexcessively
wornordamaged,replaceit.
8.Installthedrivesprocketandclip.
9.Checktheoiloutlet(Figure32)fordebrisand
cleantheareaifnecessary .
Ensurethattheoilchannelinthebarthataligns
withtheoiloutletonthechainsawiscleanso
thatoilcanowfreelytothechain(Figure33).
g315844
g315856
Figure33
Internalsectionsoftheguidebarshown
1.Ensurethatthischannel
connectingtotheoiloutlet
isclean.
2.Ensurethatthebar
sprocketiscleanand
rotatesfreely.
11.Inspecttheguidebarandchain;ifthebar
isbent,thegroovesaredamaged,orifthe
sprocketonthefrontenddoesnotrotatefreely,
replacetheguidebar;ifthechainisexcessively
wornordamaged,replaceit.
12.Installtheguidebarandchain;refertoInstalling
theGuideBarandChain(page23).
13.Ensurethatoilisowingtothechain;referto
CheckingtheFlowofBarandChainOil(page
20).
22

InstallingtheGuideBarand
Chain
DANGER
Contactwiththechainsawteethcancause
seriouspersonalinjury.
•Removethebatterypackbeforeadjusting
ormaintainingthechainsaw.
•Alwaysweargloveswhenadjustingor
maintainingthechainsaw.
1.Ifthesidecoverisinstalledtothemachine,
loosenthe2captivenutssecuringthesidecover
tothemachineandremoveit(Figure34Aand
Figure34B).
2.Placethechainaroundthedrivesprocketon
thefrontendoftheguidebar,withthecutting
edgeofthechainteethonthetopofthebar
facingforwardasshowninthediagramonthe
sidecoverofthechainsaw(Figure34C).
3.Feedthechainaroundtheguidebarandalign
thechainteethintothegrooveofthebar.
Note:Ifyouareinstallinganewchain,ipthe
guidebartoavoidunevenwear.
4.Positiontheopenloopofthechain(notonthe
guidebar)aroundthedrivesprocketonthe
chainsawandinstalltheguidebarandattached
chainontothechainsawasshowninFigure
34C.
Important:Ensurethatthechainadjusting
studisinsertedintotheholeindicatedbythe
arrowinFigure34C.Youmayneedtorotate
thechaintensioningknobtotthestudinto
theholeintheguidebar.
5.Installthesidecover,butdonotfullytightenthe
captivenuts(Figure34D).
6.Adjustthechaintension;refertoAdjustingthe
ChainTension(page21).
SharpeningtheChain
Yearlyorbeforestorage
Asharpchainensuresbettercuttingperformanceand
longerbatterylife.
Thechainneedstobesharpenedorreplacedifyou
mustforceitontothewood,orifitproducessawdust
insteadoffullwoodchips.
ContactanAuthorizedServiceDealertohavethe
chainsharpenedorreplaced.
Service
Shouldthechainsawneedservice,takethetoolto
yourAuthorizedServiceDealer.
Figure34
g315857
23
Storage
PreparingtheBatteryPack
Important:Storethemachine,batterypack,and
chargeronlyintemperaturesthatarewithinthe
appropriaterange;refertoSpecications(page
10).
Important:Ifyouarestoringthebatterypack
fortheoff-season,chargeituntil2or3LED
indicatorsturngreenonthebattery.Donotstore
afullychargedorfullydepletedbattery.When
youarereadytousethemachineagain,charge
thebatterypackuntiltheleftindicatorlightturns
greenonthechargerorall4LEDindicatorsturn
greenonthebattery.
•Disconnectthemachinefromthepowersupply
(i.e.,removethebatterypack)andcheckfor
damageafteruse.
•Cleanallforeignmaterialfromthemachine.
•Donotstorethemachinewiththebatterypack
installed.
•Storethemachine,batterypack,andbattery
chargerinawell-ventilatedplacethatis
inaccessibletochildren.
forRecycling
Important:Uponremoval,covertheterminalsof
thebatterypackwithheavy-dutyadhesivetape.
Donotattempttodestroyordisassemblethe
batterypackorremoveanyofitscomponents.
Lithium-ionbatterypackslabeledwiththe
Call2Recyclesealcanberecycledatany
participatingretailerorbatteryrecycling
facilityintheCall2Recycleprogram(US
andCanadaonly).T olocateaparticipating
retailerorfacilityclosesttoyou,pleasecall
1-800-822-8837orvisitwww.call2recycle.org.
Ifyoucannotlocateaparticipatingretaileror
facilitynearby,orifyourrechargeablebattery
isnotlabeledwiththeCall2Recycleseal,
pleasecontactyourlocalmunicipalityformore
informationonhowtoresponsiblyrecyclethe
battery.IfyouarelocatedoutsideoftheUS
andCanada,pleasecontactyourauthorized
Torodistributor.
•Keepthemachine,batterypack,andbattery
chargerawayfromcorrosiveagentssuchas
gardenchemicalsandde-icingsalts.
•T oreducetheriskofseriouspersonalinjury,do
notstorethebatterypackoutsideorinvehicles.
•Storethemachine,batterypack,andbattery
chargerinanenclosedclean,dryarea.
24

Troubleshooting
Performonlythestepsdescribedintheseinstructions.Allfurtherinspection,maintenance,andrepairwork
mustbeperformedbyanauthorizedservicecenterorasimilarlyqualiedspecialistifyoucannotsolvethe
problemyourself.
Problem
Thechainsawdoesnotrunordoesnot
runcontinuously.
Thechainsawruns,butthechaindoes
notrotate.
Thechainbrakedoesnotengage.1.Thechainbrakeisdamaged.1.Immediatelytakethechainsawtoa
Thechainsawdoesnotproperlycut.
1.Thebatterypackislowoncharge.
2.Thebatterypackisnotfullyseated.
3.Thebatterypackisoverorunderthe
appropriatetemperaturerange.
4.Thebatterypackhasexceededhigh
amperagelimits.
5.Thereismoistureontheleadsofthe
batterypack.
6.Thechainbrakeisengaged.6.Disengagethechainbrakebymoving
7.Thereisdebrisunderthecover.7.Removethecoverandcleanoutany
1.Thechainisnotproperlyseatedonthe
drivesprocket.
2.Thereisdebrisunderthecover.2.Removethecoverandcleanoutany
1.Thechainisnottensionedcorrectly.
2.Thechainisdullordamaged.2.Replacethechain.
3.Theguidebarisbentorthegrooves
aredamaged.
4.Thechainisinstalledbackward.4.Installthechaincorrectly.
5.Thechainisnotbeinglubricated
properly.
PossibleCauseCorrectiveAction
1.Chargethebatterypack.
2.Ensurethatthebatterypackisinserted
allthewayintothehousing.
3.Movethebatterypacktoaplace
whereitisdryandthetemperatureis
between5°C(41°F)and40°C(104°F).
4.Releasethetrigger,thenpressthe
triggerswitch.
5.Allowthebatterypacktodryorwipeit
dry.
thechainbrakerearward.
debris.
1.Installthechainandensurethatthe
linksareproperlyseatedinthedrive
sprocket.
debris.
AuthorizedServiceDealer.
1.Setthepropertensiononthechain.
3.Replacetheguidebar
5.Checktheoillevelandensurethatoil
isowingtothechain.
Thechainoilisnotlubricatingproperly.
Thebatterypackloseschargequickly.
Thebatterychargerisnotworking.
1.Theoillevelislow .
2.Theoiloutletisplugged.
3.Thereisdebrisunderthecover.3.Removethecoverandcleanoutany
4.Theoilchannelorgrooveintheguide
barisplugged.
1.Thebatterypackisoverorunderthe
appropriatetemperaturerange.
2.Thechainisdullordamaged.2.Replacethechain.
3.Theguidebarisbentorthegrooves
aredamaged.
4.Themachineisoverloaded.4.Applylesspressurewhencutting.
5.Thechainisnotbeinglubricated
properly.
1.Thebatterychargerisoverorunder
theappropriatetemperaturerange.
2.Theoutletthatthebatterychargeris
pluggedintodoesnothavepower.
1.Checktheoillevel.
2.Cleanoutdebrisfromtheoiloutlet.
debris.
4.Cleanoutdebrisinthebar.
1.Movethebatterypacktoaplace
whereitisdryandthetemperatureis
between5°C(41°F)and40°C(104°F).
3.Replacetheguidebar
5.Checktheoillevelandensurethatoil
isowingtothechain.
1.Unplugthebatterychargerandmove
ittoaplacewhereitisdryandthe
temperatureisbetween5°C(41°F)
and40°C(104°F).
2.Contactyourlicensedelectricianto
repairtheoutlet.
25

Problem
PossibleCauseCorrectiveAction
TheLEDindicatorlightonthebattery
chargerisred.
TheLEDindicatorlightonthebattery
chargerisblinkingred.
1.Thebatterychargerand/orbattery
packisoverorundertheappropriate
temperaturerange.
1.Thereisanerrorinthecommunication
betweenthebatterypackandthe
charger.
2.Thebatterypackisweak.
1.Unplugthebatterychargerandmove
thebatterychargerandbatterypack
toaplacewhereitisdryandthe
temperatureisbetween5°C(41°F)
and40°C(104°F).
1.Removethebatterypackfromthe
batterycharger,unplugthebattery
chargerfromtheoutlet,andwait10
seconds.Plugthebatterychargerinto
theoutletagainandplacethebattery
packonthebatterycharger.IftheLED
indicatorlightonthebatterychargeris
stillblinkingred,repeatthisprocedure
again.IftheLEDindicatorlighton
thebatterychargerisstillblinkingred
after2attempts,properlydisposeof
thebatterypackatabatteryrecycling
facility.
2.Contactyourauthorizedservicedealer
ifthebatteryisinwarranty,orproperly
disposeofthebatterypackatabattery
recyclingfacility.
26
 Loading...