

Page 1

FORM NO. 3321–822 Rev B
Cordless, Electric Hedge Trimmer
51595, 51596, and 51597 – 9900001 and Up
Operator’s Manual
Para
obtener una versión gratis de este manual en español, escriba a la dirección indicada
más abajo. Asegúrese de indicar el modelo y el número de serie de su producto.
The T
oro Company
, Attn: Parts Dept., 8111 L
yndale A
ve S, Bloomington, MN 55420–1
196.
English (EN)
Page 2

Contents
Page
Introduction 2.
Safety 3
Read All Instructions3. . . . . . . . . . . . . . . . . . . . . . .
Save These Instructions4. . . . . . . . . . . . . . . . . . . . .
Safety and Instruction Decals5. . . . . . . . . . . . . . . . .
Installation 5
Mounting the Char
Mounting the Char
Operation 6
Features 6
Char
Preparing For Operation9. . . . . . . . . . . . . . . . . . . . .
T
rimming A Hedge9. . . . . . . . . . . . . . . . . . . . . . . .
T
rimming T
Maintenance 11
Recommended Maintenance Schedule11. . . . . . . . .
Cleaning the T
Blade Lubrication11. . . . . . . . . . . . . . . . . . . . . . . . . .
Lubrication 11
Blade Replacement11. . . . . . . . . . . . . . . . . . . . . . . . .
Replacing the battery13. . . . . . . . . . . . . . . . . . . . . . .
Maintenance and Storage T
Screw Location T
Warranty
. . . . . . . . . . . . . . . . . . . . . . . . . . . . . . . .
. . . . . . . . . . . . . . . . . . . . . . . . . . . . . . . . . . . . . .
. . . . . . . . . . . . . . . . . . . . . . . . . . . . . . . . . .
ger (Model 51596 Only)5. . . . .
ger (Model 51597 Only)5. . . . .
. . . . . . . . . . . . . . . . . . . . . . . . . . . . . . . . . . .
. . . . . . . . . . . . . . . . . . . . . . . . . . . . . . . . .
ging the Battery7. . . . . . . . . . . . . . . . . . . . . . .
echniques 10
. . . . . . . . . . . . . . . . . . . . . . . . . . . . . . . . .
rimmer 11
. . . . . . . . . . . . . . . . . . . . . . . . . . . . . . .
emplate for Model 5159615. . . . . . . .
. . . . . . . . . . . . . . . . . . . . . . . . . . . . . .
. . . . . . . . . . . . . . . . . . . . . .
. . . . . . . . . . . . . . . . . . . . . .
ips 13
. . . . . . . . . . . . . . . .
Back Cover
Introduction
Thank you for purchasing a T
All of us at T
your new product, so feel free to contact your local
Authorized Service Dealer for help with service, genuine
T
oro parts, or other information you may require.
Whenever you contact your Authorized Service Dealer or
the factory
your product. These numbers will help the Service Dealer
or Service Representative provide exact information about
your specific product. Y
number decal located in a unique place on the product as
shown below
oro want you to be completely satisfied with
, always know the model and serial numbers of
.
oro product.
ou will find the model and serial
m–4115
1. Model
For
numbers in the space below
Read
maintain your product correctly
help you and others avoid personal injury and damage to
the product. Although T
markets safe, state-of-the-art products, you are responsible
for using the product properly and safely
responsible for training persons who you allow to use the
product about safe operation.
The warning system in this manual identifies potential
hazards and has special safety messages that help you and
others avoid personal injury
W
identify the level of hazard. However
hazard, be extremely careful.
DANGER
serious injury or death if the recommended precautions
are not followed.
WARNING
or death if the recommended precautions are not followed.
CAUTION
moderate injury if the recommended precautions are not
followed.
wo other words are also used to highlight information.
T
“Important” calls attention to special mechanical
information and “Note” emphasizes general information
worthy of special attention.
and Serial Number Decal
your convenience, write the product model and serial
.
Model No:
Serial No.
this manual carefully to learn how to operate and
. Reading this manual will
oro designs, produces, and
. Y
ou are also
, even death. DANGER,
ARNING and CAUTION are signal words used to
, regardless of the
signals an extreme hazard that will cause
signals a hazard that may cause serious injury
signals a hazard that may cause minor or
The Toro Company
All Rights Reserved
– 1998
2
Printed in USA
Page 3

Safety
WARNING:
when using electric hedge trimmers to reduce the risk of
fire, electric shock, and personal injury
Read
POTENTIAL
• T
pr
WHA
•
If safety pr
personal injury could occur
HOW T
•
Read thor
the following rules for safe operation and all
instructions.
Before Operating
• KNOW
FOLLOW ALL INSTRUCTIONS.
manual carefully
as well as the specific potential hazards related to this
tool.
Always follow these basic safety precautions
.
All Instructions
WARNING
HAZARD
o guard against injury
ecautions should be observed.
T CAN HAPPEN
ecautions ar
O AVOID THE HAZARD
oughly and understand completely
YOUR HEDGE TRIMMER – READ AND
. Learn its applications and limitations
, basic safety
e not followed, serious
.
Read owner
’s
WARNING
POTENTIAL HAZARD
•
Use of trimmer can cause electric shock.
WHA
T CAN HAPPEN
•
Electric shock can cause serious personal injury
or death.
HOW T
•
•
O AVOID THE HAZARD
Don’t use trimmer in rain, in wet locations, or
on wet hedges or shrubbery
Do not charge the trimmer in wet or damp
locations.
.
WARNING
POTENTIAL HAZARD
•
During operation for
thr
own into your eyes or bystander’s eyes.
WHA
T CAN HAPPEN
•
Contact with thr
eye damage.
HOW T
•
•
O AVOID THE HAZARD
Always wear safety goggles, safety glasses with
side shields, or a full face mask during
operation. W
Mask for use over eyeglasses or standard safety
glasses with side shields.
Keep all bystanders and pets away fr
ar
ea of operation.
e r
eign objects may be
own objects can cause sever
ecommend W
ide V
ision Safety
om the
e
While Operating
DANGER
POTENTIAL
•
Blades ar
WHA
T CAN HAPPEN
•
Contact with blades can cause serious personal
injury.
HOW T
•
Keep hands away fr
•
Keep both hands on handles during operation.
•
Do not r
be cut when blades ar
• Ensur
clearing jammed material fr
•
Do not grasp the exposed cutting blades or
cutting edges of trimmer
HAZARD
e sharp.
O AVOID THE HAZARD
om blades.
emove cut material or hold material to
e moving.
e that the trimmer switch is off when
om blades.
.
CAUTION
POTENTIAL HAZARD
•
Blades will coast after trimmer is turned off.
WHA
T CAN HAPPEN
•
Contact with moving blades can cause serious
personal injury
HOW T
• W
• A
•
•
•
O AVOID THE HAZARD
ait for all moving parts to stop befor
trimmer down or handling blades.
void Danger
trimmer in damp or wet locations.
Do not
Do not
locations.
Do not
explosive or vaporous environment. The motor causes
sparks in the trimmer which may ignite the fumes.
use battery–operated hedge trimmer in rain.
char
use battery–operated hedge trimmer in an
.
e setting
ous Envir
ge hedge trimmer in rain, or in wet
onment
– Don’
t use hedge
3
Page 4

•
Keep Childr
distance from work area.
• Dr
ess Pr
jewelry
work gloves and substantial footwear is recommended
when working outdoors. W
to contain long hair
Don’t Overr
•
at all times.
•
Stay Alert
sense. Do not operate hedge trimmer when you are
tired.
Use Safety Glasses
•
operation is dusty
Use Right Appliance
•
job except that for which it is intended.
• A
void Unintentional Starting
trimmer with finger on switch.
•
Danger – Risk of Cut
Blades – Keep both hands on handles when power is
on.
Don’t For
•
better and with less likelihood of a risk of injury at the
rate for which it was designed.
•
Do not cut branches over 3/8 inches (9.5 mm) thick.
•
Do not attempt to remove cut material nor hold
material to be cut when blades are moving. Ensure that
the trigger is of
when clearing jammed material from blades. Do not
grasp the exposed cutting blades or cutting edges when
picking up or holding the hedge trimmer
en Away
operly
. They can be caught in moving parts. Use of
each
– W
ce Hedge T
– All visitors should be kept at a
– Do not wear loose clothing or
ear protective hair covering
.
– Keep proper footing and balance
atch what you are doing. Use common
– Always use face or dust mask if
.
– Do not use appliance for any
– Don’
t carry hedge
– Keep Hands A
rimmer
f and the lock–of
– It will do the job
way From
f button is not pressed
.
Do not dispose of the battery in a fire. The battery
•
may explode. Check with local codes for possible
special disposal instructions.
•
Do not open or mutilate the battery. Released
chemicals may be corrosive and may cause damage to
the eyes or skin. It may be toxic if swallowed.
•
Do not place battery on a metal surface.
terminals may spark and or over heat if place on a
metal surface.
•
Exercise care in handling batteries in order not to short
the battery with conducting materials such as rings,
bracelets, and keys. The battery or conductor may
overheat and cause burns.
•
When inserting batteries into this product, the proper
polarity or direction must be observed. Reverse
insertion of batteries can result in leakage or
explosion.
Ensure that the trigger is of
•
not pressed before servicing, cleaning, or removing
material from the hedge trimmer
Always install the sheath over the blade when finished
•
using the trimmer
• Stor
•
Save
e Idle Hedge T
use, hedge trimmer should be stored indoors in dry
location, out of reach of children.
DO NOT A
repair call 1-800-237-2654 in the United States. See
that only original T
These Instructions
.
TTEMPT T
oro replacement parts are used.
f and the lock–of
.
rimmer Indoors
O REP
AIR.
Battery
f button is
– When not in
For service or
Maintenance and Storage
• Maintain
edge sharp and clean for best performance and to
reduce the risk of injury
lubricating and changing accessories. Keep handles
dry
•
Check Damaged Parts
hedge trimmer
should be carefully checked to determine that it will
operate properly and perform its intended function.
Check for alignment of moving parts, binding of
moving parts, breakage of parts, mounting, and any
other condition that may af
or other part that is damaged should be properly
repaired or replaced by an authorized service center
unless indicated elsewhere in this manual.
•
Use only genuine Toro r
available from your local Authorized Service Dealer
Hedge T
, clean, and free from oil and grease.
rimmer W
, a guard or other part that is damaged
ith Care – Keep cutting
. Follow instructions for
– Before further use of the
fect its operation. A guard
eplacement batteries
,
.
4
Page 5
Safety and Instruction Decals
Safety
decals and instructions are easily visible to the operator and are located near any
area of potential danger
ON
. Replace any decal that is damaged or lost.
BLADE
ON CHARGER
Installation
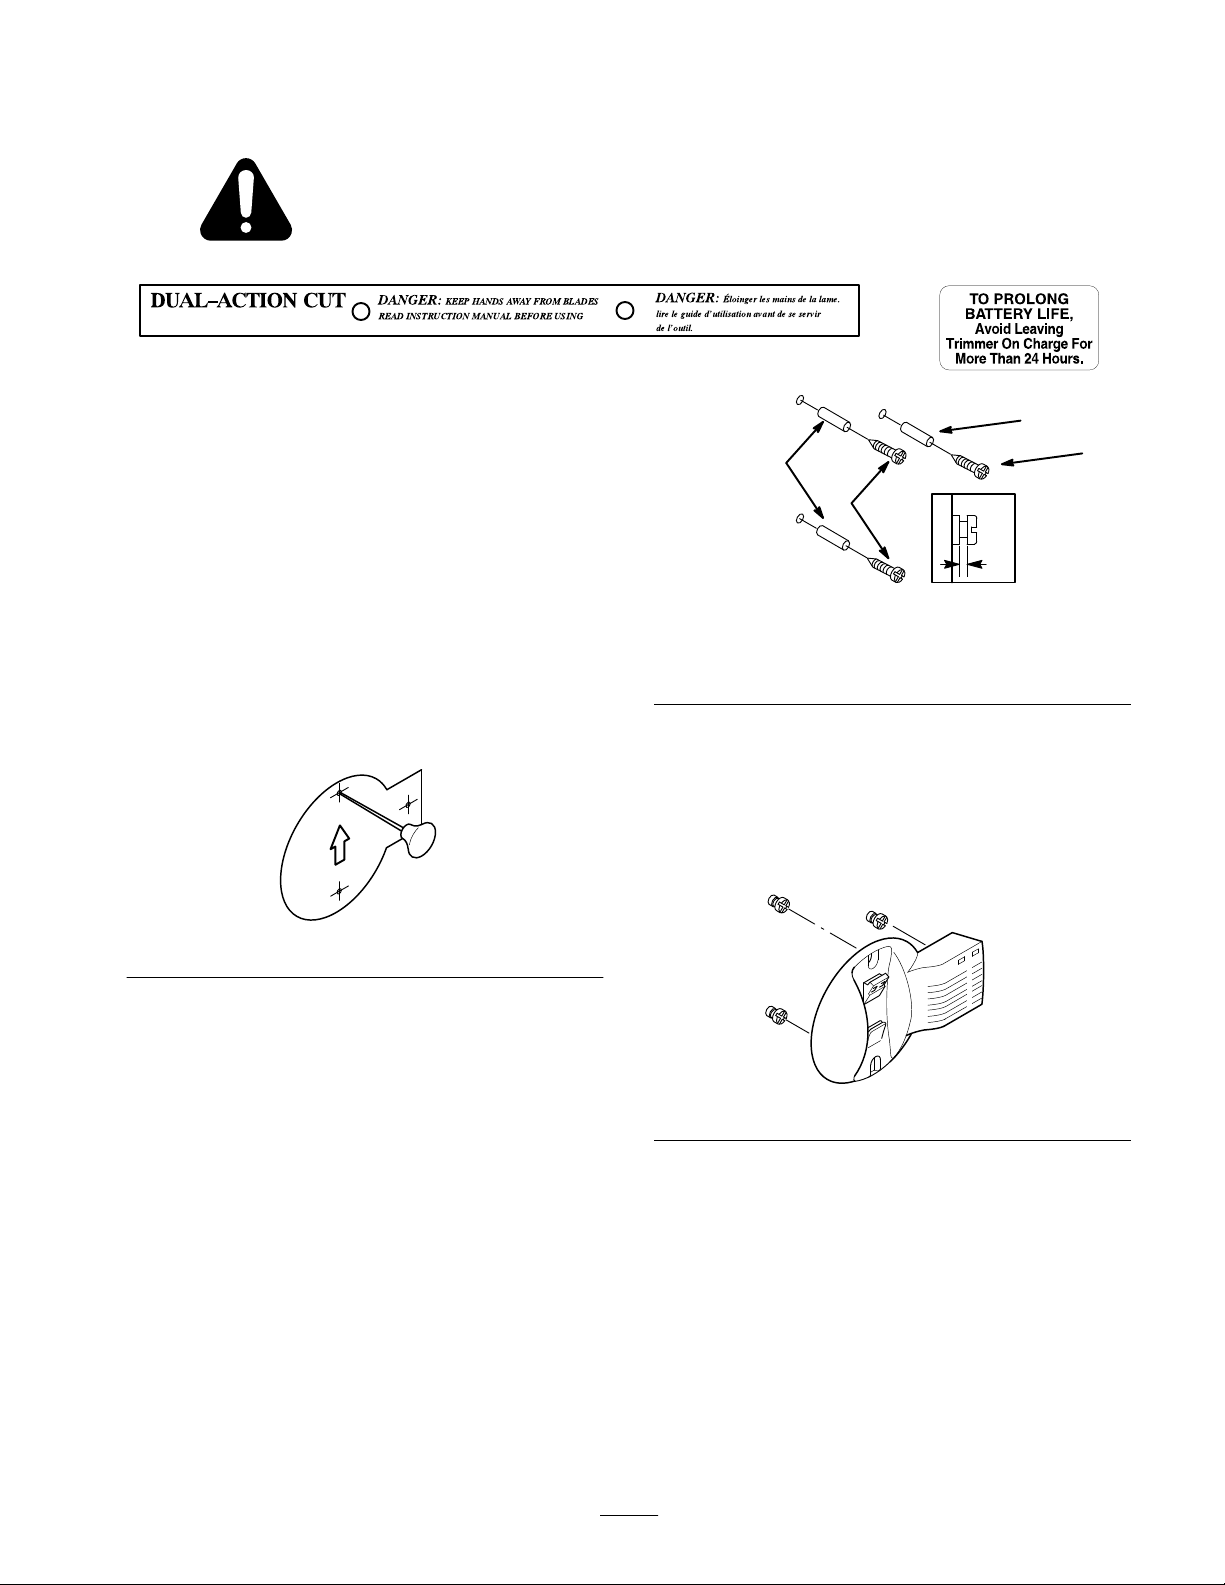
Mounting
51596 Only)
The
char
ger should be mounted indoors (such as a garage
or other dry place), near a power outlet, and out of reach
of children. Y
heads approximately 1/4 inch (6.3 mm) across and, if
mounting the char
for the screws
1.
Lay the provided template (page 15) against the wall
and mark the three hole locations as shown in
Figure 1.
the Charger (Model
ou will need to supply three screws with
ger on wall board, three wall anchors
Figure
1
m–4110
1
2
Figure
1. Wall
Anchors
2. Screws
• If
installing the charger on wood, drive the screws
into the three holes until they are 1/8 inch (5mm)
from the wall.
A.
Place the keyhole slots in the back of the char
over the three screws and push down on the char
to secure it (Fig. 3).
2
3.
1/8 inch
1
2
3
m–4111
ger
ger
2. Drill
3.
pilot holes as follows:
•
If installing the char
cement, drill three holes for the wall anchors (as
indicated by the wall anchor manufacturer) at the
marked locations.
•
If installing the char
slightly smaller than the diameter of the screw
threads, at the marked locations.
Install the screws as follows:
•
If installing the char
cement, insert the three wall anchors into the holes
then thread the screws into the wall anchors until
they are 1/8 inch (5 mm) from the edge of the wall
anchor (Fig. 2).
ger on wall board, plaster
ger on wood, drill three holes,
ger on wall board, plaster
, or
, or
Mounting
Figure
the Charger (Model
3
51597 Only)
The
char
ger should be mounted indoors (such as a garage
or other dry place), near a power outlet, and out of reach
of children. Y
heads approximately 1/4 inch (0.6 cm) across and, if
mounting the char
the screws
5
ou will need to supply two screws with
ger on wall board, two wall anchors for
m–4093
Page 6

1.
Place the charger against the wall and mark the two
hole locations, through the top of the keyholes in the
charger.
Drill pilot holes as follows:
2.
•
If installing the char
ger on wall board, plaster
cement, drill two holes for the wall anchors (as
indicated by the wall anchor manufacturer) at the
marked locations.
•
If installing the char
ger on wood, drill two holes,
slightly smaller than the diameter of the screw
threads, at the marked locations.
3.
If installing the char
ger on wall board, plaster
cement, insert the two wall anchors into the holes
(Fig. 4).
4.
Hold the char
ger against the wall and drive the screws
into the wall anchors or holes (Fig. 4).
, or
, or
4
3
2
1
7
1. Battery
2.
3. Lock–of
4.
compartment
Rear handle
f button
Front handle
Battery
The
battery powers the trimmer
Figure
5
6
m–4091
5
5. Guard
6. Blade
7. Trigger
.
1
3
1. Wall
anchors
2. Screws
Figure
4
3. Charger
Operation
IMPORTANT:
Important Safety Instructions in the Safety section;
r
efer to page 3.
Features
Compare the features illustrated in Figure 5 with your
trimmer to familiarize yourself with it.
Befor
e using your trimmer
, r
ead the
2
m–4092
Handles
Use the front and rear handles to hold the trimmer during
operation.
Lock-off Button
The lock-of
starting. Y
can squeeze the trigger
time the trigger is released.
f button reduces the possibility of accidental
ou must press the lock–of
. The lock–of
f button before you
f button resets each
Trigger
T
o turn on the trimmer
squeeze the trigger
Release the trigger to turn of
, press and hold the lock-of
, then release the lock-of
f the trimmer
f button,
f button.
.
WARNING
POTENTIAL HAZARD
•
If the trigger is pr
running.
WHA
T CAN HAPPEN
•
Accidental starting of your trimmer could
r
esult in serious personal injury
HOW T
•
O AVOID THE HAZARD
Only squeeze the trigger when you have both
hands on the handles and ar
the trimmer
essed, the trimmer will be
e r
.
.
eady to operate
6
Page 7

Guard
The guard helps to protect you from flying debris.
remove the guard. Replace it immediately if it becomes
damaged.
Never
Blade
Use the blade to cut hedges.
without first ensuring that the lock–of
are of
f. When not in use, keep the blade covered in the
supplied protective sheath.
Do not
handle the blade
f button and trigger
4.
Ensure that the red char
handle is on (Fig. 7).
Note:
If the light is not lit, ensure that the power cord and
transformer are completely inserted into the trimmer and
power outlet. If the light still does not come on, contact
you local Authorized T
ging light under the trimmer
oro Dealer
.
1
Charging
Your
trimmer requires char
for char
model you purchased. Refer to the appropriate section
below.
ging your trimmer will vary
the Battery
ging before use. The procedure
, depending on the
Model 51595
This
trimmer has a built–in char
to a wall outlet via a removable cord and transformer
takes approximately 8 hours to fully char
When not in use, this trimmer will lose about 1% of its
char
ge per day
trimmer.
IMPORTANT
power outlet for mor
plugged in longer than 24 hours, battery damage
WILL occur
Place the trimmer indoors (such as a garage or other
1.
dry place), on a high shelf, near an outlet, but out of
reach of children.
2.
Insert the round plug on the charging cord into the
receptacle under the rear handle (Fig. 6).
. Therefore, char
: Do not leave the charger plugged into a
e than 24 hours. If the charger is
.
ger that can be connected
ge this trimmer
ge it just prior to using the
1
. It
m–4097
Figure
1. Red
charging light
5. After
.
Model 51596
This
approximately 3 hours to fully charge this trimmer
normal use. If the battery is fully drained, it may take as
long as 8 hours. When not in use, this trimmer will lose
about 1% of its char
prior to using the trimmer
IMPORTANT
power outlet for mor
plugged in longer than 24 hours, battery damage
WILL occur
1.
a maximum of 24 hours, disconnect the power
cord from the trimmer and from the power outlet.
trimmer has a wall mounted char
ge per day
: Do not leave the charger plugged into a
e than 24 hours. If the charger is
.
Insert the trimmer into the char
the char
trimmer (Fig. 8).
ger slide into the slots on the bottom of the
7
. Therefore, char
.
ger so that the hooks on
ger
. It takes
, after
ge it just
1. Round
3. Plug
plug
the transformer on the other end of the power
cord into a power outlet.
Figure
2
6
2. Receptacle
M–4098
7
Page 8

m–4096
m–4095
Figure
2. Plug
3.
Note:
the power cord of the char
Ensure that the green power light and orange char
light on the char
ger are on.
If the green light is lit but the orange is not, ensure
that the trimmer is fully seated into the char
8
ger into a power outlet.
ger
. If neither
ging
light is lit, ensure that the power cord is completely
inserted into the power outlet and that the power outlet is
functioning properly
contact your Authorized T
After a maximum of 24 hours, disconnect the power
4.
. If you cannot solve the problem,
oro Dealer
.
cord from the power outlet.
Model 51597
This
trimmer has a wall mounted char
approximately 8 hours to fully charge this trimmer
not in use, this trimmer will lose about 3 to 10% of its
char
ge per day
. Therefore, char
trimmer.
IMPORTANT
power outlet for mor
: Do not leave the charger plugged in to a
e than 24 hours. If the charger is
plugged in longer than 24 hours, battery damage
WILL occur
Insert the trimmer into the char
1.
the char
.
ger slide into the slots on the bottom of the
trimmer (Fig. 9).
ger
. It takes
. When
ge it just prior to using the
ger so that the hooks on
Figure
2. Plug
3.
Note:
seated into the char
the power cord of the char
Ensure that the red char
If the light is not lit, ensure that the trimmer is fully
ger and that the power cord is
9
ger into a power outlet.
ging light on the char
ger is on.
completely inserted into the power outlet. If the light still
does not come on, contact you local Authorized T
oro
Dealer.
After a maximum of 24 hours, disconnect the power
4.
cord from the power outlet.
Charging Tips
• To
obtain maximum battery life, char
for no more than 16 hours.
Do not leave the charger
plugged in to a power outlet for more than 24
hours. If the charger is plugged in longer than 24
hours, battery damage WILL occur
Do not char
•
•
Do not char
C) or above 105°F (41°C). T
(5°
ge the trimmer in a wet or damp location.
ge the trimmer at temperatures under 40
this range can damage the battery
char
ge the battery at around 75°F (25
• Char
ge the trimmer whenever it begins to slow down
and act sluggish. Do not completely discharge the
battery.
During char
•
ging the char
ger will be warm and make a
soft humming sound.
ge the trimmer
.
emperatures outside
. For best results,
°C).
°F
•
Use only authentic T
char
8
oro replacement batteries and
gers with your trimmer
.
Page 9
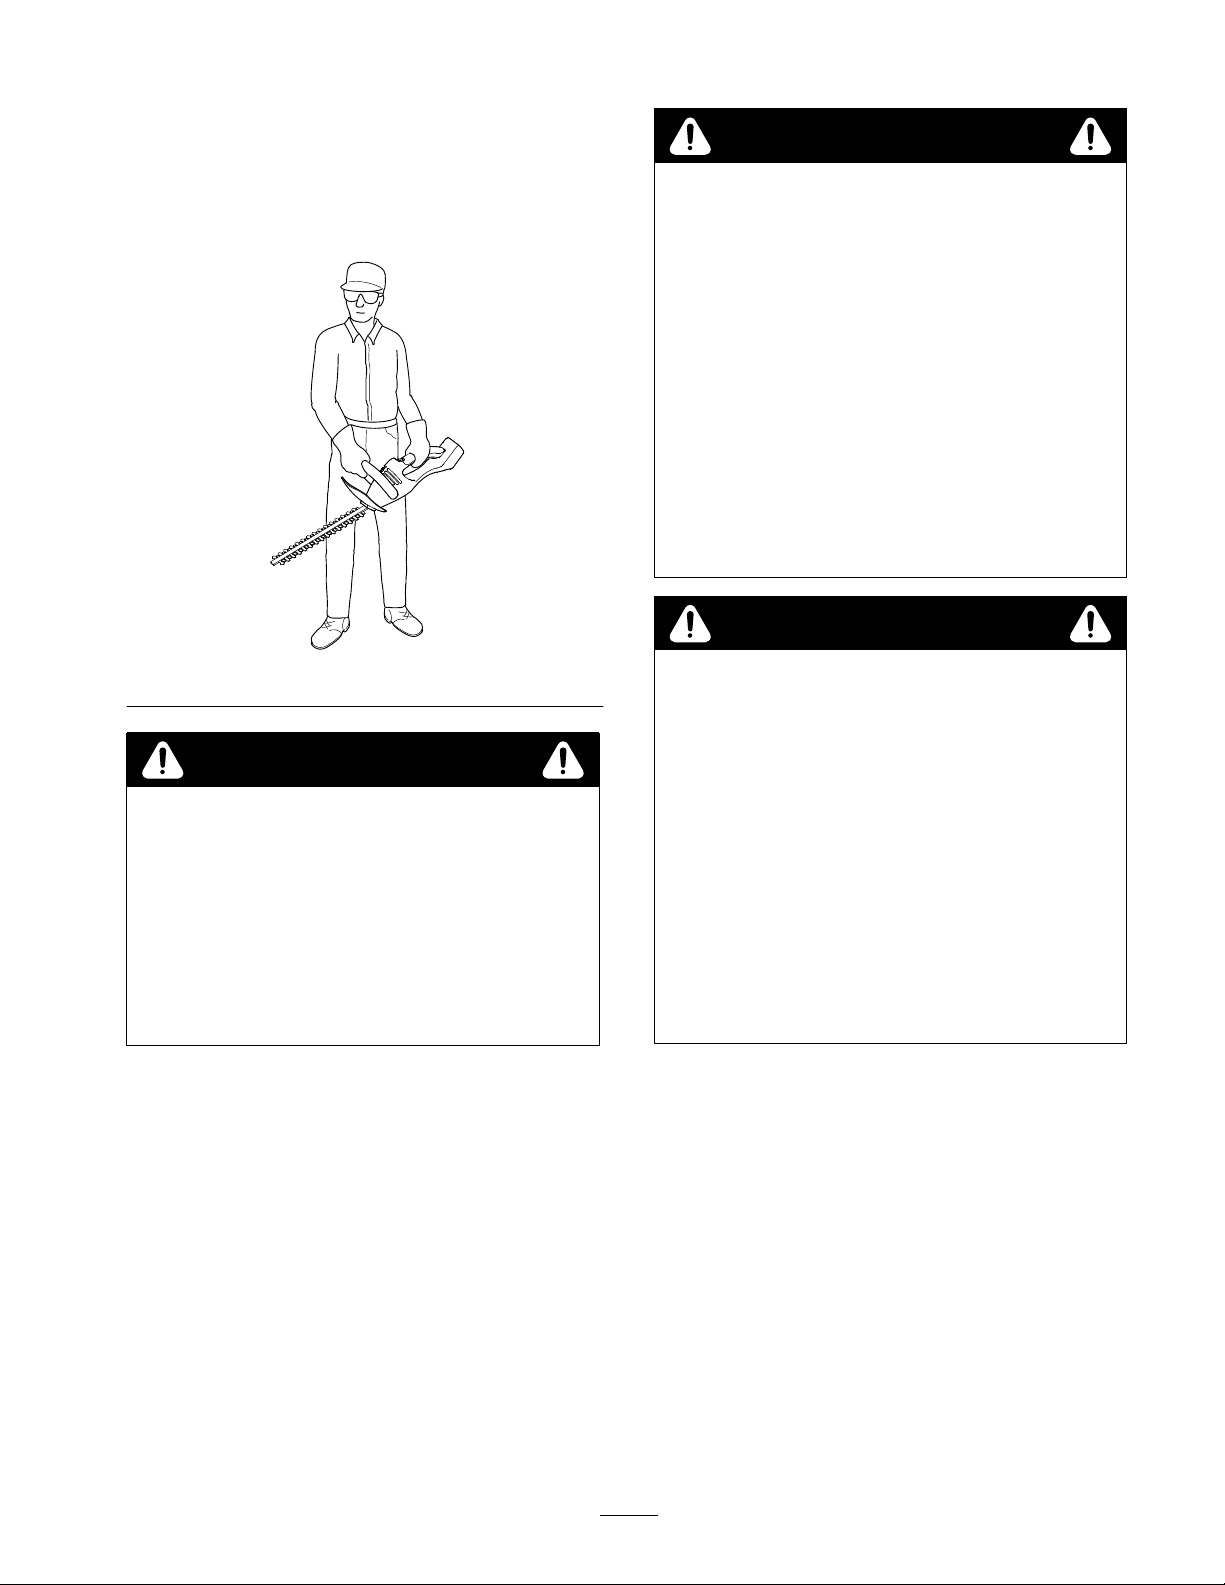
Preparing
For
your protection always wear work gloves, long pants,
a long sleeved shirt, shoes (not sandals), and safety glasses
when operating the trimmer (Fig. 10). Also, always
operate the trimmer using both hands.
For Operation
WARNING
POTENTIAL HAZARD
• T
rimmer has sharp blades.
WHA
T CAN HAPPEN
•
Contact with moving trimmer blades can cause
serious personal injury or damage.
HOW T
•
•
•
•
•
•
O AVOID THE HAZARD
Stay alert and watch what you ar
Do not operate trimmer when you ar
or under the influence of drugs, alcohol or
medication.
Do not operate trimmer if the guard is missing
or damaged.
Do not use the guard as a gripping surface.
Do not use the trimmer with only one hand.
If using a ladder
unbalancing yourself.
, take car
e not to over r
e doing.
e fatigued
each,
Figure
10
WARNING
POTENTIAL
•
It is possible to attempt to use the trimmer with
only one hand.
WHA
T CAN HAPPEN
•
Operating trimmer with only one hand could
cause serious personal injury
HOW T
•
Always use both hands when operating the
trimmer.
HAZARD
.
O AVOID THE HAZARD
m–4112
WARNING
POTENTIAL HAZARD
•
The operation of any hedge trimmer can r
in for
eign objects being thr
or bystander’s eyes.
WHA
T CAN HAPPEN
•
Contact with thr
eye damage.
HOW T
•
•
O AVOID THE HAZARD
Always wear safety goggles, safety glasses with
side shields, or a full face mask during
operation. W
Mask for use over eyeglasses or standard safety
glasses with side shields.
Keep all bystanders and pets away fr
ar
ea of operation.
Trimming
1. Hold
2.
the trimmer with both hands and with the blade
away from you
Push the lock-of
(Fig. 1
1).
own objects can cause sever
e r
ecommend W
A Hedge
before squeezing the trigger
f button and squeeze the trigger
own into your eyes
ide V
ision Safety
esult
e
om the
.
9
Page 10

Figure 11
WARNING
m–4099
• Do
not try to trim hedges which are above your normal
reach. Y
all times while operating.
• T
narrower at the top as shown in Figure 13. More of the
hedge will be exposed when shaped this way and its
growth will be more uniform.
ou must hold the trimmer with both hands at
rim the side of a hedge so that it will be slightly
POTENTIAL
•
When trimmer is in operation, sharp parts ar
moving.
WHA
T CAN HAPPEN
•
Any part of the body coming in contact with
moving parts could r
injury.
HOW T
•
Keep hands and fingers away fr
parts.
3. T
rim the hedge.
4.
When finished, release the trigger
Cover the blade with the sheath.
5.
6. Char
ge the battery (refer to Char
page 7).
HAZARD
esult in serious personal
O AVOID THE HAZARD
om moving
.
ging the Battery
Trimming Techniques
• If
desired, you can use a string to help cut your hedge
level. Decide how high you want the hedge. Then,
stretch a piece of string along the hedge at this height.
T
rim the hedge just above this guide line of string
(Fig. 12).
e
Figure
13
• When
•
,
trimming new growth, use a wide, sweeping
action so that the stems are fed directly into the cutter
blade. Older growth will have thicker stems and will
be trimmed easiest by using a sawing movement.
Do not try to cut stems that are lar
or those obviously too lar
blade. Use a non-powered hand saw or pruning saw to
cut the lar
ger stems.
ge to feed into the cutter
ger than 3/8 in. thick
Figure
12
10
Page 11

Maintenance
Continued safe and dependable operation requires routine maintenance.
Recommended
Service
Housing
Blade Lubricate
Blade Replace
Battery Replace
Item
Maintenance Schedule
Clean built-up dirt.
WARNING
POTENTIAL
•
Use of non-Toro r
pr
oduct damage.
WHA
T CAN HAPPEN
•
Using a damaged pr
personal injury
HOW T
•
When servicing use only original T
eplacement parts.
r
•
Never use “will-fit” r
HAZARD
eplacement parts could cause
oduct could cause serious
.
O AVOID THE HAZARD
eplacement parts.
Service Operation
oro
Frequency
After each use
After each use
When worn or damaged
When it will not charge
Blade
For
easier operation and longer blade life, lubricate the
hedge trimmer blade before and after each use.
1.
2.
Lubrication
Ensure that the trimmer is of
is not pressed.
Apply light machine oil along the edge of the blade
(Fig. 14).
f and the lock–of
f switch
Cleaning
Avoid
using solvents when cleaning plastic parts. Most
plastics are susceptible to various types of solvents and
may be damaged by their use. Use clean cloths to remove
dirt, carbon dust, etc.
the T
rimmer
WARNING
POTENTIAL HAZARD
•
Plastic parts can be damaged by many cleaning
solvents and other fluids.
WHA
T CAN HAPPEN
•
Damaged parts can cause trimmer to operate
impr
operly which could lead to serious
personal injury
HOW T
•
O AVOID THE HAZARD
Do not let brake fluids, gasoline,
petr
oleum-based pr
etc., contact the plastic parts. They contain
chemicals that can damage plastics.
.
oducts, penetrating oils,
Figure
14
Lubrication
All
of the bearings in this tool are lubricated with a
suf
ficient amount of high grade lubricant for the life of the
unit under normal operating conditions. Therefore, no
further lubrication is required.
Blade
Replace
1.
Replacement
the blade when it is worn or damaged.
Remove the two screws securing the battery cover and
remove the cover (Fig. 15).
m–4100
11
Page 12

1
Figure
1. Battery
2. Pull
3.
cover
the battery out of the trimmer (Fig. 16).
Disconnect the the wire leads from the battery
15
2. Screw
(Fig. 16).
2
1
2
m–4169
m–4101
Figure
17
1. Blade
5. Align
cover
2.
Blade cover screws
the cams that are fitted in the blade loops by
moving the blades slightly (Fig. 18).
3
2
5
4
1
m–4170
16
3.
Negative terminal
4.
Positive connector
5.
Positive terminal
1. Battery
2.
4. Place
(some models
may have a slightly
dif
ferent configuration)
Negative connector
hedge trimmer upside down on workbench and
Figure
remove the blade cover screws and the blade cover
(Fig. 17).
Note:
Be very careful throughout this procedure not to
lose the screws or the screw inserts on the inside of the
trimmer.
1. Blade
2.
loops
Misaligned cams
6. Remove
Figure
18
3.
blade screws (Fig. 19).
1
1
1
2
3
m–4103
Aligned cams
1. Blade screws
7. Pull
blade from the trimmer
Ensure that the cams are still aligned (Fig. 18).
8.
12
Figure
the blade up and of
m–4102
19
f of the cams, removing the
.
Page 13

9.
Slide the new blade into the blade housing, while
aligning the blade loops and pushing them down over
both cams.
10.
Replace blade screws (Fig. 19).
11.
Replace blade cover and secure it with the screws
removed previously (Fig. 17)
12.
Connect the wire leads to the battery (Fig. 16).
13.
Insert the battery into the trimmer
Replace the battery cover and secure it with the screws
14.
removed previously (Fig. 15).
Replacing
Although
be necessary to replace it when it no longer holds a
charge.
the battery is designed to have a long life, it will
the battery
.
m–4536
Figure
Only
contact RBRC for nickel-cadmium batteries
(models 51595 and 51596 only). For the nickel-metal
hydride batteries (model 51597), contact your local
waste management authorities for disposal
information.
20
IMPORTANT
surface. The battery terminals may spark or overheat
if placed on a metal surface.
1.
Remove the two screws securing the battery cover and
remove the cover (Fig. 15).
2.
Pull the battery out of the trimmer (Fig. 16).
3.
Disconnect the the wire leads from the battery
(Fig. 16).
4.
Connect the wire leads to the new battery (Fig. 16).
5.
Insert the new battery into the trimmer
Replace the battery cover and secure it with the screws
6.
removed previously (Fig. 15).
7.
Recycle the old battery
IMPORTANT
(models 51595 and 51596) or nickel-metal hydride
(model 51597). The battery must be r
disposed of pr
The EP
(Fig. 20) on the nickel-cadmium (Ni–Cd) battery
indicates that Toro is voluntarily participating in an
industry pr
at the end of their useful life, when taken out of service
in the United States or Canada. The RBRC pr
pr
ovides a convenient alternative to placing used
Ni–Cd batteries into the trash or the municipal waste
str
eam, which may be illegal in your ar
1–800–8–BATTERYt
battery r
ar
ea. T
oro’
commitment to pr
conserving our natural r
: Do not set the battery on a metal
.
.
: The battery contains nickel-cadmium
ecycled or
operly.
A certified RBRC Battery Recycling Seal
ogram to collect and r
for information on Ni–Cd
ecycling and disposal bans/r
s involvement in this pr
eserving our envir
esources.
ecycle these batteries
ogram
ea. Please call
estrictions in your
ogram is part of our
onment and
Maintenance
• If
the trimmer is dropped, inspect it for damage, such
as a bent blade, cracked housing, or any other damage.
If damaged, contact your Authorized T
Fertilizers and other chemicals can cause corrosion of
•
metal and/or plastic parts. Do not store the trimmer
near these chemicals.
•
Do not allow any liquid to get into the trimmer
immerse the trimmer in water or other liquid.
and Storage T
oro Dealer
ips
.
. Never
13
Page 14

14
Page 15

Screw
Location T
emplate for Model 51596
15
Page 16

The Toro Promise
A
Full T
wo Y
For the United States, Canada and Mexico
The T
oro Company warrants this TORO Product for two years against defects in material or workmanship.
T
o receive a replacement or repair
seller
. (U.S. customers ONL
Dealer or the T
product defects only.
ORO Service Center
It does not cover incidental or consequential damages. Some states do not allow
, at T
Y may return their unit, with proof of purchase, to any T
ear Residential Use W
oro’
s option, just return the complete unit, postage prepaid, to the
, 5300 Shoreline Blvd., Mound, MN 55364.) This warranty covers
the exclusion or limitation of incidental or consequential damages, so the above limitation may not
apply to you.
This warranty gives you specific rights, and you may have other rights which vary from state
to state. If all other remedies fail, you may contact us at The T
811
1 L
yndale A
ve S, Bloomington, MN, 55420-1
196. (Do not return defective product to this address.)
arranty
ORO Master Service
oro Company, Customer Service Department,
COUNTRIES
Customers who have purchased T
should contact their T
OTHER THAN THE UNITED STATES, CANADA OR MEXICO
ORO products exported from the United States, Canada or Mexico
ORO Distributor (Dealer) to obtain guarantee policies for your country
state. If for any reason you are dissatisfied with your Distributor’s service or have dif
guarantee information, contact the T
ORO importer
.
, province or
ficulty obtaining
 Loading...