


FORM NO. 3321±231
Electric Trimmers
25 cm, 30 cm and 35 cm Cutting Widths
Model No. 51249, 51349, 51449Ð89000001 & Up
Taille-bordures électriques
Largeur de coupe 25, 30 et 35 cm
Modèle No. 51249, 51349, 51449Ð89000001 et suivants
Recortadoras electricas
Anchos de corte de 25, 30 y 35 cm
Modelos N. 51249, 51349, 51449Ð89000001 y siguientes
Elektro-Trimmer
Schnittbreite 25 cm, 30 cm und 35 cm
Modell Nr. 51249, 51349, 51449Ð89000001 & aufwärts
Elektrische trimmers
Maaibreedte 25, 30 en 35 cm
Model nr. 51249, 51349, 51449Ð89000001 en hoger
Operator's Manual |
Bedieningshandleiding |
Manuel de l'Utilisateur |
|
Manual del Operador |
|
Gebrauchsanleitung |
|
Figures Ð Figuras Ð Abbildungen Ð Figuren Ð Rysunki Ð Obrázky
1 |
2 |
|
1807 |
|
English
1. Model and serial number decal
Français
1. Décalcomanie de numéros de modèle et de série
Español
1. Calcomanía con los números de modelo y serie
Deutsch
1. Modellund Seriennummernschild
Nederlands
1. Plaatje met modelen serienummer
1810
English |
|
|
||
1. |
Smooth side of support |
3. |
Carriage bolt |
|
|
handle |
4. |
Knob |
|
2. |
Upper handle |
|||
|
|
|||
Français |
|
|
||
1. |
Côté lisse de la poignée |
3. |
Boulon de carrossier |
|
|
de soutien |
4. |
Bouton |
|
2. |
Poignée supérieure |
|||
|
|
|||
Español |
|
|
||
1. |
Lado liso de la manija de |
3. |
Tornillo de carruaje |
|
|
soporte |
4. |
Perilla |
|
2. |
Manija superior |
|||
|
|
|||
Deutsch |
|
|
||
1. |
Glatte Seite des |
3. |
Rahmenschraube |
|
|
Haltegriffs |
4. |
Knopf |
|
2. |
Oberer Griff |
|||
|
|
|||
Nederlands |
|
|
||
1. |
Gladde kant van de |
3. |
Bevestigingsbout |
|
|
steungreep |
4. |
Knop |
|
2. |
Bovenste handgreep |
|||
|
|
|||
|
The Toro Company ± 1998 |
|
i |
||
All Rights Reserved |
Printed in USA
Figures Ð Figuras Ð Abbildungen Ð Figuren Ð Rysunki Ð Obrázky
3 |
4
|
|
1099 |
English |
|
|
1. |
Grass shield |
2. Long, curved slot in motor |
|
|
housing |
Français |
|
|
1. |
Pare±herbe |
2. Longue fente courbée du |
|
|
carter moteur |
Español |
|
|
1. |
Guardahierbas |
2. Muesca larga curvada de |
|
|
la caja del motor |
Deutsch |
|
|
1. |
Grasschild |
2. Langer, gebogener Schlitz |
|
|
im Motorgehäuse |
Nederlands |
|
|
1. |
Grasscherm |
2. Lange ronde sleuf in |
|
|
motorhuis |
|
|
|
1100
English
1. Self-tapping screw (2)
Français
1. Vis autotaraudeuse (2)
Español
1. Tornillo autoenroscante (2)
Deutsch
1. Schneidschraube (2)
Nederlands
1. Zelftappende schroeven (2)
ii
Figures Ð Figuras Ð Abbildungen Ð Figuren Ð Rysunki Ð Obrázky |
|
5 |
|
6 |
|
|
|
1102
|
|
|
English |
|
|
|
1101 |
1. |
Line taped to cutter head |
|
|
|
|
|
English |
|
Français |
||
1. |
Cutting knife |
|
1. |
Fil collé sur la tête de coupe |
Français |
|
Español |
||
1. |
Lame de coupe |
|
1. |
Línea pegada al cabezal cortador |
Español |
|
Deutsch |
||
1. |
Cuchilla cortadora |
|
1. |
Leine an Schnittkopf geklebt |
Deutsch |
|
Nederlands |
||
1. |
Schnittmesser |
|
1. |
Snijdraad vastgeplakt op snijkop |
Nederlands |
|
|
|
|
1. |
Mes |
|
|
|
iii

7 |
|
English
1. Cord lock
Français
1. Blocage du cordon
Español
1. Traba del cable
Deutsch
1. Schnursperre
Nederlands
1. Snoer vastzetten
Figures Ð Figuras Ð Abbildungen Ð Figuren Ð Rysunki Ð Obrázky
8 |
1808
1105
9 |
1106
iv
Figures Ð Figuras Ð Abbildungen Ð Figuren Ð Rysunki Ð Obrázky
10 |
12 |

1107
11 |
1108
1809
English
1. Support handle rotated 180_
Français
1. Support de la poignée tournée à 180_
Español
1. Manija de soporte girada 180_
Deutsch
1. Haltegriff um 180_ gedreht
Nederlands
1. Steungreep 180_ gedraaid
v
Figures Ð Figuras Ð Abbildungen Ð Figuren Ð Rysunki Ð Obrázky
13 |
14 |
|
|
|
|
|
|
|
|
|
|
|
|
|
|
|
1111 |
|
|
|
|
English |
|
|
|
|
|
|
1. |
Cap |
3. |
Tabs on cap |
|
1110 |
|||||||
|
|
|
2. |
Spool |
|
|
|
|
|
|
|
|
|||
|
|
|
|
Français |
|
|
|
|
|
|
1. |
Capuchon |
3. |
Ergots sur le capuchon |
|
|
|
|
2. |
Bobine |
|
|
|
|
|
|
|
Español |
|
|
|
|
|
|
1. |
Tapa |
3. |
Lengüetas de la tapa |
|
|
|
|
2. |
Bobina |
|
|
|
|
|
|
|
Deutsch |
|
|
|
|
|
|
1. |
Kappe |
3. |
Kappenansätze |
|
|
|
|
2. |
Spule |
|
|
|
|
|
|
|
Nederlands |
|
|
|
|
|
|
1. |
Kap |
3. |
Lippen aan de kap |
|
|
|
|
2. |
Spoel |
|
|
|
|
|
|
|
|
|
|
|
vi
Figures Ð Figuras Ð Abbildungen Ð Figuren Ð Rysunki Ð Obrázky |
|
|
|
15 |
16 |
|
|
|
|
|
|
|
||
|
1117
|
|
|
|
|
English |
|
|
|
|
|
|
|
|
1. |
Cap & spool |
3. |
Tabs on cap |
|
|
|
|
1119 |
2. |
Eyelet |
|
|
|
|
|
|
|
|
|
|
|
English |
|
|
|
Français |
|
|
||
|
|
|
|
|
|
|
||
1. |
Cap & spool |
2. |
Spring |
|
1. |
Capuchon et bobine |
3. |
Ergots sur le capuchon |
|
2. |
Oeillet |
|
|
||||
Français |
|
|
|
|
|
|||
|
|
|
Español |
|
|
|||
1. |
Capuchon et bobine |
2. |
Ressort |
|
|
|
||
|
1. |
Tapa y bobina |
3. |
Lengüetas de la tapa |
||||
Español |
|
|
|
|||||
|
|
|
2. |
Ojal |
|
|
||
1. |
|
2. |
|
|
|
|
||
p o |
o t |
|
Deutsch |
|
|
|||
Deutsch |
|
|
|
|
|
|||
|
|
|
1. |
Kappe & Spule |
3. |
Kappenansätze |
||
1. |
Kappe & Spule |
2. |
Feder |
|
||||
|
2. |
Löse |
|
|
||||
|
|
|
|
|
|
|
||
Nederlands |
|
|
|
Nederlands |
|
|
||
|
|
|
|
|
|
|
||
1. |
Kap en spoel |
2. |
Veer |
|
1. |
Kap en spoel |
3. |
Lippen aan de kap |
|
|
|
|
|
||||
|
|
|
|
|
2. |
Opening |
|
|
vii
Figures Ð Figuras Ð Abbildungen Ð Figuren Ð Rysunki Ð Obrázky
17 |
|
18 |
|
|
|
|
|
|
|
|
|
|
1113 |
|
English |
|
|
|
|
|
|
|
|
|
||
1. |
1/8 inch maximum |
2. |
Wind line |
|
|
Français |
|
|
|
1115 |
|
1. |
3 mm maximum |
2. |
Embobiner le fil |
English |
|
|
|
|
|
||
Español |
|
|
1. |
Air intake vents |
|
1. |
Máximo de 3 mm |
2. |
Enrosque la linea |
Français |
|
|
|
|
|
||
Deutsch |
|
|
1. |
Trous d'admission d'air |
|
1. |
1/8 Inch maximal |
2. |
Leine aufspulen |
Español |
|
|
|
|
|
||
Nederlands |
|
|
1. |
Tomas de aire |
|
1. |
Maximaal 3 mm |
2. |
Draad opwikkelen |
Deutsch |
|
|
|
|
|
||
|
|
|
|
1. |
Lufteinlaûöffnungen |
|
|
|
|
Nederlands |
|
|
|
|
|
1. |
Openingen voor luchttoevoer |
19 |
1807
viii

Contents |
|
|
Page |
Contents . . . . . . . . . . . . . . . . . . . . . . . . . . . . . . . |
1 |
Introduction . . . . . . . . . . . . . . . . . . . . . . . . . . . . |
1 |
Safety . . . . . . . . . . . . . . . . . . . . . . . . . . . . . . . . . |
2 |
Symbol Glossary . . . . . . . . . . . . . . . . . . . . |
4 |
Assembly . . . . . . . . . . . . . . . . . . . . . . . . . . . . . . |
5 |
Attach Support Handle . . . . . . . . . . . . . . . . |
5 |
Attach Grass Shield . . . . . . . . . . . . . . . . . . |
5 |
Before Starting . . . . . . . . . . . . . . . . . . . . . . . . . . |
5 |
Cutting Line . . . . . . . . . . . . . . . . . . . . . . . . |
5 |
Securing Extension Cord . . . . . . . . . . . . . . |
5 |
Operation . . . . . . . . . . . . . . . . . . . . . . . . . . . . . . |
6 |
Lengthening Cutting Line . . . . . . . . . . . . . . . . . |
7 |
Replacing Cutting Line . . . . . . . . . . . . . . . . . . . |
8 |
Rewinding Empty Spools . . . . . . . . . . . . . . . . . |
9 |
Maintenance . . . . . . . . . . . . . . . . . . . . . . . . . . . . |
9 |
Accessories . . . . . . . . . . . . . . . . . . . . . . . . . . . . . |
10 |
The Toro Promise . . . . . . . . . . . . . . . . . . . . . . . . |
10 |
Introduction |
|
Thank you for purchasing a Toro product. |
|
All of us at Toro want you to be completely satisfied with your new product, so feel free to contact your local Authorized Service Dealer for help with service, genuine Toro parts, or other information you may require.
Whenever you contact your Authorized Service Dealer or the factory, always know the model and serial numbers of your product. These numbers will help the Service Dealer or Service Representative provide exact information about your specific product. You will find the model and serial number decal located in a unique place on the product
(Fig. 1).
For your convenience, write the product model and serial numbers in the space below.
Model No.
Serial No.
Read this manual carefully to learn how to operate and maintain your product correctly. Reading this manual will help you and others avoid personal injury and damage to the product. Although Toro designs, produces and markets safe, state-of-the-art products, you are responsible for using the product properly and safely. You are also responsible for training persons who you allow to use the product about safe operation.
The Toro warning system in this manual identifies potential hazards and has special safety messages that help you and others avoid personal injury, even death. DANGER, WARNING and CAUTION are signal words used to identify the level of hazard. However, regardless of the hazard, be extremely careful.
DANGER signals an extreme hazard that will cause serious injury or death if the recommended precautions are not followed.
WARNING signals a hazard that may cause serious injury or death if the recommended precautions are not followed.
CAUTION signals a hazard that may cause minor or moderate injury if the recommended precautions are not followed.
Two other words are also used to highlight information. ªImportantº calls attention to special mechanical information and ªNoteº emphasizes general information worthy of special attention.
GB±1
Safety
IMPORTANT SAFETY
INSTRUCTIONS
To assure maximum safety, best performance, and to gain knowledge of the appliance, it is essential that you or any other operator of the appliance read and understand the contents of this manual before operating the appliance. Pay particular
attention to the safety alert symbol  which means CAUTION, WARNING OR DANGER Ð ªpersonal safety instruction.º Read and understand the instruction because it has to do with safety. FAILURE TO COMPLY WITH INSTRUCTION MAY RESULT IN PERSONAL INJURY, RISK OF FIRE OR ELECTRICAL SHOCK.
READ ALL INSTRUCTIONS BEFORE USING THIS APPLIANCE
SAVE THESE INSTRUCTIONS FOR FUTURE REFERENCE!
WARNINGÐTo reduce the risk of fire, electric shock or injury, follow these safety instructions.
1.Read and understand the contents of this manual before operating the trimmer. Become familiar with all controls and know how to stop it quickly.
2.Keep everyone, especially children and pets, away from area of operation. Never allow children to operate the appliance. It is not a toy. Never allow adults to operate unit without first reading the Operator's Manual.
3.Always wear safety goggles or other suitable eye protection when trimmer is used for trimming or decorative edging.
4.Never operate the appliance in wet or damp conditions. DO NOT USE IN THE RAIN.
5.Inspect area thoroughly where trimmer will be used. Pick up any debris or objects that could be entangled in trimmer or picked up by trimmer and thrown. Keep area of operation clear of all persons, particularly small children and pets.
6.Dress properly. Do not wear loose clothing or jewelry. They can catch in moving parts. Pin up long hair so that it cannot be drawn into unit's air inlet. Always wear substantial footwear and long pants.
7.Use the right applianceÐDo not use the appliance for any job except that for which it was intended such as cutting grass and small weeds.
8.To reduce the risk of electric shock, use only an extension cord recommended for outdoor use. Replace a damaged extension cord immediately.
9.Extension cordÐTo prevent disconnection of the trimmer from the extension cord during operation, properly connect extension cord prior to operating.
10.Avoid unintentional starting. Be sure switch is off when plugging in. Do not carry plugged±in trimmer with finger on switch.
11.Turn off all controls before unplugging cord.
12.Do not handle plug or appliance with wet hands or while standing in water.
13.Do not use appliance with a damaged cord or plug. If appliance is not working as it should, has been dropped, damaged, left outdoors, or dropped into water, return it to an Authorized Toro Service Dealer.
14.Don't abuse cord. Do not pull or carry appliance by cord, close a door on cord or pull cord around sharp edges or corners. Do not use cord as a handle. Do not unplug appliance by pulling cord. To unplug, grasp the plug, not the cord.
15.Keep cord away from extreme heat, oil, and sharp edges. Replace damaged cords.
16.Do not force the trimmer. It operates better and safer at the rate for which it was designed.
GB±2

17.Use only in daylight or with good artificial light. Always be sure of your footing. Keep a firm hold on the handle and walk, never run.
18.Stop the motor and unplug the supply cord whenever you leave the appliance, before cleaning the housing, and when making any repairs or inspections.
19.When not in use, store your trimmer in a dry place; high or locked up out of the reach of children.
20.Keep all fasteners tight to be sure the appliance is in safe working condition.
21.Make sure spool and cap are properly secured before operation.
22.Never operate without factory installed guards or other protective safety devices in place.
23.Do not put hands or feet near or under rotating parts. Keep clear at all times.
24.If the appliance should start to vibrate abnormally, stop the motor, unplug the cord and check immediately for the cause. Vibration is generally a warning of trouble.
25.Do not operate your appliance after it has been dropped or damaged. Return it to your nearest Authorized Toro Service Dealer for inspection or repair.
26.When servicing use only identical TORO replacement parts. Replace or repair damaged cords.
27.Don't OverreachÐKeep proper footing and balance at all times when operating the trimmer.
28.Maintain Appliance With CareÐKeep cutting head and motor housing clean for best performance and to reduce the risk of injury. Follow Maintenance instructions on page 9.
29.CAUTIONÐCutting knife on grass shield is sharp and care should be taken when cleaning and handling.
30.EXTENSION CORD REQUIREMENTSÐUse an extension cord suitable for outdoor use and one that complies with requirements specified in your country's electric code. Make sure your cord is in good condition; if damaged, replace. Use a cord that is large enough to carry the current the trimmer will draw.
See Figure 7 for proper cord connection.
Note: Use of an extension cord over 150 feet is not recommended.
Certified to CEE 10
Sound Emissions
This unit has a maximum airborne noise emission, based on measurement of identical machines.
70 dB(A)
Vibration Level
This unit has a maximum vibration level of 8.5 m/s@, based on measurement of identical machines.
GB±3
Symbol Glossary
Safety alert triangle Ð symbol within triangle indicates a hazard
Safety alert symbol
Read operator's manual
Consult technical manual for proper service procedures
Do not open or remove safety shields while engine is running
Thrown or flying objects Ð Whole body exposure
Keep dry
Electrical shock/electrocution
Cutting of finger or hand
Cutting of foot
Wear eye protection |
Disconnect power |
Keep bystanders away
GB±4
Assembly
Note: Trimmer should appear as shown in Figure 1 when fully assembled.
Attach Support Handle
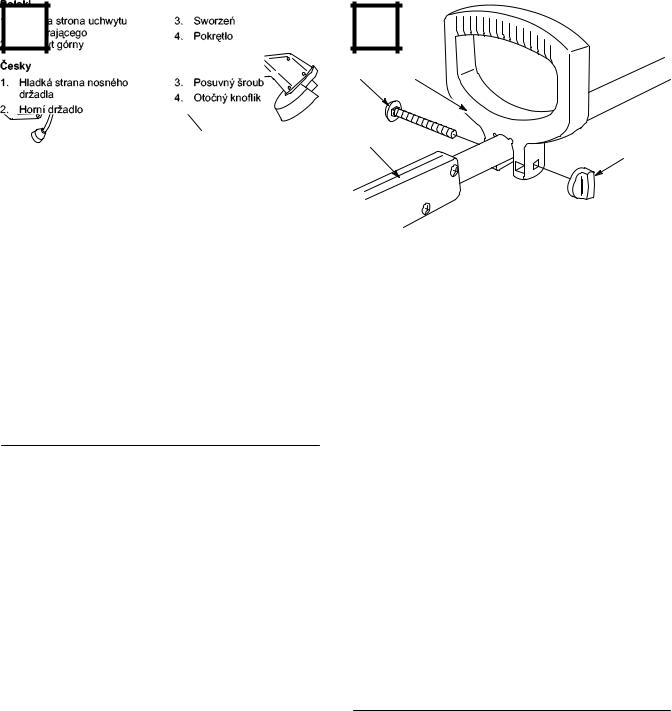
1.Press support handle onto tube with smooth side of support handle facing toward upper handle. Loosely secure support handle to tube with carriage bolt and knob (Fig. 2).
Note: Support handle height may be adjusted by sliding handle up and down tube. When support handle is at desired operating height, tighten knob securely.
Attach Grass Shield
POTENTIAL HAZARD
• Cutting knife on grass shield is sharp.
WHAT CAN HAPPEN
•Contact with cutting knife could cause personal injury.
HOW TO AVOID THE HAZARD
•Be careful when handling shield. Avoid contact with knife blade.
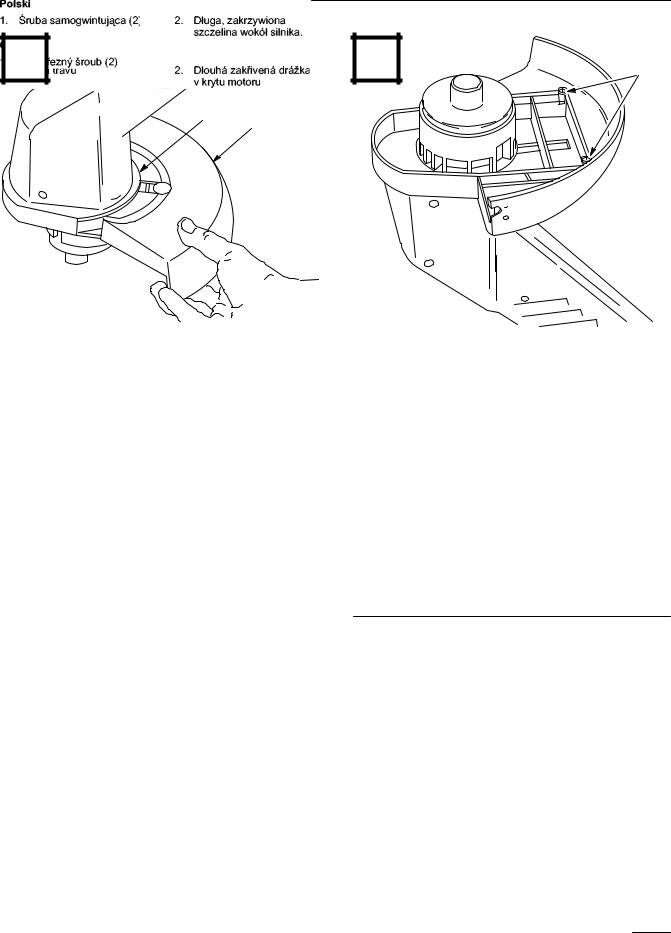
1.Fit grass shield into long, curved slot in motor housing (Fig. 3).
2.Invert trimmer and secure grass shield to underside of motor housing with (2) two self-tapping screws (Fig. 4).
3.Remove tape from cutting knife on grass shield (Fig. 5).
Before Starting
Cutting Line
Note: The cutting line for your trimmer is a special monofilament line. Your trimmer comes complete with a supply of this line already wound onto the spool.
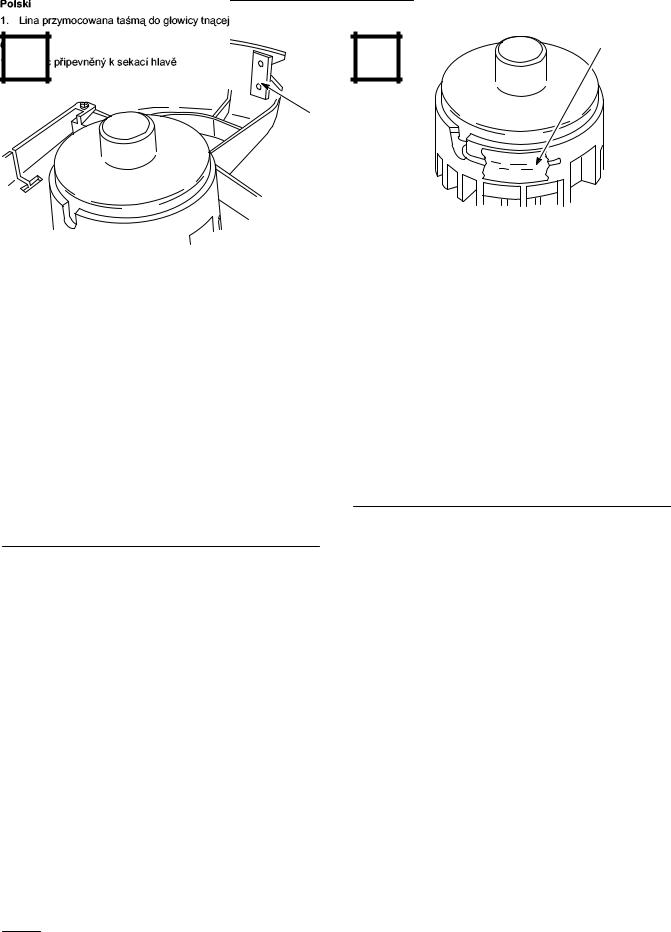
1.To avoid line tangle during shipment, the tip of the monofilament line has been taped to the cutter head. The tape must be removed before operation (Fig. 6).
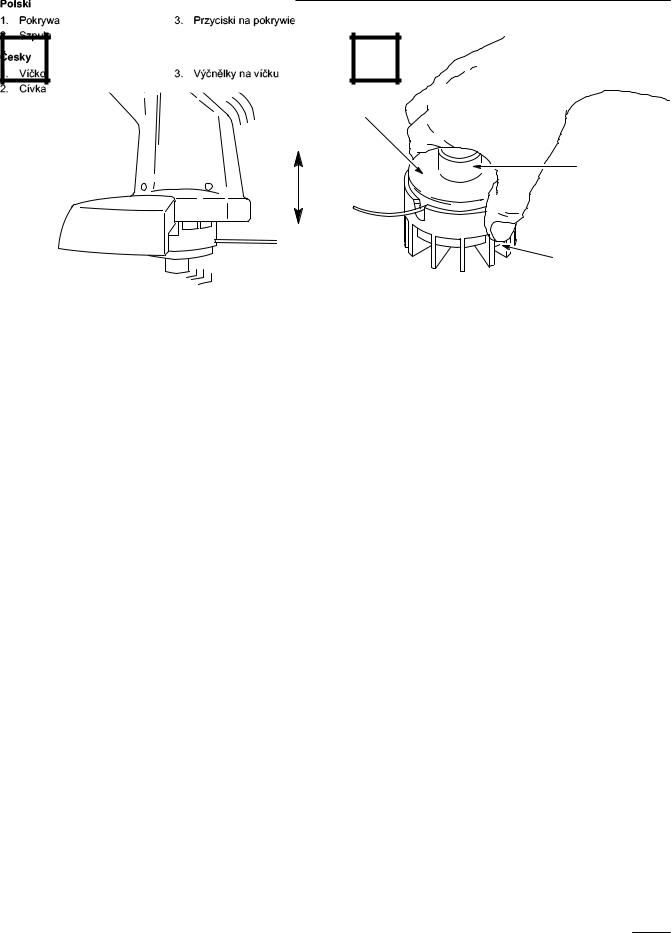
2.Check cap to be sure it is securely snapped in place. Align cap tabs with slots in cutter head, press in tabs and push down cap and spool to lock cap in place (Fig. 16).
POTENTIAL HAZARD
•Cap may loosen during shipment. A loose or improperly installed cap or spool could fly off trimmer.
WHAT CAN HAPPEN
•Contact with a thrown spool or cap could cause injury to operator or bystanders.
HOW TO AVOID THE HAZARD
•Be sure spool and cap are fully secured before operating the unit. Replace spool if it is damaged or if cap does not securely snap onto cutter head.
•Keep bystanders and pets away from trimming area.
Securing Extension Cord
Note: The proper extension cord is a requirement for safe and efficient use of your Toro trimmer. Use only an extension cord recommended for outdoor use.
GB±5
1.Plug extension cord into trimmer plug (Fig. 7).
2.Form a loop in the extension cord and insert it into the slot in the rear of the upper handle (Fig. 7).
3.Secure extension cord in cord lock as as shown in Figure 7.
POTENTIAL HAZARD
•Never use an electrical cord that is damaged.
WHAT CAN HAPPEN
•A damaged electrical cord could cause a shock or fire.
HOW TO AVOID THE HAZARD
•Thoroughly inspect electrical cord before using trimmer. If cord is damaged, do not operate trimmer. Replace or repair damaged cord immediately. Contact your TORO service dealer for assistance.
Operation
POTENTIAL HAZARD
•Objects can be thrown by the trimmer while it is in operation.
WHAT CAN HAPPEN
•Thrown objects could cause injury to the operator or bystanders.
HOW TO AVOID THE HAZARD
•Always wear safety goggles or other suitable eye protection, long pants and shoes while operating trimmer.
•Keep people and pets away from trimming area.
Your trimmer will cut grass and small weeds in difficult and hard to reach places. However, you will most likely experience some line breakage during your first few uses. As you learn the trimming techniques, you will be able to cut areas around trees, shrubs, foundation walls, fences, sidewalks, patios, etc., with minimal line wear or line breakage.
1.Inspect area to be trimmed for any wire, cord, or string-like matter which could become entangled in the rotating line. Also pick up any objects or debris that could be thrown by the trimmer.
2.Lay out the extension cord so that it won't be in your way and to prevent kinking or tangling.
3.Trim only when grass and weeds are dry.
4.Slowly move unit in and out of area being cut, maintaining unit at desired cutting height. This can be either a forward-backward or side-to-side motion as indicated (Fig. 8 & 9).
5.Grass in excess of eight inches tall or small weeds should be cut by working from the top to the bottom in small increments to avoid premature line wear.
6.DO NOT FORCE THE UNIT. Allow the very tip of the nylon line to do the cutting (especially along walls) (Fig. 10). Cutting with more than the tip will reduce cutting efficiency and overload the motor.
The tip of the cutting line will wear during use and cause a reduction in the cutting swath. If the line is not advanced occasionally, it will wear down to the eyelet. When the trimmer is stopped the line will tend to relax and may retract into the cutter head. Should this occur, remove spool, refeed the line through eyelet, and reassemble spool to trimmer.
7.The life of your cutting line is dependent upon following the preceding trimming techniques, as well as what is being cut, and where the cutting is being done. For example, line wears faster when trimming against a foundation wall as opposed to trimming around a tree.
Some line breakage will occur from moving unit too fast, from entanglement with foreign matter, from normal line fatigue, and from attempting to
GB±6

cut thick, stalky weeds in excess of unit's capability. As cutting line wears, for best performance, lengthen as indicated in Lengthening Cutting Line procedure.
8.NEVER drag the trimmer spool on the ground while trimming (Fig. 11). This causes motor overload and spool wear.
9.After each use, feed out some line to prevent line from retracting into cutting head.
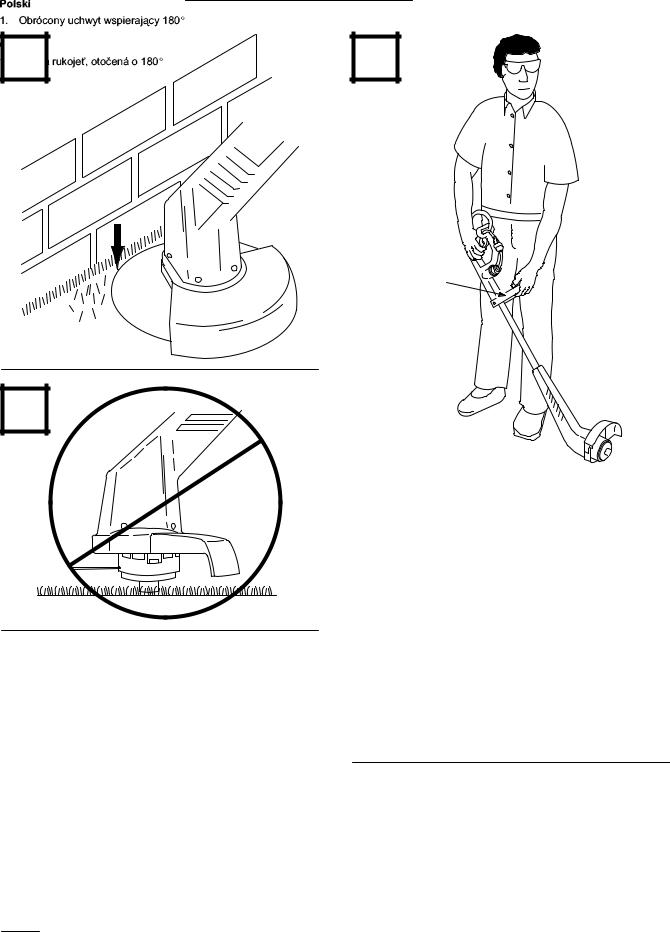
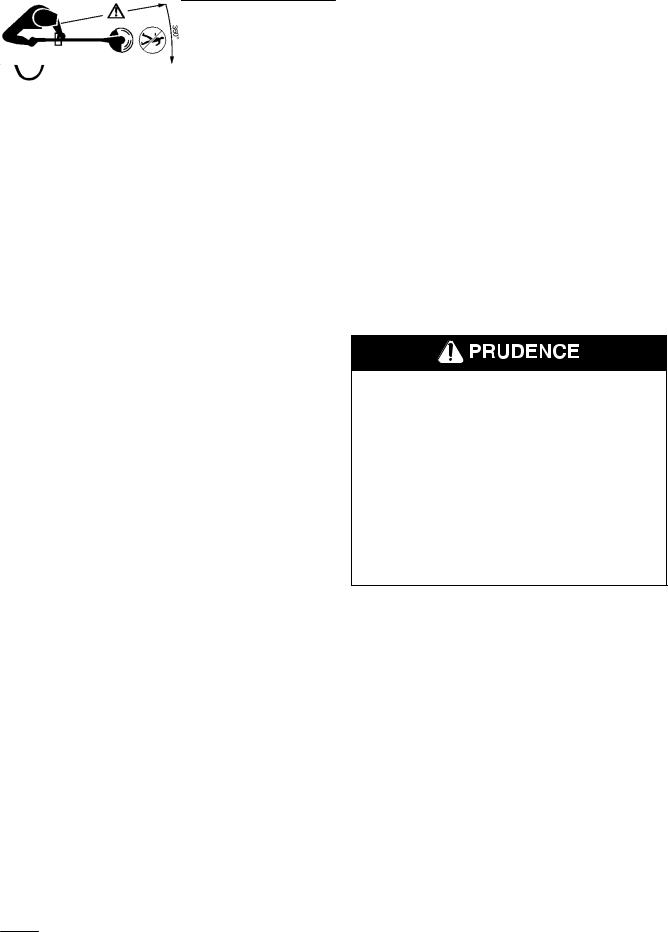
10.Trimmer may be used as a decorative edger by rotating support handle 180_ (Fig. 12).
POTENTIAL HAZARD
•When trimmer is used for decorative edging, objects may be thrown in operator's or bystander's direction.
WHAT CAN HAPPEN
•Thrown objects could cause injury to the operator or bystanders.
HOW TO AVOID THE HAZARD
•Always wear safety goggles or other suitable eye protection, long pants and shoes while operating trimmer.
•Keep people and pets away from trimming area.
Lengthening Cutting
Line
1.To lengthen line, firmly tap spool on the ground while the motor continues to run. The line will be fed from the spool and cut off to the proper length by the cutting knife attached to the shield (Fig. 13).
Remember to keep the trimmer `on' while lengthening the line. Just tap the trimmer on the ground; do not hold it on the ground. After the line feeds out, wait until you hear the line being cut to the proper length before continuing to trim.
Note: To help prevent line tangle, tap only once to lengthen line. If additional line is required, wait a few seconds before retapping trimmer head. Do not allow line to wear too short. Keep line length at full cutting diameter as much as possible.
2.Lengthen line only when line has been shortened by wear. Unnecessary lengthening will waste line.
Note: The spool may wear during normal use of the line advance feature and may require occasional replacement. Replacement spools are available through your TORO retailer. See
page 10 for accessories.
GB±7
Replacing Cutting
Line
Prewound replacement spools can be purchased from your local Toro retailer. The cutting line used by Toro is specially formulated for use on your trimmer. Other line may not provide the same high quality performance.
POTENTIAL HAZARD
•Use of line other than proper monofilament cutting line could cause personal injury.
WHAT CAN HAPPEN
•Wire or other string-like substances could cut through clothes, skin, etc. and cause personal injury.
HOW TO AVOID THE HAZARD
•Do not use any type of wire or other string-like substance.
•Use only TORO .065º dia. nylon monofilament cutting line, 30 feet maximum.
POTENTIAL HAZARD
•When trimmer is in operation, the cutting head is rotating.
WHAT CAN HAPPEN
•Contact with rotating cutting head could cause personal injury.
HOW TO AVOID THE HAZARD
•Always be sure cutting head has completely stopped rotating and trimmer is unplugged before inverting trimmer.
•Never activate trimmer when it is in an inverted position.
1.Disconnect trimmer from power source.
POTENTIAL HAZARD
• Cutting knife on grass shield is sharp.
WHAT CAN HAPPEN
•Contact with cutting knife could cause personal injury.
HOW TO AVOID THE HAZARD
•Be careful when removing spool. Avoid contact with knife blade.
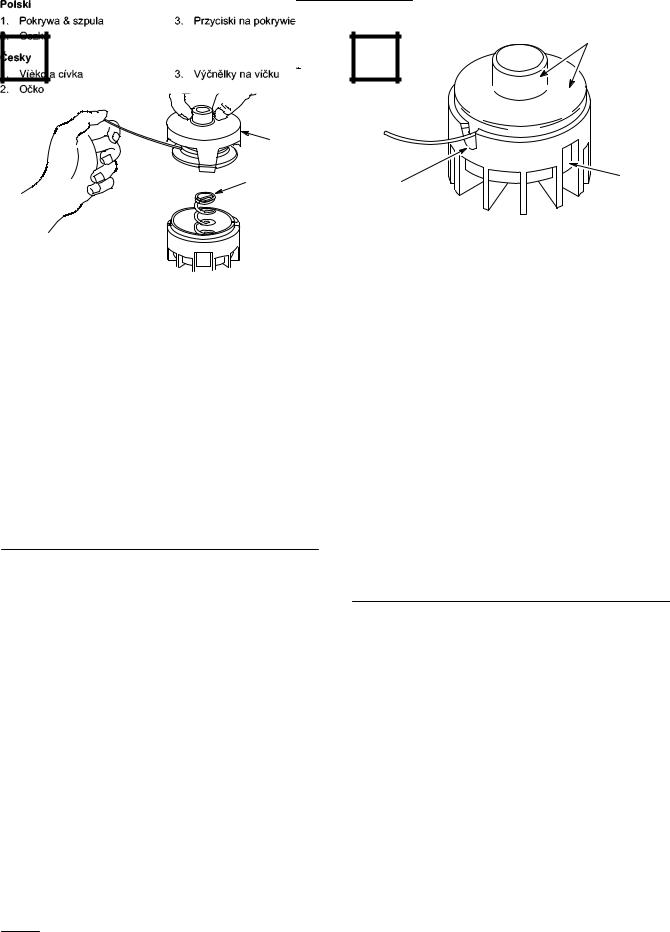
2.To remove empty spool, invert trimmer, place hand over spool and press in tabs on each side of cap (Fig. 14).
3.If there is any line on spool, hold free end of line with one hand to prevent spool from unraveling and with other hand grasp spool and lift off spool and cap together (Fig. 15).
Note: If spring falls off cutter head during this procedure, reinstall spring before reinstalling spool and cap.
Note: Before reinstalling spool, be sure to thoroughly clean out cutter head and visually inspect for any damaged or worn parts.
4.Unwind no more than three inches of line from new spool and hold line and spool to prevent unraveling.
5.Place cap on spool.
6.Insert line into eyelet in cutter head (Fig. 16) and hold line with one hand while using your other hand to place spool and cap on spring. Align cap tabs with slots in cutter head, press in tabs and push down cap and spool to lock cap in place (Fig. 16).
Note: Spool may need to be rotated slightly to allow it to be fully installed.
GB±8

POTENTIAL HAZARD
•An improperly installed cap or spool could fly off trimmer.
WHAT CAN HAPPEN
•Contact with a thrown spool or cap could cause injury to operator or bystanders.
HOW TO AVOID THE HAZARD
•Be sure spool and cap are fully secured before operating the unit. Replace spool if it is damaged or if cap does not securely snap onto cutter head.
•Keep bystanders and pets away from trimming area.
7.If line should tangle or break at eyelet, unplug trimmer, remove spool, refeed the line through eyelet, and reassemble spool to trimmer.
Rewinding Empty
Spools
To rewind an empty spool, follow the steps below:
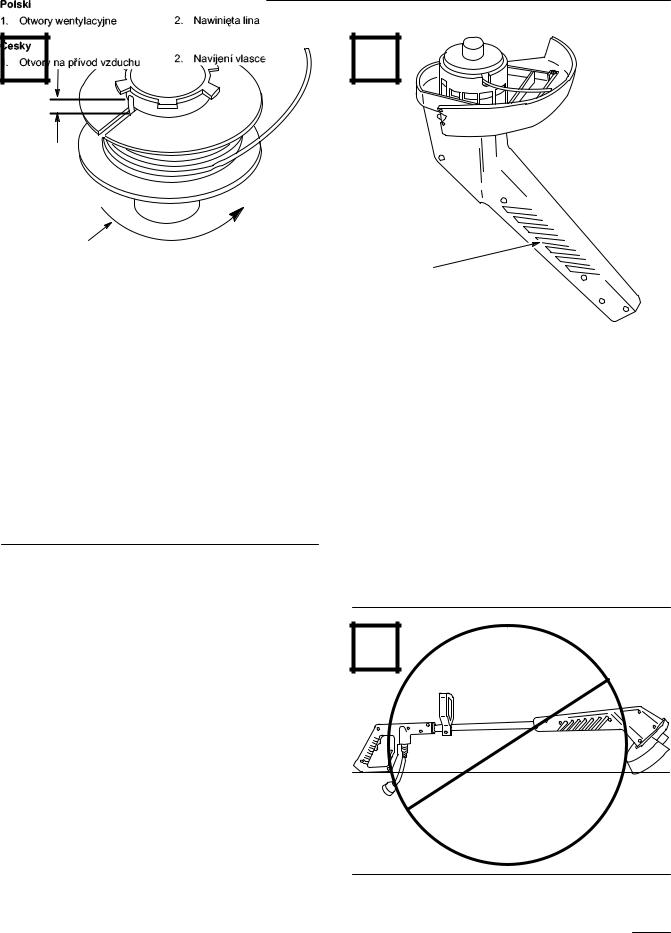
1.Hook one end of line into slot on spool, allowing no more than 1/8º to protrude. Push end of line all the way to the inner end of slot.
Wind line in direction of arrow on spool in level rows between spool flanges (Fig. 17).
Note: Trimmer will not function properly if line is wound in the wrong direction or if end of line protrudes more than 1/8º at inner end of slot.
2.Do not wind line beyond outer edges of spool; trimmer will not function properly.
GB±9
Maintenance
POTENTIAL HAZARD
•There is the possibility that trimmer could be inadvertently started when the extension cord is plugged into an electrical socket.
WHAT CAN HAPPEN
•Inadvertent starting could cause personal injury to operator or bystanders.
HOW TO AVOID THE HAZARD
•Always be sure your trimmer is unplugged and the cutting head has stopped rotating before attempting any maintenance or repairs.
1.To keep the exterior clean, just wipe it off with a damp cloth. Never hose it down.
2.Wipe or scrape clean the cutter head and spool area any time there is an accumulation of dirt or cuttings.
3.Check and tighten all fasteners. If any part is damaged or lost, repair or replace it.
4.Scrape debris away from air intake vents in both sides of motor housing (Fig. 18).
Important: Keeping air intake vents free of grass and debris prevents motor overheating and possible failure.
Important: To avoid damaging shield when storing trimmer, rest trimmer on cutter head or motor housing or hang trimmer from handle(s). DO NOT REST TRIMMER ON GRASS SHIELD AS SHOWN (Fig. 19). THE GRASS SHIELD MAY WARP AND INTERFERE WITH CUTTING LINE.
5.Any other servicing should be performed by an authorized Toro Service Dealer.

Accessories
REPLACEMENT PART NUMBERS
PREWOUND SPOOL |
EMPTY SPOOL |
|
|
Model #88176 |
Part #73±8190 |
|
|
The Toro Promise
A Full Two Year Residential Use Warranty
The Toro Company warrants this TORO Product for two years against defects in material or workmanship. To receive a replacement or repair, at Toro's option, just return the complete unit, postage prepaid, to the Distributor (dealer) along with proof of purchase. This warranty covers product defects only. It does not cover incidental or consequential damages. This warranty gives you specific rights, and you may have other rights which vary from country to country. If all other remedies fail, you may contact us at The Toro Company, Dreve Richelle 161, Batiment ªCº, 1410 Waterloo, Belgium. (Do not return defective product to this address.)
GB±10

Table des matières |
|
|
Page |
Introduction . . . . . . . . . . . . . . . . . . . . . . . . . . . . |
1 |
Sécurité . . . . . . . . . . . . . . . . . . . . . . . . . . . . . . . |
2 |
Glossaire des pictogrammes . . . . . . . . . . . . |
4 |
Assemblage . . . . . . . . . . . . . . . . . . . . . . . . . . . . |
5 |
Fixation de la poignée inférieure . . . . . . . . |
5 |
Fixation du pare-herbe . . . . . . . . . . . . . . . . |
5 |
Avant le démarrage . . . . . . . . . . . . . . . . . . . . . . |
6 |
Fil de coupe . . . . . . . . . . . . . . . . . . . . . . . . |
6 |
Fixation du cordon prolongateur . . . . . . . . |
6 |
Fonctionnement . . . . . . . . . . . . . . . . . . . . . . . . . |
7 |
Avancement du fil de coupe . . . . . . . . . . . . . . . . |
8 |
Remplacement du fil de coupe . . . . . . . . . . . . . . |
8 |
Remplissage des bobines vides . . . . . . . . . . . . . |
10 |
Entretien . . . . . . . . . . . . . . . . . . . . . . . . . . . . . . . |
10 |
Accessoires . . . . . . . . . . . . . . . . . . . . . . . . . . . . . |
11 |
La promesse Toro . . . . . . . . . . . . . . . . . . . . . . . . |
11 |
Introduction
Merci pour votre achat d'un produit Toro.
Chez Toro, notre désir à tous est que vous soyez entièrement satisfait de votre nouveau produit. N'hésitez donc pas à contacter votre concessionnaire agréé local qui tient à votre disposition un service d'entretien et de réparations, des pièces détachées et toute information qui pourrait vous être utile.
Chaque fois que vous contactez votre concessionnaire agréé ou l'usine, tenez à sa disposition les numéros de modèle et de série du produit. Ces numéros aideront
le concessionnaire ou le représentant du service après-vente à vous fournir des informations précises pour votre produit particulier. Les numéros de modèle et de série de l'appareil sont indiqués sur une décalcomanie comme illustré à la figure 1.
A titre de référence, notez les numéros de modèle et de série de l'appareil dans l'espace ci-dessous.
No. de modèle :
No. de série :
Lisez attentivement ce manuel pour vous familiariser avec l'utilisation et l'entretien correct de votre produit. La lecture de ce manuel vous aidera, ainsi que les autres utilisateurs, à éviter des accidents corporels et des dommages au produit. Bien que Toro conçoive, fabrique et commercialise des produits
sûrs, à la pointe de la technologie, vous avez la responsabilité de l'utiliser correctement et en toute sécurité. Vous êtes également responsables d'instruire les personnes auxquelles vous permettrez d'utiliser le produit, sur l'usage en toute sécurité.
Les mises en garde de ce manuel identifient les dangers potentiels et comprennent des messages de sécurité spécifiques destinés à vous éviter et à éviter à d'autres des blessures ou même la mort. Les mises en garde sont intitulées DANGER, AVERTISSEMENT et ATTENTION, suivant le niveau de danger. Toutefois, quel que soit ce niveau, soyez extrêmement prudent.
DANGER signale un risque extrême de blessures ou de mort si les précautions recommandées ne sont pas respectées.
AVERTISSEMENT signale un risque de blessures ou de mort si les précautions recommandées ne sont pas respectées.
ATTENTION signale un risque de blessures légères ou modérées si les précautions recommandées ne sont pas respectées.
Deux autres termes sont également utilisés pour signaler des messages d'informations essentielles : ºImportantº, pour attirer l'attention sur des informations mécaniques spécifiques, et ºRemarqueº, pour des informations d'ordre général méritant une attention particulière.
F±1
Sécurité
INSTRUCTIONS DE SÉCURITÉ IMPORTANTES
Pour assurer une sécurité maximale et les meilleures performance et connaissance possibles de l'appareil, il est essentiel que vous ou tout autre utilisateur de l'appareil, lisiez et compreniez le contenu de ce manuel avant d'utiliser l'appareil. Prêter une attention particulière aux textes
marqués du symbole de sécurité  indiquant les mises en garde telles que ATTENTION, AVERTISSEMENT ou DANGER. Les textes intitulés ºinstructions pour la sécurité personnelleº concernent la sécurité et devront donc également être lus attentivement. TOUT MANQUEMENT À SE CONFORMER À CES INSTRUCTIONS PEUT ENTRAÎNER DES DOMMAGES CORPORELS, UN RISQUE D'INCENDIE OU D'ÉLECTROCUTION.
LIRE TOUTES LES INSTRUCTIONS AVANT D'UTILISER CET APPAREIL
CONSERVER CES INSTRUCTIONS POUR RÉFÉRENCE ULTÉRIEURE!
AVERTISSEMENT : pour réduire les risques d'incendie, de choc électrique ou de blessure, respecter les consignes de sécurité ci-dessous.
1.Lire attentivement le contenu de ce manuel avant d'utiliser le taille-bordures. Se familiariser avec le fonctionnement et savoir comment arrêter l'appareil immédiatement.
2.Tenir tout le monde, en particulier les enfants et les animaux domestiques, à l'écart de la zone de travail. Ne jamais laisser les enfants utiliser l'appareil. Ce n'est pas un jouet. Ne permettre à personne d'utiliser l'appareil sans avoir lu le Manuel de l'utilisateur.
3.Porter toujours des lunettes de sécurité ou toute autre protection oculaire appropriée lorsqu'on utilise l'appareil pour la finition de bordures ou la coupe décorative.
4.Ne jamais utiliser l'appareil dans un environnement mouillé ou humide. NE PAS
UTILISER SOUS LA PLUIE.
5.Inspecter soigneusement l'endroit où le taille-bordures doit être utilisé. Ramasser tous débris et objets susceptibles de se prendre dans le taille-bordures ou d'être projetés lors de l'utilisation. Tenir tout le monde à l'écart de la zone de travail, en particulier les jeunes enfants et les animaux domestiques.
6.Porter des vêtements appropriés. Ne pas porter de vêtements amples ou de bijoux risquant de s'accrocher dans les pièces en mouvement.
Attacher les cheveux longs pour qu'ils ne risquent pas d'être aspirés dans l'admission d'air. Porter toujours des chaussures robustes et des pantalons longs.
7.Ne pas utiliser l'appareil à des tâches pour lesquelles il n'est pas conçu. N'utiliser l'appareil que pour couper le gazon ou les mauvaises herbes.
8.Pour réduire les risques de décharge électrique , utiliser impérativement un cordon prolongateur destiné à l'usage extérieur. Remplacer immédiatement le prolongateur s'il est endommagé.
9.ProlongateurÐRattacher correctement le prolongateur au cordon d'alimentation de façon à empêcher le débranchement en cours d'utilisation.
10.Éviter le démarrage accidentel. S'assurer que le commutateur est en position éteinte (off) avant de brancher l'appareil. Ne pas transporter l'appareil branché en plaçant les doigts sur la détente.
11.Éteindre toutes les commandes avant de débrancher le cordon d'alimentation.
12.Ne pas toucher les prises ou l'appareil avec des mains mouillées ou en se tenant dans l'eau.
F±2

13.Ne pas utiliser l'appareil si la prise ou le cordon est endommagé. Si l'appareil ne fonctionne pas comme il devrait, s'il est tombé à terre ou dans l'eau, a été endommagé, ou oublié à l'extérieur,
le retourner à un concessionnaire réparateur Toro agréé.
14.Ne pas maltraiter le cordon. Ne pas tirer ou soulever l'appareil par le cordon, ne pas refermer une porte sur le cordon ou le tirer autour d'angles vifs ou de coins. Ne pas utiliser le cordon comme poignée. Ne pas débrancher l'appareil en tirant sur le cordon. Pour débrancher, saisir la prise, pas le cordon.
15.Tenir le cordon à l'abri des températures extrêmes, de l'huile et des angles vifs. Remplacer le cordon s'il est endommagé.
16.Ne pas forcer le taille-bordures. Il fonctionne mieux et de façon plus sûre s'il est utilisé à la vitesse pour laquelle il a été conçu.
17.Utiliser uniquement de jour ou sous un bon éclairage artificiel. Toujours se tenir bien en équilibre. Tenir fermement la poignée et marcher, ne jamais courir.
18.Arrêter le moteur et débrancher le cordon d'alimentation avant de quitter l'appareil, de nettoyer le carter ou de procéder à des réparations ou des inspections.
19.Lorsque le taille-bordures n'est pas utilisé, le ranger dans un endroit sec, en hauteur ou sous clé, hors de la portée des enfants.
20.S'assurer que toutes les fixations sont bien serrées pour garantir la sécurité de l'utilisation.
21.S'assurer que la bobine et le capuchon sont bien assujettis avant de mettre l'appareil en marche.
22.Ne jamais utiliser le taille-bordures si les gardes installées en usine et les autres dispositifs de sécurité ne sont pas en place.
23.Ne jamais placer les pieds ou les mains près des pièces en rotation.
24.Si l'appareil commence à vibrer de façon anormale, arrêter le moteur, débrancher le cordon d'alimentation et examiner immédiatement l'appareil pour déterminer la cause des vibrations. Les vibrations sont généralement signe de problème.
25.Ne pas utiliser un appareil qui est tombé ou a été endommagé. Le retourner au concessionnaire réparateur Toro agréé le plus proche.
26.Lors des réparations, utiliser exclusivement des TORO pièces de rechange d'origine. Remplacer ou réparer les cordons d'alimentation endommagés.
27.Ne pas tenter d'atteindre des endroits trop éloignés. Toujours se tenir bien en équilibre lors de l'usage du taille-bordures.
28.Entretenir soigneusement l'appareil. Pour une performance optimale et pour réduire les risques d'accident, maintenir la tête de coupe et le carter moteur en bon état de propreté. Se conformer aux instructions d'entretien de la page 9.
29.ATTENTIONÐLa lame de coupe du pare-herbe est tranchante. Il convient de procéder avec précaution lors des opérations de nettoyage et de l'utilisation.
30.CORDON PROLONGATEURÐUtiliser un cordon prolongateur destiné à l'usage extérieur, conforme à la réglementation électrique en vigueur. S'assurer que le cordon est en bon état. S'il est endommagé, le remplacer. Utiliser un prolongateur d'une section suffisante pour le courant utilisé par l'appareil.
Voir à la figure 7 comment connecter correctement le cordon.
Remarque: l'usage d'un cordon prolongateur de plus de 46 m (150 pi.) est déconseillé.
Certifié selon CEE 10
F±3

Niveau de bruit
Cette machine a un niveau de bruit aérien maximum établi par mesure de machines identiques.
70 dB(A)
Glossaire des pictogrammes
Triangle d'alerte de sécurité ± le pictogramme à l'intérieur indique un danger
Symbole d'alerte de sécurité
Lire le manuel de l'utilisateur
Suivre la procédure d'entretien décrite dans le manuel
Ne pas ouvrir ou retirer les boucliers de protection quand le moteur tourne
Niveau de vibrations
Cette machine a un niveau de vibrations maximum de 8.5 m/s@, établi par mesure de machines identiques.
Projection d'objets ± risques pour tout le corps
Conserver au sec
Décharges
électriques/électrocuti on
Coupure des doigts ou de la main
Coupure du pied
F±4
Porter des lunettes de
Débrancher l'appareil
protection
Tenir toute personne à distance
Assemblage
Fixation du pare-herbe
Remarque: Une fois assemblé, le taille-bordures doit se présenter comme illustré dans la Figure 1.
Fixation de la poignée inférieure
1.Engager la poignée inférieure sur le tube, le côté lisse de la poignée tourné vers le haut. Fixer la poignée sur le tube à l'aide du boulon de carrossier et de bouton, sans serrer (Fig. 2).
Remarque: Régler la hauteur de la poignée sur le tube en la faisant glisser vers le haut ou vers le bas, puis bloquer la poignée à la hauteur voulue en serrant fermement bouton.
DANGER POTENTIEL
•La lame de coupe sur le pare-herbe est tranchante.
QUELS SONT LES RISQUES?
•Le contact avec cette lame peut entraîner des dommages corporels.
COMMENT SE PROTÉGER?
•Être attentif lors de la manipulation du pare-herbe. Éviter tout contact avec la lame de coupe.
1.Insérer le pare-herbe dans la longue fente courbée du carter moteur (Fig. 3).
2.Retourner le taille-bordures et fixer le pare-herbe sous le carter moteur au moyen des 2 vis autotaraudeuses (Fig. 4).
3.Retirer la bande adhésive de la lame de coupe sur le pare-herbe (Fig. 5).
F±5
Avant le démarrage
Fil de coupe
Remarque: Le fil de coupe du taille-bordures est un fil spécial monofilament. Le taille-bordures est vendu avec une provision de fil déjà enroulé sur la bobine.
1.Pour éviter que le fil ne s'emmêle pendant l'expédition, l'extrémité du fil a été collée sur la tête de coupe. Enlever la bande adhésive avant de démarrer l'appareil (Fig. 6).
2.Vérifier si le capuchon est bien encliqueté en position. Tourner les ergots du capuchon en regard des ouvertures de la tête de coupe, pincer les ergots et appuyer sur le capuchon et la bobine pour bloquer le capuchon en position (Fig. 16).
DANGER POTENTIEL
•Le capuchon peut se desserrer pendant le transport. Desserrés ou mal installés, le capuchon et la bobine peuvent être projetés.
QUELS SONT LES RISQUES?
•Le capuchon ou la bobine projetés peuvent blesser l'utilisateur ou des personnes se tenant à proximité.
COMMENT SE PROTÉGER?
•S'assurer que la bobine et le capuchon sont bien assujettis avant d'utiliser l'appareil. Remplacer la bobine si elle est endommagée ou si le capuchon ne s'encliquete pas correctement sur la tête de coupe.
•Tenir les personnes et les animaux domestiques à l'écart de la zone de travail.
Fixation du cordon prolongateur
Remarque: Un cordon prolongateur approprié est indispensable pour assurer un fonctionnement efficace de l'appareil en toute sécurité. Utiliser impérativement un prolongateur destiné à l'usage extérieur.
1.Enficher le prolongateur dans la prise de l'appareil (Fig. 7).
2.Former une boucle dans le cordon prolongateur et l'insérer dans la fente à l'arrière de la poignée supérieure (Fig. 7).
3.Attacher le cordon prolongateur comme indiqué à la figure 7.
DANGER POTENTIEL
•Ne jamais utiliser un cordon électrique endommagé.
QUELS SONT LES RISQUES?
•Un cordon électrique endommagé peut causer un choc électrique ou un incendie.
COMMENT SE PROTÉGER?
•Inspecter la totalité du cordon électrique avant d'utiliser le taille-bordures. Si le cordon est endommagé, ne pas utiliser le taille-bordures. Remplacer ou réparer le cordon immédiatement. Contacter votre concessionnaire réparateur TORO pour toute assistance concernant l'entretien.
F±6

Fonctionnement
DANGER POTENTIEL
•Des objets peuvent être projetés par le taille-bordures pendant son utilisation.
QUELS SONT LES RISQUES?
•Les objets projetés peuvent entraîner des dommages corporels à l'opérateur ou aux personnes se tenant à proximité.
COMMENT SE PROTÉGER?
•Porter toujours des lunettes de sécurité ou toute autre protection oculaire appropriée, des pantalons longs et des chaussures lors de l'utilisation du taille-bordures.
•Tenir les personnes et les animaux domestiques à l'écart de la zone de travail.
Le taille-bordures est conçu pour permettre de couper l'herbe et les mauvaises herbes dans les endroits délicats ou d'accès difficile. Il est possible que le fil se casse lors des premières utilisations. Dès que la technique s'améliore, on peut cependant travailler facilement autour des arbres et des buissons, au pied des murs, contre les grillages, trottoirs, cours, etc.. avec un minimum d'usure et de cassure du fil.
1.Inspecter la surface à tailler pour enlever tout morceau de fil, câble ou objet similaire susceptible de se prendre dans le fil en rotation. Ramasser également tous les objets ou débris qui pourraient être projetés par le taille-bordures.
2.Installer le cordon prolongateur de façon à ce qu'il ne vous gêne pas pendant l'utilisation et à éviter qu'il ne se noue ou ne s'emmêle.
3.Ne jamais tailler l'herbe humide ou mouillée.
4.Amener l'appareil progressivement dans la zone à tailler, en le tenant à la hauteur désirée. Déplacer l'appareil d'avant en arrière ou latéralement, comme illustré (Fig. 8 et 9).
5.L'herbe haute de plus de 20 cm (8 po.) doit être coupée en plusieurs fois, par passes successives, pour éviter l'usure prématurée du fil.
6.NE PAS FORCER L'APPAREIL. Couper avec la pointe du fil (surtout le long des murs)
(Fig. 10). Un engagement plus important du fil est moins efficace et risque de surcharger le moteur.
L'extrémité du fil de coupe s'use progressivement, ce qui réduit la largeur de coupe. Si on n'avance pas le fil de temps en temps, il risque de s'user jusqu'à l'oeillet en métal. Lorsqu'on arrête l'appareil, la tension sur le fil a tendance à se relâcher et le fil risque de disparaître dans la tête de coupe . Si cela se produit, retirer la bobine, faire sortir le fil par l'oeillet et remettre la bobine en place dans le taille-bordures.
7.La durée de vie du fil dépend de l'application des techniques ci-dessus, ainsi que de l'objet et de l'endroit de la taille. La taille de l'herbe au pied d'un mur, par exemple, use le fil beaucoup plus vite que la taille autour des arbres.
Des cassures du fil peuvent être dues à un déplacement trop rapide de l'appareil, à l'enchevêtrement d'objets étrangers, à l'usure normale du fil ou à la tentative de couper des tiges de mauvaises herbes trop épaisses, qui dépassent les capacités de l'appareil. Pour un meilleur résultat, compenser l'usure du fil en le faisant avancer comme expliqué dans la procédure Avancement du fil de coupe.
8.Ne pas laisser traîner la bobine du taille-bordures sur le sol pendant la taille (Fig. 11). Ceci provoquerait une surcharge du moteur et une usure de la bobine.
9.Après chaque utilisation, faire avancer le fil pour éviter qu'il ne se rétracte dans la tête de coupe.
10.Le taille-bordures peut être utilisé pour tailler de façon décorative en faisant pivoter le support de la poignée à 180 _ (Fig. 12).
F±7
 Loading...