

Page 1
FormNo.3418-153RevB
PowerPlex
™
35cm40VMAX
Chainsaw
ModelNo.51138—SerialNo.318000001andUp
ModelNo.51138T—SerialNo.318000001andUp
Registeratwww.T oro.com.
OriginalInstructions(EN)
*3418-153*B
Page 2

Introduction
Thischainsawisdesignedforcuttingtreebranches,
logs,andwoodenbeamsofadiameternolongerthan
thecuttinglengthoftheguidebar.Itistobeused
onlybyadults.Itisdesignedtouseonlybatterypack
Model88525(providedwithModel51138)orModel
88526.
Safety
Whenusingelectricpowertools,basicsafety
precautionsshouldalwaysbefollowedtoreduce
theriskofre,electricshock,andpersonalinjury,
includingthefollowing:
WARNING
Failuretofollowallwarningsandinstructions
mayresultinelectricshock,reand/or
seriouspersonalinjury.
Readthisinformationcarefullytolearnhowtooperate
andmaintainyourproductproperlyandtoavoid
injuryandproductdamage.Youareresponsiblefor
operatingtheproductproperlyandsafely .
YoumaycontactTorodirectlyatwww.T oro.comfor
productandaccessoryinformation,helpndinga
dealer,completewarrantydetails,ortoregisteryour
product.
Model51138Tdoesnotincludeabatterypackor
acharger.
Readallsafetywarningsandallinstructions.
Saveallwarningsandinstructionsforfuture
reference.
Theterm“powertool”inallthewarningsrefersto
yourcordedpowertoolorbattery-operated(cordless)
powertool.
1.Workareasafety
A.Keepworkareacleanandwelllit.
Clutteredordarkareasinviteaccidents.
B.Donotoperatepowertoolsinexplosive
atmospheres,suchasinthepresence
ofammableliquids,gasses,ordust.
Powertoolscreatesparks,whichmayignite
thedustorfumes.
C.Keepchildrenandbystandersaway
whileoperatingapowertool.Distractions
cancauseyoutolosecontrol.
2.Personalsafety
A.Stayalert,watchwhatyouaredoing,
andusecommonsensewhenoperating
apowertool.Donotuseapowertool
whileyouaretiredorundertheinuence
ofdrugs,alcohol,ormedication.A
momentofinattentionwhileoperatingpower
toolscouldresultinseriouspersonalinjury.
B.Usepersonalprotectiveequipment.
Alwaysweareyeprotection.Protective
equipmentsuchasadustmask,non-skid
safetyshoes,hardhat,orhearingprotection
usedforappropriateconditionsreduces
personalinjuries.
C.Preventunintentionalstarting.Ensure
thattheswitchisintheOFFposition
beforeyouconnectthetooltoapower
sourceand/orbatterypack,pickitup,
orcarryit.Carryingpowertoolswith
yourngerontheswitchorenergizing
powertoolsthathavetheswitchoninvites
accidents.
D.Removeanyadjustingkeyorwrench
beforeturningthepowertoolon.A
©2018—TheToro®Company
8111LyndaleAvenueSouth
Bloomington,MN55420
Contactusatwww.Toro.com.
2
PrintedinChina
AllRightsReserved
Page 3

wrenchorakeyleftattachedtothepower
toolmayresultinpersonalinjury .
cuttingedgesarelesslikelytobindandare
easiertocontrol.
E.Donotoverreach.Keepproper
footingandbalanceatalltimes.This
enablesbettercontrolofthepowertoolin
unexpectedsituations.
F.Dressproperly.Donotwearloose
clothingorjewelry.Keepyourhair,
clothing,andglovesawayfrommoving
parts.Looseclothes,jewelry,orlonghair
cangetcaughtinmovingparts.
G.Ifdevicesareprovidedforthedust
extractionandcollection,ensurethat
theseareconnectedandproperly
used.Usingthesedevicescanreduce
dust-relatedhazards.
H.Keepyourhandsandfeetawayfromthe
cuttingarea.
3.Powertooluseandcare
A.Donotforcethepowertool.Usethe
correctpowertoolforyourapplication.
Thecorrectpowertoolwilldothejob
betterandsaferattherateforwhichitwas
designed.
B.Donotusethepowertooliftheswitch
doesnotturnitonandoff.Anypowertool
thatcannotbecontrolledwiththeswitchis
dangerousandmustberepaired.
C.Disconnecttheplugfromthepower
sourceand/orthebatterypackfromthe
powertoolbeforeadjustingit,changing
accessoriesonit,orstoringit.Such
preventivesafetymeasuresreducetherisk
ofstartingthepowertoolaccidentally.
D.Storeidlepowertoolsoutofthereach
ofchildren,anddonotallowpersons
unfamiliarwiththepowertoolorthese
instructionstooperatethepowertool.
Powertoolsaredangerousinthehandsof
untrainedusers.
E.Storeidleappliancesindoors.Whennot
inuse,appliancesshouldbestoredindoors
inadryandhighorlocked-upplace,outof
thereachofchildren.
F.Maintainpowertools.Checkfor
misalignmentorbindingofmoving
parts,brokenparts,andanyother
conditionthatmayaffecttheoperation
ofthepowertools.Ifdamaged,havethe
powertoolrepairedbeforeuse.Many
accidentsarecausedbypoorlymaintained
powertools.
G.Keepcuttingtoolssharpandclean.
Properlymaintainedcuttingtoolswithsharp
H.Usethepowertool,accessories,
toolbits,etc.inaccordancewith
theseinstructionsandinthemanner
intendedfortheparticulartypeofpower
tool,takingintoaccounttheworking
conditionsandtheworktobeperformed.
Usingthepowertoolforoperationsdifferent
fromthoseintendedcouldresultina
hazardoussituation.
I.Keepguardsinplaceandinworking
order.
J.Useonlyreplacementguidebarsand
chainsspeciedbythemanufacturer.
Incorrectreplacementguidebarsand
chainsmaycausechainbreakageand/or
kickback.
K.Followthemanufacturer’ssharpening
andmaintenanceinstructionsforthe
sawchain.Decreasingthedepthgauge
heightcanleadtoincreasedkickback.
4.ChainSawSafety
A.Holdthepowertoolbyinsulatedgripping
surfacesonly,becausethesawchain
maycontacthiddenwiringoritsown
cord.Sawchainscontactingalivewiremay
makeexposedmetalpartsofthepowertool
liveandcouldgiveyouanelectricshock.
B.Wearsafetyglasses,hearingprotection,
andprotectiveequipmentforyourhead,
hands,legs,andfeet.Wearingadequate
protectiveclothingreducespersonalinjury
byyingdebrisoraccidentalcontactwith
thesawchain.
C.Cuttingtreescanbehazardousand
requiresexpertise.Donotusethechain
sawtofelllargetreesthathaveadiameter
greaterthanthelengthoftheguidebar.
D.Donotoperateachainsawinatree.
Operatingachainsawwhileupinatree
mayresultinpersonalinjury .
E.Alwayskeepproperfootingandoperate
thechainsawonlywhenstandingona
xed,secure,andlevelsurface.Slippery
orunstablesurfacessuchasladdersmay
causealossofbalanceorcontrolofthe
chainsaw.
F.Whencuttingalimbthatisunder
tension,bealertforspringback.When
thetensioninthewoodberisreleased,the
springloadedlimbmaystrikeyouand/or
throwthechainsawoutofcontrol.
3
Page 4

G.Useextremecautionwhencuttingbrush
andsaplings.Theslendermaterialmay
catchthesawchainandbewhippedtoward
youorpullyouoffbalance.
H.Carrythechainsawbythefronthandle
withthechainsawswitchedoffand
awayfromyourbody .Whentransporting
orstoringthechainsaw,alwaysuse
theguidebarcover.Properhandlingof
thechainsawreducesthelikelihoodof
accidentalcontactwiththemovingsaw
chain.
I.Followtheinstructionsforlubricating,
chaintensioning,andchanging
accessories.Improperlytensionedor
lubricatedchainmayeitherbreakor
increasethechanceforkickback.
J.Keephandlesdry ,clean,andfreefrom
oilandgrease.Greasy,oilyhandlesare
slippery,causinglossofcontrol.
K.Avoidkickback.Kickbackmayoccurwhen
thenoseortipoftheguidebartouchesan
object,orwhenthewoodpinchesthesaw
chainwhileyouarecutting.Tipcontactmay
causeasuddenreversereaction,kicking
theguidebarupandbacktowardyou;
pinchingthesawchainalongthetopofthe
guidebarmaypushtheguidebarrapidly
backtowardyou.Eitherofthesereactions
maycauseyoutolosecontrolofthesaw,
whichcouldresultinaseriouspersonal
injury.Youcanavoidkickbackbytaking
properprecautionsasgivenbelow:
•Usebothhandswheneveryou
operatethechainsaw.Maintaina
rmgrip,withthumbsandngers
encirclingthechainsawhandles,
withbothhandsonthesaw,andwith
yourbodyandarminpositionthat
allowsyoutoresistkickbackforces.
Youcancontrolkickbackforcesifproper
precautionsaretaken.Donotletgoof
thechainsaw!
•Donotoverreachanddonotcut
aboveshoulderheight.Thishelps
preventunintendedtipcontactand
enablesbettercontrolofthechainsaw
inunexpectedsituations.
5.Service
Haveyourpowertoolservicedbya
qualiedrepairpersonusingonlyidentical
replacementparts.Thisensuresthatthesafety
ofthepowertoolismaintained.
6.BatterySafety
A.Donotchargethepowertoolinrainorin
wetlocations.
B.Donotuseabattery-operatedpowertool
intherain.
C.Useonlythefollowingtypeandsizeof
battery(ies):T orobatteryModel88525or
88526andbatterychargerModel88527.
D.Removeordisconnectthebatterybefore
servicing,cleaning,orremovingmaterial
fromthepowertool.
E.Donotdisposeofthebatteryinare;the
cellmayexplode.Checkwithlocalcodes
forpossiblespecialdisposalinstructions.
F.Donotopenormutilatethebattery.
Releasedelectrolyteiscorrosiveandmay
causedamagetotheeyesorskin.Itmay
betoxicifswallowed.
G.Donotopenormutilatethebattery .
Releasedelectrolyteisammableandcan
causedamageifexposedtore.
H.Exercisecareinhandlingbatteriesto
preventshortingthebatterywithconducting
materialssuchasrings,bracelets,andkeys.
Thebatteryorconductormayoverheatand
causeburns.
I.Chargingtimeincreasesifthebattery
packisnotchargedwithintheappropriate
temperaturerange.
SAVETHESEINSTRUCTIONS
SoundPressure
Thisunithasasoundpressurelevelattheoperator’s
earof85dBA,withanUncertaintyValue(K)of3dBA.
Thesoundpressurelevelwasdeterminedaccording
totheproceduresoutlinedinENISO11201.
SoundPower
Thisunithasaguaranteedsoundpowerlevelof105
dBA,whichincludesanUncertaintyValue(K)of1
dBA.
Thesoundpowerlevelwasdeterminedaccordingto
theproceduresoutlinedinENISO22868.
Hand/ArmVibration
Measuredvibrationlevelforrighthand=1.65m/s
Measuredvibrationlevelforlefthand=1.65m/s
UncertaintyValue(K)=1.5m/s
Themeasuredvaluesweredeterminedaccordingto
theproceduresoutlinedinENISO20643.
2
2
2
4
Page 5

Important:Thevibrationemissionduringactual
useofthepowertoolcandifferfromthedeclared
totalvaluedependingonthewaythetoolis
SafetyandInstructionalDecals
Safetydecalsandinstructionsareeasilyvisibletotheoperatorandarelocatednearanyarea
ofpotentialdanger.Replaceanydecalthatisdamagedormissing.
136-2497
1.Donotdiscard.
used.Theoperatorshouldtakesafetymeasures
basedonanestimationofexposureintheactual
conditionsofuse.
decal136-2497
136-2498
1.Donotdiscard.
136-2499
1.ReadtheOperator’s
Manual.
2.Donotburnthebattery .4.Donotdiscard.
3.Donotoperateinwet
decal136-2501
136-2501
decal136-2498
decal136-2499
conditions.
1.Donotdiscard.3.Residential
2.Doubleinsulated
1.Thebatterypackis
charging.
2.Thebatterypackisfully
charged.
4.ReadtheOperator’s
Manual.
decal136-2504
136-2504
3.Thebatterypackistoo
warm.
4.Thebatterypackneedsto
bereplaced.
5
Page 6
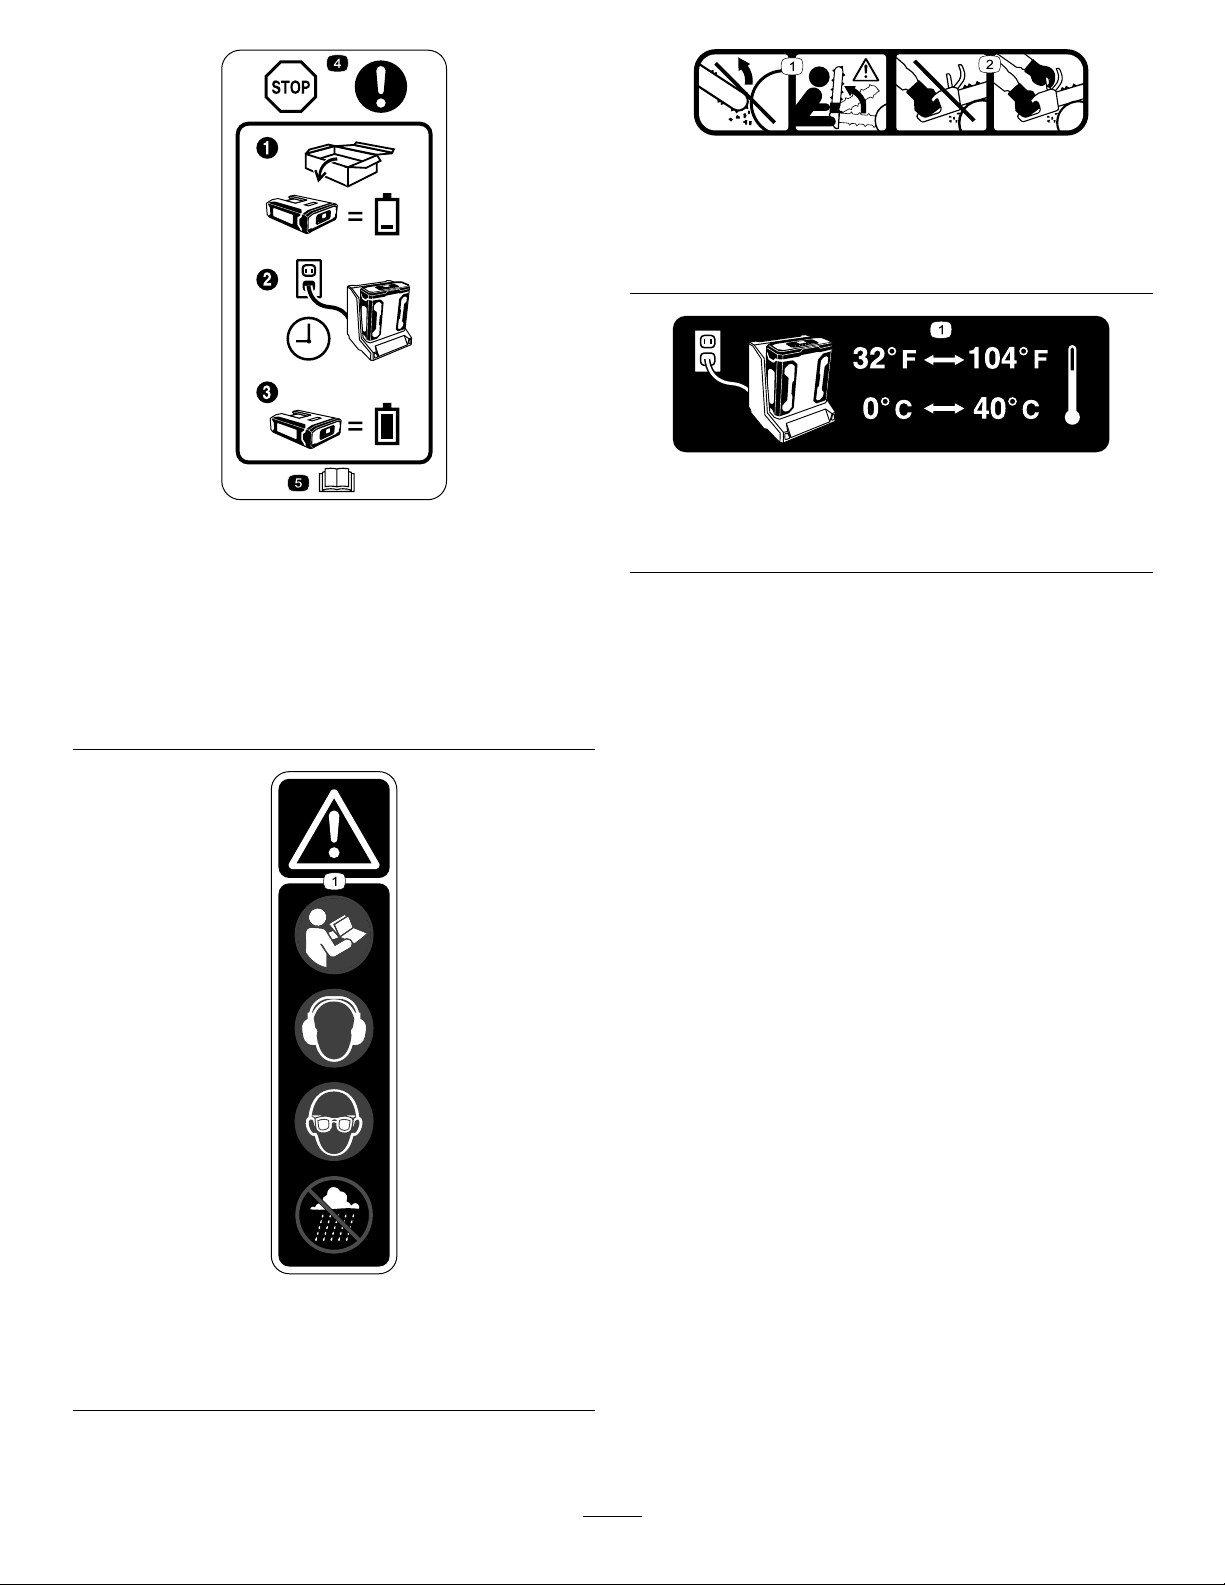
decal136-2538
136-2538
1.Thebatterydoesnot
comeoutoftheboxfully
charged.
2.Placethebatteryinthe
batterycharger.
3.Waituntilthebatteryis
fullychargedbeforethe
rstuse.
136-2534
4.Stop—followthese
instructionsbeforerst
use.
5.ReadtheOperator’s
Manual.
1.Donotcontactobjects
withtheguidebartip;tip
2.Alwaysuse2handswhen
operatingthechainsaw.
contactcancauseserious
personalinjury.
decal136-2539
136–2539
decal136-2534
1.Chargethebatterywherethetemperatureisbetween0°C
and40°C(32°Fand104°F).
136-2537
1.Warning—readtheOperator’sManual;wearhearing
protection;weareyeprotection;donotoperateinwet
conditions.
decal136-2537
6
Page 7
Setup
Note:Thebatterypackisnotfullychargedwhenyou
purchaseit.Beforeusingthetoolforthersttime,
refertoChargingtheBatteryPack(page15).
FillingtheChainSawwith
BarandChainOil
Important:Useonlybarandchainoil(sold
separately).
1.Placethechainsawonalevelsurface.
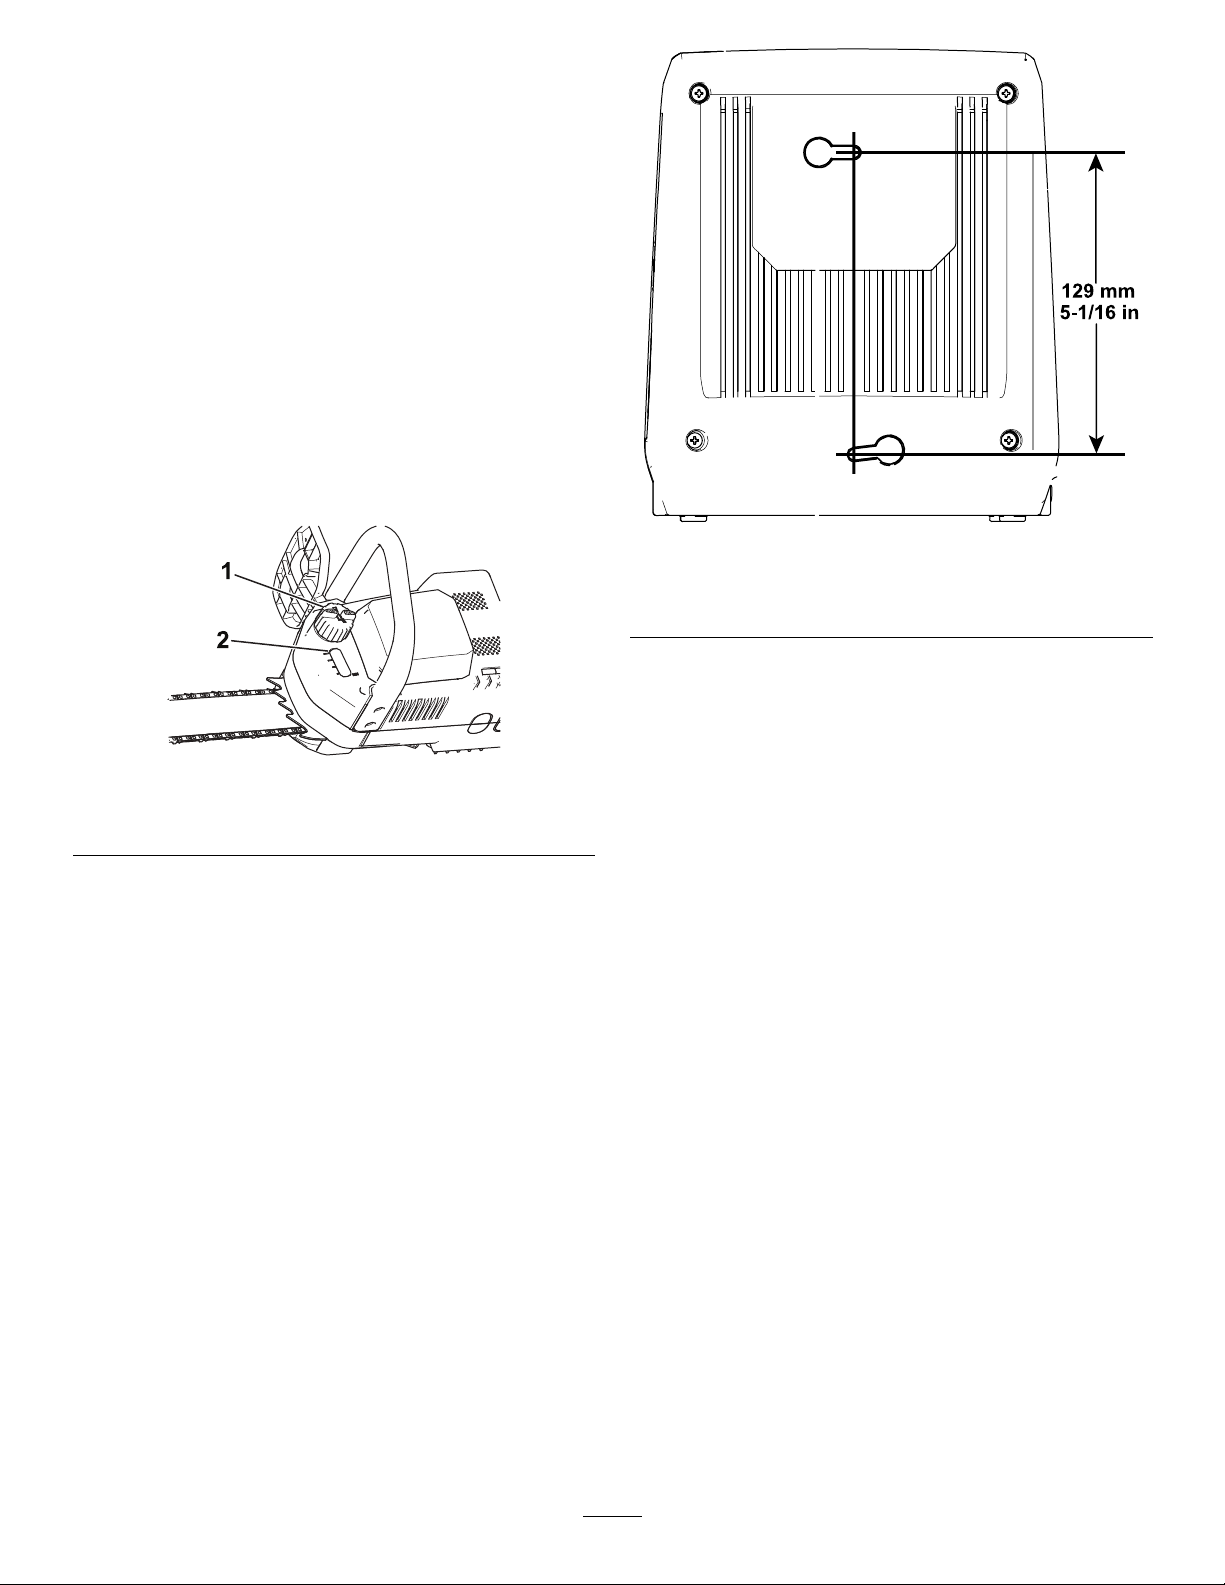
2.Cleantheareaaroundtheoilcap(Figure1).
Note:Makesurethatyoudonotallow
debris/woodchipstoentertheoiltank.
g194202
Figure2
Figure1
1.Oilcap2.Oilwindow
3.Removethecapandpouroilintothechainsaw
untiltheoilllsthewindow(Figure1).
Donotllthechainsawhigherthanthebottom
ofthellneck.
4.Cleanupanyspilledoilandreplacetheoilcap.
MountingtheBattery
Charger(Optional)
Ifdesired,mountthebatterychargersecurelyona
wallusingthewall-mountkeyholesonthebackof
thecharger.
Mountitindoors(suchasagarageorotherdryplace),
nearapoweroutlet,andoutofthereachofchildren.
RefertoFigure2forassistanceinmountingthe
charger.
g192110
Note:Slideandtwistthechargeroverthe
appropriatelypositionedhardwaretosecurethe
chargerinplace(hardwarenotincluded).
7
Page 8
ProductOverview
Specications
Weights
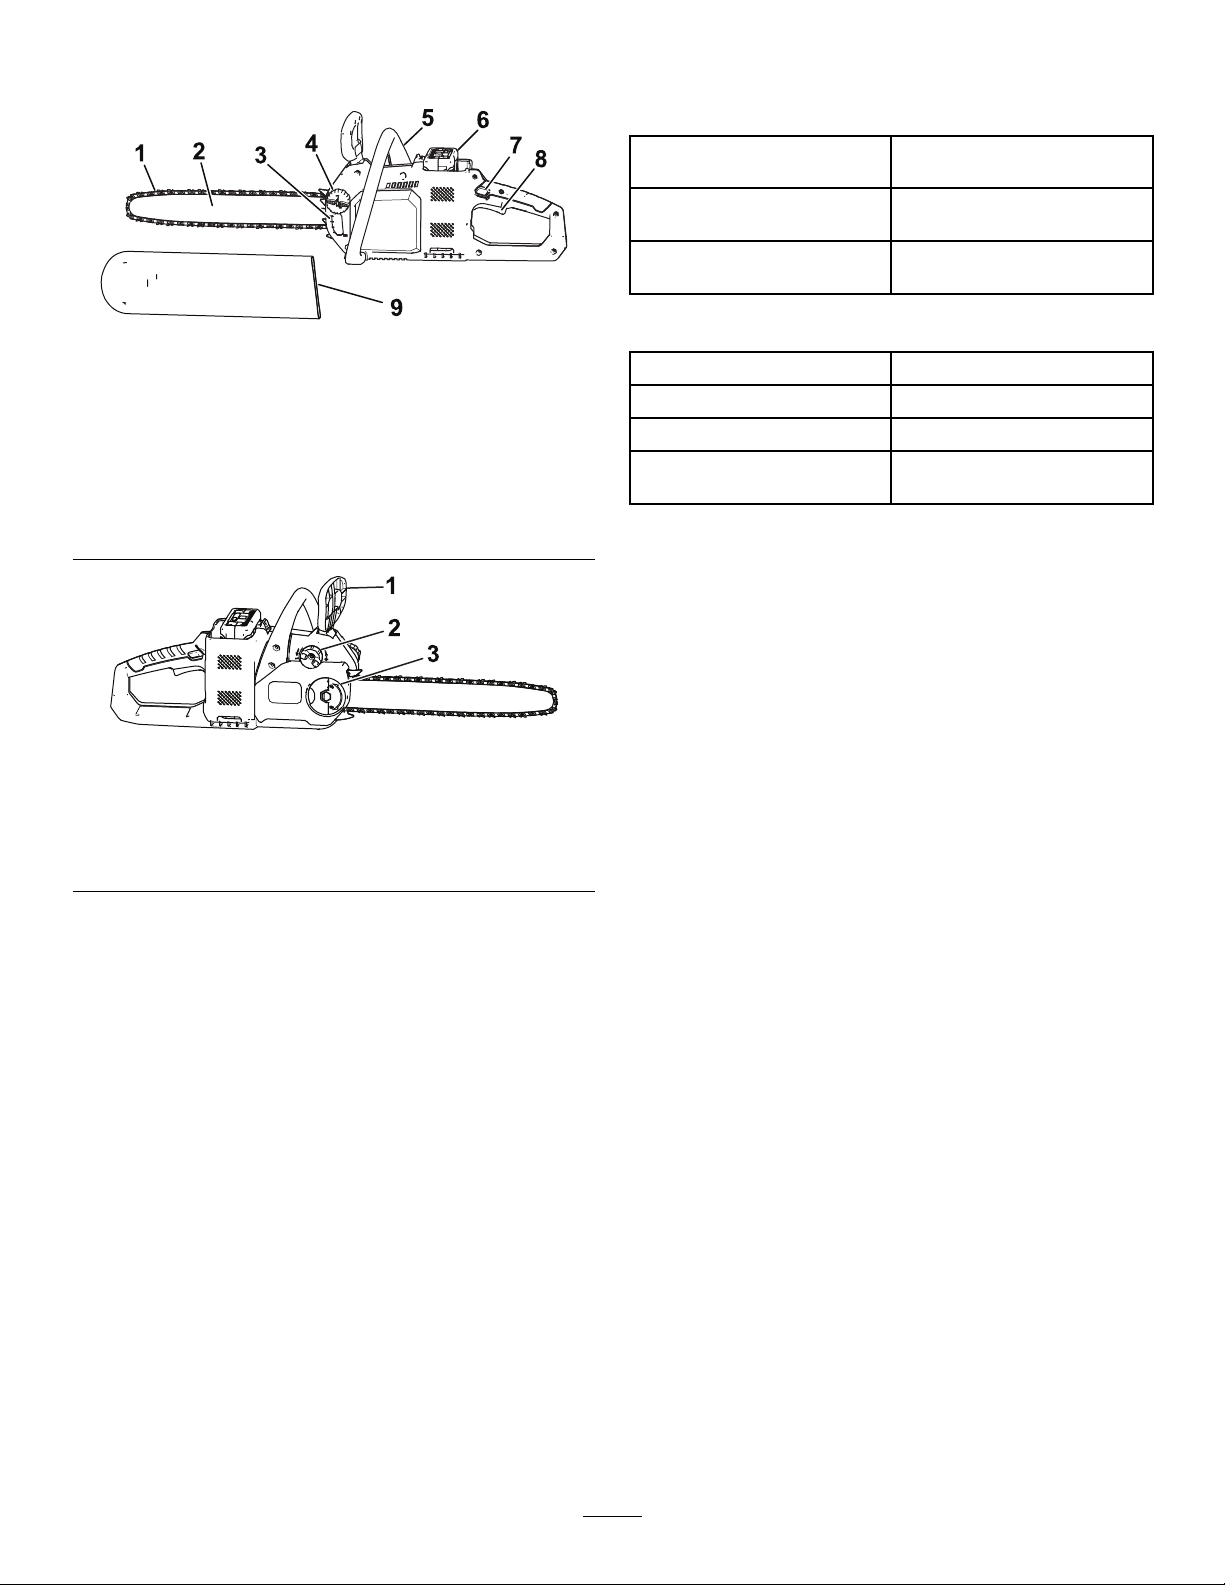
Figure3
LeftSideofChainSaw
1.Chain
2.Guidebar
3.Oilwindow8.Trigger(onrearhandle)
4.Oilcap9.Guidebarcover
5.Fronthandle
6.Batterypack
7.Triggerlock
Massofthemachinewithout
thebattery
Massofthemachinewith
battery88525
Massofthemachinewith
battery88526
g192115
AppropriateTemperatureRanges
Chargethebatteryat0°C(32°F)to40°C(104°F)*
Useproductsat
Storeproductsat-15°C(5°F)to60°C(140°F)
UnplugthechargerifBelow0°C(32°F)orabove
5.4kg(12.0lb)
6.4kg(14.2lb)
7.0kg(15.5lb)
-15°C(5°F)to60°C(140°F)
40°C(104°F)
*Chargingtimewillincreaseifyoudonotchargethe
batterywithinthisrange.
Storethetool,batterypackandbatterychargerinan
enclosedclean,dryarea.
1.Chainbrake
2.Chaintensioningknob
g192114
Figure4
RightSideofChainSaw
3.Wingnut
8
Page 9

Operation
BeforeUsingtheChainSaw
Beforeusingthechainsaw,dothefollowing:
•Checkthechaintension;refertoAdjustingthe
ChainT ension(page18).
•Cleanandcheckthechaincomponentsfor
excessivewearordamageandreplacethemas
needed;refertoServicingtheGuideBar,Chain,
andDriveSprocket(page19)andSharpeningthe
Chain(page20).
•Checktheoillevel;refertoCheckingtheOilLevel
andAddingBarandChainOil(page17).
•Checkthechainbrake;refertoCheckingthe
ChainBrake(page17).
StartingtheChainSaw
1.Makesurethattheventsonthechainsaw
(Figure5andFigure6)arefreefromdustand
debris.
2.Setthechainsawdownonalevelsurface.
3.Alignthetongueofthebatterypackwiththe
batterycavityinthechainsaw(Figure7).
g228731
Figure7
4.Pushthebatterypackintothebatterycavityuntil
thebatterypacklocksintoplace.
5.Removetheprotectivecoverfromthechain.
6.EnsurethatthechainbrakeisintheOPERATING
position(Figure8).
1.Vent
1.Vent(insidethebattery
cavity)
Figure5
Figure6
2.Vent
g19211 1
Figure8
1.Chainbrake(OPERATING
position)
g197204
7.With1handonthefronthandleandtheother
2.Chainbrake(STOP
position)
ontherearhandle,pressthetriggerlock,then
squeezethetrigger(Figure9).
g197205
1.Fronthandle3.Triggerlock
2.Chainbrake
Figure9
4.Trigger
g192113
9
Page 10

ShuttingOfftheChainSaw
Toshutoffthechainsaw,releasethetrigger.
Wheneveryouarenotusingthesaworare
transportingthesawtoorfromtheworkarea,move
thechainbraketotheSTOPposition(Figure8)and
removethebatterypack.
CuttingwiththeChainSaw
WARNING
Note:Keepingyourleftarmstraightwithyour
elbowlockedhelpsreducekickback.
Operatingachainsawimproperlycancause
seriouspersonalinjuryordeath.
Readandfollowalloperatinginstructions
carefullytoavoidpossiblepersonalinjury.
WARNING
Kickbackcancauseseriousorfatalinjuryto
you.
Alwaysensurethatthechainbrakesystem
isworkingproperlybeforeyouoperatethe
chainsaw.
Avoidtouchingobjectstobecutwiththetip
ofthechainsaw.
Thereare2typesofkickback:
•Afastupwardmotionofthechainsawthatresults
whenthechainatthenoseortopofthebar
contactsanobject
•Afastbackwardmotionofthechainsawthat
resultswhenthechainatthenoseortopofthebar
ispinchedbytheobjectbeingcut
g025213
Figure11
2.Standtotheleftsideofthechainsawandnot
inlinewiththechain,andpositionyourselffor
balanced,stablefootingwhilesawing.
3.Standonsolid,evengroundinfrontofthewood
tobecut.
4.Whilecutting,havethewoodnearthechainsaw
head,attheexposednearendoftheguidebar.
Youcanusethebuckingteeth(Figure12)toadd
pressurebutitworksbestwithasharp-toothed
chain.
g200720
Figure12
1.Buckingteeth
Figure10showstheareaofthebartoavoid
contactinganobjecttopreventkickback.
Figure10
1.Gripthechainsawwith2hands,withyourleft
handonthefronthandleandyourrighthandon
therearhandleasshowninFigure11.
5.Pressthechainsawlightlyagainstthewood,
allowingtheweightofthechainsawtodrivethe
cutting.
6.Keepsteadypressureonthechainsaw
throughoutthecut,andreleasepressureonly
neartheendofthecut.
g026070
10
Page 11

PruningaTree
WARNING
Cuttinghigherlimbsfromatreeofftheground
canputyouinanunstablepositionthatcould
beunsafeforyouwhilehandlingachainsaw,
resultinginpossibleseriouspersonalinjury
ordeathtoyouorbystanders.
Whencuttinglimbsfromastandingtree,use
thefollowingpractices:
•Donotclimbonlimbsorbrancheswitha
chainsaw.
•Donotoverreach,andcutwithbothhands
onthechainsaw.
•Ensurethatallbystandersareawayfrom
theareawherebranchesmayfall.
1.GripthechainsawasshowninFigure11.
2.Whilecuttingsmallbranches,applylight
pressuretothebranchtobecut.
3.Whilecuttinglargerbranches,makeashallow
undercutandthencompletethecutfromthe
topsideofthebranch.
A.Cutfromtheundersideofthelimbabout15
cm(6inches)fromthetrunk.Cutathirdof
thewaythroughthelimb.
B.Cut5.0to10.0cm(2to4inches)farther
outonthelimbandfromabove.Cutthe
limbuntilitfalls.
C.Cutaboutathirdofthediameterofthelimb
stubfromunderneathasclosetothetrunk
aspossible.
D.Cutthelimbstubfromabovesothatit
meetsthepreviouscutasclosetothetrunk
aspossible.
FellingaTree
g195831
Figure13
1.Determinethedirectionthatthetreewillfall.
Considerthewinddirection,ifthereareheavier
limbson1sideofthetree,andthenaturaltilt
ofthetree,ifany.
2.Determineaclear,saferetreatpathawayfrom
thedangerarea;refertoFigure14.
WARNING
Cuttingstandingtreesrequiresexpertiseand
poseshazards.
•Beforeattemptingtocutabigtree,practice
cuttingafewbranches,limbs,orsmalllogs
tofamiliarizeyourselfwiththechainsaw.
•Donotusethischainsawtofelllargetrees
withadiameterlargerthanthelengthof
theguidebar.
Theproperoperatorstanceforfellingatreeisshown
inFigure13.
g024800
Figure14
1.Retreatpath3.Dangerarea
2.45degreeangle
3.Gripthechainsawasshownin(Figure11).
4.Maketherstcutathirdofthewaythroughthe
treediameteronthesidewhereyouwantthe
treetofall(Figure15).
Note:Makingthiscutpreventsthechainsaw
frombeingpinchedwhilemakingthenextcut.
11
Page 12

Figure15
1.Firstcut3.Hinge
2.Secondcut
4.Backcut
5.Makeasecondcuttoformanotch,startingthe
cutatleast5cm(2inches)aboveandaway
fromtherstcut(Figure15).
LimbingaFallenTree
1.GripthechainsawasshowninFigure11.
2.Cutoffthesmallerlimbsfromthetreethatare
notsupportingitsweightofftheground.
g194824
Figure16
g228707
6.Makethebackcutfromtheoppositesideofthe
notchandabout5cm(2inches)higherthanthe
bottomofthenotchasshowninFigure15.
Important:Stopthethirdcut2.5to5.0cm
(1to2inches)fromthenotchtoformahinge
betweenthecuts(Figure15),whichkeeps
thetreefromfallinginthewrongdirection
ortwistingasitfalls.
Note:Asthebackcutnearsthehinge(Figure
15),thetreeshouldbegintofall.
7.Whenthetreebeginstofall,removethechain
saw,shutitoff,putitdown,andretreatalongthe
pathyoudeterminedinstep2.
Important:Ifthetreebeginstofallinan
undesireddirection,immediatelystopthe
cut,shutoffthechainsaw,putthechainsaw
down,anduseawedgetoopenthecutand
pushthetreeinthedesireddirection.
g194825
Figure17
3.Cutthelargerlimbsthatsupporttheweightof
thetreefromthebottomupwardsothatthe
limbsdonotpinchthesawblade(Figure18).
12
Page 13

Figure18
g194822
13
Page 14

BuckingaLog
•Ifyouarecuttingbranchesfromafallentreeor
cuttingalogintolengths,supportthelogoffthe
ground(preferablyonasawbuck);refertoFigure
19.
Figure19
g194820
•Ifthelogissupportedonanend,cutfromthetop.
Ifthechainsawbindsinthecut,donotattempt
tofreeitbyrunningthemotor.Shutoffthesaw,
thenuseawedgetopryopenthecutandrelease
thesaw.
•Ifthelogissupportedonbothends,startfrom
thetopandcutaboutathirdofthewaythrough
thelog(Figure19A).Makeasecondcutfromthe
undersidetomeettherstcut(Figure19Band
Figure19C).Thiskeepsthelogfrompinchingthe
saw.
•Ifthelogissupportedalongitsentirelength,cut
allthewaythroughthelogfromthetop.
•Ifthelogissupportedonbothendsbutnotinthe
middle,cutathirdofthediameterfromthetop,
theneithercutfromthebottomorrollthelogover
tomeettherstcut(Figure20).
g194819
Figure20
•Ifthelogisonahill,alwaysstandontheuphill
sideofthelog(Figure21).
14
g024807
Figure21
1.Directionofslope
Page 15

RemovingtheBatteryPack
1.Placethechainsawonaatsurface.
2.Pressdownonthelatchandremovethebattery
packfromthecavity.
g228487
Figure23
Figure22
1.Latch
ChargingtheBatteryPack
Important:Makesuretoreadallsafety
precautions.
Important:Chargethebatterypackonlyin
temperaturesthatarewithintheappropriate
range;refertoSpecications(page8).
Note:Atanytime,pressthebattery-charge-indicator
buttononthebatterypacktodisplaythecurrent
charge(LEDindicators).
1.Plugthepowercordthatmatchesyourpower
outletsintothebatterycharger.
2.Makesurethattheventsonthebatterypackare
clearofanydustanddebris.
1.Batterypackcavity4.Battery-charge-indicator
g192109
2.Batterypackterminals
3.Batterypackventingareas
button
5.LEDindicators(current
charge)
4.Makesurethattheventsonthebatterycharger
areclearofanydustanddebris.
5.Slidethebatterypackintothechargeruntilitis
fullyseated(Figure24).
3.Lineupthecavityinthebatterypack(Figure23)
withthetongueonthecharger.
Figure24
1.Chargerventingareas
2.Leftindicatorlight
3.Rightindicatorlight
6.Toremovethebatterypack,slidethebattery
backwardoutofthecharger.
7.RefertothefollowingtabletointerprettheLED
indicatorsonthebatterycharger.
15
g194423
Page 16

LeftLight
Off
RedRedBatterypackischarging
Green
Orange
RedBlinkingRed
RightLight
Red
RedBatterypackischarged
RedBatterypackistoowarm
Indicates:
Chargerison;nobattery
packinserted
Batterypackisdefective
InstallingtheBatteryPack
1.Setthechainsawdownonalevelsurface.
2.Alignthetongueofthebatterypackwiththe
batterycavityinthechainsaw(Figure25).
Figure25
3.Pushthebatterypackintothebatterycavityuntil
thebatterypacklocksintoplace.
g192108
16
Page 17

Maintenance
RecommendedMaintenanceSchedule(s)
MaintenanceService
Interval
Beforeeachuseordaily
Aftereachbatterydrain
cycle
Yearlyorbeforestorage
MaintenanceProcedure
•Checktheoillevelandaddbarandchainoilifnecessary.
•Checkthechainbrake.
•Checkthechaintensionandadjustitifnecessary.
•Checkthechainforsharpness;contactanAuthorizedServiceDealertohavethe
chainsharpenedorreplaced.
•Checktheoillevelandaddbarandchainoilifnecessary.
•Checkthechainbrake.
•Checkthechaintensionandadjustitifnecessary.
•Servicetheguidebar,chain,anddrivesprocket.
•Checkthechainforsharpness;contactanAuthorizedServiceDealertohavethe
chainsharpenedorreplaced.
CheckingtheOilLeveland AddingBarandChainOil
ServiceInterval:Beforeeachuseordaily
Aftereachbatterydraincycle
1.Placethechainsawonaatsurfaceand
removethebatterypack;refertoRemovingthe
BatteryPack(page15).
2.Checktheoillevelinthewindow.Ifyoucannot
seeoilinthewindow,addbarandchainoilto
thechainsaw(Figure26).
CheckingtheChainBrake
ServiceInterval:Beforeeachuseordaily
Aftereachbatterydraincycle
1.Placethechainsawonaatsurfaceand
removethebatterypack;refertoRemovingthe
BatteryPack(page15).
2.Engagethechainbrakebymovingthechain
brakeforwardtotheSTOPposition(Figure27).
Figure26
1.Oilcap
3.Cleantheareaaroundtheoilcap(Figure26).
2.Window
Note:Makesurethatyoudonotallow
debris/woodchipstoentertheoiltank.
4.Removethecapandpouroilintothechainsaw
untiltheoilllsthewindow(Figure26).
Note:Donotllthechainsawhigherthanthe
bottomofthellneck.
5.Cleanupanyspilledoilandreplacetheoilcap.
g19211 1
Figure27
g192110
1.Chainbrake(OPERATING
position)
3.Gripthechainwithaglovedhandandattempt
topullitaroundtheguidebar;thechainshould
notmovearoundtheguidebar.Ifitdoes,take
thechainsawtoanAuthorizedServiceDealer
forrepair.
4.Disengagethechainbrakebymovingthe
chainbrakerearwardtotheOPERATINGposition
(Figure27).
5.Gripthechainwithaglovedhandandattempt
topullitaroundtheguidebar;thechainshould
17
2.Chainbrake(STOP
position)
Page 18

movearoundtheguidebar.Ifitdoesnot,take
thechainsawtoanAuthorizedServiceDealer
forrepair.
AdjustingtheChain Tension
ServiceInterval:Beforeeachuseordaily
Aftereachbatterydraincycle
Ensurethatthechainisproperlytensioned.Aloose
chainwillshortenthelifeofthedrivesprocketandthe
guidebarandmaybreakthechain.Anovertightened
chainwilloverheattheguidebarandchain,causing
rapidwearandpossiblemotorburnout.Also,check
thechaintensionafterafewcuts.Anewchainusually
stretchesandrequiresadjustmentafteritsrstuse.
Thechaintensioniscorrectwhenyouareabletouse
aglovedhandtopullthechainsmoothlyaroundthe
guidebar.Thechainshouldremainincontactwith
thebottomedgeoftheguidebar.
Adjustthechainuntilthechaintouchesthe
bottomedgeoftheguidebar,thentightenthe
knobanadditional1/8to1/4turn.
5.Tightenthewingnutuntilitissnugandfoldthe
wing-nuttab(Figure29).
6.Checkthechaintension;ifthechainisloose,
repeatthisprocedure.
DANGER
Contactwiththechainsawteethcancause
seriouspersonalinjury.
•Removethebatterypackbeforeadjusting
ormaintainingthechainsaw.
•Alwaysweargloveswhenadjustingor
maintainingthechainsaw.
1.Placethechainsawonalevelsurfaceand
removethebatterypack;refertoRemovingthe
BatteryPack(page15).
2.Unfoldthewing-nuttabandloosen,butdonot
removethewingnutonthecover(Figure29).
3.Holdupthetipoftheguidebar(Figure28).
Figure28
4.Adjustthechain.
•Totightenthechain,turnthechain
tensioningknobclockwise.
•Toloosenthechain,turnthechain
tensioningknobcounterclockwise
g192117
18
Page 19

ServicingtheGuideBar, Chain,andDriveSprocket
ServiceInterval:Yearlyorbeforestorage
DANGER
Contactwiththechainsawteethcancause
seriouspersonalinjury.
•Removethebatterypackbeforeadjusting
ormaintainingthechainsaw.
•Alwaysweargloveswhenadjustingor
maintainingthechainsaw.
1.Placethechainsawonaatsurfaceand
removethebatterypack;refertoRemovingthe
BatteryPack(page15).
2.Unfoldthewing-nuttabandremovethewingnut
thatsecuresthecover(Figure29).
Figure29
1.Chaintensioningknob
2.Cover
3.Loosenthechainbyturningthechain-tightening
screwcounterclockwise(Figure29).
4.Separatethechainfromtheguidebarandset
themaside.
3.Wingnut
4.Wing-nuttab
g192116
Figure30
1.Oilpassage3.Spacer
2.Clip
4.Drivesprocket
6.Inspectthedrivesprocket;ifitisexcessively
wornordamaged,replaceit.
7.Checktheoilpassage(Figure30)fordebrisand
cleantheareaifnecessary.
8.Installthedrivesprocket,spacer,andclip.
9.Cleantheguidebarandchain;useawireora
smallat-headscrewdrivertoremovedirtand
debrisfromthegroovealongtheedgeofthe
guidebar,startingfromthesprocketonthefront
g228710
endandmovingrearward.
Iftheguidebarorgroovesaredamagedorthe
sprocketonthefrontenddoesnotrotatefreely,
replacetheguidebar;ifthechainisexcessively
wornordamaged,replaceit.
10.Placethechainaroundthedrivesprocketon
thefrontendoftheguidebar,withthecutting
edgeofthechainteethonthetopofthebar
facingforwardasshowninthediagramonthe
sideofthechainsaw(Figure31C).
5.Removetheclip,spacer,anddrivesprocket
fromthechainsaw(Figure30).
19
Page 20

Thechainneedssharpeningorreplacementwhen
youmustforceitontothewoodoritproducessmaller
chipsthanwhenitwasnew.
ContactanAuthorizedServiceDealertohavethe
chainsharpenedorreplaced.
PreparingtheBatteryPack forRecycling
Important:Uponremoval,covertheterminalsof
thebatterypackwithheavy-dutyadhesivetape.
Donotattempttodestroyordisassemblethe
batterypackorremoveanyofitscomponents.
Recycleorproperlydisposeoflithium-ionbattery
packsatabatteryrecyclingfacility.
Formoreinformationonrecyclinglithium-ion
batterypacksandtolocatethebattery
recyclingfacilityclosesttoyou,visit
www.Call2Recycle.org(USandCanadaonly).
IfyouarelocatedoutsideoftheUSand
Canada,pleasecontactyourauthorizedT oro
distributor.
Figure31
11.Feedthechainaroundtheguidebarandalign
thechainteethintothegrooveofthebar.
12.Positiontheopenloopofthechain(notonthe
guidebar)aroundthedrivesprocketonthe
chainsawandinstalltheguidebarandattached
chainontothechainsawasshowninFigure31.
Important:Ensurethatthechainadjusting
studisinsertedintotheholeindicatedbythe
arrowinFigure31C.Youmayneedtorotate
thechaintensioningknobtotthestudinto
theholeintheguidebar.
13.Installthecoverandthewingnut,butdonot
fullytightenthewingnut(Figure31D).Foldthe
wing-nuttab.
14.Adjustthechaintension;refertoAdjustingthe
ChainT ension(page18).
Service
Shouldthechainsawneedservice,taketheproduct
g192112
toyourAuthorizedServiceDealer.
SharpeningtheChain
ServiceInterval:Beforeeachuseordaily
Yearlyorbeforestorage
20
Page 21

Storage
Important:Storethetool,batterypack,and
chargeronlyintemperaturesthatarewithinthe
appropriaterange;refertoSpecications(page8).
Important:Ifyouarestoringthetoolforayear
orlonger,removethebatterypackfromthetool
andchargethebatterypackuntil2or3LED
indicatorsturnblueonthebattery.Donotstorea
fullychargedorfullydepletedbattery .Whenyou
arereadytousethetoolagain,chargethebattery
packuntiltheleftindicatorlightturnsgreenon
thechargerorall4LEDindicatorsturnblueon
thebattery.
•Cleanallforeignmaterialfromtheproduct.
•Storethetool,batterypack,andbatterycharger
inawell-ventilatedplacethatisinaccessibleto
children.
•Keepthetool,batterypack,andbatterycharger
awayfromcorrosiveagentssuchasgarden
chemicalsandde-icingsalts.
•Toreducetheriskofseriouspersonalinjury,do
notstorethebatterypackoutsideorinvehicles.
•Storethetool,batterypack,andbatterycharger
inanenclosedclean,dryarea.
21
Page 22

Troubleshooting
Performonlythestepsdescribedintheseinstructions.Allfurtherinspection,maintenance,andrepairwork
mustbeperformedbyanauthorizedservicecenterorasimilarlyqualiedspecialistifyoucannotsolvethe
problemyourself.
Problem
Themotordoesnotrunorruns
intermittently.
Themotorruns,butthechaindoesnot
rotate.
Thechainbrakedoesnotengage.
Thechainsawdoesnotproperlycut.
Thechainoilisnotlubricatingproperly .
PossibleCauseCorrectiveAction
1.Thechainbrakeisengaged.1.Disengagethechainbrakebymoving
2.Thebatterypackislowoncharge.
3.Thebatterypackisnotfullyseated.
4.Thebatterypackistoohot.4.Allowthebatterypacktocool.
5.Thebatterypackhasexceededhigh
amperagelimits.
6.Thereisdebrisunderthecover .6.Removethecoverandcleanoutany
1.Thechainisnotproperlyseatedonthe
drivesprocket.
1.Thereisachainbrakemalfunction.
1.Thechainisnottensionedcorrectly.
2.Thechainisdull.2.Replacethechain.
3.Thechainisinstalledbackward.3.Installthechaincorrectly.
4.Thechainisdry.
1.Theoilportisplugged.
2.Theoilgrooveintheguidebaris
plugged.
3.Thestrainerintheoiltankisplugged
(ifequipped).
thechainbrakerearward.
2.Chargethebatterypack.
3.Ensurethatthebatterypackisinserted
allthewayintothehousing.
5.Releasethetrigger,thenpressthe
triggerswitch.
debris.
1.Installthechainandensurethatthe
linksareproperlyseatedinthedrive
sprocket.
1.Immediatelytakethechainsawtoa
AuthorizedServiceDealer .
1.Setthepropertensiononthechain.
4.Checktheoillevel.
1.Cleanoutdebrisfromtheoilport.
2.Cleanoutdebrisinthebar.
3.Cleandebrisoutofthestrainerinthe
oiltank(ifequipped).
Thebatterypackloseschargequickly .1.Thebatterypackisoverorunderthe
Thebatterychargerisnotworking.
Thechainsawdoesnotrunorrun
continuously.
Thebatterypackshowsonly3LED
indicatorsafteronlyafewsecondsof
usingafullychargedbattery.
All4LEDindicatorsareblinkingon
thebatterypackafteryoupressthe
battery-charge-indicatorbuttononthe
batterypackandthecurrentcharge
displays(whenthebatterypackisnotin
use).
appropriatetemperaturerange.
1.Thebatterychargerisoverorunder
theappropriatetemperaturerange.
2.Theoutletthatthebatterychargeris
pluggedintodoesnothavepower .
1.Thereismoistureontheleadsofthe
batterypack.
2.Thebatterypackisnotfullyinstalled
intothechainsaw.
1.Thisisanormaloccurrence.
1.Thebatterypackisoverorunderthe
appropriatetemperaturerange.
1.Movethebatterypacktoaplace
whereitisdryandthetemperatureis
between0°C(32°F)and40°C(104°F).
1.Unplugthebatterychargerandmove
ittoaplacewhereitisdryandthe
temperatureisbetween0°C(32°F)
and40°C(104°F).
2.Contactyourlicensedelectricianto
repairtheoutlet.
1.Allowthebatterypacktodryorwipeit
dry.
2.Removeandthenreplacethebattery
packintothechainsawmakingsure
thatitisfullyinstalledandlatched.
1.Shutoffthetoolandpressthe
battery-charge-indicatorbuttonorthe
removethebatteryfromthetoolto
displaytheactualbatterycharge.
1.Movethebatterypacktoaplace
whereitisdryandthetemperatureis
between0°C(32°F)and40°C(104°F).
22
Page 23

Problem
PossibleCauseCorrectiveAction
All4LEDindicatorsareblinkingonthe
batterypackafterreleasingthetrigger
(whenthebatterypackisinuse).
2LEDindicatorsareblinkingon
thebatterypackafteryoupressthe
battery-charge-indicatorbuttononthe
batterypackandthecurrentcharge
displays(whenthebatterypackisnotin
use).
2LEDindicatorsareblinkingonthe
batterypackafterreleasingthetrigger
(whenthebatterypackisinuse).
1LEDindicatorisblinkingonthebattery
pack.
Itisdifculttoremovethebatterypack
fromthetool.
1.Thebatterypackisoverorunderthe
appropriatetemperaturerange.
1.Thereisadifferenceinvoltage
betweencellsinthebatterypack.
1.Thereisadifferenceinvoltage
betweencellsinthebatterypack.
1.Thebatterypackvoltageislow .1.Placethebatterypackonthecharger.
1.Thebatterypack/toolisneworthere
iscorrosioninthebatteryterminals
and/ortheterminalsonthetool.
1.Movethebatterypacktoaplace
whereitisdryandthetemperatureis
between0°C(32°F)and40°C(104°F).
1.Placethebatteryonthechargeruntil
itisfullycharged.
1.Placethebatteryonthechargeruntil
itisfullycharged.
1.Cleantheterminalsonthebatterypack
andthetool.Thenapplydielectric
greasetothebatteryterminals;donot
useanyothertypeoflubricantasitcan
damagetheterminals.
23
Page 24

EuropeanPrivacyNotice
TheInformationT oroCollects
ToroWarrantyCompany(T oro)respectsyourprivacy.Inordertoprocessyourwarrantyclaimandcontactyouintheeventofaproductrecall,weaskyou
tosharecertainpersonalinformationwithus,eitherdirectlyorthroughyourlocalT orocompanyordealer.
TheT orowarrantysystemishostedonserverslocatedwithintheUnitedStateswhereprivacylawmaynotprovidethesameprotectionasapplies
inyourcountry.
BYSHARINGYOURPERSONALINFORMATIONWITHUS,YOUARECONSENTINGTOTHEPROCESSINGOFYOURPERSONALINFORMA TION
ASDESCRIBEDINTHISPRIV ACYNOTICE.
TheWayT oroUsesInformation
Toromayuseyourpersonalinformationtoprocesswarrantyclaims,tocontactyouintheeventofaproductrecallandforanyotherpurposewhichwetell
youabout.ToromayshareyourinformationwithT oro'safliates,dealersorotherbusinesspartnersinconnectionwithanyoftheseactivities.Wewillnot
sellyourpersonalinformationtoanyothercompany.Wereservetherighttodisclosepersonalinformationinordertocomplywithapplicablelawsand
withrequestsbytheappropriateauthorities,tooperateoursystemsproperlyorforourownprotectionorthatofotherusers.
RetentionofyourPersonalInformation
Wewillkeepyourpersonalinformationaslongasweneeditforthepurposesforwhichitwasoriginallycollectedorforotherlegitimatepurposes
(suchasregulatorycompliance),orasrequiredbyapplicablelaw .
Toro'sCommitmenttoSecurityofY ourPersonalInformation
Wetakereasonableprecautionsinordertoprotectthesecurityofyourpersonalinformation.Wealsotakestepstomaintaintheaccuracyandcurrent
statusofpersonalinformation.
AccessandCorrectionofyourPersonalInformation
Ifyouwouldliketorevieworcorrectyourpersonalinformation,pleasecontactusbyemailatlegal@toro.com.
AustralianConsumerLaw
AustraliancustomerswillnddetailsrelatingtotheAustralianConsumerLaweitherinsidetheboxoratyourlocalToroDealer.
374-0282RevC
 Loading...