

Page 1
FormNo.3418-117RevB
PowerPlex
™
36cm40VMAX
StringTrimmer
ModelNo.51132—SerialNo.318000001andUp
ModelNo.51132T—SerialNo.318000001andUp
Registeratwww.T oro.com.
OriginalInstructions(EN)
*3418-117*B
Page 2

ThisproductcomplieswithallrelevantEuropean
directives.Fordetails,pleaseseetheseparate
productspecicDeclarationofConformity(DOC)
sheet.
Safety
WARNING:Whenusingelectricgardeningappliances,
alwaysfollowbasicsafetyprecautionstoreduce
theriskofre,electricshock,andpersonalinjury,
includingthefollowing:
Introduction
Thistrimmerisintendedtobeusedbyresidential
homeownerstotrimgrassasneeded.Itisdesigned
touseonlybatterypackModels88525(providedwith
model51132)or88526.
Readthisinformationcarefullytolearnhowtooperate
andmaintainyourproductproperlyandtoavoid
injuryandproductdamage.Youareresponsiblefor
operatingtheproductproperlyandsafely .
YoumaycontactT orodirectlyatwww.T oro.comfor
productandaccessoryinformation,helpndinga
dealer,completewarrantydetails,ortoregisteryour
product.
Model51132Tdoesnotincludeabatterypackor
acharger.
WARNING
Failuretofollowallwarningsandinstructions
mayresultinelectricshock,reand/or
seriouspersonalinjury .
Readallsafetywarningsandallinstructions.
Saveallwarningsandinstructionsforfuture
reference.
Theterm“powertool”inallthewarningsrefers
toyourmains-operated(corded)powertoolor
battery-operated(cordless)powertool.
1.Workareasafety
A.Keeptheworkareacleanandwelllit.
Clutteredordarkareasinviteaccidents.
B.Donotoperatepowertoolsinexplosive
atmospheres,suchasinthepresence
ofammableliquids,gasses,ordust.
Powertoolscreatesparks,whichmayignite
thedustorfumes.
C.Keepchildrenandbystandersaway
whileoperatingapowertool.Distractions
cancauseyoutolosecontrol.
D.Avoiddangerousenvironments.Donot
useappliancesindamporwetlocations.
2.Personalsafety
A.Stayalert;watchwhatyouaredoing
andusecommonsensewhenoperating
apowertool.Donotuseapowertool
whileyouaretiredorundertheinuence
ofdrugs,alcohol,ormedication.A
momentofinattentionwhileoperatingpower
toolsmayresultinseriouspersonalinjury .
B.Usepersonalprotectiveequipment.
Alwaysweareyeprotection.Protective
equipmentsuchasadustmask,non-skid
safetyshoes,ahardhat,orhearing
protectionusedforappropriateconditions
willreducepersonalinjuries.
C.Preventunintentionalstarting.Ensure
theswitchisintheOFFpositionbefore
connectingtopowersourceand/or
batterypackandpickinguporcarrying
thetool.Carryingpowertoolswithyour
ngerontheswitchorenergizingpower
toolsthathavetheswitchoninvites
accidents.
©2018—TheToro®Company
8111LyndaleAvenueSouth
Bloomington,MN55420
Contactusatwww.Toro.com.
2
PrintedinChina
AllRightsReserved
Page 3

D.Donotoverreach.Keepproper
footingandbalanceatalltimes.This
enablesbettercontrolofthepowertoolin
unexpectedsituations.
E.Dressproperly .Donotwearloose
clothingorjewelry.Keepyourhair,
clothingandglovesawayfrommoving
parts.Looseclothes,jewelry,orlonghair
canbecaughtinmovingparts.
F.Keepyourhandsandfeetawayfromthe
cuttingarea.
3.Powertooluseandcare
A.Donotforcethepowertool.Usethe
correctpowertoolforyourapplication.
Thecorrectpowertoolwilldothejob
betterandsaferattherateforwhichitwas
designed.
B.Donotusethepowertooliftheswitch
doesnotturnitonandoff.Anypowertool
thatcannotbecontrolledwiththeswitchis
dangerousandmustberepaired.
C.Removethebatterypackfromthepower
toolbeforemakinganyadjustments,
changingaccessories,orstoringpower
tools.Suchpreventivesafetymeasures
reducetheriskofstartingthepowertool
accidentally.
D.Storeidlepowertoolsoutofthereach
ofchildrenanddonotallowpersons
unfamiliarwiththepowertoolorthese
instructionstooperatethepowertool.
Powertoolsaredangerousinthehandsof
untrainedusers.
E.Storeidleappliancesindoors.Whennot
inuse,appliancesshouldbestoredindoors
inadryandhighorlocked-upplace,outof
thereachofchildren.
F.Maintainpowertools.Checkfor
misalignmentorbindingofmoving
parts,breakageofpartsandanyother
conditionthatmayaffectthepowertools
operation.Ifdamaged,havethepower
toolrepairedbeforeuse.Manyaccidents
arecausedbypoorlymaintainedpower
tools.
G.Maintainappliancewithcare.Keepcutting
edgesharpandcleanforbestperformance
andtoreducetheriskofinjury.Follow
instructionsforlubricatingandchanging
accessories.Keephandlesdry,clean,and
freefromoilandgrease.
H.Keepcuttingtoolssharpandclean.
Properlymaintainedcuttingtoolswithsharp
cuttingedgesarelesslikelytobindandare
easiertocontrol.
I.Usethepowertoolinaccordancewith
theseinstructionsandinthemanner
intendedfortheparticulartypeofpower
tool,takingintoaccounttheworking
conditionsandtheworktobeperformed.
Usingthepowertoolforoperationsdifferent
fromthoseintendedcouldresultina
hazardoussituation.
J.Keepguardsinplaceandinworking
order.
K.Checkfordamagedparts.Beforefurther
useoftheappliance,aguardorother
partthatisdamagedshouldbecarefully
checkedtodeterminethatitwilloperate
properlyandperformitsintendedfunction.
Checkforalignmentofmovingparts,
bindingofmovingparts,breakageofparts,
mounting,andanyotherconditionthatmay
affectitsoperation.Aguardorotherpart
thatisdamagedshouldbeproperlyrepaired
orreplacedbyanauthorizedservicecenter
unlessindicatedelsewhereinthismanual.
4.Service
Haveyourpowertoolservicedbya
qualiedrepairpersonusingonlyidentical
replacementparts.Thiswillensurethatthe
safetyofthepowertoolismaintained.
5.BatterySafety
A.Donotchargeapplianceinrainorinwet
locations.
B.Donotusebattery-operatedappliancein
therain.
C.Useonlythefollowingtypeandsize
battery(ies):T orobatteryModel88525or
88526.
D.Removeordisconnectthebatterybefore
servicing,cleaning,orremovingmaterial
fromthegardeningappliance.
E.Donotdisposeofthebattery(ies)ina
re.Thecellmayexplode.Checkwith
localcodesforpossiblespecialdisposal
instructions.
F.Donotopenormutilatethebattery(ies).
Releasedelectrolyteiscorrosiveandmay
causedamagetotheeyesorskin.Itmay
betoxicifswallowed.
G.Exercisecareinhandlingbatteriesinorder
nottoshortthebatterywithconducting
materialssuchasrings,bracelets,andkeys.
Thebatteryorconductormayoverheatand
causeburns.
SAVETHESEINSTRUCTIONS
3
Page 4

SoundPressure
Thisunithasasoundpressurelevelattheoperator’s
earof77.6dBA,withanUncertaintyValue(K)of3
dBA.
Thesoundpressurelevelwasdeterminedaccording
totheproceduresoutlinedinENISO11201.
SoundPower
Thisunithasaguaranteedsoundpowerlevelof96
dBA,whichincludesanUncertaintyValue(K)of1
dBA.
Thesoundpowerlevelwasdeterminedaccordingto
theproceduresoutlinedinENISO11094.
Hand/ArmVibration
Measuredvibrationlevelforrighthand=1.54m/s
Measuredvibrationlevelforlefthand=1.23m/s
UncertaintyValue(K)=1.5m/s
Themeasuredvaluesweredeterminedaccordingto
theproceduresoutlinedinENISO20643.
2
Important:Thevibrationemissionduringactual
useofthepowertoolcandifferfromthedeclared
totalvaluedependingonthewaythetoolis
used.Theoperatorshouldtakesafetymeasures
basedonanestimationofexposureintheactual
conditionsofuse.
2
2
4
Page 5

SafetyandInstructionalDecals
Safetydecalsandinstructionsareeasilyvisibletotheoperatorandarelocatednearanyarea
ofpotentialdanger.Replaceanydecalthatisdamagedormissing.
136-2491
1.Donotdiscard.2.Doubleinsulated
decal136-2491
136-2492
1.Donotdiscard.2.Doubleinsulated
136-2499
1.ReadtheOperator’s
Manual.
2.Donotburnthebattery .4.Donotdiscard.
3.Donotoperateinwet
decal136-2492
decal136-2501
136-2501
1.Donotdiscard.3.Residential
2.Doubleinsulated
decal136-2499
conditions.
1.Thebatterypackis
charging.
2.Thebatterypackisfully
charged.
4.ReadtheOperator’s
Manual.
decal136-2504
136-2504
3.Thebatterypackistoo
warm.
4.Thebatterypackneedsto
bereplaced.
5
Page 6
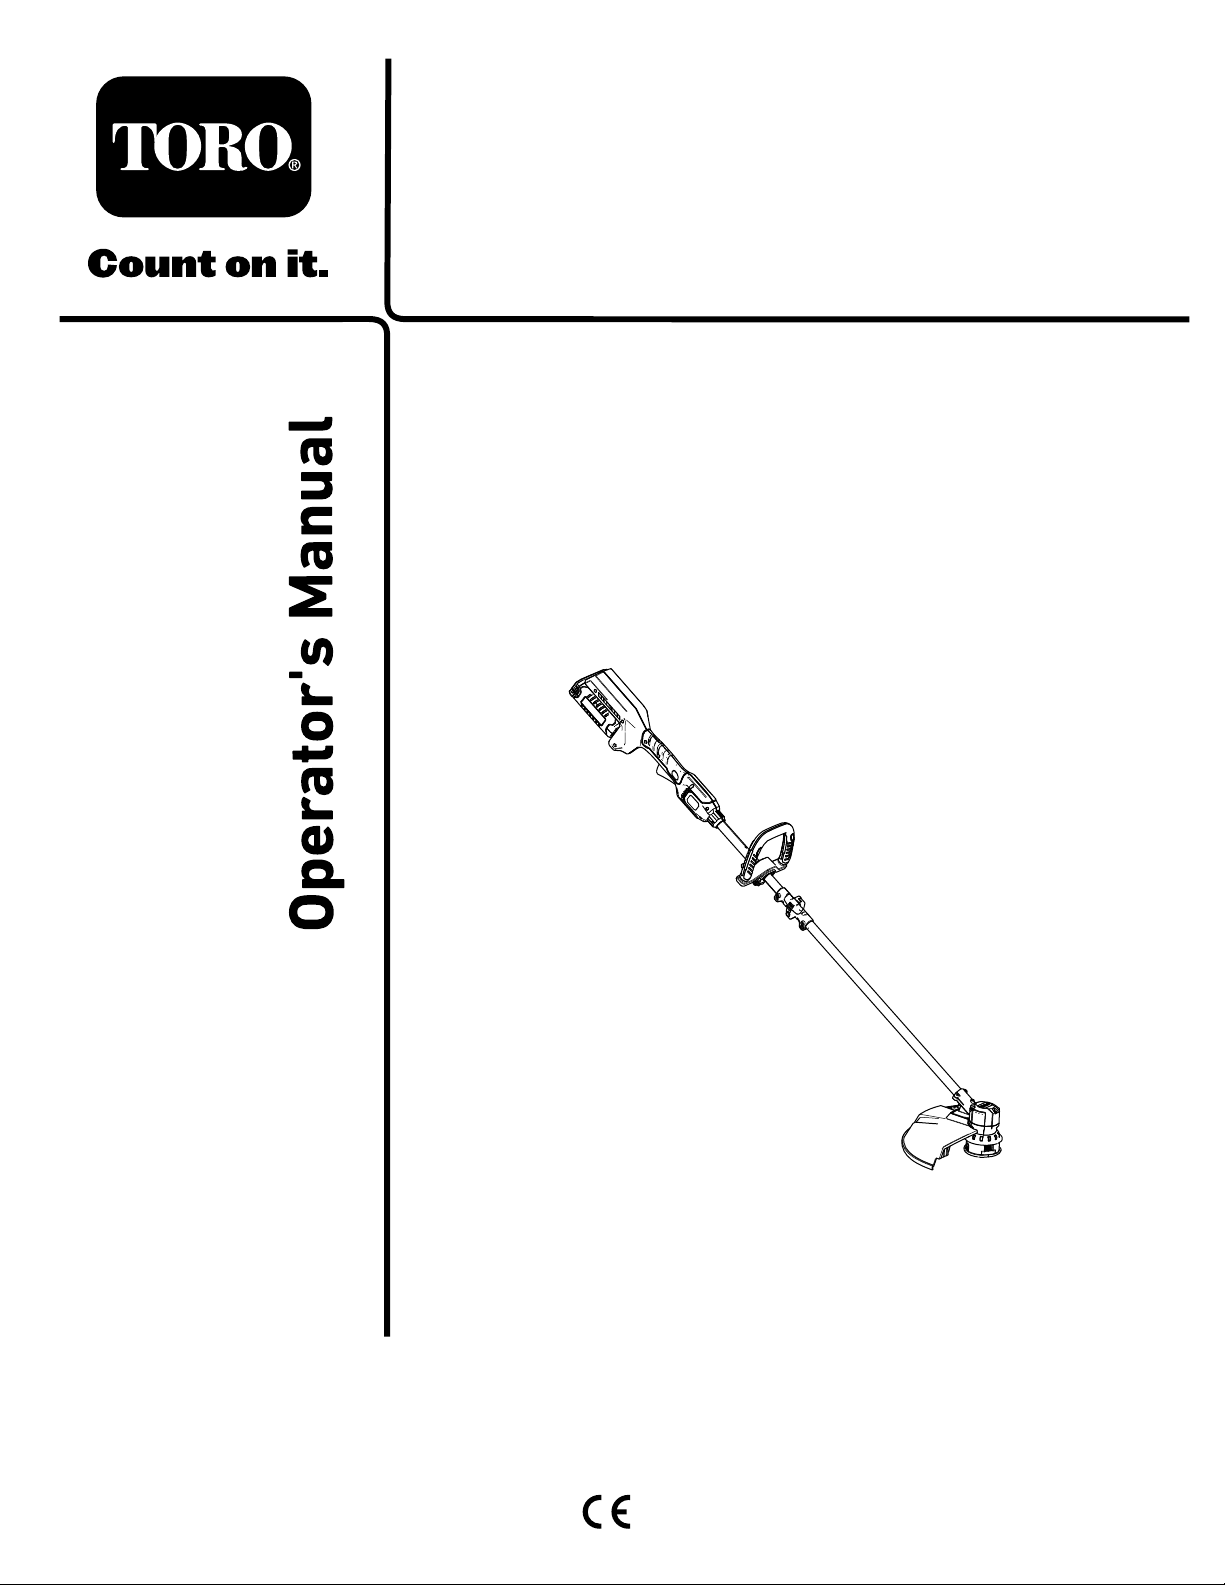
1.Thebatterydoesnot
comeoutoftheboxfully
charged.
2.Placethebatteryinthe
batterycharger.
3.Waituntilthebatteryis
fullychargedbeforethe
rstuse.
136-2534
4.Stop—followthese
instructionsbeforerst
use.
5.ReadtheOperator’s
Manual.
decal136-2534
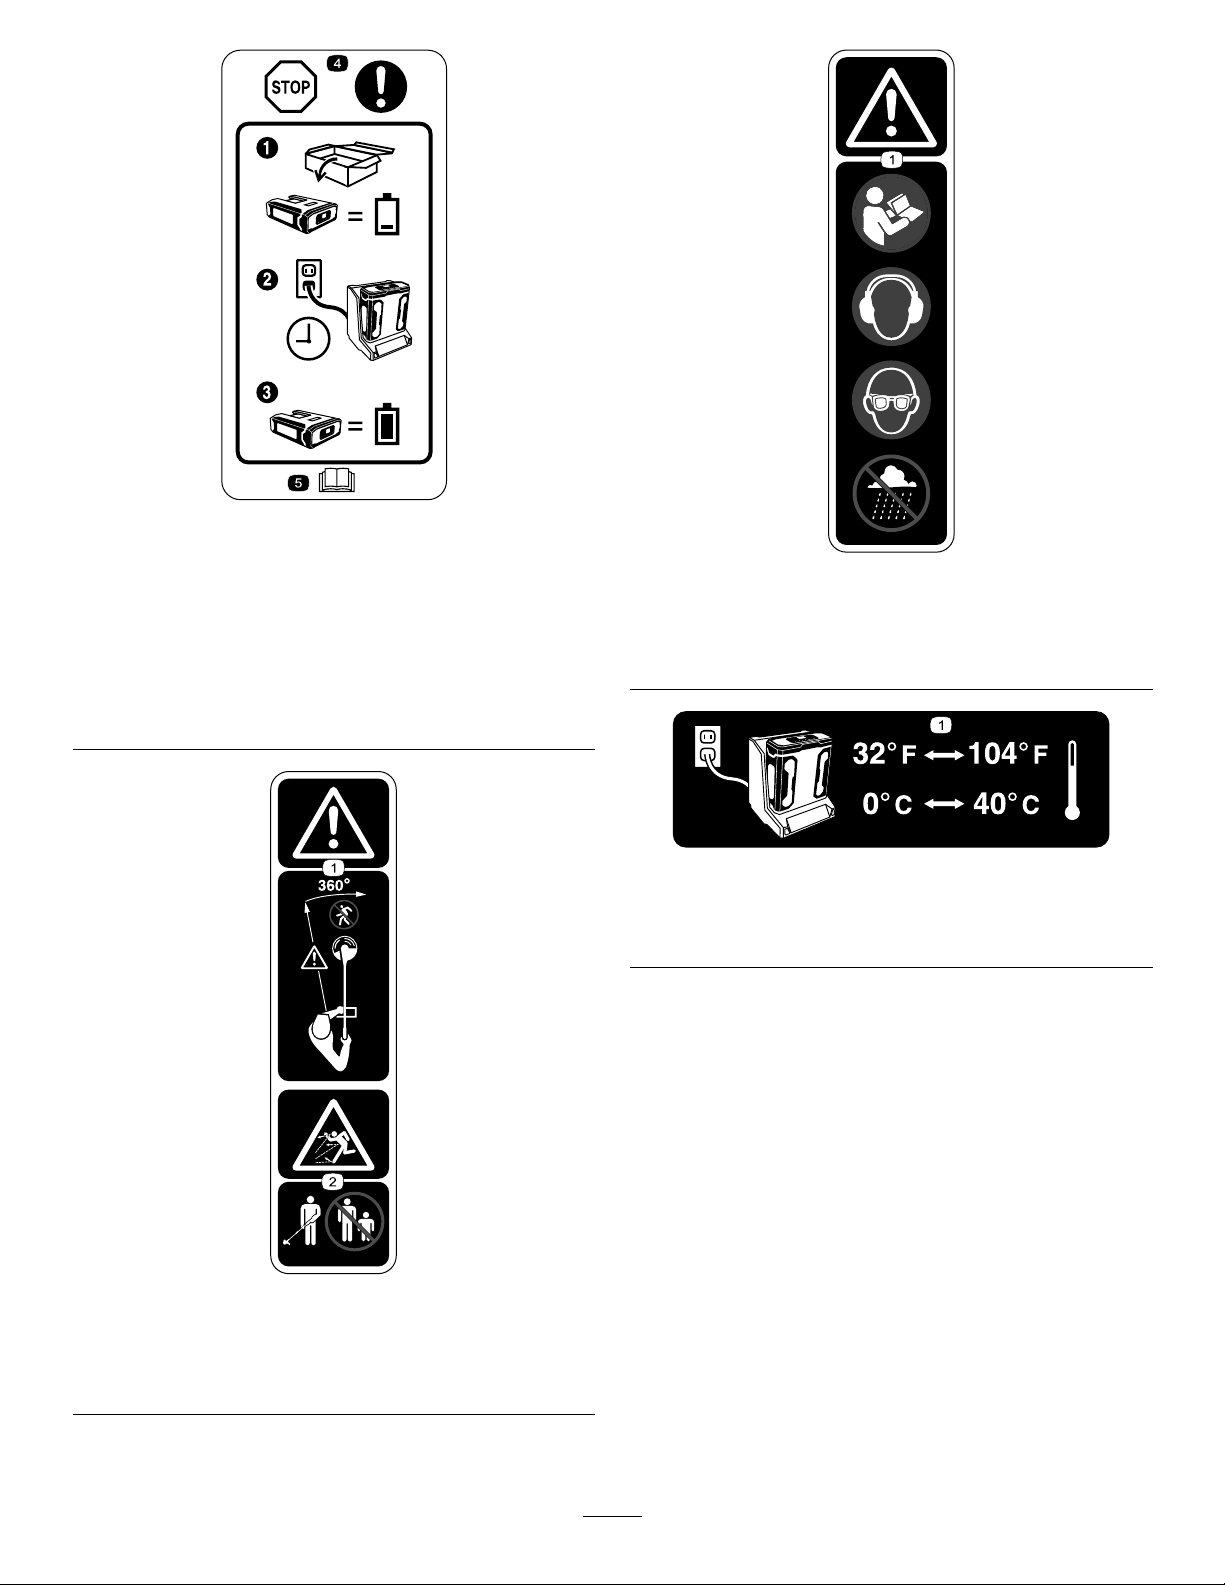
decal136-2537
136-2537
1.Warning—readtheOperator’sManual;wearhearing
protection;weareyeprotection;donotoperateinwet
conditions.
decal136-2539
136–2539
1.Chargethebatterywherethetemperatureisbetween0°C
and40°C(32°Fand104°F).
1.Warning—keep
bystandersawayfromthe
machineinalldirections.
decal136-2535
136-2535
2.Thrownobject
hazard—keepbystanders
awayfromthemachine.
6
Page 7

Setup
LooseParts
Usethechartbelowtoverifythatallpartshavebeenshipped.
ProcedureDescription
1
2
3
4
Note:Thebatterypackisnotfullychargedwhenyoupurchaseit.Beforeusingthetoolforthersttime,refer
toChargingtheBatteryPack(page11).
Nopartsrequired
Connectorknob
Auxiliaryhandle1Installtheauxiliaryhandle.
Guard
Phillipsheadscrew4
Qty.
–
1
1
Mountthebatterycharger.
Unfoldthehandle.
Mountingtheguardtothebaseofthe
trimmer.
Use
1
MountingtheBattery Charger(Optional)
NoPartsRequired
Procedure
Ifdesired,mountthebatterychargersecurelyona
wallusingthewall-mountkeyholesonthebackof
theunit.
Makesuretomountitindoors(suchasagarageor
otherdryplace),nearapoweroutlet,andoutofthe
reachofchildren.
RefertoFigure1forassistanceinmountingthe
charger.
Note:Slideandtwistthechargeroverthe
appropriatelypositionedhardwaretosecurethe
chargerinplace.
g194202
Figure1
7
Page 8

2
UnfoldingtheHandle
Partsneededforthisprocedure:
1
Connectorknob
Procedure
1.Unfoldthehandle(AofFigure2).
2.Installtheconnectorknobandnuttosecurethehandle(BofFigure2).
Note:Thenutthatholdsthehandleconnectorknobinplaceislightlysecuredintheconnectorhousing
withthepieceoftape.Removethetapeafteryouinstalltheconnectorknob.
Figure2
8
g228753
Page 9

3
4
InstallingtheAuxiliary Handle
Partsneededforthisprocedure:
1Auxiliaryhandle
Procedure
1.Lineupthegroovealongthehandlewiththe
grooveontheauxiliaryhandleandslidethe
auxiliaryhandletowardthetrimmerhandle(Aof
Figure3).
2.Snapthehandlesecurelyintoplace(BofFigure
3).
InstallingtheGuard
Partsneededforthisprocedure:
1
Guard
4Phillipsheadscrew
Procedure
Removethe4Phillipsheadscrewsthataretapedto
theguardandusethemtoinstalltheguard(Figure4).
Figure3
g207324
Figure4
g195362
9
Page 10

ProductOverview
Operation
Specications
Weights
Massofthemachinewithout
thebattery
Massofthemachinewith
battery88525
Massofthemachinewith
battery88526
AppropriateTemperatureRanges
Chargethebatteryat0°C(32°F)to40°C(104°F)*
Useproductsat
Storeproductsat-15°C(5°F)to60°C(140°F)
UnplugthechargerifBelow0°C(32°F)orabove
*Chargingtimewillincreaseifyoudonotchargethe
batterywithinthisrange.
Storethetool,batterypack,andbatterychargerinan
enclosedclean,dryarea.
3.2kg(7.0lb)
4.2kg(9.2lb)
4.8kg(10.5lb)
-15°C(5°F)to60°C(140°F)
40°C(104°F)
StartingtheTrimmer
1.Makesurethattheventsonthetrimmerare
clearofanydustanddebris.
g207326
Figure5
1.Trimmerventingareas
2.Alignthecavityinthebatterypackwiththe
tongueonthehandlehousing(Figure6).
3.Pushthebatterypackintothehandleuntilthe
batterypacklocksintothelatch(Figure6).
Figure6
1.Batterylatch
4.Tostartthetrimmer,pressthelockoutbutton,
thensqueezethevariable-speedtrigger(Figure
7).
Figure7
1.Lockoutbutton2.Variable-speedtrigger
g189881
g189886
10
Page 11

ShuttingOfftheTrimmer
Toshutoffthetrimmer,releasethetrigger.
Wheneveryouarenotusingthetrimmerorare
transportingthetrimmertoorfromtheworkarea,
removethebatterypack.
RemovingtheBatteryPack fromtheTrimmer
Pressthebatterylatchonthemachinetoreleasethe
batterypackandslidethebatterypackoutofthe
machine(Figure8).
g228487
Figure9
Figure8
1.Batterylatch
ChargingtheBatteryPack
Important:Readallsafetyprecautions.
Important:Chargethebatterypackonlyin
temperaturesthatarewithintheappropriate
range;refertoSpecications(page10).
Note:Atanytime,pressthebattery-charge-indicator
buttononthebatterypacktodisplaythecurrent
charge(LEDindicators).
1.Batterypackcavity4.Battery-charge-indicator
2.Batterypackterminals
3.Batterypackventingareas
button
5.LEDindicators(current
charge)
4.Makesurethattheventsonthebatterycharger
areclearofanydustanddebris.
g192774
5.Slidethebatterypackintothechargeruntilitis
fullyseated(Figure10).
1.Plugthepowercordthatmatchesyourpower
outletsintothebatterycharger.
2.Makesurethattheventsonthebatterypackare
clearofanydustanddebris.
3.Lineupthecavityinthebatterypack(Figure10)
withthetongueonthecharger.
Figure10
1.Chargerventingareas
2.Leftindicatorlight
6.Toremovethebatterypack,slidethebattery
backwardoutofthecharger.
11
g194423
3.Rightindicatorlight
Page 12

7.RefertothefollowingtabletointerprettheLED
indicatorsonthebatterycharger.
LeftLight
Off
RedRedBatterypackischarging
Green
Orange
RedBlinkingRedReplacethebatterypack
RightLight
Red
RedBatterypackischarged
RedBatterypackistoowarm
Indicates:
Chargerison;nobattery
packinserted
AdvancingtheLineUsing theBumpFeed
1.Runthetoolatfullthrottle.
2.Tapthebumpbuttononthegroundtoadvance
theline.Thelineadvanceseachtimethebump
buttonistapped.Donotholdthebumpbutton
ontheground.
Note:Thelinetrimmingcut-offbladeonthe
grassdeectorcutsthelinetothecorrectlength.
AdjustingtheAuxiliary Handle
1.Releasetheauxiliary-handlelatch(AofFigure
12).
2.Slidetheauxiliaryhandleupordowntoyour
desiredheight(BofFigure12).
Important:Donotremovetherubber
bumper.
3.Closetheauxiliary-handlelatchtosecurethe
auxiliaryhandleinplace(CofFigure12).
g189875
Figure12
Note:Ifthelineisworntooshort,youmaynot
beabletoadvancethelinebytappingitonthe
ground.Ifso,releasethetriggerandreferto
AdvancingtheLineManually(page12).
Figure11
1.Bumpbutton
AdvancingtheLine Manually
Trimming
g194633
Removethebatterypackfromthetrimmer,thenpush
thebumpbuttonatthebaseofthespoolretainer
whilepullingonthetrimmerlinetomanuallyadvance
theline.
g207329
Figure13
12
Page 13

OperatingTips
•Keepthetrimmertiltedtowardtheareabeingcut;
thisisthebestcuttingarea.
•Thestringtrimmercutswhenyoumoveitfromleft
toright.Thispreventsthetrimmerfromthrowing
debrisatyou.
•Usethetipofthestringtodothecutting;donot
forcethestringheadintouncutgrass.
•Wireandpicketfencescancausethestringto
wearrapidlyandevenbreak.Stoneandbrick
walls,curbs,andwoodcanalsocausethestring
towearrapidly.
•Avoidtreesandshrubs.Thestringcaneasily
damagetreebark,woodmoldings,siding,and
fenceposts.
Figure14
1.Directionofrotation2.Stringpath
g207327
13
Page 14

Maintenance
Aftereachuseofthetrimmer,completethefollowing:
1.Removethebatteryfromthetrimmer.
ReplacingtheSpool
Useonly2mm(0.08inch)diametermonolament
string.Useoriginalmanufacturer’sreplacementstring
forbestperformance(T oroPartNo.88546TE).
2.Wipethetrimmercleanwithadampcloth.Do
nothosethetrimmerdownorsubmergeitin
water.
CAUTION
Thelinecutoffbladeonthedeectoris
sharpandcancutyou.
Donotuseyourhandstocleanthe
deectorshieldandblade.
3.Wipeorscrapecleanthecuttingheadareaany
timethereisanaccumulationofdebris.
4.Checkandtightenallfasteners.Ifanypartis
damagedorlost,repairorreplaceit.
5.Brushdebrisawayfromairintakeventsand
exhaustonmotorhousingtopreventthemotor
fromoverheating.
Important:Usingalargerdiameterstringwill
causethemotortooverheatandfail.
1.Removethebattery.
2.Pushinthetabonthesideofthespoolretainer
(Figure15).
Figure15
1.Spoolretainer
2.Spool5.Linecutoffblade
3.Slot
4.Tab
g203887
3.Pullthespoolretaineruptoremoveitand
removethespool.
4.Toinstallthenewspool,makesurethatthe
stringiscapturedinoneoftheretainingslotson
thenewspool.Makesuretheendofthestring
extendsapproximately152mm(6inches).
5.Installthenewspoolsothatthestringaligns
withtheeyeletinthestringhead.Threadthe
stringintotheeyelet.
6.Pullthestringextendingfromthestringheadso
thatthestringreleasesfromtheslotinthespool.
7.Installthespoolretainerbypressingtabsinto
slotsandpushingdownuntilthespoolretainer
clicksintoplace.
14
Page 15

ReplacingtheString
Storage
1.Removethebattery.
2.Removethespool;refertoReplacingtheSpool
(page14).
Figure16
1.Spool
2.Anchorslot
Note:Removeanyoldstringremainingonthe
spool.
3.Eachsideofthespoolacceptsapproximately
3.6m(12ft)ofstring.Useonly2mm(0.08
inch)diametermonolamentstring.
Note:Donotuseanyothergaugeortypeof
string,asthiscoulddamagethetrimmer.
4.Insertthestringintotheanchorholeintheupper
partofthespool(Figure16).Windthestring
ontothespoolinthedirectionshownbythe
arrowsonthespool.
5.Placethestringintheslotontheupperspool
ange,leavingabout152mm(6inches)
extendedbeyondtheslot.
Note:Donotoverll.Afterwindingthestring,
thereshouldbeatleast6mm(1/4inch)between
thewoundstringandtheoutsideedgeofthe
spool.
6.Replacethespoolandthespoolretainer;refer
toReplacingtheSpool(page14).
Important:Storethetool,batterypack,and
chargeronlyintemperaturesthatarewithinthe
appropriaterange;refertoSpecications(page
10).
Important:Ifyouarestoringthetoolforayear
orlonger,removethebatterypackfromthetool
andchargethebatterypackuntil2or3LED
indicatorsturnblueonthebattery.Donotstorea
fullychargedorfullydepletedbattery .Whenyou
arereadytousethetoolagain,chargethebattery
g203888
packuntiltheleftindicatorlightturnsgreenon
thechargerorall4LEDindicatorsturnblueon
thebattery.
•Cleanallforeignmaterialfromtheproduct.
•Storethetool,batterypack,andbatterycharger
inawell-ventilatedplacethatisinaccessibleto
children.
•Keepthetool,batterypack,andbatterycharger
awayfromcorrosiveagentssuchasgarden
chemicalsandde-icingsalts.
•Toreducetheriskofseriouspersonalinjury,do
notstorethebatterypackoutsideorinvehicles.
•Storethetool,batterypack,andbatterycharger
inanenclosedclean,dryarea.
PreparingtheBatteryPack forRecycling
Important:Uponremoval,covertheterminalsof
thebatterypackwithheavy-dutyadhesivetape.
Donotattempttodestroyordisassemblethe
batterypackorremoveanyofitscomponents.
Lithium-ionbatterypacksmustberecycled
ordisposedofproperlyatthenearestbattery
recyclingfacility.
Formoreinformationonrecyclinglithium-ion
batterypacksandtolocatethebattery
recyclingfacilityclosesttoyou,visit
www.Call2Recycle.org(USandCanadaonly).
IfyouarelocatedoutsideoftheUSand
Canada,pleasecontactyourauthorizedT oro
distributor.
15
Page 16

Troubleshooting
Performonlythestepsdescribedintheseinstructions.Allfurtherinspection,maintenance,andrepairwork
mustbeperformedbyanauthorizedservicecenterorasimilarlyqualiedspecialistifyoucannotsolvethe
problemyourself.
Problem
Thetooldoesnotstart.
Thetooldoesnotreachfullpower.
Thetoolisproducingexcessivevibration
ornoise.
Thebatterypackloseschargequickly .1.Thebatterypackisoverorunderthe
Thebatterychargerisnotworking.
1.Thebatteryisnotfullyinstalledinthe
tool.
2.Thebatterypackisnotcharged.
3.Thebatterypackisdamaged.3.Replacethebatterypack.
4.Thereisanotherelectricalproblem
withthetool.
1.Thebatterypackchargecapacityis
toolow .
2.Theairventsareblocked.
1.Thereisdebrisonthedrumareaon
thetrimmer .
2.Thespoolisnotproperlywound.
appropriatetemperaturerange.
1.Thebatterychargerisoverorunder
theappropriatetemperaturerange.
2.Theoutletthatthebatterychargeris
pluggedintodoesnothavepower .
PossibleCauseCorrectiveAction
1.Removeandthenreplacethebattery
intothetool,makingsurethatitisfully
installedandlatched.
2.Removethebatterypackfromthetool
andchargeit.
4.ContactanAuthorizedServiceDealer.
1.Removethebatterypackfromthetool
andfullychargethebatterypack.
2.Cleantheairvents.
1.Removeandebrisoffofthedrumarea.
2.Advancethelineusingthebumpfeed
and/orremovethelineonthespool
andwindthespoolagain.
1.Movethebatterypacktoaplace
whereitisdryandthetemperatureis
between0°C(32°F)and40°C(104°F).
1.Unplugthebatterychargerandmove
ittoaplacewhereitisdryandthe
temperatureisbetween0°C(32°F)
and40°C(104°F).
2.Contactyourlicensedelectricianto
repairtheoutlet.
Thebatterypackshowsonly3LED
indicatorsafteronlyafewsecondsof
usingafullychargedbattery.
All4LEDindicatorsareblinkingon
thebatterypackafteryoupressthe
battery-charge-indicatorbuttononthe
batterypackandthecurrentcharge
displays(whenthebatterypackisnotin
use).
All4LEDindicatorsareblinkingonthe
batterypackafterreleasingthetrigger
(whenthebatterypackisinuse).
2LEDindicatorsareblinkingon
thebatterypackafteryoupressthe
battery-charge-indicatorbuttononthe
batterypackandthecurrentcharge
displays(whenthebatterypackisnotin
use).
2LEDindicatorsareblinkingonthe
batterypackafterreleasingthetrigger
(whenthebatterypackisinuse).
1LEDindicatorisblinkingonthebattery
pack.
1.Thisisanormaloccurrence.
1.Thebatterypackisoverorunderthe
appropriatetemperaturerange.
1.Thebatterypackisoverorunderthe
appropriatetemperaturerange.
1.Thereisadifferenceinvoltage
betweencellsinthebatterypack.
1.Thereisadifferenceinvoltage
betweencellsinthebatterypack.
1.Thebatterypackvoltageislow .1.Placethebatterypackonthecharger.
1.Stopthetoolandpressthe
battery-charge-indicatorbuttonor
theremovethebatteryfromthetoolto
displaytheactualbatterycharge.
1.Movethebatterypacktoaplace
whereitisdryandthetemperatureis
between0°C(32°F)and40°C(104°F).
1.Movethebatterypacktoaplace
whereitisdryandthetemperatureis
between0°C(32°F)and40°C(104°F).
1.Placethebatteryonthechargeruntil
itisfullycharged.
1.Placethebatteryonthechargeruntil
itisfullycharged.
16
Page 17

Problem
PossibleCauseCorrectiveAction
Anaudibletonesoundswhenadvancing
thelineusingthebumpfeed.
Itisdifculttoremovethebatterypack
fromthetool.
1.Thisisanormaloccurrence.
1.Thebatterypack/toolisneworthere
iscorrosioninthebatteryterminals
and/ortheterminalsonthetool.
1.Stopthetoolbyreleasingthetrigger
andthenstartthetool.
1.Cleantheterminalsonthebatterypack
andthetool.Thenapplydielectric
greasetothebatteryterminals;donot
useanyothertypeoflubricantasitcan
damagetheterminals.
17
Page 18

Notes:
Page 19

Notes:
Page 20

EuropeanPrivacyNotice
TheInformationToroCollects
ToroWarrantyCompany(T oro)respectsyourprivacy .Inordertoprocessyourwarrantyclaimandcontactyouintheeventofaproductrecall,weaskyou
tosharecertainpersonalinformationwithus,eitherdirectlyorthroughyourlocalT orocompanyordealer.
TheT orowarrantysystemishostedonserverslocatedwithintheUnitedStateswhereprivacylawmaynotprovidethesameprotectionasapplies
inyourcountry.
BYSHARINGYOURPERSONALINFORMATIONWITHUS,YOUARECONSENTINGTOTHEPROCESSINGOFYOURPERSONALINFORMA TION
ASDESCRIBEDINTHISPRIV ACYNOTICE.
TheWayT oroUsesInformation
Toromayuseyourpersonalinformationtoprocesswarrantyclaims,tocontactyouintheeventofaproductrecallandforanyotherpurposewhichwetell
youabout.ToromayshareyourinformationwithT oro'safliates,dealersorotherbusinesspartnersinconnectionwithanyoftheseactivities.Wewillnot
sellyourpersonalinformationtoanyothercompany .Wereservetherighttodisclosepersonalinformationinordertocomplywithapplicablelawsand
withrequestsbytheappropriateauthorities,tooperateoursystemsproperlyorforourownprotectionorthatofotherusers.
RetentionofyourPersonalInformation
Wewillkeepyourpersonalinformationaslongasweneeditforthepurposesforwhichitwasoriginallycollectedorforotherlegitimatepurposes
(suchasregulatorycompliance),orasrequiredbyapplicablelaw .
Toro'sCommitmenttoSecurityofY ourPersonalInformation
Wetakereasonableprecautionsinordertoprotectthesecurityofyourpersonalinformation.Wealsotakestepstomaintaintheaccuracyandcurrent
statusofpersonalinformation.
AccessandCorrectionofyourPersonalInformation
Ifyouwouldliketorevieworcorrectyourpersonalinformation,pleasecontactusbyemailatlegal@toro.com.
AustralianConsumerLaw
AustraliancustomerswillnddetailsrelatingtotheAustralianConsumerLaweitherinsidetheboxoratyourlocalT oroDealer.
374-0282RevC
 Loading...