

Page 1
PowerClear
G016241
ModelNo.38451—SerialNo.313000001andUp
ModelNo.38452—SerialNo.313000001andUp
®
621R/621ESnowthrower
FormNo.3373-698RevC
Operator'sManual
Introduction
Thismachineisintendedtobeusedbyresidential
homeownersorprofessional,hiredoperators.Itis
designedprimarilyforremovingsnowfrompaved
surfaces,suchasdrivewaysandsidewalks,andother
surfacesfortrafconresidentialorcommercial
properties.Itisnotdesignedforremovingmaterials
otherthansnow,norisitdesignedforclearingoffgravel
surfaces.
Readthisinformationcarefullytolearnhowtooperateand
maintainyourmachineproperlyandtoavoidinjuryand
machinedamage.Youareresponsibleforoperatingthe
machineproperlyandsafely.
YoumaycontactTorodirectlyatwww .Toro.comformachine
andaccessoryinformation,helpndingadealer,ortoregister
yourmachine.
Wheneveryouneedservice,genuineT oroparts,oradditional
information,contactanAuthorizedServiceDealerorToro
CustomerServiceandhavethemodelandserialnumbersof
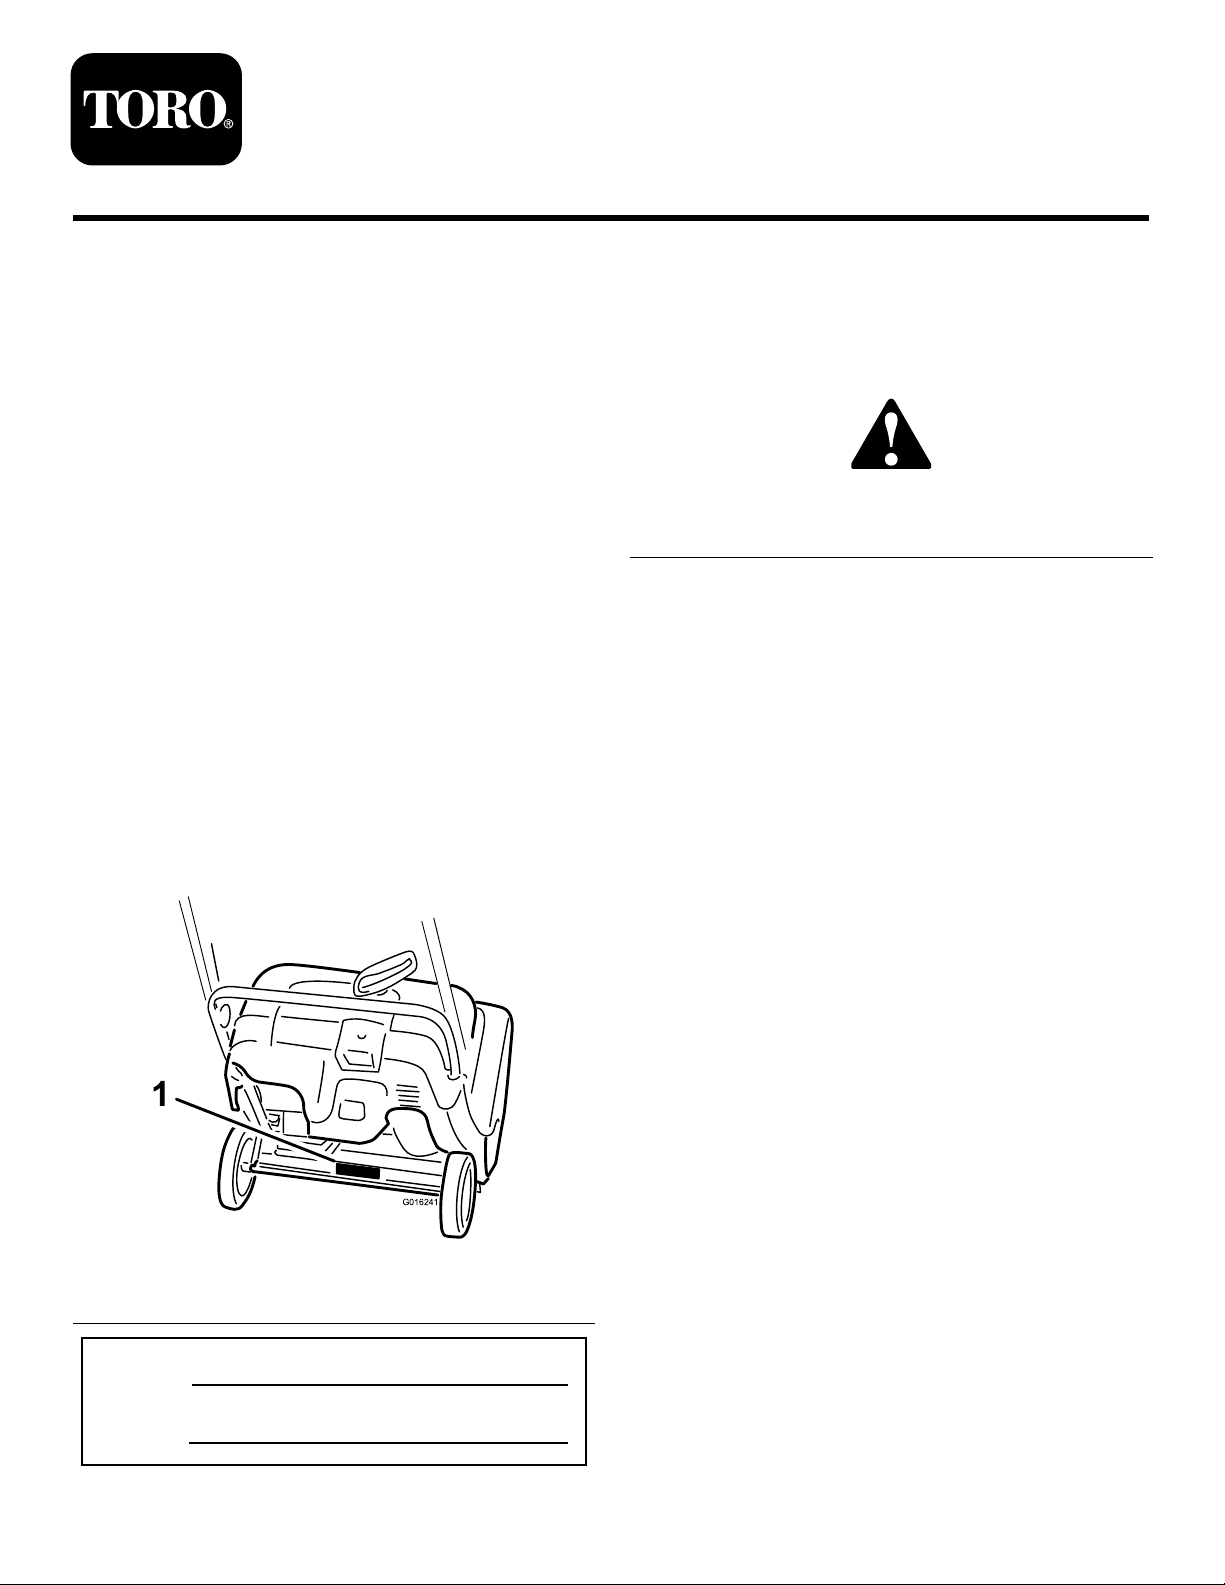
yourmachineready.Figure1identiesthelocationofthe
modelandserialnumbersonthemachine.Writethenumbers
inthespaceprovided.
Figure1
1.Modelandserialnumberlocation
ModelNo.
SerialNo.
Thismanualidentiespotentialhazardsandhassafety
messagesidentiedbythesafetyalertsymbol(Figure2),
whichsignalsahazardthatmaycauseseriousinjuryordeath
ifyoudonotfollowtherecommendedprecautions.
Figure2
1.Safetyalertsymbol
Thismanualuses2wordstohighlightinformation.
Importantcallsattentiontospecialmechanicalinformation
andNoteemphasizesgeneralinformationworthyofspecial
attention.
Contents
Introduction..................................................................1
Training.................................................................2
Preparation.............................................................2
Operation...............................................................2
ClearingaCloggedDischargeChute..........................3
MaintenanceandStorage..........................................3
ToroSnowthrowerSafety.........................................3
SafetyandInstructionalDecals.................................4
Setup............................................................................5
1UnfoldingtheHandle............................................5
2InstallingtheDischargeChute................................5
3FillingtheEnginewithOil......................................6
4AdjustingtheControlCable...................................7
ProductOverview..........................................................7
Operation.....................................................................7
FillingtheFuelTank................................................8
CheckingtheEngineOilLevel..................................8
StartingtheEngine..................................................8
EngagingtheRotorBlades.......................................10
DisengagingtheRotorBlades..................................10
StoppingtheEngine...............................................10
AdjustingtheDischargeChute.................................10
ClearingaCloggedDischargeChute.........................11
PreventingFreeze-upafterUse.................................11
OperatingTips......................................................11
Maintenance.................................................................12
RecommendedMaintenanceSchedule(s)......................12
AdjustingtheControlCable.....................................13
©2012—TheT oro®Company
8111LyndaleAvenueSouth
Bloomington,MN55420
Registeratwww.T oro.com.
OriginalInstructions(EN)
PrintedintheUSA
AllRightsReserved
*3373-698*C
Page 2

InspectingtheRotorBlades.....................................14
ChangingtheEngineOil.........................................14
ServicingtheSparkPlug..........................................15
ReplacingtheDriveBelt..........................................16
Storage........................................................................18
StoringtheSnowthrower.........................................18
Safety
Readandunderstandthecontentsofthismanualbefore
youstarttheengine.
Thesafetyalertsymbolshownin
alertyoutopotentialpersonalinjuryhazards.Obeyall
safetymessagesthatfollowthissymboltoavoidpossible
injuryordeath.
Improperlyusingormaintainingthismachinecould
resultininjuryordeath.Toreducethispotential,
complywiththefollowingsafetyinstructions.
Thismachineiscapableofamputatinghandsandfeet
andofthrowingobjects.Failuretoobservethefollowing
safetyinstructionscouldresultinseriousinjury.
Figure2isusedto
thisisnotpossible,thenrefuelsuchmachineryona
trailerwithaportablecontainer,ratherthanfroma
gasolinedispensernozzle.
–Keepthenozzleincontactwiththerimofthefuel
tankorcontaineropeningatalltimes,untilrefueling
iscomplete.Donotuseanozzlelock-opendevice.
–Replacegasolinecapsecurelyandwipeupspilledfuel.
–Iffuelisspilledonclothing,changeclothing
immediately.
•Useextensioncordsandreceptaclesasspeciedby
themanufacturerforallmachineswithelectricstarting
motors.
•Donotattempttoclearsnowfromagravelorcrushed
rocksurface.Thismachineisintendedforuseonlyon
pavedsurfaces.
•Neverattempttomakeanyadjustmentswhiletheengine
isrunning(exceptwhenspecicallyrecommendedby
manufacturer).
•Alwayswearsafetyglassesoreyeshieldsduringoperation
orwhileperforminganadjustmentorrepairtoprotect
eyesfromforeignobjectsthatmaybethrownfromthe
machine.
Training
•Read,understand,andfollowallinstructionsonthe
machineandinthemanual(s)beforeoperatingthis
machine.Bethoroughlyfamiliarwiththecontrolsand
theproperuseofthemachine.Knowhowtostopthe
machineanddisengagethecontrolsquickly.
•Neverallowchildrentooperatethemachine.Neverallow
adultstooperatethemachinewithoutproperinstruction.
•Keeptheareaofoperationclearofallpersons,particularly
smallchildren.
•Exercisecautiontoavoidslippingorfalling.
Preparation
•Thoroughlyinspecttheareawherethemachineistobe
usedandremovealldoormats,sleds,boards,wires,and
otherforeignobjects.
•Donotoperatethemachinewithoutwearingadequate
wintergarments.Avoidloosettingclothingthatcanget
caughtinmovingparts.W earfootwearthatwillimprove
footingonslipperysurfaces.
•Handlefuelwithcare;itishighlyammable.
–Useanapprovedfuelcontainer.
–Neveraddfueltoarunningengineorhotengine.
–Fillfueltankoutdoorswithextremecare.Neverll
fueltankindoors.
–Neverllcontainersinsideavehicleoronatruckor
trailerbedwithaplasticliner.Alwaysplacecontainers
ontheground,awayfromyourvehicle,beforelling.
–Whenpractical,removegas-poweredmachineryfrom
thetruckortrailerandrefuelitontheground.If
Operation
•Donotputhandsorfeetnearorunderrotatingparts.
Keepclearofthedischargeopeningatalltimes.
•Exerciseextremecautionwhenoperatingonorcrossing
graveldrives,walks,orroads.Stayalertforhidden
hazardsortrafc.
•Afterstrikingaforeignobject,stoptheengine,remove
theignitionkey ,thoroughlyinspectthemachineforany
damage,andrepairthedamagebeforerestartingand
operatingthemachine.
•Ifthemachineshouldstarttovibrateabnormally,stopthe
engineandcheckimmediatelyforthecause.Vibrationis
generallyawarningoftrouble.
•Stoptheenginewheneveryouleavetheoperating
position,beforeuncloggingtherotorbladehousing
ordischargechute,andwhenmakinganyrepairs,
adjustmentsorinspections.
•Whencleaning,repairing,orinspectingthemachine,stop
theengineandmakecertainthattherotorbladesandall
movingpartshavestopped.
•Donotruntheengineindoors,exceptwhenstarting
theengineandfortransportingthemachineinorout
ofthebuilding.Opentheoutsidedoors;exhaustfumes
aredangerous.
•Exerciseextremecautionwhenoperatingonslopes.
•Neveroperatethemachinewithoutproperguardsand
othersafetyprotectivedevicesinplaceandworking.
•Neverdirectthedischargetowardpeopleorareaswhere
propertydamagecanoccur.Keepchildrenandothers
away.
2
Page 3

•Donotoverloadthemachinecapacitybyattemptingto
clearsnowattoofastarate.
•Lookbehindandusecarewhenbackingupwiththe
machine.
•Disengagepowertotherotorbladeswhenmachineis
transportedornotinuse.
•Neveroperatethemachinewithoutgoodvisibilityor
light.Alwaysbesureofyourfooting,andkeeparm
holdonthehandles.Walk;neverrun.
•Nevertouchahotengineormufer(
Figure3
1.Symbolstampedontheexhaustbafeindicatingahot
surface.
Figure3).
ToroSnowthrowerSafety
ThefollowinglistcontainssafetyinformationspecictoToro
productsorothersafetyinformationthatyoumustknow .
•Rotatingrotorbladescaninjurengersorhands.
Staybehindthehandlesandawayfromthedischarge
openingwhileoperatingthemachine.Keepyourface,
hands,feet,andanyotherpartofyourbodyor
clothingawayfrommovingorrotatingparts.
•Beforeadjusting,cleaning,repairing,andinspectingthe
machine,andbeforeuncloggingthedischargechute,stop
theengine,removethekey,andwaitforallmoving
partstostop.
•Beforeleavingtheoperatingposition,stoptheengine,
removetheignitionkey,andwaitforallmovingpartsto
stop.
•Ifashield,safetydevice,ordecalisdamaged,illegible,or
lost,repairorreplaceitbeforebeginningoperation.Also,
tightenanyloosefasteners.
•Donotsmokewhilehandlinggasoline.
•Donotusethemachineonaroof.
ClearingaCloggedDischarge Chute
Handcontactwiththerotatingrotorbladesinsidethe
dischargechuteisthemostcommoncauseofinjury
associatedwithsnowthrowers.Neveruseyourhandtoclean
outthedischargechute.
Toclearthechute:
•Shuttheengineoff!
•Wait10secondstobesuretherotorbladeshavestopped
rotating.
•Alwaysuseaclean-outtool,notyourhands.
MaintenanceandStorage
•Checkallfastenersatfrequentintervalsforproper
tightnesstobesurethemachineisinsafeworking
condition.
•Neverstorethemachinewithfuelinthefueltankinsidea
buildingwhereignitionsourcesarepresent,suchashot
waterheaters,spaceheaters,orclothesdryers.Allowthe
enginetocoolbeforestoringinanyenclosure.
•Donottouchtheenginewhileitisrunningorsoonafter
ithasstoppedbecausetheenginemaybehotenoughto
causeaburn.
•Performonlythosemaintenanceinstructionsdescribedin
thismanual.Beforeperforminganymaintenance,service,
oradjustment,stoptheengineandremovethekey .If
majorrepairsareeverneeded,contactanAuthorized
ServiceDealer.
•Donotchangethegovernorsettingsontheengine.
•Whenstoringthemachineformorethan30days,drain
thefuelfromthefueltanktopreventapotentialhazard.
Storefuelinanapprovedfuelcontainer.Removethekey
fromtheignitionswitchbeforestoringthemachine.
•PurchaseonlygenuineTororeplacementpartsand
accessories.
•AlwaysrefertotheOperator’ sManualforimportantdetails
ifthemachineistobestoredforanextendedperiod.
•Maintainorreplacesafetyandinstructionlabels,as
necessary.
•Runthemachineafewminutesafterthrowingsnowto
preventfreeze-upoftherotorblades.
3
Page 4
SafetyandInstructionalDecals
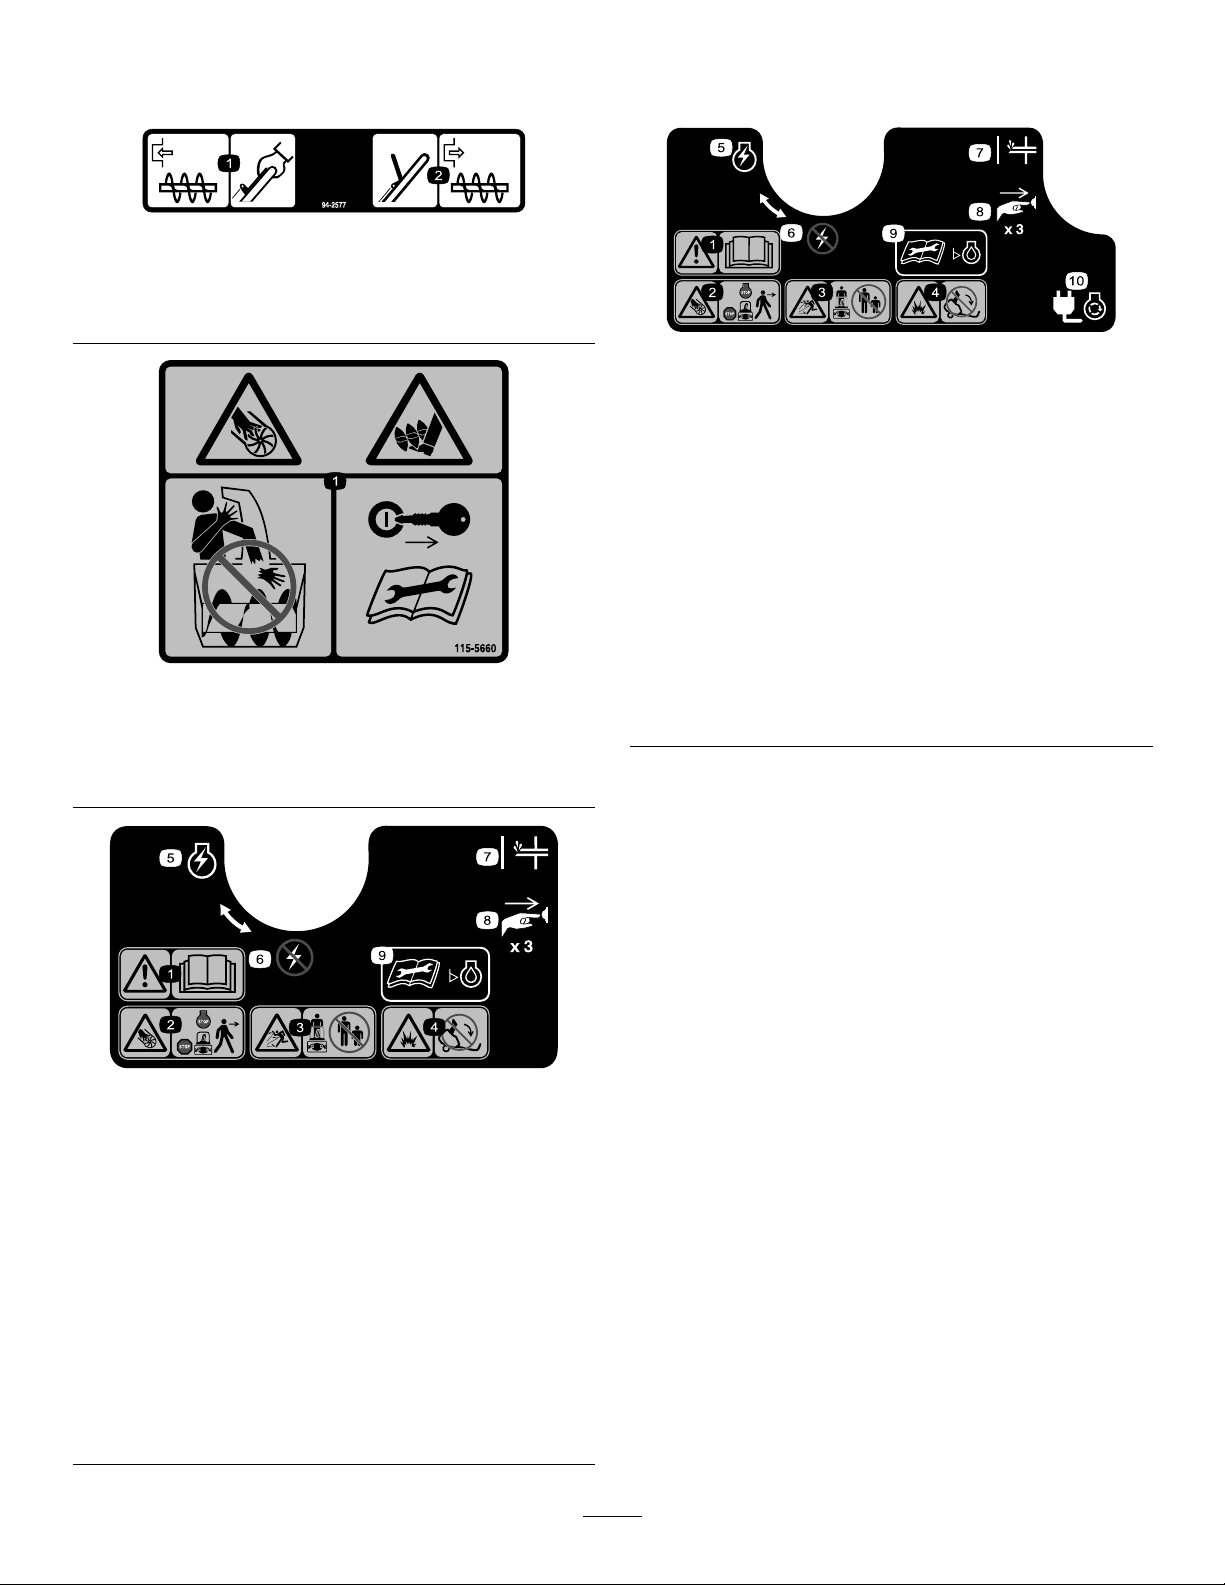
Important:Safetyandinstructiondecalsarelocatednearareasofpotentialdanger.Replacedamageddecals.
94-2577
1.Toengagetherotorblades,holdthecontrolbaragainst
thehandle.
2.Todisengagetherotorblades,releasethecontrolbar.
117-9103(Model38452only)
Orderpartno.117-6046
115-5660
1.Cuttingdismembermenthazards,impellerandauger—do
notplaceyourhandinthechute;removetheignitionkey
andreadtheinstructionsbeforeservicingorperforming
maintenance.
1.Warning—readthe
Operator'sManual.
2.Cutting/dismemberment
hazard,impeller—stopthe
enginebeforeleavingthe
machine.
3.Thrownobject
hazard—keepbystanders
asafedistancefromthe
machine.
4.Fuelspillhazard—donot
tipmachinebackward.
5.EngineswitchOn
6.EngineswitchOff
7.Primer
8.Pushtheprimerthree
timestoprimetheengine.
9.ReadtheOperator's
Manualbeforechecking
engineoillevel.
10.Plugthemachineinto
powertheelectricstarter.
117-9102(Model38451only)
Orderpartno.117-6036
1.Warning—readthe
Operator'sManual.
2.Cutting/dismemberment
hazard,impeller—stopthe
enginebeforeleavingthe
machine.
3.Thrownobject
hazard—keepbystanders
asafedistancefromthe
machine.
4.Fuelspillhazard—donot
tipmachinebackward.
5.EngineswitchOn
6.EngineswitchOff
7.Primer
8.Pushtheprimerthree
timestoprimetheengine.
9.ReadtheOperator's
Manualbeforechecking
engineoillevel.
4
Page 5
Setup
G016242
LooseParts
Usethechartbelowtoverifythatallpartshavebeenshipped.
ProcedureDescription
1
2
Nopartsrequired
Dischargechute1
Chutehandle
Phillipsheadbolts3
Washers3
Locknuts3
1
UnfoldingtheHandle
NoPartsRequired
Procedure
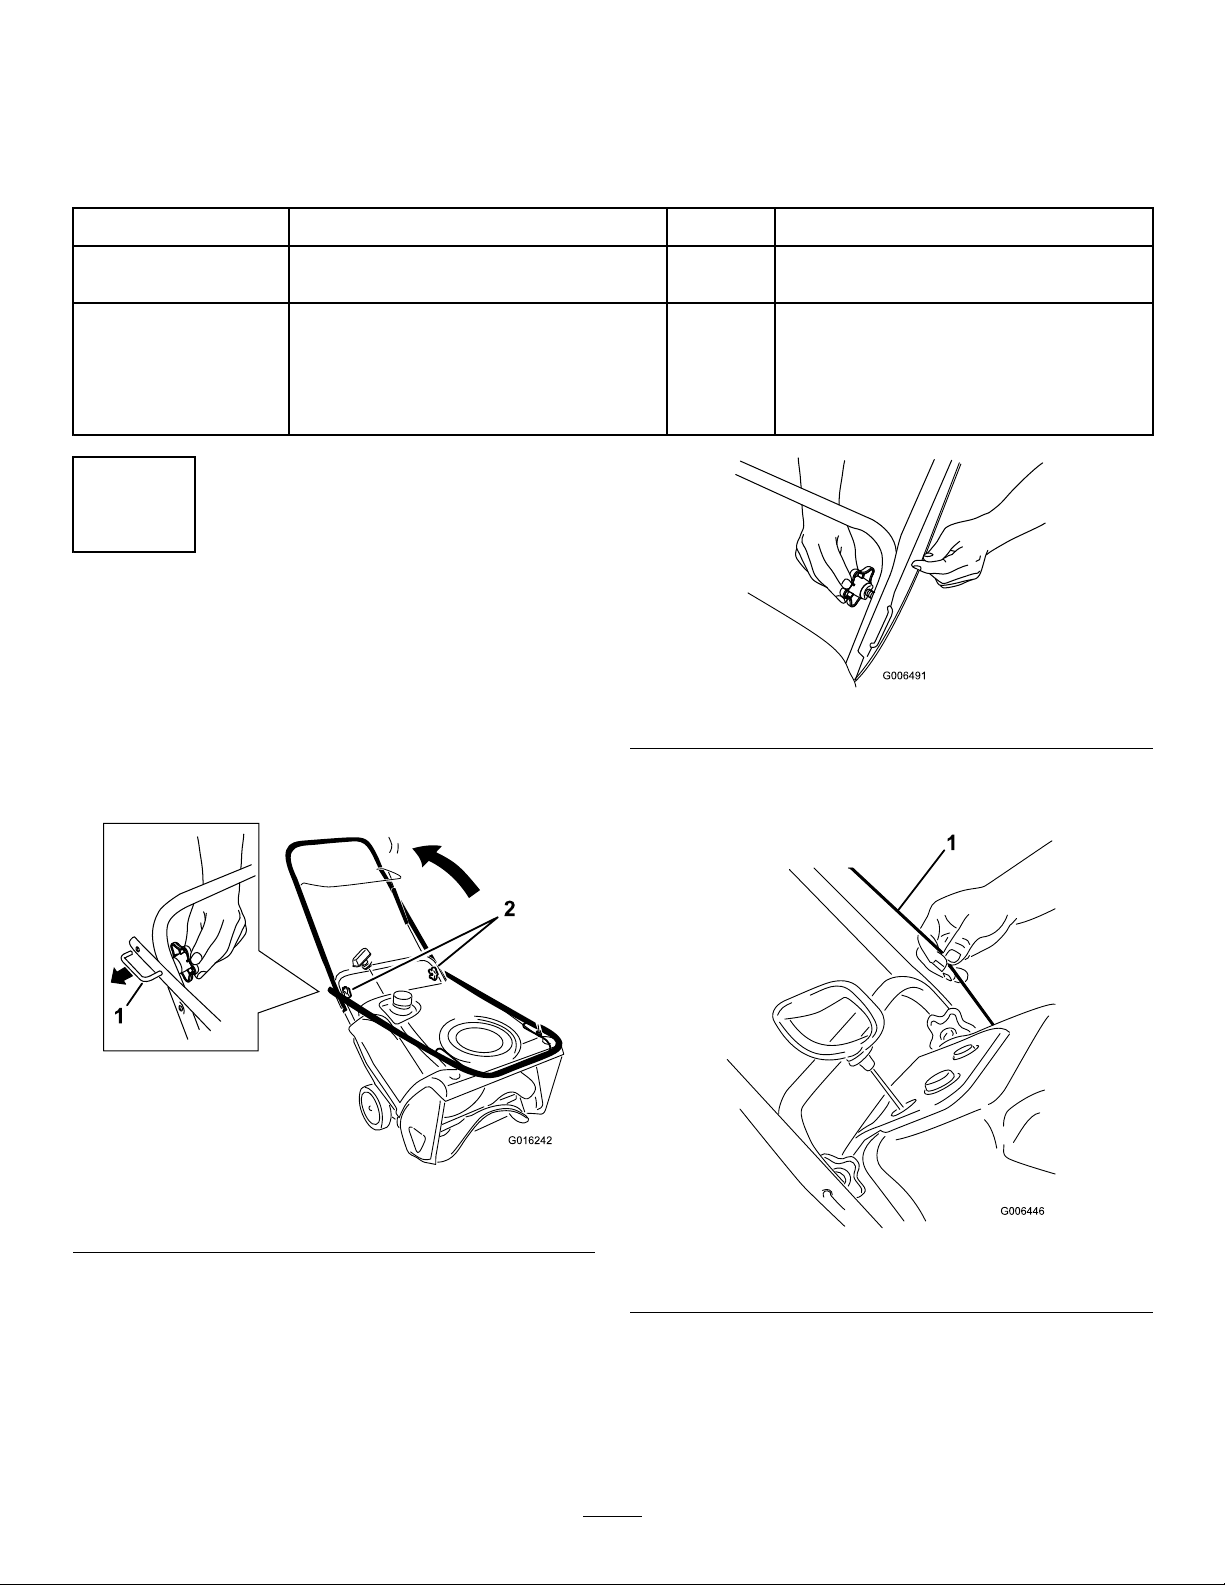
1.Loosenthehandleknobs,pulloutthe“U”-shaped
handlelocksuntilyoucanmovethehandlefreely,and
rotatethehandletotheoperatingposition(Figure4).
Qty.
–
1
Important:Ensurethatyoudonotpinchorkink
thecontrolcable(Figure6).
Unfoldthehandle.
Installthedischargechute.
Figure5
Use
Figure4
1.“U”-shapedhandlelock(2)
2.Inserttheendofthe“U”-shapedhandlelockintothe
openholeinthehandleandtightenthehandleknobs
untiltheyaresnug(Figure5).
2.Handleknobs
Figure6
1.Controlcable
5
Page 6
2
3
InstallingtheDischargeChute
Partsneededforthisprocedure:
1Dischargechute
1
Chutehandle
3Phillipsheadbolts
3Washers
3Locknuts
Procedure
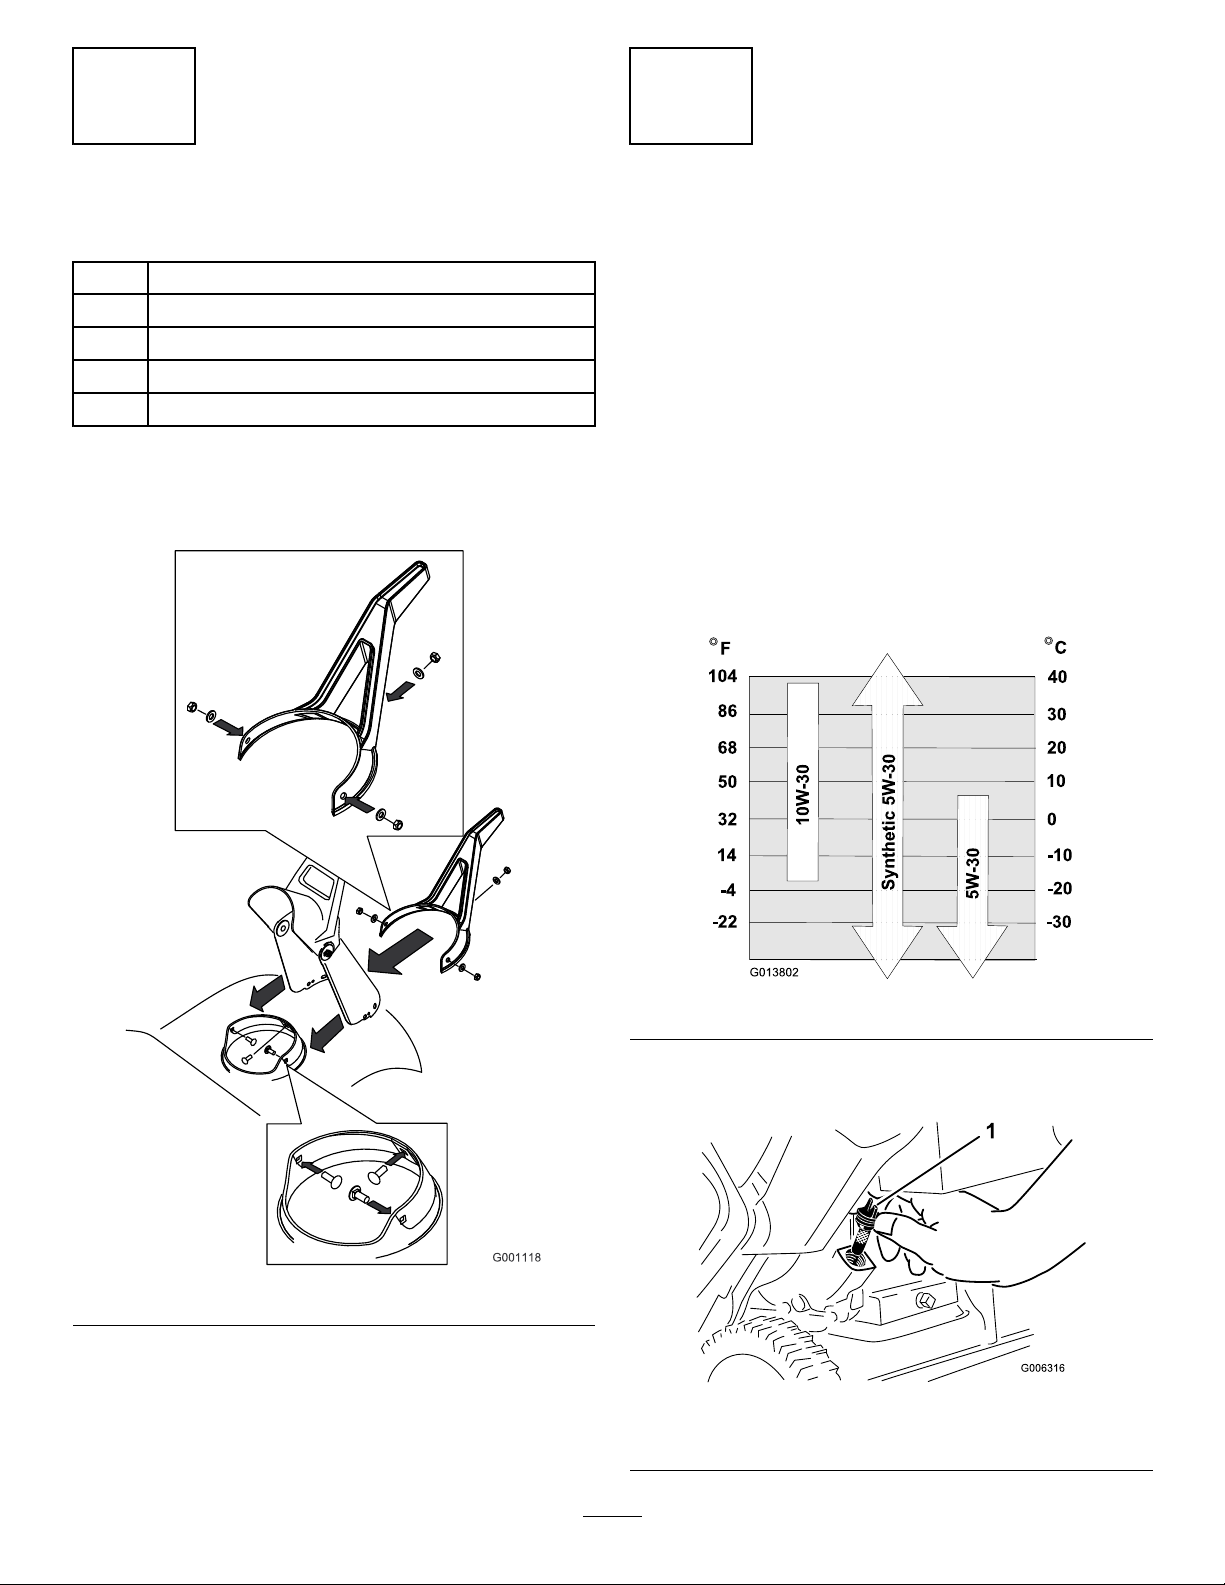
Installthedischargechuteasshown(Figure7).
FillingtheEnginewithOil
NoPartsRequired
Procedure
Yourmachinedoesnotcomewithoilintheengine,butit
doescomewithabottleofoil.
Important:Beforestartingtheengine,lltheengine
withoil.
Note:Thebottleofoilmaycontainanounceortwomore
thantheenginerequires.Donotoverllorunderllthe
engine.
Maxll:20oz.(0.6l),type:automotivedetergentoilwithan
APIserviceclassicationofSJ,SL,orhigher.
Figure8belowtoselectthebestoilviscosityforthe
Use
outdoortemperaturerangeexpected:
Figure7
Figure8
1.Movethemachinetoalevelsurface.
2.Cleanaroundtheoilllcap(
Figure9
1.Oilllcap
6
Figure9).
Page 7
3.Unscrewtheoilllcapandremoveit.
1
2
G016243
4.Withthemachineintheoperatingposition,carefully
pouroilintothecrankcase.Wait3minutesfortheoil
tosettleandaddenoughtobringittothepointof
overow .Thereshouldbeverylittle,ifany,oilleftin
thebottle.
Note:Youmaytipthemachineforward(handleup)
tomakeaddingoileasier.Remembertoreturnthe
machinetotheoperatingpositionbeforecheckingthe
oillevel.
Important:Donottipthemachinealltheway
forwardontoitsnose,orfuelmayleakoutofthe
machine.
5.Screwtheoilllcapintotheoilllholeandtightenit
securely.
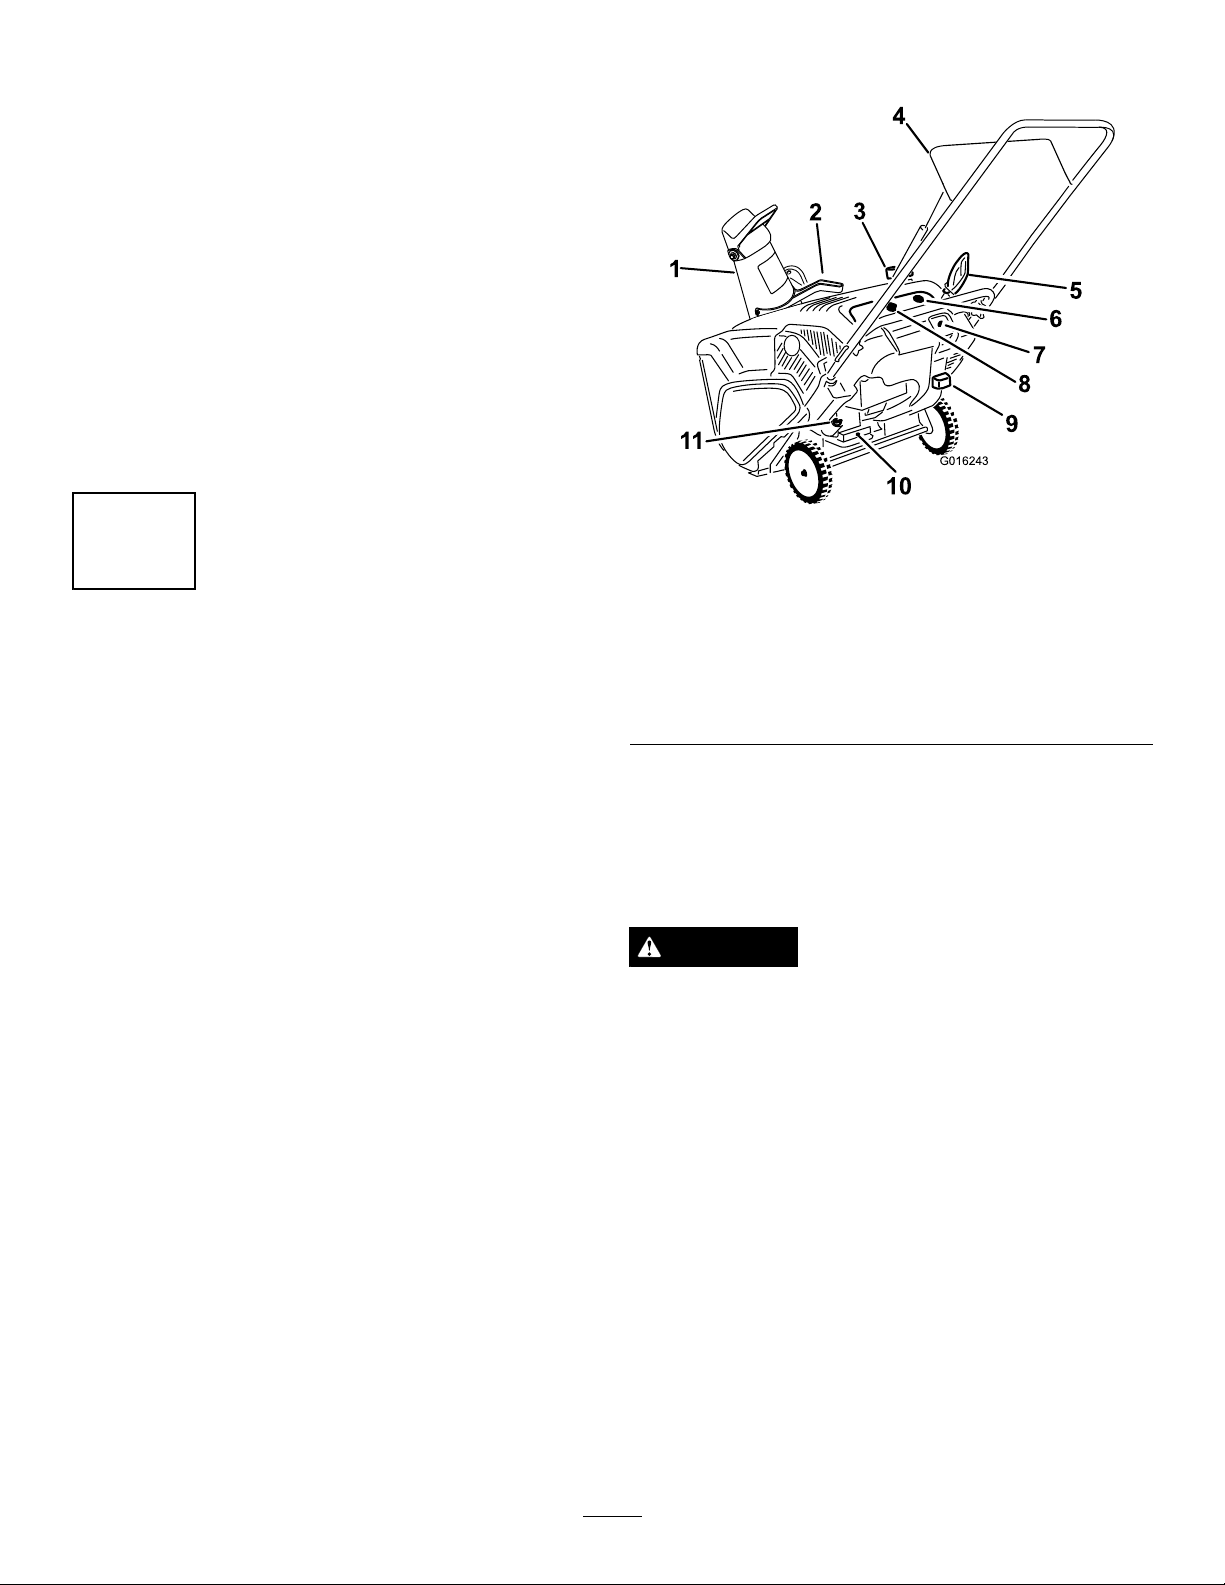
ProductOverview
Figure10
4
AdjustingtheControlCable
NoPartsRequired
Procedure
RefertoAdjustingtheControlCableinMaintenance.
1.Dischargechute7.Electric-startbutton
2.Dischargechutehandle8.Ignitionkey
3.Fueltankcap
4.Controlbar10.Oildrainplug
5.Recoilstarthandle
6.Primer
(model38452only)
9.Chokelever
11.Oilllcap
Operation
Note:Determinetheleftandrightsidesofthemachine
fromthenormaloperatingposition.
DANGER
Gasolineisextremelyammableandexplosive.A
reorexplosionfromgasolinecanburnyouand
others.
•Topreventastaticchargefromignitingthe
gasoline,placethecontainerand/ormachine
onthegroundbeforelling,notinavehicleor
onanobject.
•Fillthetankoutdoorswhentheengineiscold.
Wipeupspills.
•Donothandlegasolinewhensmokingoraround
anopenameorsparks.
•Storegasolineinanapprovedfuelcontainer,out
ofthereachofchildren.
•Donottipthemachinebackwardwithfuelin
thefueltank;otherwise,fuelmayleakoutof
themachine.
7
Page 8
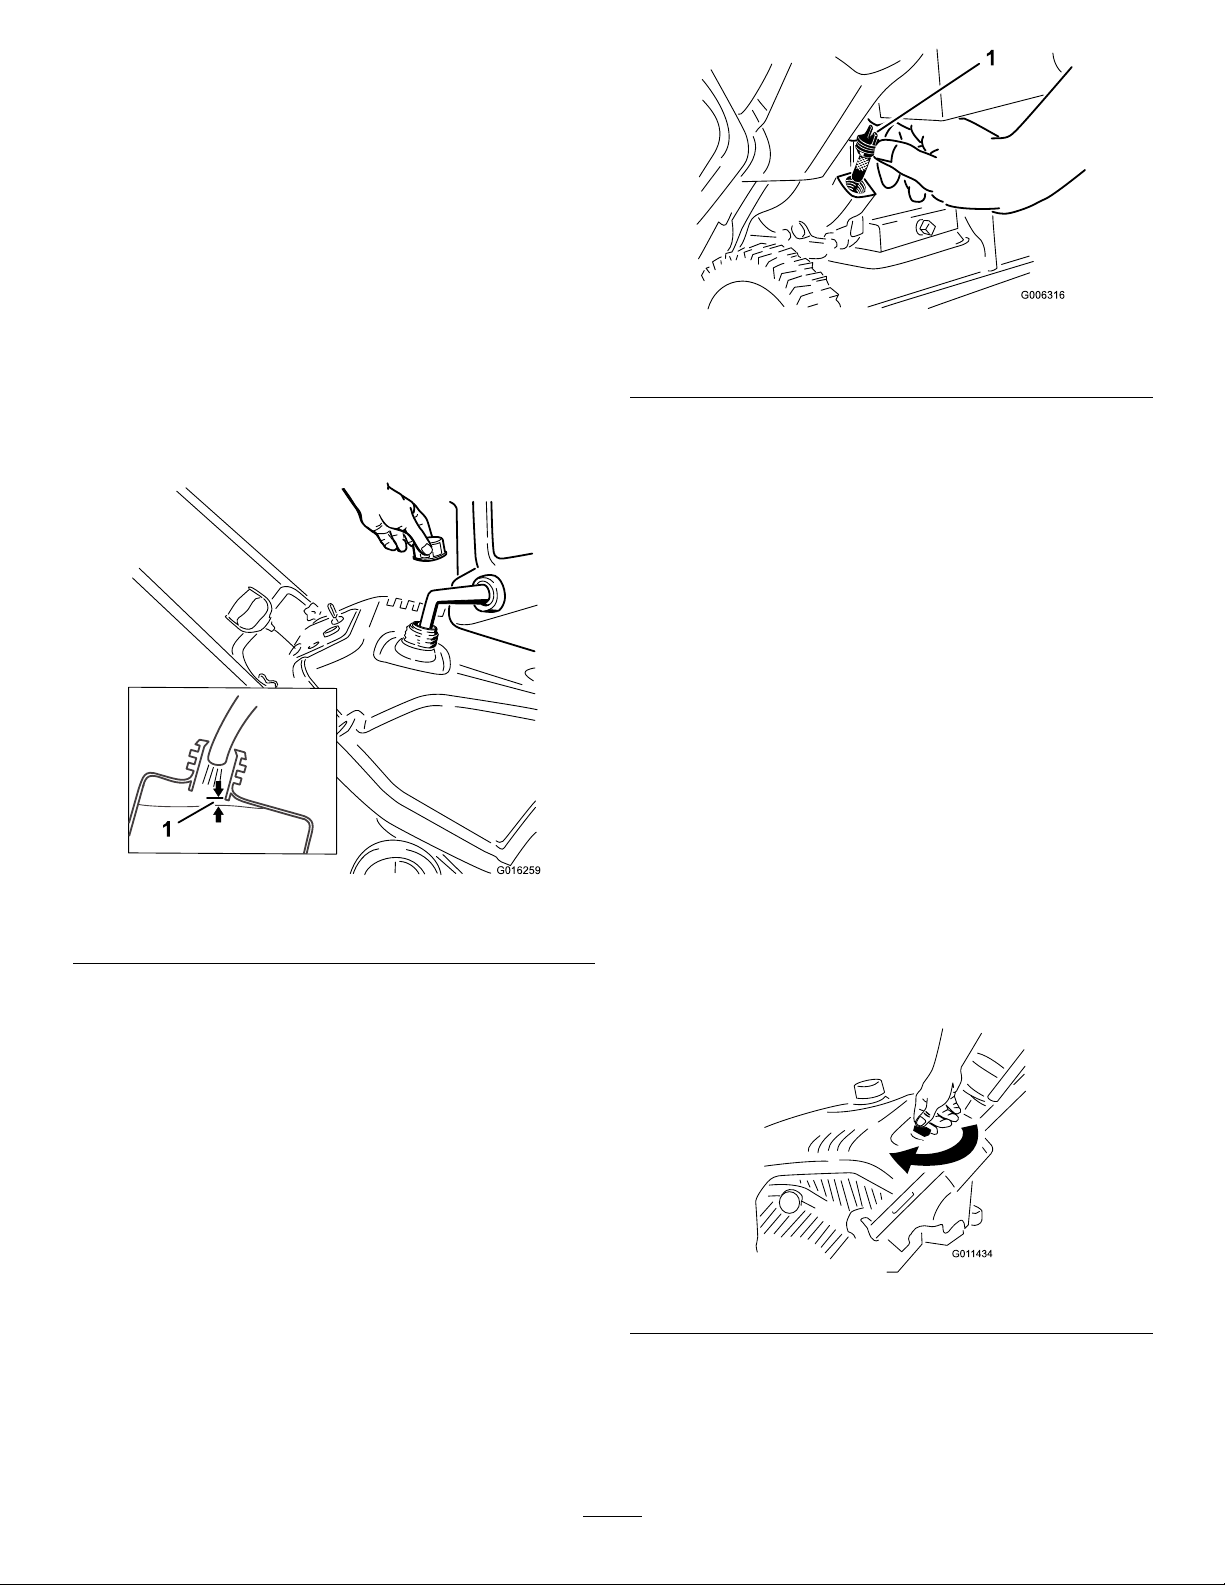
FillingtheFuelTank
G016259
•Forbestresults,useonlyclean,fresh,unleadedgasoline
withanoctaneratingof87orhigher((R+M)/2rating
method).
•Oxygenatedfuelwithupto10%ethanolor15%MTBE
byvolumeisacceptable.
•DoNotuseethanolblendsofgasoline(suchasE15
orE85)withmorethan10%ethanolbyvolume.
Performanceproblemsand/orenginedamagemayresult
whichmaynotbecoveredunderwarranty.
•DoNotusegasolinecontainingmethanol.
•DoNotstorefueleitherinthefueltankorfuelcontainers
overthewinterunlessafuelstabilizerisused.
•DoNotaddoiltogasoline.
Figure12
1.Oilllcap
3.Unscrewtheoilllcapandremoveit.
4.Iftheoillevelislow,keepthemachineintheoperating
positionandcarefullypouroilintothecrankcase
untilthepointofoverow .Wait3minutesfortheoil
tosettleandaddenoughtobringittothepointof
overow .(Max.ll:20oz.(0.6l),type:automotive
detergentoilwithanAPIserviceclassicationofSJ,
SL,orhigher.)
Figure11
1.1/4inch(6mm)
Note:Forbestresults,purchaseonlythequantityofgasoline
thatyouexpecttousein30days.Otherwise,youmayadd
fuelstabilizertonewlypurchasedgasolinetokeepitfreshfor
upto6months.
CheckingtheEngineOilLevel
ServiceInterval:Beforeeachuseordaily—Checktheengine
oillevelandaddoilifnecessary.
Note:Youmaytipthemachineforward(handleup)
tomakeaddingoileasier.Remembertoreturnthe
machinetotheoperatingpositionbeforecheckingthe
oillevel.
Important:Donottipthemachinealltheway
forwardontoitsnose,orfuelmayleakoutofthe
machine.
5.Screwtheoilllcapintotheoilllholeandhand
tightenitsecurely.
StartingtheEngine
1.TurntheignitionkeyclockwisetotheOnposition
(
Figure13).
1.Movethemachinetoalevelsurface.
2.Cleanaroundtheoilllcap(Figure12).
Figure13
2.Pulloutthechokelever(Figure14andFigure15).
8
Page 9

Figure14
Figure17
1.Chokelever
Figure15
1.Symbolsonthechokeleverindicatingtomovethechoke
levertotherighttoactivatethechoke.
3.Firmlypushintheprimer3timeswithyourthumb,
holdingtheprimerinaforasecondbeforereleasingit
eachtime(Figure16).
Note:UseonlyaUL-listed,16-gaugeextensioncord
recommendedforoutdoorusethatisnotlongerthan
50feet(15m).
WARNING
Theelectricalcordcanbecomedamaged,
causingashockorre.
Thoroughlyinspecttheelectricalcordbefore
pluggingitintoapowersource.Ifthe
cordisdamaged,donotuseittostartthe
machine.Replaceorrepairthedamagedcord
immediately.ContactanAuthorizedService
Dealerforassistance.
Figure16
Note:Removeyourglovewhenyoupushinthe
primersothataircannotescapefromtheprimerhole.
Important:Donotusetheprimerorthechokeif
theenginehasbeenrunningandishot.Excessive
primingmayoodtheengineandpreventitfrom
starting.
4.Connectanextensioncordtoapowersourceandthe
machine,andpushtheelectric-startbutton(model
38452only)(
Figure17),orpulltherecoilstarthandle
(Figure18).
Figure18
Important:Runtheelectricstarternomore
than10timesatintervalsof5secondson,then
5secondsoff.Runningtheelectricstarter
extensivelycanoverheatanddamageit.Ifthe
enginedoesnotstartafterthisseriesofattempts,
waitatleast40minutestoallowthestartertocool
beforeattemptingtostartitagain.Iftheengine
doesnotstartafterthesecondseriesofattempts,
takethemachinetoanAuthorizedServiceDealer
forservice(model38452only).
9
Page 10

Note:Ifyoupulltherecoilhandleandfeelno
resistance,thestartermaybefrozen.Thawoutthe
starterbeforeattemptingtostartthemachine.
5.Whiletheengineisrunning,pushinthechokelever
slowly.
6.Unplugtheextensioncordfromthepowersourceand
themachine(model38452only).
CAUTION
Ifyouleavethemachinepluggedintoapower
source,someonecaninadvertentlystartthe
machineandinjurepeopleordamageproperty
(model38452only).
Unplugthepowercordwheneveryouarenot
startingthemachine.
EngagingtheRotorBlades
DisengagingtheRotorBlades
Todisengagetherotorblades,releasethecontrolbar
(Figure20).
Figure20
Toengagetherotorblades,holdthecontrolbaragainstthe
handle(Figure19).
Figure19
1.Controlbar
StoppingtheEngine
Tostoptheengine,turntheignitionkeycounterclockwiseto
theOffposition(Figure21).
Figure21
AdjustingtheDischargeChute
Toadjustthedischargechute,movethechutehandleandthe
chutedeectorhandleasshown(Figure22).
10
Page 11

Figure22
G0 16 29 7
1
2
G016654
3
4
1.Chutehandle2.Chutedeectorhandle
ClearingaCloggedDischarge Chute
Important:Handcontactwiththerotatingrotorblades
insidethedischargechuteisthemostcommoncauseof
injuryassociatedwithsnowthrowers.Neveruseyour
handtocleanoutthedischargechute.
PreventingFreeze-upafterUse
•Lettheenginerunforafewminutestopreventmoving
partsfromfreezing.Stoptheengine,waitforallmoving
partstostop,andremoveiceandsnowfromthemachine.
•Cleanoffanysnowandicefromthebaseofthechute.
•Rotatethedischargechuteleftandrighttofreeitfrom
anyicebuildup.
•WiththeignitionkeyintheOffposition,pulltherecoil
starterhandleseveraltimesorconnecttheelectricalcord
toapowersourceandthemachineandpushtheelectric
startbuttononcetopreventtherecoilstarterand/orthe
electricstarterfromfreezingup.
•Insnowyandcoldconditions,somecontrolsandmoving
partsmayfreeze.Donotuseexcessiveforcewhen
tryingtooperatefrozencontrols.Ifyouhavedifculty
operatinganycontrolorpart,starttheengineandletit
runforafewminutes.
Toclearthechute:
•Shuttheengineoff!
•Wait10secondstobesuretherotorbladeshavestopped
rotating.
•Alwaysuseaclean-outtool,notyourhands(
Figure23).
Figure24
OperatingTips
WARNING
Therotorbladescanthrowstones,toys,andother
foreignobjectsandcauseseriouspersonalinjuryto
theoperatorortobystanders.
Figure23
•Keeptheareatobeclearedfreeofallobjects
thattherotorbladescouldpickupandthrow.
•Keepallchildrenandpetsawayfromthearea
ofoperation.
•Removethesnowassoonaspossibleafteritfalls.
11
Page 12

•Ifthemachinedoesnotpropelitselfforwardonslippery
surfacesorinheavysnow,pushforwardonthehandle,
butallowthemachinetoworkatitsownpace.
•Overlapeachswathtoensurecompletesnowremoval.
•Dischargethesnowdownwindwheneverpossible.
Maintenance
Note:Determinetheleftandrightsidesofthemachinefromthenormaloperatingposition.
RecommendedMaintenanceSchedule(s)
MaintenanceService
Interval
Afterthersthour
Aftertherst2hours
Beforeeachuseordaily
Yearly
Yearlyorbeforestorage
MaintenanceProcedure
•Checkthecontrolcableandadjustitifnecessary.
•Checkforloosefastenersandtightenthemifnecessary.
•Changetheengineoil.
•Checktheengineoillevelandaddoilifnecessary.
•Checkthecontrolcableandadjustitifnecessary.
•InspecttherotorbladesandhaveanAuthorizedServiceDealerreplacetherotor
bladesandscraperifnecessary.
•Changetheengineoil.
•Checkthesparkplugandreplaceitifnecessary.
•Checkforloosefastenersandtightenthemifnecessary.
•HaveanAuthorizedServiceDealerinspectthedrivebeltandreplaceitifnecessary.
•Preparethemachineforstorage.
12
Page 13
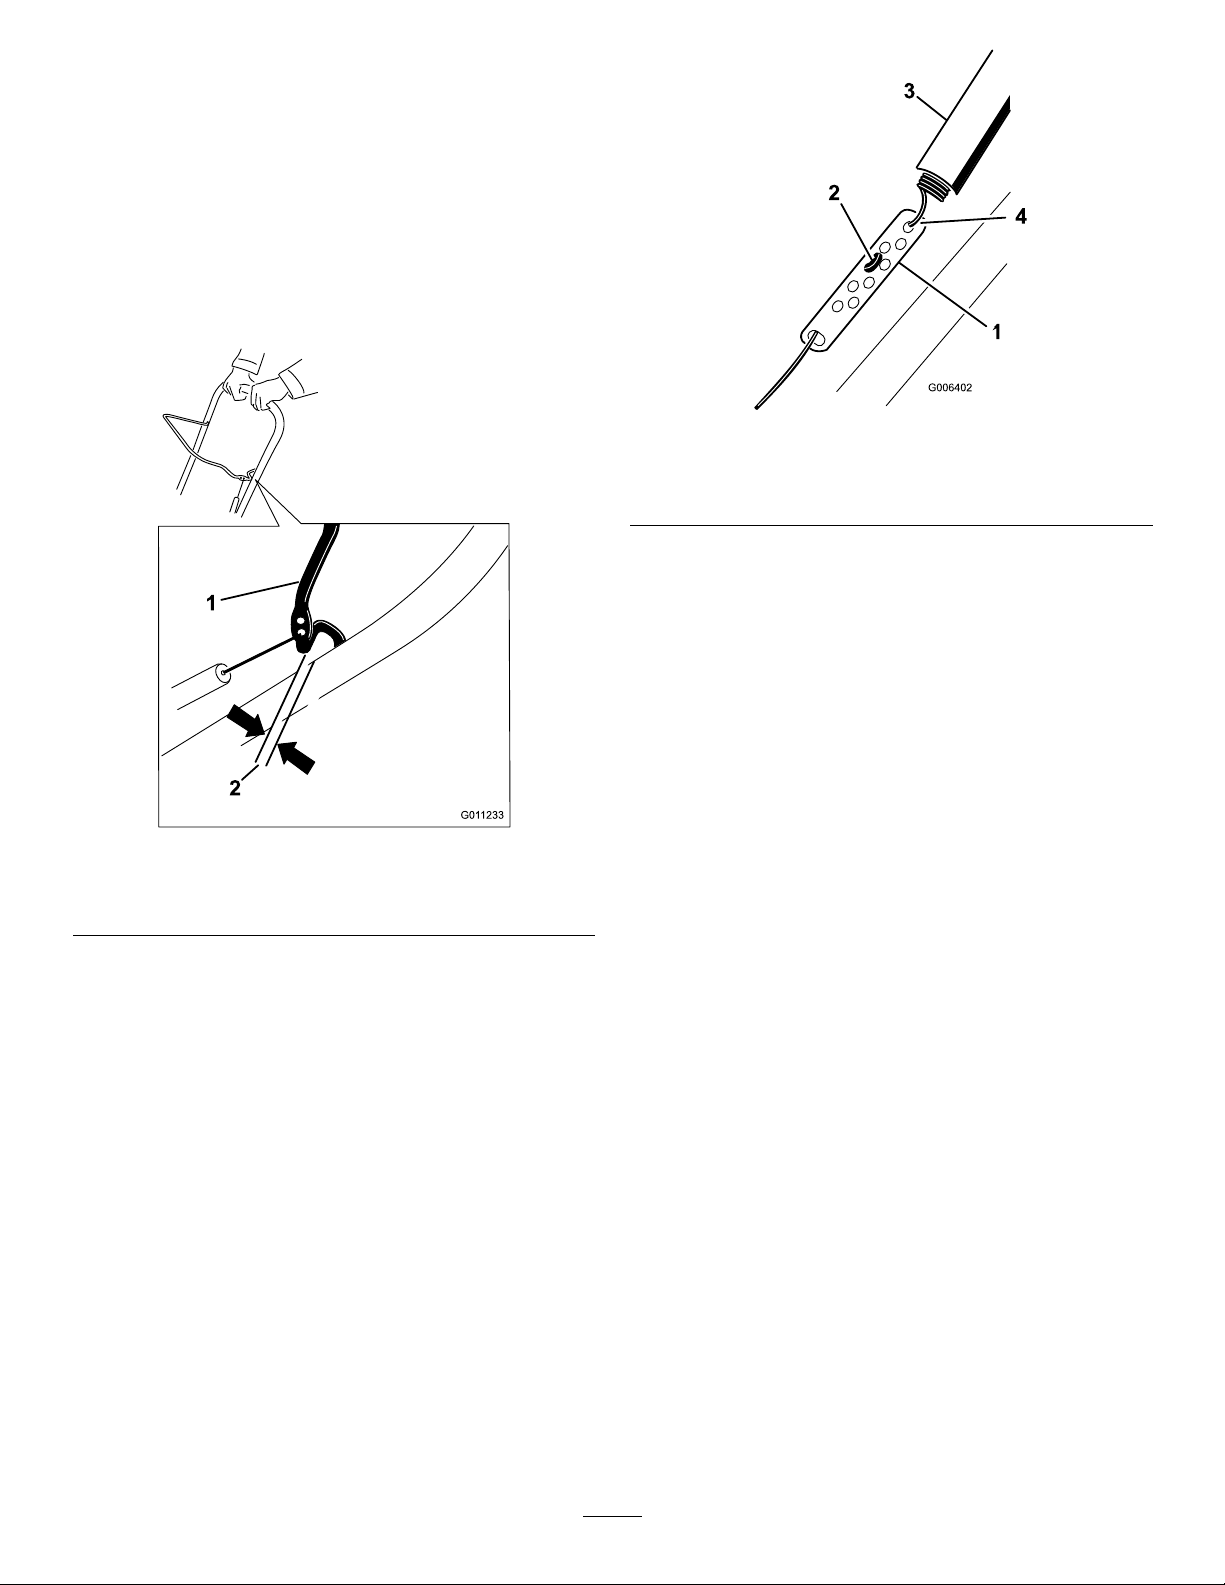
AdjustingtheControlCable
CheckingtheControlCable
ServiceInterval:Afterthersthour—Checkthecontrol
cableandadjustitifnecessary.
Yearly—Checkthecontrolcableandadjustitif
necessary.
Movethecontrolbarbacktowardthehandletoremovethe
slackinthecontrolcable(Figure25).
Figure26
Figure25
1.Controlbar2.1/16-inchto1/8-inch(2
mmto3mm)gap
Note:Ensurethata1/16-inchto1/8-inch(2mmto3mm)
gapexistsbetweenthecontrolbarandthehandle(Figure25).
Important:Thecontrolcablemustcontainsomeslack
whenyoudisengagethecontrolbarfortherotorblades
tostopproperly.
1.Adjusterlink
2.Z-tting
3.Springcover
4.Unhookthespringhere.
Note:Youcanpulluptheadjusterlinkandcableto
makeunhookingthespringeasier.
2.MovetheZ-ttingtoahigherorlowerholeonthe
adjusterlinkasneededtoobtainthe1/16-inchto
1/8-inch(2mmto3mm)gapbetweenthecontrolbar
andthehandle(Figure26).
Note:MovingtheZ-ttinghigherdecreasesthegap
betweenthecontrolbarandthehandle;movingit
lowerincreasesthegap.
3.Hookthespringtotheadjusterlinkandslidethespring
coverovertheadjusterlink.
4.Checktheadjustment;refertoCheckingtheControl
Cable.
Note:Afterextendeduse,thedrivebeltmaywear
andloseitsproperbelttension.Ifthedrivebeltslips
(continuouslysqueals)underaheavyload,disconnect
thespringfromtheadjustorlinkandmovetheupper
endofthespringtotheholethatisfurtherfrom
thepivotpointinthecontrolbar(Figure27).Then
connectthespringtotheadjustorlinkandadjustthe
controlcable.
AdjustingtheControlCable
1.Slideupthespringcoverandunhookthespringfrom
theadjusterlink(Figure26).
13
Page 14

Figure27
ChangingtheEngineOil
ServiceInterval:Aftertherst2hours
Yearly
Runtheengineafewminutesbeforechangingtheoiltowarm
it.Warmoilowsbetterandcarriesmorecontaminants.
1.Siphonthefuelfromthefueltankintoanapproved
fuelcontainer,orruntheengineuntilitstops.
2.Movethemachinetoalevelsurface.
3.Placeanoildrainpanundertheoildrainplug,remove
theoildrainplug,andtipthemachinebackwardand
draintheusedoilintheoildrainpanFigure29).
1.Upperendofspring
2.Inserttheupperendof
springintothishole
3.Pivotpoint
4.Removetheupperendof
springfromthishole
Note:Thebeltmayslip(squeal)inwetconditions;
todryoutthedrivesystem,starttherotorandrunit
withoutaloadfor30seconds.
InspectingtheRotorBlades
ServiceInterval:Y early—Inspecttherotorbladesandhave
anAuthorizedServiceDealerreplacethe
rotorbladesandscraperifnecessary.
Beforeeachsession,inspecttherotorbladesforwear.When
arotorbladeedgehasworndowntothewearindicatorhole,
haveanAuthorizedServiceDealerreplacetherotorblades
andthescraper(Figure28).
Figure29
4.Afterdrainingtheusedoil,returnthemachinetothe
operatingposition.
5.Installtheoildrainplugandtightenitsecurely .
6.Cleanaroundtheoilllcap(Figure30).
Figure30
1.Oilllcap
1.Thewearindicatorholeis
intact;youdonotneedto
replacetherotorblades.
Figure28
2.Thewearindicatorholeis
exposed;replacetherotor
blades.
7.Unscrewtheoilllcapandremoveit(Figure30).
8.Withthemachineintheoperatingposition,carefully
pouroilintotheoilllhole.Wait3minutesforthe
oiltosettleandaddenoughtobringittothepointof
overow .Thereshouldbeverylittle,ifany,oilleftin
thebottle.(Figure32).
Note:Youmaytipthemachineforward(handleup)
tomakeaddingoileasier.Remembertoreturnthe
machinetotheoperatingpositionbeforecheckingthe
oillevel.
Important:Donottipthemachinealltheway
forwardontoitsnose,orfuelmayleakoutofthe
machine.
14
Page 15

Maxll:20oz.(0.6l),type:automotivedetergentoil
G016327
withanAPIserviceclassicationofSJ,SL,orhigher.
UseFigure31belowtoselectthebestoilviscosityfor
theoutdoortemperaturerangeexpected:
Figure31
Figure32
9.Screwtheoilllcapintotheoilllhole,andhand
tightenitsecurely.
10.Wipeupanyspilledoil.
11.Disposeoftheusedoilproperlyatalocalrecycling
center.
ServicingtheSparkPlug
ServiceInterval:Y early—Checkthesparkplugandreplace
itifnecessary.
UseaNGKBPR6ESorChampionRN9YCsparkplug
orequivalent.
1.Stoptheengineandwaitforallmovingpartstostop.
Figure33
4.Removethe4screwsthatsecuretheshroud(Figure34).
2.Rotatethedischargechutesothatitfacesforward.
3.Removethedischargechutebyremovingthethree
screwsholdingthechute,andthescrewsholdingthe
chuteseal(Figure33).
15
Page 16

13.Connectthewiretothesparkplug.
Note:Ensurethatthebreathertubeisroutedabove
thesparkplugwireasshowninFigure36.
Figure36
Figure34
1.Screw(4)3.Sparkplug
2.Shroud4.Spark-plugwire
5.Removethefueltankcap.
6.Removetheshroud(
Figure34).
7.Installthefueltankcap.
8.Disconnectthewirefromthesparkplug.
9.Cleanaroundthesparkplug.
10.Removethesparkplugfromthecylinderhead.
Important:Replaceacracked,fouled,ordirty
sparkplug.Donotcleantheelectrodesbecause
gritenteringthecylindercandamagetheengine.
11.Setthegapontheplugto0.030inch(0.76mm)
(
Figure35).
1.Breathertube
2.Carburetordrainbolt
14.Removethefueltankcap.
15.Installtheshroudwiththescrewsyouremovedinstep
4.
Note:Ensurethattheupperandlowershroudst
togetherinthesidegrooves.
16.Installthefueltankcap.
17.Installthechuteseal,thedischargechute,andthe
dischargechutehandleontothemachineusingthe
hardwareyouremovedinstep
3.
Note:Thesmallscrewgoesthroughthesmallhole
inthechutesealatthefrontofthedischargechute
opening.
ReplacingtheDriveBelt
Ifdrivebeltbecomesworn,oil-soaked,excessivelycracked,
frayed,orotherwisedamaged,replacethebelt.
1.Removethedrivebeltcoverbyremovingthe3boltsas
showninFigure37.
Figure35
1.Centerelectrodeinsulator3.Airgap(nottoscale)
2.Sideelectrode
12.Installthesparkplugandtorqueitto20–22ft-lb
(27–30N-m).
16
Page 17

Figure37
1.Drivebeltcover6.Drivebelt
2.Bolt(3)7.Rotorshaft
3.Rotorpulleybolt
4.Curvedwasher
5.Rotorpulley10.Enginepulley
8.Brakespring(unhookfrom
idlerarmhere)
9.Idlerpulley
8.Installthebrakespringontotheidlerarm(
Figure38).
9.Installthedrivebeltcoverwiththeboltsyouremoved
instep1.
Note:Ensurethatthedrivebeltisproperlyadjusted
andoperating;refertoCheckingtheControlCableand
AdjustingtheControlCable.
2.Unhookthebrakespringfromtheidlerarmtorelease
thebelttension(Figure37).
3.Removethescrewandcurvedwasherthatholdsthe
rotorpulley(Figure37).
4.Removetherotorpulleyandthedrivebelt(
Figure37).
5.Installthenewdrivebelt,routingitasshownin
(
Figure38).
Figure38
1.Brakespring(installon
idlerarmhere)
2.Idlerpulley4.Rotorpulley
3.Enginepulley
Note:Routethenewdrivebeltrstaroundtheengine
pulley,thentheidlerpulley ,andnallyaroundthe
looserotorpulleypositionedjustabovetherotorshaft
(Figure37).
6.Installtherotorpulleyontotherotorshaft(Figure37).
7.Installthecurvedwasherandtherotorpulleyboltand
tightenthemsecurely(
Figure37).
Note:Theconcavesideofthecurvedwashergoes
againsttheoutsideofthepulley.
17
Page 18

Storage
StoringtheSnowthrower
WARNING
•Gasolinefumesarehighlyammable,explosive,
anddangerousifinhaled.Ifyoustorethe
machineinanareawithanopename,the
gasolinefumesmayigniteandcausean
explosion.
•Donotstorethemachineinahouse(living
area),basement,oranyotherareawhereignition
sourcesmaybepresent,suchashotwaterand
spaceheaters,clothesdryers,furnaces,and
otherlikeappliances.
•Donottipthemachinebackwardwithfuelin
thefueltank;otherwise,fuelmayleakoutof
themachine.
1.Onthelastrefuelingoftheseason,addfuelstabilizer
tofreshfuelasdirectedbytheenginemanufacturer.
16.Coverthemachineandstoreitinaclean,dryplace
outofthereachofchildren.Allowtheenginetocool
beforestoringitinanyenclosure.
2.Runtheenginefor10minutestodistributethe
conditionedfuelthroughthefuelsystem.
3.Stoptheengine,allowittocool,andsiphonthefuel
tankorruntheengineuntilitstops.
4.Starttheengineandrunituntilitstops.
5.Chokeorprimetheengine,startitathirdtime,and
runtheengineuntilitwillnotstart.
6.Drainthefuelinthecarburetorthroughthecarburetor
drainbolt(Figure36)intoanapprovedgasoline
container.
7.Disposeofunusedfuelproperly.Recycleitaccording
tolocalcodes,oruseitinyourautomobile.
8.Whiletheengineisstillwarm,changetheengineoil.
RefertoChangingtheEngineOil.
9.Removethesparkplug.
10.Squirt2teaspoonsofoilintothesparkplughole.
11.Installthesparkplugbyhandandthentorqueitto
20–22ft-lb(27–30N-m).
12.WiththeignitionkeyintheOffposition,pulltherecoil
starterslowlytodistributetheoilontheinsideofthe
cylinder.
13.Cleanthemachine.
14.Touchupchippedsurfaceswithpaintavailablefroman
AuthorizedServiceDealer.Sandaffectedareasbefore
painting,andusearustpreventativetopreventthe
metalpartsfromrusting.
15.Tightenanyloosefasteners.Repairorreplaceany
damagedparts.
18
Page 19

Notes:
19
Page 20

Notes:
20
Page 21

Notes:
21
Page 22

EmissionControlWarrantyStatement
FortheUnitedStates,California,andCanada
TheCaliforniaAirResourcesBoard(CARB),theU.S.EnvironmentalProtectionAgency(EP A),andTheToroCompany ,arepleasedtoexplainthe
emissioncontrolsystemwarrantyonyour2012–2013smalloff-roadengine/equipment.InCaliforniaandtheUnitedStates,newsmalloff-road
engines/equipmentmustbedesigned,built,andcertiedtomeetstringentanti-smogstandards.TheToroCompanywarrantstheemissioncontrol
systemonyoursmalloff-roadengine/equipmentfortheperiodoftimelistedabove,providedtherehasbeennoabuse,neglect,orimpropermaintenance
ofyoursmalloff-roadengine/equipment.
Youremissioncontrolsystemmayincludepartssuchasthecarburetor ,fuel-injectionsystem,theignitionsystem,catalyticconverter ,fueltanks,fuellines,
fuelcaps,valves,canisters,lters,vaporhoses,clamps,connectors,andotherassociatedemission-relatedcomponents.
Whereawarrantableconditionexists,TheT oroCompanywillrepairyoursmalloff-roadengine/equipmentatnocosttoyouincludingdiagnosis,
partsandlabor.
TheToroCompanyanditsafliate,T oroWarrantyCompany,pursuanttoanagreementbetweenthem,jointlywarrantthe2012–2013smalloff-road
engine/equipmentfortwoyearsfromthedateofdelivery .Ifanyemission-relatedpartonyourengine/equipmentisdefective,thepartwillberepairedor
replacedbyTheT oroCompany.
Asthesmalloff-roadengineowner,youareresponsiblefortheperformanceoftherequiredmaintenancelistedinyourOperator'sManual.Werecommend
thatyouretainallreceiptscoveringmaintenanceonyoursmalloff-roadengine/equipment,butwecannotdenywarrantysolelyforthelackofreceipts.
Asthesmalloff-roadengine/equipmentowner,youshouldhoweverbeawarethatwemaydenyyouwarrantycoverageifyoursmalloff-road
engine/equipmentoraparthasfailedduetoabuse,neglect,impropermaintenanceorunapprovedmodications.
Youareresponsibleforpresentingyoursmalloff-roadengine/equipmenttoanAuthorizedServiceDealerassoonasaproblemexists.Thewarranty
repairsshouldbecompletedinareasonableamountoftime,nottoexceedthirty(30)days.
Ifyouhaveanyquestionsregardingyourwarrantycoverage,contactusat:
CustomerCareDepartment,ConsumerDivision
ToroWarrantyCompany
811 1LyndaleAvenueSouth
Bloomington,MN55420-1196
Tollfreeat800–348–2424(U.S.customers)
Tollfreeat800–544–5364(Canadiancustomers)
ATwo-YearLimitedWarranty
YourWarrantyRightsandObligations
Manufacturer’sWarrantyCoverage
OwnerResponsibilities
GeneralEmissionsWarrantyCoverage
TheT oroCompanyanditsafliate,T oroWarrantyCompany ,jointlywarranttotheinitial
ownerandeachsubsequentpurchaserthatthesmalloff-roadengine/equipmentis:
•Designed,built,andcertiedtoconformwithallapplicableemissionsregulations;and
•Freefromdefectsinmaterialsandworkmanshipthatcouldcausethefailureofawarrantedpart;and
•Identicalinallmaterialrespectstothepartsasdescribedintheapplicationforcertication.
Thewarrantyperiodbeginsonthedatethesmalloff-roadengine/equipmentisdeliveredtoanultimatepurchaser.Thewarrantedperiodistwoyears.
Subjecttocertainconditionsandexclusionsasstatedbelow,thewarrantyonevaporativeemissions-relatedpartsisasfollows:
1.Anywarrantedpartthatisnotscheduledforreplacementasrequiredmaintenanceinthewritteninstructionssupplied,iswarranted
forthewarrantyperiodstatedabove.Ifthepartfailsduringtheperiodofwarrantycoverage,thepartwillberepairedorreplacedby
TheT oroCompany .Anysuchpartrepairedorreplacedunderwarrantywillbewarrantedfortheremainderofthewarrantyperiod.
2.Anywarrantedpartthatisscheduledonlyforregularinspectioninthewritteninstructionssuppliediswarrantedforthewarranty
periodstatedabove.Anysuchpartrepairedorreplacedunderthewarrantywillbewarrantedfortheremainderofthewarrantyperiod.
3.Anywarrantedpartthatisscheduledforreplacementasrequiredmaintenanceinthewritteninstructionssuppliedis
warrantedfortheperiodoftimebeforetherstscheduledreplacementdateforthatpart.Ifthepartfailsbeforetherst
scheduledreplacement,thepartwillberepairedorreplacedbyTheToroCompany .Anysuchpartrepairedorreplaced
underwarrantywillbewarrantedfortheremainderoftheperiodpriortotherstscheduledreplacementpointforthepart.
4.Repairorreplacementofanywarrantedpartunderthewarrantyprovisionshereinmustbeperformedatan
AuthorizedServiceDealeratnochargetotheowner.
5.Notwithstandingtheprovisionsherein,warrantyservicesorrepairswillbeprovidedatallServiceDealers
authorizedtoservicethesubjectenginesorequipment.
6.Thesmalloff-roadengine/equipmentownerwillnotbechargedfordiagnosticlaborthatisdirectlyassociatedwithdiagnosis
ofadefective,emission-relatedwarrantedpart,providedthatsuchdiagnosticworkisperformedatanAuthorizedServiceDealer.
7.TheT oroCompanyisliablefordamagestootherengine/equipmentcomponentscausedbyafailureunderwarrantyofanyemissionspart.
8.Throughoutthesmalloff-roadengine/equipmentwarrantyperiodstatedabove,TheT oroCompany
willmaintainasupplyofwarrantedpartssufcienttomeettheexpecteddemandforsuchparts.
9.Manufacturerapprovedreplacementpartsmaybeusedintheperformanceofanywarrantymaintenanceorrepairsand
mustbeprovidedwithoutchargetotheowner.SuchusewillnotreducethewarrantyobligationsofTheT oroCompany .
10.Add-onormodiedpartsthatarenotapprovedbyTheT oroCompanymaynotbeused.Theuseofanon-approvedadd-onormodiedparts
bythepurchaserwillbegroundsfordisallowingawarrantyclaim.TheToroCompanywillnotbeliabletowarrantfailuresofwarrantedparts
causedbytheuseofannon-approvedadd-onormodiedparts.
374-0287RevA
Page 23

WarrantedParts
Thefollowingemissionwarrantypartsarecovered,totheextentthesepartswerepresentontheT oroengine/equipmentand/orT orosuppliedfuelsystem:
1.FuelSystemParts
•Carburetorandinternalparts
•Coldstartingenrichment(primerorchoke)
•Fuelpump
•Fuelline,ttings,andclamps
•Fueltank,cap,andtether
•Carboncanister
2.AirInductionSystem
•Aircleaner
•Intakemanifold
•Crankcaseventandline(s)
•Purgelineandttings
3.IgnitionSystem
•Sparkplug(s)andwire(s)
•Magnetoignitionsystem
4.CatalyticExhaustSystem
•Catalyticconverter
•Exhaustmanifold
•Airinjectorsystemandvalve(s)
5.MiscellaneousItemsUsedinEmissionControlSystem
•Valves,switches,andlinkages
•Connectors,ttings,andbrackets
374-0287RevA
Page 24

TheToro2-YearGTSStartingGuaranteeand
TheT oroT otalCoverageGuarantee
AT wo-YearFullWarranty(45DayLimitedWarrantyforCommercialUse)
PowerClear
Single-StageSnowthrowers
TheToroStartingGuarantee
TheT oroCompanyanditsafliate,ToroWarrantyCompany,pursuant
toanagreementbetweenthem,jointlyguaranteethatyourT oroGTS
(GuaranteedtoStart)engine,whenusedforresidentialpurposes*,will
startontherstorsecondpullfortwo(2)yearsfromthedateofpurchase,
ifyouprovidetheroutinemaintenanceitrequires,orwewillxitfreeof
charge.
Thiswarrantycoversthecostofpartsandlabor,butyoumustpay
transportationcosts.
TheToroTotalCoverageGuarantee
TheToroCompanyanditsafliate,T oroWarrantyCompany,pursuantto
anagreementbetweenthem,jointlypromisetorepairtheT oroProduct
listedbelowifusedforresidentialpurposes*,ifdefectiveinmaterialsor
workmanshiporifitstopsfunctioningduetothefailureofacomponent
fortheperiodlistedbelow.
Thiswarrantycoversthecostofpartsandlabor,butyoumustpay
transportationcosts.
Thefollowingtimeperiodsapplyfromthedateofpurchase:
ProductsWarrantyPeriod
PowerClearSnowthrowersandAttachments
2years
LimitedWarrantyforCommercialUse
Gas-poweredT oroProductsusedforcommercial,institutional,or
rentaluse,arewarrantedfor45daysagainstdefectsinmaterialsor
workmanship.Componentsfailingduetonormalweararenotcovered
bythiswarranty.
InstructionsforObtainingWarrantyService
IfyouthinkthatyourT oroProductcontainsadefectinmaterialsor
workmanship,followthisprocedure:
1.ContactanyAuthorizedToroServiceDealertoarrangeservice
attheirdealership.Tolocateadealerconvenienttoyou,referto
theY ellowPagesofyourtelephonedirectory(lookunder“Lawn
Mowers”)oraccessourwebsiteatwww .T oro.com.Youmayalso
callthenumberslistedinitem#3tousethe24-hourT oroDealer
locatorsystem.
2.Bringtheproductandyourproofofpurchase(salesreceipt)tothe
ServiceDealer.Thedealerwilldiagnosetheproblemanddetermine
ifitiscoveredunderwarranty.
3.IfforanyreasonyouaredissatisedwiththeServiceDealer’s
analysisorwiththeassistanceprovided,contactusat:
CustomerCareDepartment,ConsumerDivision
TheT oroCompany
811 1LyndaleAvenueSouth
Bloomington,MN55420-1196
Tollfreeat866-336-5205(U.S.customers)
Tollfreeat866-854–9033(Canadiancustomers)
OwnerResponsibilities
YoumustmaintainyourT oroProductbyfollowingthemaintenance
proceduresdescribedintheOperator'sManual.Suchroutine
maintenance,whetherperformedbyadealerorbyyou,isatyourexpense.
ItemsandConditionsNotCovered
Thereisnootherexpresswarrantyexceptforspecialemissionsystem
coverageandenginewarrantycoverageonsomeproducts.Thisexpress
warrantydoesnotcoverthefollowing:
•Costofregularmaintenanceorreplacementofwearparts,suchas
rotorblades(paddles),scraperblades,belts,fuel,lubricants,oil
changes,sparkplugs,cable/linkageorbrakeadjustments
•Anyproductorpartwhichhasbeenalteredormisusedandrequires
replacementorrepairduetoaccidentsorlackofpropermaintenance
•Repairsnecessaryduetofailuretousefreshfuel(lessthanone
monthold),orfailuretoproperlypreparetheunitpriortoanyperiod
ofnon-useoveronemonth
•Pickupanddeliverycharges
•Operationalmisuse,neglect,oraccidents
•RepairsorattemptedrepairsbyanyoneotherthananAuthorized
ToroServiceDealer
•Repairsoradjustmentstocorrectstartingdifcultiesduetothe
following:
–failuretofollowpropermaintenanceprocedures
–snowthrowerauger/paddlesstrikinganobject
–contaminantsinthefuelsystem
–improperfuel(consultyourOperator'sManualifindoubt)
–failuretodrainthefuelsystempriortoanyperiodofnon-use
overonemonth
•Specialoperationalconditionswherestartingmayrequiremorethan
twopulls:
–rsttimestartsafterextendedperiodofnon-useoverthree
monthsorseasonalstorage
–improperstartingprocedures
–startingin-10°F(-23°C)orbelowtemperatures
Ifyouarehavingdifcultystartingyourunit,pleasechecktheOperator's
Manualtoensurethatyouareusingthecorrectstartingprocedures.This
cansaveanunnecessaryvisittoaServiceDealer.
GeneralConditions
Allrepairscoveredbythesewarrantiesmustbeperformedbyan
AuthorizedToroServiceDealerusingT oroapprovedreplacementparts.
RepairbyanAuthorizedT oroServiceDealerisyoursoleremedyunder
thiswarranty .
NeitherTheToroCompanynorToroWarrantyCompanyisliablefor
indirect,incidental,orconsequentialdamagesinconnectionwiththe
useoftheToroProductscoveredbythesewarranties,includingany
costorexpenseofprovidingsubstituteequipmentorserviceduring
reasonableperiodsofmalfunctionornon-usependingcompletionof
repairsunderthesewarranties.
Somestatesdonotallowexclusionsofincidentalorconsequential
damages,sotheaboveexclusionsmaynotapplytoyou.
Thiswarrantygivesyouspeciclegalrights,andyoumayalsohaveother
rightswhichvaryfromstatetostate.
CountriesOtherthantheUnitedStatesorCanada
CustomerswhohavepurchasedToroproductsexportedfromtheUnitedStatesorCanadashouldcontacttheirT oroDistributor(Dealer)toobtain
guaranteepoliciesforyourcountry,province,orstate.IfforanyreasonyouaredissatisedwithyourDistributor'sserviceorhavedifcultyobtaining
guaranteeinformation,contacttheT oroimporter.Ifallotherremediesfail,youmaycontactusatT oroWarrantyCompany.
AustralianConsumerLaw
AustraliancustomerswillnddetailsrelatingtotheAustralianConsumerLaweitherinsidetheboxoratyourlocalT oroDealer.
*Residentialpurposesmeansuseoftheproductonthesamelotasyourhome.Useatmorethanonelocation,orinstitutionalorrentaluse,isconsidered
commercialuse,andthecommercialusewarrantywouldapply.
374-0264RevD
 Loading...