

Page 1
PowerMax
ModelNo.37798—SerialNo.400000000andUp
ModelNo.37799—SerialNo.400000000andUp
®
824OEand826OXESnowthrower
FormNo.3423-315RevB
Operator'sManual
Introduction
Thismachineisintendedtobeusedbyresidential
homeowners.Itisdesignedprimarilyforremoving
snowfrompavedsurfaces,suchasdrivewaysand
sidewalks,andothersurfacesfortrafconresidential
orcommercialproperties.Itisnotdesignedfor
removingmaterialsotherthansnow.
Readthisinformationcarefullytolearnhowtooperate
andmaintainyourproductproperlyandtoavoid
injuryandproductdamage.Youareresponsiblefor
operatingtheproductproperlyandsafely.
YoumaycontactT orodirectlyatwww.Toro.com
forproductsafetyandoperationtrainingmaterials,
accessoryinformation,helpndingadealer,orto
registeryourproduct.
Wheneveryouneedservice,genuineToroparts,or
additionalinformation,contactanAuthorizedService
DealerorToroCustomerServiceandhavethemodel
andserialnumbersofyourproductready .Figure1
identiesthelocationofthemodelandserialnumbers
ontheproduct.Writethenumbersinthespace
provided.
Important:Withyoursmartphoneortablet,scan
theQRcodeontheserialnumberdecaltoaccess
warranty,parts,andotherproductinformation.
Figure1
1.Modelandserialnumberlocation
Thismanualidentiespotentialhazardsandhas
safetymessagesidentiedbythesafety-alertsymbol
(Figure2),whichsignalsahazardthatmaycause
seriousinjuryordeathifyoudonotfollowthe
recommendedprecautions.
g000502
Figure2
Safety-alertsymbol
Thismanualuses2wordstohighlightinformation.
Importantcallsattentiontospecialmechanical
informationandNoteemphasizesgeneralinformation
worthyofspecialattention.
Important:Ifyouareusingthismachineabove
1500m(5,000ft)foracontinuousperiod,ensure
thattheHighAltitudeKithasbeeninstalled
sothattheenginemeetsCARB/EPAemission
regulations.TheHighAltitudeKitincreases
engineperformancewhilepreventingspark-plug
fouling,hardstarting,andincreasedemissions.
Onceyouhaveinstalledthekit,attachthe
high-altitudelabelnexttotheserialdecalonthe
machine.ContactanyAuthorizedToroService
DealertoobtaintheproperHighAltitudeKitand
high-altitudelabelforyourmachine.T olocate
adealerconvenienttoyou,accessourwebsite
atwww.Toro.comorcontactourToroCustomer
CareDepartmentatthenumber(s)listedinyour
EmissionControlWarrantyStatement.Remove
thekitfromtheengineandrestoretheengineto
itsoriginalfactorycongurationwhenrunningthe
engineunder1500m(5,000ft).Donotoperatean
g219962
enginethathasbeenconvertedforhigh-altitude
useatloweraltitudes;otherwise,youcould
overheatanddamagetheengine.
Ifyouareunsurewhetherornotyourmachinehas
beenconvertedforhigh-altitudeuse,lookforthe
followinglabel(Figure3).
ModelNo.
SerialNo.
©2018—TheT oro®Company
8111LyndaleAvenueSouth
Bloomington,MN55420
Registeratwww.Toro.com.
OriginalInstructions(EN)
PrintedinMexico
AllRightsReserved
*3423-315*B
Page 2

Figure3
WARNING
CALIFORNIA
Proposition65Warning
Theengineexhaustfromthisproduct
containschemicalsknowntotheStateof
Californiatocausecancer,birthdefects,
orotherreproductiveharm.
Useofthisproductmaycauseexposure
tochemicalsknowntotheStateof
Californiatocausecancer,birthdefects,
orotherreproductiveharm.
Contents
OperatingtheAuger/ImpellerDrive...................15
OperatingtheQuickStick®...............................15
ClearingaCloggedDischargeChute................16
OperatingTips.................................................17
AfterOperation....................................................17
AfterOperationSafety......................................17
decal127-9363
PreventingFreeze-upafterUse........................17
Maintenance...........................................................18
RecommendedMaintenanceSchedule(s)...........18
MaintenanceSafety..........................................18
PreparingforMaintenance...............................18
CheckingtheEngine-OilLevel..........................19
CheckingandAdjustingtheSkidsand
Scraper.........................................................19
CheckingandAdjustingtheTraction
Cable............................................................20
CheckingandAdjustingtheAuger/Impeller
Cable............................................................21
CheckingtheAuger-Gearbox-OilLevel.............21
ChangingtheEngineOil...................................22
LubricatingtheHexShaft..................................22
ReplacingtheSparkPlug.................................23
AdjustingtheDischarge-ChuteLatch................24
ReplacingtheDriveBelts..................................24
ReplacingtheHeadlight....................................25
Storage...................................................................25
StoringtheMachine..........................................25
RemovingtheMachinefromStorage................25
Troubleshooting......................................................26
Introduction...............................................................1
Safety.......................................................................2
GeneralSafety...................................................2
SafetyandInstructionalDecals..........................3
Setup........................................................................5
1InstallingtheUpperHandle..............................5
2InstallingtheChute..........................................5
3InstallingtheTraction-ControlLinkage.............5
4InstallingtheChute-ControlRod......................6
5InstallingtheSnow-CleanoutT ool....................7
6CheckingtheEngine-OilLevel.........................8
7CheckingtheTirePressure..............................8
8CheckingtheSkidsandScraper......................9
9CheckingtheOperationoftheTraction
Drive...............................................................9
ProductOverview...................................................10
Specications...................................................11
Attachments/Accessories..................................11
Operation.................................................................11
BeforeOperation..................................................11
BeforeOperationSafety....................................11
FillingtheFuelT ank..........................................12
DuringOperation.................................................12
DuringOperationSafety...................................12
StartingtheEngine...........................................13
ShuttingOfftheEngine.....................................14
OperatingtheTractionDrive.............................14
OperatingtheSpeedSelector...........................15
Safety
Thissnowthroweriscapableofinjuringhandsand
feetandofthrowingobjects.Failuretoobservethe
followingsafetyinstructionscouldresultinserious
injury.
GeneralSafety
ThismachinecomplieswithANSIB71.3specications.
•Readandunderstandthecontentsofthis
Operator’sManualbeforeyoustarttheengine.
Ensurethateveryoneusingthisproductknows
howtouseit,knowshowtoshutofftheengine
quickly,andunderstandsthewarnings.
•Shutofftheenginewheneveryouleavethe
operatingpositionforanyreason.
•Donotputyourhandsorfeetnearmovingparts
onthemachine.
•Donotoperatethemachinewithoutallguards
andothersafetyprotectivedevicesinplaceand
working.
2
Page 3
•Keepclearofanydischargeopening.Keep
x 3
1
2
3
4
5
120-9805
bystanders,especiallysmallchildren,outofthe
operatingarea.
•Neverallowchildrentooperatethemachine.
SafetyandInstructionalDecals
Safetydecalsandinstructionsareeasilyvisibletotheoperatorandarelocatednearanyarea
ofpotentialdanger.Replaceanydecalthatisdamagedormissing.
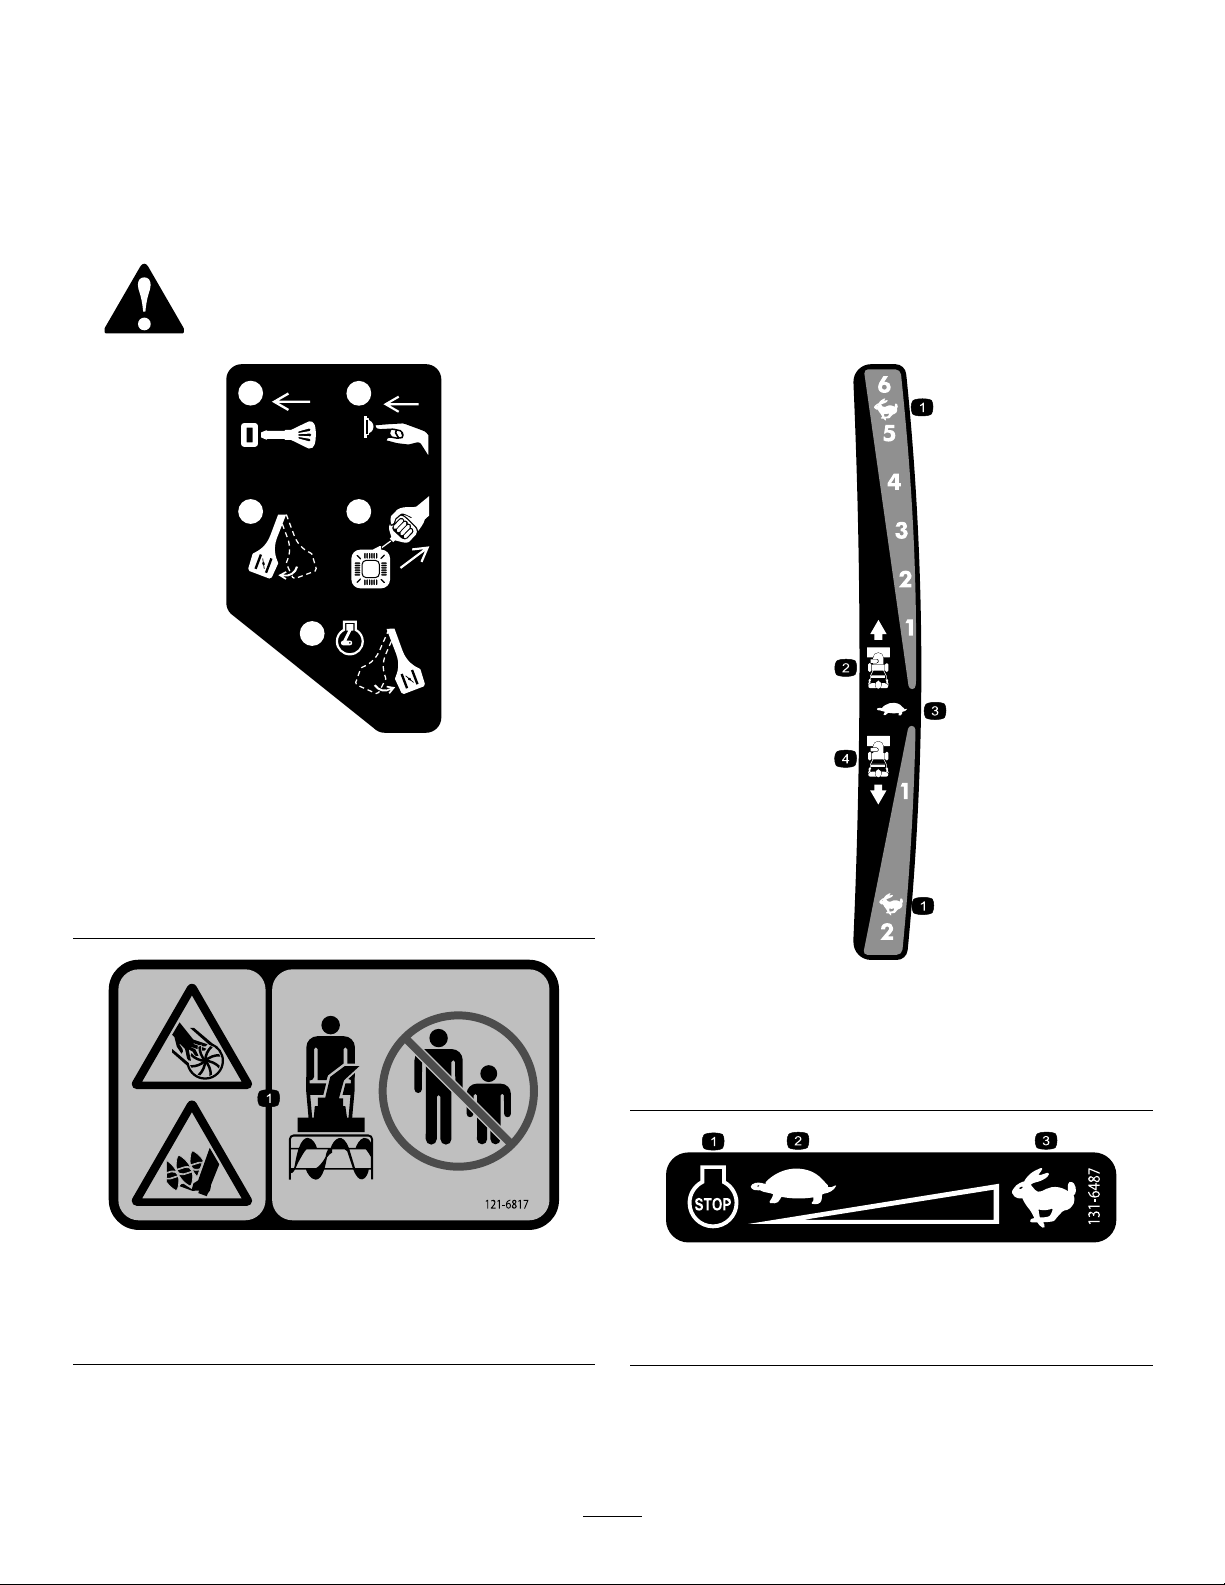
decal120-9805
120-9805
1.Insertthekey.
2.Primetheengine3times.
3.Engagethechoke.
4.Pullthestartercord.
5.Oncetheengineisrunning,disengagethechoke.
decal121-6823
121-6823
OrderPartNo.138-8487
1.Fast
2.Forwardspeeds4.Reversespeeds
1.Cutting/dismembermenthazardsofhandorfoot,impeller
andauger—keepbystandersasafedistanceawayfrom
themachine.
121-6817
decal121-6817
1.Engine—shutoff
2.Slow
3.Slow
decal131-6487
131-6487
3.Fast
3
Page 4
decal133-8061
133-8061
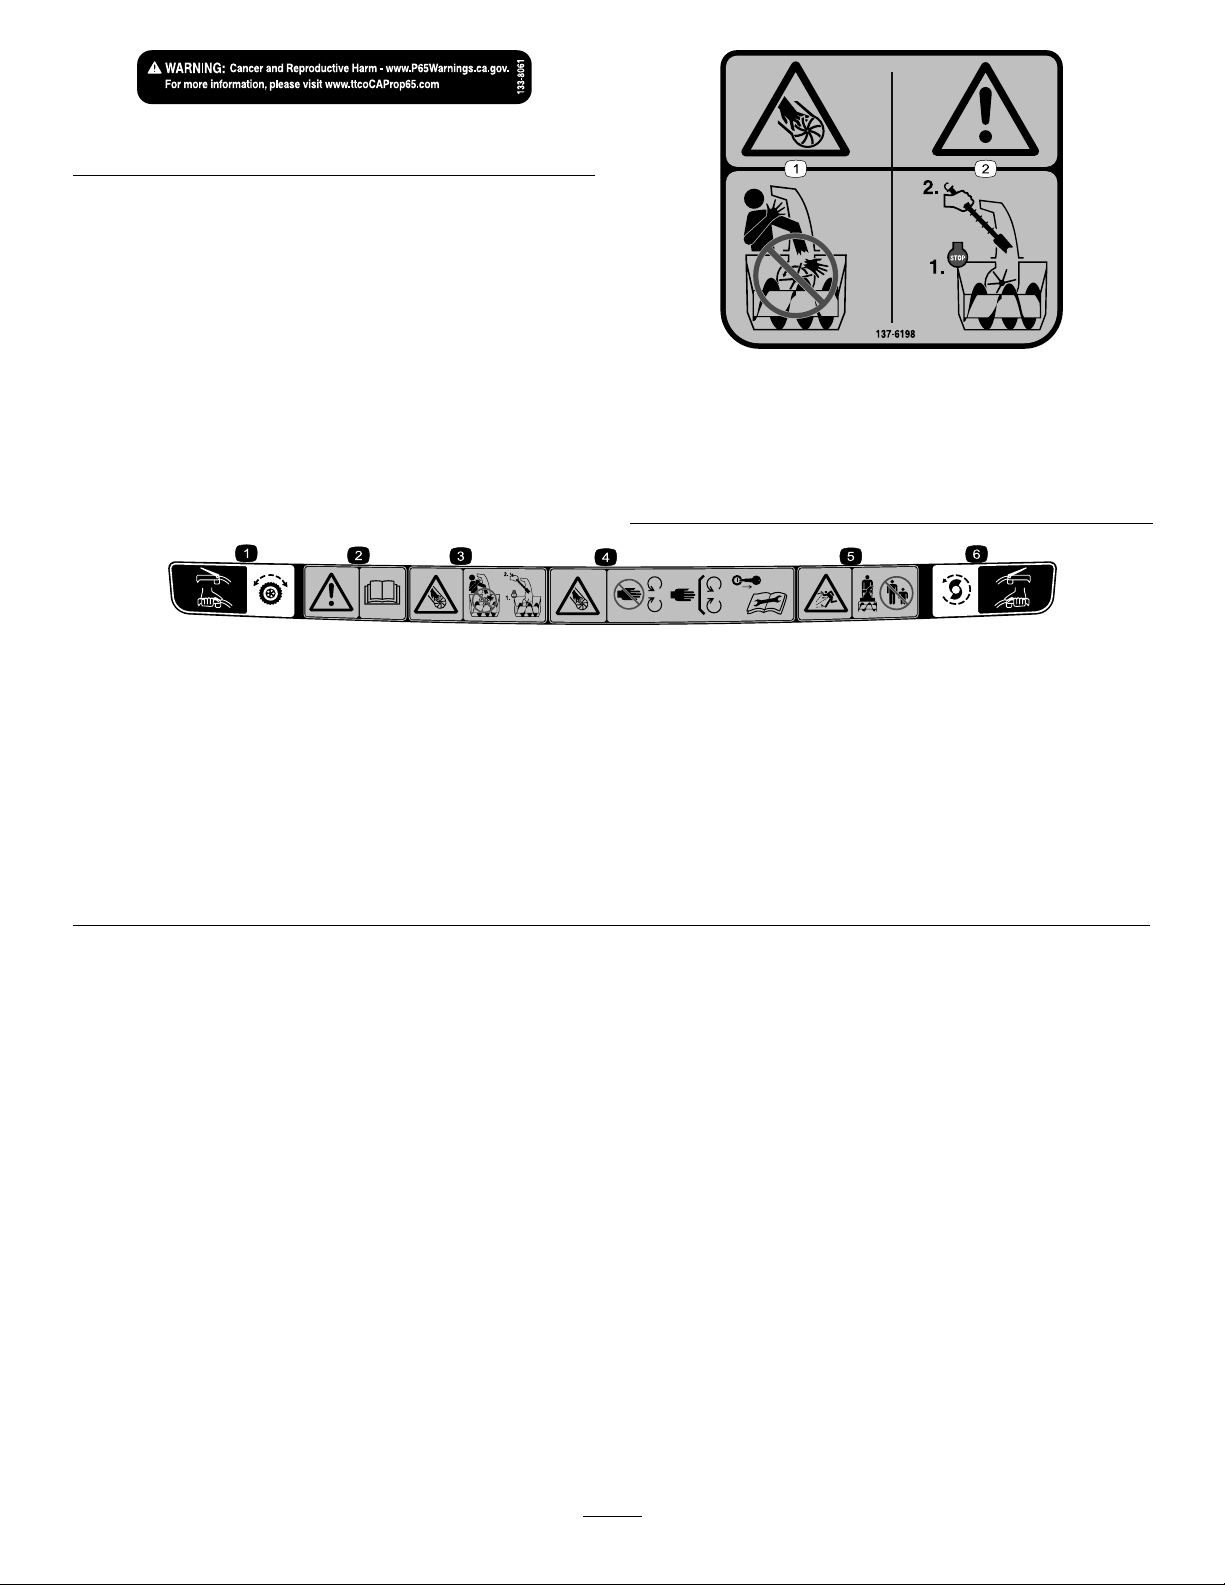
decal137-6198
137-6198
1.Cutting/dismemberment
hazardofthengersor
hand,impeller—donot
2.Warning—shutoffthe
enginebeforeusingthe
tooltoclearthechute.
placeyourhandinthe
chute.
121-1240
OrderPartNo.138-8487
1.Tractiondrive—squeezethelevertoengage;releasethe
levertodisengage.
2.Warning—readtheOperator’sManual.5.Thrownobjecthazard—keepbystandersasafedistance
3.Cutting/dismembermenthazard,impeller—donotplaceyour
handinthechute;shutofftheenginebeforeleavingthe
operatingpositionanduseatooltoclearthechute.
4.Cutting/dismembermenthazard,impeller—stayawayfrom
movingparts;keepallguardsandshieldsinplace;remove
theignitionkeyandreadtheinstructionsbeforeservicingor
performingmaintenance.
awayfromthemachine.
6.Auger/impellerdrive—squeezethelevertoengage;release
thelevertodisengage.
decal121-1240
4
Page 5
Setup
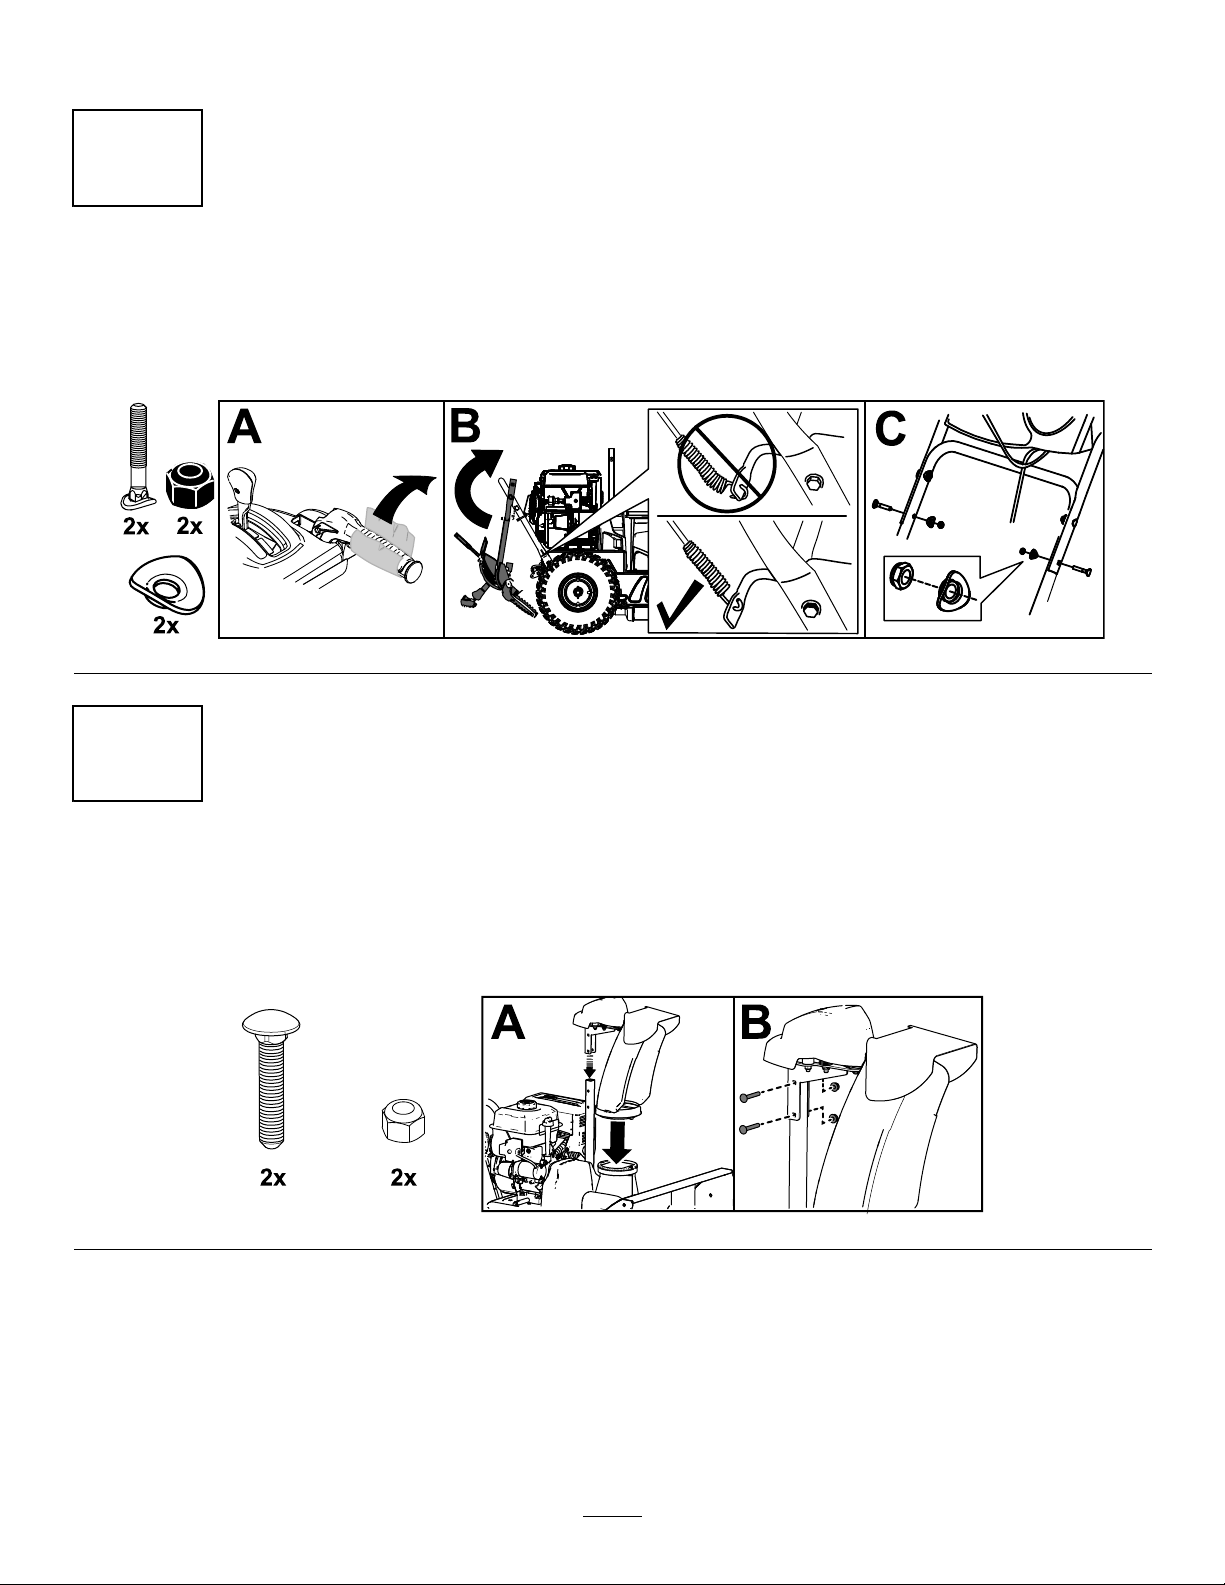
1
InstallingtheUpperHandle
NoPartsRequired
Procedure
g252379
2
InstallingtheChute
NoPartsRequired
Procedure
g252568
5
Page 6
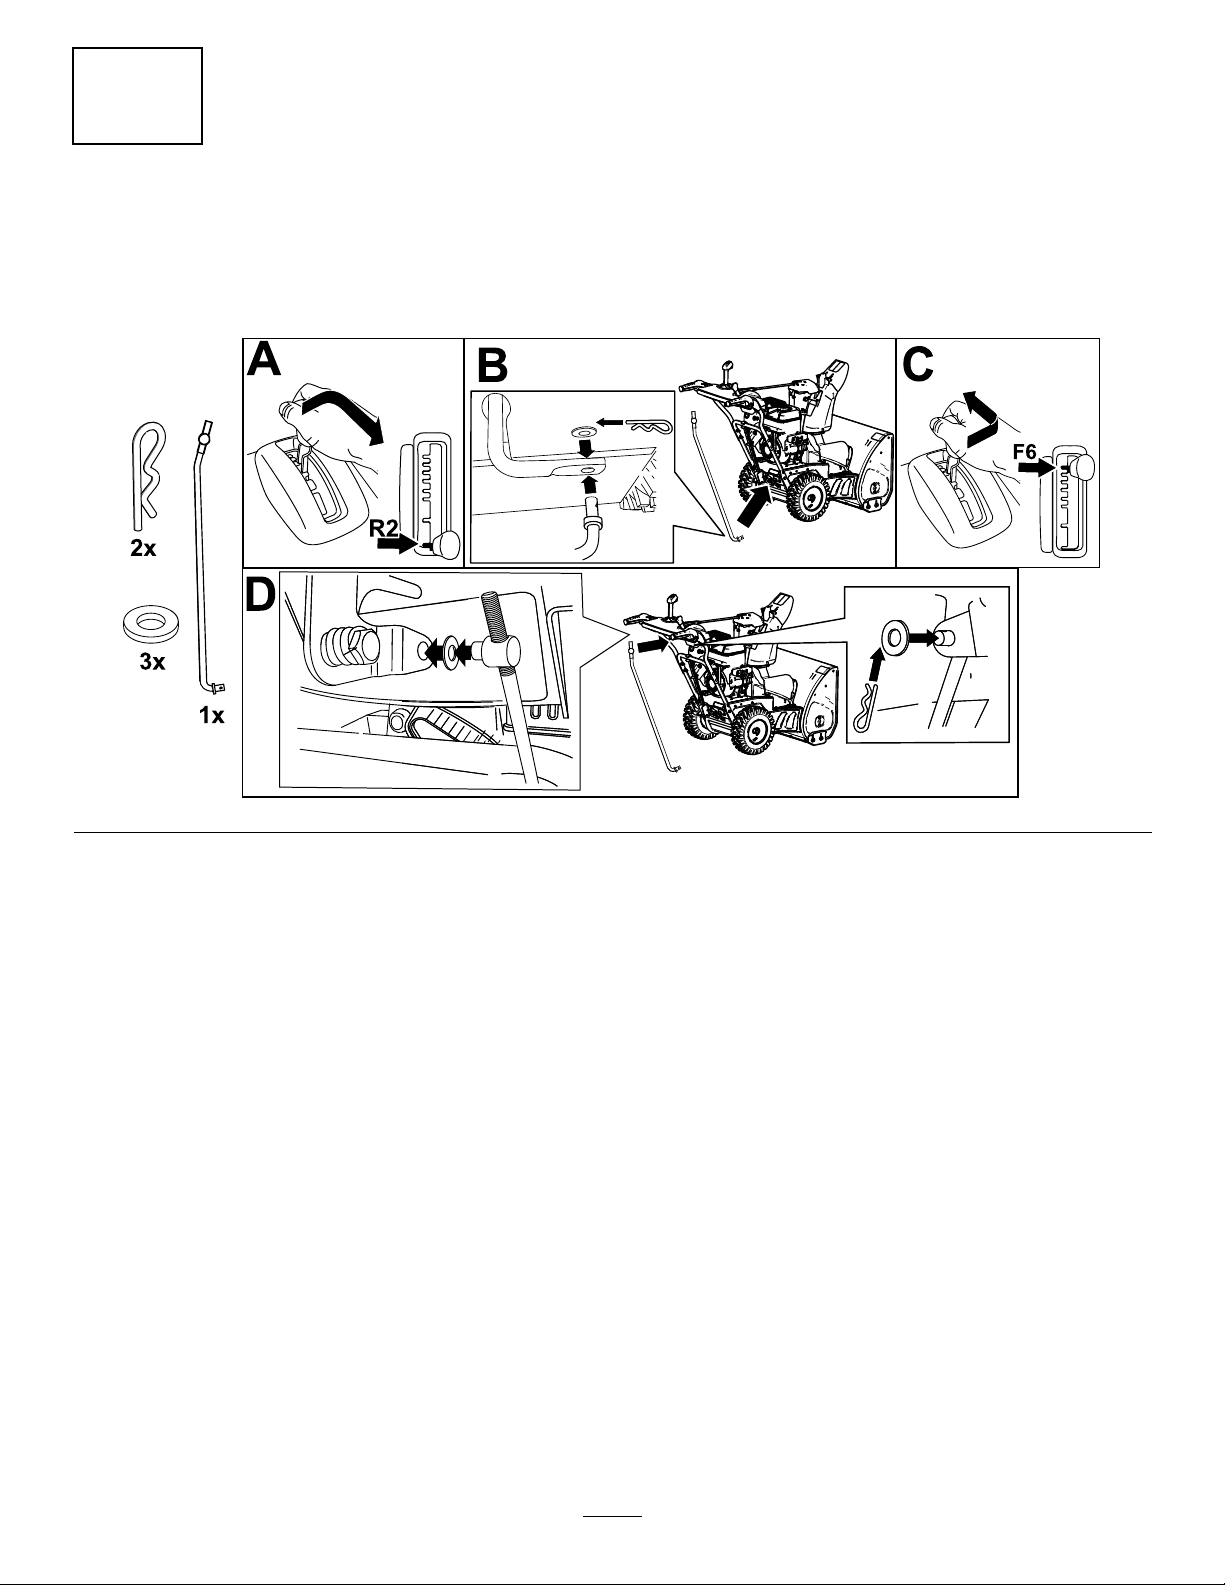
3
InstallingtheTraction-ControlLinkage
NoPartsRequired
Procedure
g252391
6
Page 7
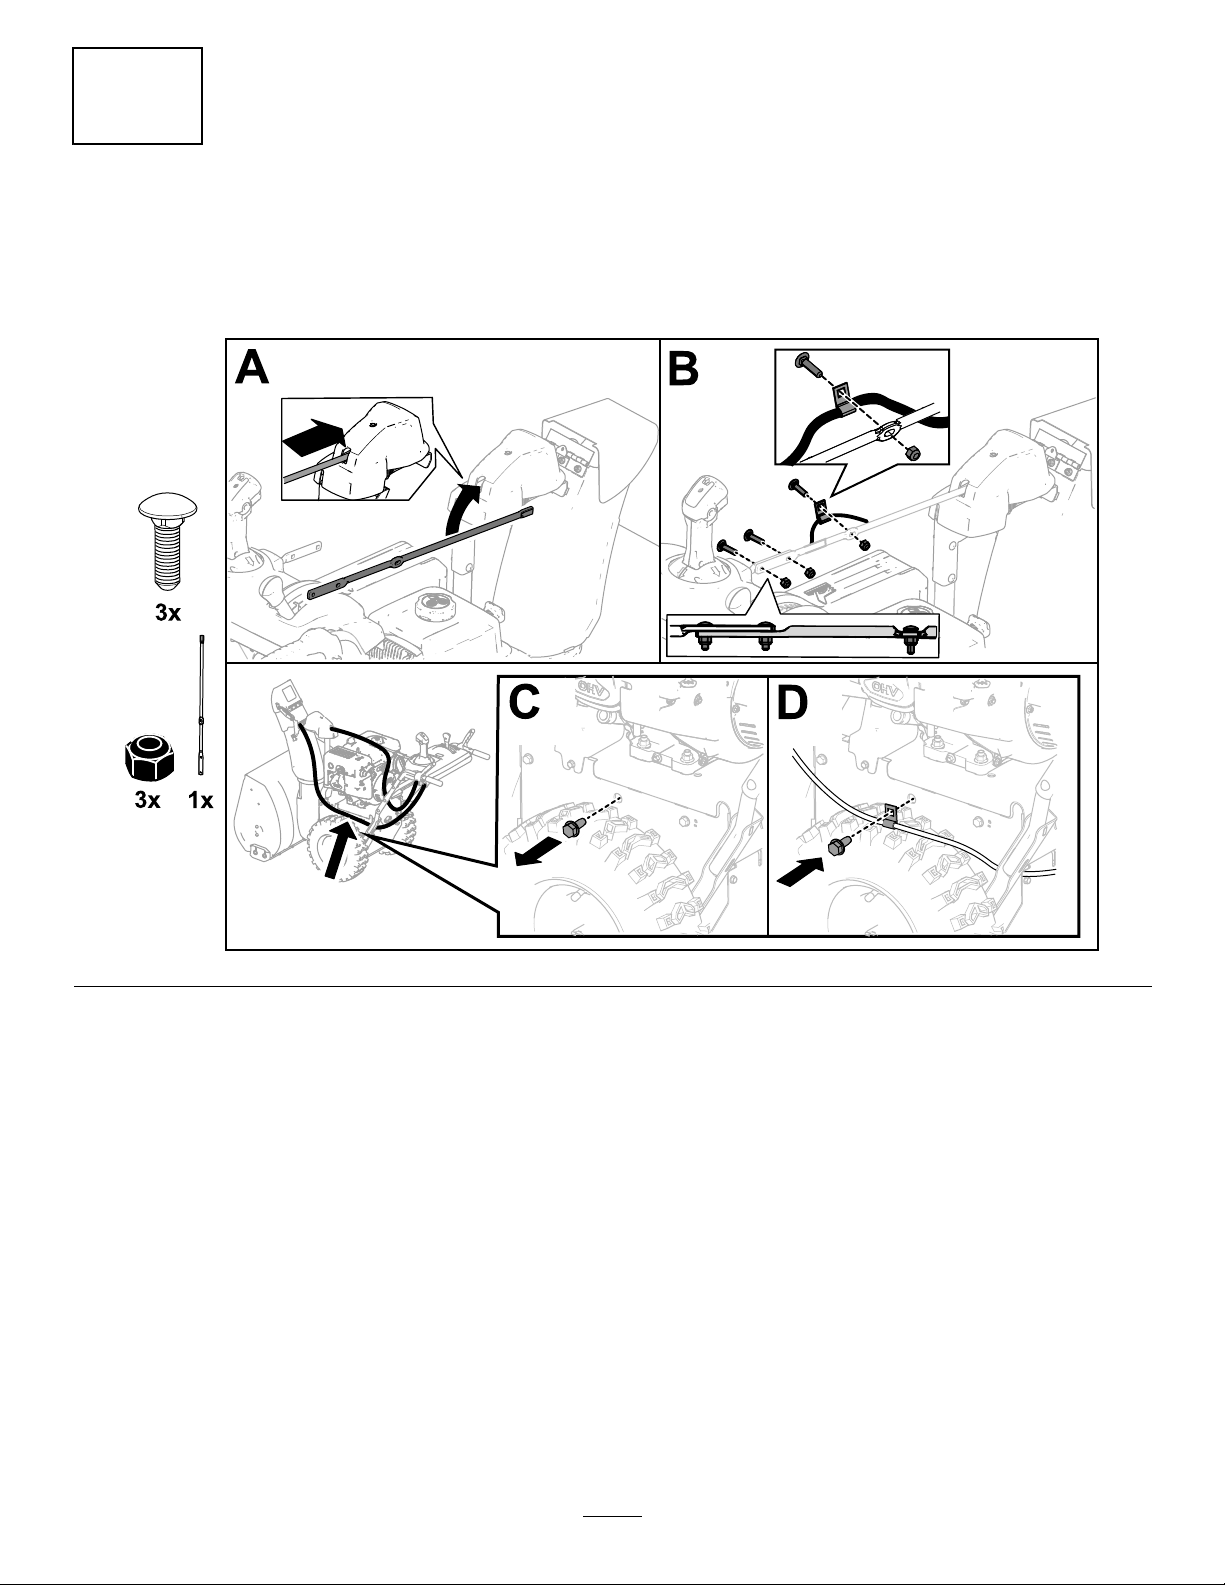
4
InstallingtheChute-ControlRod
NoPartsRequired
Procedure
g257848
7
Page 8
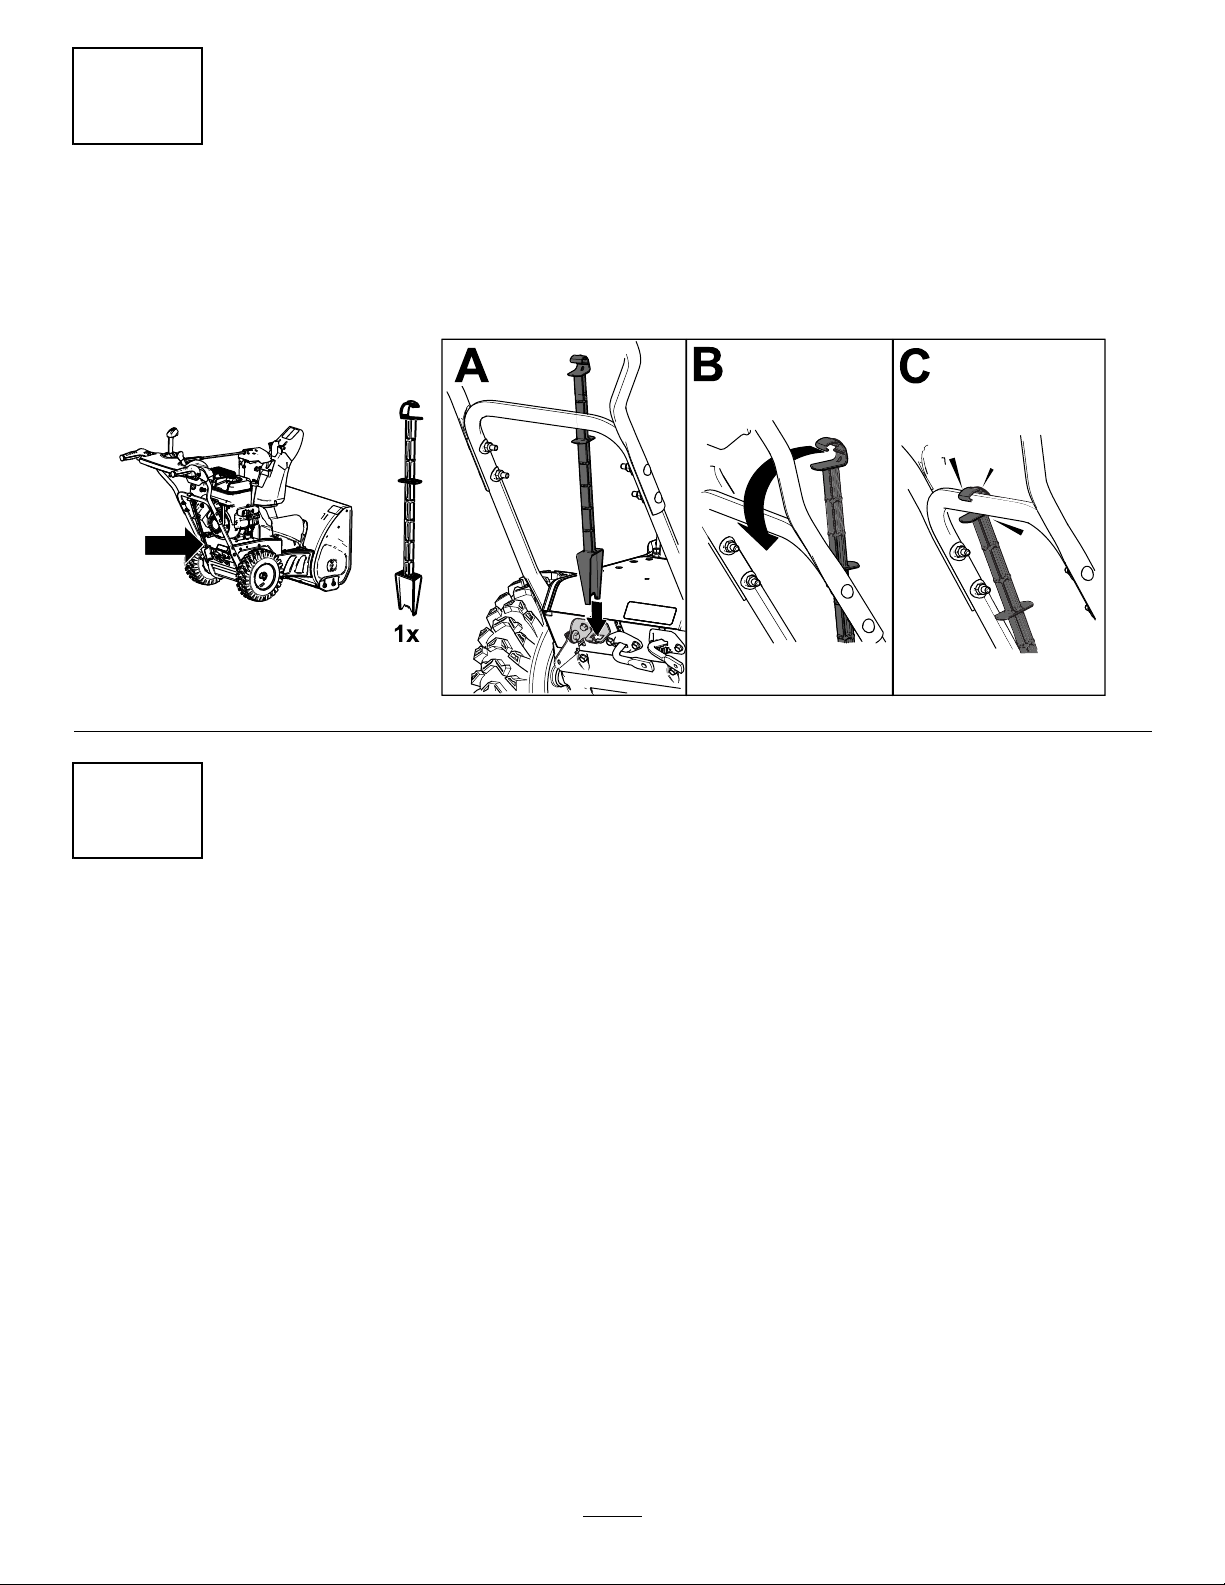
5
InstallingtheSnow-CleanoutTool
NoPartsRequired
Procedure
g252394
6
CheckingtheEngine-OilLevel
NoPartsRequired
Procedure
Note:Yourmachinecomeswithoilintheenginecrankcase.Beforestartingtheengine,checktheoillevel
andaddoilifnecessary.
RefertoCheckingtheEngine-OilLevel(page19).
8
Page 9
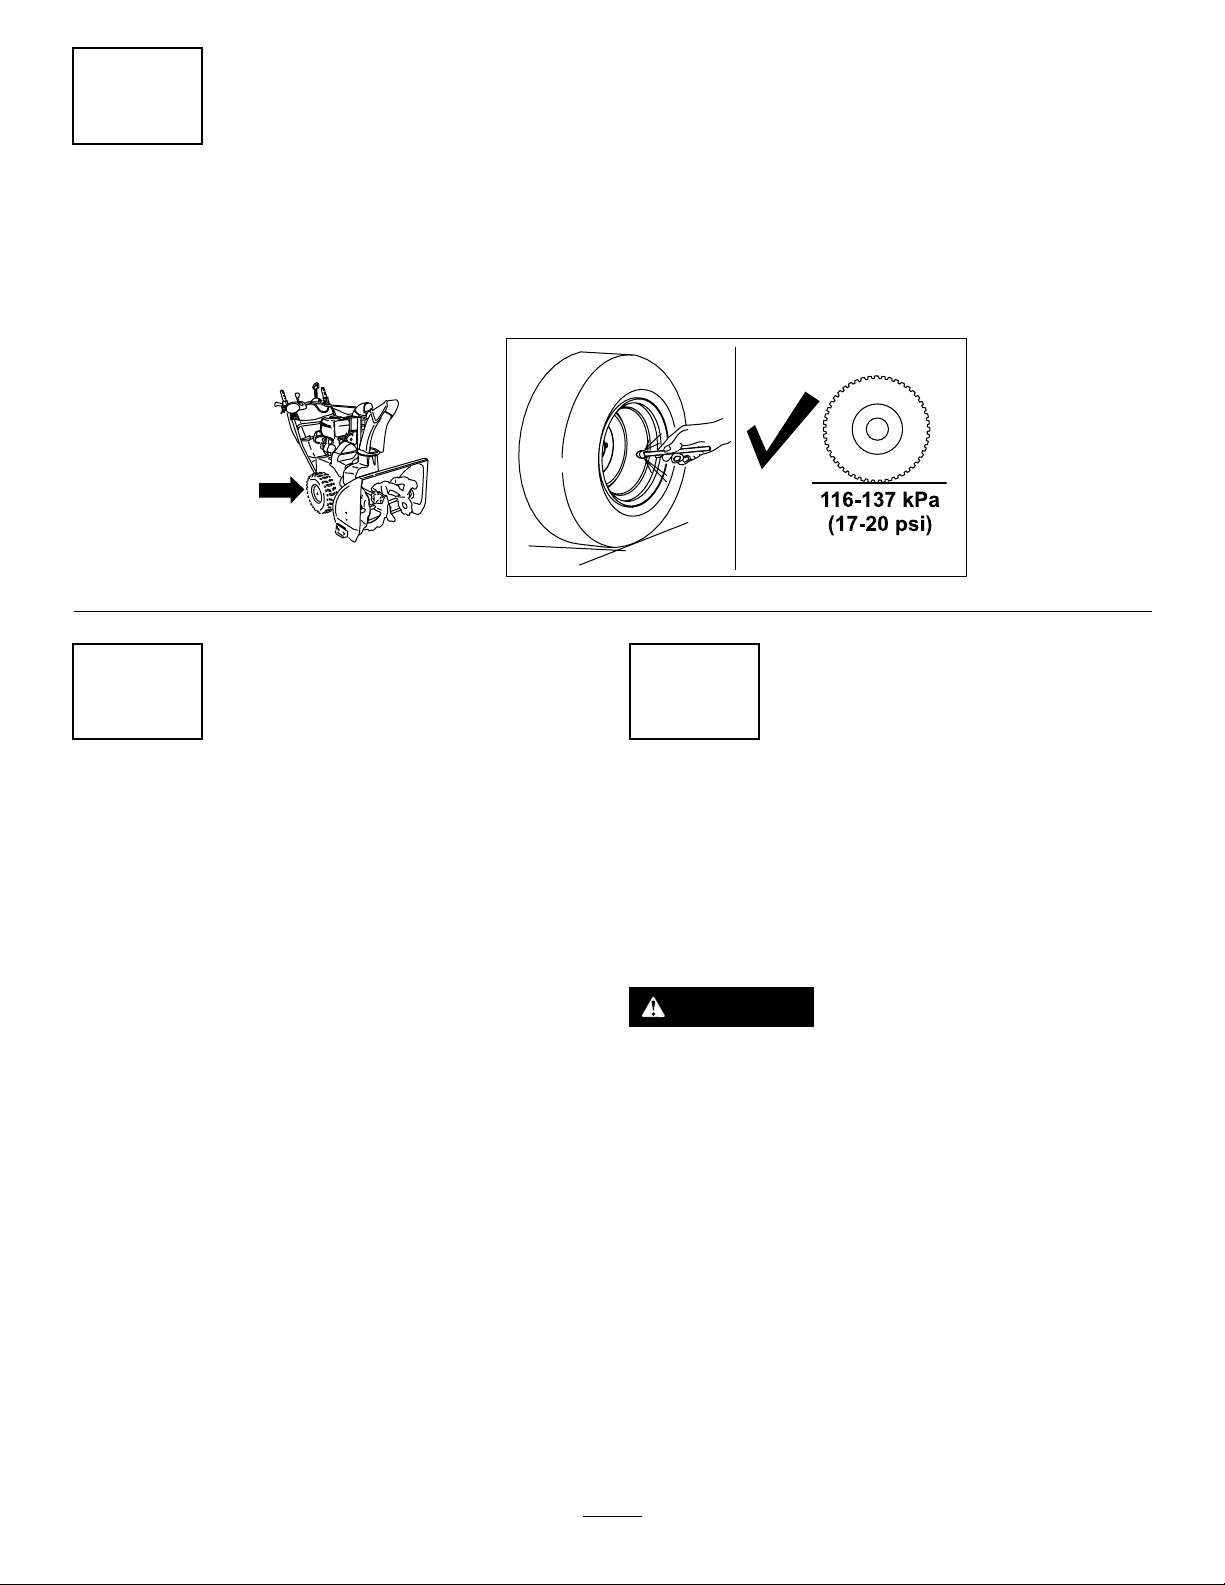
7
CheckingtheTirePressure
NoPartsRequired
Procedure
g252396
8
CheckingtheSkidsand Scraper
NoPartsRequired
Procedure
RefertoCheckingandAdjustingtheSkidsand
Scraper(page19).
9
CheckingtheOperationof theTractionDrive
NoPartsRequired
Procedure
CAUTION
Ifthetractiondriveisnotproperlyadjusted,
themachinemaymoveinthedirection
oppositeofwhatyouintended,causinginjury
and/orpropertydamage.
Carefullycheckthetractiondriveandadjustit
properly,ifnecessary.
1.Starttheengine;refertoStartingtheEngine
(page13).
2.MovethespeedselectortoPositionR1;referto
OperatingtheSpeedSelector(page15).
3.Squeezetheleft(traction)levertothehandgrip
(Figure10).
9
Page 10
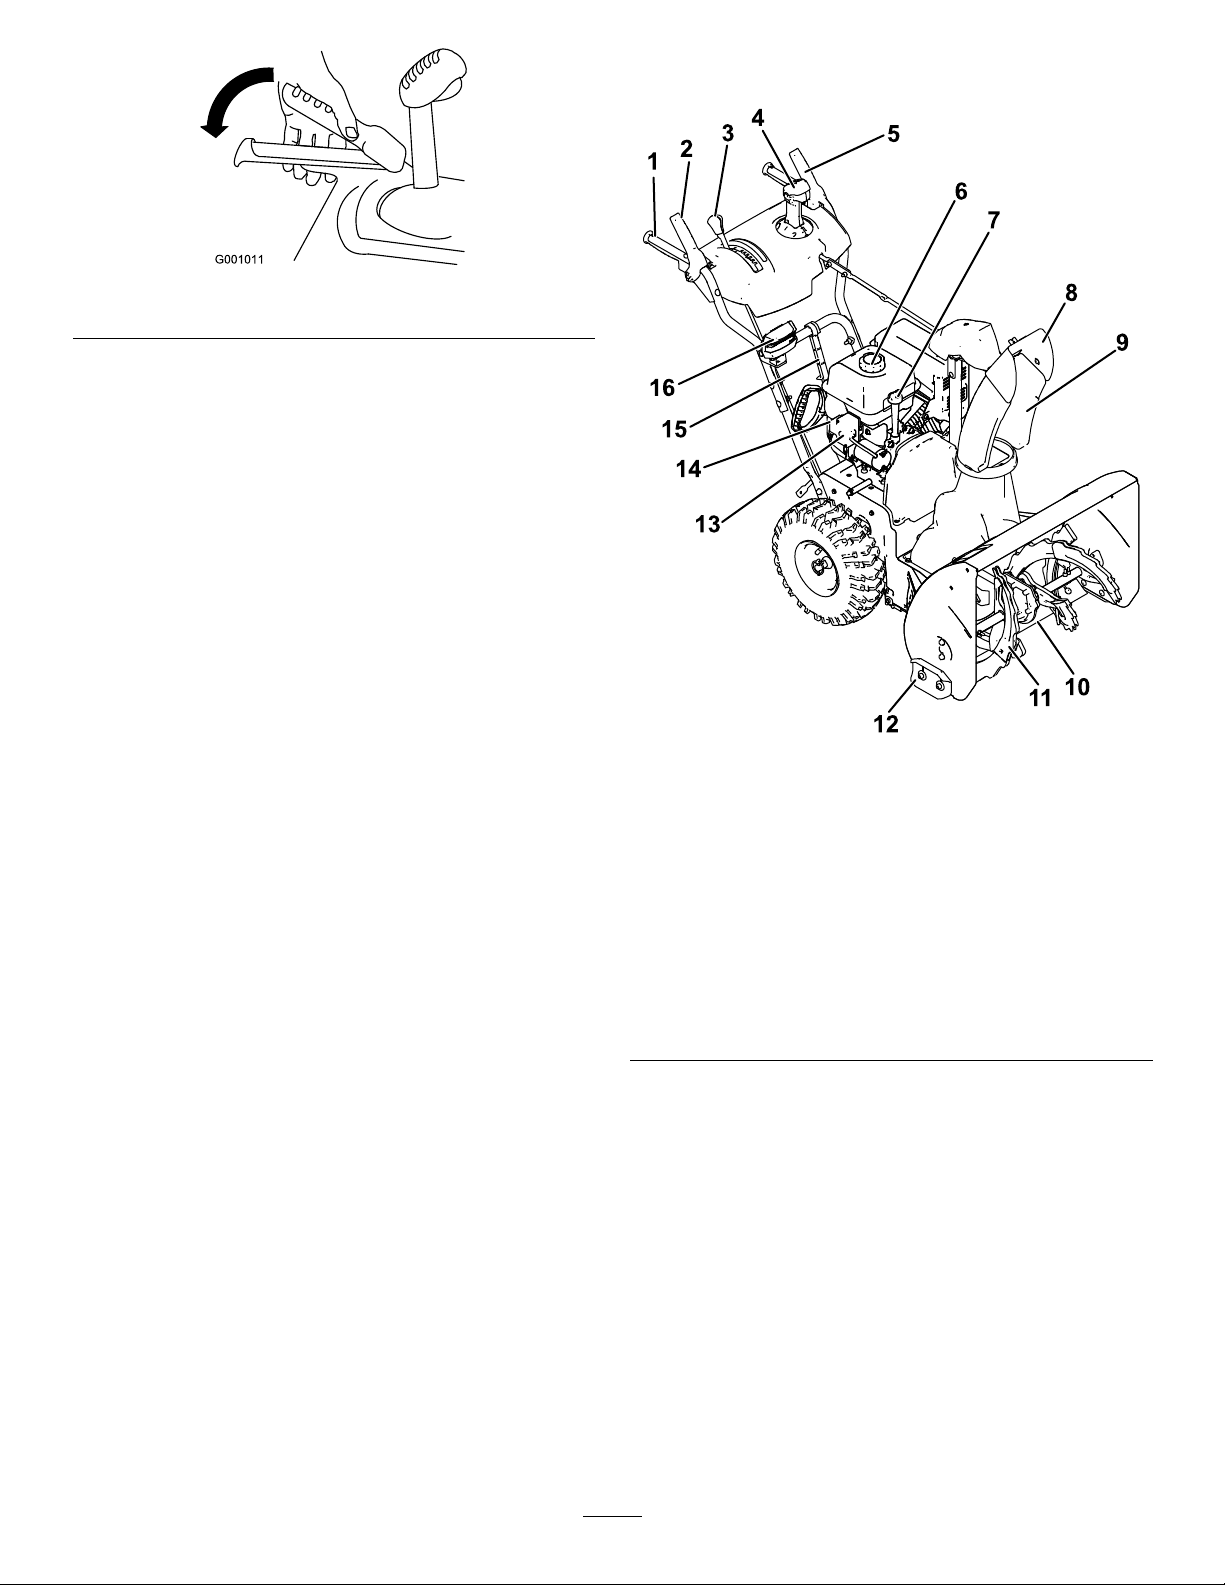
Figure10
Themachineshouldmoverearward.Ifthe
machinedoesnotmoveormovesforward,
completethefollowing:
A.Releasethetractionleverandshutoffthe
engine.
B.Disconnectthetrunnionfromthe
speed-selectorlever.
C.Turnthetrunniondownward(clockwise)on
thespeed-controlrod.
D.Connectthetrunniontothespeed-selector
lever.
ProductOverview
g001011
4.Releasethetractionlever.
5.MovethespeedselectortoPosition1;referto
OperatingtheSpeedSelector(page15).
6.Squeezetheleft(traction)levertothehandgrip
(Figure10).
Themachineshouldmoveforward.Ifthe
machinedoesnotmoveormovesrearward,
completethefollowing:
A.Releasethetractionleverandshutoffthe
engine.
B.Disconnectthetrunnionfromthe
speed-selectorlever.
C.Turnthetrunnionupward(counterclockwise)
onthespeed-controlrod.
D.Connectthetrunniontothespeed-selector
lever.
7.Ifyoumadeanyadjustments,repeatthis
procedureuntilnoadjustmentsarerequired.
Important:Ifthemachinemoveswhenthe
tractionleverisinthereleasedposition,checkthe
tractioncable;refertoCheckingandAdjusting
theTractionCable(page20)ortakethemachine
toanAuthorizedServiceDealerforservice.
Figure11
1.Handgrip(2)
2.Auger/impellerlever10.Scraper
3.Speed-selectorlever
4.QuickStick®
discharge-chutecontrol
5.Tractionlever13.Electric-startbutton
6.Fuel-tankcap14.Electric-startplug-in
7.Oil-lltube/dipstick15.Snow-cleanouttool
8.Chutedeector16.Headlight(Model37799
9.Dischargechute
11.Auger
12.Skid(2)
only)
g254701
10
Page 11
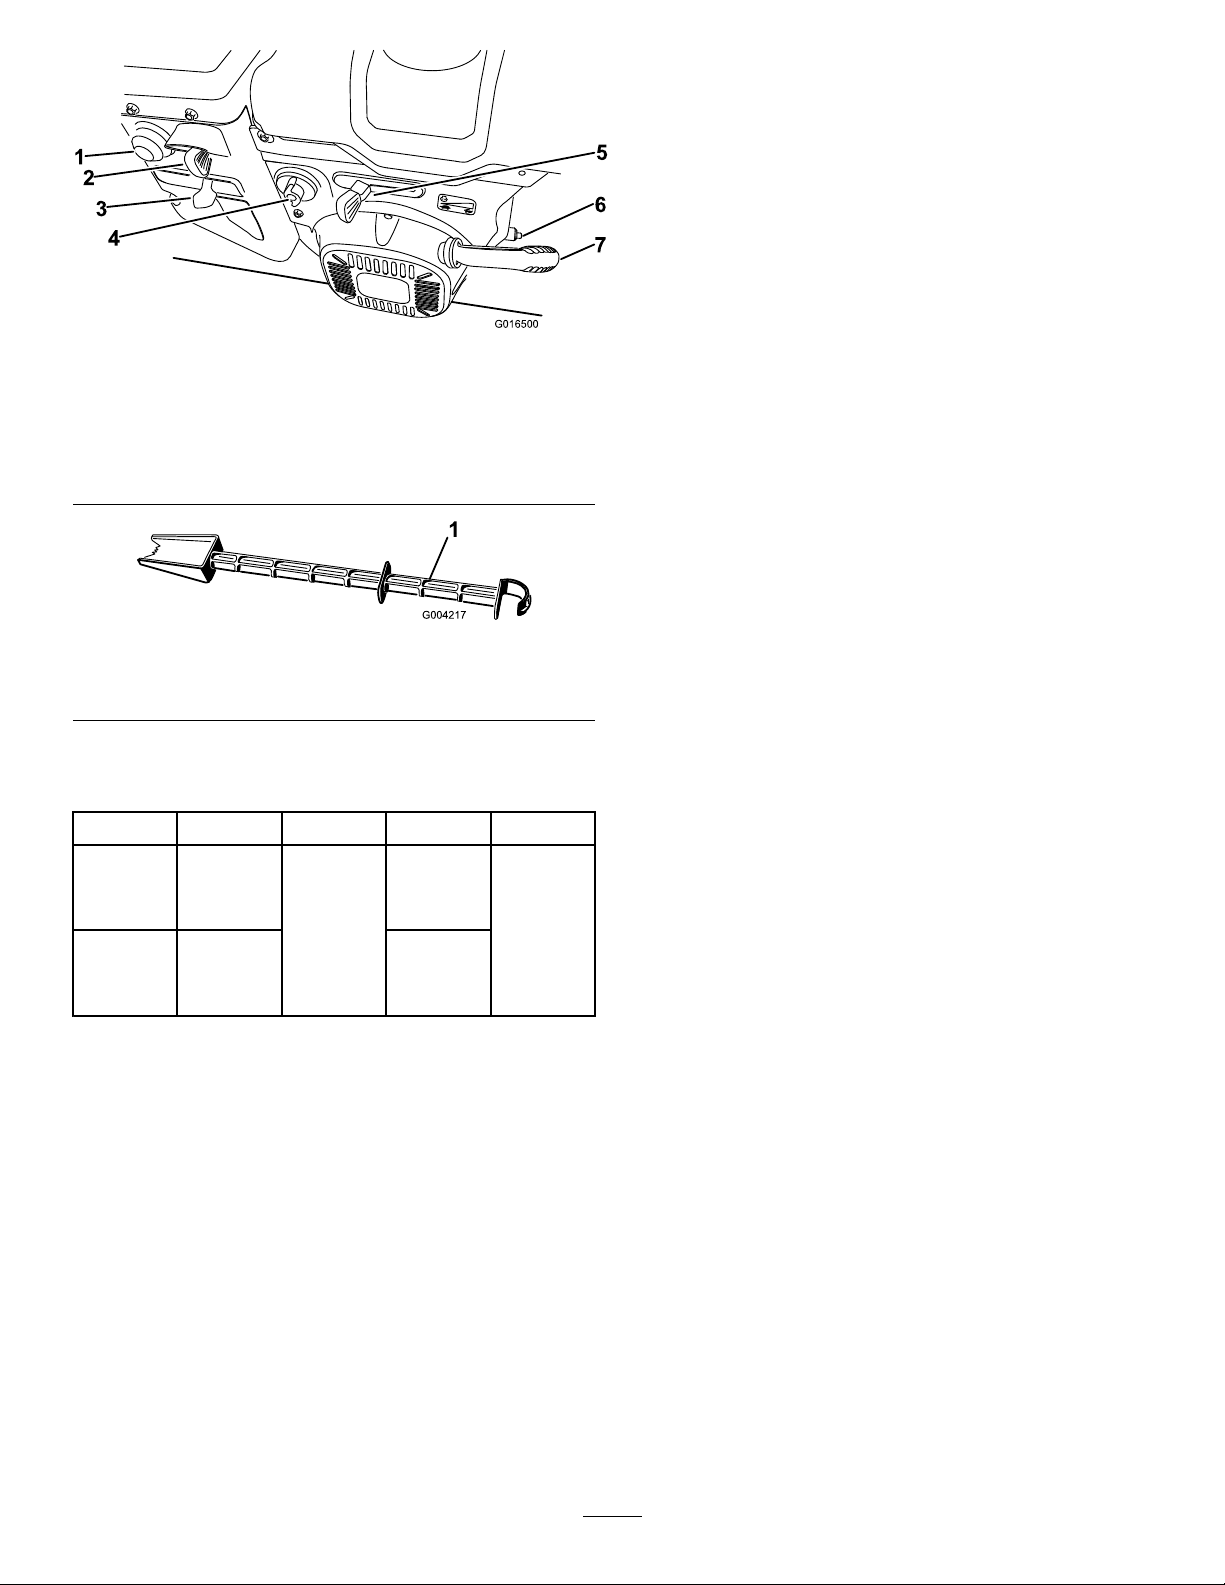
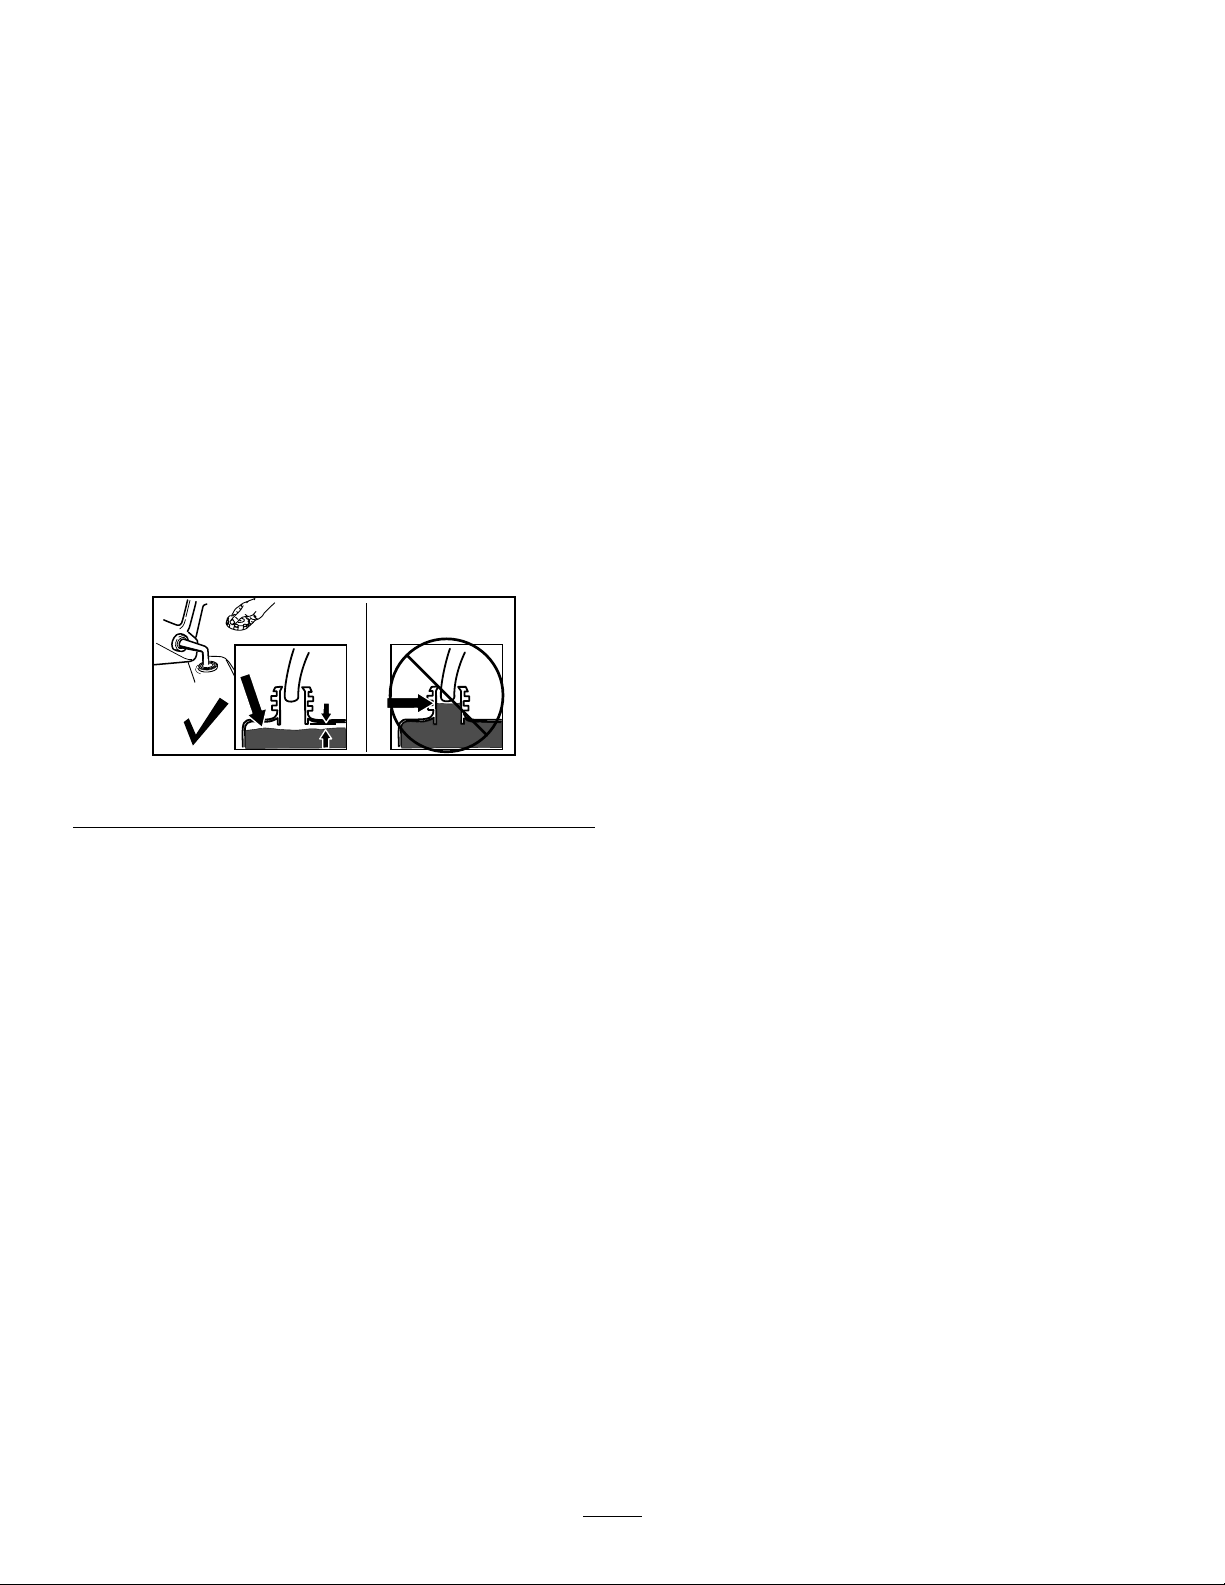
Figure12
1.Primer5.Throttle
2.Ignitionswitch
3.Choke
4.Fuel-shutoffvalve
Figure13
1.Snow-cleanouttool(attachedtothehandle)
6.Oil-drainplug
7.Recoil-starthandle
Operation
Note:Determinetheleftandrightsidesofthe
machinefromthenormaloperatingposition.
BeforeOperation
BeforeOperationSafety
g016500
GeneralSafety
•Forelectric-startmodelsonly:Useextension
cordsandreceptaclesasspeciedinthemanual.
Inspecttheelectricalcordbeforepluggingitinto
apowersource.Ifthecordisdamaged,replace
it.Unplugthepowercordwheneveryouarenot
startingthemachine.
•Wearappropriateclothing,includingeye
protection;longpants;substantial,slip-resistant
g004217
footwear;andhearingprotection.Tiebacklong
hair,securelooseclothing,anddonotwearloose
jewelry.
•Thoroughlyinspecttheareawhereyouwillusethe
machine,andremovealldoormats,sleds,boards,
wires,andotherforeignobjects.
Specications
ModelWeightLengthWidthHeight
80.3kg66cm
37798
(177lb)
81.6kg71cm
37799
(180lb)
142cm
(56
inches)
Attachments/Accessories
AselectionofToroapprovedattachmentsand
accessoriesisavailableforusewiththemachine
toenhanceandexpanditscapabilities.Contact
yourAuthorizedServiceDealerorauthorizedT oro
distributororgotowww.T oro.comforalistofall
approvedattachmentsandaccessories.
Toensureoptimumperformanceandcontinuedsafety
certicationofthemachine,useonlygenuineToro
replacementpartsandaccessories.Replacement
partsandaccessoriesmadebyothermanufacturers
couldbedangerous,andsuchusecouldvoidthe
productwarranty.
(26
inches)
(28
inches)
•Ifashield,safetydevice,ordecalisdamaged,
illegible,ormissing,repairorreplaceitbefore
beginningoperation.Also,tightenanyloose
fasteners.
•Two-stagemodelsonly:Adjustthecollector
117cm
(46
inches)
housingheighttoclearagravelorcrushed-rock
surface.
FuelSafety
Fuelisextremelyammableandexplosive.Areor
explosionfromfuelcanburnyouandothers.
•Topreventastaticchargefromignitingthefuel,
placethecontainerand/ormachineontheground
beforelling,notinavehicleoronanobject.
•Fillthefueltankoutdoorswhentheengineiscold.
Replacethefuelcapsecurelyandwipeupspills.
•Donothandlefuelwhensmokingoraroundan
openameorsparks.
•Storefuelinanapprovedfuelcontainer,outofthe
reachofchildren.
•Whenfuelisinthetank,tipthemachineonlyas
directedintheinstructions.
•Ifyouspillfuelonyourclothing,changeyour
clothingimmediately.
11
Page 12
FillingtheFuelTank
•Forbestresults,useonlyclean,fresh(lessthan
30daysold),unleadedgasolinewithanoctane
ratingof87orhigher((R+M)/2ratingmethod).
•Oxygenatedfuelwithupto10%ethanolor15%
MTBEbyvolumeisacceptable.
•Donotuseethanolblendsofgasoline(such
asE15orE85)withmorethan10%ethanolby
volume.Performanceproblemsand/orengine
damagemayresultwhichmaynotbecovered
underwarranty.
•Donotusegasolinecontainingmethanol.
•Donotstorefueleitherinthefueltankorfuel
containersoverthewinterunlessyouuseafuel
stabilizer.
•Donotaddoiltogasoline.
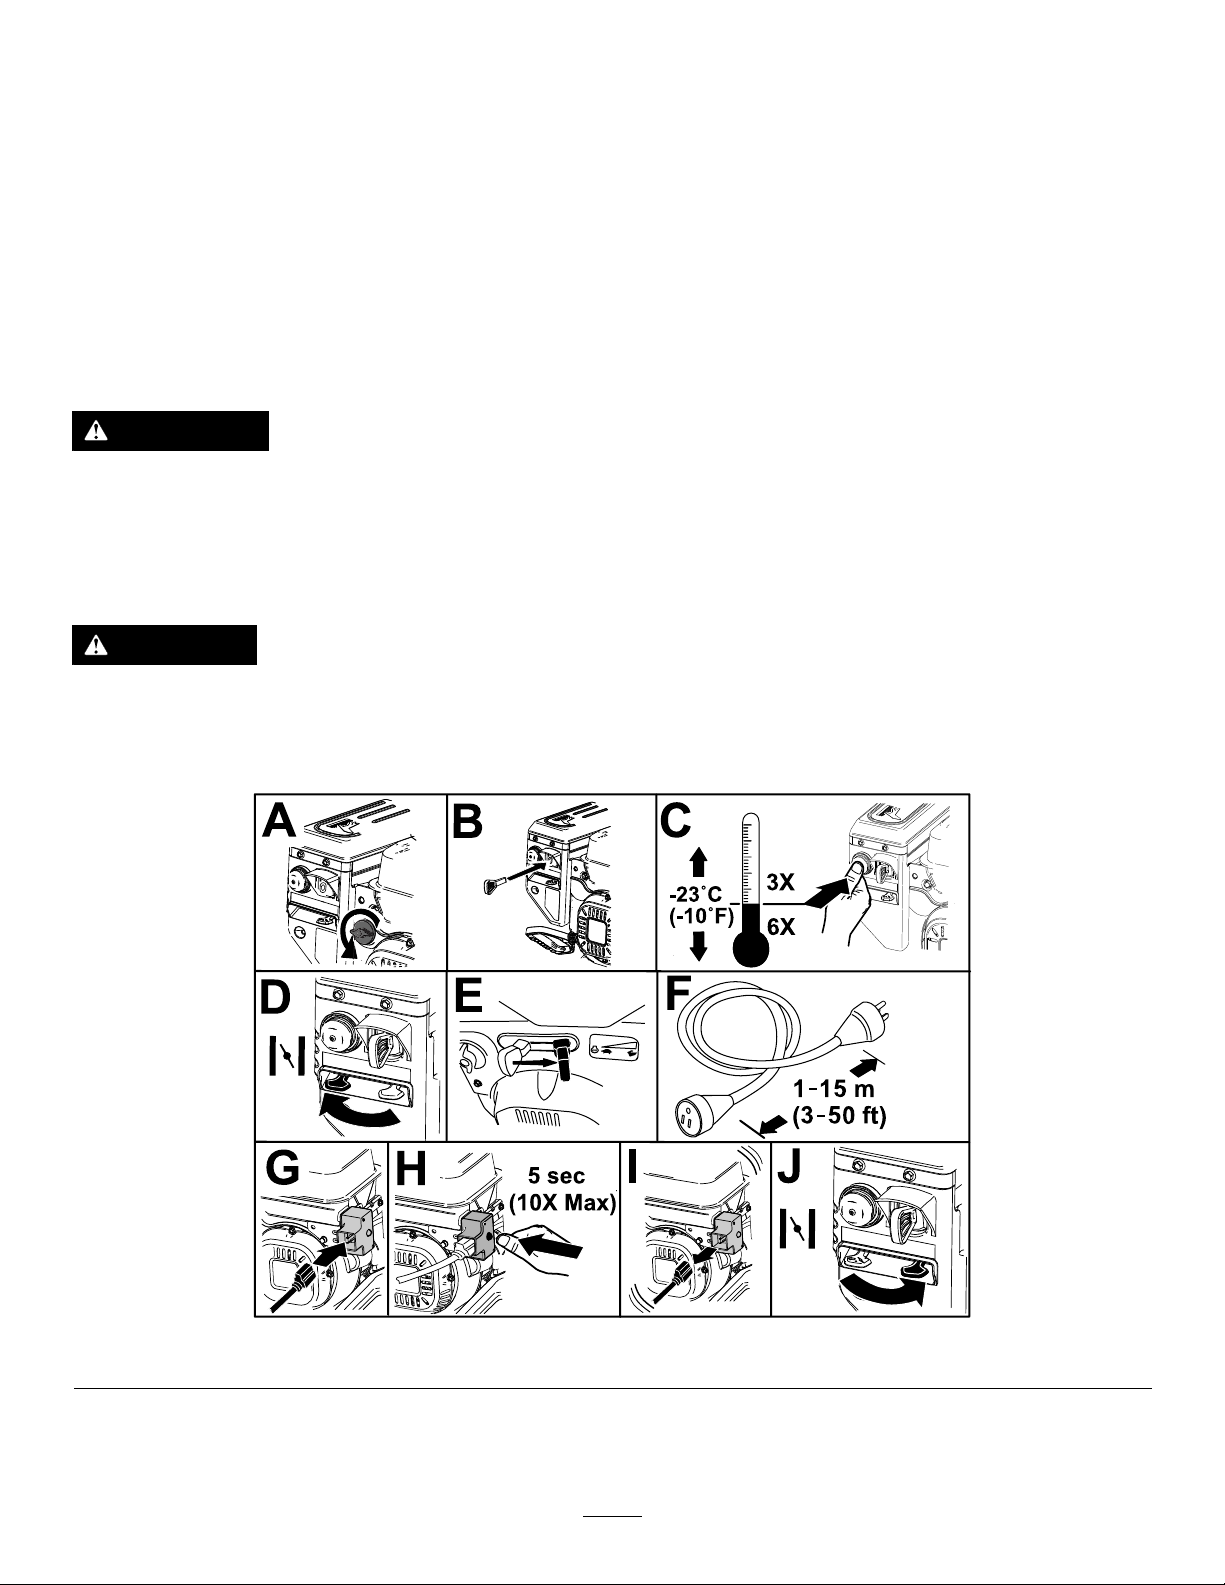
Donotllabovethebottomofthefueltankneck
(Figure14).
Figure14
Important:Forbestresults,purchaseonlythe
quantityoffuelthatyouexpecttousein30days.
Otherwise,youmayusefuelstabilizer/conditioner
inthemachineatalltimestokeepthefuelfresh
longerwhenusedasdirectedbythefuel-stabilizer
manufacturer.
DuringOperation
DuringOperationSafety
•Shutofftheenginebeforeuncloggingthe
machineandalwaysuseastickorthe
snow-cleanouttool(ifprovided).
•Staybehindthehandlesandawayfromthe
dischargeopeningwhileoperatingthemachine.
Keepyourface,hands,feet,andanyotherpart
ofyourbodyorclothingawayfrommovingor
rotatingparts.
•Neverdirectthedischargetowardpeopleorareas
wherepropertydamagecanoccur.
•Useyourfullattentionwhileoperatingthe
machine.Donotengageinanyactivitythat
causesdistractions;otherwise,injuryorproperty
damagemayoccur.
•Exercisecautiontoavoidslippingorfalling,
especiallywhenoperatingthemachineinreverse.
•Alwaysbesureofyourfooting,andkeeparm
holdonthehandles.Walk;neverrun.
•Exerciseextremecautionwhenoperatingthe
machineonaslope.
•Donotoperatethemachinewithoutgoodvisibility
orlight.
g216203
•Lookbehindandusecarewhenbackingupthe
machine.
•Whennotactivelyclearingsnow,disengagepower
totheauger.
•Exerciseextremecautionwhenoperatingthe
machineonorcrossinggraveldrives(2-stage
modelsonly),walks,orroads.Stayalertforhidden
hazardsortrafc.
•Neverattempttomakeanyadjustmentswhile
theengineisrunning,exceptasdirectedinthe
instructions.
•Afterstrikingaforeignobject,shutofftheengine,
removetheignitionkey(electric-startmodels
only),inspectthemachinefordamage.Repairany
damagebeforestartingthemachine.
•Ifthemachinestartstovibrateabnormally,shutoff
theengineandcheckimmediatelyforthecause.
•Donotruntheengineindoors;exhaustfumesare
dangerous.
•Donotoverloadthemachinecapacityby
attemptingtoclearsnowattoofastarate.
•Disengageallclutchesandshiftintoneutralbefore
startingtheengine.
•Shutofftheenginewheneveryouleavethe
operatingposition,beforeclearingorunclogging
thecollector,impeller,ordischargechute,and
12
Page 13
whenmakinganyrepairs,adjustments,or
inspections.
•Neveroperatethemachineathightransport
speedsonslipperysurfaces.
StartingtheEngine
Electric-StartModel
Note:T ousetheelectricstarter(electric-startmodelsonly),connectapowercordtotheplug-inrstandthen
toapoweroutlet.UseonlyaUL-listed,16-gaugeextensioncordrecommendedforoutdoorusethatisnot
longerthan50ft(15m).
WARNING
Theelectricalcordcanbecomedamaged,causingashockorre.
Thoroughlyinspecttheelectricalcordbeforeusingthemachine.Ifthecordisdamaged,do
notuseit.Replaceorrepairthedamagedcordimmediately .ContactanAuthorizedService
Dealerforassistance.
CAUTION
Ifyouleavethemachinepluggedintoapoweroutlet,someonecaninadvertentlystartthe
machineandinjurepeopleordamageproperty.
Unplugthepowercordwheneveryouarenotstartingthemachine.
Figure15
g254927
13
Page 14
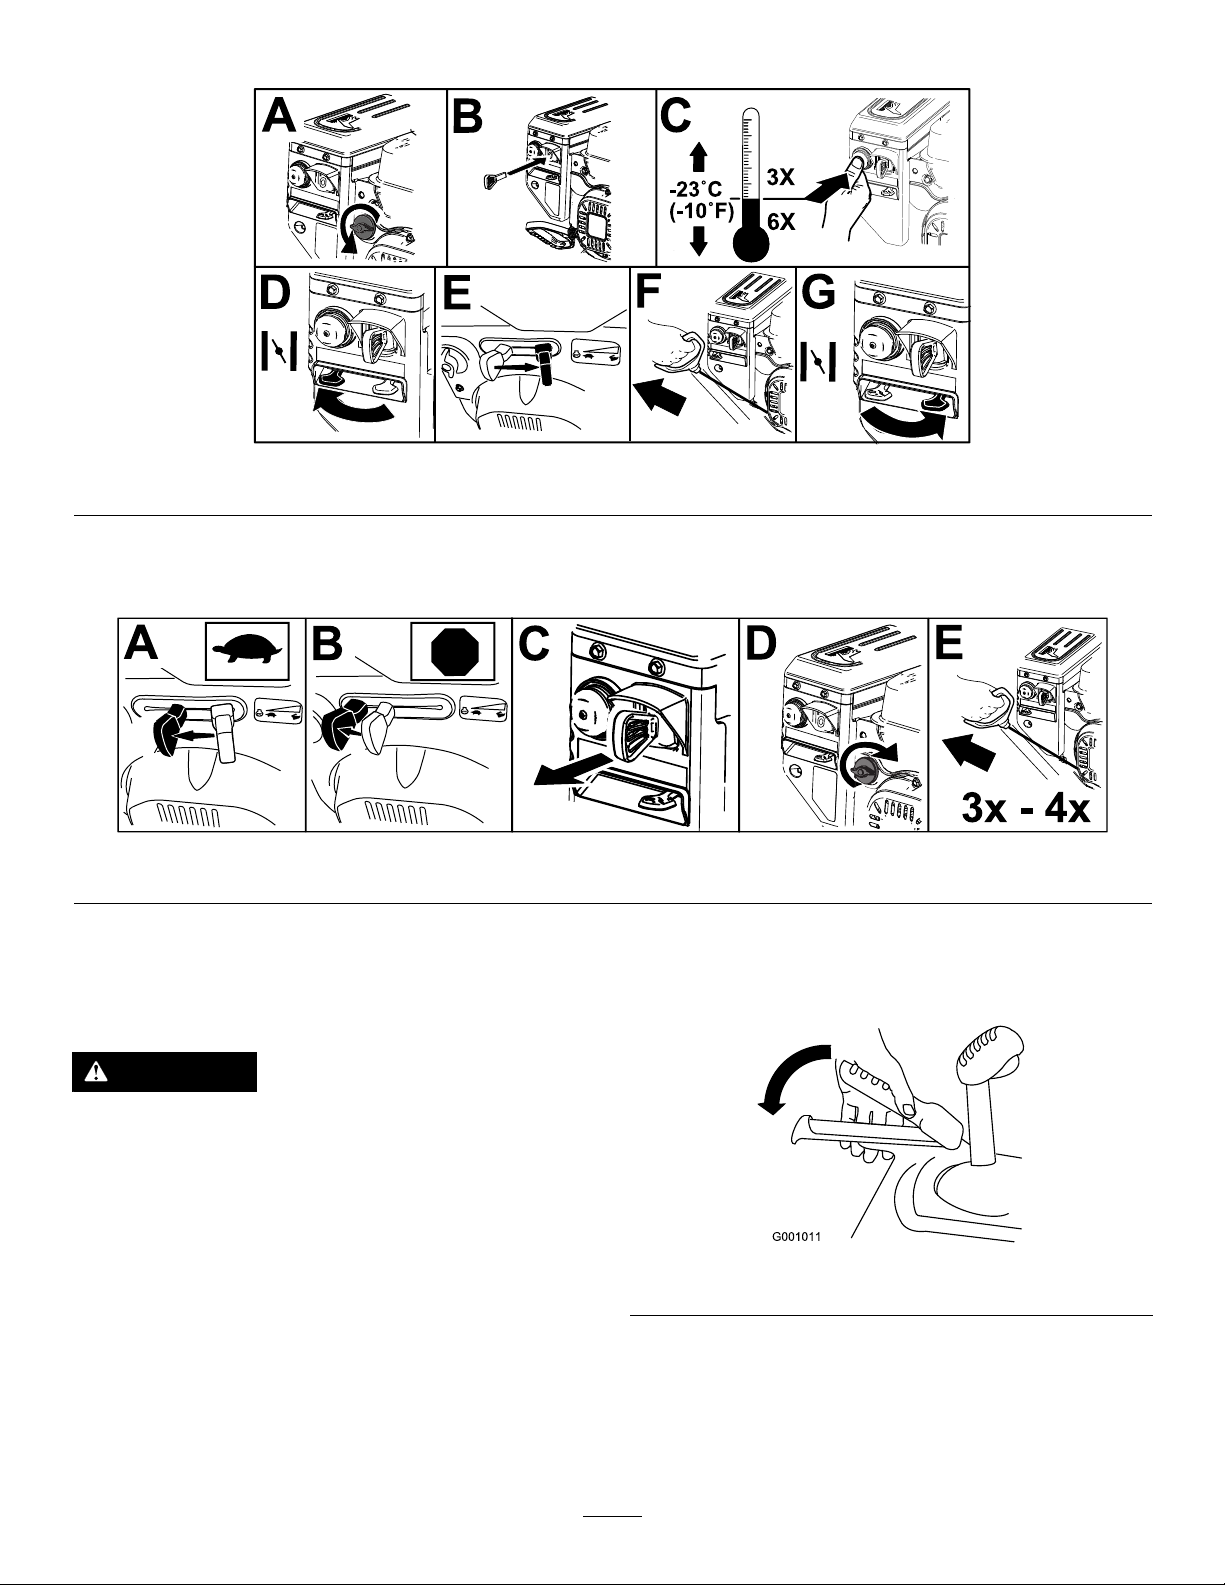
StandardModel
ShuttingOfftheEngine
g254928
Figure16
OperatingtheTraction Drive
CAUTION
Ifthetractiondriveisnotproperlyadjusted,
themachinemaymoveinthedirection
oppositeofwhatyouintended,causinginjury
and/orpropertydamage.
Carefullycheckthetractiondriveandadjust
itproperly,ifnecessary;refertoChecking
andAdjustingtheTractionCable(page20)for
moreinformation.
Important:Ifthemachinemoveswhenthe
tractionleverisinthereleasedposition,checkthe
tractioncable;refertoCheckingandAdjusting
theTractionCable(page20)ortakethemachine
toanAuthorizedServiceDealerforservice.
g252411
Figure17
1.Toengagethetractiondrive,squeezetheleft
(traction)levertothehandgrip(Figure18).
g001011
Figure18
2.Tostopthetractiondrive,releasethetraction
lever.
14
Page 15
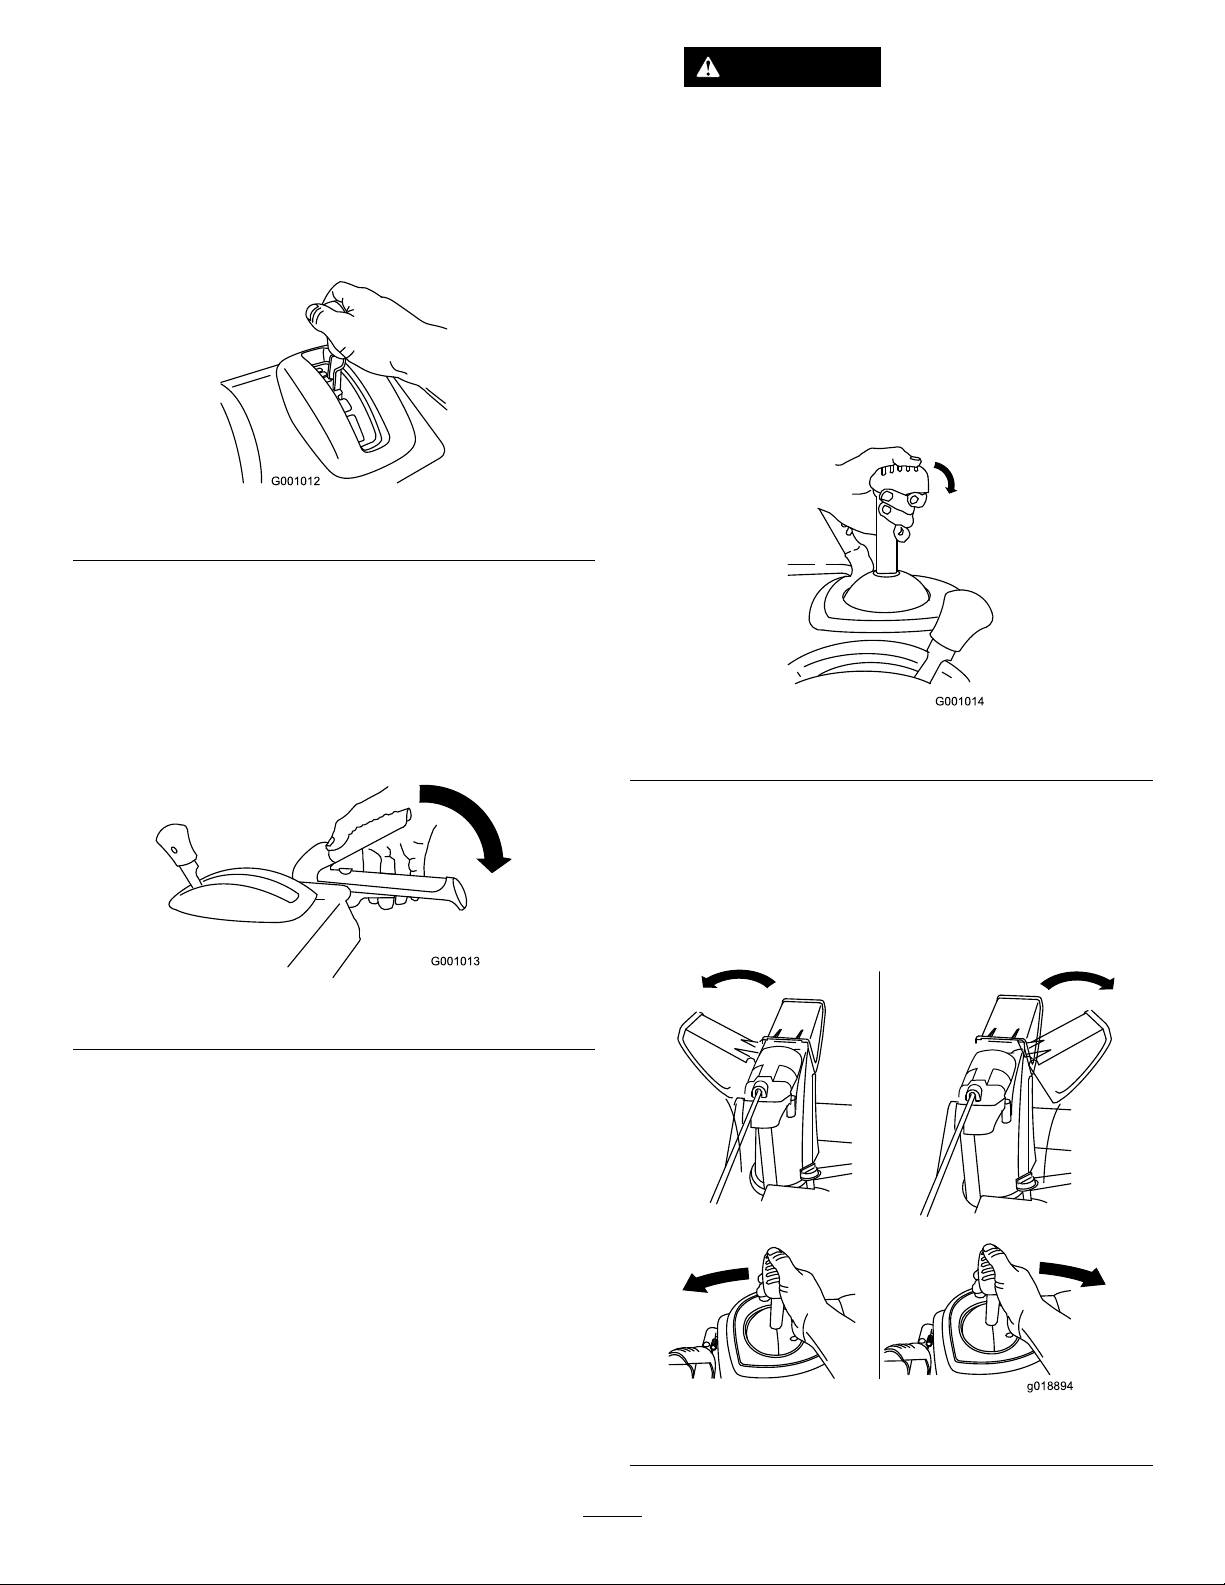
OperatingtheSpeed
WARNING
Selector
Thespeedselectorhas6forwardand2reverse
gears.T ochangespeeds,releasethetractionlever
andshiftthespeed-selectorlevertothedesired
position(Figure19).Theleverlocksinanotchat
eachspeedselection.
Figure19
Operatingthe Auger/ImpellerDrive
Iftheaugerandimpellercontinue
torotatewhenyoureleasethe
auger/impellerlever,youcouldseriously
injureyourselforothers.
Donotoperatethemachine.Takeittoan
AuthorizedServiceDealerforservice.
OperatingtheQuickStick®
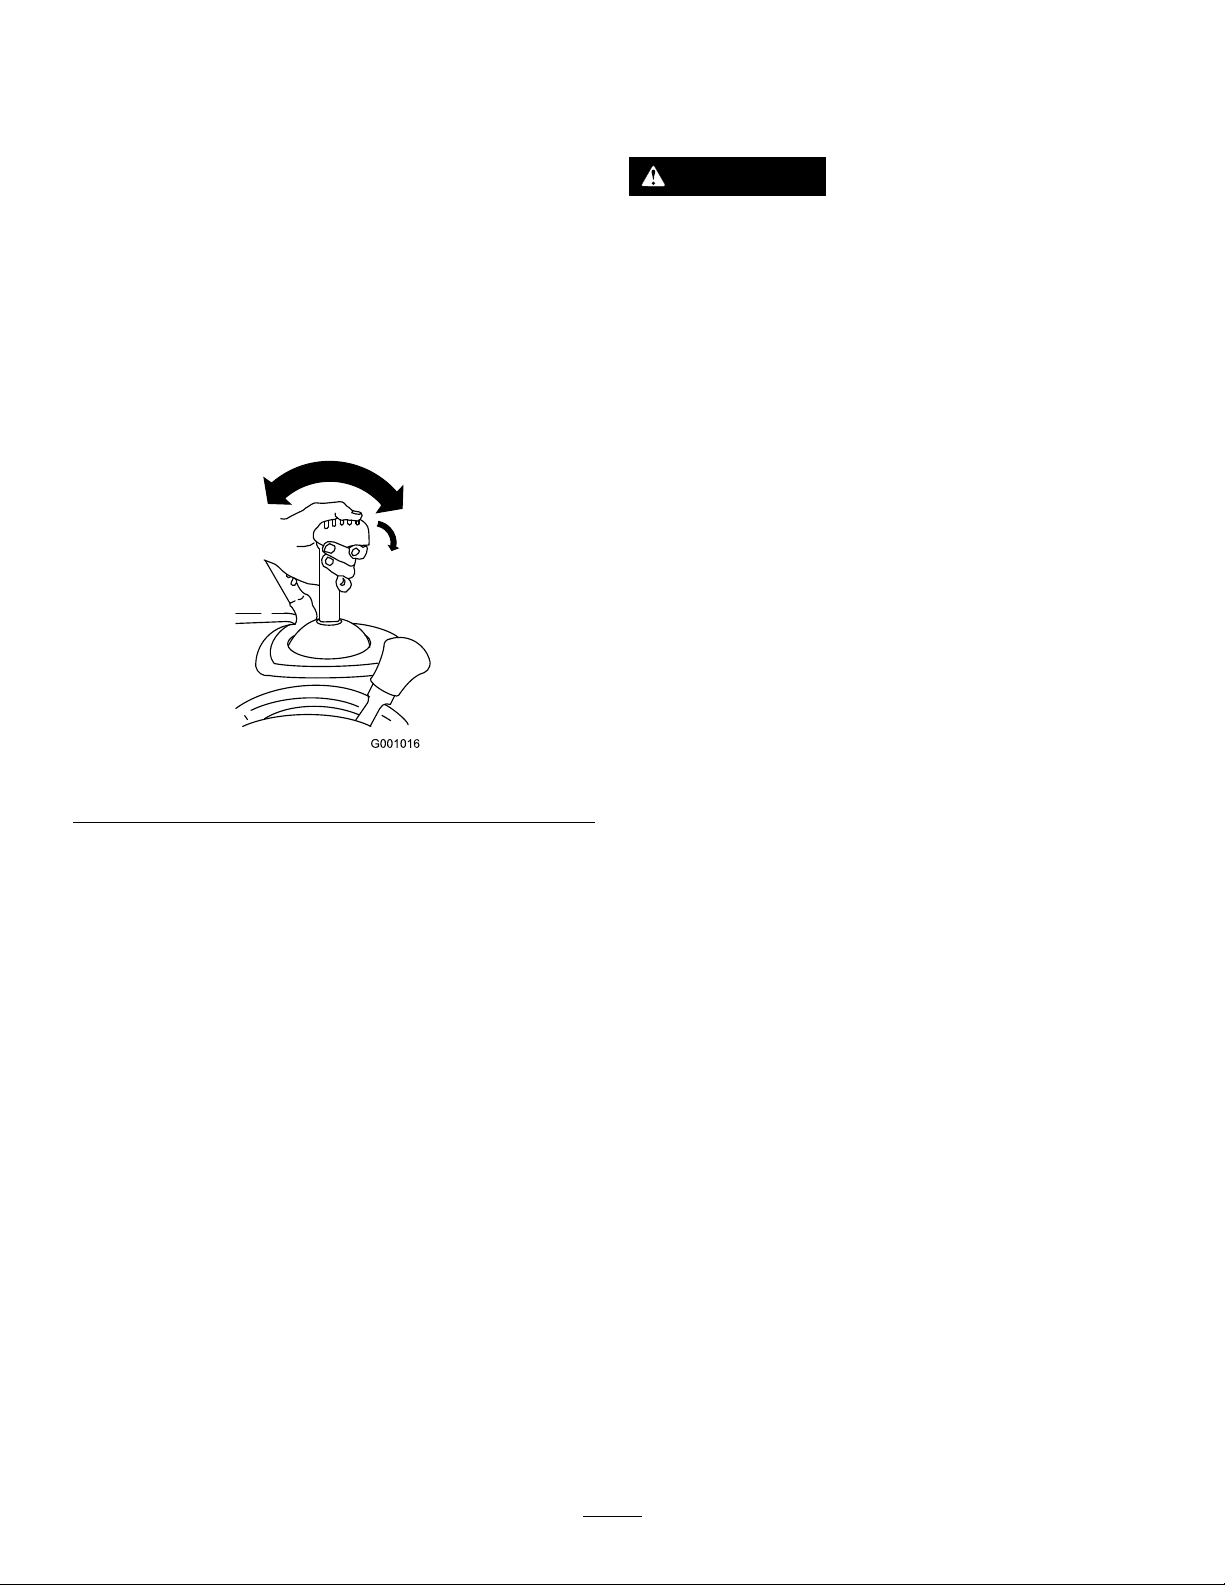
HoldthebluetriggercapdowntousetheQuickStick
tomovethedischargechuteandthechutedeector.
Releasethetriggercaptolockthedischargechute
andchutedeectorintoposition(Figure21).
g001012
1.Toengagetheauger/impellerdrive,squeeze
theright(auger/impeller)levertothehandgrip
(Figure20).
Figure20
2.Tostoptheaugerandimpeller,releasetheright
lever.
Important:Whenyouengageboththe
auger/impellerleverandthetractionlever,
thetractionleverlockstheauger/impeller
leverdown,freeingyourrighthand.To
releasebothlevers,simplyreleasetheleft
(traction)lever.
g001014
Figure21
MovingtheDischargeChute
HoldthebluetriggercapdownandmovetheQuick
Sticktothelefttomovethedischargechutetothe
left;movetheQuickSticktotherighttomovethe
dischargechutetotheright(Figure22).
g001013
3.Iftheaugerandimpellercontinuetorotatewhen
youreleasetheauger/impellerlever,donot
operatethemachine.Checktheauger/impeller
cable;refertoCheckingandAdjustingthe
Auger/ImpellerCable(page21)andadjustitif
necessary.Otherwise,takethemachinetoan
AuthorizedServiceDealerforservice.
g018894
Figure22
15
Page 16
•Ifthechutedoesnotmove,refertoAdjustingthe
Discharge-ChuteLatch(page24).
•Ifthechutedoesnotturnasfartotheleftasit
doestotheright,ensurethatthecableisroutedto
theinsideofthehandles.Referto1Installingthe
UpperHandle(page5).
•Ifthechutedoesnotlockintoplacewhenyou
releasethetriggercap,refertoAdjustingthe
Discharge-ChuteLatch(page24).
MovingtheChuteDeector
HoldthebluetriggercapdownandmovetheQuick
Stickforwardtolowerthechutedeector;moveit
rearwardtoraisethechutedeector(Figure23).
ClearingaClogged DischargeChute
WARNING
Iftheauger/impellerisrunningbutthereisno
snowcomingoutofthedischargechute,the
dischargechutemaybeclogged.
Neveruseyourhandstoclearaclogged
dischargechute.Thiscouldresultinpersonal
injury.
•Tounclogthedischargechute,stayinthe
operatingpositionandreleasetheleft(traction)
lever.Whilerunningtheauger/impeller,pushdown
onthehandlestoraisethefrontofthemachinea
fewcentimeters(inches)offthepavement.Then
liftthehandlesquicklytobumpthefrontofthe
machineonthepavement.Repeatifnecessary
untilastreamofsnowcomesoutthedischarge
chute.
Figure23
•Ifyoucannotunclogthedischargechuteby
bumpingthefrontofthemachine,shutoffthe
engine,waitforallmovingpartstostop,and
usethesnow-cleanouttool(Figure13).
g001016
Important:Uncloggingthedischargechute
bybumpingthefrontofthemachineonthe
pavementmaycausetheskidstomove.Adjust
theskidsandtightentheskidboltssecurely;
refertoCheckingandAdjustingtheSkidsand
Scraper(page19).
16
Page 17

OperatingTips
AfterOperation
DANGER
Whenthemachineisinoperation,theimpeller
andaugerrotateandcaninjureoramputate
handsorfeet.
•Beforeadjusting,cleaning,inspecting,
troubleshooting,orrepairingthemachine,
shutofftheengineandwaitforallmoving
partstostop.Disconnectthewirefrom
thesparkplugandkeepitawayfromthe
plugtopreventsomeonefromaccidentally
startingtheengine.
•Removeanobstructionfromthedischarge
chute;refertoClearingaClogged
DischargeChute(page16).Usethe
snow-cleanouttool(Figure14),notyour
hands,toremoveanobstructionfromthe
dischargechute.
•Staybehindthehandlesandawayfrom
thedischargeopeningwhileoperatingthe
machine.
•Keepyourface,hands,feet,andanyother
partofyourbodyorclothingawayfrom
concealed,moving,orrotatingparts.
WARNING
Theimpellercanthrowstones,toys,andother
foreignobjectsandcauseseriouspersonal
injurytoyouorbystanders.
•Keeptheareatobeclearedfreeofall
objectsthattheaugercouldpickupand
throw.
AfterOperationSafety
•Neverstorethemachinewithfuelinthefuel
tankinsideabuildingwhereignitionsourcesare
present,suchashotwaterheaters,spaceheaters,
orclothesdryers.Allowtheenginetocoolbefore
storingthemachineinanyenclosure.
•Whenstoringthemachineformorethan30
days,refertoStorage(page25)forimportant
information.
•Runthemachineafewminutesafterthrowing
snowtopreventfreeze-upofthecollectorand
impeller.
PreventingFreeze-upafter Use
•Insnowyandcoldconditions,somecontrolsand
movingpartsmayfreeze.Donotuseexcessive
forcewhentryingtooperatefrozencontrols.
Ifyouhavedifcultyoperatinganycontrolorpart,
starttheengineandletitrunforafewminutes.
•Afterusingthemachine,lettheenginerunfor
afewminutestopreventmovingpartsfrom
freezing.Engagetheauger/impellertoclearany
remainingsnowfrominsidethehousing.Rotate
theQuickSticktopreventitfromfreezing.Shutoff
theengine,waitforallmovingpartstostop,and
removealliceandsnowfromthemachine.
•Withtheengineoff,pulltherecoil-starthandle
severaltimesandpushtheelectric-startbutton
oncetopreventtherecoilstarterandelectric
starterfromfreezingup.
•Keepallchildrenandpetsawayfromthe
areaofoperation.
•AlwayssetthethrottletotheFASTpositionwhen
throwingsnow.
•Iftheengineslowsdownunderaloadorthe
wheelsslip,shiftthemachineintoalowergear.
•Ifthefrontofthemachineridesup,shiftthe
machineintoalowergear.Ifthefrontcontinuesto
rideup,liftuponthehandles.
17
Page 18

Maintenance
RecommendedMaintenanceSchedule(s)
MaintenanceService
Interval
Aftertherst2hours
Aftertherst5hours
Beforeeachuseordaily
Every100hours
Yearly
Yearlyorbeforestorage
MaintenanceProcedure
•Inspectthetractioncableandadjustitifnecessary.
•Inspecttheauger/impellercableandadjustitifnecessary .
•Changetheengineoil.
•Checktheengine-oillevelandaddoilifnecessary.
•Replacethesparkplug.
•Checktheskidsandthescraperandadjustthemifnecessary.
•Inspectthetractioncableandadjustorreplaceitifnecessary.
•Inspecttheauger/impellercableandadjustorreplaceitifnecessary.
•Checktheauger-gearboxoilandaddoilifnecessary.
•Changetheengineoil.
•Lubricatethehexshaft.
•Checktheairpressureinthetiresandinatethemto1 16to137kPa(17to20psi).
•Drainthefuelandruntheenginetodryoutthefueltankandthecarburetoratthe
endoftheseason.
•HaveanAuthorizedServiceDealerinspectandreplacethetractiondrivebeltand/or
theauger/impellerdrivebelt,ifnecessary.
Important:Y oucanndmoreinformationaboutmaintainingandservicingyourmachineat
www.Toro.com.
MaintenanceSafety
Readthefollowingsafetyprecautionsbefore
performinganymaintenanceonthemachine:
•Beforeservicing,adjusting,orcleaningthe
machine,shutofftheengineandremovethe
key.Ifmajorrepairsareeverneeded,contactan
AuthorizedServiceDealer.
•Alwaysweareyeprotectionwhileperformingan
adjustmentorrepairtoprotectyoureyesfrom
foreignobjectsthatthemachinemaythrow.
•Checkallfastenersatfrequentintervalsforproper
tightnesstoensurethatthemachineisinsafe
workingcondition.
•Donotchangethegovernorsettingsontheengine.
PurchaseonlygenuineTororeplacementparts
andaccessories.
PreparingforMaintenance
1.Movethemachinetoalevelsurface.
2.Shutofftheengineandwaitforallmovingparts
tostop.
3.Disconnectthespark-plugwire.Referto
ReplacingtheSparkPlug(page23).
18
Page 19
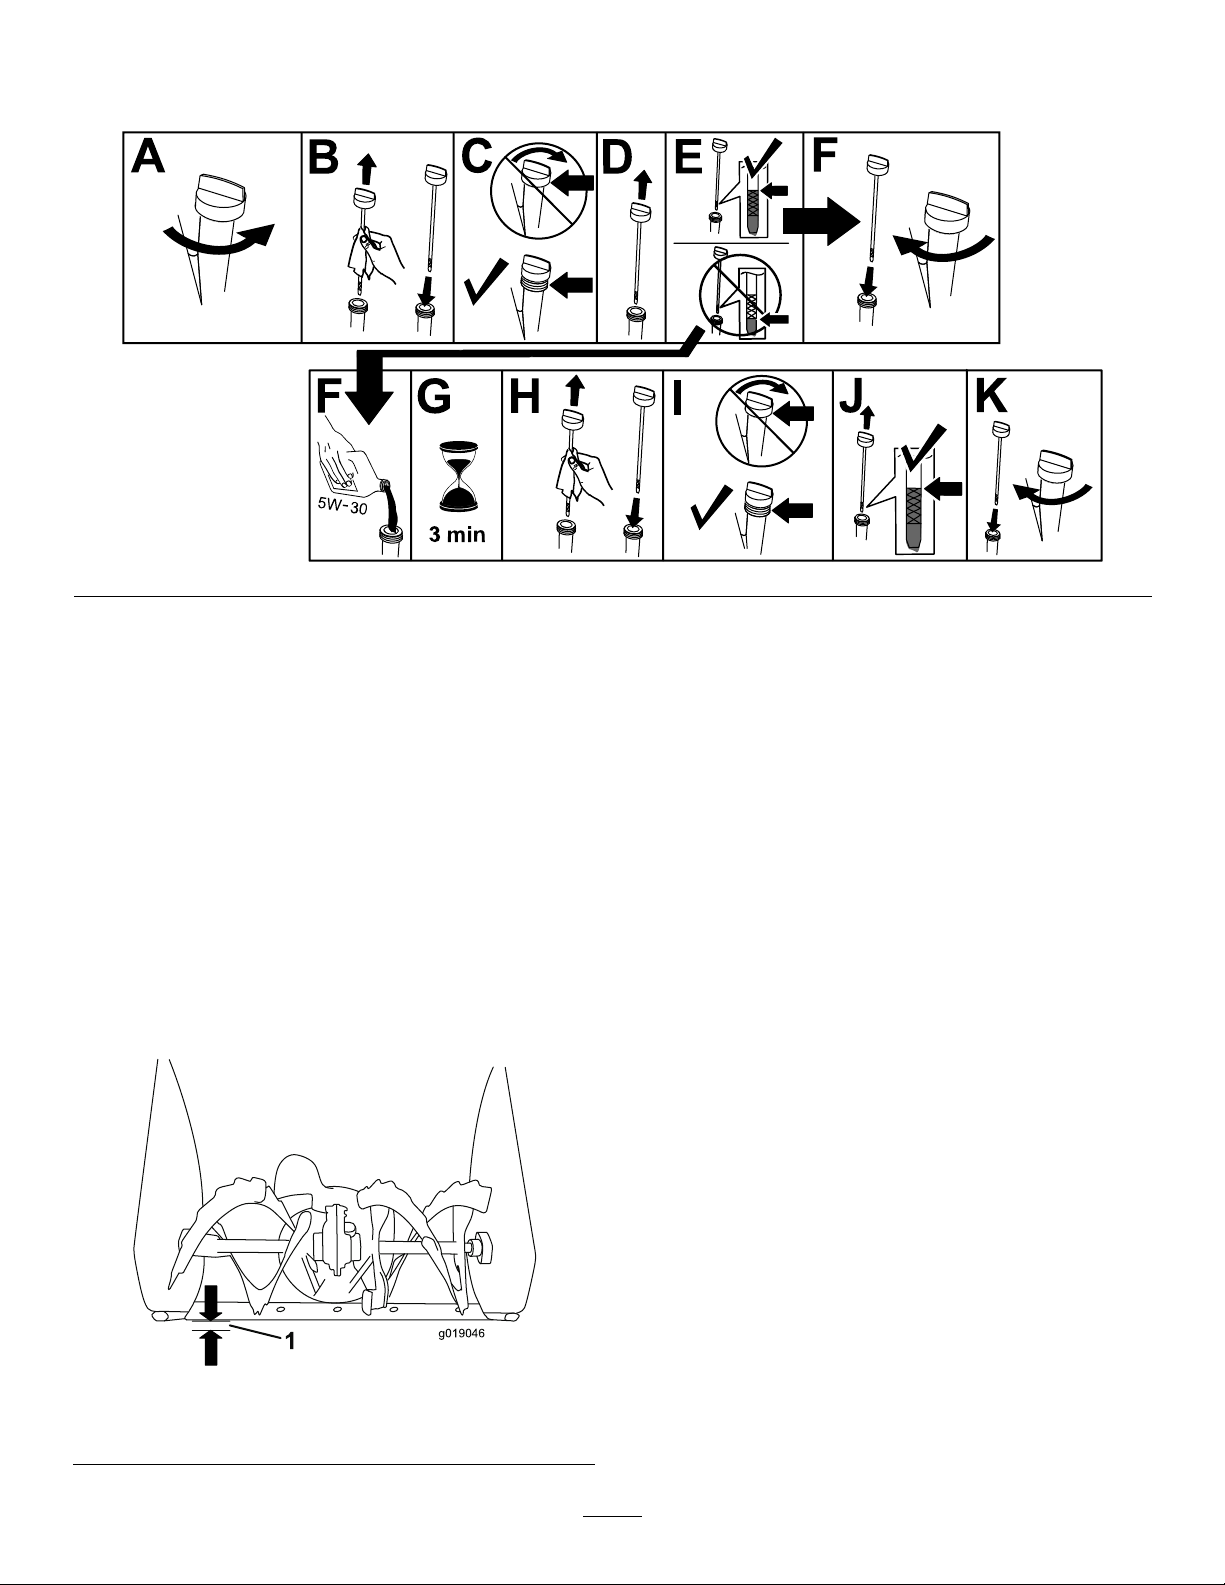
CheckingtheEngine-OilLevel
ServiceInterval:Beforeeachuseordaily—Checktheengine-oillevelandaddoilifnecessary.
g252395
CheckingandAdjustingthe SkidsandScraper
ServiceInterval:Y early—Checktheskidsand
thescraperandadjustthemif
necessary.
Checktheskidsandthescrapertoensurethatthe
augerdoesnotcontactthepavedorgravelsurface.
Adjusttheskidsandthescraperasneededto
compensateforwear.
1.Checkthetirepressure;referto7Checkingthe
TirePressure(page8).
2.Loosenthenutsthatsecurebothskidstothe
augersidesuntiltheskidsslideupanddown
easily.
Important:Theaugerbladesmustbe
supportedabovethegroundbytheskids.
3.Ensurethatthescraperis3mm(1/8inch)above
andparalleltoalevelsurface.
Note:Ifthepavementiscracked,rough,or
uneven,adjusttheskidstoraisethescraper.For
gravelsurfaces,adjusttheskidsfurtherdownto
preventthemachinefrompickinguprocks.
4.Movetheskidsdownuntiltheyareevenwith
theground.
5.Firmlytightenthenutsthatsecurebothskids
totheaugersides.
Note:T oquicklyadjusttheskidsiftheyloosen,
supportthescraper3mm(1/8inch)offthe
pavement,thenadjusttheskidsdowntothe
pavement.
Note:Iftheskidsbecomeexcessivelyworn,
youcanturnthemoverandsettheunusedside
towardthepavement.
1.3mm(1/8inch)
g019046
Figure25
19
Page 20
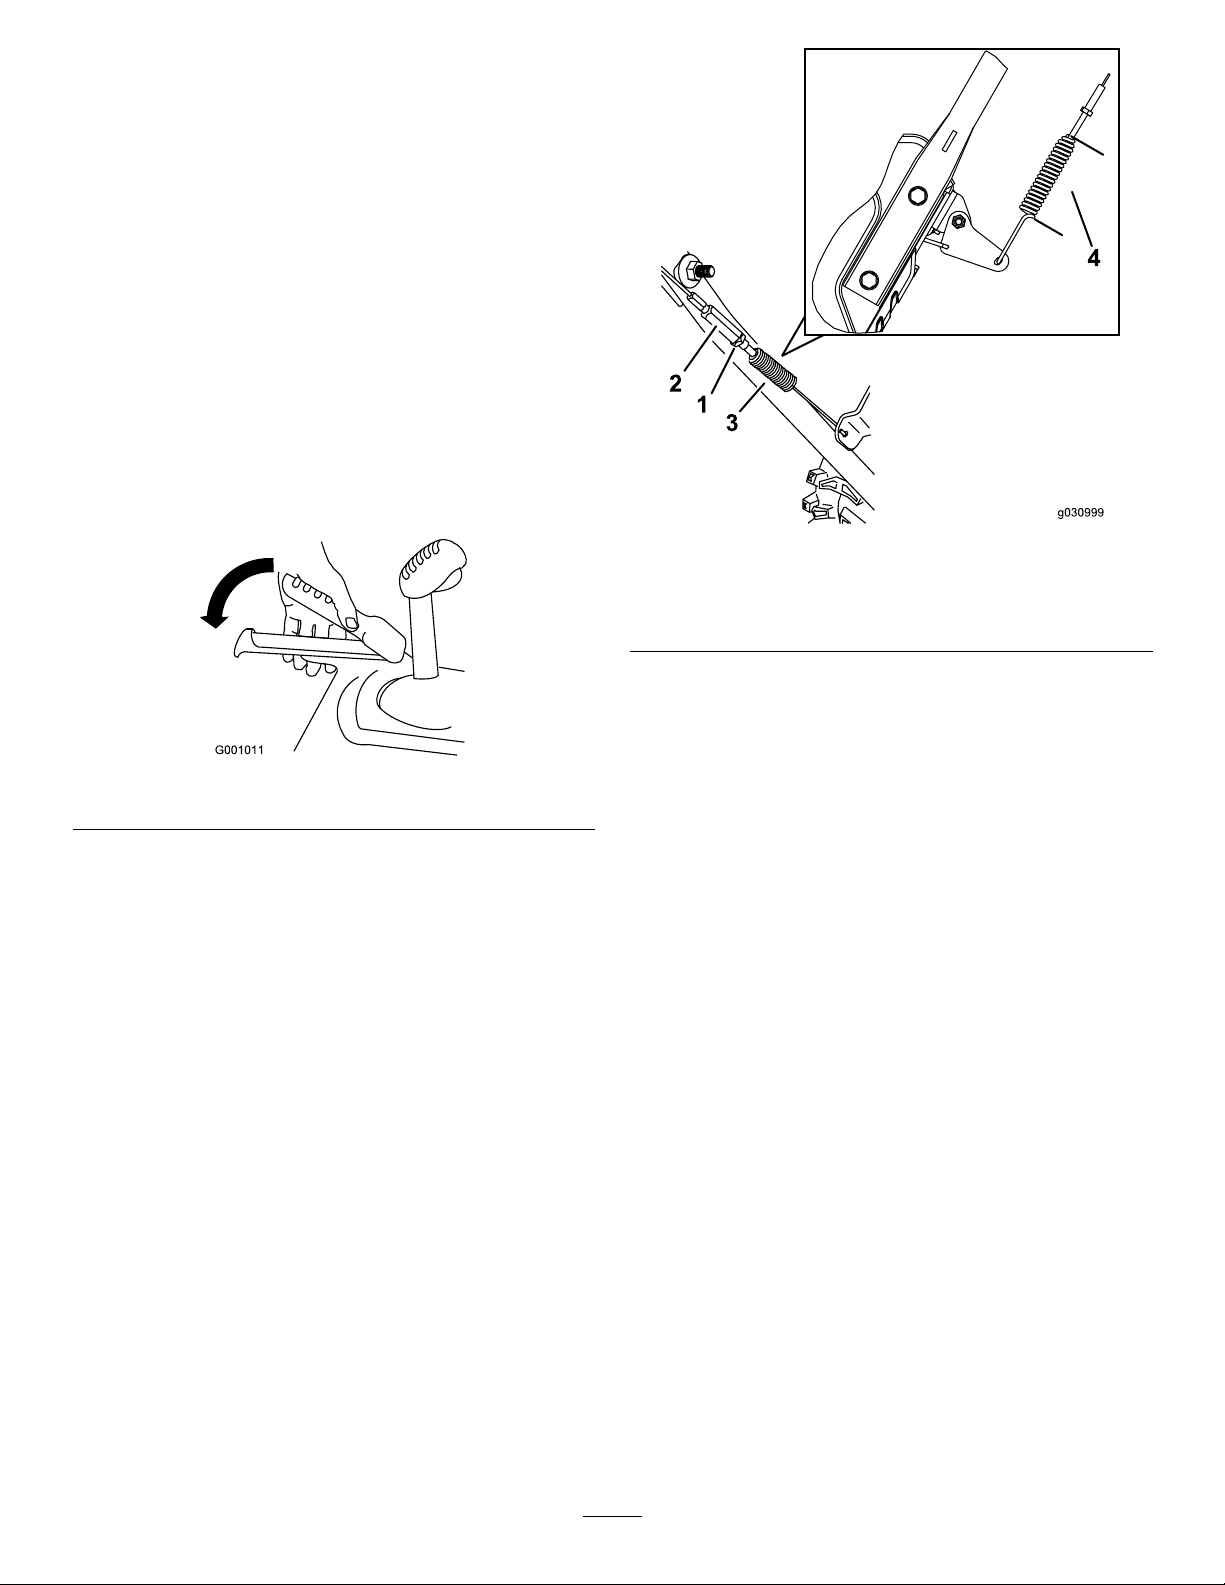
CheckingandAdjustingthe TractionCable
ServiceInterval:Aftertherst2hours—Inspect
thetractioncableandadjustitif
necessary.
Yearly—Inspectthetractioncableandadjustor
replaceitifnecessary.
Ifthemachinedoesnotdriveintheforwardorreverse
speedsoritdriveswhenyoureleasethetractionlever,
adjustthetractioncable.
Iftheleft(traction)cableisnotproperlyadjusted,do
thefollowingsteps:
1.Loosenthejamnut.
2.Engagethetractionleverandholditinplace
(Figure26).
g030998
Figure27
Figure26
3.Loosenortightentheturnbuckletoadjustthe
springlengthto5.5cm(2–3/16inches)as
showninFigure27.
g001011
1.Jamnut
2.Turnbuckle
3.Spring
4.5.5cm(2–3/16inches)
4.Tightenthejamnut(Figure27),ensuringthat
thereisslighttensiononthecable.
5.Ifthetractioncableisproperlyadjustedbuta
problemremains,contactanAuthorizedService
Dealer.
20
Page 21
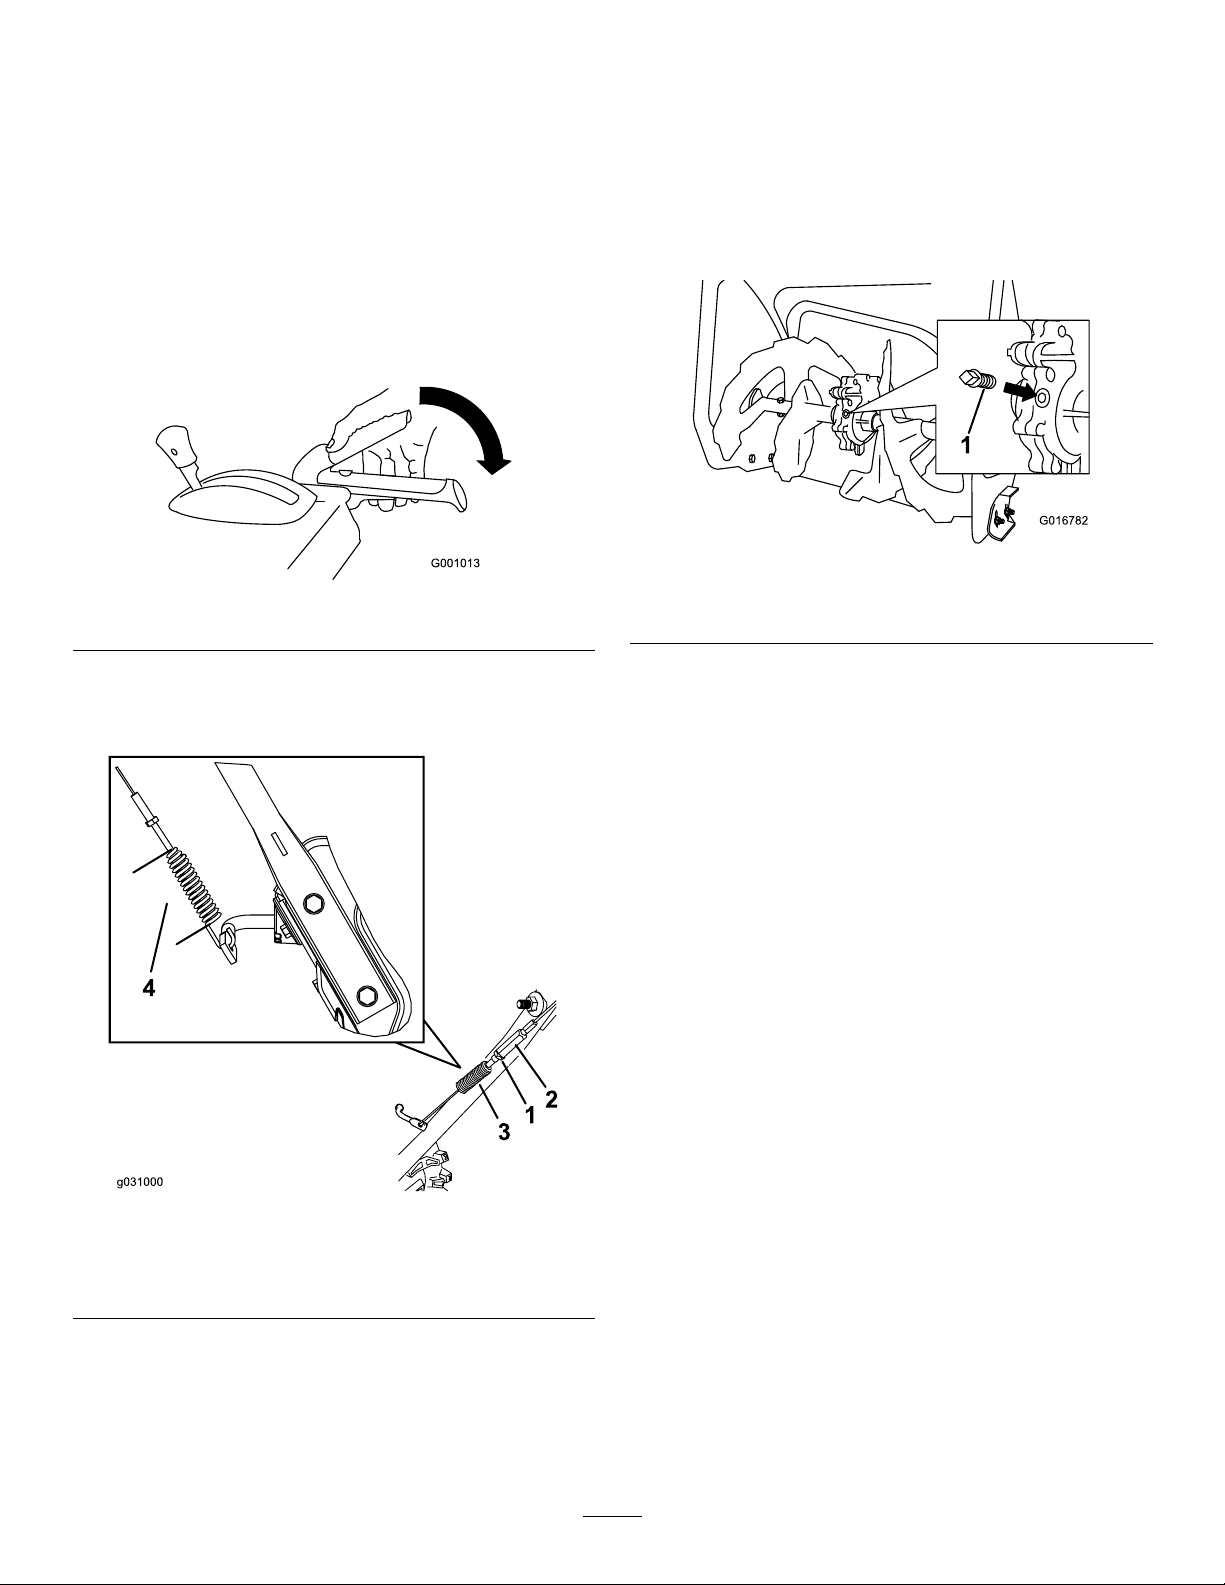
CheckingandAdjustingthe
Checkingthe
Auger/ImpellerCable
ServiceInterval:Aftertherst2hours—Inspectthe
auger/impellercableandadjustitif
necessary.
Yearly—Inspecttheauger/impellercableand
adjustorreplaceitifnecessary.
1.Loosenthejamnut.
2.Engagetheauger/impellerleverandholditin
place(Figure28).
Figure28
3.Loosenortightentheturnbuckletoadjustthe
springlengthto7cm(2-3/4inches)asshown
inFigure29.
Auger-Gearbox-OilLevel
ServiceInterval:Y early—Checktheauger-gearbox
oilandaddoilifnecessary.
1.Movethemachinetoalevelsurface.
2.Cleantheareaaroundthepipeplug(Figure30).
g016782
g001013
1.Pipeplug
3.Removethepipeplugfromthegearbox.
4.Checktheoillevelinthegearbox.Theoilshould
be9.5mm(3/8inch)belowthelleropening.
Figure30
Figure29
1.Jamnut
2.Turnbuckle
4.Tightenthejamnut(Figure29),ensuringthat
thereisslighttensiononthecable.
3.Spring
4.7cm(2-3/4inches)
5.Iftheoillevelislow,addGL-5orGL-6,SAE
80-90EPgearoillubricanttothegearboxuntil
theoillevelis9.5mm(3/8inch)belowtheller
opening.
Note:Donotusesyntheticoil.
6.Installthepipepluginthegearbox.
g031000
5.Iftheauger/impellercableisproperlyadjusted
butaproblemremains,contactanAuthorized
ServiceDealer.
21
Page 22
ChangingtheEngineOil
LubricatingtheHexShaft
ServiceInterval:Aftertherst5hours—Changethe
engineoil.
Yearly—Changetheengineoil.
Ifpossible,runtheengineforafewminutesbefore
changingtheoilbecausewarmoilowsbetterand
carriesmorecontaminants.
Engineoilcapacity
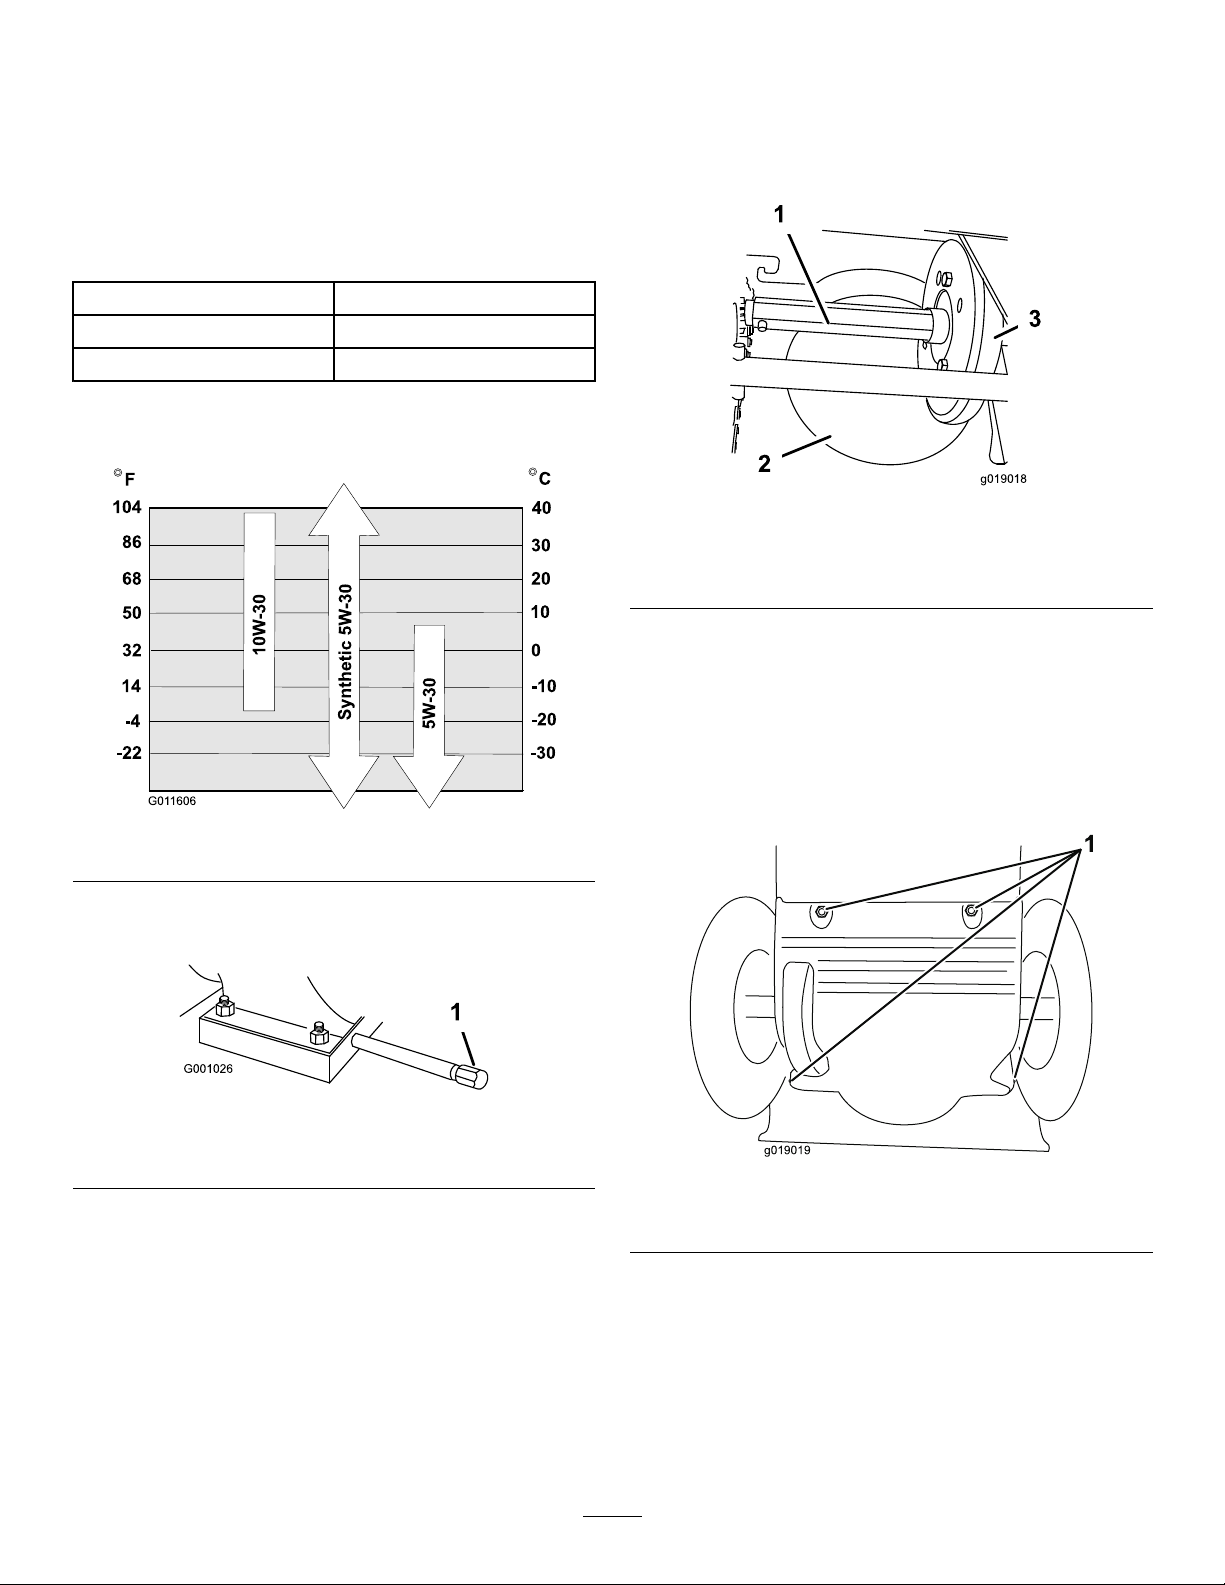
OilviscosityRefertoFigure31.
APIserviceclassicationSJorhigher
0.70L(24oz)
UseFigure31belowtoselectthebestoilviscosityfor
theoutdoortemperaturerangeexpected:
Figure31
ServiceInterval:Yearly—Lubricatethehexshaft.
Lightlylubricatethehexshaftyearlywithautomotive
engineoil(Figure33).
g019018
Figure33
1.Hexshaft
2.Steelfrictionpulley
3.Rubberwheel
Important:Donotgetoilontherubberwheelor
thesteelfrictionpulleybecausethetractiondrive
willslip(Figure33).
1.Drainthefuelfromthefueltank.
2.Tipthemachineforwardontoitsaugerhousing
andblockitsothatitcannotfall.
g011606
3.Removethebackcover(Figure34).
1.Cleantheareaaroundtheoil-draincap(Figure
32).
Figure32
1.Oil-draincap
2.Slideanoil-drainpanunderthedrainextension
andremovetheoil-draincap.
3.Draintheoil.
Note:Disposeoftheusedoilproperlyatalocal
recyclingcenter.
4.Installtheoil-draincap.
5.Fillthecrankcasewithoil.
g001026
g019019
Figure34
1.Screws
4.Movethespeed-selectorlevertoPositionR2.
5.Dipyourngerinautomotiveengineoiland
lightlylubricatethehexshaft.
6.Movethespeed-selectorlevertoPosition6.
7.Lubricatetheotherendofthehexshaft.
8.Movethespeed-selectorleverforwardand
rearwardafewtimes.
22
Page 23
9.Installthebackcoverandreturnthemachineto
theoperatingposition.
ReplacingtheSparkPlug
ServiceInterval:Every100hours—Replacethe
sparkplug.
WARNING
4.Setthegapbetweentheelectrodesonanew
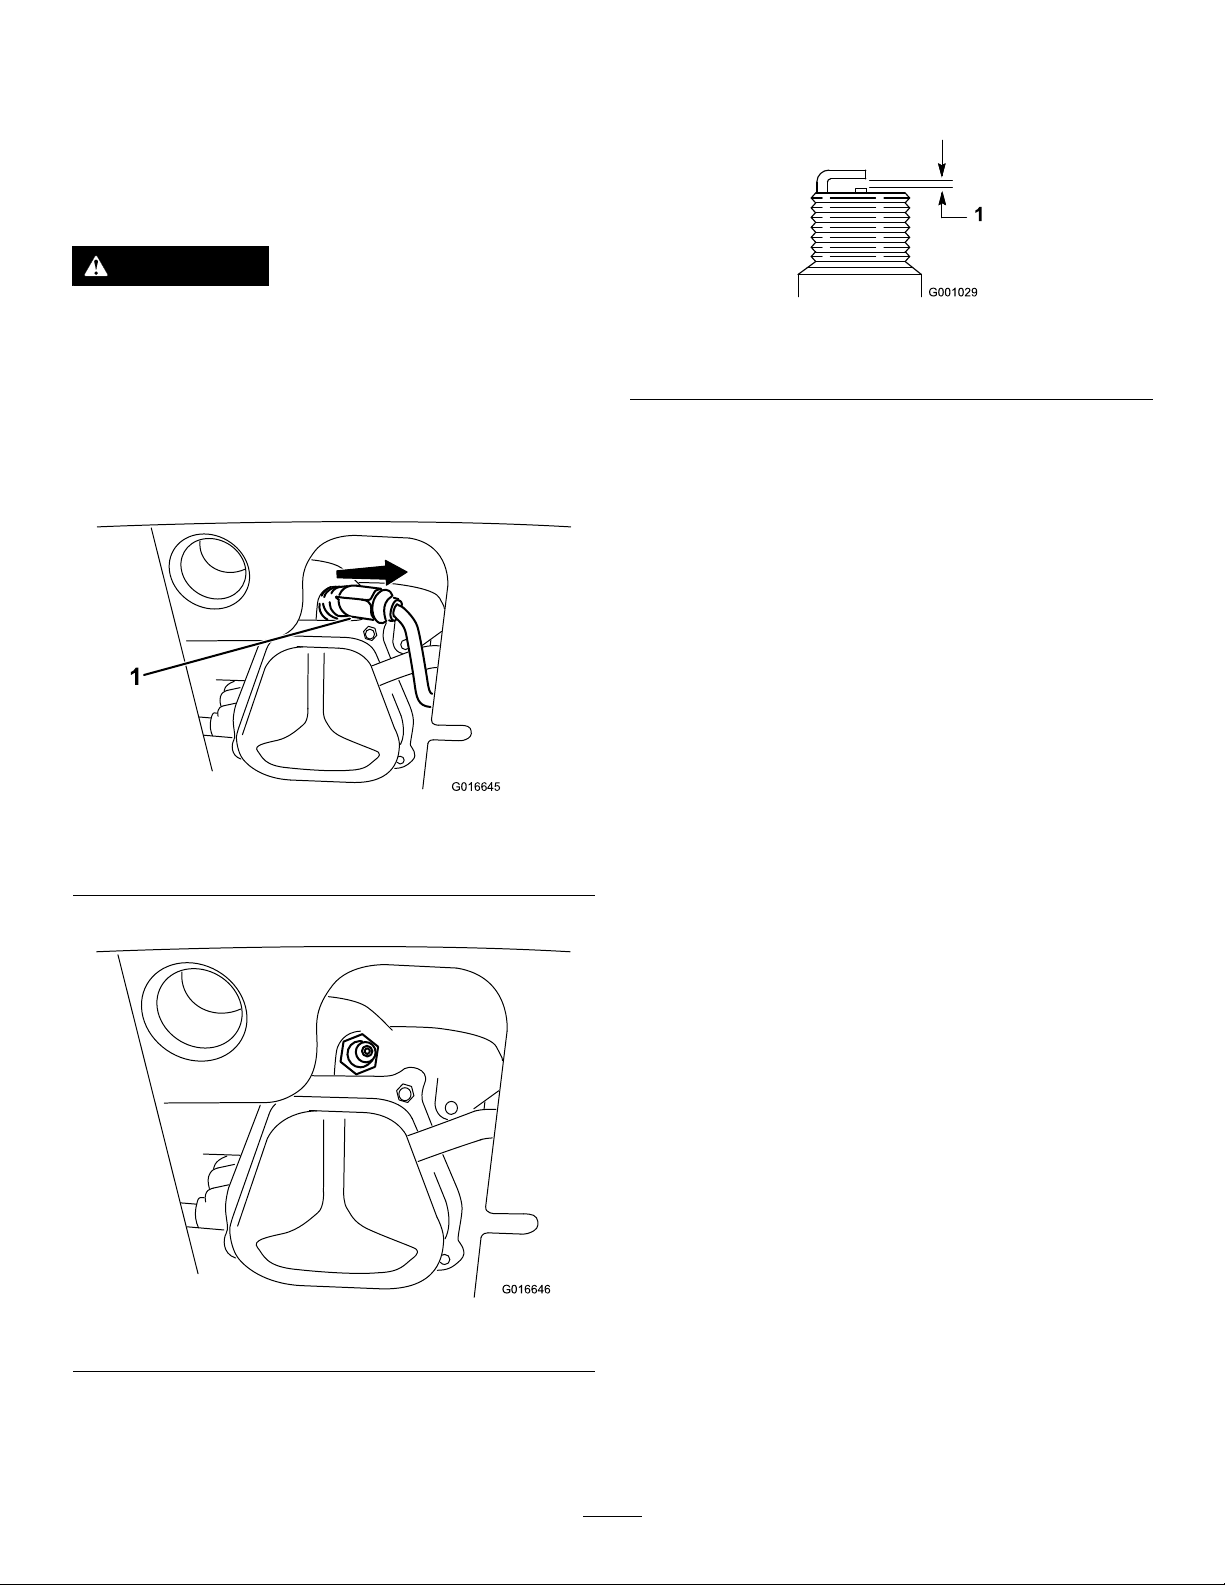
sparkplugat0.76mm(0.030inch)asshown
inFigure37.
Replacingthesparkplugwhiletheengineis
hotcanresultinburns.
Waituntiltheengineiscooltoreplacethe
sparkplug.
UseaT orosparkplugorequivalent(Champion®
RN9YCorNGKBPR6ES).
1.Removetheboot(Figure35).
Figure35
1.Spark-plugboot
g001029
Figure37
1.0.76mm(0.030inch)
5.Installthenewsparkplug,tightenitrmly ,and
attachtheignitionwiretothesparkplug.
Note:Ensurethattheignitionwiresnaps
completelyintoplaceonthesparkplug.
g016645
2.Cleanaroundthebaseofthesparkplug.
Figure36
3.Removeanddiscardtheoldsparkplug.
Note:Y ouwillneedaratchetwrenchextension
toremovethesparkplug.
g016646
23
Page 24
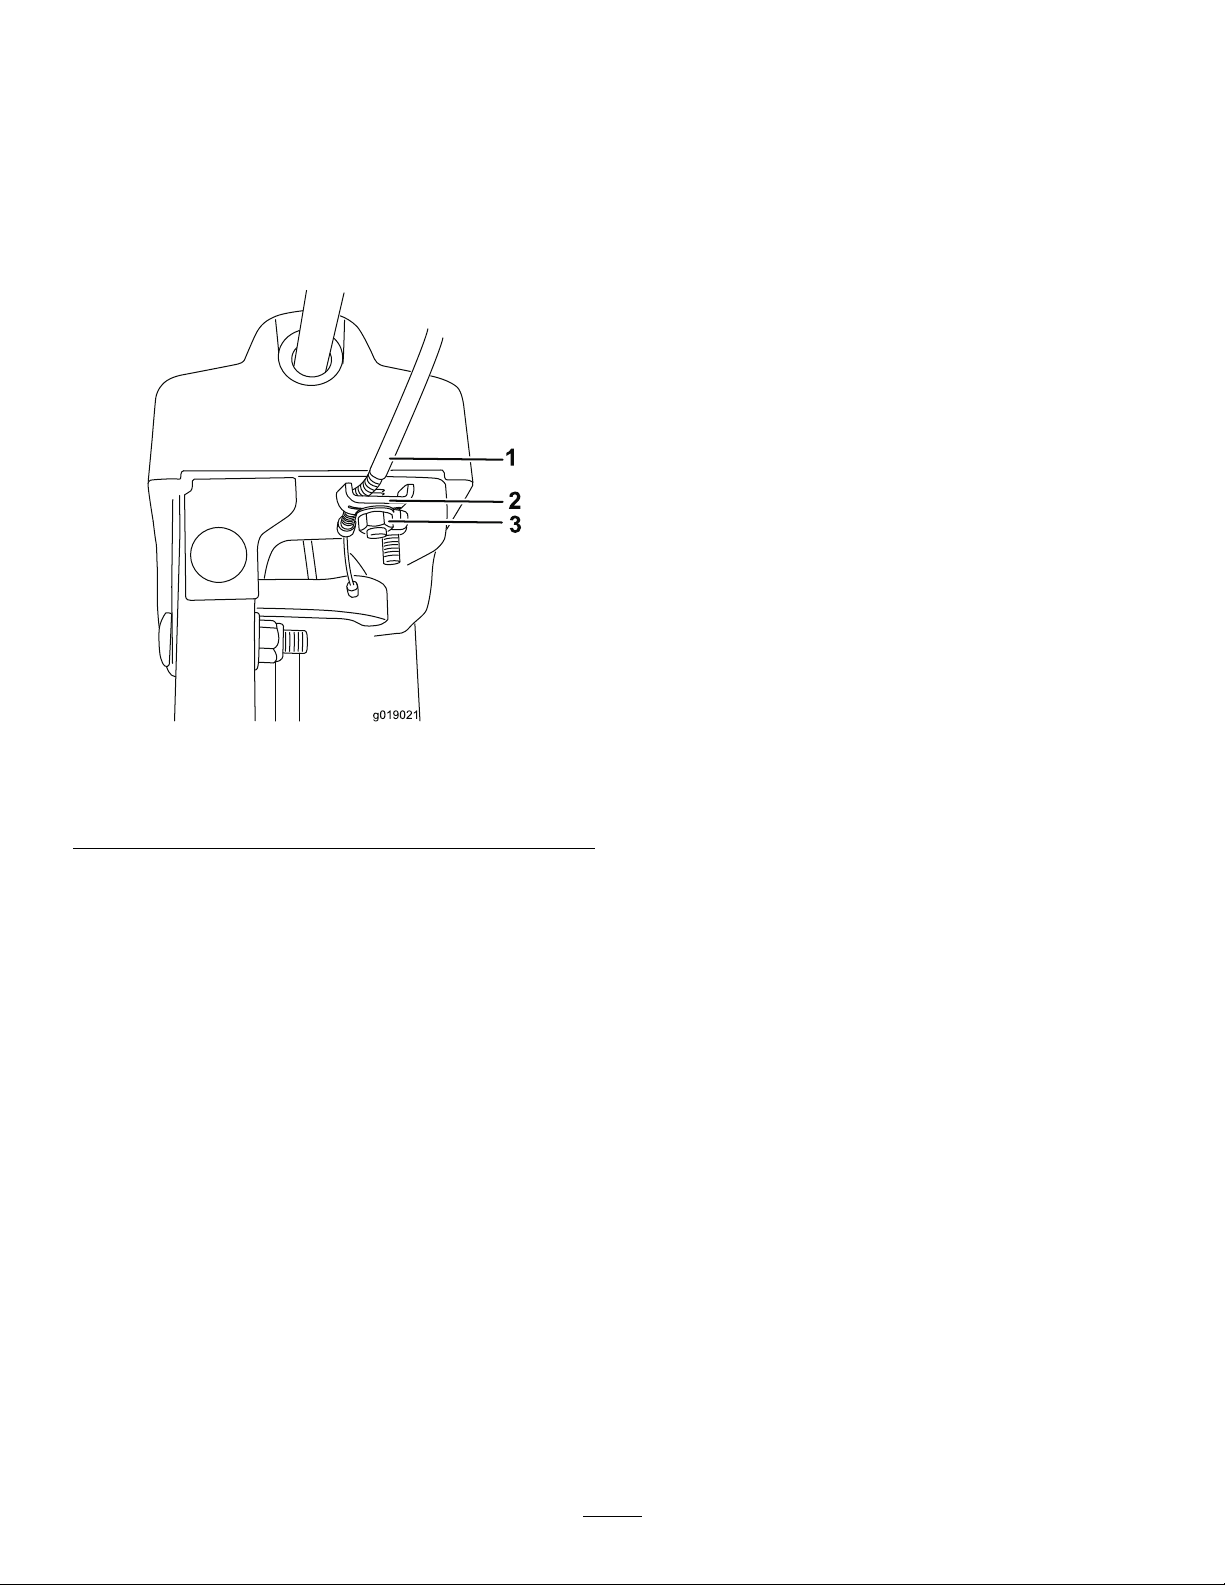
Adjustingthe Discharge-ChuteLatch
Ifthedischargechutedoesnotlockintothedesired
positionordoesnotunlocksothatyoucanmoveitto
anotherposition,adjustthedischarge-chutelatch.
1.Loosentheclampfasteneronthechute-support
plateuntilthecableisfree.
Figure38
1.Cableconduit3.Clampfastener
2.Cableclamp
2.Removeanyslackinthecablebypullingthe
cableconduitrearward.
3.Tightentheclampfastenerwhileholdingthe
cableinplace.
ReplacingtheDriveBelts
Iftheauger/impellerdrivebeltorthetraction-drivebelt
becomesworn,oil-soaked,orotherwisedamaged,
haveanAuthorizedServiceDealerreplacethebelt.
g019021
24
Page 25
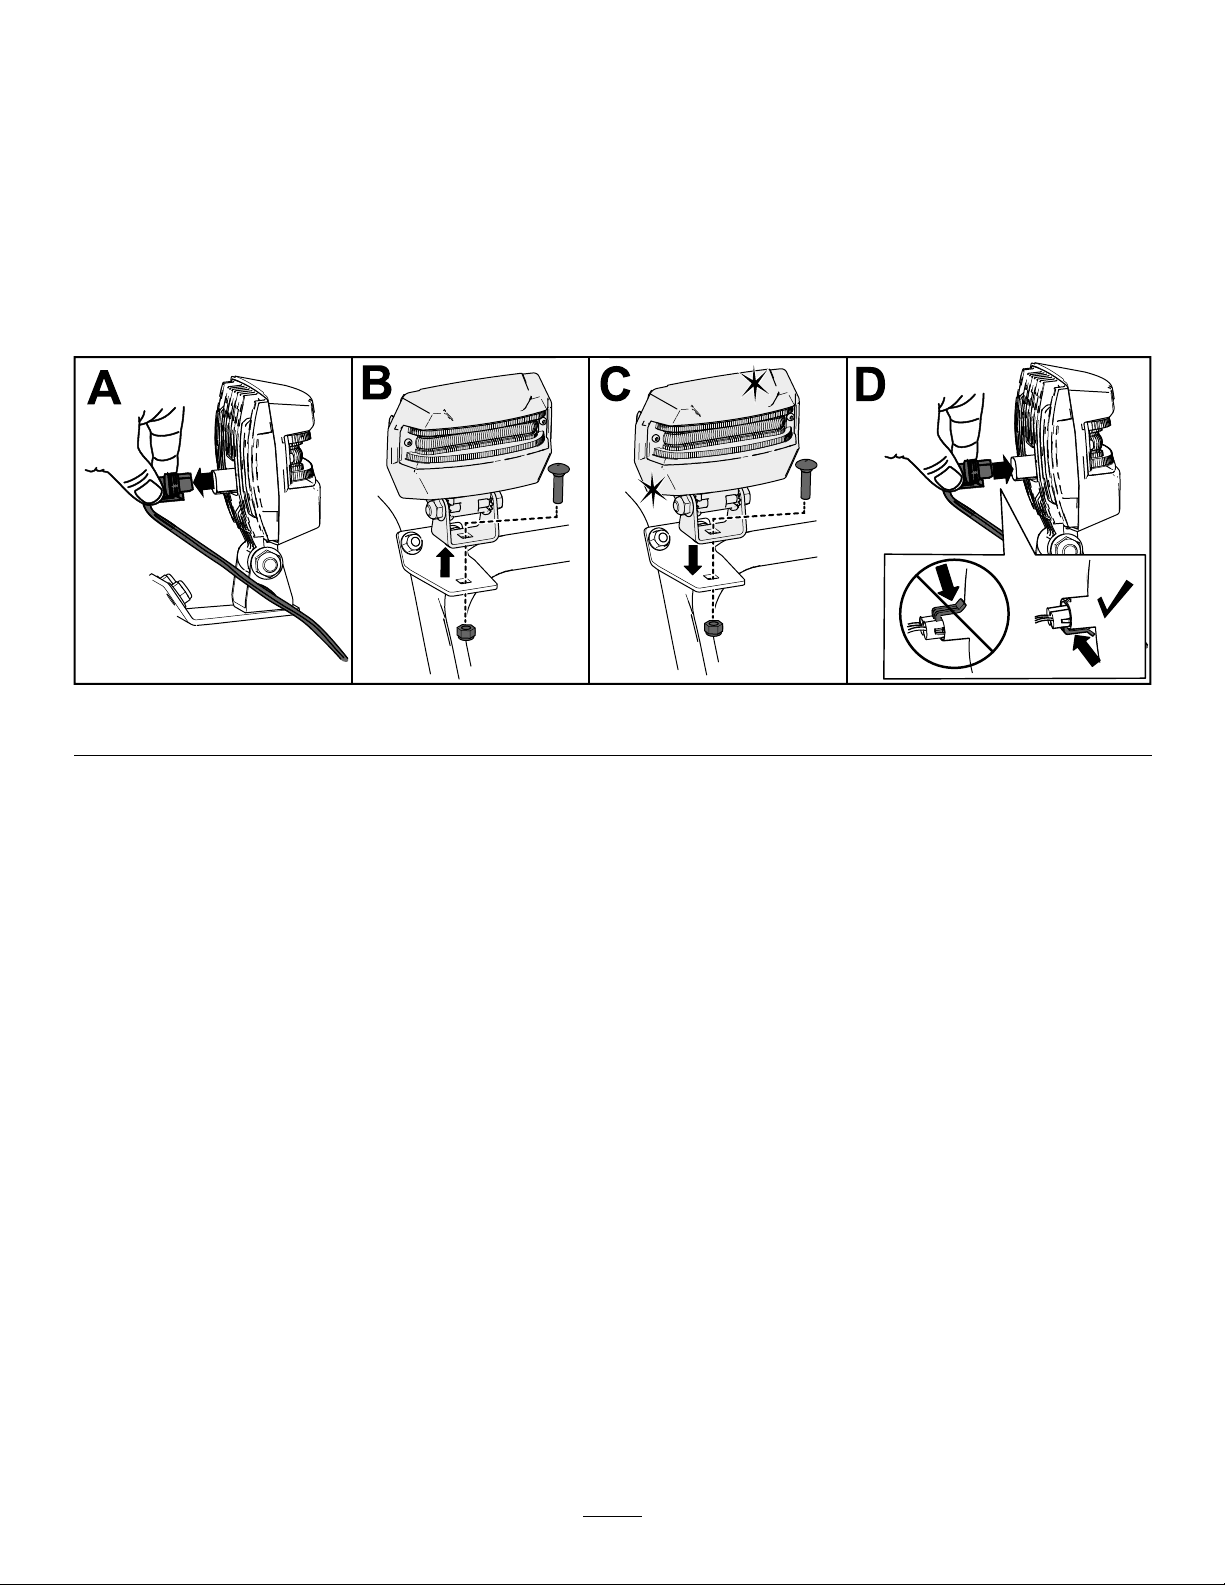
ReplacingtheHeadlight
Model37799only
Replacetheheadlightassembly(T oropartnumber138-0670)whenneeded.
1.Removetheheadlightwirefromthebackoftheheadlight(AofFigure39).
2.Removetheboltandnutholdingtheheadlightassemblyontotheheadlightbracketandthenremovethe
oldheadlightassembly(BofFigure39).
3.Securethenewheadlightassemblyontotheheadlightbracketwiththepreviouslyremovednutand
bolt(CofFigure39).
4.Inserttheheadlightwirestraightintothebackoftheheadlightuntilitissecurelyinplace(DofFigure39).
Storage
StoringtheMachine
1.Onthelastrefuelingoftheyear,addfuel
stabilizertofreshfuelasdirectedbythefuel
stabilizermanufacturer.
Important:Donotstorefuellonger
thanthatsuggestedbythefuelstabilizer
manufacturer.
2.Runtheenginefor10minutestodistributethe
conditionedfuelthroughthefuelsystem.
3.Runthemachineuntiltheenginerunsoutoffuel.
4.Primetheengineandstartitagain.
5.Allowtheenginetorununtilitshutsoff.
Whenyoucannolongerstarttheengine,itis
sufcientlydry.
6.Allowtheenginetocool.
7.Removetheignitionkey.
8.Cleanthemachinethoroughly.
9.Touchupchippedsurfaceswithpaintavailable
fromanAuthorizedServiceDealer.Sand
affectedareasbeforepainting,andusearust
g256137
Figure39
preventativetopreventthemetalpartsfrom
rusting.
10.Tightenallloosescrews,bolts,andlocknuts.
Repairorreplaceanydamagedparts.
11.Coverthemachineandstoreitinaclean,dry
placeoutofthereachofchildren.
RemovingtheMachine fromStorage
Performtheannualmaintenanceproceduresasgiven
intheRecommendedMaintenanceSchedule;referto
Maintenance(page18).
25
Page 26

Troubleshooting
Problem
Theelectricstarterdoesnotturn
(electric-startmodelsonly).
Theenginedoesnotstartorstartshard.
PossibleCauseCorrectiveAction
1.Thepowercordisdisconnectedatthe
outletorthemachine.
2.Thepowercordisworn,corroded,or
damaged.
3.Thepoweroutletisnotenergized.
1.Thekeyisnotintheignitionorisinthe
STOPposition.
2.ThechokeisintheOFFpositionand
theprimerhasnotbeenpressed.
3.Thefuel-shutoffvalveisnotopen.3.Openthefuel-shutoffvalve.
4.ThethrottleisnotintheFASTposition.4.MovethethrottletotheFASTposition.
5.Thefueltankisemptyorthefuel
systemcontainsstalefuel.
6.Thespark-plugwireislooseor
disconnected.
7.Thesparkplugispitted,fouled,orthe
gapisincorrect.
8.Thefuel-ventcapisrestricted.
9.Theengine-oillevelintheengine
crankcaseistoolowortoohigh.
1.Connectthepowercordtotheoutlet
and/orthemachine.
2.Replacethepowercord.
3.Haveaqualiedelectricianenergize
theoutlet.
1.Insertthekeyintotheignitionandturn
ittotheONposition.
2.MovethechoketotheONpositionand
presstheprimer3times.
5.Drainand/orllthefueltankwith
freshfuel(notmorethan30daysold).
Iftheproblempersists,contactan
AuthorizedServiceDealer.
6.Connectthewiretothesparkplug.
7.Checkthesparkplugandadjustthe
gapifnecessary .Replacethespark
plugifitispitted,fouled,orcracked.
8.Removetheventrestrictionorreplace
thefuelcap.
9.Addordrainoiltoadjusttheoillevelin
theenginecrankcasetotheFullmark
onthedipstick.
Theenginerunsrough.
1.ThechokeisintheONposition.1.MovethechoketotheOFFposition.
2.Thefuel-shutoffvalveisnotcompletely
open.
3.Thefueltankisnearlyemptyor
containsstalefuel.
4.Thespark-plugwireisloose.
5.Thesparkplugispitted,fouled,orthe
gapisincorrect.
6.Theengine-oillevelintheengine
crankcaseistoolowortoohigh.
2.Openthefuel-shutoffvalve.
3.Drainandllthefueltankwithfresh
fuel(notmorethan30daysold).
Iftheproblempersists,contactan
AuthorizedServiceDealer.
4.Connectthewiretothesparkplug.
5.Checkthesparkplugandadjustthe
gapifnecessary .Replacethespark
plugifitispitted,fouled,orcracked.
6.Addordrainoiltoadjusttheoillevelin
theenginecrankcasetotheFullmark
onthedipstick.
26
Page 27

Problem
PossibleCauseCorrectiveAction
Theengineruns,butthemachine
dischargessnowpoorlyornotatall.
Thedischargechuteeitherdoesnotlock
intoplaceordoesnotmove.
Themachinedoesnotproperlyclearthe
snowoffthesurface.
1.ThethrottleisnotintheFASTposition
whenthrowingsnow .
2.Themachineismovingtoofasttoclear
thesnow.
3.Y ouaretryingtoremovetoomuch
snowperswath.
4.Y ouaretryingtoremoveextremely
heavyorwetsnow.
5.Thedischargechuteisplugged.5.Unclogthedischargechute.
6.Theauger/impellerdrivebeltisloose
orisoffthepulley.
7.Theauger/impellerdrivebeltisworn
orbroken.
1.Thedischarge-chutelatchisnot
properlyadjusted.
1.Theskidsand/orscraperarenot
properlyadjusted.
2.Thepressureinthetiresisnotequal.
1.MovethethrottletotheFASTposition.
2.Shiftthemachineintoalowergear.
3.Reducetheamountofsnowremoved
perswath.
4.Donotoverloadthemachinewith
extremelyheavyorwetsnow.
6.Installand/oradjusttheauger/impeller
drivebelt;refertowww.Toro.com
forservicinginformationortakethe
machinetoanAuthorizedService
Dealer.
7.Replacetheauger/impellerdrivebelt;
refertowww.Toro.comforservicing
informationortakethemachinetoan
AuthorizedServiceDealer.
1.Adjustthedischarge-chutelatch.
1.Adjusttheskidsand/orthescraper.
2.Checkandadjustthepressurein1or
bothtires.
27
Page 28

CaliforniaProposition65WarningInformation
Whatisthiswarning?
Youmayseeaproductforsalethathasawarninglabellikethefollowing:
WARNING:CancerandReproductiveHarm—www.p65Warnings.ca.gov.
WhatisProp65?
Prop65appliestoanycompanyoperatinginCalifornia,sellingproductsinCalifornia,ormanufacturingproductsthatmaybesoldinorbroughtinto
California.ItmandatesthattheGovernorofCaliforniamaintainandpublishalistofchemicalsknowntocausecancer,birthdefects,and/orother
reproductiveharm.Thelist,whichisupdatedannually,includeshundredsofchemicalsfoundinmanyeverydayitems.ThepurposeofProp65isto
informthepublicaboutexposuretothesechemicals.
Prop65doesnotbanthesaleofproductscontainingthesechemicalsbutinsteadrequireswarningsonanyproduct,productpackaging,orliteraturewith
theproduct.Moreover ,aProp65warningdoesnotmeanthataproductisinviolationofanyproductsafetystandardsorrequirements.Infact,the
CaliforniagovernmenthasclariedthataProp65warning“isnotthesameasaregulatorydecisionthataproductis‘safe’or‘unsafe.’”Manyofthese
chemicalshavebeenusedineverydayproductsforyearswithoutdocumentedharm.Formoreinformation,gotohttps://oag.ca.gov/prop65/faqs-view-all
AProp65warningmeansthatacompanyhaseither(1)evaluatedtheexposureandhasconcludedthatitexceedsthe“nosignicantrisklevel”;or(2)
haschosentoprovideawarningbasedonitsunderstandingaboutthepresenceofalistedchemicalwithoutattemptingtoevaluatetheexposure.
Doesthislawapplyeverywhere?
Prop65warningsarerequiredunderCalifornialawonly.ThesewarningsareseenthroughoutCaliforniainawiderangeofsettings,includingbutnot
limitedtorestaurants,grocerystores,hotels,schools,andhospitals,andonawidevarietyofproducts.Additionally ,someonlineandmailorder
retailersprovideProp65warningsontheirwebsitesorincatalogs.
.
HowdotheCaliforniawarningscomparetofederallimits?
Prop65standardsareoftenmorestringentthanfederalandinternationalstandards.TherearevarioussubstancesthatrequireaProp65warning
atlevelsthatarefarlowerthanfederalactionlimits.Forexample,theProp65standardforwarningsforleadis0.5μg/day,whichiswellbelow
thefederalandinternationalstandards.
Whydon’tallsimilarproductscarrythewarning?
•ProductssoldinCaliforniarequireProp65labellingwhilesimilarproductssoldelsewheredonot.
•AcompanyinvolvedinaProp65lawsuitreachingasettlementmayberequiredtouseProp65warningsforitsproducts,butothercompanies
makingsimilarproductsmayhavenosuchrequirement.
•TheenforcementofProp65isinconsistent.
•CompaniesmayelectnottoprovidewarningsbecausetheyconcludethattheyarenotrequiredtodosounderProp65;alackofwarningsfora
productdoesnotmeanthattheproductisfreeoflistedchemicalsatsimilarlevels.
WhydoesToroincludethiswarning?
Torohaschosentoprovideconsumerswithasmuchinformationaspossiblesothattheycanmakeinformeddecisionsabouttheproductstheybuyand
use.Toroprovideswarningsincertaincasesbasedonitsknowledgeofthepresenceofoneormorelistedchemicalswithoutevaluatingthelevelof
exposure,asnotallthelistedchemicalsprovideexposurelimitrequirements.WhiletheexposurefromT oroproductsmaybenegligibleorwellwithinthe
“nosignicantrisk”range,outofanabundanceofcaution,T orohaselectedtoprovidetheProp65warnings.Moreover,ifT orodoesnotprovidethese
warnings,itcouldbesuedbytheStateofCaliforniaorbyprivatepartiesseekingtoenforceProp65andsubjecttosubstantialpenalties.
RevA
 Loading...