

Page 1

FormNo.3373-148RevB
SGR-13StumpGrinder
ModelNo.22602THD—SerialNo.311000701andUp
ModelNo.22611—SerialNo.311000001andUp
ModelNo.22611G—SerialNo.311000001andUp
ModelNo.32611—SerialNo.312000001andUp
ToregisteryourproductordownloadanOperator'sManualorPartsCatalogatnocharge,gotowww.T oro.com.OriginalInstructions(EN)
Page 2
WARNING
Introduction
CALIFORNIA
Proposition65Warning
Theengineexhaustfromthisproduct
containschemicalsknowntotheStateof
Californiatocausecancer,birthdefects,
orotherreproductiveharm.
DANGER
Theremaybeburiedpower,gas,and/ortelephone
linesintheworkarea.Shockorexplosionmay
occurifyoudigintothem.
Havethepropertyorworkareamarkedforburied
linesanddonotdiginmarkedareas.Contactyour
localmarkingserviceorutilitycompanytohavethe
propertymarked(forexample,intheUnitedStates,
call811forthenationwidemarkingservice).
ThissparkignitionsystemcomplieswithCanadianICES-002.
Becauseinsomeareastherearelocal,state,orfederal
regulationsrequiringthatasparkarresterbeusedonthe
engineofthismachine,asparkarresterisavailableas
anoption.Ifyourequireasparkarrestor,contactyour
AuthorizedToroServiceDealer.
Thismachineisdesignedtogrindandremovetreestumps
andsurfaceroots.Itisnotintendedtocutrockoranyother
materialotherthanwoodandthesoilaroundastump.
Readthisinformationcarefullytolearnhowtooperateand
maintainyourproductproperlyandtoavoidinjuryand
productdamage.Youareresponsibleforoperatingthe
productproperlyandsafely .
YoumaycontactTorodirectlyatwww.Toro.comforproduct
andaccessoryinformation,helpndingadealer,ortoregister
yourproduct.
Wheneveryouneedservice,genuineT oroparts,oradditional
information,contactanAuthorizedServiceDealerorToro
CustomerServiceandhavethemodelandserialnumbersof
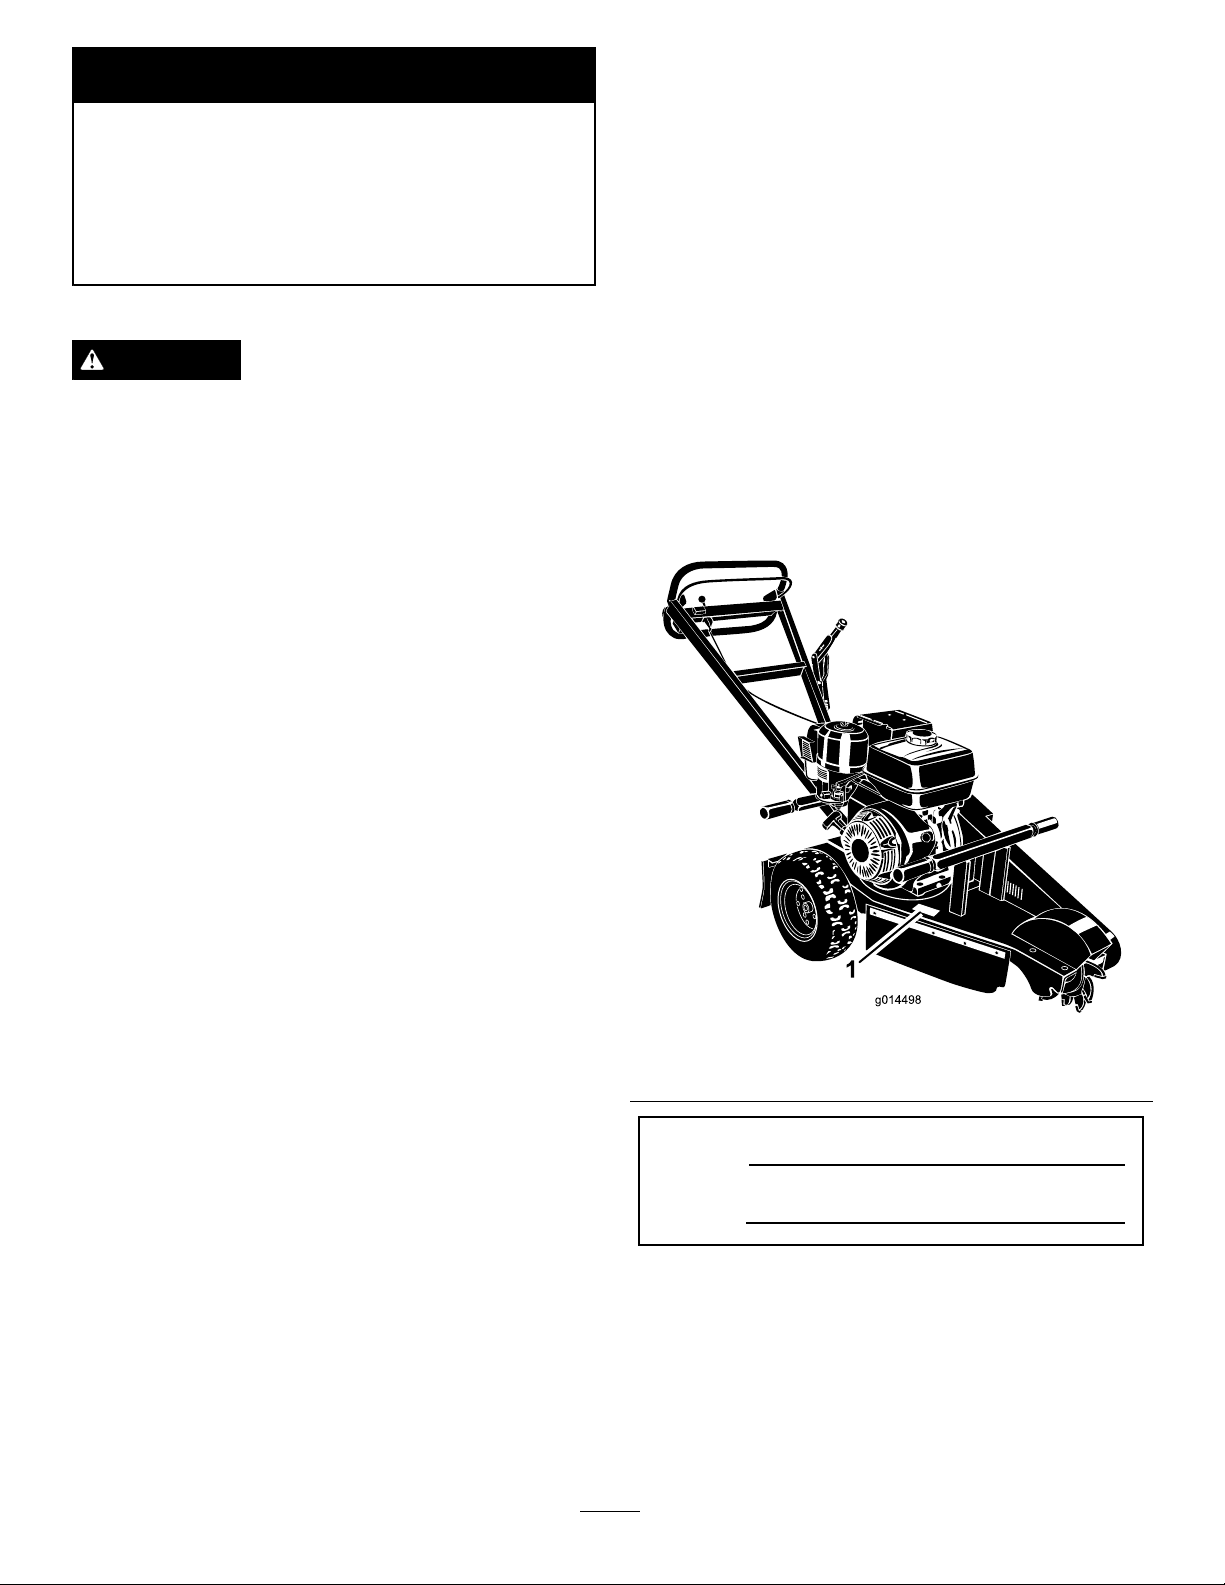
yourproductready .Figure1illustratesthelocationofthe
modelandserialnumbersontheproduct.Writethenumbers
inthespaceprovided.
GenuineTorosparkarrestersareapprovedbytheUSDA
ForestryService.
Important:ItisaviolationofCaliforniaPublic
ResourceCodeSection4442touseoroperatetheengine
onanyforest-covered,brush-covered,orgrass-covered
landwithoutasparkarrestermufermaintainedin
workingorder,ortheengineconstricted,equipped,and
maintainedforthepreventionofre.Otherstatesor
federalareasmayhavesimilarlaws.
Theenclosed
informationregardingtheUSEnvironmentalProtection
Agency(EPA)andtheCaliforniaEmissionControl
Regulationofemissionsystems,maintenance,and
warranty.Replacementsmaybeorderedthroughthe
enginemanufacturer.
Engine Owner's Man ual
issuppliedfor
Figure1
1.Modelandserialnumberplate
ModelNo.
SerialNo.
Thismanualidentiespotentialhazardsandhassafety
messagesidentiedbythesafetyalertsymbol(Figure2),
whichsignalsahazardthatmaycauseseriousinjuryordeath
ifyoudonotfollowtherecommendedprecautions.
©2012—TheToro®Company
8111LyndaleAvenueSouth
Bloomington,MN55420
Contactusatwww.Toro.com.
2
PrintedintheUSA.
AllRightsReserved
Page 3

Safety
Figure2
1.Safetyalertsymbol
Thismanualuses2otherwordstohighlightinformation.
Importantcallsattentiontospecialmechanicalinformation
andNoteemphasizesgeneralinformationworthyofspecial
attention.
Contents
Introduction..................................................................2
Safety...........................................................................3
SafeOperatingPractices...........................................3
SafetyandInstructionalDecals.................................5
ProductOverview..........................................................6
Controls................................................................6
Specications.........................................................7
Attachments/Accessories.........................................7
Operation.....................................................................8
BeforeyouStart......................................................8
AddingFuel............................................................8
CheckingtheEngineOilLevel..................................9
StartingandStoppingtheEngine..............................10
GrindingaStump...................................................10
Maintenance.................................................................12
RecommendedMaintenanceSchedule(s)......................12
Lubrication...............................................................12
GreasingtheMachine.............................................12
EngineMaintenance..................................................13
ServicingtheAirCleaner.........................................13
ServicingtheEngineOil..........................................14
ServicingtheSparkPlug..........................................14
BrakeMaintenance....................................................15
AdjustingtheParkingBrake.....................................15
BeltMaintenance......................................................16
AdjustingtheDriveBeltTension..............................16
ReplacingtheDriveBelt..........................................16
GrinderMaintenance..................................................17
CheckingtheCuttingWheelBlades...........................17
ReplacingtheCuttingWheelBlades..........................17
Cleaning...................................................................18
RemovingDebrisfromtheMachine..........................18
Storage........................................................................18
............................................................................18
Troubleshooting...........................................................19
Improperuseormaintenancebytheoperatororowner
canresultininjury.Toreducethepotentialforinjury,
complywiththesesafetyinstructionsandalways
payattentiontothesafetyalertsymbol,which
means:
instruction.Failuretocomplywiththeinstructionmay
resultinpersonalinjuryordeath.
Caution
,
W ar ning
,or
Danger
—personalsafety
SafeOperatingPractices
Thisproductiscapableofamputatinghandsandfeet.Always
followallsafetyinstructionstoavoidseriousinjuryordeath.
WARNING
Engineexhaustcontainscarbonmonoxide,an
odorless,deadlypoisonthatcankillyou.
Donotruntheengineindoorsorinanenclosed
area.
Training
•ReadtheOperator'sManualandothertrainingmaterial.If
theoperator(s)ormechanic(s)cannotreadEnglish,itis
theowner'sresponsibilitytoexplainthismaterialtothem.
•Becomefamiliarwiththesafeoperationoftheequipment,
operatorcontrols,andsafetysigns.
•Alloperatorsandmechanicsshouldbetrained.The
ownerisresponsiblefortrainingtheusers.
•Neverletchildrenoruntrainedpeopleoperateorservice
theequipment.Localregulationsmayrestricttheageof
theoperator.
•Theowner/usercanpreventandisresponsiblefor
accidentsorinjuriesoccurringtohimselforherself,other
peopleorproperty.
Preparation
•Evaluatetheterraintodeterminewhataccessoriesand
attachmentsareneededtoproperlyandsafelyperform
thejob.Onlyuseaccessoriesandattachmentsapproved
bythemanufacturer.
•Wearappropriateclothingincludinghardhat,faceshield,
safetyglasses,longpants,safetyshoes,andhearing
protection.Longhair,looseclothingorjewelrymayget
tangledinmovingparts.
•Inspecttheareawheretheequipmentistobeusedand
removeallobjectssuchasrocks,toys,andwirewhichcan
bethrownbythemachine.
•Useextracarewhenhandlinggasolineandotherfuels.
Theyareammableandvaporsareexplosive.
–Useonlyanapprovedcontainer
–Neverremovethegascaporaddfuelwiththeengine
running.Allowtheenginetocoolbeforerefueling.
Donotsmoke.
3
Page 4

–Neverrefuelordrainthemachineindoors.
•Checkthattheoperatorpresencecontrols,safetyswitches,
andshieldsareattachedandfunctioningproperly.Donot
operateunlesstheyarefunctioningproperly .
•Checkthatthecuttingwheelhasstoppedrotatingwhen
youreducethethrottle.
Operation
•Neverrunanengineinanenclosedarea.
•Onlyoperateingoodlight,keepingawayfromholesand
hiddenhazards.
•Besurealldrivesareinneutralbeforestartingtheengine.
Onlystarttheenginefromtheoperator'sposition.
•Slowdownanduseextracareonhillsides.Besureto
travelintherecommendeddirectiononhillsides.Turf
conditionscanaffectthemachine'sstability.
•Slowdownandusecautionwhenmakingturnsandwhen
changingdirectionsonslopes.
•Neveroperatewiththeguardsnotsecurelyinplace.Be
sureallinterlocksareattached,adjustedproperly ,and
functioningproperly.
•Donotchangetheenginegovernorsettingoroverspeed
theengine.
•Stoponlevelground,lowerthegrinder,andshutoff
theenginebeforeleavingtheoperator'spositionforany
reason.
•Keephandsandfeetawayfromthemovinggrinderwheel
andteeth.
•Lookbehindanddownbeforebackinguptobesureof
aclearpath.
•Nevercarrypassengersandkeeppetsandbystanders
away.
•Slowdownandusecautionwhenmakingturnsand
crossingroadsandsidewalks.
•Donotoperatethemachineundertheinuenceof
alcoholordrugs.
•Usecarewhenloadingorunloadingthemachineintoa
trailerortruck.
•Usecarewhenapproachingblindcorners,shrubs,trees,
orotherobjectsthatmayobscurevision.
•Ensurethattheareaisclearofotherpeoplebefore
operatingthemachine.Stopthemachineifanyoneenters
thearea.
•Neverleavearunningmachineunattended.Alwaysstop
theengineandverifythecuttingwheelhasstopped
rotating.
•Neverjerkthecontrols;useasteadymotion.
•Watchfortrafcwhenoperatingnearorcrossing
roadways.
•Donottouchpartswhichmaybehotfromoperation.
Allowthemtocoolbeforeattemptingtomaintain,adjust,
orservice.
•Ensurethatyouoperatethemachineinareaswhere
therearenoobstaclesincloseproximitytotheoperator.
Failuretomaintainadequatedistancefromtrees,walls,
andotherbarriersmayresultininjuryasthemachine
backsupduringoperationiftheoperatorisnotattentive
tothesurroundings.Onlyoperatetheunitinareaswhere
thereissufcientclearancefortheoperatortosafely
maneuvertheproduct.
•Beforegrinding,havetheareamarkedforunderground
utilities,anddonotgrindinmarkedareas.
•Locatethepinchpointareasmarkedonthemachineand
keephandsandfeetawayfromtheseareas.
•Lightningcancausesevereinjuryordeath.Iflightning
isseenorthunderisheardinthearea,donotoperate
themachine;seekshelter.
MaintenanceandStorage
•Stoptheengine.Waitforallmovementtostopbefore
adjusting,cleaning,orrepairing.
•Cleandebrisfromthegrinder,drives,mufers,andengine
tohelppreventres.Cleanupoilorfuelspillage.
•Lettheenginecoolbeforestoringanddonotstorenear
ame.
•Donotstorefuelnearamesordrainindoors.
•Parkthemachineonlevelground.Neverallowuntrained
personneltoservicethemachine.
•Usejackstandstosupportcomponentswhenrequired.
•Carefullyreleasepressurefromcomponentswithstored
energy.
•Removethesparkplugwirebeforemakinganyrepairs.
•Keephandsandfeetawayfrommovingparts.Ifpossible,
donotmakeadjustmentswiththeenginerunning.
•Keepallpartsingoodworkingconditionandallhardware
tightened.Replaceallwornordamageddecals.
•Keepnutsandboltstight.Keepequipmentingood
condition.
•Nevertamperwithsafetydevices.
•Keepthemachinefreeofgrass,leaves,orotherdebris
build-up.Cleanupoilorfuelspillage.Allowthemachine
tocoolbeforestoring.
•Useextracarewhenhandlinggasolineandotherfuels.
Theyareammableandvaporsareexplosive.
–Useonlyanapprovedcontainer.
–Neverremovethegascaporaddfuelwhenthe
engineisrunning.Allowtheenginetocoolbefore
refueling.Donotsmoke.
–Neverrefuelthemachineindoors.
–Neverstorethemachineorfuelcontainerinside
wherethereisanopename,suchasnearawater
heaterorfurnace.
–Neverllacontainerwhileitisinsideavehicle,trunk,
pick-upbed,oranysurfaceotherthantheground.
4
Page 5
–Keepcontainernozzleincontactwiththetankduring
lling.
•Stopandinspecttheequipmentifyoustrikeanobject.
Makeanynecessaryrepairsbeforerestarting.
•UseonlygenuineTororeplacementpartstoensurethat
originalstandardsaremaintained.
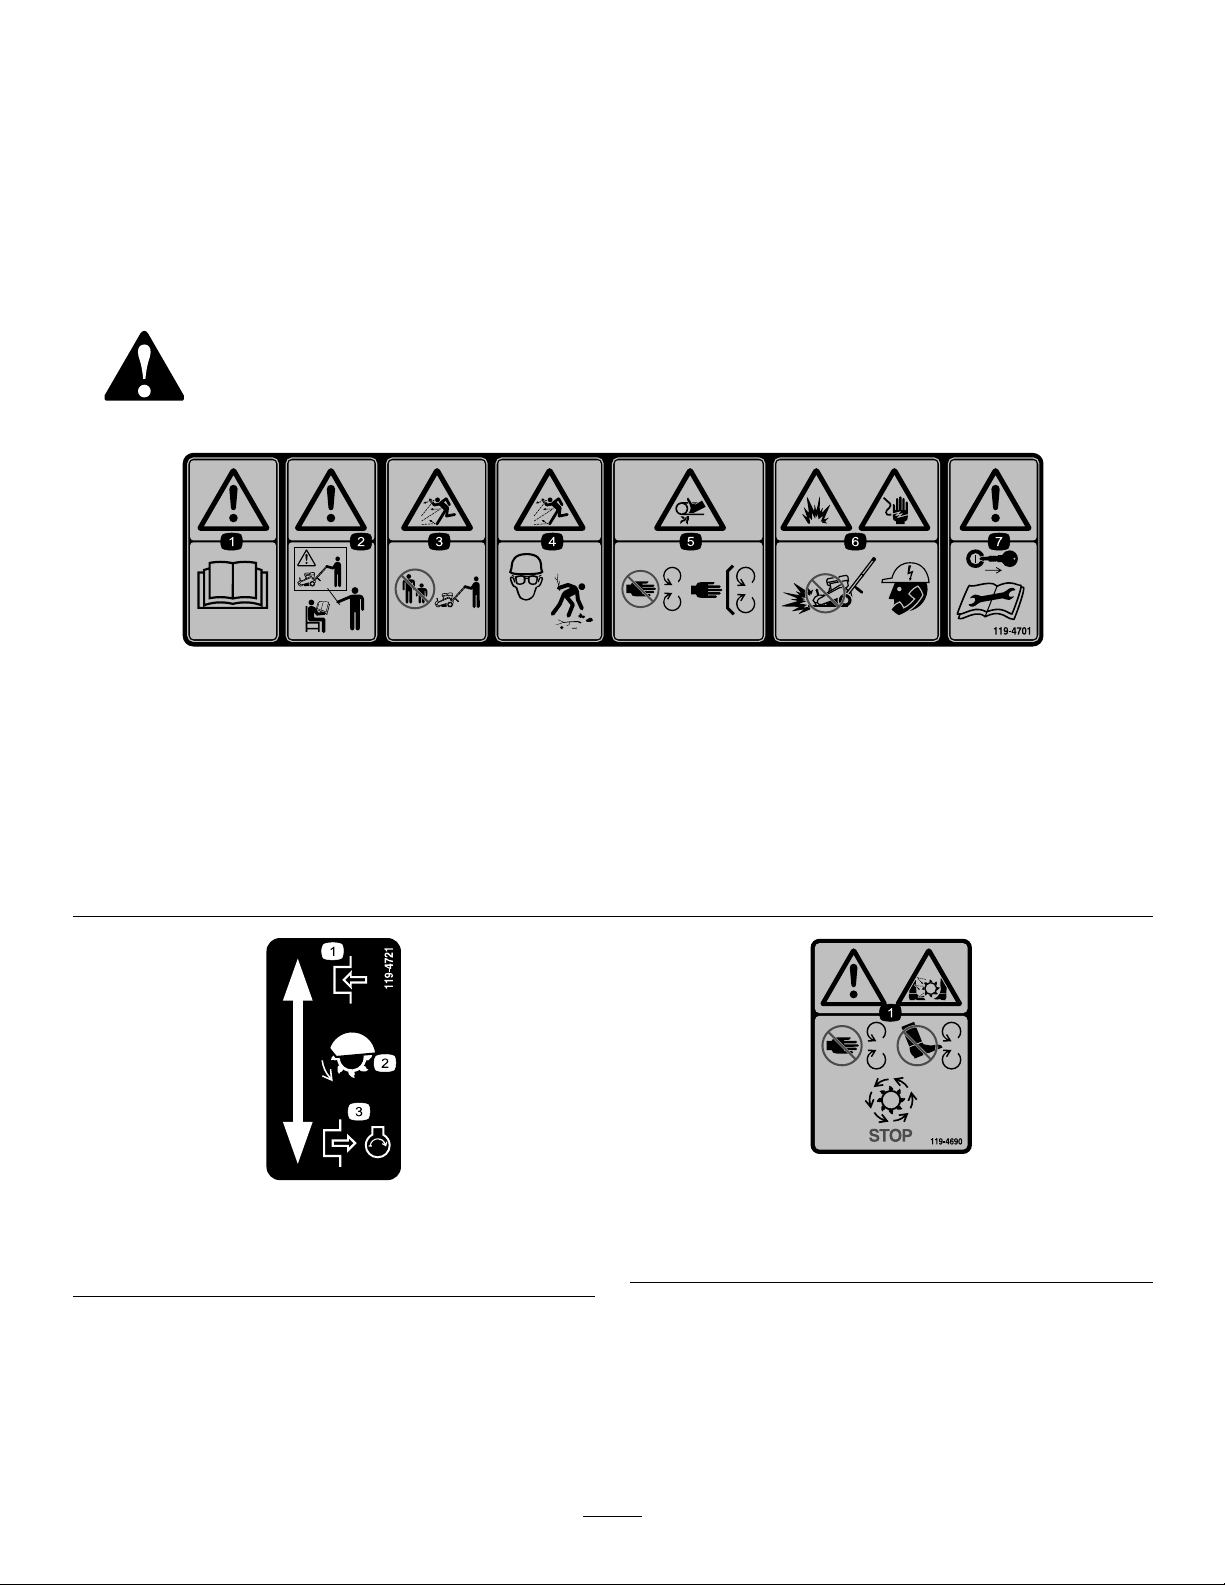
SafetyandInstructionalDecals
Safetydecalsandinstructionsareeasilyvisibletotheoperatorandarelocatednearanyareaofpotential
danger.Replaceanydecalthatisdamagedorlost.
119-4701
1.Warning—readtheOperator'sManual.5.Crushinghazardofhand—stayawayfrommovingparts,keep
2.Warning—donotoperatethismachineunlessyouaretrained.6.Explosionhazard;electricalshockhazard—donotdiginareas
3.Thrownobjecthazard—keepbystandersasafedistancefrom
themachine.
4.Thrownobjecthazard—weareyeprotection,pickupdebris
beforeoperating.
119-4721
1.Engage3.Disengage,engineruns
2.Grindingblade
allguardsandshieldsinplace.
withburiedutilitylines;contactlocalpowerorganizations
beforedigging.
7.Warning—removetheignitionkey(ifapplicable)andreadthe
instructionsbeforeservicingorperformingmaintenance.
119-4690
1.Warning;cutting/dismembermenthazard,grinding
blade—keephandsandfeetawayfromallmovingparts,
keepallshieldsinplace;waitforallmovingpartstostop.
5
Page 6
119-4692
g014497
1
2
3
4
5
6
7
8
9
10
11
12
13
14
1.Warning—stoptheengine;usebothhandholdstoliftthe
grinder.
ProductOverview
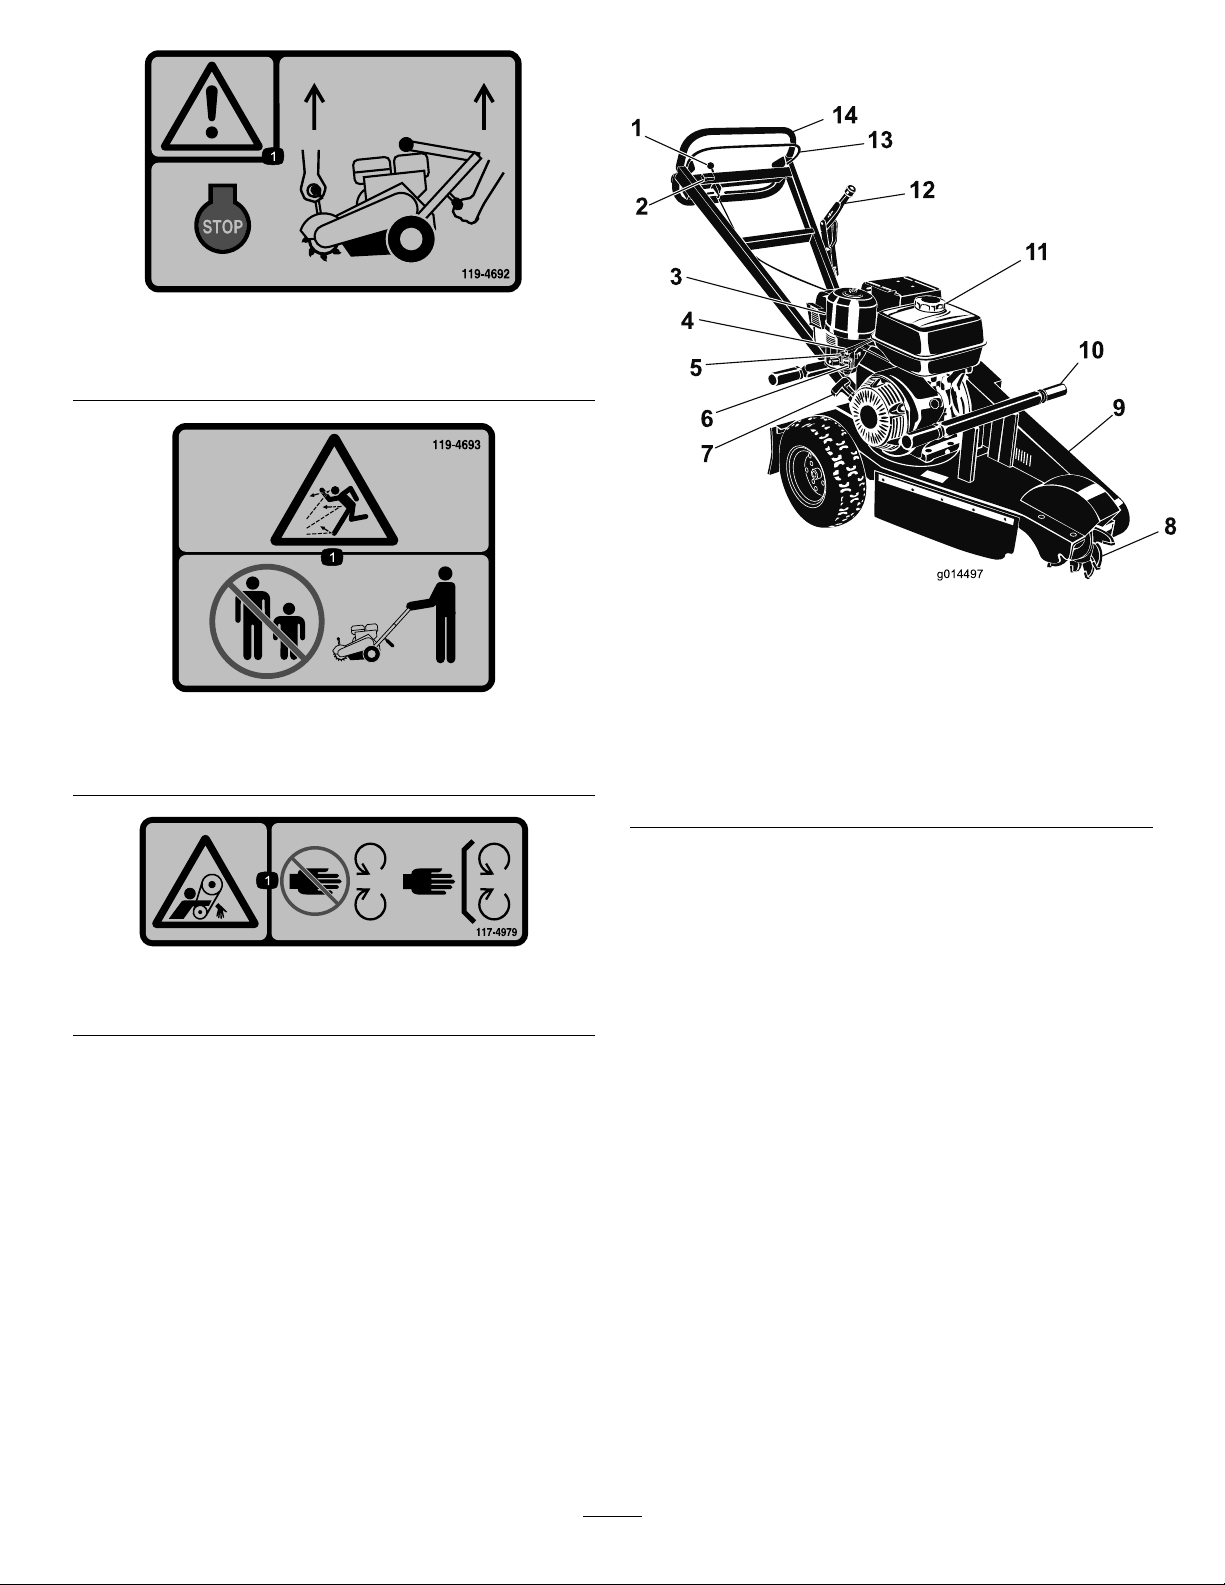
Figure3
119-4693
1.Thrownobjecthazard—keepbystandersasafedistance
fromthemachine.
1.Throttlelever
2.Hourmeter9.Beltcover
3.Cycloneairlter10.Lift
4.Choke11.FuelCap
5.Fuelvalve12.Parkingbrake
6.Sedimentcup13.Safetybail
7.Starter
8.Cuttingwheel
14.Handle
Controls
Becomefamiliarwithallthecontrols(Figure3andFigure4)
117–4979
1.Rotatingbelt—Keepguardinplace
beforeyoustarttheengineandoperatethemachine.
ThrottleLever
Thethrottlelevercontrolsenginespeed.Withthelever
down,intheDisengagedposition,theenginerunsatidle.
Thisisalsothestartingposition.Whentheenginespeed
increases,totheEngagedposition,thecentrifugalclutch
engagesandthecuttingwheelrotates.
6
Page 7
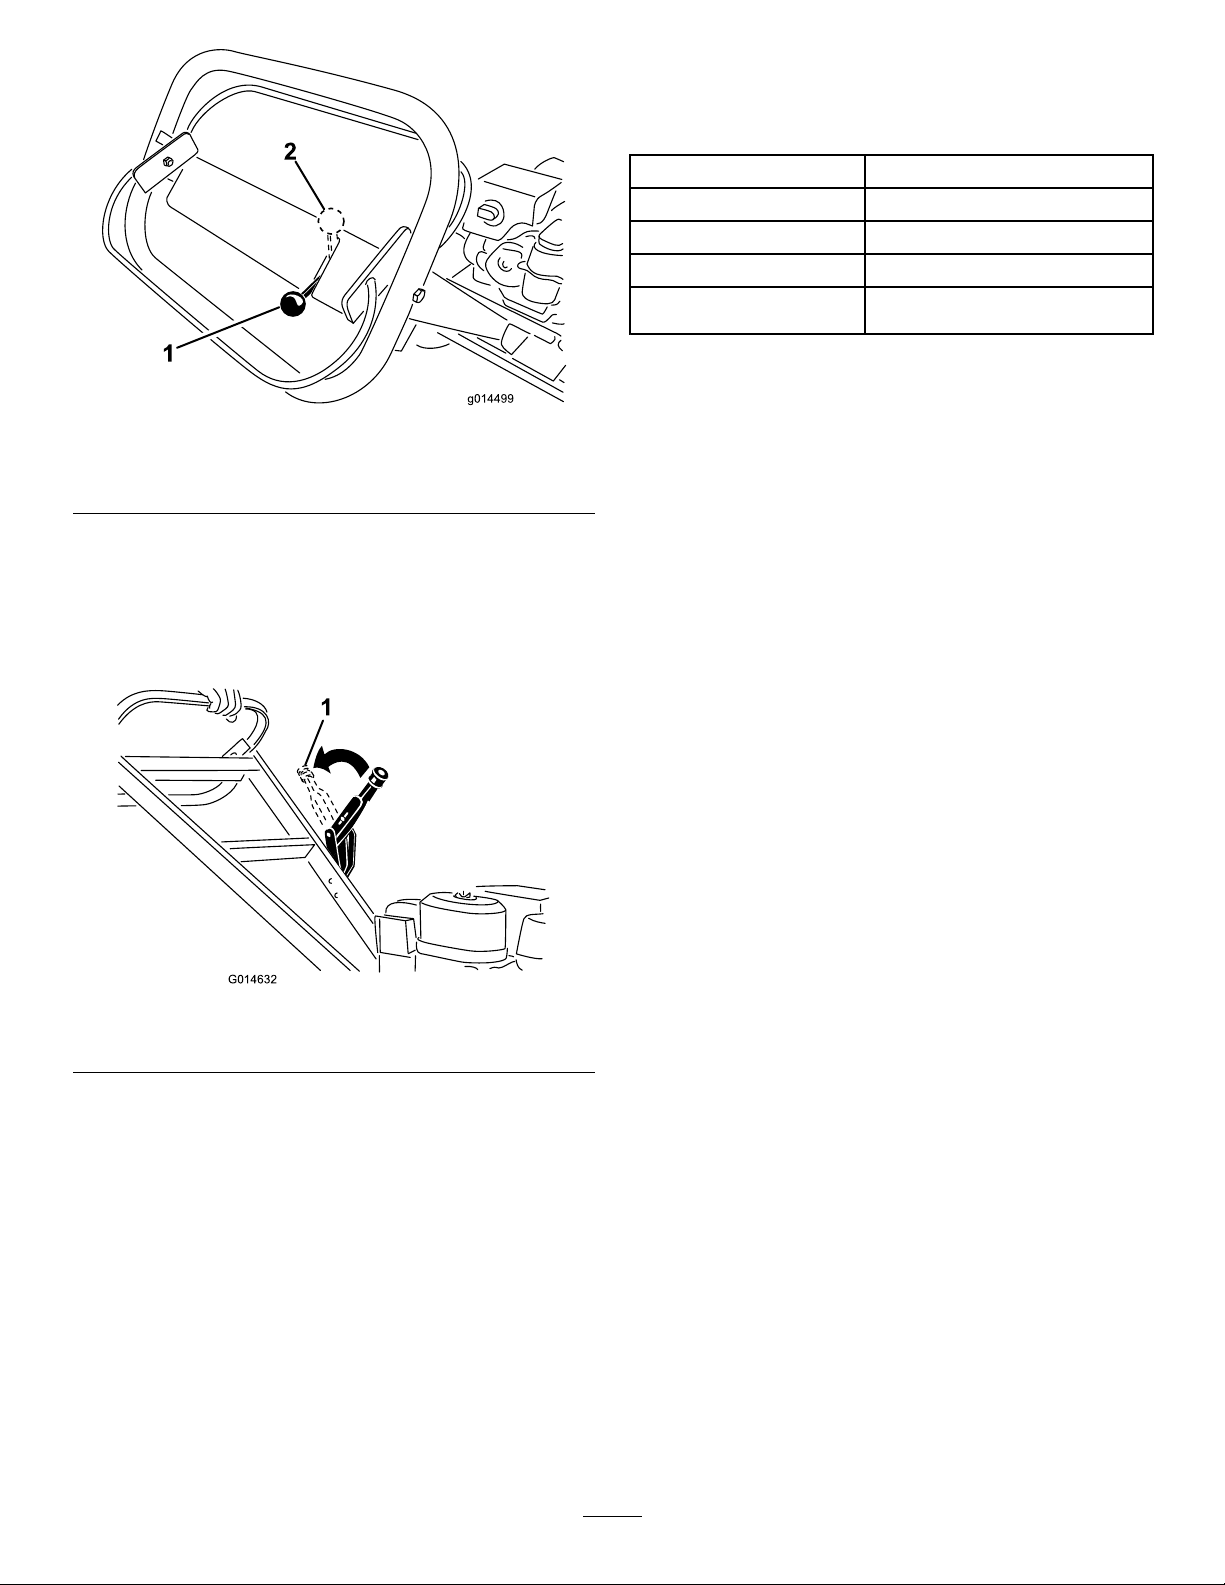
Figure4
G014632
1.Disengagedthrottle
position
2.Engagedthrottleposition
ParkingBrake
Theparkingbrakeholdstheleftwheelfromturningtosecure
themachineandforeasymovementofthemachinefromside
tosidewhengrindingthestump.
Specications
Note:Specicationsanddesignaresubjecttochange
withoutnotice.
CuttingDepthApprox12inches(30.48cm)
Length
Width
Height
Weight
Attachments/Accessories
AselectionofToroapprovedattachmentsandaccessoriesare
availableforusewiththemachinetoenhanceandexpand
itscapabilities.ContactyourAuthorizedServiceDealeror
Distributororgotowww .Toro.comforalistofallapproved
attachmentsandaccessories.
76inches(193cm)
29.5inches(75cm)
42inches(107cm)
240lbs(109Kg)
Figure5
1.Pullbacktoengagebrake
HourMeter
Whentheengineisoff,thehourmeterdisplaysthenumber
ofhoursofoperationthathavebeenloggedonthemachine.
7
Page 8

Operation
Note:Determinetheleftandrightsidesofthemachine
fromthenormaloperatingposition.
Important:Beforeoperating,checkthefuelandoil
level,andremovedebrisfromthemachine.Also,ensure
thattheareaisclearofpeopleanddebris.Youshould
alsoknowandhavemarkedthelocationsofallutility
lines.
DANGER
Incertainconditions,gasolineisextremely
ammableandhighlyexplosive.Areorexplosion
fromgasolinecanburnyouandothersandcan
damageproperty.
•Fillthefueltankoutdoors,inanopenarea,
whentheengineiscold.Wipeupanygasoline
thatspills.
•Neverllthefueltankinsideanenclosedtrailer.
BeforeyouStart
•Digawaytheearthandremoveanystonesnearthetree
stumpthatmayinterferewithyourwork.Checkthatthe
groundisfreeofforeignobjects,suchaselectricalcables,
barbedwire,etc.
•Cutortrimthestumpusingapowersaw.
•Reviewallthemachine’ssafetydecals.
•Useahard-hat,hearing,andeyeprotection.Amesh
visoralonedoesnotprovidesufcienteyeprotection;
supplementwithprotectiveglasses.
•Ensurethatyouarefamiliarwithsafetyregulationsand
shutdownproceduresdescribedintheOperator’ sManual.
•Ensurethatallguardsareinplaceandingoodcondition.
•Ensurethatthebladesandcuttersareinplaceandin
goodcondition.
•Ensurethattheworkarea,cutter,andstumpinparticular
arefreefrommetallicobjectssuchaswire,nails,etc.that
couldbethrownoutandinjurepersonsinthevicinity
anddamagetheequipment.
•Ensurethateveryone,includingchildrenandanimals,
maintainadistanceofatleast50feet(15m)fromthe
machine.Debriscanbethrownoutandinjurepeople
andanimals.
AddingFuel
Useunleadedgasoline(87pumpoctaneminimum).Leaded,
regulargasolinemaybeusedifunleadedisnotavailable.
•Donotllthefueltankcompletelyfull.Add
gasolinetothefueltankuntilthelevelis1/4to
1/2inch(6to13mm)belowthebottomofthe
llerneck.Thisemptyspaceinthetankallows
gasolinetoexpand.
•Neversmokewhenhandlinggasoline,andstay
awayfromanopenameorwheregasoline
fumesmaybeignitedbyaspark.
•Storegasolineinanapprovedcontainerand
keepitoutofthereachofchildren.Neverbuy
morethana30-daysupplyofgasoline.
•Donotoperatewithoutentireexhaustsystemin
placeandinproperworkingcondition.
DANGER
Incertainconditionsduringfueling,static
electricitycanbereleasedcausingasparkwhich
canignitethegasolinevapors.Areorexplosion
fromgasolinecanburnyouandothersandcan
damageproperty.
•Alwaysplacegasolinecontainersontheground
awayfromyourvehiclebeforelling .
•Donotllgasolinecontainersinsideavehicleor
onatruckortrailerbedbecauseinteriorcarpets
orplastictruckbedlinersmayinsulatethe
containerandslowthelossofanystaticcharge.
•Whenpractical,removegas-poweredequipment
fromthetruckortrailerandrefueltheequipment
withitswheelsontheground.
•Ifthisisnotpossible,thenrefuelsuch
equipmentonatruckortrailerfromaportable
container,ratherthanfromagasolinedispenser
nozzle.
•Ifagasolinedispensernozzlemustbeused,
keepthenozzleincontactwiththerimofthe
fueltankorcontaineropeningatalltimesuntil
fuelingiscomplete.
Important:Donotusemethanol,gasolinecontaining
methanol,orgasoholcontainingmorethan10%ethanol
8
Page 9
becausethefuelsystemcouldbedamaged.Donotmix
oilwithgasoline.
CheckingtheEngineOilLevel
ServiceInterval:Beforeeachuseordaily
UsingStabilizer/Conditioner
Useafuelstabilizer/conditionerinthemachinetoprovide
thefollowingbenets:
•Keepsgasolinefreshduringstorageof90daysorless.
Forlongerstorageitisrecommendedthatthefueltank
bedrained.
•Cleanstheenginewhileitruns.
•Eliminatesgum-likevarnishbuildupinthefuelsystem,
whichcauseshardstarting.
Important:Donotusefueladditivescontaining
methanolorethanol.
Addthecorrectamountofgasstabilizer/conditionertothe
gas.
Note:Afuelstabilizer/conditionerismosteffectivewhen
mixedwithfreshgasoline.Tominimizethechanceofvarnish
depositsinthefuelsystem,usefuelstabilizeratalltimes.
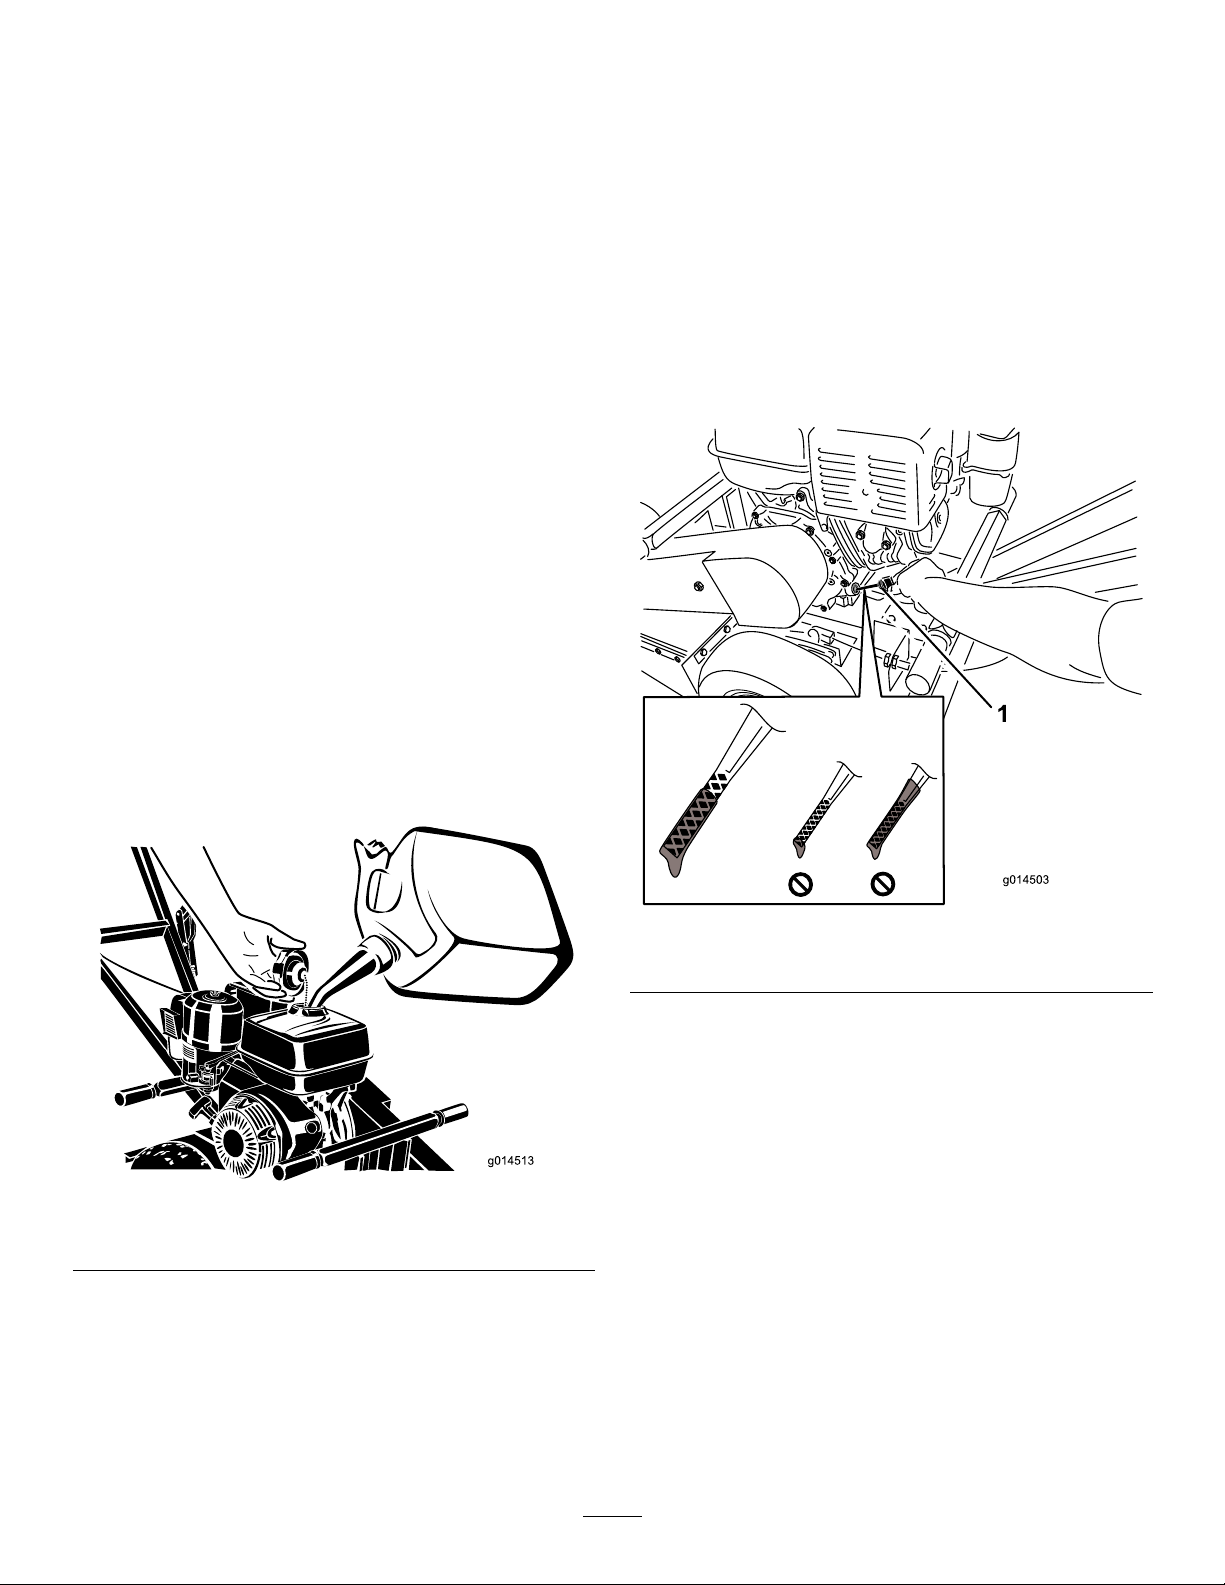
FillingtheFuelTank
1.Parkthemachineonalevelsurface,lowerthegrinder,
andstoptheengine.
1.Tiltthemachinesotheengineislevel,andstopthe
engine.
2.Allowtheenginetocool.
3.Cleanaroundtheoildipstick.
4.Removethedipstickandwipetheendclean.
5.Slidethedipstickfullyintothedipsticktubewithout
threadingitintothellerneck.
6.Pullthedipstickoutandlookattheend.Theoil
shouldbetothetopoftheupperlimitrange(
Figure7).
2.Allowtheenginetocool.
3.Cleanaroundthefueltankcapandremoveit(Figure6).
Figure6
1.Fueltankcap
4.Addunleadedgasolinetothefueltank,untilthelevelis
1/4to1/2inchbelowthebottomofthellerneck.
Figure7
1.Oildipstick
Important:Runningtheenginewithlowoillevel
cancauseenginedamage.Thistypeofdamageis
notcoveredbywarranty.
Theengineisequippedwithanoilalertsystem
thatwillautomaticallystoptheenginebeforethe
oillevelfallsbelowthesafelimit.
7.Iftheoillevelislow ,slowlypouronlyenoughoilinto
thecrankcasetoraisetheleveltotheupperlimit.
Important:Donotoverllthecrankcasewithoil
becausetheenginemaybedamaged.
8.Replacethedipstick.
Important:Thisspaceinthetankallowsgasoline
toexpand.Donotllthefueltankcompletelyfull.
5.Installthefueltankcapsecurely.
6.Wipeupanygasolinethatmayhavespilled.
9
Page 10

StartingandStoppingthe
WARNING
Engine
StartingtheEngine
1.MovethefuelvalvetotheOpenposition,alltheway
totheright.
Note:Ifyourmodelisequippedwithanenginewith
anOn/Offswitch,movetheswitchtotheOnposition.
2.MovethechokeleverlefttotheOnpositionifyou
arestartingacoldengine.
Note:Awarmorhotenginemaynotrequirechoking.
3.MovethethrottletotheDisengageposition.
4.Holdthesafetybailagainstthehandleandpushthe
handledownenoughtoraisethecuttingwheeloffthe
ground.
5.Pullthestarterhandlelightlyuntilyoufeelresistance,
thenpullthehandlebriskly.Returnthestarterhandle
gently.
6.Aftertheenginestarts,graduallymovethechoke
leverbacktotheOffposition.Iftheenginestallsor
hesitates,movethechokebacktoOnagainuntilthe
enginewarmsup.ThenmoveittotheOffposition.
Grindingastumpwillthrowwoodchips,soil,and
otherdebrisintotheairwhichcouldinjureyouor
bystanders.
•Alwaysweareyeprotectionwhenusingthe
machine.
•Keepallbystandersasafedistancefromthe
machine.
WARNING
Themachineisveryloudandcandamageyour
ears.
Alwayswearhearingprotectionwhenusingthe
machine.
1.SetthrottletotheDisengageposition.
2.Starttheengine;referto(page).
3.Allowenginetowarmupatidlefortwominutes.
4.Pushthehandledownenoughtoraisethecutting
wheelofftheground.
StoppingtheEngine
1.MovethethrottletotheDisengageposition.
Note:Iftheenginehasbeenworkinghardorishot,
letitrunforaminutebeforereleasingthesafetybail.
Thishelpstocooltheenginebeforestopping.Inan
emergency,theenginemaybestoppedimmediately .
2.Releasethesafetybailtostoptheengine.
3.MovethefuelvalvetotheClosedposition,alltheway
totheleft.
Note:Ifyourmodelisequippedwithanenginewith
anOn/Offswitch,movetheswitchtotheOffposition.
GrindingaStump
Placethemachineintopositionwiththecuttingwheelnear
thefront-topedgeofthestump.
DANGER
Themachinewillcutandamputatehandsandfeet.
•Stayintheoperator'spositionwhilethemachine
isrunningandkeepawayfromthecutting
wheel.
5.MovethrottleuptotheEngageposition,thiswill
engagethecentrifugalclutchandthecuttingwheel
rotates.
6.Movethemachinetofrontofthestumpandsetthe
parkingbrake
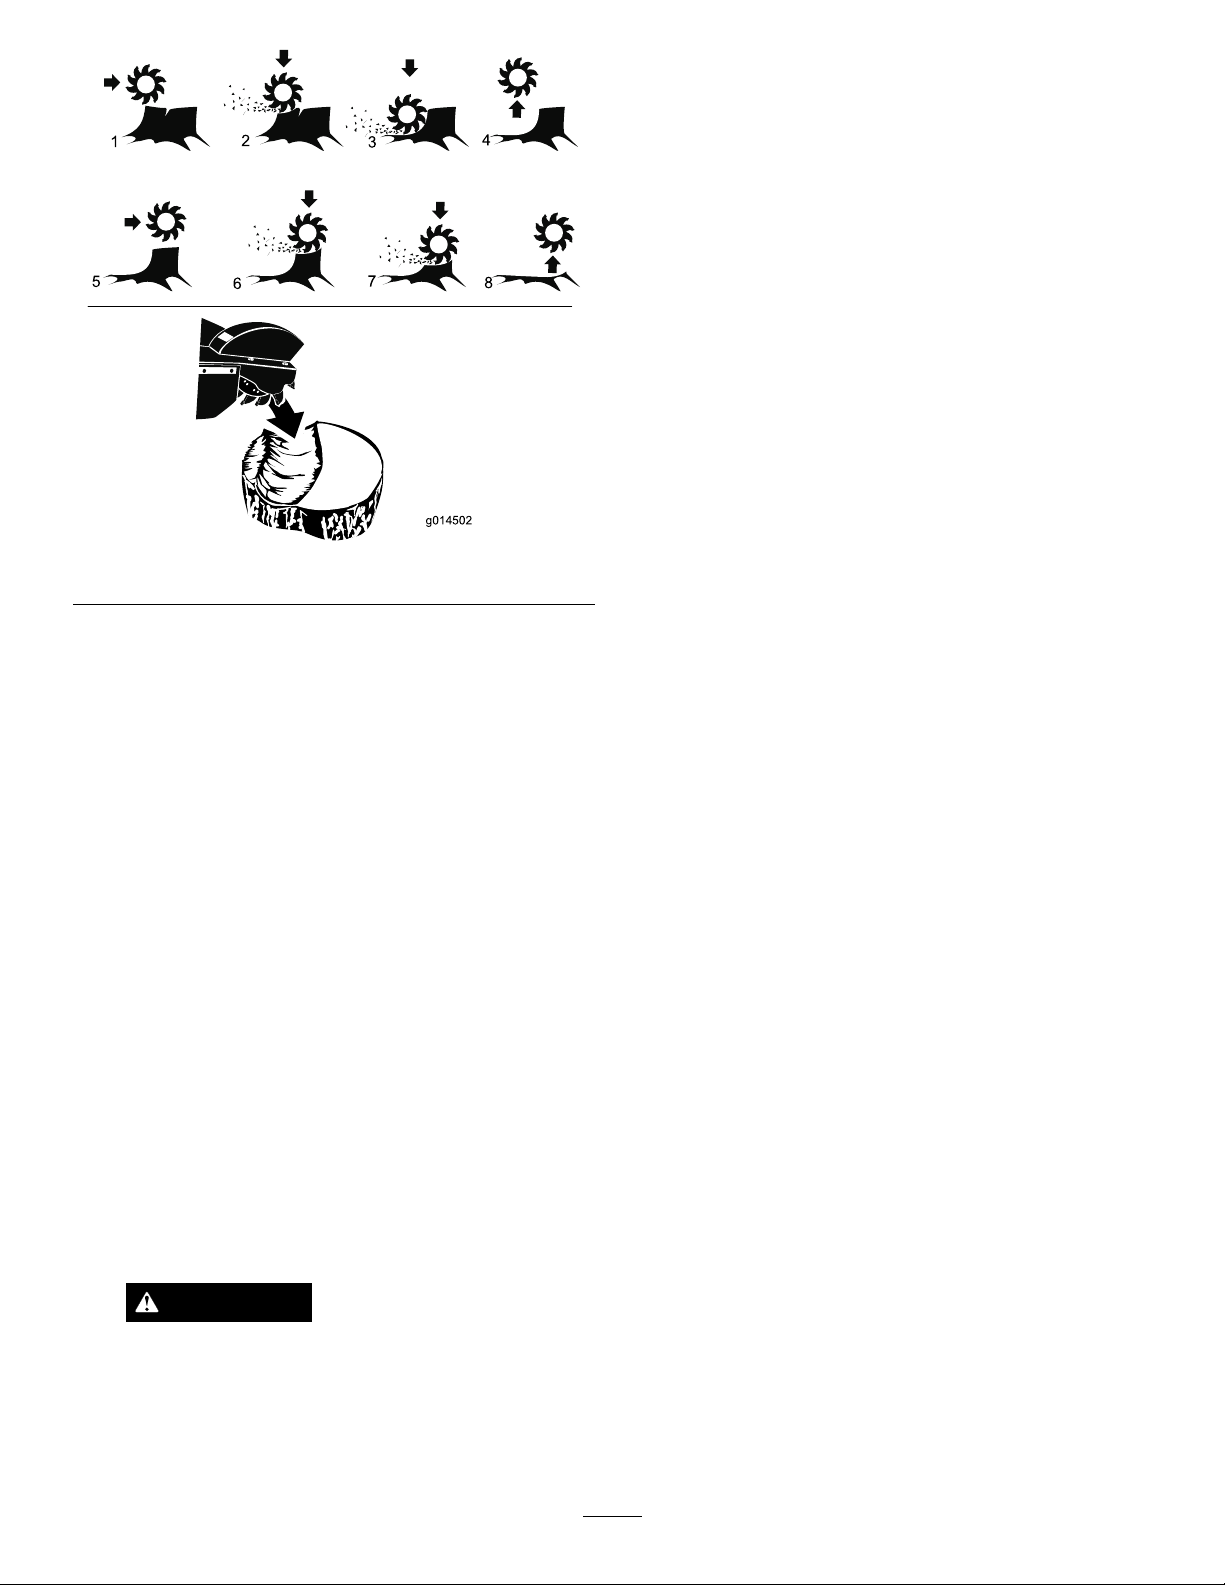
7.Swingthecuttingwheeltooneside,thenlowerit
approximately1/2inchto1inchintothefront-top
cornerofthestump.Swingthecuttingwheelback
andforth,loweringthecuttingwheelapproximately
1/2inchto1inchbeforeeachsweep,untilyouhave
removedthefrontportionofthestumptoground
Figure8).
level(
•Keepallbystandersasafedistancefromthe
machine.
•Stopthemachineimmediatelyifanypeopleor
animalsentertheworkarea.
10
Page 11
g014502
1
2
3
4
5
6
8
7
Figure8
8.Raisethecuttingwheeluntilcenterofcuttingwheelis
justabovetopofthestump.
9.Withthecuttingwheelofftooneside,releasethe
parkingbrakeandadvancethemachineforward,reset
theparkingbrake.
10.Continuesweepingandcuttingwheelleftandright
acrossstump,advancingthemachinebeforeeach
sweep,cutting1/2inchto1inchdepthofcutwith
eachsweep.
11.Continuecuttinguntiltoplevelofstumpisallremoved,
makingsurenottocutstumpdeeperthangroundlevel
duringthisrststage.
12.MovethrottletotheDisengageposition,pushthe
handledownenoughtoraisethecuttingwheeloffthe
ground.Waittensecondsforthecuttingwheeltostop
rotatingthenreleasethebrakeandpullthemachine
awayfromthestump.
13.Rakethechipsawayfromthestump.
14.Continuecuttingthestumpusingtheprocedureabove
untilthedesireddepthisachieved.
15.Stopthemachine;referto
(page).
Note:DoNotletthefrontoftheunittouchthe
grounduntilyouaresurethecuttingwheelhasstopped
turning.
WARNING
Arotatingcuttingwheelisverydangerousand
cancutandamputatehandsandfeet.
Stayattheoperatingpositionandbesurethat
thecuttingwheelhascometoacompletestop
beforedoinganythingelse.
11
Page 12
Maintenance
Note:Determinetheleftandrightsidesofthemachinefromthenormaloperatingposition.
Important:Themachinemaybetippedbackwardor
onitssidetofacilitateaccessforcleaningorservice,
butnolongerthan2minutes.Ifthemachineisheldin
thispositionfortoolong,theenginecanbedamaged
RecommendedMaintenanceSchedule(s)
MaintenanceService
Interval
Aftertherst25hours
Beforeeachuseordaily
Every50hours
Every100hours
Every200hours
MaintenanceProcedure
•Changetheoil.
•Checktheengineoillevel.
•Greasethemachine.
•Checktheairlter.
•Checkthedrivebelttension.
•Checkthecuttingwheelblades.
•Removedebrisfromthemachine.
•Servicetheairlter.
•Changetheoil.
•Cleanthesedimentcup.
•Checkthesparkplugs.
•Replacethedrivebelt.
•Replacetheairlter.
bygasolinedrainingintothecrankcase.Shouldthis
happen,performanextraoilchangeontheengine.
Thenturntheengineoverafewrevolutionswiththe
starterhandlebeforestartingtheengineagain.
Yearlyorbeforestorage
Important:Refertoyour
•Changetheoil.
•Cleanthesedimentcup.
Engine Operator's Man ual
Lubrication
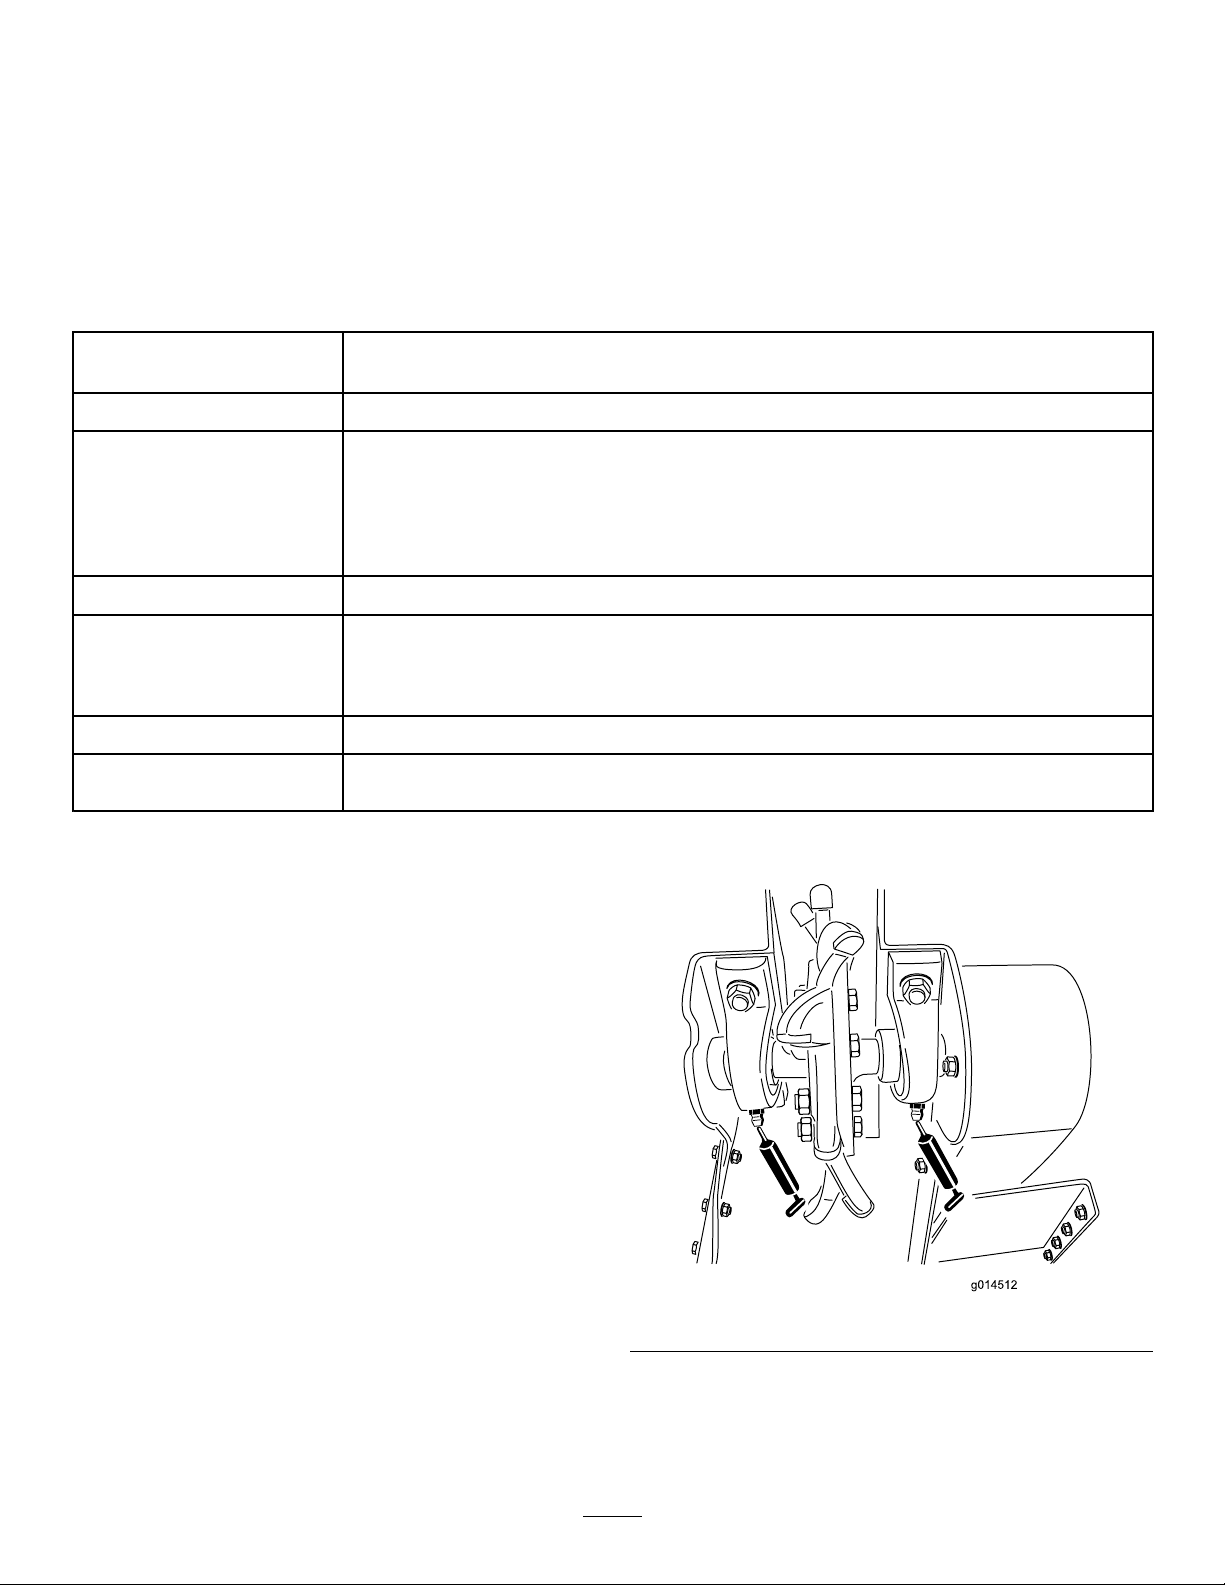
GreasingtheMachine
ServiceInterval:Beforeeachuseordaily
GreaseType:General-purposegrease.
1.Cleanthegreasettingswitharag.
2.Connectagreaseguntoeachtting.
3.Lubricatetwottings,oneoneachcuttingwheel
bearing.
4.Pumpgreaseintothettingsuntilgreasebeginsto
oozeoutofthebearings(approximately3pumps).
5.Wipeupanyexcessgrease.
Important:Pumpgreaseinslowlyandcarefully
topreventdamagetothebearingseals.
foradditionalmaintenanceprocedures.
Figure9
12
Page 13
EngineMaintenance
ServicingtheAirCleaner
ServiceInterval:Beforeeachuseordaily
Thecycloneairltercollectsthelargestcontaminantparticles,
whichcollectinthecontainer.Whenyoucanseealayerof
dirtatthebottomofthecontainer,cleanthecyclonehousing,
airchannels,andairintakescreen.
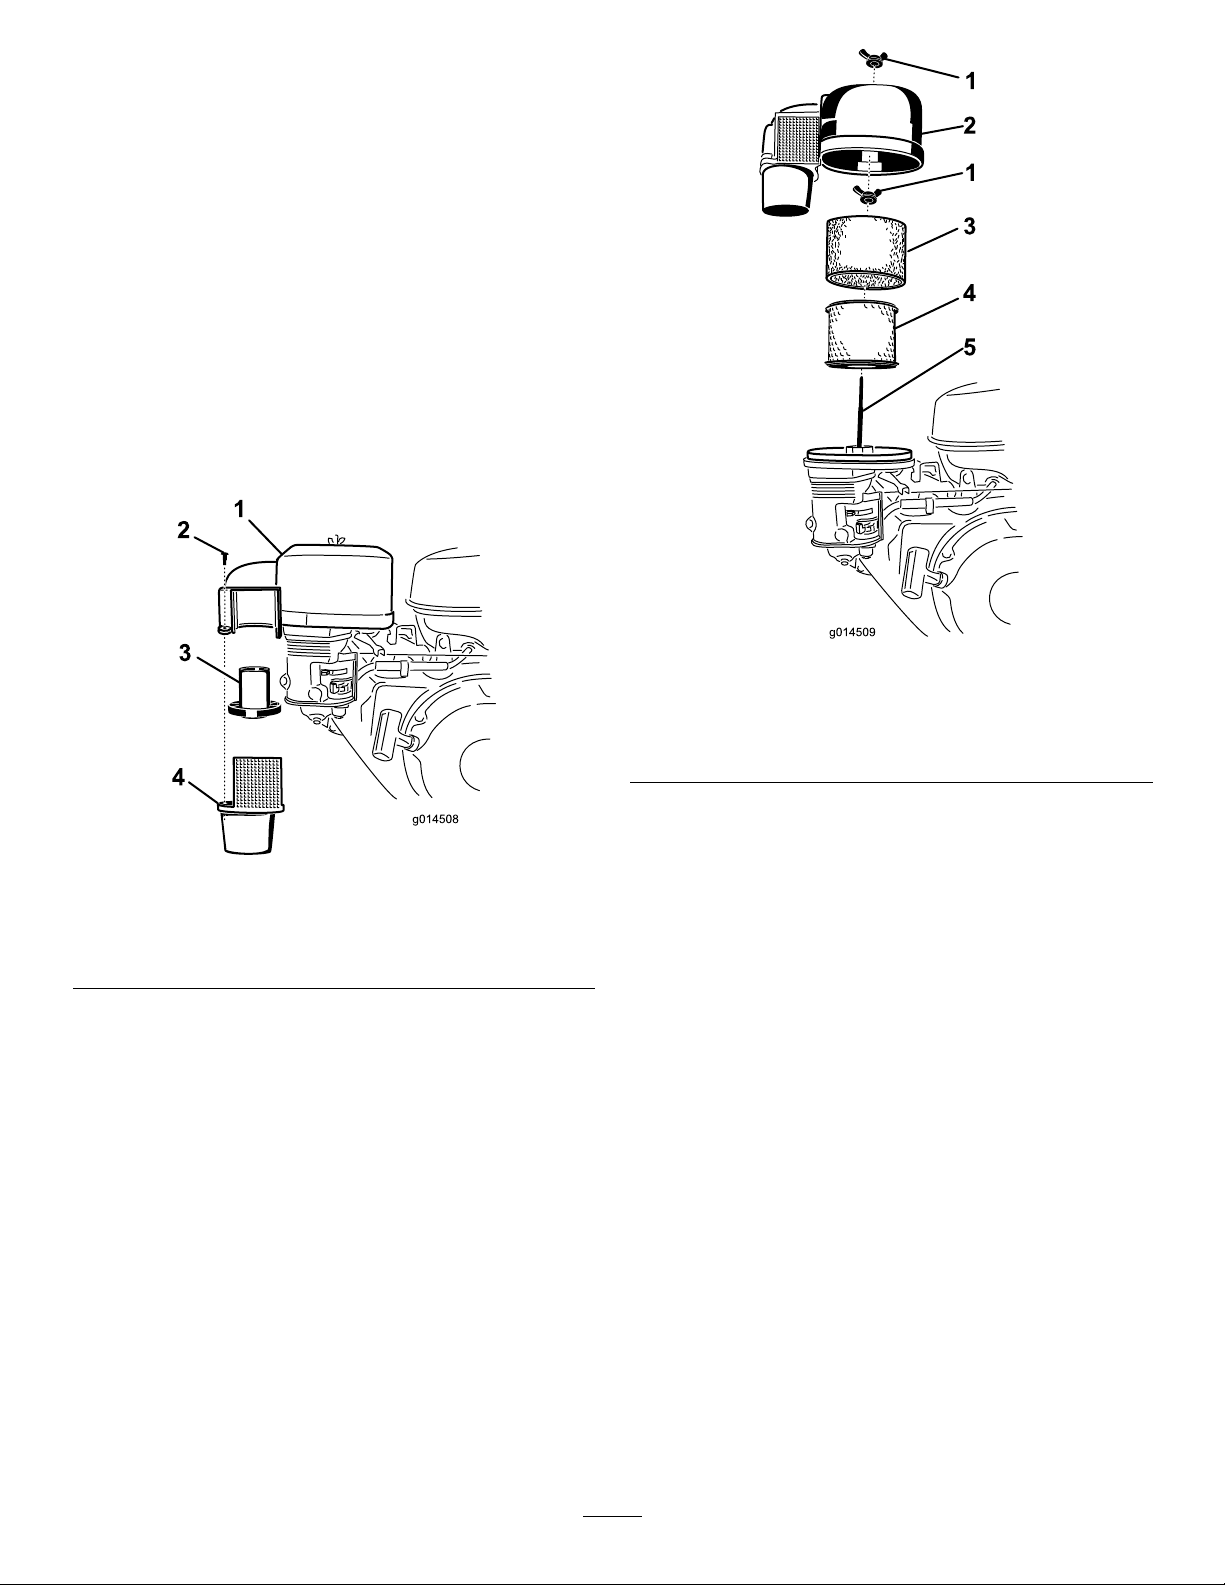
ServicingtheCycloneAirFilter
ServiceInterval:Every50hours
1.Removethe3screwsholdingthecyclonehousing.
2.Removethehousingwiththeairintakescreenand
removetheairchannels.
Figure10
1.Cyclonehousing
2.Screw4.Cyclonehousingwithair
Note:Theairchannelsmayremainintheupper
portionorfollowalongwiththehousingwhen
removed.
3.Cleanthecomponents.Usewater,detergentanda
brush.Drycarefully.
4.Placetheairchannelsinthecyclonehousing.
5.Insertcyclonehousingintopositionandmakesureit
tsintheupperportion.Donotuseforce;alignitin
placebeforettingthescrews.
3.Airchannels
intakescreen
ReplacingtheAirFilter
ServiceInterval:Every200hours
Iftheengineislowonpower,producesblacksmokeorruns
unevenly,theairltermaybeclogged.
1.Removethewingnutandliftoffthecyclonelterwith
theairltercowling(Figure11).
Figure11
1.Wingnut
2.Cycloneairlter5.Stud
3.Foampre-lter
2.Removethefoampre-lterandcleanitasfollows
A.Washthepre-lterusingamilddetergentand
water.
B.Squeezeitdrywithacleancloth.
C.Soakitwithnewengineoil.
D.Gentlywindthelterinanabsorbentclothand
squeezeoutexcessoil.
3.Removethewingnutontopoftheairlterand
removethepaperlter.
4.Tapthepaperlteragainstaxedsurfacetoremove
dust.Ifthepaperlterisstilldirtyordamaged,replace
it.Thepaperltershouldbereplacedevery200hours.
Important:Donotusecompressedairtoblow
outthepaperelement,thiscandamageit.
5.Mountthepaperlterintheairlterhousingand
secureitwiththewingnut.
6.Positionthefoampre-lteroverthepaperlter.
7.Installthecyclonelterwiththeairltercoverand
secureitwiththewingnut.
4.Airlter
13
Page 14
ServicingtheEngineOil
g014504
1
2
CleaningtheSedimentCup
Note:Changetheoilmorefrequentlywhentheoperating
conditionsareextremelydustyorsandy.
OilType:DetergentoilwithanAPIserviceofSJorhigher.
CrankcaseCapacity:2.1qt(2liters)
Viscosity:SAE10W-30isrecommendedforgeneraluse.
ChangingtheEngineOil
ServiceInterval:Aftertherst25hours
Every100hours
Yearlyorbeforestorage
1.Starttheengineandletitrunveminutes.Thiswarms
theoilsoitdrainsbetter.
2.Parkthemachinesothatthedrainsideisslightlylower
thantheoppositesidetoensurethattheoildrains
completely.
3.Settheparkingbrakeandstoptheengine.
4.Placeapanundertheoildrainhole.
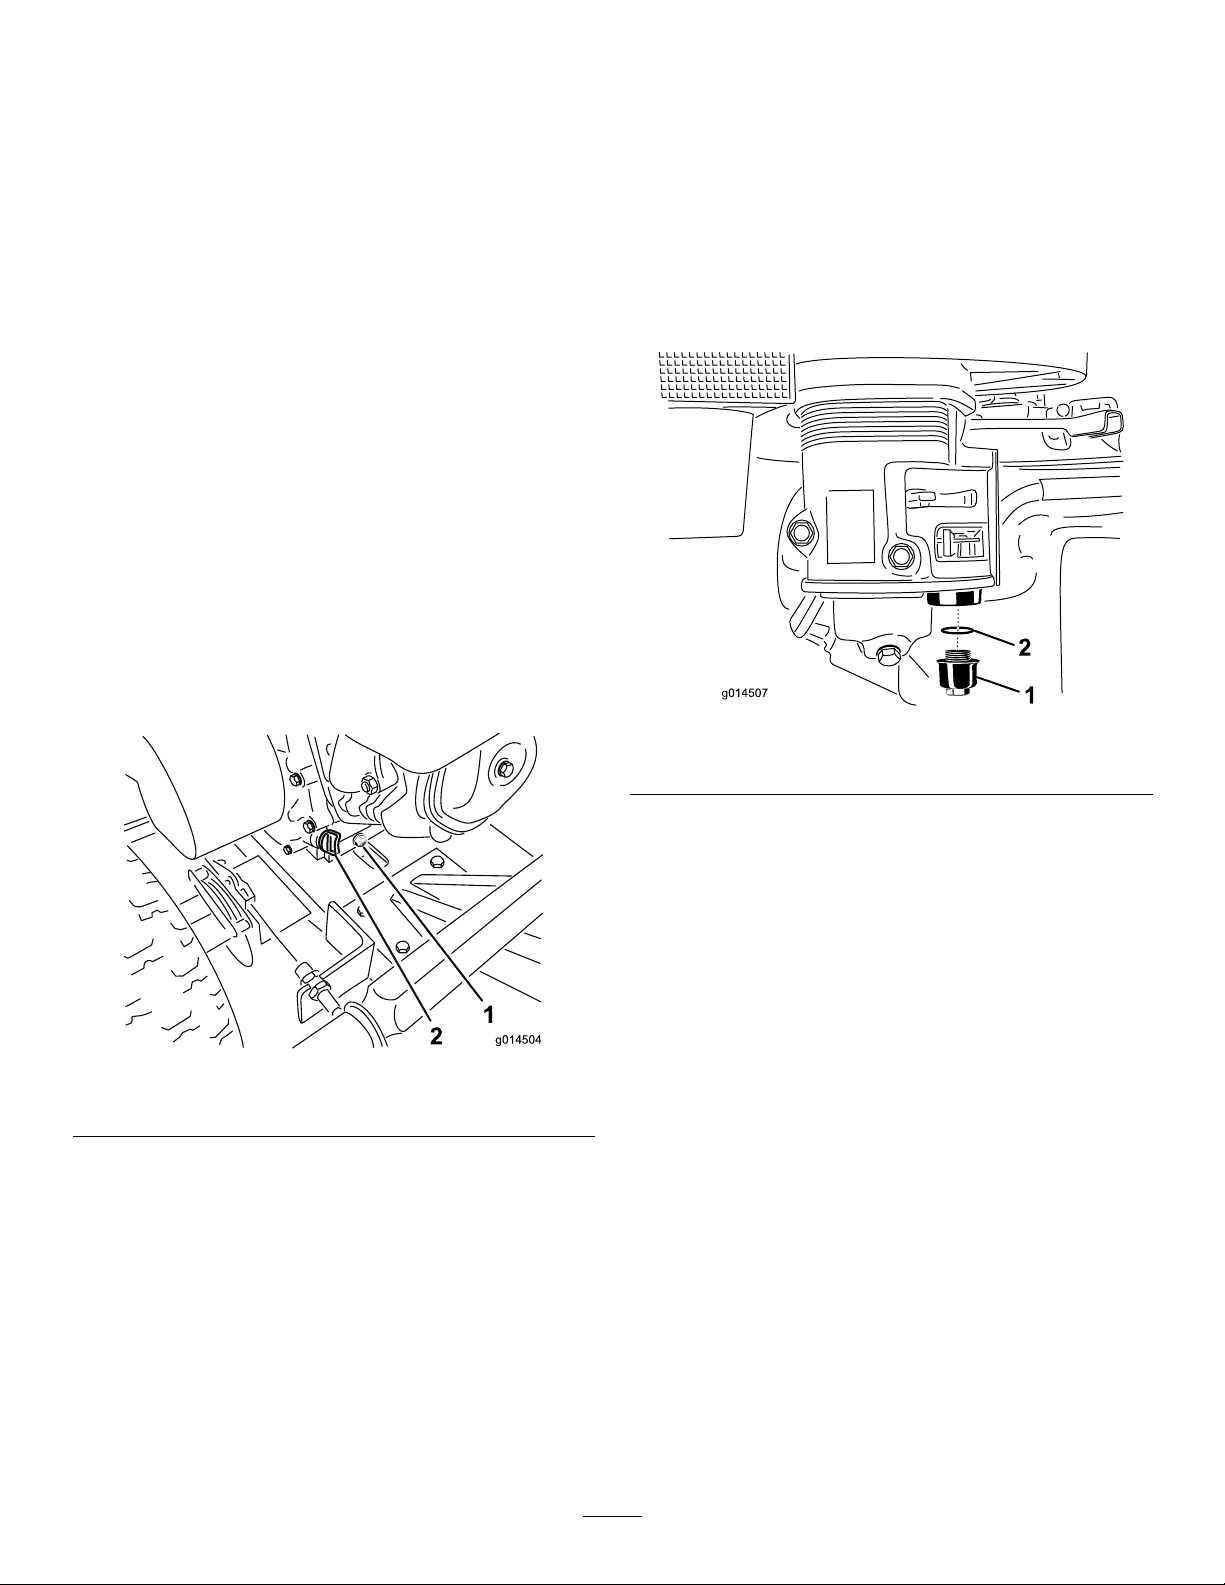
5.Removethedrainpluganddraintheoilthroughthe
holeslotintheframe(
Figure12).
ServiceInterval:Every100hours
Yearlyorbeforestorage
Underneaththefuelvalveisasedimentcuptocatchdirtin
thefuel.
1.MovethefuelvalvetotheOffposition,alltheway
totheleft.
2.Unscrewthesedimentcup.Makesurenottomisplace
theo-ring(
Figure13).
Figure13
Figure12
1.Oildrainhole2.Oilllcap
6.Whentheoilhasdrainedcompletely,installtheplug
andwipeupanyspilledoil.
Note:Disposeoftheusedoilatacertiedrecycling
center.
7.Removetheoilllcapandslowlypourapproximately
80percentofthespeciedamountofoilintothe
engine(
Figure12).
1.Sedimentcup2.O-Ring
3.Cleanthereservoirandtheo-ringusingacleaning
solventanddrycarefully .
Note:Makesurenottomisplacetheo-ring.
4.Puttheo-ringinplaceinthegrooveofthecupand
replacethesedimentcup.
5.TurnthefuelvalvetotheOnposition,allthewaytothe
right,andcheckforleaks.Ifitleaks,replacetheo-ring.
ServicingtheSparkPlug
ServiceInterval:Every100hours—Checkthesparkplugs.
Ensurethattheairgapbetweenthecenterandsideelectrodes
iscorrectbeforeinstallingthesparkplug.Useasparkplug
wrenchforremovingandinstallingthesparkpluganda
gappingtool/feelergaugetocheckandadjusttheairgap.
Installanewsparkplugifnecessary.
Type:BPR6ES(NKG)orequivalent
AirGap:0.28–0.031inch(0.70-0.80mm)
8.Slowlyaddadditionaloiltobringtheoillevel
totheupperlimitmarkonthedipstick.Refer
to
CheckingtheEngineOilLevel(page9).
9.Installtheoilllcap.
RemovingtheSparkPlug
1.Lowerthegrinderandstopthemachine;Referto
(page).
14
Page 15
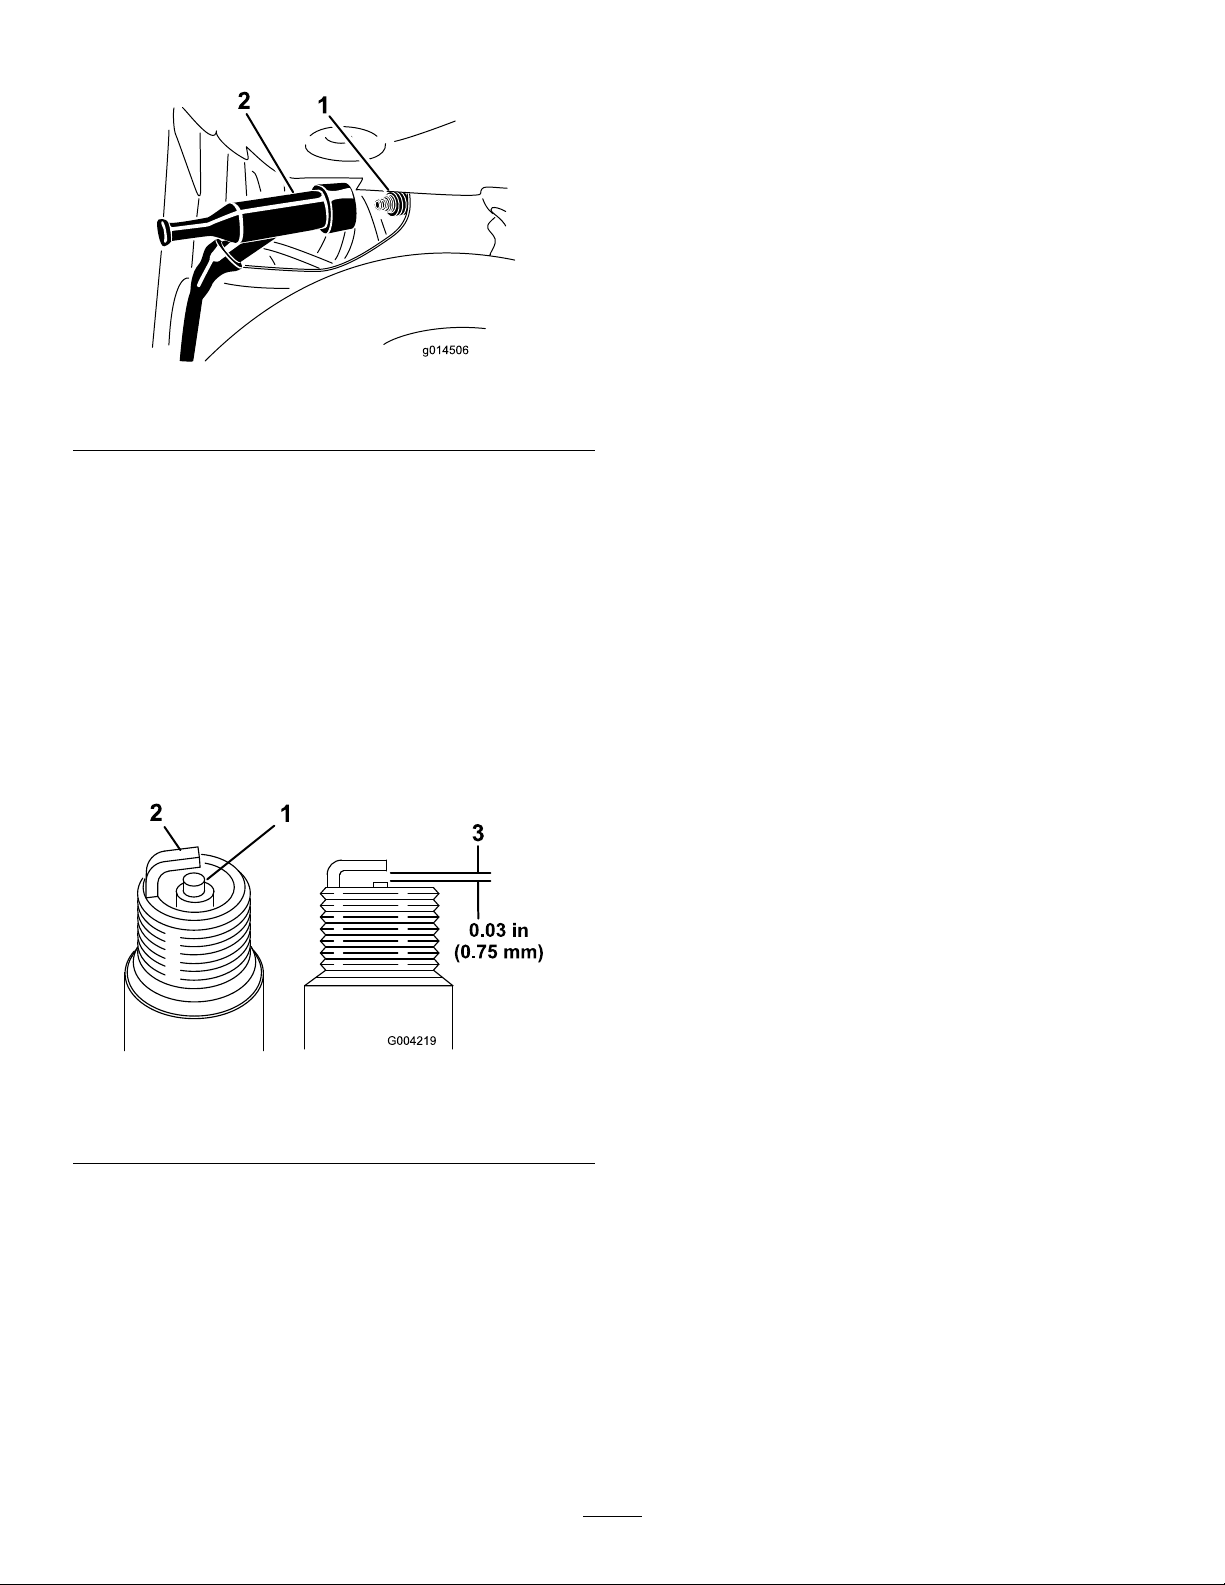
2.Pullthewireoffofthesparkplug(Figure14).
Figure14
BrakeMaintenance
AdjustingtheParkingBrake
1.Loosenthesetscrewonsideofbrakeleverknob.Turn
theknobclockwisetotightenthebrake;adjustcounter
clockwisetoloosenthebrake.Theleftwheelshould
lockcompletelywhenthebrakeisset.
2.Tightenthesetscrew .
1.Sparkplug
3.Cleanaroundthesparkplug.
4.Removethesparkplugandthemetalwasher.
2.Wire
CheckingtheSparkPlug
1.Lookatthecenterofthesparkplug(Figure15).Ifyou
seelightbrownorgrayontheinsulator,theengineis
operatingproperly.Ablackcoatingontheinsulator
usuallymeansthattheaircleanerisdirty .
Important:NeverCleanthesparkplug.Always
replacethesparkplugwhenithasablackcoating,
wornelectrodes,anoilylm,orcracks.
Figure15
1.Centerelectrodeinsulator3.Airgap(nottoscale)
2.Sideelectrode
2.Checkthegapbetweenthecenterandsideelectrodes
(Figure15).Bendthesideelectrode(Figure15)ifthe
gapisnotcorrect.
InstallingtheSparkPlug
1.Threadthesparkplugintothesparkplughole.
2.Tightenthesparkplugto20ft-lb(27N-m).
3.Pushthewireontothesparkplug.
15
Page 16
BeltMaintenance
G017432
G016617
G017434
AdjustingtheDriveBelt Tension
ServiceInterval:Beforeeachuseordaily
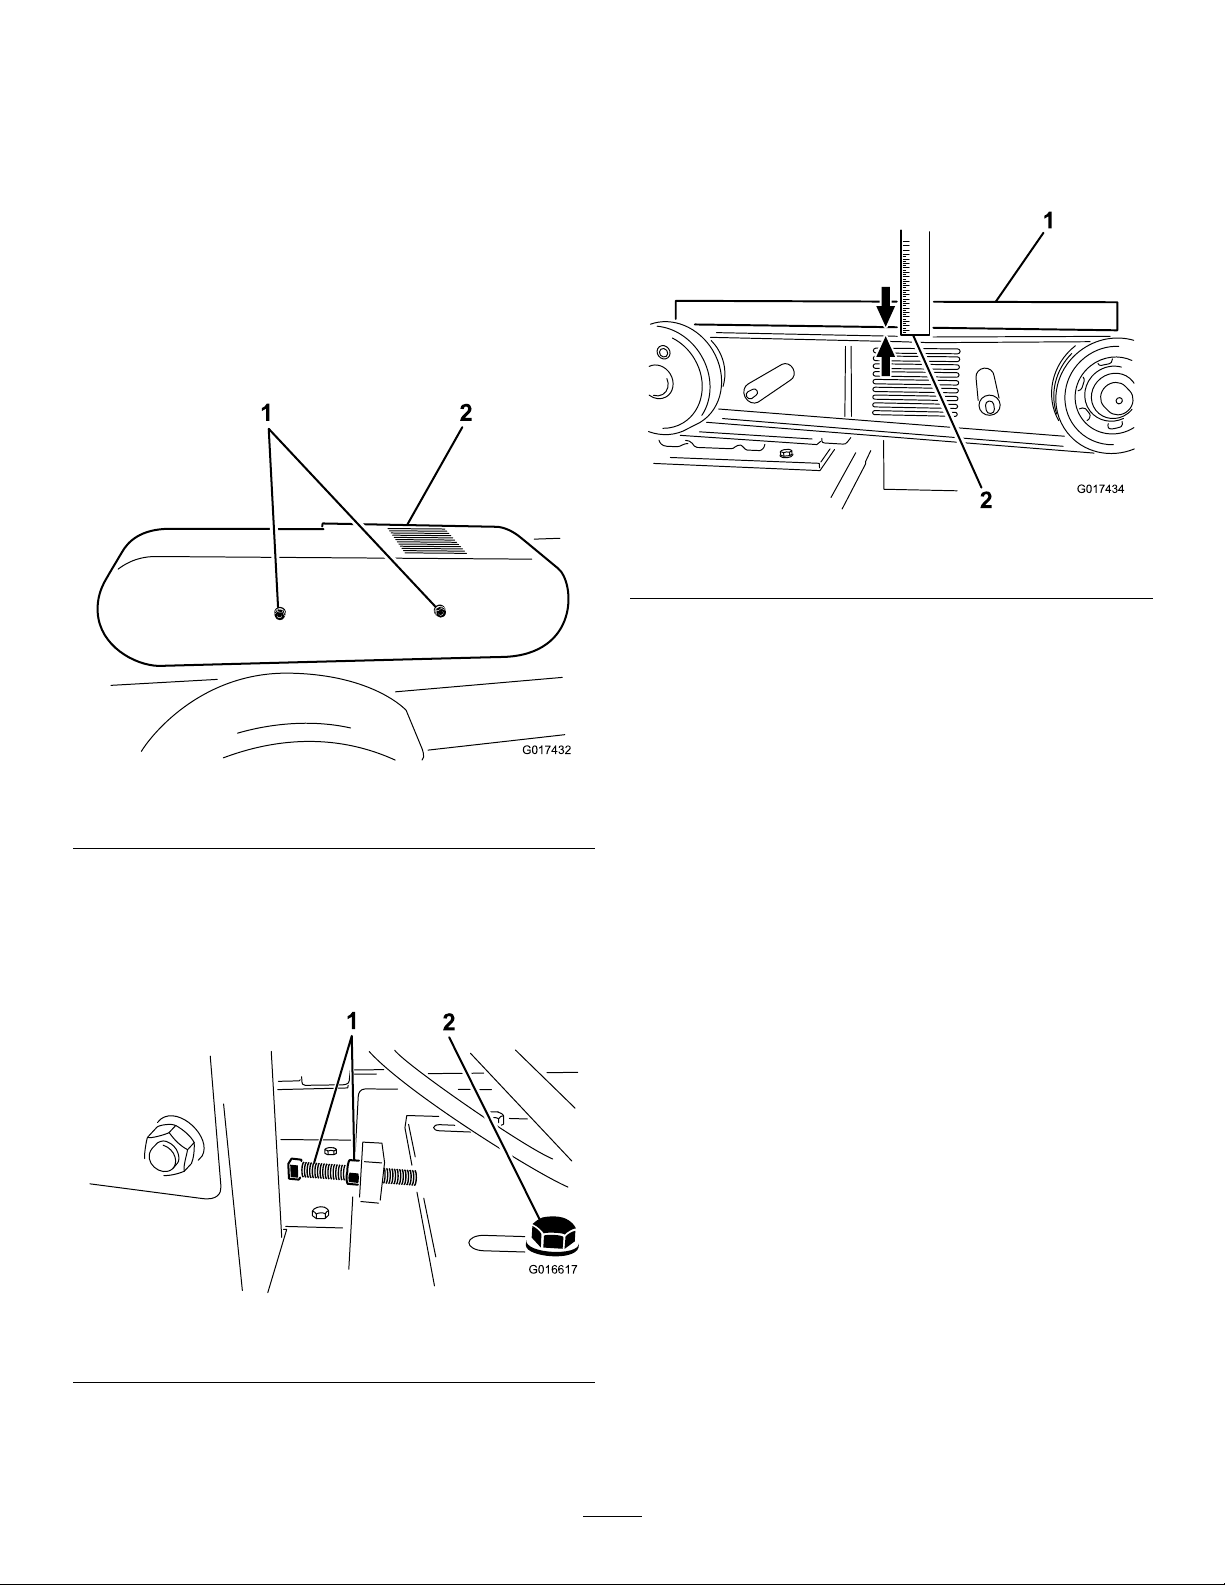
Note:Inspectthedrivebeltthroughtheslotontopofthe
beltcover.Adjustasrequired.
1.Removetheboltsandwasherssecuringthebeltguard
tomachine.
6.Layastraightedgeacrossclutchandywheelpulleys,
tightenbelttensionboltsothereis0.40inch(1cm)of
exinthebeltwhenpushingdownwith15lbs(6.8
kg)force,atmid-span(whenre-tensioningabeltin
use)orwith18lbs(8kg)forcewheninstallinganew
belt(Figure18).
2.Removethebeltguard(
1.Boltsandwashers2.Beltguard
3.Loosenthe4engineplatemountingboltsandthe4
boltssecuringtherearofthebeltguardtotheengine.
4.Loosenthebelttensionboltandjamnut,slidethe
enginetowardtheywheelhousingtoloosenbelt
(Figure17).
Figure16).
Figure16
Figure18
1.Straightedge2.Flexof0.40inches(1cm)
7.Ensurethatthepulleysarealignedandtheengineis
parallelwiththeframe(notangledtowardtheside),
thentightenthe4engineplatemountingboltsandthe
4boltssecuringtherearofthebeltguardtotheengine.
8.Installthebeltguardandsecureitwiththepreviously
removedwashersandbolts.
ReplacingtheDriveBelt
ServiceInterval:Every100hours
Note:Replacethebeltifitshowsanysignsofwear,cracks,
glazing,ordamage.
1.Removetheboltsandwasherssecuringthebeltguard
tomachine.
Figure17
1.Tensionboltandjam2.Engineplatemountingbolt
5.Adjustthedrivebelttensionbytighteningtensionbolt
andjamnutagainsttheenginemountingplate,pushing
theenginerearward.
2.Removethebeltguard(Figure16).
3.Loosenthe4engineplatemountingboltsandthe4
boltssecuringtherearofthebeltguardtotheengine.
4.Loosenthebelttensionboltandjamnut,slidethe
enginetowardtheywheelhousingtoloosenbelt
Figure17).
(
5.Replacedrivebelt.
6.Adjusttensionofnewbeltto18±0.9lbforceand
0.40inch(10mm)beltdeectionatmid-span.
7.Tightenthe4engineplatemountingboltsandthe4
boltssecuringtherearofthebeltguardtotheengine.
8.Installthebeltguardandsecureitwiththepreviously
removedwashersandbolts.
16
Page 17
GrinderMaintenance
CheckingtheCuttingWheel Blades
ServiceInterval:Beforeeachuseordaily
Amongthemostcriticalelementsofthemachineisthe
cuttingwheelblades.Theyarealsothemostsubjectto
damageandwear.Inthecourseofgrindingstumpstheynot
onlymakecontactwiththewood,buttheyalsoencounter
numerousabrasivesandobjects,suchasdirt,stones,and
occasionallyalargerockorburiedscrap.
Thewearandlossofcuttingteethcansignicantlyimpairthe
efciencyandperformanceofthemachine.Therefore,itis
importanttomakefrequentchecksoftheconditionofall
ofthecuttingteethandreplaceanydamagedorwornblade
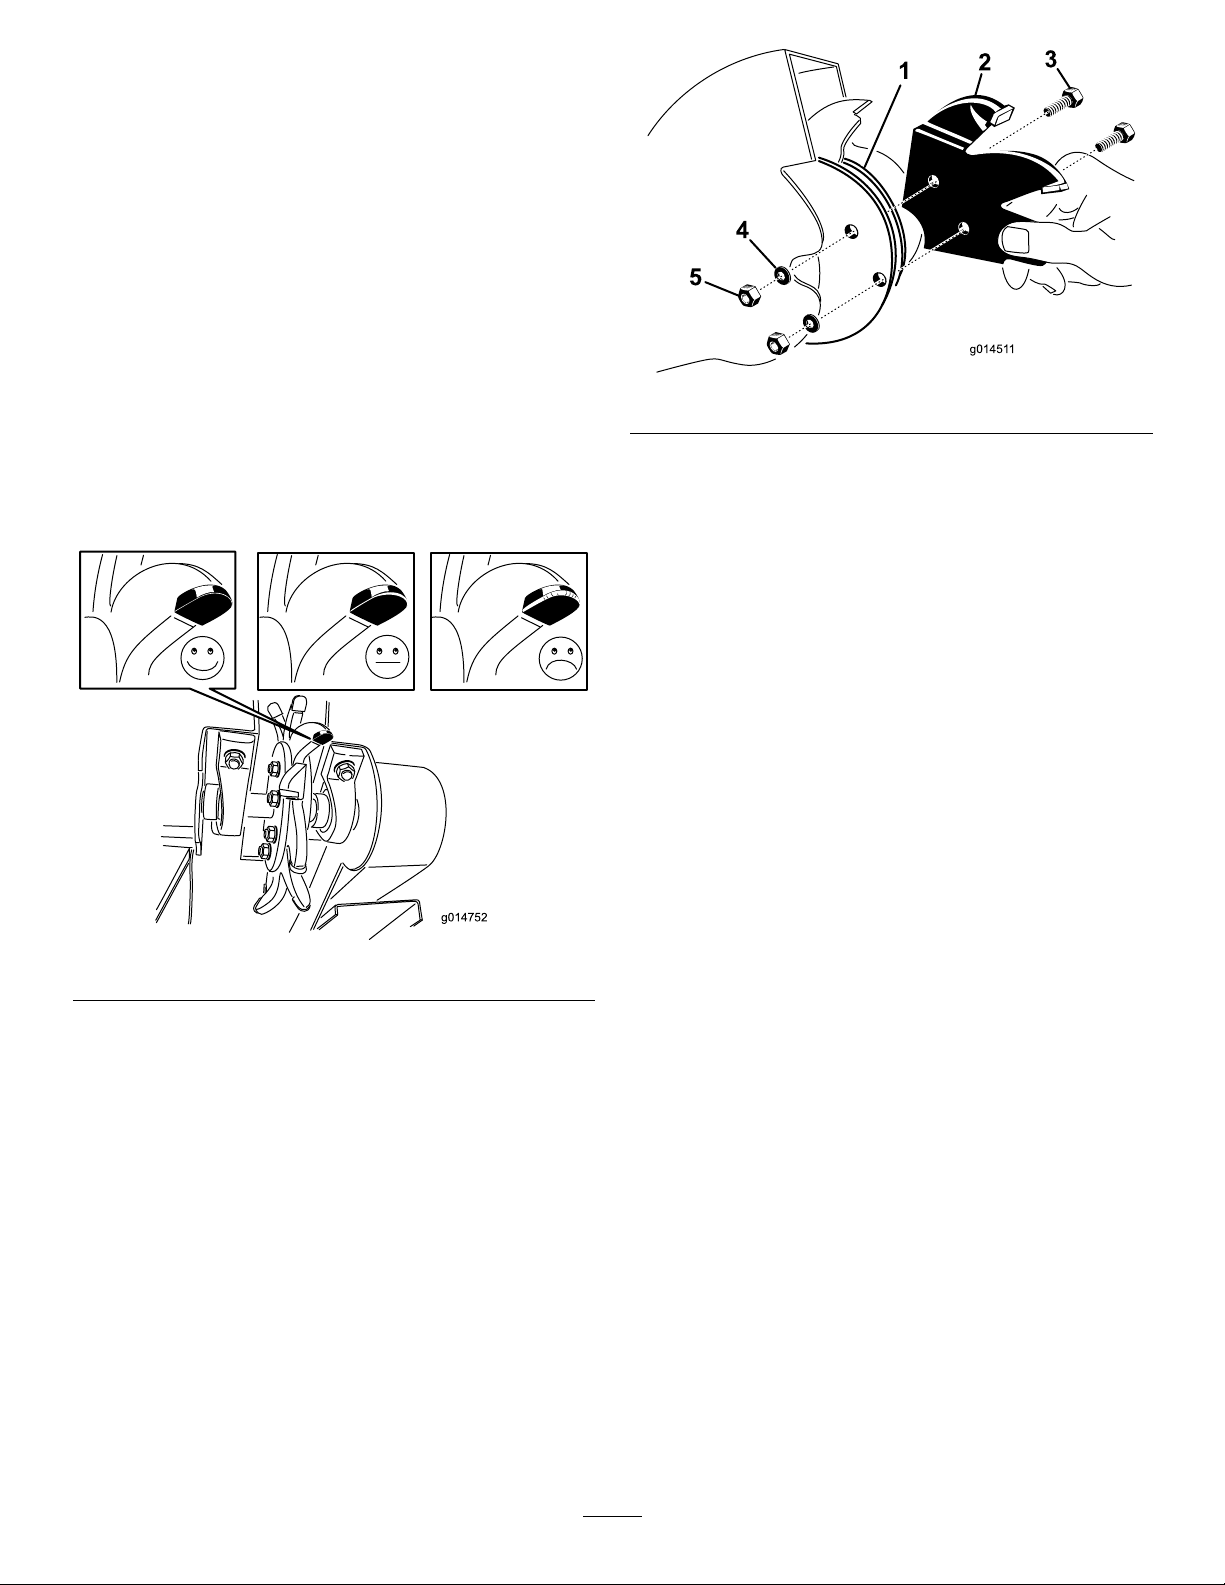
sections(
Figure19).
Figure20
3.Checkeachsectionforcracks.Replaceabladesection
ifitiscrackedorhasmissingorwornteeth.
Note:Whenreplacingcuttingwheelbladesections,
makesurebladesectionisplacedincorrectalignment
withbladerotation.
4.Insertthebladesectionbetweentheblademounting
anges(Figure20),andsecurethemwith2bolts,
lockwashers,andnuts.
Figure19
ReplacingtheCuttingWheel Blades
1.Cleanalldirtfromthecuttingwheelandmounting
anges.
2.Removethetwoboltsthatholdeachcuttingblade
section.Usecarenottoletasectiondropandchip
whentheybecomeloose(Figure20).
5.Torquethefastenersto27–33ft-lb(37–45N-m).
17
Page 18

Cleaning
RemovingDebrisfromthe Machine
Regularcleaningandwashingwillincreasethelifespanof
themachine.Cleanthemachinedirectlyafteruse,beforethe
dirthardens.
Checkbeforecleaningthatthefueltankcapisproperlyin
placetoavoidgettingwaterinthetank.
Usecarewhenusingahigh-pressuresprayerbecauseitcan
damagewarningdecals,instructionsigns,andtheengine
Storage
Forstorageover30days,preparetheunitasfollows:
1.Removedirtandgrimefromtheexternalpartsof
theentireunit,especiallytheengine.Cleandirtand
sawdustchipsfromtheoutsideoftheenginecylinder
headnsandblowerhousing.
Important:Y oucanwashtheunitwithmild
detergentandwater.
2.Addapetroleumbasedstabilizer/conditionertofuel
inthetank.Followmixinginstructionsfromstabilizer
manufacturer.(1oz.perUSgallon).Donotusean
alcoholbasedstabilizer(ethanolormethanol).
Important:Lubricatethecuttingwheelbladebearings
aftercleaning.
Note:Fuelstabilizer/conditionerismosteffective
whenmixedwithfreshgasolineandusedatalltimes.
Important:Donotstorestabilizer/conditioned
gasolineover90days.
3.Runtheenginetodistributeconditionedfuelthrough
thefuelsystem(5minutes).
4.Stoptheengine,allowittocool,anddrainthefueltank
usingapumptypesiphon.Disposeoffuelproperly;
recycleasperlocalcodes.
5.Starttheengineandrunituntilitstops.
6.Choketheengine.
7.Startandruntheengineuntilitwillnotstartagain.
8.Cleanthesedimentcup;referto
CleaningtheSedimentCup(page14).
9.Servicetheaircleaner;referto
ServicingtheCycloneAirFilter(page13)and,
ReplacingtheAirFilter(page13).
10.Changetheenginecrankcaseoil;referto
ChangingtheEngineOil(page14).
11.Removethesparkplugandcheckthecondition;refer
to
ServicingtheSparkPlug(page14).
12.Withthesparkplugremovedfromtheengine,pour
twotablespoonsofengineoilintothesparkplughole.
13.Pullthestarterslowlytocranktheengineanddistribute
theoilinsidethecylinder.
14.Installthesparkplug,butdonotinstallthewireon
thesparkplug.
15.Greasethecutterwheelbearings;referto
16.Checkandtightenallbolts,nuts,andscrews.Repairor
replaceanypartthatisdamaged.
17.Paintallscratchedorbaremetalsurfaces.Paintis
availablefromyourAuthorizedServiceDealer.
18.Storetheunitinaclean,drygarageorstoragearea.
19.Covertheunittoprotectitandkeepitclean.
18
(page).
Page 19

Troubleshooting
Problem
Theenginewillnotstart.
Theenginerunsrough.
Thebeltslipsorcomesoffthepulleys1.Thebelttensionisinsufcient.
Thecuttingwheeldoesnotrotate.
1.ThesafetybaleisintheOffposition.1.Holdthesafetybailagainstthehandle.
2.Ifyourmodelisequippedwithan
enginewithanOn/Offswitch,the
switchisintheOffposition.
3.Thefuelshutoffvalveisclosed.3.Openthefuelvalve.
4.Thechokeisopen.
5.Thefueltankisempty .5.Filltankwithfreshfuel.
6.Thesparkplugwireislooseor
disconnected.
1.Thechokeislefton.1.Openthechoke.
2.Theairlterisclogged.2.Cleanorreplacetheairlter.
3.Thefuellineisclogged.3.Cleanthesedimentcup.
4.Thereiswaterorcontaminantsinthe
fuel.
5.Thesparkplugsarewornorhave
buildupontheelectrodes.
1.Theenginespeedisinsufcientto
activatethecentrifugalclutch.
2.Thebelttensionisinsufcient.
3.Theclutchshoesareworn.3.Replacetheclutch.
PossibleCauseCorrectiveAction
2.MovetheswitchtotheOnposition.
4.Closethechokewhenstartingacold
engine.
6.Checktheelectrodegapandcleanor
replacethesparkplug.
4.Drainandllthetankwithfreshfuel.
5.Checktheelectrodegapandcleanor
replacethesparkplug.
1.Adjustthebelttension.Reducethe
cuttingdepth.
1.MovethethrottletotheEngaged
position.
2.Adjustthebelttension.
Thecuttingwheelcontinuestorotate.
1.Theenginespeedisexcessive.1.MovethethrottletotheDisengaged
2.Thebeltisoffofthepulleysorbroken.
3.Clutchspringsareweakorbroken.
1.Theparkingbrakeisoutofadjustment.
2.Thebrakepadsareworn.2.Replacethebrake.
position.
2.Replacethedrivebelt.
3.Replacetheclutch.
1.Adjusttheparkingbrake. Theparkingbrakedoesnothold.
19
Page 20

ToroCompactUtilityEquipmentWarranty
AOne-YearLimitedWarranty
CUEProducts
ConditionsandProductsCovered
TheT oro®Companyanditsafliate,T oroWarrantyCompany,pursuant
toanagreementbetweenthem,jointlywarrantyourT oroCompactUtility
Equipment(“Product”)tobefreefromdefectsinmaterialsorworkmanship.
Thefollowingtimeperiodsapplyfromthedateofpurchase:
ProductsWarrantyPeriod
Loaders,Trenchers,StumpGrinders,
Chippers,LogSplittersandAttachments
KohlerEngines3years
AllotherEngines2years
Whereawarrantableconditionexists,wewillrepairtheProductatnocost
toyouincludingdiagnosis,labor ,andparts.
1yearor1000operating
hours,whicheveroccursrst
InstructionsforObtainingWarrantyService
IfyouthinkthatyourT oroProductcontainsadefectinmaterialsor
workmanship,followthisprocedure:
1.ContactanyAuthorizedT oroCompactUtilityEquipment(CUE)
ServiceDealertoarrangeserviceattheirdealership.T olocatea
dealerconvenienttoyou,accessourwebsiteatwww.T oro.com.
YoumayalsocallourT oroCustomerCareDepartmenttollfree
at888-865-5676(U.S.customers)or888-865-5691(Canadian
customers).
2.Bringtheproductandyourproofofpurchase(salesreceipt)tothe
ServiceDealer.
3.IfforanyreasonyouaredissatisedwiththeServiceDealer’s
analysisorwiththeassistanceprovided,contactusat:
LCBCustomerCareDepartment
ToroWarrantyCompany
811 1LyndaleAvenueSouth
Bloomington,MN55420-1 196
TollFree:888-865-5676(U.S.customers)
TollFree:888-865-5691(Canadacustomers)
OwnerResponsibilities
YoumustmaintainyourT oroProductbyfollowingthemaintenance
proceduresdescribedintheOperator’sManual.Suchroutine
maintenance,whetherperformedbyadealerorbyyou,isatyourexpense.
Partsscheduledforreplacementasrequiredmaintenance(“Maintenance
Parts”),arewarrantedfortheperiodoftimeuptothescheduled
replacementtimeforthatpart.Failuretoperformrequiredmaintenance
andadjustmentscanbegroundsfordisallowingawarrantyclaim.
ItemsandConditionsNotCovered
Notallproductfailuresormalfunctionsthatoccurduringthewarranty
periodaredefectsinmaterialsorworkmanship.Thisexpresswarranty
doesnotcoverthefollowing:
•Productfailureswhichresultfromtheuseofnon-T ororeplacement
parts,orfrominstallationanduseofadd-on,modied,orunapproved
accessories
•Productfailureswhichresultfromfailuretoperformrequired
maintenanceand/oradjustments
•ProductfailureswhichresultfromoperatingtheProductinan
abusive,negligentorrecklessmanner
•Partssubjecttoconsumptionthroughuseunlessfoundtobe
defective.Examplesofpartswhichareconsumed,orusedup,during
normalProductoperationinclude,butarenotlimitedto,teeth,tines,
blades,sparkplugs,tires,tracks,lters,chains,etc.
•Failurescausedbyoutsideinuence.Itemsconsideredtobeoutside
inuenceinclude,butarenotlimitedto,weather,storagepractices,
contamination,useofunapprovedcoolants,lubricants,additives,or
chemicals,etc.
•Normal“wearandtear”items.Normal“wearandtear”includes,butis
notlimitedto,wornpaintedsurfaces,scratcheddecalsorwindows,
etc.
•Anycomponentcoveredbyaseparatemanufacturer’swarranty
•Pickupanddeliverycharges
GeneralConditions
RepairbyanAuthorizedT oroCompactUtilityEquipment(CUE)Service
Dealerisyoursoleremedyunderthiswarranty.
NeitherTheT oro®CompanynorToroWarrantyCompanyisliable
forindirect,incidentalorconsequentialdamagesinconnectionwith
theuseoftheT oroProductscoveredbythiswarranty ,including
anycostorexpenseofprovidingsubstituteequipmentorservice
duringreasonableperiodsofmalfunctionornon-usepending
completionofrepairsunderthiswarranty .Allimpliedwarranties
ofmerchantabilityandtnessforusearelimitedtotheduration
ofthisexpresswarranty .Somestatesdonotallowexclusionsof
incidentalorconsequentialdamages,orlimitationsonhowlong
animpliedwarrantylasts,sotheaboveexclusionsandlimitations
maynotapplytoyou.
Thiswarrantygivesyouspeciclegalrights,andyoumayalsohaveother
rightswhichvaryfromstatetostate.
ExceptfortheenginewarrantycoverageandtheEmissionswarranty
referencedbelow,ifapplicable,thereisnootherexpresswarranty.The
EmissionsControlSystemonyourProductmaybecoveredbyaseparate
warrantymeetingrequirementsestablishedbytheU.S.Environmental
ProtectionAgency(EP A)ortheCaliforniaAirResourcesBoard(CARB).
ThehourlimitationssetforthabovedonotapplytotheEmissions
ControlSystemWarranty.RefertotheCaliforniaEmissionControl
WarrantyStatementsuppliedwithyourProductorcontainedintheengine
manufacturer’sdocumentationfordetails.
CountriesOtherthantheUnitedStatesorCanada
CustomerswhohavepurchasedT oroproductsexportedfromtheUnitedStatesorCanadashouldcontacttheirT oroDistributor(Dealer)toobtain
guaranteepoliciesforyourcountry,province,orstate.IfforanyreasonyouaredissatisedwithyourDistributor’sserviceorhavedifcultyobtaining
guaranteeinformation,contacttheT oroimporter.Ifallotherremediesfail,youmaycontactusatT oroWarrantyCompany .
374-0261RevB
 Loading...