

Toro 22291 Operator's Manual

FormNo.3418-976RevB
53cmHeavy-DutyRecycler®/RearBagger
LawnMower
22291
ProfessionellerRasenmähermitRecycler®
bzw.Heckfänger(53cm)
22291
CortacéspeddeserviciopesadoRecycler®de
53cmconreciclado/ensacadotrasero
22291
TondeusegrandrendementRecycler®de53
cmavecbacarrière
22291
Zwaaruitgevoerdegazonmaaiervan53cm
metRecycler®/grasvanger
22291
www.T oro.com.
*3418-976*B
FormNo.3418-967RevB
53cmHeavy-DutyRecycler
BaggerLawnMower
ModelNo.22291—SerialNo.402100000andUp
®
/Rear
Registeratwww.T oro.com.
OriginalInstructions(EN)
CV
*3418-967*B

ThisproductcomplieswithallrelevantEuropean
directives;fordetails,pleaseseetheseparateproduct
specicDeclarationofConformity(DOC)sheet.
g000502
Figure2
Safety-alertsymbol
Introduction
Thisrotary-blade,walk-behindlawnmowerisintended
tobeusedbyresidentialhomeownersorprofessional,
hiredoperators.Itisdesignedprimarilyforcutting
grassonwell-maintainedlawnsonresidentialor
commercialproperties.Itisnotdesignedforcutting
brushorforagriculturaluses.
Readthisinformationcarefullytolearnhowtooperate
andmaintainyourproductproperlyandtoavoid
injuryandproductdamage.Youareresponsiblefor
operatingtheproductproperlyandsafely .
YoumaycontactT orodirectlyatwww.T oro.comfor
productandaccessoryinformation,helpndinga
dealer,ortoregisteryourproduct.
Wheneveryouneedservice,genuineToroparts,or
additionalinformation,contactanAuthorizedService
DealerorToroCustomerServiceandhavethemodel
andserialnumbersofyourproductready.Figure1
identiesthelocationofthemodelandserialnumbers
ontheproduct.Writethenumbersinthespace
provided.
Thismanualuses2wordstohighlightinformation.
Importantcallsattentiontospecialmechanical
informationandNoteemphasizesgeneralinformation
worthyofspecialattention.
GrossorNetTorque:Thegrossornettorque
ofthisenginewaslaboratoryratedbytheengine
manufacturerinaccordancewiththeSocietyof
AutomotiveEngineers(SAE)J1940orJ2723.As
conguredtomeetsafety,emission,andoperating
requirements,theactualenginetorqueonthisclass
ofmowerwillbesignicantlylower.Pleasereferto
theenginemanufacturer’sinformationincludedwith
themachine.
Donottamperwithordisablesafetydevicesonthe
machine,andchecktheirproperoperationregularly.
Donotattempttoadjustortamperwiththeengine
speedcontrol;doingsomaycreateanunsafe
operatingcondition,resultinginpersonalinjury.
Important:Withyoursmartphoneortablet,scan
theQRcodeontheserialnumberdecaltoaccess
warranty,parts,andotherproductinformation.
Figure1
1.Modelandserialnumberplate
ModelNo.
SerialNo.
Thismanualidentiespotentialhazardsandhas
safetymessagesidentiedbythesafety-alertsymbol
(Figure2),whichsignalsahazardthatmaycause
seriousinjuryordeathifyoudonotfollowthe
recommendedprecautions.
g226628
©2018—TheToro®Company
8111LyndaleAvenueSouth
Bloomington,MN55420
Contactusatwww.Toro.com.
2
PrintedintheUSA
AllRightsReserved

Contents
Safety
Safety.......................................................................3
GeneralSafety...................................................3
SafetyandInstructionalDecals..........................4
Setup........................................................................6
1InstallingtheHandle........................................6
2InstallingtheRecoil-StarterRopeinthe
RopeGuide.....................................................8
3FillingtheCrankcasewithOil...........................8
4AdjustingtheSelf-PropelDrive........................9
5AssemblingtheGrassBag...............................9
ProductOverview...................................................10
Specications..................................................10
BeforeOperation..................................................11
BeforeOperationSafety....................................11
FillingtheFuelTank...........................................11
CheckingtheEngine-OilLevel..........................12
AdjustingtheCuttingHeight.............................12
DuringOperation.................................................12
DuringOperationSafety...................................12
StartingtheEngine...........................................13
ShuttingOfftheEngine.....................................14
OperatingtheSelf-PropelDrive........................14
RecyclingtheClippings....................................14
BaggingtheClippings.......................................15
OperatingTips.................................................15
AfterOperation....................................................16
AfterOperationSafety......................................16
CleaningundertheMachine.............................17
Maintenance...........................................................18
RecommendedMaintenanceSchedule(s)...........18
MaintenanceSafety..........................................18
ServicingtheAirFilter.......................................19
ChangingtheEngineOil...................................19
ServicingtheSparkPlug...................................20
AdjustingtheSelf-PropelDrive.........................20
MaintainingtheBlade.......................................21
Storage...................................................................24
PreparingtheFuelSystem...............................24
PreparingtheEngine........................................24
GeneralInformation..........................................24
RemovingtheMachinefromStorage................24
Troubleshooting......................................................25
Thismachinehasbeendesignedinaccordancewith
ENISO5395:2013.
Improperlyusingormaintainingthismachinecan
resultininjury.Toreducethepotentialforinjury,
complywiththesesafetyinstructions.
Toensuremaximumsafety,bestperformance,and
togainknowledgeoftheproduct,itisessential
thatyouandanyotheroperatorofthemower
readandunderstandthecontentsofthismanual
beforetheengineiseverstarted.Payparticular
attentiontothesafety-alertsymbol(Figure2),
whichmeansCaution,Warning,orDanger.Read
andunderstandtheinstructionbecauseithas
todowithsafety .Failuretocomplywiththe
instructionmayresultinpersonalinjury.
GeneralSafety
Thisproductiscapableofamputatinghandsand
feetandofthrowingobjects.Alwaysfollowallsafety
instructionstoavoidseriouspersonalinjury.
Usingthisproductforpurposesotherthanitsintended
usecouldprovedangeroustoyouandbystanders.
•Read,understand,andfollowtheinstructions
andwarningsinthisOperator’sManualandon
themachineandattachmentsbeforestartingthe
engine.
•Donotputyourhandsorfeetnearmovingpartsof
orunderthemachine.Keepclearofanydischarge
opening.
•Donotoperatethemachinewithoutallguards
andothersafetyprotectivedevicesinplaceand
workingonthemachine.
•Keepbystandersandchildrenasafedistance
awayfromthemachine.Donotallowchildrento
operatethemachine.Allowonlypeoplewhoare
responsible,trained,familiarwiththeinstructions,
andphysicallycapabletooperatethemachine.
•Stopthemachine,shutofftheengine,andwaitfor
allmovingpartstostopbeforeservicing,fueling,
oruncloggingthemachine.
Improperlyusingormaintainingthismachinecan
resultininjury.T oreducethepotentialforinjury,
complywiththesesafetyinstructionsandalwayspay
attentiontothesafety-alertsymbol,whichmeans
Caution,Warning,orDanger—personalsafety
instruction.Failuretocomplywiththeseinstructions
mayresultinpersonalinjuryordeath.
Youcanndadditionalsafetyinformationwhere
neededthroughoutthismanual.
3

SafetyandInstructionalDecals
Important:Safetyandinstructiondecalsarelocatednearareasofpotentialdanger.Replacedamaged
decals.
decaloemmarkt
Manufacturer'sMark
1.Thismarkindicatesthatthebladeisidentiedasapart
fromtheoriginalmachinemanufacturer.
112-8760
1.Thrownobjecthazard—keepbystandersasafedistance
awayfromthemachine.
2.Cutting/dismembermentofhandorfoot—stayawayfrom
movingparts.
125-8403
KawasakiNon-BBCUnits
decal112-8760
decal125-8404
125-8404
1.Pushtheprimeronce.2.Pulltherecoil-starthandle.
decal131-0822
131-0822
1.Self-propeldrive—Attention;prematurewearofthe
transmissionmayoccurifthebeltisover-tightened;before
servicingorperformingmaintenance,readtheOperator's
Manual.
decal125-8403
1.Pushtheprimeronce.2.Pulltherecoil-starthandle.
4

decal116-7583
116-7583
1.Warning—readtheOperator’sManual.Donotoperatethis
machineunlessyouaretrained.
2.Thrownobjecthazard—keepbystandersasafedistance
awayfromthemachine.
3.Thrownobjecthazard—donotoperatethemachinewithout
therear-dischargeplugorbaginplace.
4.Cutting/dismembermenthazardofhandorfoot,mower
blade—stayawayfrommovingparts;keepallguardsinplace.
5.Warning—wearhearingprotection.
6.Cutting/dismembermenthazardofhandorfoot,mower
blade—donotoperateupanddownslopes;operateside
tosideonslopes;shutofftheenginebeforeleavingthe
operatingposition—pickupobjectsthatthebladescould
throw;andlookbehindyouwhenbackingup.
5
Setup
LooseParts
Usethechartbelowtoverifythatallpartshavebeenshipped.
ProcedureDescription
Handle1
Hex-head-angebolt(5/16x1-1/2
1
2
3
4
5
inches)
Carriagebolt(5/16x1-1/2inches)
Flangenut(5/16inch)
Nopartsrequired
Nopartsrequired
Nopartsrequired
Nopartsrequired
Important:Removeanddiscardtheprotective
plasticsheetthatcoverstheengineandanyother
plasticorwrappingonthemachine.
Note:Determinetheleftandrightsidesofthe
machinefromthenormaloperatingposition.
Qty.
Use
2
2
4
–
–
–
–
Installthehandle.
Installtherecoil-starterropeintherope
guide.
Fillthecrankcasewithoil.
Adjusttheself-propeldrive.
Assemblethegrassbag.
1
InstallingtheHandle
Partsneededforthisprocedure:
1Handle
2
Hex-head-angebolt(5/16x1-1/2inches)
2
Carriagebolt(5/16x1-1/2inches)
4
Flangenut(5/16inch)
Procedure
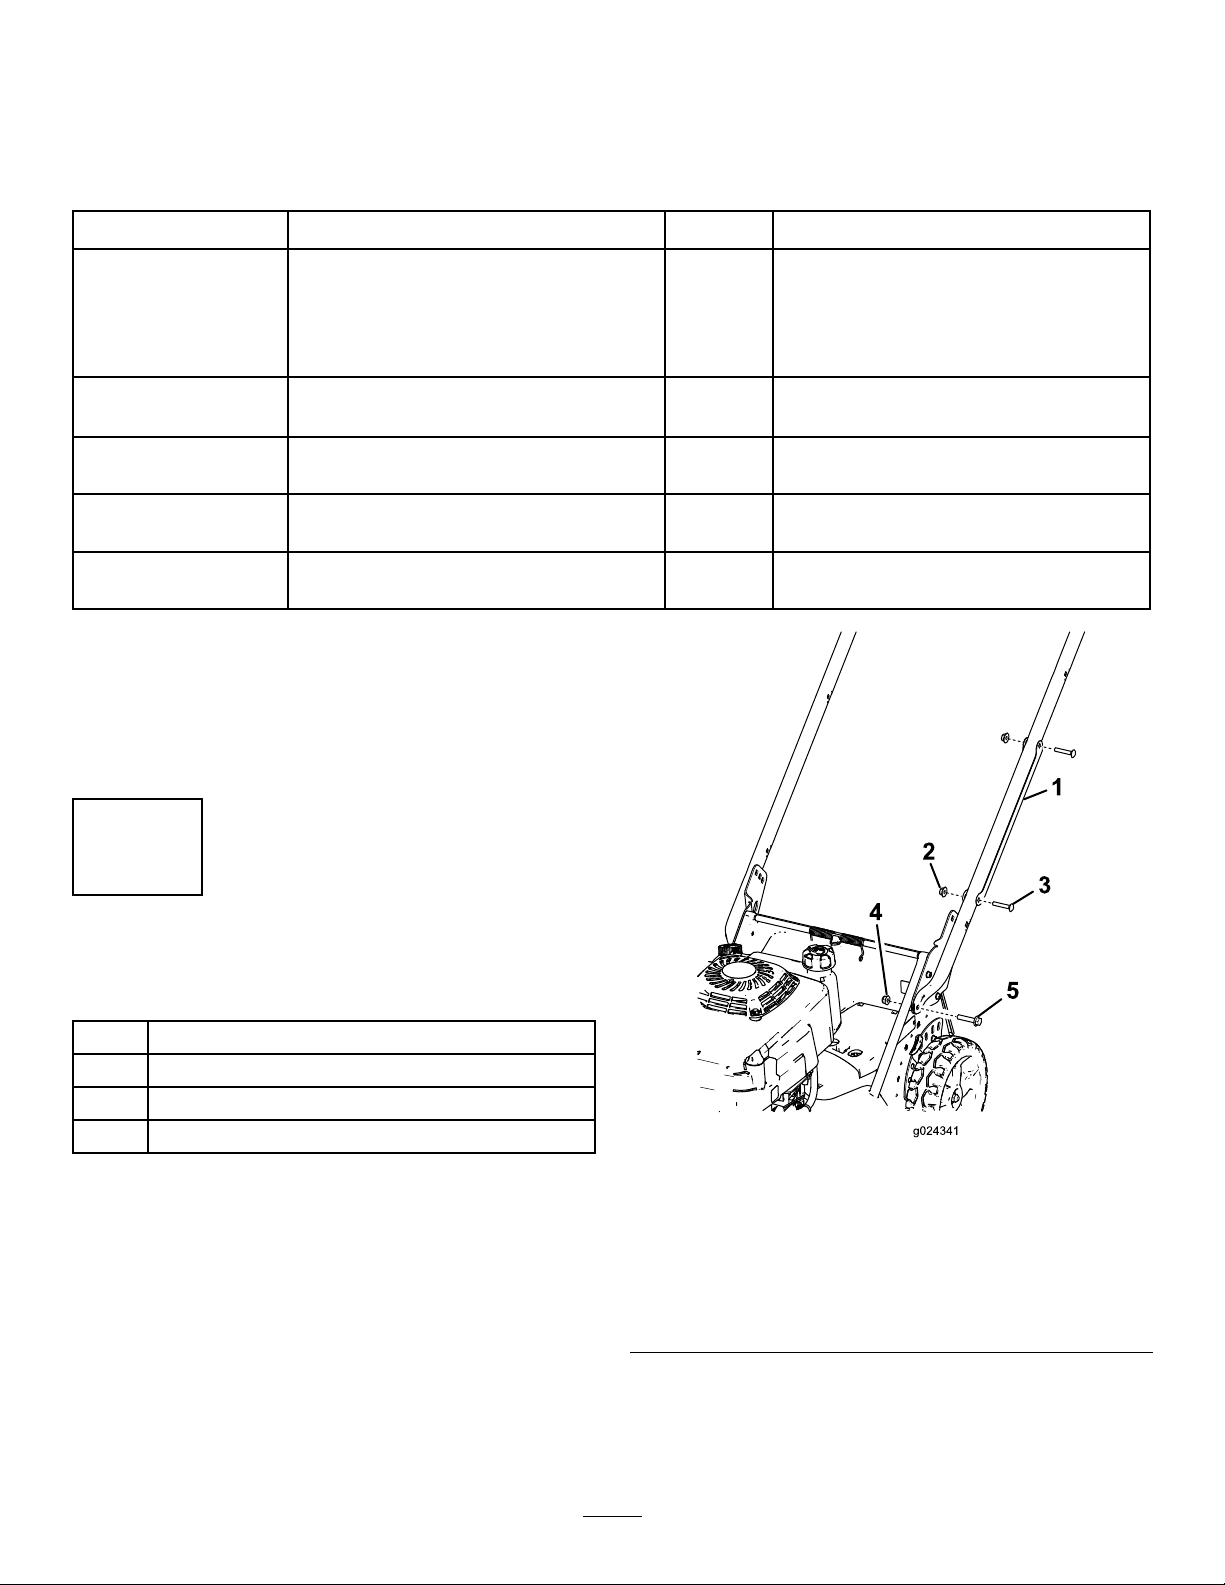
1.Removethecableguardfromthehandle(Figure
3)byremovingthe2carriageboltsand2
locknutsthatholdthecableguardtothehandle.
g024341
Figure3
1.Cableguard4.Flangenut—5/16inch(2)
2.Locknut(2)5.Hex-head-ange
bolt—5/16x1-1/2inches
(2)
3.Carriagebolt—1/4x1-1/2
inches(2)
Note:Savetheguard,thecarriagebolts,and
thelocknutssothatyoucaninstallthemonto
thehandlelaterinthisprocedure.
6
2.Installthehandleendsontothemowerhousing
with2hex-head-angebolts(5/16x1-1/2
inches)and2angenuts(5/16inch)asshown
inFigure3.
3.Setthemachinetothedesiredcuttingheight;
refertoAdjustingtheCuttingHeight(page12).
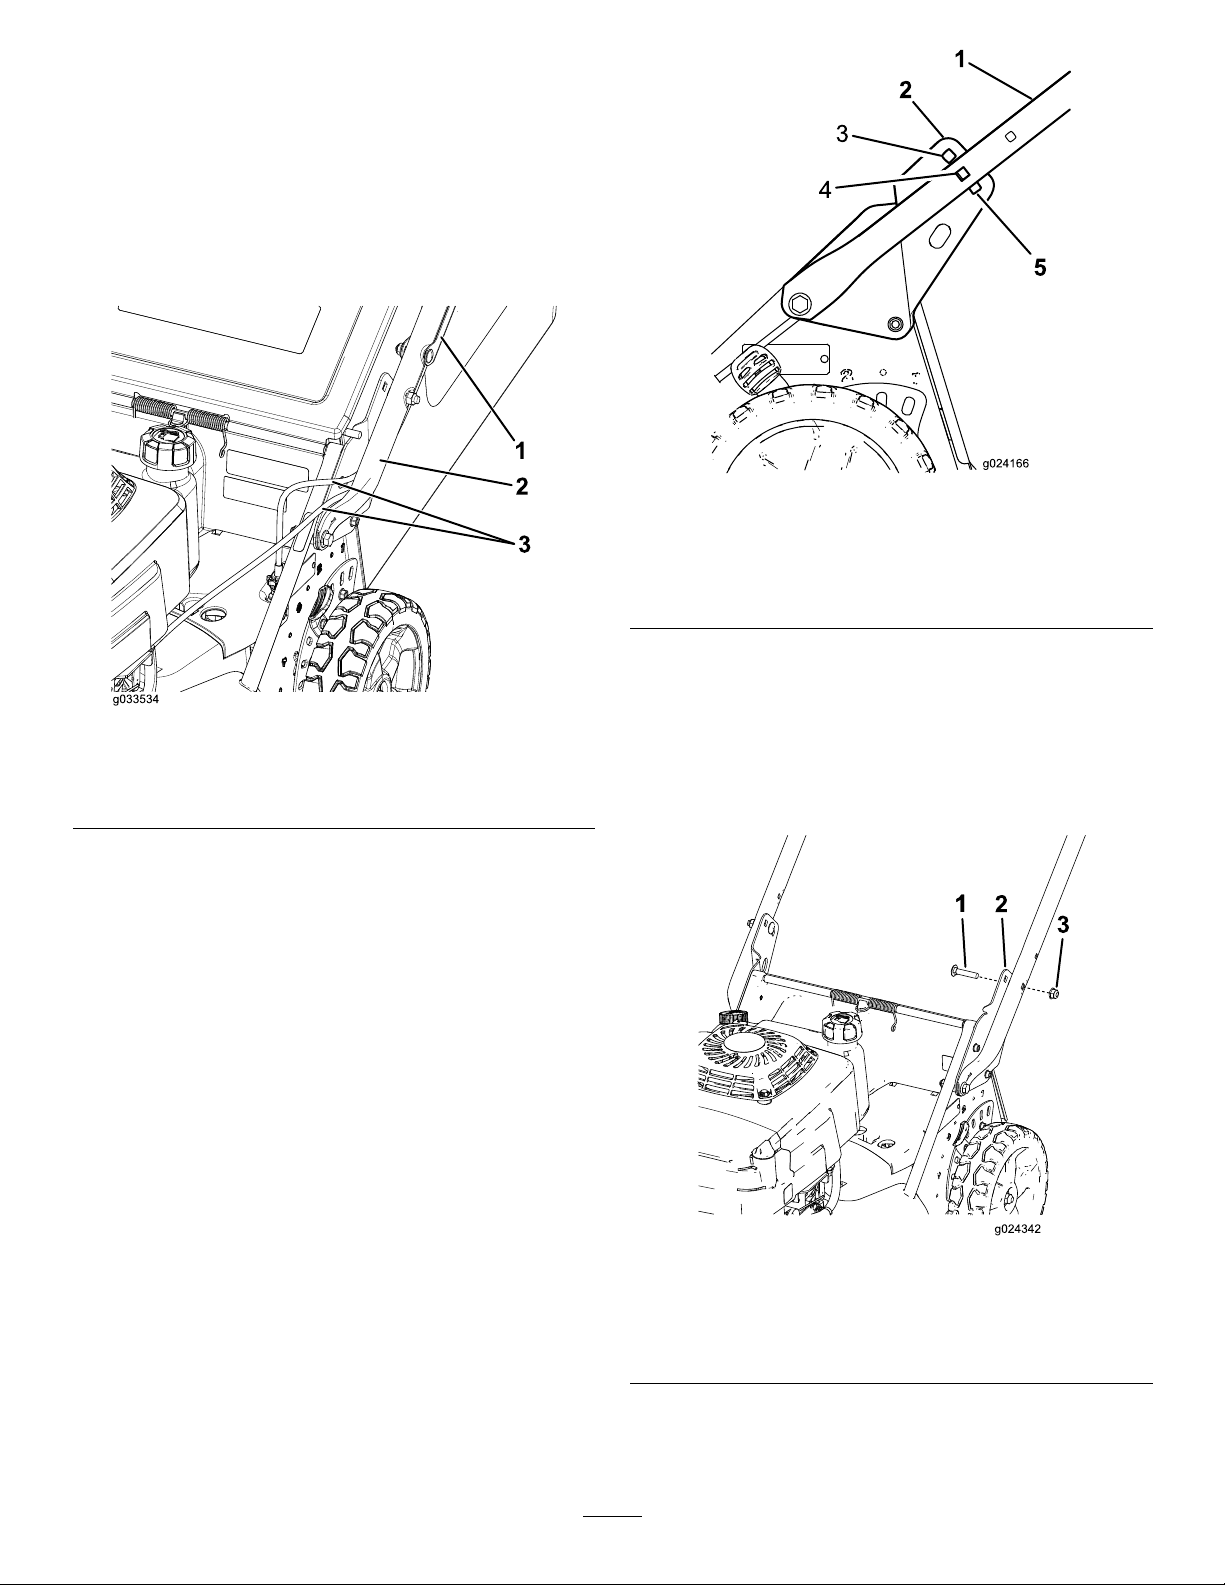
4.Routethecontrolcablesbetweenthedeckand
thehandletoprotectthecablesfrombeing
damaged(Figure4).
Figure5
1.Handle4.Mediumhandleheight
2.Handlebracket(2)
3.Highesthandleheight
5.Lowesthandleheight
g024166
Figure4
1.Cableguard3.Cable(s)
2.Handle
5.Standintheoperatingpositiontodeterminethe
handleheightthatismostcomfortableforyou
(Figure5).
6.Securethehandleontothehandlebracketsat
yourdesiredhandleheightwith2carriagebolts
g033534
(5/16x1-1/2inches)and2angenuts(5/16
inch)asshowninFigure6.
Important:Ensurethattheboltheadsare
ontheinsideofthehandleandthatthenuts
areontheoutsideofthehandle.
Figure6
1.Carriagebolt—5/16x
1-1/2inches(2)
2.Handlebracket(2)
3.Flangenut—5/16inch(2)
7.Positionthecableguardontothehandlewith
thecable(s)insidetheguard,andsecurethe
guardtothehandlewiththe2carriagebolts
7
g024342

andthe2locknutsthatyoupreviouslyremoved
(Figure3).
Important:Ensurethatyoudonotpinchthe
cable(s)tothehandlewhenyouinstallthe
cableguardsontothehandle.
2
InstallingtheRecoil-Starter RopeintheRopeGuide
NoPartsRequired
Procedure
Important:Tostarttheenginesafelyandeasily
wheneveryouusethemachine,installthe
recoil-starterropeintheropeguide.
Holdtheblade-controlbartotheupperhandleand
pulltherecoil-starterropethroughtheropeguideon
thehandle(Figure7).
3
FillingtheCrankcasewith Oil
NoPartsRequired
Procedure
Important:Y ourmachinedoesnotcomewithoil
intheengine.Beforestartingtheengine,llthe
enginewithoil.
EngineOilSpecications
Engineoilcapacity
OilviscositySAE30orSAE10W-30
APIserviceclassicationSJorhigher
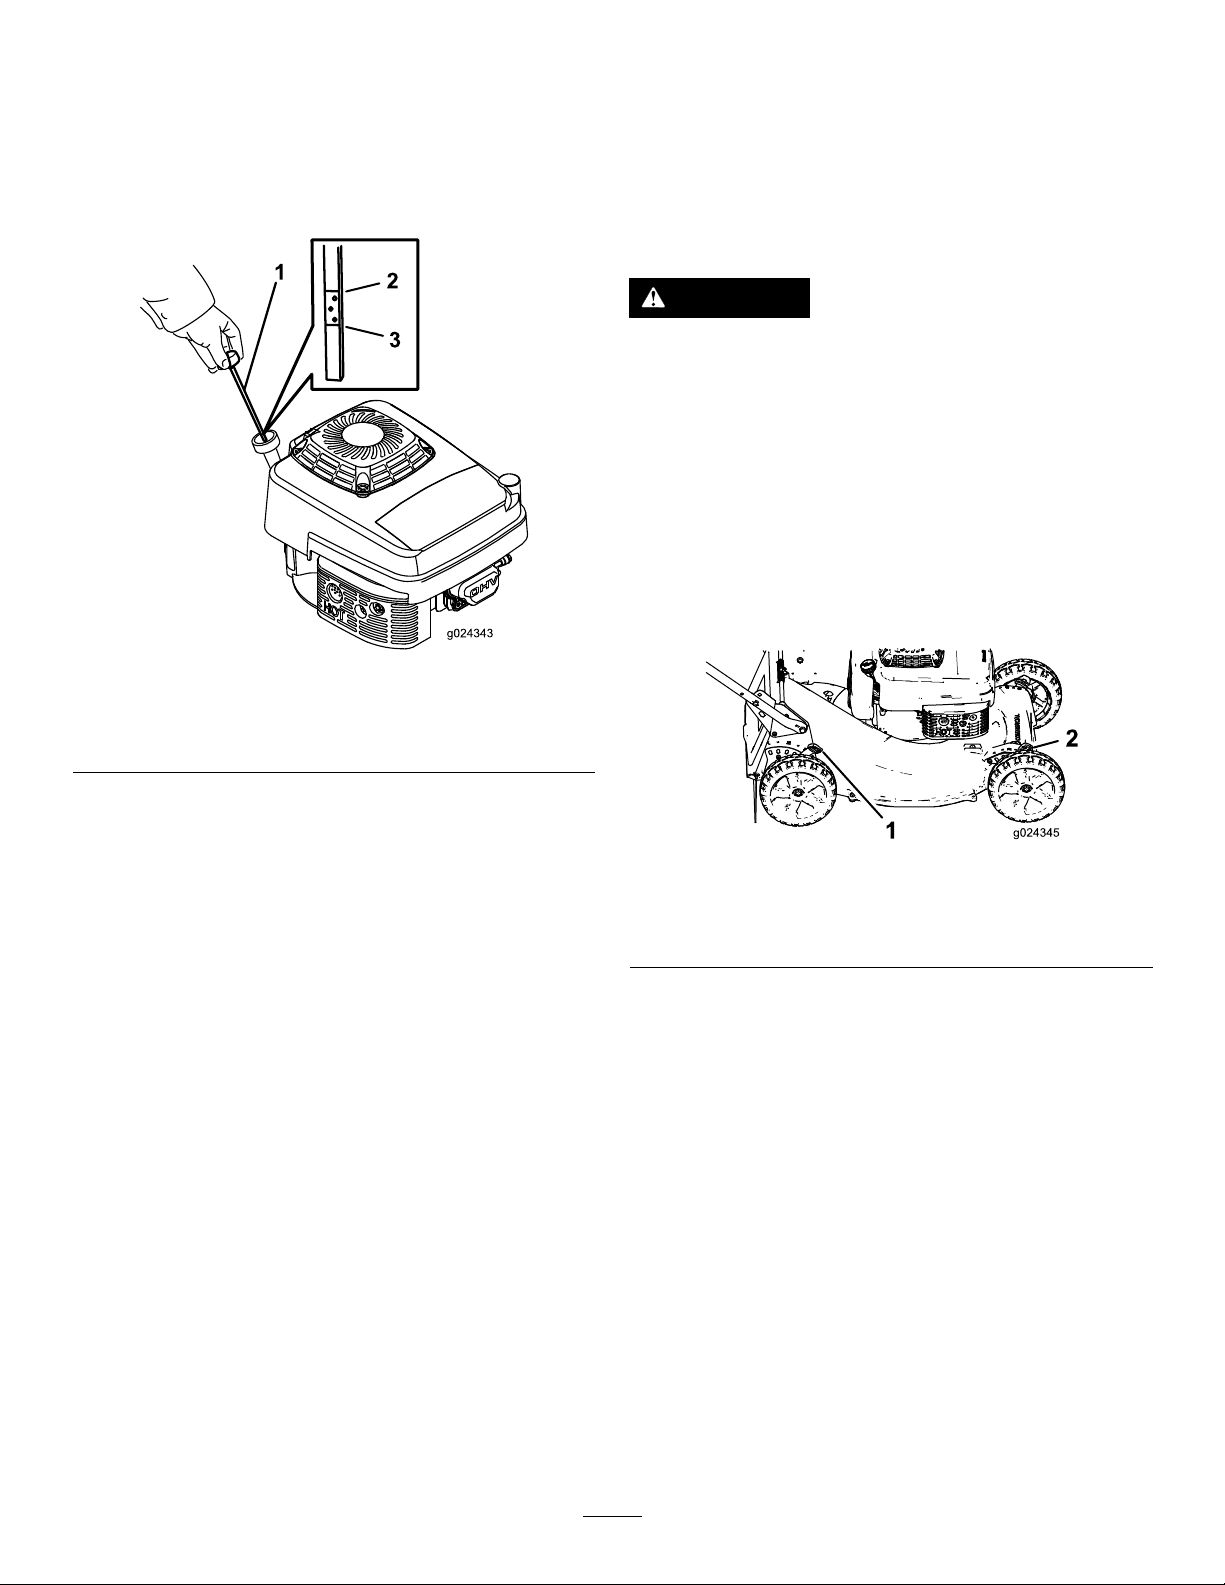
1.Movethemachinetoalevelsurface.
2.Removethedipstickbyrotatingthecap
counterclockwiseandpullingitout(Figure8).
0.65L(22oz)
detergentoil
Figure7
1.Recoil-starterrope2.Ropeguide
g024170
g024343
Figure8
1.Dipstick3.Add
2.Full
3.Carefullypourabout3/4oftheenginecapacity
ofoilintotheoil-lltube.
4.Wait3minutesfortheoiltosettleintheengine.
5.Wipethedipstickcleanwithacleancloth.
6.Insertthedipstickintotheoil-lltube,then
removethedipstick.
7.Readtheoillevelonthedipstick(Figure8).
8
•Iftheoillevelonthedipstickistoolow,
carefullypourasmallamountofoilintothe
oil-lltube,wait3minutes,andrepeatsteps
5through7untiltheoilonthedipstickisat
thecorrectlevel.
•Iftheoillevelonthedipstickistoohigh,drain
theexcessoiluntiltheoilonthedipstickis
atthecorrectlevel;refertoChangingthe
EngineOil(page19).
5
AssemblingtheGrassBag
NoPartsRequired
Important:Iftheoillevelintheengineistoo
lowortoohighandyouruntheengine,you
maydamagetheengine.
8.Installthedipstickintotheoil-lltubesecurely.
4
AdjustingtheSelf-Propel
Drive
NoPartsRequired
Procedure
Important:Y oumustadjusttheself-propel-drive
cablebeforeyouoperatethemachinefortherst time.Referto4AdjustingtheSelf-PropelDrive
(page9).
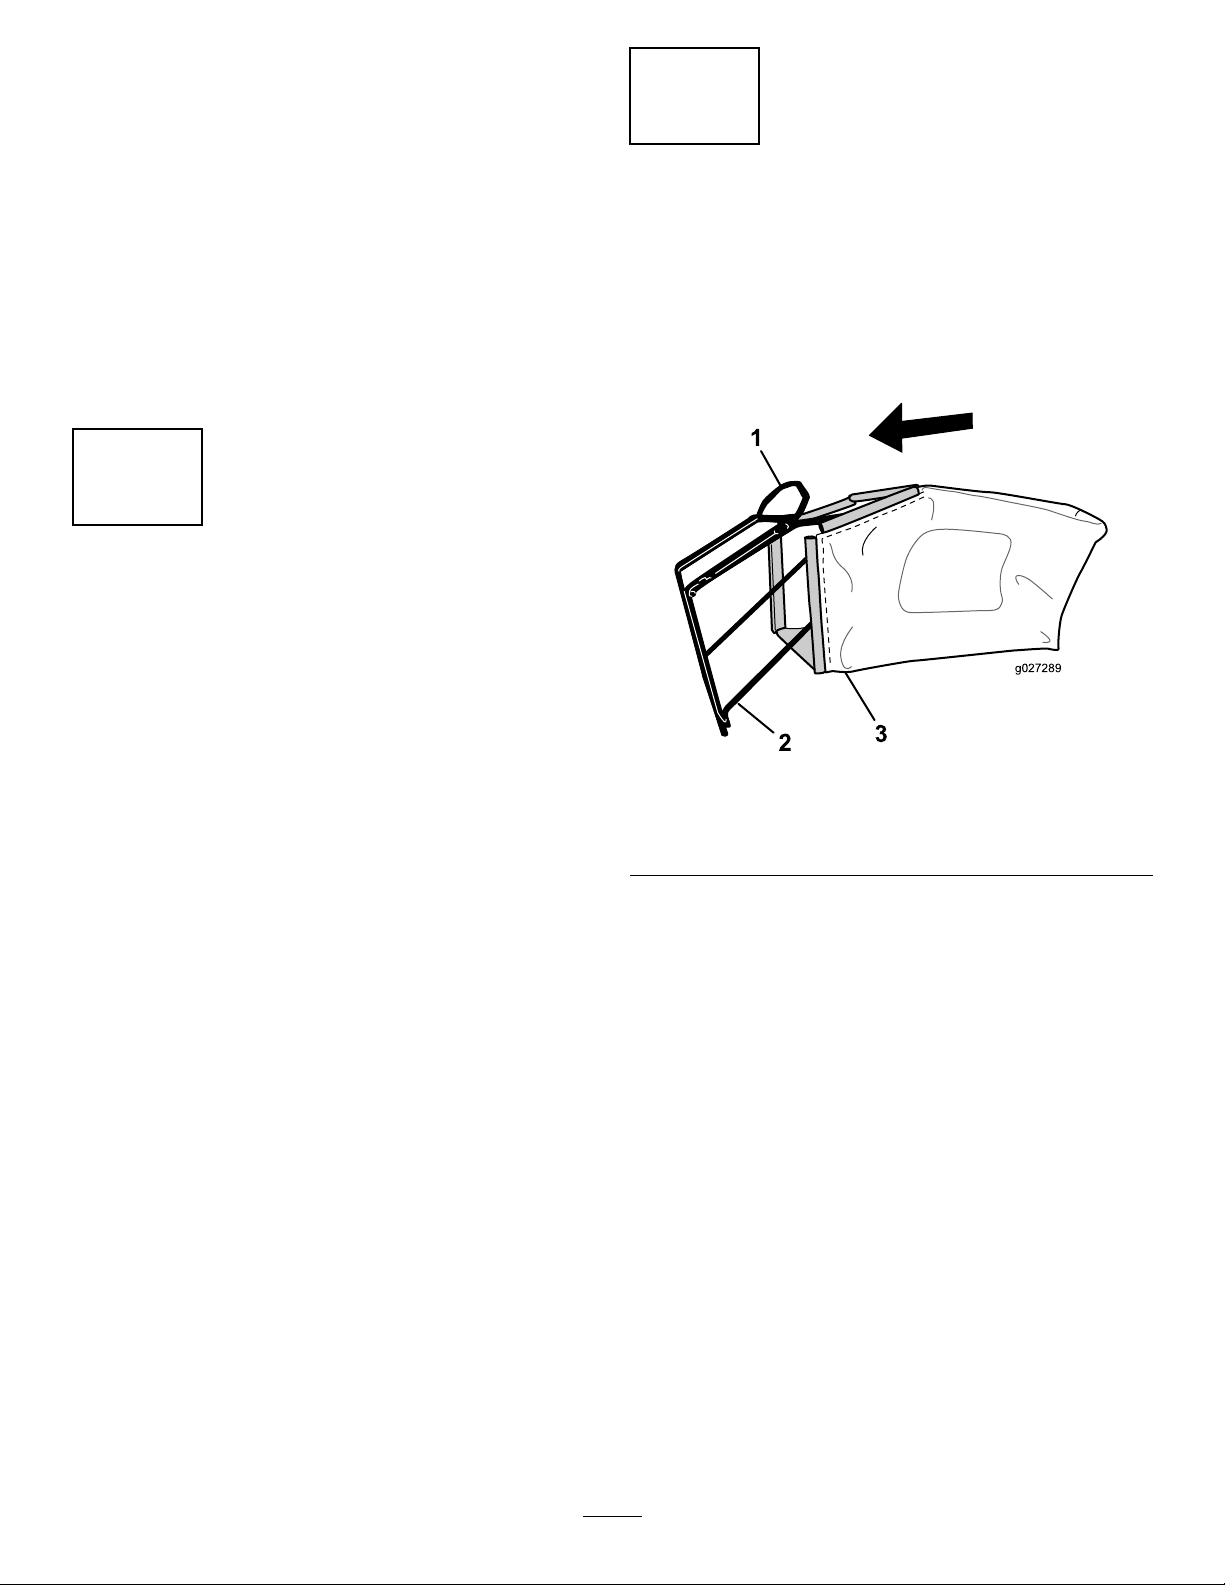
Procedure
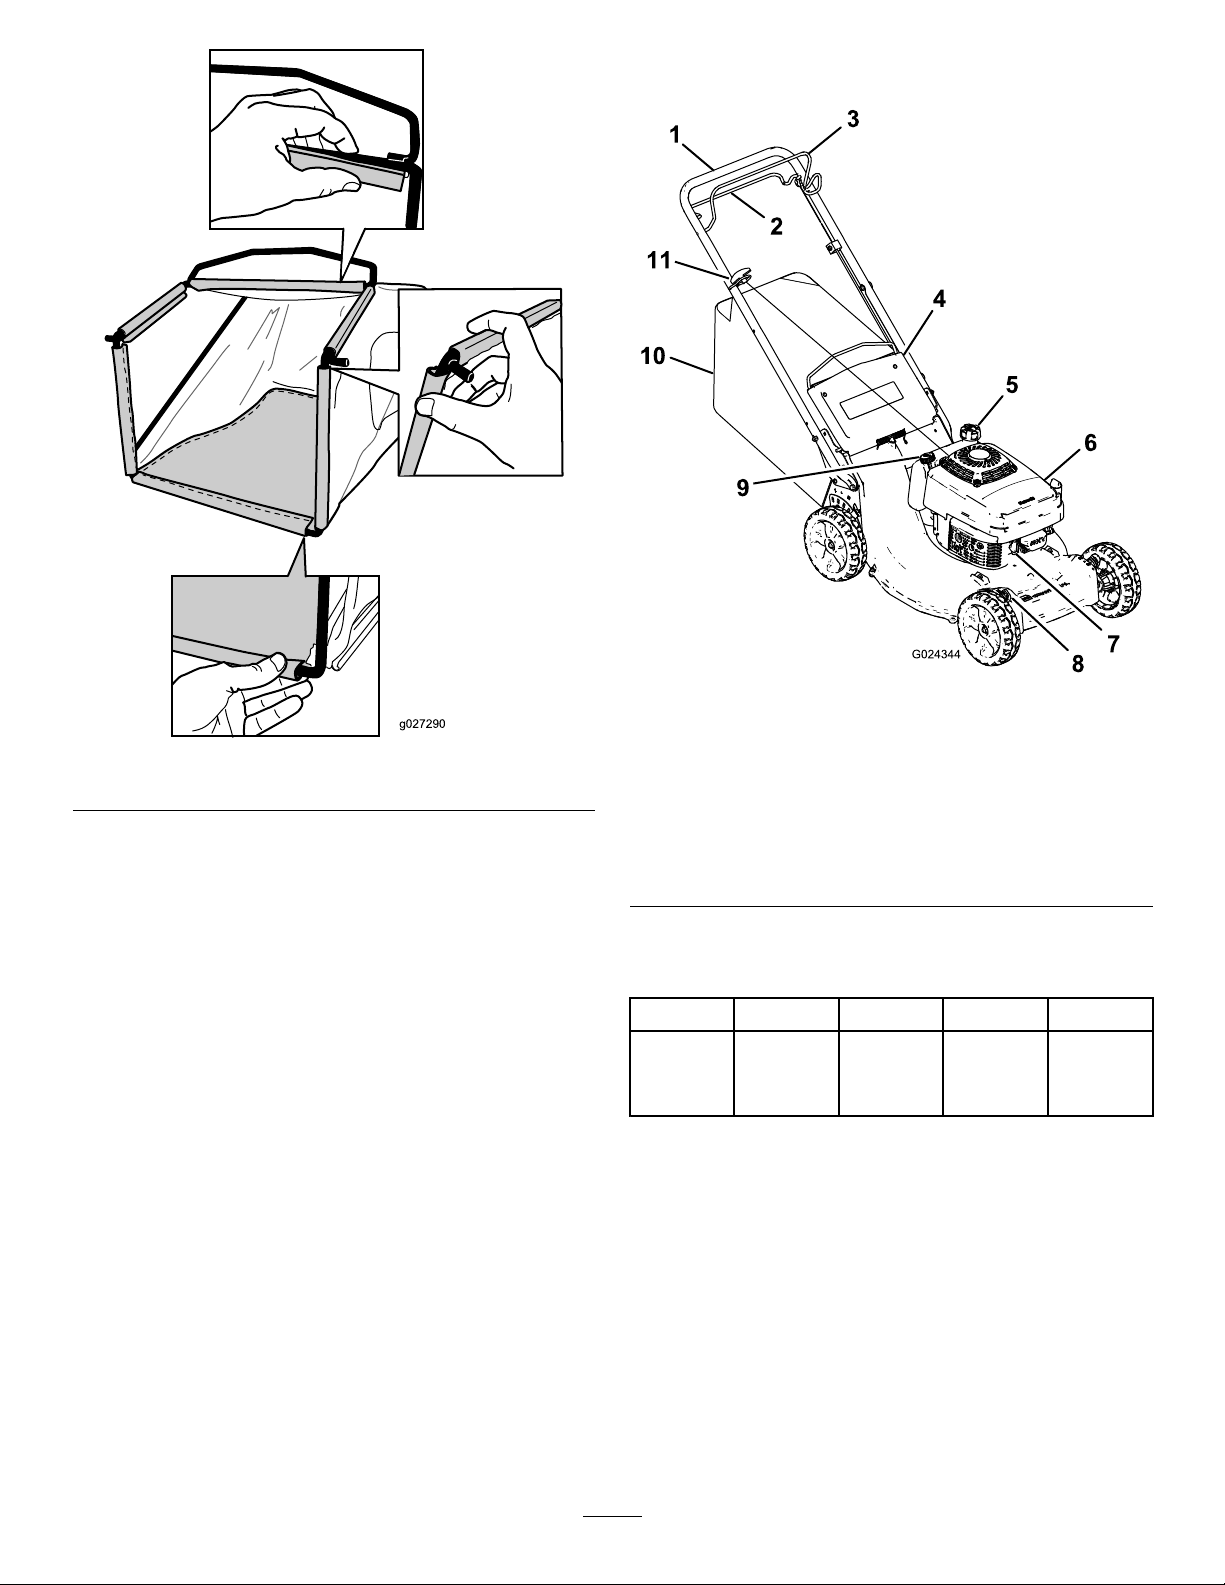
1.Slipthegrassbagovertheframeasshownin
Figure9.
Figure9
1.Handle
2.Frame
3.Grassbag
g027289
Note:Donotslipthebagoverthehandle
(Figure9).
2.Hookthebottomchannelofthebagontothe
bottomoftheframe(Figure10).
9
ProductOverview
Figure10
3.Hookthetopandsidechannelsofthebagonto
thetopandsidesoftheframe,respectively
(Figure10).
g024344
Figure11
g027290
1.Handle
2.Self-propel-drivebar8.Cutting-heightlever(4)
3.Blade-controlbar
4.Reardoor
5.Fuel-tankcap11.Recoil-starthandle
6.Aircleaner
7.Sparkplug
9.Oilll/dipstick
10.Grassbag
Specications
ModelWeightLengthWidthHeight
56kg161cm
22291
(124lb)(64
inches)
55cm
(22
inches)
88cm
(35
inches)
10

Operation
–Avoidprolongedbreathingofvapors.
–Keepyourhandsandfaceawayfromthe
nozzleandthefuel-tankopening.
BeforeOperation
–Keepfuelawayfromyoureyesandskin.
BeforeOperationSafety
GeneralSafety
•Becomefamiliarwiththesafeoperationofthe
equipment,operatorcontrols,andsafetysigns.
•Checkthatallguardsandsafetydevices,suchas
deectorsand/orgrasscatcher,areinplaceand
workingproperly.
•Alwaysinspectthemachinetoensurethatthe
blades,bladebolts,andcuttingassemblyarenot
wornordamaged.
•Inspecttheareawhereyouwillusethemachine,
andremoveallobjectsthatcouldinterferewith
theoperationofthemachineorthatthemachine
couldthrow.
•Adjustingthecuttingheightmaybringyouinto
contactwiththemovingblade,causingserious
injury.
–Shutofftheengine,removetheignitionkey
(electric-startmodelonly),andwaitforall
movingpartstostop.
–Donotputyourngersunderthehousing
whenadjustingthecuttingheight.
FuelSafety
•Fuelisextremelyammableandhighlyexplosive.
Areorexplosionfromfuelcanburnyouand
othersandcandamageproperty.
–Topreventastaticchargefromignitingthefuel,
placethecontainerand/ormachinedirectlyon
thegroundbeforelling,notinavehicleoron
anobject.
–Fillthefueltankoutdoors,inanopenarea,
whentheengineiscold.Wipeupanyfuelthat
spills.
–Donothandlefuelwhensmokingoraroundan
openameorsparks.
–Donotremovethefuelcaporaddfueltothe
tankwhiletheengineisrunningorhot.
–Ifyouspillfuel,donotattempttostartthe
engine.Avoidcreatingasourceofignitionuntil
thefuelvaporshavedissipated.
–Storefuelinanapprovedcontainerandkeep
itoutofthereachofchildren.
•Fuelisharmfulorfatalifswallowed.Long-term
exposuretovaporscancauseseriousinjuryand
illness.
FillingtheFuelTank
DANGER
Gasolineisextremelyammableand
explosive.Areorexplosionfromgasoline
canburnyouandothers.
•Topreventastaticchargefromigniting
thegasoline,placethecontainerand/or
machinedirectlyonthegroundbefore
lling,notinavehicleoronanobject.
•Fillthetankoutdoorswhentheengineis
cold.Wipeupspills.
•Donothandlegasolinewhensmokingor
aroundanopenameorsparks.
•Storegasolineinanapprovedfuel
container,outofthereachofchildren.
•Forbestresults,useonlyclean,fresh(lessthan
30daysold),unleadedgasolinewithanoctane
ratingof87orhigher((R+M)/2ratingmethod).
•Oxygenatedfuelwithupto10%ethanolor15%
MTBEbyvolumeisacceptable.
•Ethanol:Gasolinewithupto10%ethanol
(gasohol)or15%MTBE(methyltertiarybutyl
ether)byvolumeisacceptable.Ethanoland
MTBEarenotthesame.Gasolinewith15%
ethanol(E15)byvolumeisnotapprovedforuse.
Neverusegasolinethatcontainsmorethan
10%ethanolbyvolume,suchasE15(contains
15%ethanol),E20(contains20%ethanol),orE85
(containsupto85%ethanol).Usingunapproved
gasolinemaycauseperformanceproblemsand/or
enginedamagewhichmaynotbecoveredunder
warranty.
•Donotusegasolinecontainingmethanol.
•Donotstorefueleitherinthefueltankorinfuel
containersoverthewinterunlessyouuseafuel
stabilizer.
•Donotaddoiltogasoline.
Important:Toreducestartingproblems,add
fuelstabilizertothegasolineallseason.Mixthe
stabilizerwithgasolinelessthan30daysold.
Note:Thecapacityofthefueltankis1.8L(0.47
USgallon).
11
CheckingtheEngine-Oil
AdjustingtheCutting
Level
1.Movethemachinetoalevelsurface.
2.Removethedipstickbyrotatingthecap
counterclockwiseandpullingitout(Figure12).
Figure12
Height
Youcanchangethecuttingheightateachwheelby
adjustingacutting-heightlever.Cuttingheightsare25
mm(1inch),38mm(1-1/2inches),51mm(2inches),
64mm(2-1/2inches),76mm(3inches),89mm(3-1/2
inches),102mm(4inches),114mm(4-1/2inches).
DANGER
Adjustingthecutting-heightleverscould
bringyourhandsintocontactwithamoving
bladeandresultinseriousinjury.
•Shutofftheengineandwaitforall
movementtostopbeforeadjustingthe
cuttingheight.
•Donotputyourngersunderthehousing
whenadjustingthecuttingheight.
1.Pullthecutting-heightlevertowardthewheel
(Figure13)andmovethelevertothedesired
setting.
g024343
1.Dipstick3.Add
2.Full
3.Wipethedipstickcleanwithacleancloth.
4.Insertthedipstickintotheoil-lltube,butdonot
screwitin,thenremovethedipstick.
5.Readtheoillevelonthedipstick(Figure12).
•Iftheoillevelonthedipstickistoolow
(Figure12),carefullypourasmallamount
ofSAE30orSAE10W-30detergentoilinto
theoil-lltube,wait3minutes,andrepeat
steps3through5untiltheoilonthedipstick
isatthecorrectlevel.
•Iftheoillevelonthedipstickistoohigh
(Figure12),draintheexcessoiluntiltheoil
onthedipstickisatthecorrectlevel;referto
ChangingtheEngineOil(page19).
Important:Iftheoillevelintheengineistoo
lowortoohighandyouruntheengine,you
maydamagetheengine.
6.Installthedipstickintotheoil-lltubesecurely.
g024345
Figure13
1.Rearcutting-heightlever(2)
2.Frontcutting-heightlever(2)
2.Releasethecutting-heightleverandseatit
securelyinthenotch.
3.Adjustallthewheelstothesamecutting-height
setting.
DuringOperation
DuringOperationSafety
GeneralSafety
•Wearappropriateclothing,includingeye
protection;longpants;slip-resistant,substantial
footwear;andhearingprotection.Tiebacklong
hair,securelooseclothing,anddonotwearloose
jewelry.
•Donotoperatethemachinewhileill,tired,or
undertheinuenceofalcoholordrugs.
12
•Thebladeissharp;contactingthebladecanresult
inseriouspersonalinjury.Shutofftheengine,
removetheignitionkey(electric-startmodelonly),
andwaitforallmovingpartstostopbeforeleaving
theoperatingposition.
•Whenyoureleasetheblade-controlbar,the
engineshouldshutoffandthebladeshouldstop
within3seconds.Ifnot,stopusingyourmachine
immediatelyandcontactanAuthorizedService
Dealer.
•Keepbystanders,especiallysmallchildren,outof
theoperatingarea.Stopthemachineifanyone
entersthearea.
•Alwayslookdownandbehindyoubeforemoving
themachineinreverse.
•Operatethemachineonlyingoodvisibilityand
appropriateweatherconditions.Donotoperate
themachinewhenthereistheriskoflighting.
•Wetgrassorleavescancauseseriousinjuryif
youslipandcontacttheblade.Avoidmowingin
wetconditions.
•Useextremecarewhenapproachingblind
corners,shrubs,trees,orotherobjectsthatmay
blockyourview.
•Donotmowonexcessivelysteepslopes.Poor
footingcouldcauseaslip-and-fallaccident.
•Mowwithcautionneardrop-offs,ditches,or
embankments.
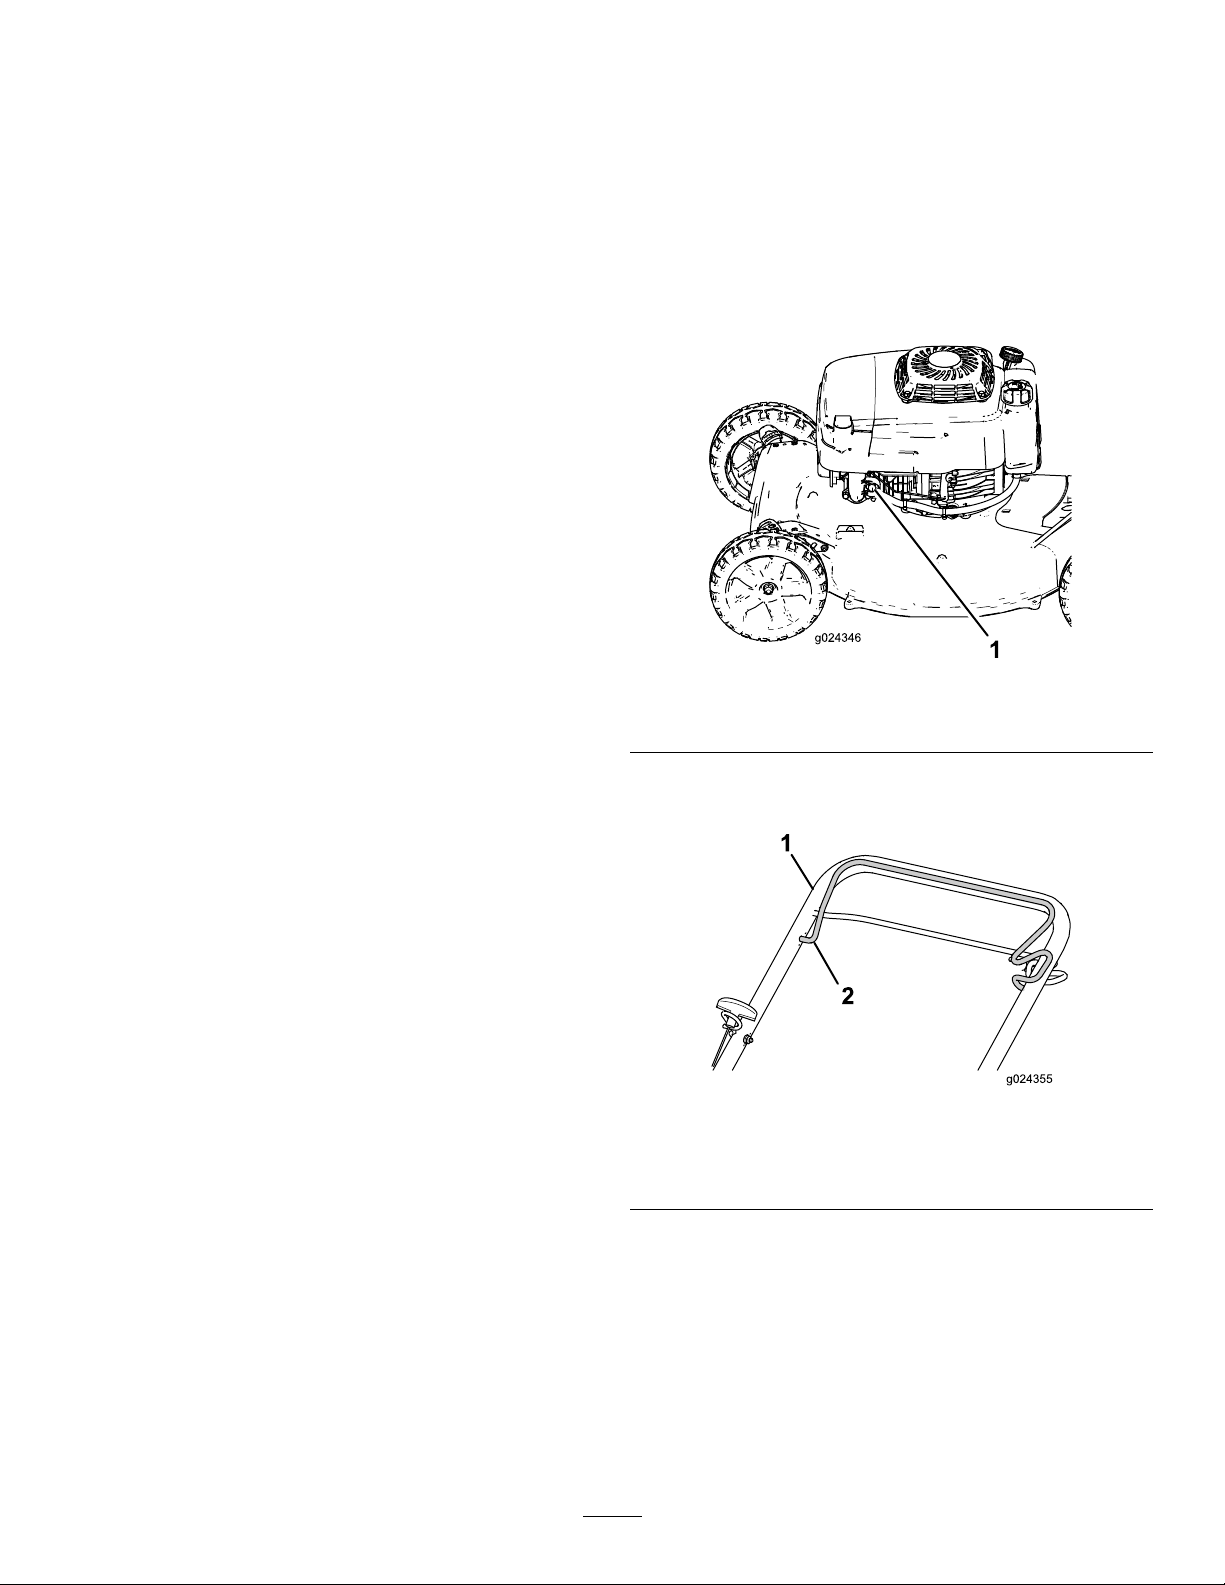
StartingtheEngine
1.Connectthespark-plugwiretothesparkplug.
2.Firmlypushintheprimer(Figure14),holding
theprimerbulbfor1second.
g024346
Figure14
•Watchforholes,ruts,bumps,rocks,orother
hiddenobjects.Uneventerraincouldcausethe
machinetooverturnorcauseyoutoloseyour
balanceorfooting.
•Ifthemachinestrikesanobjectorstartstovibrate,
immediatelyshutofftheengine,removethekey
(ifequipped),waitforallmovingpartstostop,and
disconnectthewirefromthesparkplugbefore
examiningthemachinefordamage.Makeall
necessaryrepairsbeforeresumingoperation.
•Beforeleavingtheoperatingposition,shutoff
theengine,removetheignitionkey(electric-start
modelonly),andwaitforallmovingpartstostop.
•Iftheenginehasbeenrunningthemuferwillbe
hotandcanseverelyburnyou.Keepawayfrom
thehotmufer.
•Checkthegrasscatchercomponentsand
thedischargechutefrequentlyforanywear
ordeteriorationandreplacethemwiththe
manufacturer'srecommendedpartswhen
necessary.
•Useaccessoriesandattachmentsapprovedby
TheT oro®Companyonly .
SlopeSafety
1.Primer
3.Pulltheblade-controlbartotheupperhandle
andholdit(Figure15).
g024355
Figure15
1.Upperhandle
2.Blade-controlbar
4.Pulltherecoil-starthandlelightlyuntilyoufeel
resistance,thenpullitsharply,andallowitto
returntotheropeguideonthehandle.
Note:Iftheenginedoesnotstart,repeatsteps
2through4.
•Mowacrossthefaceofslopes;neverupand
down.Useextremecautionwhenchanging
directiononslopes.
13
ShuttingOfftheEngine
RecyclingtheClippings
ServiceInterval:Beforeeachuseordaily—Ensure
thattheengineshutsoffwithin
3secondsafterreleasingthe
blade-controlbar.
Toshutofftheengine,releasetheblade-controlbar.
Important:Whenyoureleasetheblade-control
bar,boththeengineandbladeshouldstopwithin
3seconds.Iftheydonotstopproperly,stop
usingyourmachineimmediatelyandcontactan
AuthorizedServiceDealer.
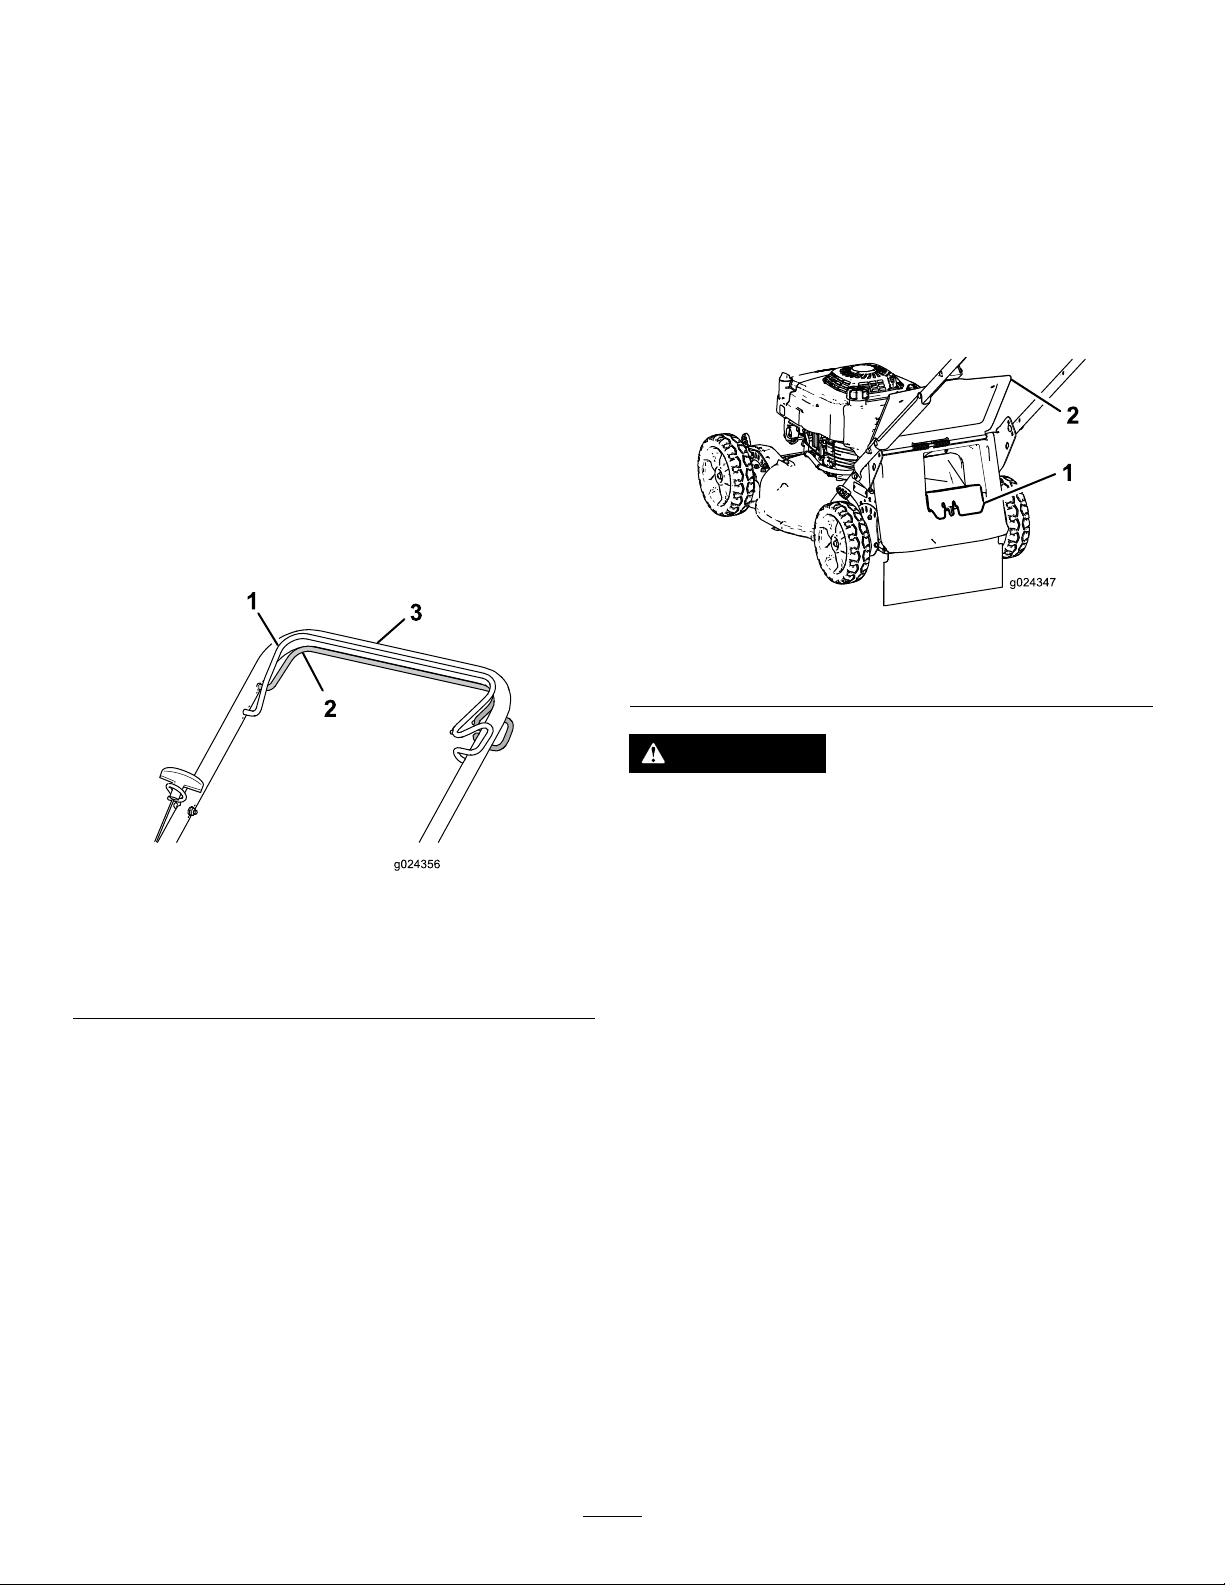
OperatingtheSelf-Propel Drive
•Toengagetheself-propel-drive:Pullthe
self-propel-drivebartothehandleandholdit
(Figure16).
Thismachinecomesfromthefactoryreadytorecycle
grassandleafclippingsbackintothelawn.T oprepare
themachinetorecycle:
•Ifthegrassbagisonthemachine,removeit;refer
toRemovingtheGrassBag(page15).
•Iftherear-dischargeplugisnotinstalled,gripitby
thehandle,raisethereardeector,andinsertit
intotherear-dischargechuteuntilthelatchlocks
intoplace(Figure17).
Figure17
1.Rear-dischargeplug
2.Reardeector
g024347
Figure16
1.Blade-controlbar(shown
engaged)
2.Self-propel-drivebar
3.Upperhandle
Note:Themaximumself-propel-drivespeedis
xed.T oreducethespeed,increasethespace
betweentheself-propel-drivebarandthehandle.
•Todisengagetheself-propeldrive:Releasethe
self-propel-drivebar.
Note:Themachinecomeswithfreewheeling
clutchesthatmakeiteasiertopullthemachine
rearward.Todisengagetheclutches,you
mayneedtopushthemachineforwardabout
2.5cm(1inch)ormoreafteryoureleasethe
self-propel-drivebar.
WARNING
Operatingthemachinetorecyclelawn
clippingswithoutthepluginplaceallows
objectstobethrowntowardyouor
g024356
bystanders.Also,contactwiththeblades
couldoccur.Thrownobjectsorbladecontact
cancauseseriousinjuryordeath.
Ensurethattherear-dischargeplugisin
placebeforeyourecycletheclippings.
Neverengagethebladeswithouteitherthe
rear-dischargeplugorthegrassbaginstalled
onthemachine.
14

BaggingtheClippings
RemovingtheGrassBag
Usethegrassbagwhenyouwanttocollectgrassand
leafclippingsfromthelawn.
WARNING
Aworngrassbagcouldallowsmallstones
andothersimilardebristobethrowntoward
youorbystanders,resultinginserious
personalinjuryordeath.
Checkthegrassbagfrequently.Ifitis
damaged,installanewTororeplacementbag.
WARNING
Thebladesaresharp;contactingtheblades
canresultinseriouspersonalinjury.
Shutofftheengineandwaitforallmoving
partstostopbeforeleavingtheoperating
position.
InstallingtheGrassBag
1.Shutofftheengineandwaitforallmovingparts
tostop.
2.Raiseandholdupthereardeector(Figure18).
DANGER
Themachinecanthrowgrassclippings
andotherobjectsthroughanopeningin
themachinehousing.Objectsthrownwith
enoughforcecouldcauseseriouspersonal
injuryordeathtoyouortobystanders.
•Neverremovethegrassbagandthenstart
theenginewithoutthedischargeplug
installedonthemachine.
•Neveropenthereardeectoronthe
machinewhentheengineisrunning.
1.Shutofftheengineandwaitforallmovingparts
tostop.
2.Raisethereardeector.
3.Removethebagrodonthegrassbagfromthe
notchesatthebaseofthehandle(Figure18).
4.Installthedischargeplug;refertoRecyclingthe
Clippings(page14).
5.Lowerthereardeector.
OperatingTips
Figure18
1.Reardeector
2.Bag-rodend(2)4.Grassbag
3.Removetherear-dischargeplugbypushingin
thelatchwithyourthumbandpullingtheplug
outfromthemachine(Figure17).
4.Installthebag-rodendsintothenotchesatthe
baseofthehandle,androckthebagbackand
forthtoensurethatthebag-rodendsareseated
atthebottomofbothnotches(Figure18).
5.Lowerthereardeectoruntilitrestsonthe
grassbag.
3.Notch(2)
GeneralTips
•Reviewthesafetyinstructionsandreadthis
manualcarefullybeforeoperatingthemachine.
•Cleartheareaofsticks,stones,wire,branches,
andotherdebristhatthebladecouldhitandthrow.
•Keepeveryone,especiallychildrenandpets,away
fromtheareaofoperation.
•Avoidstrikingtrees,walls,curbs,orothersolid
objects.Neverdeliberatelymowoveranyobject.
•Ifthemachinestrikesanobjectorstartstovibrate,
immediatelyshutofftheengine,disconnect
g024348
thewirefromthesparkplug,andexaminethe
machinefordamage.
•Maintainasharpbladethroughoutthecutting
season.Periodicallyledownnicksontheblade.
•Replacethebladewhennecessarywithanoriginal
Tororeplacementblade.
•Mowonlydrygrassorleaves.Wetgrassand
leavestendtoclumpontheyardandcancause
themachinetoplugortheenginetostall.
WARNING
Wetgrassorleavescancauseserious
injuryifyouslipandcontacttheblade.
Mowonlyindryconditions.
15

•Cleanunderthemachineaftereachmowing;refer
toCleaningundertheMachine(page17).
•Keeptheengineingoodrunningcondition.
•Cleantheairlterfrequently.Mulchingstirsup
moreclippingsanddustwhichclogstheairlter
andreducesengineperformance.
•Settheenginespeedtothefastestpositionforthe
bestcuttingresults.
•Forlightleafcoverage,setallthewheelsatthe
samecutting-heightsetting.
•Slowdownyourmowingspeedifthemachine
doesnotcuttheleavesnelyenough.
AfterOperation
WARNING
Operatingamachinewithitsengine
runningataspeedgreaterthanthefactory
settingcancausethemachinetothrowa
partofthebladeorenginetowardyouor
bystanders,resultinginseriouspersonal
injuryordeath.
–Donotchangetheenginespeedsetting.
–Ifyoususpecttheenginespeedisfaster
thannormal,contactanAuthorized
ServiceDealer.
CuttingGrass
•Grassgrowsatdifferentratesatdifferenttimes
oftheyear.Inthesummerheat,itisbesttocut
grassatthe64mm(2-1/2inch),76mm(3inch),
or89mm(3-1/2inch)cutting-heightsettings.Cut
onlyaboutathirdofthegrassbladeatatime.
Donotcutbelowthe64mm(2-1/2inch)setting
unlessthegrassissparseoritislatefallwhen
grassgrowthbeginstoslowdown.
•Whencuttinggrassover15cm(6inches)tall,rst
mowatthehighestcutting-heightsettingandwalk
slower;thenmowagainatalowersettingforthe
bestlawnappearance.Ifthegrassistoolongand
theleavesclumpontopofthelawn,themachine
mayplugandcausetheenginetostall.
•Alternatethemowingdirection.Thishelps
dispersetheclippingsoverthelawnforeven
fertilization.
AfterOperationSafety
GeneralSafety
•Cleangrassanddebrisfromthemachinetohelp
preventres.Cleanupoilorfuelspills.
•Allowtheenginetocoolbeforestoringthemachine
inanyenclosure.
•Neverstorethemachineorfuelcontainerwhere
thereisanopename,spark,orpilotlight,such
asonawaterheateroronotherappliances.
HaulingSafety
•Removetheignitionkey(ifequipped)before
loadingthemachineforhauling.
•Usecarewhenloadingorunloadingthemachine.
•Securethemachinefromrolling.
Ifthenishedlawnappearanceisunsatisfactory ,try1
ormoreofthefollowing:
•Sharpentheblade.
•Walkataslowerpacewhilemowing.
•Raisethecuttingheightonyourmachine.
•Cutthegrassmorefrequently.
•Overlapcuttingswathsinsteadofcuttingafull
swathwitheachpass.
CuttingLeaves
•Aftercuttingthelawn,ensurethathalfofthelawn
showsthroughthecutleafcover.Y oumayneed
tomakemorethanasinglepassovertheleaves.
16
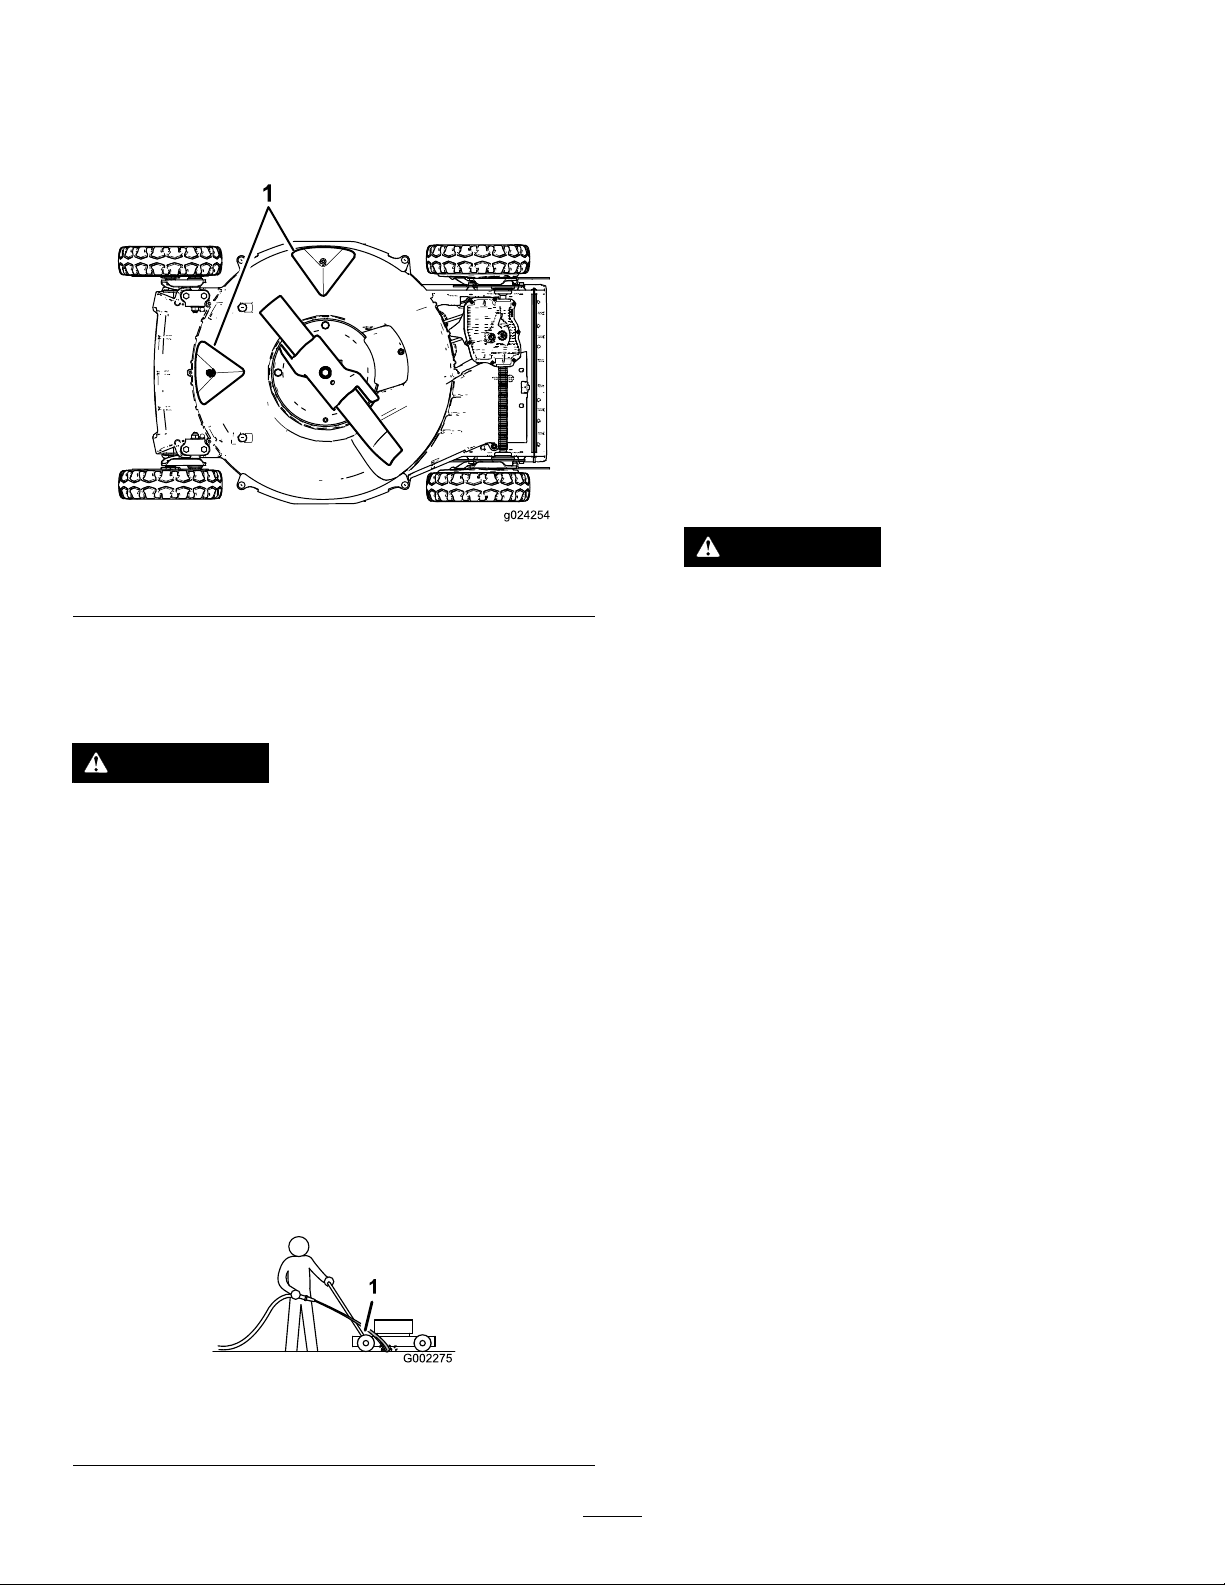
CleaningundertheMachine
Toensurethebestperformance,keeptheunderside
ofthemachineclean.Beespeciallycarefultokeep
thekickersfreeofdebris(Figure19).
Figure19
1.Kickers
WashingMethod
ServiceInterval:Beforeeachuseordaily
Note:Thebladewilldrawinwaterandwash
outtheclippings.Letthewaterrununtilyou
nolongerseeclippingsbeingwashedoutfrom
underthemachine.
4.Shutofftheengineandwaitforallmovingparts
tostop.
5.Turnoffthewater.
6.Startthemachineandletitrunforafewminutes
todryouttheundersideofthemachine.
ScrapingMethod
Ifwashingdoesnotremovealldebrisfromunderthe
machine,scrapeitclean.
1.Disconnectthewirefromthesparkplug.
2.Drainthefuelfromthefueltank.
g024254
WARNING
Tippingthemachinemaycausethefuel
toleakfromthecarburetororthefuel
tank.Fuelisextremelyammable,highly
explosive,and,undercertainconditions,
cancausepersonalinjuryorproperty
damage.
WARNING
Themachinemaydislodgematerialfrom
underthemachine.
•Weareyeprotection.
•Alwaysweargloveswhenworkingnear
theblade
•Stayintheoperatingposition(behindthe
handle)whiletheengineisrunning.
•Donotallowbystandersinthearea.
1.Movethemachinetoapavedlevelsurfacenear
agardenhose.
2.Starttheengine.
3.Holdtherunninggardenhoseathandlelevel
anddirectthewatertoowonthegroundjustin
frontoftheright,rearwheel(Figure20).
Avoidfuelspillsbyrunningtheengine
dryorbyremovingthefuelwithahand
pump;neversiphon.
3.Tipthemachineontoitsrightside(aircleaner
up).
4.Removethedirtandgrassclippingswitha
hardwoodscraper.Avoidburrsandsharp
edges.
5.Returnthemachinetotheoperatingposition.
6.Connectthewiretothesparkplug.
1.Right,rearwheel
g002275
Figure20
17

Maintenance
RecommendedMaintenanceSchedule(s)
MaintenanceService
Interval
Aftertherst8hours
Aftertherst25hours
Beforeeachuseordaily
Every25hours
Every40hours
Every50hours
Every100hours
MaintenanceProcedure
•Changetheengineoil.
•Tightenanyloosefasteners.
•Ensurethattheengineshutsoffwithin3secondsafterreleasingtheblade-control
bar.
•Removegrassclippingsanddirtfromunderthemachine.
•Inspectthemowerbladesforwearordamage.
•Inspecttheacceleratorforwearordamage.
•Checkthestoppingtimeofthebladebrake.Theblademuststopwithin3seconds
ofreleasingtheblade-controlbar;ifitdoesnot,contactanAuthorizedService
Dealerforrepair.
•Checkforlooseormissingfastenersontheengine.
•Checkforfueloroilleaks.
•Checkorcleantherecoilstarterandtheair-intakescreen.
•Cleanthefoampre-lter(morefrequentlyindustyconditions).
•Cleanthewheelsandgears.
•Changetheengineoil(morefrequentlyindustyconditions).
•Sharpenorreplacetheblade.Maintainitmorefrequentlyiftheedgedullsquicklyin
roughorinsandyconditions.
•Removegrassclippingsanddebrisfromunderthebeltcover.
•Inspect,clean,andadjustthesparkpluggap;replacethesparkplugifnecessary.
•Tightenanyloosefasteners.
•Checkorcleantherecoilstarterandtheair-intakescreen.
Every200hours
Every300hours
•Haveanauthorizedengineservicingdealercheckforleaksinthefuelsystemand/or
adeterioratingfuelhose.Replacepartsifnecessary.
•Replacethepaperairlter(morefrequentlyindustyconditions).
•Cleanthecylinderandthecylinder-headns.
•Haveanauthorizedengineservicingdealercheckandadjusttheengineidlespeed.
•Haveanauthorizedengineservicingdealercleanthecombustionchamber.
•Haveanauthorizedengineservicingdealercheckandadjustthevalveclearance.
•Haveanauthorizedengineservicingdealercleanandlapthevalveseatingsurface.
MaintenanceSafety
•Disconnectthespark-plugwirefromthesparkplug
beforeperforminganymaintenanceprocedure.
•Wearglovesandeyeprotectionwhenservicing
themachine.
•Thebladeissharp;contactingthebladecanresult
inseriouspersonalinjury.Weargloveswhen
servicingtheblade.Donotrepairoralterthe
blade(s).
•Nevertamperwithsafetydevices.Checktheir
properoperationregularly.
personalinjury.Runtheenginedryorremovethe
fuelwithahandpump;neversiphonthefuel.
•Toensureoptimumperformanceandcontinued
safetycerticationofthemachine,useonly
genuineT ororeplacementpartsandaccessories.
Replacementpartsandaccessoriesmadeby
othermanufacturerscouldbedangerous,and
suchusecouldvoidtheproductwarranty.
•Tippingthemachinemaycausethefueltoleak.
Fuelisammableandexplosive,andcancause
18
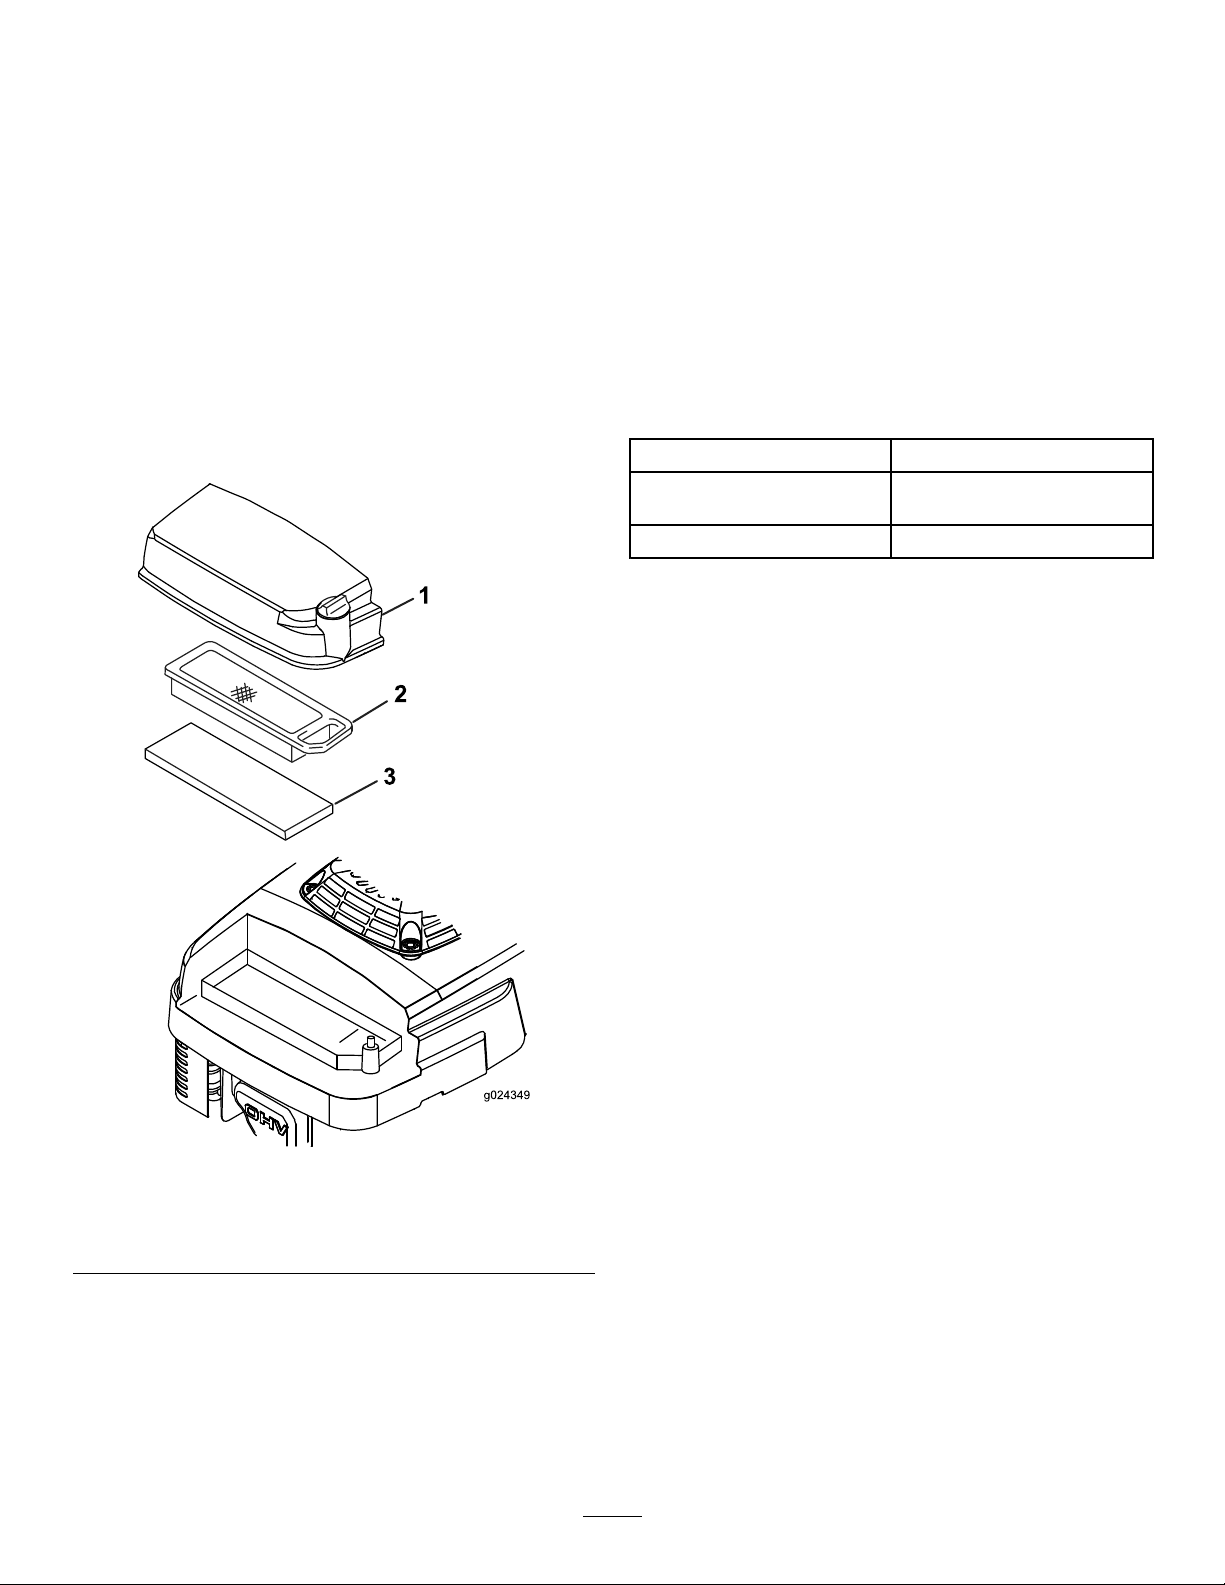
ServicingtheAirFilter
ServiceInterval:Every25hours—Cleanthefoam
pre-lter(morefrequentlyindusty
conditions).
7.Installthefoampre-lter.
8.Installthepaperairlter.
9.Installthecoverandsecureitwiththescrew.
Every300hours—Replacethepaperairlter
(morefrequentlyindustyconditions).
Important:Donotoperatetheenginewithoutthe
airlterassemblyinplace;otherwise,extreme
enginedamagewilloccur.
1.Shutofftheengineandwaitforallmovingparts
tostop.
2.Disconnectthewirefromthesparkplug.
3.Loosenthescrewontheair-ltercover(Figure
21).
ChangingtheEngineOil
ServiceInterval:Aftertherst8hours
Every50hours
Runtheengineafewminutesbeforechangingtheoil
towarmit.Warmoilowsbetterandcarriesmore
contaminants.
EngineOilSpecications
Engineoilcapacity
OilviscositySAE30orSAE10W-30
APIserviceclassicationSJorhigher
1.Shutofftheengineandwaitforallmovingparts
tostop.
2.Disconnectthewirefromthesparkplug.
3.Drainthefuelfromthefueltank.
4.Placeasuitabledrainpanunderthedipstick/oil
drain.
0.65L(22oz)
detergentoil
Figure21
1.Air-ltercover3.Foampre-lter
2.Paperairlter
4.Removethecoverandcleanitthoroughly.
5.Removeandinspectthepaperairlter(Figure
21),andreplaceitifitisexcessivelydirty.
5.Cleanaroundthedipstick.
6.Removethedipstickbyrotatingthecap
counterclockwiseandpullingitout.
7.Tipthemachineontoitsrightside(airlterup)
todraintheoilintothedrainpan.
8.Afterdrainingtheoil,returnthemachinetothe
operatingposition.
9.Fillthecrankcasetothecorrectlevelonthe
dipstickwithfreshoil;referto3Fillingthe
CrankcasewithOil(page8).
10.Insertthedipstickintothellerneckandrotate
thecapclockwiseuntilitistight.
g024349
11.Wipeupanyspilledoil.
12.Recycletheusedoilaccordingtolocalcodes.
Important:Donottrytocleanapaperlter.
6.Removethefoampre-lter(Figure21)andwash
itwithamilddetergentandwater,thenblotitdry.
19
ServicingtheSparkPlug
ServiceInterval:Every100hours—Inspect,clean,
andadjustthesparkpluggap;
replacethesparkplugifnecessary.
UseanNGKBPR5ESsparkplugorequivalent.
1.Shutofftheengineandwaitforallmovingparts
tostop.
2.Disconnectthewirefromthesparkplug.
3.Cleanaroundthesparkplug.
machinefrommovingforwardwhiletheengine
isrunning.
2.Positionthemachinewiththefronttiresagainst
thewall.
Note:Ensurethattheareaiswellventilated
andclearofdebristhatcouldbethrownbythe
machine.
3.Shiftthetransmissiontothirdgear.
4.Starttheengine;refertoStartingtheEngine
(page13).
4.Removethesparkplugfromthecylinderhead.
Important:Replaceacracked,fouled,or
dirtysparkplug.Donotcleantheelectrodes
becausegritenteringthecylindercan
damagetheengine.
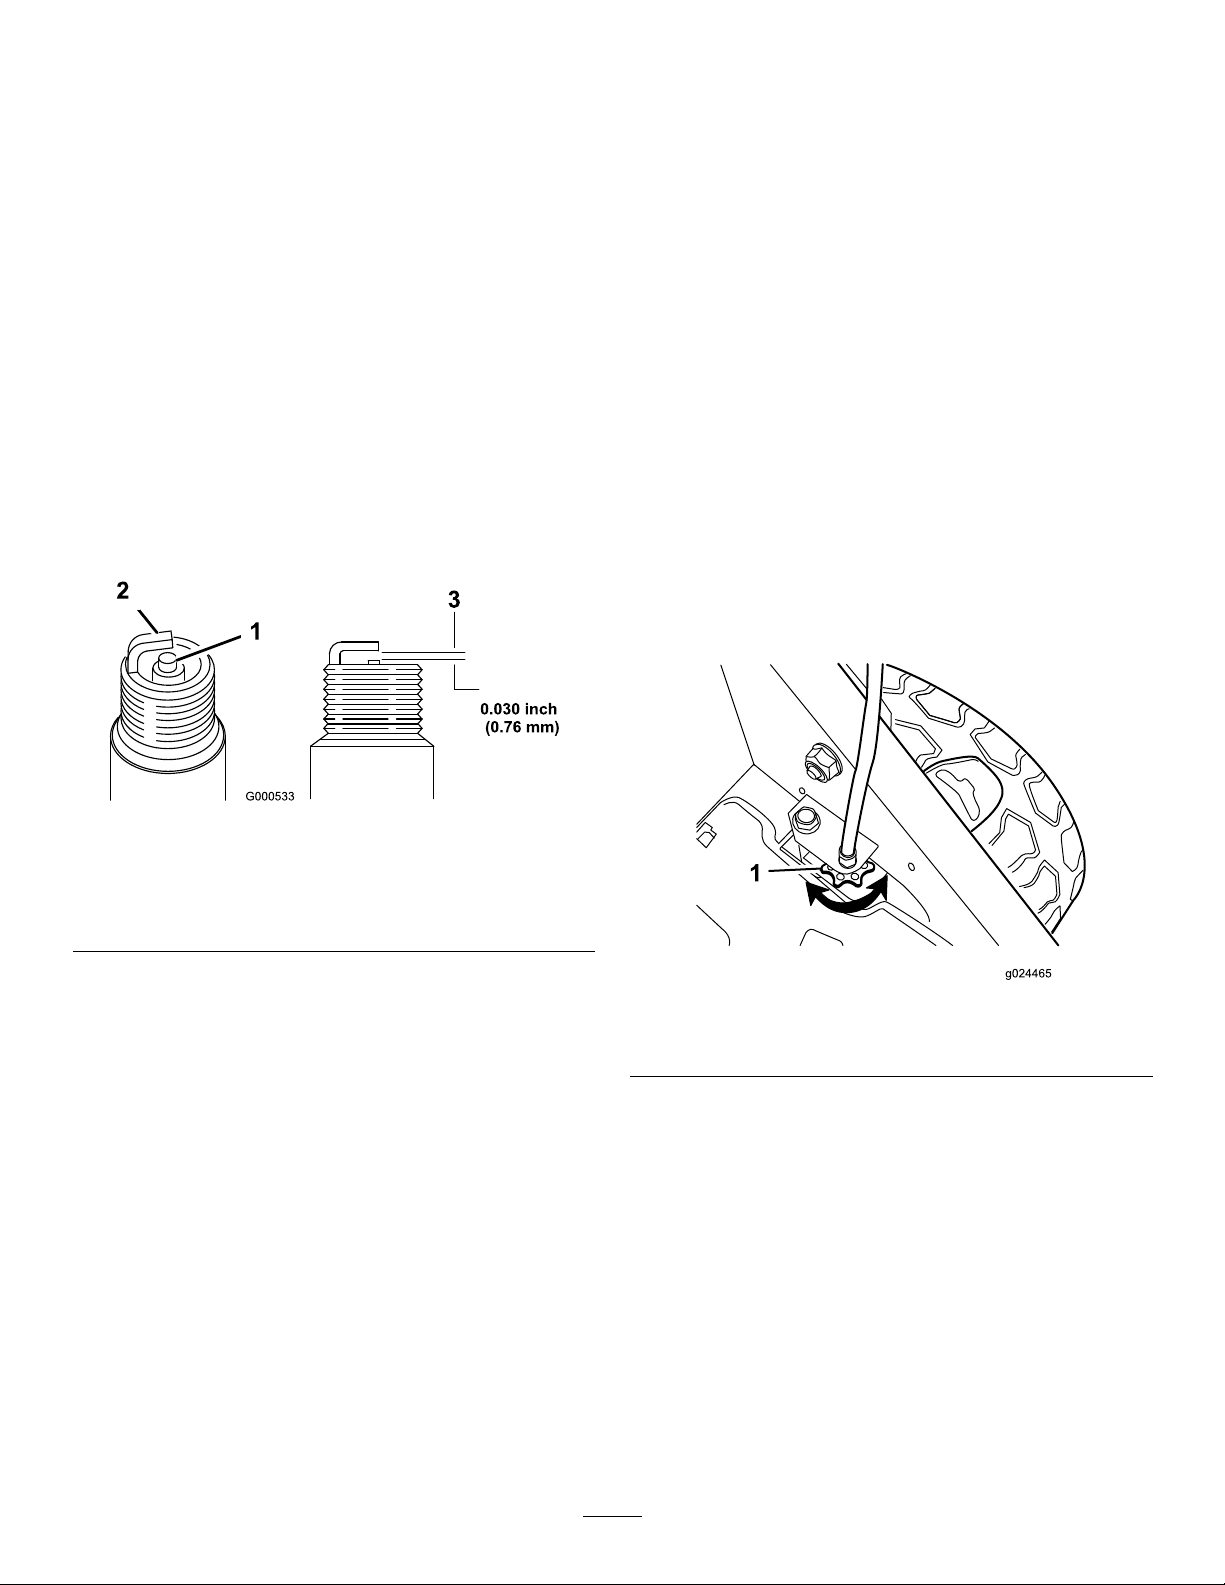
5.Setthegapontheplugto0.76mm(0.030inch);
refertoFigure22.
Figure22
1.Center-electrodeinsulator
2.Sideelectrode
3.Airgap(nottoscale)
5.Pulltheself-propel-drivebartothehandle.
Note:Thewheelsshouldstarttoturnasthe
self-propel-drivebarjusttouchesthehandle.
6.Shutofftheengine.
7.Ifyoumustadjustthemachine,dothefollowing:
•Ifthewheelsdonotspinwhenyouengage
theself-propel-drivebar,thetractionbeltis
tooloose.Rotatethewheel-drive-control
knob(Figure23)clockwise1turnandrepeat
steps4through6.
g000533
6.Carefullyinstallthesparkplugbyhand(toavoid
crossthreading)untilitishandtight.
7.Tightenthesparkplugto23N∙m(2.3kgf-m,17
ft-lb).
Important:Aloosesparkplugcanbecome
veryhotandcandamagetheengine;
overtighteningasparkplugmaydamagethe
threadsinthecylinderhead.
8.Connectthewiretothesparkplug.
AdjustingtheSelf-Propel Drive
Ifthemachineisnew,doesnotself-propel,orittends
tocreepforward,adjustthedrivecable.
1.Movethemachineoutsideandontoapaved
surfacenearasolidwalltosafelypreventthe
g024465
Figure23
1.Wheel-drive-controlknob
•Ifthewheelsspinbeforeyoufullyengage
theself-propel-drivebar,thetractionbelt
istootight.Rotatethewheel-drive-control
knob(Figure23)counterclockwise1turn
andrepeatsteps4through6.
8.Foranewtractionbelt,rotatethe
drive-cable-adjustmentknobclockwise1
additionalturntoallowforthenormalstretching
ofthebeltduringthebreak-inperiod.
Note:Youcanskipthisstepifyouareadjusting
ausedbelt.
20

MaintainingtheBlade
Alwaysmowwithasharpblade.Asharpbladecuts
cleanlyandwithouttearingorshreddingthegrass
blades.
PreparingtheMachine
1.Shutofftheengineandwaitforallmovingparts
tostop.
2.Disconnectthewirefromthesparkplug.
g002278
Figure25
3.Drainthefuelfromthefueltank.
4.Tipthemachineontoitsrightside(aircleaner
up)asshowninFigure24.
Figure24
1.Blade3.Bladeboltandlockwasher
2.Accelerator
1.Sail
2.Flatpartoftheblade4.Slotformed
3.Wear
Note:Forthebestperformance,installanewblade
beforethemowingseasonbegins.Duringtheyear,
ledownanysmallnickstomaintainthecuttingedge.
DANGER
Awornordamagedbladecanbreak,anda
pieceofthebladecouldbethrowntowardyou
orbystanders,resultinginseriouspersonal
injuryordeath.
•Inspectthebladeperiodicallyforwearor
damage.
g024253
•Replaceawornordamagedblade.
InspectingtheAccelerator
ServiceInterval:Beforeeachuseordaily—Inspect
theacceleratorforwearordamage.
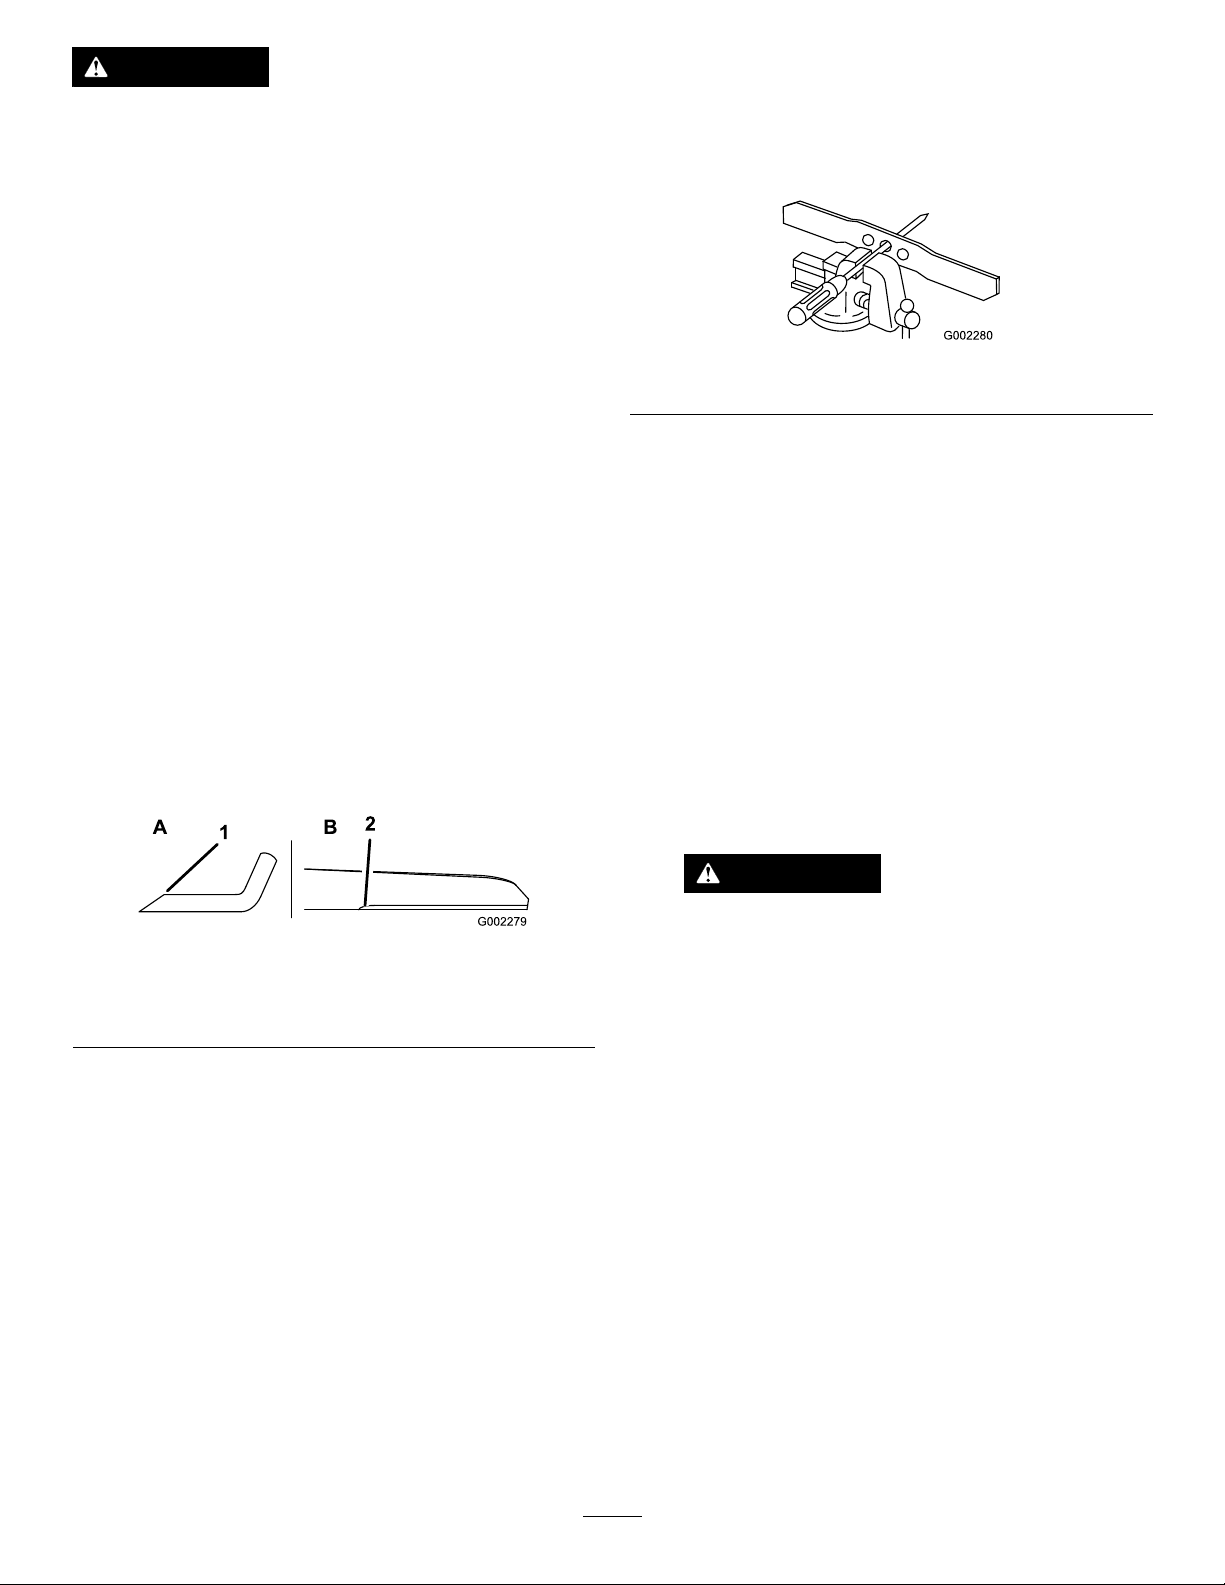
InspectingtheBlade
ServiceInterval:Beforeeachuseordaily—Inspect
themowerbladesforwearor
damage.
Carefullyexaminethebladeforsharpnessandwear,
especiallywheretheatandthecurvedpartsmeet
(Figure25A).Becausesandandabrasivematerial
canwearawaythemetalthatconnectstheatand
curvedpartsoftheblade,checkthebladebefore
usingthemachine.Ifyounoticeaslotorwear(Figure
25BandFigure25C),replacetheblade;referto
RemovingtheBlade(page22).
Carefullyexaminetheacceleratorforexcessivewear
(Figure26).Becausesandandabrasivematerialcan
wearawaythemetal(especiallyintheareashown
asitem2inFigure26),checktheacceleratorbefore
usingthemachine.Ifyounoticethatatabonthe
acceleratorhasbeenworndowntoasharpedge
orthereisacrack,replacetheaccelerator;referto
RemovingtheBlade(page22).
Figure26
1.Accelerator3.T ab
2.Weararea
4.Crackformed
g027496
21
WARNING
Awornordamagedacceleratorcanbreak,
andapieceoftheacceleratorcouldbethrown
towardyouorbystanders,resultinginserious
personalinjuryordeath.
•Inspecttheacceleratorperiodicallyfor
wearordamage.
•Replaceawornordamagedaccelerator.
BalancingtheBlade
1.Checkthebalanceofthebladebyplacing
thecenterholeofthebladeoveranailor
screwdrivershankclampedhorizontallyinavise
(Figure28).
RemovingtheBlade
1.Grasptheendofthebladeusingaragora
thicklypaddedglove.
2.Removethebladenuts,theaccelerator,andthe
blade(Figure25).
SharpeningtheBlade
ServiceInterval:Every50hours—Sharpenor
replacetheblade.Maintainitmore
frequentlyiftheedgedullsquicklyin
roughorinsandyconditions.
Filethetopsideofthebladetomaintainitsoriginal
cuttingangle(Figure27A)andinnercuttingedge
radius(Figure27B).Thebladewillremainbalancedif
youremovethesameamountofmaterialfromboth
cuttingedges.
Figure27
1.Sharpenthebladeatthis
angleonly.
2.Maintaintheoriginalradius
here.
g002280
Figure28
Note:Y oucanalsocheckthebalanceusinga
commerciallymanufacturedbladebalancer.
2.Ifeitherendofthebladerotatesdownward,le
thatend(notthecuttingedgeortheendnear
thecuttingedge)untilneitherendoftheblade
drops.
InstallingtheBlade
1.Installasharp,balancedT oroblade,the
accelerator,andthebladenuts.Thesailofthe
blademustpointtowardthetopofthemower
housingforproperinstallation.
Note:T orquethebladenutsto20to37N∙m
(15to27ft-lb).
WARNING
Operatingthemachinewithoutthe
g002279
acceleratorinplacecancausethe
bladetoex,bend,orbreak,resulting
inseriousinjuryordeathtoyouorto
bystanders.
Donotoperatethemachinewithoutthe
acceleratorinplace.
2.Returnthemachinetotheoperatingposition.
22
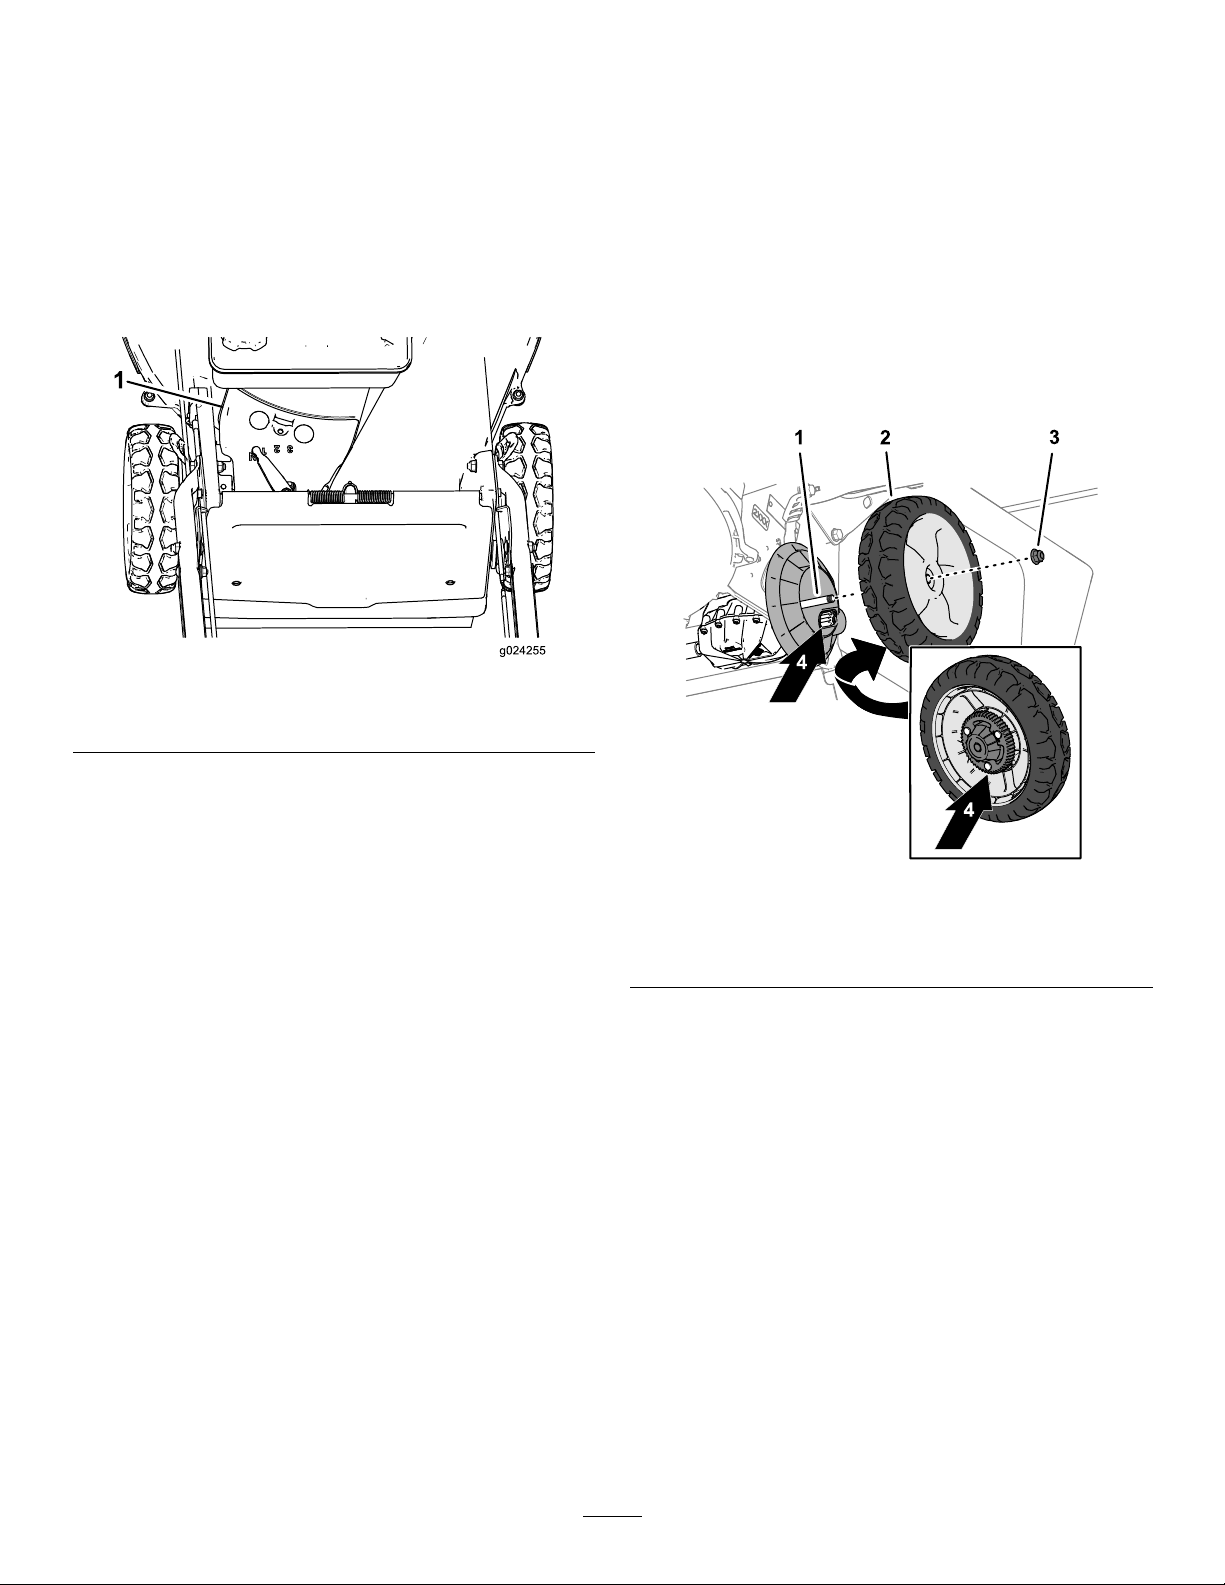
CleaningundertheBeltCover
CleaningtheWheels
ServiceInterval:Every50hours—Removegrass
clippingsanddebrisfromunderthe
beltcover.
1.Shutofftheengineandwaitforallmovingparts
tostop.
2.Disconnectthewirefromthesparkplug.
3.Removethebeltcover(Figure29)fromthe
mowerhousing.
Figure29
ServiceInterval:Every40hours
Important:Topreventdamagetothebearing
seals,donotuseahigh-pressurewatersprayon
thebearings.
Note:Ifyouoperatethemachineinextreme
conditions,cleaningthewheelsmorefrequentlythan
recommendedwillincreasegearlife.
1.Removetheangelocknutandwheelassemble
fromtheaxlebolt(Figure30).
2.Cleananydebrisfromthewheel-geararea
(Figure30).
g024255
1.Beltcover
4.Liftoffthecoverandbrushoutallthedebris
aroundthebeltarea.
5.Installthebeltcover.
6.Connectthewiretothesparkplug.
Figure30
1.Axlebolt3.Flangelocknut
2.Wheelassembly
4.Gears
3.Aftercleaning,applyasmallamountof
anti-seizecompoundtothegears(Figure30).
4.Assemblethewheelassembletotheaxlebolt
withtheangelocknut(Figure30).
g233814
23

Storage
Topreparethemachineforoff-seasonstorage,
performtherecommendedmaintenanceprocedures;
refertoStorage(page24).
Storethemachineinacool,clean,dryplace.Cover
themachinetokeepitcleanandprotected.
8.T ouchupallrustedorchippedpaintsurfaces
withpaintavailablefromanAuthorizedService
Dealer.
RemovingtheMachine fromStorage
1.Checkandtightenallfasteners.
PreparingtheFuelSystem
Emptythefuelfromthefueltankwhenmowingforthe
lasttimebeforestoringthemachine.
1.Runtheengineuntilitshutsofffromrunning
outoffuel.
2.Choketheengineandstartitagain.
3.Allowtheenginetorununtilitshutsoff.
Whenyoucannolongerstarttheengine,itis
sufcientlydry.
PreparingtheEngine
1.Whiletheengineisstillwarm,changetheoilin
thecrankcase;refertoChangingtheEngineOil
(page19).
2.Removethesparkplug.
3.Usinganoilcan,addabout30ml(1oz)of
engineoiltotheenginecrankcasethroughthe
spark-plughole.
4.Slowlyrotatetheengineseveraltimesby
pullingtherecoil-starthandletodistributetheoil
throughouttheenginecrankcase.
2.Removethesparkplugandspintheengine
rapidlyusingthestartertoblowouttheexcess
oilfromthecylinder.
3.Cleanthesparkplugorreplaceitifitiscracked,
broken,oriftheelectrodesareworn.
4.Installthesparkplug;refertoServicingthe
SparkPlug(page20).
5.Performanyneededmaintenanceprocedures;
refertoMaintenance(page18).
6.Fillthefuelinthefueltankwithfreshfuel.
7.Checktheengine-oillevel.
8.Connectthewiretothesparkplug.
5.Installthesparkplugbutdonotconnectthe
wiretothesparkplug.
GeneralInformation
1.Cleanunderthemachine;refertoCleaning
undertheMachine(page17).
2.Cleananydirtandchafffromthecylinder,
cylinderheadns,andblowerhousing.
3.Removegrassclippings,dirt,andgrimefrom
theexternalpartsoftheengine,theshrouding,
andthetopofthemowerhousing.
4.Checktheconditionoftheblade;referto
InspectingtheBlade(page21).
5.Checktheconditionoftheaccelerator;referto
InspectingtheAccelerator(page21).
6.Servicetheairlter;refertoServicingtheAir
Filter(page19).
7.Tightenallnuts,bolts,andscrews.
24

Troubleshooting
Problem
Theenginedoesnotstart.
Theenginestartshardorlosespower.
Theenginerunsrough.
PossibleCauseCorrectiveAction
1.Thefueltankisemptyorthefuel
systemcontainsstalefuel.
2.ThethrottleleverisnotintheCHOKE
position.
3.Thewireisnotconnectedtothespark
plug.
4.Thesparkplugispitted,fouled,orthe
gapisincorrect.
1.Thefueltankcontainsstalefuel.1.Drainandllthefueltankwithfresh
2.Theair-lterelementisdirtyandis
restrictingtheairow.
3.Theundersideofthemachinecontains
clippingsanddebris.
4.Thesparkplugispitted,fouled,orthe
gapisincorrect.
5.Theengine-oillevelislowortheoilis
dirty.
1.Thewireisnotconnectedtothespark
plug.
2.Thesparkplugispitted,fouled,orthe
gapisincorrect.
3.ThethrottleleverisnotintheFAST
position.
4.Theair-lterelementisdirtyandis
restrictingtheairow.
1.Drainand/orllthefueltankwithfresh
fuel.Iftheproblempersists,contactan
AuthorizedServiceDealer .
2.MovethethrottlelevertotheCHOKE
position.
3.Connectthewiretothesparkplug.
4.Checkthesparkplugandadjustthe
gapifnecessary .Replacethespark
plugifitispitted,fouled,orcracked.
fuel.
2.Cleantheair-lterpre-cleanerand/or
replacethepaperairlter.
3.Cleantheundersideofthemachine.
4.Checkthesparkplugandadjustthe
gapifnecessary .Replacethespark
plugifitispitted,fouled,orcracked.
5.Checktheengineoil.Changetheoilif
itisdirtyoraddoilifitislow.
1.Connectthewiretothesparkplug.
2.Checkthesparkplugandadjustthe
gapifnecessary .Replacethespark
plugifitispitted,fouled,orcracked.
3.MovethethrottlelevertotheFAST
position.
4.Cleantheair-lterpre-cleanerand/or
replacethepaperairlter.
Themachineorenginevibrates
excessively.
Thecuttingpatternisuneven.
Thedischargechuteplugsup.
Themachinedoesnotself-propel.
1.Thebladeisbentorisoutofbalance.
2.Theblademountingnutsareloose.2.Tightentheblademountingnuts.
3.Theundersideofthemachinecontains
clippingsanddebris.
4.Theenginemountingboltsareloose.4.Tightentheenginemountingbolts.
1.All4wheelsarenotatthesameheight.1.Placeall4wheelsatthesameheight.
2.Thebladeisdull.
3.Y ouaremowinginthesamepattern
repeatedly.
4.Theundersideofthemachinecontains
clippingsanddebris.
1.ThethrottleleverisnotintheFAST
position.
2.Thecuttingheightistoolow.2.Raisethecuttingheight.
3.
Youaremowingtoofast.
4.Thegrassiswet.
5.
Theundersideofthemachinecontains
clippingsanddebris.
1.Theself-propeldrivecableisoutof
adjustmentorisdamaged.
2.Thereisdebrisunderthebeltcover.
1.Balancetheblade.Ifthebladeisbent,
replaceit.
3.Cleantheundersideofthemachine.
2.Sharpenandbalancetheblade.
3.Changethemowingpattern.
4.Cleantheundersideofthemachine.
1.MovethethrottlelevertotheFAST
position.
3.
Slowdown.
4.Allowthegrasstodrybeforemowing.
5.Cleantheundersideofthemachine.
1.Adjusttheself-propeldrivecable.
Replacethecableifnecessary .
2.Cleanthedebrisfromunderthebelt
cover.
25

EuropeanPrivacyNotice
TheInformationToroCollects
ToroWarrantyCompany(Toro)respectsyourprivacy .Inordertoprocessyourwarrantyclaimandcontactyouintheeventofaproductrecall,weaskyou
tosharecertainpersonalinformationwithus,eitherdirectlyorthroughyourlocalT orocompanyordealer.
TheT orowarrantysystemishostedonserverslocatedwithintheUnitedStateswhereprivacylawmaynotprovidethesameprotectionasapplies
inyourcountry.
BYSHARINGYOURPERSONALINFORMATIONWITHUS,YOUARECONSENTINGTOTHEPROCESSINGOFYOURPERSONALINFORMATION
ASDESCRIBEDINTHISPRIV ACYNOTICE.
TheWayT oroUsesInformation
Toromayuseyourpersonalinformationtoprocesswarrantyclaims,tocontactyouintheeventofaproductrecallandforanyotherpurposewhichwetell
youabout.ToromayshareyourinformationwithT oro'safliates,dealersorotherbusinesspartnersinconnectionwithanyoftheseactivities.Wewillnot
sellyourpersonalinformationtoanyothercompany.Wereservetherighttodisclosepersonalinformationinordertocomplywithapplicablelawsand
withrequestsbytheappropriateauthorities,tooperateoursystemsproperlyorforourownprotectionorthatofotherusers.
RetentionofyourPersonalInformation
Wewillkeepyourpersonalinformationaslongasweneeditforthepurposesforwhichitwasoriginallycollectedorforotherlegitimatepurposes
(suchasregulatorycompliance),orasrequiredbyapplicablelaw .
Toro'sCommitmenttoSecurityofYourPersonalInformation
Wetakereasonableprecautionsinordertoprotectthesecurityofyourpersonalinformation.Wealsotakestepstomaintaintheaccuracyandcurrent
statusofpersonalinformation.
AccessandCorrectionofyourPersonalInformation
Ifyouwouldliketorevieworcorrectyourpersonalinformation,pleasecontactusbyemailatlegal@toro.com.
AustralianConsumerLaw
AustraliancustomerswillnddetailsrelatingtotheAustralianConsumerLaweitherinsidetheboxoratyourlocalT oroDealer.
374-0282RevC
ProfessionellerRasenmäher
FormNo.3418-968RevB
mitRecycler
®
bzw.Heckfänger
(53cm)
Modellnr.22291—Seriennr.402100000undhöher
RegistrierenSieIhrProduktunterwww.Toro.com.
Originaldokuments(DE)
CV
*3418-968*B

DiesesProdukterfülltallerelevanteneuropäischen
Richtlinien;weitereDetailsndenSieinder
produktspezischenKonformitätserklärung(DOC).
Einführung
IndieserAnleitungwerdenpotenzielleGefahren
angeführt,undSicherheitsmeldungenwerdenvom
Sicherheitswarnsymbol(Bild2)gekennzeichnet,
dasaufeineGefahrhinweist,diezuschweren
odertödlichenVerletzungenführenkann,wenn
SiedieempfohlenenSicherheitsvorkehrungennicht
einhalten.
DieserhandgeführteRasenmähermitSichelmessern
solltevonPrivatleutenodergeschultenLohnarbeitern
verwendetwerden.Eristhauptsächlichfürdas
MähenvonGrasaufgepegtenGrünächenin
Privat-oderöffentlichenAnlagengedacht.Erist
nichtfürdasSchneidenvonBüschenoderfüreinen
landwirtschaftlichenEinsatzgedacht.
LesenSiedieseInformationensorgfältigdurch,
umsichmitdemordnungsgemäßenEinsatzund
derWartungdesGerätsvertrautzumachenund
VerletzungenundeineBeschädigungdesGerätszu
vermeiden.SietragendieVerantwortungfüreinen
ordnungsgemäßenundsicherenEinsatzdesGeräts.
WendenSiesichhinsichtlichInformationenzu
ProduktenundZubehörsowieAngabenzuIhrem
örtlichenVertragshändleroderzurRegistrierungdes
ProduktesdirektanTorounterwww.T oro.com.
WendenSiesichandenT oro-Vertragshändler
oderKundendienst,wennSieeineServiceleistung,
OriginalersatzteilevonTorooderweitere
Informationenbenötigen.HabenSiedafürdieModellundSeriennummernderMaschinegriffbereit.InBild
1wirdderStandortderModell-undSeriennummern
aufdemProduktangegeben.TragenSiehierbittedie
Modell-undSeriennummerndesGerätsein.
Wichtig:ScannenSiemitIhremSmartphone
oderTabletdenQR-Codeaufdem
Seriennummernaufkleber,umaufGarantie-,
Ersatzteil-oderandereProduktinformationen
zuzugreifen.
g000502
Bild2
Sicherheitswarnsymbol
IndieserAnleitungwerdenzweiBegriffezur
HervorhebungvonInformationenverwendet.Wichtig
weistaufspeziellemechanischeInformationenhin,
undHinweishebtallgemeineInformationenhervor,
dieIhrebesondereBeachtungverdienen.
Brutto-oderNettodrehmoment:DasBruttooderNettodrehmomentdiesesMotorswurde
vomMotorherstellerimLaborgemäßSAEJ1940
oderJ2723ermittelt.AufgrundderKonguration
zurErfüllungvonSicherheits-,EmissionsundBetriebsanforderungenistdietatsächliche
MotorleistungindieserKlassederRasenmäher
wesentlichniedriger.WeitereInformationennden
SieinderMotorbedienungsanleitungdesHerstellers,
diemitderMaschineausgeliefertwurde.
ManipulierenoderdeaktivierenSiekeine
SicherheitsvorrichtungenanderMaschineundprüfen
SiedieeinwandfreieFunktioninregelmäßigen
Abständen.ModizierenodermanipulierenSienicht
dieBedienelementefürdieMotordrehzahl,dadieszu
unsicherenEinsatzbedingungenundVerletzungen
führenkann.
1.TypenschildmitModell-undSeriennummern
Modellnr.
Seriennr.
©2018—TheToro®Company
8111LyndaleAvenueSouth
Bloomington,MN55420
Bild1
g226628
KontaktierenSieunsunterwww.Toro.com.
2
AlleRechtevorbehalten
Druck:USA

Inhalt
Sicherheit
Sicherheit..................................................................3
AllgemeineSicherheit.........................................3
Sicherheits-undBedienungsschilder.................4
Einrichtung................................................................6
1MontierendesHolms.......................................6
2BefestigendesRücklaufstarterseilsinder
Seilführung......................................................8
3AuffüllendesKurbelgehäusesmit
Öl....................................................................8
4EinstellendesSelbstantriebs...........................9
5MontierendesFangkorbs................................9
Produktübersicht.....................................................10
TechnischeDaten............................................10
VordemEinsatz...................................................11
VordersicherenVerwendung............................11
Betanken...........................................................11
PrüfendesMotorölstands.................................12
EinstellenderSchnitthöhe................................13
WährenddesEinsatzes.......................................13
HinweisezurSicherheitwährenddes
Betriebs.........................................................13
AnlassendesMotors........................................14
AbstellendesMotors........................................15
VerwendendesSelbstantriebs.........................15
Schnittgutrecyclen............................................15
SammelndesSchnittguts.................................16
Betriebshinweise.............................................16
NachdemEinsatz...............................................18
HinweisezurSicherheitnachdem
Betrieb..........................................................18
ReinigenunterdemGerät.................................18
Wartung..................................................................20
EmpfohlenerWartungsplan.................................20
Wartungssicherheit...........................................21
WartendesLuftlters........................................21
WechselndesMotoröls....................................22
WartenderZündkerze......................................22
EinstellendesSelbstantriebs............................23
WartendesSchnittmessers..............................23
Einlagerung............................................................27
VorbereitenderKraftstoffanlage.......................27
VorbereitendesMotors.....................................27
AllgemeineAngaben........................................27
HerausnehmendesRasenmähersausder
Einlagerung...................................................27
Fehlersucheund-behebung...................................28
DieseMaschineerfülltENISO5395:2013.
DerunsachgemäßeEinsatzoderdiefalsche
WartungdieserMaschinekannzuVerletzungen
führen.BefolgenSiezurReduzierungder
VerletzungsgefahrdieseSicherheitsanweisungen.
UmdiemaximaleSicherheit,optimaleLeistung
unddasnötigeWissenüberdieMaschinezu
erhalten,müssenSieundjederandereBediener
derMaschinedenInhaltdervorliegenden
AnleitungvordemAnlassendesMotorssorgfältig
lesenundverstehen.AchtenSiebesondersauf
dasSicherheitswarnsymbolBild2,dasVorsicht,
WarnungoderGefahrbedeutet.Lesenund
verstehenSiedieAnweisungen,dasiewichtig
fürdieSicherheitsind.DasNichtbeachtender
AnweisungenkannzuKörperverletzungenführen.
AllgemeineSicherheit
DiesesProduktkannHändeundFüßeamputieren
undGegenständeaufschleudern.Befolgenimmer
sämtlicheSicherheitshinweise,umschwereoder
tödlicheVerletzungenzuvermeiden.
WenndiesesProduktfüreinenanderenZweck
eingesetztwird,kanndasfürBedienerundandere
Personengefährlichsein.
•Lesen,verstehenundbefolgenSievordem
AnlassendesMotorsalleAnweisungenund
WarnungeninderBedienungsanleitungundan
derMaschine.
•BerührenSiebeweglicheTeileoderdieUnterseite
derMaschinenichtmitdenHändenoderFüßen.
KommenSieAuswurföffnungennichtzunahe.
•SetzenSiedieMaschinenurein,wenn
alleSchutzvorrichtungenundandere
Sicherheitsvorrichtungenmontiertund
funktionsfähigsind.
•HaltenSieUnbeteiligteundKinderineinem
sicherenAbstandzurMaschine.DasFahrzeug
darfniemalsvonKindernbetriebenwerden.
NurverantwortungsbewusstePersonen,die
geschultundmitdenAnweisungenvertrautsind
undkörperlichfähigsind,solltendieMaschine
verwenden.
•HaltenSiedieMaschinean,stellenSieden
MotorabundwartenSie,bisallebeweglichen
TeilezumStillstandgekommensind,bevorSie
Wartungsarbeitendurchführen,Auftankenoder
Verstopfungenentfernen.
DerunsachgemäßeEinsatzoderdiefalscheWartung
dieserMaschinekannzuVerletzungenführen.
DurchdasBefolgendieserSicherheitshinweisekann
3
 Loading...