


FormNo.3418-491RevC
53cmHeavy-DutyRecycler®/RearBaggerLawn
Mower
22280
ProfessionellerRasenmähermitRecycler®bzw.
Heckfänger(53cm)
22280
CortacéspeddeserviciopesadoRecycler®de53cm
conreciclado/ensacadotrasero
22280
TondeusegrandrendementRecycler®de53cmavec
bacarrière
22280
Zwaaruitgevoerdegazonmaaiervan53cmmet
Recycler®/grasvanger
22280
www.T oro.com.
*3418-491*

FormNo.3418-480RevC
53cmHeavy-DutyRecycler
BaggerLawnMower
ModelNo.22280—SerialNo.400000000andUp
®
/Rear
Registeratwww.T oro.com.
OriginalInstructions(EN)
*3418-480*
ThisproductcomplieswithallrelevantEuropean
directives;fordetails,pleaseseetheseparateproduct
specicDeclarationofConformity(DOC)sheet.
ModelNo.
GrossorNetTorque:Thegrossornettorque
ofthisenginewaslaboratoryratedbytheengine
manufacturerinaccordancewiththeSocietyof
AutomotiveEngineers(SAE)J1940.Asconguredto
meetsafety,emission,andoperatingrequirements,
theactualenginetorqueonthisclassofmowerwill
besignicantlylower.Gotowww.Toro.comtoview
specicationsonyourmowermodel.
Donottamperwithordisablesafetydevicesonthe
machine,andchecktheirproperoperationregularly.
Donotattempttoadjustortamperwiththeengine
speedcontrol;doingsomaycreateanunsafe
operatingcondition,resultinginpersonalinjury.
Introduction
Thisrotary-blade,walk-behindlawnmowerisintended
tobeusedbyresidentialhomeownersorprofessional,
hiredoperators.Itisdesignedprimarilyforcutting
grassonwell-maintainedlawnsonresidentialor
commercialproperties.Itisnotdesignedforcutting
brushorforagriculturaluses.
SerialNo.
Thismanualidentiespotentialhazardsandhas
safetymessagesidentiedbythesafety-alertsymbol
(Figure2),whichsignalsahazardthatmaycause
seriousinjuryordeathifyoudonotfollowthe
recommendedprecautions.
g000502
Figure2
Safety-alertsymbol
Thismanualuses2wordstohighlightinformation.
Importantcallsattentiontospecialmechanical
informationandNoteemphasizesgeneralinformation
worthyofspecialattention.
Readthisinformationcarefullytolearnhowtooperate
andmaintainyourproductproperlyandtoavoid
injuryandproductdamage.Youareresponsiblefor
operatingtheproductproperlyandsafely .
Visitwww.Toro.comformoreinformation,including
safetytips,trainingmaterials,accessoryinformation,
helpndingadealer,ortoregisteryourproduct.
Wheneveryouneedservice,genuinethe
manufacturerparts,oradditionalinformation,contact
anAuthorizedServiceDealerorthemanufacturer
CustomerServiceandhavethemodelandserial
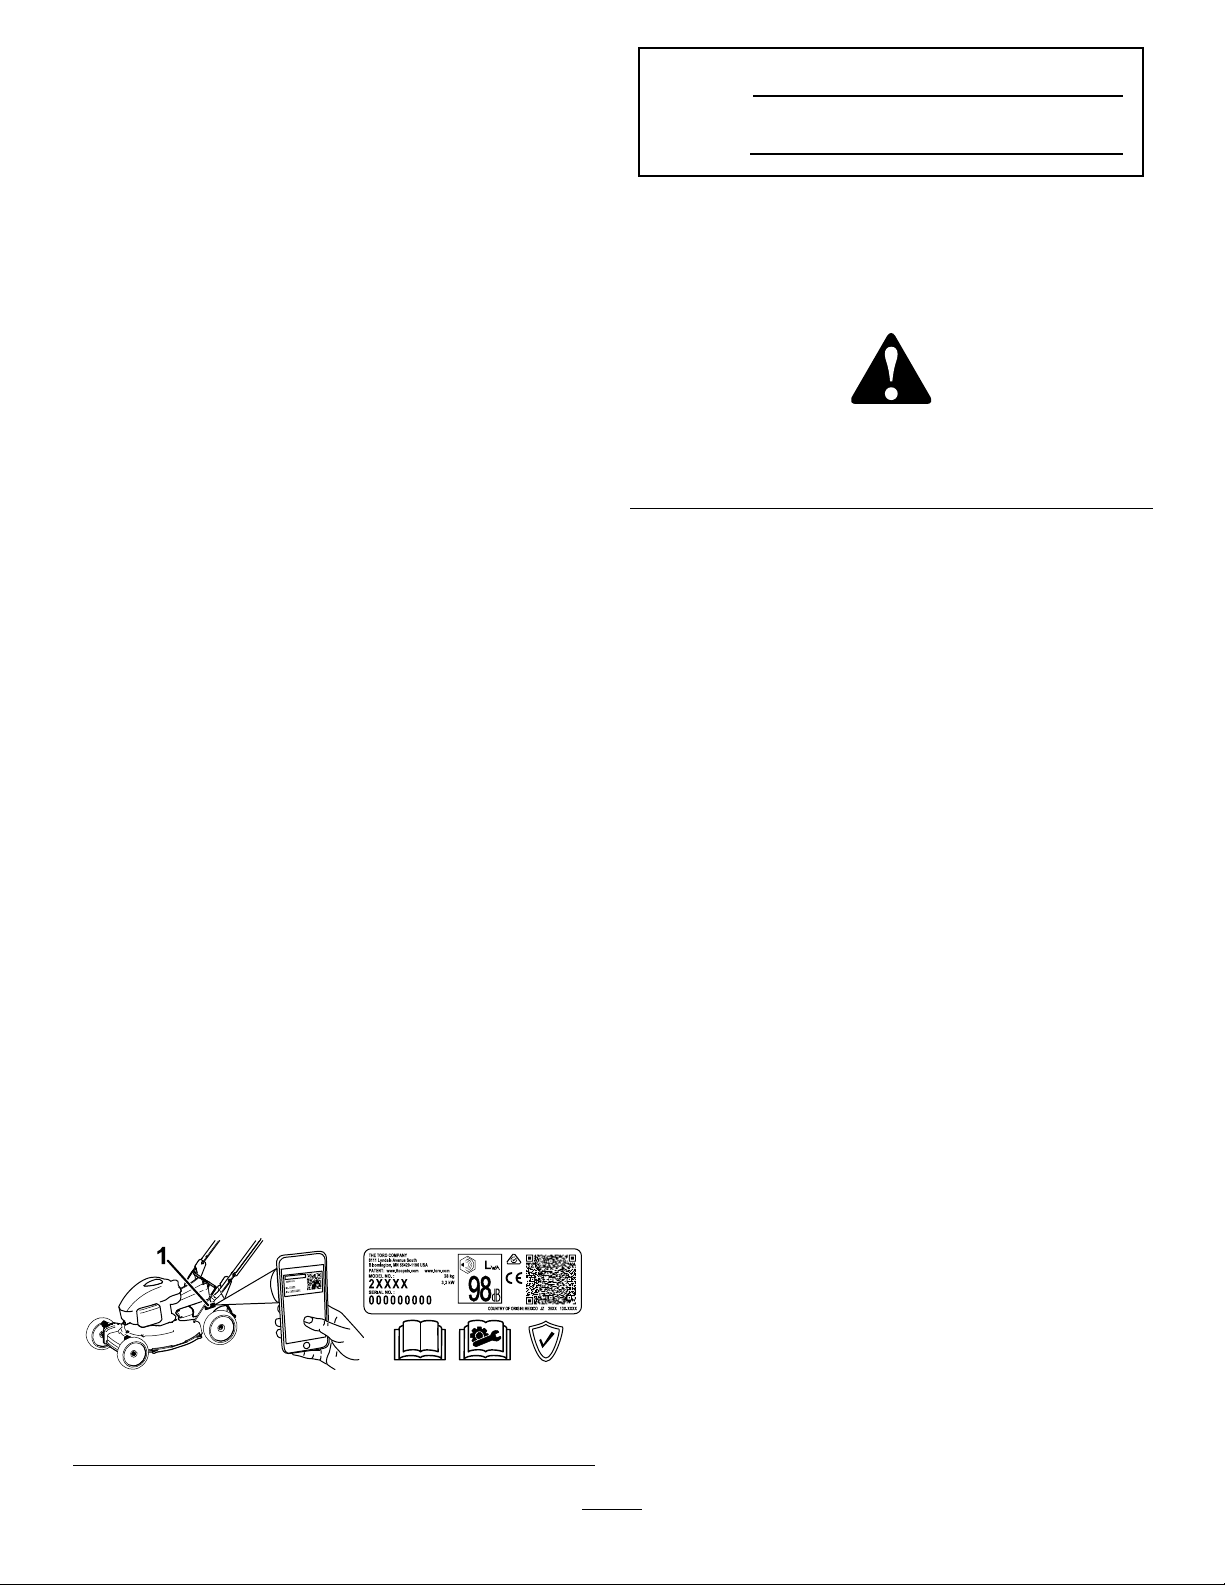
numbersofyourproductready.Figure1identies
thelocationofthemodelandserialnumbersonthe
product.Writethenumbersinthespaceprovided.
Important:Withyoursmartphoneortablet,scan
theQRcodeontheserialnumberdecaltoaccess
warranty,parts,andotherproductinformation.
1.Modelandserialnumberlocation
©2020—TheToro®Company
8111LyndaleAvenueSouth
Bloomington,MN55420
Figure1
g333679
Contactusatwww.Toro.com.
2
PrintedinMexico
AllRightsReserved

Contents
Safety
Safety.......................................................................3
GeneralSafety...................................................3
SafetyandInstructionalDecals..........................4
Setup........................................................................6
1RemovingtheCableGuard..............................6
2InstallingtheHandle........................................7
3InstallingtheCableGuard................................7
4AddingOiltotheEngine...................................9
5AssemblingtheGrassBag.............................10
6AdjustingtheSelf-PropelDrive......................10
ProductOverview....................................................11
Specications...................................................11
Attachments/Accessories..................................11
BeforeOperation.................................................12
BeforeOperationSafety...................................12
FillingtheFuelTank..........................................12
CheckingtheEngine-OilLevel..........................13
AdjustingtheHandleHeight.............................14
AdjustingtheCuttingHeight.............................15
DuringOperation.................................................15
DuringOperationSafety...................................15
StartingtheEngine...........................................16
ShuttingOfftheEngine.....................................16
OperatingtheSelf-PropelDriveand
EngagingtheBlades.....................................17
CheckingtheBlade-BrakeClutch.....................18
RecyclingtheClippings....................................18
BaggingtheClippings.......................................19
OperatingTips.................................................21
AfterOperation....................................................21
AfterOperationSafety......................................21
CleaningUndertheMachine............................22
Maintenance...........................................................23
RecommendedMaintenanceSchedule(s)...........23
MaintenanceSafety..........................................23
ServicingtheAirFilter.......................................24
ChangingtheEngineOil...................................24
ChangingtheEngine-OilFilter..........................24
ServicingtheSparkPlug...................................25
AdjustingtheSelf-PropelDrive.........................26
MaintainingtheBlade.......................................26
AdjustingtheBlade-BrakeCable......................28
CleaningundertheBeltCover..........................29
CleaningtheBlade-Brake-ClutchShield...........30
CleaningtheWheels.........................................30
Storage...................................................................31
StorageSafety..................................................31
PreparingtheFuelSystem...............................31
PreparingtheEngine........................................31
GeneralInformation..........................................31
RemovingtheMachinefromStorage................31
Troubleshooting......................................................32
Thismachinehasbeendesignedinaccordancewith
ENISO5395.
GeneralSafety
Thisproductiscapableofamputatinghandsand
feetandofthrowingobjects.Alwaysfollowallsafety
instructionstoavoidseriouspersonalinjuryordeath.
•Read,understand,andfollowtheinstructions
andwarningsinthisOperator’sManualandon
themachineandattachmentsbeforestartingthe
engine.
•Donotputyourhandsorfeetnearmovingpartsor
underthemachine.Keepclearofanydischarge
opening.
•Donotoperatethemachinewithoutallguards
andothersafetyprotectivedevicesinplaceand
functioningproperlyonthemachine.
•Keepbystandersandchildrenoutoftheoperating
area.Donotallowchildrentooperatethemachine.
Allowonlypeoplewhoareresponsible,trained,
familiarwiththeinstructions,andphysically
capabletooperatethemachine.
•Stopthemachine,shutofftheengine,andwaitfor
allmovingpartstostopbeforeservicing,fueling,
oruncloggingthemachine.
Improperlyusingormaintainingthismachinecan
resultininjury.T oreducethepotentialforinjury ,
complywiththesesafetyinstructionsandalways
payattentiontothesafety-alertsymbol
meansCaution,Warning,orDanger—personalsafety
instruction.Failuretocomplywiththeseinstructions
mayresultinpersonalinjuryordeath.
,which
3

SafetyandInstructionalDecals
Safetydecalsandinstructionsareeasilyvisibletotheoperatorandarelocatednearanyarea
ofpotentialdanger.Replaceanydecalthatisdamagedormissing.
Manufacturer'sMark
1.Thismarkindicatesthatthebladeisidentiedasapart
fromtheoriginalmachinemanufacturer.
decaloemmarkt
112-8760
1.Thrownobjecthazard—keepbystandersaway .
2.Cutting/dismembermenthazardofhandorfoot,mower
blade—stayawayfrommovingparts.
130-6722
1.Attention—readtheOperator'sManual.
decal130-9656
decal112-8760
1.Choke3.Slow
2.Fast
decal130-6722
130-9656
4.Engine—stop(shutoff)
4

decal116-7583
116-7583
1.Warning—readtheOperator’sManual;donotoperatethis
machineunlessyouaretrained.
4.Cutting/dismembermenthazardofhandorfoot,mower
blade—stayawayfrommovingparts;keepallguardsinplace.
2.Thrownobjecthazard—keepbystandersaway .5.Warning—wearhearingprotection.
3.Thrownobjecthazard—donotoperatethemowerwithoutthe
reardischargeplugorbaginplace.
6.Cutting/dismembermenthazardofhandorfoot,mower
blade—donotoperateupanddownslopes;operateside
tosideonslopes;shutofftheenginebeforeleavingthe
machine;pickupanydebrisbeforemowing;lookbehindyou
whenmovinginreverse.
5

Setup
Important:Removeanddiscardtheprotectiveplasticsheetthatcoverstheengineandanyother
plasticorwrappingonthemachine.
1
RemovingtheCableGuard
NoPartsRequired
Procedure
Figure3
g234471
6
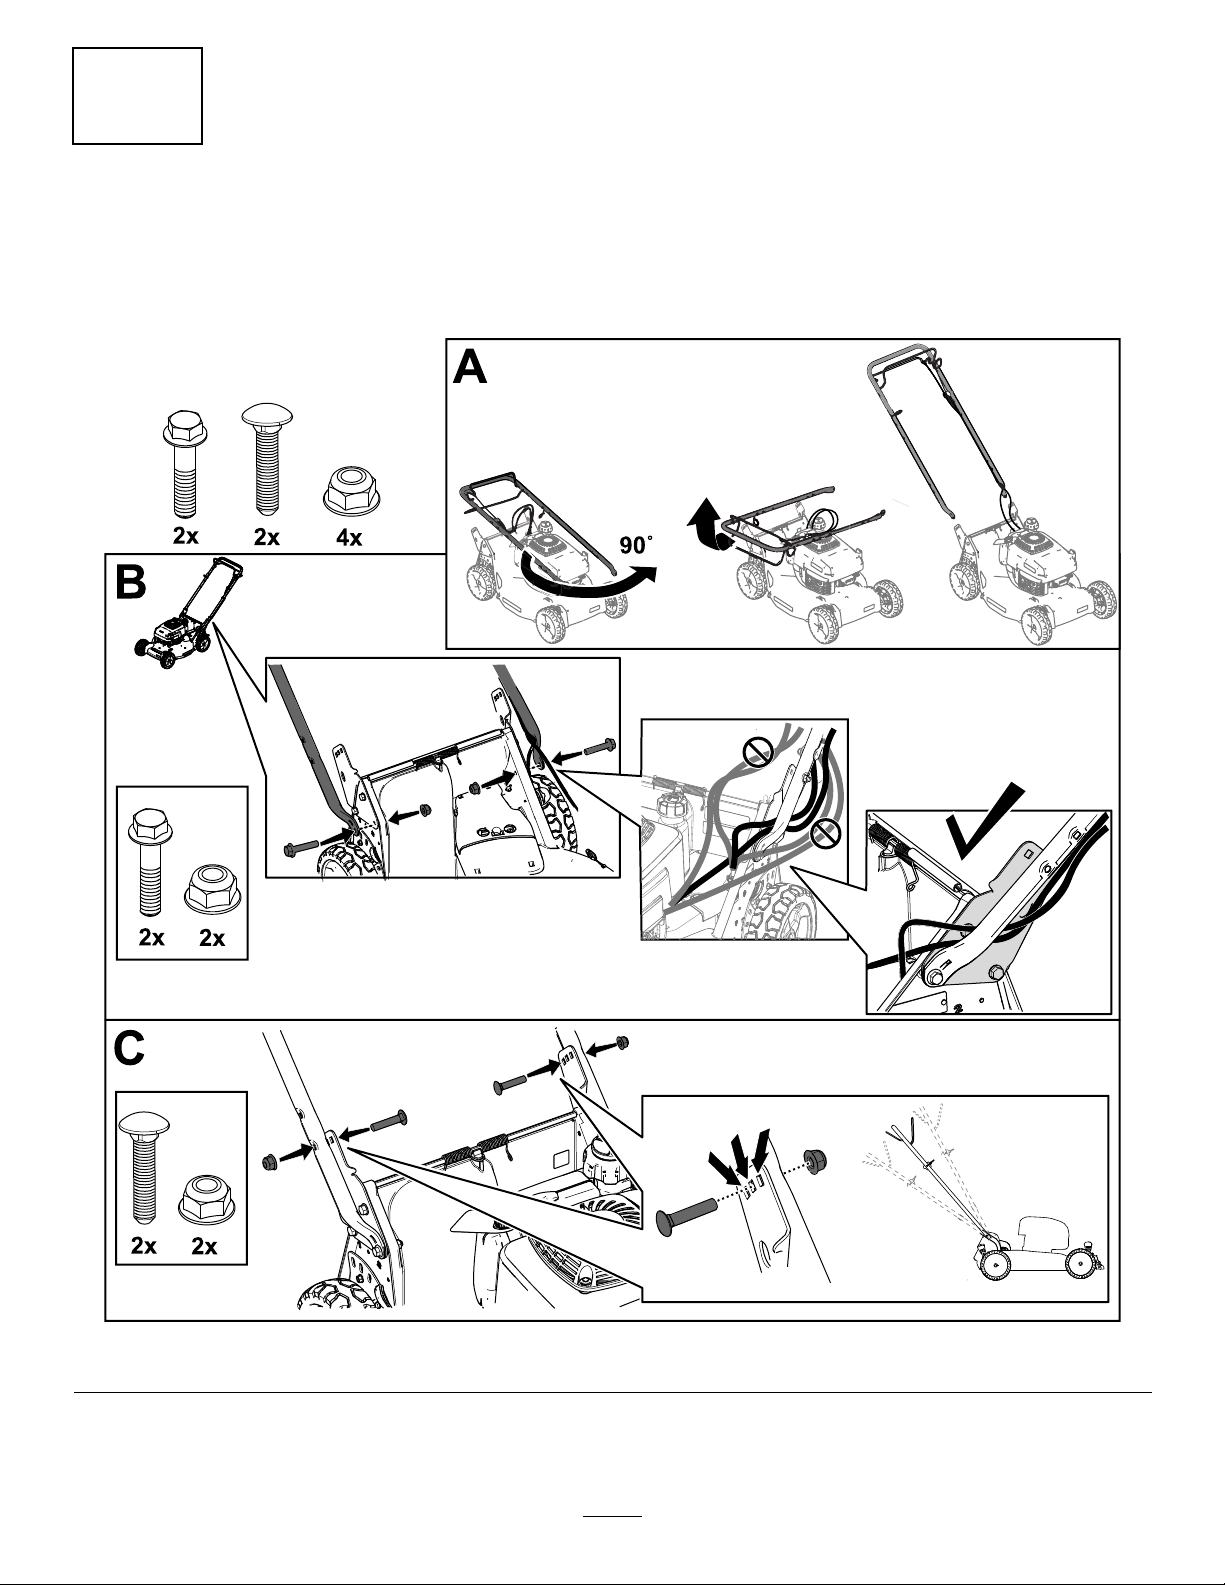
2
InstallingtheHandle
NoPartsRequired
Procedure
Figure4
7
g234475
3
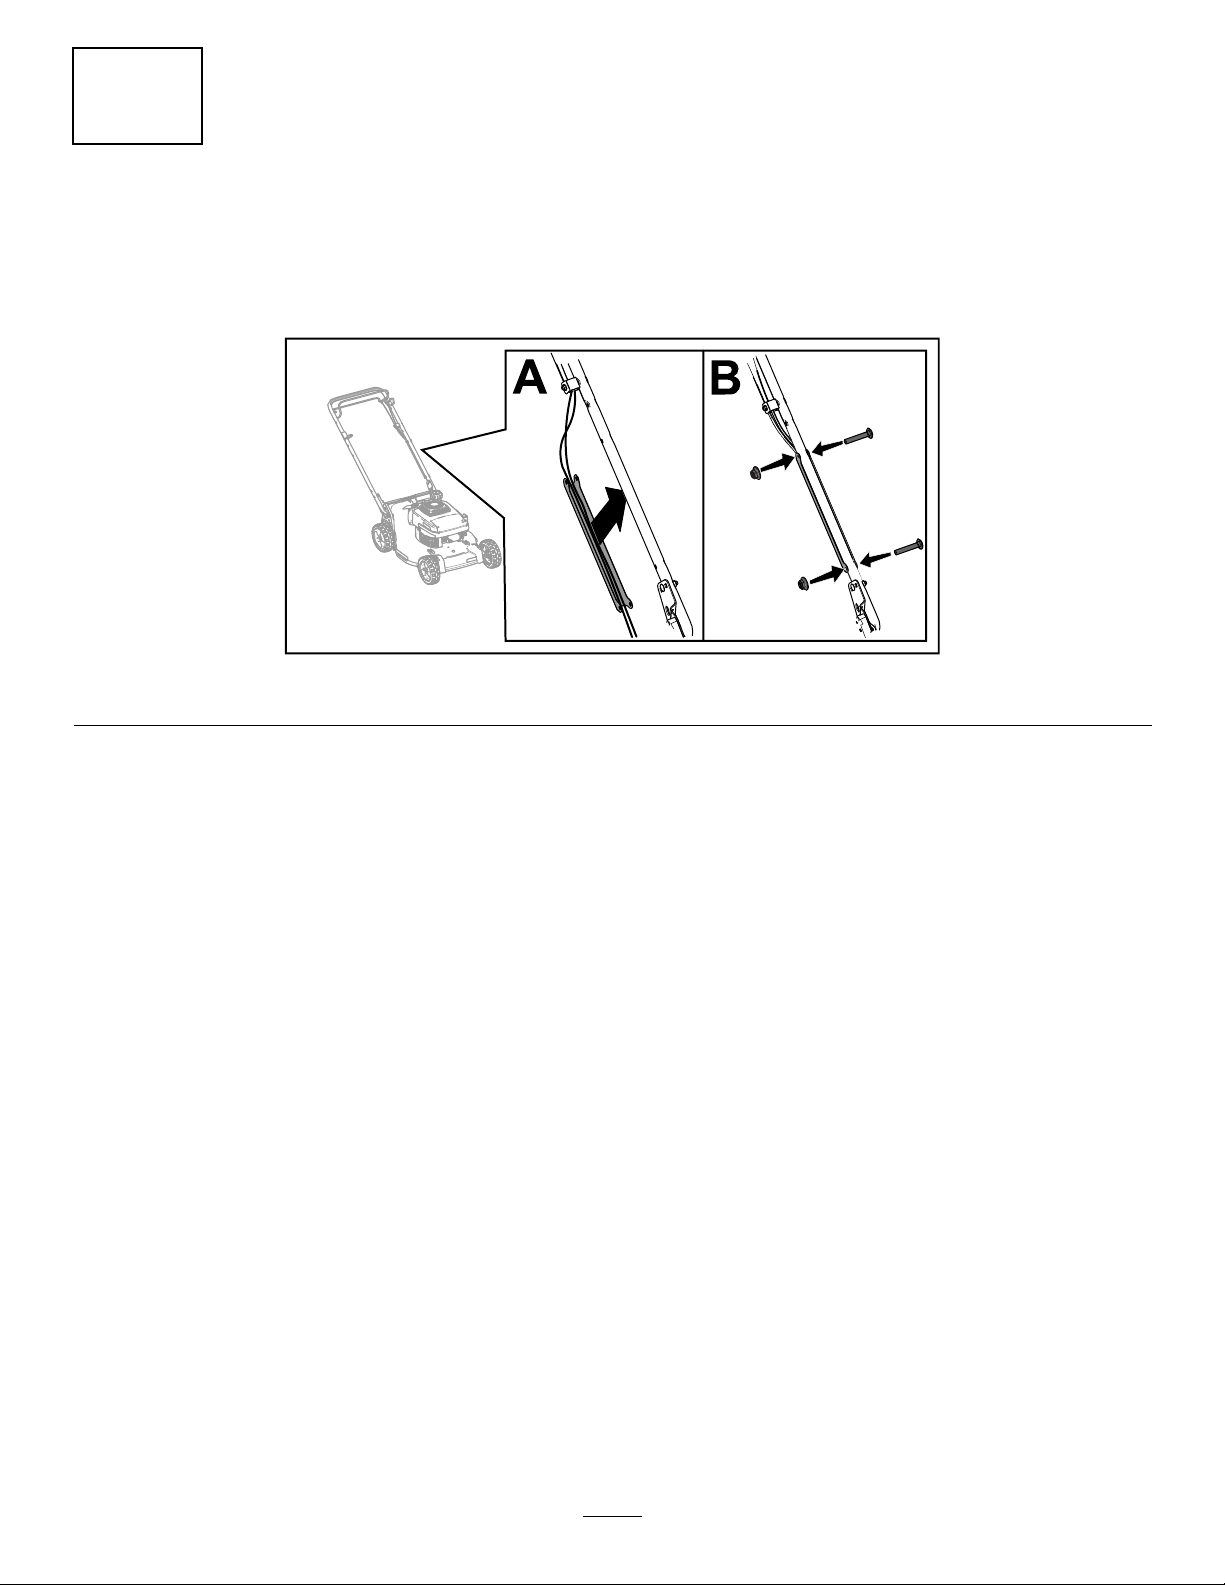
InstallingtheCableGuard
NoPartsRequired
Procedure
g234486
Figure5
8

4
AddingOiltotheEngine
NoPartsRequired
Procedure
Important:Iftheoillevelintheengineistoolowortoohighandyouruntheengine,youmaydamage
theengine.
Figure6
g235721
9

5
AssemblingtheGrassBag
NoPartsRequired
Procedure
g238450
Figure7
6
AdjustingtheSelf-Propel
Drive
NoPartsRequired
Procedure
Important:Y oumustadjusttheself-propel-drive
cablebeforeyouoperatethemachinefortherst
time.RefertoAdjustingtheSelf-PropelDrive
(page26).
10

ProductOverview
g331712
Figure10
Controlbar
1.Blade-controllock-lever3.Handle
2.Blade-controlbail4.Drivebail
Specications
Figure8
1.Handle6.Throttle-controllever
2.Self-propel-drivebar
3.Blade-controlbar
4.Reardeector(notshown)9.Cutting-heightlever(4)
5.Fuel-tankcap
7.Aircleaner
8.Sparkplug
10.Oilll/dipstick
Figure9
ModelWeightLengthWidthHeight
g231063
22280
59kg150cm56cm107cm
(130lb)
(59
inches)
(22
inches)
(42
inches)
Attachments/Accessories
AselectionofToroapprovedattachmentsand
accessoriesisavailableforusewiththemachine
toenhanceandexpanditscapabilities.Contact
yourAuthorizedServiceDealerorauthorizedT oro
distributororgotowww.Toro.comforalistofall
approvedattachmentsandaccessories.
Toensureoptimumperformanceandcontinuedsafety
certicationofthemachine,useonlygenuineT oro
replacementpartsandaccessories.Replacement
partsandaccessoriesmadebyothermanufacturers
couldbedangerous,andsuchusecouldvoidthe
productwarranty.
g231061
1.Grassbag
2.Rear-dischargeplug
11

Operation
Note:Determinetheleftandrightsidesofthe
machinefromthenormaloperatingposition.
–Avoidprolongedbreathingofvapors.
–Keepyourhandsandfaceawayfromthe
nozzleandthefuel-tankopening.
–Keepfuelawayfromyoureyesandskin.
BeforeOperation
BeforeOperationSafety
GeneralSafety
•Alwaysshutoffthemachine,waitforallmoving
partstostop,andallowthemachinetocoolbefore
adjusting,servicing,cleaning,orstoringit.
•Becomefamiliarwiththesafeoperationofthe
equipment,operatorcontrols,andsafetysigns.
•Checkthatallguardsandsafetydevices,suchas
deectorsand/orgrasscatcher,areinplaceand
functioningproperly.
•Alwaysinspectthemachinetoensurethatthe
bladesandbladeboltsarenotwornordamaged.
•Inspecttheareawhereyouwillusethemachine,
andremoveallobjectsthatcouldinterferewith
theoperationofthemachineorthatthemachine
couldthrow.
•Contactwiththemovingbladewillcauseserious
injury.Donotputyourngersunderthehousing.
FuelSafety
•Fuelisextremelyammableandhighlyexplosive.
Areorexplosionfromfuelcanburnyouand
othersandcandamageproperty.
–Topreventastaticchargefromignitingthefuel,
placethecontainerand/ormachinedirectlyon
thegroundbeforelling,notinavehicleoron
anobject.
–Fillthefueltankoutdoors,inanopenarea,
whentheengineiscold.Wipeupanyfuelthat
spills.
–Donothandlefuelwhensmokingoraroundan
openameorsparks.
–Donotremovethefuelcaporaddfueltothe
tankwhiletheengineisrunningorhot.
–Ifyouspillfuel,donotattempttostartthe
engine.Avoidcreatingasourceofignitionuntil
thefuelvaporshavedissipated.
–Storefuelinanapprovedcontainerandkeep
itoutofthereachofchildren.
•Fuelisharmfulorfatalifswallowed.Long-term
exposuretovaporscancauseseriousinjuryand
illness.
FillingtheFuelTank
DANGER
Gasolineisextremelyammableand
explosive.Areorexplosionfromgasoline
canburnyouandothers.
•Topreventastaticchargefromigniting
thegasoline,placethecontainerand/or
machinedirectlyonthegroundbefore
lling,notinavehicleoronanobject.
•Fillthetankoutdoorswhentheengineis
cold.Wipeupspills.
•Donothandlegasolinewhensmokingor
aroundanopenameorsparks.
•Storegasolineinanapprovedfuel
container,outofthereachofchildren.
•Forbestresults,useonlyclean,fresh(lessthan
30daysold),unleadedgasolinewithanoctane
ratingof87orhigher((R+M)/2ratingmethod).
•Oxygenatedfuelwithupto10%ethanolor15%
MTBEbyvolumeisacceptable.
•Ethanol:Gasolinewithupto10%ethanol
(gasohol)or15%MTBE(methyltertiarybutyl
ether)byvolumeisacceptable.Ethanoland
MTBEarenotthesame.Gasolinewith15%
ethanol(E15)byvolumeisnotapprovedforuse.
Neverusegasolinethatcontainsmorethan
10%ethanolbyvolume,suchasE15(contains
15%ethanol),E20(contains20%ethanol),orE85
(containsupto85%ethanol).Usingunapproved
gasolinemaycauseperformanceproblemsand/or
enginedamagewhichmaynotbecoveredunder
warranty.
•Donotusegasolinecontainingmethanol.
•Donotstorefueleitherinthefueltankorinfuel
containersoverthewinterunlessyouuseafuel
stabilizer.
•Donotaddoiltogasoline.
Important:Toreducestartingproblems,addfuel
stabilizer/conditionertofreshfuelasdirectedby
thefuel-stabilizermanufacturer.
Note:Thecapacityofthefueltankis3.8L(1.0US
gallon).
12

g230458
Figure11
CheckingtheEngine-OilLevel
ServiceInterval:Beforeeachuseordaily
Important:Iftheoillevelinthecrankcaseistoolowortoohighandyouruntheengine,youmay
damagetheengine.
Figure12
g235721
13

AdjustingtheHandleHeight
Youcanraiseorlowerthehandlein1of3positionsthatismorecomfortableforyou(Figure13).
Figure13
1.Removebothhandleboltsandcorrespondingnuts.
2.Movethehandletothedesiredheightposition.
3.Securethehandlewiththepreviouslyremovedboltsandcorrespondingnuts.
g272748
14
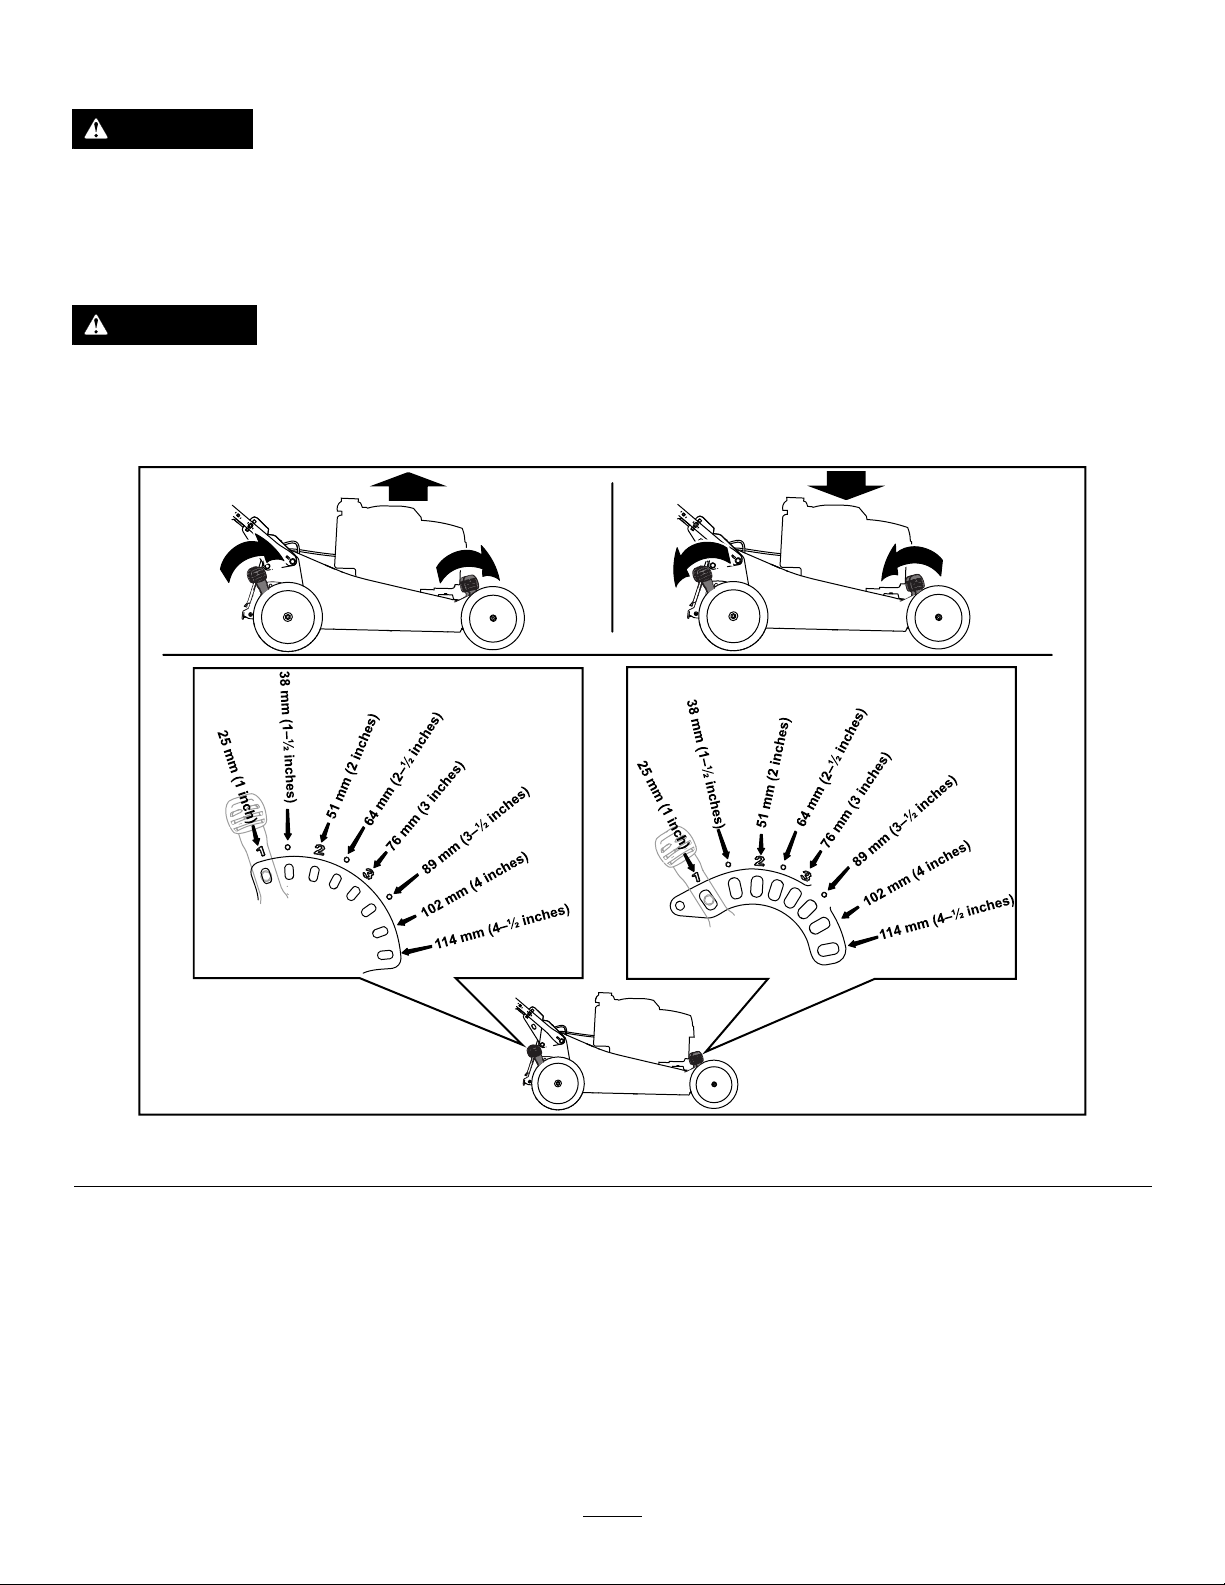
AdjustingtheCuttingHeight
DANGER
Adjustingthecutting-heightleverscouldbringyourhandsintocontactwithamovingblade
andresultinseriousinjury.
•Shutofftheengineandwaitforallmovementtostopbeforeadjustingthecuttingheight.
•Donotputyourngersunderthehousingwhenadjustingthecuttingheight.
CAUTION
Iftheenginehasbeenrunning,themuferwillbehotandcanburnyou.
Keepawayfromthehotmufer.
Adjustthecuttingheightasdesired.Setallwheelstothesamecuttingheight(Figure14).
DuringOperation
DuringOperationSafety
GeneralSafety
•Wearappropriateclothing,includingeye
protection;longpants;substantial,slip-resistant
footwear;andhearingprotection.Tiebacklong
g234297
Figure14
hairanddonotwearlooseclothingorloose
jewelry.
•Useyourfullattentionwhileoperatingthe
machine.Donotengageinanyactivitythat
causesdistractions;otherwise,injuryorproperty
damagemayoccur.
•Donotoperatethemachinewhileill,tired,or
undertheinuenceofalcoholordrugs.
15

•Thebladeissharp;contactingthebladecanresult
inseriouspersonalinjury.Shutofftheengineand
waitforallmovingpartstostopbeforeleavingthe
operatingposition.
•Whenyoureleasetheblade-controlbar,the
engineshouldshutoffandthebladeshouldstop
within3seconds.Ifnot,stopusingyourmachine
immediatelyandcontactanAuthorizedService
Dealer.
•Keepbystandersoutoftheoperatingarea.Keep
smallchildrenoutoftheoperatingareaandunder
thewatchfulcareofaresponsibleadultwhois
notoperatingthemachine.Stopthemachineif
anyoneentersthearea.
•Alwayslookdownandbehindyoubeforemoving
themachineinreverse.
•Operatethemachineonlyingoodvisibilityand
appropriateweatherconditions.Donotoperate
themachinewhenthereistheriskoflightning.
•Wetgrassorleavescancauseseriousinjuryif
youslipandcontacttheblade.Avoidmowingin
wetconditions.
•Useextremecarewhenapproachingblind
corners,shrubs,trees,orotherobjectsthatmay
blockyourview.
•Donotdirectthedischargematerialtoward
anyone.Avoiddischargingmaterialagainstawall
orobstruction;materialmayricochettowardyou.
Stoptheblade(s)whencrossinggravelsurfaces.
•Watchforholes,ruts,bumps,rocks,orother
hiddenobjects.Uneventerraincouldcauseyou
toloseyourbalanceorfooting.
•Ifthemachinestrikesanobjectorstartsto
vibrate,immediatelyshutofftheengine,waitfor
allmovingpartstostop,anddisconnectthewire
fromthesparkplugbeforeexaminingthemachine
fordamage.Makeallnecessaryrepairsbefore
resumingoperation.
•Beforeleavingtheoperatingposition,shutoffthe
engineandwaitforallmovingpartstostop.
•Iftheenginehasbeenrunning,itwillbehotand
canseverelyburnyou.Keepawayfromthehot
engine.
•Operatetheengineonlyinwell-ventilatedareas.
Exhaustgasescontaincarbonmonoxide,whichis
anodorless,deadlypoison.
•Checkthegrasscatchercomponentsandthe
dischargechutefrequentlyforanywearor
deteriorationandreplacethemwithgenuineToro
partswhennecessary.
•Donotmowonexcessivelysteepslopes.Poor
footingcouldcauseaslip-and-fallaccident.
•Mowwithcautionneardrop-offs,ditches,or
embankments.
StartingtheEngine
1.Connectthespark-plugwiretothesparkplug.
2.Openthefuelvalvebymovingthefuel-valve
levertotheright(Figure15).
g024304
Figure15
1.Throttle-controllever2.Fuel-valvelever
3.Movethethrottle-controllevertotheCHOKE
position.
Note:Donotusethechokewhentheengine
iswarm.
4.Pullthestarterhandlelightlyuntilyoufeel
resistance,thenpullitsharply.
Note:Allowtheropetoreturnslowlytothe
ropeguideonthehandle.
5.Whentheenginestarts,movethethrottle-control
levertotheFASTposition.
ShuttingOfftheEngine
Releasetheblade-controlbarandmovethe
throttle-controllever(Figure15)totheSTOPposition.
Note:Closethefuelvalve(Figure15)ifyouwillnot
bestartingtheenginesoonafterward.
SlopeSafety
•Mowacrossthefaceofslopes;neverupand
down.Useextremecautionwhenchanging
directiononslopes.
16

OperatingtheSelf-Propel
DriveandEngagingthe
1.Movetheself-propel-drivelevertothedesired
groundspeed.
2.Starttheengine.
Blades
Thismachinehas3groundspeeds:1(slow),2
(medium),and3(fast);italsohasaNeutral(N)
position.Theself-propel-driveleverislocatedbelow
andbehindthefueltank(Figure16).
Figure16
1.Self-propel-drivelever
3.Tooperatetheself-propeldrive,squeezethe
self-propel-drivebar(Figure17).
g331713
Figure17
Note:Youcanvarythegroundspeedby
increasingordecreasingthedistancebetween
theself-propel-drivebarandthehandle.
g024167
Toengagetheblades,dothefollowing:
1.Pushandholdtheblade-controllocklever
forwardtoreleasetheblade-controlbail(Aof
Figure18).
2.Pulltheblade-controlbailtothehandleand
releasetheblade-control-locklever;theblade
shouldengage(AofFigure18).
3.Releasetheblade-controlbailtodisengagethe
blade(BofFigure18).Theblade-control-lock
leverresetstolocktheblade-controlbail.
g237185
Figure18
17

CheckingtheBlade-Brake
Clutch
Checktheblade-controlbarbeforeeachusetoensure
thattheblade-brakeclutchisoperatingproperly.
2.Setall4wheelstothe76mm(3inch)
cutting-heightsetting;refertoAdjustingthe
CuttingHeight(page15).
3.Takeahalfsheetofnewspaperandcrumpleit
intoaballsmallenoughtogounderthemachine
housing(about76mmor3inchesindiameter).
CheckingwiththeGrassBag
1.Installtheemptygrassbagonthemachine.
2.Starttheengine.
3.Engagetheblade.
Note:Thebagshouldbegintoinate,indicating
thatthebladeisengagedandrotating.
4.Releasetheblade-controlbar.
Note:Ifthebagdoesnotimmediatelydeate,
thebladeisstillrotating.Theblade-brakeclutch
maybedeterioratingand,ifignored,could
resultinanunsafeoperatingcondition.Have
themachineinspectedandservicedbyan
AuthorizedServiceDealer.
5.Shutofftheengineandwaitforallmovingparts
tostop.
CheckingwithouttheGrassBag
1.Movethemachineontoapavedsurfaceina
non-windyarea.
4.Placethenewspaperballabout13cm(5inches)
infrontofthemachine.
5.Starttheengine.
6.Engagetheblade.
7.Releasetheblade-controlbar.
8.Immediatelypushthemachineoverthe
newspaperball.
9.Shutofftheengineandwaitforallmovingparts
tostop.
10.Gotothefrontofthemachineandcheckthe
newspaperball.
Note:Ifthenewspaperballdidnotgounder
themachine,repeatsteps4through10.
Note:Ifthenewspaperisunravelledor
shredded,thebladedidnotstopproperly ,which
couldresultinanunsafeoperatingcondition.
ContactanAuthorizedServiceDealer.
RecyclingtheClippings
Thismachinecomesfromthefactoryreadytorecyclegrassandleafclippingsbackintothelawn.T oprepare
themachinetorecycle:
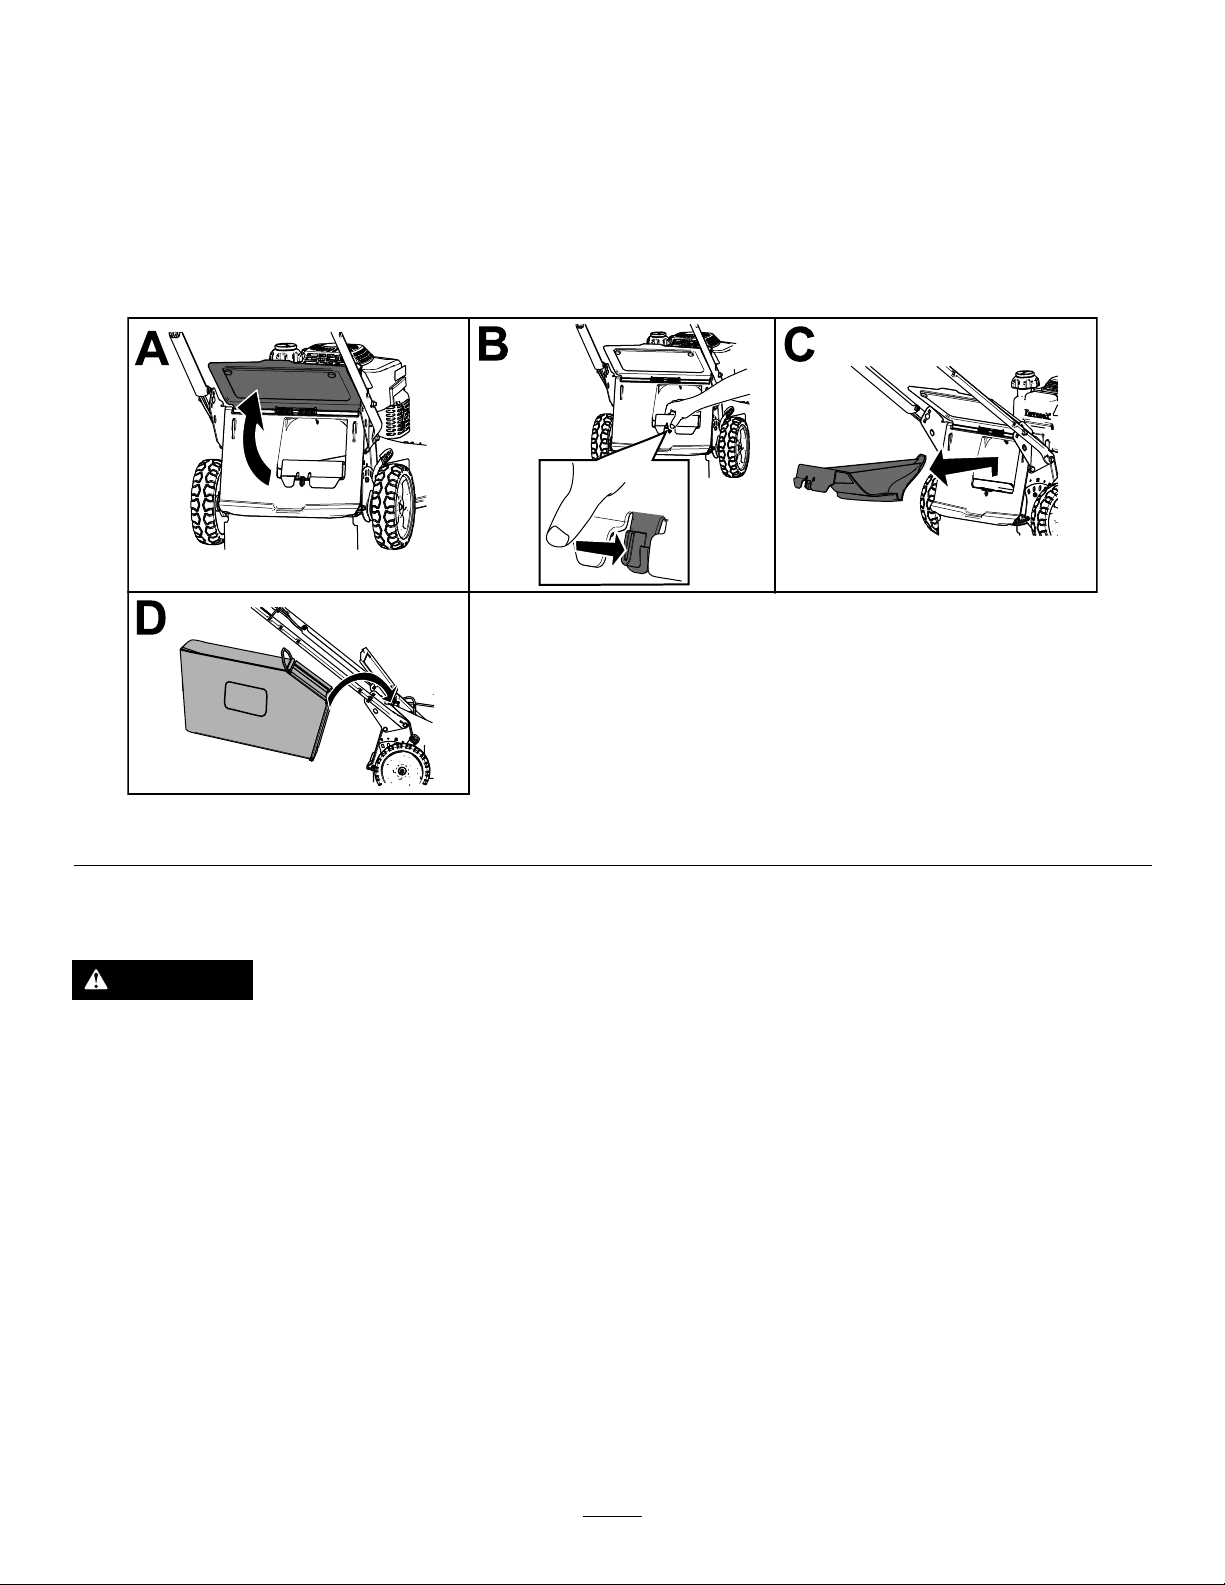
•Ifthegrassbagisonthemachine,removeit(AofFigure19).
•Iftherear-dischargeplugisnotinstalled,gripitbythehandle,raisethereardeector,andinsertitintothe
rear-dischargechuteuntilthelatchlocksintoplace(BofFigure19).
Figure19
g236734
18

WARNING
Operatingthemachinetorecyclelawnclippingswithoutthepluginplaceallowsobjectstobe
throwntowardyouorbystanders.Also,contactwiththebladescouldoccur.Thrownobjects
orbladecontactcancauseseriousinjuryordeath.
Ensurethattherear-dischargeplugisinplacebeforeyourecycletheclippings.Neverengage
thebladeswithouteithertherear-dischargeplugorthegrassbaginstalledonthemachine.
BaggingtheClippings
Usethegrassbagwhenyouwanttocollectgrassandleafclippingsfromthelawn.
WARNING
Aworngrassbagcouldallowsmallstonesandothersimilardebristobethrowntowardyou
orbystanders,resultinginseriouspersonalinjuryordeath.
Checkthegrassbagfrequently.Ifitisdamaged,installanewthemanufacturerreplacement
bag.
WARNING
Thebladesaresharp;contactingthebladescanresultinseriouspersonalinjury .
Shutofftheengineandwaitforallmovingpartstostopbeforeleavingtheoperatingposition.
19
InstallingtheGrassBag
1.Shutofftheengineandwaitforallmovingpartstostop.
2.Raiseandholdupthereardeector(AofFigure20).
3.Removetherear-dischargeplugbypushinginthelatchwithyourthumbandpullingtheplugoutfrom
themachine(BandCofFigure20).
4.Installthebag-rodendsintothenotchesatthebaseofthehandle,androckthebagbackandforthto
ensurethatthebag-rodendsareseatedatthebottomofbothnotches(DofFigure20).
5.Lowerthereardeectoruntilitrestsonthegrassbag.
Figure20
RemovingtheGrassBag
DANGER
Themachinecanthrowgrassclippingsandotherobjectsthroughanopeninginthemachine
housing.Objectsthrownwithenoughforcecouldcauseseriouspersonalinjuryordeathto
youortobystanders.
•Neverremovethegrassbagandthenstarttheenginewithoutthedischargepluginstalled
onthemachine.
•Neveropenthereardeectoronthemachinewhentheengineisrunning.
1.Shutofftheengineandwaitforallmovingpartstostop.
2.Raisethereardeector.
3.Removethebagrodonthegrassbagfromthenotchesatthebaseofthehandle(AofFigure19).
4.Installthedischargeplug(BofFigure19).
5.Lowerthereardeector(CofFigure19).
g236745
20

OperatingTips
GeneralTips
•Reviewthesafetyinstructionsandreadthis
manualcarefullybeforeoperatingthemachine.
•Cleartheareaofsticks,stones,wire,branches,
andotherdebristhatthebladecouldhitandthrow.
•Keepeveryone,especiallychildrenandpets,away
fromtheareaofoperation.
•Avoidstrikingtrees,walls,curbs,orothersolid
objects.Neverdeliberatelymowoveranyobject.
•Ifthemachinestrikesanobjectorstartstovibrate,
immediatelyshutofftheengine,disconnect
thewirefromthesparkplug,andexaminethe
machinefordamage.
•Maintainasharpbladethroughoutthecutting
season.Periodicallyledownnicksontheblade.
•Replacethebladewhennecessarywithanoriginal
themanufacturerreplacementblade.
•Mowonlydrygrassorleaves.Wetgrassand
leavestendtoclumpontheyardandcancause
themachinetoplugortheenginetostall.
WARNING
grassatthe64mm(2-1/2inch),76mm(3inch),
or89mm(3-1/2inch)cutting-heightsettings.Cut
onlyaboutathirdofthegrassbladeatatime.
Donotcutbelowthe64mm(2-1/2inch)setting
unlessthegrassissparseoritislatefallwhen
grassgrowthbeginstoslowdown.
•Whencuttinggrassover15cm(6inches)tall,rst
mowatthehighestcutting-heightsettingandwalk
slower;thenmowagainatalowersettingforthe
bestlawnappearance.Ifthegrassistoolongand
theleavesclumpontopofthelawn,themachine
mayplugandcausetheenginetostall.
•Alternatethemowingdirection.Thishelps
dispersetheclippingsoverthelawnforeven
fertilization.
Ifthenishedlawnappearanceisunsatisfactory ,try1
ormoreofthefollowing:
•Sharpentheblade.
•Walkataslowerpacewhilemowing.
•Raisethecuttingheightonyourmachine.
•Cutthegrassmorefrequently.
•Overlapcuttingswathsinsteadofcuttingafull
swathwitheachpass.
Wetgrassorleavescancauseserious
injuryifyouslipandcontacttheblade.
Mowonlyindryconditions.
•Cleanunderthemachineaftereachmowing;refer
toCleaningUndertheMachine(page22).
•Keeptheengineingoodrunningcondition.
•Cleantheairlterfrequently .Mulchingstirsup
moreclippingsanddustwhichclogstheairlter
andreducesengineperformance.
•Settheenginespeedtothefastestpositionforthe
bestcuttingresults.
WARNING
Operatingamachinewithitsengine
runningataspeedgreaterthanthefactory
settingcancausethemachinetothrowa
partofthebladeorenginetowardyouor
bystanders,resultinginseriouspersonal
injuryordeath.
–Donotchangetheenginespeedsetting.
–Ifyoususpecttheenginespeedisfaster
thannormal,contactanAuthorized
ServiceDealer.
CuttingLeaves
•Aftercuttingthelawn,ensurethathalfofthelawn
showsthroughthecutleafcover.Youmayneed
tomakemorethanasinglepassovertheleaves.
•Forlightleafcoverage,setallthewheelsatthe
samecutting-heightsetting.
•Slowdownyourmowingspeedifthemachine
doesnotcuttheleavesnelyenough.
AfterOperation
AfterOperationSafety
GeneralSafety
•Alwaysshutoffthemachine,waitforallmoving
partstostop,andallowthemachinetocoolbefore
adjusting,servicing,cleaning,orstoringit.
•Cleangrassanddebrisfromthemachinetohelp
preventres.Cleanupoilorfuelspills.
•Neverstorethemachineorfuelcontainerwhere
thereisanopename,spark,orpilotlight,such
asonawaterheateroronotherappliances.
CuttingGrass
•Grassgrowsatdifferentratesatdifferenttimes
oftheyear.Inthesummerheat,itisbesttocut
HaulingSafety
•Usecarewhenloadingorunloadingthemachine.
21

•Securethemachinefromrolling.
•Closethefuelvalvebeforeloadingthemachine
forhauling.
CleaningUnderthe
Machine
Toensurethebestperformance,keeptheunderside
ofthemachineclean.Beespeciallycarefultokeep
thekickersfreeofdebris(Figure21).
Figure21
1.Kickers
g002275
Figure22
1.Right,rearwheel
Note:Thebladewilldrawinwaterandwash
outtheclippings.Letthewaterrununtilyou
nolongerseeclippingsbeingwashedoutfrom
underthemachine.
4.Shutofftheengineandwaitforallmovingparts
tostop.
5.Turnoffthewater.
6.Startthemachineandletitrunforafewminutes
todryouttheundersideofthemachine.
ScrapingMethod
Ifwashingdoesnotremovealldebrisfromunderthe
machine,scrapeitclean.
g024281
1.Disconnectthewirefromthesparkplug(Figure
8).
2.Drainthefuelfromthefueltank.
WashingMethod
ServiceInterval:Aftereachuse
WARNING
Themachinemaydislodgematerialfrom
underthemachine.
•Weareyeprotection.
•Stayintheoperatingposition(behindthe
handle)whiletheengineisrunning.
•Donotallowbystandersinthearea.
1.Movethemachinetoapavedlevelsurfacenear
agardenhose.
2.Starttheengine.
3.Holdtherunninggardenhoseathandlelevel
anddirectthewatertoowonthegroundjustin
frontoftheright,rearwheel(Figure22).
WARNING
Tippingthemachinemaycausethefuel
toleakfromthecarburetororthefuel
tank.Fuelisextremelyammable,highly
explosive,and,undercertainconditions,
cancausepersonalinjuryorproperty
damage.
Avoidfuelspillsbyrunningtheengine
dryorbyremovingthefuelwithahand
pump;neversiphon.
3.Tipthemachineontoitsrightside(aircleaner
up).
4.Removethedirtandgrassclippingswitha
hardwoodscraper.Avoidburrsandsharp
edges.
5.Returnthemachinetotheoperatingposition.
6.Connectthewiretothesparkplug.
22

Maintenance
Note:Determinetheleftandrightsidesofthemachinefromthenormaloperatingposition.
RecommendedMaintenanceSchedule(s)
MaintenanceService
Interval
Aftertherst8hours
Aftertherst25hours
Beforeeachuseordaily
Aftereachuse
Every25hours
Every40hours
Every50hours
MaintenanceProcedure
•Changetheengineoil.
•Tightenanyloosefasteners.
•Checktheengine-oillevelandaddoilasneeded.
•Inspectthemowerbladesforwearordamage.
•Inspecttheacceleratorforwearordamage.
•Checkthestoppingtimeofthebladebrake.Theblademuststopwithin3seconds
ofreleasingtheblade-controlbar;ifitdoesnot,contactanAuthorizedService
Dealerforrepair.
•Checkforlooseormissingfastenersontheengine.
•Checkforfueloroilleaks.
•Checkorcleantherecoilstarterandtheair-intakescreen.
•Removegrassclippingsanddirtfromunderthehousing.
•Cleanthefoampre-lter(morefrequentlyindustyconditions).
•Cleanthewheelsandgears.
•Changetheengineoil(morefrequentlyindustyconditions).
•Sharpenorreplacetheblade.Maintainitmorefrequentlyiftheedgedullsquicklyin
roughorinsandyconditions.
•Removegrassclippingsanddebrisfromunderthebeltcover.
•Cleantheblade-brake-clutchshield.
•Inspect,clean,andadjustthesparkpluggap;replacethesparkplugifnecessary.
Every100hours
Every200hours
Every300hours
•Tightenanyloosefasteners.
•Checkorcleantherecoilstarterandtheair-intakescreen.
•Changetheengine-oillter.
•Haveanauthorizedengineservicingdealercheckforleaksinthefuelsystemand/or
adeterioratingfuelhose.Replacepartsifnecessary.
•Replacethepaperairlter(morefrequentlyindustyconditions).
•Cleanthecylinderandthecylinder-headns.
•Haveanauthorizedengineservicingdealercheckandadjusttheengineidlespeed.
•Haveanauthorizedengineservicingdealercleanthecombustionchamber.
•Haveanauthorizedengineservicingdealercheckandadjustthevalveclearance.
•Haveanauthorizedengineservicingdealercleanandlapthevalveseatingsurface.
Important:Refertoyourenginemanualforadditionalmaintenanceprocedures.
MaintenanceSafety
•Alwaysshutoffthemachine,waitforallmoving
partstostop,andallowthemachinetocoolbefore
adjusting,servicing,cleaning,orstoringit.
•Disconnectthespark-plugwirefromthesparkplug
beforeperforminganymaintenanceprocedure.
•Wearglovesandeyeprotectionwhenservicing
themachine.
•Thebladeissharp;contactingthebladecanresult
inseriouspersonalinjury .Weargloveswhen
•Nevertamperwithsafetydevices.Checktheir
•Tippingthemachinemaycausethefueltoleak.
•Toensureoptimumperformanceofthemachine,
servicingtheblade.Donotrepairoralterthe
blade(s).
properoperationregularly.
Fuelisammableandexplosive,andcancause
personalinjury.Runtheenginedryorremovethe
fuelwithahandpump;neversiphonthefuel.
useonlygenuineT ororeplacementpartsand
23
accessories.Replacementpartsandaccessories
madebyothermanufacturerscouldbedangerous,
andsuchusecouldvoidtheproductwarranty.
9.Installthecover.
ChangingtheEngineOil
ServicingtheAirFilter
ServiceInterval:Every25hours—Cleanthefoam
pre-lter(morefrequentlyindusty
conditions).
Every300hours—Replacethepaperairlter
(morefrequentlyindustyconditions).
Important:Donotoperatetheenginewithoutthe
airlterassemblyinplace;otherwise,extreme
enginedamagewilloccur.
1.Shutofftheengineandwaitforallmovingparts
tostop.
2.Disconnectthewirefromthesparkplug.
3.Removethecoverandcleanitthoroughly
(Figure23).
Figure23
1.Cover3.Air-lterbase
2.Foampre-lterandpaper
airlter
4.Removeandthefoampre-lterandthepaper-air
lterfromtheair-lterbase(Figure23).
5.Removethefoampre-lterfromthepaperair
lter,andwashthefoampre-lterwithamild
detergentandwater,thenblotitdry.
6.Inspectthepaperairlter,andreplaceitifitis
excessivelydirty.
Important:Donottrytocleanapaperlter.
7.Installthefoampre-lterontothepaperairlter.
8.Installthefoampre-lterandpaperairlteronto
theair-lterbase.
ServiceInterval:Aftertherst8hours
Every50hours
Runtheengineafewminutesbeforechangingtheoil
towarmit.Warmoilowsbetterandcarriesmore
contaminants.
EngineOilSpecications
Engineoilcapacity
OilviscositySAE30orSAE10W-30
APIserviceclassicationSJorhigher
1.Shutofftheengineandwaitforallmovingparts
tostop.
2.Disconnectthewirefromthesparkplug.
3.Drainthefuelfromthefueltank.
4.Placeasuitabledrainpanunderthedipstick/oil
drain.
5.Cleanaroundthedipstick.
6.Removethedipstickbyrotatingthecap
counterclockwiseandpullingitout.
7.Tipthemachineontoitsrightside(airlterup)
todraintheoilintothedrainpan.
8.Afterdrainingtheoil,returnthemachinetothe
operatingposition.
9.Fillthecrankcasetothecorrectlevelonthe
dipstickwithfreshoil;referto4AddingOiltothe
Engine(page9).
10.Insertthedipstickintothellerneckandrotate
g005347
thecapclockwiseuntilitistight.
11.Wipeupanyspilledoil.
12.Recycletheusedoilaccordingtolocalcodes.
0.65L(22oz)withoutoil
lter;0.85L(29oz)withoil
lter
detergentoil
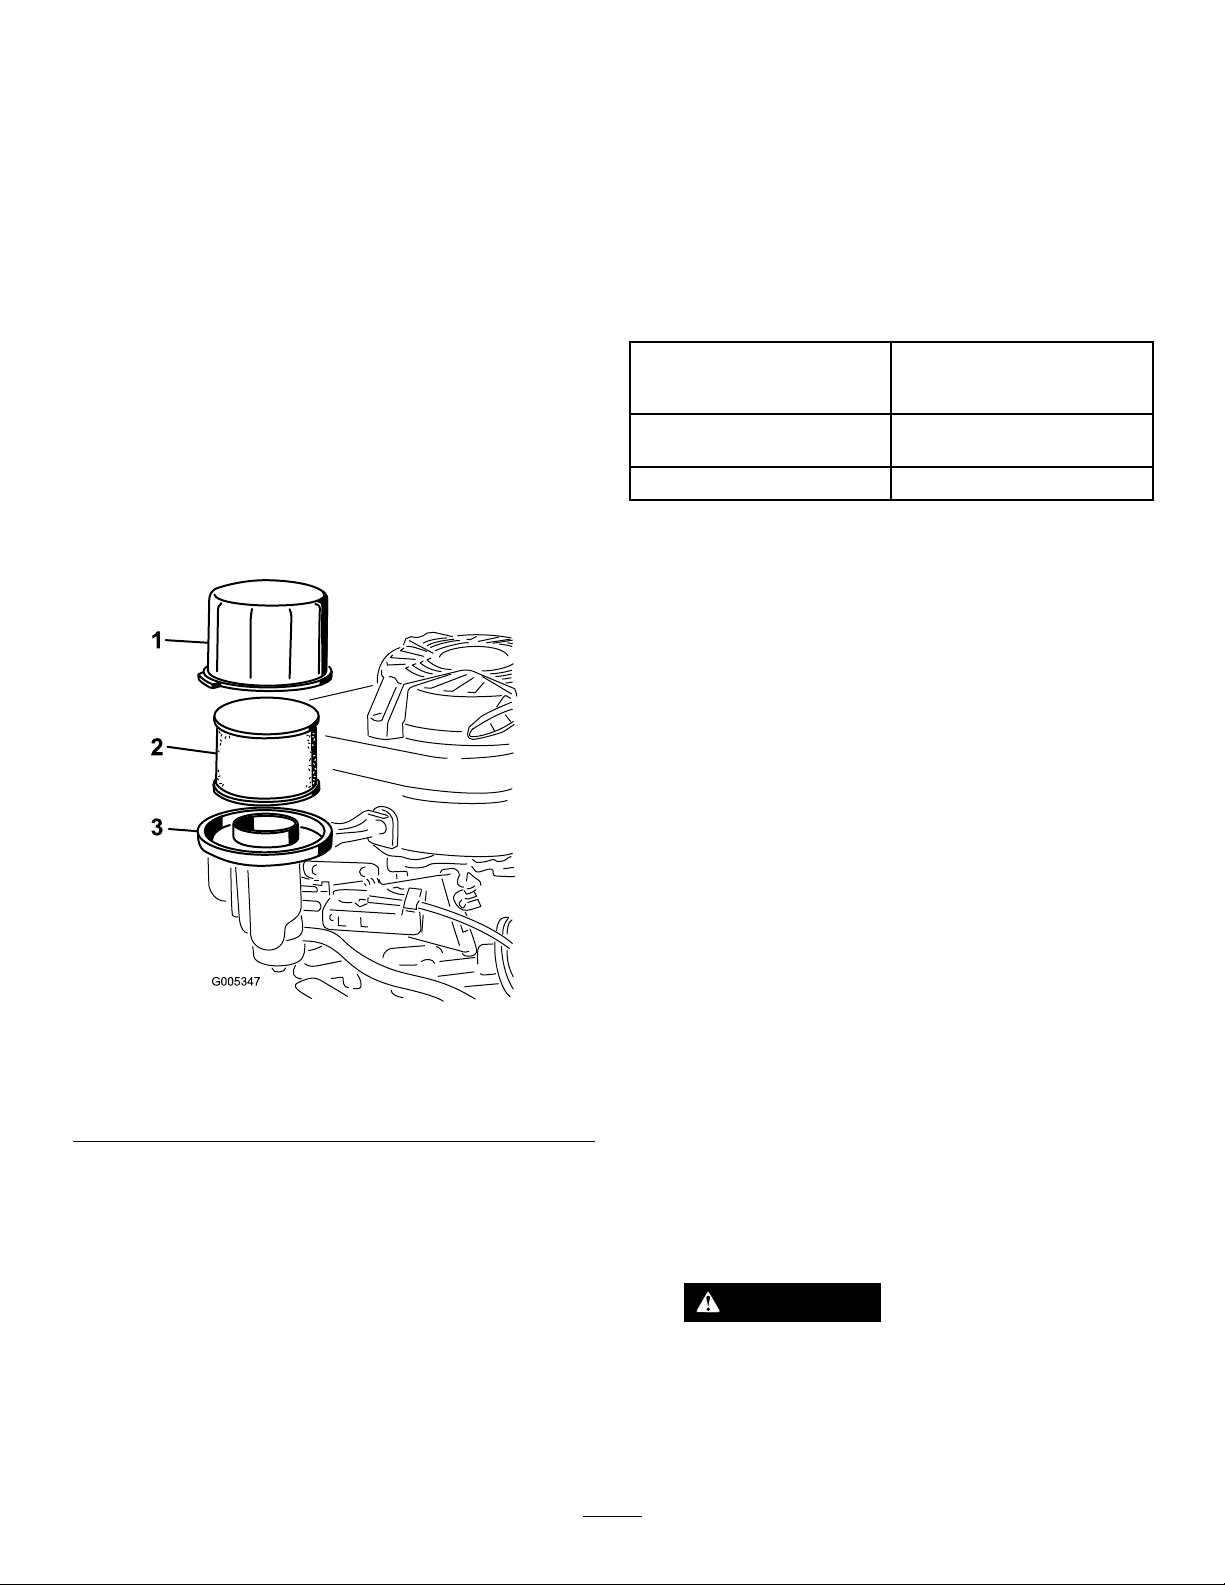
ChangingtheEngine-Oil
Filter
ServiceInterval:Every200hours
1.Runtheenginetowarmtheoil.
WARNING
Oilmaybehotaftertheenginehasbeen
run,andcontactwithhotoilcancause
severepersonalinjury .
Avoidcontactingthehotengineoilwhen
youdrainit.
24

2.Shutofftheengineandwaitforallmovingparts
tostop.
13.Stoptheengine,waitforallmovingpartstostop,
andcheckforoilleakagearoundthelter.
3.Disconnectthewirefromthesparkplug.
4.Drainthegasolinefromthefueltank.
5.Draintheengineoil;refertoChangingthe
EngineOil(page24).
6.Placearagundertheoillter(Figure24)to
catchanyoilthatmayleakoutasyouremove
theoillter.
Figure24
1.Oillter
7.Removetheoillter.
14.Addoiltocompensatefortheoilintheoillter.
Referto4AddingOiltotheEngine(page9).
15.Recycletheusedoillterproperly.
ServicingtheSparkPlug
ServiceInterval:Every100hours—Inspect,clean,
andadjustthesparkpluggap;
replacethesparkplugifnecessary.
UseanNGKBPR5ESsparkplugorequivalent.
1.Shutofftheengineandwaitforallmovingparts
tostop.
2.Disconnectthewirefromthesparkplug(Figure
8).
3.Cleanaroundthesparkplug.
4.Removethesparkplugfromthecylinderhead.
Important:Replaceacracked,fouled,or
g024331
dirtysparkplug.Donotcleantheelectrodes
becausegritenteringthecylindercan
damagetheengine.
5.Setthegapontheplugto0.76mm(0.030inch);
refertoFigure26.
8.Useyourngertocoatthegasketonthenewoil
lterwithoil(Figure26).
Figure25
1.Gasket
9.Installthenewlterbyrotatingitclockwiseuntil
thesealcontactsthelterhousing,thenrotate
thelteranadditional3/4turnbyhand.
10.FillthecrankcasetotheFulllineonthedipstick
withfreshoil;referto4AddingOiltotheEngine
(page9).
g000533
Figure26
1.Center-electrodeinsulator
2.Sideelectrode
g002805
3.Airgap(nottoscale)
6.Carefullyinstallthesparkplugbyhand(toavoid
crossthreading)untilitishandtight.
7.Tightenthesparkplugto23N∙m(2.3kgf-m,17
ft-lb).
Important:Aloosesparkplugcanbecome
veryhotandcandamagetheengine;
overtighteningasparkplugmaydamagethe
threadsinthecylinderhead.
11.Connectthewiretothesparkplug.
12.Runtheengineforabout3minutes.
8.Connectthewiretothesparkplug.
25

AdjustingtheSelf-Propel
MaintainingtheBlade
Drive
Ifthemachineisnew,doesnotself-propel,orittends
tocreepforward,adjustthedrivecable.
1.Movethemachineoutsideandontoapaved
surfacenearasolidwalltosafelypreventthe
machinefrommovingforwardwhiletheengine
isrunning.
2.Positionthemachinewiththefronttiresagainst
thewall.
Note:Ensurethattheareaiswellventilated
andclearofdebristhatcouldbethrownbythe
machine.
3.Shiftthetransmissiontothirdgear.
4.Starttheengine;refertoStartingtheEngine
(page16).
5.Pulltheself-propel-drivebartothehandle.
Note:Thewheelsshouldstarttoturnasthe
self-propel-drivebarjusttouchesthehandle.
6.Shutofftheengine.
7.Ifyoumustadjustthemachine,dothefollowing:
•Ifthewheelsdonotspinwhenyouengage
theself-propel-drivebar,thetractionbeltis
tooloose.Rotatethewheel-drive-control
knob(Figure27)clockwise1turnandrepeat
steps4through6.
Alwaysmowwithasharpblade.Asharpbladecuts
cleanlyandwithouttearingorshreddingthegrass
blades.
1.Shutofftheengineandwaitforallmovingparts
tostop.
2.Disconnectthewirefromthesparkplug.
3.Closethefuelvalvebymovingthefuel-valve
levertotheleft(Figure15).
4.Drainthefuelfromthefueltank.
5.Tipthemachineontoitsrightside(aircleaner
up)asshowninFigure28.
g024280
Figure28
1.Blade3.Accelerator
2.Bladenuts
Figure27
1.Wheel-drive-controlknob
•Ifthewheelsspinbeforeyoufullyengage
theself-propel-drivebar,thetractionbelt
istootight.Rotatethewheel-drive-control
knob(Figure27)counterclockwise1turn
andrepeatsteps4through6.
8.Foranewtractionbelt,rotatethe
drive-cable-adjustmentknobclockwise1
additionalturntoallowforthenormalstretching
ofthebeltduringthebreak-inperiod.
Note:Youcanskipthisstepifyouareadjusting
ausedbelt.
InspectingtheBlade
ServiceInterval:Beforeeachuseordaily—Inspect
themowerbladesforwearor
damage.
g024468
Carefullyexaminethebladeforsharpnessandwear,
especiallywheretheatandthecurvedpartsmeet
(Figure29A).Becausesandandabrasivematerial
canwearawaythemetalthatconnectstheatand
curvedpartsoftheblade,checkthebladebefore
usingthemachine.Ifyounoticeaslotorwear(Figure
29BandFigure29C),replacetheblade;referto
RemovingtheBlade(page27).
26

WARNING
Awornordamagedacceleratorcanbreak,
andapieceoftheacceleratorcouldbethrown
towardyouorbystanders,resultinginserious
personalinjuryordeath.
•Inspecttheacceleratorperiodicallyfor
wearordamage.
Figure29
1.Sail
2.Flatpartoftheblade4.Slotformed
3.Wear
Note:Forthebestperformance,installanewblade
beforethemowingseasonbegins.Duringtheyear,
ledownanysmallnickstomaintainthecuttingedge.
DANGER
Awornordamagedbladecanbreak,anda
pieceofthebladecouldbethrowntowardyou
orbystanders,resultinginseriouspersonal
injuryordeath.
•Inspectthebladeperiodicallyforwearor
damage.
•Replaceawornordamagedblade.
InspectingtheAccelerator
g002278
•Replaceawornordamagedaccelerator.
RemovingtheBlade
1.Grasptheendofthebladeusingaragora
thicklypaddedglove.
2.Removethebladenuts,theaccelerator,andthe
blade(Figure29).
SharpeningtheBlade
ServiceInterval:Every50hours—Sharpenor
replacetheblade.Maintainitmore
frequentlyiftheedgedullsquicklyin
roughorinsandyconditions.
Filethetopsideofthebladetomaintainitsoriginal
cuttingangle(Figure31A)andinnercuttingedge
radius(Figure31B).Thebladewillremainbalancedif
youremovethesameamountofmaterialfromboth
cuttingedges.
ServiceInterval:Beforeeachuseordaily—Inspect
theacceleratorforwearordamage.
Carefullyexaminetheacceleratorforexcessivewear
(Figure30).Becausesandandabrasivematerialcan
wearawaythemetal(especiallyintheareashown
asitem2inFigure30),checktheacceleratorbefore
usingthemachine.Ifyounoticethatatabonthe
acceleratorhasbeenworndowntoasharpedge
orthereisacrack,replacetheaccelerator;referto
RemovingtheBlade(page27).
Figure30
1.Accelerator3.Tab
2.Weararea
4.Crackformed
g002279
Figure31
1.Sharpenthebladeatthis
angleonly.
g027496
2.Maintaintheoriginalradius
here.
27

BalancingtheBlade
1.Checkthebalanceofthebladebyplacing
thecenterholeofthebladeoveranailor
screwdrivershankclampedhorizontallyinavise
(Figure32).
AdjustingtheBlade-Brake
Cable
Theblade-brakecableisadjustedatthefactory;you
donotneedtoadjustitunlessyouarereplacingthe
cableortheblade-brakebelt.Ifyouneedtoreplace
thecable,replaceboththecableandthebeltat
thesametime.
1.Shutofftheengineandwaitforallmovingparts
tostop.
Figure32
Note:Y oucanalsocheckthebalanceusinga
commerciallymanufacturedbladebalancer.
2.Ifeitherendofthebladerotatesdownward,le
thatend(notthecuttingedgeortheendnear
thecuttingedge)untilneitherendoftheblade
drops.
InstallingtheBlade
1.Installasharp,balancedT oroblade,the
accelerator,andthebladenuts.Thesailofthe
blademustpointtowardthetopofthemower
housingforproperinstallation.
Note:T orquethebladenutsto20to37N∙m
(15to27ft-lb).
WARNING
Operatingthemachinewithoutthe
acceleratorinplacecancausethe
bladetoex,bend,orbreak,resulting
inseriousinjuryordeathtoyouorto
bystanders.
Donotoperatethemachinewithoutthe
acceleratorinplace.
2.Returnthemachinetotheoperatingposition.
g002280
2.Disconnectthewirefromthesparkplug.
3.Installanewblade-brakebeltandassemblethe
machineexceptforthe2beltcoversonthetop
ofthemowerhousing.
4.Installthenewblade-brakecable,butdonot
tightenthecableclamponthetopofthemower
housing(Figure33).
g024466
Figure33
1.Spring2.Cableclampandscrew
5.Loosenthecable-clampscrew(Figure33).
6.Pullthecablejackettoremoveslack(Figure34).
Note:Donotputtensiononthespring.
g239131
Figure34
28
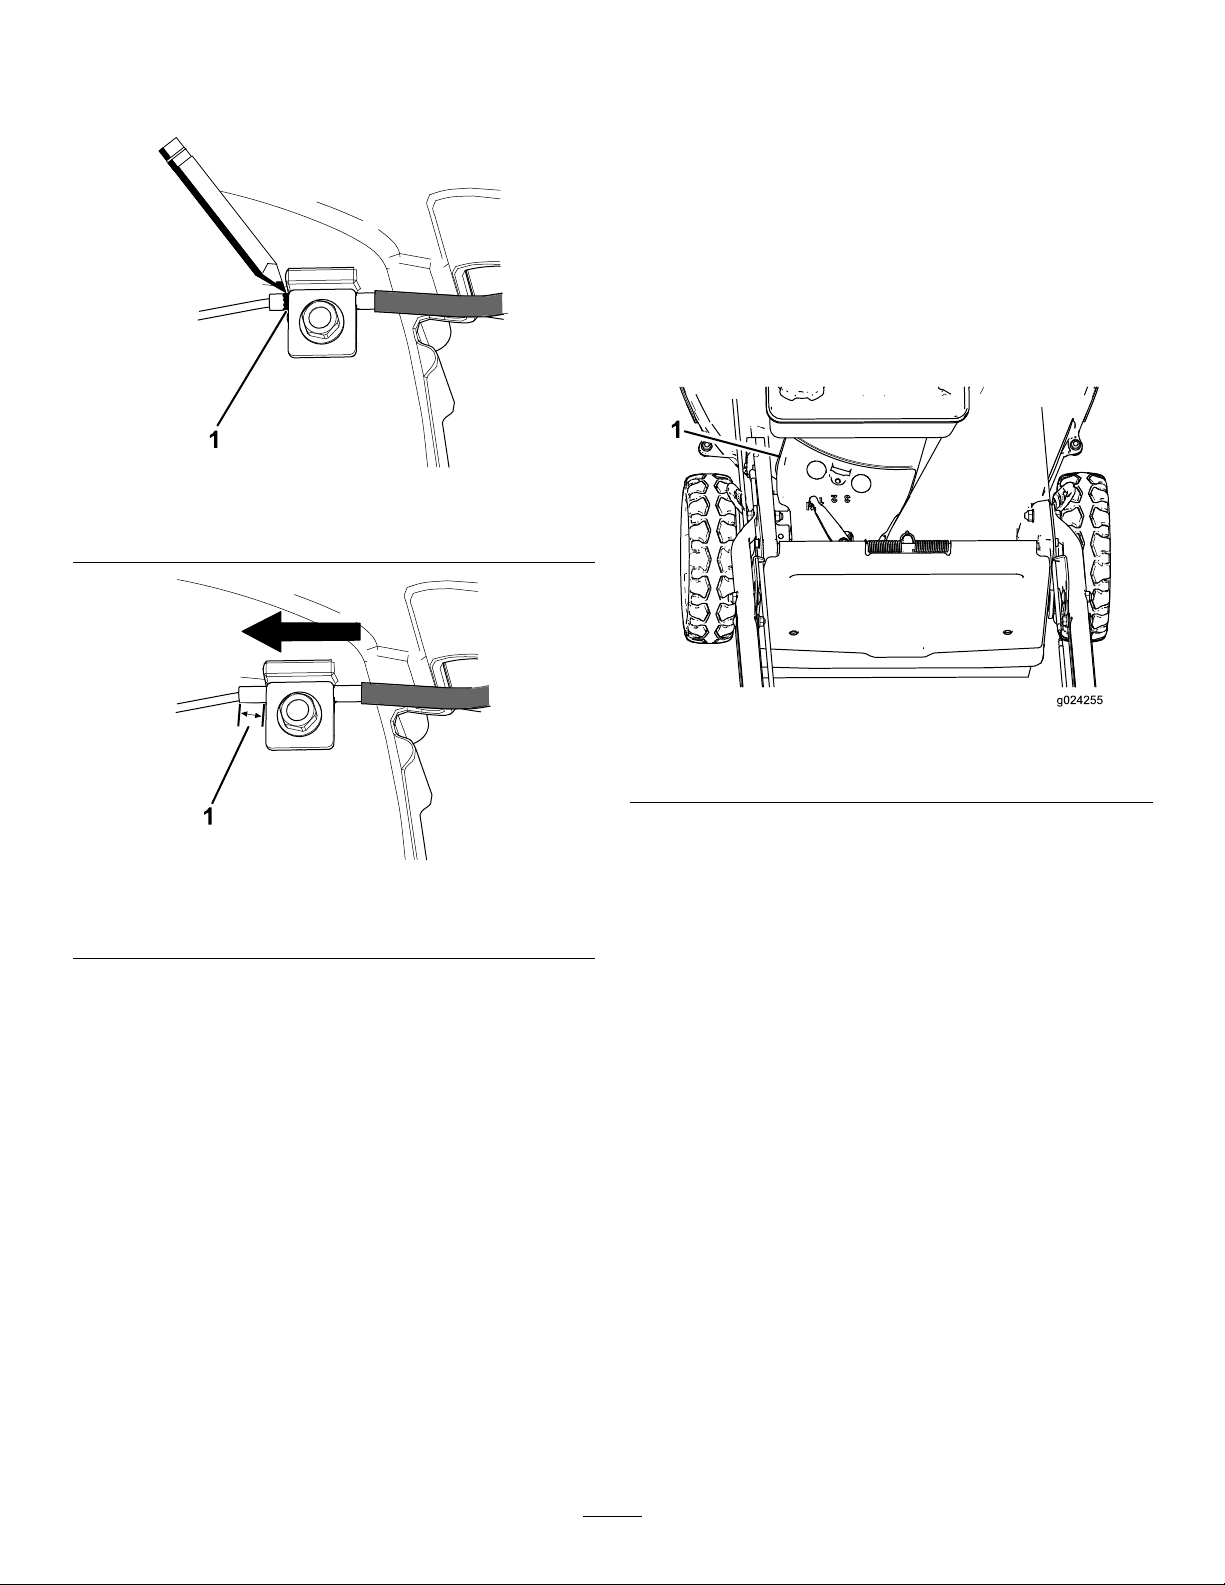
7.Markthebrakecable(Figure35),thenadjust
thejacketuntilthereisapproximately8mm
(5/16inch)ofslack(Figure36).
Figure35
1.Markthecablehere
CleaningundertheBelt
Cover
ServiceInterval:Every50hours—Removegrass
clippingsanddebrisfromunderthe
beltcover.
1.Shutofftheengineandwaitforallmovingparts
tostop.
2.Disconnectthewirefromthesparkplug.
3.Removethebeltcover(Figure37)fromthe
mowerhousing.
g239133
Figure36
1.Slack—8mm(5/16inch)
8.T orquethecable-clampscrewto1 1to14N∙m
(99to121in-lb)tolocktheadjustmentinplace.
9.Installthebeltcoverwiththeboltsthatyou
removedtotakeoffthe2beltcovers.
10.Connectthewiretothesparkplug.
g024255
Figure37
1.Beltcover
4.Liftoffthecoverandbrushoutallthedebris
g239134
aroundthebeltarea.
5.Installthebeltcover.
6.Connectthewiretothesparkplug.
29

Cleaningthe
Blade-Brake-ClutchShield
ServiceInterval:Every50hours
Cleantheblade-brake-clutchshieldtoensurethebest
performanceandtopreventpartsfromdegrading.
Cleantheblade-brake-clutchshieldwhenyousharpen
theblade,becauseyouneedtoremovethebladein
ordertoremovetheblade-brake-clutchshield.
8.Removetheblade-brake-clutchshieldandbrush
orblowallthedebrisfromundertheshieldand
aroundtheblade-brake-clutch.
9.Tightenthescrewstosecurethe
blade-brake-clutchshieldtothehousing.
10.Installtheblade,theaccelerator,andthe2blade
nuts.
11.Returnthemachinetotheoperatingposition.
1.Shutofftheengineandwaitforallmovingparts
tostop.
2.Disconnectthewirefromthesparkplug.
3.Closethefuelvalvebymovingthefuel-valve
levertotheleft(Figure15).
4.Drainthefuelfromthefueltank.
5.Tipthemachineontoitsrightside(airlterup).
WARNING
Tippingthemachinemaycausethefuel
toleakfromthecarburetororthefuel
tank.Fuelisextremelyammable,highly
explosive,and,undercertainconditions,
cancausepersonalinjuryorproperty
damage.
Avoidfuelspillsbyemptyingthefuel
tankasdirected;neversiphon.
6.Removethe2bladenuts,theaccelerator,and
theblade(Figure38).
CleaningtheWheels
ServiceInterval:Every40hours
1.Removetherearwheelsandcleananydebris
fromthewheel-geararea.
g033535
Figure39
Figure38
1.Blade
2.Bladenuts5.Blade-brake-clutchshield
3.Accelerator
7.Removethescrewsthatsecurethe
blade-brake-clutchshieldtothemowerhousing
(Figure38).
4.Screw
1.Gears
2.Aftercleaning,applyasmallamountof
anti-seizecompoundtothegears.
Note:Ifyouoperatethemachineinextreme
conditions,cleaningthewheelsmorefrequentlythan
recommendedwillincreasegearlife.
Note:T opreventdamagetothebearingseals,do
notuseahigh-pressurewatersprayonthebearings.
g024282
30

Storage
5.Checktheconditionoftheaccelerator;referto
InspectingtheAccelerator(page27).
Topreparethemachineforoff-seasonstorage,
performtherecommendedmaintenanceprocedures;
refertoMaintenance(page23).
Storethemachineinacool,clean,dryplace.Cover
themachinetokeepitcleanandprotected.
StorageSafety
Alwaysshutoffthemachine,waitforallmoving
partstostop,andallowthemachinetocoolbefore
adjusting,servicing,cleaning,orstoringit.
PreparingtheFuelSystem
Emptythefuelfromthefueltankwhenmowingforthe
lasttimebeforestoringthemachine.
1.Runtheengineuntilitshutsofffromrunning
outoffuel.
2.Choketheengineandstartitagain.
3.Allowtheenginetorununtilitshutsoff.
Whenyoucannolongerstarttheengine,itis
sufcientlydry.
6.BBCmodelsonly:Cleantheblade-brake-clutch
shield;refertoCleaningtheBlade-Brake-Clutch
Shield(page30).
7.Servicetheairlter;refertoServicingtheAir
Filter(page24).
8.Tightenallnuts,bolts,andscrews.
9.T ouchupallrustedorchippedpaintsurfaces
withpaintavailablefromanAuthorizedService
Dealer.
RemovingtheMachine
fromStorage
1.Checkandtightenallfasteners.
2.Removethesparkplugandspintheengine
rapidlyusingthestartertoblowouttheexcess
oilfromthecylinder.
3.Cleanthesparkplugorreplaceitifitiscracked,
broken,oriftheelectrodesareworn.
4.Installthesparkplug;refertoServicingthe
SparkPlug(page25).
PreparingtheEngine
1.Whiletheengineisstillwarm,changetheoilin
thecrankcase;refertoChangingtheEngineOil
(page24).
2.Removethesparkplug.
3.Usinganoilcan,addabout30ml(1oz)of
engineoiltotheenginecrankcasethroughthe
spark-plughole.
4.Slowlyrotatetheengineseveraltimesby
pullingtherecoil-starthandletodistributetheoil
throughouttheenginecrankcase.
5.Installthesparkplugbutdonotconnectthe
wiretothesparkplug.
GeneralInformation
1.Cleanunderthemachine;refertoCleaning
UndertheMachine(page22).
2.Cleananydirtandchafffromthecylinder,
cylinderheadns,andblowerhousing.
5.Performanyneededmaintenanceprocedures;
refertoMaintenance(page23).
6.Fillthefuelinthefueltankwithfreshfuel.
7.Checktheengine-oillevel.
8.Connectthewiretothesparkplug.
3.Removegrassclippings,dirt,andgrimefrom
theexternalpartsoftheengine,theshrouding,
andthetopofthemowerhousing.
4.Checktheconditionoftheblade;referto
InspectingtheBlade(page26).
31

Troubleshooting
Problem
Theenginedoesnotstart.
Theenginestartshardorlosespower.
Theenginerunsrough.
PossibleCauseCorrectiveAction
1.Thefueltankisemptyorthefuel
systemcontainsstalefuel.
2.ThethrottleleverisnotintheCHOKE
position.
3.Thewireisnotconnectedtothespark
plug.
4.Thesparkplugispitted,fouled,orthe
gapisincorrect.
1.Thefueltankcontainsstalefuel.1.Drainandllthefueltankwithfresh
2.Theair-lterelementisdirtyandis
restrictingtheairow.
3.Theundersideofthemachinecontains
clippingsanddebris.
4.Thesparkplugispitted,fouled,orthe
gapisincorrect.
5.Theengine-oillevelislowortheoilis
dirty.
1.Thewireisnotconnectedtothespark
plug.
2.Thesparkplugispitted,fouled,orthe
gapisincorrect.
3.ThethrottleleverisnotintheFAST
position.
4.Theair-lterelementisdirtyandis
restrictingtheairow.
1.Drainand/orllthefueltankwithfresh
fuel.Iftheproblempersists,contactan
AuthorizedServiceDealer .
2.MovethethrottlelevertotheCHOKE
position.
3.Connectthewiretothesparkplug.
4.Checkthesparkplugandadjustthe
gapifnecessary .Replacethespark
plugifitispitted,fouled,orcracked.
fuel.
2.Cleantheair-lterpre-cleanerand/or
replacethepaperairlter.
3.Cleantheundersideofthemachine.
4.Checkthesparkplugandadjustthe
gapifnecessary .Replacethespark
plugifitispitted,fouled,orcracked.
5.Checktheengineoil.Changetheoilif
itisdirtyoraddoilifitislow.
1.Connectthewiretothesparkplug.
2.Checkthesparkplugandadjustthe
gapifnecessary .Replacethespark
plugifitispitted,fouled,orcracked.
3.MovethethrottlelevertotheFAST
position.
4.Cleantheair-lterpre-cleanerand/or
replacethepaperairlter.
Themachineorenginevibrates
excessively.
Theisanunevencuttingpattern.
Thedischargechuteplugsup.
Themachinedoesnotself-propel.
1.Thebladeisbentorisoutofbalance.
2.Theblademountingnutsareloose.2.Tightentheblademountingnuts.
3.Theundersideofthemachinecontains
clippingsanddebris.
4.Theenginemountingboltsareloose.4.Tightentheenginemountingbolts.
1.All4wheelsarenotatthesameheight.1.Placeall4wheelsatthesameheight.
2.Thebladeisdull.
3.Y ouaremowinginthesamepattern
repeatedly.
4.Theundersideofthemachinecontains
clippingsanddebris.
1.ThethrottleleverisnotintheFAST
position.
2.Thecuttingheightistoolow.2.Raisethecuttingheight.
3.
Youaremowingtoofast.
4.Thegrassiswet.
5.
Theundersideofthemachinecontains
clippingsanddebris.
1.Theself-propeldrivecableisoutof
adjustmentorisdamaged.
2.Thereisdebrisunderthebeltcover.
1.Balancetheblade.Ifthebladeisbent,
replaceit.
3.Cleantheundersideofthemachine.
2.Sharpenandbalancetheblade.
3.Changethemowingpattern.
4.Cleantheundersideofthemachine.
1.MovethethrottlelevertotheFAST
position.
3.
Slowdown.
4.Allowthegrasstodrybeforemowing.
5.Cleantheundersideofthemachine.
1.Adjusttheself-propeldrivecable.
Replacethecableifnecessary .
2.Cleanthedebrisfromunderthebelt
cover.
32

EEA/UKPrivacyNotice
Toro’sUseofY ourPersonalInformation
TheT oroCompany(“Toro”)respectsyourprivacy.Whenyoupurchaseourproducts,wemaycollectcertainpersonalinformationaboutyou,eitherdirectly
fromyouorthroughyourlocalT orocompanyordealer .Torousesthisinformationtofullcontractualobligations-suchastoregisteryourwarranty,
processyourwarrantyclaimortocontactyouintheeventofaproductrecall-andforlegitimatebusinesspurposes-suchastogaugecustomer
satisfaction,improveourproductsorprovideyouwithproductinformationwhichmaybeofinterest.Toromayshareyourinformationwithoursubsidiaries,
afliates,dealersorotherbusinesspartnersinconnectiontheseactivities.Wemayalsodisclosepersonalinformationwhenrequiredbylaworin
connectionwiththesale,purchaseormergerofabusiness.Wewillneversellyourpersonalinformationtoanyothercompanyformarketingpurposes.
RetentionofyourPersonalInformation
Torowillkeepyourpersonalinformationaslongasitisrelevantfortheabovepurposesandinaccordancewithlegalrequirements.Formoreinformation
aboutapplicableretentionperiodspleasecontactlegal@toro.com.
Toro’sCommitmenttoSecurity
YourpersonalinformationmaybeprocessedintheUSoranothercountrywhichmayhavelessstrictdataprotectionlawsthanyourcountryofresidence.
Wheneverwetransferyourinformationoutsideofyourcountryofresidence,wewilltakelegallyrequiredstepstoensurethatappropriatesafeguardsare
inplacetoprotectyourinformationandtomakesureitistreatedsecurely.
AccessandCorrection
Youmayhavetherighttocorrectorreviewyourpersonaldata,orobjecttoorrestricttheprocessingofyourdata.Todoso,pleasecontactusbyemail
atlegal@toro.com.IfyouhaveconcernsaboutthewayinwhichT orohashandledyourinformation,weencourageyoutoraisethisdirectlywithus.
PleasenotethatEuropeanresidentshavetherighttocomplaintoyourDataProtectionAuthority.
374-0282RevC


ProfessionellerRasenmäher
FormNo.3418-481RevC
mitRecycler
®
bzw.Heckfänger
(53cm)
Modellnr.22280—Seriennr.400000000undhöher
RegistrierenSieIhrProduktunterwww.Toro.com.
Originaldokuments(DE)
*3418-481*

DiesesProdukterfülltallerelevanteneuropäischen
Richtlinien;weitereDetailsndenSieinder
produktspezischenKonformitätserklärung(DOC).
Brutto-oderNettodrehmoment:DieBruttooderNettodrehzahldiesesMotorswurdenvom
MotorherstellerimLaborgemäßSAEJ1940ermittelt.
AufgrundderKongurationzurErfüllungvon
Sicherheits-,Emissions-undBetriebsanforderungen
istdietatsächlicheMotorleistungindieserKlasse
derRasenmäherwesentlichniedriger.Unter
www.T oro.comndenSiedietechnischenDatenfür
IhreRasenmäher-Modell.
g333679
Bild1
1.TypenschildmitModell-undSeriennummer
Modellnr.
ManipulierenoderdeaktivierenSiekeine
SicherheitsvorrichtungenanderMaschineundprüfen
SiedieeinwandfreieFunktioninregelmäßigen
Abständen.ModizierenodermanipulierenSienicht
dieBedienelementefürdieMotordrehzahl,dadieszu
unsicherenEinsatzbedingungenundVerletzungen
führenkann.
Einführung
DieserhandgeführteRasenmähermitSichelmessern
solltevonPrivatleutenodergeschultenLohnarbeitern
verwendetwerden.Eristhauptsächlichfürdas
MähenvonGrasaufgepegtenGrünächenin
Privat-oderöffentlichenAnlagengedacht.Erist
nichtfürdasSchneidenvonBüschenoderfüreinen
landwirtschaftlichenEinsatzgedacht.
LesenSiedieseInformationensorgfältigdurch,
umsichmitdemordnungsgemäßenEinsatzund
derWartungdesGerätsvertrautzumachenund
VerletzungenundeineBeschädigungdesGerätszu
vermeiden.SietragendieVerantwortungfüreinen
ordnungsgemäßenundsicherenEinsatzdesGeräts.
Seriennr.
IndieserAnleitungwerdenpotenzielleGefahren
angeführt,undSicherheitshinweisewerdenvom
Sicherheitswarnsymbol(Bild2)gekennzeichnet.
DiesesWarnsymbolweistaufeineGefahrhin,diezu
schwerenodertödlichenVerletzungenführenkann,
wennSiedieempfohlenenSicherheitsvorkehrungen
nichteinhalten.
g000502
Bild2
Sicherheitswarnsymbol
IndieserAnleitungwerdenzweiBegriffezur
HervorhebungvonInformationenverwendet.Wichtig
weistaufspezielletechnischeInformationenhin,und
HinweishebtallgemeineInformationenhervor,die
IhrebesondereBeachtungverdienen.
BesuchenSiewww.toro.comhinsichtlich
Sicherheitstipps,Schulungsunterlagen,
Zubehörinformationen,StandorteinesHändlersoder
RegistrierungdesProdukts.
WendenSiesichandenVertragshändleroder
KundendienstdesHerstellers,wennSieeine
Serviceleistung,OriginalersatzteiledesHerstellers
oderweitereInformationenbenötigen.HabenSie
dafürdieModell-undSeriennummernderMaschine
griffbereit.Bild1zeigtdiePositionderModell-und
SeriennummernamProdukt.TragenSiehierbittedie
Modell-undSeriennummerndesGerätsein.
Wichtig:ScannenSiemitIhremSmartphone
oderTabletdenQR-Codeaufdem
Seriennummernaufkleber,umaufGarantie-,
Ersatzteil-oderandereProduktinformationen
zuzugreifen.
©2020—TheToro®Company
8111LyndaleAvenueSouth
Bloomington,MN55420
KontaktierenSieunsunterwww.Toro.com.
2
AlleRechtevorbehalten
Druck:Mexiko

Inhalt
Sicherheit..................................................................4
AllgemeineSicherheit.........................................4
Sicherheits-undBedienungsschilder.................4
Einrichtung................................................................6
1EntfernendesKabelschutzes..........................6
2MontierendesHolms.......................................7
3MontagedesKabelschutzes............................7
4Motorölnachfüllen...........................................9
5MontierendesFangkorbs..............................10
6EinstellendesSelbstantriebs.........................10
Produktübersicht......................................................11
TechnischeDaten.............................................11
Anbaugeräte/Zubehör.......................................11
VordemEinsatz..................................................12
SicherheitshinweisevorderInbetrieb-
nahme...........................................................12
Betanken..........................................................12
PrüfendesMotorölstands.................................13
EinstellenderHolmhöhe...................................14
EinstellenderSchnitthöhe................................15
WährenddesEinsatzes.......................................16
HinweisezurSicherheitwährenddes
Betriebs.........................................................16
AnlassendesMotors........................................16
AbstellendesMotors........................................17
VerwendendesSelbstantriebsund
EinkuppelnderMesser.................................17
PrüfenderMesserbremse(BBC)......................19
Schnittgutrecyclen............................................20
SammelndesSchnittguts.................................20
Betriebshinweise.............................................22
NachdemEinsatz...............................................23
HinweisezurSicherheitnachdem
Betrieb..........................................................23
ReinigenunterdemGerät.................................23
Wartung..................................................................25
EmpfohlenerWartungsplan.................................25
Wartungssicherheit...........................................25
WartendesLuftlters........................................26
WechselndesMotoröls....................................26
AuswechselndesMotoröllters........................27
WartenderZündkerze......................................28
EinstellendesSelbstantriebs............................28
WartendesSchnittmessers..............................29
EinstellendesMesserbremszugs.....................31
ReinigenunterderRiemenabdeckung..............32
ReinigendesSchutzblechsder
Messerbremse..............................................33
ReinigenderRäder..........................................33
Einlagerung............................................................34
SicherheitbeiderEinlagerung..........................34
VorbereitenderKraftstoffanlage.......................34
VorbereitendesMotors.....................................34
AllgemeineAngaben........................................34
HerausnehmendesRasenmähersausder
Einlagerung...................................................35
Fehlersucheund-behebung...................................36
3

Sicherheit
DieseMaschineerfülltENISO5395.
AllgemeineSicherheit
DiesesProduktkannHändeundFüßeamputieren
undGegenständeaufschleudern.BefolgenSiezum
VermeidenvonschwerenodertödlichenVerletzungen
immeralleSicherheitshinweise.
•Lesen,verstehenundbefolgenSievordem
AnlassendesMotorsalleAnweisungenund
WarnungeninderBedienungsanleitungundan
derMaschine.
•BerührenSiebeweglicheTeileoderdieUnterseite
derMaschinenichtmitdenHändenoderFüßen.
BleibenSieimmervonderAuswurföffnungfern.
•BedienenSiedieMaschineniemals,wennnicht
alleSchutzvorrichtungenundAbdeckungen
angebrachtundfunktionstüchtigsind.
Sicherheits-undBedienungsschilder
•HaltenSieUnbeteiligte,insbesondereKinder,
ausdemArbeitsbereichfern.DasFahrzeug
darfniemalsvonKindernbetriebenwerden.
NurverantwortungsbewusstePersonen,die
geschultundmitdenAnweisungenvertrautsind
undkörperlichfähigsind,solltendieMaschine
verwenden.
•HaltenSiedieMaschinean,stellenSieden
MotorabundwartenSie,bisallebeweglichen
TeilezumStillstandgekommensind,bevorSie
Wartungsarbeitendurchführen,Auftankenoder
Verstopfungenentfernen.
DerunsachgemäßeEinsatzoderdiefalscheWartung
dieserMaschinekannzuVerletzungenführen.Halten
SiedieseSicherheitsanweisungenein,umdas
Verletzungsrisikozuverringern.AchtenSieimmerauf
dasSicherheitswarnsymbol
WarnungoderGefahr–„Sicherheitshinweis“.Wenn
SiedieseAnweisungennichteinhalten,kanneszu
Verletzungenggf.tödlichenVerletzungenkommen.
,esbedeutetVorsicht,
DieSicherheitsaufkleberundBedienungsanweisungensindgutsichtbar;siebendensich
inderNähedermöglichenGefahrenbereiche.T auschenSiebeschädigteoderverloren
gegangeneAufkleberaus.
Herstellermarke
1.DieseMarkegibtan,dassdasMessereinTeildes
HerstellersderOriginalmaschineist.
decaloemmarkt
decal130-6722
130-6722
1.Achtung:LesenSiedieBedienungsanleitung.
112-8760
1.GefahrdurchherausgeschleuderteObjekte:Unbeteiligte
müsseneinenAbstandzurMaschinehalten.
2.GefahrvonSchnittverletzungen/einerAmputationvon
HändenoderFüßendurchMähwerkmesser:HaltenSie
sichvonbeweglichenT eilenfern.
decal112-8760
4

decal130-9656
130-9656
1.Choke
3.Langsam
2.Schnell4.Motorstopp(Abstellen)
1.Warnung:LesenSiedieBedienungsanleitung;setzenSie
dasGerätnurnachentsprechenderSchulungein.
2.GefahrdurchausgeworfeneGegenstände:HaltenSie
Unbeteiligtefern.
3.GefahrdurchherausgeschleuderteGegenstände:Setzen
SiedenRasenmähernichtohneHeckauswurfklappeoder
Fangkorbein.
decal116-7583
116-7583
4.Schnitt-bzw.AmputationsgefahranHändenoderFüßen
durchdasMähwerkmesser:BerührenSiekeinebeweglichen
TeileundlassenSiealleSchutzvorrichtungenmontiert.
5.Warnung:TragenSieeinenGehörschutz.
6.Schnitt-bzw.AmputationsgefahrvonHändenundFüßen
durchMähwerkmesser:MähenSieniehangaufwärtsoder
-abwärts,mähenSieimmerhorizontalzumHang.StellenSie
denMotorab,bevorSiedieMaschineverlassen.Sammeln
SievorBeginnderMäharbeitenSchuttundGeröllauf.
SchauenSienachhinten,wennSierückwärtsfahren.
5

Einrichtung
Wichtig:NehmenSiedenKunststoffschutzabundalleanderenKunststoffteileoderVerpackungenab,
mitdenenderMotorabgedecktist.EntsorgenSiesie.
1
EntfernendesKabelschutzes
KeineTeilewerdenbenötigt
Verfahren
Bild3
g234471
6

2
MontierendesHolms
KeineTeilewerdenbenötigt
Verfahren
Bild4
g234475
7

3
MontagedesKabelschutzes
KeineTeilewerdenbenötigt
Verfahren
g234486
Bild5
8

4
Motorölnachfüllen
KeineTeilewerdenbenötigt
Verfahren
Wichtig:WennderÖlstandimMotorzuhochoderzuniedrigistundSiedenMotorlaufenlassen,
könnenMotorschädenauftreten.
Bild6
g235721
9

5
MontierendesFangkorbs
KeineTeilewerdenbenötigt
Verfahren
g238450
Bild7
6
Einstellendes
Selbstantriebs
KeineTeilewerdenbenötigt
Verfahren
Wichtig:VordemerstenEinsatzderMaschine
müssenSiedenBowdenzugdesSelbstantrieb
einstellen.SieheEinstellendesSelbstantriebs
(Seite28).
10

Produktübersicht
g331712
Bild10
Schaltbügel
1.Holm
2.Selbstantriebsbügel
3.Schaltbügel
4.Heckablenkblech(nicht
abgebildet)
5.Tankdeckel
Bild8
1.SperrhebelfürSchaltbügel
2.Schaltbügel
3.Holm
4.Antriebsschaltbügel
TechnischeDaten
g231063
6.Gasbedienungshebel
7.Luftlter
8.Zündkerze
9.Schnitthöheneinstellhebel
(4)
10.Einfüllstutzen/Peilstab
Modell
22280
Anbaugeräte/Zubehör
EinSortimentanvonT orozugelassenen
AnbaugerätenundZubehörwirdfürdieseMaschine
GewichtLänge
59kg150cm56cm107cm
angeboten,umdenFunktionsumfangdesGeräts
zuerhöhenundzuerweitern.WendenSiesichan
einenofziellenVertragshändlerodereinenofziellen
Toro-DistributorodernavigierenSiezuwww.Toro.com
füreineListederzugelassenenAnbaugeräteunddes
Zubehörs.
VerwendenSie,umdieoptimaleLeistungund
Sicherheitzugewährleisten,nurOriginalersatzteile
und-zubehörteilevonToro.ErsatzteileundZubehör
andererHerstellerkönnengefährlichseinundeine
VerwendungkönntedieGarantieungültigmachen.
Breite
Höhe
g231061
Bild9
1.Fangkorb
2.Heckauswurfklappe
11

Betrieb
Hinweis:BestimmenSiedielinkeundrechteSeite
derMaschineanhandderüblichenBetriebsposition.
VordemEinsatz
Sicherheitshinweisevor
derInbetriebnahme
AllgemeineSicherheit
•StellenSiedieMaschineabundwartenSie,bis
allebeweglichenT eilezumStillstandgekommen
sind.LassenSiedieMaschineabkühlen,bevor
Siedieseeinstellen,reinigen,verstauen,oder
reparieren.
•MachenSiesichmitdemsicherenEinsatz
desGeräts,derBedienelementeundden
Sicherheitsaufklebernvertraut.
•PrüfenSie,oballeSchutzvorrichtungenund
Sicherheitsvorrichtungen,wiez.B.Ablenkbleche
und/oderGrasfangkörbemontiertsindundrichtig
funktionieren.
•ÜberprüfenSieimmerdieMaschineundstellen
Siesicher,dassdieSchnittmesserund-schrauben
nichtabgenutztoderbeschädigtsind.
•PrüfenSiedenArbeitsbereichderMaschine
undentfernenSiealleObjekte,diesichaufden
EinsatzderMaschineauswirkenodervonihr
aufgeschleudertwerdenkönnten.
•DerKontaktmiteinemsichdrehendenMessers
kanneszuschwerenVerletzungenführen.
SteckenSieIhreFingernichtunterdasGehäuse.
Kraftstoffsicherheit
•Kraftstoffistextremleichtentammbar
undhochexplosiv.FeuerundExplosionen
durchKraftstoffkönnenVerbrennungenund
Sachschädenverursachen.
–StellenSiedenKanisterbzw.dieMaschine
vordemAuftankenaufdenBodenundnicht
aufeinFahrzeugoderaufeinObjekt,umeine
elektrischeLadungdurchdasEntzündendes
Kraftstoffszuvermeiden.
–FüllenSiedenKraftstofftankimFreien
auf,wennderMotorkaltist.WischenSie
verschüttetenKraftstoffauf.
–RauchenSienichtbeimUmgangmitKraftstoff,
undgehenSienichtinderNähevonoffenem
FeueroderFunkenmitKraftstoffum.
–BetankenSiedieMaschineniebeilaufendem
oderheißemMotoroderentfernenSieden
Tankdeckel.
–LassenSiedenMotorniebei
Kraftstoffverschüttungenan.Vermeiden
Sie,dassSieZündquellenschaffen,bisdie
Kraftstoffdämpfeverdunstetsind.
–BewahrenSieKraftstoffinvorschriftsmäßigen,
fürKinderunzugänglichenKanisternauf.
•KraftstoffistbeiEinnahmegesundheitsschädlich
odertödlich.WenneinePersonlangfristig
Benzindünstenausgesetztist,kanndieszu
schwerenVerletzungenundKrankheitenführen.
–VermeidenSiedaslangfristigeEinatmenvon
Benzindünsten.
–HaltenSieIhreHändeunddasGesichtvom
FüllstutzenundderÖffnungdesKraftstofftanks
fern.
–HaltenSieKraftstoffvonAugenundderHaut
fern.
Betanken
GEFAHR
Benzinistbrennbarundexplodiertschnell.
FeuerundExplosionendurchBenzinkönnen
VerbrennungenbeiIhnenundanderen
Personenverursachen.
•StellenSiedenKanisterbzw.dieMaschine
vordemAuftankenaufdenBodenund
nichtaufeinFahrzeugoderaufeinObjekt,
umeineelektrischeLadungdurchdas
EntzündendesBenzinszuvermeiden.
•FüllenSiedenTankaußen,wennder
Motorkaltist.WischenSieverschütteten
Kraftstoffauf.
•RauchenSienichtbeimUmgangmit
Benzin,undgehenSienichtinderNähe
vonoffenemFeueroderFunkenmitBenzin
um.
•BewahrenSieBenzinnurinzugelassenen
BenzinkanisternundaneinemfürKinder
unzugänglichenOrtauf.
•DiebestenErgebnisseerhaltenSie,wennSie
sauberes,frisches(höchstens30Tagealt),
bleifreiesBenzinmiteinerMindestoktanzahlvon
87(R+M)/2verwenden.
•MitSauerstoffangereicherterKraftstoffmit10%
Ethanoloder15%MTBE(Volumenanteil)istauch
geeignet.
12

•Ethanol:Kraftstoff,dermit10%Ethanoloder
15%MTBE(Volumenanteil)angereichertist,
istauchgeeignet.EthanolundMTBEsind
nichtidentisch.Benzinmit15%Ethanol(E15)
(Volumenanteil)kannnichtverwendetwerden.
VerwendenSienieBenzin,dasmehrals
10%Ethanol(Volumenanteil)enthält,z.B.
E15(enthält15%Ethanol),E20(enthält20%
Ethanol)oderE85(enthält85%Ethanol).Die
VerwendungvonnichtzugelassenemBenzinkann
zuLeistungsproblemenund/oderMotorschäden
führen,dieggf.nichtvonderGarantieabgedeckt
sind.
•VerwendenSiekeinBenzinmitMethanol.
•LagernSiekeinenKraftstoffimKraftstofftankoder
inKraftstoffbehälternüberdenWinter,wennSie
keinenKraftstoffstabilisatorverwenden.
•VermischenSienieBenzinmitÖl.
PrüfendesMotorölstands
Wartungsintervall:BeijederVerwendungodertäglich
Wichtig:GebenSiedieMengedes
Kraftstoffstabilisatorsbzw.-konditionierers
indenfrischenKraftstoff,wievomHersteller
desKraftstoffstabilisatorsvorgeschrieben,um
Startproblemezuvermeiden.
Hinweis:DerKraftstofftankfasst3,8Liter.
g230458
Bild11
Wichtig:WennderÖlstandimKurbelgehäusezuhochoderzuniedrigist,undSiedenMotorlaufen
lassen,könnenMotorschädenauftreten.
Bild12
g235721
13

EinstellenderHolmhöhe
SiekönnendenHolminPosition1oder3anhebenoderabsenken,jenachdemwelcheSiealsangenehmer
empnden(Bild13).
Bild13
1.EntfernenSiebeideHolmschraubenund-muttern.
2.StellenSiedenGriffindiegewünschteHöheneinstellung.
3.SichernSiedenHolmmitdenvorherentferntenSchraubenundzugehörigenMuttern.
g272748
14

EinstellenderSchnitthöhe
GEFAHR
BeimEinstellenderSchnitthöhenhebelkönnenIhreHändeeinbeweglichesMesserberühren
undSiekönnenschwereVerletzungenerleiden.
•StellenSiedenMotorabundwartendenStillstandallerbeweglichenTeileab,bevorSie
dieSchnitthöheeinstellen.
•FührenSieIhreFingerbeimEinstellenderSchnitthöhenieunterdasMähwerk.
ACHTUNG
WennderMotorgeradelief,istderAuspuffheißundSiekönntensichverbrennen.
BerührenSieniedenheißenAuspuff.
StellenSiedieSchnitthöheein.StellenSiealleRäderaufdiegleicheSchnitthöheein(Bild14).
Bild14
g234297
15

WährenddesEinsatzes
HinweisezurSicherheit
währenddesBetriebs
AllgemeineSicherheit
•TragenSiegeeigneteKleidung,u.a.eine
Schutzbrille,langeHosen,rutschfeste
ArbeitsschuheundeinenGehörschutz.Binden
SielangeHaarehintenzusammenundtragenSie
keinenSchmuckoderweiteKleidung.
•KonzentrierenSiesichimmerbeiderVerwendung
derMaschine.TunSienichts,wasSieablenken
könnte,sonstkönnenVerletzungenoder
Sachschädenauftreten.
•BedienenSiedieMaschinenicht,wennSie
müdeoderkranksindoderunterAlkohol-oder
Drogeneinussstehen.
•DasMesseristscharf;einKontaktdamitkannzu
schwerenVerletzungenführen.StellenSieden
MotorabundwartenSie,bisallebeweglichen
TeilezumStillstandgekommensind,bevorSiedie
Bedienungspositionverlassen.
•WennSiedenSchaltbügelloslassen,sollten
derMotorunddasMesserinnerhalbvondrei
Sekundenabstellen.WenndiesnichtderFall
ist,setzenSiedieMaschinenichtmehrein
undwendensichsofortaneinenofziellen
Vertragshändler.
•HaltenSieumstehendePersonenvom
Arbeitsbereichfern.HaltenSiekleineKinderaus
demMähbereichfernundunterAufsichteines
verantwortlichenErwachsenen,dernichtdie
Maschinebedient.StellenSie,wennjemandden
Arbeitsbereichbetritt,sofortdieMaschineab.
•SchauenSieimmernachuntenundnachhinten,
bevorSiedieMaschinerückwärtsbewegen.
•SetzenSiedieMaschinenurbeiguten
Sichtverhältnissenundgeeigneten
Witterungsbedingungenein.FahrenSie
dieMaschineniebeiGewitter,bzw.wennGefahr
durchBlitzschlagbesteht.
•NassesGrasund/odernasseBlätterkönnenzu
schwerenVerletzungenführen,solltenSiedarauf
ausrutschenundmitdemMesserinBerührung
kommen.VermeidenSieMäharbeitenbeinassen
Umgebungsbedingungen.
•GehenSiebeimAnfahrenvonblindenEcken,
Sträuchern,BäumenundanderenGegenständen,
dieIhreSichtbehindernkönnen,vorsichtigvor.
•WerfenSiedasSchnittgutnichtgegenPersonen
aus.VermeidenSie,MaterialgegeneineWand
odereinHindernisauszuwerfen,dadasMaterial
aufSiezurückprallenkann.StellenSiedas/die
Messerab,wennSieeineKiesoberächen
überqueren.
•AchtenSieaufLöcher,Rillen,Bodenwellen,Steine
oderandereverborgeneObjekte.Unebenes
Geländekanndazuführen,dassSiedas
GleichgewichtoderdenHaltverlieren.
•StellenSiedenMotorsofortab,wennderMäher
aufeinenGegenstandaufpralltoderanfängt
zuvibrieren,warten,bisallebeweglichenTeile
zumStillstandgekommensind,undziehenden
Zündkerzensteckerab,bevorSiedenMäherauf
eventuelleBeschädigungenuntersuchen.Führen
SiedieerforderlichenReparaturarbeitenaus,
bevorSiedieMaschineerneuteinsetzen.
•StellenSievordemVerlassenderBedienerposition
denMotorabundwartenSie,bisallebeweglichen
TeilezumStillstandgekommensind.
•DerMotoristnachdemBetriebsehrheißundSie
könntensichverbrennen.BerührenSienieden
heißenMotor.
•BetreibenSiedenMotornuringutbelüfteten
Bereichen.AbgaseenthaltenKohlenmonoxid,ein
geruchloses,tödlichesGift.
•PrüfenSiedieTeiledesFangkorbsunddes
AuswurfkanalshäugaufRisseoderAbnutzung
undwechselnSiesieggf.mitOriginalteilenvon
Toroaus.
SicherheitanHanglagen
•MähenSieimmerquerzumHang,nicht
hangaufwärtsoder-abwärts.GehenSiebeim
RichtungswechselanHanglagenäußerst
vorsichtigvor.
•VersuchenSienicht,steileHanglagenzu
mähen.EinschlechterHaltkannzuRutsch-und
Fallunfällenführen.
•GehenSiebeiMäharbeiteninderNähevonsteilen
Gefällen,GräbenoderBöschungenbesonders
vorsichtigvor.
AnlassendesMotors
1.SteckenSiedenZündkerzensteckeraufdie
Zündkerze.
2.DrehenSiedenHebeldesKraftstoffhahnsnach
rechts,umdenKraftstoffhahnzuöffnen(Bild
15).
16

Bild15
1.Gasbedienungshebel2.Kraftstoffhahnhebel
verfügtsieübereineNeutralposition(N).Der
Selbstantriebshebelbendetsichunterundhinter
demKraftstofftank(Bild16).
g024304
3.StellenSiedenGasbedienungshebelindie
CHOKE-Stellung.
Hinweis:VerwendenSiedenChokenichtbei
warmemMotor.
4.ZiehenSieleichtamStartergriff,bisSieeinen
Widerstandspüren.ZiehenSieihndannkräftig
durch.
Hinweis:LassenSiedasRücklaufstarterseil
langsamindieSeilführungamHolm
zurückgehen.
5.StellenSiedenGasbedienungshebelindie
SCHNELL-Stellung,wennderMotoranspringt.
AbstellendesMotors
LassenSiedenSchaltbügellosundstellenSieden
Gasbedienungshebel(Bild15)aufdieStopp-Stellung.
Hinweis:SchließenSiedenKraftstoffhahn(Bild15),
wennSiedenMotornichtbaldwiederanlassen.
Verwendendes
g024167
Bild16
1.Selbstantriebshebel
1.BewegenSiedenSelbstantriebshebelaufdie
gewünschteFahrgeschwindigkeit.
2.LassenSiedenMotoran.
3.UmdenSelbstantriebzubetätigen,drückenSie
denSelbstantriebsbügel(Bild17)zusammen.
g331713
Bild17
Selbstantriebsund
EinkuppelnderMesser
DieseMaschinehat3Fahrgeschwindigkeiten:1
(langsam),2(mittel)und3(schnell);außerdem
KuppelnSiedieMesserwiefolgtein:
1.HaltenSiedenSperrhebelfürdenSchaltbügel
nachvornegedrückt,umdenSchaltbügelzu
lösen(AinBild18)
2.ZiehenSiedenSchaltbügelzumGriffundlösen
SiedenSperrhebelfürSchaltbügel;dasMesser
sollteeinkuppeln(AinBild18).
3.LassenSiedenSchaltbügellos,umdas
Schnittmesserauszukuppeln(BinBild18).Der
Hinweis:SiekönnendieFahrgeschwindigkeit
durchErhöhenoderVerringerndesAbstandes
zwischendemSelbstantriebsbügelunddem
Griffändern.
SperrhebelfürSchaltbügelwirdzurückgesetzt,
umdenSchaltbügelzuverriegeln.
17

Bild18
g237185
18

PrüfenderMesserbremse
(BBC)
Hinweis:WenndasKnäuelnichtunterdie
Maschineging,wiederholeSiedieSchritte4bis
10.
PrüfenSiedenSchaltbügelfürdieMesserbremse
vorjedemEinsatz,umdieeinwandfreieFunktionder
Messerbremsesicherzustellen.
EntleerendesFangkorbs
1.SetzenSiedenleerenFangkorbander
Maschineein.
2.LassenSiedenMotoran.
3.SchaltenSiedasSchnittmesserzu.
Hinweis:DerKorbmussbeginnen,sich
aufzublasen,wodurchangezeigtwird,dassdas
Messereingekuppeltistundsichdreht.
4.LassenSiedenSchaltbügellos.
Hinweis:WennderGrasfangkorbnicht
sofortseineLuftverliert,drehtsichdas
Messernoch.DieFunktionderMesserbremse
kannabnehmen,waszueinemunsicheren
Betriebszustandführenkann.LassenSiedie
MaschinevoneinemofziellenVertragshändler
prüfenundwarten.
Hinweis:WennsichdasZeitungspapierknäuel
aufgerollthatoderzerschnitzeltwurde,hatsich
dasMessernichteinwandfreiabgestellt,d.h.
derBetriebistnichtsicher.SetzenSiesichdann
mitIhremToro-VertragshändlerinVerbindung.
5.StellenSiedenMotorabundwartenSie,bis
allebeweglichenT eilezumStillstandgekommen
sind.
PrüfenohneFangkorb
1.FahrenSiedieMaschineaufeine
windgeschützte,befestigteFläche.
2.StellenSieallevierRäderaufeine
Schnitthöheneinstellungvon76cmein,siehe
EinstellenderSchnitthöhe(Seite15).
3.KnüllenSieeinhalbesBlattZeitungspapier
zueinerKugelzusammen,dieunterdas
Rasenmähergehäusepasst(Durchmesservon
ca.76mm).
4.LegenSiediePapierkugelca.13cmvordie
Maschine.
5.LassenSiedenMotoran.
6.SchaltenSiedasSchnittmesserzu.
7.LassenSiedenSchaltbügellos.
8.SchiebenSiedieMaschinesofortüberdas
Zeitungspapierknäuel.
9.StellenSiedenMotorabundwartenSie,bis
allebeweglichenT eilezumStillstandgekommen
sind.
10.GehenSiezurVorderseitederMaschineund
prüfenSiedasZeitungspapierknäuel.
19

Schnittgutrecyclen
DieseMaschineistwerksseitigaufdasRecycelnvonSchnittgutundLaubeingestellt.SobereitenSiedie
MaschinefürdasRecycelnvor:
•NehmenSieggf.denFangkorbab(AvonBild19).
•WenndieHeckauswurfklappenichteingesetztist,fassenSiesieamGriffan,hebenSiedas
HeckablenkblechanundsetzenSiesieindenHeckauswurfkanalein,bisderRiegeleinrastet(BvonBild19).
Bild19
WARNUNG:
g236734
WennSiedieMaschinezumRecyclenvonSchnittgutohneeingesetzteKlappeverwenden,
könnenObjekteinihreoderdieRichtungvonUnbeteiligtenherausgeschleudertwerden.
AußerdemkönnteesauchzumKontaktmitdemMesserkommen.Herausgeschleuderte
ObjekteodereinBerührendesMesserskannschwereodertödlicheVerletzungenverursachen.
StellenSiesicher,dassdieHeckauswurfklappeeingesetztist,bevorSieSchnittgutrecyclen.
KuppelnSiedieMessernurein,wenndieHeckauswurfklappeoderderFangkorbeingesetzt
sind.
SammelndesSchnittguts
VerwendenSiedenFangkorb,wennSieSchnittgutundLaubimFangkorbsammelnmöchten.
WARNUNG:
EinverschlissenerFangkorbkanndasAusschleudernkleinerSteineundähnlicher
GegenständeinRichtungdesBenutzersundUnbeteiligterzulassen.Daskannzuschweren
odertödlichenVerletzungenführen.
PrüfenSiedenFangkorbregelmäßig.TauschenSieihn,wennerbeschädigtist,gegeneinen
neuenErsatzkorbdesHerstellersaus.
WARNUNG:
DieMessersindscharf;einBerührenkannzuschwerenVerletzungenführen.
StellenSiedenMotorabundwartenSie,bisallebeweglichenTeilezumStillstandgekommen
sind,bevorSiedieBedienungspositionverlassen.
20

MontierendesFangkorbs
1.StellenSiedenMotorabundwartenSie,bisallebeweglichenTeilezumStillstandgekommensind.
2.HebenSiedashintereAblenkblechanundhaltenSieeshoch(AinBild20).
3.DrückenSiezumEntfernenderHeckauswurfklappemitdemDaumenaufdenRiegelundziehendie
KlappeausderMaschine(BundCvonBild20).
4.SetzenSiedieEndenderFangkorbstangeindieKerbenanderUnterseitedesHolmseinundbewegen
denFangkorbnachvorneundhinten,umsicherzustellen,dassdieEndenderStangerichtiginden
Kerbensitzen(DvonBild20).
5.SenkenSiedasHeckablenkblechab,bisesaufdemFangkorbauiegt.
Bild20
EntfernendesFangkorbs
GEFAHR
DieMaschinekannSchnittgutundandereGegenständedurcheineÖffnungim
Maschinengehäuseherausschleudern.Gegenstände,diemitausreichenderWucht
herausgeschleudertwerden,könnensieundUnbeteiligteschwerodersogartödlichverletzen.
•NehmenSieniedenFangkorbabundlassendanndenMotoran,wenndie
Heckauswurfklappenichteingesetztist.
•ÖffnenSiedasHeckablenkblechderMaschineniebeilaufendemMotor.
1.StellenSiedenMotorabundwartenSie,bisallebeweglichenTeilezumStillstandgekommensind.
2.HebenSiedasHeckablenkblechan.
3.NehmenSiedieFangkorbstangeamFangkorbausdenKerbenanderUnterseitedesGriffs(Avon
Bild19).
4.SetzenSiedieHeckauswurfklappeein(BvonBild19).
g236745
5.SenkenSiedasHeckablenkblech(CvonBild19).
21

Betriebshinweise
AllgemeineHinweise
•LesenSiedieSicherheitsvorschriftenunddiese
Anleitungsorgfältigdurch,bevorSiedieMaschine
inBetriebnehmen.
•RäumenSieGehölz,Steine,Drähte,Äste
undandereFremdkörper,aufdiedasMesser
aufprallenunddieherausgeschleudertwerden
könnten,ausdemArbeitsbereich.
•HaltenSiealleUnbeteiligten,insbesondereKinder
undHaustiere,ausdemEinsatzbereichfern.
•VermeidenSiedenKontaktmitBäumen,Mauern,
BordsteinenundanderenfestenGegenständen.
MähenSienieabsichtlichüberirgendwelchen
Gegenständen.
•StellenSiedenMotorsofortab,wennderMäher
aufeinenGegenstandaufpralltoderanfängtzu
vibrieren,ziehendenKerzensteckervonder
ZündkerzeunduntersuchenSiedenMäherauf
eventuelleBeschädigungen.
•HaltenSiedieMesserwährendderganzen
Mähsaisonscharf.FeilenSieAuskerbungenin
denMessernregelmäßigaus.
WARNUNG:
WennSiedieMaschinemiteinerDrehzahl
einsetzen,dieüberderWerkseinstellung
liegt,kanndieszumAusschleuderneines
TeilsdesMessersoderMotorsinihreoder
dieRichtungvonUnbeteiligtenführen.
Dieskannzuschwerenodertödlichen
Verletzungenführen.
–VerändernSiedieMotordrehzahlnicht.
–WennSiebefürchten,dassdie
Motordrehzahlhöheralsnormal
ist,setzenSiesichmitIhrem
Toro-VertragshändlerinVerbindung.
Mähen
•GraswächstzuverschiedenenZeitenwährend
derSaisonunterschiedlichschnell.Im
HochsommersolltenSiedenRasenmitden
Schnitthöheneinstellungenvon64mm,76mm
oder89mmmähen.MähenSieimmernur
einDritteldesGrashalmsineinemDurchgang.
MähenSienichtunterder64-mm-Einstellung,es
seidenn,dasGraswächstsehrfein,oderesist
SpätherbstunddasGraswachstumlässtnach.
•T auschenSiedieMesserbeiBedarfdurch
OriginalersatzmesserdesHerstellersaus.
•MähenSienurtrockenesGrasoderLaub.Nasses
GrasundLaubneigenzumVerklumpenimGarten
undkönneneinVerstopfendesRasenmähersund
einAbstellendesMotorsverursachen.
WARNUNG:
NassesGrasund/odernasseBlätter
könnenzuschwerenVerletzungenführen,
solltenSiedaraufausrutschenundmit
demMesserinBerührungkommen.
MähenSienuruntertrockenen
Bedingungen.
•ReinigenSiedieUnterseitederMaschinenach
jedemMähen,sieheReinigenunterdemGerät
(Seite23).
•ErhaltenSiedengutenBetriebszustanddes
Motors.
•ReinigenSiedenLuftlterregelmäßig.Beim
MulchenwirdmehrSchnittgutundStaub
aufgewirbeltalsnormalüblich,waszum
VerstopfendesLuftltersundreduzierter
Motorleistungführt.
•StellenSiefüroptimaleErgebnissedie
MotordrehzahlaufSchnell.
•WennSieGrasmähen,daslängerals15cmist,
solltenSiebeimerstenDurchgangdieSchnitthöhe
aufdiehöchsteEinstellungstellenundlangsamer
gehen.MähenSiedannnocheinmalmiteiner
niedrigerenEinstellung,umdemRasendas
gewünschteSchnittbildzuverleihen.Wenn
dasGraszulangistundLaubaufdemRasen
verklumpt,kannderRasenmäherverstopfen,und
derMotorwirdggf.abgestellt.
•WechselnSiehäugdieMährichtung.Dadurch
verteiltsichdasSchnittgutbesseraufder
RasenächeundbewirkteineffektiveresDüngen.
ProbierenSiebeieinemunbefriedigendenSchnittbild
desRasenseinederfolgendenAbhilfenaus:
•SchärfenSiedasMesser.
•GehenSiebeimMähenlangsamer.
•HebenSiedieSchnitthöhederMaschinean.
•MähenSiehäuger.
•LassenSiedieBahnenüberlappen,anstellebei
jedemGangeineneueBahnzumähen.
SchnetzelnvonLaub
•StellenSienachdemMähensicher,dassdie
HälftedesRasensdurchdieSchnittgutdecke
sichtbarist.DabeimüssenSieunterUmständen
mehrmalsüberdasLaubmähen.
22

•StellenSiebeieinerdünnenLaubschichtalle
RäderaufdiegleicheSchnitthöhe.
•MähenSielangsamer,wenndieMaschinedas
Laubnichtfeingenughäckselt.
NachdemEinsatz
HinweisezurSicherheit
nachdemBetrieb
AllgemeineSicherheit
g024281
Bild21
•StellenSiedieMaschineabundwartenSie,bis
allebeweglichenT eilezumStillstandgekommen
sind.LassenSiedieMaschineabkühlen,bevor
Siedieseeinstellen,reinigen,verstauen,oder
reparieren.
•EntfernenSieGrasundSchmutzvonder
Maschine,umeinemBrandvorzubeugen.
WischenSieÖl-undKraftstoffverschüttungenauf.
•LagernSiedieMaschineoderdenBenzinkanister
nieanOrtenmitoffenerFlamme,Funkenoder
Zündamme,z.B.Warmwasserbereiter,oder
andereGeräte.
SicherheitbeimBefördern
•GehenSiebeimLadenundAbladenderMaschine
aufeinen/voneinemTransportmittelvorsichtigvor.
•SichernSiedieMaschinefürdenTransport.
•SchließenSiedenKraftstoffhahnbevorSiedie
MaschinezumSchleppenauaden.
1.Ablenkbleche
Reinigen
Wartungsintervall:NachjederVerwendung
WARNUNG:
DieMaschinekannAblagerungenunterder
Maschinelockern.
•TragenSieeineSchutzbrille.
•BleibenSieinderEinsatzstellung(hinter
demHolm)wennderMotorläuft.
•HaltenSieUnbeteiligtevomBereichfern.
1.StellenSiedieMaschineaufeinebefestigte
OberächeinderNäheeinesGartenschlauchs.
2.LassenSiedenMotoran.
3.HaltenSiedenWasserschlauchaufHolmhöhe
undrichtenSiedenWasserstrahlunmittelbarvor
demrechtenHinterradaufdenBoden(Bild22).
ReinigenunterdemGerät
HaltenSiedieUnterseitederMaschinesauber,umdie
besteLeistungzugarantieren.AchtenSiebesonders
darauf,dieAblenkblechesauberzuhalten(Bild21).
g002275
Bild22
1.RechtesHinterrad
Hinweis:DasWasserspritztdanninden
MesserlaufwegundspültdasSchnittgut
aus.ReinigenSieweitermitWasser,bis
keinSchnittgutmehrvonderUnterseiteder
Maschineausgespültwird.
4.StellenSiedenMotorabundwartenSie,bis
allebeweglichenT eilezumStillstandgekommen
sind.
23

5.DrehenSiedenWasserhahnzu.
6.StartenSiedieMaschineundlassenSiesiefür
einpaarMinutenlaufen,umdieUnterseiteder
Maschineauszutrocknen.
Abschaben
SchabenSieRückständevonderUnterseitedes
Mähwerksab,wennsienichtvollständigdurchdas
Waschenbeseitigtwurden.
1.KlemmenSiedasZündkabelvonderZündkerze
ab(Bild8).
2.EntleerenSiedenKraftstofftank.
WARNUNG:
DasKippendesRasenmäherskann
dazuführen,dassKraftstoffausdem
VergaseroderdemKraftstofftank
ausströmt.Kraftstoffistleichtbrennbar,
hochexplosivundkann,ingewissen
Umständen,zuVerletzungenoder
Sachschädenführen.
VermeidenSieKraftstoffverschüttungen,
indemSiedenMotortrockenlaufen
lassenoderdenKraftstoffmiteiner
Handpumpeabsaugen.SaugenSieden
Kraftstoffnieab.
3.KippenSiedieMaschineaufdierechteSeite
(Luftlternachoben).
4.EntfernenSiedieSchmutz-undSchnittgutrückständemiteinemHartholzschaber.Vermeiden
SieGrateundscharfeKanten.
5.StellenSiedieMaschinewiederindie
Betriebsstellung.
6.SchließenSiedenZündkerzensteckerwieder
andieZündkerzean.
24

Wartung
Hinweis:BestimmenSiedielinkeundrechteSeitederMaschineanhandderüblichenEinsatzposition.
EmpfohlenerWartungsplan
Wartungsintervall
NachachtBetriebsstunden
Nach25Betriebsstunden
BeijederVerwendung
odertäglich
NachjederVerwendung
Alle25Betriebsstunden
Alle40Betriebsstunden
Alle50Betriebsstunden
Wartungsmaßnahmen
•WechselnSiedasMotoröl.
•ZiehenSieloseBefestigungenan.
•ÜberprüfenSiedenMotorölstandundfüllenSiebeiBedarfÖlnach.
•PrüfenSiedasMesserregelmäßigaufAbnutzungundDefekte.
•PrüfenSiedenBeschleunigeraufAbnutzungoderBeschädigungen.
•PrüfenSiedieMesserbremszeitbiszumStillstand.DasMessermussinnerhalbvon
dreiSekundennachdemLoslassendesSchaltbügelszumStillstandkommen.
WendenSiesichsonstfüreineReparaturanIhrenToro-Vertragshändler.
•ÜberprüfenSiedenMotoraufloseoderfehlendeBefestigungen.
•AchtenSieaufKraftstoff-oderÖllecks.
•PrüfenoderreinigenSiedenRücklaufstarterunddasAnsauggitter.
•EntfernenSieSchnittgutundRückständevonderUnterseitedesGehäuses.
•ReinigenSiedenSchaumstoffvorlter(häugerbeistaubigenBedingungen).
•ReinigenSiedieRäderundderZahnräder.
•WechselnSiedasMotoröl(häugerinstaubigenBedingungen).
•SchärfenSiedasSchnittmesserodertauschenSieesaus.Schärfenodertauschen
SiedasMesserhäugeraus,wennraueodersandigeBedingungendieKante
schnellerstumpfmachen.
•EntfernenSieSchnittgutundSchmutzrückständeunterderRiemenabdeckung.
•ReinigenSiedasSchutzblechderMesserbremse.
•Prüfen,reinigenundstellenSiedieZündkerzeein,tauschenSiesiebeiBedarfaus.
Alle100Betriebsstunden
Alle200Betriebsstunden
Alle300Betriebsstunden
•ZiehenSieloseBefestigungenan.
•PrüfenoderreinigenSiedenRücklaufstarterunddasAnsauggitter.
•WechselnSiedenMotoröllteraus.
•LassenSievoneinemofziellenHändlerprüfen,dassdieKraftstoffanlagekeine
Lecksund/odereinedegradierendeKraftstofeitungaufweist.TauschenSieTeile
beiBedarfaus.
•WechselnSiedenPapierluftlteraus(häugerbeistaubigenBedingungen).
•ReinigenSiedenZylinderunddieKühlrippendesZylinderkopfes.
•LassenSiedieMotordrehzahlimLeerlaufvoneinemofziellenMotorservicehändler
prüfenundeinstellen.
•LassenSiedieBrennkammervoneinemofziellenMotorservicehändlerreinigen.
•LassenSiedenVentilabstandvoneinemofziellenMotorservicehändlerprüfen
undeinstellen.
•LassenSiedieVentilkontaktächevoneinemofziellenMotorservicehändler
reinigenundläppen.
Wichtig:WeitereWartungsmaßnahmenndenSieinderBedienungsanleitungdesMotors.
Wartungssicherheit
•StellenSiedieMaschineabundwartenSie,bis
allebeweglichenT eilezumStillstandgekommen
sind.LassenSiedieMaschineabkühlen,bevor
Siedieseeinstellen,reinigen,verstauen,oder
reparieren.
•ZiehenSiedenZündkerzensteckerab,bevorSie
Wartungsarbeitenausführen.
•TragenSiebeimDurchführenvon
WartungsarbeitenHandschuheundeine
Schutzbrille.
•DasMesseristscharf;einKontaktdamitkann
zuschwerenVerletzungenführen.TragenSie
25

Handschuhe,wennSiedasMesserwarten.
FührenSiekeineReparaturenoderModikationen
andenMessernaus.
•ModizierenSieaufkeinenFalldie
Sicherheitsvorkehrungen.PrüfenSieihre
einwandfreieFunktioninregelmäßigen
Abständen.
•EinKippenderMaschinekannzueinem
VerschüttenvonKraftstoffführen.Kraftstoffist
entammbar,explosivundkannVerletzungen
verursachen.LassenSiedenMotorlaufen,bis
keinKraftstoffmehrimTankist,oderpumpen
SiedenKraftstoffab.SiesolltenaufkeinenFall
versuchen,Kraftstoffabzusaugen.
•UmeineoptimaleLeistungderMaschinezu
gewährleisten,verwendenSienurOriginal
ErsatzteileundZubehörvonToro.Die
VerwendungvonErsatzteilenundZubehörvon
anderenHerstellernkannGefahrenbergenund
zumErlöschenderGarantieführen.
1.Abdeckung
2.Schaumvorlterund
Papierluftlter
g005347
Bild23
3.Luftlterunterteil
WartendesLuftlters
Wartungsintervall:Alle25Betriebsstun-
den—ReinigenSiedenSchaumstoffvorlter(häugerbeistaubigen
Bedingungen).
Alle300Betriebsstunden—WechselnSieden
Papierluftlteraus(häugerbeistaubigen
Bedingungen).
Wichtig:LassenSiedenMotornieohneLuftlter
laufen,sonstentstehenschwereMotorschäden.
1.StellenSiedenMotorabundwartenSie,bis
allebeweglichenT eilezumStillstandgekommen
sind.
2.SchließenSiedenZündkerzensteckerab.
3.EntfernenSiedieAbdeckungundreinigenSie
siegründlich(Bild23).
4.NehmenSiedenSchaumvorlterundden
PapierluftlterausdemLuftlterunterteilheraus
(Bild23).
5.EntfernenSiedenSchaumvorltervom
PapierluftlterundwaschenSieihninmilder
Seifenlauge.TupfenSieihndanntrocken.
6.PrüfenSiedenPapierluftlterundtauschenSie
ihnaus,wennerzustarkverschmutztist.
Wichtig:VersuchenSienie,Papierlterzu
reinigen.
7.LegenSiedenSchaumvorlteraufden
Papierlter.
8.SetzenSiedenSchaumvorlterundden
PapierluftlterindasLuftlterunterteilein.
9.SetzenSiedieAbdeckungauf.
WechselndesMotoröls
Wartungsintervall:NachachtBetriebsstunden
Alle50Betriebsstunden
LassenSiedenMotoreinpaarMinutenlaufen,bevor
SiedasÖlwechseln,umesaufzuwärmen.Warmes
ÖließtbesserundführtmehrFremdstoffemitsich.
Motorölsorte
Motorölmenge
Ölviskosität
API-KlassikationSJoderhöher
26
OhneÖllter0,65l;mitÖllter
0,85l
WaschaktivesÖlderSorte
SAE30oderSAE10W-30

1.StellenSiedenMotorabundwartenSie,bis
allebeweglichenT eilezumStillstandgekommen
sind.
2.SchließenSiedenZündkerzensteckerab.
3.EntleerenSiedenKraftstofftank.
4.StellenSieeinepassendeAuffangwanneunter
denPeilstabbzw.Ölablass.
5.ReinigenSiedenBereichumdenPeilstab.
6.EntfernenSiedenPeilstab,indemSieden
Deckelnachlinksdrehenundherausziehen.
7.KippenSiedieMaschineaufdierechteSeite
(Luftlternachoben)undlassenSiedasÖlin
dieAuffangwanneablaufen.
8.StellenSiedenRasenmähernachdem
AblassendesÖlswiederindieBetriebsstellung.
9.FüllenSiefrischesÖlindasKurbelgehäuse
ein,bisderStandamPeilstabrichtigist,siehe
4Motorölnachfüllen(Seite9)
10.SteckenSiedenPeilstabindenFüllstutzenund
drehenSiedanndenDeckelnachrechts,bis
erfestist.
11.WischenSieverschüttetesÖlauf.
12.RecycelnSiedasAltölentsprechenddenörtlich
geltendenVorschriften.
Auswechselndes
Motoröllters
Wartungsintervall:Alle200Betriebsstunden
1.LassenSiedenMotorlaufen,umdasÖlzu
erwärmen.
g024331
Bild24
1.Öllter
7.EntfernenSiedenÖllter.
8.SchmierenSiemitdemFingeretwasÖlaufdie
DichtungdesneuenÖllters(Bild26).
g002805
Bild25
1.Dichtung
WARNUNG:
WennderMotorgelaufenist,kanndas
Ölheißgenugsein,umbeimKontakt
schwereVerletzungenzuverursachen.
VermeidenSiedenKontaktmitheißem
Öl,wennSiediesesablassen.
2.StellenSiedenMotorabundwartenSie,bis
allebeweglichenT eilezumStillstandgekommen
sind.
3.SchließenSiedenZündkerzensteckerab.
4.EntleerenSiedenKraftstofftank.
5.LassenSiedasMotorölab,sieheWechselndes
Motoröls(Seite26).
6.LegenSieeinenLappenunterdenÖllter(Bild
24),umdasÖlaufzufangen,dasggf.beim
EntfernendesÖlltersausläuft.
9.DrehenSiedenneuenFilternachrechts,bisdie
DichtungdasFiltergehäuseberührt.DrehenSie
ihndannumeineweitere3/4-Umdrehung.
10.FüllenSiedasKurbelgehäusebiszur
Voll-MarkierungamPeilstabmitfrischemÖl,
siehe4Motorölnachfüllen(Seite9)
11.SchließenSiedenZündkerzensteckerwieder
andieZündkerzean.
12.LassenSiedenMotordreiMinutenlanglaufen.
13.StellenSiedenMotorabundwarten,bisalle
beweglichenTeilezumStillstandgekommen
sind.PrüfenSiedannamFilteraufDichtheit.
14.FüllenSieanschließendÖlnach,umdenVerlust
indemFilterwettzumachen.Siehe4Motoröl
nachfüllen(Seite9).
15.EntsorgenSiedenaltenÖllterordnungsgemäß.
27

WartenderZündkerze
Einstellendes
Wartungsintervall:Alle100Betriebsstun-
den—Prüfen,reinigenundstellen
SiedieZündkerzeein,tauschenSie
siebeiBedarfaus.
VerwendenSieeineNGKBPR5ESodergleichwertige
Zündkerze.
1.StellenSiedenMotorabundwartenSie,bis
allebeweglichenT eilezumStillstandgekommen
sind.
2.KlemmenSiedasZündkabelvonderZündkerze
ab(Bild8).
3.ReinigenSiedenBereichumdieZündkerze
herum.
4.EntfernenSiedieZündkerzeausdem
Zylinderkopf.
Wichtig:TauschenSieeinegerissene,
verrußteoderverschmutzteZündkerze
aus.ReinigenSieniedieElektroden,da
AbschabungenindenZylindereindringen
unddenMotorbeschädigenkönnten.
5.StellenSiedenElektrodenabstandander
Zündkerzeauf0,76mmein,sieheBild26.
Selbstantriebs
WenndieMaschineneuist,derSelbstantrieb
ausgefallenistoderdieMaschinenachvornekriecht,
müssenSiedenTreibriemeneinstellen.
1.StellenSiedieMaschineaußenaufeine
befestigteOberächeinderNäheeinerWand,
damitsichdieMaschinebeilaufendemMotor
nichtvorwärtsbewegenkann.
2.StellenSiedieMaschineso,dassdie
VorderreifendieWandberühren.
Hinweis:StellenSiesicher,dassderBereich
gutbelüftetistundkeineGegenständeenthält,
dievonderMaschineaufgegriffenwerden
könnten.
3.SchiebenSieGetriebeindendrittenGang.
4.LassenSiedenMotoran,sieheAnlassendes
Motors(Seite16).
5.ZiehenSiedenSelbstantriebsbügelzumHolm.
Hinweis:DieRädersolltensichdrehen,wenn
derSelbstantriebsBügelgeradedenHolm
berührt.
6.StellenSiedenMotorab.
Bild26
1.IsolierunganmittlererElektrode
2.SeitlicheElektrode
3.Elektrodenabstand(nichtmaßstabsgetreu)
6.SetzenSiedieZündkerzevorsichtigmitder
Handein(zumVermeideneinesÜberdrehens),
bissiefestgezogenist.
7.ZiehenSiedieZündkerzemit23N·man.
Wichtig:EinelockereZündkerzekannsehr
heißwerdenunddenMotorbeschädigen.Ein
zustarkesFestziehenderZündkerzekann
dasGewindeimZylinderkopfbeschädigen.
8.SchließenSiedenZündkerzensteckerwieder
andieZündkerzean.
7.WennSiedieMaschineeinstellenmüssen,
führenSieeinenderfolgendenSchritteaus:
•WennsichdieRädernichtbei
eingekuppeltemSelbstantriebsbügel
drehen,istderTreibriemenzulose.Drehen
SiedasSteuerhandradfürdenRadantrieb
(Bild27)umeineUmdrehungnachrechts
undwiederholenSiedieSchritte4bis6.
g000533
g024468
Bild27
1.SteuerhandradfürdenRadantrieb
•WennsichdieRäderdrehen,bevorder
Selbstantriebsbügelganzeingekuppeltist,
istderTreibriemenzufest.DrehenSiedas
SteuerhandradfürdenRadantrieb(Bild
27)umeineUmdrehungnachlinksund
wiederholenSiedieSchritte4bis6.
28

8.DrehenSiebeieinemneuenTreibriemendas
HandradderAntriebswelleumeineweitere
Umdrehungnachrechts,umdienormale
DehnungdesRiemensinderEinfahrzeitzu
ermöglichen.
Hinweis:SiekönnendiesenSchrittauslassen,
wennSieeinengebrauchtenRiemeneinstellen.
WartendesSchnittmessers
MähenSieimmermiteinemscharfenMesser.Ein
scharfesMessermähtsauber,ohneGrashalmezu
zerreißenoderzuzerschnetzeln.
1.StellenSiedenMotorabundwartenSie,bis
allebeweglichenT eilezumStillstandgekommen
sind.
2.SchließenSiedenZündkerzensteckerab.
3.SchließenSiedenKraftstoffhahndurchDrehen
desHebelsnachlinks(Bild15).
4.EntleerenSiedenKraftstofftank.
5.KippenSiedieMaschineaufdierechteSeite
(Luftlternachoben),wieinBild28abgebildet.
EinsatzdesRasenmähersprüfen.WennSieeinen
SchlitzodereineAbnutzung(Bild29BundCBild
29)feststellen,tauschenSiedasMesseraus,siehe
EntfernendesMessers(Seite30).
Bild29
1.Windügel
2.DeracheT eildes
Messers
3.Abnutzung
4.EsbildetsicheinSchlitz
Hinweis:MontierenSiefüreineoptimaleLeistung
einneuesMesservordemSaisonbeginn.FeilenSie
imLaufederSaisonallekleinerenAuskerbungenaus,
umdiescharfeMesserkantebeizubehalten.
g002278
Bild28
1.Messer3.Beschleuniger
2.Messermuttern
PrüfendesMessers
Wartungsintervall:BeijederVerwendungoder
täglich—PrüfenSiedasMesser
regelmäßigaufAbnutzungund
Defekte.
PrüfenSievorsichtigdieSchärfeundAbnutzung
desMessers,besondersandenStellen,andenen
sichacheundgebogeneTeileberühren(Bild29A).
DaSandundanderesreibendesMaterialdasMetall
abschleifenkann,dasdieachenmitdengebogenen
Teilenverbindet,müssenSiedasMesservorjedem
GEFAHR
EinabgenutztesoderbeschädigtesMesser
kannzerbrechen.Herausgeschleuderte
MesserstückekönnenSieoderUnbeteiligte
treffenundschwereodertödliche
Verletzungenverursachen.
•PrüfenSiedasMesserregelmäßigauf
AbnutzungundDefekte.
•TauschenSieeinabgenutztesoder
defektesMesseraus.
g024280
PrüfendesBeschleunigers
Wartungsintervall:BeijederVerwendung
odertäglich—PrüfenSieden
BeschleunigeraufAbnutzungoder
Beschädigungen.
PrüfenSiedenBeschleunigeraufextreme
Abnutzungen(Bild30).DaSandundanderes
reibendesMaterialdasMetallabschleifenkann
(besondersindemalsPunkt2inBild30abgebildeten
Bereich),prüfenSiedenBeschleunigervordem
VerwendenderMaschine.WennSiefeststellen,
dasseineNaseamBeschleunigerzueinerscharfen
Kanteabgenutztist,oderdasseinRissvorhandenist,
tauschenSiedenBeschleunigeraus,sieheEntfernen
desMessers(Seite30).
29

Bild31
g002279
Bild30
1.Beschleuniger3.Nase
2.Abnutzungsbereich4.Rissbildung
WARNUNG:
Einabgenutzteroderbeschädigter
BeschleunigerkannbrechenundeinTeildes
BeschleunigerskanninIhreoderdieRichtung
vonUnbeteiligtenherausgeschleudertwerden
undschwereodertödlicheVerletzungen
verursachen.
•PrüfenSiedenBeschleunigerregelmäßig
aufAbnutzungundDefekte.
•TauschenSieeinenabgenutztenoder
defektenBeschleunigeraus.
EntfernendesMessers
1.FassenSiedasEndedesMessersmiteinem
dickenHandschuhanoderwickelnSieeinen
LappenumdasMesser.
2.EntfernenSiedieMessermuttern,dasGaspedal
unddasMesser(Bild29).
g027496
1.SchärfenSiedasMesser
nurindiesemWinkel.
2.BehaltenSiehierden
ursprünglichenRadius
bei.
AuswuchtendesMessers
1.PrüfenSiedieAuswuchtungdesMessers,
indemSiedasmittlereLochimMesserüber
einenNagelodereinenSchraubenzieherschaft
hängen,denSiehorizontalineinen
Schraubstockeinklemmen(Bild32).
g002280
Bild32
Hinweis:SiekönnendieWuchtgleichfallsin
einemfürdengewerblichenBedarferhältlichen
Messerauswuchtgerätprüfen.
2.WennsicheinEndedesMessersnachunten
dreht,feilenSiediesesEndeetwasab(nichtdie
SchnittkanteoderinderNähederSchnittäche),
bissichbeideEndendesMessersnichtmehr
nachuntendrehen.
SchärfendesMessers
Wartungsintervall:Alle50Betriebsstun-
den—SchärfenSiedasSchnittmesserodertauschenSieesaus.
SchärfenodertauschenSiedas
Messerhäugeraus,wennraue
odersandigeBedingungendie
Kanteschnellerstumpfmachen.
FeilenSiedieOberseitedesMessers,umden
ursprünglichenSchnittwinkelbeizubehalten(Bild
31A),unddenRadiusderinnerenSchnittkante(Bild
31B).DasMesserbleibtausgewuchtet,wennSie
diegleicheMengeMetallvonbeidenSchnittkanten
entfernen.
MontierendesMessers
1.MontierenSieeinscharfes,ausgewuchtetes
MesservonToro,dasGaspedalunddie
Messermuttern.DieWindügelmüssennach
obeninRichtungMähergehäuseszeigen.
Hinweis:ZiehenSiedieMessermutternmit
20-37N·man.
WARNUNG:
DerEinsatzderMaschineohneden
Beschleunigerkanndazuführen,dass
sichdasMesserbewegt,verbiegtoder
bricht.Dieskannzuschwerenoder
tödlichenVerletzungenfürsieoder
Unbeteiligteführen.
SetzenSiedieMaschinenieohne
Beschleunigerein.
30

2.StellenSiedieMaschinewiederindie
Betriebsstellung.
Einstellendes
Messerbremszugs
DerMesserbremszugwirdimWerkeingestellt.
Siemüssenihnnureinstellen,wennSieden
MesserbremszugoderdenMesserbremsriemen
auswechseln.WennSiedenZugauswechseln
müssen,tauschenSiedenZugunddenRiemen
gleichzeitigaus.
1.StellenSiedenMotorabundwartenSie,bis
allebeweglichenT eilezumStillstandgekommen
sind.
2.SchließenSiedenZündkerzensteckerab.
3.SetzenSieeinenneuenMesserbremsriemen
einundbauendieMaschine(außerdenzwei
RiemenabdeckungenobenamMähergehäuse)
zusammen.
4.SetzenSieeinenneuenMesserbremszug;
ziehenSiedieKabelklemmenobenam
Mähergehäusejedochnichtan(Bild33).
Bild33
1.Feder2.Kabelklemmeund
Schraube
5.LösenSiedieSchraubeanderSeilzugklemme
(Bild33).
6.ZiehenSieamKabelmantel,umdasSpielzu
entfernen(Bild34).
Hinweis:SpannenSiedieFedernichtan.
31
g024466
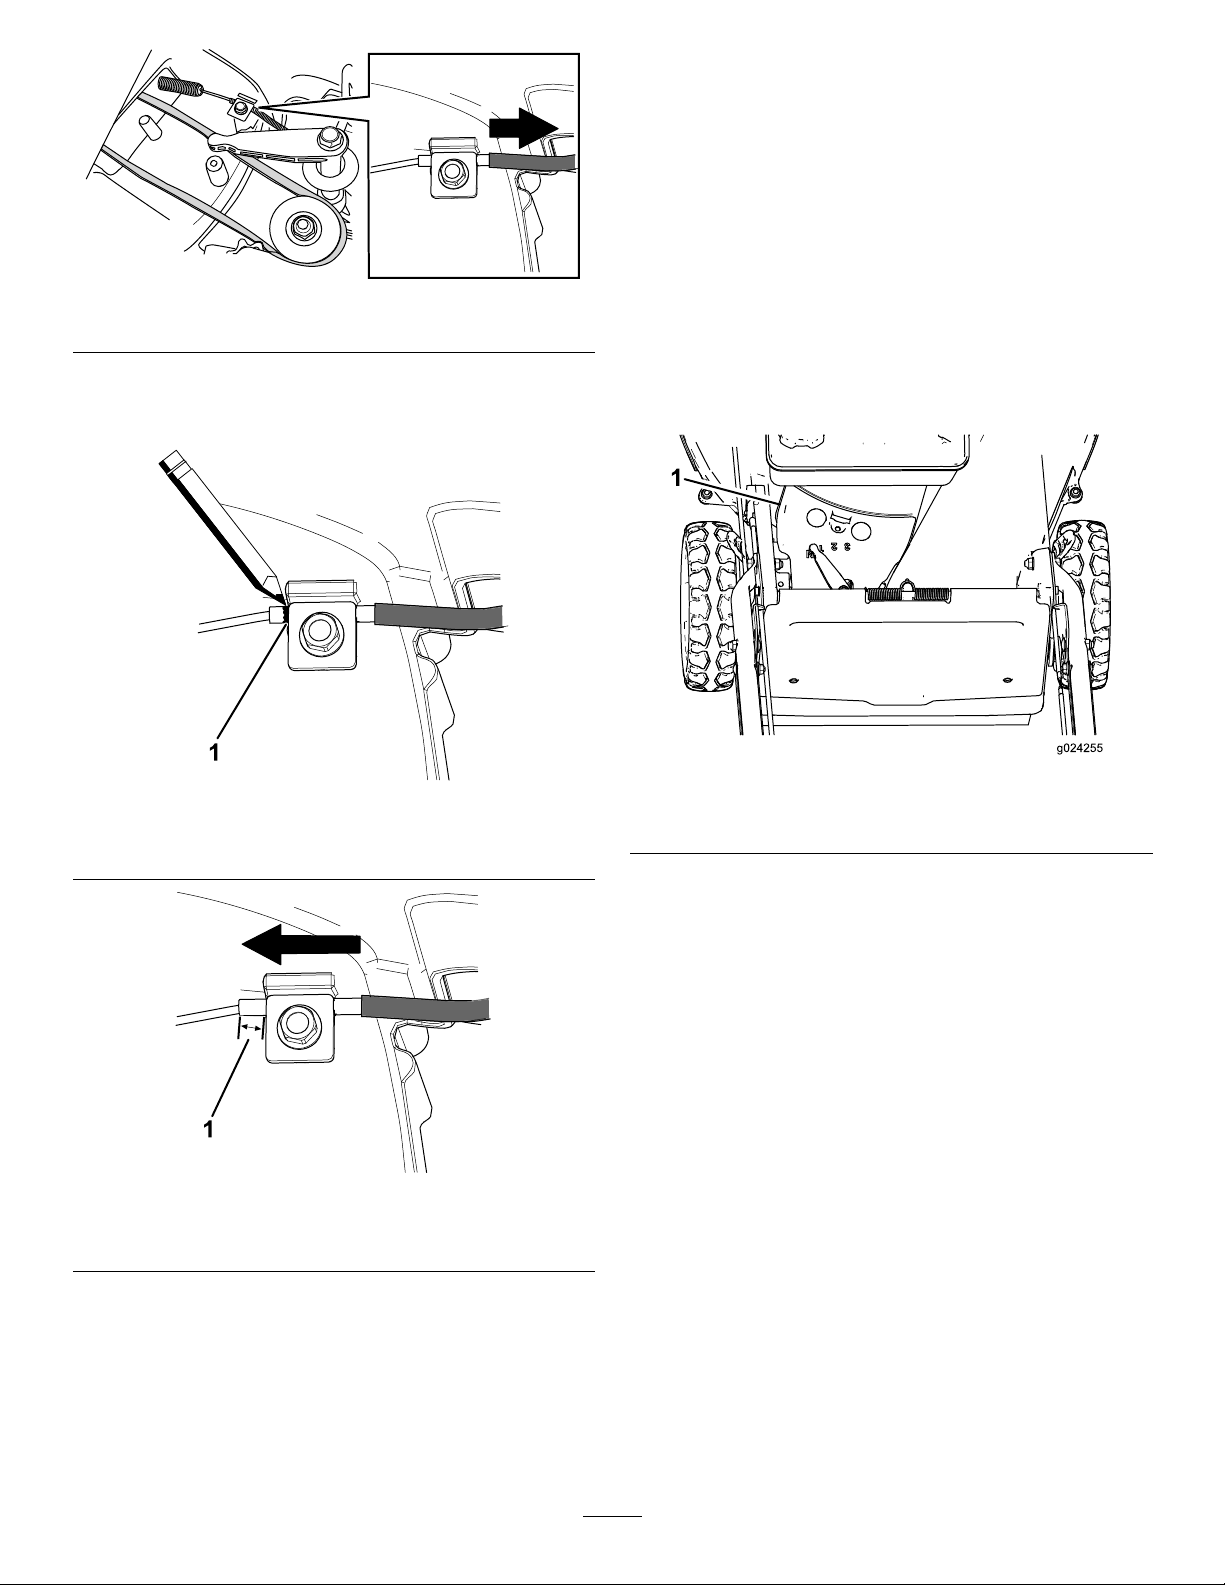
Bild34
7.MarkierenSiedenBremszug(Bild35)und
stellenSiedanndenMantelein,bisdasSpiel
ca.8mmist(Bild36).
Reinigenunterder
Riemenabdeckung
Wartungsintervall:Alle50Betriebsstun-
den—EntfernenSieSchnittgut
undSchmutzrückständeunterder
Riemenabdeckung.
1.StellenSiedenMotorabundwartenSie,bis
g239131
allebeweglichenT eilezumStillstandgekommen
sind.
2.SchließenSiedenZündkerzensteckerab.
3.NehmenSiedieRiemenabdeckung(Bild37)
vomMähwerkgehäuseab.
Bild35
1.MarkierenSiedenZughier
Bild36
1.Spielvon8mm
8.ZiehenSiedieKabelklemmenschraubemit
11-14N·man,umdieEinstellungzuarretieren.
9.BefestigenSiedieRiemenabdeckungmitden
Schrauben,dieSiebeimAbnehmenderzwei
Riemenabdeckungenentfernthaben.
10.SchließenSiedenZündkerzensteckerwieder
andieZündkerzean.
g024255
g239133
1.Riemenabdeckung
Bild37
4.HebenSiedieAbdeckunghochundbürstenalle
RückständeausdemRiemenbereichheraus.
5.BringenSiedieRiemenabdeckungwiederan.
6.SchließenSiedenZündkerzensteckerwieder
andieZündkerzean.
g239134
32

ReinigendesSchutzblechs
derMesserbremse
Wartungsintervall:Alle50Betriebsstunden
ReinigenSiedasSchutzblechderMesserbremse,
umdieoptimaleLeistungzugarantierenundeinen
VerschleißderT eilezuvermeiden.ReinigenSie
dasSchutzblechderMesserbremse,wennSiedas
Messerschärfen,daSiedasMesserzumEntfernen
desSchutzblechesderMesserbremseentfernen
müssen.
1.StellenSiedenMotorabundwartenSie,bis
allebeweglichenT eilezumStillstandgekommen
sind.
2.SchließenSiedenZündkerzensteckerab.
3.SchließenSiedenKraftstoffhahndurchDrehen
desHebelsnachlinks(Bild15).
4.EntleerenSiedenKraftstofftank.
5.KippenSiedieMaschineaufdierechteSeite
(Luftlternachoben).
WARNUNG:
DasKippendesRasenmäherskann
dazuführen,dassKraftstoffausdem
VergaseroderdemKraftstofftank
ausströmt.Kraftstoffistleichtbrennbar,
hochexplosivundkann,ingewissen
Umständen,zuVerletzungenoder
Sachschädenführen.
VermeidenSieBenzinverschüttungen
durchBefolgenderAnweisungen
zumEntleerendesKraftstofftanks;
verwendenSienieeinenSiphon.
Bild38
1.Messer
2.Messermuttern
3.Beschleuniger
7.EntfernenSiedieSchrauben,mitder
dasSchutzblechderMesserbremseam
Mähergehäusebefestigtist(Bild38).
8.EntfernenSiedasSchutzblechder
Messerbremseundbürstenoderblasen
SiealleRückständeunterdemSchutzblechund
umdieMesserbremseab.
9.ZiehendieSchraubenan,mitdasSchutzblech
derMesserbremseamGehäusezubefestigen.
10.MontierenSiedasMesser,dasGaspedalund
diezweiMessermuttern.
11.StellenSiedieMaschinewiederindie
Betriebsstellung.
4.Schraube
5.Schutzblechder
Messerbremse
ReinigenderRäder
g024282
6.EntfernenSiediezweiMessermuttern,das
GaspedalunddasMesser(Bild38).
Wartungsintervall:Alle40Betriebsstunden
1.NehmenSiedieHinterräderabundentfernen
RückständevomZahnradbereich.
33

Einlagerung
FührenSiedieempfohlenenWartungsarbeitendurch,
umdieMaschinefürdiesaisonbedingteEinlagerung
vorzubereiten;sieheWartung(Seite25).
LagernSiedieMaschineaneinemkühlen,sauberen
undtrockenenOrtein.DeckenSiedieMaschineab,
umsiesauberundgeschütztzuhalten.
Sicherheitbeider
Einlagerung
StellenSiedieMaschineabundwartenSie,bisalle
g033535
Bild39
1.Zahnräder
beweglichenTeilezumStillstandgekommensind.
LassenSiedieMaschineabkühlen,bevorSiediese
einstellen,reinigen,verstauen,oderreparieren.
2.TragenSienachdemReinigenetwas
GleitschutzmittelaufdieZahnräderauf.
Hinweis:WennSiedieMaschineinextremen
Bedingungeneinsetzen,haltendieZahnräderlänger,
wennSiedieRäderhäugerreinigen.
Hinweis:ReinigenSiedieLagernichtmit
einemHochdruckreiniger,dadieLagerdichtungen
beschädigtwerdenkönnen.
Vorbereitender
Kraftstoffanlage
EntleerenSiedenKraftstofftankbeimletztenMähen
derSaison,bevorSiedieMaschineeinlagern.
1.LassenSiedenMotorlaufen,bisderMotoraus
Kraftstoffmangelabstellt.
2.StartenSiedenMotormitChokeundlassenden
Motornocheinmalan.
3.LassenSiedenMotorlaufen,biserabstellt.
WennsichderMotornichtmehrstartenlässt,ist
erausreichendtrocken.
VorbereitendesMotors
1.WechselnSiedasÖlimKurbelgehäuse,wenn
derMotornochwarmist,sieheWechselndes
Motoröls(Seite26).
2.NehmenSiedieZündkerzeheraus.
3.GießenSiemiteinerÖlkanneca.30ml
MotoröldurchdasZündkerzenlochindas
KurbelgehäusedesMotors.
4.DrehenSiedenMotormehrmalsmitHilfe
desRücklaufstarterseils,umdasÖlim
KurbelgehäusedesMotorszuverteilen.
5.DrehenSiedieZündkerzewiederein,aber
setzenSiedenZündkerzensteckernichtauf.
AllgemeineAngaben
1.ReinigenunterdemGerät;sieheReinigenunter
demGerät(Seite23).
2.EntfernenSieSchmutzundSchnittgutrückständevomZylinder,denZylinderkopfrippen
undvomVentilatorgehäuse.
34

3.EntfernenSieSchnittgut,Schmutzund
FettrückständevondenexternenTeilendes
Motors,derMotorhaubeundderOberseitedes
Mähergehäuses.
4.PrüfenSiedenMesserzustand;siehePrüfen
desMessers(Seite29).
5.PrüfenSiedenZustanddesBeschleunigers,
siehePrüfendesBeschleunigers(Seite29).
6.NurModellemitMesserbremse:Reinigen
SiedasSchutzblechderMesserbremse,siehe
ReinigendesSchutzblechsderMesserbremse
(Seite33).
7.WartenSiedenLuftlter;sieheWartendes
Luftlters(Seite26).
8.ZiehenSiealleSchraubenundMutternan.
9.BessernSieLackschädenmitLackaus,den
SievonIhremT oro-Vertragshändlerbeziehen
können.
Herausnehmendes
Rasenmähersausder
Einlagerung
1.ZiehenSiealleBefestigungenan.
2.EntfernenSiedieZündkerzeunddrehen
SiedenMotorschnellmitdemAnlasser,um
überüssigesÖlausdemZylinderzuentfernen.
3.ReinigenSiedieZündkerzeoderersetzen
diese,wennsieangerissen/zerbrochenistoder
wenndieElektrodenabgenutztsind.
4.SetzenSiedieZündkerzeein,sieheWartender
Zündkerze(Seite28).
5.FührenSiedieempfohlenenWartungsarbeiten
durch,sieheWartung(Seite25).
6.FüllenSiedenKraftstofftankmitfrischem
Kraftstoffauf.
7.PrüfenSiedenMotorölstand.
8.SchließenSiedenZündkerzensteckerwieder
andieZündkerzean.
35

Fehlersucheund-behebung
Problem
DerMotorsolltenichtanspringen.
DerMotorspringtnurschweranoder
verliertanLeistung.
MöglicheUrsacheBehebungsmaßnahme
1.DerKraftstofftankistleer,oderdie
KraftstoffanlageenthältaltenKraftstoff.
2.DerGasbedienungshebelstehtnicht
aufCHOKE.
3.DerZündkerzensteckeristnichtauf
derZündkerze.
4.DieZündkerzeweistEinkerbungen
auf,istverschmutztoderhatden
falschenElektrodenabstand.
1.DerKraftstofftankenthältalten
Kraftstoff.
2.DerLuftltereinsatzistverschmutzt
undbehindertdieLuftströmung.
3.DieUnterseitedesGerätesweist
SchnittgutrückständeundSchmutz
auf.
4.DieZündkerzeweistEinkerbungen
auf,istverschmutztoderhatden
falschenElektrodenabstand.
5.DerMotorölstandistzuniedrig,oder
dasÖlistverschmutzt.
1.EntleerenSiedenKraftstofftank
und/oderfüllenihnmitfrischem
Kraftstoffauf.WennSiedasProblem
nichtbeseitigenkönnen,wendenSie
sichbitteanIhrenVertragshändler.
2.StellenSiedenGasbedienungshebel
aufCHOKE.
3.SchließenSiedenZündkerzenstecker
wiederandieZündkerzean.
4.PrüfenSiedieZündkerzeundstellen
SiebeiBedarfdenElektrodenabstand
ein.ErsetzenSiedieZündkerze,
wenndieseEinkerbungenaufweist,
verschmutztodergerissenist.
1.EntleerenSiedenKraftstofftankund
füllenihnmitfrischemKraftstoffauf.
2.ReinigenSiedenVorreinigerdes
Luftltersund/odertauschenden
Papierluftlteraus.
3.ReinigenSiedieUnterseitedes
Mähwerks.
4.PrüfenSiedieZündkerzeundstellen
SiebeiBedarfdenElektrodenabstand
ein.ErsetzenSiedieZündkerze,
wenndieseEinkerbungenaufweist,
verschmutztodergerissenist.
5.PrüfenSiedasMotoröl.WechselnSie
verschmutztesÖlausoderfüllenSie
beiniedrigemÖlstandÖlnach.
DerMotorläuftnichtrund.
DieMaschineoderderMotorvibriertstark.
1.DerZündkerzensteckeristnichtauf
derZündkerze.
2.DieZündkerzeweistEinkerbungen
auf,istverschmutztoderhatden
falschenElektrodenabstand.
3.DerGasbedienungshebelstehtnicht
aufSCHNELL.
4.DerLuftltereinsatzistverschmutzt
undbehindertdieLuftströmung.
1.DasMesseristverbogenoder
unwuchtig.
2.DieMesserbefestigungsmutternsind
locker.
3.DieUnterseitedesGerätesweist
SchnittgutrückständeundSchmutz
auf.
4.DieMotorbefestigungsschraubensind
locker.
1.SchließenSiedenZündkerzenstecker
wiederandieZündkerzean.
2.PrüfenSiedieZündkerzeundstellen
SiebeiBedarfdenElektrodenabstand
ein.ErsetzenSiedieZündkerze,
wenndieseEinkerbungenaufweist,
verschmutztodergerissenist.
3.StellenSiedenGasbedienungshebel
indieSCHNELL-Stellung.
4.ReinigenSiedenVorreinigerdes
Luftltersund/odertauschenden
Papierluftlteraus.
1.WuchtenSiedasMesseraus.
TauschenSieverbogeneMesseraus.
2.ZiehenSiedieMutternfest.
3.
ReinigenSiedieUnterseitedes
Mähwerks.
4.ZiehenSiedieMotorbefestigungsschraubenan.
36

Problem
MöglicheUrsacheBehebungsmaßnahme
DasSchnittmusteristnichtgleichmäßig.
DerAuswurfkanalverstopft.
DerSelbstantriebderMaschine
funktioniertnicht.
1.NichtallevierRädersindaufdie
gleicheSchnitthöheeingestellt.
2.DasMesseriststumpf.2.SchärfenSiedasMesserundwuchten
3.Siemähenwiederholtimgleichen
Muster.
4.DieUnterseitedesGerätesweist
SchnittgutrückständeundSchmutz
auf.
1.DerGasbedienungshebelstehtnicht
derSCHNELLStellung.
2.DieSchnitthöheistzuniedrig.2.VerwendenSieeinehöhere
3.Siemähenzuschnell.3.GehenSielangsamer.
4.DasGrasistnass.4.LassenSiedasGrasvordemMähen
5.DieUnterseitedesGerätesweist
SchnittgutrückständeundSchmutz
auf.
1.DerTreibriemendesSelbstantriebsist
falscheingestelltoderdefekt.
2.UnterderRiemenabdeckungbenden
sichSchmutzrückstände.
1.StellenSieallevierRäderaufdie
gleicheSchnitthöheein.
esaus.
3.VariierenSieIhrMähmuster.
4.ReinigenSiedieUnterseitedes
Mähwerks.
1.StellenSiedenGasbedienungshebel
indieSCHNELL-Stellung.
Schnitthöhe.
abtrocknen.
5.ReinigenSiedieUnterseitedes
Mähwerks.
1.StellenSiedenBowdenzugdes
Selbstantriebsein.T auschenSieden
ZugbeiBedarfaus.
2.EntfernenSiedieSchmutzrückstände.
37

Hinweise:

EEA/UKDatenschutzerklärung
TorosVerwendungIhrerpersönlichenInformationen
TheToroCompany(„Toro“)respektiertIhrePrivatsphäre.WennSieunsereProduktekaufen,könnenwirbestimmtepersönlicheInformationenüber
Siesammeln,entwederdirektvonIhnenoderüberIhrelokaleToro-NiederlassungoderIhrenHändler.T oroverwendetdieseInformationen,um
vertraglicheVerpichtungenzuerfüllen–z.B.umIhreGarantiezuregistrieren,IhrenGarantieanspruchzubearbeitenoderSieimFalleeinesRückrufs
zukontaktieren–undfürlegitimeGeschäftszwecke–z.B.umdieKundenzufriedenheitzumessen,unsereProduktezuverbessernoderIhnen
ProduktinformationenzurVerfügungzustellen,diefürSievonInteresseseinkönnten.T orokanndieInformationenimRahmendieserAktivitätenan
ToroTochtergesellschaften,HändleroderGeschäftspartnerweitergeben.WirkönnenauchpersönlicheDatenoffenlegen,wenndiesgesetzlich
vorgeschriebenistoderimZusammenhangmitdemV erkauf,KaufoderderFusioneinesUnternehmens.ToroverkauftIhrepersönlichenInformationen
niemalsananderenUnternehmen.
SpeicherungIhrerpersönlichenDaten
TorowirdIhrepersönlichenDatensolangeaufbewahren,wieesfürdieobengenanntenZweckerelevantistundinÜbereinstimmungmitden
gesetzlichenBestimmungen.FürweitereInformationenüberdiegeltendenAufbewahrungsfristenwendenSiesichbitteanlegal@toro.com.
TorosEngagementfürSicherheit
IhrepersönlichenDatenkönnenindenUSAodereinemanderenLandverarbeitetwerden,indemmöglicherweisewenigerstrengeDatenschutzgesetze
geltenalsinIhremWohnsitzland.WannimmerwirIhreDatenaußerhalbIhresWohnsitzlandesübermitteln,werdenwirdiegesetzlichvorgeschriebenen
Schritteunternehmen,umsicherzustellen,dassangemesseneSicherheitsvorkehrungenzumSchutzIhrerDatengetroffenwerdenundum
sicherzustellen,dassdiesesicherbehandeltwerden.
ZugangundKorrektur
SiehabendasRecht,IhrepersönlichenDatenzukorrigierenundzuüberprüfenoderderVerarbeitungIhrerDatenzuwidersprechenbzw.diese
einzuschränken.BittekontaktierenSieunsdazuperE-Mailunterlegal@toro.com.WennSieBedenkenhaben,wieT oromitIhrenDatenumgegangenist,
bittenwirSie,diesdirektmitunszubesprechen.BittebeachtenSie,dasseuropäischeBürgerdasRechthaben,sichbeiIhrerDatenschutzbehörde
zubeschweren.
374-0282RevC


Cortacéspeddeservicio
FormNo.3418-482RevC
pesadoRecycler
®
conreciclado/ensacadotrasero
Nºdemodelo22280—Nºdeserie400000000ysuperiores
de53cm
Registresuproductoenwww.Toro.com.
Traduccióndeloriginal(ES)
*3418-482*

Esteproductocumpletodaslasdirectivaseuropeas
aplicables;sideseamásdetalles,consultela
DeclaracióndeConformidad(Declarationof
Conformity–DOC)decadaproducto.
Parbrutooneto:Elparbrutoonetodeestemotor
fuecalculadaporelfabricantedelmotorconarreglo
aloestipuladoeneldocumentoJ1940delaSociety
ofAutomotiveEngineers(SociedaddeIngenieros
delAutomóvil–SAE).Debidoaqueelmotorestá
conguradoparacumplirlosrequisitosdeseguridad,
emisionesyoperación,supotenciarealenestetipo
decortacéspedserásignicativamentemenor.Vaya
awww.Toro.comparaverlasespecicacionesdesu
modelodecortacésped.
Nomanipulenidesactivelosdispositivosdeseguridad
delamáquina,ycompruebesufuncionamiento
regularmente.Nointenteajustarnimanipularel
controldevelocidaddelmotor;silohace,puedecrear
condicionesinsegurasquepuedenprovocarlesiones
personales.
sobrelagarantía,laspiezas,yotrainformación
sobreelproducto.
g333679
Figura1
1.Ubicacióndelosnúmerosdemodeloydeserie
Nºdemodelo
Nºdeserie
Estemanualidenticapeligrospotencialesycontiene
mensajesdeseguridadidenticadosporelsímbolo
dealertadeseguridad(Figura2),queseñalaun
peligroquepuedecausarlesionesgravesolamuerte
siustednosiguelasprecaucionesrecomendadas.
Introducción
Estecortacéspedmanualdecuchillarotativaestá
diseñadoparaserusadoporusuariosdomésticos
oporoperadoresprofesionalescontratados.
Estádiseñadoprincipalmenteparasegarcésped
bienmantenidoenzonasverdesresidencialeso
comerciales.Noestádiseñadoparacortarmalezao
paraaplicacionesagrícolas.
Leaestemanualdetenidamenteparaaprendera
utilizarymantenercorrectamentesuproducto,y
paraevitarlesionesydañosalproducto.Ustedesel
responsabledeoperarelproductodeformacorrecta
ysegura.
Visitewww.Toro.comparaobtenermásinformación,
incluidosconsejosdeseguridad,materialesde
formación,informaciónsobreaccesorios,ayuda
paraencontraraundistribuidoropararegistrarsu
producto.
Sinecesitaasistenciatécnica,piezasgenuinas
delfabricanteoinformaciónadicional,póngaseen
contactoconunServicioTécnicoAutorizadooconel
Serviciodeatenciónalclientedelfabricanteytengaa
manoelnúmerodeserieydemodelodelproducto.
Figura1identicalaubicaciónenelproductodelos
númerosdemodeloydeserie.Escribalosnúmeros
enelespacioprovisto.
g000502
Figura2
Símbolodealertadeseguridad
Estemanualutiliza2palabraspararesaltar
información.Importantellamalaatenciónsobre
informaciónmecánicaespecial,yNotaresalta
informacióngeneralquemereceunaatención
especial.
Importante:Consusmartphoneotablet,
escaneeelcódigoQRqueapareceenlapegatina
delnúmerodeserieparaaccederainformación
©2020—TheToro®Company
8111LyndaleAvenueSouth
Bloomington,MN55420
Póngaseencontactoconnosotrosenwww.Toro.com.
2
Reservadostodoslosderechos
ImpresoenMéxico

Contenido
Seguridad.................................................................4
Seguridadengeneral.........................................4
Pegatinasdeseguridadeinstrucciones.............4
Montaje.....................................................................6
1Retiradadelprotectordeloscables..................6
2Instalacióndelmanillar....................................7
3Instalacióndelprotectordeloscables..............7
4Añadidodeaceitealmotor...............................9
5Ensamblajedelabolsaderecogida...............10
6Ajustedelatransmisiónautopropul-
sada..............................................................10
Elproducto...............................................................11
Especicaciones...............................................11
Aperos/accesorios.............................................11
Antesdelfuncionamiento....................................12
Seguridadantesdeluso...................................12
Llenadodeldepósitodecombustible................12
Comprobacióndelniveldeaceitedel
motor.............................................................13
Ajustedelaalturadelmanillar..........................14
Ajustedelaalturadecorte................................15
Duranteelfuncionamiento...................................16
Seguridadduranteeluso..................................16
Arranquedelmotor...........................................16
Paradadelmotor..............................................17
Utilizacióndelatransmisiónautopropulsada
yactivacióndelascuchillas...........................17
Comprobacióndelembraguedefrenode
cuchilla..........................................................18
Recicladodelosrecortes..................................19
Ensacadodelosrecortes.................................19
Consejosdeoperación....................................21
Despuésdelfuncionamiento...............................22
Seguridaddespuésdeluso..............................22
Limpiezadelosbajosdelamáquina.................22
Mantenimiento........................................................24
Calendariorecomendadodemanteni-
miento..........................................................24
Seguridadenelmantenimiento........................25
Mantenimientodelltrodeaire.........................25
Cambiodelaceitedelmotor..............................25
Cambiodelltrodeaceitedelmotor..................26
Mantenimientodelabujía.................................27
Ajustedelatransmisiónautopropulsada...........27
Mantenimientodelacuchilla.............................28
Ajustedelcabledelfrenodelacuchilla.............30
Limpiezadelazonadedebajodelacubierta
delacorrea...................................................31
Limpiezadelprotectordelembraguede
frenodecuchilla............................................31
Limpiezadelasruedas.....................................32
Almacenamiento.....................................................33
Seguridadduranteelalmacenamiento.............33
Preparacióndelsistemadecombustible...........33
Preparacióndelmotor......................................33
Informacióngeneral..........................................33
Despuésdelalmacenamiento..........................33
Solucióndeproblemas...........................................34
3

Seguridad
Estamáquinahasidodiseñadaconarregloalo
estipuladoenlanormaENISO5395.
Seguridadengeneral
Esteproductoescapazdeamputarmanosypies
ydelanzarobjetosalaire.Sigasiempretodas
lasinstruccionesdeseguridadconelndeevitar
lesionespersonalesgravesolamuerte.
•Antesdearrancarelmotor,lea,comprendaysiga
lasinstruccionesyadvertenciasdeesteManual
deloperadorylasqueestáncolocadasenla
máquinayenlosaccesorios.
•Nocoloquelasmanosolospiescercadepiezas
móvilesodebajodelamáquina.Noseacerquea
losoriciosdedescarga.
•Noutilicelamáquinasinoestáncolocadosysino
funcionancorrectamentetodoslosprotectoresy
dispositivosdeseguridad.
•Mantengaaotraspersonas,especialmentea
losniños,alejadasdeláreadeoperación.No
permitaqueestevehículoseautilizadoporniños.
Sólopermitaquemanejenlamáquinapersonas
responsables,formadas,familiarizadasconlas
instruccionesyfísicamentecapacesdeutilizarla
máquina.
•Parelamáquina,apagueelmotoryespereaque
sedetengantodaslaspiezasenmovimientoantes
derealizartareasdemantenimiento,repostaro
eliminarobstruccionesenlamáquina.
Elusoomantenimientoincorrectodeestamáquina
puedecausarlesiones.Parareducirelpeligrode
lesiones,sigaestasinstruccionesdeseguridady
presteatenciónsiemprealsímbolodealertade
seguridad
Peligro–instrucciónrelativaalaseguridadpersonal.
Elincumplimientodeestasinstruccionespuededar
lugaralesionespersonalesolamuerte.
,quesignica:Cuidado,Advertenciao
Pegatinasdeseguridadeinstrucciones
Laspegatinaseinstruccionesdeseguridadestánalavistadeloperadoryestánubicadas
cercadecualquierzonadepeligropotencial.Sustituyacualquierpegatinaqueestédañadao
quefalte.
Marcadelfabricante
1.Estamarcaindicaquelacuchillahasidoidenticadacomo
piezadelfabricanteoriginaldelamáquina.
decaloemmarkt
decal112-8760
112-8760
1.Peligrodeobjetosarrojados–mantengaalejadasaotras
personas.
2.Peligrodecorte/desmembramientodemanoopieporla
cuchilladelcortacésped–noseacerquealaspiezasen
movimiento.
4
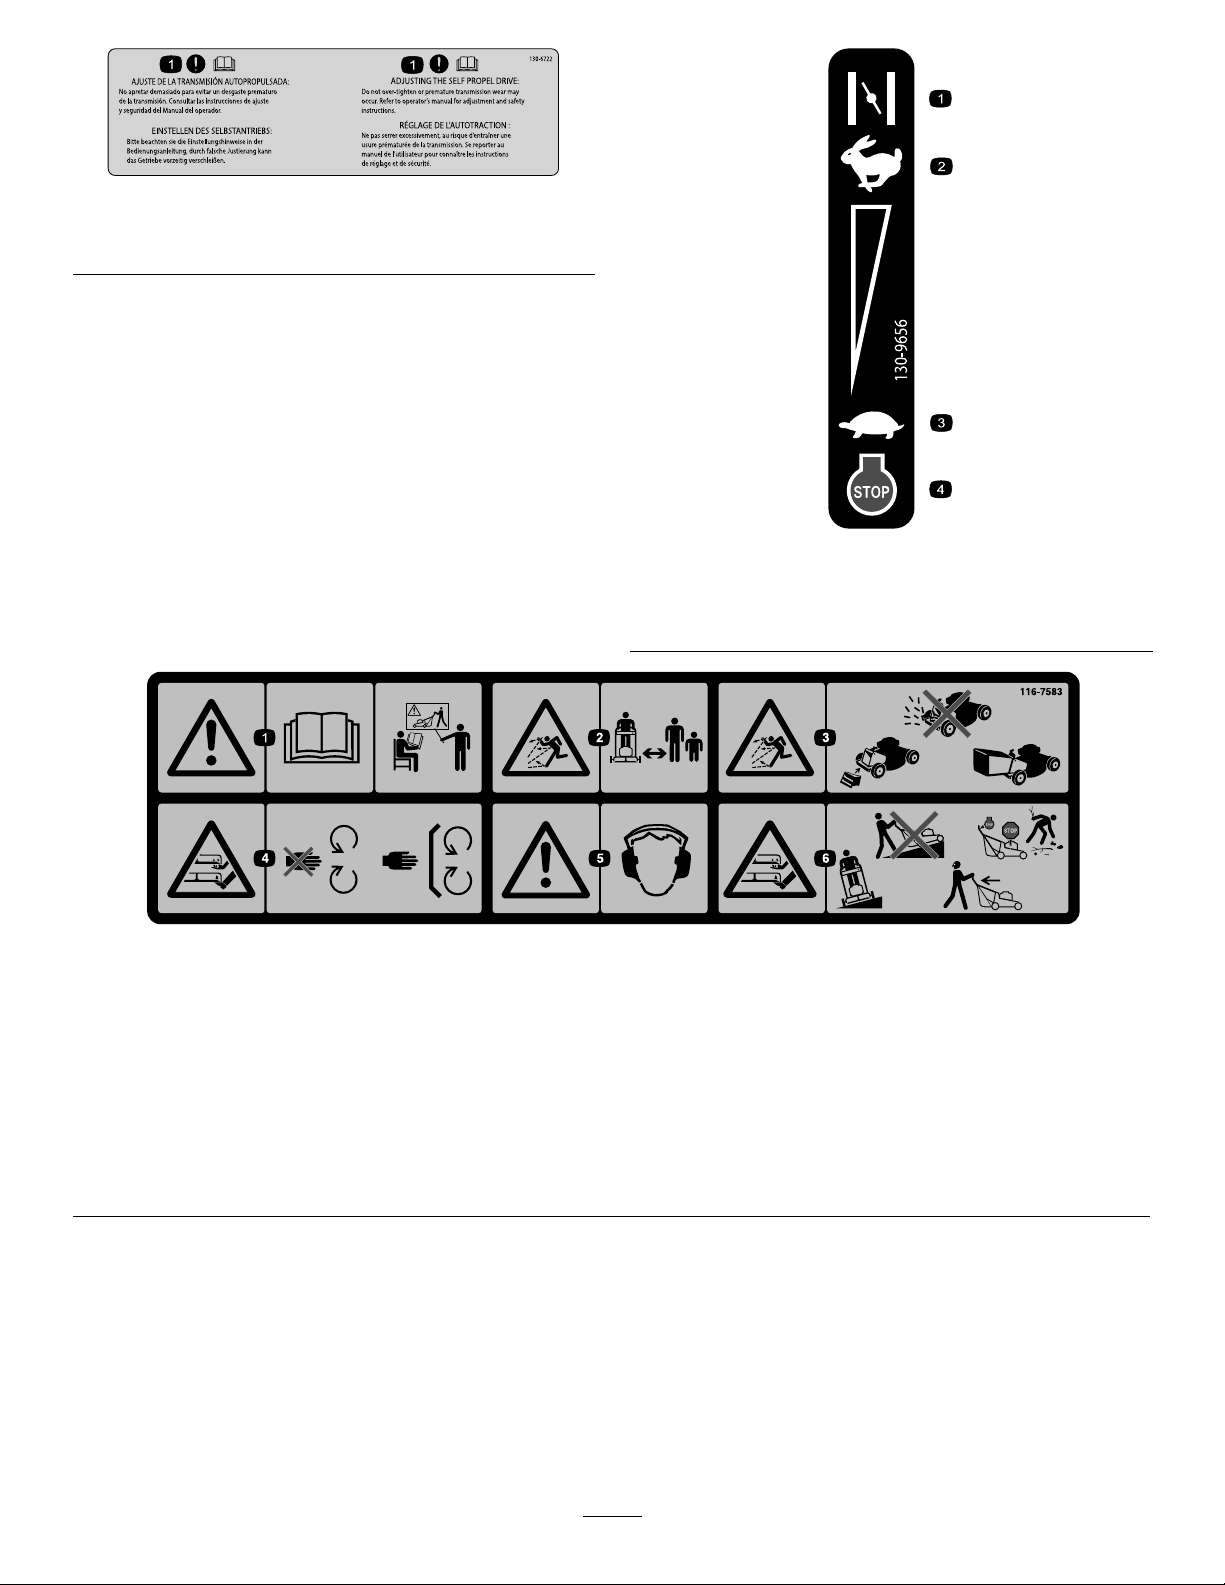
130-6722
1.¡Atención!–leaelManualdeloperador.
decal130-6722
130-9656
1.Estárter3.Lento
2.Rápido
decal130-9656
4.Motor–parar(apagar)
1.Advertencia–leaelManualdeloperador;noutiliceesta
máquinaamenosquehayarecibidoformaciónsobresu
manejo.
2.Peligrodeobjetosarrojados–mantengaalejadasaotras
personas.
3.Peligrodeobjetosarrojados–noutiliceelcortacéspedsin
queestécolocadoeltapóndedescargatraseraolabolsa.
decal116-7583
116-7583
4.Peligrodecorte/desmembramientodemanoopieporla
cuchilladelcortacésped–noseacerquealaspiezasen
movimiento;mantengacolocadostodoslosprotectores.
5.Advertencia–lleveprotecciónauditiva.
6.Peligrodecorte/desmembramientodemanoopie,cuchilla
delcortacésped–nosubanibajependientes;desplácesede
ladoaladoenpendientes;apagueelmotorantesdedejarla
máquina;retirecualquierresiduoantesdesegar;mirehacia
atrásmientrassiegueenmarchaatrás.
5

Montaje
Importante:Retireydesechelahojaprotectoradeplásticoquecubreelmotor,ycualquierotro
plásticooenvolturadelamáquina.
1
Retiradadelprotectordeloscables
Nosenecesitanpiezas
Procedimiento
Figura3
g234471
6

2
Instalacióndelmanillar
Nosenecesitanpiezas
Procedimiento
Figura4
7
g234475

3
Instalacióndelprotectordeloscables
Nosenecesitanpiezas
Procedimiento
g234486
Figura5
8

4
Añadidodeaceitealmotor
Nosenecesitanpiezas
Procedimiento
Importante:Sielniveldeaceitedelmotoresdemasiadobajoodemasiadoaltoyustedarrancael
motor,puededañarelmotor.
Figura6
g235721
9

5
Ensamblajedelabolsaderecogida
Nosenecesitanpiezas
Procedimiento
g238450
Figura7
6
Ajustedelatransmisión
autopropulsada
Nosenecesitanpiezas
Procedimiento
Importante:Esnecesarioajustarelcabledel
sistemadeautopropulsiónantesdeusarla
máquinaporprimeravez.ConsulteAjustedela
transmisiónautopropulsada(página27).
10

Elproducto
g331712
Figura10
Barradecontrol
Figura8
1.Manillar6.Palancadecontroldel
2.Barradeautopropulsión7.Limpiadordeaire
3.Barradecontroldela
cuchilla
4.Deectortrasero(no
ilustrado)
5.Tapóndeldepósitode
combustible
acelerador
8.Bujía
9.Palancadealturadecorte
(4)
10.Varilla/tapóndellenadode
aceite
1.Palancadebloqueodel
controldelascuchillas
2.Barradecontroldelas
cuchillas
3.Manillar
4.Barradecontroldela
transmisión
Especicaciones
g231063
ModeloPesoLongitudAnchuraAltura
59kg150cm56cm107cm
22280
(130li-
bras)
(59")(22")(42")
Aperos/accesorios
Estádisponibleunaseleccióndeaperosyaccesorios
homologadosporToroquesepuedenutilizarcon
lamáquinaandepotenciaryaumentarsus
prestaciones.PóngaseencontactoconsuServicio
TécnicoAutorizadooconsudistribuidorautorizado
Toro,ovisitewww.Toro.comparaobtenerunalistade
todoslosaperosyaccesorioshomologados.
Figura9
1.Recogedor2.Tapóndedescargatrasera
Paraasegurarunrendimientoóptimoymantener
lacerticacióndeseguridaddelamáquina,utilice
solamentepiezasyaccesoriosgenuinosT oro.Las
piezasderepuestoyaccesoriosdeotrosfabricantes
podríanserpeligrosos,ysuusopodríainvalidarla
garantíadelproducto.
g231061
11

Operación
Nota:Losladosderechoeizquierdodelamáquina
sedeterminandesdelaposiciónnormaldeloperador.
Antesdel
funcionamiento
Seguridadantesdeluso
Seguridadengeneral
•Apaguesiemprelamáquina,espereaquese
detengantodaslaspiezasenmovimientoydeje
quelamáquinaseenfríeantesdeajustarla,
repararla,limpiarlaoguardarla.
•Familiaríceseconlaoperaciónseguradelequipo,
loscontrolesdeloperadorylasseñalesde
seguridad.
•Compruebequetodoslosprotectoresy
dispositivosdeseguridad,comoporejemplo
deectoresy/orecogedores,estáncolocadosy
quefuncionancorrectamente.
•Inspeccionesiemprelamáquinaparaasegurarse
dequelascuchillasylospernosdelascuchillas
noestándesgastadosodañados.
•Inspeccioneeláreadondesevaautilizarla
máquina,yretirecualquierobjetoquepudiera
interferirconelfuncionamientodelamáquinao
quepudieraserarrojadoporlamáquina.
•Elcontactoconlacuchillaenmovimientocausará
lesionesgraves.Nopongalosdedosdebajodela
carcasaalajustarlaalturadecorte.
Seguridad–Combustible
•Elcombustibleesextremadamenteinamabley
altamenteexplosivo.Unincendioounaexplosión
provocadosporelcombustiblepuedecausarle
quemadurasaustedyaotraspersonasasícomo
dañosmateriales.
–Paraevitarqueunacargaestáticaincendie
elcombustible,coloqueelrecipientey/ola
máquinadirectamentesobreelsueloantesde
repostar,noenunvehículoosobreotroobjeto.
–Lleneeldepósitodecombustibleenelexterior,
enunazonaabiertayconelmotorfrío.Limpie
cualquiercombustiblederramado.
–Nomanejecombustiblesiestáfumando,ni
cercadeunallamadesnudaochispas.
–Noretireeltapóndecombustibleniañada
combustiblealdepósitosielmotorestá
calienteoenmarcha.
–Sisederramacombustible,nointentearrancar
elmotor.Evitecrearunafuentedeignición
hastaquelosvaporesdelcombustiblese
hayandisipado.
–Almaceneelcombustibleenunrecipiente
homologadoymanténgalofueradelalcance
delosniños.
•Elcombustibleesdañinoomortalsiesingerido.
Laexposiciónalargoplazoalosvaporespuede
causarlesionesyenfermedadesgraves.
–Evitelarespiraciónprolongadadelosvapores.
–Mantengalasmanosylacaraalejadasde
laboquillaydelaaberturadeldepósitode
combustible.
–Mantengaalejadoelcombustibledelosojos
ylapiel.
Llenadodeldepósitode
combustible
PELIGRO
Lagasolinaesaltamenteinamabley
explosiva.Unincendioounaexplosión
provocado(a)porlagasolinapuedecausarle
quemadurasaustedyaotraspersonas.
•Paraevitarqueunacargaestáticaincendie
lagasolina,coloqueelrecipientey/ola
máquinadirectamentesobreelsueloantes
derepostar,noenunvehículoosobreotro
objeto.
•Lleneeldepósitoenelexteriorcuandoel
motorestéfrío.Limpiecualquierderrame.
•Nomanejegasolinasiestáfumando,ni
cercadeunallamadesnudaochispas.
•Almacenelagasolinaenunrecipiente
homologadoymanténgalafueradel
alcancedelosniños.
•Paraobtenerlosmejoresresultados,utilice
solamentegasolinafresca(compradahacemenos
de30días),sinplomo,de87omásoctanos
(métododecálculo(R+M)/2).
•Sonaceptablesloscombustiblesoxigenadoscon
hastael10%deetanoloel15%deMTBEpor
volumen.
•Etanol:Esaceptableelusodegasolinaconhasta
el10%deetanol(gasohol)oel15%deMTBE
(étermetiltert-butílico)porvolumen.Eletanoly
elMTBEnosonlomismo.Noestáautorizado
elusodegasolinaconel15%deetanol(E15)
porvolumen.Noutilicenuncagasolinaque
contengamásdel10%deetanolporvolumen,
12

comoporejemplolaE15(contieneel15%de
etanol),laE20(contieneel20%deetanol)ola
E85(contienehastael85%deetanol).Elusode
gasolinanoautorizadapuedecausarproblemas
derendimientoodañosenelmotorquepueden
noestarcubiertosbajolagarantía.
alcombustiblefresco,talycomoindiqueel
fabricantedelestabilizador.
Nota:Lacapacidaddeldepósitodecombustiblees
de3,8litros.
•Noutilicegasolinaquecontengametanol.
•Noguardecombustibleeneldepósitode
combustibleoenrecipientesdecombustible
duranteelinvierno,amenosqueutiliceun
estabilizador.
•Noañadaaceitealagasolina.
Importante:Parareducirproblemasde
arranque,añadaestabilizador/acondicionador
Figura11
Comprobacióndelniveldeaceitedelmotor
Intervalodemantenimiento:Cadavezqueseutiliceodiariamente
Importante:Sielniveldeaceitedelmotoresdemasiadobajoodemasiadoaltoyustedarrancael
motor,puededañarelmotor.
g230458
Figura12
g235721
13

Ajustedelaalturadelmanillar
Ustedpuedeelevarobajarelmanillara1de3posiciones,laqueleseamáscómoda(Figura13).
Figura13
1.Retirelosdospernosdelmanillarylastuercascorrespondientes.
2.Muevaelmanillaralaalturadeseada.
3.Fijeelmanillarconlospernosqueretiróanteriormenteylastuercascorrespondientes.
g272748
14

Ajustedelaalturadecorte
PELIGRO
Alajustarlaspalancasdeajustedelaalturadecorte,susmanospodríantocarunacuchillaen
movimiento,loquepodríacausarlegraveslesiones.
•Pareelmotoryespereaquesedetengantodaslaspiezasenmovimientoantesdeajustarla
alturadecorte.
•Nopongalosdedosdebajodelacarcasaalajustarlaalturadecorte.
CUIDADO
Sielmotorhaestadoenmarcha,elsilenciadorestarámuycalienteypuedecausarle
quemaduras.
Manténgasealejadodelsilenciadorsiésteestácaliente.
Ajustelaalturadecortesegúndesee.Ajustetodaslasruedasalamismaalturadecorte(Figura14).
Figura14
g234297
15

Duranteel
funcionamiento
Seguridadduranteeluso
•Silamáquinagolpeaunobjetooempiezaavibrar,
apagueinmediatamenteelmotor,espereaque
sedetengantodaslaspiezasenmovimientoy
desconecteelcabledelabujíaantesdeexaminar
lamáquinaenbuscadedaños.Hagatodaslas
reparacionesnecesariasantesdevolverautilizar
lamáquina.
Seguridadengeneral
•Lleveropaadecuada,incluidaprotecciónocular,
pantalónlargo,calzadoresistenteyantideslizante
yprotecciónauditiva.Sitieneelpelolargo,
recójaselo,ynolleveprendasojoyassueltas.
•Prestetodasuatenciónalutilizarlamáquina.No
realiceningunaactividadquecausedistracciones;
delocontrario,podríanproducirselesioneso
dañosmateriales.
•Noutilicelamáquinasiestáenfermo,cansado,o
bajolainuenciadealcoholodrogas.
•Lacuchillaestámuyalada;cualquiercontacto
conlacuchillapuedecausarlesionespersonales
graves.Pareelmotoryespereaquese
detengantodaslaspiezasenmovimientoantes
deabandonarelpuestodeloperador.
•Cuandosueltalabarradecontroldelacuchilla,el
motordebepararseylacuchilladebedetenerse
en3segundosomenos.Sino,dejedeusarla
máquinainmediatamenteypóngaseencontacto
conunServicioTécnicoAutorizado.
•Mantengaaotraspersonasalejadasdelazonade
trabajo.Mantengaalosniñospequeñosalejados
delazonadetrabajoybajolasupervisiónde
unadultoresponsablequenoestéutilizandola
máquina.Parelamáquinasialguienentraenla
zona.
•Miresiemprehaciaabajoydetrásdeustedantes
deconducirlamáquinaenmarchaatrás.
•Utilicelamáquinaúnicamenteconbuena
visibilidadyencondicionesmeteorológicas
apropiadas.Nouselamáquinasihayriesgode
rayos.
•Lahierbamojadaolashojasmojadaspueden
causarlegraveslesionessiustedresbalaytocala
cuchilla.Evitesegarencondicioneshúmedas.
•Extremelaprecauciónalacercarseaesquinas
ciegas,arbustos,árbolesuotrosobjetosque
puedantaparlelavista.
•Nodirijaelmaterialdedescargahaciauna
persona.Eviteladescargadematerialcontrauna
pareduobstrucción,yaqueelmaterialpodría
rebotarhaciausted.Parelacuchillaolascuchillas
alcruzarsuperciesdegrava.
•Estéalertaaagujeros,surcos,montículos,rocas
uotrosobjetosocultos.Elterrenoirregularpodría
hacerquepierdaelequilibrio.
•Antesdeabandonarelpuestodeloperador,
apagueelmotoryespereaquesedetengan
todaslaspiezasenmovimiento.
•Sielmotorhaestadoenmarcha,estarácalientey
puedecausarlequemadurasgraves.Manténgase
alejadodelmotorcaliente.
•Accioneelmotorúnicamenteenáreasbien
ventiladas.Losgasesdeescapecontienen
monóxidodecarbono,queesunvenenoinodoro
ymortal.
•Inspeccionefrecuentementeloscomponentes
delrecogedorydelconductodedescarga
paracomprobarquenoesténdesgastadoso
deterioradosysustitúyalosporpiezasgenuinas
Torocuandoseanecesario.
Seguridadenlaspendientes
•Sieguedetravéslascuestasypendientes,
nuncahaciaarribaohaciaabajo.Extremelas
precaucionesalcambiardedirecciónencuestas
opendientes.
•Nosieguependientesycuestasexcesivamente
empinadas.Sinopisarme,puederesbalary
caerse.
•Extremelasprecaucionesalsegarcercade
terraplenes,fosasotaludes.
Arranquedelmotor
1.Conecteelcabledelabujíaalabujía.
2.Abralaválvuladecombustiblemoviendola
palancadelaválvuladecombustibleala
derecha(Figura15).
16

Figura15
Puntomuerto(N).Lapalancadeautopropulsiónestá
situadadebajoydetrásdeldepósitodecombustible
(Figura16).
g024304
1.Palancadecontroldel
acelerador
3.Muevalapalancadecontroldelaceleradorala
posicióndeESTÁRTER.
2.Palancadelaválvulade
combustible
Nota:Noutiliceelestártersielmotorestá
caliente.
4.Tiresuavementedelarrancadorhastaquenote
resistencia,luegotireconfuerza.
Nota:Dejequelacuerdavuelvalentamentea
laguíadecuerdadelmanillar.
5.Cuandoelmotorarranque,muevalapalancade
controldelaceleradoralaposicióndeRÁPIDO.
Paradadelmotor
Sueltelabarradecontroldelascuchillasymueva
lapalancadecontroldelacelerador(Figura15)ala
posicióndeParada.
Nota:Cierrelaválvuladecombustible(Figura15)a
menosquevayaavolveraarrancarelmotorenbreve.
Utilizaciónde
g024167
Figura16
1.Palancadeautopropulsión
1.Muevalapalancadeautopropulsiónala
velocidaddeavancedeseada.
2.Arranqueelmotor.
3.Paraactivarlatransmisiónautopropulsada,
aprietelabarradeautopropulsión(Figura17).
g331713
Figura17
latransmisión
autopropulsaday
activacióndelascuchillas
Lamáquinatiene3velocidadesdeavance:1(lenta),
2(media),y3(rápida);tambiéntieneunaposiciónde
Paraengranarlascuchillas,hagalosiguiente:
1.Empujelapalancadebloqueodecontrolde
lascuchillashaciaadelanteysosténgalapara
liberarlabarradecontroldelascuchillas(Figura
18,A).
2.Tiredelabarradecontroldelascuchillas
hastaelmanillaryliberelapalancadebloqueo
Nota:Puedevariarlavelocidaddeavance
aumentandooreduciendoladistanciaentrela
barradeautopropulsiónyelmanillar.
decontroldelascuchillas;lacuchilladebe
engranarse(Figura18,A).
3.Sueltelabarradecontroldelascuchillaspara
desengranarlacuchilla(Figura18,B).La
palancadebloqueodecontroldelascuchillas
serestableceparabloquearlabarradecontrol
delascuchillas.
17

Figura18
g237185
Comprobacióndel
embraguedefrenode
cuchilla
Compruebelabarradecontroldelascuchillasantes
decadausoparaasegurarsedequeelembraguede
frenodecuchillafuncionacorrectamente.
Comprobaciónconlabolsade
recogida
1.Instalelabolsaderecogidavacíaenlamáquina.
2.Arranqueelmotor.
3.Engranelacuchilla.
Nota:Labolsadebeempezarainarse,loque
indicaquelacuchillaestáengranadaygirando.
4.Sueltelabarradecontroldelascuchillas.
Nota:Silabolsanosedesinainmediatamente,
esquelacuchillasiguegirando.Elembrague
defrenodecuchillapuedeestardeteriorándose,
ysiestonoseremedia,podríadarlugaraun
estadodeoperacióninseguro.Hagarevisar
yrepararlamáquinaporunServicioTécnico
Autorizado.
5.Pareelmotoryespereaquesedetengantodas
laspiezasenmovimiento.
4.Coloquelaboladepapeldeperiódicoaunos
13cmpordelantedelamáquina.
5.Arranqueelmotor.
6.Engranelacuchilla.
7.Sueltelabarradecontroldelascuchillas.
8.Empujeinmediatamentelamáquinaporencima
delaboladepapeldeperiódico.
9.Pareelmotoryespereaquesedetengantodas
laspiezasenmovimiento.
10.Vayaalapartedelanteradelamáquinay
compruebelaboladepapeldeperiódico.
Nota:Silaboladepapeldeperiódiconopasó
pordebajodelamáquina,repitalospasos4a
10.
Nota:Silaboladepapeldeperiódicoestá
deshechaodeshilachada,lacuchillanose
detuvocorrectamente,locualimplicaunestado
deoperacióninseguro.Póngaseencontacto
conelServicioTécnicoAutorizado.
Comprobaciónsinlabolsade
recogida
1.Llevelamáquinaaunasuperciepavimentada
enunazonaqueestéalabrigodelviento.
2.Ajustelas4ruedasalaalturadecortede
76mm;consulteAjustedelaalturadecorte
(página15).
3.T omemediapáginadeperiódicoyhagaunabola
conellaquesealosucientementepequeña
comoparapasarpordebajodelacarcasadela
máquina(unos75mmdediámetro).
18

Recicladodelosrecortes
Estamáquinavienepreparadadefábricaparareciclarlosrecortesdehierbayhojasydevolverlosalcésped.
Paraprepararlamáquinaparaelreciclado:
•Silabolsaderecogidaestáinstaladaenlamáquina,retírela(Figura19,A).
•Sieltapóndedescargatraseronoestáinstalado,sujételoporelasa,eleveeldeectortraseroe
introdúzcaloenelconductodedescargatraserahastaqueelengancheencajeensusitio(Figura19,B).
Figura19
ADVERTENCIA
g236734
Siseutilizalamáquinaparareciclarlosrecortesdehierbasintenercolocadoeltapón,pueden
salirdespedidosobjetoshaciausteduotraspersonas.Tambiénpodríaproducirseuncontacto
conlascuchillas.Losobjetoslanzadosocualquiercontactoconlacuchillapuedencausar
lesionesgravesolamuerte.
Asegúresedequeeltapóndedescargatraseraestácolocadoantesdereciclarlosrecortes.
Noengranenuncalascuchillassintenerinstaladoenlamáquinaeltapóndedescargatrasera
olabolsaderecogida.
Ensacadodelosrecortes
Utiliceelrecogedorsidesearecogerlosrecortesdehierbaylashojasdelcésped.
ADVERTENCIA
Silabolsaderecogidaestádesgastada,puedenarrojarsepequeñaspiedrasyotrosresiduos
similareshaciaustedohaciaotraspersonas,provocandolesionespersonalesgraveso
lamuerte.
Compruebefrecuentementelabolsaderecogida.Siestádañada,instaleunanuevabolsa
derecambiodelfabricante.
ADVERTENCIA
Lascuchillasestánmuyaladas;cualquiercontactoconlascuchillaspuedecausarlesiones
personalesgraves.
Pareelmotoryespereaquesedetengantodaslaspiezasenmovimientoantesdeabandonar
elpuestodeloperador.
19

Instalacióndelabolsaderecortes
1.Pareelmotoryespereaquesedetengantodaslaspiezasenmovimiento.
2.Levanteysujeteeldeectortrasero(Figura20,A).
3.Retireeltapóndedescargatraserapresionandoelenganchehaciadentroconeldedopulgary
extrayendoeltapóndelamáquina(Figura20,ByC).
4.Insertelosextremosdelavarilladelabolsaenlasmuescasdelabasedelmanillar,ymuevalabolsa
haciaadelanteyhacíaatrásparavericarquelosextremosdelavarillaestánasentadosenelfondode
cadamuesca(Figura20,D).
5.Bajeeldeectortraserohastaquedescansesobrelabolsaderecogida.
Figura20
Cómoretirarlabolsaderecogida
PELIGRO
Lamáquinapuedearrojarrecortesdehierbayotrosobjetosporcualquierhuecoquehayaen
lacarcasadelamáquina.Losobjetosarrojadosconsucientefuerzapodríancausarlesiones
personalesgravesolamuerteaustedoaotraspersonas.
•Noarranquenuncaelmotordespuésderetirarlabolsaderecogida,sintenereltapónde
descargainstaladoenlamáquina.
•Noabranuncaeldeectortraserodelamáquinaconelmotorenmarcha.
1.Pareelmotoryespereaquesedetengantodaslaspiezasenmovimiento.
2.Eleveeldeectortrasero.
3.Retirelavarilladelabolsaderecogidadelasmuescasdelabasedelmanillar(Figura19,A).
4.Instaleeltapóndedescarga(Figura19,B).
5.Bajeeldeectortrasero(Figura19,C).
g236745
20

Consejosdeoperación
Consejosgenerales
•Reviselasinstruccionesdeseguridadylea
detenidamenteestemanualantesdeutilizarla
máquina.
•Despejelazonadepalos,piedras,alambres,
ramasyotrosresiduosquepodríansergolpeados
yarrojadosporlacuchilla.
•Mantengaatodoelmundo,especialmenteaniños
yanimales,alejadosdelaszonasdetrabajo.
•Evitegolpearárboles,muros,bordillosuotros
objetossólidos.Nosieguenuncaporencimade
objetoalguno.
•Silamáquinagolpeaunobjetooempiezaa
vibrar,pareinmediatamenteelmotor,desconecte
elcabledelabujíaeinspeccionelamáquinaen
buscadedaños.
•Mantengalacuchillaaladadurantetodala
temporadadesiega.Devezencuanto,lime
cualquierimperfeccióndelacuchilla.
•Sustituyalacuchillacuandoseaprecisoconuna
cuchilladerepuestodelfabricanteoriginal.
•Sieguesolamentehierbauhojassecas.Lahierba
mojadaylashojasmojadastiendenapegarseal
suelo,ypuedenatascarlamáquinaohacerque
secaleelmotor.
ADVERTENCIA
Lahierbamojadaolashojasmojadas
puedencausarlegraveslesionessiusted
resbalaytocalacuchilla.
Sieguesolamenteencondicionessecas.
•Limpiedebajodelamáquinadespuésdecada
uso;consulteLimpiezadelosbajosdelamáquina
(página22).
•Mantengaelmotorenbuenascondicionesde
funcionamiento.
•Limpieelltrodeaireconfrecuencia.Elpicadode
lahierbahacequeseformennubesderecortes
ypolvo,queatascanelltrodeaireyreducenel
rendimientodelmotor.
•Ajustelavelocidaddelmotoralaposiciónmás
rápidaparaconseguirresultadosóptimosdecorte.
ADVERTENCIA
Sisehacefuncionarelmotordelamáquina
aunavelocidadmayorqueelajustede
fábrica,lamáquinapuedearrojarparte
delacuchillaodelmotorhaciaustedo
haciaotraspersonas,causandolesiones
personalesgravesolamuerte.
–Nocambieelajustedevelocidaddel
motor.
–Siustedsospechaquelavelocidaddel
motoressuperioralanormal,póngase
encontactoconunServicioTécnico
Autorizado.
Cómocortarlahierba
•Lahierbacreceavelocidadesdistintassegún
laestacióndelaño.Enelcalordelverano,es
mejorcortarlahierbausandolosajustesdealtura
decortede64mm,76mmo89mm.Corte
solamenteunterciodelahojadehierbacada
vez.Nocorteconunajusteinferiora64mma
menosquelahierbaseaescasa,oanalesdel
otoñocuandoelritmodecrecimientodelahierba
empiezaadecaer.
•Cuandocortehierbademásde15cmdealto,
siegueprimerousandolaalturadecortemásalta
ycaminedespacio;luegosieguedenuevoauna
alturamenorparaobtenerelmejoraspectodel
césped.Silahierbaesdemasiadoaltaylashojas
seamontonanenelcésped,puedenatascarla
máquinayhacerquesecaleelmotor.
•Alterneladireccióndecorte.Estoayudaa
dispersarlosrecortesentodoelcésped,dando
unafertilizaciónmáshomogénea.
Sielaspectonaldelcéspednoessatisfactorio,
pruebeconunaomásdelastécnicassiguientes:
•Alarlacuchilla.
•Caminarmásdespaciomientrassiega.
•Elevarlaalturadecortedelamáquina.
•Cortarelcéspedconmásfrecuencia.
•Solaparlospasillosdecorteenlugardecortarun
pasillocompletoencadapasada.
Cortedehojas
•Despuésdesegarelcésped,asegúresedequela
mitaddelcéspedseveatravésdelacoberturade
hojascortadas.Esposiblequetengaquehacer
másdeunapasadaporencimadelashojas.
•Paraunacoberturadehojasescasa,ajustetodas
lasruedasalamismaalturadecorte.
•Sieguemásdespaciosilamáquinanocortalas
hojassucientementenas.
21

Despuésdel
funcionamiento
Métododelavado
Intervalodemantenimiento:Despuésdecadauso
ADVERTENCIA
Seguridaddespuésdeluso
Seguridadengeneral
•Apaguesiemprelamáquina,espereaquese
detengantodaslaspiezasenmovimientoydeje
quelamáquinaseenfríeantesdeajustarla,
repararla,limpiarlaoguardarla.
•Limpielosrecortesdehierbaylosresiduosdela
máquinaparaayudaraprevenirincendios.Limpie
cualquieraceiteocombustiblederramado.
•Noguardenuncalamáquinaounrecipientede
combustiblecercadeunallamadesnuda,chispa
ollamapiloto,porejemploenuncalentadorde
aguauotroelectrodoméstico.
Seguridadduranteeltransporte
•T engacuidadoalcargarodescargarlamáquina.
•Sujetelamáquinaparaevitarquesedesplace.
•Cierrelaválvuladecombustibleantesdecargar
lamáquinaparasutransporte.
Puedesoltarsematerialdedebajodela
máquina.
•Lleveprotecciónocular.
•Permanezcaenelpuestodeloperador
(detrásdelmanillar)mientraselmotoresté
enmarcha.
•Nopermitalapresenciadeotraspersonas
enlazona.
1.Llevelamáquinaaunasuperciepavimentada
niveladacercadeunamangueradejardín.
2.Arranqueelmotor.
3.Sujetelamangueraalaalturadelmanillary
dirijaelaguaparaqueuyasobreelsuelojusto
pordelantedelaruedatraseraderecha(Figura
22).
Limpiezadelosbajosdela
máquina
Paraasegurarunrendimientoóptimo,mantenga
limpialaparteinferiordelamáquina.Tengaespecial
cuidadodemantenerlibresderesiduoslosdeectores
(Figura21).
Figura21
g002275
Figura22
1.Ruedatraseraderecha
Nota:Lacuchillaaspiraráaguayexpulsarálos
recortes.Dejecorrerelaguahastaquenose
veanrecortessaliendodedebajodelamáquina.
4.Pareelmotoryespereaquesedetengantodas
laspiezasenmovimiento.
5.Cierreelgrifo.
6.Arranquelamáquinaydéjelafuncionardurante
unosminutosparasecarlaparteinferiordela
máquina.
Métododerascado
Siellavadonoeliminatodoslosresiduosdedebajo
delamáquina,rásquelahastaqueestélimpia.
1.Desconecteelcabledelabujía(Figura8).
g024281
2.Dreneelcombustibledeldepósitode
combustible.
1.Deectores
22

ADVERTENCIA
Siinclinalamáquina,elcombustible
puedesalirdelcarburadorodeldepósito
decombustible.Elcombustiblees
extremadamenteinamableyaltamente
explosivo,ybajociertascondiciones,
puedecausarlesionespersonaleso
dañosmateriales.
Evitelosderramesdejandofuncionarel
motorhastaquenoquedecombustible,o
retirandoelcombustibleconunabomba
demano;nuncautiliceunsifón.
3.Vuelquelamáquinahaciasuladoderecho
(limpiadordeairehaciaarriba).
4.Retirelasuciedadylosrecortesdehierba
conunrascadordemaderadura.Evitetocar
rebabasybordesalados.
5.Pongalamáquinaenlaposiciónnormalde
operación.
6.Conecteelcabledelabujía.
23

Mantenimiento
Nota:Losladosderechoeizquierdodelamáquinasedeterminandesdelaposiciónnormaldeloperador.
Calendariorecomendadodemantenimiento
Intervalodemanteni-
mientoyservicio
Despuésdelasprimeras
8horas
Despuésdelasprimeras
25horas
Cadavezqueseutilice
odiariamente
Despuésdecadauso
Cada25horas
Cada40horas
Cada50horas
Procedimientodemantenimiento
•Cambiodelaceitedelmotor.
•Aprietetodaslasjaciones.
•Compruebeelniveldeaceitedelmotoryañadamásaceitesiesnecesario.
•Inspeccioneperiódicamentelascuchillasdelcortacéspedparaasegurarsedeque
noestándesgastadasnidañadas.
•Inspeccioneelaceleradorenbuscadeseñalesdedesgasteodaños.
•Compruebeeltiempoquetardaelfrenoenpararlacuchilla.Lacuchilladebe
pararseen3segundosdespuésdesoltarlabarradecontroldelascuchillas;sinolo
hace,póngaseencontactoconunServicioTécnicoAutorizadoparalareparación.
•Compruebequetodaslasjacionesdelmotorestánbienapretadasyquenofalta
ninguna.
•Compruebequenohayfugasdeaceiteocombustible.
•Compruebeolimpieelarrancadorderetrocesoylarejilladelaentradadeaire.
•Retirelosrecortesdehierbaylasuciedaddedebajodelacarcasa.
•Limpieelpreltrodeespuma(conmásfrecuenciaencondicionesdemuchopolvo).
•Limpielasruedasylosengranajes.
•Cambieelaceitedelmotor(másamenudoencondicionesdemuchopolvo).
•Aleocambielacuchilla.Revíselaconmásfrecuenciasisedesalaconrapidezen
condicionesdurasodemuchaarena.
•Retirelosrecortesdehierbaylasuciedaddedebajodelacubiertadelacorrea.
•Limpieelprotectordelembraguedefrenodecuchilla.
•Inspeccioneylimpielabujíayajusteladistanciaentreloselectrodos;cambiela
Cada100horas
Cada200horas
Cada300horas
bujíasiesnecesario.
•Aprietetodaslasjaciones.
•Compruebeolimpieelarrancadorderetrocesoylarejilladelaentradadeaire.
•Sustituyaelltrodeaceitedelmotor.
•Hagaqueunservicioautorizadodemantenimientodemotorescompruebequeno
hayfugasenelsistemadecombustibleyquelostubosdecombustiblenoestán
deteriorados.Cambielaspiezassiesnecesario.
•Cambieelltrodeairedepapel(conmásfrecuenciaencondicionesdemucho
polvo).
•Limpieelcilindroylasaletasdelaculata.
•Hagaqueunservicioautorizadodemantenimientodemotorescompruebeyajuste
lavelocidadderalentídelmotor.
•Hagaqueunservicioautorizadodemantenimientodemotoreslimpielacámarade
combustión.
•Hagaqueunservicioautorizadodemantenimientodemotorescompruebeyajuste
eljuegodelasválvulas.
•Hagaqueunservicioautorizadodemantenimientodemotoresrealiceunalimpieza
yunlapeadodelasuperciedeasientodelasválvulas.
Importante:Consulteelmanualdelmotorparaconocerprocedimientosadicionalesdemantenimiento.
24

Seguridadenel
mantenimiento
•Apaguesiemprelamáquina,espereaquese
detengantodaslaspiezasenmovimientoydeje
quelamáquinaseenfríeantesdeajustarla,
repararla,limpiarlaoguardarla.
•Desconecteelcabledelabujíaantesderealizar
cualquierprocedimientodemantenimiento.
•Lleveguantesyprotecciónocularalrealizarel
mantenimientodelamáquina.
•Lacuchillaestámuyalada;cualquiercontacto
conlacuchillapuedecausarlesionespersonales
graves.Lleveguantesalrealizarelmantenimiento
delacuchilla.Noreparenicambiela(s)cuchilla(s).
•Nomanipulenuncalosdispositivosdeseguridad.
Comprueberegularmentequefuncionan
correctamente.
•Alinclinarlamáquina,puedehaberfugasde
combustible.Elcombustibleesinamabley
explosivo,ypuedecausarlesionespersonales.
Dejefuncionarelmotorhastaquenoquede
combustible,oretirelagasolinaconunabomba
demano;nuncautiliceunsifón.
•Paragarantizarunrendimientoóptimodela
máquina,utiliceúnicamentepiezasderepuesto
yaccesoriosgenuinosdeToro.Laspiezasde
repuestoyaccesoriosdeotrosfabricantespodrían
serpeligrosos,ysuusopodríainvalidarlagarantía
delproducto.
Figura23
1.Tapa
2.Preltrodegomaespuma
yltrodeairedepapel
4.Retireelpreltrodegomaespumayelltrode
airedepapeldelabasedelltrodeaire(Figura
23).
5.Retireelpreltrodegomaespumadelltrode
airedepapelylaveelpreltrodegomaespuma
condetergentesuaveyagua;luegoséquelo
apretandoconunpaño.
6.Inspeccioneelltrodeairedepapel,ycámbielo
siestáexcesivamentesucio.
3.Basedelltrodeaire
g005347
Mantenimientodelltrode
aire
Intervalodemantenimiento:Cada25horas—Limpie
elpreltrodeespuma(conmás
frecuenciaencondicionesde
muchopolvo).
Cada300horas—Cambieelltrodeairede
papel(conmásfrecuenciaencondicionesde
muchopolvo).
Importante:Nohagafuncionarelmotorsintener
colocadoelconjuntodeltrodeaire;sinose
producirángravesdañosenelmotor.
1.Pareelmotoryespereaquesedetengantodas
laspiezasenmovimiento.
2.Desconecteelcabledelabujía.
3.Retirelatapaylímpielaafondo(Figura23).
Importante:Nointentelimpiarelltrode
papel.
7.Instaleelpreltrodegomaespumasobreelltro
deairedepapel.
8.Instaleelpreltrodegomaespumayelltrode
airedepapelenlabasedelltrodeaire.
9.Coloquelatapa.
Cambiodelaceitedelmotor
Intervalodemantenimiento:Despuésdelas
primeras8horas
Cada50horas
Hagafuncionarelmotorduranteunosminutosantes
decambiarelaceiteparacalentarelaceite.Elaceite
calienteuyemejorytransportamáscontaminantes.
Especicacionesdelaceitedelmotor
25
 Loading...