


FormNo.3443-337RevC
53cmHeavy-Duty60VRecycler®/RearBaggerLawn
Mower
22275/T
Professioneller60VRasenmähermitRecycler®bzw.
Heckfänger(53cm)
22275/T
CortacéspeddeserviciopesadoRecycler®60Vde53
cmconreciclado/ensacadotrasero
22275/T
TondeusegrandrendementRecycler®60Vde53
cm/bacarrière
22275/T
Tosaerbaprofessionaleda60VRecycler®da53cm
conraccoltaposteriore
22275/T
Zwaaruitgevoerde60Vgazonmaaiervan53cmmet
Recycler®/grasvanger
22275/T
53cmHeavy-Duty60VRecycler®-gressklippermed
oppsamlingbak
22275/T
WysokowydajnakosiarkaRecycler®60Voszerokości
53cmztylnymkoszem
22275/T
Recycler®-gräsklippareförtungdriftmedbakre
uppsamlare,53cm,60V
22275/T
www.T oro.com.
*3443-337*


53cmHeavy-Duty60V
FormNo.3443-314RevC
Recycler
®
/RearBaggerLawn
Mower
ModelNo.22275—SerialNo.400000000andUp
ModelNo.22275T—SerialNo.400000000andUp
Registeratwww.T oro.com.
OriginalInstructions(EN)
*3443-314*

ThisproductcomplieswithallrelevantEuropean
directives;fordetails,pleaseseetheseparateproduct
specicDeclarationofConformity(DOC)sheet.
Introduction
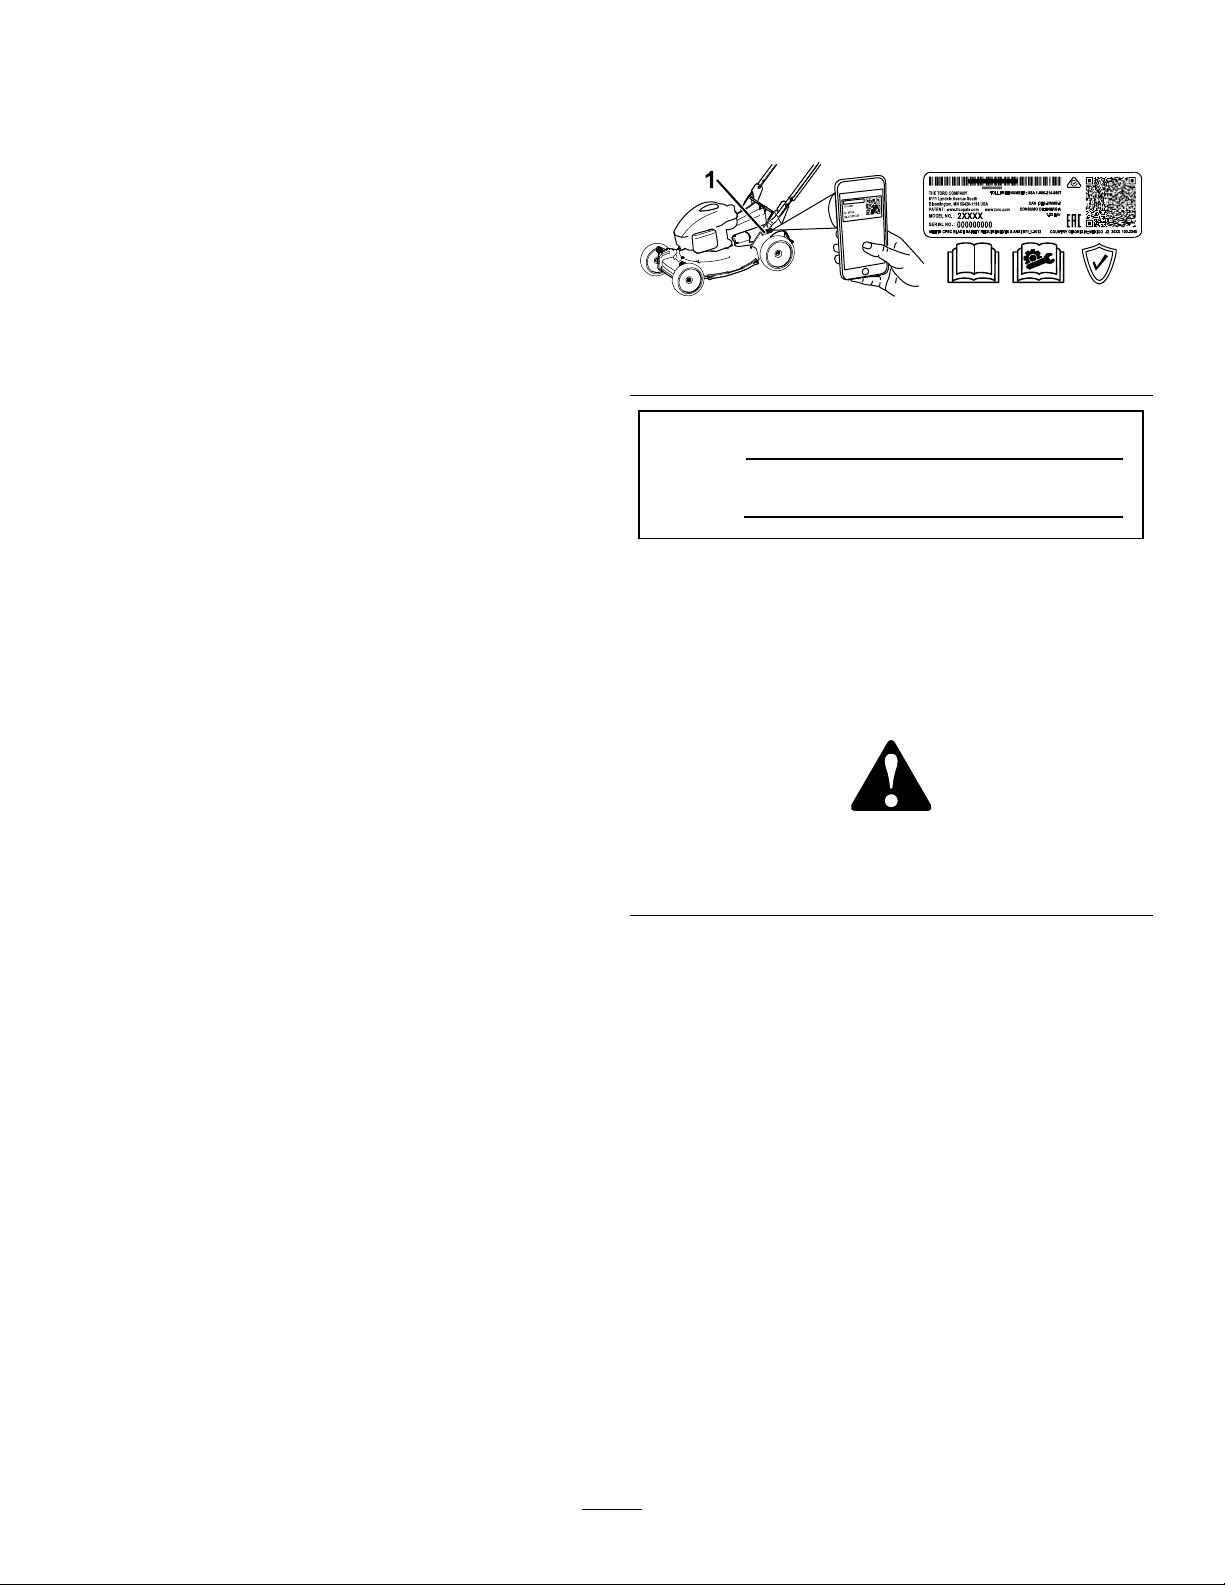
Important:Withyourmobiledevice,youcan
scantheQRcodeontheserialnumberdecal(if
equipped)toaccesswarranty,parts,andother
productinformation
Thisrotary-blade,walk-behindlawnmoweris
intendedtobeusedbyresidentialhomeowners
orprofessional,hiredoperators.Itisdesigned
primarilyforcuttinggrassonwell-maintainedlawnson
residentialorcommercialproperties.Itisdesignedto
uselithium-ionbatterypackModels81875(provided
withModel22275),81825,81850,or81860.These
batterypacksaredesignedtobechargedonlyby
batterychargerModels81805(providedwithModel
22275)or81802.Usingtheseproductsforpurposes
otherthantheirintendedusecouldprovedangerous
toyouandbystanders.
Model22275Tdoesnotincludeabatteryora
charger.
Visitwww.T oro.comformoreinformation,including
safetytips,trainingmaterials,accessoryinformation,
helpndingadealer,ortoregisteryourproduct.
Wheneveryouneedservice,genuinethe
manufacturerparts,oradditionalinformation,contact
anAuthorizedServiceDealerorthemanufacturer
CustomerServiceandhavethemodelandserial
numbersofyourproductready .Figure1identies
thelocationofthemodelandserialnumbersonthe
product.Writethenumbersinthespaceprovided.
g226623
Figure1
1.Modelandserialnumberlocation
ModelNo.
SerialNo.
Thismanualidentiespotentialhazardsandhas
safetymessagesidentiedbythesafety-alertsymbol
(Figure2),whichsignalsahazardthatmaycause
seriousinjuryordeathifyoudonotfollowthe
recommendedprecautions.
g000502
Figure2
Safety-alertsymbol
Thismanualuses2wordstohighlightinformation.
Importantcallsattentiontospecialmechanical
informationandNoteemphasizesgeneralinformation
worthyofspecialattention.
©2021—TheToro®Company
8111LyndaleAvenueSouth
Bloomington,MN55420
Contactusatwww.Toro.com.
2
PrintedintheUSA
AllRightsReserved

Contents
Safety
Safety.......................................................................3
SafetyandInstructionalDecals..........................6
Setup........................................................................8
1MountingtheBatteryCharger
(Optional)........................................................8
2RemovingtheCableGuard..............................9
3AssemblingtheLowerHandle........................10
4InstallingtheHandle.......................................11
5InstallingtheCableGuard...............................11
6AssemblingtheGrassBag.............................12
ProductOverview...................................................13
Specications..................................................13
BeforeOperation.................................................14
InstallingtheBatteryPack................................14
AdjustingtheCuttingHeight.............................15
AdjustingtheHandleHeight.............................16
DuringOperation.................................................17
StartingtheMachine.........................................17
RecyclingtheClippings....................................17
BaggingtheClippings.......................................17
OperatingtheSelf-PropelDrive........................19
AdjustingtheBladeSpeed................................19
ShuttingOfftheMachine..................................19
RemovingtheBatteryPackfromthe
Machine........................................................19
OperatingTips.................................................20
AfterOperation....................................................21
ChargingtheBatteryPack................................21
CleaningundertheMachine.............................22
Maintenance...........................................................23
RecommendedMaintenanceSchedule(s)...........23
AdjustingtheSelf-PropelDrive.........................23
MaintainingtheBlade.......................................24
CleaningtheWheels.........................................26
PreparingtheBatteryPackfor
Recycling......................................................26
Storage...................................................................27
Troubleshooting......................................................28
IMPORTANTSAFETY
INSTRUCTIONS
WARNING—Whenusinganelectricmachine,always
readandfollowbasicsafetywarningsandinstructions
toreducetheriskofre,electricshock,orinjury,
includingthefollowing:
I.Training
1.Theoperatorofthemachineisresponsiblefor
anyaccidentsorhazardsoccurringtoothersor
theirproperty .
2.Donotallowchildrentouseorplaywiththe
machine,batterypack,orthebatterycharger;
localregulationsmayrestricttheageofthe
operator.
3.Donotallowchildrenoruntrainedpeopleto
operateorservicethisdevice.Allowonlypeople
whoareresponsible,trained,familiarwiththe
instructions,andphysicallycapabletooperate
orservicethedevice.
4.Beforeusingthemachine,batterypack,and
batterycharger,readalltheinstructionsand
cautionarymarkingsontheseproducts.
5.Becomefamiliarwiththecontrolsandproper
useofthemachine,batterypack,andbattery
charger.
II.Preparation
1.Keepbystanders,especiallychildrenandpets,
outoftheoperatingarea.
2.Donotoperatethemachinewithoutallguards
andsafetydevices,suchasdeectorsandgrass
catchers,inplaceandfunctioningproperlyon
themachine.
3.Inspecttheareawhereyouwillusethemachine
andremoveallobjectsthatcouldinterferewith
theoperationofthemachineorthatthemachine
couldthrow.
4.Beforeusingthemachine,ensurethattheblade,
bladebolt,andbladeassemblyarenotwornor
damaged.Replaceanydamagedorunreadable
labels.
5.UseonlythebatterypackspeciedbyT oro.
Usingotheraccessoriesandattachmentsmay
increasetheriskofinjuryandre.
6.Pluggingthebatterychargerintoanoutletthat
isnot100to240Vcancauseareorelectric
shock.Donotplugthebatterychargerintoan
outletotherthan100to240V.Foradifferent
styleofconnection,useanattachmentplug
3

adapterofthepropercongurationforthepower
outletifneeded.
7.Donotuseadamagedormodiedbattery
packorbatterycharger,whichmayexhibit
unpredictablebehaviorthatresultsinre,
explosion,orriskofinjury.
8.Ifthesupplycordtothebatterychargeris
damaged,contactanAuthorizedServiceDealer
toreplaceit.
9.Donotusenon-rechargeablebatteries.
10.Chargethebatterypackwithonlythebattery
chargerspeciedbyToro.Achargersuitablefor
1typeofbatterypackmaycreateariskofre
whenusedwithanotherbatterypack.
11.Chargethebatterypackinawell-ventilatedarea
only.
12.Donotexposeabatterypackorbatterycharger
toreortotemperatureshigherthan68°C
(154°F).
13.Followallcharginginstructionsanddo
notchargethebatterypackoutsideofthe
temperaturerangespeciedintheinstructions.
Otherwise,youmaydamagethebatterypack
andincreasetheriskofre.
14.Dressproperly—Wearappropriateclothing,
includingeyeprotection;longpants;substantial,
slip-resistantfootwear(notbarefootorwearing
sandals);andhearingprotection.Tiebacklong
hairanddonotwearlooseclothingorloose
jewelrythatcangetcaughtinmovingparts.
Wearadustmaskindustyoperatingconditions.
III.Operation
1.Contactwiththemovingbladewillcauseserious
injury.Keepyourhandsandfeetawayfromthe
cuttingareaandallmovingpartsofthemachine.
Keepclearofanydischargeopening.
2.Usingthismachineforpurposesotherthanits
intendedusecouldprovedangeroustoyouand
bystanders.
3.Disengagetheself-propeldrive(ifequipped)
beforestartingthemachine.
4.Donottiltthemachinewhenstartingthemotor.
5.Preventunintentionalstarting—Ensurethatthe
electric-startbuttonisremovedfromtheignition
beforeconnectingthebatterypackandhandling
themachine.
6.Useyourfullattentionwhileoperatingthe
machine.Donotengageinanyactivitythat
causesdistractions;otherwise,injuryorproperty
damagemayoccur.
7.Whenyoureleasetheblade-controlbar,the
motorshouldshutoffandthebladeshould
stopwithin3seconds.Ifnot,stopusingyour
machineimmediatelyandcontactanAuthorized
ServiceDealer.
8.Stopthemachine,removetheelectric-start
button,removethebatterypackfromthe
machine,andwaitforallmovementtostop
beforeadjusting,servicing,cleaning,orstoring
themachine.
9.Removethebatterypackandelectric-start
buttonfromthemachinewheneveryouleaveit
unattendedorbeforechangingaccessories.
10.Donotforcethemachine—Allowthemachineto
dothejobbetterandsaferattherateforwhichit
wasdesigned.
11.Stayalert—Watchwhatyouaredoinganduse
commonsensewhenoperatingthemachine.
Donotusethemachinewhileill,tired,orunder
theinuenceofalcoholordrugs.
12.Operatethemachineonlyingoodvisibilityand
appropriateweatherconditions.Donotoperate
themachinewhenthereistheriskoflightning.
13.Useextremecautionwhenreversingorpulling
themachinetowardyou.
14.Keepproperfootingandbalanceatalltimes,
especiallyonslopes.Mowacrosstheface
ofslopes,neverupanddown.Useextreme
cautionwhenchangingdirectionsonslopes.Do
notmowexceedinglysteepslopes.Walk,never
runwiththemachine.
15.Donotdirectthedischargematerialtoward
anyone.Avoiddischargingmaterialagainsta
wallorobstruction;materialmayricochettoward
you.Stoptheblade(s)whencrossinggravel
surfaces.
16.Watchforholes,ruts,bumps,rocks,orother
hiddenobjects.Uneventerraincouldcauseyou
toloseyourbalanceorfooting.
17.Wetgrassorleavescancauseseriousinjuryif
youslipandcontacttheblade.Avoidmowingin
wetconditionsorwhenitisraining.
18.Ifthemachinestrikesanobjectorstartsto
vibrate,immediatelyshutoffthemachine,
removetheelectric-startbutton,removethe
batterypack,andwaitforallmovementtostop
beforeexaminingthemachinefordamage.
Makeallnecessaryrepairsbeforeresuming
operation.
19.Stopthemachineandremovetheelectric-start
buttonbeforeloadingthemachineforhauling.
20.Underabusiveconditions,thebatterypackmay
ejectliquid;avoidcontact.Ifyouaccidently
comeintocontactwiththeliquid,ushwith
water.Iftheliquidcontactsyoureyes,seek
medicalhelp.Liquidejectedfromthebattery
packmaycauseirritationorburns.
4

IV.MaintenanceandStorage
1.Stopthemachine,removetheelectric-start
button,removethebatterypackfromthe
machine,andwaitforallmovementtostop
beforeadjusting,servicing,cleaning,orstoring
themachine.
2.Donotattempttorepairthemachineexceptas
indicatedintheinstructions.HaveanAuthorized
ServiceDealerperformserviceonthemachine
usingidenticalreplacementparts.
3.Wearglovesandeyeprotectionwhenservicing
themachine.
13.Whenyouarenotusingthemachine,storeit
indoorsinadry,secureplaceoutofthereach
ofchildren.
14.CAUTION—Amistreatedbatterypackmay
presentariskofreorchemicalburn.Donot
disassemblethebatterypack.Donotheatthe
batterypackabove68°C(154°F)orincinerate
it.ReplacethebatterypackwithagenuineT oro
batterypackonly;usinganothertypeofbattery
packmaycauseareorexplosion.Keep
batterypacksoutofthereachofchildrenand
intheoriginalpackaginguntilyouarereadyto
usethem.
4.Sharpenadullbladeonbothendstomaintain
balance.Cleanthebladeandensurethatitis
balanced.
5.Replacethebladeifitisbent,worn,orcracked.
Anunbalancedbladecausesvibration,which
coulddamagethemotororcausepersonal
injury.
6.Whenservicingtheblade,beawarethatthe
bladecanstillmoveeventhoughthepower
sourceisoff.
7.Checkthegrasscollectionbagfrequentlyfor
deteriorationorwear,andreplaceawornbag
withaT oro[replacement]bag.
8.Forbestperformance,useonlygenuineToro
replacementpartsandaccessories.Other
replacementpartsandaccessoriescouldbe
dangerous,andsuchusecouldvoidtheproduct
warranty.
9.Maintainthemachine—Keepcuttingedges
sharpandcleanforthebestandsafest
performance.Keephandlesdry,clean,andfree
fromoilandgrease.Keepguardsinplaceandin
workingorder.Keepbladessharp.Useidentical
replacementbladesonly.
15.Donotdisposeofthebatteryinare.The
cellmayexplode.Checkwithlocalcodesfor
possiblespecialdisposalinstructions.
SAVETHESE
INSTRUCTIONS
10.Checkthemachinefordamagedparts—Ifthere
aredamagedguardsorotherparts,determine
whetherthemachinewilloperateproperly.
Checkformisalignedandbindingmovingparts,
brokenparts,mounting,andanyothercondition
thatmayaffectitsoperation.Unlessindicated
intheinstructions,haveanAuthorizedService
Dealerrepairorreplaceadamagedguardor
part.
11.Whenthebatterypackisnotinuse,keepit
awayfrommetalobjectssuchaspaperclips,
coins,keys,nails,andscrewsthatcanmakea
connectionfrom1terminaltoanother.Shorting
thebatteryterminalsmaycauseburnsorare.
12.Checkthebladeandmotormountingbolts
frequentlyfortightness.
5

SafetyandInstructionalDecals
Safetydecalsandinstructionsareeasilyvisibletotheoperatorandarelocatednearanyarea
ofpotentialdanger.Replaceanydecalthatisdamagedormissing.
137-9490
1.ReadtheOperator’s
Manual.
2.Recycle5.Donotexposetorain.
3.Containslithiumions;do
notdiscard.
4.Keepawayfromopen
ames.
decal137-9490
decal144-3175
144-3175
1.ReadtheOperator’s
Manual.
2.Tostartthemachine,
squeezethebartothe
handleandpressthe
button.
3.Toshutoffthemachine,
releasethebar.
116-7583
1.Warning—readtheOperator’sManual;donotoperatethis
machineunlessyouaretrained.
2.Thrownobjecthazard—keepbystandersaway.5.Warning—wearhearingprotection.
3.Thrownobjecthazard—donotoperatethemowerwithoutthe
reardischargeplugorbaginplace.
4.Cutting/dismembermenthazardofhandorfoot,mower
blade—stayawayfrommovingparts;keepallguardsinplace.
6.Cutting/dismembermenthazardofhandorfoot,mower
blade—donotoperateupanddownslopes;operateside
tosideonslopes;shutofftheenginebeforeleavingthe
machine;pickupanydebrisbeforemowing;lookbehindyou
whenmovinginreverse.
6
decal116-7583

140-8472
1.ReadtheOperator’s
Manual.
2.Donotdiscard.4.Doubleinsulated
3.Residential
112-8760
1.Thrownobjecthazard—keepbystandersaway.
2.Cutting/dismembermenthazardofhandorfoot,mower
blade—stayawayfrommovingparts.
decal131-0822
131-0822
decal140-8472
decal112-8760
1.Self-propeldrive—Attention;prematurewearofthe
transmissionmayoccurifthebeltisover-tightened;before
servicingorperformingmaintenance,readtheOperator's
Manual.
137-9461
1.Batterychargestatus
134-4691
1.Autospeed2.Maxspeed
decal137-9461
decal134-4691
7

Setup
LooseParts
Usethechartbelowtoverifythatallpartshavebeenshipped.
ProcedureDescription
1
2
3
4
5
6
Important:Removeanddiscardtheprotective
plasticsheetthatcoversthemotorandanyother
plasticorwrappingonthemachine.
Important:Thebatterypackisnotfullycharged
whenitispurchased.Beforeusingthemachine
forthersttime,refertoChargingtheBattery
Pack(page21).
Mountinghardware(notincluded)
Nopartsrequired
Upperhandleassembly1
Lowerhandle2
Bolt(5/16x1-3/4inches)
Flangelocknut(5/16inch)
Curvedwasher
Nopartsrequired
Nopartsrequired
Nopartsrequired
Qty.
2
–
4
4
8
–
–
–
Slidethechargerovertheappropriatelypositioned
hardwaretosecurethechargerinplace(hardware
notincluded).
Mountthebatterycharger(optional).
Removethecableguard.
Assemblethelowerhandle.
Installthehandle.
Installthecableguard.
Assemblethegrassbag.
Use
1
MountingtheBattery
Charger(Optional)
Partsneededforthisprocedure:
2
Mountinghardware(notincluded)
Procedure
Ifdesired,mountthebatterychargersecurelyona
wallusingthewall-mountkeyholesonthebackof
thecharger.
Mountitindoors(suchasagarageorotherdryplace),
nearapoweroutlet,andoutofthereachofchildren.
RefertoFigure3forassistanceinmountingthe
charger.
g290534
Figure3
8

2
RemovingtheCableGuard
NoPartsRequired
Procedure
g328502
Figure4
9

3
AssemblingtheLowerHandle
Partsneededforthisprocedure:
1Upperhandleassembly
2Lowerhandle
4
Bolt(5/16x1-3/4inches)
4
Flangelocknut(5/16inch)
8
Curvedwasher
Procedure
AssemblethelowerhandleasshowninFigure5.
Figure5
1.Flangelocknut(5/16inch)
2.Curvedwasher5.Bolt(5/16x1-3/4inches)
3.Upperhandleassembly
4.Lowerhandle
g340673
10

4
InstallingtheHandle
NoPartsRequired
Procedure
Figure6
11
g351011

5
InstallingtheCableGuard
NoPartsRequired
Procedure
g350108
Figure7
6
AssemblingtheGrassBag
NoPartsRequired
Procedure
g238450
Figure8
12

ProductOverview
Specications
AppropriateT emperatureRanges
Figure9
Charge/storethebatterypack
at
Usethebatterypackat
Usethemachineat
5°C(41°F)to40°C(104°F)*
-30°C(-22°F)to49°C(120°F)*
0°C(32°F)to49°C(120°F)*
*Chargingtimewillincreaseifyoudonotchargethe
batterypackwithinthisrange.
Storethemachine,batterypack,andbatterycharger
inanenclosedclean,dryarea.
g346507
1.Self-propeldrivebar5.Reardeector
2.Handle6.Batterycompartment
3.Blade-controlbar
4.Electric-startbutton
Figure10
1.BatterychargerModel
81805(includedwith
Model22275)
7.Cutting-heightlever(4)
8.Grassbag
g292995
2.BatterypackModel81875
(includedwithModel
22275)
13

Operation
BeforeOperation
InstallingtheBatteryPack
Important:Usethebatterypackonlyintemperaturesthatarewithintheappropriaterange;refer
toSpecications(page13).
1.Makesurethattheventsonthebatteryareclearofanydustanddebris.
2.Liftupthebattery-compartmentlid(AofFigure11).
3.Lineupthecavityinthebatterypackwiththetongueonthemachineandslidethebatterypackintothe
compartmentuntilitlocksintoplace(BofFigure11).
4.Closethebattery-compartmentlid(CofFigure11).
Figure11
g303151
14

AdjustingtheCuttingHeight
WARNING
Adjustingthecutting-heightleverscouldbringyourhandsintocontactwithamovingblade
andresultinseriousinjury.
•Shutoffthemotor,removetheelectric-startbutton,andwaitforallmovingpartstostop
beforeadjustingthecuttingheight.
•Donotputyourngersunderthehousingwhenadjustingthecuttingheight.
Adjustthecuttingheightasdesired.Setallwheelstothesamecuttingheight(Figure12).
Figure12
g303150
15

AdjustingtheHandleHeight
Youcanraiseorlowerthehandlein1of3positionsthatismorecomfortableforyou(Figure13).
Figure13
1.Removebothhandleboltsandcorrespondingnuts.
2.Movethehandletothedesiredheightposition.
3.Securethehandlewiththepreviouslyremovedboltsandcorrespondingnuts.
g331956
16

DuringOperation
StartingtheMachine
1.Ensurethatthebatterypackisinstalledinthemachine;refertoInstallingtheBatteryPack(page14).
2.Inserttheelectric-startbuttonintotheelectricstarterswitch(AofFigure14).
3.Squeezetheblade-controlbarandholdittothehandle(BofFigure14).
4.Presstheelectric-startbuttonandkeepitpresseduntilthemotorstarts(CofFigure14).
Figure14
g331970
RecyclingtheClippings
Yourmachinecomesfromthefactoryreadytorecyclethegrassandleafclippingsbackintothelawn.
Ifthegrassbagisonthemachine,removeitbeforerecyclingtheclippings.RefertoRemovingtheGrassBag
(page18).
BaggingtheClippings
Usethegrassbagwhenyouwanttocollectgrassandleafclippingsfromthelawn.
WARNING
Aworngrassbagcouldallowsmallstonesandothersimilardebristobethrowntowardyou
orbystanders,resultinginseriouspersonalinjuryordeath.
Checkthegrassbagfrequently.Ifitisdamaged,installanewthemanufacturerreplacement
bag.
WARNING
Thebladesaresharp;contactingthebladescanresultinseriouspersonalinjury .
Shutoffthemachineandwaitforallmovingpartstostopbeforeleavingtheoperatingposition.
InstallingtheGrassBag
1.Shutoffthemachineandwaitforallmovingpartstostop.
2.Raiseandholdupthereardeector(AofFigure15).
3.Removetherear-dischargeplugbypushinginthelatchwithyourthumbandpullingtheplugoutfrom
themachine(BandCofFigure15).
4.Installthebag-rodendsintothenotchesatthebaseofthehandle,androckthebagbackandforthto
ensurethatthebag-rodendsareseatedatthebottomofbothnotches(DofFigure15).
5.Lowerthereardeectoruntilitrestsonthegrassbag.
17

Figure15
RemovingtheGrassBag
DANGER
Themachinecanthrowgrassclippingsandotherobjectsthroughanopeninginthemachine
housing.Objectsthrownwithenoughforcecouldcauseseriouspersonalinjuryordeathto
youortobystanders.
•Neverremovethegrassbagandthenstartthemachinewithoutthedischargepluginstalled
onthemachine.
•Neveropenthereardeectoronthemachinewhenthemachineisrunning.
1.Shutoffthemachineandwaitforallmovingpartstostop.
2.Raisethereardeector.
3.Removethebagrodonthegrassbagfromthenotchesatthebaseofthehandle(AofFigure15).
4.Installthedischargeplug(BofFigure15).
5.Lowerthereardeector(CofFigure15).
g303153
18

OperatingtheSelf-Propel
Drive
Tooperatetheself-propeldrive,squeezethe
self-propeldrivebartowardthehandleandholditin
place(Figure16).
g337279
Figure17
1.AUTOposition2.MAXposition
ShuttingOfftheMachine
1.Releasetheblade-controlbar(AofFigure18).
2.Removetheelectric-startbuttonfromtheelectric
starter(BofFigure18).
Figure16
1.Self-propel-drivebar
Todisengagetheself-propeldrive,releasethe
self-propel-drivebar.
Note:Themachinecomeswithfreewheelingclutches
thatmakeiteasiertopullthemachinerearward.To
disengagetheclutches,youmayneedtopushthe
machineforwardabout2.5cm(1inch)ormoreafter
youreleasetheself-propel-drivebar.
AdjustingtheBladeSpeed
Thismachinehas2blade-speedsettings:AUTOand
MAX.
•IntheAUTOposition,thebladespeedadjusts
automaticallyforgreaterefciency .Themachine
detectschangesinthecuttingconditionsand
increasesthebladespeedasneededtomaintain
thequalityofcut.
•IntheMAXposition,thebladespeedremainsat
themaximumspeedatalltimes.
Turnthekeyinthekeyswitchtoeitherpositionto
adjustthebladespeedsetting(Figure17).
3.Removethebatterypack;refertoRemovingthe
g331972
BatteryPackfromtheMachine(page19).
Note:Wheneveryouarenotusingthemachine,
removethebatterypack.
g331971
Figure18
RemovingtheBatteryPack
fromtheMachine
1.Liftupthebattery-compartmentlid.
2.Pressthebattery-packlatchtoreleasethe
batterypackandremovethebatterypack.
3.Closethebattery-compartmentlid.
19

OperatingTips
GeneralMowingTips
•Avoidstrikingsolidobjectswiththeblade.Never
deliberatelymowoveranyobject.
•Forbestperformance,installanewbladebefore
thecuttingseasonbegins.
•ReplacethebladewhennecessarywithaToro
replacementblade.
CuttingGrass
•Grassgrowsatdifferentratesatdifferenttimes
oftheyear.Inthesummerheat,itisbesttocut
grassatthe64mm(2-1/2inch),76mm(3inch),
or89mm(3-1/2inch)cutting-heightsettings.Cut
onlyaboutathirdofthegrassbladeatatime.
Donotcutbelowthe64mm(2-1/2inch)setting
unlessthegrassissparseoritislatefallwhen
grassgrowthbeginstoslowdown.Forimproved
runtime,cutgrassatahigherheightofcut.
CuttingLeaves
•Aftercuttingthelawn,ensurethathalfofthelawn
showsthroughthecutleafcover.Youmayneed
tomakemorethanasinglepassovertheleaves.
•Iftherearemorethan13cm(5inches)ofleaves
onthelawn,mowatahighercuttingheightand
thenagainatthedesiredcuttingheight.
•Slowdownyourmowingspeedifthemachine
doesnotcuttheleavesnelyenough.
•Whencuttinggrassover15cm(6inches)tall,rst
mowatthehighestcutting-heightsettinganda
slowerspeed;thenmowagainatalowersetting
forthebestlawnappearance.Ifthegrassistoo
longandtheleavesclumpontopofthelawn,the
machinemayplugandcausethemotortostall.
•Wetgrassandleavestendtoclumpontheyard
andcancausethemachinetoplugorthemotorto
stall.Avoidmowinginwetconditions.
•Beawareofapotentialrehazardinverydry
conditions,followalllocalrewarnings,andkeep
themachinefreeofdrygrassandleafdebris.
•Alternatethemowingdirection.Thishelps
dispersetheclippingsoverthelawnforeven
fertilization.
Ifthenishedlawnappearanceisunsatisfactory,try1
ormoreofthefollowing:
•Sharpentheblade.
•Mowataslowerpace.
•Raisethecuttingheightonyourmachine.
•Cutthegrassmorefrequently.
•Overlapcuttingswathsinsteadofcuttingafull
swathwitheachpass.
20

AfterOperation
ChargingtheBatteryPack
4.T oremovethebatterypack,slidethebattery
backwardoutofthecharger.
5.RefertothefollowingtabletointerprettheLED
indicatorlightonthebatterycharger.
Important:Thebatterypackisnotfullycharged
whenyoupurchaseit.Beforeusingthetoolfor
thersttime,placethebatterypackinthecharger
andchargeituntiltheLEDdisplayindicatesthe
batterypackisfullycharged.Readallsafety
precautions.
Important:Chargethebatterypackonlyin
temperaturesthatarewithintheappropriate
range;refertoSpecications(page13).
Note:Atanytime,pressthebattery-charge-indicator
buttononthebatterypacktodisplaythecurrent
charge(LEDindicators).
1.Ensurethattheventsonthebatteryandcharger
areclearofanydustanddebris.
Indicator
light
Off
Green
blinking
Green
Red
Red
blinking
Indicates
Nobatterypackinserted
Batterypackischarging
Batterypackischarged
Batterypackand/orbatterychargerisoverorunder
theappropriatetemperaturerange
Batterypackchargingfault*
*RefertoSpecications(page13)formore
information.
Important:Thebatterycanbeleftonthecharger
forshortperiodsbetweenuses.
Ifthebatterywillnotbeusedforlongerperiods,
removethebatteryfromthecharger;referto
Storage(page27).
g290533
Figure19
1.Batterypackcavity
2.Batterypackventingareas6.Handle
3.Batterypackterminals
4.Battery-charge-indicator
button
5.LEDindicators(current
charge)
7.ChargerLEDindicator
light
8.Chargerventingareas
2.Lineupthecavityinthebatterypack(Figure19)
withthetongueonthecharger.
3.Slidethebatterypackintothechargeruntilitis
fullyseated(Figure19).
21

CleaningundertheMachine
ServiceInterval:Aftereachuse
Toensurethebestperformance,keeptheunderside
ofthemachinecleanandcleanunderthemachine
soonafteryouhavecompletedmowing.Beespecially
carefultokeepthekickersfreeofdebris(Figure20).
g002600
Figure21
1.Right,rearwheel
5.Whennomoreclippingscomeout,stopthe
waterandmovethemachinetoadryarea.
6.Runthemotorforafewminutestodrythe
undersideofthemachine.
ScrapingMethod
Ifwashingdoesnotremovealldebrisfromunderthe
machine,scrapeitclean.
Figure20
1.Kickers
WashingMethod
WARNING
Themachinemaydislodgematerialfrom
underthemachine.
•Weareyeprotection.
•Stayintheoperatingposition(behindthe
handle)whilethemachineisrunning.
•Donotallowbystandersinthearea.
1.Lowerthemachinetoitslowestcutting-height
setting.
2.Movethemachinetoapavedlevelsurface.
3.Turnonthemachineandengagetheblade.
g240549
1.Shutoffthemachineandwaitforallmoving
partstostop.
2.Removetheelectric-startbuttonandthebattery
fromthemachine.
3.Tipthemachineontoitsside.
4.Removethedirtandgrassclippingswitha
scraper.Avoidanyburrsorsharpedges.
5.Returnthemachinetotheoperatingposition.
4.Holdagardenhoseathandlelevelandspraya
streamofwaterinfrontoftheright,rearwheel
(Figure21).
Note:Thewaterwillsplashintothepathofthe
blade,cleaningouttheclippings.
22

Maintenance
RecommendedMaintenanceSchedule(s)
MaintenanceService
Interval
Aftertherst25hours
Beforeeachuseordaily
Aftereachuse
Every40hours
Every50hours
Every100hours
MaintenanceProcedure
•Tightenanyloosefasteners.
•Inspectthemowerbladesforwearordamage.
•Inspecttheacceleratorforwearordamage.
•Checkthestoppingtimeofthebladebrake.Theblademuststopwithin3seconds
ofreleasingtheblade-controlbar;ifitdoesnot,contactanAuthorizedService
Dealerforrepair .
•Cleantheundersideofthemachine.
•Cleanthewheelsandgears.
•Sharpenorreplacetheblade.Maintainitmorefrequentlyiftheedgedullsquicklyin
roughorinsandyconditions.
•Tightenanyloosefasteners.
AdjustingtheSelf-Propel
Drive
Ifthemachineisnew,doesnotself-propel,orittends
tocreepforward,adjustthedrivecable.
1.Movethemachineoutsideandontoapaved
surfacenearasolidwalltosafelypreventthe
machinefrommovingforwardwhilethemotor
isturnedon.
2.Positionthemachinewiththefronttiresagainst
thewall.
Note:Ensurethattheareaiswellventilated
andclearofdebristhatcouldbethrownbythe
machine.
3.Startthemotor;refertoStartingtheMachine
(page17).
4.Pulltheself-propel-drivebartothehandle.
Note:Thewheelsshouldstarttoturnasthe
self-propel-drivebarjusttouchesthehandle.
5.Shutoffthemotor.
6.Ifyoumustadjustthemachine,dothefollowing:
•Ifthewheelsdonotspinwhenyouengage
theself-propel-drivebar,thetractionbeltis
tooloose.Rotatethewheel-drive-control
knob(Figure22)clockwise1turnandrepeat
steps3through5.
g024465
Figure22
1.Wheel-drive-controlknob
•Ifthewheelsspinbeforeyoufullyengage
theself-propel-drivebar,thetractionbelt
istootight.Rotatethewheel-drive-control
knob(Figure22)counterclockwise1turn
andrepeatsteps3through5.
7.Foranewtractionbelt,rotatethe
drive-cable-adjustmentknobclockwise1
additionalturntoallowforthenormalstretching
ofthebeltduringthebreak-inperiod.
Note:Youcanskipthisstepifyouareadjusting
ausedbelt.
23

MaintainingtheBlade
InspectingtheBlade
Alwaysmowwithasharpblade.Asharpbladecuts
cleanlyandwithouttearingorshreddingthegrass
blades.
1.Shutoffthemachineandwaitforallmoving
partstostop.
2.Removethebatterypack;refertoRemovingthe
BatteryPackfromtheMachine(page19).
3.TipthemachineontoitssideasshowninFigure
23.
Figure23
1.Blade3.Bladeboltandlockwasher
2.Accelerator
ServiceInterval:Beforeeachuseordaily—Inspect
themowerbladesforwearor
damage.
Carefullyexaminethebladeforsharpnessandwear,
especiallywheretheatandthecurvedpartsmeet
(Figure24A).Becausesandandabrasivematerial
canwearawaythemetalthatconnectstheatand
curvedpartsoftheblade,checkthebladebefore
usingthemachine.Ifyounoticeaslotorwear(Figure
24BandFigure24C),replacetheblade;referto
RemovingtheBlade(page25).
g002278
Figure24
g240550
1.Sail
2.Flatpartoftheblade4.Slotformed
3.Wear
Note:Forthebestperformance,installanewblade
beforethemowingseasonbegins.Duringtheyear,
ledownanysmallnickstomaintainthecuttingedge.
DANGER
Awornordamagedbladecanbreak,anda
pieceofthebladecouldbethrowntowardyou
orbystanders,resultinginseriouspersonal
injuryordeath.
•Inspectthebladeperiodicallyforwearor
damage.
•Replaceawornordamagedblade.
InspectingtheAccelerator
ServiceInterval:Beforeeachuseordaily—Inspect
theacceleratorforwearordamage.
24

Carefullyexaminetheacceleratorforexcessivewear
(Figure25).Becausesandandabrasivematerialcan
wearawaythemetal(especiallyintheareashown
asitem2inFigure25),checktheacceleratorbefore
usingthemachine.Ifyounoticethatatabonthe
acceleratorhasbeenworndowntoasharpedgeor
thereisacrack,replacetheaccelerator.
Figure25
1.Accelerator3.T ab
2.Weararea
4.Crackformed
WARNING
Awornordamagedacceleratorcanbreak,
andapieceoftheacceleratorcouldbethrown
atyouorbystanders,resultinginserious
personalinjuryordeath.
•Inspecttheacceleratorperiodicallyfor
wearordamage.
RemovingtheBlade
1.Grasptheendofthebladeusingaragora
thicklypaddedglove.
2.Removethebladebolt,thelockwasher,the
accelerator,andtheblade(Figure24).
SharpeningtheBlade
ServiceInterval:Every50hours—Sharpenor
replacetheblade.Maintainitmore
frequentlyiftheedgedullsquicklyin
roughorinsandyconditions.
Filethetopsideofthebladetomaintainitsoriginal
g027496
cuttingangle(Figure26A)andinnercuttingedge
radius(Figure26B).Thebladewillremainbalancedif
youremovethesameamountofmaterialfromboth
cuttingedges.
Figure26
1.Sharpenthebladeatthis
angleonly.
2.Maintaintheoriginalradius
here.
g002279
•Replaceawornordamagedaccelerator.
BalancingtheBlade
1.Checkthebalanceofthebladebyplacing
thecenterholeofthebladeoveranailor
screwdrivershankclampedhorizontallyinavise
(Figure27).
g002280
Figure27
Note:Y oucanalsocheckthebalanceusinga
commerciallymanufacturedbladebalancer.
2.Ifeitherendofthebladerotatesdownward,le
thatend(notthecuttingedgeortheendnear
thecuttingedge)untilneitherendoftheblade
drops.
25

InstallingtheBlade
1.Installasharp,balancedToroblade,the
accelerator,thelockwasher,andthebladebolt.
Thesailoftheblademustpointtowardthetop
ofthemowerhousingforproperinstallation.
Note:Torquethebladeboltto82N∙m(60ft-lb).
PreparingtheBatteryPack
forRecycling
Important:Uponremoval,covertheterminalsof
thebatterypackwithheavy-dutyadhesivetape.
Donotattempttodestroyordisassemblethe
batterypackorremoveanyofitscomponents.
WARNING
Operatingthemachinewithoutthe
acceleratorinplacecancausethe
bladetoex,bend,orbreak,resulting
inseriousinjuryordeathtoyouorto
bystanders.
Donotoperatethemachinewithoutthe
acceleratorinplace.
2.Returnthemachinetotheoperatingposition.
CleaningtheWheels
ServiceInterval:Every40hours
1.Removetherearwheelsandcleananydebris
fromthewheel-geararea.
ContactyourlocalmunicipalityoryourauthorizedToro
distributorformoreinformationonhowtoresponsibly
recyclethebattery.
Figure28
1.Gears
2.Aftercleaning,applyasmallamountof
anti-seizecompoundtothegears.
Note:Ifyouoperatethemachineinextreme
conditions,cleaningthewheelsmorefrequentlythan
recommendedwillincreasegearlife.
Note:T opreventdamagetothebearingseals,do
notuseahigh-pressurewatersprayonthebearings.
g033535
26

Storage
Topreparethemachineforoff-seasonstorage,
performtherecommendedmaintenanceprocedures;
refertoMaintenance(page23).
Alwaysshutoffthemachine,waitforallmoving
partstostop,andallowthemachinetocoolbefore
adjusting,servicing,cleaning,orstoringit.
Storethemachineinacool,clean,dryplace.Cover
themachinetokeepitcleanandprotected.
Important:Storethemachine,batterypack,and
chargeronlyintemperaturesthatarewithinthe
appropriaterange;refertoSpecications(page
13).
Important:Ifyouarestoringthebatterypack
fortheoff-season,chargeituntil2or3LED
indicatorsturngreenonthebattery.Donotstore
afullychargedorfullydepletedbattery.When
youarereadytousethemachineagain,charge
thebatterypackuntiltheleftindicatorlightturns
greenonthechargerorall4LEDindicatorsturn
greenonthebattery.
1.Disconnectthemachinefromthepowersupply
(i.e.,removethebatterypack)andcheckfor
damageafteruse.
2.Donotstorethemachinewiththebatterypack
installed.
3.Storethemachine,batterypack,andbattery
chargerinanenclosed,clean,drywell-ventilated
placethatisinaccessibletochildren.
4.Keepthemachine,batterypack,andbattery
chargerawayfromcorrosiveagentssuchas
gardenchemicalsandde-icingsalts.
5.T oreducetheriskofseriouspersonalinjury,do
notstorethebatterypackoutsideorinvehicles.
6.Removegrassclippings,dirt,andgrimefrom
theexternalpartsofthemotor,theshrouding,
andthetopofthemowerhousing.
7.Cleanunderthemachine;refertoCleaning
undertheMachine(page22).
8.Checktheconditionoftheblade;referto
InspectingtheBlade(page24).
9.Checktheconditionoftheaccelerator;referto
InspectingtheAccelerator(page24).
10.Tightenallnuts,bolts,andscrews.
11.Touchupallrustedorchippedpaintsurfaces
withpaintavailablefromanAuthorizedService
Dealer.
27

Troubleshooting
Performonlythestepsdescribedintheseinstructions.Allfurtherinspection,maintenance,andrepairwork
mustbeperformedbyanauthorizedservicecenterorasimilarlyqualiedspecialistifyoucannotsolvethe
problemyourself.
Problem
Themachinedoesnotrunordoesnotrun
continuously.
Themachinedoesnotreachfullpower .
Themachineormotorisproducing
excessivevibrationornoise.
Theisanunevencuttingpattern.
PossibleCauseCorrectiveAction
1.Thebatteryisnotfullyinstalledinthe
machine.
2.Thebatterypackisnotcharged.
3.Thebatterypackisdamaged.3.Replacethebatterypack.
4.Thereisanotherelectricalproblem
withthemachine.
1.Thebatterypackchargecapacityis
toolow.
2.Theundersideofthemachinecontains
clippingsanddebris.
1.Thebladeisbentorisoutofbalance.1.Balancetheblade.Ifthebladeisbent,
2.Theblademountingnutsareloose.2.Tightentheblademountingnuts.
3.Theundersideofthemachinecontains
clippingsanddebris.
4.Themotormountingboltsareloose.4.Tightenthemotormountingbolts.
1.All4wheelsarenotatthesameheight.1.Placeall4wheelsatthesameheight.
2.Thebladeisdull.
3.Y ouaremowinginthesamepattern
repeatedly.
4.Theundersideofthemachinecontains
clippingsanddebris.
1.Removeandthenreplacethebattery
intothemachine,makingsurethatitis
fullyinstalledandlatched.
2.Removethebatterypackfromthe
machineandchargeit.
4.ContactanAuthorizedServiceDealer.
1.Removethebatterypackfromthe
machineandfullychargethebattery
pack.
2.Cleantheundersideofthemachine.
replaceit.
3.Cleantheundersideofthemachine.
2.Sharpenandbalancetheblade.
3.Changethemowingpattern.
4.Cleantheundersideofthemachine.
Thedischargechuteplugsup.
Themachinedoesnotself-propel.
Thebatterypackloseschargequickly.
Thebatterychargerisnotworking.
1.ThethrottleleverisnotintheFAST
position.
2.Thecuttingheightistoolow.2.Raisethecuttingheight.
3.Y ouaremowingtoofast.3.Slowdown.
4.Thegrassiswet.
5.Theundersideofthemachinecontains
clippingsanddebris.
1.Theself-propeldrivecableisoutof
adjustmentorisdamaged.
2.Thereisdebrisunderthebeltcover.
1.Thebatterypackisoverorunderthe
appropriatetemperaturerange.
2.Themachineisoverloaded2.Workataslowerpace.
1.Thebatterychargerisoverorunder
theappropriatetemperaturerange.
2.Theoutletthatthebatterychargeris
pluggedintodoesnothavepower.
1.MovethethrottlelevertotheFAST
position.
4.Allowthegrasstodrybeforemowing.
5.Cleantheundersideofthemachine.
1.Adjusttheself-propeldrivecable.
Replacethecableifnecessary .
2.Cleanthedebrisfromunderthebelt
cover.
1.Movethebatterypacktoaplace
whereitisdryandthetemperatureis
between5°C(41°F)and40°C(104°F).
1.Unplugthebatterychargerandmove
ittoaplacewhereitisdryandthe
temperatureisbetween5°C(41°F)
and40°C(104°F).
2.Contactyourlicensedelectricianto
repairtheoutlet.
28

Problem
PossibleCauseCorrectiveAction
TheLEDindicatorlightonthebattery
chargerisred.
TheLEDindicatorlightonthebattery
chargerisblinkingred.
1.Thebatterychargerand/orbattery
packisoverorundertheappropriate
temperaturerange.
1.Thereisanerrorinthecommunication
betweenthebatterypackandthe
charger.
2.Thebatterypackisweak.
1.Unplugthebatterychargerandmove
thebatterychargerandbatterypack
toaplacewhereitisdryandthe
temperatureisbetween5°C(41°F)
and40°C(104°F).
1.Removethebatterypackfromthe
batterycharger,unplugthebattery
chargerfromtheoutlet,andwait10
seconds.Plugthebatterychargerinto
theoutletagainandplacethebattery
packonthebatterycharger.IftheLED
indicatorlightonthebatterychargeris
stillblinkingred,repeatthisprocedure
again.IftheLEDindicatorlighton
thebatterychargerisstillblinkingred
after2attempts,properlydisposeof
thebatterypackatabatteryrecycling
facility.
2.Contactyourauthorizedservicedealer
ifthebatteryisinwarranty,orproperly
disposeofthebatterypackatabattery
recyclingfacility.
29

EEA/UKPrivacyNotice
Toro’sUseofYourPersonalInformation
TheToroCompany(“T oro”)respectsyourprivacy.Whenyoupurchaseourproducts,wemaycollectcertainpersonalinformationaboutyou,eitherdirectly
fromyouorthroughyourlocalT orocompanyordealer.T orousesthisinformationtofullcontractualobligations-suchastoregisteryourwarranty ,
processyourwarrantyclaimortocontactyouintheeventofaproductrecall-andforlegitimatebusinesspurposes-suchastogaugecustomer
satisfaction,improveourproductsorprovideyouwithproductinformationwhichmaybeofinterest.Toromayshareyourinformationwithoursubsidiaries,
afliates,dealersorotherbusinesspartnersinconnectiontheseactivities.Wemayalsodisclosepersonalinformationwhenrequiredbylaworin
connectionwiththesale,purchaseormergerofabusiness.Wewillneversellyourpersonalinformationtoanyothercompanyformarketingpurposes.
RetentionofyourPersonalInformation
Torowillkeepyourpersonalinformationaslongasitisrelevantfortheabovepurposesandinaccordancewithlegalrequirements.Formoreinformation
aboutapplicableretentionperiodspleasecontactlegal@toro.com.
Toro’sCommitmenttoSecurity
YourpersonalinformationmaybeprocessedintheUSoranothercountrywhichmayhavelessstrictdataprotectionlawsthanyourcountryofresidence.
Wheneverwetransferyourinformationoutsideofyourcountryofresidence,wewilltakelegallyrequiredstepstoensurethatappropriatesafeguardsare
inplacetoprotectyourinformationandtomakesureitistreatedsecurely .
AccessandCorrection
Youmayhavetherighttocorrectorreviewyourpersonaldata,orobjecttoorrestricttheprocessingofyourdata.Todoso,pleasecontactusbyemail
atlegal@toro.com.IfyouhaveconcernsaboutthewayinwhichT orohashandledyourinformation,weencourageyoutoraisethisdirectlywithus.
PleasenotethatEuropeanresidentshavetherighttocomplaintoyourDataProtectionAuthority.
374-0282RevC

Professioneller60VRasenmäher
FormNo.3443-318RevC
mitRecycler
®
bzw.Heckfänger
(53cm)
Modellnr.22275—Seriennr.400000000undhöher
Modellnr.22275T—Seriennr.400000000undhöher
RegistrierenSieIhrProduktunterwww.Toro.com.
Originaldokuments(DE)
*3443-318*
DiesesProdukterfülltallerelevanteneuropäischen
Richtlinien;weitereDetailsndenSieinder
produktspezischenKonformitätserklärung(DOC).
Einführung
Wichtig:ScannenSiemitIhremMobilgerätden
QR-CodeaufdemSeriennummernaufkleber(falls
vorhanden),umaufGarantie-,Ersatzteil-oder
andereProduktinformationenzuzugreifen
DieserhandgeführteRasenmähermitSichelmessern
solltevonPrivatleutenodergeschultenLohnarbeitern
verwendetwerden.Eristhauptsächlich
fürdasMähenvonGrasaufgepegten
GrünächeninprivatenoderöffentlichenAnlagen
gedacht.EristfürdieVerwendungmitden
Lithium-Ionen-Akkupackmodellen81875(mitgeliefert
mitModell22275),81825,81850,oder81860
vorgesehen.DieseAkkupackssindsoausgelegt,
dasssienurmitdenAkkuladegerätemodellen81805
(mitModell22275geliefert)oder81802geladen
werdenkönnen.DerzweckfremdeEinsatzdieser
ProduktekannfürSieundUnbeteiligtegefährlichsein.
Modell22275TenthältkeinenAkkuundkein
Ladegerät.
BesuchenSiewww.toro.comhinsichtlich
Sicherheitstipps,Schulungsunterlagen,
Zubehörinformationen,StandorteinesHändlersoder
RegistrierungdesProdukts.
WendenSiesichandenVertragshändleroder
KundendienstdesHerstellers,wennSieeine
Serviceleistung,OriginalersatzteiledesHerstellers
oderweitereInformationenbenötigen.HabenSie
dafürdieModell-undSeriennummernderMaschine
griffbereit.Bild1zeigtdiePositionderModell-und
SeriennummernamProdukt.TragenSiehierbittedie
Modell-undSeriennummerndesGerätsein.
g226623
Bild1
1.TypenschildmitModell-undSeriennummer
Modellnr.
Seriennr.
IndieserAnleitungwerdenpotenzielleGefahren
angeführt,undSicherheitshinweisewerdenvom
Sicherheitswarnsymbol(Bild2)gekennzeichnet.
DiesesWarnsymbolweistaufeineGefahrhin,diezu
schwerenodertödlichenVerletzungenführenkann,
wennSiedieempfohlenenSicherheitsvorkehrungen
nichteinhalten.
g000502
Bild2
Sicherheitswarnsymbol
IndieserAnleitungwerdenzweiBegriffezur
HervorhebungvonInformationenverwendet.Wichtig
weistaufspezielletechnischeInformationenhin,und
HinweishebtallgemeineInformationenhervor,die
IhrebesondereBeachtungverdienen.
©2021—TheToro®Company
8111LyndaleAvenueSouth
Bloomington,MN55420
KontaktierenSieunsunterwww.Toro.com.
2
AlleRechtevorbehalten
Druck:USA

Inhalt
Sicherheit
Sicherheit..................................................................3
Sicherheits-undBedienungsschilder.................6
Einrichtung................................................................8
1BefestigungdesAkkuladegeräts
(optional).........................................................8
2EntfernendesKabelschutzes..........................9
3MontierendesunterenHolms........................10
4MontierendesHolms......................................11
5MontierendesKabelschutzes.........................11
6MontierendesFangkorbs..............................12
Produktübersicht.....................................................13
TechnischeDaten............................................13
VordemEinsatz..................................................14
EinsetzendesAkkupacks.................................14
EinstellenderSchnitthöhe................................15
EinstellenderHolmhöhe...................................16
WährenddesEinsatzes.......................................17
AnlassenderMaschine....................................17
Schnittgutrecyclen............................................17
SammelndesSchnittguts.................................17
VerwendendesSelbstantriebs.........................19
EinstellenderMesserdrehzahl.........................19
AbstellenderMaschine....................................19
EntfernendesAkkupacksausder
Maschine......................................................19
Betriebshinweise.............................................20
NachdemEinsatz...............................................21
AuadendesAkkupacks..................................21
ReinigenunterdemGerät.................................22
Wartung..................................................................23
EmpfohlenerWartungsplan.................................23
EinstellendesSelbstantriebs............................23
WartendesSchnittmessers..............................24
ReinigenderRäder..........................................26
VorbereitendesAkkupacksfür
Recycling......................................................26
Einlagerung............................................................27
Fehlersucheund-behebung...................................28
WICHTIGE
SICHERHEITSANWEISUN-
GEN
WARNUNG:BeiderVerwendungeinerelektrischen
MaschinesinddiegrundlegendenSicherheitshinweise
undAnweisungenimmerzulesenundeinzuhalten,
umdieGefahreinesBrands,einesStromschlagsund
vonVerletzungenzuverringern,u.a.:
I.Schulung
1.DerBedienerderMaschineistfüralleUnfälle
oderGefahrenfürDritteundderenEigentum
verantwortlich.
2.LassenSieKindernichtmitderMaschine,dem
AkkupackoderdemAkkuladegerätspielen;das
MindestaltervonBenutzernistmöglicherweise
vonörtlichenVorschriftenvorgegeben.
3.KinderodernichtgeschultePersonen
dürfendiesesGerätwederverwendennoch
warten.LassenSienurPersonen,die
verantwortungsbewusst,geschult,mitden
Anweisungenvertraut,undkörperlichinder
Lagesind,dasGerätzubedienenundzu
warten.
4.VorderVerwendungderMaschine,des
AkkupacksunddesAkkuladegerätsalle
AnweisungenundWarnaufkleberaufdiesen
Produktenlesen.
5.MachenSiesichmitdenBedienelementen
undderordnungsgemäßenBedienung
derMaschine,desAkkupacksunddes
Akkuladegerätsvertraut.
II.Vorbereitung
1.HaltenSieUnbeteiligte,besonderskleineKinder
undHaustiere,ausdemArbeitsbereichfern.
2.BedienenSiedieMaschineniemals,
wennnichtalleSchutzvorrichtungen
undSicherheitsvorrichtungenwiez.B.
AblenkblecheundGrasfangkörbeangebracht
undfunktionstüchtigsind.
3.PrüfenSiedenArbeitsbereichderMaschine
undentfernenSiealleObjektediesichaufden
EinsatzderMaschineauswirkenodervonihr
aufgeschleudertwerdenkönnten.
4.StellenSievorjederVerwendungderMaschine
sicher,dassdasMesser,dieMesserschraube
unddieMessereinheitnichtabgenutztoder
beschädigtsind.ErsetzenSieallebeschädigten
oderunleserlichenAufkleber.
5.VerwendenSienureinenvonT oroangegebenen
Akkupack.DieVerwendungvonanderem
3

ZubehöroderAnbaugerätenkannein
Verletzungs-oderBrandrisikobergen.
2.DerzweckfremdeEinsatzdieserMaschinekann
fürSieundUnbeteiligtegefährlichsein.
6.DasEinsteckendesAkkuladegerätsineine
SteckdosemiteineranderenSpannungals
100bis240V,kannzueinemBrandoder
Stromschlagführen.SteckenSiedasLadegerät
nichtineineSteckdosemiteineranderen
Spannungals100bis240V.Beieinem
anderenAnschlussdesignkannbeiBedarfein
SteckeradaptermitderrichtigenKonguration
fürdieSteckdoseverwendetwerden.
7.VerwendenSiekeinebeschädigtenoder
verändertenAkkupacksoderAkkuladegeräte,
dasiesichunerwartetverhaltenundBrand,
ExplosionoderVerletzungenverursachen
können.
8.WenndasStromkabeldesAkkuladegeräts
beschädigtist,tretenSiefürErsatzmiteinem
VertragshändlerinKontakt.
9.VerwendenSiekeinenichtauadbarenAkkus.
10.LadenSiedenAkkupacknurmiteinemvonT oro
angegebenenAkkuladegerät.EinLadegerät,
dasfürdeneinenAkkupacktypgeeignetist,
kannbeieinemanderenAkkupackzueiner
Brandgefahrführen.
11.LadenSiedenAkkupacknurineinemgut
belüftetenBereichauf.
3.KuppelnSiedenSelbstantriebaus(falls
vorhanden),bevorSiedieMaschine
einschalten.
4.NeigenSiedieMaschinebeimStartdesMotors
nicht.
5.VerhindernSieunbeabsichtigtesStarten:Stellen
Siesicher,dassderElektrostarttasterausder
Zündungentferntist,bevorSiedenAkkupack
einsetzenunddieMaschinebenutzen.
6.KonzentrierenSiesichimmerbeider
VerwendungderMaschine.TunSienichts,
wasSieablenkenkönnte,sonstkönnen
VerletzungenoderSachschädenauftreten.
7.WennSiedenSchaltbügelloslassen,sollten
derMotorunddasMesserinnerhalbvondrei
Sekundenabstellen.WenndiesnichtderFall
ist,setzenSiedieMaschinenichtmehrein
undwendensichsofortaneinenofziellen
Vertragshändler.
8.HaltenSiedieMaschinean,entfernenSieden
Elektrostarttaster,entfernenSiedenAkkupack
ausderMaschineundwartenSie,bisalle
beweglichenT eilezumStillstandgekommen
sind,bevorSiesieeinstellen,warten,reinigen
oderlagern.
12.SetzenSieeinemAkkupackoderein
AkkuladegerätkeinemFeueroderT emperaturen
vonüber68°Caus.
13.BefolgenSiealleAnweisungenzum
AuadenundladenSiedenAkkupacknicht
außerhalbdesinderAnweisungangegeben
Temperaturbereichs.Andernfallskann
derAkkupackbeschädigtwerdenunddie
Brandgefahrsteigen.
14.GeeigneteKleidung:TragenSiegeeignete
Kleidung,u.a.eineSchutzbrille,langeHosen,
rutschfesteArbeitsschuhe(keineSandalen
undnichtbarfuß)undeinenGehörschutz.
BindenSielangesHaarzusammenund
tragenSiekeineloseKleidungoderlosen
Schmuck,derinbeweglichenTeilenhängen
bleibenodereingezogenwerdenkann.Tragen
SieinstaubigenBetriebsbedingungeneine
Staubmaske.
III.Betrieb
1.DerKontaktmiteinemsichdrehenden
MesserskanneszuschwerenVerletzungen
führen.HaltenSieIhreHändeundFüßevom
Schnittbereichundallenanderenbeweglichen
TeilenderMaschinefern.BleibenSieimmer
vonderAuswurföffnungfern.
9.EntfernenSiedenAkkupackundden
ElektrostarttasterausderMaschine,wenn
SiesieunbeaufsichtigtlassenoderbevorSie
Zubehörwechseln.
10.BelastenSiedieMaschinenichtübermäßig:Sie
holendasMeisteausderMaschineheraus,
wennSiesiemitdervorgesehenenLeistung
laufenlassen.
11.SeienSiewachsam:AchtenSieaufdas,was
SietunundlassenSiebeiderBenutzungder
MaschinegesundenMenschenverstandwalten.
VerwendenSiedieMaschinenicht,wennSie
müdeoderkranksindoderunterAlkohol-oder
Drogeneinussstehen.
12.SetzenSiedieMaschinenurbeiguten
Sichtverhältnissenundgeeigneten
Witterungsbedingungenein.FahrenSie
dieMaschineniebeiGewitter,bzw.wenn
GefahrdurchBlitzschlagbesteht.
13.SeienSieäußerstvorsichtig,wennSiedas
GerätzurücksetzenoderinIhreRichtung
ziehen.
14.AchtenSieimmerauffestenStandundBalance,
besondersanAbhängen.MähenSieimmer
querzumHang,nichthangaufwärtsoder
4

-abwärts.GehenSiebeimRichtungswechselan
Hanglagenäußerstvorsichtigvor.Versuchen
Sienicht,steileHängezumähen.GehenSie
mitderMaschine.Niemalsrennen.
4.SchärfenSieeinstumpfesMesservonbeiden
Seiten,umdasGleichgewichtzuerhalten.
ReinigenSiedasMesserundstellenSiesicher,
dassesinBalanceist.
15.WerfenSiedasSchnittgutnichtgegenPersonen
aus.VermeidenSie,MaterialgegeneineWand
odereinHindernisauszuwerfen,dadasMaterial
aufSiezurückprallenkann.StellenSiedas/die
Messerab,wennSieeineKiesoberächen
überqueren.
16.AchtenSieaufLöcher,Rillen,Bodenwellen,
SteineoderandereverborgeneObjekte.
UnebenesGeländekanndazuführen,dassSie
dasGleichgewichtoderdenHaltverlieren.
17.NassesGrasund/odernasseBlätterkönnen
zuschwerenVerletzungenführen,solltenSie
daraufausrutschenundmitdemMesserin
Berührungkommen.VermeidenSieeinMähen
innassenBedingungenoderimRegen.
18.WenndieMaschineeinenGegenstand
trifftoderanfängtzuvibrieren,stellenSie
sofortdieMaschineab,entfernenSieden
Elektrostarttaster,entfernenSiedenAkkupack
undwartenSie,bisallebeweglichenTeile
zumStillstandgekommensind,bevorSiedie
MaschineaufSchädenuntersuchen.Führen
SiealleerforderlichenReparaturendurch,ehe
SiedieMaschinewiederinGebrauchnehmen.
19.HaltenSiedieMaschineanundentfernenSie
denElektrostarttaster,bevorSiedieMaschine
zumTransportauaden.
20.UntermissbräuchlichenBedingungenkann
FlüssigkeitausdemAkkupackaustreten.
VermeidenSieKontakt.WennSiedie
Flüssigkeitversehentlichberühren,mitWasser
spülen.WenndieFlüssigkeitinIhreAugen
gelangt,suchenSieeinenArztauf.Vom
AkkupackausgestoßeneFlüssigkeitkannzu
HautreizungenoderVerbrennungenführen.
IV.WartungundLagerung
1.HaltenSiedieMaschinean,entfernenSieden
Elektrostarttaster,entfernenSiedenAkkupack
ausderMaschineundwartenSie,bisalle
beweglichenT eilezumStillstandgekommen
sind,bevorSiesieeinstellen,warten,reinigen
oderlagern.
2.VersuchenSienicht,dieMaschinezureparieren,
außerindemindenAnweisungenangegebenen
Maße.LassenSiedieMaschinedurcheinen
VertragshändlermitidentischenErsatzteilen
instandsetzen.
3.TragenSiebeimDurchführenvon
WartungsarbeitenHandschuheundeine
Schutzbrille.
5.ErsetzenSieeinMesser,wennesverbogen,
verschlissenoderangebrochenist.EinMesser,
dasnichtimGleichgewichtist,kannVibrationen
erzeugen,diedenMotorbeschädigenoderzu
Verletzungenführenkönnen.
6.BeimWartendesMessersdaraufachten,
dasssichdasMesserauchbeigetrennter
Stromversorgungnochbewegenkann.
7.PrüfenSiedenGrasfangkorbregelmäßigauf
VerschlechterungoderVerschleißundersetzen
SieeinenverschlissenenKorbmiteinem
ErsatzkorbvonT oro.
8.UmeinebestmöglicheLeistungsicherzustellen,
verwendenSienurOriginalersatzteileund
-zubehörteilevonToro.AndereErsatz-und
Zubehörteilekönnengefährlichseinundeine
VerwendungkönntedieGarantieungültig
machen.
9.WartenSiedieMaschine:HaltenSiedie
Schnittkantenscharfundsauber,umeine
bestmöglicheundsichereLeistungzu
gewährleisten.HaltenSiedieHolmetrocken,
sauberundöl-undfettfrei.LassenSiedie
Schutzvorrichtungeninfunktionierendem
Zustanddort,wosiehingehören.HaltenSiedie
Messerscharf.VerwendenSienuridentische
Messer.
10.PrüfenSiedieMaschineaufbeschädigte
Teile:WennSchutzvorrichtungenoderandere
Teilebeschädigtsind,stellenSiefest,obdie
Maschinenochbenutzbarist.AchtenSieauf
schlechtausgerichteteundsichberührende
beweglicheTeile,defekteTeilebzw.Befestigung
undalleanderenZustände,diedenBetrieb
beeinträchtigenkönnten.Solangeinden
Anweisungennichtandersangegeben,lassen
SiebeschädigteSchutzvorrichtungenundT eile
nurvoneinemautorisiertenVertragshändler
reparierenbzw.austauschen.
11.HaltenSieeinnichtverwendetesAkkupack
vonMetallobjektenfern,u.a.Briefklammern,
Münzen,Schlüssel,Nägel,Schrauben,dieeine
VerbindungvoneinemPolzueinemanderen
herstellenkönnen.EinKurzschließender
AkkupolekannzuVerbrennungenodereinem
Brandführen.
12.PrüfenSiedasMesserunddieMotorbefestigungsschraubenregelmäßigaufFestigkeit.
13.WennSiedieMaschinenichtverwenden,
lagernSiesiedrinnen,aneinemtrockenen
5

undsicherenOrtaußerhalbderReichweitevon
Kindern.
sieinderOriginalverpackungauf,bisSiesie
verwenden.
14.ACHTUNG:einfalschgehandhabtes
AkkupackkanneinBrandrisikodarstellenoder
Verätzungenverursachen.DemontierenSieden
Akkupacknicht.ErwärmenSiedenAkkupack
nichtüber68°CundverbrennenSieihnnicht.
ErsetzenSiedenAkkupacknurdurchein
OriginalakkupackvonT oro.DieVerwendung
einesanderenAkkupacktypskannzueinem
BrandodereinerExplosionführen.HaltenSie
AkkupacksvonKindernfernundbewahren
Sicherheits-undBedienungsschilder
DieSicherheits-undAnweisungsaufklebersindgutsichtbar;siebendensichinderNähe
dermöglichenGefahrenbereiche.TauschenSiebeschädigteoderverlorengegangene
Aufkleberaus.
15.EntsorgenSiedenAkkunichtdurchVerbrennen.
DieZellenkönnenexplodieren.PrüfenSievor
OrtgeltendeGesetzeinBezugaufmögliche
spezielleAnweisungenzurEntsorgung.
BEWAHRENSIEDIESE
SICHERHEITSANWEISUN-
GENAUF
137-9490
1.LesenSiedie
Bedienungsanleitung.
2.Recyceln5.NichtRegenaussetzen.
3.EnthältLithium-Ionen,
nichtwegwerfen.
4.VonoffenerFlamme
freihalten.
decal137-9490
1.LesenSiedie
2.DrückenSiezumAnlassen
6
Bedienungsanleitung.
derMaschinedenBügel
zumHolmunddrücken
SiedieT aste.
decal144-3175
144-3175
3.LassenSiedenBügel
los,umdieMaschine
abzustellen.

decal116-7583
116-7583
1.Warnung:LesenSiedieBedienungsanleitung;setzenSie
dasGerätnurnachentsprechenderSchulungein.
2.GefahrdurchausgeworfeneGegenstände:HaltenSie
Unbeteiligtefern.
3.GefahrdurchherausgeschleuderteGegenstände:Setzen
SiedenRasenmähernichtohneHeckauswurfklappeoder
Fangkorbein.
140-8472
1.LesenSiedie
Bedienungsanleitung.
2.Nichtwegwerfen.
3.Privatanwender
4.Doppeltisoliert
decal140-8472
4.Schnitt-bzw.AmputationsgefahranHändenoderFüßen
durchdasMähwerkmesser:BerührenSiekeinebeweglichen
TeileundlassenSiealleSchutzvorrichtungenmontiert.
5.Warnung:TragenSieeinenGehörschutz.
6.Schnitt-bzw.AmputationsgefahrvonHändenundFüßen
durchMähwerkmesser:MähenSieniehangaufwärtsoder
-abwärts,mähenSieimmerhorizontalzumHang.StellenSie
denMotorab,bevorSiedieMaschineverlassen.Sammeln
SievorBeginnderMäharbeitenSchuttundGeröllauf.
SchauenSienachhinten,wennSierückwärtsfahren.
decal137-9461
137-9461
1.Akkuladestatus
112-8760
1.GefahrdurchausgeworfeneGegenstände:HaltenSie
Unbeteiligtefern.
2.GefahrvonSchnittverletzungen/einerAmputationvon
HändenoderFüßendurchMähwerkmesser:HaltenSie
sichvonbeweglichenTeilenfern.
decal112-8760
decal134-4691
134-4691
1.Auto-Drehzahl2.MaximaleDrehzahl
decal131-0822
131-0822
1.Selbstantrieb:DasGetriebekannsichvorzeitigabnutzen,
wennderRiemenzustarkgespanntist;LesenSiedie
Bedienungsanleitung,bevorSieKundendienst-oder
Wartungsarbeitenausführen.
7

Einrichtung
Einzelteile
PrüfenSieanhanddernachstehendenTabelle,dassSiealleimLieferumfangenthaltenenTeileerhaltenhaben.
Verfahren
1
2
3
4
5
6
Wichtig:NehmenSiedenKunststoffschutz
abundalleanderenKunststoffteileoder
Verpackungenab,mitdenendieMaschine
abgedecktist.WerfenSiesieab.
Wichtig:DerAkkupackistbeimKaufnicht
vollständigaufgeladen.BevorSiedieMaschine
zumerstenMalverwenden,sieheAuadendes
Akkupacks(Seite21).
Befestigungsmaterial(nichtenthalten)
KeineTeilewerdenbenötigt
ObereHolmbaugruppe
UntererHolm2
Schraube(5/16"x1¾")
Sicherungsbundmutter(5/16")
Wellenscheibe8
KeineTeilewerdenbenötigt
KeineTeilewerdenbenötigt
KeineTeilewerdenbenötigt
BeschreibungMengeVerwendung
2
–
1
4
4
–
–
–
InBild3ndenSieHinweisezumBefestigendes
Ladegeräts.
SchiebenSiedasLadegerätüberdierichtig
angebrachtenBefestigungen,umdasLadegerätzu
befestigen(Befestigungenliegennichtbei).
BefestigungdesAkkuladegeräts
(optional).
EntfernendesKabelschutzes.
MontierendesunterenHolms.
MontierendesHolms.
MontierendesKabelschutzes.
MontierendesFangkorbs.
1
Befestigungdes
Akkuladegeräts(optional)
FürdiesenArbeitsschritterforderlicheTeile:
2
Befestigungsmaterial(nichtenthalten)
Verfahren
SiekönnenbeiBedarfdasLadegerätmitden
AussparungenzurWandmontageaufderRückseite
desLadegerätsanderWandbefestigen.
BefestigenSieesimInnenbereich(wiez.B.ineiner
GarageoderaneinemanderentrockenenOrt)inder
NäheeinerSteckdoseundaußerhalbderReichweite
vonKindern.
g290534
Bild3
8

2
EntfernendesKabelschutzes
KeineTeilewerdenbenötigt
Verfahren
g328502
Bild4
9

3
MontierendesunterenHolms
FürdiesenArbeitsschritterforderlicheTeile:
1
ObereHolmbaugruppe
2UntererHolm
4
Schraube(5/16"x1¾")
4
Sicherungsbundmutter(5/16")
8Wellenscheibe
Verfahren
MontierenSiedenunterenHolm,wieinBild5abgebildet.
1.Sicherungsbundmutter(5/16")
2.Wellenscheibe
3.ObereHolmbaugruppe
g340673
Bild5
4.UntererHolm
5.Schraube(5/16"x1¾")
10

4
MontierendesHolms
KeineTeilewerdenbenötigt
Verfahren
Bild6
11
g351011

5
MontierendesKabelschutzes
KeineTeilewerdenbenötigt
Verfahren
g350108
Bild7
6
MontierendesFangkorbs
KeineTeilewerdenbenötigt
Verfahren
g238450
Bild8
12

Produktübersicht
TechnischeDaten
GeeigneteTemperaturbereiche
Bild9
Auaden/Lagerndes
Akkupacksbei
VerwendungdesAkkupacks
bei
VerwendungderMaschinebei
5°Cbis40°C*
-30°Cbis49°C
0°Cbis49°C*
*DieLadezeitwirdverlängert,wennSiedenAkkupack
nichtindiesemBereichauaden.
LagernSiedieMaschine,denAkkupackunddas
AkkuladegerätaneinemsauberenundtrockenenOrt.
g346507
1.Selbstantriebsbügel
2.Holm6.Akkukasten
3.Schaltbügel7.Schnitthöheneinstellhebel
4.Elektrostarttaster8.Fangkorb
1.Akkuladegerätmodell
81805(mitModell22275
mitgeliefert)
5.Heckablenkblech
(4)
g292995
Bild10
2.Akkupackmodell81875
(mitModell22275
mitgeliefert)
13

Betrieb
VordemEinsatz
EinsetzendesAkkupacks
Wichtig:VerwendenSiedenAkkupacknurbeiTemperaturenimangemessenenBereich,siehe
TechnischeDaten(Seite13).
1.StellenSiesicher,dassdieEntlüftungenamAkkukeinenStaubundkeineRückständeenthalten.
2.ÖffnenSiedenDeckeldesAkkukastens(AinBild11).
3.RichtenSiedieVertiefungimAkkupackmitderNaseanderMaschineausundschiebenSieden
AkkupackindenKasten,biserinseinerPositioneinrastet(BinBild11).
4.SchließenSiedenDeckeldesAkkukastens(CinBild11).
Bild11
g303151
14

EinstellenderSchnitthöhe
WARNUNG:
BeimEinstellenderSchnitthöhenhebelkönnenIhreHändeeinbeweglichesMesserberühren
undSiekönnenschwereVerletzungenerleiden.
•SchaltenSievordemEinstellenderSchnitthöhedenMotorab,entfernenSiedieelektrische
StarttasteundwartenSie,bisallebeweglichenTeilezumStillstandgekommensind.
•FührenSieIhreFingerbeimEinstellenderSchnitthöhenieunterdasMähwerk.
StellenSiedieSchnitthöheein.StellenSiealleRäderaufdiegleicheSchnitthöheein(Bild12).
Bild12
g303150
15

EinstellenderHolmhöhe
SiekönnendenHolminPosition1oder3anhebenoderabsenken,jenachdemwelcheSiealsangenehmer
empnden(Bild13).
Bild13
1.EntfernenSiebeideHolmschraubenund-muttern.
2.StellenSiedenGriffindiegewünschteHöheneinstellung.
3.SichernSiedenHolmmitdenvorherentferntenSchraubenundzugehörigenMuttern.
g331956
16

WährenddesEinsatzes
AnlassenderMaschine
1.VergewissernSiesich,dassderAkkupackinderMaschineist;sieheEinsetzendesAkkupacks(Seite14).
2.FührenSiedenElektrostarttasterindenElektrostartschalter(AinBild14).
3.DrückenSiedenSchaltbügelundhaltenSieihngegendenHolm(BinBild14).
4.HaltenSiedenElektrostarttastergedrückt,bisderMotorstartet(CinBild14).
Bild14
g331970
Schnittgutrecyclen
DerRasenmäheristwerksseitigaufdasRecycelnvonSchnittgutundLaubeingestellt.
NehmenSieggf.denFangkorbvomGerätab,bevorSiedasSchnittgutrecyclen.SieheEntfernendes
Fangkorbs(Seite18).
SammelndesSchnittguts
VerwendenSiedenFangkorb,wennSieSchnittgutundLaubimFangkorbsammelnmöchten.
WARNUNG:
EinverschlissenerFangkorbkanndasAusschleudernkleinerSteineundähnlicher
GegenständeinRichtungdesBenutzersundUnbeteiligterzulassen.Daskannzuschweren
odertödlichenVerletzungenführen.
PrüfenSiedenFangkorbregelmäßig.TauschenSieihn,wennerbeschädigtist,gegeneinen
neuenErsatzkorbdesHerstellersaus.
WARNUNG:
DieMessersindscharf;einBerührenkannzuschwerenVerletzungenführen.
SchaltenSievordemVerlassenderBedienungspositiondieMaschineabundwartenSie,bis
allebeweglichenTeilezumStillstandgekommensind.
MontierendesFangkorbs
1.SchaltenSiedieMaschineabundwartenSie,bisallebeweglichenTeilezumStillstandgekommensind.
2.HebenSiedashintereAblenkblechanundhaltenSieeshoch(AinBild15).
3.DrückenSiezumEntfernenderHeckauswurfklappemitdemDaumenaufdenRiegelundziehendie
KlappeausderMaschine(BundCvonBild15).
17

4.SetzenSiedieEndenderFangkorbstangeindieKerbenanderUnterseitedesHolmseinundbewegen
denFangkorbnachvorneundhinten,umsicherzustellen,dassdieEndenderStangerichtiginden
Kerbensitzen(DvonBild15).
5.SenkenSiedasHeckablenkblechab,bisesaufdemFangkorbauiegt.
Bild15
EntfernendesFangkorbs
GEFAHR
DieMaschinekannSchnittgutundandereGegenständedurcheineÖffnungim
Maschinengehäuseherausschleudern.Gegenstände,diemitausreichenderWucht
herausgeschleudertwerden,könnensieundUnbeteiligteschwerodersogartödlichverletzen.
•NehmenSieniedenFangkorbabundlassendanndieMaschinean,wenndie
Heckauswurfklappenichteingesetztist.
•ÖffnenSiedasHeckablenkblechderMaschineniebeilaufenderMaschine.
1.SchaltenSiedieMaschineabundwartenSie,bisallebeweglichenTeilezumStillstandgekommensind.
2.HebenSiedasHeckablenkblechan.
3.NehmenSiedieFangkorbstangeamFangkorbausdenKerbenanderUnterseitedesGriffs(Avon
Bild15).
4.SetzenSiedieHeckauswurfklappeein(BvonBild15).
g303153
5.SenkenSiedasHeckablenkblech(CvonBild15).
18

Verwendendes
Selbstantriebs
DerSelbstantriebwirdeingekuppelt,wennSie
denSelbstantriebsbügelgegendenFührungsholm
drückenundihndorthalten(Bild16).
g337279
Bild17
1.AUTO-Stellung2.MAX-Stellung
AbstellenderMaschine
1.LassenSiedenSchaltbügellos(AinBild18).
2.EntfernenSiedenElektrostarttasterausdem
Elektrostartschalter(BinBild18).
Bild16
1.Selbstantriebsbügel
LassenSiedenSelbstantriebsbügellos,umden
Selbstantriebauszukuppeln.
Hinweis:DieMaschinehateineFreilaufkupplung,
diedasZurückziehenderMaschinevereinfacht.
ZumAuskuppelnderKupplungenmüssenSieden
Rasenmäherggf.2,5cmodermehrnachvorne
schieben,nachdemSiedenSelbstantriebsbügel
losgelassenhaben.
Einstellender
Messerdrehzahl
DieseMaschineverfügtüber2Messerdrehzahleinstellungen:AUTOundMAX.
•InderAUTO-StellungstelltsichdieMesserdrehzahl
automatischfüreinehöhereEfzienzein.
DieMaschineerkenntÄnderungeninden
MähbedingungenunderhöhtdieMesserdrehzahl
nachBedarf,umdieSchnittqualitätzuerhalten.
•InderMAX-StellungbleibtdieMesserdrehzahl
immeraufdermaximalenDrehzahl.
3.EntfernenSiedenAkkupack,sieheEntfernen
g331972
desAkkupacksausderMaschine(Seite19).
Hinweis:EntnehmenSiedenAkkupackjedes
Mal,wennSiedieMaschinenichtverwenden.
g331971
Bild18
EntfernendesAkkupacks
ausderMaschine
1.ÖffnenSiedenDeckeldesAkkukastens.
2.DrückenSiedenAkkuriegel,umdenAkkupack
zulösenundziehenSiedenAkkupackheraus.
3.SchließenSiedenDeckeldesAkkukastens.
DrehenSiedenSchlüsselimSchlüsselschalterauf
einederbeidenStellungen,umdieEinstellungder
Messerdrehzahlanzupassen(Bild17).
19

Betriebshinweise
AllgemeineMähtipps
•VermeidenSie,dassdasMesseraufFremdkörper
aufprallt.MähenSienieabsichtlichüber
irgendwelchenGegenständen.
•MontierenSiefürdieoptimaleLeistungvordem
SaisonbeginneinneuesMesser.
•T auschenSiedieMesserbeiBedarfdurchein
OriginalersatzmesservonT oroaus.
Mähen
•GraswächstzuverschiedenenZeitenwährend
derSaisonunterschiedlichschnell.Im
HochsommersolltenSiedenRasenmitden
Schnitthöheneinstellungenvon64mm,76mm
oder89mmmähen.MähenSieimmernur
einDritteldesGrashalmsineinemDurchgang.
MähenSienichtunterder64-mm-Einstellung,es
seidenn,dasGraswächstsehrfein,oderesist
SpätherbstunddasGraswachstumlässtnach.
DieLaufzeitwirdverbessert,wennSiedasGras
miteinergrößerenSchnitthöhemähen.
•WennSieGrasmähen,daslängerals15cmist,
solltenSiebeimerstenDurchgangdieSchnitthöhe
aufdiehöchsteEinstellungstellenundeine
langsamereGeschwindigkeitwählen.Mähen
Siedannnocheinmalmiteinerniedrigeren
Einstellung,umdemRasendasgewünschte
Schnittbildzuverleihen.WenndasGraszulang
istundLaubaufdemRasenverklumpt,kannder
Rasenmäherverstopfen,undderMotorwirdggf.
abgestellt.
•NassesGrasundLaubneigenzumVerklumpen
imGartenundkönneneinVerstopfender
MaschineundeinAbdrosselndesMotors
verursachen.VermeidenSieMäharbeitenbei
nassenUmgebungsbedingungen.
•InsehrtrockenenBedingungenbesteht
eineBrandgefahr.HaltenSieallelokalen
BrandgefahrwarnungeneinundentfernenSie
trockenesGrasundLaubvonderMaschine.
•WechselnSiehäugdieMährichtung.Dadurch
verteiltsichdasSchnittgutbesseraufder
RasenächeundbewirkteineffektiveresDüngen.
SchnetzelnvonLaub
•StellenSienachdemMähensicher,dassdie
HälftedesRasensdurchdieSchnittgutdecke
sichtbarist.DabeimüssenSieunterUmständen
mehrmalsüberdasLaubmähen.
•WenneineLaubdeckevonmehrals13cmauf
demRasenliegt,mähenSiemiteinerhöheren
Schnitthöheunddannmitdergewünschten
Schnitthöhe.
•MähenSielangsamer,wenndieMaschinedas
Laubnichtfeingenughäckselt.
ProbierenSiebeieinemunbefriedigendenSchnittbild
desRasenseinederfolgendenAbhilfenaus:
•SchärfenSiedasMesser.
•Langsamermähen.
•HebenSiedieSchnitthöhederMaschinean.
•MähenSiehäuger.
•LassenSiedieBahnenüberlappen,anstellebei
jedemGangeineneueBahnzumähen.
20

NachdemEinsatz
4.SchiebenSiezumHerausnehmendes
AkkupacksdenAkkupacknachhintenausdem
Ladegerät.
AuadendesAkkupacks
Wichtig:DerAkkupackistbeimKaufnicht
vollständigaufgeladen.BevorSiedieMaschine
zumerstenMalverwenden,setzenSieden
AkkupackindasLadegeräteinundladenes
auf,bisdieLED-Anzeigeangibt,dassder
Akkupackganzaufgeladenist.LesenSiealle
Sicherheitsanweisungen.
Wichtig:LadenSiedenAkkupacknurbei
TemperaturenimangemessenenBereich,siehe
TechnischeDaten(Seite13).
Hinweis:DrückenSiebeiBedarfdieT astefür
dieAkkuladeanzeigeaufdemAkkupack,umden
aktuellenLadestandanzuzeigen(LED-Anzeigen).
1.StellenSiesicher,dasssichindenEntlüftungen
amAkkuundLadegerätkeinStauboder
Schmutzbendet.
5.InderfolgendenTabellendenSieeine
BeschreibungderLED-Anzeigeleuchtenauf
demAkkuladegerät.
Anzeigeleuchte
Aus
Grün
blinkend
GrünAkkupackistaufgeladen
Rot
Rot
blinkend
Anzeige
KeinAkkupackeingeführt
Akkupackwirdaufgeladen
DerAkkupackund/oderAkkuladegerätistnichtim
geeignetenT emperaturbereich
AkkupackLadefehler*
*WeitereInformationenndenSieunterTechnische
Daten(Seite13).
Wichtig:DerAkkukannzwischendenEinsätzen
fürkurzeZeiträumeaufdemLadegerätbelassen
werden.
WennderAkkufürlängereZeitnichtbenutztwird,
nehmenSiedenAkkuausdemLadegerät;siehe
Einlagerung(Seite27).
Bild19
1.Akkupackfach
2.AkkupackEntlüftungsbereiche
3.AkkupackAnschlussklemmen
4.TastefürAkkuladeanzeige8.Entlüftungsbereicheam
5.LED-Anzeigeleuchten
(aktuellerLadezustand)
6.Bügel
7.LED-Anzeigeleuchte
Ladegerät
Ladegerät
2.FluchtenSiedasLochimAkkupack(Bild19)mit
derZungeamLadegerätaus.
3.SchiebenSiedenAkkupackindasLadegerät,
biseseinrastet(Bild19).
g290533
21
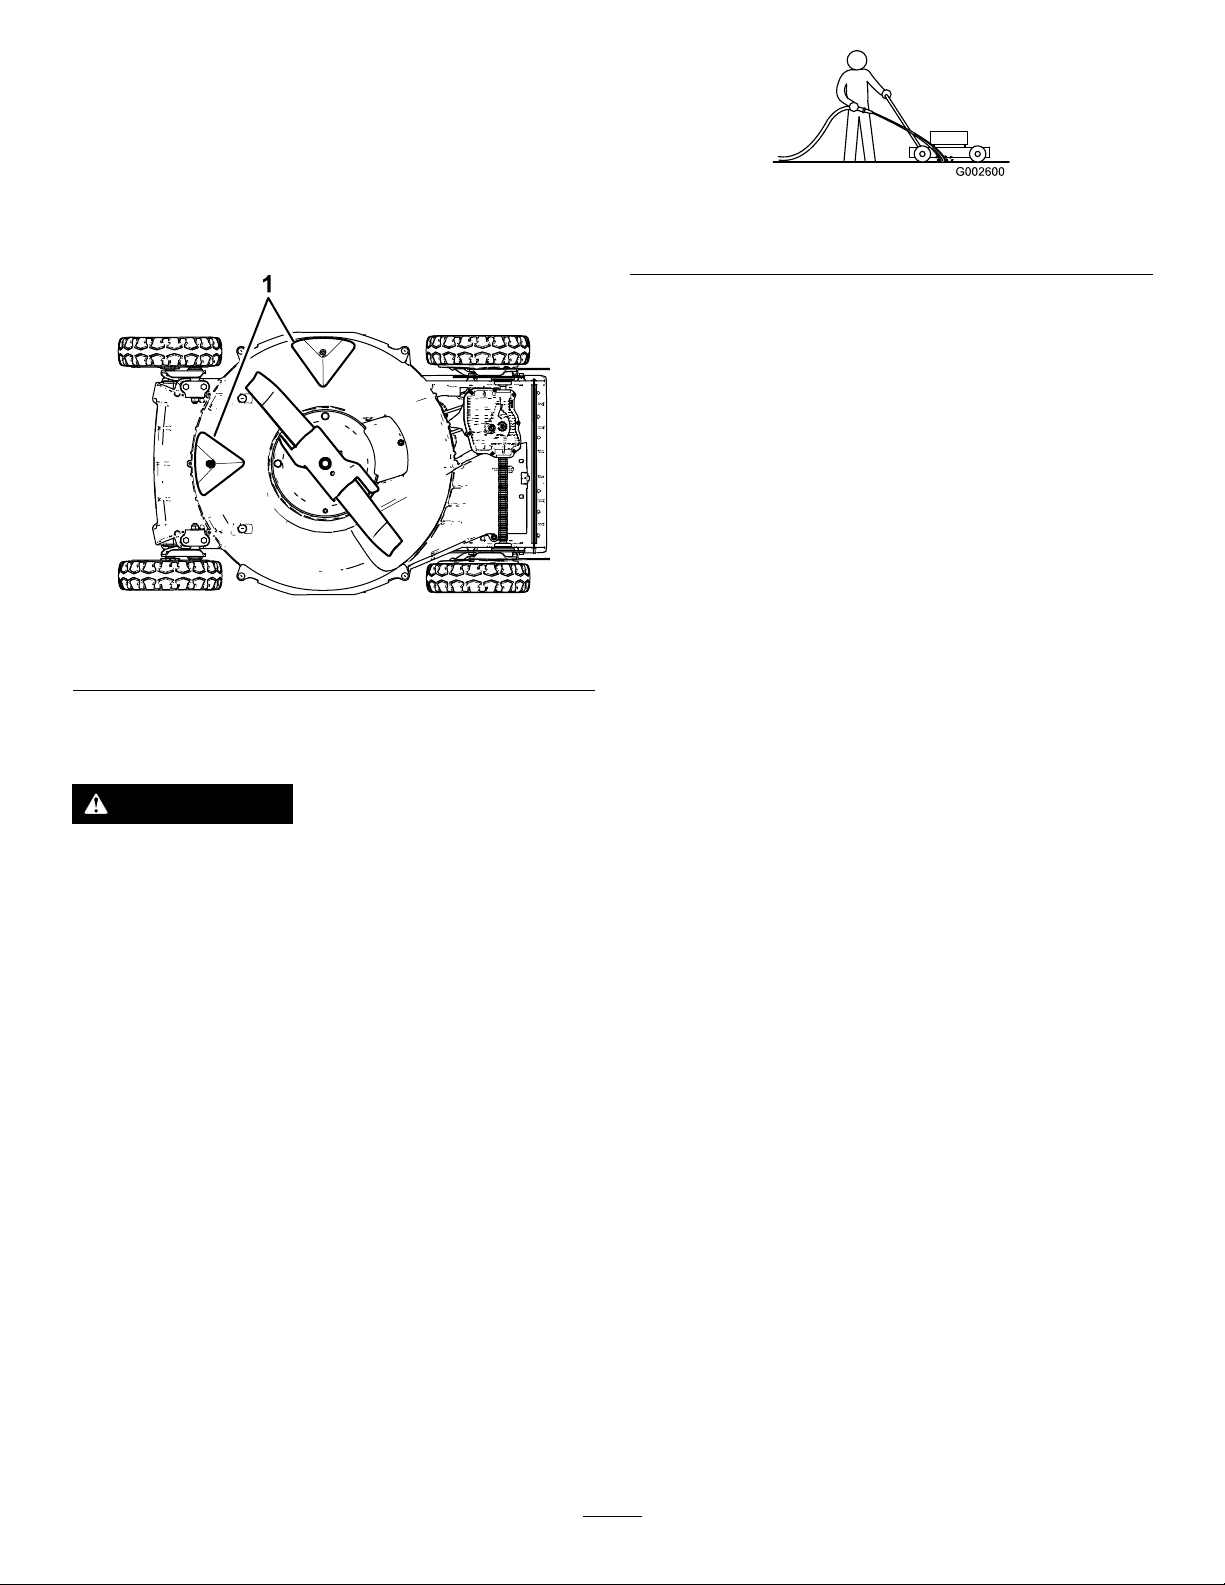
ReinigenunterdemGerät
Wartungsintervall:NachjederVerwendung
UmdiebesteLeistungzugewährleisten,haltenSie
dieUnterseitederMaschinekurznachBeendigung
desMähenssauberundreinigenSieunterder
Maschine.AchtenSiebesondersdarauf,die
Ablenkblechesauberzuhalten(Bild20).
Bild20
1.Ablenkbleche
g002600
Bild21
1.RechtesHinterrad
5.StellenSiedasWasserab,wennkeinSchnittgut
mehrherausgespültwird,undschiebenSieden
RasenmäheraufeinentrockenenBereich.
6.LassenSieihnfüreinpaarMinutenlaufen,um
dieUnterseitederMaschineauszutrocknen.
Abschaben
SchabenSieRückständevonderUnterseitedes
Mähwerksab,wennsienichtvollständigdurchdas
Waschenbeseitigtwurden.
g240549
1.SchaltenSiedieMaschineabundwarten
Sie,bisallebeweglichenT eilezumStillstand
gekommensind.
2.EntfernenSiedenElektrostarttasterundden
AkkuausderMaschine.
Reinigen
WARNUNG:
DieMaschinekannAblagerungenunterder
Maschinelockern.
•TragenSieeineSchutzbrille.
•BleibenSieinderEinsatzstellung(hinter
demHolm),wennderMotorläuft.
•HaltenSieUnbeteiligtevomBereichfern.
1.SenkenSiedieMaschineaufdieniedrigste
Schnitthöheab.
2.StellenSiedieMaschineaufeinebefestigte
Fläche.
3.SchaltenSiedieMaschineeinundrastenSie
dasMesserein.
4.HaltenSieeinenGartenschlauchaufHolmhöhe
undspritzenSieeinenWasserstrahlvordas
rechteHinterrad(Bild21).
3.LegenSiedasGerätaufdieSeite.
4.EntfernenSiedieSchmutz-und
SchnittgutrückständemiteinemSchaber.
VermeidenSieGrateoderscharfeKanten.
5.StellenSiedieMaschinewiederindie
Betriebsstellung.
Hinweis:DasWasserspritztdanninden
MesserlaufwegundspültdasSchnittgutaus.
22

Wartung
EmpfohlenerWartungsplan
Wartungsintervall
Nach25Betriebsstunden
BeijederVerwendung
odertäglich
NachjederVerwendung
Alle40Betriebsstunden
Alle50Betriebsstunden
Alle100Betriebsstunden
Wartungsmaßnahmen
•ZiehenSieloseBefestigungenan.
•PrüfenSiedasMesserregelmäßigaufAbnutzungundDefekte.
•PrüfenSiedenBeschleunigeraufAbnutzungoderBeschädigungen.
•PrüfenSiedieMesserbremszeitbiszumStillstand.DasMessermussinnerhalbvon
dreiSekundennachdemLoslassendesSchaltbügelszumStillstandkommen.
WendenSiesichsonstfüreineReparaturanIhrenT oro-Vertragshändler.
•ReinigenSiedieUnterseitedesMähwerks.
•ReinigenSiedieRäderundderZahnräder.
•SchärfenSiedasSchnittmesserodertauschenSieesaus.Schärfenodertauschen
SiedasMesserhäugeraus,wennraueodersandigeBedingungendieKante
schnellerstumpfmachen.
•ZiehenSieloseBefestigungenan.
Einstellendes
Selbstantriebs
WenndieMaschineneuist,derSelbstantrieb
ausgefallenistoderdieMaschinenachvornekriecht,
müssenSiedenTreibriemeneinstellen.
(Bild22)umeineUmdrehungnachrechts
undwiederholenSiedieSchritte3bis5.
1.BewegenSiedieMaschinenachdraußenund
aufeinebefestigteFlächeinderNäheeiner
festenWand,umsicherzuverhindern,dass
sichdieMaschinevorwärtsbewegt,während
derMotoreingeschaltetist.
2.StellenSiedieMaschineso,dassdie
VorderreifendieWandberühren.
Hinweis:StellenSiesicher,dassderBereich
gutbelüftetistundkeineGegenständeenthält,
dievonderMaschineaufgegriffenwerden
könnten.
3.LassenSiedenMotoran,sieheAnlassender
Maschine(Seite17).
4.ZiehenSiedenSelbstantriebsbügelzumHolm.
Hinweis:DieRädersolltensichdrehen,wenn
derSelbstantriebsBügelgeradedenHolm
berührt.
5.StellenSiedenMotorab.
6.WennSiedieMaschineeinstellenmüssen,
führenSieeinenderfolgendenSchritteaus:
•WennsichdieRädernichtbei
eingekuppeltemSelbstantriebsbügel
drehen,istderTreibriemenzulose.Drehen
SiedasSteuerhandradfürdenRadantrieb
g024465
Bild22
1.SteuerhandradfürdenRadantrieb
•WennsichdieRäderdrehen,bevorder
Selbstantriebsbügelganzeingekuppeltist,
istderTreibriemenzufest.DrehenSiedas
SteuerhandradfürdenRadantrieb(Bild
22)umeineUmdrehungnachlinksund
wiederholenSiedieSchritte3bis5.
7.DrehenSiebeieinemneuenTreibriemendas
HandradderAntriebswelleumeineweitere
Umdrehungnachrechts,umdienormale
DehnungdesRiemensinderEinfahrzeitzu
ermöglichen.
Hinweis:SiekönnendiesenSchrittauslassen,
wennSieeinengebrauchtenRiemeneinstellen.
23

WartendesSchnittmessers
PrüfendesMessers
MähenSieimmermiteinemscharfenMesser.Ein
scharfesMessermähtsauber,ohneGrashalmezu
zerreißenoderzuzerhäckseln.
1.SchaltenSiedieMaschineabundwarten
Sie,bisallebeweglichenT eilezumStillstand
gekommensind.
2.EntfernenSiedenAkkupack,sieheEntfernen
desAkkupacksausderMaschine(Seite19).
3.LegenSiedieMaschineaufdieSeitewieinBild
23dargestellt.
Wartungsintervall:BeijederVerwendungoder
täglich—PrüfenSiedasMesser
regelmäßigaufAbnutzungund
Defekte.
PrüfenSievorsichtigdieSchärfeundAbnutzung
desMessers,besondersandenStellen,andenen
sichacheundgebogeneTeileberühren(Bild24A).
DaSandundanderesreibendesMaterialdasMetall
abschleifenkann,dasdieachenmitdengebogenen
Teilenverbindet,müssenSiedasMesservorjedem
EinsatzdesRasenmähersprüfen.WennSieeinen
SchlitzodereineAbnutzung(Bild24BundCBild
24)feststellen,tauschenSiedasMesseraus,siehe
EntfernendesMessers(Seite25).
Bild23
1.Messer3.Messerschraubeund
Sicherungsscheibe
2.Beschleuniger
g240550
1.Windügel
2.DeracheTeildes
Messers
Bild24
3.Abnutzung
4.EsbildetsicheinSchlitz
g002278
Hinweis:MontierenSiefüreineoptimaleLeistung
einneuesMesservordemSaisonbeginn.FeilenSie
imLaufederSaisonallekleinerenAuskerbungenaus,
umdiescharfeMesserkantebeizubehalten.
GEFAHR
EinabgenutztesoderbeschädigtesMesser
kannzerbrechen.Herausgeschleuderte
MesserstückekönnenSieoderUnbeteiligte
treffenundschwereodertödliche
Verletzungenverursachen.
•PrüfenSiedasMesserregelmäßigauf
AbnutzungundDefekte.
•TauschenSieeinabgenutztesoder
defektesMesseraus.
24

PrüfendesBeschleunigers
Wartungsintervall:BeijederVerwendung
odertäglich—PrüfenSieden
BeschleunigeraufAbnutzungoder
Beschädigungen.
PrüfenSiedenBeschleunigeraufextreme
Abnutzungen(Bild25).DaSandundanderes
reibendesMaterialdasMetallabschleifenkann
(besondersindemalsPunkt2inBild25abgebildeten
Bereich),prüfenSiedenBeschleunigervordem
VerwendenderMaschine.WennSiefeststellen,
dasseineNaseamBeschleunigerzueinerscharfen
Kanteabgenutztist,oderdasseinRissvorhandenist,
tauschenSiedenBeschleunigeraus.
Bild25
EntfernendesMessers
1.FassenSiedasEndedesMessersmiteinem
dickenHandschuhanoderwickelnSieeinen
LappenumdasMesser.
2.NehmenSiedieMesserschraube,
Sicherungsscheibe,denBeschleuniger
unddasMesserab(Bild24).
SchärfendesMessers
Wartungsintervall:Alle50Betriebsstun-
den—SchärfenSiedasSchnittmesserodertauschenSieesaus.
SchärfenodertauschenSiedas
Messerhäugeraus,wennraue
odersandigeBedingungendie
Kanteschnellerstumpfmachen.
FeilenSiedieOberseitedesMessers,umden
ursprünglichenSchnittwinkelbeizubehalten(Bild
26A),unddenRadiusderinnerenSchnittkante(Bild
26B).DasMesserbleibtausgewuchtet,wennSie
diegleicheMengeMetallvonbeidenSchnittkanten
g027496
entfernen.
1.Beschleuniger3.Nase
2.Abnutzungsbereich4.Rissbildung
WARNUNG:
Einabgenutzteroderbeschädigter
BeschleunigerkannzerbrechenundeinTeil
desBeschleunigerskannherausgeschleudert
werdenundSieoderUnbeteiligtetreffen
undschwereodertödlicheVerletzungen
verursachen.
•PrüfenSiedenBeschleunigerregelmäßig
aufAbnutzungundDefekte.
•TauschenSieeinenabgenutztenoder
defektenBeschleunigeraus.
Bild26
1.SchärfenSiedasMesser
nurindiesemWinkel.
2.BehaltenSiehierden
AuswuchtendesMessers
1.PrüfenSiedieAuswuchtungdesMessers,
indemSiedasmittlereLochimMesserüber
einenNagelodereinenSchraubendreherschaft
hängen,denSiehorizontalineinen
Schraubstockeinklemmen(Bild27).
Bild27
g002279
ursprünglichenRadius
bei.
g002280
Hinweis:SiekönnendieWuchtgleichfallsin
einemfürdengewerblichenBedarferhältlichen
Messerauswuchtgerätprüfen.
2.WennsicheinEndedesMessersnachunten
dreht,feilenSiediesesEndeetwasab(nichtdie
25
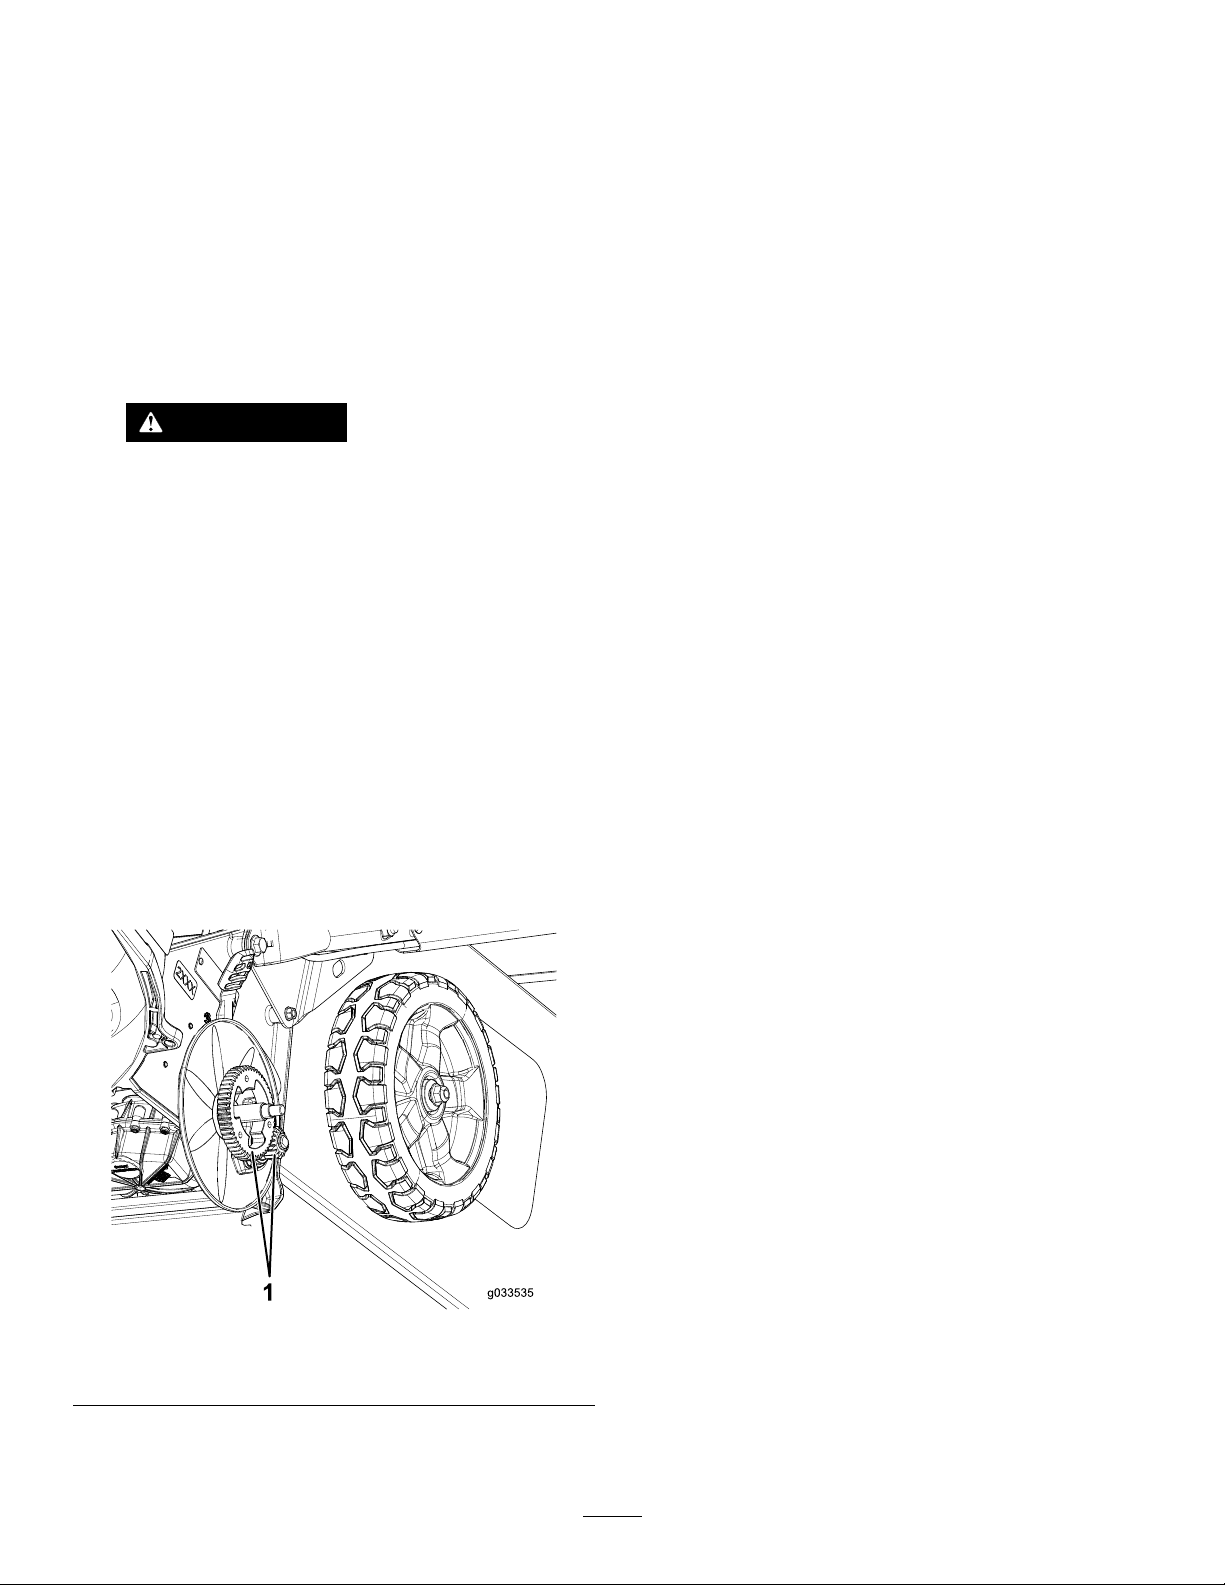
SchnittkanteoderinderNähederSchnittäche),
bissichbeideEndendesMessersnichtmehr
nachuntendrehen.
MontierendesMessers
1.MontierenSieeinscharfes,ausgewuchtetes
ToroMesser,denBeschleuniger,die
SicherungsscheibeunddieMesserschraube.
DieWindügelmüssennachobeninRichtung
desMähergehäuseszeigen.
Hinweis:ZiehenSiedieMesserschraubemit
82Nman.
WARNUNG:
DerEinsatzderMaschineohneden
Beschleunigerkanndazuführen,dass
sichdasMesserbewegt,verbiegtoder
bricht.Dieskannzuschwerenoder
tödlichenVerletzungenfürsieoder
Unbeteiligteführen.
SetzenSiedieMaschinenieohne
Beschleunigerein.
Hinweis:WennSiedieMaschineinextremen
Bedingungeneinsetzen,haltendieZahnräderlänger,
wennSiedieRäderhäugerreinigen.
Hinweis:ReinigenSiedieLagernichtmit
einemHochdruckreiniger,dadieLagerdichtungen
beschädigtwerdenkönnen.
VorbereitendesAkkupacks
fürRecycling
Wichtig:DeckenSiediePoledesAkkupacks
nachdemAusbaumitextrastarkemKlebeband
ab.VersuchenSienicht,denAkkupackzu
zerstörenoderauseinanderzubauenoderTeilezu
entfernen.
InformationenzumverantwortungsvollenRecyceln
desAkkuserhaltenSiebeiIhrerörtlichenVerwaltung
oderIhremT oro-Vertragshändler.
2.StellenSiedieMaschinewiederindie
Betriebsstellung.
ReinigenderRäder
Wartungsintervall:Alle40Betriebsstunden
1.NehmenSiedieHinterräderabundentfernen
RückständevomZahnradbereich.
Bild28
1.Zahnräder
2.TragenSienachdemReinigenetwas
GleitschutzmittelaufdieZahnräderauf.
g033535
26

Einlagerung
FührenSiedieempfohlenenWartungsarbeitendurch,
umdieMaschinefürdiesaisonbedingteEinlagerung
vorzubereiten;sieheWartung(Seite23).
StellenSiedieMaschineabundwartenSie,bisalle
beweglichenTeilezumStillstandgekommensind.
LassenSiedieMaschineabkühlen,bevorSiediese
einstellen,reinigen,verstauen,oderreparieren.
LagernSiedieMaschineaneinemkühlen,sauberen
undtrockenenOrtein.DeckenSiedieMaschineab,
umsiesauberundgeschütztzuhalten.
Wichtig:LagernSiedieMaschine,denAkkupack
unddasLadegerätnurbeiTemperaturenim
angemessenenBereich,sieheTechnischeDaten
(Seite13).
Wichtig:WennSiedenAkkupackfürdie
Nebensaisonaufbewahren,ladenSieihnauf,bis
2oder3LED-AnzeigenamAkkugrünaueuchten.
LagernSieeinganzaufgeladenesoderganzleeres
Akkunichtein.WennSiedieMaschinewieder
verwendenmöchten,ladenSiedenAkkupackauf,
bisdielinkeAnzeigeleuchteamLadegerätgrün
leuchtetoderallevierLED-AnzeigenamAkku
grünleuchten.
10.ZiehenSiealleSchraubenundMutternan.
11.BessernSieLackschädenmitLackaus,den
SievonIhremToro-Vertragshändlerbeziehen
können.
1.TrennenSiedieMaschinevonder
Stromversorgung(d.h.entfernenSie
denAkkupack)undprüfenSiesienachder
VerwendungaufSchäden.
2.BewahrenSiedieMaschinenichtmit
eingebautemAkkupackauf.
3.BewahrenSiedieMaschine,denAkkupack
unddasLadegerätaneinemgeschlossenen,
sauberen,trockenen,gutbelüftetenundfür
KinderunzugänglichenOrtauf.
4.BewahrenSiedieMaschine,denAkkupack
unddasAkkuladegerätnichtzusammenmit
Ätzmittelnauf,wiez.B.Gartenchemikalienund
Enteisungssalzen.
5.UmdieGefahrschwererVerletzungenzu
minimieren,lagernSiedenAkkupacknicht
außerhalboderinnerhalbvonFahrzeugen.
6.EntfernenSieSchnittgut,Schmutzund
FettrückständevondenexternenTeilendes
Motors,derMotorhaubeundderOberseitedes
Mähergehäuses.
7.ReinigenunterdemGerät;sieheReinigenunter
demGerät(Seite22).
8.PrüfenSiedenMesserzustand;siehePrüfen
desMessers(Seite24).
9.PrüfenSiedenZustanddesBeschleunigers,
siehePrüfendesBeschleunigers(Seite25).
27

Fehlersucheund-behebung
FührenSienurdieindieserAnleitungbeschriebenenSchrittedurch.AlleweiterenInspektions-,Wartungs-und
ReparaturarbeitenmüssenvoneinemVertrags-KundendienstodereinemähnlichqualiziertenFachbetrieb
durchgeführtwerden,wennSiedasProblemnichtselberlösenkönnen.
Problem
DieMaschineläuftnichtodernicht
durchgehend.
DieMaschineerreichtseine
Höchstleistungnicht.
DieMaschineoderderMotorerzeugt
übermäßigeVibrationenoderGeräusche.
MöglicheUrsacheBehebungsmaßnahme
1.DerAkkuistnichtvollständig
eingerastet.
2.DerAkkupackistnichtaufgeladen.2.EntfernenSiedenAkkupackausder
3.DerAkkupackistbeschädigt.
4.Esgibteinandereselektrisches
ProblemmitderMaschine.
1.DieAkkupackladungistzuniedrig.
2.DieUnterseitedesGerätesweist
SchnittgutrückständeundSchmutz
auf.
1.DasMesseristverbogenoder
unwuchtig.
2.DieMesserbefestigungsmutternsind
locker.
3.DieUnterseitedesGerätesweist
SchnittgutrückständeundSchmutz
auf.
4.DieMotorbefestigungsschraubensind
lose.
1.NehmenSiedenAkkuherausund
steckenSieihnwiedereinundstellen
Siedabeisicher,dasservollständig
eingebautundverriegeltist.
MaschineundladenSieihnauf.
3.ErsetzenSiedenAkkupack.
4.SetzenSiesichdannmiteinem
VertragshändlerinVerbindung.
1.EntfernenSiedenAkkupackausder
MaschineundladenSieihnvollständig
auf.
2.ReinigenSiedieUnterseitedes
Mähwerks.
1.WuchtenSiedasMesseraus.
TauschenSieverbogeneMesseraus.
2.ZiehenSiedieMutternfest.
3.ReinigenSiedieUnterseitedes
Mähwerks.
4.ZiehenSiedieMotorbefestigungsschraubenan.
DasSchnittmusteristnichtgleichmäßig.
DerAuswurfkanalverstopft.
DerSelbstantriebderMaschine
funktioniertnicht.
1.NichtallevierRädersindaufdie
gleicheSchnitthöheeingestellt.
2.DasMesseriststumpf.
3.Siemähenwiederholtimgleichen
Muster.
4.DieUnterseitedesGerätesweist
SchnittgutrückständeundSchmutz
auf.
1.DerGasbedienungshebelstehtnicht
derSCHNELL-Stellung.
2.DieSchnitthöheistzuniedrig.
3.Siemähenzuschnell.3.GehenSielangsamer.
4.DasGrasistnass.
5.DieUnterseitedesGerätesweist
SchnittgutrückständeundSchmutz
auf.
1.DerTreibriemendesSelbstantriebsist
falscheingestelltoderdefekt.
2.UnterderRiemenabdeckungbenden
sichSchmutzrückstände.
1.StellenSieallevierRäderaufdie
gleicheSchnitthöheein.
2.SchärfenSiedasMesserundwuchten
esaus.
3.VariierenSieIhrMähmuster.
4.ReinigenSiedieUnterseitedes
Mähwerks.
1.StellenSiedenGasbedienungshebel
indieSCHNELL-Stellung.
2.VerwendenSieeinehöhere
Schnitthöhe.
4.LassenSiedasGrasvordemMähen
abtrocknen.
5.
ReinigenSiedieUnterseitedes
Mähwerks.
1.StellenSiedenBowdenzugdes
Selbstantriebsein.TauschenSieden
ZugbeiBedarfaus.
2.EntfernenSiedieSchmutzrückstände.
28

Problem
MöglicheUrsacheBehebungsmaßnahme
DerAkkupackentlädtsehrschnell.
DasLadegerätfunktioniertnicht.
DieLED-AnzeigeleuchteamLadegerät
leuchtetrot.
DieLED-AnzeigeleuchteamLadegerät
blinktrot.
1.DerAkkupackistnichtimgeeigneten
Temperaturbereich.
2.DieMaschineistüberlastet
1.DasLadegerätistüberoderunterdem
geeigneteT emperaturbereich.
2.DieSteckdose,inwelcherdas
Ladegerätsteckt,istnichtmitdem
Stromnetzverbunden.
1.DasAkkuladegerätund/oder
Akkupackistnichtimgeeigneten
Temperaturbereich.
1.DieKommunikationzwischen
AkkupackundLadegerätistdefekt.
2.DerAkkupackistschwach.
1.BringenSiedenAkkupackaneinen
Ort,dertrockenistundandemdie
Temperaturzwischen5°Cund40°C
liegt.
2.ArbeitenSielangsamer.
1.TrennenSiedasAkkuladegerätvom
StromundbringenSieesaneinen
Ort,dertrockenistundandemdie
Temperaturzwischen5°Cund40°C
liegt.
2.LassenSiedieSteckdosevoneinem
Fachelektrikerreparieren.
1.TrennenSiedasAkkuladegerätvom
StromundbringenSieAkkuladegerät
undAkkupackaneinenOrt,der
trockenistundandemdieTemperatur
zwischen5°Cund40°Cliegt.
1.NehmenSiedenAkkupackaus
demAkkuladegerät,ziehenSiedas
LadegerätausderSteckdoseund
wartenSie10Sekunden.Stecken
SiedasAkkuladegerätwieder
indieSteckdoseundlegenSie
denAkkupackindasLadegerät.
WenndieLED-Anzeigeleuchte
amAkkuladegerätimmernochrot
blinkt,wiederholenSiedenVorgang.
WenndieLED-Anzeigeleuchte
nach2Versuchenimmernoch
rotblinkt,entsorgenSieden
Akkupackordnungsgemäßaneiner
Akkusammelstelle.
2.WendenSiesichanIhren
Vertragshändler,wennderAkku
unterGarantiesteht,oderentsorgen
SiedenAkkupackordnungsgemäßbei
einerAkkusammelstelle.
29

EEA/UKDatenschutzerklärung
TorosVerwendungIhrerpersönlichenInformationen
TheT oroCompany(„Toro“)respektiertIhrePrivatsphäre.WennSieunsereProduktekaufen,könnenwirbestimmtepersönlicheInformationenüber
Siesammeln,entwederdirektvonIhnenoderüberIhrelokaleToro-NiederlassungoderIhrenHändler.T oroverwendetdieseInformationen,um
vertraglicheVerpichtungenzuerfüllen–z.B.umIhreGarantiezuregistrieren,IhrenGarantieanspruchzubearbeitenoderSieimFalleeinesRückrufs
zukontaktieren–undfürlegitimeGeschäftszwecke–z.B.umdieKundenzufriedenheitzumessen,unsereProduktezuverbessernoderIhnen
ProduktinformationenzurVerfügungzustellen,diefürSievonInteresseseinkönnten.TorokanndieInformationenimRahmendieserAktivitätenan
ToroT ochtergesellschaften,HändleroderGeschäftspartnerweitergeben.WirkönnenauchpersönlicheDatenoffenlegen,wenndiesgesetzlich
vorgeschriebenistoderimZusammenhangmitdemVerkauf,KaufoderderFusioneinesUnternehmens.ToroverkauftIhrepersönlichenInformationen
niemalsananderenUnternehmen.
SpeicherungIhrerpersönlichenDaten
TorowirdIhrepersönlichenDatensolangeaufbewahren,wieesfürdieobengenanntenZweckerelevantistundinÜbereinstimmungmitden
gesetzlichenBestimmungen.FürweitereInformationenüberdiegeltendenAufbewahrungsfristenwendenSiesichbitteanlegal@toro.com.
TorosEngagementfürSicherheit
IhrepersönlichenDatenkönnenindenUSAodereinemanderenLandverarbeitetwerden,indemmöglicherweisewenigerstrengeDatenschutzgesetze
geltenalsinIhremWohnsitzland.WannimmerwirIhreDatenaußerhalbIhresWohnsitzlandesübermitteln,werdenwirdiegesetzlichvorgeschriebenen
Schritteunternehmen,umsicherzustellen,dassangemesseneSicherheitsvorkehrungenzumSchutzIhrerDatengetroffenwerdenundum
sicherzustellen,dassdiesesicherbehandeltwerden.
ZugangundKorrektur
SiehabendasRecht,IhrepersönlichenDatenzukorrigierenundzuüberprüfenoderderVerarbeitungIhrerDatenzuwidersprechenbzw.diese
einzuschränken.BittekontaktierenSieunsdazuperE-Mailunterlegal@toro.com.WennSieBedenkenhaben,wieToromitIhrenDatenumgegangenist,
bittenwirSie,diesdirektmitunszubesprechen.BittebeachtenSie,dasseuropäischeBürgerdasRechthaben,sichbeiIhrerDatenschutzbehörde
zubeschweren.
374-0282RevC

FormNo.3443-320RevC
Cortacéspeddeserviciopesado
Recycler
®
60Vde53cmcon
reciclado/ensacadotrasero
Nºdemodelo22275—Nºdeserie400000000ysuperiores
Nºdemodelo22275T—Nºdeserie400000000ysuperiores
Registresuproductoenwww.Toro.com.
Traduccióndeloriginal(ES)
*3443-320*

Esteproductocumpletodaslasdirectivaseuropeas
aplicables;sideseamásdetalles,consultela
DeclaracióndeConformidad(Declarationof
Conformity–DOC)decadaproducto.
Introducción
Importante:Consudispositivomóvil,puede
escanearelcódigoQRdelapegatinadelnúmero
deserie(ensucaso)paraaccederainformación
sobrelagarantía,laspiezas,yotrainformación
sobreelproducto
Estecortacéspedmanualdecuchillarotativaestá
diseñadoparaserusadoporusuariosdomésticos
oporoperadoresprofesionalescontratados.
Estádiseñadoprincipalmenteparasegarcésped
bienmantenidoenzonasverdesresidencialeso
comerciales.Estádiseñadoparausarlabatería
deionesdelitioModelo81875(suministrada
conelmodelo22275),81825,81850,o81860.
Estasbateríasestándiseñadasparasercargadas
únicamenteconelcargadordebateríasmodelo
81805(suministradoconelmodelo22275),o81802.
Elusodeestosproductosparapropósitosdiferentes
alosprevistospuedeserpeligrosoparaustedypara
otraspersonas.
ElModelo22275Tnoincluyebateríanicargador.
Visitewww.T oro.comparaobtenermásinformación,
incluidosconsejosdeseguridad,materialesde
formación,informaciónsobreaccesorios,ayuda
paraencontraraundistribuidoropararegistrarsu
producto.
Sinecesitaasistenciatécnica,piezasgenuinas
delfabricanteoinformaciónadicional,póngaseen
contactoconunServicioTécnicoAutorizadooconel
Serviciodeatenciónalclientedelfabricanteytengaa
manoelnúmerodeserieydemodelodelproducto.
Figura1identicalaubicaciónenelproductodelos
númerosdemodeloydeserie.Escribalosnúmeros
enelespacioprovisto.
g226623
Figura1
1.Ubicacióndelosnúmerosdemodeloydeserie
Nºdemodelo
Nºdeserie
Estemanualidenticapeligrospotencialesycontiene
mensajesdeseguridadidenticadosporelsímbolo
dealertadeseguridad(Figura2),queseñalaun
peligroquepuedecausarlesionesgravesolamuerte
siustednosiguelasprecaucionesrecomendadas.
g000502
Figura2
Símbolodealertadeseguridad
Estemanualutiliza2palabraspararesaltar
información.Importantellamalaatenciónsobre
informaciónmecánicaespecial,yNotaresalta
informacióngeneralquemereceunaatención
especial.
©2021—TheToro®Company
8111LyndaleAvenueSouth
Bloomington,MN55420
Póngaseencontactoconnosotrosenwww.Toro.com.
2
Reservadostodoslosderechos
ImpresoenEE.UU.

Contenido
Seguridad
Seguridad.................................................................3
Pegatinasdeseguridadeinstrucciones.............6
Montaje.....................................................................8
1Cómomontarelcargadordelabatería
(opcional)........................................................8
2Retiradadelprotectordeloscables..................9
3Montajedelmanillarinferior...........................10
4Instalacióndelmanillar...................................11
5Instalacióndelprotectordeloscables.............11
6Ensamblajedelabolsaderecogida...............12
Elproducto..............................................................13
Especicaciones..............................................13
Antesdelfuncionamiento....................................14
Instalacióndelabatería....................................14
Ajustedelaalturadecorte................................15
Ajustedelaalturadelmanillar..........................16
Duranteelfuncionamiento...................................17
Arranquedelamáquina....................................17
Recicladodelosrecortes..................................17
Ensacadodelosrecortes.................................17
Usodelatransmisiónautopropulsada..............19
Ajustedelavelocidaddelacuchilla..................19
Apagadodelamáquina....................................19
Cómoretirarlabateríadelamáquina................19
Consejosdeoperación....................................20
Despuésdelfuncionamiento...............................21
Cargadelabatería...........................................21
Limpiezadelosbajosdelamáquina.................22
Mantenimiento........................................................23
Calendariorecomendadodemanteni-
miento..........................................................23
Ajustedelatransmisiónautopropulsada...........23
Mantenimientodelacuchilla.............................24
Limpiezadelasruedas.....................................26
Preparacióndelabateríaparael
reciclado.......................................................26
Almacenamiento.....................................................27
Solucióndeproblemas...........................................28
INSTRUCCIONESDE
SEGURIDAD
IMPORTANTES
ADVERTENCIA–alutilizarunamáquinaeléctrica,
leayobservesiemprelasnormaseinstrucciones
deseguridadbásica,andereducirelriesgode
incendio,descargaeléctricaolesiones,incluyendo
lassiguientes:
I.Formación
1.Eloperadordelamáquinaesresponsablede
cualquieraccidenteopeligroqueafecteaotras
personasoasupropiedad.
2.Nodejequelosniñosutilicenojueguenconla
máquina,labateríaoelcargadordelabatería;
lanormativalocalpuederestringirlaedaddel
operador.
3.Nopermitaqueestedispositivoseautilizado
omantenidoporniñosoporpersonasque
nohayanrecibidolaformaciónadecuada.
Sólopermitaquemanejenomantenganel
dispositivopersonasresponsables,formadas,
familiarizadasconlasinstruccionesy
físicamentecapacesdeutilizarlamáquina.
4.Antesdeutilizarlamáquina,labateríay
elcargadordelabatería,leatodaslas
instruccionesysímbolosdeadvertenciade
estosproductos.
5.Familiaríceseconloscontrolesyconeluso
correctodelamáquina,labateríayelcargador
delabatería.
II.Preparación
1.Nopermitaqueentrenotraspersonas,
especialmenteniñosoanimalesdomésticos,en
lazonadetrabajo.
2.Noutilicelamáquinasinquetodoslos
protectoresydispositivosdeseguridad,
talescomodeectoresyrecogedores,estén
colocadosyfuncionencorrectamenteenla
máquina.
3.Inspeccioneeláreadondesevaautilizarla
máquinayretirecualquierobjetoquepudiera
interferirconelfuncionamientodelamáquinao
quepudieraserarrojadoporlamáquina.
4.Antesdeutilizarlamáquina,asegúresedeque
lacuchilla,elpernodelacuchillayelconjunto
delacuchillanoestándesgastadosodañados.
Sustituyacualquierpegatinaqueestédañada
oilegible.
3

5.Utiliceúnicamentelabateríaespecicada
porT oro.Elusodeotrosaccesoriospuede
aumentarelriesgodeincendioylesiones.
6.Siseenchufaelcargadordebateríaenuna
tomaquenoseade100a240V,puede
producirseunincendioounadescargaeléctrica.
Noenchufeelcargadordelabateríaenuna
tomadecorrientequenoseade100Va240
V.Paraotrostiposdeconexión,utiliceun
adaptadordeenchufedeltipocorrectoparala
tomadecorriente,siesnecesario.
7.Noutilicelabateríaoelcargadordelabatería
siestándañadosomodicados,porquepodrían
mostraruncomportamientoimpredeciblecon
resultadodeincendio,explosiónoriesgode
lesiones.
8.Sielcabledealimentacióndelcargadordela
bateríaestádañado,póngaseencontactocon
unServicioTécnicoAutorizadoparacambiarlo.
9.Noutilicebateríasnorecargables.
10.Carguelabateríaúnicamenteconelcargador
debateríaespecicadoporToro.Uncargador
diseñadoparauntipodeterminadodebatería
puedecrearunriesgodeincendiosiseutiliza
conotrabatería.
11.Carguelabateríaúnicamenteenunazonabien
ventilada.
12.Noexpongalabateríaoelcargadoralfuegooa
temperaturassuperioresa68°C.
13.Sigatodaslasinstruccionesdecargayno
carguelabateríasilatemperaturaestáfueradel
intervaloespecicadoenlasinstrucciones.De
locontrario,podríadañarlabateríayaumentar
elriesgodeincendio.
14.Vestimentaadecuada–lleveropaadecuada,
incluyendoprotecciónocular;pantalónlargo;
calzadoresistenteyantideslizante(novaya
descalzoniconsandalias);yprotecciónauditiva.
Sitieneelpelolargo,recójaselo,ynolleve
prendasholgadasojoyassueltasquepuedan
quedaratrapadasenlaspiezasmóviles.Lleve
unamascarillaencondicionesdemuchopolvo.
III.Operación
1.Elcontactoconlacuchillaenmovimiento
causarálesionesgraves.Mantengalasmanos
ylospiesalejadosdelazonadecorteyde
todaslaspiezasmóvilesdelamáquina.Nose
acerquealosoriciosdedescarga.
2.Elusodeestamáquinaparaotrospropósitos
quelosprevistospodríaserpeligrosopara
ustedyparaotraspersonas.
3.Desengranelatransmisiónautopropulsada(si
estáinstalada)antesdearrancarlamáquina.
4.Noinclinelamáquinaalarrancarelmotor.
5.Eviteelarranqueaccidental–asegúresede
queelbotóndearranqueeléctricoseretira
delencendidoantesdeconectarlabateríay
manejarlamáquina.
6.Prestetodasuatenciónalutilizarlamáquina.
Norealiceningunaactividadquecause
distracciones;delocontrario,podrían
producirselesionesodañosmateriales.
7.Cuandoustedsueltalabarradecontroldelas
cuchillas,elmotordebeapagarseylacuchilla
debedetenerseen3segundosomenos.Si
no,dejedeusarlamáquinainmediatamentey
póngaseencontactoconunServicioTécnico
Autorizado.
8.Parelamáquina,retireelbotóndearranque
eléctrico,retirelabateríadelamáquinayespere
aquesedetengatodomovimientoantesde
ajustar,revisar,limpiaroalmacenarlamáquina.
9.Retirelabateríayelbotóndearranqueeléctrico
delamáquinaantesdedejarladesatendidao
antesdecambiardeaccesorio.
10.Nofuercelamáquina–dejequelamáquina
hagaeltrabajomejoryconmásseguridadala
velocidadparalaquefuediseñada.
11.Manténgasealerta–estéatentoaloqueestá
haciendoyutiliceelsentidocomúnmientras
trabajeconlamáquina.Noutilicelamáquinasi
estáenfermo,cansado,obajolainuenciade
alcoholodrogas.
12.Utilicelamáquinaúnicamenteconbuena
visibilidadyencondicionesmeteorológicas
apropiadas.Nouselamáquinasihayriesgo
derayos.
13.Extremelasprecaucionesalirhaciaatrásoal
tirardelamáquinahaciausted.
14.Pisermeymantengaelequilibrioentodo
momento,sobretodoenpendientes.Siegue
detravésencuestasypendientes,nunca
haciaarribaohaciaabajo.Extremelas
precaucionesalcambiardedirecciónencuestas
opendientes.Nosieguependientesocuestas
extremadamenteempinadas.Camine,nocorra
nuncaconlamáquina.
15.Nodirijaelmaterialdedescargahaciauna
persona.Eviteladescargadematerialcontra
unapareduobstrucción,yaqueelmaterial
podríarebotarhaciausted.Parelacuchillaolas
cuchillasalcruzarsuperciesdegrava.
16.Estéalertaaagujeros,surcos,montículos,
rocasuotrosobjetosocultos.Elterrenoirregular
podríahacerquepierdaelequilibrio.
17.Lahierbamojadaolashojasmojadaspueden
causarlegraveslesionessiustedresbalaytoca
4

lacuchilla.Evitesegarencondicioneshúmedas
ocuandollueve.
18.Silamáquinagolpeaunobjetooempiezaa
vibrar,apagueinmediatamentelamáquina,
retireelbotóndearranqueeléctrico,retire
labateríayespereaquesedetengatodo
movimientoantesdeexaminarlamáquinaen
buscadedaños.Hagatodaslasreparaciones
necesariasantesdevolverautilizarlamáquina.
19.Parelamáquinayretireelbotóndearranque
eléctricoantesdecargarlamáquinaparael
transporte.
20.Encondicionesabusivas,labateríapuede
expulsarlíquido;eviteelcontacto.Encasode
uncontactoaccidentalconellíquido,enjuague
conagua.Siellíquidoentraencontactocon
susojos,busqueayudamédica.Ellíquido
expulsadodelabateríapuedecausarirritación
oquemaduras.
paraobtenerelmejorrendimientoylamayor
seguridad.Mantengalosmanillaressecos,
limpiosylibresdeaceiteygrasa.Mantenga
losprotectorescolocadosyenbuenestado
defuncionamiento.Mantengalascuchillas
aladas.Utiliceúnicamentecuchillasde
repuestoidénticas.
10.Inspeccionelamáquinaenbuscadepiezas
dañadas–sihaydañosenlosprotectoresoen
otraspiezas,determinesilamáquinafunciona
correctamente.Compruebequelaspiezas
móvilesestáncorrectamentealineadasyquese
muevenlibrementesinagarrotarse,queestán
correctamentemontadas,quenohaypiezas
rotas,yquenohayotrascircunstanciasque
pudieranafectarasuuso.Amenosquese
indiquelocontrarioenlasinstrucciones,haga
queunServicioTécnicoAutorizadorepareo
sustituyacualquierprotectorocomponente
dañado.
IV.Mantenimientoyalmacenamiento
1.Parelamáquina,retireelbotóndearranque
eléctrico,retirelabateríadelamáquinayespere
aquesedetengatodomovimientoantesde
ajustar,revisar,limpiaroalmacenarlamáquina.
2.Nointenterepararlamáquina,salvocon
arregloaloindicadoenlasinstrucciones.Haga
queunServicioTécnicoAutorizadorealiceel
mantenimientodelamáquinausandopiezasde
repuestoidénticas.
3.Lleveguantesyprotecciónocularalrealizarel
mantenimientodelamáquina.
4.Aleunacuchillaromaenambosextremos
paramantenerelequilibrio.Limpielacuchillay
asegúresedequeestáequilibrada.
5.Cambielacuchillasiestádoblada,desgastadao
agrietada.Unacuchilladesequilibradaproduce
vibraciones,quepodríandañarelmotoro
causarlesionespersonales.
6.Alrealizarelmantenimientodelacuchilla,sepa
quelacuchillapuedemoverseinclusosila
fuentedealimentaciónestáapagada.
7.Compruebefrecuentementelabolsaderecogida
derecortesenbuscadedeteriorosodesgaste,
ysustituyacualquierbolsadesgastadaporuna
bolsa[derecambio]Toro.
8.Paraobtenerelmejorrendimiento,utilice
solamentepiezasyaccesoriosgenuinosde
Toro.Otrosaccesoriosypiezasderepuesto
podríanserpeligrosos,ydichousopodría
invalidarlagarantíadelproducto.
11.Cuandolabateríanoestáenuso,debe
mantenersealejadadeobjetosmetálicoscomo
clips,monedas,llaves,clavosytornillosque
pudieranhacerunaconexiónentreunterminal
yotro.Uncortocircuitoentrelosterminales
delabateríapuedecausarquemadurasoun
incendio.
12.Compruebefrecuentementequelospernosde
montajedelacuchillaydelmotorestánbien
apretados.
13.Cuandonoestéutilizandolamáquina,guárdela
enunlugarcerrado,secoyseguro,fueradel
alcancedelosniños.
14.CUIDADO–unabateríamaltratadapuede
representarunriesgodeincendiooquemadura
química.Nodesmontelabatería.Nocaliente
labateríaamásde68°Cnilaincinere.
Sustituyalabateríaúnicamenteconunabatería
Torogenuina;elusodeotrotipodebatería
podríaprovocarunincendioounaexplosión.
Mantengalasbateríasfueradelalcancedelos
niñosyenelembalajeoriginalhastasuuso.
15.Notirelabateríausadaalfuego.Lacelda
puedeexplosionar.Compruebesilanormativa
localcontienealgunainstrucciónespecialsobre
laeliminacióndelasbaterías.
GUARDEESTAS
INSTRUCCIONES
9.Mantengalamáquinacorrectamente–
mantengaloslosdecortealadosylimpios
5

Pegatinasdeseguridadeinstrucciones
Laspegatinaseinstruccionesdeseguridadestánalavistadeloperadoryestánubicadas
cercadecualquierzonadepeligropotencial.Sustituyacualquierpegatinaqueestédañadao
quefalte.
137-9490
1.Leaelmanualdel
operador.
2.Reciclar5.Noexponeralalluvia.
3.Contieneionesdelitio;no
desechar.
4.Manteneralejadade
llamasdesnudas.
decal137-9490
1.Leaelmanualdel
operador.
2.Paraarrancarlamáquina,
aprietelabarracontrael
manillarypulseelbotón.
decal144-3175
144-3175
3.Paraapagarlamáquina,
sueltelabarra.
1.Advertencia–leaelManualdeloperador;noutiliceesta
máquinaamenosquehayarecibidoformaciónsobresu
manejo.
2.Peligrodeobjetosarrojados–mantengaalejadasaotras
personas.
3.Peligrodeobjetosarrojados–noutiliceelcortacéspedsin
queestécolocadoeltapóndedescargatraseraolabolsa.
decal116-7583
116-7583
4.Peligrodecorte/desmembramientodemanoopieporla
cuchilladelcortacésped–noseacerquealaspiezasen
movimiento;mantengacolocadostodoslosprotectores.
5.Advertencia–lleveprotecciónauditiva.
6.Peligrodecorte/desmembramientodemanoopie,cuchilla
delcortacésped–nosubanibajependientes;desplácesede
ladoaladoenpendientes;apagueelmotorantesdedejarla
máquina;retirecualquierresiduoantesdesegar;mirehacia
atrásmientrassiegueenmarchaatrás.
6

140-8472
1.Leaelmanualdel
operador.
2.Nolosdeseche.4.Dobleaislamiento
3.Residencial
112-8760
1.Peligrodeobjetosarrojados–mantengaalejadasaotras
personas.
2.Peligrodecorte/desmembramientodemanoopieporla
cuchilladelcortacésped–noseacerquealaspiezasen
movimiento.
decal140-8472
decal112-8760
decal131-0822
131-0822
1.Transmisiónautopropulsada—Atención;puedeproducirse
undesgasteprematurodelatransmisiónsiseaprieta
demasiadolacorrea;antesderealizarcualquiertareade
mantenimiento,leaelManualdeloperador.
137-9461
1.Estadodecargadelabatería
134-4691
1.Velocidadautomática2.Velocidadmáxima
decal137-9461
decal134-4691
7

Montaje
Piezassueltas
Utilicelatablasiguienteparavericarquenofaltaningunapieza.
Procedimiento
1
2
3
4
5
6
Importante:Retireydesechelahojaprotectora
deplásticoquecubreelmotor,ycualquierotro
plásticooenvolturadelamáquina.
Importante:Enelmomentodelacomprala
bateríanoestátotalmentecargada.Antesde
utilizarlamáquinaporprimeravez,consulte
Cargadelabatería(página21).
Fijacionesdemontaje(noincluidas)
Nosenecesitanpiezas
Conjuntodemanillarsuperior
Manillarinferior
Perno(5/16"x1¾")
Contratuercaconarandelaprensada
(5/16")
Arandelacurva8
Nosenecesitanpiezas
Nosenecesitanpiezas
Nosenecesitanpiezas
DescripciónCant.
Uso
2
–
1
2
4
4
–
–
–
ConsultelaFigura3paraobtenerasistenciasobre
elmontajedelcargador.
Coloqueelcargadorsobrelasjaciones
correctamenteposicionadasparajarloensulugar
(jacionesnoincluidas).
Monteelcargadordelabatería
(opcional).
Retireelprotectordeloscables.
Montajedelmanillarinferior.
Instaleelmanillar.
Instalacióndelprotectordeloscables.
Ensamblajedelabolsaderecogida.
1
Cómomontarelcargador
delabatería(opcional)
Piezasnecesariasenestepaso:
2
Fijacionesdemontaje(noincluidas)
Procedimiento
Silodesea,monteelcargadordelabatería
rmementeenlaparedutilizandolosoriciosde
montajeenparedenlapartetraseradelcargador.
Mónteloenunespaciointerior(talcomoungarajeu
otrolugarseco),cercadeunatomadecorrientey
fueradelalcancedelosniños.
g290534
Figura3
8

2
Retiradadelprotectordeloscables
Nosenecesitanpiezas
Procedimiento
g328502
Figura4
9

3
Montajedelmanillarinferior
Piezasnecesariasenestepaso:
1
Conjuntodemanillarsuperior
2
Manillarinferior
4
Perno(5/16"x1¾")
4
Contratuercaconarandelaprensada(5/16")
8Arandelacurva
Procedimiento
MonteelmanillarinferiorcomosemuestraenlaFigura5.
Figura5
1.Contratuercaconarandelaprensada(5/16")4.Manillarinferior
2.Arandelacurva
3.Conjuntodemanillarsuperior
5.Perno(5/16"x1¾")
g340673
10

4
Instalacióndelmanillar
Nosenecesitanpiezas
Procedimiento
Figura6
11
g351011

5
Instalacióndelprotectordeloscables
Nosenecesitanpiezas
Procedimiento
g350108
Figura7
6
Ensamblajedelabolsaderecogida
Nosenecesitanpiezas
Procedimiento
g238450
Figura8
12
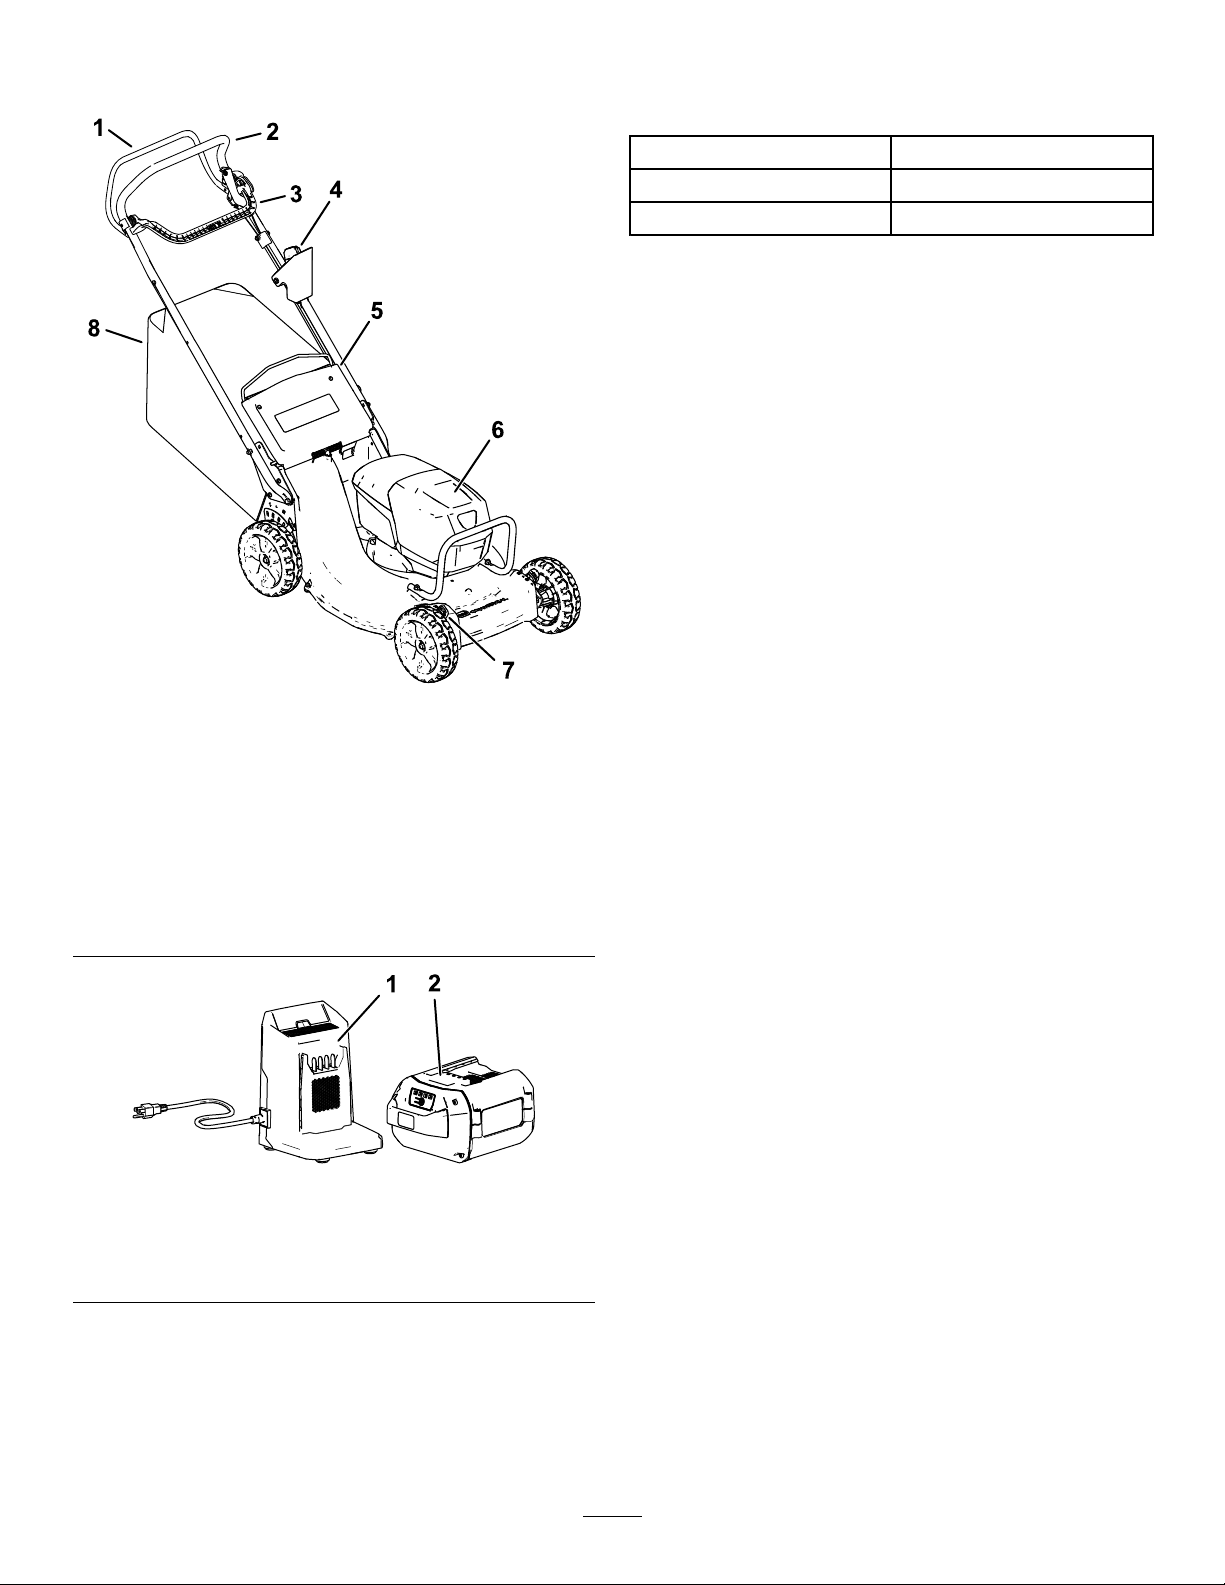
Elproducto
Especicaciones
Intervalosdetemperaturaadecuados
Cargue/guardelabateríaa5°Ca40°C*
Utilicelabateríaa
Utilicelamáquinaa
*Eltiempodecargaserámayorsilatemperaturano
estádentrodeesteintervalodurantelacarga.
Guardelamáquina,labateríayelcargadorenun
lugarcerrado,limpioyseco.
-30°Ca49°C*
0°Ca49°C*
1.Barradecontrol
delatransmisión
autopropulsada
2.Manillar
3.Barradecontroldela
cuchilla
4.Botóndearranque
eléctrico
1.Cargadordebaterías
Modelo81805(incluido
conelModelo22275)
g346507
Figura9
5.Deectortrasero
6.Compartimentodela
batería
7.Palancadealturadecorte
(4)
8.Bolsaderecogida
g292995
Figura10
2.Bateríamodelo81875
(incluidaconelModelo
22275)
13

Operación
Antesdel
funcionamiento
Instalacióndelabatería
Importante:Utilicelabateríasoloatemperaturasqueesténdentrodelintervaloapropiado;consulte
Especicaciones(página13).
1.Compruebequelosoriciosdeventilacióndelabateríaestánlibresdepolvoyresiduos.
2.Levantelatapadelcompartimentodelabatería(Figura11,A).
3.Alineeelhuecodelabateríaconlalengüetadelamáquina,eintroduzcalabateríaenelcompartimento
hastaqueseengancheensusitio(Figura11,B).
4.Cierrelatapadelcompartimentodelabatería(Figura11,C).
Figura11
g303151
14

Ajustedelaalturadecorte
ADVERTENCIA
Alajustarlaspalancasdealturadecorte,podríatocarunacuchillaenmovimientoconlas
manos,loquepodríacausarlegraveslesiones.
•Apagueelmotor,retireelbotóndearranqueeléctrico,yespereaquesedetengantodaslas
piezasenmovimientoantesdeajustarlaalturadecorte.
•Nopongalosdedosdebajodelacarcasaalajustarlaalturadecorte.
Ajustelaalturadecortesegúndesee.Ajustetodaslasruedasalamismaalturadecorte(Figura12).
Figura12
g303150
15

Ajustedelaalturadelmanillar
Ustedpuedeelevarobajarelmanillara1de3posiciones,laqueleseamáscómoda(Figura13).
Figura13
1.Retirelosdospernosdelmanillarylastuercascorrespondientes.
2.Muevaelmanillaralaalturadeseada.
3.Fijeelmanillarconlospernosqueretiróanteriormenteylastuercascorrespondientes.
g331956
16

Duranteel
funcionamiento
Arranquedelamáquina
1.Asegúresedequelabateríaestáinstaladaenlamáquina;consulteInstalacióndelabatería(página14).
2.Introduzcaelbotóndearranqueeléctricoenelinterruptordearranqueeléctrico(Figura14,A).
3.Aprietelabarradecontroldelacuchillacontraelmanillar(Figura14,B).
4.Pulseelbotóndearranqueeléctricoymanténgalopulsadohastaqueelmotorarranque(Figura14,C).
Figura14
g331970
Recicladodelosrecortes
Sumáquinavienepreparadadefábricaparareciclar,esdecir,parapicarlosrecortesdehierbayhojasy
devolverlosalcésped.
Silabolsaderecogidaestáinstaladaenlamáquina,retírelaantesdeprocederalrecicladodelosrecortes.
ConsulteCómoretirarlabolsaderecogida(página18).
Ensacadodelosrecortes
Utilicelabolsaderecogidasidesearecogerlosrecortesdehierbaylashojasdelcésped.
ADVERTENCIA
Silabolsaderecogidaestádesgastada,puedenarrojarsepequeñaspiedrasyotrosresiduos
similareshaciaustedohaciaotraspersonas,provocandolesionespersonalesgraveso
lamuerte.
Compruebefrecuentementelabolsaderecogida.Siestádañada,instaleunanuevabolsa
derecambiodelfabricante.
ADVERTENCIA
Lascuchillasestánmuyaladas;cualquiercontactoconlascuchillaspuedecausarlesiones
personalesgraves.
Apaguelamáquinayespereaquesedetengantodaslaspiezasenmovimientoantesde
abandonarelpuestodeloperador.
Instalacióndelabolsaderecogida
1.Apaguelamáquinayespereaquesedetengantodaslaspiezasenmovimiento.
2.Levanteysujeteeldeectortrasero(Figura15,A).
17

3.Retireeltapóndedescargatraserapresionandoelenganchehaciadentroconeldedopulgary
extrayendoeltapóndelamáquina(Figura15,ByC).
4.Insertelosextremosdelavarilladelabolsaenlasmuescasdelabasedelmanillar,ymuevalabolsa
haciaadelanteyhacíaatrásparavericarquelosextremosdelavarillaestánasentadosenelfondode
cadamuesca(Figura15,D).
5.Bajeeldeectortraserohastaquedescansesobrelabolsaderecogida.
Figura15
Cómoretirarlabolsaderecogida
PELIGRO
Lamáquinapuedearrojarrecortesdehierbayotrosobjetosporcualquierhuecoquehayaen
lacarcasadelamáquina.Losobjetosarrojadosconsucientefuerzapodríancausarlesiones
personalesgravesolamuerteaustedoaotraspersonas.
•Despuésderetirarlabolsaderecogida,noarranquenuncalamáquinasintenerinstalado
enlamáquinaeltapóndedescarga.
•Noabranuncaeldeectortraserodelamáquinaconlamáquinaenmarcha.
1.Apaguelamáquinayespereaquesedetengantodaslaspiezasenmovimiento.
2.Eleveeldeectortrasero.
3.Retirelavarilladelabolsaderecogidadelasmuescasdelabasedelmanillar(Figura15,A).
4.Instaleeltapóndedescarga(Figura15,B).
5.Bajeeldeectortrasero(Figura15,C).
g303153
18
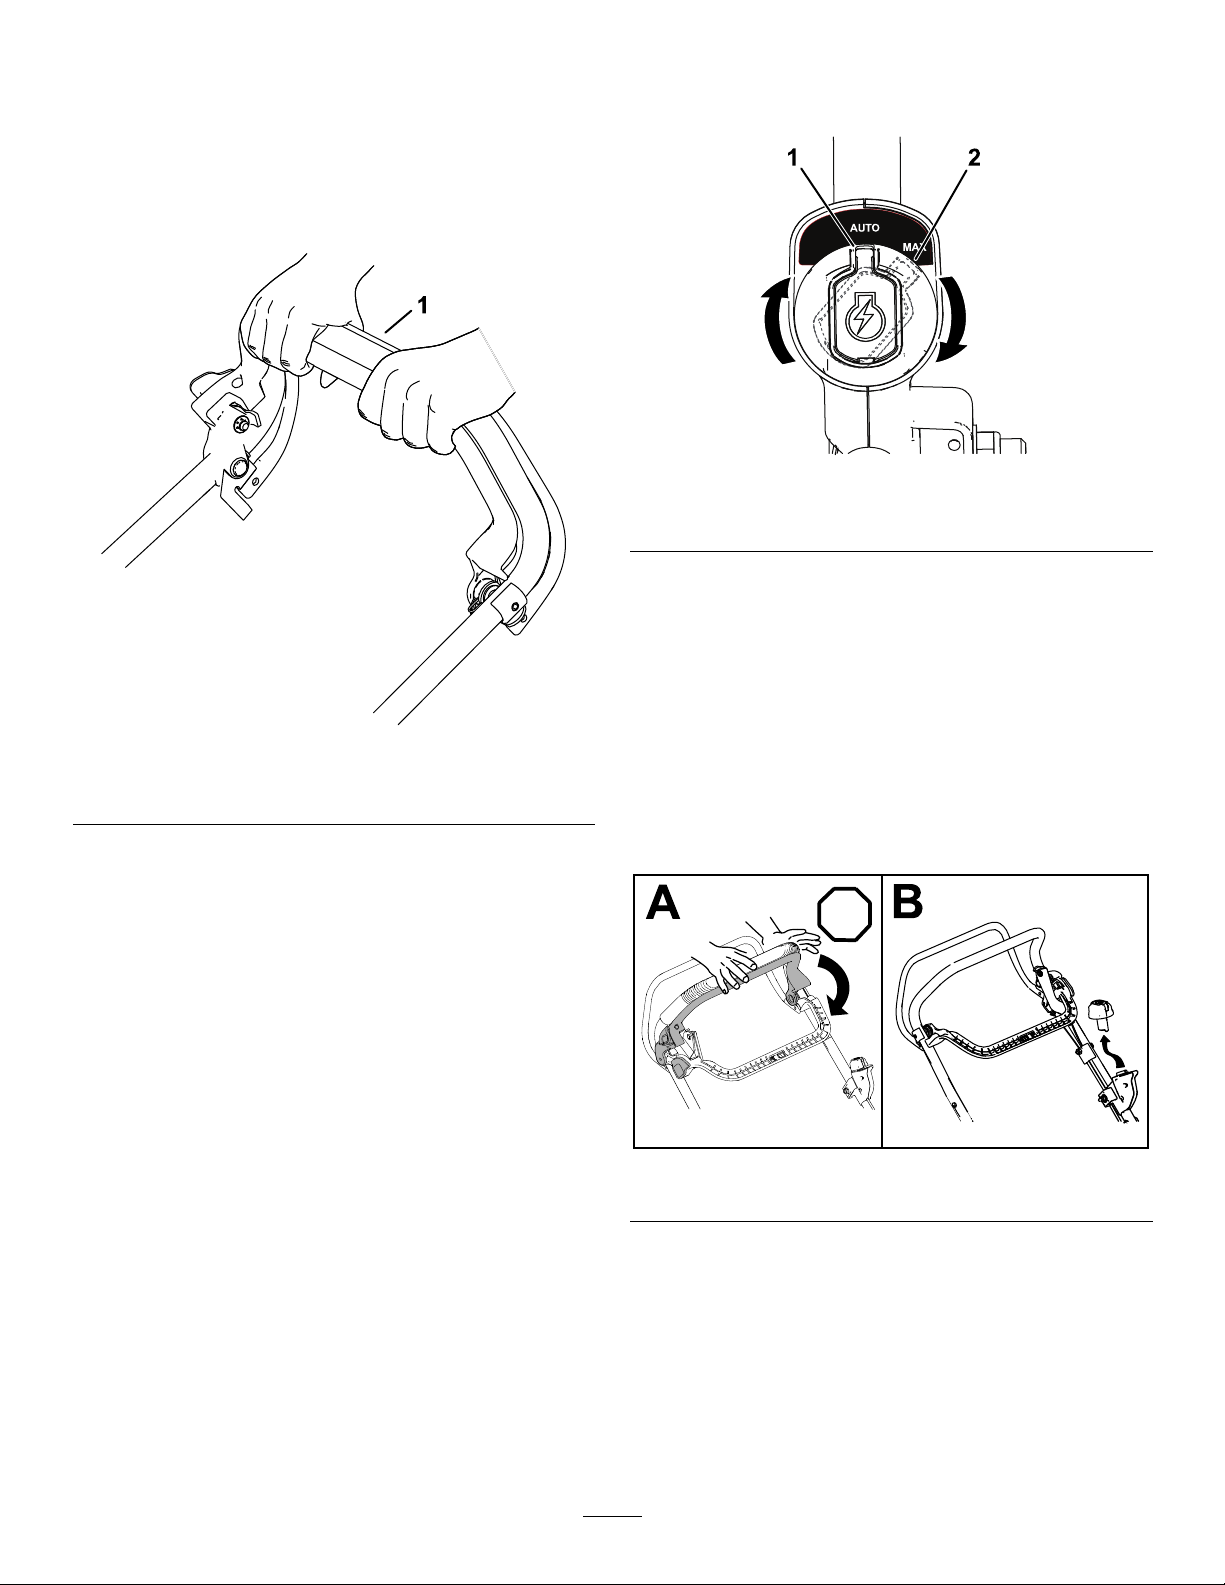
Usodelatransmisión
autopropulsada
Paraaccionarlatransmisiónautopropulsada,apriete
labarradecontroldelatransmisiónautopropulsada
haciaelmanillarymanténgalaenesaposición
(Figura16).
Girelallavedelinterruptordeencendidoacualquier
posiciónparaajustarlavelocidaddelacuchilla
(Figura17).
g337279
Figura17
1.PosiciónAUTO2.PosiciónMÁX
Apagadodelamáquina
Figura16
1.Barradecontroldelatransmisiónautopropulsada
Paradesengranarlatransmisiónautopropulsada,
sueltelabarradecontroldelatransmisión
autopropulsada.
Nota:Lamáquinaestáequipadaconembragues
deruedalibrequefacilitaneltirarhaciaatrásdela
máquina.Paradesengranarlosembragues,puede
sernecesarioempujarlamáquinahaciaadelante
unos2–3cmomásdespuésdesoltarlabarrade
autopropulsión.
Ajustedelavelocidaddela
cuchilla
Estamáquinatienedosajustesdevelocidaddela
cuchilla:AUTOyMAX.
1.Sueltelabarradecontroldelacuchilla(Figura
18,A).
g331972
2.Retireelbotóndearranqueeléctricodel
arrancadoreléctrico(Figura18,B).
3.Retirelabatería;consulteCómoretirarla
bateríadelamáquina(página19).
Nota:Cuandonovayaausarlamáquina,retire
labatería.
g331971
Figura18
•EnlaposiciónAUTO,lavelocidaddelacuchillase
ajustaautomáticamenteparamejorarlaecacia.
Lamáquinadetectacambiosenlascondiciones
decorteyaumentalavelocidaddelacuchilla
segúnseanecesarioparamantenerlacalidadde
corte.
•EnlaposiciónMAX,semantienelavelocidad
máximadelacuchillaentodomomento.
Cómoretirarlabateríade
lamáquina
1.Levantelatapadelcompartimentodelabatería.
2.Presioneelcierredelabateríaparaliberarla
batería,yretirelabatería.
3.Cierrelatapadelcompartimentodelabatería.
19

Consejosdeoperación
Consejosgeneralesdesiega
•Evitegolpearobjetossólidosconlacuchilla.No
sieguenuncaporencimadeobjetoalguno.
•Paraobtenerelmejorrendimiento,instaleuna
cuchillanuevaantesdequeempiecelatemporada
desiega.
•Sustituyalacuchillacuandoseaprecisoconuna
cuchilladerepuestoToro.
Siegadelahierba
•Lahierbacreceavelocidadesdistintassegún
laestacióndelaño.Enelcalordelverano,es
mejorcortarlahierbausandolosajustesdealtura
decortede64mm,76mmo89mm.Corte
solamenteunterciodelahojadehierbacada
vez.Nocorteconunajusteinferiora64mma
menosquelahierbaseaescasa,oanalesdel
otoñocuandoelritmodecrecimientodelahierba
empiezaadecaer.Paramejorarlaautonomía,
siegueaunaalturadecortemayor.
Cortedehojas
•Despuésdesegarelcésped,asegúresedequela
mitaddelcéspedseveatravésdelacoberturade
hojascortadas.Esposiblequetengaquehacer
másdeunapasadaporencimadelashojas.
•Sihaymásde13cmdehojasenelcésped,
siegueaunaalturadecortemásaltaydespués
vuelvaasegaralaalturadecortequedesee.
•Sieguemásdespaciosilamáquinanocortalas
hojassucientementenas.
•Cuandocortehierbademásde15cmdealto,
siegueprimerousandoelajustedealturade
cortemásaltoaunavelocidadmáslenta;a
continuación.sieguedenuevoconunajustemás
bajoparaobtenerelmejoraspectodelcésped.
Silahierbaesdemasiadoaltaylashojasse
amontonanenelcésped,puedenatascarla
máquinayhacerquesecaleelmotor.
•Lahierbamojadaylashojasmojadastiendena
pegarsealsuelo,ypuedenatascarlamáquina
ohacerquesecaleelmotor.Evitesegaren
condicioneshúmedas.
•Estéatentoalposibleriesgodeincendio
encondicionesmuysecas,sigatodaslas
advertenciaslocalesparacasosdeincendio
ymantengalamáquinalibredehierbasecay
residuosdehojas.
•Alterneladireccióndecorte.Estoayudaa
dispersarlosrecortesentodoelcésped,dando
unafertilizaciónmáshomogénea.
Sielaspectonaldelcéspednoessatisfactorio,
pruebeconunaomásdelastécnicassiguientes:
•Alarlacuchilla.
•Segaraunavelocidadinferior.
•Elevarlaalturadecortedelamáquina.
•Cortarelcéspedconmásfrecuencia.
•Solaparlospasillosdecorteenlugardecortarun
pasillocompletoencadapasada.
20

Despuésdel
4.Pararetirarlabatería,deslicelabateríahacia
atrásparasacarladelcargador.
funcionamiento
Cargadelabatería
Importante:Enelmomentodelacomprala
bateríanoestátotalmentecargada.Antesdeusar
laherramientaporprimeravez,coloquelabatería
enelcargadorycárguelahastaqueelindicador
LEDindiquequelabateríaestácompletamente
cargada.Leatodaslasprecaucionesde
seguridad.
Importante:Carguelabateríasoloatemperaturas
queesténdentrodelintervaloapropiado;consulte
Especicaciones(página13).
Nota:Encualquiermomento,presioneelbotóndel
indicadordecargadelabateríadelabateríapara
mostrarlacargaactual(indicadoresLED).
1.Compruebequelosoriciosdeventilaciónde
labateríaydelcargadorestánlibresdepolvo
yresiduos.
5.Consultelatablasiguienteparainterpretarel
indicadorLEDdelcargadordelabatería.
Indicador
Desconectado
Verde
intermitente
VerdeLabateríaestácargada
Roja
Rojointermitente
Indica
Nohaybateríainsertada
Labateríaseestácargando
Labateríay/oelcargadordelabateríaestá(n)por
encimaopordebajodelintervalodetemperatura
adecuado
Fallodecargadelabatería*
*ConsulteEspecicaciones(página13)sideseamás
información.
Importante:Labateríapuededejarseconectada
alcargadorduranteperiodoscortosentreusos.
Silabateríanosevaautilizarduranteperiodos
máslargos,retirelabateríadelcargador;consulte
Almacenamiento(página27).
Figura19
1.Huecodelabatería
2.Zonasdeventilacióndela
batería
3.Terminalesdelabatería7.IndicadorLEDdel
4.Botóndelindicadorde
cargadelabatería
5.IndicadoresLED(carga
actual)
6.Manillar
cargador
8.Zonasdeventilacióndel
cargador
2.Alineeelhuecodelabatería(Figura19)conla
lengüetadelcargador.
3.Introduzcalabateríaenelcargadorhastaque
estécompletamenteasentada(Figura19).
g290533
21

Limpiezadelosbajosdela
máquina
Intervalodemantenimiento:Despuésdecadauso
Paraasegurarelmejorrendimiento,mantengalimpia
laparteinferiordelamáquinaylimpiedebajode
lamáquinapocodespuésdehaberterminadola
siega.Tengaespecialcuidadodemantenerlibresde
residuoslosdeectores(Figura20).
g002600
Figura21
1.Ruedatraseraderecha
5.Cuandoyanosalganmásrecortes,cierreel
grifodelaguaymuevalamáquinaaunazona
seca.
6.Hagafuncionarelmotorduranteunosminutos
parasecarlaparteinferiordelamáquina.
Métododerascado
Siellavadonoeliminatodoslosresiduosdedebajo
delamáquina,rásquelahastaqueestélimpia.
1.Apaguelamáquinayespereaquesedetengan
todaslaspiezasenmovimiento.
Figura20
1.Deectores
Métododelavado
ADVERTENCIA
Puedesoltarsematerialdedebajodela
máquina.
•Lleveprotecciónocular.
•Permanezcaenlaposicióndeoperación
(detrásdelmanillar)mientraslamáquina
estéenmarcha.
•Nopermitalapresenciadeotraspersonas
enlazona.
1.Bajelamáquinaalaalturadecortemásbaja.
2.Muevalamáquinaaunasuperciepavimentada
nivelada.
g240549
2.Retireelbotóndearranqueeléctricoylabatería
delamáquina.
3.Vuelquelamáquinasobresucostado.
4.Retirelasuciedadylosrecortesdehierbacon
unrascador.Evitecualquierrebabaoborde
alado.
5.Pongalamáquinaenlaposiciónnormalde
operación.
3.Enciendalamáquinayengranelacuchilla.
4.Sostengaunamangueradejardínalaalturadel
manillarydirijaunchorrodeaguapordelante
delaruedatraseraderecha(Figura21).
Nota:Elaguarebotaráhacialazonadela
cuchilla,arrastrandolosrecortes.
22

Mantenimiento
Calendariorecomendadodemantenimiento
Intervalodemanteni-
mientoyservicio
Despuésdelasprimeras
25horas
Cadavezqueseutilice
odiariamente
Despuésdecadauso
Cada40horas
Cada50horas
Cada100horas
Procedimientodemantenimiento
•Aprietetodaslasjaciones.
•Inspeccioneperiódicamentelascuchillasdelcortacéspedparaasegurarsedeque
noestándesgastadasnidañadas.
•Inspeccioneelaceleradorenbuscadeseñalesdedesgasteodaños.
•Compruebeeltiempoquetardaelfrenoenpararlacuchilla.Lacuchilladebe
pararseen3segundosdespuésdesoltarlabarradecontroldelascuchillas;sinolo
hace,póngaseencontactoconunServicioTécnicoAutorizadoparalareparación.
•Limpiezadelosbajosdelamáquina.
•Limpielasruedasylosengranajes.
•Aleocambielacuchilla.Revíselaconmásfrecuenciasisedesalaconrapidezen
condicionesdurasodemuchaarena.
•Aprietetodaslasjaciones.
Ajustedelatransmisión
autopropulsada
Silamáquinaesnueva,sinoavanzaautomáticamente
ositienetendenciaaavanzarlentamente,ajusteel
cabledelatransmisión.
unavueltaenelsentidodelasagujasdel
relojyrepitalospasos3a5.
1.Llevelamáquinaaunasuperciepavimentada
alairelibre,cercadeunmurosólido,para
evitarquelamáquinasemuevahaciaadelante
mientraselmotorestáencendido.
2.Coloquelamáquinaconlosneumáticos
delanteroscontralapared.
Nota:Asegúresedequelazonaestábien
ventiladaylibrederesiduosquepudieranser
arrojadosporlamáquina.
3.Arranqueelmotor;consulteArranquedela
máquina(página17).
4.Tiredelabarradeautopropulsiónhastael
manillar.
Nota:Lasruedasdebenempezaragirarjusto
cuandolabarradeautopropulsióntoqueel
manillar.
5.Apagueelmotor.
6.Siesnecesarioajustarlamáquina,sigaunode
estosprocedimientos:
•Silasruedasnogiranalapretarlabarrade
autopropulsión,lacorreadetransmisiónestá
demasiadooja.Gireelmandodecontrol
delatransmisióndelasruedas(Figura22)
g024465
Figura22
1.Mandodecontroldelatransmisióndelasruedas
•Silasruedasgiranantesdeapretardel
todolabarradeautopropulsión,lacorreade
transmisiónestádemasiadoapretada.Gire
elmandodecontroldelatransmisióndelas
ruedas(Figura22)unavueltaenelsentido
contrarioalasagujasdelrelojyrepitalos
pasos3a5.
7.Silacorreadetracciónesnueva,gireelpomo
deajustedelcabledelatransmisiónunavuelta
másensentidohorario,porquelacorrease
estiraráduranteelperiododerodaje.
23

Nota:Puedesaltarseestepasosilacorrea
estáusada.
Mantenimientodela
cuchilla
Sieguesiempreconlacuchillaalada.Unacuchilla
aladacortalimpiamentesindesgarraropicarlas
hojasdehierba.
1.Apaguelamáquinayespereaquesedetengan
todaslaspiezasenmovimiento.
2.Retirelabatería;consulteCómoretirarla
bateríadelamáquina(página19).
g002278
Figura24
1.Vela3.Desgaste
2.Parteplanadelacuchilla4.Formacióndeuna
hendidura
3.Coloquelamaquinasobreelcostado,comose
muestraenlaFigura23.
g240550
Figura23
1.Cuchilla3.Pernoyarandeladefreno
delacuchilla
2.Acelerador
Inspeccióndelacuchilla
Intervalodemantenimiento:Cadavezquese
utiliceodiariamente—Inspeccione
periódicamentelascuchillasdel
cortacéspedparaasegurarse
dequenoestándesgastadasni
dañadas.
Examinecuidadosamentelacuchillaparaasegurarse
dequeestáaladayparadetectarcualquier
desgaste,sobretodoenlareuniónentrelaparte
planaylapartecurvadelacuchilla(Figura24A).
Puestoquelaarenaycualquiermaterialabrasivo
puedendesgastarelmetalqueconectalaspartes
curvayplanadelacuchilla,compruebelacuchilla
antesdeutilizarlamáquina.Siobservaunahendidura
odesgaste(Figura24ByFigura24C),cambiela
cuchilla;consulteCómoretirarlacuchilla(página25).
Nota:Paraobtenerelmejorrendimiento,instaleuna
cuchillanuevaantesdequeempiecelatemporadade
siega.Duranteelaño,limecualquierimperfección
conelndemantenerellodecorte.
PELIGRO
Unacuchilladesgastadaodañadapuede
romperseypodríasalirdespedidohacia
usteduotrapersonauntrozodelacuchilla,
loquepuedeprovocarlesionespersonales
gravesolamuerte.
•Inspeccioneperiódicamentelascuchillas,
paraasegurarsedequenoestán
desgastadasnidañadas.
•Sustituyacualquiercuchillaqueesté
desgastadaodañada.
Inspeccióndelacelerador
Intervalodemantenimiento:Cadavezquese
utiliceodiariamente—Inspeccione
elaceleradorenbuscadeseñales
dedesgasteodaños.
Inspeccionecuidadosamenteelaceleradorenbusca
deseñalesdedesgasteexcesivo(Figura25).Puesto
quelaarenaylosmaterialesabrasivospueden
desgastarelmetal(sobretodoenlazona2dela
Figura25),compruebeelaceleradorantesdeutilizar
lamáquina.Siobservaquelapestañadelacelerador
tieneelbordealadodebidoaldesgaste,osihayuna
grieta,sustituyaelacelerador.
24

Cómoretirarlacuchilla
1.Sujeteelextremodelacuchillausandounpaño
ounguantegrueso.
2.Retireelpernodelacuchilla,laarandelade
freno,elaceleradorylacuchilla(Figura24).
Figura25
1.Acelerador3.Pestaña
2.Zonadedesgaste
4.Grieta
ADVERTENCIA
Unaceleradordesgastadoodañadopuede
romperse,yuntrozodelaceleradorpodría
serarrojadohaciausteduotrapersona,
provocandolesionespersonalesgravesola
muerte.
•Inspeccioneelaceleradorperiódicamente
enbuscadedesgasteodaños.
•Sustituyaelaceleradorsiestádesgastado
odañado.
g027496
Cómoalarlacuchilla
Intervalodemantenimiento:Cada50horas—Ale
ocambielacuchilla.Revíselacon
másfrecuenciasisedesalacon
rapidezencondicionesdurasode
muchaarena.
Limeelbordesuperiordelacuchillaparamantenerel
ángulodecorteoriginal(Figura26A)yelradiointerior
dellodecorte(Figura26B).Lacuchillapermanece
equilibradasiseretiralamismacantidaddematerial
deamboslosdecorte.
g002279
Figura26
1.Alelacuchillaconeste
ángulosolamente.
2.Mantengaelradiooriginal
aquí.
Equilibradodelacuchilla
1.Compruebeelequilibriodelacuchillacolocando
eltaladrocentraldelacuchillasobreun
clavooelpalodeundestornilladorjado
horizontalmenteenuntornodebanco(Figura
27).
Figura27
Nota:T ambiénpuedecomprobarelequilibrio
usandounequilibradordecuchillasde
fabricacióncomercial.
2.Sialgúnextremodelacuchillagirahacia
abajo,limeeseextremo(noellodecorteni
elextremocercadellodecorte)hastaque
ningúnextremodelacuchilladescienda.
g002280
25

Cómoinstalarlacuchilla
1.InstaleunacuchillaToroaladayequilibrada,el
acelerador,laarandeladefrenoyelpernode
lacuchilla.Laveladelacuchilladebeapuntar
hacialapartesuperiordelacarcasadecorte.
Nota:Aprieteelpernodelacuchillaa82N·m.
ADVERTENCIA
Elusodelamáquinasinqueesté
colocadoelacelerador,puedehacerque
lacuchillaseexione,sedobleose
rompa,causandolesionesgravesola
muerteaustedoaotraspersonas.
Noutilicelamáquinasinqueesté
colocadoelacelerador.
2.Pongalamáquinaenlaposiciónnormalde
operación.
Limpiezadelasruedas
Intervalodemantenimiento:Cada40horas
1.Retirelasruedastraserasylimpiecualquier
suciedaddelazonadelaruedaydelos
engranajes.
Preparacióndelabatería
paraelreciclado
Importante:Despuésderetirarla,cubralos
terminalesdelabateríaconcintaadhesivade
serviciopesado.Nointentedestruirodesmontar
labateríaniintenteretirarcualquieradelos
componentesdelamisma.
Póngaseencontactoconlasautoridadesmunicipales
oconsudistribuidorautorizadoT orosideseamás
informaciónsobrecómoreciclarlabateríadeforma
responsable.
Figura28
1.Engranajes
2.Despuésdelalimpieza,apliqueunapequeña
cantidaddecompuestoantigripantealos
engranajes.
Nota:Siutilizalamáquinaencondicionesextremas,
unalimpiezamásfrecuentedelasruedasaumentará
lavidaútildelosengranajes.
Nota:Paraevitardañarlasjuntasdecojinete,no
utiliceunpulverizadordeaguadealtapresiónsobre
loscojinetes.
g033535
26

Almacenamiento
Paraprepararlamáquinaparaelalmacenamiento
cuandoacabelatemporadadesiega,sigalos
procedimientosdemantenimientorecomendados;
consulteMantenimiento(página23).
Apaguesiemprelamáquina,espereaquese
detengantodaslaspiezasenmovimientoydejeque
lamáquinaseenfríeantesdeajustarla,repararla,
limpiarlaoguardarla.
Almacenelamáquinaenunlugarfresco,limpioy
seco.Cubralamáquinaparamantenerlalimpiay
protegida.
Importante:Almacenelamáquina,labateríayel
cargadorsoloatemperaturasqueesténdentrodel
intervaloapropiado;consulteEspecicaciones
(página13).
Importante:Sivaaalmacenarlabateríahasta
latemporadasiguiente,cárguelahastaque2o
3delosindicadoresLEDdelabateríacambien
averde.Noalmacenelabateríacompletamente
cargadanicompletamentedescargada.Antesde
volverausarlamáquina,carguelabateríahasta
quesevuelvaverdeelindicadorizquierdodel
cargador,ohastaquelos4indicadoresLEDdela
bateríasevuelvanverdes.
10.Aprietetodoslospernos,tuercasytornillos.
11.Retoquetodaslassuperciespintadasoxidadas
odescascarilladasconpintura,quepuede
adquirirenelServicioTécnicoAutorizado.
1.Desconectelamáquinadelsuministrode
energía(esdecir,retirelabatería)ycompruebe
sihaydañosdespuésdeluso.
2.Noalmacenelamáquinaconlabatería
instalada.
3.Almacenelamáquina,labateríayelcargador
delabateríaenunlugarbienventiladoalque
nopuedanaccederlosniños.
4.Mantengalamáquina,labateríayelcargador
delabateríaalejadosdeagentescorrosivos
comoproductostosanitariosdejardínosal
paradeshielo.
5.Parareducirelriesgodelesionespersonales
graves,noalmacenelabateríaenelexterior
oenunvehículo.
6.Eliminelosrecortesdehierba,lasuciedady
lagrasadelaspiezasexternasdelmotor,la
cubiertaylapartesuperiordelacarcasadel
cortacésped.
7.Limpiedebajodelamáquina;consulteLimpieza
delosbajosdelamáquina(página22).
8.Compruebelacondicióndelacuchilla;consulte
Inspeccióndelacuchilla(página24).
9.Compruebelacondicióndelacelerador;
consulteInspeccióndelacelerador(página24).
27

Solucióndeproblemas
Realicesololospasosdescritosenestasinstrucciones.Cualquierotrotrabajodeinspección,mantenimientoo
reparacióndebeserrealizadoporunServicioTécnicoAutorizadooporunespecialistaautorizadosino
puedesolucionarelproblemaustedmismo.
ProblemaPosiblecausa
Lamáquinanofuncionaonofuncionade
formacontinua.
Lamáquinanoalcanzalamáxima
potencia.
Lamáquinaoelmotorproducevibraciones
oruidosexcesivos.
Elpatróndecortenoesuniforme.
Accióncorrectora
1.Labateríanoestácorrectamente
instaladaenlamáquina.
2.Labateríanoestácargada.2.Retirelabateríadelamáquinay
3.Labateríaestádañada.
4.Hayotroproblemaeléctricoconla
máquina.
1.Lacapacidaddecargadelabatería
esdemasiadobaja.
2.Losbajosdelamáquinacontienen
recortesyresiduos.
1.Lacuchillaestádobladao
desequilibrada.
2.Lastuercasdemontajedelacuchilla
estánsueltas.
3.Losbajosdelamáquinacontienen
recortesyresiduos.
4.Lospernosdemontajedelmotorestán
sueltos.
1.Lascuatroruedasnoestánalamisma
altura.
2.Lacuchillanoestáalada.2.Aleyequilibrelacuchilla.
3.Ustedestásegandorepetidamente
conelmismopatrón.
4.Losbajosdelamáquinacontienen
recortesyresiduos.
1.Retireyluegovuelvaacolocarla
bateríaenlamáquina,asegurándose
dequeestácompletamenteinstalada
ybloqueada.
cárguela.
3.Sustituyalabatería.
4.PóngaseencontactoconelServicio
TécnicoAutorizado.
1.Retirelabateríadelamáquinay
carguecompletamentelabatería.
2.Limpielosbajosdelamáquina.
1.Equilibrelacuchilla.Silacuchillaestá
doblada,cámbiela.
2.Aprietelastuercasdemontajedela
cuchilla.
3.Limpielosbajosdelamáquina.
4.Aprietelospernosdemontajedel
motor.
1.Ajustelascuatroruedasalamisma
altura.
3.Cambieelpatróndesiega.
4.Limpielosbajosdelamáquina.
Seatascaelconductodedescarga.
Lamáquinanoavanzaconelsistemade
autopropulsión.
Labateríasedescargarápidamente.
1.Lapalancadelaceleradornoestáen
laposicióndeRÁPIDO.
2.Laalturadecorteesdemasiadobaja.2.Elevelaalturadecorte.
3.Ustedestásegandodemasiadode
prisa.
4.Lahierbaestáhúmeda.4.Dejequelahierbasesequeantesde
5.Losbajosdelamáquinacontienen
recortesyresiduos.
1.Elcabledelatransmisión
autopropulsadaestámalajustadoo
dañado.
2.Hayresiduosdebajodelacubiertade
lacorrea.
1.Latemperaturadelabateríaestápor
encimaopordebajodelintervalode
temperaturaadecuado.
2.Lamáquinaestásobrecargada2.Trabajeaunritmomáslento.
1.Muevalapalancadelaceleradorala
posicióndeRÁPIDO.
3.Vayamásdespacio.
segar.
5.Limpielosbajosdelamáquina.
1.Ajusteelcabledelatransmisión
autopropulsada.Cambieelcablesies
necesario.
2.Limpielosresiduosdedebajodela
cubiertadelacorrea.
1.Trasladelabateríaaunlugarseco
cuyatemperaturaseadeentre5°Cy
40°C.
28

ProblemaPosiblecausa
Accióncorrectora
Elcargadordelabateríanofunciona.
ElindicadorLEDdelcargadordela
bateríaestárojo.
ElindicadorLEDdelcargadordela
bateríaparpadeaenrojo.
1.Latemperaturadelcargadordela
bateríaestáporencimaopordebajo
delintervalodetemperaturaadecuado.
2.Latomadecorrienteenlaqueestá
enchufadoelcargadordelabateríano
tienecorriente.
1.Elcargadordelabateríay/olabatería
estáporencimaopordebajodel
intervalodetemperaturaadecuado.
1.Hayunerrordecomunicacionesentre
labateríayelcargador.
2.Labateríaestácasiagotada.2.Póngaseencontactoconunservicio
1.Desenchufeelcargadordelabatería
ytrasládeloaunlugarsecocuya
temperaturaseadeentre5°Cy40°C.
2.Póngaseencontactoconun
electricistaautorizadoparaquerepare
latomadecorriente.
1.Desenchufeelcargadordelabatería
ymuevaelcargadordelabatería
ylabateríaaunlugarsecocuya
temperaturaseadeentre5°Cy40°C.
1.Retirelabateríadelcargador,
desconecteelcargadordelatoma
decorrienteyespere10segundos.
Vuelvaaenchufarelcargadorenla
tomadecorrienteycoloquelabatería
enelcargador.SielindicadorLED
delcargadorsigueparpadeandoen
rojo,repitaesteprocedimiento.Si
elindicadorLEDdelcargadorsigue
parpadeandodespuésde2intentos,
eliminelabateríacorrectamente
enunainstalaciónderecicladode
baterías.
técnicoautorizadosilabateríaestáen
garantía,oeliminecorrectamentela
bateríaenunainstalacióndereciclado
debaterías.
29

AvisosobreprivacidadenelEEE/ReinoUnido
UsodesusdatospersonalesporpartedeT oro
TheT oroCompany(“T oro”)respetasuprivacidad.Aladquirirnuestrosproductos,podemosrecopilarciertosdatospersonalessobreusted,yasea
deformadirectaatravésdeustedodenuestraempresaonuestrorepresentantelocaldeToro.T oroutilizaestosdatosparacumplirobligaciones
contractuales,comoregistrarsugarantía,procesarunareclamacióndegarantíaoponerseencontactoconustedencasodelaretiradadeunproducto,
asícomoparanescomercialeslegítimos,comovalorarlasatisfaccióndelosclientes,mejorarnuestrosproductosuofrecerleinformacióndeproductos
quepuedanserdesuinterés.T oropuedecompartirsusdatosconliales,concesionariosuotrossocioscomercialesdeT oroenrelaciónconcualquiera
delasactividadesantesmencionadas.Tambiénpodemosrevelarsusdatospersonalescuandoserequieraporleyoenrelaciónconlaventa,la
adquisiciónolafusióndeunaempresa.Novenderemossusdatospersonalesaningunaotraempresaconnesdemarketing.
Retencióndesuinformaciónpersonal
Toroconservarásusdatospersonaleshastaqueseanrelevantesparalasnalidadesindicadasanteriormenteysegúnlosrequisitoslegales.Para
obtenermásinformaciónsobrelosperiodosderetenciónaplicables,póngaseencontactoconlegal@toro.com.
CompromisodeToroconlaseguridad
SusdatospersonalessepuedenprocesarenEstadosUnidosoenotropaísqueapliqueleyesdeproteccióndedatosmenosestrictasquelasdesupaís
deresidencia.Cuandotransramossusdatospersonalesfueradesupaísderesidencia,daremoslospasoslegalmentepertinentesparagarantizarque
seaplicanlasmedidasadecuadasparaprotegersuinformaciónyparagarantizarquesetrataconseguridad.
Accesoycorrección
Puedetenerderechoacorregirorevisarsusdatospersonales,obienanegarsealprocesamientodesusdatosorestringirlo.Paraello,póngase
encontactoconnosotrosenladirecciónlegal@toro.com.SitienealgunapreocupaciónacercadecómohagestionadoTorosuinformación,le
instamosaquesepongaencontactoconnosotrosdirectamente.Recuerdequelosresidenteseuropeostienenderechoapresentarquejasantela
autoridadresponsabledelaproteccióndedatos.
374-0282RevC

Tondeusegrandrendement
FormNo.3443-322RevC
Recycler
®
60Vde53cm/bac
arrière
N°demodèle22275—N°desérie400000000etsuivants
N°demodèle22275T—N°desérie400000000etsuivants
Enregistrezvotreproduitàwww.Toro.com.
Traductiondutexted'origine(FR)
*3443-322*

Ceproduitestconformeàtouteslesdirectives
européennespertinentes.Pourplusde
renseignements,reportez-vousàlaDéclarationde
conformitéspéciqueduproduitfournieséparément.
Introduction
Cettetondeuseautotractéeàlamerotativeest
destinéeaugrandpublic,auxprofessionnelsetaux
utilisateurstemporaires.Elleestprincipalement
conçuepourtondrelespelousesrégulièrement
entretenuesdesterrainsprivésetcommerciaux.Elle
estconçueprincipalementpourfonctionneravecla
batterieion-lithiummodèle81875(fournieavecle
modèle22275).Cesbatteriessontconçuespourêtre
chargéesuniquementaveclechargeurmodèle81805
(fourniaveclemodèle22275)ou81802.L'utilisation
decesproduitsàd'autresnsquecellesprévuespeut
êtredangereusepourvous-mêmeettoutepersonne
àproximité.
Lemodèle22275Tnecomprendpasdebatterie
nidechargeur.
Pourplusd’informations,ycomprisdesconseils
desécurité,desdocumentsdeformation,des
renseignementsconcernantunaccessoire,
pourobtenirl'adressed'unconcessionnaireou
pourenregistrervotreproduit,rendez-voussur
www.T oro.com.
Pourobtenirdesprestationsdeservice,despièces
d'origineoudesrenseignementscomplémentaires,
contactezunconcessionnaire-réparateuragrééou
leserviceclientenayantlesnumérosdemodèleet
desérieduproduitàportéedelamain.LaFigure1
indiquel'emplacementdesnumérosdemodèleetde
sérieduproduit.Inscrivezlesnumérosdansl'espace
réservéàceteffet.
Important:Avecvotreappareilmobile,vous
pouvezscannerlecodeQRsurl'autocollantdu
numérodesérie(lecaséchéant)and'accéder
auxinformationssurlagarantie,lespièces
détachéesetautresrenseignementssurle
produit.
g226623
Figure1
1.Emplacementdesnumérosdemodèleetdesérie
N°demodèle
N°desérie
Lesmisesengardedecemanuelsoulignentdes
dangerspotentielsetsontsignaléesparlesymbole
desécurité(Figure2),quiindiqueundangerpouvant
entraînerdesblessuresgravesoumortellessiles
précautionsrecommandéesnesontpasrespectées.
g000502
Figure2
Symboledesécurité
Cemanuelutilisedeuxtermespourfairepasser
desrenseignementsessentiels.Important,pour
attirerl'attentionsurdesrenseignementsmécaniques
spéciquesetRemarque,pourinsistersurdes
renseignementsd'ordregénéralméritantuneattention
particulière.
©2021—TheToro®Company
8111LyndaleAvenueSouth
Bloomington,MN55420
Contactez-noussurwww.Toro.com.
2
ImpriméauxÉtats-Unis
Tousdroitsréservés

Tabledesmatières
Sécurité
Sécurité....................................................................3
Autocollantsdesécuritéetd'instruction..............6
Miseenservice.........................................................8
1Montageduchargeurdebatterie
(option)............................................................8
2Déposeduprotège-câble.................................9
3Assemblagedelapartieinférieuredu
guidon...........................................................10
4Montageduguidon.........................................11
5Poseduprotège-câble....................................11
6Montagedubacàherbe................................12
Vued'ensembleduproduit......................................13
Caractéristiquestechniques............................13
Avantl'utilisation..................................................14
Installationdelabatterie...................................14
Réglagedelahauteurdecoupe.......................15
Réglagedelahauteurduguidon.......................16
Pendantl'utilisation.............................................17
Démarragedelamachine.................................17
Recyclagedel'herbecoupée............................17
Ramassagedel'herbecoupée.........................17
Utilisationdelacommanded'autopropul-
sion...............................................................19
Réglagedelavitessedelalame.......................19
Arrêtdelamachine...........................................19
Retraitdelabatteriedelamachine...................20
Conseilsd'utilisation........................................20
Aprèsl'utilisation.................................................21
Chargedelabatterie........................................21
Nettoyagedudessousdelamachine................22
Entretien.................................................................23
Programmed'entretienrecommandé..................23
Réglagedel'autopropulsion.............................23
Entretiendelalame..........................................24
Nettoyagedesroues.........................................26
Préparationdelabatteriepourle
recyclage......................................................26
Remisage...............................................................27
Dépistagedesdéfauts............................................28
IMPORTANTES
CONSIGNES
DESÉCURITÉ
ATTENTION–quandvousutilisezunemachine
électrique,lisezetrespecteztoujourslesmisesen
gardeetconsignesdesécuritéélémentairespour
réduirelesrisquesd'incendie,dechocélectriqueou
deblessure,notamment:
I.Formationàl'utilisation
1.L'utilisateurdelamachineestresponsabledes
accidentsetdommagescausésauxautres
personnesetàleurspossessions.
2.N'autorisezpaslesenfantsàjoueravecla
machine,labatterieoulechargeurdebatterie;
laréglementationlocalepeutimposerunâge
minimumpourlesutilisateurs.
3.Neconezpasl'utilisationoul'entretiendece
produitàdesenfantsouàdespersonnesnon
qualiées.Seuleslespersonnesresponsables,
ayantsuiviuneformation,ayantluetcompris
lesinstructions,etphysiquementaptessont
autoriséesàutiliserleproduit.
4.Avantd'utiliserlamachine,labatterieetle
chargeurdebatterie,liseztouteslesinstructions
etmisesengardequigurentsurcesproduits.
5.Familiarisez-vousaveclescommandesetle
maniementcorrectdelamachine,delabatterie
etduchargeurdebatterie.
II.Avantd'utiliserlamachine
1.Teneztoutlemonde,enparticulierlesenfants
etlesanimaux,àl'écartdelazonedetravail.
2.N'utilisezpaslamachinesidescapotsoudes
dispositifsdeprotection,telsquelesdéecteurs
etbacsàherbe,manquentousontdéfectueux.
3.Examinezlazonedetravailetdébarrassez-lade
toutobjetpouvantgênerlefonctionnementdela
machineouêtreprojetépendantsonutilisation.
4.Avantd'utiliserlamachine,vériezquelalame,
leboulondelalameetl'ensemblenesontpas
usésniendommagés.Remplacezlesétiquettes
endommagéesouillisibles.
5.Utilisezuniquementlabatteriespéciéepar
Toro.L'utilisationd'autresaccessoireset
outilspeutaccroîtrelerisquedeblessureet
d'incendie.
6.Vouspouvezcauserunincendieouunchoc
électriquesivousbranchezlechargeurde
batterieàuneprisequin'estpasde100à240
V.Nebranchezlechargeurdebatteriequ'à
3

uneprisede100à240V.Pouruntypede
branchementdifférent,utilisezunadaptateur
correctementcongurépourlaprise,lecas
échéant.
7.N'utilisezpaslabatterieoulechargeurs'ils
sontendommagésoumodiés,carleur
comportementpourraitêtreimprévisibleet
causerunincendie,uneexplosionoudes
blessures.
8.Silecordond'alimentationduchargeur
estendommagé,adressez-vousàun
concessionnaire-réparateuragréépourlefaire
remplacer.
9.N’utilisezpasdebatteriesnonrechargeables.
10.Chargezlabatterieuniquementaveclechargeur
spéciéparToro.Unchargeurconvenantàun
certaintypedebatteriepeutcréerunrisque
d'incendies'ilestutiliséavecuneautrebatterie.
11.Nechargezlabatteriequedansunendroitbien
aéré.
12.N'exposezpaslabatterieoulechargeuraufeu
ouàdestempératuressupérieuresà68ºC.
13.Respecteztouteslesinstructionsdecharge
etnechargezpaslabatteriehorsdelaplage
detempératurespéciéedanslesinstructions.
Vousrisquezsinond'endommagerlabatterieet
d'accroîtrelerisqued'incendie.
14.Portezunetenueadéquate–portezdes
vêtementsappropriés,ycomprisuneprotection
oculaire,unpantalon,deschaussuressolidesà
semelleantidérapante(netravaillezpaspieds
nusouchaussédesandales),desgantsde
caoutchoucetdesprotecteursd'oreilles.Sivos
cheveuxsontlongs,attachez-lesetneportez
pasdevêtementsamplesoudebijouxpendants
quipourraientseprendredanslespièces
mobiles.Portezunmasqueantipoussièresi
l'atmosphèreestpoussiéreuse.
III.Utilisation
1.Lecontactaveclalameenrotationpeutcauser
desblessuresgraves.N'approchezpasles
mainsetlespiedsdelazonedecoupeetdes
piècesmobilesdelamachine.Nevoustenez
pasdevantl'ouvertured'éjection.
2.L'utilisationdecettemachineàd'autresns
quecelleprévuepeutêtredangereusepour
vous-mêmeetlespersonnesàproximité.
3.Désengagezl'autopropulsion(selon
l'équipement)avantdedémarrerlamachine.
4.Nebasculezpaslamachinequandvous
démarrezlemoteur.
5.Évitezlesdémarragesaccidentels–
assurez-vousqueleboutondedémarrage
électriqueestretirédudémarreurélectrique
avantdebrancherlabatterieetdemanipuler
lamachine.
6.Accordeztoutevotreattentionàl'utilisationdela
machine.Nefaitesriend’autrequipuissevous
distraire,aurisquedecauserdesdommages
corporelsoumatériels.
7.Lorsquevousrelâchezlabarredecommande
delalame,lemoteuretlalamedoivents'arrêter
enmoinsde3secondes.Sicen'estpaslecas,
cessezimmédiatementd'utiliserlamachineet
adressez-vousàunconcessionnaire-réparateur
agréé.
8.Arrêtezlamachine,enlevezleboutonde
démarrageélectrique,enlevezlabatteriedela
machineetattendezl'arrêtdetoutmouvement
avantderégler,réviser,nettoyerouremiserla
machine.
9.Enlevezlabatterieetleboutondedémarrage
électriquedelamachinechaquefoisquevous
lalaissezsanssurveillanceouavantdechanger
d'accessoires.
10.Nefaitespasforcerlamachine–elledonnera
debienmeilleursrésultatsetseraplussûresi
vousl'utilisezàlavitessepourlaquelleelleest
prévue.
11.Restezalerte–Concentrez-voussurvotre
tâcheetfaitespreuvedebonsenslorsquevous
utilisezlamachine.N'utilisezpaslamachinesi
vousêtesmaladeoufatigué(e),nisousl'emprise
del'alcool,dedroguesoudemédicaments.
12.N'utilisezlamachinequesilavisibilitéest
sufsanteetlesconditionsmétéorologiques
favorables.N'utilisezpaslamachinesilafoudre
menace.
13.Redoublezdeprudenceenmarchearrièreou
quandvoustirezlamachineversvous.
14.Gardeztoujourslespiedsbienposésàterreet
maintenezvotreéquilibre,enparticuliersurles
pentes.Travailleztransversalementàlapente,
jamaisenmontantoudescendant.Changezde
directionaveclaplusgrandeprudencesurles
terrainsenpente.Netondezpasdepentestrop
raides.Avanceztoujoursàuneallurenormale
aveclamachine,necourezpas.
15.Nedirigezpasl'éjectionversquiquecesoit.
N'éjectezpasl'herbecoupéecontreunmurou
unobstacle,carellepourraitricocherdansvotre
direction.Arrêtezlaouleslamesquandvous
passezsurdugravier.
16.Méez-vousdestrous,ornières,bosses,
rochersouautresobstaclescachés.Vous
pouvezglisserouperdrel'équilibresileterrain
estirrégulier.
4

17.Entravaillantsurl'herbeoulesfeuilleshumides,
vousrisquezdeglisseretdevousblesser
gravementsivoustouchezlalameentombant.
Netondezpassil'herbeesthumideousousla
pluie.
18.Silamachineheurteunobjetousemetàvibrer,
arrêtez-laimmédiatement,enlevezlebouton
dedémarrageélectrique,enlevezlabatterieet
attendezl'arrêtcomplettoutmouvementavant
devérierl'étatdelamachine.Effectueztoutes
lesréparationsnécessairesavantderéutiliser
lamachine.
19.Arrêtezlamachineetenlevezleboutonde
démarrageélectriqueavantdechargerla
machinepourletransport.
20.Dansdesconditionsd'utilisationabusive,du
liquidepeutjaillirhorsdelabatterie;éviteztout
contact.Encasdecontactaccidentelavecle
liquide,rincezàl'eau.Encasdecontactdu
liquideaveclesyeux,consultezunmédecin.Le
liquideéjectéhorsdelabatteriepeutcauserdes
irritationsoudesbrûlures.
IV.Entretienetremisage
1.Arrêtezlamachine,enlevezleboutonde
démarrageélectrique,enlevezlabatteriedela
machineetattendezl'arrêtdetoutmouvement
avantderégler,réviser,nettoyerouremiserla
machine.
2.N'essayezpasderéparerlamachinesauf
commeexpliquédanslesinstructions.
Conezl'entretiendelamachineàun
concessionnaire-réparateuragrééquiutilisedes
piècesderechangeidentiques.
3.Portezdesgantsetuneprotectionoculairepour
fairel'entretiendelamachine.
4.Aiguisezleslamesémousséesauxdeux
extrémitéspourlesmainteniréquilibrées.
Nettoyezlalameetvériezqu'elleestéquilibrée.
5.Remplacezlalamesielleestfaussée,uséeou
ssurée.Unelamemaléquilibréeprovoquedes
vibrationsquipeuventendommagerlemoteur
oucauserdesblessures.
6.Quandvousfaitesl'entretiendelalame,
n'oubliezpasqu'ellepeutencorebougermême
sil'alimentationélectriqueestcoupée.
7.Vériezfréquemmentquelebacderamassage
n'estpasdétérioréouusé,etremplacezunbac
uséparunbacT oro.
8.Pourobtenirdesrésultatsoptimaux,utilisez
uniquementdespiècesderechangeetdes
accessoiresTorod'origine.T ousautres
accessoiresoupiècesderechangepeuventêtre
dangereux,etleurutilisationrisqued'annuler
lagarantieproduit.
9.Maintenezlamachineenbonétat–Pour
obtenirdesperformancesoptimalesetsûres,
conservezletranchantdeslamespropreetbien
affûté.Gardezlespoignéespropresetsèches,
etexemptesd'huileetdegraisse.Gardez
toujourslesprotectionsenplaceetenbonétat.
Maintenezleslamesbienaiguisées.Utilisez
uniquementdeslamesderechangeidentiques.
10.Vériezqu'aucunepiècedelamachine
n'estendommagée–Sivousconstatez
quedesprotectionsoud'autrespiècessont
endommagées,déterminezsilamachinepeut
fonctionnercorrectement.Vériezqu'aucune
despiècesmobilesn'estmalalignéeougrippée,
etqu'aucunepiècen'estcassée,malxéeou
présentetoutautredéfautquipourraitaffecter
sonfonctionnement.Saufindicationcontraire
danslesinstructions,faitesréparerouremplacer
lesprotectionsoulespiècesendommagéespar
unconcessionnaire-réparateuragréé.
11.Lorsquelabatterienesertpas,rangez-laà
l'écartd'objetsmétalliquestelsquetrombones,
piècesdemonnaie,clés,clousouvisqui
pourraientrelierlesbornesentreelles.Un
court-circuitauxbornesdelabatteriepeut
causerdesbrûluresouunincendie.
12.Vériezfréquemmentleserragedesboulonsde
montagedelalameetdumoteur.
13.Lorsquevousn'utilisezpaslamachine,
remisez-ladansunlocalsecetsécurisé,ethors
deportéedesenfants.
14.PRUDENCE–Labatteriepeutprésenterun
risqued'incendieoudebrûlurechimiqueen
casdemauvaistraitement.Nedémontezpas
labatterie.N'exposezpaslabatterieàune
températuresupérieureà68ºCetnel'incinérez
pas.Remplaceztoujourslabatterieparune
batterieTorod'origine;l'utilisationdetoutautre
typedebatteriepeutentraînerunincendieou
uneexplosion.Conservezlesbatterieshorsde
laportéedesenfantsetdansleuremballage
d'originejusqu'aumomentdelesutiliser.
15.Nejetezpaslabatterieaufeu.L'élément
pourraitexploser.Vériezsilaréglementation
localestipuledesprocéduresdemiseaurebut
spéciales.
CONSERVEZCES
INSTRUCTIONS
5

Autocollantsdesécuritéetd'instruction
Desautocollantsdesécuritéetdesinstructionsbienvisiblesparl'opérateursontplacésprès
detouslesendroitspotentiellementdangereux.Remplaceztoutautocollantendommagé
oumanquant.
137-9490
1.Lisezlemanuelde
l'utilisateur.
2.Recyclage5.Nepasexposeràlapluie.
3.Contientdesionslithium;
nepasmettreaurebut.
4.Teniràl'écartdes
ammes.
decal137-9490
1.Lisezlemanuelde
l'utilisateur.
2.Pourdémarrerlamachine,
serrezlabarrecontrele
guidonetappuyezsurle
bouton.
decal144-3175
144-3175
3.Pourarrêterlamachine,
relâchezlabarre.
1.Attention–lisezleManueldel'utilisateur;n'utilisezpascette
machineàmoinsd'avoirlescompétencesnécessaires.
2.Risquedeprojectiond'objets–n'autorisezpersonneà
s'approcher.
3.Risquedeprojectiond'objets–n'utilisezpaslatondeusesans
l'obturateurd'éjectionarrièreoulebacàherbe.
decal116-7583
116-7583
4.Risquedecoupure/sectionnementdesmainsoudespieds
parlalamedelatondeuse–nevousapprochezpasdes
piècesmobilesetgardeztouteslesprotectionsenplace.
5.Attention–portezdesprotecteursd'oreilles.
6.Risquedecoupure/mutilationdesmainsoudespiedsparla
lamedelatondeuse–netravaillezpasdanslesensdela
pente,maistransversalement;coupezlemoteuravantde
quitterlamachine;ramassezlesdébrisavantdetondre;
regardezderrièrevousavantdetondreenmarchearrière.
6

140-8472
1.Lisezlemanuelde
l'utilisateur.
2.Nepasmettreaurebut.4.Doubleisolation
3.Résidentiel
112-8760
1.Risquedeprojectiond'objets–n'autorisezpersonneà
s'approcher.
2.Risquedecoupure/mutilationdesmainsoudespieds
parlalamedelatondeuse–nevousapprochezpasdes
piècesmobiles.
decal140-8472
decal112-8760
decal131-0822
131-0822
1.Autopropulsion–Attention:latransmissionpeuts'user
prématurémentsilacourroieesttropserrée;lisezle
Manueldel'utilisateuravantd'effectuerdesentretiensou
desrévisions.
137-9461
1.Étatdechargedelabatterie
134-4691
1.Vitesseauto2.Vitessemax.
decal137-9461
decal134-4691
7

Miseenservice
Piècesdétachées
Reportez-vousautableauci-dessouspourvériersitouteslespiècesontétéexpédiées.
Procédure
1
2
3
4
5
6
Important:Retirezetmettezaurebutlapellicule
deplastiquequiprotègelemoteurainsiquetout
autreemballageouélémentenplastiqueutilisé
surlamachine.
Important:Labatterien'estpascomplètement
chargéeàl'achat.Avantd'utiliserlamachinepour
lapremièrefois,voirChargedelabatterie(page
21).
Fixationsdemontage(nonincluses)
Aucunepiècerequise
Partiesupérieureduguidon1
Partieinférieureduguidon
Boulon(5/16"x1¾")
Contre-écrouàembase(5/16")
Rondellecourbe8
Aucunepiècerequise
Aucunepiècerequise
Aucunepiècerequise
Description
Qté
2
–
2
4
4
–
–
–
VoirlaFigure3poursavoircommentmonterle
chargeur.
Pourxerlechargeurenplace,glissez-lesurles
xationsplacéesaubonendroit(xationsnon
incluses).
Montageduchargeurdebatterie
(option).
Déposeduprotège-câble.
Assemblagedelapartieinférieuredu
guidon.
Montageduguidon.
Poseduprotège-câble.
Montagedubacàherbe.
Utilisation
1
Montageduchargeurde
batterie(option)
Piècesnécessairespourcetteopération:
2
Fixationsdemontage(nonincluses)
Procédure
Sivouslesouhaitez,vouspouvezxerlechargeur
debatteriesurunmuràl'aidedesfentesentroude
serruresituéesaudos.
Montez-leàl'intérieur(parexempledansungarage
outoutautreendroitàl'abridel'humidité),àproximité
d'uneprisedecourantethorsdelaportéedes
enfants.
g290534
Figure3
8
 Loading...