


FormNo.3442-386RevB
e-Dingo500CompactToolCarrier
ModelNo.22218—SerialNo.407100000andUp
ModelNo.22218G—SerialNo.400000000andUp
Registeratwww.T oro.com.
OriginalInstructions(EN)
*3442-386*

ThisproductcomplieswithallrelevantEuropean
directives;fordetails,pleaseseetheseparateproduct
specicDeclarationofConformity(DOC)sheet.
WARNING
CALIFORNIA
Proposition65Warning
Thepowercordonthisproductcontains
lead,achemicalknowntotheState
ofCaliforniatocausebirthdefects
orotherreproductiveharm.Wash
handsafterhandling.
Batteryposts,terminals,andrelated
accessoriescontainleadandlead
compounds,chemicalsknownto
theStateofCaliforniatocause
cancerandreproductiveharm.Wash
handsafterhandling.
Useofthisproductmaycauseexposure
tochemicalsknowntotheStateof
Californiatocausecancer,birthdefects,
orotherreproductiveharm.
Important:Withyourmobiledevice,youcan
scantheQRcodeontheserialnumberdecal(if
equipped)toaccesswarranty,parts,andother
productinformation.
g311261
Figure1
1.Modelandserialnumberlocation
Introduction
Thismachineisacompacttoolcarrierintendedfor
useinvariousearthandmaterialsmovingactivitiesfor
landscapingandconstructionwork.Itisdesignedto
operateawidevarietyofattachments,eachofwhich
performsaspecializedfunction.Usingthisproduct
forpurposesotherthanitsintendedusecouldprove
dangeroustoyouandbystanders.
Readthisinformationcarefullytolearnhowtooperate
andmaintainyourproductproperlyandtoavoid
injuryandproductdamage.Youareresponsiblefor
operatingtheproductproperlyandsafely .
Visitwww.T oro.comforproductsafetyandoperation
trainingmaterials,accessoryinformation,helpnding
adealer,ortoregisteryourproduct.
Wheneveryouneedservice,genuineToroparts,or
additionalinformation,contactanAuthorizedService
DealerorToroCustomerServiceandhavethemodel
andserialnumbersofyourproductready.Figure1
identiesthelocationofthemodelandserialnumbers
ontheproduct.Writethenumbersinthespace
provided.
ModelNo.
SerialNo.
Thismanualidentiespotentialhazardsandhas
safetymessagesidentiedbythesafety-alertsymbol
(Figure2),whichsignalsahazardthatmaycause
seriousinjuryordeathifyoudonotfollowthe
recommendedprecautions.
g000502
Figure2
Safety-alertsymbol
Thismanualuses2wordstohighlightinformation.
Importantcallsattentiontospecialmechanical
informationandNoteemphasizesgeneralinformation
worthyofspecialattention.
©2021—TheToro®Company
8111LyndaleAvenueSouth
Bloomington,MN55420
Contactusatwww.Toro.com.
2
PrintedintheUSA
AllRightsReserved

Contents
Safety.......................................................................4
GeneralSafety...................................................4
SafetyandInstructionalDecals..........................4
Setup........................................................................8
1CheckingtheHydraulicFluidLevel..................8
2ChargingtheBatteries.....................................8
ProductOverview.....................................................9
Controls.............................................................9
InfoCenterDisplay........................................10
Specications..................................................13
Attachments/Accessories.................................13
BeforeOperation.................................................13
BeforeOperationSafety...................................13
PerformingDailyMaintenance..........................14
AdjustingtheThighSupport..............................14
DuringOperation.................................................14
DuringOperationSafety...................................14
StartingtheMachine.........................................16
DrivingtheMachine..........................................16
PowerSaveMode............................................16
ShuttingOfftheMachine..................................16
UsingAttachments...........................................16
UsingtheInfoCenter.........................................18
AfterOperation....................................................19
AfterOperationSafety......................................19
MovingaNon-FunctioningMachine..................21
HaulingtheMachine.........................................21
LiftingtheMachine...........................................23
MaintainingtheBatteries..................................23
TransportingtheBatteries.................................24
UsingtheBatteryCharger................................24
Maintenance...........................................................27
MaintenanceSafety..........................................27
RecommendedMaintenanceSchedule(s)...........27
Pre-MaintenanceProcedures..............................28
UsingtheCylinderLocks..................................28
AccessingInternalComponents.......................29
DisconnectingtheMainPower..........................30
Lubrication..........................................................31
GreasingtheMachine.......................................31
ElectricalSystemMaintenance...........................32
ElectricalSystemSafety...................................32
DisconnectingorConnectingPowertothe
Machine........................................................32
ReplacingtheStaticStrap................................32
ServicingtheBatteries......................................32
MaintainingtheBatteryCharger.......................32
ServicingtheFuse............................................33
DriveSystemMaintenance..................................33
CheckingtheTireTreads..................................33
CheckingtheWheel-LugNuts..........................33
BrakeMaintenance.............................................34
TestingtheParkingBrake.................................34
HydraulicSystemMaintenance...........................34
HydraulicSystemSafety...................................34
RelievingHydraulicPressure............................34
HydraulicFluidSpecications...........................35
CheckingtheHydraulic-FluidLevel...................35
ReplacingtheHydraulicFilter...........................36
ChangingtheHydraulicFluid............................36
Cleaning..............................................................37
RemovingDebris..............................................37
WashingtheMachine.......................................37
Storage...................................................................37
StorageSafety..................................................37
StoringtheMachine..........................................37
BatteryStorageRequirements.........................38
Troubleshooting......................................................39
3

Safety
bucketmakesthefrontofthemachinetheheavy
end.Mostotherattachmentsmakethefrontofthe
machinetheheavyend.
GeneralSafety
DANGER
Theremaybeburiedutilitylinesinthework
area.Diggingintothemmaycauseashock
oranexplosion.
Havethepropertyorworkareamarkedfor
buriedlinesanddonotdiginmarkedareas.
Contactyourlocalmarkingserviceorutility
companytohavethepropertymarked(for
example,intheUS,call811orinAustralia,
call1100forthenationwidemarkingservice).
Alwaysfollowallsafetyinstructionstoavoidserious
injuryordeath.Usingthisproductforpurposesother
thanitsintendedusecouldprovedangeroustoyou
andbystanders.
•Donotcarryaloadwiththearmsraised;always
carryloadsclosetotheground.
•Slopesareamajorfactorrelatedtoloss-of-control
andtip-overaccidents,whichcanresultinsevere
injuryordeath.Operatingthemachineonany
slopeoruneventerrainrequiresextracaution.
•Operatethemachineupanddownslopeswith
theheavyendofthemachineuphillandtheload
closetotheground.Weightdistributionchanges
withattachments.Anemptybucketmakesthe
rearofthemachinetheheavyend,andafull
•Havethepropertyorworkareamarkedforburied
linesandotherobjects,anddonotdiginmarked
areas.
•ReadandunderstandthecontentofthisOperator’s
Manualbeforestartingthemachine.
•Useyourfullattentionwhileoperatingthe
machine.Donotengageinanyactivitythat
causesdistractions;otherwise,injuryorproperty
damagemayoccur.
•Neverallowchildrenoruntrainedpeopleto
operatethemachine.
•Keepyourhandsandfeetawayfromthemoving
componentsandattachments.
•Donotoperatethemachinewithouttheguards
andothersafetyprotectivedevicesinplaceand
workingonthemachine.
•Keepbystandersandchildrenoutoftheoperating
area.
•Stopthemachine,shutoffthemachine,and
removethekeybeforeservicingorunclogging
themachine.
Improperlyusingormaintainingthismachinecan
resultininjury.T oreducethepotentialforinjury,
complywiththesesafetyinstructionsandalways
payattentiontothesafety-alertsymbol
meansCaution,Warning,orDanger—personalsafety
instruction.Failuretocomplywiththeseinstructions
mayresultinpersonalinjuryordeath.
,which
SafetyandInstructionalDecals
Safetydecalsandinstructionsareeasilyvisibletotheoperatorandarelocatednearanyarea
ofpotentialdanger.Replaceanydecalthatisdamagedormissing.
93-6686
1.Hydraulicuid2.ReadtheOperator's
Manual.
decal93-6686
decal93-9084
93-9084
1.Liftpoint/Tie-downpoint
4

1.Warning—wearhearingprotection.
decal98-4387
98-4387
decal132-9051
132-9051
1.Tie-downpoint
decal133-8061
133-8061
108-4723
1.Auxiliaryhydraulics
2.Lockedreverse(detent)
3.Neutral(off)
4.Forward
130-2836
1.Crushinghazardfromabove;cuttinghazardofthe
hand—keepawayfromtheattachmentandtheliftarm.
130-2837
decal108-4723
decal137-9712
137-9712
1.Warning—readthe
Operator’sManual.
2.Warning—keepat
temperaturesbelow65°C
(149°F).
decal130-2836
decal130-2837
3.Explosionhazard—donot
openthebattery;donot
useadamagedbattery.
4.Warning—readthe
Operator’sManual
forbatterycharging
information.
1.Warning—donotcarrypassengersinthebucket.
5

decal139-7709
139-7709
1.Waterlevel2.Attention—readthe
Operator’sManual.
decal139-7707
139-7707
1.Parking
2.Parkingbrake—engaged
139-7717
decal139-7717
brake—disengaged
decal139-7718
139-7718
1.Warning—Disconnectthepower,stopthemachine,read
theOperator’sManual.
139-7708
1.Crushinghazardfromabove,fallingload—ensurethatthe
quick-attachleversarelocked.
decal139-7708
decal139-7721
139-7721
1.Warning—readtheOperator’sManualbeforeperforming
batterymaintenance;donotoperatethemachinewhen
thebatterychargerisconnected;disconnectthebattery
chargerbeforeoperatingthemachine.
6

139-7738
> -5° C
> 23° F
139-7738
1.Keepthebatteryattemperaturesabove-5°C(23°F);
readtheOperator’sManual;slidethecoverupandpivotit
sidewaystoaccessthebatterychargingport,donotuse
awrench.
decal139-8343
139-8343
1.RecyclableLithium-Ion3.Electricshockhazard
2.Donotdiscardimproperly.4.Firehazard
decal139-7738
decal137-9713
137-9713
1.Warning—readtheOperator'sManual.5.Explosionhazard—avoidsparks;nore,openames,or
2.Warning—keepoutoftherainandotherwetconditions.6.Asphyxiationhazard,poisonousfumesortoxicgases—donot
3.Warning—donottouchthehotsurface.7.Electricshockhazard—donotperformmaintenanceonthe
4.Warning—donotopenthebattery;donotuseadamaged
battery.
smoking.
chargethebatteryinanenclosedspace.
battery.
139-7660
1.Warning—readtheOperator’sManual.
2.Warning—alloperatorsshouldbetrainedbeforeoperating
themachine.
3.Warning—keepbystandersaway.
4.Tippinghazard—donotdrivethemachinewiththeload
raised;positiontheheavyendofthemachineuphillwhen
drivingonaslope.
5.Lowertheattachment.
6.Raisetheattachment.
7.Tractioncontrols
8.Tilttheattachmentdown.
9.Titletheattachmentup.
10.Ecomode—On
11.Ecomode—Off
12.InchMode—On
13.InchMode—Off
14.On
15.Off
decal139-7660
7

Setup
1
CheckingtheHydraulic
FluidLevel
NoPartsRequired
Procedure
Beforestartingthemachineforthersttime,check
thehydraulic-uidlevel;refertoCheckingthe
Hydraulic-FluidLevel(page35).
2
ChargingtheBatteries
NoPartsRequired
Procedure
Chargethebatteries;refertoChargingtheBatteries
(page25).
8

ProductOverview
g281979
Figure3
1.Attachmentmountplate
2.Tiltcylinder6.Batterybox
3.Auxiliaryhydrauliccouplers
4.Loaderarms8.Wheel12.Parking-brakelever
5.Cylinderlock
7.Liftcylinder1 1.Controlpanel15.Operatorplatform
Controls
ControlPanel
9.Handle13.Thighsupport
10.Liftpoint14.Counterweight
KeySwitch
Thekeyswitchhas2positions:ONandOFF(Figure
4).
Usethekeyswitchtostartorshutoffthemachine;
refertoStartingtheMachine(page16)andShutting
OfftheMachine(page16).
Traction-ControlLevers
•Tomoveforward,movethetraction-controllevers
forward.
•Tomoverearward,movethetraction-controllevers
rearward.
•Toturn,movetheleverlocatedonthesideyou
g281978
Figure4
wanttoturnbacktowardtheNEUTRALposition
whilekeepingtheotherleverengaged.
1.InfoCenter
2.Loader-armlever6.Keyswitch
3.Traction-controllevers7.Eco-modeswitch
4.Attachment-tiltlever8.Inch-modeswitch
5.Auxiliary-hydraulicslever
Note:Thefartheryoumovethetraction-control
leversineitherdirection,thefasterthemachine
movesinthatdirection.
•Tosloworstop,movethetraction-controllevers
totheNEUTRALposition.
Attachment-TiltLever
•Totilttheattachmentforward,slowlypushthe
attachment-tiltleverforward.
•Totilttheattachmentrearward,slowlypullthe
attachment-tiltleverrearward.
9
Loader-ArmLever
Inch-ModeSwitch
•Tolowertheloaderarms,slowlypushthe
loader-armleverforward.
•Toraisetheloaderarms,slowlypulltheloader-arm
leverrearward.
Auxiliary-HydraulicsLever
•Tooperateahydraulicattachmentintheforward
direction,slowlypulltheauxiliary-hydraulicslever
outandthenpulldown.
•Tooperateahydraulicattachmentinthereverse
direction,slowlypulltheauxiliary-hydraulicslever
outandthenpushitupward.Thisisalsocalled
theDETENTpositionbecauseitdoesnotrequire
operatorpresence.
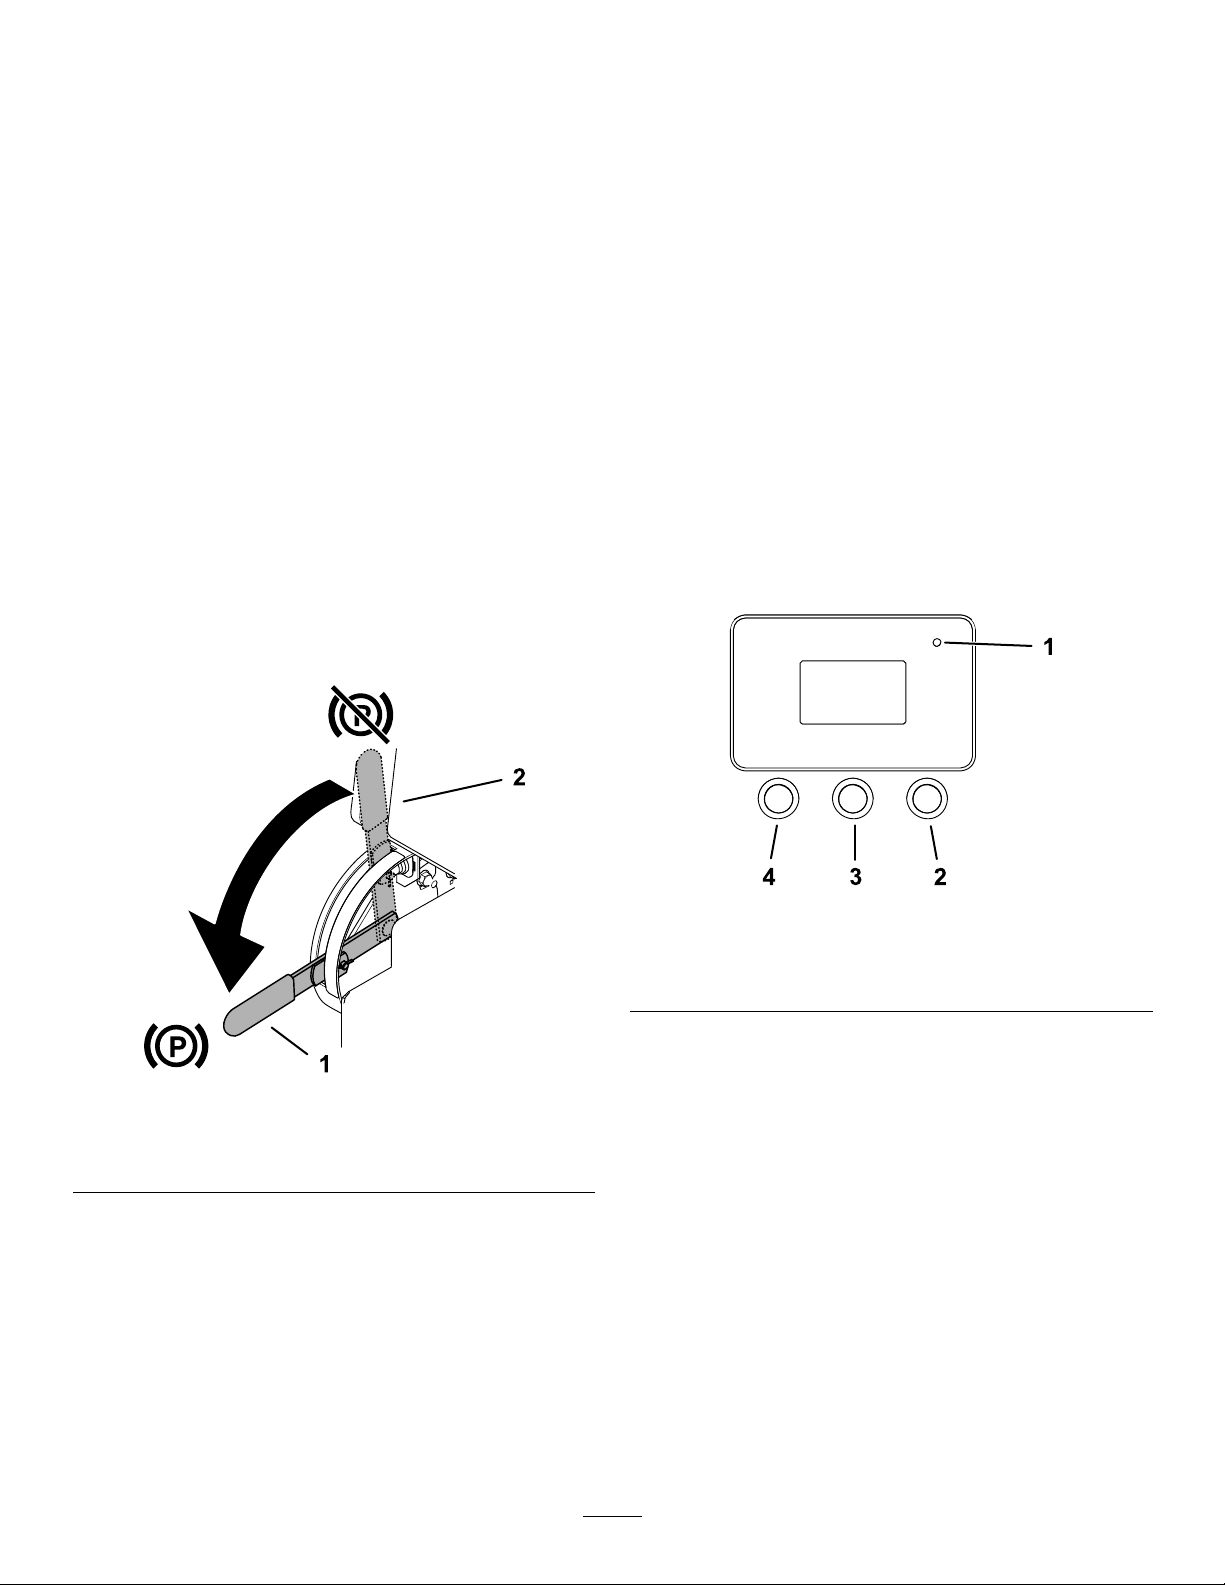
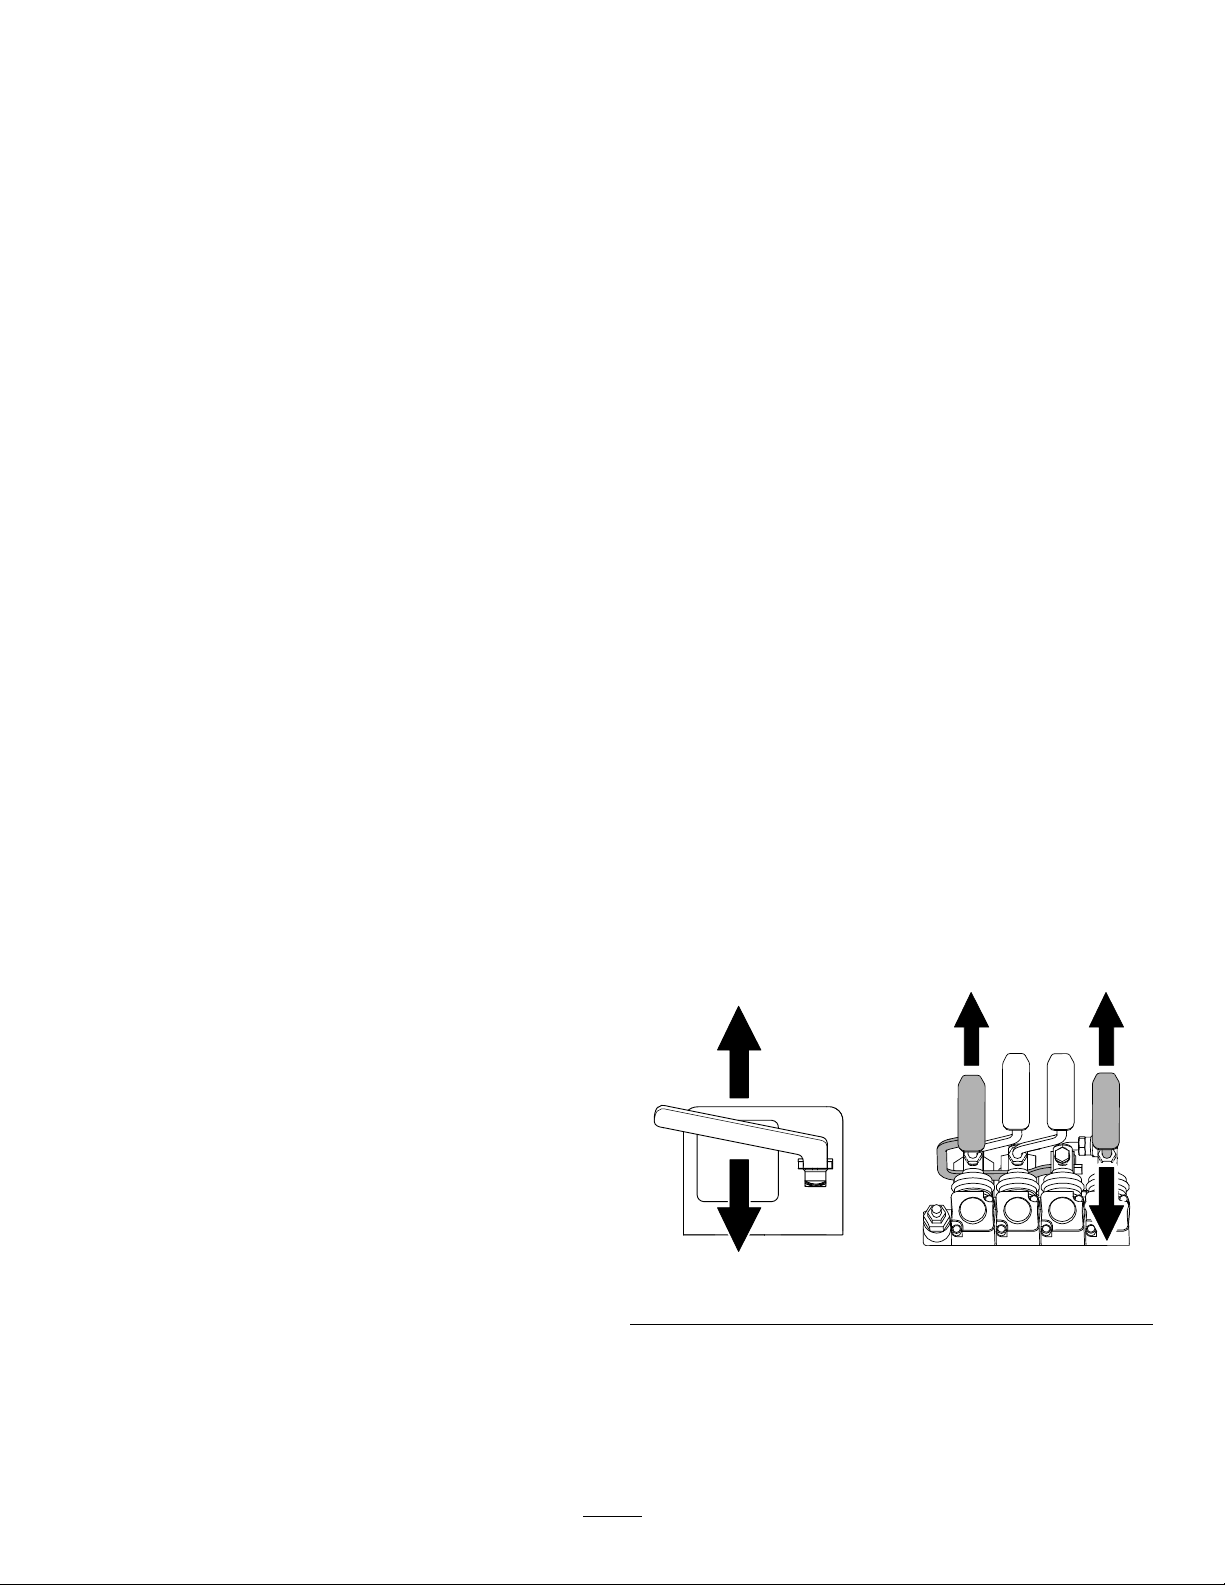
Parking-BrakeLever
•Toengagetheparkingbrake,rotatethelever
down(Figure5).
•Toreleasetheparkingbrake,rotatetheleverup
(Figure5).
PresstheswitchtotheONpositiontoactivateInch
Mode.UseInchModetoslowthespeedofthe
machinewheninstallingorremovingattachments,
makingsmalladjustmentswiththemachine,and
turningcorners.
Note:InchModeoverridesanycurrentsettings(e.g.,
Ecomode,attachmentmodes).Themachinewill
returntothosesettingswhenInchModeisoff.
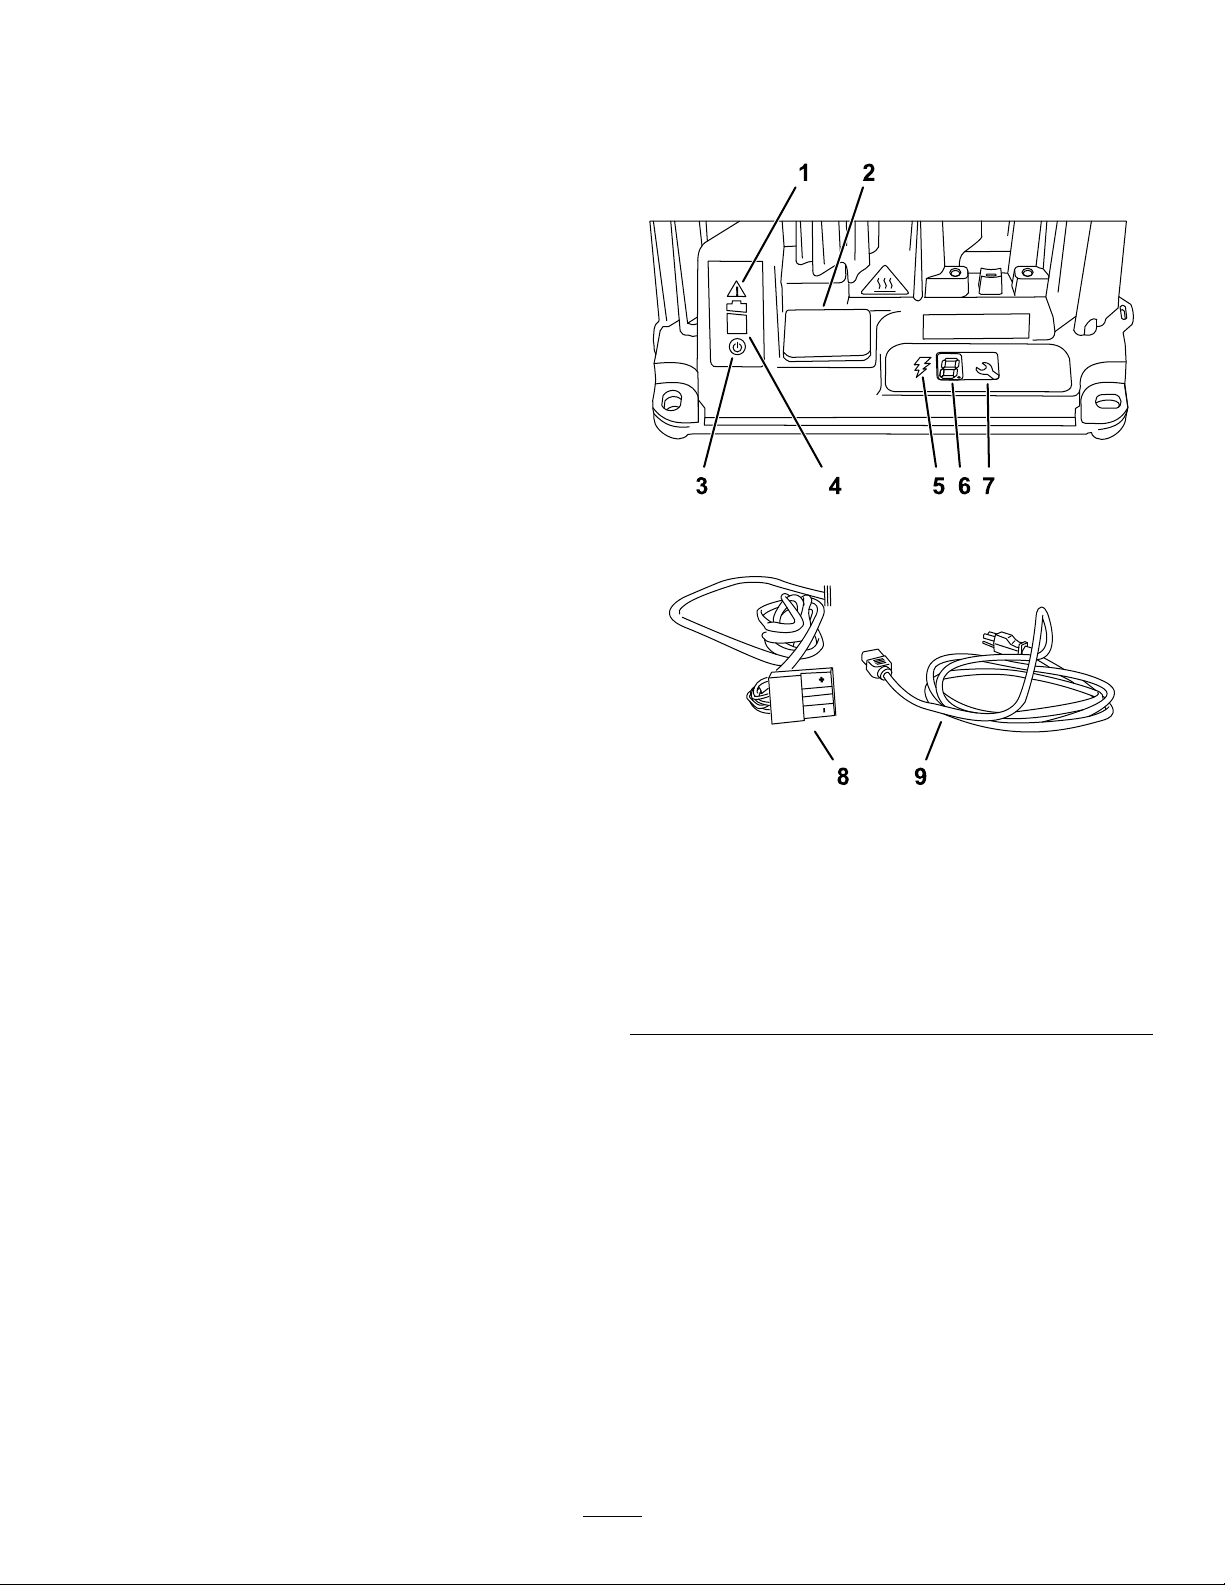
InfoCenterDisplay
TheInfoCenterLCDdisplayshowsinformationabout
yourmachine,suchastheoperatingstatus,various
diagnosticsandotherinformationaboutthemachine
(Figure6).Thereisasplashscreenandmain
informationscreenoftheInfoCenter.Youcanswitch
betweenthesplashscreenandmaininformation
screenatanytimebypressinganyoftheInfoCenter
buttonsandthenselectingtheappropriatedirectional
arrow.
Figure5
1.Parking-brake
lever—engaged
2.Parking-brake
lever—disengaged
Eco-ModeSwitch
PresstheswitchtotheONpositiontoactivateEco
Mode.UseEcoModetoreducethemotorspeedand
reducebatteryconsumption.
g264015
Figure6
1.Indicatorlight3.Middlebutton
2.Rightbutton
4.Leftbutton
•LeftButton,MenuAccess/BackButton—pressthis
g303557
buttontoaccesstheInfoCentermenus.Youcan
useittoexitanymenuthatyouarecurrentlyusing.
•MiddleButton—usethisbuttontoscrolldown
menus.
•RightButton—usethisbuttontoopenamenu
wherearightarrowindicatesadditionalcontent.
Note:Thepurposeofeachbuttonmaychange
dependingonwhatisrequiredatthetime.Each
buttonislabeledwithanicondisplayingitscurrent
function.
Figure7showswhatyoumayseeontheInfoCenter
whenyourunthemachine.Thesplashscreen
displaysforafewsecondsafteryouturnthekeyto
theONpositionthentherunscreendisplays.
10
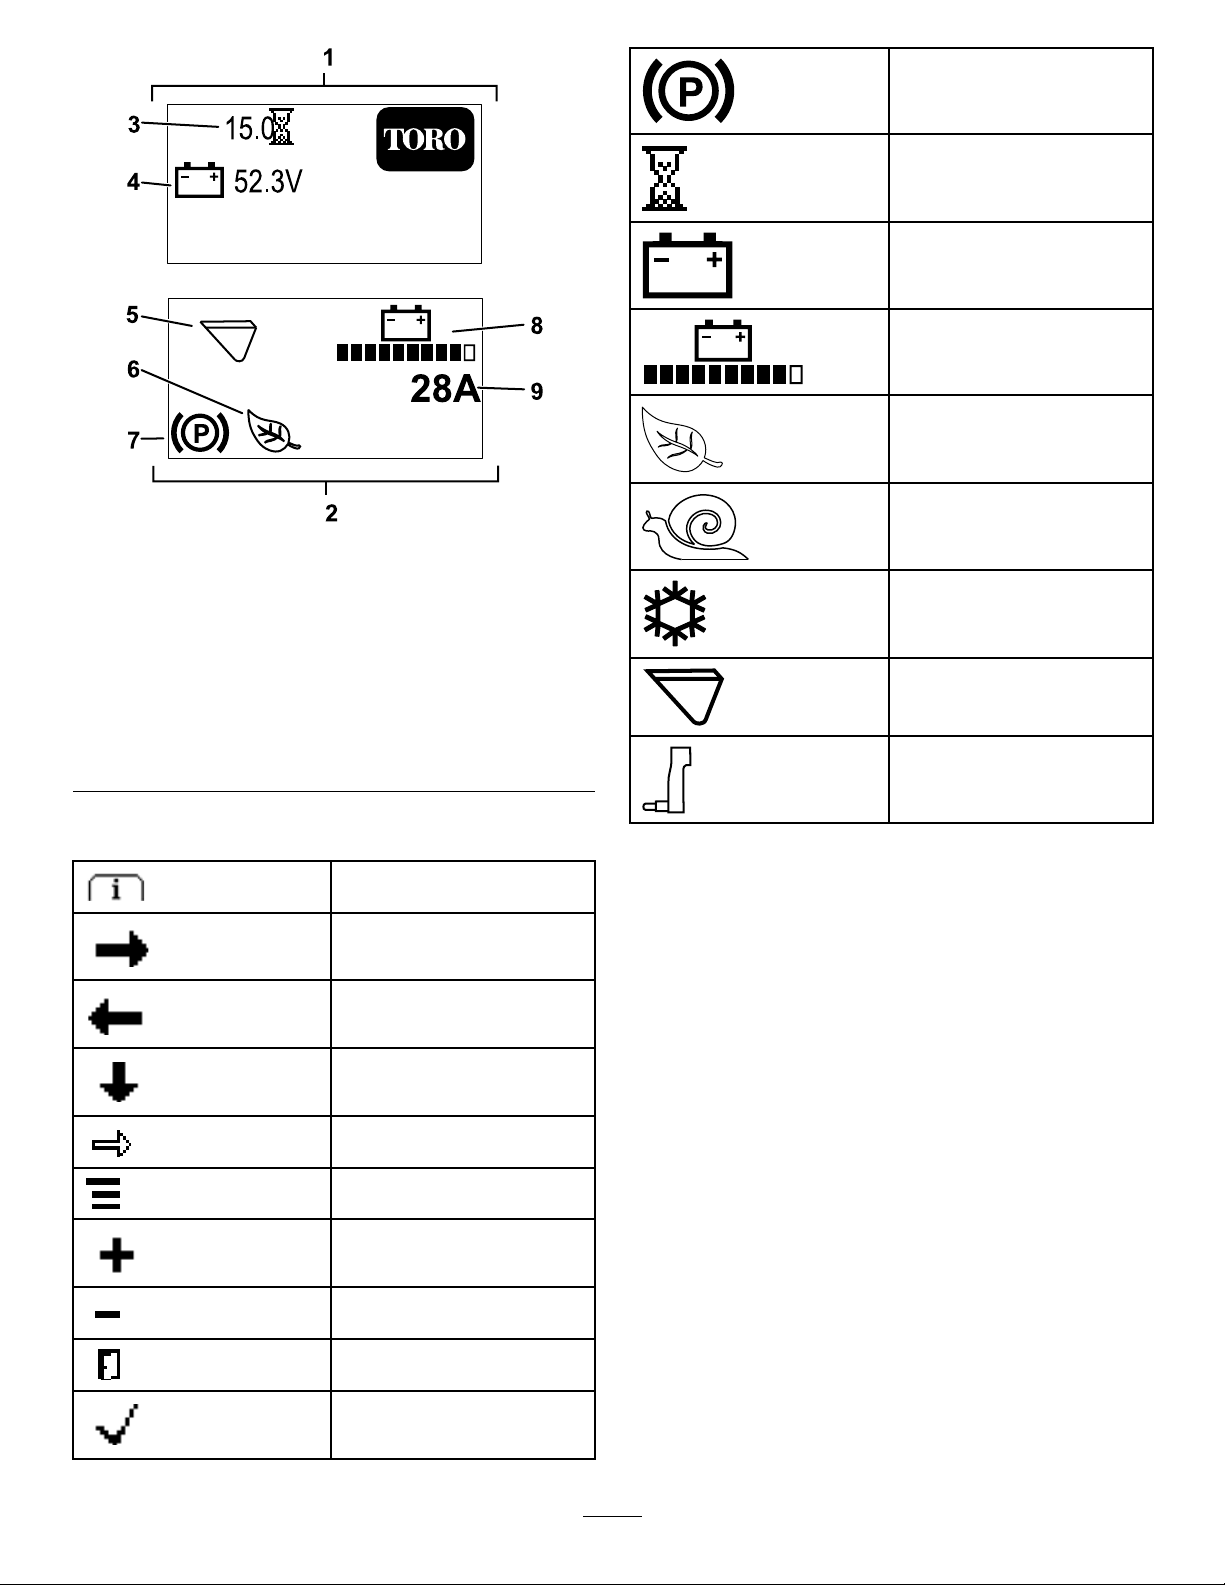
Parkingbrakeisengaged.
Hourmeter
Batteryvoltage
Batterycharge—eachsolidbar
representsthechargein10%
increments.
EcoModeison.
Figure7
1.Splashscreen
2.Runscreen7.Parkingbrakeisengaged.
3.Hoursoperated8.Batterycharge
4.Batteryvoltage9.Instantaneousmachine
5.Attachmentmode(Bucket
Modeshown)
6.EcoorInchModeison
(EcoModeshown).
amperage
InfoCenterIconDescriptions
Menuaccess
Next
Previous
Scrolldown
g315353
InchModeison.
Coldstart
BucketModeison.
HammerModeison.
Enter
Changetheattachmentmode.
Increase
Decrease
Exitmenu
CheckPINentry
11

InfoCenterMenus
Service
ToaccesstheInfoCentermenusystem,pressthe
menuaccessbuttonwhileatthemainscreen.
Thiswillbringyoutothemainmenu.Refertothe
followingtablesforasynopsisoftheoptionsavailable
fromthemenus:
MainMenu
MenuItemDescription
Faults
ServiceTheServicemenucontains
DiagnosticsTheDiagnosticsmenu
SettingsTheSettingsmenuallows
AboutTheAboutmenuliststhe
TheFAULTSmenucontains
alistoftherecentmachine
faults.RefertotheService
ManualoryourAuthorized
ServiceDealerformore
informationontheF AULTS
menu.
informationonthemachine
suchashoursofuseandother
similarnumbers.
displaysthestateofeach
machineswitch,sensorand
controloutput.Y oucanuse
thistotroubleshootcertain
issuesasitwillquicklytellyou
whichmachinecontrolsareon
andwhichareoff.
youtocustomizeandmodify
congurationvariablesonthe
InfoCenterdisplay.
modelnumber,serialnumber,
andsoftwareversionofyour
machine.
Faults
MenuItemDescription
CurrentListsthetotalnumberof
LastIndicatesthelastkey-onhour
First
OccurrencesIndicatesthenumberoffault
key-onhours(i.e.,hoursthat
thekeyhasbeenintheON
position).
thatthefaultoccurredon.
Indicatestherstkey-onhour
thatthefaultoccurredon.
occurrences.
MenuItemDescription
Hours
CountsListsthenumberoftimesthe
Liststhetotalnumberofhours
thatthekey,motor,andEco
Modehavebeenonandthe
tractioncontrolshavebeen
engaged.
motorhasbeenstartedand
theamperagehoursforthe
battery.
Diagnostics
MenuItemDescription
BatteryIndicatestheinputsand
MotorcontrolIndicatestheinputsand
outputsforthebattery .Inputs
includethecurrentbattery
voltage;outputsincludethe
batterycurrentandpercentage
stateofcharge.
outputsforthemotorcontrol.
Inputsincludekeyrun,
neutral,parkingbrake,
auxiliary,Inch,Ecomode,
andraise/lower;usethese
tocheckinputfeedbackon
themachine.Outputsinclude
motorspeed(inrpm),phase
current,DCcurrent,controller
temperature,andmotor
temperature.
Settings
MenuItemDescription
Language
Backlight
ContrastControlsthecontrastofthe
ProtectedMenusAllowsyoutoaccess
Controlsthelanguageused
ontheInfoCenter.
Controlsthebrightnessofthe
LCDdisplay
LCDdisplay.
protectedmenusbyinputting
apasscode.
About
MenuItemDescription
Model
SerialListstheserialnumberofthe
S/WRevListsthesoftwarerevisionof
MotorCtrlSWListsthesoftwarerevisionof
BatterySWListsthesoftwarerevisionof
Liststhemodelnumberofthe
machine
machine
themastercontroller .
themotorcontrol.
thebattery.
12

Specications
Note:Specicationsanddesignaresubjectto
changewithoutnotice.
Width
Length
Height
Weight(withoutattachment)938kg(2,068lb)
Ratedoperatingcapacity—with74.8
kg(165lb)operatorandthestandard
bucket
Tippingcapacity—with74.8kg(165lb)
operatorandthestandardbucket
Wheelbase
Dumpheight(withstandardbucket)120cm(47inches)
Reach—fullyraised(withstandard
bucket)
Heighttohingepin(narrowbucketin
standardposition)
Attachments/Accessories
AselectionofToroapprovedattachmentsand
accessoriesisavailableforusewiththemachine
toenhanceandexpanditscapabilities.Contact
yourAuthorizedServiceDealerorauthorizedT oro
distributororgotowww.T oro.comforalistofall
approvedattachmentsandaccessories.
Toensureoptimumperformanceandcontinuedsafety
certicationofthemachine,useonlygenuineToro
replacementpartsandaccessories.Replacement
partsandaccessoriesmadebyothermanufacturers
couldbedangerous,andsuchusecouldvoidthe
productwarranty.
89cm(35inches)
152cm(62inches)
125cm(49inches)
234kg(515lb)
590kg(1,300lb)
71cm(28inches)
71cm(28inches)
168cm(66inches)
Operation
BeforeOperation
BeforeOperationSafety
GeneralSafety
•Neverallowchildrenoruntrainedpeopleto
operateorservicethemachine.Localregulations
mayrestricttheageorrequirecertiedtrainingof
theoperator.Theownerisresponsiblefortraining
alloperatorsandmechanics.
•Becomefamiliarwiththesafeoperationofthe
equipment,operatorcontrols,andsafetydecals.
•Alwaysengagetheparkingbrake,shutoffthe
machine,removethekey,waitforallmoving
partstostop,andallowthemachinetocool
beforeadjusting,servicing,cleaning,orstoring
themachine.
•Knowhowtostopthemachineandshutoffthe
machinequickly.
•Checkthatthesafetyswitchesandshieldsare
attachedandfunctioningproperly.Donotoperate
themachineunlesstheyarefunctioningproperly .
•Locatethepinch-pointareasmarkedonthe
machineandattachments;keepyourhandsand
feetawayfromtheseareas.
•Beforeoperatingthemachinewithanattachment,
ensurethattheattachmentisproperlyinstalled
andthatitisagenuineT oroattachment.Readall
theattachmentmanuals.
•Evaluatetheterraintodeterminewhataccessories
andattachmentsyouneedtoproperlyandsafely
performthejob.
•Havethepropertyorworkareamarkedforburied
linesandotherobjects,anddonotdiginmarked
areas;notethelocationofunmarkedobjectsand
structures,suchasundergroundstoragetanks,
wells,andsepticsystems.
•Inspecttheareawhereyouwillusetheequipment
forunevensurfacesorhiddenhazards.
•Ensurethattheareaisclearofbystandersbefore
operatingthemachine.Stopthemachineifa
bystanderentersthearea.
13

PerformingDaily
Maintenance
Beforestartingthemachineeachday ,performthe
EachUse/DailyprocedureslistedinMaintenance
(page27).
AdjustingtheThigh
Support
Toadjustthethighsupport(Figure8),loosenthe
knobsandraiseorlowerthesupportpadtothe
desiredheight.Y oucanalsoobtainadditional
adjustmentbylooseningthenutsecuringthepad
totheadjustmentplateandmovingtheplateupor
downasneeded.Tightenallfastenerssecurelywhen
nished.
Figure8
1.Thigh-supportbracket
2.Adjustmentplate
3.Thigh-supportpad
4.Knobandatwasher
5.Carriagebolt
6.Locknutandatwasher
DuringOperation
DuringOperationSafety
GeneralSafety
•Donotcarryaloadwiththearmsraised.Always
carryloadsclosetotheground.
•Donotexceedtheratedoperatingcapacity,asthe
machinemaybecomeunstable,whichmayresult
inlossofcontrol.
•UseonlyT oro-approvedattachmentsand
accessories.Attachmentscanchangethestability
andtheoperatingcharacteristicsofthemachine.
•Formachineswithaplatform:
–Lowertheloaderarmsbeforesteppingoffthe
platform.
–Donottrytostabilizethemachinebyputting
yourfootontheground.Ifyoulosecontrolof
themachine,stepofftheplatformandaway
fromthemachine.
–Donotplaceyourfeetundertheplatform.
–Donotmovethemachineunlessyouare
standingwithbothfeetontheplatformandyour
handsareholdingontothereferencebars.
•Useyourfullattentionwhileoperatingthe
machine.Donotengageinanyactivitythat
causesdistractions;otherwise,injuryorproperty
damagemayoccur.
g006054
•Lookbehindanddownbeforebackingupto
ensurethatthepathisclear.
•Neverjerkthecontrols;useasteadymotion.
•Theowner/usercanpreventandisresponsible
foraccidentsthatmaycausepersonalinjuryor
propertydamage.
•Wearappropriateclothingincludinggloves,eye
protection,longpants,substantialslip-resistant
footwear,andhearingprotection.Tiebacklong
hairanddonotwearlooseclothingorloose
jewelry.
•Donotoperatethemachinewhenyouaretired,ill,
orundertheinuenceofalcoholordrugs.
•Nevercarrypassengersandkeeppetsand
bystandersawayfromthemachine.
•Operatethemachineonlyingoodlight,keeping
awayfromholesandhiddenhazards.
•Ensurethatallthedrivesareinneutralbefore
startingthemachine.Startthemachineonlyfrom
theoperator'sposition.
•Usecarewhenapproachingblindcorners,shrubs,
trees,orotherobjectsthatmayobscurevision.
14

•Slowdownandusecautionwhenmakingturns
andcrossingroadsandsidewalks.Watchfor
trafc.
•Stoptheattachmentwhenyouarenotworking.
•Stopthemachine,shutoffthemachine,remove
thekey,andinspectthemachineifyoustrike
anobject.Makeanynecessaryrepairsbefore
resumingoperation.
•Neverleaveamachineonwhenunattended.
•Beforeleavingtheoperatingposition,dothe
following:
–Parkthemachineonalevelsurface.
–Lowertheloaderarmsanddisengagethe
auxiliaryhydraulics.
–Shutoffthemachineandremovethekey.
•Donotoperatethemachinewhenthereistherisk
oflightning.
•Operatethemachineonlyinareaswherethereis
sufcientclearanceforyoutosafelymaneuver.
Beawareofobstaclesincloseproximitytoyou.
Failuretomaintainadequatedistancefromtrees,
walls,andotherbarriersmayresultininjuryasthe
machinebacksupduringoperationifyouarenot
attentivetothesurroundings.
•Checkforoverheadclearance(i.e.,electrical
wires,branches,ceilings,anddoorways)before
drivingunderanyobjectsanddonotcontactthem.
•Donotoverlltheattachmentandalwayskeepthe
loadlevelwhenraisingtheloaderarms.Itemsin
theattachmentcouldfallandcauseinjury.
SlopeSafety
•Operatethemachineupanddownslopeswith
theheavyendofthemachineuphill.Weight
distributionchangeswithattachments.Anempty
bucketmakestherearofthemachinetheheavy
end,andafullbucketmakesthefrontofthe
machinetheheavyend.Mostotherattachments
makethefrontofmachinetheheavyend.
•Slowdownanduseextracareonhillsides.Ground
conditionscanaffectthestabilityofthemachine.
•Avoidstartingorstoppingonaslope.Ifthe
machinelosestraction,proceedslowly,straight
downtheslope.
•Avoidturningonslopes.Ifyoumustturn,turn
slowlyandkeeptheheavyendofthemachine
uphill.
•Keepallmovementsonslopesslowandgradual.
Donotmakesuddenchangesinspeedor
direction.
•Ifyoufeeluneasyoperatingthemachineona
slope,donotdoit.
•Watchforholes,ruts,orbumps,asuneventerrain
couldoverturnthemachine.T allgrasscanhide
obstacles.
•Usecautionwhenoperatingonwetsurfaces.
Reducedtractioncouldcausesliding.
•Evaluatetheareatoensurethatthegroundis
stableenoughtosupportthemachine.
•Usecautionwhenoperatingthemachinenearthe
following:
–Drop-offs
–Ditches
–Embankments
–Bodiesofwater
Themachinecouldsuddenlyrolloverifatrack
goesovertheedgeortheedgecavesin.Maintain
asafedistancebetweenthemachineandany
hazard.
•Donotremoveoraddattachmentsonaslope.
•Donotparkthemachineonahillsideorslope.
•Raisingtheloaderarmsonaslopeaffectsthe
stabilityofthemachine.Keeptheloaderarmsin
theloweredpositionwhenonslopes.
•Slopesareamajorfactorrelatedtolossofcontrol
andtip-overaccidents,whichcanresultinsevere
injuryordeath.Operatingthemachineonany
slopeoruneventerrainrequiresextracaution.
•Establishyourownproceduresandrulesfor
operatingonslopes.Theseproceduresmust
includesurveyingthesitetodeterminewhich
slopesaresafeformachineoperation.Always
usecommonsenseandgoodjudgmentwhen
performingthissurvey.
15

StartingtheMachine
ShuttingOfftheMachine
1.Standontheplatform.
2.Ensurethattheparkingbrakeisengagedandall
4leversareintheNEUTRALposition.
3.Insertthekeyintothekeyswitchandturnitto
theONposition.
Note:Themachinemayhavedifcultystartingunder
severecoldconditions.Whenstartingacoldmachine,
keepthemachineabove-18°C(0°F).
Note:Whenthemachinetemperatureisbelow-1°C
(30°F),thecold-startsymbol(Figure9)willappear
ontheInfoCenterwhilethemotorincreasesspeed
for2minutes.Duringthistime,donotmovethe
tractioncontrolswhiletheparkingbrakeisengaged;
otherwise,themotorshutsoffandthe2minutes
resets.Thecold-startsymboldisappearswhenthe
motorreachesfullspeed.
Figure9
DrivingtheMachine
Usethetractioncontrolstomovethemachine.The
fartheryoumovethetractioncontrolsinanydirection,
thefasterthemachinemovesinthatdirection.
Releasethetractioncontrolstostopthemachine.
PowerSaveMode
Whenthemachineidles,itwillgointoapowersaver
modeaftersometime.
1.Parkthemachineonalevelsurface,lowerthe
loaderarms,andengagetheparkingbrake.
2.Ensurethattheauxiliaryhydraulicsleverisin
theNEUTRALposition.
3.TurnthekeyswitchtotheOFFpositionand
removethekey.
CAUTION
Childrenorbystandersmaybeinjuredifthey
moveorattempttooperatethemachinewhile
itisunattended.
Alwaysremovethekeyandengagethe
parkingbrakewhenleavingthemachine
unattended.
UsingAttachments
g304012
InstallinganAttachment
Important:UseonlyToro-approvedattachments.
Attachmentscanchangethestabilityandthe
operatingcharacteristicsofthemachine.The
warrantyofthemachinemaybevoidedifyouuse
themachinewithunapprovedattachments.
Important:Beforeinstallingtheattachment,
ensurethatthemountplatesarefreeofanydirtor
debrisandthatthepinsrotatefreely.Ifthepins
donotrotatefreely,greasethem.
1.Positiontheattachmentonalevelsurfacewith
enoughspacebehindittoaccommodatethe
machine.
2.Startthemachine.
3.Tilttheattachmentmountplateforward.
PowerSave1
Afteridling5to7seconds,themotorspeed
decreases.T oresumenormaloperationspeed,move
atractionlever,attachment-tiltlever,orloader-arm
lever.
PowerSave2
Afteridling30seconds,themotorshutsoff.T o
resumeoperation,rapidlymoveatractionlevertwice.
PowerSave3
Afteridling5minutes,themachineshutsoff.To
resumeoperation,turnthekeytotheOFFposition,
engagetheparkingbrake,andturnthekeytoON
position.
4.Positionthemountplateintotheupperlipofthe
attachmentreceiverplate(Figure10).
g003710
Figure10
1.Mountplate2.Receiverplate
16

5.Raisetheloaderarmswhiletiltingbackthe
mountplateatthesametime.
ConnectingtheHydraulicHoses
Important:Raisetheattachmentenoughto
clearthegroundandtiltthemountplateall
thewayback.
6.Shutoffthemachineandremovethekey.
7.Engagethequick-attachpins,ensuringthatthey
arefullyseatedinthemountplate(Figure11).
Important:Ifthepinsdonotrotatetothe
engagedposition,themountplateisnot
fullyalignedwiththeholesintheattachment
receiverplate.Checkthereceiverplateand
cleanitifnecessary.
WARNING
Ifyoudonotfullyseatthequick-attach
pinsthroughtheattachmentmountplate,
theattachmentcouldfalloffthemachine,
crushingyouorbystanders.
Ensurethatthequick-attachpinsarefully
seatedintheattachmentmountplate.
WARNING
Hydraulicuidescapingunderpressurecan
penetrateskinandcauseinjury.Fluidinjected
intotheskinmustbesurgicallyremoved
withinafewhoursbyadoctorfamiliarwith
thisformofinjury;otherwise,gangrenemay
result.
•Ensurethatallhydraulic-uidhoses
andlinesareingoodconditionandall
hydraulicconnectionsandttingsaretight
beforeapplyingpressuretothehydraulic
system.
•Keepyourbodyandhandsawayfrom
pinholeleaksornozzlesthateject
high-pressurehydraulicuid.
•Usecardboardorpapertondhydraulic
leaks;neveruseyourhands.
CAUTION
Hydrauliccouplers,hydrauliclines/valves,
andhydraulicuidmaybehot.Ifyoucontact
hotcomponents,youmaybeburned.
1.Quick-attachpins
(engagedposition)
2.Disengagedposition
Figure11
3.Engagedposition
g003711
•Weargloveswhenoperatingthehydraulic
couplers.
•Allowthemachinetocoolbeforetouching
hydrauliccomponents.
•Donottouchhydraulicuidspills.
Iftheattachmentrequireshydraulicsforoperation,
connectthehydraulichosesasfollows:
1.Shutoffthemachineandremovethekey.
2.Movetheauxiliary-hydraulicsleverforward,
backward,andbacktotheNEUTRALpositionto
relievepressureatthehydrauliccouplers.
3.Removetheprotectivecoversfromthehydraulic
connectorsonthemachine.
4.Ensurethatallforeignmatteriscleanedfrom
thehydraulicconnectors.
5.Pushtheattachmentmaleconnectorintothe
femaleconnectoronthemachine.
Note:Whenyouconnecttheattachmentmale
connectorrst,yourelieveanypressurebuilt
upintheattachment.
6.Pushtheattachmentfemaleconnectorontothe
maleconnectoronthemachine.
7.Conrmthattheconnectionissecurebypulling
onthehoses.
17

RemovinganAttachment
AccessingProtectedMenus
1.Parkthemachineonalevelsurface.
2.Lowertheattachmenttotheground.
3.Shutoffthemachineandremovethekey.
4.Disengagethequick-attachpinsbyturningthem
totheoutside.
5.Iftheattachmentuseshydraulics,movethe
auxiliary-hydraulicsleverforward,backward,
andbacktotheNEUTRALpositiontorelieve
pressureatthehydrauliccouplers.
6.Iftheattachmentuseshydraulics,slidethe
collarsbackonthehydrauliccouplersand
disconnectthem.
Important:Connecttheattachmenthoses
togethertopreventhydraulicsystem
contaminationduringstorage.
7.Installtheprotectivecoversontothehydraulic
couplersonthemachine.
8.Startthemachine,tiltthemountplateforward,
andbackthemachineawayfromtheattachment.
Note:ThefactorydefaultPINcodeforyoumachine
iseither0000or1234.
IfyouchangedthePINcodeandforgotthecode,
contactyourAuthorizedServiceDealerforassistance.
1.FromtheMAINMENU,usethecenterbuttonto
scrolldowntotheSETTINGSMENUandpressthe
rightbutton(Figure13).
g264775
Figure13
2.IntheSETTINGSMENU,usethecenterbuttonto
scrolldowntothePROTECTEDMENUandpress
therightbutton(Figure14A).
UsingtheInfoCenter
ChangingtheAttachmentMode
1.FromtheRunscreen,pressthemiddlebuttonto
accesstheAttachmentChangescreen.
2.Pressthemiddleorrightbuttontoswitch
betweenHammerorBucketmode.
Note:TurnonEcomodewhenusingHammer
mode.HammerMode,whenusedwithEco
mode,slowsthemotorspeed(inrpm)toreduce
energyconsumptionwhenusingattachments.
BucketMode
3.PresstheleftbuttontoreturntotheRunscreen.
1.Currentattachmentmode
2.Changeattachmentmode
maintainsthemotorspeed.
Figure12
3.ReturntoRunscreen
g264249
Figure14
3.ToenterthePINcode,pressthecenterbutton
g304809
untilthecorrectrstdigitappears,thenpress
therightbuttontomoveontothenextdigit
(Figure14BandFigure14C).Repeatthisstep
untilthelastdigitisenteredandpresstheright
buttononcemore.
4.PressthemiddlebuttontoenterthePINcode
(Figure14D).
18

Note:IftheInfoCenteracceptsthePINcode
andtheprotectedmenuisunlocked,theword
“PIN”displaysintheupperrightcornerofthe
screen.
Youcanviewandchangethesettingsinthe
PROTECTEDMENU.OnceyouaccessthePROTECTED
MENU,scrolldowntoPROTECTSETTINGSoption.
Usetherightbuttontochangethesetting.Setting
theProtectSettingstoOFFallowsyoutoviewand
changethesettingsinthePROTECTEDMENUwithout
enteringthePINcode.SettingtheProtectSettings
toONhidestheprotectedoptionsandrequiresyou
toenterthePINcodetochangethesettinginthe
PROTECTEDMENU.
AfterOperation
AfterOperationSafety
GeneralSafety
•Shutoffthemachine,removethekey ,waitforall
movementtostop,andallowthemachinetocool
beforeadjusting,cleaning,storing,orservicingit.
•Cleandebrisfromtheattachmentsanddrivesto
helppreventres.
•Keepallpartsingoodworkingconditionandall
hardwaretightened.
•Donottouchpartsthatmaybehotfromoperation.
Allowthemtocoolbeforeattemptingtomaintain,
adjust,orservicethemachine.
•Usecarewhenloadingorunloadingthemachine
intoatrailerortruck.
BatteryandChargerSafety
General
•Improperlyusingormaintainingthebattery
chargercouldresultininjury.T oreducethis
potential,complywiththeallsafetyinstructions.
•Useonlythesuppliedchargerforbatterycharging.
•Conrmthevoltagethatisavailableinyour
countrybeforeusingthecharger.
•ForconnectiontoasupplynotintheUS,
useanattachmentplugadapteroftheproper
congurationforthepoweroutlet,ifneeded.
•Donotgetthechargerwet;keepitprotectedfrom
rainandsnow.
•Ariskofre,electricshock,orinjurymayresult
fromusinganaccessorynotrecommendedor
soldbyToro.
•Toreduceriskofabatteryexplosion,followthese
instructionsandtheinstructionsforanyequipment
thatyouintendtousenearthecharger.
•Donotopenbatteries.
•Intheeventthatabatteryleaks,avoidcontact
withtheliquid.Ifyouaccidentlycomeintocontact
withtheliquid,ushwithwaterandseekmedical
help.Liquidejectedfromthebatterymaycause
irritationorburns.
•RefertoanAuthorizedServiceDealertoservice
orreplaceabattery.
Training
•Neverallowchildrenoruntrainedpeopleto
operateorservicethecharger.Localregulations
mayrestricttheageoftheoperator.Theowner
19

isresponsiblefortrainingalloperatorsand
mechanics.
•Read,understand,andfollowallinstructionson
thechargerandinthemanualbeforeoperating
thecharger.Befamiliarwiththeproperuseofthe
charger.
MaintenanceandStorage
•Storethechargerindoorsinadry,secureplace
thatisoutofthereachofunauthorizedusers.
•Donotdisassemblethecharger.T akethecharger
toanAuthorizedServiceDealerwhenserviceor
repairisrequired.
Preparation
•Keepbystandersandchildrenawaywhile
charging.
•Wearappropriateclothingwhilecharging,
includingeyeprotection;longpants;and
substantial,slip-resistantfootwear.
•Shutoffthemachineandwait5secondsuntilthe
machinehascompletelypowereddownbefore
charging.Failuretodothismaycausearcing.
•Ensurethattheareaiswellventilatedwhile
charging.
•Readandfollowallprecautionsforcharging.
•Thechargerisforuseonlyonnominal120and
240VACcircuits,andisequippedwithagrounding
plugfor120V ACoperation.Forusewith240V
circuits,contactyourAuthorizedServiceDealer
forthecorrectpowercord.
Operation
•Donotabusethecord.Donotcarrythecharger
bythecordoryankonthepowersupplycordto
disconnectthechargerfromthereceptacle.Keep
thecordfromheat,oil,andsharpedges.
•Unplugthepowercordfromtheoutletbefore
startinganymaintenanceorcleaningtoreduce
riskofelectricshock.
•Maintainorreplacesafetyandinstructionlabels
asneeded.
•Donotoperatethechargerwithadamaged
cordorplug.Replaceadamagedcordorplug
immediately.
•Ifthechargerhasreceivedanimpact,been
dropped,orotherwisedamaged,donotuseit;
takeittoanAuthorizedServiceDealer.
•Connectthechargerdirectlytoagrounding
(3-prong)receptacle.Donotusethechargeron
anungroundedoutlet,evenwithanadaptor.
•Donotaltertheprovidedpowercordorplug.
•Avoiddroppingametaltoolnearorontoabattery;
itmightcauseasparkorshort-circuitanelectrical
partthatcouldleadtoanexplosion.
•Removemetalitemssuchasrings,bracelets,
necklaces,andwatcheswhenworkingwitha
lithium-ionbattery.Alithium-ionbatterycan
produceenoughcurrenttocauseasevereburn.
•Neveroperatethechargerwithoutgoodvisibility
orlight.
•Useanappropriateextensioncord.
•Ifthepowersupplycordisdamagedwhileitis
pluggedin,disconnectthecordfromthewall
receptacleandcontactanAuthorizedService
Dealerforareplacement.
•Unplugthechargerfromtheelectricaloutletwhen
notinuse,beforemovingittoanotherlocation,or
priortoservicingit.
20

MovingaNon-Functioning
Machine
Important:Donottoworpullthemachine
withoutrstopeningthetowvalves,oryouwill
damagethehydraulicsystem.
1.Shutoffthemachineandremovethekey.
2.Removetheplugcoveringeachtowvalve
(Figure15).
3.Loosenthejamnutoneachtowvalve.
g304100
Figure16
1.Towvalve
4.Turneachvalvecounterclockwise1turnwitha
hexwrenchtoopenthem.
5.Towthemachineasrequired.
Important:Donotexceed4.8km/h(3mph)
whentowing.
6.Afterrepairingthemachine,closethetowvalves
andtightenthejamnuts.
Important:Donotovertightenthetow
valves.
7.Replacetheplugs.
g304099
Figure15
1.Plug
HaulingtheMachine
Useaheavy-dutytrailerortrucktohaulthemachine.
Useafull-widthramp.Ensurethatthetrailerortruck
hasallthenecessarybrakes,lighting,andmarkingas
requiredbylaw.Pleasecarefullyreadallthesafety
instructions.Knowingthisinformationcouldhelp
youorbystandersavoidinjury.Refertoyourlocal
ordinancesfortrailerandtie-downrequirements.
WARNING
Drivingonthestreetorroadwaywithout
turnsignals,lights,reectivemarkings,ora
slow-moving-vehicleemblemisdangerous
andcanleadtoaccidentscausingpersonal
injury.
Donotdrivethemachineonapublicstreet
orroadway .
21
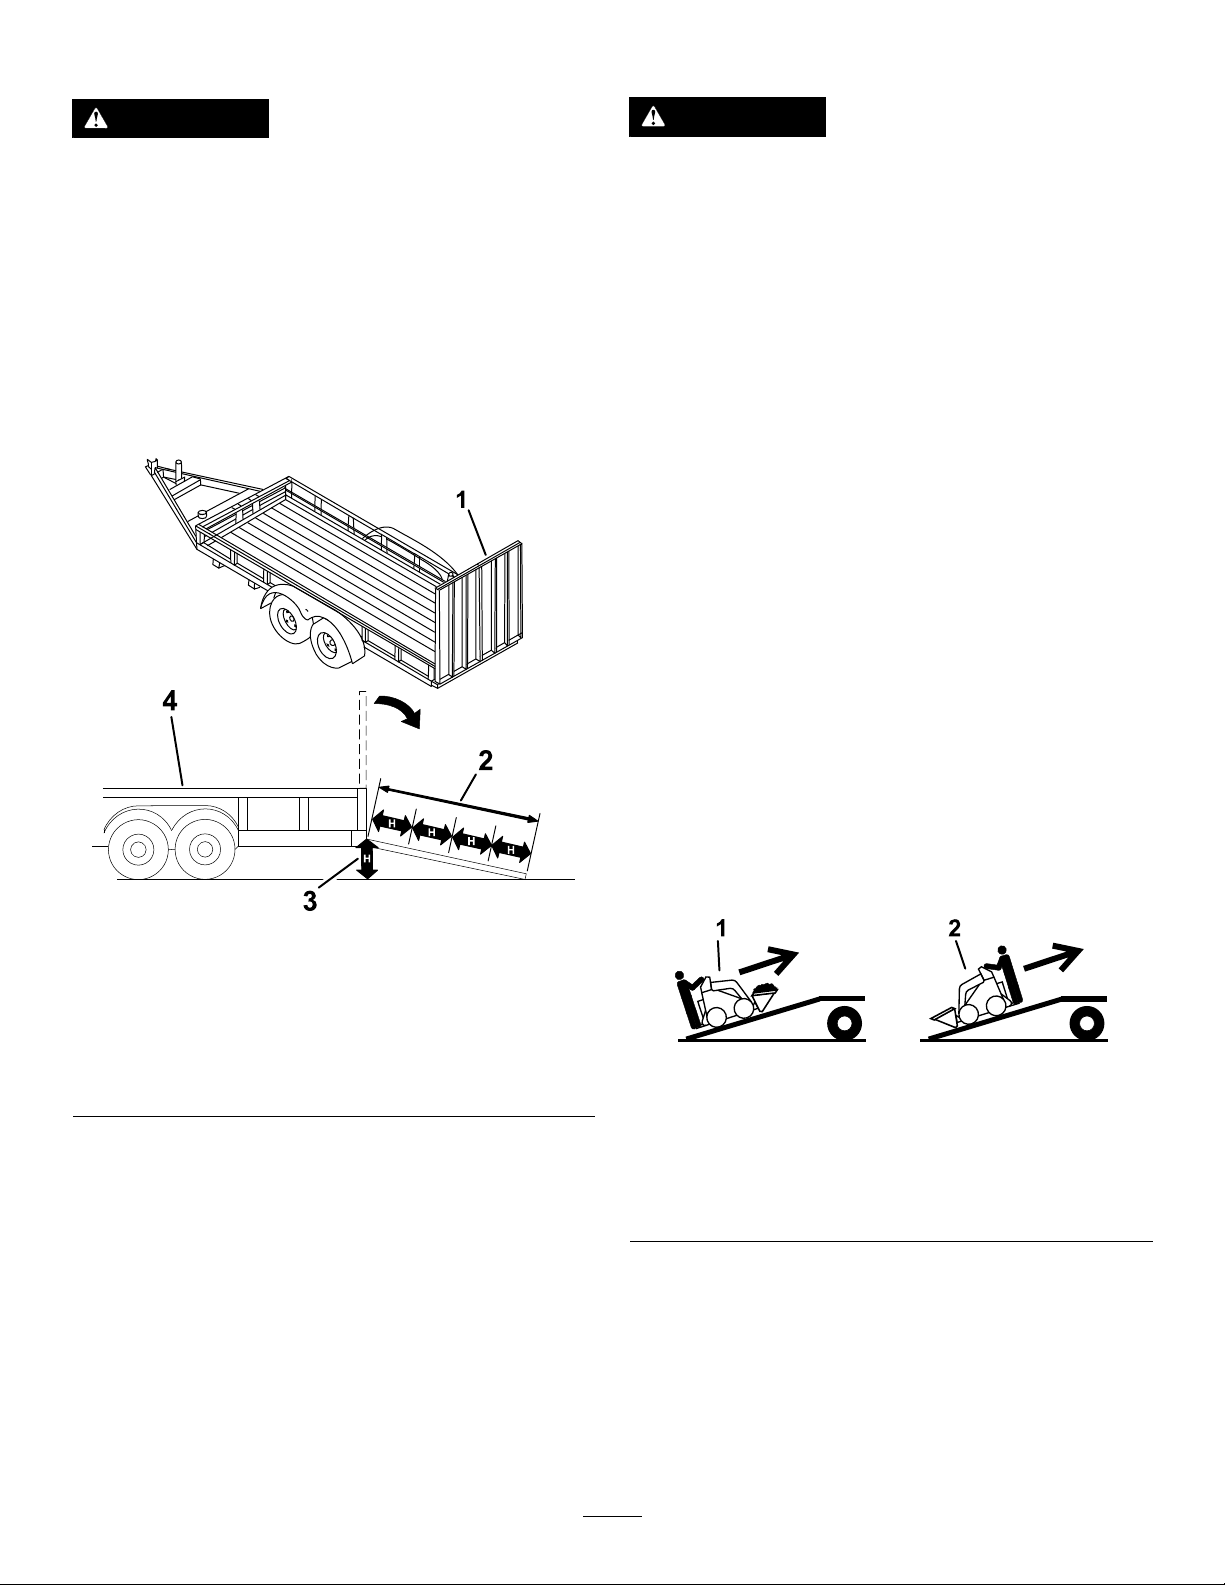
SelectingaTrailer
LoadingtheMachine
WARNING
Loadingorunloadingamachineontoatrailer
ortruckincreasesthepossibilityoftip-over
andcouldcauseseriousinjuryordeath
(Figure17).
•Useonlyfull-widthramps.
•Ensurethatthelengthoframpisatleast4
timesaslongastheheightofthetraileror
truckbedtotheground.Thisensuresthat
rampangledoesnotexceed15degreeson
atground.
Figure17
WARNING
Loadingamachineontoatrailerortruck
increasesthepossibilityoftip-overandcould
causeseriousinjuryordeath.
•Useextremecautionwhenoperatinga
machineonaramp.
•Loadandunloadthemachinewiththe
heavyenduptheramp.
•Avoidsuddenaccelerationordeceleration
whiledrivingthemachineonarampas
thiscouldcausealossofcontrolora
tip-oversituation.
1.Ifusingatrailer,connectittothetowingvehicle
andconnectthesafetychains.
2.Ifapplicable,connectthetrailerbrakes.
3.Lowertheramp(s).
4.Lowertheloaderarms.
5.Loadthemachineontothetrailerwiththeheavy
enduptheramp,carryingloadslow(Figure18).
•Ifthemachinehasafullload-bearing
attachment(e.g.,bucket)ora
non-load-bearingattachment(e.g.,
trencher),drivethemachineforwardupthe
ramp.
•Ifthemachinehasanemptyload-bearing
attachmentornoattachment,backthe
machineuptheramp.
g229507
1.Full-widthramp(s)in
stowedposition
2.Rampisatleast4times
aslongastheheightof
thetrailerortruckbedto
theground
3.H=heightofthetraileror
truckbedtotheground
4.Trailer
Figure18
1.Machinewithfull
attachmentor
non-load-bearing
attachment—drivethe
machineforwardupthe
ramp(s).
6.Lowertheloaderarmsallthewaydown.
7.Engagetheparkingbrake,shutoffthemachine,
andremovethekey.
8.Usethemetaltie-downloopsonthemachine
tosecurelyfastenthemachinetothetraileror
truckwithstraps,chains,cable,orropes(Figure
19).Refertolocalregulationsfortie-down
requirements.
22
g237904
2.Machinewithemptyor
noattachment—backthe
machineuptheramp(s).
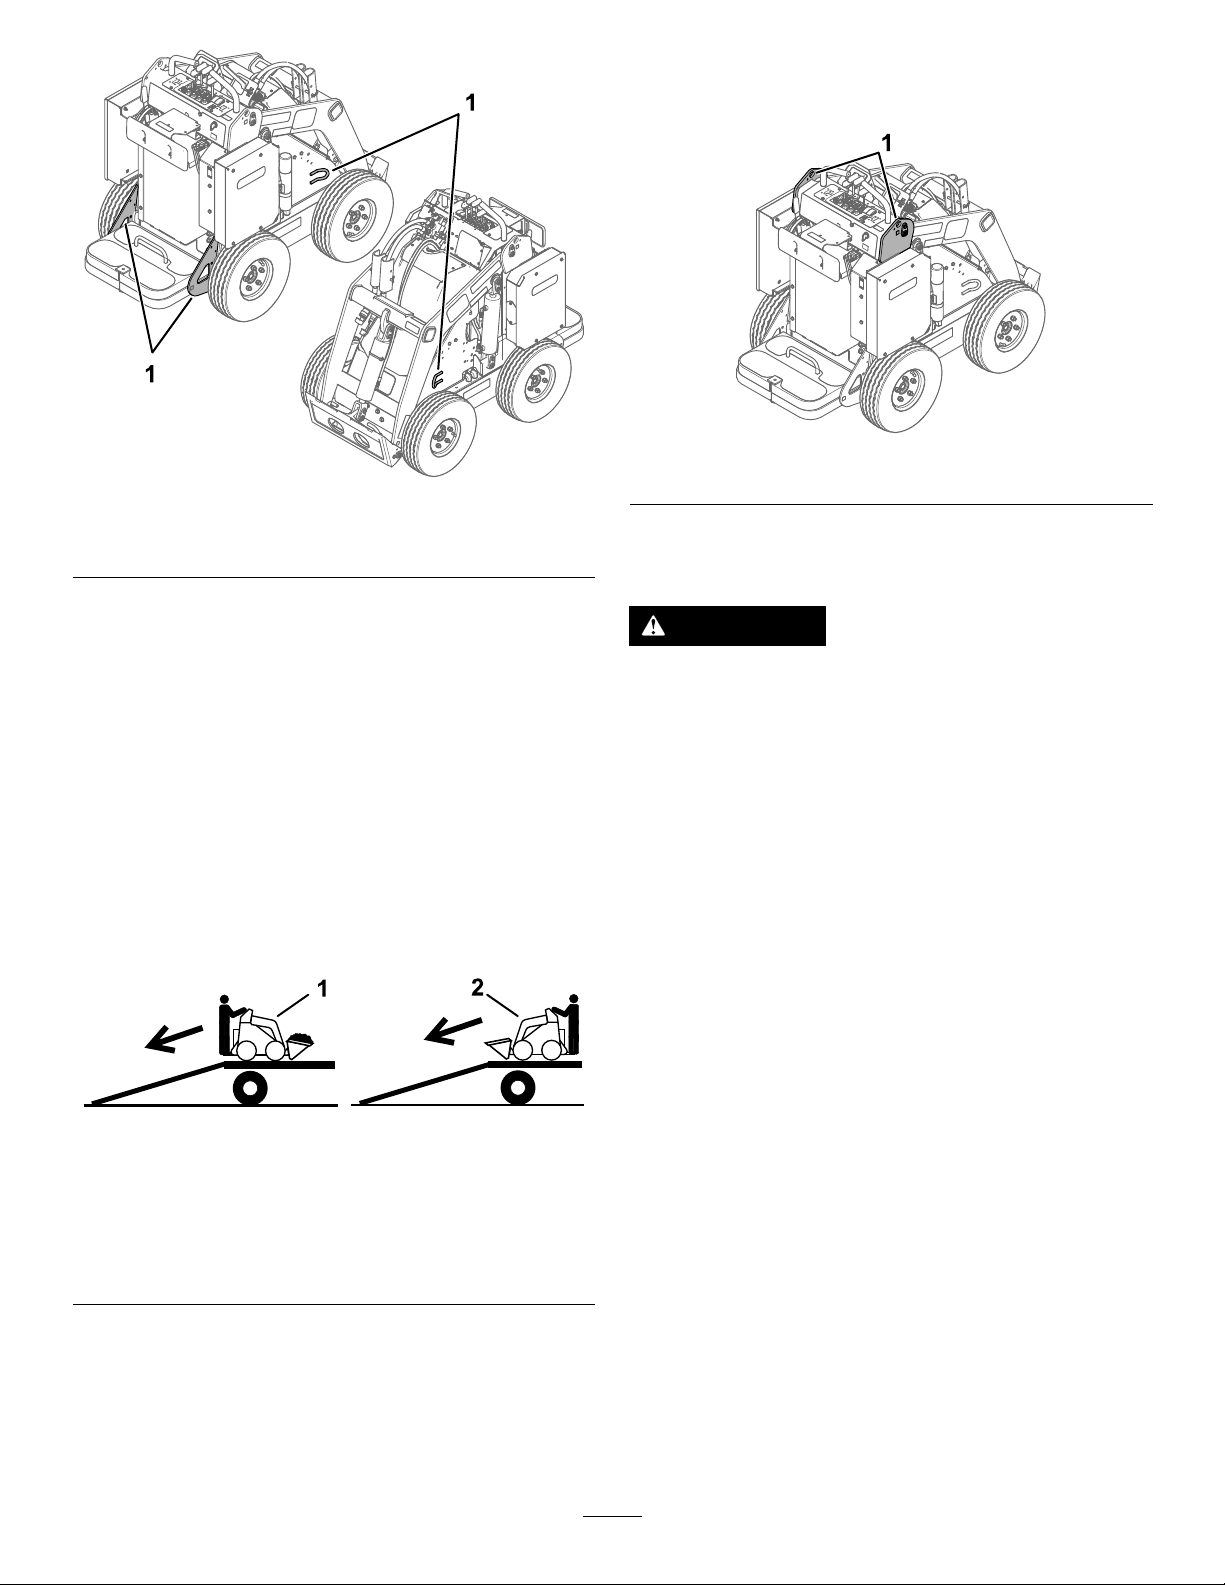
1.Tie-downloops
LiftingtheMachine
Liftthemachineusingtheliftpoints(Figure19).
g305397
Figure21
g304319
Figure19
MaintainingtheBatteries
UnloadingtheMachine
1.Lowertheramp(s).
2.Unloadthemachinefromthetrailerwiththe
heavyenduptheramp,carryingloadslow
(Figure20).
•Ifthemachinehasafullload-bearing
attachment(e.g.,bucket)ora
non-load-bearingattachment(e.g.,
trencher),backitdowntheramp.
•Ifthemachinehasanemptyload-bearing
attachmentornoattachment,driveitforward
downtheramp.
Figure20
1.Machinewithfull
attachmentor
non-load-bearing
attachment—backthe
machinedownthe
ramp(s).
2.Machinewithemptyor
noattachment—drivethe
machineforwarddownthe
ramp(s).
WARNING
Thebatteriescontainshighvoltage,which
couldburnorelectrocuteyou.
•Donotattempttoopenthebatteries.
•Useextremecarewhenhandlingabattery
withacrackedcase.
•Useonlythechargerdesignedforthe
batteries.
Thelithium-ionbatteriesholdasufcientchargeto
performintendedworkduringitslifespan.Astime
goesby,thetotalamountofworkthatthebatteries
areabletocompleteonasinglechargegradually
diminishes.
Note:Y ourresultsmayvarydependingonthe
distanceyouneedtotransportthemachine,the
undulationsthatyoutravelacross,andotherfactors
asdiscussedinthissection.
g237905
Toachievemaximumlifeandusefromyourbatteries,
followtheseguidelines:
•Donotopenthebattery.Therearenouser
serviceablepartsinside.Ifyouopenthepack,
youwillvoidyourwarranty.Thebatteriesare
protectedbytamper-alertingdevices.
•Store/parkthemachineinaclean,drygarageor
storagearea,awayfromdirectsunlightand
heatsources.Donotstoreitinalocationwhere
thetemperaturedropsbelow-30°C(-22°F)or
risesabove60°C(140°F).Temperaturesoutside
ofthisrangewilldamageyourbatteries.High
temperaturesduringstorage,especiallyatahigh
stateofcharge,reducesthelifeofthebatteries.
23
•Whenstoringthemachineformorethan10days,
ensurethatthemachineisinacoollocation,out
ofsunlight,andatleast50%charged.
•Ifyouareoperatingthemachineinhotconditions
orinsunlight,thebatterymayoverheat.Ifthis
happens,ahigh-temperaturealertwillappear
ontheInfoCenter.Inthiscondition,themachine
slowsdown.
Immediatelydrivethemachinetoacoollocation
outofthesun,turnoffthemachine,andallowthe
batteriestocoolfullybeforeresumingoperation.
•IfyourmachineisequippedwiththeLightKit,shut
offthelightswhentheyarenotinuse.
TransportingtheBatteries
UsingtheBatteryCharger
RefertoFigure22foranoverviewofthe
battery-chargerdisplaysandcords.
TheUSDepartmentofTransportationand
internationaltransportationauthoritiesrequirethat
lithiumionbatteriesbetransportedusingspecial
packagingandonlybetransportedbycarrierscertied
tohaulthem.IntheUS,youareallowedtotransport
abatterywhenitisinstalledonthemachineas
batterypoweredequipment,withsomeregulatory
requirements.ContacttheUSDepartmentof
Transportationortheappropriategovernmentbodyin
yourcountryfordetailedregulationsontransportation
ofyourbatteriesorthemachinewiththebatteries
equipped.
ContactyourAuthorizedServiceDealerforwaysto
shipordisposeofthebatteries.
Figure22
1.Errorindicatorlight
2.USBportcover7.Selectbutton
3.ACPowerindicatorlight8.Outputconnectorandcord
4.Battery-chargingindicator
light
5.Charging-outputindicator
light
6.LCDdisplay
9.Power-supplycord
g251620
g251632
24

ConnectingtoaPowerSource
ChargingtheBatteries
Toreducetheriskofelectricshock,thischargerhasa
3-pronggroundedplug(typeB).Iftheplugdoesnot
tintothewallreceptacle,othergroundedplugtypes
areavailable;contactanAuthorizedServiceDealer.
Donotchangethechargerorthepower-supply-cord
pluginanyway.
DANGER
Contactwithwaterwhilechargingthe
machinecouldcauseelectricshock,causing
injuryordeath.
Donothandletheplugorthechargerwithwet
handsorwhilestandinginwater.
Important:Checkthepowersupplycord
periodicallyforholesorcracksintheinsulation.
Donotuseadamagedcord.Donotrunthecord
throughstandingwaterorwetgrass.
1.Insertthechargerplugonthepower-supply
cordintothematchinginputpowersocketon
thecharger.
WARNING
Adamagedchargercordcancausean
electricalshockorare.
Important:Chargethebatteriesonlyin
temperaturesthatarewithintherecommended
range;refertothefollowingtableforthe
recommendedrange:
RecommendedTemperatureRangefor
Charging
Chargingrange0°to45°C(32°to113°F)
Low-temperaturecharging
range(ReducedCurrent)
High-temperaturecharging
range(ReducedCurrent)
Ifthetemperatureisbelow-5°C(23°F),thebatteries
willnotcharge.Ifthetemperaturerisesabove-5°C
(23°F),unplugthechargerandplugitinagainto
chargethebatteries.
1.Parkthemachineinthedesignatedlocationfor
charging.
2.Engagetheparkingbrake.
3.Shutoffthemachineandremovethekey.
4.Ensurethattheconnectorsarefreeofdustand
debris.
5.Connectthechargerpowercordtoapower
source;refertoConnectingtoaPowerSource
(page25).
-5°to0°C(23°to32°F)
45°to60°C(113°to140°F)
Thoroughlyinspectthepowersupply
cordbeforeusingthecharger.Ifthecord
isdamaged,donotoperatethecharger
untilyouobtainareplacement.
2.Insertthewallplugendofthepowersupplycord
intoagroundedelectricaloutlet.
6.Slidethechargercoverupandpivotitoutofthe
way(Figure23).
g304908
Figure23
1.Chargercover
25
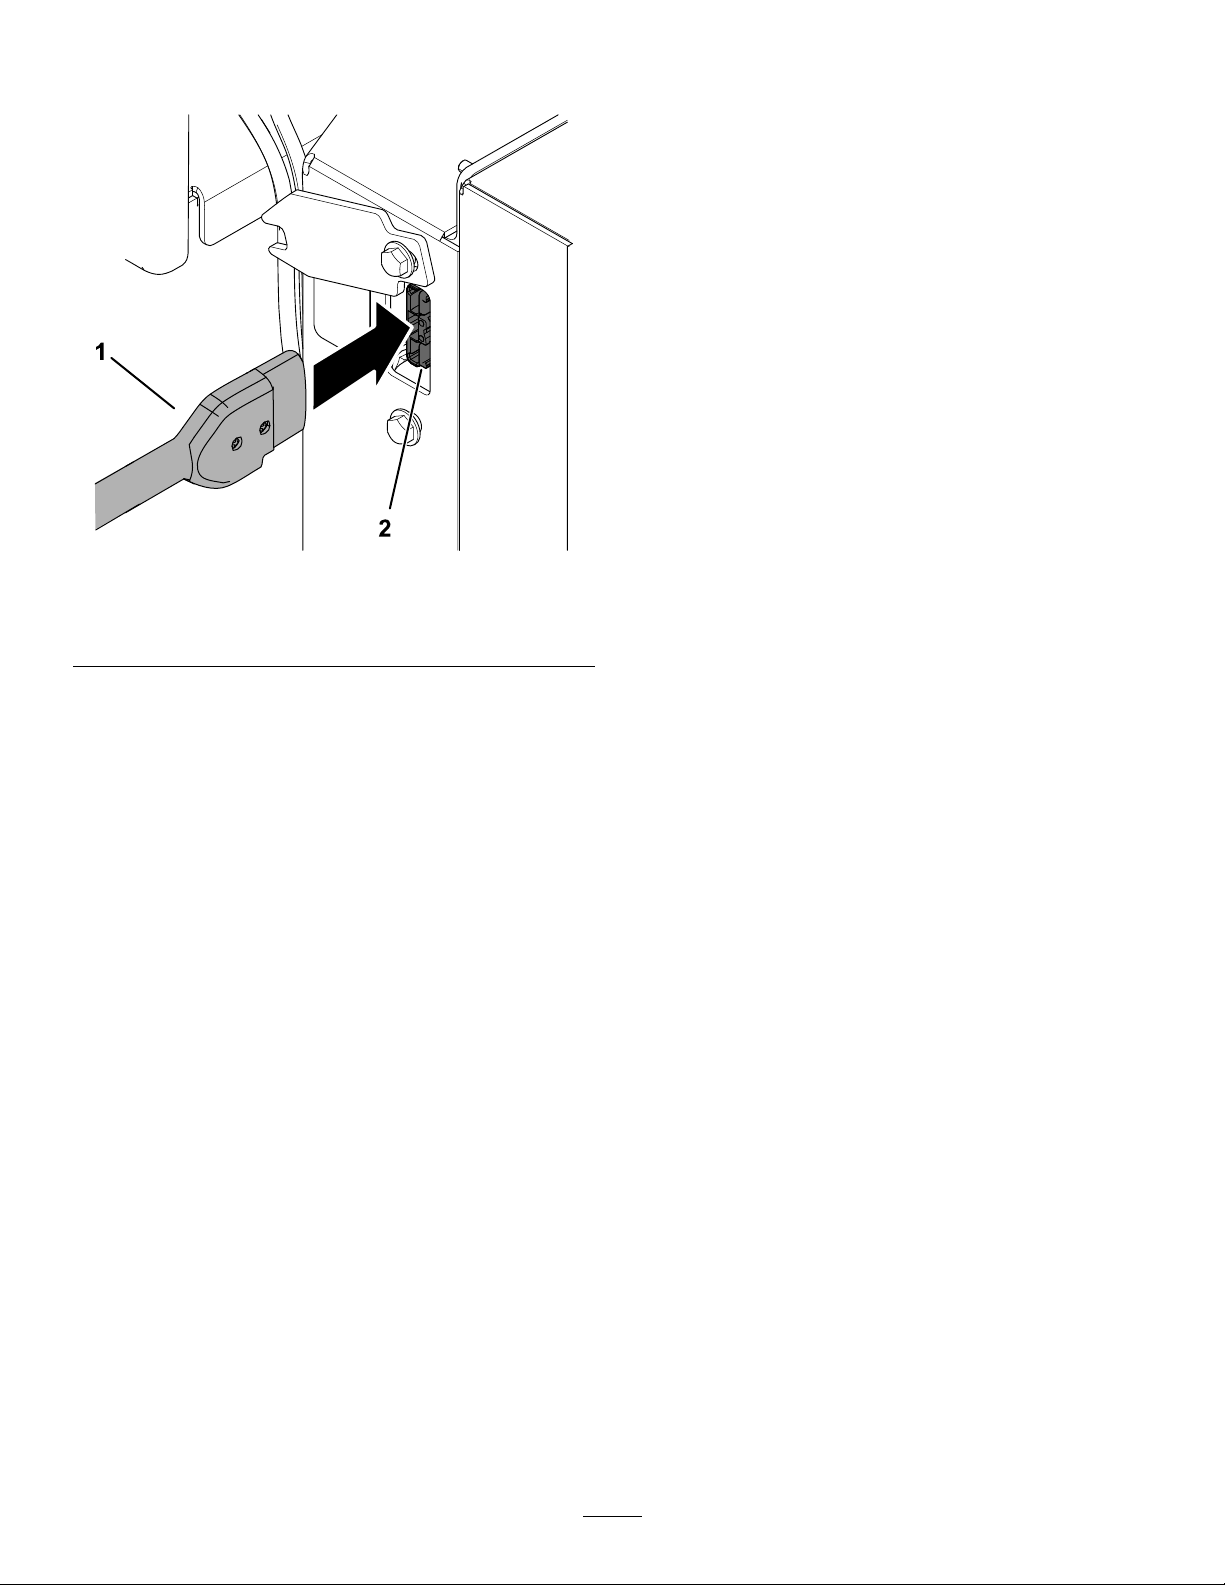
7.Plugthecharger-outputconnectorintothe
chargerconnectoronthemachine.
Figure24
MonitoringtheChargingProcess
andTroubleshooting
Note:TheLCDstatusdisplaydisplaysmessages
duringthecourseofcharging.Mostareroutine.
Ifthereisafault,theerrorindicatorlightwillash
amberorasolid,lightred.Anerrormessagewill
appearintheInfoCenter1digitatatime,startingwith
theletterEorF(e.g.,E-0-1-1).
Tocorrectanerror,refertoTroubleshooting(page39).
Ifnoneofthesesolutionscorrecttheissue,contactan
AuthorizedServiceDealer.
CompletingtheChargingProcess
Whenchargingiscomplete,thebattery-charging
indicatorlight(Figure22)showssolidgreenand
themachineInfoCenterdisplays10solidbars.
g306958
Disconnectthechargerconnectorfromthemachine
connector.
1.Charger-outputconnector
8.Observethechargertoensurethatthebatteries
arecharging.
2.Machinecharger
connector
Note:Thebattery-chargingindicatorlight
shouldashandthecharging-outputindicator
lightshouldilluminate.
Themachineamperage,displayedonthe
InfoCenter,increaseswhilethebatteriescharge.
Iftheamperageremainsat0,thebatteriesare
notcharging.
9.Disconnectthechargerwhenthemachine
reachesasufcientlevel;refertoCompleting
theChargingProcess(page26).
10.Pivotthechargercoverinplaceandslideit
downoverthelowerbolt(Figure23).
26

Maintenance
Note:Determinetheleftandrightsidesofthemachinefromthenormaloperatingposition.
MaintenanceSafety
CAUTION
Ifyouleavethekeyintheswitch,someonecouldaccidentlystarttheengineandseriously
injureyouorotherbystanders.
Removethekeyfromtheswitchbeforeyouperformanymaintenance.
•Parkthemachineonalevelsurface,disengage
theauxiliaryhydraulics,lowertheattachment,
engagetheparkingbrake,shutoffthemachine,
andremovethekey.Waitforallmovementtostop
andallowthemachinetocoolbeforeadjusting,
cleaning,storing,orrepairingit.
•Donotallowuntrainedpersonneltoservicethe
machine.
•Usejackstandstosupportthecomponentswhen
required.
•Carefullyreleasepressurefromcomponents
withstoredenergy;refertoRelievingHydraulic
Pressure(page34).
•Disconnectthebatterybeforemakinganyrepairs;
refertoDisconnectingorConnectingPowertothe
Machine(page32).
RecommendedMaintenanceSchedule(s)
MaintenanceService
Interval
MaintenanceProcedure
•Keepyourhandsandfeetawayfromthemoving
parts.Ifpossible,donotmakeadjustmentswith
theenginerunning.
•Keepallpartsingoodworkingconditionandall
hardwaretightened.Replaceallwornordamaged
decals.
•Donottamperwiththesafetydevices.
•UseonlyT oro-approvedattachments.
Attachmentscanchangethestabilityandthe
operatingcharacteristicsofthemachine.Youmay
voidthewarrantyifyouusethemachinewith
unapprovedattachments.
•UseonlygenuineTororeplacementparts.
•Ifanymaintenanceorrepairrequirestheloader
armstobeintheraisedposition,securethearms
intheraisedpositionwiththehydraulic-cylinder
lock(s).
Aftertherst8hours
Beforeeachuseordaily
Every25hours
Every100hours
Every400hours
Every1,500hoursor
2years,whichever
comesrst
•T orquethewheel-lugnuts.
•Replacethehydrauliclter.
•Greasethemachine.(Greaseimmediatelyaftereverywashing.)
•Checkthestaticstrap;replaceitifwornormissing.
•Checkthetiretreads.
•T esttheparkingbrake.
•Removedebrisfromthemachine.
•Checkforloosefasteners.
•Checkthehydrauliclinesforleaks,loosettings,kinkedlines,loosemounting
supports,wear,weather,andchemicaldeterioration.
•Checkthehydraulic-uidlevel.
•T orquethewheel-lugnuts.
•Replacethehydrauliclter.
•Replaceallmovinghydraulichoses.
27

MaintenanceService
Interval
MaintenanceProcedure
Yearly
Yearlyorbeforestorage
•Changethehydraulicuid.
•T ouchupchippedpaint.
Pre-Maintenance
Procedures
UsingtheCylinderLocks
WARNING
Theloaderarmsmaylowerwhenintheraised
position,crushinganyoneunderthem.
Installthecylinderlock(s)beforeperforming
maintenancethatrequiresraisedloaderarms.
InstallingtheCylinderLocks
1.Removetheattachment.
2.Raisetheloaderarmstothefullyraisedposition.
RemovingandStoringthe
CylinderLocks
Important:Removethecylinderlocksfromthe
rodsandfullysecuretheminthestorageposition
beforeoperatingthemachine.
1.Startthemachine.
2.Raisetheloaderarmstothefullyraisedposition.
3.Shutoffthemachineandremovethekey.
4.Removetheclevispinandcotterpinsecuring
eachcylinderlock.
5.Removethecylinderlocks.
6.Lowertheloaderarms.
7.Installthecylinderlocksoverthehydraulic
hosesandsecurethemwiththeclevispinsand
cotterpins(Figure26).
3.Shutoffthemachineandremovethekey.
4.Positionacylinderlockovereachlift-cylinder
rod(Figure25).
Figure25
1.Cylinderlock4.Clevispin
2.Liftcylinder5.Lift-cylinderrod
3.Hairpincotter
5.Secureeachcylinderlockwithaclevispinand
cotterpin(Figure25).
6.Slowlylowertheloaderarmsuntilthecylinder
lockscontactthecylinderbodiesandrodends.
g005162
1.Hydraulichoses3.Hairpincotter
2.Cylinderlocks4.Clevispin
Figure26
g319295
28
AccessingInternal
RemovingtheHood
Components
WARNING
Openingorremovingcovers,hoods,and
screenswhilethemachineisrunningcould
allowyoutocontactmovingparts,seriously
injuringyou.
Beforeopeninganyofthecovers,hoods,and
screens,shutoffthemachine,removethekey
fromthekeyswitch,andallowthemachine
tocool.
WARNING
Therotatingfancancausepersonalinjury.
•Donotoperatethemachinewithoutguards
inplace.
•Keepyourngers,hands,andclothing
clearoftherotatingfan.
Note:Ifyouneedtoaccessthemain-power
connectorsorfusebutcannotsafelyraisetheloader
armstoremovethehood,refertoRemovingtheFront
Cover(page30)foraccess.
1.Parkthemachineonalevelsurface.
2.Raisetheloaderarmsandinstallthecylinder
locks.
Note:Ifyoucannotraisetheloaderarmsusing
themachinepower,pulltheloader-armlever
rearwardanduseahoisttolifttheloaderarms.
3.Shutoffthemachine,removethekey,andwait
formovingpartstostop.
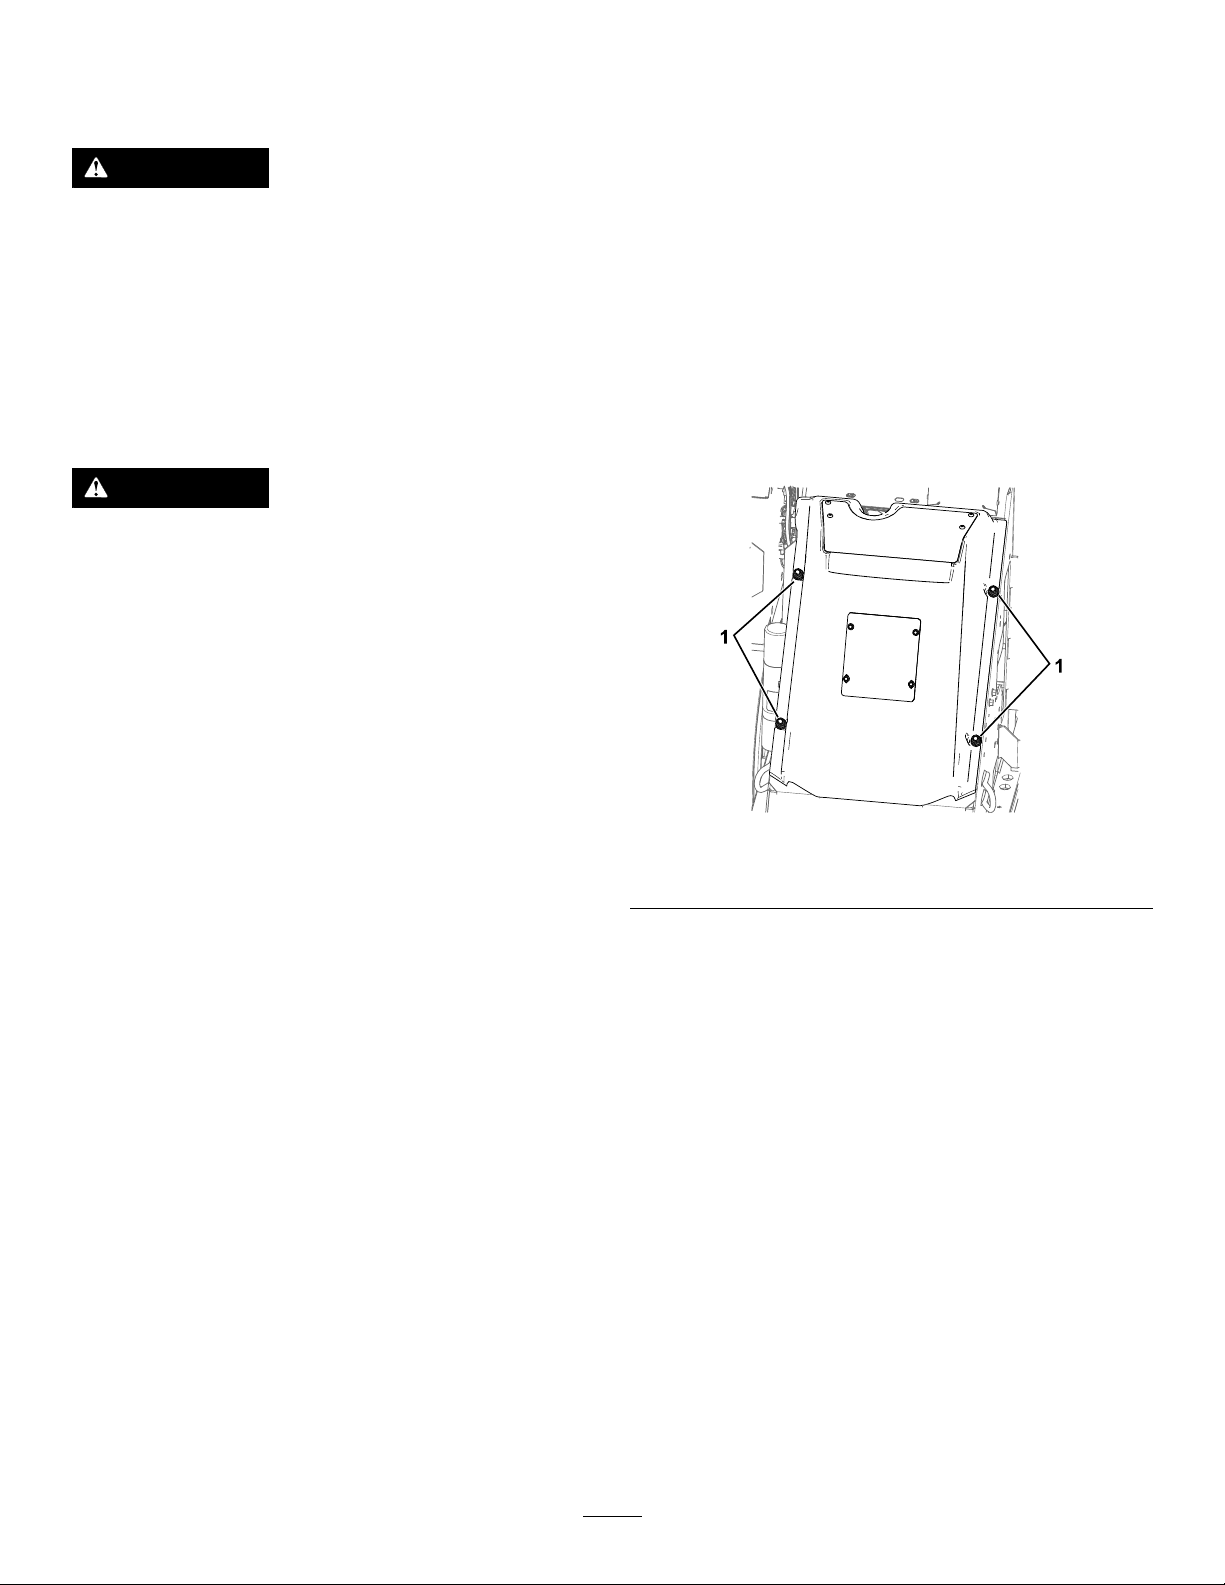
4.Loosenthe4nutssecuringthehood.
•Shutoffthemachineandremovethekey
beforeperformingmaintenance.
g304438
Figure27
1.Nuts
5.Liftthehoodandunplugthefan.
6.Pullthehoodoffthemachine.
29

RemovingtheFrontCover
DisconnectingtheMain
Important:Removethefrontcovertoaccess
themain-powerconnectorsandfuseonlywhen
youareunabletosafelyraisetheloaderarmsto
removethehood.
1.Parkthemachineonalevelsurface,lowerthe
loaderarms,andengagetheparkingbrake.
2.Shutoffthemachine,removethekey,andwait
formovingpartstostop.
3.Removethe4boltssecuringthefrontcover,
removethecover,andunplugthefan.
Power
Beforeyouservicethemachine,disconnectthe
machinefromthepowersupplybyseparatingthe
main-powerconnectors(Figure29).
CAUTION
Ifyoudonotdisconnectthepowertothe
machine,someonecouldaccidentallyturnon
themachine,causingseriousbodilyinjury.
Alwaysseparatetheconnectorsbefore
workingonthemachine.
1.Parkthemachineonalevelsurface.
2.Raisetheloaderarmsandinstallthecylinder
locks.
3.Shutoffthemachineandremovethekey.
4.Removethehood;refertoRemovingtheHood
(page29).
5.Separatethe2powerconnectors(Figure29).
Figure28
6.Makeanyrepairs.
g356986
7.Plugtheconnectorstogetherbeforeoperating
themachine.
g304040
Figure29
1.Main-powerconnectors
30

Lubrication
GreasingtheMachine
ServiceInterval:Beforeeachuseordaily(Grease
immediatelyaftereverywashing.)
GreaseType:General-purposegrease
1.Parkthemachineonalevelsurface,lowerthe
loaderarms,andengagetheparkingbrake.
2.Shutoffthemachineandremovethekey.
3.Cleanthegreasettingswitharag.
g004209
Figure31
4.Connectagreaseguntoeachtting(Figure30
andFigure31).
5.Pumpgreaseintothettingsuntilgreasebegins
tooozeoutofthebearings(approximately3
pumps).
6.Wipeupanyexcessgrease.
Figure30
g304444
31

ElectricalSystem
ServicingtheBatteries
Maintenance
ElectricalSystemSafety
•Disconnectthemain-powerconnectorsbefore
repairingthemachine.
•Chargethebatteryinanopen,well-ventilated
area,awayfromsparksandames.Unplugthe
chargerbeforeconnectingordisconnectingthe
battery.Wearprotectiveclothinganduseinsulated
tools.
Disconnectingor
ConnectingPowerto
theMachine
Themain-powerconnectorsprovidepowerfrom
thebatteriestothemachine.Disconnectthepower
byseparatingtheconnectors;connectthepower
byinstallingtheconnectorstogether.Referto
DisconnectingtheMainPower(page30).
ReplacingtheStaticStrap
ServiceInterval:Beforeeachuseordaily—Check
thestaticstrap;replaceitifwornor
missing.
1.Parkthemachineonalevelsurface,lowerthe
loaderarms,andengagetheparkingbrake.
2.Shutoffthemachineandremovethekey.
3.Undertheplatform,replacethestaticstrapas
showninFigure32.
Note:Themachineisequippedwith7lithium-ion
batteries.
Ifyouattempttoopenthemaincompartmentof
abattery,youwillvoidyourwarranty.Ifabattery
requiresservice,contactyourAuthorizedService
Dealerforassistance.
Disposeoforrecyclelithium-ionbatteriesin
accordancewithlocalandfederalregulations.
MaintainingtheBattery
Charger
Important:Allelectricalrepairsshouldbe
performedbyanAuthorizedServiceDealeronly .
Theoperatorcanperformverylittlemaintenanceother
thanprotectingthechargerfromdamageandweather.
MaintainingtheBattery-Charger
Cords
•Cleanthecordswithaslightlydampclothafter
eachuse.
•Coilthecordswhennotinuse.
•Periodicallyexaminethecordsfordamage,and
replacethemwhennecessarywithToro-approved
parts.
CleaningtheBattery-ChargerCase
Cleanthecasewithaslightlydampclothaftereach
use.
Figure32
1.Nut3.Washer
2.Staticstrap
g315429
4.Bolt
32
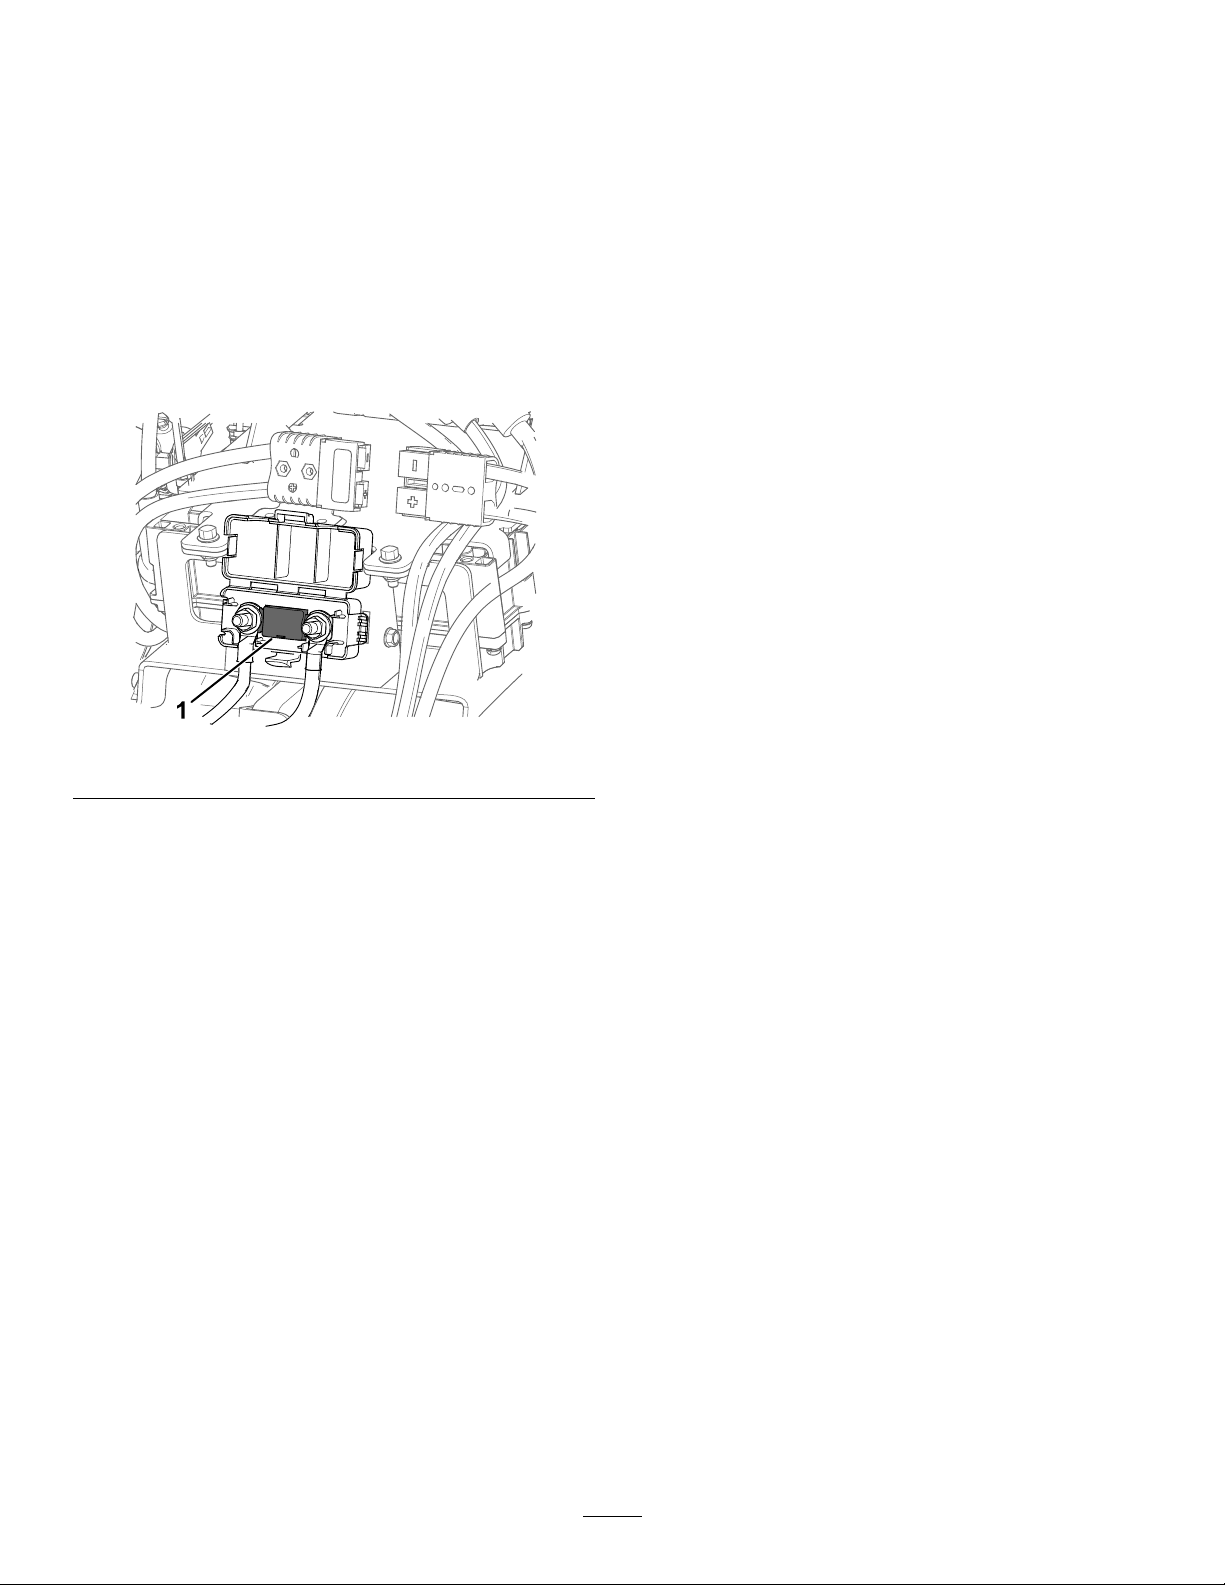
ServicingtheFuse
1.Parkthemachineonalevelsurface.
2.Raisetheloaderarmsandinstallthecylinder
locks.
3.Shutoffthemachineandremovethekey.
DriveSystem
Maintenance
CheckingtheTireTreads
4.Removethehood;refertoRemovingtheHood
(page29).
5.Disconnectthemainpowertothemachine;
refertoDisconnectingorConnectingPowerto
theMachine(page32).
6.Locatethefuseandreplaceit(Figure33).
Figure33
ServiceInterval:Beforeeachuseordaily
Checkthetiretreadsforwear.Replacethetireswhen
thetreadsarewornandshallow.
CheckingtheWheel-Lug
Nuts
ServiceInterval:Aftertherst8hours
Every100hours
Checkandtorquethewheellugnutsto68N∙m(50
ft-lb).
g304512
7.Torquethenutsto12to18N∙m(9to13ft-lb).
8.Connectthemain-powerconnectors.
9.Installthefrontcover.
33
BrakeMaintenance
TestingtheParkingBrake
HydraulicSystem
Maintenance
ServiceInterval:Beforeeachuseordaily
1.Engagetheparking-brake;referto
Parking-BrakeLever(page10).
2.Startthemachine.
3.Slowlyattempttodrivethemachineforwardor
rearward.
Note:Themachinemaymovesomebeforethe
parkingbrakelocksinplace.
4.Ifthemachinemoveswithouttheparkingbrake
lockinginplace,contactyourAuthorizedService
Dealerforservice.
HydraulicSystemSafety
•Seekimmediatemedicalattentionifuidisinjected
intoskin.Injecteduidmustbesurgicallyremoved
withinafewhoursbyadoctor.
•Ensurethatallhydraulic-uidhosesandlinesare
ingoodconditionandallhydraulicconnections
andttingsaretightbeforeapplyingpressureto
thehydraulicsystem.
•Keepyourbodyandhandsawayfrompinhole
leaksornozzlesthatejecthigh-pressurehydraulic
uid.
•Usecardboardorpapertondhydraulicleaks.
•Safelyrelieveallpressureinthehydraulicsystem
beforeperforminganyworkonthehydraulic
system.
RelievingHydraulic
Pressure
Torelievehydraulicpressurewhilethemachineison,
disengagetheauxiliaryhydraulicsandfullylowerthe
loaderarms.
Torelievethepressurewhilethemachineisoff,move
theauxiliary-hydraulicsleverbetweentheforwardand
reverseowpositionstorelieveauxiliaryhydraulic
pressure,movetheattachment-tiltleverforwardand
rearward,andmovetheloader-armleverforwardto
lowertheloaderarms(Figure34).
Figure34
g281214
34
HydraulicFluid
Checkingthe
Specications
HydraulicTankCapacity:56L(14.8USgallons)
Useonly1ofthefollowinguidsinthehydraulic
system:
•ToroPremiumTransmission/HydraulicTractor
Fluid(refertoyourAuthorizedServiceDealerfor
moreinformation)
•ToroPXExtendedLifeHydraulicFluid(refer
toyourAuthorizedServiceDealerformore
information)
•IfeitheroftheaboveT orouidsarenotavailable,
youmayuseanotherUniversalTractorHydraulic
Fluid(UTHF),buttheymustbeonlyconventional,
petroleum-basedproducts.Thespecications
mustfallwithinthelistedrangeforallthefollowing
materialpropertiesandtheuidshouldmeet
thelistedindustrystandards.Checkwithyour
hydraulicuidsuppliertodetermineiftheuid
meetsthesespecications.
Note:T orowillnotassumeresponsibilityfor
damagecausedbyimpropersubstitutions,souse
onlyproductsfromreputablemanufacturerswho
willstandbehindtheirrecommendations.
Hydraulic-FluidLevel
ServiceInterval:Every25hours
Checkthehydraulic-uidlevelbeforethemachineis
rststartedandafterevery25operatinghours.
RefertoHydraulicFluidSpecications(page35).
Important:Alwaysusethecorrecthydraulic
uid.Unspecieduidswilldamagethehydraulic
system.
1.Parkthemachineonalevelsurface,remove
anyattachment,engagetheparkingbrake,raise
theloaderarms,andinstallthecylinderlocks.
2.Shutoffthemachine,removethekey,andallow
themachinetocool.
3.Removethehood/frontaccesscover.
4.Cleantheareaaroundthellerneckofthe
hydraulictank(Figure35).
5.Removetheller-neckcapandchecktheuid
levelonthedipstick(Figure35).
Theuidlevelshouldbebetweenthemarkson
thedipstick.
MaterialProperties
cStat40°C:55to62 Viscosity,ASTMD445
cStat100°C:9.1to9.8
Viscosityindex,ASTMD2270
PourPoint,ASTMD97-43to-37°C(-46to-35°F)
IndustryStandards
APIGL-4,AGCOPoweruid821XL,FordNewHolland
FNHA-2-C-201.00,KubotaUDT ,JohnDeereJ20C,Vickers
35VQ25andVolvoWB-101/BM
140to152
Note:Manyhydraulicuidsarealmostcolorless,
makingitdifculttospotleaks.Areddyeadditive
forthehydraulicsystemuidisavailablein20ml
(0.67oz)bottles.Onebottleissufcientfor15to
22L(4to6USgallons)ofhydraulicuid.Order
PartNo.44-2500fromyourAuthorizedService
Dealer.
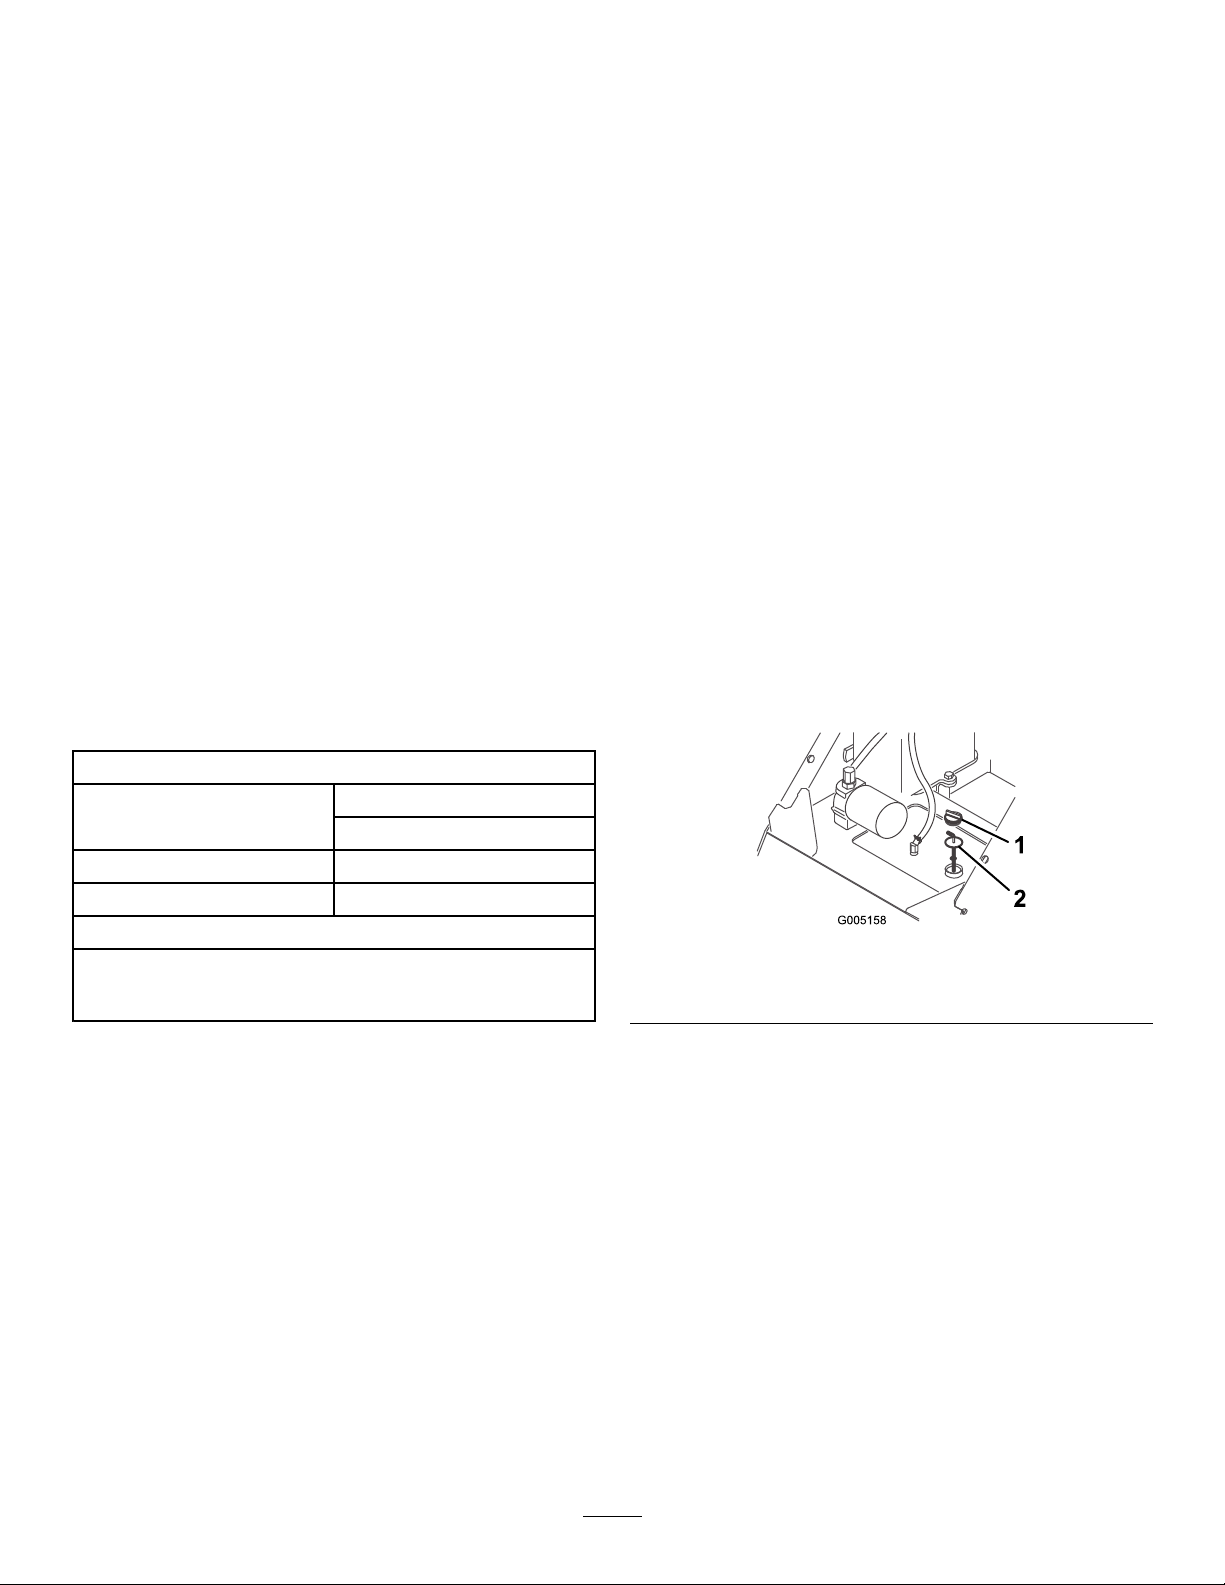
g005158
Figure35
1.Fillerneckcap2.Dipstick
6.Ifthelevelislow,addenoughuidtoraiseitto
theproperlevel.
7.Installtheller-neckcap.
8.Installthehood/frontaccesscover.
9.Removeandstorethecylinderlocksandlower
theloaderarms.
35
ReplacingtheHydraulic
ChangingtheHydraulic
Filter
ServiceInterval:Aftertherst8hours
Every400hours
Important:Donotsubstituteanautomotiveoil
lter;otherwise,severehydraulicsystemdamage
mayresult.
1.Parkthemachineonalevelsurface,remove
anyattachment,engagetheparkingbrake,raise
theloaderarms,andinstallthecylinderlocks.
2.Shutoffthemachineandremovethekey.
3.Removethehood.
4.Placeadrainpanunderthelter.
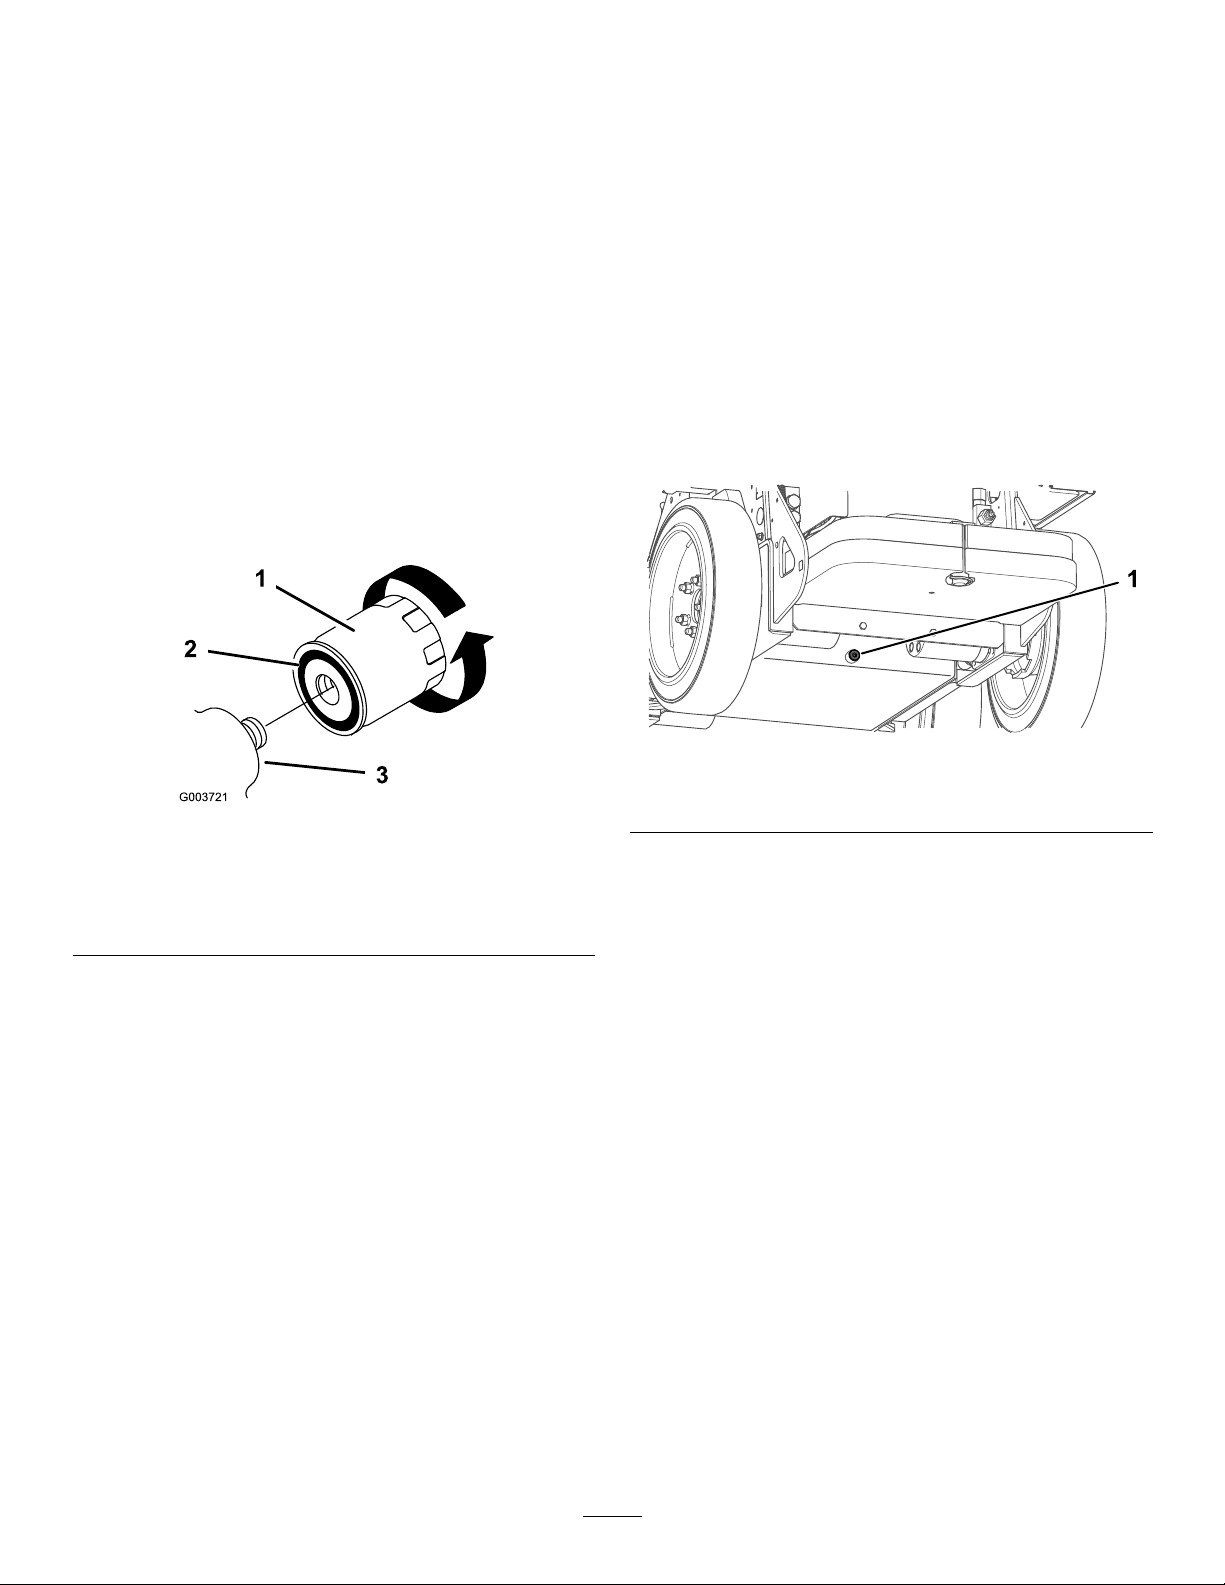
5.Removetheoldlter(Figure36)andwipethe
surfaceofthelteradapterclean.
Fluid
ServiceInterval:Yearly
1.Parkthemachineonalevelsurface,remove
anyattachment,engagetheparkingbrake,raise
theloaderarms,andinstallthecylinderlocks.
2.Shutoffthemachineandremovethekey.
3.Removethehood.
4.Placealargedrainpanunderthemachinethat
canholdatleast61L(16USgallons).
5.Removethedrainplugfromthebottomofthe
hydraulictankandallowtheuidtocompletely
drainout(Figure37).
Figure36
1.Hydrauliclter
2.Gasket
3.Filteradapter
6.Applyathincoathydraulicuidtotherubber
gasketonthereplacementlter(Figure36).
7.Installthereplacementhydrauliclterontothe
lteradapter(Figure36).Tightenitclockwise
untiltherubbergasketcontactsthelteradapter,
thentightenthelteranadditional1/2turn.
8.Cleanupanyspilleduid.
9.Startthemachineandletitrunforabout2
minutestopurgeairfromthesystem.
10.Shutoffthemachineandcheckforleaks.
11.Checktheuidlevelinthehydraulictank;refer
toCheckingtheHydraulic-FluidLevel(page35).
Adduidtoraisetheleveltomarkondipstick.
Donotoverllthetank.
g305431
Figure37
g003721
1.Drainplug
6.Installthedrainplug.
7.Fillthehydraulictankwithhydraulicuid;refer
toHydraulicFluidSpecications(page35).
Note:Disposeofuseduidatacertied
recyclingcenter.
8.Installthehood.
9.Removeandstorethecylinderlocksandlower
theloaderarms.
12.Installthehood.
13.Removeandstorethecylinderlocksandlower
theloaderarms.
36

Cleaning
Storage
RemovingDebris
ServiceInterval:Beforeeachuseordaily
1.Parkthemachineonalevelsurface,lowerthe
loaderarms,andengagetheparkingbrake.
2.Shutoffthemachineandremovethekey.
3.Cleananydebrisfromthemachine.
Important:Blowthedirtoutratherthan
washitout.Ifyouusewater,keepitaway
fromelectricalitemsandhydraulicvalves.
Cleanelectricalconnectorsusing
compressedair;donotusecontactcleaner.
4.Removeandstorethecylinderlocksandlower
theloaderarms.
WashingtheMachine
Whenpressurewashingthemachine,dothefollowing:
•Wearappropriatepersonalprotectiveequipment
forthepressurewasher.
•Keepallguardsinplaceonthemachine.
•Avoidsprayingatelectroniccomponents.
•Avoidsprayingatedgesofdecals.
•Spraytheexteriorofthemachineonly .Donot
spraydirectlyintoopeningsinthemachine.
•Sprayonlythedirtypartsofthemachine.
•Usea40-degreeorlargerspraynozzle.40-degree
nozzlesareusuallywhite.
•Keepthetipofthepressurewasheratleast61cm
(2ft)awayfromthesurfacebeingwashed.
•Useonlypressurewasherswithpressurebelow
13790kpa(2000psi)andowbelow7.6L(2US
gallons)perminute.
•Replacedamagedorpeelingdecals.
StorageSafety
•Shutoffthemachine,removethekey ,waitforall
movingpartstostop,andallowthemachineto
coolbeforestoringit.
•Donotstorethemachinenearames.
StoringtheMachine
1.Parkthemachineonalevelsurface,lowerthe
loaderarms,andengagetheparkingbrake.
2.Shutoffthemachineandremovethekey.
3.Removedirtandgrimefromtheexternalparts
oftheentiremachine.
Important:Washthemachineusingmild
detergentandwater.Avoidexcessiveuse
ofwater,especiallynearthecontrolpanel,
hydraulicpumps,andmotors.
4.Greasethemachine;refertoGreasingthe
Machine(page31).
5.Torquethewheellugnuts;refertoCheckingthe
Wheel-LugNuts(page33).
6.Checkthehydraulicuidlevel;refertoChecking
theHydraulic-FluidLevel(page35).
7.Checkandtightenallfasteners.Repairor
replaceanyworn,damaged,ormissingparts.
8.Paintallscratchedorbaremetalsurfaceswith
paintavailablefromyourAuthorizedService
Dealer.
9.Storethemachineinaclean,drygarageor
storagearea.Removethekeyfromthekey
switchandkeepitinamemorableplace.
10.Forprolongedstorage,followthebattery
storagerequirements;refertoBatteryStorage
Requirements(page38).
11.Coverthemachinetoprotectitandkeepitclean.
•Greaseallgreasepointsafterwashing;referto
GreasingtheMachine(page31).
37

BatteryStorage
Requirements
Note:Y oudonotneedtoremovethebatteriesfrom
themachineforstorage.
Fortemperaturerequirementsforstorage,refertothe
followingtable:
TemperatureRequirementsforStorage
StorageConditions
Normalstorageconditions
Extremeheat—1monthor
less
Extremecold—3monthsor
less
TemperatureRequirement
-20°to45°C(-12°to1 13°F)
45°to60°C(113°to140°F)
-30°to-20°C(-22°to-12°F)
Important:Temperaturesoutsideofthisrange
willdamageyourbatteries.
Thetemperatureatwhichthebatteriesarestored
affectstheirlong-termlife.Storageforlong
periodsoftimeatextremetemperatureswill
reducethebatterylife.Storethemachineinthe
normalstorageconditionsindicatedinthetable
above.
•Beforeyoustorethemachine,chargeordischarge
thebatteriesbetween40%to60%(50.7Vto
52.1V).
Note:A50%chargeisoptimaltoensurea
maximumbatterylife.Whenthebatteriesare
chargedto100%beforestorage,thebatterylife
shortens.
Ifyouanticipatethatthemachinewillbestored
foralongerperiodoftime,chargethebatteries
toaround60%.
•Forevery6monthsofstorage,checkthe
battery-chargelevelandensurethatitisbetween
40%and60%.Ifthechargeisbelow40%,charge
thebatteriesbetween40%to60%.
•Afterchargingthebatteries,disconnectthebattery
chargerfrompower.
•Ifyouleavethechargeronthemachine,itshutsoff
afterthebatteriesarefullychargedanddoesnot
turnbackonunlessthechargerisdisconnected
andreconnected.
38

Troubleshooting
MachineTroubleshooting
Problem
Themachinedoesnotdrive.
Whenatrest,theloaderarmslowermore
than7.6cm(3inches)perhour(lessthan
7.6cmor3inchesanhourisnormalfor
themachine).
Whenatrest,theloaderarmslower5cm
(2inches)quicklyandthenstop.
Themachinedoesnotcharge.
Themachinedoesnotstartimmediately
aftershuttingitoff.
Themachinedoesnotresumeoperation
afteridling.
Battery-ChargerErrorCodes
Problem
PossibleCauseCorrectiveAction
1.Theparkingbrakeisengaged.1.Disengagetheparkingbrake.
2.Thehydraulic-uidlevelislow.2.Addhydraulicuidtothereservoir.
3.Thehydraulicsystemisdamaged.
1.Thevalvespoolisleaking.
1.Thecylindersealsareleaking.1.Replacetheseals.
1.Thetemperatureisabove60°C(1 13°F)
orbelow-5°C(23°F).
1.Themachinedidnotpowerdown
completely.
1.ThemachineisinPowerSaveMode.
PossibleCauseCorrectiveAction
3.ContactyourAuthorizedService
Dealer.
1.ContactyourAuthorizedService
Dealer.
1.Chargethemachineinconditions
between-5°C(23°F)and60°C(113°F).
1.Allowthemachinetocompletelypower
downbeforestartingitagain.
1.Rapidlymoveatractionlevertwiceor
shutoffandstartthemachineagain.
CodeE-0-0-1,orE-0-4-7
CodeE-0-0-41.BMSorbatteryfaultdetected1.ContactanAuthorizedServiceDealer.
CodeE-0-0-7
CodeE-0-1-2
CodeE-0-2-31.HighACvoltageerror(>270VAC)1.ConnectchargertoanACsourcethat
CodeE-0-2-41.Chargerfailedtoinitialize
CodeE-0-2-51.LowACvoltageoscillationerror
1.Batteryhighvoltage1.Ensurethatthebatteryvoltageis
correctandthecableconnectionsare
secure;ensurethatthebatteryisin
goodcondition.
1.Batteryamphourlimitexceeded1.Possiblecausesincludepoorbattery
health,verydeeplydischargedbattery,
poorlyconnectedbattery ,and/or
highparasiticloadsonbatterywhile
charging.Possiblesolutions:Replace
batteries.Disconnectparasiticloads.
Thiserrorwillclearoncethechargeris
resetbycyclingDC.
1.Reversepolarityerror1.Thebatteryisconnectedtothecharger
incorrectly.Ensurethatthebattery
connectionsaresecure.
providesstableACbetween85-270
VAC/45-65Hz.
1.Thechargerhasfailedtoturnon
properly.DisconnecttheACinputand
batteryconnectionfor30seconds
beforeretrying.
1.TheACsourceisunstable.Could
becausedbyundersizedgenerator
orseverelyundersizedinputcables.
ConnectchargertoanACsourcethat
providesstableACbetween85-270
VAC/45-65Hz.
39

Problem
PossibleCauseCorrectiveAction
CodeE-0-3-71.Re-programmingfailed1.Softwareupgradefailureorscript
CodeE-0-2-9,E-0-3-0,E-0-3-2,E-0-4-6,
orE-0-6-0
1.Communicationerrorwithbattery1.Ensurethattheconnectionofthe
operationfailure.Ensurethatthenew
softwareiscorrect.
signalwirestothebatteryissecure.
Battery-ChargerFaultCodes
Problem
F-0-0-1,F-0-0-2,F-0-0-3,F-0-0-4,
F-0-0-5,F-0-0-6,orF-0-0-7
1.Internalchargerfault1.RemovetheACconnectionand
PossibleCauseCorrectiveAction
batteryconnectionforaminimumof
30secondsandretry.Ifitfailsagain,
pleasecontactanAuthorizedService
Dealer.
40

Notes:

Notes:

EEA/UKPrivacyNotice
Toro’sUseofYourPersonalInformation
TheT oroCompany(“T oro”)respectsyourprivacy .Whenyoupurchaseourproducts,wemaycollectcertainpersonalinformationaboutyou,eitherdirectly
fromyouorthroughyourlocalT orocompanyordealer.T orousesthisinformationtofullcontractualobligations-suchastoregisteryourwarranty,
processyourwarrantyclaimortocontactyouintheeventofaproductrecall-andforlegitimatebusinesspurposes-suchastogaugecustomer
satisfaction,improveourproductsorprovideyouwithproductinformationwhichmaybeofinterest.T oromayshareyourinformationwithoursubsidiaries,
afliates,dealersorotherbusinesspartnersinconnectiontheseactivities.Wemayalsodisclosepersonalinformationwhenrequiredbylaworin
connectionwiththesale,purchaseormergerofabusiness.Wewillneversellyourpersonalinformationtoanyothercompanyformarketingpurposes.
RetentionofyourPersonalInformation
Torowillkeepyourpersonalinformationaslongasitisrelevantfortheabovepurposesandinaccordancewithlegalrequirements.Formoreinformation
aboutapplicableretentionperiodspleasecontactlegal@toro.com.
Toro’sCommitmenttoSecurity
YourpersonalinformationmaybeprocessedintheUSoranothercountrywhichmayhavelessstrictdataprotectionlawsthanyourcountryofresidence.
Wheneverwetransferyourinformationoutsideofyourcountryofresidence,wewilltakelegallyrequiredstepstoensurethatappropriatesafeguardsare
inplacetoprotectyourinformationandtomakesureitistreatedsecurely.
AccessandCorrection
Youmayhavetherighttocorrectorreviewyourpersonaldata,orobjecttoorrestricttheprocessingofyourdata.T odoso,pleasecontactusbyemail
atlegal@toro.com.IfyouhaveconcernsaboutthewayinwhichT orohashandledyourinformation,weencourageyoutoraisethisdirectlywithus.
PleasenotethatEuropeanresidentshavetherighttocomplaintoyourDataProtectionAuthority.
374-0282RevC

CaliforniaProposition65WarningInformation
Whatisthiswarning?
Youmayseeaproductforsalethathasawarninglabellikethefollowing:
WARNING:CancerandReproductiveHarm—www.p65Warnings.ca.gov.
WhatisProp65?
Prop65appliestoanycompanyoperatinginCalifornia,sellingproductsinCalifornia,ormanufacturingproductsthatmaybesoldinorbroughtinto
California.ItmandatesthattheGovernorofCaliforniamaintainandpublishalistofchemicalsknowntocausecancer,birthdefects,and/orother
reproductiveharm.Thelist,whichisupdatedannually,includeshundredsofchemicalsfoundinmanyeverydayitems.ThepurposeofProp65isto
informthepublicaboutexposuretothesechemicals.
Prop65doesnotbanthesaleofproductscontainingthesechemicalsbutinsteadrequireswarningsonanyproduct,productpackaging,orliteraturewith
theproduct.Moreover,aProp65warningdoesnotmeanthataproductisinviolationofanyproductsafetystandardsorrequirements.Infact,the
CaliforniagovernmenthasclariedthataProp65warning“isnotthesameasaregulatorydecisionthataproductis‘safe’or‘unsafe.’”Manyofthese
chemicalshavebeenusedineverydayproductsforyearswithoutdocumentedharm.Formoreinformation,gotohttps://oag.ca.gov/prop65/faqs-view-all
AProp65warningmeansthatacompanyhaseither(1)evaluatedtheexposureandhasconcludedthatitexceedsthe“nosignicantrisklevel”;or(2)
haschosentoprovideawarningbasedonitsunderstandingaboutthepresenceofalistedchemicalwithoutattemptingtoevaluatetheexposure.
Doesthislawapplyeverywhere?
Prop65warningsarerequiredunderCalifornialawonly.ThesewarningsareseenthroughoutCaliforniainawiderangeofsettings,includingbutnot
limitedtorestaurants,grocerystores,hotels,schools,andhospitals,andonawidevarietyofproducts.Additionally ,someonlineandmailorder
retailersprovideProp65warningsontheirwebsitesorincatalogs.
.
HowdotheCaliforniawarningscomparetofederallimits?
Prop65standardsareoftenmorestringentthanfederalandinternationalstandards.TherearevarioussubstancesthatrequireaProp65warning
atlevelsthatarefarlowerthanfederalactionlimits.Forexample,theProp65standardforwarningsforleadis0.5μg/day,whichiswellbelow
thefederalandinternationalstandards.
Whydon’tallsimilarproductscarrythewarning?
•ProductssoldinCaliforniarequireProp65labellingwhilesimilarproductssoldelsewheredonot.
•AcompanyinvolvedinaProp65lawsuitreachingasettlementmayberequiredtouseProp65warningsforitsproducts,butothercompanies
makingsimilarproductsmayhavenosuchrequirement.
•TheenforcementofProp65isinconsistent.
•CompaniesmayelectnottoprovidewarningsbecausetheyconcludethattheyarenotrequiredtodosounderProp65;alackofwarningsfora
productdoesnotmeanthattheproductisfreeoflistedchemicalsatsimilarlevels.
WhydoesToroincludethiswarning?
Torohaschosentoprovideconsumerswithasmuchinformationaspossiblesothattheycanmakeinformeddecisionsabouttheproductstheybuyand
use.T oroprovideswarningsincertaincasesbasedonitsknowledgeofthepresenceofoneormorelistedchemicalswithoutevaluatingthelevelof
exposure,asnotallthelistedchemicalsprovideexposurelimitrequirements.WhiletheexposurefromT oroproductsmaybenegligibleorwellwithinthe
“nosignicantrisk”range,outofanabundanceofcaution,T orohaselectedtoprovidetheProp65warnings.Moreover,ifT orodoesnotprovidethese
warnings,itcouldbesuedbytheStateofCaliforniaorbyprivatepartiesseekingtoenforceProp65andsubjecttosubstantialpenalties.
RevA
 Loading...