

Page 1
FormNo.3364-349RevB
53cmHeavy-DutyRearBagger
LawnMower
ModelNo.22189TE—SerialNo.310000001andUp
ToregisteryourproductordownloadanOperator'sManualorPartsCatalogatnocharge,gotowww.T oro.com.OriginalInstructions(EN)
Page 2
Introduction
Thisrotary-blade,walk-behindlawnmoweris
intendedtobeusedbyresidentialhomeowners
orprofessional,hiredoperators.Itisdesigned
primarilyforcuttinggrassonwell-maintainedlawns
onresidentialorcommercialproperties.Itisnot
designedforcuttingbrushorforagriculturaluses.
Readthisinformationcarefullytolearnhowtooperate
andmaintainyourproductproperlyandtoavoidinjury
andproductdamage.Youareresponsibleforoperating
theproductproperlyandsafely.
YoumaycontactTorodirectlyatwww .T oro.comfor
productandaccessoryinformation,helpndingadealer,
ortoregisteryourproduct.
Wheneveryouneedservice,genuineToroparts,
oradditionalinformation,contactanAuthorized
ServiceDealerorToroCustomerServiceandhave
themodelandserialnumbersofyourproductready .
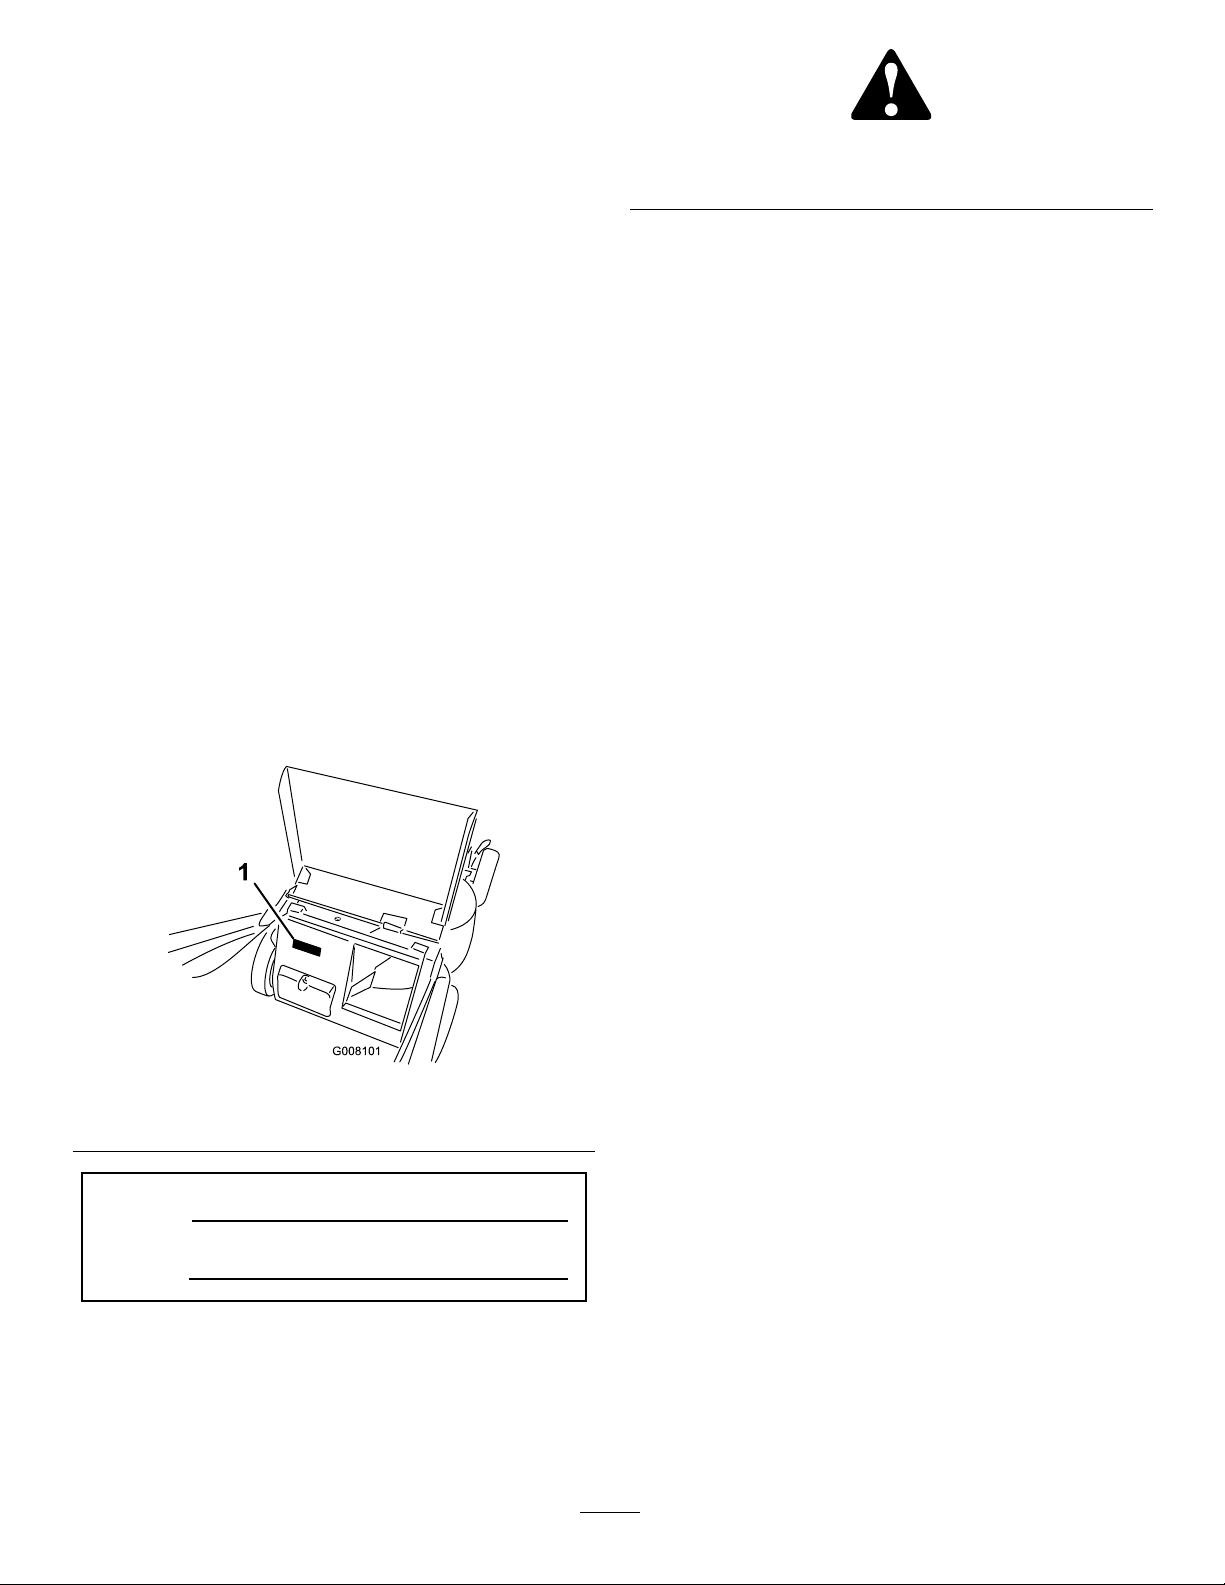
Figure1identiesthelocationofthemodelandserial
numbersontheproduct.Writethenumbersinthe
spaceprovided.
Figure1
1.Modelandserialnumberlocation
ModelNo.
SerialNo.
Thismanualidentiespotentialhazardsandhassafety
messagesidentiedbythesafetyalertsymbol(Figure2),
whichsignalsahazardthatmaycauseseriousinjury
ordeathifyoudonotfollowtherecommended
precautions.
Figure2
1.Safetyalertsymbol
Thismanualuses2wordstohighlightinformation.
Importantcallsattentiontospecialmechanical
informationandNoteemphasizesgeneralinformation
worthyofspecialattention.
Contents
Introduction.................................................................2
Safety...........................................................................3
GeneralLawnMowerSafety.................................3
SoundPressure.....................................................5
SoundPower........................................................5
Hand-ArmVibration............................................5
SafetyandInstructionalDecals.............................5
Setup...........................................................................7
1InstallingtheHandle..........................................7
2InstallingtheFuelTankandtheFuel
Line..................................................................7
3FillingtheCrankcasewithOil.............................8
ProductOverview........................................................9
Controls...............................................................9
Specications.......................................................9
Operation...................................................................10
CheckingtheEngineOilLevel............................10
FillingtheFuelTankwithGasoline.....................11
StartingtheEngine.............................................12
StoppingtheEngine...........................................12
OperatingtheBlade............................................12
OperatingtheTractionDrive..............................13
CheckingtheBladeBrakeClutch........................13
AdjustingtheCuttingHeight..............................14
UsingtheGrassBag...........................................14
OperatingTips...................................................15
Maintenance...............................................................17
RecommendedMaintenanceSchedule(s)................17
Lubrication.............................................................18
LubricatingthePivotArms.................................18
LubricatingtheGearCase...................................18
EngineMaintenance...............................................18
ServicingtheAirFilter........................................18
ChangingtheEngineOil....................................19
ChangingtheOilFilter.......................................19
ServicingtheSparkPlug.....................................20
FuelSystemMaintenance.......................................21
EmptyingtheFuelTankandCleaningthe
FuelFilter.......................................................21
©2013—TheT oro®Company
8111LyndaleAvenueSouth
Bloomington,MN55420
Contactusatwww.Toro.com.
2
PrintedintheUSA
AllRightsReserved
Page 3

DriveSystemMaintenance.....................................21
AdjustingtheSelf-propelDrive...........................21
ControlsSystemMaintenance.................................23
AdjustingtheBladeBrakeCable.........................23
BladeMaintenance.................................................24
MaintainingtheCuttingBlade.............................24
Cleaning.................................................................26
CleaningundertheMowerHousing....................26
CleaningtheBladeBrakeClutchShield...............26
Storage.......................................................................27
PreparingtheFuelSystem...................................27
PreparingtheEngine..........................................27
GeneralInformation..........................................27
RemovingtheLawnMowerfromStorage............28
Troubleshooting.........................................................29
Safety
Improperlyusingormaintainingthismowercan
resultininjury .Toreducethepotentialforinjury,
complywiththesesafetyinstructions.
Torodesignedandtestedthismowerforreasonablysafe
service;however,failuretocomplywiththefollowing
instructionsmayresultinpersonalinjury.
Toensuremaximumsafety,bestperformance,and
togainknowledgeoftheproduct,itisessential
thatyouandanyotheroperatorofthemowerread
andunderstandthecontentsofthismanualbefore
theengineiseverstarted.Payparticularattention
tothesafetyalertsymbol(
Caution,Warning,orDanger—“personalsafety
instruction.”Readandunderstandtheinstruction
becauseithastodowithsafety .Failuretocomply
withtheinstructionmayresultinpersonalinjury.
GeneralLawnMowerSafety
Figure2)whichmeans
ThefollowinginstructionshavebeenadaptedfromEN
836.
Thiscuttingmachineiscapableofamputatinghands
andfeetandthrowingobjects.Failuretoobservethe
followingsafetyinstructionscouldresultinserious
injuryordeath.
Training
•Readtheinstructionscarefully.Befamiliarwiththe
controlsandtheproperuseoftheequipment.
•Neverallowchildrenorpeopleunfamiliarwiththese
instructionstousethemower.Localregulationscan
restricttheageoftheoperator.
•Keepinmindthattheoperatororuserisresponsible
foraccidentsorhazardsoccurringtootherpeopleor
theirproperty.
•Understandexplanationsforallpictogramsusedon
themowerorintheinstructions.
Gasoline
WARNING-Gasolineishighlyammable.Takethe
followingprecautions.
•Storefuelincontainersspecicallydesignedforthis
purpose.
•Refueloutdoorsonlyanddonotsmokewhile
refueling.
•Addfuelbeforestartingtheengine.Neverremove
thecapofthefueltankoraddgasolinewhilethe
engineisrunningorwhentheengineishot.
3
Page 4

•Ifgasolineisspilled,donotattempttostartthe
enginebutmovethemowerawayfromtheareaof
spillageandavoidcreatinganysourceofignition
untilgasolinevaporshavedissipated.
•Replaceallfueltankandcontainercapssecurely.
Preparation
•Whilemowing,alwayswearsubstantialfootwearand
longtrousers.Donotoperatetheequipmentwhen
barefootorwearingopensandals.
•Thoroughlyinspecttheareawheretheequipmentis
tobeusedandremoveallstones,sticks,wires,bones
andotherforeignobjects.
•Beforeusing,alwaysvisuallyinspecttoseethat
guards,andsafetydevices,suchasdeectorsand/or
grasscatchers,areinplaceandworkingcorrectly.
•Beforeusing,alwaysvisuallyinspecttoseethatthe
blades,bladeboltsandcutterassemblyarenotworn
ordamaged.Replacewornordamagedbladesand
boltsinsetstopreservebalance.
Starting
•Donottiltmowerwhenstartingtheengineunless
themowerhastobetiltedforstarting.Inthiscase,
donottiltitmorethanabsolutelynecessaryandlift
onlythepart,whichisawayfromtheoperator.
•Starttheenginecarefullyaccordingtoinstructions
andwithfeetwellawayfromtheblade(s)andnotin
frontofthedischargechute.
Operation
•Nevermowwhilepeople,especiallychildren,orpets
arenearby .
•Mowonlyindaylightoringoodarticiallight.
•Stayalertforholesintheterrainandotherhidden
hazards.
•Donotputhandsorfeetnearorunderrotatingparts.
Keepclearofthedischargeopeningatalltimes.
•Neverpickuporcarryalawnmowerwhilethe
engineisrunning.
•Useextremecautionwhenreversingorpullinga
pedestriancontrolledlawnmowertowardsyou.
•Walk,neverrun.
•Slopes:
–Donotmowexcessivelysteepslopes.
–Exerciseextremecautionwhenonslopes.
–Mowacrossthefaceofslopes,neverupand
downandexerciseextremecautionwhen
changingdirectiononslopes.
–Alwaysbesureofyourfootingonslopes.
•Reducespeedonslopesandinsharpturnstoprevent
overturningorlossofcontrol.
•Stopthebladeifthelawnmowerhastobetiltedfor
transportationwhencrossingsurfacesotherthan
grassandwhentransportingthelawnmowertoand
fromtheareatobemowed.
•Donotoperatetheengineinaconnedspacewhere
dangerouscarbonmonoxidefumescancollect.
•Stoptheengine
–wheneveryouleavethelawnmower.
–beforerefueling.
–beforeremovingthegrasscatcher.
–beforemakingheightadjustmentunless
adjustmentcanbemadefromtheoperator's
position.
•Stoptheengineanddisconnectthespark-plugwire.
–beforeclearingblockagesoruncloggingchute.
–beforechecking,cleaningorworkingonthelawn
mower.
–afterstrikingaforeignobject,inspectthelawn
mowerfordamageandmakerepairsbefore
restartingandoperatingthelawnmower.
–iflawnmowerstartstovibrateabnormally(check
immediately).
•Lightningcancausesevereinjuryordeath.Ifyousee
lightningorhearthunderinthearea,donotoperate
themachine;seekshelter.
•Watchoutfortrafcwhencrossingornearroadways.
MaintenanceandStorage
•Keepallnuts,boltsandscrewstighttobesurethe
equipmentisinsafeworkingcondition.
•Donotusepressurecleaningequipmentonmachine.
•Neverstoretheequipmentwithgasolineinthetank
andinsideabuildingwherefumescanreachanopen
ameorspark.
•Allowtheenginetocoolbeforestoringinany
enclosure.
•Toreducetherehazard,keeptheengine,silencer,
batterycompartmentandgasolinestoragearefreeof
grass,leaves,orexcessivegrease.
•Checkgrasscatchercomponentsandthedischarge
guardfrequentlyandreplacewithmanufacturer's
recommendedparts,whennecessary.
•Replacewornordamagedpartsforsafety .
•Replacefaultysilencers.
4
Page 5
•Ifthefueltankhastobedrained,dothisoutdoors.
•Donotchangetheenginegovernorsettingsor
overspeedtheengine.Operatinganengineat
excessivespeedcanincreasethehazardofpersonal
injury.
•Onmultibladedlawnmowers,takecareasrotating
oneblademaycauseotherstorotate.
•Becarefulduringadjustmentofthelawnmowerto
prevententrapmentofthengersbetweenmoving
bladesandxedpartsofthelawnmower.
•Toensurethebestperformanceandsafety ,
purchaseonlygenuineT ororeplacementparts
andaccessories.Donotuse
will t
partsand
accessories;theymaycauseasafetyhazard.
of1dBA.Thesoundpressurelevelwasdetermined
accordingtotheproceduresoutlinedinEN836.
SoundPower
Thisunithasaguaranteedsoundpowerlevelof98dBA,
whichincludesanUncertaintyValue(K)of1dBA.The
soundpowerlevelwasdeterminedaccordingtothe
proceduresoutlinedinISO11094.
Hand-ArmVibration
Measuredvibrationlevelforthelefthand=5.3m/s
Measuredvibrationlevelfortherighthand=3.5m/s
UncertaintyValue(K)=2.1m/s
2
2
2
SoundPressure
Thisunithasasoundpressurelevelattheoperator’s
earof90dBA,whichincludesanUncertaintyValue(K)
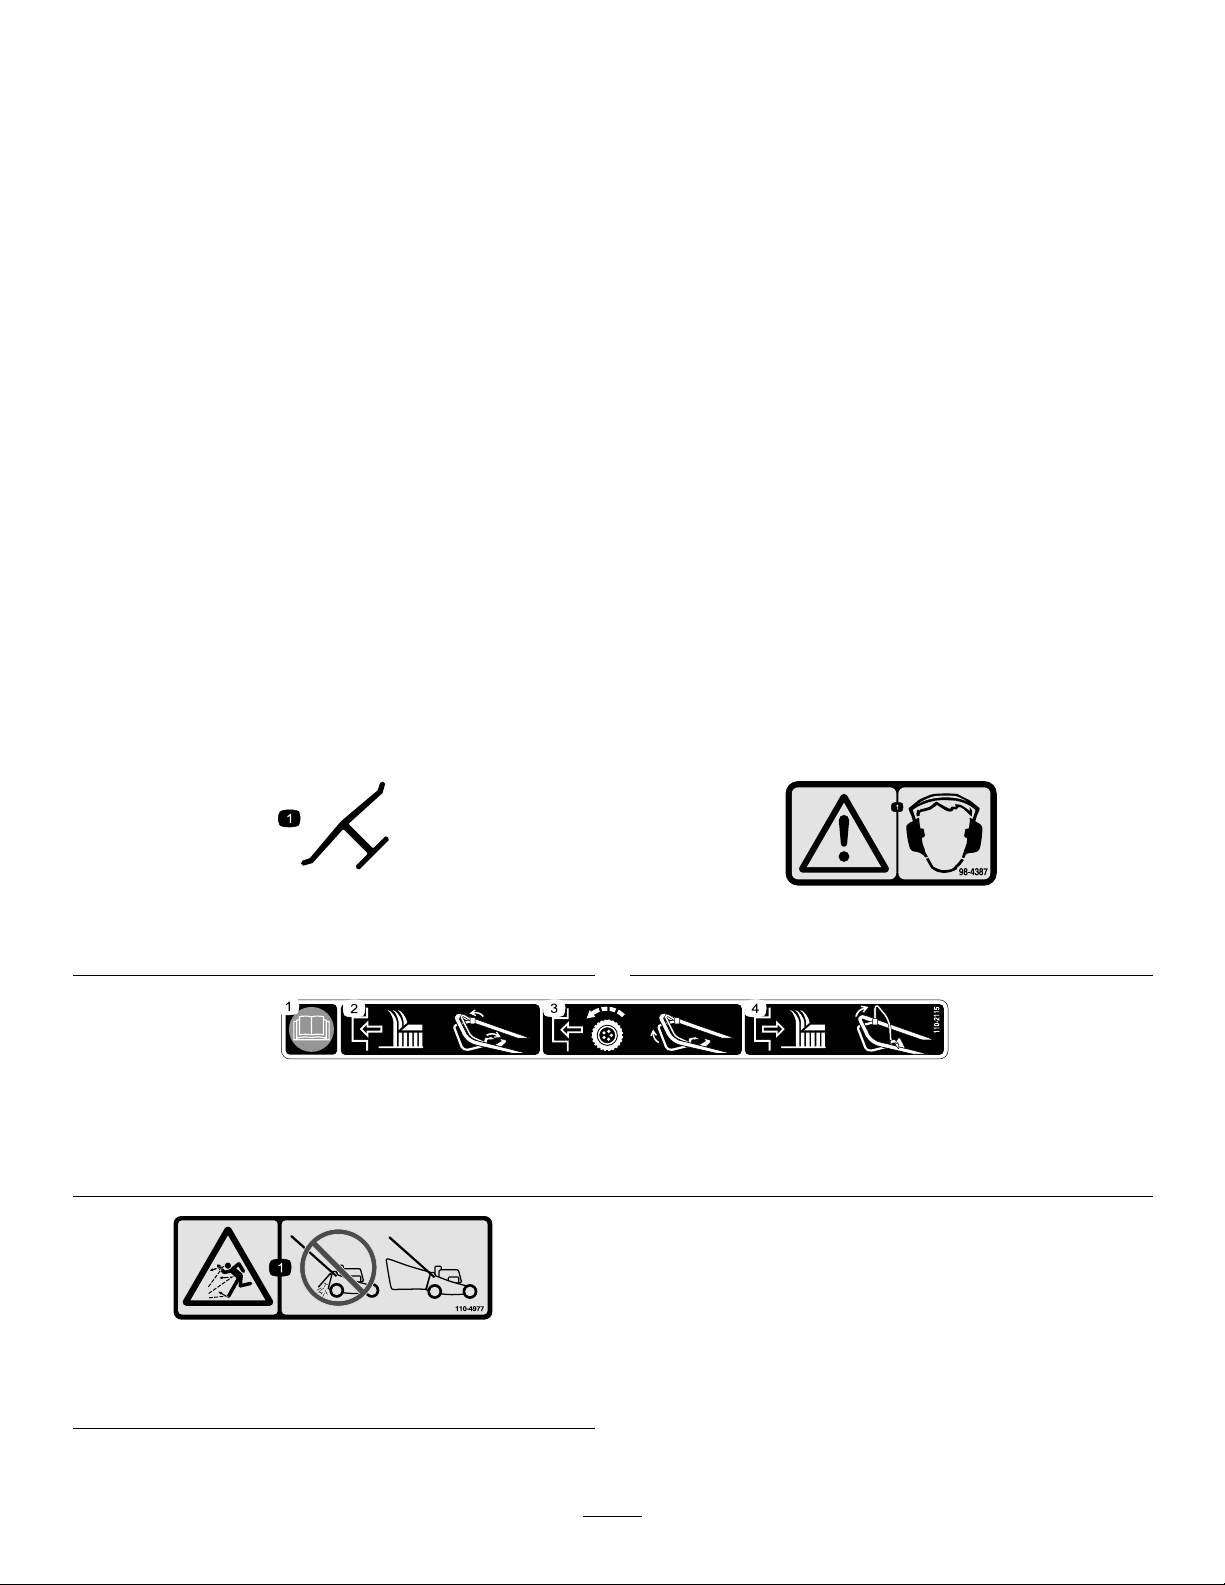
SafetyandInstructionalDecals
Safetydecalsandinstructionsareeasilyvisibletotheoperatorandarelocatednearanyareaof
potentialdanger.Replaceanydecalthatisdamagedorlost.
Manufacturer'sMark
1.Indicatesthebladeisidentiedasapartfromtheoriginal
machinemanufacturer.
Themeasuredvaluesweredeterminedaccordingtothe
proceduresoutlinedinEN836.
98-4387
1.Warning—wearhearingprotection.
110-2115
1.ReadtheOperator'sManual.3.Toengagethetractioncontrol,liftthelowerbailupward.
2.Toengagetheblade,rstmovethesafetylatchforwardand
thenpulltheupperbailtotherear.
110-4977
1.Thrownobjecthazard—donotoperatethemowerwithout
abaginplace.
4.Todisengagetheblade,releasetheupperbail.
5
Page 6
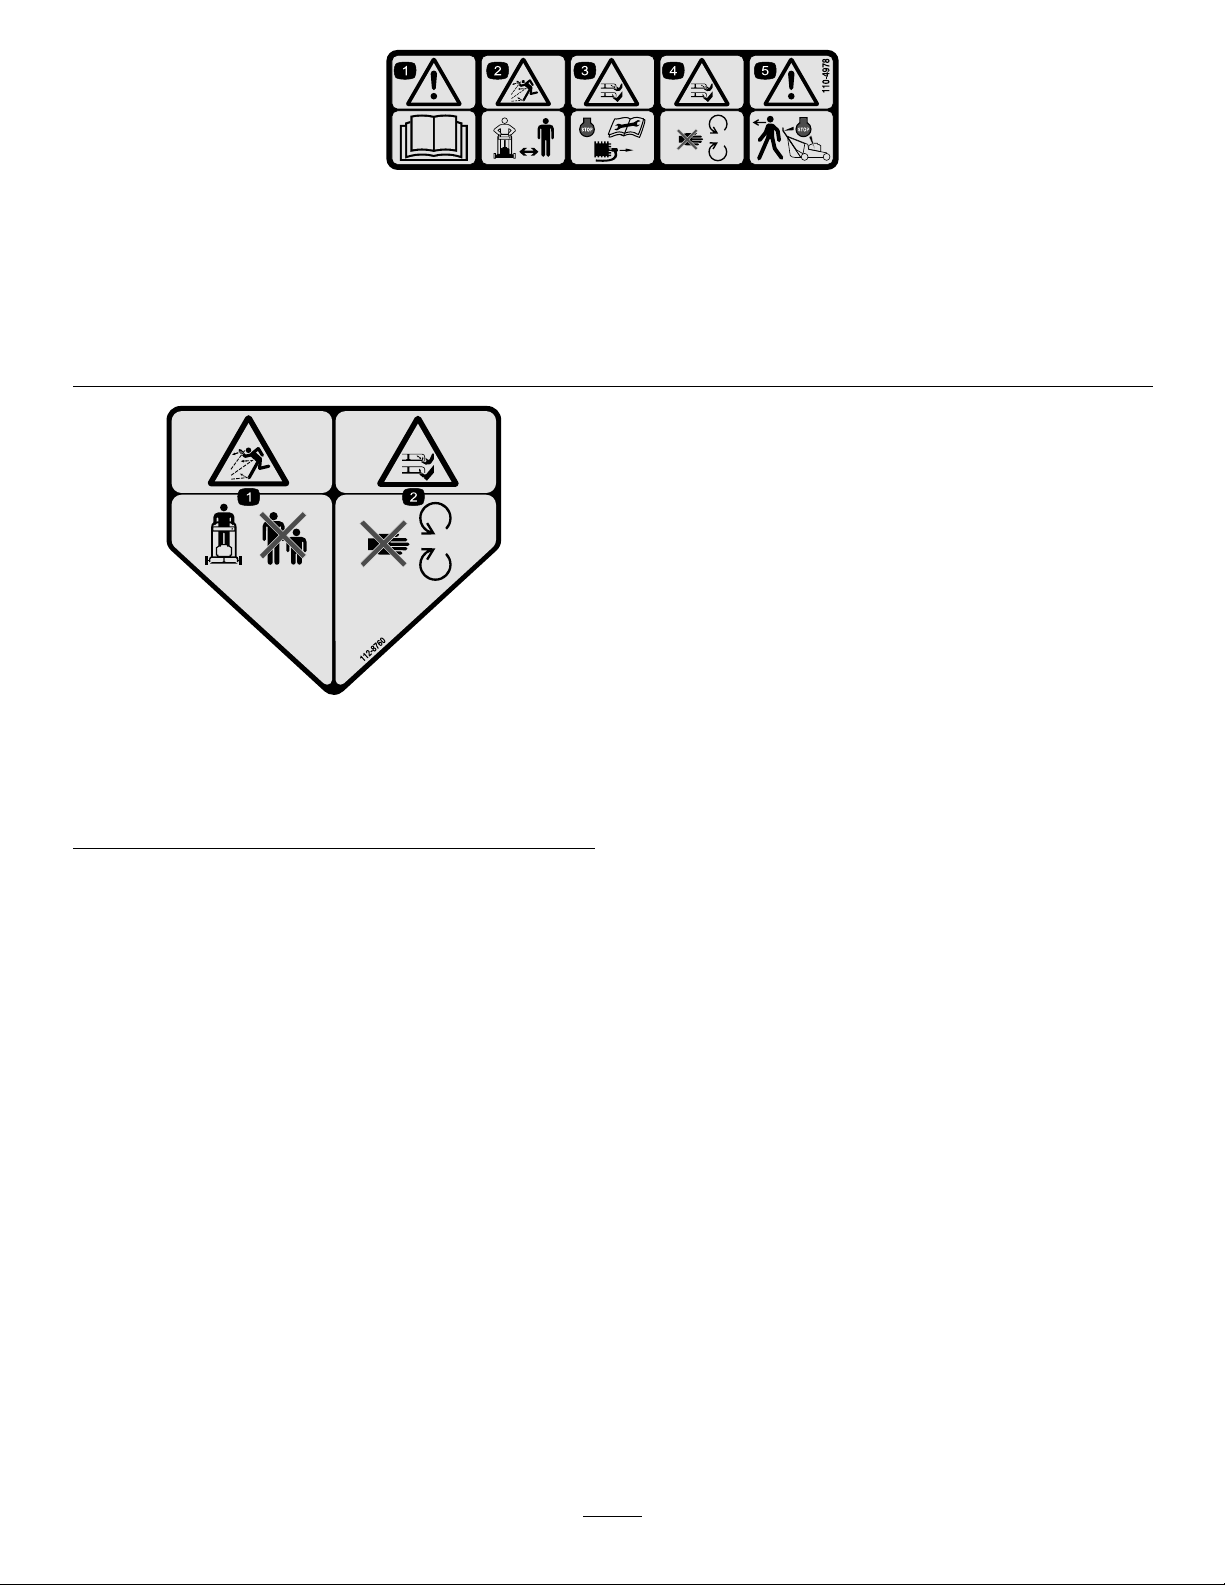
110-4978
1.Warning—readtheOperator'sManual.
2.Thrownobjecthazard—keepbystandersasafedistancefromthemachine.
3.Cutting,dismembermenthazardofhandorfoot—stoptheengineandremovethesparkplugwirebeforeperformingany
maintenanceonthemachine.
4.Cutting,dismembermenthazardofhandorfoot—stayawayfrommovingparts.
5.Warning—stoptheenginebeforeleavingthemachine.
112-8760
1.Thrownobjecthazard—keepbystandersasafedistance
fromthemachine.
2.Cutting/dismembermentofhandorfoot—stayawayfrom
movingparts.
6
Page 7
Setup
LooseParts
Usethechartbelowtoverifythatallpartshavebeenshipped.
ProcedureDescription
Handle1
Bolt(5/16x7/8inch)
Bolt(5/16x1-1/2inches)
1
2
3
Washer4
Locknut(5/16inch)
Cabletie
Self-tappingscrew
Fueltank1
Nopartsrequired
Note:Determinetheleftandrightsidesofthemachine
fromthenormaloperatingposition.
1
InstallingtheHandle
Qty.
Use
2
2
4
3
2
–
Installthehandle.
Installthefueltankandfuelline.
Fillthecrankcasewithoil.
Partsneededforthisprocedure:
1Handle
2
Bolt(5/16x7/8inch)
2
Bolt(5/16x1-1/2inches)
4Washer
4
Locknut(5/16inch)
3
Cabletie
Procedure
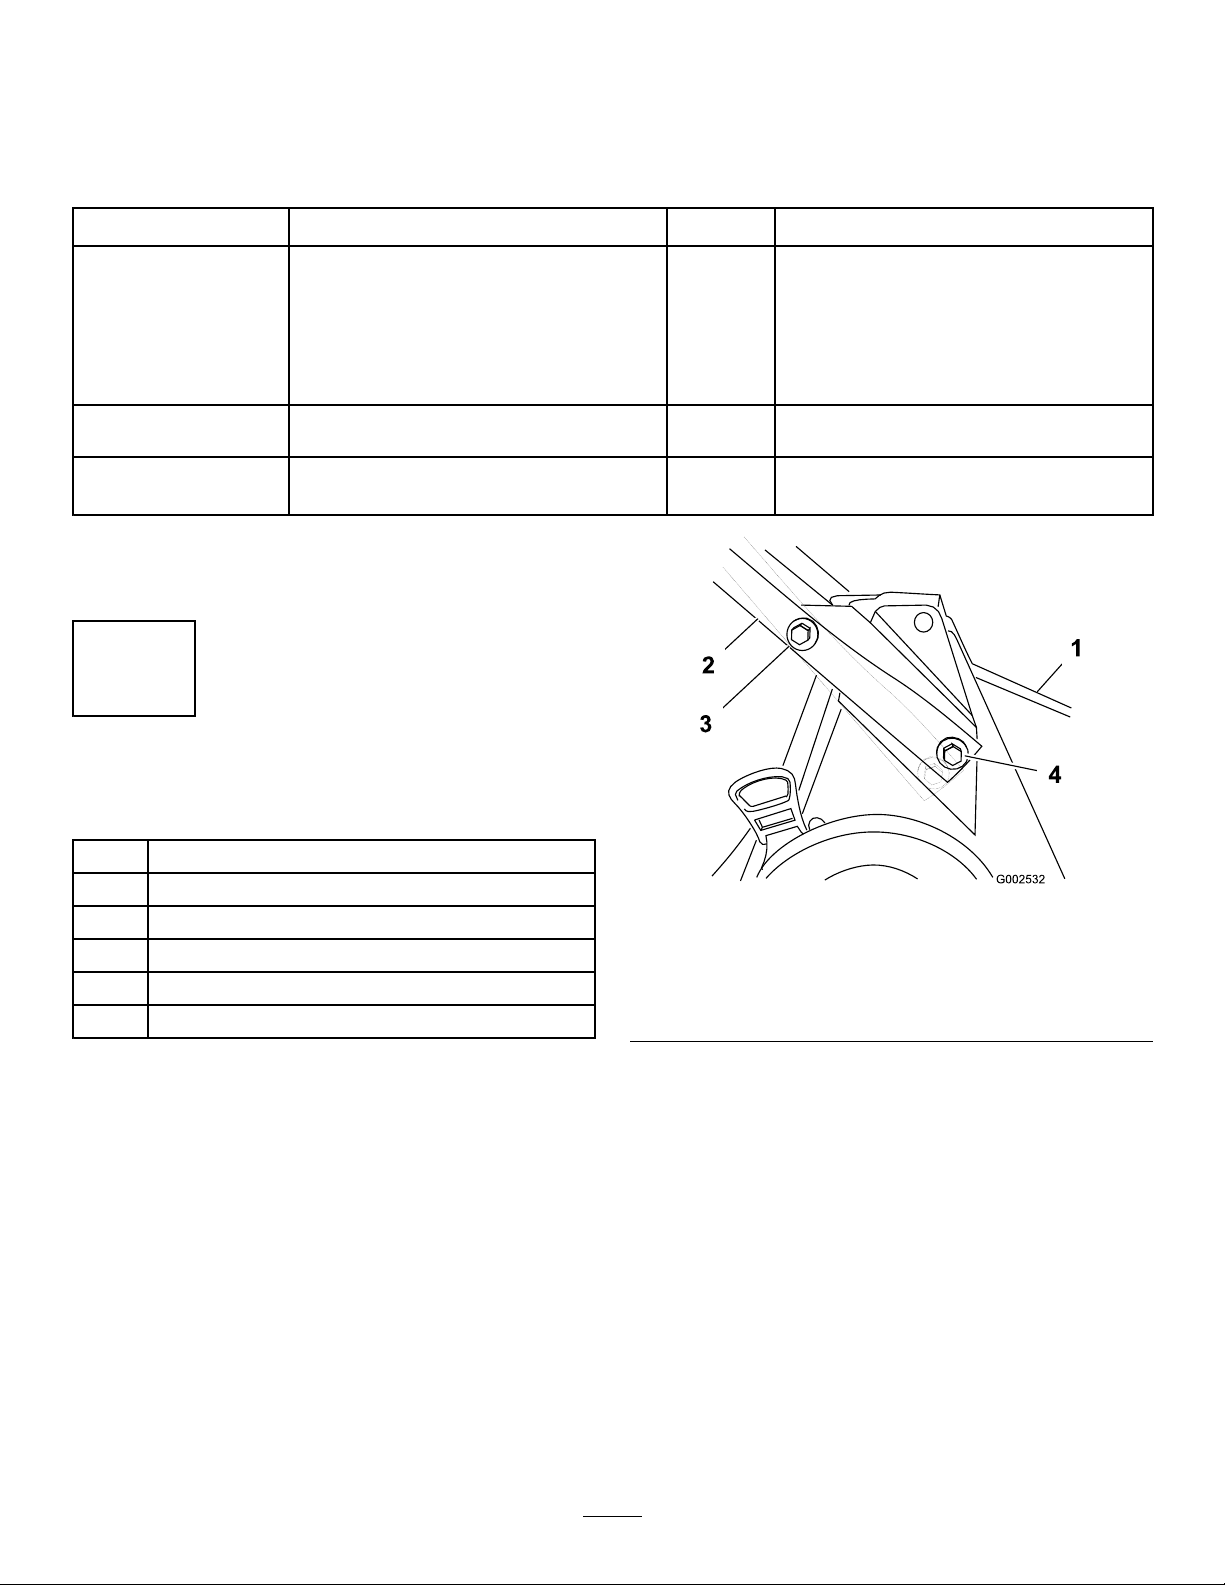
1.Mountthehandletothemowerhousingwith2bolts
(5/16x7/8inch),2bolts(5/16x1-1/2inches),4
washers,and4locknuts(Figure3).
Figure3
1.Housing
2.Handle
3.Bolt(5/16x1-1/2inches),
washer,andlocknut
4.Bolt(5/16x7/8inch),
washer,andlocknut
Note:Installthewasherswiththecupsidefacing
thehandle.
Note:Youcanadjustthehandleheightformore
comfortableoperation.Securingthelowerhandle
endintheupperholelowersthehandle;securingthe
lowerhandleendinthelowerholeraisesthehandle.
2.Usethecabletiesprovidedtosecurethecontrol
cablestothehandle.
7
Page 8
2
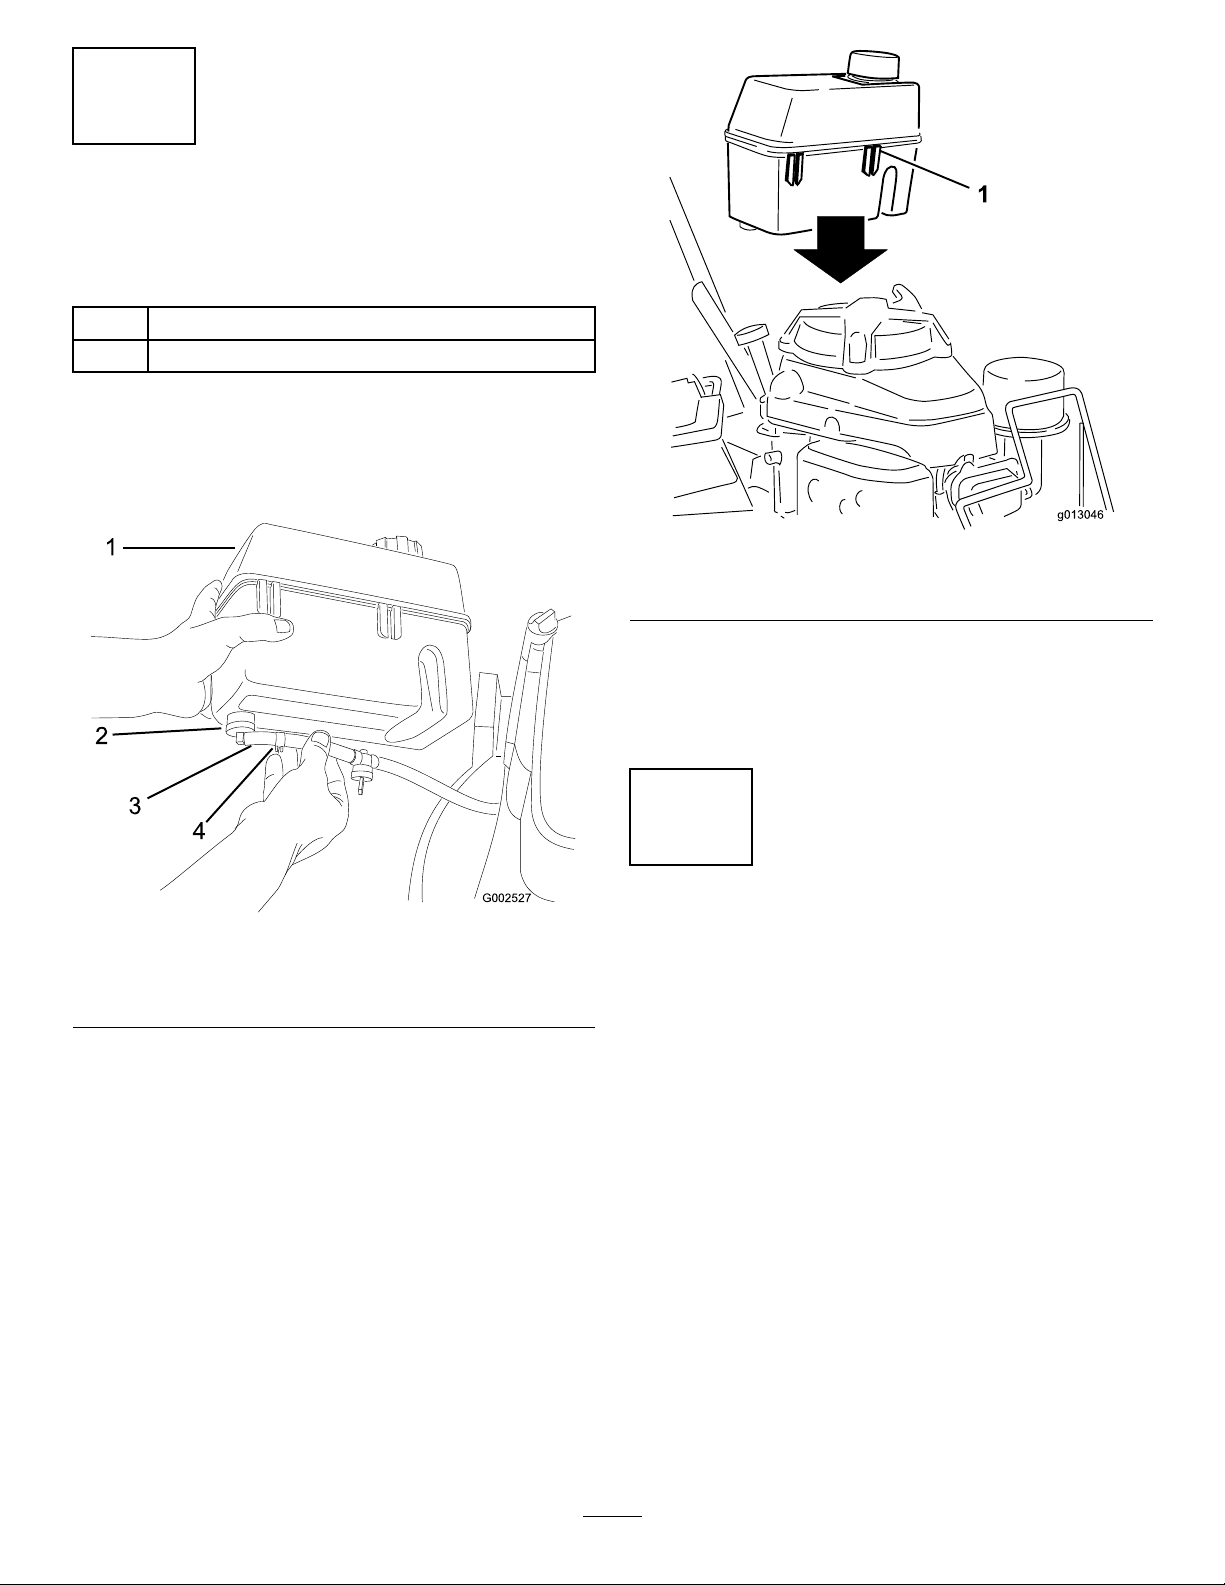
G002527
1
2
3
4
InstallingtheFuelTankand
theFuelLine
Partsneededforthisprocedure:
2
Self-tappingscrew
1Fueltank
Procedure
1.Slidetheendofthefuellineontotheelbowtting
(Figure4).
Figure5
1.Plasticclip(2)
4.Securethebottomofthefueltanktothefueltank
bracketbyinstallingtheself-tappingscrewsfromthe
bottom.Torquethescrewsto40to50in-lb(4.5
to5.6N-m).Donotovertightenthescrews.
3
FillingtheCrankcasewithOil
Figure4
1.Fueltank3.Fuelline
2.Elbowtting
2.Securethefuellineinplacewiththefuellineclamp
(Figure4).
3.Slidetheplasticclipsonthefrontofthefueltank
ontothefueltankmount(
4.Fuellineclamp
Figure5).
NoPartsRequired
Procedure
Theenginecrankcaseisshippedwithoutoil.Youmust
llitwithapproximately30oz.(0.88l)ofoilbefore
startingtheengine.RefertoCheckingtheEngineOil
LevelintheOperationsectionforoilspecicationsand
instructions.
8
Page 9
ProductOverview
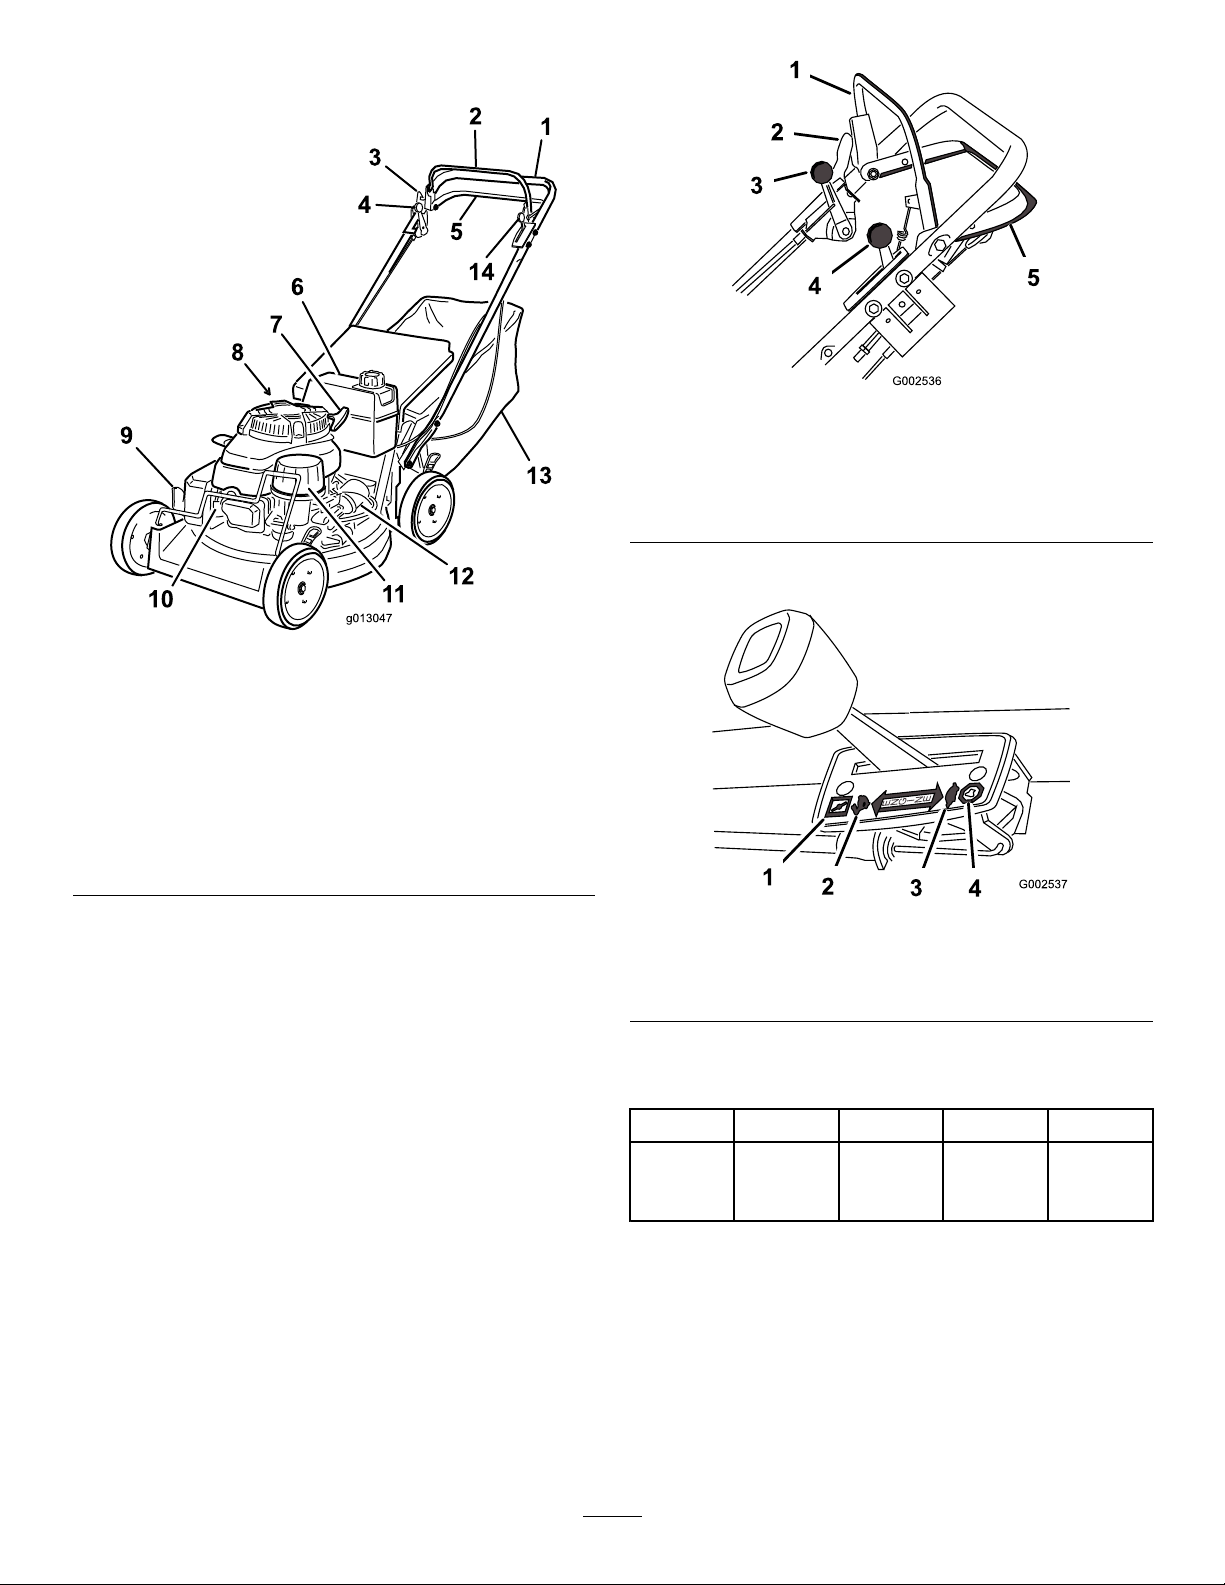
Figure7
1.Bladecontrolbar4.Throttlecontrollever
2.Controlbarlock
3.Groundspeedcontrol
lever
Thethrottlesettingsareshownin(Figure8).
Figure6
5.Tractioncontrolbar
1.Handle
2.Bladecontrolbar
3.Controlbarlock10.Sparkplug
4.Groundspeedcontrol
lever
5.Tractioncontrolbar
6.Fueltank
7.Starterhandle
8.Oilll/dipstick(notshown)
9.Cuttingheightlever
11.Airlter
12.Oillter
13.Grassbag
14.Throttlecontrollever
Controls
Thebladecontrolbar,controlbarlock,groundspeed
controllever,throttlecontrollever,andtractioncontrol
barareontheupperhandleasshownin(Figure7).
Figure8
1.Choke3.Slow
2.Fast
4.Stop
Specications
ModelWeightLengthWidthHeight
22189TE123lb
(56kg)
59in
(149cm)
(57cm)
23in
38in
(97cm)
9
Page 10
Operation
Note:Determinetheleftandrightsidesofthe
machinefromthenormaloperatingposition.
Eachtimebeforeyoumow ,makesurethatthe
self-propeldriveandthebladecontrolbaroperate
properly.Whenyoureleasethebladecontrolbar,the
bladeshouldstop.Ifitdoesnot,contactanAuthorized
ServiceDealer.
CAUTION
Thismachineproducessoundlevelsinexcessof
85dBAattheoperator'searandcancausehearing
lossthroughextendedperiodsofexposure.
Wearhearingprotectionwhenoperatingthis
machine.
Figure9
1.Warning—wearhearingprotection.
Figure10
1.Dipstick3.Add
2.Full
Note:Whenthecrankcaseisempty,pourabout3/4
ofthecrankcasecapacityofoilinthecrankcase,then
followtheprocedureinthissection.
1.Movethelawnmowertoalevelsurface.
CheckingtheEngineOilLevel
ServiceInterval:Beforeeachuseordaily
Initially,llthecrankcasewith30ounces(0.88liters)
ofoil.Useonlyhigh-qualitySAE30orSAE10W30
weightdetergentoilthathastheAmericanPetroleum
Institute(API)serviceclassicationSF,SG,SH,orSJ .
Beforeeachuse,ensurethattheoillevelisbetweenthe
AddandFullmarksonthedipstick(
Figure10).
2.Cleanaroundthedipstick(
3.Removethedipstickbyrotatingthecap
counterclockwiseandpullingitout.
4.Wipethedipstickcleanwithacleancloth.
5.Insertthedipstickintothellerneck,butdonot
screwitin.
6.Removethedipstickandreadtheoillevelonthe
dipstick(
7.IftheoillevelreadingisbelowtheAddmarkon
thedipstick,slowlypouronlyenoughoilintothe
llerholetoraisetheoilleveltotheFullmarkon
thedipstick.
Important:Donotoverllthecrankcasewith
oilandruntheengine;enginedamagewill
result.Draintheexcessoiluntiltheoillevelon
thedipstickreadsFull.
8.Insertthedipstickintothellerneckandrotatethe
capclockwiseuntilitistight.
Figure10).
Figure10).
10
Page 11

FillingtheFuelTankwith
DANGER
Gasoline
Forbestresults,useclean,fresh,lead-freegasolinewith
anoctaneratingof87orhigher.Toensurefreshness,
purchaseonlythequantityofgasolinethatyouexpectto
usein30days.Usingunleadedgasolineresultsinfewer
combustiondepositsandlongerenginelife.Youmay
useleadedgasolineifunleadedgasolineisnotavailable.
Important:Donotaddoiltothegasoline.
Important:Donotusemethanol,gasoline
containingmethanol,gasoholcontainingmore
than10%ethanol,premiumgasoline,orwhitegas.
Usingthesefuelscandamagetheengine'sfuel
system.
Important:Donotusegasolinethathasbeen
storedsincethelastmowingseasonorlonger.
DANGER
Incertainconditions,gasolineisextremely
ammableandhighlyexplosive.Areorexplosion
fromgasolinecanburnyouandothersandcan
damageproperty.
Whenfueling,undercertaincircumstances,astatic
chargecandevelop,ignitingthegasoline.Areor
explosionfromgasolinecanburnyouandothers
anddamageproperty.
•Alwaysplacegasolinecontainersontheground
andawayfromyourvehiclebeforelling .
•Donotllgasolinecontainersinsideavehicle
oronatruckortrailerbedbecauseinterior
carpetsorplastictruckbedlinersmayinsulate
thecontainerandslowthelossofanystatic
charge.
•Whenpractical,removegasoline-powered
equipmentfromthetruckortrailerandrefuel
theequipmentwithitswheelsontheground.
•Ifthisisnotpossible,thenrefuelsuch
equipmentonatruckortrailerfromaportable
container,notfromagasolinedispensernozzle.
•Ifyoumustuseagasolinedispensernozzle,
keepthenozzleincontactwiththerimofthe
fueltankorcontaineropeningatalltimesuntil
fuelingiscomplete.
•Fillthefueltankoutdoors,inanopenarea,and
whentheengineiscold.Wipeupanygasoline
thatspills.
•Donotllthefueltankcompletelyfull.Add
gasolinetothefueltankuntilthelevelis1/4to
1/2in.(6to13mm)belowthebottomofthe
llerneck.Thisemptyspaceinthetankallows
thegasolinetoexpand.
•Neversmokewhenhandlinggasoline,andstay
awayfromanopenameorwhereasparkmay
ignitethegasolinefumes.
•Storegasolineinanapprovedfuelcontainer
andkeepitoutofthereachofchildren.
•Neverbuymorethana30-daysupplyof
gasoline.
Useafuelstabilizer/conditionerregularlyduring
operationandstorage.Astabilizer/conditionercleans
theengineduringoperationandpreventsgum-like
varnishdepositsfromformingintheengineduring
periodsofstorage.
Important:Donotusefueladditivesotherthan
afuelstabilizer/conditioner.Donotusefuel
stabilizerswithanalcoholbasesuchasethanol,
methanol,orisopropanol.
1.Cleanaroundthefueltankcap(
Figure11).
11
Page 12

Figure11
1.Fueltankcap3.Aircleaner
2.Oilll/dipstick
OperatingtheBlade
EngagingtheBlade
Whenyoustartyourengine,thebladedoesnotturn.
Youmustengagethebladetomow .
1.Pushthecontrolbarlockforward(Figure12).
2.Removethecapfromthetank.
3.Fillthefueltankwithunleadedgasolinetowithin
1/4to1/2inch(6to13mm)fromthetopofthe
tank.Donotllintothellerneck.
Important:Donotllthetankmorethan1/4
inch(6mm)fromthetopofthetankbecause
thegasolinemusthaveroomtoexpand.
4.Installthefueltankcapandwipeupanyspilled
gasoline.
StartingtheEngine
1.Connectthewiretothesparkplug(Figure11).
2.Openthefuelvalve(Figure22)
3.MovethethrottlecontrollevertotheChoke
position(Figure8).
4.MovethegroundspeedcontrollevertotheNeutral
(N)position.
5.Pullthestarterhandlelightlyuntilyoufeel
resistance,thenpullitsharply.
6.Regulatethethrottleandthegroundspeedcontrol
asdesiredwhentheenginestarts.
Figure12
2.Pullthebladecontrolbartothehandleandhold
it(Figure13).
Figure13
Note:Iftheenginefailstostartafter3pulls,repeat
steps
3through6.
StoppingtheEngine
1.MovethethrottlecontroltotheStopposition.
2.Disconnectthewirefromthesparkplugifyoudo
notusethelawnmowerorleaveitunattended.
12
Page 13

DisengagingtheBlade
DisengagingtheTractionDrive
Releasethebladecontrolbar.
Important:Whenyoureleasethebladecontrol
bar,thebladeshouldstopwithin3seconds.Ifit
doesnotstopproperly,stopusingyourmower
immediatelyandcontactanAuthorizedService
Dealer.
OperatingtheTractionDrive
EngagingtheTractionDrive
1.Releasethetractioncontrolbar(Figure14).
Releasethetractioncontrolbar.
CheckingtheBladeBrake
Clutch
Checkthebladecontrolbarbeforeeachusetoensure
thatthebladebrakeclutchsystemisoperatingproperly.
1.Installtheemptygrassbagonthedischargetunnel.
2.Starttheengine.
3.Pullthebladecontrolbartothenormalblade
engagedposition.Thebagshouldbegintoinate,
indicatingthatthebladeisengagedandrotating.
4.Releasethebladecontrolbar.Ifthebagdoes
notimmediatelydeate,itindicatesthattheblade
isstillrotating.Thebladebrakeclutchmaybe
deteriorating,and,ifignored,couldresultinan
unsafeoperatingcondition.Havethelawnmower
inspectedandservicedbyanAuthorizedService
Dealer.
Figure14
2.Movethegroundspeedcontrollevertothedesired
gearposition.
3.Squeezethetractioncontrolbaragainstthehandle
(Figure15).
DANGER
Ifthebladebrakeclutchsystemisinoperative,the
bladewillcontinuetorotatewhenyoureleasethe
bladecontrolbail.Contactwithbladecouldoccur,
causingseriousinjury.
•Checkthebladebrakeclutchoperationbefore
eachuse.
•Neveruseamowerequippedwithabladebrake
clutchthathasaninoperativesafetysystem.
•TakeyourmowertoanAuthorizedService
Dealerforrepairifthesafetysystemfailsto
operateproperly.
Figure15
13
Page 14

AdjustingtheCuttingHeight
Eachwheelisadjustedindividuallywithawheelheight
adjustmentlever.Cuttingheightsare1inch(25mm),
1-1/2inches(38mm),2inches(51mm),2-1/2inches
(64mm),3inches(76mm),3-1/2inches(89mm),and
3-3/4inches(95mm).
DANGER
Adjustingthecuttingheightleverscouldbring
yourhandsintocontactwithamovingbladeand
resultinseriousinjury.
•Stoptheengineandwaitforallmovementto
stopbeforeadjustingthecuttingheight.
•Donotputyourngersunderthehousing
whenadjustingthecuttingheight.
1.Pullthewheelheightadjustmentlevertowardthe
wheel(Figure16)andmoveittothedesiredsetting.
UsingtheGrassBag
InstallingtheGrassBag
1.Waitforallmovingpartstostop.
2.Raiseandholdupthereardoor(Figure17).
Figure17
1.Reardoor
Figure16
1.Wheelheightadjustmentlever
2.Releasethewheelheightadjustmentleverandseat
itsecurelyinthenotch.
3.Adjustallthewheelstothesamecuttingheight
setting.
3.Installthebagonthebagmountingposts
(Figure18).
Figure18
1.Bagmountingposts
4.Lowerthereardoor.
RemovingtheGrassBag
Toremovethebag,reversethestepsabove.
14
Page 15

DANGER
WARNING
Themowercanthrowgrassclippingsand
otherobjectsthroughanopendischargetunnel.
Objectsthrownwithenoughforcecouldcause
seriouspersonalinjuryordeathtotheoperatoror
bystander.
Donotoperatethemowerwithoutagrassbag
installed.
MowingwiththeGrassBag
WARNING
Aworngrassbagcouldallowsmallstones
andothersimilardebristobethrowninthe
operator'sorbystander'sdirectionandresultin
seriouspersonalinjuryordeathtotheoperatoror
bystanders.
Checkthegrassbagfrequently.Ifitisdamaged,
installanewT ororeplacementbag.
OperatingTips
GeneralTips
•Maintainasharpbladethroughoutthecutting
season.Periodicallyledownnicksontheblade.
•Replacethebladewhennecessarywithanoriginal
Tororeplacementblade.
•Mowonlydrygrassorleaveswherefeasible.Wet
grassandleavestendtoclumpontheyardandcan
causethemowertoplugortheenginetostall.
WARNING
Wetgrassorleavescancauseseriousinjuryif
youslipandcontacttheblade.
Mowonlyindryconditionswherefeasible.
•Cleanunderthemowerhousingaftereachmowing.
SeeCleaningundertheMowerHousing.
•Keeptheengineingoodrunningcondition.
•Settheenginespeedtothefastestpositionforthe
bestcuttingresults.
Operatingamowerwithitsenginerunningat
aspeedgreaterthanthefactorysettingcan
causethemowertothrowapartofthebladeor
engineintotheoperator'sorbystander'sarea
andresultinseriouspersonalinjuryordeath.
–Donotchangetheenginespeedsetting.
–Ifyoususpecttheenginespeedisfaster
thannormal,contactanAuthorizedService
Dealer.
•Cleantheairlterfrequently.Mulchingstirsup
moreclippingsanddustwhichclogstheairlter
andreducesengineperformance.
CuttingGrass
•Grassgrowsatdifferentratesatdifferenttimes
oftheyear.Inthesummerheat,itisbesttocut
grassatthe2-1/2inch(64mm),3inch(76mm),
or3-1/2inch(89mm)cuttingheightsettings.Cut
onlyaboutathirdofthegrassbladeatatime.Do
notcutbelowthe2-1/2inch(64mm)settingunless
thegrassissparseoritislatefallwhengrassgrowth
beginstoslowdown.
•Whencuttinggrassover6inches(15cm)tall,rst
mowatthehighestcuttingheightsettingandwalk
slower;thenmowagainatalowersettingforthe
bestlawnappearance.Ifthegrassistoolongand
theleavesclumpontopofthelawn,themowermay
plugandcausetheenginetostall.
•Alternatethemowingdirection.Thishelpsdisperse
theclippingsoverthelawnforevenfertilization.
Ifthenishedlawnappearanceisunsatisfactory,try
oneormoreofthefollowing:
•Sharpentheblade.
•Walkataslowerpacewhilemowing.
•Raisethecuttingheightonyourmower.
•Cutthegrassmorefrequently .
•Overlapcuttingswathsinsteadofcuttingafull
swathwitheachpass.
•Setthecuttingheightonthefrontwheelsonenotch
lowerthantherearwheels.Forexample,setthe
frontwheelsat2-1/2inches(64mm)andtherear
wheelsat3inches(76mm).
CuttingLeaves
•Aftercuttingthelawn,ensurethathalfofthelawn
showsthroughthecutleafcover.Youmayneedto
makemorethanonepassovertheleaves.
15
Page 16

•Forlightleafcoverage,setallthewheelsatthesame
cuttingheightsetting.
•Iftherearemorethan5inches(12.7cm)ofleaves
onthelawn,setthefrontcuttingheight1or2
notcheshigherthantherearcuttingheight.This
makesiteasiertofeedtheleavesunderthemower
housing.
•Slowdownyourmowingspeedifthemowerdoes
notcuttheleavesnelyenough.
16
Page 17

Maintenance
Note:Determinetheleftandrightsidesofthemachinefromthenormaloperatingposition.
RecommendedMaintenanceSchedule(s)
MaintenanceService
Interval
Aftertherst8hours
Beforeeachuseordaily
Every25hours
Every50hours
Every100hours
Every300hours
Yearlyorbeforestorage
Important:Refertoyour
MaintenanceProcedure
•Changetheengineoil.
•Checktheengineoillevel.
•Inspectthemowerbladesforwearordamage.
•Cleanunderthemowerhousing.
•Cleanthefoampre-cleaner(morefrequentlyindustyconditions).
•Lubricatethepivotarms.
•Lubricatethegearcase.
•Changetheengineoil(moreoftenindustyconditions).
•Checkthefuelhoseandreplaceitifnecessary.
•Cleanthebladebrakeclutchshield.
•Cleantheaircoolingns.
•Changetheoillter.
•Checkthesparkplug.
•Cleanthefuellter.
•Replacethepaperairlter(morefrequentlyindustyconditions).
•Emptythefueltank.
Engine Operator's Man ual
foradditionalmaintenanceprocedures.
CAUTION
Ifyouleavethewireonthesparkplug,someonecouldaccidentlystarttheengineandseriouslyinjure
youorotherbystanders.
Disconnectthewirefromthesparkplugbeforeyoudoanymaintenance.Setthewireasidesothatitdoes
notaccidentlycontactthesparkplug.
17
Page 18

Lubrication
EngineMaintenance
LubricatingthePivotArms
ServiceInterval:Every50hours
1.Movetherearwheelcuttingheightleverstothe
centersetting.
2.Wipethegreasettingswithacleanrag(
Figure19
3.Installagreasegunontothettingandgentlyapply2
or3pumpsof#2multi-purposelithium-basegrease.
Figure19).
ServicingtheAirFilter
ServiceInterval:Every25hours—Cleanthefoam
pre-cleaner(morefrequentlyindusty
conditions).
Every300hours—Replacethepaper
airlter(morefrequentlyindusty
conditions).
Cleanthefoampre-cleanerevery25operatinghours.
Replacethepaperairlteronceeveryseasonorevery
300operatinghours;replaceitmorefrequentlyindusty
conditions.
Important:Donotoperatetheenginewithoutthe
airlterassembly;extremeenginedamagewill
occur.
1.Stoptheengineandwaitforallmovingpartstostop.
2.Disconnectthewirefromthesparkplug(
3.Removethecoverandcleanitthoroughly(Figure21).
Figure11).
Important:Excessivegreasepressuremay
damagetheseals.
LubricatingtheGearCase
ServiceInterval:Every50hours
1.Removethegrassbag.
2.Installagreasegunontothettingthroughthebelt
coveropening(
Figure20).
Figure20
Figure21
1.Cover3.Airlterbase
2.Paperairlter
4.Removeandinspectthepaperairlter(Figure21),
anddiscarditifitisexcessivelydirty.
Important:Donottrytocleanapaperlter.
5.Removethefoampre-cleanerandwashitwithamild
detergentandwater,thenblotitdry(
6.Installthefoampre-cleanerontothepaperairlter.
7.Installtheairlterassembly.
Figure21).
3.Gentlyapplyoneto2pumpsof#2multi-purpose
lithium-basegrease.
4.Installthegrassbag.
Note:Installanewpaperairlterifyoudiscarded
theoldone.
8.Installthecover.
18
Page 19

ChangingtheEngineOil
ChangingtheOilFilter
ServiceInterval:Aftertherst8hours
Every50hours
OilCapacity
Withoillter29ounces(0.85liters)
Withoutoillter22ounces(0.65liters)
Note:Theoilcapacitiesinthetableaboveaccount
fortheemptycrankcasetocontainasmallamountof
residualoil.
1.Runtheenginetowarmtheengineoil.
Note:Warmoilowsbetterandcarriesmore
contaminants.
WARNING
Oilmaybehotafterenginehasbeenrun,and
contactwithhotoilcancauseseverepersonal
injury.
Avoidcontactingthehotengineoilwhenyou
drainit.
ServiceInterval:Every100hours
1.Runtheenginetowarmtheoil.
WARNING
Oilmaybehotaftertheenginehasbeenrun,
andcontactwithhotoilcancausesevere
personalinjury.
Avoidcontactingthehotengineoilwhenyou
drainit.
2.Stoptheengineandwaitforallmovingpartstostop.
3.Disconnectthewirefromthesparkplug(Figure11).
4.Draintheengineoil;refertoChangingtheEngine
Oil.
5.Placearagundertheoilltertocatchanyoilthat
mayleakoutasyouremovethelter(
Figure22).
2.Stoptheengineandwaitforallmovingpartstostop.
3.Disconnectthewirefromthesparkplug(Figure11).
4.Placeasuitabledrainpanundertherightsideof
themower.
5.Removethedipstickbyrotatingthecap
counterclockwiseandpullingitout.
6.Tipthemowerontoitsrightsidetodraintheoil
intothedrainpan.
Note:Youcanalsoremovetheoilfromthe
crankcaseusinganoilextractor.
7.Returnthemowertoitsoperatingposition.
8.Insertthedipstickintothellerneckandrotatethe
capclockwiseuntilitistight.
9.Recycletheusedoilaccordingtolocalcodes.
10.FillthecrankcasetotheFulllineonthedipstickwith
freshoil.RefertotheFillingtheCrankcasewithOil.
11.Wipeupanyspilledoil.
Figure22
1.Oillter
2.Fuelvalve
6.Removetheoillter.
7.Useyourngertocoatthegasketonthenewlter
withoil(Figure23).
Figure23
1.Gasket
8.Installthenewlterandhandtightenit2/3turn
only.
19
Page 20

9.FillthecrankcasetotheFulllineonthedipstickwith
freshoil.RefertoFillingtheCrankcasewithOil.
10.Connectthewiretothesparkplug.
11.Runtheengineforabout3minutes.
12.Stoptheengine,waitforallmovingpartstostop,
andcheckforoilleakagearoundthelter.
13.Addoiltocompensatefortheoilintheoillter.
RefertoCheckingtheEngineOilLevel.
ServicingtheSparkPlug
ServiceInterval:Every100hours—Checkthespark
plug.
UseanNGKBPR5ESsparkplugorequivalent.
1.Stoptheengineandwaitforallmovingpartstostop.
2.Disconnectthewirefromthesparkplug(
3.Cleanaroundthesparkplug.
Figure11).
14.Recycletheusedoillteraccordingtolocalcodes.
4.Removethesparkplugfromthecylinderhead.
Important:Replaceacracked,fouled,or
dirtysparkplug.Donotcleantheelectrodes
becausegritenteringthecylindercandamage
theengine.
5.Setthegapontheplugto0.030in.(0.76mm)
Figure24).
(
Figure24
1.Centerelectrodeinsulator
2.Sideelectrode
3.Airgap(nottoscale)
6.Installthesparkplugandthegasketseal.
7.Torquetheplugto17ft-lb(23N-m).
8.Connectthewiretothesparkplug.
20
Page 21

FuelSystem
DriveSystem
Maintenance
EmptyingtheFuelTankand
CleaningtheFuelFilter
ServiceInterval:Every50hours—Checkthefuelhose
andreplaceitifnecessary.
Every100hours—Cleanthefuel
lter.
Yearlyorbeforestorage—Emptythe
fueltank.
Thefuellter(screen)elementislocatedinsidethefuel
tank.Cleanthefuellterelementevery100operating
hours.
1.Stoptheengineandwaitforittocooldown.
Important:Draingasolinefromacoldengine
only.
2.Disconnectthewirefromthesparkplug(
Figure11).
Maintenance
AdjustingtheSelf-propelDrive
Ifthemowerdoesnotself-propelorhasatendencyto
creepforwardwhenthecontrolbarismorethan1-1/2
inches(3.8cm)fromthehandle,adjusttheself-propel
drive.
1.Loosenthenutthatsecurestheadjuster(Figure25).
3.Closethefuelvalve(Figure22).
4.Disconnectthefuellinebylooseningthetubeclamp
atthecarburetor.
5.Openthefuelvalve.
6.Drainthegasolinecompletelyfromthetankandfuel
lineintoanapprovedfuelcontainer.
7.Removethefueltankfromthemower.
8.Closethefuelvalve.
9.Pourasmallamountoffuelinthefueltank,move
thefuelaroundinthetank,andpouritoutintoan
approvedfuelcontainer.
10.Installthefueltankandfuelline;refertoInstalling
theFuelTankandtheFuelLine.
Figure25
1.Adjuster
2.Nut
2.Turntheadjusteruntilyouremovetheslackinthe
exposedcable(Figure25).
3.Tightenthenut.
Note:Tochecktheadjustment,slowlypullthe
mowerbackwardwhileyougraduallymovethe
controlbartowardthehandle.Theadjustmentis
correctwhentherearwheelsstopturningandthe
topofthecontrolbarisabout1-1/2inches(3.8cm)
fromthebottomofthehandle.
Note:Iftheadjusterisfullyextendedandthe
mowerdoesnotself-propelwhenthebladecontrol
baris1-1/2inches(3.8cm)fromthehandle,you
willneedtoadjusttheloweranchorbracket.Refer
tosteps
4to9.
3.Cable
4.1-1/2inches(3.8cm)
4.Movetheadjustertoobtainthemaximumslackin
thecable.
5.Removethefueltank.
Note:Youdonotneedtodisconnectthefuelline
fromthefueltank.
6.Removetheupperbeltcover(
21
Figure26).
Page 22

G012156
1
Figure26
1.Upperbeltcover
7.Removethescrewsfromtheloweranchorbracket
(Figure27).
8.Movetheloweranchorbracketuponehole
(Figure27).
9.Repeatsteps1through3toadjustthecontrolbar.
Note:Whenyouinstallanewbelt,movethelower
anchorbrackettoitsoriginalfactoryposition,which
isindicatedbythenotchesnexttotheholesinthe
bracket(Figure27).
Figure27
1.Loweranchorbracket2.Notches
Note:Thelowerbeltcoverhasbeenremoved
inFigure27forthepurposeforclarity.Itisnot
necessarytoremovethelowerbeltcovertoperform
thisprocedure.
22
Page 23

ControlsSystem
Maintenance
AdjustingtheBladeBrake
Cable
Wheneveryouinstallanewbladebrakecableassembly
orreplacethebelt,adjustthebladebrakecable.
1.Stoptheengineandwaitforallmovingpartstostop.
2.Disconnectthewirefromthesparkplug(
3.Removethefueltankfromthetankbracket.
Note:Youdonotneedtodisconnectthefuelline
fromthefueltank.
4.Resetthecableadjusteronthehandlesothat1/4
inch(6mm)ofthethreadsshow ,thentightenthe
Figure28).
nut(
Figure28
Figure11).
Figure29
1.Spring3.Cableclampscrew
2.Brakecableconduit
6.Holdthebladecontrolbarsothattheoutsideofthe
baris5-1/2inches(14cm)fromtheoutsideofthe
handle,andpullthecabletotheremovetheslack,
butdonotputtensiononthespring(Figure30).
1.Adjuster
2.Nut
3.1/4inch(6mm)ofthreads
5.Loosenthecableclampscrewuntilthebrakecable
conduitslides(
Figure29).
Figure30
1.5-1/2inches(14cm)
2.Handle
3.Bladecontrolbar
7.Torquethecableclampscrewto100to120in-lb(11
to14N-m)tolocktheadjustmentinplace.
8.Measurethelengthofthespringbothbeforeand
afterengagingthebladecontrolbar.Thedifference
betweenthese2lengthsisthespringstretch.
23
Page 24

Note:Thespringstretchmustbebetween0.290
and0.310inches(7.4to7.9mm).Youmayneedto
adjustthecableadjustertoachievethisvalue.
WARNING
Donotovertightenthebladebrakecable.
Overtighteningthebladebrakecablecouldprevent
thebladebrakefromcontactingthebrakedrum
whenyoureleasethecontrolbar.Ifthebladebrake
doesnotcontactthebrakedrum,thebladewillnot
stoprotating,whichcouldcauseseriouspersonal
injury.
•Eachtimeyouadjustthebrakecable,ensure
thatthebrakestopsthebladein3secondsor
less.
•Ifthebladedoesnotstoprotatingin3seconds
orless,bringthemowertoanAuthorizedService
Dealerforinspectionandrepair.
BladeMaintenance
MaintainingtheCuttingBlade
Alwaysmowwithasharpblade.Asharpbladecuts
cleanlyandwithouttearingorshreddingthegrassblades.
1.Stoptheengineandwaitforallmovingpartstostop.
2.Disconnectthewirefromthesparkplug(
3.Drainthegasolinefromthefueltank;referto
EmptyingtheFuelTankandCleaningtheFuelFilter.
4.Tipthemowerontoitsrightside(
Figure31).
Figure11).
Figure31
1.Blade3.Anti-scalpcup
2.Bladenuts
InspectingtheBlade
ServiceInterval:Beforeeachuseordaily
Carefullyexaminethebladeforsharpnessandwear,
especiallywheretheatandthecurvedpartsmeet
(Figure32A).Becausesandandabrasivematerialcan
wearawaythemetalthatconnectstheatandcurved
partsoftheblade,checkthebladebeforeusingthe
mower.Ifyounoticeaslotorwear(
Figure32C),replacetheblade;refertoRemovingthe
Blade.
Figure32Band
24
Page 25

Figure32
1.Sail
2.Flatpartoftheblade4.Slotformed
3.Wear
BalancingtheBlade
1.Checkthebalanceofthebladebyplacingthecenter
holeofthebladeoveranailorscrewdrivershank
clampedhorizontallyinavise(
Figure34
Figure34).
Note:Forthebestperformance,installanewblade
beforethecuttingseasonbegins.Duringtheyear,le
downanysmallnickstomaintainthecuttingedge.
DANGER
Awornordamagedbladecanbreak,andapiece
ofthebladecouldbethrownintotheoperator's
orbystander'sarea,resultinginseriouspersonal
injuryordeath.
•Inspectthebladeperiodicallyforwearor
damage.
•Replaceawornordamagedblade.
RemovingtheBlade
Grasptheendofthebladeusingaragorathickly
paddedglove.Removethebladenuts,theanti-scalpcup,
andtheblade(Figure31).
SharpeningtheBlade
Note:Youcanalsocheckthebalanceusinga
commerciallymanufacturedbladebalancer.
2.Ifeitherendofthebladerotatesdownward,lethat
end(notthecuttingedgeortheendnearthecutting
edge).Thebladeisproperlybalancedwhenneither
enddrops.
InstallingtheBlade
1.Installasharp,balancedT oroblade,theanti-scalp
cup,andthebladenuts.Thesailoftheblademust
pointtowardthetopofthemowerhousingfor
properinstallation.Torquethebladenutsto23to
27ft-lb(32to37N-m).
2.Returnthemowertoitsoperatingposition.
3.Connectthewiretothesparkplug.
Filethetopsideofthebladetomaintainitsoriginal
cuttingangle(Figure33A)andinnercuttingedgeradius
(Figure33B).Thebladewillremainbalancedifyou
removethesameamountofmaterialfrombothcutting
edges.
Figure33
1.Sharpenatthisangleonly.
2.Maintaintheoriginalradius
here.
25
Page 26

Cleaning
CleaningundertheMower
Housing
Toensurethebestperformance,keeptheundersideof
themowerhousingclean.
3.Tipthemowerontoitsrightside.
4.Removethedirtandgrassclippingswithahardwood
scraper.Avoidburrsandsharpedges.
5.Returnthemowertoitsoperatingposition.
6.Fillthefueltank.
7.Connectthewiretothesparkplug.
WashingMethod
ServiceInterval:Beforeeachuseordaily
1.Positionthemoweronaatconcreteorasphalt
surfacenearagardenhose.
2.Starttheengine.
3.Holdtherunninggardenhoseathandleleveland
directthewatertoowonthegroundjustinfront
oftherightrearwheel(Figure35).
Figure35
1.Rightrearwheel
Note:Thebladewillsplashintothepathofthe
blade,cleaningouttheclippings.
4.Stoptheengineandwaitforallmovingpartstostop.
5.Turnoffthewater.
6.Startthemowerandletitrunforafewminutes
todryoutthemoistureonthemowerandits
components.
ScrapingMethod
Ifwashingdoesnotremovealldebrisfromunderthe
mower,scrapeitclean.
1.Disconnectthewirefromthesparkplug(Figure11).
2.Drainthefuelfromthefueltank.RefertoEmptying
theFuelTankandCleaningtheFuelFilter.
CleaningtheBladeBrake
ClutchShield
ServiceInterval:Every50hours
Cleaninsidethebladebrakeclutchshieldwhenyou
changetheengineoiltoensurethebestperformance
andtopreventpartsfromdegradingorwhenyou
sharpenthebladebecauseyouneedtoremovetheblade
inordertoremovetheshield.
1.Stoptheengineandwaitforallmovingpartstostop.
2.Disconnectthewirefromthesparkplug.
3.Drainthegasolinefromthefueltank;referto
EmptyingtheFuelTankandCleaningtheFuelFilter.
4.Tipthemoweronitsrightside.
WARNING
Tippingthemowermaycausethefueltoleak
fromthecarburetororthefueltank.Gasoline
isextremelyammable,highlyexplosive,and,
undercertainconditions,cancausepersonal
injuryorpropertydamage.
Avoidfuelspillsbyemptyingthefueltankas
directed;neversiphon.
5.Remove2bladenuts,theanti-scalpcup,andthe
blade(
6.Loosenthe4screwsthatholdtheshieldinplace
(Figure36).
Figure31).
WARNING
Tippingthemowermaycausethefueltoleak
fromthecarburetororthefueltank.Gasoline
isextremelyammable,highlyexplosive,and,
undercertainconditions,cancausepersonal
injuryorpropertydamage.
Avoidfuelspillsbyrunningtheenginedryorby
removingthegasolinewithahandpump;never
siphon.
26
Page 27

Figure36
1.Screws(4)
7.Removetheshieldandbrushorblowallthedebris
fromundertheshieldandaroundthebladebrake
clutchsystem.
8.Installtheshield.
2.Bladebrakeclutchshield
Storage
Topreparethemowerforoff-seasonstorage,perform
therecommendedmaintenanceprocedures.Referto
Maintenance.
Storethemowerinacool,clean,dryplace.Coverthe
mowertokeepitcleanandprotected.
PreparingtheFuelSystem
WARNING
Gasolinecanvaporizeifyoustoreitoverlong
periodsoftimeandexplodeifitcomesintocontact
withanopename.
•Donotstoregasolineoverlongperiodsoftime.
•Donotstorethemowerwithgasolineinthefuel
tankorthecarburetorinanenclosurewithan
opename.(Forexample,afurnaceorawater
heaterpilotlight.)
•Allowtheenginetocoolbeforestoringitinany
enclosure.
9.Installtheblade,theanti-scalpcup,andthe2blade
nuts.
10.Returnthemowertoitsoperatingposition.
11.Connectthewiretothesparkplug.
Emptythefueltankwhenmowingthelasttimebefore
storingthemower.
1.Runthemoweruntiltheenginestopsfromrunning
outoffuel.
2.Choketheengineandstartitagain.
3.Allowtheenginetorununtilitstops.Whenyoucan
nolongerstarttheengine,itissufcientlydry.
PreparingtheEngine
1.Whiletheengineisstillwarm,changetheoilfrom
thecrankcase.RefertoChangingtheEngineOil.
2.Removethesparkplug.
3.Usinganoilcan,addaboutonetablespoonofoilto
thecrankcasethroughthesparkplughole.
4.Slowlyrotatetheengineseveraltimes,usingthe
starterrope,todistributetheoil.
5.Installthesparkplugbutdonotconnectthewireto
thesparkplug.
GeneralInformation
1.Cleanthemowerhousing.RefertoCleaningunder
theMowerHousing.
2.Cleananydirtandchafffromthecylinder,cylinder
headns,andblowerhousing.
3.Removegrassclippings,dirt,andgrimefromthe
externalpartsoftheengine,theshrouding,andthe
topofthemowerhousing.
27
Page 28

4.Checktheconditionoftheblade.Referto
MaintainingtheCuttingBlade.
5.Cleanthebladebrakeclutchshield;refertoCleaning
theBladeBrakeClutchShield.
6.Servicetheairlter;refertoServicingtheAirFilter.
7.Lubricatethepivotarms;refertoLubricatingthe
PivotArms.
8.Tightenallnuts,bolts,andscrews.
9.Touchupallrustedorchippedpaintsurfaceswith
paintavailablefromanAuthorizedServiceDealer.
RemovingtheLawnMower
fromStorage
1.Checkandtightenallfasteners.
2.Removethesparkplugandspintheenginerapidly
usingthestartertoblowexcessoilfromthecylinder.
3.Cleanthesparkplugorreplaceitifitiscracked,
broken,oriftheelectrodesareworn.
4.Installthesparkplugandtorqueitto17ft-lb(23
N-m).
5.Performanyneededmaintenanceprocedures;refer
toMaintenance.
6.Fillthefuelinthefueltankwithfreshgasoline.
7.Checktheengineoillevel.
8.Connectthewiretothesparkplug.
28
Page 29

Troubleshooting
Problem
Enginedoesnotstart
Enginestartshardorlosespower
Enginerunsrough
PossibleCauseCorrectiveAction
1.Thefueltankisemptyorthefuel
systemcontainsstalefuel.
2.ThethrottleleverisnotintheChoke
position.
3.Thewireisnotconnectedtothespark
plug.
4.Thesparkplugispitted,fouled,orthe
gapisincorrect.
1.Thefueltankcontainsstalefuel.1.Drainandllthefueltankwithfresh
2.Thefuelcapventholeisplugged.2.Cleanthefuelcapventholeorreplace
3.Theairlterelementisdirtyandis
restrictingtheairow .
4.Theundersideofthemowerhousing
containsclippingsanddebris.
5.Thesparkplugispitted,fouled,orthe
gapisincorrect.
6.Theengineoillevelislowortheoilis
dirty.
1.Thewireisnotconnectedtothespark
plug.
2.Thesparkplugispitted,fouled,orthe
gapisincorrect.
3.ThethrottleleverisnotintheFast
position.
4.Theairlterelementisdirtyandis
restrictingtheairow .
1.Drainand/orllthefueltankwith
freshgasoline.Iftheproblempersists,
contactanAuthorizedServiceDealer.
2.MovethethrottlelevertotheChoke
position.
3.Connectthewiretothesparkplug.
4.Checkthesparkplugandadjustthe
gapifnecessary.Replacethespark
plugifitispitted,fouled,orcracked.
gasoline.
thefuelcap.
3.Cleantheairlterpre-cleanerand/or
replacethepaperairlter.
4.Cleanunderthemowerhousing.
5.Checkthesparkplugandadjustthe
gapifnecessary.Replacethespark
plugifitispitted,fouled,orcracked.
6.Checktheengineoil.Changetheoilif
itisdirtyoraddoilifitislow.
1.Connectthewiretothesparkplug.
2.Checkthesparkplugandadjustthe
gapifnecessary.Replacethespark
plugifitispitted,fouled,orcracked.
3.MovethethrottlelevertotheFast
position.
4.Cleantheairlterpre-cleanerand/or
replacethepaperairlter.
Lawnmowerorenginevibrates
excessively
Unevencuttingpattern
Mowerdoesnotself-propel1.Theself-propeldrivecableisoutof
1.Thebladeisbentorisoutofbalance.1.Balancetheblade.Ifthebladeisbent,
2.Theblademountingnutsareloose.2.Tightentheblademountingnuts.
3.Theundersideofthemowerhousing
containsclippingsanddebris.
4.Theenginemountingboltsareloose.4.Tightentheenginemountingbolts.
1.All4wheelsarenotatthesameheight.1.Placeall4wheelsatthesameheight.
2.Thebladeisdull.
3.Y ouaremowinginthesamepattern
repeatedly.
4.Theundersideofthemowerhousing
containsclippingsanddebris.
adjustmentorisdamaged.
replaceit.
3.Cleanunderthemowerhousing.
2.Sharpenandbalancetheblade.
3.Changethemowingpattern.
4.Cleanunderthemowerhousing.
1.Adjusttheself-propeldrivecable.
Replacethecableifnecessary.
29
Page 30

Notes:
30
Page 31

InternationalDistributorList
Distributor:
AtlantisSuveSulamaSisstemleriLt
BalamaPrimaEngineeringEquip.HongKong85221552163
B-RayCorporation
CascoSalesCompany
CeresS.A.CostaRica
CSSCTurfEquipment(pvt)Ltd.SriLanka
CyrilJohnston&Co.
EquiverMexico525553995444
FemcoS.A.Guatemala
G.Y .K.CompanyLtd.
GeomechanikiofAthensGreece
GuandongGoldenStarChina
HakoGroundandGardenSweden
HakoGroundandGarden
HayterLimited(U.K.)
HydroturfInt.CoDubai
HydroturfEgyptLLC
IbeaS.P.A.
IrriamcPortugal351212388260
IrrigationProductsInt'lPvtLtd.India862283960789
JeanHeybroekb.v .Netherlands31306394611
Lely(U.K.)Limited
MaquiverS.A.Colombia
MaruyamaMfg.Co.Inc.
MetraKft
Mountelda.s.CzechRepublic
MunditolS.A.
OslingerTurfEquipmentSA
OyHakoGroundandGardenAb
ParklandProductsLtd.NewZealand6433493760
Prochaska&Cie
RTCohen2004Ltd.
Riversa
RothMotorgerateGmBh&Co.Germany
ScSvendCarlsenA/S
SolvertS.A.S.
SpyprosStavrinidesLimitedCyprus
SurgeSystemsIndiaLimited
T-MarktLogisticsLtd.Hungary3626525500
ToroAustraliaAustralia61395807355
ToroEuropeBVBABelgium3214562960
Country:
Turkey902163448674
Korea82325512076
PuertoRico7877888383
NorthernIreland442890813121
Japan81726325861
Norway4722907760
UnitedKingdom441279723444
UnitedArabEmirates97143479479
Egypt2025194308
Italy390331853611
UnitedKingdom441480226800
Japan81332522285
Hungary3613263880
Argentina541148219999
Ecuador59342396970
Finland35898700733
Austria4312785100
Israel97298617979
Spain
Denmark4566109200
France33130817700
India911292299901
PhoneNumber:
5062391 138
94112746100
5024423277
30109350054
862087651338
4635100000
5712364079
420255704220
34952837500
4971442050
35722434131
374-0269RevA
Page 32

TheT oroWarranty
ConditionsandProductsCovered
TheToro®Companyanditsafliate,T oroWarrantyCompany ,pursuantto
anagreementbetweenthem,jointlypromisetorepairtheToroProduct
listedbelowifusedforresidentialpurposes*ifdefectiveinmaterialsor
workmanship.
Thefollowingtimeperiodsapplyfromthedateofpurchase:
ProductsWarrantyPeriod
WalkPowerMowers2yearlimitedwarranty
RearEngineRiders2yearlimitedwarranty
Lawn&GardenTractors
ElectricHandHeldProducts2yearlimitedwarranty
Snowthrowers
ConsumerZeroTurn
*OriginalPurchasermeansthepersonwhooriginallypurchasedtheT oro
Product
*Residentialpurposesmeansuseoftheproductonthesamelotasyour
home.Useatmorethanonelocation,orinstitutionalorrentaluse,is
consideredcommercialuse,andthecommercialusewarrantywouldapply.
2yearlimitedwarranty
2yearlimitedwarranty
2yearlimitedwarranty
LimitedWarrantyforCommercialUse
ToroConsumerProductsandattachmentsusedforcommercial,
institutional,orrentaluse,arewarrantedagainstdefectsinmaterials
orworkmanshipforthefollowingtimeperiodsfromthedateoforiginal
purchase:
ProductsWarrantyPeriod
WalkPowerMowers90daywarranty
RearEngineRiders90daywarranty
Lawn&GardenTractors
ElectricHandHeldProducts90daywarranty
Snowthrowers
ConsumerZeroTurn
90daywarranty
90daywarranty
45daywarranty
InstructionsforObtainingWarrantyService
IfyouthinkthatyourT oroProductcontainsadefectinmaterialsor
workmanship,followthisprocedure:
1.Contactyoursellertoarrangeserviceoftheproduct.Ifforanyreason
itisimpossibleforyoutocontactyourseller,youmaycontactany
ToroAuthorizedDistributortoarrangeservice.
2.Bringtheproductandyourproofofpurchase(salesreceipt)tothe
ServiceDealer.IfforanyreasonyouaredissatisedwiththeService
Dealer’sanalysisorwiththeassistanceprovided,contactusat:
CustomerCareDepartment,ConsumerDivision
TheT oroCompany
811 1LyndaleAvenueSouth
Bloomington,MN55420-1196
Manager:T echnicalProductSupport:001–952–887–8248
SeeattachedDistributorList
OwnerResponsibilities
YoumustmaintainyourT oroProductbyfollowingthemaintenance
proceduresdescribedintheOperator'sManual.Suchroutine
maintenance,whetherperformedbyadealerorbyyou,isatyourexpense.
ItemsandConditionsNotCovered
Thisexpresswarrantydoesnotcoverthefollowing:
•Costofregularmaintenanceserviceorwearparts,suchasrotor
blades(paddles),scraperblades,belts,fuel,lubricants,oilchanges,
sparkplugs,cable/linkageorbrakeadjustments
•Anyproductorpartwhichhasbeenalteredormisusedandrequires
replacementorrepairduetoaccidentsorlackofpropermaintenance
•Repairsnecessaryduetofailuretousefreshfuel(lessthanone
monthold),orfailuretoproperlypreparetheunitpriortoanyperiod
ofnon-useoveronemonth
•Engineandtransmission.Thesearecoveredbytheappropriate
manufacturer’sguaranteeswithseparatetermsandconditions
Allrepairscoveredbythesewarrantiesmustbeperformedbyan
AuthorizedToroServiceDealerusingT oroapprovedreplacementparts.
GeneralConditions
Thepurchaseriscoveredbythenationallawsofeachcountry.Therights
towhichthepurchaserisentitledwiththesupportoftheselawsarenot
restrictedbythiswarranty.
374-0268RevA
 Loading...