


60V21inSuperRecycler
ModelNo.21388—SerialNo.409320000andUp
ModelNo.21388T—SerialNo.409320000andUp
FormNo.3445-769RevB
®
LawnMower
Operator'sManual
Introduction
Thisrotary-blade,walk-behindlawnmowerisintended
tobeusedbyresidentialhomeowners.Itisdesigned
primarilyforcuttinggrassonwell-maintainedlawns
onresidentialproperties.Itisnotdesignedforcutting
brushorforagriculturaluses.Itisdesignedtouse
ToroFlex-Forcelithium-ionbatterypackModel88660
(providedwithModel21388);itcanalsousebattery
packModels88620,88625,88640,88650,or88675.
Thesebatterypacksaredesignedtobecharged
onlybybatterychargerModels88602(providedwith
Model21388),88605,or88610.Usingthisproduct
forpurposesotherthanitsintendedusecouldprove
dangeroustoyouandbystanders.
Model21388Tdoesnotincludeabatteryora
charger.
Readthisinformationcarefullytolearnhowtooperate
andmaintainyourproductproperlyandtoavoid
injuryandproductdamage.Youareresponsiblefor
operatingtheproductproperlyandsafely.
Visitwww.T oro.comformoreinformation,including
safetytips,trainingmaterials,accessoryinformation,
helpndingadealer,ortoregisteryourproduct.
Wheneveryouneedservice,genuinethe
manufacturerparts,oradditionalinformation,contact
anAuthorizedServiceDealerorthemanufacturer
CustomerServiceandhavethemodelandserial
numbersofyourproductready.Figure1identies
thelocationofthemodelandserialnumbersonthe
product.Writethenumbersinthespaceprovided.
Important:Withyourmobiledevice,youcan
scantheQRcodeontheserialnumberdecal(if
equipped)toaccesswarranty,parts,andother
productinformation.
ModelNo.
SerialNo.
Thismanualidentiespotentialhazardsandhas
safetymessagesidentiedbythesafety-alertsymbol
(Figure2),whichsignalsahazardthatmaycause
seriousinjuryordeathifyoudonotfollowthe
recommendedprecautions.
g000502
Figure2
Safety-alertsymbol
Thismanualuses2wordstohighlightinformation.
Importantcallsattentiontospecialmechanical
informationandNoteemphasizesgeneralinformation
worthyofspecialattention.
WARNING
CALIFORNIA
Proposition65Warning
Thepowercordonthisproductcontains
lead,achemicalknowntotheState
ofCaliforniatocausebirthdefects
orotherreproductiveharm.Wash
handsafterhandling.
Useofthisproductmaycauseexposure
tochemicalsknowntotheStateof
Californiatocausecancer,birthdefects,
orotherreproductiveharm.
Figure1
1.Modelandserialnumberlocation
©2021—TheT oro®Company
8111LyndaleAvenueSouth
Bloomington,MN55420Registeratwww.Toro.com.
g275230
OriginalInstructions(EN)
PrintedinMexico
AllRightsReserved
*3445-769*

Contents
Safety
Introduction...............................................................1
Safety.......................................................................2
SafetyandInstructionalDecals..........................5
Setup........................................................................7
1MountingtheBatteryCharger
(Optional)........................................................7
2UnfoldingtheHandle.......................................8
3AssemblingtheGrassBag...............................9
ProductOverview...................................................10
Specications...................................................11
Attachments/Accessories..................................11
Operation................................................................12
BeforeOperation.................................................12
InstallingtheBatteryPack................................12
AdjustingtheHandleHeight.............................12
AdjustingtheCuttingHeight.............................13
DuringOperation.................................................14
StartingtheMachine.........................................14
UsingtheSelf-PropelDrive...............................14
AdjustingtheBladeSpeed................................14
ShuttingOfftheMachine..................................15
RecyclingtheClippings....................................15
BaggingtheClippings.......................................16
DischargingtheClippings.................................18
RemovingtheBatteryPackfromthe
Machine........................................................19
OperatingTips.................................................19
AfterOperation....................................................20
ChargingtheBatteryPack................................20
CleaningundertheMachine.............................21
FoldingtheHandle...........................................21
Maintenance...........................................................23
RecommendedMaintenanceSchedule(s)...........23
LubricatingtheWheelGears............................23
ReplacingtheBlade..........................................23
AdjustingtheSelf-PropelDrive.........................24
PreparingtheBatteryPackfor
Recycling......................................................25
Storage...................................................................25
Troubleshooting......................................................26
IMPORTANTSAFETY
INSTRUCTIONS
WARNING—Whenusinganelectricmachine,always
readandfollowbasicsafetywarningsandinstructions
toreducetheriskofre,electricshock,orinjury,
includingthefollowing:
I.Training
1.Theoperatorofthemachineisresponsiblefor
anyaccidentsorhazardsoccurringtoothersor
theirproperty.
2.Donotallowchildrentouseorplaywiththe
machine,batterypack,orthebatterycharger;
localregulationsmayrestricttheageofthe
operator.
3.Donotallowchildrenoruntrainedpeopleto
operateorservicethisdevice.Allowonlypeople
whoareresponsible,trained,familiarwiththe
instructions,andphysicallycapabletooperate
orservicethedevice.
4.Beforeusingthemachine,batterypack,and
batterycharger,readalltheinstructionsand
cautionarymarkingsontheseproducts.
5.Becomefamiliarwiththecontrolsandproper
useofthemachine,batterypack,andbattery
charger.
II.Preparation
1.Keepbystanders,especiallychildrenandpets,
outoftheoperatingarea.
2.Donotoperatethemachinewithoutallguards
andsafetydevices,suchasdeectorsandgrass
catchers,inplaceandfunctioningproperlyon
themachine.
3.Inspecttheareawhereyouwillusethemachine
andremoveallobjectsthatcouldinterferewith
theoperationofthemachineorthatthemachine
couldthrow.
4.Beforeusingthemachine,ensurethattheblade,
bladebolt,andbladeassemblyarenotwornor
damaged.Replaceanydamagedorunreadable
labels.
5.UseonlythebatterypackspeciedbyT oro.
Usingotheraccessoriesandattachmentsmay
increasetheriskofinjuryandre.
6.Pluggingthebatterychargerintoanoutletthatis
not120Vcancauseareorelectricshock.Do
notplugthebatterychargerintoanoutletother
than120V.Foradifferentstyleofconnection,
useanattachmentplugadapteroftheproper
congurationforthepoweroutletifneeded.
2

7.Donotuseadamagedormodiedbattery
packorbatterycharger,whichmayexhibit
unpredictablebehaviorthatresultsinre,
explosion,orriskofinjury.
8.Ifthesupplycordtothebatterychargeris
damaged,contactanAuthorizedServiceDealer
toreplaceit.
9.Donotusenon-rechargeablebatteries.
10.Chargethebatterypackwithonlythebattery
chargerspeciedbyToro.Achargersuitablefor
1typeofbatterypackmaycreateariskofre
whenusedwithanotherbatterypack.
11.Chargethebatterypackinawell-ventilatedarea
only.
12.Donotexposeabatterypackorbatterycharger
toreortotemperatureshigherthan68°C
(154°F).
13.Followallcharginginstructionsanddo
notchargethebatterypackoutsideofthe
temperaturerangespeciedintheinstructions.
Otherwise,youmaydamagethebatterypack
andincreasetheriskofre.
14.Dressproperly—Wearappropriateclothing,
includingeyeprotection;longpants;substantial,
slip-resistantfootwear(notbarefootorwearing
sandals);andhearingprotection.Tiebacklong
hairanddonotwearlooseclothingorloose
jewelrythatcangetcaughtinmovingparts.
Wearadustmaskindustyoperatingconditions.
Useofrubberglovesisrecommended.
III.Operation
1.Contactwiththemovingbladewillcauseserious
injury.Keepyourhandsandfeetawayfromthe
cuttingareaandallmovingpartsofthemachine.
Keepclearofanydischargeopening.
2.Usingthismachineforpurposesotherthanits
intendedusecouldprovedangeroustoyouand
bystanders.
3.Disengagetheself-propeldrive(ifequipped)
beforestartingthemachine.
4.Donottilttheappliancewhenstartingthemotor.
5.Preventunintentionalstarting—Ensurethatthe
electric-startbuttonisremovedfromtheignition
beforeconnectingthebatterypackandhandling
themachine.
6.Useyourfullattentionwhileoperatingthe
machine.Donotengageinanyactivitythat
causesdistractions;otherwise,injuryorproperty
damagemayoccur.
7.Whenyoureleasetheblade-controlbar,the
motorshouldshutoffandthebladeshould
stopwithin3seconds.Ifnot,stopusingyour
machineimmediatelyandcontactanAuthorized
ServiceDealer.
8.Stopthemachine,removetheelectric-start
button,removethebatterypackfromthe
machine,andwaitforallmovementtostop
beforeadjusting,servicing,cleaning,orstoring
themachine.
9.Removethebatterypackandelectric-start
buttonfromthemachinewheneveryouleaveit
unattendedorbeforechangingaccessories.
10.Donotforcethemachine—Allowthemachineto
dothejobbetterandsaferattherateforwhichit
wasdesigned.
11.Stayalert—Watchwhatyouaredoinganduse
commonsensewhenoperatingthemachine.
Donotusethemachinewhileill,tired,orunder
theinuenceofalcoholordrugs.
12.Operatethemachineonlyingoodvisibilityand
appropriateweatherconditions.Donotoperate
themachinewhenthereistheriskoflightning.
13.Useextremecautionwhenreversingorpulling
themachinetowardyou.
14.Keepproperfootingandbalanceatalltimes,
especiallyonslopes.Mowacrosstheface
ofslopes,neverupanddown.Useextreme
cautionwhenchangingdirectionsonslopes.Do
notmowexceedinglysteepslopes.Walk,never
runwiththemachine.
15.Donotdirectthedischargematerialtoward
anyone.Avoiddischargingmaterialagainsta
wallorobstruction;materialmayricochettoward
you.Stoptheblade(s)whencrossingsurfaces
otherthangrass.
16.Watchforholes,ruts,bumps,rocks,orother
hiddenobjects.Uneventerraincouldcauseyou
toloseyourbalanceorfooting.
17.Wetgrassorleavescancauseseriousinjuryif
youslipandcontacttheblade.Avoidmowingin
wetconditionsorwhenitisraining.
18.Ifthemachinestrikesanobjectorstartsto
vibrate,immediatelyshutoffthemachine,
removetheelectric-startbutton,removethe
batterypack,andwaitforallmovementtostop
beforeexaminingthemachinefordamage.
Makeallnecessaryrepairsbeforeresuming
operation.
19.Stopthemachineandremovetheelectric-start
buttonbeforeloadingthemachineforhauling.
20.Underabusiveconditions,thebatterypackmay
ejectliquid;avoidcontact.Ifyouaccidently
comeintocontactwiththeliquid,ushwith
water.Iftheliquidcontactsyoureyes,seek
3

medicalhelp.Liquidejectedfromthebattery
packmaycauseirritationorburns.
12.Checkthebladeandmotormountingbolts
frequentlyfortightness.
IV.MaintenanceandStorage
1.Stopthemachine,removetheelectric-start
button,removethebatterypackfromthe
machine,andwaitforallmovementtostop
beforeadjusting,servicing,cleaning,orstoring
themachine.
2.Donotattempttorepairthemachineexceptas
indicatedintheinstructions.HaveanAuthorized
ServiceDealerperformserviceonthemachine
usingidenticalreplacementparts.
3.Wearglovesandeyeprotectionwhenservicing
themachine.
4.Sharpenadullbladeonbothedgestomaintain
balance.Cleanthebladeandensurethatitis
balanced.
5.Replacethebladeifitisbent,worn,orcracked.
Anunbalancedbladecausesvibration,which
coulddamagethemotororcausepersonal
injury.
6.Whenservicingtheblade,beawarethatthe
bladecanstillmoveeventhoughthepower
sourceisoff.
13.Whenyouarenotusingthemachine,storeit
indoorsinadry,secureplaceoutofthereach
ofchildren.
14.CAUTION—Amistreatedbatterypackmay
presentariskofreorchemicalburn.Donot
disassemblethebatterypack.Donotheatthe
batterypackabove68°C(154°F)orincinerate
it.ReplacethebatterypackwithagenuineToro
batterypackonly;usinganothertypeofbattery
packmaycauseareorexplosion.Keep
batterypacksoutofthereachofchildrenand
intheoriginalpackaginguntilyouarereadyto
usethem.
15.Donotdisposeofthebatteryinare.The
cellmayexplode.Checkwithlocalcodesfor
possiblespecialdisposalinstructions.
SAVETHESE
INSTRUCTIONS
7.Checkthegrasscollectionbagfrequentlyfor
deteriorationorwear,andreplaceawornbag
withaToro[replacement]bag.
8.Forbestperformance,useonlygenuineT oro
replacementpartsandaccessories.Other
replacementpartsandaccessoriescouldbe
dangerous,andsuchusecouldvoidtheproduct
warranty.
9.Maintainthemachine—Keepcuttingedges
sharpandcleanforthebestandsafest
performance.Keephandlesdry,clean,andfree
fromoilandgrease.Keepguardsinplaceandin
workingorder.Keepbladessharp.Useidentical
replacementbladesonly .
10.Checkthemachinefordamagedparts—Ifthere
aredamagedguardsorotherparts,determine
whetherthemachinewilloperateproperly.
Checkformisalignedandbindingmovingparts,
brokenparts,mounting,andanyothercondition
thatmayaffectitsoperation.Unlessindicated
intheinstructions,haveanAuthorizedService
Dealerrepairorreplaceadamagedguardor
part.
11.Whenthebatterypackisnotinuse,keepit
awayfrommetalobjectssuchaspaperclips,
coins,keys,nails,andscrewsthatcanmakea
connectionfrom1terminaltoanother.Shorting
thebatteryterminalsmaycauseburnsorare.
4

SafetyandInstructionalDecals
Safetydecalsandinstructionsareeasilyvisibletotheoperatorandarelocatednearanyarea
ofpotentialdanger.Replaceanydecalthatisdamagedormissing.
Manufacturer'sMark
decaloemmarkt
1.Thismarkindicatesthatthebladeisidentiedasapart
fromtheoriginalmachinemanufacturer .
94-8072
115-8411
decal94-8072
decal115-841 1
1.Warning—readthe
Operator'sManual.
2.Cutting/dismemberment
hazardofhand,mower
blade—stayawayfrom
movingparts;keepall
guardsandshieldsin
place.
3.Cutting/dismemberment
hazardofhand,mower
blade—removethekey
andreadtheOperator’s
Manualbeforeperforming
maintenance.
decal144-6368
144-6368
4.Thrownobject
hazard—keepbystanders
away;shutoffthe
machinebeforeleaving
theoperatingposition;
pickupanydebrisbefore
mowing.
5.Cutting/dismemberment
hazardoffoot,mower
blade—donotoperateup
anddownslopes;operate
sidetosideonslopes;look
behindyouwhenmoving
inreverse.
1.Unlocked2.Locked
133-8062
134-4691
1.Autospeed2.Maxspeed
decal133-8062
decal137-9196
137-9196
1.Lock2.Unlock
decal134-4691
5

decal137-9461
137-9461
1.Batterychargestatus
decal137-9455
137-9455
1.ReadtheOperator’s
Manual.
2.Keepawayfromopenre
orames.
3.Donotexposetorain.
decal137-9462
137-9462
decal137-9463
137-9463
1.Thebatterypackischarging.
2.Thebatterypackisfullycharged.
3.Thebatterypackisoverorundertheappropriatetemperaturerange.
4.Batterypackchargingfault
6

Setup
Important:Thebatterypackisnotfullycharged
whenitispurchased.Beforeusingthemachine
forthersttime,refertoChargingtheBattery
Pack(page20).
1
MountingtheBattery
Charger(Optional)
Partsneededforthisprocedure:
2
Mountinghardware(notincluded)
Procedure
Ifdesired,mountthebatterychargersecurelyona
decal139-8986
139-8986
wallusingthewall-mountkeyholesonthebackof
thecharger.
Mountitindoors(suchasagarageorotherdryplace),
nearapoweroutlet,andoutofthereachofchildren.
RefertoFigure3forassistanceinmountingthe
charger.
Slidethechargerovertheappropriatelypositioned
hardwaretosecurethechargerinplace(hardware
notincluded).
Figure3
g290534
7

2
UnfoldingtheHandle
NoPartsRequired
Procedure
WARNING
Unfoldingthehandleimproperlycandamagethecables,causinganunsafeoperating
condition.
•Donotdamagethecable(s)whenfoldingorunfoldingthehandle.
•Ensurethatthecable(s)areroutedtotheoutsideofthehandle.
•Ifacableisdamaged,contactanAuthorizedServiceDealer.
Important:Holdthehandlewhileengagingthehandlelockstoavoidpinchingyourhands.
Figure4
8
g333107

3
AssemblingtheGrassBag
NoPartsRequired
Procedure
Figure5
Note:Bydefaultthismachineisequippedwithaneconomybladeforimprovedruntime;italsoincludesan
optionalperformancebladeforimprovedbaggingandperformance.Beforebagging,installtheperformance
blade;refertoReplacingtheBlade(page23).
g241560
9

ProductOverview
g337937
Figure7
Figure6
1.Handle
2.Self-propeldrivebar
3.Blade-controlbar
4.Electric-startbutton
5.Electric-startignition11.Handle-heightadjustment
6.Reardeector(notshown)12.Handlelever(2)
7.Washoutport(notshown)
8.Batterycompartment
9.Cutting-heightlever(4)
10.Sidedeector
knob
1.Grassbag4.Rearplug(installedby
2.Side-dischargechute5.Curvedperformanceblade
3.Economyblade(installed
g333108
bydefault)
default)
(included)
g355813
Figure8
1.Batterycharger(included
withModel21388)
2.Batterypackmodel88660
(includedwithModel
21388)
10

Specications
BatteryPack
Model88660
Batterypack
capacity
Batterymanufacturerrating=60Vmaximumand54Vnominal.
Actualvoltagevarieswithload.
BatteryCharger
Model88602
Type
Input
Output60VMAXDC2.0A
AppropriateTemperatureRanges
6.0Ah
324Wh
60VMAXLithium-IonBatteryCharger
120VAC50/60HzMax2.0A
Charge/storethebatterypack
at
Usethebatterypackat
Usethemachineat
5°C(41°F)to40°C(104°F)*
-30°C(-22°F)to49°C(120°F)*
0°C(32°F)to49°C(120°F)*
*Chargingtimewillincreaseifyoudonotchargethe
batterypackwithinthisrange.
Storethemachine,batterypack,andbatterycharger
inanenclosedclean,dryarea.
Attachments/Accessories
AselectionofToroapprovedattachmentsand
accessoriesmaybeavailableforusewiththemachine
toenhanceandexpanditscapabilities.Contact
yourAuthorizedServiceDealerorauthorizedT oro
distributororgotowww.T oro.comforalistofall
approvedattachmentsandaccessories.
Toensureoptimumperformanceandcontinuedsafety
certicationofthemachine,useonlygenuineToro
replacementpartsandaccessories.Replacement
partsandaccessoriesmadebyothermanufacturers
couldbedangerous,andsuchusecouldvoidthe
productwarranty.
11

Operation
Note:Determinetheleftandrightsidesofthemachinefromthenormaloperatingposition.
BeforeOperation
InstallingtheBatteryPack
Important:Usethebatterypackonlyintemperaturesthatarewithintheappropriaterange;refer
toSpecications(page11).
1.Makesurethattheventsonthebatteryareclearofanydustanddebris.
2.Liftupthebattery-compartmentlid(AofFigure9).
3.Lineupthecavityinthebatterypackwiththetongueonthemachineandslidethebatterypackintothe
compartmentuntilitlocksintoplace(BofFigure9).
4.Closethebattery-compartmentlid(CofFigure9).
Note:Ifthebattery-compartmentliddoesnotclosecompletely,thebatteryisnotfullyinstalled.
Figure9
AdjustingtheHandleHeight
Youmayraiseorlowerthehandletoapositioncomfortableforyou.
Rotatethehandlelock,movethehandleto1of3positions,andlockthehandleintoposition(Figure10).
Figure10
g251221
g333109
12

AdjustingtheCuttingHeight
WARNING
Adjustingtheheight-of-cutcouldbringyourhandsintocontactwithamovingbladeand
resultinseriousinjury.
•Shutoffthemotor,removethebattery,andwaitforallmovingpartstostopbeforeadjusting
thecuttingheight.
•Donotputyourngersunderthehousingwhenadjustingthecuttingheight.
Adjustthecuttingheightasdesired.Setallwheelstothesamecuttingheight(Figure11).
Figure11
g225876
13

DuringOperation
StartingtheMachine
1.Ensurethatthebatterypackisinstalledinthemachine;refertoInstallingtheBatteryPack(page12).
2.Inserttheelectric-startbuttonintotheelectricstarterswitch(AofFigure12).
3.Squeezetheblade-controlbarandholdittothehandle(BofFigure12).
4.Presstheelectric-startbuttonandkeepitpresseduntilthemotorstarts(CofFigure12).
Note:Ifthebattery-compartmentliddoesnotclosecompletely,thebatteryisnotfullyinstalled.
Figure12
g331863
UsingtheSelf-PropelDrive
Tooperatetheself-propeldrive,simplywalkwithyour
handsontheupperhandleandyourelbowsatyour
sides,andthemachinewillautomaticallykeeppace
withyou(Figure13).
Figure13
Note:Ifthemachinedoesnotfreelyrollbackward
afterself-propelling,stopwalking,holdyourhands
inplace,andallowthemachinetorollacoupleof
centimeters(inches)forwardtodisengagethewheel
drive.Youcanalsotryreachingjustundertheupper
handletothemetalhandleandpushingthemachine
forwardacoupleofcentimeters(inches).Ifthe
machinestilldoesnotrollbackwardeasily,contactan
AuthorizedServiceDealer.
AdjustingtheBladeSpeed
Thismachinehas2blade-speedsettings:AUTOand
MAX.
•WhensettotheAUTOposition,thebladespeed
isadjustedautomaticallyforgreaterefciency;
changesincuttingconditionsaredetectedand
thebladespeedincreaseswhennecessaryto
maintainqualityofcut.
•WhensettotheMAXposition,thebladespeed
remainsatthehighestspeedatalltimes.
Turnthekeyinthekeyswitchtoeitherpositionto
adjustthebladespeedsetting(Figure14).
g233423
g337279
Figure14
1.AUTOposition2.MAXposition
14
ShuttingOfftheMachine
1.Releasetheblade-controlbar(AofFigure15).
2.Removetheelectric-startbuttonfromtheelectricstarter(BofFigure15).
3.Removethebatterypack;refertoRemovingtheBatteryPackfromtheMachine(page19).
Note:Wheneveryouarenotusingthemachine,removethebatterypack.
Figure15
g251435
RecyclingtheClippings
Yourmachinecomesfromthefactoryreadytorecyclethegrassandleafclippingsbackintothelawn.
Iftheside-dischargechuteisonthemachine,removeitandlocktheside-dischargedeector;refertoRemoving
theSide-DischargeChute(page19)beforerecyclingtheclippings.
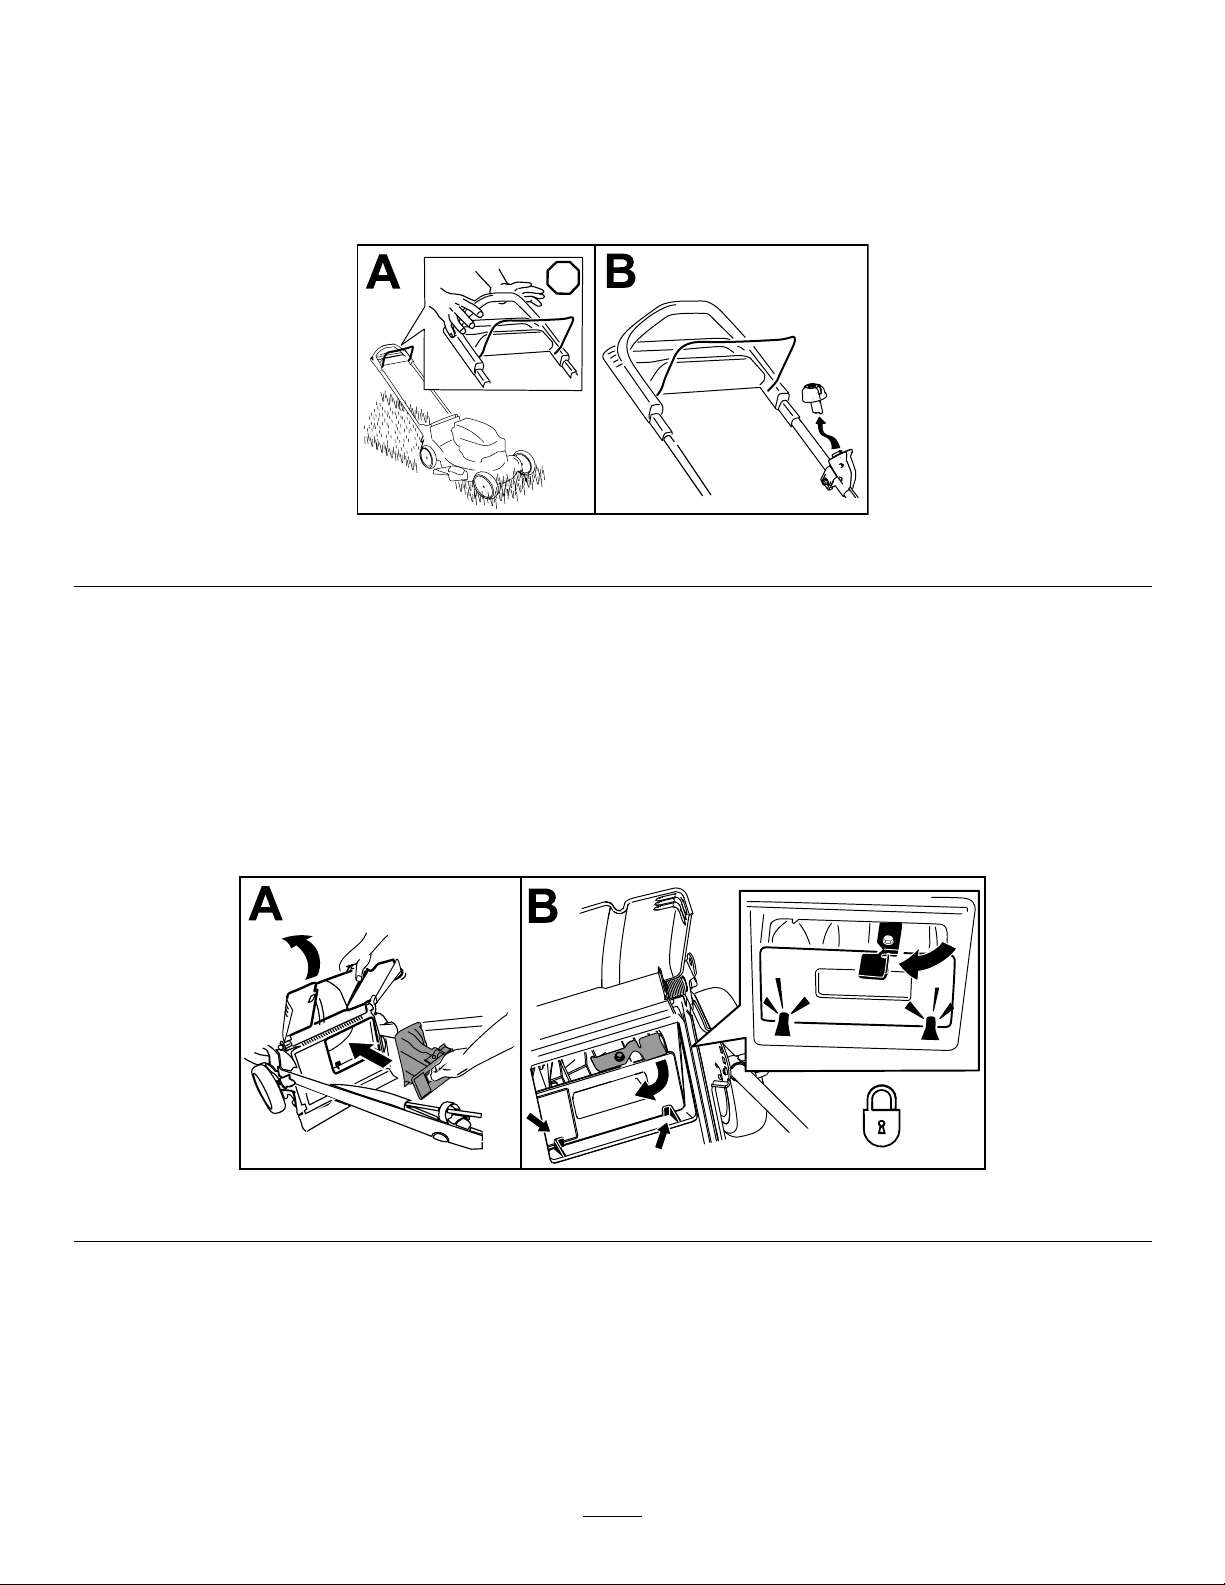
Important:Ensurethattherearplugislockedinplace.Tolocktheplug,raisethereardeector(A
ofFigure16),rmlypushthepluginuntilitsnapsintoplacebehindthetabs,androtatetheleveron
theplugtotheleft(BofFigure16).
Figure16
g239445
Note:T ounlocktherearplug,rotatetheleverontheplugtotheright(Figure17).
15

BaggingtheClippings
Usethegrassbagwhenyouwanttocollectgrassandleafclippingsfromthelawn.
Iftheside-dischargechuteisonthemachine,removeitandlocktheside-dischargedeector;refertoRemoving
theSide-DischargeChute(page19).
Note:Bydefaultthismachineisequippedwithaneconomybladeforimprovedruntime;italsoincludesan
optionalperformancebladeforimprovedbaggingandperformance.Beforebagging,installtheperformance
blade;refertoReplacingtheBlade(page23).
InstallingtheGrassBag
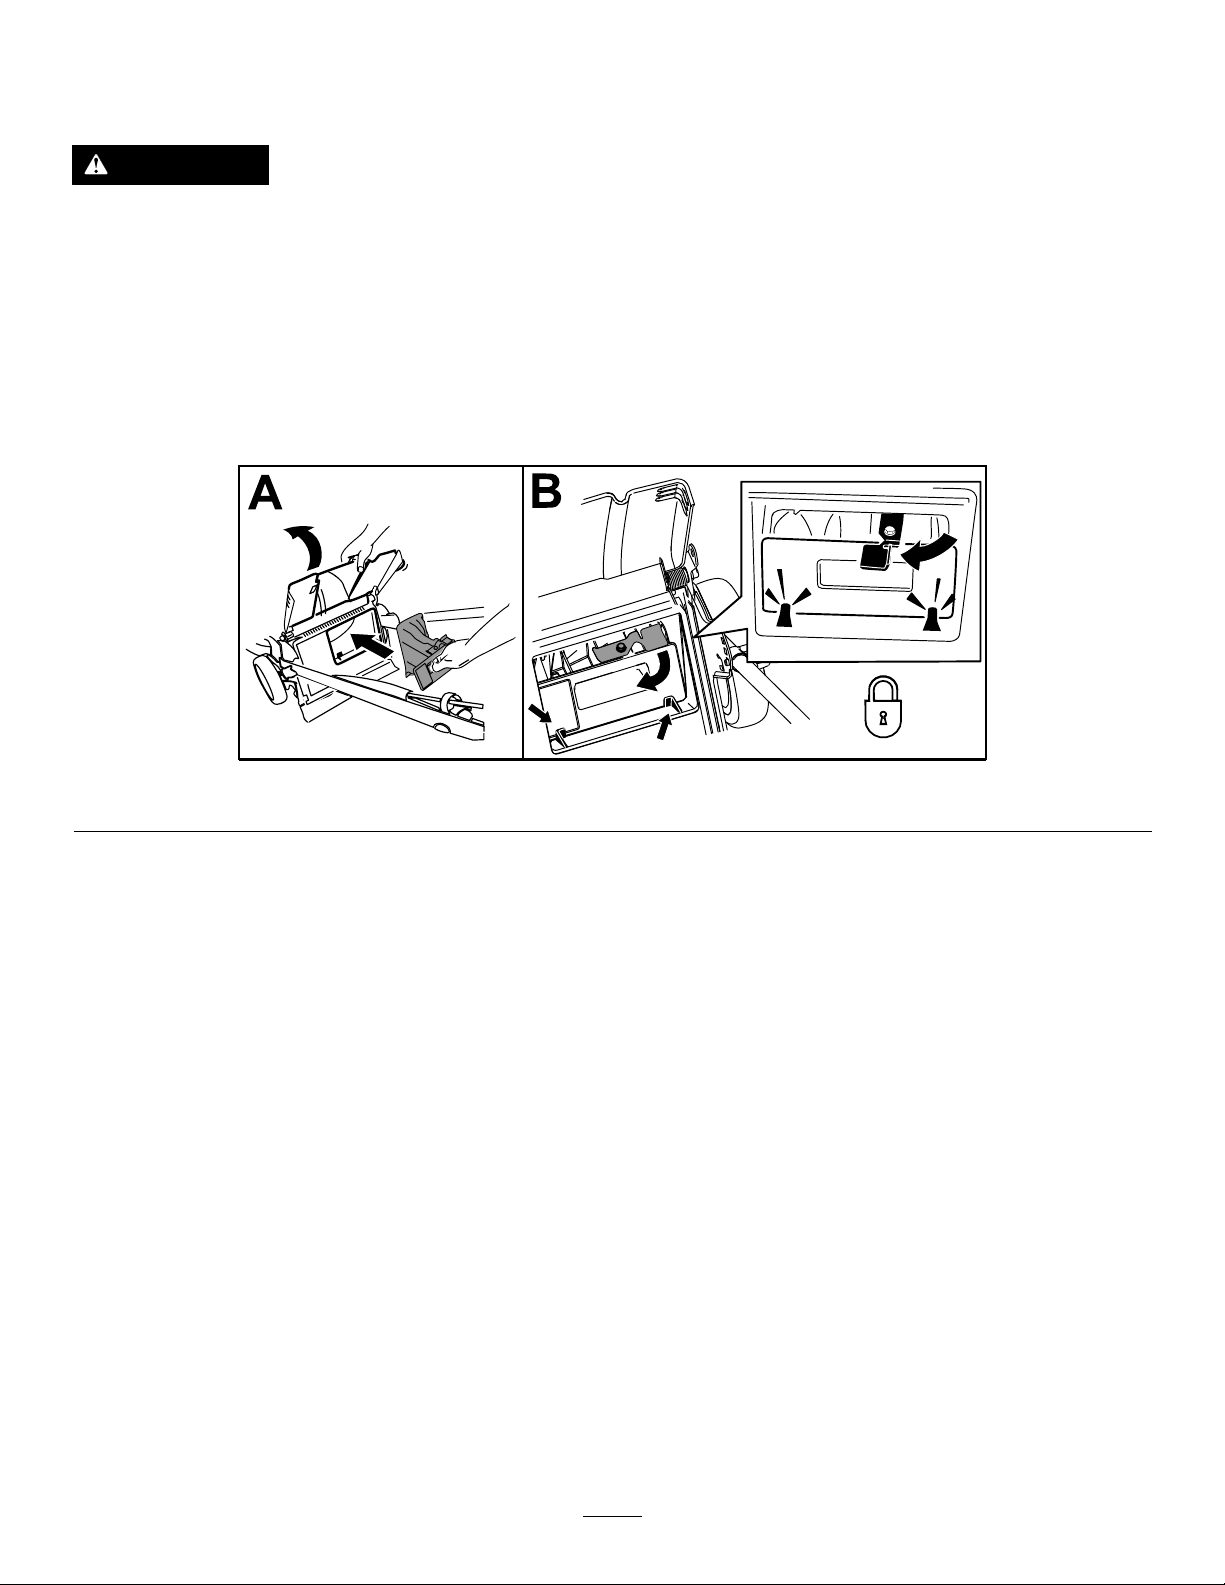
1.Raiseandholdupthereardeectorandunlocktherearplug(AofFigure17).
2.Pullouttherearplug(BofFigure17).
3.Hangtheupperfrontedgeofthebagfromthegrass-bagpinsonthenotchesofthehandlebrackets
(CofFigure17).
4.Lowerthereardeector.
Figure17
g240403
16

RemovingtheGrassBag
1.Raiseandholdupthereardeectorandliftthegrassbagupbythehandleoffthenotchesofthehandle
brackets(AofFigure18).
2.Installtherearplug(BofFigure18).
Important:Ensurethattherearplugislockedinplace.Tolocktheplug,rmlypushtheplugin
untilitsnapsintoplacebehindthetabs,androtatetheleverontheplugtotheleft(CofFigure18).
Note:T ounlocktheplug,rotatetheleverontheplugtotheright.
3.Lowerthereardeector.
Figure18
g333110
17
DischargingtheClippings
Side-dischargeorrear-dischargetheclippingswhencuttingverytallgrass.
WARNING
Thebladeissharp;contactingthebladecanresultinseriouspersonalinjury.
Shutoffthemachineandwaitforallmovingpartstostopbeforeleavingtheoperatingposition.
Side-DischargingtheClippings
Ifthebagisonthemachine,removeitandinserttherearplug;refertoRemovingtheGrassBag(page17).
Important:Ensurethattherearplugislockedinplace.Tolocktheplug,raisethereardeector
(Figure19),rmlypushthepluginuntilitsnapsintoplacebehindthetabs,androtatetheleveronthe
plugtotheleft(Figure19).
Figure19
Note:T ounlocktheplug,rotatetheleverontheplugtotheright.
InstallingtheSide-DischargeChute
1.Unlocktheside-dischargedeector(AofFigure20).
2.Liftopentheside-dischargedeector(BofFigure20).
3.Installtheside-dischargechuteandclosethedeectorontothechute(B,C,andDofFigure20).
g231918
18
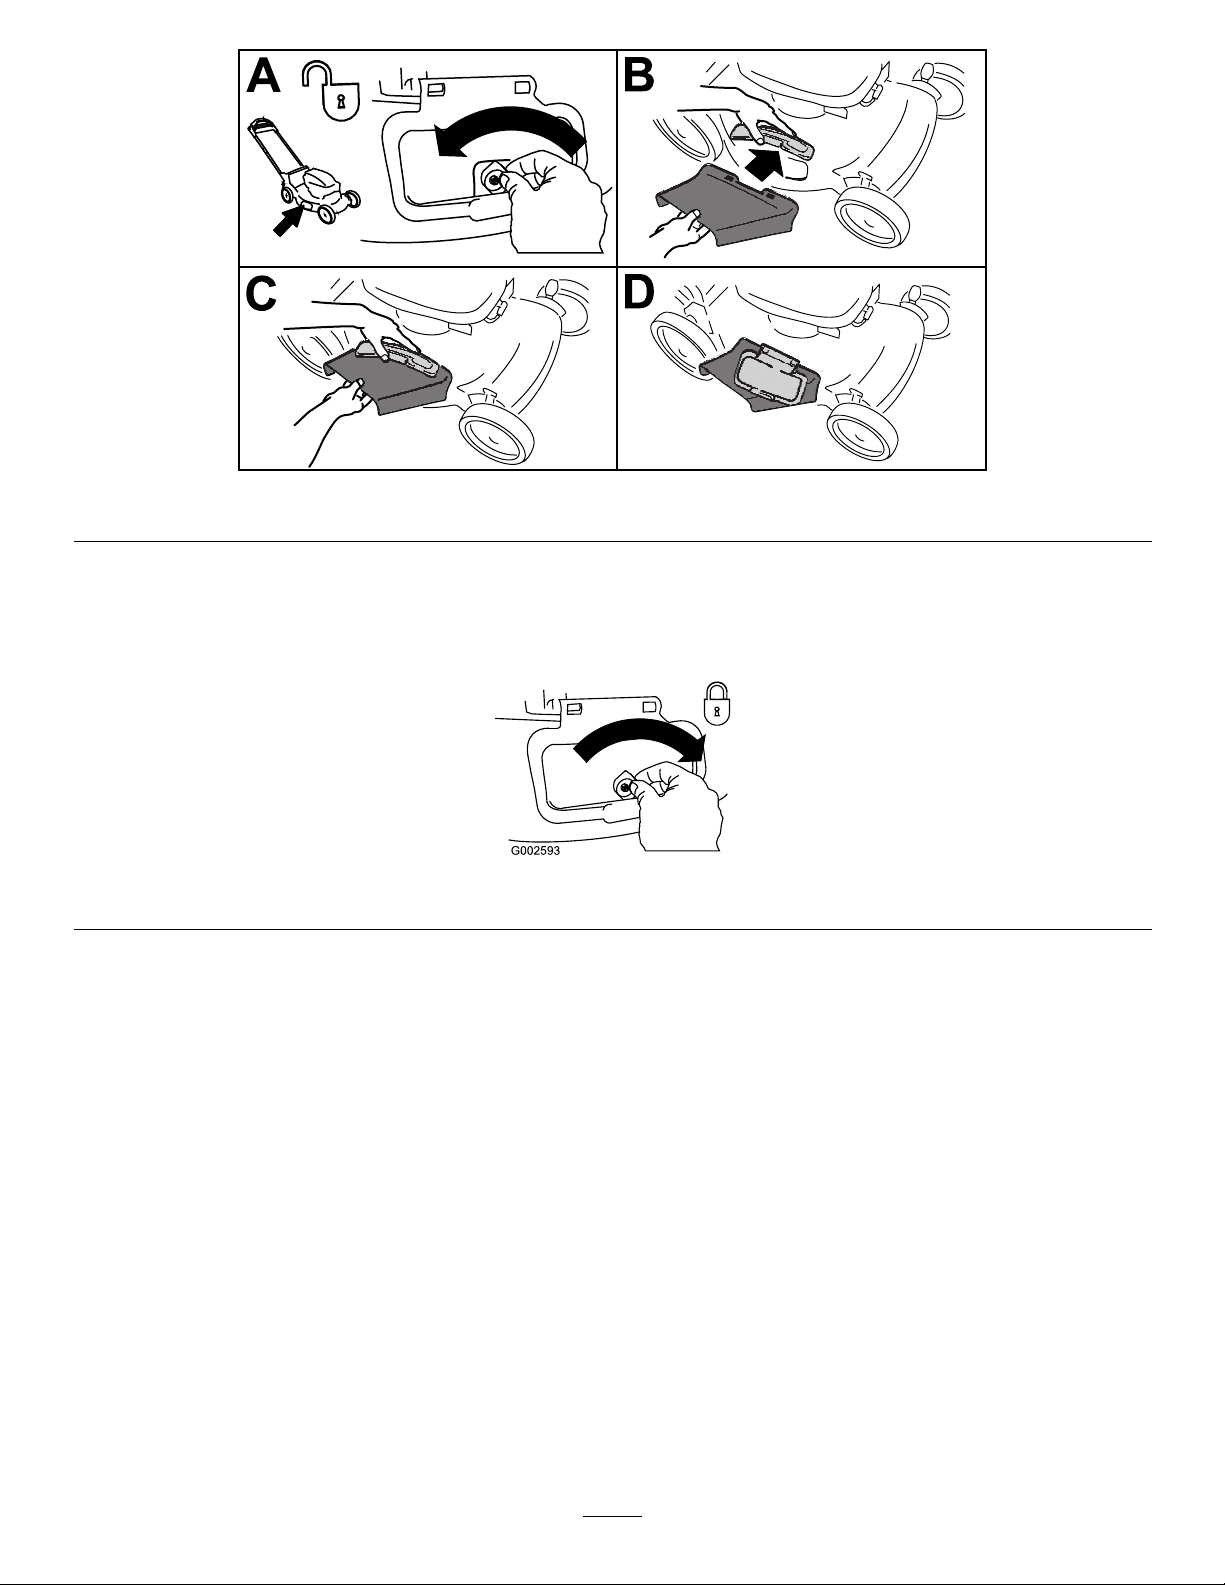
Figure20
RemovingtheSide-DischargeChute
Toremovetheside-dischargechute,reversethestepsabove.
Important:Locktheside-dischargedeectorafteryoucloseit(Figure21).
Figure21
g231920
g002593
RemovingtheBatteryPack
fromtheMachine
1.Liftupthebattery-compartmentlid.
2.Pressthebattery-packlatchtoreleasethe
batterypackandremovethebatterypack.
3.Closethebattery-compartmentlid.
OperatingTips
GeneralMowingTips
•Avoidstrikingsolidobjectswiththeblade.Never
deliberatelymowoveranyobject.
•Forbestperformance,installanewbladebefore
thecuttingseasonbegins.
•ReplacethebladewhennecessarywithaToro
replacementblade.
CuttingGrass
•Cutonlyaboutathirdofthegrassbladeatatime.
Forimprovedruntime,cutgrassatahigherheight
ofcut.
•Donotcutbelow51mm(2inches)unlessthe
grassissparseoritislatefallwhengrassgrowth
beginstoslowdown.
•Whencuttinggrassover15cm(6inches)tall,
mowatthehighestcuttingheightsettingandwalk
slower;thenmowagainatalowersettingforthe
bestlawnappearance.Ifthegrassistoolong,the
machinemayplugandcausethemotortostall.
•Wetgrassandleavestendtoclumpontheyard
andcancausethemachinetoplugorthemotorto
stall.Avoidmowinginwetconditions.
•Beawareofapotentialrehazardinverydry
conditions,followalllocalrewarnings,andkeep
themachinefreeofdrygrassandleafdebris.
19
•Alternatethemowingdirection.Thishelps
dispersetheclippingsoverthelawnforeven
fertilization.
•Ifthenishedlawnappearanceisunsatisfactory,
try1ormoreofthefollowing:
–Replacethebladeorhaveitsharpened.
–Walkataslowerpacewhilemowing.
–Raisethecuttingheightonyourmachine.
–Cutthegrassmorefrequently.
–Overlapcuttingswathsinsteadofcuttingafull
swathwitheachpass.
CuttingLeaves
•Aftercuttingthelawn,ensurethathalfofthelawn
showsthroughthecutleafcover.Youmayneed
tomakemorethanasinglepassovertheleaves.
•Iftherearemorethan13cm(5inches)ofleaves
onthelawn,mowatahighercuttingheightand
thenagainatthedesiredcuttingheight.
•Slowdownyourmowingspeedifthemachine
doesnotcuttheleavesnelyenough.
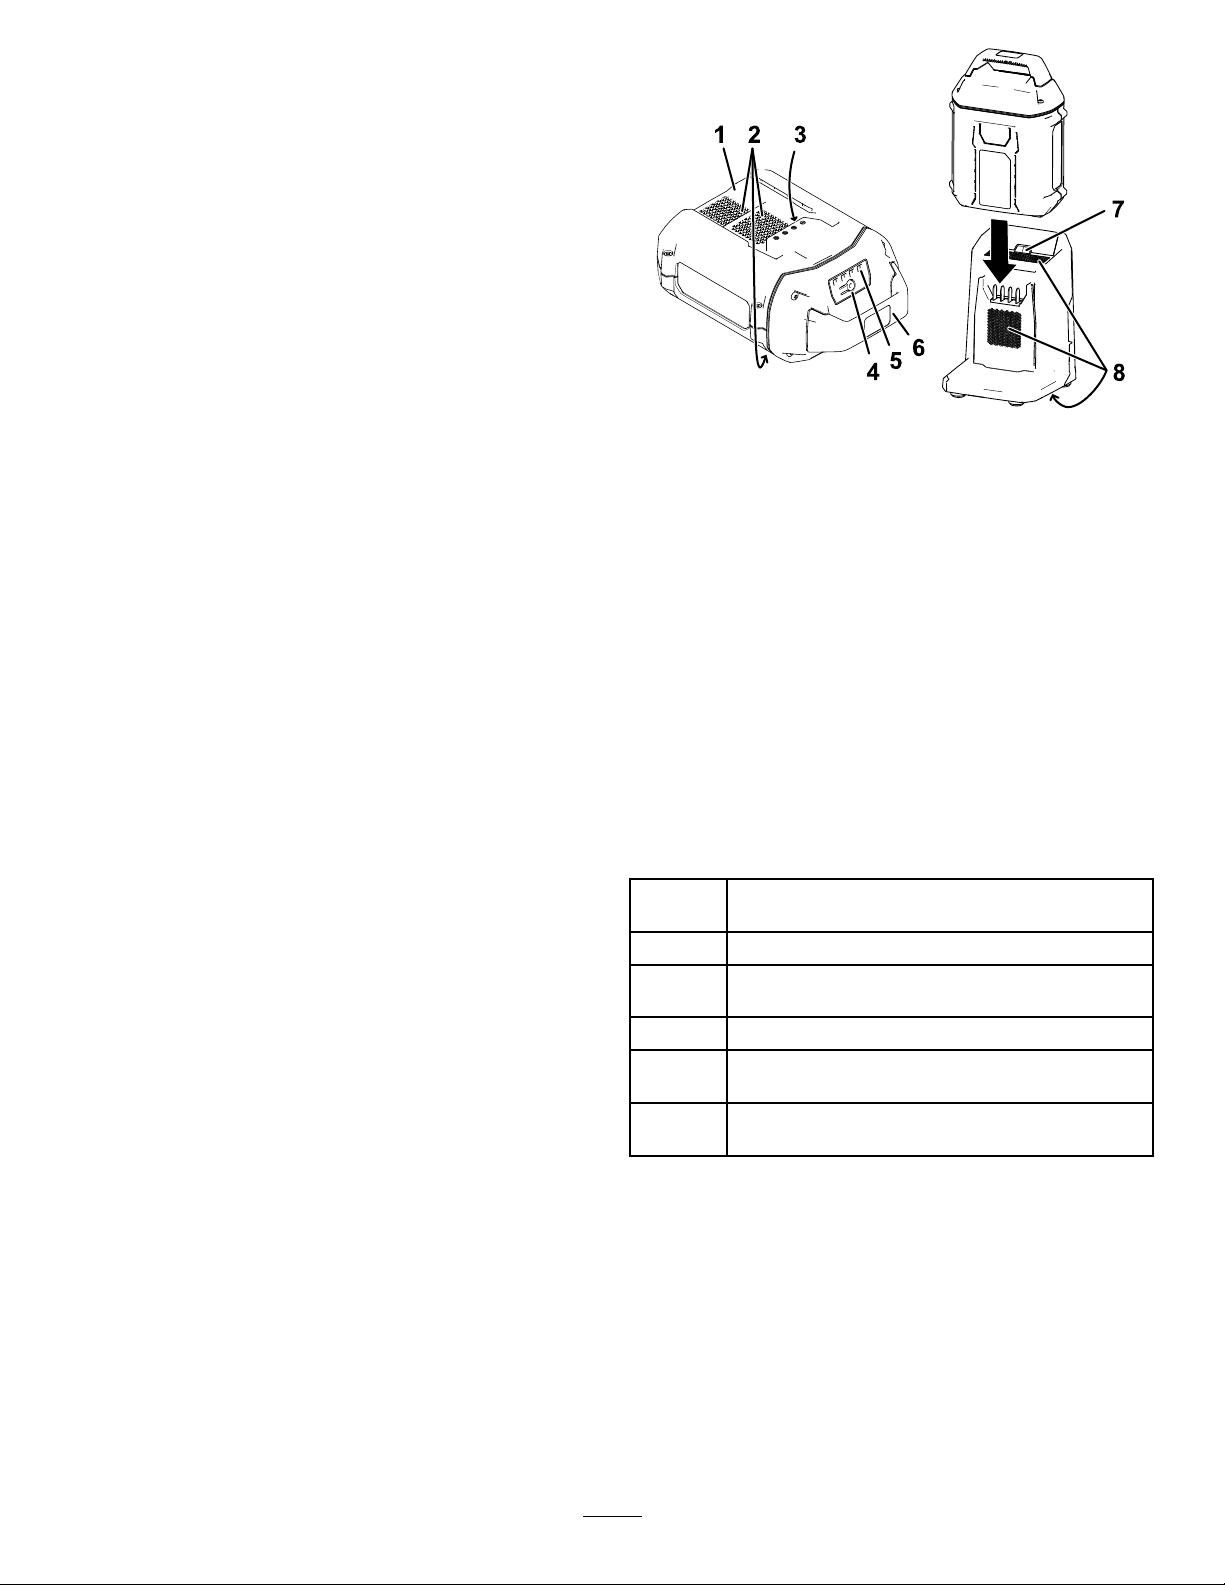
g290533
Figure22
1.Batterypackcavity
2.Batterypackventingareas6.Handle
3.Batterypackterminals
4.Battery-charge-indicator
button
5.LEDindicators(current
charge)
7.ChargerLEDindicator
light
8.Chargerventingareas
2.Lineupthecavityinthebatterypack(Figure22)
withthetongueonthecharger.
AfterOperation
ChargingtheBatteryPack
Important:Thebatterypackisnotfullycharged
whenyoupurchaseit.Beforeusingthetoolfor
thersttime,placethebatterypackinthecharger
andchargeituntiltheLEDdisplayindicatesthe
batterypackisfullycharged.Readallsafety
precautions.
Important:Chargethebatterypackonlyin
temperaturesthatarewithintheappropriate
range;refertoSpecications(page11).
Note:Atanytime,pressthebattery-charge-indicator
buttononthebatterypacktodisplaythecurrent
charge(LEDindicators).
1.Ensurethattheventsonthebatteryandcharger
areclearofanydustanddebris.
3.Slidethebatterypackintothechargeruntilitis
fullyseated(Figure22).
4.Toremovethebatterypack,slidethebattery
backwardoutofthecharger.
5.RefertothefollowingtabletointerprettheLED
indicatorlightonthebatterycharger.
Indicator
light
Off
Green
blinking
Green
Red
Red
blinking
Indicates
Nobatterypackinserted
Batterypackischarging
Batterypackischarged
Batterypackand/orbatterychargerisoverorunder
theappropriatetemperaturerange
Batterypackchargingfault*
*RefertoTroubleshooting(page26)formore
information.
Important:Thebatterycanbeleftonthecharger
forshortperiodsbetweenuses.
Ifthebatterywillnotbeusedforlongerperiods,
removethebatteryfromthecharger;referto
Storage(page25).
20

CleaningundertheMachine
ServiceInterval:Aftereachuse
WARNING
Themachinemaydislodgematerialfrom
underthemachine.
•Weareyeprotection.
•Stayintheoperatingposition(behindthe
handle)whenthemotorisrunning.
•Donotallowbystandersinthearea.
FoldingtheHandle
WARNING
Foldingorunfoldingthehandleimproperly
candamagethecables,causinganunsafe
operatingcondition.
•Donotdamagethecableswhenfoldingor
unfoldingthehandle.
•Ifacableisdamaged,contactan
AuthorizedServiceDealer.
Forbestresults,cleanthemachinesoonafteryou
havecompletedmowing.
1.Lowerthemachinetothelowestcutting-height
setting.RefertoAdjustingtheCuttingHeight
(page13).
2.Movethemachineontoalevelsurface.
3.Washouttheareaunderthereardoor(if
applicable)wheretheclippingsgofromthe
undersideofthemachinetothegrassbag.
4.Attachagardenhosethatisconnectedtoa
watersupplytothewashoutport(Figure23).
Figure23
1.Removetheelectric-startbutton(Figure24).
g251571
Figure24
2.Holdthehandlewhiledisengagingthehandle
lockstoavoidpinchingyourhands.
3.Disengagethehandlelocksuntilyoucanmove
theupperhandlefreely.
4.Foldthehandleforwardeithertothevertical
positionorthefullyforwardpositionasshown
inFigure25.
Important:Routethecablestotheoutside
ofthehandlelocksasyoufoldthehandle.
g189103
1.Washoutport
5.Turnthewateron.
6.Startthemotorandrunituntiltherearenomore
clippingsthatcomeoutfromunderthemachine.
7.Shutoffthemotor.
8.Shutoffthewateranddisconnectthegarden
hosefromthemachine.
9.Startthemotorandrunitforafewminutesto
drytheundersideofthemachine.
10.Shutoffthemotorandallowittocool.
21

Figure25
5.Tounfoldthehandle,referto2Unfoldingthe
Handle(page8).
g251299
22
Maintenance
Removetheelectric-startbuttonandbatterypackfromthemachinebeforemaintainingorcleaningthemachine.
Useonlythemanufacturer’srecommendedreplacementpartsandaccessories.
Inspectandmaintainthemachineregularly.HavethemachinerepairedonlybyanAuthorizedServiceDealer.
RecommendedMaintenanceSchedule(s)
MaintenanceService
Interval
Aftereachuse
Every25hours
Yearly
MaintenanceProcedure
•Cleangrassclippingsanddirtfromunderthemachine.
•Lubricatetherearwheelgears.
•Replacethebladesorhavethemsharpened(morefrequentlyiftheedgedulls
quickly).
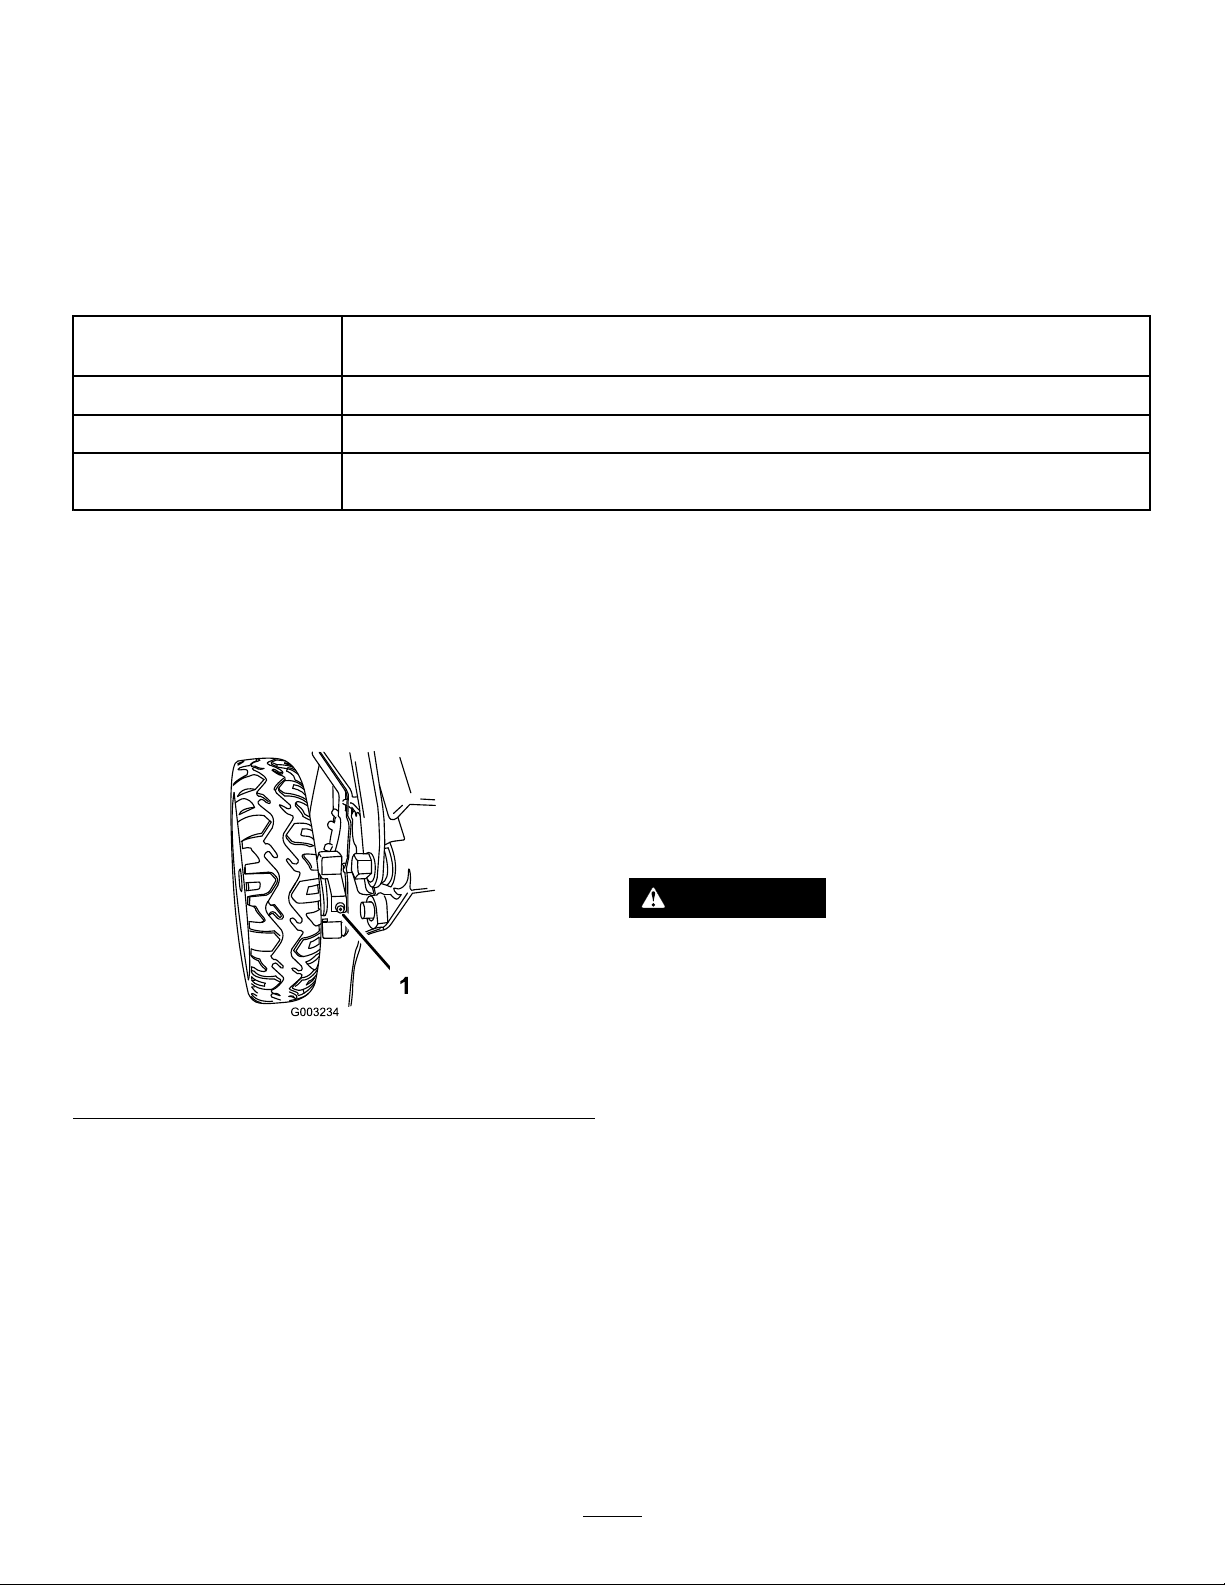
LubricatingtheWheel
Gears
ServiceInterval:Every25hours
1.Wipethegreasettingsjustinsidetherear
wheelswithacleanrag(Figure26).
ReplacingtheBlade
ServiceInterval:Yearly
Important:Youwillneedatorquewrenchto
installthebladeproperly.Ifyoudonothavea
torquewrenchorareuncomfortableperforming
thisprocedure,contactanAuthorizedService
Dealer.
Ifthebladeisdamagedorcracked,replaceit
immediately.Ifthebladeedgeisdullornicked,have
itsharpenedandbalanced,orreplaceit.
WARNING
Figure26
1.Greasetting
2.Installagreasegunontoeachttingandgently
apply2or3pumpsofNo.2lithiumgrease.
Whenservicingtheblade,beawarethatthe
bladecanstillmoveeventhoughthepower
sourceisoff.Thebladeissharp;contacting
g003234
thebladecanresultinseriouspersonalinjury.
Weargloveswhenservicingtheblade.
1.Removetheelectric-startbuttonandbattery
packfromthemachine.
2.Useablockofwoodtoholdthebladesteady
(Figure27).
3.Removetheblade,savingallmountinghardware
(Figure27).
23
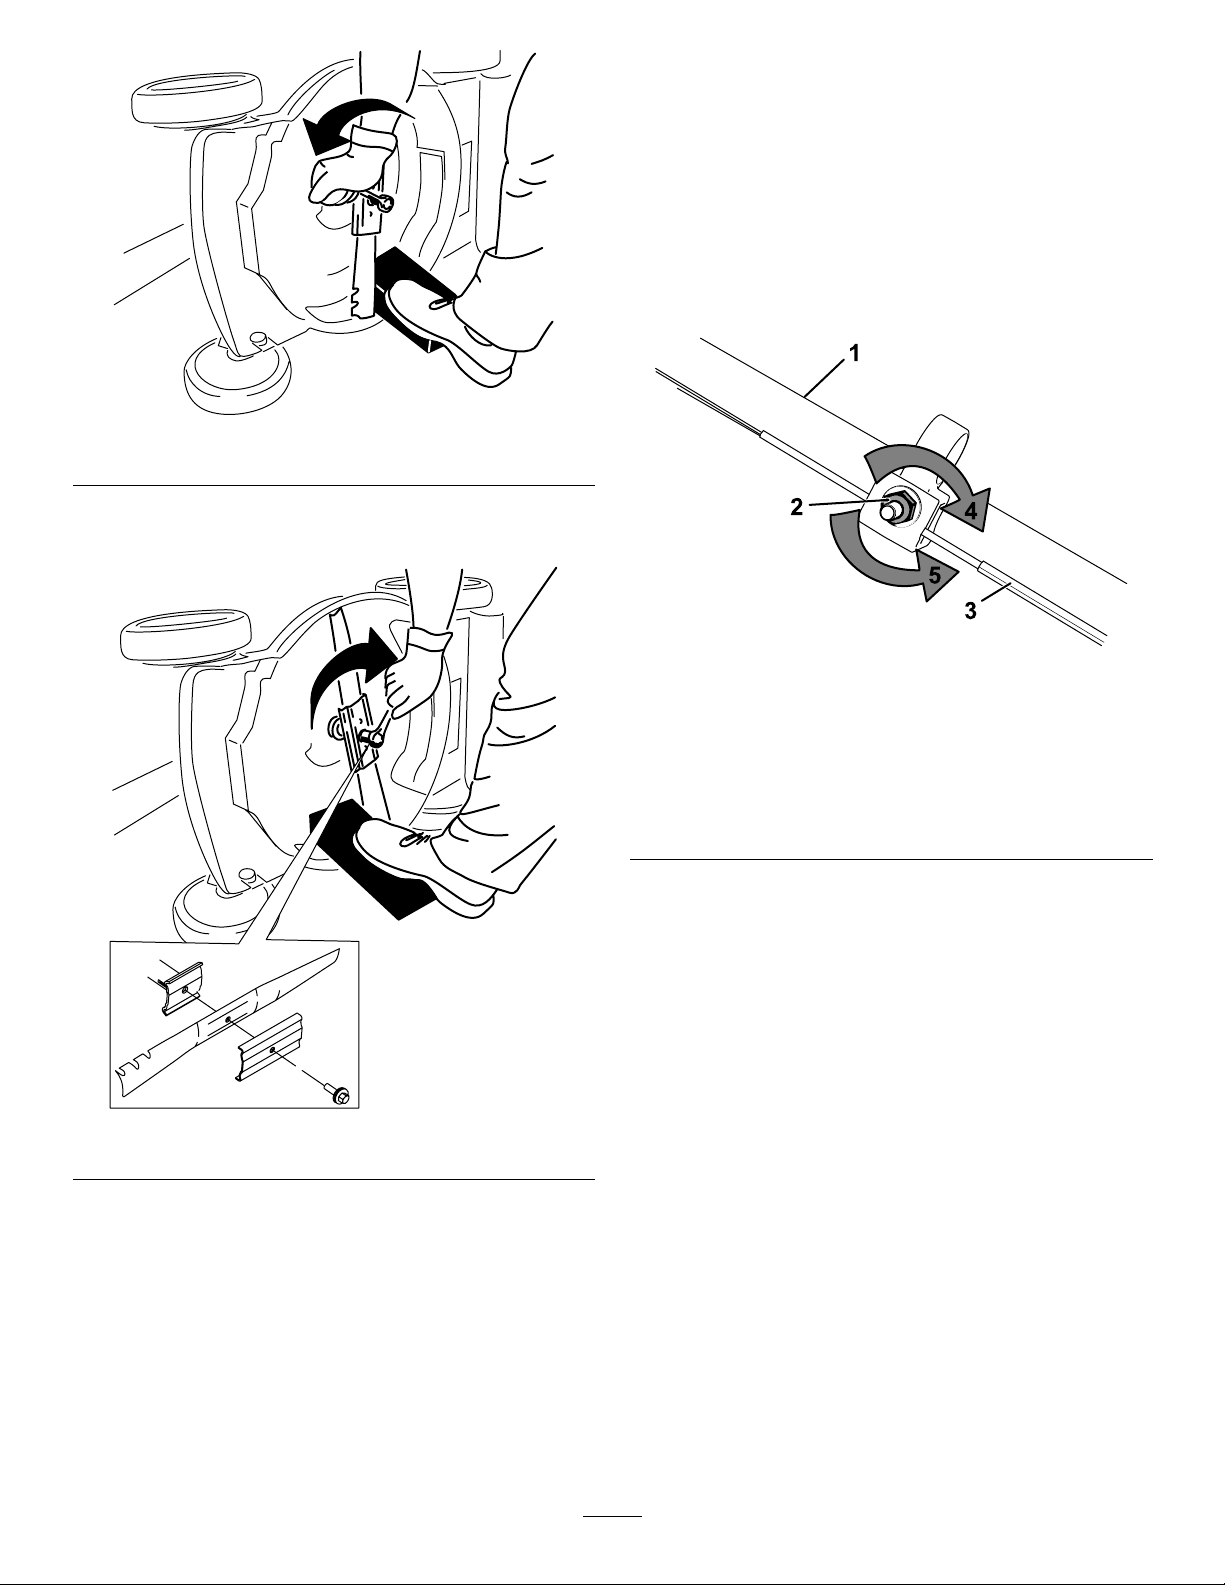
Figure27
4.Installthenewbladeandallmountinghardware
(Figure28).
AdjustingtheSelf-Propel
Drive
ForSelf-Propel-DriveModelsOnly
Wheneveryouinstallanewself-propelcableorif
theself-propeldriveisoutofadjustment,adjustthe
self-propeldrive.
1.Turntheadjustmentnutcounterclockwiseto
loosenthecableadjustment(Figure29).
g231389
g269307
Figure29
Figure28
Important:Positionthecurvedendsofthe
bladefacinguptowardthemachinehousing.
5.Useatorquewrenchtotightenthebladebolt
to88N∙m(65ft-lb).
1.Handle(leftside)
2.Adjustmentnut5.Turnthenut
3.Self-propel-drivecable
4.Turnthenutclockwiseto
tightentheadjustment.
counterclockwiseto
loosentheadjustment.
2.Adjustthetensiononthecable(Figure29)by
pullingitbackorpushingitforwardandholding
thatposition.
Note:Pushthecabletowardthemotorto
increasethetraction;pullthecableawayfrom
themotortodecreasethetraction.
3.Turntheadjustmentnutclockwisetotightenthe
cableadjustment.
g231390
Note:Tightenthenutrmlywithasocketor
wrench.
24

PreparingtheBatteryPack
Storage
forRecycling
Important:Uponremoval,covertheterminalsof
thebatterypackwithheavy-dutyadhesivetape.
Donotattempttodestroyordisassemblethe
batterypackorremoveanyofitscomponents.
Lithium-ionbatterypackslabeledwiththe
Call2Recyclesealcanberecycledatany
participatingretailerorbatteryrecycling
facilityintheCall2Recycleprogram(US
andCanadaonly).T olocateaparticipating
retailerorfacilityclosesttoyou,pleasecall
1-800-822-8837orvisitwww .call2recycle.org.
Ifyoucannotlocateaparticipatingretaileror
facilitynearby ,orifyourrechargeablebattery
isnotlabeledwiththeCall2Recycleseal,
pleasecontactyourlocalmunicipalityformore
informationonhowtoresponsiblyrecyclethe
battery.IfyouarelocatedoutsideoftheUS
andCanada,pleasecontactyourauthorized
Torodistributor.
Important:Storethemachine,batterypack,and
chargeronlyintemperaturesthatarewithinthe
appropriaterange;refertoSpecications(page
11).
Important:Ifyouarestoringthebatterypack
fortheoff-season,chargeituntil2or3LED
indicatorsturngreenonthebattery.Donotstore
afullychargedorfullydepletedbattery.When
youarereadytousethemachineagain,charge
thebatterypackuntiltheleftindicatorlightturns
greenonthechargerorall4LEDindicatorsturn
greenonthebattery.
•Disconnecttheproductfromthepowersupply(i.e.,
removethebatterypack)andcheckfordamage
afteruse.
•Donotstorethemachinewiththebatterypack
installed.
•Cleanallforeignmaterialfromtheproduct.
•Whennotinuse,storethemachine,electric-start
button,batterypack,andbatterychargeroutofthe
reachofchildren.
•Keepthemachine,batterypack,andbattery
chargerawayfromcorrosiveagents,suchas
gardenchemicalsandde-icingsalts.
•T oreducetheriskofseriouspersonalinjury,do
notstorethebatterypackoutsideorinvehicles.
•Storethemachine,batterypack,andbattery
chargerinanenclosedclean,dryarea.
25

Troubleshooting
Performonlythestepsdescribedintheseinstructions.Allfurtherinspection,maintenance,andrepairwork
mustbeperformedbyanauthorizedservicecenterorasimilarlyqualiedspecialistifyoucannotsolvethe
problemyourself.
Problem
Themachinedoesnotstart.
Themachinedoesnotruncontinuously.
Themachinedoesnotreachfullpower.
Thebatterypackloseschargequickly.1.Thebatterypackisoverorunderthe
Thebatterychargerisnotworking.
1.Thebatteryisnotfullyinstalledinthe
machine.
2.Thebatterypackisnotcharged.
3.Thebatterypackisdamaged.3.Replacethebatterypack.
4.Thereisanotherelectricalproblem
withthemachine.
1.Thereismoistureontheleadsofthe
batterypack.
2.Thebatteryisnotfullyinstalledintothe
tool.
1.Thebatterypackchargecapacityis
toolow.
2.Theairventsareblocked.
appropriatetemperaturerange.
1.Thebatterychargerisoverorunder
theappropriatetemperaturerange.
2.Theoutletthatthebatterychargeris
pluggedintodoesnothavepower .
PossibleCauseCorrectiveAction
1.Removeandthenreplacethebattery
intothemachine,makingsurethatitis
fullyinstalledandlatched.
2.Removethebatterypackfromthe
machineandchargeit.
4.ContactanAuthorizedServiceDealer.
1.Allowthebatterypacktodryorwipeit
dry.
2.Removeandthenreplacethebattery
intothetoolmakingsurethatitisfully
installedandlatched.
1.Removethebatterypackfromthe
machineandfullychargethebattery
pack.
2.Cleantheairvents.
1.Movethebatterypacktoaplace
whereitisdryandthetemperatureis
between5°C(41°F)and40°C(104°F).
1.Unplugthebatterychargerandmove
ittoaplacewhereitisdryandthe
temperatureisbetween5°C(41°F)
and40°C(104°F).
2.Contactyourlicensedelectricianto
repairtheoutlet.
TheLEDindicatorlightonthebattery
chargerisred.
TheLEDindicatorlightonthebattery
chargerisblinkingred.
1.Thebatterychargerand/orbattery
packisoverorundertheappropriate
temperaturerange.
1.Thereisanerrorinthecommunication
betweenthebatterypackandthe
charger.
2.Thebatterypackisweak.
1.Unplugthebatterychargerandmove
thebatterychargerandbatterypack
toaplacewhereitisdryandthe
temperatureisbetween5°C(41°F)
and40°C(104°F).
1.Removethebatterypackfromthe
batterycharger,unplugthebattery
chargerfromtheoutlet,andwait10
seconds.Plugthebatterychargerinto
theoutletagainandplacethebattery
packonthebatterycharger.IftheLED
indicatorlightonthebatterychargeris
stillblinkingred,repeatthisprocedure
again.IftheLEDindicatorlighton
thebatterychargerisstillblinkingred
after2attempts,properlydisposeof
thebatterypackatabatteryrecycling
facility.
2.Properlydisposeofthebatterypackat
abatteryrecyclingfacility.
26

Problem
PossibleCauseCorrectiveAction
Themachineisproducingabeeping
sound.
Thequalityofcutisdecreasedor
unsatisfactory.
Themachineisvibrating.1.Thebladeisbentordamaged.
1.Thebatterypackisnotcharged.
2.Themachineisinanunsafeposition
foroperation.
3.Themachineisoverloaded.
4.Thereisanotherelectricalproblem
withthemachine.
1.Thebladeisdull.1.Havethebladesharpenedorreplaced.
2.Thecuttingdeckhasdebrisbuildup.
1.Thebladeisdull.1.Havethebladesharpenedorreplaced. Themachineiscuttingunevenly.
2.Thecuttingdeckisdamaged.
1.Removethebatterypackfromthe
machineandchargeit.
2.Ensurethatthemachineisnotatan
extremeanglewhileoperating.
3.Cutthegrassatahigherheightofcut
orwalkataslowerpacewhilemowing.
4.Attempttheothertroubleshooting
actions,ifthealarmstillsounds,
contactanAuthorizedServiceDealer.
2.Cleanunderthemachine.
2.ContactanAuthorizedServiceDealer.
1.Inspectthebladeandreplaceif
necessary.
27

CaliforniaProposition65WarningInformation
Whatisthiswarning?
Youmayseeaproductforsalethathasawarninglabellikethefollowing:
WARNING:CancerandReproductiveHarm—www.p65Warnings.ca.gov.
WhatisProp65?
Prop65appliestoanycompanyoperatinginCalifornia,sellingproductsinCalifornia,ormanufacturingproductsthatmaybesoldinorbroughtinto
California.ItmandatesthattheGovernorofCaliforniamaintainandpublishalistofchemicalsknowntocausecancer,birthdefects,and/orother
reproductiveharm.Thelist,whichisupdatedannually,includeshundredsofchemicalsfoundinmanyeverydayitems.ThepurposeofProp65isto
informthepublicaboutexposuretothesechemicals.
Prop65doesnotbanthesaleofproductscontainingthesechemicalsbutinsteadrequireswarningsonanyproduct,productpackaging,orliteraturewith
theproduct.Moreover,aProp65warningdoesnotmeanthataproductisinviolationofanyproductsafetystandardsorrequirements.Infact,the
CaliforniagovernmenthasclariedthataProp65warning“isnotthesameasaregulatorydecisionthataproductis‘safe’or‘unsafe.’”Manyofthese
chemicalshavebeenusedineverydayproductsforyearswithoutdocumentedharm.Formoreinformation,gotohttps://oag.ca.gov/prop65/faqs-view-all
AProp65warningmeansthatacompanyhaseither(1)evaluatedtheexposureandhasconcludedthatitexceedsthe“nosignicantrisklevel”;or(2)
haschosentoprovideawarningbasedonitsunderstandingaboutthepresenceofalistedchemicalwithoutattemptingtoevaluatetheexposure.
Doesthislawapplyeverywhere?
Prop65warningsarerequiredunderCalifornialawonly.ThesewarningsareseenthroughoutCaliforniainawiderangeofsettings,includingbutnot
limitedtorestaurants,grocerystores,hotels,schools,andhospitals,andonawidevarietyofproducts.Additionally,someonlineandmailorder
retailersprovideProp65warningsontheirwebsitesorincatalogs.
.
HowdotheCaliforniawarningscomparetofederallimits?
Prop65standardsareoftenmorestringentthanfederalandinternationalstandards.TherearevarioussubstancesthatrequireaProp65warning
atlevelsthatarefarlowerthanfederalactionlimits.Forexample,theProp65standardforwarningsforleadis0.5μg/day,whichiswellbelow
thefederalandinternationalstandards.
Whydon’tallsimilarproductscarrythewarning?
•ProductssoldinCaliforniarequireProp65labellingwhilesimilarproductssoldelsewheredonot.
•AcompanyinvolvedinaProp65lawsuitreachingasettlementmayberequiredtouseProp65warningsforitsproducts,butothercompanies
makingsimilarproductsmayhavenosuchrequirement.
•TheenforcementofProp65isinconsistent.
•CompaniesmayelectnottoprovidewarningsbecausetheyconcludethattheyarenotrequiredtodosounderProp65;alackofwarningsfora
productdoesnotmeanthattheproductisfreeoflistedchemicalsatsimilarlevels.
Whydoesthemanufacturerincludethiswarning?
themanufacturerhaschosentoprovideconsumerswithasmuchinformationaspossiblesothattheycanmakeinformeddecisionsabouttheproducts
theybuyanduse.themanufacturerprovideswarningsincertaincasesbasedonitsknowledgeofthepresenceofoneormorelistedchemicalswithout
evaluatingthelevelofexposure,asnotallthelistedchemicalsprovideexposurelimitrequirements.Whiletheexposurefromthemanufacturerproducts
maybenegligibleorwellwithinthe“nosignicantrisk”range,outofanabundanceofcaution,themanufacturerhaselectedtoprovidetheProp65
warnings.Moreover,ifthemanufacturerdoesnotprovidethesewarnings,itcouldbesuedbytheStateofCaliforniaorbyprivatepartiesseekingto
enforceProp65andsubjecttosubstantialpenalties.
RevA
 Loading...