

Page 1
Eurocycler
ModelNo.21083—SerialNo.280G00001andUp
TM
34cmLawnMower
FormNo.3360-228RevA
Operator'sManual
Introduction
Thislawnmowerhasbeendesignedforprivateuse
onresidentialpropertyonly.Itisnottobeusedfor
commercialpurposesonpublicproperty.
ThankyouforchoosingaToroelectricmowerfor
residentialuse.Readthismanualcarefullytolearnhow
tooperateandmaintainyourmowerproperly .The
informationinthismanualcanhelpyouandothers
avoidinjuryandproductdamage.AlthoughToro
designsandproducessafeproducts,youareresponsible
foroperatingtheproductproperlyandsafely.
Regulationsontheoperationofmowersvaryfrom
oneareatoanother.Consultwithlocalauthoritiesfor
regulationsandrestrictionsregardingpermittedmowing
timesinyourarea.
Safety
Readandunderstandthecontentsofthismanual
beforestartingthemotor.
Thisisthesafetyalertsymbol.Itisusedtoalert
youtopotentialpersonalinjuryhazards.Obeyall
safetymessagesthatfollowthissymboltoavoid
possibleinjuryordeath.
Improperlyusingormaintainingthislawn
mowercouldresultininjuryordeath.Toreduce
thispotential,complywiththefollowingsafety
instructions.
SafeOperatingPractices
GeneralInformation
•Readtheinstructionscarefully.Befamiliarwiththe
controlsandtheproperuseoftheequipment.
•Thisapplianceisnotintendedforusebyyoung
childrenorinrmpersonsunlesstheyhavebeen
adequatelysupervisedbyaresponsiblepersonto
ensuretheycanusetheappliancesafely .
•Youngchildrenshouldbesupervisedtoensurethat
theydonotplaywiththeappliance.
•Nevermowwhilepeople,especiallychildrenorpets,
arenearby.
•Theoperatororuserisresponsibleforaccidentsor
hazardsoccurringtootherpeopleortheirproperty.
Preparation
•Whilemowing,alwayswearsubstantialfootwearand
longtrousers.Donotoperatetheequipmentwhen
barefootorwearingopensandals.
•Thoroughlyinspecttheareawheretheequipment
istobeusedandremoveallobjectswhichcanbe
thrownbythemachine.
•Beforeusing,alwaysvisuallyinspecttoseethatthe
blade,bladebolts,andcutterassemblyarenotworn
ordamaged.Replaceawornordamagedbladeand
boltsasasettopreservebalance.
•Tororecommendsthatthemowershouldbe
suppliedwitharesidualcurrentdevice(RCD)having
atrippingcurrentofnotmorethan30mA.
•Useonly1.00mm
30mlongsuitableforoutdooruse(ifapplicable).
2
sizeextensioncordnomorethan
Toreducetheriskofre,electricshock,and
personalinjurywhenusingthiselectriclawn
mower,alwaysfollowthesesafetyinstructions.
Thefollowingsafetyinformationhasbeenadapted
fromEuropeanStandardEN836:1997and
CEI/IEC60335-77:2001andfromAS2657-1985and
AS60335-1:2002.
©2008—TheToro®Company
8111LyndaleAvenueSouth
Bloomington,MN55420
Registeratwww.Toro.com.
Handling
•Mowonlyindaylightoringoodarticiallight.
•Neveruseanelectricallypoweredlawnmowerinthe
rainorwhenthegrassiswet.
•Werecommendthatyouwearsuitableeyeprotection
whenoperatingalawnmower.
•Avoidoperatingtheequipmentinwetgrass,where
feasible.
•Alwaysbesureofyourfootingonslopes.
OriginalInstructions(EN)
PrintedinHungary
AllRightsReserved
Page 2
•Walk;neverrun.
•Forwheeledrotarymowers,mowacrossthefaceof
slopes,neverupanddown.
•Exerciseextremecautionwhenchangingdirection
onslopes.
•Donotmowexcessivelysteepslopes.
•Useextremecautionwhenreversingorpullingthe
lawnmowertowardyou.
•Stopthebladeifthelawnmowerhastobetiltedfor
transportationwhencrossingsurfacesotherthen
grass,andwhentransportingthelawnmowertoand
fromtheareatobemowed.
•Neveroperatethelawnmowerwithdefectiveguards
orwithoutsafetydevices(forexample,deectors
and/orgrasscatchers)inplace.
•Switchonthemotorcarefullyaccordingto
instructionsandwithfeetwellawayfromtheblade.
•Donottiltthelawnmowerwhenswitchingonthe
motor,exceptifthelawnmowerhastobetilted
forstarting.Inthiscase,donottiltitmorethan
absolutelynecessaryandliftonlythepartwhichis
awayfromtheoperator.Alwaysensurethatboth
handsareintheoperatingpositionbeforereturning
theappliancetotheground.
•Donotputhandsorfeetnearorunderrotatingparts.
Keepclearofthedischargeopeningatalltimes.
•Neverpickuporcarryalawnmowerwhilethe
motorisrunning.
•Pulltheplugfromthesocket:
–wheneveryouleavethelawnmower;
–beforeclearingablockage;
–beforechecking,cleaning,orworkingonthe
lawnmower;
–afterstrikingaforeignobject.Inspectthelawn
mowerfordamageandmakerepairsbefore
restartingandoperatingthelawnmower;
–ifthelawnmowerstartstovibrateabnormally
(checkimmediately).
SafetyandInstructional
Decals
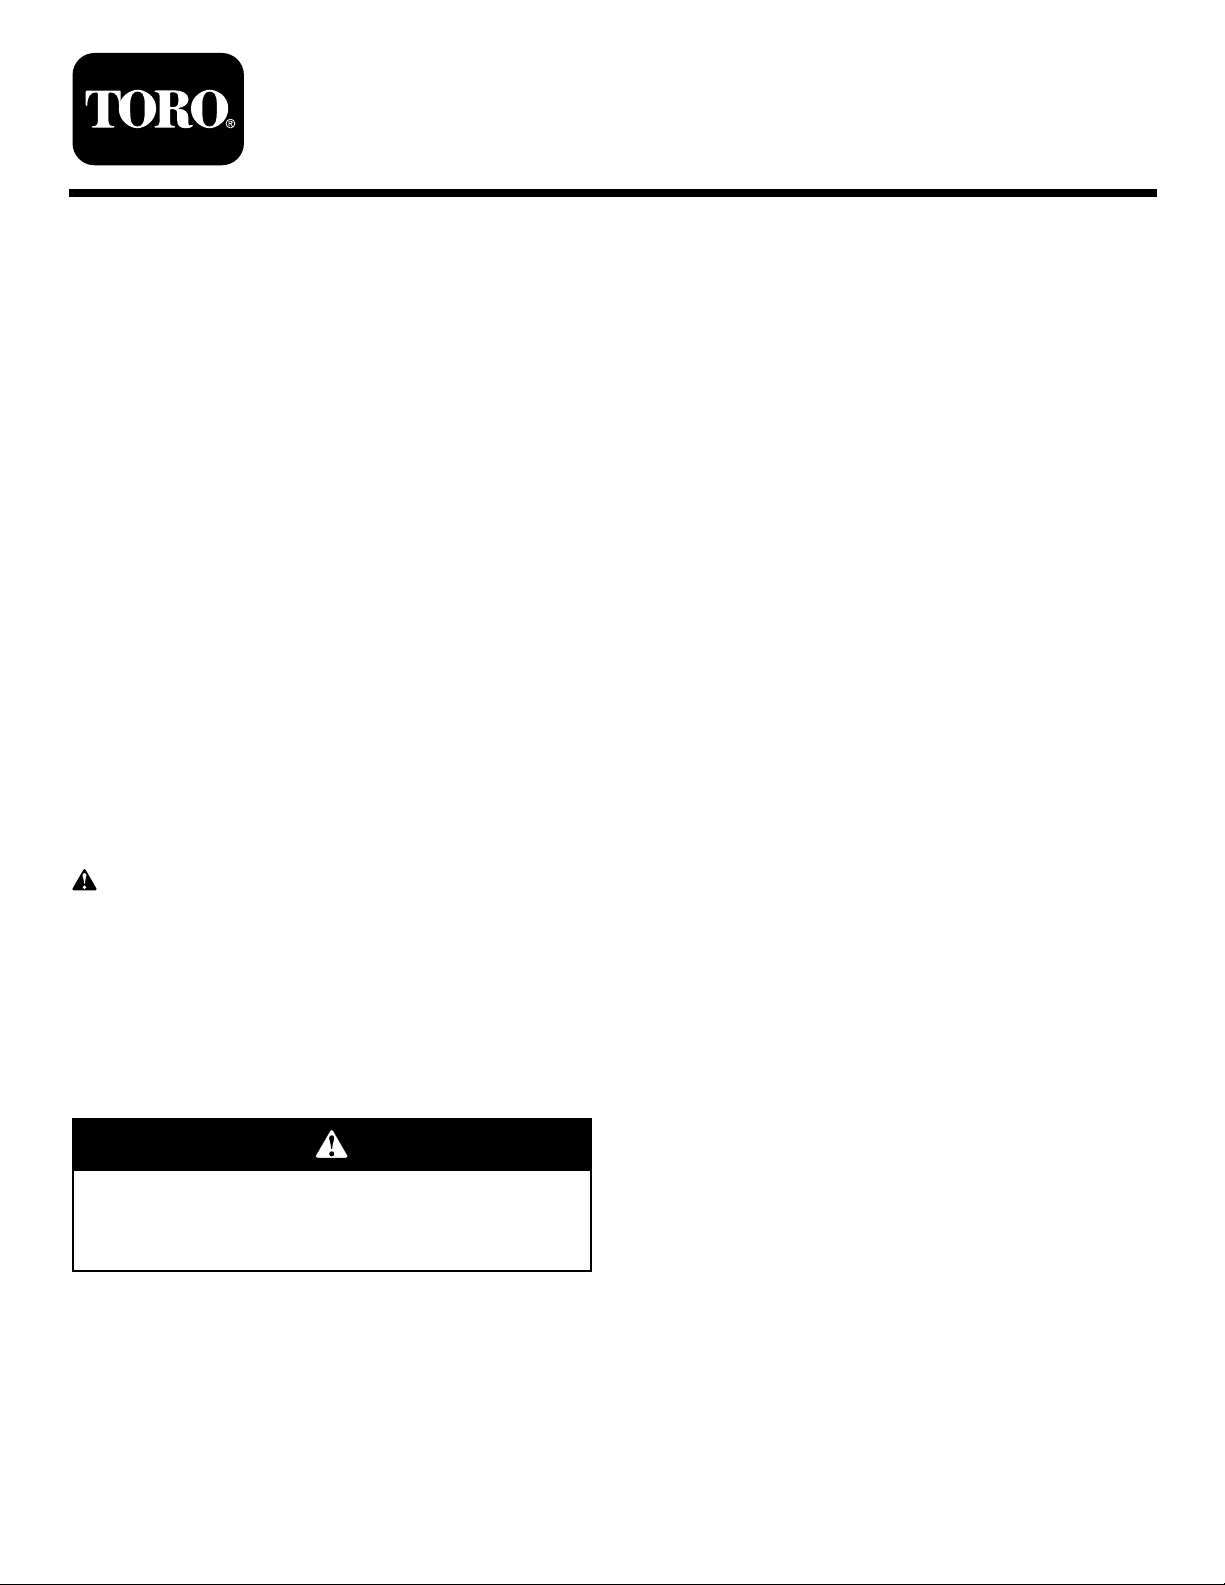
Important:Safetyandinstructiondecalsare
locatednearareasofpotentialdanger.Replace
damagedorlostdecals.
110-1168
1.Off
2.On
3.Toengagethemower,pressandholdthebuttonwhile
pullingbackonthecontrolbar.
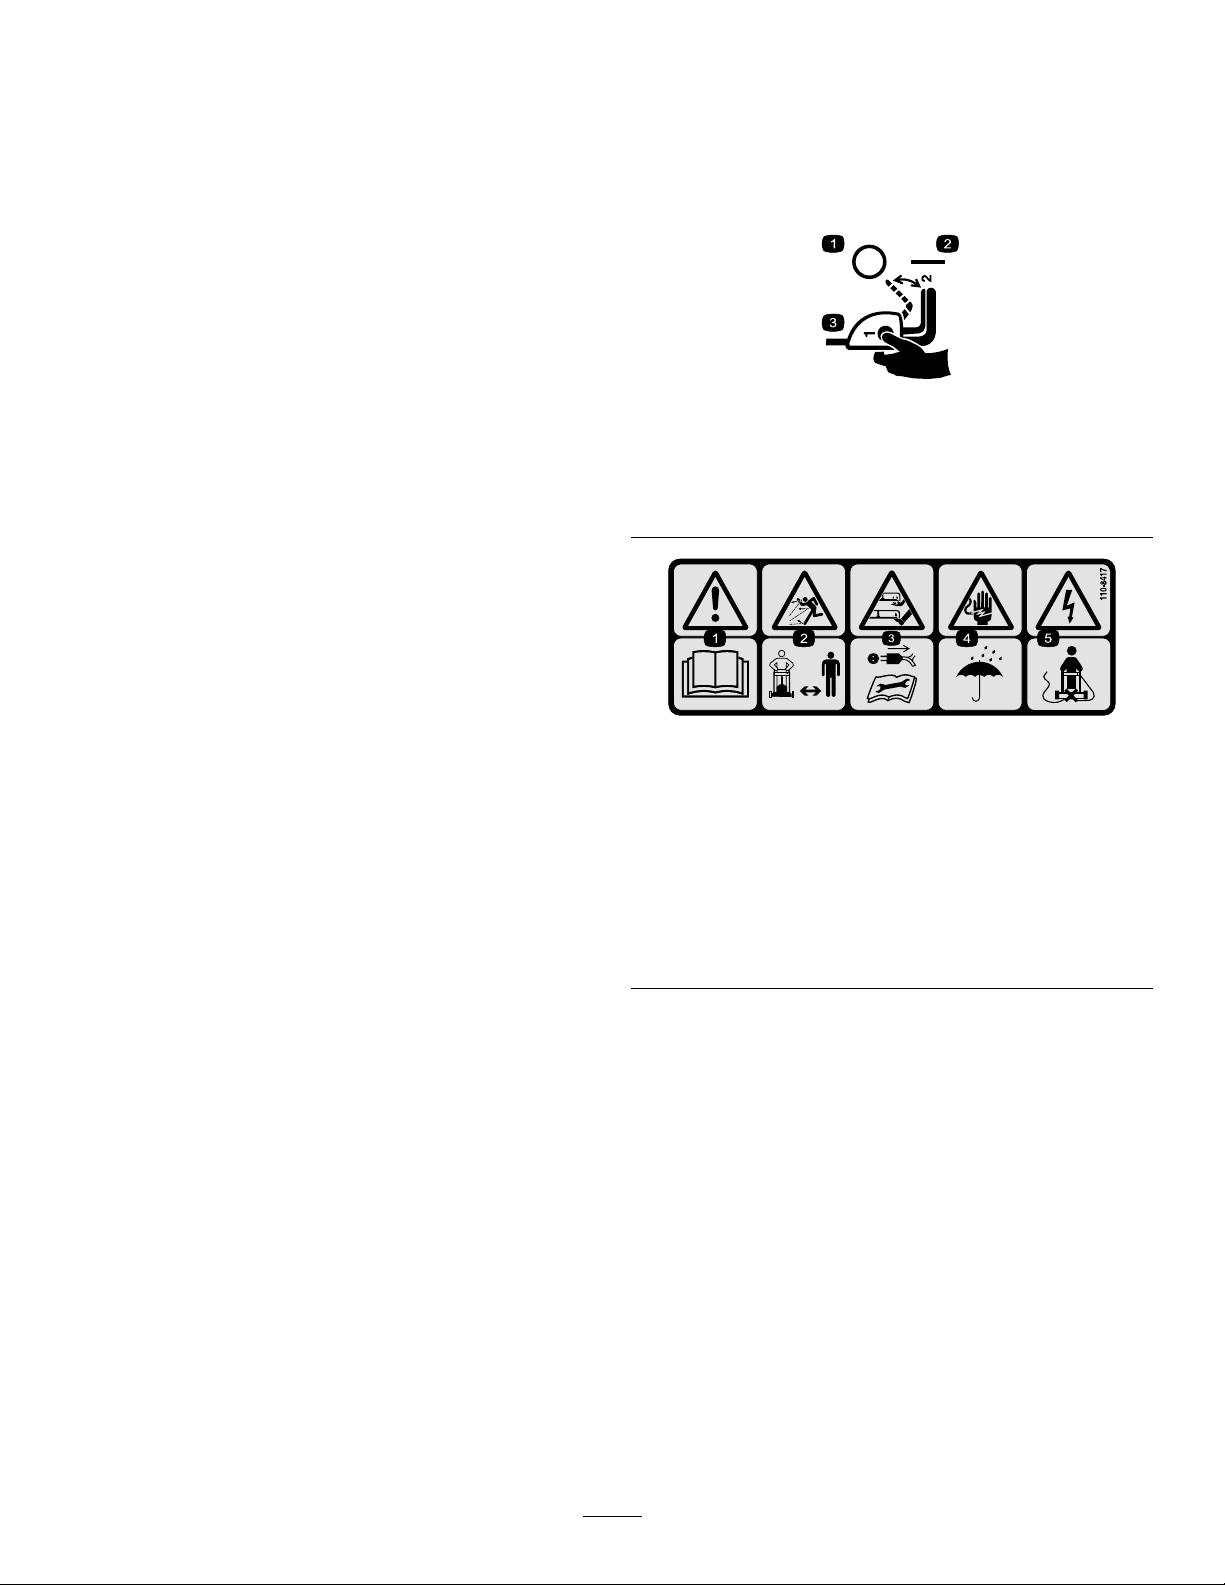
110-8417
1.Warning—readtheOperator’sManual.
2.Thrownobjecthazard—keepbystandersasafedistance
fromthemachine.
3.Attention,donottouchrotatingblade!Disconnect
powercordandreadtheinstructionsbeforeservicingor
performingmaintenance.
4.Electricshockhazard—keepthemachineoutoftherain
andotherwetconditions.
5.Electricalhazard,cuttingofelectricalcord—donotpushthe
machineoverthepowercord.
MaintenanceandStorage
•Keepallnuts,bolts,andscrewstighttobesurethe
equipmentisinsafeworkingcondition.
•Checkthegrasscatcherfrequentlyforwearor
deterioration.
•Replacewornordamagedpartsforsafety .
•Ensurethatonlytheproperreplacementcutting
bladeisused.
•PurchaseonlygenuineTororeplacementpartsand
accessories.
2
Page 3
Setup
Note:Donotconnectthemowertoapowersource
untilthemowerisfullyassembled.
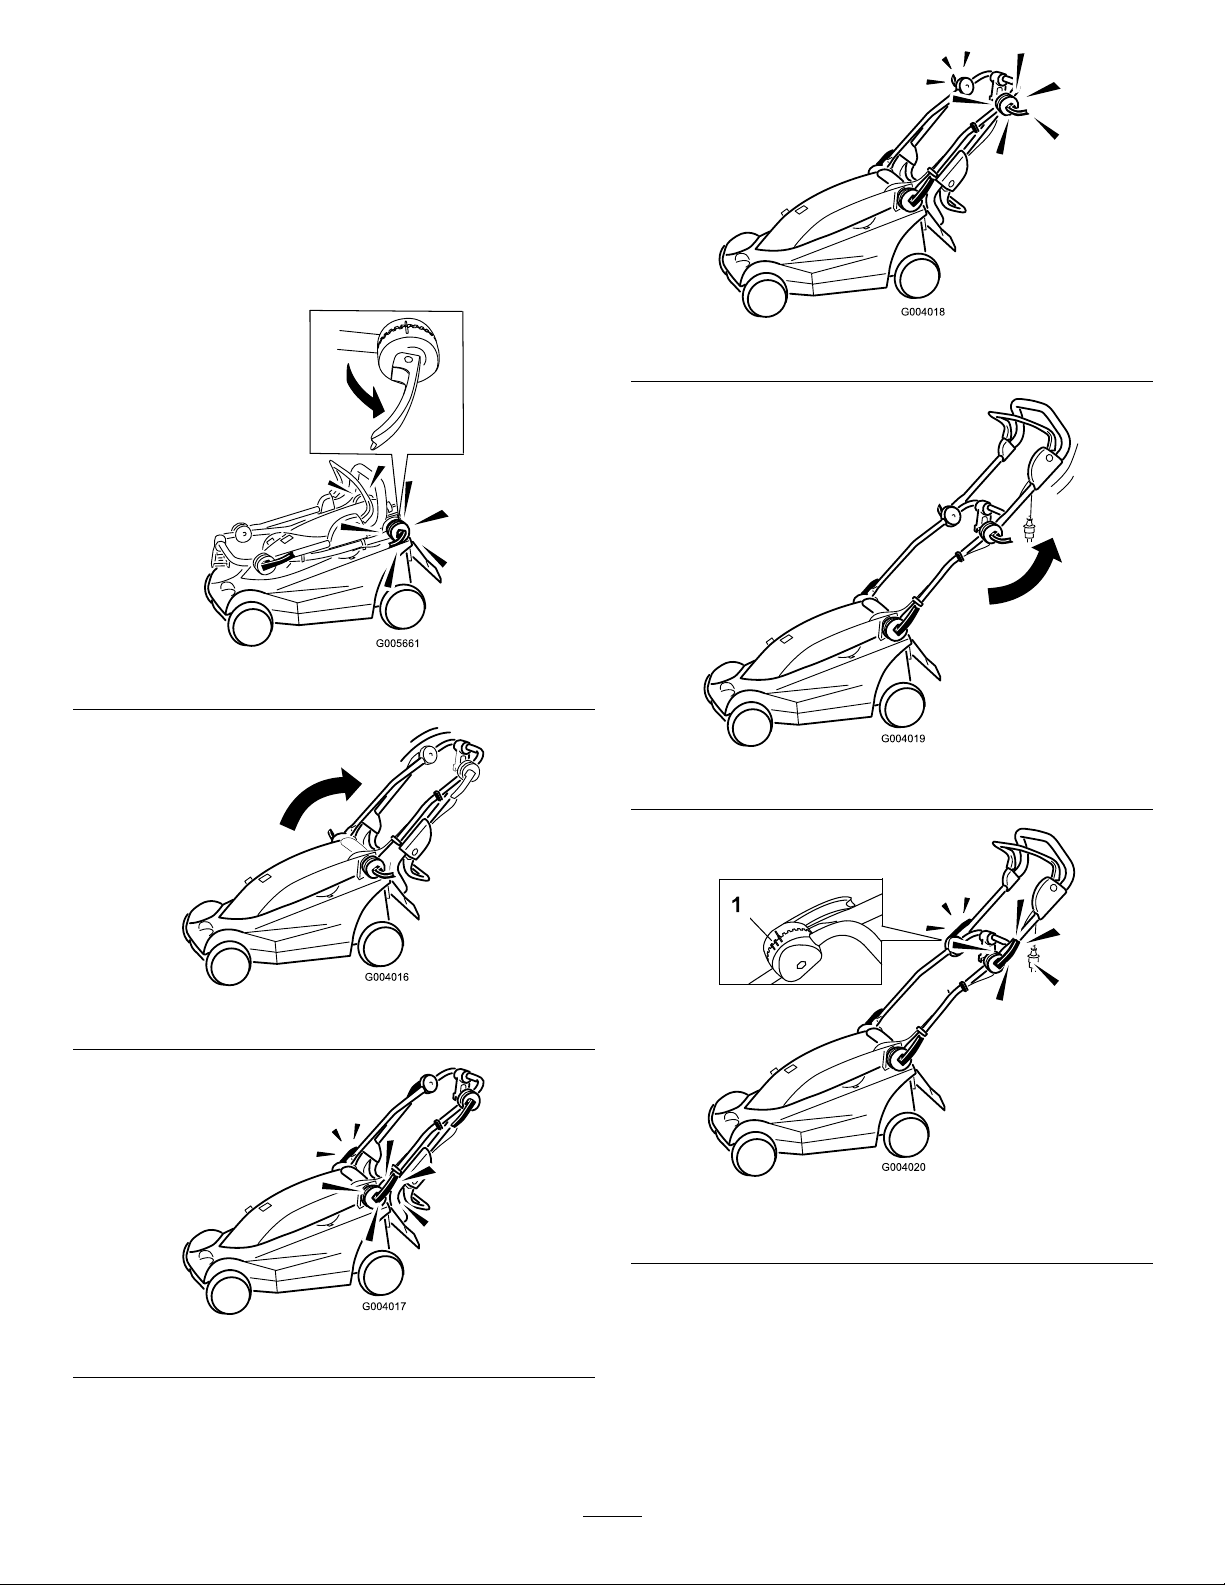
1.UnfoldingtheHandle
Procedure
Figure4
Figure1
Figure2
Figure5
Figure6
1.Marksforhandlepositions
Figure3
Note:Youcansettheupperhandleto1of3positions.
Lineupthemarkto1ofthe3marksontheinnerside
oftheupperhandlelock(Figure6).
3
Page 4
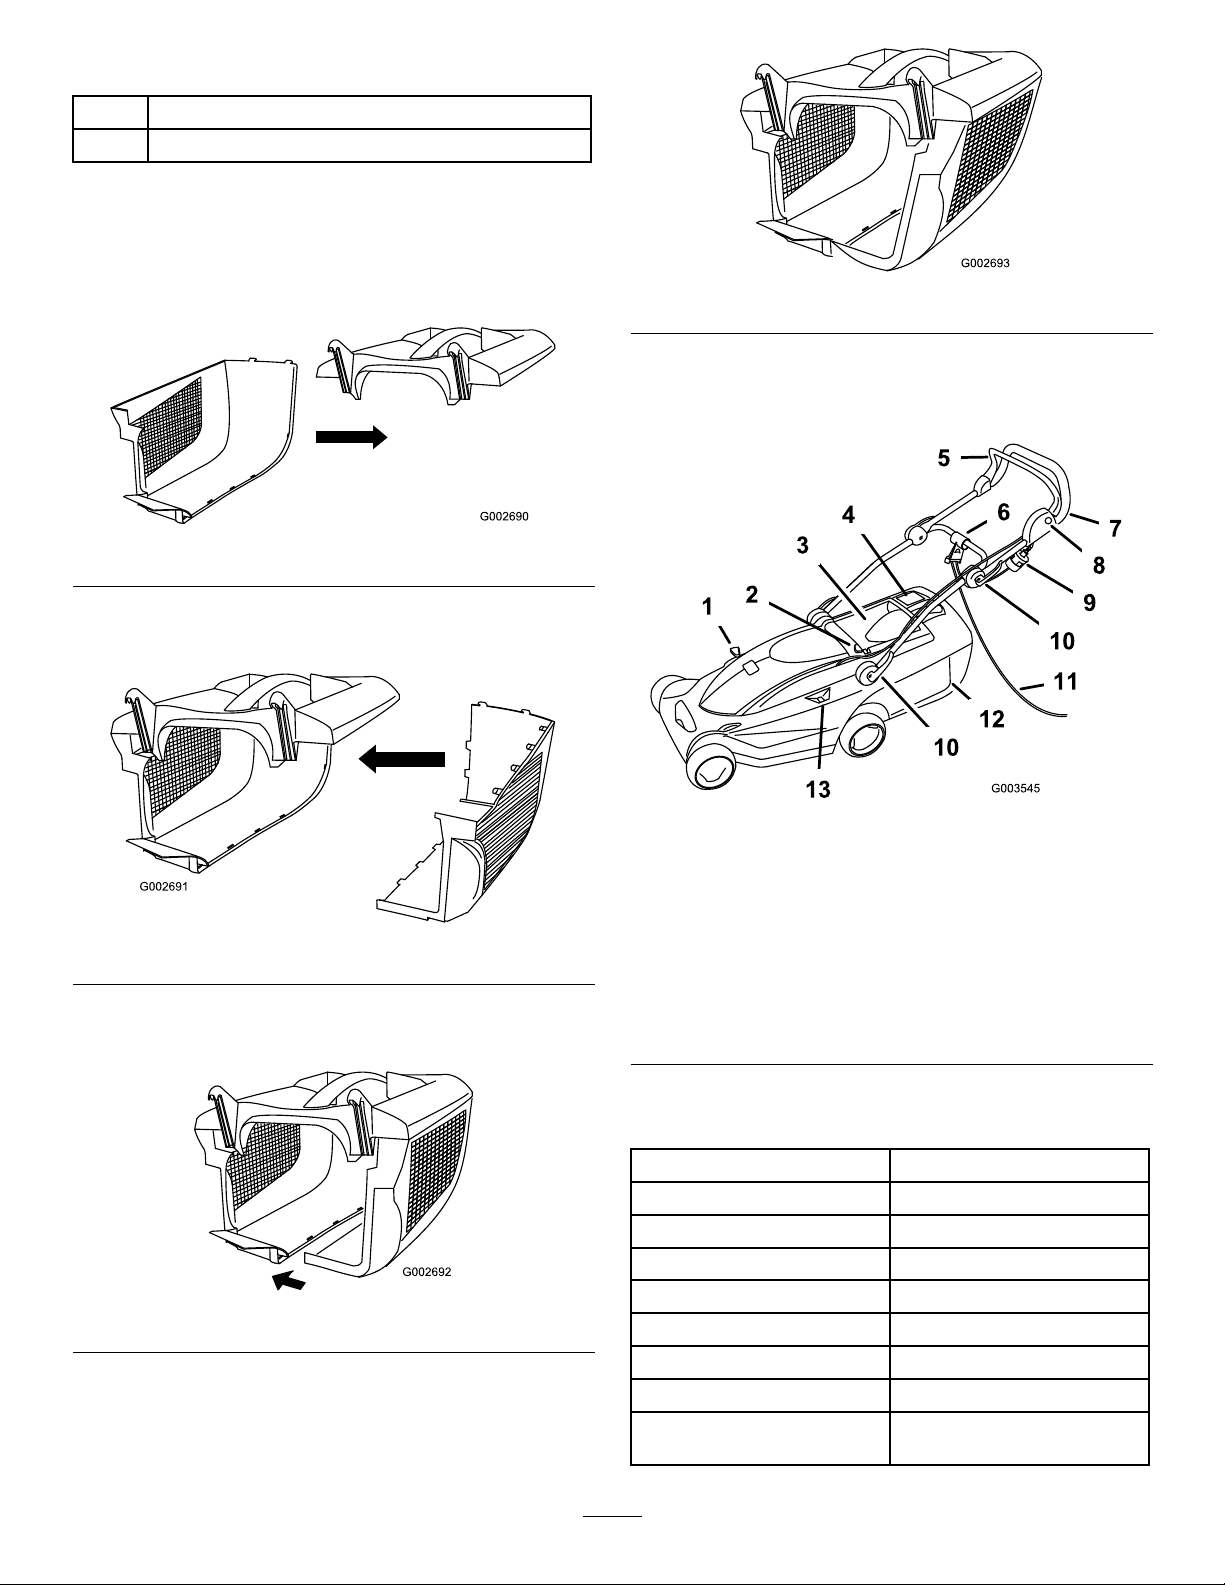
2.AssemblingtheGrassBox
1
Grassboxtop
2
Grassboxside
Procedure
Important:Followthestepsintheordershown.
1.Slidethesideintothelatchesinthetop(Figure7).
Figure7
2.Slidetheothersideintothelatchesinthetopand
latchtherearofthe2sidestogether(Figure8).
Figure10
ProductOverview
Figure8
3.Startingattherear,alignandpushtheremainderof
thesidelatchestogether(Figure9).
Figure9
Figure11
1.Recycling/bagginglever
2.Height-of-cutadjustment
button
3.Reardoor
4.Grassboxllindicator11.Extensioncord(not
5.Controlbar12.Grassbox
6.Cordlock13.Height-of-cutlevelreading
7.Handle
8.Button
9.Plug
10.Handlelocks(4)
supplied)
Specications
Model21083
Weight16kg
Length137cm
Width39cm
NominalWidthofcut
NominalHeight-of-cutrange
Grassboxvolume
NominalMotorRPM3000rpm
Voltage/
frequency
34cm
20to75mm
32L
240V/50Hz
4
Page 5

Operation
SecuringtheExtensionCord
Note:Thisprocedureisformowersthatrequirean
extensioncord.
Useonlyanextensioncordrecommendedforoutdoor
use.
Contactingwaterwhileoperatingthemower
couldcauseanelectricshock,whichcancause
aninjuryordeath.
Note:Donotunplugtheextensioncordbypulling
onthecord;tounplugthecord,grasptheplug,not
thecord.
Theelectricalcordcouldbedamaged,causing
ashockorre.
Thoroughlyinspecttheelectricalcordbefore
usingthemower.Ifthecordisdamaged,donot
operatethemower.HaveanAuthorizedToro
ServiceDealerreplaceorrepairadamagedcord
immediately.
•Don’thandletheplugorthemowerwithwet
handsorwhilestandinginwater.
•Useonlyanextensioncordrecommended
foroutdoorcoldweatheruse.
1.Formaloopintheextensioncordandsecureitin
thecordlock(Figure12).
Figure12
2.Connecttheextensioncordtothemowerplug
(Figure13).
PlanningYourMowingPattern
Followingthesuggestedmowingpatternwillreducethe
riskofrunningoverthecordwiththemower,andthe
cordwillnotsustainunnecessarywear.Donotallow
thepowercordtowraparoundtrees,shrubs,orother
obstacles.
Beginbymowingneartheelectricalpowersource.Mow
backandforth,graduallymowingawayfromthepower
source(Figure14).
Figure14
Figure13
StartingtheMotor
1.Connecttheextensioncordtothemower(if
applicable).
2.Plugtheotherendofthecordintoanormal
householdelectricalpoweroutlet.
3.Pushthebuttonontheleftsideofthehandleand
holditin(Figure15).
5
Page 6

Figure15
4.Whileholdinginthebutton,pullthecontrolbar
towardthehandle(Figure16).
Figure16
5.Holdthecontrolbartothehandleandreleasethe
button(Figure17).
Figure18
2.Disconnectthemowerfromthepowersourceifyou
leavethemowerunattended.
AdjustingtheHeight-of-Cut
Themowerhas6height-of-cutpositions(allheightsare
approximate):A=20mm;B=31mm;C=42mm;D=53
mm;E=64mm;andF=75mm.
Adjustingthecuttingheightleverscouldbring
yourhandsandfeetintocontactwithamoving
bladeandresultinseriousinjury.
Stopthemotorandwaitforallmovingpartsto
stopbeforechangingtheheight-of-cutsetting.
Figure17
StoppingtheMotor
1.Releasethecontrolbar(Figure18).
1.Stopthemotorandwaitforallmovingpartstostop.
2.Pressdownontheheight-of-cutadjustmentbutton
withyourthumbandpushdownorliftupthe
height-of-cuthandletothedesiredcuttingheight
settingshownontheheight-of-cutlevelreading
(Figure19).
Figure19
1.Height-of-cutadjustment
button
2.Height-of-cutlevelreading
3.Releasetheheight-of-cutadjustmentbutton.
6
Page 7

BaggingtheClippings
Installthegrassboxtocollecttheclippings.
1.Liftupthereardoorandinstallthegrassboxonthe
mower(Figure20).
Figure20
2.Releasethereardoor.
Figure22
1.Grassboxindicator(grassboxisfull)
2.Grassbox
5.Removethegrassboxfromthemowerandempty
thecontents.
Note:Toconvertfrombaggingtorecycling,movethe
recycling/bagginglevertorecyclingmode(Figure21)
andremovethegrassbox.
3.Movetherecycling/bagginglevertobaggingmode
(Figure21).
Figure21
1.Baggingmode
2.Recycling(mulching)
mode
3.Recycling/bagginglever
4.Mowwiththegrassboxattacheduntilthegrassbox
indicatorshowsthatthegrassboxisfull(Figure22).
7
Page 8

MowingTips
Maintenance
Torohasdesignedthisproducttogiveyouyearsof
trouble-freeuse.Shoulditneedservice,bringthe
producttoanAuthorizedToroServiceDealer.
Whenthemowerisconnectedtoanormal
householdpowersource,themoweris
operational.Someonecouldaccidentallystart
themowerandcauseaseriousinjurytoyouor
otherbystanders.
Figure23
Followtheseinstructionwhethercuttinggrassorleaves
forthebestcuttingresultsandlawnappearance.
•Maintainasharpbladethroughoutthemowing
season.
•Onlymowdrygrass.W etgrasstendstoclumpon
theyardandmaycausethemowertopluguporthe
motortostall.Theymayalsobeslipperytowalkon
andcouldcauseyoutoslipandfall.
•Whencuttingverytallgrass,youmaywanttorst
mowatthehighestheight-of-cutsettingandaslower
walkingspeed;thenmowagainatalowersettingfor
bestlawnappearance.
•Ifthenishedcutlawnappearanceisunsatisfactory,
tryoneormoreofthefollowing:
–Sharpentheblade.
–Walkataslowerpacewhilemowing.
–Raisetheheight-of-cutsettingonyourmower.
–Cutthegrassmorefrequently.
–Overlapcuttingswathsinsteadofcuttingafull
swathwitheachpass.
Alwaysdisconnectthemowerfromthepower
sourcewhenyouleavethemowerunattended.
Double-insulatedAppliances
Inadouble-insulatedappliance,twosystemsof
insulationareprovidedinsteadofgrounding.No
groundingmeansisprovidedonadouble-insulated
appliance,norshouldameansforgroundingbeadded
totheappliance.Servicingadouble-insulatedappliance
requiresextremecareandknowledgeofthesystem,and
shouldbedoneonlybythequaliedservicepersonnel
atanAuthorizedToroServiceDealer.Replacement
partsforadouble-insulatedappliancemustbeidentical
tothepartstheyreplace.Adouble-insulatedapplianceis
markedwiththewords“DoubleInsulation”or“Double
Insulated.”Thesymbol(squarewithinasquare)
alsobemarkedontheappliance.
may
CleaningtheMowerHousing
Aftereachuse,cleanthemowerhousing.
Beforecleaning,stopthemotor,waitforallmoving
partstostop,anddisconnectthemowerfromthepower
source.
Important:Donotcleanthemowerwithwater.
Moisturecangettrappedinthemowerandmay
causecorrosionofinternalparts.
•Cleantheundersideofthemowerhousing.Remove
dirtandgrassclippingswithahardwoodscraper.
•Removethedebrisfromthehousingventsalongthe
topofthemower.
•Brushallthedebrisoffthemowerhousing.
•Inspectthepowerplugreceptacleforsignsof
meltingorheating.Oldworn-outextensioncord
plugsthattlooselyintheplugreceptaclecan
causeoverheatingfrompoorcontact.Replaceany
8
Page 9

damagedextensioncordsimmediately(ifapplicable)
.
ServicingtheBlade
Alwaysmowwithasharpblade.Assharpbladecutsthe
grassevenly,withouttearingorshreddingthegrass.
Whenyoureplacetheblade,useonlygeniuneToro
replacementblades.
Someonecouldaccidentallystartthemotor
andcauseaseriousinjurytotheoperatororto
bystanders.
Donotattempttoinspect,remove,orreplace
thebladewithoutrstdisconnectingthemower
fromthepowersource.
1.Stopthemotorandwaitforallmovingpartstostop.
2.Disconnectthemowerfromtheelectricalpower
source.
3.Tipthemowerontoitsside.
4.Carefullyexaminethebladeforsharpnessandwear,
especiallywheretheatandcurvedpartsofthe
blademeet.Ifyounoticewear,replacetheblade.
Note:Forbestperformance,installanewblade
beforethemowingseasonbegins.Duringthe
season,ledownsmallnicksonthebladeto
maintainitscuttingedge.
Awornordamagedbladecouldbreakanda
pieceofbladecouldbethrownintheoperator’s
orbystander’sdirection,causingserious
personalinjuryordeath.
Inspectthebladeperiodicallyforwearor
damage,andreplaceawornordamagedblade.
RemovingtheBlade
Figure24
1.Bladebolt3.Bladeadapter
2.Blade
2.Removethebladeboltandtheblade.
Important:Ifthebladeadaptercomesoff,
ensurethatyouinstallitbeforeinstallingthe
bladeandbladebolt.Operatingthemower
withoutthebladeadapterwilldamagethe
mower.
SharpeningtheBlade
Usealetosharpenthetopsideofthebladeand
maintaintheoriginalcuttingangle.
Note:Thebladewillremainbalancedifyouremove
thesameamountofmaterialfrombothcuttingedges.
Important:Checkthebalanceofthebladeby
puttingitonabladebalancer.Youcanpurchase
aninexpensivebalanceratahardwarestore.A
balancedbladestaysinahorizontalposition;an
unbalancedbladesettlestotheheavyside.Ifthe
bladeisnotbalanced,lemoremetaloffthecutting
edgeontheheavyendoftheblade.
InstallingtheBlade
Installasharp,balancedbladeandthebladebolt.The
sailpartoftheblademustpointtowardthetopofthe
mowerhousingtoensurecorrectinstallation.Tighten
thebladeboltto15N-m.
1.Grasptheendoftheblade(Figure24)witharag
orthicklypaddedglove.
9
Page 10

ServicingtheOn/OffandBlade
BrakeSystem
Themotorandbladearedesignedtostopwithin3
secondsafteryoureleasethecontrolbar.Ensurethat
thecontrolbarfunctionsproperlyeachtimebefore
youoperatethemower.Ifthebladedoesnotstop
within3secondsorthereisagrindingorscraping,
metal-to-metalnoisewhenyoureleasethecontrolbar,
contactanAuthorizedToroServiceDealer.
Storage
Storethemowerinacool,clean,anddryplaceaway
fromchildren.Coverthemowertokeepitcleanand
protected.
Figure25
1.Cleanthemowerhousing.
2.Checktheconditionoftheblade.
10
Page 11

Troubleshooting
Problem
Motorwillnotstart
Motorstartshardorlosespower
Mowerormotorvibratesexcessively
Unevencuttingpattern
PossibleCauseCorrectiveAction
1.Theextensioncordisnotconnectedto
themower.
2.Theextensioncordisdamaged.
3.Thefuseorcircuitbreakerisblown.3.Checktheoutletfuseorthecircuit
1.Themowerdischargechuteisplugged.
2.Theundersideofthemowerhousing
needstobecleaned.
3.Themowerisonthegrass.3.Movethemowertothepavementand
1.Thebladeisnotbalanced.1.Balancetheblade.
2.Theblademountingboltisloose.2.Tightentheblademountingbolt.
3.Themowerdischargechuteisplugged.
4.Theundersideofthemowerhousing
needstobecleaned.
5.Themotormountingboltsareloose.5.Tightenthemotormountingbolts.
1.Thebladeisdullandisnotbalanced.
2.Youaremowingthesamepattern
everytimeyoumow.
3.Theundersideofthemowerhousing
needstobecleaned.
1.Connecttheextensioncordtothe
mowerandplugtheotherendofthe
extensioncordintoanormalhousehold
outlet.
2.Checktheextensioncord,andrepair
thecordifitisdamaged.
breaker.
1.Cleanthemowerdischargechute.
2.Cleantheundersideofthemower
housing.
startthemower.
3.Cleanthemowerdischargechute.
4.Cleantheundersideofthemower
deck.
1.Sharpenandbalancetheblade.
2.Changethemowingpattern.
3.Cleantheundersideofthemower
deck.
Dischargechuteplugs
1.Thecuttingheightissettoolow.1.Raisethecuttingheight.
2.Youaretryingtomowwetgrass.
3.Theundersideofthemowerhousing
needstobecleaned.
2.Allowthegrasstodrybeforemowing.
3.Cleantheundersideofthemower
deck.
11
Page 12

 Loading...