

Page 1
FormNo.3381-303RevA
53cmRecycler
ModelNo.20995—SerialNo.314000001andUp
ModelNo.20996—SerialNo.314000001andUp
®
LawnMower
Operator'sManual
Introduction
Thisrotary-blade,walk-behindlawnmowerisintended
tobeusedbyresidentialhomeowners.Itisdesigned
primarilyforcuttinggrassonwell-maintainedlawns
onresidentialproperties.Itisnotdesignedforcutting
brushorforagriculturaluses.
Readthisinformationcarefullytolearnhowtooperateand
maintainyourmachineproperlyandtoavoidinjuryand
equipmentdamage.Youareresponsibleforoperatingthe
machineproperlyandsafely.
YoumaycontactTorodirectlyatwww .Toro.comforproduct
andaccessoryinformation,helpndingadealer,ortoregister
yourproduct.
Wheneveryouneedservice,genuineToroparts,oradditional
information,contactanAuthorizedServiceDealerorToro
CustomerServiceandhavethemodelandserialnumbersof
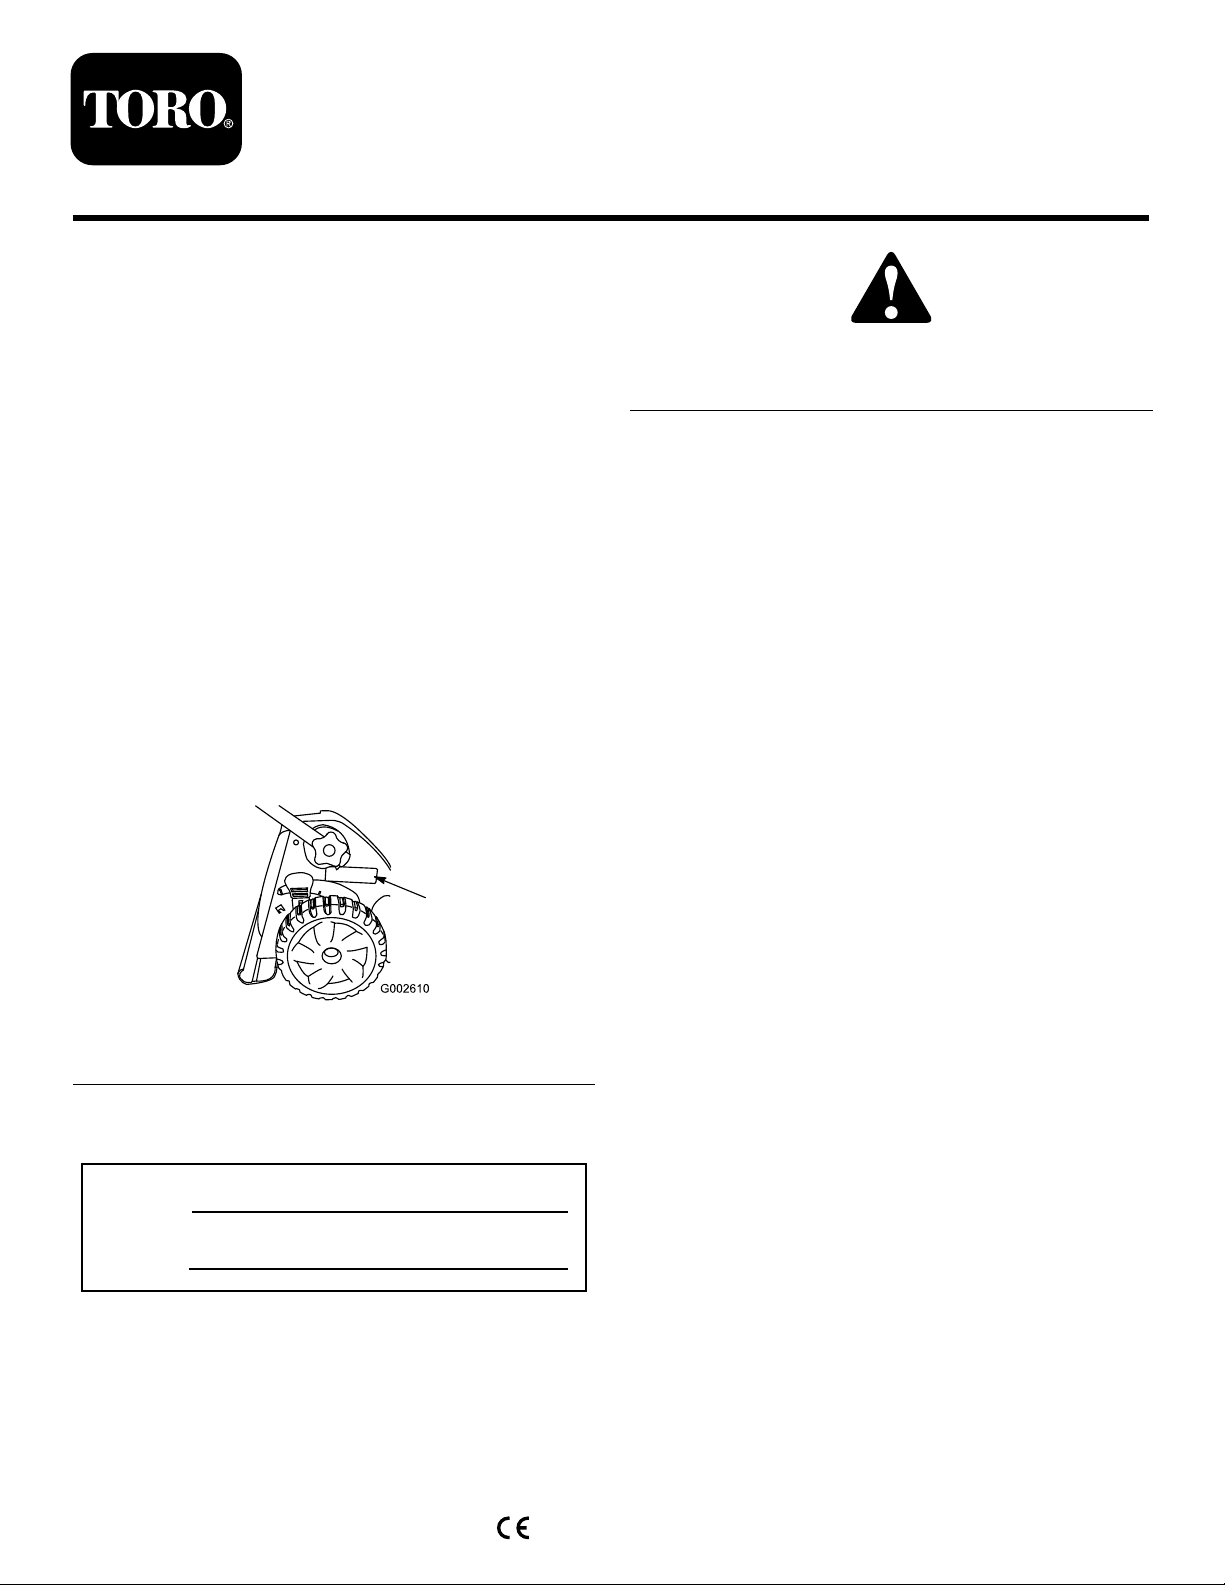
yourmachineready.Figure1identiesthelocationofthe
modelandserialnumbersontheproduct.
Figure2
1.Safetyalertsymbol
Thismanualuses2wordstohighlightinformation.
Importantcallsattentiontospecialmechanicalinformation
andNoteemphasizesgeneralinformationworthyofspecial
attention.
ThisproductcomplieswithallrelevantEuropeandirectives.
Fordetails,seetheseparateproduct-specicDeclarationof
Conformity(DOC)sheet.
Formodelswithstatedenginehorsepower,thegross
horsepoweroftheenginewaslaboratoryratedbytheengine
manufacturerinaccordancewithSAEJ1940.Ascongured
tomeetsafety,emission,andoperatingrequirements,the
actualenginehorsepoweronthisclassoflawnmowerwill
besignicantlylower.
Donottamperwiththeenginecontrolsoralterthegovernor
speed;doingsomaycreateanunsafeconditionresultingin
personalinjury.
Figure1
1.Modelandserialnumberlocation
Writetheproductmodelandserialnumbersinthefollowing
space:
ModelNo.
SerialNo.
Thismanualidentiespotentialhazardsandhassafety
messagesidentiedbythesafetyalertsymbol(Figure2),
whichsignalsahazardthatmaycauseseriousinjuryordeath
ifyoudonotfollowtherecommendedprecautions.
©2013—TheToro®Company
8111LyndaleAvenueSouth
Bloomington,MN55420
Registeratwww.T oro.com.
Contents
Introduction..................................................................1
GeneralLawnMowerSafety.....................................2
SoundPressure......................................................3
SoundPower..........................................................3
Hand/ArmVibration..............................................3
SafetyandInstructionalDecals.................................4
Setup............................................................................5
1UnfoldingtheHandle............................................5
2InstallingtheRecoil-starterRopeintheRope
Guide.................................................................6
3FillingtheEnginewithOil......................................6
4InstalltheMulchPlugortheGrassBag....................7
ProductOverview..........................................................8
Specications.........................................................9
Operation.....................................................................9
FillingtheFuelTank................................................9
CheckingtheEngineOilLevel.................................10
AdjustingtheCuttingHeight....................................10
AdjustingtheUpperHandleHeight..........................11
StartingtheEngine.................................................11
UsingtheSelf-propelDrive......................................12
OriginalInstructions(EN)
PrintedintheUSA
AllRightsReserved
*3381-303*A
Page 2

UsingtheSelf-propelDrive......................................12
StoppingtheEngine...............................................13
MulchingtheClippings...........................................13
BaggingtheClippings.............................................13
Side-dischargingtheClippings..................................14
OperatingTips......................................................15
Maintenance.................................................................17
RecommendedMaintenanceSchedule(s)......................17
PreparingforMaintenance.......................................17
ReplacingtheAirFilter............................................17
ChangingtheEngineOil.........................................18
LubricatingtheWheelGears....................................19
LubricatingtheUpperHandle..................................19
AdjustingtheSelf-propelDriveCable........................19
AdjustingtheSelf-propelDriveCable........................20
ReplacingtheBlade................................................20
CleaningtheUndersideoftheMachine
Housing............................................................21
Storage........................................................................22
PreparingtheMachineforStorage............................22
FoldingtheHandle.................................................22
FoldingtheHandle.................................................22
RemovingtheMachinefromStorage.........................23
TestingtheMachineSafetySystem............................23
•Neverallowchildrenorpeopleunfamiliarwiththese
instructionstousethemower.Localregulationscan
restricttheageoftheoperator.
•Keepinmindthattheoperatororuserisresponsiblefor
accidentsorhazardsoccurringtootherpeopleortheir
property.
•Understandexplanationsforallpictogramsusedonthe
mowerorintheinstructions.
Gasoline
WARNING-Gasolineishighlyammable.Takethe
followingprecautions.
•Storefuelincontainersspecicallydesignedforthis
purpose.
•Refueloutdoorsonlyanddonotsmokewhilerefueling.
•Addfuelbeforestartingtheengine.Neverremovethe
capofthefueltankoraddgasolinewhiletheengineis
runningorwhentheengineishot.
•Ifgasolineisspilled,donotattempttostarttheengine
butmovethemowerawayfromtheareaofspillageand
avoidcreatinganysourceofignitionuntilgasolinevapors
havedissipated.
•Replaceallfueltankandcontainercapssecurely.
Safety
Improperlyusingormaintainingthismowercanresult
ininjury.T oreducethepotentialforinjury,complywith
thesesafetyinstructions.
Torodesignedandtestedthismachineforreasonablysafe
service;however,failuretocomplywiththefollowing
instructionsmayresultinpersonalinjury.
Toensuremaximumsafety,bestperformance,and
togainknowledgeoftheproduct,itisessentialthat
youandanyotheroperatorofthemowerreadand
understandthecontentsofthismanualbeforethe
engineiseverstarted.Payparticularattentiontothe
safetyalertsymbol(
Warning,orDanger—“personalsafetyinstruction.”
Readandunderstandtheinstructionbecauseithasto
dowithsafety.Failuretocomplywiththeinstruction
mayresultinpersonalinjury.
GeneralLawnMowerSafety
ThefollowinginstructionshavebeenadaptedfromEN836.
Thiscuttingmachineiscapableofamputatinghandsandfeet
andofthrowingobjects.Failuretoobservethefollowing
safetyinstructionscouldresultinseriousinjuryordeath.
Training
•Readtheinstructionscarefully .Befamiliarwiththe
controlsandtheproperuseoftheequipment.
Figure2),whichmeansCaution,
Preparation
•Whilemowing,alwayswearsubstantialfootwearandlong
trousers.Donotoperatetheequipmentwhenbarefoot
orwearingopensandals.
•Thoroughlyinspecttheareawheretheequipmentisto
beusedandremoveallstones,sticks,wires,bonesand
otherforeignobjects.
•Beforeusing,alwaysvisuallyinspecttoseethatguards,
andsafetydevices,suchasdeectorsand/orgrass
catchers,areinplaceandworkingcorrectly.
•Beforeusing,alwaysvisuallyinspecttoseethattheblades,
bladeboltsandcutterassemblyarenotwornordamaged.
Replacewornordamagedbladesandboltsinsetsto
preservebalance.
Starting
•Donottiltthemowerwhenstartingtheengineunlessthe
mowerhastobetiltedforstarting.Inthiscase,donot
tiltitmorethanabsolutelynecessaryandliftonlythepart
whichisawayfromtheoperator.
•Starttheenginecarefullyaccordingtoinstructionsand
withfeetwellawayfromtheblade(s)andnotinfrontof
thedischargechute.
Operation
•Nevermowwhilepeople,especiallychildren,orpetsare
nearby.
•Mowonlyindaylightoringoodarticiallight.
•Stayalertforholesintheterrainandotherhiddenhazards.
2
Page 3

•Donotputhandsorfeetnearorunderrotatingparts.
Keepclearofthedischargeopeningatalltimes.
•Neverpickuporcarryalawnmowerwhiletheengineis
running.
•Neverstoretheequipmentwithgasolineinthetankand
insideabuildingwherefumescanreachanopename
orspark.
•Allowtheenginetocoolbeforestoringinanyenclosure.
•Useextremecautionwhenreversingorpullinga
pedestriancontrolledlawnmowertowardsyou.
•Walk,neverrun.
•Slopes:
–Donotmowexcessivelysteepslopes.
–Exerciseextremecautionwhenonslopes.
–Mowacrossthefaceofslopes,neverupanddown,
andexerciseextremecautionwhenchangingdirection
onslopes.
–Alwaysbesureofyourfootingonslopes.
•Reducespeedonslopesandinsharpturnstoprevent
overturningorlossofcontrol.
•Stopthebladeifthelawnmowerhastobetiltedfor
transportationwhencrossingsurfacesotherthangrass
andwhentransportingthelawnmowertoandfromthe
areatobemowed.
•Donotoperatetheengineinaconnedspacewhere
dangerouscarbonmonoxidefumescancollect.
•Stoptheengine
•Toreducetherehazard,keeptheengine,silencer,
batterycompartmentandgasolinestorageareafreeof
grass,leaves,orexcessivegrease.
•Checkgrasscatchercomponentsandthedischargeguard
frequentlyandreplacewithmanufacturer'srecommended
parts,whennecessary.
•Replacewornordamagedpartsforsafety.
•Replacefaultysilencers.
•Ifthefueltankhastobedrained,dothisoutdoors.
•Donotchangetheenginegovernorsettingsoroverspeed
theengine.Operatinganengineatexcessivespeedcan
increasethehazardofpersonalinjury.
•Becarefulduringadjustmentofthelawnmowerto
prevententrapmentofthengersbetweenmovingblades
andxedpartsofthelawnmower.
•Toensurethebestperformanceandsafety,
purchaseonlygenuineT ororeplacementpartsand
accessories.Donotuse
theymaycauseasafetyhazard.
will t
partsandaccessories;
–wheneveryouleavethelawnmower.
–beforerefueling.
–beforeremovingthegrasscatcher.
–beforemakingheightadjustmentunlessadjustment
canbemadefromtheoperator'sposition.
•Stoptheengineanddisconnectthespark-plugwire.
–beforeclearingblockagesoruncloggingchute.
–beforechecking,cleaningorworkingonthelawn
mower.
–afterstrikingaforeignobject,inspectthelawnmower
fordamageandmakerepairsbeforerestartingand
operatingthelawnmower.
–iflawnmowerstartstovibrateabnormally(check
immediately).
•Lightningcancausesevereinjuryordeath.Ifyousee
lightningorhearthunderinthearea,donotoperatethe
machine;seekshelter.
•Watchoutfortrafcwhencrossingornearroadways.
MaintenanceandStorage
SoundPressure
Thisunithasasoundpressurelevelattheoperator’searof89
dBA,whichincludesanUncertaintyValue(K)of1dBA.
Thesoundpressurelevelwasdeterminedaccordingtothe
proceduresoutlinedinEN836.
SoundPower
Thisunithasaguaranteedsoundpowerlevelof98dBA,
whichincludesanUncertaintyValue(K)of1dBA.
Thesoundpowerlevelwasdeterminedaccordingtothe
proceduresoutlinedinISO11094.
Hand/ArmVibration
Measuredvibrationlevelforrighthand=5.1m/s
Measuredvibrationlevelforlefthand=4.8m/s
UncertaintyValue(K)=2.0m/s2
Measuredvaluesweredeterminedaccordingtotheprocedures
outlinedinEN836.
•Keepallnuts,bolts,andscrewstighttobesurethe
equipmentisinsafeworkingcondition.
•Donotusepressure-cleaningequipmentonmachine.
3
Page 4
SafetyandInstructionalDecals
Important:Safetyandinstructiondecalsarelocatednearareasofpotentialdanger.Replacedamageddecals.
Manufacturer'sMark
1.Indicatesthebladeisidentiedasapartfromtheoriginal
machinemanufacturer.
1.Heightofcut
1.Heightofcut
1.EngineswitchOff
2.EngineswitchOn
108-7450
1.Thrownobjecthazard—keepbystandersasafedistance
fromthemachine.
2.Cutting/dismembermentofhandorfoot—stayawayfrom
movingparts.
112-8760
108-7451
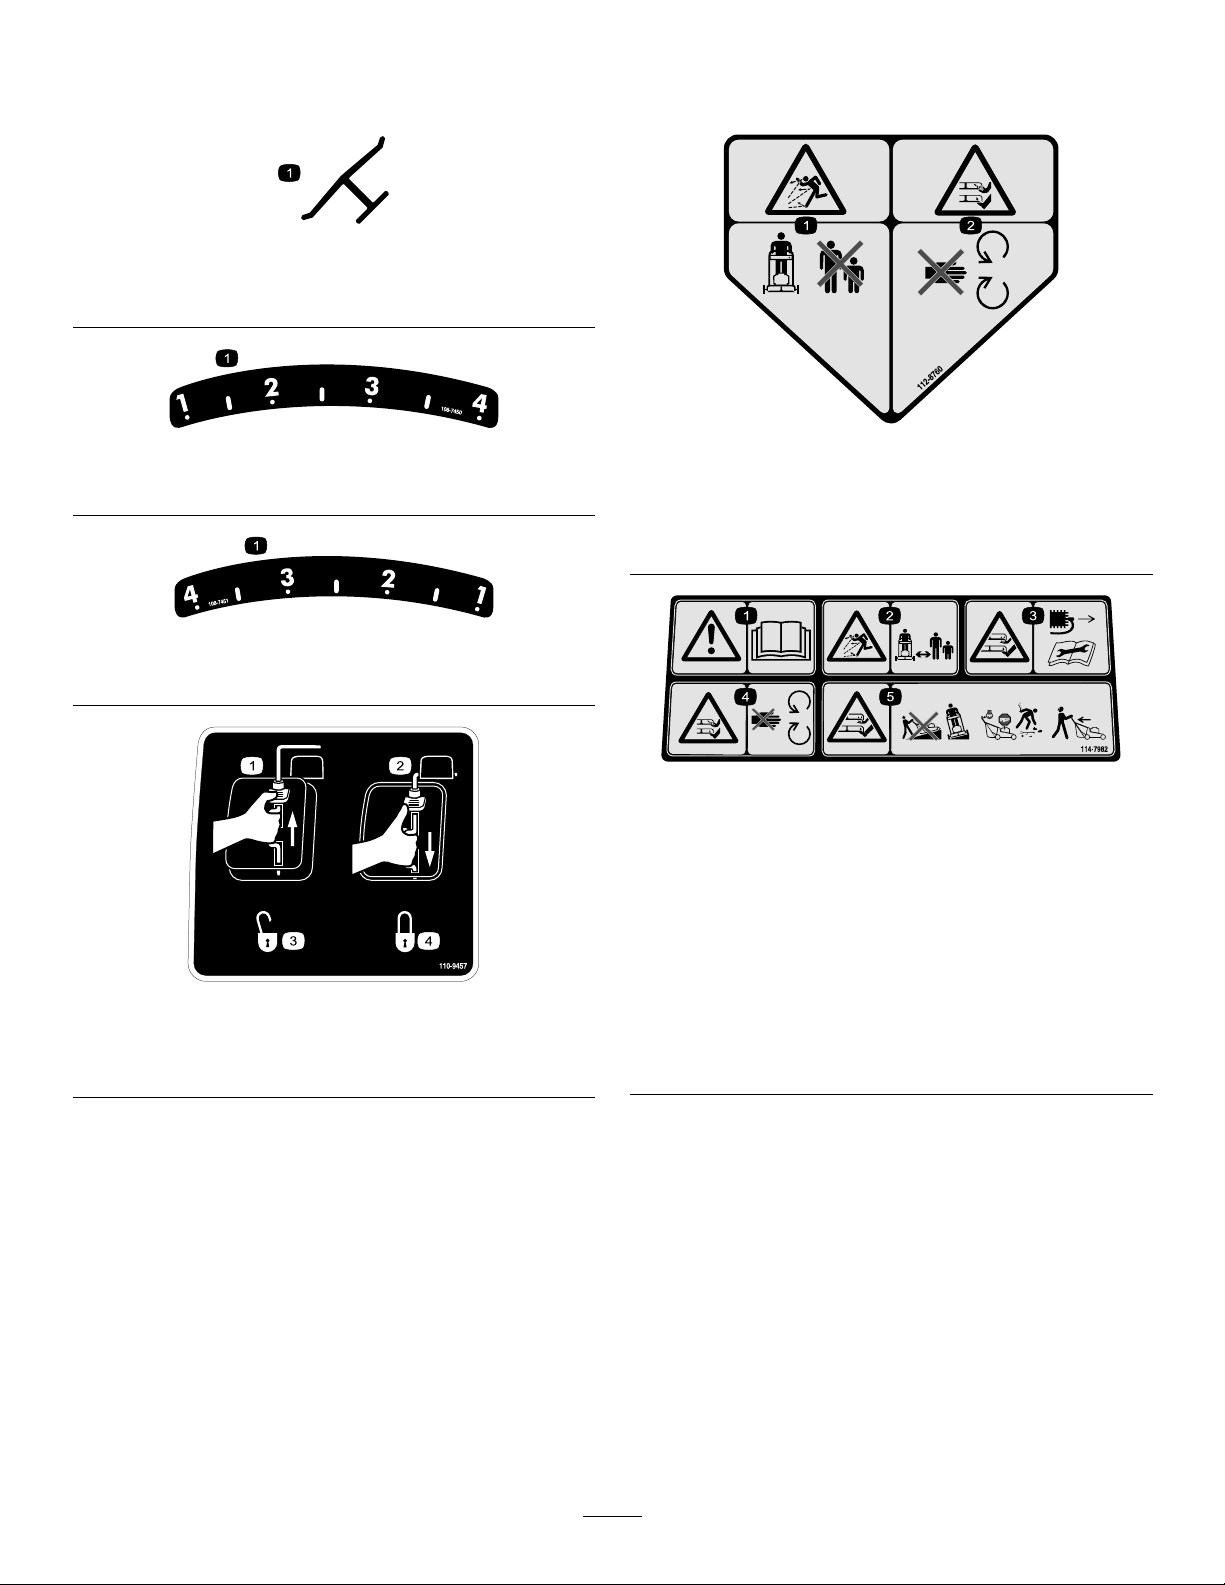
114-7982
1.Warning—readtheOperator'sManual.
2.Thrownobjecthazard—keepbystandersasafedistance
fromthemachine.
3.Cutting/dismembermenthazardofhandorfoot,mower
blade—disconnectthesparkplugwireandreadthe
instructionsbeforeservicingorperformingmaintenance.
4.Cutting/dismembermenthazardofhandorfoot,mower
blade—stayawayfrommovingparts.
110-9457
3.Unlocked
4.Locked
5.Cutting/dismembermenthazardofhandorfoot,mower
blade—donotoperateupanddownslopes;operatesideto
sideonslopes;stoptheenginebeforeleavingtheoperating
position;andlookbehindyouwhenbackingup.
4
Page 5
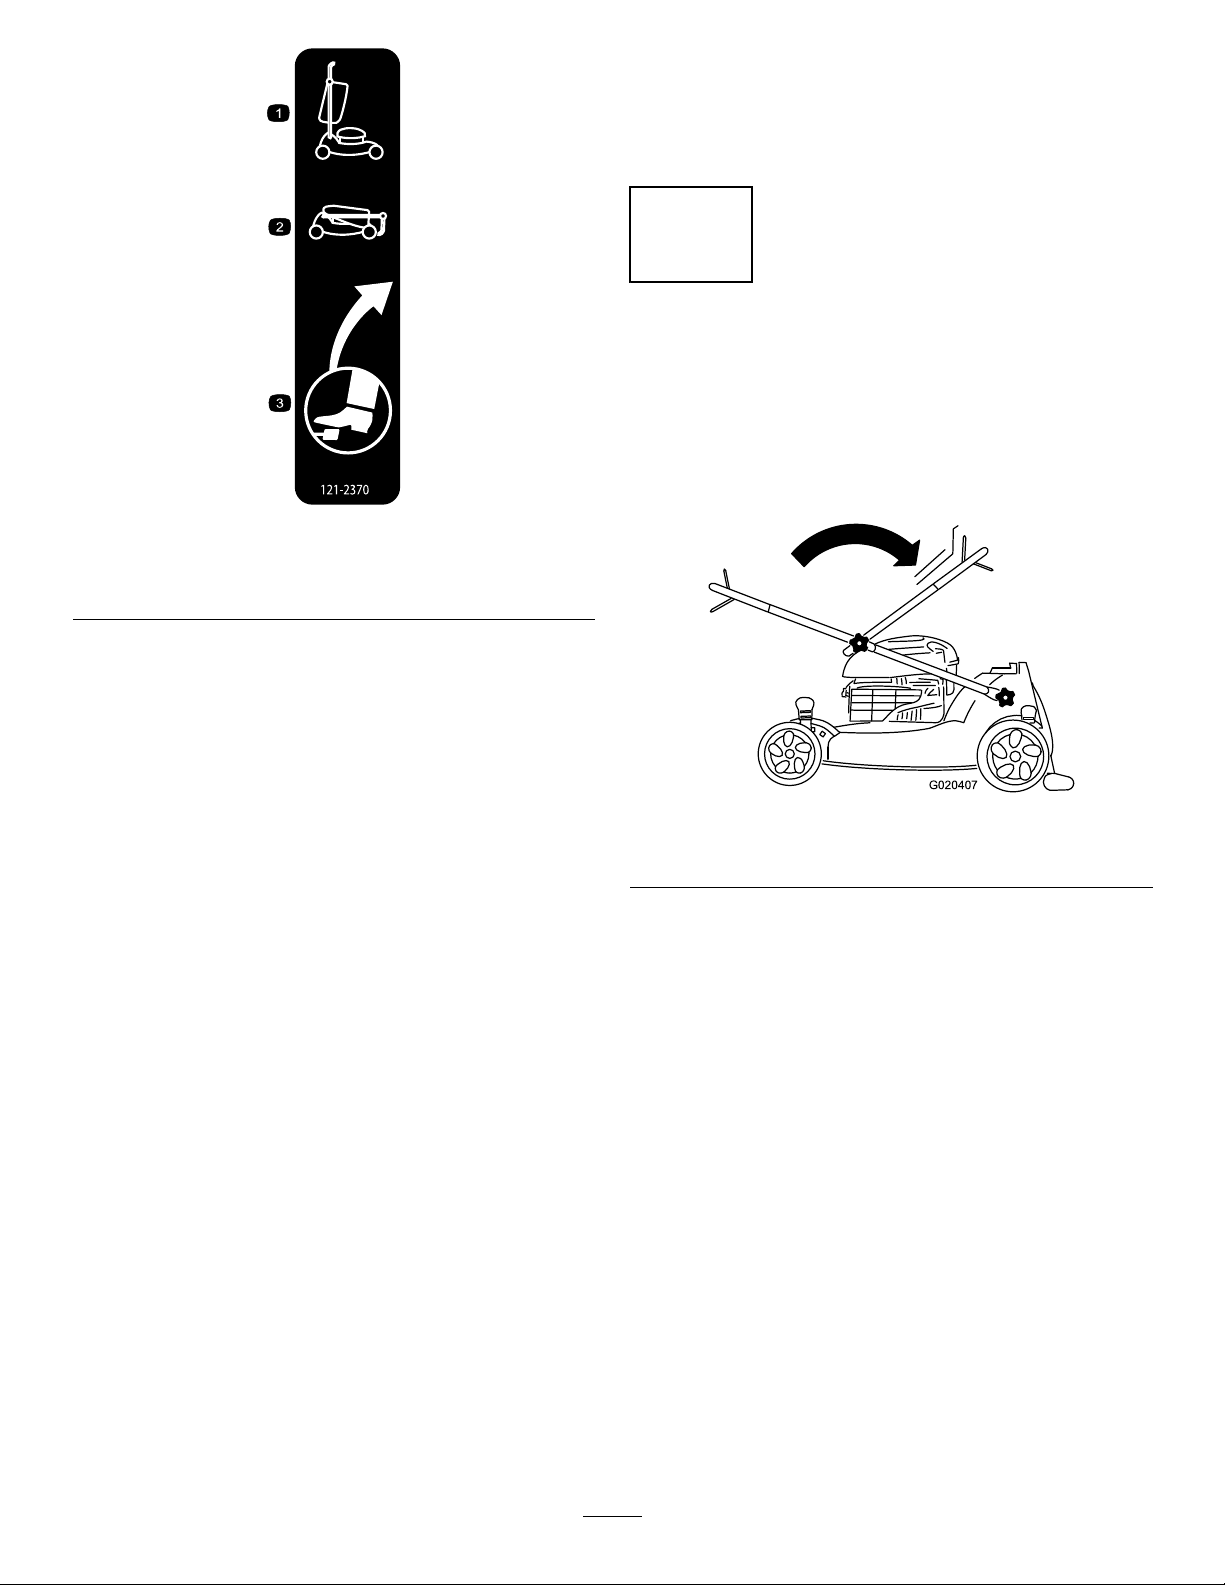
121–2370
G020407
1.Handleinraisedposition3.Footpedallocation
2.Handleinloweredposition
Setup
Important:Removeanddiscardtheprotectiveplastic
sheetthatcoverstheengine.
1
UnfoldingtheHandle
NoPartsRequired
Procedure
1.UnfoldthehandleasillustratedinFigure3andFigure
4.
Model20995shown
Figure3
5
Page 6
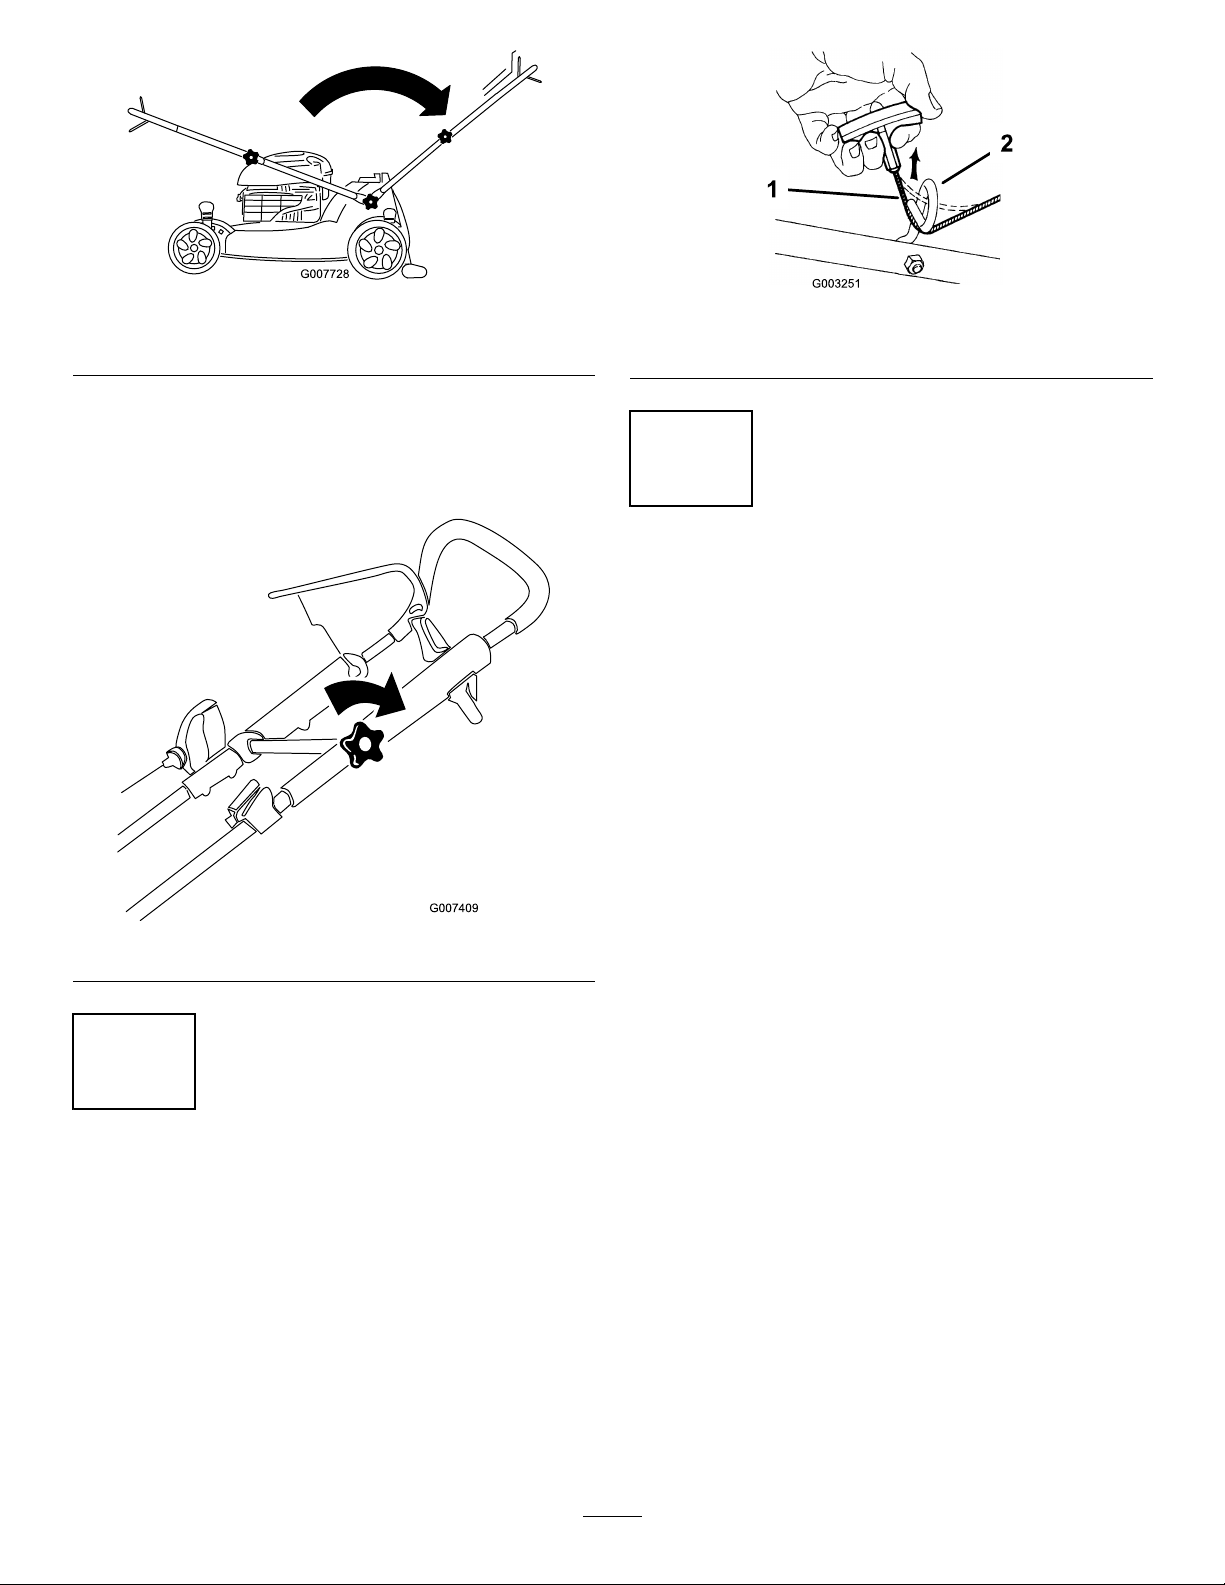
Figure4
Model20995shown
2.Tightenallhandleknobs.
3.Movetheupperhandletothedesiredpositionand
tightentheupperhandleknobrmly(model20996
only)(Figure5).
Figure6
1.Recoil-starterrope2.Ropeguide
3
FillingtheEnginewithOil
NoPartsRequired
Procedure
Important:Thismachinedoesnotcomewithoilinthe
engine.Beforestartingtheengine,lltheenginewith
oil.
Important:Changetheengineoilaftertherst5
operatinghours;changeityearlythereafter.Referto
ChangingtheEngineOil(page18).
1.Movethemachinetoalevelsurface.
Figure5
2
InstallingtheRecoil-starter RopeintheRopeGuide
NoPartsRequired
Procedure
Important:Youmustinstalltherecoil-starterropein
theropeguide.
Holdtheblade-controlbartotheupperhandleandpullthe
recoil-starterropethroughtheropeguideonthehandle
(
Figure6).
2.Removethedipstick(Figure7)andpourabout3/4of
thecrankcasecapacityofoilintotheoil-lltube.
Note:Max.ll:0.59l(20oz.),type:SAE30detergent
oilwithanAPIserviceclassicationofSF,SG,SH,
SJ,SL,orhigher.
6
Page 7
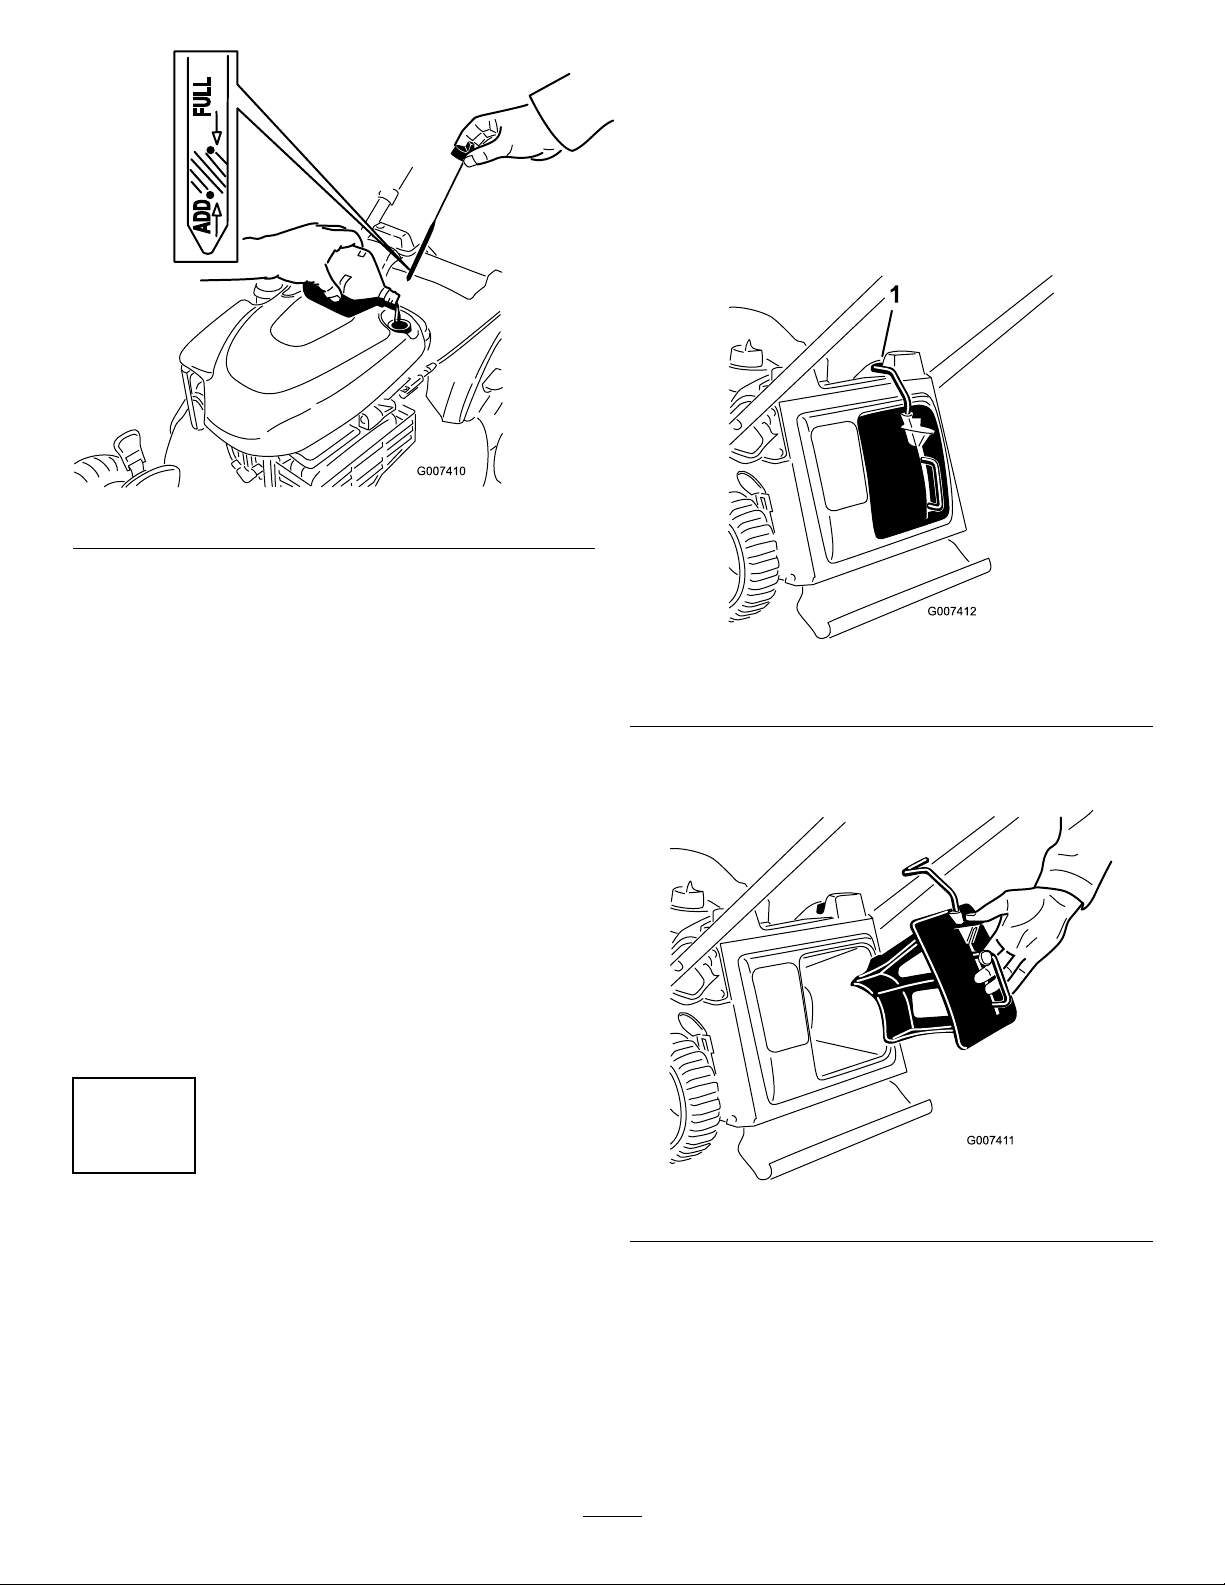
Figure7
3.Wipeoffthedipstickendwithacleancloth.
4.Insertthedipstickintotheoil-lltube,andscrewit
inuntilitstops.
5.Removethedipstickandreadtheoillevelonthe
dipstick;refertoFigure7.
Themachinehasasafetyswitch,locatedatthebottomofthe
channelatthetop,rightrearofthemachine,thatprevents
themachinefromoperatingwithoutamulchplugoragrass
bag.Thispreventsthemachinefromthrowingdebrisatthe
operatorthroughtherearchute.
Fortheswitchtodetectthepresenceofthemulchplug,the
topofthemulchpluglevermustliefullyinthebottom
ofthechannel(Figure8).
Figure8
1.Topofmulchplugleverinchannelbottom
•Iftheoillevelistoolow ,addasmallamountof
oilslowlytotheoil-lltube,andthenrepeatsteps
3through5untiltheoilleveliscorrectasshown
inFigure7.
•Iftheoillevelistoohigh,draintheexcessoiluntil
youobtainthecorrectoillevelonthedipstick.To
draintheexcessoil,referto
Oil(page18)
Important:Iftheoillevelinthecrankcaseistoo
lowortoohighandyouruntheengine,youmay
damagetheengine.
6.Installthedipsticksecurelybyhand.
.
ChangingtheEngine
4
InstalltheMulchPlugorthe GrassBag
NoPartsRequired
1.Insertthemulchplugintothemachineifitisn'talready
installed(Figure9).
Figure9
2.Squeezethebuttonontheleverwithyourthumb,and
fullyinsertthemulchplugintotheopening(Figure10).
Procedure
Important:Youmustcorrectlyinstallthemulchplug
(formulchingorside-discharging)orthegrassbag(for
bagging);otherwise,theenginewillnotstart.
7
Page 8
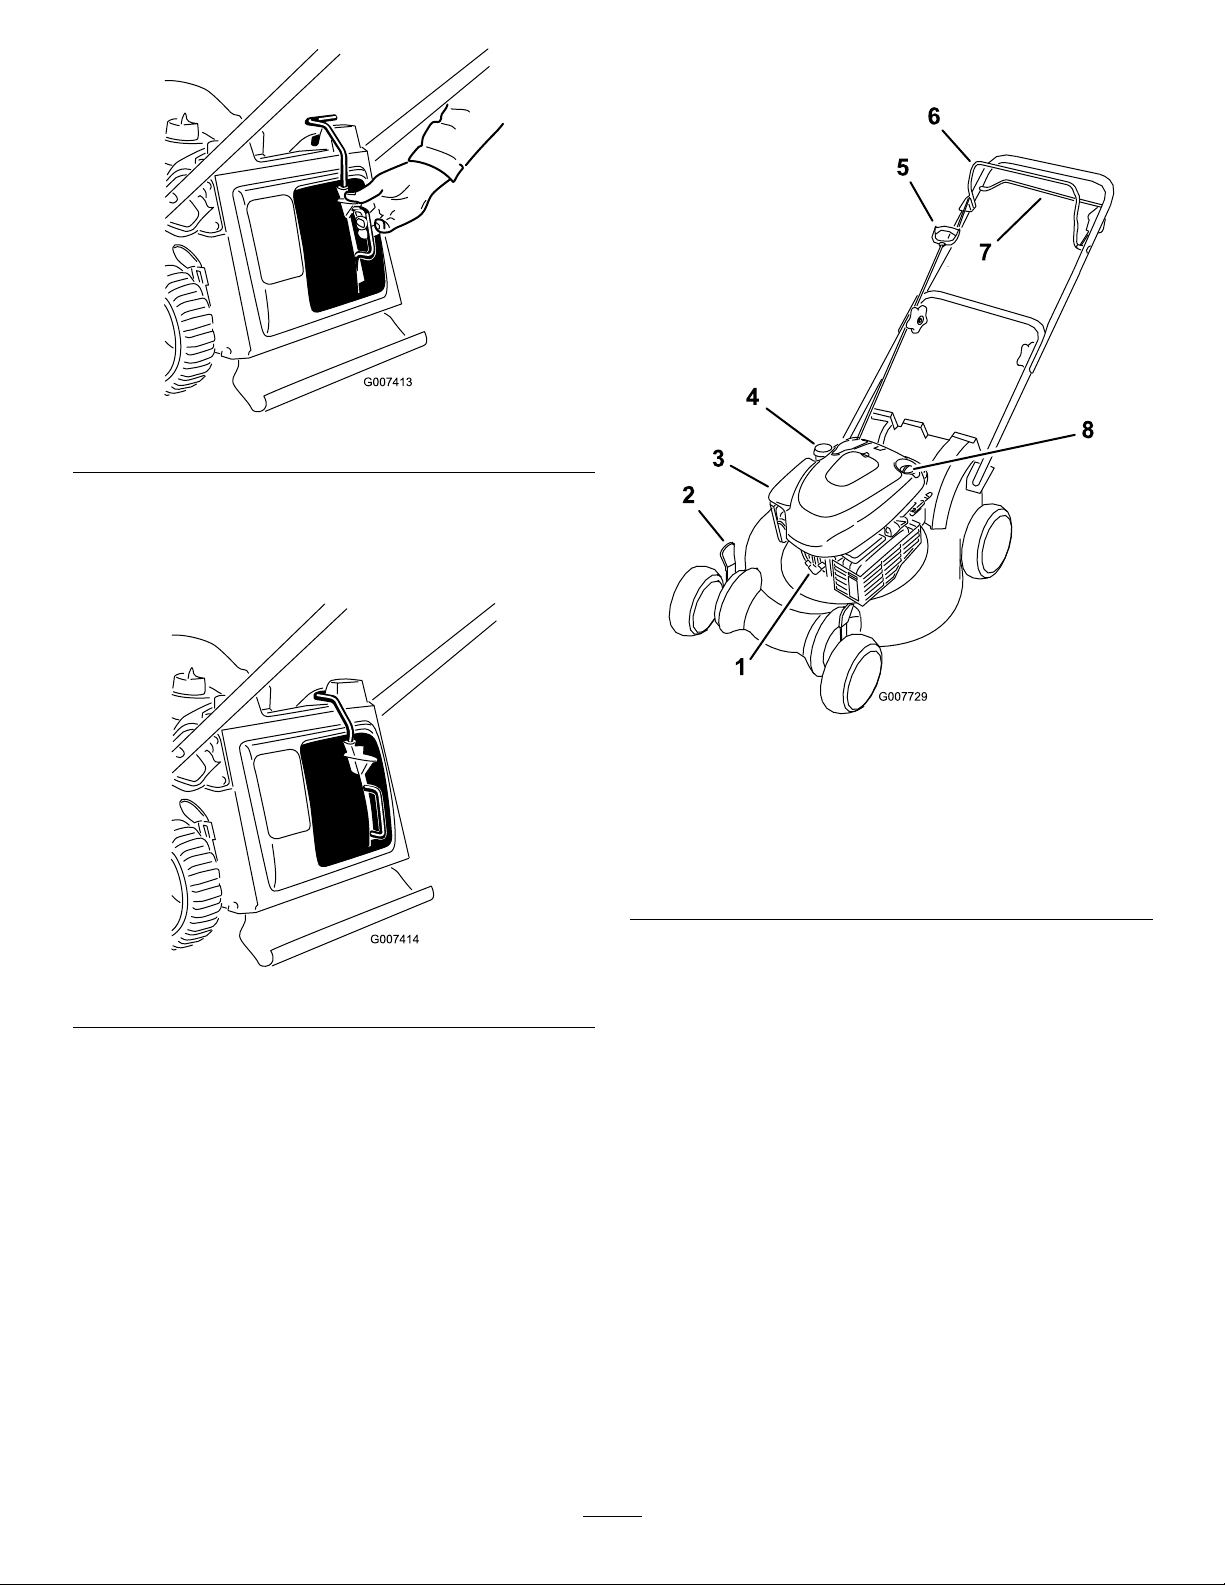
Figure10
3.Releasethebuttonontheleverandensurethatthetop
oftheleverisliesfullyintheswitchchannel(Figure
11).Ifthetopoftheleverisnotintheswitch
channel,yourmachinewillnotstart.
ProductOverview
Figure11
Note:Iftheleverdoesnotlatchproperly,disconnect
thewirefromthesparkplugandcheckforandremove
anydebrisbuildupinthetunnel.
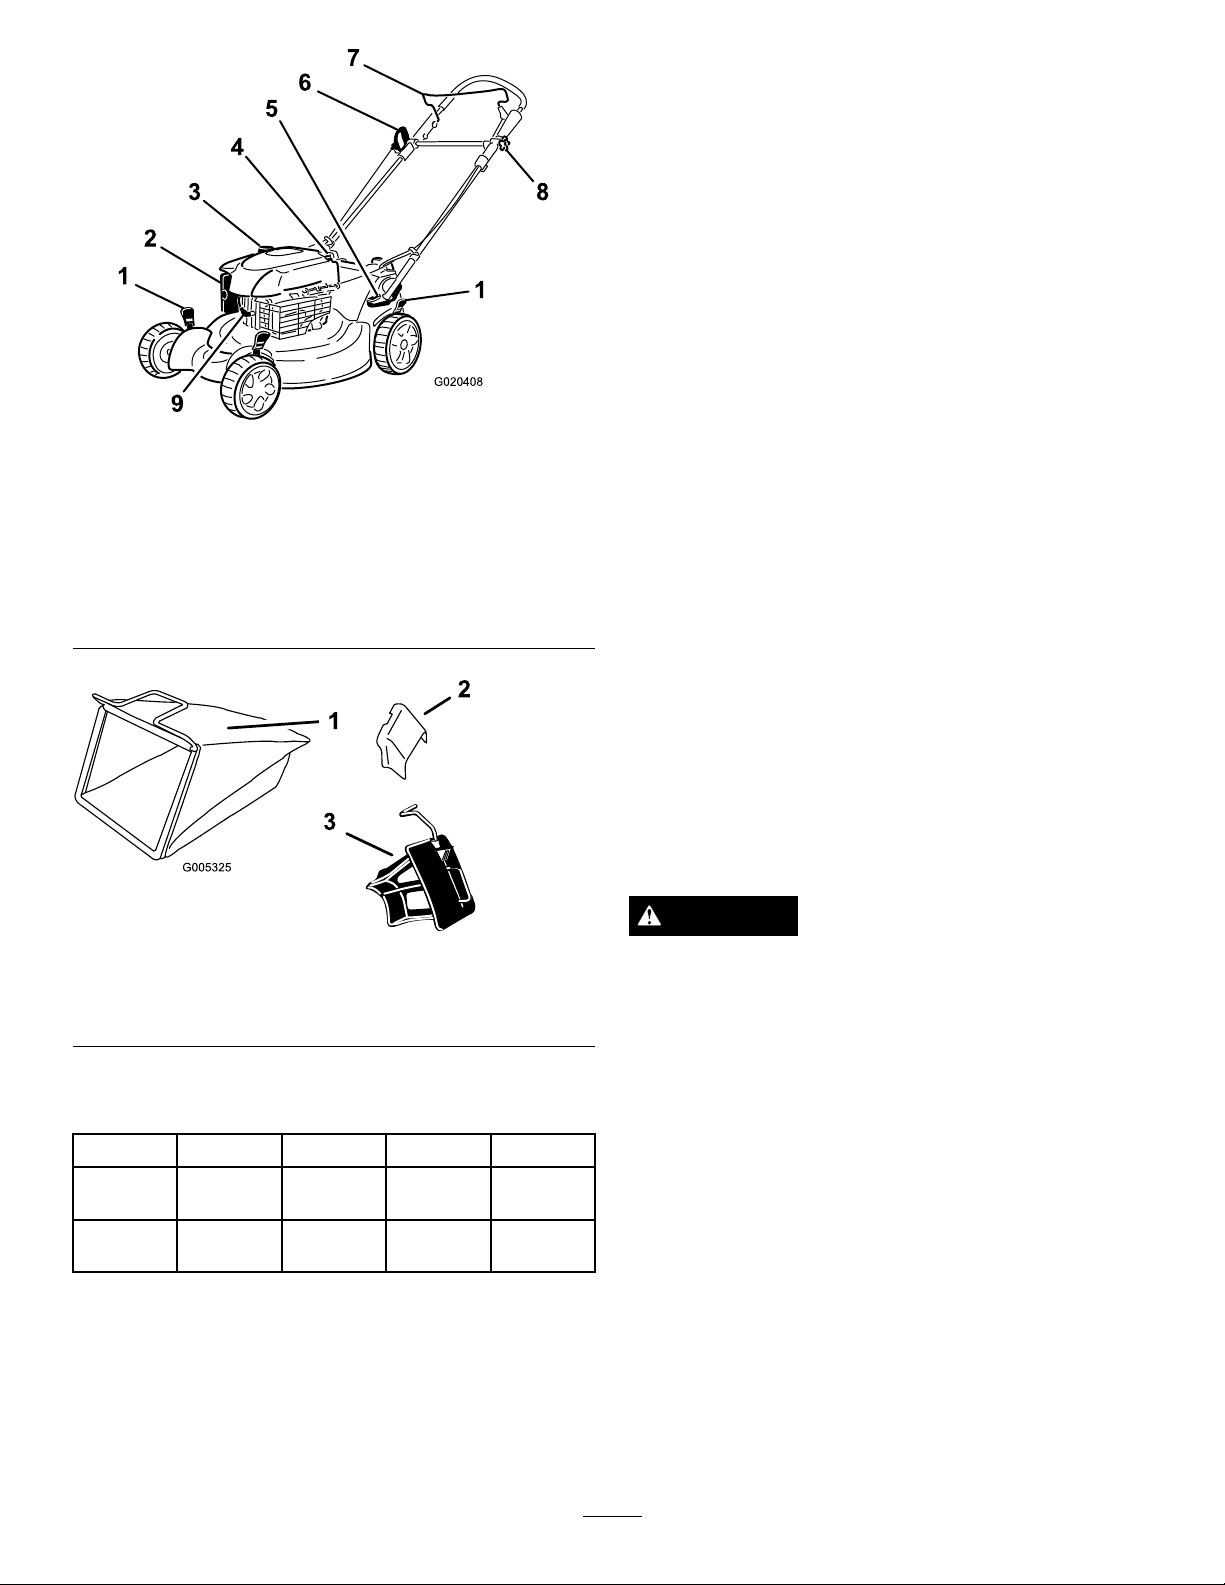
Figure12
Model20995
1.Sparkplug
2.Cutting-heightlever(4)
3.Airlter7.Self-propel-drivebar
4.Fuel-tankcap
5.Recoil-starthandle
6.Blade-controlbar
8.Oilll/Dipstick
8
Page 9
G020408
Figure13
Model20996
1.Cutting-heightlever(4)
2.Airlter
3.Fuel-tankcap8.Upper-handleknob
4.Oilll/Dipstick9.Sparkplug
5.Footpedal
6.Recoil-starthandle
7.Blade-controlbar
Operation
FillingtheFuelTank
RecommendedFuel:
•Forbestresults,useonlyclean,fresh(lessthan30days
old),unleadedgasolinewithanoctaneratingof87or
higher((R+M)/2ratingmethod).
•Ethanol:Gasolinewithupto10%ethanol(gasohol)
or15%MTBE(methyltertiarybutylether)byvolume
isacceptable.EthanolandMTBEarenotthesame.
Gasolinewith15%ethanol(E15)byvolumeisnot
approvedforuse.Neverusegasolinethatcontains
morethan10%ethanolbyvolume,suchasE15
(contains15%ethanol),E20(contains20%ethanol),or
E85(containsupto85%ethanol).Usingunapproved
gasolinemaycauseperformanceproblemsand/orengine
damagewhichmaynotbecoveredunderwarranty.
•Donotusegasolinecontainingmethanol.
•Donotstorefueleitherinthefueltankorfuelcontainers
overthewinterunlessafuelstabilizerisused.
•Donotaddoiltogasoline.
Figure14
1.Grassbag3.Mulchplug(installed)
2.Side-dischargechute
Specications
ModelWeightLengthWidthHeight
2099535kg
(77lb)
2099637kg
(82lb)
145cm
(57in)
157cm
(62in)
Important:Toreducestartingproblems,addfuel
stabilizertothefuelallseason,mixingitwithgasoline
lessthan30daysold;runthemachinedrybeforestoring
itformorethan30days.
Donotusefueladditivesotherthanafuel
stabilizer/conditioner.Donotusefuelstabilizers
withanalcoholbasesuchasethanol,methanol,or
isopropanol.
DANGER
Gasolineisextremelyammableandexplosive.A
reorexplosionfromgasolinecanburnyouand
others.
•Topreventastaticchargefromignitingthe
gasoline,placethecontainerand/ormachine
directlyonthegroundbeforelling,notina
vehicleoronanobject.
•Fillthetankoutdoorswhentheengineiscold.
56cm
(22in)
56cm
(22in)
99cm
(39in)
112cm
(44in)
Wipeupspills.
•Donothandlegasolinewhensmokingoraround
anopenameorsparks.
•Storegasolineinanapprovedfuelcontainer,out
ofthereachofchildren.
1.Cleanaroundthefuel-tankcap,andremovethecap
fromthetank(Figure15).
9
Page 10

oil-lltube,andthenrepeatsteps
theoillevelisattheFullmarkonthedipstick.
3through5until
•IftheoillevelisabovetheFullmarkonthe
dipstick,draintheexcessoiluntiltheoillevelisat
theFullmarkonthedipstick.Todraintheexcess
oil,refertoChangingtheEngineOil(page18).
Important:Iftheoillevelinthecrankcaseis
toolowortoohighandyouruntheengine,
youmaydamagetheengine.
Figure15
1.1cm(1/2in)
2.Fillthefueltank,leavingatleast1cm(1/2inch)from
thebottomoftheneckemptytoallowthegasoline
roomtoexpand.
3.Installthefueltankcapandtightenitsecurelybyhand.
CheckingtheEngineOilLevel
ServiceInterval:Beforeeachuseordaily
Max.ll:0.59l(20oz.),type:SAE30detergentoilwithan
APIserviceclassicationofSF,SG,SH,SJ,SL,orhigher.
1.Movethemachinetoalevelsurface.
2.Removethedipstick(Figure16).
6.Installthedipsticksecurelybyhand.
AdjustingtheCuttingHeight
WARNING
Adjustingthecuttingheightmaybringyouinto
contactwiththemovingblade,causingserious
injury.
•Stoptheengineandwaitforallmovingparts
tostop.
•Donotputyourngersunderthehousingwhen
adjustingthecuttingheight.
CAUTION
Iftheenginehasbeenrunning,themuferwillbe
hotandcanseverelyburnyou.Keepawayfromthe
hotmufer.
Adjustthecuttingheightasdesired.Setallfourwheelsto
thesameheight.
Figure16
3.Wipeoffthedipstickendwithacleancloth.
4.Insertthedipstickintotheoil-lltubeandscrewitin
untilitstops.
5.Removethedipstickandreadtheoillevel;referto
Figure16.
•IftheoillevelisbelowtheAddmarkonthe
dipstick,slowlyaddasmallamountofoiltothe
Note:Toraisethemachine,moveall4cuttingheightlevers
forward;tolowerthemachine,movethemallrearward
(Figure17).
Figure17
Note:Thecuttingheightsettingsare25mm(1in);38mm
(1-1/2in);51mm(2in);64mm(2-1/2in);76mm(3in);89
mm(3-1/2in);102mm(4in);and114mm(4-1/2in).
10
Page 11

AdjustingtheUpperHandle Height
Model20996only
Youmayraiseorlowertheupperhandletoaposition
comfortableforyou.
Note:Youcannotraisetheupperhandlehigherthanthe
angleofthelowerhandle.
1.Loosentheupper-handleknob(Figure18).
Figure20
StartingtheEngine
Important:Themachinehasasafetysystemthat
preventsyoufromstartingthemachineunlessyourst
installthemulchplugorthegrassbagsecurelyonthe
machine.
Figure18
2.Movetheupperhandletothedesiredposition(Figure
19).
Figure19
3.Tightentheupper-handleknobrmly(Figure19).
1.Installthemulchplug(
(Figure22)onthemachine.
Figure21
Figure21)orthegrassbag
11
Page 12

Figure22
UsingtheSelf-propelDrive
Model20995only
Tooperatetheself-propeldrive,squeezetheself-propeldrive
bar(Figure25)towardthehandleandholdit.
2.Holdtheblade-controlbaragainstthehandleandpull
therecoilstarter(Figure23orFigure24).
Figure23
1.Blade-controlbar
Figure25
1.Self-propel-drivebar
Todisengagetheself-propeldrive,releasetheself-propel-drive
bar.
Note:Themaximumself-propelgroundspeedisxed.To
reducethegroundspeed,increasethespacebetweenthe
self-propel-drivebarandthehandle.
UsingtheSelf-propelDrive
Model20996only
Tooperatetheself-propeldrive,simplywalkwithyourhands
ontheupperhandleandyourelbowsatyoursides,andthe
machinewillautomaticallykeeppacewithyou(Figure26and
Figure27).
Figure24
1.Blade-controlbar
Note:Ifthemachinestilldoesnotstart,contactan
AuthorizedServiceDealer.
3.Testthemachinesafetysystem;refertoTestingthe
MachineSafetySysteminStorage.
Figure26
12
Page 13

Figure27
Figure28
Note:Ifthemachinedoesnotfreelyrollbackwardafter
self-propelling,stopwalking,holdyourhandsinplace,and
allowthemachinetorollacoupleofinches(centimeters)
forwardtodisengagethewheeldrive.Youcanalsotry
reachingjustunderthepersonalpacehandletothemetal
handleandpushthemachineforwardacoupleofinches
(centimeters).Ifthemachinestilldoesnotrollbackward
easily,contactanAuthorizedServiceDealer.
StoppingtheEngine
ServiceInterval:Beforeeachuseordaily—Ensurethat
theenginestopswithin3secondsafter
releasingtheblade-controlbar.
Tostoptheengine,releasetheblade-controlbar.
Important:Whenyoureleasetheblade-controlbar,
boththeengineandbladeshouldstopwithin3seconds.
Iftheydonotstopproperly,stopusingyourmachine
immediatelyandcontactanAuthorizedServiceDealer.
MulchingtheClippings
1.Topofmulchplugleverinchannelbottom
BaggingtheClippings
Usethegrassbagwhenyouwanttocollectgrassandleaf
clippingsfromthelawn.
Iftheside-dischargechuteisonthemachine,removeit
andlocktheside-dischargedoor;refertoRemovingthe
Side-dischargeChute(page15)beforebaggingtheclippings.
WARNING
Thebladeissharp;contactingthebladecanresult
inseriouspersonalinjury.
Stoptheengineandwaitforallmovingpartstostop
beforeleavingtheoperatingposition.
InstallingtheGrassBag
1.Removethemulchplug(Figure29).
Yourmachinecomesfromthefactoryreadytomulchthe
grassandleafclippingsbackintothelawn.
Ifthegrassbagisonthemachine,removeit;referto
RemovingtheGrassBag(page14)beforemulchingthe
clippings.Iftheside-dischargechuteisonthemachine,
removeitandlocktheside-dischargedoor;refertoRemoving
theSide-dischargeChute(page15)beforemulchingthe
clippings.
Important:Themachinehasasafetyswitchthat
preventsyoufromstartingthemachineunlessyourst
installthemulchplugsecurelyonthemachine(Figure
28).
Figure29
2.Routethestarterropearoundthelower-ropeguide
(Figure30).
13
Page 14

Figure30
Note:Thelower-ropeguidereleasesthestarterrope
whenyoupulltherecoil-starthandle.
3.Insertthegrass-baghandleintothegroovesatthetop
ofthemachine(Figure31).
Important:Themachinehasasafetyswitchthat
preventsyoufromstartingthemachineunlessyou
rstinstallthegrassbagsecurelyonthemachine.
Figure33
3.Insertthemulchplug(Figure34).
Figure31
RemovingtheGrassBag
1.Routethestarterropearoundthelower-ropeguide
(Figure32).
Figure32
2.Liftthegrass-baghandleoutfromthegroovesatthe
topofthemachineandremovethebagfromthe
machine(Figure33).
Figure34
Side-dischargingtheClippings
Usethesidedischargeforcuttingverytallgrass.
Ifthebagisonthemachine,removeitandinsertthemulch
plug;referto
side-dischargingtheclippings.
Important:Themachinehasasafetyswitchthat
preventsyoufromstartingthemachineunlessyourst
installthemulchplugsecurelyonthemachine;referto
MulchingtheClippings(page13).
InstallingtheSide-dischargeChute
1.Unlocktheside-dischargedoor(Figure35).
RemovingtheGrassBag(page14)before
14
Page 15

Figure35
2.Liftopentheside-dischargedoor(Figure36).
Figure36
3.Installtheside-dischargechuteandclosethedooronto
thechute(
Figure37).
OperatingTips
GeneralMowingTips
•Cleartheareaofsticks,stones,wire,branches,andother
debristhatthebladecouldhit.
•Avoidstrikingsolidobjectswiththeblade.Never
deliberatelymowoveranyobject.
•Ifthemachinestrikesanobjectorstartstovibrate,
immediatelystoptheengine,disconnectthewirefrom
thesparkplug,andexaminethemachinefordamage.
•Forbestperformance,installanewbladebeforethe
cuttingseasonbegins.
•ReplacethebladewhennecessarywithaToro
replacementblade.
CuttingGrass
•Cutonlyaboutathirdofthegrassbladeatatime.Do
notcutbelowthe51mm(2in)settingunlessthegrassis
sparseoritislatefallwhengrassgrowthbeginstoslow
down.RefertoAdjustingtheCuttingHeight(page10).
•Whencuttinggrassover15cm(6in)tall,mowatthe
highestcutting-heightsettingandwalkslower;thenmow
againatalowersettingforthebestlawnappearance.If
thegrassistoolong,themachinemayplugandcause
theenginetostall.
•Mowonlydrygrassorleaves.Wetgrassandleavestend
toclumpontheyardandcancausethemachinetoplug
ortheenginetostall.
Figure37
RemovingtheSide-dischargeChute
Toremovethesidedischargechute,reversethestepsabove.
Important:Locktheside-dischargedoorafteryouclose
it(Figure38).
Figure38
WARNING
Wetgrassorleavescancauseseriousinjuryif
youslipandcontacttheblade.Mowonlyindry
conditions.
•Alternatethemowingdirection.Thishelpsdispersethe
clippingsoverthelawnforevenfertilization.
•Ifthenishedlawnappearanceisunsatisfactory,tryone
ormoreofthefollowing:
–Replacethebladeorhaveitsharpened.
–Walkataslowerpacewhilemowing.
–Raisethecuttingheightonyourmachine.
–Cutthegrassmorefrequently.
–Overlapcuttingswathsinsteadofcuttingafullswath
witheachpass.
–Setthecuttingheightonthefrontwheels1notch
lowerthantherearwheels.Forexample,setthefront
wheelsat51mm(2in)andtherearwheelsat64mm
(2-1/2in).
CuttingLeaves
•Aftercuttingthelawn,ensurethathalfofthelawnshows
throughthecutleafcover.Youmayneedtomakemore
thanasinglepassovertheleaves.
15
Page 16

•Iftherearemorethan13cm(5in)ofleavesonthelawn,
setthefrontcuttingheight1or2notcheshigherthan
therearcuttingheight.
•Slowdownyourmowingspeedifthemachinedoesnot
cuttheleavesnelyenough.
16
Page 17

Maintenance
Note:Determinetheleftandrightsidesofthemachinefromthenormaloperatingposition.
RecommendedMaintenanceSchedule(s)
MaintenanceService
Interval
Aftertherst5hours
Beforeeachuseordaily
Every25hours
Every50hours
Yearly
Yearlyorbeforestorage
Important:RefertoyourEngineOperator'sManualforadditionalmaintenanceprocedures.
PreparingforMaintenance
1.Stoptheengineandwaitforallmovingpartstostop.
2.Disconnectthespark-plugwirefromthesparkplug
(Figure39)beforeperforminganymaintenance
procedure.
MaintenanceProcedure
•Changetheengineoil.
•Checktheengineoillevel.
•Ensurethattheenginestopswithin3secondsafterreleasingtheblade-controlbar.
•Cleantheundersideofthemachinehousing.
•Replacetheairlteryearly;replaceitmorefrequentlyindustyoperatingconditions.
•Changetheengineoil;changeitmorefrequentlyindustyoperatingconditions.
•Lubricatethewheelgears.
•Lubricatetheupperhandle.
•Changetheengineoil;changeitmorefrequentlyindustyoperatingconditions.
•Replacetheblade.
WARNING
Tippingthemachinemaycausethefuelto
leak.Gasolineisammable,explosiveand
cancausepersonalinjury.
Runtheenginedryorremovethegasoline
withahandpump;neversiphon.
Figure39
3.Afterperformingthemaintenanceprocedure(s),
connectthespark-plugwiretothesparkplug.
Important:Beforetippingthemachinetochange
theoilorreplacetheblade,allowthefueltankto
rundrythroughnormalusage.Ifyoumusttip
themachinepriortorunningoutoffuel,usea
handfuelpumptoremovethefuel.Alwaystipthe
machineontoitssidewiththeairlterup.
ReplacingtheAirFilter
ServiceInterval:Every25hours
1.Useascrewdrivertoopentheair-ltercover(Figure
40).
Figure40
2.Replacetheairlter(Figure41).
17
Page 18
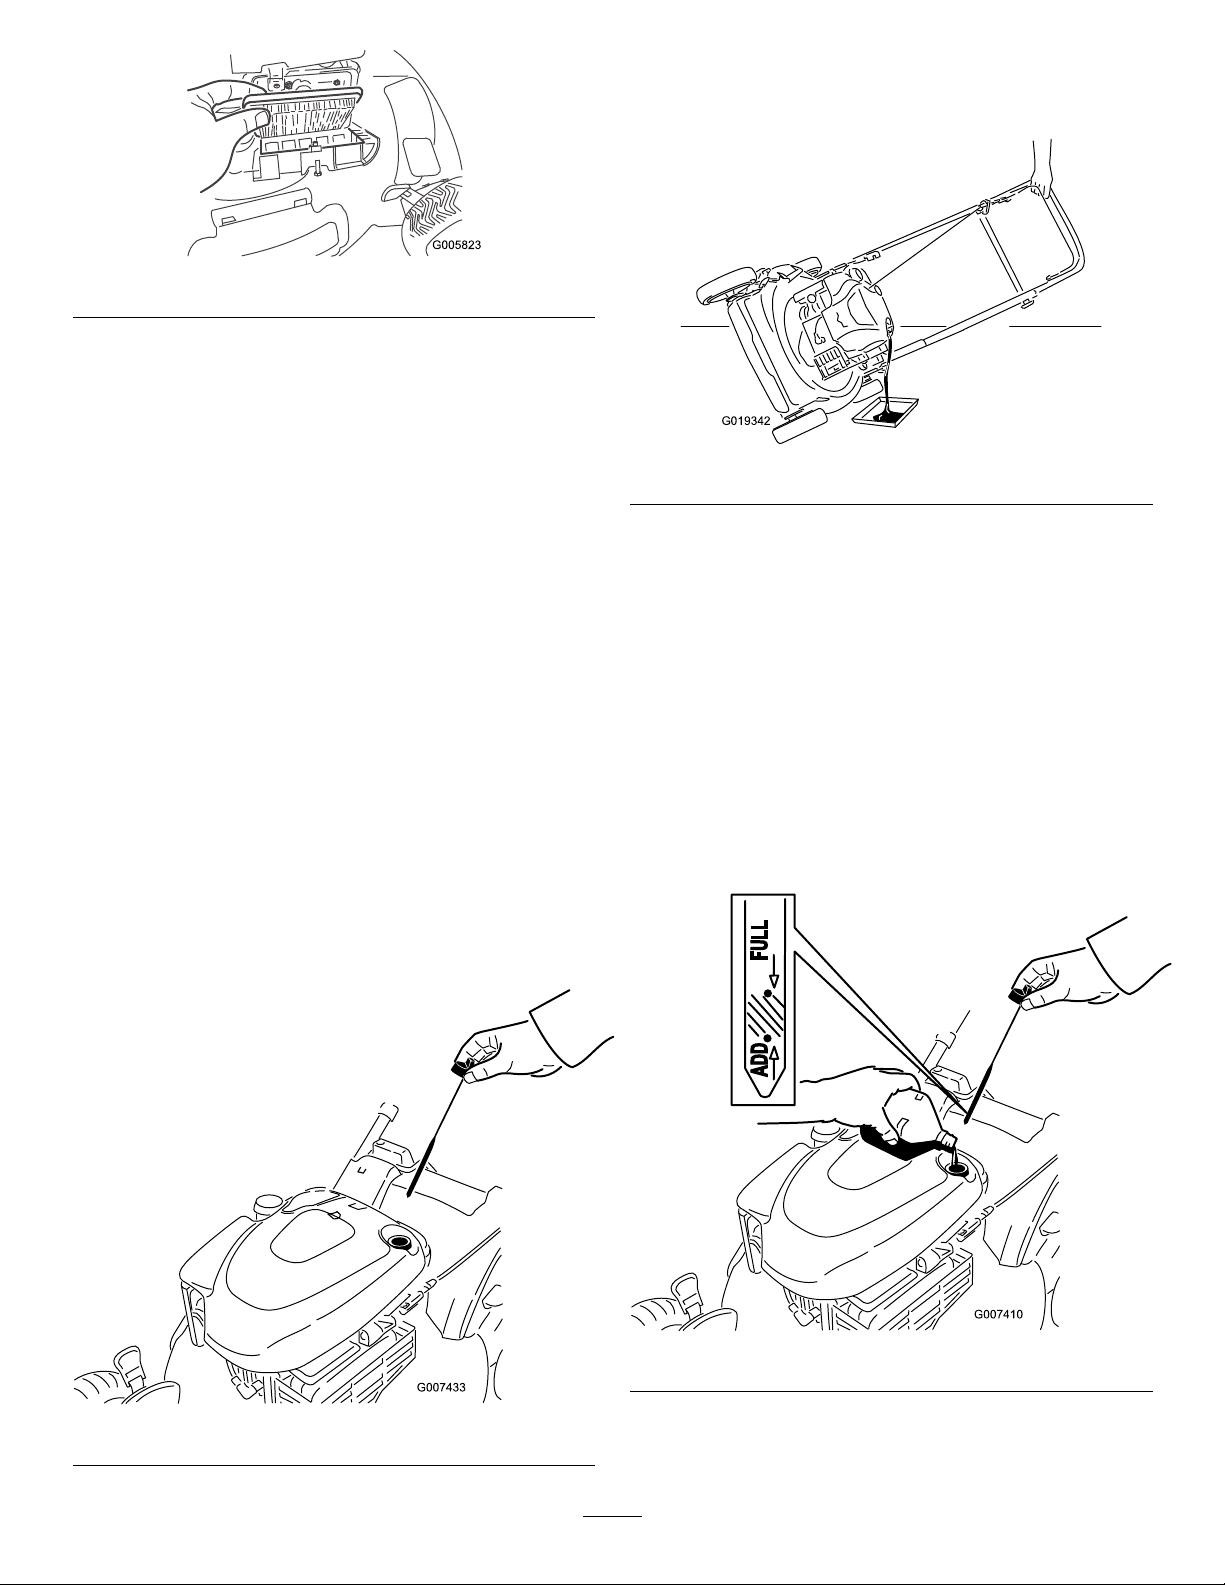
Figure41
G019342
ChangingtheEngineOil
ServiceInterval:Aftertherst5hours
Every50hours
Yearlyorbeforestorage
7.Tipthemachineontoitsside,withtheoil-lltube
down,todraintheusedoiloutthroughtheoil-lltube
intotheoil-drainpan(Figure43).
Figure43
Note:Max.ll:0.59l(20oz),type:SAE30detergentoil
withanAPIserviceclassicationofSF,SG,SH,SJ,SL,or
higher.
1.Movethemachinetoalevelsurface.
2.Ensurethatthefueltankcontainslittleornofuelso
thatfueldoesnotleakoutwhenyoutipthemachine
ontoitsside.
3.Runtheengineafewminutesbeforechangingtheoil
towarmit.
Note:Warmoilowsbetterandcarriesmore
contaminants.
4.Disconnectthewirefromthesparkplug;referto
PreparingforMaintenance(page17).
5.Setanoil-drainpanbesidethemachineonthesideof
thedipstick.
6.Removethedipstickfromtheoil-lltube(Figure42).
8.Afterdrainingtheusedoil,returnthemachinetothe
operatingposition.
9.Pourabout3/4ofthecrankcasecapacityofoilinto
theoil-lltube.
Note:Max.ll:0.59l(20oz),type:SAE30detergent
oilwithanAPIserviceclassicationofSF,SG,SH,
SJ,SL,orhigher.
10.Wipeoffthedipstickendwithacleancloth.
11.Insertthedipstickintotheoil-lltubeandscrewitin
untilitstops.
12.Removethedipstickandreadtheoillevel;referto
Figure44.
Figure42
Figure44
•IftheoillevelisbelowtheAddmarkonthe
dipstick,slowlyaddasmallamountofoiltothe
18
Page 19

oil-lltube,andthenrepeatsteps10through12
untiltheoillevelisattheFullmarkonthedipstick.
•IftheoillevelisabovetheFullmarkonthe
dipstick,draintheexcessoiluntiltheoillevelisat
theFullmarkonthedipstick.
Important:Iftheoillevelinthecrankcaseis
toolowortoohighandyouruntheengine,
youmaydamagetheengine.
13.Installthedipsticksecurelybyhand.
14.Recycletheusedoilatalocalrecyclingcenter.
LubricatingtheWheelGears
ServiceInterval:Yearly
1.Removethewheelboltinthecenterofeachrearwheel
andremovetherearwheels.
2.Applyalubricatingoiltotheinnerandoutersidesof
thegearasshownin
Figure45.
2.Pushtheupperhandlefullydownandspraytheinner
plasticsurfaceoftheouterhandle(Figure47).
Figure47
AdjustingtheSelf-propelDrive Cable
Model20995only
Wheneveryouinstallanewself-propelcableorifthe
self-propeldriveisoutofadjustment,adjusttheself-propel
drivecable.
Figure45
3.Installtherearwheels.
LubricatingtheUpperHandle
ServiceInterval:Yearly
Model20996only
Lubricatetheleftandrightsidesoftheupperhandlewitha
low-viscositysiliconespraylubricantyearlyorasneeded.
1.Spraytheouterplasticendoftheinnerhandle(Figure
46).
1.Loosenthecablesupportnut(Figure48).
Figure48
1.1to1-1/2inches(25to38
mm)
2.Self-propel-drivebar5.Cablesupport
3.Cablejacket
4.Cable-supportnut
Figure46
Note:Usethestrawthatcomeswiththespraycanto
directthespray.
2.Holdtheself-propelbail1to1-1/2inches(25to38
mm)fromthehandle(Figure48).
3.Pulldownthecablejacket(towardthemachine)until
thereisnoslackinthecable(Figure48).
4.Tightenthenutonthecablesupport.
5.Releasetheself-propel-drivebarandensurethatthe
cableisloose.
19
Page 20

Note:Thecablemustbeloosewiththe
G009696
1
self-propel-drivebarinthereleasedposition;otherwise,
themachinemaycreepwhenthebarisdisengaged.
AdjustingtheSelf-propelDrive Cable
Model20996only
1.Loosenthenutonthecablemount(
Figure49
1.Cablemount
2.Pulltheupperhandlebackfullyrearward.
Figure49).
Figure51
1.Cablemount2.Cablejacket
Note:Movingthecablejacketupwarddecreasesthe
groundspeed;movingthejacketdownwardincreases
thegroundspeed.
5.Tightenthenutrmly.
6.Startthemachineandchecktheadjustment.
Note:Iftheself-propeldriveisnotproperlyadjusted,
repeatthisprocedure.
ReplacingtheBlade
ServiceInterval:Yearlyorbeforestorage
Important:
blade pr oper l y .
uncomfortableperformingthisprocedure,contactan
AuthorizedServiceDealer.
Examinethebladewheneveryourunoutofgasoline.Ifthe
bladeisdamagedorcracked,replaceitimmediately.Ifthe
bladeedgeisdullornicked,haveitsharpenedorreplaceit.
Y ou will need a torque wr ench to install the
Ifyoudonothaveatorquewrenchorare
Note:Ifthehandledoesnotmovesmoothly ,referto
LubricatingtheUpperHandle(page19).
3.Pullthecablejacketdownwarduntilyouremovethe
slackintheexposedcable(Figure50).
Figure50
1.Exposedcable
4.Pushthecablejacketupward1/8inch(3mm).
Note:Youcanplacearuleragainsttheuppersideof
theblackcablemountandmeasurehowfartheupper
endofthecablejacketmoves(Figure51).
WARNING
Thebladeissharp;contactingthebladecanresult
inseriouspersonalinjury.
Weargloveswhenservicingtheblade.
1.Disconnectthespark-plugwirefromthesparkplug;
refertoPreparingforMaintenance(page17).
2.Tipthemachineontothesidewiththedipstickdown.
3.Useablockofwoodtoholdthebladesteady(Figure
52).
20
Page 21

Figure52
4.Removetheblade,savingallmountinghardware
(Figure52).
5.Installthenewbladeandallmountinghardware
(Figure53).
CleaningtheUndersideofthe MachineHousing
ServiceInterval:Beforeeachuseordaily
WARNING
Themachinemaydislodgematerialfromunderthe
machinehousing.
•Weareyeprotection.
•Stayintheoperatingposition(behindthe
handle).
•Donotallowbystandersinthearea.
1.Withtheenginerunningonaatpavedsurface,spraya
streamofwaterinfrontoftherightrearwheel(
54).
Note:Thewaterwillsplashintothepathoftheblade,
cleaningouttheclippings.
Figure
Figure53
Important:Positionthecurvedendsoftheblade
topointtowardthemachinehousing.
6.Useatorquewrenchtotightenthebladeboltto82
N-m(60ft-lb).
Figure54
2.Whennomoreclippingscomeout,stopthewaterand
movethemachinetoadryarea.
3.Runtheengineforafewminutestodrythehousing
topreventitfromrusting.
Important:Abolttorquedto82N-m(60ft-lb)is
verytight.Whileholdingthebladewithablock
ofwood,putyourweightbehindtheratchetor
wrenchandtightentheboltsecurely.Thisboltis
verydifculttoovertighten.
21
Page 22

Storage
PreparingtheMachinefor Storage
WARNING
Gasolinevaporscanexplode.
•Donotstoregasolinemorethan30days.
•Donotstorethemachineinanenclosurenear
anopename.
•Allowtheenginetocoolbeforestoringit.
Figure55
1.Onthelastrefuelingoftheyear,addfuelstabilizerto
thefuelasdirectedbytheenginemanufacturer.
2.Runthemachineuntiltheenginestopsfromrunning
outoffuel.
3.Primetheengineandstartitagain.
4.Allowtheenginetorununtilitstops.Whenyoucan
nolongerstarttheengine,itissufcientlydry.
5.Disconnectthewirefromthesparkplug.
6.Removethesparkplug,add30ml(1oz)ofoilthrough
thesparkplughole,andpullthestarterropeslowly
severaltimestodistributeoilthroughoutthecylinder
topreventcylindercorrosionduringtheoff-season.
7.Looselyinstallthesparkplug.
8.Tightenallnuts,bolts,andscrews.
FoldingtheHandle
Model20995only
WARNING
2.FoldtheupperhandleforwardasshowninFigure56.
Figure56
3.Tounfoldthehandle,reversethestepsabove.
FoldingtheHandle
Model20996only
UprightPosition
1.Steponthefootpedalandholditdown(Figure57).
Foldingorunfoldingthehandleimproperlycan
damagethecables,causinganunsafeoperating
condition.
•Donotdamagethecableswhenfoldingor
unfoldingthehandle.
•Ifacableisdamaged,contactanAuthorized
ServiceDealer.
1.Loosenthehandleknobsuntilyoucanmovetheupper
handlefreely(Figure55).
Figure57
22
Page 23

2.Movethehandletotheuprightposition(Figure58).
Figure58
TestingtheMachineSafety System
1.Movethemachinetoalevelsurface.
2.Stoptheengineandwaitforallmovingpartstostop.
3.Ifthegrassbagisnotattachedtothemachine,remove
thedischargeplugandinstallthegrassbag.
4.Starttheengine.
5.Whiletheengineisrunning,liftuptheupperrightrear
cornerofthegrassbaguntilthewire-bagframeatthe
upperrightfrontofthegrassbagiscompletelyoutof
theright-handslot(
stop.
Note:Theright-handslothousesasafetyinterlock
switch.
Figure60).Theengineshould
ForwardPosition
1.Withthehandleintheuprightposition,steponthe
footpedalandholditdown.
2.Movethehandleallthewayforwardandloosenthe
upperhandleknob(Figure59).
Figure59
Important:Donotstepoutsidetheoperating
positionwhileperformingthisstep.
3.Tounfoldthehandle,referto1UnfoldingtheHandle
(page5)
.
RemovingtheMachinefrom Storage
1.Removethesparkplugandspintheenginerapidly
usingthestartertoblowtheexcessoilfromthe
cylinder.
2.Installthesparkplugandtightenitwithatorque
wrenchto20N-m(15ft-lb).
3.Connectthewiretothesparkplug.
4.Testthemachinesafetysystem;referto
MachineSafetySystem(page23).
Testingthe
23
Page 24

Figure60
1.Grassbag3.Wire-bagframe
2.Rightsideofhandle
partiallyremovedfor
clarity
4.Slot
6.Iftheenginedoesnotstopwhenyouperformthis
test,releasethecontrolbaronthehandletostopthe
engine,waitforallmovingpartstostop,andtakeyour
machinetoanAuthorizedToroDealertohavethe
safetysystemproperlyrepaired.
24
Page 25

Notes:
25
Page 26

Notes:
26
Page 27

InternationalDistributorList
Distributor:
AgrolancKft
BalamaPrimaEngineeringEquip.HongKong85221552163
B-RayCorporation
CascoSalesCompany
CeresS.A.CostaRica
CSSCTurfEquipment(pvt)Ltd.SriLanka
CyrilJohnston&Co.
CyrilJohnston&Co.RepublicofIreland
EquiverMexico525553995444ParklandProductsLtd.NewZealand6433493760
FemcoS.A.Guatemala
ForGarderOU
G.Y .K.CompanyLtd.
GeomechanikiofAthensGreece
GolfinternationalTurizm
GuandongGoldenStarChina
HakoGroundandGardenSweden
HakoGroundandGarden
HayterLimited(U.K.)
HydroturfInt.CoDubai
HydroturfEgyptLLC
IrrimacPortugal351212388260T oroEuropeNVBelgium3214562960
IrrigationProductsInt'lPvtLtd.India00914424494387ValtechMorocco212537663636
JeanHeybroekb.v .Netherlands31306394611VictusEmakPoland48618238369
Country:
Hungary3627539640
Korea82325512076
PuertoRico7877888383
NorthernIreland442890813121
Estonia3723846060
Japan81726325861
Turkey902163365993Riversa
Norway4722907760
UnitedKingdom441279723444
UnitedArabEmirates97143479479T-MarktLogisticsLtd.Hungary3626525500
Egypt2025194308ToroAustraliaAustralia61395807355
PhoneNumber:Distributor:
5062391138
94112746100
442890813121
5024423277
30109350054
862087651338
4635100000
MaquiverS.A.Colombia
MaruyamaMfg.Co.Inc.
Mountelda.s.CzechRepublic
Mountelda.s.Slovakia
MunditolS.A.
NormaGarden
OslingerTurfEquipmentSA
OyHakoGroundandGardenAb
Perfetto
PratoverdeSRL.
Prochaska&Cie
RTCohen2004Ltd.
LelyTurfcare
SolvertS.A.S.
SpyprosStavrinidesLimitedCyprus
SurgeSystemsIndiaLimited
Country:
Japan81332522285
Argentina541148219999
Russia74954116120
Ecuador59342396970
Finland35898700733
Poland48618208416
Italy390499128128
Austria4312785100
Israel97298617979
Spain
Denmark4566109200
France33130817700
India911292299901
PhoneNumber:
5712364079
420255704220
420255704220
34952837500
35722434131
EuropeanPrivacyNotice
TheInformationT oroCollects
ToroWarrantyCompany(T oro)respectsyourprivacy .Inordertoprocessyourwarrantyclaimandcontactyouintheeventofaproductrecall,weaskyou
tosharecertainpersonalinformationwithus,eitherdirectlyorthroughyourlocalT orocompanyordealer.
TheTorowarrantysystemishostedonserverslocatedwithintheUnitedStateswhereprivacylawmaynotprovidethesameprotectionasapplies
inyourcountry.
BYSHARINGYOURPERSONALINFORMA TIONWITHUS,YOUARECONSENTINGTOTHEPROCESSINGOFYOURPERSONALINFORMATION
ASDESCRIBEDINTHISPRIV ACYNOTICE.
TheW ayToroUsesInformation
Toromayuseyourpersonalinformationtoprocesswarrantyclaims,tocontactyouintheeventofaproductrecallandforanyotherpurposewhichwetell
youabout.T oromayshareyourinformationwithT oro'safliates,dealersorotherbusinesspartnersinconnectionwithanyoftheseactivities.Wewillnot
sellyourpersonalinformationtoanyothercompany .Wereservetherighttodisclosepersonalinformationinordertocomplywithapplicablelawsand
withrequestsbytheappropriateauthorities,tooperateoursystemsproperlyorforourownprotectionorthatofotherusers.
RetentionofyourPersonalInformation
Wewillkeepyourpersonalinformationaslongasweneeditforthepurposesforwhichitwasoriginallycollectedorforotherlegitimatepurposes
(suchasregulatorycompliance),orasrequiredbyapplicablelaw.
Toro'sCommitmenttoSecurityofY ourPersonalInformation
Wetakereasonableprecautionsinordertoprotectthesecurityofyourpersonalinformation.Wealsotakestepstomaintaintheaccuracyandcurrent
statusofpersonalinformation.
AccessandCorrectionofyourPersonalInformation
Ifyouwouldliketorevieworcorrectyourpersonalinformation,pleasecontactusbyemailatlegal@toro.com.
AustralianConsumerLaw
AustraliancustomerswillnddetailsrelatingtotheAustralianConsumerLaweitherinsidetheboxoratyourlocalT oroDealer.
374-0269RevH
Page 28

TheToroWarranty
TheToroGTSStartingGuarantee
ResidentialProducts
and
ConditionsandProductsCovered
TheT oroCompanyanditsafliate,T oroWarrantyCompany ,pursuant
toanagreementbetweenthem,jointlypromisetorepairfortheoriginal
purchaser
workmanshiporiftheT oroGTS(GuaranteedtoStart)enginewillnotstart
ontherstorsecondpull,providedtheroutinemaintenancerequiredin
theOperator'sManualhavebeenperformed.
Thefollowingtimeperiodsapplyfromthedateofpurchase:
ProductsWarrantyPeriod
WalkPowerMowers
•CastDeck
•Engine
•Battery2years
•SteelDeck
•Engine
TimeMasterMowers3yearsResidentialUse
•Engine
•Battery2years
ElectricHandHeldProducts2yearsResidentialUse
Snowthrowers
•SingleStage
•Engine
•TwoStage
•Chute,chutedeectorand
impellerhousingcover
ElectricSnowthrowers
AllRide-OnUnitsBelow
•Engine
•Battery2yearsResidentialUse
•Attachments2yearsResidentialUse
DHLawn&GardenTractors
XLSLawn&GardenTractors
TimeCutter
TITANMowers3yearsor240hours
•Frame
1
OriginalPurchasermeansthepersonwhooriginallypurchasedtheT oroProduct.
2
Residentialusemeansuseoftheproductonthesamelotasyourhome.Useatmorethanone
locationisconsideredcommercialuseandthecommercialusewarrantywouldapply .
3
TheToroGTSStartingGuaranteedoesnotapplywhentheproductisusedcommercially .
4
SomeenginesusedonT oroProductsarewarrantedbytheenginemanufacturer.
5
Whicheveroccursrst.
6
LifetimeFrameW arranty-Ifthemainframe,consistingofthepartsweldedtogethertoformthe
tractorstructurethatothercomponentssuchastheenginearesecuredto,cracksorbreaksin
normaluse,itwillberepairedorreplaced,atT oro'soption,underwarrantyatnocostforparts
andlabor .Framefailureduetomisuseorabuseandfailureorrepairrequiredduetorustor
corrosionarenotcovered.
Warrantymaybedeniedifthehourmeterisdisconnected,altered,or
showssignsofbeingtamperedwith.
1
theT oroProductlistedbelowifdefectiveinmaterialsor
5yearsResidentialUse
90DaysCommercialUse
5yearsGTSGuarantee,
ResidentialUse
3
2yearsResidentialUse
30DaysCommercialUse
2yearsGTSGuarantee,
ResidentialUse
3
90DaysCommercialUse
3yearsGTSGuarantee,
ResidentialUse
3
NoWarrantyforCommercialUse
2yearsResidentialUse
45DaysCommercialUse
2yearsGTSGuarantee,
ResidentialUse
3
3yearsResidentialUse
45DaysCommercialUse
Lifetime(originalowneronly)
2yearsResidentialUse
NoWarrantyforCommercialUse
Seeenginemanufacturer'swarranty
2yearsResidentialUse
30DaysCommercialUse
3yearsResidentialUse
30DaysCommercialUse
3yearsResidentialUse
30DaysCommercialUse
5
Lifetime(originalowneronly)
2
2
2
2
2
2
2
2
2
2
2
2
OwnerResponsibilities
YoumustmaintainyourT oroProductbyfollowingthemaintenance
proceduresdescribedintheOperator'sManual.Suchroutine
maintenance,whetherperformedbyadealerorbyyou,isatyourexpense.
InstructionsforObtainingWarrantyService
IfyouthinkthatyourT oroProductcontainsadefectinmaterialsor
workmanship,followthisprocedure:
1.Contactyoursellertoarrangeserviceoftheproduct.Ifforany
reasonitisimpossibleforyoutocontactyourseller,youmaycontact
anyT oroAuthorizedDistributortoarrangeservice.Seeattached
DistributorList.
2.Bringtheproductandyourproofofpurchase(salesreceipt)to
theservicingoutlet.Ifforanyreasonyouaredissatisedwiththe
servicingoutlet’sanalysisorwiththeassistanceprovided,contact
usat:
ToroCustomerCareDepartment,RLCDivision
ToroWarrantyCompany
811 1LyndaleAvenueSouth
Bloomington,MN55420-1196
001–952–948–4707
ItemsandConditionsNotCovered
Thereisnootherexpresswarrantyexceptforspecialemissionsystem
coverageandenginewarrantycoverageonsomeproducts.Thisexpress
warrantydoesnotcoverthefollowing:
•Costofregularmaintenanceserviceorparts,suchaslters,fuel,
lubricants,oilchanges,sparkplugs,airltersbladesharpening
orwornblades,cable/linkageadjustments,orbrakeandclutch
adjustments
•Componentsfailingduetonormalwear
5
•Anyproductorpartwhichhasbeenalteredormisusedorneglected
andrequiresreplacementorrepairduetoaccidentsorlackofproper
maintenance
•Pickupanddeliverycharges
•RepairsorattemptedrepairsbyanyoneotherthananAuthorized
4
ToroServiceDealer
•Repairsnecessaryduetofailuretofollowrecommendedfuel
procedure(consultOperator'sManualformoredetails)
–Removingcontaminantsfromthefuelsystemisnotcovered
–Useofoldfuel(morethanonemonthold)orfuelwhichcontains
morethan10%ethanolormorethat15%MTBE
–Failuretodrainthefuelsystempriortoanyperiodofnon-use
overonemonth
•Repairsoradjustmentstocorrectstartingdifcultiesduetothe
following:
–Failuretofollowpropermaintenanceproceduresor
6
recommendedfuelprocedure
–Rotarymowerbladestrikinganobject
•Specialoperationalconditionswherestartingmayrequiremorethan
twopulls:
–Firsttimestartsafterextendedperiodofnon-useoverthree
monthsorseasonalstorage
–Cooltemperaturestartssuchasthosefoundinearlyspringand
lateautumn
–Improperstartingprocedures-ifyouarehavingdifcultystarting
yourunit,pleasechecktheOperator'sManualtoensurethat
youareusingthecorrectstartingprocedures.Thiscansavean
unnecessaryvisittoanAuthorizedT oroServiceDealer.
GeneralConditions
Thepurchaseriscoveredbythenationallawsofeachcountry .Therights
towhichthepurchaserisentitledwiththesupportoftheselawsarenot
restrictedbythiswarranty.
374-0268RevF
 Loading...