

Page 1
FormNo.3374-361-ASMRevA
53cmRecycler
ModelNo.20990—SerialNo.313000001andUp
®
LawnMower
Operator'sManual
Introduction
Thisrotary-blade,walk-behindlawnmowerisintended
tobeusedbyresidentialhomeowners.Itisdesigned
primarilyforcuttinggrassonwell-maintainedlawns
onresidentialproperties.Itisnotdesignedforcutting
brushorforagriculturaluses.
Readthisinformationcarefullytolearnhowtooperateand
maintainyourmachineproperlyandtoavoidinjuryand
equipmentdamage.Youareresponsibleforoperatingthe
machineproperlyandsafely.
YoumaycontactTorodirectlyatwww .Toro.comforproduct
andaccessoryinformation,helpndingadealer,ortoregister
yourproduct.
Wheneveryouneedservice,genuineToroparts,oradditional
information,contactanAuthorizedServiceDealerorToro
CustomerServiceandhavethemodelandserialnumbersof
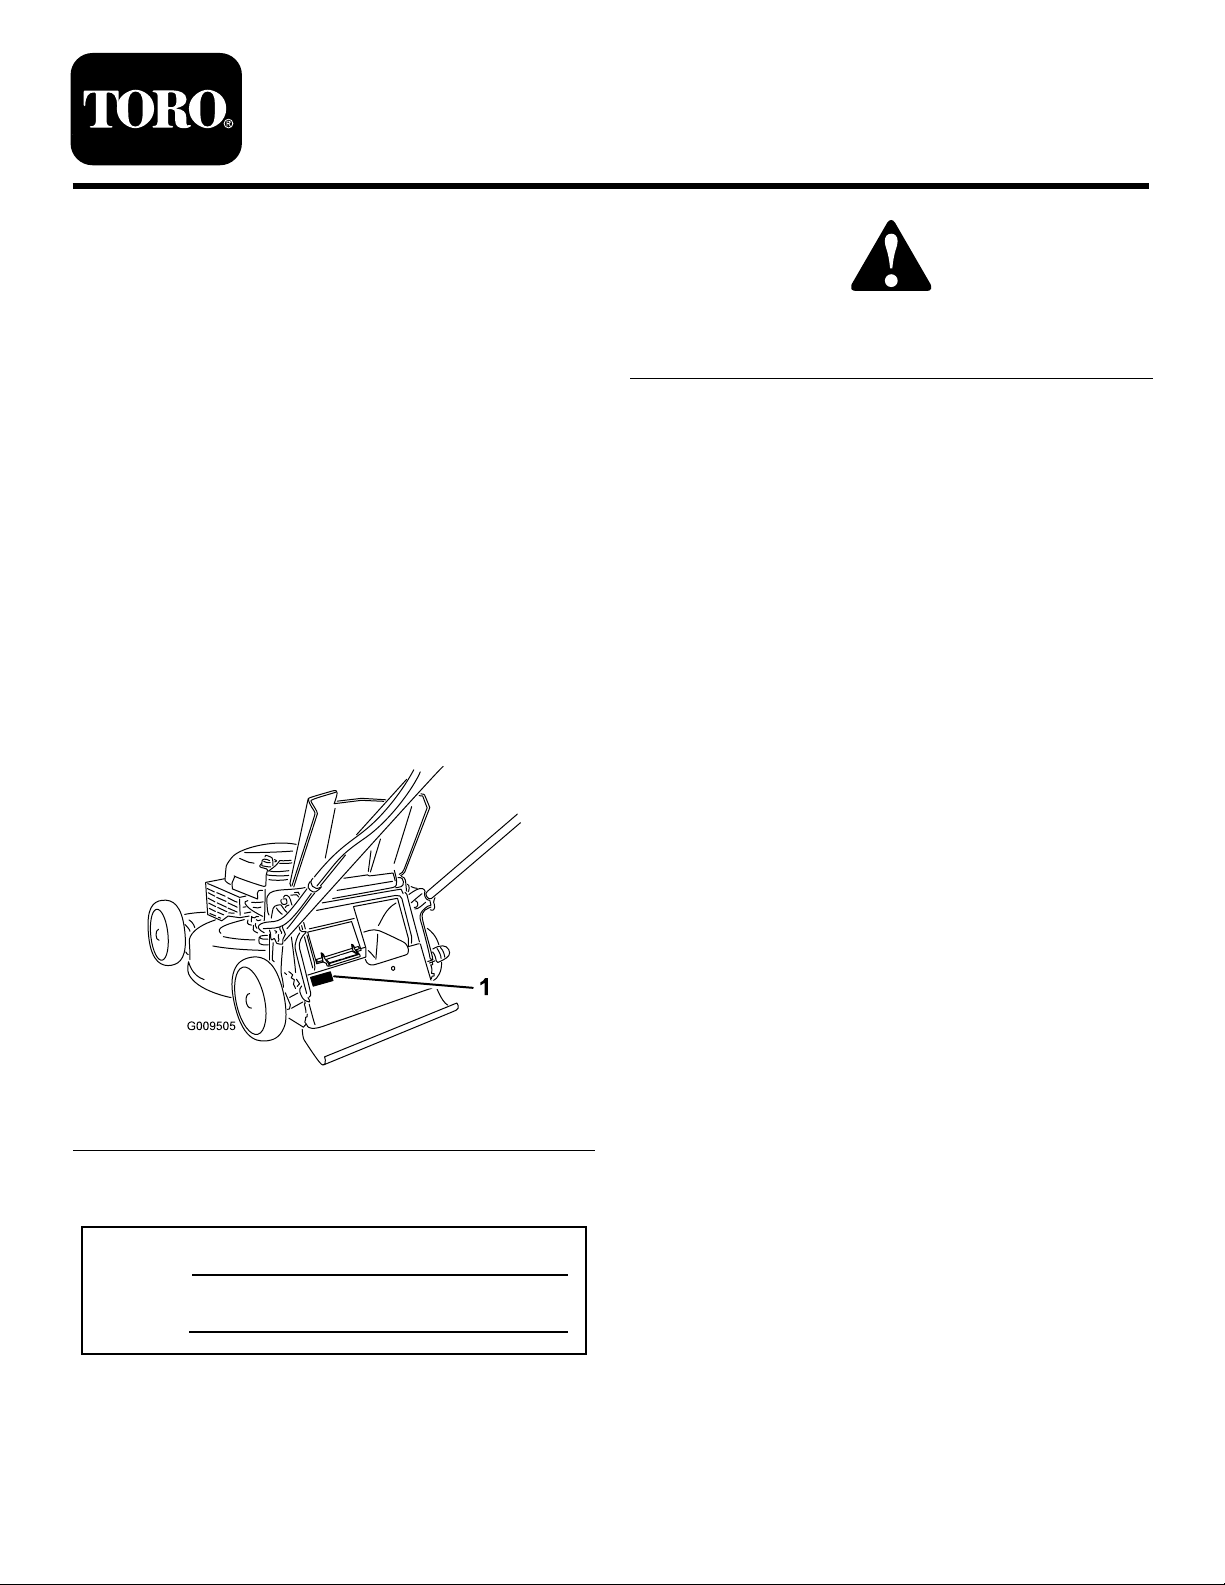
yourmachineready.Figure1identiesthelocationofthe
modelandserialnumbersontheproduct.
Figure2
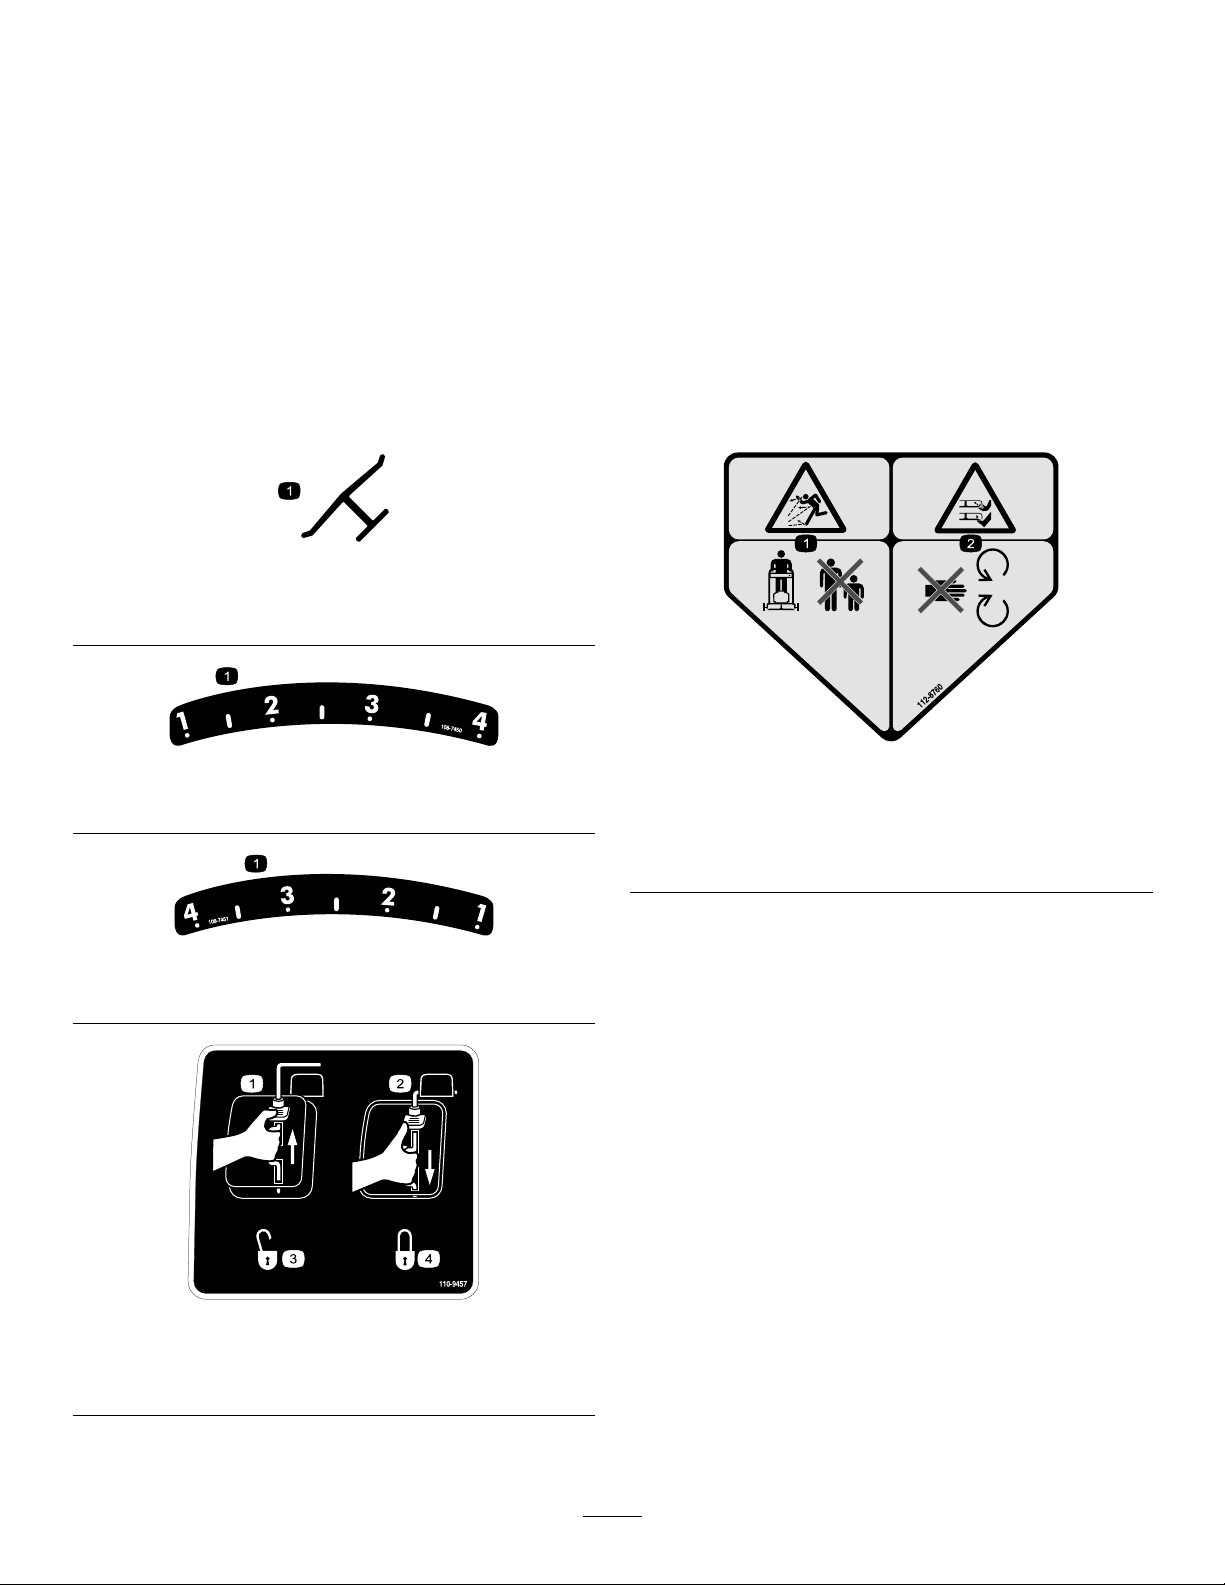
1.Safetyalertsymbol
Thismanualuses2wordstohighlightinformation.
Importantcallsattentiontospecialmechanicalinformation
andNoteemphasizesgeneralinformationworthyofspecial
attention.
Safety
Readandunderstandthecontentsofthismanualbefore
youstarttheengine.
Thesafetyalertsymbol(Figure2)isusedtoalertyouto
potentialpersonalinjuryhazards.Obeyallsafetymessages
thatfollowthissymboltoavoidpossibleinjuryordeath.
Improperlyusingormaintainingthismachinecouldresultin
injuryordeath.T oreducethispotential,complywiththe
followingsafetyinstructions.
Thefollowinginstructionshavebeenadaptedfromthe
ANSI/OPEIstandardB71.1-2003.
Figure1
1.Modelandserialnumberlocation
Writetheproductmodelandserialnumbersinthefollowing
space:
ModelNo.
SerialNo.
Thismanualidentiespotentialhazardsandhassafety
messagesidentiedbythesafetyalertsymbol(Figure2),
whichsignalsahazardthatmaycauseseriousinjuryordeath
ifyoudonotfollowtherecommendedprecautions.
©2012—TheToro®Company
8111LyndaleAvenueSouth
Bloomington,MN55420
Registeratwww.T oro.com.
Thiscuttingmachineiscapableofamputatinghands
andfeetandofthrowingobjects.Failuretoobserve
thefollowingsafetyinstructionscouldresultinserious
injuryordeath.
GeneralOperation
•Read,understand,andfollowallinstructionsonthe
machineandinthemanual(s)beforestarting.
•Donotputhandsorfeetnearorunderthemachine.
Keepclearofthedischargeopeningatalltimes.
•Onlyallowresponsibleadultswhoarefamiliarwiththe
instructionstooperatethemachine.
•Cleartheareaofobjectssuchasrocks,wire,toys,etc.,
whichcouldbethrownbytheblades.Staybehindthe
handlewhentheengineisrunning.
•Besurethattheareaisclearofbystandersbefore
operating.Stopthemachineifanyoneentersthearea.
•Donotoperatethemachinebarefootedorwhilewearing
sandals.Alwayswearsubstantialfootwear.
OriginalInstructions(EN)
PrintedintheUSA
AllRightsReserved
*3374-361-ASM*A
Page 2

•Donotpullthemachinebackwardunlessitisabsolutely
necessary.Alwayslookdownandbehindbeforeand
whilemovingbackward.
•Neverdirectdischargedmaterialtowardanyone.Avoid
dischargingmaterialagainstawallorobstruction.
Materialmayricochetbacktowardtheoperator.Stopthe
bladeswhencrossinggravelsurfaces.
•Donotoperatethemachinewithouttheentiregrass
catcher,dischargeguard,rearguard,orothersafety
protectivedevicesinplaceandworking.
•Neverleavearunningmachineunattended.
•Stoptheengineandwaituntilthebladescometoa
completestopbeforecleaningthemachine,removingthe
grasscatcher,oruncloggingthedischargeguard.
•Operatethemachineonlyindaylightoringoodarticial
light.
•Donotoperatethemachinewhileundertheinuence
ofalcoholordrugs.
•Neveroperatethemachineinwetgrass.Alwaysbesure
ofyourfooting.Walk,neverrun.
•Disengagethedrivesystem,ifsoequipped,before
startingtheengine.
•Ifthemachineshouldstarttovibrateabnormally,stop
theengineandcheckforthecauseimmediately.Vibration
isgenerallyawarningoftrouble.
•Alwaysweareyeprotectionwhenoperatingthemachine.
•Lightningcancausesevereinjuryordeath.Ifyousee
lightningorhearthunderinthearea,donotoperatethe
machine;seekshelter.
•Seemanufacturer'sinstructionsforproperoperationand
installationofaccessories.Onlyuseaccessoriesapproved
bythemanufacturer.
SlopeOperation
Slopesareamajorfactorrelatedtoslip-and-fallaccidents,
whichcanresultinsevereinjury.Operationonallslopes
requireextracaution.Ifyoufeeluneasyonaslope,donot
mowit.
•Mowacrossthefaceofslopes;neverupanddown.
Exerciseextremecautionwhenchangingdirectionon
slopes.
•Watchforholes,ruts,bumps,rocks,orotherhidden
objects.Uneventerraincouldcauseaslip-and-fall
accident.Tallgrasscanhideobstacles.
•Donotmowonwetgrassorexcessivelysteepslopes.
Poorfootingcouldcauseaslip-and-fallaccident.
•Donotmowneardrop-offs,ditches,orembankments.
Youcouldloseyourfootingorbalance.
machineandthemowingactivity.Neverassumethatchildren
willremainwhereyoulastsawthem.
•Keepchildrenoutofthemowingareaandunderthe
watchfulcareofaresponsibleadultotherthanthe
operator.
•Bealertandturnmachineoffifachildentersthearea.
•Neverallowchildrentooperatethemachine.
•Useextracarewhenapproachingblindcorners,shrubs,
trees,orotherobjectsthatmayblockyourviewofachild.
Service
SafeHandlingofGasoline
Toavoidpersonalinjuryorpropertydamage,use
extremecareinhandlinggasoline.Gasolineisextremely
ammableandthevaporsareexplosive.
•Extinguishallcigarettes,cigars,pipes,andothersources
ofignition.
•Useonlyanapprovedgasolinecontainer.
•Neverremovethefueltankcaporaddfuelwiththe
enginerunning.Allowtheenginetocoolbeforerefueling.
•Neverrefuelthemachineindoors.
•Neverstorethemachineorfuelcontainerwherethereis
anopename,spark,orpilotlight,suchasonawater
heateroronotherappliances.
•Neverllcontainersinsideavehicleoronatruckor
trailerbedwithaplasticliner.Alwaysplacecontainerson
thegroundawayfromyourvehiclebeforelling.
•Removegas-poweredequipmentfromthetruckortrailer
andrefuelitontheground.Ifthisisnotpossible,then
refuelsuchequipmentwithaportablecontainerrather
thanfromagasolinedispensernozzle.
•Keepthenozzleincontactwiththerimofthefueltank
orcontaineropeningatalltimesuntilfuelingiscomplete.
Donotuseanozzlelock-opendevice.
•Iffuelisspilledonclothing,changeclothingimmediately .
•Neveroverllthefueltank.Replacethefueltankcap
andtightenitsecurely.
WARNING
Exhaustcontainscarbonmonoxide,anodorless,
deadlypoisonthatcankillyou.
Donotruntheengineindoorsorinanenclosed
area.
Children
Tragicaccidentscanoccuriftheoperatorisnotalerttothe
presenceofchildren.Childrenareoftenattractedtothe
GeneralService
•Neveroperatethemachineinanenclosedarea.
•Keepallnutsandboltstighttoensurethattheequipment
isinsafeworkingcondition.
2
Page 3
•Nevertamperwithsafetydevices.Checktheirproper
operationregularly.
•Keepthemachinefreeofgrass,leaves,orotherdebris.
Cleanupoilorfuelspillsandremoveanyfuel-soaked
debris.Allowthemachinetocoolbeforestoring.
•Checkthegrasscatchercomponentsandthedischarge
guardfrequentlyandreplacethemwithmanufacturer's
recommendedpartswhennecessary.
•Mowerbladesaresharp.Wrapthebladesorweargloves,
anduseextracautionwhenservicingthem.
•Ifyoustrikeaforeignobject,stopandinspectthe
machine.Repairthemachine,ifnecessary,beforestarting.
•Nevermakeanyadjustmentsorrepairswiththeengine
running.Disconnectthespark-plugwireandground
•Donotchangetheenginegovernorsettingoroverspeed
theengine.
•Maintainorreplacesafetyandinstructionlabelsas
necessary.
againsttheenginetopreventunintendedstarting.
SafetyandInstructionalDecals
Important:Safetyandinstructiondecalsarelocatednearareasofpotentialdanger.Replacedamageddecals.
Manufacturer'sMark
1.Indicatesthebladeisidentiedasapartfromtheoriginal
machinemanufacturer.
112-8760
1.Heightofcut
108-7450
1.Thrownobjecthazard—keepbystandersasafedistance
fromthemachine.
2.Cutting/dismembermentofhandorfoot—stayawayfrom
movingparts.
1.Heightofcut
1.EngineswitchOff
2.EngineswitchOn
108-7451
110-9457
3.Unlocked
4.Locked
3
Page 4

114-2820
1.Warning—readthe
Operator'sManual.
2.Thrownobject
hazard—keepbystanders
asafedistancefromthe
machine.
3.Thrownobjecthazard—do
notoperatethemower
withoutthereardischarge
plugorbaginplace;do
notoperatethemower
withoutthesidedischarge
coverordeectorinplace.
Setup
4.Cutting/dismemberment
hazardofhandorfoot,
mowerblade—stayaway
frommovingparts.
5.Cutting/dismemberment
hazardofhandorfoot,
mowerblade—remove
theignitionkeyandread
theinstructionsbefore
servicingorperforming
maintenance.
6.Cutting/dismemberment
hazardofhandorfoot,
mowerblade—donot
operateupanddown
slopes;operatesideto
sideonslopes;stopthe
enginebeforeleavingthe
operatingposition;and
lookbehindyouwhen
backingup.
LooseParts
Usethechartbelowtoverifythatallpartshavebeenshipped.
ProcedureDescription
1
2
3
Important:Removeanddiscardtheprotectiveplasticsheetthatcoverstheengine.
Nopartsrequired
Nopartsrequired
Nopartsrequired
Qty.
Use
–
–
–
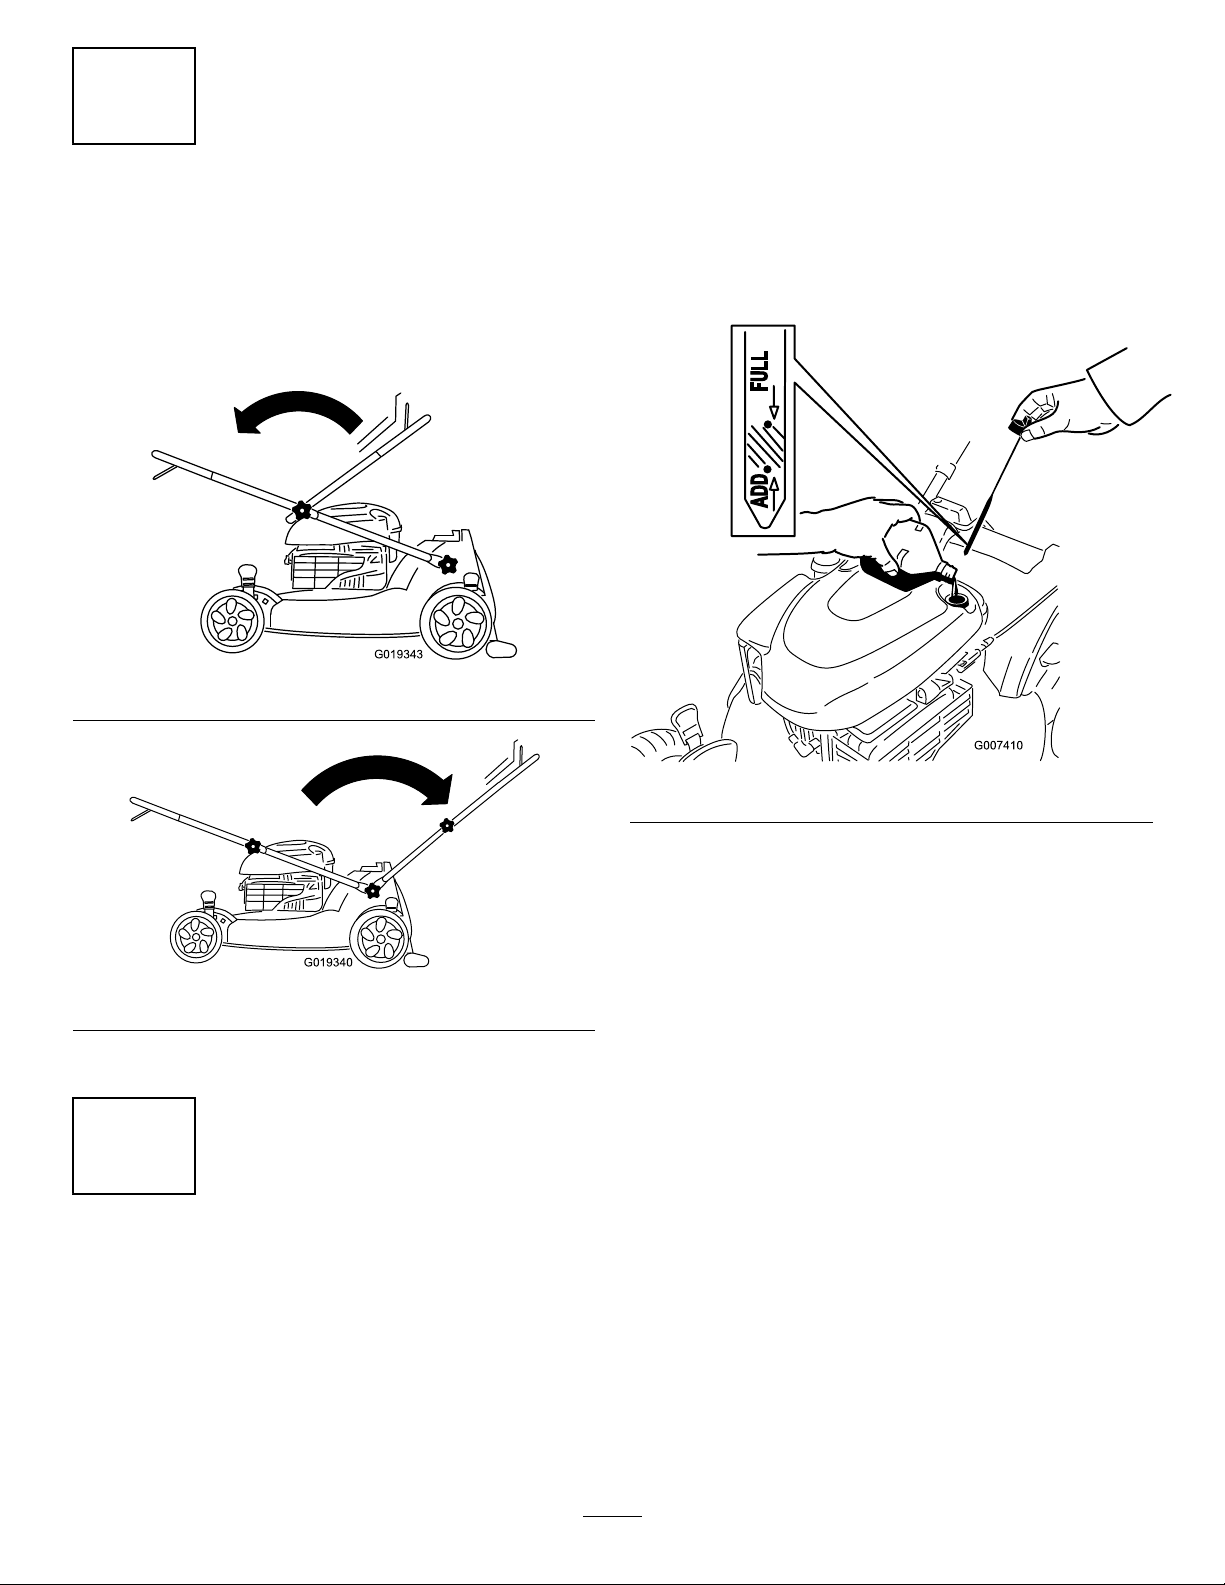
Unfoldthehandle.
Filltheenginewithoil.
Installthemulchplugorthegrassbag.
4
Page 5
1
G019343
G019340
UnfoldingtheHandle
NoPartsRequired
Procedure
1.UnfoldthehandleasillustratedinFigure3and
Figure4.
Important:Changetheengineoilaftertherst5
operatinghours;changeityearlythereafter.Referto
ChangingtheEngineOil.
1.Movethemachinetoalevelsurface.
2.Removethedipstick(Figure5)andpourabout3/4of
thecrankcasecapacityofoilintotheoil-lltube.
Note:Max.ll:0.59l(20oz.),type:SAE30detergent
oilwithanAPIserviceclassicationofSF,SG,SH,
SJ,SL,orhigher.
Figure3
Figure4
2.Tightenallhandleknobs.
2
FillingtheEnginewithOil
NoPartsRequired
Figure5
3.Wipeoffthedipstickendwithacleancloth.
4.Insertthedipstickintotheoil-lltube,andscrewit
inuntilitstops.
5.Removethedipstickandreadtheoillevelonthe
dipstick;refertoFigure5.
•Iftheoillevelistoolow ,addasmallamountof
oilslowlytotheoil-lltube,andthenrepeatsteps
3through5untiltheoilleveliscorrectasshown
inFigure5.
•Iftheoillevelistoohigh,draintheexcess
oiluntilyouobtainthecorrectoillevelon
thedipstick.Todraintheexcessoil,referto
ChangingtheEngineOil(page14).
Important:Iftheoillevelinthecrankcaseistoo
lowortoohighandyouruntheengine,youmay
damagetheengine.
6.Installthedipsticksecurelybyhand.
Procedure
Important:Thismachinedoesnotcomewithoilinthe
engine.Beforestartingtheengine,lltheenginewith
oil.
5
Page 6
3
InstalltheMulchPlugorthe
GrassBag
NoPartsRequired
Procedure
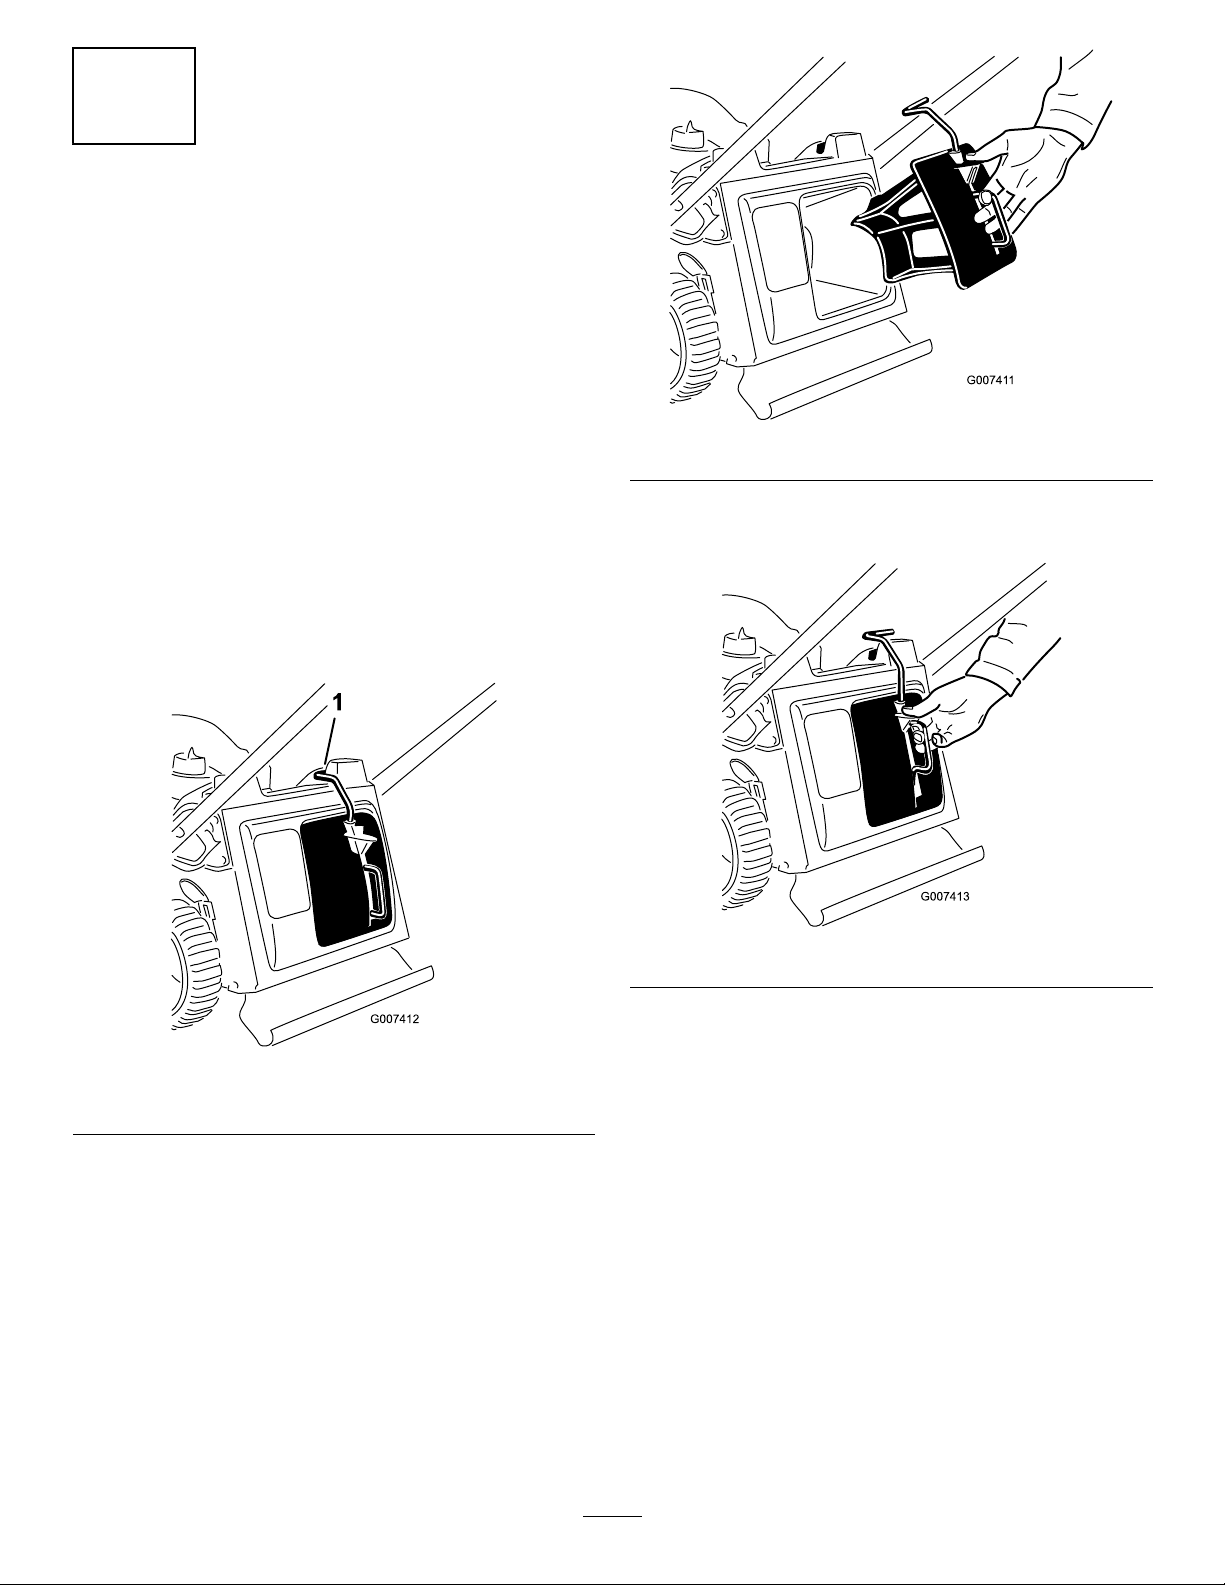
Important:Youmustcorrectlyinstallthemulchplug
(formulchingorside-discharging)orthegrassbag(for
bagging);otherwise,theenginewillnotstart.
Themachinehasasafetyswitch,locatedatthebottomofthe
channelatthetop,rightrearofthemachine,thatprevents
themachinefromoperatingwithoutamulchplugoragrass
bag.Thispreventsthemachinefromthrowingdebrisatthe
operatorthroughtherearchute.
Fortheswitchtodetectthepresenceofthemulchplug,the
topofthemulchpluglevermustliefullyinthebottom
ofthechannel(Figure6).
Figure7
2.Squeezethebuttonontheleverwithyourthumband
fullyinsertthemulchplugintotheopening(Figure8).
Figure6
1.Topofmulchplugleverinchannelbottom
1.Insertthemulchplugintothemachineifitisn'talready
installed(Figure7).
Figure8
3.Releasethebuttonontheleverandensurethatthetop
oftheleverisliesfullyintheswitchchannel(Figure9).
Ifthetopoftheleverisnotintheswitchchannel,
yourmachinewillnotstart.
6
Page 7

Figure9
G019305
Note:Iftheleverdoesnotlatchproperly,disconnect
thewirefromthesparkplugandcheckforandremove
anydebrisbuildupinthetunnel.
ProductOverview
Figure10
1.Sparkplug
2.Cutting-heightlever(4)
3.Airlter7.Oilll/Dipstick
4.Fuel-tankcap
1.Grassbag3.Mulchplug(installed)
2.Side-dischargechute
5.Recoil-starthandle
6.Blade-controlbar
Figure11
Specications
ModelWeightLengthWidthHeight
2099033kg
(72lb)
7
145cm
(57in)
56cm
(22in)
99cm
(39in)
Page 8

Operation
FillingtheFuelTank
DANGER
Gasolineisextremelyammableandexplosive.A
reorexplosionfromgasolinecanburnyouand
others.
•Topreventastaticchargefromignitingthe
gasoline,placethecontainerand/ormachine
directlyonthegroundbeforelling,notina
vehicleoronanobject.
•Fillthetankoutdoorswhentheengineiscold.
Wipeupspills.
•Donothandlegasolinewhensmokingoraround
anopenameorsparks.
•Storegasolineinanapprovedfuelcontainer,out
ofthereachofchildren.
Note:Fillthefueltankwithfreshunleadedregulargasoline
fromamajorname-brandservicestation(Figure12).
Note:Useunleadedregulargasolinesuitableforautomotive
use(87pumpoctaneminimum).Leadedregulargasolinemay
beusedifunleadedregularisnotavailable.
Important:Neverusemethanol,gasolinecontaining
methanol,orgasoholcontainingmorethan10%ethanol
becausetheycoulddamagethefuelsystem.Donotmix
oilwithgasoline.
Important:Toreducestartingproblems,addfuel
stabilizertothefuelallseason,mixingitwithgasoline
lessthan30daysold.
1.Movethemachinetoalevelsurface.
2.Removethedipstick(Figure13).
Figure13
3.Wipeoffthedipstickendwithacleancloth.
4.Insertthedipstickintotheoil-lltubeandscrewitin
untilitstops.
5.Removethedipstickandreadtheoillevel;referto
Figure13.
•IftheoillevelisbelowtheAddmarkonthe
dipstick,slowlyaddasmallamountofoiltothe
oil-lltube,andthenrepeatsteps3through5until
theoillevelisattheFullmarkonthedipstick.
•IftheoillevelisabovetheFullmarkonthe
dipstick,draintheexcessoiluntiltheoillevelisat
theFullmarkonthedipstick.Todraintheexcess
oil,refertoChangingtheEngineOil(page14).
Figure12
1.1cm(1/2in)
CheckingtheEngineOilLevel
ServiceInterval:Beforeeachuseordaily—
Max.ll:0.59l(20oz.),type:SAE30detergentoilwithan
APIserviceclassicationofSF,SG,SH,SJ,SL,orhigher.
Important:Iftheoillevelinthecrankcaseis
toolowortoohighandyouruntheengine,
youmaydamagetheengine.
6.Installthedipsticksecurelybyhand.
AdjustingtheCuttingHeight
WARNING
Adjustingthecuttingheightmaybringyouinto
contactwiththemovingblade,causingserious
injury.
•Stoptheengineandwaitforallmovingparts
tostop.
•Donotputyourngersunderthehousingwhen
adjustingthecuttingheight.
8
Page 9

CAUTION
G019308
Iftheenginehasbeenrunning,themuferwillbe
hotandcanseverelyburnyou.Keepawayfromthe
hotmufer.
Adjustthecuttingheightasdesired.Setallfourwheelsto
thesameheight.
Note:Toraisethemachine,moveall4cuttingheightlevers
forward;tolowerthemachine,movethemallrearward
(Figure14).
Figure14
Note:Thecuttingheightsettingsare25mm(1in);38mm
(1-1/2in);51mm(2in);64mm(2-1/2in);76mm(3in);89
mm(3-1/2in);102mm(4in);and114mm(4-1/2in).
Figure16
2.Holdtheblade-controlbaragainstthehandleandpull
therecoilstarter(Figure17).
StartingtheEngine
Important:Themachinehasasafetysystemthat
preventsyoufromstartingthemachineunlessyourst
installthemulchplugorthegrassbagsecurelyonthe
machine.
1.Installthemulchplug(Figure15)orthegrassbag
(Figure16)onthemachine.
Figure15
Figure17
1.Blade-controlbar
Note:Ifthemachinestilldoesnotstart,contactan
AuthorizedServiceDealer.
3.Testthemachinesafetysystem;refertoTestingthe
MachineSafetySysteminStorage.
StoppingtheEngine
ServiceInterval:Beforeeachuseordaily—Ensurethat
theenginestopswithin3secondsafter
releasingtheblade-controlbar.
Tostoptheengine,releasetheblade-controlbar(Figure17).
Important:Whenyoureleasetheblade-controlbar,
boththeengineandbladeshouldstopwithin3seconds.
Iftheydonotstopproperly,stopusingyourmachine
immediatelyandcontactanAuthorizedServiceDealer.
9
Page 10

MulchingtheClippings
Yourmachinecomesfromthefactoryreadytomulchthe
grassandleafclippingsbackintothelawn.
Ifthegrassbagisonthemachine,removeit(referto
RemovingtheGrassBag(page11))beforemulchingthe
clippings.Iftheside-dischargechuteisonthemachine,
removeitandlocktheside-dischargedoor(referto
RemovingtheSide-dischargeChute(page12))before
mulchingtheclippings.
Important:Themachinehasasafetyswitchthat
preventsyoufromstartingthemachineunlessyou
rstinstallthemulchplugsecurelyonthemachine;
Figure18.
Figure19
2.Routethestarterropearoundthelower-ropeguide
(Figure20).
Figure18
1.Topofmulchplugleverinchannelbottom
BaggingtheClippings
Usethegrassbagwhenyouwanttocollectgrassandleaf
clippingsfromthelawn.
Iftheside-dischargechuteisonthemachine,
removeitandlocktheside-dischargedoor(referto
RemovingtheSide-dischargeChute(page12))beforebagging
theclippings.
WARNING
Thebladeissharp;contactingthebladecanresult
inseriouspersonalinjury.
Stoptheengineandwaitforallmovingpartstostop
beforeleavingtheoperatingposition.
InstallingtheGrassBag
1.Removethemulchplug(Figure19).
Figure20
Note:Thelower-ropeguidereleasesthestarterrope
whenyoupulltherecoil-starthandle.
3.Insertthegrass-baghandleintothegroovesatthetop
ofthemachine(Figure21).
Important:Themachinehasasafetyswitchthat
preventsyoufromstartingthemachineunlessyou
rstinstallthegrassbagsecurelyonthemachine.
Figure21
10
Page 11

RemovingtheGrassBag
1.Routethestarterropearoundthelower-ropeguide
(Figure22).
Figure22
2.Liftthegrass-baghandleoutfromthegroovesatthe
topofthemachineandremovethebagfromthe
machine(Figure23).
Side-dischargingtheClippings
Usethesidedischargeforcuttingverytallgrass.
Ifthebagisonthemachine,removeitandinsertthemulch
plug;refertoRemovingtheGrassBag(page11)before
side-dischargingtheclippings.
Important:Themachinehasasafetyswitchthat
preventsyoufromstartingthemachineunlessyourst
installthemulchplugsecurelyonthemachine;referto
MulchingtheClippings(page10).
InstallingtheSide-dischargeChute
1.Unlocktheside-dischargedoor(Figure25).
Figure25
Figure23
3.Insertthemulchplug(Figure24).
2.Liftopentheside-dischargedoor(Figure26).
Figure26
3.Installtheside-dischargechuteandclosethedooronto
thechute(Figure27).
Figure24
Figure27
11
Page 12

RemovingtheSide-dischargeChute
–Replacethebladeorhaveitsharpened.
Toremovethesidedischargechute,reversethestepsabove.
Important:Locktheside-dischargedoorafteryouclose
it(Figure28).
Figure28
OperatingTips
GeneralMowingTips
•Cleartheareaofsticks,stones,wire,branches,andother
debristhatthebladecouldhit.
•Avoidstrikingsolidobjectswiththeblade.Never
deliberatelymowoveranyobject.
•Ifthemachinestrikesanobjectorstartstovibrate,
immediatelystoptheengine,disconnectthewirefrom
thesparkplug,andexaminethemachinefordamage.
•Forbestperformance,installanewbladebeforethe
cuttingseasonbegins.
•ReplacethebladewhennecessarywithaToro
replacementblade.
–Walkataslowerpacewhilemowing.
–Raisethecuttingheightonyourmachine.
–Cutthegrassmorefrequently .
–Overlapcuttingswathsinsteadofcuttingafullswath
witheachpass.
–Setthecuttingheightonthefrontwheels1notch
lowerthantherearwheels.Forexample,setthefront
wheelsat51mm(2in)andtherearwheelsat64mm
(2-1/2in).
CuttingLeaves
•Aftercuttingthelawn,ensurethathalfofthelawnshows
throughthecutleafcover.Youmayneedtomakemore
thanasinglepassovertheleaves.
•Iftherearemorethan13cm(5in)ofleavesonthelawn,
setthefrontcuttingheight1or2notcheshigherthan
therearcuttingheight.
•Slowdownyourmowingspeedifthemachinedoesnot
cuttheleavesnelyenough.
CuttingGrass
•Cutonlyaboutathirdofthegrassbladeatatime.Do
notcutbelowthe51mm(2in)settingunlessthegrassis
sparseoritislatefallwhengrassgrowthbeginstoslow
down.RefertoAdjustingtheCuttingHeight(page8).
•Whencuttinggrassover15cm(6in)tall,mowatthe
highestcutting-heightsettingandwalkslower;thenmow
againatalowersettingforthebestlawnappearance.If
thegrassistoolong,themachinemayplugandcause
theenginetostall.
•Mowonlydrygrassorleaves.Wetgrassandleavestend
toclumpontheyardandcancausethemachinetoplug
ortheenginetostall.
WARNING
Wetgrassorleavescancauseseriousinjuryif
youslipandcontacttheblade.Mowonlyindry
conditions.
•Alternatethemowingdirection.Thishelpsdispersethe
clippingsoverthelawnforevenfertilization.
•Ifthenishedlawnappearanceisunsatisfactory,tryone
ormoreofthefollowing:
12
Page 13

Maintenance
Note:Determinetheleftandrightsidesofthemachine
fromthenormaloperatingposition.
RecommendedMaintenanceSchedule(s)
MaintenanceService
Interval
Aftertherst5hours
Beforeeachuseordaily
Every25hours
Every50hours
Yearlyorbeforestorage
Important:RefertoyourEngineOperator'sManualforadditionalmaintenanceprocedures.
PreparingforMaintenance
1.Stoptheengineandwaitforallmovingpartstostop.
2.Disconnectthespark-plugwirefromthesparkplug
(Figure29)beforeperforminganymaintenance
procedure.
MaintenanceProcedure
•Changetheengineoil.
•
•Ensurethattheenginestopswithin3secondsafterreleasingtheblade-controlbar.
•Cleantheundersideofthemachinehousing.
•Replacetheairlteryearly;replaceitmorefrequentlyindustyoperatingconditions.
•Changetheengineoil;changeitmorefrequentlyindustyoperatingconditions.
•Changetheengineoil;changeitmorefrequentlyindustyoperatingconditions.
•
WARNING
Tippingthemachinemaycausethefuelto
leak.Gasolineisammable,explosiveand
cancausepersonalinjury.
Runtheenginedryorremovethegasoline
withahandpump;neversiphon.
Figure29
3.Afterperformingthemaintenanceprocedure(s),
connectthespark-plugwiretothesparkplug.
Important:Beforetippingthemachinetochange
theoilorreplacetheblade,allowthefueltankto
rundrythroughnormalusage.Ifyoumusttip
themachinepriortorunningoutoffuel,usea
handfuelpumptoremovethefuel.Alwaystipthe
machineontoitssidewiththeairlterup.
ReplacingtheAirFilter
ServiceInterval:Every25hours
1.Useascrewdrivertoopentheair-ltercover
(Figure30).
Figure30
2.Replacetheairlter(Figure31).
13
Page 14

Figure31
G019342
ChangingtheEngineOil
ServiceInterval:Aftertherst5hours
Every50hours
Yearlyorbeforestorage
7.Tipthemachineontoitsside,withtheoil-lltube
down,todraintheusedoiloutthroughtheoil-lltube
intotheoil-drainpan(Figure33).
Figure33
Note:Max.ll:0.59l(20oz),type:SAE30detergentoil
withanAPIserviceclassicationofSF,SG,SH,SJ,SL,or
higher.
1.Movethemachinetoalevelsurface.
2.Ensurethatthefueltankcontainslittleornofuelso
thatfueldoesnotleakoutwhenyoutipthemachine
ontoitsside.
3.Runtheengineafewminutesbeforechangingtheoil
towarmit.
Note:W armoilowsbetterandcarriesmore
contaminants.
4.Disconnectthewirefromthesparkplug;referto
PreparingforMaintenance(page13).
5.Setanoil-drainpanbesidethemachineonthesideof
thedipstick.
6.Removethedipstickfromtheoil-lltube(Figure32).
8.Afterdrainingtheusedoil,returnthemachinetothe
operatingposition.
9.Pourabout3/4ofthecrankcasecapacityofoilinto
theoil-lltube.
Note:Max.ll:0.59l(20oz),type:SAE30detergent
oilwithanAPIserviceclassicationofSF,SG,SH,
SJ,SL,orhigher.
10.Wipeoffthedipstickendwithacleancloth.
11.Insertthedipstickintotheoil-lltubeandscrewitin
untilitstops.
12.Removethedipstickandreadtheoillevel;referto
Figure34.
Figure32
Figure34
•IftheoillevelisbelowtheAddmarkonthe
dipstick,slowlyaddasmallamountofoiltothe
14
Page 15

oil-lltube,andthenrepeatsteps10through12
untiltheoillevelisattheFullmarkonthedipstick.
•IftheoillevelisabovetheFullmarkonthe
dipstick,draintheexcessoiluntiltheoillevelisat
theFullmarkonthedipstick.
Important:Iftheoillevelinthecrankcaseis
toolowortoohighandyouruntheengine,
youmaydamagetheengine.
13.Installthedipsticksecurelybyhand.
14.Recycletheusedoilatalocalrecyclingcenter.
ReplacingtheBlade
ServiceInterval:Yearlyorbeforestorage
5.Installthenewbladeandallmountinghardware
(Figure36).
Important:
bladeproperly.
uncomfortableperformingthisprocedure,contactan
AuthorizedServiceDealer.
Examinethebladewheneveryourunoutofgasoline.Ifthe
bladeisdamagedorcracked,replaceitimmediately.Ifthe
bladeedgeisdullornicked,haveitsharpenedorreplaceit.
Youwillneedatorquewrenchtoinstallthe
Ifyoudonothaveatorquewrenchorare
WARNING
Thebladeissharp;contactingthebladecanresult
inseriouspersonalinjury.
Weargloveswhenservicingtheblade.
1.Disconnectthespark-plugwirefromthesparkplug;
refertoPreparingforMaintenance(page13).
2.Tipthemachineontoitsside,withtheairlterup.
3.Useablockofwoodtoholdthebladesteady
(Figure35).
Figure36
Important:Positionthecurvedendsoftheblade
topointtowardthemachinehousing.
6.Useatorquewrenchtotightenthebladeboltto82
N-m(60ft-lb).
Important:Abolttorquedto82N⋅ ⋅⋅m(60ft-lb)is
verytight.Whileholdingthebladewithablock
ofwood,putyourweightbehindtheratchetor
wrenchandtightentheboltsecurely.Thisboltis
verydifculttoovertighten.
CleaningtheUndersideofthe
Figure35
4.Removetheblade,savingallmountinghardware
(Figure35).
MachineHousing
ServiceInterval:Beforeeachuseordaily
WARNING
Themachinemaydislodgematerialfromunderthe
machinehousing.
•Weareyeprotection.
•Stayintheoperatingposition(behindthe
handle).
•Donotallowbystandersinthearea.
1.Withtheenginerunningonaatpavedsurface,spray
astreamofwaterinfrontoftherightrearwheel
(Figure37).
15
Page 16

Note:Thewaterwillsplashintothepathoftheblade,
cleaningouttheclippings.
Figure37
2.Whennomoreclippingscomeout,stopthewaterand
movethemachinetoadryarea.
3.Runtheengineforafewminutestodrythehousing
topreventitfromrusting.
Storage
PreparingtheMachinefor Storage
WARNING
Gasolinevaporscanexplode.
•Donotstoregasolinemorethan30days.
•Donotstorethemachineinanenclosurenear
anopename.
•Allowtheenginetocoolbeforestoringit.
1.Onthelastrefuelingoftheyear,addfuelstabilizerto
thefuelasdirectedbytheenginemanufacturer.
2.Runthemachineuntiltheenginestopsfromrunning
outoffuel.
3.Primetheengineandstartitagain.
4.Allowtheenginetorununtilitstops.Whenyoucan
nolongerstarttheengine,itissufcientlydry.
5.Disconnectthewirefromthesparkplug.
6.Removethesparkplug,add30ml(1oz)ofoilthrough
thesparkplughole,andpullthestarterropeslowly
severaltimestodistributeoilthroughoutthecylinder
topreventcylindercorrosionduringtheoff-season.
7.Looselyinstallthesparkplug.
8.Tightenallnuts,bolts,andscrews.
9.Chargethebatteryfor24hours,thenunplugthe
batterychargerandstorethemachineinanunheated
area.Ifyoumuststorethemachineinaheatedarea,
youmustchargethebatteryevery90days.
FoldingtheHandle
WARNING
Foldingorunfoldingthehandleimproperlycan
damagethecables,causinganunsafeoperating
condition.
•Donotdamagethecableswhenfoldingor
unfoldingthehandle.
•Ifacableisdamaged,contactanAuthorized
ServiceDealer.
1.Loosenthehandleknobsuntilyoucanmovetheupper
handlefreely(Figure38).
16
Page 17

Figure38
G019341
2.FoldtheupperhandleforwardasshowninFigure39.
upperrightfrontofthegrassbagiscompletelyoutof
theright-handslot(Figure40).Theengineshould
stop.
Note:Theright-handslothousesasafetyinterlock
switch.
Important:Donotstepoutsidetheoperating
positionwhileperformingthisstep.
Figure39
3.Tounfoldthehandle,reversethestepsabove.
RemovingtheMachinefrom Storage
1.Removethesparkplugandspintheenginerapidly
usingthestartertoblowtheexcessoilfromthe
cylinder.
2.Installthesparkplugandtightenitwithatorque
wrenchto20N-m(15ft-lb).
3.Connectthewiretothesparkplug.
4.Testthemachinesafetysystem;refertoTestingthe
MachineSafetySystem.
TestingtheMachineSafety System
1.Movethemachinetoalevelsurface.
2.Stoptheengineandwaitforallmovingpartstostop.
3.Ifthegrassbagisnotattachedtothemachine,remove
thedischargeplugandinstallthegrassbag.
4.Starttheengine.
5.Whiletheengineisrunning,liftuptheupperrightrear
cornerofthegrassbaguntilthewire-bagframeatthe
Figure40
1.Grassbag3.Wire-bagframe
2.Rightsideofhandle
partiallyremovedfor
clarity
6.Iftheenginedoesnotstopwhenyouperformthis
test,releasethecontrolbaronthehandletostopthe
engine,waitforallmovingpartstostop,andtakeyour
machinetoanAuthorizedToroDealertohavethe
safetysystemproperlyrepaired.
4.Slot
17
Page 18

Notes:
18
Page 19

InternationalDistributorList
Distributor:
AtlantisSuveSulamaSisstemleriLt
BalamaPrimaEngineeringEquip.HongKong85221552163
B-RayCorporation
CascoSalesCompany
CeresS.A.CostaRica
CSSCTurfEquipment(pvt)Ltd.SriLanka
CyrilJohnston&Co.
EquiverMexico525553995444
FemcoS.A.Guatemala
G.Y .K.CompanyLtd.
GeomechanikiofAthensGreece
GuandongGoldenStarChina
HakoGroundandGardenSweden
HakoGroundandGarden
HayterLimited(U.K.)
HydroturfInt.CoDubai
HydroturfEgyptLLC
IbeaS.P .A.
IrriamcPortugal351212388260T oroEuropeNVBelgium3214562960
IrrigationProductsInt'lPvtLtd.India862283960789
Country:
Turkey902163448674JeanHeybroekb.v.Netherlands3130639461 1
Korea82325512076
PuertoRico7877888383
NorthernIreland442890813121
Japan81726325861
Norway4722907760
UnitedKingdom441279723444
UnitedArabEmirates97143479479
Egypt2025194308T-MarktLogisticsLtd.Hungary3626525500
Italy390331853611ToroAustraliaAustralia61395807355
PhoneNumber:Distributor:
MaquiverS.A.Colombia
MaruyamaMfg.Co.Inc.
AgrolancKft
5062391138
94112746100
5024423277ParklandProductsLtd.NewZealand6433493760
30109350054
862087651338Riversa
4635100000
Mountelda.s.CzechRepublic
MunditolS.A.
OslingerTurfEquipmentSA
OyHakoGroundandGardenAb
Prochaska&Cie
RTCohen2004Ltd.
ScSvendCarlsenA/S
SolvertS.A.S.
SpyprosStavrinidesLimitedCyprus
SurgeSystemsIndiaLimited
Country:
Japan81332522285
Hungary3627539640
Argentina541148219999
Ecuador59342396970
Finland35898700733
Austria4312785100
Israel97298617979
Spain
Denmark4566109200
France33130817700
India911292299901
PhoneNumber:
5712364079
420255704220
34952837500
35722434131
EuropeanPrivacyNotice
TheInformationT oroCollects
ToroWarrantyCompany(T oro)respectsyourprivacy.Inordertoprocessyourwarrantyclaimandcontactyouintheeventofaproductrecall,weaskyou
tosharecertainpersonalinformationwithus,eitherdirectlyorthroughyourlocalT orocompanyordealer.
TheTorowarrantysystemishostedonserverslocatedwithintheUnitedStateswhereprivacylawmaynotprovidethesameprotectionasapplies
inyourcountry.
BYSHARINGYOURPERSONALINFORMA TIONWITHUS,YOUARECONSENTINGTOTHEPROCESSINGOFYOURPERSONALINFORMATION
ASDESCRIBEDINTHISPRIVACYNOTICE.
TheW ayToroUsesInformation
Toromayuseyourpersonalinformationtoprocesswarrantyclaims,tocontactyouintheeventofaproductrecallandforanyotherpurposewhichwetell
youabout.T oromayshareyourinformationwithT oro'safliates,dealersorotherbusinesspartnersinconnectionwithanyoftheseactivities.Wewillnot
sellyourpersonalinformationtoanyothercompany .Wereservetherighttodisclosepersonalinformationinordertocomplywithapplicablelawsand
withrequestsbytheappropriateauthorities,tooperateoursystemsproperlyorforourownprotectionorthatofotherusers.
RetentionofyourPersonalInformation
Wewillkeepyourpersonalinformationaslongasweneeditforthepurposesforwhichitwasoriginallycollectedorforotherlegitimatepurposes
(suchasregulatorycompliance),orasrequiredbyapplicablelaw.
Toro'sCommitmenttoSecurityofY ourPersonalInformation
Wetakereasonableprecautionsinordertoprotectthesecurityofyourpersonalinformation.Wealsotakestepstomaintaintheaccuracyandcurrent
statusofpersonalinformation.
AccessandCorrectionofyourPersonalInformation
Ifyouwouldliketorevieworcorrectyourpersonalinformation,pleasecontactusbyemailatlegal@toro.com.
AustralianConsumerLaw
AustraliancustomerswillnddetailsrelatingtotheAustralianConsumerLaweitherinsidetheboxoratyourlocalT oroDealer.
374-0269RevE
Page 20

TheToroWarranty
ConditionsandProductsCovered
TheT oroCompanyanditsafliate,ToroWarrantyCompany ,pursuantto
anagreementbetweenthem,jointlypromisetotheoriginalpurchaser*
torepairtheT oroProductslistedbelowifdefectiveinmaterialsor
workmanship.
Thefollowingtimeperiodsapplyfromthedateofpurchase:
ProductsWarrantyPeriod
WalkPowerMowers
•CastDeck
5yearsResidentialUse
45DaysCommercialUse
•Engine
5yearsGTSPromise
Seeenginemanufacturer'swarranty
•SteelDeck
2yearsResidentialUse
45DaysCommercialUse
•Engine
2yearsGTSPromise
Seeenginemanufacturer'swarranty
ElectricHandHeldProducts2yearlimitedwarranty
Snowthrowers
•SingleStage
2yearsResidentialUse
45DaysCommercialUse
•TwoStage
2yearsResidentialUse
45DaysCommercialUse
•Electric2yearsResidentialUse
AllRide-OnUnitsBelow
•Engine
Seeenginemanufacturer'swarranty
1yearPartsonly
•Attachments1year
RearEngineRiders2yearsResidentialUse
90DaysCommercialUse
Lawn&GardenTractors
2yearsResidentialUse
90DaysCommercialUse
TimeCutterZMowers
3yearsResidentialUse
30DaysCommercialUse
TITANMowers3yearsor240hours
•Frame
Lifetime(originalowneronly)
TITANMXMowers3yearsor400hours
•Frame
ZMasterMowers—2000Series
•Frame
Lifetime(originalowneronly)
5yearsor1200hours
Lifetime(originalowneronly)
2
2
2
2
2
2
2
2
3
4
3
4
3
4
OwnerResponsibilities
YoumustmaintainyourT oroProductbyfollowingthemaintenance
proceduresdescribedintheOperator'sManual.Suchroutine
maintenance,whetherperformedbyadealerorbyyou,isatyourexpense.
InstructionsforObtainingWarrantyService
IfyouthinkthatyourT oroProductcontainsadefectinmaterialsor
workmanship,followthisprocedure:
1.Contactyoursellertoarrangeserviceoftheproduct.Ifforany
reasonitisimpossibleforyoutocontactyourseller,youmaycontact
anyToroAuthorizedDistributortoarrangeservice.
1
2.Bringtheproductandyourproofofpurchase(salesreceipt)tothe
ServiceDealer.IfforanyreasonyouaredissatisedwiththeService
Dealer’sanalysisorwiththeassistanceprovided,contactusat:
1
CustomerCareDepartment,RLCDivision
TheT oroCompany
811 1LyndaleAvenueSouth
Bloomington,MN55420-1196
Manager:TechnicalProductSupport:001–952–887–8248
SeeattachedDistributorList
ItemsandConditionsNotCovered
1
Thisexpresswarrantydoesnotcoverthefollowing:
•Costofregularmaintenanceserviceorwearparts,suchasblades,
rotorblades(paddles),scraperblades,belts,fuel,lubricants,oil
changes,sparkplugs,cable/linkageorbrakeadjustments
•Anyproductorpartwhichhasbeenalteredormisusedandrequires
replacementorrepairduetoaccidentsorlackofpropermaintenance
•Repairsnecessaryduetofailuretousefreshfuel(lessthanone
monthold),orfailuretoproperlypreparetheunitpriortoanyperiod
ofnon-useoveronemonth
•Engineandtransmission.Thesearecoveredbytheappropriate
manufacturer’sguaranteeswithseparatetermsandconditions
Allrepairscoveredbythesewarrantiesmustbeperformedbyan
AuthorizedT oroServiceDealerusingT oroapprovedreplacementparts.
*OriginalPurchasermeansthepersonwhooriginallypurchasedtheT oroProduct.
1
SomeenginesusedonT oroProductsarewarrantedbytheenginemanufacturer .
2
Residentialusemeansuseoftheproductonthesamelotasyourhome.Useatmorethanone
locationisconsideredcommercialuseandthecommercialusewarrantywouldapply.
3
Whicheveroccursrst.
4
LifetimeFrameWarranty-Ifthemainframe,consistingofthepartsweldedtogethertoformthe
tractorstructurethatothercomponentssuchastheenginearesecuredto,cracksorbreaksin
normaluse,itwillberepairedorreplaced,atT oro'soption,underwarrantyatnocostforparts
andlabor .Framefailureduetomisuseorabuseandfailureorrepairrequiredduetorustor
corrosionarenotcovered.
Thiswarrantyincludesthecostofpartsandlabor,butyoumustpay
transportationcosts.
Warrantymaybedeniedifthehourmeterisdisconnected,altered,or
showssignsofbeingtamperedwith.
GeneralConditions
Thepurchaseriscoveredbythenationallawsofeachcountry .Therights
towhichthepurchaserisentitledwiththesupportoftheselawsarenot
restrictedbythiswarranty.
374-0268RevC
 Loading...