

Page 1
FormNo.3387-816RevA
1
G017280
TimeMaster76cmLawnMower
ModelNo.20975—SerialNo.315000001andUp
ModelNo.20977—SerialNo.315000001andUp
Operator'sManual
Introduction
Thisrotary-blade,walk-behindlawnmowerisintended
tobeusedbyresidentialhomeowners.Itisdesigned
primarilyforcuttinggrassonwell-maintainedlawns
onresidentialproperties.Itisnotdesignedforcutting
brushorforagriculturaluses.
Readthisinformationcarefullytolearnhowtooperateand
maintainyourmachineproperlyandtoavoidinjuryand
equipmentdamage.Y ouareresponsibleforoperatingthe
machineproperlyandsafely.
YoumaycontactTorodirectlyatwww .Toro.comforproduct
andaccessoryinformation,helpndingadealer,ortoregister
yourproduct.
Wheneveryouneedservice,genuineToroparts,oradditional
information,contactanAuthorizedServiceDealerorToro
CustomerServiceandhavethemodelandserialnumbersof
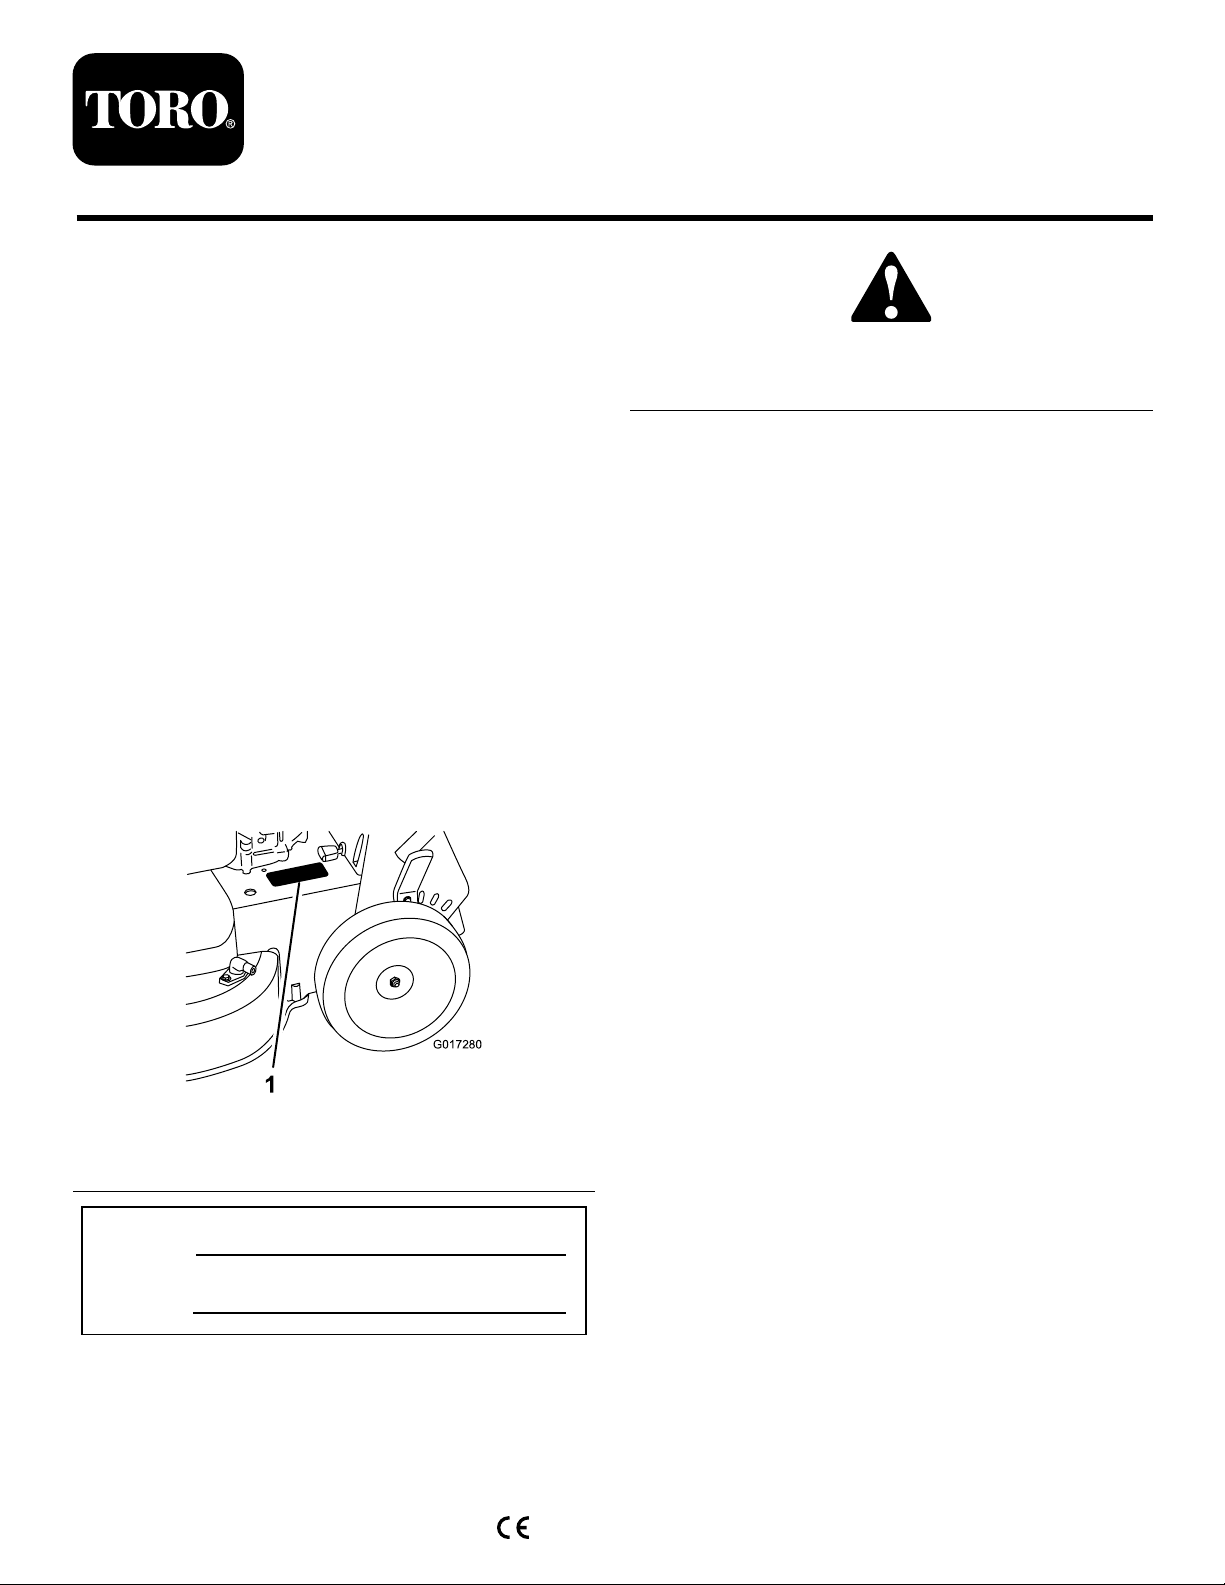
yourmachineready.Figure1identiesthelocationofthe
modelandserialnumbersontheproduct.Writethenumbers
inthespaceprovided.
Figure2
1.Safetyalertsymbol
Thismanualuses2wordstohighlightinformation.
Importantcallsattentiontospecialmechanicalinformation
andNoteemphasizesgeneralinformationworthyofspecial
attention.
ThisproductcomplieswithallrelevantEuropeandirectives.
Fordetails,seetheseparateproduct-specicDeclarationof
Conformity(DOC)sheet.
Formodelswithstatedenginehorsepower,thegross
horsepoweroftheenginewaslaboratoryratedbytheengine
manufacturerinaccordancewithSAEJ1940.Ascongured
tomeetsafety,emission,andoperatingrequirements,the
actualenginehorsepoweronthisclassoflawnmowerwill
besignicantlylower.
Donottamperwiththeenginecontrolsoralterthegovernor
speed;doingsomaycreateanunsafeconditionresultingin
personalinjury.
Figure1
1.Modelandserialnumberplate
ModelNo.
SerialNo.
Thismanualidentiespotentialhazardsandhassafety
messagesidentiedbythesafetyalertsymbol(Figure2),
whichsignalsahazardthatmaycauseseriousinjuryordeath
ifyoudonotfollowtherecommendedprecautions.
©2014—TheToro®Company
8111LyndaleAvenueSouth
Bloomington,MN55420
Registeratwww.T oro.com.
Contents
Introduction..................................................................1
Safety...........................................................................2
GeneralLawnMowerSafety.....................................2
SoundPressure......................................................3
SoundPower..........................................................3
Hand/ArmVibration..............................................4
SafetyandInstructionalDecals.................................4
Setup............................................................................6
1AssemblingtheHandle..........................................6
2InstallingtheBlade-ControlBar..............................7
3FillingtheEnginewithOil......................................7
4ChargingtheBattery..............................................7
5AssemblingtheGrassBag......................................8
ProductOverview..........................................................9
Specications.........................................................9
Operation....................................................................10
FillingtheFuelTank...............................................10
CheckingtheEngine-OilLevel.................................10
AdjustingtheCuttingHeight....................................11
AdjustingtheHandleHeight....................................12
StartingtheEngine.................................................12
OriginalInstructions(EN)
PrintedintheUSA
AllRightsReserved
*3387-816*A
Page 2

UsingtheSelf-PropelDrive.....................................12
StoppingtheEngine...............................................13
EngagingtheBlade.................................................13
DisengagingtheBlade.............................................13
CheckingtheBlade-StopSystemOperation................14
RecyclingtheClippings...........................................14
BaggingtheClippings.............................................15
Side-DischargingtheClippings.................................15
OperatingTips......................................................16
Maintenance.................................................................17
RecommendedMaintenanceSchedule(s)......................17
PreparingforMaintenance.......................................17
ServicingtheAirFilter............................................18
ChangingtheEngineOil.........................................18
ChargingtheBattery...............................................19
ReplacingtheFuse..................................................20
ReplacingtheBattery..............................................20
AdjustingtheSelf-PropelDrive................................20
ServicingtheBlade-DriveSystem.............................21
ServicingtheCuttingBlades.....................................21
CleaningundertheMachine.....................................24
Storage........................................................................25
GeneralInformation...............................................25
PreparingtheFuelSystem.......................................25
PreparingtheEngine..............................................25
RemovingtheMachinefromStorage.........................25
•Neverallowchildrenorpeopleunfamiliarwiththese
instructionstousethemachine.Localregulationscan
restricttheageoftheoperator.
•Keepinmindthattheoperatororuserisresponsiblefor
accidentsorhazardsoccurringtootherpeopleortheir
property.
•Understandexplanationsforallpictogramsusedonthe
machineorintheinstructions.
Gasoline
WARNING-Gasolineishighlyammable.Takethe
followingprecautions.
•Storefuelincontainersspecicallydesignedforthis
purpose.
•Refueloutdoorsonlyanddonotsmokewhilerefueling.
•Addfuelbeforestartingtheengine.Neverremovethe
capofthefueltankoraddgasolinewhiletheengineis
runningorwhentheengineishot.
•Ifgasolineisspilled,donotattempttostarttheengine
butmovethemachineawayfromtheareaofspillageand
avoidcreatinganysourceofignitionuntilgasolinevapors
havedissipated.
•Replaceallfueltankandcontainercapssecurely.
Safety
ThismachinehasbeendesignedinaccordancewithENISO
5395:2013.
Improperlyusingormaintainingthismowercanresult
ininjury.T oreducethepotentialforinjury,complywith
thesesafetyinstructions.
Toensuremaximumsafety,bestperformance,and
togainknowledgeoftheproduct,itisessentialthat
youandanyotheroperatorofthemowerreadand
understandthecontentsofthismanualbeforethe
engineiseverstarted.Payparticularattentiontothe
safetyalertsymbol(Figure2),whichmeansCaution,
Warning,orDanger—“personalsafetyinstruction.”
Readandunderstandtheinstructionbecauseithasto
dowithsafety.Failuretocomplywiththeinstruction
mayresultinpersonalinjury.
GeneralLawnMowerSafety
Thiscuttingmachineiscapableofamputatinghandsandfeet
andofthrowingobjects.Failuretoobservethefollowing
safetyinstructionscouldresultinseriousinjuryordeath.
Training
•Readtheinstructionscarefully .Befamiliarwiththe
controlsandtheproperuseoftheequipment.
Preparation
•Whilemowing,alwayswearsubstantial,slip-resistant
footwearandlongtrousers.Donotoperatethe
equipmentwhenbarefootorwearingopensandals.
•Thoroughlyinspecttheareawheretheequipmentisto
beusedandremoveallstones,sticks,wires,bonesand
otherforeignobjects.
•Beforeusing,alwaysvisuallyinspecttoseethatguardsand
safetydevices,suchasdeectorsand/orgrasscatchers,
areinplaceandworkingcorrectly.
•Beforeusing,alwaysvisuallyinspecttoseethattheblades,
bladeboltsandcutterassemblyarenotwornordamaged.
Replacewornordamagedbladesandboltsinsetsto
preservebalance.
Starting
•Donottiltthemachinewhenstartingtheengineunless
themachinemustbetiltedforstarting.Inthiscase,do
nottiltitmorethanabsolutelynecessaryandliftonlythe
partwhichisawayfromtheoperator.
•Starttheenginecarefullyaccordingtoinstructionsand
withfeetwellawayfromtheblade(s)andnotinfrontof
thedischargechute.
Operation
•Nevermowwhilepeople,especiallychildren,orpetsare
nearby.
•Mowonlyindaylightoringoodarticiallight.
•Stayalertforholesintheterrainandotherhiddenhazards.
2
Page 3

•Donotputhandsorfeetnearorunderrotatingparts.
Keepclearofthedischargeopeningatalltimes.
•Neverpickuporcarryalawnmowerwhiletheengineis
running.
•Useextremecautionwhenreversingorpullinga
pedestrian-controlledmowertowardyou.
•Walk,neverrun.
•Slopes:
–Donotmowexcessivelysteepslopes.
–Exerciseextremecautionwhenonslopes.
–Mowacrossthefaceofslopes,neverupanddown,
andexerciseextremecautionwhenchangingdirection
onslopes.
–Alwaysbesureofyourfootingonslopes.
•Reducespeedonslopesandinsharpturnstoprevent
overturningorlossofcontrol.
•Stopthebladeifthemachinemustbetiltedfor
transportationwhencrossingsurfacesotherthangrass
andwhentransportingthemachinetoandfromthearea
tobemowed.
•Donotoperatetheengineinaconnedspacewhere
dangerouscarbonmonoxideandotherexhaustgasses
cancollect.
•Stoptheengine
–wheneveryouleavethemachine.
–beforerefueling.
–beforeremovingthegrasscatcher.
–beforemakingheightadjustmentunlessadjustment
canbemadefromtheoperatingposition.
•Stoptheengineanddisconnectthespark-plugwire.
–beforeclearingblockagesoruncloggingchute.
–beforechecking,cleaningorworkingonthemachine.
–afterstrikingaforeignobject,inspectthemachine
fordamageandmakerepairsbeforerestartingand
operatingthemachine.
–ifthemachinestartstovibrateabnormally(check
immediately).
•Lightningcancausesevereinjuryordeath.Ifyousee
lightningorhearthunderinthearea,donotoperatethe
machine;seekshelter.
•Watchoutfortrafcwhencrossingornearroadways.
MaintenanceandStorage
•Keepallnuts,bolts,andscrewstighttobesurethatthe
equipmentisinsafeworkingcondition.
•Donotusepressure-cleaningequipmentonthemachine.
•Neverstoretheequipmentwithgasolineinthetankand
insideabuildingwherefumescanreachanopename
orspark.
•Allowtheenginetocoolbeforestoringinanyenclosure.
•Toreducetherehazard,keeptheengine,silencer,
batterycompartmentandgasolinestorageareafreeof
grass,leaves,orexcessivegrease.
•Checkgrasscatchercomponentsandthedischargeguard
frequentlyandreplacewithmanufacturer'srecommended
parts,whennecessary.
•Replacewornordamagedpartsforsafety.
•Replacefaultysilencers.
•Ifthefueltankhastobedrained,dothisoutdoors.
•Donotchangetheenginegovernorsettingsoroverspeed
theengine.Operatinganengineatexcessivespeedcan
increasethehazardofpersonalinjury.
•Becarefulwhileadjustingthemachinetoprevent
entrapmentofthengersbetweenmovingbladesand
xedpartsofthemachine.
•Toensurethebestperformanceandsafety ,
purchaseonlygenuineT ororeplacementpartsand
accessories.Donotuse
theymaycauseasafetyhazard.
will t
partsandaccessories;
Hauling
•Usecarewhenloadingorunloadingthemachineintoa
traileroratruck.
•Usefull-widthrampsforloadingthemachineintoa
traileroratruck.
•Tiethemachinedownsecurelyusingstraps,chains,cable,
orropes.Boththefrontandtherearstrapsshouldbe
directeddownandoutwardfromthemachine.
SoundPressure
Thisunithasasoundpressurelevelattheoperator’searof89
dBA,whichincludesanUncertaintyValue(K)of1dBA.
Thesoundpressurelevelwasdeterminedaccordingtothe
proceduresoutlinedinENISO5395:2013.
SoundPower
Thisunithasaguaranteedsoundpowerlevelof100dBA,
whichincludesanUncertaintyValue(K)of1dBA.
Thesoundpowerlevelwasdeterminedaccordingtothe
proceduresoutlinedinISO11094.
CAUTION
Long-termexposuretonoisewhileoperatingthe
machinemaycausesomehearingloss.
Wearadequatehearingprotectionwheneveryou
operatethemachineforanextendedperiodoftime.
3
Page 4
Hand/ArmVibration
Measuredvibrationlevelforrighthand=7.5m/s
Measuredvibrationlevelforlefthand=5.5m/s
UncertaintyValue(K)=3.0m/s
Measuredvaluesweredeterminedaccordingtotheprocedures
outlinedinENISO5395:2013.
2
2
2
CAUTION
Long-termexposuretovibrationwhileoperating
themachinemaycausesomenumbnessinthe
handsandwrists.
Wearglovesthatdampenthevibrationwhenever
youoperatethemachineforanextendedperiodof
time.
SafetyandInstructionalDecals
Important:Safetyandinstructiondecalsarelocatednearareasofpotentialdanger.Replacedamageddecals.
Manufacturer'sMark
1.Indicatesthebladeisidentiedasapartfromtheoriginal
machinemanufacturer.
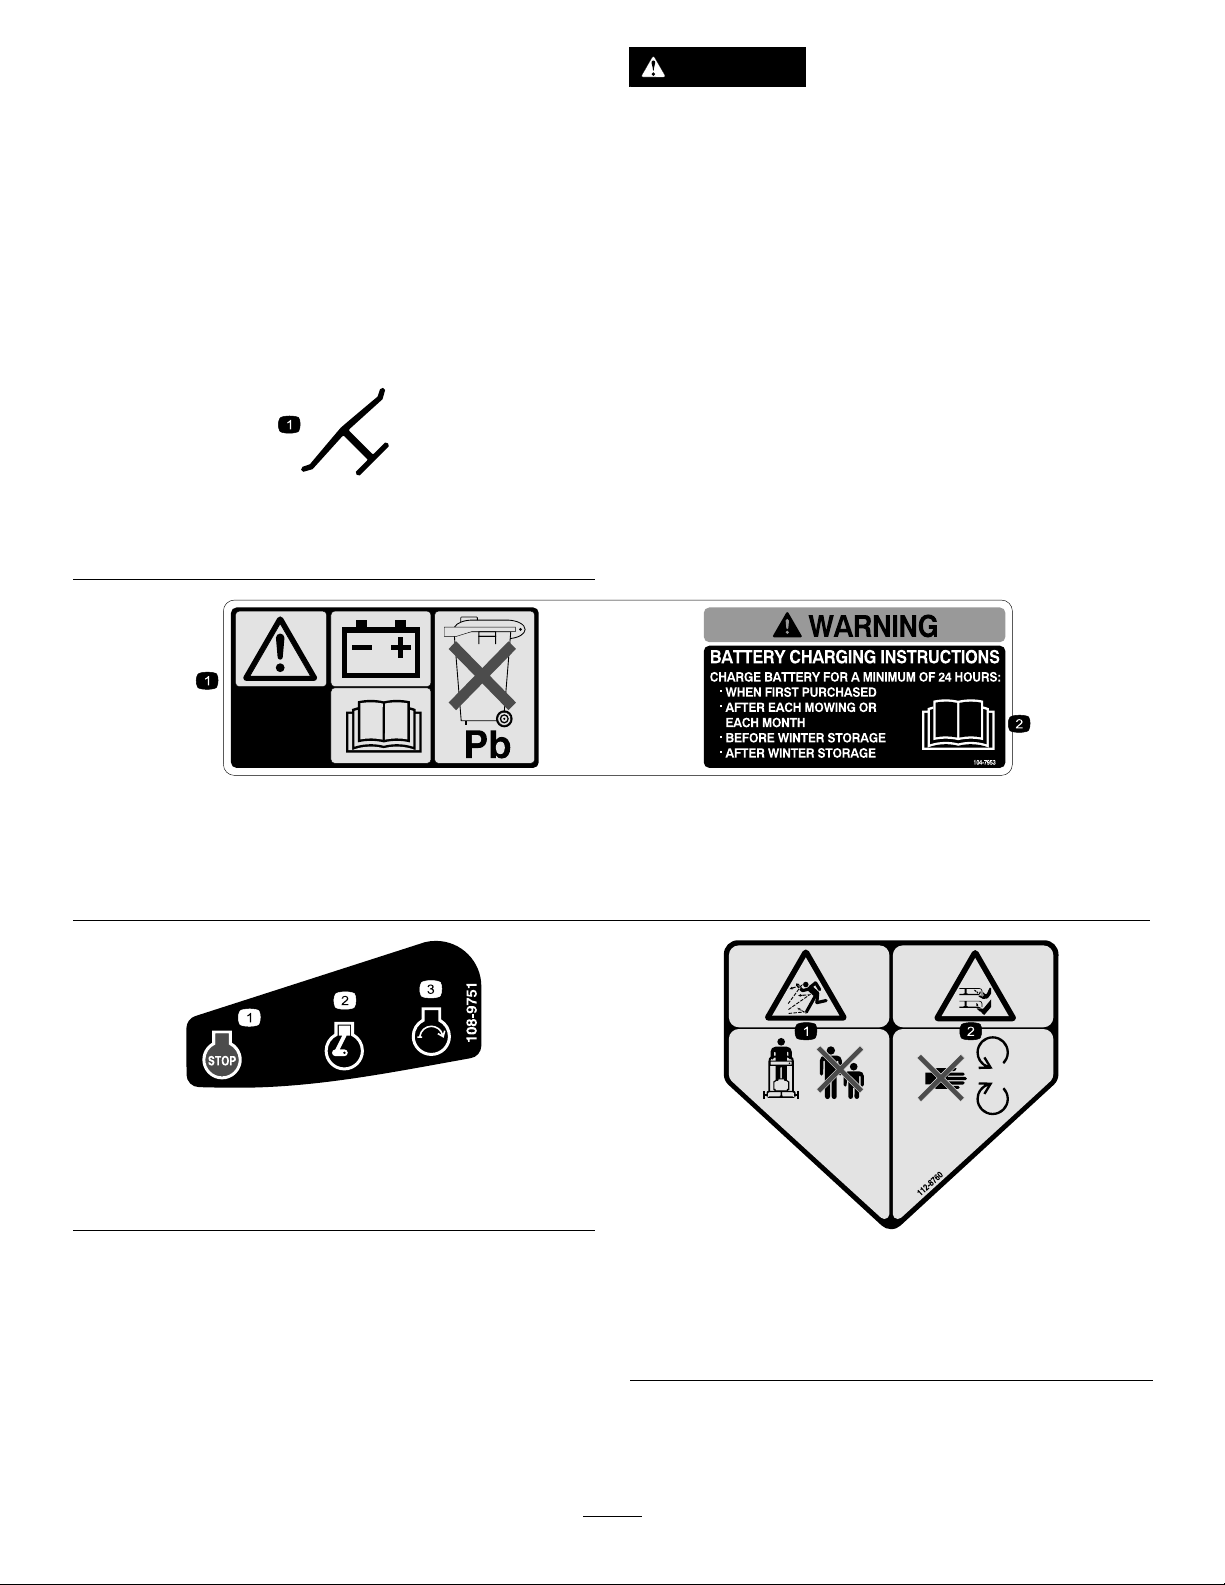
104-7953
Electric-startmodelonly
1.Warning—readtheOperator'sManualforinformationonchargingthebattery;containslead;donotdiscard.
2.ReadtheOperator'sManual.
108-9751
Electric-startmodelonly
1.Engine—stop3.Engine—start
2.Engine—run
1.Thrownobjecthazard—keepbystandersasafedistance
fromthemachine.
2.Cutting/dismembermentofhandorfoot—stayawayfrom
movingparts.
112-8760
4
Page 5
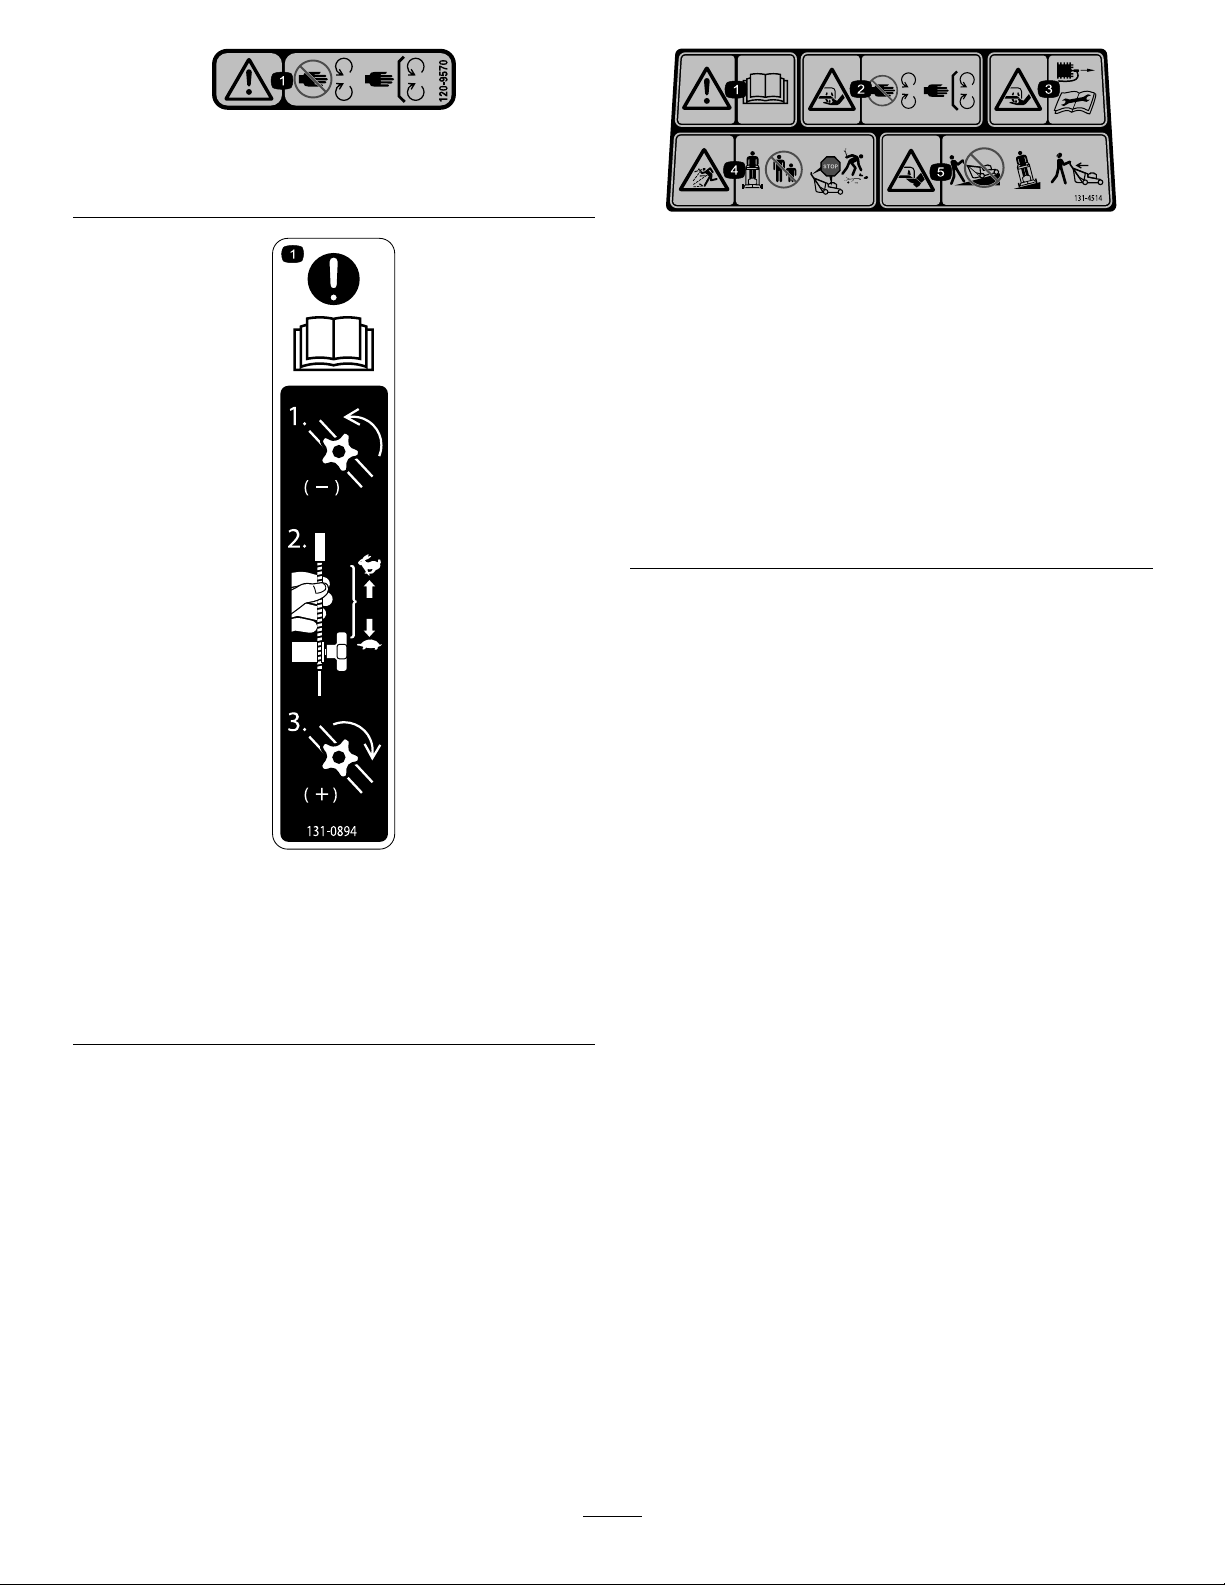
120-9570
1.Warning—stayawayfrommovingparts,keepallguards
andshieldsinplace.
131–4514
1.Warning—readtheOperator'sManual.
2.Cutting/dismembermenthazardofhandorfoot,mower
blade—stayawayfrommovingparts;keepallguardsand
shieldsinplace.
3.Cutting/dismembermenthazardofhandorfoot,mower
blade—disconnectthespark-plugwireandreadthe
instructionsbeforeservicingorperformingmaintenance.
4.Thrownobjecthazard—keepbystandersasafedistance
fromthemachine;stoptheenginebeforeleavingthe
operatingposition;pickupanydebrisbeforemowing.
5.Cutting/dismembermenthazardofhandorfoot,mower
blade—donotoperateupanddownslopes;operatesideto
sideonslopes;lookbehindyouwhenbackingup.
131-0894
TractionAdjustment
1.Attention;readtheOperator'sManual—1)Loosenthe
knobbyturningitcounterclockwise;2)Pullthecable(s)
awayfromtheenginetodecreasethetraction,orpush
thecable(s)towardtheenginetoincreasethetraction;3)
Tightentheknobbyturningitclockwise.
5
Page 6

Setup
1
G016547
2
1
G016551
Important:Removeanddiscardtheprotectiveplastic
sheetthatcoverstheengine.
1
AssemblingtheHandle
NoPartsRequired
Procedure
WARNING
Assemblingandunfoldingthehandleimproperly
candamagethecables,causinganunsafeoperating
condition.
•Donotdamagethecableswhenunfoldingthe
handle.
•Ifacableisdamaged,contactanAuthorized
ServiceDealer.
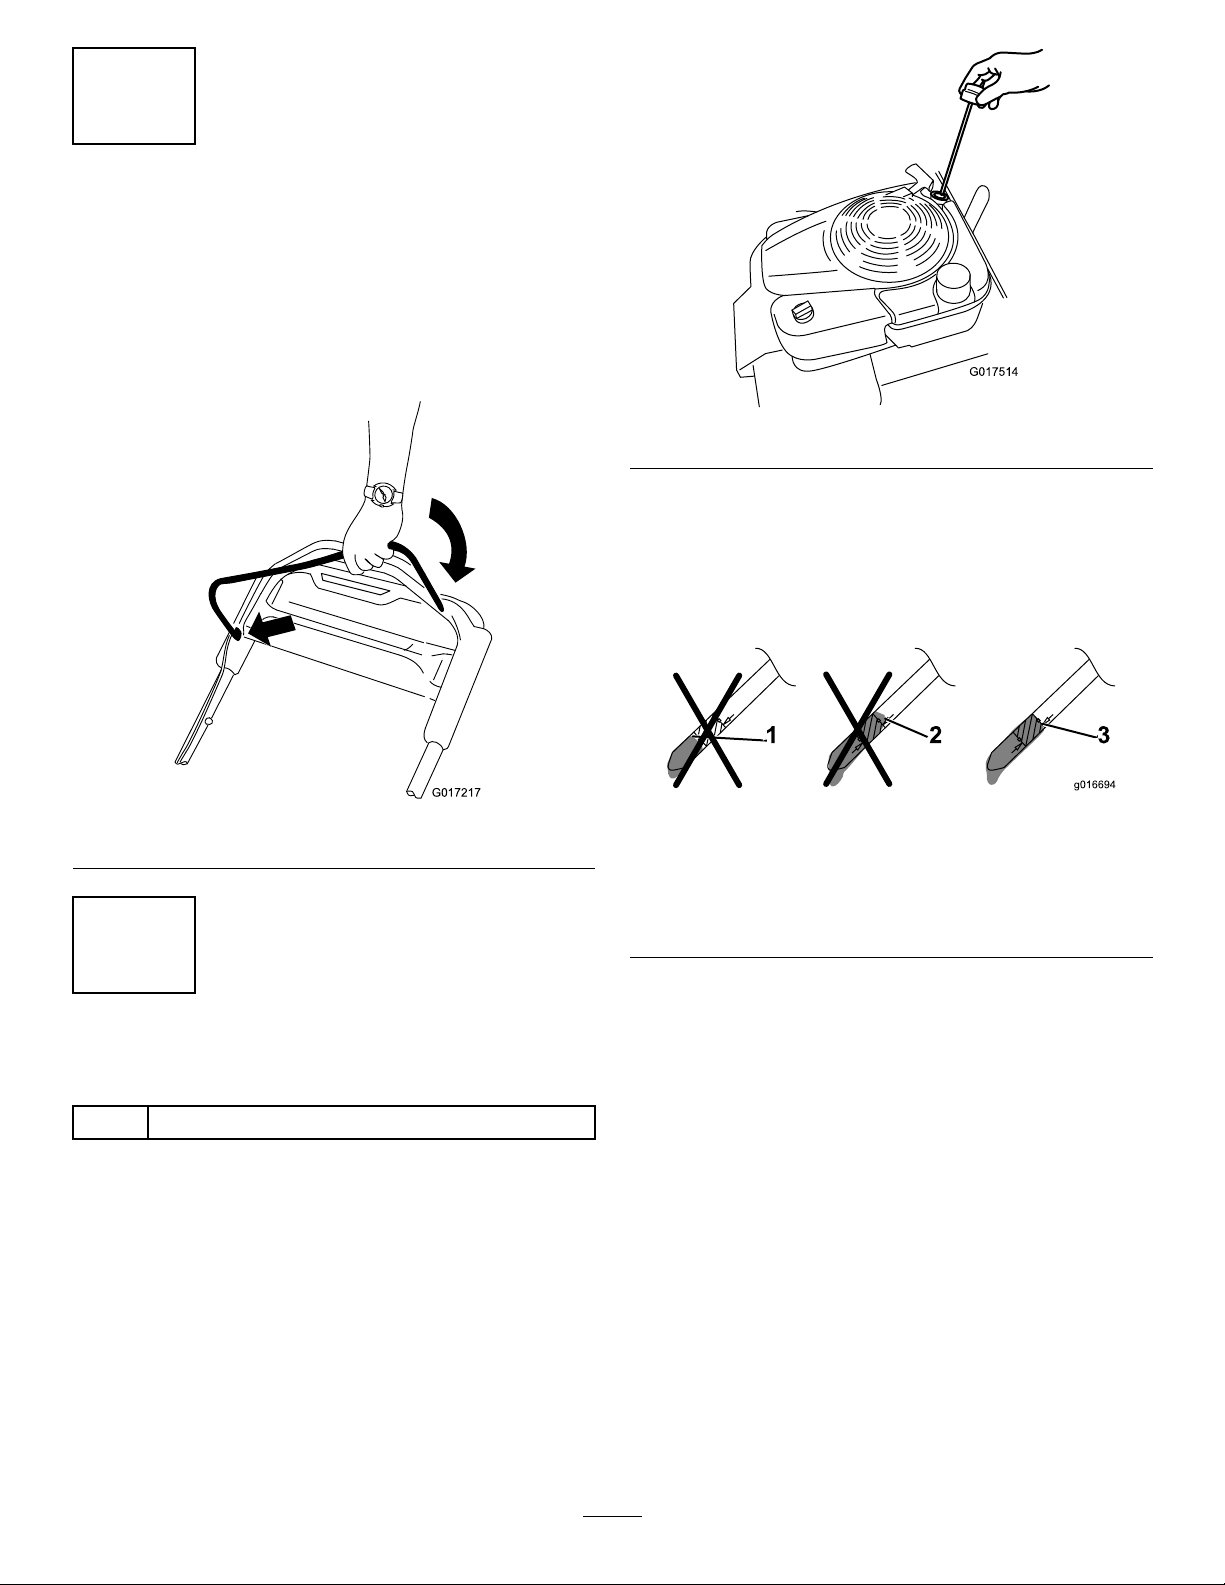
1.Rotatetheupperhandlesothatitneststogetherwith
thelowerhandle(Figure3),andtightenbothknobson
thehandletolocktheupperhandleinplace(Figure4).
Figure4
1.Handle-locklever
2.Releasethehandle-locklever(Figure4).
3.Pullthehandlerearwardandlockitintoposition
(Figure4).
Figure3
1.Upperhandle
2.Knob(2)
6
Page 7
2
G017217
G017514
InstallingtheBlade-Control Bar
NoPartsRequired
Procedure
Installtheblade-controlbarintotheupperhandle(Figure5).
Figure6
3.Wipeoffthedipstickendwithacleancloth.
4.Insertthedipstickintotheoil-lltube,andscrewit
inuntilitstops.
5.Removethedipstickandreadtheoillevelonthe
dipstick;refertoFigure7.
Figure5
3
FillingtheEnginewithOil
Partsneededforthisprocedure:
0.59LEngineoil
Procedure
Important:Thismachine
engine.Beforestartingtheengine,lltheenginewith
oil.
1.Movethemachinetoalevelsurface.
2.Removethedipstick(Figure6)andpourabout3/4of
thecrankcasecapacityofoilintotheoil-lltube.
does not
comewithoilinthe
Figure7
1.Theoillevelistoolow;
addoiltothecrankcase.
2.Theoillevelistoohigh;
removeoilfromthe
crankcase.
•Iftheoillevelistoolow,addasmallamountofoil
slowlytotheoil-lltube,andthenrepeatsteps
3through5untiltheoilleveliscorrectasshown
inFigure7.
•Iftheoillevelistoohigh,draintheexcessoiluntil
youobtainthecorrectoillevelonthedipstick.To
draintheexcessoil,refertoChangingtheEngine
Oil(page18).
Important:Iftheoillevelinthecrankcaseis
toolowortoohighandyouruntheengine,
youmaydamagetheengine.
6.Installthedipsticksecurelybyhand.
3.Theoilleveliscorrect.
Note:Max.ll:0.59L(20oz),type:SAE30
detergentoilwithanAPIserviceclassicationofSF ,
SG,SH,SJ,SL,orhigher.
7
Page 8
4
1
2
3
g027215
g027216
ChargingtheBattery
NoPartsRequired
Procedure
Electric-startmodelonly
RefertoChargingtheBattery(page19).
5
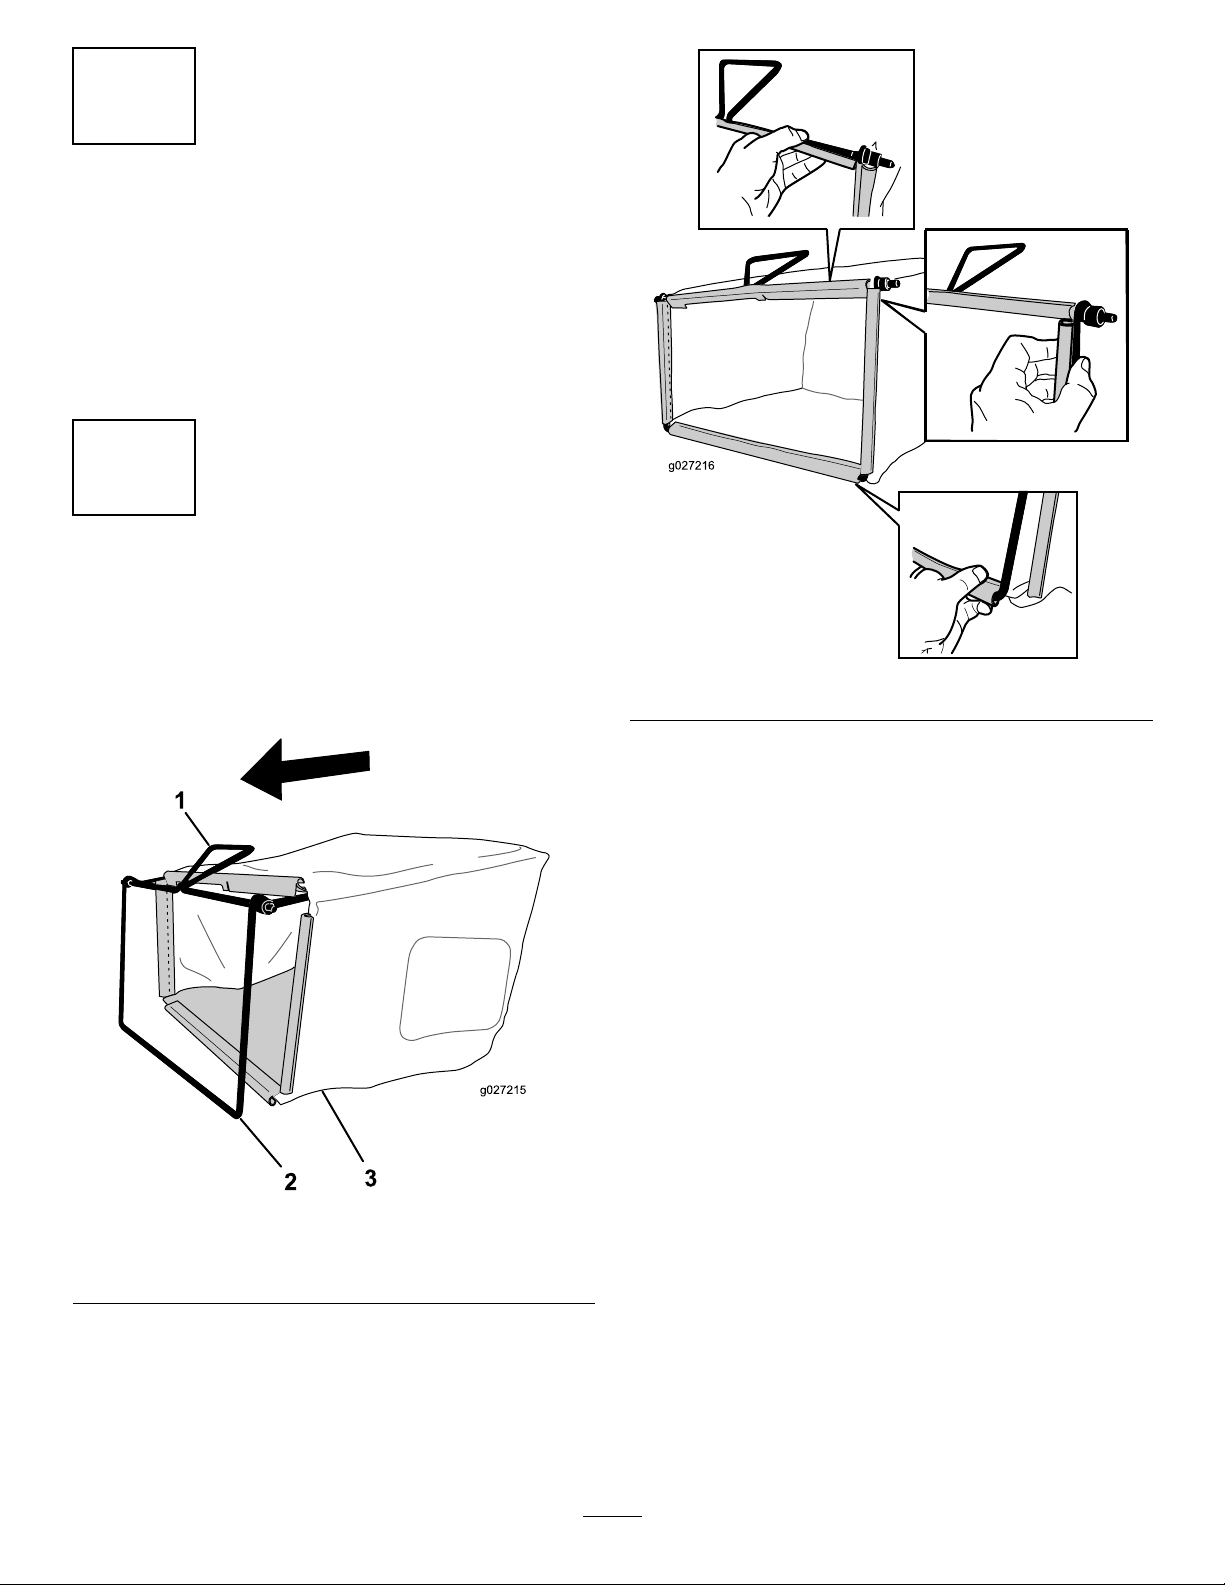
AssemblingtheGrassBag
NoPartsRequired
Procedure
1.SlipthegrassbagovertheframeasshowninFigure8.
1.Handle
2.Frame
Figure8
3.Grassbag
Figure9
3.Hookthetopandsidechannelsofthebagontothetop
andsidesoftheframe,respectively(Figure9).
Note:Donotslipthebagoverthehandle(Figure8).
2.Hookthebottomchannelofthebagontothebottom
oftheframe(Figure9).
8
Page 9
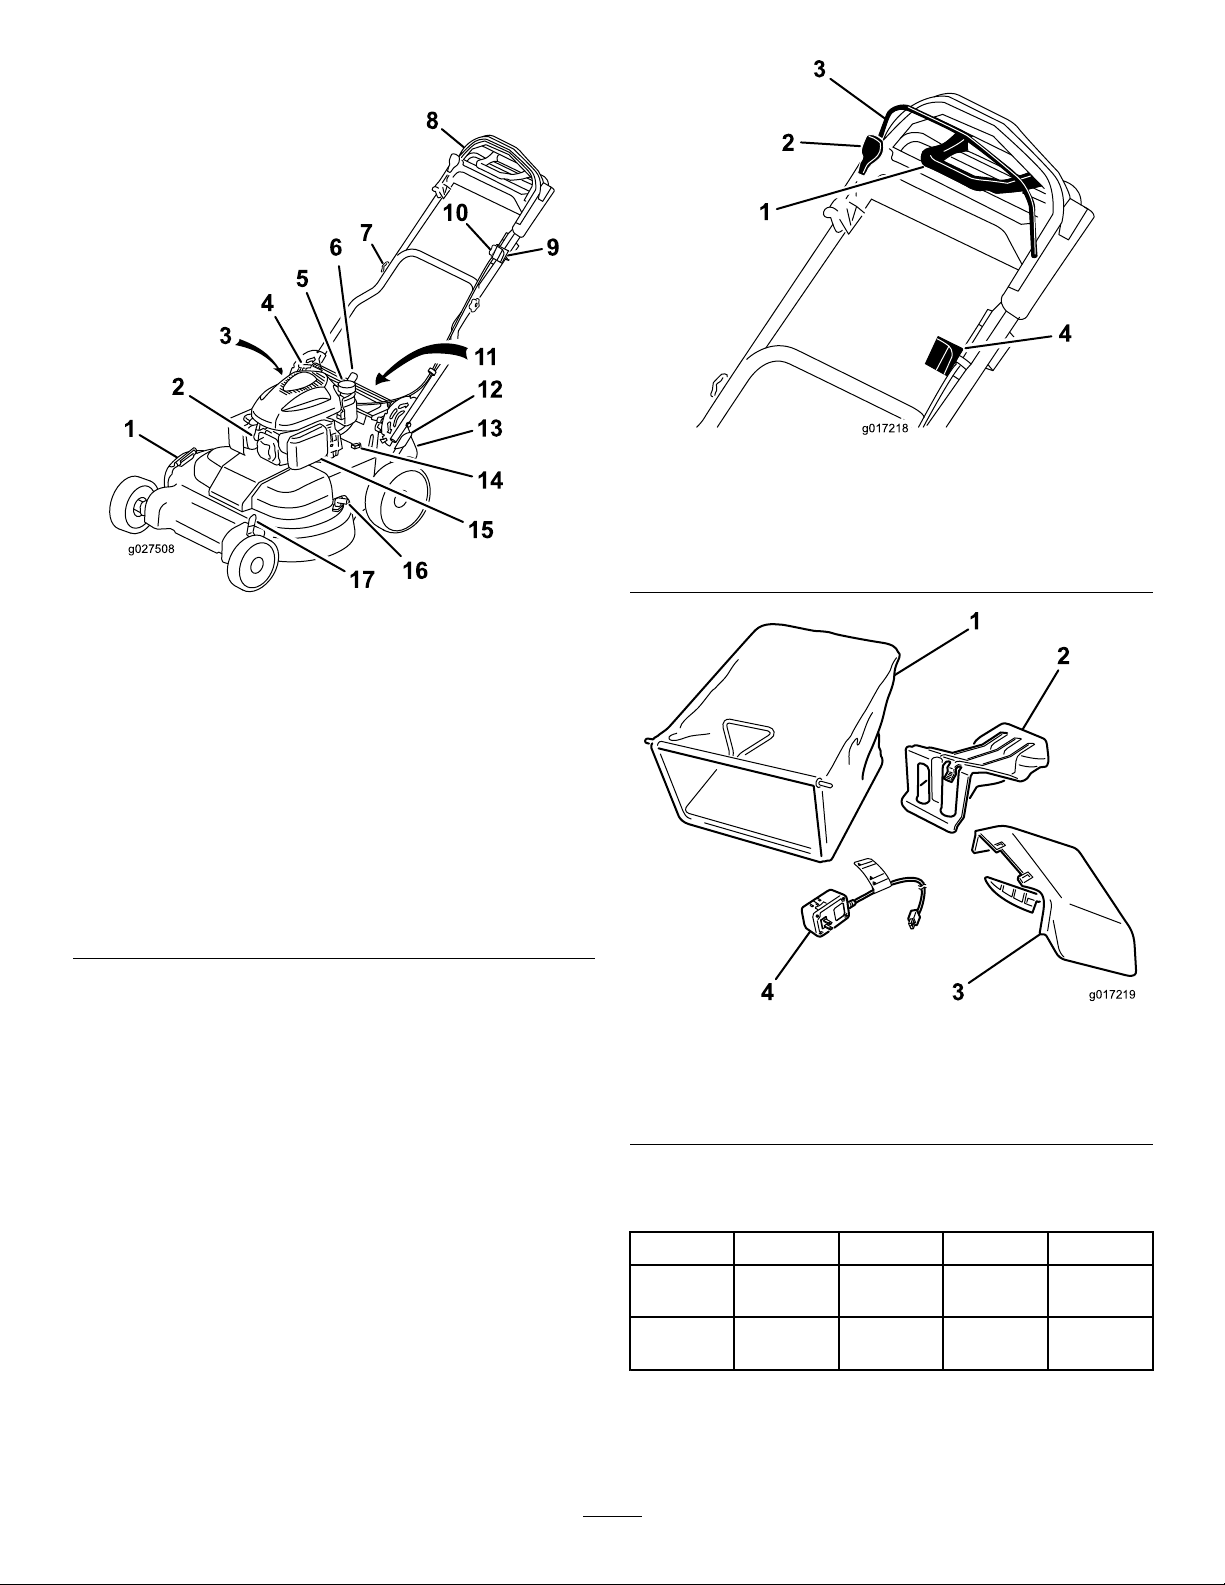
ProductOverview
2
14
1
13
3
4
5
6
7
8
9
10
11
12
15
16
17
g027508
2
1
3
4
g017218
g017219
1
2
34
Figure11
Upperhandle
1.Traction-assisthandle3.Blade-controlbar
2.Blade-controlbarlock4.Ignitionswitch
Figure10
1.Side-dischargedeector10.Adjustmentknobforthe
2.Sparkplug11.Battery(notshown;
3.Dipstick/oil-lltube(not
shown)
4.Recoil-starthandle
5.Fuel-tankcap14.Fuse
6.Handle-locklever
7.Handleknob(2)
8.Upperhandle17.Frontcutting-heightlever
9.Ignitionswitch
self-propeldrive
electric-startmodelonly)
12.Rearcutting-heightlever
13.Rear-dischargedeector
15.Airlter
16.Washoutport
Figure12
1.Grassbag3.Side-dischargechute
2.Rear-dischargeplug
(installed)
4.Batterycharger
(electric-startmodelonly)
Specications
ModelWeightLengthWidthHeight
2097562kg
(137lb)
2097765kg
(143lb)
163cm
(64in)
163cm
(64in)
81cm
(32in)
81cm
(32in)
112cm
(44in)
112cm
(44in)
9
Page 10

Operation
6 mm (1/4 inch)
g027509
G017514
FillingtheFuelTank
DANGER
Gasolineisextremelyammableandexplosive.A
reorexplosionfromgasolinecanburnyouand
others.
•Topreventastaticchargefromignitingthe
gasoline,placethecontainerand/ormachine
directlyonthegroundbeforelling,notina
vehicleoronanobject.
•Fillthetankoutdoorswhentheengineiscold.
Wipeupspills.
•Donothandlegasolinewhensmokingoraround
anopenameorsparks.
•Storegasolineinanapprovedfuelcontainer,out
ofthereachofchildren.
Figure13
•Forbestresults,useonlyclean,fresh(lessthan30days
old),unleadedgasolinewithanoctaneratingof87or
higher((R+M)/2ratingmethod).
•Oxygenatedfuelwithupto10%ethanolor15%MTBE
byvolumeisacceptable.
•Ethanol:Gasolinewithupto10%ethanol(gasohol)
or15%MTBE(methyltertiarybutylether)byvolume
isacceptable.EthanolandMTBEarenotthesame.
Gasolinewith15%ethanol(E15)byvolumeisnot
approvedforuse.Neverusegasolinethatcontainsmore
than10%ethanolbyvolume,suchasE15(contains15%
ethanol),E20(contains20%ethanol),orE85(contains
upto85%ethanol).Usingunapprovedgasolinemay
causeperformanceproblemsand/orenginedamage
whichmaynotbecoveredunderwarranty.
•Donotusegasolinecontainingmethanol.
•Donotstorefueleitherinthefueltankorinfuel
containersoverthewinterunlessafuelstabilizerisused.
•Donotaddoiltogasoline.
Fillthefueltankwithfreshunleadedregulargasolinefroma
majorname-brandservicestation(Figure13).
Important:T oreducestartingproblems,addfuel
stabilizertothefuelallseason,mixingitwithgasoline
lessthan30daysold.
CheckingtheEngine-OilLevel
ServiceInterval:Beforeeachuseordaily
Max.ll:0.59L(20oz),type:SAE30detergentoilwithan
APIserviceclassicationofSF,SG,SH,SJ,SL,orhigher.
1.Movethemachinetoalevelsurface.
2.Removethedipstick(Figure14).
Figure14
3.Wipeoffthedipstickendwithacleancloth.
4.Insertthedipstickintotheoil-lltubeandscrewitin
untilitstops.
5.Removethedipstickandreadtheoillevel;referto
Figure15.
10
Page 11

Figure15
1
2
3
4
5
6
7
G017634
1
2
3
4
5
6
7
G017635
1.Theoillevelistoolow;
addoiltothecrankcase.
2.Theoillevelistoohigh;
removeoilfromthe
crankcase.
3.Theoilleveliscorrect.
•Iftheoillevelistoolow,addasmallamountofoil
slowlytotheoil-lltube,andthenrepeatsteps
3through5untiltheoilleveliscorrectasshown
inFigure7.
•Iftheoillevelistoohigh,draintheexcessoiluntil
youobtainthecorrectoillevelonthedipstick;to
draintheexcessoil,refertoChangingtheEngine
Oil(page18).
Important:Iftheoillevelinthecrankcaseis
toolowortoohighandyouruntheengine,
youmaydamagetheengine.
6.Installthedipsticksecurelybyhand.
AdjustingtheCuttingHeight
WARNING
Figure16
Frontcutting-heightlever
1.A=10.8cm(4-1/4inches)5.E=5.7cm(2-1/4inches)
2.B=9.5cm(3-3/4inches)6.F=4.4cm(1-3/4inches)
3.C=8.3cm(3-1/4inches)7.G=3.2cm(1-1/4inches)
4.D=7.0cm(2-3/4inches)
Adjustingthecuttingheightmaybringyouinto
contactwiththemovingblades,causingserious
injury.
•Stoptheengineandwaitforallmovingparts
tostop.
•Donotputyourngersunderthehousingwhen
adjustingthecuttingheight.
Adjustthecuttingheightasdesired;refertoFigure16and
Figure17.
Note:Toraisethemachine,movethefrontandrearcutting
heightleversforward;tolowerthemachine,movethecutting
heightleversrearward.Setthefrontandrearwheelstothe
sameheightunlessspecialcircumstancesrequireotherwise;
refertoOperatingTips(page16).
Figure17
Rearcutting-heightlever
1.A=10.8cm(4-1/4inches)5.E=5.7cm(2-1/4inches)
2.B=9.5cm(3-3/4inches)6.F=4.4cm(1-3/4inches)
3.C=8.3cm(3-1/4inches)7.G=3.2cm(1-1/4inches)
4.D=7.0cm(2-3/4inches)
11
Page 12

AdjustingtheHandleHeight
2
G016488
3
1
G017516
G017595
Youcanraiseorlowerthehandletoapositionmore
comfortableforyou.
1.Pullthehandle-lockleverrearwardtodisengagethe
handle-lockpins(Figure18).
Figure18
1.Handle-locklever3.Notches
2.Handle-lockpin(2)
2.Rotatethehandleandalignthedesirednotchinthe
handlebrackettothehandle-lockpins;refertoFigure
18.
3.Releasethehandle-locklevertosecurethehandlein
place.
StartingtheEngine
StandardModel
Figure19
•Recoil-startHandle:
1.TurntheignitionkeytotheRunposition(Figure
19).
2.Pulltherecoilhandleslowlytotherearuntilyou
feelresistance,thenpullsharply .Allowtheropeto
returntotheengineslowly.
UsingtheSelf-PropelDrive
Tooperatetheself-propeldrive,simplywalkwithyourhands
grippingtheupperhandleandyourelbowsatyoursides,and
themachinewillautomaticallykeeppacewithyou(Figure20).
Note:Youcanself-propelthemachinewiththeblades
engagedordisengaged.
Pulltherecoilhandleslowlyuntilyoufeelresistance,thenpull
itsharply.Allowtheropetoreturntotheengineslowly.
Note:Ifthemachinedoesnotstartafterseveralattempts,
contactanAuthorizedServiceDealer.
Electric-startModel
Youcanstarttheengineonanelectric-startmodelbyusing
eithertheignitionkeyortherecoil-starthandle.
•IgnitionKey:TurnandholdtheignitionkeytotheStart
position(Figure19);whentheenginestarts,releasethe
key.
Important:Donotattempttostarttheenginewith
theblade-controlbarengaged;otherwise,youmay
blowthefuse.
Note:DonotholdtheignitionkeyintheStartposition
forlongerthan5secondstopreventburningoutthe
startermotor.
Figure20
Note:Usethetraction-assisthandleinsituationswhenyou
needmorecontrolthanyouhavewiththeself-propeldrive
alone.
12
Page 13

StoppingtheEngine
G017636
G017517
g016484
1
2
g016485
G017596
StandardModel
EngagingtheBlade
Whenyoustartyourengine,thebladesdonotturn.Y ou
mustengagethebladestomow.
Pressthetoggleswitch(Figure21)totheStoppositionand
holdituntiltheenginestops.
Figure21
Electric-startModel
1.TurnthekeytotheOffposition(Figure22).
1.Pulltheblade-control-barlockbacktotheblade-control
bar(Figure23).
Figure23
1.Blade-controlbarlock2.Blade-controlbar
2.Slowlypulltheblade-controlbarbacktothehandle
(Figure23).
3.Holdtheblade-controlbaragainstthehandle(Figure
24).
Figure24
DisengagingtheBlade
Releasetheblade-controlbar(Figure25).
Figure22
2.Whentheenginestops,removetheignitionkeyand
takeitwithyouwhenyouleavethemachine.
Figure25
Important:Whenyoureleasetheblade-controlbar,
thebladesshouldstopwithin3seconds.Iftheydonot
stopproperly,stopusingyourmachineimmediatelyand
contactanAuthorizedServiceDealer.
13
Page 14

CheckingtheBlade-Stop
1
2
G016490
3
RecyclingtheClippings
SystemOperation
Beforeeachuse,checkthatthebladesstopwithin3seconds
ofreleasingtheblade-controlbar.
UsingtheGrassBag
ServiceInterval:Beforeeachuseordaily
Youcanusethegrassbagtochecktheblade-stopsystem.
1.Removetherear-dischargeplug.
2.Installtheemptygrassbagonthemachine.
3.Starttheengine.
4.Engagetheblades.
Note:Thebagshouldbegintoinate,indicatingthat
thebladesarerotating.
5.Whilewatchingthebag,releasetheblade-controlbar.
Note:Ifthebagdoesnotdeatewithin3secondsof
releasingtheblade-controlbar,theblade-stopsystem
maybedeterioratingand,ifignored,couldresultin
anunsafeoperatingcondition.Havethemachine
inspectedandservicedbyanAuthorizedService
Dealer.
6.Stoptheengineandwaitforallmovingpartstostop.
Thismachinecomesfromthefactoryreadytorecyclegrass
andleafclippingsbackintothelawn.Topreparethemachine
torecycle:
•Iftheside-dischargechuteisonthemower,removeit
andlowertheside-dischargedeector;refertoRemoving
theSide-DischargeChute(page16).
•Ifthegrassbagisonthemachine,removeit;referto
RemovingtheGrassBag(page15).
•Iftherear-dischargeplugisnotinstalled,gripitbythe
handle,raisethereardeector,andinsertitintothe
rear-dischargechuteuntilthelatchlocksintoplace;refer
toFigure26.
NotUsingtheGrassBag
1.Movethemachineontoapavedsurfaceinanon-windy
area.
2.Setall4wheelstothe89mm(3-1/2inch)cutting
heightsetting.
3.Takeahalfsheetofnewspaperandcrumpleitintoa
ballsmallenoughtogounderthemachine(about75
mmor3inchesindiameter).
4.Placethenewspaperballabout13cm(5inches)in
frontofthemachine.
5.Starttheengine.
6.Engagetheblades.
7.Releasetheblade-controlbarandbegincountingout3
seconds.
8.Onthecountof3,pushthemachinequicklyforward
overthenewspaper.
9.Stoptheengineandwaitforallmovingpartstostop.
10.Gotothefrontofthemachineandcheckthe
newspaperball.
Note:Ifthenewspaperballdidnotgounderthe
machine,repeatsteps4through10.
11.Ifthenewspaperisunravelledorshredded,theblades
didnotstopproperly ,whichcouldresultinanunsafe
operatingcondition.ContactanAuthorizedService
Dealer.
Figure26
1.Reardeector
2.Inserttherear-discharge
plug
3.Therear-dischargeplug
installed
WARNING
Ensurethattherear-dischargeplugisinplace
beforeyourecycletheclippings.Neverengagethe
bladeswithouteithertherear-dischargeplugorthe
grassbaginstalled.
14
Page 15

BaggingtheClippings
1
2
G017408
3
G016513
1
2
Usethegrassbagwhenyouwanttocollectgrassandleaf
clippingsfromthelawn.
WARNING
Aworngrassbagcouldallowsmallstonesand
othersimilardebristobethrowntowardyouor
bystanders,resultinginseriouspersonalinjuryor
death.
Checkthegrassbagfrequently.Ifitisdamaged,
installanewTororeplacementbag.
Iftheside-dischargechuteisonthemower,removeitbefore
baggingtheclippings;refertoRemovingtheSide-Discharge
Chute(page16).
WARNING
Thebladesaresharp;contactingthebladescan
resultinseriouspersonalinjury.
Stoptheengineandwaitforallmovingpartstostop
beforeleavingtheoperatingposition.
InstallingtheGrassBag
1.Raiseandholdupthereardeector(Figure27).
Figure28
1.Bagrod
4.Lowerthereardeectoruntilitrestsonthegrassbag.
2.Notch(2)
RemovingtheGrassBag
Toremovethebag,reversethestepsinInstallingtheGrass
Bagabove.
Side-Dischargingthe Clippings
Usethesidedischargeforcuttingverytallgrass.
Ifthebagisonthemachine,removeitandinsertthe
rear-dischargeplug;refertoRemovingtheGrassBag(page
15)beforeside-dischargingtheclippings.
Important:Ensurethattherear-dischargeplugisin
placebeforeyourecycletheclippings(Figure26).
WARNING
Thebladeissharp;contactingthebladecanresult
inseriouspersonalinjury.
Stoptheengineandwaitforallmovingpartstostop
Figure27
1.Reardeector
2.Rear-dischargeplug
2.Removetherear-dischargeplugbypullingdownonthe
latchwithyourthumbandpullingtheplugoutfrom
themachine(Figure27).
3.Installthebagrodintothenotchesatthebaseofthe
handleandrockthebagbackandforthtoensurethat
therodisseatedatthebottomofbothnotches;refer
toFigure28.
3.Latch
beforeleavingtheoperatingposition.
InstallingtheSide-DischargeChute
Withthechuteinyourrighthand:
1.Liftopentheside-dischargedeector(Figure29).
15
Page 16

G017521
1
2
Figure29
G017522
1.Side-dischargedeector2.Side-dischargechute
2.Installtheside-dischargechuteasshowninFigure29
andFigure30,andclosethedeectorontothechute.
Figure30
RemovingtheSide-DischargeChute
Toremovetheside-dischargechute,reversethestepsin
InstallingtheSide-dischargeChuteabove.
OperatingTips
GeneralMowingTips
•Cleartheareaofloosesticks,branches,stones,wire,
twine,andotherdebristhatthebladescouldhit.
•Avoidstrikingsolidobjectswiththeblades.Never
deliberatelymowoveranyobject.
•Ifthemachinestrikesanobjectorstartstovibrate,
immediatelystoptheengine,disconnectthewirefrom
thesparkplug,andexaminethemachinefordamage.
•Forbestperformance,installnewTororeplacement
bladesforyourmodelbeforethecuttingseasonbegins.
•ReplacethebladeswhennecessarywithTororeplacement
blades.
CuttingGrass
•Cutonlyaboutathirdofthegrassbladeatatime.Do
notcutbelowthe51mm(2inch)settingunlessthegrass
issparseoritislatefallwhengrassgrowthbeginsto
slowdown.
•Whencuttinggrassover15cm(6inches)tall,mowatthe
highestcuttingheightsettingandwalkslower;thenmow
againatalowersettingforthebestlawnappearance.If
thegrassistoolong,themachinemayplugandcause
theenginetostall.
•Alternatethemowingdirection.Thishelpsdispersethe
clippingsoverthelawnforevenfertilization.
•Ifthenishedlawnappearanceisunsatisfactory,try1
ormoreofthefollowing:
–Replacethebladesorhavethemsharpened.
–Walkataslowerpacewhilemowing.
–Raisethecuttingheightonyourmachine.
–Overlapcuttingswathsinsteadofcuttingafullswath
witheachpass.
–Setthecuttingheightonthefrontwheelsanotch
lowerthantherearwheels.
–Cutthegrassmorefrequently.
•Cutonlydrygrassorleaves.Wetgrassandleavestend
toclumpontheyardandcancausethemachinetoplug
ortheenginetostall.
WARNING
Mowingwetgrassorleavescanleadtoserious
injuryifyouslipandcontacttheblade.Mow
onlyindryconditions.
CuttingLeaves
•Aftercuttingaleaf-coveredlawn,ensurethatatleasthalf
ofthelawnshowsthroughthecutleaves.Youmayneed
tomowtheleavesagain.
16
Page 17

•Iftherearemorethan13cm(5inches)ofleavesonthe
G017520
1
lawn,setthefrontcuttingheight1or2notcheshigher
thantherearcuttingheight.
•Slowdownyourmowingspeedifthemachinedoesnot
cuttheleavesnelyenough.
Maintenance
Note:Determinetheleftandrightsidesofthemachinefromthenormaloperatingposition.
RecommendedMaintenanceSchedule(s)
MaintenanceService
Interval
Aftertherst5hours
Beforeeachuseordaily
Every25hours
Every50hours
Beforestorage
Yearly
MaintenanceProcedure
•Changetheengineoil.
•Checktheengine-oillevel.
•Checktheblade-stopsystemoperation.
•Checktheaircleanerandcleanorreplaceit,ifnecessary.
•Checkthecuttingblades.
•Cleanunderthemachine.
•Chargethebattery(electric-startmodelonly).
•Changetheengineoil.
•Servicetheblade-drivesystem.
•Chargethebattery(electric-startmodelonly).
•Emptythefueltankbeforerepairsasdirectedandbeforeannualstorage.
•Servicetheairlter;replaceitmorefrequentlyindustyoperatingconditions.
•Changetheengineoil.
•Replacethebladesorhavethemsharpened(morefrequentlyifthebladeedges
dullquickly).
•Checkthesparkplug(useaChampionRC12YC,NGKBKR5SE-1 1,orequivalent);
refertotheengineowner’smanual.
•Refertoyourengineowner’smanualforadditionalmaintenanceprocedures.
Important:Refertotheengineowner’smanualforadditionalmaintenanceprocedures.
PreparingforMaintenance
1.Stoptheengineandwaitforallmovingpartstostop.
2.Disconnectthespark-plugwirefromthesparkplug
(Figure31).
Figure31
1.Spark-plugwire
Important:Beforetippingthemachinetochange
theoilorreplacetheblades,allowthefueltankto
rundrythroughnormalusage.Ifyoumusttipthe
mowerpriortorunningoutoffuel,useahandfuel
17
Page 18

pumptoremovethefuel.Alwaystipthemachine
G017216
2
1
3
4
G017281
ontoitssidesothattheairlterisupintheair.
ChangingtheEngineOil
ServiceInterval:Aftertherst5hours
WARNING
Tippingthemachinemaycausethefuelto
leak.Gasolineisammableandexplosiveand
cancausepersonalinjury.
ServicingtheAirFilter
ServiceInterval:Y early
Beforeeachuseordaily
1.Loosenthefastenerandremovethecover(Figure32).
Every50hours
Yearly
Max.ll:0.59L(20oz),type:SAE30detergentoilwithan
APIserviceclassicationofSF,SG,SH,SJ,SL,orhigher.
1.Ensurethatthefueltankcontainslittleornofuelso
thatfueldoesnotleakoutwhenyoutipthemower
ontoitsside.
2.Runtheengineafewminutesbeforechangingtheoil
towarmit.
Note:Warmoilowsbetterandcarriesmore
contaminants.
3.Disconnectthewirefromthesparkplug.Referto
PreparingforMaintenance(page17).
4.Tipthemowerontoitsside,withthedipstickdown,
untiltheupperhandlerestsontheground.
5.Setanoil-drainpanunderthedipstick.
6.Removethedipstickanddraintheusedoilintoan
oil-drainpan(Figure33).
Figure32
1.Cover
2.Fastener4.Base
2.Removeandinspectthelter.
•Ifthelterisdamagedoriswetwithoilorfuel,
replaceit.
•Ifthelterisdirty,tapitonahardsurfaceseveral
timesorblowthedebrisoutwardfromtheinterior
ofthelterusingcompressedairatlessthan207
kPa(30psi).
Note:Donotbrushorblowdirtfromtheoutside
3.Cleantheairlterbodyandcoverusingadamprag.
4.Installthelterontothebase.
5.Installthecoverandscrewthefastenerdownsecurely .
ofthelter;eitherforcesdirtintothebers.
Important:Keepdirtawayfromtheairopening.
3.Filter
Figure33
7.Afterdrainingtheusedoil,returnthemowertothe
operatingposition.
8.Removethedipstick(Figure34)andpourabout3/4of
thecrankcasecapacityofoilintotheoil-lltube.
Note:Max.ll:0.59L(20oz),type:SAE30
detergentoilwithanAPIserviceclassicationofSF ,
SG,SH,SJ,SL,orhigher.
18
Page 19

G017514
ChargingtheBattery
G017518
ServiceInterval:Every25hours
Beforestorage
Electric-startmodelonly
WARNING
Batteryposts,terminals,andrelatedaccessories
containleadandleadcompounds,chemicals
knowntotheStateofCaliforniatocausecancer
andreproductiveharm.
batter y .
W ash hands after handling
Figure34
9.Wipeoffthedipstickendwithacleancloth.
10.Insertthedipstickintotheoil-lltube,andscrewit
inuntilitstops.
11.Removethedipstickandreadtheoillevelonthe
dipstick;refertoFigure35.
Figure35
1.Theoillevelistoolow;
addoiltothecrankcase.
2.Theoillevelistoohigh;
removeoilfromthe
crankcase.
3.Theoilleveliscorrect.
•Iftheoillevelistoolow,addasmallamountofoil
slowlytotheoil-lltube,andthenrepeatsteps9
through11untiltheoilleveliscorrectasshownin
Figure35.
•Iftheoillevelistoohigh,draintheexcessoiluntil
youobtainthecorrectoillevelonthedipstick.To
draintheexcessoil,refertoChangingtheEngine
Oil(page18).
Important:Iftheoillevelinthecrankcaseis
toolowortoohighandyouruntheengine,
youmaydamagetheengine.
12.Installthedipsticksecurelybyhand.
13.Recycletheusedoil.
Chargethebatteryfor24hoursinitially,thenmonthly(every
25starts)orasneeded.Alwaysusethechargerinasheltered
area,andchargethebatteryatroomtemperature(about22°
C,or70°F)wheneverpossible.
Note:Themachineisequippedwithanalternatorcharging
system.
1.Connectthechargertothewiringharness,whichis
locatedbelowtheignitionkey(Figure36).
Figure36
2.Plugthechargerintoawalloutlet.
Note:Yourbatterychargermayhavea2-colorLEDdisplay
thatindicatesthefollowingstatesofcharging:
•Aredlightindicatesthatthechargerischargingthe
battery.
•Agreenlightindicatesthatthechargerisfullychargedor
isdisconnectedfromthebattery.
•Aashinglightthatalternatesbetweenredandgreen
indicatesthatthebatteryisnearlyfullycharged.Thisstate
lastsonlyafewminutesuntilthebatteryisfullycharged.
Note:Whenthebatterynolongerholdsacharge,recyclethe
lead-acidbatteryaccordingtolocalcodes.
19
Page 20

ReplacingtheFuse
1
g016487
AdjustingtheSelf-PropelDrive
Electric-startmodelonly
Ifthebatterydoesnotchargeortheenginedoesnotturn
withtheelectricstarter,thefusemaybeblown;replaceitwith
a40-ampplug-intypefuse.
Important:Youcannotstartthemachinewiththe
electricstarterorchargethebatteryunlessaworking
fuseisinstalled.
1.Openthesealedfuseholderandreplacethefuse
(Figure37).
Figure37
1.Fuseholder
2.Closethecovertothefuseholder,andensurethatit
issealedtightly.
Wheneveryouinstallanewself-propelcableorifthe
self-propeldriveisoutofadjustment,adjusttheself-propel
drive.
1.Turntheadjustmentknobcounterclockwisetoloosen
thecableadjustment(Figure38).
Figure38
1.Handle(leftside)
2.Adjustmentknob5.Turntheknob
3.Self-propel-drivecable
4.Turntheknobclockwiseto
tightentheadjustment.
counterclockwiseto
loosentheadjustment.
ReplacingtheBattery
Electric-startmodelonly
ContactanAuthorizedServiceDealer.
2.Adjustthetensiononthecable(Figure38)bypullingit
backorpushingitforwardandholdingthatposition.
Note:Pushthecabletowardtheenginetoincrease
thetraction;pullthecableawayfromtheengineto
decreasethetraction.
3.Turntheadjustmentknobclockwisetotightenthe
adjustmentofthecable.
Note:Tightentheknobrmlybyhand.
20
Page 21

ServicingtheBlade-Drive
g019641
1
2
3
4
5
6
7
8
g027217
1
ServicingtheCuttingBlades
System
ServiceInterval:Every50hours
1.Loosenthe2screwsonthebelt-coverpaneland
removethepanel(Figure39).
Figure39
1.Belt-tensionspring5.Blade-drivebelt
2.Adjustingbolt6.Wall
3.Gap
4.Adjustingnut8.Belt-coverpanel
2.Brushorblowoutdebrisfromtheinsideoftheshield
andaroundalltheparts.
3.Holda0.26mm(0.010inch)feelergauge,apieceof
paper,oranotecardagainstthewallandslideitdown
behindthebelttensionspring(Figure39).
7.Beltcover
ServiceInterval:Y early
Important:
blades pr oper l y
areuncomfortableperformingthisprocedure,contact
anAuthorizedServiceDealer.
Examinethebladesforsharpnessandanywearordamage
wheneveryourunoutofgasoline;refertoInspectingthe
Blades(page22).Ifthebladeedgeisdullornicked,haveit
sharpenedorreplaceit.Ifthebladeisworn,bent,damaged
orcracked,replaceitimmediatelywithagenuineToro
replacementblade.
Y ou will need a torque wr ench to install the
.Ifyoudonothaveatorquewrenchor
DANGER
Awornordamagedbladecanbreak,andapiece
ofthebladecouldbethrowntowardtheoperator
orabystander,resultinginseriouspersonalinjury
ordeath.
•Inspectthebladesperiodicallyforwearor
damage.
•Replaceawornordamagedblade.
Note:Maintainsharpbladesthroughoutthecuttingseason,
becausesharpbladescutcleanlywithouttearingorshredding
thegrassblades.Tearingandshreddingturnsgrassbrownat
theedges,whichslowsgrowthandincreasesthechanceof
disease.
PreparingtoServicetheCuttingBlades
1.Lockthehandleintheverticalposition(Figure40);
refertoAdjustingtheHandleHeight(page12).
Note:Ifthereisavisiblegapbetweenthegaugeand
thespring,tightentheadjustingboltandthenutuntil
thepaperbarelyslidesfreelyinandoutofthegap
(Figure39).
Important:Donotovertightentheadjustingbolt.
Thiscoulddamagetheblade-drivebelt.
4.Installthebelt-coverpanel.
Figure40
1.Handlelockedintheverticalposition
21
Page 22

2.Tipthemachineontoitsside,withtheairlterupin
g017223
B
B
2
1
3
g016532
theair,untiltheupperhandlerestsontheground.
WARNING
Thebladesaresharp;contactingabladecould
resultinseriouspersonalinjury.
•Disconnectthewirefromthesparkplug .
•Weargloveswhenservicingtheblade.
InspectingtheBlades
ServiceInterval:Beforeeachuseordaily
1.Inspectthecuttingedges(Figure41).Iftheedgesare
notsharporhavenicks,removethebladesandhave
themsharpenedorreplacethem.
2.Inspectthebladesthemselves,especiallythecurved
area(Figure41).
Figure42
1.Frontofcuttingdeck3.Measurefromthecutting
edgetoasmooth,level
surface
2.MeasureatlocationsA
andB
Figure41
1.Cuttingedge3.Wear/slotforming
2.Curvedarea4.Crack
Note:Ifyounoticeanydamage,wear,oraslot
forminginthisarea(Figure41),immediatelyreplace
itwithanewblade.
DANGER
Ifyouallowabladetowear,aslotwillform
betweenthesailandatpartoftheblade.
Eventuallyapieceoftheblademaybreak
offandbethrownfromunderthehousing,
possiblyresultinginseriousinjurytoyouor
bystanders.
•Inspectthebladeperiodicallyforwearor
damage.
•Nevertrytostraightenabladethatisbent
orweldabrokenorcrackedblade.
•Replaceawornordamagedblade.
3.Checkforbentblades;refertoCheckingforBent
Blades(page22).
2.Measurefromalevelsurfacetothecuttingedges
atlocationsAandB,(Figure42),andrecordboth
dimensions.
3.Rotatethebladessothattheiroppositeendsareat
locationsAandB.
4.Repeatthemeasurementsinstep2andrecordthem.
Note:Ifthedifferencebetweenthedimensions
AandBobtainedinsteps2and4exceeds3mm
(1/8inch),thebladeisbentandmustbereplaced;
refertoRemovingtheBlades(page22)andInstalling
theBlades(page23).
WARNING
Abladethatisbentordamagedcouldbreak
apartandcouldseriouslyinjureorkillyouor
bystanders.
•Alwaysreplaceabentordamagedblade
withanewblade.
•Neverleorcreatesharpnotchesinthe
edgesorsurfacesofablade.
RemovingtheBlades
Replacethebladeswhenthemachinehitsasolidobjector
whenabladeisoutofbalanceorbent.Useonlygenuine
Tororeplacementblades.
CheckingforBentBlades
1.Rotatethebladesuntiltheyarepositionedasshown
inFigure42.
1.Useablockofwoodtoholdeachbladesteadyandturn
thebladeboltcounterclockwiseasshowninFigure43.
22
Page 23

Figure43
G016530
1
2
3
4
g016537
1
G016536
2.RemoveeachbladeasshowninFigure44.
2.Steadyeachbladewithaboardandturnthebladebolt
clockwisewithatorquewrenchasshowninFigure45;
torquethebladeboltto82N-m(60ft-lb).
Important:Abolttorquedto82N-m(60ft-lb)is
verytight.Putyourweightbehindthewrenchand
tightentheboltsecurely.Thisboltisverydifcult
toovertighten.
Figure45
3.Rotatetheinstalledblade1/4turnuntilitisvertical,
andinstalltheotherbladeinthesamemannerasthe
rst(refertostep1).
Note:Thebladesshouldbeperpendicular,forming
aninverted“T”asshowninFigure46.
Figure44
1.Spindle(2)3.Blade(2)
2.Bladedriver(2)4.Bladebolt(2)
3.Inspectthepinsonthebladedriversforwearand
damage.
InstallingtheBlades
1.Installtherstbladesothatitishorizontal,alongwith
allmountinghardwareasshowninFigure44.
Note:Tightentheboltwithyourngers.
1.Blade(2)
Important:Positionthecurvedendsoftheblades
4.Tightenthesecondblade;refertostep2.
topointtowardthemachinehousing.
Besuretonesttheraisedareasoneachbladedriver
withtherecessesintheheadofitscorresponding
spindle,andthepinsontheothersideofeach
bladedriverwiththeholesinitscorresponding
blade.
5.Rotatethebladesbyhandafull360°turntoensure
thattheydonottouch.
Note:Ifthebladestoucheachother,theyarenot
mountedcorrectly.Repeatsteps1through3untilthe
bladesnolongertoucheachother.
Figure46
23
Page 24

WARNING
WARNING
Incorrectlyinstallingthebladescoulddamage
themachineorcauseaninjurytotheoperator
ortobystanders.
CleaningundertheMachine
ServiceInterval:Beforeeachuseordaily—Cleanunderthe
machine.
1.Movethemachinetoalevelsurface.
2.Stoptheengineandwaitforallmovingpartstostop
beforeleavingtheoperatingposition.
3.Lowerthemachinetothelowestheight-of-cut.
4.Attachahosetothewashouttting,andturnthewater
onhigh(Figure47).
Note:Spreadpetroleumjellyonthewashouttting
O-ringtomakethecouplingslideoneasierandprotect
theO-ring.
Abrokenormissingwashoutttingcould
exposeyouandotherstothrownobjectsor
bladecontact.Contactwithabladeorthrown
debriscancauseinjuryordeath.
•Replaceabrokenormissingwashout
ttingimmediately,beforeusingthe
machineagain.
•Neverputyourhandsorfeetunderthe
machineorthroughopeningsinthe
machine.
Figure47
1.Washouttting3.O-ring
2.Hose
5.Starttheengine,engagetheblade-controllever,andlet
themachinerunfor1to3minutes.
6.Disengagetheblade-controllever,stoptheengine,and
waitforallmovingpartstostop.
7.Shutoffthewaterandremovethecouplingfromthe
washouttting.
Note:Ifthemachineisnotcleanafterasingle
washing,soakitandletitstandfor30minutes.Then
repeattheprocess.
8.Runthemachineagainandengagethebladesfor1to3
minutestoremovetheexcesswater.
4.Coupling
24
Page 25

Storage
Storethemachineinacool,clean,dryplace.
GeneralInformation
1.Performtherecommendedannualmaintenance
procedures;refertoMaintenance(page17).
2.Cleanunderthemachine;refertoCleaningunderthe
Machine(page24).
3.Removechaff,dirt,andgrimefromtheexternalparts
oftheengine,theshrouding,andthetopofthe
machine.
PreparingtheEngine
1.Whiletheengineisstillwarm,changetheengineoil;
refertoChangingtheEngineOil(page18).
2.Removethesparkplug.
3.Usinganoilcan,addabout30ml(1oz),ofmotoroil
totheenginethroughthespark-plughole.
4.Slowlypullthestarterropeseveraltimestodistribute
oilthroughoutthecylinder.
5.Installthesparkplugbutdonotconnectthewireto
thesparkplug.Securethewiresothatitdoesnotcome
intocontactwiththesparkplug.
4.Checktheconditionoftheblades;refertoInspecting
theBlades(page22).
5.Servicetheairlter;refertoServicingtheAirFilter
(page18).
6.Tightenallnuts,bolts,andscrews.
7.Touchupallrustedorchippedpaintsurfaceswith
paintavailablefromanAuthorizedServiceDealer.
8.Chargethebatteryfor24hours,thenunplugthe
batterychargerandstorethemachineinanunheated
area.Ifyoumuststorethemachineinaheatedarea,
youmustchargethebatteryevery90days(electric-start
modelonly).
9.Foldthehandleforstorage;refertoAdjustingthe
HandleHeight(page12).
PreparingtheFuelSystem
WARNING
Gasolinecanvaporizeifyoustoreitoverlong
periodsoftimeandexplodeifitcomesintocontact
withanopename.
•Donotstoregasolineoverlongperiodsoftime.
RemovingtheMachinefrom Storage
1.Unfoldthehandle;refertoAdjustingtheHandle
Height(page12).
2.Checkandtightenallfasteners.
3.Removethesparkplugandspintheenginerapidly
usingthestartertoblowexcessoilfromthecylinder.
4.Inspectthesparkplugandreplaceitifitisdirty,worn,
orcracked;refertotheengineowner’smanual.
5.Installthesparkplugandtightenittotherecommended
torqueof20N-m(180in-lb).
6.Performanyneededmaintenanceprocedures;referto
Maintenance(page17).
7.Checktheengineoillevel;refertoCheckingthe
Engine-OilLevel(page10).
8.Fillthefuelinthefueltankwithfreshgasoline;refer
toFillingtheFuelTank(page10).
9.Chargethebattery(electric-startmodelonly);referto
ChargingtheBattery(page19).
10.Connectthewiretothesparkplug.
•Donotstorethemachinewithgasolineinthe
fueltankorthecarburetorinanenclosurewith
anopename.(Forexample,afurnaceora
waterheaterpilotlight.)
•Allowtheenginetocoolbeforestoringitinany
enclosure.
Onthelastrefuelingoftheyear,addfuelstabilizertothefuel
asdirectedbytheenginemanufacturer.Emptythefueltank
whenmowingthelasttimebeforestoringthemachine.
1.Runthemachineuntiltheenginestopsfromrunning
outoffuel.
2.Starttheengineagain.
3.Allowtheenginetorununtilitstops.Whenyoucan
nolongerstarttheengine,itissufcientlydry.
25
Page 26

Notes:
26
Page 27

InternationalDistributorList
Distributor:
AgrolancKft
BalamaPrimaEngineeringEquip.HongKong85221552163
B-RayCorporation
CascoSalesCompany
CeresS.A.CostaRica
CSSCTurfEquipment(pvt)Ltd.SriLanka
CyrilJohnston&Co.
CyrilJohnston&Co.RepublicofIreland
EquiverMexico525553995444ParklandProductsLtd.NewZealand6433493760
FemcoS.A.Guatemala
ForGarderOU
G.Y .K.CompanyLtd.
GeomechanikiofAthensGreece
GolfinternationalTurizm
GuandongGoldenStarChina
HakoGroundandGardenSweden
HakoGroundandGarden
HayterLimited(U.K.)
HydroturfInt.CoDubai
HydroturfEgyptLLC
IrrimacPortugal351212388260T oroEuropeNVBelgium3214562960
IrrigationProductsInt'lPvtLtd.India0091442449
JeanHeybroekb.v .Netherlands3130639461 1VictusEmakPoland48618238369
Country:
Hungary3627539640
Korea82325512076
PuertoRico7877888383
NorthernIreland442890813121
Estonia3723846060
Japan81726325861
Turkey902163365993Riversa
Norway4722907760
UnitedKingdom441279723444
UnitedArabEmirates97143479479T-MarktLogisticsLtd.Hungary3626525500
Egypt2025194308ToroAustraliaAustralia61395807355
PhoneNumber:Distributor:
5062391138
94112746100
442890813121
5024423277
30109350054
862087651338
4635100000
4387
Country:
MaquiverS.A.Colombia
MaruyamaMfg.Co.Inc.
Mountelda.s.CzechRepublic
Mountelda.s.Slovakia
MunditolS.A.
NormaGarden
OslingerTurfEquipmentSA
OyHakoGroundandGarden
Ab
Perfetto
PratoverdeSRL.
Prochaska&Cie
RTCohen2004Ltd.
LelyTurfcare
SolvertS.A.S.
SpyprosStavrinidesLimitedCyprus
SurgeSystemsIndiaLimited
ValtechMorocco21253766
Japan81332522285
Argentina54114821
Russia749541 16120
Ecuador59342396970
Finland35898700733
Poland48618208416
Italy390499128
Austria4312785100
Israel97298617979
Spain
Denmark4566109200
France331308177
India911292299901
Phone
Number:
5712364079
420255704
220
420255704
220
9999
128
34952837500
00
35722434131
3636
EuropeanPrivacyNotice
TheInformationT oroCollects
ToroWarrantyCompany(Toro)respectsyourprivacy.Inordertoprocessyourwarrantyclaimandcontactyouintheeventofaproductrecall,weaskyou
tosharecertainpersonalinformationwithus,eitherdirectlyorthroughyourlocalT orocompanyordealer.
TheTorowarrantysystemishostedonserverslocatedwithintheUnitedStateswhereprivacylawmaynotprovidethesameprotectionasapplies
inyourcountry.
BYSHARINGYOURPERSONALINFORMA TIONWITHUS,YOUARECONSENTINGTOTHEPROCESSINGOFYOURPERSONALINFORMATION
ASDESCRIBEDINTHISPRIV ACYNOTICE.
TheWayToroUsesInformation
Toromayuseyourpersonalinformationtoprocesswarrantyclaims,tocontactyouintheeventofaproductrecallandforanyotherpurposewhichwetell
youabout.T oromayshareyourinformationwithToro'safliates,dealersorotherbusinesspartnersinconnectionwithanyoftheseactivities.Wewillnot
sellyourpersonalinformationtoanyothercompany .Wereservetherighttodisclosepersonalinformationinordertocomplywithapplicablelawsand
withrequestsbytheappropriateauthorities,tooperateoursystemsproperlyorforourownprotectionorthatofotherusers.
RetentionofyourPersonalInformation
Wewillkeepyourpersonalinformationaslongasweneeditforthepurposesforwhichitwasoriginallycollectedorforotherlegitimatepurposes
(suchasregulatorycompliance),orasrequiredbyapplicablelaw.
Toro'sCommitmenttoSecurityofY ourPersonalInformation
Wetakereasonableprecautionsinordertoprotectthesecurityofyourpersonalinformation.Wealsotakestepstomaintaintheaccuracyandcurrent
statusofpersonalinformation.
AccessandCorrectionofyourPersonalInformation
Ifyouwouldliketorevieworcorrectyourpersonalinformation,pleasecontactusbyemailatlegal@toro.com.
AustralianConsumerLaw
AustraliancustomerswillnddetailsrelatingtotheAustralianConsumerLaweitherinsidetheboxoratyourlocalToroDealer.
374-0269RevH
Page 28

TheToroWarranty
TheToroGTSStartingGuarantee
ResidentialProducts
and
ConditionsandProductsCovered
TheT oroCompanyanditsafliate,T oroWarrantyCompany ,pursuant
toanagreementbetweenthem,jointlypromisetorepairfortheoriginal
purchaser
workmanshiporiftheT oroGTS(GuaranteedtoStart)enginewillnotstart
ontherstorsecondpull,providedtheroutinemaintenancerequiredinthe
Operator'sManualhavebeenperformed.
Thefollowingtimeperiodsapplyfromthedateofpurchase:
ProductsWarrantyPeriod
WalkPowerMowers
•CastDeck
•Engine
•Battery2years
•SteelDeck
•Engine
TimeMasterMowers3yearsResidentialUse
•Engine
•Battery2years
ElectricHandHeldProducts2yearsResidentialUse
Snowthrowers
•SingleStage
•Engine
•TwoStage
•Chute,chutedeectorand
impellerhousingcover
ElectricSnowthrowers
AllRide-OnUnitsBelow
•Engine
•Battery2yearsResidentialUse
•Attachments2yearsResidentialUse
DHLawn&GardenTractors
XLSLawn&GardenTractors
TimeCutter
TITANMowers3yearsor240hours
•Frame
1
OriginalPurchasermeansthepersonwhooriginallypurchasedtheToroProduct.
2
Residentialusemeansuseoftheproductonthesamelotasyourhome.Useatmorethanone
locationisconsideredcommercialuseandthecommercialusewarrantywouldapply .
3
TheToroGTSStartingGuaranteedoesnotapplywhentheproductisusedcommercially.
4
SomeenginesusedonToroProductsarewarrantedbytheenginemanufacturer.
5
Whicheveroccursrst.
6
LifetimeFrameWarranty-Ifthemainframe,consistingofthepartsweldedtogethertoformthe
tractorstructurethatothercomponentssuchastheenginearesecuredto,cracksorbreaksin
normaluse,itwillberepairedorreplaced,atToro'soption,underwarrantyatnocostforpartsand
labor.Framefailureduetomisuseorabuseandfailureorrepairrequiredduetorustorcorrosion
arenotcovered.
Warrantymaybedeniedifthehourmeterisdisconnected,altered,or
showssignsofbeingtamperedwith.
1
theT oroProductlistedbelowifdefectiveinmaterialsor
5yearsResidentialUse
90DaysCommercialUse
5yearsGTSGuarantee,
ResidentialUse
3
2yearsResidentialUse
30DaysCommercialUse
2yearsGTSGuarantee,
ResidentialUse
3
90DaysCommercialUse
3yearsGTSGuarantee,
ResidentialUse
3
NoWarrantyforCommercialUse
2yearsResidentialUse
45DaysCommercialUse
2yearsGTSGuarantee,
ResidentialUse
3
3yearsResidentialUse
45DaysCommercialUse
Lifetime(originalowneronly)
2yearsResidentialUse
NoWarrantyforCommercialUse
Seeenginemanufacturer'swarranty
2yearsResidentialUse
30DaysCommercialUse
3yearsResidentialUse
30DaysCommercialUse
3yearsResidentialUse
30DaysCommercialUse
5
Lifetime(originalowneronly)
2
2
2
2
2
2
5
2
2
2
2
2
2
6
OwnerResponsibilities
YoumustmaintainyourT oroProductbyfollowingthemaintenance
proceduresdescribedintheOperator'sManual.Suchroutinemaintenance,
whetherperformedbyadealerorbyyou,isatyourexpense.
InstructionsforObtainingWarrantyService
IfyouthinkthatyourToroProductcontainsadefectinmaterialsor
workmanship,followthisprocedure:
1.Contactyoursellertoarrangeserviceoftheproduct.Ifforany
reasonitisimpossibleforyoutocontactyourseller ,youmaycontact
anyT oroAuthorizedDistributortoarrangeservice.Seeattached
DistributorList.
2.Bringtheproductandyourproofofpurchase(salesreceipt)tothe
servicingoutlet.Ifforanyreasonyouaredissatisedwiththeservicing
outlet’sanalysisorwiththeassistanceprovided,contactusat:
ToroCustomerCareDepartment,RLCDivision
ToroWarrantyCompany
811 1LyndaleAvenueSouth
Bloomington,MN55420-1 196
001–952–948–4707
ItemsandConditionsNotCovered
Thereisnootherexpresswarrantyexceptforspecialemissionsystem
coverageandenginewarrantycoverageonsomeproducts.Thisexpress
warrantydoesnotcoverthefollowing:
•Costofregularmaintenanceserviceorparts,suchaslters,fuel,
lubricants,oilchanges,sparkplugs,airltersbladesharpeningorworn
blades,cable/linkageadjustments,orbrakeandclutchadjustments
•Componentsfailingduetonormalwear
•Anyproductorpartwhichhasbeenalteredormisusedorneglected
andrequiresreplacementorrepairduetoaccidentsorlackofproper
maintenance
•Pickupanddeliverycharges
•RepairsorattemptedrepairsbyanyoneotherthananAuthorizedT oro
ServiceDealer
•Repairsnecessaryduetofailuretofollowrecommendedfuel
4
procedure(consultOperator'sManualformoredetails)
–Removingcontaminantsfromthefuelsystemisnotcovered
–Useofoldfuel(morethanonemonthold)orfuelwhichcontains
morethan10%ethanolormorethat15%MTBE
–Failuretodrainthefuelsystempriortoanyperiodofnon-use
overonemonth
•Repairsoradjustmentstocorrectstartingdifcultiesduetothe
following:
–Failuretofollowpropermaintenanceproceduresorrecommended
fuelprocedure
–Rotarymowerbladestrikinganobject
•Specialoperationalconditionswherestartingmayrequiremorethan
twopulls:
–Firsttimestartsafterextendedperiodofnon-useoverthree
monthsorseasonalstorage
–Cooltemperaturestartssuchasthosefoundinearlyspringand
lateautumn
–Improperstartingprocedures-ifyouarehavingdifcultystarting
yourunit,pleasechecktheOperator'sManualtoensurethat
youareusingthecorrectstartingprocedures.Thiscansavean
unnecessaryvisittoanAuthorizedT oroServiceDealer .
GeneralConditions
Thepurchaseriscoveredbythenationallawsofeachcountry .Therights
towhichthepurchaserisentitledwiththesupportoftheselawsarenot
restrictedbythiswarranty.
374-0268RevF
 Loading...