

Page 1

FormNo.3418-460RevB
55cmRecycler®LawnMower
20964
Recycler®Rasenmäher(55
cm)
20964
TondeuseRecycler®55cm
20964
TosaerbaRecycler®da55cm
20964
55cmRecycler®gazonmaaier
20964
www.T oro.com.
*3418-460*B
Page 2
55cmRecycler
ModelNo.20964—SerialNo.400000000andUp
®
Introduction
Thisrotary-blade,walk-behindlawnmowerisintended
tobeusedbyresidentialhomeowners.Itisdesigned
primarilyforcuttinggrassonwell-maintainedlawns
onresidentialproperties.Itisnotdesignedforcutting
brushorforagriculturaluses.
Readthisinformationcarefullytolearnhowtooperate
andmaintainyourproductproperlyandtoavoid
injuryandproductdamage.Youareresponsiblefor
operatingtheproductproperlyandsafely.
YoumaycontactT orodirectlyatwww.T oro.comfor
productandaccessoryinformation,helpndinga
dealer,ortoregisteryourproduct.
Wheneveryouneedservice,genuineToroparts,or
additionalinformation,contactanAuthorizedService
DealerorToroCustomerServiceandhavethemodel
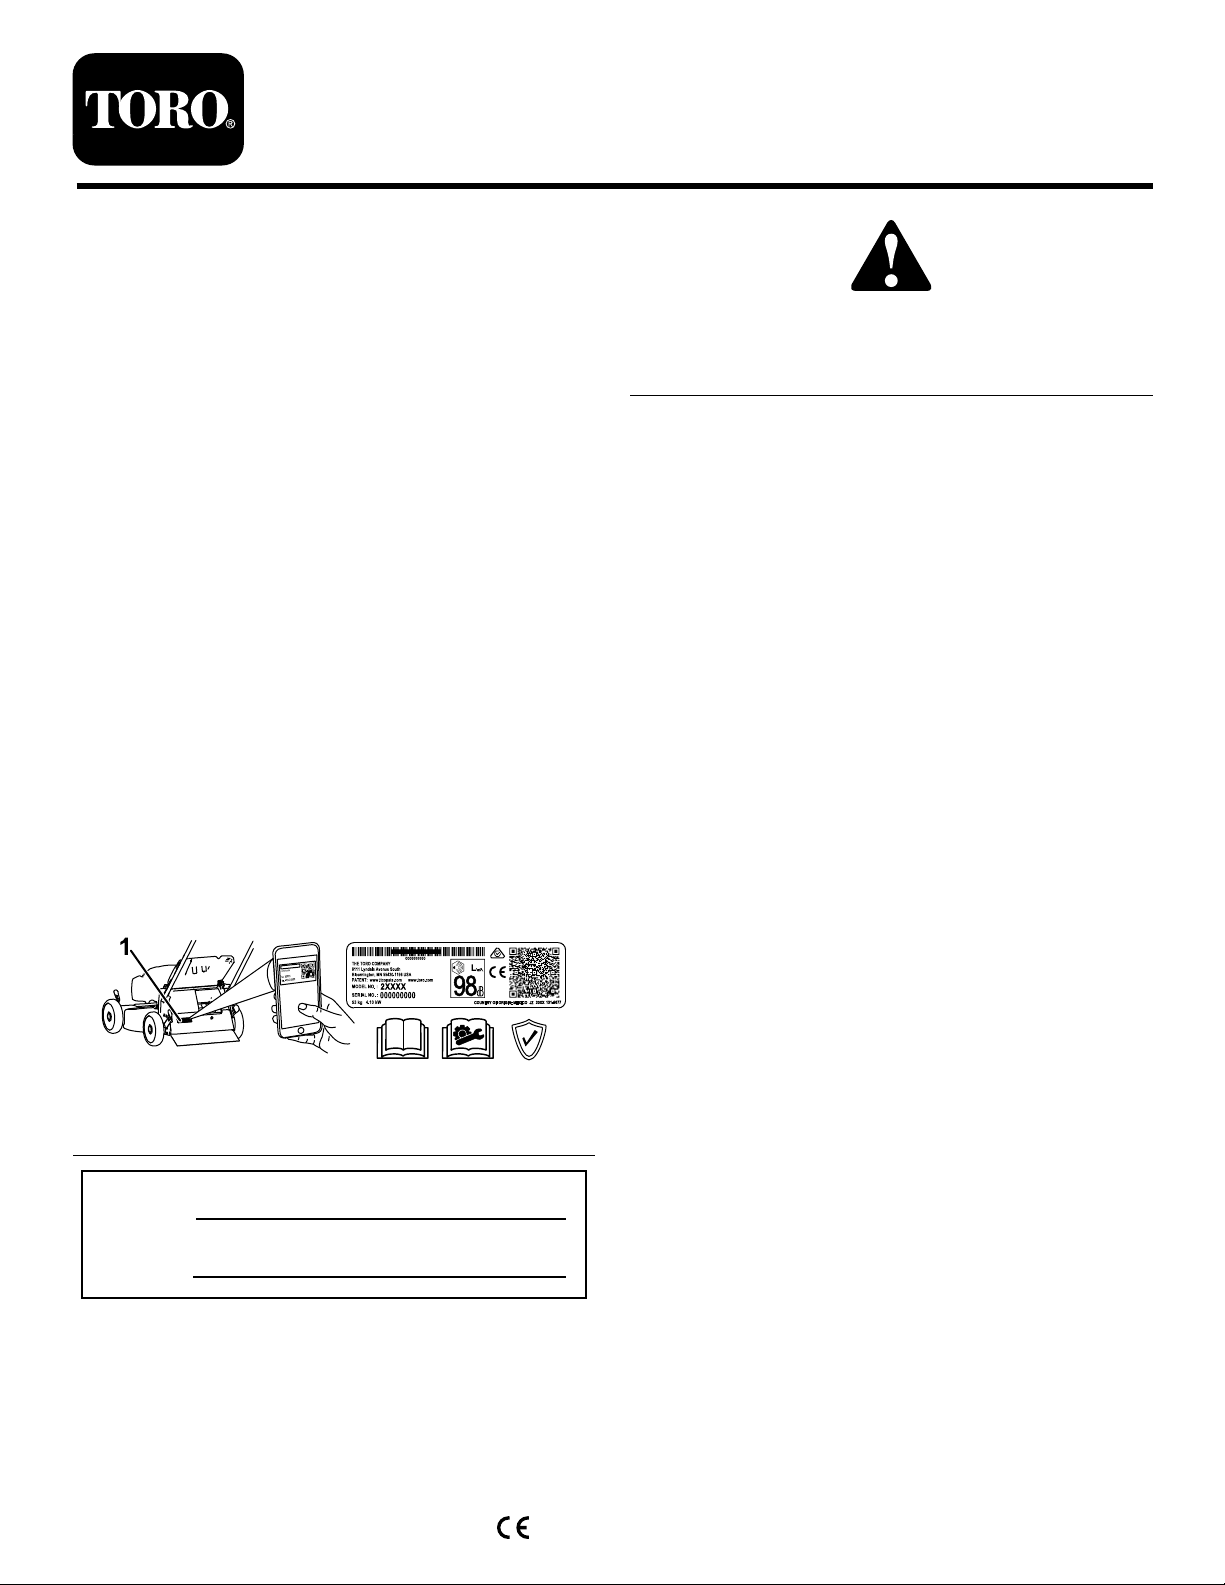
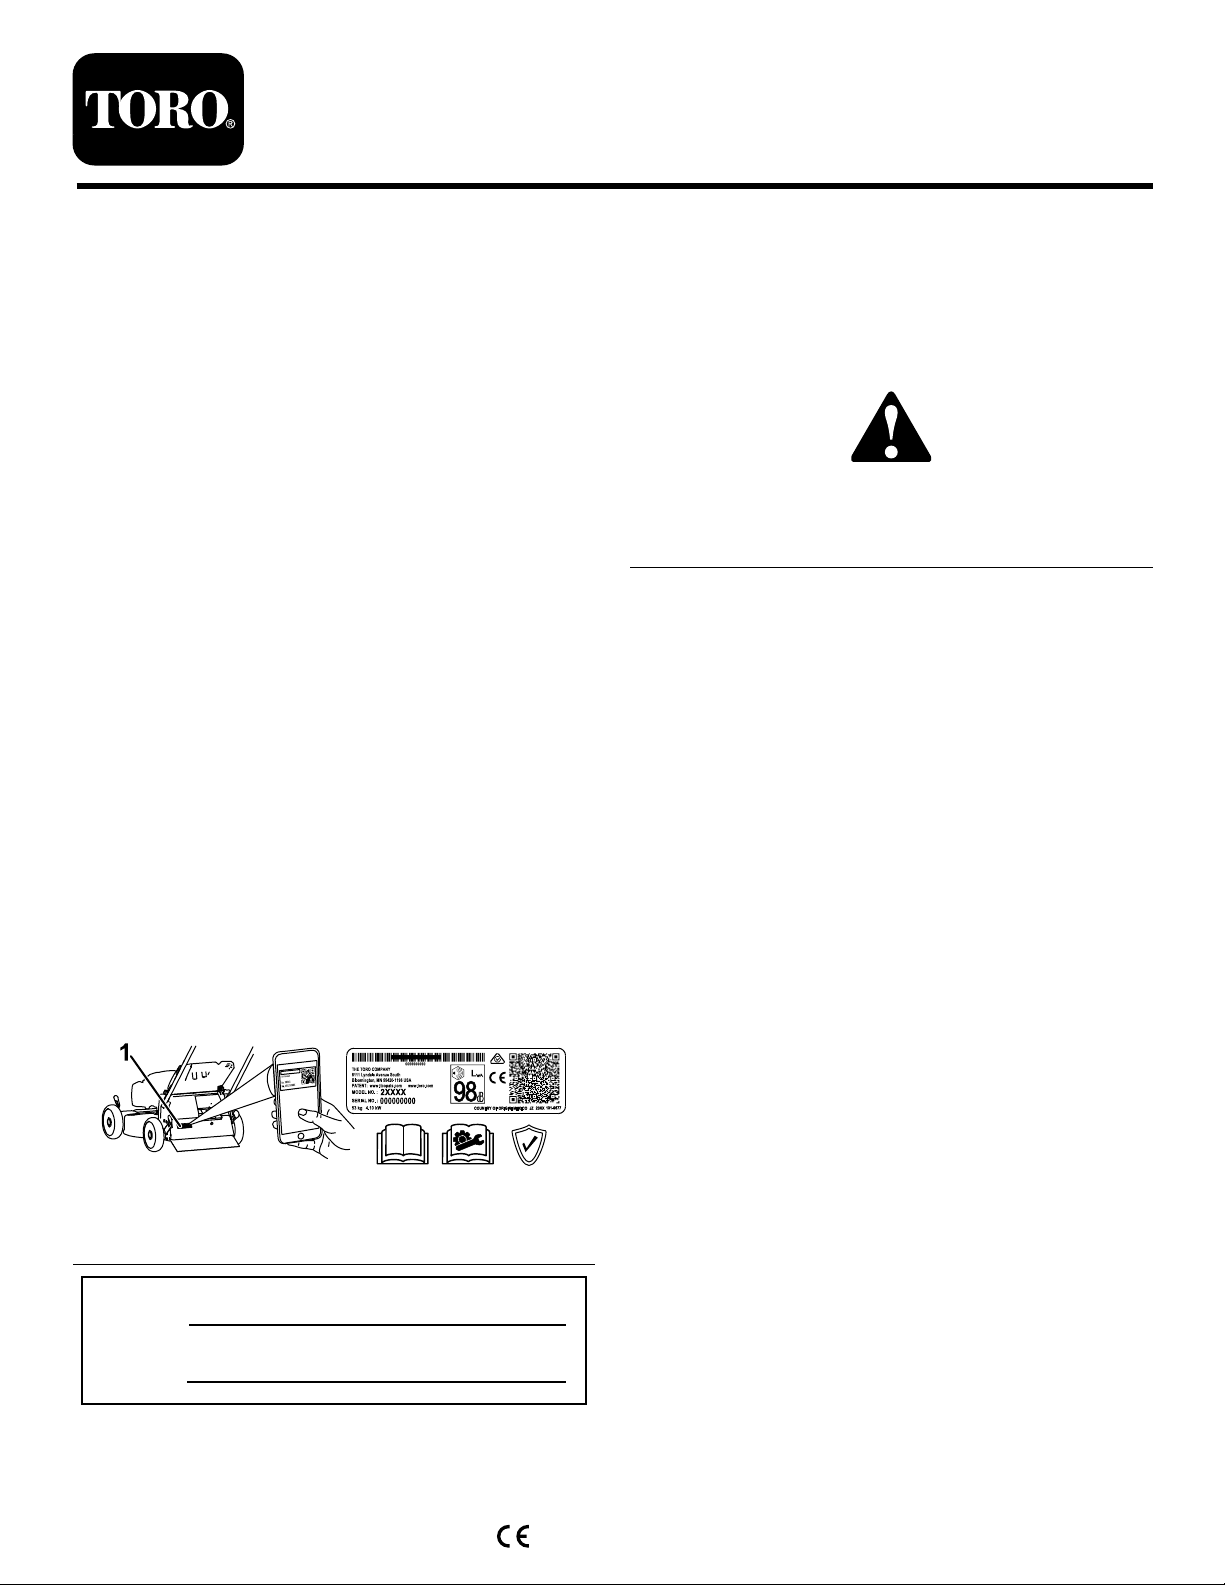
andserialnumbersofyourproductready .Figure1
identiesthelocationofthemodelandserialnumbers
ontheproduct.Writethenumbersinthespace
provided.
Important:Withyourmobiledevice,youcan
scantheQRcodeontheserialnumberdecal(if
equipped)toaccesswarranty,parts,andother
productinformation
FormNo.3418-446RevB
LawnMower
Operator'sManual
g000502
Figure2
Safety-alertsymbol
Thismanualuses2wordstohighlightinformation.
Importantcallsattentiontospecialmechanical
informationandNoteemphasizesgeneralinformation
worthyofspecialattention.
ThisproductcomplieswithallrelevantEuropean
directives;fordetails,pleaseseetheseparateproduct
specicDeclarationofConformity(DOC)sheet.
GrossorNetTorque:Thegrossornettorque
ofthisenginewaslaboratoryratedbytheengine
manufacturerinaccordancewiththeSocietyof
AutomotiveEngineers(SAE)J1940orJ2723.As
conguredtomeetsafety,emission,andoperating
requirements,theactualenginetorqueonthisclass
ofmowerwillbesignicantlylower.Pleasereferto
theenginemanufacturer’sinformationincludedwith
themachine.
Donottamperwithordisablesafetydevicesonthe
machine,andchecktheirproperoperationregularly.
Donotattempttoadjustortamperwiththeengine
speedcontrol;doingsomaycreateanunsafe
operatingcondition,resultinginpersonalinjury.
Figure1
1.Modelandserialnumberlocation
ModelNo.
SerialNo.
Thismanualidentiespotentialhazardsandhas
safetymessagesidentiedbythesafety-alertsymbol
(Figure2),whichsignalsahazardthatmaycause
seriousinjuryordeathifyoudonotfollowthe
recommendedprecautions.
©2017—TheT oro®Company
8111L yndaleAvenueSouth
Bloomington,MN55420
CV
Registeratwww.Toro.com.
g226627
Contents
Introduction...............................................................1
Safety.......................................................................2
GeneralSafety...................................................2
SafetyandInstructionalDecals..........................3
Setup........................................................................5
1AssemblingandUnfoldingtheHandle..............5
2InstallingtheRecoil-starterRopeinthe
RopeGuide.....................................................5
3FillingtheEnginewithOil.................................6
4AssemblingtheGrassBag...............................6
ProductOverview.....................................................7
Specications....................................................7
Operation..................................................................8
BeforeOperation...................................................8
BeforeOperationSafety.....................................8
FillingtheFuelTank............................................8
OriginalInstructions(EN)
PrintedinMexico
AllRightsReserved
*3418-446*B
Page 3

CheckingtheEngine-OilLevel............................9
AdjustingtheHandleHeight...............................9
AdjustingtheCuttingHeight.............................10
DuringOperation.................................................10
DuringOperationSafety...................................10
StartingtheEngine............................................11
UsingtheSelf-PropelDrive................................11
ShuttingOfftheEngine......................................11
RecyclingtheClippings.....................................11
BaggingtheClippings.......................................12
OperatingtheBag-on-DemandLever...............12
Side-DischargingtheClippings.........................13
OperatingTips.................................................13
AfterOperation....................................................14
AfterOperationSafety......................................14
CleaningundertheMachine.............................14
FoldingtheHandle...........................................15
Maintenance...........................................................16
RecommendedMaintenanceSchedule(s)...........16
MaintenanceSafety..........................................16
PreparingforMaintenance...............................16
ServicingtheAirFilter.......................................17
ChangingtheEngineOil...................................17
ReplacingtheBlade..........................................18
AdjustingtheSelf-PropelDrive.........................19
Storage...................................................................20
PreparingtheMachineforStorage...................20
RemovingtheMachinefromStorage................20
Safety
Thismachinehasbeendesignedinaccordancewith
ENISO5395:2013.
GeneralSafety
Thisproductiscapableofamputatinghandsand
feetandofthrowingobjects.Alwaysfollowallsafety
instructionstoavoidseriouspersonalinjury .
Usingthisproductforpurposesotherthanitsintended
usecouldprovedangeroustoyouandbystanders.
•Read,understand,andfollowtheinstructions
andwarningsinthisOperator’sManualandon
themachineandattachmentsbeforestartingthe
engine.
•Donotputyourhandsorfeetnearmovingpartsof
orunderthemachine.Keepclearofanydischarge
opening.
•Donotoperatethemachinewithoutallguards
andothersafetyprotectivedevicesinplaceand
workingonthemachine.
•Keepbystandersandchildrenasafedistance
awayfromthemachine.Donotallowchildrento
operatethemachine.Allowonlypeoplewhoare
responsible,trained,familiarwiththeinstructions,
andphysicallycapabletooperatethemachine.
•Stopthemachine,shutofftheengine,andwaitfor
allmovingpartstostopbeforeservicing,fueling,
oruncloggingthemachine.
Improperlyusingormaintainingthismachinecan
resultininjury.T oreducethepotentialforinjury ,
complywiththesesafetyinstructionsandalwayspay
attentiontothesafety-alertsymbol,whichmeans
Caution,Warning,orDanger—personalsafety
instruction.Failuretocomplywiththeseinstructions
mayresultinpersonalinjuryordeath.
Youcanndadditionalsafetyinformationwhere
neededthroughoutthismanual.
2
Page 4
SafetyandInstructionalDecals
Safetydecalsandinstructionsareeasilyvisibletotheoperatorandarelocatednearanyarea
ofpotentialdanger.Replaceanydecalthatisdamagedormissing.
Manufacturer'sMark
1.Thismarkindicatesthatthebladeisidentiedasapart
fromtheoriginalmachinemanufacturer .
decaloemmarkt
112-8760
1.Thrownobjecthazard—keepbystandersasafedistance
awayfromthemachine.
2.Cutting/dismembermentofhandorfoot—stayawayfrom
movingparts.
decal112-8760
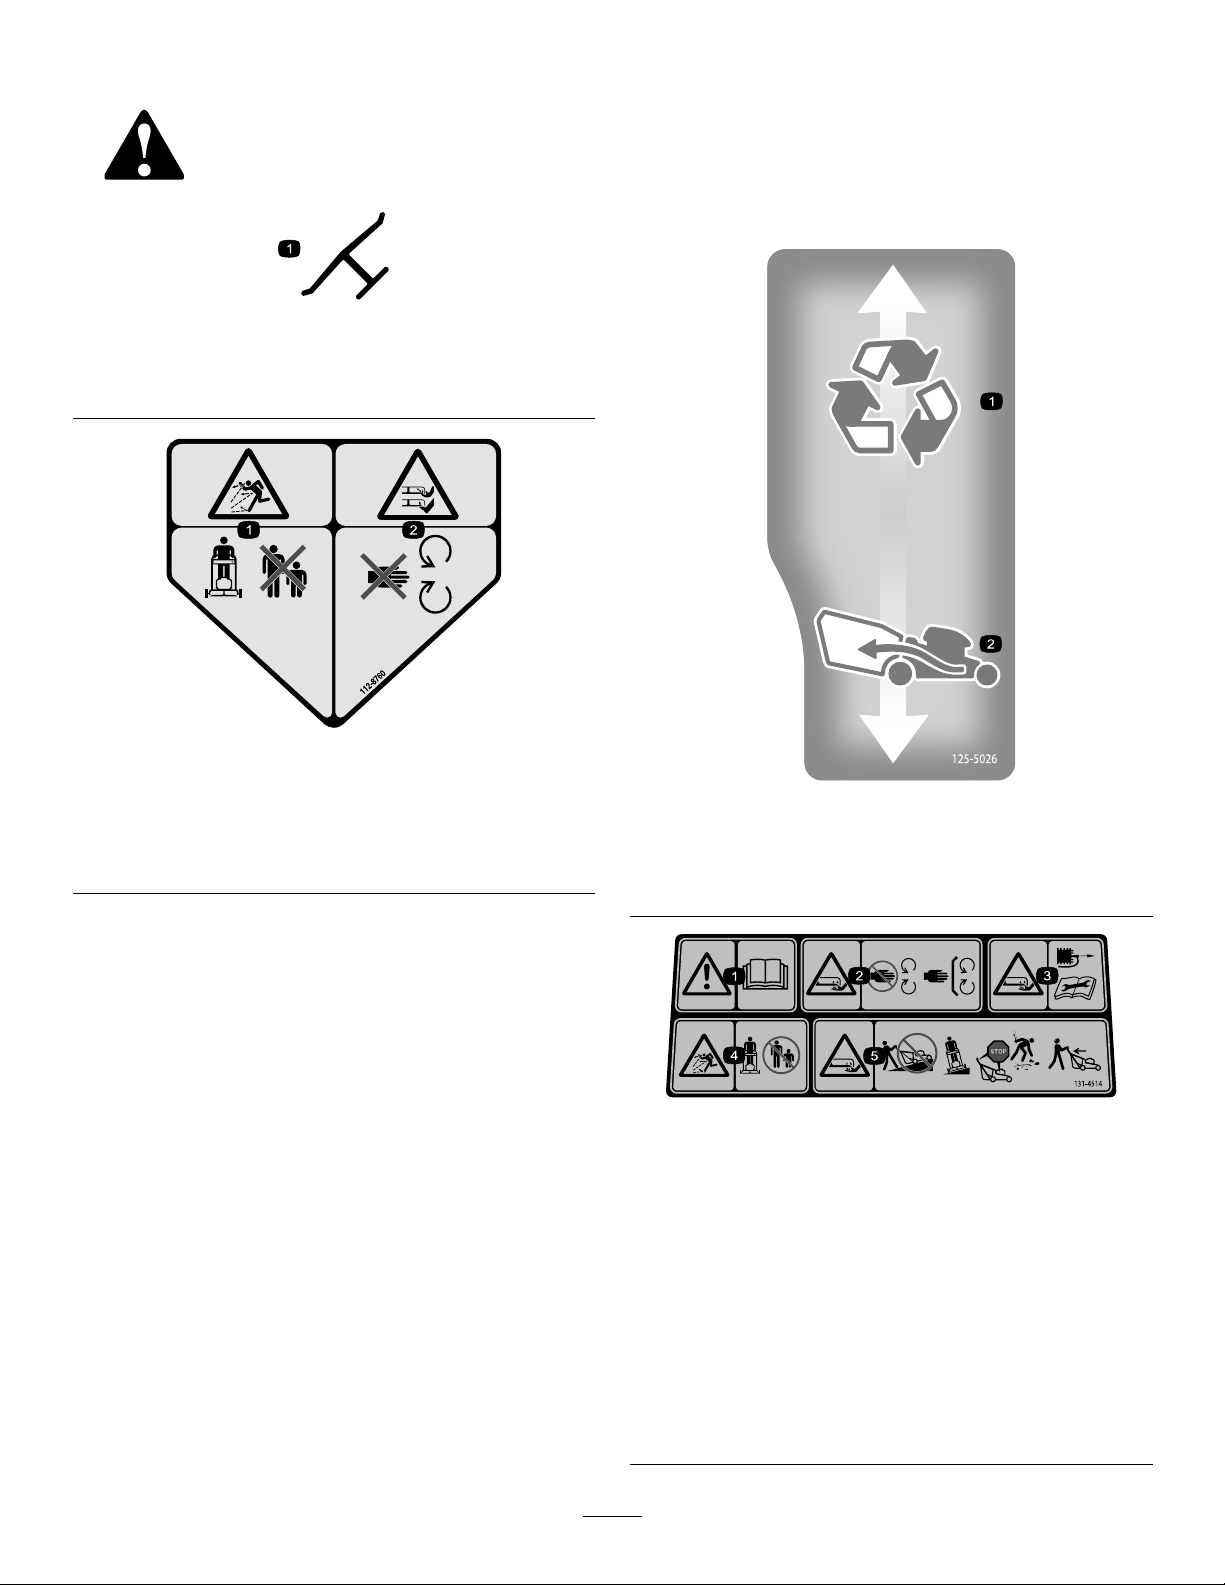
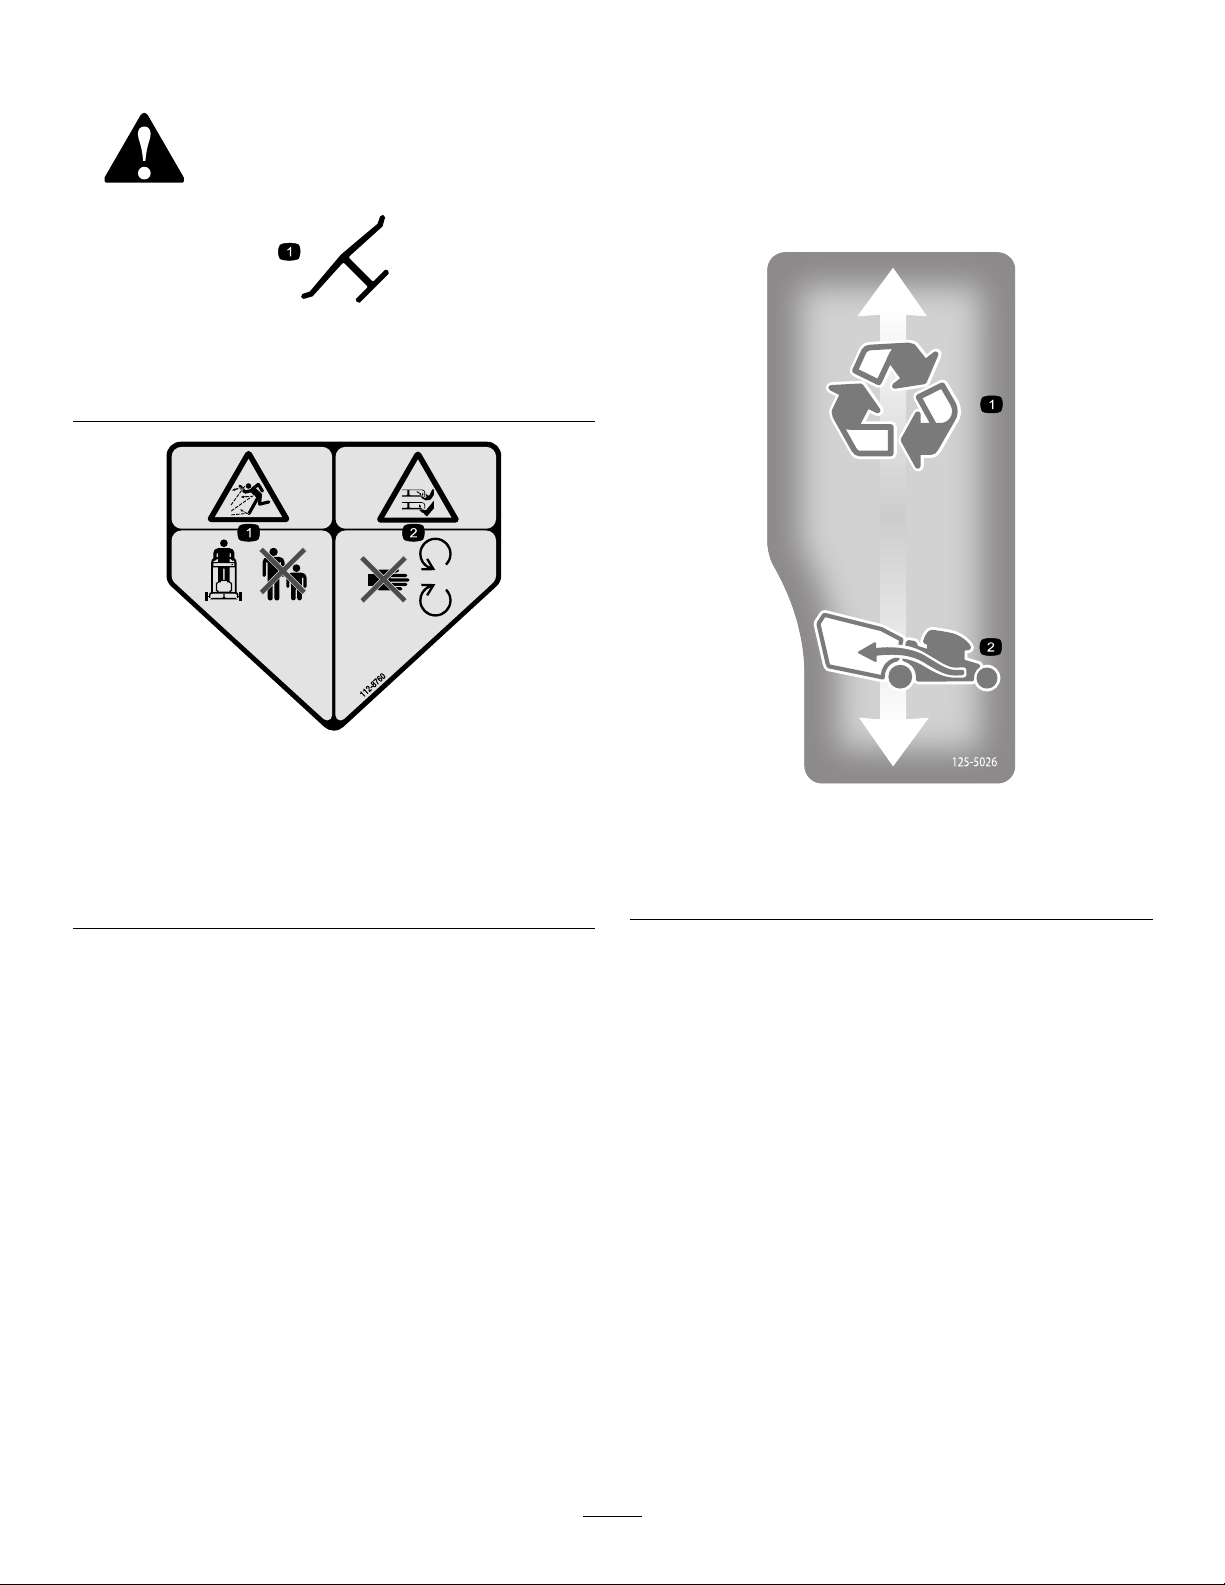
decal125-5026
125-5026
1.Recyclingmode2.Baggingmode
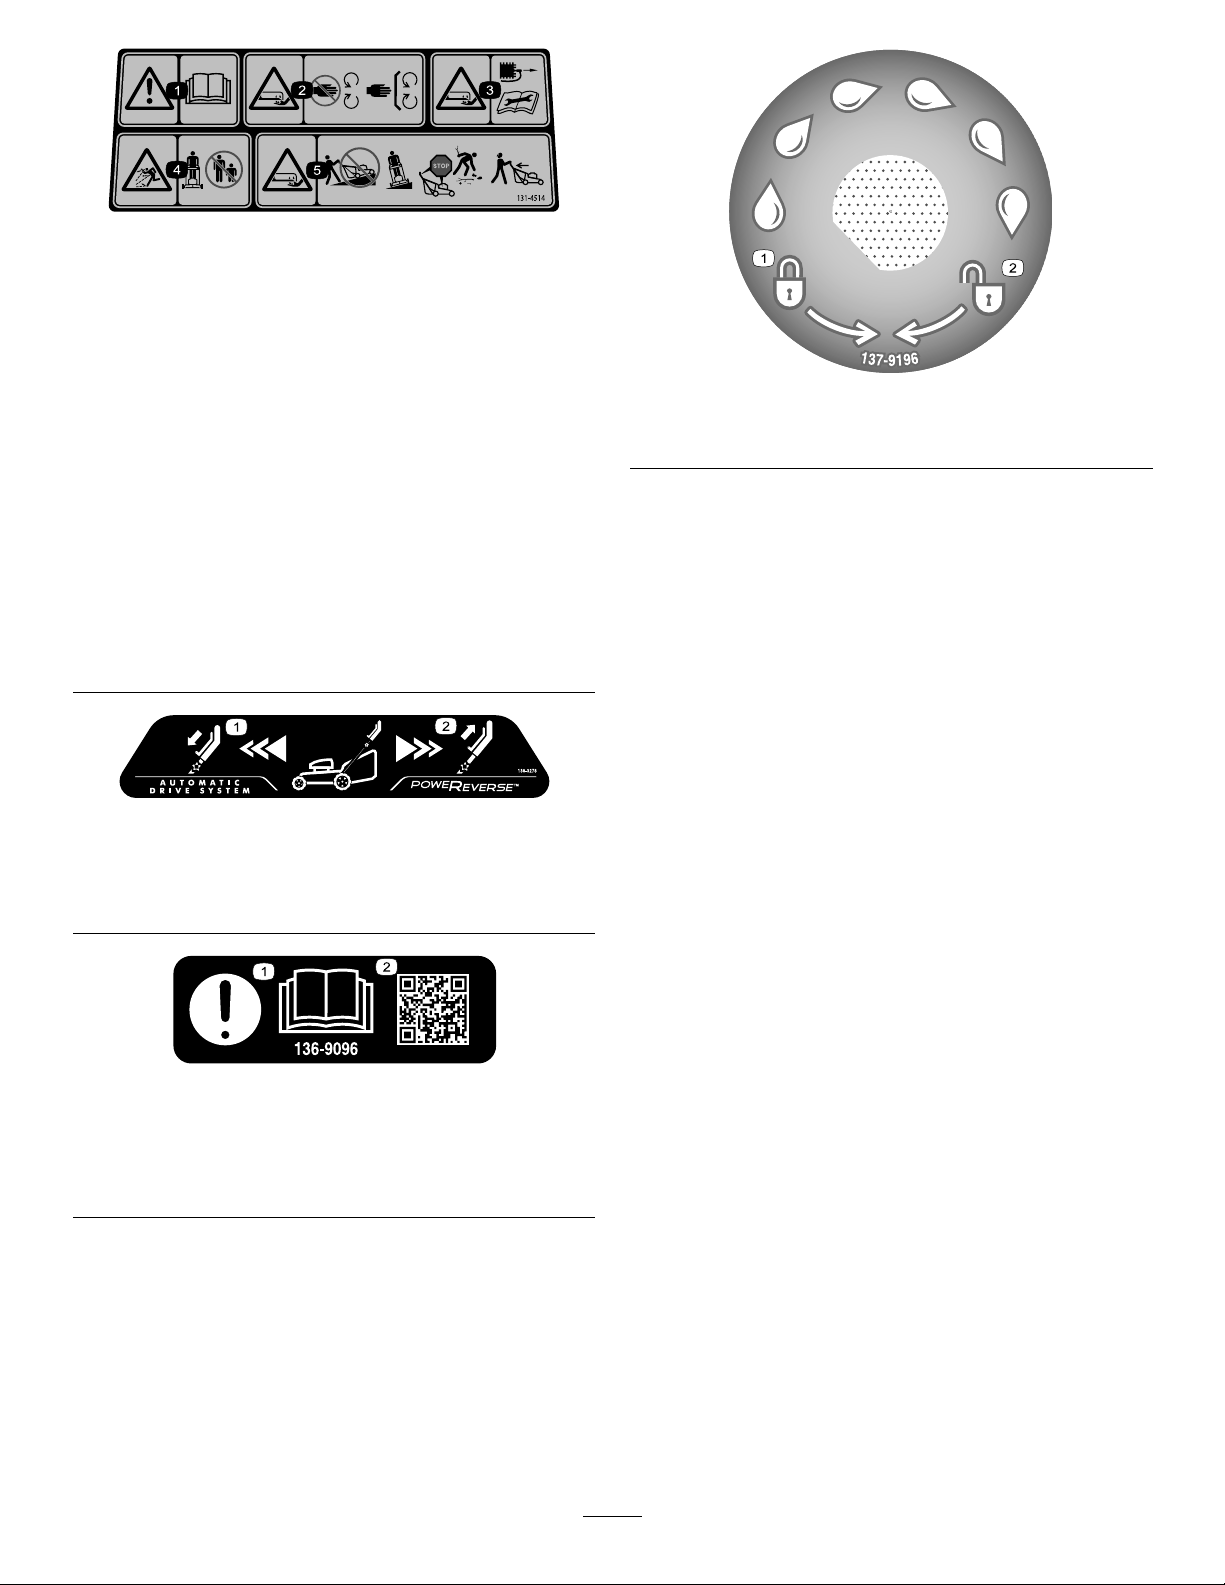
decal131-4514
131-4514
1.Warning—readtheOperator'sManual.
2.Cutting/dismembermenthazardofhand,mower
blade—stayawayfrommovingparts;keepallguardsand
shieldsinplace.
3.Cutting/dismembermenthazardofhand,mower
blade—disconnectthespark-plugwireandreadthe
instructionsbeforeservicingorperformingmaintenance.
4.Thrownobjecthazard—keepbystandersasafedistance
awayfromthemachine;shutofftheenginebeforeleaving
theoperatingposition;pickupanydebrisbeforemowing.
5.Cutting/dismembermenthazardofhand,mowerblade—do
notoperateupanddownslopes;operatesidetosideon
slopes;lookbehindyouwhenbackingup.
3
Page 5
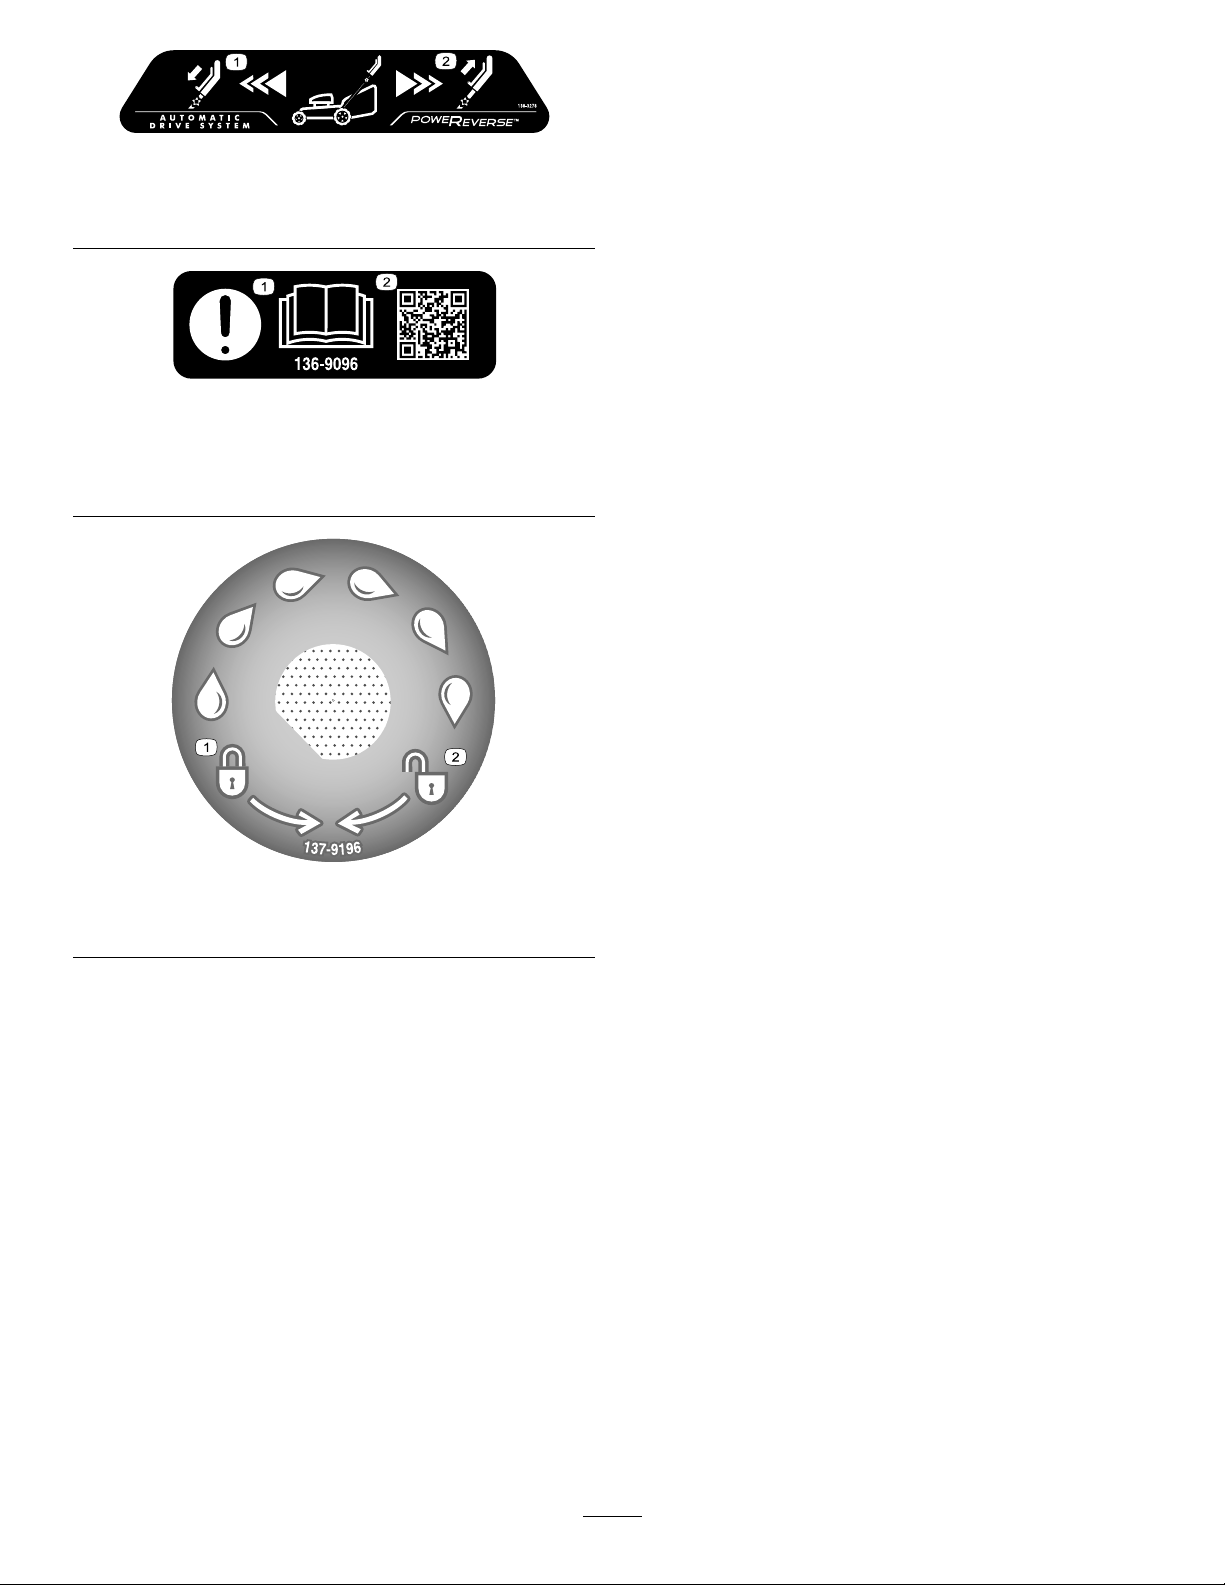
decal138-3278
138-3278
1.Pushthehandledownto
moveforward.
1.Attention—readthe
Operator'sManual.
2.Pullthehandleuptomove
backward.
decal136-9096
136-9096
2.ScantheQRcodefor
moreinformationon
tractionadjustment.
137-9196
1.Lock2.Unlock
decal137-9196
4
Page 6
Setup
Important:Removeanddiscardtheprotectiveplasticsheetthatcoverstheengineandanyother
plasticorwrappingonthemachine.
1
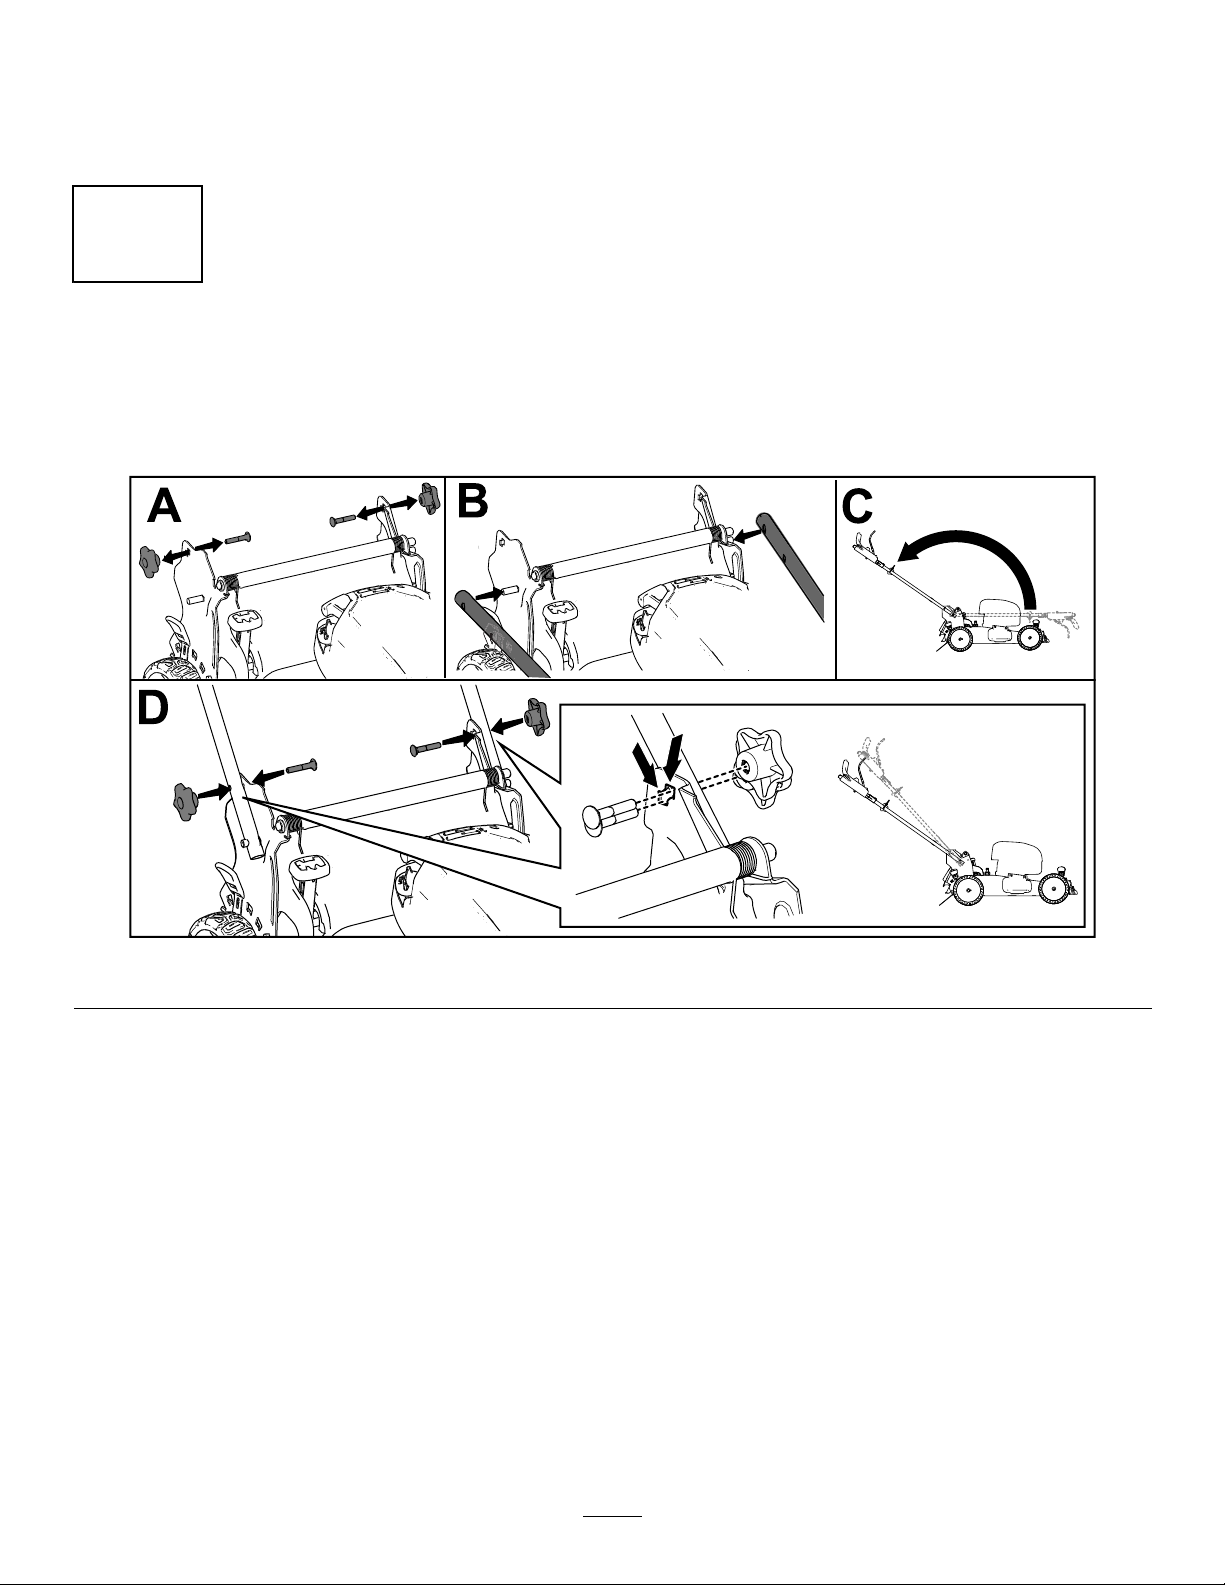
AssemblingandUnfoldingtheHandle
NoPartsRequired
Procedure
Figure3
g227424
5
Page 7
2
InstallingtheRecoil-starterRopeintheRopeGuide
NoPartsRequired
Procedure
Figure4
g230719
3
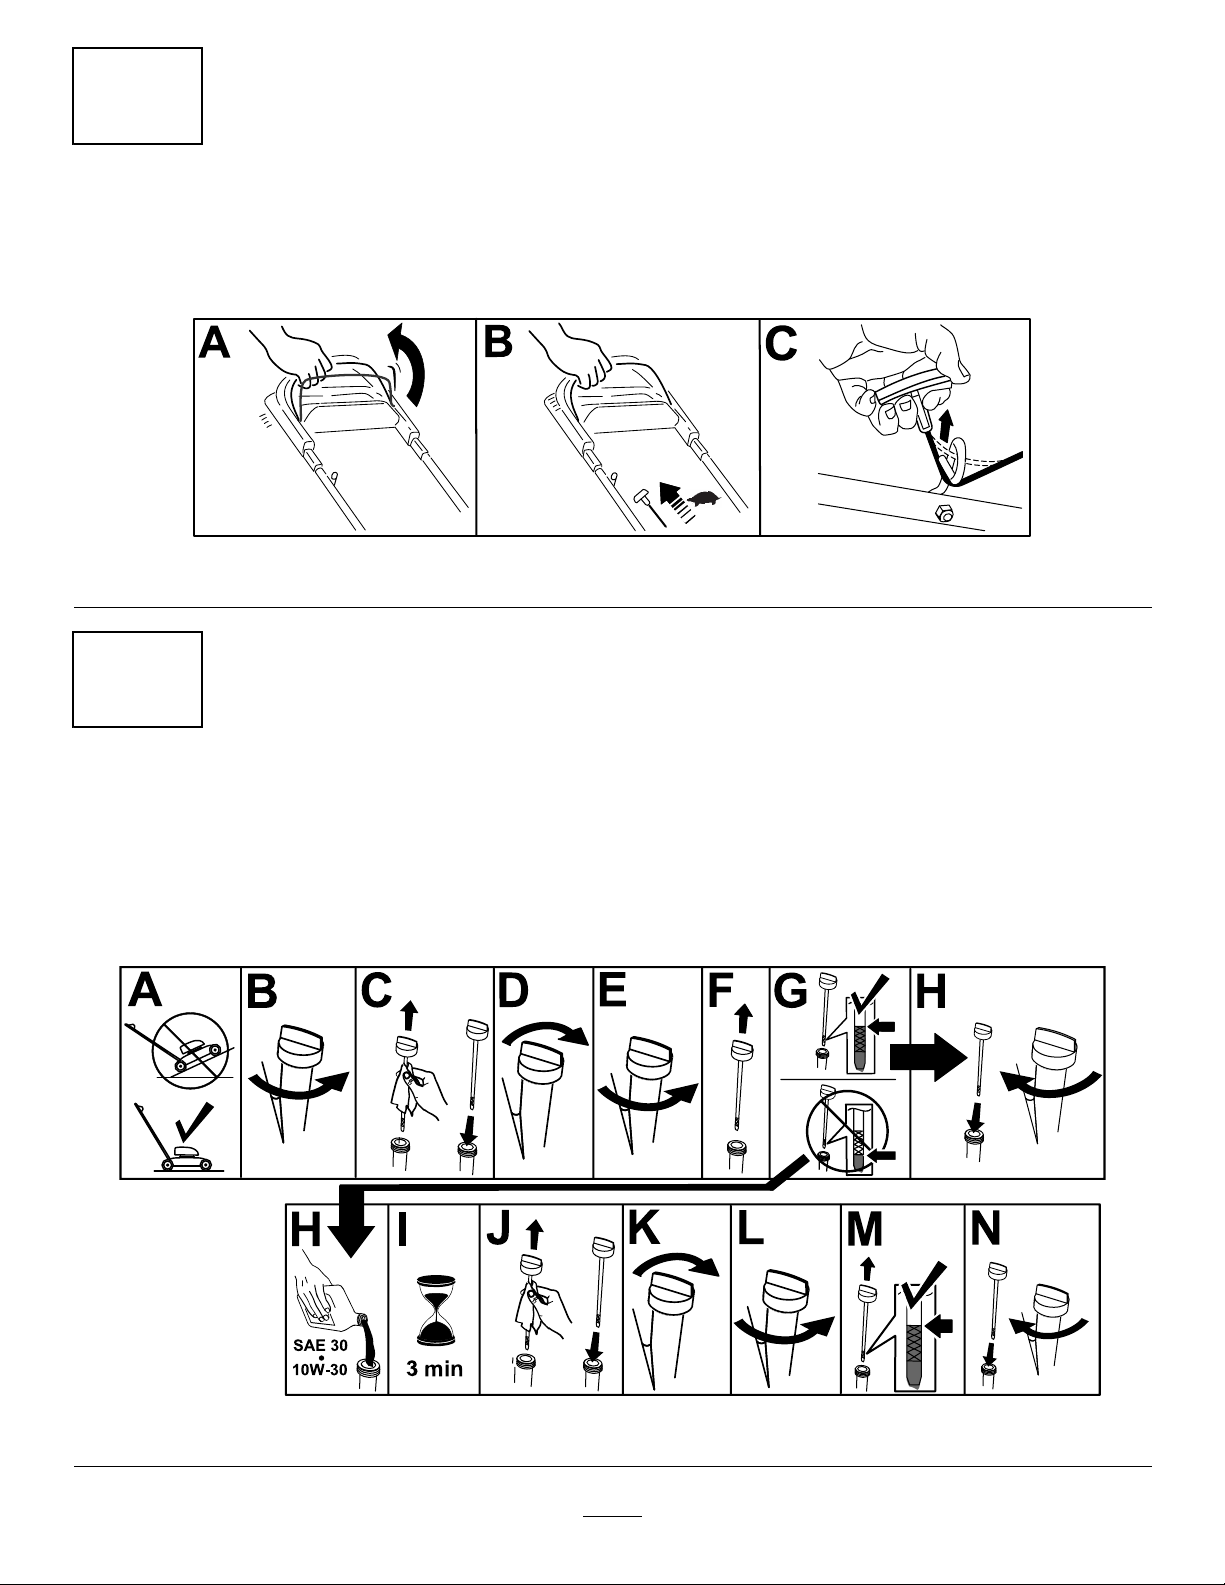
FillingtheEnginewithOil
NoPartsRequired
Procedure
Important:Y ourmachinedoesnotcomewithoilintheengine,butitdoescomewithabottleofoil.
Beforestartingtheengine,lltheenginewithoil.
Figure5
6
g222533
Page 8
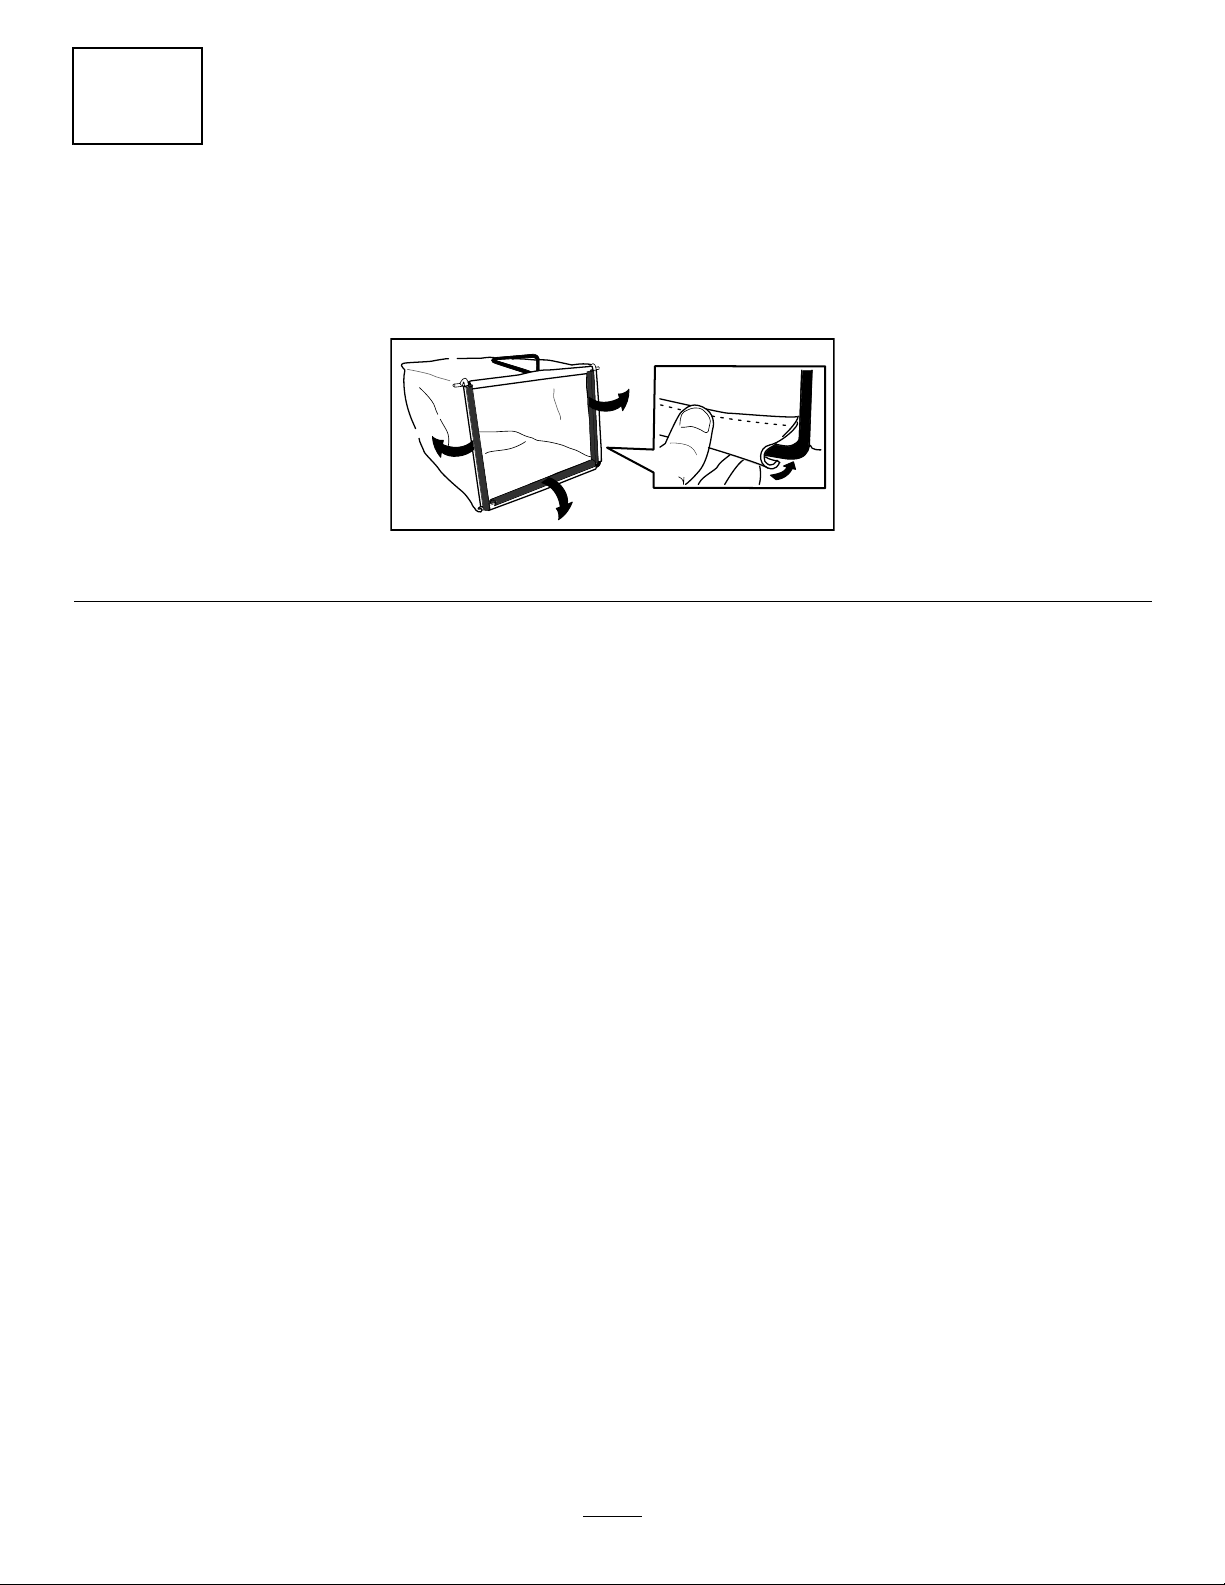
4
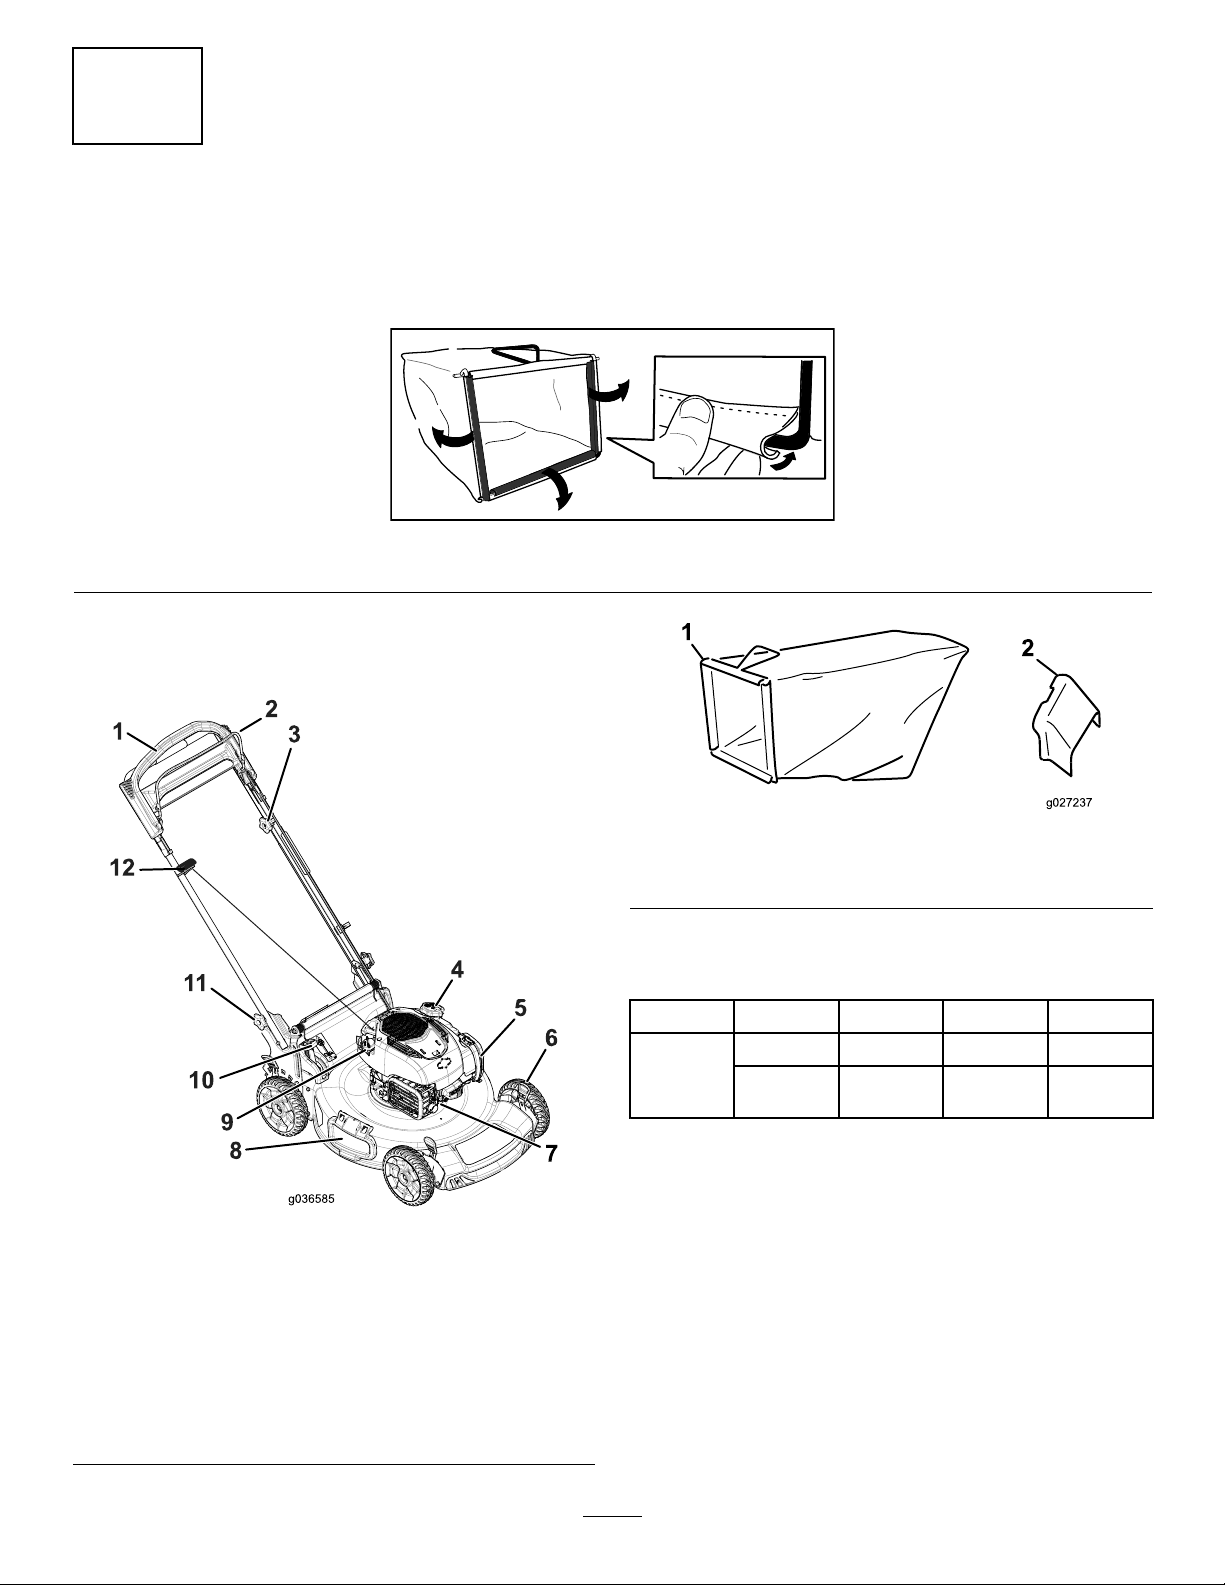
AssemblingtheGrassBag
NoPartsRequired
Procedure
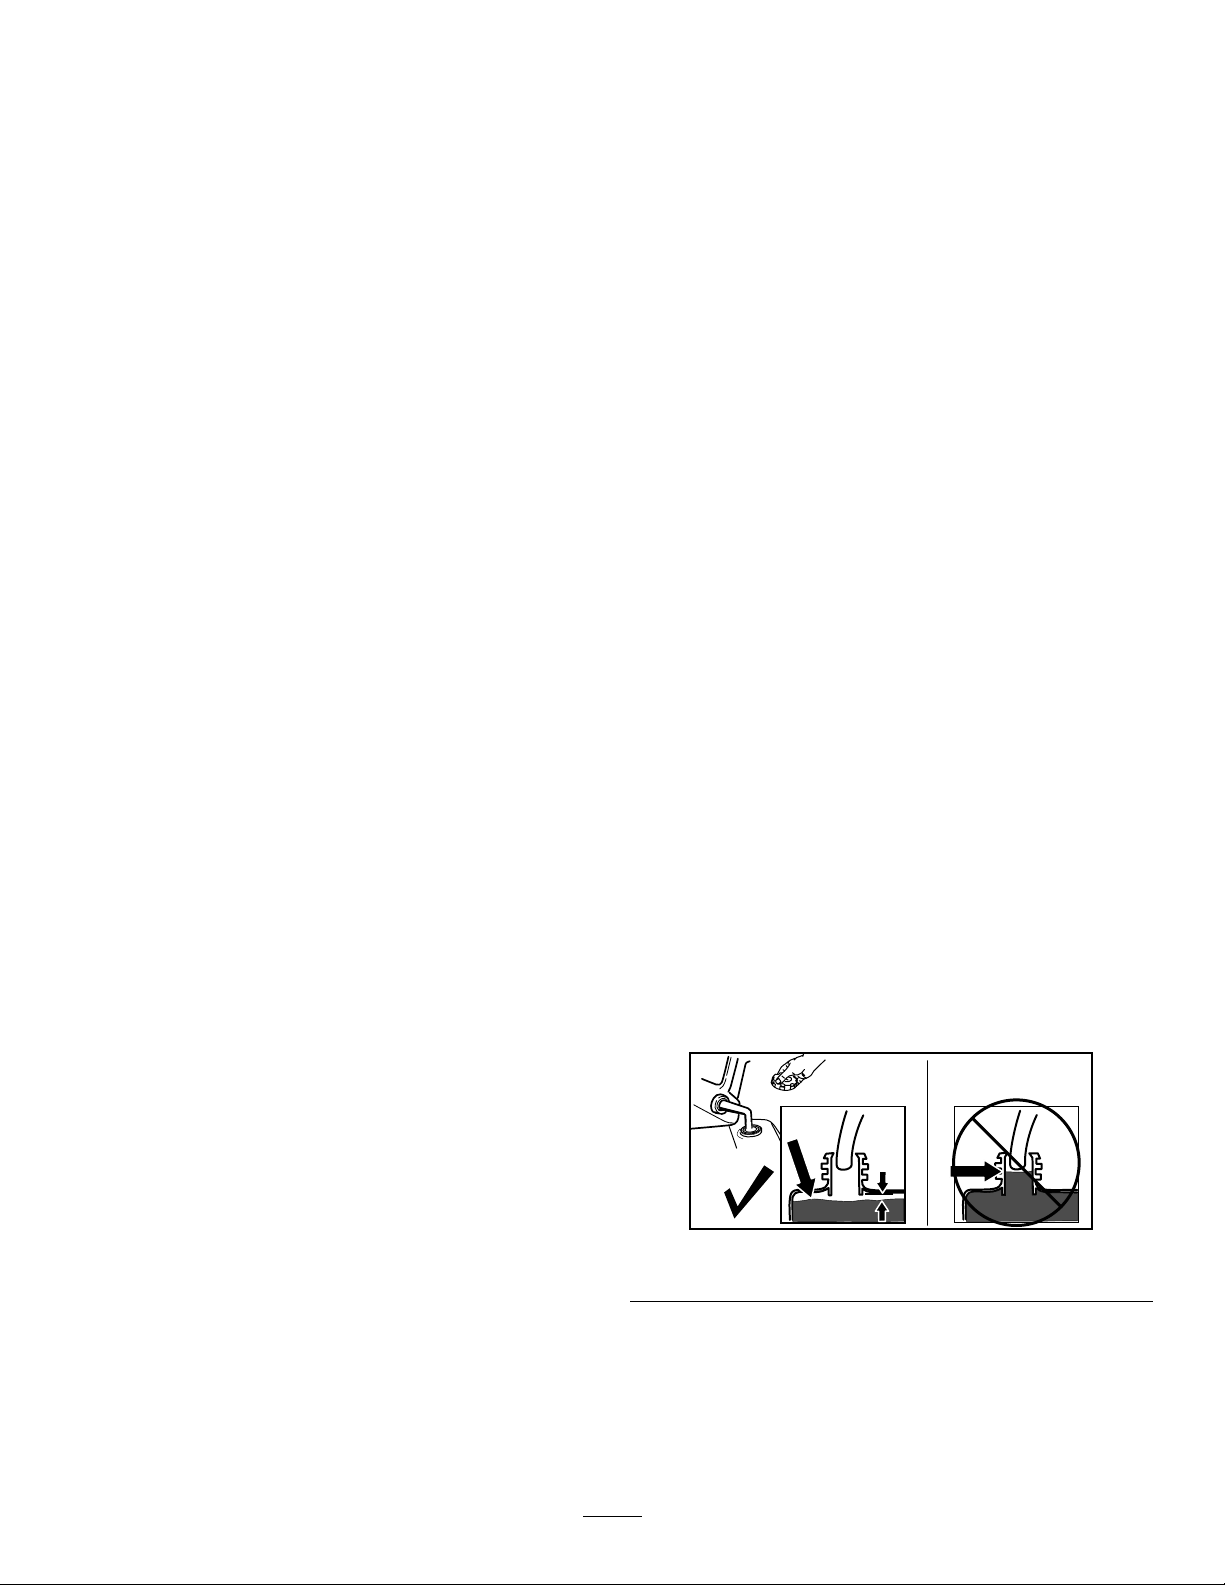
ProductOverview
g230447
Figure6
Figure7
1.Handle
2.Blade-controlbar
3.Adjustmentknobforthe
self-propeldrive
4.Fuel-tankcap10.Bag-on-demandlever
5.Airlter11.Handleknob(2)
6.Cutting-heightlever(4)
7.Sparkplug
8.Side-dischargedeector
9.Oilll/dipstick
12.Recoil-starthandle
g027237
Figure8
1.Grassbag2.Side-dischargechute
Specications
ModelWeightLengthWidthHeight
35kg152cm58cm109cm
20964
(77lb)
g036585
(60
inches)
(23
inches)
(43
inches)
7
Page 9
Operation
–Storefuelinanapprovedcontainerandkeep
itoutofthereachofchildren.
Note:Determinetheleftandrightsidesofthe
machinefromthenormaloperatingposition.
BeforeOperation
BeforeOperationSafety
GeneralSafety
•Becomefamiliarwiththesafeoperationofthe
equipment,operatorcontrols,andsafetysigns.
•Checkthatallguardsandsafetydevices,suchas
deectorsand/orgrasscatcher,areinplaceand
workingproperly.
•Alwaysinspectthemachinetoensurethatthe
blades,bladebolts,andcuttingassemblyarenot
wornordamaged.
•Inspecttheareawhereyouwillusethemachine,
andremoveallobjectsthatcouldinterferewith
theoperationofthemachineorthatthemachine
couldthrow.
•Adjustingthecuttingheightmaybringyouinto
contactwiththemovingblade,causingserious
injury.
–Shutofftheengine,removetheignitionkey
(electric-startmodelonly),andwaitforall
movingpartstostop.
–Donotputyourngersunderthehousing
whenadjustingthecuttingheight.
FuelSafety
•Fuelisextremelyammableandhighlyexplosive.
Areorexplosionfromfuelcanburnyouand
othersandcandamageproperty.
•Fuelisharmfulorfatalifswallowed.Long-term
exposuretovaporscancauseseriousinjuryand
illness.
–Avoidprolongedbreathingofvapors.
–Keepyourhandsandfaceawayfromthe
nozzleandthefuel-tankopening.
–Keepfuelawayfromyoureyesandskin.
FillingtheFuelTank
•Forbestresults,useonlyclean,fresh,unleaded
gasolinewithanoctaneratingof87orhigher
((R+M)/2ratingmethod).
•Oxygenatedfuelwithupto10%ethanolor15%
MTBEbyvolumeisacceptable.
•Donotuseethanolblendsofgasoline,such
asE15orE85,withmorethan10%ethanolby
volume.Performanceproblemsand/orengine
damagemayresult,whichmaynotbecovered
underwarranty.
•Donotusegasolinecontainingmethanol.
•Donotstorefueleitherinthefueltankorinfuel
containersoverthewinterunlessfuelstabilizer
hasbeenaddedtothefuel.
•Donotaddoiltogasoline.
Fillthefueltankwithfreshunleadedregulargasoline
fromamajorname-brandservicestation(Figure9).
Important:Toreducestartingproblems,add
fuelstabilizertothegasolineallseason.Mixthe
stabilizerwithgasolinelessthan30daysold.
Refertoyourengineowner’smanualforadditional
information.
–Topreventastaticchargefromignitingthefuel,
placethecontainerand/ormachinedirectlyon
thegroundbeforelling,notinavehicleoron
anobject.
–Fillthefueltankoutdoors,inanopenarea,
whentheengineiscold.Wipeupanyfuelthat
spills.
–Donothandlefuelwhensmokingoraroundan
openameorsparks.
–Donotremovethefuelcaporaddfueltothe
tankwhiletheengineisrunningorhot.
–Ifyouspillfuel,donotattempttostartthe
engine.Avoidcreatingasourceofignitionuntil
thefuelvaporshavedissipated.
g230458
Figure9
8
Page 10
CheckingtheEngine-OilLevel
ServiceInterval:Beforeeachuseordaily
Important:Iftheoillevelinthecrankcaseistoolowortoohighandyouruntheengine,youmay
damagetheengine.
Figure10
g222533
AdjustingtheHandle Height
Youcanraiseorlowerthehandlein1of2positions
thatismorecomfortableforyou(Figure11).
Figure11
1.Loosenbothhandleknobsuntilyoucanpush
thesquareedgesofthecarriageboltsoutofthe
squareholesinthehandlebrackets.
2.Pushtheknobsuntiltheyareloose.
3.Movethehandletotheupperorlowerheight
position.
4.Pulltheknobsuntilthesquareedgesofeach
carriagebolttsintoitsrelatedsquarehole.
5.Tightenthehandleknobsastightasyoucan.
g032867
9
Page 11
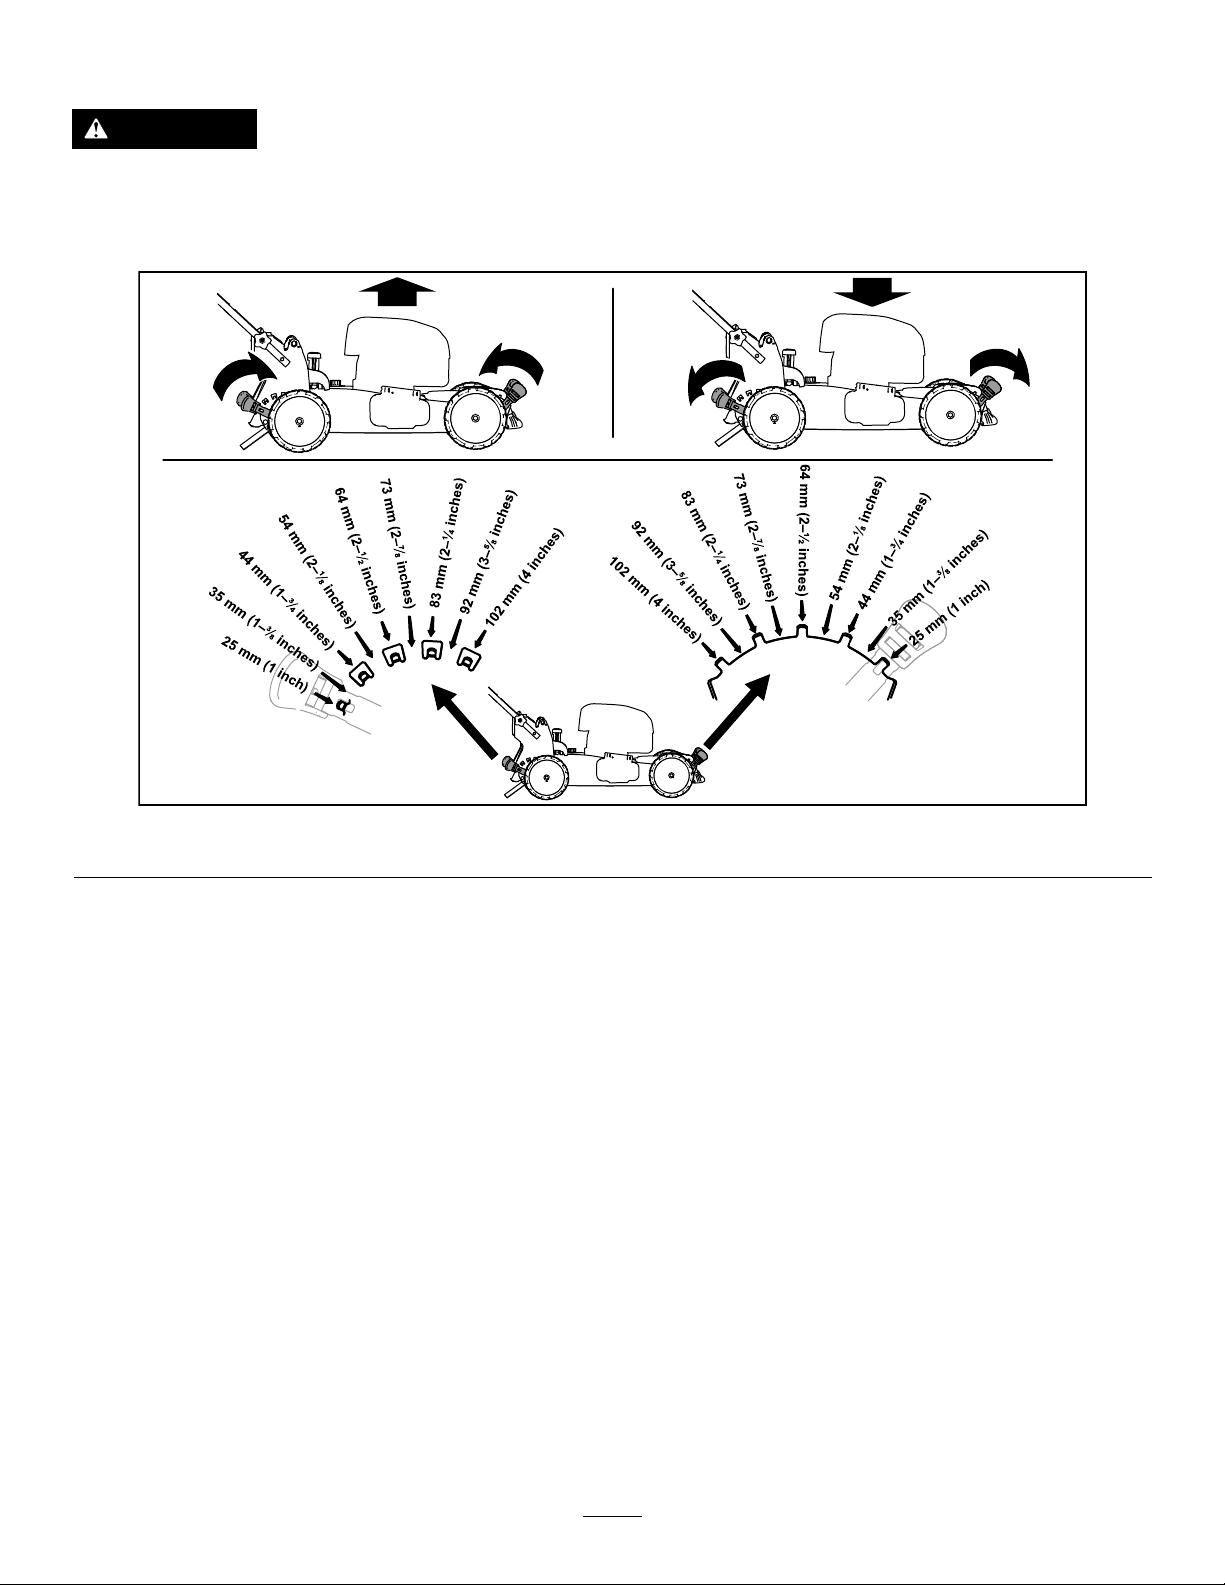
AdjustingtheCuttingHeight
CAUTION
Iftheenginehasbeenrunning,themuferwillbehotandcanseverelyburnyou.
Keepawayfromthehotmufer.
Adjustthecuttingheightasdesired.Setthefrontwheelstothesameheightastherearwheels(Figure12).
DuringOperation
DuringOperationSafety
GeneralSafety
•Wearappropriateclothing,includingeye
protection;longpants;slip-resistant,substantial
footwear;andhearingprotection.Tiebacklong
hair,securelooseclothing,anddonotwearloose
jewelry.
•Donotoperatethemachinewhileill,tired,or
undertheinuenceofalcoholordrugs.
•Thebladeissharp;contactingthebladecanresult
inseriouspersonalinjury.Shutofftheengine,
removetheignitionkey(electric-startmodelonly),
andwaitforallmovingpartstostopbeforeleaving
theoperatingposition.
•Whenyoureleasetheblade-controlbar,the
engineshouldshutoffandthebladeshouldstop
within3seconds.Ifnot,stopusingyourmachine
g223084
Figure12
immediatelyandcontactanAuthorizedService
Dealer.
•Keepbystanders,especiallysmallchildren,outof
theoperatingarea.Stopthemachineifanyone
entersthearea.
•Alwayslookdownandbehindyoubeforemoving
themachineinreverse.
•Operatethemachineonlyingoodvisibilityand
appropriateweatherconditions.Donotoperate
themachinewhenthereistheriskoflighting.
•Wetgrassorleavescancauseseriousinjuryif
youslipandcontacttheblade.Avoidmowingin
wetconditions.
•Useextremecarewhenapproachingblind
corners,shrubs,trees,orotherobjectsthatmay
blockyourview.
•Watchforholes,ruts,bumps,rocks,orother
hiddenobjects.Uneventerraincouldcausethe
machinetooverturnorcauseyoutoloseyour
balanceorfooting.
10
Page 12
•Ifthemachinestrikesanobjectorstartstovibrate,
immediatelyshutofftheengine,removethekey
(ifequipped),waitforallmovingpartstostop,and
disconnectthewirefromthesparkplugbefore
examiningthemachinefordamage.Makeall
necessaryrepairsbeforeresumingoperation.
•Beforeleavingtheoperatingposition,shutoff
theengine,removetheignitionkey(electric-start
modelonly),andwaitforallmovingpartstostop.
•Iftheenginehasbeenrunningthemuferwillbe
hotandcanseverelyburnyou.Keepawayfrom
thehotmufer.
•Checkthegrasscatchercomponentsand
thedischargechutefrequentlyforanywear
ordeteriorationandreplacethemwiththe
manufacturer'srecommendedpartswhen
necessary.
•Useaccessoriesandattachmentsapprovedby
TheToro®Companyonly .
SlopeSafety
•Mowacrossthefaceofslopes;neverupand
down.Useextremecautionwhenchanging
directiononslopes.
•Donotmowonexcessivelysteepslopes.Poor
footingcouldcauseaslip-and-fallaccident.
•Mowwithcautionneardrop-offs,ditches,or
embankments.
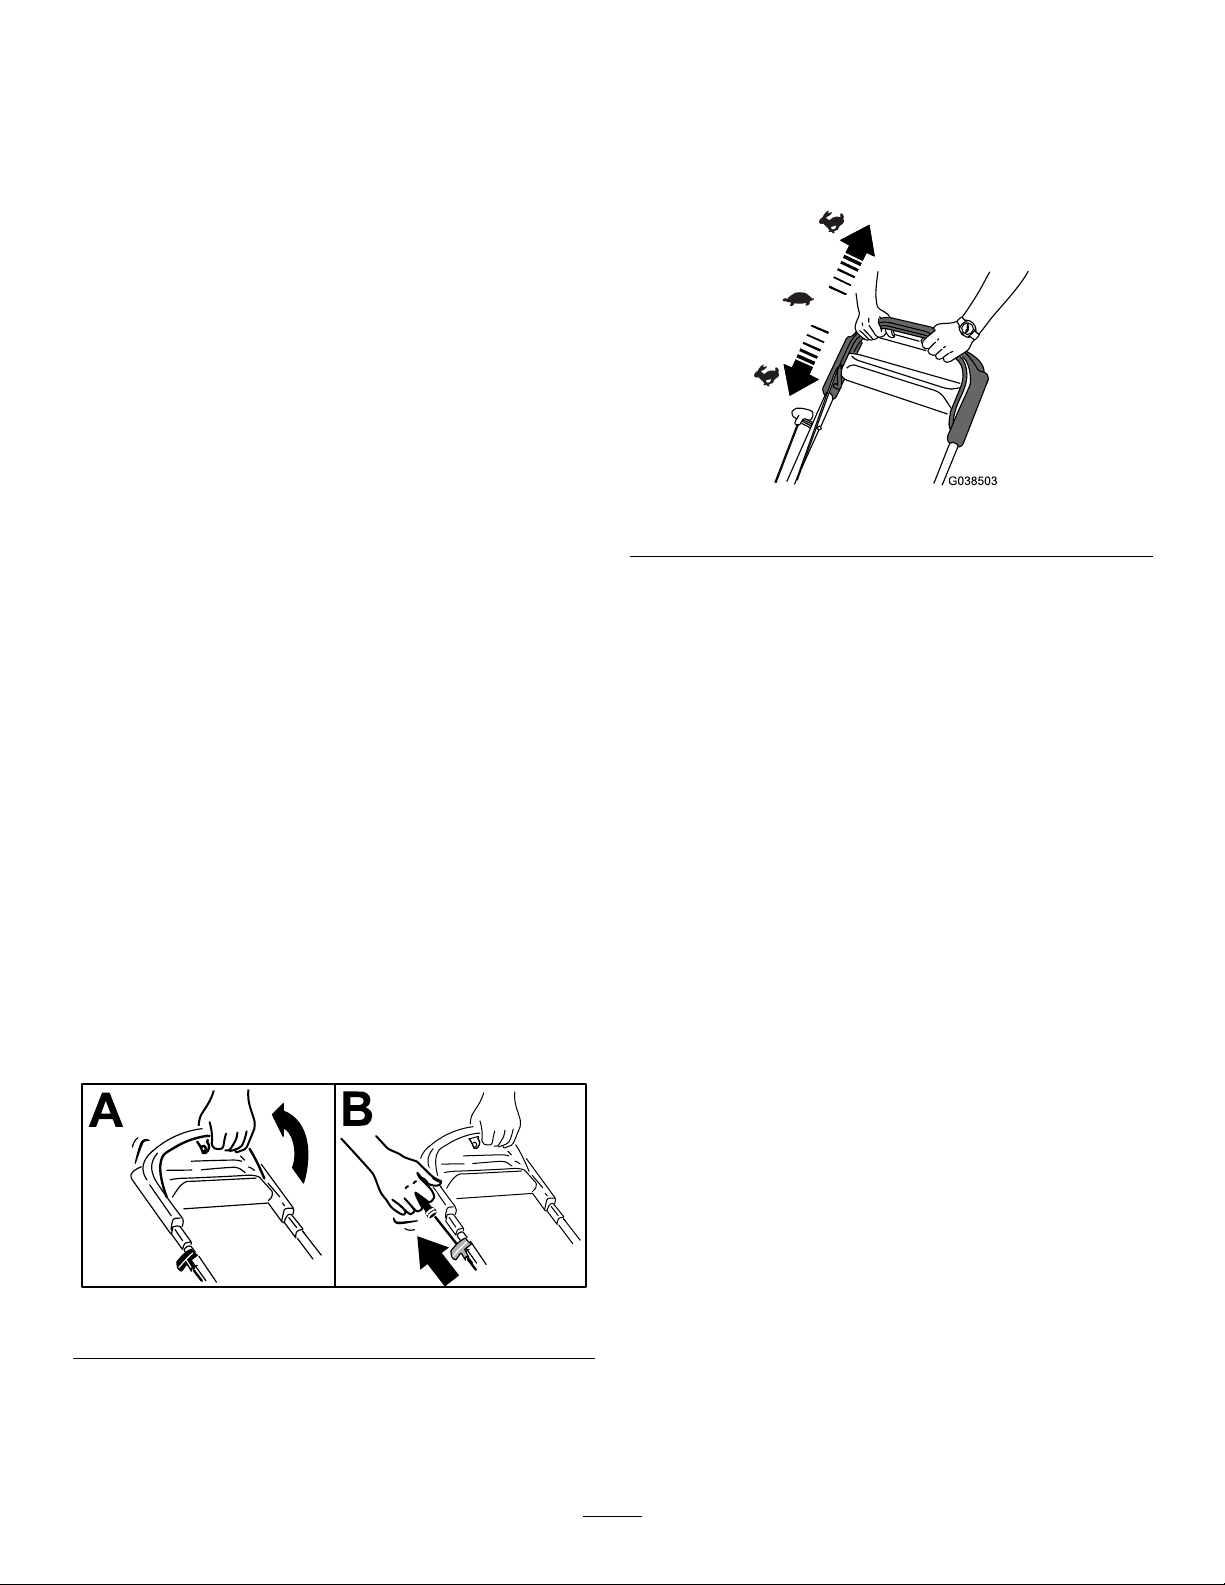
UsingtheSelf-PropelDrive
Tooperatetheself-propeldrive,simplywalkforward
orbackwardwithyourhandsontheupperhandle
andyourelbowsatyoursides,andthemachinewill
automaticallykeeppacewithyou(Figure14).
g038503
Figure14
Note:Ifthemachinedoesnotfreelyrollforward
orbackwardafterself-propelling,stopwalking,hold
yourhandsinplace,andallowthemachinetorolla
coupleofcentimeters(inches)forwardtodisengage
thewheeldrive.Youcanalsotryreachingjustunder
theupperhandletothemetalhandleandpushingthe
machineforwardacoupleofcentimeters(inches).If
youarehavingissuespropellinginreverse,slightlylift
thehandle.Ifthemachinestilldoesnotrollbackward
easily,contactanAuthorizedServiceDealer.
StartingtheEngine
1.Holdtheblade-controlbaragainstthehandle
(AofFigure13).
2.Pulltherecoil-starthandlelightlyuntilyoufeel
resistance,thenpullitsharply,andallowitto
returntotheropeguideonthehandleslowly(B
ofFigure13).
Figure13
Note:Ifthemachinedoesnotstartafterseveral
attempts,contactanAuthorizedServiceDealer.
ShuttingOfftheEngine
ServiceInterval:Beforeeachuseordaily
Toshutofftheengine,releasetheblade-controlbar.
Important:Whenyoureleasetheblade-control
bar,boththeengineandbladeshouldstopwithin
3seconds.Iftheydonotstopproperly,stop
usingyourmachineimmediatelyandcontactan
AuthorizedServiceDealer.
RecyclingtheClippings
Yourmachinecomesfromthefactoryreadytorecycle
thegrassandleafclippingsbackintothelawn.
g230459
Ifthegrassbagisonthemachineandthe
bag-on-demandleverisinthebaggingposition,
movethelevertotherecyclingposition;referto
OperatingtheBag-on-DemandLever(page12).If
theside-dischargechuteisonthemachine,remove
it;refertoRemovingtheSide-DischargeChute(page
13).
11
Page 13
BaggingtheClippings
Operatingthe
Usethegrassbagwhenyouwanttocollectgrassand
leafclippingsfromthelawn.
Iftheside-dischargechuteisonthemachine,remove
it;refertoRemovingtheSide-DischargeChute(page
13).Ifthebag-on-demandleverisintherecycling
position,moveittothebaggingposition;referto
OperatingtheBag-on-DemandLever(page12).
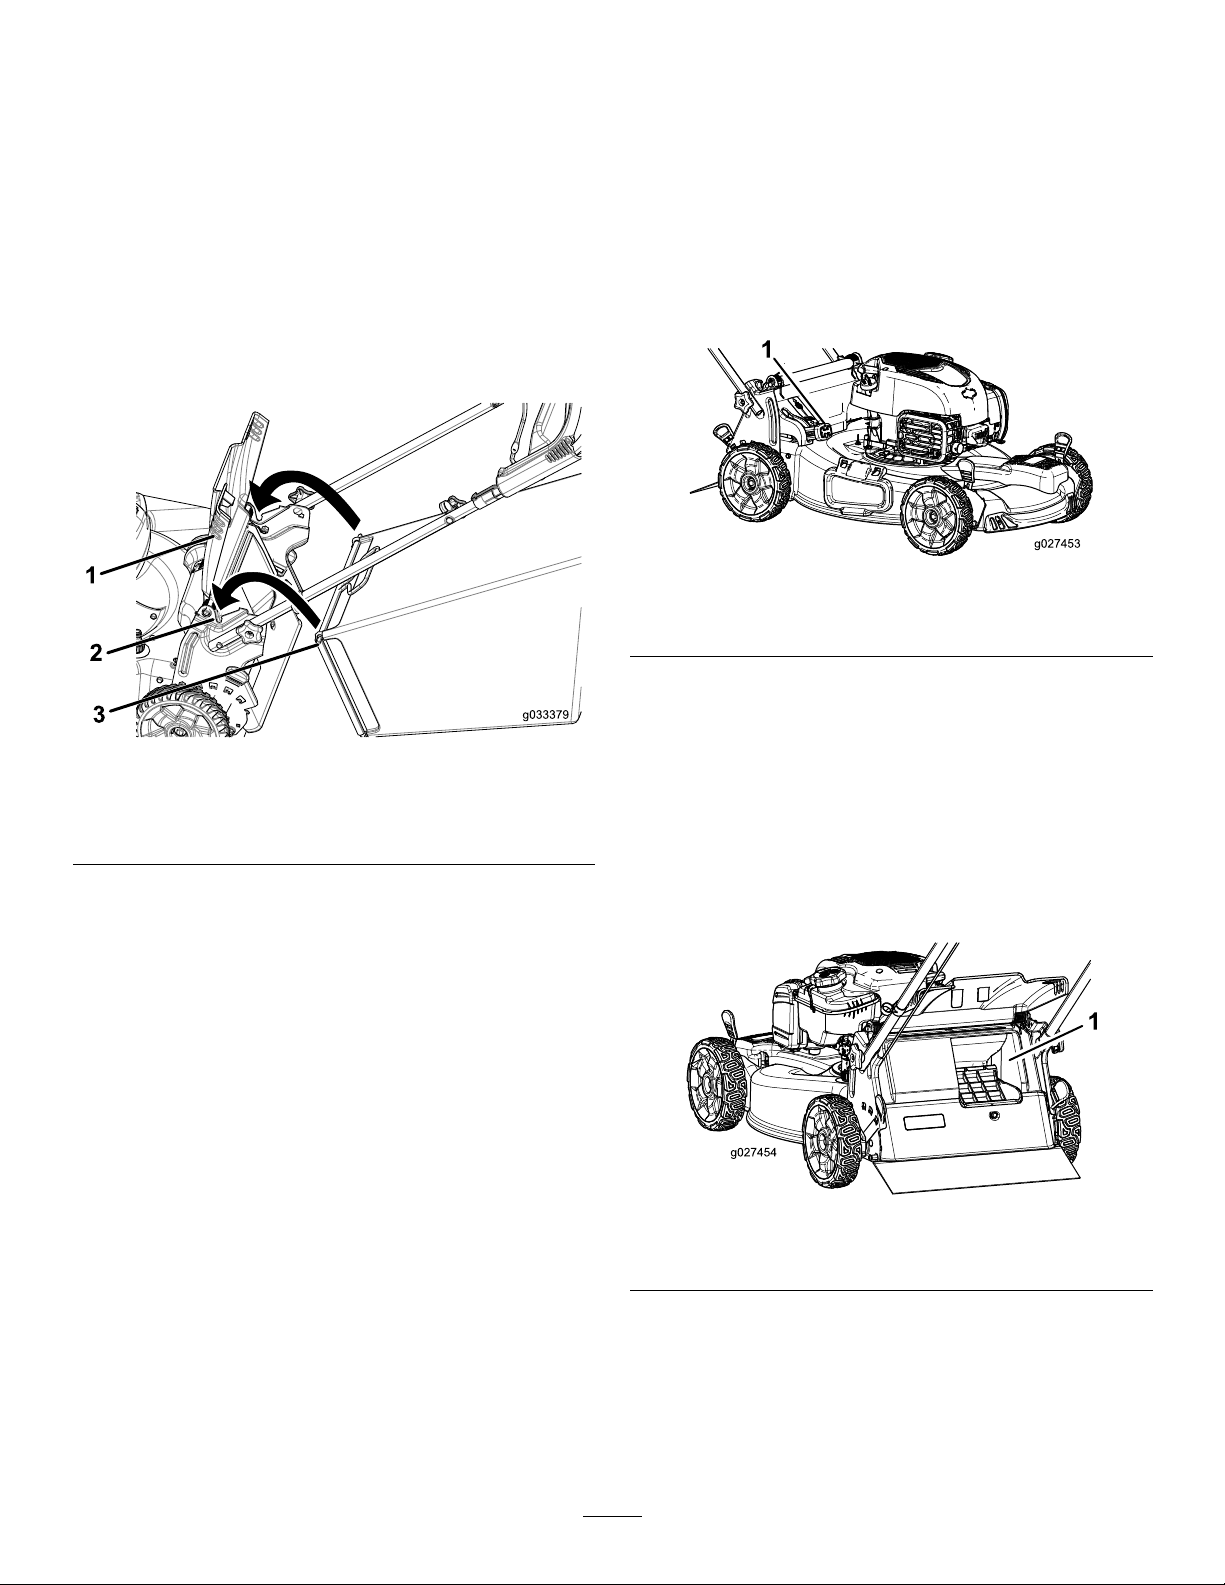
InstallingtheGrassBag
1.Raiseandholdupthereardeector(Figure15).
Figure15
1.Reardeector3.Grass-bagpin(2)
2.Notches(2)
2.Installthegrassbag,ensuringthatthepinson
thebagrestinthenotchesonthehandle(Figure
15).
Bag-on-DemandLever
Thebag-on-demandfeatureallowsyoutoeither
collectorrecyclegrassandleafclippingswhilethe
grassbagisattachedtothemachine.
•Tobagthegrassandleafclippings,pressthe
buttononthebag-on-demandleverandmovethe
leverforwarduntilthebuttonontheleverpopsup
(Figure16).
g027453
Figure16
1.Bag-on-demandlever(inthebaggingposition)
•Torecycleorside-dischargethegrassand
leafclippings,pressthebuttonontheleverand
g033379
movetheleverrearwarduntilthebuttononthe
leverpopsup.
Important:Forproperoperation,remove
anygrassclippingsanddebrisfromthe
bag-on-demanddoorandthesurrounding
opening(Figure17)beforeyoumovethe
bag-on-demandleverfrom1positionto
another.
3.Lowerthereardeector.
RemovingtheGrassBag
Toremovethebag,reversethestepsinInstallingthe
GrassBag(page12).
g027454
Figure17
1.Cleanhere
12
Page 14
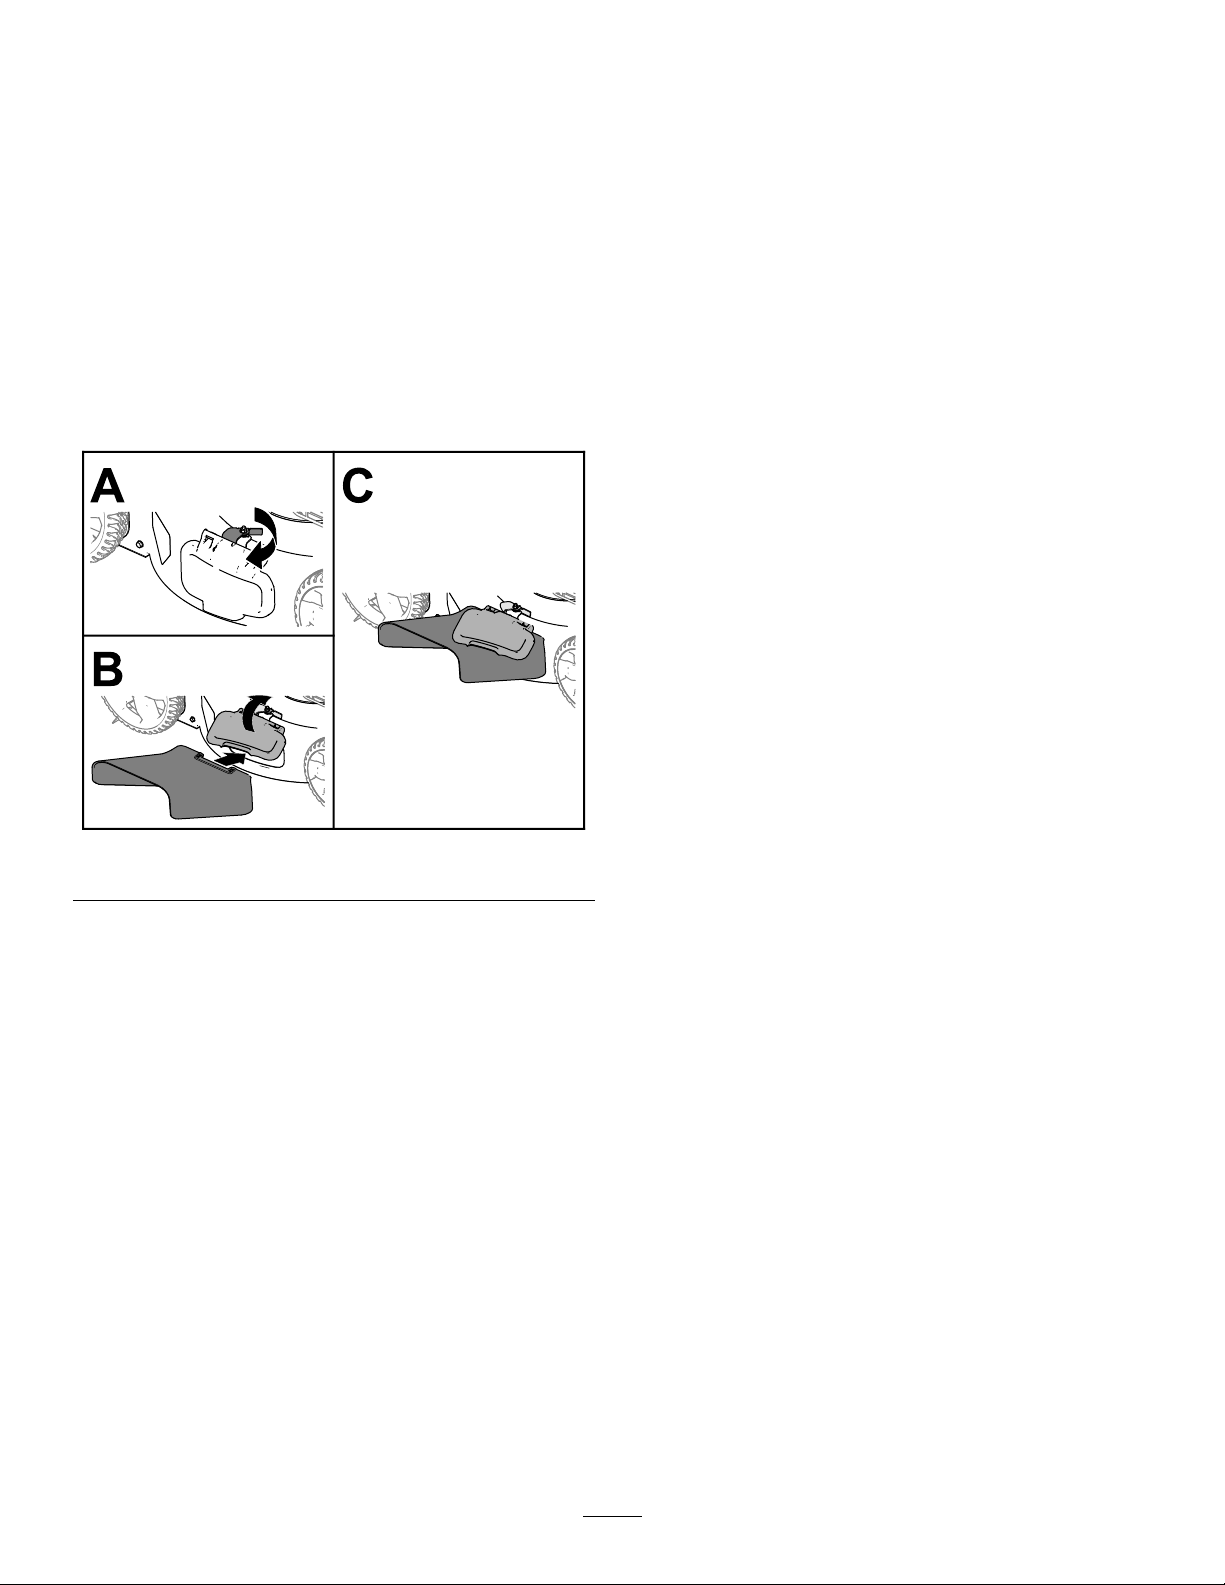
Side-Dischargingthe Clippings
Useside-dischargingforcuttingverytallgrass.
Ifthegrassbagisonthemachineandthe
bag-on-demandleverisinthebaggingposition,move
thelevertotherecyclingposition;refertoOperating
theBag-on-DemandLever(page12).
InstallingtheSide-Discharge Chute
Unlatchandliftupthesidedeectorandinstallthe
side-dischargechute(Figure18).
•Forbestperformance,installanewbladebefore
thecuttingseasonbegins.
•ReplacethebladewhennecessarywithaT oro
replacementblade.
CuttingGrass
•Cutonlyaboutathirdofthegrassbladeatatime.
Donotcutbelow51mm(2inches)unlessthe
grassissparseoritislatefallwhengrassgrowth
beginstoslowdown.
•Whencuttinggrassover15cm(6inches)tall,
mowatthehighestcuttingheightsettingandwalk
slower;thenmowagainatalowersettingforthe
bestlawnappearance.Ifthegrassistoolong,the
machinemayplugandcausetheenginetostall.
•Wetgrassandleavestendtoclumpontheyard
andcancausethemachinetoplugortheengine
tostall.Avoidmowinginwetconditions.
•Beawareofapotentialrehazardinverydry
conditions,followalllocalrewarnings,andkeep
themachinefreeofdrygrassandleafdebris.
Figure18
RemovingtheSide-Discharge Chute
Toremovetheside-dischargechute,liftuptheside
deector,removetheside-dischargechute,andlower
theside-dischargedeectoruntilitlatchessecurely.
OperatingTips
GeneralMowingTips
•Inspecttheareawhereyouwillusethemachine
andremoveallobjectsthatthemachinecould
throw.
•Avoidstrikingsolidobjectswiththeblade.Never
deliberatelymowoveranyobject.
•Ifthemachinestrikesanobjectorstartstovibrate,
immediatelyshutofftheengine,removethekey
(ifequipped),disconnectthewirefromthespark
plug,andexaminethemachinefordamage.
•Alternatethemowingdirection.Thishelps
dispersetheclippingsoverthelawnforeven
fertilization.
•Ifthenishedlawnappearanceisunsatisfactory,
try1ormoreofthefollowing:
–Replacethebladeorhaveitsharpened.
g235646
–Walkataslowerpacewhilemowing.
–Raisethecuttingheightonyourmachine.
–Cutthegrassmorefrequently.
–Overlapcuttingswathsinsteadofcuttingafull
swathwitheachpass.
CuttingLeaves
•Aftercuttingthelawn,ensurethathalfofthelawn
showsthroughthecutleafcover.Y oumayneed
tomakemorethanasinglepassovertheleaves.
•Iftherearemorethan13cm(5inches)ofleaves
onthelawn,mowatahighercuttingheightand
thenagainatthedesiredcuttingheight.
•Slowdownyourmowingspeedifthemachine
doesnotcuttheleavesnelyenough.
13
Page 15
AfterOperation
CleaningundertheMachine
ServiceInterval:Beforeeachuseordaily
AfterOperationSafety
GeneralSafety
•Cleangrassanddebrisfromthemachinetohelp
preventres.Cleanupoilorfuelspills.
•Allowtheenginetocoolbeforestoringthemachine
inanyenclosure.
•Neverstorethemachineorfuelcontainerwhere
thereisanopename,spark,orpilotlight,such
asonawaterheateroronotherappliances.
HaulingSafety
•Removetheignitionkey(ifequipped)before
loadingthemachineforhauling.
•Usecarewhenloadingorunloadingthemachine.
•Securethemachinefromrolling.
Forbestresults,cleanthemachinesoonafteryou
havecompletedmowing.
1.Movethemachineontoaatpavedsurface.
2.Shutofftheengineandwaitforallmovingparts
tostopbeforeleavingtheoperatingposition.
3.Lowerthemachinetoitslowestcutting-height
setting.RefertoAdjustingtheCuttingHeight
(page10).
4.Washouttheareaunderthereardoorwherethe
clippingsgofromtheundersideofthemachine
tothegrassbag.
Note:Washouttheareawiththe
bag-on-demand(ifequipped)inboththefully
forwardandfullyrearwardpositions.
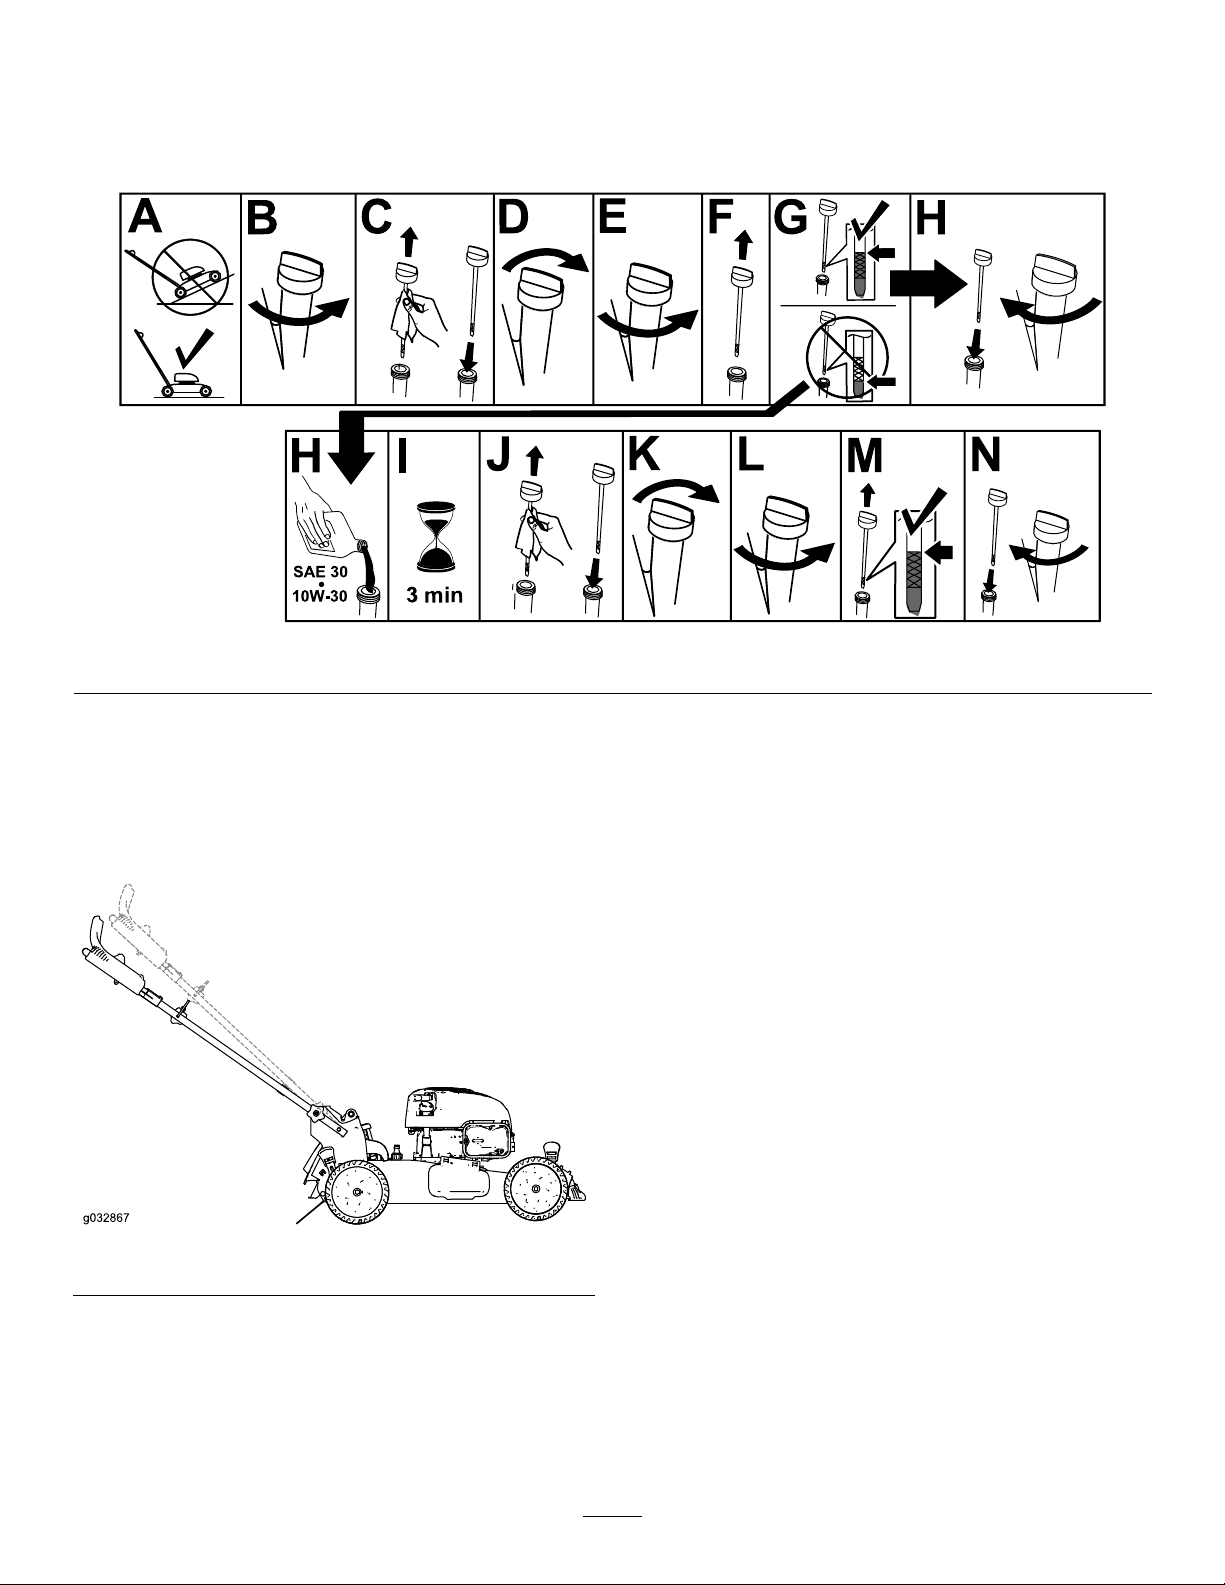
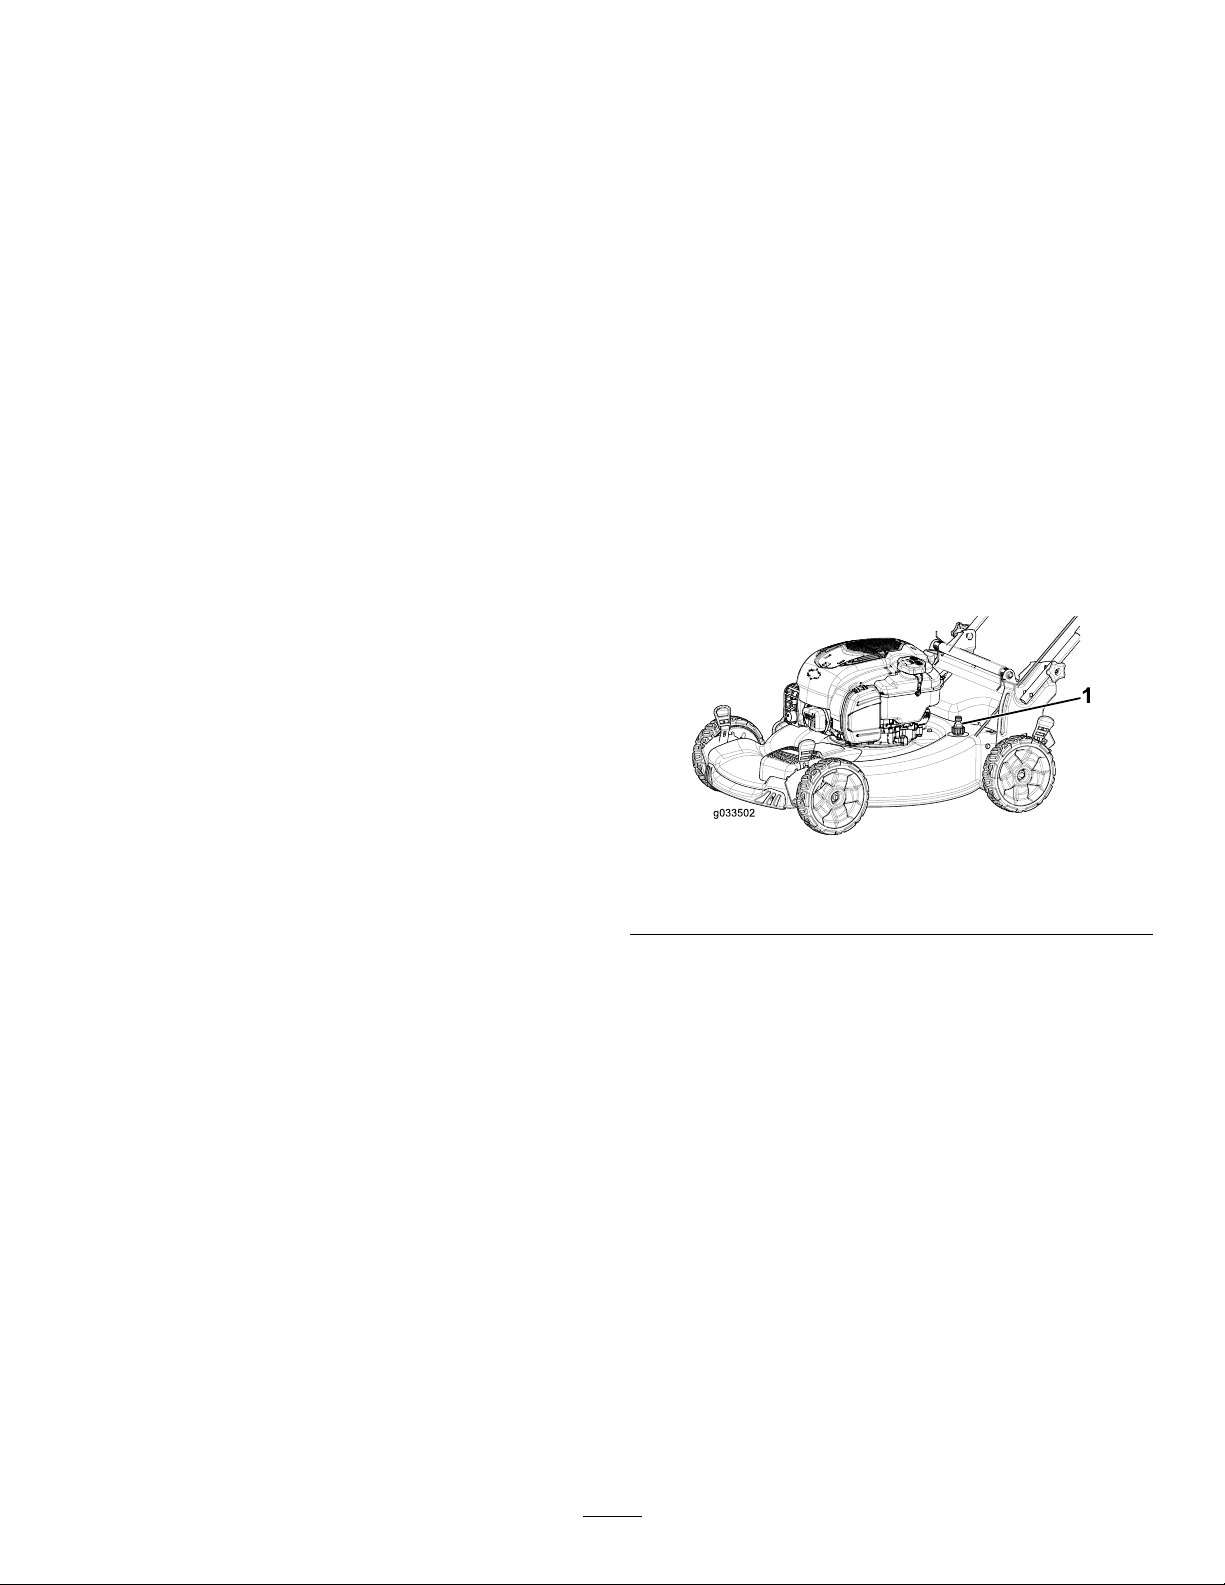
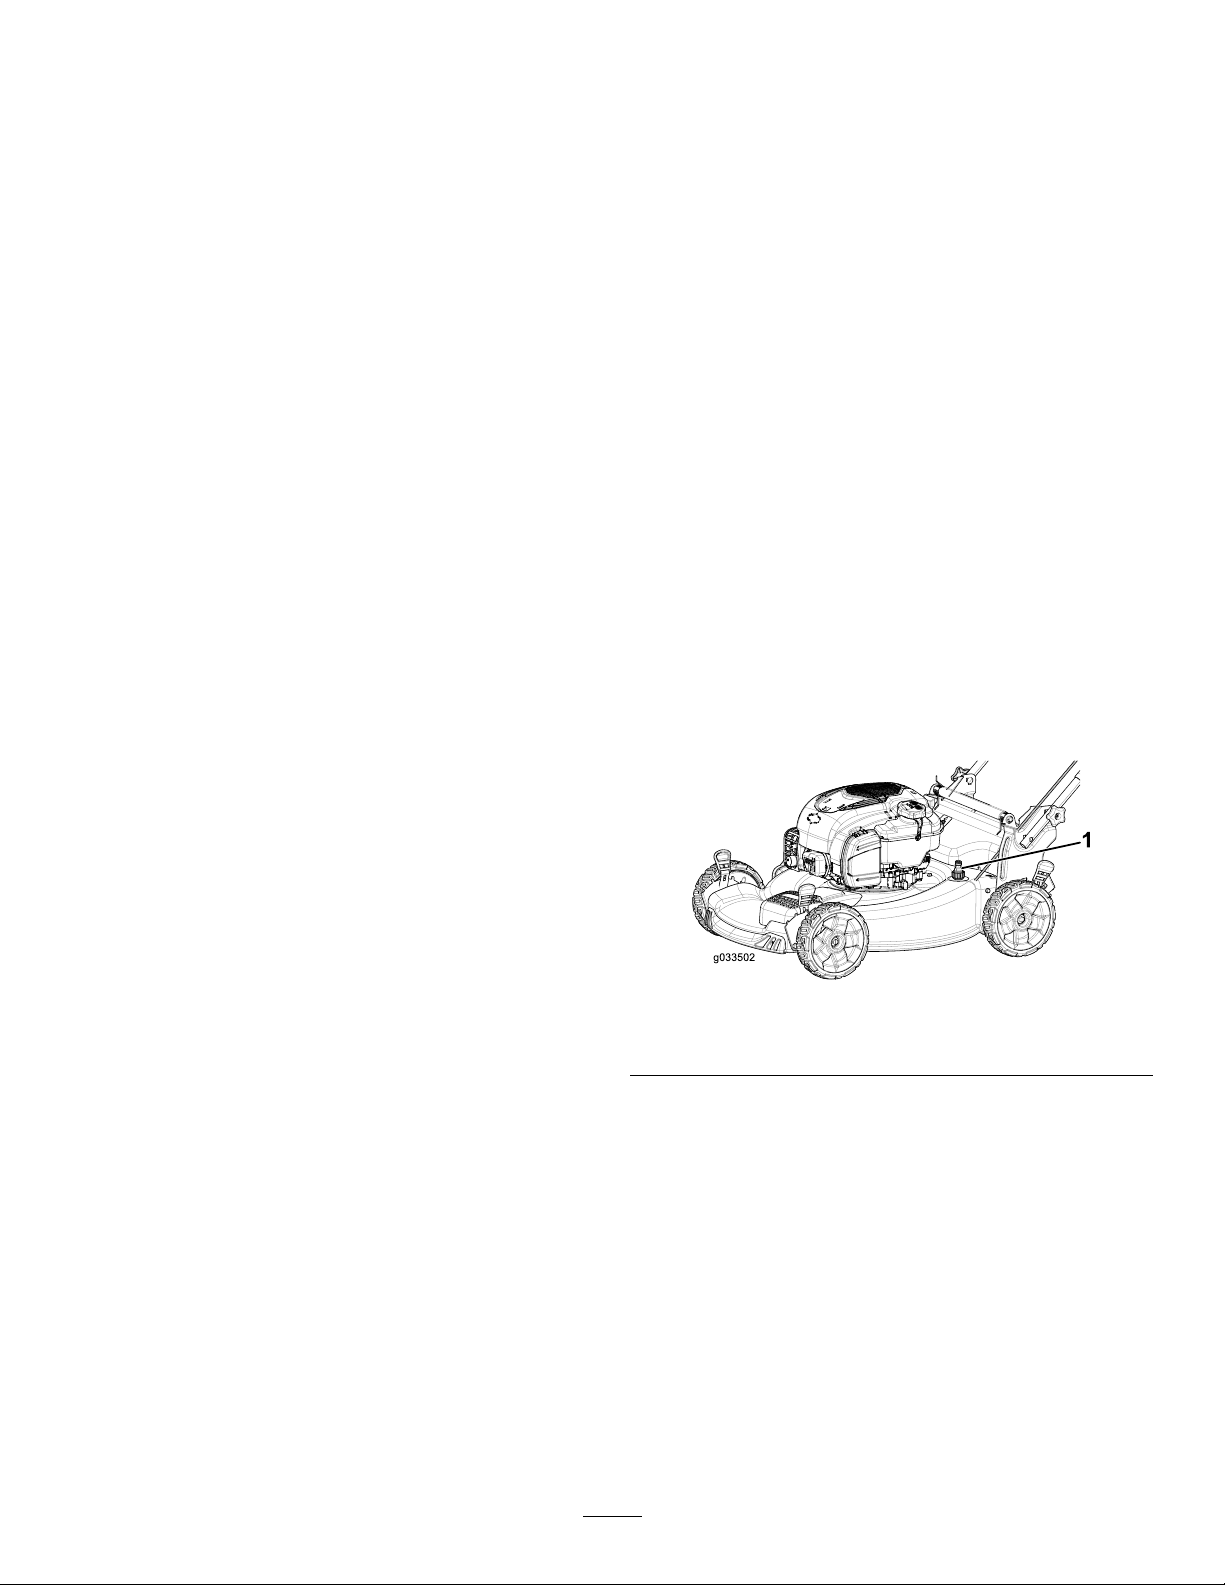
5.Attachagardenhosethatisconnectedtoa
watersupplytothewashoutport(Figure19).
Figure19
1.Washoutport
6.Turnthewateron.
7.Starttheengineandrunituntiltheclippingsno
longercomeoutfromunderthemachine.
8.Shutofftheengine.
9.Shutoffthewateranddisconnectthegarden
hosefromthemachine.
10.Starttheengineandrunitforafewminutesto
drytheundersideofthemachinetopreventit
fromrusting.
11.Shutofftheengineandallowittocoolbefore
storingthemachineinanenclosedarea.
g033502
14
Page 16
FoldingtheHandle
WARNING
Foldingorunfoldingthehandleimproperly
candamagethecables,causinganunsafe
operatingcondition.
•Donotdamagethecableswhenfoldingor
unfoldingthehandle.
•Ifacableisdamaged,contactan
AuthorizedServiceDealer.
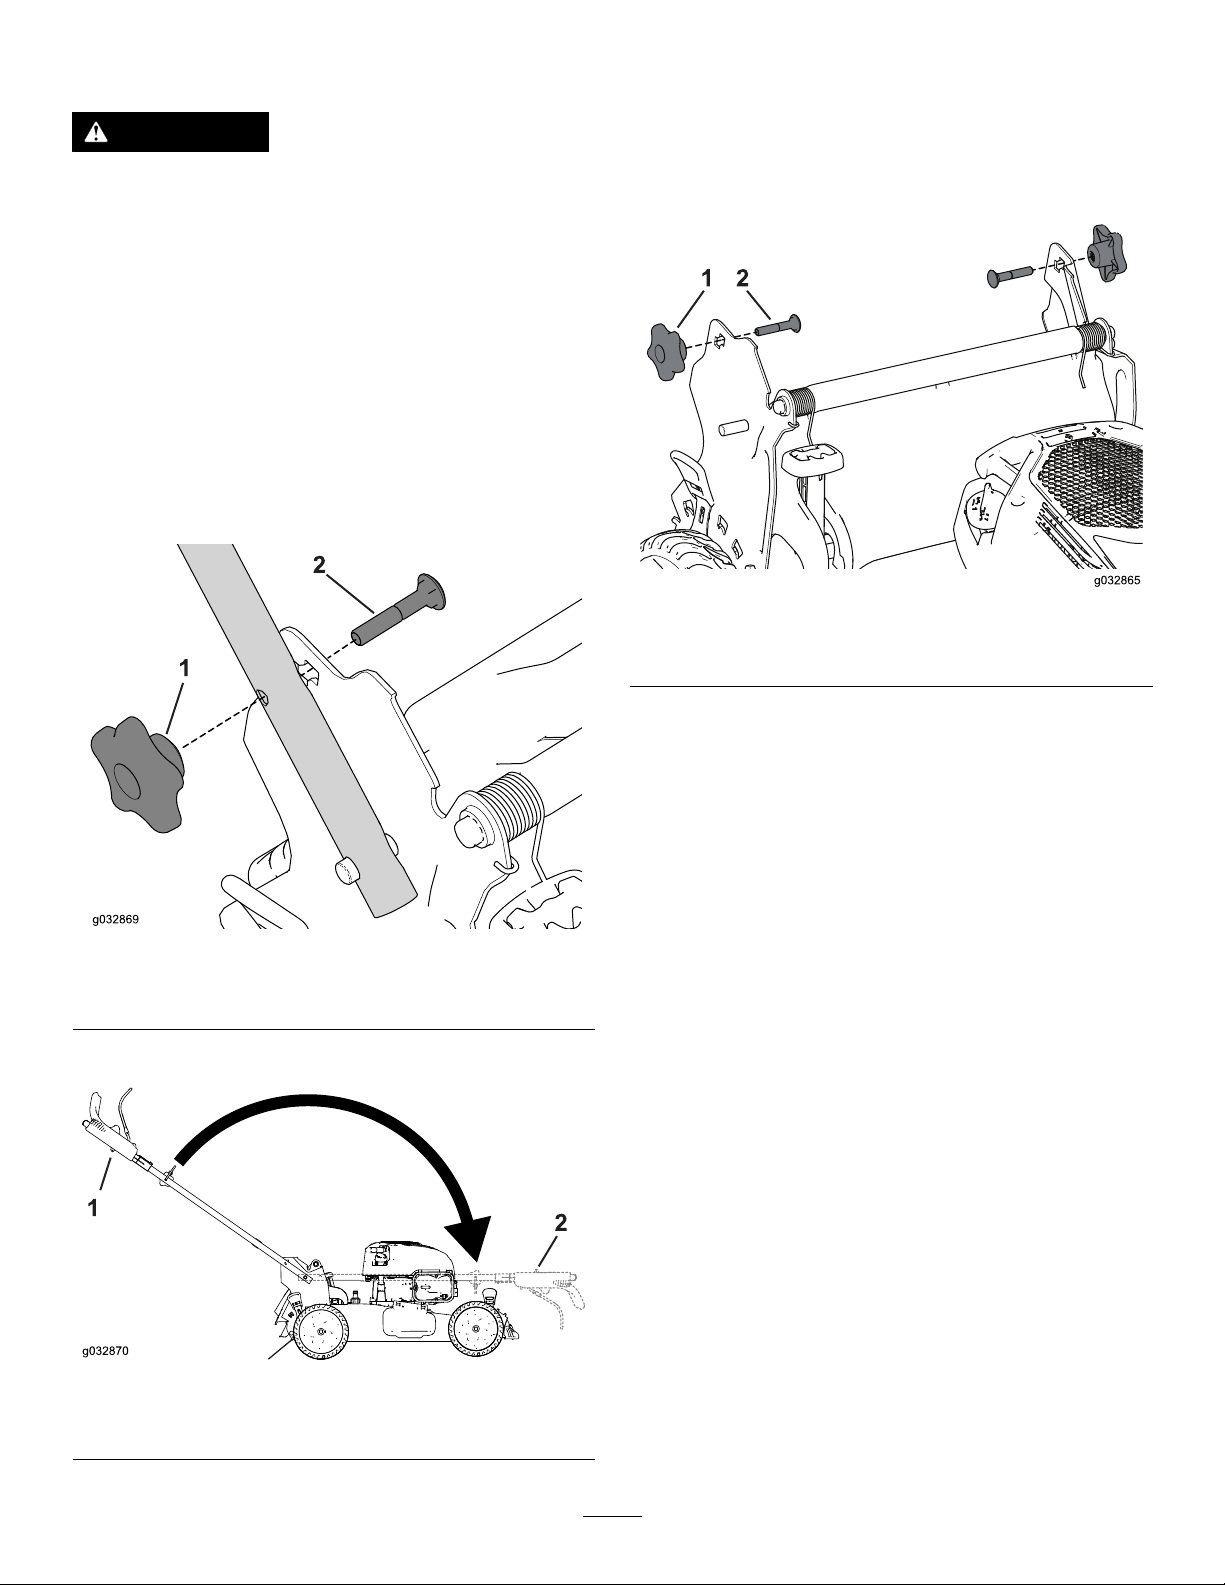
1.Removeandsavethe2handleknobsand2
carriageboltsfromthehandlebrackets(Figure
20).
Important:Routethecablestotheoutside
ofthehandleknobsasyoufoldthehandle.
3.Insertthecarriagebolt(withtheboltheadtoward
theinside)throughthehandlebracketandthe
upperholeinthehandleend.Ensurethatthe
squareedgesofeachcarriagebolttsintothe
upperorlowersquareholeinitsrelatedhandle
bracket(Figure22).
g032865
Figure22
Figure20
1.Handleknob
2.Carriagebolt
2.Foldthehandlebyrotatingitforward(Figure21).
1.Handleknob
2.Carriagebolt
4.Looselyinstallthehandleknobsandcarriage
boltsonthehandlebrackets.
5.T ounfoldthehandle,referto1Assemblingand
UnfoldingtheHandle(page5).
g032869
1.Operatingposition
g032870
Figure21
2.Foldedposition
15
Page 17
Maintenance
RecommendedMaintenanceSchedule(s)
MaintenanceService
Interval
Beforeeachuseordaily
Every25hours
Yearly
Yearlyorbeforestorage
MaintenanceProcedure
•Checktheengine-oillevelandaddoilasneeded.
•Ensurethattheenginestopswithin3secondsafterreleasingtheblade-controlbar.
•Cleangrassclippingsanddirtfromunderthemachine.
•Servicetheairlter;serviceitmorefrequentlyindustyoperatingconditions.
•Replacetheairlter;replaceitmorefrequentlyindustyoperatingconditions.
•Changetheengineoil.
•Replacethebladeorhaveitsharpened(morefrequentlyiftheedgedullsquickly).
•Cleantheenginebyremovingdirtanddebrisfromitstopandsides;cleanitmore
frequentlyindustyoperatingconditions.
•Emptythefueltankbeforerepairsasdirectedandbeforeyearlystorage.
Important:Refertoyourenginemanualforadditionalmaintenanceprocedures.
MaintenanceSafety
•Disconnectthespark-plugwirefromthesparkplug
beforeperforminganymaintenanceprocedure.
•Wearglovesandeyeprotectionwhenservicing
themachine.
•Thebladeissharp;contactingthebladecanresult
inseriouspersonalinjury .Weargloveswhen
servicingtheblade.Donotrepairoralterthe
blade(s).
•Nevertamperwithsafetydevices.Checktheir
properoperationregularly .
•Tippingthemachinemaycausethefueltoleak.
Fuelisammableandexplosive,andcancause
personalinjury.Runtheenginedryorremovethe
fuelwithahandpump;neversiphonthefuel.
•T oensureoptimumperformanceandcontinued
safetycerticationofthemachine,useonly
genuineTororeplacementpartsandaccessories.
Replacementpartsandaccessoriesmadeby
othermanufacturerscouldbedangerous,and
suchusecouldvoidtheproductwarranty .
PreparingforMaintenance
1.Shutofftheengineandwaitforallmovingparts
tostop.
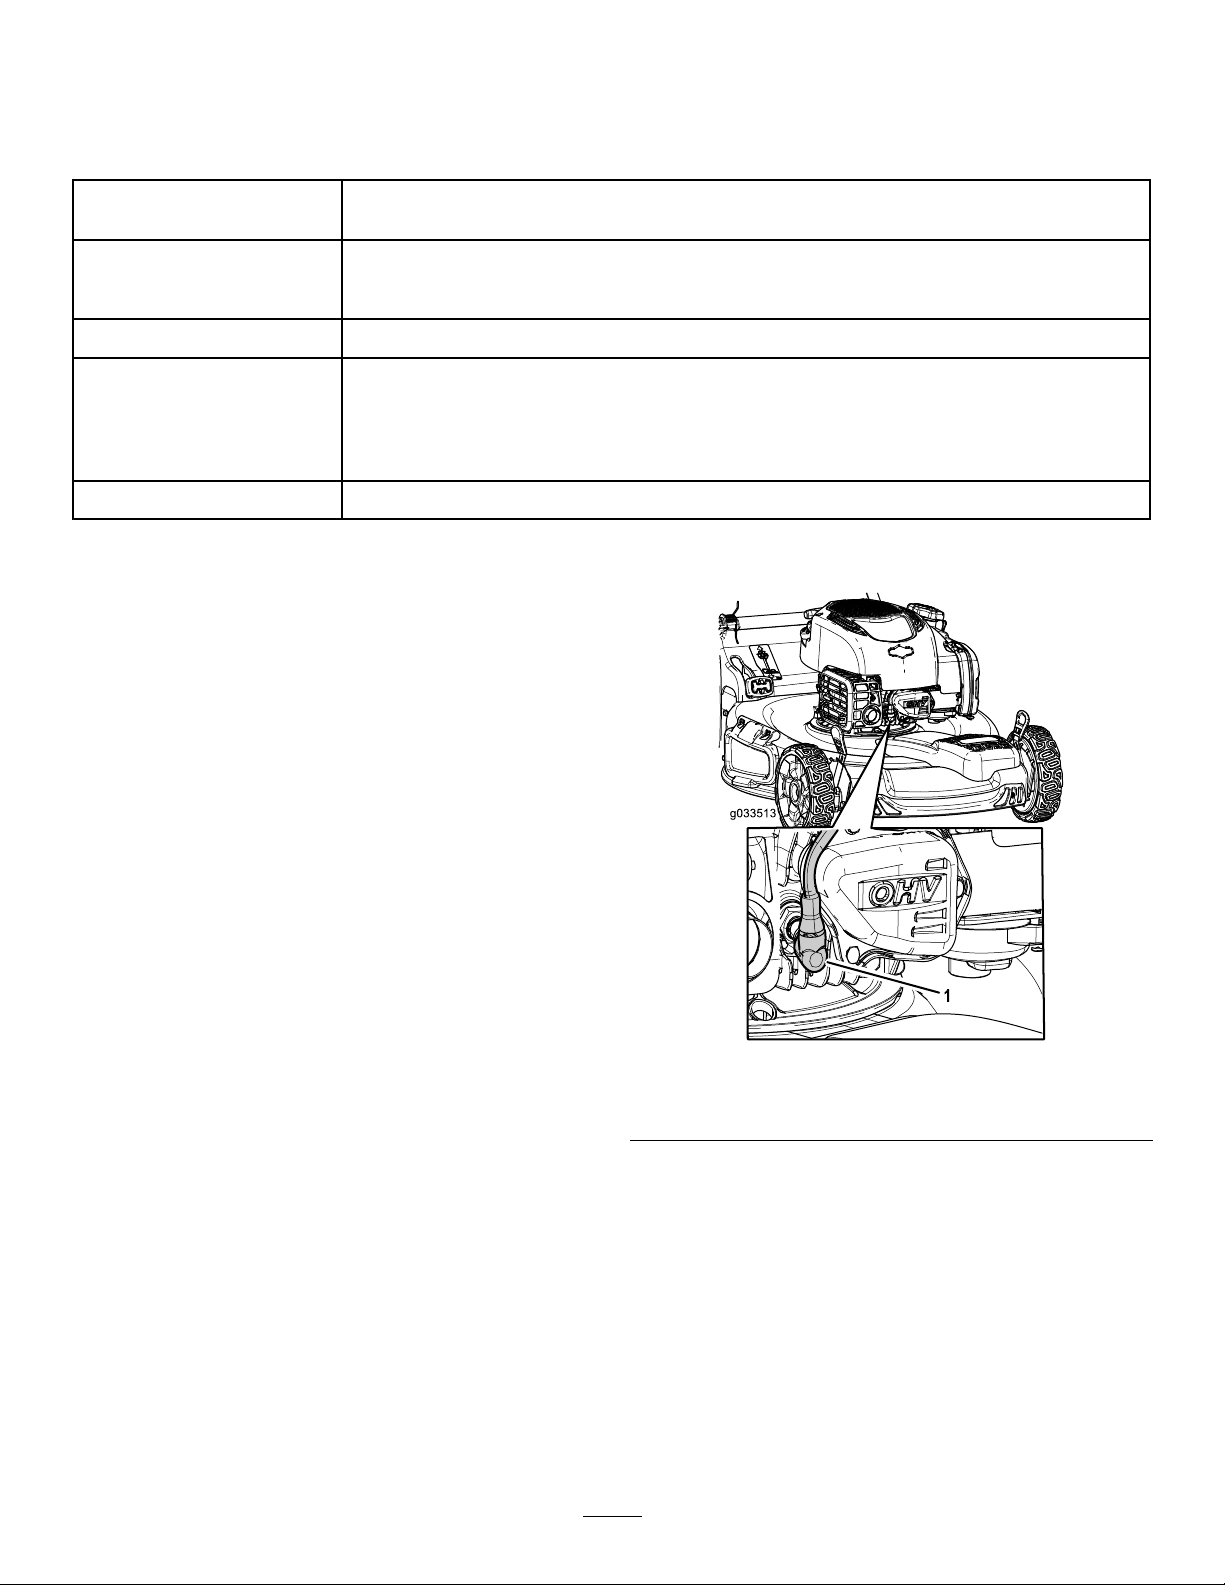
2.Disconnectthespark-plugwirefromthespark
plug(Figure23).
g033513
Figure23
1.Spark-plugwire
3.Afterperformingthemaintenanceprocedure(s),
connectthespark-plugwiretothesparkplug.
Important:Beforetippingthemachineto
changetheoilorreplacetheblade,allowthe
fueltanktorundrythroughnormalusage.If
youmusttipthemachinepriortorunning
outoffuel,useahandfuelpumptoremove
thefuel.Alwaystipthemachineontoits
side,withthedipstickdown.
16
Page 18
ServicingtheAirFilter
ChangingtheEngineOil
ServiceInterval:Every25hours
Yearly
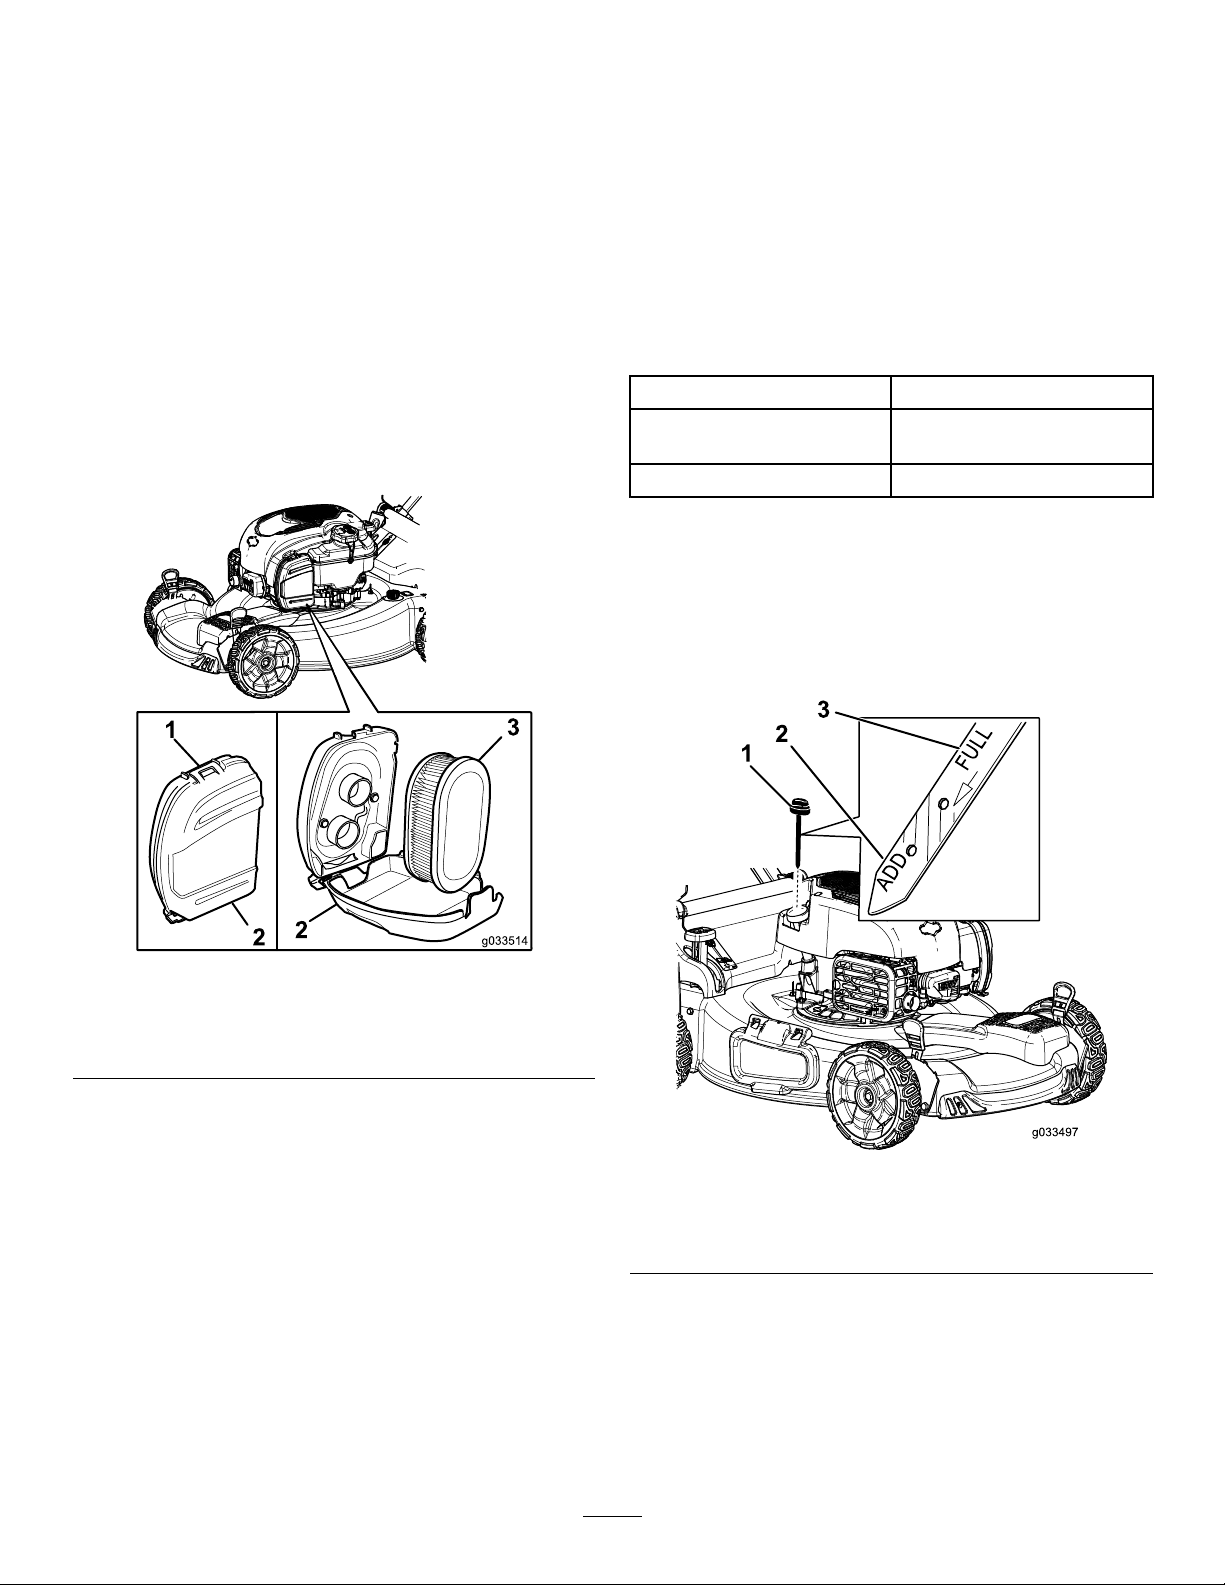
1.Unclipthetopoftheair-ltercover(Figure24).
Figure24
ServiceInterval:Yearly
Changingtheengineoilisnotrequired,butif
youwanttochangetheoil,usethefollowing
procedure.
Note:Runtheengineafewminutesbeforechanging
theoiltowarmit.Warmoilowsbetterandcarries
morecontaminants.
EngineOilSpecications
Engineoilcapacity
OilviscositySAE30orSAE10W-30
APIserviceclassicationSJorhigher
1.Movethemachinetoalevelsurface.
2.RefertoPreparingforMaintenance(page16).
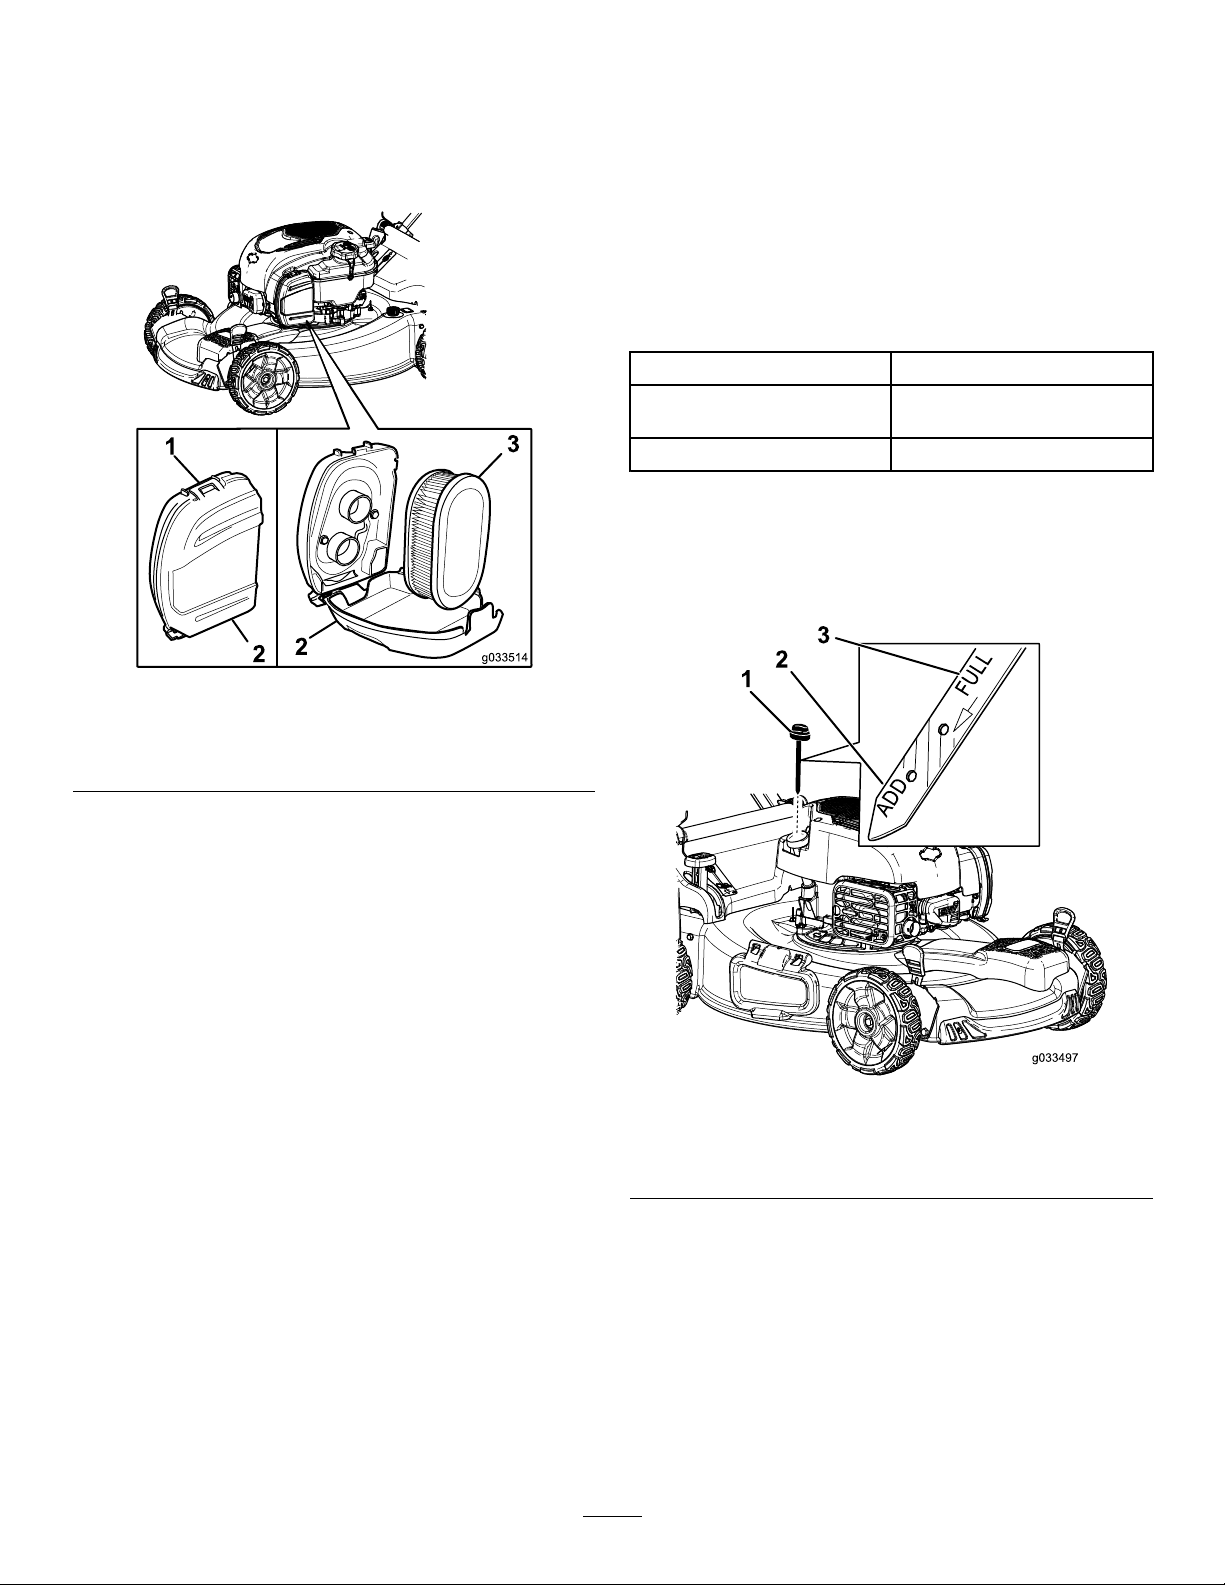
3.Removethedipstickbyrotatingthecap
counterclockwiseandpullingitout(Figure25).
g033514
0.44L(15oz)
detergentoil
1.Clip3.Airlter
2.Air-ltercover
2.Removetheairlter(Figure24).
3.Inspecttheairlter.
Note:Iftheairlterisexcessivelydirty,replace
itwithanewlter.Otherwise,gentlytaptheair
lteronahardsurfacetoloosendebris.
4.Installtheairlter.
5.Usethecliptoinstalltheair-ltercover.
g033497
Figure25
1.Dipstick3.Full
2.Add
4.Tipthemachineontoitsside(sothattheair
lterisup)todraintheusedoilfromtheoil-ll
tube(Figure26).
17
Page 19
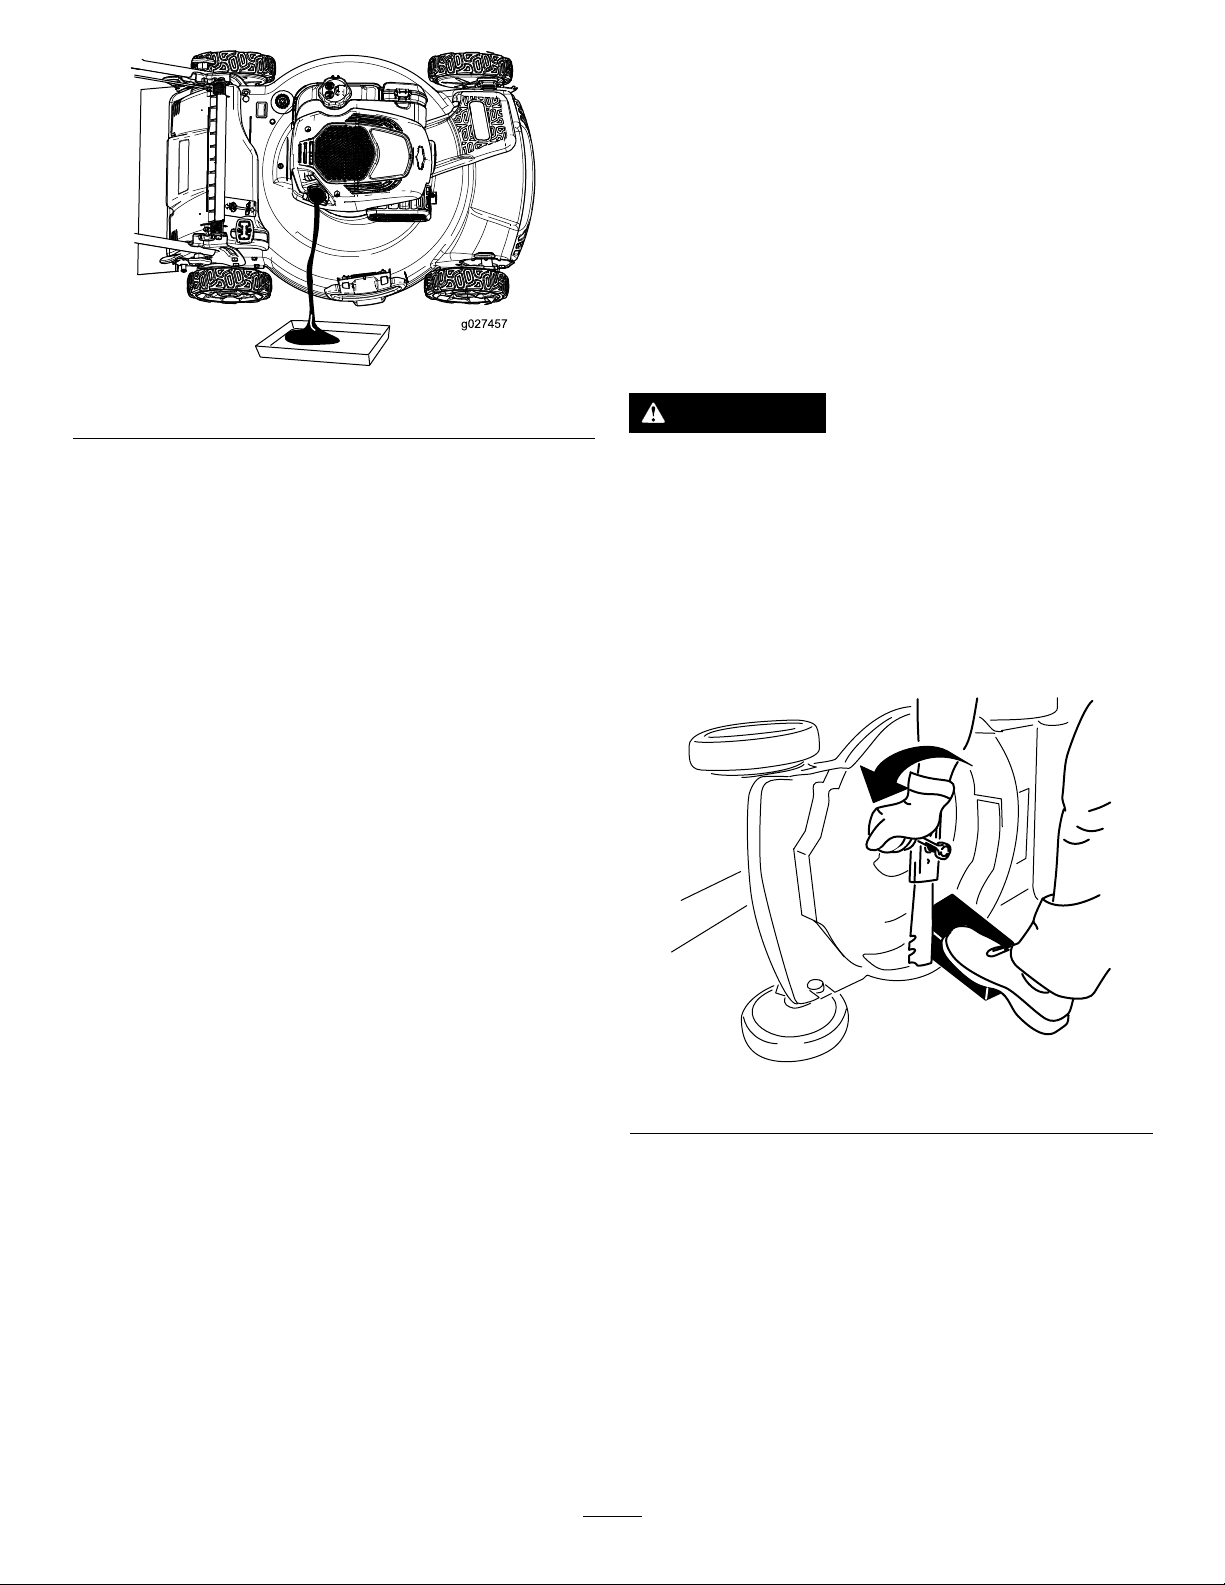
Figure26
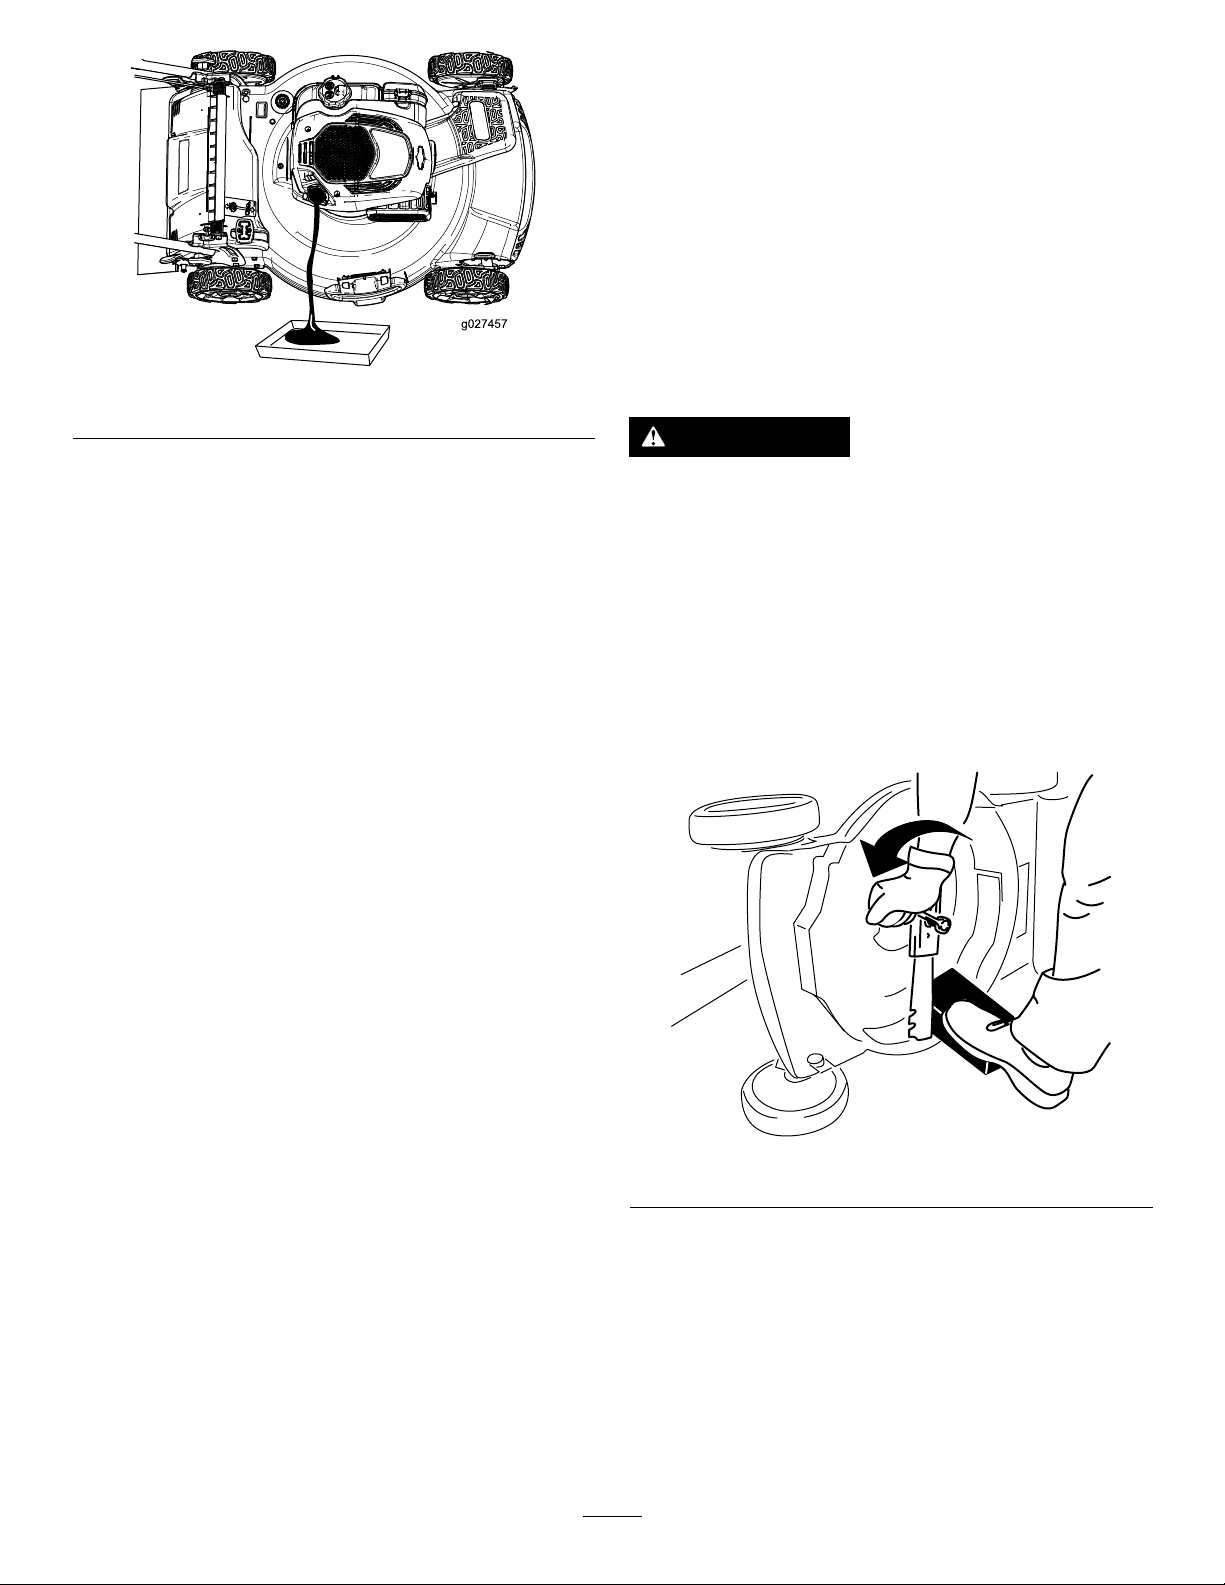
ReplacingtheBlade
ServiceInterval:Yearly
Important:Youwillneedatorquewrenchto
installthebladeproperly.Ifyoudonothavea
torquewrenchorareuncomfortableperforming
thisprocedure,contactanAuthorizedService
Dealer.
Examinethebladewheneveryourunoutoffuel.Ifthe
bladeisdamagedorcracked,replaceitimmediately.
Ifthebladeedgeisdullornicked,haveitsharpened
g027457
andbalanced,orreplaceit.
WARNING
5.Afterdrainingtheusedoil,returnthemachineto
theoperatingposition.
6.Carefullypourabout3/4oftheenginecapacity
ofoilintotheoil-lltube.
7.Wait3minutesfortheoiltosettleintheengine.
8.Wipethedipstickcleanwithacleancloth.
9.Insertthedipstickintotheoil-lltube,then
removethedipstick.
10.Readtheoillevelonthedipstick(Figure25).
•Iftheoillevelonthedipstickistoolow,
carefullypourasmallamountofoilintothe
oil-lltube,wait3minutes,andrepeatsteps
8through10untiltheoillevelonthedipstick
iscorrect.
•Iftheoillevelonthedipstickistoohigh,
draintheexcessoiluntiltheoillevelonthe
dipstickiscorrect.
Important:Iftheoillevelintheengineistoo
lowortoohighandyouruntheengine,you
maydamagetheengine.
Thebladeissharp;contactingthebladecan
resultinseriouspersonalinjury.
Weargloveswhenservicingtheblade.
1.RefertoPreparingforMaintenance(page16).
2.Tipthemachineontoitssidewiththeairlterup.
3.Useablockofwoodtoholdthebladesteady
(Figure27).
11.Installthedipstickintotheoil-lltubesecurely.
12.Recycletheusedoilproperly.
g231389
Figure27
4.Removetheblade,savingallmountinghardware
(Figure27).
5.Installthenewbladeandallmountinghardware
(Figure28).
18
Page 20
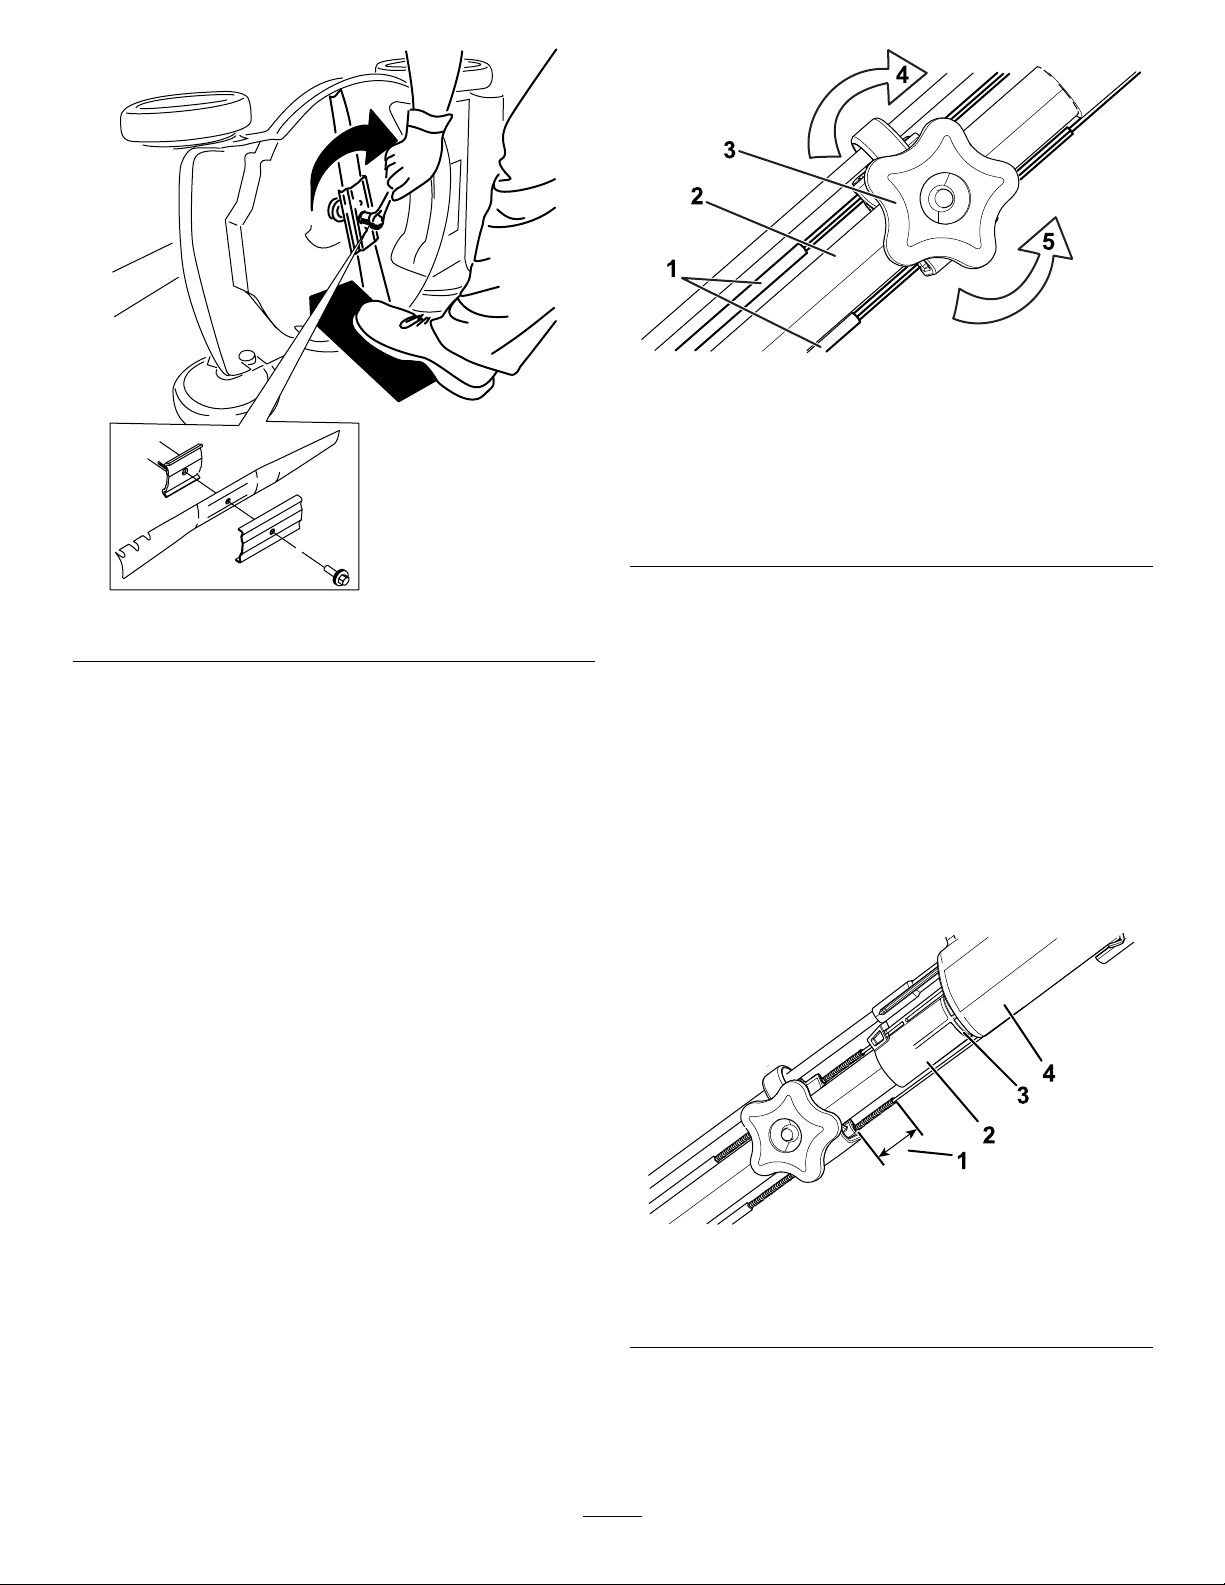
Figure29
g208188
Figure28
Important:Positionthecurvedendsofthe
bladetopointtowardthemachinehousing.
6.Useatorquewrenchtotightenthebladebolt
to82N∙m(60ft-lb).
Important:Abolttorquedto82N∙m(60
ft-lb)isverytight.Whileholdingtheblade
withablockofwood,putyourweight
behindtheratchetorwrenchandtightenthe
boltsecurely.Thisboltisverydifcultto
overtighten.
1.Self-propel-drivecables
2.Handle(leftside)
3.Adjustmentknob
g231390
2.Adjustthetensiononthecables(Figure29)
4.Turntheknobclockwiseto
tightentheadjustment.
5.Turntheknob
counterclockwiseto
loosentheadjustment.
bypullingbothofthembackorpushingthem
forwardandthenholdingtheminthatposition,
maintainingequallengths.
Note:Pushthecablestowardtheengineto
increasethetraction;pullthecablesawayfrom
theenginetodecreasethetraction.
3.Turntheadjustmentknobclockwisetotighten
theadjustmentofthecables.
Note:Bothofthecablesshouldextend38mm(1.5
inches)pasttheclampswhenthehandleisaligned
withtherstmarkontheguide;refertoFigure30.
AdjustingtheSelf-Propel Drive
Wheneveryouinstallnewself-propelcablesorif
theself-propeldriveisoutofadjustment,adjustthe
self-propeldrive.
1.Turntheadjustmentknobcounterclockwiseto
loosenthecableadjustment(Figure29).
19
1.38mm(1.5inches)
2.Guide
g209518
Figure30
3.Firstmark
4.Handle
Page 21

Storage
Storethemachineinacool,clean,dryplace.
PreparingtheMachinefor Storage
1.Onthelastrefuelingoftheyear,addfuel
stabilizer(suchasToroPremiumFuel
Treatment)tothefuelasdirectedonthelabel.
2.Disposeofanyunusedfuelproperly.Recycle
itaccordingtolocalcodesoruseitinyour
automobile.
Note:Oldfuelinthefueltankistheleading
causeofhardstarting.Donotstorefuelwithout
fuelstabilizermorethan30days,anddonot
storestabilizedfuelmorethan90days.
3.Runthemachineuntiltheengineshutsofffrom
runningoutoffuel.
4.Starttheengineagainandallowittorununtil
itshutsoff.Whenyoucannolongerstartthe
engine,itissufcientlydry.
5.Disconnectthewirefromthesparkplugand
connectthewiretotheretainingpost(if
equipped).
6.Removethesparkplug,add30ml(1oz)of
engineoilthroughthespark-plughole,andpull
thestarterropeslowlyseveraltimestodistribute
oilthroughoutthecylindertopreventcylinder
corrosionduringtheoff-season.
7.Looselyinstallthesparkplug.
8.Tightenallnuts,bolts,andscrews.
RemovingtheMachine fromStorage
1.Checkandtightenallfasteners.
2.Removethesparkplugandspintheengine
rapidlybypullingtherecoil-starthandletoblow
theexcessoilfromthecylinder.
3.Installthesparkplugandtightenitwithatorque
wrenchto20N∙m(15ft-lb).
4.Performanymaintenanceprocedures;referto
Maintenance(page16).
5.Checktheengine-oillevel;refertoCheckingthe
Engine-OilLevel(page9).
6.Fillthefueltankwithfreshfuel;refertoFilling
theFuelT ank(page8).
7.Connectthewiretothesparkplug.
20
Page 22

Notes:
Page 23

EuropeanPrivacyNotice
TheInformationT oroCollects
ToroWarrantyCompany(Toro)respectsyourprivacy.Inordertoprocessyourwarrantyclaimandcontactyouintheeventofaproductrecall,weaskyou
tosharecertainpersonalinformationwithus,eitherdirectlyorthroughyourlocalT orocompanyordealer .
TheTorowarrantysystemishostedonserverslocatedwithintheUnitedStateswhereprivacylawmaynotprovidethesameprotectionasapplies
inyourcountry.
BYSHARINGYOURPERSONALINFORMA TIONWITHUS,YOUARECONSENTINGTOTHEPROCESSINGOFYOURPERSONALINFORMATION
ASDESCRIBEDINTHISPRIVACYNOTICE.
TheWayToroUsesInformation
Toromayuseyourpersonalinformationtoprocesswarrantyclaims,tocontactyouintheeventofaproductrecallandforanyotherpurposewhichwetell
youabout.ToromayshareyourinformationwithT oro'safliates,dealersorotherbusinesspartnersinconnectionwithanyoftheseactivities.Wewillnot
sellyourpersonalinformationtoanyothercompany .Wereservetherighttodisclosepersonalinformationinordertocomplywithapplicablelawsand
withrequestsbytheappropriateauthorities,tooperateoursystemsproperlyorforourownprotectionorthatofotherusers.
RetentionofyourPersonalInformation
Wewillkeepyourpersonalinformationaslongasweneeditforthepurposesforwhichitwasoriginallycollectedorforotherlegitimatepurposes
(suchasregulatorycompliance),orasrequiredbyapplicablelaw.
Toro'sCommitmenttoSecurityofY ourPersonalInformation
Wetakereasonableprecautionsinordertoprotectthesecurityofyourpersonalinformation.Wealsotakestepstomaintaintheaccuracyandcurrent
statusofpersonalinformation.
AccessandCorrectionofyourPersonalInformation
Ifyouwouldliketorevieworcorrectyourpersonalinformation,pleasecontactusbyemailatlegal@toro.com.
AustralianConsumerLaw
AustraliancustomerswillnddetailsrelatingtotheAustralianConsumerLaweitherinsidetheboxoratyourlocalT oroDealer.
374-0282RevC
Page 24
Recycler
Modellnr.20964—Seriennr.400000000undhöher
®
Rasenmäher(55cm)
FormNo.3418-449RevB
Bedienungsanleitung
Einführung
DieserhandgeführteRasenmähermitSichelmessern
solltevonPrivatleutenodergeschultenLohnarbeitern
verwendetwerden.EristhauptsächlichfürdasMähen
vonGrasaufgepegtenGrünächeninPrivatanlagen
gedacht.EristnichtfürdasSchneidenvonBüschen
oderfüreinenlandwirtschaftlichenEinsatzgedacht.
LesenSiedieseInformationensorgfältigdurch,
umsichmitdemordnungsgemäßenEinsatzund
derWartungdesGerätsvertrautzumachenund
VerletzungenundeineBeschädigungdesGerätszu
vermeiden.SietragendieVerantwortungfüreinen
ordnungsgemäßenundsicherenEinsatzdesGeräts.
WendenSiesichhinsichtlichInformationenzu
ProduktenundZubehörsowieAngabenzuIhrem
örtlichenVertragshändleroderzurRegistrierungdes
ProduktesdirektanTorounterwww.T oro.com.
WendenSiesichandenToro-Vertragshändler
oderKundendienst,wennSieeineServiceleistung,
OriginalersatzteilevonTorooderweitere
Informationenbenötigen.HabenSiedafürdieModellundSeriennummernderMaschinegriffbereit.InBild
1wirdderStandortderModell-undSeriennummern
aufdemProduktangegeben.TragenSiehierbittedie
Modell-undSeriennummerndesGerätsein.
Wichtig:ScannenSiemitIhremMobilgerätden
QR-CodeaufdemSeriennummernaufkleber(falls
vorhanden),umaufGarantie-,Ersatzteil-oder
andereProduktinformationenzuzugreifen
Sicherheitswarnsymbol(Bild2)gekennzeichnet,
dasaufeineGefahrhinweist,diezuschweren
odertödlichenVerletzungenführenkann,wenn
SiedieempfohlenenSicherheitsvorkehrungennicht
einhalten.
g000502
Bild2
Sicherheitswarnsymbol
IndieserAnleitungwerdenzweiBegriffezur
HervorhebungvonInformationenverwendet.Wichtig
weistaufspeziellemechanischeInformationenhin,
undHinweishebtallgemeineInformationenhervor,
dieIhrebesondereBeachtungverdienen.
DiesesProdukterfülltallerelevanteneuropäischen
Richtlinien;weitereDetailsndenSieinder
produktspezischenKonformitätserklärung(DOC).
Brutto-oderNettodrehmoment:DasBruttooderNettodrehmomentdiesesMotorswurde
vomMotorherstellerimLaborgemäßSAEJ1940
oderJ2723ermittelt.AufgrundderKonguration
zurErfüllungvonSicherheits-,EmissionsundBetriebsanforderungenistdietatsächliche
MotorleistungindieserKlassederRasenmäher
wesentlichniedriger.WeitereInformationennden
SieinderMotorbedienungsanleitungdesHerstellers,
diemitderMaschineausgeliefertwurde.
Bild1
1.TypenschildmitModell-undSeriennummer
Modellnr.
Seriennr.
IndieserAnleitungwerdenpotenzielleGefahren
angeführt,undSicherheitsmeldungenwerdenvom
©2017—TheT oro®Company
8111LyndaleAvenueSouth
Bloomington,MN55420
CV
RegistrierenSieIhrProduktunter
www.T oro.com.
ManipulierenoderdeaktivierenSiekeine
SicherheitsvorrichtungenanderMaschineundprüfen
SiedieeinwandfreieFunktioninregelmäßigen
Abständen.ModizierenodermanipulierenSienicht
g226627
dieBedienelementefürdieMotordrehzahl,dadieszu
unsicherenEinsatzbedingungenundVerletzungen
führenkann.
Inhalt
Einführung................................................................1
Sicherheit..................................................................2
AllgemeineSicherheit.........................................2
Sicherheits-undBedienungsschilder.................3
Einrichtung................................................................5
Originaldokuments(DE)
AlleRechtevorbehalten
Druck:Mexiko
*3418-449*B
Page 25

1Zusammen-undAufklappendes
Holms..............................................................5
2BefestigendesRücklaufstarterseilsinder
Seilführung......................................................5
3AuffüllendesMotorsmitÖl..............................6
4MontierendesFangkorbs................................6
Produktübersicht.......................................................8
TechnischeDaten..............................................8
Betrieb......................................................................8
VordemEinsatz....................................................8
VordersicherenVerwendung.............................8
Betanken............................................................9
PrüfendesMotorölstands.................................10
EinstellenderHolmhöhe...................................10
EinstellenderSchnitthöhe.................................11
WährenddesEinsatzes........................................11
HinweisezurSicherheitwährenddes
Betriebs..........................................................11
AnlassendesMotors........................................12
VerwendendesSelbstantriebs.........................12
AbstellendesMotors........................................13
Schnittgutrecyclen............................................13
SammelndesSchnittguts.................................13
VerwendendesHebelsfürden
zuschaltbarenFangkorb...............................14
SeitenauswurfdesSchnittguts.........................14
Betriebshinweise.............................................15
NachdemEinsatz...............................................16
HinweisezurSicherheitnachdem
Betrieb..........................................................16
ReinigenunterdemGerät.................................16
ZusammenklappendesHolms.........................17
Wartung..................................................................18
EmpfohlenerWartungsplan.................................18
Wartungssicherheit...........................................18
VorbereitenfürdieWartung..............................18
WartendesLuftlters........................................19
WechselndesMotoröls....................................19
AuswechselndesMessers...............................20
EinstellendesSelbstantriebs............................21
Einlagerung............................................................22
VorbereitenderMaschinefürdas
Einlagern.......................................................22
HerausnehmendesRasenmähersausder
Einlagerung...................................................22
Sicherheit
DieseMaschineerfülltENISO5395:2013.
AllgemeineSicherheit
DiesesProduktkannHändeundFüßeamputieren
undGegenständeaufschleudern.Befolgenimmer
sämtlicheSicherheitshinweise,umschwereoder
tödlicheVerletzungenzuvermeiden.
WenndiesesProduktfüreinenanderenZweck
eingesetztwird,kanndasfürBedienerundandere
Personengefährlichsein.
•Lesen,verstehenundbefolgenSievordem
AnlassendesMotorsalleAnweisungenund
WarnungeninderBedienungsanleitungundan
derMaschine.
•BerührenSiebeweglicheT eileoderdieUnterseite
derMaschinenichtmitdenHändenoderFüßen.
KommenSieAuswurföffnungennichtzunahe.
•SetzenSiedieMaschinenurein,wenn
alleSchutzvorrichtungenundandere
Sicherheitsvorrichtungenmontiertund
funktionsfähigsind.
•HaltenSieUnbeteiligteundKinderineinem
sicherenAbstandzurMaschine.DasFahrzeug
darfniemalsvonKindernbetriebenwerden.
NurverantwortungsbewusstePersonen,die
geschultundmitdenAnweisungenvertrautsind
undkörperlichfähigsind,solltendieMaschine
verwenden.
•HaltenSiedieMaschinean,stellenSieden
MotorabundwartenSie,bisallebeweglichen
TeilezumStillstandgekommensind,bevorSie
Wartungsarbeitendurchführen,Auftankenoder
Verstopfungenentfernen.
DerunsachgemäßeEinsatzoderdiefalscheWartung
dieserMaschinekannzuVerletzungenführen.
DurchdasBefolgendieserSicherheitshinweisekann
dasVerletzungsrisikoverringertwerden.Achten
SieimmeraufdasWarnsymbol.Esbedeutet
Vorsicht,WarnungoderGefahr–Hinweisefürdie
Personensicherheit.WennSiedieseAnweisungen
nichteinhalten,kanneszuVerletzungenggf.
tödlichenVerletzungenkommen.
SiendenweitereSicherheitsinformationenbei
BedarfindieserBedienungsanleitung.
2
Page 26
Sicherheits-undBedienungsschilder
DieSicherheits-undBedienungsaufklebersindgutsichtbar;siebendensichinderNähe
dermöglichenGefahrenbereiche.T auschenSiebeschädigteoderverlorengegangene
Aufkleberaus.
Herstellermarke
1.DieseMarkegibtan,dassdasMessereinT eildes
HerstellersderOriginalmaschineist.
decaloemmarkt
112-8760
1.GefahrdurchherausgeschleuderteGegenstände:Achten
Siedarauf,dassUnbeteiligtedenSicherheitsabstandzur
Maschineeinhalten.
2.GefahreinerSchnittwundeund/oderderAmputationvon
HändenoderFüßen:BerührenSiekeinebeweglichen
Teilen.
decal112-8760
decal125-5026
125-5026
1.Recycler-Stellung2.Fangkorb-Stellung
3
Page 27
131-4514
1.Warnung:LesenSiedieBedienungsanleitung.
2.Schnitt-bzw.AmputationsgefahrfürHändeam
Mähwerkmesser:BerührenSiekeinebeweglichen
TeileundnehmenSiekeineSchutzblecheund
Schutzvorrichtungenab.
3.Schnitt-bzw.AmputationsgefahrandenHändenbeim
Schnittmesser:ZiehenSiedenZündkerzensteckerabund
lesenSiedieAnweisungen,bevorSieWartungs-oder
Reparaturarbeitenausführen.
4.GefahrdurchherausgeschleuderteGegenstände:
StellenSiesicher,dassUnbeteiligteimmereinen
SicherheitsabstandzurMaschineeinhalten;stellenSieden
Motorab,bevorSiedieBedienerpositionverlassenund
sammelnSieRückständevordemEinsatzderMaschine
auf.
5.Schnitt-bzw.AmputationsgefahrvonHändenam
Mähwerkmesser:MähenSieniehangaufwärtsoder
-abwärts,mähenSieimmerwaagrechtzumHang.Schauen
Sienachhinten,wennSierückwärtsfahren.
decal131-4514
decal137-9196
137-9196
1.Einrasten2.Ausrasten
1.DrückenSiedenHolm
zumVorwärtsfahrennach
unten.
1.Achtung:LesenSiedie
Bedienungsanleitung.
decal138-3278
138-3278
2.ZiehenSiedenHolmzum
Rückwärtsfahrennach
oben.
decal136-9096
136-9096
2.ScannenSieden
QR-Codefürweitere
Informationenzum
EinstellendesAntriebs.
4
Page 28

Einrichtung
Wichtig:NehmenSiedenKunststoffschutzabundalleanderenKunststoffteileoderVerpackungenab,
mitdenenderMotorabgedecktist.WerfenSiesieab.
1
Zusammen-undAufklappendesHolms
KeineTeilewerdenbenötigt
Verfahren
Bild3
g227424
5
Page 29

2
BefestigendesRücklaufstarterseilsinderSeilführung
KeineTeilewerdenbenötigt
Verfahren
Bild4
g230719
3
AuffüllendesMotorsmitÖl
KeineTeilewerdenbenötigt
Verfahren
Wichtig:DieMaschinewirdohneÖlimMotorausgeliefert.SieerhaltenjedocheineFlaschemitÖl.
FüllenSiedenMotormitÖl,bevorSieihnanlassen.
Bild5
g222533
6
Page 30
4
MontierendesFangkorbs
KeineTeilewerdenbenötigt
Verfahren
g230447
Bild6
7
Page 31

Produktübersicht
Bild7
1.Holm7.Zündkerze
2.Schaltbügel8.Seitenauswurfkanal
3.Einstellhandradfürdie
Selbstantrieb
4.Tankdeckel10.Zuschaltbarer
5.Luftlter11.Holmhandrad(2)
6.Schnitthöheneinstellhebel
(4)
9.Einfüllstutzen/Ölpeilstab
Fangkorb-Hebel
12.Rücklaufstarterbügel
Betrieb
Hinweis:BestimmenSiedielinkeundrechteSeite
derMaschineanhandderüblichenEinsatzposition.
VordemEinsatz
Vordersicheren Verwendung
AllgemeineSicherheit
•MachenSiesichmitdemsicherenEinsatz
desGeräts,derBedienelementeundden
Sicherheitsaufklebernvertraut.
•PrüfenSie,oballeSchutzvorrichtungenund
Sicherheitsvorrichtungen,wiez.B.Ablenkbleche
und/oderGrasfangkörbemontiertsindundrichtig
g036585
funktionieren.
•ÜberprüfenSieimmerdieMaschineundstellen
Siesicher,dassdieSchnittmesser,-schrauben
unddasMähwerknichtabgenutztoderbeschädigt
sind.
•PrüfenSiedenArbeitsbereichderMaschine
undentfernenSiealleObjekte,diesichaufden
EinsatzderMaschineauswirkenodervonihr
aufgeschleudertwerdenkönnten.
•WennSiedieSchnitthöheeinstellen,könnenSie
mitdemMesserinKontaktkommenundschwere
Verletzungenerleiden.
1.Fangkorb
TechnischeDaten
Modell
20964
Bild8
2.Seitenauswurfkanal
GewichtLänge
35kg152cm58cm109cm
(77lb)(60")(23")(43")
Breite
–StellenSiedenMotorab,ziehenSie
denZündschlüsselab(nurModellemit
Elektro-Sofortstart)undwartenSie,bisalle
beweglichenTeilezumStillstandgekommen
sind.
–FührenSieIhreFingerbeimEinstellender
g027237
Höhe
SchnitthöhenichtunterdasMähwerk.
8
Page 32

Kraftstoffsicherheit
•Kraftstoffistextremleichtentammbar
undhochexplosiv.FeuerundExplosionen
durchKraftstoffkönnenVerbrennungenund
Sachschädenverursachen.
–StellenSiedenKanisterbzw.dieMaschine
vordemAuftankenaufdenBodenundnicht
aufeinFahrzeugoderaufeinObjekt,umeine
elektrischeLadungdurchdasEntzündendes
Kraftstoffszuvermeiden.
–FüllenSiedenKraftstofftankimFreien
auf,wennderMotorkaltist.WischenSie
verschüttetenKraftstoffauf.
–RauchenSienichtbeimUmgangmitKraftstoff,
undgehenSienichtinderNähevonoffenem
FeueroderFunkenmitKraftstoffum.
–BetankenSiedieMaschineniebeilaufendem
oderheißemMotoroderentfernenSieden
Tankdeckel.
–LassenSiedenMotorniebei
Kraftstoffverschüttungenan.Vermeiden
Sie,dassSieZündquellenschaffen,bisdie
Kraftstoffdämpfeverdunstetsind.
–BewahrenSieKraftstoffinvorschriftsmäßigen,
fürKinderunzugänglichenKanisternauf.
•KraftstoffistbeiEinnahmegesundheitsschädlich
odertödlich.WenneinePersonlangfristig
Benzindünstenausgesetztist,kanndieszu
schwerenVerletzungenundKrankheitenführen.
Betanken
•DiebestenErgebnisseerhaltenSie,wennSie
sauberes,frisches,bleifreiesBenzinmiteiner
Mindestoktanzahlvon87(R+M)/2verwenden.
•MitSauerstoffangereicherterKraftstoffmit10%
Ethanoloder15%MTBE(Volumenanteil)istauch
geeignet.
•VerwendenSiekeineBenzin-Ethanolmischungen
(z.B.E15oderE85)mitmehrals10%Ethanol
(Volumenanteil).SonstkönnenLeistungsprobleme
und/oderMotorschädenauftreten,dieggf.nicht
vonderGarantieabgedecktsind.
•VerwendenSiekeinBenzinmitMethanol.
•LagernSiekeinenKraftstoffimKraftstofftankoder
inKraftstoffbehälternüberdenWinter,wennSie
keinenKraftstoffstabilisatorverwenden.
•VermischenSienieBenzinmitÖl.
FüllenSiedenKraftstofftankmitfrischem,bleifreiem
NormalbenzinvoneinerangesehenenT ankstelle(Bild
9).
Wichtig:FügenSiezurVermeidungvon
AnlassproblemendemBenzininjederSaison
Kraftstoffstabilisatorzu.MischenSieden
StabilisatormitBenzin,dasnichtälterals30Tage
ist.
WeitereInformationenndenSieinder
BedienungsanleitungfürdenMotor.
–VermeidenSiedaslangfristigeEinatmenvon
Benzindünsten.
–HaltenSieIhreHändeunddasGesichtvom
FüllstutzenundderÖffnungdesKraftstofftanks
fern.
–HaltenSieKraftstoffvonAugenundderHaut
fern.
g230458
Bild9
9
Page 33

PrüfendesMotorölstands
Wartungsintervall:BeijederVerwendungodertäglich
Wichtig:WennderÖlstandimKurbelgehäusezuhochoderzuniedrigist,undSiedenMotorlaufen
lassen,könnenMotorschädenauftreten.
Bild10
g222533
EinstellenderHolmhöhe
SiekönnendenHolminPosition1oder2anheben
oderabsenken,jenachdemwelcheSieals
angenehmerempnden(Bild11).
Bild11
1.LockernSiebeideHolmhandräderbisSiedie
eckigenSchlosschraubenausdenviereckigen
ÖffnungenderHolmhalterungdrückenkönnen.
4.Handräderziehenbisdieeckige
Schlossschrauberichtiginderdazugehörigen
viereckigenÖffnungsitzt.
5.ZiehenSiedieHolmhandrädersofestwiees
geht.
g032867
2.Handräderherausdrücken.
3.StellenSiedenHolmindieobereoderuntere
Stellung.
10
Page 34

EinstellenderSchnitthöhe
ACHTUNG
WennderMotorgelaufenist,istderAuspuffsehrheißundSiekönntensichverbrennen.
BerührenSieniedenheißenAuspuff.
StellenSiedieSchnitthöheein.StellenSiedieVorderräderaufdieselbeHöhewiedieHinterräderein(Bild12).
WährenddesEinsatzes
HinweisezurSicherheit währenddesBetriebs
AllgemeineSicherheit
•TragenSiegeeigneteKleidung,u.a.eine
Schutzbrille,langeHosen,rutschfeste
ArbeitsschuheundeinenGehörschutz.BindenSie
langeHaarehintenzusammen,tragenkeinelosen
Kleidungsstückeundkeinenherunterhängenden
Schmuck.
•BedienenSiedieMaschinenicht,wennSie
müdeoderkranksindoderunterAlkohol-oder
Drogeneinussstehen.
•DasMesseristscharf;einKontaktdamitkannzu
schwerenVerletzungenführen.StellenSievor
demVerlassenderBedienerpositiondenMotor
ab,ziehenSiedieZündschlüssel(nurModelle
g223084
Bild12
mitElektro-Sofortstart)abundwarten,bisalle
beweglichenTeilezumStillstandgekommensind.
•WennSiedenSchaltbügelloslassen,sollten
derMotorunddasMesserinnerhalbvondrei
Sekundenabstellen.WenndiesnichtderFall
ist,setzenSiedieMaschinenichtmehrein
undwendensichsofortaneinenofziellen
Vertragshändler.
•HaltenSieUnbeteiligte,besonderskleineKinder,
ausdemArbeitsbereichfern.StellenSie,wenn
jemanddenArbeitsbereichbetritt,sofortdie
Maschineab.
•SchauenSieimmernachuntenundnachhinten,
bevorSiedieMaschinerückwärtsbewegen.
•SetzenSiedieMaschinenuringuten
Sichtverhältnissenundgeeigneten
Wetterbedingungenein.VerwendenSie
dieMaschinenichtbeimöglichenGewittern.
•NassesGrasund/odernasseBlätterkönnenzu
schwerenVerletzungenführen,solltenSiedarauf
11
Page 35

ausrutschenundmitdemMesserinBerührung
kommen.VermeidenSieMäharbeitenbeinassen
Umgebungsbedingungen.
•GehenSiebeimAnfahrenvonblindenEcken,
Sträuchern,BäumenundanderenGegenständen,
dieIhreSichtbehindernkönnen,vorsichtigvor.
•AchtenSieaufLöcher,Rillen,Bodenwellen,Steine
oderandereverborgeneObjekte.Unebenes
TerrainkannzumÜberschlagenderMaschine
führen,oderSiekönnendasGleichgewichtoder
denHaltverlieren.
•StellenSiedenMotorsofortab,wennderMäher
aufeinenGegenstandaufpralltoderanfängt
zuvibrieren,ziehendenZundschlüssel(falls
vorhanden)ab,warten,bisallebeweglichenT eile
zumStillstandgekommensindundziehenden
Zündkerzensteckerab,bevorSiedenMäherauf
eventuelleBeschädigungenuntersuchen.Führen
SiedieerforderlichenReparaturarbeitenaus,
bevorSiedieMaschineerneuteinsetzen.
•StellenSievordemVerlassender
BedienungspositiondenMotorab,ziehen
SiedenZündschlüssel(nurModellemit
Elektrostart)abundwarten,bisallebeweglichen
TeilezumStillstandgekommensind.
•WennderMotorgelaufenist,istderAuspuffheiß
undSiekönntensichverbrennen.BerührenSie
niedenheißenAuspuff.
•PrüfenSiedieT eiledesFangkorbsunddes
AuswurfkanalshäugaufRisseoderAbnutzung
undwechselnSiesieggf.mitdenvomHersteller
empfohlenenTeilenaus.
•VerwendenSienurvonTheT oro®Company
zugelassenesZubehörundzugelassene
Anbaugeräte.
AnlassendesMotors
1.DrückenSiedenSchaltbügelgegendenHolm
(AinBild13).
2.ZiehenSieleichtamRücklaufstartergriff,bis
SieeinenWiderstandspüren.ZiehenSieihn
dannkräftigdurchundlassenihnlangsamin
dieSeilführungamHolmzurückgehen(Binin
Bild13).
g230459
Bild13
Hinweis:WennderRasenmähernachmehreren
Versuchennichtanspringt,wendenSiesichanden
ofziellenVertragshändler.
Verwendendes Selbstantriebs
UmdenSelbstantriebzubenutzen,gehenSieeinfach
vorwärtsoderrückwärtsundhaltenSiedabeiIhre
HändeamoberenHolmundIhreEllbogenanIhren
Seiten;dieMaschinehältautomatischmitIhnen
Schritt(Bild14).
SicherheitanHanglagen
•MähenSieimmerquerzumHang,nicht
hangaufwärtsoder-abwärts.GehenSiebeim
RichtungswechselanHanglagenäußerst
vorsichtigvor.
•VersuchenSienicht,steileHanglagenzu
mähen.EinschlechterHaltkannzuRutsch-und
Fallunfällenführen.
•GehenSiebeiMäharbeiteninderNähevonsteilen
Gefällen,GräbenoderBöschungenbesonders
vorsichtigvor.
g038503
Bild14
Hinweis:WenndieMaschinenichtungehindert
nachvorneoderhintenrolltnachdemSelbstantrieb,
gehenSienichtweiter,lassenSiedieHändeamHolm
undlassenSiedieMaschineeinpaarZentimeter
vorwärtsrollen,umdenRadantriebeinzukuppeln.Sie
könnenauchunterdemoberenHolmdenMetallbügel
anfassenunddieMaschineeinpaarZentimeternach
vorneschieben.WennSiebeimrückwärtsgehenmit
12
Page 36

demSelbstantriebProblemehaben,hebenSieden
Holmetwasan.WenndieMaschineimmernochnicht
ungehindertrückwärtsrollt,wendenSiesichanden
ofziellenVertragshändler.
AbstellendesMotors
Wartungsintervall:BeijederVerwendungoder
täglich
LassenSiezumAbstellendesMotorsdenSchaltbügel
los.
SammelndesSchnittguts
VerwendenSiedenFangkorb,wennSieSchnittgut
undLaubimFangkorbsammelnmöchten.
IstderSeitenauswurfkanalanderMaschine
montiert,entfernenSiediesen,sieheEntfernendes
Seitenauswurfkanals(Seite14).WennderHebelfür
denzuschaltbarenFangkorbinderRecycler-Stellung
ist,schiebenSieihnindieFangkorb-Stellung,
sieheVerwendendesHebelsfürdenzuschaltbaren
Fangkorb(Seite14).
Wichtig:WennSiedenSchaltbügelloslassen,
werdenderMotorunddasMesserinnerhalbvon
dreiSekundenabgestellt.Wenndiesnichtder
Fallist,setzenSiedieMaschinenichtmehrein
undwendenSiesichsofortaneinenofziellen
Vertragshändler.
Schnittgutrecyclen
DerRasenmäheristwerksseitigaufdasRecycelnvon
SchnittgutundLaubeingestellt.
WennderGrasfangkorbanderMaschineangebracht
ist,undderHebelfürdenzuschaltbarenFangkorb
aufderFangkorb-Stellungsteht,schiebenSieden
HebelindieRecycler-Stellung,sieheVerwenden
desHebelsfürdenzuschaltbarenFangkorb(Seite
14).IstderSeitenauswurfkanalanderMaschine
montiert,entfernenSiediesen,sieheEntfernendes
Seitenauswurfkanals(Seite14).
MontierendesFangkorbs
1.HebenSiedashintereAblenkblechanund
haltenSieeshoch(Bild15).
Bild15
1.Heckablenkblech
2.Kerben(2)
3.Grasfangkorb-Stift(2)
g033379
2.SetzenSiedenGrasfangkorbein,stellenSie
sicher,dassdieStifteamFangkorbinden
KerbenamHolmsind(Bild15).
3.SenkenSiedashintereAblenkblechab.
EntfernendesFangkorbs
WennSiedenFangkorbabnehmenmöchten,gehen
SieumgekehrtvoralsinMontierendesFangkorbs
(Seite13).
13
Page 37

VerwendendesHebels
Seitenauswurfdes
fürdenzuschaltbaren
Fangkorb
MitdemzuschaltbarenFangkorbkönnenSie
SchnittgutundLaubentwedersammelnoder
recyceln,wennderGrasfangkorbanderMaschine
angebrachtist.
•ZumSammelndesSchnittgutsundLaubsdrücken
SiedieTasteamHebelfürdenzuschaltbaren
FangkorbundbewegendenHebelnachvorne,bis
dieTasteamHebelherausspringt(Bild16).
Bild16
1.HebelfürdenzuschaltbarenFangkorb(in
Fangkorb-Stellung)
Schnittguts
VerwendenSiedenSeitenauswurf,wennSiesehr
hohesGrasschneiden.
WennderGrasfangkorbanderMaschineangebracht
ist,undderHebelfürdenzuschaltbarenFangkorb
aufderFangkorb-Stellungsteht,schiebenSieden
HebelindieRecycler-Stellung,sieheVerwendendes
HebelsfürdenzuschaltbarenFangkorb(Seite14).
EinbauendesSeitenauswurfkanals
EntriegelnundhebenSiedasseitlicheAblenkblechan
undsetzenSiedenSeitenauswurfkanalein(Bild18).
g027453
•ZumRecyclenoderseitlichenAuswurfdes
SchnittgutsundLaubsdrückenSiedieTaste
amHebelundbewegendenHebelnachhinten,
bisdieTasteamHebelherausspringt.
Wichtig:FüreineneinwandfreienBetrieb
solltenSieSchnittgutundRückständevon
derKlappedeszuschaltbarenFangkorbsund
denumgebendenÖffnungenentfernen(Bild
17),bevorSiedieStellungdesHebelsfürden
zuschaltbarenFangkorbändern.
Bild17
1.AndieserStellereinigen
g235646
Bild18
EntfernendesSeitenauswurfkanals
HebenSiezumEntfernendesSeitenauswurfkanals
dasSeitenablenkblechan,nehmenden
Seitenauswurfkanalabundsenkendas
Seitenablenkblechab,biseseinrastet.
g027454
14
Page 38

Betriebshinweise
–GehenSiebeimMähenlangsamer.
–HebenSiedieSchnitthöhederMaschinean.
AllgemeineMähtipps
•PrüfenSiedenArbeitsbereichgründlichund
entfernenSiealleObjekte,dievonderMaschine
aufgeschleudertwerdenkönnten.
•VermeidenSie,dassdasMesseraufFremdkörper
aufprallt.MähenSienieabsichtlichüber
irgendwelchenGegenständen.
•StellenSiedenMotorsofortab,wennderMäher
aufeinenGegenstandaufpralltoderanfängt
zuvibrieren,ziehendenZündschlüssel(falls
vorhanden)ab,ziehendenZündkerzensteckerab
unduntersuchenSiedenMäheraufeventuelle
Beschädigungen.
•MontierenSiefürdieoptimaleLeistungvordem
SaisonbeginneinneuesMesser.
•T auschenSiedieMesserbeiBedarfdurchein
OriginalersatzmesservonToroaus.
Mähen
•MähenSieimmernureinDritteldesGrashalms
ineinemDurchgang.MähenSienichtunter
einerEinstellungvon51mm,wenndasGras
sehrfeinwächst,oderimSpätherbst,wenndas
Graswachstumnachlässt.
–MähenSiehäuger.
–LassenSiedieBahnenüberlappen,anstelle
beijedemGangeineneueBahnzumähen.
SchnetzelnvonLaub
•StellenSienachdemMähensicher,dassdie
HälftedesRasensdurchdieSchnittgutdecke
sichtbarist.DabeimüssenSieunterUmständen
mehrmalsüberdasLaubmähen.
•WenneineLaubdeckevonmehrals13cmauf
demRasenliegt,mähenSiemiteinerhöheren
Schnitthöheunddannmitdergewünschten
Schnitthöhe.
•MähenSielangsamer,wenndieMaschinedas
Laubnichtfeingenughäckselt.
•StellenSiebeimerstenDurchgangdieSchnitthöhe
aufdiehöchsteEinstellungundgehenlangsamer,
wennSieGrasmähen,daslängerals15cmist.
MähenSiedannnocheinmalmiteinerniedrigeren
Einstellung,umdemRasendasgewünschte
Schnittbildzugeben.WenndasGraszulangist,
kanndieMaschineverstopfenundderMotorkann
abstellen.
•NassesGrasundLaubneigenzumVerklumpenim
GartenundkönneneinVerstopfenderMaschine
undeinAbstellendesMotorsverursachen.
VermeidenSieMäharbeitenbeinassen
Umgebungsbedingungen.
•InsehrtrockenenBedingungenbesteht
eineBrandgefahr.HaltenSieallelokalen
BrandgefahrwarnungeneinundentfernenSie
trockenesGrasundLaubvonderMaschine.
•WechselnSiehäugdieMährichtung.Dadurch
verteiltsichdasSchnittgutbesseraufder
RasenächeundbewirkteineffektiveresDüngen.
•ProbierenSiebeieinemunbefriedigenden
SchnittbilddesRasenseinederfolgenden
Abhilfenaus:
–WechselnSiedasMesserausoderlassenSie
esschärfen.
15
Page 39
NachdemEinsatz
HinweisezurSicherheit nachdemBetrieb
AllgemeineSicherheit
ReinigenunterdemGerät
Wartungsintervall:BeijederVerwendungoder
täglich
UmdiebestenErgebnissezuerzielen,reinigenSie
dieMaschinesobaldSiemitdemMähenfertigsind.
1.FahrenSiedieMaschineaufeineebene,
befestigteFläche.
•EntfernenSieGrasundSchmutzvonder
Maschine,umeinemBrandvorzubeugen.
WischenSieÖl-undKraftstoffverschüttungenauf.
•LassenSiedenMotorabkühlen,bevorSie
dieMaschineineinemgeschlossenenRaum
abstellen.
•LagernSiedieMaschineoderdenBenzinkanister
nieanOrtenmitoffenerFlamme,Funkenoder
Zündamme,z.B.Warmwasserbereiter,oderauf
anderenGeräten.
SicherheitbeimBefördern
•ZiehenSiedenZündschlüssel(fallsvorhanden)
ab,bevorSiedieMaschinefürdenTransport
verladen.
•GehenSiebeimLadenundAbladenderMaschine
aufeinen/voneinemTransportmittelvorsichtigvor.
•SichernSiedieMaschinefürdenTransport.
2.StellenSiedenMotorabundwartenSie,bis
allebeweglichenT eilezumStillstandgekommen
sind,bevorSiedieBedienungsposition
verlassen.
3.SenkenSiedieMaschineaufdieniedrigste
Schnitthöheab.SieheEinstellender
Schnitthöhe(Seite11).
4.ReinigenSiedenBereichunterderHeckklappe,
anderStelle,anderdasSchnittgutvonder
UnterseitederMaschineindenFangkorb
befördertwird.
Hinweis:ReinigenSiedenBereichmitdem
zuschaltbarenFangkorb(fallsvorhanden)inder
Vorwärts-undRückwärtsstellung.
5.BefestigenSieeinenGartenschlauch,deran
einenWasserhahnangeschlossenist,am
Wasseranschluss(Bild19).
Bild19
1.Wasseranschluss
6.DrehenSiedenWasserhahnauf.
7.StartenSiedenMotorundlassenSieihnso
langelaufen,biskeinweiteresSchnittgutander
UnterseitederMaschineaustritt.
8.StellenSiedenMotorab.
9.DrehenSiedenWasserhahnzuundschließen
SiedenGartenschlauchvonderMaschineab.
10.StartenSiedenMotorundlassenSieihnfür
einpaarMinutenlaufen,umdieUnterseiteder
Maschineauszutrocknen,damitsienichtrostet.
11.StellenSiedenMotorabundlassenSieihn
abkühlen,bevorSiedieMaschineineinem
geschlossenenRaumabstellen.
16
g033502
Page 40

Zusammenklappendes Holms
WARNUNG:
WennSiedenHolmfalschauf-oder
zusammenklappen,könnenSiedieKabel
beschädigenunddensicherenGeräteeinsatz
gefährden.
•BeschädigenSiebeimAuf-oder
ZusammenklappendesHolmsnichtdie
Kabel.
•WendenSiesichbeieinembeschädigten
KabelaneinenofziellenVertragshändler.
1.EntfernenSiedie2Griffhandrädersowiedie2
SchlossschraubenvondenHandgriffhalterungen
(Bild20)undhebenSiesieauf.
Wichtig:VerlegenSiebeimZusammenklap-
pendesHolmsdieKabelanderAußenseite
derHolmhandräder.
g032870
Bild21
1.Betriebsstellung2.Zusammengeklappte
Stellung
3.FührenSiedieSchlossschraube(mitdem
Schraubenkopfnachinnenzeigend)durch
dieHolmhalterungunddasobereLochim
Holmende.StellenSiesicher,dassjedeeckige
Schlossschrauberichtiginderdazugehörigen
oberenoderunterenviereckigenÖffnungder
jeweiligenHolmhalterungsitzt(Bild22).
Bild20
1.Holmhandrad
2.Schlossschraube
2.KlappenSiedenHolmzusammen,indemSie
ihnnachvornedrehen(Bild21).
g032869
1.Holmhandrad
Bild22
2.Schlossschraube
g032865
4.BefestigenSiedieHolmhandräderunddie
SchlossschraubenandenHolmhalterungen.
5.ZumAufklappendesHolmsiehe1Zusammen-
undAufklappendesHolms(Seite5).
17
Page 41

Wartung
EmpfohlenerWartungsplan
Wartungsintervall
BeijederVerwendung
odertäglich
Alle25Betriebsstunden
Jährlich
Jährlichodervorder
Einlagerung
Wartungsmaßnahmen
•ÜberprüfenSiedenMotorölstandundfüllenSiebeiBedarfÖlnach.
•StellenSiesicher,dassderMotorinnerhalbvondreiSekundennachdemLoslassen
desSchaltbügelsabstellt.
•EntfernenSieSchnittgutundSchmutzvonderUnterseitedesMähwerks.
•WartenSiedenLuftlter;wartenSieihnhäugerinstaubigenBedingungenaus.
•WechselnSiedenLuftlteraus(häugerunterstaubigenBedingungen).
•WechselnSiedasMotoröl.
•WechselnSiedasMesserausoderlassenSieesschärfen(öfter,wenndieKanten
schnellstumpfwerden).
•ReinigenSiedenMotor,umSchmutzundRückständevonderOberseiteundden
Seitenzuentfernen;reinigenSieihnöfterinstaubigenBedingungen.
•EntleerenSiedenKraftstofftanklautAnweisungvorirgendwelchenReparaturen
undderEinlagerung.
Wichtig:WeitereWartungsmaßnahmenndenSieinderBedienungsanleitungdesMotors.
Wartungssicherheit
•ZiehenSiedenZündkerzensteckerab,bevorSie
Wartungsarbeitenausführen.
•TragenSiebeimDurchführenvon
WartungsarbeitenHandschuheundeine
Schutzbrille.
VorbereitenfürdieWartung
1.StellenSiedenMotorabundwartenSie,bis
allebeweglichenT eilezumStillstandgekommen
sind.
2.ZiehenSiedenKerzensteckervonder
Zündkerzeab(Bild23).
•DasMesseristscharf;einKontaktdamitkann
zuschwerenVerletzungenführen.TragenSie
Handschuhe,wennSiedasMesserwarten.
FührenSiekeineReparaturenoderModikationen
andenMessernaus.
•ModizierenSieaufkeinenFalldie
Sicherheitsvorkehrungen.PrüfenSieihre
einwandfreieFunktioninregelmäßigen
Abständen.
•EinKippenderMaschinekannzueinem
VerschüttenvonKraftstoffführen.Kraftstoffist
entammbar,explosivundkannVerletzungen
verursachen.LassenSiedenMotorlaufen,bis
keinKraftstoffmehrimTankist,oderpumpen
SiedenKraftstoffab.SiesolltenaufkeinenFall
versuchen,Kraftstoffabzusaugen.
•VerwendenSienurT oro-Originalteileund
-Zubehör,damiteineoptimaleLeistung
erzieltwirdunddieMaschineweiterhinden
Sicherheitsbestimmungenentspricht.Die
VerwendungvonErsatzteilenundZubehörvon
anderenHerstellernkannGefahrenbergenund
zumErlöschenderGarantieführen.
g033513
Bild23
1.Zündkerzenstecker
3.SteckenSienachdemAbschlussder
WartungsarbeitendasZündkabelwiederaufdie
Zündkerze.
18
Page 42
Wichtig:LassenSiedenMotorlaufen,bis
eraufgrundvonKraftstoffmangelabstellt,
bevorSiedenRasenmäherumkippen,um
dasÖloderMesserzuwechseln.WennSie
dieMaschinekippenmüssen,währendsich
KraftstoffimTankbendet,pumpenSieden
KraftstoffmiteinerHandpumpeab.Kippen
SiedieMaschineimmersoaufdieSeite,
dassderPeilstabnachuntenzeigt.
WartendesLuftlters
Wartungsintervall:Alle25Betriebsstunden
Jährlich
1.LössenSiedasOberteilderLuftlterabdeckung
(Bild24).
WechselndesMotoröls
Wartungsintervall:Jährlich
EinÖlwechselistnichterforderlich,wennSie
jedochdasÖlwechselnmöchten,führenSiedie
folgendenSchritteaus.
Hinweis:LassenSiedenMotoreinpaar
Minutenlaufen,bevorSiedasÖlwechseln,umes
aufzuwärmen.WarmesÖließtbesserundführt
mehrFremdstoffemitsich.
Motorölsorte
Motorölmenge
Ölviskosität
API-KlassikationSJoderhöher
1.StellenSiedieMaschineaufeinerebenen
Flächeab.
2.SieheVorbereitenfürdieWartung(Seite18).
3.EntfernenSiedenPeilstab,indemSieden
Deckelnachlinksdrehenundherausziehen
(Bild25).
0,44Liter
WaschaktivesÖlderSorte
SAE30oderSAE10W-30
Bild24
1.Clip3.Luftlter
2.Luftlterabdeckung
2.EntfernenSiedenLuftlter(Bild24).
3.PrüfenSiedenLuftlter.
Hinweis:WennderLuftlterstarkverunreinigt
ist,ersetzenSieihndurcheinenneuen.
AndernfallsklopfenSiedenLuftltersanftauf
einerhartenOberächeaus,umRückstände
zulösen.
4.BringenSiedenLuftlteran.
5.NutzenSiedenClipzumWiederanbringender
Luftlterabdeckung.
g033514
g033497
Bild25
1.Peilstab3.Voll
2.Add(Nachfüllen)
4.KippenSiedieMaschineseitlich(Luftlternach
oben),umdasAltölausdemÖleinfüllstutzen
abzulassen(Bild26).
19
Page 43
g027457
Bild26
5.StellenSiedieMaschinenachdemAblassen
desAltölswiederindieBetriebsstellung.
6.GießenSieca.¾derMotorölfüllmengelangsam
indenÖleinfüllstutzen.
7.WartenSiedreiMinuten,damitsichdasÖlim
Motorsetzenkann.
8.WischenSiedenPeilstabmiteinemsauberen
Lappenab.
9.SteckenSiedenPeilstabindenÖleinfüllstutzen
undziehenihndannheraus.
10.LesenSiedenÖlstandamPeilstabab.(Bild25)
AuswechselndesMessers
Wartungsintervall:Jährlich
Wichtig:SiebenötigenfürdenrichtigenEinbau
desMesserseinenDrehmomentschlüssel.Wenn
SiekeinenDrehmomentschlüsselhabenoder
dieseArbeitnichtausführenmöchten,wenden
SiesichaneinenofziellenVertragshändler.
PrüfenSiedasMesser,wennderKraftstofftankleer
ist.WechselnSiedasMessersofortaus,wenn
esbeschädigtodergerissenist.SchärfenSiedie
Messerkante,wennsiestumpfistoderEinkerbungen
aufweist.WechselnSieggf.dasMesseraus.
WARNUNG:
DasMesseristscharf;einKontaktkannzu
schwerenVerletzungenführen.
TragenSieHandschuhe,wennSiedasMesser
warten.
1.SieheVorbereitenfürdieWartung(Seite18).
2.KippenSiedieMaschineaufdieSeite,sodass
derLuftlternachobenzeigt.
3.StabilisierenSiedasMessermiteinem
Holzblock(Bild27).
•WennderÖlstandamPeilstabzuniedrig
ist,füllenSielangsametwasÖlinden
Öleinfüllstutzen,wartenSiedreiMinutenund
wiederholenSiedanndieSchritte8bis10,
bisderÖlstandamPeilstabrichtigist.
•WennderÖlstandamPeilstabzuhochist,
lassenSieÖlab,bisderÖlstandamPeilstab
richtigist.
Wichtig:WennderÖlstandimMotor
zuhochoderzuniedrigistundSieden
Motorlaufenlassen,könnenMotorschäden
auftreten.
11.SteckenSiedenPeilstabfestinden
Einfüllstutzen.
12.EntsorgenSiedasAltölordnungsgemäß.
g231389
Bild27
4.NehmenSiedasMesserabundbewahrenSie
alleBefestigungsschraubenauf(Bild27).
5.SetzenSiedasneueMesserundalleSchrauben
auf(Bild28).
20
Page 44

Bild29
g208188
Bild28
Wichtig:DasgebogeneEndedesMessers
solltezumMähwerkgehäusezeigen.
6.ZiehenSiedieMesserschraubemiteinem
Drehmomentschlüsselmit82N·man.
Wichtig:Einemit82N·mangezogene
Schraubesitztsehrfest.ArretierenSie
dasMessermiteinemHolzstückund
verlagernSiegleichzeitigdasGewichtauf
denSchlüsselundziehenSiedieSchraube
fest.DieseSchraubekannfastnichtzufest
angezogenwerden.
1.Selbstantriebszüge4.DrehenSiedasHandrad
nachrechts,umdie
Einstellungzuarretieren.
2.Holm(linkeSeite)5.DrehenSiedasHandrad
nachlinks,umdie
Einstellungzulösen.
3.Einstellhandrad
g231390
2.StellenSiedieSpannungderZüge(Bild29)
ein,indemSiesiebeidezurückziehenoder
nachvornedrückenunddannindieserStellung
halten;behaltenSiegleicheLängenbei.
Hinweis:DrückenSiedieZügezurMaschine,
umdenAntriebzuerhöhen;ziehenSiedieZüge
vomMotorweg,umdenAntriebzuverringern.
3.DrehenSiedasHandradnachrechts,umdie
EinstellungderZügezuarretieren.
Hinweis:BeideZügesollten38mmhintenden
Klemmenherausragen,wennderHolmmitderersten
MarkierunganderFührungausgeuchtetist,siehe
Bild30.
Einstellendes Selbstantriebs
BeimEinbaueinesSelbstantriebszugsoderbeieiner
falschenEinstellungdesSelbstantriebsmüssenSie
denSelbstantriebeinstellen.
1.DrehenSiedasHandradnachlinks,umdie
Zugeinstellungzulösen(Bild29).
g209518
Bild30
1.38mm3.ErsteMarkierung
2.Führung4.Holm
21
Page 45

Einlagerung
Herausnehmendes
LagernSiedieMaschineaneinemkühlen,sauberen
undtrockenenOrtein.
VorbereitenderMaschine fürdasEinlagern
1.GebenSiedemBenzinbeimletztenAuftanken
imJahreinenKraftstoffstabilisator(z.B.T oro
PremiumFuelTreatment)bei,wieaufdem
Etikettangegeben.
2.EntsorgenSienichtverwendetenKraftstoff
ordnungsgemäß.RecycelnSiedenKraftstoff
vorschriftsmäßigoderverwendenSieihnfürIhr
Auto.
Hinweis:AlterKraftstoffimKraftstofftankist
diehäugsteUrsachefürschweresAnspringen.
LagernSieKraftstoffohneStabilisatornicht
längerals30Tage.LagernSieKraftstoffmit
Stabilisatornichtlängerals90T age.
3.LassenSiedieMaschinesolangelaufen,bis
derMotorinfolgevonBenzinknappheitabstellt.
Rasenmähersausder
Einlagerung
1.ZiehenSiealleBefestigungenan.
2.EntfernenSiedieZündkerzeunddrehen
SiedenMotorschnelldurchZiehendes
Rücklaufstarters,umüberüssigesÖlausdem
Zylinderzuentfernen.
3.SetzenSiedieZündkerzeeinundziehenSiesie
miteinemDrehmomentschlüsselmit20N·man.
4.FührenSiedieempfohlenenWartungsarbeiten
durch,sieheWartung(Seite18).
5.PrüfenSiedenMotorölstand;siehePrüfendes
Motorölstands(Seite10).
6.FüllenSiefrischenKraftstofftankinden
Kraftstofftank,sieheBetanken(Seite9).
7.SchließenSiedenZündkerzensteckerwieder
andieZündkerzean.
4.StartenSiedenMotorundlassenSieihnlaufen,
biserabstellt.WennsichderMotornichtmehr
startenlässt,isterausreichendtrocken.
5.ZiehenSiedenKerzensteckervonder
Zündkerzeundbefestigenihnander
Haltestrebe(fallsvorhanden).
6.NehmenSiedieZündkerzeheraus,füllenSie
30mlMotorölindasZündkerzenlochundziehen
SiemehrmalslangsamamStarterkabel,umdas
ÖlimZylinderzuverteilenundeineKorrosion
desZylinderswährendderEinlagerungzu
vermeiden.
7.SteckenSiedieZündkerzelockerauf.
8.ZiehenSiealleSchraubenundMutternan.
22
Page 46

Hinweise:
Page 47

EuropäischerDatenschutzhinweis
DievonT orogespeichertenInformationen
ToroWarrantyCompany(Toro)respektiertIhrePrivatsphäre.ZumBearbeitenIhresGarantieanspruchsundzurKontaktaufnahmebeieinem
ProduktrückrufbittetT oroSie,T orodirektoderüberdenlokalenVertragshändlerbestimmtepersönlicheInformationenmitzuteilen.
DasGarantiesystemvonT orowirdaufServerninUSAgehostet;dortgeltenggf.andereVorschriftenzumDatenschutzggf.alsinIhremLand.
WennSieToropersönlicheInformationenmitteilen,stimmenSiederVerarbeitungderpersönlichenInformationenzu,wieindiesemDatenschutzhinweis
beschrieben.
VerwendungderInformationendurchToro
TorokannIhrepersönlichenInformationenzumBearbeitenvonGarantieansprüchen,zurKontaktaufnahmebeieinemProduktrückrufoderanderen
Zwecken,dieToroIhnenmitteilt,verwenden.T orokanndieInformationenimRahmendieserAktivitätenanT ochtergesellschaftenvonT oro,
HändleroderGeschäftspartnerweitergeben.T oroverkauftIhrepersönlichenInformationenankeineanderenUnternehmen.T orohatdasRecht,
persönlicheInformationenmitzuteilen,umgeltendeV orschriftenundAnfragenvonentsprechendenBehördenzuerfüllen,umdieSystemerichtigzu
pegenoderTorooderandereBenutzerzuschützen.
SpeicherungpersönlicherInformationen
TorospeichertpersönlicheInformationensolange,wieesfürdenZweckerforderlichist,fürdendieInformationengesammeltwurden,oderfürandere
legitimeZwecke(z.B.EinhaltungvonVorschriften)oderGesetzesvorschriften.
TorosEngagementzurSicherungIhrerpersönlichenInformationen
TorotrifftangemesseneSicherheitsmaßnahmen,umIhrepersönlichenInformationenzuschützen.T orounternimmtauchSchritte,umdieGenauigkeit
unddenaktuellenStatusderpersönlichenInformationenzuerhalten.
ZugriffaufpersönlicheInformationenundBerichtigung
WennSieIhrepersönlichenInformationenprüfenoderberichtigenmöchten,sendenSiebitteeineE-Mailanlegal@toro.com.
AustralischesVerbrauchergesetz
KundeninAustralienndenweitereDetailszumaustralischenVerbrauchergesetzentwederinderVerpackungoderkönnensichandenörtlichen
Toro-Fachhändlerwenden.
374-0282RevC
Page 48
TondeuseRecycler
N°demodèle20964—N°desérie400000000etsuivants
®
FormNo.3418-452RevB
55cm
Manueldel'utilisateur
Introduction
Cettetondeuseautotractéeàlamerotativeest
destinéeaugrandpublic.Elleestprincipalement
conçuepourtondrelespelousesentretenues
régulièrementdanslesterrainsprivés.Ellen'estpas
conçuepourcouperlesbroussaillesnipourunusage
agricole.
Lisezattentivementcettenoticepourapprendre
commentutiliseretentretenircorrectementvotre
produit,etéviterdel'endommageroudevousblesser.
Vousêtesresponsabledel'utilisationsûreetcorrecte
duproduit.
VouspouvezcontacterT orodirectementà
www.T oro.compourtoutrenseignementconcernant
unproduitouunaccessoire,pourobtenirl'adresse
desconcessionnairesoupourenregistrervotre
produit.
Pourobtenirdesprestationsdeservice,des
piècesTorod'origineoudesrenseignements
complémentaires,munissez-vousdesnuméros
demodèleetdesérieduproduitetcontactezun
concessionnaire-réparateuragrééouleserviceclient
Toro.LaFigure1indiquel'emplacementdesnuméros
demodèleetdesérieduproduit.Inscrivezles
numérosdansl'espaceréservéàceteffet.
Important:Avecvotreappareilmobile,vous
pouvezscannerlecodeQRsurl'autocollantdu
numérodesérie(lecaséchéant)pouraccéder
auxrenseignementssurlagarantie,lespièceset
autresinformationsproduit
Lesmisesengardedecemanuelsoulignentdes
dangerspotentielsetsontsignaléesparlesymbole
desécurité(Figure2),quiindiqueundangerpouvant
entraînerdesblessuresgravesoumortellessiles
précautionsrecommandéesnesontpasrespectées.
g000502
Figure2
Symboledesécurité
Cemanuelutilisedeuxtermespourfairepasser
desrenseignementsessentiels.Important,pour
attirerl'attentionsurdesrenseignementsmécaniques
spéciquesetRemarque,pourinsistersurdes
renseignementsd'ordregénéralméritantuneattention
particulière.
Ceproduitestconformeàtouteslesdirectives
européennespertinentes.Pourplusde
renseignements,reportez-vousàlaDéclarationde
conformitéspéciqueduproduitfournieséparément.
Couplebrutounet:lecouplebrutounetdece
moteuraétécalculéenlaboratoireparleconstructeur
dumoteurselonlanormeSAEJ1940ouJ2723de
laSocietyofAutomotiveEngineers(SAE).Étant
congurépoursatisfaireauxnormesdesécurité,
antipollutionetd'exploitation,lemoteurmontésur
cetteclassedetondeuseaurauncoupleeffectif
nettementinférieur.Reportez-vousauxinformations
duconstructeurdumoteurquiaccompagnentla
machine.
Figure1
1.Emplacementdesnumérosdemodèleetdesérie
N°demodèle
N°desérie
©2017—TheToro®Company
8111LyndaleAvenueSouth
Bloomington,MN55420
CV
Enregistrezvotreproduitàwww.T oro.com.
Nemodiezpasounedésactivezpaslessystèmes
desécuritédemachine,etvériezrégulièrement
qu'ilsfonctionnentcorrectement.N'essayezpasde
g226627
régleroudemodierlacommandederégimemoteur,
aurisquedecompromettrelefonctionnementsûrde
lamachineetdecauserdesblessures.
Tabledesmatières
Introduction...............................................................1
Sécurité....................................................................2
Consignesdesécuritégénérales........................2
Autocollantsdesécuritéetd'instruction..............3
Traductiondutexted'origine(FR)
ImpriméauMexique
Tousdroitsréservés
*3418-452*B
Page 49

Miseenservice.........................................................5
1Assemblageetdépliageduguidon...................5
2Montageducâbledulanceurdansle
guide...............................................................5
3Pleind'huilemoteur.........................................6
4Montagedubacàherbe..................................6
Vued'ensembleduproduit........................................8
Caractéristiquestechniques..............................8
Utilisation..................................................................9
Avantl'utilisation....................................................9
Contrôlesdesécuritéavantl'utilisation...............9
Remplissageduréservoirdecarburant.............10
Contrôleduniveaud'huilemoteur.....................10
Réglagedelahauteurduguidon........................11
Réglagedelahauteurdecoupe.......................12
Pendantl'utilisation.............................................12
Sécuritépendantl'utilisation.............................12
Démarragedumoteur.......................................13
Utilisationdelacommanded'autopropul-
sion...............................................................14
Arrêtdumoteur.................................................14
Recyclagedel'herbecoupée............................14
Ramassagedel'herbecoupée.........................14
Utilisationdulevierderamassagesur
demande.......................................................15
Éjectionlatéraledel'herbecoupée...................15
Conseilsd'utilisation........................................16
Aprèsl'utilisation.................................................17
Sécuritéaprèsl'utilisation.................................17
Nettoyagedudessousdelamachine................17
Pliageduguidon...............................................18
Entretien.................................................................19
Programmed'entretienrecommandé..................19
Consignesdesécuritépendant
l'entretien......................................................19
Préparationàl'entretien....................................19
Entretiendultreàair.......................................20
Vidangedel'huilemoteur..................................20
Remplacementdelalame................................21
Réglagedel'autopropulsion.............................22
Remisage...............................................................24
Préparationdelamachineauremisage............24
Remiseenserviceaprèsremisage...................24
Sécurité
Cettemachineestconçueenconformitéavecla
normeENISO5395:2013.
Consignesdesécurité générales
Ceproduitpeutsectionnerlesmainsoulespieds
etprojeterdesobjets.Respecteztoujourstoutes
lesconsignesdesécuritépouréviterdesblessures
graves.
L'utilisationdeceproduitàd'autresnsquecellequi
estprévuepeutêtredangereusepourvous-mêmeet
pourlespersonnesàproximité.
•Avantdedémarrerlemoteur,vousdevezlire,
comprendreetrespectertouteslesinstructions
etmisesengardedonnéesdansceManuel
del'utilisateurainsiquesurlamachineetles
accessoires.
•Neplacezpaslesmainsoulespiedsprèsdes
piècesmobilesousouslamachine.Nevoustenez
pasdevantl'ouvertured'éjection.
•N'utilisezpaslamachines'ilmanquedescapots
oud'autresdispositifsdeprotection,ous'ilssont
endommagés.
•Tenezadultesetenfantsàunedistancesufsante
delamachine.N'autorisezjamaisunenfant
àutiliserlamachine.Seuleslespersonnes
responsables,forméesàl'utilisationdela
machine,ayantluetcomprislesinstructionset
physiquementaptessontautoriséesàutiliserla
machine.
•Arrêtezlamachine,coupezlemoteuretattendez
l'arrêtcompletdetouteslespiècesmobilesavant
defairel'entretien,defairelepleindecarburant
oudedéboucherlamachine.
L'usageoul'entretienincorrectdecettemachinepeut
occasionnerdesaccidents.Pourréduirelesrisques
d'accidentsetdeblessures,respectezlesconsignes
desécuritéquisuivent.Teneztoujourscomptedes
misesengardesignaléesparlesymboledesécurité
etlamentionPrudence,AttentionouDanger.Ne
pasrespectercesinstructions,c'estrisquerdevous
blesser,parfoismortellement.
Voustrouverezd'autresconsignesdesécurité,lecas
échéant,envousreportantauxsectionsrespectives
danscemanuel.
2
Page 50
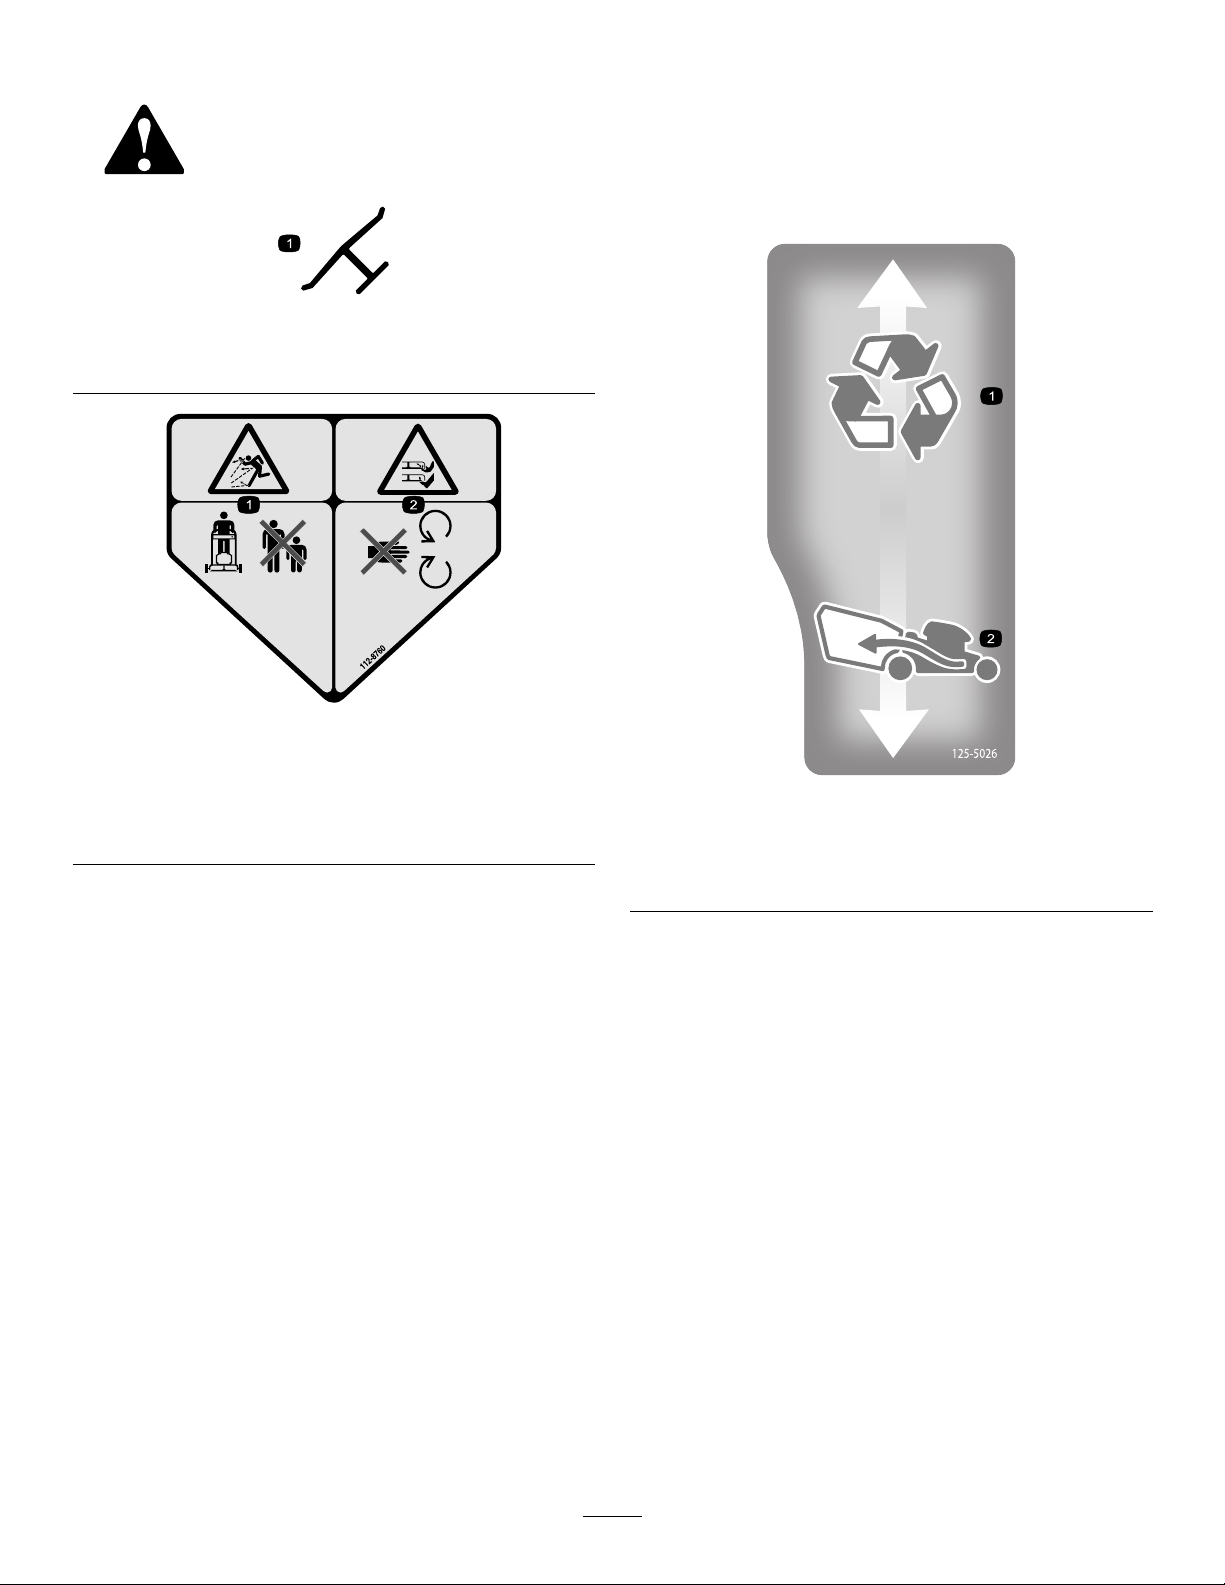
Autocollantsdesécuritéetd'instruction
Desautocollantsdesécuritéetdesinstructionsbienvisiblesparl'opérateursontplacésprès
detouslesendroitspotentiellementdangereux.Remplaceztoutautocollantendommagé
oumanquant.
Marquedufabricant
1.Cettemarqueidentielalamecommepièced'origine.
decaloemmarkt
112-8760
1.Risquedeprojectiond'objets–tenezlesspectateursà
bonnedistancedelamachine.
2.Risquedecoupure/mutilationdesmainsoudespieds–ne
vousapprochezpasdespiècesmobiles.
decal112-8760
decal125-5026
125-5026
1.Moderecyclage2.Moderamassage
3
Page 51

decal131-4514
131-4514
1.Attention–lisezleManueldel'utilisateur.
2.Risquedecoupure/mutilationdesmainsparlalamedela
tondeuse–nevousapprochezpasdespiècesmobileset
gardeztouteslesprotections.
3.Risquedecoupure/mutilationdesmainsparlalamedela
tondeuse–débranchezlabougieetlisezlesinstructions
avantd'entreprendreunentretienouunerévision.
4.Risquedeprojectiond'objets–n'autorisezpersonneà
s'approcherdelamachine;coupezlemoteuravant
dequitterlapositiond'utilisation;ramassezlesdébris
éventuellementprésentsavantdetondre.
5.Risquedecoupure/mutilationdesmainsparlalamedela
tondeuse–netravaillezpasdanslesensdelapente,mais
transversalement;regardezderrièrevousavantdefaire
marchearrière.
decal138-3278
138-3278
decal137-9196
137-9196
1.Verrouillage2.Déverrouillage
1.Poussezleguidonversle
baspouravancer.
1.Attention–lisezleManuel
del'utilisateur.
2.Tirezleguidonverslehaut
pourreculer.
decal136-9096
136-9096
2.ScannezlecodeQRpour
plusderenseignements
surleréglagedela
traction.
4
Page 52

Miseenservice
Important:Retirezetmettezaurebutlapelliculedeplastiquequiprotègelemoteurainsiquetoutautre
emballageouélémentenplastiqueutilisésurlamachine.
1
Assemblageetdépliageduguidon
Aucunepiècerequise
Procédure
Figure3
g227424
5
Page 53

2
Montageducâbledulanceurdansleguide
Aucunepiècerequise
Procédure
Figure4
g230719
3
Pleind'huilemoteur
Aucunepiècerequise
Procédure
Important:Àlalivraisondelamachine,lecartermoteurestvide,maisunbidond'huilemoteurest
fourni.Avantdemettrelemoteurenmarche,faiteslepleind'huilemoteur.
Figure5
6
g222533
Page 54

4
Montagedubacàherbe
Aucunepiècerequise
Procédure
g230447
Figure6
7
Page 55
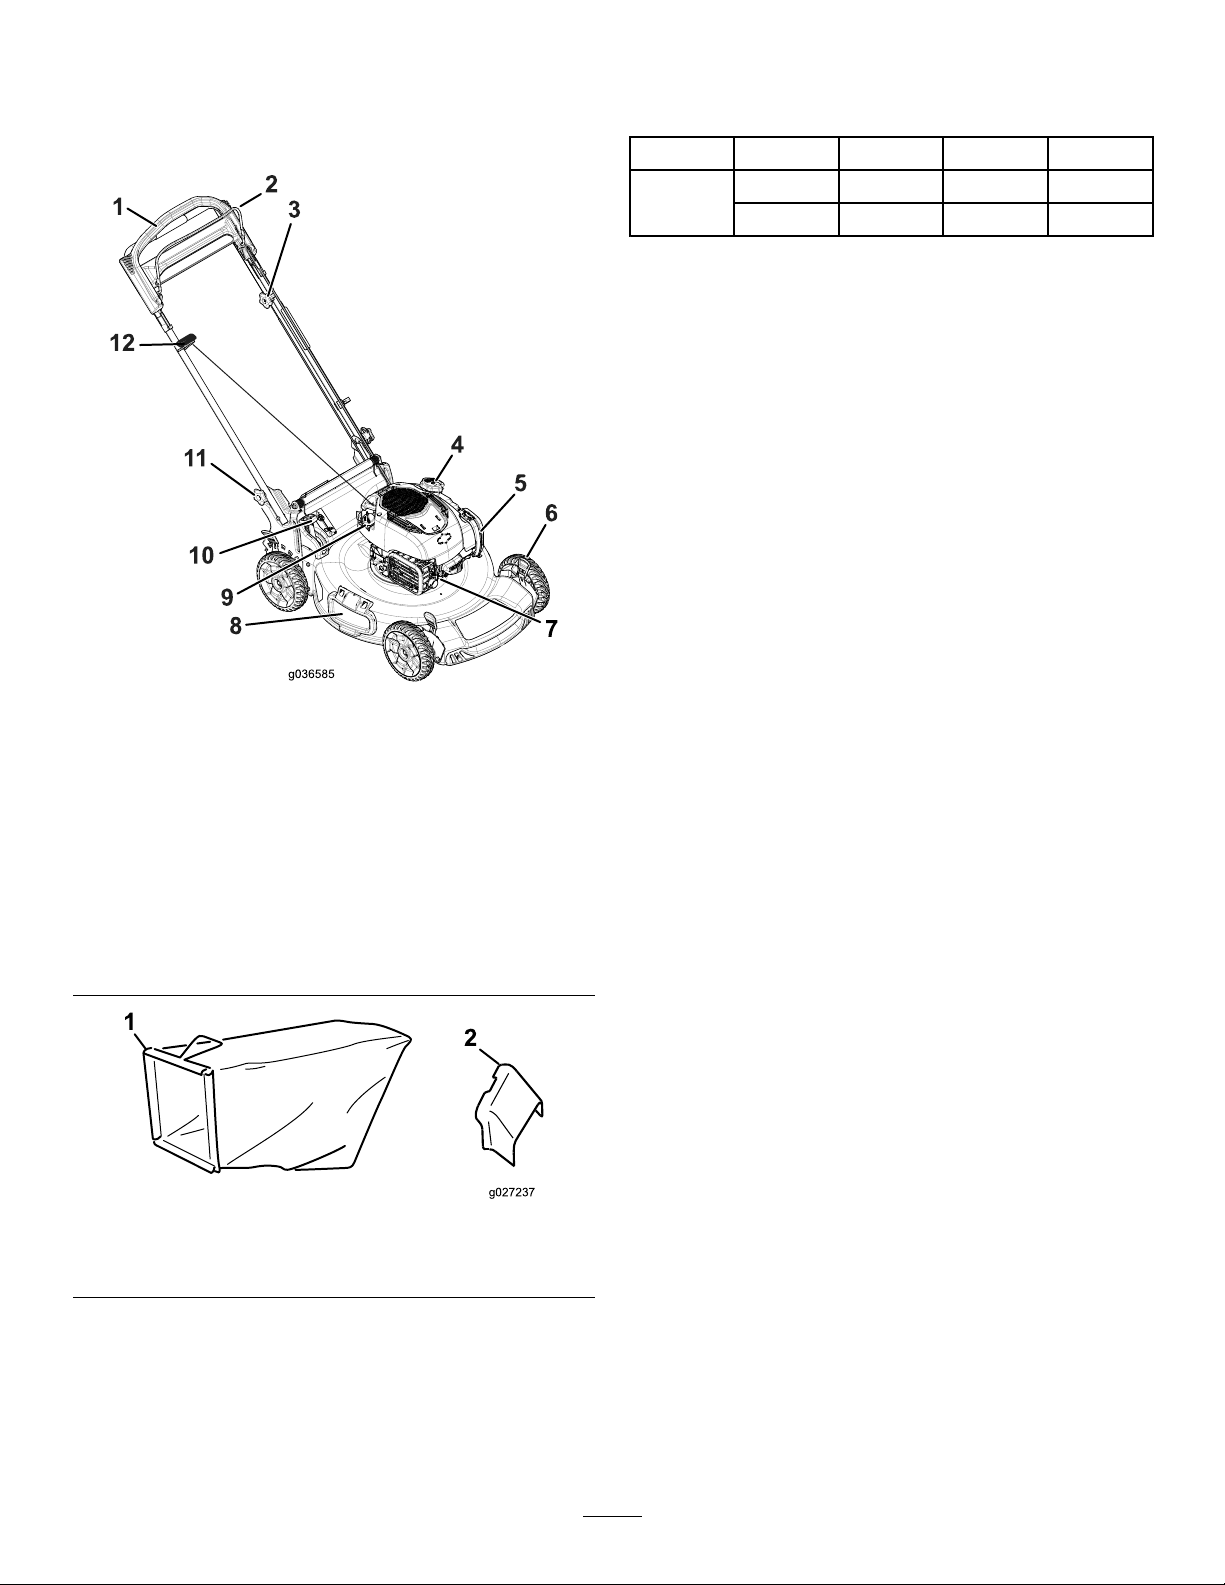
Vued'ensembledu
produit
Caractéristiques
techniques
Modèle
20964
Poids
35kg152cm58cm109cm
(77lb)(60")(23")(43")
LongueurLargeur
Hauteur
1.Guidon
2.Barredecommandedela
lame
3.Boutonderéglagede
l'autopropulsion
4.Bouchonduréservoirde
carburant
5.Filtreàair
6.Levierdehauteurde
coupe(4)
1.Bacàherbe
g036585
Figure7
7.Bougie
8.Déecteurd'éjection
latérale
9.Bouchonde
remplissage-jauge
10.Levierdecommandede
ramassagesurdemande
11.Boutonduguidon(2)
12.Poignéedulanceur
g027237
Figure8
2.Goulotted'éjectionlatérale
8
Page 56

Utilisation
Remarque:Lescôtésgaucheetdroitdelamachine
sontdéterminésd'aprèslapositiond'utilisation
normale.
Sécuritérelativeaucarburant
•Lecarburantestextrêmementinammableet
hautementexplosif.Unincendieouuneexplosion
causé(e)parducarburantpeutvousbrûler,ainsi
quelespersonnessetenantàproximité,etcauser
desdommagesmatériels.
Avantl'utilisation
Contrôlesdesécuritéavant l'utilisation
Consignesdesécuritégénérales
•Familiarisez-vousaveclemaniementcorrectdu
matériel,lescommandesetlessymbolesde
sécurité.
•Vérieztoujoursquelescapotsetlesdispositifsde
sécurité,commelesdéecteurset/oulesbacsà
herbe,sontenplaceetfonctionnentcorrectement.
•Vérieztoujoursqueleslames,boulonsdelames
etensemblesdecoupenesontpasusésni
endommagés.
•Examinezlazonedetravailetenleveztoutobjet
pouvantgênerlefonctionnementdelamachineou
êtrerejetépendantsonutilisation.
•Pendantleréglagedelahauteurdecoupe,vous
risquezdetoucherlalameenmouvementetde
vousblessergravement.
–Pouréviterquel'électricitéstatiquen'enamme
lecarburant,posezlerécipientet/oula
machinedirectementsurlesol,pasdansun
véhiculeousurunsupportquelconque,avant
deremplirleréservoir.
–Faiteslepleinduréservoirdecarburantà
l'extérieur,dansunendroitbiendégagé,
lorsquelemoteurestfroid.Essuyeztout
carburantrépandu.
–Nefumezjamaisquandvousmanipulezdu
carburantettenez-vousàl'écartdesammes
nuesoudessourcesd'étincelles.
–Restezàlapositiond'utilisation(derrièrele
guidon)quandlemoteurestenmarche.
–Sivousrenversezducarburant,nemettez
paslemoteurenmarcheàcetendroit.Évitez
decréerdessourcesd'inammationjusqu'à
dissipationcomplètedesvapeursdecarburant.
–Conservezlecarburantdansunrécipient
homologuéethorsdelaportéedesenfants.
•Lecarburantesttoxiqueetmêmemortelencas
d'ingestion.L'expositionprolongéeauxvapeurs
decarburantpeutcauserdesblessuresetdes
maladiesgraves.
–Coupezlemoteur,enlevezlaclédecontact
(modèleàdémarrageélectriqueseulement)et
attendezl'arrêtcompletdetouteslespièces
mobiles.
–Nemettezpaslesdoigtssouslecarterdela
tondeusequandvousréglezlahauteurde
coupe.
–Évitezderespirerlesvapeursdecarburantde
façonprolongée.
–N'approchezpaslesmainsnilevisagedu
pistoletoudel'ouvertureduréservoirde
carburant.
–N'approchezpaslecarburantdesyeuxetde
lapeau.
9
Page 57

Remplissageduréservoir decarburant
•Pourassurerlefonctionnementoptimaldela
machine,utilisezuniquementdel'essencesans
plombpropreetfraîcheavecunindiced'octanede
87ouplus(méthodedecalcul[R+M]/2).
Faiteslepleinavecdel'essencesansplombordinaire
fraîched'unemarqueréputée(Figure9).
Important:Pourréduirelesproblèmesde
démarrage,ajoutezunstabilisateuràl'essence
pendanttoutelasaisondecoupe.Mélangezle
stabilisateuràdel'essencestockéedepuismoins
d'unmois.
•L'utilisationdecarburantoxygénécontenant
jusqu'à10%d'éthanolou15%deMTBEpar
volumeesttolérée.
Reportez-vousaumanueldupropriétairedumoteur
pourtoutrenseignementcomplémentaire.
•N'utilisezpasdemélangesd'essenceàl'éthanol
(E15ouE85parexemple)avecplusde10%
d'éthanolparvolume.Celapeutentraînerdes
problèmesdeperformanceset/oudesdégâtsdu
moteurquinesontpascouvertsparlagarantie.
•N'utilisezpasd'essencecontenantduméthanol.
•Nestockezpaslecarburantdansleréservoirou
dansdesbidonsdecarburantpendantl'hiver,à
moinsd'yajouterunstabilisateurdecarburant.
Figure9
•N'ajoutezpasd'huileàl'essence.
Contrôleduniveaud'huilemoteur
Périodicitédesentretiens:Àchaqueutilisationouunefoisparjour
Important:Sivousfaitestournerlemoteuralorsqueleniveaud'huiledanslecarteresttropbasou
tropélevé,vousrisquezd'endommagerlemoteur.
g230458
Figure10
g222533
10
Page 58
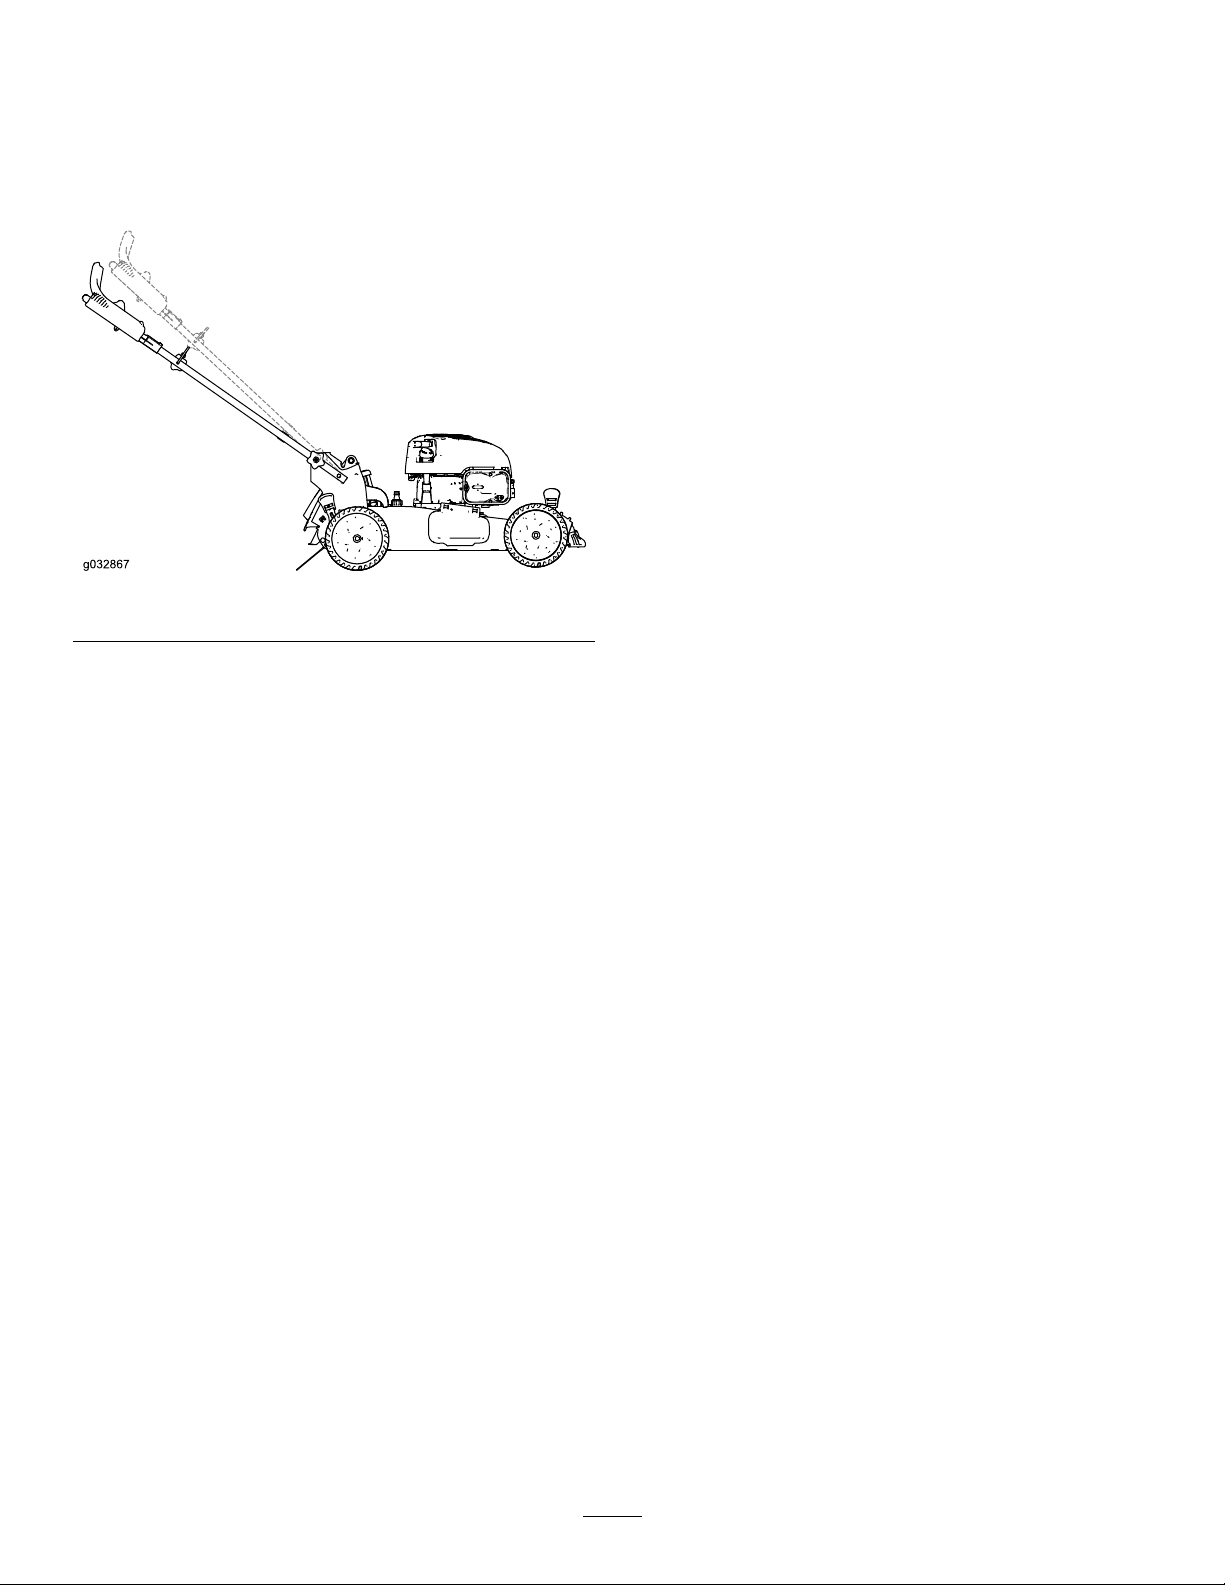
Réglagedelahauteurdu guidon
Vouspouvezéleverouabaisserleguidonàl'une
desdeuxpositionsproposées,seloncellequivous
convientlemieux(Figure11).
Figure11
g032867
1.Desserrezlesdeuxboutonsdeguidonjusqu'à
cequ'ilsoitpossibledepousserlesbordscarrés
desboulonsdecarrosseriehorsdestrous
carrésdanslessupportsduguidon.
2.Poussezlesboutonsjusqu'àcequ'ilssoient
dégagés.
3.Réglezleguidonàlahauteursupérieureou
inférieure.
4.Tirezsurlesboutonsjusqu'àcequeles
bordscarrésdechaqueboulondecarrosserie
s'engagedansletroucarrécorrespondant.
5.Serrezlesboutonsduguidonautantque
possible.
11
Page 59
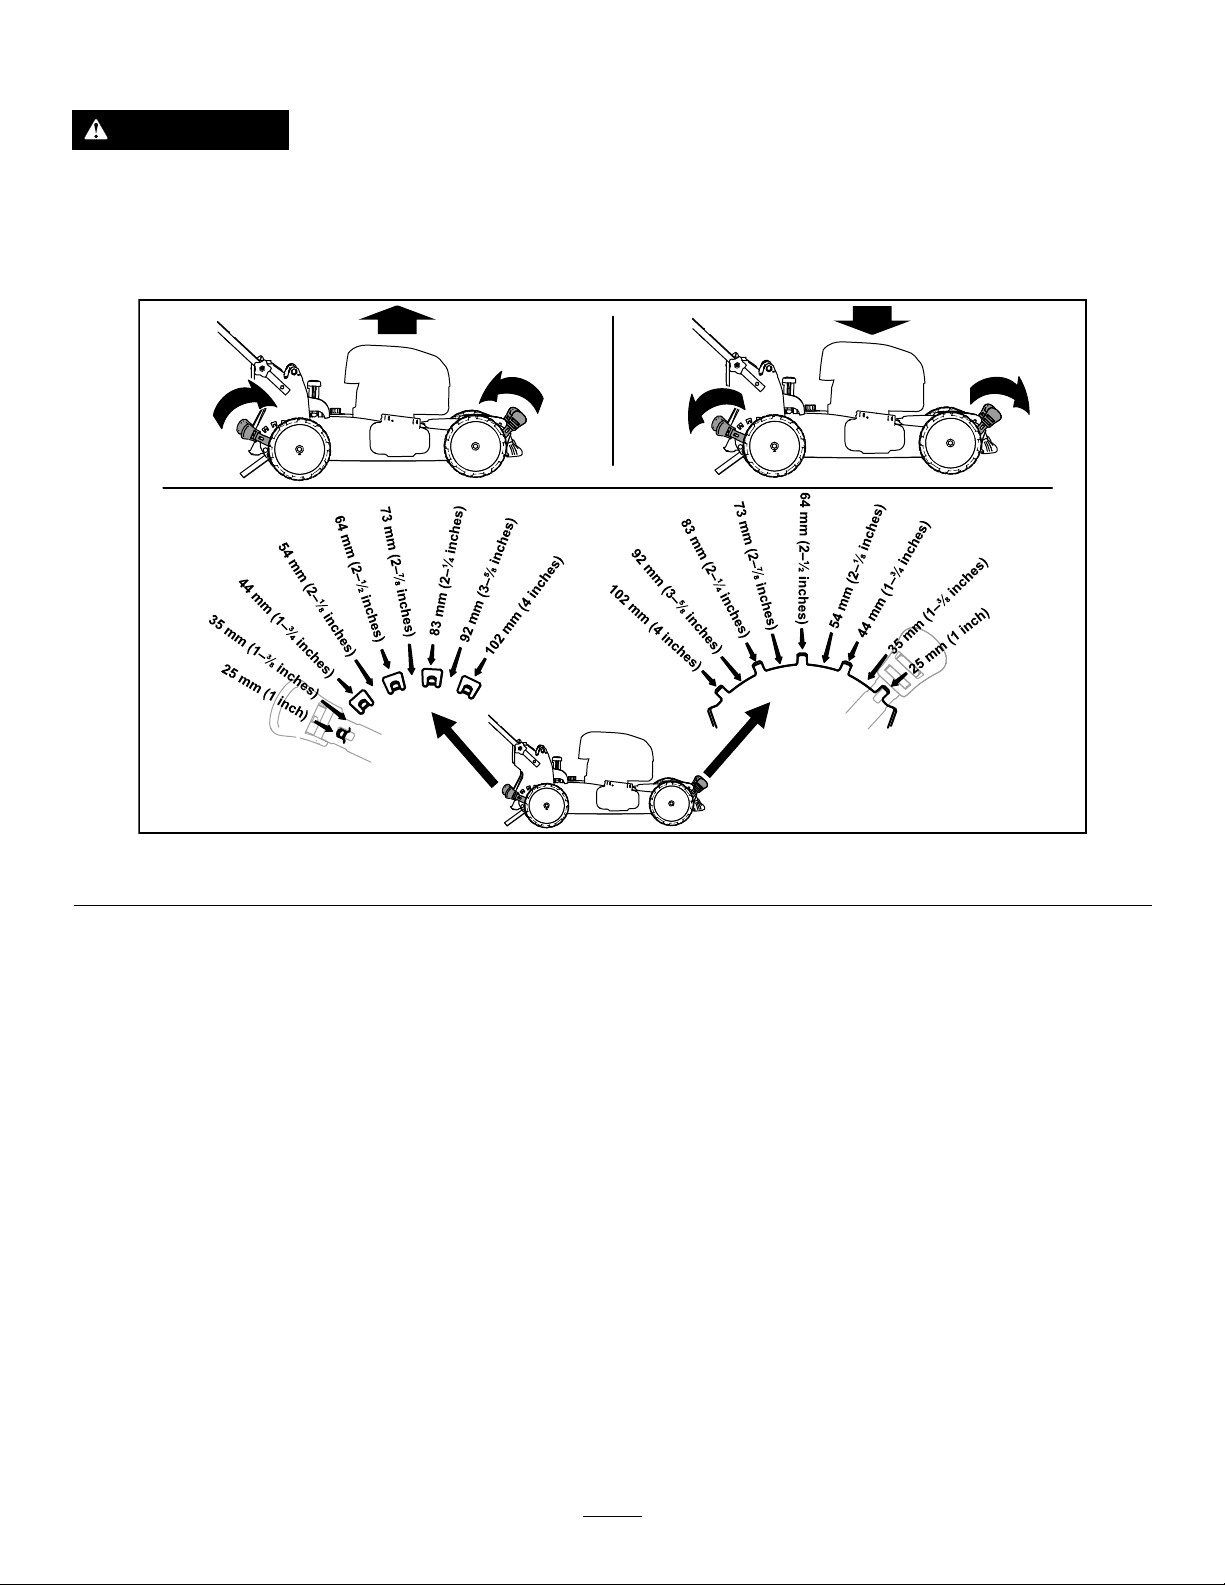
Réglagedelahauteurdecoupe
PRUDENCE
Silemoteurvientdetourner,lesilencieuxesttrèschaudetrisquedevousbrûlergravement.
Nevousapprochezpasdusilencieuxencorechaud.
Choisissezlahauteurdecoupevoulue.Réglezlesrouesavantàlamêmehauteurquelesrouesarrière
(Figure12).
Pendantl'utilisation
Sécuritépendant l'utilisation
Consignesdesécuritégénérales
•Portezdesvêtementsappropriés,ycomprisune
protectionoculaire,unpantalon,deschaussures
solidesàsemelleantidérapanteetdesprotecteurs
d'oreilles.Attachezlescheveuxlongsetles
vêtementsamples,etneportezpasdebijoux
pendants.
•N'utilisezpaslamachinesivousêtesfatigué,
maladeousousl'emprisedel'alcool,dedrogues
oudemédicaments.
•Lalameesttranchanteetvouspouvezvous
blessergravementàsoncontact.Avantdequitter
lapositiond'utilisation,retirezlaclédecontact
g223084
Figure12
(modèleàdémarrageélectriqueseulement)et
attendezl'arrêtcompletdetouteslespièces
mobiles.
•Lorsquevousrelâchezlabarredecommande
delalame,lemoteuretlalamedoivents'arrêter
enmoinsde3secondes.Sicen'estpaslecas,
cessezimmédiatementd'utiliserlamachineet
adressez-vousàunconcessionnaire-réparateur
agréé.
•Teneztoutlemonde,enparticulierlesjeunes
enfants,àl'écartdelazonedetravail.Arrêtezla
machinesiquelqu'unentredanslazonedetravail.
•Vérieztoujoursquelavoieestlibrejustederrière
lamachineetsursatrajectoireavantdefaire
marchearrière.
•N'utilisezlamachinequesilavisibilitéest
sufsanteetlesconditionsmétéorologiques
favorables.N'utilisezpaslamachinesilafoudre
menace.
12
Page 60
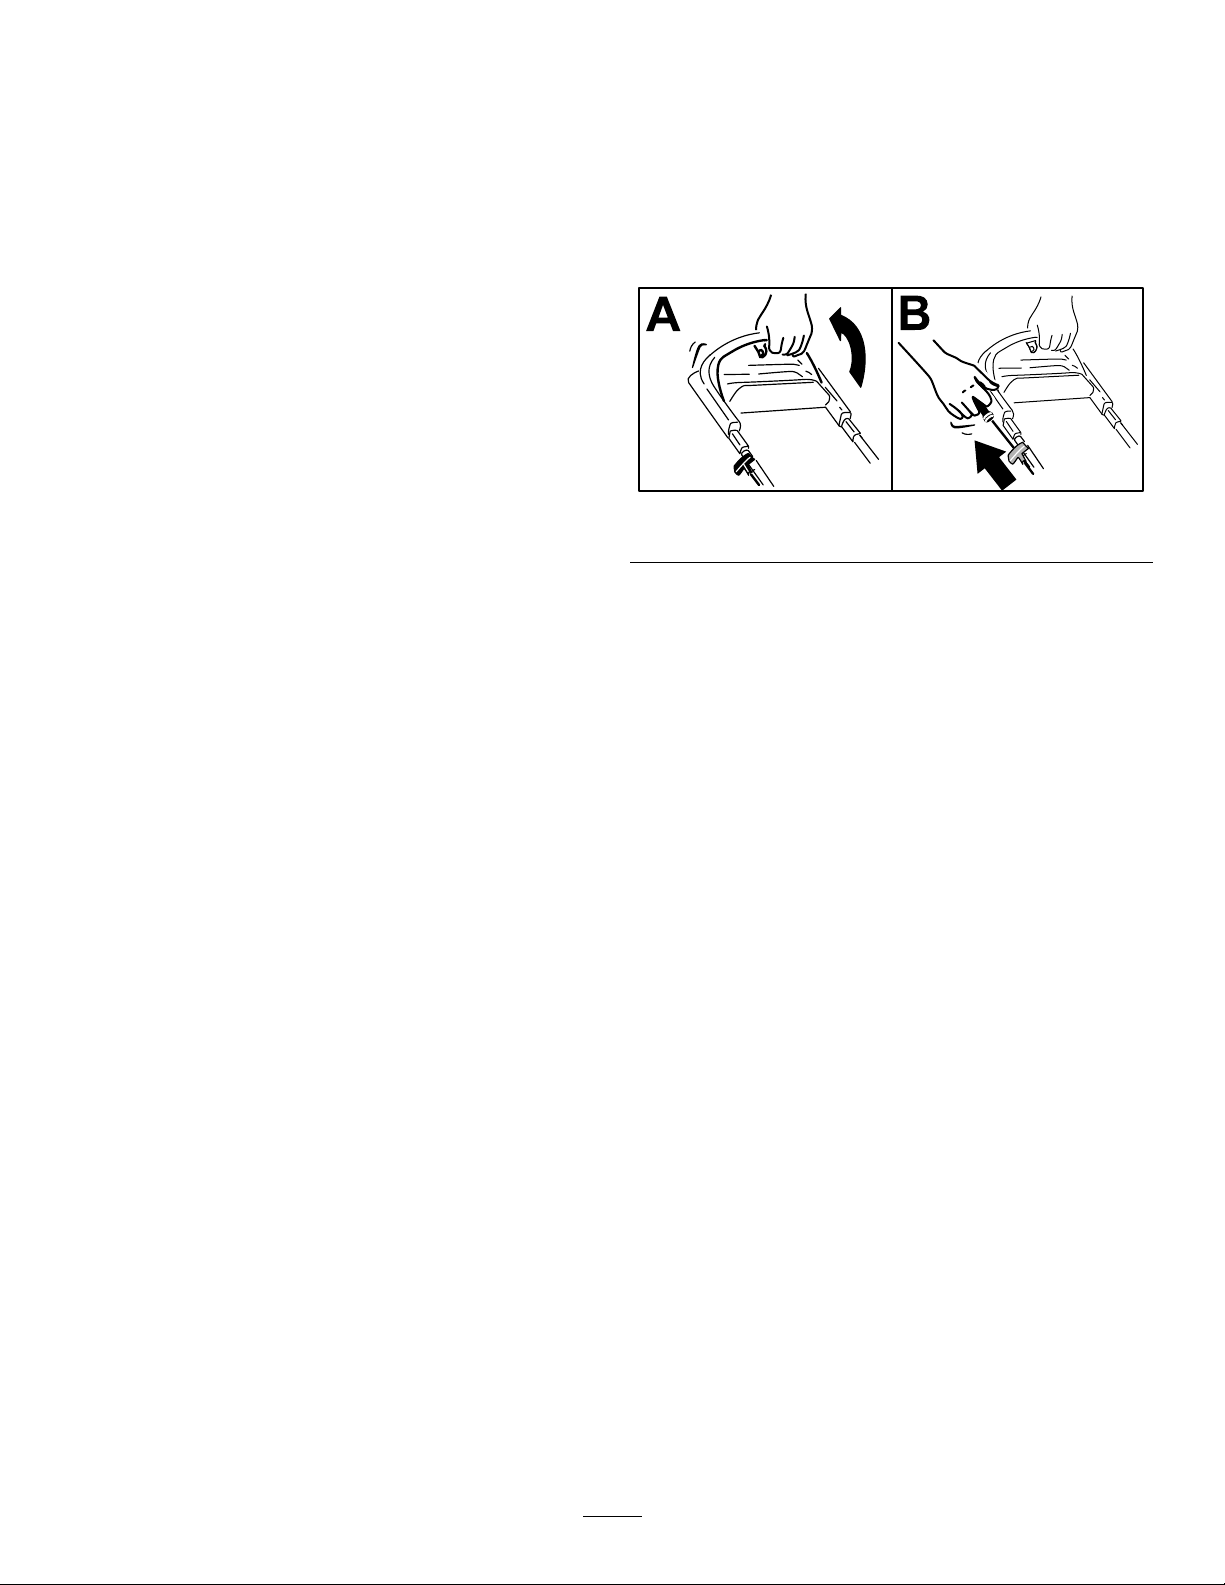
•Entravaillantsurl'herbeoulesfeuilleshumides,
vousrisquezdeglisseretdevousblesser
gravementsivoustouchezlalameentombant.
Évitezdetondrequandl'herbeesthumide.
•Soyezparticulièrementprudentàl'approchede
tournantssansvisibilité,debuissons,d'arbresou
d'autresobjetssusceptiblesdemasquerlavue.
•Méez-vousdestrous,ornières,bosses,rochers
ouautresobstaclescachés.Lesirrégularitésdu
terrainpeuventprovoquerleretournementdela
machineouvousfaireperdrel'équilibre.
•Silamachineaheurtéunobstacleoucommence
àvibrer,coupezimmédiatementlemoteur,retirez
laclé(selonl'équipement),attendezl'arrêtcomplet
detouteslespiècesmobilesetdébranchezlelde
labougieavantdevériersilamachinen'estpas
endommagée.Effectueztouteslesréparations
nécessairesavantderéutiliserlamachine.
•Avantdequitterlapositiond'utilisation,coupez
lemoteur,retirezlaclédecontact(modèleà
démarrageélectriqueseulement)etattendez
l'arrêtdetouteslespiècesmobiles.
•Silemoteurvientdetourner,lesilencieuxesttrès
chaudetpeutvousbrûlergravement.Nevous
approchezpasdusilencieuxencorechaud.
Démarragedumoteur
1.Maintenezlabarredecommandedeslames
contreleguidon(AdeFigure13).
2.Tirezlégèrementlapoignéedulanceurjusqu'à
cequevoussentiezunerésistance,puistirez
vigoureusementetlaissezlelanceurserétracter
lentementjusqu'auguide-câblesurleguidon(B
deFigure13).
g230459
Figure13
Remarque:Silemoteurnedémarrepas
aprèsplusieurstentatives,contactezun
concessionnaire-réparateuragréé.
•Vériezfréquemmentl'étatdescomposants
dubacàherbeetdelagoulotted'éjection,et
remplacezlespiècesuséesouendommagéespar
lespiècesrecommandéesparleconstructeur.
•Utilisezuniquementlesaccessoireset
équipementsagréésparTheToro®Company.
Consignesdesécuritépour l'utilisationsurdespentes
•Travailleztransversalementàlapente,jamais
enmontantoudescendant.Soyezextrêmement
prudentlorsquevouschangezdedirectionsurun
terrainenpente.
•Netondezpasdepentestropraides.Vous
pourriezglisseretvousblesserentombant.
•Faitespreuvedeprudencequandvoustondezà
proximitédedénivellations,fossésouberges.
13
Page 61
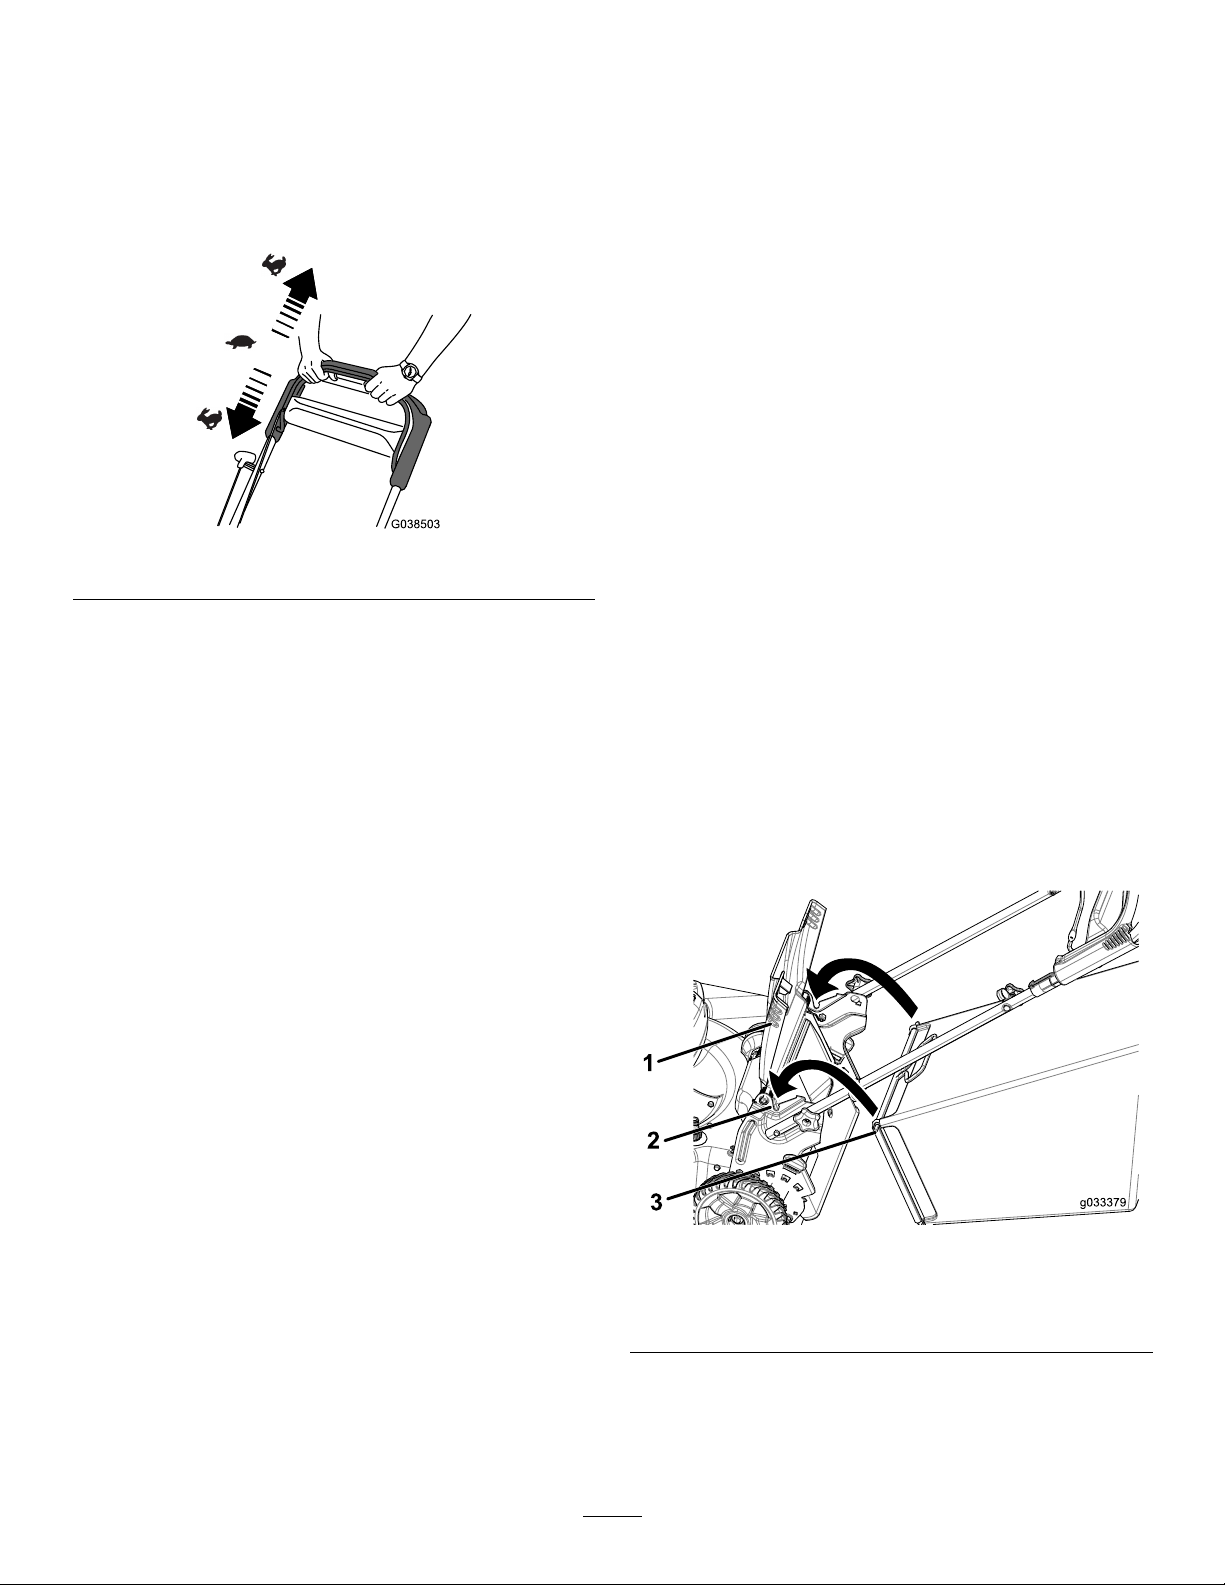
Utilisationdelacommande
Recyclagedel'herbe
d'autopropulsion
Pouractionnerl'autopropulsion,ilvoussuftd'avancer
oudereculer,lesmainssurlapartiesupérieuredu
guidonetlescoudesserrés;lamachineavance
automatiquementàvotrerythme(Figure14).
Figure14
Remarque:Sivousavezdesdifcultésàfairerouler
lamachineenavantouenarrièreaprèsavoirutilisé
l'autopropulsion,immobilisez-vous,laissezvosmains
enplaceetlaissezlamachineavancerdequelques
centimètrespourdésengagerlatransmissionaux
roues.Vouspouvezaussiessayerd'atteindre
lapoignéeenmétal,situéejustesouslapartie
supérieureduguidon,etdepousserlamachineen
avantsurquelquescentimètres.Sil'autopropulsion
nefonctionnepascorrectementenmarchearrière,
soulevezlégèrementleguidon.Sivousavezdes
difcultésàfairereculerlamachine,contactezun
concessionnaire-réparateuragréé.
coupée
Àlalivraison,votremachineestprêteàrecycler
l'herbeetlesfeuillescoupéespournourrirvotre
pelouse.
Silebacàherbeestmontésurlamachineetsile
levierderamassagesurdemandeestenpositionde
ramassage,placezlelevierenpositionderecyclage;
voirUtilisationdulevierderamassagesurdemande
(page15).Silagoulotted'éjectionlatéraleestmontée
surlamachine,déposez-la;voirDéposedela
goulotted'éjectionlatérale(page15).
Ramassagedel'herbe coupée
g038503
Utilisezlebacàherbepourrecueillirlesdébris
d'herbeetdefeuillesdéposéssurlapelouse.
Silagoulotted'éjectionlatéraleestmontéesurla
machine,déposez-la;voirDéposedelagoulotte
d'éjectionlatérale(page15).Silelevierderamassage
surdemandeestenpositionderecyclage,placez-le
enpositionderamassage;voirUtilisationdulevierde
ramassagesurdemande(page15).
Montagedubacàherbe
1.Soulevezledéecteurarrièreetgardez-ledans
cetteposition(Figure15)
Arrêtdumoteur
Périodicitédesentretiens:Àchaqueutilisationou
unefoisparjour
Pourarrêterlemoteur,relâchezlabarrede
commandedelalame.
Important:Lorsquevousrelâchezlabarrede
commandedelalame,lemoteuretlalamedoivent
s'arrêterenmoinsde3secondes.Sicen'estpas
lecas,cessezimmédiatementd'utiliserlamachine
etadressez-vousàunconcessionnaire-réparateur
agréé.
g033379
Figure15
1.Déecteurarrière3.Ergotdebacàherbe(2)
2.Crans(2)
2.Montezlebacàherbeenveillantàplacerles
ergotsdanslescransduguidon(Figure15).
3.Abaissezledéecteurarrière.
14
Page 62
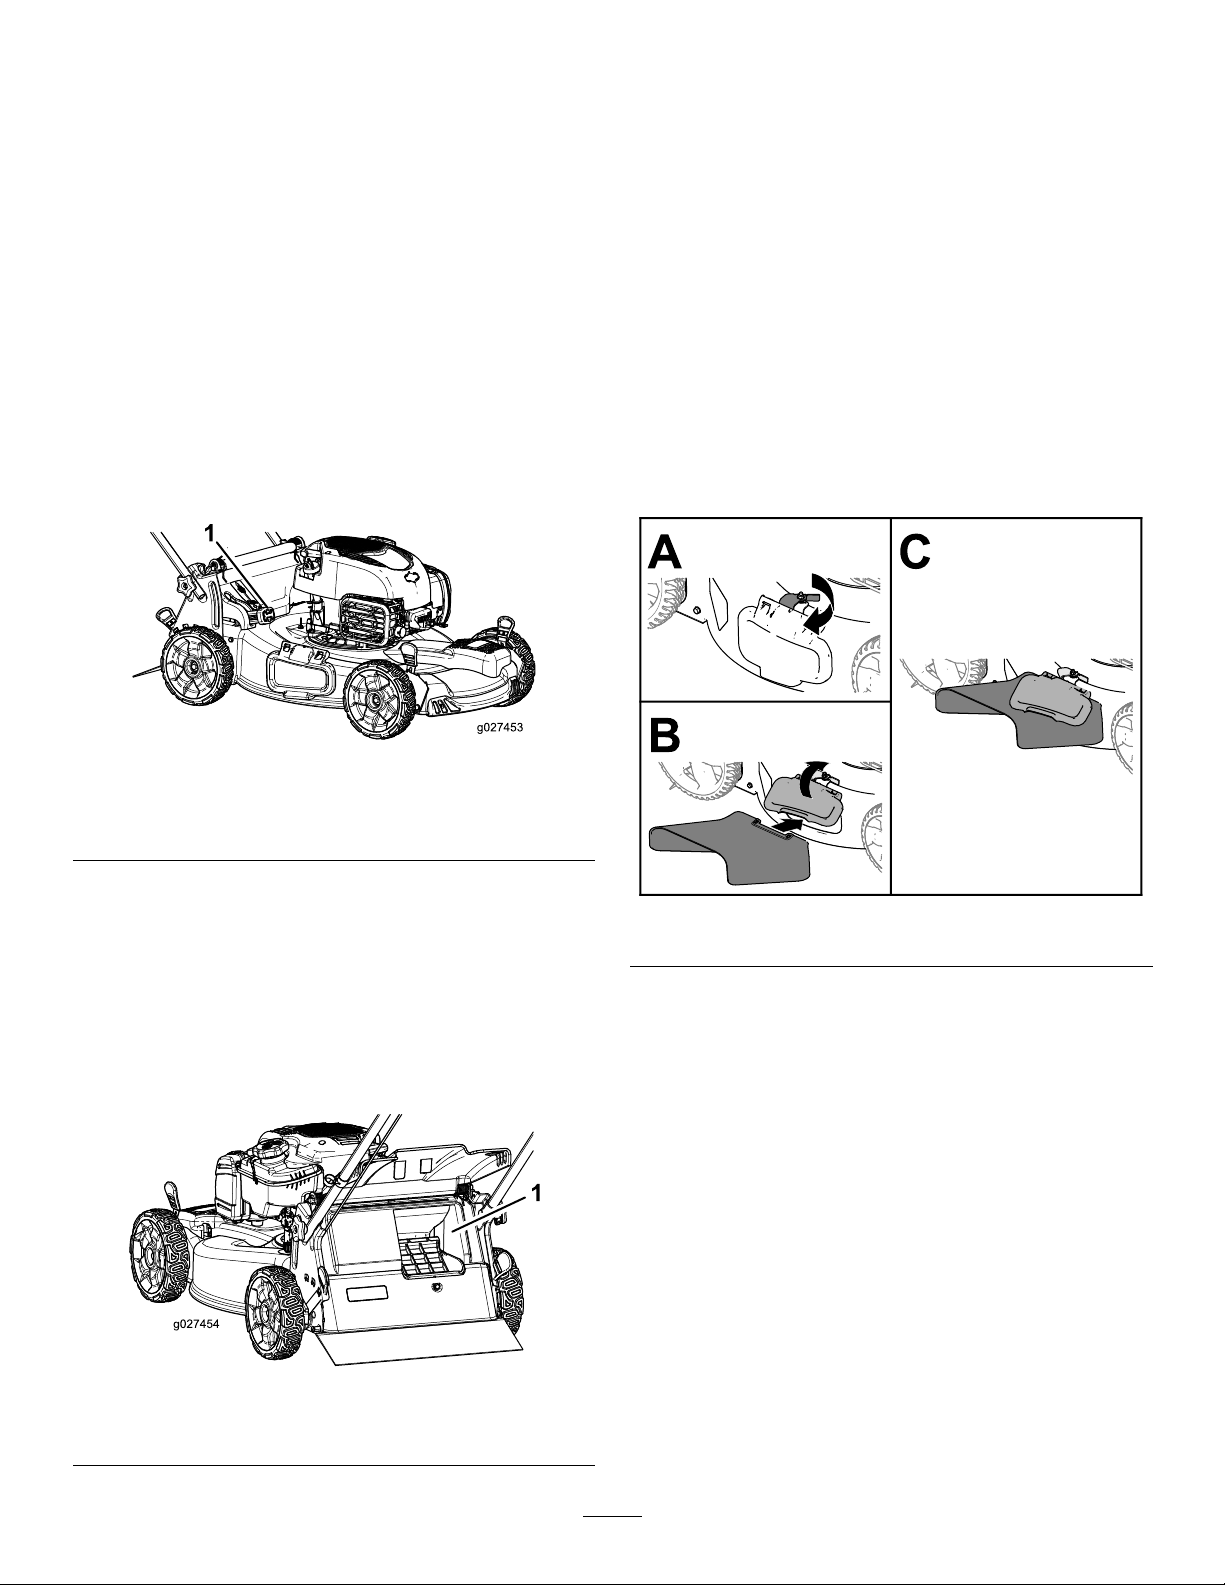
Retraitdubacàherbe
Pourretirerlebacàherbe,inversezlaprocédurede
montagedécritedansMontagedubacàherbe(page
14).
Utilisationdulevierde ramassagesurdemande
Lafonctionderamassagesurdemandevouspermet
deramasserouderecyclerlesdéchetsd'herbeet
defeuillesquandlebacàherbeestmontésurla
machine.
•Pourramasserlesdéchetsd'herbeetde
feuilles,appuyezsurleboutondulevierde
ramassagesurdemandeetdéplacezlelevieren
avantjusqu'àcequeleboutonressorte(Figure
16).
Éjectionlatéraledel'herbe coupée
Utilisezl'éjectionlatéralelorsquel'herbeesttrès
haute.
Silebacàherbeestmontésurlamachineetsile
levierderamassagesurdemandeestenpositionde
ramassage,placezlelevierenpositionderecyclage;
voirUtilisationdulevierderamassagesurdemande
(page15).
Montagedelagoulotted'éjection latérale
Déverrouillezetsoulevezledéecteurlatéral,et
montezlagoulotted'éjectionlatérale(Figure18).
g027453
Figure16
1.Levierderamassagesurdemande(enpositionde
ramassage)
•Pourrecyclerlesdéchetsd'herbeetdefeuilles,
appuyezsurleboutondulevieretdéplacezle
levierenarrièrejusqu'àcequeleboutonressorte.
Important:Pourqueleramassages'effectue
correctement,enlevezlesdéchetsd'herbe
etautresquisetrouventsurlevoletde
ramassagesurdemandeetl'ouverture(Figure
17)avantdechangerlapositiondulevierde
ramassagesurdemande.
g235646
Figure18
Déposedelagoulotted'éjection latérale
Pourdéposerlagoulotted'éjectionlatérale,soulevez
ledéecteurlatéral,déposezlagoulotte,puis
rabaissezledéecteurjusqu'àcequ'ils'enclenche
solidementenplace.
1.Nettoyerici
g027454
Figure17
15
Page 63

Conseilsd'utilisation
Conseilsdetontegénéraux
•Inspectezlazonedetravailetenleveztoutobjet
pouvantêtreprojetéparlamachine.
•Évitezdeheurterdesobstaclesaveclalame.Ne
passezjamaisintentionnellementsurunobjetquel
qu'ilsoit.
•Silamachineaheurtéunobstacleoucommence
àvibrer,coupezimmédiatementlemoteur,retirez
laclé(selonl'équipement),débranchezlel
delabougieetvériezsilamachinen'estpas
endommagée.
•Pourobtenirdesrésultatsoptimaux,remplacezla
lameaudébutdelasaisondetonte.
•Remplacezlalamedèsquenécessaireparune
lameTorod'origine.
Latonte
•Netondezl'herbequesuruntiersdesahauteur
àchaquefois.N'utilisezpasunehauteurde
coupeinférieureà51mm,saufsil'herbeest
clairseméeouàlandel'automnequandla
poussecommenceàralentir.
•Sil'herbefaitplusde15cm,effectuezunpremier
passageàvitesseréduiteàlahauteurdecoupe
laplushaute.Effectuezensuiteundeuxième
passageàunehauteurdecoupeinférieurepour
obtenirunecoupeplusesthétique.L'herbetrop
hauterisqued'obstruerlamachineetdefairecaler
lemoteur.
•L'herbeetlesfeuilleshumidesonttendanceà
s'agglomérersurlapelouseetpeuventobstruerla
machineetfairecalerlemoteur.Évitezdetondre
quandl'herbeesthumide.
•Soyezconscientdesrisquesd'incendiepartemps
trèssec,respecteztouslesavertissementslocaux
relatifsauxincendies,etnelaissezpasl'herbeet
lesfeuillessèchess'accumulersurlamachine.
•Alternezladirectiondelatonte.Celapermet
dedisperserlesdéchetsplusuniformémentet
d'obtenirunefertilisationplushomogène.
•Sil'aspectdelapelousetonduen'estpas
satisfaisant,essayezuneouplusieursdes
solutionssuivantes:
–Remplacezlalameoufaites-laaiguiser.
–Tondezenavançantpluslentement.
–Augmentezlahauteurdecoupe.
–Tondezplussouvent.
–Empiétezsurlespassagesprécédentspour
tondreunelargeurdebanderéduite.
Hachagedesfeuilles
•Aprèslatonte,50%delapelousedoitêtrevisible
souslacouchedefeuilleshachées.Vousdevrez
peut-êtrerepasserplusieursfoissurlesfeuilles.
•Silacouchedefeuillessurlapelousefaitplusde
13cmd'épaisseur,utilisezunehauteurdecoupe
plusélevée,puisfaitesunsecondpassageàla
hauteurdecoupedésirée.
•Ralentissezlavitessedetontesilesfeuillesne
sontpashachéesassezmenues.
16
Page 64
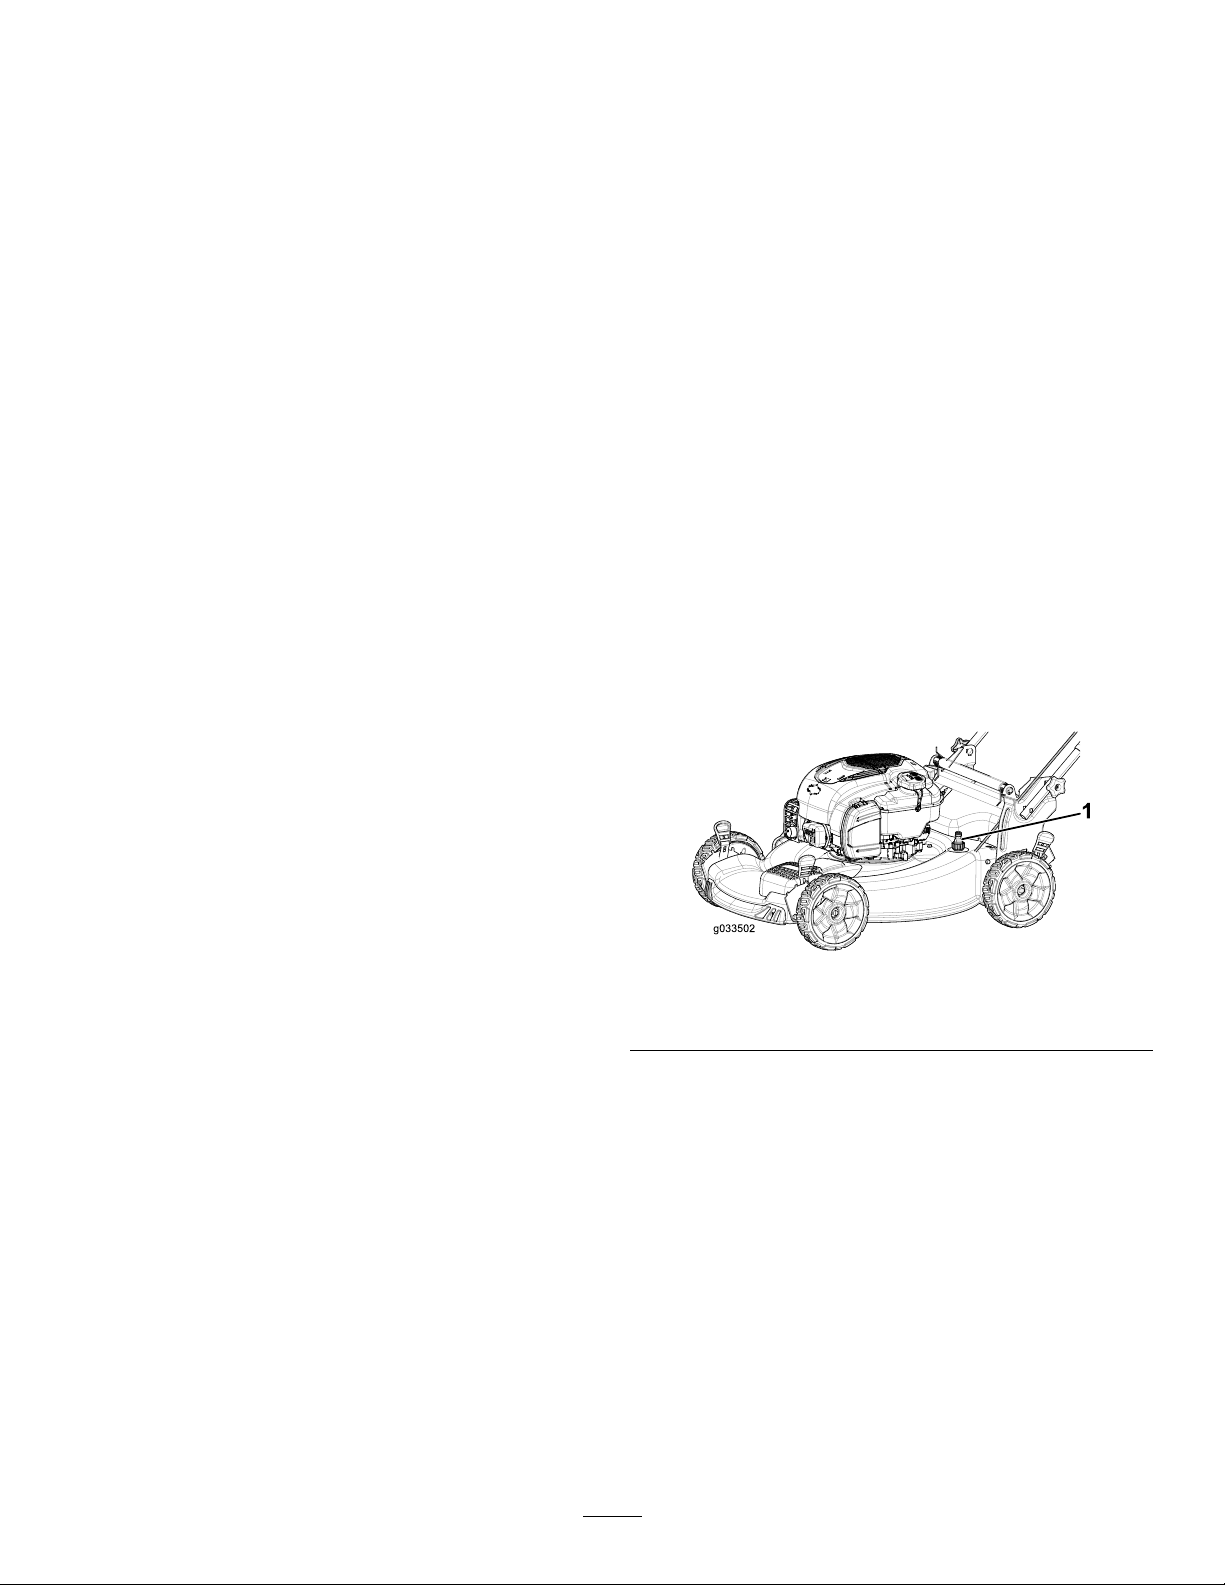
Aprèsl'utilisation
Nettoyagedudessousde lamachine
Sécuritéaprèsl'utilisation
Consignesdesécuritégénérales
•Pouréviterlesrisquesd'incendie,enlevezles
brinsd'herbeetautresdébrisquisontagglomérés
surlamachine.Nettoyezlescouléeséventuelles
d'huileoudecarburant.
•Laissezrefroidirlemoteuravantderangerla
machinedansunlocalfermé.
•Neremisezjamaislamachinenilesbidonsde
carburantàproximitéd'uneammenue,d'une
sourced'étincellesoud'uneveilleuse,tellecelle
d'unchauffe-eauoud'autresappareils.
Consignesdesécuritérelativeau transport
•Retirezlaclédecontact(selonl'équipement)
avantdechargerlamachinepourletransport.
•Faitespreuvedeprudencepourlechargementou
ledéchargementdelamachine.
Périodicitédesentretiens:Àchaqueutilisationou
unefoisparjour
Pourobtenirdesrésultatsoptimaux,nettoyez
rapidementlamachineaprèslatonte.
1.Placezlamachinesurunesurfaceplateet
revêtue.
2.Coupezlemoteuretattendezl'arrêtcomplet
detouteslespiècesmobilesavantdequitterla
positiond'utilisation.
3.Abaissezlamachineàlahauteurdecoupe
laplusbasse.VoirRéglagedelahauteurde
coupe(page12).
4.Lavezlasurfacesouslevoletarrièreaupointoù
l'herbecoupéepassedelafaceinférieuredela
machineaubacderamassage.
Remarque:Lavezlecôtéramassagesur
demande(selonl'équipement)auxpositions
avantetarrièremaximales.
5.Branchezuntuyaud'arrosage,reliéàune
arrivéed'eau,auraccorddelavage(Figure19).
•Empêchezlamachinederouler.
g033502
Figure19
1.Raccorddelavage
6.Ouvrezl'arrivéed'eau.
7.Mettezlemoteurenmarcheetlaissez-letourner
jusqu'àcequ'ilneresteplusdedéchetsd'herbe
souslamachine.
8.Coupezlemoteur.
9.Coupezl'eauetdébranchezletuyaud'arrosage
duraccorddelavage.
10.Mettezlemoteurenmarcheetlaissez-letourner
quelquesminutespoursécherladessousdela
machineetl'empêcherderouiller.
11.Coupezlemoteuretlaissez-lerefroidiravantde
remiserlamachinedansunlocalfermé.
17
Page 65

Pliageduguidon
ATTENTION
Vousrisquezd'endommagerlescâblesetde
rendrelamachinedangereuseàutilisersi
vouspliezoudépliezmalleguidon.
•Veillezànepasendommagerlescâblesen
pliantoudépliantleguidon.
•Siuncâbleestendommagé,adressez-vous
àunconcessionnaire-réparateuragréé.
1.Retirezles2boutonsdeguidonetles2boulons
decarrosseriedessupportsduguidon(Figure
20)etconservez-les.
Important:Faitespasserlescâblesà
l'extérieurdesboutonsquandvouspliezle
guidon.
3.Insérezleboulondecarrosserie(latêtedu
boulonversl'intérieur)danslesupportduguidon
etdansletrousupérieuràl'extrémitéduguidon.
Vériezquelesbordscarrésdechaqueboulon
decarrosseries'engagentdansletroucarré
supérieurouinférieurdusupportdeguidon
correspondant(Figure22).
g032865
Figure22
Figure20
1.Boutonduguidon2.Boulondecarrosserie
2.Repliezleguidonenlefaisantpivoterenavant
(Figure21).
1.Boutonduguidon2.Boulondecarrosserie
4.Montez,sanslesserrer,lesboutonsetles
boulonsdecarrosseriesurlessupportsdu
guidon.
5.Pourdéplierleguidon,voir1Assemblageet
dépliageduguidon(page5).
g032869
Figure21
1.Positiond'utilisation2.Positionrepliée
g032870
18
Page 66
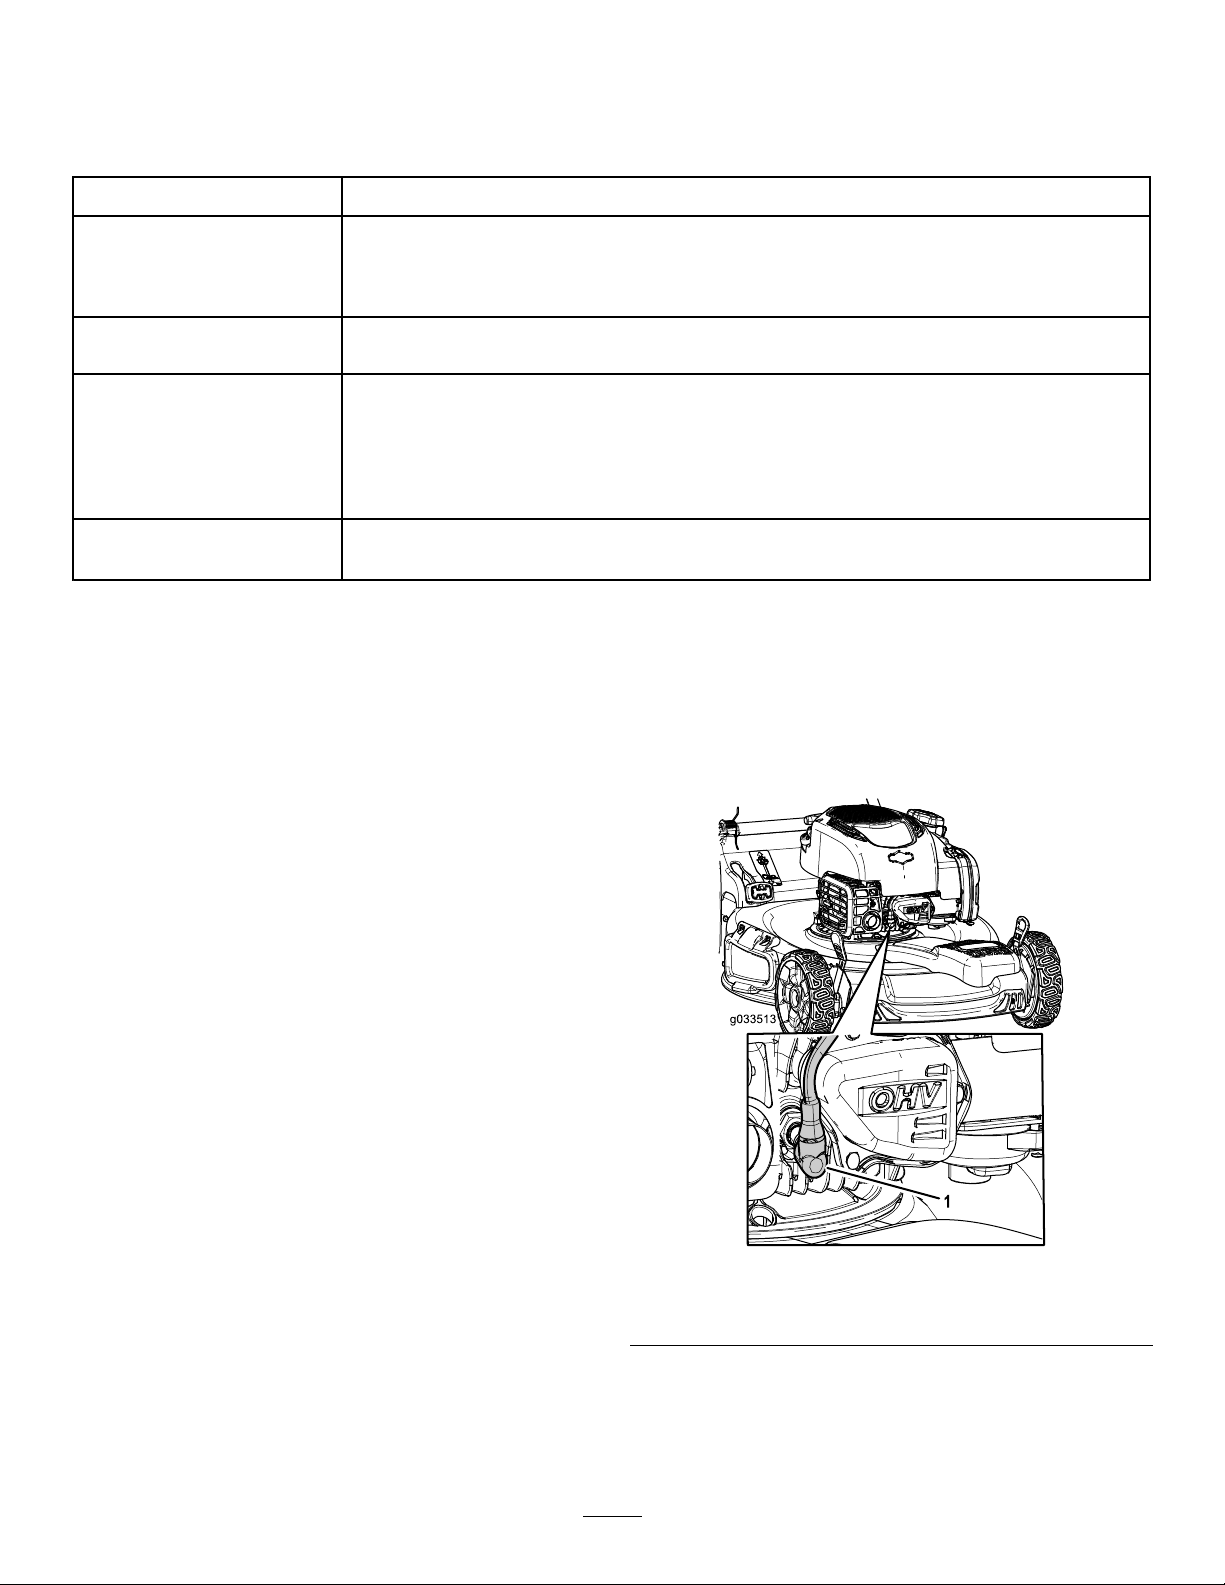
Entretien
Programmed'entretienrecommandé
Périodicitéd'entretienProcédured'entretien
Àchaqueutilisationou
unefoisparjour
•Contrôlezleniveaud'huilemoteuretfaitesl'appointsinécessaire.
•Vériezquelemoteurs'arrêtedansles3secondessuivantlerelâchementdela
barredecommandedelalame.
•Enlevezl'herbecoupéeetautresdébrisaccumuléssouslamachine.
Toutesles25heures
Unefoisparan
Unefoisparanouavant
leremisage
•Effectuezl'entretiendultreàair;faites-leplusfréquemmentsil'atmosphèreest
trèspoussiéreuse.
•Remplacezleltreàairunefoisparanouplussouvents'ilyabeaucoupde
poussière.
•Vidangezl'huilemoteur.
•Remplacezlalameoufaites-laaiguiser(plussouventsielles'émousserapidement).
•Nettoyezlemoteurenenlevantlessaletésetlesdébrissurlesommetetlescôtés;
nettoyez-leplusfréquemmentsivoustravaillezdansuneatmosphèrepoussiéreuse.
•Vidangezleréservoirdecarburantavantleremisageannueletavantlesréparations
quilenécessitent.
Important:Reportez-vousaumanueldumoteurpourtoutesprocéduresd'entretiensupplémentaires.
Consignesdesécurité pendantl'entretien
•Débranchezleldelabougieavantdeprocéderà
unquelconqueentretien.
Préparationàl'entretien
1.Coupezlemoteuretattendezl'arrêtcompletde
touteslespiècesmobiles.
2.Débranchezleldelabougie(Figure23).
•Portezdesgantsetuneprotectionoculairepour
fairel'entretiendelamachine.
•Lalameesttranchanteetvouspouvezvous
blessergravementàsoncontact.Portezdes
gantspoureffectuerl'entretiendelalame.Ne
réparezpasetnemodiezpasleslames.
•N'enlevezpasetnemodiezpaslesdispositifsde
sécurité.Vériezrégulièrementqu'ilsfonctionnent
correctement.
•Ducarburantpeuts'échapperlorsquelamachine
estbasculéesurlecôté.Lecarburantest
inammableetexplosif,etpeutcauserdes
blessures.Laisseztournerlemoteurjusqu'àce
qu'ils'arrêtefautedecarburantouvidangezle
restedecarburantavecunepompemanuelle;ne
siphonnezjamaislecarburant.
•Pourgarantirunrendementoptimaletlasécurité
continuedelamachine,utilisezuniquement
despiècesderechangeetaccessoiresT oro
d'origine.Lespiècesderechangeetaccessoires
d'autresconstructeurspeuventêtredangereuxet
leurutilisationrisqued'annulerlagarantiedela
machine.
g033513
Figure23
1.Fildebougie
3.Rebranchezleldelabougieunefoisl'entretien
terminé.
Important:Avantdebasculerlamachine
pourvidangerl'huileouremplacerlalame,
19
Page 67
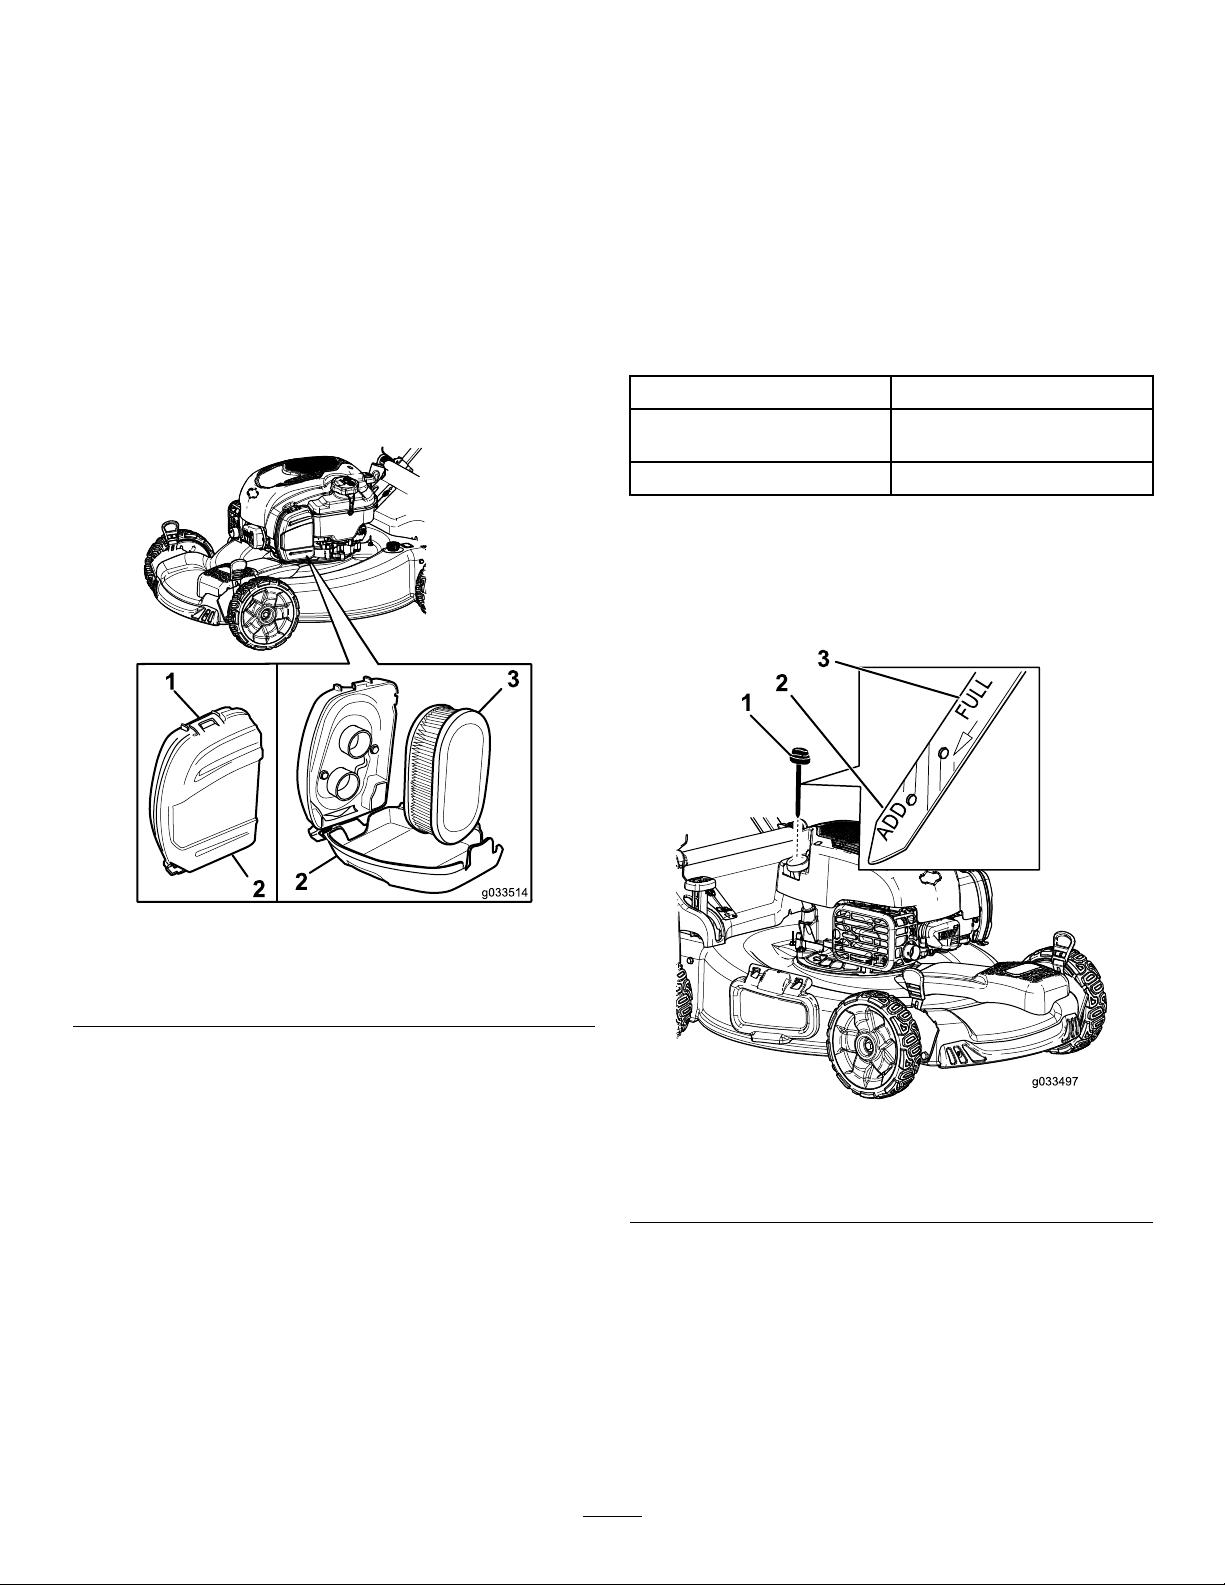
laissezlemoteurenmarchejusqu'àce
qu'ils'arrêtefautedecarburant.Sivousne
pouvezpasattendrequelemoteurs'arrête
parmanquedecarburant,utilisezunepompe
manuellepourviderlerestedecarburant.
Basculeztoujourslamachinesurlecôté
(jaugeenbas).
Entretiendultreàair
Périodicitédesentretiens:Toutesles25heures
Unefoisparan
Vidangedel'huilemoteur
Périodicitédesentretiens:Unefoisparan
Iln'estpasnécessairedevidangerl'huilemoteur,
maissivoussouhaitezlefaire,procédezcomme
suit.
Remarque:Faitestournerlemoteurpendant
quelquesminutesavantlavidangepourréchauffer
l'huile.L'huilechaudes'écouleplusfacilementet
entraîneplusd'impuretés.
Huilemoteurspéciée
1.Déclipsezlehautducouvercledultreàair
(Figure24).
Figure24
1.Clip
2.Couvercledultreàair
3.Filtreàair
Capacitéd'huilemoteur
Viscositéd'huileHuiledétergenteSAE30ou
ClassedeserviceAPISJoumieux
0,44l
SAE10W-30
1.Amenezlamachinesurunsolplatethorizontal.
2.VoirPréparationàl'entretien(page19).
3.Tournezlebouchondanslesensantihoraireet
sortezlajauge(Figure25).
g033514
2.Retirezleltreàair(Figure24).
3.Examinezleltreàair.
Remarque:Sileltreàairestexcessivement
encrassé,remplacez-leparunneuf.Sinon,
tapotezleltresurunesurfacedurepour
délogerlesdébris.
4.Posezleltreàair.
5.Fixezlecouvercledultreàairavecleclip.
g033497
Figure25
1.Jaugedeniveau3.Niveaumax.
2.Niveaumin.
4.Basculezlamachinesurlecôté(ltreàairen
haut)pourvidangerl'huileusagéeparletubede
remplissage(Figure26).
20
Page 68

Figure26
Remplacementdelalame
Périodicitédesentretiens:Unefoisparan
Important:Vousaurezbesoind'uneclé
dynamométriquepourmonterlalame
correctement.Sivousn'enpossédezpas
ousivousnevoussentezpascapable
d'effectuercetteprocédure,adressez-vousàun
concessionnaire-réparateuragréé.
Examinezl'étatdelalamechaquefoisqueleréservoir
decarburantestvide.Silalameestendommagéeou
g027457
fêlée,remplacez-laimmédiatement.Silalameest
émousséeouébréchée,faites-laaiguiseretéquilibrer
ouremplacez-la.
5.Redressezlamachineaprèsavoirvidangé
l'huileusagée.
6.Versezavecprécaution75%environde
lacapacitéd'huilemoteurdansletubede
remplissaged'huile.
7.Attendez3minutespourdonnerletempsà
l'huiledesestabiliserdanslemoteur.
8.Essuyezlajaugesurunchiffonpropre.
9.Insérezlajaugeaufonddugoulotde
remplissage,puisressortez-la.
10.Relevezleniveaud'huileindiquésurlajauge
(Figure25).
•Sileniveaun'atteintpaslerepèreminimum
surlajauge,versezlentementunepetite
quantitéd'huiledansletubederemplissage,
attendez3minutespuisrépétezles
opérations8à10jusqu'àatteindreunniveau
d'huilecorrect.
•Sileniveaud'huileesttropélevé,vidangez
l'excédentd'huilejusqu'àobtentionduniveau
d'huilecorrectsurlajauge.
ATTENTION
Lalameesttranchanteetvouspouvezvous
blessergravementàsoncontact.
Portezdesgantspoureffectuerl'entretiende
lalame.
1.VoirPréparationàl'entretien(page19).
2.Basculezlamachinesurlecôté(ltreàairen
haut).
3.Immobilisezlalameavecunmorceaudebois
(Figure27).
Important:Sivousfaitestournerlemoteur
alorsqueleniveaud'huiledanslecarter
esttropbasoutropélevé,vousrisquez
d'endommagerlemoteur.
11.Insérezetvissezsolidementlajaugedansle
tubederemplissage.
12.Recyclezl'huileusagéeconformément
àlaréglementationlocaleenmatière
d'environnement.
g231389
Figure27
4.Déposezlalamemaisnejetezpaslesxations
(Figure27).
5.Montezlanouvellelameettouteslesxations
(Figure28).
21
Page 69

Figure28
Réglagedel'autopropulsion
Lorsquevousremplacezuncâbledecommande
d'autopropulsionouquel'autopropulsionestdéréglée,
vousdevezréglerlacommanded'autopropulsion.
1.Tournezleboutonderéglagedanslesens
antihorairepourdesserrerleréglageducâble
(Figure29).
g231390
g208188
Figure29
Important:Lesextrémitésrelevéesdela
lamedoiventêtredirigéesverslatondeuse.
6.Àl'aided'uneclédynamométrique,serrezle
boulondelalameà82N·m.
Important:Unboulonvisséà82N·m
esttrèsserré.Bloquezlalameavecune
caleenbois,appuyezdetoutvotrepoids
surlerochetoulaclé,etserrezleboulon
solidement.Ilestpratiquementimpossible
detropserrerceboulon.
1.Câblesd'autopropulsion
2.Guidon(côtégauche)
3.Boutonderéglage
4.Tournezleboutondansle
senshorairepourserrerle
réglage.
5.Tournezleboutondans
lesensantihorairepour
desserrerleréglage.
2.Ajustezlatensiondescâbles(Figure29)enles
tiranttousdeuxenarrièreouenlespoussanten
avantpuisenlesmaintenantàcetteposition,à
lamêmelongueur.
Remarque:Poussezlescâblesverslemoteur
pouraccroîtrelatractionetéloignez-lesdu
moteurpourréduirelatraction.
3.Tournerleboutonderéglagedanslesens
horairepourserrerleréglagedescâbles.
Remarque:Lesdeuxcâblesdoiventdépasserde
38mmdescolliersquandleguidonestalignésurle
premierrepèreduguide;voirFigure30.
22
Page 70

Figure30
1.38mm3.Premierrepère
2.Guide4.Guidon
g209518
23
Page 71

Remisage
Remiseenserviceaprès
Remisezlamachinedansunlocalfrais,propreetsec.
Préparationdelamachine auremisage
1.Lorsdudernierpleindel'année,ajoutezdu
stabilisateur(tell'additifdetraitementToro
Premium)aucarburantfraisselonlesindications
del'étiquette.
2.Débarrassez-vouscorrectementducarburant
inutilisé.Recyclez-leconformémentàla
réglementationlocaleouutilisez-ledansune
voiture.
Remarque:Laprésencedecarburanttrop
vieuxdansleréservoirestlaprincipalecause
desproblèmesdedémarrage.Neconservez
paslecarburantnontraitéplusde30joursetle
carburanttraitéplusde90jours.
3.Laisseztournerlemoteurdelamachinejusqu'à
cequ'ils'arrêtefautedecarburant.
remisage
1.Contrôlezetresserreztouteslesxations.
2.Déposezlabougieetfaitestournerlemoteur
rapidemententirantsurlapoignéedulanceur
pouréliminerl'excédentd'huiledanslecylindre.
3.Reposezetserrezlabougieà20N·màl'aide
d'uneclédynamométrique.
4.Procédezauxentretiens;voirEntretien(page
19).
5.Contrôlezleniveaud'huilemoteur;voirContrôle
duniveaud'huilemoteur(page10).
6.Remplissezleréservoirdecarburantneuf;voir
Remplissageduréservoirdecarburant(page
10).
7.Rebranchezleldelabougie.
4.Remettezlemoteurenmarcheetlaissez-le
tournerjusqu'àcequ'ils'arrête.Lemoteurest
sufsammentseclorsqu'iln'yaplusmoyende
lefairedémarrer.
5.Débranchezleldelabougieetbranchez-leau
plotderetenue(selonl'équipement).
6.Retirezlabougieetversez30mld'huilemoteur
dansl'orice.Tirezensuitelapoignéedu
lanceurlentementàplusieursreprisespour
bienrépartirl'huileàl'intérieurducylindre
etempêchercelui-ciderouillerpendantle
remisagedelamachine.
7.Reposezlabougiesanslaserrer.
8.Serreztouslesécrous,boulonsetvis.
24
Page 72

Remarques:
Page 73

Déclarationdecondentialitéeuropéenne
LesrenseignementsrecueillisparT oro
ToroWarrantyCompany(T oro)respectevotrevieprivée.Pournouspermettredetraitervotreréclamationautitredelagarantieetdevouscontacter
dansl’éventualitéd’unrappeldeproduit,nousvousprionsdenouscommuniquercertainsrenseignementspersonnels,soitdirectementsoitpar
l’intermédiairedevotresociétéouconcessionnaireT orolocal(e).
LesystèmedegarantiedeT oroesthébergésurdesserveurssituésauxÉtats-Unisoùlaloirelativeàlaprotectiondelavieprivéen'offrepasforcément
lamêmeprotectionquedansvotrepays.
ENNOUSFOURNISSANTDESRENSEIGNEMENTSPERSONNELS,VOUSCONSENTEZÀCEQUENOUSLESTRAITIONSCOMMEDÉCRIT
DANSLEPRÉSENTA VISDECONFIDENTIALITÉ.
L'utilisationdesrenseignementsparToro
Toropeututiliservosrenseignementspersonnelspourtraitervosréclamationsautitredelagarantieetvouscontacterdansl'éventualitéd'unrappelde
produit,ainsiquepourvouscommuniquertouteinformationnécessaire.Toropourrapartagerlesrenseignementspersonnelsquevousluiaurez
communiquésaveclesliales,concessionnairesouautresassociésToroenrapportaveccesactivités.Nousnevendronsvosrenseignements
personnelsàaucuneautresociété.Nousnousréservonsledroitdedivulguerdesrenseignementspersonnelsandesatisfaireauxloisapplicableset
auxdemandesdesautoritésconcernées,pourassurerl'utilisationcorrectedenossystèmesouvotreprotectionetcelled'autresusagers.
Conservationdevosrenseignementspersonnels
Nousconserveronsvosrenseignementspersonnelsuniquementpendantladuréenécessairepourrépondreauxnspour
lesquellesnouslesavonscollectésouautresnslégitimes(commelaconformitéréglementaire),ouconformémentàlaloienvigueur.
EngagementdeTororelatifàlasécuritédevosrenseignementspersonnels
Nousprenonstouteslesprécautionsraisonnablespourprotégerlasécuritédevosrenseignementspersonnels.Nousprenonségalementlesmesures
nécessairespourquevosrenseignementspersonnelsrestentexactsetàjour.
Consultationetcorrectiondevosrenseignementspersonnels
Sivoussouhaitezvérieroucorrigervosrenseignementspersonnels,veuilleznouscontacterparcourrielàlegal@toro.com.
Droitaustraliendelaconsommation
LesclientsaustralienstrouverontlesdétailsconcernantleDroitaustraliendelaconsommationàl'intérieurdel'emballageouauprèsdeleur
concessionnaireT orolocal.
374-0282RevC
Page 74

TosaerbaRecycler
Nºdelmodello20964—Nºdiserie400000000esuperiori
®
FormNo.3418-453RevB
da55cm
Manualedell'operatore
Introduzione
Questotosaerbaalamerotanticonoperatoreapiedi
èpensatoperl'utilizzodapartediprivati.Ilsuo
scopoèquelloditagliarel'erbadipratibentenutidi
complessiresidenziali.Nonèstatoprogettatoper
tagliareareecespuglioseoperimpieghiinagricoltura.
Leggeteattentamentequesteinformazionialnedi
utilizzareemantenerecorrettamenteilprodottoe
dievitareinfortuniedanni.Voisieteresponsabili
delcorrettoutilizzodelprodotto,all'insegnadella
sicurezza.
Perinformazionisuprodottieaccessori,perlaricerca
diunrivenditoreolaregistrazionedelvostroprodotto,
potetecontattareTorodirettamenteawww.Toro.com.
Perassistenza,ricambioriginaliT orooulteriori
informazioni,rivolgeteviaunDistributoreT oro
autorizzatooaunCentroAssistenzaT oro,eabbiate
sempreaportatadimanoilnumerodelmodello
eilnumerodiseriedelprodotto.Figura1indica
laposizionedelnumerodimodelloediseriesul
prodotto.Scriveteinumerinell'appositospazio.
Importante:Conilvostrodispositivomobile,
potetescansionareilcodiceQRsull’adesivo
delnumerodiserie(sepresente)peraccedere
ainformazionisugaranzia,ricambiealtre
informazionisuiprodotti
gradodiprovocareinfortunigraviolamortesenonsi
osservanoleprecauzioniraccomandate.
g000502
Figura2
Simbolodiavvertimento
Perevidenziareleinformazionivengonoutilizzatedue
parole.Importanteindicainformazionimeccanichedi
particolareimportanza,eNotaevidenziainformazioni
generalidiparticolarerilevanza.
Questoprodottoèconformeatutteledirettiveeuropee
pertinenti;vedereidettaglinellaDichiarazionedi
Conformità(DICO)specicadelprodotto,fornitaa
parte.
Coppialordaonetta:Lacoppialordaonettadi
questomotoreèstatavalutatainlaboratoriodal
produttoredelmotoreinconformitàallanorma
SAE(SocietyofAutomotiveEngineers)J1940o
J2723.Lacongurazionerispondenteairequisiti
disicurezza,emissioneefunzionamentocomporta
unasensibileriduzionedellapotenzaeffettivadel
motorediquestaclasseditosaerba.Sirimandaalle
informazionidelproduttoredelmotoreforniteconla
macchina.
Figura1
1.Posizionedelnumerodelmodelloedelnumerodiserie
Nºdelmodello
Nºdiserie
Ilsistemadiavvertimentoadottatodalpresente
manualeidenticaipericolipotenzialieriporta
messaggidisicurezza,identicatidalsimbolodi
avvertimento(Figura2),chesegnalanounpericoloin
©2017—TheToro®Company
8111LyndaleAvenueSouth
Bloomington,MN55420
Registrateilvostroprodottopresso
CV
Nonmanometteteodisattivateidispositividi
sicurezzasullamacchinaevericateneilcorretto
funzionamentoregolarmente.Nontentatediregolare
omanomettereilcomandodivelocitàdelmotore:
g226627
cosìfacendopotrestecrearecondizionioperativenon
sicureedeterminareinfortunipersonali.
Indice
Introduzione..............................................................1
Sicurezza..................................................................2
Requisitigeneralidisicurezza............................2
Adesividisicurezzaeinformativi........................3
Preparazione............................................................5
1Montaggioeaperturadellastegola..................5
2Montaggiodelcavodell'avviatore
autoavvolgentenelguidacavo.........................5
3Riempimentodelmotoreconolio.....................6
www.T oro.com.
Traduzionedell'originale(IT)
StampatoinMessico
Tuttiidirittisonoriservati
*3418-453*B
Page 75

4Montaggiodelcestodiraccolta........................7
Quadrogeneraledelprodotto...................................8
Speciche..........................................................8
Funzionamento.........................................................9
Primadell’uso........................................................9
Sicurezzaprimadelfunzionamento....................9
Riempimentodelserbatoiodel
carburante.......................................................9
Controllodellivellodell'oliomotore...................10
Regolazionedell'altezzadellastegola..............10
Regolazionedell'altezzaditaglio.......................11
Durantel’uso........................................................11
Sicurezzaduranteilfunzionamento
.......................................................................11
Avviamentodelmotore.....................................12
Utilizzodellatrazioneautomatica......................12
Spegnimentodelmotore...................................13
Riciclaggiodellosfalcio.....................................13
Utilizzodelcestodiraccolta..............................13
UtilizzodellalevaBag-on-demand....................14
Scaricolateraledellosfalcio.............................14
Suggerimenti...................................................15
Dopol’uso...........................................................16
Sicurezzadopoleoperazioni............................16
Puliziasottolamacchina..................................16
Piegaturadellastegola.....................................17
Manutenzione.........................................................18
Programmadimanutenzioneraccoman-
dato..............................................................18
Sicurezzadurantelamanutenzione..................18
Preparazioneperlamanutenzione...................18
Manutenzionedelltrodell'aria.........................19
Cambiodell'oliomotore....................................19
Sostituzionedellalama.....................................20
Regolazionedellatrazioneautomatica.............21
Rimessaggio...........................................................22
Preparazionedeltosaerbaperil
rimessaggio..................................................22
Rimozionedeltosaerbadalrimessaggio...........22
Sicurezza
Questamacchinaèstataprogettatainconformitàcon
ENISO5395:2013.
Requisitigeneralidi sicurezza
Questoprodottoèingradodiamputaremaniepiedie
discagliareoggetti.Rispettatesempretuttelenorme
disicurezzaperevitaregraviinfortuni.
L'utilizzodiquestoprodottoperscopinonconformi
allefunzionipercuièstatoconcepitopuòessere
pericolosoperl'utenteegliastanti.
•Primadiavviareilmotoreleggete,comprendeteed
osservateleistruzionieleavvertenzeriportatenel
presenteManualedell'operatore,sullamacchina
esugliaccessori.
•Nonmettetelemanioipiedivicinoosottoleparti
mobili,oppuresottolamacchina.Restatesempre
lontanidall'aperturadiscarico.
•Azionatelamacchinasoloconleprotezioniei
dispositividisicurezzamontatiefunzionanti.
•Tenetegliastantieibambiniadistanzadi
sicurezzadallamacchina.Nonpermettete
chebambinieragazziutilizzinolamacchina.
Permettetesoltantoapersoneresponsabili,
addestrate,cheabbianodimestichezzaconle
istruzionieinadeguatecondizionisichedi
utilizzarelamacchina.
•Arrestatelamacchina,spegneteilmotoree
attendetechetuttelepartiinmovimentosifermino
primadieseguireinterventidimanutenzione,fare
rifornimentodicarburanteoeliminareeventuali
ostruzioni.
L'erratoutilizzool'erratamanutenzionediquesta
macchinapuòcausareinfortuni.Perridurreilrischio
diincidenti,rispettateleseguentinormedisicurezza
efatesempreattenzionealsimbolodiallarme,che
indicaAttenzione,AvvertenzaoPericolo–normedi
sicurezzapersonali.Lamancanzadirispettodelle
presentiistruzionipuòprovocareinfortuniolamorte.
Nelpresentemanualesonodisponibiliulteriori
informazionisullasicurezzaqualoranecessarie.
2
Page 76

Adesividisicurezzaeinformativi
Adesivieistruzionidisicurezzasonochiaramentevisibiliall'operatoreeubicatevicinoa
qualsiasiareadipotenzialepericolo.Sostituiteeventualiadesivisedanneggiatiomancanti.
Marchiodelproduttore
1.Questomarchioindicachelalamaèidenticatacome
componentedelfabbricantedimacchineoriginale.
decaloemmarkt
112-8760
1.Pericolodioggettiscagliati–Tenetegliastantiadistanza
disicurezzadallamacchina.
2.Feritaosmembramentodimanoopiede–Nonavvicinatevi
allepartiinmovimento.
decal112-8760
decal125-5026
125-5026
1.Posizionediriciclaggio2.Posizionediraccolta
3
Page 77
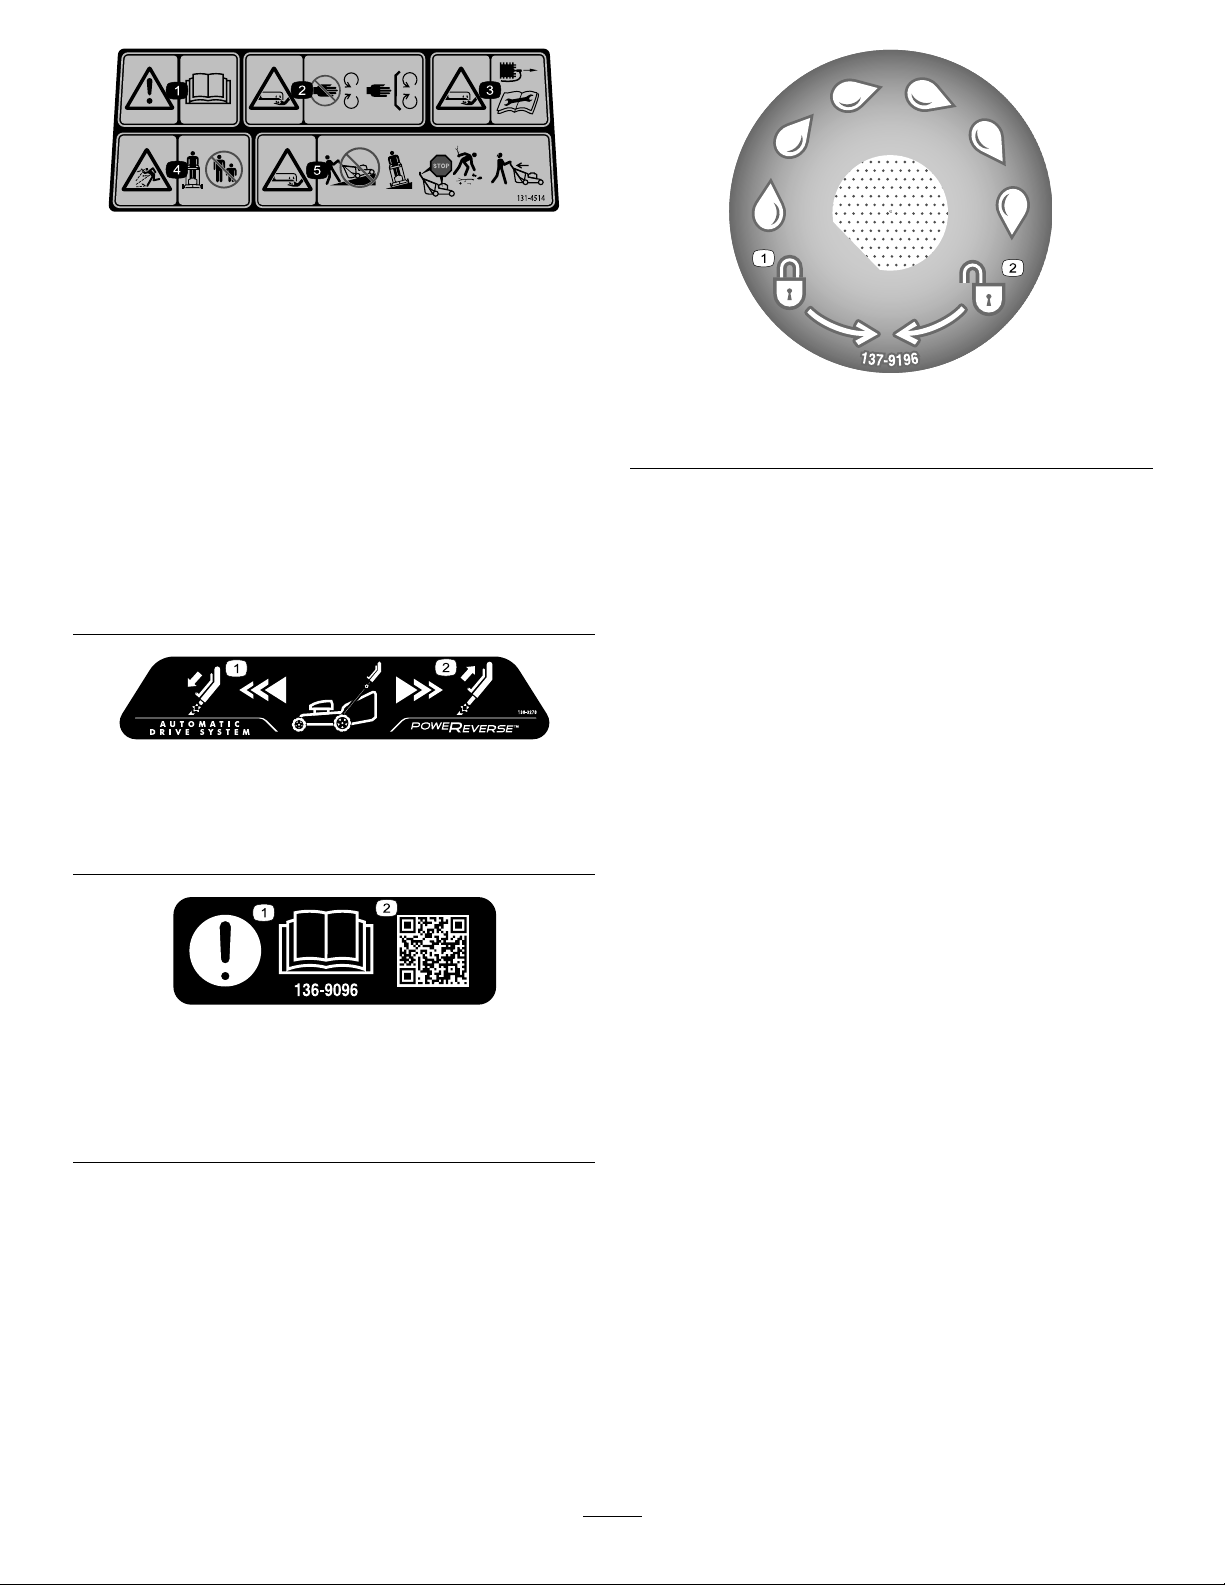
131-4514
1.Avvertenza–LeggeteilManualedell'operatore.
2.Pericolodilesioniosmembramentodellemaniacausa
dellalamadeltosaerba–T eneteviadistanzadallepartiin
movimento;nonrimuoveteicartereleprotezioni.
3.Pericolodiferiteosmembramentodellemaniacausa
dellalamadeltosaerba–Scollegateilcappellottodalla
candelaeleggeteleistruzioniprimadieseguireinterventi
direvisioneomanutenzione.
4.Pericolodioggettiscagliati–Tenetegliastantiadistanza
disicurezzadallamacchina;spegneteilmotoreprimadi
abbandonarelaposizioneoperativa;raccoglieteeventuali
detritiprimadellatosatura.
5.Pericoloditaglio/smembramentodimani,lamadeltosaerba
–Nonutilizzatelamacchinainsalitaoindiscesadapendii;
utilizzatelamacchinainsensotrasversalesuipendii;
guardatedietrodivoiinfasediretromarcia.
138-3278
decal131-4514
decal138-3278
decal137-9196
137-9196
1.Blocco
2.Sblocco
1.Premeteinbassola
stegolaperprocederein
marciaavanti.
1.Attenzione–Leggeteil
Manualedell'operatore.
2.Tirateinaltolastegolaper
procedereinretromarcia.
decal136-9096
136-9096
2.Scansionateilcodice
QRperaveremaggiori
informazionicircala
regolazionedellatrazione.
4
Page 78

Preparazione
Importante:Toglieteegettateilfogliodiprotezionediplasticachericopreilmotore,cosìcome
qualsiasialtraplasticaoelementodiconfezionamentosullamacchina.
1
Montaggioeaperturadellastegola
Nonoccorronoparti
Procedura
Figura3
g227424
5
Page 79

2
Montaggiodelcavodell'avviatoreautoavvolgentenel
guidacavo
Nonoccorronoparti
Procedura
Figura4
g230719
3
Riempimentodelmotoreconolio
Nonoccorronoparti
Procedura
Importante:Lamacchinavienefornitasenzaolionelmotore,maprovvistadiunabottigliadiolio.
Primadiavviareilmotore,riempiteloconolio.
6
Page 80
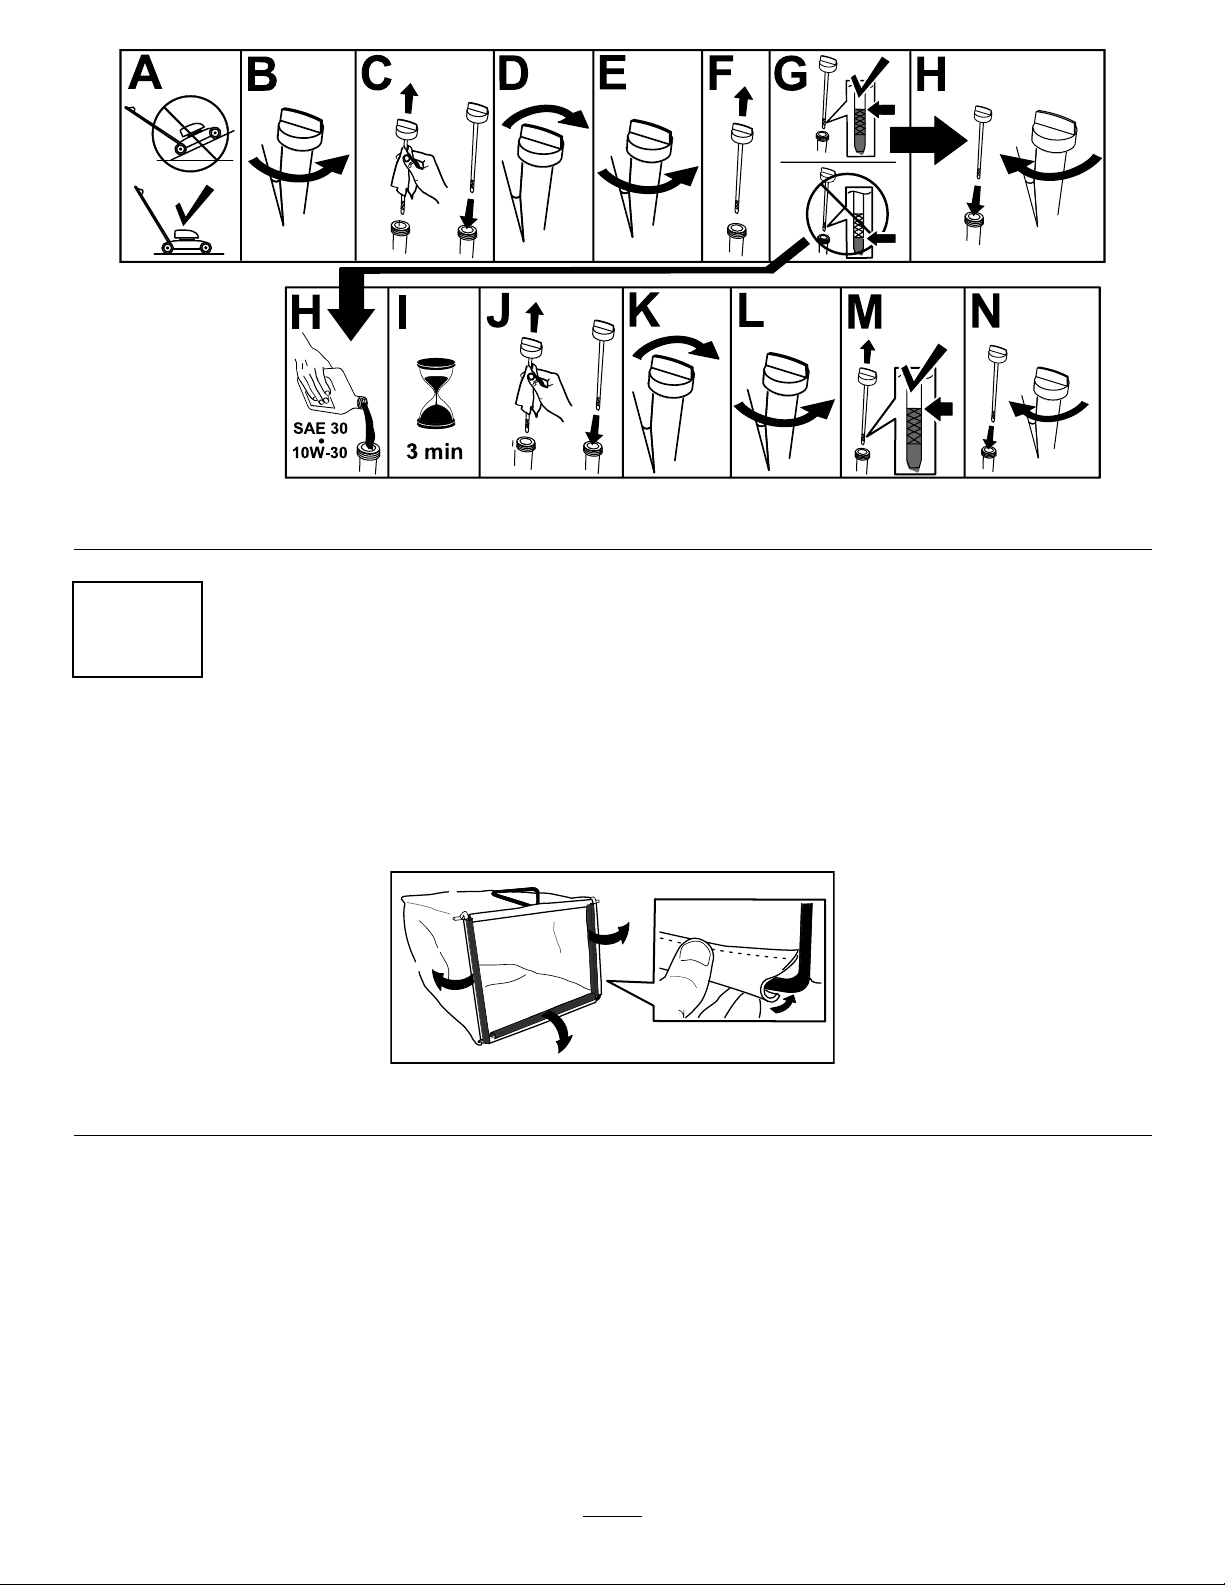
4
Montaggiodelcestodiraccolta
Nonoccorronoparti
Procedura
g222533
Figura5
Figura6
7
g230447
Page 81

Quadrogeneraledel
prodotto
Speciche
ModelloPeso
20964
Lunghezza
35kg152cm58cm109cm
(77lb)(60")(23")(43")
Larghezza
Altezza
Figura7
1.Stegola7.Candela
2.Barradicomandodella
lama
3.Manopoladiregolazione
dellatrazioneautomatica
4.Tappodelserbatoiodel
carburante
5.Filtrodell'aria
6.Levadell'altezzaditaglio
(4)
1.Cestodiraccolta2.Condottodiscarico
8.Deettorediscarico
laterale
9.Rifornimentoolio/astadi
livello
10.LevaBag-on-demand
11.Manopoladellastegola(2)
12.Stegoladell'avviatore
autoavvolgente
Figura8
laterale
g036585
g027237
8
Page 82

Funzionamento
Nota:Stabiliteilatisinistroedestrodellamacchina
dallanormaleposizionediguida.
Primadell’uso
Sicurezzaprimadel funzionamento
Requisitigeneralidisicurezza
•Familiarizzateconilfunzionamentosicuro
dell'apparecchiatura,conicomandidell'operatore
econgliadesividisicurezza.
•Controllatecheleprotezionieidispositividi
sicurezza,comedeettorie/ocestidiraccolta,
sianomontatieperfettamentefunzionanti.
•Controllatesemprechelelame,ibullonidelle
lameeilgruppoditagliononsianousuratio
danneggiati.
•Ispezionatel'areaincuiuseretelamacchinaed
eliminatetuttiglioggettichepotrebberointerferire
conilsuofunzionamentoochelamacchina
potrebbescagliare.
•Mentreregolatel'altezzaditagliopotrestetoccare
lalamainmovimentoeferirvigravemente.
–Spegneteilmotore,rimuovetelachiavedi
accensione(solomodelliconavviamento
elettrico)eattendetel'arrestodellepartiin
movimento.
–Noninseriteleditasottolascoccamentre
regolatel'altezzaditaglio.
Sicurezzadelcarburante
•Ilcarburanteèestremamenteinammabilee
altamenteesplosivo.Unincendiooun'esplosione
dicarburantepossonoustionarevoiedaltre
personeecausaredanni.
–Perimpedirecheunacaricaelettrostatica
facciaincendiareilcarburante,mettetela
tanicae/olamacchinaperterraprimadel
riempimento,maiinunveicoloosuunoggetto.
–Fateilpienodicarburanteall'ariaaperta,a
motorefreddo,Tergeteilcarburanteversato.
–Nonmaneggiateilcarburantequandofumate
onelleadiacenzediunaammaliberaodi
scintille.
–Nontoglieteiltappodelcarburantené
aggiungetecarburantealserbatoiomentreil
motoreèinfunzioneocaldo.
–Noncercatediavviareilmotoreseavete
versatodelcarburante.Noncreatepossibili
fontidiincendionchéivaporidelcarburante
nonsisarannodissipati.
–Conservateilcarburanteintanicheomologate
etenetelontanodallaportatadeibambini.
•Seingerito,ilcarburanteènocivoofatale.
L'esposizionealungotermineaivaporidibenzina
puòcausaregravidanniemalattie.
–Evitatedirespirarealungoivapori.
–Teneteilvisoelemanilontanodagliugellie
dall'aperturadelserbatoiodelcarburante.
–Teneteilcarburantelontanodagliocchiedalla
pelle.
Riempimentodelserbatoio delcarburante
•Perottenererisultatiottimaliutilizzatesolobenzina
senzapiombofrescaepulita,di87opiùottani
(metododiclassicazione(R+M)/2).
•Èaccettabileilcarburanteossigenatoconetanolo
noal10%o15%diMTBEpervolume.
•Nonutilizzatemisceledibenzinaconetanolo,
comeE15oE85,superioreal10%pervolume.
Possonovericarsiproblemidiprestazionie/o
dannialmotorenoncopertidallagaranzia.
•Nonutilizzatebenzinacontenentemetanolo.
•Nellastagioneinvernale,nonconservate
ilcarburantenelserbatoiooneicontenitori
senzaaggiungereunappositostabilizzatoreal
carburante.
•Nonaggiungeteolioallabenzina.
Riempiteilserbatoiodelcarburanteconbenzina
normalefrescasenzapiombo,provenientedauna
stazionedirifornimentodibuonamarca(Figura9).
Importante:Perridurreiproblemidiavviamento,
aggiungeteunostabilizzatoredicarburante
allabenzinaperl'interastagione.Miscelatelo
stabilizzatoreconbenzinacheabbiamenodi30
giorni.
Fateriferimentoalmanualedelmotoreperavere
maggioriinformazioni.
g230458
Figura9
9
Page 83

Controllodellivellodell'oliomotore
Intervallotragliinterventitecnici:Primadiogniutilizzooquotidianamente
Importante:Nonavviateilmotoreconillivellodell'olionellacoppatroppobassootroppoaltoper
evitaredidanneggiarlo.
Figura10
g222533
Regolazionedell'altezza dellastegola
Potetealzareoabbassarelastegolain1di2posizioni
piùcomodepervoi(Figura11).
Figura11
1.Allentateentrambelemanopoledellastegola,
noaquandononsieteingradodispingerei
bordiquadratideibulloniatestatondafuoridai
foriquadratinellestaffedellastegola.
2.Spingetelemanopolenoaquandononsono
lente.
3.Spostatelastegolanellaposizionedell'altezza
superioreoinferiore.
4.Tiratelemanopolenoaquandoibordi
quadratidiciascunbulloneatestatondanonsi
inseriscononelrelativoforoquadrato.
5.Serratelemanopoledellastegolaavvitandole
afondo.
g032867
10
Page 84

Regolazionedell'altezzaditaglio
ATTENZIONE
Seilmotoreèstatoacceso,ilsilenziatoresaràcaldoepotrebbeprovocarviustioni.
Nonavvicinatevialsilenziatorecaldo.
Regolatel'altezzaditagliocomeopportuno.Impostateleruoteanterioriallastessaaltezzadiquelleposteriori
(Figura12).
Durantel’uso
Sicurezzaduranteil funzionamento
Requisitigeneralidisicurezza
•Indossateunabbigliamentoidoneo,comprendente
protezionepergliocchi,pantalonilunghi,calzature
robusteanti-scivoloeprotezionedell'udito.Legate
icapellilunghidietroilcapo,bloccategliindumenti
ampienonindossategioiellipendenti.
•Nonutilizzatelamacchinaincasodimalattia,
stanchezzaosottol'effettodialcolodroga.
•Lalamaèaflata,epuòcausaregraviferite.
Primadilasciarelaposizioneoperativa,spegnete
ilmotore,rimuovetelachiavediaccensione(solo
modelliconavviamentoelettrico)eattendete
l'arrestodellepartiinmovimento.
g223084
Figura12
•Quandorilasciatelabarradicomandodellalama,
siailmotoresialalamadevonofermarsientro
3secondi.Incasocontrario,smettetesubito
diusareiltosaerbaerivolgeteviadunCentro
Assistenzaautorizzato.
•Tenetelontanigliastanti,soprattuttoibambini,
dall'areaoperativa.Fermatelamacchinase
qualcunoentranell'areadilavoro.
•Guardatesempreinbassoedietroprimadi
azionarelamacchinainretromarcia.
•Azionatelamacchinasoltantoincondizionimeteo
idoneeedibuonavisibilità.Nonusatelamacchina
qualoravisiailrischiodifulmini.
•Erbaefogliebagnatepossonocausaregraviferite
sedovestescivolareetoccarelalama.Evitatedi
tosareincondizionidibagnato.
•Prestatelamassimaattenzionequandovi
avvicinateacurvecieche,cespugli,alberioadaltri
oggettichepossanoostruirelavisuale.
11
Page 85
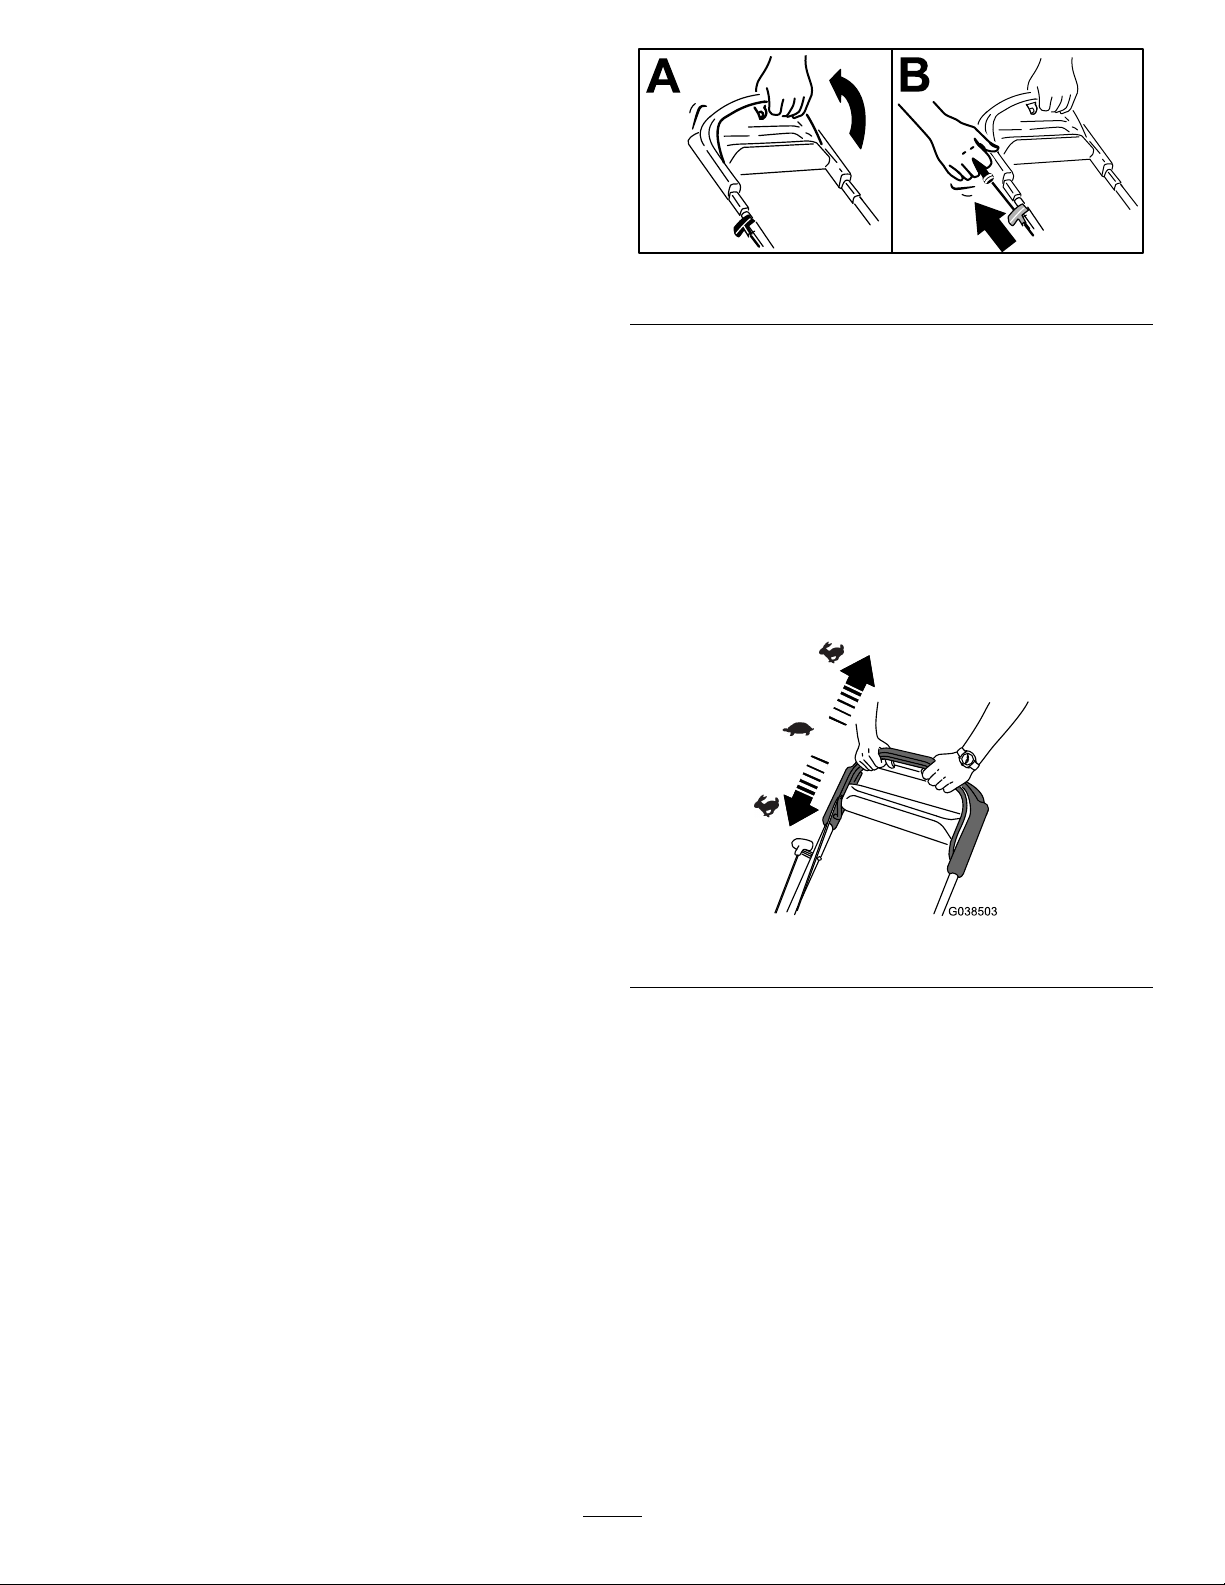
•Fateattenzioneabuche,solchi,gobbe,rocceo
altreinsidiedelterreno.Leirregolaritàdelterreno
potrebberocausareilcapovolgimentodella
macchinaofarviperderel’equilibriool’aderenza
alsuolo.
•Selamacchinacolpisceunoggettooiniziaa
vibrare,spegneteimmediatamenteilmotore,
toglietelachiave(sepresente),attendetel'arresto
dituttelepartiinmovimentoescollegateil
cappellottodallacandelaprimadiesaminare
lamacchinaperescluderedanni.Effettuate
leriparazioninecessarieprimadiriprenderea
utilizzarelamacchina.
•Primadilasciarelaposizioneoperativa,spegnete
ilmotore,rimuovetelachiavediaccensione(solo
modelliconavviamentoelettrico)eattendete
l'arrestodellepartiinmovimento.
•Seilmotoreèstatoacceso,ilsilenziatore
saràcaldoepotrebbeprovocarviustioni.Non
avvicinatevialsilenziatorecaldo.
•Controllatespessoicomponentidelcestodi
raccoltaeilcondottodiscaricoalnedivericare
lapresenzadisegnidiusuraodeterioramentoe
all'occorrenzasostituiteliconpartiraccomandate
dalproduttore.
g230459
Figura13
Nota:Selamacchinanonsiavviadopodiversi
tentativi,contattateunCentroAssistenzaautorizzato.
Utilizzodellatrazione automatica
Perazionarelatrazioneautomatica,camminatein
avantioindietroconlemanisullastegolasuperioree
igomitiailatielamacchinaterràautomaticamenteil
passoconvoi(Figura14).
•Utilizzatesoloaccessorieattrezziapprovatida
TheToro®Company.
Sicurezzasuipendii
•Eseguiteunmovimentolaterale,maiversol'alto
eilbasso.Sullependenzeinvertiteladirezione
conlamassimacautela.
•Nontosatependenzeeccessivamenteripide.A
causadellascarsatenuta,lamacchinapotrebbe
slittareecadere.
•Tosateconcautelainprossimitàdiscarpate,
fossatioterrapieni.
Avviamentodelmotore
1.Tenetelabarradicomandodellelamecontrola
maniglia(AdiFigura13).
2.Tiratedelicatamentelamanigliadell'avviatore
autoavvolgentenoaquandononavvertite
resistenza,poitiratelainmodoseccoe
lasciatecheritorninelguidacavosullamaniglia
lentamente(BdiFigura13).
g038503
Figura14
Nota:Selamacchinanonprocedeliberamentein
avantioindietrodopol'avanzamentoautomatico,
smettetedicamminare,tenetefermelemaniin
posizioneelasciatechelamacchinaprocedainavanti
perunpaiodicentimetriperdisinnestarelatrazione
delleruote.Poteteinoltretentaredipassaresotto
lamanigliasuperioreperraggiungerelamanigliadi
metalloespingereavantilamacchinadiqualche
centimetro.Seaveteproblemiconl'avanzamentoin
retromarcia,sollevateleggermentelastegola.Sela
macchinaancoranonarretrafacilmente,contattate
unCentroAssistenzaautorizzato.
12
Page 86

Spegnimentodelmotore
Utilizzodelcestodiraccolta
Intervallotragliinterventitecnici:Primadiogni
utilizzooquotidianamente
Perspegnereilmotorerilasciatelabarradicomando
dellalama.
Importante:Quandorilasciatelabarradi
comandodellalama,siailmotoresialalama
devonofermarsientrotresecondi.Senonsi
dovesserofermareperfettamente,smettetesubito
diusareiltosaerbaerivolgeteviadunCentro
Assistenzaautorizzato.
Riciclaggiodellosfalcio
Iltosaerbavienespeditodallafabbricaprontoper
ilriciclaggiodellosfalcioedellefoglieneltappeto
erboso.
Seilcestodiraccoltaèmontatosullamacchinae
lalevaBag-on-demandèinposizionediraccolta
spostatelainposizionediriciclaggio;vedereUtilizzo
dellalevaBag-on-demand(pagina14)primadi
riciclarelosfalcio.Seilcondottodiscaricolateraleè
montatosullamacchina,toglietelo;vedereRimozione
delcondottodiscaricolaterale(pagina14).
Utilizzateilcestodiraccoltaquandodesiderate
raccoglierelosfalcioelefogliedaltappetoerboso.
Rimuoveteilcondottodiscaricolateraleseinstallato
sullamacchina;fateriferimentoaRimozionedel
condottodiscaricolaterale(pagina14)Selaleva
dicomandodelcestoèinposizionediriciclaggio,
spostatelainposizionediraccolta;vedereUtilizzo
dellalevaBag-on-demand(pagina14).
Montaggiodelcestodiraccolta
1.Sollevateildeettoreposterioreetenetelo
sollevato(Figura15).
Figura15
1.Deettoreposteriore
2.Tacche(2)
2.Montateilcestodiraccolta,accertandoviche
isuoipernisianoinseritinelletacchepresenti
sullastegola(Figura15).
3.Abbassateildeettoreposteriore.
3.Pernodelcestodiraccolta
(2)
Rimozionedelcestodiraccolta
Perrimuovereilcesto,eseguitelefasiinMontaggio
delcestodiraccolta(pagina13)inordineinverso.
g033379
13
Page 87

Utilizzodellaleva
Scaricolateraledello
Bag-on-demand
LafunzionalitàBag-on-demandviconsentedi
raccogliereoriciclarelosfalcioelefoglieconilcesto
montato.
•Perinsaccareerbaesfalcio,premeteilpulsante
sullalevaBag-on-demandespostatelainavanti
noaquandoilpulsantesullalevanonsisolleva
discatto(Figura16).
Figura16
1.LevaBag-on-demand(nellaposizionediraccolta)
•PerlafunzionalitàRecycleroloscaricolaterale
dierbaesfalcio,premeteilpulsantesullalevae
spostatelaindietronoaquandoilpulsantesulla
levanonsisollevadiscatto.
sfalcio
Utilizzateloscaricolateraleperiltagliodell'erbamolto
alta.
Seilcestodiraccoltaèmontatosullamacchinae
lalevaBag-on-demandèinposizionediraccolta
spostatelainposizionediriciclaggio;vedereUtilizzo
dellalevaBag-on-demand(pagina14)primadi
riciclarelosfalcio.
Montaggiodelcondottodiscarico laterale
Sbloccateesollevateildeettorelateraleemontateil
condottodiscaricolaterale(Figura18).
g027453
Importante:Peruncorrettofunzionamento
delsistema,eliminatetuttolosfalcioeidetriti
dallosportellodelsistemaBag-on-demand
edallarelativaapertura(Figura17)prima
dispostarelalevaBag-on-demanddauna
posizioneall'altra.
Figura17
1.Pulitequest'area
g235646
Figura18
Rimozionedelcondottodiscarico laterale
Perrimuovereilcondottodiscaricolaterale,sollevate
ildeettorelaterale,rimuoveteilcondottodiscarico
lateraleeabbassateildeettorediscaricolaterale
sinchénonsiagganciasaldamente.
g027454
14
Page 88

Suggerimenti
Suggerimentigeneraliperla
tosatura
•Ispezionatel'areaincuiuseretelamacchinaed
eliminatetuttiglioggettichelamacchinapotrebbe
scagliare.
•Evitatedicolpireoggettisolidiconlalama.Non
tosatedeliberatamentesopraunoggetto.
•Selamacchinacolpisceunoggettooiniziaa
vibrare,spegneteimmediatamenteilmotore,
rimuovetelachiave(seindotazione),scollegateil
cappellottodallacandelaevericateseiltosaerba
hasubitodanni.
•Perottenereprestazioniottimalimontateuna
nuovalamaprimadell'iniziodellastagionedella
tosatura.
•All'occorrenzasostituitelalamaconunalamadi
ricambioT oro.
Sminuzzarelefoglie
•Dopolatosaturadeltappetoerboso,almenometà
diessodeveesserevisibileattraversolefoglie.
All'occorrenza,effettuatepiùdiunasolapassata
sullefoglie.
•Selefogliesulpratosuperanoi13cm,tagliatea
un'altezzaditagliomaggiore,quindiall'altezzadi
tagliodesiderata.
•Seiltosaerbanonsminuzzanementelefoglie,
rallentatelavelocitàditosatura.
Falciaturadell'erba
•Falciatesoltantounterzodellod'erbapervolta.
Nonfalciateconimpostazioniinferioria51mm,a
menochel'erbanonsiaradaoneltardoautunno,
quandol'erbainiziaarallentarelacrescita.
•Perfalciareerbaaltapiùdi15cm,tosate
primaall'altezzaditagliosuperiorecamminando
lentamente,quinditosatedinuovoadun'altezza
inferioreperottenereuntappetoerbosopiù
attraente.Sel'erbaètroppoalta,iltosaerbapuò
intasarsiearrestareilmotore.
•Erbaefogliebagnatetendonoadammucchiarsi
sultappetoerboso,epossonointasareiltosaerba
oarrestareilmotore.Evitateditosareincondizioni
dibagnato.
•Incondizionidiparticolaresiccitàprestate
attenzionealrischiodiincendio,seguitelerelative
avvertenzelocaliemantenetelamacchinalibera
daerbaseccaescartidifoglie.
•Alternateladirezioneditosatura,percontribuire
adisperderelosfalciosultappetoerbosoed
ottenereunafertilizzazioneuniforme.
•Sel'aspettodeltappetoerbosotosatononè
soddisfacente,provateunoopiùdeiseguenti:
–Sostituitelalamaofatelaaflare.
–Camminatepiùlentamentementretosate.
–Alzatel'altezzaditagliodeltosaerba.
–Tosatel'erbapiùdifrequente.
–Sovrapponetelepassate,anzichéfalciare
un'interaandanaadognipassata.
15
Page 89

Dopol’uso
Sicurezzadopole operazioni
Requisitigeneralidisicurezza
Puliziasottolamacchina
Intervallotragliinterventitecnici:Primadiogni
utilizzooquotidianamente
Perottenereimiglioririsultati,pulitelamacchina
subitodopoaverterminatoillavoro.
1.Portatelamacchinasuunasupercielastricata
epianeggiante.
•Perprevenireunincendio,eliminateerbaedetriti
dallamacchina.Tergetel'olioeilcarburante
versati.
•Lasciateraffreddareilmotoreprimadiriporrela
macchinainunambientechiuso.
•Nondepositatemailamacchinaolatanicadel
carburanteinpresenzadiammelibere,scintille
ospie,comevicinoaunoscaldabagnooaltre
apparecchiature.
Sicurezzaduranteilrimorchio
•Rimuovetelachiavediaccensione(sein
dotazione)primadicaricarelamacchinaperil
trasporto.
•Prestatecauteladuranteilcaricooloscaricodella
macchina.
•Fissatelamacchinaperevitareilrotolamento.
2.Primadilasciarelapostazionedell'operatore,
spegneteilmotoreeattendetel'arrestoditutte
lepartiinmovimento.
3.Abbassatelamacchinaall'altezzaditaglio
minima.FateriferimentoaRegolazione
dell'altezzaditaglio(pagina11).
4.Lavatel'areasottolosportelloposteriore,
attraversoilqualelosfalciovienetrasferitodal
sottoscoccaalcestodiraccolta.
Nota:Lavatel'areaconilsistema
Bag-on-demand(sepresente)nelleposizioni
completamenteavantiecompletamenteindietro.
5.Collegateunacannadagiardinoalrubinetto
dell'acquaealforodilavaggio(Figura19).
Figura19
1.Forodilavaggio
6.Apriteilrubinetto.
7.Avviateilmotoreelasciateloinfunzionenoa
quandolosfalciononfuoriescepiùdasottola
macchina.
8.Spegneteilmotore.
9.Chiudeteilrubinettodell'acquaescollegatela
cannadallamacchina.
10.Avviateilmotoreperalcuniminutiperasciugare
ilsottoscoccaeimpedirechearrugginisca.
11.Spegneteilmotoreelasciateloraffreddare
primadiriporrelamacchinainun'areachiusa.
g033502
16
Page 90
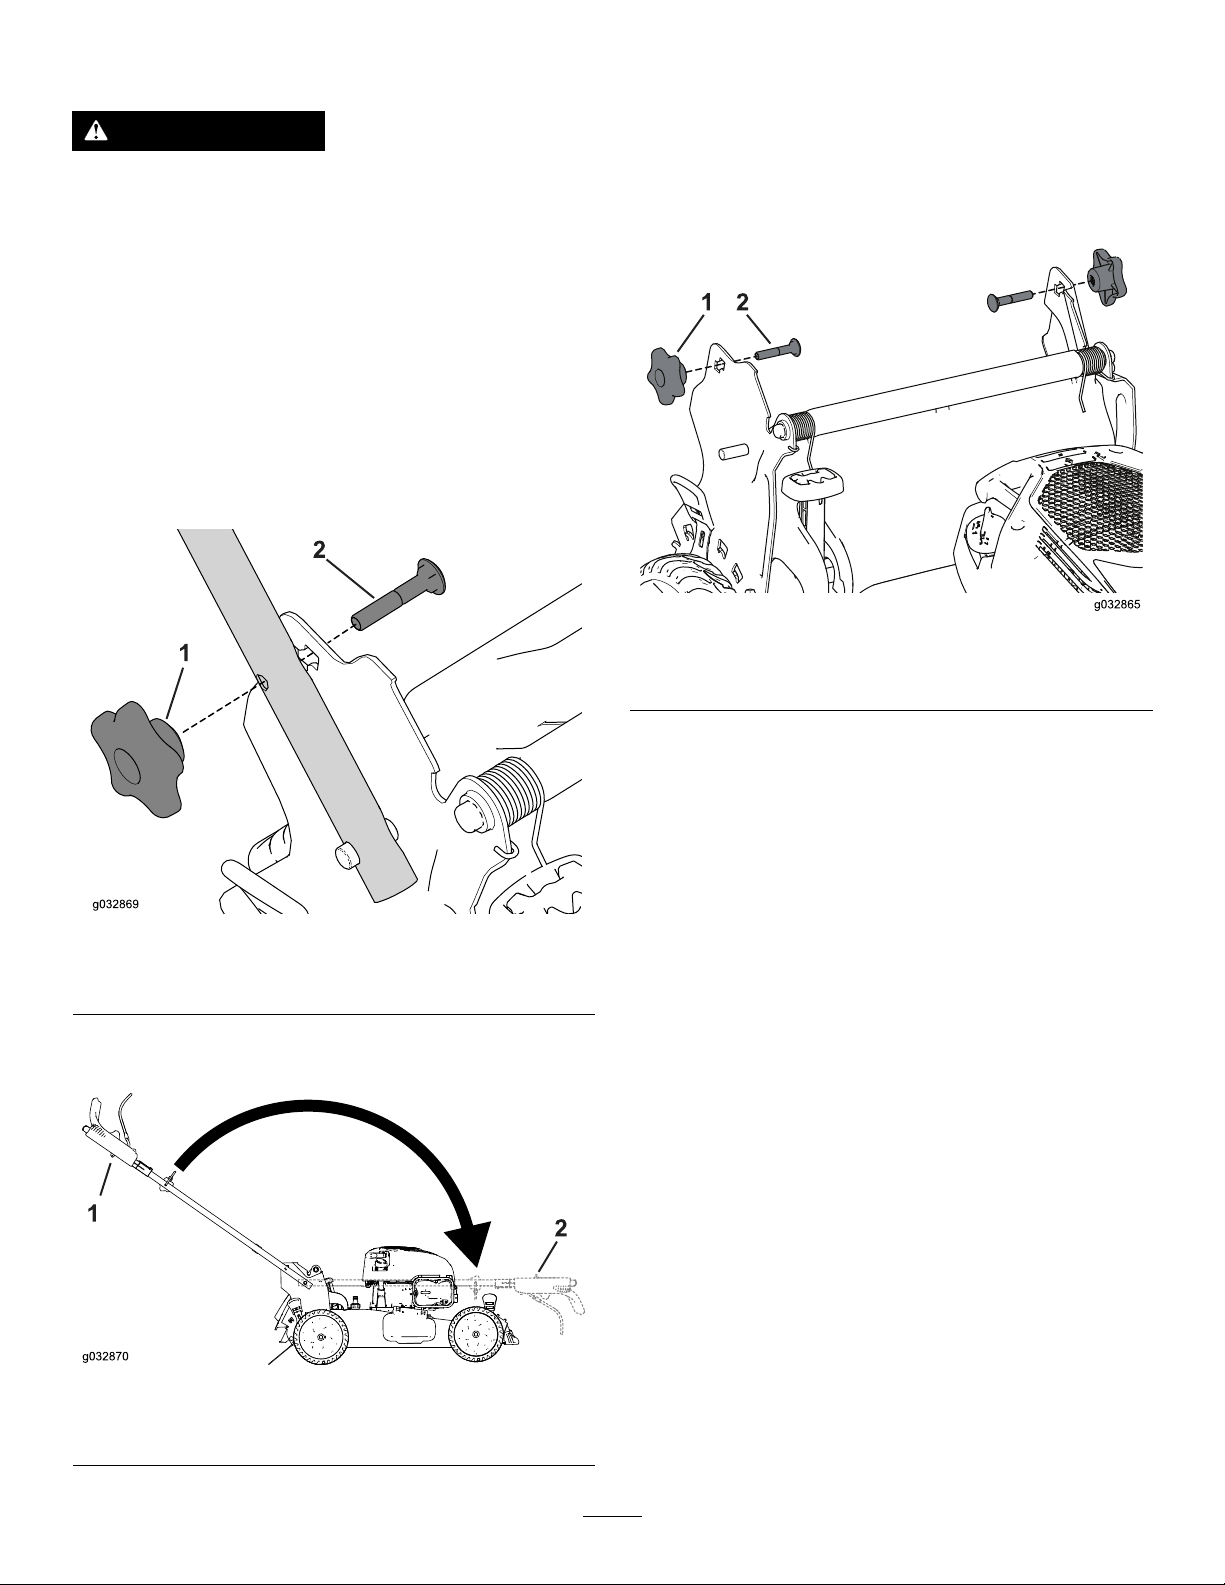
Piegaturadellastegola
AVVERTENZA
L'incorrettaaperturaochiusuradellastegola
puòdanneggiareicaviecrearecondizionidi
utilizzopericolose.
•Fateattenzioneanondanneggiareicavi
quandoapriteopiegatelastegola.
•Seuncavoèdanneggiato,rivolgeteviaun
CentroAssistenzaautorizzato.
1.Toglieteeconservatele2manopoledella
stegolaei2bulloniatestatondadallestaffe
dellastegola(Figura20).
Importante:Mentrepiegatelastegola,fate
passareicaviall'esternodellesuemanopole.
3.Inseriteilbulloneatestatonda(conlatestadel
bullonerivoltaversol'interno)attraversolastaffa
dellastegolaeilforosuperiorenell'estremità
dellastegola.Assicuratevicheibordiquadratidi
ciascunbulloneatestatondasiinseriscanonel
foroquadratosuperioreoinferiorenellarelativa
staffadellastegola(Figura22).
g032865
Figura22
Figura20
1.Manopoladellastegola2.Bulloneatestatonda
2.Piegatelastegola,ruotandolainavanti(Figura
21).
1.Manopoladellastegola2.Bulloneatestatonda
4.Montate,senzaserrarle,lemanopoledella
stegolaeibulloniatestatondasullestaffedella
stegola.
5.Peraprirelastegolafateriferimentoa1
Montaggioeaperturadellastegola(pagina5).
g032869
Figura21
1.Posizionediguida2.Posizionepiegata
g032870
17
Page 91
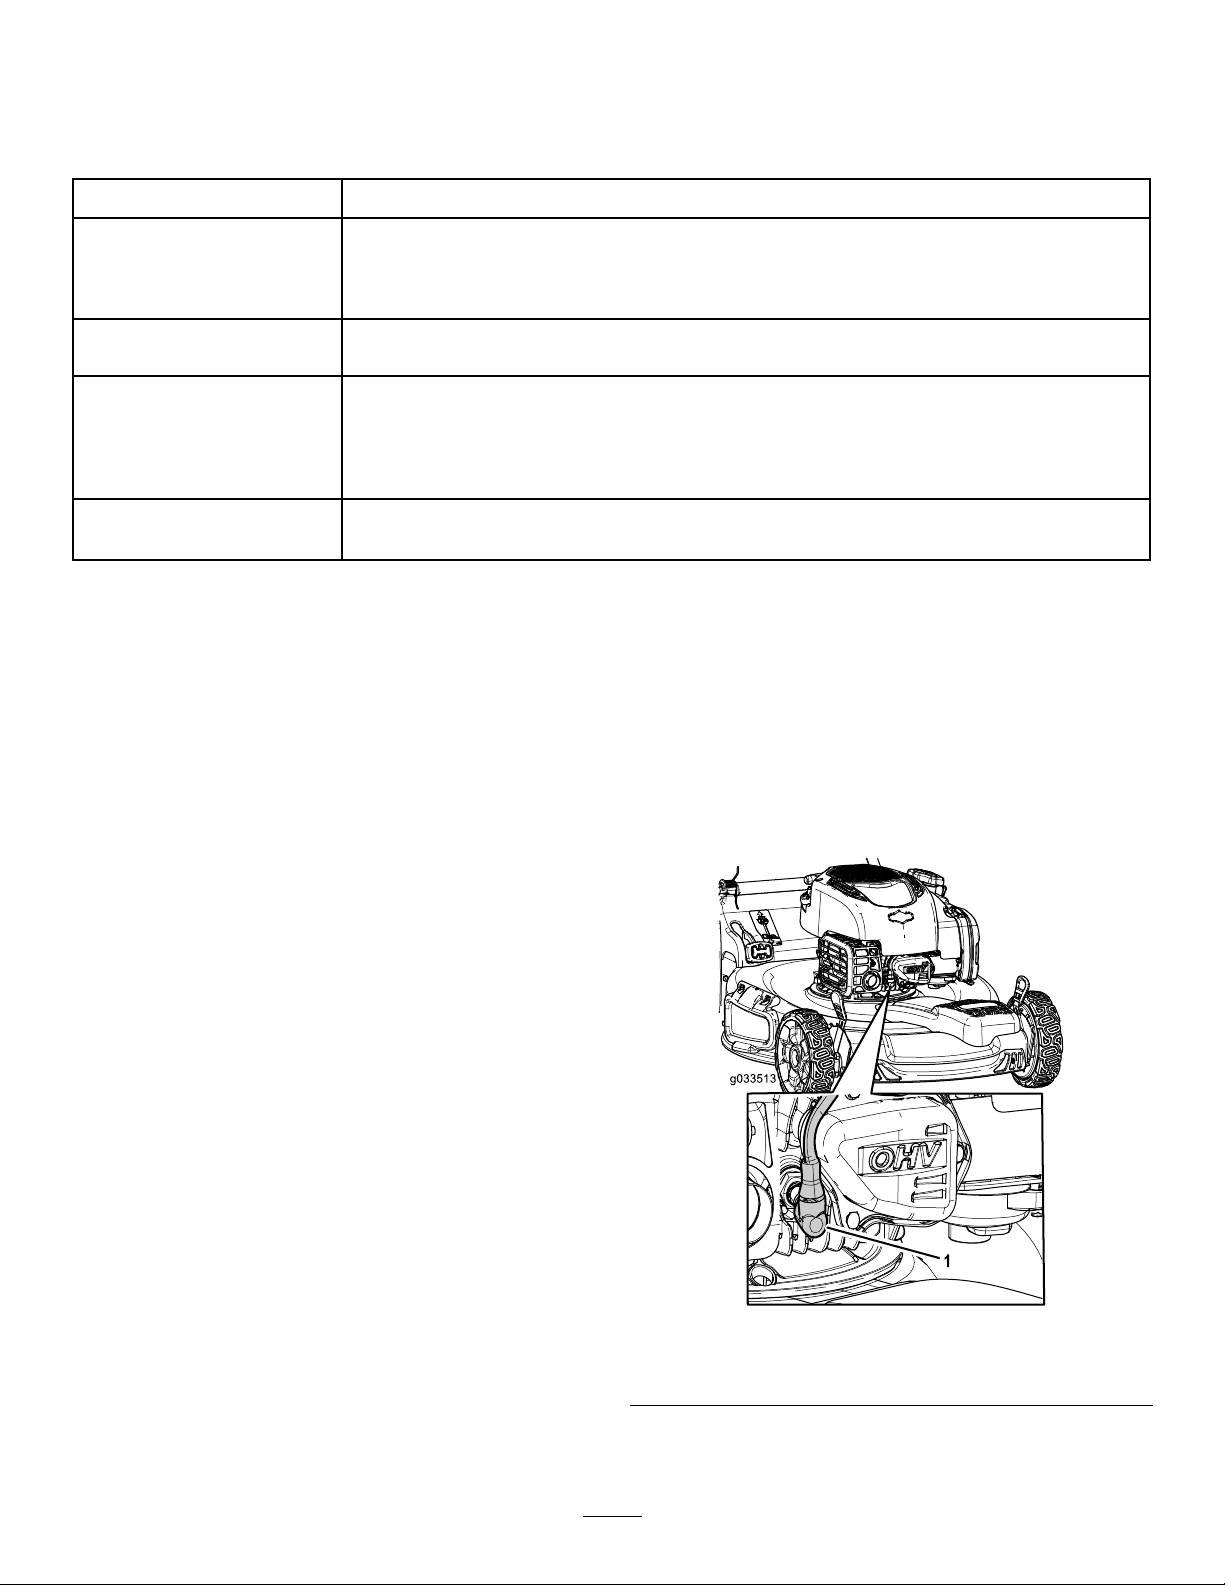
Manutenzione
Programmadimanutenzioneraccomandato
Cadenzadimanutenzione
Primadiogniutilizzoo
quotidianamente
Ogni25ore
Ognianno
Ogniannooprimadel
rimessaggio
Proceduradimanutenzione
•Controllateillivellodell'oliomotoreeall'occorrenzarabboccate.
•Ilmotoredevefermarsientrotresecondidalrilasciodellabarradicomandodella
lama.
•Toglietesfalcioemorchiadasottoiltosaerba.
•Effettuatelamanutenzionedelltrodell’aria;eseguitelamanutenzionecon
maggiorefrequenzainambientipolverosi.
•Sostituiteilltrodell'aria(piùsoventeinambientipolverosi).
•Cambiodell'oliomotore.
•Sostituitelalamaofatelaaflare(piùspessoseiltaglientesismussarapidamente).
•Puliteilmotorerimuovendosporcoedetritidallapartesuperioreedailati;pulitecon
maggiorefrequenzaquandooperateinpresenzadipolvere.
•Svuotateilserbatoiodelcarburanteprimadieffettuareriparazioni,inbaseaquanto
indicatoeprimadelrimessaggioannuale.
Importante:Perulterioriinterventidimanutenzionesirimandaalmanualeperl'usodelmotore.
Sicurezzadurantela manutenzione
•Staccateilcappellottodallacandelaprimadi
eseguireinterventidimanutenzione.
Preparazioneperla manutenzione
1.Spegneteilmotoreeattendetechetutteleparti
inmovimentosisianofermate.
•Indossateiguantielaprotezionepergliocchi
durantelamanutenzionedellamacchina.
•Lalamaèaflata,epuòcausaregraviferite.
Indossateiguantipereseguirelamanutenzione
dellalama.Noneseguiteriparazioniorevisioni
sullalama/e.
•Nonmanomettereidispositividisicurezza.
Controllateneilfunzionamentoadintervalli
regolari.
•Inclinandolamacchinapotrestefarefuoriuscireil
carburante.Ilcarburanteèinammabile,esplosivo
epuòcausareinfortuni.Fategirareilmotore
nchénonèvuoto,otoglietelabenzinaconuna
pompaamano;nontravasatelamaipermezzo
diunsifone.
•Perottenereprestazioniottimaliemantenere
lacerticazionedisicurezzadellamacchina,
utilizzatesoloricambieaccessorioriginaliT oro.I
ricambiegliaccessorirealizzatidaaltriproduttori
possonoesserepericolosietaleutilizzopuò
renderenullalagaranziadelprodotto.
2.Scollegateilcappellottodallacandela(Figura
23).
g033513
Figura23
1.Cappellottodellacandela
3.Alterminedell'interventodimanutenzione
ricollegateilcappellottoallacandela.
18
Page 92
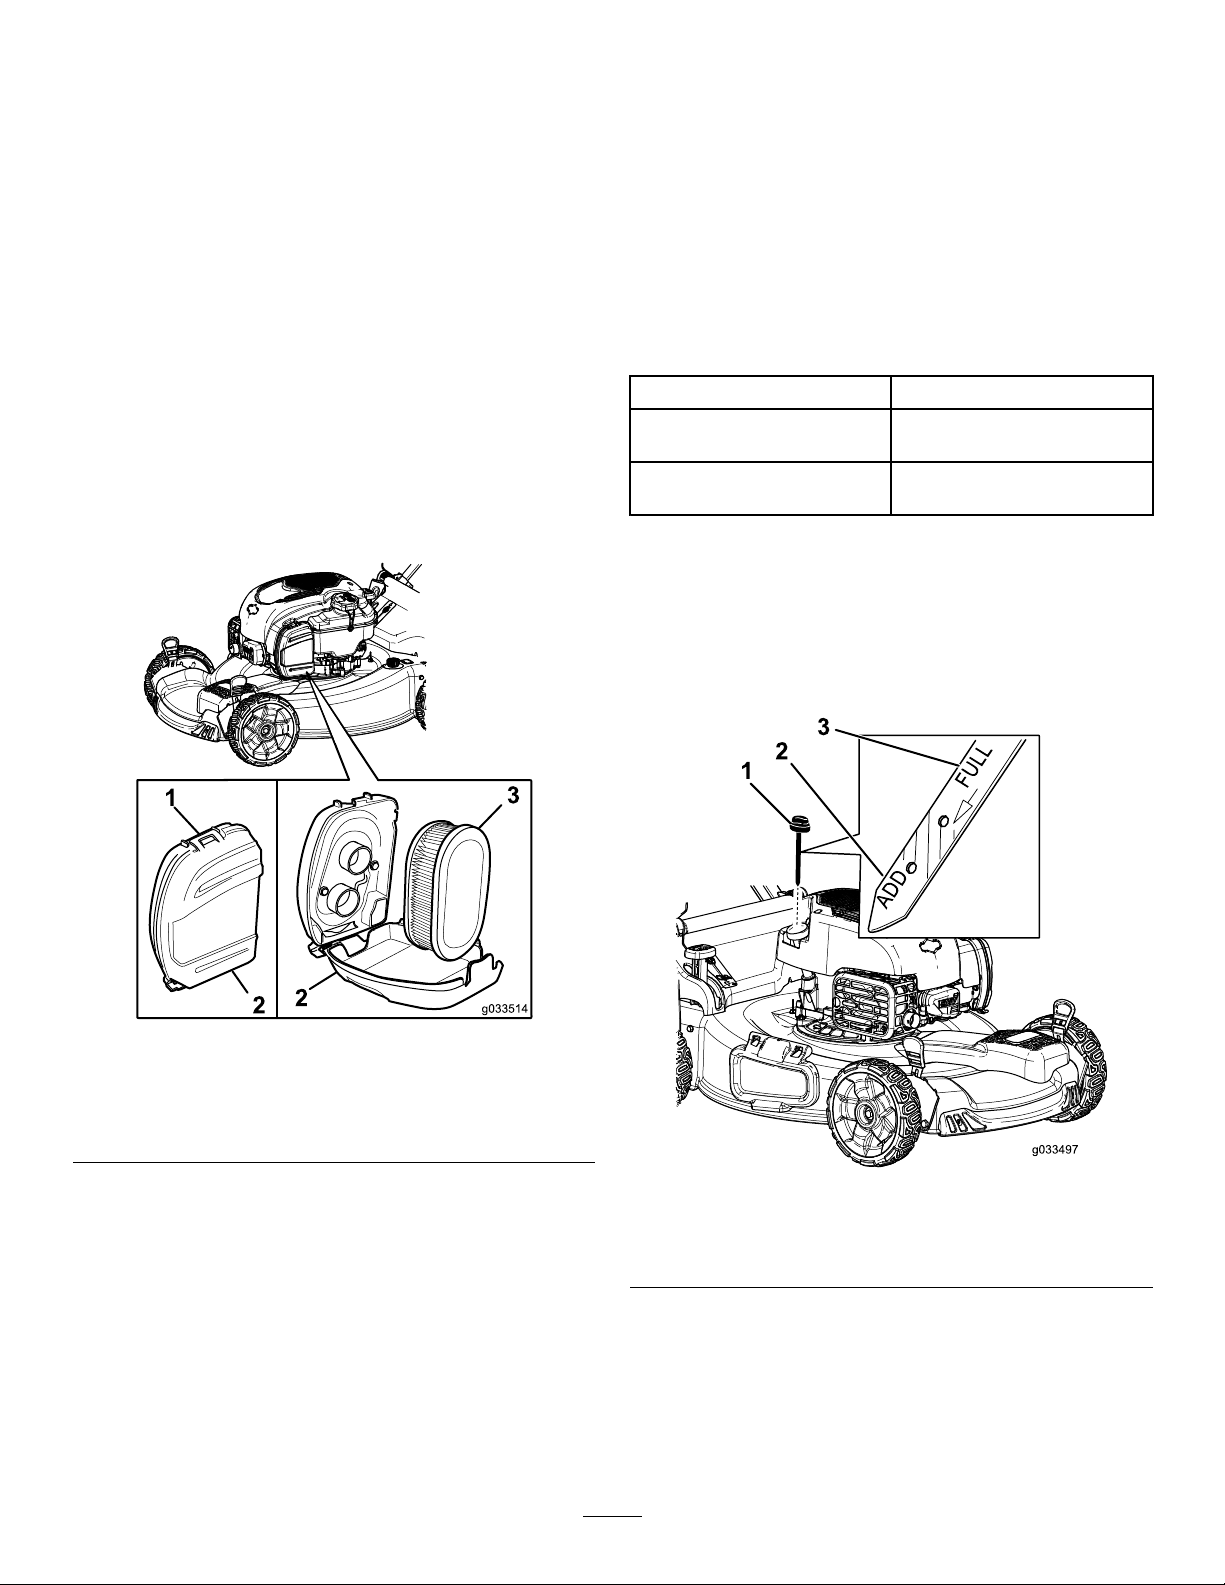
Importante:Primadiinclinarelamacchina
perilcambiodell'olioolasostituzionedella
lama,utilizzatelanchéilserbatoiodel
carburantenonsaràcompletamentevuoto.
Nelcasodobbiateinclinarelamacchina
primadirestaresenzabenzina,rimuovete
ilcarburantedalserbatoiomedianteuna
pompacarburantemanuale.Inclinate
semprelamacchinasulancoconl'astadi
livelloinbasso.
Cambiodell'oliomotore
Intervallotragliinterventitecnici:Ognianno
Nonènecessariocambiarel'oliomotore,ma
qualoradecidiatedifarlo,seguitelaprocedura
indicata.
Nota:Fategirareilmotoreperalcuniminutiprima
dicambiarel'olio,perriscaldarlo.L'oliocaldouisce
meglioetrasportaunamaggiorequantitàdisostanze
inquinanti.
Manutenzionedelltro
dell'aria
Intervallotragliinterventitecnici:Ogni25ore
Ognianno
1.Sbloccatelapartesuperioredelcoperchiodel
ltrodell'aria(Figura24).
Specichedell'oliomotore
Capacitàdell'oliomotore
Viscositàdell'olioOliodetergenteSAE30o
Classicazionediservizio
API
1.Portatelamacchinasuunasupercie
pianeggiante.
2.VederePreparazioneperlamanutenzione
(pagina18).
3.Girateiltappoinsensoantiorarioedestraete
l'astadilivello(Figura25).
0,44litri
SAE10W-30
SJosuperiore
Figura24
1.Clip
2.Coperchiodelltro
dell'aria
3.Filtrodell'aria
2.Rimuoveteilltro(Figura24).
3.Controllateilltrodell'aria.
Nota:Seilltrodell'ariaèeccessivamente
sporco,sostituiteloconunonuovo.Altrimenti,
picchiettatelodelicatamentesuunasupercie
duraperstaccareidetriti.
4.Montateilltrodell'aria.
5.Utilizzatelaclippermontareilcoperchiodel
ltrodell'aria.
g033514
g033497
Figura25
1.Astadilivello3.Pieno
2.Rabboccare
4.Inclinatelamacchinasulanco(dimodocheil
ltrodell'ariasitroviinalto)perscaricarel'olio
usatoattraversoiltubodiriempimento(Figura
26).
19
Page 93

Figura26
5.Dopoaverefattodeuirel'oliousato,riportatela
macchinainposizioneoperativa.
6.Versateconcautelaunaquantitàd'olioparia
circa3/4dellacapacitàdelmotoreneltubodi
riempimentodell'olio.
7.Attendeteper3minutichel'oliosistabilizzinel
motore
8.Tergetel'astaconunpannopulito.
9.Inseritel’astadilivelloneltubodiriempimento
edestraetela.
10.Controllateillivellodell'oliosull'asta(Figura25).
Sostituzionedellalama
Intervallotragliinterventitecnici:Ognianno
Importante:Perilcorrettomontaggiodellalama
doveteusareunachiavetorsiometrica.Senon
disponetediunachiavetorsiometricaoavete
dubbisull'esecuzionediquestaoperazione,
contattateunCentroAssistenzaautorizzato.
Esaminatelalamaogniqualvoltaesauriteil
carburante.Selalamaèdanneggiata,sostituitela
immediatamente.Seiltaglienteèsmussatoo
g027457
scheggiato,fateloaflareelivellare,oppuresostituite
lalama.
AVVERTENZA
Lalamaèaflata,epuòcausaregraviferite.
Indossateiguantipereseguirela
manutenzionedellalama.
1.VederePreparazioneperlamanutenzione
(pagina18).
2.Inclinatelamacchinasulanco,conilltro
dell'ariainalto.
3.Usateunbloccodilegnopertenerefermala
lama(Figura27).
•Seillivellodell'oliosull'astaètroppobasso,
versateconcautelaunapiccolaquantità
diolionelrelativotubodiriempimento,
attendete3minutieripetetelefasida8a10
noaraggiungereillivellocorrettosull'asta.
•Seillivellodell'oliosull'astaètroppoalto,
drenatel'olioineccessonchél'oliosull'asta
nonappareallivelloadeguato.
Importante:Nonavviateilmotoreconil
livellodell'oliotroppobassootroppoalto,
perevitaredidanneggiareilmotorestesso.
11.Inseritel'astadilivelloneltubodiriempimento
dell'olioechiudetesaldamente.
12.Riciclatecorrettamentel'olioesausto.
g231389
Figura27
4.Toglietelalamaeconservatelabulloneriadi
montaggio(Figura27).
5.Montatelanuovalamausandolabulloneriadi
montaggio(Figura28).
20
Page 94
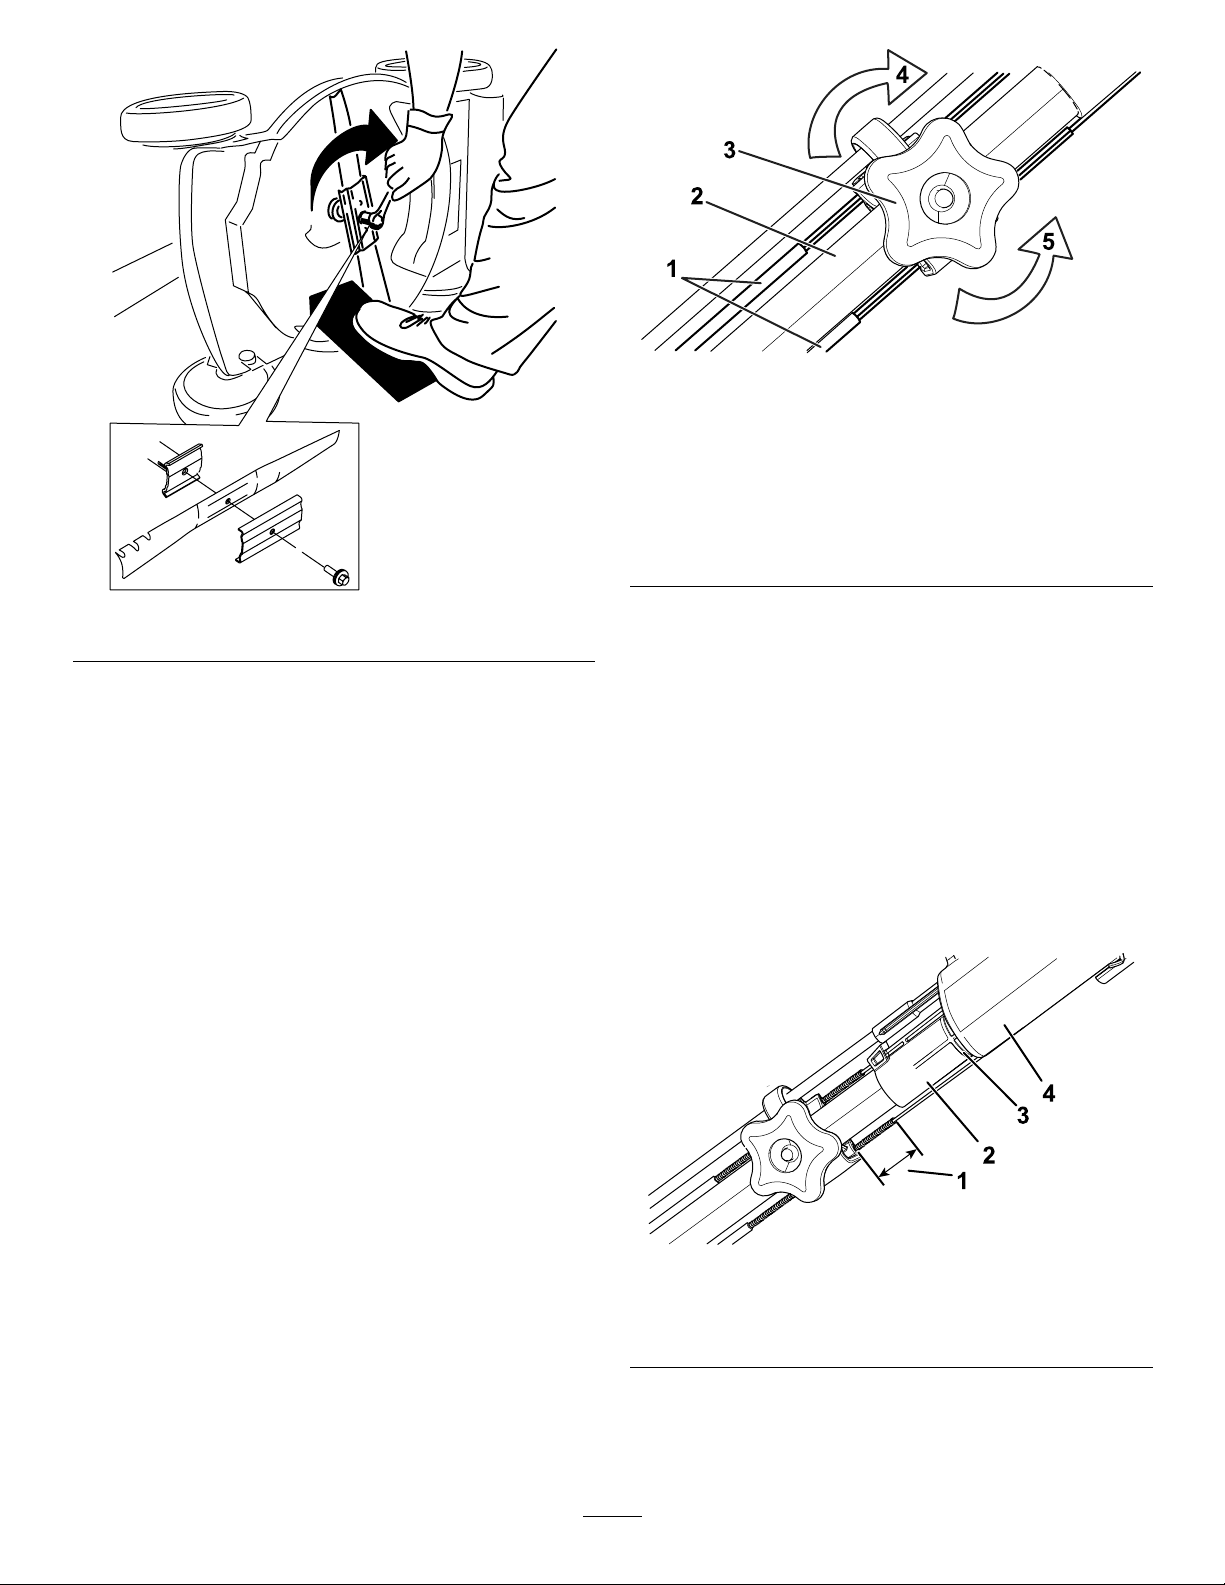
Figura29
g208188
Figura28
Importante:Leestremitàcurvedellalama
devonoessererivolteversolascoccadel
tosaerba.
6.Utilizzateunachiavetorsiometricaper
serrareilbullonedellalamaa82N∙m.
Importante:Unbulloneserratoa82N∙m
èmoltostretto.Trattenetelalamaconun
bloccodilegnoeserratesaldamenteil
bullonefacendoforzacolvostrocorposul
criccoosullachiavetorsiometrica.Èmolto
difcileserrareeccessivamentequesto
bullone.
1.Caviditrazione
automatica
2.Stegola(latosinistro)5.Giratelamanopolain
3.Manopoladiregolazione
g231390
4.Giratelamanopolain
sensoorarioperstringere
laregolazione.
sensoantiorarioper
allentarelaregolazione.
2.Regolatelatensionesuicavi(Figura29)tirandoli
entrambiindietroospingendoliavantiequindi
tenendoliinquellaposizione,mantenendopari
lunghezze.
Nota:Spingeteicaviversoilmotoreper
aumentarelatrazione;tirateicaviviadalmotore
perridurrelatrazione.
3.Ruotatelamanopoladiregolazioneinsenso
orarioperstringerelaregolazionedeicavi.
Nota:Entrambiicavidevonoestendersidi38mm
oltreimorsettiquandolastegolaèallineataconla
primataccasullaguida;fateriferimentoaFigura30.
Regolazionedellatrazione automatica
Ognivoltacheinstallatenuovicavidellatrazione
automaticaoselatrazionenonèregolata,regolatela
trazioneautomatica.
1.Ruotatelamanopoladiregolazioneinsenso
antiorarioperallentarelaregolazionedelcavo
(Figura29).
g209518
Figura30
1.38mm3.Primatacca
2.Guida4.Stegola
21
Page 95

Rimessaggio
Rimozionedeltosaerbadal
Riponetelamacchinainunluogofresco,pulitoe
asciutto.
Preparazionedeltosaerba perilrimessaggio
1.Nell'ultimorifornimentodell'anno,aggiungete
l'appositostabilizzatorealcarburante(come
ToroPremiumFuelTreatment)comeindicato
sull'etichetta.
2.Smaltiteecologicamenteilcarburantenon
utilizzato.Riciclatelosecondolenormativelocali
ousateloperl'automobile.
Nota:Ilcarburantestantionelserbatoioèla
causaprincipaledelledifcoltàdiavviamento.
Nonconservateilcarburantesenzal'apposito
stabilizzatoreperoltre30giornienonconservate
ilcarburantestabilizzatoperoltre90giorni.
3.Lasciateinfunzionelamacchinanoaquando
ilmotorenonsispegneperesaurimentodel
carburante.
rimessaggio
1.Controllatetuttiidispositividifermoeserrateli.
2.Rimuovetelacandelaefategirarerapidamente
ilmotoretirandol'avviatoreautoavvolgenteper
eliminarel'olioineccessodalcilindro.
3.Montatelacandelaeserratelaconunachiave
torsiometricaa20N∙m.
4.Osservateleproceduredimanutenzione;
vedereManutenzione(pagina18).
5.Controllateillivellodell'oliomotore;vedere
Controllodellivellodell'oliomotore(pagina10).
6.Rabboccateilserbatoiodelcarburantecon
carburantefresco;vedereRiempimentodel
serbatoiodelcarburante(pagina9).
7.Collegateilcappellottoallacandela.
4.Riavviateilmotoreelasciatelogirarenoallo
spegnimento.Quandononsiaccendepiù,il
motoreèasciuttoabbastanza.
5.Scollegateilcappellottodallacandelae
collegateilcappellottoalpolorimanente(se
presente).
6.Toglietelacandela,aggiungete30mldi
oliomotoreattraversoilrelativoforoetirate
lentamenteilcavodiavviamentovarievolteper
distribuirel'oliointuttoilcilindroedevitarela
corrosionedelcilindrodurantelastagionedi
fermo.
7.Montatelacandelasenzastringerla.
8.Serratetuttiidadi,ibullonieleviti.
22
Page 96

Note:
Page 97

Informativaeuropeasullaprivacy
DatiraccoltidaT oro
ToroWarrantyCompany(Toro)rispettalaprivacy .Alnedielaborareireclamiingaranziaecontattarviincasodirichiamodiunprodotto,vichiediamodi
comunicarcideterminatidatipersonalidirettamenteotramiteTheToroCompanyounrivenditoreT oroinloco.
IlsistemadigaranziaT oroèinstallatosuserversituatinegliStatiUniti,dovelaleggesullatuteladellaprivacypuòprevedereunaprotezionediversada
quelladelvostropaese.
COMUNICANDOCIIVOSTRIDATIPERSONALIACCONSENTITEALLALOROELABORAZIONECOMEINDICATONELL'INFORMATIVASULLA
PRIVACY .
UtilizzodelleinformazionidapartediToro
Toropuòutilizzareivostridatipersonaliperelaborareireclamiingaranzia,contattarviincasodirichiamodiunprodottoeperqualsiasialtroscopodicui
viinformiamo,nonchécondividereivostridaticonconsociate,rivenditoriealtripartnercommercialicollegatiataliattività.Nonvenderemoivostridati
personaliadaltrecompagnie.Ciriserviamoildirittodidivulgareidatipersonaliascopodiconformitàconlalegislazioneapplicabileesurichiestadelle
autoritàcompetenti,perilcorrettofunzionamentodelnostrosistemaopertutelarenoistessioglialtriutenti.
Conservazionedeidatipersonali
Conserveremoivostridatipersonalinchésarannonecessaripergliscopiprevistialmomentodellalororaccoltainizialeoperaltriscopilegittimi(come
laconformitànormativa)oladdoverichiestodallalegislazioneapplicabile.
ImpegnodiT oroallasicurezzadeidatipersonali
Adottiamoprecauzioniragionevolialneditutelarelasicurezzadeivostridatipersonali,nonchémisureatteamantenere
l'accuratezzaelostatuscorrentedeidatipersonali.
Accessoecorrezionedellevostreinformazionipersonali
Sedesideraterivedereocorreggerelevostreinformazionipersonali,contattateciviae-mailall'indirizzolegal@toro.com.
Legislazioneaustralianarelativaaiconsumatori
Iclientiaustralianipotrannoreperireidettagliconcernentilalegislazioneaustralianarelativaaiconsumatoriall'internodellaconfezioneopressoil
rivenditoreT oroinloco.
374-0282RevC
Page 98

55cmRecycler
Modelnr.:20964—Serienr.:400000000enhoger
®
gazonmaaier
FormNo.3418-455RevB
Gebruikershandleiding
Inleiding
Dezeloopmaaiermetdraaiendemessenisbedoeld
voorgebruikdoorparticulieren.Demachineis
voornamelijkontworpenvoorhetmaaienvangrasop
goedonderhoudenparticulieregazons.Demachine
isnietontworpenvoorhetmaaienvanstruikgewasof
voorgebruikindelandbouw.
Leesdezeinformatiezorgvuldigdoor,zodatuweet
hoeudemachineopdejuistewijzemoetgebruiken
enonderhoudenenomletselenschadeaande
machinetevoorkomen.Ubentverantwoordelijkvoor
hetjuisteenveiligegebruikvandemachine.
UkuntrechtstreekscontactopnemenmetT orovia
www.T oro.comvoorinformatieoverproductenen
accessoires,omeendealertevindenofomuw
productteregistreren.
Alsuservice,origineleToroonderdelenofaanvullende
informatienodighebt,kuntucontactopnemenmet
eenerkendeservicedealerofmetdeklantenservice
vanToro.Udienthierbijaltijdhetmodelnummeren
hetserienummervanhetproducttevermelden.De
locatievanhetplaatjemethetmodelnummeren
hetserienummervanhetproductisaangegevenop
Figuur1.Ukuntdenummersnotereninderuimte
hieronder.
Belangrijk:Ukuntmetuwmobielapparaatde
QR-codeophetplaatjemethetserienummer
(indienaanwezig)scannenomtoegangte
krijgentotdegarantie,onderdelenenandere
productinformatie
Erwordenindezehandleidingeenaantalmogelijke
gevareneneenaantalveiligheidsberichtengenoemd
(Figuur2)metdevolgendewaarschuwingssymbolen,
dieduidenopeengevaarlijkesituatiediezwaar
lichamelijkletselofdedoodtotgevolgkanhebben
wanneerdeveiligheidsvoorschriftennietinacht
wordengenomen.
g000502
Figuur2
Waarschuwingssymbool
Erwordenindezehandleidingtweewoordengebruikt
omuwaandachtopbijzondereinformatietevestigen.
Belangrijkattendeertuopbijzonderetechnische
informatieenOpmerkingduidtalgemeneinformatie
aandiebijzondereaandachtverdient.
DitproductvoldoetaanallerelevanteEuropese
richtlijnen;zievoordetailsdeaparteproductspecieke
conformiteitsverklaring.
Bruto-ennettokoppel:Hetbruto-ennettokoppel
vandezemotorisdoordemotorfabrikantin
laboratoriumomstandighedengemetenvolgens
standaardJ1940ofJ2723vandeSocietyof
AutomotiveEngineers(SAE).Omdatbijde
conguratierekeningisgehoudenmetdeveiligheidsengebruiksvoorschriften,zaldittypemaaiersin
depraktijkeenveellagermotorkoppelhebben.
Raadpleegdeinformatievandemotorfabrikantdie
wordtmeegeleverdmetdemachine.
1.Plaatsvanmodelnummerenserienummer
Modelnr.:
Serienr.:
©2017—TheT oro®Company
8111L yndaleAvenueSouth
Bloomington,MN55420
CV
Figuur1
Registreeruwproductopwww.Toro.com.
Gelievenietteknoeienmetdeveiligheidsvoorzieningenofdezeuitteschakelen.Controleerook
regelmatigdatdezenogwerken.Probeerhet
g226627
afgesteldmotortoerentalnietteveranderen,anders
kanereenonveiligesituatieontstaanwaardooru
letselkuntoplopen.
Inhoud
Inleiding....................................................................1
Veiligheid..................................................................2
Algemeneveiligheid...........................................2
Veiligheids-eninstructiestickers........................3
Vertalingvandeoorspronkelijketekst(NL)
Allerechtenvoorbehouden
GedruktinMexico
*3418-455*B
Page 99

Montage....................................................................5
1Dehandgreepmonterenenuitklappen.............5
2Destartkoordaanbrengeninde
koordgeleider..................................................5
3Demotorbijvullenmetolie...............................6
4Degrasvangermonteren.................................6
Algemeenoverzichtvandemachine.........................8
Specicaties......................................................8
Gebruiksaanwijzing..................................................9
Voorgebruik..........................................................9
Veiligheidvóórgebruik........................................9
Brandstoftankvullen...........................................9
Hetmotoroliepeilcontroleren............................10
Hoogtevanhandgreepinstellen.......................10
Demaaihoogteinstellen....................................11
Tijdensgebruik.....................................................11
Veiligheidtijdensgebruik...................................11
Motorstarten....................................................12
Dezelfaandrijvinggebruiken............................12
Demotorafzetten.............................................13
Maaiselrecyclen...............................................13
Hetmaaiselopvangen......................................13
Degrasvangerhendelbedienen........................14
Hetmaaiselzijwaartsafvoeren.........................14
Tipsvoorbedieningengebruik.........................15
Nagebruik...........................................................16
Veiligheidnahetwerk.......................................16
Deonderkantvandemachinereinigen.............16
Handgreepinklappen.......................................17
Onderhoud..............................................................18
Aanbevolenonderhoudsschema.........................18
Demachineveiligonderhouden........................18
Voorbereidingenvooronderhoudswerk-
zaamheden...................................................18
Onderhoudvanhetluchtlter............................19
Motorolieverversen..........................................19
Hetmaaimesvervangen...................................20
Zelfaandrijvingafstellen....................................21
Stalling....................................................................22
Voorbereidingenvoorstalling...........................22
Demaaimachineuitdestallinghalen................22
Veiligheid
Dezemachineisontworpeninovereenstemmingmet
deEN-normISO5395:2013.
Algemeneveiligheid
Ditproductkanhandenofvoetenafsnijden
envoorwerpenuitwerpen.Volgaltijdalle
veiligheidsinstructiesopomernstigletselte
voorkomen.
Gebruikvanditproductvooranderedoeleindendan
dezekangevaarlijkzijnvooruofomstanders.
•Voordatudemotorstart,moetudeinstructiesen
waarschuwingenindezeGebruikershandleiding
enopdemachineendewerktuigenlezen,
begrijpenenuitvoeren.
•Houduwhandenenvoetenuitdebuurtvan
bewegendeonderdelenvanofonderdemachine.
Blijfaltijduitdebuurtvanafvoeropeningen.
•Gebruikdemachinenietalserschermenof
anderebeveiligingsmiddelenontbrekenofals
dezenietwerken.
•Houdomstandersenkinderenopeenveilige
afstandvandemachine.Laatkinderennooit
demachinebedienen.Laatenkelmensendie
verantwoordelijkengetraindzijnendiebovendien
vertrouwdzijnmetdeinstructiesenfysiekertoein
staatzijndemachinebedienen.
•Stopdemachine,zetdemotoruitenwacht
totdatallebewegendeonderdelentotstilstand
zijngekomenvoordatuservicewerkzaamheden
uitvoert,brandstofbijvultofverstoppingen
verwijdert.
Onjuistgebruikofonderhoudvandezemachine
kanletseltotgevolghebben.Omhetrisicoop
letselteverkleinen,dientuzichaandevolgende
veiligheidsinstructiestehoudenenaltijdophet
veiligheidssymboolteletten,datbetekentVoorzichtig,
WaarschuwingofGevaar–instructievoorpersoonlijke
veiligheid.Niet-nalevingvandezeinstructieskan
leidentotlichamelijkofdodelijkletsel.
Uvindtbijkomendeveiligheidsinformatiewaarnodig
indezehandleiding.
2
Page 100

Veiligheids-eninstructiestickers
Veiligheidsstickersenveiligheidsinstructieszijngemakkelijkzichtbaarvoordebestuurder
enbevindenzichbijplaatsenwaargevaarkanontstaan.Vervangallebeschadigdeof
ontbrekendestickers.
Merktekenvanfabrikant
1.Ditmerktekengeeftaandathetmesonderdeelvaneen
origineleT oromaaimachineis.
decaloemmarkt
112-8760
1.Demachinekanvoorwerpenuitwerpen–Houdomstanders
opeenveiligeafstandvandemachine.
2.Handenofvoetenkunnenwordengesneden/geamputeerd
–Blijfuitdebuurtvanbewegendeonderdelen.
decal112-8760
1.Recycling-modus
decal125-5026
125-5026
2.Opvangmodus
3
 Loading...