


FormNo.3428-136RevA
55cmRecycler®LawnMowerwith
SmartStow®
20961
Recycler®Rasenmäher(55cm)mit
SmartStow®
20961
TondeuseRecycler®de55cmavec
SmartStow®
20961
55cmRecycler®maaiermetSmartStow®
20961
www.T oro.com.
*3428-136*A

55cmRecycler
ModelNo.20961—SerialNo.404320000andUp
®
Introduction
Thisrotary-blade,walk-behindlawnmowerisintended
tobeusedbyresidentialhomeowners.Itisdesigned
primarilyforcuttinggrassonwell-maintainedlawnson
residentialproperties.Usingthisproductforpurposes
otherthanitsintendedusecouldprovedangerousto
youandbystanders.
Readthisinformationcarefullytolearnhowtooperate
andmaintainyourproductproperlyandtoavoid
injuryandproductdamage.Youareresponsiblefor
operatingtheproductproperlyandsafely.
Visitwww.T oro.comformoreinformation,including
safetytips,trainingmaterials,accessoryinformation,
helpndingadealer,ortoregisteryourproduct.
Wheneveryouneedservice,genuineToroparts,or
additionalinformation,contactanAuthorizedService
DealerorToroCustomerServiceandhavethemodel
andserialnumbersofyourproductready .Figure1
identiesthelocationofthemodelandserialnumbers
ontheproduct.Writethenumbersinthespace
provided.
LawnMowerwithSmartStow
Thismanualuses2wordstohighlightinformation.
Importantcallsattentiontospecialmechanical
informationandNoteemphasizesgeneralinformation
worthyofspecialattention.
ThisproductcomplieswithallrelevantEuropean
directives;fordetails,pleaseseetheseparateproduct
specicDeclarationofConformity(DOC)sheet.
GrossorNetTorque:Thegrossornettorque
ofthisenginewaslaboratoryratedbytheengine
manufacturerinaccordancewiththeSocietyof
AutomotiveEngineers(SAE)J1940orJ2723.As
conguredtomeetsafety,emission,andoperating
requirements,theactualenginetorqueonthisclass
ofmowerwillbesignicantlylower.Pleasereferto
theenginemanufacturer’sinformationincludedwith
themachine.
FormNo.3428-124RevA
®
Operator'sManual
g000502
Figure2
Safety-alertsymbol
Important:Withyourmobiledevice,scanthe
QRcodeontheserialnumberdecaltoaccess
warranty,parts,andotherproductinformation.
Figure1
1.Modelandserialnumberlocation
ModelNo.
SerialNo.
Thismanualidentiespotentialhazardsandhas
safetymessagesidentiedbythesafety-alertsymbol
(Figure2),whichsignalsahazardthatmaycause
seriousinjuryordeathifyoudonotfollowthe
recommendedprecautions.
Donottamperwithordisablesafetydevicesonthe
machine,andchecktheirproperoperationregularly.
Donotattempttoadjustortamperwiththeengine
speedcontrol;doingsomaycreateanunsafe
operatingcondition,resultinginpersonalinjury.
g274803
©2018—TheT oro®Company
8111L yndaleAvenueSouth
Bloomington,MN55420
CV
Registeratwww.Toro.com.
OriginalInstructions(EN)
PrintedinMexico
AllRightsReserved
*3428-124*A

Contents
Safety
Introduction...............................................................1
Safety.......................................................................2
GeneralSafety...................................................2
SafetyandInstructionalDecals..........................3
Setup........................................................................5
1UnfoldingtheHandle.......................................5
2InstallingtheRecoil-StarterRopeinthe
RopeGuide.....................................................6
3FillingtheCrankcasewithOil...........................7
4AssemblingtheGrassBag...............................7
ProductOverview.....................................................8
Specications....................................................8
Attachments/Accessories...................................8
Operation..................................................................8
BeforeOperation...................................................8
BeforeOperationSafety.....................................8
FillingtheFuelTank............................................9
CheckingtheEngine-OilLevel..........................10
AdjustingtheHandleHeight.............................10
AdjustingtheCuttingHeight..............................11
DuringOperation..................................................11
DuringOperationSafety....................................11
StartingtheEngine...........................................12
UsingtheSelf-PropelDrive...............................13
ShuttingOfftheEngine.....................................13
RecyclingtheClippings....................................13
BaggingtheClippings.......................................14
OperatingtheBag-on-DemandLever...............14
Side-DischargingtheClippings.........................15
OperatingTips.................................................15
AfterOperation....................................................16
AfterOperationSafety......................................16
CleaningundertheMachine.............................16
FoldingtheHandle...........................................17
StoringtheMachineintheVertical-Stow
Position.........................................................18
Maintenance...........................................................20
RecommendedMaintenanceSchedule(s)...........20
MaintenanceSafety..........................................20
PreparingforMaintenance...............................20
ServicingtheAirFilter.......................................21
ChangingtheEngineOil...................................21
ReplacingtheBlade..........................................22
AdjustingtheSelf-PropelDrive.........................23
Storage...................................................................24
StorageSafety..................................................24
PreparingtheMachineforStorage...................24
RemovingtheMachinefromStorage................24
Thismachinehasbeendesignedinaccordancewith
ENISO5395.
GeneralSafety
Thisproductiscapableofamputatinghandsand
feetandofthrowingobjects.Alwaysfollowallsafety
instructionstoavoidseriouspersonalinjury .
•Read,understand,andfollowtheinstructions
andwarningsinthisOperator’sManualandon
themachineandattachmentsbeforestartingthe
engine.
•Donotputyourhandsorfeetnearmovingpartsof
orunderthemachine.Keepclearofanydischarge
opening.
•Donotoperatethemachinewithoutallguards
andothersafetyprotectivedevicesinplaceand
functioningproperlyonthemachine.
•Keepbystandersandchildrenoutoftheoperating
area.Donotallowchildrentooperatethemachine.
Allowonlypeoplewhoareresponsible,trained,
familiarwiththeinstructions,andphysically
capabletooperatethemachine.
•Stopthemachine,shutofftheengine,andwaitfor
allmovingpartstostopbeforeservicing,fueling,
oruncloggingthemachine.
Improperlyusingormaintainingthismachinecan
resultininjury.T oreducethepotentialforinjury ,
complywiththesesafetyinstructionsandalways
payattentiontothesafety-alertsymbol
meansCaution,Warning,orDanger—personalsafety
instruction.Failuretocomplywiththeseinstructions
mayresultinpersonalinjuryordeath.
,which
2

SafetyandInstructionalDecals
Safetydecalsandinstructionsareeasilyvisibletotheoperatorandarelocatednearanyarea
ofpotentialdanger.Replaceanydecalthatisdamagedormissing.
Manufacturer'sMark
1.Thismarkindicatesthatthebladeisidentiedasapart
fromtheoriginalmachinemanufacturer .
decaloemmarkt
112-8760
1.Thrownobjecthazard—keepbystandersaway.
2.Cutting/dismembermenthazardofhandorfoot,mower
blade—stayawayfrommovingparts.
decal112-8760
decal125-5026
125-5026
1.Recyclingmode2.Baggingmode
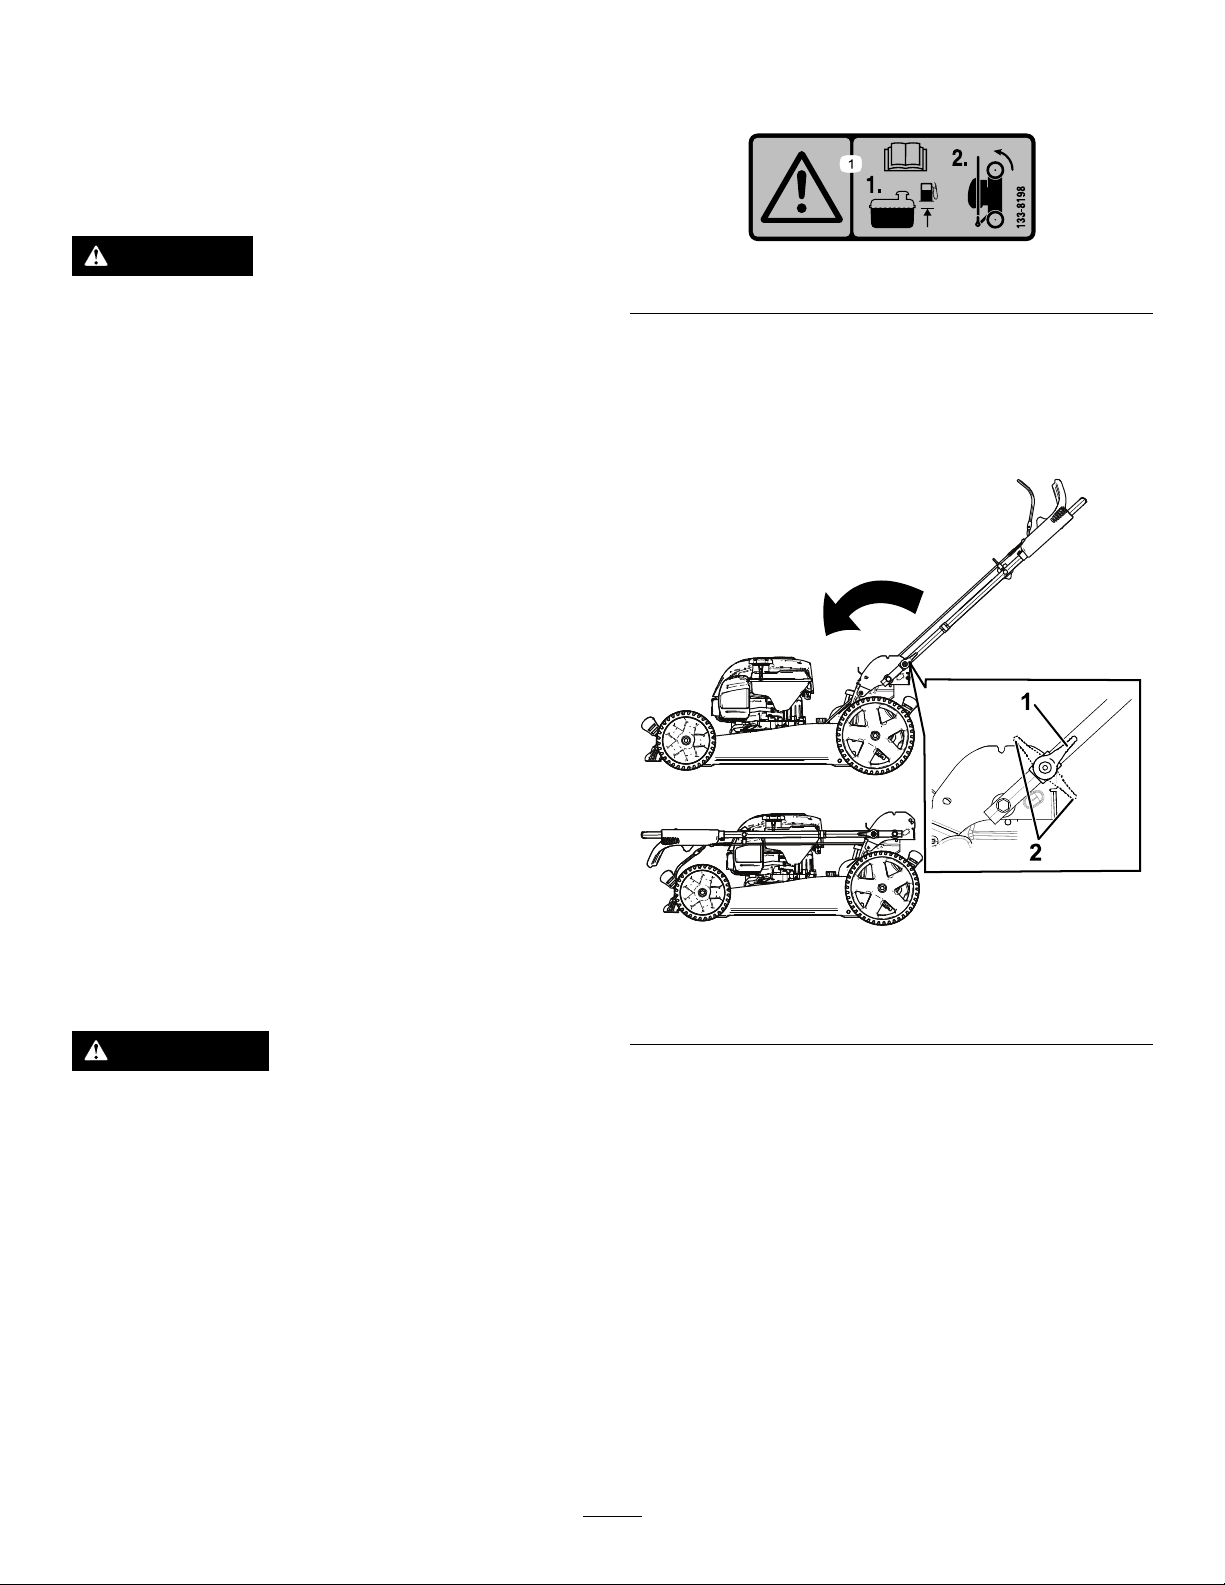
decal133-8198
133-8198
1.Warning—readtheOperator'sManual;1)Addfueluptothe
indicatedlevel.2)Tipthemachineforwardforstorage.
3
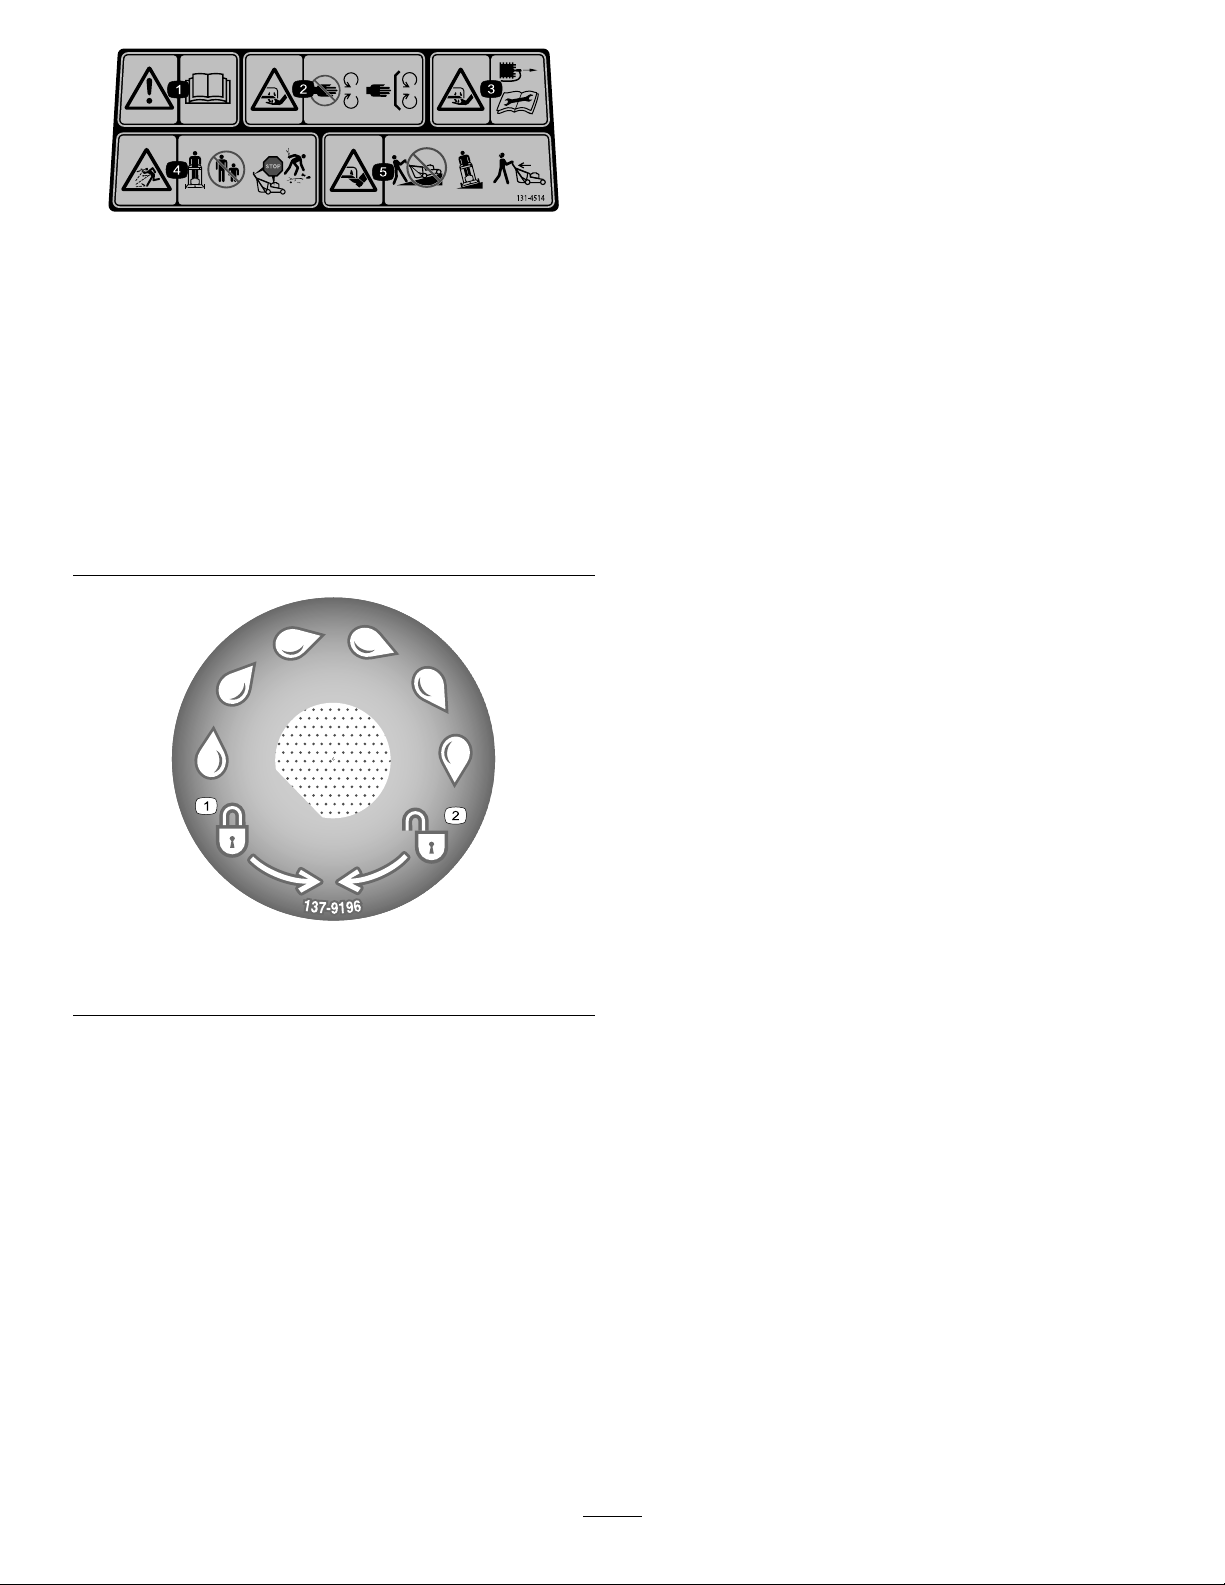
131-4514
1.Warning—readtheOperator'sManual.
2.Cutting/dismembermenthazardofhand,mower
blade—stayawayfrommovingparts;keepallguardsand
shieldsinplace.
3.Cutting/dismembermenthazardofhand,mower
blade—disconnectthespark-plugwirebeforeperforming
maintenance.
4.Thrownobjecthazard—keepbystandersaway.
5.Cutting/dismembermenthazardoffoot,mowerblade—do
notoperateupanddownslopes;operatesidetosideon
slopes;shutofftheenginebeforeleavingthemachine;
pickupanydebrisbeforemowing;lookbehindyouwhen
movinginreverse.
decal131-4514
137-9196
1.Lock2.Unlock
decal137-9196
4
Setup
Important:Removeanddiscardtheprotectiveplasticsheetthatcoverstheengineandanyother
plasticorwrappingonthemachine.
1
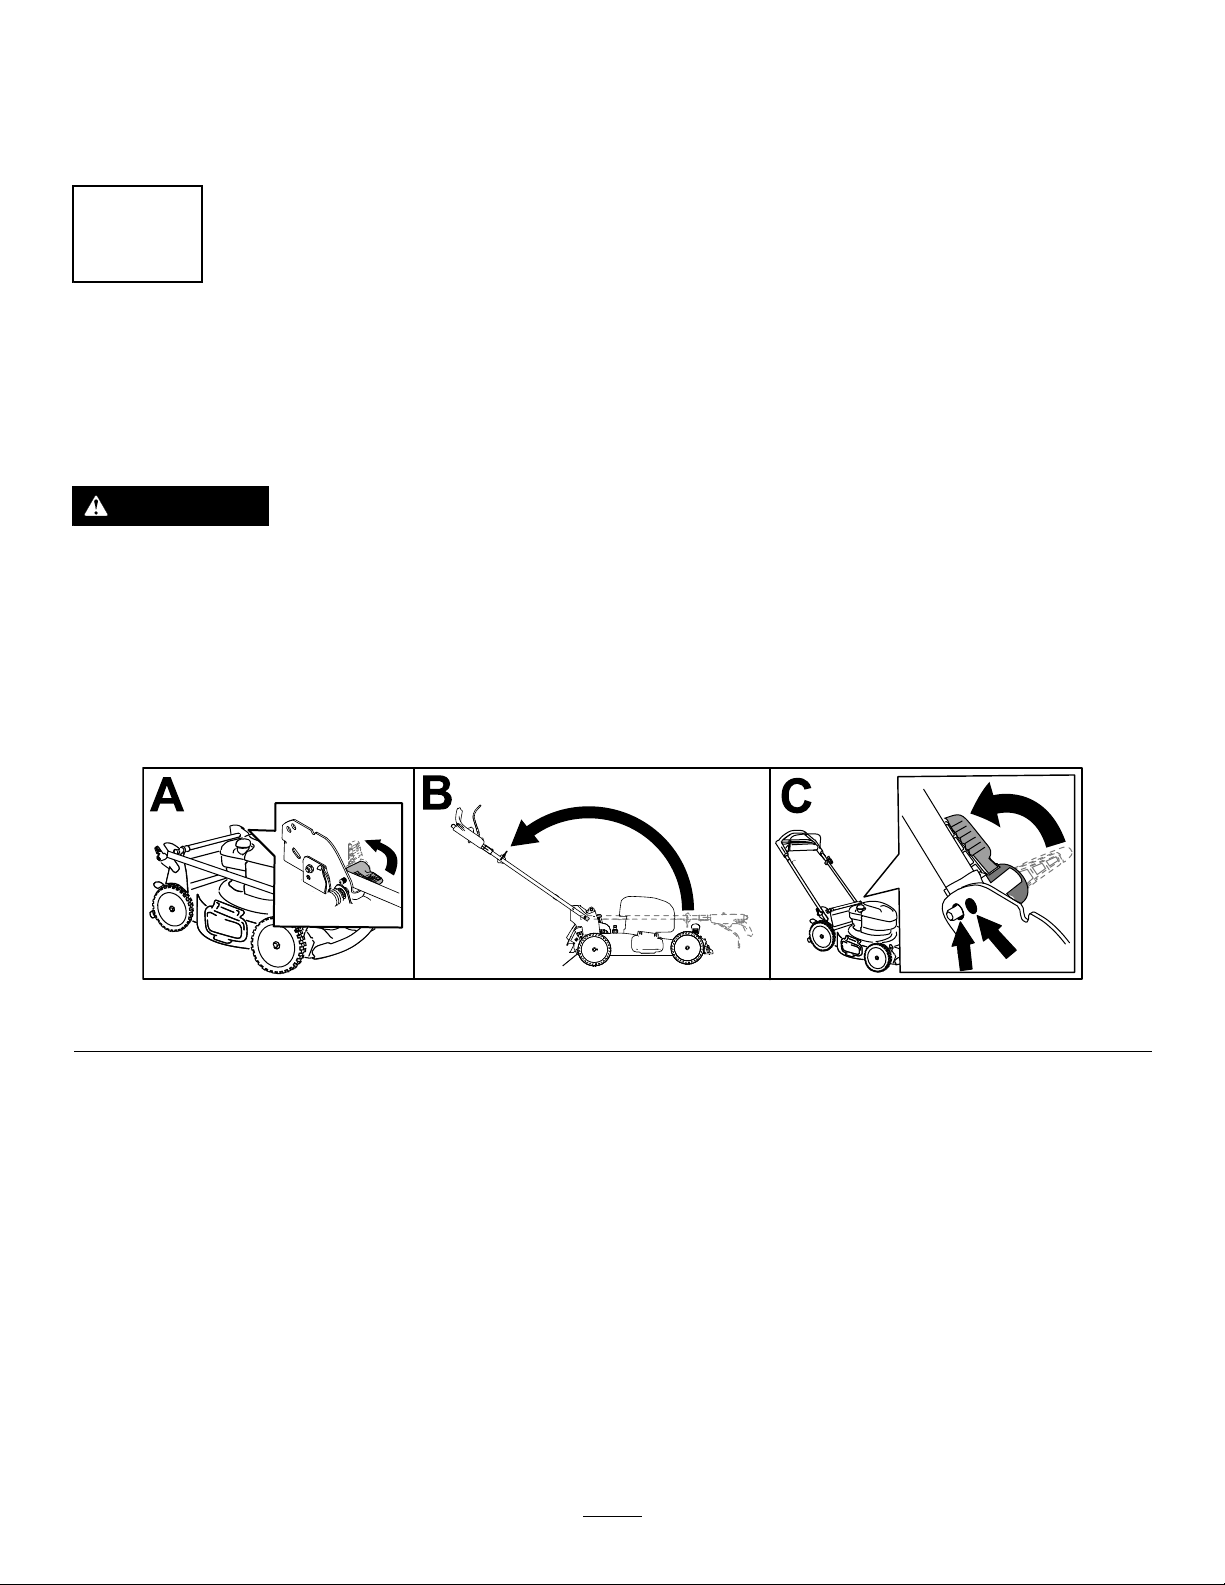
UnfoldingtheHandle
NoPartsRequired
Procedure
WARNING
Unfoldingthehandleimproperlycandamagethecables,causinganunsafeoperating
condition.
•Donotdamagethecable(s)whenfoldingorunfoldingthehandle.
•Ensurethatthecable(s)areroutedtotheoutsideofthehandle.
•Ifacableisdamaged,contactanAuthorizedServiceDealer.
Important:Holdthehandlewhileengagingthehandlelockstoavoidpinchingyourhands.
Figure3
g272938
5
2
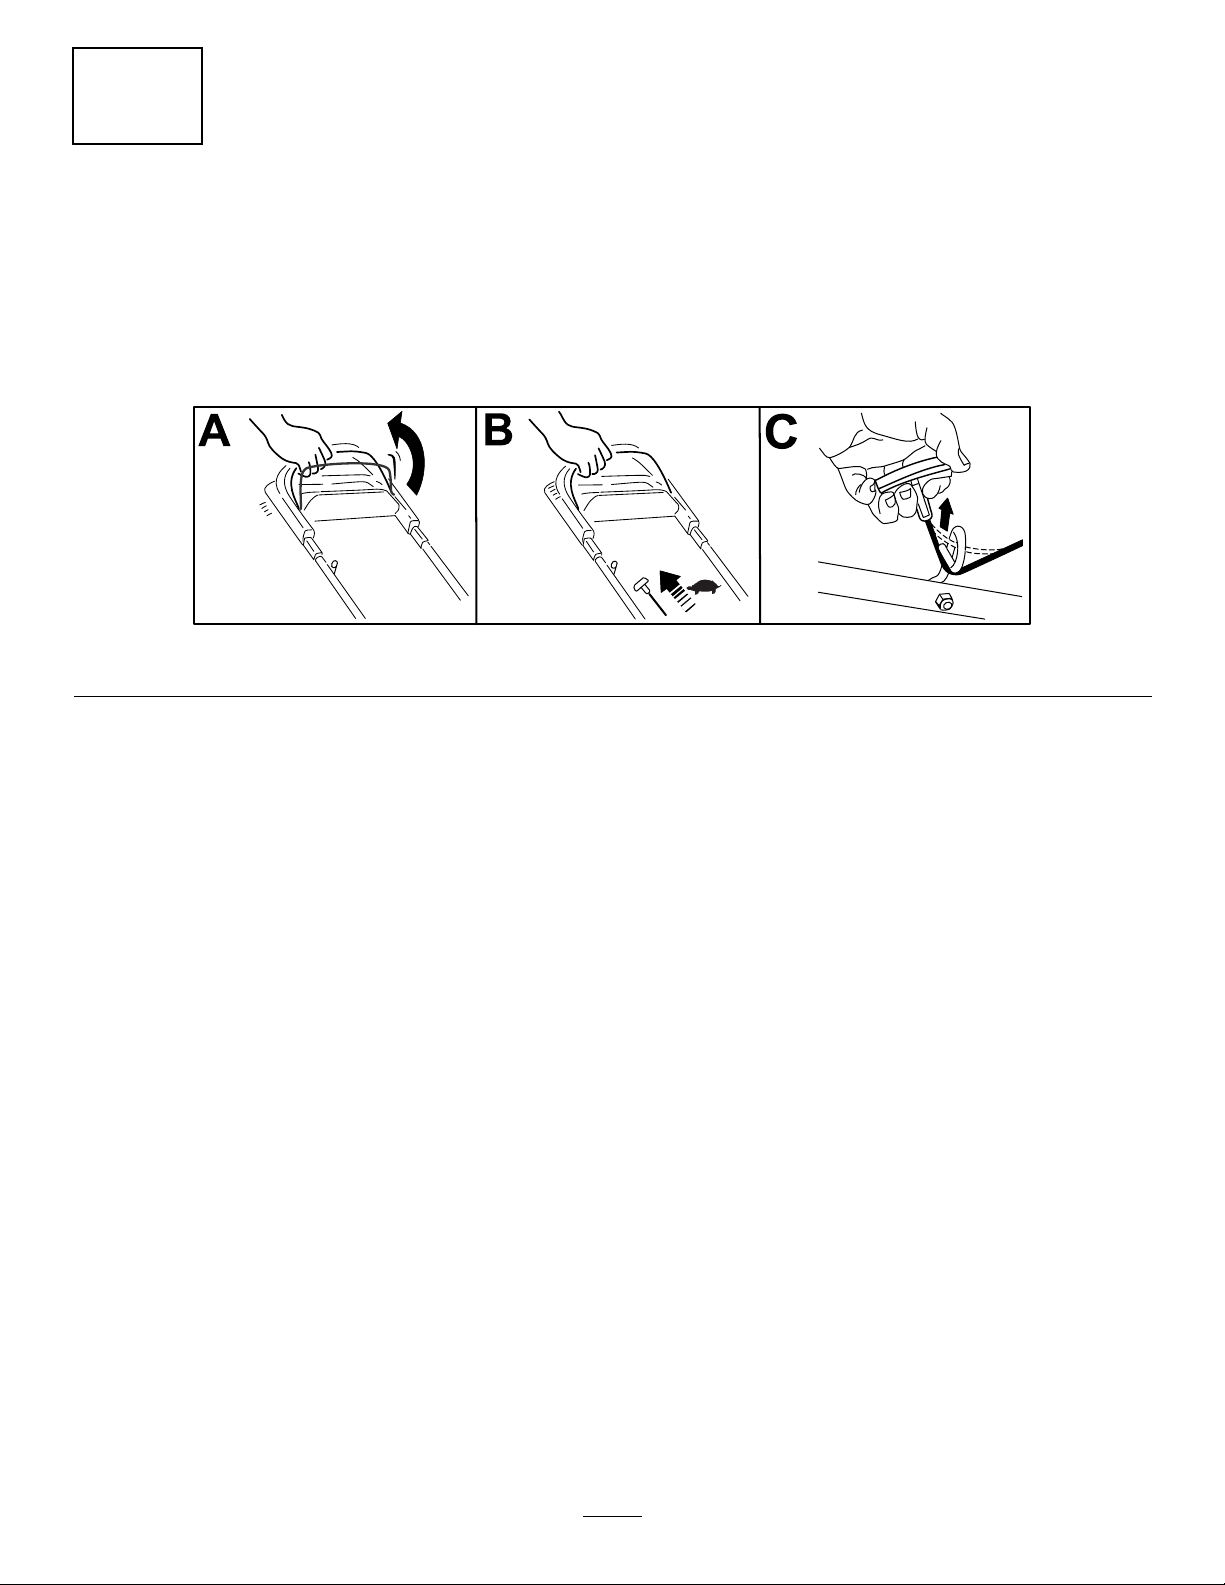
InstallingtheRecoil-StarterRopeintheRopeGuide
NoPartsRequired
Procedure
Important:Tostarttheenginesafelyandeasilywheneveryouusethemachine,installtherecoil-starter
ropeintheropeguide.
Figure4
g230719
6
3
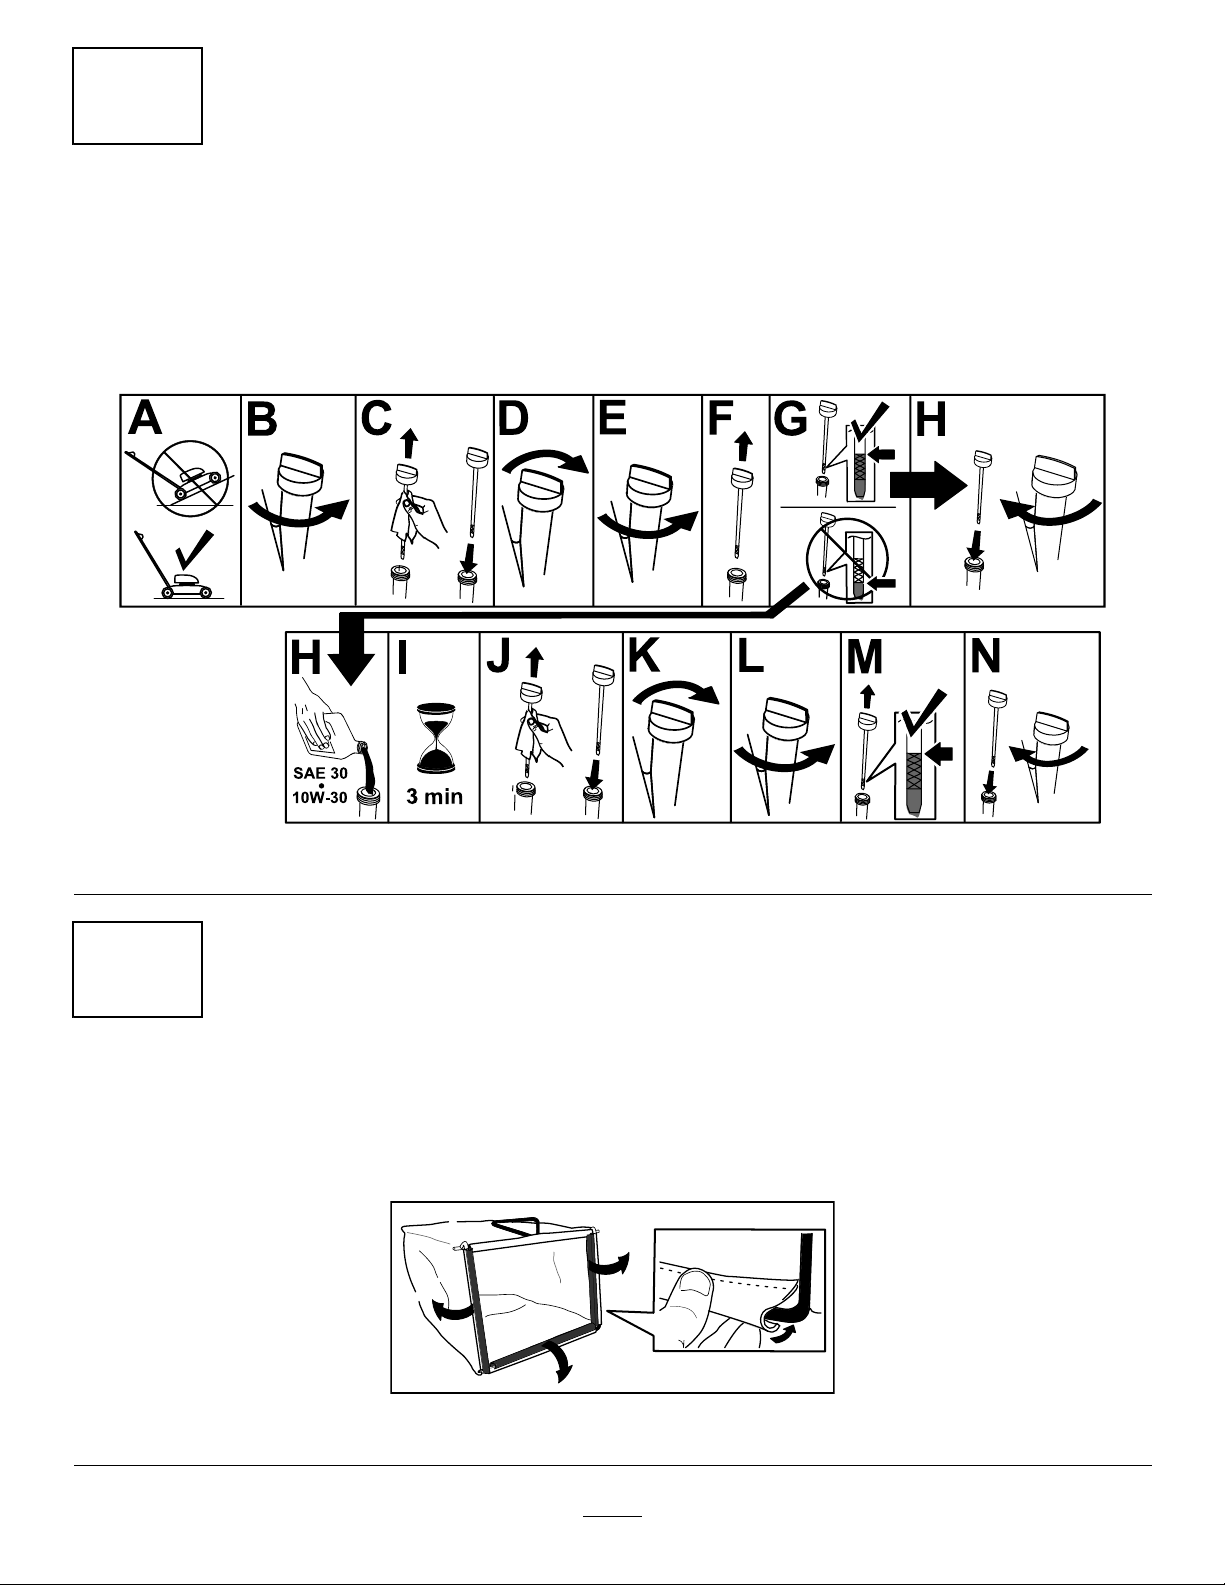
FillingtheCrankcasewithOil
NoPartsRequired
Procedure
Important:Iftheoillevelinthecrankcaseistoolowortoohighandyouruntheengine,youmay
damagetheengine.
4
AssemblingtheGrassBag
NoPartsRequired
Procedure
g222533
Figure5
g230447
Figure6
7
ProductOverview
Specications
ModelWeightLengthWidthHeight
35kg152cm58cm104cm
20961
(77lb)(60
inches)
(23
inches)
(41
inches)
Attachments/Accessories
AselectionofToroapprovedattachmentsand
accessoriesisavailableforusewiththemachine
toenhanceandexpanditscapabilities.Contact
yourAuthorizedServiceDealerorauthorizedT oro
distributororgotowww.T oro.comforalistofall
approvedattachmentsandaccessories.
Toensureoptimumperformanceandcontinuedsafety
certicationofthemachine,useonlygenuineToro
replacementpartsandaccessories.Replacement
partsandaccessoriesmadebyothermanufacturers
couldbedangerous,andsuchusecouldvoidthe
productwarranty.
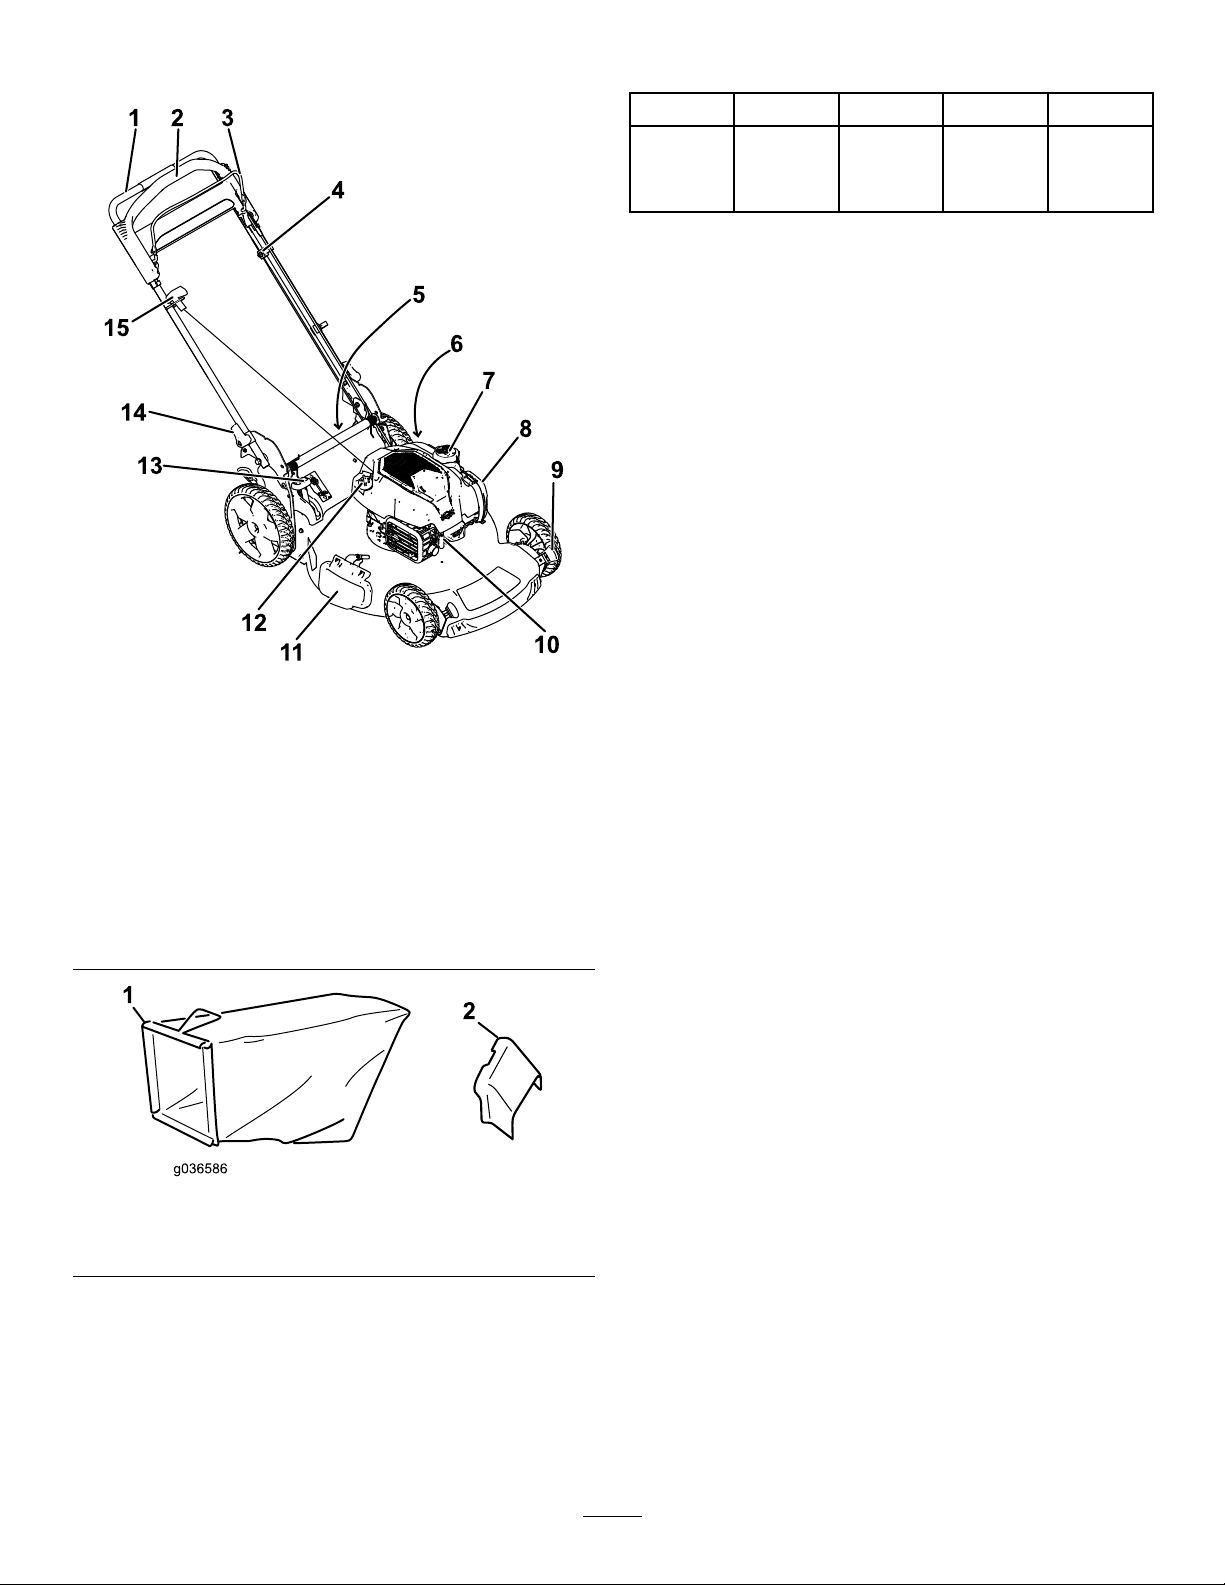
Figure7
1.Handle
2.Self-propelbar10.Sparkplug
3.Blade-controlbar
4.Adjustmentforthe
self-propeldrive
5.Reardeector(notshown)
6.Washoutport(notshown)14.Handlelock(2)
7.Fuel-tankcap15.Recoil-starthandle
8.Airlter
1.Grassbag2.Side-dischargechute
9.Cutting-heightlever(4)
11.Side-dischargedeector
12.Oil-lltube/dipstick
13.Bag-on-demandlever
Figure8
g272915
Operation
Note:Determinetheleftandrightsidesofthe
machinefromthenormaloperatingposition.
BeforeOperation
BeforeOperationSafety
GeneralSafety
•Alwaysshutoffthemachine,waitforallmoving
partstostop,andallowthemachinetocoolbefore
adjusting,servicing,cleaning,orstoringit.
•Becomefamiliarwiththesafeoperationofthe
equipment,operatorcontrols,andsafetysigns.
•Checkthatallguardsandsafetydevices,suchas
g036586
deectorsand/orgrasscatcher,areinplaceand
functioningproperly.
•Alwaysinspectthemachinetoensurethatthe
bladesandbladeboltsarenotwornordamaged.
•Inspecttheareawhereyouwillusethemachine,
andremoveallobjectsthatcouldinterferewith
theoperationofthemachineorthatthemachine
couldthrow.
•Contactwiththemovingbladewillcauseserious
injury.Donotputyourngersunderthehousing
whenadjustingthecuttingheight.
8

FuelSafety
•Fuelisextremelyammableandhighlyexplosive.
Areorexplosionfromfuelcanburnyouand
othersandcandamageproperty.
–Topreventastaticchargefromignitingthefuel,
placethecontainerand/ormachinedirectlyon
thegroundbeforelling,notinavehicleoron
anobject.
Refertoyourengineowner’smanualforadditional
information.
–Fillthefueltankoutdoors,inanopenarea,
whentheengineiscold.Wipeupanyfuelthat
spills.
–Donothandlefuelwhensmokingoraroundan
openameorsparks.
–Donotremovethefuelcaporaddfueltothe
tankwhiletheengineisrunningorhot.
–Ifyouspillfuel,donotattempttostartthe
engine.Avoidcreatingasourceofignitionuntil
thefuelvaporshavedissipated.
–Storefuelinanapprovedcontainerandkeep
itoutofthereachofchildren.
•Fuelisharmfulorfatalifswallowed.Long-term
exposuretovaporscancauseseriousinjuryand
illness.
–Avoidprolongedbreathingofvapors.
–Keepyourhandsandfaceawayfromthe
nozzleandthefuel-tankopening.
–Keepfuelawayfromyoureyesandskin.
g230458
Figure9
FillingtheFuelTank
•Forbestresults,useonlyclean,fresh,unleaded
gasolinewithanoctaneratingof87orhigher
((R+M)/2ratingmethod).
•Oxygenatedfuelwithupto10%ethanolor15%
MTBEbyvolumeisacceptable.
•Donotuseethanolblendsofgasoline,such
asE15orE85,withmorethan10%ethanolby
volume.Performanceproblemsand/orengine
damagemayresult,whichmaynotbecovered
underwarranty.
•Donotusegasolinecontainingmethanol.
•Donotstorefueleitherinthefueltankorinfuel
containersoverthewinterunlessfuelstabilizer
hasbeenaddedtothefuel.
•Donotaddoiltogasoline.
Fillthefueltankwithfreshunleadedregulargasoline
fromamajorname-brandservicestation(Figure9).
Important:T oreducestartingproblems,addfuel
stabilizer/conditionertofreshfuelasdirectedby
thefuel-stabilizermanufacturer.
9
CheckingtheEngine-OilLevel
ServiceInterval:Beforeeachuseordaily
Important:Iftheoillevelinthecrankcaseistoolowortoohighandyouruntheengine,youmay
damagetheengine.
Figure10
g231765
AdjustingtheHandleHeight
Youmayraiseorlowerthehandletoapositioncomfortableforyou.
Rotatethehandlelock,movethehandleto1of2positions,andlockthehandleintoposition(Figure11).
Figure11
g272926
10
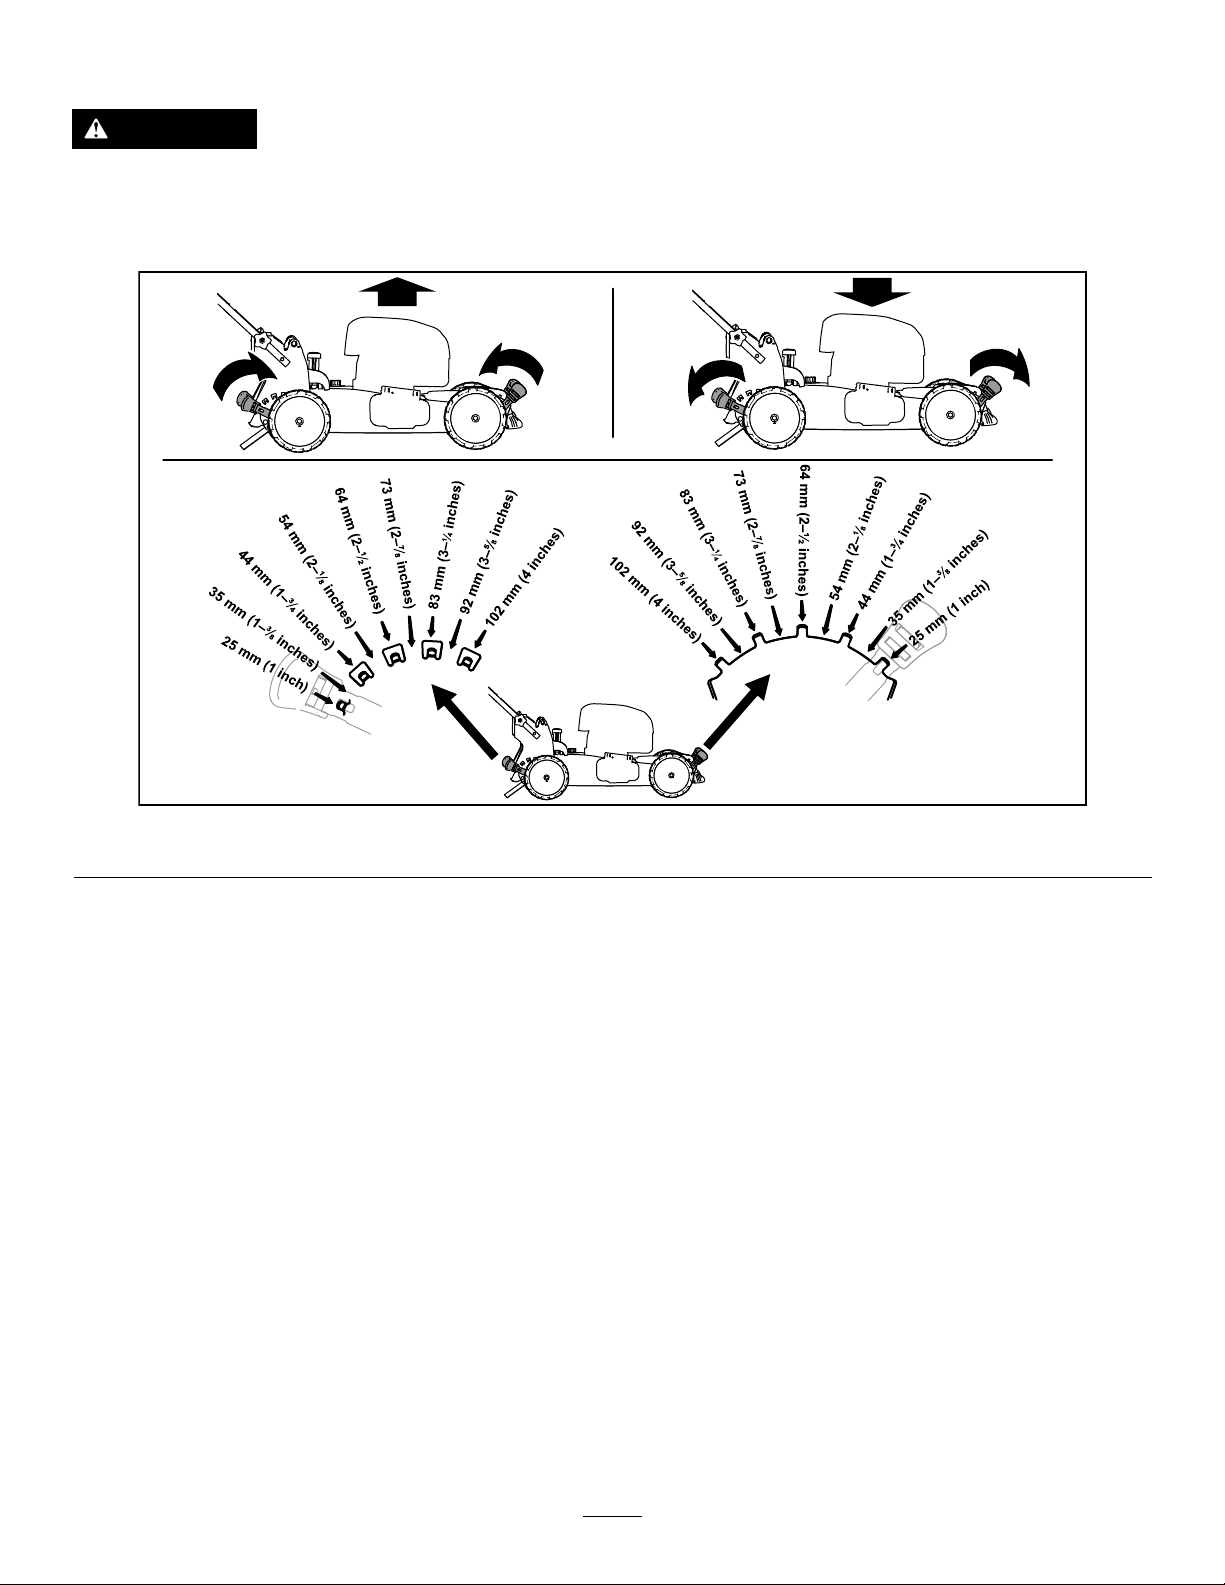
AdjustingtheCuttingHeight
CAUTION
Iftheenginehasbeenrunning,themuferwillbehotandcanseverelyburnyou.
Keepawayfromthehotmufer.
Adjustthecuttingheightasdesired.Setallwheelstothesamecuttingheight(Figure12).
DuringOperation
DuringOperationSafety
GeneralSafety
•Wearappropriateclothing,includingeye
protection;longpants;substantial,slip-resistant
footwear;andhearingprotection.Tiebacklong
hairanddonotwearlooseclothingorloose
jewelry.
•Useyourfullattentionwhileoperatingthe
machine.Donotengageinanyactivitythat
causesdistractions;otherwise,injuryorproperty
damagemayoccur.
•Donotoperatethemachinewhileill,tired,or
undertheinuenceofalcoholordrugs.
•Thebladeissharp;contactingthebladecanresult
inseriouspersonalinjury.Shutofftheengineand
waitforallmovingpartstostopbeforeleavingthe
operatingposition.
g254131
Figure12
•Whenyoureleasetheblade-controlbar,the
engineshouldshutoffandthebladeshouldstop
within3seconds.Ifnot,stopusingyourmachine
immediatelyandcontactanAuthorizedService
Dealer.
•Keepbystandersoutoftheoperatingarea.Keep
smallchildrenoutoftheoperatingareaandunder
thewatchfulcareofaresponsibleadultwhois
notoperatingthemachine.Stopthemachineif
anyoneentersthearea.
•Alwayslookdownandbehindyoubeforemoving
themachineinreverse.
•Operatethemachineonlyingoodvisibilityand
appropriateweatherconditions.Donotoperate
themachinewhenthereistheriskoflightning.
•Wetgrassorleavescancauseseriousinjuryif
youslipandcontacttheblade.Avoidmowingin
wetconditions.
•Useextremecarewhenapproachingblind
corners,shrubs,trees,orotherobjectsthatmay
blockyourview.
11
•Donotdirectthedischargematerialtoward
anyone.Avoiddischargingmaterialagainstawall
orobstruction;materialmayricochettowardyou.
Stoptheblade(s)whencrossinggravelsurfaces.
•Watchforholes,ruts,bumps,rocks,orother
hiddenobjects.Uneventerraincouldcauseyou
toloseyourbalanceorfooting.
•Ifthemachinestrikesanobjectorstartsto
vibrate,immediatelyshutofftheengine,waitfor
allmovingpartstostop,anddisconnectthewire
fromthesparkplugbeforeexaminingthemachine
fordamage.Makeallnecessaryrepairsbefore
resumingoperation.
•Beforeleavingtheoperatingposition,shutoffthe
engineandwaitforallmovingpartstostop.
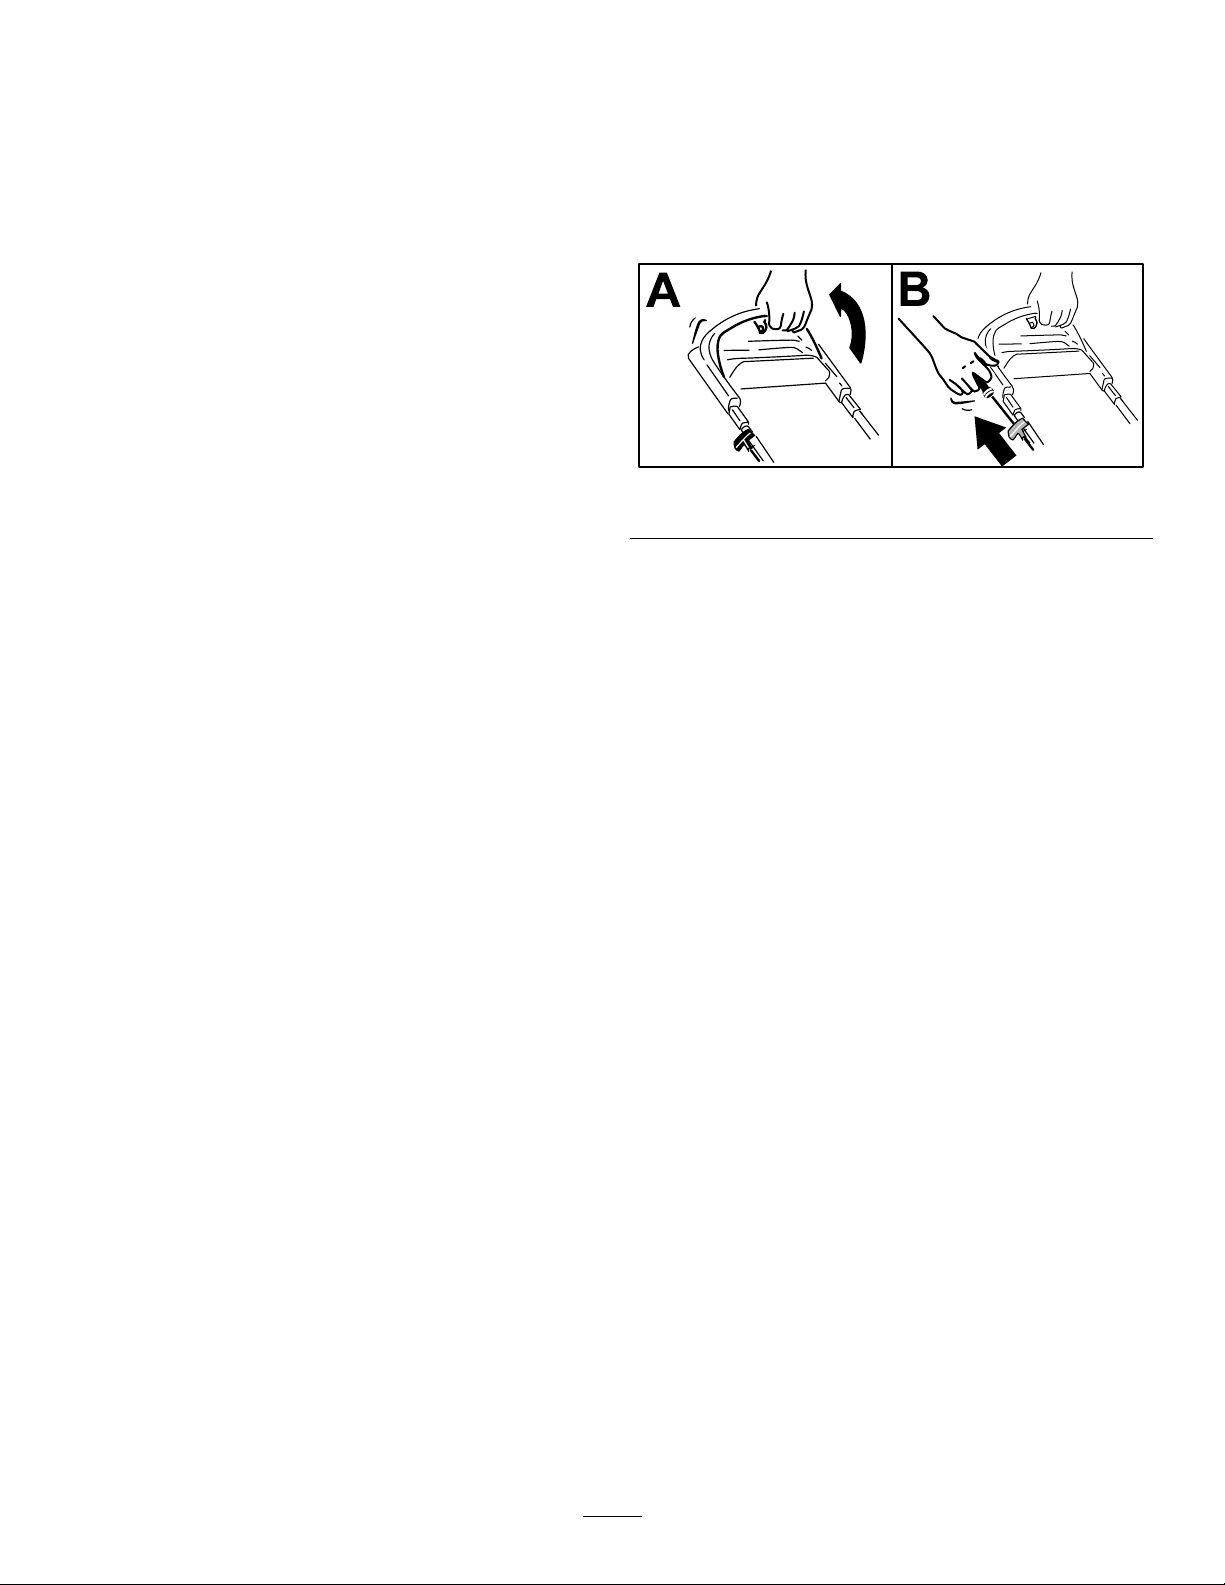
StartingtheEngine
1.Holdtheblade-controlbaragainstthehandle
(AofFigure13).
2.Pulltherecoil-starthandlelightlyuntilyoufeel
resistance,thenpullitsharply,andallowitto
returntotheropeguideonthehandleslowly(B
ofFigure13).
•Iftheenginehasbeenrunning,itwillbehotand
canseverelyburnyou.Keepawayfromthehot
engine.
•Operatetheengineonlyinwell-ventilatedareas.
Exhaustgasescontaincarbonmonoxide,which
islethalifinhaled.
•Checkthegrasscatchercomponentsandthe
dischargechutefrequentlyforanywearor
deteriorationandreplacethemwithgenuineT oro
partswhennecessary.
SlopeSafety
•Mowacrossthefaceofslopes;neverupand
down.Useextremecautionwhenchanging
directiononslopes.
•Donotmowonexcessivelysteepslopes.Poor
footingcouldcauseaslip-and-fallaccident.
•Mowwithcautionneardrop-offs,ditches,or
embankments.
g230459
Figure13
Note:Ifthemachinedoesnotstartafterseveral
attempts,contactanAuthorizedServiceDealer.
12
UsingtheSelf-PropelDrive
RecyclingtheClippings
Tooperatetheself-propeldrive,simplywalkwithyour
handsontheupperhandleandyourelbowsatyour
sides,andthemachinewillautomaticallykeeppace
withyou(Figure14).
Figure14
Note:Ifthemachinedoesnotfreelyrollbackward
afterself-propelling,stopwalking,holdyourhands
inplace,andallowthemachinetorollacoupleof
centimeters(inches)forwardtodisengagethewheel
drive.Y oucanalsotryreachingjustundertheupper
handletothemetalhandleandpushingthemachine
forwardacoupleofcentimeters(inches).Ifthe
machinestilldoesnotrollbackwardeasily,contactan
AuthorizedServiceDealer.
Yourmachinecomesfromthefactoryreadytorecycle
thegrassandleafclippingsbackintothelawn.
Ifthegrassbagisonthemachineandthe
bag-on-demandleverisinthebaggingposition,
movethelevertotherecyclingposition;referto
OperatingtheBag-on-DemandLever(page14).If
theside-dischargechuteisonthemachine,remove
it;refertoRemovingtheSide-DischargeChute(page
15).
g233423
ShuttingOfftheEngine
ServiceInterval:Beforeeachuseordaily
Toshutofftheengine,releasetheblade-controlbar.
Important:Whenyoureleasetheblade-control
bar,boththeengineandbladeshouldstopwithin
3seconds.Iftheydonotstopproperly ,stop
usingyourmachineimmediatelyandcontactan
AuthorizedServiceDealer.
13
BaggingtheClippings
Usethegrassbagwhenyouwanttocollectgrassandleafclippingsfromthelawn.
Iftheside-dischargechuteisonthemachine,removeit;refertoRemovingtheSide-DischargeChute(page
15).Ifthebag-on-demandleverisintherecyclingposition,moveittothebaggingposition;refertoOperating
theBag-on-DemandLever(page14).
InstallingtheGrassBag
1.Raiseandholdupthereardeector(AofFigure15).
2.Installthegrassbag,ensuringthatthepinsonthebagrestinthenotchesonthehandle(BofFigure15).
3.Lowerthereardeector.
Figure15
g233434
RemovingtheGrassBag
Toremovethebag,reversethestepsinInstallingtheGrassBag(page14).
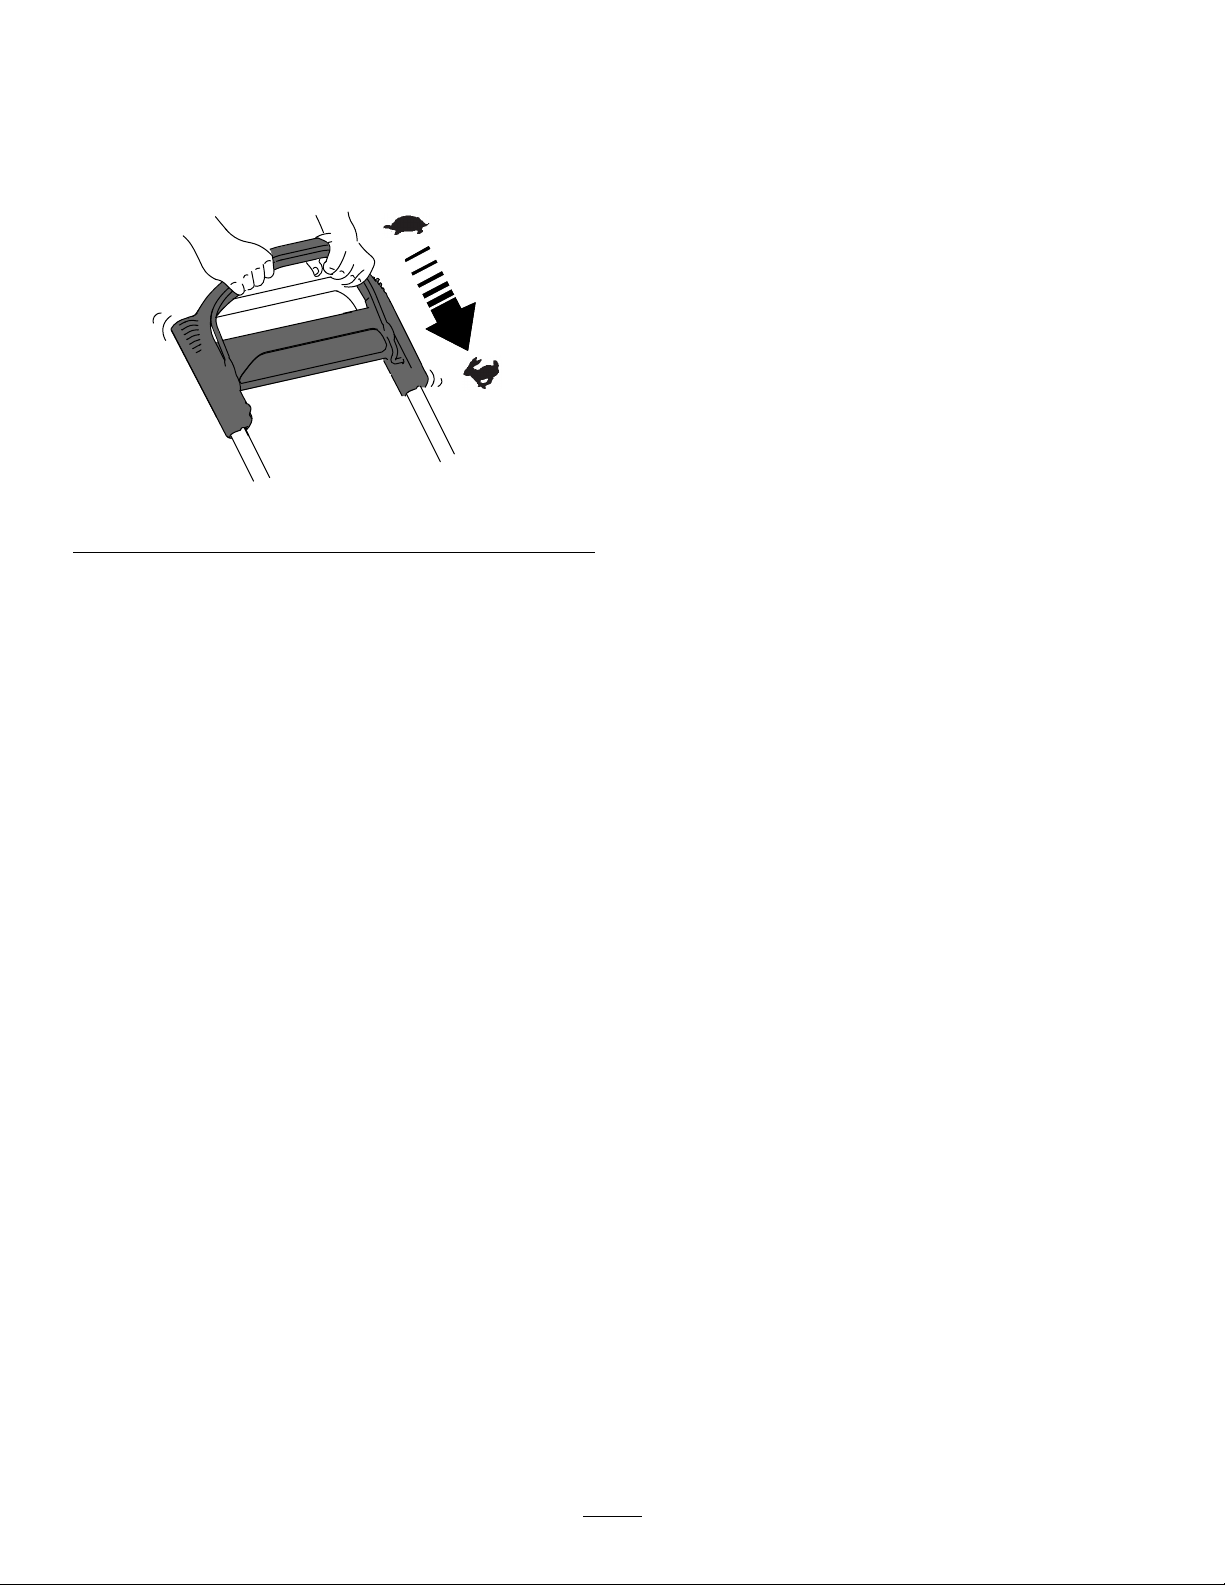
Operatingthe
Bag-on-DemandLever
Thebag-on-demandfeatureallowsyoutoeither
collectorrecyclegrassandleafclippingswhilethe
grassbagisattachedtothemachine.
•Tobagthegrassandleafclippings,pressthe
buttononthebag-on-demandleverandmovethe
leverforwarduntilthebuttonontheleverpopsup
(Figure16).
1.Bag-on-demandlever(inthebaggingposition)
•Torecycleorside-dischargethegrassand
leafclippings,pressthebuttonontheleverand
movetheleverrearwarduntilthebuttononthe
leverpopsup.
g198723
Figure16
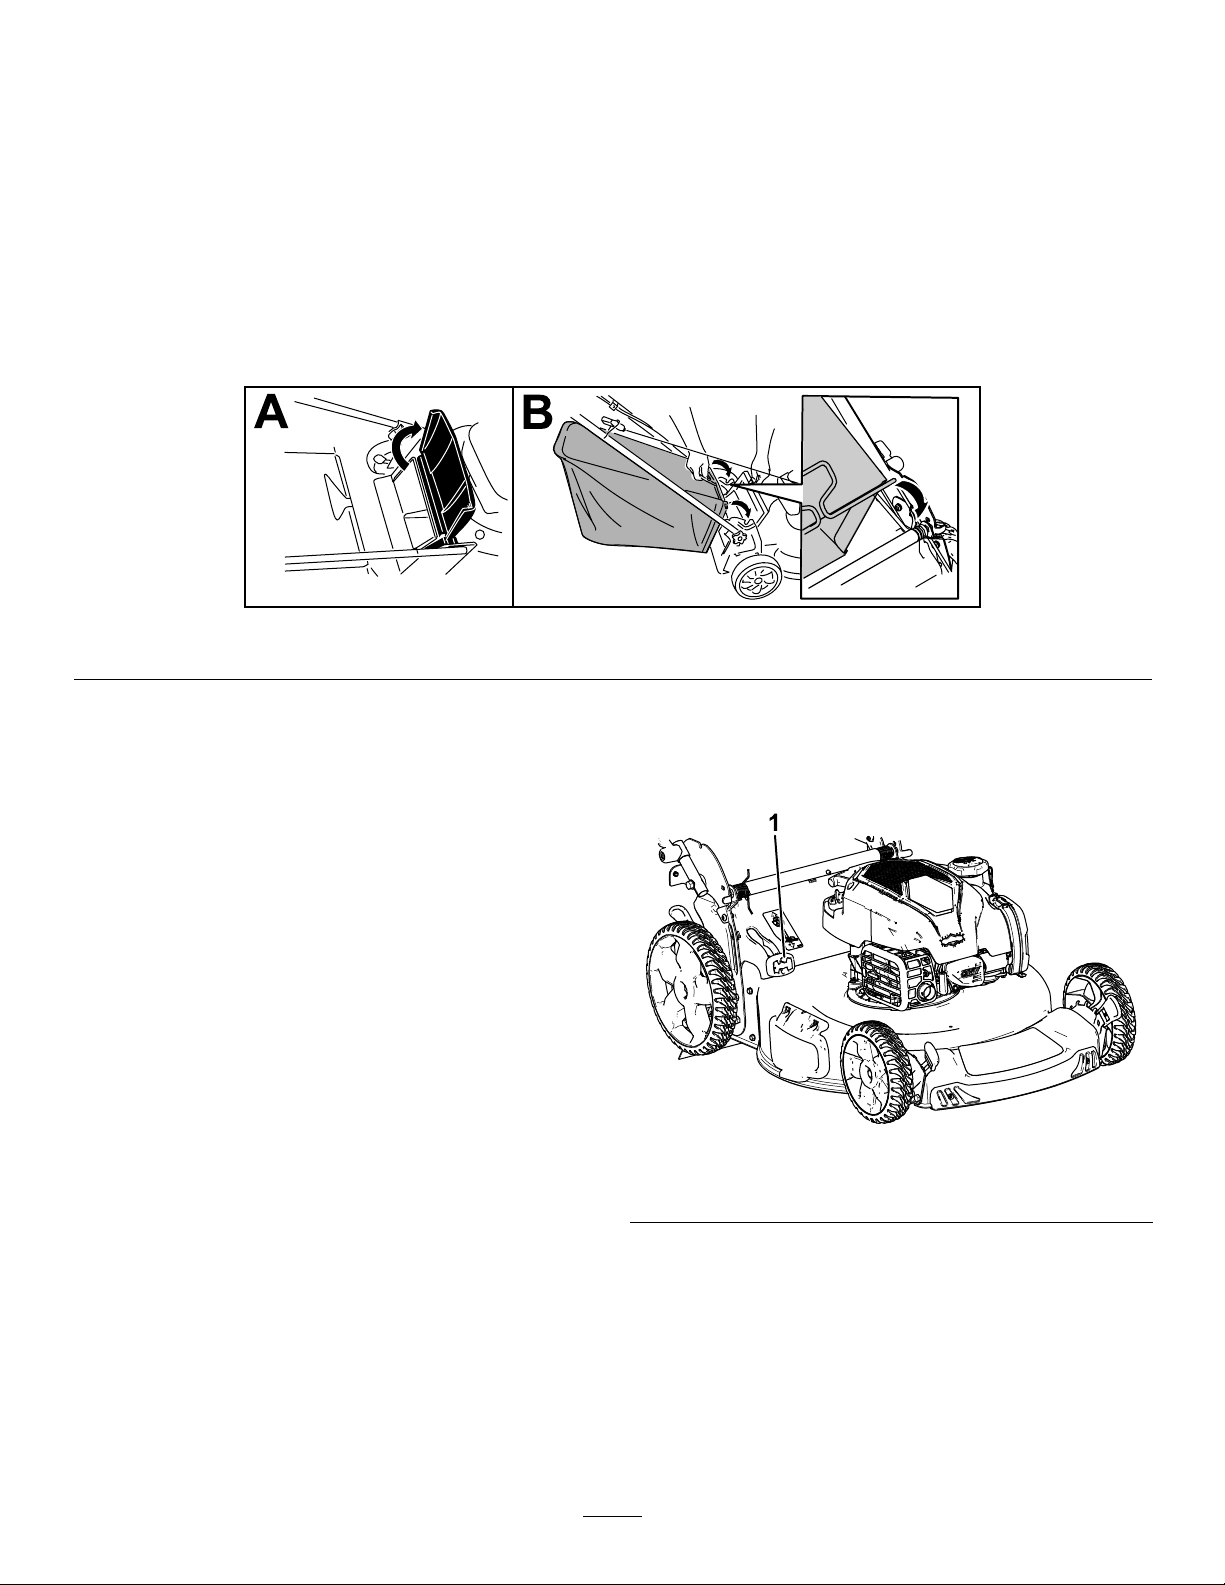
Important:Forproperoperation,shutoff
theengine,waitforallmovingpartstostop,
andthenremoveanygrassclippingsand
debrisfromthebag-on-demanddoorandthe
surroundingopening(Figure17)beforeyou
14
movethebag-on-demandleverfrom1position
toanother.
Figure17
1.Cleanhere
Side-Dischargingthe
Clippings
RemovingtheSide-Discharge
Chute
Toremovetheside-dischargechute,liftuptheside
deector,removetheside-dischargechute,andlower
theside-dischargedeectoruntilitlatchessecurely.
OperatingTips
GeneralMowingTips
•Inspecttheareawhereyouwillusethemachine
andremoveallobjectsthatthemachinecould
throw.
•Avoidstrikingsolidobjectswiththeblade.Never
g198734
deliberatelymowoveranyobject.
•Ifthemachinestrikesanobjectorstartstovibrate,
immediatelyshutofftheengine,removethekey
(ifequipped),disconnectthewirefromthespark
plug,andexaminethemachinefordamage.
•Forbestperformance,installanewbladebefore
thecuttingseasonbegins.
•ReplacethebladewhennecessarywithaT oro
replacementblade.
Useside-dischargingforcuttingverytallgrass.
Ifthegrassbagisonthemachineandthe
bag-on-demandleverisinthebaggingposition,move
thelevertotherecyclingposition;refertoOperating
theBag-on-DemandLever(page14).
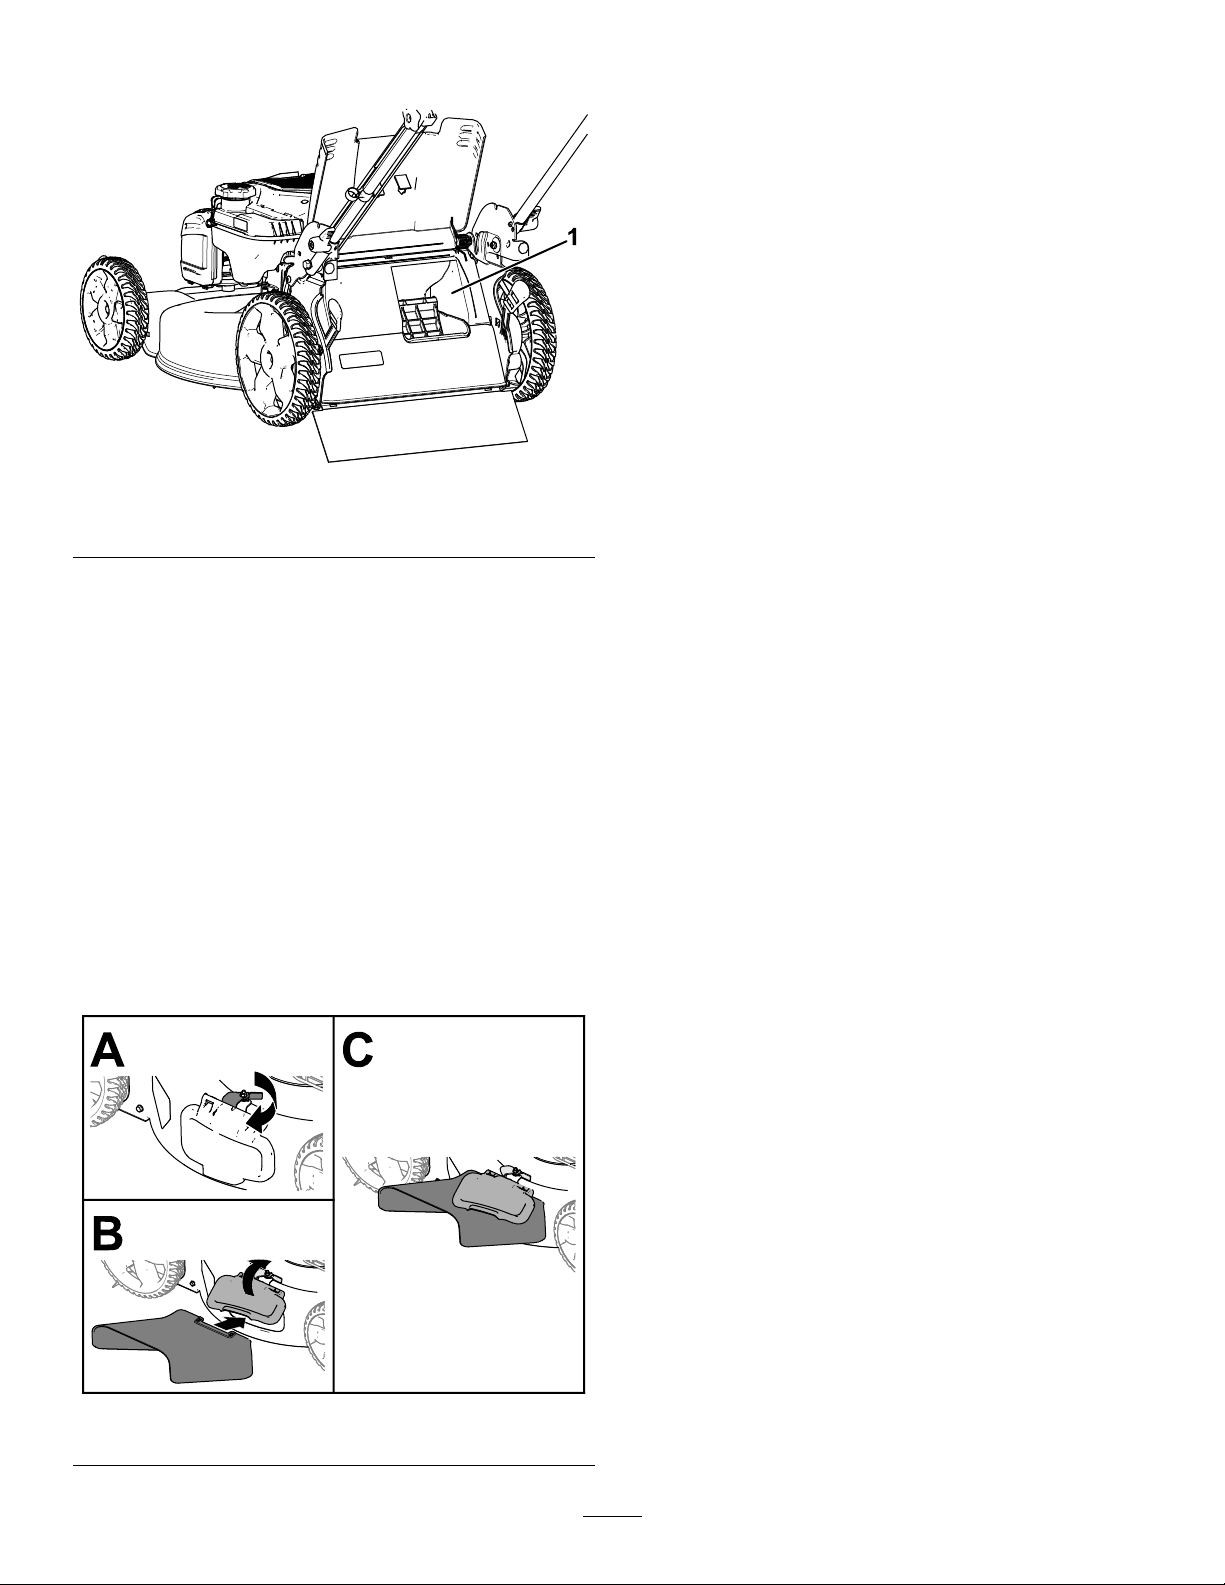
InstallingtheSide-Discharge
Chute
Unlatchandliftupthesidedeectorandinstallthe
side-dischargechute(Figure18).
Figure18
CuttingGrass
•Cutonlyaboutathirdofthegrassbladeatatime.
Donotcutbelow51mm(2inches)unlessthe
grassissparseoritislatefallwhengrassgrowth
beginstoslowdown.
•Whencuttinggrassover15cm(6inches)tall,
mowatthehighestcuttingheightsettingandwalk
slower;thenmowagainatalowersettingforthe
bestlawnappearance.Ifthegrassistoolong,the
machinemayplugandcausetheenginetostall.
•Wetgrassandleavestendtoclumpontheyard
andcancausethemachinetoplugortheengine
tostall.Avoidmowinginwetconditions.
•Beawareofapotentialrehazardinverydry
conditions,followalllocalrewarnings,andkeep
themachinefreeofdrygrassandleafdebris.
•Alternatethemowingdirection.Thishelps
dispersetheclippingsoverthelawnforeven
fertilization.
•Ifthenishedlawnappearanceisunsatisfactory,
try1ormoreofthefollowing:
–Replacethebladeorhaveitsharpened.
–Walkataslowerpacewhilemowing.
–Raisethecuttingheightonyourmachine.
g235646
–Cutthegrassmorefrequently.
–Overlapcuttingswathsinsteadofcuttingafull
swathwitheachpass.
15

CuttingLeaves
•Aftercuttingthelawn,ensurethathalfofthelawn
showsthroughthecutleafcover.Youmayneed
tomakemorethanasinglepassovertheleaves.
•Iftherearemorethan13cm(5inches)ofleaves
onthelawn,mowatahighercuttingheightand
thenagainatthedesiredcuttingheight.
•Slowdownyourmowingspeedifthemachine
doesnotcuttheleavesnelyenough.
AfterOperation
AfterOperationSafety
GeneralSafety
•Alwaysshutoffthemachine,waitforallmoving
partstostop,andallowthemachinetocoolbefore
adjusting,servicing,cleaning,orstoringit.
•Cleangrassanddebrisfromthemachinetohelp
preventres.Cleanupoilorfuelspills.
•Neverstorethemachineorfuelcontainerwhere
thereisanopename,spark,orpilotlight,such
asonawaterheateroronotherappliances.
HaulingSafety
•Usecarewhenloadingorunloadingthemachine.
•Securethemachinefromrolling.
CleaningundertheMachine
ServiceInterval:Beforeeachuseordaily
CleaningundertheMachineUsing
theWashoutPort
Forbestresults,cleanthemachinesoonafteryou
havecompletedmowing.
1.Movethemachineontoaatpavedsurface.
2.Shutofftheengineandwaitforallmovingparts
tostopbeforeleavingtheoperatingposition.
3.Lowerthemachinetoitslowestcutting-height
setting.RefertoAdjustingtheCuttingHeight
(page1 1).
4.Washouttheareaunderthereardoorwherethe
clippingsgofromtheundersideofthemachine
tothegrassbag.
Note:Washouttheareawiththe
bag-on-demand(ifequipped)inboththefully
forwardandfullyrearwardpositions.
5.Attachagardenhosethatisconnectedtoa
watersupplytothewashoutport(Figure19).
16
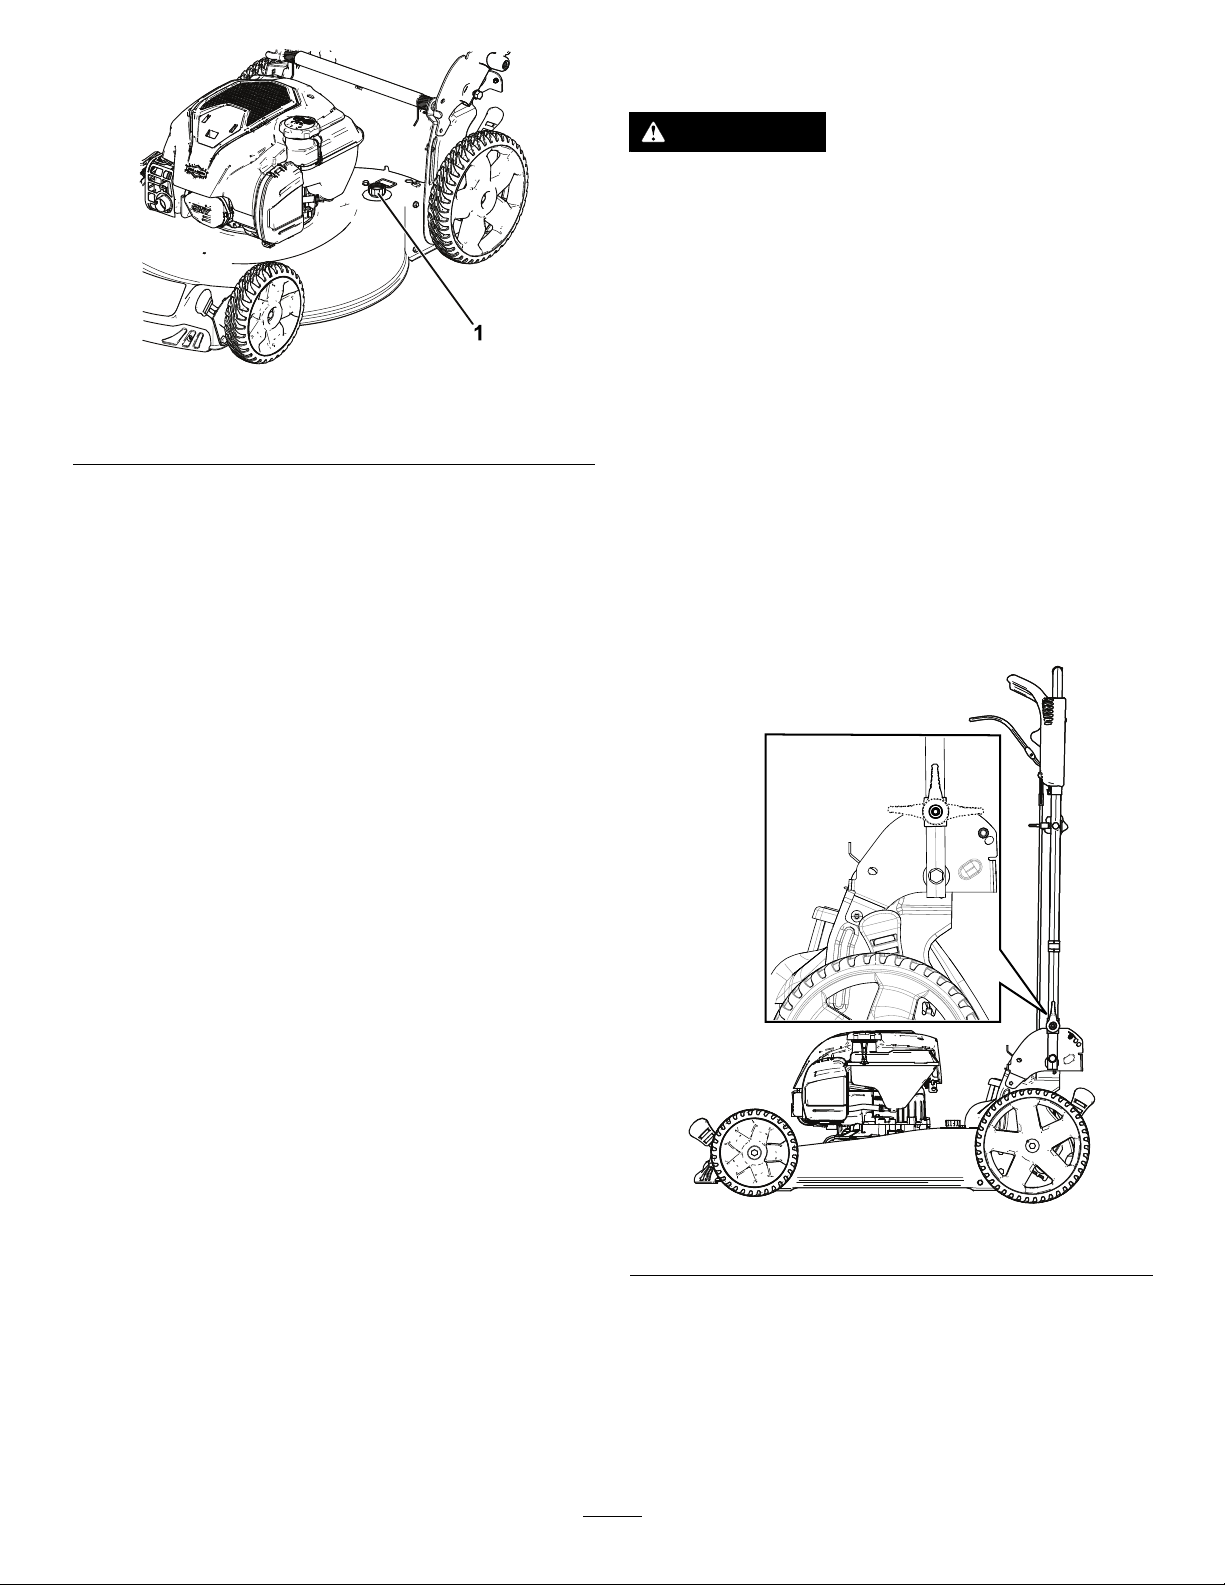
Figure19
1.Washoutport
6.Turnthewateron.
7.Starttheengineandrunituntiltheclippingsno
longercomeoutfromunderthemachine.
8.Shutofftheengine.
9.Shutoffthewateranddisconnectthegarden
hosefromthemachine.
FoldingtheHandle
WARNING
Foldingorunfoldingthehandleimproperly
candamagethecables,causinganunsafe
operatingcondition.
•Donotdamagethecableswhenfoldingor
unfoldingthehandle.
•Ifacableisdamaged,contactan
AuthorizedServiceDealer.
g186136
1.Holdthehandlewhiledisengagingthehandle
lockstoavoidpinchingyourhands.
2.Disengagethehandlelocksuntilyoucanmove
theupperhandlefreely.
3.Foldthehandleforwardeithertothevertical
positionorthefullyforwardpositionasshown
inFigure20.
Important:Routethecablestotheoutside
ofthehandlelocksasyoufoldthehandle.
10.Starttheengineandrunitforafewminutesto
drytheundersideofthemachinetopreventit
fromrusting.
11.Shutofftheengineandallowittocoolbefore
storingthemachineinanenclosedarea.
CleaningundertheMachineinthe
Vertical-stowPosition
1.Setthemachineinthevertical-stowposition;
refertoStoringtheMachineintheVertical-Stow
Position(page18).
2.Washouttheclippingsfromunderthemachine.
g186137
Figure20
4.T ounfoldthehandle,referto1Unfoldingthe
Handle(page5).
17
StoringtheMachineinthe
Vertical-StowPosition
Duringthemowingseasonorintheoff-season,you
canstoreyourmachineintheverticalpositionto
minimizestoragespace.
intoanapprovedfuelcontaineruntilitisator
belowthelevelrecommendedbytheengine
manufacturer.
DANGER
Fuelisextremelyammableandexplosive.A
reorexplosionfromfuelcanburnyouand
others.
•Storingthemachineintheverticalposition
whenthereistoomuchfuelinthefueltank
maycausefueltoleakfromthefueltank.
Fuelisextremelyammableandexplosive.
Areorexplosionfromfuelcanburnyou
andothers.
•Storethemachineintheverticalposition
onlywhentheleveloffuelinthefueltank
isnohigherthanwhatisrecommendedin
thisOperator’sManual.
•Donotstorethemachineinaposition
thatisbeyondthevertical(90°)position;
otherwise,fuelmayescapefromthefuel
tank.
•Donottransportthemachineinthe
vertical-stowposition.
decal133-8198
Figure21
2.Ensurethatthecutting-heightsettingonthe
machineis92mm(3-5/8inches)orlower.If
itisnot,lowerit;refertoAdjustingtheCutting
Height(page11).
3.Disengagethehandlelocks(Figure22).
•Donotattempttostartthemachineinthe
vertical-stowposition.
•Donotattempttostoreanymachinewith
fuelandoilinthevertical-stowposition
thatisnotdesignedforthatpurpose.
WARNING
Foldingorunfoldingthehandleimproperly
candamagethecables,causinganunsafe
operatingcondition.
•Donotdamagethecableswhenfoldingor
unfoldingthehandle.
•Ifacableisdamaged,contactan
AuthorizedServiceDealer.
1.Ensurethattheleveloffuelinthefueltankisno
higherthanwhatisrecommendedbytheengine
manufacturer;refertotheenginemanufacturer’s
decalontheengine(Figure21).
Figure22
1.Handlelockdisengaged
positions
4.Foldthehandlefullyforward(Figure22).
2.Handlelockengaged
position
Important:Routethecablestotheoutside
ofthehandleknobsasyoufoldthehandle.
5.Engagethehandlelocks.
6.Liftthefrontofthemachinebythehandleand
moveitintoastoragespace(Figure23).
g186012
Note:Ifthereistheleveloffuelinthefuel
tankistoohigh,drainthefuelfromthefueltank
18
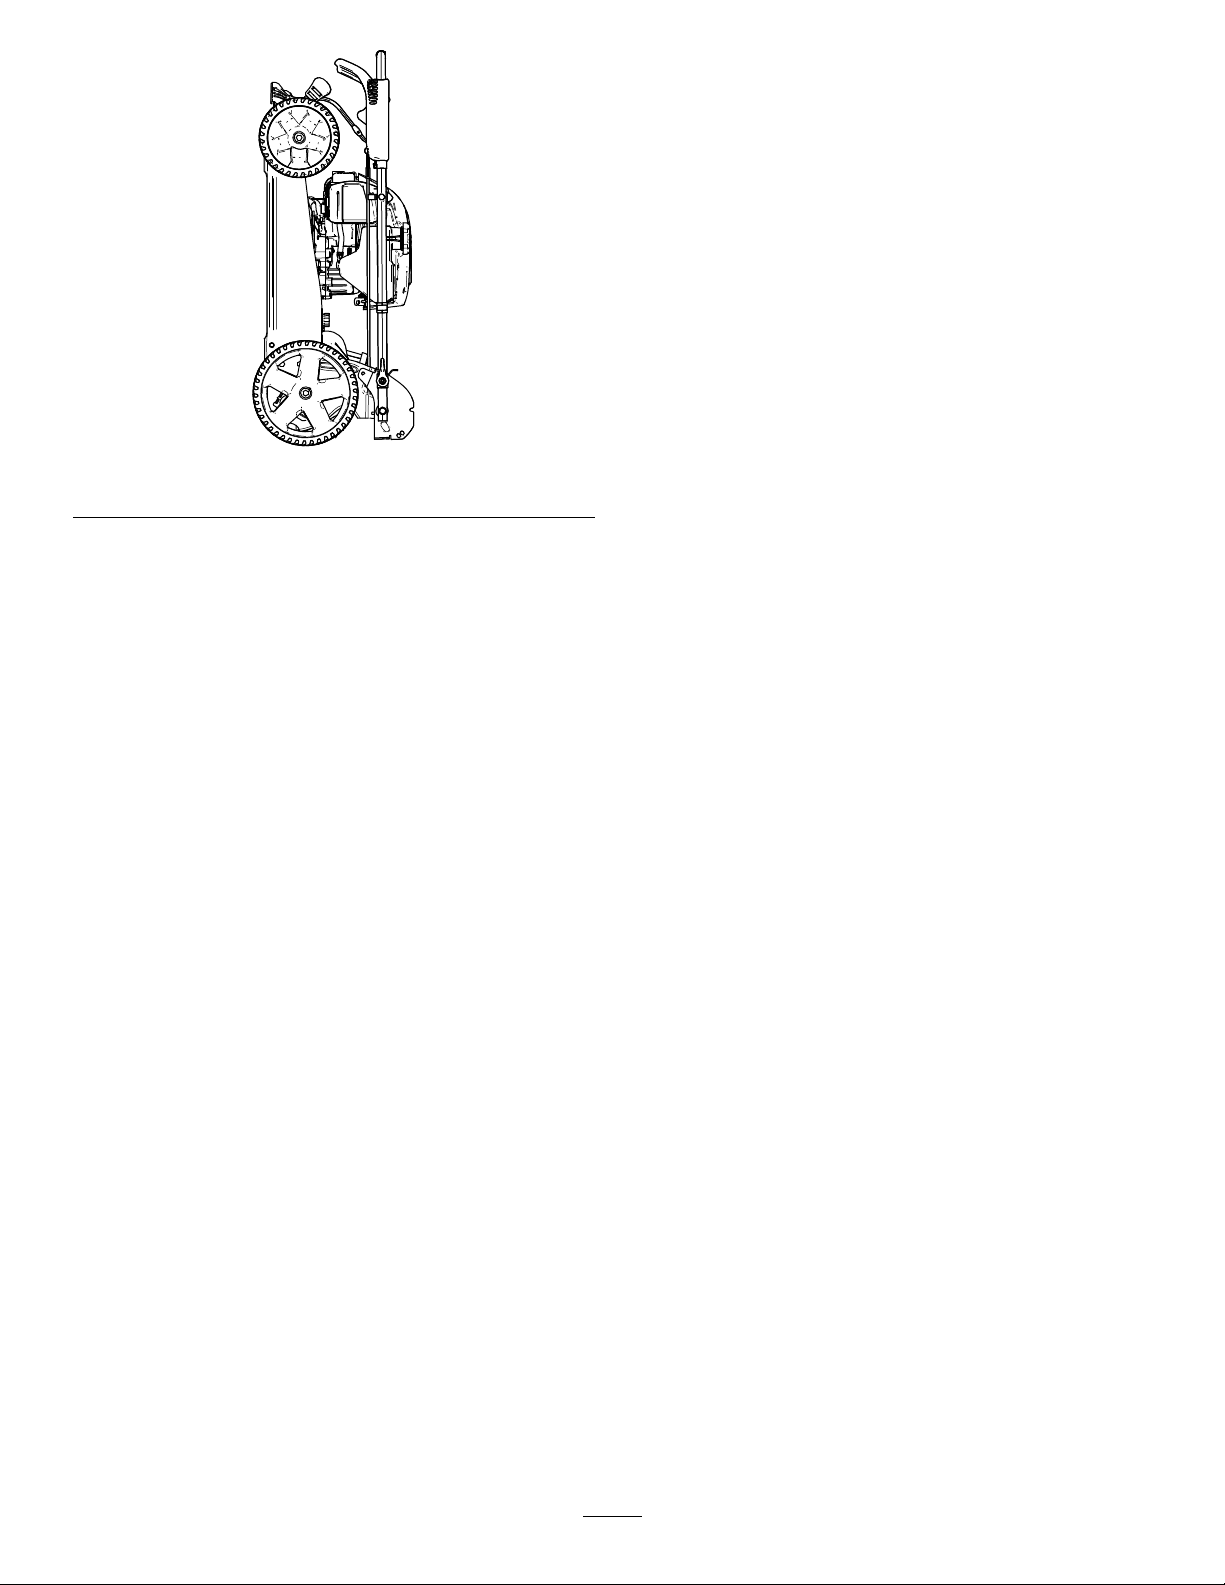
Figure23
g186013
19

Maintenance
Important:Refertoyourengineowner’smanualforadditionalmaintenanceprocedures.
RecommendedMaintenanceSchedule(s)
MaintenanceService
Interval
Beforeeachuseordaily
Yearly
Yearlyorbeforestorage
MaintenanceProcedure
•Checktheengine-oillevelandaddoilasneeded.
•Ensurethattheengineshutsoffwithin3secondsafterreleasingtheblade-control
bar.
•Cleangrassclippingsanddirtfromunderthemachine.
•Servicetheairlter;serviceitmorefrequentlyindustyoperatingconditions.
•Changetheengineoil(ifdesired).
•Replacethebladeorhaveitsharpened(morefrequentlyiftheedgedullsquickly).
•Cleantheenginebyremovingdirtanddebrisfromitstopandsides;cleanitmore
frequentlyindustyoperatingconditions.
•Emptythefueltankbeforerepairsasdirectedandbeforeyearlystorage.
MaintenanceSafety
•Disconnectthespark-plugwirefromthesparkplug
beforeperforminganymaintenanceprocedure.
•Wearglovesandeyeprotectionwhenservicing
themachine.
•Thebladeissharp;contactingthebladecanresult
inseriouspersonalinjury .Weargloveswhen
servicingtheblade.Donotrepairoralterthe
blade(s).
PreparingforMaintenance
1.Shutofftheengineandwaitforallmovingparts
tostop.
2.Disconnectthespark-plugwirefromthespark
plug(Figure24).
•Nevertamperwithsafetydevices.Checktheir
properoperationregularly .
•Tippingthemachinemaycausethefueltoleak.
Fuelisammableandexplosive,andcancause
personalinjury.Runtheenginedryorremovethe
fuelwithahandpump;neversiphonthefuel.
•T oensureoptimumperformanceofthemachine,
useonlygenuineTororeplacementpartsand
accessories.Replacementpartsandaccessories
madebyothermanufacturerscouldbedangerous,
andsuchusecouldvoidtheproductwarranty.
g186014
Figure24
1.Spark-plugwire
3.Afterperformingthemaintenanceprocedure(s),
connectthespark-plugwiretothesparkplug.
Important:Beforetippingthemachineto
changetheoilorreplacetheblade,allowthe
fueltanktorundrythroughnormalusage.If
youmusttipthemachinepriortorunning
outoffuel,useahandfuelpumptoremove
thefuel.Alwaystipthemachineontoits
side,withthedipstickdown.
20
ServicingtheAirFilter
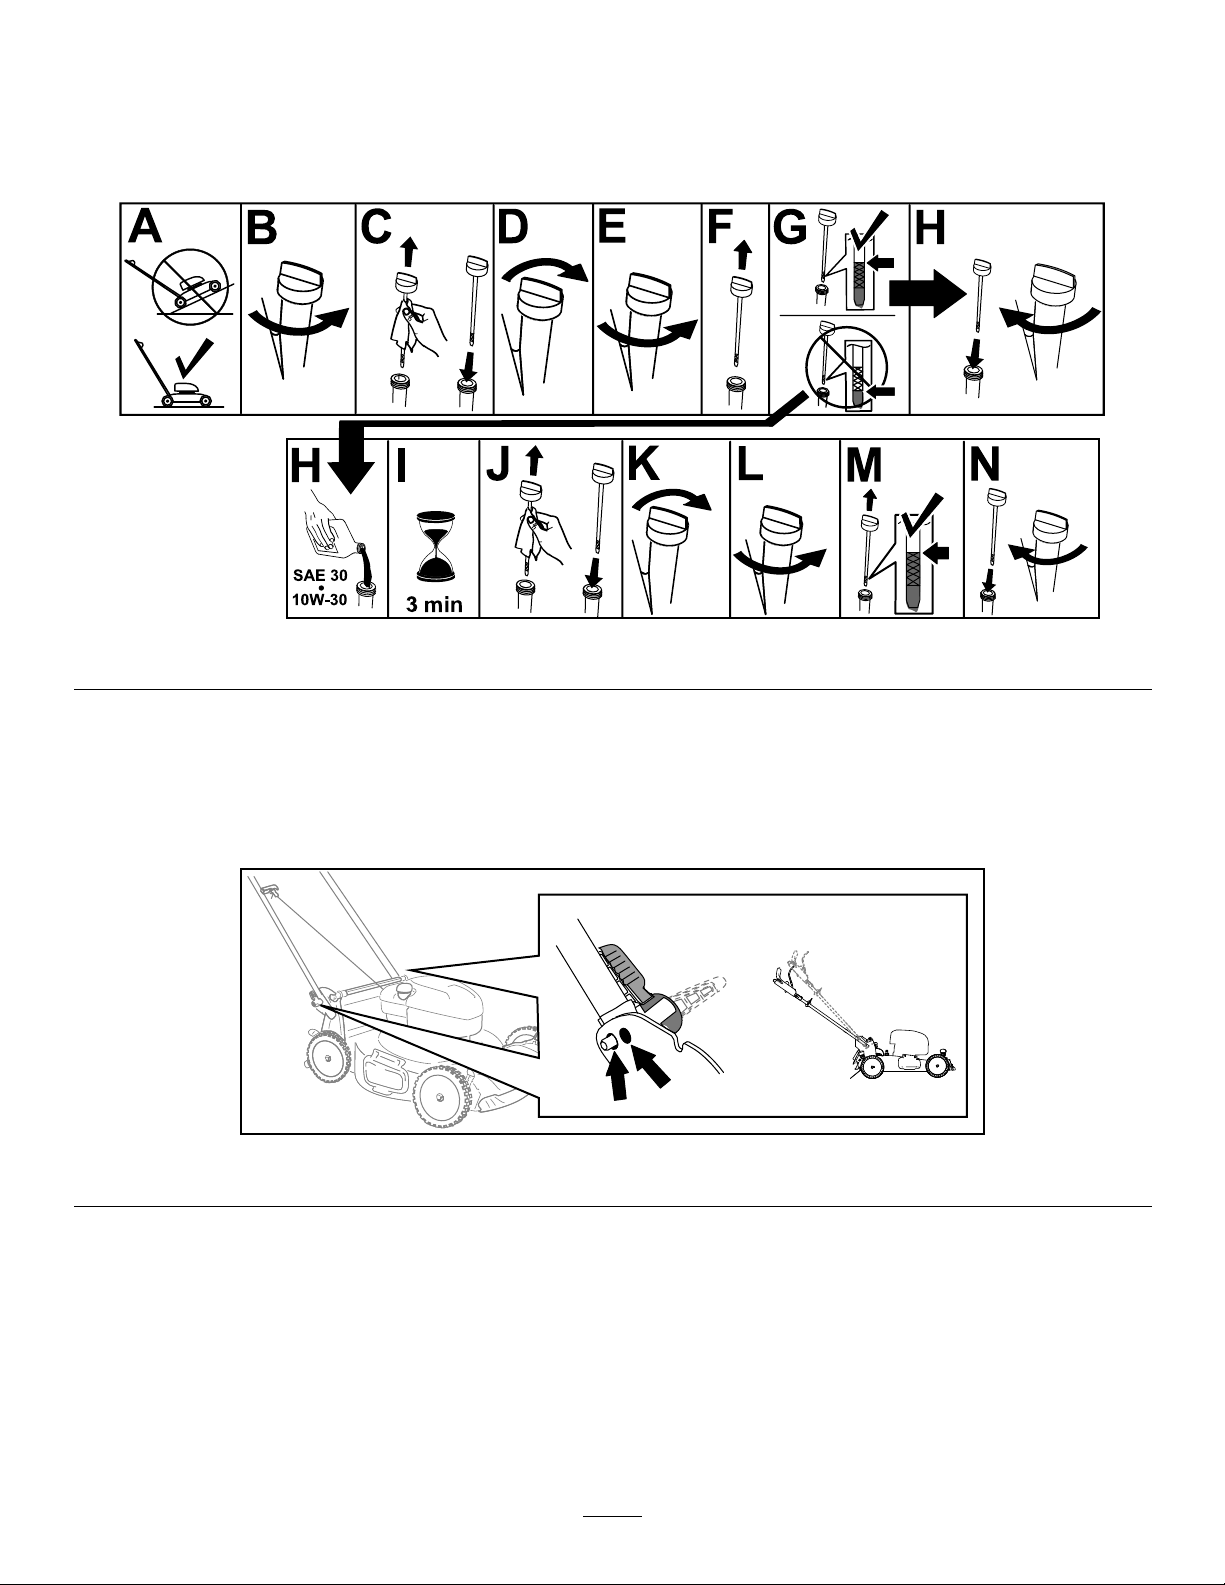
ChangingtheEngineOil
ServiceInterval:Y early
1.Unclipthetopoftheair-ltercover(Figure25).
Figure25
ServiceInterval:Y early
Changingtheengineoilisnotrequired,butif
youwanttochangetheoil,usethefollowing
procedure.
Note:Runtheengineafewminutesbeforechanging
theoiltowarmit.Warmoilowsbetterandcarries
morecontaminants.
EngineOilSpecications
Engineoilcapacity
OilviscositySAE30orSAE10W-30
APIserviceclassicationSJorhigher
1.Movethemachinetoalevelsurface.
2.RefertoPreparingforMaintenance(page20).
3.Removethedipstickbyrotatingthecap
counterclockwiseandpullingitout(Figure26).
g186256
0.44L(15oz)
detergentoil
1.Clip
2.Air-ltercover
3.Airlter
2.Removetheairlter(Figure25).
3.Inspecttheairlter.
Note:Iftheairlterisexcessivelydirty ,replace
itwithanewlter.Otherwise,gentlytaptheair
lteronahardsurfacetoloosendebris.
4.Installtheairlter.
5.Usethecliptoinstalltheair-ltercover.
g187518
Figure26
1.Dipstick3.Full
2.Add
4.Tipthemachineontoitsside(sothattheair
lterisup)todraintheusedoilfromtheoil-ll
tube(Figure27).
21

Figure27
5.Afterdrainingtheusedoil,returnthemachineto
theoperatingposition.
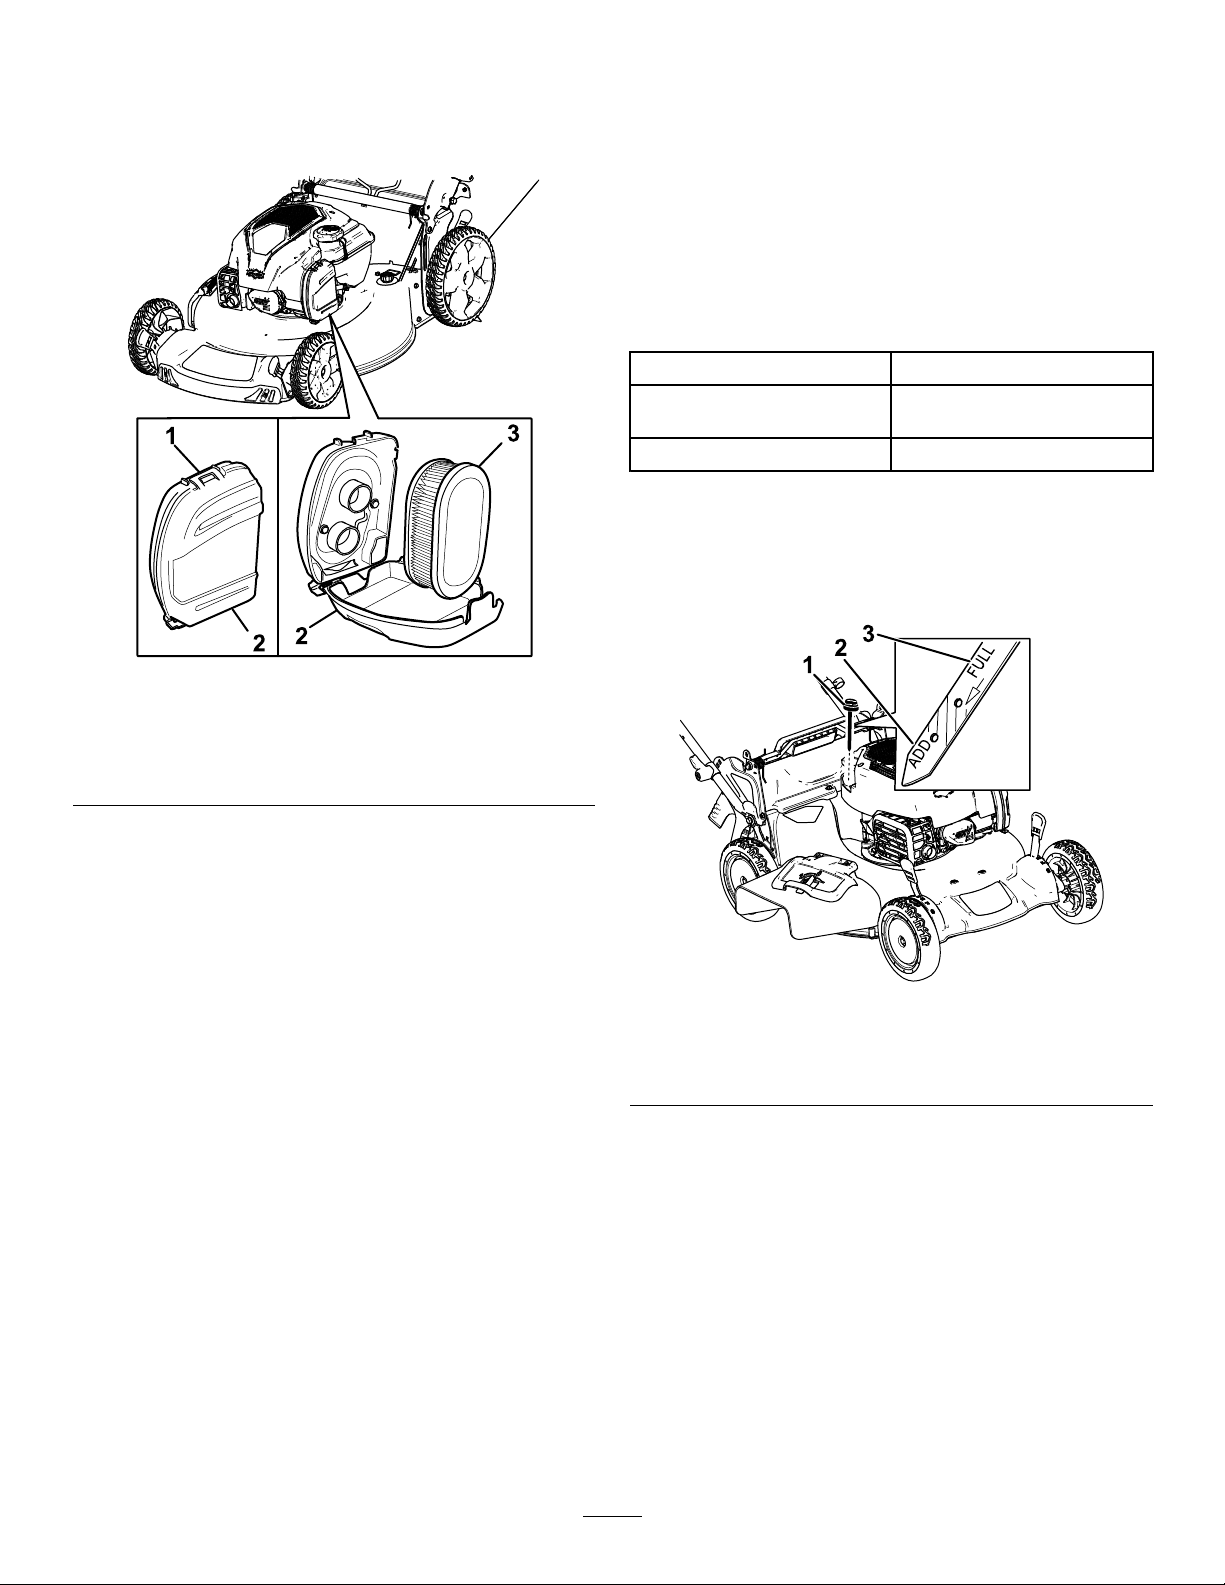
ReplacingtheBlade
ServiceInterval:Y early
Important:Youwillneedatorquewrenchto
installthebladeproperly.Ifyoudonothavea
torquewrenchorareuncomfortableperforming
thisprocedure,contactanAuthorizedService
Dealer.
Examinethebladewheneveryourunoutoffuel.Ifthe
bladeisdamagedorcracked,replaceitimmediately.
Ifthebladeedgeisdullornicked,haveitsharpened
andbalanced,orreplaceit.
WARNING
g186039
Thebladeissharp;contactingthebladecan
resultinseriouspersonalinjury.
Weargloveswhenservicingtheblade.
1.RefertoPreparingforMaintenance(page20).
6.Carefullypourabout3/4oftheenginecapacity
ofoilintotheoil-lltube.
7.Wait3minutesfortheoiltosettleintheengine.
8.Wipethedipstickcleanwithacleancloth.
9.Insertthedipstickintotheoil-lltube,then
removethedipstick.
10.Readtheoillevelonthedipstick(Figure26).
•Iftheoillevelonthedipstickistoolow,
carefullypourasmallamountofoilintothe
oil-lltube,wait3minutes,andrepeatsteps
8through10untiltheoillevelonthedipstick
iscorrect.
•Iftheoillevelonthedipstickistoohigh,
draintheexcessoiluntiltheoillevelonthe
dipstickiscorrect.
Important:Iftheoillevelintheengineistoo
lowortoohighandyouruntheengine,you
maydamagetheengine.
11.Installthedipstickintotheoil-lltubesecurely.
12.Recycletheusedoilproperly.
2.Tipthemachineontoitssidewiththeairlterup.
3.Useablockofwoodtoholdthebladesteady
(Figure28).
g231389
Figure28
4.Removetheblade,savingallmountinghardware
(Figure28).
5.Installthenewbladeandallmountinghardware
(Figure29).
22
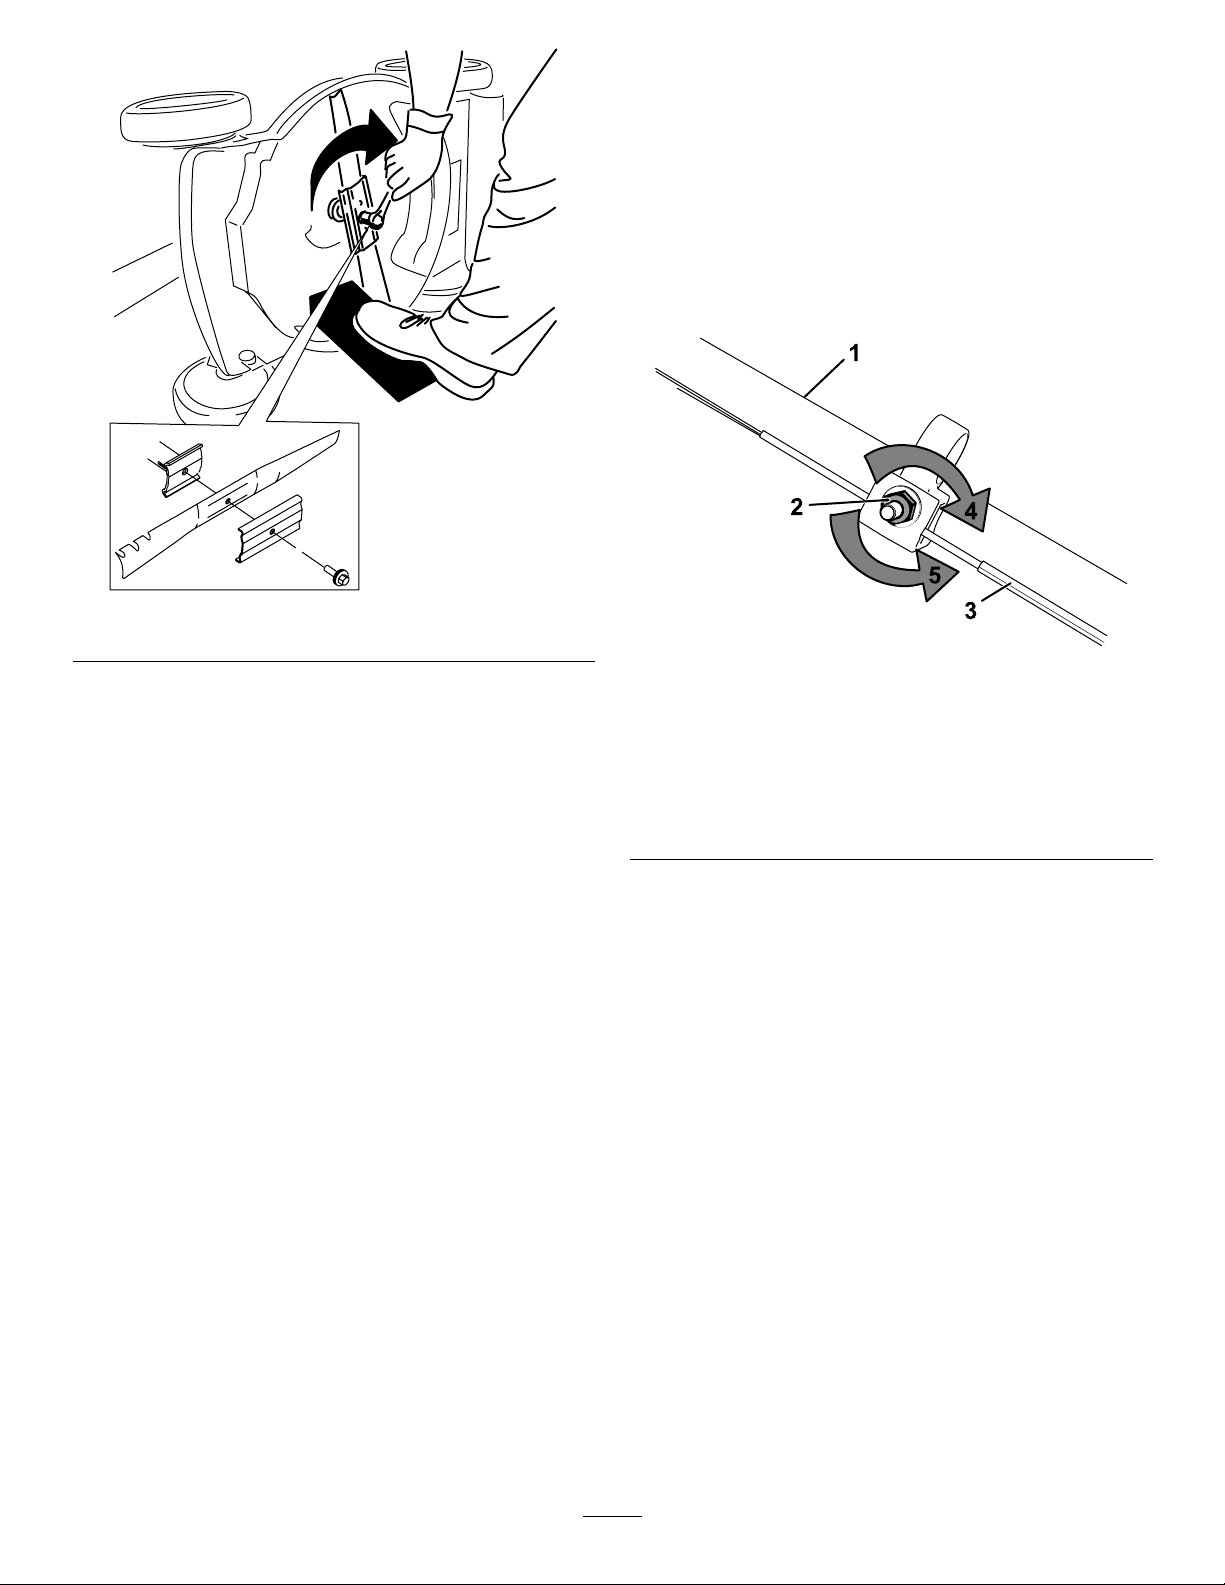
Figure29
Important:Positionthecurvedendsofthe
bladetopointtowardthemachinehousing.
6.Useatorquewrenchtotightenthebladebolt
to82N∙m(60ft-lb).
Important:Abolttorquedto82N∙m(60
ft-lb)isverytight.Whileholdingtheblade
withablockofwood,putyourweight
behindtheratchetorwrenchandtightenthe
boltsecurely.Thisboltisverydifcultto
overtighten.
AdjustingtheSelf-Propel
Drive
ForSelf-Propel-DriveModelsOnly
Wheneveryouinstallanewself-propelcableorif
theself-propeldriveisoutofadjustment,adjustthe
self-propeldrive.
1.Turntheadjustmentnutcounterclockwiseto
loosenthecableadjustment(Figure30).
g231390
g269307
Figure30
1.Handle(leftside)
2.Adjustmentnut5.Turnthenut
3.Self-propel-drivecable
2.Adjustthetensiononthecable(Figure30)by
pullingitbackorpushingitforwardandholding
thatposition.
4.Turnthenutclockwiseto
tightentheadjustment.
counterclockwiseto
loosentheadjustment.
Note:Pushthecabletowardtheengineto
increasethetraction;pullthecableawayfrom
theenginetodecreasethetraction.
3.Turntheadjustmentnutclockwisetotightenthe
cableadjustment.
Note:Tightenthenutrmlywithasocketor
wrench.
23

Storage
5.Checktheengine-oillevel;refertoCheckingthe
Engine-OilLevel(page10).
Storethemachineinacool,clean,dryplace.
StorageSafety
Alwaysshutoffthemachine,waitforallmoving
partstostop,andallowthemachinetocoolbefore
adjusting,servicing,cleaning,orstoringit.
PreparingtheMachinefor
Storage
1.Onthelastrefuelingoftheyear,addfuel
stabilizer(suchasToroPremiumFuel
Treatment)tothefuelasdirectedonthelabel.
2.Disposeofanyunusedfuelproperly.Recycle
itaccordingtolocalcodesoruseitinyour
automobile.
Note:Oldfuelinthefueltankistheleading
causeofhardstarting.Donotstorefuelwithout
fuelstabilizermorethan30days,anddonot
storestabilizedfuelmorethan90days.
6.Fillthefueltankwithfreshfuel;refertoFilling
theFuelT ank(page9).
7.Connectthewiretothesparkplug.
3.Runthemachineuntiltheengineshutsofffrom
runningoutoffuel.
4.Starttheengineagainandallowittorununtil
itshutsoff.Whenyoucannolongerstartthe
engine,itissufcientlydry.
5.Disconnectthewirefromthesparkplugand
connectthewiretotheretainingpost(if
equipped).
6.Removethesparkplug,add30ml(1oz)of
engineoilthroughthespark-plughole,andpull
thestarterropeslowlyseveraltimestodistribute
oilthroughoutthecylindertopreventcylinder
corrosionduringtheoff-season.
7.Looselyinstallthesparkplug.
8.Tightenallnuts,bolts,andscrews.
RemovingtheMachine
fromStorage
1.Checkandtightenallfasteners.
2.Removethesparkplugandspintheengine
rapidlybypullingtherecoil-starthandletoblow
theexcessoilfromthecylinder.
3.Installthesparkplugandtightenitwithatorque
wrenchto20N∙m(15ft-lb).
4.Performanymaintenanceprocedures;referto
Maintenance(page20).
24

Notes:

Notes:

EEA/UKPrivacyNotice
Toro’sUseofY ourPersonalInformation
TheToroCompany(“Toro”)respectsyourprivacy.Whenyoupurchaseourproducts,wemaycollectcertainpersonalinformationaboutyou,eitherdirectly
fromyouorthroughyourlocalT orocompanyordealer .Torousesthisinformationtofullcontractualobligations-suchastoregisteryourwarranty,
processyourwarrantyclaimortocontactyouintheeventofaproductrecall-andforlegitimatebusinesspurposes-suchastogaugecustomer
satisfaction,improveourproductsorprovideyouwithproductinformationwhichmaybeofinterest.T oromayshareyourinformationwithoursubsidiaries,
afliates,dealersorotherbusinesspartnersinconnectiontheseactivities.Wemayalsodisclosepersonalinformationwhenrequiredbylaworin
connectionwiththesale,purchaseormergerofabusiness.Wewillneversellyourpersonalinformationtoanyothercompanyformarketingpurposes.
RetentionofyourPersonalInformation
Torowillkeepyourpersonalinformationaslongasitisrelevantfortheabovepurposesandinaccordancewithlegalrequirements.Formoreinformation
aboutapplicableretentionperiodspleasecontactlegal@toro.com.
Toro’sCommitmenttoSecurity
YourpersonalinformationmaybeprocessedintheUSoranothercountrywhichmayhavelessstrictdataprotectionlawsthanyourcountryofresidence.
Wheneverwetransferyourinformationoutsideofyourcountryofresidence,wewilltakelegallyrequiredstepstoensurethatappropriatesafeguardsare
inplacetoprotectyourinformationandtomakesureitistreatedsecurely.
AccessandCorrection
Youmayhavetherighttocorrectorreviewyourpersonaldata,orobjecttoorrestricttheprocessingofyourdata.T odoso,pleasecontactusbyemail
atlegal@toro.com.IfyouhaveconcernsaboutthewayinwhichT orohashandledyourinformation,weencourageyoutoraisethisdirectlywithus.
PleasenotethatEuropeanresidentshavetherighttocomplaintoyourDataProtectionAuthority.
374-0282RevC

Recycler
Modellnr.20961—Seriennr.404320000undhöher
®
Rasenmäher(55cm)mitSmartStow
FormNo.3428-127RevA
®
Bedienungsanleitung
Einführung
DieserhandgeführteRasenmähermitSichelmessern
solltevonPrivatleutenodergeschultenLohnarbeitern
verwendetwerden.EristhauptsächlichfürdasMähen
vonGrasaufgepegtenGrünächeninPrivatanlagen
gedacht.WenndiesesProduktfüreinenanderen
Zweckeingesetztwird,kanndasfürBedienerund
anderePersonengefährlichsein.
LesenSiedieseInformationensorgfältigdurch,
umsichmitdemordnungsgemäßenEinsatzund
derWartungdesGerätsvertrautzumachenund
VerletzungenundeineBeschädigungdesGerätszu
vermeiden.SietragendieVerantwortungfüreinen
ordnungsgemäßenundsicherenEinsatzdesGeräts.
BesuchenSieT oro.comfürweitereInformationen,
einschließlichSicherheitstipps,Schulungsunterlagen,
Zubehörinformationen,StandorteinesHändlers,oder
RegistrierungIhresProdukts.
WendenSiesichandenVertragshändlervon
TorooderdenKundendienst,wennSieeine
Serviceleistung,OriginalersatzteilevonTorooder
weitereInformationenbenötigen.HabenSiedafür
dieModell-undSeriennummernderMaschine
griffbereit.InBild1wirdderStandortderModell-und
SeriennummernaufdemProduktangegeben.Tragen
SiehierdieModell-undSeriennummerndesGeräts
ein.
Wichtig:ScannenSiemitIhremMobilgerätden
QR-CodeaufdemSeriennummernaufkleber,
umaufGarantie-,Ersatzteil-oderandere
Produktinformationenzuzugreifen.
IndieserAnleitungwerdenpotenzielleGefahren
angeführt,undSicherheitsmeldungenwerdenvom
Sicherheitswarnsymbol(Bild2)gekennzeichnet,
dasaufeineGefahrhinweist,diezuschweren
odertödlichenVerletzungenführenkann,wenn
SiedieempfohlenenSicherheitsvorkehrungennicht
einhalten.
g000502
Bild2
Sicherheitswarnsymbol
IndieserAnleitungwerdenzweiBegriffezur
HervorhebungvonInformationenverwendet.Wichtig
weistaufspeziellemechanischeInformationenhin,
undHinweishebtallgemeineInformationenhervor,
dieIhrebesondereBeachtungverdienen.
DiesesProdukterfülltallerelevanteneuropäischen
Richtlinien;weitereDetailsndenSieinder
produktspezischenKonformitätserklärung(DOC).
Brutto-oderNettodrehmoment:DasBruttooderNettodrehmomentdiesesMotorswurde
vomMotorherstellerimLaborgemäßSAEJ1940
oderJ2723ermittelt.AufgrundderKonguration
zurErfüllungvonSicherheits-,EmissionsundBetriebsanforderungenistdietatsächliche
MotorleistungindieserKlassederRasenmäher
wesentlichniedriger.WeitereInformationennden
SieinderMotorbedienungsanleitungdesHerstellers,
diemitderMaschineausgeliefertwurde.
1.TypenschildmitModell-undSeriennummer
©2018—TheT oro®Company
8111LyndaleAvenueSouth
Bloomington,MN55420
CV
Modellnr.
Seriennr.
Bild1
RegistrierenSieIhrProduktunter
www.T oro.com.
ManipulierenoderdeaktivierenSiekeine
SicherheitsvorrichtungenanderMaschineundprüfen
SiedieeinwandfreieFunktioninregelmäßigen
Abständen.ModizierenodermanipulierenSienicht
g274803
dieBedienelementefürdieMotordrehzahl,dadieszu
unsicherenEinsatzbedingungenundVerletzungen
führenkann.
Originaldokuments(DE)
AlleRechtevorbehalten
Druck:Mexiko
*3428-127*A

Inhalt
Sicherheit
Einführung................................................................1
Sicherheit..................................................................2
AllgemeineSicherheit.........................................2
Sicherheits-undBedienungsschilder.................3
Einrichtung................................................................5
1AufklappendesHolms.....................................5
2BefestigendesRücklaufstarterseilsinder
Seilführung......................................................6
3AuffüllendesKurbelgehäusesmit
Öl....................................................................7
4MontierendesFangkorbs................................7
Produktübersicht.......................................................8
TechnischeDaten..............................................8
Anbaugeräte,Zubehör.......................................8
Betrieb......................................................................8
VordemEinsatz....................................................8
VordersicherenVerwendung.............................8
Betanken............................................................9
PrüfendesMotorölstands...................................9
EinstellenderHolmhöhe...................................10
EinstellenderSchnitthöhe.................................11
WährenddesEinsatzes........................................11
HinweisezurSicherheitwährenddes
Betriebs..........................................................11
AnlassendesMotors........................................12
VerwendendesSelbstantriebs.........................13
AbstellendesMotors........................................13
Schnittgutrecyclen............................................13
SammelndesSchnittguts.................................14
VerwendendesHebelsfürden
zuschaltbarenFangkorb...............................14
SeitenauswurfdesSchnittguts.........................15
Betriebshinweise.............................................15
NachdemEinsatz...............................................16
HinweisezurSicherheitnachdem
Betrieb..........................................................16
ReinigenunterdemGerät.................................16
ZusammenklappendesHolms.........................17
LagernderMaschineinderaufrechten
Lagerstellung................................................18
Wartung..................................................................20
EmpfohlenerWartungsplan.................................20
Wartungssicherheit...........................................20
VorbereitenfürdieWartung..............................20
WartendesLuftlters........................................21
WechselndesMotoröls....................................21
AuswechselndesMessers...............................22
EinstellendesSelbstantriebs............................23
Einlagerung............................................................24
SicherheitbeiderEinlagerung..........................24
VorbereitenderMaschinefürdie
Einlagerung...................................................24
HerausnehmendesRasenmähersausder
Einlagerung...................................................24
DieseMaschineerfülltENISO5395.
AllgemeineSicherheit
DiesesProduktkannHändeundFüßeamputieren
undGegenständeaufschleudern.Befolgenimmer
sämtlicheSicherheitshinweise,umschwereoder
tödlicheVerletzungenzuvermeiden.
•Lesen,verstehenundbefolgenSievordem
AnlassendesMotorsalleAnweisungenund
WarnungeninderBedienungsanleitungundan
derMaschine.
•BerührenSiebeweglicheT eileoderdieUnterseite
derMaschinenichtmitdenHändenoderFüßen.
KommenSieAuswurföffnungennichtzunahe.
•BedienenSiedieMaschineniemals,wennnicht
alleSchutzvorrichtungenundAbdeckungen
angebrachtundfunktionstüchtigsind.
•HaltenSieUnbeteiligte,insbesondereKinder,
ausdemArbeitsbereichfern.DasFahrzeug
darfniemalsvonKindernbetriebenwerden.
NurverantwortungsbewusstePersonen,die
geschultundmitdenAnweisungenvertrautsind
undkörperlichfähigsind,solltendieMaschine
verwenden.
•HaltenSiedieMaschinean,stellenSieden
MotorabundwartenSie,bisallebeweglichen
TeilezumStillstandgekommensind,bevorSie
Wartungsarbeitendurchführen,Auftankenoder
Verstopfungenentfernen.
DerunsachgemäßeEinsatzoderdiefalscheWartung
dieserMaschinekannzuVerletzungenführen.Halten
SiedieseSicherheitsanweisungenein,umdas
Verletzungsrisikozuverringern.AchtenSieimmerauf
dasSicherheitswarnsymbol,esbedeutetVorsicht,
WarnungoderGefahr–„Sicherheitshinweis“.Wenn
SiedieseAnweisungennichteinhalten,kanneszu
Verletzungenggf.tödlichenVerletzungenkommen.
2
 Loading...