

Page 1
46cmLawnMower
ModelNo.20942—SerialNo.317000001andUp
Introduction
Thisrotary-blade,walk-behindlawnmowerisintended
tobeusedbyresidentialhomeowners.Itisdesigned
primarilyforcuttinggrassonwell-maintainedlawns
onresidentialproperties.Itisnotdesignedforcutting
brushorforagriculturaluses.
Readthisinformationcarefullytolearnhowtooperate
andmaintainyourproductproperlyandtoavoid
injuryandproductdamage.Youareresponsiblefor
operatingtheproductproperlyandsafely.
YoumaycontactT orodirectlyatwww.T oro.comfor
productandaccessoryinformation,helpndinga
dealer,ortoregisteryourproduct.
Wheneveryouneedservice,genuineToroparts,or
additionalinformation,contactanAuthorizedService
DealerorToroCustomerServiceandhavethemodel
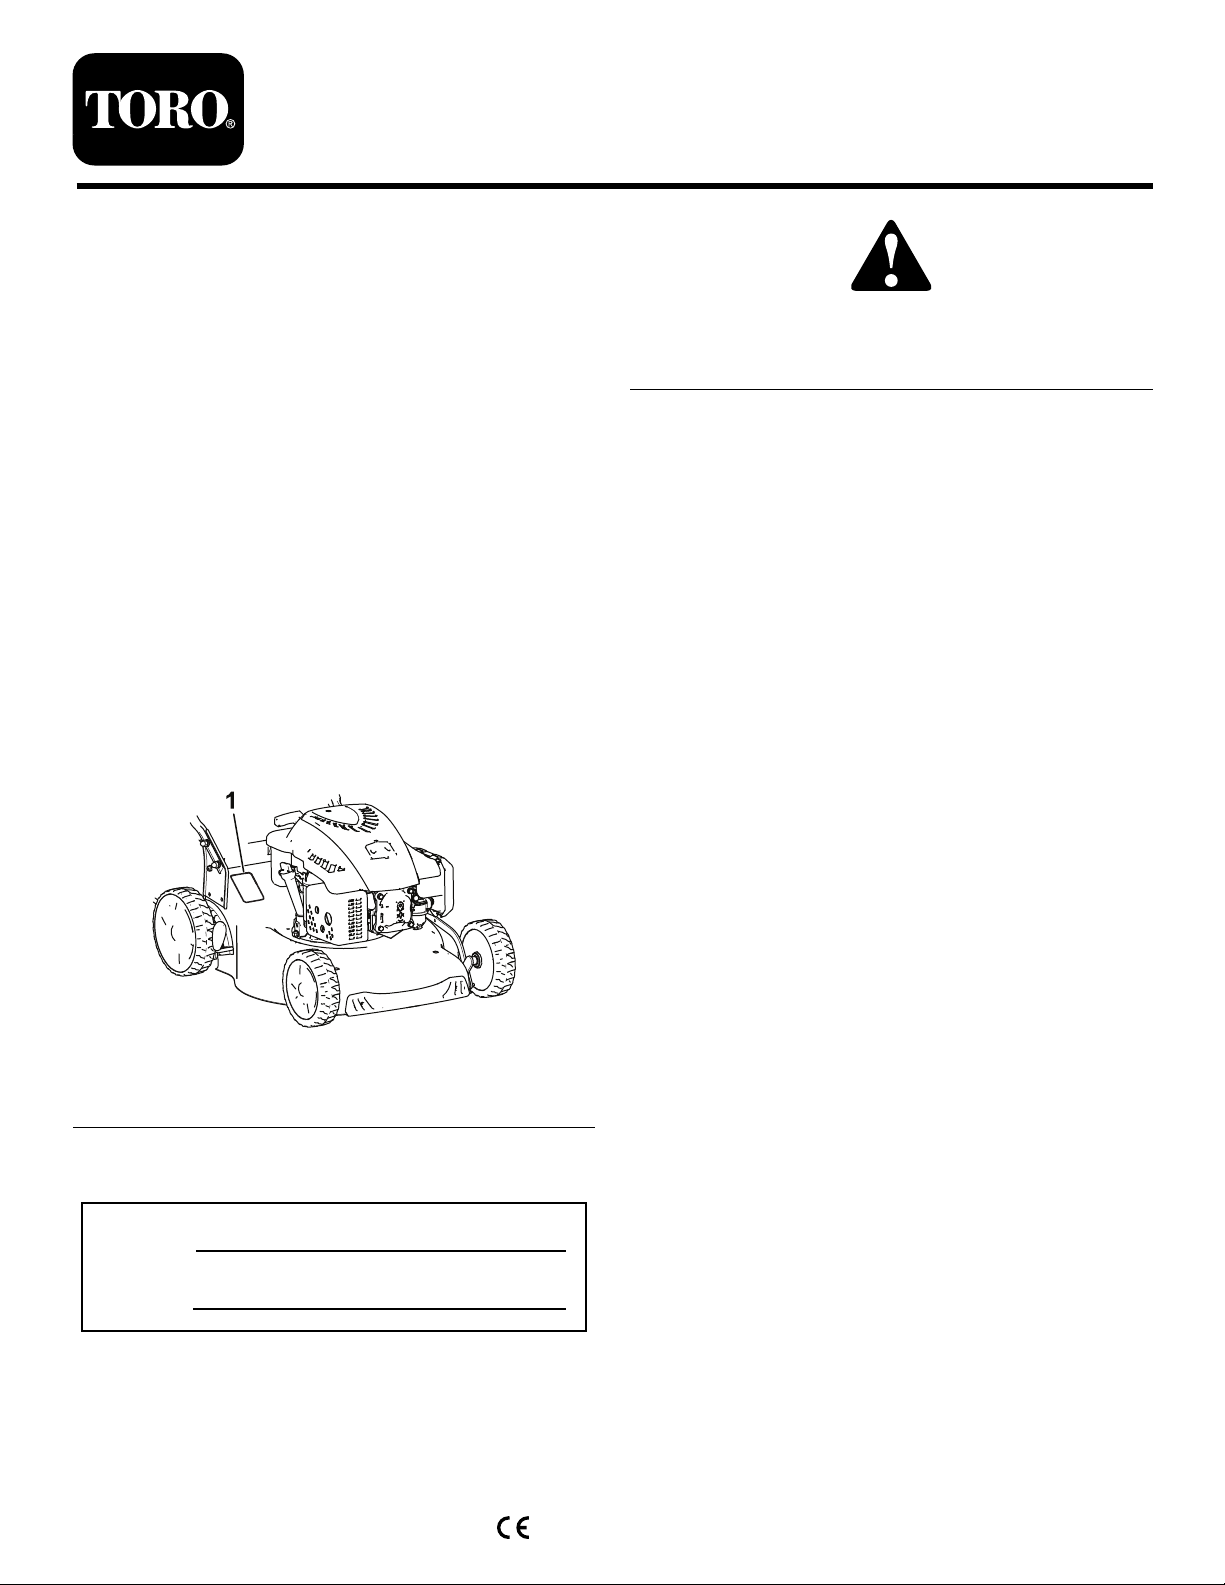
andserialnumbersofyourproductready .Figure1
identiesthelocationofthemodelandserialnumbers
ontheproduct.
FormNo.3414-173RevB
Operator'sManual
g000502
Figure2
1.Safety-alertsymbol
Thismanualuses2wordstohighlightinformation.
Importantcallsattentiontospecialmechanical
informationandNoteemphasizesgeneralinformation
worthyofspecialattention.
NetTorque:Thegrossornettorqueofthisengine
waslaboratoryratedbytheenginemanufacturerin
accordancewiththeSocietyofAutomotiveEngineers
(SAE)J1940.Asconguredtomeetsafety,emission,
andoperatingrequirements,theactualenginetorque
onthisclassofmowerwillbesignicantlylower.Goto
www.T oro.comtoviewspecicationsonyourmower
model.
Figure1
1.Modelandserialnumberplate
Writetheproductmodelandserialnumbersinthe
spacebelow:
ModelNo.
SerialNo.
Thismanualidentiespotentialhazardsandhas
safetymessagesidentiedbythesafety-alertsymbol
(Figure2),whichsignalsahazardthatmaycause
seriousinjuryordeathifyoudonotfollowthe
recommendedprecautions.
Contents
Introduction...............................................................1
Safety.......................................................................2
GeneralSafety...................................................2
SafetyandInstructionalDecals..........................3
Setup........................................................................4
1AssemblingtheHandle....................................4
2InstallingtheRecoil-StarterRopeinthe
g188341
ProductOverview.....................................................6
Operation..................................................................6
RopeGuide.....................................................4
3FillingtheEnginewithOil.................................4
4AssemblingtheGrassBag...............................5
Specications....................................................6
BeforeOperation...................................................6
BeforeOperationSafety.....................................6
FillingtheFuelTank............................................7
CheckingtheEngine-OilLevel............................7
AdjustingtheCuttingHeight...............................8
DuringOperation...................................................8
DuringOperatingSafety.....................................8
StartingtheEngine.............................................9
UsingtheSelf-PropelDrive.................................9
ShuttingOfftheEngine.......................................9
MulchingtheGrassClippings.............................9
BaggingtheGrassClippings............................10
Rear-DischargingtheGrassClippings..............10
©2017—TheT oro®Company
8111L yndaleAvenueSouth
Bloomington,MN55420
Registeratwww.Toro.com.
OriginalInstructions(EN)
PrintedinChina
AllRightsReserved
*3414-173*B
Page 2

OperatingTips..................................................11
AfterOperation.....................................................11
AfterOperatingSafety.......................................11
CleaningundertheMachine.............................12
FoldingtheHandle...........................................12
Maintenance...........................................................13
RecommendedMaintenanceSchedule(s)...........13
MaintenanceSafety..........................................13
PreparingforMaintenance...............................13
ReplacingtheSparkPlug.................................14
ReplacingtheAirFilter......................................14
ChangingtheEngineOil...................................14
ReplacingtheBlade..........................................15
LubricatingtheWheels.....................................16
Storage...................................................................17
PreparingtheMachineforStorage...................17
RemovingtheMachinefromStorage................17
Safety
Thismachinehasbeendesignedinaccordancewith
ENISO5395:2013.
GeneralSafety
Thisproductiscapableofamputatinghandsand
feetandofthrowingobjects.Alwaysfollowallsafety
instructionstoavoidseriouspersonalinjury .
Usingthisproductforpurposesotherthanitsintended
usecouldprovedangeroustoyouandbystanders.
•Readandunderstandthecontentsofthis
Operator’sManualbeforestartingtheengine.
•Donotputyourhandsorfeetnearmoving
componentsofthemachine.
•Donotoperatethemachinewithoutallguards
andothersafetyprotectivedevicesinplaceand
workingonthemachine.
•Keepclearofanydischargeopening.Keep
bystandersasafedistanceawayfromthe
machine.
•Keepchildrenoutoftheoperatingarea.Never
allowchildrentooperatethemachine.
•Stopthemachineandshutofftheenginebefore
servicing,fueling,oruncloggingthemachine.
Improperlyusingormaintainingthismachinecan
resultininjury.Toreducethepotentialforinjury,
complywiththesesafetyinstructionsandalwayspay
attentiontothesafety-alertsymbol,whichmeans
Caution,Warning,orDanger—personalsafety
instruction.Failuretocomplywiththeseinstructions
mayresultinpersonalinjuryordeath.
Youcanndadditionalitemsofsafetyinformationin
theirrespectivesectionsthroughoutthismanual.
2
Page 3
SafetyandInstructionalDecals
Safetydecalsandinstructionsareeasilyvisibletotheoperatorandarelocatednearanyarea
ofpotentialdanger.Replaceanydecalthatisdamagedormissing.
134-0082
1.Quick-washport
decal134-0082
134-0084
1.Warning—readtheOperator'sManual.4.Thrownobjecthazard—keepbystandersawayfromthe
2.Cuttinghazard—keepawayfrommovingparts;keepall
guardsandshieldsinplace.
3.Cuttinghazard—disconnectthesparkplugandreadthe
Operator'sManualbeforeperformingmaintenance.
decalh295159
machine.
5.Cuttinghazard—donotmowupaslope;alwaysmowfrom
sidetoside;ensurethatthebladeisstoppedandtheengine
isshutoffbeforepickingupnearbydebris;alwayslookbehind
youwhenbackingupwiththemachine.
H295159
1.Enginestop
decal134-0084
3
Page 4
Setup
1
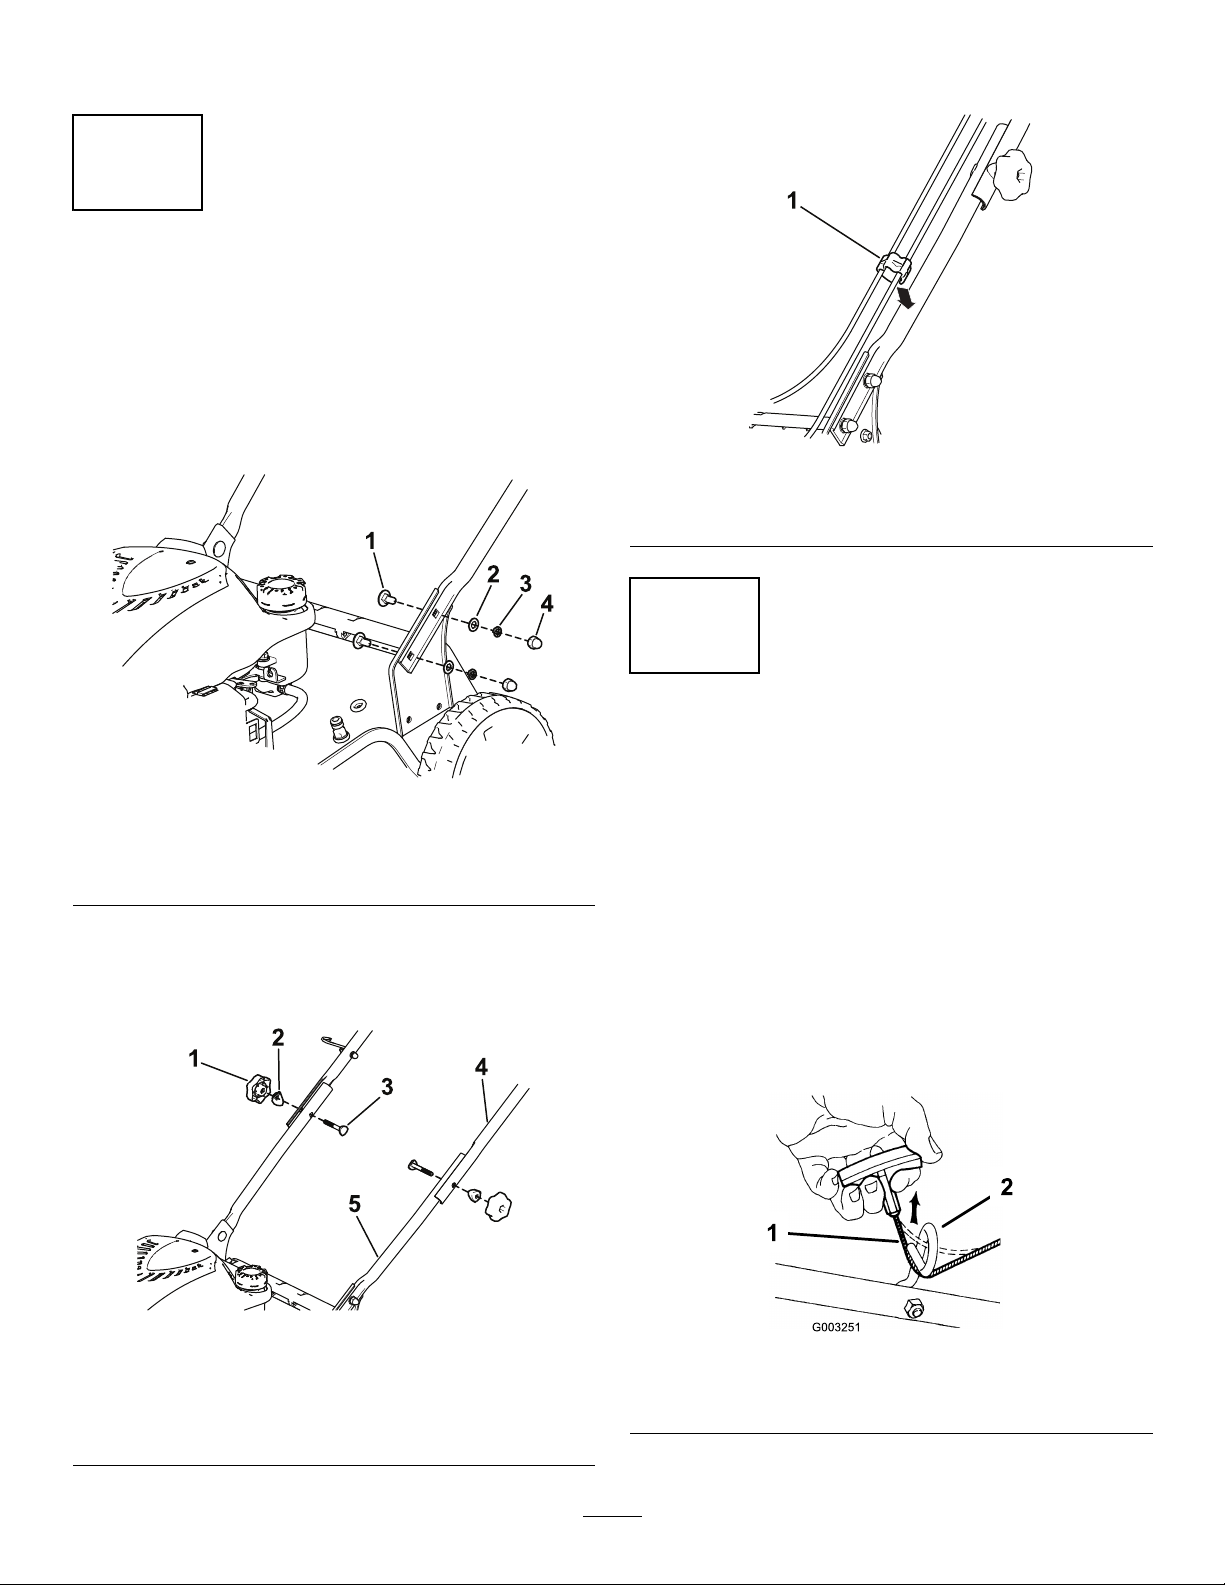
AssemblingtheHandle
NoPartsRequired
Procedure
1.Attachthelowerhandletothemowerhousing
withthe4bolts,4atwashers,4splitwashers,
and4nuts(Figure3).
3.Insertthecablesintothecableclampandattach
thecablecliptothehandleasshowninFigure5.
g189081
Figure5
1.Cableclip
Figure3
1.Bolt(4)3.Splitwasher(4)
2.Flatwasher(4)4.Nut(4)
2.Attachtheupperhandletothelowerhandle
using2handleknobs,2curvedwashers,and
2bolts.Tightenthehandleknobssecurelyby
hand(Figure4).
2
InstallingtheRecoil-Starter RopeintheRopeGuide
g188335
NoPartsRequired
Procedure
Important:Tostarttheenginesafelyandeasily
wheneveryouusethemachine,installthe
recoil-starterropeintheropeguide.
Holdtheblade-controlbartotheupperhandle(Figure
9)andpulltherecoil-starterropethroughtherope
guideonthehandle(Figure6).
1.Handleknob(2)
2.Curvedwasher(2)
3.Bolt(2)
Figure4
4.Upperhandle
5.Lowerhandle
g188346
g003251
Figure6
1.Recoil-starterrope2.Ropeguide
4
Page 5
3
FillingtheEnginewithOil
NoPartsRequired
Procedure
Important:Yourmachinedoesnotcomewithoil
intheengine.Beforestartingtheengine,llthe
enginewithoil.
oil-lltube,wait3minutes,andrepeatsteps
3through5untiltheoilonthedipstickisat
thecorrectlevel.
•Iftheoillevelonthedipstickistoohigh,drain
theexcessoiluntiltheoilonthedipstickis
atthecorrectlevel;refertoChangingthe
EngineOil(page14).
Important:Iftheoillevelintheengineistoo
lowortoohighandyouruntheengine,you
maydamagetheengine.
8.Installthedipsticksecurely.
Engineoilcapacity:0.55L
Oilviscosity:SAE30orSAE10W-30detergentoil
APIserviceclassication:SJorhigher
1.Movethemachinetoalevelsurface.
2.Removethedipstickbyrotatingthecap
counterclockwiseandpullingitout(Figure7).
4
AssemblingtheGrassBag
NoPartsRequired
Procedure
1.Slidethegrass-bagframeintothegrassbag
(Figure8).
2.Positionall6grass-bagclipsoverthegrass-bag
frame(Figure8).
Figure7
1.Full3.Low
2.High
3.Carefullypourabout3/4oftheenginecapacity
ofoilintotheoil-lltube.
4.Waitabout3minutesfortheoiltosettleinthe
engine.
5.Wipethedipstickcleanwithacleancloth.
6.Insertthedipstickintotheoil-lltube,then
removethedipstick.
7.Readtheoillevelonthedipstick(Figure7).
•Iftheoillevelonthedipstickistoolow,
carefullypourasmallamountofoilintothe
g188326
g209825
Figure8
1.Grass-bagframe2.Grass-bagclip
5
Page 6
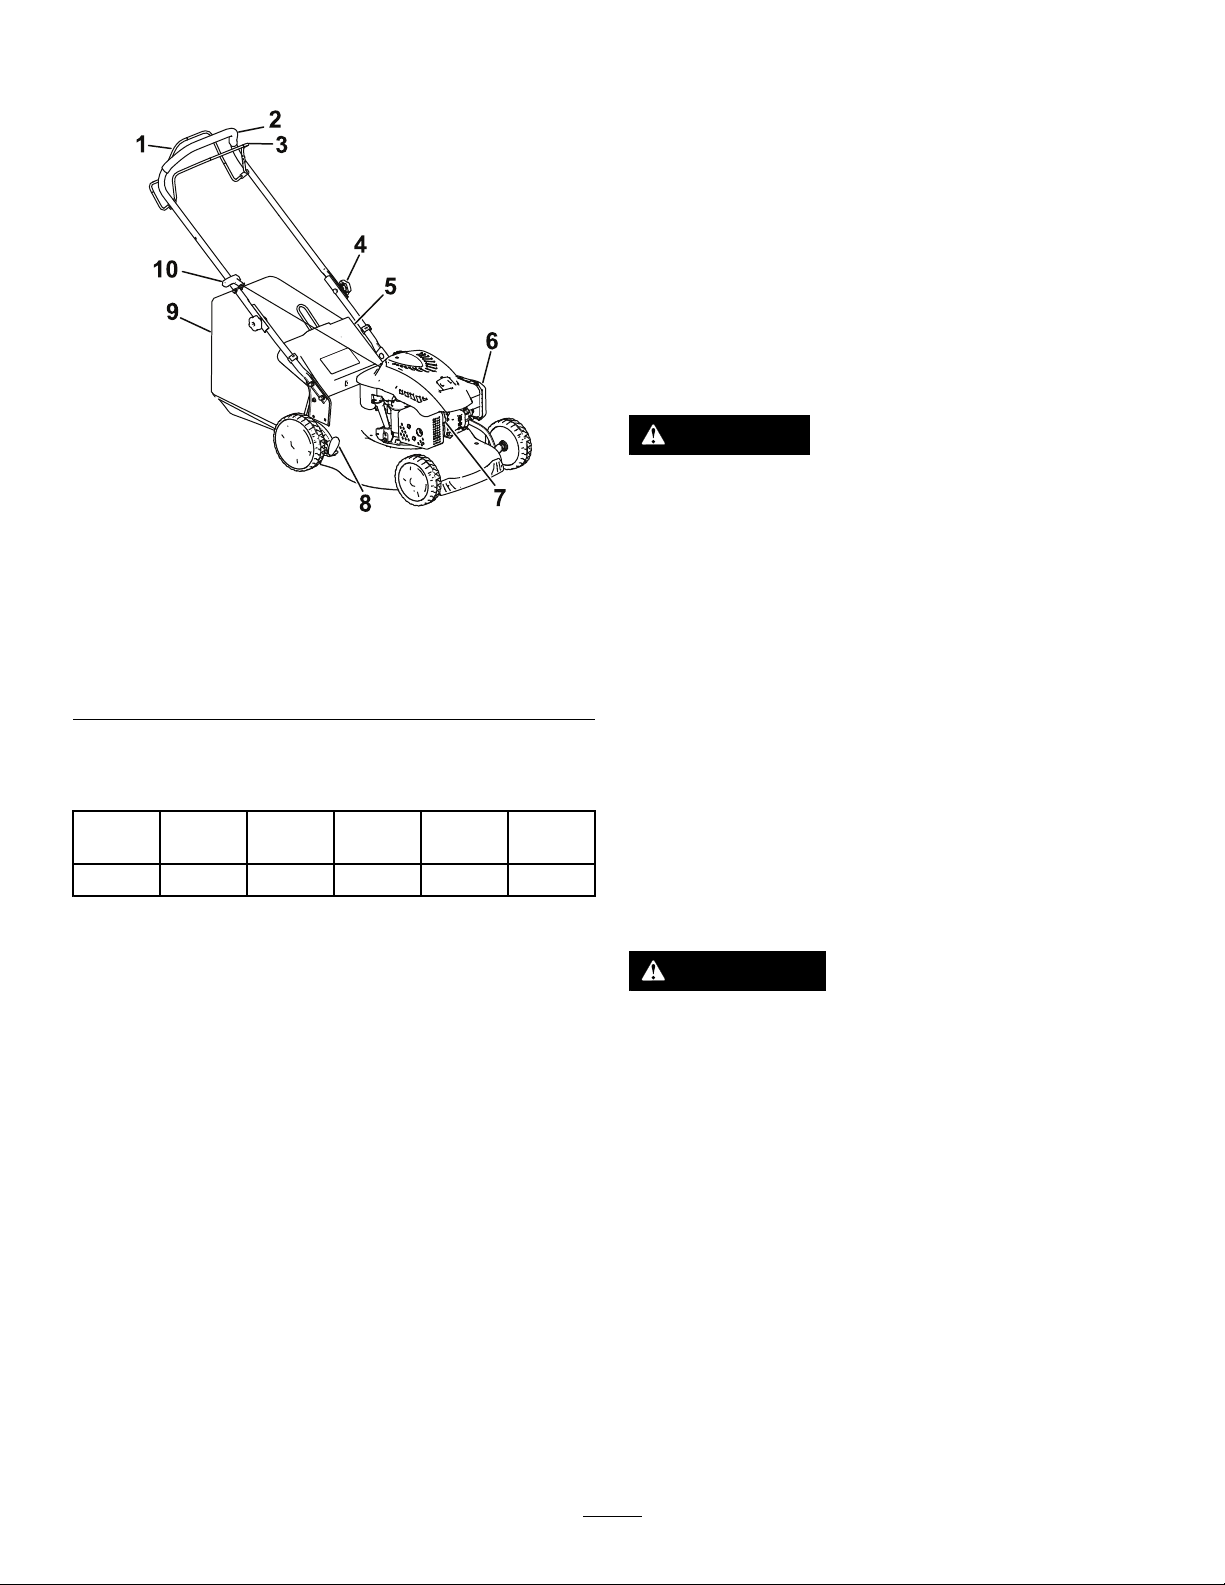
ProductOverview
Figure9
1.Self-propel-drivebar6.Airlter
2.Handle
3.Blade-controlbar
4.Handleknob
5.Reardoor10.Recoil-starthandle
Specications
ModelWeightLengthWidth
2094233kg140cm53cm46cm105cm
7.Sparkplug
8.Cutting-heightlever
9.Grassbag
Cutting
Width
•Inspecttheareawhereyouwillusethemachine
andremoveallobjectsthatthemachinecould
throw.
•Adjustingthecuttingheightmaybringyouinto
contactwiththemovingblade,causingserious
injury.
–Shutofftheengineandwaitforallmoving
partstostop.
–Donotputyourngersunderthehousing
whenadjustingthecuttingheight.
FuelSafety
DANGER
Fuelisextremelyammableandhighly
g188337
Height
explosive.Areorexplosionfromfuel
canburnyouandothersandcandamage
property.
•Topreventastaticchargefromignitingthe
fuel,placethecontainerand/ormachine
directlyonthegroundbeforelling,notin
avehicleoronanobject.
•Fillthefueltankoutdoors,inanopenarea,
whentheengineiscold.Wipeupanyfuel
thatspills.
•Donothandlefuelwhensmokingor
aroundanopenameorsparks.
•Storefuelinanapprovedcontainerand
keepitoutofthereachofchildren.
Operation
BeforeOperation
BeforeOperationSafety
GeneralSafety
•Becomefamiliarwiththesafeoperationofthe
equipment,operatorcontrols,andsafetysigns.
•Checkthatallguardsandsafetydevices,such
asdoorsand/orgrasscatchers,areinplaceand
workingproperly.
•Alwaysinspectthemachinetoensurethatthe
blade,bladebolts,andcuttingassemblyarenot
wornordamaged.
WARNING
Fuelisharmfulorfatalifswallowed.
Long-termexposuretovaporscancause
seriousinjuryandillness.
•Avoidprolongedbreathingofvapors.
•Keepyourhandsandfaceawayfromthe
nozzleandthefuel-tankopening.
•Keepfuelawayfromyoureyesandskin.
6
Page 7

FillingtheFuelTank
CheckingtheEngine-Oil
•Forbestresults,useonlyclean,fresh,unleaded
gasolinewithanoctaneratingof87orhigher
((R+M)/2ratingmethod).
•ETHANOL:Gasolinewithupto10%ethanol
(gasohol)or15%MTBE(methyltertiarybutyl
ether)byvolumeisacceptable.Ethanoland
MTBEarenotthesame.Gasolinewith15%
ethanol(E15)byvolumeisnotapprovedforuse.
Neverusegasolinethatcontainsmorethan10%
ethanolbyvolume,suchasE15(contains15%
ethanol),E20(contains20%ethanol),orE85
(containsupto85%ethanol).Usingunapproved
gasolinemaycauseperformanceproblemsand/or
enginedamage.Usingunapprovedgasolineisnot
coveredundertheproductwarranty.
•Donotusegasolinecontainingmethanol.
•Donotstorefueleitherinthefueltankorinfuel
containersoverthewinterunlessfuelstabilizer
hasbeenaddedtothefuel.
•Donotaddoiltogasoline.
Important:Toreducestartingproblems,addfuel
stabilizertothefuelallseason,mixingitwith
gasolinelessthan30daysold.
Level
ServiceInterval:Beforeeachuseordaily
1.Movethemachinetoalevelsurface.
2.Removethedipstickbyrotatingthecap
counterclockwiseandpullingitout(Figure11).
g188326
Figure11
1.Full3.Low
2.High
Figure10
3.Wipethedipstickcleanwithacleancloth.
4.Insertthedipstickintotheoil-lltube,then
removethedipstick.
5.Readtheoillevelonthedipstick(Figure11).
•Iftheoillevelonthedipstickistoolow,
slowlypourasmallamountofoilintothe
oil-lltube,wait3minutes,andthenrepeat
g189388
steps3through5untiltheoilonthedipstick
isatthecorrectlevel.
•Iftheoillevelonthedipstickistoohigh,drain
theexcessoiluntiltheoilonthedipstickis
atthecorrectlevel.T odraintheexcessoil,
refertoChangingtheEngineOil(page14).
Important:Iftheoillevelinthecrankcase
istoolowortoohighandyourunthe
engine,youmaydamagetheengine.
6.Installthedipstickintotheoil-lltubesecurely.
7
Page 8

AdjustingtheCutting Height
WARNING
Adjustingthecuttingheightmaybringyou
intocontactwiththemovingblade,causing
seriousinjury.
•Shutofftheengineandwaitforallmoving
partstostop.
•Donotputyourngersunderthehousing
whenadjustingthecuttingheight.
Thereare7cutting-heightsettingsfrom25to70mm.
Adjustthecuttingheightasdesired.Setthefront
wheelstothesameheightastherearwheels.
Toadjustthecuttingheight,disengagethelever
(Figure12),raiseorlowerthemachine,andthen
engagethelever.
Figure12
ThecuttingheightpositionsareshowninFigure13.
g208642
Figure13
1.70.0mm5.40.0mm
2.62.5mm6.32.5mm
3.55.0mm7.25.0mm
4.47.5mm
DuringOperation
DuringOperatingSafety
GeneralSafety
•Wearappropriateclothing,includingeye
protection;slip-resistant,substantialfootwear;and
hearingprotection.Tiebacklonghair,secure
looseclothing,anddonotwearjewelry.
•Donotoperatethemachinewhileill,tired,or
undertheinuenceofalcoholordrugs.
•Thebladeissharp;contactingthebladecanresult
inseriouspersonalinjury.Shutofftheengineand
waitforallmovingpartstostopbeforeleavingthe
operatingposition.
•Whenyoureleasetheblade-controlbar,the
engineshouldshutoffandthebladeshouldstop
within3seconds.Ifnot,stopusingyourmachine
immediatelyandcontactanAuthorizedService
Dealer.
•Operatethemachineonlyingoodvisibilityand
g188329
appropriateweatherconditions.Donotoperate
themachinewhenthereistheriskoflightning.
•Wetgrassorleavescancauseseriousinjuryif
youslipandcontacttheblade.Avoidmowingin
wetconditionsifpossible.
•Useextremecarewhenapproachingblind
corners,shrubs,trees,orotherobjectsthatmay
blockyourview.
•Watchforholes,ruts,bumps,rocks,orother
hiddenobjects.Uneventerraincouldcausea
slip-and-fallaccident.
•Stopthemachineandinspectthebladeafter
strikinganobjectorifthereisanabnormal
vibrationinthemachine.Makeallnecessary
repairsbeforeresumingoperation.
8
Page 9

•Beforeleavingtheoperatingposition,shutoffthe
engine,andwaitforallmovingpartstostop.
•Iftheenginehasbeenrunningthemuferwillbe
hotandcanseverelyburnyou.Keepawayfrom
thehotmufer.
•Checkthegrasscatchercomponentsandthe
dischargeguardfrequentlyandreplacethemwith
themanufacturer’srecommendedpartswhen
necessary.
•Useaccessoriesandattachmentsapprovedby
theTheT oro®Companyonly .
SlopeSafety
•Mowacrossthefaceofslopes;neverupand
down.Useextremecautionwhenchanging
directiononslopes.
•Donotmowonexcessivelysteepslopes.Poor
footingcouldcauseaslip-and-fallaccident.
•Mowwithcautionneardrop-offs,ditches,or
embankments.
Whentheenginestarts,allowtheropetoreturn
tothehandleslowly.
UsingtheSelf-PropelDrive
Tooperatetheself-propeldrive,squeezethe
self-propel-drivebar(Figure15)towardthehandle
andholdit.
StartingtheEngine
Important:Thismachinecomeswitharubber
bootovertheendofthesparkplug.Ensurethat
themetalloopontheendofthespark-plugwire
(insidetherubberboot)isfastenedsecurelyon
themetaltiponthesparkplug.
1.Holdtheblade-controlbaragainstthehandle
(Figure14A).
g188340
Figure15
1.Self-propel-drivebar
Note:Themachinehasaxedmaximumspeedof
approximately3.0km/h.
Todisengagetheself-propeldrive,releasethe
self-propel-drivebar.
ShuttingOfftheEngine
Toshutofftheengine,releasetheblade-controlbar.
Note:Disconnectandgroundthespark-plugwire
beforeyouleavethemachinetopreventsomeone
fromaccidentlystartingtheengine.
MulchingtheGrass Clippings
Figure14
1.Blade-controlbar
2.Pulltherecoil-starthandlelightlyuntilyoufeel
resistance,thenpullitsharply(Figure14B).
WARNING
Thebladeissharp;contactingthebladecan
g188344
resultinseriouspersonalinjury.
•Ensurethatthemulchingplugisinplace
beforeyoumulchtheclippings.
•Neverengagethebladewithoutthe
mulchingpluginplace,thegrassbag
installed,orthereardoordown.
9
Page 10

Ifthegrassbagisonthemachine,removeit;referto
RemovingtheGrassBag(page10).
1.Raiseandholdupthereardoor(Figure16).
Figure16
1.Latch2.Mulchingplug
2.Installthemulchingplugintothehousingand
locktheplugintotheopeninginthehousing
(Figure16).
3.Lowerthereardoor.
WARNING
Themachinecanthrowgrassclippingsand
otherobjectsthroughanopendischarge
tunnel.Objectsthrownwithenoughforce
couldcauseseriouspersonalinjuryordeath
totheyouorabystander.
Neveropenthedooronthedischargetunnel
whentheengineisrunning.
Ifthemulchingwedgeisinstalledonthemachine,
raisethereardoor,removethemulchingwedge,and
lowerthereardoor.
g188334
InstallingtheGrassBag
1.Ifnecessary,assemblethegrassbag;referto4
AssemblingtheGrassBag(page5).
2.Raiseandholdupthereardoor(Figure17).
BaggingtheGrass Clippings
Usethegrassbagwhenyouwanttocollectgrassand
leafclippingsfromthelawn.
WARNING
Aworngrassbagcouldallowsmallstones
andothersimilardebristobethrowntoward
youorbystanders,resultinginserious
personalinjuryordeath.
Checkthegrassbagfrequently.Ifitis
damaged,installanewTororeplacementbag.
WARNING
Thebladeissharp;contactingthebladecan
resultinseriouspersonalinjury.
•Ensurethatthegrassbagisinplacebefore
youbagtheclippings.
•Neverengagethebladewithoutthe
mulchingpluginplace,thegrassbag
installed,orthereardoordown.
g188333
Figure17
3.Installthegrassbag,ensuringthatthepinson
thebagrestinthenotchesonthehandle(Figure
17).
4.Lowerthereardoor.
RemovingtheGrassBag
1.Raiseandholdupthereardoor(Figure17).
2.Removethebag.
3.Lowerthereardoor.
Rear-DischargingtheGrass Clippings
1.Ifthegrassbagisonthemachine,removeit
beforerear-dischargingtheclippings;referto
RemovingtheGrassBag(page10).
10
Page 11

2.Ifthemulchingwedgeisinstalledonthe
machine,raisethereardoor,removethe
mulchingwedge,andlowerthereardoor.
WARNING
Thebladeissharp;contactingthebladecan
resultinseriouspersonalinjury.
•Ensurethatthereardoorisdownbefore
rear-dischargingthegrassclippings.
•Neverengagethebladewithoutthe
mulchingpluginplace,thegrassbag
installed,orthereardoordown.
OperatingTips
–Replacethebladeorhaveitsharpened.
–Walkataslowerpacewhilemowing.
–Raisethecuttingheightonyourmachine.
–Cutthegrassmorefrequently.
–Overlapcuttingswathsinsteadofcuttingafull
swathwitheachpass.
CuttingLeaves
•Aftercuttingthelawn,ensurethathalfofthelawn
showsthroughthecutleafcover.Youmayneed
tomakemorethanasinglepassovertheleaves.
•Iftherearemorethan13cmofleavesonthelawn,
mowatahighercuttingheightandthenagainat
thedesiredcuttingheight.
GeneralMowingTips
•Inspecttheareawhereyouwillusethemachine
andremoveallobjectsthatthemachinecould
throw.
•Avoidstrikingsolidobjectswiththeblade.Never
deliberatelymowoveranyobject.
•Ifthemachinestrikesanobjectorstartstovibrate,
immediatelyshutofftheengine,disconnect
thewirefromthesparkplug,andexaminethe
machinefordamage.
•Forbestperformance,installanewbladebefore
thecuttingseasonbegins.
•ReplacethebladewhennecessarywithaToro
replacementblade.
CuttingGrass
•Cutonlyaboutathirdofthegrassbladeata
time.Donotcutbelow51mmunlessthegrassis
sparseoritislatefallwhengrassgrowthbegins
toslowdown.
•Whencuttinggrassover15cmtall,mowatthe
highestcuttingheightsettingandwalkslower;
thenmowagainatalowersettingforthebestlawn
appearance.Ifthegrassistoolong,themachine
mayplugandcausetheenginetostall.
•Wetgrassandleavestendtoclumpontheyard
andcancausethemachinetoplugortheengine
tostall.Avoidmowinginwetconditions.
•Beawareofapotentialrehazardinverydry
conditions,followalllocalrewarnings,andkeep
themachinefreeofdrygrassandleafdebris.
•Alternatethemowingdirection.Thishelps
dispersetheclippingsoverthelawnforeven
fertilization.
•Ifthenishedlawnappearanceisunsatisfactory,
try1ormoreofthefollowing:
•Slowdownyourmowingspeedifthemachine
doesnotcuttheleavesnelyenough.
AfterOperation
AfterOperatingSafety
GeneralSafety
•Cleangrassanddebrisfromthemachinetohelp
preventres.Cleanupoilorfuelspills.
•Allowtheenginetocoolbeforestoringthemachine
inanyenclosure.
•Neverstorethemachineorfuelcontainerwhere
thereisanopename,spark,orpilotlight,such
asonawaterheateroronotherappliances.
HaulingSafety
•Usecarewhenloadingorunloadingthemachine.
•Securethemachinefromrolling.
11
Page 12

CleaningundertheMachine
ServiceInterval:Beforeeachuseordaily
WARNING
Themachinemaydislodgematerialfrom
underthemachine.
•Weareyeprotection.
10.Starttheengineandrunitforafewminutesto
drytheundersideofthemachinetopreventit
fromrusting.
11.Allowtheenginetocoolbeforestoringthe
machineinanenclosedarea.
FoldingtheHandle
•Stayintheoperatingposition(behindthe
handle)whentheengineisrunning.
•Donotallowbystandersinthearea.
Forbestresults,cleanthemachinesoonafteryou
havecompletedmowing.
1.Movethemachineontoaatpavedsurface.
2.Shutofftheengineandwaitforallmovingparts
tostopbeforeleavingtheoperatingposition.
3.Lowerthemachinetoitslowestcutting-height
setting;refertoAdjustingtheCuttingHeight
(page8).
4.Washouttheareaunderthereardoorwherethe
clippingsgofromthehousingtothegrassbag.
Note:Washouttheareawiththe
bag-on-demandinboththefullyforwardand
fullyrearwardpositions.
5.Attachagardenhosethatisconnectedtoa
watersupplytothewashoutport(Figure18).
WARNING
Foldingorunfoldingthehandleimproperly
candamagethecables,causinganunsafe
operatingcondition.
•Donotdamagethecableswhenfoldingor
unfoldingthehandle.
•Ifacableisdamaged,contactan
AuthorizedServiceDealer.
1.Loosenthe2handleknobs(Figure19A).
Figure18
1.Washoutport
6.Turnthewateron.
7.Starttheengineandrunituntiltherearenomore
clippingsthatcomeoutfromunderthemachine.
8.Shutofftheengine.
9.Shutoffthewateranddisconnectthegarden
hosefromthemachine.
g188328
Figure19
g188338
2.Foldthehandlebyrotatingitforward(Figure
19B).
12
Page 13

Maintenance
Note:Determinetheleftandrightsidesofthemachinefromthenormaloperatingposition.
RecommendedMaintenanceSchedule(s)
MaintenanceService
Interval
Beforeeachuseordaily
Every100hours
Yearly
Yearlyorbeforestorage
MaintenanceProcedure
•Checktheengine-oillevel.
•Cleangrassclippingsanddirtfromunderthemachine.
•Replacethesparkplug.
•Replacetheairlter;replaceitmorefrequentlyindustyoperatingconditions.
•Replacethebladeorhaveitsharpened(morefrequentlyiftheedgedullsquickly).
•Cleantheair-coolingsystem;cleanitmorefrequentlyindustyoperatingconditions.
Refertoyourenginemanual.
•Lubricatethewheels.
•Emptythefueltankbeforerepairsasdirectedandbeforeyearlystorage.
MaintenanceSafety
•Disconnectthespark-plugwirefromthesparkplug
beforeperforminganymaintenanceprocedure.
•Wearglovesandeyeprotectionwhenservicing
themachine.
•Thebladeissharp;contactingthebladecanresult
inseriouspersonalinjury .Weargloveswhen
servicingtheblade.
•Nevertamperwithsafetydevices.Checktheir
properoperationregularly .
•Tippingthemachinemaycausethefueltoleak.
Fuelisammableandexplosive,andcancause
personalinjury.Runtheenginedrytoremovethe
fuelwithahandpump;neversiphonthefuel.
PreparingforMaintenance
1.Shutofftheengineandwaitforallmovingparts
tostop.
2.Disconnectthespark-plugwirefromthespark
plug(Figure20).
g188342
Figure20
3.Afterperformingthemaintenanceprocedure(s),
connectthespark-plugwiretothesparkplug.
Important:Beforetippingthemachineto
changetheoilorreplacetheblade,allowthe
fueltanktorundrythroughnormalusage.If
youmusttipthemachinepriortorunning
outoffuel,useahandfuelpumptoremove
thefuel.Alwaystipthemachineontoits
side,withthedipstickdown.
WARNING
Tippingthemachinemaycausethefuelto
leak.Fuelisammableandexplosiveandcan
causepersonalinjury.
Runtheenginedryorremovethefuelwitha
handpump;neversiphon.
13
Page 14

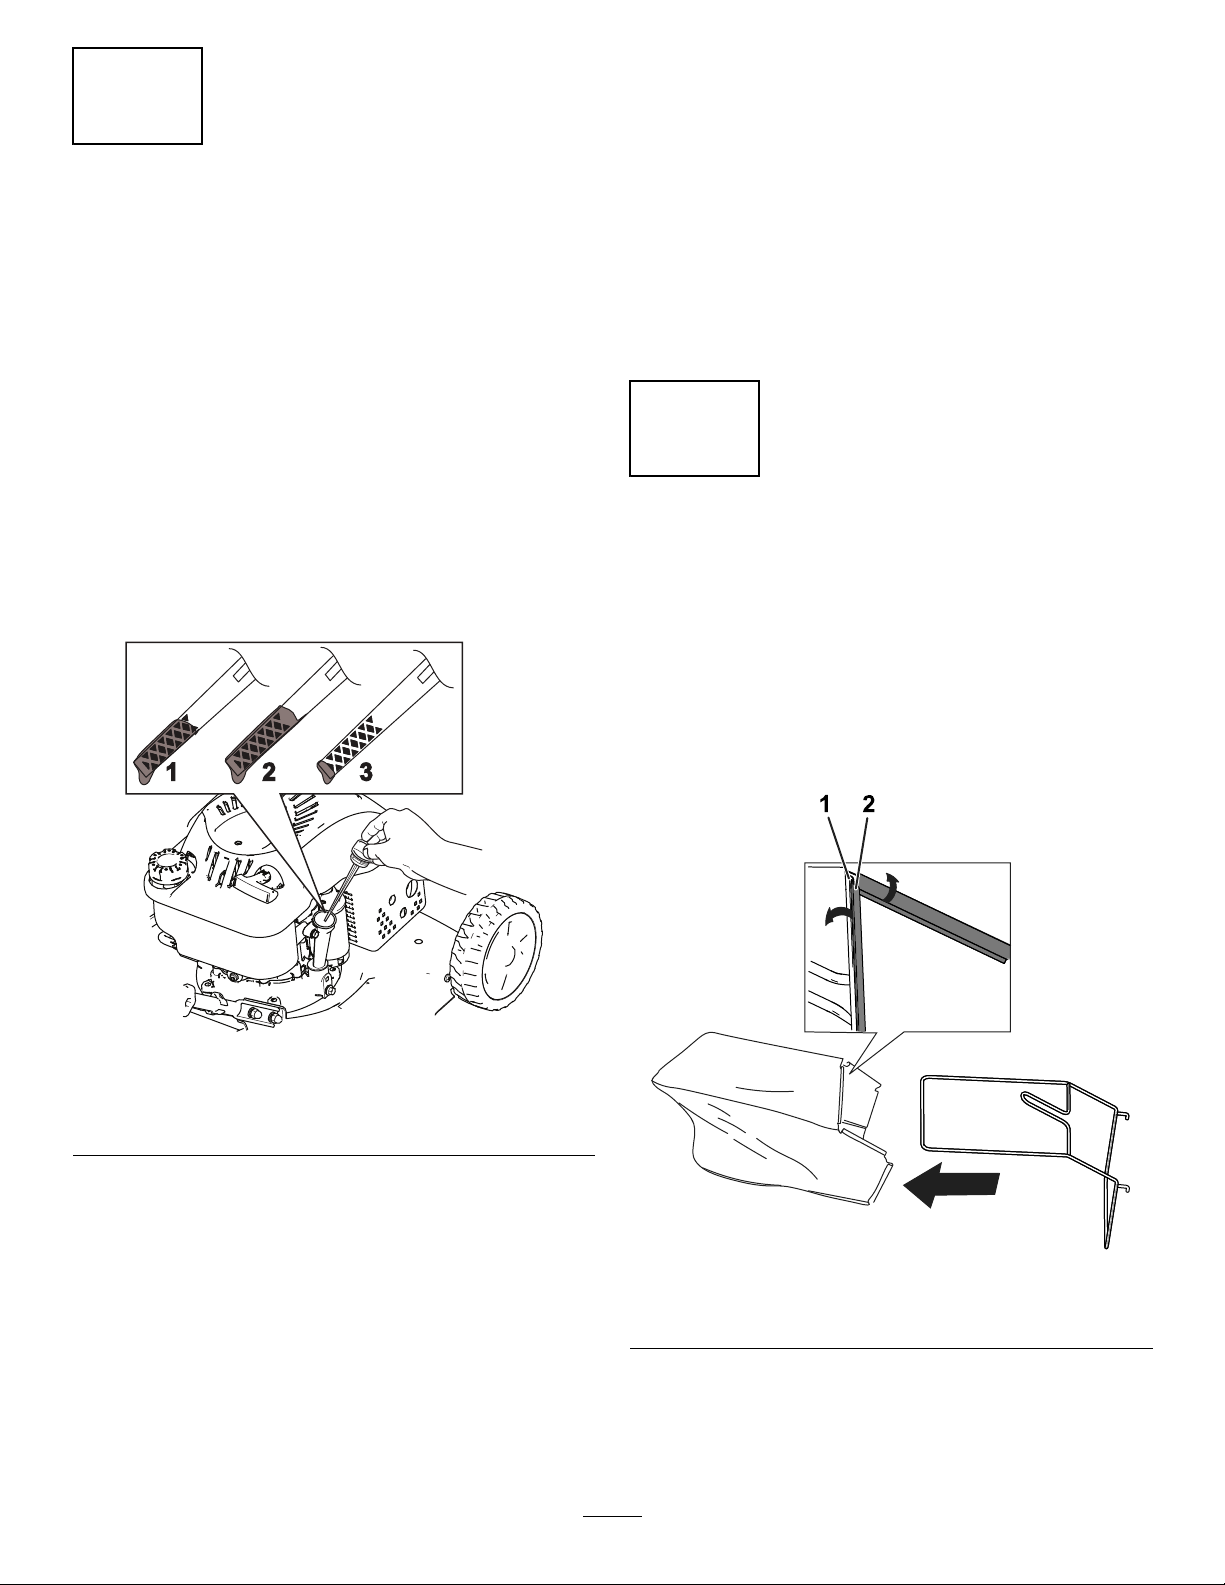
ReplacingtheSparkPlug
ServiceInterval:Every100hours
UseaChampionRN9YCsparkplugorequivalent.
1.Shutofftheengineandwaitforallmovingparts
tostop.
2.Disconnectthewirefromthesparkplug.
3.Removethepaperairlterandthefoam
pre-lter(Figure23).
3.Cleanaroundthesparkplug.
4.Removethesparkplugfromtheengine.
Important:Replaceacracked,fouled,or
dirtysparkplug.Donotcleantheelectrodes
becausegritenteringtheenginecandamage
theengine.
5.Setthegaponthenewplugto0.76mmas
showninFigure21.
Figure21
1.Centerelectrode3.Airgap(nottoscale)
2.Sideelectrode
g015984
Figure23
1.Paperairlter2.Foampre-lter
4.Inspectthefoampre-lter,andreplaceitifitis
damagedorexcessivelydirty.
5.Inspectthepaperairlter.
A.Ifthepaperairlterisdamagedoriswet
withoilorfuel,replaceit.
B.Ifthepaperairlterisdirty ,tapitonahard
surfaceseveraltimesorblowcompressed
airlessthan207kPa(30psi)throughthe
sideofthelterthatfacestheengine.
Note:Donotbrushthedirtoffthelter;
brushingforcesdirtintothebers.
g000533
6.Removedirtfromtheair-cleanerbodyand
cover,usingamoistrag.Donotwipedirtinto
theairduct.
7.Insertthefoampre-lterandthepaperairlter
intotheaircleaner.
6.Installthesparkplug
7.Tightentheplugto20N∙m.
8.Connectthewiretothesparkplug.
ReplacingtheAirFilter
ServiceInterval:Y early
1.Pressdownonthelatchtabsontopofthe
air-ltercover(Figure22).
Figure22
1.Latchtabs
2.Openthecover.
8.Installthecover.
ChangingtheEngineOil
Changingtheengineoilisnotrequired,butif
youdesiretochangetheoil,usethefollowing
procedure.
Engineoilcapacity:0.55L
Oilviscosity:SAE30orSAE10W-30detergentoil
APIserviceclassication:SJorhigher
Note:Runtheengineafewminutesbeforechanging
theoiltowarmit.Warmoilowsbetterandcarries
morecontaminants.
1.Movethemachinetoalevelsurface.
g015983
2.RefertoPreparingforMaintenance(page13).
3.Removethedipstickbyrotatingthecap
counterclockwiseandpullingitout(Figure24).
14
Page 15

Figure24
1.Full3.Low
2.High
Important:Iftheoillevelintheengineistoo
lowortoohighandyouruntheengine,you
maydamagetheengine.
11.Installthedipsticksecurely.
12.Recycletheusedoilproperly.
ReplacingtheBlade
ServiceInterval:Y early
Important:Youwillneedatorquewrenchto
installthebladeproperly.Ifyoudonothavea
torquewrenchorareuncomfortableperforming
thisprocedure,contactanAuthorizedService
g188326
Dealer.
Examinethebladewheneveryourunoutoffuel.Ifthe
bladeisdamagedorcracked,replaceitimmediately.
Ifthebladeedgeisdullornicked,haveitsharpened
andbalanced,orreplaceit.
4.Tipthemachineontoitsside(sothattheair
lterisup)todraintheusedoilfromtheoil-ll
tube(Figure25).
Figure25
5.Afterdrainingtheusedoil,returnthemachineto
theoperatingposition.
6.Carefullypourabout3/4oftheenginecapacity
ofoilintotheoil-lltube.
7.Waitabout3minutesfortheoiltosettleinthe
engine.
8.Wipethedipstickcleanwithacleancloth.
9.Insertthedipstickintotheoil-lltube,then
removethedipstick.
10.Readtheoillevelonthedipstick(Figure25).
•Iftheoillevelonthedipstickistoolow,
carefullypourasmallamountofoilintothe
oil-lltube,wait3minutes,andrepeatsteps
8through10untiltheoilonthedipstickisat
thecorrectlevel.
•Iftheoillevelonthedipstickistoohigh,drain
theexcessoiluntiltheoilonthedipstickisat
thecorrectlevel.
WARNING
Thebladeissharp;contactingthebladecan
resultinseriouspersonalinjury.
Weargloveswhenservicingtheblade.
1.RefertoPreparingforMaintenance(page13).
2.Tipthemachineontoitssidewiththedipstick
down.
3.Useablockofwoodtoholdthebladesteady
g015604
(Figure26).
g188339
Figure26
4.Removetheblade,savingallmountinghardware
(Figure26).
5.Installthenewbladeandallmountinghardware
(Figure27).
15
Page 16

LubricatingtheWheels
ServiceInterval:Yearlyorbeforestorage
ApplyafewdropsofNo.2lithiumgreasetotheball
bearingsoneachofthewheels(Figure28).
Figure27
Important:Positionthecurvedendsofthe
bladetopointtowardthemowerhousing.
6.Useatorquewrenchtotightenthebladeboltto
45N∙m(33ft-lb).
Important:Abolttorquedto45N∙m(33
ft-lb)isverytight.Whileholdingtheblade
withablockofwood,putyourweight
behindtheratchetorwrenchandtightenthe
boltsecurely.Thisboltisverydifcultto
overtighten.
g188330
Figure28
1.Ballbearings
g189817
16
Page 17

Storage
Storethemachineinacool,clean,dryplace.
PreparingtheMachinefor Storage
1.Onthelastrefuelingoftheyear,addfuel
stabilizer(suchasToroPremiumFuel
Treatment)tothefuel.
2.Disposeofanyunusedfuelproperly.Recycle
itaccordingtolocalcodes,oruseitinyour
automobile.
Note:Oldfuelinthefueltankistheleading
causeofhardstarting.Donotstorefuelwithout
stabilizermorethan30days,anddonotstore
stabilizedfuelmorethan90days.
3.Runthemachineuntiltheengineshutsofffrom
runningoutoffuel.
4.Starttheengineagain.
5.Allowtheenginetorununtilitshutsoff.
Whenyoucannolongerstarttheengine,itis
sufcientlydry.
6.Disconnectthewirefromthesparkplug.
7.Removethesparkplug,add30mlofengine
oilthroughthespark-plughole,andpullthe
starterropeslowlyseveraltimestodistribute
oilthroughoutthecylindertopreventcylinder
corrosionduringtheoff-season.
8.Looselyinstallthesparkplug.
9.Tightenallnuts,bolts,andscrews.
RemovingtheMachine fromStorage
1.Checkandtightenallfasteners.
2.Removethesparkplugandspintheengine
rapidlybypullingtherecoil-starthandletoblow
theexcessoilfromthecylinder.
3.Installthesparkplugandtightenitwithatorque
wrenchto20N∙m.
4.Performanymaintenanceprocedures;referto
PreparingforMaintenance(page13).
5.Checktheengine-oillevel;refertoCheckingthe
Engine-OilLevel(page7).
6.Fillthefueltankwithfreshfuel;refertoFilling
theFuelT ank(page7).
7.Connectthewiretothesparkplug.
17
Page 18

Notes:
Page 19

EuropeanPrivacyNotice
TheInformationT oroCollects
ToroWarrantyCompany(Toro)respectsyourprivacy.Inordertoprocessyourwarrantyclaimandcontactyouintheeventofaproductrecall,weaskyou
tosharecertainpersonalinformationwithus,eitherdirectlyorthroughyourlocalT orocompanyordealer .
TheTorowarrantysystemishostedonserverslocatedwithintheUnitedStateswhereprivacylawmaynotprovidethesameprotectionasapplies
inyourcountry.
BYSHARINGYOURPERSONALINFORMA TIONWITHUS,YOUARECONSENTINGTOTHEPROCESSINGOFYOURPERSONALINFORMATION
ASDESCRIBEDINTHISPRIVACYNOTICE.
TheWayToroUsesInformation
Toromayuseyourpersonalinformationtoprocesswarrantyclaims,tocontactyouintheeventofaproductrecallandforanyotherpurposewhichwetell
youabout.ToromayshareyourinformationwithT oro'safliates,dealersorotherbusinesspartnersinconnectionwithanyoftheseactivities.Wewillnot
sellyourpersonalinformationtoanyothercompany .Wereservetherighttodisclosepersonalinformationinordertocomplywithapplicablelawsand
withrequestsbytheappropriateauthorities,tooperateoursystemsproperlyorforourownprotectionorthatofotherusers.
RetentionofyourPersonalInformation
Wewillkeepyourpersonalinformationaslongasweneeditforthepurposesforwhichitwasoriginallycollectedorforotherlegitimatepurposes
(suchasregulatorycompliance),orasrequiredbyapplicablelaw.
Toro'sCommitmenttoSecurityofY ourPersonalInformation
Wetakereasonableprecautionsinordertoprotectthesecurityofyourpersonalinformation.Wealsotakestepstomaintaintheaccuracyandcurrent
statusofpersonalinformation.
AccessandCorrectionofyourPersonalInformation
Ifyouwouldliketorevieworcorrectyourpersonalinformation,pleasecontactusbyemailatlegal@toro.com.
AustralianConsumerLaw
AustraliancustomerswillnddetailsrelatingtotheAustralianConsumerLaweitherinsidetheboxoratyourlocalT oroDealer.
374-0282RevC
Page 20

TheT oroWarranty
TheT oroGTSStartingGuarantee
ResidentialProducts
and
ConditionsandProductsCovered
TheToroCompanyanditsafliate,T oroWarrantyCompany,pursuantto
anagreementbetweenthem,jointlypromisetorepairtheToroProduct
listedbelowifdefectiveinmaterialsorworkmanshiporiftheT oroGTS
(GuaranteedtoStart)enginewillnotstartontherstorsecondpull,
providedtheroutinemaintenancerequiredintheOperator'sManualhave
beenperformed.
Thefollowingtimeperiodsapplyfromtheoriginaldateofpurchase:
ProductsWarrantyPeriod
WalkPowerMowers
•CastDeck
5yearsResidentialUse
2
90DaysCommercialUse
—Engine
5yearsGTSGuarantee,Residential
3
Use
—Battery2years
•SteelDeck
2yearsResidentialUse
2
30DaysCommercialUse
—Engine
TimeMasterMowers3yearsResidentialUse
2yearsGTSGuarantee,Residential
3
Use
2
90DaysCommercialUse
•Engine
•Battery2years
ElectricHandHeldProducts2yearsResidentialUse
andElectricWalkPowerMowers
3yearsGTSGuarantee,Residential
3
Use
NoWarrantyforCommercialUse
2
AllRide-OnUnitsBelow
•Engine
•Battery2yearsResidentialUse
•Attachments2yearsResidentialUse
DHLawn&GardenTractors
TimeCutter
•Engine3yearsResidentialUse
TimeCutterHD
•Engine
1
OriginalPurchasermeansthepersonwhooriginallypurchasedtheT oroProduct.
2
Residentialusemeansuseoftheproductonthesamelotasyourhome.Useatmorethanone
locationisconsideredcommercialuseandthecommercialusewarrantywouldapply .
3
TheT oroGTSStartingGuaranteedoesnotapplywhentheproductisusedcommercially.
4
SomeenginesusedonToroProductsarewarrantedbytheenginemanufacturer.
5
Whicheveroccursrst.
Seeenginemanufacturer'swarranty
2yearsResidentialUse
30DaysCommercialUse
3yearsResidentialUse
30DaysCommercialUse
2yearsor300hoursCommercial
5
Use
3yearsor300hours
3yearsor300hoursCommercial
5
Use
2
2
2
2
2
5
Warrantymaybedeniedifthehourmeterisdisconnected,altered,or
showssignsofbeingtamperedwith.
OwnerResponsibilities
YoumustmaintainyourT oroProductbyfollowingthemaintenance
proceduresdescribedintheOperator'sManual.Suchroutinemaintenance,
whetherperformedbyadealerorbyyou,isatyourexpense.
InstructionsforObtainingWarrantyService
IfyouthinkthatyourT oroProductcontainsadefectinmaterialsor
workmanship,followthisprocedure:
1.Contactyoursellertoarrangeserviceoftheproduct.Ifforany
reasonitisimpossibleforyoutocontactyourseller ,youmay
contactanyT oroAuthorizedDistributortoarrangeservice.Visit
http://www.toro.com/en-us/locator/pages/default.aspxtolocateaToro
distributorinyourarea.
2.Bringtheproductandyourproofofpurchase(salesreceipt)tothe
servicingoutlet.Ifforanyreasonyouaredissatisedwiththeservicing
outlet’sanalysisorwiththeassistanceprovided,contactusat:
ToroWarrantyCompany
ToroCustomerCareDepartment,RLCDivision
811 1LyndaleAvenueSouth
Bloomington,MN55420-1196
001–952–948–4707
ItemsandConditionsNotCovered
Thereisnootherexpresswarrantyexceptforspecialemissionsystem
coverageandenginewarrantycoverageonsomeproducts.Thisexpress
warrantydoesnotcoverthefollowing:
•Costofregularmaintenanceserviceorparts,suchaslters,fuel,
lubricants,oilchanges,sparkplugs,airlters,bladesharpening
orwornblades,cable/linkageadjustments,orbrakeandclutch
4
adjustments
•Componentsfailingduetonormalwear
•Anyproductorpartwhichhasbeenaltered,misused,neglected,
requiresreplacement,orrepairduetoaccidentsorlackofproper
maintenance
•Pickupanddeliverycharges
•RepairsorattemptedrepairsbyanyoneotherthananAuthorizedToro
ServiceDealer
•Repairsnecessaryduetofailuretofollowrecommendedfuel
procedure(consultOperator'sManualformoredetails)
–Removingcontaminantsfromthefuelsystemisnotcovered
–Useofoldfuel(morethanonemonthold)orfuelwhichcontains
morethan10%ethanolormorethat15%MTBE
–Failuretodrainthefuelsystempriortoanyperiodofnon-use
overonemonth
•Repairsoradjustmentstocorrectstartingdifcultiesduetothe
following:
–Failuretofollowpropermaintenanceproceduresorrecommended
fuelprocedure
–Rotarymowerbladestrikinganobject
•Specialoperationalconditionswherestartingmayrequiremorethan
twopulls:
–Firsttimestartsafterextendedperiodofnon-useoverthree
monthsorseasonalstorage
–Cooltemperaturestartssuchasthosefoundinearlyspringand
lateautumn
–Improperstartingprocedures-ifyouarehavingdifcultystarting
yourunit,pleasechecktheOperator'sManualtoensurethat
youareusingthecorrectstartingprocedures.Thiscansavean
unnecessaryvisittoanAuthorizedToroServiceDealer .
GeneralConditions
Thepurchaseriscoveredbythenationallawsofeachcountry.Therights
towhichthepurchaserisentitledwiththesupportoftheselawsarenot
restrictedbythiswarranty .
374-0268RevK
 Loading...