

Page 1
48cmSuperBaggerLawnMower
ModelNo.20838—SerialNo.401700000andUp
Introduction
Thisrotary-blade,walk-behindlawnmowerisintended
tobeusedbyresidentialhomeowners.Itisdesigned
primarilyforcuttinggrassonwell-maintainedlawns
onresidentialproperties.Itisnotdesignedforcutting
brushorforagriculturaluses.
Readthisinformationcarefullytolearnhowtooperate
andmaintainyourproductproperlyandtoavoid
injuryandproductdamage.Youareresponsiblefor
operatingtheproductproperlyandsafely.
YoumaycontactT orodirectlyatwww.T oro.comfor
productandaccessoryinformation,helpndinga
dealer,ortoregisteryourproduct.
Wheneveryouneedservice,genuineToroparts,or
additionalinformation,contactanAuthorizedService
DealerorToroCustomerServiceandhavethemodel
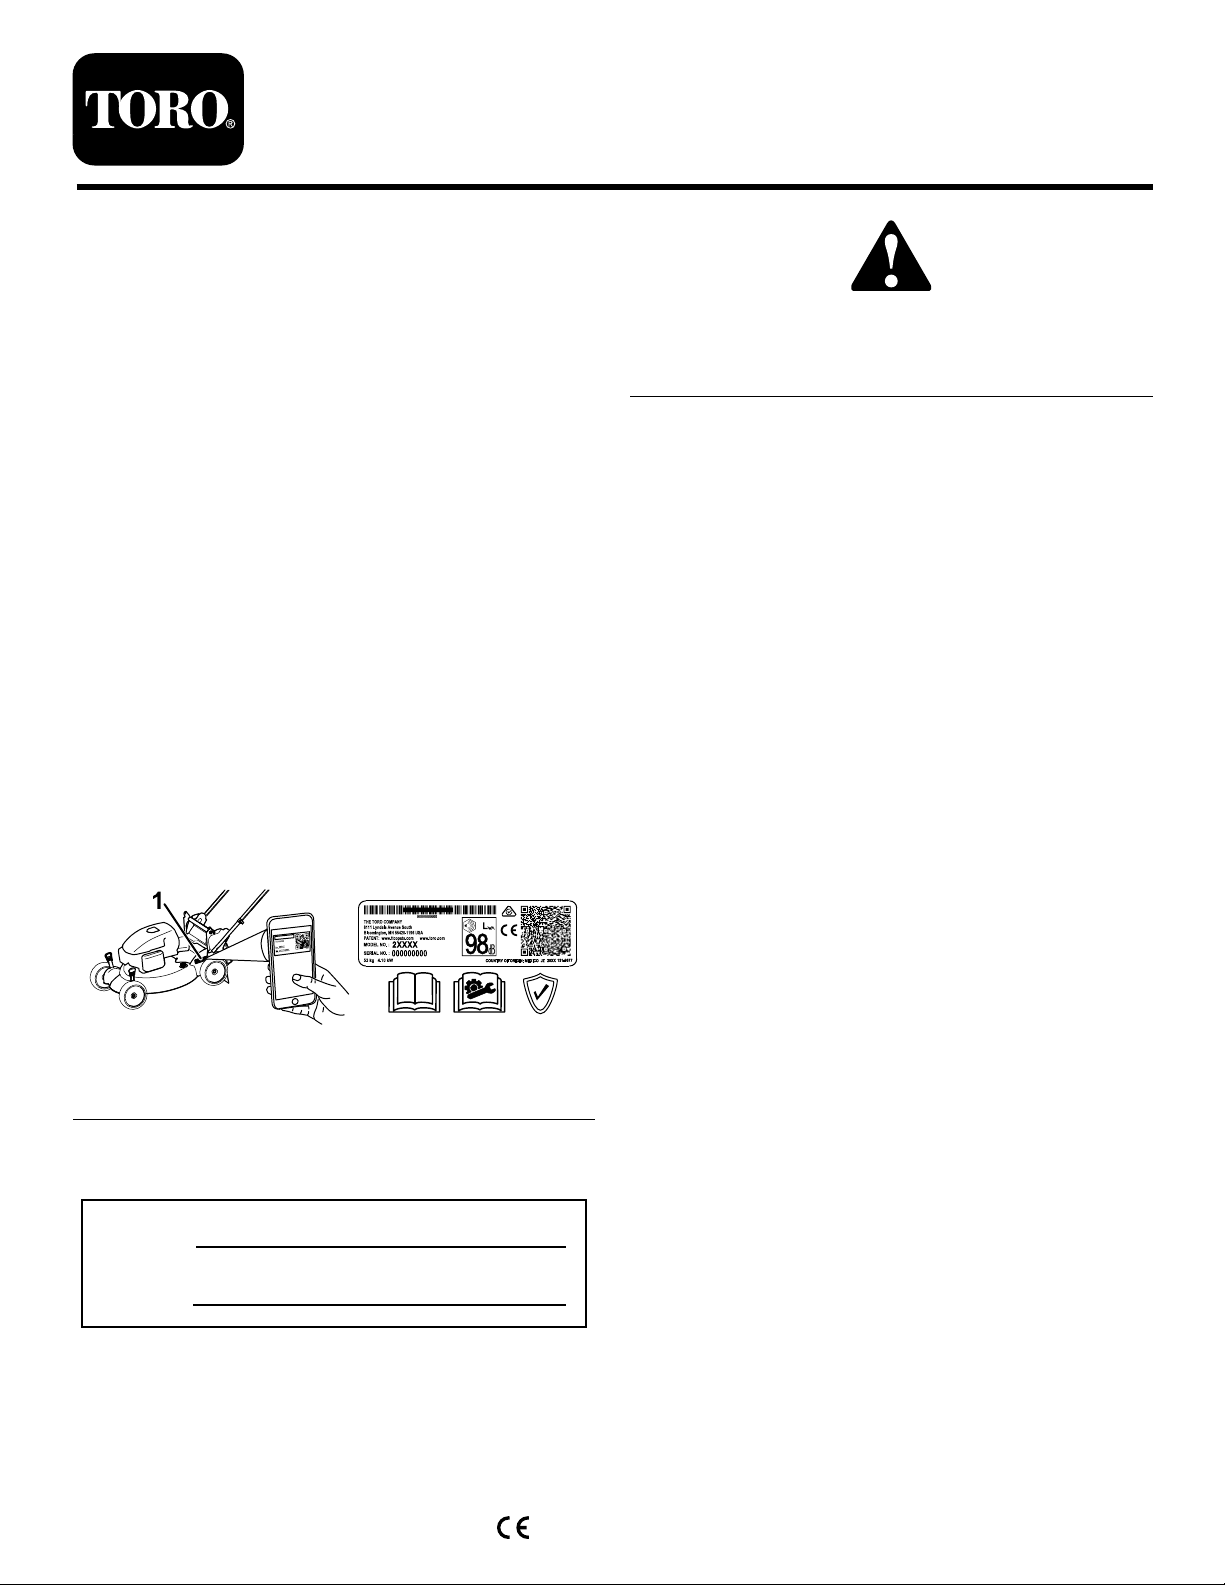
andserialnumbersofyourproductready .Figure1
identiesthelocationofthemodelandserialnumber
ontheproduct.
Important:Withyoursmartphoneortablet,scan
theQRcodeontheserialnumberdecaltoaccess
warranty,parts,andotherproductinformation.
FormNo.3418-955RevB
Operator'sManual
g000502
Figure2
Safety-alertsymbol
Thismanualuses2wordstohighlightinformation.
Importantcallsattentiontospecialmechanical
informationandNoteemphasizesgeneralinformation
worthyofspecialattention.
GrossorNetTorque:Thegrossornettorque
ofthisenginewaslaboratoryratedbytheengine
manufacturerinaccordancewiththeSocietyof
AutomotiveEngineers(SAE)J1940orJ2723.As
conguredtomeetsafety,emission,andoperating
requirements,theactualenginetorqueonthisclass
ofmowerwillbesignicantlylower.Pleasereferto
theenginemanufacturer’sinformationincludedwith
themachine.
Donottamperwithordisablesafetydevicesonthe
machine,andchecktheirproperoperationregularly.
Donotattempttoadjustortamperwiththeengine
speedcontrol;doingsomaycreateanunsafe
operatingcondition,resultinginpersonalinjury.
Figure1
1.Modelandserialnumberlocation
Writetheproductmodelandserialnumbersinthe
spacebelow:
ModelNo.
SerialNo.
Thismanualidentiespotentialhazardsandhas
safetymessagesidentiedbythesafety-alertsymbol
(Figure2),whichsignalsahazardthatmaycause
seriousinjuryordeathifyoudonotfollowthe
recommendedprecautions.
Important:Ifyouareusingthismachineabove
1500m(5,000ft)foracontinuousperiod,ensure
thattheHighAltitudeKithasbeeninstalled
sothattheenginemeetsCARB/EPAemission
regulations.TheHighAltitudeKitincreases
g226629
engineperformancewhilepreventingspark-plug
fouling,hardstarting,andincreasedemissions.
Onceyouhaveinstalledthekit,attachthe
high-altitudelabelnexttotheserialdecalonthe
machine.ContactanyAuthorizedToroService
DealertoobtaintheproperHighAltitudeKitand
high-altitudelabelforyourmachine.Tolocate
adealerconvenienttoyou,accessourwebsite
atwww.Toro.comorcontactourToroCustomer
CareDepartmentatthenumber(s)listedinyour
EmissionControlWarrantyStatement.
Removethekitfromtheengineandrestorethe
enginetoitsoriginalfactorycongurationwhen
runningtheengineunder1500m(5,000ft).Do
notoperateanenginethathasbeenconverted
forhigh-altitudeuseatloweraltitudes;otherwise,
youcouldoverheatanddamagetheengine.
©2018—TheT oro®Company
8111L yndaleAvenueSouth
Bloomington,MN55420
Registeratwww.Toro.com.
OriginalInstructions(EN)
PrintedinMexico
AllRightsReserved
*3418-955*B
Page 2

Ifyouareunsurewhetherornotyourmachinehas
beenconvertedforhigh-altitudeuse,lookforthe
followinglabel(Figure3).
ServicingtheSparkPlug...................................19
ReplacingtheBlade..........................................20
Storage...................................................................21
PreparingtheMachineforStorage...................21
RemovingtheMachinefromStorage................21
Safety
decal127-9363
Figure3
Contents
Introduction...............................................................1
Safety.......................................................................2
GeneralSafety...................................................2
SafetyandInstructionalDecals..........................3
Setup........................................................................5
1UnfoldingtheHandle.......................................5
2InstallingtheRecoil-StarterRopeinthe
RopeGuide.....................................................5
3FillingtheEnginewithOil.................................6
4ChargingtheBattery........................................6
5AssemblingtheGrassBag...............................7
ProductOverview.....................................................8
Specications....................................................8
Operation..................................................................8
BeforeOperation...................................................8
BeforeOperationSafety.....................................8
FillingtheFuelTank............................................9
CheckingtheEngine-OilLevel............................9
AdjustingtheHandleHeight...............................9
AdjustingtheCuttingHeight.............................10
DuringOperation.................................................10
DuringOperationSafety...................................10
StartingtheEngine............................................11
UsingtheSelf-PropelDrive...............................12
ShuttingOfftheEngine.....................................12
RecyclingtheClippings....................................12
BaggingtheClippings.......................................12
Rear-DischargingtheClippings........................13
OperatingTips.................................................13
AfterOperation....................................................14
AfterOperationSafety......................................14
CleaningundertheMachine.............................14
FoldingtheHandle...........................................15
Maintenance...........................................................16
RecommendedMaintenanceSchedule(s)...........16
MaintenanceSafety..........................................16
PreparingforMaintenance...............................16
ServicingtheAirFilter.......................................17
ChangingtheEngineOil...................................17
ChargingtheBattery.........................................18
ReplacingtheFuse...........................................19
Thismachinehasbeendesignedinaccordancewith
ENISO5395:2013.
GeneralSafety
Thisproductiscapableofamputatinghandsand
feetandofthrowingobjects.Alwaysfollowallsafety
instructionstoavoidseriouspersonalinjury .
Usingthisproductforpurposesotherthanitsintended
usecouldprovedangeroustoyouandbystanders.
•Read,understand,andfollowtheinstructions
andwarningsinthisOperator’sManualandon
themachineandattachmentsbeforestartingthe
engine.
•Donotputyourhandsorfeetnearmovingpartsof
orunderthemachine.Keepclearofanydischarge
opening.
•Donotoperatethemachinewithoutallguards
andothersafetyprotectivedevicesinplaceand
workingonthemachine.
•Keepbystandersandchildrenasafedistance
awayfromthemachine.Donotallowchildrento
operatethemachine.Allowonlypeoplewhoare
responsible,trained,familiarwiththeinstructions,
andphysicallycapabletooperatethemachine.
•Stopthemachine,shutofftheengine,removethe
electric-startbutton(ifequipped),andwaitforall
movingpartstostopbeforeservicing,fueling,or
uncloggingthemachine.
Improperlyusingormaintainingthismachinecan
resultininjury.T oreducethepotentialforinjury,
complywiththesesafetyinstructionsandalwayspay
attentiontothesafety-alertsymbol,whichmeans
Caution,Warning,orDanger—personalsafety
instruction.Failuretocomplywiththeseinstructions
mayresultinpersonalinjuryordeath.
Youcanndadditionalsafetyinformationwhere
neededthroughoutthismanual.
2
Page 3
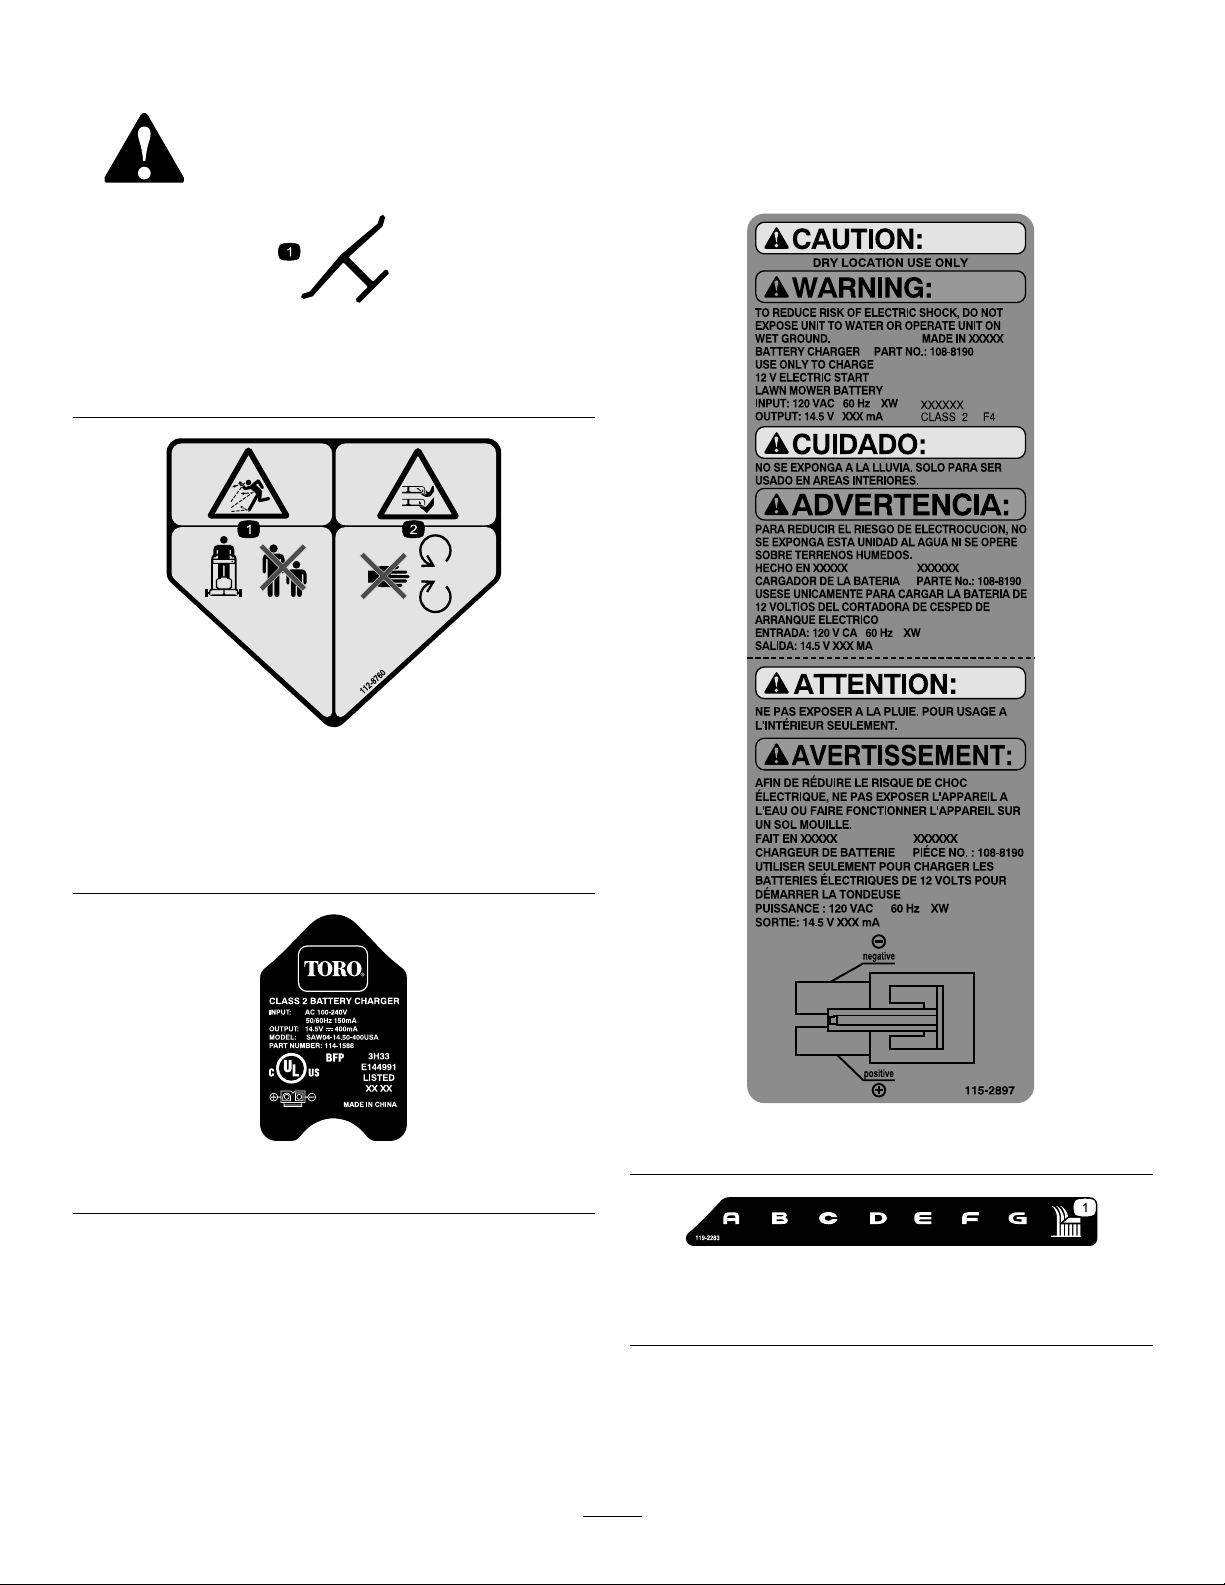
SafetyandInstructionalDecals
Safetydecalsandinstructionsareeasilyvisibletotheoperatorandarelocatednear
anyareaofpotentialdanger.Replaceanydecalthatisdamagedormissing.
Manufacturer'sMark
1.Indicatesthebladeisidentiedasapartfromtheoriginal
machinemanufacturer.
decaloemmarkt
112-8760
1.Thrownobjecthazard—keepbystandersasafedistance
awayfromthemachine.
2.Cutting/dismembermentofhandorfoot—stayawayfrom
movingparts.
115-2896
decal112-8760
decal115-2897
115-2897
decal115-2896
decal119-2283
119-2283
1.Height-of-cutsettings
3
Page 4
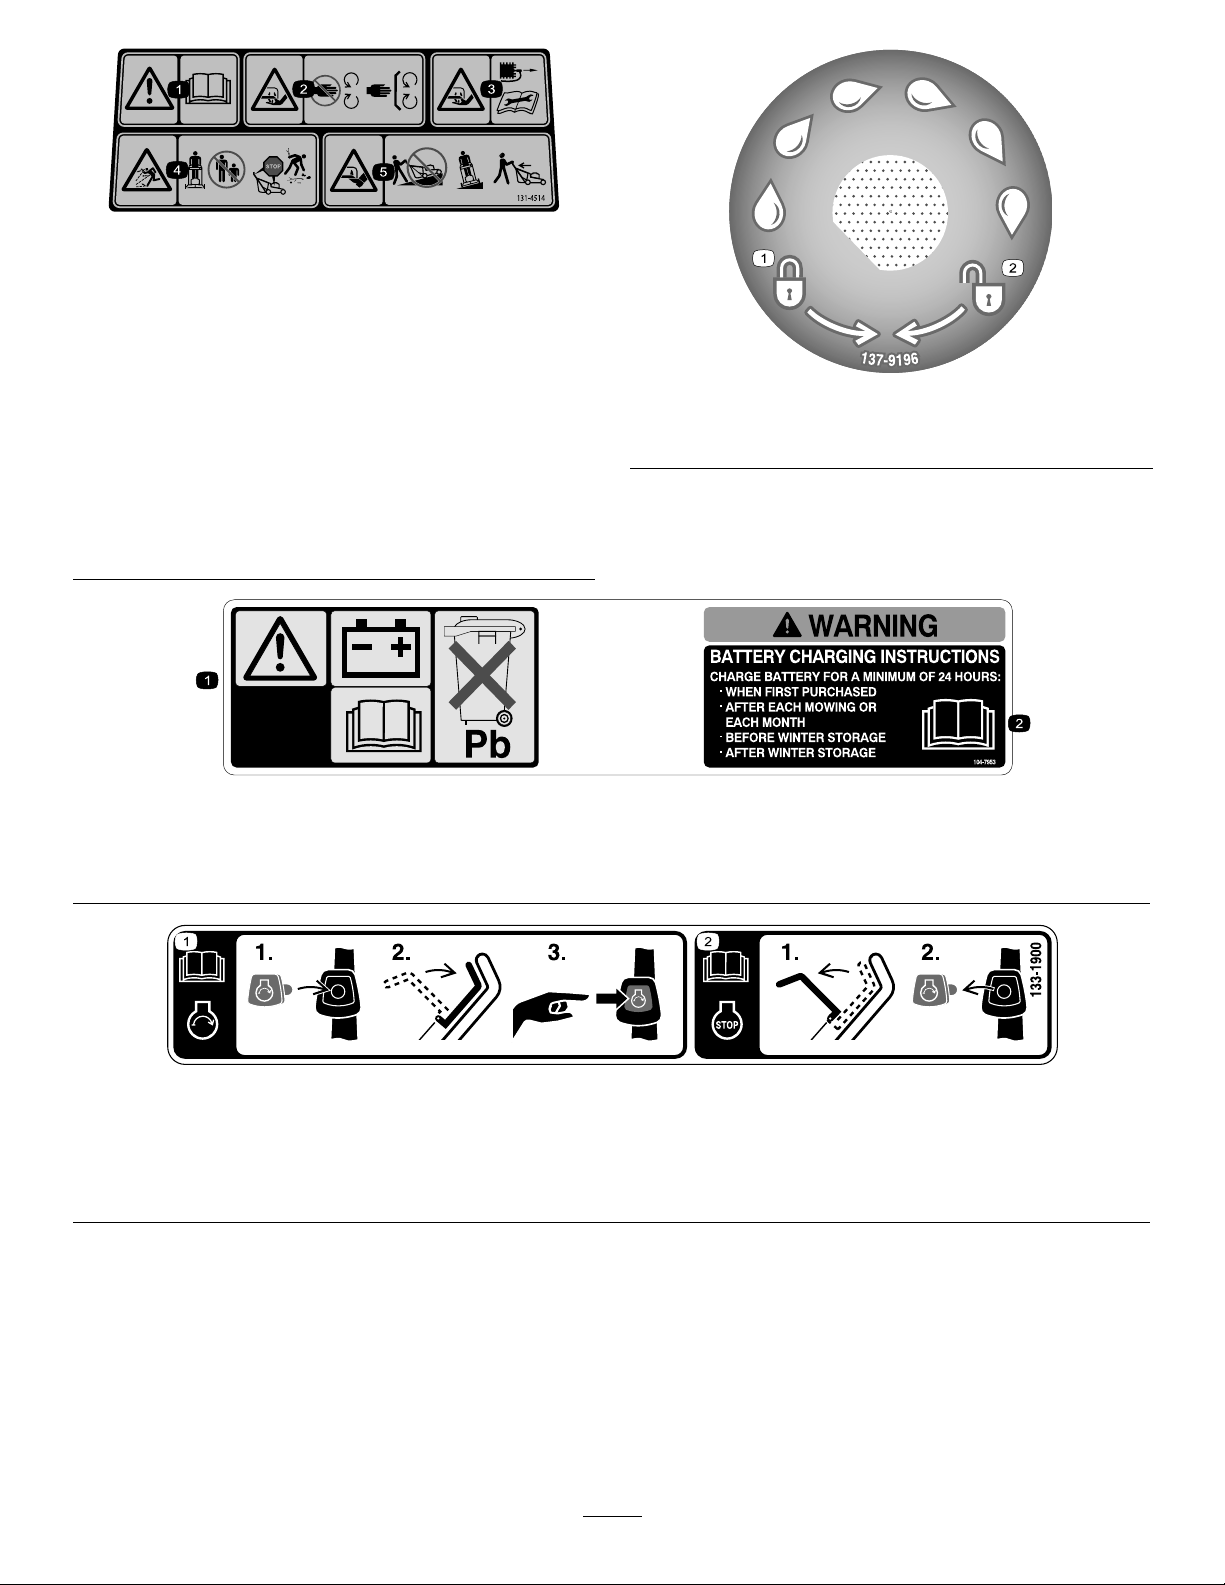
131-4514
1.Warning—readtheOperator'sManual.
2.Cutting/dismembermenthazardofhand,mower
blade—stayawayfrommovingparts;keepallguardsand
shieldsinplace.
3.Cutting/dismembermenthazardofhand,mower
blade—disconnectthespark-plugwireandreadthe
instructionsbeforeservicingorperformingmaintenance.
4.Thrownobjecthazard—keepbystandersasafedistance
awayfromthemachine;shutofftheenginebeforeleaving
theoperatingposition;pickupanydebrisbeforemowing.
5.Cutting/dismembermenthazardoffoot,mowerblade—do
notoperateupanddownslopes;operatesidetosideon
slopes;lookbehindyouwhenbackingup.
decal131-4514b
decal137-9196
137-9196
1.Lock2.Unlock
decal104-7953
104-7953
1.Warning—readtheOperator'sManualforinformationonchargingthebattery;containslead;donotdiscard.
2.ReadtheOperator'sManual.
133-1900
1.ReadtheOperator’sManualformoreinformationonstarting
theengine—1)Inserttheelectric-startbuttonintothe
electricstarter;2)Engagetheblade-controlbar;3)Pushthe
electric-startbuttontostarttheengine.
2.ReadtheOperator’sManualformoreinformationonstopping
theengine—1)Releasetheblade-controlbar;2)Removethe
electric-startbuttonfromtheelectricstarter.
decal133-1900
4
Page 5
Setup
Important:Removeanddiscardtheprotective
plasticsheetthatcoverstheengineandanyother
plasticorwrappingonthemachine.
Important:Topreventaccidentalstarting,
donotinserttheelectric-startbuttonintothe
electric-startignition(ifequipped)untilyouare
readytostarttheengine.
1
UnfoldingtheHandle
NoPartsRequired
Procedure
WARNING
Foldingorunfoldingthehandleimproperly
candamagethecables,causinganunsafe
operatingcondition.
•Donotdamagethecableswhenfoldingor
unfoldingthehandle.
•Ifacableisdamaged,contactan
AuthorizedServiceDealer.
g038688
Figure5
3.Tightenthehandleknobsrmlybyhand.
4.Rotatethehandlerearwardtotheoperating
position,andlockthehandleatyourdesired
height.RefertoAdjustingtheHandleHeight
(page9).
2
InstallingtheRecoil-Starter RopeintheRopeGuide
NoPartsRequired
Procedure
Important:T ostarttheenginesafelyandeasily
wheneveryouusethemachine,installthe
recoil-starterropeintheropeguide.
1.Loosenthehandleknobs(Figure4).
Figure4
1.Handleknobs
2.Carefullymovetheupperhandleforwarduntil
thehandlehalvesareinlineandnesttogether
asshowninFigure5.
Holdtheblade-controlbartotheupperhandleand
pulltherecoil-starterropethroughtheropeguideon
thehandle(Figure6).
g003251
g038687
1.Recoil-starterrope2.Ropeguide
Figure6
5
Page 6
3
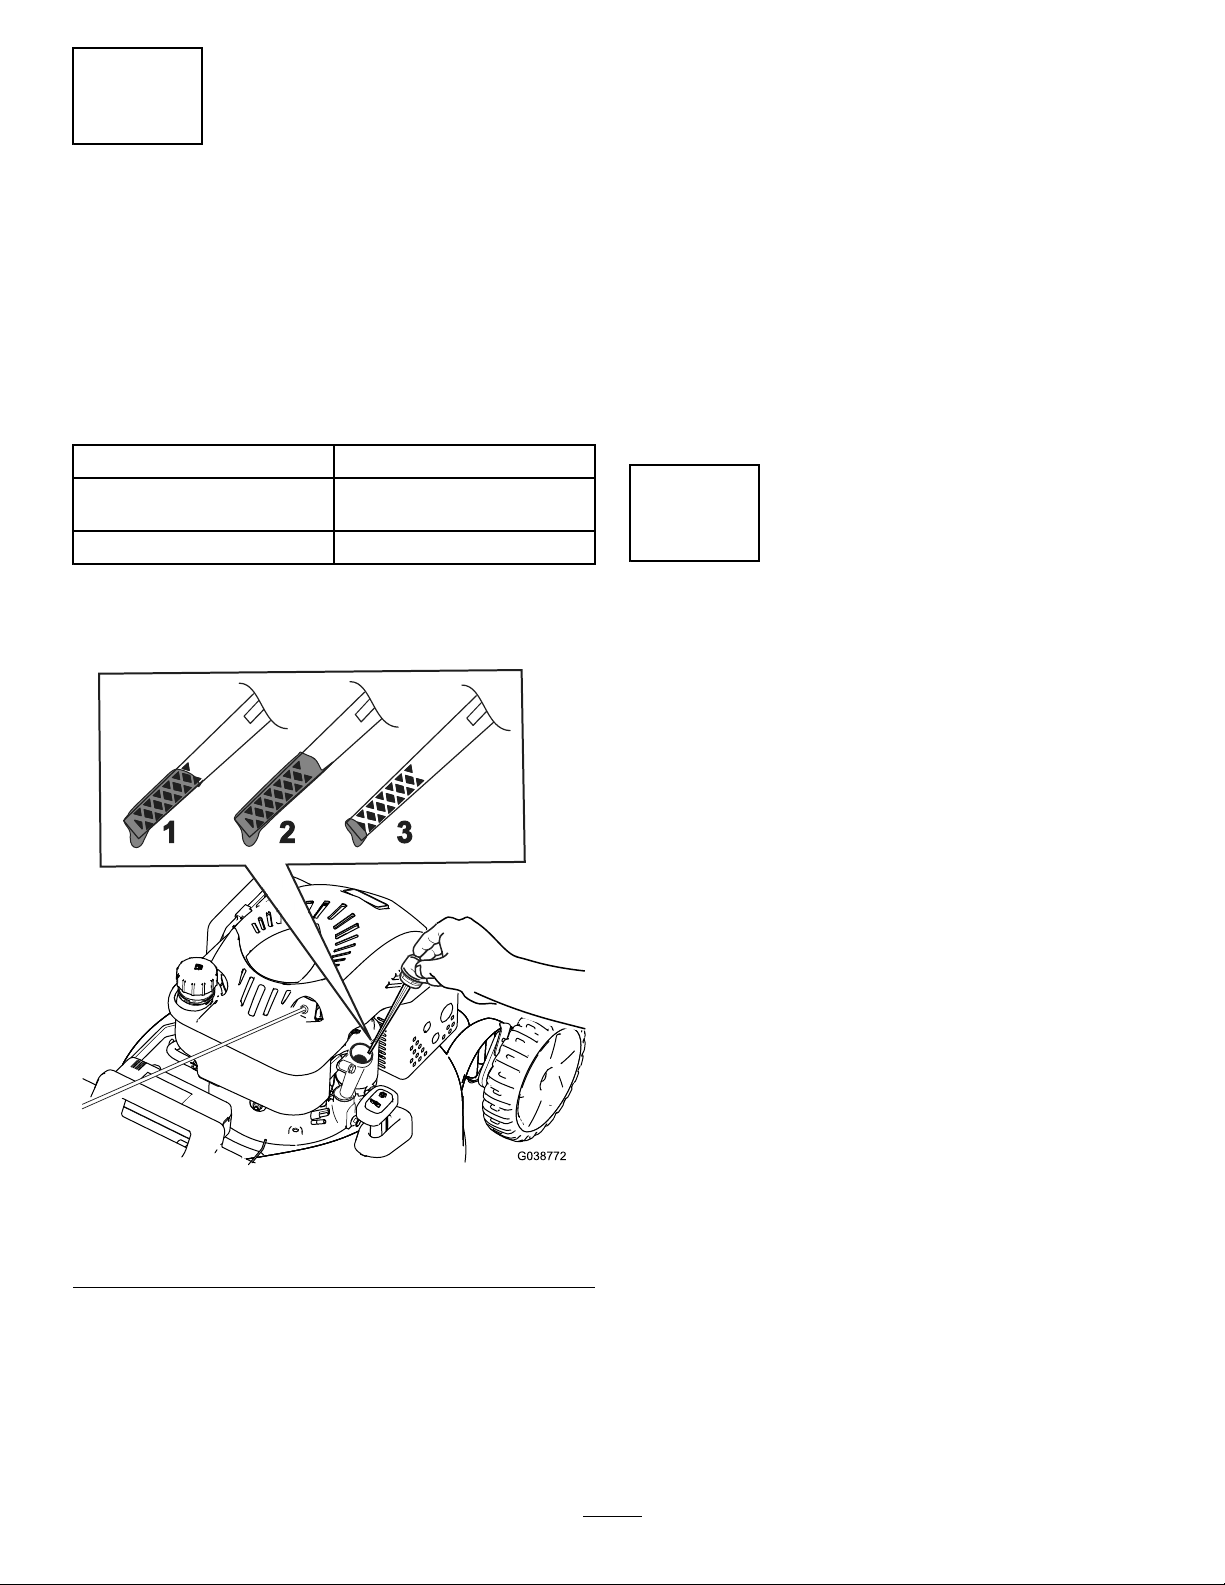
FillingtheEnginewithOil
7.Readtheoillevelonthedipstick(Figure7).
•Iftheoillevelonthedipstickistoolow,
carefullypourasmallamountofoilintothe
oil-lltube,wait3minutes,andrepeatsteps
5through7untiltheoilonthedipstickisat
thecorrectlevel.
NoPartsRequired
Procedure
Important:Yourmachinedoesnotcomewithoil
intheengine.Beforestartingtheengine,llthe
enginewithoil.
EngineOilSpecications
Engineoilcapacity
OilviscositySAE30orSAE10W-30
APIserviceclassicationSJorhigher
1.Movethemachinetoalevelsurface.
2.Removethedipstickbyrotatingthecap
counterclockwiseandpullingitout(Figure7).
0.55L(18.6oz)
detergentoil
•Iftheoillevelonthedipstickistoohigh,drain
theexcessoiluntiltheoilonthedipstickis
atthecorrectlevel;refertoCheckingthe
Engine-OilLevel(page9).
Important:Iftheoillevelintheengineistoo
lowortoohighandyouruntheengine,you
maydamagetheengine.
8.Installthedipstickintotheoil-lltubesecurely.
4
ChargingtheBattery
NoPartsRequired
Procedure
RefertoChargingtheBattery(page18).
Figure7
1.Full3.Add
2.High
3.Carefullypourabout3/4oftheenginecapacity
ofoilintotheoil-lltube.
4.Wait3minutesfortheoiltosettleintheengine.
5.Wipethedipstickcleanwithacleancloth.
6.Insertthedipstickintotheoil-lltube,butdonot
screwitin,thenremovethedipstick.
g038772
6
Page 7
5
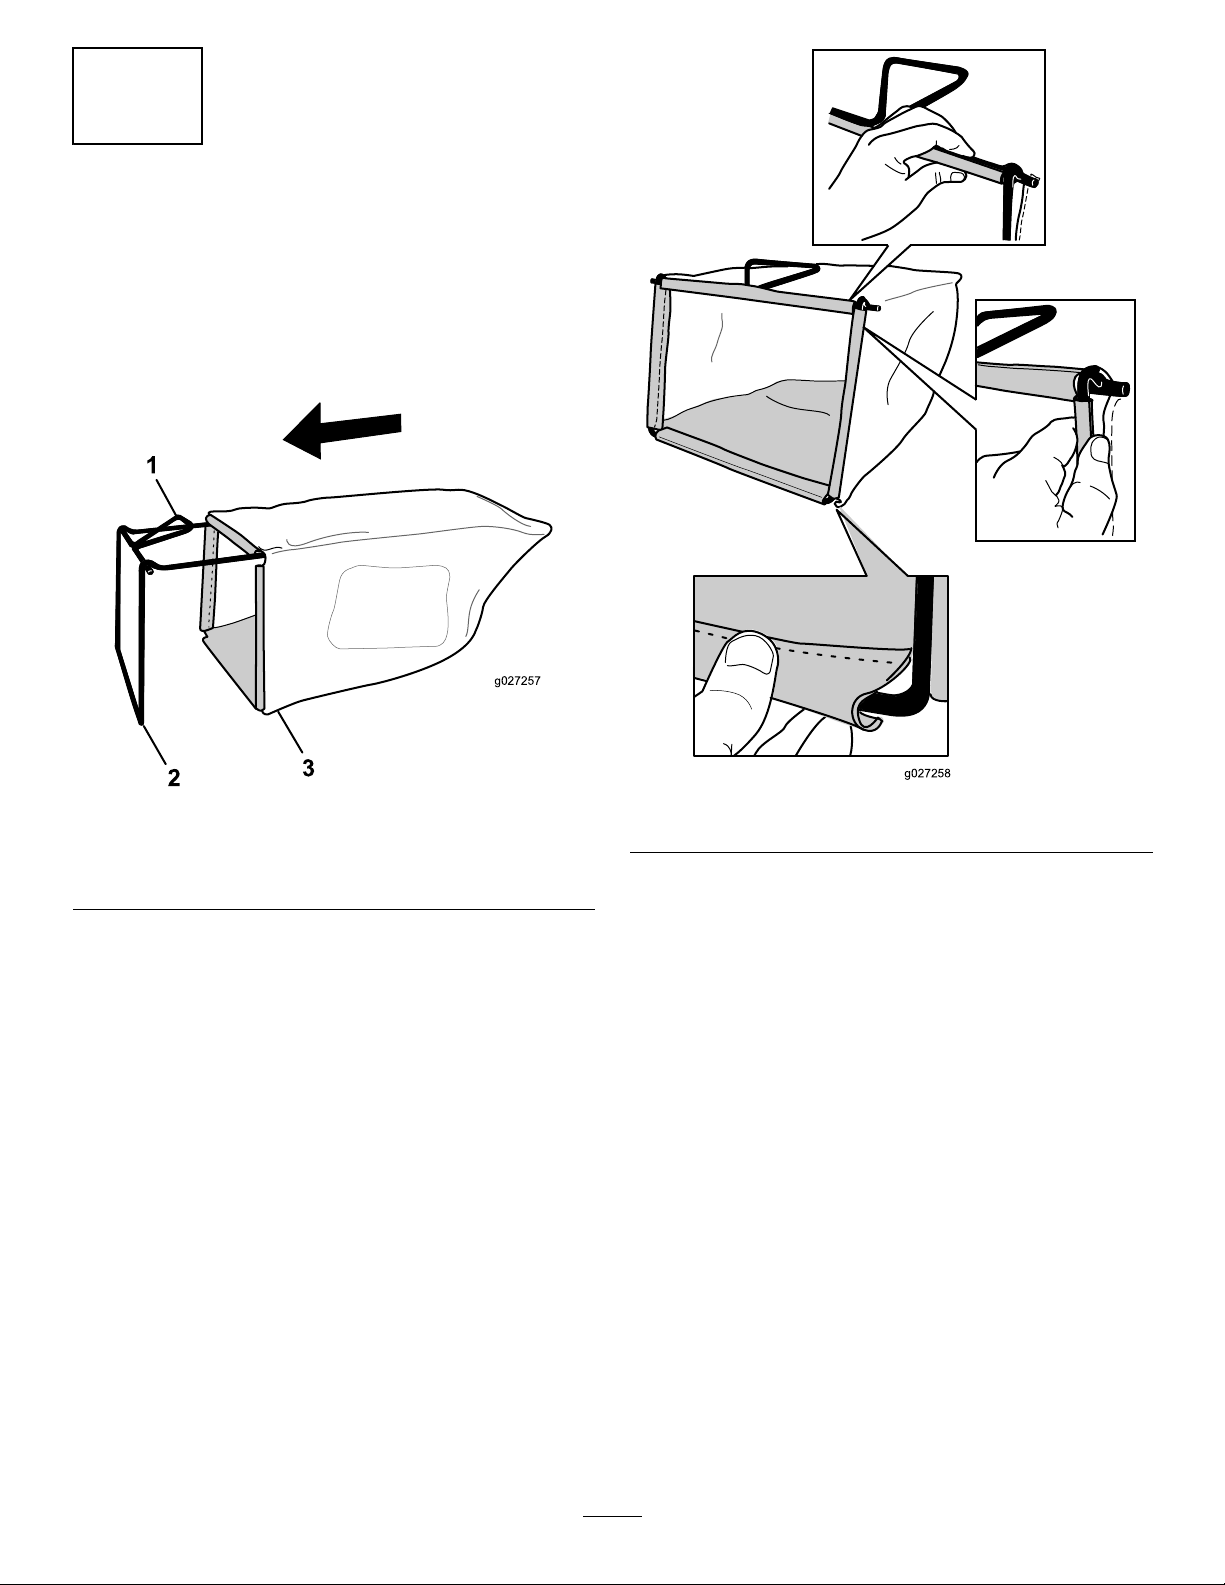
AssemblingtheGrassBag
NoPartsRequired
Procedure
1.Slipthegrassbagovertheframeasshownin
Figure8.
Figure8
1.Handle
2.Frame
Note:Donotslipthebagoverthehandle
(Figure8).
2.Hookthebottomchannelofthebagontothe
bottomoftheframe(Figure9).
3.Grassbag
g027257
Figure9
3.Hookthetopandsidechannelsofthebagonto
thetopandsidesoftheframe,respectively
(Figure9).
g027258
7
Page 8
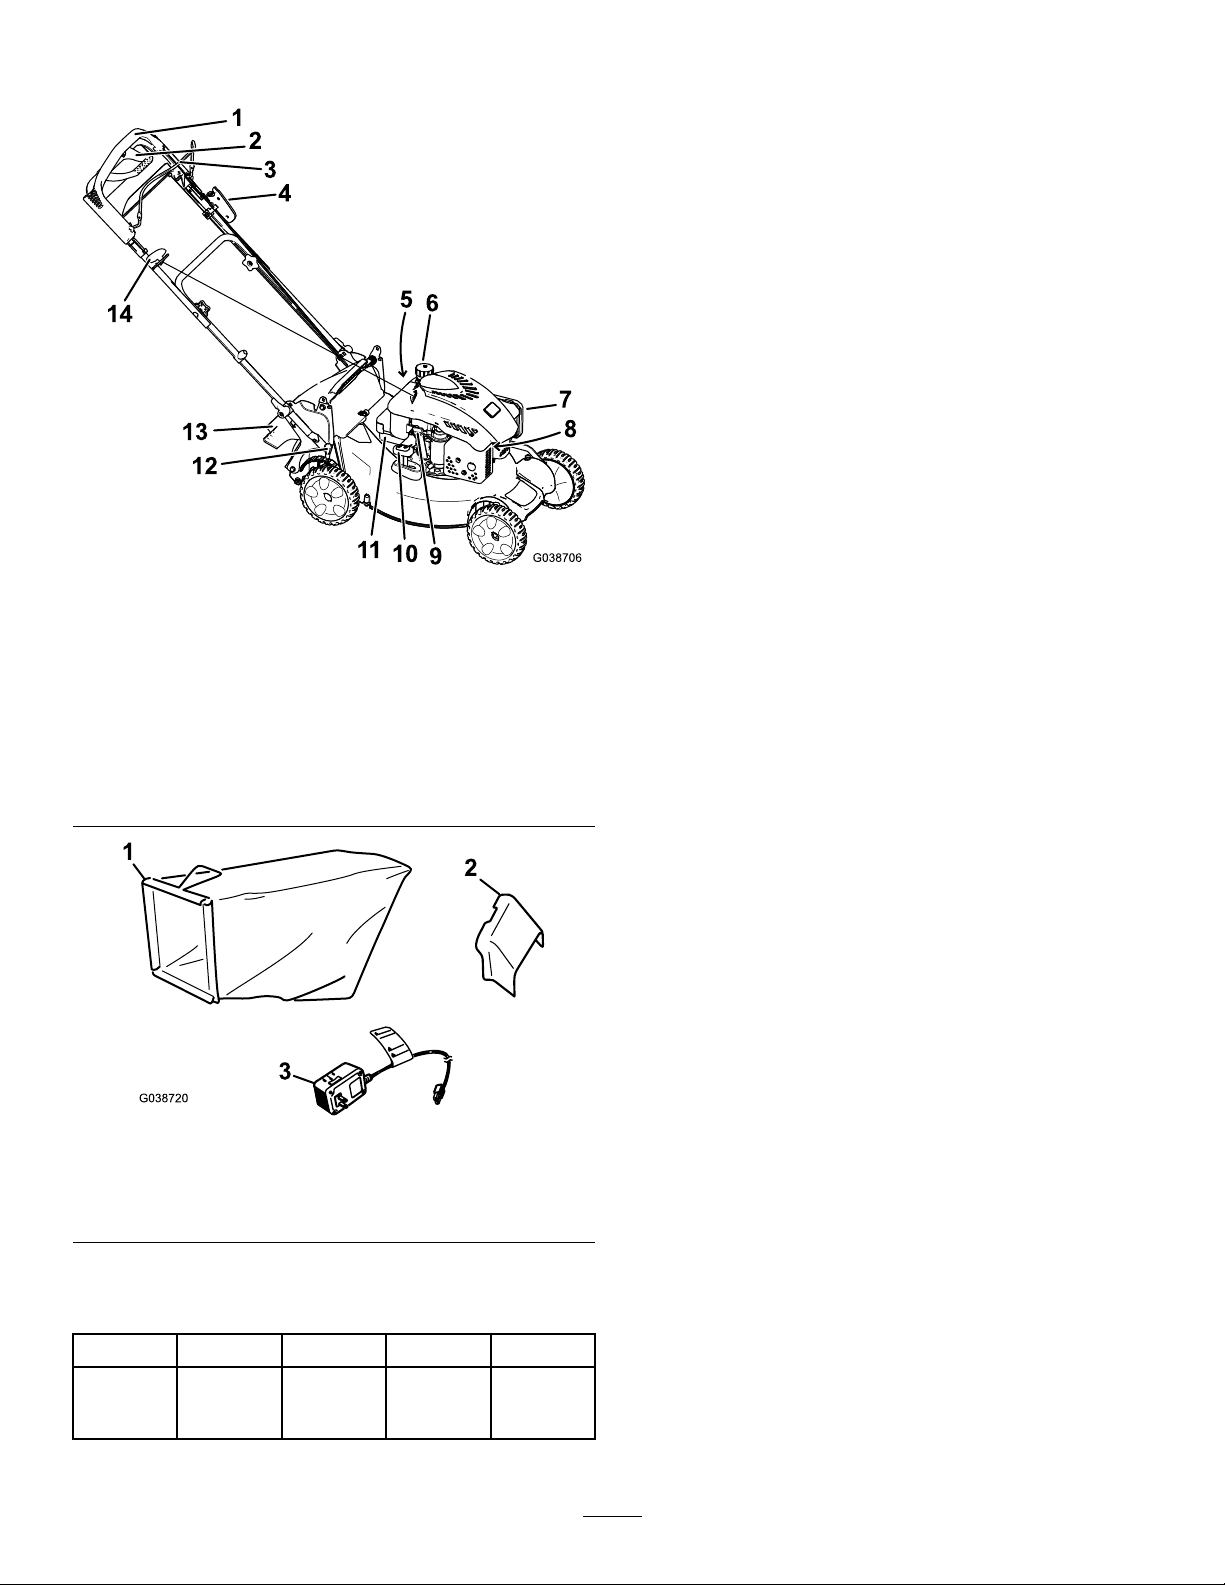
ProductOverview
Operation
Note:Determinetheleftandrightsidesofthe
machinefromthenormaloperatingposition.
BeforeOperation
BeforeOperationSafety
GeneralSafety
•Becomefamiliarwiththesafeoperationofthe
equipment,operatorcontrols,andsafetysigns.
•Checkthatallguardsandsafetydevices,suchas
deectorsand/orgrasscatcher,areinplaceand
workingproperly.
•Alwaysinspectthemachinetoensurethatthe
g038706
Figure10
blades,bladebolts,andcuttingassemblyarenot
wornordamaged.
1.Upperhandle
2.Traction-assisthandle
3.Blade-controlbar10.Bag-on-demandlever
4.Electric-startbutton11.Battery
5.Washoutport(notshown)12.Cutting-heightlever
6.Fuel-tankcap
7.Airlter
1.Grassbag
2.Side-dischargechute
8.Sparkplug(notshown)
9.Oil-lltube/dipstick
13.Rear-deectordeector
14.Recoil-starthandle
Figure11
3.Batterycharger
•Inspecttheareawhereyouwillusethemachine,
andremoveallobjectsthatcouldinterferewith
theoperationofthemachineorthatthemachine
couldthrow.
•Adjustingthecuttingheightmaybringyouinto
contactwiththemovingblade,causingserious
injury.
–Shutofftheengine,removetheelectric-start
button(electric-startmodelonly),andwaitfor
allmovingpartstostop.
–Donotputyourngersunderthehousing
whenadjustingthecuttingheight.
FuelSafety
•Fuelisextremelyammableandhighlyexplosive.
Areorexplosionfromfuelcanburnyouand
othersandcandamageproperty.
g038720
–Topreventastaticchargefromignitingthefuel,
placethecontainerand/ormachinedirectlyon
thegroundbeforelling,notinavehicleoron
anobject.
–Fillthefueltankoutdoors,inanopenarea,
whentheengineiscold.Wipeupanyfuelthat
spills.
Specications
ModelWeightLengthWidthHeight
2083841kg
(91lb)
152cm
(60
inches)
–Donothandlefuelwhensmokingoraroundan
openameorsparks.
–Donotremovethefuelcaporaddfueltothe
53cm
(21
inches)
109cm
(43
inches)
8
tankwhiletheengineisrunningorhot.
–Ifyouspillfuel,donotattempttostartthe
engine.Avoidcreatingasourceofignitionuntil
thefuelvaporshavedissipated.
Page 9

–Storefuelinanapprovedcontainerandkeep
itoutofthereachofchildren.
•Fuelisharmfulorfatalifswallowed.Long-term
exposuretovaporscancauseseriousinjuryand
illness.
–Avoidprolongedbreathingofvapors.
–Keepyourhandsandfaceawayfromthe
nozzleandthefuel-tankopening.
–Keepfuelawayfromyoureyesandskin.
FillingtheFuelTank
•Forbestresults,useonlyclean,fresh,unleaded
gasolinewithanoctaneratingof87orhigher
((R+M)/2ratingmethod).
•Oxygenatedfuelwithupto10%ethanolor15%
MTBEbyvolumeisacceptable.
•Donotuseethanolblendsofgasoline,such
asE15orE85,withmorethan10%ethanolby
volume.Performanceproblemsand/orengine
damagemayresult,whichmaynotbecovered
underwarranty.
g038772
Figure13
1.Full3.Add
2.High
•Donotusegasolinecontainingmethanol.
•Donotstorefueleitherinthefueltankorinfuel
containersoverthewinterunlessfuelstabilizer
hasbeenaddedtothefuel.
•Donotaddoiltogasoline.
Fillthefueltankwithfreshunleadedregulargasoline
fromamajorname-brandservicestation(Figure12).
Important:T oreducestartingproblems,add
fuelstabilizertothegasolineallseason.Mixthe
stabilizerwithgasolinelessthan30daysold.
Figure12
3.Wipethedipstickcleanwithacleancloth.
4.Insertthedipstickintotheoil-lltube,butdonot
screwitin,thenremovethedipstick.
5.Readtheoillevelonthedipstick(Figure28).
•Iftheoillevelonthedipstickistoolow
(Figure28),carefullypourasmallamount
ofSAE30orSAE10W-30detergentoilinto
theoil-lltube,wait3minutes,andrepeat
steps3through5untiltheoilonthedipstick
isatthecorrectlevel.
•Iftheoillevelonthedipstickistoohigh
(Figure28),draintheexcessoiluntiltheoil
onthedipstickisatthecorrectlevel;referto
ChangingtheEngineOil(page17).
Important:Iftheoillevelintheengineistoo
lowortoohighandyouruntheengine,you
maydamagetheengine.
g230458
6.Installthedipstickintotheoil-lltubesecurely.
AdjustingtheHandle
CheckingtheEngine-Oil Level
1.Movethemachinetoalevelsurface.
2.Removethedipstickbyrotatingthecap
counterclockwiseandpullingitout(Figure13).
Height
Youmayraiseorlowerthehandletoaposition
comfortableforyou.
Rotatethehandlelock,movethehandleto1of3
positions,andlockthehandleintoposition(Figure
14).
9
Page 10

DuringOperation
DuringOperationSafety
GeneralSafety
•Wearappropriateclothing,includingeye
protection;longpants;slip-resistant,substantial
footwear;andhearingprotection.Tiebacklong
hair,securelooseclothing,anddonotwearloose
jewelry.
•Donotoperatethemachinewhileill,tired,or
undertheinuenceofalcoholordrugs.
•Thebladeissharp;contactingthebladecanresult
inseriouspersonalinjury.Shutofftheengine,
removetheelectric-startbutton(electric-start
modelonly),andwaitforallmovingpartstostop
beforeleavingtheoperatingposition.
Figure14
1.Handlelock2.Handlepositions
AdjustingtheCutting Height
Adjustthecuttingheightasdesired.
Note:Toraisethemachine,movebothcutting-height
leversforward;tolowerthemachine,movethem
rearward(Figure15).
g007284
•Whenyoureleasetheblade-controlbar,the
engineshouldshutoffandthebladeshouldstop
within3seconds.Ifnot,stopusingyourmachine
immediatelyandcontactanAuthorizedService
Dealer.
•Keepbystanders,especiallysmallchildren,outof
theoperatingarea.Stopthemachineifanyone
entersthearea.
•Alwayslookdownandbehindyoubeforemoving
themachineinreverse.
•Operatethemachineonlyingoodvisibilityand
appropriateweatherconditions.Donotoperate
themachinewhenthereistheriskoflighting.
•Wetgrassorleavescancauseseriousinjuryif
youslipandcontacttheblade.Avoidmowingin
wetconditions.
•Useextremecarewhenapproachingblind
corners,shrubs,trees,orotherobjectsthatmay
blockyourview.
•Watchforholes,ruts,bumps,rocks,orother
hiddenobjects.Uneventerraincouldcausethe
machinetooverturnorcauseyoutoloseyour
balanceorfooting.
Figure15
1.Cutting-heightlever
Note:TheapproximatecuttingheightsettingsareA=
25mm(1inch);B=38mm(1-1/2inch);C=51mm(2
inches);D=64mm(2-1/2inches);E=83mm(3-1/4
inches);F=95mm(3-3/4inches);andG=108mm
(4-1/4inches).
g012130
•Ifthemachinestrikesanobjectorstartstovibrate,
immediatelyshutofftheengine,removethekey
(ifequipped),waitforallmovingpartstostop,and
disconnectthewirefromthesparkplugbefore
examiningthemachinefordamage.Makeall
necessaryrepairsbeforeresumingoperation.
•Beforeleavingtheoperatingposition,shutoff
theengine,removetheelectric-startbutton
(electric-startmodelonly),andwaitforallmoving
partstostop.
10
Page 11

•Iftheenginehasbeenrunningthemuferwillbe
hotandcanseverelyburnyou.Keepawayfrom
thehotmufer.
•Checkthegrasscatchercomponentsand
thedischargechutefrequentlyforanywear
ordeteriorationandreplacethemwiththe
manufacturer'srecommendedpartswhen
necessary.
•Useaccessoriesandattachmentsapprovedby
TheToro®Companyonly .
SlopeSafety
•Mowacrossthefaceofslopes;neverupand
down.Useextremecautionwhenchanging
directiononslopes.
•Donotmowonexcessivelysteepslopes.Poor
footingcouldcauseaslip-and-fallaccident.
•Mowwithcautionneardrop-offs,ditches,or
embankments.
StartingtheEngine
1.Pulltheblade-controlbartothehandleandhold
it(Figure16).
g020174
Figure17
1.Electricstarter3.Electric-startbutton
(installed)
2.Electric-startbutton
g009548
Figure18
Note:Ifthemachinedoesnotstartafterseveral
attempts,contactanAuthorizedServiceDealer.
Figure16
1.Blade-controlbar
2.Pushtheelectric-startbutton(Figure17)orpull
therecoil-starthandle(Figure18)lightlyuntilyou
feelresistance,thenpullitsharply,andallowit
toreturntotheropeguideonthehandleslowly.
Note:Iftheelectric-startbuttonhasbeen
removed,insertitintheelectricstarter.
g009546
11
Page 12

UsingtheSelf-PropelDrive
Tooperatetheself-propeldrive,simplywalkwithyour
handsontheupperhandleandyourelbowsatyour
sides,andthemachinewillautomaticallykeeppace
withyou(Figure19).
Figure19
Note:Ifthemachinedoesnotfreelyrollbackward
afterself-propelling,stopwalking,holdyourhands
inplace,andallowthemachinetorollacoupleof
centimeters(inches)forwardtodisengagethewheel
drive.Youcanalsotryreachingjustundertheupper
handletothemetalhandleandpushingthemachine
forwardacoupleofcentimeters(inches).Ifthe
machinestilldoesnotrollbackwardeasily,contactan
AuthorizedServiceDealer.
g003221
g038696
Figure20
1.RECYCLINGposition2.BAGGINGposition
ShuttingOfftheEngine
ServiceInterval:Beforeeachuseordaily—Ensure
thattheengineshutsoffwithin
3secondsafterreleasingthe
blade-controlbar.
Toshutofftheengine,releasetheblade-controlbar.
Note:Removetheelectric-startbuttonwheneveryou
leavethemachine.
Important:Whenyoureleasetheblade-control
bar,theengineshouldshutoffandtheblade
shouldstopwithin3seconds.Iftheydonot,stop
usingyourmachineimmediatelyandcontactan
AuthorizedServiceDealer.
RecyclingtheClippings
Yourmachinecomesfromthefactoryreadytorecycle
thegrassandleafclippingsbackintothelawn.
Note:Thegrassbagmayremainonthemachine
whileyouarerecyclingtheclippings.
Torecycletheclippings,movethebag-on-demand
levertotheRECYCLINGposition(Figure20).
BaggingtheClippings
Usethegrassbagtocollectgrassandleafclippings
fromthelawn.
WARNING
Aworngrassbagcouldallowsmallstones
andothersimilardebristobethrowntoward
youorbystanders,resultinginserious
personalinjuryordeath.
Checkthegrassbagfrequently.Ifitis
damaged,installanewTororeplacementbag.
WARNING
Thebladeissharp;contactingthebladecan
resultinseriouspersonalinjury.
Shutofftheengineandwaitforallmoving
partstostopbeforeleavingtheoperating
position.
1.Shutofftheengineandwaitforallmovingparts
tostop.
12
Page 13

2.Installthegrassbag;refertoInstallingtheGrass
Bag(page13)andmovethebag-on-demand
levertotheBAGGINGpositionasshowninFigure
20.
Rear-Dischargingthe Clippings
Usethereardischargeforcuttingverytallgrass.
InstallingtheGrassBag
1.Shutofftheengineandwaitforallmovingparts
tostop.
2.Raiseandholdupthereardeector,installthe
baginthenotches,andlowerthereardeector
(Figure21).
Figure21
RemovingtheGrassBag
1.Shutofftheengineandwaitforallmovingparts
tostop.
2.Liftupthegrassbagupandawayfromthe
handle.
Note:Tiltthegrassbagslightlybackwardto
preventthecollectedgrassclippingsfromfalling
out.
Note:Ifthegrassbagisonthemachine,remove
itbeforerear-dischargingtheclippings;refer
toRemovingtheGrassBag(page13).The
bag-on-demandlevershouldbeintheBAGGING
positionasshowninFigure20.
WARNING
Thebladeissharp;contactingthebladecan
resultinseriouspersonalinjury.
Shutofftheengineandwaitforallmoving
partstostopbeforeleavingtheoperating
position.
OperatingTips
GeneralMowingTips
•Inspecttheareawhereyouwillusethemachine
andremoveallobjectsthatthemachinecould
throw.
•Avoidstrikingsolidobjectswiththeblade.Never
deliberatelymowoveranyobject.
•Ifthemachinestrikesanobjectorstartstovibrate,
immediatelyshutofftheengine,disconnectthe
g038773
wirefromthesparkplug,removetheelectric-start
button(ifequipped),andexaminethemachinefor
damage.
•Forbestperformance,installanewbladebefore
thecuttingseasonbegins.
•ReplacethebladewhennecessarywithaToro
replacementblade.
CuttingGrass
•Cutonlyaboutathirdofthegrassbladeatatime.
Donotcutbelow51mm(2inches)unlessthe
grassissparseoritislatefallwhengrassgrowth
beginstoslowdown.
•Whencuttinggrassover15cm(6inches)tall,
mowatthehighestcuttingheightsettingandwalk
slower;thenmowagainatalowersettingforthe
bestlawnappearance.Ifthegrassistoolong,the
machinemayplugandcausetheenginetostall.
•Wetgrassandleavestendtoclumpontheyard
andcancausethemachinetoplugortheengine
tostall.Avoidmowinginwetconditions.
•Beawareofapotentialrehazardinverydry
conditions,followalllocalrewarnings,andkeep
themachinefreeofdrygrassandleafdebris.
13
Page 14

•Alternatethemowingdirection.Thishelps
dispersetheclippingsoverthelawnforeven
fertilization.
CleaningundertheMachine
ServiceInterval:Beforeeachuseordaily
•Ifthenishedlawnappearanceisunsatisfactory,
try1ormoreofthefollowing:
–Replacethebladeorhaveitsharpened.
–Walkataslowerpacewhilemowing.
–Raisethecuttingheightonyourmachine.
–Cutthegrassmorefrequently.
–Overlapcuttingswathsinsteadofcuttingafull
swathwitheachpass.
CuttingLeaves
•Aftercuttingthelawn,ensurethathalfofthelawn
showsthroughthecutleafcover.Y oumayneed
tomakemorethanasinglepassovertheleaves.
•Iftherearemorethan13cm(5inches)ofleaves
onthelawn,mowatahighercuttingheightand
thenagainatthedesiredcuttingheight.
•Slowdownyourmowingspeedifthemachine
doesnotcuttheleavesnelyenough.
Forbestresults,cleanthemachinesoonafteryou
havecompletedmowing.
1.Lowerthemachinetothelowestcutting-height
setting.RefertoAdjustingtheCuttingHeight
(page10).
2.Movethemachineontoalevelsurface.
3.Attachagardenhosethatisconnectedtoa
watersupplytothewashoutport(Figure22).
g014538
Figure22
AfterOperation
AfterOperationSafety
GeneralSafety
•Cleangrassanddebrisfromthemachinetohelp
preventres.Cleanupoilorfuelspills.
•Allowtheenginetocoolbeforestoringthemachine
inanyenclosure.
•Neverstorethemachineorfuelcontainerwhere
thereisanopename,spark,orpilotlight,such
asonawaterheateroronotherappliances.
HaulingSafety
•Removetheelectric-startbutton(ifequipped)
beforeloadingthemachineforhauling.
•Usecarewhenloadingorunloadingthemachine.
•Securethemachinefromrolling.
1.Washoutport
4.Turnthewateron.
5.Starttheengineandrunituntiltherearenomore
clippingsthatcomeoutfromunderthemachine.
6.Shutofftheengine.
7.Shutoffthewateranddisconnectthegarden
hosefromthemachine.
8.Starttheengineandrunitforafewminutesto
drytheundersideofthemachine.
9.Shutofftheengineandallowittocool.
14
Page 15

FoldingtheHandle
WARNING
Foldingorunfoldingthehandleimproperly
candamagethecables,causinganunsafe
operatingcondition.
•Donotdamagethecableswhenfoldingor
unfoldingthehandle.
•Ifacableisdamaged,contactan
AuthorizedServiceDealer.
1.Removetheelectric-startbutton(ifequipped);
refertoFigure23.
g038687
Figure25
1.Handleknobs
Figure23
1.Electricstarter2.Electric-startbutton
2.Loosenthehandleknobs.
3.Rotatetheentirehandleforward(Figure24).
Important:Routethecablestotheoutside
ofthehandleknobsasyoufoldtheupper
handle.
Figure24
4.Rotatetheupperportionofthehandleback
towardtheengine;refertoFigure25.
g186627
g038688
15
Page 16

Maintenance
Note:Determinetheleftandrightsidesofthemachinefromthenormaloperatingposition.
RecommendedMaintenanceSchedule(s)
MaintenanceService
Interval
Aftertherst5hours
Beforeeachuseordaily
Every25hours
Every100hours
Yearly
Yearlyorbeforestorage
MaintenanceProcedure
•Changetheengineoil.
•Ensurethattheengineshutsoffwithin3secondsafterreleasingtheblade-control
bar.
•Cleangrassclippingsanddirtfromunderthemachine.
•Chargethebatteryfor24hours.
•Servicethesparkplug.
•Servicetheairlter.
•Changetheengineoil.
•Replacethebladeorhaveitsharpened(morefrequentlyiftheedgedullsquickly).
•Cleantheenginebyremovingdirtanddebrisfromitstopandsides;cleanitmore
frequentlyindustyoperatingconditions.
•Emptythefueltankbeforerepairsasdirectedandbeforeyearlystorage.
MaintenanceSafety
•Disconnectthespark-plugwirefromthespark
plugandremovetheelectric-startbuttonbefore
performinganymaintenanceprocedure.
•Wearglovesandeyeprotectionwhenservicing
themachine.
•Thebladeissharp;contactingthebladecanresult
inseriouspersonalinjury .Weargloveswhen
servicingtheblade.Donotrepairoralterthe
blade(s).
•Nevertamperwithsafetydevices.Checktheir
properoperationregularly .
•Tippingthemachinemaycausethefueltoleak.
Fuelisammableandexplosive,andcancause
personalinjury.Runtheenginedrytoremovethe
fuelwithahandpump;neversiphonthefuel.
•Toensureoptimumperformanceandcontinued
safetycerticationofthemachine,useonly
genuineTororeplacementpartsandaccessories.
Replacementpartsandaccessoriesmadeby
othermanufacturerscouldbedangerous,and
suchusecouldvoidtheproductwarranty .
PreparingforMaintenance
1.Shutofftheengine,removetheelectric-start
button(ifequipped),andwaitforallmoving
partstostop.
2.Disconnectthespark-plugwirefromthespark
plug(Figure26).
g038697
Figure26
1.Spark-plugwire
3.Afterperformingthemaintenanceprocedure(s),
connectthespark-plugwiretothesparkplug.
Important:Beforetippingthemachineto
changetheoilorreplacetheblade,allowthe
fueltanktorundrythroughnormalusage.If
youmusttipthemachinepriortorunning
outoffuel,useahandfuelpumptoremove
thefuel.Alwaystipthemachineontoits
side,withthedipstickdown.
16
Page 17

ServicingtheAirFilter
ChangingtheEngineOil
ServiceInterval:Yearly
1.Pressdownonthelatchtabsontopofthe
air-ltercover(Figure27).
ServiceInterval:Aftertherst5hours
Yearly
Note:Runtheengineafewminutesbeforechanging
theoiltowarmit.Warmoilowsbetterandcarries
morecontaminants.
EngineOilSpecications
Engineoilcapacity
OilviscositySAE30orSAE10W-30
APIserviceclassicationSJorhigher
1.Movethemachinetoalevelsurface.
2.RefertoPreparingforMaintenance(page16).
3.Removethedipstickbyrotatingthecap
counterclockwiseandpullingitout(Figure28).
0.55L(18.6oz)
detergentoil
Figure27
1.Latchtabs
2.Paperairlter
3.Foampre-lter
2.Openthecover.
3.Removethepaperairlterandthefoam
pre-lter(Figure27).
4.Inspectthefoampre-lter,andreplaceitifitis
damagedorexcessivelydirty.
5.Inspectthepaperairlter.
•Iftheairlterisdamagedoriswetwithoil
orfuel,replaceit.
•Iftheairlterisdirty,tapitonahardsurface
severaltimesorblowcompressedairless
than207kPa(30psi)throughthesideofthe
lterthatfacestheengine.
Note:Donotbrushthedirtoffthelter;
brushingforcesdirtintothebers.
6.Removethedirtfromtheair-lterbodyandthe
coverusingamoistrag.
g011722
g010261
Figure28
4.Tipthemachineontoitsside(sothattheair
lterisup)todraintheusedoilfromtheoil-ll
tube(Figure28).
Important:Donotwipedirtintotheairduct.
7.Installthefoampre-lterandthepaperairlter
intotheairlter.
8.Installthecover.
17
Page 18

Figure29
ChargingtheBattery
ServiceInterval:Every25hours
Chargethebatteryfor24hoursinitially ,thenmonthly
(every25starts)orasneeded.Alwaysusethe
chargerinashelteredareaandchargethebatteryat
roomtemperature(22°Cor70°F)wheneverpossible.
1.Connectthechargertothewireharnesslocated
belowtheelectric-startbutton(Figure30).
g002889
Figure30
g038698
2.Plugthechargerintoawalloutlet.
5.Afterdrainingtheusedoil,returnthemachineto
theoperatingposition.
6.Carefullypourabout3/4oftheenginecapacity
ofoilintotheoil-lltube.
7.Wait3minutesfortheoiltosettleintheengine.
8.Wipethedipstickcleanwithacleancloth.
9.Insertthedipstickintotheoil-lltube,butdonot
screwitin,thenremovethedipstick.
10.Readtheoillevelonthedipstick(Checkingthe
Engine-OilLevel(page9)).
•Iftheoillevelonthedipstickistoolow,
carefullypourasmallamountofoilintothe
oil-lltube,wait3minutes,andrepeatsteps
8through10untiltheoillevelonthedipstick
iscorrect.
•Iftheoillevelonthedipstickistoohigh,
draintheexcessoiluntiltheoillevelonthe
dipstickiscorrect.
Important:Iftheoillevelintheengineistoo
lowortoohighandyouruntheengine,you
maydamagetheengine.
Note:Whenthebatterynolongerholdsa
charge,recycleordisposeofthelead-acid
batteryaccordingtolocalcodes.
Note:Y ourbatterychargermayhavea2-colorLED
displaythatindicatesthefollowingstatesofcharging:
•Aredlightindicatesthatthechargerischarging
thebattery .
•Agreenlightindicatesthatthechargerisfully
chargedorthechargerisdisconnectedfromthe
battery.
•Aashinglightthatalternatesbetweenredand
greenindicatesthatthebatteryisnearlyfully
charged.Thisstatelastsonlyafewminutesuntil
thebatteryisfullycharged.
11.Installthedipstickintotheoil-lltubesecurely.
12.Recycletheusedoilproperly.
18
Page 19

ReplacingtheFuse
ServicingtheSparkPlug
Ifthebatterydoesnotchargeortheenginedoesnot
turnwiththeelectricstarter,thefusemaybeblown.
Replaceitwitha40Aplug-intypefuse.
Important:Youcannotstartthemachinewiththe
electricstarterorchargethebatteryunlessyou
installthefuse.
1.RefertoPreparingforMaintenance(page16).
2.Unclipbothendsofthebatterycoverand
removeit(Figure31).
Figure31
3.Replacethefuseinthefuseholder(Figure32).
ServiceInterval:Every100hours
UseaChampionRL87YCsparkplugorequivalent.
1.Shutofftheengineandwaitforallmovingparts
tostop.
2.Disconnectthewirefromthesparkplug(Figure
26).
3.Cleanaroundthesparkplug.
4.Removethesparkplugfromthecylinderhead.
Important:Replaceacracked,fouled,or
dirtysparkplug.Donotcleantheelectrodes
becausegritenteringthecylindercan
damagetheengine.
5.Setthegapontheplugto0.76mm(0.030inch)
asshowninFigure33.
g017476
Figure32
Note:Yourmachinecomeswithasparefusein
thebatterycompartment.
4.Installthebatterycover.
g000533
Figure33
g002878
1.Centerelectrodeinsulator3.Airgap(nottoscale)
2.Sideelectrode
6.Installthesparkplug.
7.Torquetheplugto20N∙m(15ft-lb).
8.Connectthewiretothesparkplug.
19
Page 20

ReplacingtheBlade
ServiceInterval:Yearly
Important:Youwillneedatorquewrenchto
installthebladeproperly.Ifyoudonothavea
torquewrenchorareuncomfortableperforming
thisprocedure,contactanAuthorizedService
Dealer.
Examinethebladewheneveryourunoutoffuel.Ifthe
bladeisdamagedorcracked,replaceitimmediately.
Ifthebladeedgeisdullornicked,haveitsharpened
andbalanced,orreplaceit.
WARNING
Thebladeissharp;contactingthebladecan
resultinseriouspersonalinjury.
Weargloveswhenservicingtheblade.
1.RefertoPreparingforMaintenance(page16).
2.Tipthemachineontoitssidewiththeairlterup.
3.Useablockofwoodtoholdthebladesteady
(Figure34).
g231390
Figure35
Important:Positionthecurvedendsofthe
bladetopointtowardthemachinehousing.
Figure34
4.Removetheblade,savingallmountinghardware
(Figure34).
5.Installthenewbladeandallmountinghardware
(Figure35).
6.Useatorquewrenchtotightenthebladebolt
to82N∙m(60ft-lb).
Important:Abolttorquedto82N∙m(60
ft-lb)isverytight.Whileholdingtheblade
withablockofwood,putyourweight
behindtheratchetorwrenchandtightenthe
boltsecurely.Thisboltisverydifcultto
overtighten.
g231389
20
Page 21

Storage
4.Installthesparkplugandtightenitwithatorque
wrenchto20N∙m(15ft-lb).
Storethemachineinacool,clean,dryplace.
PreparingtheMachinefor Storage
1.Onthelastrefuelingoftheyear,addfuel
stabilizer(suchasToroPremiumFuel
Treatment)tothefuelasdirectedonthelabel.
2.Disposeofanyunusedfuelproperly .Recycle
itaccordingtolocalcodesoruseitinyour
automobile.
Note:Oldfuelinthefueltankistheleading
causeofhardstarting.Donotstorefuelwithout
fuelstabilizermorethan30days,anddonot
storestabilizedfuelmorethan90days.
3.Runthemachineuntiltheengineshutsofffrom
runningoutoffuel.
4.Starttheengineagainandallowittorununtil
itshutsoff.Whenyoucannolongerstartthe
engine,itissufcientlydry.
5.Performanymaintenanceprocedures;referto
Maintenance(page16).
6.Checktheengine-oillevel;refertoCheckingthe
Engine-OilLevel(page9).
7.Fillthefueltankwithfreshfuel;refertoFilling
theFuelT ank(page9).
8.Connectthewiretothesparkplug.
5.Disconnectthewirefromthesparkplugand
connectthewiretotheretainingpost(if
equipped)andremovetheelectric-startbutton
(ifequipped).
6.Removethesparkplug,add30ml(1oz)of
engineoilthroughthespark-plughole,andpull
therecoil-starterropeslowlyseveraltimesto
distributeoilthroughoutthecylindertoprevent
cylindercorrosionduringtheoff-season.
7.Looselyinstallthesparkplug.
8.Tightenallnuts,bolts,andscrews.
9.Electric-startmodelsonly:Chargethebattery
for24hours,thenunplugthebatterycharger
andstorethemachineinanunheatedarea.If
youmuststorethemachineinaheatedarea,
youmustchargethebatteryevery90days.
RefertoChargingtheBattery(page18).
RemovingtheMachine fromStorage
1.Electric-startmodelsonly:Chargethebattery
for24hours;refertoChargingtheBattery(page
18).
2.Checkandtightenallfasteners.
3.Removethesparkplugandspintheengine
rapidlybypullingtherecoil-starthandletoblow
theexcessoilfromthecylinder.
21
Page 22

Notes:
Page 23

Notes:
Page 24

EuropeanPrivacyNotice
TheInformationT oroCollects
ToroWarrantyCompany(Toro)respectsyourprivacy.Inordertoprocessyourwarrantyclaimandcontactyouintheeventofaproductrecall,weaskyou
tosharecertainpersonalinformationwithus,eitherdirectlyorthroughyourlocalT orocompanyordealer .
TheTorowarrantysystemishostedonserverslocatedwithintheUnitedStateswhereprivacylawmaynotprovidethesameprotectionasapplies
inyourcountry.
BYSHARINGYOURPERSONALINFORMA TIONWITHUS,YOUARECONSENTINGTOTHEPROCESSINGOFYOURPERSONALINFORMATION
ASDESCRIBEDINTHISPRIVACYNOTICE.
TheWayToroUsesInformation
Toromayuseyourpersonalinformationtoprocesswarrantyclaims,tocontactyouintheeventofaproductrecallandforanyotherpurposewhichwetell
youabout.ToromayshareyourinformationwithT oro'safliates,dealersorotherbusinesspartnersinconnectionwithanyoftheseactivities.Wewillnot
sellyourpersonalinformationtoanyothercompany .Wereservetherighttodisclosepersonalinformationinordertocomplywithapplicablelawsand
withrequestsbytheappropriateauthorities,tooperateoursystemsproperlyorforourownprotectionorthatofotherusers.
RetentionofyourPersonalInformation
Wewillkeepyourpersonalinformationaslongasweneeditforthepurposesforwhichitwasoriginallycollectedorforotherlegitimatepurposes
(suchasregulatorycompliance),orasrequiredbyapplicablelaw.
Toro'sCommitmenttoSecurityofY ourPersonalInformation
Wetakereasonableprecautionsinordertoprotectthesecurityofyourpersonalinformation.Wealsotakestepstomaintaintheaccuracyandcurrent
statusofpersonalinformation.
AccessandCorrectionofyourPersonalInformation
Ifyouwouldliketorevieworcorrectyourpersonalinformation,pleasecontactusbyemailatlegal@toro.com.
AustralianConsumerLaw
AustraliancustomerswillnddetailsrelatingtotheAustralianConsumerLaweitherinsidetheboxoratyourlocalT oroDealer.
374-0282RevC
 Loading...