

Page 1

FormNo.3419-112RevA
48cmSuperBaggerLawn
Mower
20836
SuperBagger-Rasenmäher(48
cm)
20836
TondeuseSuperBaggerde48
cm
20836
SuperBaggergazonmaaier
van48cm
20836
www.T oro.com.
*3419-112*A
Page 2
48cmSuperBaggerLawnMower
ModelNo.20836—SerialNo.401500000andUp
Introduction
Thisrotary-blade,walk-behindlawnmowerisintended
tobeusedbyresidentialhomeownersorprofessional,
hiredoperators.Itisdesignedprimarilyforcutting
grassonwell-maintainedlawnsonresidentialor
commercialproperties.Itisnotdesignedforcutting
brushorforagriculturaluses.
Readthisinformationcarefullytolearnhowtooperate
andmaintainyourproductproperlyandtoavoid
injuryandproductdamage.Youareresponsiblefor
operatingtheproductproperlyandsafely.
YoumaycontactT orodirectlyatwww.T oro.comfor
productandaccessoryinformation,helpndinga
dealer,ortoregisteryourproduct.
Wheneveryouneedservice,genuineToroparts,or
additionalinformation,contactanAuthorizedService
DealerorToroCustomerServiceandhavethemodel
andserialnumbersofyourproductready .Figure1
identiesthelocationofthemodelandserialnumbers
ontheproduct.Writethenumbersinthespace
provided.
FormNo.3419-101RevA
Operator'sManual
g000502
Figure2
Safetyalertsymbol
Thismanualuses2wordstohighlightinformation.
Importantcallsattentiontospecialmechanical
informationandNoteemphasizesgeneralinformation
worthyofspecialattention.
ThisproductcomplieswithallrelevantEuropean
directives.Fordetails,seetheseparateproduct
specicDeclarationofConformity(DOC)sheet.
GrossorNetTorque:Thegrossornettorque
ofthisenginewaslaboratoryratedbytheengine
manufacturerinaccordancewiththeSocietyof
AutomotiveEngineers(SAE)J1940orJ2723.As
conguredtomeetsafety,emission,andoperating
requirements,theactualenginetorqueonthisclass
ofmowerwillbesignicantlylower.Pleasereferto
theenginemanufacturer’sinformationincludedwith
themachine.
Important:Withyourmobiledevice,youcan
scantheQRcodeontheserialnumberdecal(if
equipped)toaccesswarranty,parts,andother
productinformation.
Figure1
1.Modelandserialnumberlocation
ModelNo.
SerialNo.
Thismanualidentiespotentialhazardsandhas
safetymessagesidentiedbythesafety-alertsymbol
(Figure2),whichsignalsahazardthatmaycause
seriousinjuryordeathifyoudonotfollowthe
recommendedprecautions.
Important:Ifyouareusingthismachineabove
1500m(5,000ft)foracontinuousperiod,ensure
thattheHighAltitudeKithasbeeninstalled
sothattheenginemeetsCARB/EPAemission
regulations.TheHighAltitudeKitincreases
engineperformancewhilepreventingspark-plug
fouling,hardstarting,andincreasedemissions.
Onceyouhaveinstalledthekit,attachthe
high-altitudelabelnexttotheserialdecalonthe
g226629
machine.ContactanyAuthorizedToroService
DealertoobtaintheproperHighAltitudeKitand
high-altitudelabelforyourmachine.Tolocate
adealerconvenienttoyou,accessourwebsite
atwww.Toro.comorcontactourToroCustomer
CareDepartmentatthenumber(s)listedinyour
EmissionControlWarrantyStatement.
Removethekitfromtheengineandrestorethe
enginetoitsoriginalfactorycongurationwhen
runningtheengineunder1500m(5,000ft).Do
notoperateanenginethathasbeenconverted
forhigh-altitudeuseatloweraltitudes;otherwise,
youcouldoverheatanddamagetheengine.
Ifyouareunsurewhetherornotyourmachine
hasbeenconvertedforhigh-altitudeuse,lookfor
thefollowinglabel:
©2017—TheT oro®Company
8111LyndaleAvenueSouth
Bloomington,MN55420
CV
Registeratwww.Toro.com.
OriginalInstructions(EN)
PrintedinMexico
AllRightsReserved
*3419-101*A
Page 3

Safety
Thismachinehasbeendesignedinaccordancewith
ENISO5395:2013.
decal127-9363
Contents
Introduction...............................................................1
Safety.......................................................................2
GeneralSafety...................................................2
SafetyandInstructionalDecals..........................3
Setup........................................................................4
1UnfoldingtheHandle.......................................4
2InstallingtheRecoil-StarterRopeinthe
RopeGuide.....................................................4
3FillingtheEnginewithOil.................................5
4AssemblingtheGrassBag...............................5
ProductOverview.....................................................6
Specications....................................................6
Operation..................................................................7
BeforeOperation...................................................7
BeforeOperationSafety.....................................7
FillingtheFuelTank............................................7
CheckingtheEngine-OilLevel............................7
AdjustingtheHandleHeight...............................8
AdjustingtheCuttingHeight...............................8
DuringOperation...................................................9
DuringOperationSafety.....................................9
StartingtheEngine.............................................9
UsingtheSelf-PropelDrive...............................10
ShuttingOfftheEngine.....................................10
RecyclingtheClippings....................................10
BaggingtheClippings.......................................10
Rear-DischargingtheClippings.........................11
OperatingTips..................................................11
AfterOperation....................................................12
AfterOperationSafety......................................12
CleaningundertheMachine.............................12
FoldingtheHandle...........................................13
Maintenance...........................................................14
RecommendedMaintenanceSchedule(s)...........14
MaintenanceSafety..........................................14
PreparingforMaintenance...............................14
ServicingtheAirFilter.......................................15
ChangingtheEngineOil...................................15
ServicingtheSparkPlug...................................16
ReplacingtheBlade..........................................17
Storage...................................................................18
PreparingtheMachineforStorage...................18
RemovingtheMachinefromStorage................18
GeneralSafety
Thisproductiscapableofamputatinghandsand
feetandofthrowingobjects.Alwaysfollowallsafety
instructionstoavoidseriouspersonalinjury .
Usingthisproductforpurposesotherthanitsintended
usecouldprovedangeroustoyouandbystanders.
•Read,understand,andfollowtheinstructions
andwarningsinthisOperator’sManualandon
themachineandattachmentsbeforestartingthe
engine.
•Donotputyourhandsorfeetnearmovingpartsof
orunderthemachine.Keepclearofanydischarge
opening.
•Donotoperatethemachinewithoutallguards
andothersafetyprotectivedevicesinplaceand
workingonthemachine.
•Keepbystandersandchildrenasafedistance
awayfromthemachine.Donotallowchildrento
operatethemachine.Allowonlypeoplewhoare
responsible,trained,familiarwiththeinstructions,
andphysicallycapabletooperatethemachine.
•Stopthemachineandshutofftheenginebefore
servicing,fueling,oruncloggingthemachine.
Improperlyusingormaintainingthismachinecan
resultininjury.T oreducethepotentialforinjury,
complywiththesesafetyinstructionsandalwayspay
attentiontothesafety-alertsymbol,whichmeans
Caution,Warning,orDanger—personalsafety
instruction.Failuretocomplywiththeseinstructions
mayresultinpersonalinjuryordeath.
Youcanndadditionalsafetyinformationwhere
neededthroughoutthismanual.
2
Page 4
SafetyandInstructionalDecals
Safetydecalsandinstructionsareeasilyvisibletotheoperatorandarelocatednearanyarea
ofpotentialdanger.Replaceanydecalthatisdamagedormissing.
Manufacturer'sMark
decaloemmarkt
1.Thismarkindicatesthatthebladeisidentiedasapart
fromtheoriginalmachinemanufacturer .
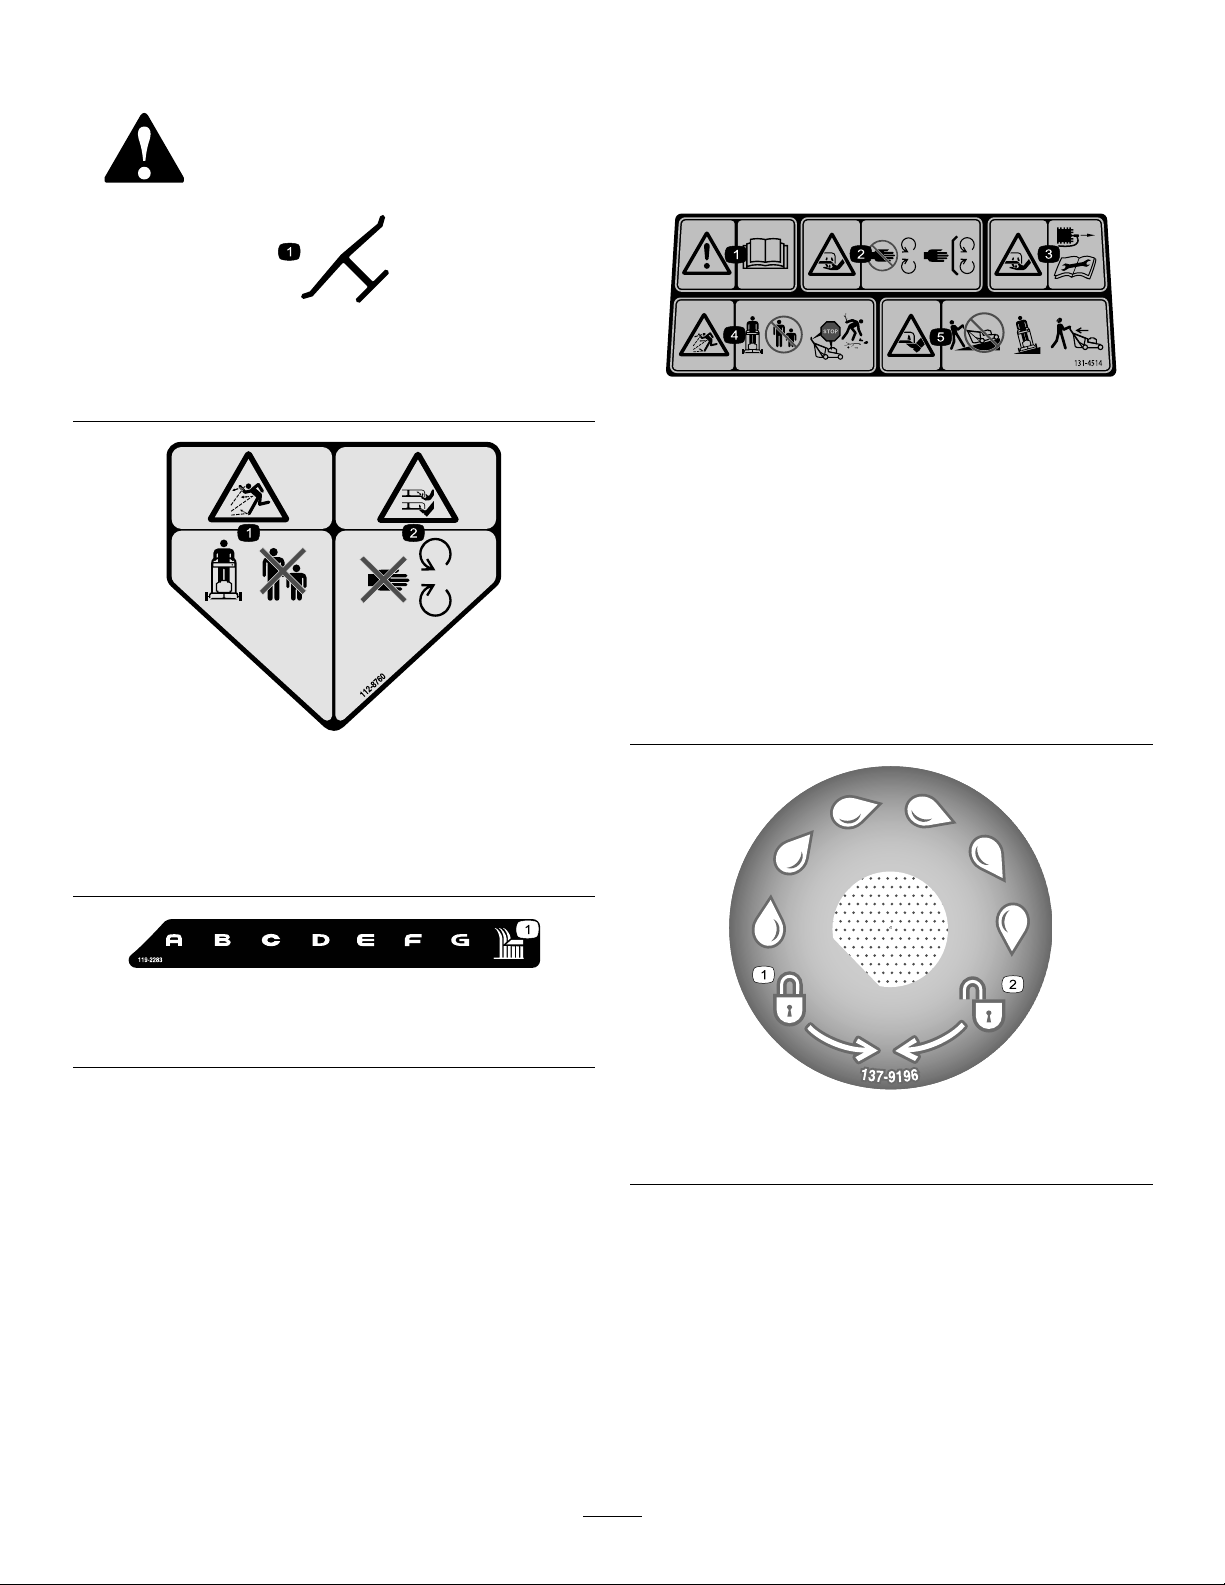
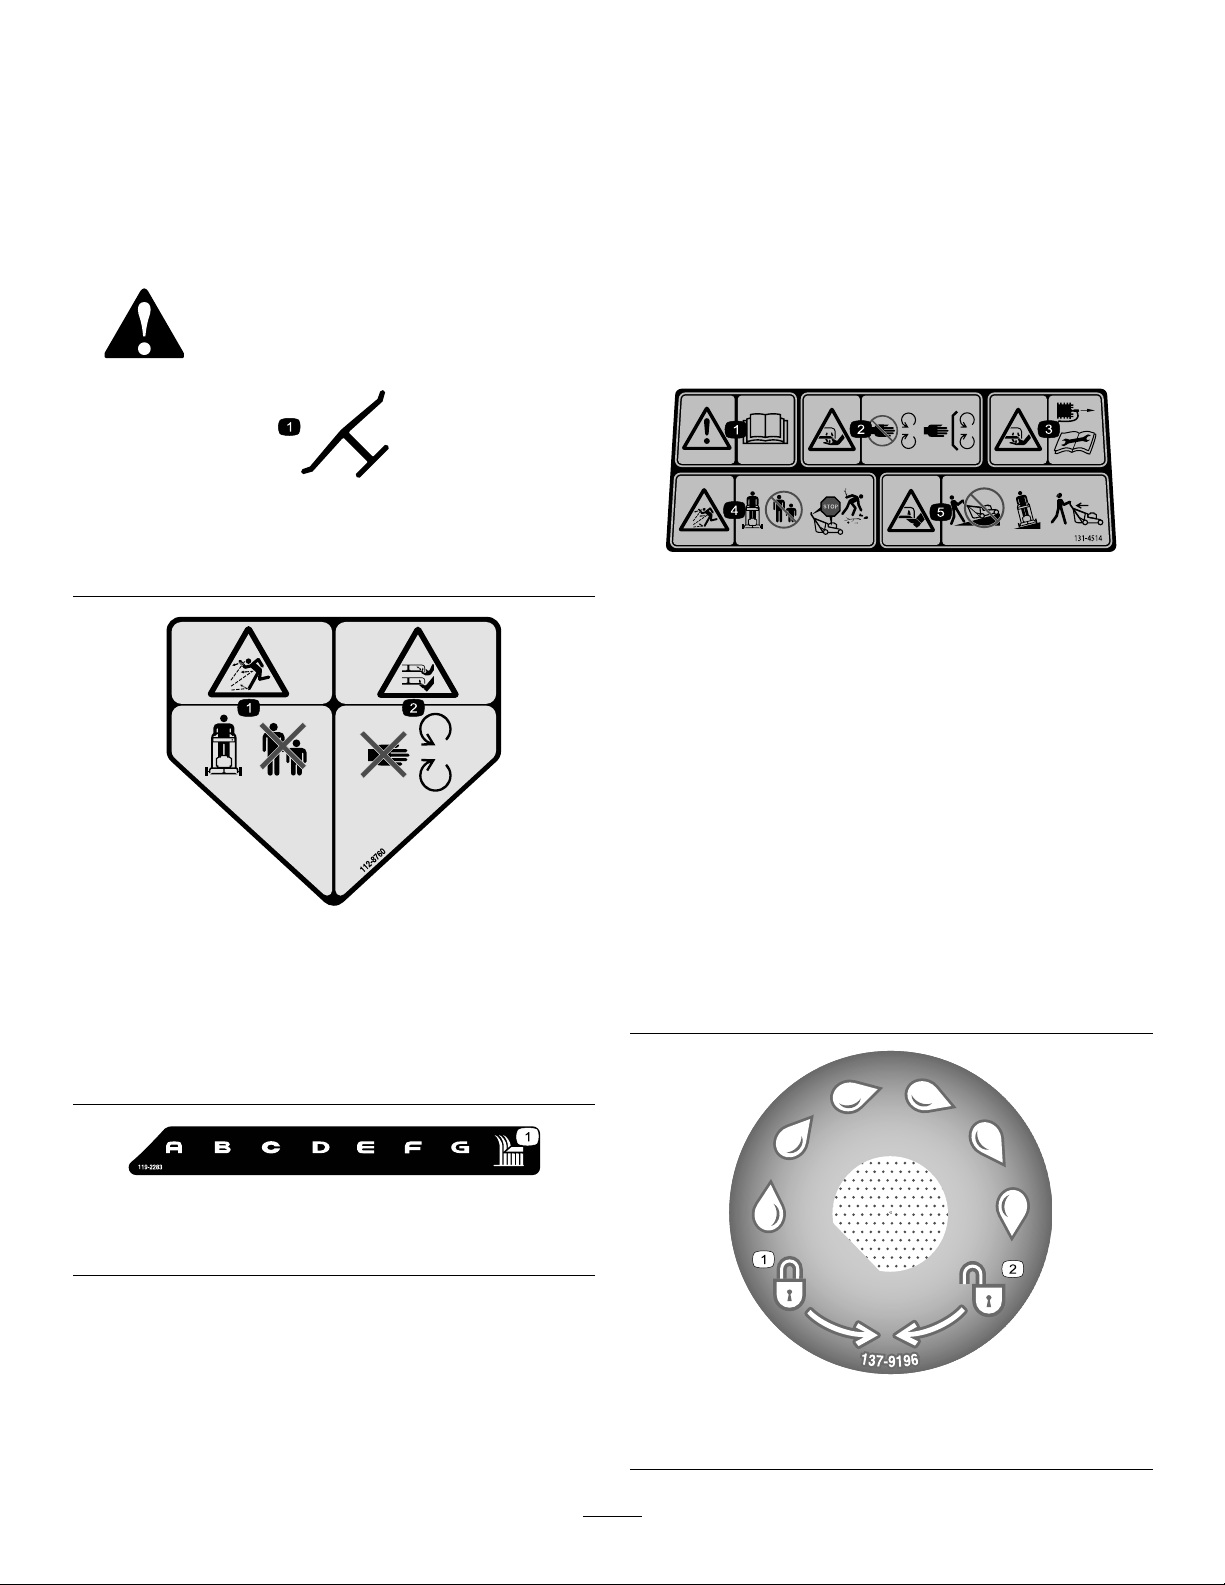
112-8760
1.Thrownobjecthazard—keepbystandersasafedistance
awayfromthemachine.
2.Cutting/dismembermentofhandorfoot—stayawayfrom
movingparts.
decal131-4514b
131-4514
1.Warning—readtheOperator'sManual.
2.Cutting/dismembermenthazardofhand,mower
blade—stayawayfrommovingparts;keepallguardsand
shieldsinplace.
3.Cutting/dismembermenthazardofhand,mower
blade—disconnectthespark-plugwireandreadthe
instructionsbeforeservicingorperformingmaintenance.
4.Thrownobjecthazard—keepbystandersasafedistance
awayfromthemachine;shutofftheenginebeforeleaving
theoperatingposition;pickupanydebrisbeforemowing.
5.Cutting/dismembermenthazardofhand,mowerblade—do
notoperateupanddownslopes;operatesidetosideon
slopes;lookbehindyouwhenbackingup.
decal112-8760
1.Height-of-cutsettings
decal119-2283
119-2283
decal137-9196
137-9196
1.Lock2.Unlock
3
Page 5
Setup
1
UnfoldingtheHandle
NoPartsRequired
Procedure
WARNING
Foldingorunfoldingthehandleimproperly
candamagethecables,causinganunsafe
operatingcondition.
•Donotdamagethecableswhenfoldingor
unfoldingthehandle.
•Ifacableisdamaged,contactan
AuthorizedServiceDealer.
Important:Removeanddiscardtheprotective
plasticsheetthatcoverstheengineandanyother
plasticorwrappingonthemachine.
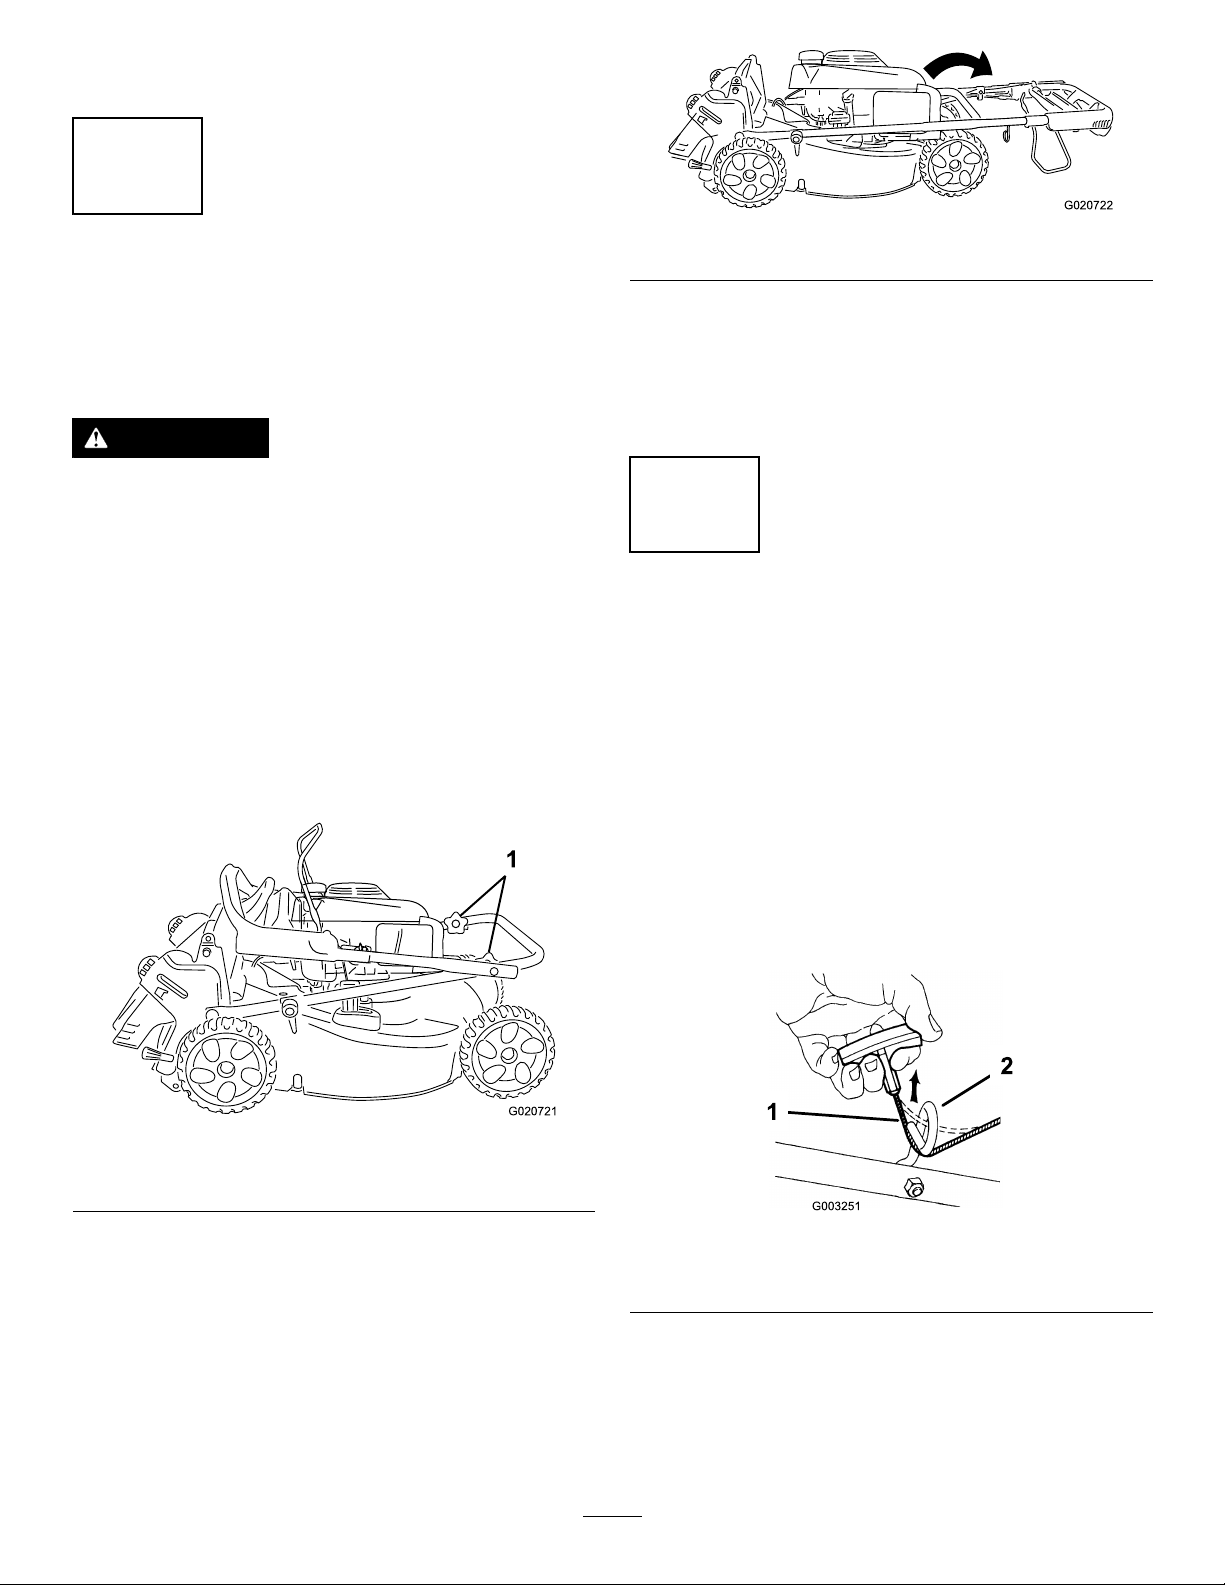
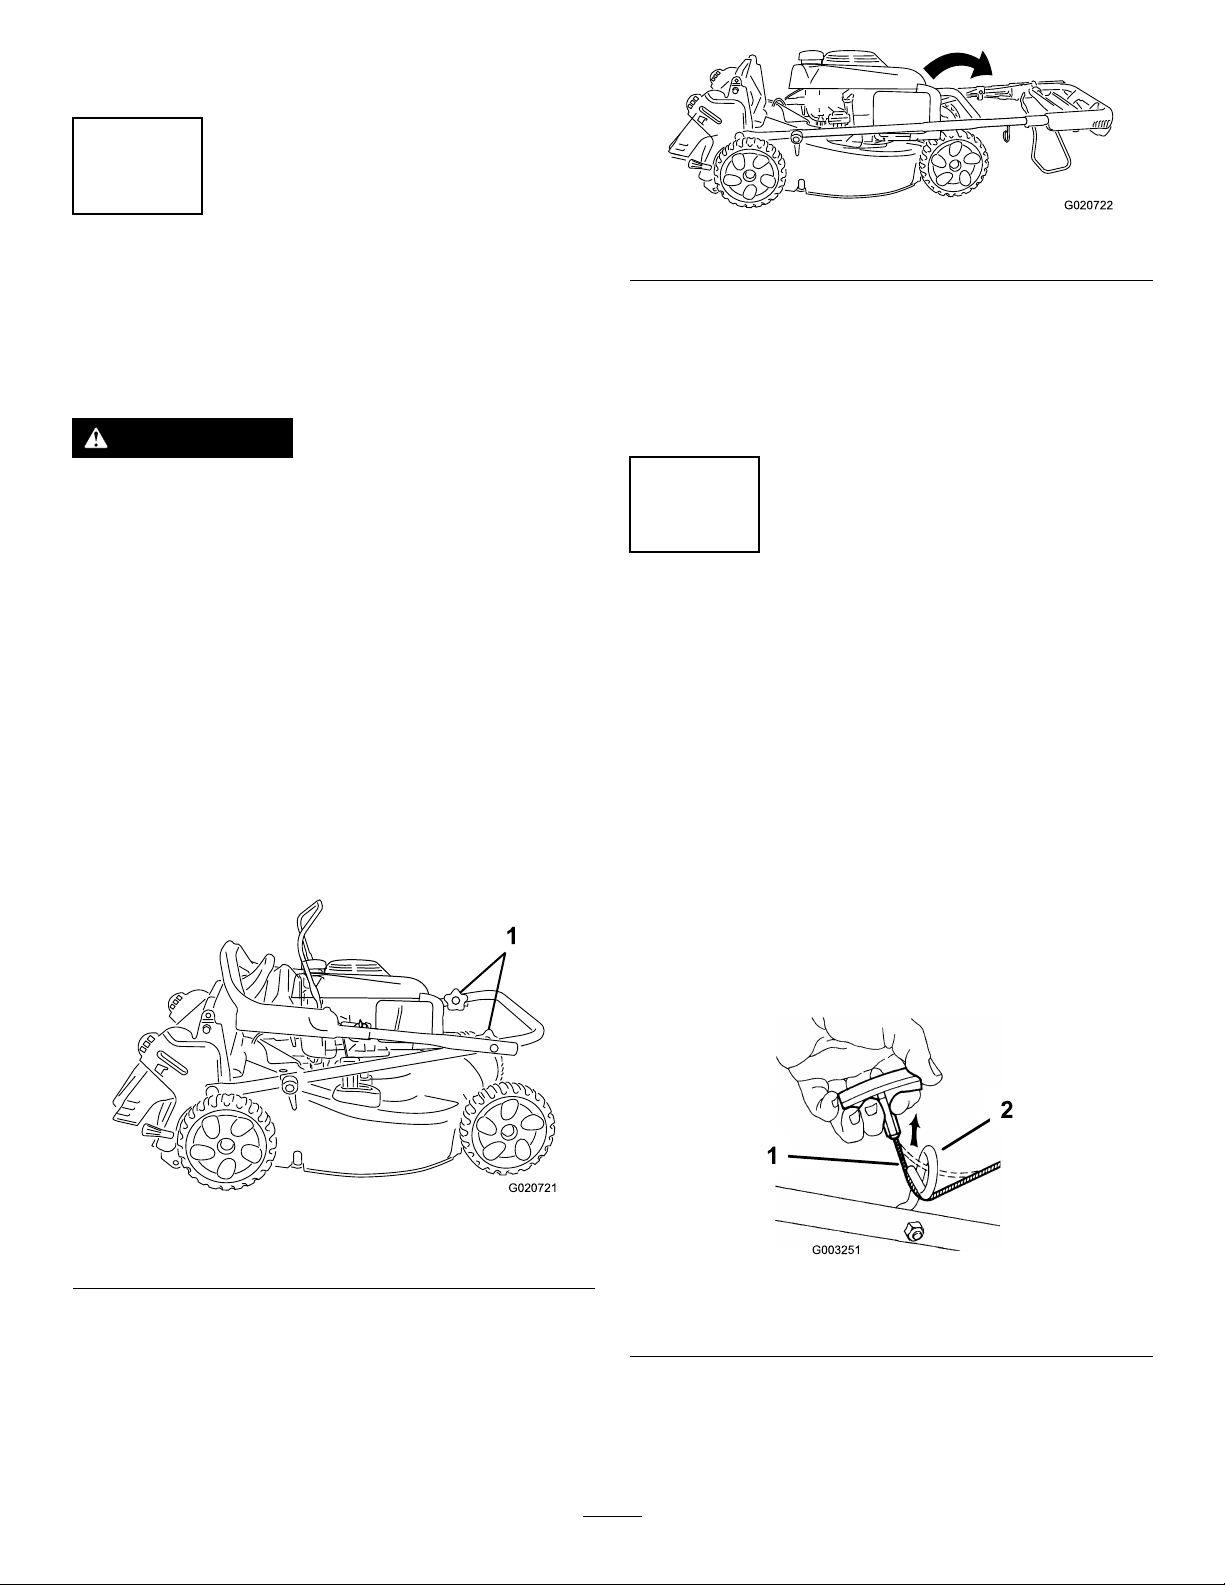
1.Loosenthehandleknobs(Figure4).
g020722
Figure5
3.Tightenthehandleknobsrmlybyhand.
4.Rotatethehandlerearwardtotheoperating
position,andlockthehandleatyourdesired
height.RefertoAdjustingtheHandleHeight
(page8).
2
InstallingtheRecoil-Starter RopeintheRopeGuide
NoPartsRequired
Procedure
Important:T ostarttheenginesafelyandeasily
wheneveryouusethemachine,installthe
recoil-starterropeintheropeguide.
Figure4
1.Handleknobs
2.Carefullymovetheupperhandleforwarduntil
thehandlehalvesareinlineandnesttogether
asshowninFigure5.
Holdtheblade-controlbartotheupperhandleand
pulltherecoil-starterropethroughtheropeguideon
thehandle(Figure6).
g020721
g003251
Figure6
1.Recoil-starterrope2.Ropeguide
4
Page 6
3
FillingtheEnginewithOil
7.Readtheoillevelonthedipstick(Figure7).
•Iftheoillevelonthedipstickistoolow,
carefullypourasmallamountofoilintothe
oil-lltube,wait3minutes,andrepeatsteps
5through7untiltheoilonthedipstickisat
thecorrectlevel.
NoPartsRequired
Procedure
Important:Yourmachinedoesnotcomewithoil
intheengine.Beforestartingtheengine,llthe
enginewithoil.
EngineOilSpecications
Engineoilcapacity
OilviscositySAE30orSAE10W-30
APIserviceclassicationSJorhigher
1.Movethemachinetoalevelsurface.
2.Removethedipstickbyrotatingthecap
counterclockwiseandpullingitout(Figure7).
0.55L(18.6oz)
detergentoil
•Iftheoillevelonthedipstickistoohigh,drain
theexcessoiluntiltheoilonthedipstickis
atthecorrectlevel;refertoChangingthe
EngineOil(page15).
Important:Iftheoillevelintheengineistoo
lowortoohighandyouruntheengine,you
maydamagetheengine.
8.Installthedipstickintotheoil-lltubesecurely.
4
AssemblingtheGrassBag
NoPartsRequired
Procedure
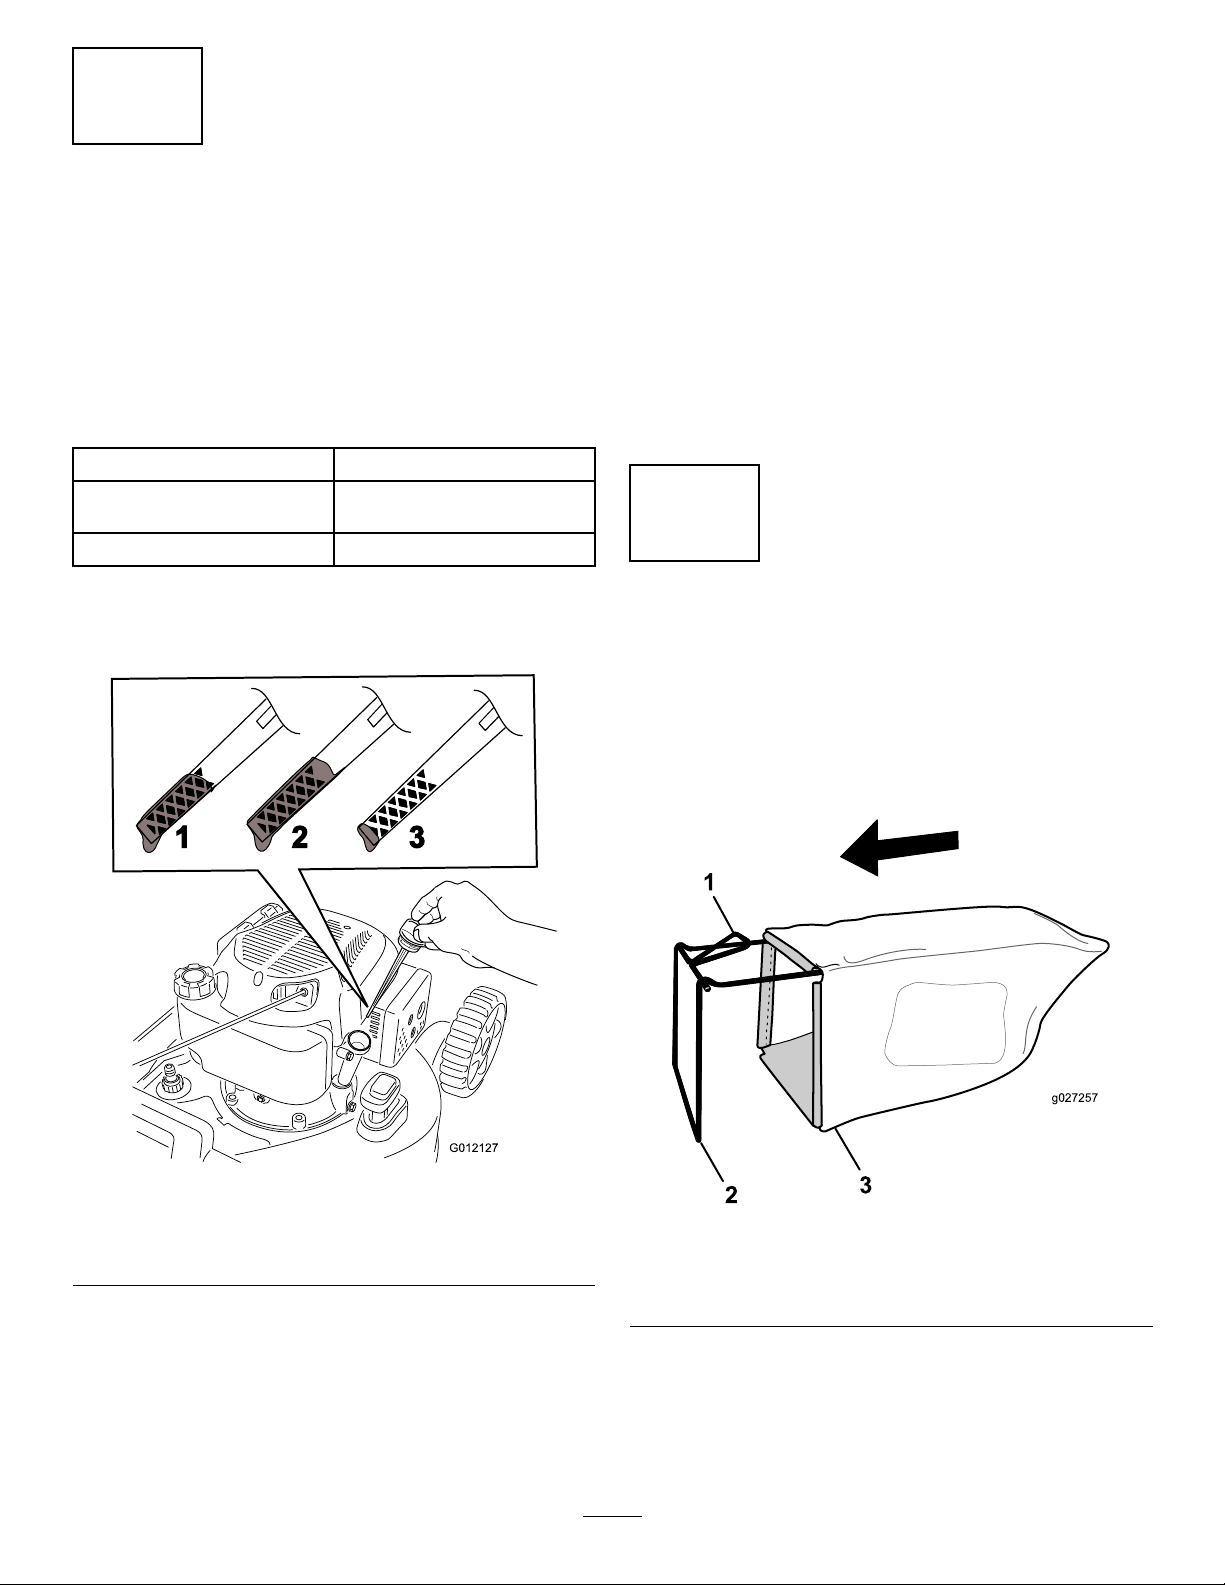
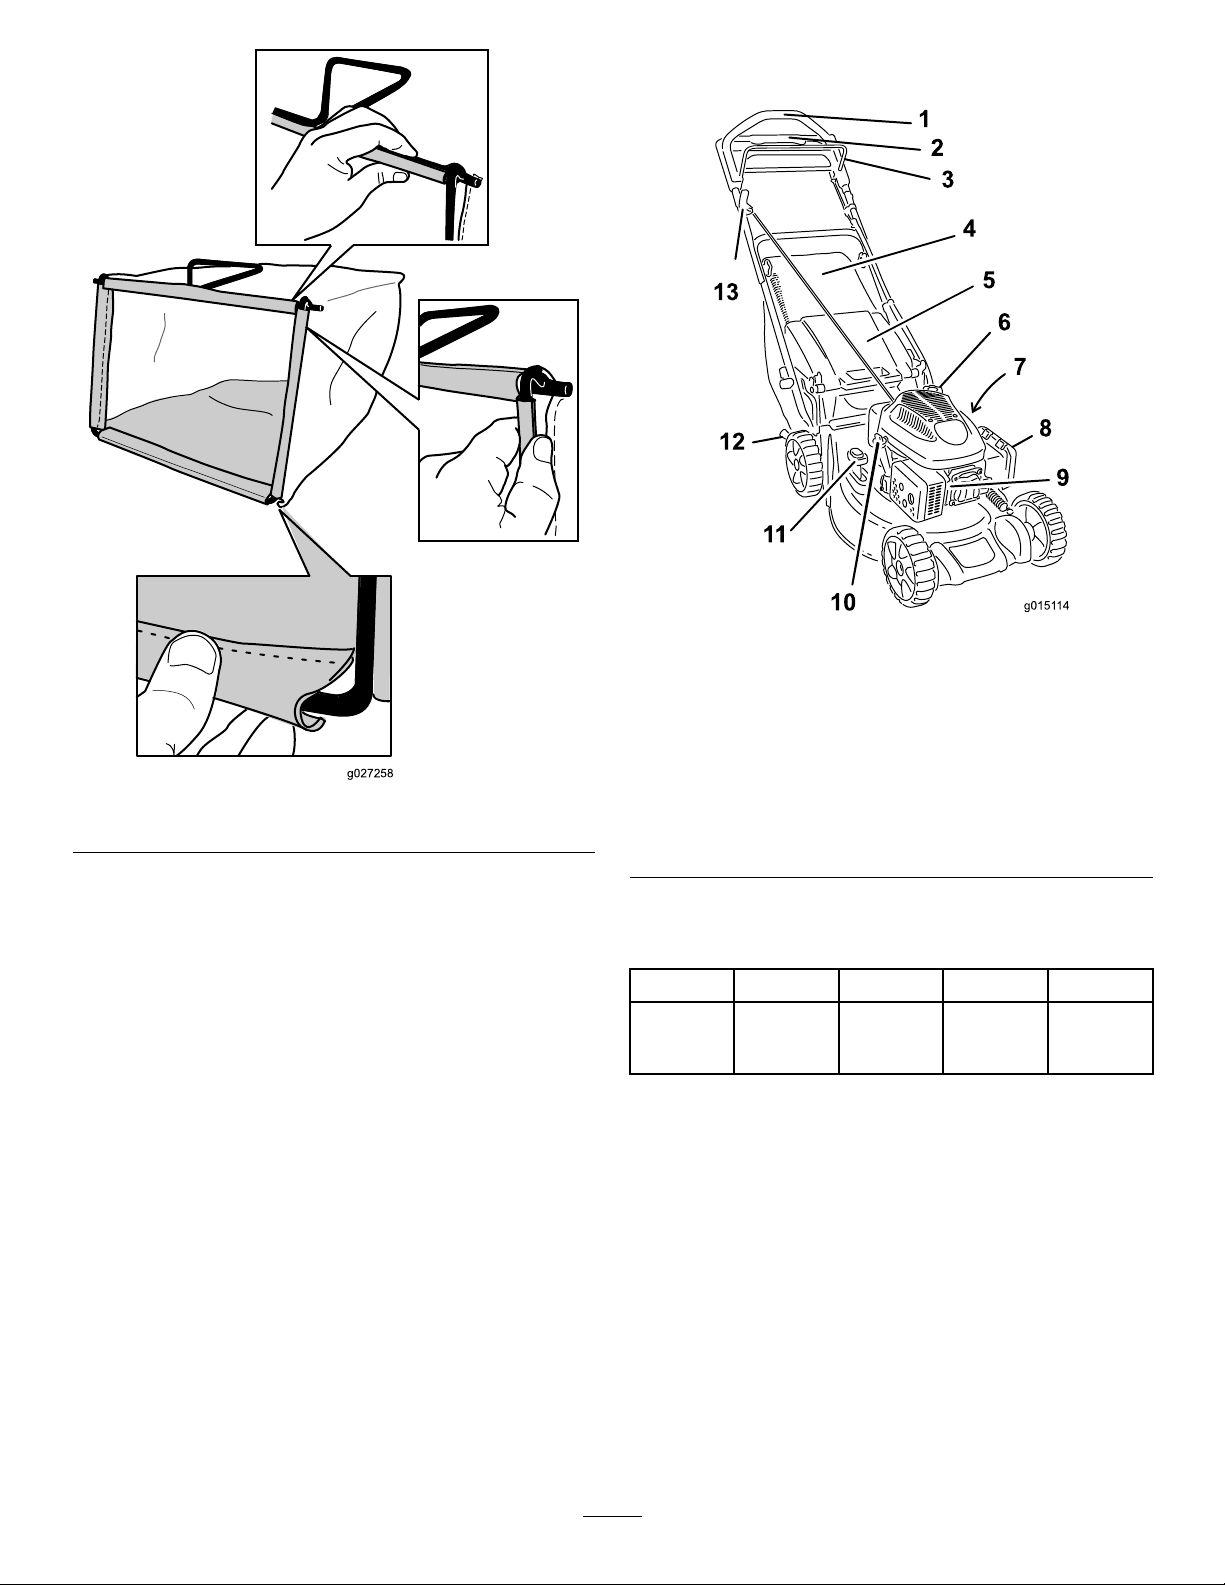
1.Slipthegrassbagovertheframeasshownin
Figure8.
Figure7
1.Full3.Add
2.High
3.Carefullypourabout3/4oftheenginecapacity
ofoilintotheoil-lltube.
4.Wait3minutesfortheoiltosettleintheengine.
5.Wipethedipstickcleanwithacleancloth.
6.Insertthedipstickintotheoil-lltube,butdonot
screwitin,thenremovethedipstick.
g012127
g027257
Figure8
1.Handle
2.Frame
Note:Donotslipthebagoverthehandle
(Figure8).
2.Hookthebottomchannelofthebagontothe
bottomoftheframe(Figure9).
5
3.Grassbag
Page 7
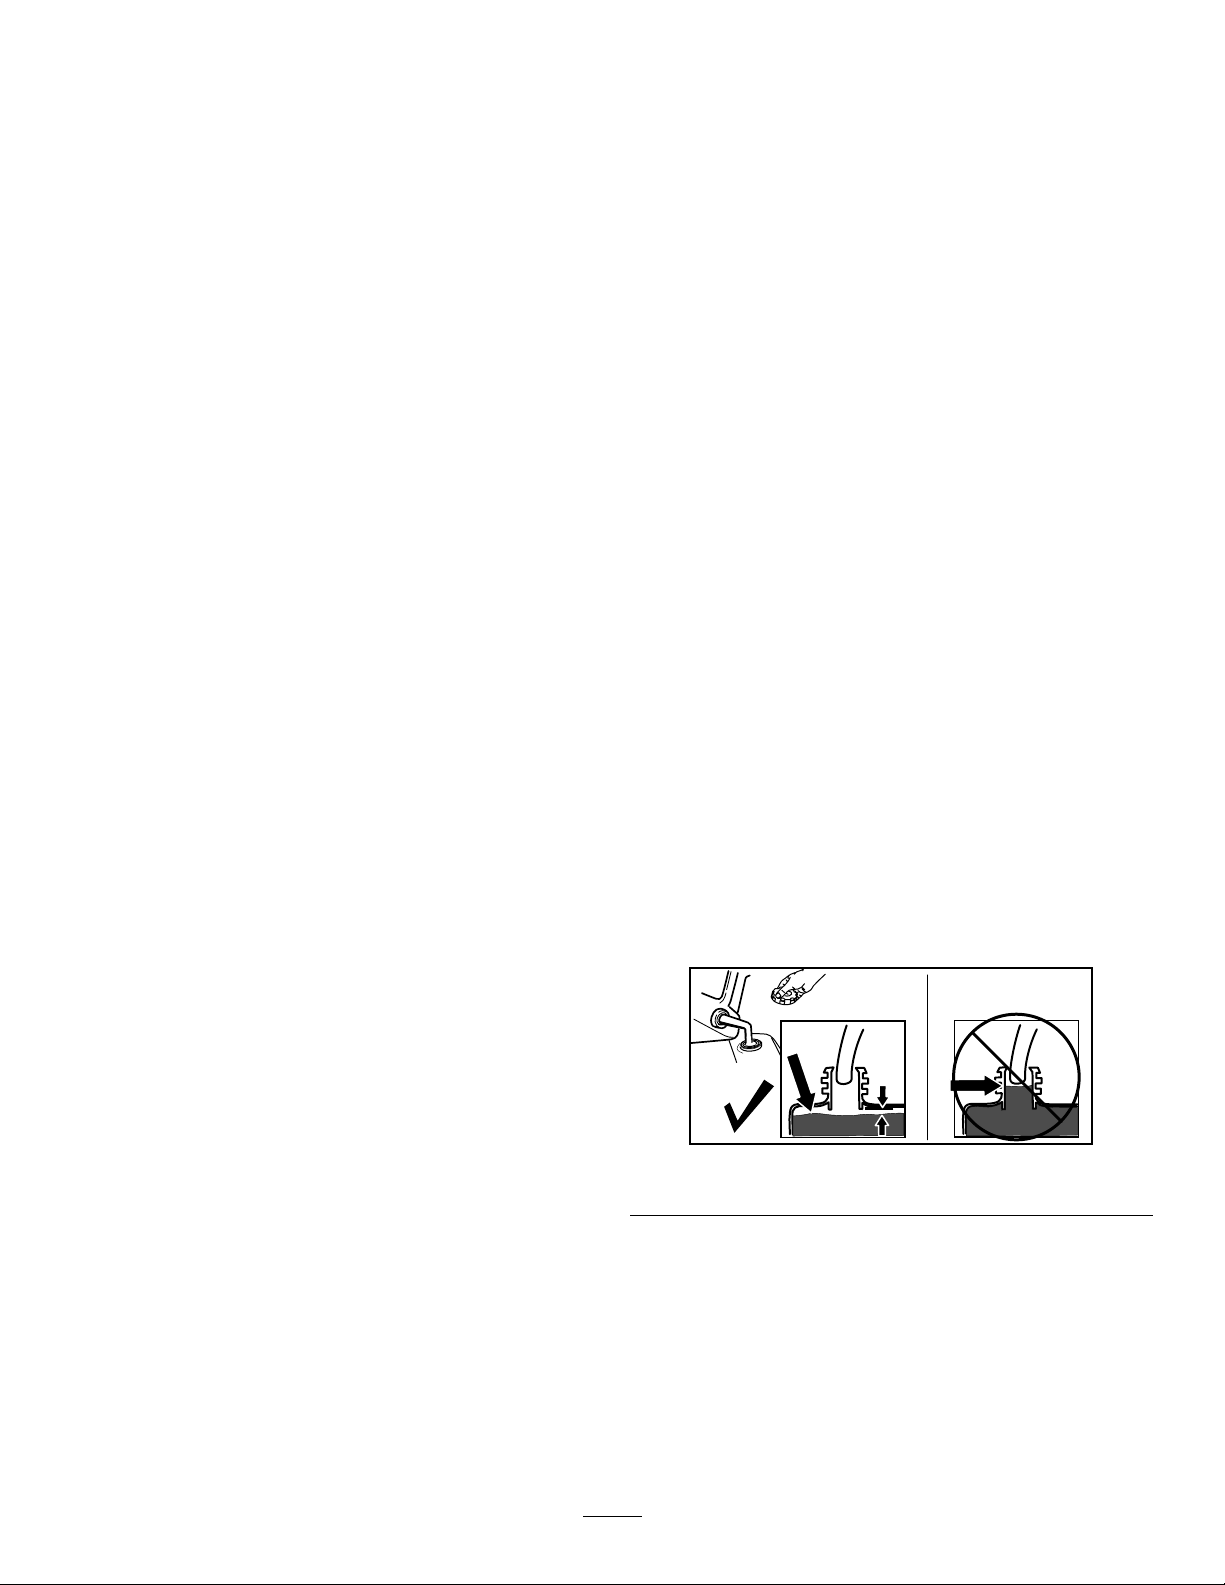
ProductOverview
g015114
Figure10
Figure9
3.Hookthetopandsidechannelsofthebagonto
thetopandsidesoftheframe,respectively
(Figure9).
1.Upperhandle
2.Traction-assisthandle
3.Blade-controlbar
4.Grassbag
g027258
5.Reardeector12.Cutting-heightlever(2)
6.Fuel-tankcap13.Recoil-starthandle
7.Washoutport(notshown)
8.Airlter
9.Sparkplug
10.Oil-lltube/dipstick
11.Bag-on-demandlever
Specications
ModelWeightLengthWidthHeight
2083639kg
(86lb)
152cm
(60
inches)
53cm
(21
inches)
109cm
(43
inches)
6
Page 8
Operation
–Storefuelinanapprovedcontainerandkeep
itoutofthereachofchildren.
Note:Determinetheleftandrightsidesofthe
machinefromthenormaloperatingposition.
BeforeOperation
BeforeOperationSafety
GeneralSafety
•Becomefamiliarwiththesafeoperationofthe
equipment,operatorcontrols,andsafetysigns.
•Checkthatallguardsandsafetydevices,suchas
deectorsand/orgrasscatcher,areinplaceand
workingproperly.
•Alwaysinspectthemachinetoensurethatthe
blades,bladebolts,andcuttingassemblyarenot
wornordamaged.
•Inspecttheareawhereyouwillusethemachine,
andremoveallobjectsthatcouldinterferewith
theoperationofthemachineorthatthemachine
couldthrow.
•Adjustingthecuttingheightmaybringyouinto
contactwiththemovingblade,causingserious
injury.
–Shutofftheengine,removetheignitionkey
(electric-startmodelonly),andwaitforall
movingpartstostop.
–Donotputyourngersunderthehousing
whenadjustingthecuttingheight.
•Fuelisharmfulorfatalifswallowed.Long-term
exposuretovaporscancauseseriousinjuryand
illness.
–Avoidprolongedbreathingofvapors.
–Keepyourhandsandfaceawayfromthe
nozzleandthefuel-tankopening.
–Keepfuelawayfromyoureyesandskin.
FillingtheFuelTank
•Forbestresults,useonlyclean,fresh,unleaded
gasolinewithanoctaneratingof87orhigher
((R+M)/2ratingmethod).
•Oxygenatedfuelwithupto10%ethanolor15%
MTBEbyvolumeisacceptable.
•Donotuseethanolblendsofgasoline,such
asE15orE85,withmorethan10%ethanolby
volume.Performanceproblemsand/orengine
damagemayresult,whichmaynotbecovered
underwarranty.
•Donotusegasolinecontainingmethanol.
•Donotstorefueleitherinthefueltankorinfuel
containersoverthewinterunlessfuelstabilizer
hasbeenaddedtothefuel.
•Donotaddoiltogasoline.
Fillthefueltankwithfreshunleadedregulargasoline
fromamajorname-brandservicestation(Figure11).
Important:Toreducestartingproblems,add
fuelstabilizertothegasolineallseason.Mixthe
stabilizerwithgasolinelessthan30daysold.
FuelSafety
•Fuelisextremelyammableandhighlyexplosive.
Areorexplosionfromfuelcanburnyouand
othersandcandamageproperty.
–Topreventastaticchargefromignitingthefuel,
placethecontainerand/ormachinedirectlyon
thegroundbeforelling,notinavehicleoron
anobject.
–Fillthefueltankoutdoors,inanopenarea,
whentheengineiscold.Wipeupanyfuelthat
spills.
–Donothandlefuelwhensmokingoraroundan
openameorsparks.
–Donotremovethefuelcaporaddfueltothe
tankwhiletheengineisrunningorhot.
–Ifyouspillfuel,donotattempttostartthe
engine.Avoidcreatingasourceofignitionuntil
thefuelvaporshavedissipated.
g230458
Figure11
CheckingtheEngine-Oil Level
ServiceInterval:Beforeeachuseordaily
1.Movethemachinetoalevelsurface.
2.Removethedipstickbyrotatingthecap
counterclockwiseandpullingitout(Figure12).
7
Page 9
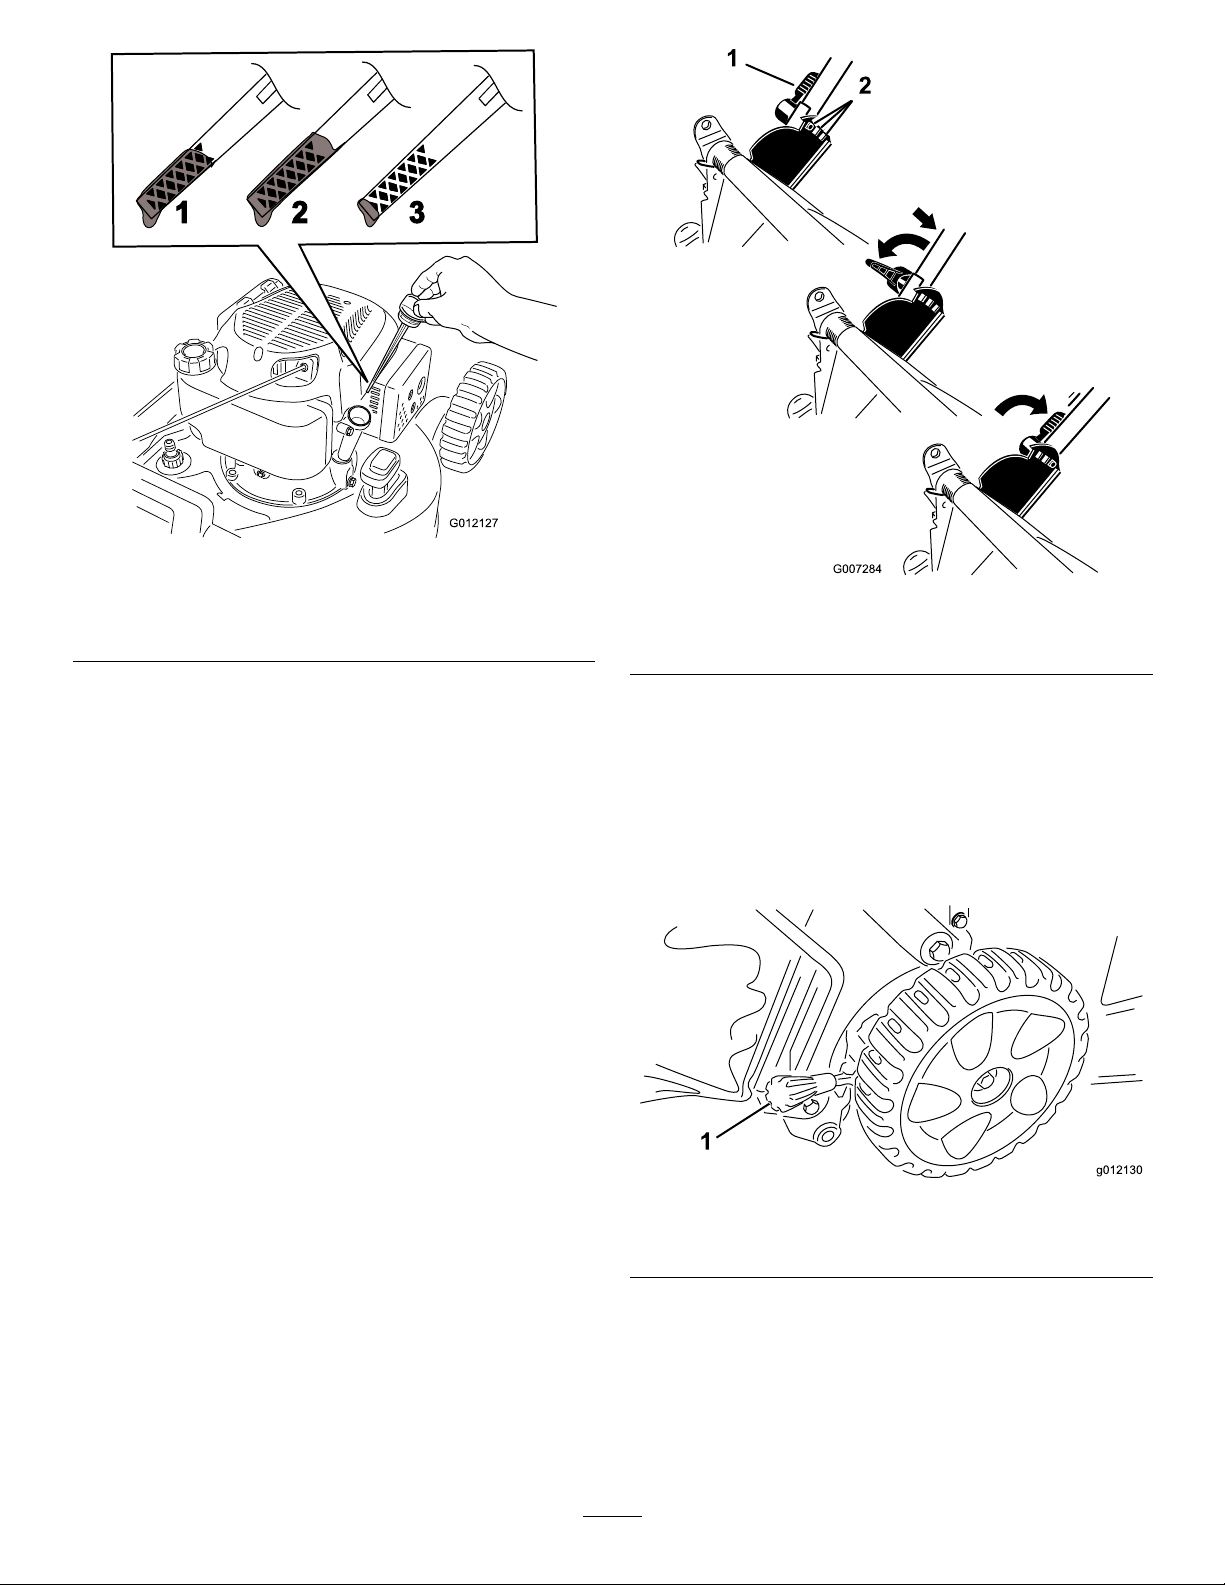
Figure12
1.Full3.Add
2.High
3.Wipethedipstickcleanwithacleancloth.
g012127
g007284
Figure13
1.Handlelock2.Handlepositions
4.Insertthedipstickintotheoil-lltube,butdonot
screwitin,thenremovethedipstick.
5.Readtheoillevelonthedipstick(Figure12).
•Iftheoillevelonthedipstickistoolow
(Figure12),carefullypourasmallamount
ofSAE30orSAE10W-30detergentoilinto
theoil-lltube,wait3minutes,andrepeat
steps3through5untiltheoilonthedipstick
isatthecorrectlevel.
•Iftheoillevelonthedipstickistoohigh
(Figure12),draintheexcessoiluntiltheoil
onthedipstickisatthecorrectlevel;referto
ChangingtheEngineOil(page15).
Important:Iftheoillevelintheengineistoo
lowortoohighandyouruntheengine,you
maydamagetheengine.
6.Installthedipstickintotheoil-lltubesecurely.
AdjustingtheHandle Height
Youmayraiseorlowerthehandletoaposition
comfortableforyou.
Rotatethehandlelock,movethehandleto1of3
positions,andlockthehandleintoposition(Figure
13).
AdjustingtheCutting Height
Adjustthecuttingheightasdesired.Setallthe
cutting-heightleverstothesameheight.Toraiseand
lowerthemachine,refertoFigure14.
g012130
Figure14
1.Cutting-heightlever
Important:Thecuttingheightsettingsare25mm
(1inch);38mm(1-1/2inch);51mm(2inches);64
mm(2-1/2inches);83mm(3-1/4inches);95mm
(3-3/4inches);108mm(4-1/4inches).
8
Page 10
DuringOperation
DuringOperationSafety
GeneralSafety
•Wearappropriateclothing,includingeye
protection;longpants;slip-resistant,substantial
footwear;andhearingprotection.Tiebacklong
hair,securelooseclothing,anddonotwear
jewelry.
•Donotoperatethemachinewhileill,tired,or
undertheinuenceofalcoholordrugs.
•Thebladeissharp;contactingthebladecanresult
inseriouspersonalinjury.Shutofftheengine,
removetheignitionkey(electric-startmodelonly),
andwaitforallmovingpartstostopbeforeleaving
theoperatingposition.
•Whenyoureleasetheblade-controlbar,the
engineshouldshutoffandthebladeshouldstop
within3seconds.Ifnot,stopusingyourmachine
immediatelyandcontactanAuthorizedService
Dealer.
•Checkthegrasscatchercomponentsand
thedischargechutefrequentlyforanywear
ordeteriorationandreplacethemwiththe
manufacturer'srecommendedpartswhen
necessary.
•Useaccessoriesandattachmentsapprovedby
TheToro®Companyonly .
SlopeSafety
•Mowacrossthefaceofslopes;neverupand
down.Useextremecautionwhenchanging
directiononslopes.
•Donotmowonexcessivelysteepslopes.Poor
footingcouldcauseaslip-and-fallaccident.
•Mowwithcautionneardrop-offs,ditches,or
embankments.
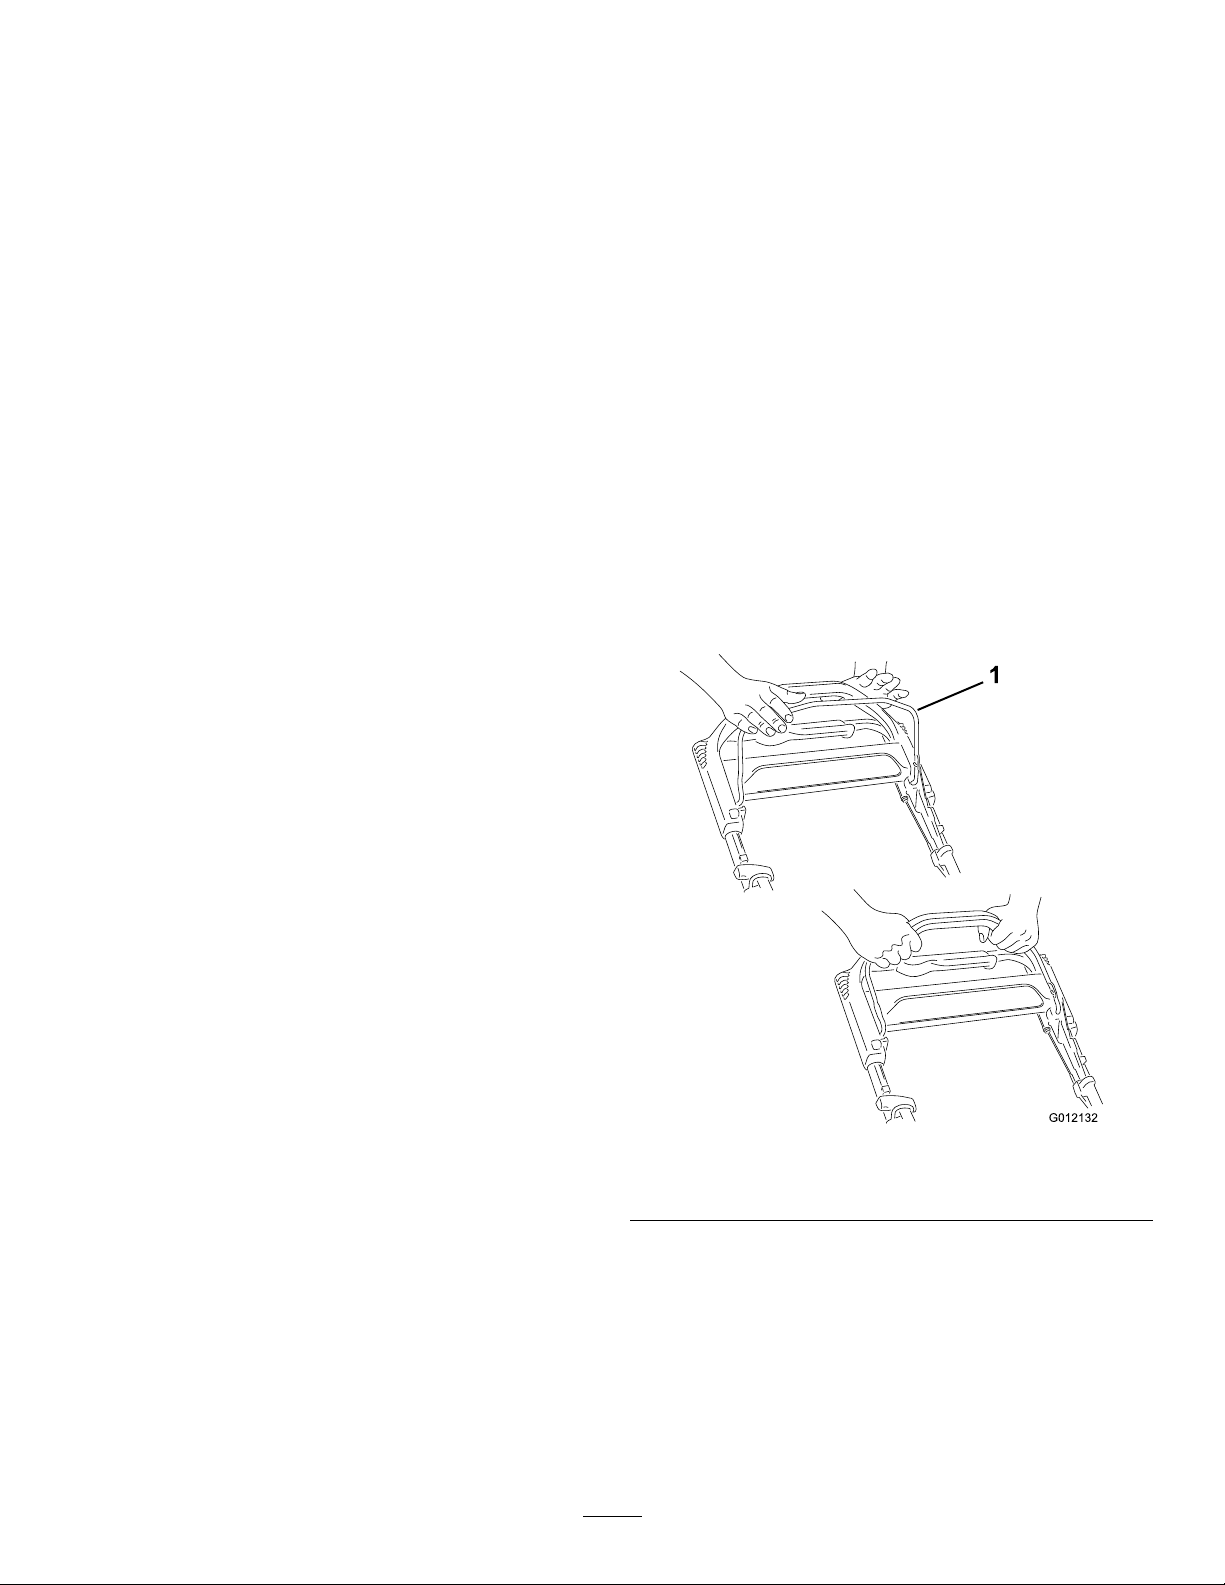
StartingtheEngine
1.Pulltheblade-controlbartothehandleandhold
it(Figure15).
•Keepbystanders,especiallysmallchildren,outof
theoperatingarea.Stopthemachineifanyone
entersthearea.
•Alwayslookdownandbehindyoubeforemoving
themachineinreverse.
•Operatethemachineonlyingoodvisibilityand
appropriateweatherconditions.Donotoperate
themachinewhenthereistheriskoflighting.
•Wetgrassorleavescancauseseriousinjuryif
youslipandcontacttheblade.Avoidmowingin
wetconditions.
•Useextremecarewhenapproachingblind
corners,shrubs,trees,orotherobjectsthatmay
blockyourview.
•Watchforholes,ruts,bumps,rocks,orother
hiddenobjects.Uneventerraincouldcausethe
machinetooverturnorcauseyoutoloseyour
balanceorfooting.
•Stopthemachineandinspectthebladesafter
strikinganobjectorifthereisanabnormal
vibrationinthemachine.Makeallnecessary
repairsbeforeresumingoperation.
•Beforeleavingtheoperatingposition,shutoff
theengine,removetheignitionkey(electric-start
modelonly),andwaitforallmovingpartstostop.
g012132
Figure15
1.Blade-controlbar
2.Pulltherecoil-starthandle(Figure16)lightly
untilyoufeelresistance,thenpullitsharply,and
allowittoreturntotheropeguideonthehandle
slowly.
•Iftheenginehasbeenrunningthemuferwillbe
hotandcanseverelyburnyou.Keepawayfrom
thehotmufer.
9
Page 11

Figure16
Note:Ifthemachinedoesnotstartafterseveral
attempts,contactanAuthorizedServiceDealer.
UsingtheSelf-PropelDrive
Tooperatetheself-propeldrive,simplywalkwithyour
handsontheupperhandleandyourelbowsatyour
sides,andthemachinewillautomaticallykeeppace
withyou(Figure17).
shouldstopwithin3seconds.Iftheydonot,stop
usingyourmachineimmediatelyandcontactan
AuthorizedServiceDealer.
RecyclingtheClippings
Yourmachinecomesfromthefactoryreadytorecycle
thegrassandleafclippingsbackintothelawn.
Note:Thegrassbagmayremainonthemachine
whileyouarerecyclingtheclippings.
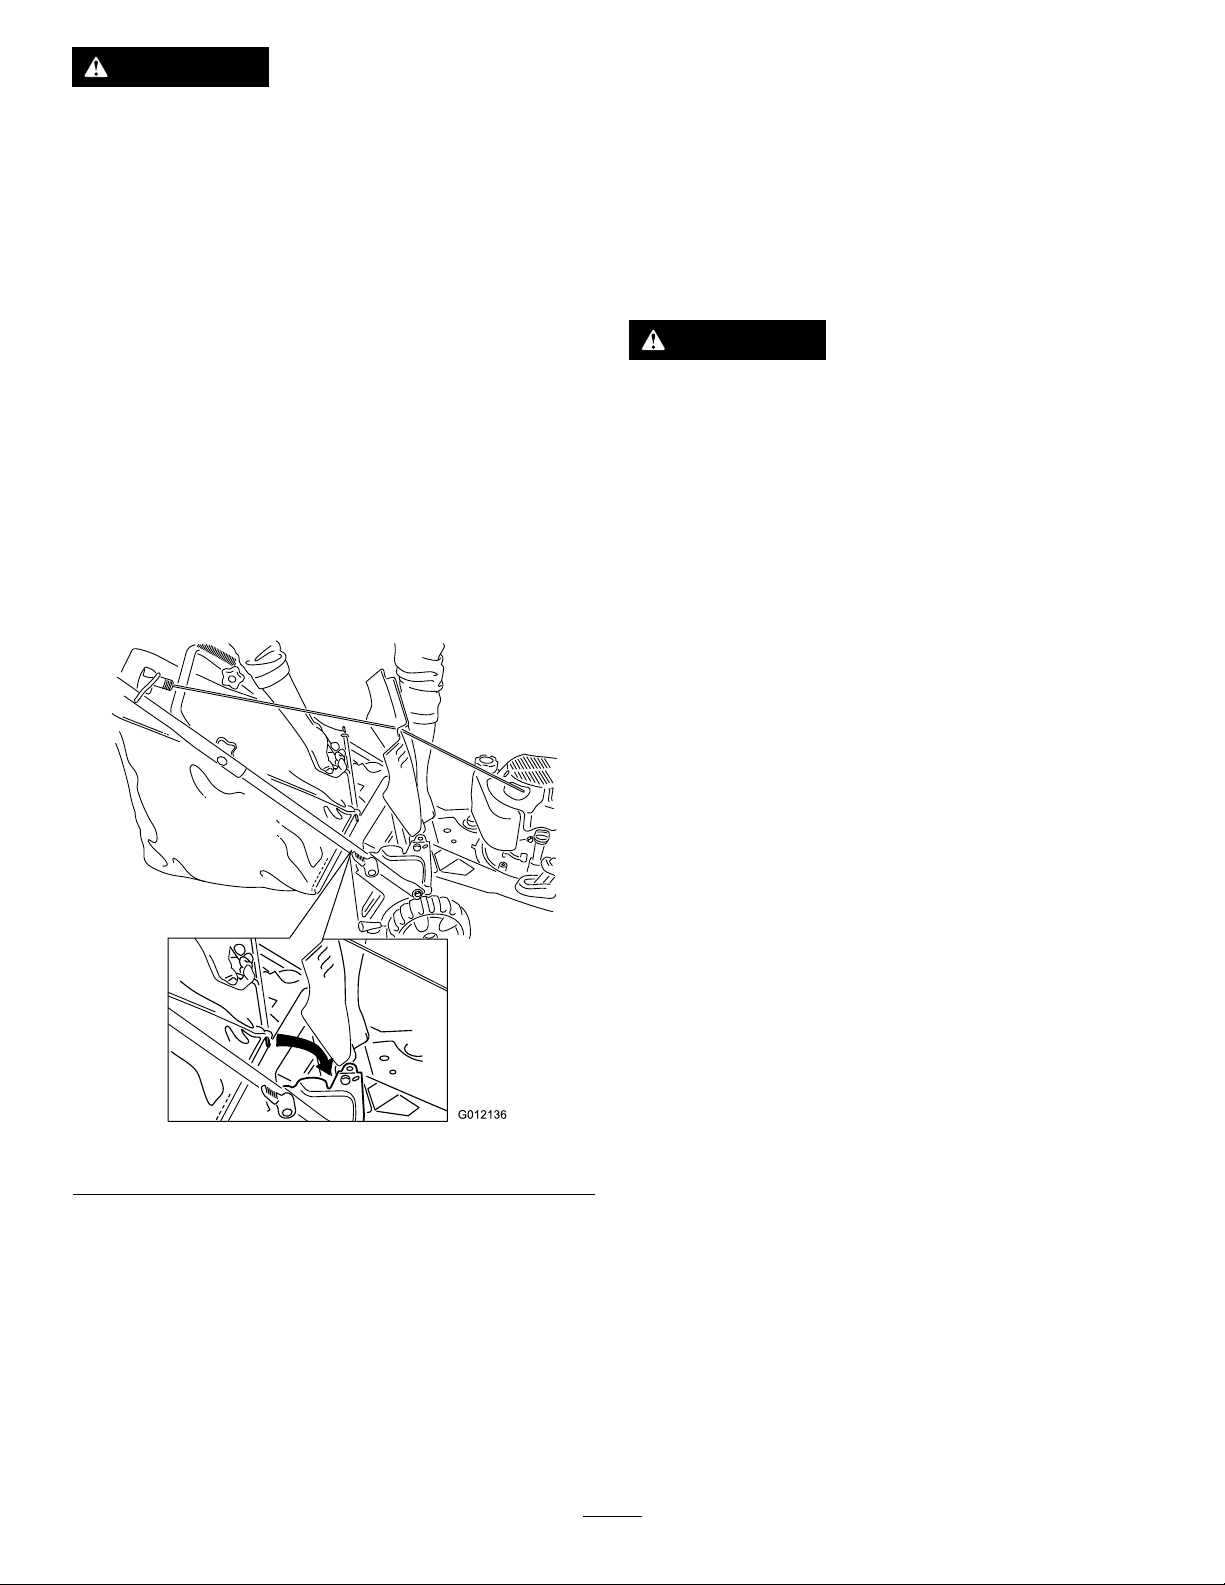
Torecycletheclippings,movethebag-on-demand
g012133
levertotheRECYCLINGposition(Figure18).
Figure17
Note:Ifthemachinedoesnotfreelyrollbackward
afterself-propelling,stopwalking,holdyourhands
inplace,andallowthemachinetorollacoupleof
centimeters(inches)forwardtodisengagethewheel
drive.Youcanalsotryreachingjustundertheupper
handletothemetalhandleandpushingthemachine
forwardacoupleofcentimeters(inches).Ifthe
machinestilldoesnotrollbackwardeasily,contactan
AuthorizedServiceDealer.
ShuttingOfftheEngine
ServiceInterval:Beforeeachuseordaily
Toshutofftheengine,releasetheblade-controlbar.
Important:Whenyoureleasetheblade-control
bar,theengineshouldshutoffandtheblade
g003221
g012135
Figure18
1.RECYCLINGposition2.BAGGINGposition
BaggingtheClippings
Usethegrassbagtocollectgrassandleafclippings
fromthelawn.
WARNING
Aworngrassbagcouldallowsmallstones
andothersimilardebristobethrowntoward
youorbystanders,resultinginserious
personalinjuryordeath.
Checkthegrassbagfrequently.Ifitis
damaged,installanewTororeplacementbag.
10
Page 12
WARNING
Rear-Dischargingthe
Thebladeissharp;contactingthebladecan
resultinseriouspersonalinjury.
Shutofftheengineandwaitforallmoving
partstostopbeforeleavingtheoperating
position.
1.Shutofftheengineandwaitforallmovingparts
tostop.
2.Installthegrassbag;refertoInstallingtheGrass
Bag(page11)andmovethebag-on-demand
levertotheBAGGINGpositionasshowninFigure
18.
InstallingtheGrassBag
1.Shutofftheengineandwaitforallmovingparts
tostop.
2.Raiseandholdupthereardeector,installthe
baginthenotches,andlowerthereardeector
(Figure19).
Clippings
Usethereardischargeforcuttingverytallgrass.
Note:Ifthegrassbagisonthemachine,remove
itbeforerear-dischargingtheclippings;refer
toRemovingtheGrassBag(page11).The
bag-on-demandlevershouldbeintheBAGGING
positionasshowninFigure18.
WARNING
Thebladeissharp;contactingthebladecan
resultinseriouspersonalinjury.
Shutofftheengineandwaitforallmoving
partstostopbeforeleavingtheoperating
position.
OperatingTips
GeneralMowingTips
•Inspecttheareawhereyouwillusethemachine
andremoveallobjectsthatthemachinecould
throw.
•Avoidstrikingsolidobjectswiththeblade.Never
deliberatelymowoveranyobject.
•Ifthemachinestrikesanobjectorstartstovibrate,
immediatelyshutofftheengine,removethekey
(ifequipped),disconnectthewirefromthespark
plug,andexaminethemachinefordamage.
•Forbestperformance,installanewbladebefore
thecuttingseasonbegins.
•ReplacethebladewhennecessarywithaT oro
replacementblade.
Figure19
RemovingtheGrassBag
1.Shutofftheengineandwaitforallmovingparts
tostop.
2.Liftupthegrassbagupandawayfromthe
handle.
Note:Tiltthegrassbagslightlybackwardto
preventthecollectedgrassclippingsfromfalling
out.
CuttingGrass
•Cutonlyaboutathirdofthegrassbladeatatime.
g012136
11
Donotcutbelow51mm(2inches)unlessthe
grassissparseoritislatefallwhengrassgrowth
beginstoslowdown.
•Whencuttinggrassover15cm(6inches)tall,
mowatthehighestcuttingheightsettingandwalk
slower;thenmowagainatalowersettingforthe
bestlawnappearance.Ifthegrassistoolong,the
machinemayplugandcausetheenginetostall.
•Wetgrassandleavestendtoclumpontheyard
andcancausethemachinetoplugortheengine
tostall.Avoidmowinginwetconditions.
•Beawareofapotentialrehazardinverydry
conditions,followalllocalrewarnings,andkeep
themachinefreeofdrygrassandleafdebris.
Page 13

•Alternatethemowingdirection.Thishelps
dispersetheclippingsoverthelawnforeven
fertilization.
AfterOperation
•Ifthenishedlawnappearanceisunsatisfactory,
try1ormoreofthefollowing:
–Replacethebladeorhaveitsharpened.
–Walkataslowerpacewhilemowing.
–Raisethecuttingheightonyourmachine.
–Cutthegrassmorefrequently.
–Overlapcuttingswathsinsteadofcuttingafull
swathwitheachpass.
CuttingLeaves
•Aftercuttingthelawn,ensurethathalfofthelawn
showsthroughthecutleafcover.Y oumayneed
tomakemorethanasinglepassovertheleaves.
•Iftherearemorethan13cm(5inches)ofleaves
onthelawn,mowatahighercuttingheightand
thenagainatthedesiredcuttingheight.
•Slowdownyourmowingspeedifthemachine
doesnotcuttheleavesnelyenough.
AfterOperationSafety
GeneralSafety
•Cleangrassanddebrisfromthemachinetohelp
preventres.Cleanupoilorfuelspills.
•Allowtheenginetocoolbeforestoringthemachine
inanyenclosure.
•Neverstorethemachineorfuelcontainerwhere
thereisanopename,spark,orpilotlight,such
asonawaterheateroronotherappliances.
HaulingSafety
•Removetheignitionkey(ifequipped)before
loadingthemachineforhauling.
•Usecarewhenloadingorunloadingthemachine.
•Securethemachinefromrolling.
CleaningundertheMachine
ServiceInterval:Beforeeachuseordaily
Forbestresults,cleanthemachinesoonafteryou
havecompletedmowing.
1.Lowerthemachinetothelowestcutting-height
setting.RefertoAdjustingtheCuttingHeight
(page8).
2.Movethemachineontoalevelsurface.
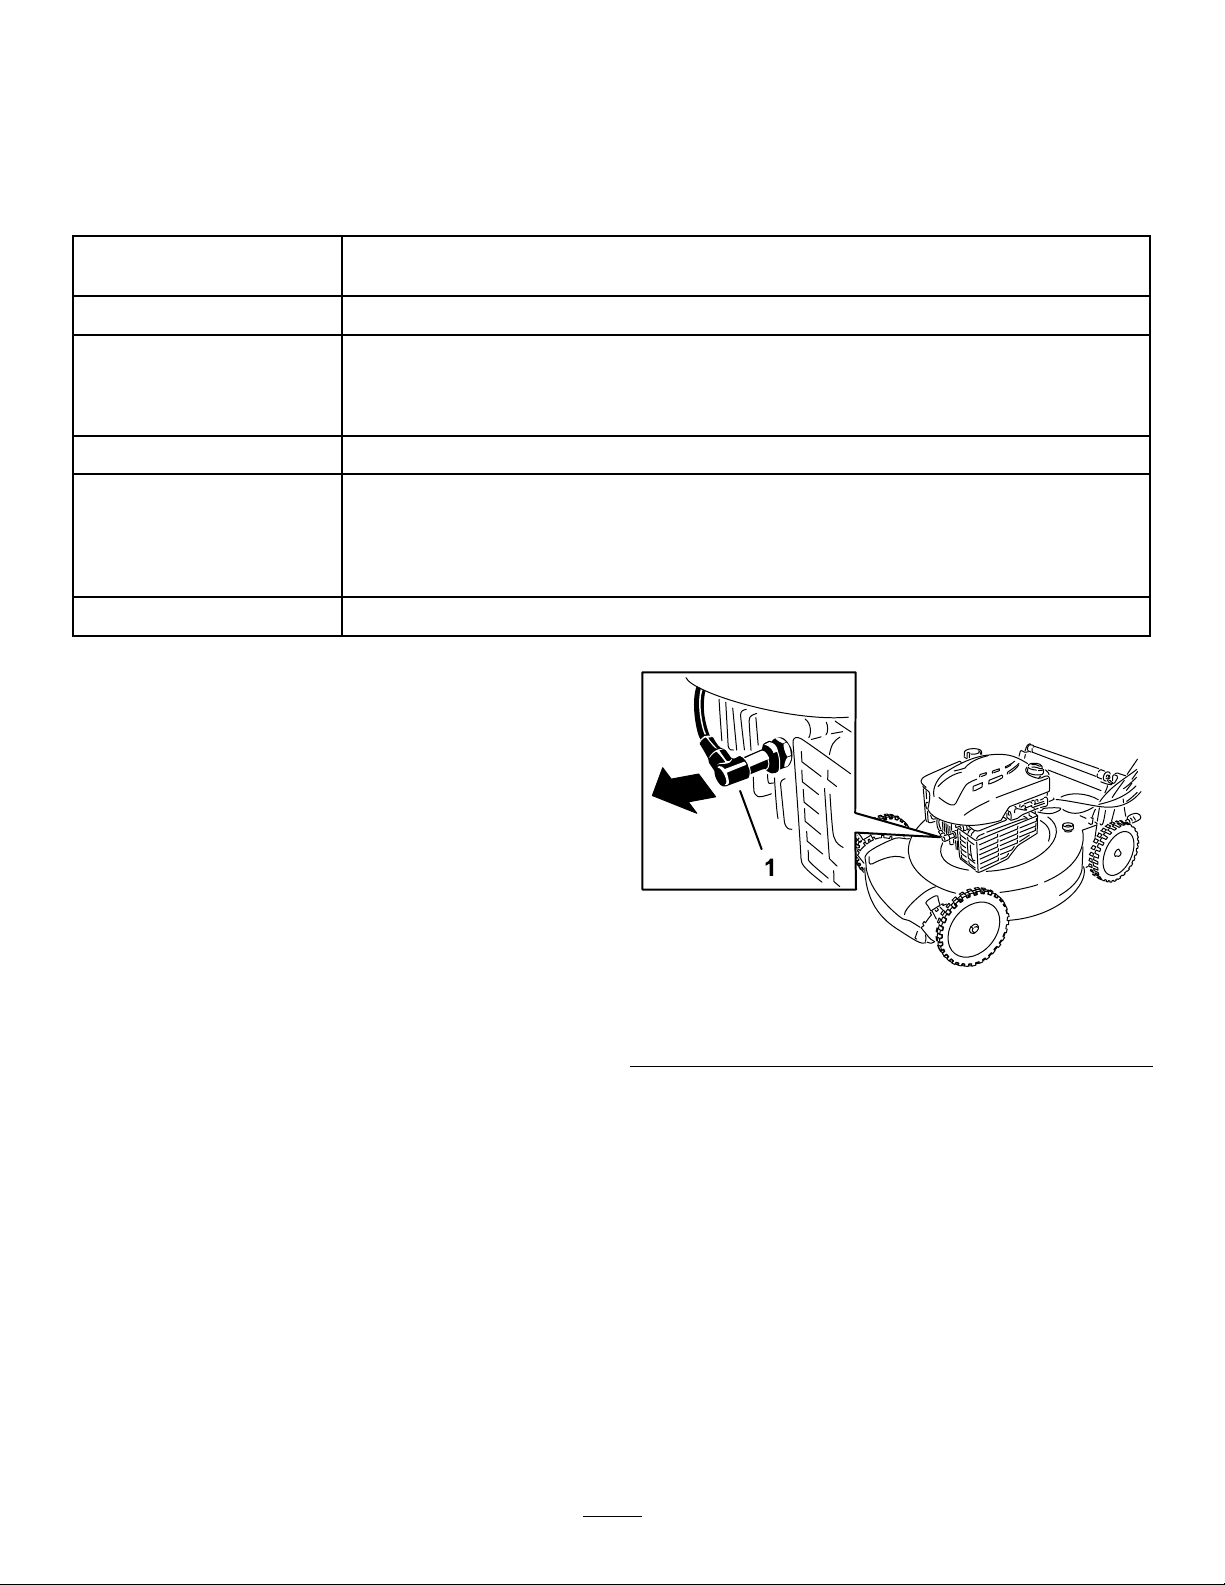
3.Attachagardenhosethatisconnectedtoa
watersupplytothewashoutport(Figure20).
Figure20
1.Washoutport
g014538
4.Turnthewateron.
5.Starttheengineandrunituntiltherearenomore
clippingsthatcomeoutfromunderthemachine.
6.Shutofftheengine.
12
Page 14
7.Shutoffthewateranddisconnectthegarden
hosefromthemachine.
8.Starttheengineandrunitforafewminutesto
drytheundersideofthemachine.
9.Shutofftheengineandallowittocool.
FoldingtheHandle
WARNING
Foldingorunfoldingthehandleimproperly
candamagethecables,causinganunsafe
operatingcondition.
•Donotdamagethecableswhenfoldingor
unfoldingthehandle.
•Ifacableisdamaged,contactan
AuthorizedServiceDealer.
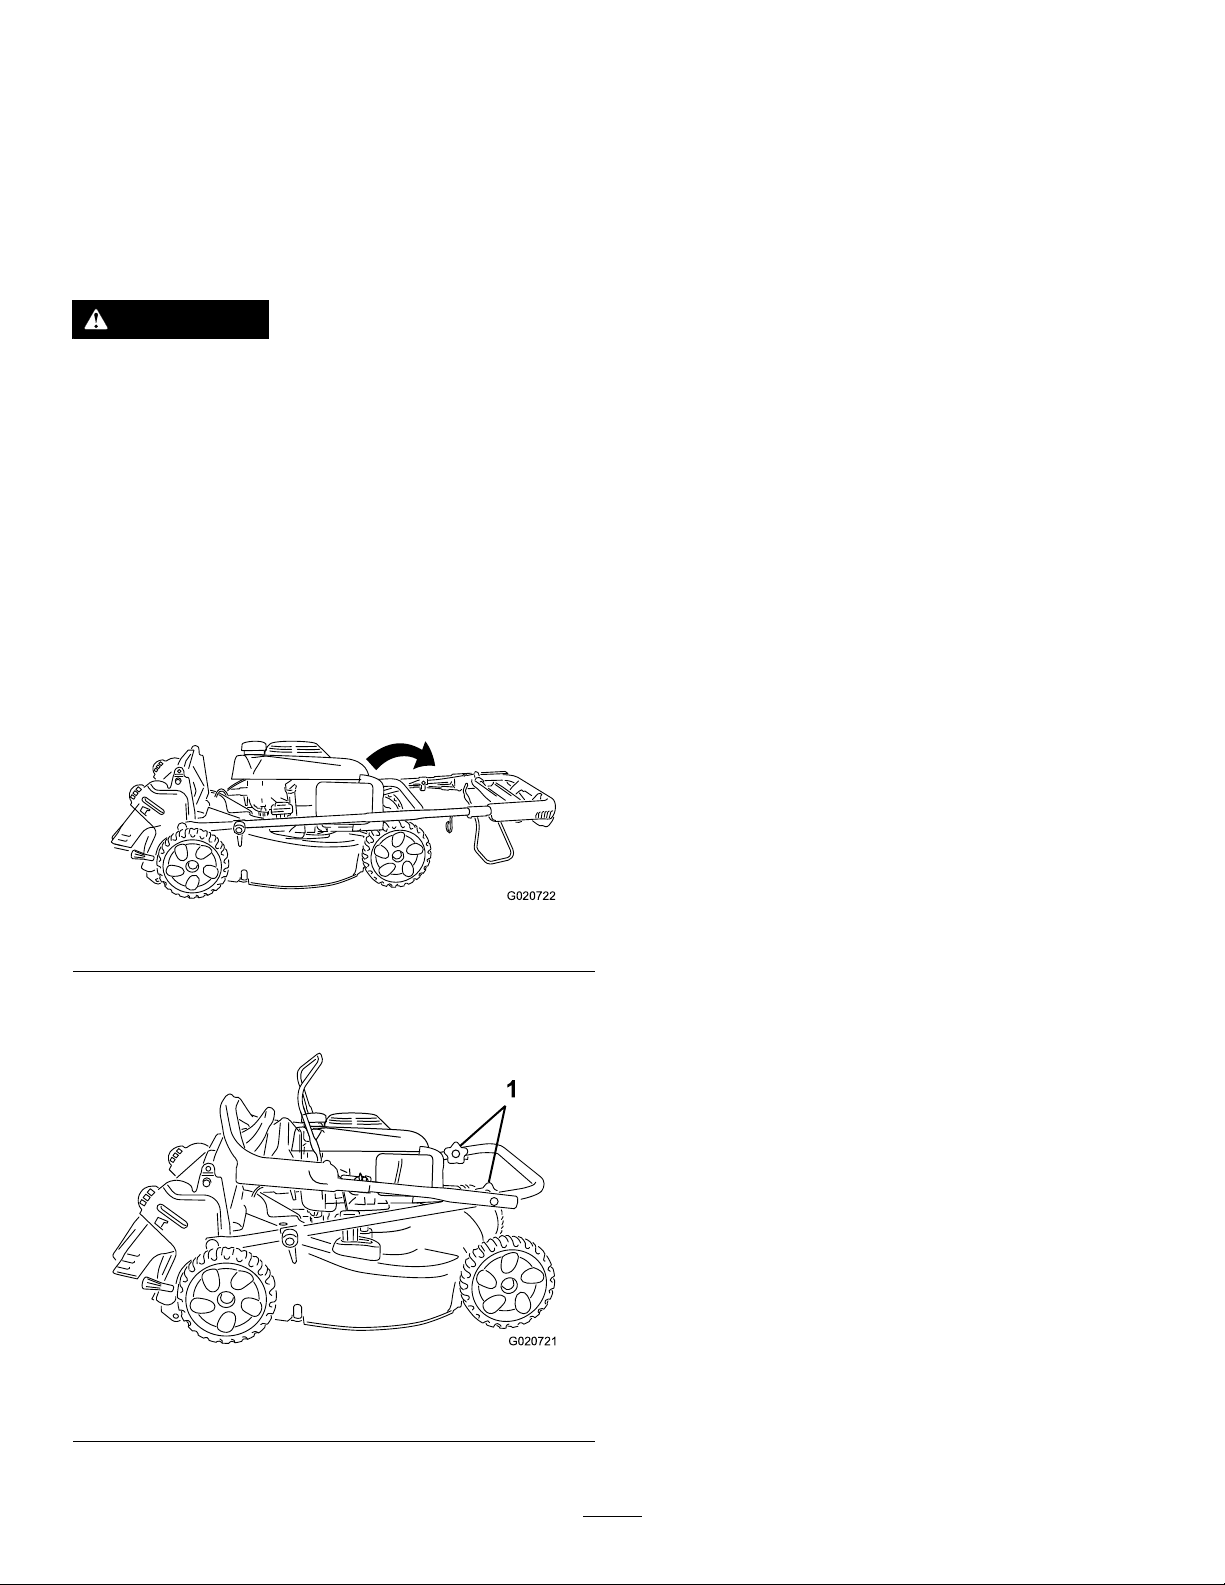
1.Loosenthehandleknobs.
2.Rotatetheentirehandleforward(Figure21).
Important:Routethecablestotheoutside
ofthehandleknobsasyoufoldtheupper
handle.
Figure21
3.Rotatetheupperportionofthehandleback
towardtheengine;refertoFigure22.
g020722
1.Handleknobs
g020721
Figure22
13
Page 15
Maintenance
Important:Refertoyourengineowner’smanualforadditionalmaintenanceprocedures.
RecommendedMaintenanceSchedule(s)
MaintenanceService
Interval
Aftertherst5hours
Beforeeachuseordaily
Every100hours
Yearly
Yearlyorbeforestorage
MaintenanceProcedure
•Changetheengineoil.
•Checktheengine-oillevel.
•Ensurethattheengineshutsoffwithin3secondsafterreleasingtheblade-control
bar.
•Cleangrassclippingsanddirtfromunderthemachine.
•Servicethesparkplug.
•Servicetheairlter.
•Changetheengineoil.
•Replacethebladeorhaveitsharpened(morefrequentlyiftheedgedullsquickly).
•Cleantheenginebyremovingdirtanddebrisfromitstopandsides;cleanitmore
frequentlyindustyoperatingconditions.
•Emptythefueltankbeforerepairsasdirectedandbeforeyearlystorage.
MaintenanceSafety
•Disconnectthespark-plugwirefromthesparkplug
beforeperforminganymaintenanceprocedure.
•Wearglovesandeyeprotectionwhenservicing
themachine.
•Thebladeissharp;contactingthebladecanresult
inseriouspersonalinjury .Weargloveswhen
servicingtheblade.Donotrepairoralterthe
blade(s).
•Nevertamperwithsafetydevices.Checktheir
properoperationregularly .
•Tippingthemachinemaycausethefueltoleak.
Fuelisammableandexplosive,andcancause
personalinjury.Runtheenginedryorremovethe
fuelwithahandpump;neversiphonthefuel.
•Toensureoptimumperformanceandcontinued
safetycerticationofthemachine,useonly
genuineTororeplacementpartsandaccessories.
Replacementpartsandaccessoriesmadeby
othermanufacturerscouldbedangerous,and
suchusecouldvoidtheproductwarranty .
PreparingforMaintenance
1.Shutofftheengineandwaitforallmovingparts
tostop.
2.Disconnectthespark-plugwirefromthespark
plug(Figure23).
g236094
Figure23
1.Spark-plugwire
3.Afterperformingthemaintenanceprocedure(s),
connectthespark-plugwiretothesparkplug.
Important:Beforetippingthemachineto
changetheoilorreplacetheblade,allowthe
fueltanktorundrythroughnormalusage.If
youmusttipthemachinepriortorunning
outoffuel,useahandfuelpumptoremove
thefuel.Alwaystipthemachineontoits
side,withthedipstickdown.
14
Page 16
ServicingtheAirFilter
ChangingtheEngineOil
ServiceInterval:Yearly
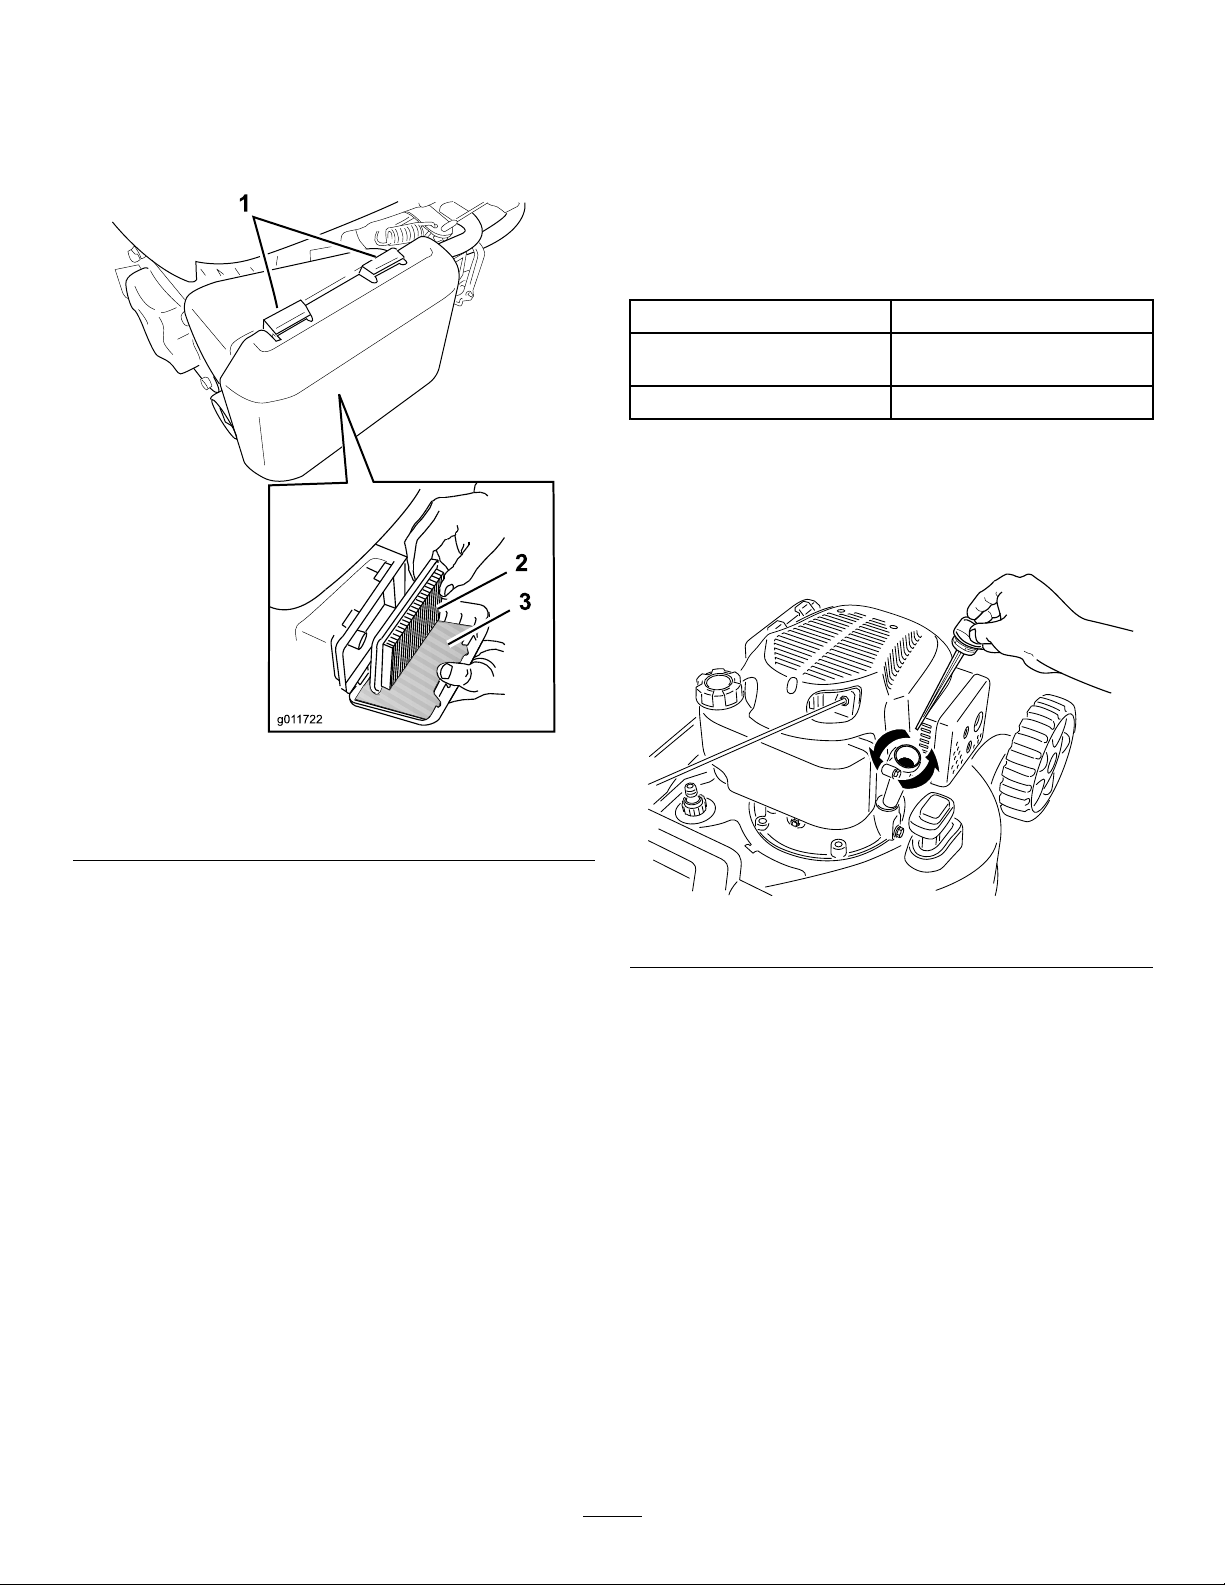
1.Pressdownonthelatchtabsontopofthe
air-ltercover(Figure24).
ServiceInterval:Aftertherst5hours
Yearly
Note:Runtheengineafewminutesbeforechanging
theoiltowarmit.Warmoilowsbetterandcarries
morecontaminants.
EngineOilSpecications
Engineoilcapacity
OilviscositySAE30orSAE10W-30
APIserviceclassicationSJorhigher
1.Movethemachinetoalevelsurface.
2.RefertoPreparingforMaintenance(page14).
3.Removethedipstickbyrotatingthecap
counterclockwiseandpullingitout(Figure25).
0.55L(18.6oz)
detergentoil
Figure24
1.Latchtabs
2.Paperairlter
3.Foampre-lter
2.Openthecover.
3.Removethepaperairlterandthefoam
pre-lter(Figure24).
4.Inspectthefoampre-lter,andreplaceitifitis
damagedorexcessivelydirty.
5.Inspectthepaperairlter.
•Iftheairlterisdamagedoriswetwithoil
orfuel,replaceit.
•Iftheairlterisdirty ,tapitonahardsurface
severaltimesorblowcompressedairless
than207kPa(30psi)throughthesideofthe
lterthatfacestheengine.
Note:Donotbrushthedirtoffthelter;
brushingforcesdirtintothebers.
6.Removethedirtfromtheair-lterbodyandthe
coverusingamoistrag.
g011722
g235096
Figure25
4.Tipthemachineontoitsside(sothattheair
lterisup)todraintheusedoilfromtheoil-ll
tube(Figure25).
Important:Donotwipedirtintotheairduct.
7.Installthefoampre-lterandthepaperairlter
intotheairlter.
8.Installthecover.
15
Page 17
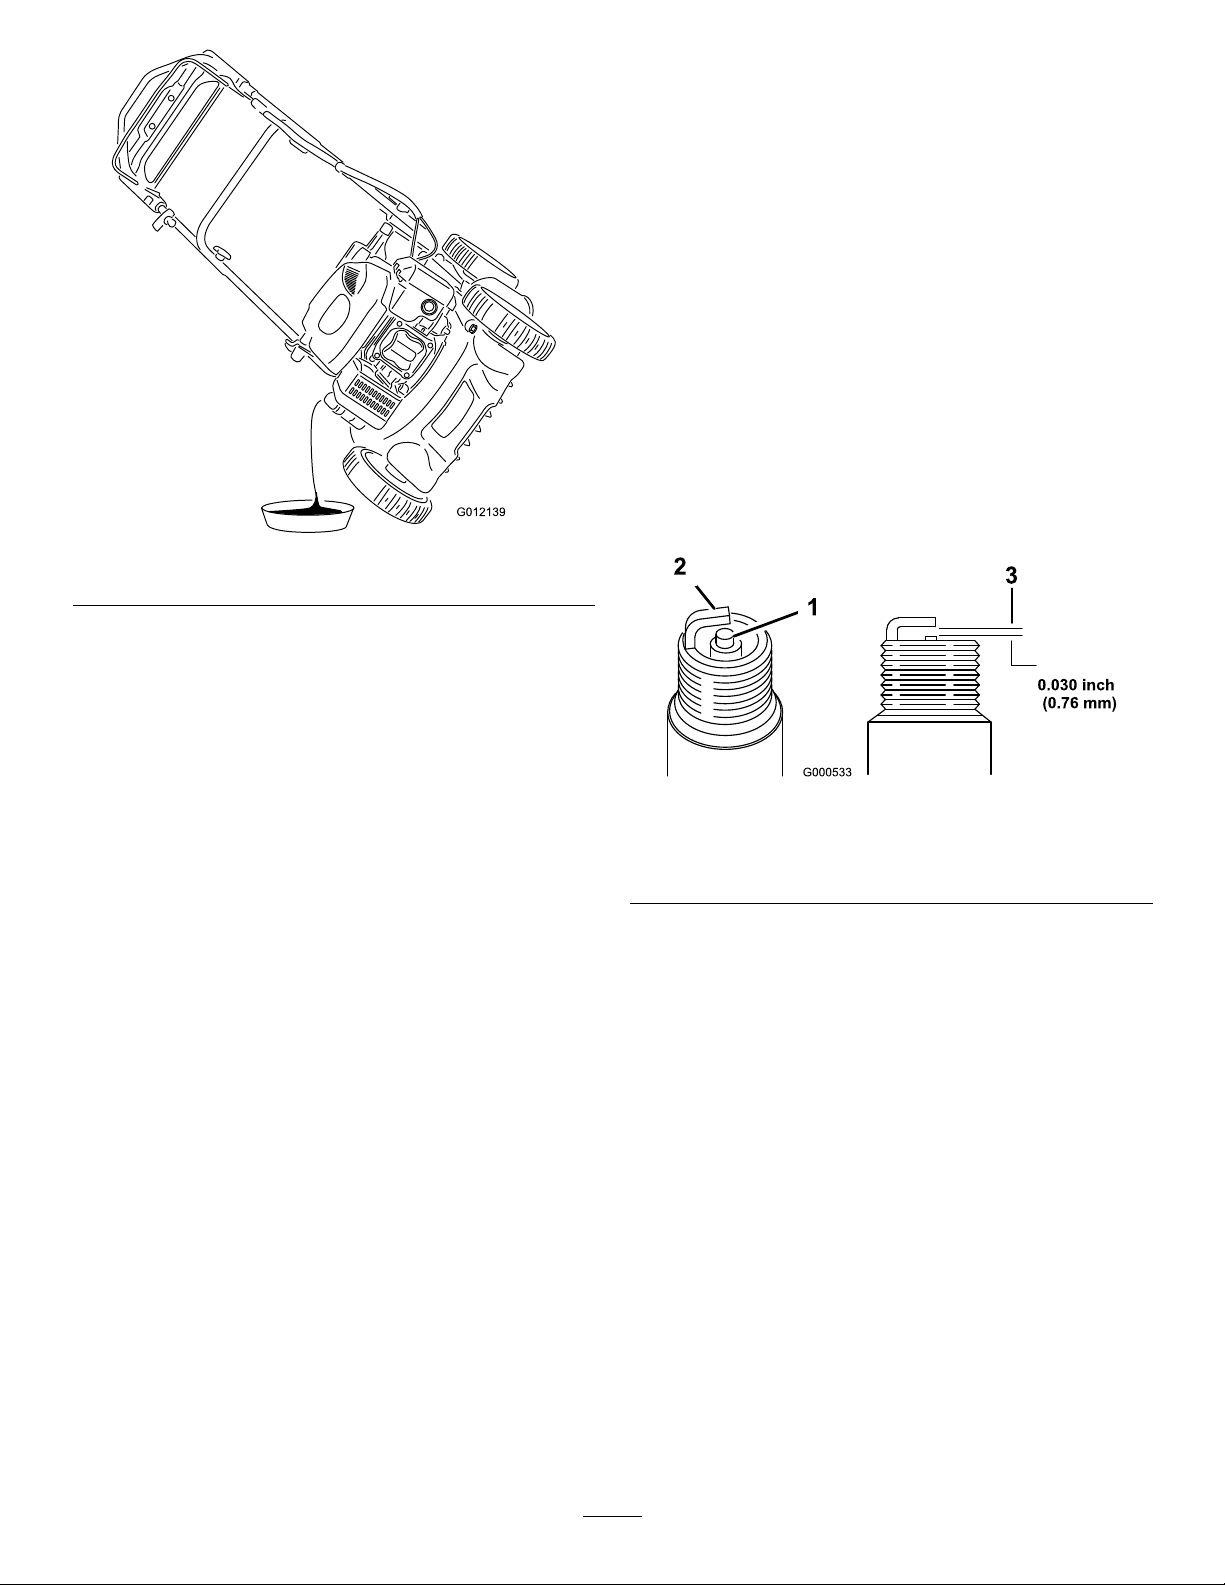
Figure26
5.Afterdrainingtheusedoil,returnthemachineto
theoperatingposition.
ServicingtheSparkPlug
ServiceInterval:Every100hours
UseaChampionRN9YCsparkplugorequivalent.
1.Shutofftheengineandwaitforallmovingparts
tostop.
2.Disconnectthewirefromthesparkplug(Figure
22).
3.Cleanaroundthesparkplug.
4.Removethesparkplugfromthecylinderhead.
Important:Replaceacracked,fouled,or
dirtysparkplug.Donotcleantheelectrodes
becausegritenteringthecylindercan
damagetheengine.
5.Setthegapontheplugto0.76mm(0.030inch)
asshowninFigure27.
g012139
6.Carefullypourabout3/4oftheenginecapacity
ofoilintotheoil-lltube.
7.Wait3minutesfortheoiltosettleintheengine.
8.Wipethedipstickcleanwithacleancloth.
9.Insertthedipstickintotheoil-lltube,butdonot
screwitin,thenremovethedipstick.
10.Readtheoillevelonthedipstick(Checkingthe
Engine-OilLevel(page7)).
•Iftheoillevelonthedipstickistoolow,
carefullypourasmallamountofoilintothe
oil-lltube,wait3minutes,andrepeatsteps
8through10untiltheoillevelonthedipstick
iscorrect.
•Iftheoillevelonthedipstickistoohigh,
draintheexcessoiluntiltheoillevelonthe
dipstickiscorrect.
Important:Iftheoillevelintheengineistoo
lowortoohighandyouruntheengine,you
maydamagetheengine.
11.Installthedipstickintotheoil-lltubesecurely.
g000533
Figure27
1.Centerelectrodeinsulator3.Airgap(nottoscale)
2.Sideelectrode
6.Installthesparkplug.
7.Torquetheplugto20N∙m(15ft-lb).
8.Connectthewiretothesparkplug.
12.Recycletheusedoilproperly.
16
Page 18
ReplacingtheBlade
ServiceInterval:Yearly
Important:Youwillneedatorquewrenchto
installthebladeproperly.Ifyoudonothavea
torquewrenchorareuncomfortableperforming
thisprocedure,contactanAuthorizedService
Dealer.
Examinethebladewheneveryourunoutoffuel.Ifthe
bladeisdamagedorcracked,replaceitimmediately.
Ifthebladeedgeisdullornicked,haveitsharpened
andbalanced,orreplaceit.
WARNING
Thebladeissharp;contactingthebladecan
resultinseriouspersonalinjury.
Weargloveswhenservicingtheblade.
1.RefertoPreparingforMaintenance(page14).
2.Tipthemachineontoitssidewiththeairlterup.
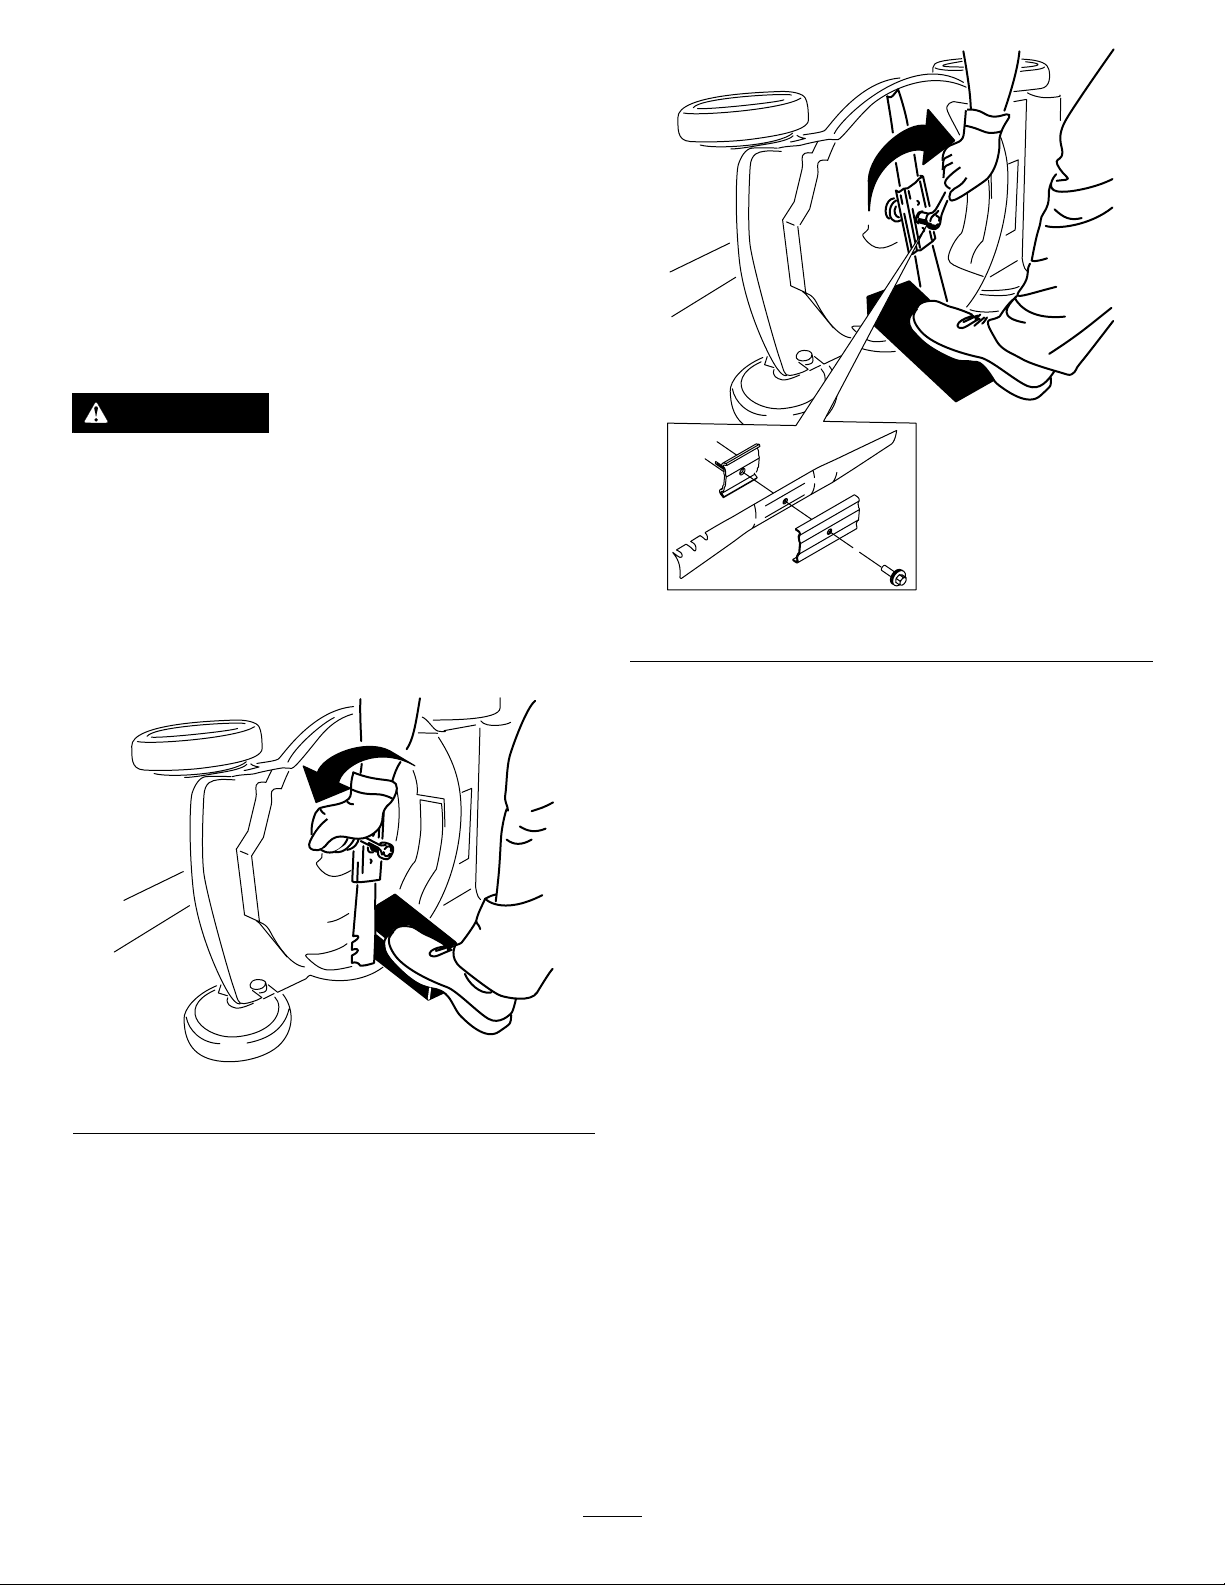
3.Useablockofwoodtoholdthebladesteady
(Figure28).
g231390
Figure29
Important:Positionthecurvedendsofthe
bladetopointtowardthemachinehousing.
Figure28
4.Removetheblade,savingallmountinghardware
(Figure28).
5.Installthenewbladeandallmountinghardware
(Figure29).
6.Useatorquewrenchtotightenthebladebolt
to82N∙m(60ft-lb).
Important:Abolttorquedto82N∙m(60
ft-lb)isverytight.Whileholdingtheblade
withablockofwood,putyourweight
behindtheratchetorwrenchandtightenthe
boltsecurely.Thisboltisverydifcultto
overtighten.
g231389
17
Page 19

Storage
Storethemachineinacool,clean,dryplace.
PreparingtheMachinefor Storage
1.Onthelastrefuelingoftheyear,addfuel
stabilizer(suchasToroPremiumFuel
Treatment)tothefuelasdirectedonthelabel.
2.Disposeofanyunusedfuelproperly.Recycle
itaccordingtolocalcodesoruseitinyour
automobile.
Note:Oldfuelinthefueltankistheleading
causeofhardstarting.Donotstorefuelwithout
fuelstabilizermorethan30days,anddonot
storestabilizedfuelmorethan90days.
3.Runthemachineuntiltheengineshutsofffrom
runningoutoffuel.
4.Starttheengineagainandallowittorununtil
itshutsoff.Whenyoucannolongerstartthe
engine,itissufcientlydry.
5.Disconnectthewirefromthesparkplugand
connectthewiretotheretainingpost(if
equipped).
6.Removethesparkplug,add30ml(1oz)of
engineoilthroughthespark-plughole,andpull
thestarterropeslowlyseveraltimestodistribute
oilthroughoutthecylindertopreventcylinder
corrosionduringtheoff-season.
7.Looselyinstallthesparkplug.
8.Tightenallnuts,bolts,andscrews.
RemovingtheMachine fromStorage
1.Checkandtightenallfasteners.
2.Removethesparkplugandspintheengine
rapidlybypullingtherecoil-starthandletoblow
theexcessoilfromthecylinder.
3.Installthesparkplugandtightenitwithatorque
wrenchto20N∙m(15ft-lb).
4.Performanymaintenanceprocedures;referto
Maintenance(page14).
5.Checktheengine-oillevel;refertoCheckingthe
Engine-OilLevel(page7).
6.Fillthefueltankwithfreshfuel;refertoFilling
theFuelT ank(page7).
7.Connectthewiretothesparkplug.
18
Page 20

EuropeanPrivacyNotice
TheInformationT oroCollects
ToroWarrantyCompany(T oro)respectsyourprivacy.Inordertoprocessyourwarrantyclaimandcontactyouintheeventofaproductrecall,weaskyou
tosharecertainpersonalinformationwithus,eitherdirectlyorthroughyourlocalT orocompanyordealer .
TheTorowarrantysystemishostedonserverslocatedwithintheUnitedStateswhereprivacylawmaynotprovidethesameprotectionasapplies
inyourcountry.
BYSHARINGYOURPERSONALINFORMA TIONWITHUS,YOUARECONSENTINGTOTHEPROCESSINGOFYOURPERSONALINFORMATION
ASDESCRIBEDINTHISPRIVACYNOTICE.
TheWayToroUsesInformation
Toromayuseyourpersonalinformationtoprocesswarrantyclaims,tocontactyouintheeventofaproductrecallandforanyotherpurposewhichwetell
youabout.ToromayshareyourinformationwithT oro'safliates,dealersorotherbusinesspartnersinconnectionwithanyoftheseactivities.Wewillnot
sellyourpersonalinformationtoanyothercompany .Wereservetherighttodisclosepersonalinformationinordertocomplywithapplicablelawsand
withrequestsbytheappropriateauthorities,tooperateoursystemsproperlyorforourownprotectionorthatofotherusers.
RetentionofyourPersonalInformation
Wewillkeepyourpersonalinformationaslongasweneeditforthepurposesforwhichitwasoriginallycollectedorforotherlegitimatepurposes
(suchasregulatorycompliance),orasrequiredbyapplicablelaw.
Toro'sCommitmenttoSecurityofY ourPersonalInformation
Wetakereasonableprecautionsinordertoprotectthesecurityofyourpersonalinformation.Wealsotakestepstomaintaintheaccuracyandcurrent
statusofpersonalinformation.
AccessandCorrectionofyourPersonalInformation
Ifyouwouldliketorevieworcorrectyourpersonalinformation,pleasecontactusbyemailatlegal@toro.com.
AustralianConsumerLaw
AustraliancustomerswillnddetailsrelatingtotheAustralianConsumerLaweitherinsidetheboxoratyourlocalT oroDealer.
374-0282RevC
Page 21

SuperBagger-Rasenmäher(48cm)
Modellnr.20836—Seriennr.401500000undhöher
FormNo.3419-103RevA
Bedienungsanleitung
Einführung
DieserhandgeführteRasenmähermitSichelmessern
solltevonPrivatleutenodergeschultenLohnarbeitern
verwendetwerden.Eristhauptsächlichfürdas
MähenvonGrasaufgepegtenGrünächenin
Privat-oderöffentlichenAnlagengedacht.Erist
nichtfürdasSchneidenvonBüschenoderfüreinen
landwirtschaftlichenEinsatzgedacht.
LesenSiedieseInformationensorgfältigdurch,
umsichmitdemordnungsgemäßenEinsatzund
derWartungdesGerätsvertrautzumachenund
VerletzungenundeineBeschädigungdesGerätszu
vermeiden.SietragendieVerantwortungfüreinen
ordnungsgemäßenundsicherenEinsatzdesGeräts.
WendenSiesichhinsichtlichInformationenzu
ProduktenundZubehörsowieAngabenzuIhrem
örtlichenVertragshändleroderzurRegistrierungdes
ProduktesdirektanTorounterwww.T oro.com.
WendenSiesichandenToro-Vertragshändler
oderKundendienst,wennSieeineServiceleistung,
OriginalersatzteilevonTorooderweitere
Informationenbenötigen.HabenSiedafürdieModellundSeriennummernderMaschinegriffbereit.InBild
1wirdderStandortderModell-undSeriennummern
aufdemProduktangegeben.TragenSiehierbittedie
Modell-undSeriennummerndesGerätsein.
Wichtig:ScannenSiemitIhremMobilgerätden
QR-CodeaufdemSeriennummernaufkleber(falls
vorhanden),umaufGarantie-,Ersatzteil-oder
andereProduktinformationenzuzugreifen.
IndieserAnleitungwerdenpotenzielleGefahren
angeführt,undSicherheitsmeldungenwerdenvom
Sicherheitswarnsymbol(Bild2)gekennzeichnet,
dasaufeineGefahrhinweist,diezuschweren
odertödlichenVerletzungenführenkann,wenn
SiedieempfohlenenSicherheitsvorkehrungennicht
einhalten.
g000502
Bild2
Sicherheitswarnsymbol
IndieserAnleitungwerdenzweiBegriffezur
HervorhebungvonInformationenverwendet.Wichtig
weistaufspeziellemechanischeInformationenhin,
undHinweishebtallgemeineInformationenhervor,
dieIhrebesondereBeachtungverdienen.
DiesesProduktentsprichtallenrelevanten
europäischenRichtlinien.WeitereAngaben
ndenSieindenproduktspezischen
Konformitätsbescheinigungen.
Brutto-oderNettodrehmoment:DasBruttooderNettodrehmomentdiesesMotorswurde
vomMotorherstellerimLaborgemäßSAEJ1940
oderJ2723ermittelt.AufgrundderKonguration
zurErfüllungvonSicherheits-,EmissionsundBetriebsanforderungenistdietatsächliche
MotorleistungindieserKlassederRasenmäher
wesentlichniedriger.WeitereInformationennden
SieinderMotorbedienungsanleitungdesHerstellers,
diemitderMaschineausgeliefertwurde.
1.TypenschildmitModell-undSeriennummer
©2017—TheT oro®Company
8111LyndaleAvenueSouth
Bloomington,MN55420
CV
Modellnr.
Seriennr.
Bild1
RegistrierenSieIhrProduktunter
www.T oro.com.
Wichtig:SolldieMaschineineinerHöhe
vonüber1.500mdauerhafteingesetzt
werden,musszuvordasKitfürHöhenlagen
g226629
nachgerüstetwerden.DamitdieMaschine
denEmissionsvorschriftenvonCARB/EPA
entspricht.DasKitfürHöhenlagensteigertdie
LeistungdesMotorsundverhindertzugleich
Zündkerzenverschmutzung,Startschwierigkeiten
underhöhteEmissionen.NachdemEinbaudes
KitsmussdieKennzeichnungfürHöhenlagen
nebendemTypenschildanderMaschine
angebrachtwerden.WendenSiesichanein
autorisiertesToroVertragshändler,umdas
entsprechendeKitfürHöhenlagenunddie
Originaldokuments(DE)
AlleRechtevorbehalten
Druck:Mexiko
*3419-103*A
Page 22
dazugehörigeKennzeichnungzuerhalten.Den
IhnennächstgelegenenVertragshändlernden
SieaufunsererWebsiteunterwww.Toro.comoder
wendenSiesichanunserenToroKundendienst
untereinederinderAussagezurGarantie
hinsichtlichderMotoremissionskontrolle
aufgeführtenTelefonnummern.
SolldieMaschinewiederunter1.500m
Höhenmetereingesetztwerden,bauenSiedas
KitwiedervomMotorabundstellenSiedie
ursprünglichenwerksseitigenEinstellungen
wiederher.NutzenSiekeinenMotor,derfür
großeHöhenlagenumgebautwurde,inniedrigen
Höhenlagen,dieskannzurÜberhitzungundzur
BeschädigungdesMotorsführen.
SindSiesichnichtsicher,obIhreMaschinefür
großeHöhenlagenumgebautwurde,achtenSie
aufdiefolgendeKennzeichnung:
HeckauswurfdesSchnittguts............................11
Betriebshinweise.............................................12
NachdemEinsatz...............................................13
HinweisezurSicherheitnachdem
Betrieb..........................................................13
ReinigenunterdemGerät.................................13
ZusammenklappendesHolms.........................13
Wartung..................................................................15
EmpfohlenerWartungsplan.................................15
Wartungssicherheit...........................................15
VorbereitenfürdieWartung..............................15
WartendesLuftlters........................................16
WechselndesMotoröls....................................16
WartenderZündkerze......................................17
AuswechselndesMessers...............................18
Einlagerung............................................................19
VorbereitenderMaschinefürdas
Einlagern.......................................................19
HerausnehmendesRasenmähersausder
Einlagerung...................................................19
Sicherheit
decal127-9363
Inhalt
Einführung................................................................1
Sicherheit..................................................................2
AllgemeineSicherheit.........................................2
Sicherheits-undBedienungsschilder.................3
Einrichtung................................................................4
1AufklappendesHolms.....................................4
2BefestigendesRücklaufstarterseilsinder
Seilführung......................................................4
3AuffüllendesMotorsmitÖl..............................5
4MontierendesFangkorbs................................5
Produktübersicht.......................................................6
TechnischeDaten..............................................6
Betrieb......................................................................7
VordemEinsatz....................................................7
VordersicherenVerwendung.............................7
Betanken............................................................7
PrüfendesMotorölstands...................................8
EinstellenderHolmhöhe.....................................8
EinstellenderSchnitthöhe..................................9
WährenddesEinsatzes.........................................9
HinweisezurSicherheitwährenddes
Betriebs...........................................................9
AnlassendesMotors........................................10
VerwendendesSelbstantriebs.........................10
AbstellendesMotors........................................10
Schnittgutrecyclen............................................10
SammelndesSchnittguts..................................11
DieseMaschineerfülltENISO5395:2013.
AllgemeineSicherheit
DiesesProduktkannHändeundFüßeamputieren
undGegenständeaufschleudern.Befolgenimmer
sämtlicheSicherheitshinweise,umschwereoder
tödlicheVerletzungenzuvermeiden.
WenndiesesProduktfüreinenanderenZweck
eingesetztwird,kanndasfürBedienerundandere
Personengefährlichsein.
•Lesen,verstehenundbefolgenSievordem
AnlassendesMotorsalleAnweisungenund
WarnungeninderBedienungsanleitungundan
derMaschine.
•BerührenSiebeweglicheTeileoderdieUnterseite
derMaschinenichtmitdenHändenoderFüßen.
KommenSieAuswurföffnungennichtzunahe.
•SetzenSiedieMaschinenurein,wenn
alleSchutzvorrichtungenundandere
Sicherheitsvorrichtungenmontiertund
funktionsfähigsind.
•HaltenSieUnbeteiligteundKinderineinem
sicherenAbstandzurMaschine.DasFahrzeug
darfniemalsvonKindernbetriebenwerden.
NurverantwortungsbewusstePersonen,die
geschultundmitdenAnweisungenvertrautsind
undkörperlichfähigsind,solltendieMaschine
verwenden.
•HaltenSiedieMaschineanundstellendenMotor
ab,bevorSieWartungsarbeitendurchführen,
AuftankenoderVerstopfungenentfernen.
2
Page 23
DerunsachgemäßeEinsatzoderdiefalscheWartung
dieserMaschinekannzuVerletzungenführen.
DurchdasBefolgendieserSicherheitshinweisekann
dasVerletzungsrisikoverringertwerden.Achten
SieimmeraufdasWarnsymbol.Esbedeutet
Vorsicht,WarnungoderGefahr–Hinweisefürdie
Sicherheits-undBedienungsschilder
DieSicherheits-undBedienungsaufklebersindgutsichtbar;siebendensichinderNähe
dermöglichenGefahrenbereiche.T auschenSiebeschädigteoderverlorengegangene
Aufkleberaus.
Herstellermarke
Personensicherheit.WennSiedieseAnweisungen
nichteinhalten,kanneszuVerletzungenggf.
tödlichenVerletzungenkommen.
SiendenweitereSicherheitsinformationenbei
BedarfindieserBedienungsanleitung.
decaloemmarkt
1.DieseMarkegibtan,dassdasMessereinTeildes
HerstellersderOriginalmaschineist.
112-8760
1.GefahrdurchherausgeschleuderteGegenstände:Achten
Siedarauf,dassUnbeteiligtedenSicherheitsabstandzur
Maschineeinhalten.
2.GefahreinerSchnittwundeund/oderderAmputationvon
HändenoderFüßen:BerührenSiekeinebeweglichen
Teilen.
decal112-8760
decal131-4514b
131-4514
1.Warnung:LesenSiedieBedienungsanleitung.
2.Schnitt-bzw.AmputationsgefahrfürHändeam
Mähwerkmesser:BerührenSiekeinebeweglichen
TeileundnehmenSiekeineSchutzblecheund
Schutzvorrichtungenab.
3.Schnitt-bzw.AmputationsgefahrandenHändenbeim
Schnittmesser:ZiehenSiedenZündkerzensteckerabund
lesenSiedieAnweisungen,bevorSieWartungs-oder
Reparaturarbeitenausführen.
4.GefahrdurchherausgeschleuderteGegenstände:
StellenSiesicher,dassUnbeteiligteimmereinen
SicherheitsabstandzurMaschineeinhalten;stellenSieden
Motorab,bevorSiedieBedienerpositionverlassenund
sammelnSieRückständevordemEinsatzderMaschine
auf.
5.Schnitt-bzw.AmputationsgefahrvonHändenam
Mähwerkmesser:MähenSieniehangaufwärtsoder
-abwärts,mähenSieimmerwaagrechtzumHang.Schauen
Sienachhinten,wennSierückwärtsfahren.
1.SchnitthöheEinstellungen
decal119-2283
119-2283
decal137-9196
137-9196
1.Einrasten2.Ausrasten
3
Page 24
Einrichtung
1
AufklappendesHolms
KeineTeilewerdenbenötigt
Verfahren
WARNUNG:
WennSiedenHolmfalschauf-oder
zusammenklappen,könnenSiedie
Bowdenzügebeschädigenunddensicheren
Geräteeinsatzgefährden.
•BeschädigenSiebeimAuf-oder
ZusammenklappendesHolmsnichtdie
Kabel.
•WendenSiesichbeieinembeschädigten
KabelaneinenofziellenVertragshändler.
Wichtig:NehmenSiedenKunststoffschutz
abundalleanderenKunststoffteileoder
Verpackungenab,mitdenenderMotorabgedeckt
ist.EntsorgenSiesie.
1.LösenSiedieGriffhandräder(Bild4).
g020722
Bild5
3.ZiehenSiedieGriffhandrädermitderHandfest.
4.DrehenSiedenBügelnachhintenindie
BetriebsstellungundarretierenSieihninder
gewünschtenHöhe.SieheEinstellender
Holmhöhe(Seite8).
2
Befestigendes Rücklaufstarterseilsin derSeilführung
KeineTeilewerdenbenötigt
Verfahren
Wichtig:BefestigenSiedasRücklaufstarterseil
inderSeilführung,umdenMotorsicherund
mühelosanzulassen.
Bild4
1.Griffhandräder
2.SchiebenSiedenoberenGriffvorsichtignach
vorne,bisdieGriffhälftenausgerichtetsindund
enganliegen,sieheBild5.
DrückenSiedenSchaltbügelzumoberenHolm
undziehenSiedasRücklaufstarterseildurchdie
SeilführungamHolm(Bild6).
g020721
g003251
Bild6
1.Rücklaufstarterseil2.Seilführung
4
Page 25

3
AuffüllendesMotorsmitÖl
KeineTeilewerdenbenötigt
Verfahren
Wichtig:DieMaschinehatbeiderAuslieferung
keinÖlimMotor.FüllenSiedenMotormitÖl,
bevorSieihnanlassen.
Motorölsorte
Motorölmenge
Ölviskosität
API-KlassikationSJoderhöher
1.StellenSiedieMaschineaufeinerebenen
Flächeab.
0,55l
WaschaktivesÖlderSorte
SAE30oderSAE10W-30
5.WischenSiedenPeilstabmiteinemsauberen
Lappenab.
6.SteckenSiedenPeilstabindenÖleinfüllstutzen,
schraubenSieihnjedochnichtein;nehmenSie
denPeilstabdannheraus.
7.LesenSiedenÖlstandamPeilstabab.(Bild7)
•WennderÖlstandamPeilstabzuniedrig
ist,füllenSielangsametwasÖlinden
Öleinfüllstutzen,wartenSiedreiMinutenund
wiederholenSiedanndieSchritte5bis7,bis
derÖlstandamPeilstabrichtigist.
•WennderÖlstandamPeilstabzuhochist,
lassenSieÖlab,bisderÖlstandamPeilstab
richtigist,sieheWechselndesMotoröls
(Seite16).
Wichtig:WennderÖlstandimMotor
zuhochoderzuniedrigistundSieden
Motorlaufenlassen,könnenMotorschäden
auftreten.
8.SteckenSiedenPeilstabfestinden
Öleinfüllstutzen.
2.EntfernenSiedenPeilstab,indemSieden
Deckelnachlinksdrehenundherausziehen
(Bild7).
Bild7
4
MontierendesFangkorbs
KeineTeilewerdenbenötigt
Verfahren
1.SchiebenSiedenFangkorbaufdenRahmen,
wieinBild8abgebildet.
g012127
1.Voll
2.Hoch
3.GießenSieca.¾derMotorölfüllmengelangsam
indenÖleinfüllstutzen.
4.WartenSiedreiMinuten,damitsichdasÖlim
Motorsetzenkann.
3.Add(Nachfüllen)
g027257
Bild8
1.Holm3.Fangkorb
2.Rahmen
5
Page 26

Hinweis:SchiebenSiedenGrasfangkorbnicht
überdenHolm(Bild8).
2.HakenSiedenunterenKanaldesGrasfangkorbs
anderUnterseitedesRahmensein(Bild9).
Produktübersicht
g015114
Bild10
Bild9
3.HakenSiedieoberenundseitlichenKanäledes
GrasfangkorbsanderOberseiteundderSeite
desRahmensein(Bild9).
1.ObererHolm8.Luftlter
2.Antischlupfregelungsgriff
3.Schaltbügel
4.Fangkorb11.Zuschaltbarer
5.Heckablenkblech
6.Tankdeckel
7.Wasseranschluss(nicht
g027258
dargestellt)
9.Zündkerze
10.Öleinfüllstutzen/Peilstab
Fangkorb-Hebel
12.Schnitthöheneinstellhebel
(2)
13.Rücklaufstarterbügel
TechnischeDaten
Modell
2083639kg152cm53cm109cm
GewichtLänge
Breite
Höhe
6
Page 27

Betrieb
Hinweis:BestimmenSiedielinkeundrechteSeite
derMaschineanhandderüblichenEinsatzposition.
VordemEinsatz
Vordersicheren
–RauchenSienichtbeimUmgangmitKraftstoff,
undgehenSienichtinderNähevonoffenem
FeueroderFunkenmitKraftstoffum.
–BetankenSiedieMaschineniebeilaufendem
oderheißemMotoroderentfernenSieden
Tankdeckel.
–LassenSiedenMotorniebei
Kraftstoffverschüttungenan.Vermeiden
Sie,dassSieZündquellenschaffen,bisdie
Kraftstoffdämpfeverdunstetsind.
Verwendung
AllgemeineSicherheit
•MachenSiesichmitdemsicherenEinsatz
desGeräts,derBedienelementeundden
Sicherheitsaufklebernvertraut.
•PrüfenSie,oballeSchutzvorrichtungenund
Sicherheitsvorrichtungen,wiez.B.Ablenkbleche
und/oderGrasfangkörbemontiertsindundrichtig
funktionieren.
•ÜberprüfenSieimmerdieMaschineundstellen
Siesicher,dassdieSchnittmesser,-schrauben
unddasMähwerknichtabgenutztoderbeschädigt
sind.
•PrüfenSiedenArbeitsbereichderMaschine
undentfernenSiealleObjekte,diesichaufden
EinsatzderMaschineauswirkenodervonihr
aufgeschleudertwerdenkönnten.
•WennSiedieSchnitthöheeinstellen,könnenSie
mitdemMesserinKontaktkommenundschwere
Verletzungenerleiden.
–StellenSiedenMotorab,ziehenSie
denZündschlüsselab(nurModellemit
Elektro-Sofortstart)undwartenSie,bisalle
beweglichenTeilezumStillstandgekommen
sind.
–FührenSieIhreFingerbeimEinstellender
SchnitthöhenichtunterdasMähwerk.
–BewahrenSieKraftstoffinvorschriftsmäßigen,
fürKinderunzugänglichenKanisternauf.
•KraftstoffistbeiEinnahmegesundheitsschädlich
odertödlich.WenneinePersonlangfristig
Benzindünstenausgesetztist,kanndieszu
schwerenVerletzungenundKrankheitenführen.
–VermeidenSiedaslangfristigeEinatmenvon
Benzindünsten.
–HaltenSieIhreHändeunddasGesichtvom
FüllstutzenundderÖffnungdesKraftstofftanks
fern.
–HaltenSieKraftstoffvonAugenundderHaut
fern.
Betanken
•DiebestenErgebnisseerhaltenSie,wennSie
sauberes,frisches,bleifreiesBenzinmiteiner
Mindestoktanzahlvon87(R+M)/2verwenden.
•MitSauerstoffangereicherterKraftstoffmit10%
Ethanoloder15%MTBE(Volumenanteil)istauch
geeignet.
•VerwendenSiekeineBenzin-Ethanolmischungen
(z.B.E15oderE85)mitmehrals10%Ethanol
(Volumenanteil).SonstkönnenLeistungsprobleme
und/oderMotorschädenauftreten,dieggf.nicht
vonderGarantieabgedecktsind.
•VerwendenSiekeinBenzinmitMethanol.
Kraftstoffsicherheit
•Kraftstoffistextremleichtentammbar
undhochexplosiv.FeuerundExplosionen
durchKraftstoffkönnenVerbrennungenund
Sachschädenverursachen.
–StellenSiedenKanisterbzw.dieMaschine
vordemAuftankenaufdenBodenundnicht
aufeinFahrzeugoderaufeinObjekt,umeine
elektrischeLadungdurchdasEntzündendes
Kraftstoffszuvermeiden.
–FüllenSiedenKraftstofftankimFreien
auf,wennderMotorkaltist.WischenSie
verschüttetenKraftstoffauf.
•LagernSiekeinenKraftstoffimKraftstofftankoder
inKraftstoffbehälternüberdenWinter,wennSie
keinenKraftstoffstabilisatorverwenden.
•VermischenSienieBenzinmitÖl.
FüllenSiedenKraftstofftankmitfrischem,bleifreiem
NormalbenzinvoneinerangesehenenT ankstelle(Bild
11).
Wichtig:FügenSiezurVermeidungvon
AnlassproblemendemBenzininjederSaison
Kraftstoffstabilisatorzu.MischenSieden
StabilisatormitBenzin,dasnichtälterals30Tage
ist.
7
Page 28

Bild11
PrüfendesMotorölstands
Wartungsintervall:BeijederVerwendungoder
täglich
1.StellenSiedieMaschineaufeinerebenen
Flächeab.
2.EntfernenSiedenPeilstab,indemSieden
Deckelnachlinksdrehenundherausziehen
(Bild12).
waschaktivesÖl(SAE30oderSAE10W-30)
indenÖleinfüllstutzen,wartenSiedrei
MinutenundwiederholenSiedanndie
Schritte3bis5,bisderÖlstandamPeilstab
richtigist.
•WennderÖlstandamPeilstabzuhochist
g230458
(Bild12),lassenSieÖlab,bisderÖlstand
amPeilstabrichtigist,sieheWechselndes
Motoröls(Seite16).
Wichtig:WennderÖlstandimMotor
zuhochoderzuniedrigistundSieden
Motorlaufenlassen,könnenMotorschäden
auftreten.
6.SteckenSiedenPeilstabfestinden
Öleinfüllstutzen.
EinstellenderHolmhöhe
SiekönnendenHolmaufeinefürSiepassendeHöhe
anhebenoderabsenken.
DrehenSiedieHolmarretierung,stellenSiedenHolm
ineinederdreiStellungenundarretierenihn(Bild13).
g012127
Bild12
1.Voll
2.Hoch
3.Add(Nachfüllen)
3.WischenSiedenPeilstabmiteinemsauberen
Lappenab.
4.SteckenSiedenPeilstabindenÖleinfüllstutzen,
schraubenSieihnjedochnichtein;nehmenSie
denPeilstabdannheraus.
5.LesenSiedenÖlstandamPeilstabab.(Bild12)
•WennderÖlstandamPeilstabzuniedrig
ist(Bild12),füllenSielangsametwas
g007284
Bild13
1.Holmarretierung2.Holmstellungen
8
Page 29

EinstellenderSchnitthöhe
StellenSiedieSchnitthöheein.StellenSiealle
SchnitthöheneinstellhebelaufdiegleicheSchnitthöhe
ein.ZumAnhebenoderAbsenkenderMaschine,
sieheBild14.
Bild14
1.Schnitthöheneinstellhebel
Wichtig:DieEinstellungenfürdieSchnitthöhen
sind25mm,38mm,51mm,64mm,83mm,95
mmund108mm.
WährenddesEinsatzes
HinweisezurSicherheit währenddesBetriebs
AllgemeineSicherheit
•TragenSiegeeigneteKleidung,u.a.eine
Schutzbrille,langeHosen,rutschfeste
ArbeitsschuheundeinenGehörschutz.Binden
SielangeHaarehintenzusammen,tragenkeine
losenKleidungsstückeundkeinenSchmuck.
•BedienenSiedieMaschinenicht,wennSie
müdeoderkranksindoderunterAlkohol-oder
Drogeneinussstehen.
•DasMesseristscharf;einKontaktdamitkannzu
schwerenVerletzungenführen.StellenSievor
demVerlassenderBedienerpositiondenMotor
ab,ziehenSiedieZündschlüssel(nurModelle
mitElektro-Sofortstart)abundwarten,bisalle
beweglichenTeilezumStillstandgekommensind.
•WennSiedenSchaltbügelloslassen,sollten
derMotorunddasMesserinnerhalbvondrei
Sekundenabstellen.WenndiesnichtderFall
ist,setzenSiedieMaschinenichtmehrein
undwendensichsofortaneinenofziellen
Vertragshändler.
•HaltenSieUnbeteiligte,besonderskleineKinder,
ausdemArbeitsbereichfern.StellenSie,wenn
jemanddenArbeitsbereichbetritt,sofortdie
Maschineab.
•SchauenSieimmernachuntenundnachhinten,
bevorSiedieMaschinerückwärtsbewegen.
•SetzenSiedieMaschinenuringuten
Sichtverhältnissenundgeeigneten
Wetterbedingungenein.VerwendenSie
dieMaschinenichtbeimöglichenGewittern.
•NassesGrasund/odernasseBlätterkönnenzu
schwerenVerletzungenführen,solltenSiedarauf
ausrutschenundmitdemMesserinBerührung
kommen.VermeidenSieMäharbeitenbeinassen
Umgebungsbedingungen.
•GehenSiebeimAnfahrenvonblindenEcken,
Sträuchern,BäumenundanderenGegenständen,
dieIhreSichtbehindernkönnen,vorsichtigvor.
g012130
•AchtenSieaufLöcher,Rillen,Bodenwellen,Steine
oderandereverborgeneObjekte.Unebenes
TerrainkannzumÜberschlagenderMaschine
führen,oderSiekönnendasGleichgewichtoder
denHaltverlieren.
•StellenSiedieMaschineabundprüfenSiedie
Messer,wennsieeinObjektberührthabenoder
ungewöhnlicheVibrationenauftreten.FührenSie
dieerforderlichenReparaturarbeitenaus,bevor
SiedieMaschineerneuteinsetzen.
•StellenSievordemVerlassender
BedienungspositiondenMotorab,ziehen
SiedenZündschlüssel(nurModellemit
Elektrostart)abundwarten,bisallebeweglichen
TeilezumStillstandgekommensind.
•WennderMotorgelaufenist,istderAuspuffheiß
undSiekönntensichverbrennen.BerührenSie
niedenheißenAuspuff.
•PrüfenSiedieT eiledesFangkorbsunddes
AuswurfkanalshäugaufRisseoderAbnutzung
undwechselnSiesieggf.mitdenvomHersteller
empfohlenenTeilenaus.
•VerwendenSienurvonTheT oro®Company
zugelassenesZubehörundzugelassene
Anbaugeräte.
SicherheitanHanglagen
•MähenSieimmerquerzumHang,nicht
hangaufwärtsoder-abwärts.GehenSiebeim
RichtungswechselanHanglagenäußerst
vorsichtigvor.
•VersuchenSienicht,steileHanglagenzu
mähen.EinschlechterHaltkannzuRutsch-und
Fallunfällenführen.
•GehenSiebeiMäharbeiteninderNähevonsteilen
Gefällen,GräbenoderBöschungenbesonders
vorsichtigvor.
9
Page 30

AnlassendesMotors
Verwendendes
1.DrückenSiedenSchaltbügelgegenden
Führungsholmundhaltensieihngegenden
Führungsholmgedrückt(Bild15).
Bild15
1.Schaltbügel
2.ZiehenSieleichtamRücklaufstartergriff
(Bild16),bisSieeinenWiderstandspüren.
ZiehenSieihndannkräftigdurchundlassen
ihnlangsamindieSeilführungamHolm
zurückgehen.
Selbstantriebs
UmdenSelbstantriebzubenutzen,gehenSieeinfach
vorwärtsundhaltenSiedabeiIhreHändeamoberen
HolmundIhreEllbogenanIhrenSeiten;dieMaschine
hältautomatischmitIhnenSchritt(Bild17).
g003221
Bild17
Hinweis:WenndieMaschinenichtungehindertnach
demSelbstantriebrückwärtsrollt,gehenSienicht
weiter,lassenSiedieHändeamBügelundlassenSie
g012132
dieMaschineeinpaarZentimetervorwärtsrollen,um
denRadantriebeinzukuppeln.Siekönnenauchunter
demoberenHolmdenMetallbügelanfassenunddie
MaschineeinpaarZentimeternachvorneschieben.
WenndieMaschineimmernochnichtungehindert
rückwärtsrollt,wendenSiesichandenofziellen
Vertragshändler.
AbstellendesMotors
Wartungsintervall:BeijederVerwendungoder
täglich
Bild16
Hinweis:WennderRasenmähernach
mehrerenVersuchennichtanspringt,wenden
SiesichandenofziellenVertragshändler.
LassenSiezumAbstellendesMotorsdenSchaltbügel
los.
Wichtig:WennSiedenSchaltbügelloslassen,
solltenderMotorunddasMesserinnerhalb
vondreiSekundenabstellen.Wenndiesnicht
derFallist,setzenSiedieMaschinenichtmehr
einundwendensichsofortaneinenofziellen
Vertragshändler.
Schnittgutrecyclen
g012133
DerRasenmäheristwerksseitigaufdasRecycelnvon
SchnittgutundLaubeingestellt.
Hinweis:DerFangkorbmussnichtvonder
Maschineabgenommenwerden,wennSiedas
Schnittgutrecyclen.
SchiebenSiedenHebelfürdenzuschaltbaren
GrasfangkorbindieRECYCLING-Stellung,umdas
Schnittgutzurecyceln(Bild18).
10
Page 31

Bild18
2.SetzenSiedenFangkorbein,sieheMontieren
desFangkorbs(Seite11),undstellenden
HebelfürdenzuschaltbarenFangkorbindie
BAGGING-Stellung,wieinBild18abgebildet.
MontierendesFangkorbs
1.StellenSiedenMotorabundwartenSie,bis
allebeweglichenT eilezumStillstandgekommen
sind.
2.HaltenSiedasHeckablenkblechhoch,setzen
SiedenFangkorbindieKerbeneinundsenken
dasHeckablenkblechab(Bild19).
g012135
1.RECYCLING-Stellung2.FANGKORB-Stellung
SammelndesSchnittguts
VerwendenSiedenFangkorb,umSchnittgutund
LaubimFangkorbzusammeln.
WARNUNG:
EinverschlissenerFangkorbkanndas
AusschleudernkleinerSteineundähnlicher
GegenständeinRichtungdesBenutzersund
Unbeteiligterzulassen.Daskannzuschweren
odertödlichenVerletzungenführen.
PrüfenSiedenFangkorbregelmäßig.
TauschenSieihn,wennerbeschädigtist,
gegeneinenneuenErsatzkorbvonToroaus.
WARNUNG:
DasMesseristscharf;einKontaktkannzu
schwerenVerletzungenführen.
StellenSiedenMotorabundwarten
Sie,bisallebeweglichenTeilezum
Stillstandgekommensind,bevorSiedie
Bedienungspositionverlassen.
g012136
Bild19
EntfernendesFangkorbs
1.StellenSiedenMotorabundwartenSie,bis
allebeweglichenT eilezumStillstandgekommen
sind.
2.HebenSiedenFangkorbanundvomGriffweg.
Hinweis:KippenSiedenFangkorbetwasnach
hinten,damitdasSchnittgutnichtherausfällt.
Heckauswurfdes Schnittguts
VerwendenSiedenHeckauswurf,wennSiesehr
hohesGrasschneiden.
1.StellenSiedenMotorabundwartenSie,bis
allebeweglichenT eilezumStillstandgekommen
sind.
Hinweis:NehmenSieggf.denFangkorbvon
derMaschineab,bevorSiedasSchnittguthinten
auswerfen,sieheEntfernendesFangkorbs(Seite11).
11
Page 32

DerHebelfürdenzuschaltbarenFangkorbsolltein
derBAGGING-Stellungsein,wieinBild18abgebildet.
BrandgefahrwarnungeneinundentfernenSie
trockenesGrasundLaubvonderMaschine.
WARNUNG:
DasMesseristscharf;einKontaktkannzu
schwerenVerletzungenführen.
StellenSiedenMotorabundwarten
Sie,bisallebeweglichenTeilezum
Stillstandgekommensind,bevorSiedie
Bedienungspositionverlassen.
Betriebshinweise
AllgemeineMähtipps
•PrüfenSiedenArbeitsbereichgründlichund
entfernenSiealleObjekte,dievonderMaschine
aufgeschleudertwerdenkönnten.
•VermeidenSie,dassdasMesseraufFremdkörper
aufprallt.MähenSienieabsichtlichüber
irgendwelchenGegenständen.
•StellenSiedenMotorsofortab,wennderMäher
aufeinenGegenstandaufpralltoderanfängt
zuvibrieren,ziehendenZündschlüssel(falls
vorhanden)ab,ziehendenZündkerzensteckerab
unduntersuchenSiedenMäheraufeventuelle
Beschädigungen.
•MontierenSiefürdieoptimaleLeistungvordem
SaisonbeginneinneuesMesser.
•TauschenSiedieMesserbeiBedarfdurchein
OriginalersatzmesservonToroaus.
•WechselnSiehäugdieMährichtung.Dadurch
verteiltsichdasSchnittgutbesseraufder
RasenächeundbewirkteineffektiveresDüngen.
•ProbierenSiebeieinemunbefriedigenden
SchnittbilddesRasenseinederfolgenden
Abhilfenaus:
–WechselnSiedasMesserausoderlassenSie
esschärfen.
–GehenSiebeimMähenlangsamer.
–HebenSiedieSchnitthöhederMaschinean.
–MähenSiehäuger.
–LassenSiedieBahnenüberlappen,anstelle
beijedemGangeineneueBahnzumähen.
SchnetzelnvonLaub
•StellenSienachdemMähensicher,dassdie
HälftedesRasensdurchdieSchnittgutdecke
sichtbarist.DabeimüssenSieunterUmständen
mehrmalsüberdasLaubmähen.
•WenneineLaubdeckevonmehrals13cmauf
demRasenliegt,mähenSiemiteinerhöheren
Schnitthöheunddannmitdergewünschten
Schnitthöhe.
•MähenSielangsamer,wenndieMaschinedas
Laubnichtfeingenughäckselt.
Mähen
•MähenSieimmernureinDritteldesGrashalms
ineinemDurchgang.MähenSienichtunter
einerEinstellungvon51mm,wenndasGras
sehrfeinwächst,oderimSpätherbst,wenndas
Graswachstumnachlässt.
•StellenSiebeimerstenDurchgangdieSchnitthöhe
aufdiehöchsteEinstellungundgehenlangsamer,
wennSieGrasmähen,daslängerals15cmist.
MähenSiedannnocheinmalmiteinerniedrigeren
Einstellung,umdemRasendasgewünschte
Schnittbildzugeben.WenndasGraszulangist,
kanndieMaschineverstopfenundderMotorkann
abstellen.
•NassesGrasundLaubneigenzumVerklumpenim
GartenundkönneneinVerstopfenderMaschine
undeinAbstellendesMotorsverursachen.
VermeidenSieMäharbeitenbeinassen
Umgebungsbedingungen.
•InsehrtrockenenBedingungenbesteht
eineBrandgefahr.HaltenSieallelokalen
12
Page 33

NachdemEinsatz
HinweisezurSicherheit nachdemBetrieb
AllgemeineSicherheit
•EntfernenSieGrasundSchmutzvonder
Maschine,umeinemBrandvorzubeugen.
WischenSieÖl-undKraftstoffverschüttungenauf.
•LassenSiedenMotorabkühlen,bevorSie
dieMaschineineinemgeschlossenenRaum
abstellen.
•LagernSiedieMaschineoderdenBenzinkanister
nieanOrtenmitoffenerFlamme,Funkenoder
Zündamme,z.B.Warmwasserbereiter,oderauf
anderenGeräten.
SicherheitbeimBefördern
•ZiehenSiedenZündschlüssel(fallsvorhanden)
ab,bevorSiedieMaschinefürdenTransport
verladen.
•GehenSiebeimLadenundAbladenderMaschine
aufeinen/voneinemTransportmittelvorsichtigvor.
•SichernSiedieMaschinefürdenTransport.
g014538
Bild20
1.Wasseranschluss
4.DrehenSiedenWasserhahnauf.
5.StartenSiedenMotorundlassenSieihnso
langelaufen,biskeinweiteresSchnittgutander
UnterseitederMaschineaustritt.
6.StellenSiedenMotorab.
7.DrehenSiedenWasserhahnzuundschließen
SiedenGartenschlauchvonderMaschineab.
8.StartenSiedenMotorundlassenSieihnfür
einpaarMinutenlaufen,umdieUnterseiteder
Maschineauszutrocknen.
9.StellenSiedenMotorabundwarten,bisersich
abgekühlthat.
ReinigenunterdemGerät
Wartungsintervall:BeijederVerwendungoder
täglich
UmdiebestenErgebnissezuerzielen,reinigenSie
dieMaschinesobaldSiemitdemMähenfertigsind.
1.SenkenSiedieMaschineaufdieniedrigste
Schnitthöheab.SieheEinstellender
Schnitthöhe(Seite9).
2.StellenSiedieMaschineaufeinerebenen
Flächeab.
3.BefestigenSieeinenGartenschlauch,deran
einenWasserhahnangeschlossenist,am
Wasseranschluss(Bild20).
Zusammenklappendes Holms
WARNUNG:
WennSiedenHolmfalschauf-oder
zusammenklappen,könnenSiedieKabel
beschädigenunddensicherenGeräteeinsatz
gefährden.
•BeschädigenSiebeimAuf-oder
ZusammenklappendesHolmsnichtdie
Kabel.
•WendenSiesichbeieinembeschädigten
KabelaneinenofziellenVertragshändler.
1.LösenSiedieGriffhandräder.
2.DrehenSiedenGriffnachvorne(Bild21).
Wichtig:VerlegenSiedieKabelaußenan
denHolmhandrädern,wennSiedenoberen
Holmzusammenklappen.
13
Page 34

Bild21
3.DrehenSiedasobereT eildesGriffszurückin
RichtungMotor,sieheBild22.
Bild22
1.Holmhandräder
g020722
g020721
14
Page 35

Wartung
Wichtig:WeitereInformationenzuWartungsarbeitenndenSieinderMotorbedienungsanleitung.
EmpfohlenerWartungsplan
Wartungsintervall
NachfünfBetriebsstunden
BeijederVerwendung
odertäglich
Alle100Betriebsstunden
Jährlich
Jährlichodervorder
Einlagerung
Wartungsmaßnahmen
•WechselnSiedasMotoröl.
•PrüfendesMotorölstands.
•StellenSiesicher,dassderMotorinnerhalbvondreiSekundennachdemLoslassen
desSchaltbügelsabstellt.
•EntfernenSieSchnittgutundSchmutzvonderUnterseitedesMähwerks.
•WartenSiedieZündkerze.
•WartenSiedenLuftlter.
•WechselnSiedasMotoröl.
•WechselnSiedasMesserausoderlassenSieesschärfen(öfter,wenndieKanten
schnellstumpfwerden).
•ReinigenSiedenMotor,umSchmutzundRückständevonderOberseiteundden
Seitenzuentfernen;reinigenSieihnöfterinstaubigenBedingungen.
•EntleerenSiedenKraftstofftanklautAnweisungvorirgendwelchenReparaturen
undderEinlagerung.
Wartungssicherheit
•ZiehenSiedenZündkerzensteckerab,bevorSie
Wartungsarbeitenausführen.
•TragenSiebeimDurchführenvon
WartungsarbeitenHandschuheundeine
Schutzbrille.
VorbereitenfürdieWartung
1.StellenSiedenMotorabundwartenSie,bis
allebeweglichenT eilezumStillstandgekommen
sind.
2.ZiehenSiedenKerzensteckervonder
Zündkerzeab(Bild23).
•DasMesseristscharf;einKontaktdamitkann
zuschwerenVerletzungenführen.TragenSie
Handschuhe,wennSiedasMesserwarten.
FührenSiekeineReparaturenoderModikationen
andenMessernaus.
•ModizierenSieaufkeinenFalldie
Sicherheitsvorkehrungen.PrüfenSieihre
einwandfreieFunktioninregelmäßigen
Abständen.
•EinKippenderMaschinekannzueinem
VerschüttenvonKraftstoffführen.Kraftstoffist
entammbar,explosivundkannVerletzungen
verursachen.LassenSiedenMotorlaufen,bis
keinKraftstoffmehrimTankist,oderpumpen
SiedenKraftstoffab.SiesolltenaufkeinenFall
versuchen,Kraftstoffabzusaugen.
•VerwendenSienurT oro-Originalteileund
-Zubehör,damiteineoptimaleLeistung
erzieltwirdunddieMaschineweiterhinden
Sicherheitsbestimmungenentspricht.Die
VerwendungvonErsatzteilenundZubehörvon
anderenHerstellernkannGefahrenbergenund
zumErlöschenderGarantieführen.
g236094
Bild23
1.Zündkerzenstecker
3.SteckenSienachdemAbschlussder
WartungsarbeitendasZündkabelwiederaufdie
Zündkerze.
Wichtig:LassenSiedenMotorlaufen,bis
eraufgrundvonKraftstoffmangelabstellt,
bevorSiedenRasenmäherumkippen,um
dasÖloderMesserzuwechseln.WennSie
15
Page 36

dieMaschinekippenmüssen,währendsich
KraftstoffimTankbendet,pumpenSieden
KraftstoffmiteinerHandpumpeab.Kippen
SiedieMaschineimmersoaufdieSeite,
dassderPeilstabnachuntenzeigt.
Hinweis:BürstenSieSchmutznievomFilter
ab.EinBürstendrücktdenSchmutznochtiefer
indieFasern.
6.EntfernenSiedenSchmutzvomLiftltergehäuse
undvonderAbdeckungmiteinemfeuchten
Lappen.
WartendesLuftlters
Wartungsintervall:Jährlich
1.DrückenSiedieVerriegelungsnasenobenan
derLuftlterabdeckungnachunten(Bild24).
Wichtig:WischenSiekeinenSchmutzin
denLuftschacht.
7.SetzenSiedenSchaumstoffvorlterundden
PapierlterindenLuftlterein.
8.SetzenSiedieAbdeckungauf.
WechselndesMotoröls
Wartungsintervall:NachfünfBetriebsstunden
Jährlich
Hinweis:LassenSiedenMotoreinpaar
Minutenlaufen,bevorSiedasÖlwechseln,umes
aufzuwärmen.WarmesÖließtbesserundführt
mehrFremdstoffemitsich.
Motorölsorte
Motorölmenge
Ölviskosität
API-KlassikationSJoderhöher
0,55l
WaschaktivesÖlderSorte
SAE30oderSAE10W-30
Bild24
1.Verriegelungslaschen
2.Papierluftlter
3.Schaumvorlter
2.ÖffnenSiedieAbdeckung.
3.EntfernenSiedenPapierlterundden
Schaumvorlter(Bild24).
4.PrüfenSiedenSchaumvorlterundwechseln
ihnaus,wennerbeschädigtodersehr
verschmutztist.
5.PrüfenSiedenPapierlter.
•WennderLuftlterbeschädigtodermitÖl
oderKraftstoffbefeuchtetist,wechselnSie
ihnaus.
•WennderLuftlterschmutzigist,klopfenSie
ihnmehrmalsaufeinerfestenOberäche
ausoderblasenSieDruckluftunter2,07bar
durchdieSeitedesFilters,diezumMotor
zeigt.
1.StellenSiedieMaschineaufeinerebenen
Flächeab.
2.SieheVorbereitenfürdieWartung(Seite15).
g011722
3.EntfernenSiedenPeilstab,indemSieden
Deckelnachlinksdrehenundherausziehen
(Bild25).
g235096
Bild25
4.KippenSiedieMaschineseitlich(Luftlternach
oben),umdasAltölausdemÖleinfüllstutzen
abzulassen(Bild25).
16
Page 37

Bild26
5.StellenSiedieMaschinenachdemAblassen
desAltölswiederindieBetriebsstellung.
WartenderZündkerze
Wartungsintervall:Alle100Betriebsstunden
VerwendenSieeineChampionRN9YCoder
gleichwertigeZündkerze.
1.StellenSiedenMotorabundwartenSie,bis
allebeweglichenT eilezumStillstandgekommen
sind.
2.KlemmenSiedasZündkabelvonderZündkerze
ab(Bild22).
3.ReinigenSiedenBereichumdieZündkerze
herum.
4.EntfernenSiedieZündkerzeausdem
Zylinderkopf.
Wichtig:TauschenSieeinegerissene,
verrußteoderverschmutzteZündkerze
g012139
aus.ReinigenSieniedieElektroden,da
AbschabungenindenZylindereindringen
unddenMotorbeschädigenkönnten.
5.StellenSiedenElektrodenabstandauf0,76mm
ein,sieheBild27.
6.GießenSieca.¾derMotorölfüllmengelangsam
indenÖleinfüllstutzen.
7.WartenSiedreiMinuten,damitsichdasÖlim
Motorsetzenkann.
8.WischenSiedenPeilstabmiteinemsauberen
Lappenab.
9.SteckenSiedenPeilstabindenÖleinfüllstutzen,
schraubenSieihnjedochnichtein;nehmen
SiedenPeilstabdannheraus.
10.LesenSiedenÖlstandamPeilstabab.(Prüfen
desMotorölstands(Seite8))
•WennderÖlstandamPeilstabzuniedrig
ist,füllenSielangsametwasÖlinden
Öleinfüllstutzen,wartenSiedreiMinutenund
wiederholenSiedanndieSchritte8bis10,
bisderÖlstandamPeilstabrichtigist.
•WennderÖlstandamPeilstabzuhochist,
lassenSieÖlab,bisderÖlstandamPeilstab
richtigist.
Wichtig:WennderÖlstandimMotor
zuhochoderzuniedrigistundSieden
Motorlaufenlassen,könnenMotorschäden
auftreten.
Bild27
1.Kerzensteindermittleren
Elektrode
2.SeitlicheElektrode
3.Elektrodenabstand(nicht
maßstabsgetreu)
6.SteckenSiedenZündkerzensteckerwiederauf
dieKerze.
7.ZiehenSiedieKerzemit20N·man.
8.SchließenSiedenZündkerzensteckerwieder
andieZündkerzean.
g000533
11.SteckenSiedenPeilstabfestinden
Einfüllstutzen.
12.EntsorgenSiedasAltölordnungsgemäß.
17
Page 38

AuswechselndesMessers
Wartungsintervall:Jährlich
Wichtig:SiebenötigenfürdenrichtigenEinbau
desMesserseinenDrehmomentschlüssel.Wenn
SiekeinenDrehmomentschlüsselhabenoder
dieseArbeitnichtausführenmöchten,wenden
SiesichaneinenofziellenVertragshändler.
PrüfenSiedasMesser,wennderKraftstofftankleer
ist.WechselnSiedasMessersofortaus,wenn
esbeschädigtodergerissenist.SchärfenSiedie
Messerkante,wennsiestumpfistoderEinkerbungen
aufweist.WechselnSieggf.dasMesseraus.
WARNUNG:
DasMesseristscharf;einKontaktkannzu
schwerenVerletzungenführen.
TragenSieHandschuhe,wennSiedasMesser
warten.
1.SieheVorbereitenfürdieWartung(Seite15).
g231390
Bild29
2.KippenSiedieMaschineaufdieSeite,sodass
derLuftlternachobenzeigt.
3.StabilisierenSiedasMessermiteinem
Holzblock(Bild28).
Bild28
4.NehmenSiedasMesserabundbewahrenSie
alleBefestigungsschraubenauf(Bild28).
Wichtig:DasgebogeneEndedesMessers
solltezumMähwerkgehäusezeigen.
6.ZiehenSiedieMesserschraubemiteinem
Drehmomentschlüsselmit82N∙man.
Wichtig:Einemit82N∙mangezogene
Schraubesitztsehrfest.ArretierenSie
dasMessermiteinemHolzstückund
verlagernSiegleichzeitigdasGewichtauf
denSchlüsselundziehenSiedieSchraube
fest.DieseSchraubekannfastnichtzufest
angezogenwerden.
g231389
5.SetzenSiedasneueMesserundalleSchrauben
auf(Bild29).
18
Page 39

Einlagerung
5.PrüfenSiedenMotorölstand;siehePrüfendes
Motorölstands(Seite8).
LagernSiedieMaschineaneinemkühlen,sauberen
undtrockenenOrtein.
VorbereitenderMaschine fürdasEinlagern
1.GebenSiedemBenzinbeimletztenAuftanken
imJahreinenKraftstoffstabilisator(z.B.T oro
PremiumFuelTreatment)bei,wieaufdem
Etikettangegeben.
2.EntsorgenSienichtverwendetenKraftstoff
ordnungsgemäß.RecycelnSiedenKraftstoff
vorschriftsmäßigoderverwendenSieihnfürIhr
Auto.
Hinweis:AlterKraftstoffimKraftstofftankist
diehäugsteUrsachefürschweresAnspringen.
LagernSieKraftstoffohneStabilisatornicht
längerals30Tage.LagernSieKraftstoffmit
Stabilisatornichtlängerals90T age.
3.LassenSiedieMaschinesolangelaufen,bis
derMotorinfolgevonBenzinknappheitabstellt.
4.StartenSiedenMotorundlassenSieihnlaufen,
biserabstellt.WennsichderMotornichtmehr
startenlässt,isterausreichendtrocken.
5.ZiehenSiedenKerzensteckervonder
Zündkerzeundbefestigenihnander
Haltestrebe(fallsvorhanden).
6.NehmenSiedieZündkerzeheraus,füllenSie
30mlMotorölindasZündkerzenlochundziehen
SiemehrmalslangsamamStarterkabel,umdas
ÖlimZylinderzuverteilenundeineKorrosion
desZylinderswährendderEinlagerungzu
vermeiden.
7.SteckenSiedieZündkerzelockerauf.
8.ZiehenSiealleSchraubenundMutternan.
6.FüllenSiefrischenKraftstofftankinden
Kraftstofftank,sieheBetanken(Seite7).
7.SchließenSiedenZündkerzensteckerwieder
andieZündkerzean.
Herausnehmendes Rasenmähersausder Einlagerung
1.ZiehenSiealleBefestigungenan.
2.EntfernenSiedieZündkerzeunddrehen
SiedenMotorschnelldurchZiehendes
Rücklaufstarters,umüberüssigesÖlausdem
Zylinderzuentfernen.
3.SetzenSiedieZündkerzeeinundziehenSiesie
miteinemDrehmomentschlüsselmit20N·man.
4.FührenSiedieempfohlenenWartungsarbeiten
durch,sieheWartung(Seite15).
19
Page 40

EuropäischerDatenschutzhinweis
DievonT orogespeichertenInformationen
ToroWarrantyCompany(Toro)respektiertIhrePrivatsphäre.ZumBearbeitenIhresGarantieanspruchsundzurKontaktaufnahmebeieinem
ProduktrückrufbittetT oroSie,T orodirektoderüberdenlokalenVertragshändlerbestimmtepersönlicheInformationenmitzuteilen.
DasGarantiesystemvonT orowirdaufServerninUSAgehostet;dortgeltenggf.andereVorschriftenzumDatenschutzggf.alsinIhremLand.
WennSieToropersönlicheInformationenmitteilen,stimmenSiederVerarbeitungderpersönlichenInformationenzu,wieindiesemDatenschutzhinweis
beschrieben.
VerwendungderInformationendurchToro
TorokannIhrepersönlichenInformationenzumBearbeitenvonGarantieansprüchen,zurKontaktaufnahmebeieinemProduktrückrufoderanderen
Zwecken,dieToroIhnenmitteilt,verwenden.T orokanndieInformationenimRahmendieserAktivitätenanT ochtergesellschaftenvonT oro,
HändleroderGeschäftspartnerweitergeben.T oroverkauftIhrepersönlichenInformationenankeineanderenUnternehmen.T orohatdasRecht,
persönlicheInformationenmitzuteilen,umgeltendeV orschriftenundAnfragenvonentsprechendenBehördenzuerfüllen,umdieSystemerichtigzu
pegenoderTorooderandereBenutzerzuschützen.
SpeicherungpersönlicherInformationen
TorospeichertpersönlicheInformationensolange,wieesfürdenZweckerforderlichist,fürdendieInformationengesammeltwurden,oderfürandere
legitimeZwecke(z.B.EinhaltungvonVorschriften)oderGesetzesvorschriften.
TorosEngagementzurSicherungIhrerpersönlichenInformationen
TorotrifftangemesseneSicherheitsmaßnahmen,umIhrepersönlichenInformationenzuschützen.T orounternimmtauchSchritte,umdieGenauigkeit
unddenaktuellenStatusderpersönlichenInformationenzuerhalten.
ZugriffaufpersönlicheInformationenundBerichtigung
WennSieIhrepersönlichenInformationenprüfenoderberichtigenmöchten,sendenSiebitteeineE-Mailanlegal@toro.com.
AustralischesVerbrauchergesetz
KundeninAustralienndenweitereDetailszumaustralischenVerbrauchergesetzentwederinderVerpackungoderkönnensichandenörtlichen
Toro-Fachhändlerwenden.
374-0282RevC
Page 41

TondeuseSuperBaggerde48cm
N°demodèle20836—N°desérie401500000etsuivants
FormNo.3419-106RevA
Manueldel'utilisateur
Introduction
Cettetondeuseautotractéeàlamerotativeest
destinéeaugrandpublic,auxprofessionnelsetaux
utilisateurstemporaires.Elleestprincipalement
conçuepourtondrelespelousesrégulièrement
entretenuesdesterrainsprivésetcommerciaux.Elle
n'estpasconçuepourcouperlesbroussaillesnipour
unusageagricole.
Lisezattentivementcettenoticepourapprendre
commentutiliseretentretenircorrectementvotre
produit,etéviterdel'endommageroudevousblesser.
Vousêtesresponsabledel'utilisationsûreetcorrecte
duproduit.
VouspouvezcontacterT orodirectementà
www.T oro.compourtoutrenseignementconcernant
unproduitouunaccessoire,pourobtenirl'adresse
desconcessionnairesoupourenregistrervotre
produit.
Pourobtenirdesprestationsdeservice,des
piècesTorod'origineoudesrenseignements
complémentaires,munissez-vousdesnuméros
demodèleetdesérieduproduitetcontactezun
concessionnaire-réparateuragrééouleserviceclient
Toro.LaFigure1indiquel'emplacementdesnuméros
demodèleetdesérieduproduit.Inscrivezles
numérosdansl'espaceréservéàceteffet.
Important:Avecvotreappareilmobile,vous
pouvezscannerlecodeQRsurl'autocollantdu
numérodesériepouraccéderauxrenseignements
surlagarantie,lespiècesetautresinformations
produit.
Lesmisesengardedecemanuelsoulignentdes
dangerspotentielsetsontsignaléesparlesymbole
desécurité(Figure2),quiindiqueundangerpouvant
entraînerdesblessuresgravesoumortellessiles
précautionsrecommandéesnesontpasrespectées.
g000502
Figure2
Symboledesécurité
Cemanuelutilisedeuxtermespourfairepasser
desrenseignementsessentiels.Important,pour
attirerl'attentionsurdesrenseignementsmécaniques
spéciquesetRemarque,pourinsistersurdes
renseignementsd'ordregénéralméritantuneattention
particulière.
Ceproduitestconformeàtouteslesdirectives
européennespertinentes.Pourplusde
renseignements,consultezlaDéclarationde
conformitéspéciqueauproduitfournieséparément.
Couplebrutounet:lecouplebrutounetdece
moteuraétécalculéenlaboratoireparleconstructeur
dumoteurselonlanormeSAEJ1940ouJ2723de
laSocietyofAutomotiveEngineers(SAE).Étant
congurépoursatisfaireauxnormesdesécurité,
antipollutionetd'exploitation,lemoteurmontésur
cetteclassedetondeuseaurauncoupleeffectif
nettementinférieur.Reportez-vousauxinformations
duconstructeurdumoteurquiaccompagnentla
machine.
Figure1
1.Emplacementdesnumérosdemodèleetdesérie
N°demodèle
N°desérie
©2017—TheToro®Company
8111LyndaleAvenueSouth
Bloomington,MN55420
CV
Enregistrezvotreproduitàwww.T oro.com.
Important:Sivousutilisezlamachineau-dessus
de1500mpendantunepériodecontinue,veillez
àinstallerlekitpourhautealtitudeanque
lemoteurrépondeauxnormesantipollution
g226629
CARB/EPA.Lekitpourhautealtitudeaccroît
lesperformancesdumoteurtoutenprévenant
l'encrassementdesbougies,lesdifcultésde
démarrageetl'augmentationdesémissions
polluantes.Aprèsavoirinstallélekit,apposez
l'étiquettedehautealtitudeprèsdel'autocollant
dunumérodesériesurlamachine.Contactez
unconcessionnaire-réparateurToroagréépour
vousprocurerlekithautealtitudeetl'étiquette
associéepourvotremachine.Pourtrouverle
concessionnaireleplusproche,consulteznotre
Traductiondutexted'origine(FR)
ImpriméauMexique
Tousdroitsréservés
*3419-106*A
Page 42

sitewebàwww.Toro.comoucontactezleservice
clientdeToroau(x)numéro(s)indiqué(s)dans
votreDéclarationdegarantiedeconformitéàla
réglementationantipollution.
Déposezlekitdumoteuretrétablissezla
congurationd'originedumoteursivousdevez
utiliserlamachineendessousde1500m.Sile
moteuraétéconvertipourl'usageàhautealtitude,
nelefaitespastourneràplusbassealtitude,au
risquedelefairesurchaufferetdel'endommager.
Encasdedouteconcernantlaconversionde
votremachinepourl'usageàhautealtitude,
consultezl'étiquettesuivante:
decal127-9363
Pliageduguidon...............................................13
Entretien.................................................................15
Programmed'entretienrecommandé..................15
Consignesdesécuritépendant
l'entretien......................................................15
Préparationàl'entretien....................................15
Entretiendultreàair.......................................16
Vidangedel'huilemoteur..................................16
Entretiendelabougie.......................................17
Remplacementdelalame................................18
Remisage...............................................................19
Préparationdelamachineauremisage............19
Remiseenserviceaprèsremisage...................19
Sécurité
Cettemachineestconçueenconformitéavecla
normeENISO5395:2013.
Consignesdesécurité générales
Tabledesmatières
Introduction...............................................................1
Sécurité....................................................................2
Consignesdesécuritégénérales........................2
Autocollantsdesécuritéetd'instruction..............3
Miseenservice.........................................................4
1Dépliageduguidon..........................................4
2Montageducâbledulanceurdansle
guide...............................................................4
3Pleind'huilemoteur.........................................5
4Montagedubacàherbe..................................5
Vued'ensembleduproduit........................................6
Caractéristiquestechniques..............................6
Utilisation..................................................................7
Avantl'utilisation....................................................7
Contrôlesdesécuritéavantl'utilisation...............7
Remplissageduréservoirdecarburant...............7
Contrôleduniveaud'huilemoteur.......................8
Réglagedelahauteurduguidon........................8
Réglagedelahauteurdecoupe.........................9
Pendantl'utilisation...............................................9
Sécuritépendantl'utilisation...............................9
Démarragedumoteur.......................................10
Utilisationdelacommanded'autopropul-
sion...............................................................10
Arrêtdumoteur.................................................10
Recyclagedel'herbecoupée.............................11
Ramassagedel'herbecoupée..........................11
Éjectionarrièredel'herbecoupée.....................12
Conseilsd'utilisation........................................12
Aprèsl'utilisation.................................................13
Sécuritéaprèsl'utilisation.................................13
Nettoyagedudessousdelamachine................13
Ceproduitpeutsectionnerlesmainsoulespieds
etprojeterdesobjets.Respecteztoujourstoutes
lesconsignesdesécuritépouréviterdesblessures
graves.
L'utilisationdeceproduitàd'autresnsquecellequi
estprévuepeutêtredangereusepourvous-mêmeet
pourlespersonnesàproximité.
•Avantdedémarrerlemoteur,vousdevezlire,
comprendreetrespectertouteslesinstructions
etmisesengardedonnéesdansceManuel
del'utilisateurainsiquesurlamachineetles
accessoires.
•Neplacezpaslesmainsoulespiedsprèsdes
piècesmobilesousouslamachine.Nevoustenez
pasdevantl'ouvertured'éjection.
•N'utilisezpaslamachines'ilmanquedescapots
oud'autresdispositifsdeprotection,ous'ilssont
endommagés.
•Tenezadultesetenfantsàunedistancesufsante
delamachine.N'autorisezjamaisunenfant
àutiliserlamachine.Seuleslespersonnes
responsables,forméesàl'utilisationdela
machine,ayantluetcomprislesinstructionset
physiquementaptessontautoriséesàutiliserla
machine.
•Arrêtezlamachineetcoupezlemoteuravantde
fairel'entretien,defairelepleindecarburantou
dedéboucherlamachine.
L'usageoul'entretienincorrectdecettemachinepeut
occasionnerdesaccidents.Pourréduirelesrisques
2
Page 43

d'accidentsetdeblessures,respectezlesconsignes
desécuritéquisuivent.Teneztoujourscomptedes
misesengardesignaléesparlesymboledesécurité
etlamentionPrudence,AttentionouDanger.Ne
pasrespectercesinstructions,c'estrisquerdevous
blesser,parfoismortellement.
Autocollantsdesécuritéetd'instruction
Desautocollantsdesécuritéetdesinstructionsbienvisiblesparl'opérateursontplacésprès
detouslesendroitspotentiellementdangereux.Remplaceztoutautocollantendommagé
oumanquant.
Marquedufabricant
Voustrouverezd'autresconsignesdesécurité,lecas
échéant,envousreportantauxsectionsrespectives
danscemanuel.
decaloemmarkt
1.Cettemarqueidentielalamecommepièced'origine.
112-8760
1.Risquedeprojectiond'objets–tenezlesspectateursà
bonnedistancedelamachine.
2.Risquedecoupure/mutilationdesmainsoudespieds–ne
vousapprochezpasdespiècesmobiles.
decal112-8760
decal131-4514b
131-4514
1.Attention–lisezleManueldel'utilisateur.
2.Risquedecoupure/mutilationdesmainsparlalamedela
tondeuse–nevousapprochezpasdespiècesmobileset
gardeztouteslesprotections.
3.Risquedecoupure/mutilationdesmainsparlalamedela
tondeuse–débranchezlabougieetlisezlesinstructions
avantd'entreprendreunentretienouunerévision.
4.Risquedeprojectiond'objets–n'autorisezpersonneà
s'approcherdelamachine;coupezlemoteuravant
dequitterlapositiond'utilisation;ramassezlesdébris
éventuellementprésentsavantdetondre.
5.Risquedecoupure/mutilationdesmainsparlalamedela
tondeuse–netravaillezpasdanslesensdelapente,mais
transversalement;regardezderrièrevousavantdefaire
marchearrière.
1.Réglagesdehauteurdecoupe
decal119-2283
119-2283
decal137-9196
137-9196
1.Verrouillage2.Déverrouillage
3
Page 44

Miseenservice
1
Dépliageduguidon
g020722
Figure5
Aucunepiècerequise
Procédure
ATTENTION
Vousrisquezd'endommagerlescâblesetde
rendrelamachinedangereuseàutilisersi
vouspliezoudépliezmalleguidon.
•Veillezànepasendommagerlescâblesen
pliantoudépliantleguidon.
•Siuncâbleestendommagé,adressez-vous
àunconcessionnaire-réparateuragréé.
Important:Retirezetmettezaurebutlapellicule
deplastiquequiprotègelemoteurainsiquetout
autreemballageouélémentenplastiqueutilisé
surlamachine.
1.Desserrezlesboutonsduguidon(Figure4).
3.Serrezsolidementlesboutonsduguidonàla
main.
4.Faitespivoterleguidonenarrièreenposition
d'utilisationetverrouillez-leàlahauteurquivous
convient.VoirRéglagedelahauteurduguidon
(page8).
2
Montageducâbledu lanceurdansleguide
Aucunepiècerequise
Procédure
Important:Pourdémarrerlemoteurfacilementet
entoutesécuritéchaquefoisquevousutilisezla
machine,placezlecâbledulanceurdansleguide.
Figure4
1.Boutonsdeguidon
2.Dépliezlamoitiésupérieureduguidonvers
l'avantjusqu'àcequelesdeuxmoitiéssoient
dansleprolongementl'unedel'autreet
s'emmanchentensemblecorrectement,comme
montréàlaFigure5.
Maintenezlabarredecommandedelalamecontrela
partiesupérieureduguidonettirezlecâbleàtravers
leguidesurleguidon(Figure6).
g020721
g003251
Figure6
1.Câbledulanceur2.Guide-câble
4
Page 45

6.Insérezlajaugeaufonddutubederemplissage,
sanslavisser,puisressortez-la.
3
Pleind'huilemoteur
Aucunepiècerequise
Procédure
Important:Lecartermoteurdecettemachineest
videàlalivraison.Avantdemettrelemoteuren
marche,faiteslepleind'huilemoteur.
Huilemoteurspéciée
Capacitéd'huilemoteur
Viscositéd'huileHuiledétergenteSAE30ou
ClassedeserviceAPISJoumieux
1.Amenezlamachinesurunsolplatethorizontal.
2.Tournezlebouchondanslesensantihoraireet
sortezlajauge(Figure7).
0,55l
SAE10W-30
7.Relevezleniveaud'huileindiquésurlajauge
(Figure7).
•Sileniveaun'atteintpaslerepèreminimum
surlajauge,versezlentementunepetite
quantitéd'huiledansletubederemplissage,
attendez3minutespuisrépétezles
opérations5à7jusqu'àatteindreunniveau
d'huilecorrect.
•Sileniveaud'huileesttropélevé,vidangez
l'excédentd'huilejusqu'àobtentionduniveau
d'huilecorrectsurlajauge;voirVidangede
l'huilemoteur(page16).
Important:Sivousfaitestournerlemoteur
alorsqueleniveaud'huiledanslecarter
esttropbasoutropélevé,vousrisquez
d'endommagerlemoteur.
8.Insérezetvissezsolidementlajaugedansle
tubederemplissage.
4
Figure7
1.Niveaumax.3.Niveaumin.
2.Niveautropélevé
3.Versezavecprécaution75%environde
lacapacitéd'huilemoteurdansletubede
remplissaged'huile.
4.Attendez3minutespourdonnerletempsà
l'huiledesestabiliserdanslemoteur.
5.Essuyezlajaugesurunchiffonpropre.
Montagedubacàherbe
Aucunepiècerequise
Procédure
1.Glissezlebacsurl'armature,commemontré
àlaFigure8.
g012127
g027257
Figure8
1.Poignée3.Bacàherbe
2.Armature
5
Page 46

Remarque:Nefaitespaspasserlebacsurle
guidon(Figure8).
Vued'ensembledu
2.Accrochezlaglissièreinférieuredubacaubas
del'armature(Figure9).
produit
g015114
Figure10
Figure9
3.Accrochezlesglissièressupérieuretlatérales
dubacausommetetsurlescôtédel'armature
respectivement(Figure9).
1.Partiesupérieuredu
guidon
2.Poignéed'aideau
déplacement
3.Barredecommandedela
lame
4.Bacàherbe11.Levierdecommandede
g027258
5.Déecteurarrière
6.Bouchonduréservoirde
carburant
7.Raccorddelavage(non
représenté)
8.Filtreàair
9.Bougie
10.Tubede
remplissage/jauge
ramassagesurdemande
12.Levierdehauteurde
coupe(2)
13.Poignéedulanceur
Caractéristiques
techniques
Modèle
2083639kg152cm53cm109cm
Poids
LongueurLargeur
Hauteur
6
Page 47

Utilisation
Remarque:Lescôtésgaucheetdroitdelamachine
sontdéterminésd'aprèslapositiond'utilisation
normale.
Avantl'utilisation
–Nefumezjamaisquandvousmanipulezdu
carburantettenez-vousàl'écartdesammes
nuesoudessourcesd'étincelles.
–Restezàlapositiond'utilisation(derrièrele
guidon)quandlemoteurestenmarche.
–Sivousrenversezducarburant,nemettez
paslemoteurenmarcheàcetendroit.Évitez
decréerdessourcesd'inammationjusqu'à
dissipationcomplètedesvapeursdecarburant.
Contrôlesdesécuritéavant l'utilisation
Consignesdesécuritégénérales
•Familiarisez-vousaveclemaniementcorrectdu
matériel,lescommandesetlessymbolesde
sécurité.
•Vérieztoujoursquelescapotsetlesdispositifsde
sécurité,commelesdéecteurset/oulesbacsà
herbe,sontenplaceetfonctionnentcorrectement.
•Vérieztoujoursqueleslames,boulonsdelames
etensemblesdecoupenesontpasusésni
endommagés.
•Examinezlazonedetravailetenleveztoutobjet
pouvantgênerlefonctionnementdelamachineou
êtrerejetépendantsonutilisation.
•Pendantleréglagedelahauteurdecoupe,vous
risquezdetoucherlalameenmouvementetde
vousblessergravement.
–Coupezlemoteur,enlevezlaclédecontact
(modèleàdémarrageélectriqueseulement)et
attendezl'arrêtcompletdetouteslespièces
mobiles.
–Nemettezpaslesdoigtssouslecarterdela
tondeusequandvousréglezlahauteurde
coupe.
Sécuritérelativeaucarburant
•Lecarburantestextrêmementinammableet
hautementexplosif.Unincendieouuneexplosion
causé(e)parducarburantpeutvousbrûler,ainsi
quelespersonnessetenantàproximité,etcauser
desdommagesmatériels.
–Pouréviterquel'électricitéstatiquen'enamme
lecarburant,posezlerécipientet/oula
machinedirectementsurlesol,pasdansun
véhiculeousurunsupportquelconque,avant
deremplirleréservoir.
–Faiteslepleinduréservoirdecarburantà
l'extérieur,dansunendroitbiendégagé,
lorsquelemoteurestfroid.Essuyeztout
carburantrépandu.
–Conservezlecarburantdansunrécipient
homologuéethorsdelaportéedesenfants.
•Lecarburantesttoxiqueetmêmemortelencas
d'ingestion.L'expositionprolongéeauxvapeurs
decarburantpeutcauserdesblessuresetdes
maladiesgraves.
–Évitezderespirerlesvapeursdecarburantde
façonprolongée.
–N'approchezpaslesmainsnilevisagedu
pistoletoudel'ouvertureduréservoirde
carburant.
–N'approchezpaslecarburantdesyeuxetde
lapeau.
Remplissageduréservoir decarburant
•Pourassurerlefonctionnementoptimaldela
machine,utilisezuniquementdel'essencesans
plombpropreetfraîcheavecunindiced'octanede
87ouplus(méthodedecalcul[R+M]/2).
•L'utilisationdecarburantoxygénécontenant
jusqu'à10%d'éthanolou15%deMTBEpar
volumeesttolérée.
•N'utilisezpasdemélangesd'essenceàl'éthanol
(E15ouE85parexemple)avecplusde10%
d'éthanolparvolume.Celapeutentraînerdes
problèmesdeperformanceset/oudesdégâtsdu
moteurquinesontpascouvertsparlagarantie.
•N'utilisezpasd'essencecontenantduméthanol.
•Nestockezpaslecarburantdansleréservoirou
dansdesbidonsdecarburantpendantl'hiver,à
moinsd'yajouterunstabilisateurdecarburant.
•N'ajoutezpasd'huileàl'essence.
Faiteslepleinavecdel'essencesansplombordinaire
fraîched'unemarqueréputée(Figure11).
Important:Pourréduirelesproblèmesde
démarrage,ajoutezunstabilisateuràl'essence
pendanttoutelasaisondecoupe.Mélangezle
stabilisateuràdel'essencestockéedepuismoins
d'unmois.
7
Page 48

Figure11
3minutespuisrépétezlesopérations3à5
jusqu'àcequeleniveaud'huilecorrectsoit
atteint.
•Sileniveaud'huileesttropélevé(Figure12),
vidangezl'excédentd'huilejusqu'àobtention
duniveaud'huilecorrectsurlajauge;voir
g230458
Vidangedel'huilemoteur(page16).
Important:Sivousfaitestournerlemoteur
alorsqueleniveaud'huiledanslecarter
esttropbasoutropélevé,vousrisquez
d'endommagerlemoteur.
Contrôleduniveaud'huile moteur
Périodicitédesentretiens:Àchaqueutilisationou
unefoisparjour
1.Amenezlamachinesurunsolplatethorizontal.
2.Tournezlebouchondanslesensantihoraireet
sortezlajauge(Figure12).
6.Insérezetvissezsolidementlajaugedansle
tubederemplissage.
Réglagedelahauteurdu guidon
Vouspouvezéleverouabaisserleguidonàlaposition
quivousconvientlemieux.
Tournezleverrouduguidon,réglezleguidonàl'une
detroispositions,puisverrouillez-leàcetteposition
(Figure13).
Figure12
1.Niveaumax.3.Niveaumin.
2.Niveautropélevé
3.Essuyezlajaugesurunchiffonpropre.
4.Insérezlajaugeaufonddutubederemplissage,
sanslavisser,puisressortez-la.
5.Relevezleniveaud'huileindiquésurlajauge
(Figure12).
•Sileniveaud'huileesttropbas,(Figure12),
versezavecprécautionunepetitequantité
d'huiledétergenteSAE30ouSAE10W-30
dansletubederemplissage,attendez
g012127
g007284
Figure13
1.Verrouduguidon2.Positionsduguidon
8
Page 49

Réglagedelahauteurde coupe
Choisissezlahauteurdecoupevoulue.Régleztous
lesleviersdehauteurdecoupeàlamêmehauteur.
Pouréleveretabaisserlamachine,voirFigure14.
Figure14
1.Levierdehauteurdecoupe
Important:Leshauteursdecoupesuivantes
sontdisponibles:25mm,38mm,51mm,64mm,
83mm,95mmet108mm.
Pendantl'utilisation
Sécuritépendant l'utilisation
Consignesdesécuritégénérales
•Portezdesvêtementsappropriés,ycomprisune
protectionoculaire,unpantalon,deschaussures
solidesàsemelleantidérapanteetdesprotecteurs
d'oreilles.Attachezlescheveuxlongsetles
vêtementsamples,etneportezpasdebijoux.
•N'utilisezpaslamachinesivousêtesfatigué,
maladeousousl'emprisedel'alcool,dedrogues
oudemédicaments.
•Lalameesttranchanteetvouspouvezvous
blessergravementàsoncontact.Avantdequitter
lapositiond'utilisation,retirezlaclédecontact
(modèleàdémarrageélectriqueseulement)et
attendezl'arrêtcompletdetouteslespièces
mobiles.
•Lorsquevousrelâchezlabarredecommande
delalame,lemoteuretlalamedoivents'arrêter
enmoinsde3secondes.Sicen'estpaslecas,
cessezimmédiatementd'utiliserlamachineet
adressez-vousàunconcessionnaire-réparateur
agréé.
•Teneztoutlemonde,enparticulierlesjeunes
enfants,àl'écartdelazonedetravail.Arrêtezla
machinesiquelqu'unentredanslazonedetravail.
•Vérieztoujoursquelavoieestlibrejustederrière
lamachineetsursatrajectoireavantdefaire
marchearrière.
•N'utilisezlamachinequesilavisibilitéest
sufsanteetlesconditionsmétéorologiques
favorables.N'utilisezpaslamachinesilafoudre
menace.
•Entravaillantsurl'herbeoulesfeuilleshumides,
vousrisquezdeglisseretdevousblesser
gravementsivoustouchezlalameentombant.
Évitezdetondrequandl'herbeesthumide.
•Soyezparticulièrementprudentàl'approchede
tournantssansvisibilité,debuissons,d'arbresou
g012130
d'autresobjetssusceptiblesdemasquerlavue.
•Méez-vousdestrous,ornières,bosses,rochers
ouautresobstaclescachés.Lesirrégularitésdu
terrainpeuventprovoquerleretournementdela
machineouvousfaireperdrel'équilibre.
•Arrêtezlamachineetvériezl'étatdeslames
sivousheurtezunobstacleousilamachine
vibredemanièreinhabituelle.Effectueztoutes
lesréparationsnécessairesavantderéutiliserla
machine.
•Avantdequitterlapositiond'utilisation,coupez
lemoteur,retirezlaclédecontact(modèleà
démarrageélectriqueseulement)etattendez
l'arrêtdetouteslespiècesmobiles.
•Silemoteurvientdetourner,lesilencieuxesttrès
chaudetpeutvousbrûlergravement.Nevous
approchezpasdusilencieuxencorechaud.
•Vériezfréquemmentl'étatdescomposants
dubacàherbeetdelagoulotted'éjection,et
remplacezlespiècesuséesouendommagéespar
lespiècesrecommandéesparleconstructeur.
•Utilisezuniquementlesaccessoireset
équipementsagréésparTheToro®Company.
Consignesdesécuritépour l'utilisationsurdespentes
•Travailleztransversalementàlapente,jamais
enmontantoudescendant.Soyezextrêmement
prudentlorsquevouschangezdedirectionsurun
terrainenpente.
•Netondezpasdepentestropraides.Vous
pourriezglisseretvousblesserentombant.
•Faitespreuvedeprudencequandvoustondezà
proximitédedénivellations,fossésouberges.
9
Page 50

Démarragedumoteur
Utilisationdelacommande
1.Serrezetmaintenezlabarredecommandede
lalamecontreleguidon(Figure15).
Figure15
1.Barredecommandedelalame
2.Tirezlégèrementlapoignéedulanceur(Figure
16)jusqu'àcequevoussentiezunerésistance,
puistirezvigoureusementetlaissezlelanceur
serétracterlentementjusqu'auguide-câblesur
leguidon.
d'autopropulsion
Pouractionnerl'autopropulsion,ilvoussuft
d'avancer,lesmainssurlapartiesupérieuredu
guidonetlescoudesserrés;lamachineavance
automatiquementàvotrerythme(Figure17).
g003221
Figure17
Remarque:Sivousavezdesdifcultésàfaire
reculerlamachineaprèsavoirutilisél'autopropulsion,
g012132
immobilisez-vous,laissezvosmainsenplaceet
laissezlamachineavancerdequelquescentimètres
pourdésengagerlatransmissionauxroues.Vous
pouvezaussiessayerd'atteindrelapoignéeenmétal,
situéejustesouslapartiesupérieureduguidon,
etdepousserlamachineenavantsurquelques
centimètres.Sivousavezdesdifcultésàfairereculer
lamachine,contactezunconcessionnaire-réparateur
agréé.
Figure16
Remarque:Silemoteurnedémarrepas
aprèsplusieurstentatives,contactezun
concessionnaire-réparateuragréé.
Arrêtdumoteur
Périodicitédesentretiens:Àchaqueutilisationou
unefoisparjour
Pourarrêterlemoteur,relâchezlabarrede
commandedelalame.
Important:Lorsquevousrelâchezlabarrede
commandedelalame,lemoteuretlalamedoivent
s'arrêterenmoinsde3secondes.Sicen'estpas
lecas,cessezimmédiatementd'utiliserlamachine
etadressez-vousàunconcessionnaire-réparateur
agréé.
g012133
10
Page 51

Recyclagedel'herbe
ATTENTION
coupée
Àlalivraison,votremachineestprêteàrecycler
l'herbeetlesfeuillescoupéespournourrirvotre
pelouse.
Remarque:Lebacàherbepeutrestersurla
machinependantlerecyclagedel'herbecoupée.
Pourrecyclerl'herbecoupée,placezlelevierde
ramassagesurdemandeenpositionRECYCLAGE
(Figure18).
Silebacderamassageestusé,desgravillons
ouautresdébrissimilairespeuventêtre
projetésversvousoudespersonnesà
proximité,etcauserdesblessuresgravesou
mortelles.
Contrôlezfréquemmentlebacàherbe.S'il
estendommagé,remplacez-leparunbacToro
neufd'origine.
ATTENTION
Lalameesttranchanteetvouspouvezvous
blessergravementàsoncontact.
Coupezlemoteuretattendezl'arrêtcomplet
detouteslespiècesmobilesavantdequitter
lapositiond'utilisation.
1.Coupezlemoteuretattendezl'arrêtcompletde
touteslespiècesmobiles.
2.Montezlebacàherbe;voirMontagedu
bacàherbe(page11)etamenezlelevier
deramassagesurdemandeenpositionde
RAMASSAGE,commemontréàlaFigure18.
Figure18
1.PositionRECYCLAGE2.PositionRAMASSAGE
Ramassagedel'herbe coupée
Utilisezlebacàherbepourrecueillirlesdébris
d'herbeetdefeuillesdéposéssurlapelouse.
Montagedubacàherbe
1.Coupezlemoteuretattendezl'arrêtcompletde
touteslespiècesmobiles.
2.Soulevezetbloquezledéecteurarrière,
placezlebacdanslesencochesetabaissezle
déecteur(Figure19).
g012135
g012136
Figure19
11
Page 52

Retraitdubacàherbe
1.Coupezlemoteuretattendezl'arrêtcompletde
touteslespiècesmobiles.
2.Soulevezlebacàherbepourl'enleverdu
guidon.
Remarque:Inclinezlégèrementlebacen
arrièrepouréviterdefairetomberl'herbequ'il
contient.
coupeinférieureà51mm,saufsil'herbeest
clairseméeouàlandel'automnequandla
poussecommenceàralentir.
•Sil'herbefaitplusde15cm,effectuezunpremier
passageàvitesseréduiteàlahauteurdecoupe
laplushaute.Effectuezensuiteundeuxième
passageàunehauteurdecoupeinférieurepour
obtenirunecoupeplusesthétique.L'herbetrop
hauterisqued'obstruerlamachineetdefairecaler
lemoteur.
Éjectionarrièredel'herbe coupée
Utilisezl'éjectionarrièrequandvoustondezdel'herbe
trèshaute.
Remarque:Silebacàherbeestmontésurla
machine,enlevez-leavantdeprocéderàl'éjection
arrièredel'herbecoupée;voirRetraitdubacàherbe
(page12).Lelevierderamassagesurdemande
doitêtreenpositionRAMASSAGEcommemontréàla
Figure18.
ATTENTION
Lalameesttranchanteetvouspouvezvous
blessergravementàsoncontact.
Coupezlemoteuretattendezl'arrêtcomplet
detouteslespiècesmobilesavantdequitter
lapositiond'utilisation.
Conseilsd'utilisation
•L'herbeetlesfeuilleshumidesonttendanceà
s'agglomérersurlapelouseetpeuventobstruerla
machineetfairecalerlemoteur.Évitezdetondre
quandl'herbeesthumide.
•Soyezconscientdesrisquesd'incendiepartemps
trèssec,respecteztouslesavertissementslocaux
relatifsauxincendies,etnelaissezpasl'herbeet
lesfeuillessèchess'accumulersurlamachine.
•Alternezladirectiondelatonte.Celapermet
dedisperserlesdéchetsplusuniformémentet
d'obtenirunefertilisationplushomogène.
•Sil'aspectdelapelousetonduen'estpas
satisfaisant,essayezuneouplusieursdes
solutionssuivantes:
–Remplacezlalameoufaites-laaiguiser.
–Tondezenavançantpluslentement.
–Augmentezlahauteurdecoupe.
–Tondezplussouvent.
–Empiétezsurlespassagesprécédentspour
tondreunelargeurdebanderéduite.
Conseilsdetontegénéraux
•Inspectezlazonedetravailetenleveztoutobjet
pouvantêtreprojetéparlamachine.
•Évitezdeheurterdesobstaclesaveclalame.Ne
passezjamaisintentionnellementsurunobjetquel
qu'ilsoit.
•Silamachineaheurtéunobstacleoucommence
àvibrer,coupezimmédiatementlemoteur,retirez
laclé(selonl'équipement),débranchezlel
delabougieetvériezsilamachinen'estpas
endommagée.
•Pourobtenirdesrésultatsoptimaux,remplacezla
lameaudébutdelasaisondetonte.
•Remplacezlalamedèsquenécessaireparune
lameTorod'origine.
Latonte
•Netondezl'herbequesuruntiersdesahauteur
àchaquefois.N'utilisezpasunehauteurde
Hachagedesfeuilles
•Aprèslatonte,50%delapelousedoitêtrevisible
souslacouchedefeuilleshachées.Vousdevrez
peut-êtrerepasserplusieursfoissurlesfeuilles.
•Silacouchedefeuillessurlapelousefaitplusde
13cmd'épaisseur,utilisezunehauteurdecoupe
plusélevée,puisfaitesunsecondpassageàla
hauteurdecoupedésirée.
•Ralentissezlavitessedetontesilesfeuillesne
sontpashachéesassezmenues.
12
Page 53

Aprèsl'utilisation
Sécuritéaprèsl'utilisation
Consignesdesécuritégénérales
•Pouréviterlesrisquesd'incendie,enlevezles
brinsd'herbeetautresdébrisquisontagglomérés
surlamachine.Nettoyezlescouléeséventuelles
d'huileoudecarburant.
•Laissezrefroidirlemoteuravantderangerla
machinedansunlocalfermé.
•Neremisezjamaislamachinenilesbidonsde
carburantàproximitéd'uneammenue,d'une
sourced'étincellesoud'uneveilleuse,tellecelle
d'unchauffe-eauoud'autresappareils.
Consignesdesécuritérelativeau transport
•Retirezlaclédecontact(selonl'équipement)
avantdechargerlamachinepourletransport.
•Faitespreuvedeprudencepourlechargementou
ledéchargementdelamachine.
•Empêchezlamachinederouler.
g014538
Figure20
1.Raccorddelavage
4.Ouvrezl'arrivéed'eau.
5.Mettezlemoteurenmarcheetlaissez-letourner
jusqu'àcequ'ilneresteplusd'herbesousla
machine.
6.Coupezlemoteur.
7.Coupezl'eauetdébranchezletuyaud'arrosage
duraccorddelavage.
8.Mettezlemoteurenmarcheetlaissez-letourner
quelquesminutespoursécherledessousde
lamachine.
9.Arrêtezlemoteuretlaissez-lerefroidir.
Nettoyagedudessousde lamachine
Périodicitédesentretiens:Àchaqueutilisationou
unefoisparjour
Pourobtenirdesrésultatsoptimaux,nettoyez
rapidementlamachineaprèslatonte.
1.Abaissezlamachineàlahauteurdecoupe
laplusbasse.VoirRéglagedelahauteurde
coupe(page9).
2.Garezlamachinesurunsolplatethorizontal.
3.Branchezuntuyaud'arrosage,reliéàune
arrivéed'eau,auraccorddelavage(Figure20).
Pliageduguidon
ATTENTION
Vousrisquezd'endommagerlescâblesetde
rendrelamachinedangereuseàutilisersi
vouspliezoudépliezmalleguidon.
•Veillezànepasendommagerlescâblesen
pliantoudépliantleguidon.
•Siuncâbleestendommagé,adressez-vous
àunconcessionnaire-réparateuragréé.
1.Desserrezlesboutonsduguidon.
2.Faitespivotertoutleguidonenavant(Figure
21).
Important:Repoussezlescâblesà
l'extérieurdesboutonspendantquevous
pliezlamoitiésupérieureduguidon.
13
Page 54

Figure21
3.Rabattezlapartiesupérieureduguidonversle
moteur;voirFigure22.
Figure22
1.Boutonsdeguidon
g020722
g020721
14
Page 55

Entretien
Important:Reportez-vousaumanueldupropriétairedumoteurpourtoutesprocéduresd'entretien
supplémentaires.
Programmed'entretienrecommandé
Périodicitéd'entretienProcédured'entretien
Aprèsles5premières
heuresdefonctionnement
Àchaqueutilisationou
unefoisparjour
Toutesles100heures
Unefoisparan
Unefoisparanouavant
leremisage
•Vidangezl'huilemoteur.
•Contrôleduniveaud'huilemoteur.
•Vériezquelemoteurs'arrêtedansles3secondessuivantlerelâchementdela
barredecommandedelalame.
•Enlevezl'herbecoupéeetautresdébrisaccumuléssouslamachine.
•Faitesl'entretiendelabougie.
•Faitesl'entretiendultreàair.
•Vidangezl'huilemoteur.
•Remplacezlalameoufaites-laaiguiser(plussouventsielles'émousserapidement).
•Nettoyezlemoteurenenlevantlessaletésetlesdébrissurlesommetetlescôtés;
nettoyez-leplusfréquemmentsivoustravaillezdansuneatmosphèrepoussiéreuse.
•Vidangezleréservoirdecarburantavantleremisageannueletavantlesréparations
quilenécessitent.
Consignesdesécurité pendantl'entretien
•Débranchezleldelabougieavantdeprocéderà
unquelconqueentretien.
•Portezdesgantsetuneprotectionoculairepour
fairel'entretiendelamachine.
Préparationàl'entretien
1.Coupezlemoteuretattendezl'arrêtcompletde
touteslespiècesmobiles.
2.Débranchezleldelabougie(Figure23).
•Lalameesttranchanteetvouspouvezvous
blessergravementàsoncontact.Portezdes
gantspoureffectuerl'entretiendelalame.Ne
réparezpasetnemodiezpasleslames.
•N'enlevezpasetnemodiezpaslesdispositifsde
sécurité.Vériezrégulièrementqu'ilsfonctionnent
correctement.
•Ducarburantpeuts'échapperlorsquelamachine
estbasculéesurlecôté.Lecarburantest
inammableetexplosif,etpeutcauserdes
blessures.Laisseztournerlemoteurjusqu'àce
qu'ils'arrêtefautedecarburantouvidangezle
restedecarburantavecunepompemanuelle;ne
siphonnezjamaislecarburant.
•Pourgarantirunrendementoptimaletlasécurité
continuedelamachine,utilisezuniquement
despiècesderechangeetaccessoiresT oro
d'origine.Lespiècesderechangeetaccessoires
d'autresconstructeurspeuventêtredangereuxet
leurutilisationrisqued'annulerlagarantiedela
machine.
g236094
Figure23
1.Fildebougie
3.Rebranchezleldelabougieunefoisl'entretien
terminé.
Important:Avantdebasculerlamachine
pourvidangerl'huileouremplacerlalame,
laissezlemoteurenmarchejusqu'àce
qu'ils'arrêtefautedecarburant.Sivousne
pouvezpasattendrequelemoteurs'arrête
parmanquedecarburant,utilisezunepompe
15
Page 56

manuellepourviderlerestedecarburant.
Basculeztoujourslamachinesurlecôté
(jaugeenbas).
Entretiendultreàair
Périodicitédesentretiens:Unefoisparan
1.Appuyezsurleslanguettesdeverrouillageen
hautducouvercledultreàair(Figure24).
6.Avecunchiffonhumide,essuyezlapoussière
surleboîtieretlecouvercledultreàair.
Important:Nefaitespaspénétrerde
poussièredansleconduitd'air.
7.Insérezlepréltreenmousseetl'élémenten
papierdansleltreàair.
8.Remettezlecouvercleenplace.
Vidangedel'huilemoteur
Périodicitédesentretiens:Aprèsles5premières
heuresdefonctionnement
Unefoisparan
Remarque:Faitestournerlemoteurpendant
quelquesminutesavantlavidangepourréchauffer
l'huile.L'huilechaudes'écouleplusfacilementet
entraîneplusd'impuretés.
Huilemoteurspéciée
Figure24
1.Languettesdeverrouillage
2.Élémentenpapierdultre
àair
3.Préltreenmousse
2.Ouvrezlecouvercle.
3.Retirezl'élémentenpapieretlepréltreen
mousse(Figure24).
4.Vérierl'étatdupréltreenmousseet
remplacez-les'ilestendommagéou
excessivementencrassé.
5.Examinezl'élémentenpapier.
•Remplacezleltreàairs'ilestendommagé
ouhumidiépardel'huileoudel'essence.
•Sileltreàairestencrassé,tapotez-le
àplusieursreprisessurunesurfacedure
ousoufezdel'aircompriméàmoinsde
2,07barparlecôtédultrequiestfaceau
moteur.
Capacitéd'huilemoteur
Viscositéd'huileHuiledétergenteSAE30ou
ClassedeserviceAPISJoumieux
0,55l
SAE10W-30
1.Amenezlamachinesurunsolplatethorizontal.
2.VoirPréparationàl'entretien(page15).
3.Tournezlebouchondanslesensantihoraireet
g011722
sortezlajauge(Figure25).
g235096
Figure25
4.Basculezlamachinesurlecôté(ltreàairen
haut)pourvidangerl'huileusagéeparletubede
remplissage(Figure25).
Remarque:Nebrossezpasleltrepourle
débarrasserdesimpuretés,carcelaaurapour
effetd'incrusterlesimpuretésdanslesbres.
16
Page 57

Figure26
5.Redressezlamachineaprèsavoirvidangé
l'huileusagée.
Entretiendelabougie
Périodicitédesentretiens:Toutesles100heures
UtilisezunebougieChampionRN9YCoudetype
équivalent.
1.Coupezlemoteuretattendezl'arrêtcompletde
touteslespiècesmobiles.
2.Débranchezleldelabougie(Figure22).
3.Nettoyezlasurfaceautourdelabougie.
4.Retirezlabougiedelaculasse.
Important:Remplacezlabougiesielle
estssurée,calaminéeouencrassée.
Nenettoyezpaslesélectrodes,cardes
particulespourraienttomberdanslaculasse
etendommagerlemoteur.
5.Réglezl'écartementdesélectrodesà0,76mm,
g012139
commemontréàlaFigure27.
6.Versezavecprécautionlestroisquartsenviron
delacapacitéd'huilemoteurdansletubede
remplissaged'huile.
7.Attendez3minutespourdonnerletempsà
l'huiledesestabiliserdanslemoteur.
8.Essuyezlajaugesurunchiffonpropre.
9.Insérezlajaugeaufonddutubederemplissage,
sanslavisser,puisressortez-la.
10.Relevezleniveaud'huileindiquésurlajauge(
Contrôleduniveaud'huilemoteur(page8)).
•Sileniveaun'atteintpaslerepèreminimum
surlajauge,versezlentementunepetite
quantitéd'huiledansletubederemplissage,
attendez3minutespuisrépétezles
opérations8à10jusqu'àatteindreunniveau
d'huilecorrect.
•Sileniveaud'huileesttropélevé,vidangez
l'excédentd'huilejusqu'àobtentionduniveau
d'huilecorrectsurlajauge.
Important:Sivousfaitestournerlemoteur
alorsqueleniveaud'huiledanslecarter
esttropbasoutropélevé,vousrisquez
d'endommagerlemoteur.
1.Becisolantd'électrode
centrale
2.Électrodelatérale
6.Posezlabougie.
7.Serrezlabougieà20N·m.
8.Rebranchezleldelabougie.
g000533
Figure27
3.Écartement(pasà
l'échelle)
11.Insérezetvissezsolidementlajaugedansle
tubederemplissage.
12.Recyclezl'huileusagéeconformément
àlaréglementationlocaleenmatière
d'environnement.
17
Page 58

Remplacementdelalame
Périodicitédesentretiens:Unefoisparan
Important:Vousaurezbesoind'uneclé
dynamométriquepourmonterlalame
correctement.Sivousn'enpossédezpas
ousivousnevoussentezpascapable
d'effectuercetteprocédure,adressez-vousàun
concessionnaire-réparateuragréé.
Examinezl'étatdelalamechaquefoisqueleréservoir
decarburantestvide.Silalameestendommagéeou
fêlée,remplacez-laimmédiatement.Silalameest
émousséeouébréchée,faites-laaiguiseretéquilibrer
ouremplacez-la.
ATTENTION
Lalameesttranchanteetvouspouvezvous
blessergravementàsoncontact.
Portezdesgantspoureffectuerl'entretiende
lalame.
1.VoirPréparationàl'entretien(page15).
g231390
Figure29
2.Basculezlamachinesurlecôté(ltreàairen
haut).
3.Immobilisezlalameavecunmorceaudebois
(Figure28).
Figure28
4.Déposezlalamemaisnejetezpaslesxations
(Figure28).
Important:Lesextrémitésrelevéesdela
lamedoiventêtredirigéesverslatondeuse.
6.Àl'aided'uneclédynamométrique,serrezle
boulondelalameà82N·m.
Important:Unboulonvisséà82N·m
esttrèsserré.Bloquezlalameavecune
caleenbois,appuyezdetoutvotrepoids
surlerochetoulaclé,etserrezleboulon
solidement.Ilestpratiquementimpossible
detropserrerceboulon.
g231389
5.Montezlanouvellelameettouteslesxations
(Figure29).
18
Page 59

Remisage
6.Remplissezleréservoirdecarburantneuf;voir
Remplissageduréservoirdecarburant(page7).
Remisezlamachinedansunlocalfrais,propreetsec.
Préparationdelamachine auremisage
1.Lorsdudernierpleindel'année,ajoutezdu
stabilisateur(tell'additifdetraitementToro
Premium)aucarburantfraisselonlesindications
del'étiquette.
2.Débarrassez-vouscorrectementducarburant
inutilisé.Recyclez-leconformémentàla
réglementationlocaleouutilisez-ledansune
voiture.
Remarque:Laprésencedecarburanttrop
vieuxdansleréservoirestlaprincipalecause
desproblèmesdedémarrage.Neconservez
paslecarburantnontraitéplusde30joursetle
carburanttraitéplusde90jours.
3.Laisseztournerlemoteurdelamachinejusqu'à
cequ'ils'arrêtefautedecarburant.
4.Remettezlemoteurenmarcheetlaissez-le
tournerjusqu'àcequ'ils'arrête.Lemoteurest
sufsammentseclorsqu'iln'yaplusmoyende
lefairedémarrer.
7.Rebranchezleldelabougie.
5.Débranchezleldelabougieetbranchez-leau
plotderetenue(selonl'équipement).
6.Retirezlabougieetversez30mld'huilemoteur
dansl'orice.Tirezensuitelapoignéedu
lanceurlentementàplusieursreprisespour
bienrépartirl'huileàl'intérieurducylindre
etempêchercelui-ciderouillerpendantle
remisagedelamachine.
7.Reposezlabougiesanslaserrer.
8.Serreztouslesécrous,boulonsetvis.
Remiseenserviceaprès remisage
1.Contrôlezetresserreztouteslesxations.
2.Déposezlabougieetfaitestournerlemoteur
rapidemententirantsurlapoignéedulanceur
pouréliminerl'excédentd'huiledanslecylindre.
3.Reposezetserrezlabougieà20N·màl'aide
d'uneclédynamométrique.
4.Procédezauxentretiens;voirEntretien(page
15).
5.Contrôlezleniveaud'huilemoteur;voirContrôle
duniveaud'huilemoteur(page8).
19
Page 60

Déclarationdecondentialitéeuropéenne
LesrenseignementsrecueillisparT oro
ToroWarrantyCompany(T oro)respectevotrevieprivée.Pournouspermettredetraitervotreréclamationautitredelagarantieetdevouscontacter
dansl’éventualitéd’unrappeldeproduit,nousvousprionsdenouscommuniquercertainsrenseignementspersonnels,soitdirectementsoitpar
l’intermédiairedevotresociétéouconcessionnaireT orolocal(e).
LesystèmedegarantiedeT oroesthébergésurdesserveurssituésauxÉtats-Unisoùlaloirelativeàlaprotectiondelavieprivéen'offrepasforcément
lamêmeprotectionquedansvotrepays.
ENNOUSFOURNISSANTDESRENSEIGNEMENTSPERSONNELS,VOUSCONSENTEZÀCEQUENOUSLESTRAITIONSCOMMEDÉCRIT
DANSLEPRÉSENTA VISDECONFIDENTIALITÉ.
L'utilisationdesrenseignementsparToro
Toropeututiliservosrenseignementspersonnelspourtraitervosréclamationsautitredelagarantieetvouscontacterdansl'éventualitéd'unrappelde
produit,ainsiquepourvouscommuniquertouteinformationnécessaire.Toropourrapartagerlesrenseignementspersonnelsquevousluiaurez
communiquésaveclesliales,concessionnairesouautresassociésToroenrapportaveccesactivités.Nousnevendronsvosrenseignements
personnelsàaucuneautresociété.Nousnousréservonsledroitdedivulguerdesrenseignementspersonnelsandesatisfaireauxloisapplicableset
auxdemandesdesautoritésconcernées,pourassurerl'utilisationcorrectedenossystèmesouvotreprotectionetcelled'autresusagers.
Conservationdevosrenseignementspersonnels
Nousconserveronsvosrenseignementspersonnelsuniquementpendantladuréenécessairepourrépondreauxnspour
lesquellesnouslesavonscollectésouautresnslégitimes(commelaconformitéréglementaire),ouconformémentàlaloienvigueur.
EngagementdeTororelatifàlasécuritédevosrenseignementspersonnels
Nousprenonstouteslesprécautionsraisonnablespourprotégerlasécuritédevosrenseignementspersonnels.Nousprenonségalementlesmesures
nécessairespourquevosrenseignementspersonnelsrestentexactsetàjour.
Consultationetcorrectiondevosrenseignementspersonnels
Sivoussouhaitezvérieroucorrigervosrenseignementspersonnels,veuilleznouscontacterparcourrielàlegal@toro.com.
Droitaustraliendelaconsommation
LesclientsaustralienstrouverontlesdétailsconcernantleDroitaustraliendelaconsommationàl'intérieurdel'emballageouauprèsdeleur
concessionnaireT orolocal.
374-0282RevC
Page 61

SuperBaggergazonmaaiervan48cm
Modelnr.:20836—Serienr.:401500000enhoger
FormNo.3419-108RevA
Gebruikershandleiding
Inleiding
Dezeloopmaaiermetdraaiendemessenisbedoeld
voorgebruikdoorparticulierenofprofessionele
bestuurders.Demachineisvoornamelijkontworpen
voorhetmaaienvangrasopgoedonderhouden
particuliereofcommerciëlegazons.Demachineis
nietontworpenvoorhetmaaienvanstruikgewasof
voorgebruikindelandbouw.
Leesdezeinformatiezorgvuldigdoor,zodatuweet
hoeudemachineopdejuistewijzemoetgebruiken
enonderhoudenenomletselenschadeaande
machinetevoorkomen.Ubentverantwoordelijkvoor
hetjuisteenveiligegebruikvandemachine.
UkuntrechtstreekscontactopnemenmetT orovia
www.T oro.comvoorinformatieoverproductenen
accessoires,omeendealertevindenofomuw
productteregistreren.
Alsuservice,origineleToroonderdelenofaanvullende
informatienodighebt,kuntucontactopnemenmet
eenerkendeservicedealerofmetdeklantenservice
vanToro.Udienthierbijaltijdhetmodelnummeren
hetserienummervanhetproducttevermelden.De
locatievanhetplaatjemethetmodelnummeren
hetserienummervanhetproductisaangegevenop
Figuur1.Ukuntdenummersnotereninderuimte
hieronder.
Belangrijk:Ukuntmetuwmobielapparaatde
QR-codeophetplaatjemethetserienummer
(indienaanwezig)scannenomtoegangte
krijgentotdegarantie,onderdelenenandere
productinformatie.
Erwordenindezehandleidingeenaantalmogelijke
gevareneneenaantalveiligheidsberichtengenoemd
(Figuur2)metdevolgendewaarschuwingssymbolen,
dieduidenopeengevaarlijkesituatiediezwaar
lichamelijkletselofdedoodtotgevolgkanhebben
wanneerdeveiligheidsvoorschriftennietinacht
wordengenomen.
g000502
Figuur2
Veiligheidssymbool
Erwordenindezehandleidingtweewoordengebruikt
omuwaandachtopbijzondereinformatietevestigen.
Belangrijkattendeertuopbijzonderetechnische
informatieenOpmerkingduidtalgemeneinformatie
aandiebijzondereaandachtverdient.
Ditproductvoldoetaanallerelevante
Europeserichtlijnen.Zievoordetailsde
aparteproduct-speciekeconformiteitsverklaring.
Bruto-ennettokoppel:Hetbruto-ennettokoppel
vandezemotorisdoordemotorfabrikantin
laboratoriumomstandighedengemetenvolgens
standaardJ1940ofJ2723vandeSocietyof
AutomotiveEngineers(SAE).Omdatbijde
conguratierekeningisgehoudenmetdeveiligheidsengebruiksvoorschriften,zaldittypemaaiersin
depraktijkeenveellagermotorkoppelhebben.
Raadpleegdeinformatievandemotorfabrikantdie
wordtmeegeleverdmetdemachine.
1.Plaatsvanmodelnummerenserienummer
Modelnr.:
Serienr.:
©2017—TheT oro®Company
8111LyndaleAvenueSouth
Bloomington,MN55420
CV
Figuur1
Registreeruwproductopwww.Toro.com.
Belangrijk:Alsudezemachinegedurendeeen
ononderbrokenperiodeboven1.500mgebruikt,
moetuervoorzorgendatdesetvoorgrote
hoogteisgemonteerdzodatdemotorvoldoet
g226629
aandeCARB-enEPA-emissierichtlijnen.Deset
voorgrotehoogtevergrootdemotorprestaties
envoorkomtvervuilingvandebougie,moeilijk
startenengrotereemissies.Zodraudesethebt
gemonteerd,dientuhetlabelvoorgrotehoogte
opdemachinetebevestigennaastdesticker
methetserienummer.Neemcontactopmeteen
erkendeToroservicedealeromdegeschikteset
voorgrotehoogteenhetlabelvoorgrotehoogte
vooruwmachineteverkrijgen.Omeendealerin
uwbuurttevinden,kuntukijkenoponzewebsite
Vertalingvandeoorspronkelijketekst(NL)
Allerechtenvoorbehouden
GedruktinMexico
*3419-108*A
Page 62

www.Toro.comofcontactopnemenmetonzeToro
CustomerCareDepartementophetnummerdat
isopgegevenindegarantieverklaringvoorhet
emissiecontrolesysteem.
Verwijderdesetvandemotorenzetdemotor
terugnaarzijnoriginelefabrieksinstellingalsu
demotorgebruiktonder1.500m.Gebruikgeen
motordiegeschiktisgemaaktvoorgebruikop
grotehoogteoplagerehoogtes;anderskande
motoroververhitrakenenwordenbeschadigd.
Indienunietzekerbentofuwmachinegeschikt
isgemaaktvoorgebruikopgrotehoogte,moetu
zoekennaarhetvolgendelabel:
Onderhoud..............................................................15
Aanbevolenonderhoudsschema.........................15
Demachineveiligonderhouden........................15
Voorbereidingenvooronderhoudswerk-
zaamheden...................................................15
Onderhoudvanhetluchtlter............................16
Demotorolieverversen.....................................16
Onderhoudvandebougie................................17
Hetmaaimesvervangen...................................18
Stalling....................................................................19
Voorbereidingenvoorstalling...........................19
Demaaimachineuitdestallinghalen................19
Veiligheid
Dezemachineisontworpeninovereenstemmingmet
deEN-normISO5395:2013.
decal127-9363
Inhoud
Inleiding....................................................................1
Veiligheid..................................................................2
Algemeneveiligheid...........................................2
Veiligheids-eninstructiestickers........................3
Montage....................................................................4
1Dehandgreepuitklappen.................................4
2Destartkoordaanbrengeninde
koordgeleider..................................................4
3Cartermetoliebijvullen....................................5
4Degrasvangermonteren.................................5
Algemeenoverzichtvandemachine.........................6
Specicaties......................................................6
Gebruiksaanwijzing..................................................7
Voorgebruik..........................................................7
Veiligheidvóórgebruik........................................7
Brandstoftankvullen...........................................7
Hetmotoroliepeilcontroleren..............................8
Hoogtevanhandgreepinstellen.........................8
Demaaihoogteinstellen.....................................8
Tijdensgebruik......................................................9
Veiligheidtijdensgebruik....................................9
Motorstarten......................................................9
Dezelfaandrijvinggebruiken............................10
Demotorafzetten.............................................10
Maaiselrecyclen...............................................10
Hetmaaiselopvangen.......................................11
Achteruitworpgebruiken....................................11
Tipsvoorbedieningengebruik.........................12
Nagebruik...........................................................13
Veiligheidnahetwerk.......................................13
Deonderkantvandemachinereinigen.............13
Handgreepinklappen.......................................13
Algemeneveiligheid
Ditproductkanhandenofvoetenafsnijden
envoorwerpenuitwerpen.Volgaltijdalle
veiligheidsinstructiesopomernstigletselte
voorkomen.
Gebruikvanditproductvooranderedoeleindendan
dezekangevaarlijkzijnvooruofomstanders.
•Voordatudemotorstart,moetudeinstructiesen
waarschuwingenindezeGebruikershandleiding
enopdemachineendewerktuigenlezen,
begrijpenenuitvoeren.
•Houduwhandenenvoetenuitdebuurtvan
bewegendeonderdelenvanofonderdemachine.
Blijfaltijduitdebuurtvanafvoeropeningen.
•Gebruikdemachinenietalserschermenof
anderebeveiligingsmiddelenontbrekenofals
dezenietwerken.
•Houdomstandersenkinderenopeenveilige
afstandvandemachine.Laatkinderennooit
demachinebedienen.Laatenkelmensendie
verantwoordelijkengetraindzijnendiebovendien
vertrouwdzijnmetdeinstructiesenfysiekertoein
staatzijndemachinebedienen.
•Stopdemachineenzetdemotoruitvoordatu
servicewerkzaamhedenuitvoert,brandstofbijvult
ofverstoppingenverwijdert.
Onjuistgebruikofonderhoudvandezemachine
kanletseltotgevolghebben.Omhetrisicoop
letselteverkleinen,dientuzichaandevolgende
veiligheidsinstructiestehoudenenaltijdophet
veiligheidssymboolteletten,datbetekentVoorzichtig,
WaarschuwingofGevaar–instructievoorpersoonlijke
veiligheid.Niet-nalevingvandezeinstructieskan
leidentotlichamelijkofdodelijkletsel.
2
Page 63

Uvindtbijkomendeveiligheidsinformatiewaarnodig
indezehandleiding.
Veiligheids-eninstructiestickers
Veiligheidsstickersenveiligheidsinstructieszijngemakkelijkzichtbaarvoordebestuurder
enbevindenzichbijplaatsenwaargevaarkanontstaan.Vervangallebeschadigdeof
ontbrekendestickers.
Merktekenvanfabrikant
decaloemmarkt
1.Ditmerktekengeeftaandathetmesonderdeelvaneen
origineleT oromaaimachineis.
112-8760
1.Demachinekanvoorwerpenuitwerpen–Houdomstanders
opeenveiligeafstandvandemachine.
2.Handenofvoetenkunnenwordengesneden/geamputeerd
–Blijfuitdebuurtvanbewegendeonderdelen.
decal112-8760
decal131-4514b
131-4514
1.Waarschuwing–LeesdeGebruikershandleiding.
2.Handenofvoetenkunnenwordengesneden/geamputeerd
doorhetmaaimes–Blijfuitdebuurtvanbewegende
onderdelen;houdallebeschermendedelenophunplaats.
3.Handenkunnenwordengesneden/geamputeerddoor
hetmaaimes–Trekdebougiekabellosenraadpleegde
instructiesvóóruservice-ofonderhoudswerkzaamheden
uitvoert.
4.Demachinekanvoorwerpenuitwerpen–Houomstanders
opeenveiligeafstandvandemachine;zetdemotoraf
voordatudebestuurderspositieverlaat;verwijdervuil
voordatugaatmaaien.
5.Handenkunnenwordengesneden/geamputeerddoorhet
maaimes–Maainooitheuvelopwaartsenheuvelafwaarts;
gebruikdemachinedwarsophellingen;kijkachteromals
uachteruitloopt.
1.Maaihoogte-instellingen
decal119-2283
119-2283
decal137-9196
137-9196
1.Vergrendelen
2.Ontgrendelen
3
Page 64

Montage
1
Dehandgreepuitklappen
Geenonderdelenvereist
Procedure
WAARSCHUWING
Alsdehandgreepverkeerdwordtin-en
uitgeklapt,kunnendekabelsschadeoplopen,
waardoordemachinenietveiligkanworden
gebruikt.
•Zorgervoordatudekabelsnietbeschadigt
alsudehandgreepin-ofuitklapt.
•Indieneenkabelisbeschadigd,moetu
contactopnemenmeteenerkendeService
Dealer.
Belangrijk:Verwijderhetplasticwaarmeede
motorisafgedekteneventueelanderplasticof
verpakkingsmateriaalopdemachine.
1.Draaideknoppenvandehandgreeplos(Figuur
4).
g020722
Figuur5
3.Draaideknoppenmetdehandstevigvast.
4.Draaidehendelnaarachterennaarde
bedieningsstandenvergrendeldehendelopde
gewenstehoogte.ZieHoogtevanhandgreep
instellen(bladz.8).
2
Destartkoordaanbrengen indekoordgeleider
Geenonderdelenvereist
Procedure
Belangrijk:Omdemotorveiligensneltekunnen
startenvoorelkgebruikdientudestartkoordaan
tebrengenindekoordgeleider.
Houddebedieningsstangtegendebovenste
handgreepentrekdestartkoorddoorde
koordgeleideraandehandgreep(Figuur6).
Figuur4
1.Handgreepknoppen
2.Beweeghetbovenstedeelvandehandgreep
voorzichtignaarvorentotdatdehelftenvande
handgreepineenlijnstaanenlaatzedanin
elkaarvallenFiguur5.
g020721
g003251
Figuur6
1.Startkoord
4
2.Koordgeleider
Page 65

3
Cartermetoliebijvullen
Geenonderdelenvereist
Procedure
Belangrijk:Uwmachinewordtgeleverdzonder
olieinhetcarter.Vulhetcartermetolievoordatu
demotorstart.
Motorolietype
Motoroliecapaciteit0,55liter
OlieviscositeitSAE30ofSAE10W-30
API-onderhoudsclassicatie
reinigingsolie
SJofhoger
6.Steekdepeilstokindevulbuis,maardraaihem
ernietin.Verwijderdandepeilstok.
7.Leeshetoliepeilafvandepeilstok(Figuur7).
•Alshetpeilopdepeilstoktelaagstaat,giet
danvoorzichtigeenkleinehoeveelheidolie
indevulbuis,wacht3minutenenherhaal
stappen5totenmet7totdatdepeilstokhet
juistepeilaangeeft.
•Alshetoliepeilopdepeilstoktehoogis,
taptudeovertolligeolieaftotdepeilstok
hetjuisteoliepeilaangeeft;zieDemotorolie
verversen(bladz.16).
Belangrijk:Alshetoliepeilinhetmotorte
hoogoftelaagisenulaatdemotortoch
draaien,kuntudezebeschadigen.
8.Plaatsdepeilstokgoedindevulbuis.
4
1.Plaatsdemachineopeenhorizontaaloppervlak.
2.Verwijderdepeilstokdoordedoplinksomte
draaieneneruittetrekken(Figuur7).
Figuur7
1.Vol3.Bijvullen
2.Hoog
3.Gietlangzaamongeveer¾vandeinhoudvan
hetoliecarterindevulbuis.
4.Wacht3minutentotdeolieindemotorgezakt
is.
5.Veegdepeilstokmeteenschonedoekschoon.
Degrasvangermonteren
Geenonderdelenvereist
Procedure
1.Schuifdegrasvangeroverhetframe;zieFiguur
8.
g012127
g027257
Figuur8
1.Handgreep
2.Frame
Opmerking:Schuifdegrasvangernietover
dehandgreep(Figuur8).
2.Haakhetonderstekanaalvandegrasvanger
overdeonderzijdevanhetframe(Figuur9).
3.Grasvanger
5
Page 66

Algemeenoverzicht
vandemachine
Figuur9
3.Haakhetbovensteendezijkanalenvan
degrasvangerachtereenvolgensoverde
bovenzijdeendezijkantenvanhetframe(Figuur
9).
g015114
Figuur10
1.Bovenstedeelvande
handgreep
g027258
2.Handgreeptractiehulp9.Bougie
3.Bedieningsstangvoor
maaimes
4.Grasvanger11.Grasvangerhendel
5.Achteruitworpgeleider
6.Dopvanbrandstoftank
7.Wasaansluiting(niet
afgebeeld)
8.Luchtlter
10.Vulbuis/peilstok
12.Maaihoogtehendel(2)
13.Handgreepvanstartkoord
Specicaties
Type
2083639kg152cm53cm109cm
Gewicht
Lengte
BreedteHoogte
6
Page 67

Gebruiksaanwijzing
enmagdetanknietmetbrandstofworden
bijgevuld.
Opmerking:Bepaalvanuitdenormale
bestuurderspositiedelinker-enrechterzijdevande
machine.
Voorgebruik
Veiligheidvóórgebruik
Algemeneveiligheid
•Zorgervoordatuvertrouwdraaktmetde
bedieningsorganenendeveiligheidssymbolen,en
weethoeudemachineveiligkuntgebruiken.
•Controleerofdebeschermplatenen
veiligheidsvoorzieningenzoalsgrasgeleiders
en/ofdegrasvangerophunplaatszittenennaar
behorenwerken.
•Controleerdemessen,bevestigingsboutenenhet
maaimechanismealtijdopslijtageofbeschadiging.
•Controleerhetwerkgebiedenverwijderalle
voorwerpendiehetgebruikvandemachine
zoudenkunnenhinderenofdiedemachinezou
kunnenuitwerpen.
•Bijhetinstellenvandemaaihoogtekuntuin
aanrakingkomenmeteenbewegendmes.Ditkan
ernstigletselveroorzaken.
–Zetdemotoraf,verwijderhetcontactsleuteltje
(alleenopmodelmetelektrischstartsysteem)
enwachttotdatallebewegendeonderdelentot
stilstandzijngekomen.
–Plaatsuwvingersnietonderdemaaikastalsu
demaaihoogteinstelt.
–Probeerdemotorniettestartenalsu
brandstofmorst.Zorgervoordatergeen
ontstekingsbronnenindebuurtzijntotdatde
brandstofdampenvolledigzijnverdwenen.
–Bewaarbrandstofineengoedgekeurdvatof
blikenbuitenbereikvankinderen.
•Brandstofisschadelijkofdodelijkbijinname.
Langdurigeblootstellingaandampenkanleiden
toternstigletselenziekte.
–Voorkomdatudampenlangetijdinademt.
–Houduwhandenengezichtuitdebuurtvande
vulpijpendeopeningvandebrandstoftank.
–Houdbrandstofuitdebuurtvanuwogenen
huid.
Brandstoftankvullen
•Gebruikvoordebesteresultatenuitsluitend
schone,verse,loodvrijebenzinemeteen
octaangetalvan87ofhoger(indelingsmethode
(R+M)/2).
•Metzuurstofverrijktebenzinemettenhoogste
10%ethanolof15%MTBEisgeschikt.
•Geenethanolmengselsvanbenzinegebruiken
(zoalsE15ofE85)metmeerdan10%ethanolper
volume.Ditkanleidentotverminderdeprestaties
en/ofmotorschadediemogelijknietgedektwordt
doordegarantie.
•Geenbenzinegebruikendiemethanolbevat.
•Tijdensdewintergeenbrandstofbewareninde
brandstoftankofinbrandstofblikken,tenzijeen
stabilizeraandebrandstofwerdtoegevoegd.
•Mengnooitoliedoorbenzine.
Veiligomgaanmetbrandstof
•Brandstofisuiterstontvlambaarenzeerexplosief.
Brandofexplosievanbrandstofkanbrandwonden
bijuofanderenenmateriëleschadeveroorzaken.
–Omtevoorkomendateenstatischeladingde
brandstoftotontbrandingkanbrengen,moetu
hetbrandstofreservoiren/ofdemachineopde
grondplaatsenvoordatudetankvult,nietop
eenvoertuigofeenanderobject.
–Vuldebrandstoftankindeopenluchtwanneer
demotorkoudis.Neemeventueelgemorste
benzineop.
–Rooknietalsuomgaatmetbrandstof,enhoud
brandstofuitdebuurtvanopenvuurofvonken.
–Alsdemotordraaitofheetis,magde
brandstoftankdopnietwordenverwijderd
Vuldebrandstoftankmetverseloodvrije,normale
benzinevaneenbekendmerk(Figuur11).
Belangrijk:Omstartproblementeverminderen,
moetuhetheleseizoeneenstabilizertoevoegen
aandebenzine.Mengdestabilizermetbenzine
dienietouderisdan30dagen.
g230458
Figuur11
7
Page 68

Hetmotoroliepeil
Hoogtevanhandgreep
controleren
Onderhoudsinterval:Bijelkgebruikofdagelijks
1.Plaatsdemachineopeenhorizontaaloppervlak.
2.Verwijderdepeilstokdoordedoplinksomte
draaieneneruittetrekken(Figuur12).
instellen
Ukuntdehandgreephogeroflagerzettenineen
standdieucomfortabelvindt.
Draaiaandehandgreepvergrendeling,verplaats
dehandgreepnaaréénvandedriestandenen
vergrendeldehandgreep(Figuur13).
Figuur12
1.Vol3.Bijvullen
2.Hoog
3.Veegdepeilstokmeteenschonedoekschoon.
4.Steekdepeilstokindevulbuis,maardraaihem
ernietin.Verwijderdandepeilstok.
5.Leeshetoliepeilafvandepeilstok(Figuur12).
•Alshetoliepeilopdepeilstoktelaagis
(Figuur12),gietdanvoorzichtigeenkleine
hoeveelheidSAE30ofSAE10W-30
reinigingsolieindevulbuis,wacht3minuten
enherhaalstappen3totenmet5totdatde
peilstokhetjuistepeilaangeeft.
•Alshetoliepeilopdepeilstoktehoogis
(Figuur12),taptudeovertolligeolieaftotdat
depeilstokhetjuistepeilaangeeft,zieDe
motorolieverversen(bladz.16).
Belangrijk:Alshetoliepeilinhetmotorte
hoogoftelaagisenulaatdemotortoch
draaien,kuntudezebeschadigen.
6.Plaatsdepeilstokgoedindevulbuis.
g012127
g007284
Figuur13
1.Handgreepvergrendeling2.Handgreepstanden
Demaaihoogteinstellen
Zetdemaaihoogteopdegewenstestand.Zetalle
maaihoogtehendelsopdezelfdehoogte.Zie(Figuur
14)voorhethogerenlagerstellenvandemachine.
g012130
Figuur14
1.Maaihoogtehendel
8
Page 69

Belangrijk:Demaaihoogte-instellingenzijn
25mm,38mm,51mm,64mm,83mm,95mmen
108mm.
Tijdensgebruik
Veiligheidtijdensgebruik
Algemeneveiligheid
•Draaggeschiktekledingenuitrusting,
zoalsoogbescherming,eenlangebroek,
stevigeschoenenmeteengripvastezoolen
gehoorbescherming.Bindlanghaarvast,steek
lossekledingstukkengoedvastendraaggeen
juwelen.
•Gebruikdemachinenietalsuziekofmoebentof
onderdeinvloedvanalcoholofdrugsbent.
•Hetmaaimesisscherp,contactmethetmaaimes
kanernstiglichamelijkletselveroorzaken.Zetde
motoraf,verwijderhetcontactsleuteltje(alleen
modellenmetelektrischstartsysteem)enwacht
totdatallebewegendeonderdelentotstilstandzijn
gekomenvoordatudebestuurderspositieverlaat.
•Alsudebedieningsstangloslaat,moetendemotor
enhetmesbinnen3secondenstoppen.Alsdit
niethetgevalis,magudemachinenietmeer
gebruikenenmoetucontactopnemenmeteen
erkendeservicedealer.
•Houdomstanders,inhetbijzonderkleinekinderen,
uitdebuurtvanhetwerkgebied.Stopdemachine
alsiemandhetwerkgebiedbetreedt.
•Kijkaltijdnaarbenedenenachteromvoordatu
achteruitrijdt.
•Gebruikdemachineenkelbijeen
goedezichtbaarheideningeschikte
weersomstandigheden.Gebruikdemachineniet
alshetkanbliksemen.
•Alsunatgrasennattebladerenmaait,kuntu
uitglijden,inaanrakingkomenmethetmesen
ernstigletseloplopen.Gebruikdemachinenietin
vochtigeomstandigheden.
•Weesuiterstvoorzichtigbijhetnaderenvanblinde
hoeken,struiken,bomenenandereobjectendie
uwzichtkunnenbelemmeren.
•Kijkuitvoorgaten,geulen,hobbels,stenenof
andereverborgenobjecten.Oponeffenterrein
kandemachineomslaanofukuntuwevenwicht
verliezenofwegglijden.
•Stopdemachineencontroleerdemaaimessen
alsueenvoorwerpheeftgeraaktofdemachine
abnormaalbeginttetrillen.Voerallenoodzakelijke
reparatiesuitvoordatudemachineweerin
gebruikneemt.
•Voordatudebedieningspositieverlaat,moetude
motorafzetten,hetcontactsleuteltjeverwijderen
(alleenmodellenmetelektrischstartsysteem)
enwachtentotallebewegendeonderdelentot
stilstandzijngekomen.
•Alsdemotorheeftgelopen,kandegeluiddemper
heetzijnenernstigebrandwondenveroorzaken.
Blijfuitdebuurtvaneenhetegeluiddemper.
•Controleerdeonderdelenvandegrasvanger
enhetuitwerpkanaalregelmatigopslijtageen
beschadigingenvervangzeindiennodigdoor
onderdelendiedefabrikantheeftaanbevolen.
•Gebruikalleenaccessoiresenwerktuigendiedoor
TheToro®Companyzijngoedgekeurd.
Demachineveiliggebruikenop hellingen
•Maaimetdehellingmee,nooithellingopenaf.
Gazeerzorgvuldigtewerkalsuvanrichting
verandertopeenhelling.
•Maainietopaltesteilehellingen.Hetniet
goedneerzettenvandevoetenkanongevallen
veroorzakenwaarbijdegebruikerwegglijdtenten
valkomt.
•Maaivoorzichtigindebuurtvansteilehellingen,
greppelsofdijken.
Motorstarten
1.Drukdebedieningsstangvanhetmaaimes
tegendehandgreepenhouddezepositievast
(Figuur15).
g012132
Figuur15
1.Bedieningsstangvoormaaimes
9
Page 70

2.Trekvoorzichtigaandehandgreepvanhet
startkoord(Figuur16)totuweerstandvoelt,trek
dehandeldansnel,enlaatdezelangzaamtot
dekoordgeleideropdehandgreepteruglopen.
Figuur16
Opmerking:Alsdemotornaenkelepogingen
nietwilstarten,moetucontactopnemenmet
eenerkendeServiceDealer.
naarachterenwilrollen,moetucontactopnemenmet
eenerkendeServiceDealer.
Demotorafzetten
Onderhoudsinterval:Bijelkgebruikofdagelijks
Omdemotortestoppenmoetudebedieningsstang
vanhetmaaimesloslaten.
Belangrijk:Alsudebedieningsstangloslaat,
moetendemotorenhetmesbinnen3seconden
stoppen.Alsditnietgebeurt,magudemachine
nietverdergebruikenenmoetucontactopnemen
meteenerkendeservicedealer.
Maaiselrecyclen
g012133
Demachinekanmaaiselenbladafvaloverhetgazon
verspreiden(recycling).
Opmerking:Degrasvangerkanopdemaaimachine
blijvenalsuhetmaaiselgaatrecyclen.
Omhetmaaiselterecyclen,zetudegrasvanghendel
indeRECYCLEST AND(Figuur18).
Dezelfaandrijving gebruiken
Omdezelfaandrijvingteactiveren,looptueenvoudig
vooruitmetuwhandenophetbovenstedeelvan
dehandgreepenuwellebogennaastuwlichaam;
demaaimachinerichtzichautomatischnaaruw
loopsnelheid(Figuur17).
Figuur17
Opmerking:Alsdemaaimachinenietvrij
naarachterenroltnahetinschakelenvande
zelfaandrijving,stadanstil,houduwhandenbij
dehandgreepenlaatdemaaimachineeenpaar
centimeternaarvorenrollenomhetaandrijfsysteem
uitteschakelen.Ukuntookdemetalenhendel
aanrakendiezichnetonderdebovenstehandgreep
bevindtendemachineeenpaarcentimeternaar
vorenduwen.Alsdemaaimachinenogsteedsniet
g003221
g012135
Figuur18
1.RECYCLESTAND
2.GRASVANGSTAND
10
Page 71

Hetmaaiselopvangen
Gebruikdegrasvangerommaaiselenbladafvalte
verzamelen.
WAARSCHUWING
Eenversletengrasvangerkankleinesteentjes
enanderevoorwerpenuitwerpen,waardooru
ofomstandersernstiglichamelijkofdodelijk
letselkunnenoplopen.
Controleerdegrasvangerregelmatig.Plaats
eennieuweTorograsvangeralsdeoudeis
beschadigd.
WAARSCHUWING
Hetmaaimesisscherp,contactmethet
maaimeskanernstiglichamelijkletsel
veroorzaken.
Zetdemotorafenwachttotdatalle
bewegendeonderdelentotstilstandzijn
gekomenvoordatudebestuurderspositie
verlaat.
1.Zetdemotoruitenwachttotdatallebewegende
onderdelentotstilstandgekomenzijn.
2.Plaatsdegrasvanger;zieMontagevan
degrasvanger(bladz.11)enzetde
grasvanghendelindeGRASVANGST ANDzoals
getoondinFiguur18.
Montagevandegrasvanger
1.Zetdemotoruitenwachttotdatallebewegende
onderdelentotstilstandgekomenzijn.
2.Zetdeafvoergeleideraandeachterzijde
omhoogenhoudhemindezestand,monteer
degrasvangerindeinkepingenenzetde
afvoergeleideraandeachterzijdeomlaag
(Figuur19)
g012136
Figuur19
Degrasvangerverwijderen
1.Zetdemotoruitenwachttotdatallebewegende
onderdelentotstilstandgekomenzijn.
2.Tildegrasvangeromhoogentrekdezelosvan
dehendel.
Opmerking:Kanteldegrasvangerietsnaar
achterenomtevoorkomendathetverzamelde
maaiseleruitvalt.
Achteruitworpgebruiken
Gebruikdeachteruitworpalsuzeerhooggrasmaait.
Opmerking:Alsdegrasvangeropdemachinezit,
moetudieverwijderenalvorensdeachteruitworpte
gebruiken;zieDegrasvangerverwijderen(bladz.11).
DegrasvanghendelmoetindeGRASVANGSTANDstaan
zoalsgetoondinFiguur18.
WAARSCHUWING
Hetmaaimesisscherp,contactmethet
maaimeskanernstiglichamelijkletsel
veroorzaken.
Zetdemotorafenwachttotdatalle
bewegendeonderdelentotstilstandzijn
gekomenvoordatudebestuurderspositie
verlaat.
11
Page 72

Tipsvoorbedieningen
gebruik
Algemenemaaitips
•Controleerhetwerkgebiedenverwijderalle
voorwerpendiedemachinezoukunnenuitwerpen.
–Laatdemaaibanenoverlappeninplaatsvan
steedseenvolledignieuwebaantemaaien.
Bladerenjnmaken
•Nahetmaaienmoetaltijd50%vanhetgazon
zichtbaarblijvendoordebladerlaag.Ditkaneenof
meerdererondgangenoverdebladerenvereisen.
•Zorgervoordathetmesgeenvastevoorwerpen
raakt.Maainooitmetopzetovervoorwerpen.
•Alsdemaaimachinetocheenvoorwerpraakten
beginttetrillen,moetumeteendemotorafzetten,
decontactsleutelverwijderen(indiendemachine
hiermeeisuitgerust)debougiekabellosmakenen
demaaimachineopbeschadigingcontroleren.
•Debesteresultatenkrijgtudooreennieuwmeste
monterenvoordathetmaaiseizoenbegint.
•VervangindiennodighetmaaimesdooreenT oro
mes.
Grasmaaien
•Umoettelkensnietmeerdanongeveeréénderde
vandegrassprietenafmaaien.Maainietmeteen
standlagerdan51mm,tenzijdegrasmatdunis,
ofalshetlaatinhetnajaariswanneerhetgras
langzamerbeginttegroeien.
•Alsugraswiltmaaiendatlangerdan15cmis,
moetumaaienopdemaximalemaaihoogteen
meteenlangzamereloopsnelheid.Vervolgens
gaatumaaienopeenlageremaaihoogteomhet
gazoneenzofraaimogelijkuiterlijktegeven.Als
hetgrastehoogis,kandemachineverstoptraken
endemotorafslaan.
•Alsereenlaagbladerenvanmeerdan13cm
ophetgazonligt,moetueerstmeteenhogere
maaihoogtewerkenenvervolgensnogmaals
maaienopdegewenstehoogte.
•Alsdemaaimachinedebladerennietjngenoeg
maakt,ishetbeteromwatlangzamertemaaien.
•Natgrasennattebladerengaanaankoeken,
waardoordemaaimachineverstoptkanrakenof
demotorkanafslaan.Gebruikdemachinenietin
vochtigeomstandigheden.
•Weesbedachtophetrisicovanbrandinzeer
drogeomstandigheden;neemalleplaatselijke
brandwaarschuwingeninachtenhouddemachine
vrijvandrooggrasenbladafval.
•Maaisteedsinwisselenderichtingen.Hierdoor
wordthetmaaiselbeteroverhetgazonverstrooid,
zodathetgazongelijkmatigwordtbemest.
•Alsumethetuiterlijkvanhetvoltooidegazonniet
tevredenbent,probeerdaneenofmeervande
volgendestappen:
–Vervanghetmaaimesoflaathetslijpen.
–Looplangzamertijdenshetmaaien.
–Steldemaaimachineinopeenhogere
maaihoogte.
–Maaihetgrasvaker.
12
Page 73

Nagebruik
Veiligheidnahetwerk
Algemeneveiligheid
•Verwijdergrasenvuilvandemachineombrandte
voorkomen.Neemgemorsteolieofbrandstofop.
•Laatdemotorafkoelenvoordatudemachinein
eenafgeslotenruimteopslaat.
•Bewaardemachineofbrandstofhoudernooitbij
eenopenvlam,vonkofwaakvlambijbijv.een
geiserofandereapparaten.
4.Draaidekraanopen.
5.Startdemotorenlaatdezelopentotdatergeen
maaiselmeeronderdemachinevandaankomt.
6.Zetdemotoraf.
7.Draaidekraandichtenmaakdetuinslanglos
vandemaaimachine.
8.Startdemotorenlaatdezeeenpaarminuten
lopenomdeonderzijdevandemachinete
drogen.
9.Schakeldemotoruitenlaatdezeafkoelen.
Handgreepinklappen
Demachineveiligvervoeren
•Verwijderdecontactsleutel(indiendemachine
hiermeeisuitgerust)voordatudemachinevoor
transportinlaadt.
•Weesvoorzichtigbijhetin-ofuitladenvande
machine.
•Zetdemachinevastzodatzenietkangaanrollen.
Deonderkantvande machinereinigen
Onderhoudsinterval:Bijelkgebruikofdagelijks
Omdebesteresultatenteverkrijgen,dientude
machinetereinigenzodrauklaarbentmetmaaien.
1.Zetdemachineindelaagstemaaistand.ZieDe
maaihoogteinstellen(bladz.8).
2.Plaatsdemachineopeenhorizontaaloppervlak.
3.Bevestigeentuinslangdieaangeslotenisop
eenkraanaandewasaansluiting(Figuur20).
WAARSCHUWING
Alsdehandgreepverkeerdwordtin-en
uitgeklapt,kunnendekabelsschadeoplopen,
waardoordemachinenietveiligkanworden
gebruikt.
•Zorgervoordatudekabelsnietbeschadigt
alsudehandgreepin-ofuitklapt.
•Indieneenkabelisbeschadigd,moetu
contactopnemenmeteenerkendeService
Dealer.
1.Draaideknoppenvandehandgreeplos.
2.Draaidevolledigehandgreepnaarvoren(Figuur
21).
Belangrijk:Zorgervoordatdekabels
aandebuitenkantvandeknoppenvande
handgreeplopenalsuhetbovenstedeelvan
dehandgreepinklapt.
g020722
Figuur21
3.Draaihetbovenstedeelvandehandgreepterug
naardemotor;zieFiguur22.
g014538
Figuur20
1.Wasaansluiting
13
Page 74

g020721
Figuur22
1.Handgreepknoppen
14
Page 75

Onderhoud
Belangrijk:Raadpleegdegebruikershandleidingvandemotorvoorverdereonderhoudsprocedures.
Aanbevolenonderhoudsschema
OnderhoudsintervalOnderhoudsprocedure
Nadeeerste5bedrijfsuren
Bijelkgebruikofdagelijks
Omde100bedrijfsuren
Jaarlijks
Jaarlijksofvóórstalling
•Verversdemotorolie.
•Hetmotoroliepeilcontroleren.
•Controleerofdemotorbinnen3secondenstoptnadatudebedieningsstangvan
hetmaaimeshebtlosgelaten.
•Verwijdermaaiselenvuilvandeonderkantvandemachine.
•Onderhoudvandebougie.
•Geefhetluchtltereenonderhoudsbeurt.
•Verversdemotorolie.
•Vervanghetmaaimesoflaathetslijpen(vakeralsdesnijrandsnelbotwordt).
•Reinigdemotordoorvuilvandebovenkantendezijkantenteverwijderen;doedit
vakeralsdemachinewordtgebruiktinstofgeomstandigheden.
•Laatdebenzineuitdebrandstoftanklopenvoordatuvereistereparatiesuitvoertof
voordejaarlijksestalling.
Demachineveilig onderhouden
•Trekdebougiekabellosvandebougievoordatu
onderhoudswerkzaamhedenuitvoert.
•Draaghandschoenenenoogbescherming
wanneeruservicewerkzaamhedenverricht.
Voorbereidingenvooronderhoudswerkzaamheden
1.Zetdemotoruitenwachttotdatallebewegende
onderdelentotstilstandgekomenzijn.
2.Maakdebougiekabellosvandebougie(Figuur
23).
•Hetmaaimesisscherp,contactmethetmaaimes
kanernstiglichamelijkletselveroorzaken.Gebruik
handschoenenalsuhetmesmonteert.Repareer
ofwijzighetmes/demessenniet.
•Knoeinooitmetdeveiligheidsvoorzieningen.
Controleerregelmatigofdezegoedwerken.
•Alsudemachinekantelt,kanerbenzineuitde
tanklekken.Benzineisontvlambaarenexplosief
enkanlichamelijkletselveroorzaken.Laatde
motordrooglopenofpompdebrandstofmeteen
handpompuitdetank.Gebruiknooiteenhevel.
•Omdebesteprestatiesteverkrijgenenervoor
tezorgendatdeveiligheidscerticatenvande
machineblijvengelden,moetutervervanging
altijdorigineleonderdelenenaccessoiresvan
Toroaanschaffen.Gebruiktervervanging
nooitonderdelenenaccessoiresvanandere
fabrikanten,omdatditgevaarlijkkanzijnende
productgarantiehierdoorkanvervallen.
g236094
Figuur23
1.Bougiekabel
3.Nadatudeonderhoudswerkzaamhedenhebt
uitgevoerd,moetudekabelweeraansluitenop
debougie.
Belangrijk:Voordatudemachinekantelt
omolieteverversenofhetmestevervangen,
moetudemachinegebruikentotdatde
benzinetankleegis.Alsudemachinemoet
kantelenvoordatdebenzinetankleegis,
15
Page 76

dientudebenzinemeteenhandpompuit
detanktepompen.Kanteldemaaimachine
altijdopdezijkant,metdepeilstokomlaag.
Onderhoudvanhet
6.Verwijderhetvuilvandeluchtlterbehuizingen
hetdekselmeteenvochtigedoek.
Belangrijk:Veeggeenvuilindeluchtgang.
7.Plaatshetpapierenlterelementenhet
schuimlterinhetluchtlter.
luchtlter
Onderhoudsinterval:Jaarlijks
1.Drukdelippenvandevergrendelingbovenop
hetluchtlterdekselomlaag(Figuur24).
8.Plaatshetdekselterug.
Demotorolieverversen
Onderhoudsinterval:Nadeeerste5bedrijfsuren
Jaarlijks
Opmerking:Voordatudeolieververst,moetu
demotorenkeleminutenlatenlopenzodatdeolie
warmwordt.Warmeoliestroomtbeterenvoert
verontreinigingenbetermee.
Motorolietype
Motoroliecapaciteit0,55liter
OlieviscositeitSAE30ofSAE10W-30
API-onderhoudsclassicatie
1.Plaatsdemachineopeenhorizontaaloppervlak.
2.ZieVoorbereidingenvooronderhoudswerk-
zaamheden(bladz.15).
reinigingsolie
SJofhoger
Figuur24
1.Lippenvanvergrendeling
2.Papierelement
2.Openhetdeksel.
3.Verwijderhetpapierelementenhetschuimlter
(Figuur24).
4.Inspecteerhetschuimlterenvervangditalshet
beschadigdofheelergvuilis.
5.Inspecteerhetpapierenluchtlterelement.
3.Schuimlter
•Alshetluchtlterisbeschadigdofnatisvan
olieofbrandstof,moetuhetltervervangen.
•Alshetluchtltervuilis,kloperdaneenpaar
keermeeopeenhardeondergrondofblaas
metpersluchtondereendrukvanminder
dan2,07bardoordezijdevanhetlterdat
naardemotorisgericht.
3.Verwijderdepeilstokdoordedoplinksomte
draaieneneruittetrekken(Figuur25).
g011722
g235096
Figuur25
4.Kanteldemachineopdezijkant(methet
luchtlternaarboven)omdeoudeolieuitde
vulbuistelatenlopen(Figuur25).
Opmerking:Borstelhetvuilnietuithetlter,
alsuborsteltwordthetvuilindevezelsgeduwd.
16
Page 77

Onderhoudvandebougie
Onderhoudsinterval:Omde100bedrijfsuren
GebruikeenChampionRN9YCbougieofeenbougie
vaneenequivalenttype.
1.Zetdemotoruitenwachttotdatallebewegende
onderdelentotstilstandgekomenzijn.
2.Verwijderdebougiekabelvandebougie(Figuur
22).
3.Maakdeomgevingvandebougieschoon.
4.Haaldebougieuitdecilinderkop.
Belangrijk:Alsdebougiegebarstenofvuil
is,moetdezewordenvervangen.Umag
deelektrodennietreinigenomdathierdoor
gruisindecilinderterechtkankomen.Dit
leidtmeestaltotbeschadigingvandemotor.
Figuur26
5.Nadatdegebruikteolieisafgetapt,zetude
maaimachineterugindewerkstand.
6.Gietlangzaamongeveer¾vandeinhoudvan
hetoliecarterindevulbuis.
7.Wacht3minutentotdeolieindemotorgezakt
is.
8.Veegdepeilstokmeteenschonedoekschoon.
9.Steekdepeilstokindevulbuis,maardraaihem
ernietin.Verwijderdandepeilstok.
10.Leeshetoliepeilafvandepeilstok(Het
motoroliepeilcontroleren(bladz.8)).
•Alshetpeilopdepeilstoktelaagstaat,giet
danvoorzichtigeenkleinehoeveelheidolie
indevulbuis,wacht3minutenenherhaal
stappen8totenmet10totdatdepeilstok
hetjuistepeilaangeeft.
•Alshetoliepeilopdepeilstoktehoogis,tapt
udeovertolligeolieaftotdepeilstokhet
juisteoliepeilaangeeft.
g012139
5.Steldeelektrodenafstandinop0,76mmzoals
getoondinFiguur27.
g000533
Figuur27
1.Centraleelektrodemet
isolator
2.Massa-elektrode
3.Elektrodenafstand(nietop
schaalweergegeven)
6.Plaatsdebougie.
7.Draaidebougievastmeteentorsievan20N·m.
8.Sluitdebougiekabelaanopdebougie.
Belangrijk:Alshetoliepeilinhetmotorte
hoogoftelaagisenulaatdemotortoch
draaien,kuntudezebeschadigen.
11.Plaatsdepeilstokgoedindevulbuis.
12.Recycleerdegebruikteolieopdejuistewijze.
17
Page 78

Hetmaaimesvervangen
Onderhoudsinterval:Jaarlijks
Belangrijk:Uhebteenmomentsleutelnodigom
hetmesopcorrectewijzetemonteren.Alsugeen
momentsleutelhebtofnietgoedweethoeude
montagemoetuitvoeren,kuntucontactopnemen
meteenerkendeservicedealer.
Controleerhetmeswanneerdebrandstoftankleeg
is.Eenbeschadigdofgescheurdmesmoetdirect
wordenvervangen.Alsdesnijrandbotisofbramen
vertoont,moetuhetmeslatenslijpenenbalanceren
ofhetmesvervangen.
WAARSCHUWING
Hetmaaimesisscherp,contactmethet
maaimeskanernstiglichamelijkletsel
veroorzaken.
Gebruikhandschoenenalsuhetmes
monteert.
1.ZieVoorbereidingenvooronderhoudswerk-
zaamheden(bladz.15).
2.Kanteldemaaimachineopzijnzijmethet
luchtlternaarboven.
3.Gebruikeenblokhoutomhetmesstiltehouden
(Figuur28).
g231390
Figuur29
Belangrijk:Degebogenuiteindenvanhet
mesmoetennaardemachinewijzen.
6.Gebruikeenmomentsleutelomdemesbout
vasttedraaienmet82N·m.
Belangrijk:Eenboutdieisaangetrokken
tot82N·mzitergvast.Zethetmesvastmet
eenstukhoutenplaatsuwvollegewicht
achterde(dop)sleutelomdeboutgoedvast
tedraaien.Hetisergmoeilijkomdezebout
tevasttedraaien.
Figuur28
4.Verwijderhetmesenbewaaralle
bevestigingselementen(Figuur28).
5.Monteerhetnieuwemesenalle
bevestigingselementen(Figuur29).
g231389
18
Page 79

Stalling
5.Controleerhetoliepeilindemotor;zieHet
motoroliepeilcontroleren(bladz.8).
Staldemaaimachineopeenkoele,schone,droge
plaats.
Voorbereidingenvoor stalling
1.Voegdelaatstekeerinhetseizoendatu
brandstoftoevoegtookeenstabilizer(zoals
ToroPremiumFuelTreatment)toevolgensde
voorschriftenophetetiket.
2.Umoetongebruiktebrandstofopdejuistewijze
afvoeren.Voerdezebrandstofafvolgensde
plaatselijkgeldendevoorschriftenofgebruik
dezevooruwauto.
Opmerking:Oudebrandstofindetankis
debelangrijksteoorzaakvoorstartproblemen.
Bewaarbrandstofzonderstabilizernietlanger
dan30dagenenbrandstofwaaraanstabilizeris
toegevoegdnietlangerdan90dagen.
3.Laatdemotorlopentotdathijafslaatdoor
gebrekaanbrandstof.
6.Vuldebrandstoftankmetversebrandstof;zie
Brandstoftankvullen(bladz.7).
7.Sluitdebougiekabelaanopdebougie.
4.Startdemotoropnieuwenlaathemlopentotdat
hijafslaat.Alsdemotornietmeerwilstarten,is
debrandstofvoldoendeverbruikt.
5.Maakdekabellosvandebougieenbevestigde
kabelaandesteunstang(indienaanwezig).
6.Verwijderdebougie,giet30mlmotoroliein
debougieopeningentrekverschillendekeren
langzaamaanhetstartkoordomdeolieoverde
cilinderwandteverspreidenteneindecorrosiein
destallingsperiodetevoorkomen.
7.Monteerdebougiezonderdezevasttedraaien.
8.Draaiallemoeren,boutenenschroevengoed
aan.
Demaaimachineuitde stallinghalen
1.Controleerallebevestigingenendraaideze
vast.
2.Verwijderdebougiesenlaatdemotorsnel
draaiendooraandehandgreepvanhet
startkoordtetrekkenomdeovermatigeolieuit
decilinderteverwijderen.
3.Plaatsdebougieendraaihemmetbehulpvan
eenmomentsleutelvastmeteentorsievan
20N·m.
4.Voerdeonderhoudsproceduresuit;zie
Onderhoud(bladz.15).
19
Page 80

PrivacyverklaringvoorEuropa
DeinformatiedieToroverzamelt
ToroWarrantyCompany(Toro)respecteertuwprivacy .Omuwaanspraakopgarantietebehandelenencontactmetuoptenemeninhetgevalvaneen
terugroepactievragenwijombepaaldepersoonlijkeinformatie,hetzijdirectofviauwlokaleT orodealer.
HetTorogarantiesysteemwordtgehostopserversindeVerenigdeStaten,waardeprivacywetmogelijknietdezelfdebeschermingbiedtalsinuwland.
DOORUWPERSOONLIJKEGEGEVENSMETONSTEDELENSTEMTUINMETDEVERWERKINGV ANUWPERSOONSGEGEVENSZOALS
BESCHREVENINDEZEPRIV ACYVERKLARING.
HoeT oroinformatiegebruikt
Torokanuwpersoonsgegevensgebruikenomuwaanspraakopgarantietebehandelen,contactmetuoptenemeninhetgevalvaneenterugroepactie,
ofvooreenanderdoeleindewaarvanweuopdehoogtebrengen.T orokanuwinformatiedelenmetzijnafdelingen,dealersofanderezakenpartnersin
verbandmetdezeactiviteiten.Weverkopenuwpersoonsgegevensnietaananderebedrijven.Webehoudenonshetrechtvoorompersoonsgegevenste
delenteneindetevoldoenaangeldendewettenenverzoekenvandeaangewezenautoriteiten,opdatwijonzesystemennaarbehorenkunnengebruiken
ofmethetoogoponzeeigenbeschermingofdievananderegebruikers.
Behoudvanuwpersoonlijkeinformatie
Wijbewarenuwpersoonsgegevenszolangalsnodigisvoordedoeleindenwaarvoorzeoorspronkelijkwerdenverzameldofvooranderelegitieme
doeleinden(zoalsnalevingvanvoorschriften),ofzolangalsvereistisdoordevantoepassingzijndewet.
Toro'sengagementvoordebeschermingvanuwpersoonlijkeinformatie
Wijnemenredelijkevoorzorgenomuwpersoonlijkeinformatietebeschermen.Weproberenbovendiendenauwkeurigheidengeldigheidvan
persoonlijkegegevenstewaarborgen.
Toegangtotenwijzigingvanuwpersoonsgegevens
Alsutoegangwilttotuwpersoonsgegevensofdezewiltwijzigen,gelievedaneene-mailtesturennaarlegal@toro.com.
Australischeconsumentenwet
AustralischeklantenkunnenvoorinformatieoverdeAustralischeconsumentenwet(AustralianConsumerLaw)terechtbijdelokaleToroverdelerofze
kunnendezeinformatieindedoosvinden.
374-0282RevC
 Loading...