

Page 1
53cm Super Recycler
Lawn Mower
Model No. 20793—Serial No. 250000001 and Up
Model No. 20795—Serial No. 250000001 and Up
Introduction
Read this manual carefully to learn how to operate
and maintain your product properly and to avoid injury
and product damage. You are responsible for
operating the product properly and safely.
You may contact Toro directly at www.toro.com for
product and accessory information, help finding a
dealer, or to register your product.
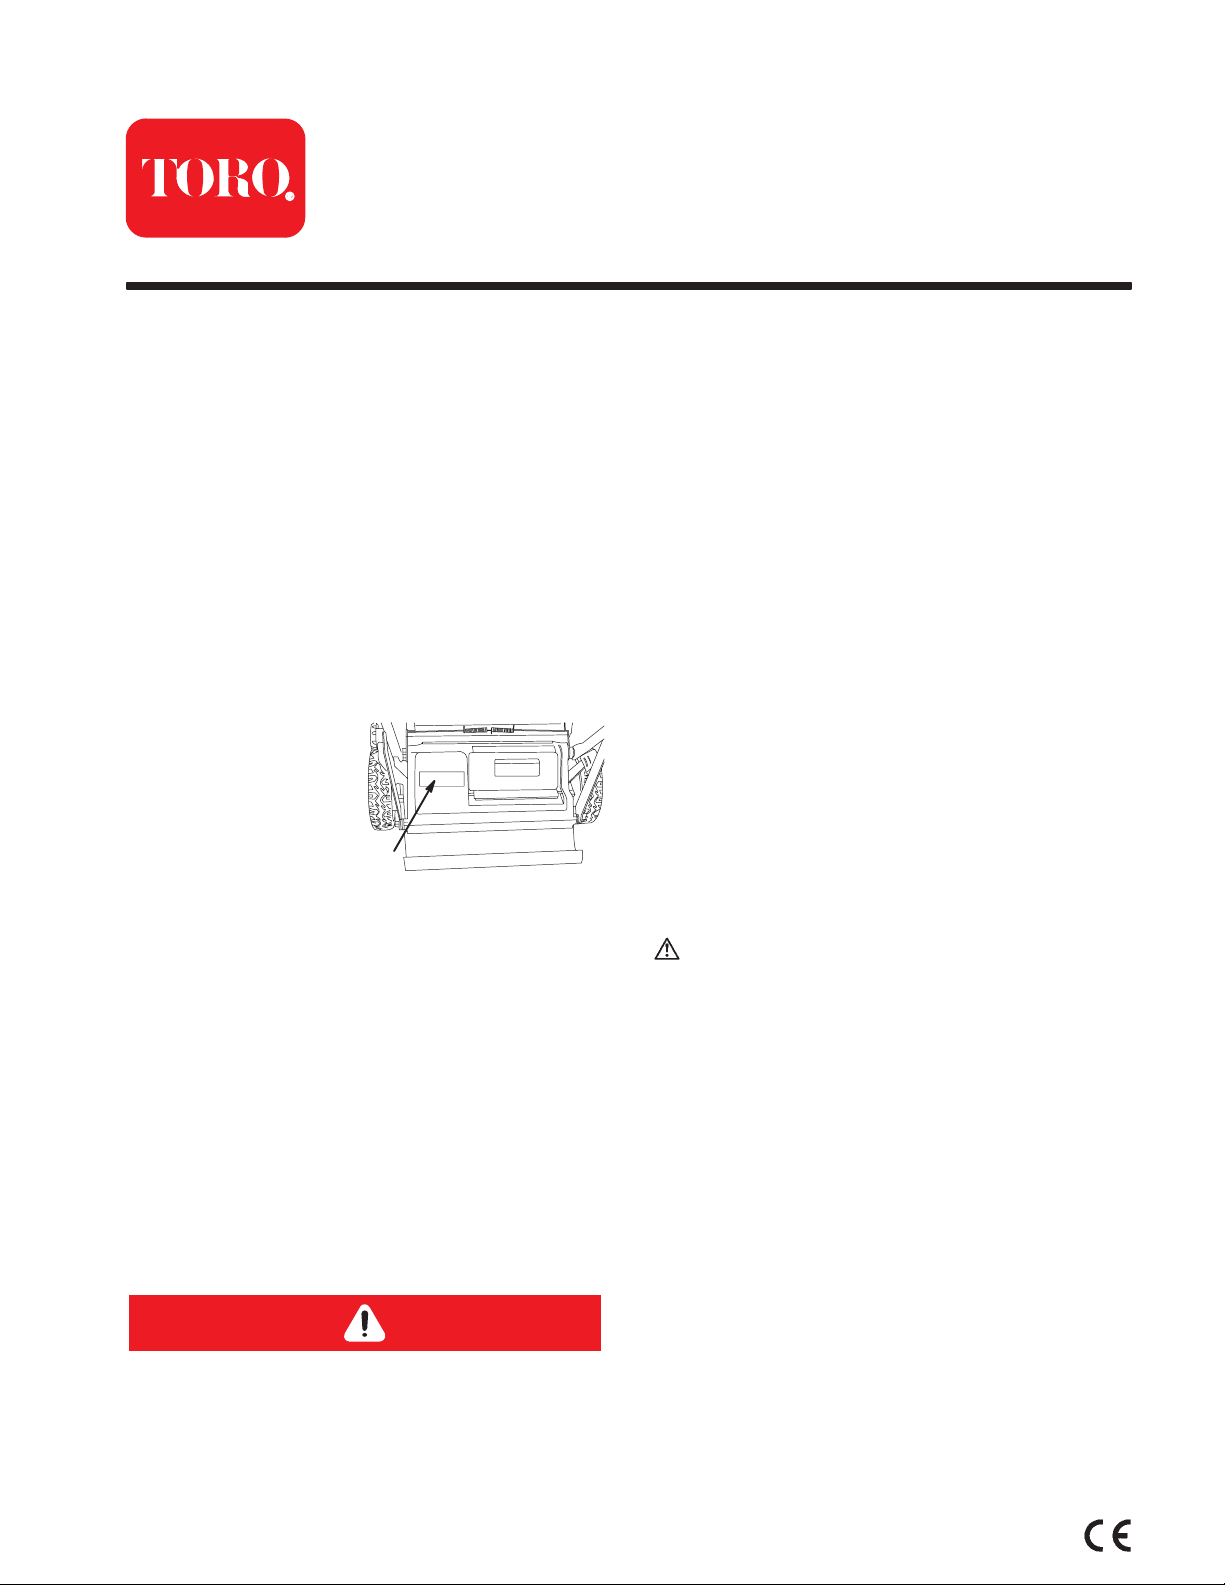
Whenever you need service, genuine Toro parts, or
additional information, contact an Authorized Service
Dealer and have the model and serial numbers of
your product ready. The illustration below identifies
the location of the model and serial numbers on the
product. Write the numbers in the space provided
below:
Form No. 3353-459 Rev A
)
Operator’s Manual
Important: This engine is not equipped with a spark
arrester muffler. It is a violation of California Public
Resource Code Section 4442 to use or operate this
engine on any forest-covered, brush-covered or
grass-covered land. Other states or federal areas
may have similar laws.
This spark ignition system complies with Canadian
ICES-002.
Ce système d’allumage par étincelle de véhicule est
conforme à la norme NMB-002 du Canada.
The enclosed Engine Owner’s Manual is supplied for
information regarding The U.S. Environmental
Protection Agency (EPA) and the California Emission
Control Regulation of emission systems, maintenance
and warranty. Replacements may be ordered through
the engine manufacturer.
Model #:
Serial #:
m-8102
This manual identifies potential hazards and has
safety messages identified by the following words:
• Danger signals an extreme hazard that will
cause serious injury or death if you do not follow
the recommended precautions.
• Warning signals a hazard that may cause
serious injury or death if you do not follow the
recommended precautions.
• Caution signals a hazard that may cause minor
or moderate injury if you do not follow the
recommended precautions.
This manual uses two other words to highlight
information. Important: calls attention to special
mechanical information and Note: emphasizes
general information worthy of special attention.
The engine exhaust from this product contains
chemicals known to the State of California to
cause cancer, birth defects, or other reproductive
harm.
Safety
This lawn mower meets or exceeds the EN 836 and
the ISO 5395 standards in effect at the time of
production.
Read and understand the contents of this manual
before the engine is ever started.
This is the safety alert symbol. It is used to
alert you to potential personal injury hazards.
Obey all safety messages that follow this symbol
to avoid possible injury or death.
Improperly using or maintaining this mower
could result in injury or death. To reduce this
potential, comply with the following safety
instructions.
The following instructions have been adapted from
ANSI/OPEI standard B71.1 and ISO standard 5395.
General Operation
• Read, understand, and follow all instructions on
the machine and in the manual. Be thoroughly
familiar with the controls and the proper use of
the mower before starting.
• Do not put hands or feet near or under rotating
parts. Keep clear of the discharge opening at all
times.
2005 by The Toro Company
8111 Lyndale Ave., Bloomington, MN 55420, USA
Printed in the USA
All Rights Reserved
Register your product at www.toro.com
Original Instructions (EN)
Page 2

2
• Only allow responsible individuals, who are
familiar with the instructions, to operate the
mower.
• Clear the area of objects such as rocks, toys,
wire, bones, sticks etc., which could be picked up
and thrown by the blade.
• Be sure the area is clear of other people before
mowing. Stop mower if anyone enters the area.
• Do not operate the mower when barefoot or
wearing open sandals. Always wear substantial
foot wear.
• Do not pull the mower backward unless
absolutely necessary. Look down and behind
before and while moving backward.
• Do not operate the mower without proper guards,
plates, grass catcher or other safety protective
devices in place.
• See the Toro instructions for proper operation and
installation of accessories. Only use Toro
accessories.
• Stop the blade when crossing gravel drives,
walks, or roads.
• Stop the engine whenever you leave the
equipment, before cleaning the mower or
unclogging the chute.
• Shut the engine off and wait until the blade comes
to complete stop before removing grass catcher.
• Mow only in daylight or good artificial light.
• Do not operate the mower while under the
influence of alcohol or drugs.
• Never operate mower in wet grass. Always be
sure of your footing; keep a firm hold on the
handle and walk; never run.
• Never pick up or carry a lawn mower while the
engine is running.
• Disengage the self-propelled mechanism before
starting the engine.
• If the equipment should start to vibrate
abnormally, stop the engine and check
immediately for the cause. Vibration is generally a
warning of trouble.
• Always wear safety goggles or safety glasses
with side shields when operating mower.
• Remove objects such as rocks, tree limbs, etc.
Watch for holes, ruts, or bumps. Tall grass can
hide obstacles.
• Do not mow near drop-offs, ditches, or
embankments. The operator could lose footing or
balance.
• Do not mow excessively steep slopes.
• Do not mow on wet grass. Reduced footing could
cause slipping.
Children
Tragic accidents can occur if the operator is not alert
to the presence of children. Children are often
attracted to the mower and the mowing activity. Never
assume that children will remain where you last saw
them.
• Keep children out of the mowing area and under
the watchful care of a responsible adult
• Be alert and turn mower off if children enter the
area.
• Before and while moving backward, look behind
and down for small children.
• Never allow children to operate the mower.
• Use extra care when approaching blind corners,
shrubs, trees, or other objects that may obscure
vision.
Service
• Use extra care in handling gasoline. It is
flammable and vapors are explosive.
• Use only an approved container.
• Never remove gas cap or add fuel with the
engine running. Allow engine to cool before
refueling. Do not smoke.
• Never refuel the machine indoors.
• Never store the machine or fuel container
inside where there is an open flame, such as
a water heater.
• Never run an engine inside a closed area.
Slope Operation
• Slopes are a major factor related to slip and fall
accidents which can result in severe injury. All
slopes require extra caution. If you feel uneasy on
a slope, do not mow it.
• Mow across the face of slopes; never up and
down. Exercise extreme caution when changing
direction on slopes.
Exhaust contains carbon monoxide, an odorless,
deadly poison that can kill you.
Do not run the engine indoors or in an enclosed
area.
• Never make adjustments or repairs with the
engine running. Disconnect the spark plug wire,
and keep the wire away from the plug to prevent
accidental starting.
3353-459 Rev A
Page 3
3
• Keep all nuts and bolts, especially blade
attachment bolts, tight and keep equipment in
good condition.
• Never tamper with safety devices. Check their
proper operation regularly.
• Keep mower free of grass, leaves, or other debris
build-up. Clean up oil or fuel spillage. Allow
mower to cool before storing.
• Stop and inspect the equipment if you strike an
object. Repair, if necessary, before restarting.
• Never attempt to make wheel height adjustments
while the engine is running.
• Grass catcher components are subject to wear,
damage, and deterioration, which could expose
moving parts or allow objects to be thrown.
Frequently check components and replace with
genuine Toro parts, when necessary.
• Mower blades are sharp and can cut. Wrap the
blade or wear gloves, and use extra caution when
servicing them.
• Replace a faulty muffler.
• Do not change the engine governor setting or
overspeed the engine.
Sound Pressure
This unit has a maximum sound pressure level at the
operator’s ear of 89 dBA, based on measurements of
identical machines per EN 11094 and EN 836.
Sound Power
This unit has a guaranteed sound power level of
100 dBA, based on measurements of identical
machines per EN 11094.
Vibration
This unit does not exceed a hand/arm vibration level
of 7.0 m/s2, based on measurements of identical
machines per EN 1033.
Safety/Instruction Decals
Important: Safety and instruction decals are located near areas of potential danger. Replace damaged decals.
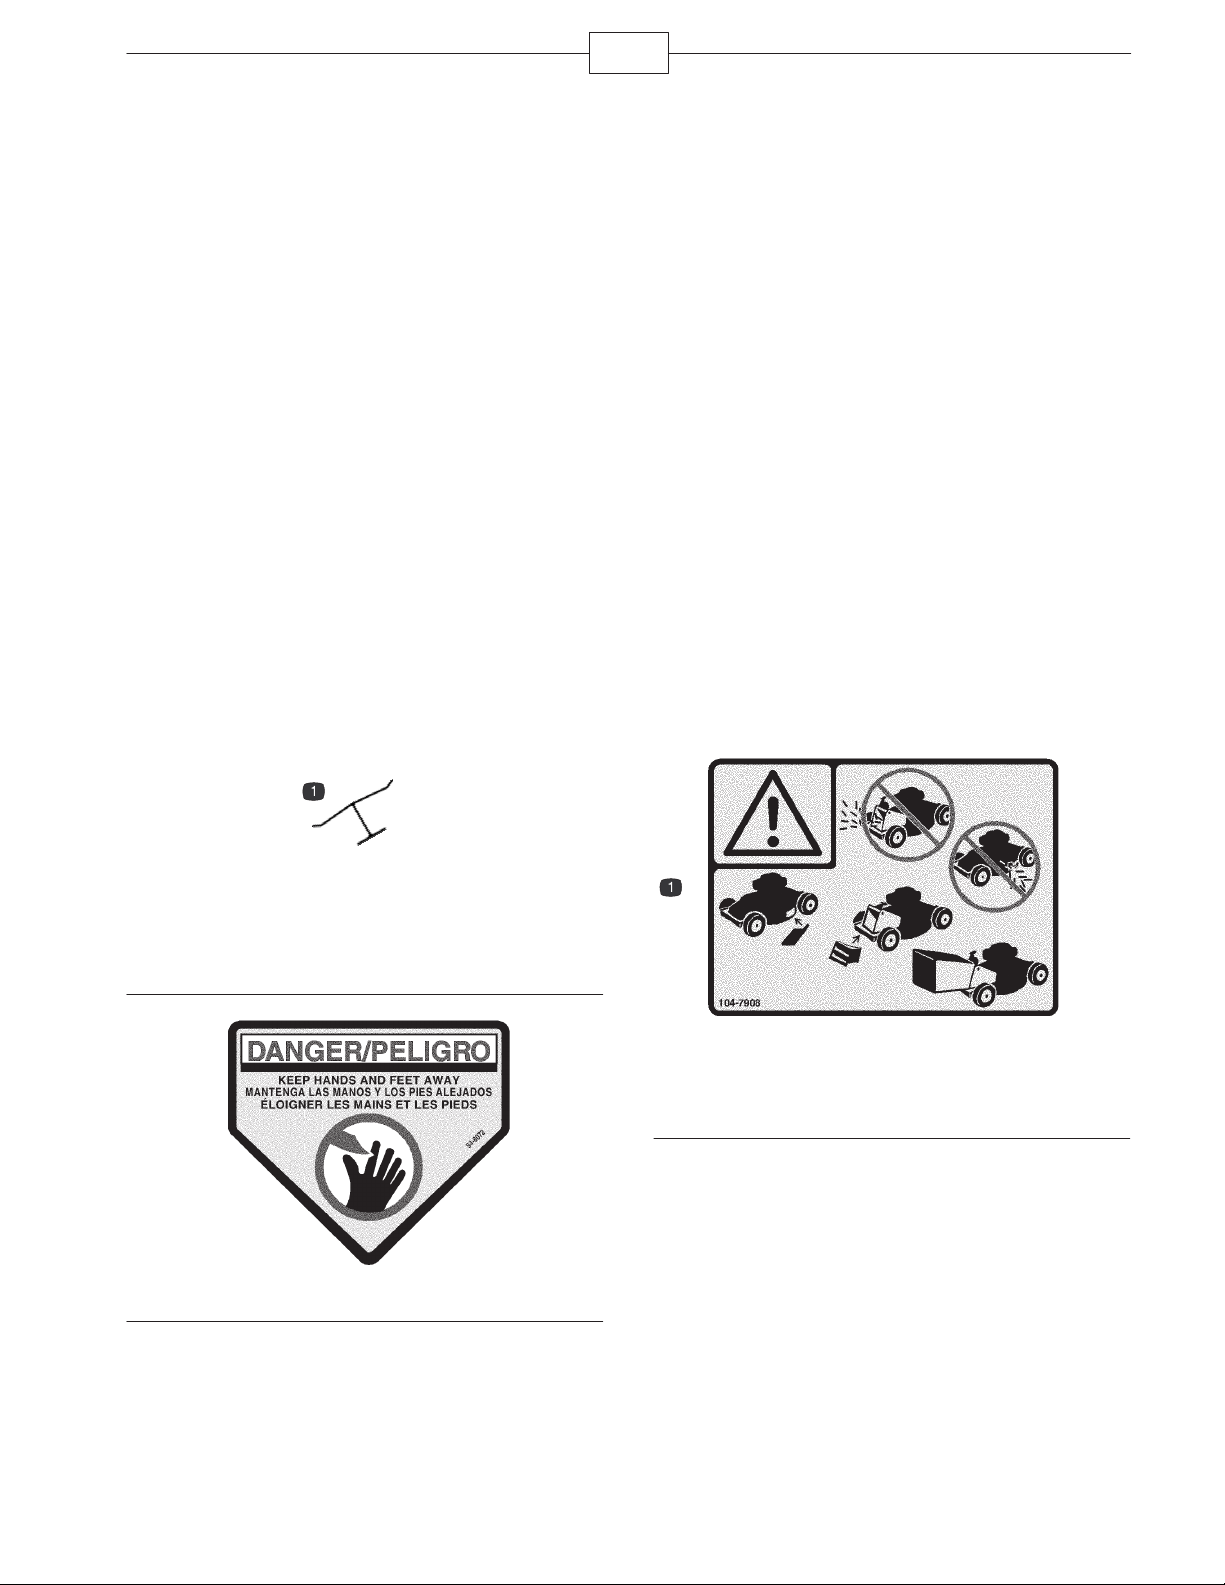
Manufacturer’s Mark
1. Indicates the blade is identified as a part from the original
machine manufacturer.
104-7908
1. Warning—do not operate the mower without the rear discharge
plug or bag in place; do not operate the mower without the side
discharge cover or deflector in place.
94-8072
3353-459 Rev A
Page 4
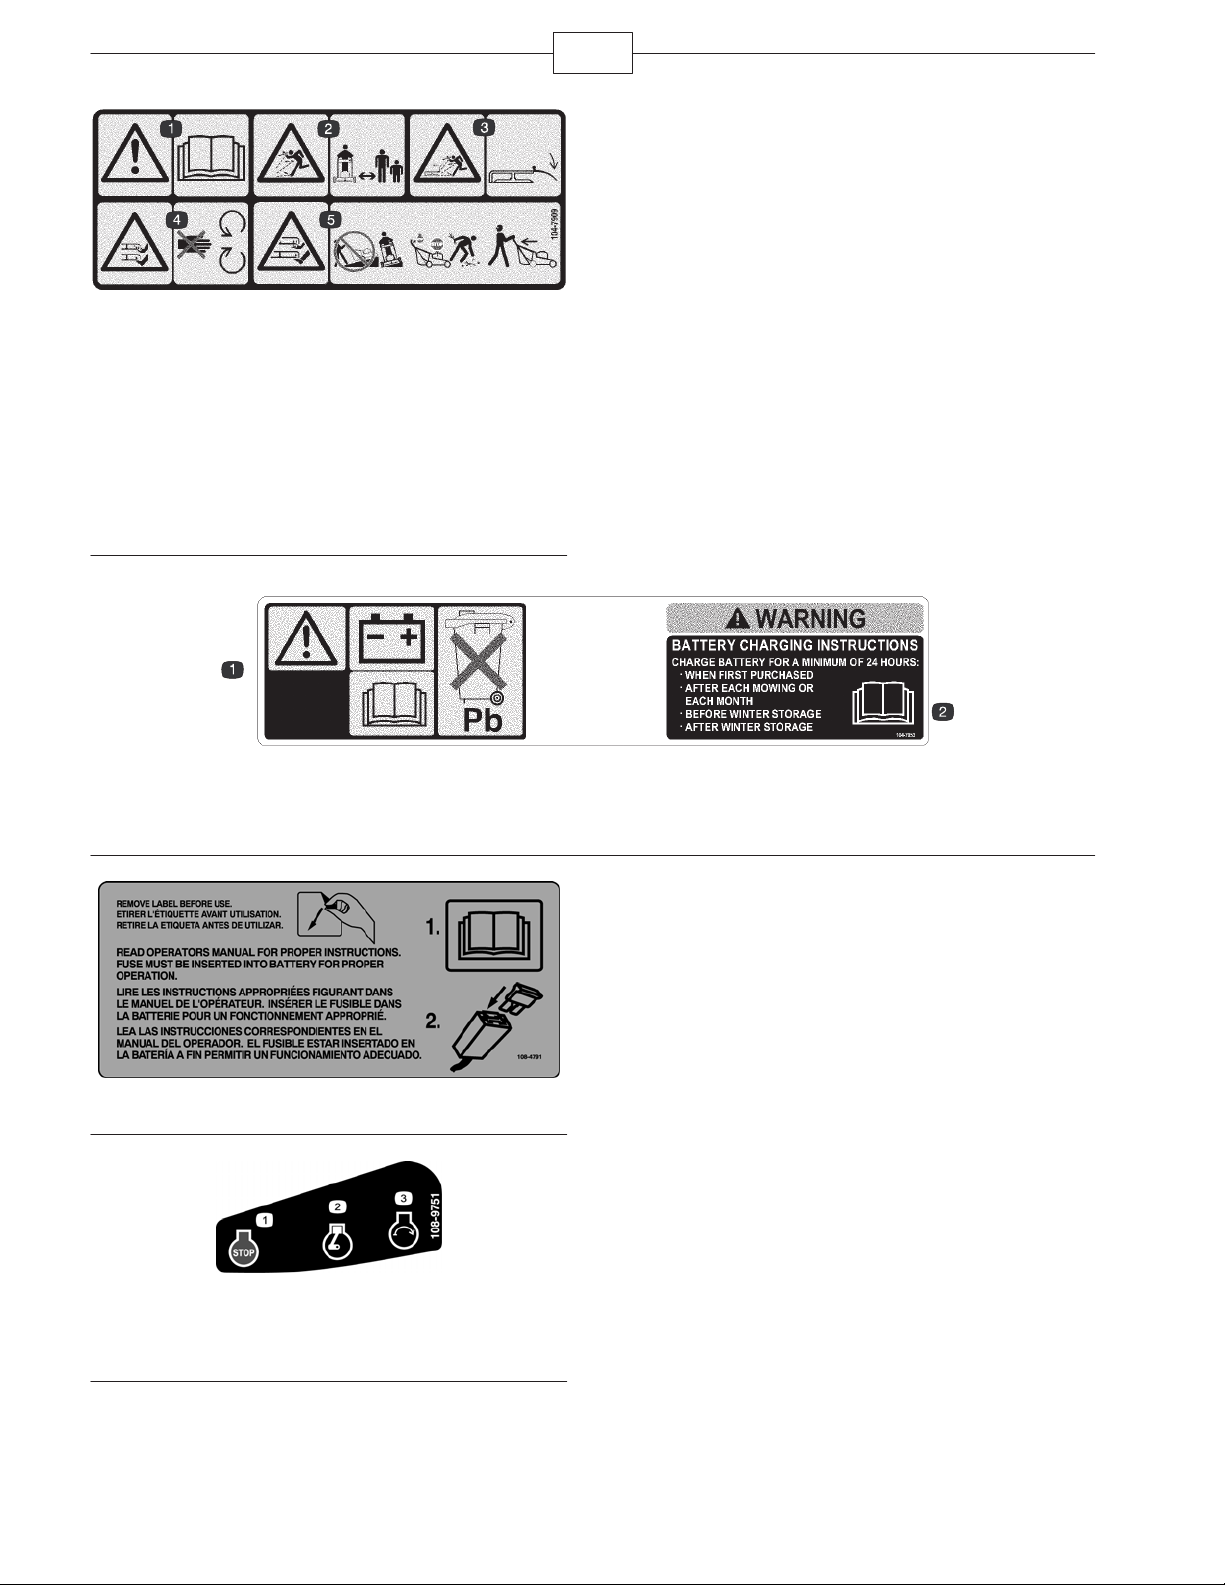
104-7909
1. Warning—read the Operator’s Manual.
2. Thrown object hazard—keep bystanders a safe distance from
the machine.
3. Thrown object hazard, mower—keep the deflector in place.
4. Cutting/dismemberment hazard of hand or foot, mower
blade—stay away from moving parts.
5. Cutting/dismemberment hazard of hand or foot, mower
blade—do not operate up and down slopes; operate side to side
on slopes; stop the engine before leaving the operating position;
and look behind you when backing.
4
104-7953 (model 20795 only)
1. Warning—read the Operator’s Manual for information on charging the battery; contains lead; do not discard.
2. Read the Operator’s Manual.
108-4791 (model 20795 only)
108-9751
1. Engine—stop
2. Engine—run
3. Engine—start
3353-459 Rev A
Page 5
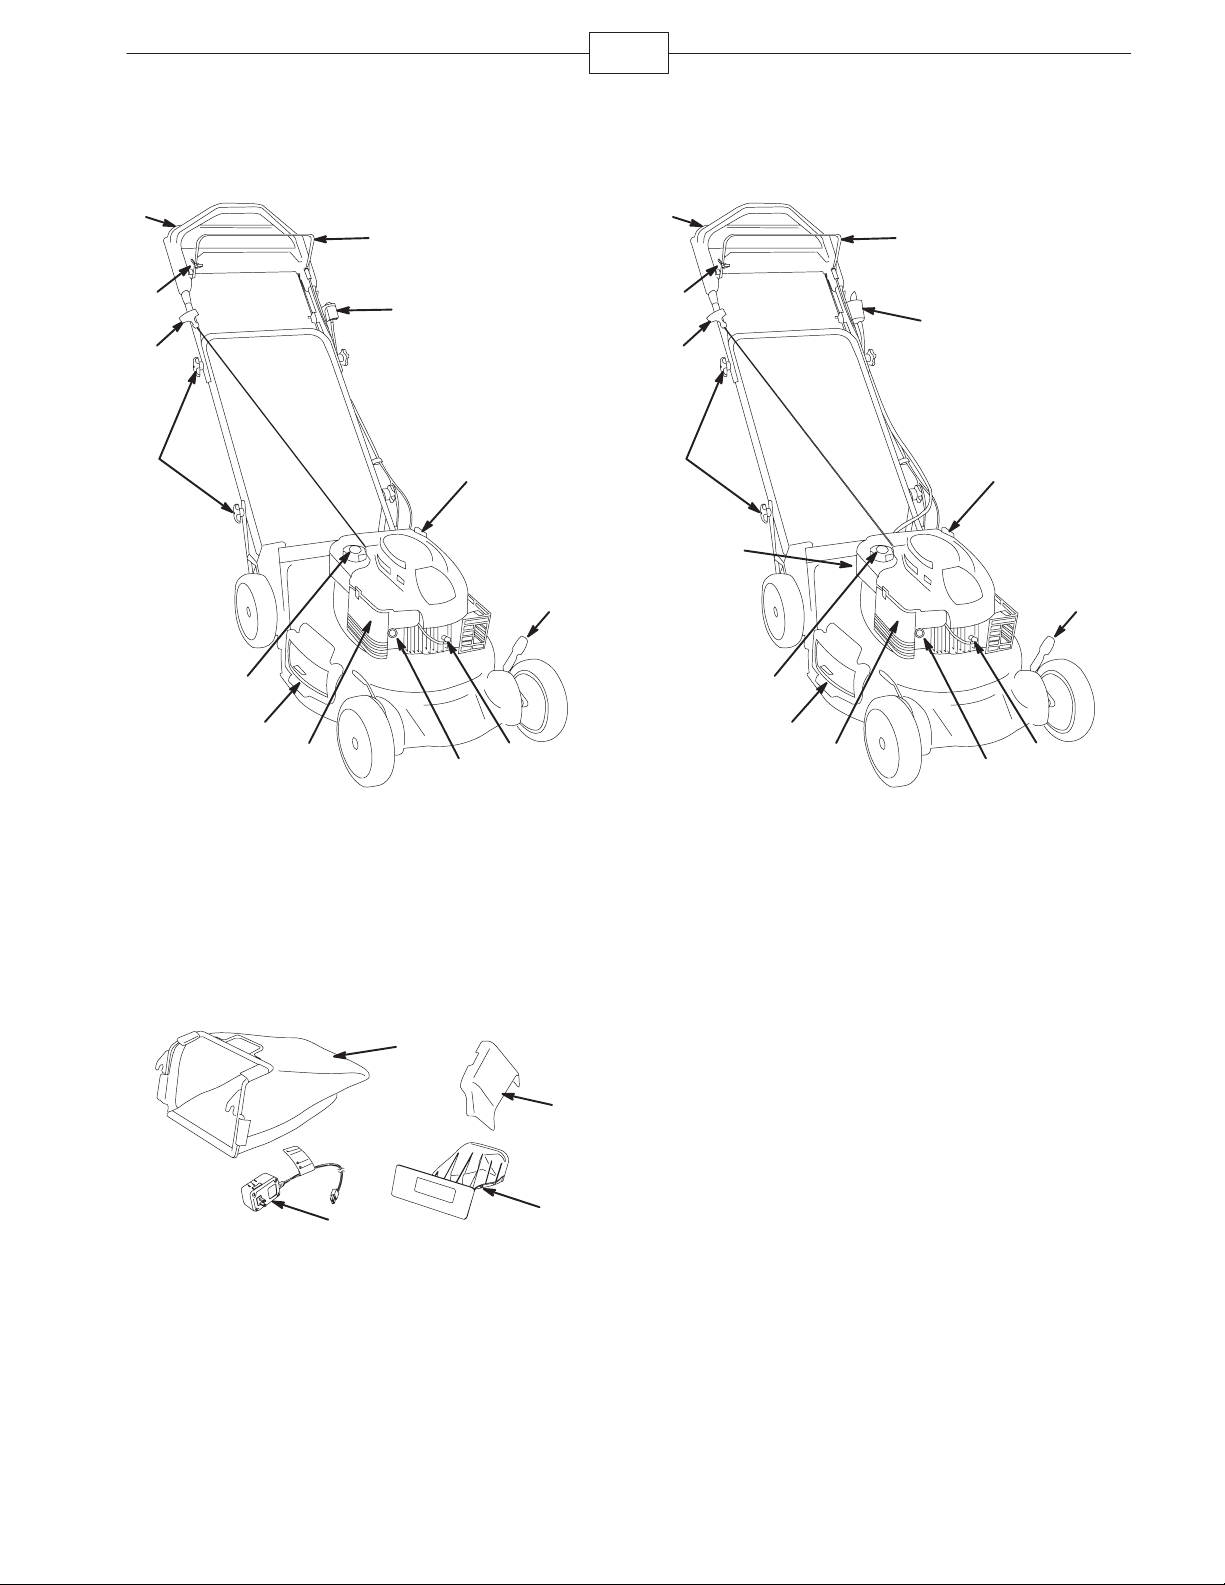
Product Overview
5
Model 20793
1
2
3
4
Model 20795
1
13
12
2
14
13
3
11
4
12
5
10
5
6
7
9
8
m-8206
6
7
8
9
10
11
m-8192
1. Upper handle
2. Control bar lock
3. Recoil start handle
4. Upper and lower handle
knobs (4)
5. Fuel tank cap
6. Side discharge
Models 20793 and 20795
3
1. Grass bag
2. Side discharge chute
3. Battery charger
(model 20795 only)
7. Air filter
8. Primer
9. Spark plug
10. Cutting height lever (4)
11. Oil fill/Dipstick
12. Ignition toggle switch
13. Blade control bar
1
4
m-5630/m-5637/m-8092
4. Rear discharge plug
(installed)
1. Upper handle
2. Control bar lock
3. Recoil start handle
4. Upper and lower handle
knobs (4)
5. Battery (not shown)
6. Fuel tank cap
7. Side discharge
8. Air filter
9. Primer
10. Spark plug
11. Cutting height lever (4)
12. Oil fill/Dipstick
13. Electric starter
14. Blade control bar
2
3353-459 Rev A
Page 6
Setup
6
Important: Remove and discard the protective plastic
sheet that covers the engine.
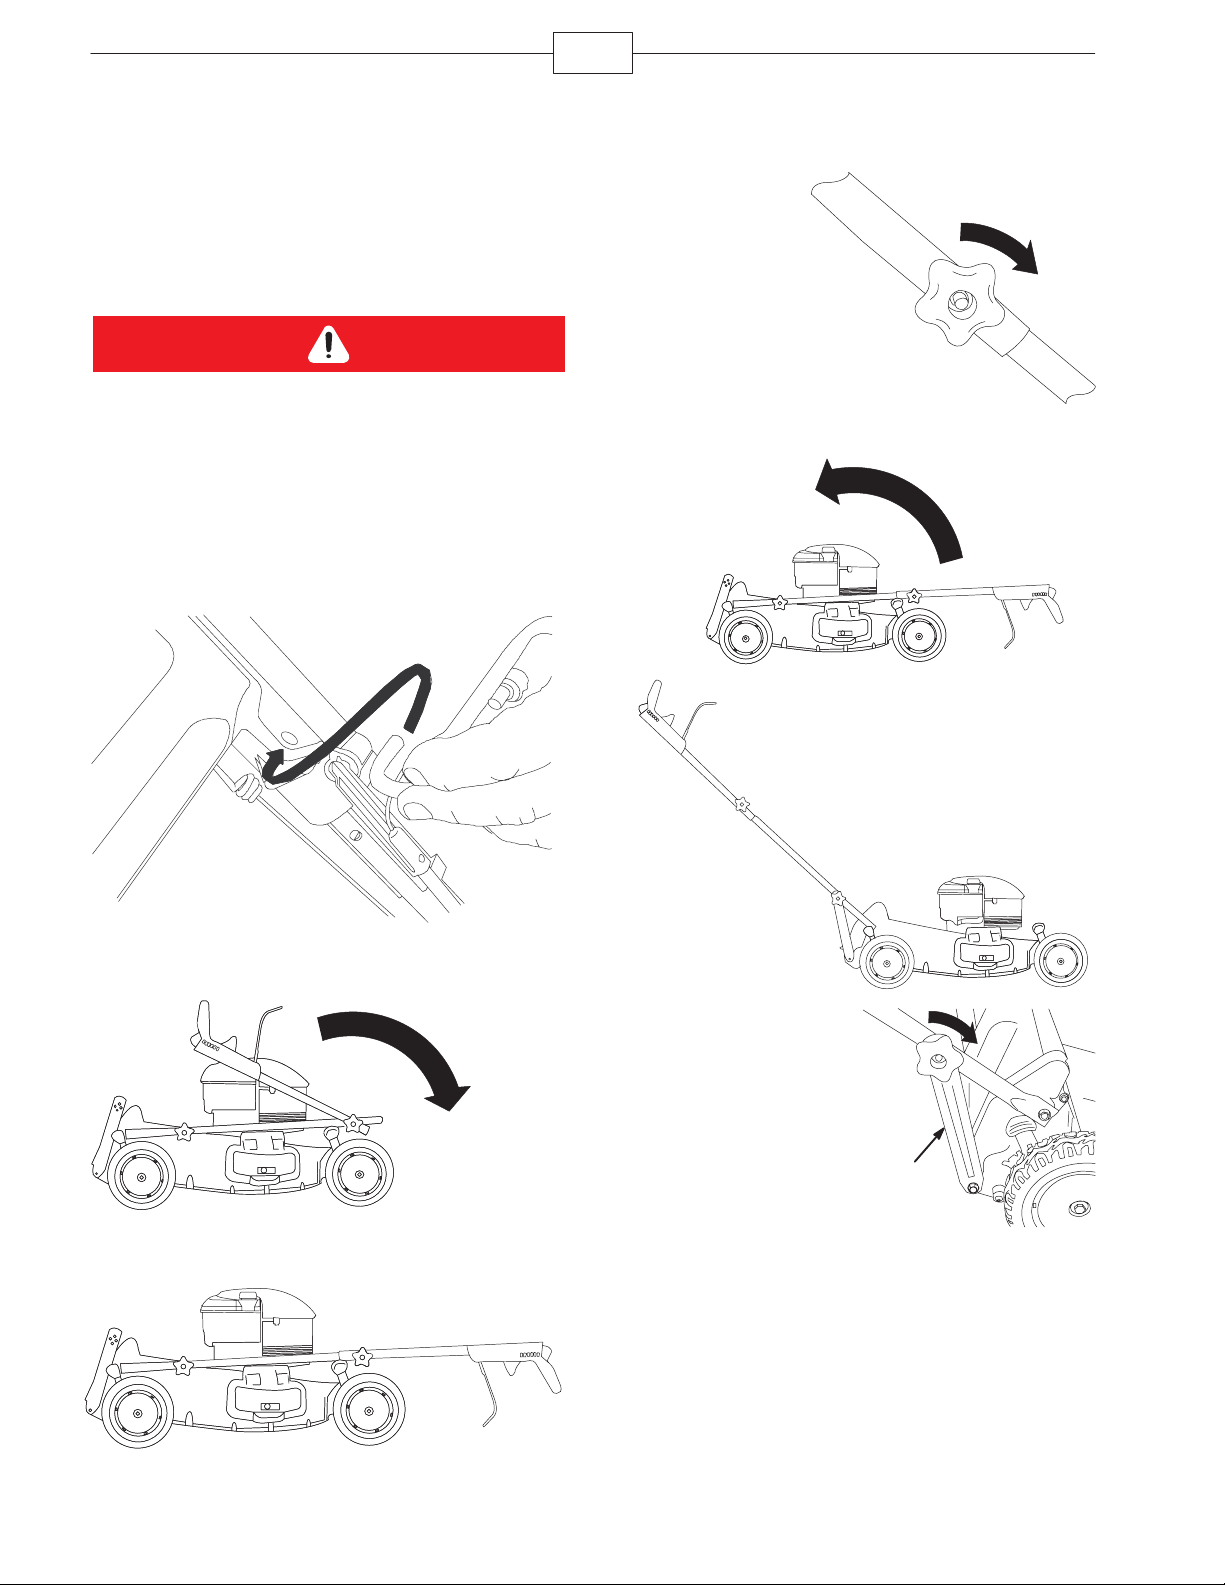
Unfolding the Handle
Folding or unfolding the handle improperly can
damage the cables, causing an unsafe operating
condition.
S Do not damage the cables when folding or
unfolding the handle.
S If a cable is damaged, contact an Authorized
Service Dealer.
1. Install the blade control bar into the upper handle.
3. Tighten the
upper handle
knobs as tight as
you can.
m-8095
4. Rotate the handle rearward.
A.
m-8109
B.
m-8233
2. Carefully move the upper handle forward until the
handle halves are in line and nest together.
A.
m-8108
B.
m-8109
m-8110
5. Attach the handle
brackets (A) to the lower
handle sides.
Note: Insert a lock
washer between
each bracket and
knob, and tighten the
lower handle knob as
tight as you can by
hand.
A
m-8097
3353-459 Rev A
Page 7

Filling the Engine with Oil
7
Important: Your mower does not come with oil in the
engine.
1. Remove the dipstick.
m-8098
m-8099/m-5571
Before Operating
2. Slowly pour oil into the oil fill tube until the oil
level reaches the Full line on the dipstick. Do not
overfill. (Max. fill: 0.65 l, type: SAE 30W detergent oil
with an API service classification of SF, SG, SH, SJ,
SL, or higher.)
3. Install the dipstick securely.
Important: Change the engine oil after the first
5 operating hours; change it yearly thereafter. Refer
to Changing the Engine Oil on page 17.
Gasoline is extremely flammable and explosive. A fire or explosion from gasoline can
burn you and others.
S To prevent a static charge from igniting the gasoline, place the container and/or
mower directly on the ground before filling, not in a vehicle or on an object.
S Fill the tank outdoors when the engine is cold. Wipe up spills.
S Do not handle gasoline when smoking or around an open flame or sparks.
S Store gasoline in an approved fuel container, out of the reach of children.
Adjusting the cutting height may bring you into contact with the moving blade, causing
serious injury.
S Stop the engine and wait for all moving parts to stop.
S Do not put your fingers under the housing when adjusting the cutting height.
3353-459 Rev A
Page 8

8
Installing the Fuse
Model 20795 only
Your mower comes with a 40-amp fuse that protects
the electric starter.
Important: You cannot start the mower with the
electric starter or charge the battery unless you install
the fuse.
1. Unclip both
ends of the battery
cover and
remove it.
m-5621
Note: Remove the temporary decal from the
battery cover.
2. Install the fuse in
the fuse holder as
shown.
Note: Your mower
comes with a fuse in
your owner’s packet and
another fuse in the
battery box.
3. Install the battery cover.
m-4796
Filling the Fuel Tank
Fill the fuel tank with fresh unleaded regular gasoline
from a major name-brand service station.
Important: To reduce starting problems, add fuel
stabilizer to the fuel all season, mixing it with gasoline
less than 30 days old.
1/2 in. (1 cm)
m-?
m-8099/m-5571
Checking the Engine Oil
Level
1. Remove the dipstick, wipe it clean, and fully
install the dipstick.
Charging the Battery
Model 20795 only
Refer to Charging the Battery on page 17.
m-8098
m-8099/m-5571
2. Remove the dipstick and check the oil level. If the
oil level is below the Add mark on the dipstick,
slowly pour oil into the oil fill tube to raise the oil level
to the Full mark on the dipstick. Do not overfill.
(Max. fill: 0.65 l., type: SAE 30W detergent oil with an
API service classification of SF, SG, SH, SJ, SL, or
higher.)
3. Install the dipstick.
3353-459 Rev A
Page 9

Adjusting the Cutting Height
If the engine has been running, the muffler will be hot and can severely burn you.
Keep away from the hot muffler.
Adjust the cutting height
as desired. Set all four
wheels to the same
height.
Note: To raise the mower,
move all 4 cutting height
levers forward; to lower
the mower, move them all
rearward.
m-8098
9
m-5629a
m-8100
Adjusting the Handle Height
You may raise or lower the handle to a position
comfortable for you.
1. Remove the
lower handle knobs
and lock washers
that attach the
lower handle ends
to the handle
brackets.
m-8097
2. Insert the bolt
through the hole in each
of the handle brackets
that sets the handle to
the desired position.
Note: A is the
highest position; B
(either hole) is the
middle position; and
C is the lowest
position.
A
B
C
m-8101
A= 3 cm
B= 4 cm
C= 6 cm
E= 8 cm
F= 10 cm
G=11 cm
D= 7 cm
3. Install the lock
washers and lower
handle knobs and
tighten the knobs as
tight as you can.
Note: Ensure that
each lock washer is
between the handle
bracket and the
lower handle knob.
m-8097
3353-459 Rev A
Page 10

Operation
10
Starting the Engine
Model 20793 only
1. Push the
ignition toggle
switch to the On
(“I”) position.
2. Firmly push in
the primer 3 times
with your thumb,
holding the primer
in for a second
before releasing it
each time.
Note: If the air
temperature is
below 13°C, firmly
push the primer in
5 times.
3. Pull the recoil
starter in the
operating position.
m-8203
m-7311
Starting the Engine
Model 20795 only
1. Firmly push in
the primer 3 times
with your thumb,
holding the primer
in for a second
before releasing it
each time.
Note: If the air
temperature is
below 13°C, firmly
push the primer in
5 times.
2. Start the engine in one of two ways:
• Turn the
ignition key to
the Start
position; when
the engine
starts, release
the key.
• Turn the
ignition key to
the Run
position and
pull the recoil
starter in the
operating
position.
m-5592a
A.
m-5592a
m-7311
m-4268
m-4268
m-8208
4. If the mower does not start in 1 or 2 pulls, press
the primer button 1 or 2 times and try starting it again.
Note: If the mower still does not start, contact an
Authorized Service Dealer.
3353-459 Rev A
B.
m-8208
3. If the mower does not start in 1 or 2 pulls (or
within 5 seconds using the electric starter), press the
primer button 1 or 2 times and try starting it again.
Note: If the mower still does not start, contact an
Authorized Service Dealer.
Page 11

11
Using the Self-propel Drive
To operate the self-propel drive, simply walk with your
hands on the upper handle and your elbows at your
sides, and the mower will automatically keep pace
with you.
Note: You can self-propel the mower with the blade
engaged or disengaged.
m-8209
Stopping the Engine
Model 20795 only
1. Turn the key to
the Off position.
m-5592a
m-4268
2. When the engine stops, remove the ignition key
when you leave the mower.
Engaging the Blade
When you start your engine, the blade does not turn.
You must engage the blade to mow.
1. Pull the control
bar lock back.
Stopping the Engine
Model 20793 only
Push the ignition
toggle switch to the
Stop position.
m-8156
m-8200
2. Pull the blade
control bar (A) to
the handle.
A
m-5578
3. Hold the blade
control bar against
the handle.
m-5582
m-8203
3353-459 Rev A
Page 12

12
Disengaging the Blade
Release the blade control bar.
m-5582
Important: When you release the blade control bar,
the blade should stop within 3 seconds. If it does not
stop properly, stop using your mower immediately and
contact an Authorized Service Dealer.
Checking the Blade Brake
Control Operation
Check the control bar before each use to ensure that
the blade brake clutch (BBC) system is operating
properly.
Using the Grass Bag
You can use the grass bag to perform an additional
test to check the BBC mechanism.
1. Install the empty grass bag on the mower.
2. Start the engine.
3. Engage the blade.
Note: The bag should begin to inflate, indicating
that the blade is engaged and rotating.
4. Release the blade control bar.
Note: If the bag does not immediately deflate, the
blade is still rotating. The BBC mechanism may be
deteriorating and, if ignored, could result in an unsafe
operating condition. Have the mower inspected and
serviced by an Authorized Service Dealer.
5. Stop the engine and wait for all moving parts to
stop.
Not Using the Grass Bag
1. Move the mower onto a paved surface in a
non-windy area.
2. Set all 4 wheels to the E (8 cm) cut setting.
3. Take a half sheet of newspaper and crumple it
into a ball small enough to go under the mower
housing (about 8 cm in diameter).
13 cm
m-8202
4. Place the newspaper ball about 13 cm in front of
the mower.
5. Start the engine.
6. Engage the blade.
7. Release the blade control bar.
8. Immediately push the mower over the newspaper
ball.
9. Stop the engine and wait for all moving parts to
stop.
10. Go to the front of the mower and check the
newspaper ball.
Note: If the newspaper ball did not go under the
mower, repeat steps 4 through 10.
11. If the newspaper is unravelled or shredded, the
blade did not stop properly, which could result in an
unsafe operating condition. Contact an Authorized
Service Dealer.
Recycling the Clippings
Your mower comes from the factory ready to recycle
the grass and leaf clippings back into the lawn.
If the grass bag is on the mower, remove it (refer to
Removing the Grass Bag on page 13) before
recycling the clippings. If the side discharge chute is
on the mower, remove it and lock the side discharge
door (refer to Removing the Side Discharge Chute on
page 14) before recycling the clippings.
Important: Ensure that
the rear discharge plug
is in place before you
recycle the clippings.
3353-459 Rev A
m-8103
Page 13

13
Bagging the Clippings
Use the grass bag when you want to collect grass
and leaf clippings from the lawn.
If the side discharge chute is on the mower, remove it
and lock the side discharge door (refer to Removing
the Side Discharge Chute on page 14) before bagging
the clippings.
The blade is sharp; contacting the blade can
result in serious personal injury.
Stop the engine and wait for all moving parts to
stop before leaving the operating position.
Installing the Grass Bag
1. Raise and hold up
the rear door.
2. Remove the rear
discharge plug.
2.
1.
4. Install the bag onto the door rod.
m-8158
m-8159
m-8157
3. Route the starter rope around the lower rope
guide.
m-8182
Note: The lower rope guide releases the starter
rope when you pull the recoil start handle.
5. Lower the rear door.
m-8169
Removing the Grass Bag
To remove the bag, reverse the steps above.
3353-459 Rev A
Page 14

14
Side Discharging the
Clippings
Use the side discharge for cutting very tall grass.
If the bag is on the mower, remove it and insert the
rear discharge plug (refer to Removing the Grass Bag
on page 13) before side discharging the clippings.
The blade is sharp; contacting the blade can
result in serious personal injury.
Stop the engine and wait for all moving parts to
stop before leaving the operating position.
Installing the Side Discharge Chute
1. Unlock the
side discharge
door.
m-7195
2. Lift open the side
discharge door.
Removing the Side Discharge Chute
To remove the side discharge chute, reverse the
steps above.
Important: Lock
the side discharge
door after you
close it.
m-7196
Operating Tips
• Clear the area of sticks, stones, wire, branches,
and other debris that the blade could hit.
• Avoid striking solid objects with the blade. Never
deliberately mow over any object.
• If the mower strikes an object or starts to vibrate,
immediately stop the engine, disconnect the wire
from the spark plug, and examine the mower for
damage.
• For best performance, install a new blade before
the cutting season begins.
• Replace the blade when necessary with a Toro
replacement blade.
m-5584
3. Install the side discharge chute and close the
door onto the chute.
m-5585
Cutting Grass
• Cut only about a third of the grass blade at a
time. Do not cut below the 6 cm setting unless
the grass is sparse or it is late fall when grass
growth begins to slow down. Refer to Adjusting
the Cutting Height on page 9.
• When cutting grass over 15 cm tall, mow at the
highest cutting height setting and walk slower;
then mow again at a lower setting for the best
lawn appearance. If the grass is too long, the
mower may plug and cause the engine to stall.
• Mow only dry grass or leaves. Wet grass and
leaves tend to clump on the yard and can cause
the mower to plug or the engine to stall.
Wet grass or leaves can cause serious injury if
you slip and contact the blade. Mow only in dry
conditions.
• Alternate the mowing direction. This helps
disperse the clippings over the lawn for even
fertilization.
If the finished lawn appearance is unsatisfactory, try
one or more of the following:
• Replace the blade or have it sharpened.
• Walk at a slower pace while mowing.
3353-459 Rev A
Page 15

15
• Raise the cutting height on your mower.
• Cut the grass more frequently.
• Overlap cutting swaths instead of cutting a full
swath with each pass.
• Set the cutting height on the front wheels one
notch lower than the rear wheels. For example,
set the front wheels at 6 cm and the rear wheels
at 7 cm.
Cutting Leaves
• After cutting the lawn, ensure that half of the lawn
shows through the cut leaf cover. You may need
to make more than one pass over the leaves.
• If there are more than 13 cm of leaves on the
lawn, set the front cutting height one or two
notches higher than the rear cutting height.
• Slow down your mowing speed if the mower does
not cut the leaves finely enough.
Maintenance
Note: Determine the left and right sides of the mower by standing in the operating position.
Recommended Maintenance Schedule
Important: Refer to your engine operator’s manual for additional maintenance procedures.
Maintenance Service
Interval
Each Use
Maintenance Procedure
• Check the engine oil level. Refer to Checking the Engine Oil Level on page 8.
• Check the stopping time of the blade brake. The blade must stop within
3 seconds of releasing the blade control bar; if it does not, contact an Authorized
Service Dealer. Refer to Checking the Blade Brake Clutch Operation on
page 12.
• Remove grass clippings and dirt from under the housing. Refer to Cleaning the
Mower on page 18.
1 Month (5 Hours)
1 Year (25 Hours)
2 Years (50 Hours)
4 Years (100 Hours)
Annual Storage
1
Whichever comes first
2
Change the engine oil after the first 5 operating hours.
1
1
1
• Charge the Battery (model 20795 only). Refer to Charging the Battery on
page 17.
• Replace the air filter; replace it more frequently in dusty operating conditions.
Refer to Replacing the Air Filter on page 16.
• Check the spark plug (refer to your engine operator’s manual).
• Replace the blade or have the blade sharpened; replace it or have it sharpened
more frequently if the edge dulls quickly. Refer to Replacing the Blade on
page 17.
• Lubricate the wheel gears. Refer to Lubricating the Wheel Gears on page 18.
• Clean the blade brake control (BBC) shield. Refer to Cleaning the Blade Brake
Control Shield on page 18.
• Change the engine oil.
• Replace the spark plug (refer to your engine operator’s manual).
1
• Clean the cooling system (refer to your engine operator’s manual).
• Empty the fuel tank before repairs as directed or before annual storage. Refer to
Preparing the Mower for Storage on page 19.
• Charge the Battery (model 20795 only). Refer to Charging the Battery on
page 17.
2
Refer to Changing the Engine Oil on page 17.
3353-459 Rev A
Page 16

16
Preparing for Maintenance
1. Stop the engine and wait for all moving parts to
stop.
2. Disconnect the
spark plug wire from the
spark plug before
performing any
maintenance procedure.
m-7313
If you leave the key in the ignition switch,
someone could accidently start the engine and
seriously injure you or bystanders.
Remove the key from the ignition switch before
you service, transport, or store your mower.
3. After performing the maintenance procedure(s),
connect the spark plug wire to the spark plug.
Note: Before tipping the mower to change the oil or
replace the blade, allow the fuel tank to run dry
through normal usage. If you must tip the mower prior
to running out of fuel, use a hand fuel pump to
remove the fuel. Always tip the mower onto its side
with the air filter up.
Replacing the Air Filter
Replace the air filter yearly; replace it more frequently
in dusty operating conditions.
Refer to Preparing for Maintenance on page 16.
1. Use a screw
driver to open the
air filter cover.
m-7314
2. Replace the air
filter.
m-7315
3. Install the cover.
Tipping the mower may cause the fuel to leak.
Gasoline is flammable, explosive and can cause
personal injury.
Run the engine dry or remove the gasoline with a
hand pump; never siphon.
3353-459 Rev A
Page 17

17
Changing the Engine Oil
Change the engine oil after the first 5 operating
hours; change it yearly thereafter.
Run the engine a few minutes before changing the oil
to warm it. Warm oil flows better and carries more
contaminants.
Refer to Preparing for Maintenance on page 16.
1. Remove the
dipstick.
m-7310
2. Tip the mower onto
its side (with the air filter
up) to drain the used oil
out through the oil fill
tube.
m-7316
3. Slowly pour oil into
the oil fill tube until the
oil level reaches the Full
line on the dipstick. Do
not overfill. (Max. fill:
0.65 l., type: SAE 30W
detergent oil with an API
service classification of
SF, SG, SH, SJ, SL, or
higher.)
m-7310
4. Install the dipstick securely.
5. Dispose of the used oil properly at a local
recycling center.
Charging the Battery
Model 20795 only
Battery posts, terminals, and related accessories
contain lead and lead compounds, chemicals
known to the State of California to cause cancer
and reproductive harm. Wash hands after
handling battery.
Charge the battery for 24 hours initially, then only as
needed thereafter. Always use the charger in a
sheltered area and charge the battery at room
temperature (22C) whenever possible.
Note: The engine is equipped with an alternator.
Running the engine helps to maintain the battery
charge during the mowing season.
1. Connect the
charger to the
mower wire
harness located
below the ignition
key.
Important: Use
only the charger
supplied with the
mower.
2. Plug the charger into a wall outlet.
When the battery no longer holds a charge, recycle or
dispose of the lead-acid battery according to local
codes.
m-8303
Replacing the Fuse
Model 20795 only
If the battery does not charge or the engine does not
turn with the electric starter, the fuse may be blown.
Replace it with a 40-amp plug-in type fuse. Refer to
Installing the Fuse on page 8.
3353-459 Rev A
Page 18

18
Lubricating the Wheel
Gears
Lubricate each rear wheel with grease yearly.
1. Wipe the grease
fittings just inside the
rear wheels with a clean
rag.
2. Install a grease gun
onto each fitting and
gently apply 2 or
3 pumps of
#2 multi-purpose
lithium-base grease.
m-8104
Replacing the Blade
Important: You will need a torque wrench to
install the blade properly. If you do not have a
torque wrench or are uncomfortable performing this
procedure, contact an Authorized Service Dealer.
Examine the blade whenever you run out of gasoline.
If the blade is damaged or cracked, replace it
immediately. If the blade edge is dull or nicked, have
it sharpened or replace it.
The blade is sharp; contacting the blade can
result in serious personal injury.
Wear cloth or leather gloves when servicing the
blade.
1. Disconnect the spark plug wire from the spark
plug. Refer to Preparing for Maintenance on page 16.
2. Tip the mower onto its side with the air filter up.
3. Remove the 2
blade nuts (A) and
the stiffener (B).
B
m-8071
4. Remove the blade.
5. Install the new blade.
6. Install the stiffener you removed in step 3.
7. Install the blade bolts and torque them to 20 to
37 N⋅m.
A
Cleaning the Blade Brake
Control Shield
Clean the blade brake clutch (BBC) shield at least
every 25 operating hours or yearly to prevent the
blade from stalling while you mow.
1. Disconnect the spark plug wire from the spark
plug. Refer to Preparing for Maintenance on page 16.
2. Tip the mower onto its side with the air filter up.
3. Remove the
2 blade nuts (A)
and the
stiffener (B).
4. Remove the
blade (C).
5. Remove the
blade driver (D)
and disk (E).
6. Remove the
BBC shield (F).
7. Brush or blow out debris from the inside of the
shield and around all the parts.
8. Install the BBC shield that you removed in step 6.
9. Install the blade driver that you removed in
step 5.
10. Install the blade and the stiffener that you
removed in steps 3 and 4.
11. Install the blade bolts and torque them to 20 to
37 N⋅m.
E
C
m-8071
F
D
B
A
Cleaning the Mower
1. With the engine
running on a flat paved
surface, spray a stream
of water in front of the
right rear wheel.
1093
The water will splash into the path of the blade,
cleaning out the clippings.
2. When no more clippings come out, stop the water
and move the mower to a dry area.
3. Run the engine for a few minutes to dry the
housing to prevent corrosion.
3353-459 Rev A
Page 19

19
Storage
Store the mower in a cool, clean, dry place.
If you leave the key in the ignition switch,
someone could accidently start the engine and
seriously injure you or bystanders.
Remove the key from the ignition switch before
you service, transport, or store your mower.
Preparing the Mower for
Storage
Gasoline vapors can explode.
S Do not store gasoline more than 30 days.
S Do not store the mower in an enclosure near
an open flame.
S Allow the engine to cool before storing it.
1. On the last refueling of the year, add fuel
stabilizer to the fuel as directed by the engine
manufacturer.
2. Run the mower until the engine stops from
running out of fuel.
3. Prime the engine and start it again.
4. Allow the engine to run until it stops. When you
can no longer start the engine, it is sufficiently dry.
5. Disconnect the wire from the spark plug.
6. Remove the spark plug, add 30 ml of oil through
the spark plug hole, and pull the starter rope slowly
several times to distribute oil throughout the cylinder
to prevent cylinder corrosion during the off-season.
7. Loosely install the spark plug.
8. Tighten all nuts, bolts, and screws.
9. Charge the battery for 24 hours (model 20795
only), then unplug the battery charger and store the
mower in an unheated area. If you must store the
mower in a heated area, you must charge the battery
every 90 days.
Folding the Handle
1. Remove the
lower handle knobs
and lock washers.
2. Detach the
handle brackets
(A) from the lower
handle sides.
A
m-8097
Note: Attach the lock washers and lower handle
knobs onto the bolts in the handle to prevent
losing them.
3. Rotate the handle forward.
A.
m-8110
B.
m-8109
4. To unfold the handle, refer to Unfolding the
Handle on page 6.
Removing the Mower from
Storage
1. Remove the spark plug and pull the recoil start
handle a few times to blow the excess oil from the
cylinder.
2. Install the spark plug and tighten it with a torque
wrench to 20 Nm.
3. Charge the battery (model 20795 only).
4. Connect the wire to the spark plug.
3353-459 Rev A
Page 20

Attachments/
Accessories
A selection of Toro approved attachments and
accessories are available for use with the machine to
enhance and expand its capabilities. Contact an
Authorized Service Dealer or Distributor or go to
www.toro.com for a list of all approved attachments
and accessories.
20
3353-459 Rev A
 Loading...