


FormNo.3442-187RevC
Flex-ForcePowerSystem™60VMAX21inRecycler®LawnMower
20367and20367T
CortacéspedRecycler®60VMAXde53cm(21")conFlex-Force
PowerSystem™
20367and20367T
TondeuseRecycler®60VMAX53cm(21po)avecFlex-Force
PowerSystem™
20367and20367T
www.T oro.com.
*3442-187*


FormNo.3442-184RevC
Flex-ForcePowerSystem
MAX21inRecycler
ModelNo.20367—SerialNo.407300000andUp
ModelNo.20367T—SerialNo.407300000andUp
®
LawnMower
™
60V
Registeratwww.T oro.com.
OriginalInstructions(EN)
*3442-184*

Forassistance,pleasesee
www.Toro.com/support
forinstructionalvideos
orcontact1-888-384-9939
beforereturningthis
product.
WARNING
CALIFORNIA
Proposition65Warning
Thepowercordonthisproductcontains
lead,achemicalknowntotheState
ofCaliforniatocausebirthdefects
orotherreproductiveharm.Wash
handsafterhandling.
Useofthisproductmaycauseexposure
tochemicalsknowntotheStateof
Californiatocausecancer,birthdefects,
orotherreproductiveharm.
Wheneveryouneedservice,genuinethe
manufacturerparts,oradditionalinformation,contact
anAuthorizedServiceDealerorthemanufacturer
CustomerServiceandhavethemodelandserial
numbersofyourproductready.Figure1identies
thelocationofthemodelandserialnumbersonthe
product.Writethenumbersinthespaceprovided.
Important:Withyourmobiledevice,youcan
scantheQRcodeontheserialnumberdecal(if
equipped)toaccesswarranty,parts,andother
productinformation.
g275230
Figure1
1.Modelandserialnumberlocation
ModelNo.
Introduction
Thisrotary-blade,walk-behindlawnmowerisintended
tobeusedbyresidentialhomeowners.Itisdesigned
primarilyforcuttinggrassonwell-maintainedlawns
onresidentialproperties.Itisnotdesignedforcutting
brushorforagriculturaluses.Itisdesignedtouse
ToroFlex-Forcelithium-ionbatterypackModels
88640(providedwithModel20367)and88660or
88675;itcanalsousebatterypackModel88620,
Model88625,Model88640,orModel88650.These
batterypacksaredesignedtobechargedonlyby
batterychargerModels88602(providedwithModel
20367),88605,or88610.Usingtheseproductsfor
purposesotherthantheirintendedusecouldprove
dangeroustoyouandbystanders.
Model20367Tdoesnotincludeabatteryora
charger.
Readthisinformationcarefullytolearnhowtooperate
andmaintainyourproductproperlyandtoavoid
injuryandproductdamage.Youareresponsiblefor
operatingtheproductproperlyandsafely.
SerialNo.
Thismanualidentiespotentialhazardsandhas
safetymessagesidentiedbythesafety-alertsymbol
(Figure2),whichsignalsahazardthatmaycause
seriousinjuryordeathifyoudonotfollowthe
recommendedprecautions.
g000502
Figure2
Safety-alertsymbol
Thismanualuses2wordstohighlightinformation.
Importantcallsattentiontospecialmechanical
informationandNoteemphasizesgeneralinformation
worthyofspecialattention.
Visitwww.Toro.comformoreinformation,including
safetytips,trainingmaterials,accessoryinformation,
helpndingadealer,ortoregisteryourproduct.
©2021—TheToro®Company
8111LyndaleAvenueSouth
Bloomington,MN55420
Contactusatwww .Toro.com.
2
PrintedinChina
AllRightsReserved

Contents
Safety
Safety.......................................................................3
SafetyandInstructionalDecals..........................6
Setup........................................................................9
1MountingtheBatteryCharger
(Optional)........................................................9
2AssemblingtheGrassBag...............................9
3UnfoldingtheHandle.....................................10
ProductOverview....................................................11
Specications...................................................11
Attachments/Accessories..................................11
BeforeOperation.................................................12
InstallingtheBatteryPack................................12
AdjustingtheCuttingHeight.............................13
DuringOperation.................................................14
StartingtheMachine.........................................14
RecyclingtheClippings....................................14
BaggingtheClippings.......................................14
ShuttingOfftheMachine..................................15
RemovingtheBatteryPackfromthe
Machine........................................................15
OperatingTips.................................................15
AfterOperation....................................................16
ChargingtheBatteryPack................................16
CleaningundertheMachine.............................17
FoldingtheHandle...........................................17
StoringtheMachineintheVertical-Stow
Position.........................................................18
Maintenance...........................................................19
LubricatingtheMachine....................................19
ReplacingtheBlade..........................................19
PreparingtheBatteryPackfor
Recycling......................................................20
Storage...................................................................20
Troubleshooting......................................................21
IMPORTANTSAFETY
INSTRUCTIONS
WARNING—Whenusinganelectricmachine,always
readandfollowbasicsafetywarningsandinstructions
toreducetheriskofre,electricshock,orinjury,
includingthefollowing:
I.Training
1.Theoperatorofthemachineisresponsiblefor
anyaccidentsorhazardsoccurringtoothersor
theirproperty.
2.Donotallowchildrentouseorplaywiththe
machine,batterypack,orthebatterycharger;
localregulationsmayrestricttheageofthe
operator.
3.Donotallowchildrenoruntrainedpeopleto
operateorservicethisdevice.Allowonlypeople
whoareresponsible,trained,familiarwiththe
instructions,andphysicallycapabletooperate
orservicethedevice.
4.Beforeusingthemachine,batterypack,and
batterycharger,readalltheinstructionsand
cautionarymarkingsontheseproducts.
5.Becomefamiliarwiththecontrolsandproper
useofthemachine,batterypack,andbattery
charger.
II.Preparation
1.Keepbystanders,especiallychildrenandpets,
outoftheoperatingarea.
2.Donotoperatethemachinewithoutallguards
andsafetydevices,suchasdeectorsandgrass
catchers,inplaceandfunctioningproperlyon
themachine.
3.Inspecttheareawhereyouwillusethemachine
andremoveallobjectsthatcouldinterferewith
theoperationofthemachineorthatthemachine
couldthrow.
4.Beforeusingthemachine,ensurethattheblade,
bladebolt,andbladeassemblyarenotwornor
damaged.Replaceanydamagedorunreadable
labels.
5.UseonlythebatterypackspeciedbyT oro.
Usingotheraccessoriesandattachmentsmay
increasetheriskofinjuryandre.
6.Pluggingthebatterychargerintoanoutletthatis
not120Vcancauseareorelectricshock.Do
notplugthebatterychargerintoanoutletother
than120V.Foradifferentstyleofconnection,
useanattachmentplugadapteroftheproper
congurationforthepoweroutletifneeded.
3

7.Donotuseadamagedormodiedbattery
packorbatterycharger,whichmayexhibit
unpredictablebehaviorthatresultsinre,
explosion,orriskofinjury.
8.Ifthesupplycordtothebatterychargeris
damaged,contactanAuthorizedServiceDealer
toreplaceit.
9.Donotusenon-rechargeablebatteries.
10.Chargethebatterypackwithonlythebattery
chargerspeciedbyToro.Achargersuitablefor
1typeofbatterypackmaycreateariskofre
whenusedwithanotherbatterypack.
11.Chargethebatterypackinawell-ventilatedarea
only.
12.Donotexposeabatterypackorbatterycharger
toreortotemperatureshigherthan68°C
(154°F).
13.Followallcharginginstructionsanddo
notchargethebatterypackoutsideofthe
temperaturerangespeciedintheinstructions.
Otherwise,youmaydamagethebatterypack
andincreasetheriskofre.
14.Dressproperly—Wearappropriateclothing,
includingeyeprotection;longpants;substantial,
slip-resistantfootwear(notbarefootorwearing
sandals);andhearingprotection.Tiebacklong
hairanddonotwearlooseclothingorloose
jewelrythatcangetcaughtinmovingparts.
Wearadustmaskindustyoperatingconditions.
Useofrubberglovesisrecommended.
III.Operation
1.Contactwiththemovingbladewillcauseserious
injury.Keepyourhandsandfeetawayfromthe
cuttingareaandallmovingpartsofthemachine.
Keepclearofanydischargeopening.
2.Usingthismachineforpurposesotherthanits
intendedusecouldprovedangeroustoyouand
bystanders.
3.Disengagetheself-propeldrive(ifequipped)
beforestartingthemachine.
4.Donottiltthemachinewhenstartingthemotor.
5.Preventunintentionalstarting—Ensurethatthe
electric-startbuttonisremovedfromtheignition
beforeconnectingthebatterypackandhandling
themachine.
6.Useyourfullattentionwhileoperatingthe
machine.Donotengageinanyactivitythat
causesdistractions;otherwise,injuryorproperty
damagemayoccur.
7.Whenyoureleasetheblade-controlbar,the
motorshouldshutoffandthebladeshould
stopwithin3seconds.Ifnot,stopusingyour
machineimmediatelyandcontactanAuthorized
ServiceDealer.
8.Stopthemachine,removetheelectric-start
button,removethebatterypackfromthe
machine,andwaitforallmovementtostop
beforeadjusting,servicing,cleaning,orstoring
themachine.
9.Removethebatterypackandelectric-start
buttonfromthemachinewheneveryouleaveit
unattendedorbeforechangingaccessories.
10.Donotforcethemachine—Allowthemachineto
dothejobbetterandsaferattherateforwhichit
wasdesigned.
11.Stayalert—Watchwhatyouaredoinganduse
commonsensewhenoperatingthemachine.
Donotusethemachinewhileill,tired,orunder
theinuenceofalcoholordrugs.
12.Operatethemachineonlyingoodvisibilityand
appropriateweatherconditions.Donotoperate
themachinewhenthereistheriskoflightning.
13.Useextremecautionwhenreversingorpulling
themachinetowardyou.
14.Keepproperfootingandbalanceatalltimes,
especiallyonslopes.Mowacrosstheface
ofslopes,neverupanddown.Useextreme
cautionwhenchangingdirectionsonslopes.Do
notmowexceedinglysteepslopes.Walk,never
runwiththemachine.
15.Donotdirectthedischargematerialtoward
anyone.Avoiddischargingmaterialagainsta
wallorobstruction;materialmayricochettoward
you.Stoptheblade(s)whencrossingsurfaces
otherthangrass.
16.Watchforholes,ruts,bumps,rocks,orother
hiddenobjects.Uneventerraincouldcauseyou
toloseyourbalanceorfooting.
17.Wetgrassorleavescancauseseriousinjuryif
youslipandcontacttheblade.Avoidmowingin
wetconditionsorwhenitisraining.
18.Ifthemachinestrikesanobjectorstartsto
vibrate,immediatelyshutoffthemachine,
removetheelectric-startbutton,removethe
batterypack,andwaitforallmovementtostop
beforeexaminingthemachinefordamage.
Makeallnecessaryrepairsbeforeresuming
operation.
19.Stopthemachineandremovetheelectric-start
buttonbeforeloadingthemachineforhauling.
20.Underabusiveconditions,thebatterypackmay
ejectliquid;avoidcontact.Ifyouaccidently
comeintocontactwiththeliquid,ushwith
water.Iftheliquidcontactsyoureyes,seek
4

medicalhelp.Liquidejectedfromthebattery
packmaycauseirritationorburns.
IV.MaintenanceandStorage
1.Stopthemachine,removetheelectric-start
button,removethebatterypackfromthe
machine,andwaitforallmovementtostop
beforeadjusting,servicing,cleaning,orstoring
themachine.
2.Donotattempttorepairthemachineexceptas
indicatedintheinstructions.HaveanAuthorized
ServiceDealerperformserviceonthemachine
usingidenticalreplacementparts.
3.Wearglovesandeyeprotectionwhenservicing
themachine.
4.Sharpenadullbladeonbothsidestomaintain
balance.Cleanthebladeandensurethatitis
balanced.
5.Replacethebladeifitisbent,worn,orcracked.
Anunbalancedbladecausesvibration,which
coulddamagethemotororcausepersonal
injury.
6.Whenservicingtheblade,beawarethatthe
bladecanstillmoveeventhoughthepower
sourceisoff.
7.Checkthegrasscollectionbagfrequentlyfor
deteriorationorwear,andreplaceawornbag
withaT oro[replacement]bag.
8.Forbestperformance,useonlygenuineT oro
replacementpartsandaccessories.Other
replacementpartsandaccessoriescouldbe
dangerous,andsuchusecouldvoidtheproduct
warranty.
9.Maintainthemachine—Keepcuttingedges
sharpandcleanforthebestandsafest
performance.Keephandlesdry,clean,andfree
fromoilandgrease.Keepguardsinplaceandin
workingorder.Keepbladessharp.Useidentical
replacementbladesonly.
10.Checkthemachinefordamagedparts—Ifthere
aredamagedguardsorotherparts,determine
whetherthemachinewilloperateproperly.
Checkformisalignedandbindingmovingparts,
brokenparts,mounting,andanyothercondition
thatmayaffectitsoperation.Unlessindicated
intheinstructions,haveanAuthorizedService
Dealerrepairorreplaceadamagedguardor
part.
11.Whenthebatterypackisnotinuse,keepit
awayfrommetalobjectssuchaspaperclips,
coins,keys,nails,andscrewsthatcanmakea
connectionfrom1terminaltoanother.Shorting
thebatteryterminalsmaycauseburnsorare.
12.Checkthebladeandmotormountingbolts
frequentlyfortightness.
13.Whenyouarenotusingthemachine,storeit
indoorsinadry,secureplaceoutofthereach
ofchildren.
14.CAUTION—Amistreatedbatterypackmay
presentariskofreorchemicalburn.Donot
disassemblethebatterypack.Donotheatthe
batterypackabove68°C(154°F)orincinerate
it.ReplacethebatterypackwithagenuineT oro
batterypackonly;usinganothertypeofbattery
packmaycauseareorexplosion.Keep
batterypacksoutofthereachofchildrenand
intheoriginalpackaginguntilyouarereadyto
usethem.
15.Donotdisposeofthebatteryinare.The
cellmayexplode.Checkwithlocalcodesfor
possiblespecialdisposalinstructions.
SAVETHESE
INSTRUCTIONS
5

SafetyandInstructionalDecals
Safetydecalsandinstructionsareeasilyvisibletotheoperatorandarelocatednearanyarea
ofpotentialdanger.Replaceanydecalthatisdamagedormissing.
140-3811
Model88640
decal140-3811
1.Warning—readthe
Operator'sManual.
2.Thrownobject
hazard—keepbystanders
away.
3.Cutting/dismember
hazard,mower
blade—removethekey
andreadtheOperator’s
Manualbeforeperforming
maintenance.
4.Cutting/dismember
hazard,mower
blade—stayawayfrom
movingparts;keepall
guardsandshieldsin
place.
5.Cutting/dismember
hazard,mowerblade—do
notmowupordown
slopes;onlymowacross
slopes;shutofftheengine,
waitformovingpartsto
stop,andpickupdebris
beforemowing;look
behindyouwhenmowing
inreverse.
1.ReadtheOperator’s
Manual.
2.Call2Recycle
recyclingprogram
®
battery
decal140-2155
140-2155
3.KeeptheLithiumIon
batteryawayfromopen
reorames.
4.Donotexposetorain.
decal133-8061
133-8061
decal137-9462
137-9462
6

1.Thebatterypackischarging.
2.Thebatterypackisfullycharged.
3.Thebatterypackisoverorundertheappropriatetemperaturerange.
4.Batterypackchargingfault
decal94-8072
94-8072
decal137-9463
137-9463
1.Batterychargestatus
decal137-9461
137-9461
decal139-8986
139-8986
7

decal144-3175
144-3175
1.ReadtheOperator’s
Manual.
2.Tostartthemachine,
squeezethebartothe
handleandpressthe
button.
3.Toshutoffthemachine,
releasethebar.
8

Setup
Important:Thebatterypackisnotfullychargedwhenitispurchased.Beforeusingthemachinefor
thersttime,refertoChargingtheBatteryPack(page16).
1
MountingtheBattery
Charger(Optional)
Partsneededforthisprocedure:
2
Mountinghardware(notincluded)
Procedure
Ifdesired,mountthebatterychargersecurelyona
wallusingthewall-mountkeyholesonthebackof
thecharger.
Mountitindoors(suchasagarageorotherdryplace),
nearapoweroutlet,andoutofthereachofchildren.
RefertoFigure3forassistanceinmountingthe
charger.
Slidethechargerovertheappropriatelypositioned
hardwaretosecurethechargerinplace(hardware
notincluded).
2
AssemblingtheGrassBag
NoPartsRequired
Procedure
g235791
Figure4
Figure3
g290534
9

3
UnfoldingtheHandle
NoPartsRequired
Procedure
WARNING
Unfoldingthehandleimproperlycandamagethecables,causinganunsafeoperating
condition.
•Donotdamagethecable(s)whenfoldingorunfoldingthehandle.
•Ensurethatthecable(s)areroutedtotheoutsideofthehandle.
•Ifacableisdamaged,contactanAuthorizedServiceDealer.
Important:Removeanddiscardtheprotectiveplasticsheetthatcoversthemotorandanyother
plasticorwrappingonthemachine.
1.Unlockthehandlelocks(AofFigure5).
2.Movethehandlerearwardtotheoperatingposition(BofFigure5).
3.Holdthehandlewhileengagingthehandlelockstoavoidpinchingyourhands.
4.Engagethehandlelockuntilthepinclicksinplacetolockthehandleintotheoperatingposition(Cof
Figure5).
Figure5
g304886
10

ProductOverview
Specications
BatteryPack
Model88640
Batterypackcapacity
Batterymanufacturerrating=60Vmaximumand54Vnominal.
Actualvoltagevarieswithload.
4.0Ah
216Wh
BatteryCharger
Model88602
Type
Input
Output60VMAXDC2.0A
60VMAXLithium-IonBatteryCharger
120VAC50/60HzMax2.0A
AppropriateTemperatureRanges
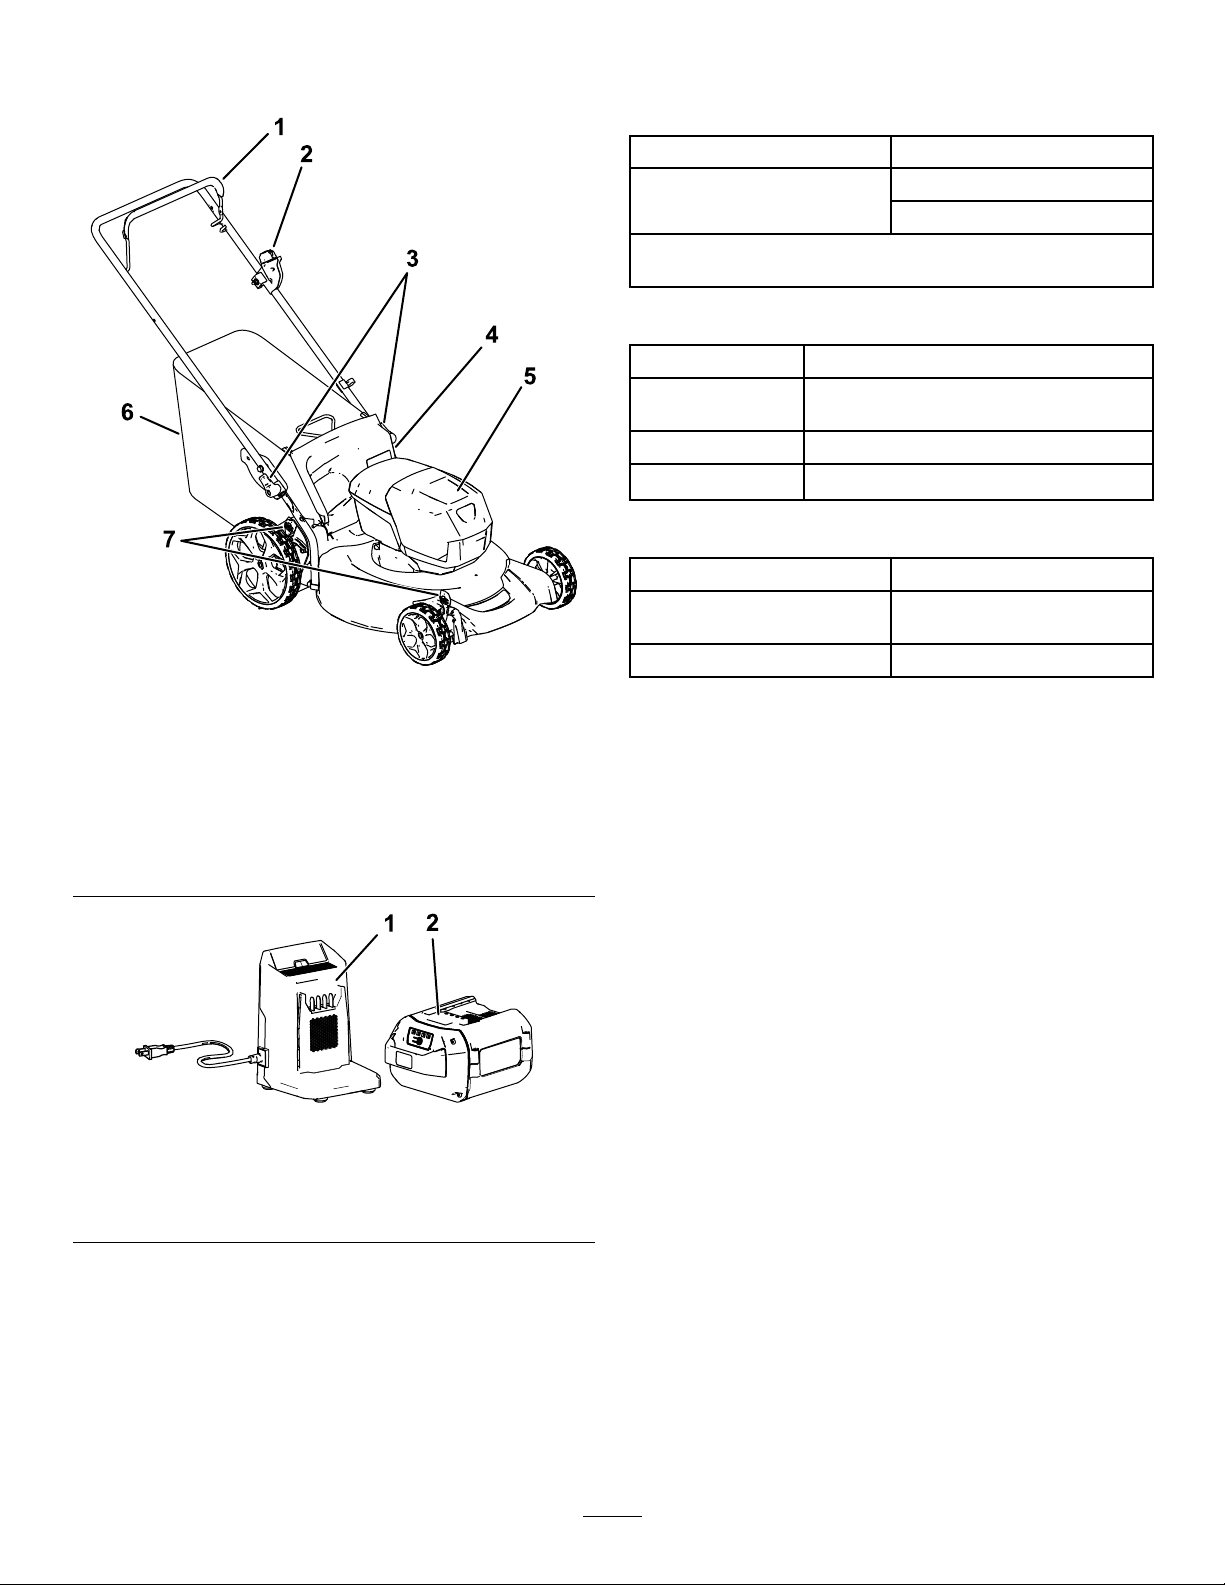
Figure6
1.Blade-controlbar5.Batterycompartment
2.Electric-startbutton
3.Handlelock(2)7.Cutting-heightlever(2)
4.Reardeector
1.BatterychargerModel
88602(includedwith
Model20367)
6.Grassbag
Figure7
2.BatterypackModel88640
(includedwithModel
20367)
Charge/storethebatterypack
at
Usethebatterypackat
Usethemachineat
g296936
5°C(41°F)to40°C(104°F)*
-30°C(-22°F)to49°C(120°F)*
0°C(32°F)to49°C(120°F)*
*Chargingtimewillincreaseifyoudonotchargethe
batterypackwithinthisrange.
Storethemachine,batterypack,andbatterycharger
inanenclosedclean,dryarea.
Attachments/Accessories
AselectionofToroapprovedattachmentsand
accessoriesmaybeavailableforusewiththemachine
toenhanceandexpanditscapabilities.Contact
yourAuthorizedServiceDealerorauthorizedToro
distributororgotowww.T oro.comforalistofall
approvedattachmentsandaccessories.
g355813
Toensureoptimumperformanceandcontinuedsafety
certicationofthemachine,useonlygenuineToro
replacementpartsandaccessories.Replacement
partsandaccessoriesmadebyothermanufacturers
couldbedangerous,andsuchusecouldvoidthe
productwarranty.
11

Operation
BeforeOperation
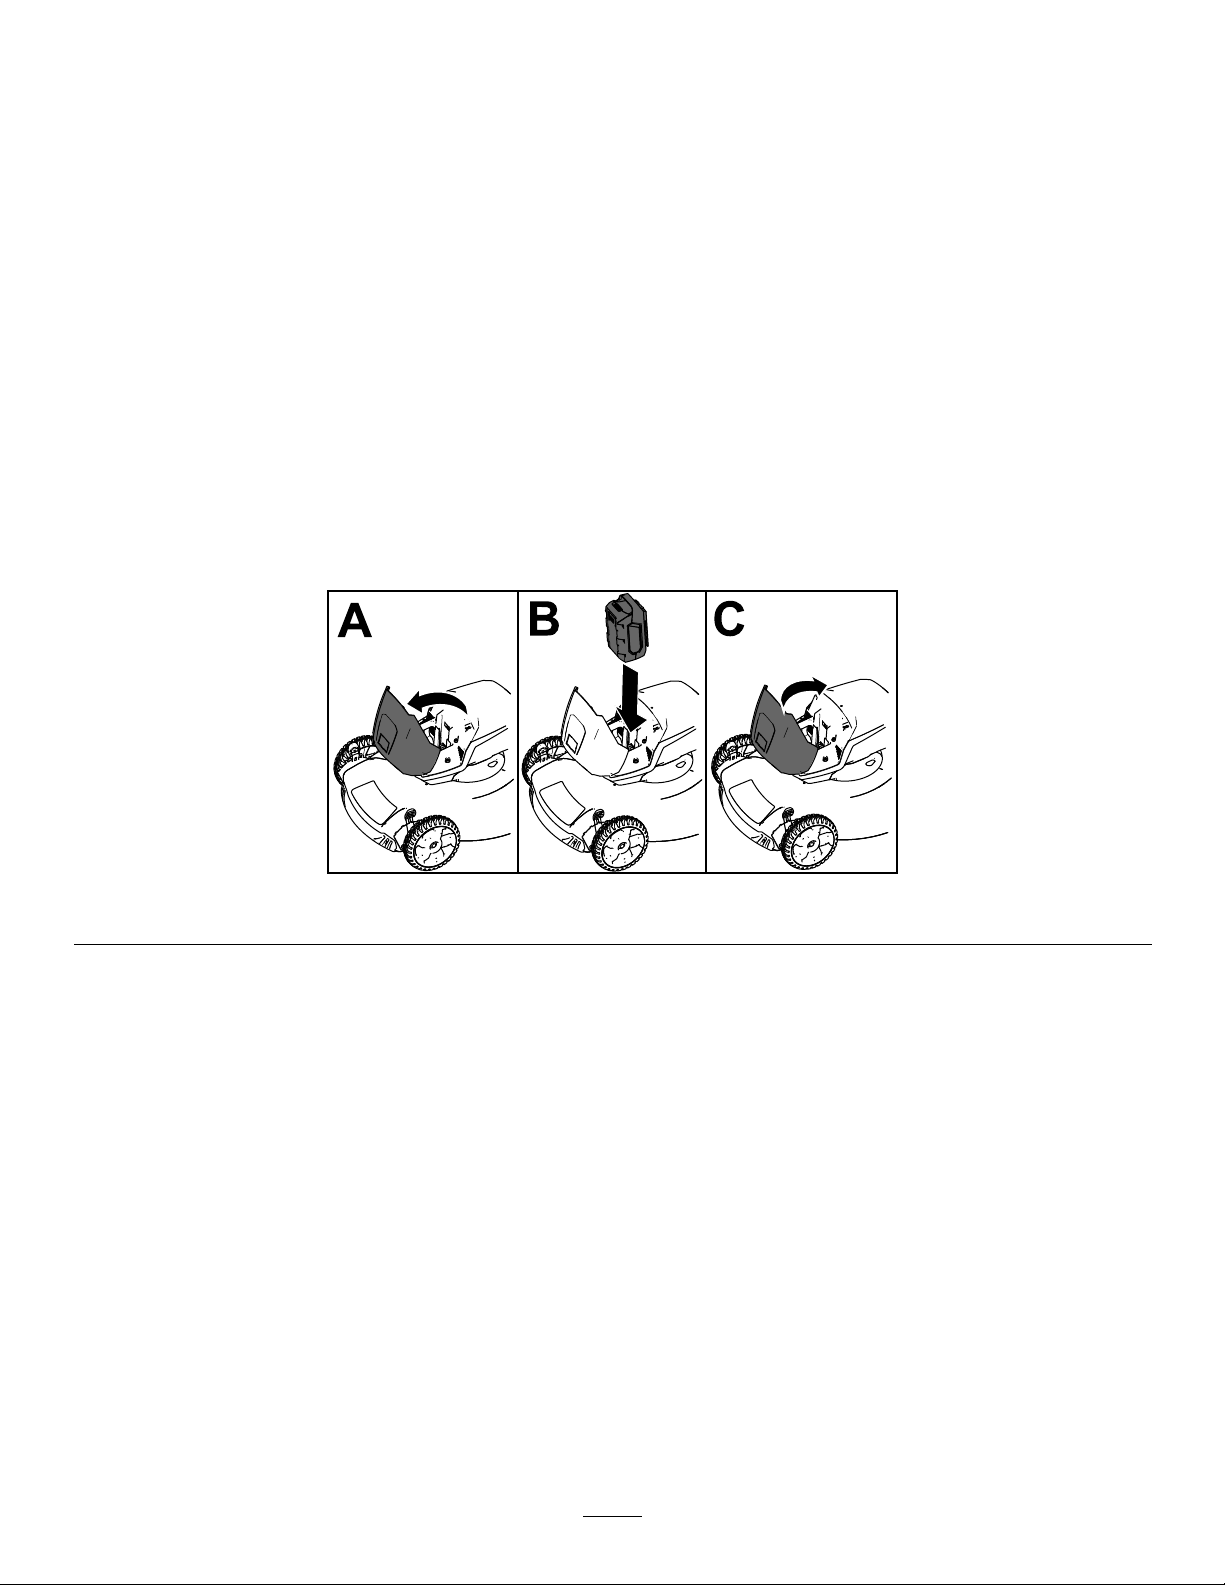
InstallingtheBatteryPack
Important:Usethebatterypackonlyintemperaturesthatarewithintheappropriaterange;refer
toSpecications(page11).
1.Makesurethattheventsonthebatteryareclearofanydustanddebris.
2.Liftupthebattery-compartmentlid(AofFigure8).
3.Lineupthecavityinthebatterypackwiththetongueonthemachineandslidethebatterypackintothe
compartmentuntilitlocksintoplace(BofFigure8).
4.Closethebattery-compartmentlid(CofFigure8).
Note:Ifthebattery-compartmentliddoesnotclosecompletely,thebatteryisnotfullyinstalled.
Figure8
g251221
12

AdjustingtheCuttingHeight
WARNING
Adjustingtheheight-of-cutcouldbringyourhandsintocontactwithamovingbladeand
resultinseriousinjury .
•Shutoffthemotor,removethebattery,andwaitforallmovingpartstostopbeforeadjusting
thecuttingheight.
•Donotputyourngersunderthehousingwhenadjustingthecuttingheight.
Adjustthecuttingheightasdesired.Setallwheelstothesamecuttingheight(Figure9).
Figure9
13
g304633

DuringOperation
StartingtheMachine
1.Ensurethatthebatterypackischargedandinstalledinthemachine;refertoInstallingtheBatteryPack
(page12).
2.Inserttheelectric-startbuttonintotheelectricstarterswitch(AofFigure10).
3.Squeezetheblade-controlbarandholdittothehandle(BofFigure10).
4.Presstheelectric-startbuttonandkeepitpresseduntilthemotorstarts(CofFigure10).
Figure10
g296941
RecyclingtheClippings
Yourmachinecomesfromthefactoryreadytorecyclethegrassandleafclippingsbackintothelawn.
Ifthegrassbagisonthemachine,removeitbeforerecyclingtheclippings.RefertoRecyclingtheClippings
(page14).
BaggingtheClippings
Usethegrassbagwhenyouwanttocollectgrassandleafclippingsfromthelawn.
InstallingtheGrassBag
1.Liftupthereardeector(AofFigure11).
2.Inserttherodendsofthegrassbagintothenotchesinthehandlebrackets(BofFigure11).
3.Allowthereardeectortorestonthebag.
Figure11
RemovingtheGrassBag
Toremovethebag,reversethestepsinInstallingtheGrassBag(page14).
14
g240796

ShuttingOfftheMachine
1.Releasetheblade-controlbar(AofFigure12).
2.Removetheelectric-startbuttonfromtheelectric
starter(BofFigure12).
3.Removethebatterypack;refertoRemovingthe
BatteryPackfromtheMachine(page15).
Note:Wheneveryouarenotusingthemachine,
removethebatterypack.
Figure12
•Donotcutbelow51mm(2inches)unlessthe
grassissparseoritislatefallwhengrassgrowth
beginstoslowdown.
•Whencuttinggrassover15cm(6inches)tall,
mowatthehighestcuttingheightsettingandwalk
slower;thenmowagainatalowersettingforthe
bestlawnappearance.Ifthegrassistoolong,the
machinemayplugandcausethemotortostall.
•Wetgrassandleavestendtoclumpontheyard
andcancausethemachinetoplugorthemotorto
stall.Avoidmowinginwetconditions.
•Beawareofapotentialrehazardinverydry
conditions,followalllocalrewarnings,andkeep
themachinefreeofdrygrassandleafdebris.
•Alternatethemowingdirection.Thishelps
dispersetheclippingsoverthelawnforeven
fertilization.
•Ifthenishedlawnappearanceisunsatisfactory,
try1ormoreofthefollowing:
g296945
–Replacethebladeorhaveitsharpened.
–Walkataslowerpacewhilemowing.
RemovingtheBatteryPack
fromtheMachine
1.Liftupthebattery-compartmentlid.
2.Pressthebattery-packlatchtoreleasethe
batterypackandremovethebatterypack.
3.Closethebattery-compartmentlid.
OperatingTips
GeneralMowingTips
•Inspecttheareawhereyouwillusethemachine
andremoveallobjectsthatthemachinecould
throw.
•Avoidstrikingsolidobjectswiththeblade.Never
deliberatelymowoveranyobject.
•Ifthemachinestrikesanobjectorstartstovibrate,
immediatelyshutoffthemotor,waitforallmoving
partstostop,removethebattery,andexaminethe
machinefordamage.
•Forbestperformance,installanewToroblade
beforethecuttingseasonbeginsorwhen
necessary.
–Raisethecuttingheightonyourmachine.
–Cutthegrassmorefrequently.
–Overlapcuttingswathsinsteadofcuttingafull
swathwitheachpass.
CuttingLeaves
•Aftercuttingthelawn,ensurethathalfofthelawn
showsthroughthecutleafcover.Y oumayneed
tomakemorethanasinglepassovertheleaves.
•Iftherearemorethan13cm(5inches)ofleaves
onthelawn,mowatahighercuttingheightand
thenagainatthedesiredcuttingheight.
•Slowdownyourmowingspeedifthemachine
doesnotcuttheleavesnelyenough.
CuttingGrass
•Cutonlyaboutathirdofthegrassbladeatatime.
Forimprovedqualityofcut,runtime,andbagging,
cutgrassatahigherheightofcut.
15

AfterOperation
ChargingtheBatteryPack
Important:Thebatterypackisnotfullycharged
whenyoupurchaseit.Beforeusingthetoolfor
thersttime,placethebatterypackinthecharger
andchargeituntiltheLEDdisplayindicatesthe
batterypackisfullycharged.Readallsafety
precautions.
Important:Chargethebatterypackonlyin
temperaturesthatarewithintheappropriate
range;refertoSpecications(page11).
Note:Atanytime,pressthebattery-charge-indicator
buttononthebatterypacktodisplaythecurrent
charge(LEDindicators).
1.Ensurethattheventsonthebatteryandcharger
areclearofanydustanddebris.
Green
blinking
Green
Red
Red
blinking
Batterypackischarging
Batterypackischarged
Batterypackand/orbatterychargerisoverorunder
theappropriatetemperaturerange
Batterypackchargingfault*
*RefertoTroubleshooting(page21)formore
information.
Important:Thebatterycanbeleftonthecharger
forshortperiodsbetweenuses.
Ifthebatterywillnotbeusedforlongerperiods,
removethebatteryfromthecharger;referto
Storage(page20).
g290533
Figure13
1.Batterypackcavity
2.Batterypackventingareas6.Handle
3.Batterypackterminals
4.Battery-charge-indicator
button
5.LEDindicators(current
charge)
7.ChargerLEDindicator
light
8.Chargerventingareas
2.Lineupthecavityinthebatterypack(Figure13)
withthetongueonthecharger.
3.Slidethebatterypackintothechargeruntilitis
fullyseated(Figure13).
4.T oremovethebatterypack,slidethebattery
backwardoutofthecharger.
5.RefertothefollowingtabletointerprettheLED
indicatorlightonthebatterycharger.
Indicator
light
Off
Indicates
Nobatterypackinserted
16

CleaningundertheMachine
ServiceInterval:Aftereachuse
FoldingtheHandle
WARNING
CleaningundertheMachine
Forbestresults,cleanunderthemachinesoonafter
youhavecompletedmowing.
1.Lowerthemachinetoitslowestcutting-height
setting.
2.Movethemachineontoapavedlevelsurface.
3.Withthemotorrunningandthebladeengaged,
sprayastreamofwaterinfrontoftheright,rear
wheel(Figure14).
Note:Thewaterwillsplashintothepathofthe
blade,cleaningouttheclippings.
Figure14
4.Whennomoreclippingscomeout,stopthe
waterandmovethemachinetoadryarea.
5.Runthemotorforafewminutestodrythe
undersideofthemachine.
Foldingorunfoldingthehandleimproperly
candamagethecables,causinganunsafe
operatingcondition.
•Donotdamagethecableswhenfoldingor
unfoldingthehandle.
•Ifacableisdamaged,contactan
AuthorizedServiceDealer.
1.Removetheelectric-startbutton(Figure15).
g002600
2.Removethebatteryfromthemachine.
3.Holdthehandlewhiledisengagingthehandle
lockstoavoidpinchingyourhands.
4.Disengagethehandlelocksuntilyoucanmove
theupperhandlefreely.
Figure15
g296946
CleaningundertheMachineinthe
Vertical-StowPosition
1.Setthemachineinthevertical-stowposition;
refertoStoringtheMachineintheVertical-Stow
Position(page18).
2.Washouttheclippingsfromunderthemachine.
5.Foldthehandleforwardtothefullyforward
positionasshowninFigure17.
Important:Routethecablestotheoutside
ofthehandlelocksasyoufoldthehandle.
6.T ounfoldthehandle,referto3Unfoldingthe
Handle(page10).
17

StoringtheMachineinthe
Vertical-StowPosition
Youcanstoreyourmachineintheverticalpositionto
minimizestoragespace.
WARNING
Foldingorunfoldingthehandleimproperly
candamagethecables,causinganunsafe
operatingcondition.
•Donotdamagethecableswhenfoldingor
unfoldingthehandle.
•Ifacableisdamaged,contactan
AuthorizedServiceDealer.
1.Removetheelectric-startbuttonandbattery
fromthemachine.
2.Ensurethatthecutting-heightsettingonthe
machineis44mm(1-3/4inches)orhigher;if
itisnot,raiseit;refertoAdjustingtheCutting
Height(page13).
3.Disengagethehandlelocks(Figure16).
Figure16
4.Foldthehandlefullyforward.
Important:Routethecablestotheoutside
ofthehandlelocksasyoufoldthehandle.
5.Engagethehandlelocks.
6.Liftthefrontofthemachinebythehandleand
moveitintoastoragespace(Figure17).
Figure17
g297000
g297023
18

Maintenance
Removetheelectric-startbuttonandbatterypack
fromthemachinebeforemaintainingorcleaningthe
machine.
Alwaysshutoffthemachine,waitforallmoving
partstostop,andallowthemachinetocoolbefore
adjusting,servicing,cleaning,orstoringit.
Useonlythemanufacturer’srecommended
replacementpartsandaccessories.
Inspectandmaintainthemachineregularly.Have
themachinerepairedonlybyanAuthorizedService
Dealer.
LubricatingtheMachine
Youdonotneedtolubricatethemachine;allthe
bearingshavebeenlubricatedatthefactoryforthe
lifeofthemachine.
ReplacingtheBlade
g231389
Figure18
4.Installthenewblade,bracket,andbladebolt
(Figure19).
ServiceInterval:Yearly
Important:Youwillneedatorquewrenchto
installthebladeproperly.Ifyoudonothavea
torquewrenchorareuncomfortableperforming
thisprocedure,contactanAuthorizedService
Dealer.
Ifthebladeisdamagedorcracked,replaceit
immediately.Ifthebladeedgeisdullornicked,have
itsharpenedandbalanced,orreplaceit.
WARNING
Whenservicingtheblade,beawarethatthe
bladecanstillmoveeventhoughthepower
sourceisoff.Thebladeissharp;contacting
thebladecanresultinseriouspersonalinjury.
Weargloveswhenservicingtheblade.
1.Removetheelectric-startbuttonandbattery
packfromthemachine.
2.Useablockofwoodtoholdthebladesteady
(Figure18).
3.Removethebladebolt,bracket,andblade;save
thebracketandbladebolt(Figure18).
g231390
Figure19
Important:Positionthecurvedendsofthe
bladefacinguptowardthemachinehousing.
5.Useatorquewrenchtotightenthebladebolt
to68N∙m(50ft-lb).
19

PreparingtheBatteryPack
Storage
forRecycling
Important:Uponremoval,covertheterminalsof
thebatterypackwithheavy-dutyadhesivetape.
Donotattempttodestroyordisassemblethe
batterypackorremoveanyofitscomponents.
Lithium-ionbatterypackslabeledwiththe
Call2Recyclesealcanberecycledatany
participatingretailerorbatteryrecycling
facilityintheCall2Recycleprogram(US
andCanadaonly).T olocateaparticipating
retailerorfacilityclosesttoyou,pleasecall
1-800-822-8837orvisitwww .call2recycle.org.
Ifyoucannotlocateaparticipatingretaileror
facilitynearby,orifyourrechargeablebattery
isnotlabeledwiththeCall2Recycleseal,
pleasecontactyourlocalmunicipalityformore
informationonhowtoresponsiblyrecyclethe
battery.IfyouarelocatedoutsideoftheUS
andCanada,pleasecontactyourauthorized
Torodistributor.
Important:Storethemachine,batterypack,and
chargeronlyintemperaturesthatarewithinthe
appropriaterange;refertoSpecications(page
11).
Important:Ifyouarestoringthebatterypack
fortheoff-season,chargeituntil2or3LED
indicatorsturngreenonthebattery.Donotstore
afullychargedorfullydepletedbattery.When
youarereadytousethemachineagain,charge
thebatterypackuntiltheleftindicatorlightturns
greenonthechargerorall4LEDindicatorsturn
greenonthebattery.
•Disconnecttheproductfromthepowersupply(i.e.,
removethebatterypack)andcheckfordamage
afteruse.
•Donotstorethemachinewiththebatterypack
installed.
•Cleanallforeignmaterialfromtheproduct.
•Whennotinuse,storethemachine,electric-start
button,batterypack,andbatterychargeroutofthe
reachofchildren.
•Keepthemachine,batterypack,andbattery
chargerawayfromcorrosiveagents,suchas
gardenchemicalsandde-icingsalts.
•T oreducetheriskofseriouspersonalinjury ,do
notstorethebatterypackoutsideorinvehicles.
•Storethemachine,batterypack,andbattery
chargerinanenclosedclean,dryarea.
20

Troubleshooting
Performonlythestepsdescribedintheseinstructions.Allfurtherinspection,maintenance,andrepairwork
mustbeperformedbyanauthorizedservicecenterorasimilarlyqualiedspecialistifyoucannotsolvethe
problemyourself.
Problem
Themachinedoesnotstart.
Themachinedoesnotrunordoesnotrun
continuously.
Themachinedoesnotreachfullpower.
Thebatterypackloseschargequickly .
PossibleCauseCorrectiveAction
1.Thebatteryisnotfullyinstalledinthe
machine.
2.Thebatterypackisnotcharged.
3.Thebatterypackisdamaged.3.Replacethebatterypack.
4.Thereisanotherelectricalproblem
withthemachine.
1.Thereismoistureontheleadsofthe
batterypack.
2.Thebatteryisnotfullyinstalledintothe
tool.
1.Thebatterypackchargecapacityis
toolow.
2.Theairventsareblocked.
1.Thebatterypackisoverorunderthe
appropriatetemperaturerange.
2.Themachineisoverloaded
1.Removeandthenreplacethebattery
intothemachine,makingsurethatitis
fullyinstalledandlatched.
2.Removethebatterypackfromthe
machineandchargeit.
4.ContactanAuthorizedServiceDealer.
1.Allowthebatterypacktodryorwipeit
dry.
2.Removeandthenreplacethebattery
intothetoolmakingsurethatitisfully
installedandlatched.
1.Removethebatterypackfromthe
machineandfullychargethebattery
pack.
2.Cleantheairvents.
1.Movethebatterypacktoaplace
whereitisdryandthetemperatureis
between5°C(41°F)and40°C(104°F).
2.Cutthegrassatahigherheightofcut
orwalkataslowerpacewhilemowing.
Thebatterychargerisnotworking.
TheLEDindicatorlightonthebattery
chargerisred.
TheLEDindicatorlightonthebattery
chargerisblinkingred.
1.Thebatterychargerisoverorunder
theappropriatetemperaturerange.
2.Theoutletthatthebatterychargeris
pluggedintodoesnothavepower.
1.Thebatterychargerand/orbattery
packisoverorundertheappropriate
temperaturerange.
1.Thereisanerrorinthecommunication
betweenthebatterypackandthe
charger.
2.Thebatterypackisweak.
1.Unplugthebatterychargerandmove
ittoaplacewhereitisdryandthe
temperatureisbetween5°C(41°F)
and40°C(104°F).
2.Contactyourlicensedelectricianto
repairtheoutlet.
1.Unplugthebatterychargerandmove
thebatterychargerandbatterypack
toaplacewhereitisdryandthe
temperatureisbetween5°C(41°F)
and40°C(104°F).
1.Removethebatterypackfromthe
batterycharger,unplugthebattery
chargerfromtheoutlet,andwait10
seconds.Plugthebatterychargerinto
theoutletagainandplacethebattery
packonthebatterycharger.IftheLED
indicatorlightonthebatterychargeris
stillblinkingred,repeatthisprocedure
again.IftheLEDindicatorlighton
thebatterychargerisstillblinkingred
after2attempts,properlydisposeof
thebatterypackatabatteryrecycling
facility.
2.Contactyourauthorizedservicedealer
ifthebatteryisinwarranty ,orproperly
disposeofthebatterypackatabattery
recyclingfacility .
21

Problem
PossibleCauseCorrectiveAction
Themachineisproducingabeeping
sound.
Thequalityofcutisdecreasedor
unsatisfactory.
Thebaggingisdecreasedor
unsatisfactory.
Themachineisvibrating.1.Thebladeisbentordamaged.
1.Thebatterypackisnotcharged.
2.Themachineisinanunsafeposition
foroperation.
3.Themachineisoverloaded.
4.Thereisanotherelectricalproblem
withthemachine.
1.Thebladeisdull.1.Havethebladesharpenedorreplaced.
1.Themachineisoverloaded
1.Thebladeisdull.1.Havethebladesharpenedorreplaced. Themachineiscuttingunevenly.
2.Thecuttingdeckisdamaged.
1.Removethebatterypackfromthe
machineandchargeit.
2.Ensurethatthemachineisnotatan
extremeanglewhileoperating.
3.Cutthegrassatahigherheightofcut
orwalkataslowerpacewhilemowing.
4.Attempttheothertroubleshooting
actions,ifthealarmstillsounds,
contactanAuthorizedServiceDealer.
1.Cutthegrassatahigherheightofcut.
2.ContactanAuthorizedServiceDealer.
1.Inspectthebladeandreplaceif
necessary.
22

CaliforniaProposition65WarningInformation
Whatisthiswarning?
Youmayseeaproductforsalethathasawarninglabellikethefollowing:
WARNING:CancerandReproductiveHarm—www.p65Warnings.ca.gov.
WhatisProp65?
Prop65appliestoanycompanyoperatinginCalifornia,sellingproductsinCalifornia,ormanufacturingproductsthatmaybesoldinorbroughtinto
California.ItmandatesthattheGovernorofCaliforniamaintainandpublishalistofchemicalsknowntocausecancer,birthdefects,and/orother
reproductiveharm.Thelist,whichisupdatedannually ,includeshundredsofchemicalsfoundinmanyeverydayitems.ThepurposeofProp65isto
informthepublicaboutexposuretothesechemicals.
Prop65doesnotbanthesaleofproductscontainingthesechemicalsbutinsteadrequireswarningsonanyproduct,productpackaging,orliteraturewith
theproduct.Moreover,aProp65warningdoesnotmeanthataproductisinviolationofanyproductsafetystandardsorrequirements.Infact,the
CaliforniagovernmenthasclariedthataProp65warning“isnotthesameasaregulatorydecisionthataproductis‘safe’or‘unsafe.’”Manyofthese
chemicalshavebeenusedineverydayproductsforyearswithoutdocumentedharm.Formoreinformation,gotohttps://oag.ca.gov/prop65/faqs-view-all
AProp65warningmeansthatacompanyhaseither(1)evaluatedtheexposureandhasconcludedthatitexceedsthe“nosignicantrisklevel”;or(2)
haschosentoprovideawarningbasedonitsunderstandingaboutthepresenceofalistedchemicalwithoutattemptingtoevaluatetheexposure.
Doesthislawapplyeverywhere?
Prop65warningsarerequiredunderCalifornialawonly.ThesewarningsareseenthroughoutCaliforniainawiderangeofsettings,includingbutnot
limitedtorestaurants,grocerystores,hotels,schools,andhospitals,andonawidevarietyofproducts.Additionally,someonlineandmailorder
retailersprovideProp65warningsontheirwebsitesorincatalogs.
.
HowdotheCaliforniawarningscomparetofederallimits?
Prop65standardsareoftenmorestringentthanfederalandinternationalstandards.TherearevarioussubstancesthatrequireaProp65warning
atlevelsthatarefarlowerthanfederalactionlimits.Forexample,theProp65standardforwarningsforleadis0.5μg/day,whichiswellbelow
thefederalandinternationalstandards.
Whydon’tallsimilarproductscarrythewarning?
•ProductssoldinCaliforniarequireProp65labellingwhilesimilarproductssoldelsewheredonot.
•AcompanyinvolvedinaProp65lawsuitreachingasettlementmayberequiredtouseProp65warningsforitsproducts,butothercompanies
makingsimilarproductsmayhavenosuchrequirement.
•TheenforcementofProp65isinconsistent.
•CompaniesmayelectnottoprovidewarningsbecausetheyconcludethattheyarenotrequiredtodosounderProp65;alackofwarningsfora
productdoesnotmeanthattheproductisfreeoflistedchemicalsatsimilarlevels.
WhydoesToroincludethiswarning?
Torohaschosentoprovideconsumerswithasmuchinformationaspossiblesothattheycanmakeinformeddecisionsabouttheproductstheybuyand
use.Toroprovideswarningsincertaincasesbasedonitsknowledgeofthepresenceofoneormorelistedchemicalswithoutevaluatingthelevelof
exposure,asnotallthelistedchemicalsprovideexposurelimitrequirements.WhiletheexposurefromToroproductsmaybenegligibleorwellwithinthe
“nosignicantrisk”range,outofanabundanceofcaution,T orohaselectedtoprovidetheProp65warnings.Moreover,ifTorodoesnotprovidethese
warnings,itcouldbesuedbytheStateofCaliforniaorbyprivatepartiesseekingtoenforceProp65andsubjecttosubstantialpenalties.
RevA

FormNo.3442-185RevC
CortacéspedRecycler
de53cm(21")conFlex-Force
PowerSystem
Nºdemodelo20367—Nºdeserie407300000ysuperiores
Nºdemodelo20367T—Nºdeserie407300000ysuperiores
™
®
60VMAX
Registresuproductoenwww.Toro.com.
Traduccióndeloriginal(ES)
*3442-185*

Sinecesitaayuda,consulte
losvídeosinstruccionales
enwww.Toro.com/support
ollameal1-888-384-9939
antesdedevolvereste
producto.
ADVERTENCIA
formación,informaciónsobreaccesorios,para
localizarundistribuidoropararegistrarsuproducto.
Sinecesitaasistenciatécnica,piezasgenuinas
delfabricanteoinformaciónadicional,póngaseen
contactoconunServicioTécnicoAutorizadooconel
Serviciodeatenciónalclientedelfabricanteytengaa
manoelnúmerodeserieydemodelodelproducto.
Figura1identicalaubicacióndelosnúmerosde
modeloyserieenelproducto.Escribalosnúmeros
enelespacioprovisto.
CALIFORNIA
AdvertenciadelaPropuesta65
Elcableeléctricodeesteproducto
contieneplomo,queelEstadode
Californiasabequecausadefectos
congénitosuotrospeligrosparala
reproducción.Láveselasmanosdespués
demanejarelmaterial.
Elusodeesteproductopuedeprovocarla
exposiciónasustanciasquímicasqueel
EstadodeCaliforniaconsideracausantes
decáncer,defectoscongénitosuotros
trastornosdelsistemareproductor.
Introducción
Estecortacéspedmanualdecuchillasrotativasestá
diseñadoparaserusadoporusuariosdomésticos.
Estádiseñadoprincipalmenteparasegarcésped
bienmantenidoenzonasverdesresidenciales.No
estádiseñadoparacortarmalezaoparaaplicaciones
agrícolas.Estádiseñadoparausarlabateríade
ionesdelitioFlex-ForcedeToro,Modelo88640
(suministradaconelModelo20367)yelModelo
88660o88675;tambiénpuedeutilizarlabatería
Modelo88620,88625,88640o88650.Estasbaterías
estándiseñadasparasercargadasúnicamenteconel
cargadordebateríasmodelo88602(suministradocon
elmodelo20367),88605o88610.Elusodeestos
productosparapropósitosdiferentesalosprevistos
puedeserpeligrosoparaustedyparaotraspersonas.
ElModelo20367Tnoincluyebateríanicargador.
Leaestemanualdetenidamenteparaaprendera
utilizarymantenercorrectamentesuproducto,y
paraevitarlesionesydañosalproducto.Ustedesel
responsabledeutilizarelproductodeformacorrecta
ysegura.
Importante:Consudispositivomóvil,puede
escanearelcódigoQRdelapegatinadelnúmero
deserie(ensucaso)paraaccederainformación
sobrelagarantía,laspiezas,yotrainformación
sobreelproducto.
g275230
Figura1
1.Ubicacióndelosnúmerosdemodeloydeserie
Nºdemodelo
Nºdeserie
Estemanualidenticapeligrospotencialesycontiene
mensajesdeseguridadidenticadosporelsímbolo
dealertadeseguridad(Figura2),queseñalaun
peligroquepuedecausarlesionesgravesolamuerte
siustednosiguelasprecaucionesrecomendadas.
g000502
Figura2
Símbolodealertadeseguridad
Estemanualutiliza2palabraspararesaltar
información.Importantellamalaatenciónsobre
informaciónmecánicaespecial,yNotaresalta
informacióngeneralquemereceunaatención
especial.
Visitewww.Toro.comparamásinformación,
incluyendoconsejosdeseguridad,materialesde
©2021—TheToro®Company
8111LyndaleAvenueSouth
Bloomington,MN55420
Póngaseencontactoconnosotrosenwww.Toro.com.
2
Reservadostodoslosderechos
ImpresoenChina

Contenido
Seguridad
Seguridad.................................................................3
Pegatinasdeseguridadeinstrucciones.............6
Montaje.....................................................................9
1Cómomontarelcargadordelabatería
(opcional)........................................................9
2Ensamblajedelabolsaderecogida.................9
3Cómodesplegarelmanillar............................10
Elproducto...............................................................11
Especicaciones...............................................11
Aperos/Accesorios............................................11
Antesdelfuncionamiento....................................12
Instalacióndelabatería....................................12
Ajustedelaalturadecorte...............................13
Duranteelfuncionamiento...................................14
Cómoarrancarlamáquina...............................14
Recicladodelosrecortes..................................14
Ensacadodelosrecortes.................................14
Apagadodelamáquina....................................15
Cómoretirarlabateríadelamáquina................15
Consejosdeoperación....................................15
Despuésdelfuncionamiento...............................16
Cargadelabatería...........................................16
Limpiezadelosbajosdelamáquina.................17
Cómoplegarelmanillar....................................17
Almacenamientodelamáquinaenposición
vertical..........................................................18
Mantenimiento........................................................19
Lubricacióndelamáquina................................19
Cómocambiarlacuchilla..................................19
Preparacióndelabateríaparael
reciclado.......................................................20
Almacenamiento.....................................................20
Solucióndeproblemas...........................................21
INSTRUCCIONESDE
SEGURIDAD
IMPORTANTES
ADVERTENCIA–alutilizarunamáquinaeléctrica,
leayobservesiemprelasnormaseinstrucciones
deseguridadbásica,incluyendolassiguientes,an
dereducirelriesgodeincendio,descargaeléctrica
olesiones:
I.Formación
1.Eloperadordelamáquinaesresponsablede
cualquieraccidenteopeligroqueafecteaotras
personasoasupropiedad.
2.Nodejequelosniñosutilicenojueguenconla
máquina,labateríaoelcargadordelabatería;
lanormativalocalpuederestringirlaedaddel
operador.
3.Nopermitaqueestedispositivoseautilizado
omantenidoporniñosoporpersonasque
nohayanrecibidolaformaciónadecuada.
Sólopermitaquemanejenomantenganel
dispositivopersonasresponsables,formadas,
familiarizadasconlasinstruccionesy
físicamentecapacesdeutilizarlamáquina.
4.Antesdeutilizarlamáquina,labateríay
elcargadordelabatería,leatodaslas
instruccionesysímbolosdeadvertenciade
estosproductos.
5.Familiaríceseconloscontrolesyconeluso
correctodelamáquina,labateríayelcargador
delabatería.
II.Preparación
1.Nopermitaqueentrenotraspersonas,
especialmenteniñosoanimalesdomésticos,en
lazonadetrabajo.
2.Noutilicelamáquinasinquetodoslos
protectoresydispositivosdeseguridad,
talescomodeectoresyrecogedores,estén
colocadosyfuncionencorrectamenteenla
máquina.
3.Inspeccioneeláreadondesevaautilizarla
máquina,yretirecualquierobjetoquepudiera
interferirconelfuncionamientodelamáquinao
quepudieraserarrojadoporlamáquina.
4.Antesdeutilizarlamáquina,asegúresedeque
lacuchilla,elpernodelacuchillayelconjunto
delacuchillanoestándesgastadosodañados.
Sustituyacualquierpegatinadañadaoilegible.
5.Utiliceúnicamentelabateríaespecicada
porToro.Elusodeotrosaccesoriospuede
aumentarelriesgodeincendioylesiones.
3

6.Siseenchufaelcargadorenunatomade
corrientequenoseade120voltios,puede
causarunincendioounadescargaeléctrica.
Noconecteelcargadordelabateríaaunatoma
decorrientequenoseade120voltios.Para
otrostiposdeconexión,utiliceunadaptador
deenchufedeltipocorrectoparalatomade
corriente,siesnecesario.
7.Noutilicelabateríaoelcargadordelabatería
siestándañadosomodicados,porquepodrían
mostraruncomportamientoimpredeciblecon
resultadodeincendio,explosiónoriesgode
lesiones.
8.Sielcabledealimentacióndelcargadordela
bateríaestádañado,póngaseencontactocon
unServicioTécnicoAutorizadoparacambiarlo.
9.Noutilicebateríasnorecargables.
10.Carguelabateríaúnicamenteconelcargador
delabateríaespecicadoporToro.Uncargador
diseñadoparauntipodebateríapuedecrearun
riesgodeincendiosiseutilizaconotrabatería.
11.Carguelabateríaúnicamenteenunazonabien
ventilada.
12.Noexpongalabateríaoelcargadoralfuegooa
temperaturassuperioresa68°C(154°F).
13.Sigatodaslasinstruccionesdecargayno
carguelabateríasilatemperaturaestáfueradel
intervaloespecicadoenlasinstrucciones.De
locontrario,podríadañarlabateríayaumentar
elriesgodeincendio.
14.Vestimentaadecuada–lleveropaadecuada,
incluyendoprotecciónocular;pantalónlargo;
calzadoresistenteyantideslizante(novaya
descalzoniconsandalias);yprotección
auditiva.Sitieneelpelolargo,recójaselo,y
nolleveprendasholgadasojoyassueltasque
puedanquedaratrapadasenlaspiezasmóviles.
Lleveunamascarillaencondicionesdetrabajo
demuchopolvo.Serecomiendaelusode
guantesdegoma.
III.Operación
1.Uncontactoconlacuchillaenmovimiento
causarálesionesgraves.Mantengalasmanos
ylospiesalejadosdelazonadecorteyde
todaslaspiezasmóvilesdelamáquina.Nose
acerquealosoriciosdedescarga.
2.Elusodeestamáquinaparaotrospropósitos
quelosprevistospodríaserpeligrosopara
ustedyparaotraspersonas.
3.Desengranelatransmisiónautopropulsada(si
estáinstalada)antesdearrancarlamáquina.
4.Noinclinelamáquinaalarrancarelmotor.
5.Eviteelarranqueaccidental–asegúresede
queelbotóndearranqueeléctricoseretira
delencendidoantesdeconectarlabateríay
manejarlamáquina.
6.Dediquetodasuatenciónalmanejodela
máquina.Norealiceningunaactividadque
pudieradistraerle;delocontrario,podrían
producirselesionesodañosmateriales.
7.Cuandoustedsueltalabarradecontroldelas
cuchillas,elmotordebeapagarseylacuchilla
debedetenerseen3segundosomenos.Si
no,dejedeusarlamáquinainmediatamentey
póngaseencontactoconunServicioTécnico
Autorizado.
8.Parelamáquina,retireelbotóndearranque
eléctrico,retirelabateríadelamáquinayespere
aquesedetengatodomovimientoantesde
ajustar,revisar,limpiaroalmacenarlamáquina.
9.Retirelabateríayelbotóndearranqueeléctrico
delamáquinaantesdedejarladesatendidao
antesdecambiardeaccesorio.
10.Nofuercelamáquina–dejequelamáquina
hagaeltrabajomejoryconmásseguridadala
velocidadparalaquefuediseñada.
11.Manténgasealerta–estéatentoaloqueestá
haciendoyutiliceelsentidocomúnmientras
trabajeconlamáquina.Noutilicelamáquinasi
estáenfermo,cansado,obajolainuenciade
alcoholodrogas.
12.Utilicelamáquinaúnicamenteconbuena
visibilidadyencondicionesmeteorológicas
apropiadas.Nouselamáquinacuandohay
riesgoderayos.
13.Extremelasprecaucionesalirhaciaatrásotirar
delamáquinahaciausted.
14.Pisermeymantengaelequilibrioentodo
momento,sobretodoenpendientes.Siegue
detravésencuestasypendientes,nunca
haciaarribaohaciaabajo.Extremelas
precaucionesalcambiardedirecciónencuestas
opendientes.Nosieguependientesycuestas
extremadamenteempinadas.Camine,nocorra
nuncaconlamáquina.
15.Nodirijaelmaterialdedescargahacianadie.
Evitedescargarmaterialcontraunapareduotra
obstrucción;elmaterialpodríarebotarhacia
usted.Detengala(s)cuchilla(s)antesdecruzar
superciesquenoesténcubiertasdehierba.
16.Estéalertaaagujeros,surcos,montículos,
rocasuotrosobjetosocultos.Losterrenos
irregularespuedenhacerqueustedpierdael
equilibriooresbale.
17.Lahierbamojadaolashojasmojadaspueden
causarlegraveslesionessiustedresbalaytoca
lacuchilla.Evitesegarencondicioneshúmedas
ocuandollueve.
4

18.Silamáquinagolpeaunobjetooempiezaa
vibrar,apagueinmediatamentelamáquina,
retireelbotóndearranqueeléctrico,retire
labateríayespereaquesedetengatodo
movimientoantesdeexaminarlamáquinaen
buscadedaños.Hagatodaslasreparaciones
necesariasantesdevolverautilizarlamáquina.
19.Parelamáquinayretireelbotóndearranque
eléctricoantesdecargarlamáquinaparael
transporte.
20.Encondicionesabusivas,labateríapuede
expulsarlíquido;eviteelcontacto.Encasode
uncontactoaccidentalconellíquido,enjuague
conagua.Siellíquidoentraencontactocon
susojos,busqueayudamédica.Ellíquido
expulsadodelabateríapuedecausarirritación
oquemaduras.
IV.Mantenimientoyalmacenamiento
1.Parelamáquina,retireelbotóndearranque
eléctrico,retirelabateríadelamáquinayespere
aquesedetengatodomovimientoantesde
ajustar,revisar,limpiaroalmacenarlamáquina.
2.Nointenterepararlamáquina,salvocon
arregloaloindicadoenlasinstrucciones.Haga
queunServicioTécnicoAutorizadorealiceel
mantenimientodelamáquinausandopiezasde
repuestoidénticas.
3.Lleveguantesyprotecciónocularalrealizarel
mantenimientodelamáquina.
losprotectorescolocadosyenbuenestado
defuncionamiento.Mantengalascuchillas
aladas.Utiliceúnicamentecuchillasde
repuestoidénticas.
10.Inspeccionelamáquinaenbuscadepiezas
dañadas–sihaydañosenlosprotectoresoen
otraspiezas,determinesilamáquinafunciona
correctamente.Compruebequelaspiezas
móvilesestáncorrectamentealineadasyquese
muevenlibrementesinagarrotarse,queestán
correctamentemontadas,quenohaypiezas
rotas,yquenohayotrascircunstanciasque
pudieranafectarasuuso.Amenosquese
indiquelocontrarioenlasinstrucciones,haga
queunServicioTécnicoAutorizadorepareo
sustituyacualquierprotectorocomponente
dañado.
11.Cuandolabateríanoestáenuso,debe
mantenersealejadadeobjetosmetálicoscomo
clips,monedas,llaves,clavosytornillosque
pudieranhacerunaconexiónentreunterminal
yotro.Uncortocircuitoentrelosterminales
delabateríapuedecausarquemadurasoun
incendio.
12.Compruebefrecuentementequelospernosde
montajedelacuchillaydelmotorestánbien
apretados.
13.Cuandonoestéutilizandolamáquina,guárdela
enunlugarcerrado,secoyseguro,fueradel
alcancedelosniños.
4.Aleunacuchillaromaenambosladospara
mantenerelequilibrio.Limpielacuchillay
asegúresedequeestáequilibrada.
5.Cambielacuchillasiestádoblada,desgastadao
agrietada.Unacuchilladesequilibradaproduce
vibraciones,quepodríandañarelmotoro
causarlesionespersonales.
6.Alrealizarelmantenimientodelacuchilla,sepa
quelacuchillapuedemoverseinclusosila
fuentedealimentaciónestáapagada.
7.Compruebefrecuentementelabolsaderecogida
derecortesenbuscadedeteriorosodesgaste,
ysustituyacualquierbolsadesgastadaporuna
bolsa[derecambio]Toro.
8.Paraobtenerelmejorrendimiento,utilice
solamentepiezasyaccesoriosgenuinosde
Toro.Otrosaccesoriosypiezasderepuesto
podríanserpeligrosos,ydichousopodría
invalidarlagarantíadelproducto.
9.Mantengalamáquinacorrectamente–
mantengaloslosdecortealadosylimpios
paraobtenerelmejorrendimientoylamayor
seguridad.Mantengalosmanillaressecos,
limpiosylibresdeaceiteygrasa.Mantenga
14.CUIDADO–unabateríamaltratadapuede
representarunriesgodeincendiooquemadura
química.Nodesmontelabatería.Nocalientela
bateríaamásde68°C(154°F)nilaincinere.
Sustituyalabateríaúnicamenteconunabatería
Torogenuina;elusodeotrotipodebatería
podríaprovocarunincendioounaexplosión.
Mantengalasbateríasfueradelalcancedelos
niñosyenelembalajeoriginalhastasuuso.
15.Notirelabateríaalfuego.Laceldapuede
explosionar.Compruebesilanormativalocal
contienealgunainstrucciónespecialsobrela
eliminacióndelasbaterías.
GUARDEESTAS
INSTRUCCIONES
5

Pegatinasdeseguridadeinstrucciones
Laspegatinasdeseguridadeinstruccionesestánalavistadeloperadoryestánubicadas
cercadecualquierzonadepeligropotencial.Sustituyacualquierpegatinaqueestédañadao
quefalte.
Modelo88640
decal140-3811
140-3811
1.Advertencia–leael
Manualdeloperador.
2.Peligrodeobjetos
arrojados–mantenga
alejadasaotraspersonas.
3.Peligrode
corte/desmembramiento,
cuchilladelcortacésped–
retirelallaveyleael
Manualdeloperador
antesderealizartareasde
mantenimiento.
4.Peligrode
corte/desmembramiento,
cuchilladelcortacésped
–noseacerquealas
piezasenmovimiento;
mantengacolocados
todoslosprotectoresy
defensas.
5.Peligrode
corte/desmembramiento,
cuchilladelcortacésped
–nosieguecuesta
arribaocuestaabajo
enpendientes;siegue
únicamentedeladoalado
enpendientes;apague
elmotor,espereaque
sedetenganlaspiezas
enmovimientoyrecoja
cualquierresiduoantes
desegar;mirehaciaatrás
mientrassiegaenmarcha
atrás.
1.LeaelManualdel
operador.
2.Programaderecicladode
bateríasCall2Recycle
140-2155
3.Mantengalabateríade
ionesdelitioalejadadel
fuegoydelasllamas
desnudas.
4.Noexponeralalluvia.
®
133-8061
decal140-2155
decal133-8061
6

137-9462
137-9463
1.Labateríaseestácargando.
2.Labateríaestácompletamentecargada.
3.Latemperaturadelabateríaestáporencimaopordebajodelintervalodetemperaturaadecuado.
4.Fallodecargadelabatería
decal137-9462
decal137-9463
1.Estadodecargadelabatería
decal94-8072
94-8072
decal137-9461
137-9461
decal139-8986
139-8986
7

decal144-3175
144-3175
1.LeaelManualdel
operador.
2.Paraarrancarlamáquina,
aprietelabarracontrael
manillarypulseelbotón.
3.Paraapagarlamáquina,
sueltelabarra.
8

Montaje
Importante:Enelmomentodelacompralabateríanoestátotalmentecargada.Antesdeutilizarla
máquinaporprimeravez,consulteCargadelabatería(página16).
1
Cómomontarelcargador
delabatería(opcional)
Piezasnecesariasenestepaso:
2
Fijacionesdemontaje(noincluidas)
Procedimiento
Silodesea,monteelcargadordelabatería
rmementeenlaparedutilizandolosoriciosde
montajeenparedenlapartetraseradelcargador.
Mónteloenunespaciointerior(talcomoungarajeu
otrolugarseco),cercadeunatomadecorrientey
fueradelalcancedelosniños.
ConsultelaFigura3paraobtenerasistenciasobre
elmontajedelcargador.
Coloqueelcargadorsobrelasjaciones
correctamenteposicionadasparajarloensulugar
(jacionesnoincluidas).
2
Ensamblajedelabolsade
recogida
Nosenecesitanpiezas
Procedimiento
g235791
Figura4
Figura3
g290534
9

3
Cómodesplegarelmanillar
Nosenecesitanpiezas
Procedimiento
ADVERTENCIA
Sidespliegaelmanillardeformaincorrecta,puedendañarseloscables,creandocondiciones
deoperacióninseguras.
•Nodañeel/loscable(s)alplegarodesplegarelmanillar.
•Asegúresedecolocarel/loscable(s)enelexteriordelmanillar.
•Siuncableestádañado,póngaseencontactoconelServicioTécnicoAutorizado.
Importante:Retireydesechelahojaprotectoradeplásticoquecubreelmotor,ycualquierotro
plásticooenvolturadelamáquina.
1.Abralaspalancasdebloqueodelmanillar(Figura5,A).
2.Muevaelmanillarhaciaatrásalaposicióndeuso(Figura5,B).
3.Sujeteelmanillarmientrascierralaspalancasdebloqueodelmanillar,paraevitarquelasmanosqueden
atrapadas.
4.Muevalapalancadebloqueodelmanillarhastaqueelpasadorseengancheensusitio,parabloquear
elmanillarenlaposicióndeuso(Figura5,C).
Figura5
g304886
10
Elproducto
1.Barradecontroldelas
cuchillas
2.Botóndearranque
eléctrico
3.Palancadebloqueodel
manillar(2)
4.Deectortrasero
Figura6
5.Compartimentodela
batería
6.Bolsaderecogida
7.Palancadealturadecorte
(2)
Especicaciones
Batería
Modelo88640
Capacidaddelabatería
Voltajesegúnelfabricantedelabatería=60Vmáximoy54V
nominal.Elvoltajerealdependedelacarga.
Cargadordebaterías
Modelo88602
Tipo
Entrada
Salida
Cargadordebateríasdeionesdelitio
60VMAX
120Vca50/60HzMáx.2.0A
60VMÁXCC2.0A
Intervalosdetemperaturaadecuados
Cargue/guardelabateríaa5°C(41°F)a40°C(104°F)*
Utilicelabateríaa
g296936
Utilicelamáquinaa
*Eltiempodecargaserámayorsilatemperaturano
estádentrodeesteintervalodurantelacarga.
Guardelamáquina,labateríayelcargadorenun
lugarcerrado,limpioyseco.
Aperos/Accesorios
4.0Ah
216Wh
-30°C(-22°F)a49°C
(120°F)*
0°C(32°F)a49°C(120°F)*
1.Cargadordebaterías
Modelo88602(incluido
conelModelo20367)
Figura7
2.Bateríamodelo88640
(incluidaconelModelo
20367)
Puedeestardisponibleunaseleccióndeaperos
yaccesorioshomologadosporToroparasuuso
conlamáquinaandepotenciaryaumentarsus
prestaciones.PóngaseencontactoconsuServicio
TécnicoAutorizadoodistribuidorautorizadoToroo
visitewww.Toro.comparaobtenerunalistadetodos
losaperosyaccesorioshomologados.
Paraasegurarunrendimientoóptimoymantener
g355813
lacerticacióndeseguridaddelamáquina,utilice
solamentepiezasyaccesoriosgenuinosToro.Las
piezasderecambioyaccesoriosdeotrosfabricantes
podríanserpeligrosos,ysuusopodríainvalidarla
garantíadelproducto.
11
Operación
Antesdel
funcionamiento
Instalacióndelabatería
Importante:Utilicelabateríasoloatemperaturasqueesténdentrodelintervaloapropiado;consulte
Especicaciones(página11).
1.Compruebequelosoriciosdeventilacióndelabateríaestánlibresdepolvoyresiduos.
2.Levantelatapadelcompartimentodelabatería(Figura8,A).
3.Alineeelhuecodelabateríaconlalengüetadelamáquina,eintroduzcalabateríaenelcompartimento
hastaqueseengancheensusitio(Figura8,B).
4.Cierrelatapadelcompartimentodelabatería(Figura8,C).
Nota:Silatapadelcompartimentodelabateríanosecierraporcompleto,labateríanoestá
correctamenteinstalada.
Figura8
g251221
12

Ajustedelaalturadecorte
ADVERTENCIA
Alajustarlaalturadecorte,podríatocarunacuchillaenmovimientoconlasmanos,loque
podríacausarlegraveslesiones.
•Apagueelmotor,retirelabatería,yespereaquesedetengantodaslaspiezasen
movimientoantesdeajustarlaalturadecorte.
•Nopongalosdedosdebajodelacarcasaalajustarlaalturadecorte.
Ajustelaalturadecortesegúndesee.Ajustelascuatroruedasalamismaalturadecorte(Figura9).
Figura9
13
g304633

Duranteel
funcionamiento
Cómoarrancarlamáquina
1.Asegúresedequelabateríaestácargadaeinstaladaenlamáquina;consulteInstalacióndelabatería
(página12).
2.Introduzcaelbotóndearranqueeléctricoenelinterruptordearranqueeléctrico(Figura10,A).
3.Aprietelabarradecontroldelacuchillacontraelmanillar(Figura10,B).
4.Pulseelbotóndearranqueeléctricoymanténgalopulsadohastaqueelmotorarranque(Figura10,C).
Figura10
g296941
Recicladodelosrecortes
Sumáquinavienepreparadadefábricaparareciclarlosrecortesdehierbayhojasydevolverlosalcésped.
Silabolsaderecogidaestáinstaladaenlamáquina,retírelaantesdereciclarlosrecortes.ConsulteReciclado
delosrecortes(página14).
Ensacadodelosrecortes
Utilicelabolsaderecogidasidesearecogerlosrecortesdehierbayhojasdelcésped.
Instalacióndelabolsaderecogida
1.Levanteeldeectortrasero(Figura11,A).
2.Introduzcalosextremosdelavarilladelabolsaderecogidaenlasmuescasdelossoportesdelmanillar
(Figura11,B).
3.Dejequeeldeectortraserodescansesobrelabolsaderecogida.
Figura11
14
g240796

Cómoretirarlabolsaderecogida
Pararetirarlabolsa,sigalospasosdeInstalacióndelabolsaderecogida(página14)ensentidoinverso.
Apagadodelamáquina
1.Sueltelabarradecontroldelacuchilla(Figura
12,A).
2.Retireelbotóndearranqueeléctricodel
arrancadoreléctrico(Figura12,B).
3.Retirelabatería;consulteCómoretirarla
bateríadelamáquina(página15).
Nota:Cuandonovayaausarlamáquina,retire
labatería.
Figura12
Cómocortarlahierba
•Cortesolamenteunterciodelahojadehierba
cadavez.Paramejorarlacalidaddecorte,la
autonomíayelensacado,siegueaunaalturade
cortemayor.
•Nocorteamenosde51mm(2")amenosquela
hierbaseaescasa,oanalesdelotoñocuando
elritmodecrecimientodelahierbaempiezaa
decaer.
•Cuandocortehierbademásde15cm(6")dealto,
siegueprimerousandolaalturadecortemásalta
ycaminedespacio,luegosieguedenuevoauna
alturamenorparaobtenerelmejoraspectodel
césped.Silahierbaesdemasiadolarga,puede
atascarlamáquinayhacerquesecaleelmotor.
•Lahierbamojadaylashojasmojadastiendena
pegarsealsuelo,ypuedenatascarlamáquina
ohacerquesecaleelmotor.Evitesegaren
condicioneshúmedas.
g296945
•Estéatentoalposibleriesgodeincendio
encondicionesmuysecas,sigatodaslas
advertenciaslocalesparacasosdeincendio
ymantengalamáquinalibredehierbasecay
residuosdehojas.
Cómoretirarlabateríade
lamáquina
1.Levantelatapadelcompartimentodelabatería.
2.Presioneelcierredelabateríaparaliberarla
batería,yretirelabatería.
3.Cierrelatapadelcompartimentodelabatería.
Consejosdeoperación
Consejosgeneralesdesiega
•Inspeccionelazonaenlaquevaautilizarla
máquinayretirecualquierobjetoquepudieraser
arrojadoporlamáquina.
•Evitegolpearobjetossólidosconlacuchilla.No
sieguenuncaporencimadeobjetoalguno.
•Silamáquinagolpeaunobjetooempiezaavibrar,
apagueinmediatamenteelmotor,espereaquese
detengantodaslaspiezasenmovimiento,retire
labateríaeinspeccionelamáquinaenbuscade
daños.
•Paraobtenerelmejorrendimiento,instaleuna
cuchillanuevaT oroantesdequeempiecela
temporadadesiega,ocuandoseanecesario.
•Alterneladireccióndecorte.Estoayudaa
dispersarlosrecortesentodoelcésped,dando
unafertilizaciónmáshomogénea.
•Sielaspectonaldelcéspednoessatisfactorio,
pruebeconunaomásdelastécnicassiguientes:
–Cambiarlacuchillaomandarlaaalar.
–Caminarmásdespaciomientrassiega.
–Elevarlaalturadecortedelamáquina.
–Cortarelcéspedconmásfrecuencia.
–Solaparlospasillosdecorteenlugardecortar
unpasillocompletoencadapasada.
Cómocortarhojas
•Despuésdesegarelcésped,asegúresedequela
mitaddelcéspedseveatravésdelacoberturade
hojascortadas.Esposiblequetengaquehacer
másdeunapasadaporencimadelashojas.
•Sihaymásde13cm(5")dehojassobreelcésped,
siegueaunaalturadecortesuperioryluego
sieguenuevamentealaalturadecortedeseada.
•Sieguemásdespaciosilamáquinanocortalas
hojassucientementenas.
15

Despuésdel
funcionamiento
Cargadelabatería
Importante:Enelmomentodelacomprala
bateríanoestátotalmentecargada.Antesdeusar
laherramientaporprimeravez,coloquelabatería
enelcargadorycárguelahastaqueelindicador
LEDindiquequelabateríaestácompletamente
cargada.Leatodaslasprecaucionesde
seguridad.
Indicador
ApagadaNohaybateríainsertada
Verde
intermitente
VerdeLabateríaestácargada
Rojo
Rojointermitente
Indica:
Labateríaseestácargando
Labateríay/oelcargadordelabateríaestápor
encimaopordebajodelintervalodetemperatura
adecuado
Fallodecargadelabatería*
Importante:Carguelabateríasoloatemperaturas
queesténdentrodelintervaloapropiado;consulte
Especicaciones(página11).
Nota:Encualquiermomento,presioneelbotóndel
indicadordecargadelabateríaparamostrarlacarga
actual(indicadoresLED).
1.Compruebequelosoriciosdeventilaciónde
labateríaydelcargadorestánlibresdepolvo
yresiduos.
*ConsulteSolucióndeproblemas(página21)si
deseamásinformación.
Importante:Labateríapuededejarseconectada
alcargadorduranteperiodoscortosentreusos.
Silabateríanosevaautilizarduranteperiodos
máslargos,retirelabateríadelcargador;consulte
Almacenamiento(página20).
Figura13
1.Huecodelabatería
2.Zonasdeventilacióndela
batería
3.Terminalesdelabatería
4.Botóndelindicadorde
cargadelabatería
5.IndicadoresLED(carga
actual)
6.Manillar
7.IndicadorLEDdel
cargador
8.Zonasdeventilacióndel
cargador
2.Alineeelhuecodelabatería(Figura13)conla
lengüetadelcargador.
3.Introduzcalabateríaenelcargadorhastaque
estécompletamenteasentada(Figura13).
4.Pararetirarlabatería,deslicelabateríahacia
atrásparasacarladelcargador.
5.Consultelatablasiguienteparainterpretarel
indicadorLEDdelcargadordelabatería.
g290533
16

Limpiezadelosbajosdela
máquina
Intervalodemantenimiento:Despuésdecadauso
Limpiezadelosbajosdela
máquina
Paraobtenerresultadosóptimos,limpiedebajo
delamáquinainmediatamentedespuésdehaber
terminadolasiega.
1.Bajelamáquinaalaalturadecortemásbaja.
Cómoplegarelmanillar
ADVERTENCIA
Sipliegaodespliegaelmanillardeforma
incorrecta,puedendañarseloscables,
creandocondicionesdeoperacióninseguras.
•Nodañeloscablesalplegarodesplegarel
manillar.
•Siuncableestádañado,póngase
encontactoconelServicioTécnico
Autorizado.
2.Muevalamáquinaaunasuperciepavimentada
nivelada.
3.Conelmotorenmarchaylacuchillaengranada,
dirijaunchorrodeaguapordelantedelarueda
traseraderecha(Figura14).
Nota:Elaguaentraráenlazonadelacuchilla,
arrastrandolosrecortes.
Figura14
4.Cuandoyanosalganmásrecortes,cierrela
llavedelaguaymuevalamáquinaaunazona
seca.
5.Hagafuncionarelmotorduranteunosminutos
parasecarlaparteinferiordelamáquina.
Limpiezadelosbajosdela
máquinaenlaposiciónde
almacenamientovertical
1.Pongalamáquinaenlaposiciónde
almacenamientovertical;consulte
Almacenamientodelamáquinaenposición
vertical(página18).
1.Retireelbotóndearranqueeléctrico(Figura15).
g296946
Figura15
g002600
2.Retirelabateríadelamáquina.
3.Sujeteelmanillarmientrasabrelaspalancasde
bloqueodelmanillar,paraevitarquelasmanos
quedenatrapadas.
4.Abralaspalancasdebloqueodelmanillarhasta
quepuedamoverlibrementelasecciónsuperior
delmanillar.
5.Pliegueelmanillarhaciaadelantedeltodo,
comoseindicaenlaFigura17.
Importante:Asegúresedequeloscables
quedanporfueradelaspalancasdebloqueo
delmanillaralplegarlasecciónsuperior.
6.Paradesplegarelmanillar,consulte3Cómo
desplegarelmanillar(página10).
2.Eliminelosrecortesdehierbadedebajodela
máquinaconagua.
17

Almacenamientodela
máquinaenposición
vertical
Puedealmacenarlamáquinaenposiciónverticalpara
aprovecharalmáximoelespaciodealmacenamiento.
ADVERTENCIA
Sipliegaodespliegaelmanillardeforma
incorrecta,puedendañarseloscables,
creandocondicionesdeoperacióninseguras.
•Nodañeloscablesalplegarodesplegarel
manillar.
•Siuncableestádañado,póngase
encontactoconelServicioTécnico
Autorizado.
1.Retireelbotóndearranqueeléctricoylabatería
delamáquina.
2.Asegúresedequelaalturadecortedela
máquinaesde44mm(1¾")omás;sino,
aumentelaalturadecorte;consulteAjustede
laalturadecorte(página13).
3.Abralaspalancasdebloqueodelmanillar
(Figura16).
g297023
Figura17
Figura16
4.Pliegueelmanillarcompletamentehacia
adelante.
Importante:Asegúresedequeloscables
quedanporfueradelaspalancasdebloqueo
delmanillaralplegarlasecciónsuperior.
5.Cierrelaspalancasdebloqueodelmanillar.
6.Levantelapartedelanteradelamáquinaconel
manillaryllévelaallugardealmacenamiento
(Figura17).
g297000
18

Mantenimiento
Retireelbotóndearranqueeléctricoylabateríadela
máquinaantesderealizartareasdemantenimientoo
limpiezaenlamáquina.
Siempreapaguelamáquina,espereaquese
detengantodaslaspiezasenmovimiento,ydeje
quelamáquinaseenfríeantesdehacertrabajosde
ajuste,revisión,limpiezaoalmacenamiento.
Utiliceúnicamentepiezasderepuestoyaccesorios
recomendadosporelfabricante.
Inspeccioneyreviselamáquinadeformaregular.
Lamáquinadebeserreparadaúnicamenteporun
ServicioTécnicoAutorizado.
g231389
Figura18
Lubricacióndelamáquina
Noesnecesariolubricarlamáquina;todoslos
cojinetesvienendefábricalubricadosparatodala
vidadelamáquina.
Cómocambiarlacuchilla
Intervalodemantenimiento:Cadaaño
Importante:Ustednecesitaráunallave
dinamométricaparainstalarlacuchilla
correctamente.Sinodisponedeunallave
dinamométricaopreerenorealizareste
procedimiento,póngaseencontactoconel
ServicioTécnicoAutorizado.
Silacuchillaestádañadaoagrietada,sustitúyala
inmediatamente.Siellodelacuchillaestáromoo
mellado,mandeaalarlacuchillaocámbiela.
ADVERTENCIA
Alrealizarelmantenimientodelacuchilla,
sepaquelacuchillapuedemoverseincluso
silafuentedealimentaciónestáapagada.La
cuchillaestámuyalada;cualquiercontacto
conlacuchillapuedecausarlesiones
personalesgraves.
4.Instalelacuchillanueva,elsoporteyelperno
delacuchilla(Figura19).
g231390
Figura19
Lleveguantesalrealizarelmantenimientode
lacuchilla.
1.Retireelbotóndearranqueeléctricoylabatería
delamáquina.
2.Utiliceunbloquedemaderaparainmovilizarla
cuchilla(Figura18).
3.Retireelpernodelacuchilla,elsoporteyla
cuchilla;guardeelsoporteyelpernodela
cuchilla(Figura18).
Importante:Coloquelacuchillaconlos
extremoscurvoshaciaarriba,haciala
carcasadelamáquina.
5.Utiliceunallavedinamométricaparaapretar
elpernodelacuchillaa68N·m(50pies-libra).
19

Preparacióndelabatería
Almacenamiento
paraelreciclado
Importante:Despuésderetirarla,cubralos
terminalesdelabateríaconcintaadhesivade
serviciopesado.Nointentedestruirodesmontar
labateríaniintenteretirarcualquieradelos
componentesdelamisma.
Lasbateríasdeionesdelitioetiquetadascon
elselloCall2Recyclepuedenserrecicladasen
cualquiercomerciooinstalacióndereciclado
debateríasadscritoalprogramaCall2Recycle
(soloEE.UU.yCanadá).Paralocalizar
uncomercioounainstalaciónparticipante
cercano,llameal1-800-822-8837ovisite
www.call2recycle.org.Sinopuedelocalizarun
comerciooinstalaciónparticipantecercano,o
sisubateríarecargablenoestáetiquetadacon
elselloCall2Recycle,póngaseencontacto
consuayuntamientoparaobtenermás
informaciónsobreelrecicladoresponsable
delabatería.SiseencuentrafueradeEE.
UU.oCanadá,póngaseencontactoconsu
distribuidorT oroautorizado.
Importante:Almacenelamáquina,labateríayel
cargadorsoloatemperaturasqueesténdentrodel
intervaloapropiado;consulteEspecicaciones
(página11).
Importante:Sivaaalmacenarlaherramienta
hastalatemporadasiguiente,cárguelahastaque
2o3delosindicadoresLEDdelabateríacambien
averde.Noalmacenelabateríacompletamente
cargadanicompletamentedescargada.Antesde
volverausarlamáquina,carguelabateríahasta
quesevuelvaverdeelindicadorizquierdodel
cargador,ohastaquelos4indicadoresLEDdela
bateríasevuelvanverdes.
•Desconecteelproductodelsuministrodeenergía
(esdecir,retirelabatería)ycompruebesihay
dañosdespuésdeluso.
•Noalmacenelamáquinaconlabateríainstalada.
•Limpiecualquiermaterialextrañodelproducto.
•Cuandonoseesténutilizando,almacenela
máquina,elbotóndearranqueeléctrico,labatería
yelcargadordelabateríafueradelalcancede
losniños.
•Mantengalamáquina,labateríayelcargadorde
labateríaalejadosdeagentescorrosivoscomo
productosquímicosdejardínosalparadeshielo.
•Parareducirelriesgodelesionespersonales
graves,noalmacenelabateríaenelexterioroen
unvehículo.
•Guardelamáquina,labateríayelcargadorenun
lugarcerrado,limpioyseco.
20

Solucióndeproblemas
Realicesololospasosdescritosenestasinstrucciones.Cualquierotrotrabajodeinspección,mantenimientoo
reparacióndebeserrealizadoporunServicioTécnicoAutorizadooporunespecialistaautorizadosino
puedesolucionarelproblemaustedmismo.
ProblemaPosiblecausa
Lamáquinanoarranca.
Lamáquinanofuncionaonofuncionade
formacontinua.
Lamáquinanoalcanzalamáxima
potencia.
Labateríasedescargarápidamente.
Accióncorrectora
1.Labateríanoestácorrectamente
instaladaenlamáquina.
2.Labateríanoestácargada.2.Retirelabateríadelamáquinay
3.Labateríaestádañada.
4.Hayotroproblemaeléctricoconla
máquina.
1.Hayhumedadenloscablesdela
batería.
2.Labateríanoestáinstaladapor
completoenlaherramienta.
1.Lacapacidaddecargadelabatería
esdemasiadobaja.
2.Losoriciosdeventilaciónestán
obstruidos.
1.Latemperaturadelabateríaestápor
encimaopordebajodelintervalode
temperaturaadecuado.
2.Lamáquinaestásobrecargada.
1.Retireyluegovuelvaacolocarla
bateríaenlamáquina,asegurándose
dequeestácompletamenteinstalada
ybloqueada.
cárguela.
3.Sustituyalabatería.
4.PóngaseencontactoconelServicio
TécnicoAutorizado.
1.Dejequelabateríasesequeoséquela
conunpaño.
2.Retireyluegovuelvaacolocar
labateríaenlaherramienta,
asegurándosedequeestá
completamenteinstaladaybloqueada.
1.Retirelabateríadelamáquinay
carguecompletamentelabatería.
2.Limpielosoriciosdeventilación.
1.Trasladelabateríaaunlugarseco
cuyatemperaturaseadeentre5°C
(41°F)y40°C(104°F).
2.Siegueaunaalturadecortemásalta
ocamineaunritmomáslentodurante
lasiega.
Elcargadordelabateríanofunciona.
ElindicadorLEDdelcargadordela
bateríaestárojo.
1.Latemperaturadelcargadordela
bateríaestáporencimaopordebajo
delintervalodetemperaturaadecuado.
2.Latomadecorrienteenlaqueestá
enchufadoelcargadordelabateríano
tienecorriente.
1.Elcargadordelabateríay/olabatería
estáporencimaopordebajodel
intervalodetemperaturaadecuado.
1.Desenchufeelcargadordelabatería
ytrasládeloaunlugarsecocuya
temperaturaseadeentre5°C(41°F)
y40°C(104°F).
2.Póngaseencontactoconun
electricistaautorizadoparaquerepare
latomadecorriente.
1.Desenchufeelcargadordelabatería
ymuevaelcargadordelabatería
ylabateríaaunlugarsecocuya
temperaturaseadeentre5°C(41°F)
y40°C(104°F).
21

ProblemaPosiblecausa
Accióncorrectora
ElindicadorLEDdelcargadordela
bateríaparpadeaenrojo.
Lamáquinaproducepitidos.
1.Hayunerrordecomunicacionesentre
labateríayelcargador.
2.Labateríaestácasiagotada.2.Póngaseencontactoconunservicio
1.Labateríanoestácargada.1.Retirelabateríadelamáquinay
2.Lamáquinaestáenunaposición
inseguraparaeluso.
3.Lamáquinaestásobrecargada.
4.Hayotroproblemaeléctricoconla
máquina.
1.Retirelabateríadelcargador,
desconecteelcargadordelatoma
decorrienteyespere10segundos.
Vuelvaaenchufarelcargadorenla
tomadecorrienteycoloquelabatería
enelcargador.SielindicadorLED
delcargadorsigueparpadeandoen
rojo,repitaesteprocedimiento.Si
elindicadorLEDdelcargadorsigue
parpadeandodespuésde2intentos,
eliminelabateríacorrectamente
enunainstalaciónderecicladode
baterías.
técnicoautorizadosilabateríaestáen
garantía,oeliminecorrectamentela
bateríaenunainstalacióndereciclado
debaterías.
cárguela.
2.Asegúresedequelamáquinanotiene
unainclinaciónextremaduranteeluso.
3.Siegueaunaalturadecortemásalta
ocamineaunritmomáslentodurante
lasiega.
4.Pruebelasdemásaccionesde
solucióndeproblemas,ysilaalarma
siguesonando,póngaseencontacto
conunServicioTécnicoAutorizado.
Lacalidaddecorteesreducidao
insatisfactoria.
Elensacadoesdecienteoinsatisfactorio.
Lamáquinacortadeformadesigual.
Lamáquinavibra.1.Lacuchillaestádobladaodañada.1.Inspeccionelacuchillaycámbielasi
1.Lacuchillanoestáalada.
1.Lamáquinaestásobrecargada.
1.Lacuchillanoestáalada.
2.Lacarcasadecorteestádañada.
1.Hagaquelacuchillasealeose
cambie.
1.Siegueaunaalturadecortemásalta.
1.Hagaquelacuchillasealeose
cambie.
2.PóngaseencontactoconelServicio
TécnicoAutorizado.
esnecesario.
22

InformaciónsobrelasAdvertenciasdelaProposición65deCalifornia
¿Quésignicaestaadvertencia?
Puedeverunproductoalaventaquellevaunaetiquetadeadvertenciacomolasiguiente:
ADVERTENCIA:Cáncerydañosreproductivos–www.p65Warnings.ca.gov.
¿QuéeslaProposición65?
LaProposición65afectaacualquierempresaquetengapresenciaenCalifornia,quevendaproductosenCalifornia,oquefabriqueproductosque
podríanserintroducidosovendidosenCalifornia.EstaleyexigequeelGobernadordeCaliforniamantengaypubliqueunalistadesustanciasquímicas
identicadascomocausantesdecáncer,defectosdenacimientoy/uotrosdañosreproductivos.Lalista,queseactualizaanualmente,incluyecientos
deproductosquímicosqueseencuentranenmuchosartículosdeusodiario.ElpropósitodelaProposición65esinformaralpúblicosobrela
exposiciónaestosproductosquímicos.
LaProposición65noprohíbelaventadeproductosquecontenganestosproductosquímicos,sinoquerequierelapresenciadeadvertencias
enelproducto,elenvaseyladocumentaciónsuministradaconelproducto.Además,unaadvertenciadelaProposición65nosignicaqueel
productocontravenganingunanormaorequisitodeseguridad.Dehecho,elgobiernodeCaliforniahaaclaradoqueunaadvertenciabajola
Proposición65"noeslomismoqueunadecisiónlegalsobrela'seguridad'ola'inseguridad'deunproducto".Muchosdeestosproductosquímicos
hansidoutilizadosduranteañosenproductosdeusodiariosinquesehayanproducidodañosdocumentados.Paraobtenermásinformación,
visitehttps://oag.ca.gov/prop65/faqs-view-all.
UnaadvertenciadelaProposición65signicaqueunaempresa(1)haevaluadolaexposiciónyhaconcluidoquesuperaelnivelde"sinriesgo
signicativo";o(2)haoptadoporproporcionarunaadvertenciabasándoseensusconocimientosrespectoalapresenciadeunproductoquímicodelos
incluidosenlalista,sinintentarevaluarlaexposición.
¿Seaplicaestaleyentodaspartes?
LasadvertenciasdelaProposición65sólosonexigidasbajolalegislacióndeCalifornia.EstasadvertenciassevenportodaCaliforniaenunagran
variedaddeentornos,incluyendoentreotrosrestaurantes,tiendasdealimentación,hoteles,escuelasyhospitales,yenunaampliavariedaddeproductos.
Además,algunosminoristasdeInternetydelaventaporcorreoincluyenadvertenciasdelaProposición65ensussitiosweboensuscatálogos.
¿QuédiferenciahayentrelasadvertenciasdeCaliforniayloslímitesfederales?
LasnormasdelaProposición65sonamenudomásexigentesquelasnormasfederalesointernacionales.Variassustanciasrequierenunaadvertencia
bajolaProposición65anivelesmuyinferioresaloslímitesfederales.Porejemplo,elnivelexigidoporlaProposición65paralasadvertenciassobreel
plomoesde0.5μg/día,queesmuyinferioraloqueexigenlasnormasfederaleseinternacionales.
¿Porquénollevanlaadvertenciatodoslosproductossimilares?
•LosproductosvendidosenCaliforniadebenllevaretiquetasbajolaProposición65,mientrasqueotrosproductossimilaresquesevendenen
otroslugaresnolasnecesitan.
•UnaempresapuedeestarobligadaaincluiradvertenciasdeProposición65ensusproductoscomocondicióndeunacuerdotrasunprocedimiento
legalrelacionadoconlaProposición65,perootrasempresasquefabricanproductossimilaresnotienennecesariamentelamismaobligación.
•LaaplicacióndelaProposición65noesuniforme.
•AlgunasempresaspuedenoptarpornoproporcionaradvertenciasporqueconcluyenquenoestánobligadasahacerlobajolaProposición65;la
faltadeadvertenciasenunproductonosignicaqueelproductoestélibredelosproductosquímicosincluidosenlalistaanivelessimilares.
¿PorquéincluyeT oroestaadvertencia?
Torohaoptadoporproporcionaralconsumidorlamayorcantidadposibledeinformaciónparaquepuedatomardecisionesinformadassobrelos
productosquecomprayutiliza.T oroproporcionaadvertenciasenciertoscasosbasándoseensusconocimientossobrelapresenciadeunoomás
productosquímicosdelalista,sinevaluarelniveldeexposición,puestoquelalistanoincluyelímitesdeexposiciónparatodoslosproductosquímicos
quecontiene.AunquelaexposiciónqueprovocanlosproductosToropuedeserinsignicante,oestardentrodeloslímitesdelacategoría"sinriesgo
signicativo",TorohaoptadoporproporcionarlasadvertenciasdelaProposición65porsimpleprecaución.Además,siT oronoproporcionaraestas
advertencias,podríaserdemandadaporelEstadodeCaliforniaoporparticularesbajolaProposición65,yestarsujetaaimportantessanciones.
RevA


FormNo.3442-186RevC
TondeuseRecycler
53cm(21po)avecFlex-Force
PowerSystem
N°demodèle20367—N°desérie407300000etsuivants
N°demodèle20367T—N°desérie407300000etsuivants
™
®
60VMAX
Enregistrezvotreproduitàwww.Toro.com.
Traductiondutexted'origine(FR)
*3442-186*

Sivousavezbesoin
d'aide,visionnezles
vidéosd'instructionsur
www.Toro.com/supportou
appelezle1-888-384-9939
avantderenvoyerce
produit.
ATTENTION
CALIFORNIE
Proposition65-Avertissement
Lecordond'alimentationdecette
machinecontientduplomb,une
substancechimiqueconsidéréepar
l'étatdeCaliforniecommesusceptible
deprovoquerdesmalformations
congénitalesetautrestroublesdela
reproduction.Lavez-vouslesmains
aprèsavoirmanipulélabatterie.
L'utilisationdeceproduitpeutentraîner
uneexpositionàdessubstances
chimiquesconsidéréespasl'étatde
Californiecommecapablesdeprovoquer
descancers,desanomaliescongénitales
oud'autrestroublesdelareproduction.
Lisezattentivementcettenoticepourapprendre
commentutiliseretentretenircorrectementvotre
produit,etéviterainsidel'endommageroudevous
blesser.Vousêtesresponsabledel'utilisationsûreet
correcteduproduit.
Pourplusd’information,ycomprisdesconseils
desécurité,desdocumentsdeformation,des
renseignementsconcernantunaccessoire,pour
obtenirl'adressed'undépositaireoupourenregistrer
votreproduit,rendez-voussurlesitewww.T oro.com.
Pourobtenirdesprestationsdeservice,despièces
d'origineoudesrenseignementscomplémentaires,
munissez-vousdesnumérosdemodèleetdesérie
duproduitetcontactezundépositaire-réparateur
agrééouleserviceclientduconstructeur.LaFigure1
indiquel'emplacementdesnumérosdemodèleetde
sérieduproduit.Inscrivezlesnumérosdansl'espace
réservéàceteffet.
Important:Avecvotreappareilmobile,vous
pouvezscannerlecodeQRsurl'autocollantdu
numérodesérie(lecaséchéant)pouraccéderà
l'informationsurlagarantie,lespiècesdétachées
etautresrenseignementsconcernantleproduit.
g275230
Figure1
Introduction
Cettetondeuseautotractéeàlamerotativeest
destinéeaugrandpublic.Elleestprincipalement
conçuepourtondrelespelousesentretenues
régulièrementdanslesterrainsprivés.Ellen'estpas
conçuepourcouperlesbroussaillesnipourunusage
agricole.Elleestconçuepourfonctionneravecla
batterieion-lithiumToroFlex-Forcemodèle88640
(fournieaveclemodèle20367)etmodèle88660
ou88675;ellepeutaussiutiliserlabatterie
modèle88620,88625,88640ou88650.Cesbatteries
sontconçuespourêtrechargéesuniquement
aveclechargeurmodèle88602(fourniavecle
modèle20367),88605ou88610.L'utilisationdeces
produitsàd'autresnsquecellesprévuespeutêtre
dangereusepourvous-mêmeettoutepersonneà
proximité.
Lemodèle20367Tnecomprendpasdebatterie
nidechargeur.
1.Emplacementdesnumérosdemodèleetdesérie
N°demodèle
N°desérie
Lesmisesengardedecemanuelsoulignentdes
dangerspotentielsetsontsignaléesparlesymbole
desécurité(Figure2),quiindiqueundangerpouvant
entraînerdesblessuresgravesoumortellessiles
précautionsrecommandéesnesontpasrespectées.
g000502
Figure2
Symboledesécurité
Cemanuelutilisedeuxtermespourfairepasserdes
renseignementsessentiels.Important,pourattirer
l'attentionsuruneinformationd'ordremécanique
spécique,etRemarque,poursoulignerune
©2021—TheToro®Company
8111LyndaleAvenueSouth
Bloomington,MN55420
Contactez-noussurwww.Toro.com.
2
ImpriméenChine
Tousdroitsréservés

informationd'ordregénéralméritantuneattention
particulière.
Tabledesmatières
Sécurité....................................................................4
Autocollantsdesécuritéetd'instruction..............7
Miseenservice.......................................................10
1Montageduchargeurdebatterie
(option)..........................................................10
2Montagedubacàherbe................................10
3Dépliagedelapoignée...................................11
Vued'ensembleduproduit......................................12
Caractéristiquestechniques............................12
Outilsetaccessoires.........................................12
Avantl'utilisation..................................................13
Installationdelabatterie...................................13
Réglagedelahauteurdecoupe.......................14
Pendantl'utilisation.............................................15
Démarragedelamachine.................................15
Recyclagedel'herbecoupée............................15
Ramassagedel'herbecoupée.........................15
Arrêterlamachine............................................16
Retraitdelabatteriedelamachine...................16
Conseilsd'utilisation........................................16
Aprèsl'utilisation.................................................17
Chargedelabatterie........................................17
Nettoyagedudessousdelamachine................18
Pliageduguidon...............................................18
Remisagedelamachineenposition
verticale........................................................19
Entretien.................................................................20
Graissagedelamachine..................................20
Remplacementdelalame................................20
Préparationdelabatteriepourle
recyclage......................................................21
Remisage...............................................................21
Dépistagedesdéfauts............................................22
3

Sécurité
IMPORTANTES
CONSIGNES
DESÉCURITÉ
ATTENTION–quandvousutilisezunemachine
électrique,lisezetrespecteztoujourslesmisesen
gardeetconsignesdesécuritéélémentairespour
réduirelesrisquesd'incendie,dechocélectriqueou
deblessure,notamment:
I.Formationàl'utilisation
1.L'utilisateurdelamachineestresponsabledes
accidentsetdommagescausésauxautres
personnesetàleurspossessions.
2.N'autorisezpaslesenfantsàjoueravecla
machine,labatterieoulechargeurdebatterie;
certaineslégislationsimposentunâgeminimum
pourl'utilisationdecetypedemachine.
3.Neconezpasl'utilisationoul'entretiendela
machineàdesenfantsouàdespersonnes
noncompétentes.Neconezl'utilisationde
lamachinequ'àdespersonnesresponsables,
compétentes,quiontluetcomprisles
instructionsetsontphysiquementaptesà
l'utiliseretenfairel'entretien.
4.Avantd'utiliserlamachine,labatterieetle
chargeurdebatterie,liseztouteslesinstructions
etmisesengardequigurentsurcesproduits.
5.Familiarisez-vousaveclescommandesetle
maniementcorrectdelamachine,delabatterie
etduchargeurdebatterie.
II.Avantl'utilisation
1.T eneztoutlemonde,notammentlesenfantset
lesanimaux,àl'écartdelazonedetravail.
2.N'utilisezpaslamachines'ilmanquedes
capotsoudesdispositifsdeprotectiontelsque
déecteursetbacsàherbe,ous'ilssonten
mauvaisétat.
3.Examinezlazonedetravailetdébarrassez-lade
toutobjetpouvantgênerlefonctionnementdela
machineouêtreprojetépendantsonutilisation.
4.Avantd'utiliserlamachine,vériezquelalame,
leboulondelalameetl'ensemblenesontpas
usésniendommagés.Remplaceztoutesles
étiquettesendommagéesouillisibles.
5.Utilisezuniquementlabatteriespéciéepar
Toro.L'utilisationd'autresaccessoireset
outilspeutaccroîtrelerisquedeblessureet
d'incendie.
6.Vouspouvezcauserunincendieouunchoc
électriquesivousbranchezlechargeurde
batterieàuneprisequin'estpasde120V.Ne
branchezpaslechargeurdebatterieàune
priseautreque120V.Pourunautremodede
connexion,vouspouvez,aubesoin,utiliserun
adaptateurcongurécorrectementpourlaprise.
7.N'utilisezpaslabatterieoulechargeurde
batteries'ilssontendommagésoumodiés,
carilspourraientsecomporterdemanière
imprévisibleetcauserunincendie,une
explosionoudesblessures.
8.Silecordond'alimentationreliéauchargeur
debatterieestendommagé,contactezun
dépositaire-réparateuragréépourlefaire
remplacer.
9.N'utilisezpasdebatteriesnonrechargeables.
10.Nechargezlabatteriequ'aveclechargeur
spéciéparT oro.Unchargeurconvenantàun
certaintypedebatteriepeutcréerunrisque
d'incendies'ilestutiliséavecuneautrebatterie.
11.Nechargezlabatteriequedansunendroitbien
aéré.
12.N'exposezpaslabatterieoulechargeuraufeu
ouàdestempératuressupérieuresà68°C
(154°F).
13.Suiveztouteslesinstructionsdechargeetne
chargezpaslabatteriehorsdelaplagede
températurespéciéedanslesinstructions.
Vousrisquezsinond'endommagerlabatterieet
d'accroîtrelerisqued'incendie.
14.Portezdesvêtementsadéquats–portezune
tenueappropriée,ycomprisuneprotection
oculaire,unpantalon,deschaussuressolidesà
semelleantidérapante(netravaillezpaspieds
nusouensandales)etdesprotecteursd'oreilles.
Sivoscheveuxsontlongs,attachez-leset
neportezpasdevêtementsamplesoude
bijouxpendantsquipourraientseprendre
danslespiècesmobiles.Portezunmasque
antipoussièresil'atmosphèreestpoussiéreuse.
Ilestrecommandédeporterdesgantsde
caoutchouc.
III.Utilisation
1.Lecontactaveclalameenmouvemententraîne
desblessuresgraves.Gardezlesmainsetles
piedsàl'écartdelazonedecoupeetdetoutes
lespiècesmobilesdelamachine.Nevous
tenezpasdevantl'ouvertured'éjection.
2.L'utilisationdecettemachineàd'autresns
quecelleprévuepeutêtredangereusepour
vous-mêmeettoutepersonneàproximité.
3.Désengagezl'autopropulsion(selon
l'équipement)avantdedémarrerlamachine.
4.N'inclinezpaslamachinequandvousdémarrez
lemoteur.
4

5.Évitezlesdémarragesaccidentels–vériezque
leboutondedémarrageélectriqueestretiré
dudémarreurélectriqueavantdebrancherla
batterieetdemanipulerlamachine.
6.Accordeztoutevotreattentionàl'utilisationde
lamachine.Nevouslivrezàaucuneactivité
risquantdevousdistraire,aurisquedecauser
desdommagescorporelsoumatériels.
7.Lorsquevousrelâchezlabarredecommande
deslames,lemoteuretlalamedoivents'arrêter
enmoinsde3secondes.Sicen'estpaslecas,
cessezimmédiatementd'utiliserlamachineet
contactezundépositaire-réparateuragréé.
8.Arrêtezlamachine,retirezleboutonde
démarrageélectrique,enlevezlabatteriedela
machineetattendezl'arrêtdetoutmouvement
avantderégler,réviser,nettoyerouremiserla
machine.
9.Enlevezlabatterieetleboutondedémarrage
électriquedelamachinechaquefoisquevous
lalaissezsanssurveillanceouavantdechanger
d'accessoires.
10.Nefaitespasforcerlamachine–elledonnera
debienmeilleursrésultatsetseraplussûresi
vousl'utilisezàlavitessepourlaquelleelleest
prévue.
11.Restezalerte–concentrez-voussurvotretâche
etfaitespreuvedebonsenslorsquevous
utilisezlamachine.N'utilisezpaslamachinesi
vousêtesmaladeoufatigué(e),nisousl'emprise
del'alcool,dedroguesoudemédicaments.
12.N'utilisezlamachinequesilavisibilitéest
sufsanteetdansdebonnesconditions
météorologiques.N'utilisezpaslamachinesi
lafoudremenace.
13.Redoublezdeprudencelorsquevousfaites
marchearrièreouquevoustirezlamachine
versvous.
14.Gardeztoujourslespiedsbienposésàterreet
maintenezvotreéquilibre,enparticuliersurles
pentes.Travailleztransversalementàlapente,
jamaisenmontantoudescendant.Changezde
directionaveclaplusgrandeprudencesurles
terrainsenpente.Netondezpasdepentestrop
raides.Avanceztoujoursàuneallurenormale
aveclamachine,necourezpas.
15.Nedirigezpasl’éjectionversquiquecesoit.
N'éjectezpasl'herbecoupéecontreunmur
ouunobstacle,carellepourraitricocherdans
votredirection.Arrêtezlaouleslamesavantde
traverserdessurfacesnonrecouvertesd'herbe.
16.Méez-vousdestrous,ornières,bosses,rochers
ouautresobstaclescachés.Lesirrégularités
duterrainpeuventvousfairedéraperouperdre
l'équilibre.
17.Entravaillantsurl'herbeoulesfeuilleshumides,
vousrisquezdeglisseretdevousblesser
gravementsivoustouchezlalameentombant.
Netondezpassil'herbeesthumideousousla
pluie.
18.Silamachineheurteunobjetousemetàvibrer,
arrêtez-laimmédiatement,enlevezlebouton
dedémarrageélectrique,enlevezlabatterie
etattendezl'arrêtcompletdetoutmouvement
avantdevérierl'étatdelamachine.Effectuez
touteslesréparationsnécessairesavantde
réutiliserlamachine.
19.Arrêtezlamachineetenlevezleboutonde
démarrageélectriqueavantdechargerla
machinepourletransport.
20.Dansdesconditionsd'utilisationabusive,du
liquidepeutjaillirhorsdelabatterie;éviteztout
contact.Encasdecontactaccidentelavecle
liquide,rincezàl'eau.Encasdecontactdu
liquideaveclesyeux,consultezunmédecin.
Leliquideéjectédelabatteriepeutcauserdes
irritationsoudesbrûlures.
IV.Entretienetremisage
1.Arrêtezlamachine,retirezleboutonde
démarrageélectrique,enlevezlabatteriedela
machineetattendezl'arrêtdetoutmouvement
avantderégler,réviser,nettoyerouremiserla
machine.
2.N'essayezpasderéparerlamachinesaufen
suivantlesinstructions.Conezl'entretiendela
machineàundépositaire-réparateuragrééqui
utilisedespiècesderechangeidentiques.
3.Portezdesgantsetuneprotectionoculairepour
fairel'entretiendelamachine.
4.Aiguisezleslamesémousséesdesdeuxcôtés
pourqu'ellesrestentéquilibrées.Nettoyezla
lameetvériezqu'elleestéquilibrée.
5.Remplacezlalamesielleestfaussée,uséeou
ssurée.Unelamemaléquilibréeprovoquedes
vibrationsquirisquentd'endommagerlemoteur
oudecauserdesblessures.
6.Quandvousfaitesl'entretiendelalame,
n'oubliezpasqu'ellepeutencorebougermême
sil'alimentationélectriqueestcoupée.
7.Vériezfréquemmentquelebacderamassage
n'estpasdétérioréouusé;remplacezunbac
uséparunbacToro.
8.Pourobtenirdesrésultatsoptimaux,utilisez
uniquementdespiècesderechangeetdes
accessoiresTorod'origine.Lespiècesde
rechangeetaccessoiresd'uneautremarque
peuventêtredangereuxetleurutilisationrisque
d'annulerlagarantiedelamachine.
5

9.Maintenezlamachineenbonétat–pour
obtenirdesperformancesoptimalesetsûres,
conservezletranchantdeslamesbienaffûtéet
propre.Gardezlespoignéessèchesetpropres,
etexemptesd'huileetdegraisse.Gardez
toujourslesprotectionsenplaceetenbonétat.
Maintenezleslamesbienaiguisées.Utilisez
uniquementdeslamesderechangeidentiques.
10.Vériezl'étatdespiècesdelamachine–si
vousconstatezquedesprotectionsoud'autres
piècessontendommagées,déterminezsila
machinepeutfonctionnercorrectement.Vériez
qu'aucunepiècemobilen'estmalalignéeou
grippée,etqu'aucunepiècen'estcassée,
malxéeouneprésentetoutautredéfaut
susceptibled'affectersonfonctionnement.Sauf
indicationcontrairedanslesinstructions,faites
réparerouremplacerlesprotectionsetpièces
endommagéesparundépositaire-réparateur
agréé.
11.Lorsquelabatterienesertpas,rangez-laà
l'écartd'objetsmétalliquestelsquetrombones,
piècesdemonnaie,clés,clousetvisqui
pourraientrelierlesbornesentreelles.Un
court-circuitauxbornesdelabatteriepeut
causerdesbrûluresouunincendie.
12.Vériezfréquemmentleserragedesboulonsde
montagedelalameetdumoteur.
13.Lorsquevousn'utilisezpaslamachine,
remisez-ladansunlocalsecetsécuriséethors
delaportéedesenfants.
14.PRUDENCE–labatteriepeutprésenterun
risqued'incendieoudebrûlurechimiqueen
casdemauvaistraitement.Nedémontezpas
labatterie.N'exposezpaslabatterieàune
températuresupérieureà68°C(154°F)etne
l'incinérezpas.Remplaceztoujourslabatterie
parunebatterieTorod'origine;l'utilisation
detoutautretypedebatteriepeutentraîner
unincendieouuneexplosion.Conservez
lesbatterieshorsdelaportéedesenfantset
dansleuremballaged'originejusqu'audernier
momentavantdelesutiliser.
15.Nejetezpaslabatterieaufeu;l'élémentpourrait
exploser.Vériezsilaréglementationlocale
imposedesprocéduresdemiseaurebut
spéciales.
CONSERVEZCES
INSTRUCTIONS
6

Autocollantsdesécuritéetd'instruction
Desautocollantsdesécuritéetdesinstructionsbienvisiblesparl'opérateursontplacésprès
detouslesendroitspotentiellementdangereux.Remplaceztoutautocollantendommagé
oumanquant.
140-3811
Modèle88640
decal140-3811
1.Attention–lisezleManuel
del'utilisateur.
2.Risquedeprojection
d'objets–n'autorisez
personneàs'approcher
delamachine.
3.Risquede
coupure/mutilationpar
lalamedelatondeuse–
enlevezlaclédecontact
etlisezleManuelde
l'utilisateuravantde
procéderàtoutentretien.
4.Risquede
coupure/mutilationparla
lamedelatondeuse–ne
vousapprochezpasdes
piècesmobilesetgardez
touteslesprotectionsen
place.
5.Risquede
coupure/mutilationparla
lamedelatondeuse–ne
tondezpasdanslesens
delapente,maistoujours
transversalement;coupez
lemoteur,attendezl’arrêt
despiècesmobileset
ramassezlesdébris
avantdetondre;regardez
derrièrevousquandvous
tondezenmarchearrière.
1.LisezleManuelde
l'utilisateur.
2.Programmede
recyclagedesbatteries
Call2Recycle
decal140-2155
140-2155
3.Conserverlabatterie
ion-lithiumàl’écartdufeu
oudesammesnues.
4.Nepasexposeràlapluie.
®
decal133-8061
133-8061
decal137-9462
137-9462
7

137-9463
1.Labatterieestencharge.
2.Labatterieestcomplètementchargée.
3.Latempératuredelabatterieestsupérieureouinférieureàlaplagedetempératureappropriée.
4.Anomaliedechargedelabatterie
decal94-8072
94-8072
decal137-9463
1.Étatdechargedelabatterie
decal137-9461
137-9461
decal139-8986
139-8986
8

decal144-3175
144-3175
1.LisezleManuelde
l'utilisateur.
2.Pourdémarrerlemoteur,
serrezlabarrecontrele
guidonetappuyezsurle
boutond'allumage.
3.Relâchezlabarrepour
arrêterlamachine.
9

Miseenservice
Important:Labatterien'estpascomplètementchargéeàl'achat.Avantlatoutepremièreutilisationde
lamachine,voirChargedelabatterie(page17).
1
Montageduchargeurde
batterie(option)
Piècesnécessairespourcetteopération:
2
Fixationsdemontage(nonincluses)
Procédure
Sivouslesouhaitez,vouspouvezxerlechargeur
debatteriesurunmuràl'aidedesfentesentroude
serruresituéesaudos.
Montez-leàl'intérieur(parexempledansungarage
outoutautreendroitàl'abridel'humidité),àproximité
d'uneprisedecourantethorsdelaportéedes
enfants.
Pourvousaideràmonterlechargeur,voirlaFigure3.
Pourxerlechargeurenplace,insérez-lesurles
xationsinstalléesàlabonneposition(xationsnon
incluses).
2
Montagedubacàherbe
Aucunepiècerequise
Procédure
g235791
Figure4
Figure3
g290534
10

3
Dépliagedelapoignée
Aucunepiècerequise
Procédure
ATTENTION
Vousrisquezd'endommagerlescâblesetderendrel'utilisationdelamachinedangereusesi
vousnedépliezpasleguidoncorrectement.
•Veillezànepasendommagerle(s)câble(s)enpliantoudépliantleguidon.
•Vériezquele(s)câble(s)passe(nt)bienàl'extérieurduguidon.
•Siuncâbleestendommagé,adressez-vousàundépositaire-réparateuragréé.
Important:Retirezetmettezaurebutlapelliculedeplastiquequiprotègelemoteurainsiquetoutautre
emballageouélémentenplastiqueutilisésurlamachine.
1.Débloquezlesverrousduguidon(AdeFigure5).
2.Ramenezleguidonenarrièreàlapositiond'utilisation(BdeFigure5).
3.T enezleguidonpendantquevousengagezlesverrouspouréviterdevouscoincerlesmains.
4.Engagezleverrouduguidonjusqu'àcequelagoupilles'enclencheenplaceetverrouilleleguidonàla
positiond'utilisation(CdeFigure5).
Figure5
g304886
11

Vued'ensembledu
produit
Caractéristiques
techniques
Batterie
1.Barredecommandedes
lames
2.Boutondedémarrage
électrique
3.Dispositifdeverrouillage
duguidon(2)
4.Déecteurarrière
Figure6
5.Compartimentdela
batterie
6.Bacàherbe
7.Levierdehauteurde
coupe(2)
Modèle
Capacitédelabatterie
Tensionbatterienominaleselonlefabricant=60Vmax.,54V
nominale.Latensionréellevarieenfonctiondelacharge.
88640
4,0Ah
216Wh
Chargeurdebatterie
Modèle
Type
Entrée120VCA50/60Hz2Amax.
Sortie60VCCmax2A
88602
Chargeurdebatterieion-lithiumde60V
MAX
Plagesdetempératureadéquates
Charger/rangerlabatterie
entre
Utiliserlabatterieentre
g296936
Utiliserlamachineentre
*Letempsdechargeserapluslongendehorsde
cetteplagedetempérature.
Rangezlamachine,labatterieetlechargeurde
batteriedansunlocalfermé,propreetsec.
5°C(41°F)et40°C(104°F)*
-30°C(-22°F)et49°C
(120°F)*
0°C(32°F)et49°C(120°F)*
Outilsetaccessoires
1.Chargeurdebatterie
modèle88602(inclus
aveclemodèle20367)
Figure7
2.Batteriemodèle88640
(incluseavecle
modèle20367)
Unesélectiond'outilsetaccessoiresagrééspar
Toroestdisponiblepouraugmenteretaméliorer
lescapacitésdelamachine.Pourobtenirlaliste
detouslesaccessoiresetoutilsagréés,contactez
votredépositaire-réparateurouvotredistributeurT oro
agréé,ourendez-voussurwww.T oro.com.
Pourgarantirunrendementoptimaletconserver
lacerticationdesécuritédelamachine,utilisez
g355813
uniquementdespiècesderechangeetaccessoires
Torod'origine.Lespiècesderechangeetaccessoires
d'autresconstructeurspeuventêtredangereuxetleur
utilisationrisqued'annulerlagarantiedelamachine.
12

Utilisation
Avantl'utilisation
Installationdelabatterie
Important:Utilisezlabatterieuniquementàdestempératurescomprisesdanslaplageadéquate;voir
Caractéristiquestechniques(page12).
1.Vériezqueleséventssurlabatteriesontexemptsdepoussièreetdedébris.
2.Soulevezlecouvercleducompartimentdelabatterie(AdelaFigure8).
3.Alignezlecreuxdanslabatterieetlalanguettesurlamachine,etglissezlabatteriedanslecompartiment
jusqu'àcequ'elles'enclencheenposition(BdelaFigure8).
4.Refermezlecouvercleducompartimentdelabatterie(CdelaFigure8).
Remarque:Silecouvercleducompartimentdelabatterienesefermepascomplètement,celasignie
quelabatterien'estpasparfaitementinstallée.
Figure8
g251221
13

Réglagedelahauteurdecoupe
ATTENTION
Lorsduréglagedelahauteurdecoupe,vousrisquezdevousblessergravementsivosmains
touchentunelameenmouvement.
•Coupezlemoteur,retirezlabatterieetattendezl'arrêtcompletdetouteslespiècesmobiles
avantderéglerlahauteurdecoupe.
•Nemettezpaslesdoigtssouslecarterdutablierdecoupequandvousréglezlahauteur
decoupe.
Choisissezlahauteurdecoupevoulue.Régleztouteslesrouesàlamêmehauteurdecoupe(Figure9).
Figure9
14
g304633

Pendantl'utilisation
Démarragedelamachine
1.Vériezquelabatterieestchargéeetinstalléedanslamachine;voirInstallationdelabatterie(page13).
2.Insérezleboutondedémarrageélectriquedansl'interrupteurdudémarreurélectrique(AdelaFigure10).
3.Serrezetmaintenezlabarredecommandedelalamecontreleguidon(BdelaFigure10).
4.Maintenezleboutondedémarrageélectriqueenfoncéjusqu’àcequelemoteurdémarre(Cdela
Figure10).
Figure10
g296941
Recyclagedel'herbecoupée
Àlalivraison,votremachineestprêteàrecyclerl'herbeetlesfeuillescoupéespournourrirvotrepelouse.
Silebacàherbeestmontésurlamachine,enlevez-leavantdeprocéderaurecyclagedel'herbe;voir
Recyclagedel'herbecoupée(page15).
Ramassagedel'herbecoupée
Utilisezlebacàherbepourrecueillirl'herbeetlesfeuillescoupéesàlasurfacedelapelouse.
Montagedubacàherbe
1.Soulevezledéecteurarrière(AdeFigure11).
2.Insérezlesextrémitésdelatigedubacàherbedanslescransdessupportsduguidon(BdeFigure11).
3.Faitesreposerledéecteurarrièresurlebac.
g240796
Figure11
Retraitdubacàherbe
Pourretirerlebacàherbe,inversezlaprocéduredemontagedécritedansMontagedubacàherbe(page15).
15

Arrêterlamachine
1.Relâchezlabarredecommandedelalame(A
delaFigure12).
2.Retirezleboutondedémarrageélectriquedu
démarreurélectrique(BdelaFigure12).
3.Enlevezlabatterie;voirRetraitdelabatteriede
lamachine(page16).
Remarque:Enlevezlabatteriechaquefois
quevousn'utilisezpaslamachine.
Figure12
Latonte
•Netondezl'herbequesuruntiersdesahauteur
àchaquefois.Pourunemeilleurequalitéde
coupe,uneplusgrandeautonomieetdemeilleurs
résultatsderamassage,tondezl'herbeàune
hauteurdecoupeplusélevée.
•N’utilisezpasunehauteurdecoupeinférieureà
51mm(2po),saufsil'herbeestclairseméeouà
landel'automnequandlapoussecommenceà
ralentir.
•Sil'herbefaitplusde15cm(6po),effectuez
d'abordunpremierpassageàvitesseréduiteàla
hauteurdecoupelaplushaute.Effectuezensuite
undeuxièmepassageàunehauteurdecoupe
inférieurepourobtenirunecoupeplusesthétique.
L'herbetrophauterisqued'obstruerlamachineet
defairecalerlemoteur.
•L'herbeetlesfeuilleshumidesonttendanceà
s'agglomérersurlapelouseetpeuventobstruerla
machineetfairecalerlemoteur.Évitezdetondre
quandl'herbeesthumide.
g296945
•Soyezconscientdesrisquesd'incendiepartemps
trèssec,respecteztouslesavertissementslocaux
relatifsauxincendies,etnelaissezpasl'herbeet
lesfeuillessèchess'accumulersurlamachine.
Retraitdelabatteriedela
machine
1.Soulevezlecouvercleducompartimentdela
batterie.
2.Appuyezsurleverroudelabatteriepourla
débloqueretl'enlever.
3.Refermezlecouvercleducompartimentdela
batterie.
Conseilsd'utilisation
Conseilsdetontegénéraux
•Inspectezlazonedetravailetenleveztoutobjet
pouvantêtreprojetéparlamachine.
•Évitezdeheurterdesobstaclesaveclalame.Ne
passezjamaisintentionnellementsurunobjetquel
qu'ilsoit.
•Silamachineheurteunobstacleoucommenceà
vibrer,coupezimmédiatementlemoteur,attendez
l'arrêtcompletdetouteslespiècesmobiles,
enlevezlabatterieetvériezquelamachinen'est
pasendommagée.
•Pourobtenirdesrésultatsoptimaux,installezune
lameT oroaudébutdelasaisondetonteouquand
celaestnécessaire.
•Alternezladirectiondelatonte.Celapermet
dedisperserlesdéchetsplusuniformémentet
d'obtenirunefertilisationplushomogène.
•Sil'aspectdelapelousetonduen'estpas
satisfaisant,essayezuneouplusieursdes
solutionssuivantes:
–Remplacezlalameoufaites-laaiguiser.
–Tondezenavançantpluslentement.
–Augmentezlahauteurdecoupe.
–Tondezplussouvent.
–Empiétezsurlespassagesprécédentspour
tondreunelargeurdebanderéduite.
Hachagedefeuilles
•Aprèslatonte,50%delapelousedoitêtrevisible
souslacouchedefeuilleshachées.Àceteffet,
vousdevrezpeut-êtrerepasserplusieursfoissur
lesfeuilles.
•Silacouchedefeuillessurlapelousefaitplusde
13cm(5po)d'épaisseur,utilisezunehauteurde
coupeplusélevée,puisfaitesunsecondpassage
àlahauteurdecoupedésirée.
•Ralentissezlavitessededéplacementsiles
feuillesnesontpashachéesassezmenues.
16

Aprèsl'utilisation
Chargedelabatterie
Important:Labatterien'estpascomplètement
chargéeàl'achat.Avantd'utiliserl'outilpourla
premièrefois,placezlabatteriedanslechargeur
etchargez-lajusqu'àcequelesdiodesindiquent
quelabatterieestcomplètementchargée.Lisez
touteslesconsignesdesécurité.
VoyantIndication
Éteint
Clignotementvert
VertBatteriechargée
Rouge
Clignotement
rouge
Pasdebatterieprésente
Batterieencharge
Latempératureduchargeuret/oudelabatterieest
supérieureouinférieureàlaplageappropriée.
Anomaliedechargedelabatterie*
Important:Chargezlabatterieuniquementàdes
températurescomprisesdanslaplageadéquate;
voirCaractéristiquestechniques(page12).
Remarque:Àtoutmoment,appuyezsurlebouton
indicateurdechargedelabatteriepourafcherla
chargeactuelle(diodes).
1.Vériezqueleséventsdelabatterieetdu
chargeursontexemptsdepoussièreetde
débris.
*Reportez-vousàlaDépistagedesdéfauts(page22)
pourtoutrenseignementcomplémentaire.
Important:Vouspouvezlaisserlabatteriedans
lechargeurpendantunecourtepériodeentre
deuxutilisations.
Silabatterienedoitpasservirpendantune
périodeprolongée,retirez-laduchargeur;voir
Remisage(page21).
Figure13
1.Creuxdelabatterie5.Voyants(chargeactuelle)
2.Éventsdelabatterie
3.Bornesdelabatterie7.Voyantduchargeur
4.Boutonindicateurde
charge
6.Poignée
8.Éventsduchargeur
2.Alignezlecreuxdelabatterie(Figure13)surla
languetteduchargeur.
3.Glissezlabatteriedanslechargeurjusqu'àce
qu'ellesoitcomplètementenclenchée(Figure
13).
4.Pourretirerlabatterieduchargeur,faites-la
glisserversl'arrière.
5.Reportez-vousautableauci-dessouspour
interpréterlesindicationsduvoyantsurle
chargeurdebatterie.
g290533
17

Nettoyagedudessousde
lamachine
Périodicitédesentretiens:Aprèschaqueutilisation
Nettoyagedudessousdela
machine
Pourobtenirdesrésultatsoptimaux,nettoyez
rapidementledessousdelamachineaprèslatonte.
1.Abaissezlamachineàlahauteurdecoupela
plusbasse.
Pliageduguidon
ATTENTION
Vousrisquezd'endommagerlescâblesetde
rendrel'utilisationdelamachinedangereuse
sivousnepliezounedépliezpasleguidon
correctement.
•Veillezànepasendommagerlescâblesen
pliantoudépliantleguidon.
•Siuncâbleestendommagé,adressez-vous
àundépositaire-réparateuragréé.
2.Amenezlamachinesurunesurfacerevêtue
planeethorizontale.
3.Mettezlemoteurenmarcheetengagezlalame,
puisdirigezunjetd'eaudevantlarouearrière
droite(Figure14).
Remarque:L'eauéclabousseraendirection
delalameetenlèveralesdébrisd'herbe
agglomérés.
Figure14
4.Lorsqu'ilneresteplusd'herbesurlalame,
arrêtezl'eauetdéplacezlamachineàunendroit
sec.
5.Faitestournerlemoteurquelquesminutespour
sécherledessousdelamachine.
1.Retirezleboutondudémarreurélectrique
(Figure15).
g296946
Figure15
g002600
2.Retirezlabatteriedelamachine.
3.T enezlapoignéependantquevousdésengagez
lesverrouspouréviterdevouscoincerles
mains.
4.Déverrouillezlapoignéejusqu'àcequelamoitié
supérieurebougelibrement.
5.Rabattezleguidoncomplètementenavant,
commemontréàlaFigure17.
Nettoyagedudessousdela
machineenpositionverticale
1.Placezlamachineenpositionverticale;voir
Remisagedelamachineenpositionverticale
(page19).
2.Lavezledessousdelamachinepouréliminer
lesdébrisd'herbe.
Important:Faitespasserlescâblesà
l'extérieurdesdispositifsdeverrouillage
quandvouspliezlapoignée.
6.Pourdéplierlapoignée;voir3Dépliagedela
poignée(page11).
18

Remisagedelamachineen
positionverticale
Vouspouvezrangervotremachineenposition
verticalepourminimiserl'encombrement.
ATTENTION
Vousrisquezd'endommagerlescâblesetde
rendrel'utilisationdelamachinedangereuse
sivousnepliezounedépliezpasleguidon
correctement.
•Veillezànepasendommagerlescâblesen
pliantoudépliantleguidon.
•Siuncâbleestendommagé,adressez-vous
àundépositaire-réparateuragréé.
1.Retirezleboutondedémarrageélectriqueetla
batteriedelamachine.
2.Vériezquelahauteurdecoupedelamachine
estrégléeà44mm(1¾po)ouplus;sicen'est
paslecas,augmentez-la;voirRéglagedela
hauteurdecoupe(page14).
3.Déverrouillezleguidon(Figure16).
g297023
Figure17
Figure16
4.Pliezleguidoncomplètementenavant.
Important:Faitespasserlescâblesà
l'extérieurdesdispositifsdeverrouillage
quandvouspliezleguidon.
5.Verrouillezleguidon.
6.Levezl'avantdelamachineparleguidonet
amenez-ladansunlieuderemisage(Figure17).
g297000
19

Entretien
Enlevezleboutondedémarrageélectriqueetla
batteriedelamachineavantd'enfairel'entretienou
delanettoyer.
Coupeztoujourslemoteur,attendezl'arrêtcomplet
detouteslespiècesenmouvementetfaitesrefroidir
lamachineavantdelarégler,delaréparer,dela
nettoyeroudelaremiser.
Utilisezuniquementlespiècesetaccessoiresde
rechangerecommandésparleconstructeur.
Inspectezetfaitesl'entretiendelamachine
régulièrement.Neconezlaréparationdelamachine
qu'àundépositaire-réparateuragréé.
g231389
Figure18
Graissagedelamachine
Lamachinenenécessiteaucunelubrication,car
touslesroulementssontlubriésàvieenusine.
Remplacementdelalame
Périodicitédesentretiens:Unefoisparan
Important:Vousaurezbesoind'uneclé
dynamométriquepourmonterlalame
correctement.Sivousn'enpossédezpas
ousivousnevoussentezpascapable
d'effectuercetteprocédure,adressez-vousàun
dépositaire-réparateuragréé.
Silalameestendommagéeoufêlée,remplacez-la
immédiatement.Silalameestémousséeou
ébréchée,faites-laaiguiseretéquilibrerou
remplacez-la.
ATTENTION
Quandvousfaitesl'entretiendelalame,
n'oubliezpasqu'ellepeutencorebouger
mêmesil'alimentationélectriqueestcoupée.
Lalameesttranchanteetvouspouvezvous
blessergravementàsoncontact.
4.Montezlanouvellelame,lesupportetleboulon
delame(Figure19).
g231390
Figure19
Portezdesgantspoureffectuerl'entretiende
lalame.
1.Retirezleboutondedémarrageélectriqueetla
batteriedelamachine.
2.Immobilisezlalameavecunmorceaudebois
(Figure18).
3.Retirezleboulondelame,lesupportetlalame;
conservezlesupportetleboulondelame
(Figure18).
Important:Dirigezlesailettesdelalame
verslehaut,verslecarterdelamachine.
5.Àl'aided'uneclédynamométrique,serrezle
boulondelalameà68N·m(50pi-lb).
20

Préparationdelabatterie
Remisage
pourlerecyclage
Important:Aprèsavoirretirélabatterie,
recouvrezlesbornesderubanadhésifépais.
N'essayezpasdedétruireoudedémonterla
batterienidedéposeraucundesescomposants.
Lesbatteriesion-lithiumaveclelabel
Call2Recyclepeuventêtrerecycléesdans
n'importequelcentrederecyclageparticipant
auprogrammeCall2Recycle(États-Uniset
Canadaseulement).Pourtrouverlerevendeur
oulecentreparticipantleplusproche,appelez
le1-800-822-8837ourendez-voussur
www.call2recycle.org.Sivousnetrouvez
pasderevendeuroudecentreàproximité,
ousivotrebatterierechargeableneporte
paslelabelCall2Recycle,contactezvotre
municipalitépourvousrenseignersurle
recyclageresponsabledelabatterie.Horsdes
États-UnisetduCanada,veuillezcontacter
votredépositaireT oroagréé.
Important:Remisezlamachine,labatterieet
lechargeuruniquementàdestempératures
comprisesdanslaplageadéquate;voir
Caractéristiquestechniques(page12).
Important:Sivousremisezlabatterieàlande
lasaison,chargez-lajusqu'àceque2ou3deses
diodesdeviennentvertes.Neremisezpasune
batteriecomplètementchargéeoucomplètement
déchargée.Avantderemettrelamachineen
service,chargezlabatteriejusqu'àcequele
voyantgaucheduchargeurdeviennevert,ouque
les4diodesdelabatteriedeviennentvertes.
•Débranchezleproduitdel'alimentation(autrement
dit,retirezlabatterie)etrechercheztoutdommage
éventuelaprèsutilisation.
•Neremisezpaslamachineenlaissantlabatterie
dessus.
•Nettoyezlescorpsétrangerssurlamachine.
•Lorsquelamachinenesertpas,rangez-laainsi
queleboutondedémarrageélectrique,labatterie
etlechargeurdebatteriehorsdelaportéedes
enfants.
•N'approchezpaslamachine,labatterieetle
chargeurdesagentscorrosifs,telsqueproduits
chimiquesdejardinageetselsdedégivrage.
•Pourréduirelesrisquesdeblessuresgraves,ne
rangezpaslabatterieàl'extérieuroudansun
véhicule.
•Rangezlamachine,labatterieetlechargeurde
batteriedansunlocalfermé,propreetsec.
21

Dépistagedesdéfauts
Effectuezuniquementlesopérationsdécritesdanscesinstructions.Toutautrecontrôle,entretienouréparation
doitêtreréaliséparuncentred'entretienagrééouunspécialistequaliésivousn'arrivezpasàrésoudrele
problèmevous-même.
ProblèmeCausepossible
Lamachinenedémarrepas.
Lamachinenefonctionnepasou
fonctionneparintermittence.
Lamachinen'atteintpassapleine
puissance.
Labatteriesedéchargerapidement.
Lechargeurdebatterieestdéfectueux.
Mesurecorrective
1.Labatterien'estpascomplètement
installéedanslamachine.
2.Labatterien'estpaschargée.2.Retirezlabatteriedelamachineet
3.Labatterieestendommagée.3.Remplacezlabatterie.
4.Unautreproblèmeélectriqueexiste
surlamachine.
1.Ilyadel'humiditésurleslsdela
batterie.
2.Labatterien'estpascomplètement
installéedansl'outil.
1.Lacapacitédechargedelabatterie
esttropfaible.
2.Leséventssontobstrués.2.Nettoyezlesévents.
1.Latempératuredelabatterieest
supérieureouinférieureàlaplagede
températureappropriée.
2.Lamachineestsurchargée.2.Augmentezlahauteurdecoupeou
1.Latempératureduchargeurdebatterie
estsupérieureouinférieureàlaplage
detempératureadéquate.
2.Lapriseutiliséepourbrancherle
chargeurn'estpassoustension.
1.Enlevezetremettezlabatterieenplace
danslamachine,enprenantsoinde
l'inséreretl'enclenchercomplètement.
chargez-la.
4.Contactezundépositaire-réparateur
agréé.
1.Laissezsécherouessuyezlabatterie.
2.Retirezetremettezlabatterieenplace
dansl'outil,envériantqu'elleest
complètementinséréeetenclenchée.
1.Enlevezlabatteriedelamachineet
chargez-lacomplètement.
1.Placezlabatteriedansunendroitsec,
oulatempératureestcompriseentre
5et40°C(41et104°F).
tondezenavançantpluslentement.
1.Débranchezlechargeurdebatterie
etplacez-ledansunendroitsecoùla
températureestcompriseentre5et
40°C(41et104°F).
2.Demandezàunélectricienqualiéde
réparerlaprise.
Levoyantduchargeurdebatterieest
rouge.
Levoyantduchargeurdebatterieclignote
enrouge.
1.Latempératureduchargeurdebatterie
et/oudelabatterieestsupérieureou
inférieureàlaplagedetempérature
adéquate.
1.Uneerreurdecommunications'est
produiteentrelabatterieetlechargeur.
2.Labatterieestfaible.2.Contactezvotredépositaire-réparateur
1.Débranchezlechargeurdebatterie
etplacez-le,ainsiquelabatterie,
dansunendroitsecoùlatempérature
estcompriseentre5et40°C(41et
104°F).
1.Retirezlabatterieduchargeur,
débranchezlechargeurdelapriseet
patientez10secondes.Rebranchez
lechargeursurlapriseetinsérezla
batteriedanslechargeur.Silevoyant
duchargeurclignoteencoreenrouge,
répétezcetteprocédure.Silevoyant
duchargeurdebatterieclignoteencore
enrougeaprès2tentatives,mettezla
batterieaurebutcorrectementdansun
centrederecyclagedebatteries.
agréésilabatterieestsousgarantie,
oumettezlabatterieaurebut
correctementdansuncentrede
recyclagedebatteries.
22

ProblèmeCausepossible
Mesurecorrective
Lamachineémetunbipsonore.
Laqualitédecoupesedégradeouest
insatisfaisante.
Leramassagesedégradeouest
insatisfaisant.
Latonten'estpasuniforme.
Lamachinevibre.
1.Labatterien'estpaschargée.1.Retirezlabatteriedelamachineet
2.Lamachineestdansuneposition
d’utilisationdangereuse.
3.Lamachineestsurchargée.3.Augmentezlahauteurdecoupeou
4.Unautreproblèmeélectriqueexiste
surlamachine.
1.Lalameestémoussée.1.Faitesaiguiserouremplacerlalame.
1.Lamachineestsurchargée.1.Augmentezlahauteurdecoupe.
1.Lalameestémoussée.1.Faitesaiguiserouremplacerlalame.
2.Letablierdecoupeestendommagé.
1.Lalameestfausséeouendommagée.
chargez-la.
2.Assurez-vousquel'anglede
fonctionnementdelamachinen'est
pastropextrême.
tondezenavançantpluslentement.
4.Essayezlesautresopérations
dedépannageetsil’alarme
sonorepersiste,contactezun
dépositaire-réparateuragréé.
2.Contactezundépositaire-réparateur
agréé.
1.Examinezlalameetremplacez-laau
besoin.
23


Proposition65deCalifornie–Informationconcernantcetavertissement
Enquoiconsistecetavertissement?
Certainsproduitscommercialisésprésententuneétiquetted'avertissementsemblableàcequisuit:
AVERTISSEMENT:Cancerettroublesdelareproduction–
www.p65Warnings.ca.gov.
Qu’est-cequelaProposition65?
LaProposition65s'appliqueàtoutesociétéexerçantsonactivitéenCalifornie,quivenddesproduitsenCalifornieouquifabriquedesproduits
susceptiblesd'êtrevendusouimportésenCalifornie.EllestipulequeleGouverneurdeCaliforniedoitteniretpublierunelistedessubstances
chimiquesconnuescommecausantdescancers,malformationscongénitaleset/ouautrestroublesdelareproduction.Cetteliste,quiestmiseàjour
chaqueannée,comprenddescentainesdesubstanceschimiquesprésentesdansdenombreuxobjetsduquotidien.LaProposition65apourobjet
d'informerlepublicquantàl'expositionàcessubstanceschimiques.
LaProposition65n'interditpaslaventedeproduitscontenantcessubstanceschimiques,maisimposelaprésenced'avertissementssurtoutproduit
concerné,sursonemballageousurladocumentationfournieavecleproduit.D’autrepart,unavertissementdelaProposition65nesigniepasqu’un
produitesteninfractionaveclesnormesouexigencesdesécuritéduproduit.D'ailleurs,legouvernementcalifornienaclairementindiquéqu'un
avertissementdelaProposition65«n'estpasunedécisionréglementairequantaucaractère«sûr»ou«dangereux»d'unproduit».Bonnombre
decessubstanceschimiquessontutiliséesdansdesproduitsduquotidiendepuisdesannées,sansaucuneffetnocifdocumenté.Pourplusde
renseignements,rendez-voussurhttps://oag.ca.gov/prop65/faqs-view-all
UnavertissementdelaProposition65signiequ’unesociétéasoit(1)évaluél’expositionetconcluqu’elledépassaitle«niveauneposantaucun
risquesignicatif»;soit(2)choisid’émettreunavertissementsimplementsurlabasedesacompréhensionquantàlaprésenced’unesubstance
chimiquedelaliste,sanstenterd’enévaluerl’exposition.
.
Cettelois’applique-t-ellepartout?
LesavertissementsdelaProposition65sontexigésuniquementenvertudelaloicalifornienne.Cesavertissementssontprésentsdanstoutl'état
deCalifornie,dansdesenvironnementstrèsvariés,notammentmaispasuniquementlesrestaurants,magasinsd'alimentations,hôtels,écoles
ethôpitaux,etsurunvasteéventaildeproduits.Enoutre,certainsdétaillantsenligneetparcorrespondancefournissentdesavertissementsdela
Proposition65surleurssitesinternetoudansleurscatalogues.
QuellesdifférencesentrelesavertissementsdeCalifornieetleslimitesfédérales?
LesnormesdelaProposition65sontsouventplusstrictesquelesnormesfédéralesetinternationales.Diversessubstancesexigentunavertissement
delaProposition65àdesniveauxbieninférieursauxlimitesd'interventionfédérales.Parexemple,lanormedelaProposition65enmatière
d’avertissementspourleplombsesitueà0,5µg/jour,soitbienmoinsquelesnormesfédéralesetinternationales.
Pourquoil'avertissementnegure-t-ilpassurtouslesproduitssemblables?
•PourlesproduitscommercialisésenCalifornie,l'étiquetageProposition65estexigé,tandisqu’ilnel’estpassurdesproduitssimilaires
commercialisésailleurs.
•Ilsepeutqu’unesociétéimpliquéedansunprocèsliéàlaProposition65etparvenantàunaccordsoitobligéed’utiliserlesavertissementsdela
Proposition65poursesproduits,tandisqued’autressociétésfabriquantdesproduitssemblablespeuventnepasêtresoumisesàcetteobligation.
•L'applicationdelaProposition65n'estpasuniforme.
•Certainessociétéspeuventchoisirdenepasindiquerd'avertissementscarellesconsidèrentqu'ellesn'ysontpasobligéesautitredela
Proposition65;l'absenced'avertissementssurunproduitnesigniepasqueleproduitnecontientpasdesubstancesdelalisteàdesniveaux
semblables.
Pourquoicetavertissementapparaît-ilsurlesproduitsToro?
Toroachoisidefournirauxconsommateursleplusd'informationpossibleanqu'ilspuissentprendredesdécisionséclairéesquantauxproduits
qu'ilsachètentetutilisent.Torofournitdesavertissementsdanscertainscasd'aprèssesconnaissancesquantàlaprésencedel'uneouplusieurs
dessubstanceschimiquesdelaliste,sansenévaluerleniveaud'exposition,cardesexigencesdelimitesnesontpasfourniespourtouslesproduits
chimiquesdelaliste.Bienquel'expositionaveclesproduitsT oropuisseêtrenégligeableouparfaitementdansleslimites«sansaucunrisque
signicatif»,parmesuredeprécaution,ToroadécidédefournirlesavertissementsdelaProposition65.Deplus,enl'absencedecesavertissements,
lasociétéToropourraitêtrepoursuivieenjusticeparl'ÉtatdeCalifornieoupardesparticulierscherchantàfaireappliquerlaProposition65,et
doncassujettieàd'importantespénalités.
RevA
 Loading...