

Page 1
FormNo.3363-714RevB
SuperBaggerLawnMower
ModelNo.20197—SerialNo.310000001andUp
Operator'sManual
Introduction
Thisrotary-blade,walk-behindlawnmoweris
intendedtobeusedbyresidentialhomeowners.
Itisdesignedprimarilyforcuttinggrasson
well-maintainedlawnsonresidentialproperties.It
isnotdesignedforcuttingbrushorforagricultural
uses.
Readthisinformationcarefullytolearnhowtooperate
andmaintainyourproductproperlyandtoavoidinjury
andproductdamage.Youareresponsibleforoperating
theproductproperlyandsafely.
YoumaycontactTorodirectlyatwww.Toro.comfor
productandaccessoryinformation,helpndinga
dealer,ortoregisteryourproduct.
Wheneveryouneedservice,genuineToroparts,or
additionalinformation,contactanAuthorizedService
DealerorToroCustomerServiceandhavethemodel
andserialnumbersofyourproductready.
Figure1
identiesthelocationofthemodelandserialnumbers
ontheproduct.Writethenumbersinthespace
provided.
Figure2
1.Safetyalertsymbol
Thismanualusestwowordstohighlightinformation.
Importantcallsattentiontospecialmechanical
informationandNoteemphasizesgeneralinformation
worthyofspecialattention.
WARNING
CALIFORNIA
Proposition65Warning
Theengineexhaustfromthisproduct
containschemicalsknowntotheStateof
Californiatocausecancer,birthdefects,
orotherreproductiveharm.
Important:Thisengineisnotequippedwitha
sparkarrestermufer.ItisaviolationofCalifornia
PublicResourceCodeSection4442touseoroperate
theengineonanyforest-covered,brush-covered,or
grass-coveredland.Otherstatesorfederalareas
mayhavesimilarlaws.
Figure1
1.Modelandserialnumberplate
ModelNo.
SerialNo.
Thismanualidentiespotentialhazardsandhas
safetymessagesidentiedbythesafetyalertsymbol
(Figure2),whichsignalsahazardthatmaycauseserious
injuryordeathifyoudonotfollowtherecommended
precautions.
©2011—TheToro®Company
8111LyndaleAvenueSouth
Bloomington,MN55420
Registeratwww.Toro.com.
ThissparkignitionsystemcomplieswithCanadian
ICES-002.
Theenclosed
Engine Owner’ s Man ual
issupplied
forinformationregardingtheUSEnvironmental
ProtectionAgency(EPA)andtheCalifornia
EmissionControlRegulationofemissionsystems,
maintenance,andwarranty.Replacementsmaybe
orderedthroughtheenginemanufacturer.
Formodelswithstatedenginehorsepower,thegross
horsepoweroftheenginewaslaboratoryratedbythe
enginemanufacturerinaccordancewithSAEJ1940.
Asconguredtomeetsafety,emission,andoperating
requirements,theactualenginehorsepoweronthisclass
oflawnmowerwillbesignicantlylower.
Donottamperwiththeenginecontrolsoralterthe
governorspeed;doingsomaycreateanunsafecondition
resultinginpersonalinjury.
OriginalInstructions(EN)
PrintedintheUSA
AllRightsReserved
Page 2

Safety
ThislawnmowermeetsorexceedstheCPSCblade
safetyrequirementsforwalk-behindrotarylawnmowers
andtheB71.1specicationsoftheAmericanNational
StandardsInstituteineffectatthetimeofproduction.
Readandunderstandthecontentsofthismanual
beforeyoustarttheengine.
Thesafetyalertsymbol(Figure2)isusedtoalertyou
topotentialpersonalinjuryhazards.Obeyallsafety
messagesthatfollowthissymboltoavoidpossibleinjury
ordeath.Improperlyusingormaintainingthismower
couldresultininjuryordeath.Toreducethispotential,
complywiththefollowingsafetyinstructions.
Thefollowinginstructionshavebeenadaptedfromthe
ANSI/OPEIstandardB71.1-2003.
Thiscuttingmachineiscapableofamputating
handsandfeetandofthrowingobjects.Failure
toobservethefollowingsafetyinstructionscould
resultinseriousinjuryordeath.
GeneralOperation
•Read,understand,andfollowallinstructionsonthe
machineandinthemanual(s)beforestarting.
•Donotputhandsorfeetnearorunderthemachine.
Keepclearofthedischargeopeningatalltimes.
•Onlyallowresponsibleadults,whoarefamiliarwith
theinstructions,tooperatethismachine.
•Cleartheareaofobjectssuchasrocks,wire,toys,
etc.,whichcouldbethrownbytheblade.Stay
behindthehandlewhentheengineisrunning.
•Besuretheareaisclearofbystandersbefore
operating.Stopmachineifanyoneentersthearea.
•Donotoperatemachinebarefootedorwhilewearing
sandals.Alwayswearsubstantialfootwear.
•Donotpullmachinebackwardunlessabsolutely
necessary.Alwayslookdownandbehindbeforeand
whilemovingbackward.
•Neverdirectdischargedmaterialtowardanyone.
Avoiddischargingmaterialagainstawallor
obstruction.Materialmayricochetbacktoward
theoperator.Stopthebladewhencrossinggravel
surfaces.
•Donotoperatemachinewithouttheentiregrass
catcher,dischargeguard,rearguard,orothersafety
protectivedevicesinplaceandworking.
•Neverleavearunningmachineunattended.
•Stoptheengineandwaituntilthebladecomes
toacompletestopbeforecleaningthemachine,
removinggrasscatcher,oruncloggingthedischarge
guard.
•Operatemachineonlyindaylightorgoodarticial
light.
•Donotoperatemachinewhileundertheinuence
ofalcoholordrugs.
•Neveroperatemowerinwetgrass.Alwaysbesure
ofyourfooting;walk;neverrun.
•Disengagethedrivesystem,ifsoequipped,before
startingtheengine.
•Ifthemachineshouldstarttovibrateabnormally,
stoptheengineandcheckforthecauseimmediately.
Vibrationisgenerallyawarningoftrouble.
•Alwaysweareyeprotectionwhenoperatingmachine.
•Seemanufacturer’sinstructionsforproperoperation
andinstallationofaccessories.Onlyuseaccessories
approvedbythemanufacturer.
SlopeOperation
Slopesareamajorfactorrelatedtoslipandfallaccidents,
whichcanresultinsevereinjury.Operationonallslopes
requireextracaution.Ifyoufeeluneasyonaslope,do
notmowit.
•Mowacrossthefaceofslopes;neverupanddown.
Exerciseextremecautionwhenchangingdirection
onslopes.
•Watchforholes,ruts,bumps,rocks,orotherhidden
objects.Uneventerraincouldcauseaslipandfall
accident.Tallgrasscanhideobstacles.
•Donotmowonwetgrassorexcessivelysteepslopes.
Poorfootingcouldcauseaslipandfallaccident.
•Donotmowneardrop-offs,ditches,or
embankments.Youcouldloseyourfootingor
balance.
Children
Tragicaccidentscanoccuriftheoperatorisnotalertto
thepresenceofchildren.Childrenareoftenattractedto
themachineandthemowingactivity.Neverassume
thatchildrenwillremainwhereyoulastsawthem.
•Keepchildrenoutofthemowingareaandunder
thewatchfulcareofaresponsibleadultotherthan
theoperator.
•Bealertandturnmoweroffifachildentersthearea.
•Neverallowchildrentooperatethemachine.
•Useextracarewhenapproachingblindcorners,
shrubs,trees,orotherobjectsthatmayblockyour
viewofachild.
2
Page 3

Service
•Ifyoustrikeaforeignobject,stopandinspectthe
machine.Repair,ifnecessary,beforestarting.
SafeHandlingofGasoline
Toavoidpersonalinjuryorpropertydamage,use
extremecareinhandlinggasoline.Gasolineis
extremelyammableandthevaporsareexplosive.
•Extinguishallcigarettes,cigars,pipes,andother
sourcesofignition.
•Useonlyanapprovedgasolinecontainer.
•Neverremovegascaporaddfuelwiththeengine
running.Allowenginetocoolbeforerefueling.
•Neverrefuelthemachineindoors.
•Neverstorethemachineorfuelcontainerwhere
thereisanopename,spark,orpilotlightsuchas
onawaterheateroronotherappliances.
•Neverllcontainersinsideavehicleoronatruck
ortrailerbedwithaplasticliner.Alwaysplace
containersonthegroundawayfromyourvehicle
beforelling.
•Removegas-poweredequipmentfromthetruck
ortrailerandrefuelitontheground.Ifthisisnot
possible,thenrefuelsuchequipmentwithaportable
container,ratherthanfromagasolinedispenser
nozzle.
•Nevermakeanyadjustmentsorrepairswiththe
enginerunning.Disconnectthesparkplugwire
andgroundagainstenginetopreventunintended
starting.
•Checkgrasscatchercomponentsandthedischarge
guardfrequentlyandreplacewithmanufacturer’ s
recommendedparts,whennecessary.
•Mowerbladesaresharp.Wrapthebladeorwear
gloves,anduseextracautionwhenservicingthem.
•Donotchangetheenginegovernorsettingor
overspeedtheengine.
•Maintainorreplacesafetyandinstructionlabels,as
necessary.
•Keepthenozzleincontactwiththerimofthefuel
tankorcontaineropeningatalltimesuntilfuelingis
complete.Donotuseanozzlelock-opendevice.
•Iffuelisspilledonclothing,changeclothing
immediately.
•Neveroverllfueltank.Replacegascapandtighten
securely.
WARNING
Exhaustcontainscarbonmonoxide,anodorless,
deadlypoisonthatcankillyou.
Donotruntheengineindoorsorinanenclosed
area.
GeneralService
•Neveroperatemachineinaclosedarea.
•Keepallnutsandboltstighttobesuretheequipment
isinsafeworkingcondition.
•Nevertamperwithsafetydevices.Checktheir
properoperationregularly .
•Keepmachinefreeofgrass,leaves,orotherdebris
build-up.Cleanupoilorfuelspillageandremove
anyfuel-soakeddebris.Allowmachinetocool
beforestoring.
3
Page 4
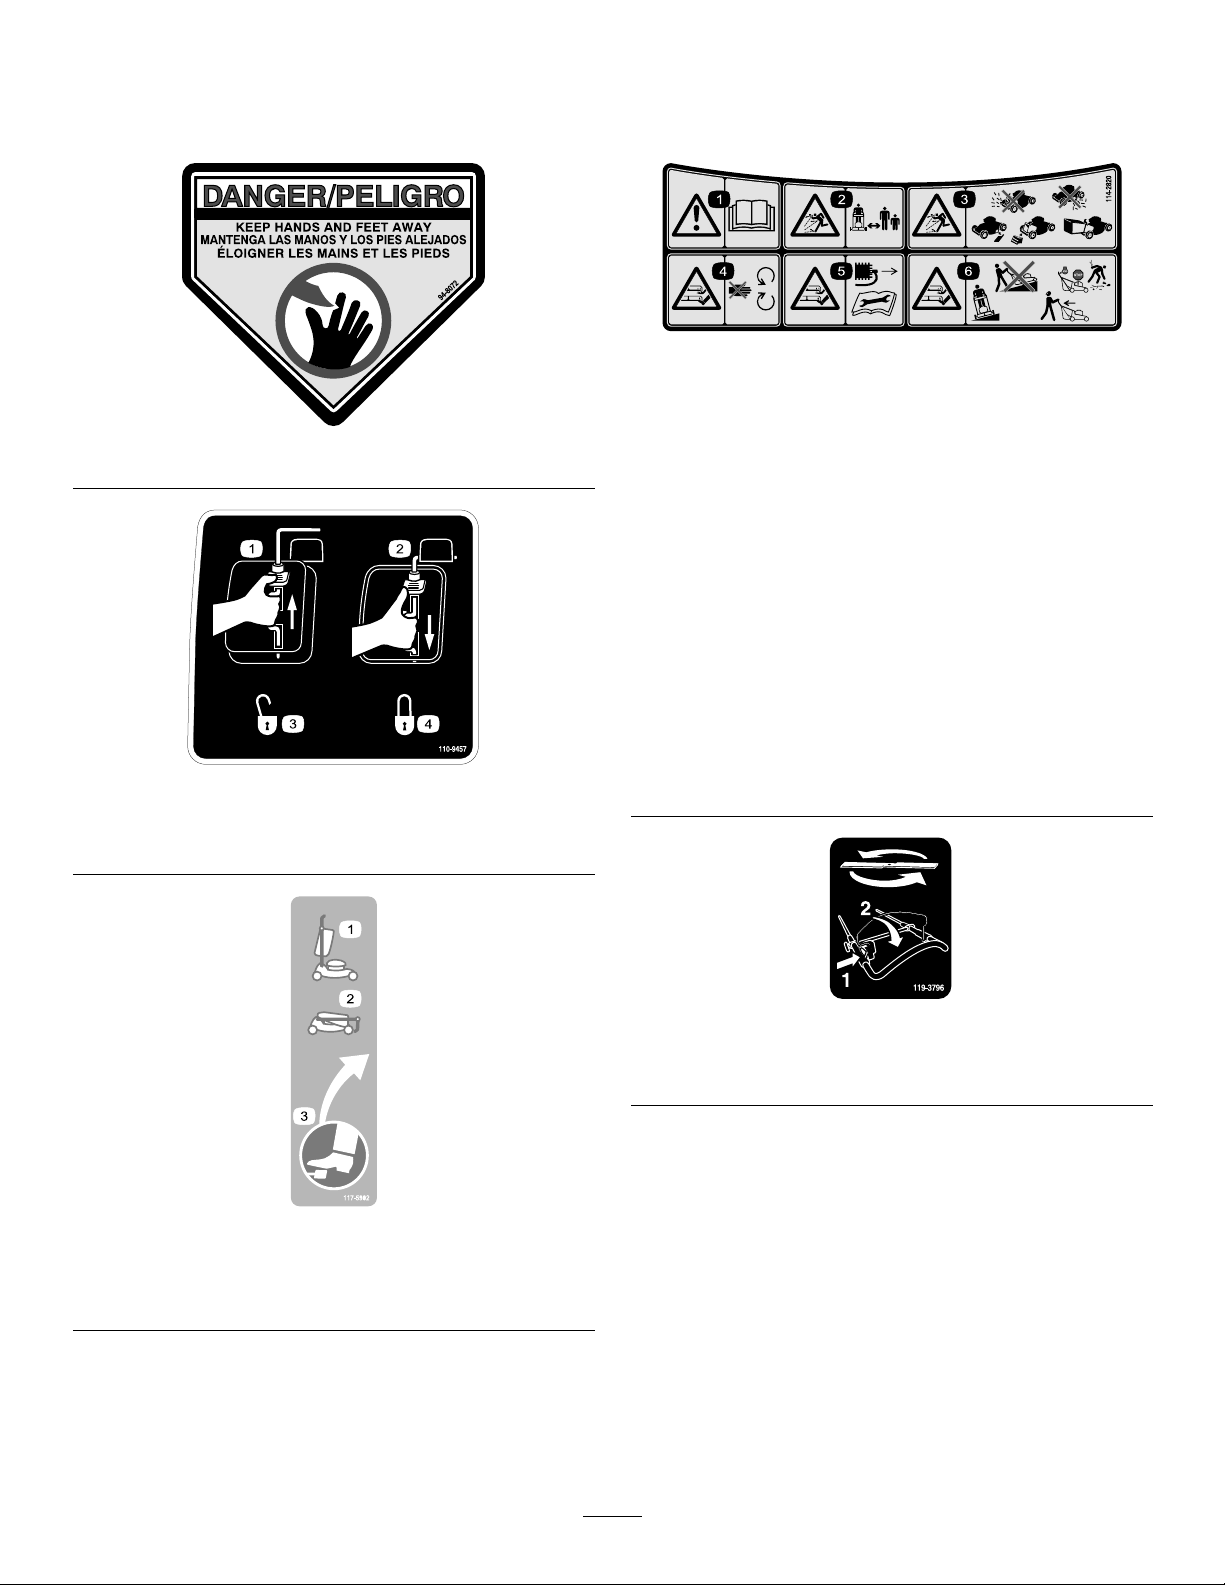
SafetyandInstructionalDecals
Important:Safetyandinstructiondecalsarelocatednearareasofpotentialdanger.Replacedamaged
decals.
114-2820
1.EngineswitchOff
2.EngineswitchOn
1.Warning—readthe
Operator’sManual.
94-8072
2.Thrownobject
hazard—keepbystanders
asafedistancefromthe
machine.
3.Thrownobjecthazard—do
notoperatethemower
withoutthereardischarge
plugorbaginplace;do
notoperatethemower
withoutthesidedischarge
coverordeectorinplace.
110-9457
3.Unlocked
4.Locked
4.Cutting/dismemberment
hazardofhandorfoot,
mowerblade—stayaway
frommovingparts.
5.Cutting/dismemberment
hazardofhandorfoot,
mowerblade—remove
theignitionkeyandread
theinstructionsbefore
servicingorperforming
maintenance.
6.Cutting/dismemberment
hazardofhandorfoot,
mowerblade—donot
operateupanddown
slopes;operatesideto
sideonslopes;stopthe
enginebeforeleavingthe
operatingposition;and
lookbehindyouwhen
backingup.
1.HandleUpright
2.Handlefolded
119-3796
1.Toengagetheblade,pressthebutton.
2.Pullbackthebailtothehandle.
117-5902
3.Releasefootswitchtofold
handle
4
Page 5
Setup
2
1
UnfoldingtheHandle
NoPartsRequired
Procedure
1.Movethehandlerearwardandholdtheupperhandle
inplace(Figure3).
Figure3
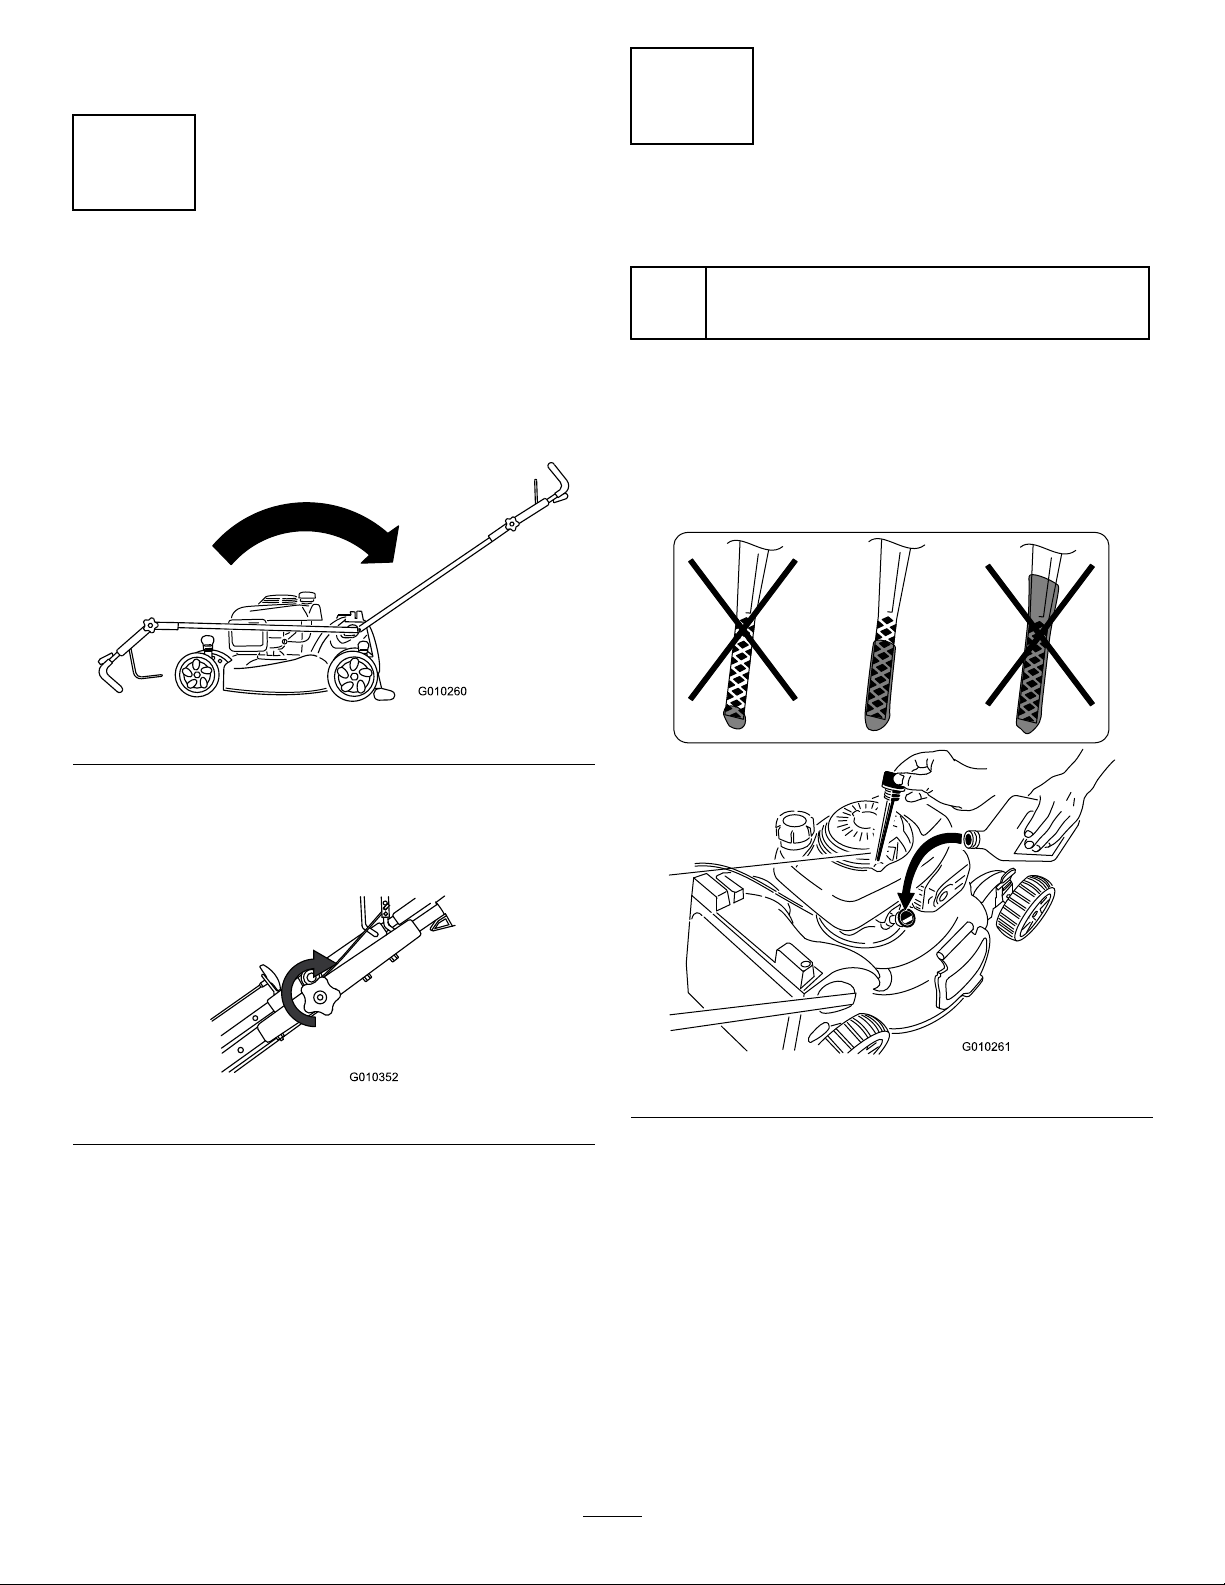
FillingtheEnginewithOil
Partsneededforthisprocedure:
0.58
quart
(0.55l)
Procedure
Important:Yourmower
intheengine.
1.Removethedipstick(
SAE30detergentoilwithanAPIserviceclassication
ofSH,SJ,SL,orhigher(notsuppliedwiththemower).
does not
Figure5).
comewithoil
Note:Thehandlewillclickintoposition.
2.Tightentheupperhandleknobastightasyoucan
Figure4).
(
Figure4
Figure5
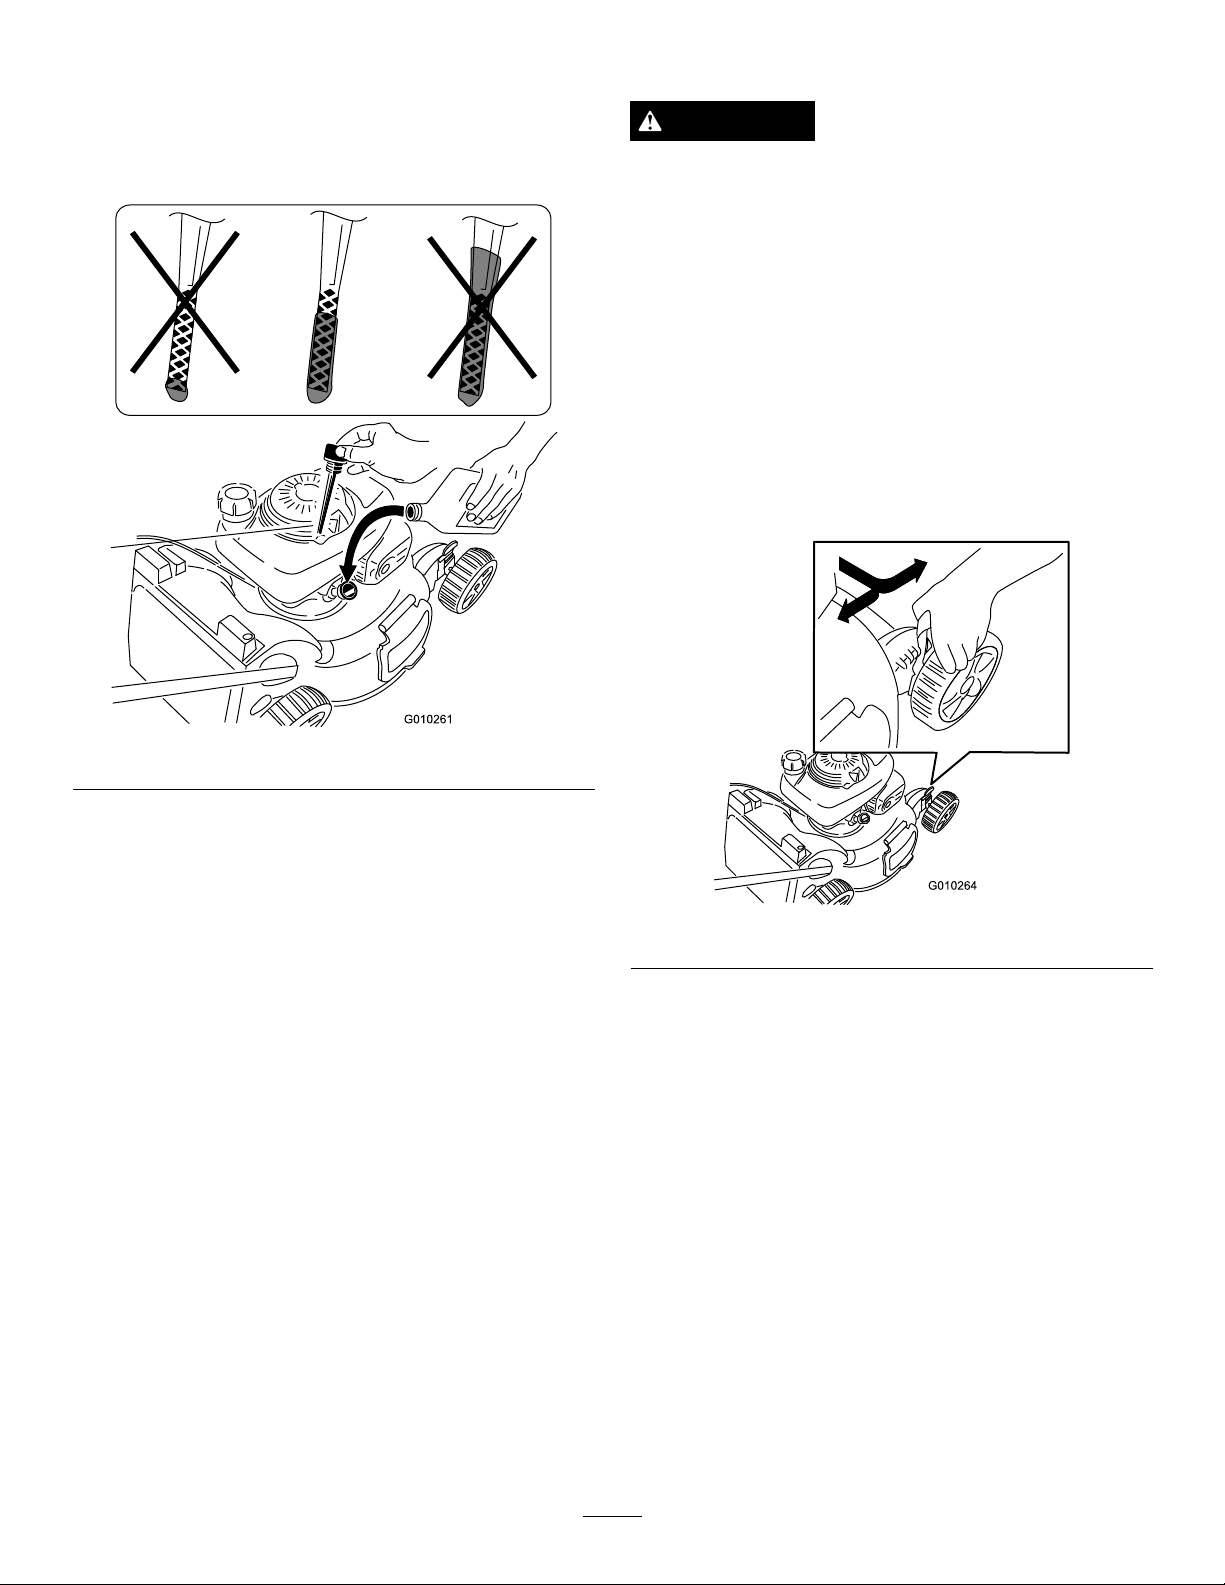
2.Slowlypouroilintotheoillltube,periodically
checkingthelevelwiththedipstick,untilthedipstick
indicatesthattheengineisfullasillustratedin
Figure5.Donotoverll.(Max.ll:0.58quart(0.55
l),type:SAE30detergentoilwithanAPIservice
classicationofSH,SJ,SL,orhigher.)
Note:Eachtimeyouchecktheoillevel,removethe
dipstickandwipeitclean,insertitintotheoilller
neck(butdonotscrewitin),thenremoveitagain
andcheckthelevel(
Figure5).
5
Page 6
Note:Ifyouoverlltheengine,poursomeoilout
ofitasdirectedinChangingtheEngineOil.
3.Installthedipsticksecurely.
Important:
5 operating hour s
RefertoChangingtheEngineOil.
Change the engine oil after the r st
;changeityearlythereafter.
3
InstalltheMulchPlugorGrass
Bag
NoPartsRequired
Procedure
Youmustcorrectlyinstallthemulchplug(formulching
orside-discharging)orgrassbag(forbagging)orthe
enginewillnotstart.
Themowerhasasafetyswitch,locatedatthebottom
ofachannelonthetop,rightrearofthemower,that
preventsthemowerfromoperatingwithoutamulch
plugorgrassbag.Thispreventsthemowerfrom
throwingdebrisattheoperatorthroughtherearchute.
Figure7
2.Squeezethebuttonontheleverwithyourthumb
andfullyinsertthemulchplugintotheopening
(Figure8).
Fortheswitchtodetectthepresenceofthemulchplug,
thetopofthemulchpluglevermustliefullyinthe
bottomofthechannel(
1.Topofmulchplugleverinswitchchannel
1.Insertthemulchplugintothemower,ifitisn’t
alreadyinstalled(Figure7).
Figure6).
Figure6
Figure8
3.Releasethebuttonontheleverandensurethatthe
topoftheleverisliesfullyintheswitchchannel
Figure9).Ifthetopoftheleverisnotinthe
(
switchchannel,yourmowerwillnotstart!
Figure9
6
Page 7
Note:Iftheleverdoesnotlatchproperly,
G012240
1
2
3
4
5
6
7
8
9
10
11
12
13
disconnectthewirefromthesparkplugandcheck
forandremoveanydebrisbuildupinthetunnel.
Operation
FillingtheFuelTank
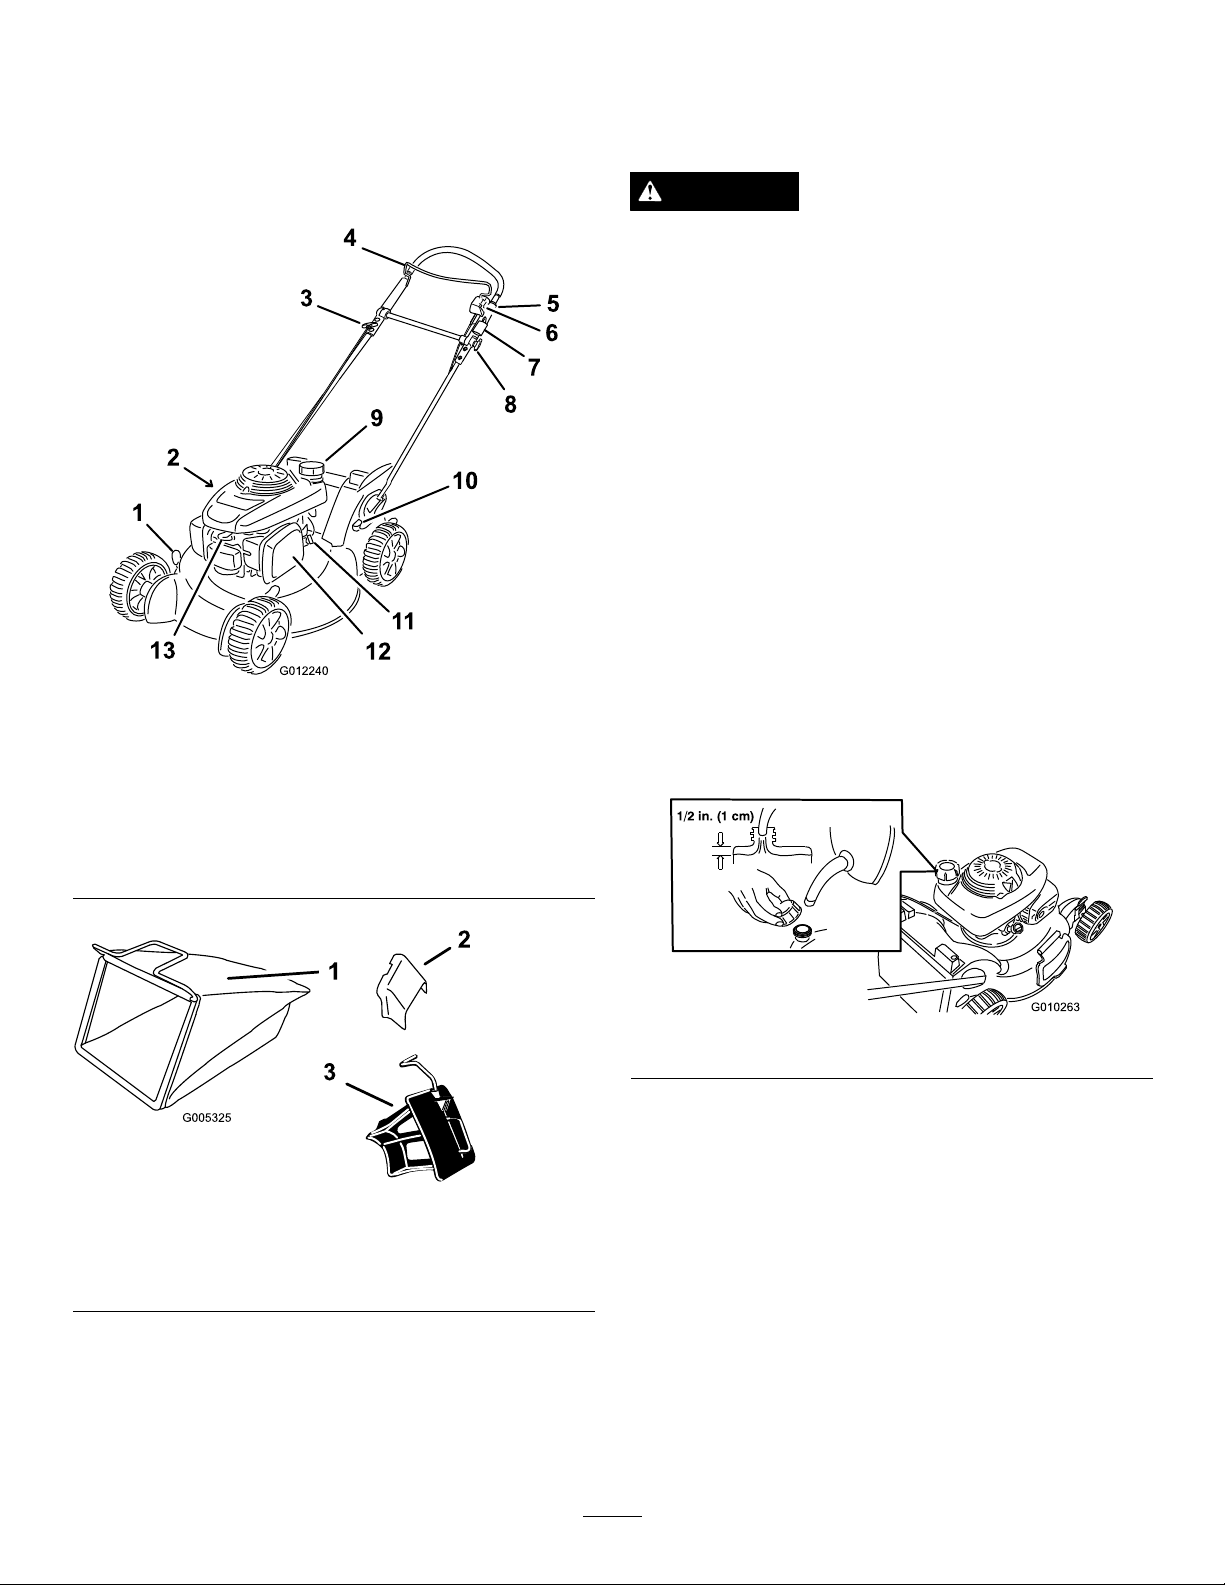
ProductOverview
Figure10
1.Cuttingheightlever
2.Oilll/Dipstick(notshown)
3.Recoilstarthandle10.Footpedal
4.Bladecontrolbar11.Fuelvalve
5.Upperhandle
6.Bladecontrolbutton
7.Ignitionswitch
12.Airlter
13.Sparkplug
8.Upperhandleknob
9.Fueltankcap
DANGER
Gasolineisextremelyammableandexplosive.A
reorexplosionfromgasolinecanburnyouand
others.
•Topreventastaticchargefromignitingthe
gasoline,placethecontainerand/ormower
directlyonthegroundbeforelling,notina
vehicleoronanobject.
•Fillthetankoutdoorswhentheengineiscold.
Wipeupspills.
•Donothandlegasolinewhensmokingoraround
anopenameorsparks.
•Storegasolineinanapprovedfuelcontainer,out
ofthereachofchildren.
Fillthefueltankwithfreshunleadedregulargasoline
fromamajorname-brandservicestation(Figure12).
Important:Toreducestartingproblems,add
fuelstabilizertothefuelallseason,mixingitwith
gasolinelessthan30daysold.
Figure12
Figure11
installedonthemower)
1.Grassbag3.Mulchplug(comes
2.Sidedischargechute
7
Page 8
CheckingtheEngineOilLevel
AdjustingtheCuttingHeight
ServiceInterval:Beforeeachuseordaily
1.Removethedipstick,wipeitclean,andinsertitinto
theoilllerneck,butdonotscrewitin(Figure13).
WARNING
Adjustingthecuttingheightmaybringyouinto
contactwiththemovingblade,causingserious
injury.
•Stoptheengineandwaitforallmovingparts
tostop.
•Donotputyourngersunderthehousingwhen
adjustingthecuttingheight.
Adjustthecuttingheightasdesired.Setallfourwheels
tothesameheight.
Note:Toraisethemower,moveall4cuttingheight
leversforward;tolowerthemower,movethem
rearward.
Figure13
2.Removethedipstickandchecktheoillevel
(Figure13).
Ifthereisnooilonthedipstick,slowlypouroil
intotheoillltube,periodicallycheckingthelevel
withthedipstick,untilthedipstickindicatesthat
theengineisfullasillustratedinFigure13.Donot
overll.(Max.ll:0.58quart(0.55l),type:SAE
30detergentoilwithanAPIserviceclassication
ofSH,SJ,SL,orhigher.)
Note:Ifyouoverlltheengine,poursomeoilout
ofitasdirectedinChangingtheEngineOil.
3.Installthedipsticksecurely.
Figure14
8
Page 9

AdjustingtheUpperHandle
StartingtheEngine
Height
Youmayraiseorlowertheupperhandletoaposition
comfortableforyou.
Note:Youcannotraisetheupperhandlehigherthan
theangleofthelowerhandle.
1.Loosentheupperhandleknob(
Figure15
2.Movetheupperhandletothedesiredposition
(Figure16).
Figure15).
Important:Themowerhasasafetyswitchthat
preventsyoufromstartingthemowerunlessyou
rstinstallthemulchplugorthegrassbagsecurely
onthemower.
1.Installthemulchplug(Figure18)orthegrassbag
(Figure19)onthemower.
Figure18
Figure16
3.Tightentheupperhandleknobastightasyoucan
(Figure17).
Figure17
Figure19
2.TurnthefuelvalvelevertotheOnposition
Figure20).
(
Figure20
3.Pulltherecoilstarter(Figure21).
9
Page 10

Figure21
Note:Ifthemowerstilldoesnotstart,contactan
AuthorizedServiceDealer.
UsingtheSelf-propelDrive
Tooperatetheself-propeldrive,simplywalkwithyour
handsontheupperhandleandyourelbowsatyour
sides,andthemowerwillautomaticallykeeppacewith
you(Figure22).
Figure22
1.Nudgehere
Note:If,whenbackingupafterself-propelling,the
mowerdoesnotrollbackwardfreely,nudgethemower
forwardaboutaninchortwowithoutengagingthe
self-propeldrive(
backward.
Figure22),thenpullthemower
Figure23
2.Holdthebladecontrolbaragainstthehandle
(Figure24).
Figure24
DisengagingtheBlade
Releasethebladecontrolbar(Figure25).
EngagingtheBlade
Whenyoustarttheenginethebladedoesnotturn.You
mustengagethebladetomow.
1.Pushthebladecontrolbuttonandpulltheblade
controlbartothehandle(Figure23).
Figure25
Important:Whenyoureleasethebladecontrol
bar,thebladeshouldstopwithin3seconds.If
itdoesnotstopproperly,stopusingyourmower
10
Page 11

immediatelyandcontactanAuthorizedService
Dealer.
CheckingtheBladeBrake
ClutchOperation
5.Starttheengine.
6.Engagetheblade.
7.Releasethebladecontrolbar.
8.Immediatelypushthemoweroverthenewspaper
ball.
Checkthecontrolbarbeforeeachusetoensurethatthe
bladebrakeclutchsystemisoperatingproperly.
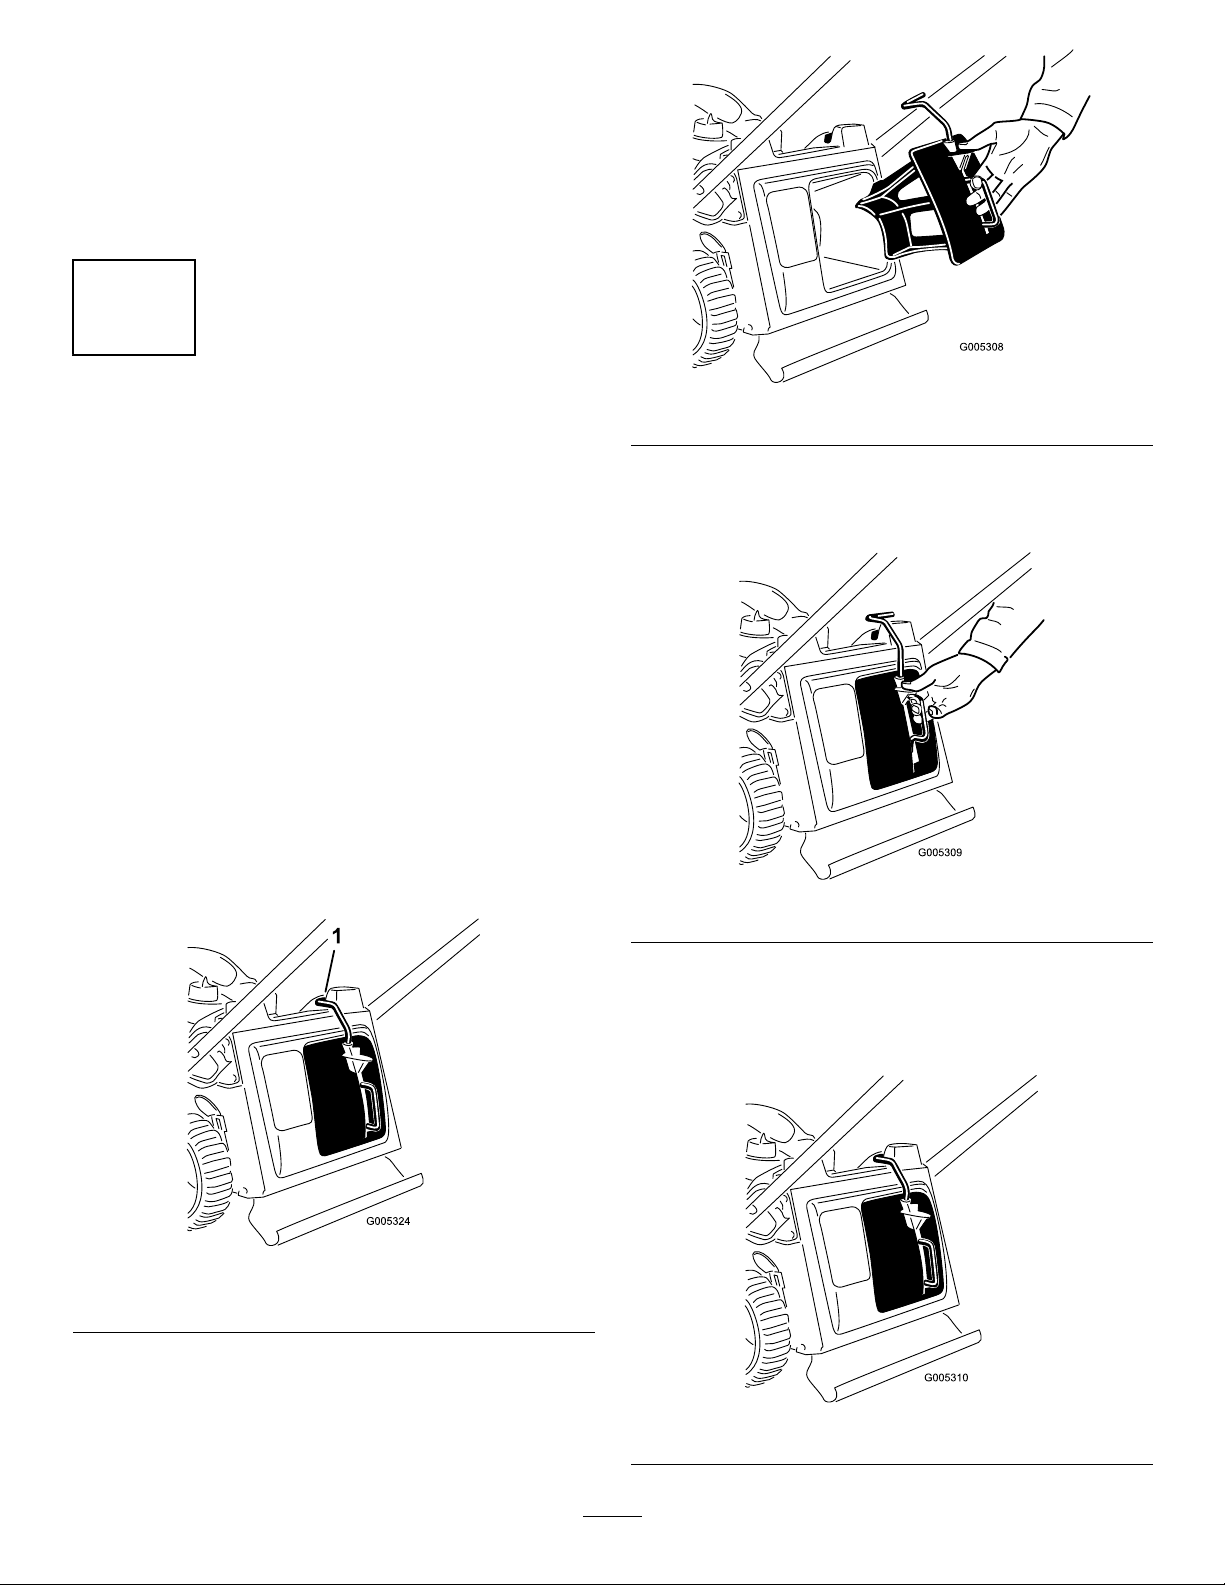
UsingtheGrassBag
ServiceInterval:Beforeeachuseordaily
Youcanusethegrassbagtoperformanadditionaltest
tocheckthebladebrakeclutchmechanism.
1.Installtheemptygrassbagonthemower.
2.Starttheengine.
3.Engagetheblade.
Note:Thebagshouldbegintoinate,indicating
thatthebladeisengagedandrotating.
4.Releasethebladecontrolbar.
Note:Ifthebagdoesnotimmediatelydeate,
thebladeisstillrotating.Thebladebrakeclutch
mechanismmaybedeterioratingand,ifignored,
couldresultinanunsafeoperatingcondition.Have
themowerinspectedandservicedbyanAuthorized
ServiceDealer.
9.Stoptheengineandwaitforallmovingpartstostop.
10.Gotothefrontofthemowerandcheckthe
newspaperball.
Note:Ifthenewspaperballdidnotgounderthe
mower,repeatsteps
11.Ifthenewspaperisunravelledorshredded,the
bladedidnotstopproperly,whichcouldresultinan
unsafeoperatingcondition.ContactanAuthorized
ServiceDealer.
2through10.
StoppingtheEngine
ServiceInterval:Beforeeachuseordaily
HolddowntheignitionswitchintheStoppositionuntil
theenginestops.
Important:Whenyoureleasethebladecontrol
bar,boththeengineandbladeshouldstopwithin
3seconds.Iftheydonotstopproperly,stopusing
yourmowerimmediatelyandcontactanAuthorized
ServiceDealer.
5.Stoptheengineandwaitforallmovingpartstostop.
NotUsingtheGrassBag
1.Movethemowerontoapavedsurfaceina
non-windyarea.
2.Setall4wheelstothe3inch(76mm)cutsetting.
3.Takeahalfsheetofnewspaperandcrumpleitinto
aballsmallenoughtogounderthemowerhousing
(about3inchesor76mmindiameter).
4.Placethenewspaperballabout5inches(13cm)in
frontofthemower(Figure26).
Figure26
MulchingtheClippings
Yourmowercomesfromthefactoryreadytomulchthe
grassandleafclippingsbackintothelawn.
Ifthegrassbagisonthemower,removeit(referto
RemovingtheGrassBag)beforemulchingtheclippings.
Ifthesidedischargechuteisonthemower,removeit
andlockthesidedischargedoor(refertoRemovingthe
SideDischargeChute)beforemulchingtheclippings.
Important:Themowerhasasafetyswitchthat
preventsyoufromstartingthemowerunlessyou
rstinstallthemulchplugsecurelyonthemower
Figure27).
(
InstallthemulchplugasillustratedinFigure27.
11
Page 12

Figure27
1.Topofmulchplugleverinswitchchannel
BaggingtheClippings
Usethegrassbagwhenyouwanttocollectgrassand
leafclippingsfromthelawn.
Ifthesidedischargechuteisonthemower,removeit
andlockthesidedischargedoor(refertoRemovingthe
SideDischargeChute)beforebaggingtheclippings.
WARNING
Aworngrassbagcouldallowsmallstonesand
othersimilardebristobethrownintheoperator’sor
bystander’sdirectionandresultinseriouspersonal
injuryordeathtotheoperatororbystanders.
Figure28
2.Routethestarterropearoundthelowerropeguide
(Figure29).
Figure29
Checkthegrassbagfrequently.Ifitisdamaged,
installanewTororeplacementbag.
WARNING
Thebladeissharp;contactingthebladecanresult
inseriouspersonalinjury.
Stoptheengineandwaitforallmovingpartstostop
beforeleavingtheoperatingposition.
InstallingtheGrassBag
1.Removethemulchplug(Figure28).
Note:Thelowerropeguidereleasesthestarterrope
whenyoupulltherecoilstarthandle.
3.Insertthegrassbaghandleintothegroovesatthe
topofthemower(Figure30).
Important:Themowerhasasafetyswitchthat
preventsyoufromstartingthemowerunlessyou
rstinstallthegrassbagsecurelyonthemower.
Figure30
12
Page 13

RemovingtheGrassBag
1.Routethestarterropearoundthelowerropeguide
(Figure31).
Figure31
2.Liftthegrassbaghandleoutfromthegroovesat
thetopofthemowerandremovethebagfromthe
mower(
Figure32).
Side-dischargingtheClippings
Usethesidedischargeforcuttingverytallgrass.
Ifthebagisonthemower,removeitandinsertthe
mulchplug(refertoRemovingtheGrassBag)before
side-dischargingtheclippings.
Important:Themowerhasasafetyswitchthat
preventsyoufromstartingthemowerunlessyou
rstinstallthemulchplugsecurelyonthemower
(refertoMulchingtheClippings).
InstallingtheSideDischargeChute
1.Unlockthesidedischargedoor(Figure34).
Figure34
Figure32
3.Insertthemulchplug(Figure33).
2.Liftopenthesidedischargedoor(Figure35).
Figure35
3.Installthesidedischargechuteandclosethedoor
ontothechute(Figure36).
Figure33
Figure36
13
Page 14
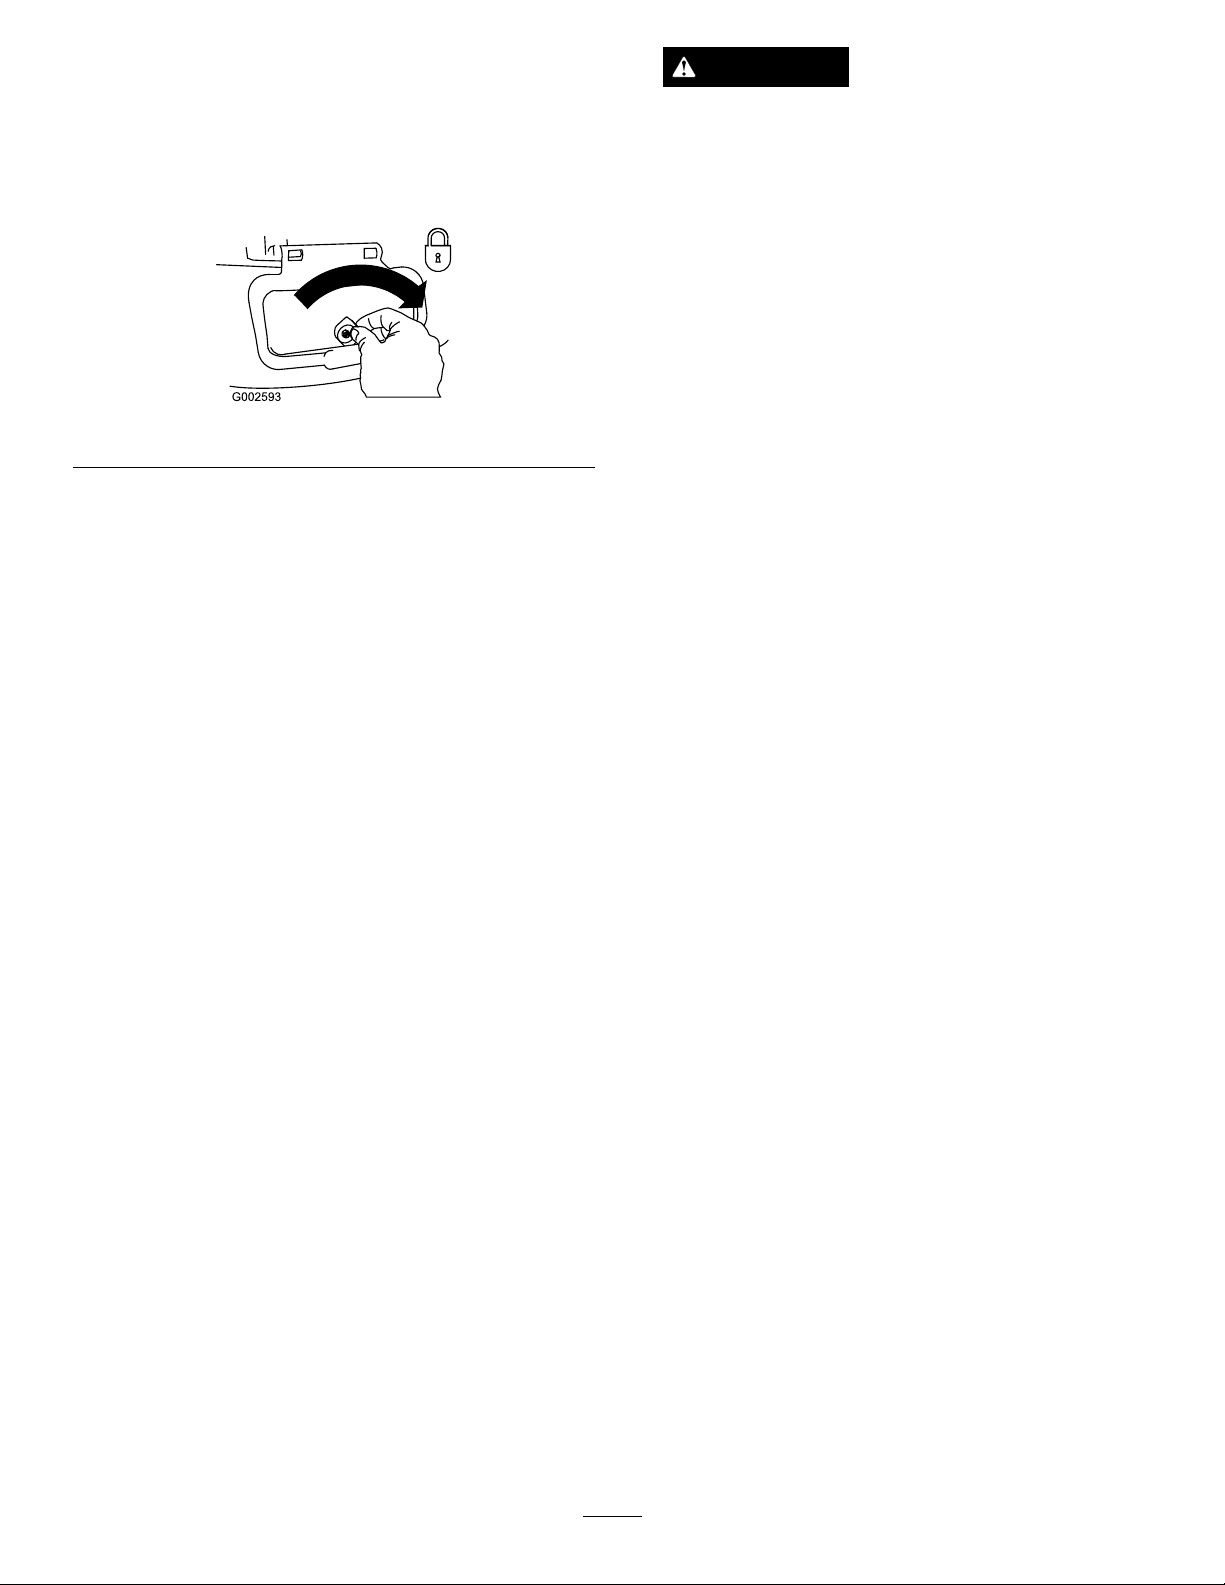
RemovingtheSideDischargeChute
Toremovethesidedischargechute,reversethesteps
above.
Important:Lockthesidedischargedoorafteryou
closeit(
Figure37).
WARNING
Wetgrassorleavescancauseseriousinjuryif
youslipandcontacttheblade.Mowonlyindry
conditions.
•Alternatethemowingdirection.Thishelpsdisperse
theclippingsoverthelawnforevenfertilization.
•Ifthenishedlawnappearanceisunsatisfactory,try
oneormoreofthefollowing:
–Ifthebladeisdullornicked,replaceitorhave
itsharpened.
Figure37
OperatingTips
GeneralMowingTips
•Cleartheareaofsticks,stones,wire,branches,and
otherdebristhatthebladecouldhit.
•Avoidstrikingsolidobjectswiththeblade.Never
deliberatelymowoveranyobject.
•Ifthemowerstrikesanobjectorstartstovibrate,
immediatelystoptheengine,disconnectthewire
fromthesparkplug,andexaminethemowerfor
damage.
•Forbestperformance,installanewbladebeforethe
cuttingseasonbegins.
•ReplacethebladewhennecessarywithaToro
replacementblade.
–Walkataslowerpacewhilemowing.
–Raisethecuttingheightonyourmower.
–Cutthegrassmorefrequently.
–Overlapcuttingswathsinsteadofcuttingafull
swathwitheachpass.
–Setthecuttingheightonthefrontwheelsone
notchlowerthantherearwheels.Forexample,
setthefrontwheelsat2inches(51mm)andthe
rearwheelsat2-1/2inches(64mm).
CuttingLeaves
•Aftercuttingthelawn,ensurethathalfofthelawn
showsthroughthecutleafcover.Youmayneedto
makemorethanonepassovertheleaves.
•Iftherearemorethan5inches(13cm)ofleaves
onthelawn,setthefrontcuttingheightoneortwo
notcheshigherthantherearcuttingheight.
•Slowdownyourmowingspeedifthemowerdoes
notcuttheleavesnelyenough.
CuttingGrass
•Cutonlyaboutathirdofthegrassbladeatatime.
Donotcutbelowthe2inch(51mm)settingunless
thegrassissparseoritislatefallwhengrassgrowth
beginstoslowdown.RefertoAdjustingtheCutting
Height.
•Whencuttinggrassover6inches(15cm)tall,mow
atthehighestcuttingheightsettingandwalkslower;
thenmowagainatalowersettingforthebestlawn
appearance.Ifthegrassistoolong,themowermay
plugandcausetheenginetostall.
•Mowonlydrygrassorleaves.Wetgrassandleaves
tendtoclumpontheyardandcancausethemower
toplugortheenginetostall.
14
Page 15

Maintenance
Note:Determinetheleftandrightsidesofthemachinefromthenormaloperatingposition.
RecommendedMaintenanceSchedule(s)
MaintenanceService
Interval
Aftertherst5hours
Beforeeachuseordaily
Every25hours
Beforestorage
Yearly
Important:Refertoyour
MaintenanceProcedure
•Changetheengineoil.
•Checktheengineoillevel.
•Checkthebladebrakeclutchoperation.
•Ensurethattheenginestopswithin3secondsafterreleasingthebladecontrolbar.
•Checktheaircleanerfordirtand/ordamageandcleanorreplaceitifnecessary .
•Cleangrassclippingsanddirtfromunderthemower.
•Cleanthebladebrakeclutchshield.
•Emptythefueltankbeforerepairsasdirectedandbeforeannualstorage.
•Cleantheairlter(morefrequentlyindustyoperatingconditions).
•Changetheengineoil.
•Lubricatetheupperhandle.
•Replacethebladeorhaveitsharpened(morefrequentlyiftheedgedullsquickly).
•RefertoyourEngineOperator’sManualforanyadditionalyearlymaintenance
procedures.
Engine Operator’ s Man ual
PreparingforMaintenance
1.Stoptheengineandwaitforallmovingpartstostop.
2.Disconnectthesparkplugwirefromthesparkplug
Figure38)beforeperforminganymaintenance
(
procedure.
foradditionalmaintenanceprocedures.
WARNING
Tippingthemowermaycausethefueltoleak.
Gasolineisammable,explosiveandcancause
personalinjury.
Runtheenginedryorremovethegasolinewith
ahandpump;neversiphon.
Figure38
3.Afterperformingthemaintenanceprocedure(s),
connectthesparkplugwiretothesparkplug.
Important:Beforetippingthemowertochange
theoilorreplacetheblade,allowthefueltank
torundrythroughnormalusage.Ifyoumust
tipthemowerpriortorunningoutoffuel,usea
handfuelpumptoremovethefuel.Alwaystip
themowerontoitssidewiththeairlterup.
ServicingtheAirCleaner
ServiceInterval:Beforeeachuseordaily
Yearly
1.Pressdownonthelatchtabsontopoftheaircleaner
cover(Figure39).
Figure39
1.Latchtabs
2.Openthecover.
15
Page 16

3.Removetheairlter(Figure40).
Figure40
4.Iftheairlterisdamagedoriswetwithoilorfuel,
replaceit.
5.Iftheairlterisdirty,tapitonahardsurfaceseveral
timesorblowcompressedairlessthan30psi(207
kPa)throughthesideofthelterthatfacesthe
engine.
Note:Donotbrushthedirtoffthelter;brushing
forcesdirtintothebers.
Figure41
4.Tipthemowerontoitsside,withtheairlterup,
todraintheusedoiloutthroughtheoillltube
(Figure42).
Figure42
6.Removedirtfromtheaircleanerbodyandcover
usingamoistrag.Donotwipedirtintotheair
duct.
7.Installthelterintotheaircleaner.
8.Closethecover.
ChangingtheEngineOil
ServiceInterval:Aftertherst5hours
Yearly
Changetheengineoilaftertherst5operating
hours;changeityearlythereafter.
Runtheengineafewminutesbeforechangingtheoil
towarmit.Warmoilowsbetterandcarriesmore
contaminants.
1.Performthepre-maintenanceprocedures;referto
PreparingforMaintenance.
2.TurnthefuelvalvetotheOffpositiontoprevent
anyfuelleakage.
5.Slowlypouroilintotheoillltube,periodically
checkingthelevelwiththedipstick,untilthedipstick
indicatesthattheengineisfullasillustratedin
Figure43.Donotoverll.(Max.ll:0.58quart
(0.55l),type:SAE30detergentoilwithanAPI
serviceclassicationofSH,SJ,SL,orhigher.)
Note:Eachtimeyouchecktheoillevel,removethe
dipstickandwipeitclean,insertitintotheoilller
neck(butdonotscrewitin),thenremoveitagain
andcheckthelevel(
Figure43).
Note:Ifyouoverlltheengine,poursomeoilout
ofit.
3.Removethedipstick(
Figure41).
16
Page 17

Figure45
AdjustingtheSelf-propelDrive
Ifyourmowerdoesnotself-propelproperly,adjustthe
self-propeldrivecable.
Figure43
6.Installthedipsticksecurely.
7.Disposeoftheusedoilproperlyatalocalrecycling
center.
LubricatingtheUpperHandle
ServiceInterval:Yearly
Lubricatetheleftandrightsidesoftheupperhandle
withalow-viscositysiliconespraylubricantyearlyor
asneeded.
1.Spraytheouterplasticendoftheinnerhandle
(Figure44).
1.Loosenthenutonthecablemount(
Figure46
1.Cablemount
2.Pulltheupperhandlebackfullyrearward.
Figure46).
Figure44
Note:Usethestrawthatcomeswiththespraycan
todirectthespray.
2.Pushtheupperhandlefullydownandspraythe
innerplasticsurfaceoftheouterhandle(Figure45).
Note:Ifthehandledoesnotmovesmoothly,refer
toLubricatingtheUpperHandle.
3.Pullthecablejacketdownwarduntilyouremovethe
slackintheexposedcable(Figure47).
17
Page 18

Figure47
1.Exposedcable
4.Pushthecablejacketupward1/8inch(3mm).
Note:Youcanplacearuleragainsttheupperside
oftheblackcablemountandmeasurehowfarthe
upperendofthecablejacketmoves(
Figure48).
Ifthebladeedgeisdullornicked,haveitsharpenedor
replaceit.
WARNING
Thebladeissharp;contactingthebladecanresult
inseriouspersonalinjury.
Weargloveswhenservicingtheblade.
1.Disconnectthesparkplugwirefromthesparkplug.
RefertoPreparingforMaintenance.
2.Tipthemowerontoitssidewiththeairlterup.
3.Removethe2bladenutsandthestiffener(
Figure49).
Figure48
1.Cablemount2.Cablejacket
Note:Movingthecablejacketupwarddecreases
thegroundspeed;movingthejacketdownward
increasesthegroundspeed.
5.Tightenthenutrmly.
6.Startthemowerandchecktheadjustment.
Note:Iftheself-propeldriveisnotproperly
adjusted,repeatthisprocedure.
ReplacingtheBlade
ServiceInterval:Yearly
Important:
the blade pr oper l y
wrenchorareuncomfortableperformingthis
procedure,contactanAuthorizedServiceDealer.
Examinethebladewheneveryourunoutofgasoline.If
thebladeisdamagedorcracked,replaceitimmediately.
Y ou will need a torque wr ench to install
.Ifyoudonothaveatorque
Figure49
1.Bladenuts
4.Removetheblade(Figure49).
5.Installthenewblade(Figure49).
Important:Positionthecurvedendsofthe
bladetopointtowardthemowerhousing.
6.Installthestiffeneryouremovedinstep3.
7.Installthebladenutsandtorquethemto15to
27ft-lb(20to37N-m).
2.Stiffener
CleaningtheBladeBrake
ClutchShield
ServiceInterval:Every25hours
Cleanthebladebrakeclutchshieldatleastevery25
operatinghoursoryearlytopreventthebladefrom
stallingwhileyoumow .
1.Disconnectthesparkplugwirefromthesparkplug.
RefertoPreparingforMaintenanceonpage18.
2.Tipthemowerontoitssidewiththeairlterup.
3.Removethe2bladenutsandthestiffener(Figure50).
18
Page 19

Figure50
1.Bladenuts4.Bladedriver
2.Stiffener
3.Blade6.Bladebrakeclutchshield
5.Disk
4.Removetheblade(Figure50).
5.Removethebladedriveranddisk(Figure50).
Figure51
3.Whennomoreclippingscomeout,stopthewater
andmovethemowertoadryarea.
4.Runtheenginewiththebladeengagedforafew
minutestodrythehousingtopreventitfromrusting.
6.Removethebladebrakeclutchshield(
Figure50).
7.Brushorblowoutdebrisfromtheinsideofthe
shieldandaroundalltheparts.
8.Installthebladebrakeclutchshield(Figure50).
9.Installthebladedriver(
Figure50).
10.Installtheblade(Figure50).
Important:Positionthecurvedendsofthe
bladetopointtowardthemowerhousing.
11.Installthestiffener(Figure50).
12.Installthebladenutsandtorquethemto15to
27ft-lb(20to37N⋅ ⋅⋅m).
CleaningtheMower
ServiceInterval:Beforeeachuseordaily
WARNING
Themowermaydislodgematerialfromunderthe
mowerhousing.
•Weareyeprotection.
•Stayintheoperatingposition(behindthe
handle).
•Donotallowbystandersinthearea.
1.Movethemowerontoaatpavedsurface.
2.Withtheenginerunningandthebladeengaged,
sprayastreamofwaterinfrontoftherightrear
wheel(Figure51).
Thewaterwillsplashintothepathoftheblade,
cleaningouttheclippings.
19
Page 20

Storage
Storethemowerinacool,clean,dryplace.
PreparingtheMowerfor
Storage
WARNING
Gasolinevaporscanexplode.
•Donotstoregasolinemorethan30days.
•Donotstorethemowerinanenclosurenearan
opename.
•Allowtheenginetocoolbeforestoringit.
1.Onthelastrefuelingoftheyear,addfuelstabilizer
tothefuelasdirectedbytheenginemanufacturer.
2.Runthemoweruntiltheenginestopsfromrunning
outoffuel.
3.Primetheengineandstartitagain.
4.Allowtheenginetorununtilitstops.Whenyoucan
nolongerstarttheengine,itissufcientlydry.
5.Disconnectthewirefromthesparkplugandconnect
thewireontotheretainingpost.
6.Removethesparkplug,add1oz.(30ml)ofoil
throughthesparkplughole,andpullthestarterrope
slowlyseveraltimestodistributeoilthroughoutthe
cylindertopreventcylindercorrosionduringthe
off-season.
7.Installthesparkplugandtightenitwithatorque
wrenchto15ft-lb(20N-m).
8.Tightenallnuts,bolts,andscrews.
Figure53
ForwardPosition
1.Withthehandleintheuprightposition,steponthe
footpedalandholditdown.
2.Movethehandleallthewayforwardandloosenthe
upperhandleknob(Figure54).
Figure54
3.Tounfoldthehandle,refertoUnfoldingtheHandle.
RemovingtheMowerfrom
Storage
FoldingtheHandle
UprightPosition
1.Steponthefootpedalandholditdown(Figure52).
Figure52
2.Movethehandletotheuprightposition(Figure53).
Connectthewiretothesparkplug.
20
Page 21

Notes:
21
Page 22

Notes:
22
Page 23

Notes:
23
Page 24

TheT oroTotalCoverageGuarantee
A5-YearFullWarranty(45DayLimitedWarrantyforCommercialUse)
TheToroGTSStartingGuarantee
A5-YearFullWarranty(NotApplicableforCommercialUse)
SuperRecycler
SuperBagger
WalkPowerMowers
®
ConditionsandProductsCovered
TheToroCompanyanditsafliate,T oroWarrantyCompany ,pursuantto
anagreementbetweenthem,jointlypromisetorepairtheT oroProducts
listedbelowifusedforresidentialpurposes*ifitisdefectiveinmaterialsor
workmanshiporifitstopsfunctioningduetothefailureofacomponent;or
iftheT oroGTS(GuaranteedtoStart)enginewillnotstartontherstor
secondpull,providedtheroutinemaintenancerequiredintheOperator’s
Manualhavebeenperformed.
Thiswarrantycoversthecostofpartsandlabor,butyoumustpay
transportationcosts.
Thefollowingtimeperiodsapplyfromthedateofpurchase:
ProductsWarrantyPeriod
SuperRecycler
SuperBaggerMowers5yearfullwarranty
GTS(GuaranteedtoStart)5yearfullwarranty
Accessories(forabovemowers)5yearfullwarranty
Battery
®
Mowers5yearfullwarranty
1yearfullwarranty
LimitedWarrantyforCommercialUse
Gas-poweredT oroProductsusedforcommercial,institutional,or
rentaluse,arewarrantedfor45daysagainstdefectsinmaterialsor
workmanship.Componentsfailingduetonormalweararenotcovered
bythiswarranty.
TheToroGTS(GuaranteedtoStart)StartingGuaranteedoesnotapply
whentheproductisusedcommercially*.
InstructionsforObtainingWarrantyService
IfyouthinkthatyourT oroProductcontainsadefectinmaterialsor
workmanship,followthisprocedure:
1.ContactanyAuthorizedT oroServiceDealertoarrangeserviceattheir
dealership.Tolocateadealerconvenienttoyou,refertotheYellow
Pagesofyourtelephonedirectory(lookunder“LawnMowers”)or
accessourwebsiteatwww.T oro.com.Youmayalsocallthenumbers
listedinitem#3tousethe24-hourToroDealerlocatorsystem.
2.Bringtheproductandyourproofofpurchase(salesreceipt)tothe
ServiceDealer.Thedealerwilldiagnosetheproblemanddetermine
ifitiscoveredunderwarranty.
3.IfforanyreasonyouaredissatisedwiththeServiceDealer’s
analysisorwiththeassistanceprovided,contactusat:
CustomerCareDepartment,RLCDivision
ToroWarrantyCompany
811 1LyndaleAvenueSouth
Bloomington,MN55420-1196
Tollfreeat888-865-5688(U.S.customers)
Tollfreeat888-865-5705(Canadiancustomers)
OwnerResponsibilities
YoumustmaintainyourToroProductbyfollowingthemaintenance
proceduresdescribedintheOperator’sManual.Suchroutine
maintenance,whetherperformedbyadealerorbyyou,isatyourexpense.
ItemsandConditionsNotCovered
Thereisnootherexpresswarrantyexceptforspecialemissionsystem
coverageandenginewarrantycoverageonsomeproducts.Thisexpress
warrantydoesnotcoverthefollowing:
•Costofregularmaintenanceserviceorparts,suchaslters,fuel,
lubricants,oilchanges,sparkplugs,airlters,bladesharpening
orwornblades,cable/linkageadjustments,orbrakeandclutch
adjustments
•Anyproductorpartwhichhasbeenalteredormisusedandrequires
replacementorrepairduetoaccidentsorlackofpropermaintenance
•Repairsnecessaryduetofailuretousefreshfuel(lessthanone
monthold),orfailuretoproperlypreparetheunitpriortoanyperiod
ofnon-useoveronemonth
•Pickupanddeliverycharges
•Operationalmisuse,neglect,oraccidents
•RepairsorattemptedrepairsbyanyoneotherthananAuthorized
ToroServiceDealer
•Repairsoradjustmentstocorrectstartingdifcultiesduetothe
following:
–failuretofollowpropermaintenanceprocedures
–rotarymowerbladestrikinganobject
–contaminantsinthefuelsystem
–improperfuel(consultyourOperator’sManualifindoubt)
–failuretodrainthefuelsystempriortoanyperiodofnon-use
overonemonth
•Specialoperationalconditionswherestartingmayrequiremorethan
twopulls:
–rsttimestartsafterextendedperiodofnon-useoveronemonth
orseasonalstorage
–cooltemperaturestartssuchasthosefoundinearlyspringand
lateautumn
–improperstartingprocedures-ifyouarehavingdifcultystarting
yourunit,pleasechecktheOperator’sManualtoensurethat
youareusingthecorrectstartingprocedures.Thiscansavean
unnecessaryvisittoanAuthorizedT oroServiceDealer.
GeneralConditions
Allrepairscoveredbythesewarrantiesmustbeperformedbyan
AuthorizedToroServiceDealerusingT oroapprovedreplacementparts.
RepairbyanAuthorizedT oroServiceDealerisyoursoleremedyunder
thiswarranty .
NeitherTheT oroCompanynorToroWarrantyCompanyisliablefor
indirect,incidental,orconsequentialdamagesinconnectionwiththe
useoftheT oroProductscoveredbythesewarranties,includingany
costorexpenseofprovidingsubstituteequipmentorserviceduring
reasonableperiodsofmalfunctionornon-usependingcompletionof
repairsunderthesewarranties.
Somestatesdonotallowexclusionsofincidentalorconsequential
damages,orlimitationsonhowlonganimpliedwarrantylasts,sothe
aboveexclusionsmaynotapplytoyou.
Thiswarrantygivesyouspeciclegalrights,andyoumayalsohaveother
rightswhichvaryfromstatetostate.
CountriesOtherthantheUnitedStatesorCanada
CustomerswhohavepurchasedToroproductsexportedfromtheUnitedStatesorCanadashouldcontacttheirT oroDistributor(Dealer)toobtain
guaranteepoliciesforyourcountry,province,orstate.IfforanyreasonyouaredissatisedwithyourDistributor’sserviceorhavedifcultyobtaining
guaranteeinformation,contacttheT oroimporter.Ifallotherremediesfail,youmaycontactusatT oroWarrantyCompany.
*Residentialpurposesmeansuseoftheproductonthesamelotasyourhome.Useatmorethanonelocation,orinstitutionalorrentaluse,isconsidered
commercialuse,andthecommercialusewarrantywouldapply.
374-0259RevA
 Loading...