

Page 1
FormNo.3361-146RevA
21inSuperRecycler
ModelNo.20093—SerialNo.290000001andUp
ModelNo.20093C—SerialNo.290000001andUp
®
LawnMower
Operator'sManual
Introduction
Readthisinformationcarefullytolearnhowtooperate
andmaintainyourproductproperlyandtoavoidinjury
andproductdamage.Youareresponsibleforoperating
theproductproperlyandsafely.
YoumaycontactTorodirectlyatwww.Toro.comfor
productandaccessoryinformation,helpndinga
dealer,ortoregisteryourproduct.
Wheneveryouneedservice,genuineToroparts,or
additionalinformation,contactanAuthorizedService
DealerorToroCustomerServiceandhavethemodel
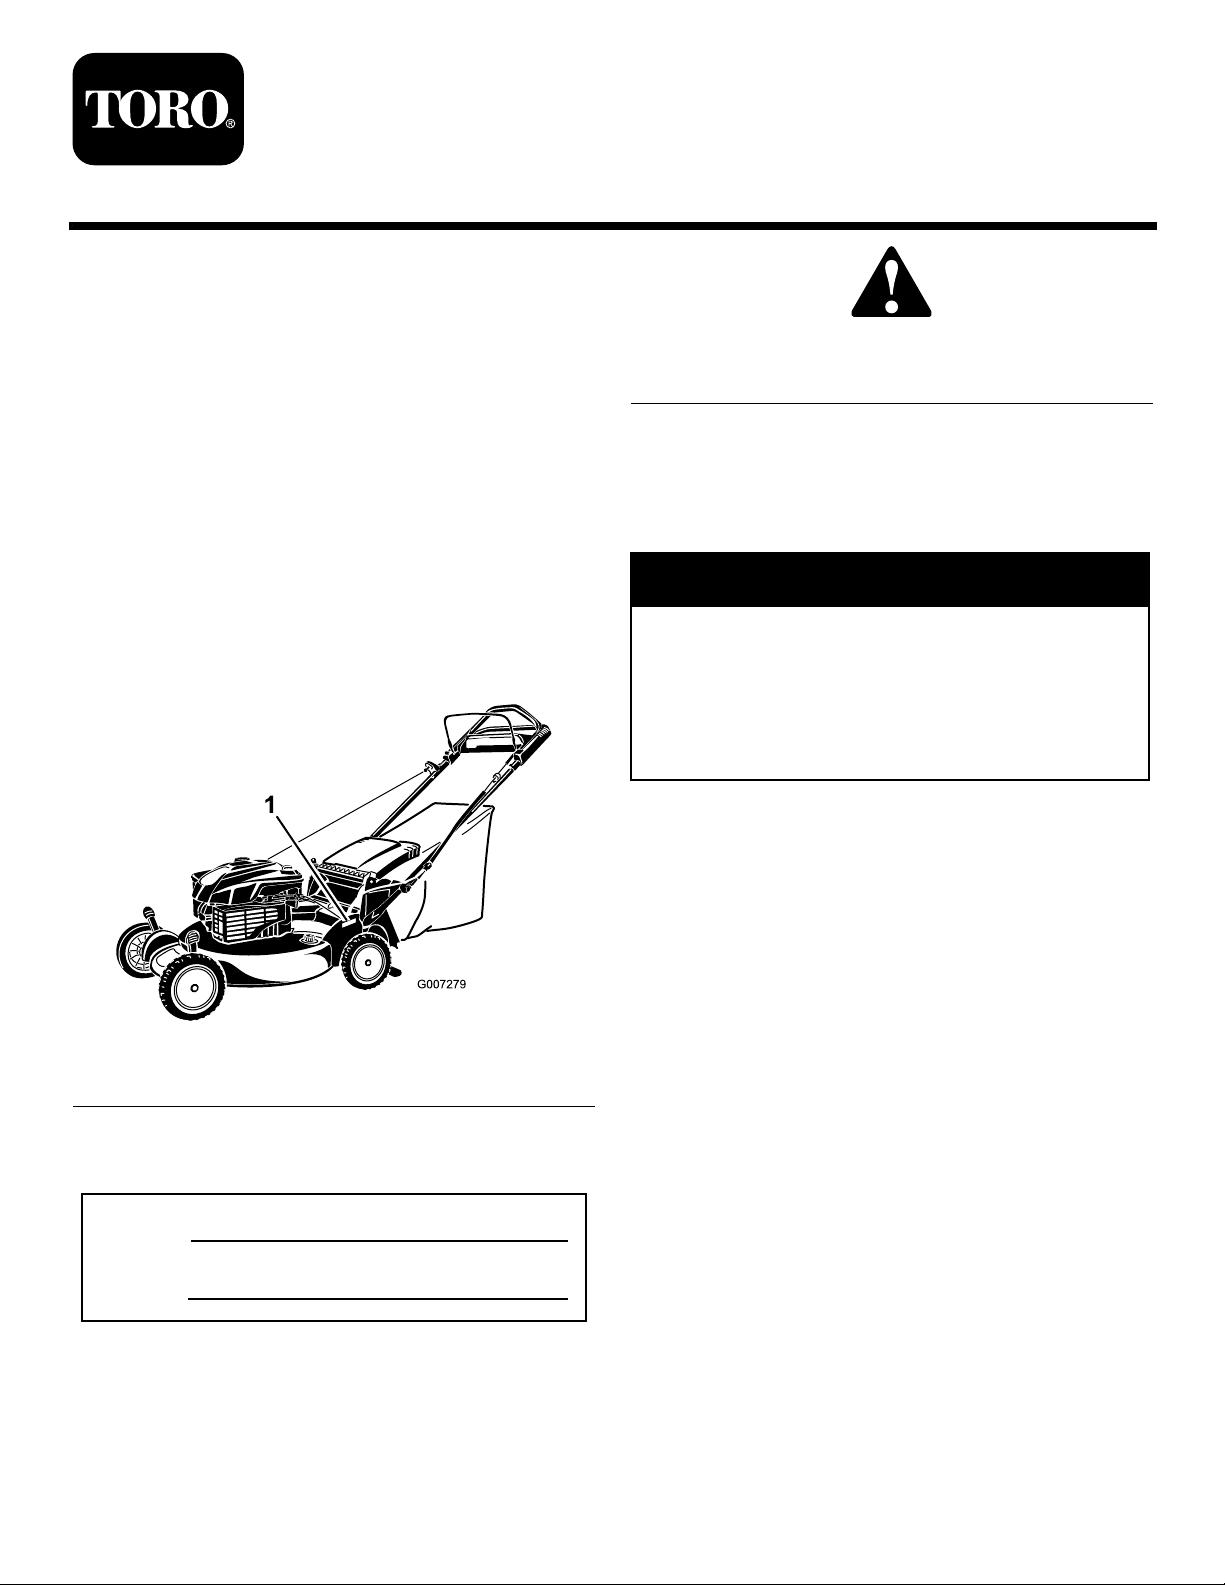
andserialnumbersofyourproductready.Figure1
identiesthelocationofthemodelandserialnumbers
ontheproduct.
Figure2
1.Safetyalertsymbol
Thismanualuses2wordstohighlightinformation.
Importantcallsattentiontospecialmechanical
informationandNoteemphasizesgeneralinformation
worthyofspecialattention.
Warning
CALIFORNIA
Proposition65Warning
Theengineexhaustfromthisproduct
containschemicalsknowntotheStateof
Californiatocausecancer,birthdefects,
orotherreproductiveharm.
Important:Thisengineisnotequippedwitha
sparkarrestermufer.ItisaviolationofCalifornia
PublicResourceCodeSection4442touseoroperate
theengineonanyforest-covered,brush-covered,or
grass-coveredland.Otherstatesorfederalareas
mayhavesimilarlaws.
Figure1
1.Modelandserialnumberplate
Writetheproductmodelandserialnumbersinthespace
below:
ModelNo.
SerialNo.
Thismanualidentiespotentialhazardsandhas
safetymessagesidentiedbythesafetyalertsymbol
(Figure2),whichsignalsahazardthatmaycauseserious
injuryordeathifyoudonotfollowtherecommended
precautions.
©2008—TheT oro®Company
8111LyndaleAvenueSouth
Bloomington,MN55420
Registeratwww.Toro.com.
ThissparkignitionsystemcomplieswithCanadian
ICES-002.
Theenclosed
Engine Owner’ s Man ual
issupplied
forinformationregardingtheUSEnvironmental
ProtectionAgency(EPA)andtheCalifornia
EmissionControlRegulationofemissionsystems,
maintenance,andwarranty.Replacementsmaybe
orderedthroughtheenginemanufacturer.
Formodelswithstatedenginehorsepower,thegross
horsepoweroftheenginewaslaboratoryratedbythe
enginemanufacturerinaccordancewithSAEJ1940.
Asconguredtomeetsafety,emission,andoperating
requirements,theactualenginehorsepoweronthisclass
oflawnmowerwillbesignicantlylower.
OriginalInstructions(EN)
PrintedintheUSA
AllRightsReserved
Page 2

Safety
ThislawnmowermeetsorexceedstheCPSCblade
safetyrequirementsforwalk-behindrotarylawnmowers
andtheB71.1specicationsoftheAmericanNational
StandardsInstituteineffectatthetimeofproduction.
Readandunderstandthecontentsofthismanual
beforeyoustarttheengine.
Thesafetyalertsymbol(Figure2)isusedtoalertyou
topotentialpersonalinjuryhazards.Obeyallsafety
messagesthatfollowthissymboltoavoidpossibleinjury
ordeath.Improperlyusingormaintainingthismower
couldresultininjuryordeath.T oreducethispotential,
complywiththefollowingsafetyinstructions.
Thefollowinginstructionshavebeenadaptedfromthe
ANSI/OPEIstandardB71.1-2003.
Thiscuttingmachinecanamputatehandsandfeet
andthrowobjects.Failuretoobservethefollowing
safetyinstructionscouldresultinseriousinjuryor
death.
GeneralOperation
•Read,understand,andfollowallinstructionsonthe
machineandinthemanual(s)beforestarting.
•Donotputhandsorfeetnearorunderthemachine.
Keepclearofthedischargeopeningatalltimes.
•Onlyallowresponsibleadults,whoarefamiliarwith
theinstructions,tooperatethismachine.
•Cleartheareaofobjectssuchasrocks,wire,toys,
etc.,whichcouldbethrownbytheblade.Stay
behindthehandlewhentheengineisrunning.
•Besuretheareaisclearofbystandersbefore
operating.Stopmachineifanyoneentersthearea.
•Donotoperatemachinebarefootedorwhilewearing
sandals.Alwayswearsubstantialfootwear.
•Donotpullmachinebackwardunlessabsolutely
necessary.Alwayslookdownandbehindbeforeand
whilemovingbackward.
•Neverdirectdischargedmaterialtowardanyone.
Avoiddischargingmaterialagainstawallor
obstruction.Materialmayricochetbacktoward
theoperator.Stopthebladewhencrossinggravel
surfaces.
•Donotoperatemachinewithouttheentiregrass
catcher,dischargeguard,rearguard,orothersafety
protectivedevicesinplaceandworking.
•Neverleavearunningmachineunattended.
•Stoptheengineandwaituntilthebladecomes
toacompletestopbeforecleaningthemachine,
removinggrasscatcher,oruncloggingthedischarge
guard.
•Operatemachineonlyindaylightorgoodarticial
light.
•Donotoperatemachinewhileundertheinuence
ofalcoholordrugs.
•Neveroperatemowerinwetgrass.Alwaysbesure
ofyourfooting;walk;neverrun.
•Disengagethedrivesystem,ifsoequipped,before
startingtheengine.
•Ifthemachineshouldstarttovibrateabnormally,
stoptheengineandcheckforthecauseimmediately.
Vibrationisgenerallyawarningoftrouble.
•Alwaysweareyeprotectionwhenoperatingmachine.
•Seemanufacturer’sinstructionsforproperoperation
andinstallationofaccessories.Onlyuseaccessories
approvedbythemanufacturer.
SlopeOperation
Slopesareamajorfactorrelatedtoslipandfallaccidents,
whichcanresultinsevereinjury.Operationonallslopes
requireextracaution.Ifyoufeeluneasyonaslope,do
notmowit.
•Mowacrossthefaceofslopes;neverupanddown.
Exerciseextremecautionwhenchangingdirection
onslopes.
•Watchforholes,ruts,bumps,rocks,orotherhidden
objects.Uneventerraincouldcauseaslipandfall
accident.Tallgrasscanhideobstacles.
•Donotmowonwetgrassorexcessivelysteepslopes.
Poorfootingcouldcauseaslipandfallaccident.
•Donotmowneardrop-offs,ditches,or
embankments.Youcouldloseyourfootingor
balance.
Children
Tragicaccidentscanoccuriftheoperatorisnotalertto
thepresenceofchildren.Childrenareoftenattractedto
themachineandthemowingactivity.Neverassume
thatchildrenwillremainwhereyoulastsawthem.
•Keepchildrenoutofthemowingareaandunder
thewatchfulcareofaresponsibleadultotherthan
theoperator.
•Bealertandturnmoweroffifachildentersthearea.
•Neverallowchildrentooperatethemachine.
•Useextracarewhenapproachingblindcorners,
shrubs,trees,orotherobjectsthatmayblockyour
viewofachild.
2
Page 3

Service
anyfuel-soakeddebris.Allowmachinetocool
beforestoring.
SafeHandlingofGasoline
Toavoidpersonalinjuryorpropertydamage,use
extremecareinhandlinggasoline.Gasolineis
extremelyammableandthevaporsareexplosive.
•Extinguishallcigarettes,cigars,pipes,andother
sourcesofignition.
•Useonlyanapprovedgasolinecontainer.
•Neverremovegascaporaddfuelwiththeengine
running.Allowenginetocoolbeforerefueling.
•Neverrefuelthemachineindoors.
•Neverstorethemachineorfuelcontainerwhere
thereisanopename,spark,orpilotlightsuchas
onawaterheateroronotherappliances.
•Neverllcontainersinsideavehicleoronatruck
ortrailerbedwithaplasticliner.Alwaysplace
containersonthegroundawayfromyourvehicle
beforelling.
•Removegas-poweredequipmentfromthetruck
ortrailerandrefuelitontheground.Ifthisisnot
possible,thenrefuelsuchequipmentwithaportable
container,ratherthanfromagasolinedispenser
nozzle.
•Ifyoustrikeaforeignobject,stopandinspectthe
machine.Repair,ifnecessary,beforestarting.
•Nevermakeanyadjustmentsorrepairswiththe
enginerunning.Disconnectthesparkplugwire
andgroundagainstenginetopreventunintended
starting.
•Checkgrasscatchercomponentsandthedischarge
guardfrequentlyandreplacewithmanufacturer’ s
recommendedparts,whennecessary.
•Mowerbladesaresharp.Wrapthebladeorwear
gloves,anduseextracautionwhenservicingthem.
•Donotchangetheenginegovernorsettingor
overspeedtheengine.
•Maintainorreplacesafetyandinstructionlabels,as
necessary.
•Keepthenozzleincontactwiththerimofthefuel
tankorcontaineropeningatalltimesuntilfuelingis
complete.Donotuseanozzlelock-opendevice.
•Iffuelisspilledonclothing,changeclothing
immediately.
•Neveroverllfueltank.Replacegascapandtighten
securely.
Exhaustcontainscarbonmonoxide,an
odorless,deadlypoisonthatcankillyou.
Donotruntheengineindoorsorinanenclosed
area.
GeneralService
•Neveroperatemachineinaclosedarea.
•Keepallnutsandboltstighttobesuretheequipment
isinsafeworkingcondition.
•Nevertamperwithsafetydevices.Checktheir
properoperationregularly .
•Keepmachinefreeofgrass,leaves,orotherdebris
build-up.Cleanupoilorfuelspillageandremove
3
Page 4
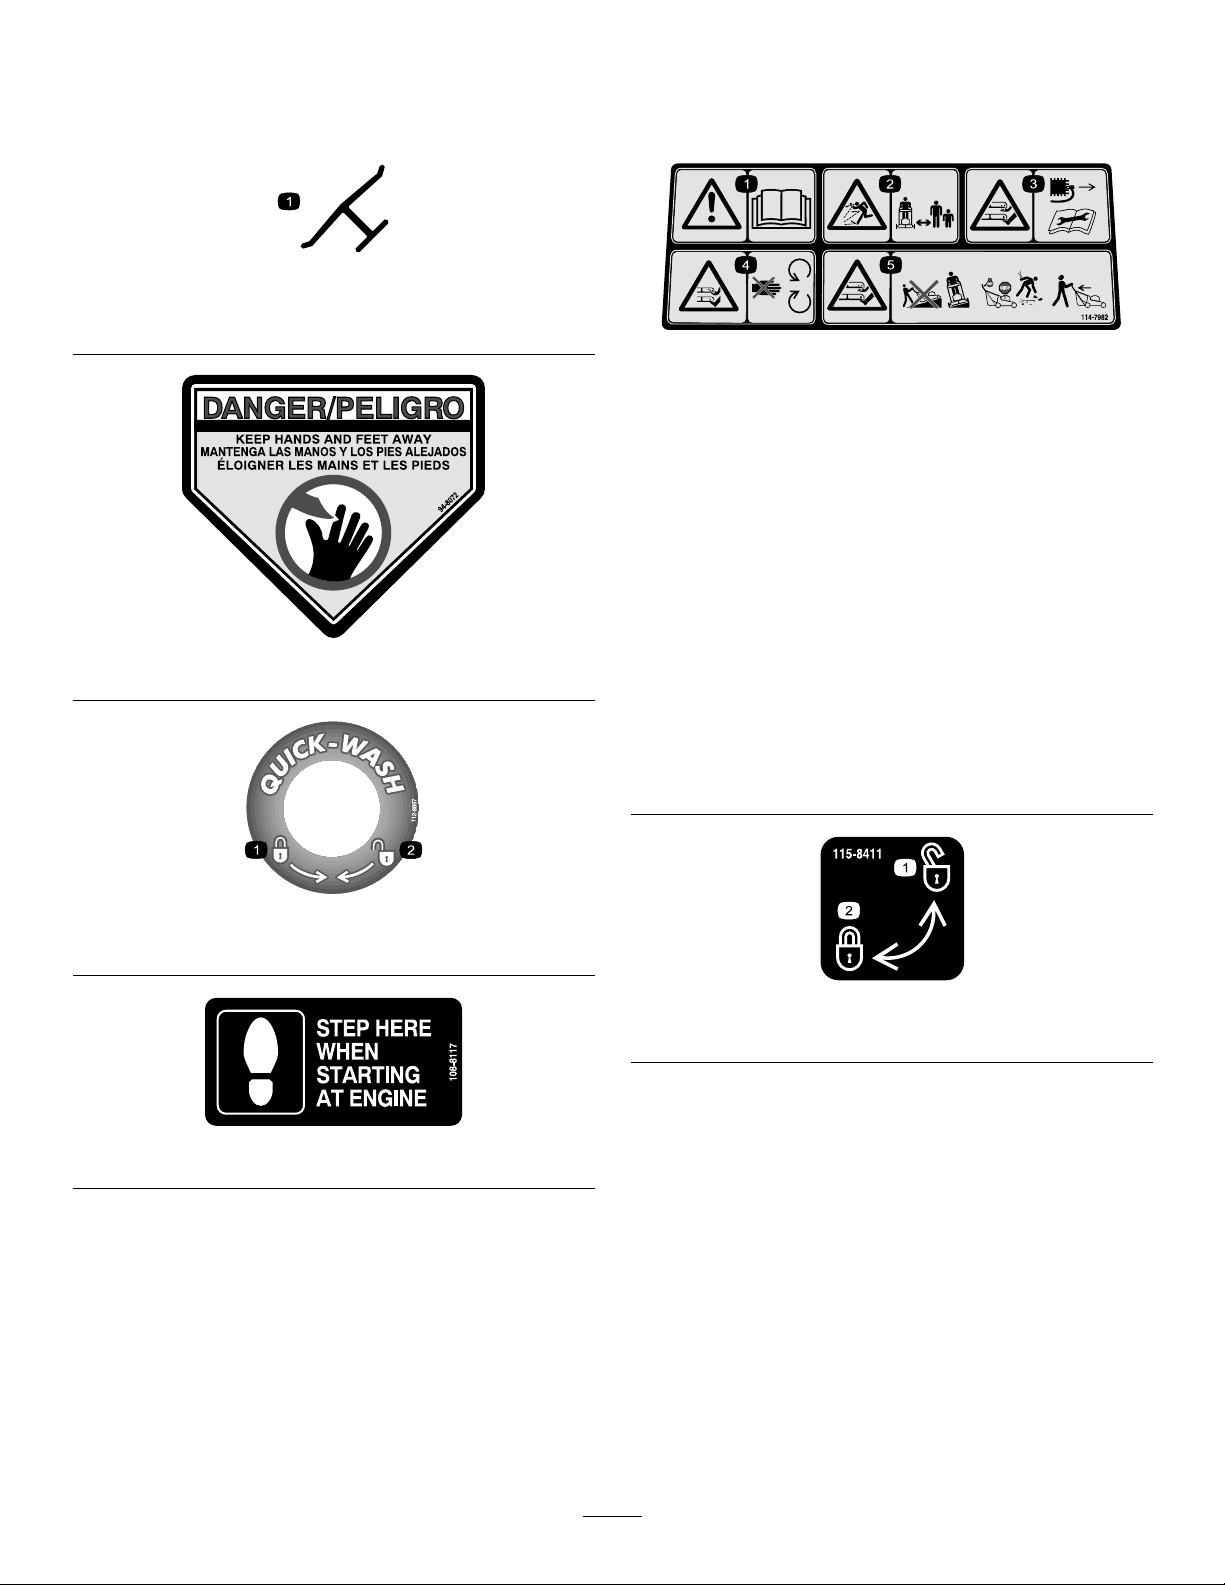
SafetyandInstructionalDecals
Important:Safetyandinstructiondecalsarelocatednearareasofpotentialdanger.Replacedamaged
decals.
Manufacturer’sMark
1.Indicatesthebladeisidentiedasapartfromtheoriginal
machinemanufacturer.
114-7982
1.Warning—readthe
Operator’sManual.
2.Thrownobject
hazard—keepbystanders
asafedistancefromthe
machine.
94-8072
3.Cutting/dismemberment
hazardofhandorfoot,
mowerblade—remove
theignitionkeyandread
theinstructionsbefore
servicingorperforming
maintenance.
4.Cutting/dismemberment
hazardofhandorfoot,
mowerblade—stayaway
frommovingparts.
5.Cutting/dismemberment
hazardofhandorfoot,
mowerblade—donot
operateupanddown
slopes;operatesideto
sideonslopes;stopthe
enginebeforeleavingthe
operatingposition;and
lookbehindyouwhen
backingup.
112-8867
1.Lock2.Unlock
108-8117
115-8411
1.Unlocked2.Locked
4
Page 5
Setup
Important:Removeanddiscardtheprotective
plasticsheetthatcoverstheengine.
1.InstallingtheBladeControl
Bar
Procedure
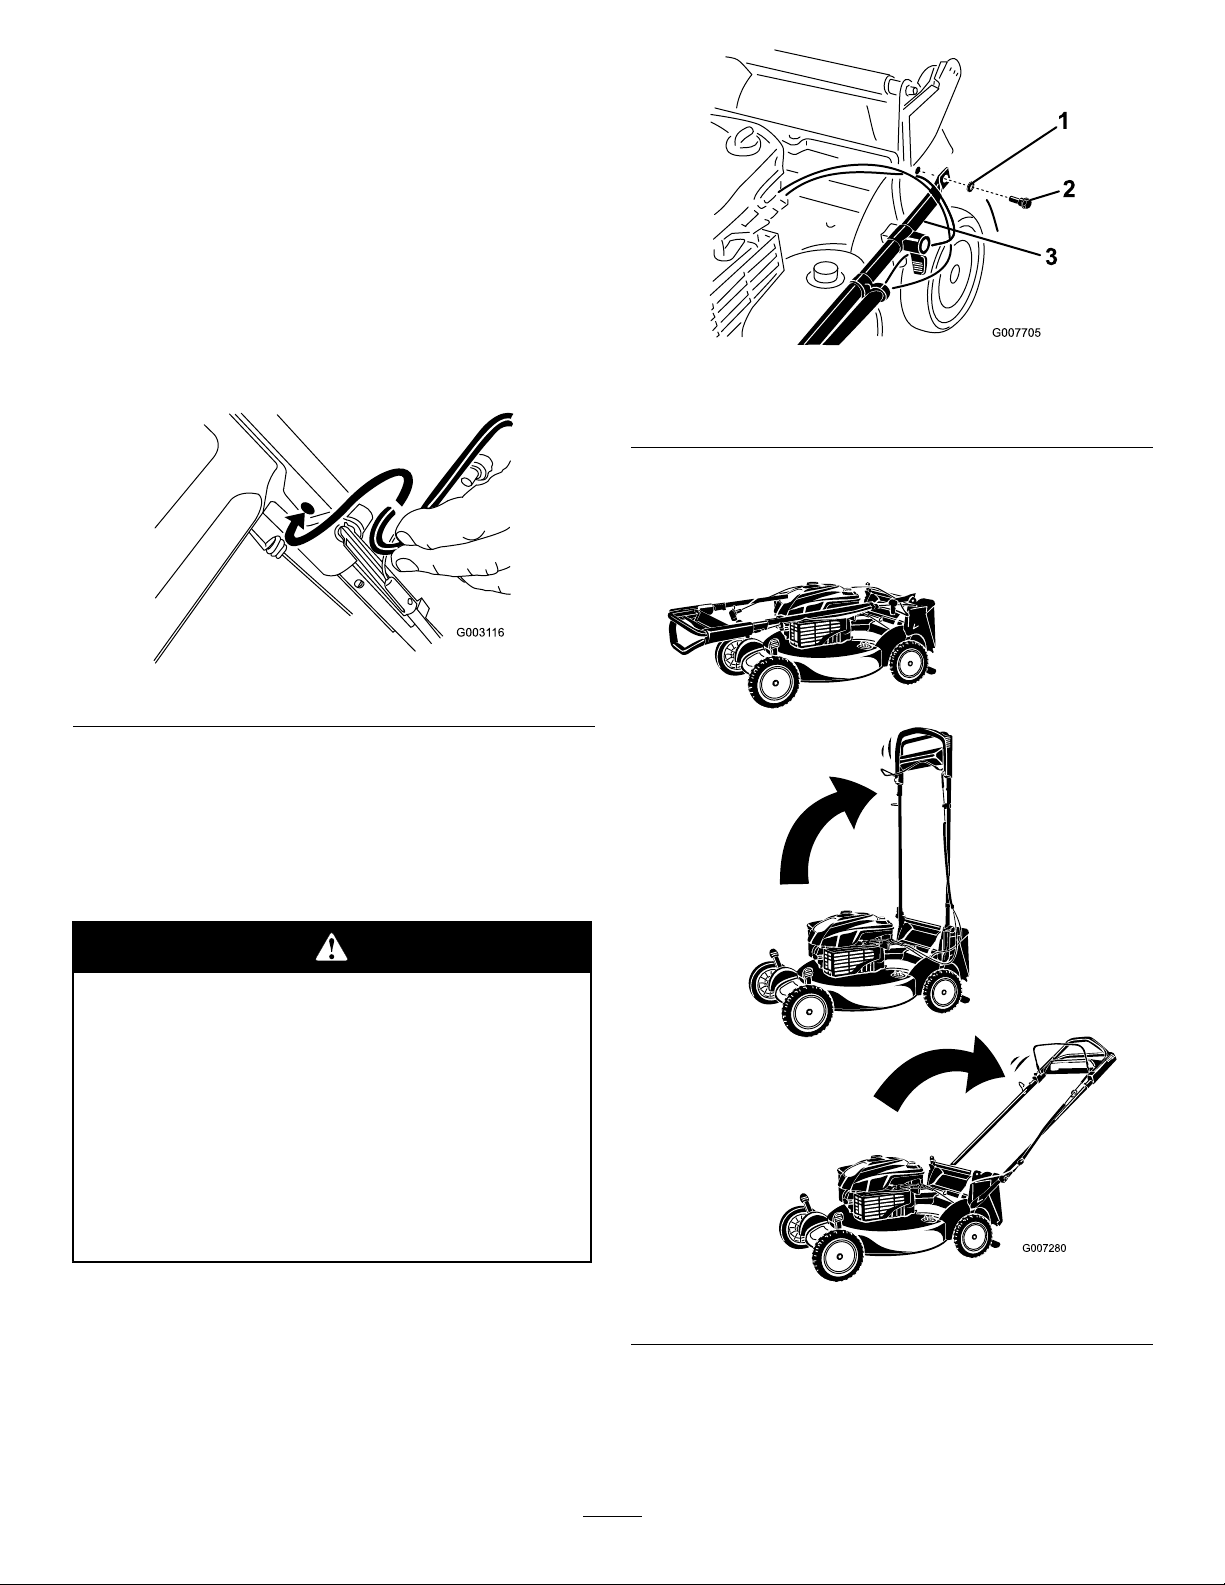
Installthebladecontrolbarintotheupperhandle
(Figure3).
Figure3
2.AssemblingandUnfolding
theHandle
Procedure
Figure4
1.Washer3.Handleend
2.Handlebolt
Important:Routethecablestothe
thehandle(Figure4).
3.Rotatethehandlerearward(Figure5).
outside
of
Assemblingandunfoldingthehandle
improperlycandamagethecables,causingan
unsafeoperatingcondition.
•Donotdamagethecableswhenassembling
andunfoldingthehandle.
•Ensurethatthecablesareroutedtothe
outsideofthehandle.
•Ifacableisdamaged,contactanAuthorized
ServiceDealer.
1.Raisetherearofthemowerhousingtoitshighest
cuttingheightsettingbymovingthe2rearcutting
heightleversallthewayforward.RefertoAdjusting
theCuttingHeightintheOperationsection.
2.Attachthehandleendstothemowerhousingwith
2washersand2handlebolts(Figure4),butdonot
tightenthehandlebolts.
Figure5
4.Lockthehandleatyourdesiredheight.Referto
AdjustingtheHandleHeightintheOperation
section.
5
Page 6
5.Torquethehandleboltsto120to160in-lb(14to
17N⋅m).
6.Adjustthecuttingheight.RefertoAdjustingthe
CuttingHeight.
Important:
5 operating hour s
Change the engine oil after the r st
;changeityearlythereafter.
RefertoChangingtheEngineOil.
3.InstallingtheStarterRope
Procedure
Pullthestarterropethroughtheropeguideonthe
handle(Figure6).
Figure6
1.Starterrope
Note:Tomaketheropeeasiertoinstall,squeezethe
controlbaronthehandle.
2.Ropeguide
ProductOverview
4.FillingtheEnginewithOil
Procedure
Yourmowerdoesnotcomewithoilintheengine.
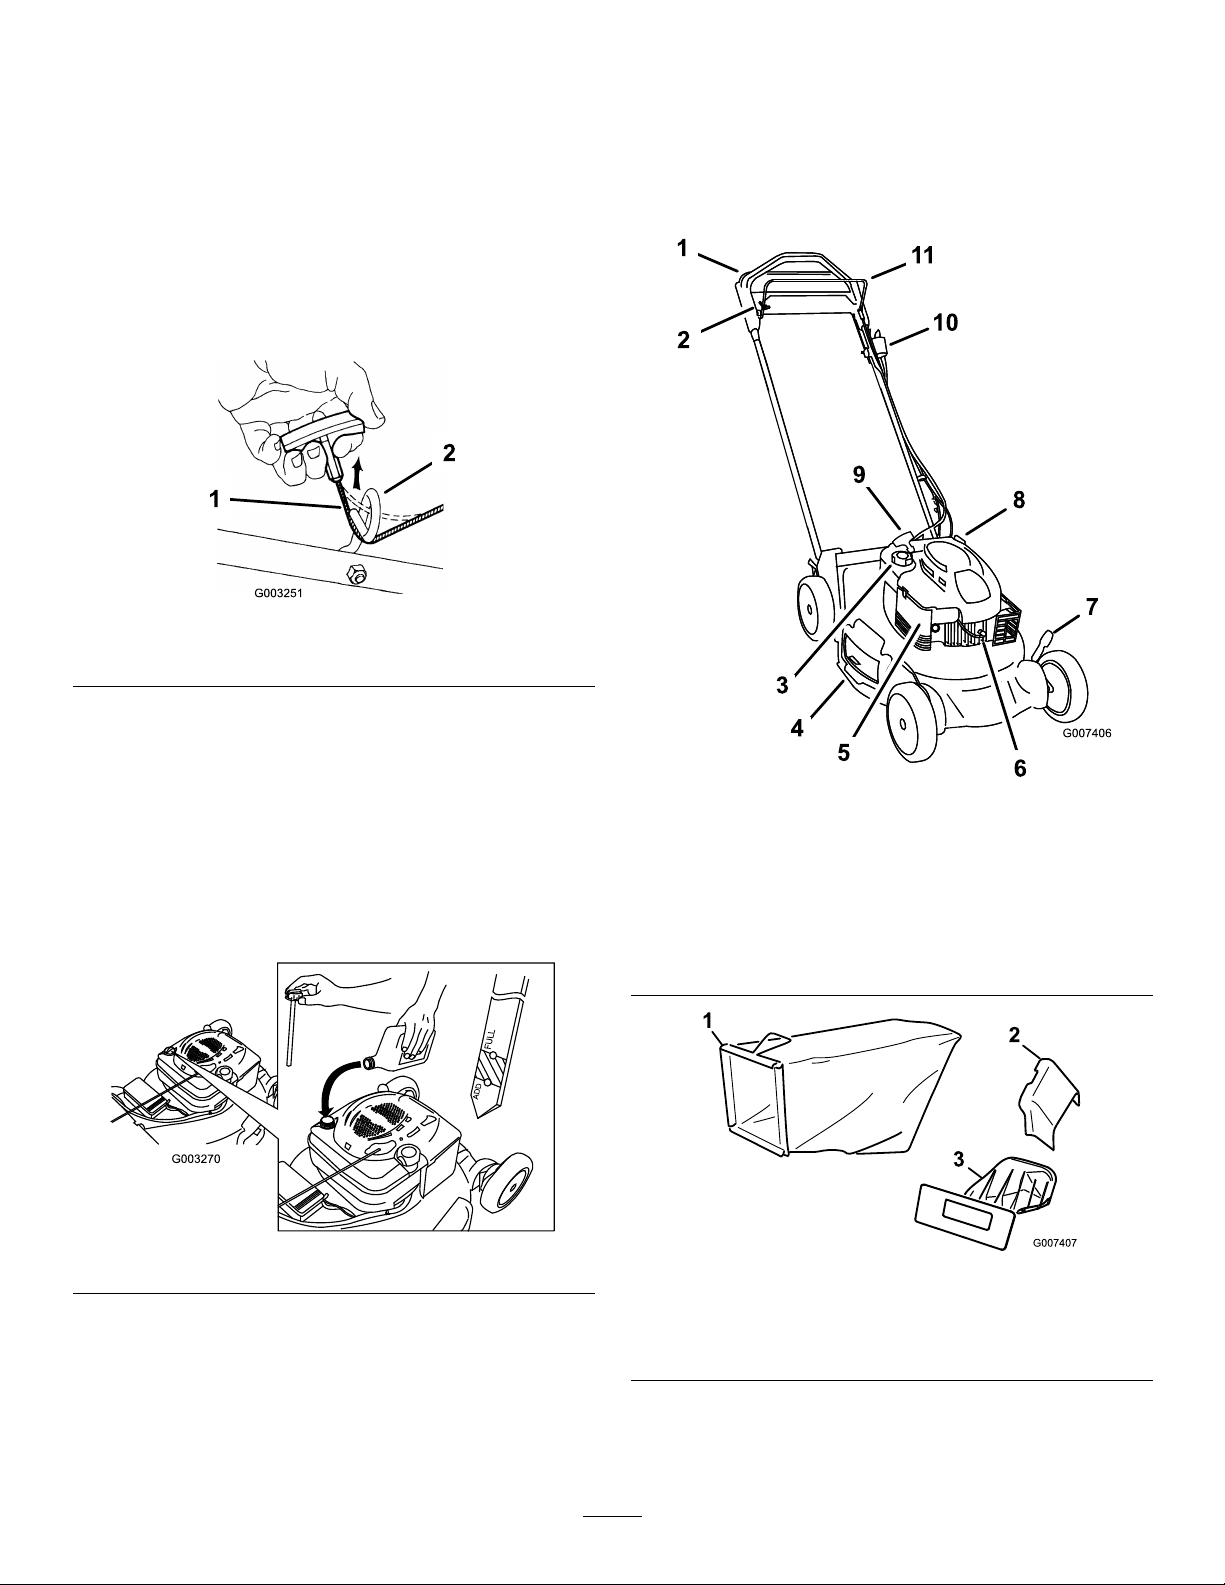
1.Removethedipstick(Figure7).
Figure7
2.Slowlypouroilintotheoillltubeuntiltheoillevel
reachestheFulllineonthedipstick(Figure7).Do
notoverll.(Max.ll:20oz.(0.59l),type:SAE30
detergentoilwithanAPIserviceclassicationofSF,
SG,SH,SJ,SL,orhigher.)
3.Installthedipsticksecurely.
Figure8
1.Upperhandle
2.Controlbarlock8.Oilll/Dipstick
3.Fueltankcap9.Recoilstarthandle
4.Sidedischarge
5.Airlter
6.Sparkplug
1.Grassbag
2.Sidedischargechute
7.Cuttingheightlever(4)
10.Ignitionswitch
11.Bladecontrolbar
Figure9
3.Reardischargeplug
(installed)
6
Page 7
Operation
FillingtheFuelTank
Gasolineisextremelyammableandexplosive.
Areorexplosionfromgasolinecanburnyou
andothers.
•Topreventastaticchargefromignitingthe
gasoline,placethecontainerand/ormower
directlyonthegroundbeforelling,notina
vehicleoronanobject.
•Fillthetankoutdoorswhentheengineis
cold.Wipeupspills.
•Donothandlegasolinewhensmokingor
aroundanopenameorsparks.
•Storegasolineinanapprovedfuelcontainer,
outofthereachofchildren.
Fillthefueltankwithfreshunleadedregulargasoline
fromamajorname-brandservicestation(Figure10).
Important:Toreducestartingproblems,add
fuelstabilizertothefuelallseason,mixingitwith
gasolinelessthan30daysold.
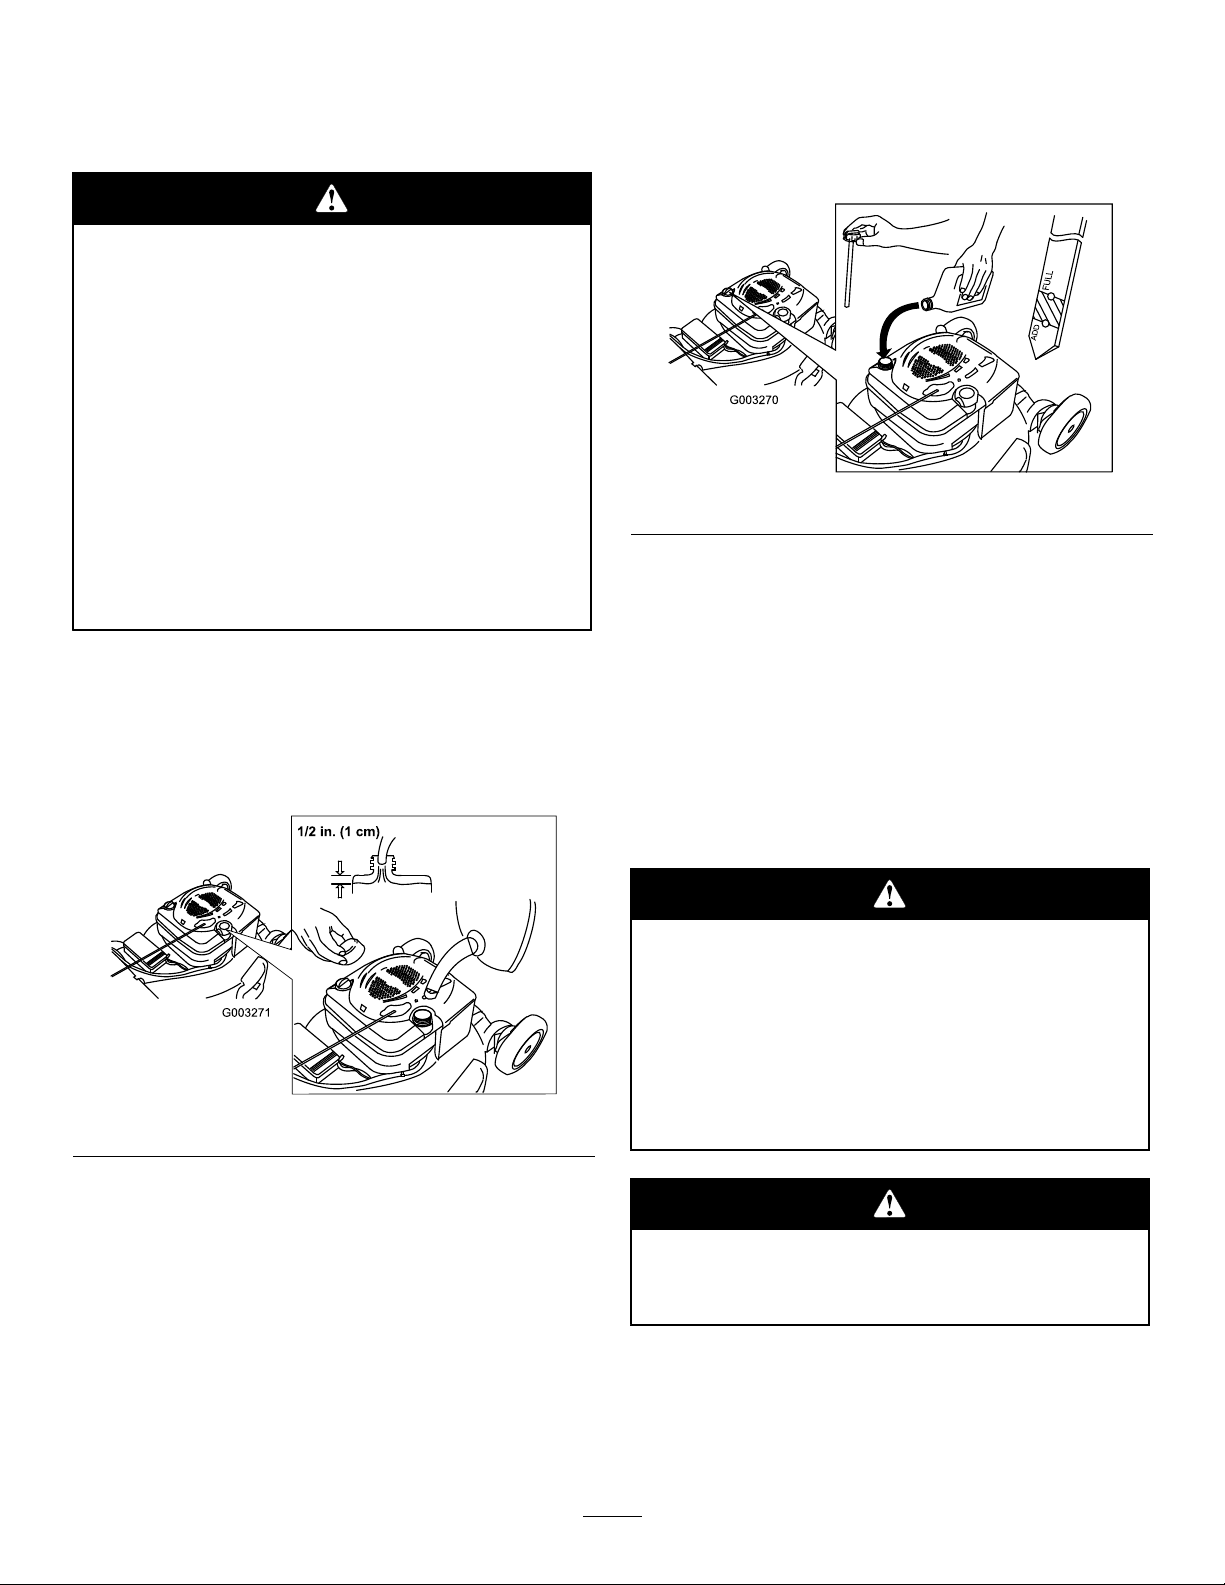
CheckingtheEngineOilLevel
ServiceInterval:Beforeeachuseordaily
1.Removethedipstick,wipeitclean,andfullyinstall
thedipstick(Figure11).
Figure11
2.Removethedipstickandchecktheoillevel
(Figure11).IftheoillevelisbelowtheAddmarkon
thedipstick,slowlypouroilintotheoillltubeto
raisetheoilleveltotheFullmarkonthedipstick.
Donotoverll.(Max.ll:20oz.(0.59l),type:SAE
30detergentoilwithanAPIserviceclassicationof
SF,SG,SH,SJ,SL,orhigher.)
3.Installthedipstick.
Figure10
AdjustingtheCuttingHeight
Adjustingthecuttingheightmaybringyouinto
contactwiththemovingblade,causingserious
injury.
•Stoptheengineandwaitforallmovingparts
tostop.
•Donotputyourngersunderthehousing
whenadjustingthecuttingheight.
Iftheenginehasbeenrunning,themuferwill
behotandcanseverelyburnyou.Keepaway
fromthehotmufer.
Adjustthecuttingheightasdesired.Setallfourwheels
tothesameheight.
7
Page 8
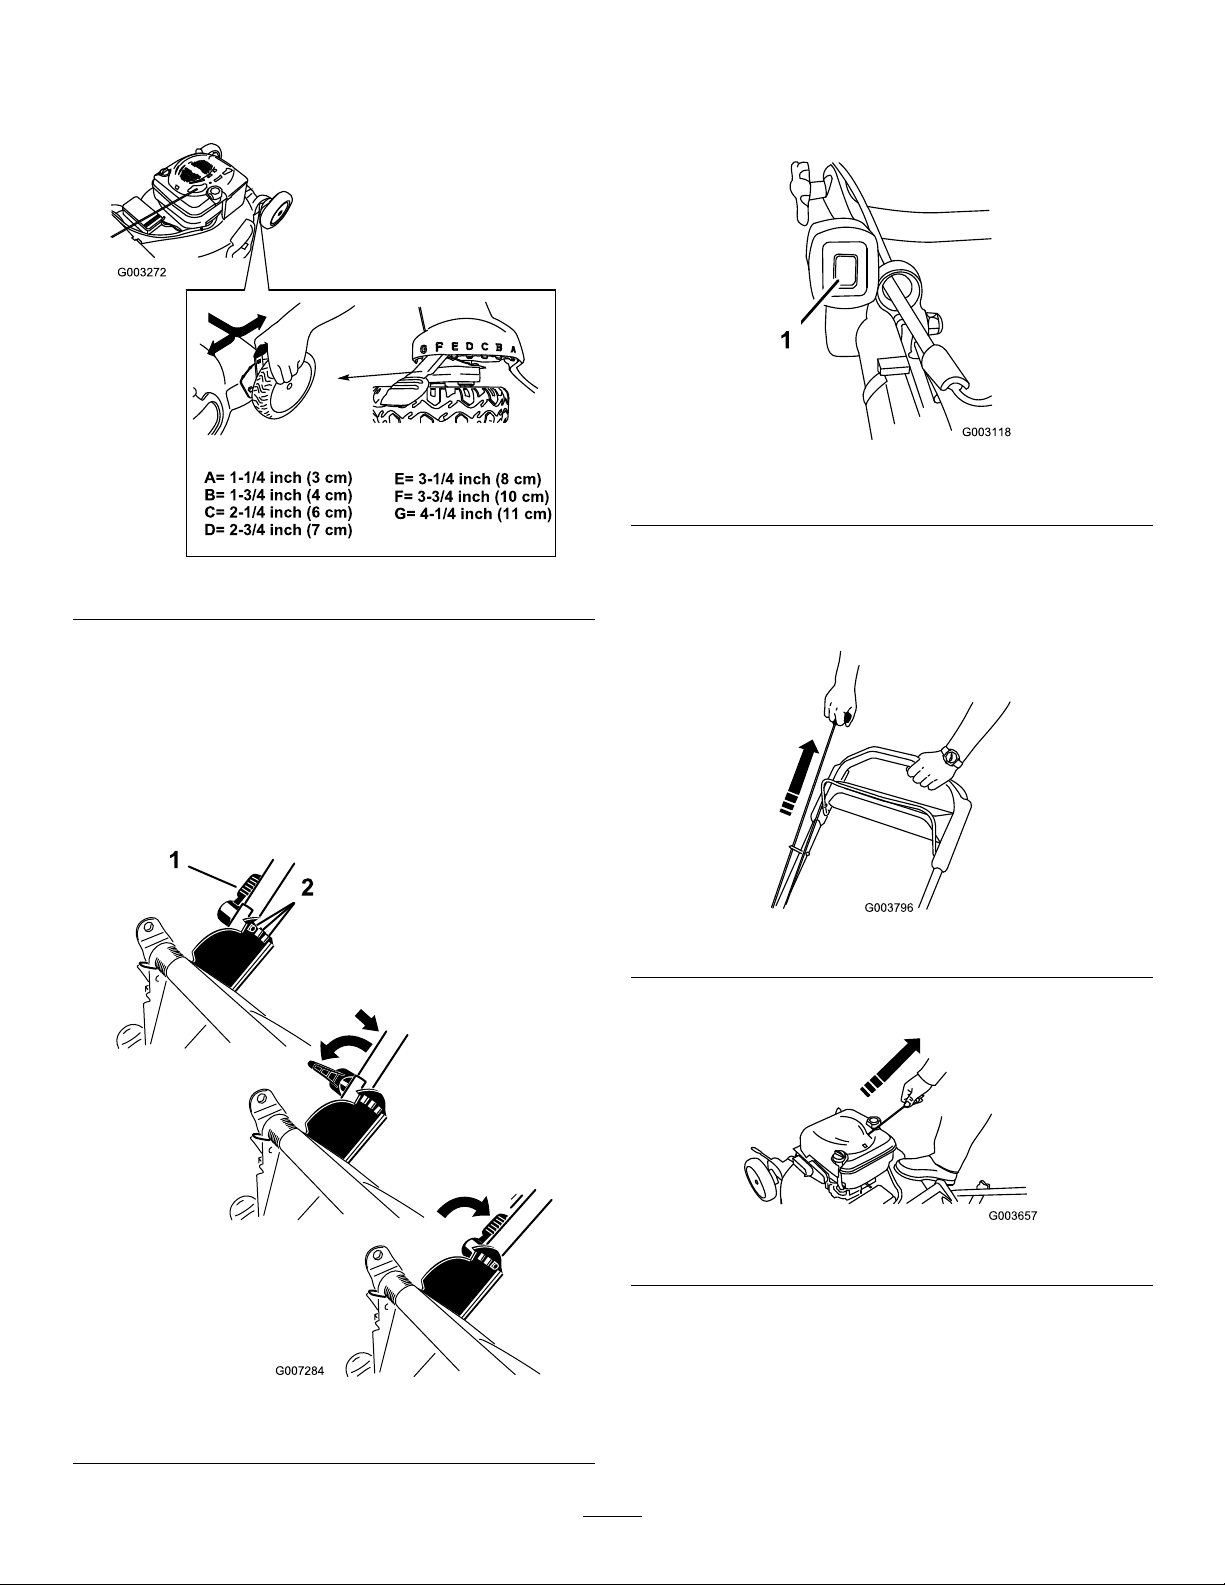
Note:Toraisethemower,moveall4cuttingheight
leversforward;tolowerthemower,movethemall
rearward(Figure12).
StartingtheEngine
1.PushtheignitiontoggleswitchtotheOn(“I”)
position(Figure14).
Figure14
1.Ignitiontoggleswitch
Figure12
AdjustingtheHandleHeight
Youmayraiseorlowerthehandletoaposition
comfortableforyou.
Rotatethehandlelock,movethehandletooneofthree
positions,andlockthehandleintoposition(Figure13).
2.Starttheengineinoneof2ways:
•Pulltherecoilstarterintheoperatingposition
(Figure15).
Figure15
•Pulltherecoilstarterattheengine(Figure16).
Figure13
1.Handlelock2.Handlepositions
Figure16
Note:Ifthemowerdoesnotstart,contactan
AuthorizedServiceDealer.
8
Page 9
UsingtheSelf-propelDrive
EngagingtheBlade
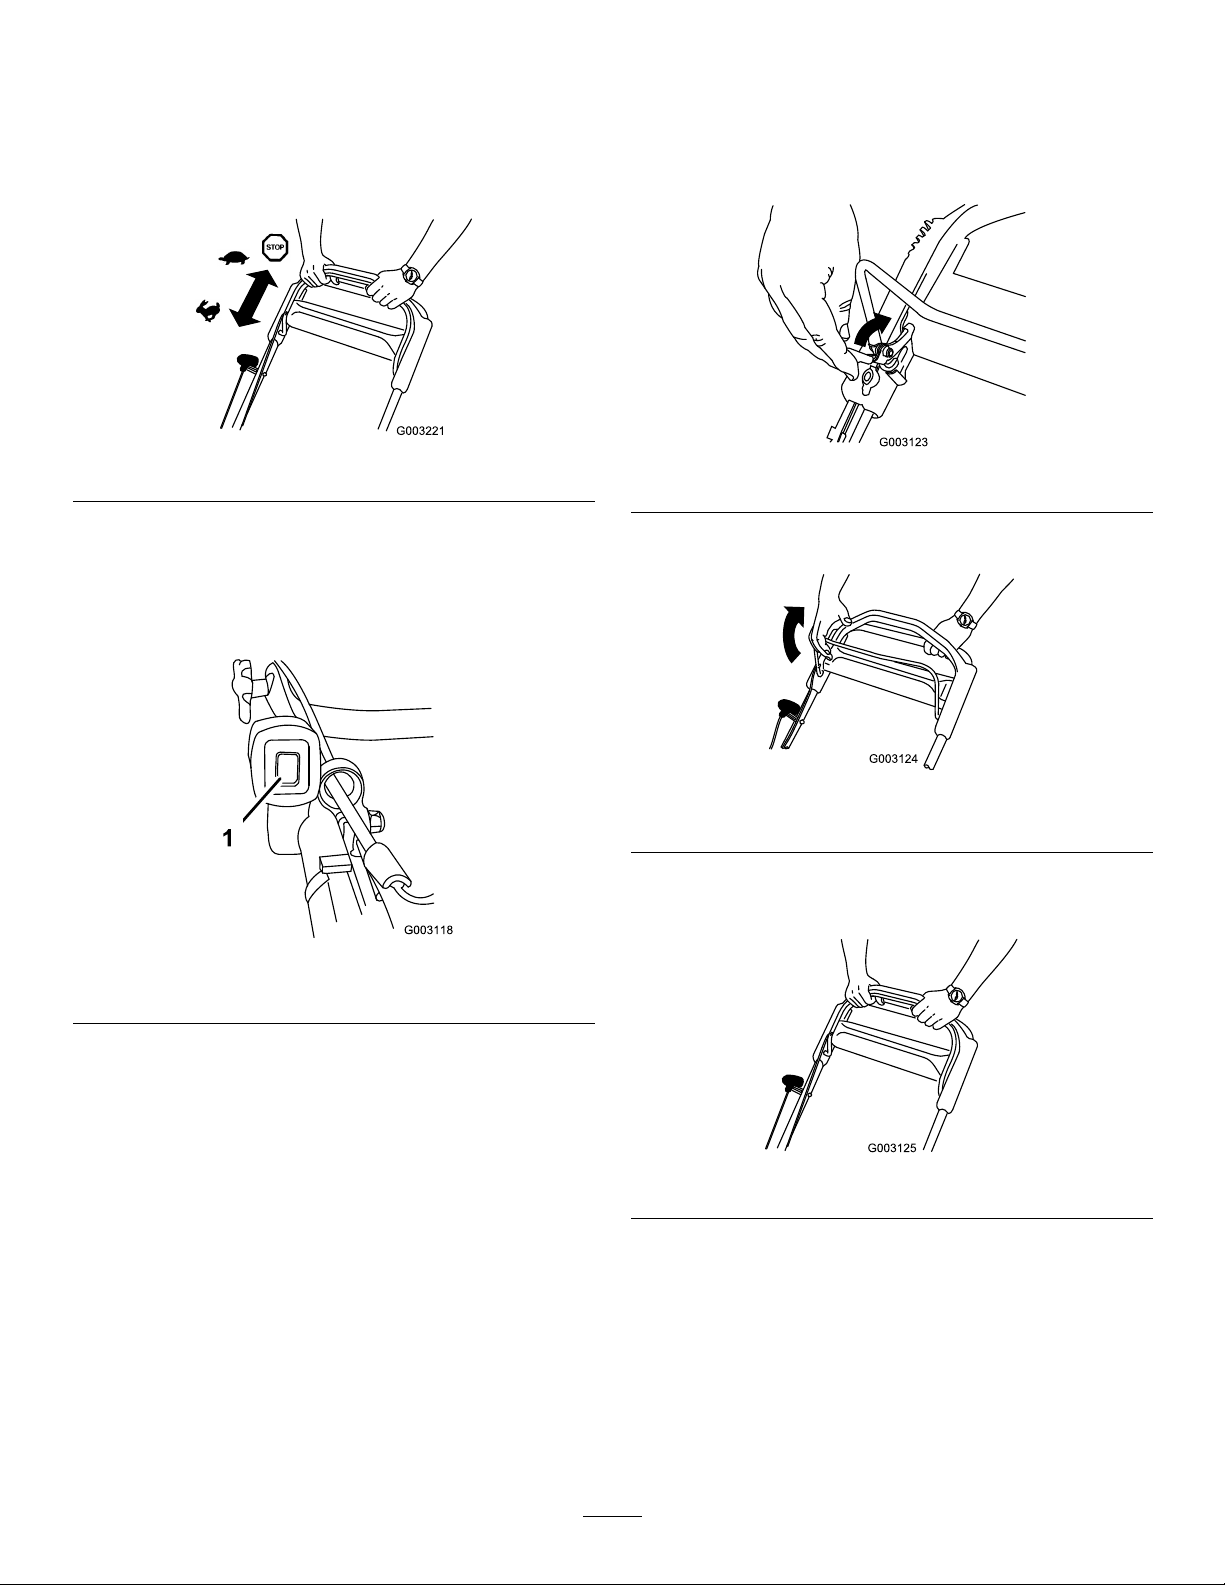
Tooperatetheself-propeldrive,simplywalkwithyour
handsontheupperhandleandyourelbowsatyour
sides,andthemowerwillautomaticallykeeppacewith
you(Figure17).
Figure17
StoppingtheEngine
1.PushtheignitiontoggleswitchtotheStopposition
(Figure18).
Whenyoustartyourengine,thebladedoesnotturn.
Youmustengagethebladetomow.
1.Pullthecontrolbarlockback(Figure19).
Figure19
2.Pullthebladecontrolbartothehandle(Figure20).
Figure18
1.Ignitiontoggleswitch
2.Whentheenginestops,removetheignitionkey
whenyouleavethemower.
Figure20
1.Bladecontrolbar
3.Holdthebladecontrolbaragainstthehandle
(Figure21).
Figure21
9
Page 10
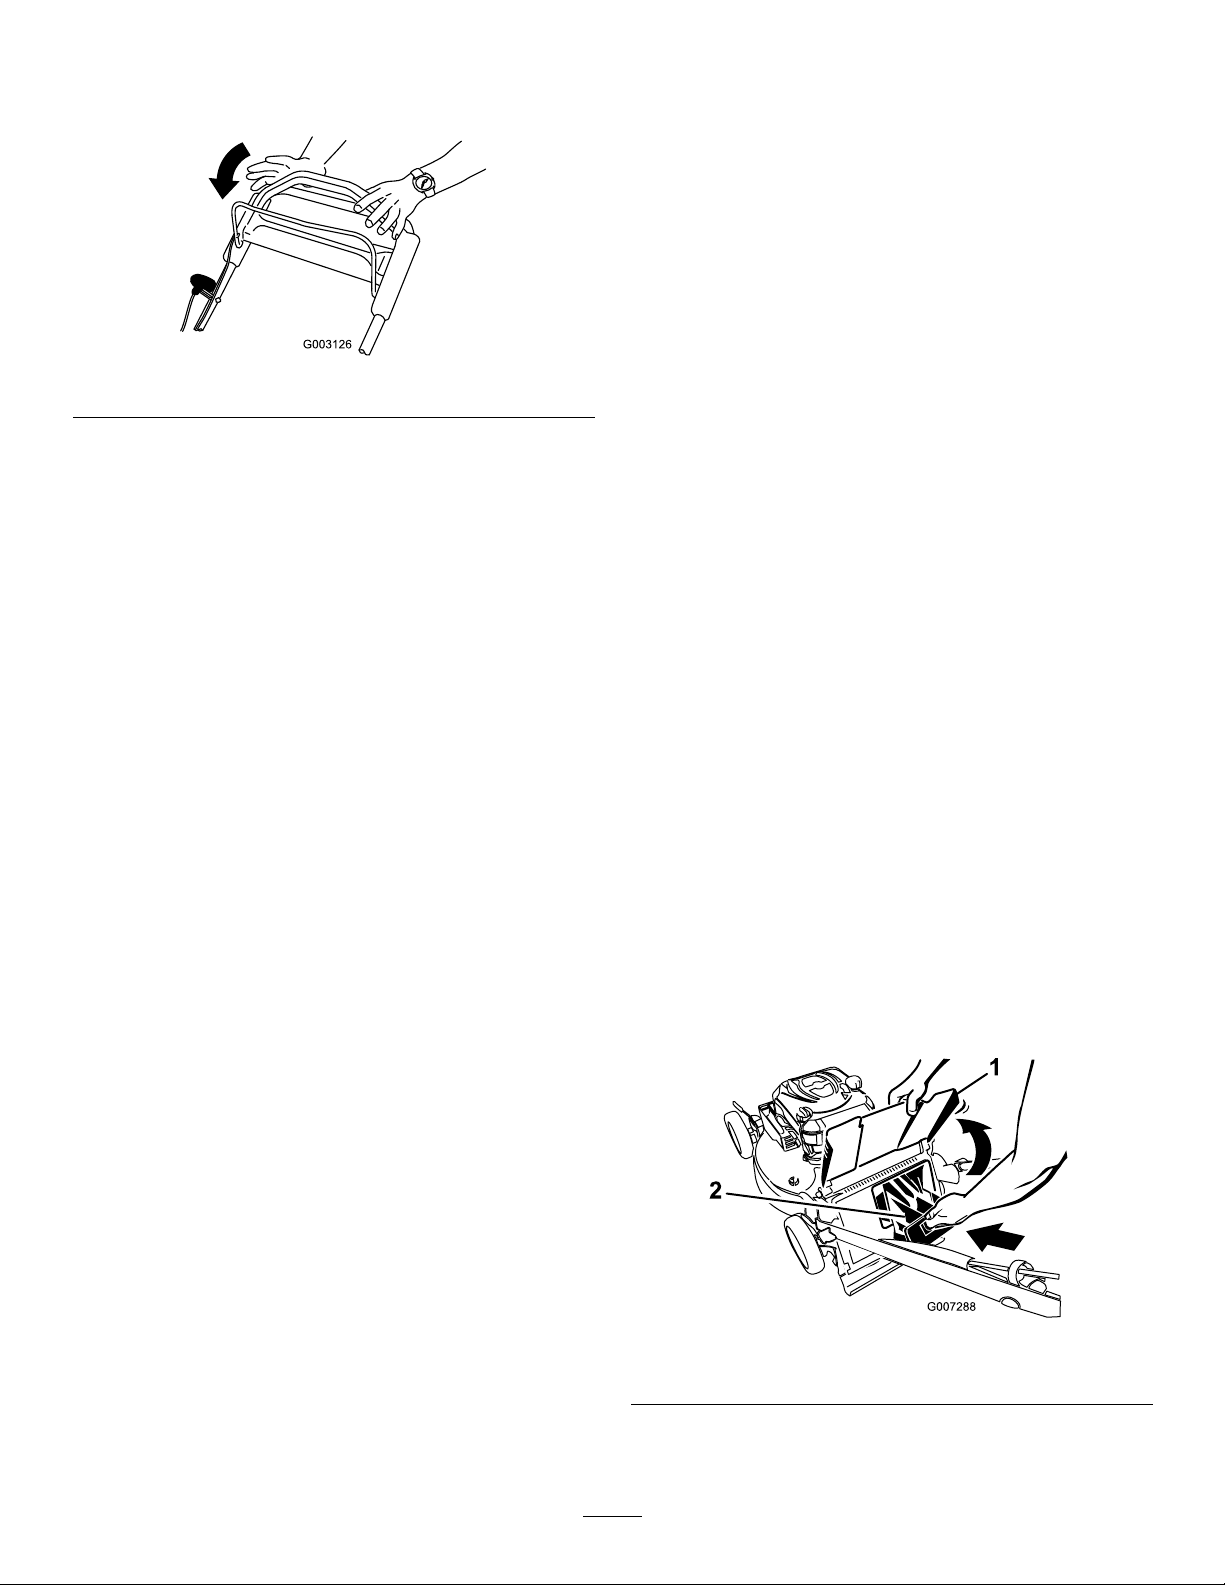
DisengagingtheBlade
Releasethebladecontrolbar(Figure22).
Figure22
3.Takeahalfsheetofnewspaperandcrumpleitinto
aballsmallenoughtogounderthemowerhousing
(about3inchesor7.6cmindiameter).
4.Placethenewspaperballabout5inches(13cm)in
frontofthemower.
5.Starttheengine.
6.Engagetheblade.
7.Releasethebladecontrolbar.
8.Immediatelypushthemoweroverthenewspaper
ball.
9.Stoptheengineandwaitforallmovingpartstostop.
Important:Whenyoureleasethebladecontrol
bar,thebladeshouldstopwithin3seconds.If
itdoesnotstopproperly,stopusingyourmower
immediatelyandcontactanAuthorizedService
Dealer.
CheckingtheBladeBrake
ClutchOperation
Checkthecontrolbarbeforeeachusetoensurethatthe
bladebrakeclutchsystemisoperatingproperly.
UsingtheGrassBag
ServiceInterval:Beforeeachuseordaily
Youcanusethegrassbagtoperformanadditionaltest
tocheckthebladebrakeclutch.
1.Installtheemptygrassbagonthemower.
2.Starttheengine.
3.Engagetheblade.
Note:Thebagshouldbegintoinate,indicating
thatthebladeisengagedandrotating.
10.Gotothefrontofthemowerandcheckthe
newspaperball.
Note:Ifthenewspaperballdidnotgounderthe
mower,repeatsteps4through10.
11.Ifthenewspaperisunravelledorshredded,the
bladedidnotstopproperly,whichcouldresultinan
unsafeoperatingcondition.ContactanAuthorized
ServiceDealer.
RecyclingtheClippings
Yourmowercomesfromthefactoryreadytorecyclethe
grassandleafclippingsbackintothelawn.
Ifthesidedischargechuteisonthemower,removeit
andlockthesidedischargedoor(refertoRemovingthe
SideDischargeChute)beforerecyclingtheclippings.
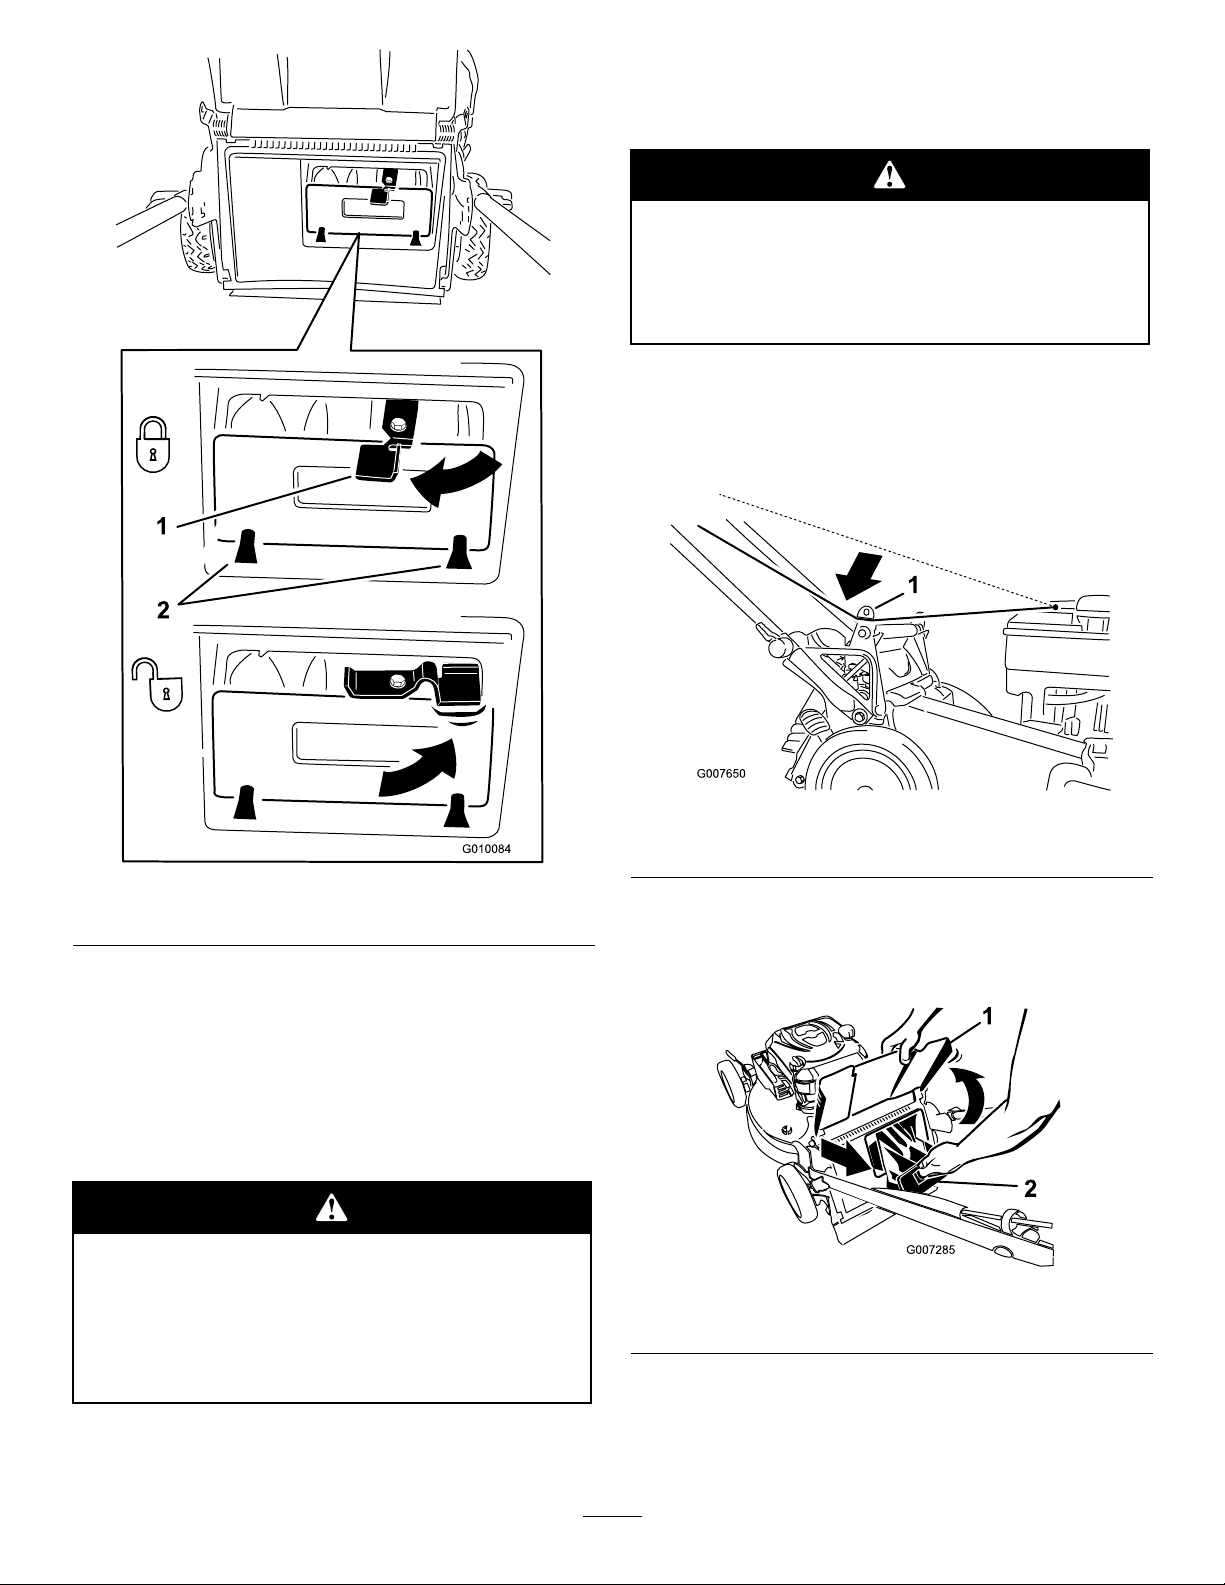
Important:Ensurethatthereardischargeplug
islockedinplace.Tolocktheplug:Raisethe
dischargedeector(Figure23),rmlypushthe
pluginuntilitsnapsintoplacebehindthetabs,and
rotatetheleverontheplugtotheleft(Figure24).
4.Releasethebladecontrolbar.
Note:Ifthebagdoesnotimmediatelydeate,the
bladeisstillrotating.Thebladebrakeclutchmaybe
deterioratingand,ifignored,couldresultinanunsafe
operatingcondition.Havethemowerinspectedand
servicedbyanAuthorizedServiceDealer.
5.Stoptheengineandwaitforallmovingpartstostop.
NotUsingtheGrassBag
1.Movethemowerontoapavedsurfaceina
non-windyarea.
2.Setall4wheelstothe3-1/4inch(8cm)cutsetting.
Figure23
1.Dischargedeector
10
2.Reardischargeplug
Page 11
Ifthesidedischargechuteisonthemower,removeit
andlockthesidedischargedoor(refertoRemovingthe
SideDischargeChute)beforebaggingtheclippings.
Thebladeissharp;contactingthebladecan
resultinseriouspersonalinjury.
Stoptheengineandwaitforallmovingpartsto
stopbeforeleavingtheoperatingposition.
InstallingtheGrassBag
1.Routethestarterropearoundthelowerropeguide
(Figure25).
Figure24
1.Lever2.Tabs
Note:T ounlocktheplug,rotatetheleverontheplug
totheright(Figure24).
BaggingtheClippings
Usethegrassbagwhenyouwanttocollectgrassand
leafclippingsfromthelawn.
Aworngrassbagcouldallowdebristobe
thrownandresultinseriouspersonalinjuryor
deathtotheoperatororbystanders.
Checkthegrassbagfrequently.Ifitis
damaged,installanewTororeplacementbag.
Figure25
1.Lowerropeguide
Note:Thelowerropeguidereleasesthestarterrope
whenyoupulltherecoilstarthandle.
2.Raiseandholdupthedischargedeector(Figure26).
Figure26
1.Dischargedeector
2.Reardischargeplug
3.Pulloutthereardischargeplug(Figure26).
4.Hangtheupperfrontedgeofthebagonthenotches
(Figure27).
11
Page 12
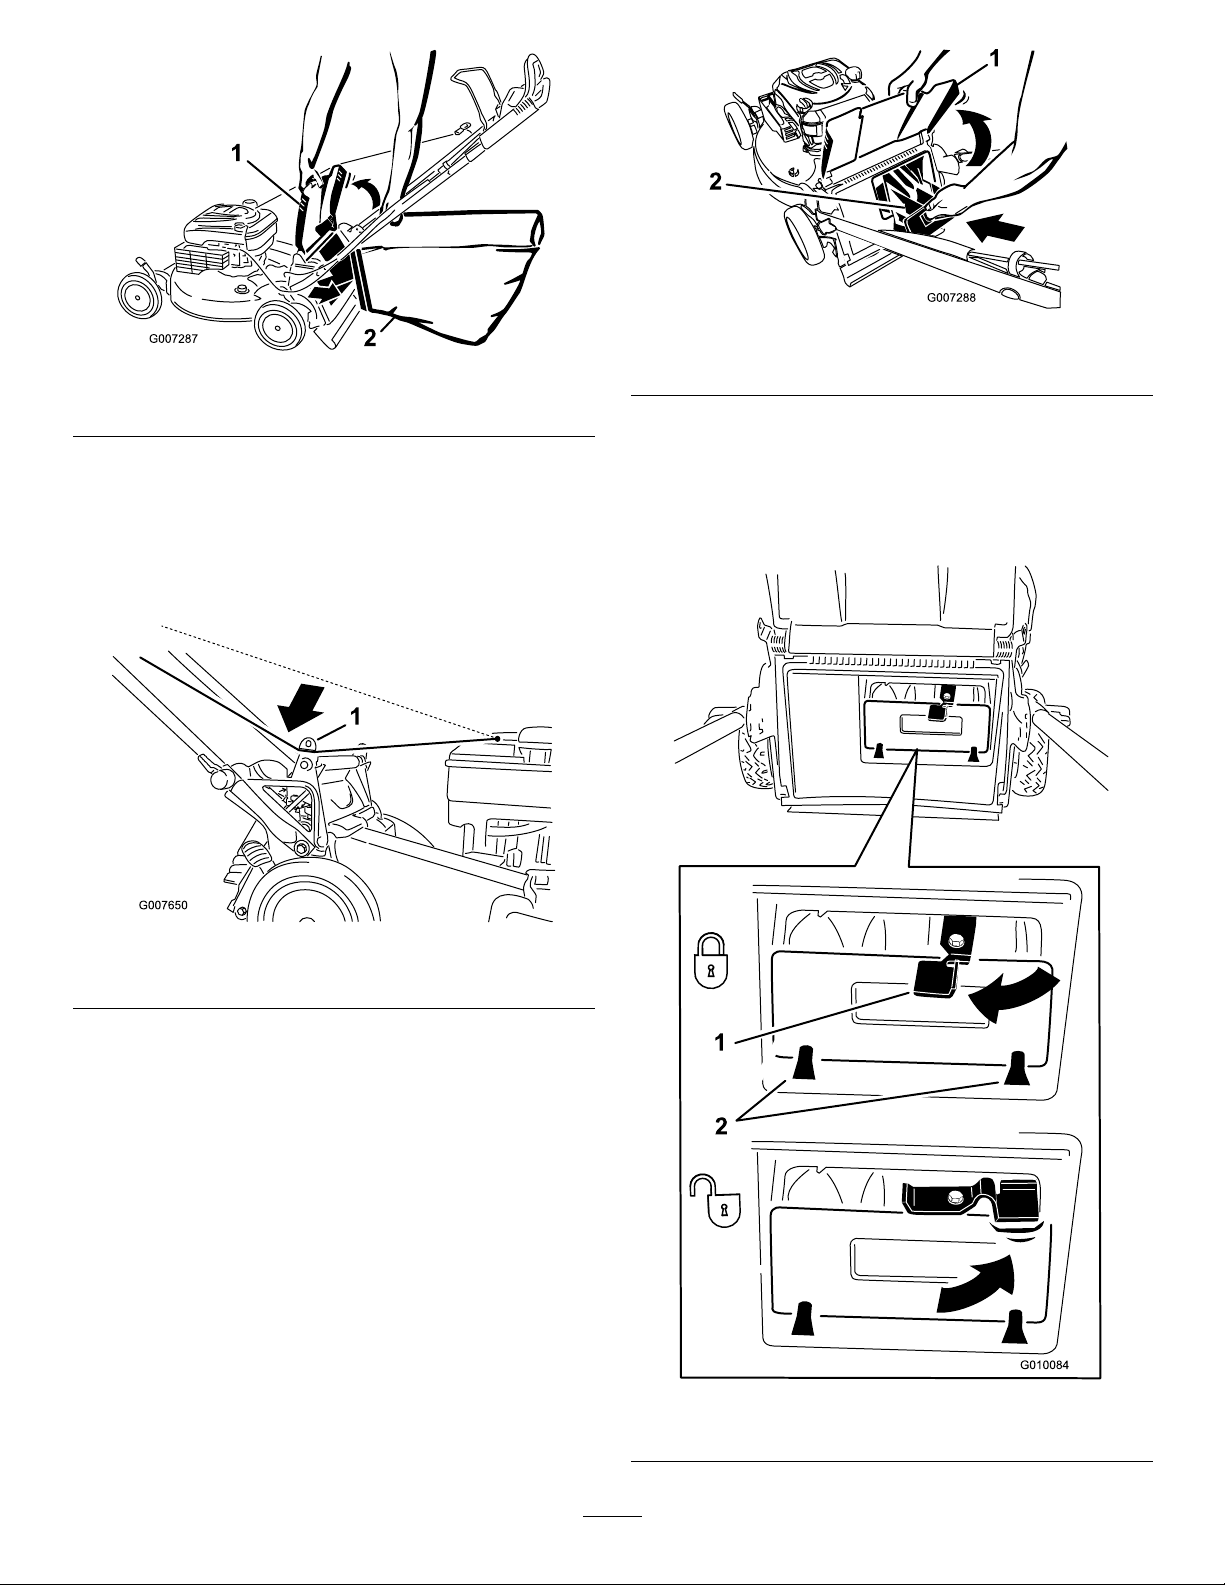
Figure27
1.Dischargedeector2.Grassbag
5.Lowerthedischargedeector.
RemovingtheGrassBag
1.Routethestarterropearoundthelowerropeguide
(Figure28).
Figure29
1.Dischargedeector
2.Reardischargeplug
Important:Ensurethatthereardischargeplug
islockedinplace.Tolocktheplug,rmlypush
thepluginuntilitsnapsintoplacebehindthe
tabs,androtatetheleverontheplugtotheleft
(Figure30).
Figure28
1.Lowerropeguide
Note:Thelowerropeguidereleasesthestarterrope
whenyoupulltherecoilstarthandle.
2.Raiseandholdupthedischargedeector.
3.Liftthegrassbagupbythehandleoffthenotches.
4.Installthereardischargeplug(Figure29).
Figure30
1.Lever2.Tabs
12
Page 13
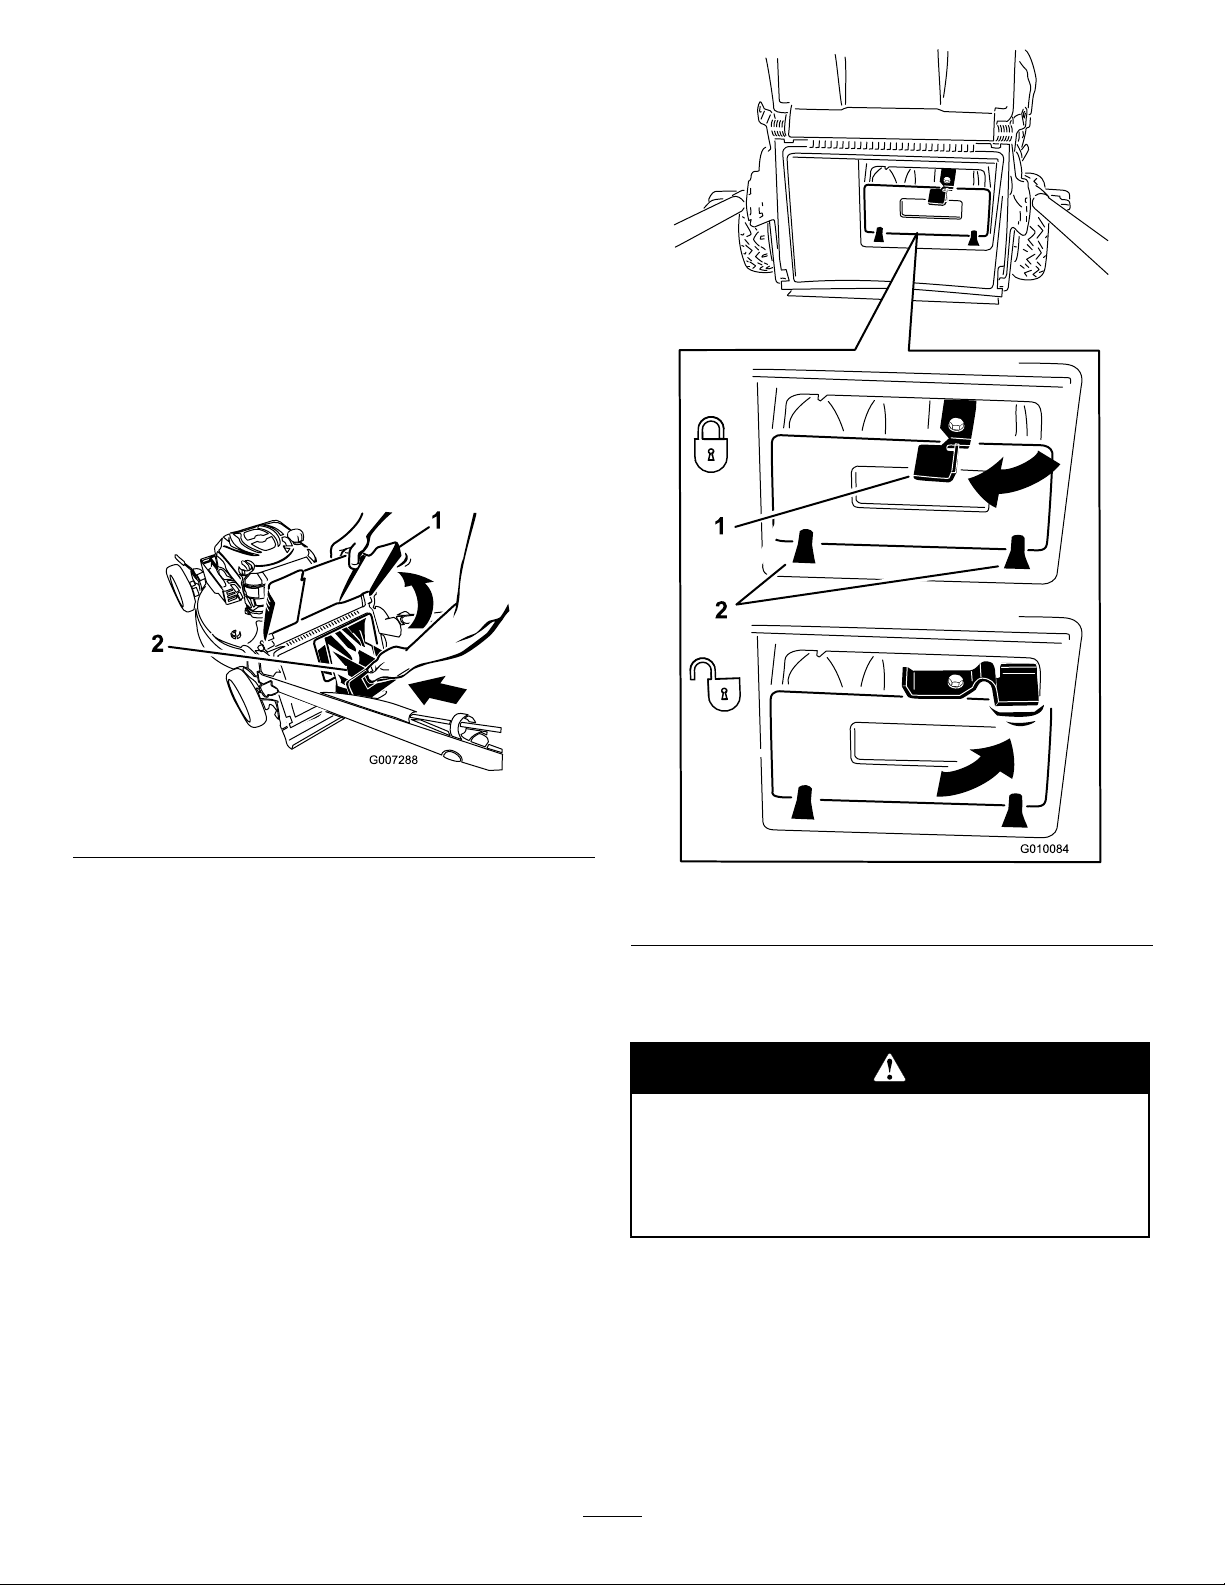
Note:Tounlocktheplug,rotatetheleveronthe
plugtotheright(Figure30).
5.Lowerthedischargedeector.
Side-dischargingtheClippings
Usethesidedischargeforcuttingverytallgrass.
Ifthebagisonthemower,removeitandinserttherear
dischargeplug(refertoRemovingtheGrassBag)before
side-dischargingtheclippings.
Important:Ensurethatthereardischargeplug
islockedinplace.Tolocktheplug:Raisethe
dischargedeector(Figure31),rmlypushthe
pluginuntilitsnapsintoplacebehindthetabs,and
rotatetheleverontheplugtotheleft(Figure32).
1.Dischargedeector
Figure31
2.Reardischargeplug
Figure32
1.Lever2.Tabs
Note:T ounlocktheplug,rotatetheleverontheplug
totheright(Figure24).
Thebladeissharp;contactingthebladecan
resultinseriouspersonalinjury.
Stoptheengineandwaitforallmovingpartsto
stopbeforeleavingtheoperatingposition.
13
Page 14
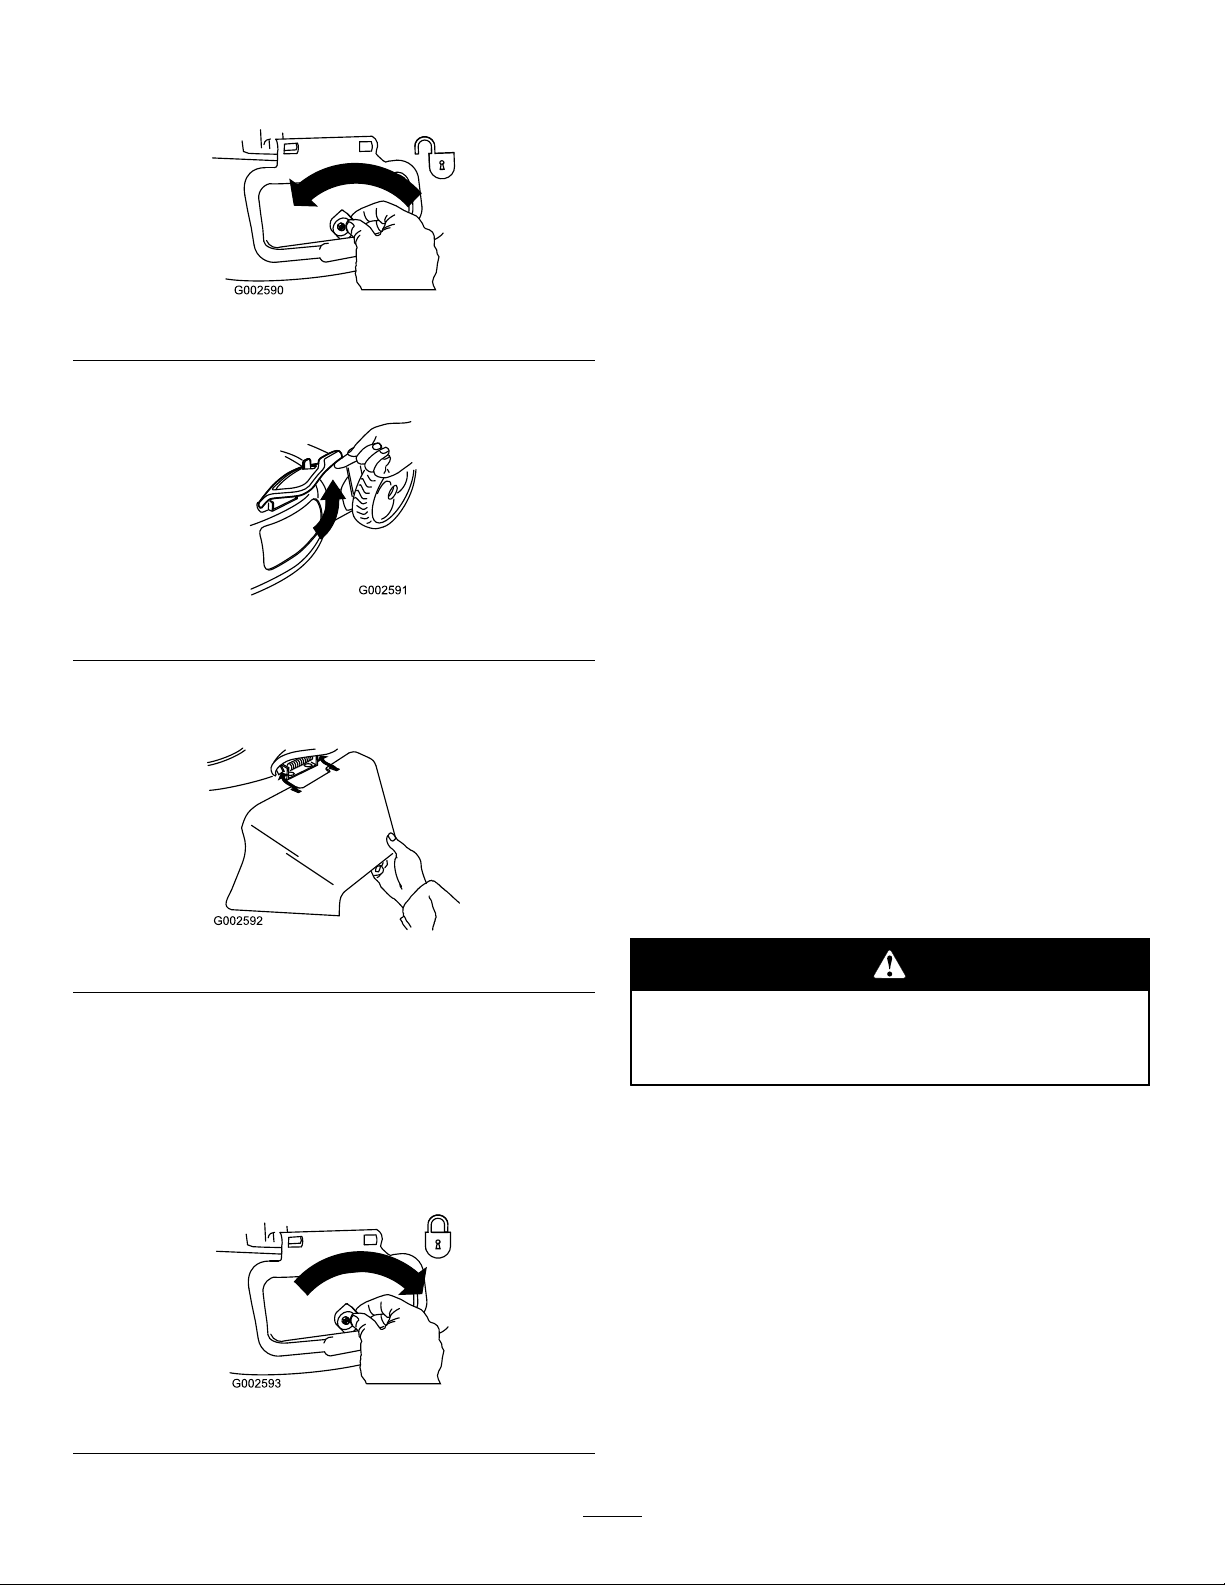
InstallingtheSideDischargeChute
1.Unlockthesidedischargedoor(Figure33).
Figure33
2.Liftopenthesidedischargedoor(Figure34).
Figure34
3.Installthesidedischargechuteandclosethedoor
ontothechute(Figure35).
OperatingTips
GeneralMowingTips
•Cleartheareaofsticks,stones,wire,branches,and
otherdebristhatthebladecouldhit.
•Avoidstrikingsolidobjectswiththeblade.Never
deliberatelymowoveranyobject.
•Ifthemowerstrikesanobjectorstartstovibrate,
immediatelystoptheengine,disconnectthewire
fromthesparkplug,andexaminethemowerfor
damage.
•Forbestperformance,installanewbladebeforethe
cuttingseasonbegins.
•ReplacethebladewhennecessarywithaToro
replacementblade.
CuttingGrass
•Cutonlyaboutathirdofthegrassbladeatatime.
Donotcutbelowthe2-inch(51mm)settingunless
thegrassissparseoritislatefallwhengrassgrowth
beginstoslowdown.RefertoAdjustingtheCutting
Height.
•Whencuttinggrassover6inches(15cm)tall,mow
atthehighestcuttingheightsettingandwalkslower;
thenmowagainatalowersettingforthebestlawn
appearance.Ifthegrassistoolong,themowermay
plugandcausetheenginetostall.
Figure35
RemovingtheSideDischargeChute
Toremovethesidedischargechute,reversethesteps
above.
Important:Lockthesidedischargedoorafteryou
closeit(Figure36).
Figure36
•Mowonlydrygrassorleaves.Wetgrassandleaves
tendtoclumpontheyardandcancausethemower
toplugortheenginetostall.
Wetgrassorleavescancauseseriousinjuryif
youslipandcontacttheblade.Mowonlyindry
conditions.
•Alternatethemowingdirection.Thishelpsdisperse
theclippingsoverthelawnforevenfertilization.
•Ifthenishedlawnappearanceisunsatisfactory,try
oneormoreofthefollowing:
–Replacethebladeorhaveitsharpened.
–Walkataslowerpacewhilemowing.
–Raisethecuttingheightonyourmower.
–Cutthegrassmorefrequently.
–Overlapcuttingswathsinsteadofcuttingafull
swathwitheachpass.
–Setthecuttingheightonthefrontwheelsone
notchlowerthantherearwheels.Forexample,
14
Page 15
setthefrontwheelsat2-1/4inches(60mm)and
therearwheelsat2-3/4inches(70mm).
•Iftherearemorethan5inches(13cm)ofleaves
onthelawn,setthefrontcuttingheightoneortwo
notcheshigherthantherearcuttingheight.
CuttingLeaves
•Aftercuttingthelawn,ensurethathalfofthelawn
•Slowdownyourmowingspeedifthemowerdoes
notcuttheleavesnelyenough.
showsthroughthecutleafcover.Youmayneedto
makemorethanonepassovertheleaves.
Maintenance
Note:Determinetheleftandrightsidesofthemachinefromthenormaloperatingposition.
RecommendedMaintenanceSchedule(s)
MaintenanceService
Interval
Aftertherst5hours
Beforeeachuseordaily
Every25hours
Every50hours
Every100hours
Beforestorage
Yearly
Important:Refertoyour
PreparingforMaintenance
MaintenanceProcedure
•Changetheengineoil.
•Checktheengineoillevel.
•Checkthebladebrakeclutchoperation.
•Cleangrassclippingsanddirtfromunderthemower.
•Lubricatetherearwheelgears.
•Cleanthebladebrakeclutchshield.
•Changetheengineoil.
•Cleanthecoolingsystem(refertoyourengineowner’smanual).
•Replacethesparkplug(refertoyourengineowner’smanual).
•Emptythefueltankbeforerepairsasdirectedandbeforeannualstorage.
•Replacetheairlter(morefrequentlyindustyoperatingconditions).
•Checkthesparkplug(refertoyourengineowner’smanual).
•Replacethebladeorhaveitsharpened(morefrequentlyiftheedgedullsquickly).
•RefertoyourEngineOperator’sManualforanyadditionalyearlymaintenance
procedures.
Engine Operator’ s Man ual
foradditionalmaintenanceprocedures.
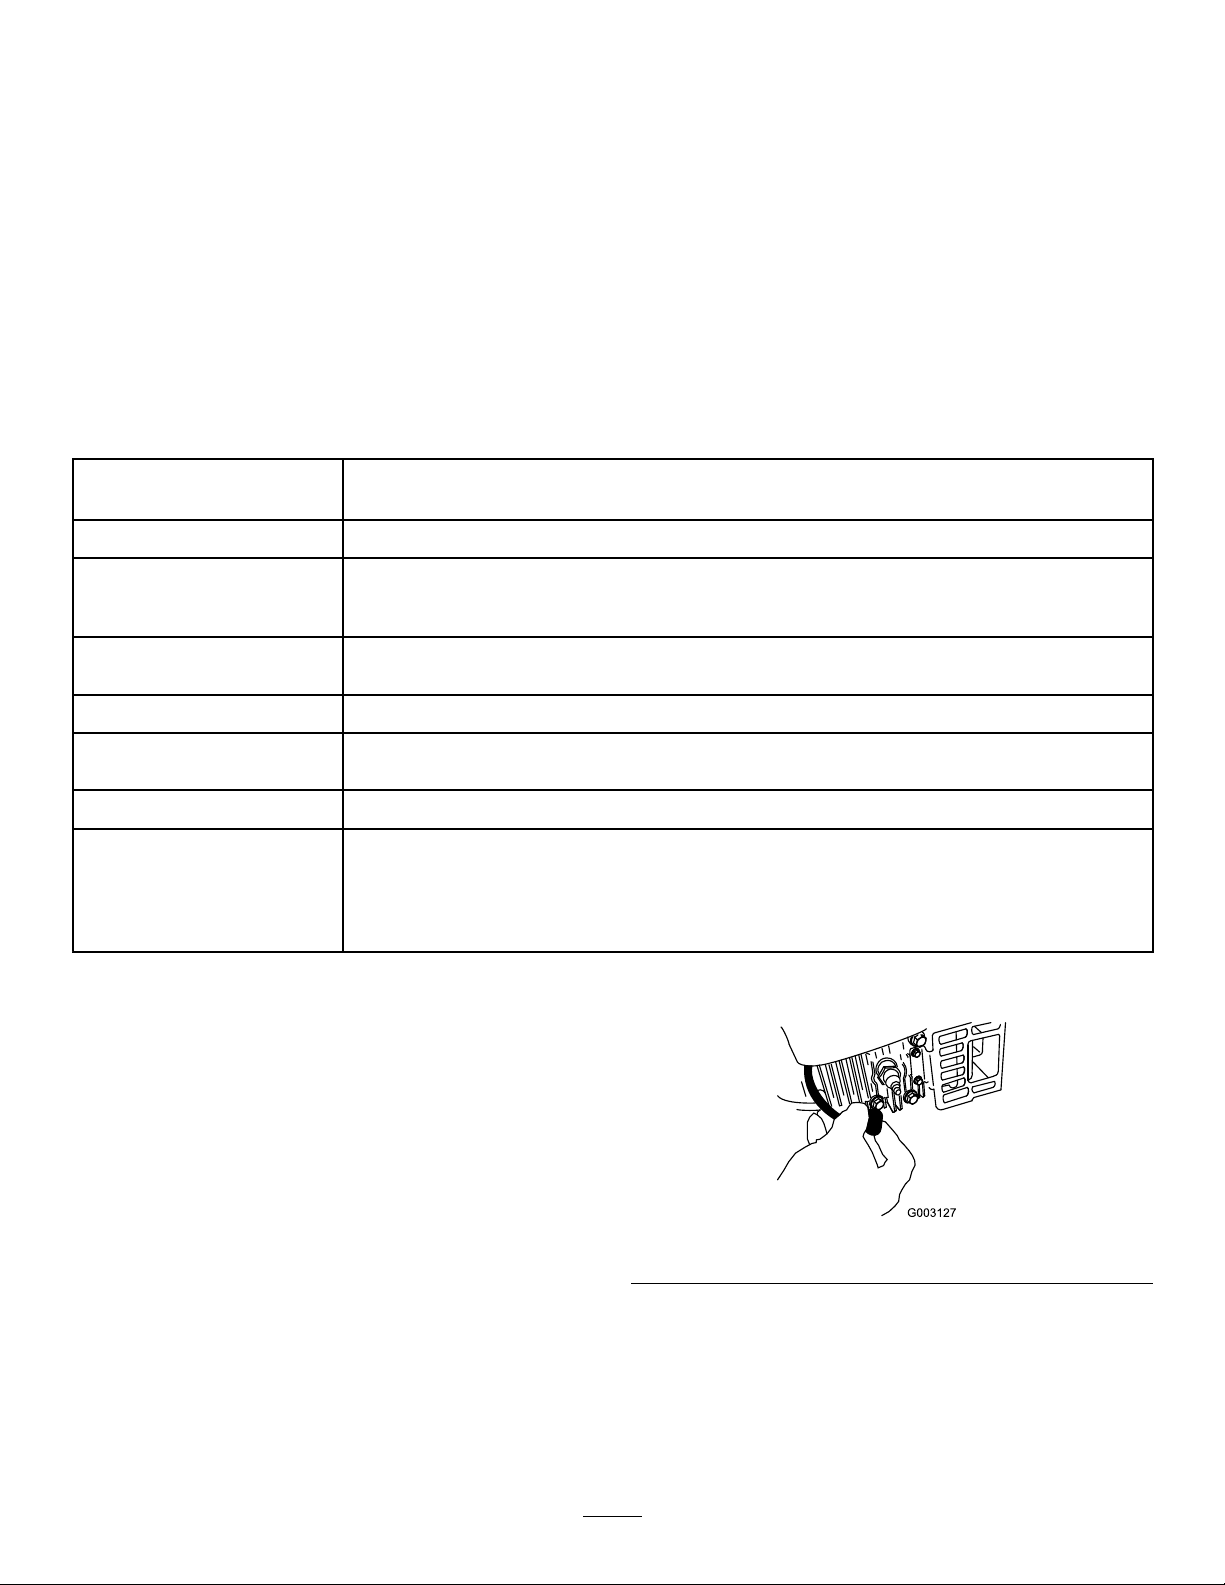
1.Stoptheengineandwaitforallmovingpartstostop.
2.Disconnectthesparkplugwirefromthesparkplug
(Figure37)beforeperforminganymaintenance
procedure.
Figure37
3.Afterperformingthemaintenanceprocedure(s),
connectthesparkplugwiretothesparkplug.
Important:Beforetippingthemowertochange
theoilorreplacetheblade,allowthefueltank
torundrythroughnormalusage.Ifyoumust
tipthemowerpriortorunningoutoffuel,usea
15
Page 16
handfuelpumptoremovethefuel.Alwaystip
themowerontoitssidewiththeairlterup.
Tippingthemowermaycausethefueltoleak.
Gasolineisammable,explosiveandcancause
personalinjury.
Runtheenginedryorremovethegasolinewith
ahandpump;neversiphon.
1.Performthepre-maintenanceprocedures;referto
PreparingforMaintenance.
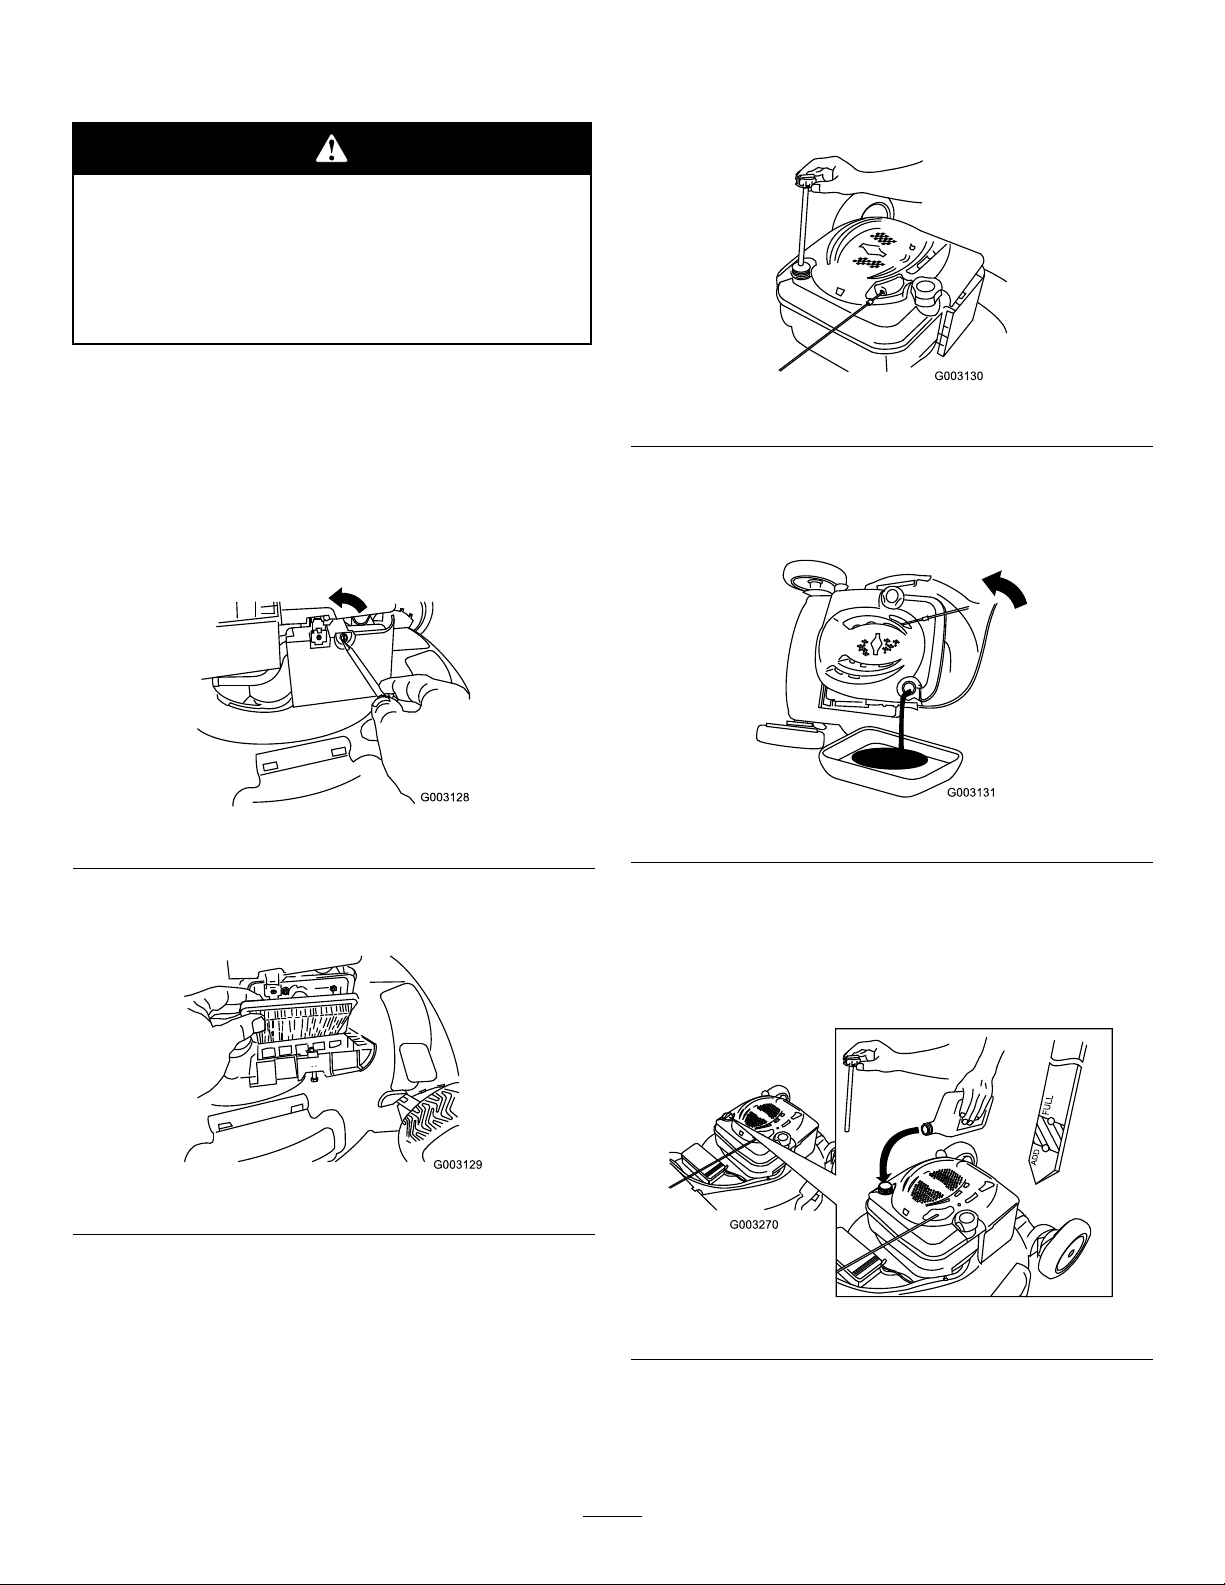
2.Removethedipstick(Figure40).
ReplacingtheAirFilter
ServiceInterval:Yearly
1.Performthepre-maintenanceprocedures;referto
PreparingforMaintenance.
2.Useascrewdrivertoopentheairltercover
(Figure38).
Figure38
3.Replacetheairlter.
4.Installthecover(Figure39).
Figure40
3.Tipthemowerontoitsside,withtheairlterup,
todraintheusedoiloutthroughtheoillltube
(Figure41).
Figure41
4.Slowlypouroilintotheoillltubeuntiltheoillevel
reachestheFulllineonthedipstick(Figure42).Do
notoverll.(Max.ll:20oz.(0.59l),type:SAE30
detergentoilwithanAPIserviceclassicationofSF,
SG,SH,SJ,SL,orhigher.)
Figure39
ChangingtheEngineOil
ServiceInterval:Aftertherst5hours
Every50hours
Runtheengineafewminutesbeforechangingtheoil
towarmit.Warmoilowsbetterandcarriesmore
contaminants.
Figure42
5.Installthedipsticksecurely.
6.Disposeoftheusedoilproperlyatalocalrecycling
center.
16
Page 17
LubricatingtheWheelGears
ServiceInterval:Every25hours
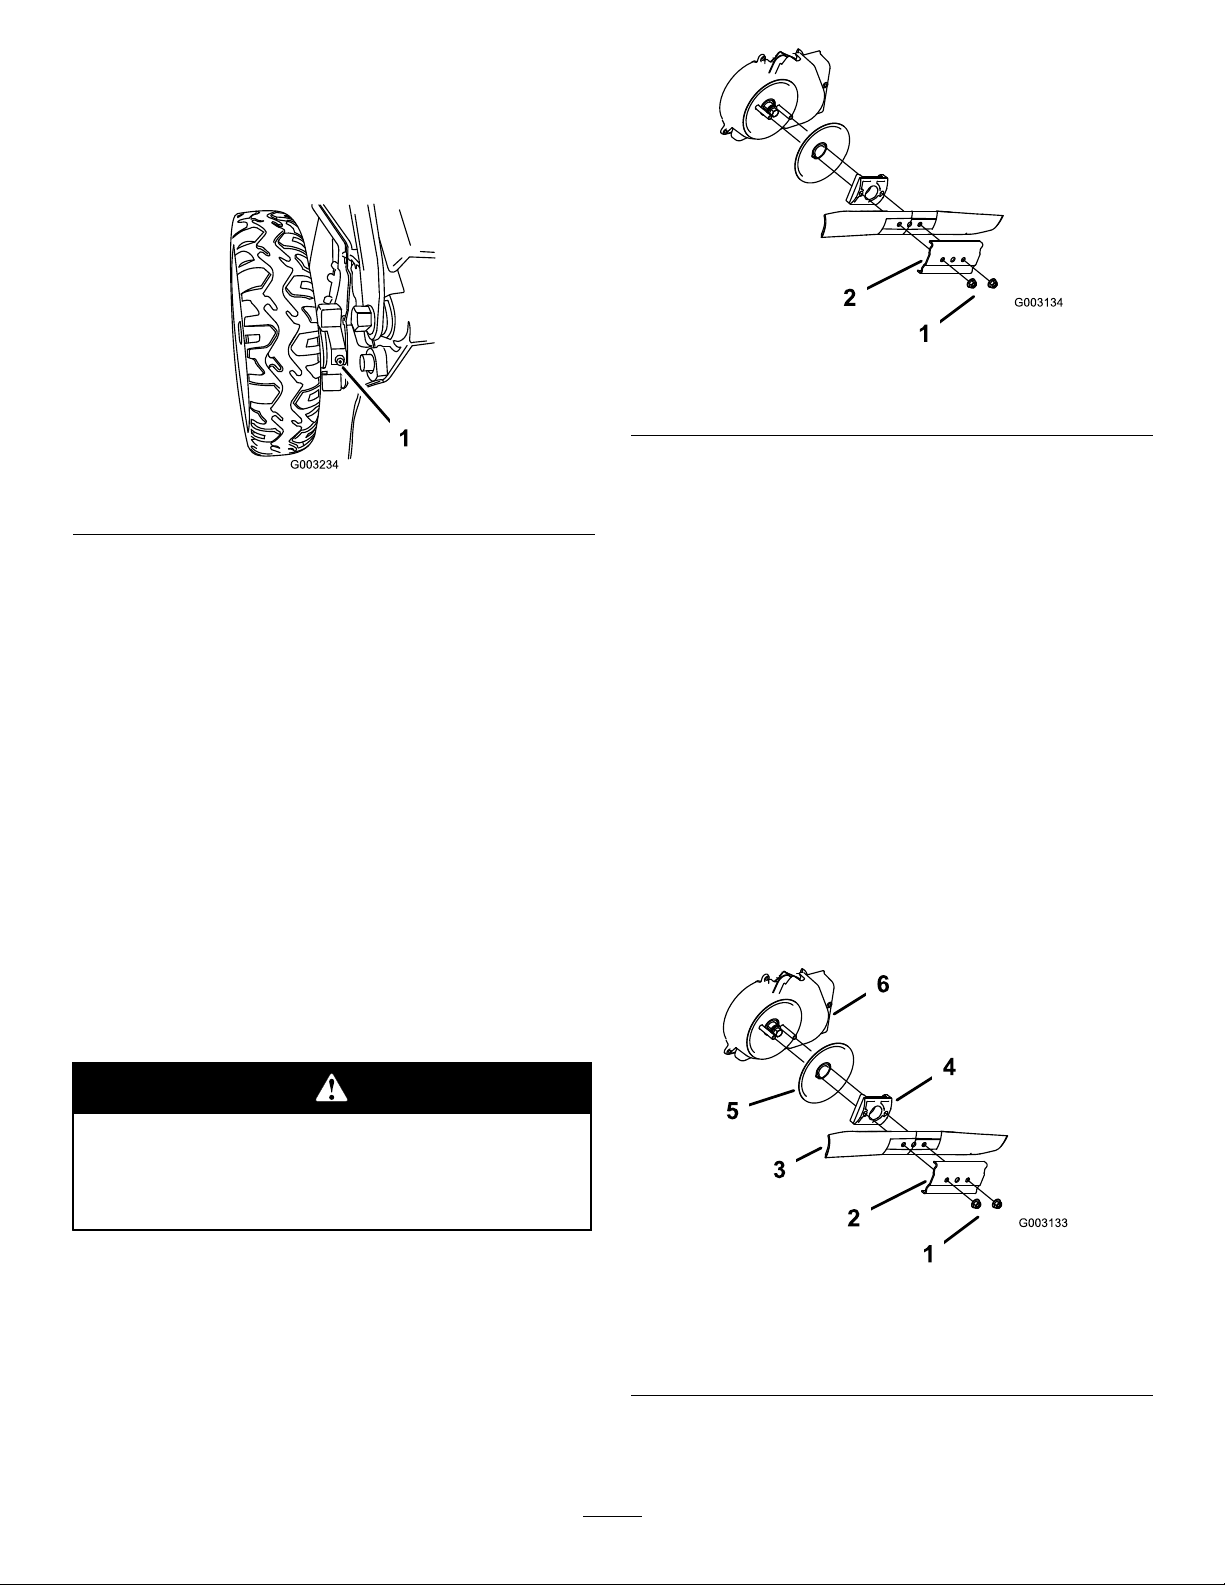
1.Wipethegreasettingsjustinsidetherearwheels
withacleanrag(Figure43).
Figure43
2.Installagreasegunontoeachttingandgentlyapply
2or3pumpsof#2multi-purposelithium-base
grease.
Figure44
1.Bladenuts
2.Stiffener
4.Removetheblade(Figure44).
5.Installthenewblade(Figure44).
6.Installthestiffeneryoupreviouslyremoved.
7.Installthebladenutsandtorquethemto15to
27ft-lb(20to37N⋅ ⋅⋅m).
ReplacingtheBlade
ServiceInterval:Yearly—Replacethebladeorhave
itsharpened(morefrequentlyifthe
edgedullsquickly).
Important:
the blade pr oper l y
wrenchorareuncomfortableperformingthis
procedure,contactanAuthorizedServiceDealer.
Examinethebladewheneveryourunoutofgasoline.If
thebladeisdamagedorcracked,replaceitimmediately.
Ifthebladeedgeisdullornicked,haveitsharpenedor
replaceit.
Thebladeissharp;contactingthebladecan
resultinseriouspersonalinjury.
Weargloveswhenservicingtheblade.
Y ou will need a torque wr ench to install
.Ifyoudonothaveatorque
CleaningtheBladeBrake
ClutchShield
ServiceInterval:Every25hours
Cleanthebladebrakeclutchshieldyearlytopreventthe
bladefromstallingwhileyoumow .
1.Disconnectthesparkplugwirefromthesparkplug.
RefertoPreparingforMaintenanceonpage18.
2.Tipthemowerontoitssidewiththeairlterup.
3.Removethe2bladenutsandthestiffener(Figure45).
1.Disconnectthesparkplugwirefromthesparkplug.
RefertoPreparingforMaintenance.
2.Tipthemowerontoitssidewiththeairlterup.
3.Removethe2bladenutsandthestiffener(Figure44).
Figure45
1.Bladenuts4.Bladedriver
2.Stiffener
3.Blade6.Bladebrakeclutchshield
5.Disk
4.Removetheblade(Figure45).
5.Removethebladedriveranddisk(Figure45).
17
Page 18
6.Removethebladebrakeclutchshield(Figure45).
7.Brushorblowoutdebrisfromtheinsideofthe
shieldandaroundalltheparts.
8.Installthebladebrakeclutchshieldthatyou
previouslyremoved.
9.Installthebladedriverthatyoupreviouslyremoved.
10.Installthebladeandthestiffenerthatyoupreviously
removed(Figure45).
11.Installthebladenutsandtorquethemto15to
27ft-lb(20to37N⋅ ⋅⋅m).
CleaningtheMower
ServiceInterval:Beforeeachuseordaily
Themowermaydislodgematerialfromunder
themowerhousing.
•Weareyeprotection.
•Stayintheoperatingposition(behindthe
handle)whentheengineisrunning.
•Donotallowbystandersinthearea.
Forbestresults,cleanthemowersoonafteryouhave
completedmowing.
1.Lowerthemowertoitslowestcuttingheightsetting.
RefertoAdjustingtheCuttingHeight.
2.Movethemowerontoaatpavedsurface.
3.Attachagardenhosethatisconnectedtoawater
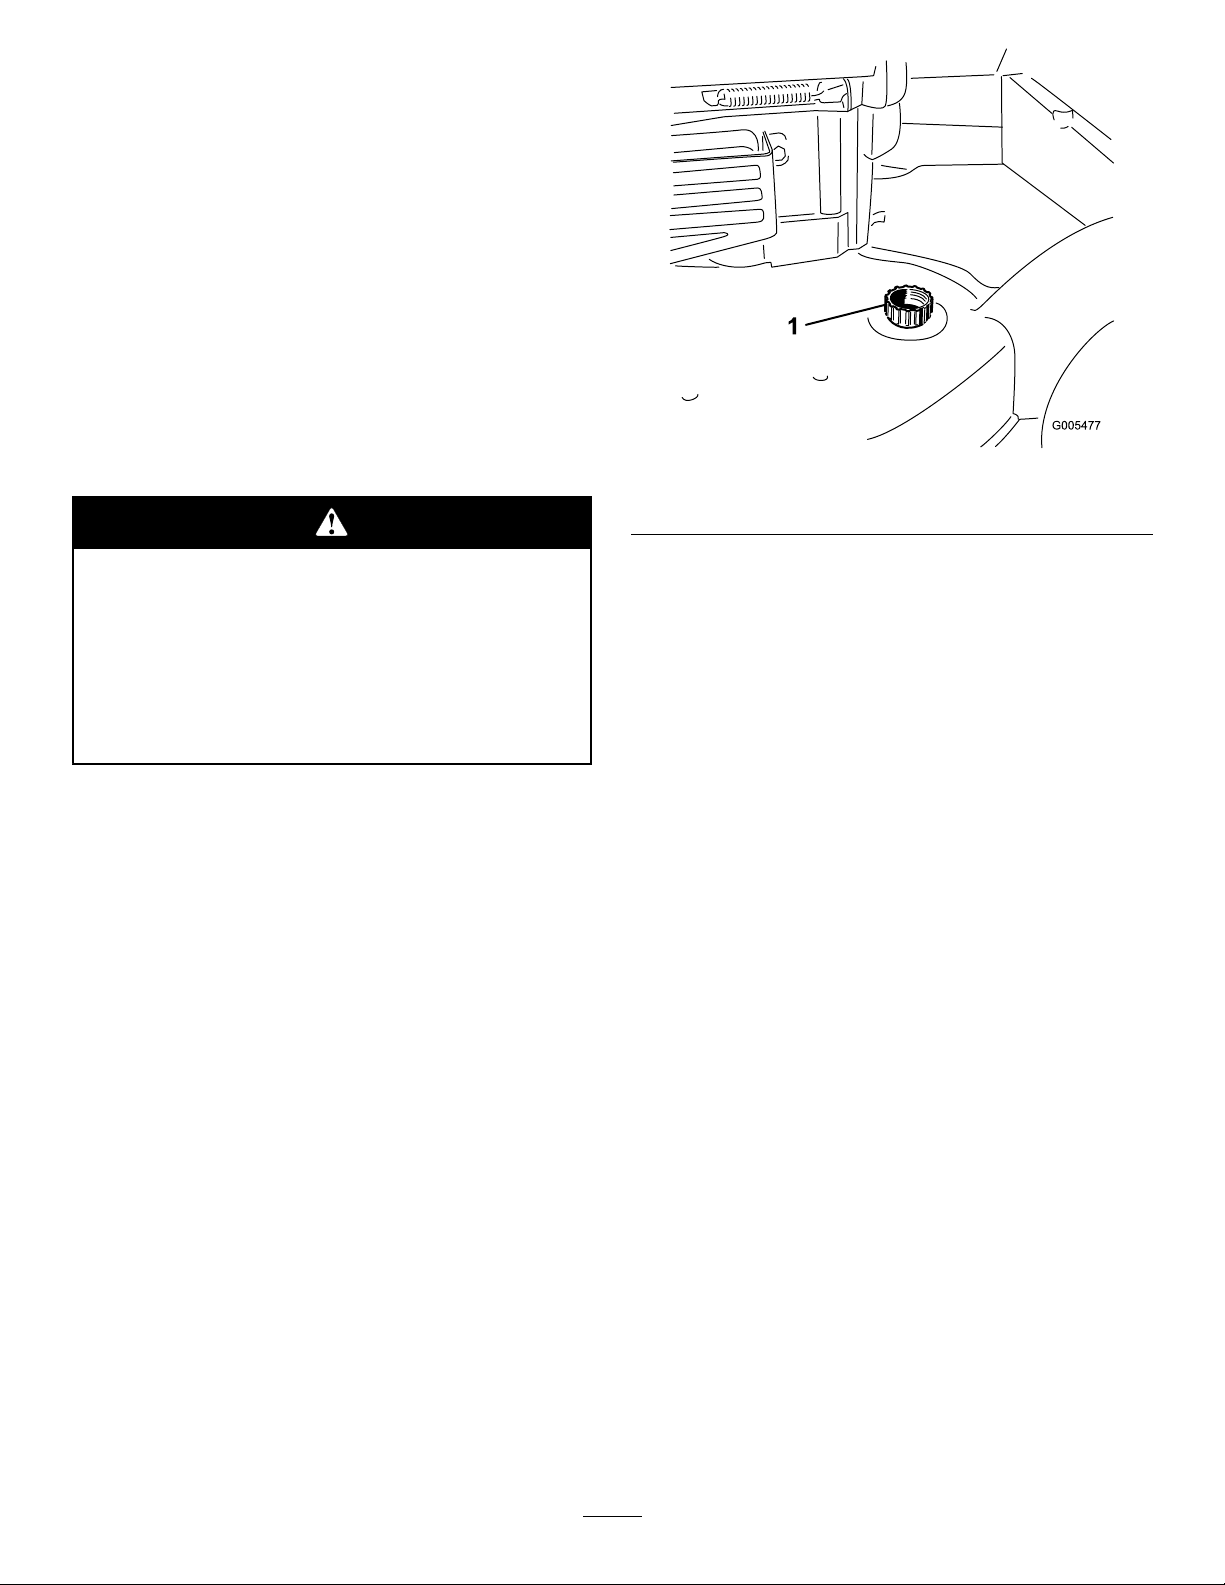
supplytothewashoutportonthemowerhousing
(Figure46).
Figure46
1.Washoutport
4.Turnthewateron.
5.Starttheengineandrunituntiltherearenomore
clippingsthatcomeoutfromunderthemower
housing.
6.Stoptheengine.
7.Shutoffthewateranddisconnectthegardenhose
fromthemower.
8.Starttheengineandrunitforafewminutestodry
thehousing.
18
Page 19
Storage
Storethemowerinacool,clean,dryplace.
PreparingtheMowerfor
Storage
Gasolinevaporscanexplode.
•Donotstoregasolinemorethan30days.
•Donotstorethemowerinanenclosurenear
anopename.
•Allowtheenginetocoolbeforestoringit.
1.Onthelastrefuelingoftheyear,addfuelstabilizer
tothefuelasdirectedbytheenginemanufacturer.
2.Runthemoweruntiltheenginestopsfromrunning
outoffuel.
3.Allowtheenginetorununtilitstops.Whenyoucan
nolongerstarttheengine,itissufcientlydry.
4.Removethewirefromthesparkplugandconnect
thewireontotheretainingpost.
5.Removethesparkplug,add1oz.(30ml)ofoil
throughthesparkplughole,andpullthestarterrope
slowlyseveraltimestodistributeoilthroughoutthe
cylindertopreventcylindercorrosionduringthe
off-season.
6.Looselyinstallthesparkplug.
7.Tightenallnuts,bolts,andscrews.
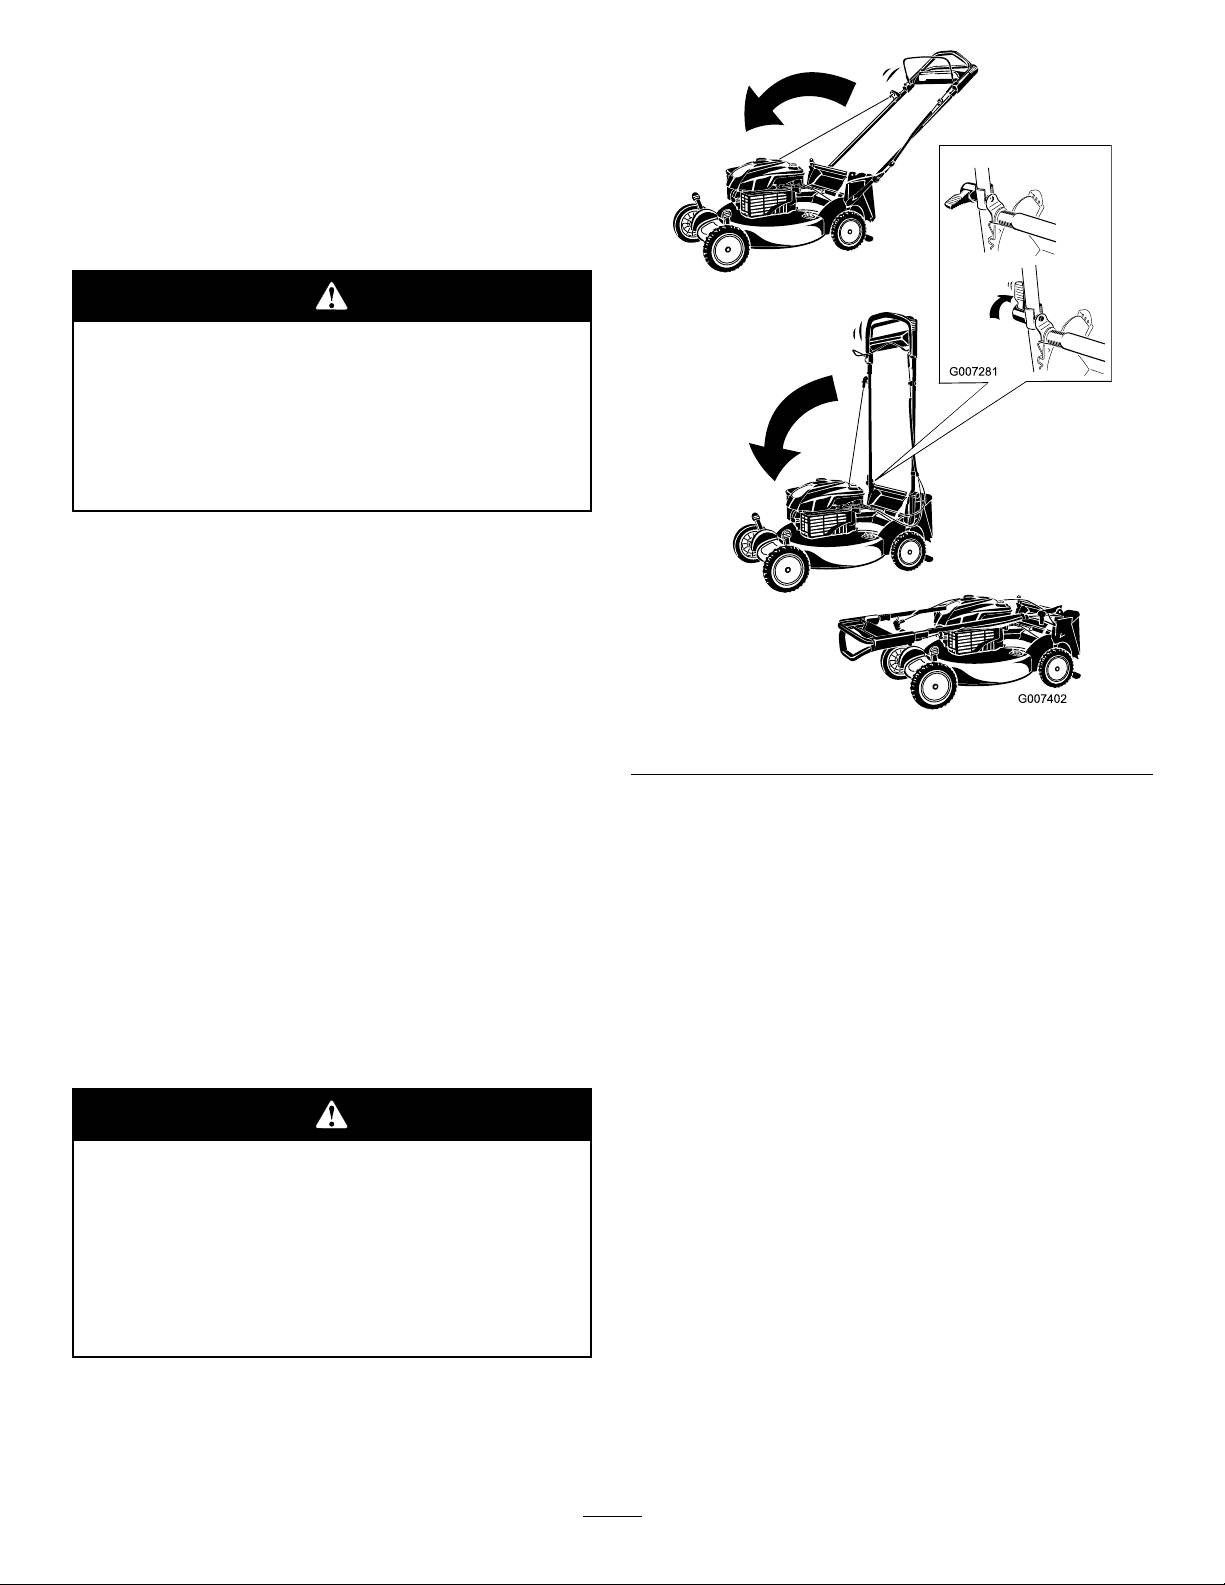
FoldingtheHandle
If,whilefoldingthehandleforstoringor
transportingthemower,youaccidentlybump
thekeyandengagethebladecontrolbar,the
enginecouldstartandrotatetheblade,causing
seriouspersonalinjury.
Figure47
2.Tounfoldthehandle,refertoAssemblingand
UnfoldingtheHandleintheSetupsection.
RemovingtheMowerfrom
Storage
1.Removethesparkplugandspintheenginerapidly
usingthestartertoblowtheexcessoilfromthe
cylinder.
2.Installthesparkplugandtightenitwithatorque
wrenchto15ft-lb(20N⋅m).
3.Connectthewiretothesparkplug.
Alwaysremovetheignitionkeybeforeyoufold
thehandle.
1.Rotatethehandleforward(Figure47).
Important:Routethecablestotheoutsideof
thehandleknobsasyoufoldtheupperhandle.
19
Page 20

Notes:
20
Page 21

Notes:
21
Page 22

Super Recycler
Walk Mowers
The Toro Starting Guarantee
A Five-Year Full Warranty on All
Toro GTS
®
-5 Engines
Conditions and Products Covered
The Toro Company and its affiliate, Toro Warranty Company,
pursuant to an agreement between them, jointly guarantee that
your Toro Engine will start on the first or second pull for five years
from the date of purchase—if you provide the routine maintenance
it requires—or we will fix it free of charge. This warranty covers the
cost of parts and labor, but you must pay transportation costs. This
covers Toro rotary mower engines.
Instructions for Obtaining Warranty Service
If you think that your Toro product contains a defect in materials or
workmanship, follow this procedure:
1. Contact any Toro Authorized or Master Service Dealer to
arrange service at their dealership. To locate a dealer
convenient to you, refer to the Yellow Pages of your telephone
directory (look under “Lawn Mowers”) or access our website at
www.Toro.com. You may also call our Toro Customer Care
Department toll free at 888-865-5688 (U.S. customers) or
888-865-5705 (Canada customers).
2. Bring the product and your proof of purchase (sales receipt) to
the Service Dealer.
If for any reason you are dissatisfied with the Service Dealer’s
analysis or with the assistance provided, call us toll free at the
numbers listed or write us at:
Customer Care Department, Consumer Division
Toro Warranty Company
8111 Lyndale Avenue South
Bloomington, MN 55420-1196
Owner Responsibilities
You must maintain your Toro Engine by following the maintenance
schedule detailed in the Operator’s Manual. You must record this
work in the maintenance chart provided in your Operator’s Manual
and keep your proof of purchase. Such routine maintenance,
whether performed by a dealer or by you, is at your expense.
Items and Conditions Not Covered
There is no other express warranty except for The Toro Total
Coverage Guarantee and special emission system coverage on
some products. This warranty does not cover the following:
• Any repairs on products used commercially
• Normal maintenance including replacement of spark plugs, air
filter, fuel filter, and carburetor adjustments
• Oil change and lubrication
• Repairs or adjustments due to the following:
– failure to follow proper maintenance procedures
– rotary mower blade striking an object
– contaminants in the fuel system
– improper fuel or fuel mixture (consult your operator’s
manual if in doubt)
– failure to drain the fuel system prior to any period of
non-use over three months
– operation misuse, neglect, or accidents
– repairs or attempted repairs by anyone other than an
Authorized Service Dealer
• Special operational conditions where starting may require
more than two pulls, including the following:
– first time starts after extended period of non-use or
seasonal storage
– cool temperature starts such as those found in early spring
and late autumn (applies to rotary products only)
– improper starting procedures
If you have difficulty starting your unit, please check the Operator’s
Manual to ensure that you are using the correct starting procedure.
This can save an unnecessary visit to a Service Dealer.
General Conditions
All repairs covered by this warranty must be performed by an
Authorized Toro Service Dealer using Toro approved replacement
parts. Repair by an Authorized Toro Service Dealer is your sole
remedy under this warranty.
Neither The Toro Company nor Toro Warranty Company is
liable for indirect, incidental or consequential damages in
connection with the use of the Toro products covered by this
warranty, including any cost or expense of providing substitute equipment or service during reasonable periods of
malfunction or non-use pending completion of repairs under
this warranty.
Some states do not allow exclusions of incidental or
consequential damages, or limitations on how long an
implied warranty lasts, so the above exclusions and
limitations may not apply to you. This warranty gives you
specific legal rights, and you may also have other rights
which vary from state to state.
Guaranteed to Start Maintenance Record
To keep the starting guarantee in effect, you must perform the following maintenance according to the recommended maintenance
schedule. Follow the procedures in this operator’s manual and record all maintenance activities on this chart.
Date
Hours
Used
Air Cleaner
Service
(mowers only)
Change Oil
(does not apply
to two-cycle)
Lubricate Wheels
(mowers only)
Check Spark
Plug
Storage
Preparation
Page 23

Date Storage
Hours
Used
Air Cleaner
Service
(mowers only)
Change Oil
(does not apply
to two-cycle)
Lubricate Wheels
(mowers only)
Check Spark
Plug
Preparation
Part No. 374-0018 Rev. E
Page 24

Super Recycler
Walk Mowers
The Toro Total Coverage Guarantee
A Full Warranty
(Limited Warranty for Commercial Use)
Conditions and Products Covered
The Toro Company and its affiliate, Toro Warranty Company,
pursuant to an agreement between them, jointly promise to repair
any Toro product used for normal residential purposes* if defective
in materials or workmanship or if it stops functioning due to the
failure of a component. The following time periods apply from the
date of purchase:
Products
• Super Recyclerr Walk Mowers
and Accessories
• Batteries 1 year full warranty
This warranty includes the cost of parts and labor, but you must
pay transportation costs.
This warranty applies to Super Recycler
Accessories.
Warranty Period
5 year full warranty
r
Walk Mowers and
Limited Warranty for Commercial Use
Toro Walk Power Mowers used for commercial, institutional, or
rental use are warranted against defects in materials or workmanship. Components failing due to normal wear are not covered by
this warranty. The following time periods apply from the date of
purchase: 45–day limited warranty for engine and entire unit.
Instructions for Obtaining Warranty Service
If you think that your Toro product contains a defect in materials or
workmanship, follow this procedure:
1. Contact any Toro Authorized or Master Service Dealer to
arrange service at their dealership. To locate a dealer
convenient to you, refer to the Yellow Pages of your telephone
directory (look under “Lawn Mowers”) or access our website at
www.Toro.com. You may also call our Toro Customer Care
Department toll free at 888-865-5688 (U.S. customers) or
888-865-5705 (Canada customers).
2. Bring the product and your proof of purchase (sales receipt) to
the Service Dealer.
If for any reason you are dissatisfied with the Service Dealer’s
analysis or with the assistance provided, call us toll free at the
numbers listed or write us at:
Customer Care Department, Consumer Division
Toro Warranty Company
8111 Lyndale Avenue South
Bloomington, MN 55420-1196
You must maintain your Toro product by following the maintenance
procedures described in the Operator’s Manual. Such routine
maintenance, whether performed by a dealer or by you, is at your
expense.
There is no other express warranty except for special emission
system coverage on some products and the Toro Starting
Guarantee on GTS Engine. This express warranty does not cover:
• Cost of regular maintenance service or parts, such as filters,
fuel, lubricants, oil changes, spark plugs, blade sharpening,
worn blade, cable/linkage adjustments, or brake and clutch
adjustments
• Any product or part which has been altered or misused or
required replacement or repair due to accidents or lack of
proper maintenance
• Repairs necessary due to improper fuel, contaminants in the
fuel system, or failure to properly prepare the fuel system prior
to any period of non-use over three months
• Repairs necessary due to improper battery care or failure to
properly prepare the mower prior to any period of non-use
• Pickup and delivery charges
If you have difficulty starting your unit, please check the Operator’s
Manual to ensure that you are using the correct starting procedure.
This can save an unnecessary visit to a Service Dealer.
All repairs covered by this warranty must be performed by an
Authorized Toro Service Dealer using Toro approved replacement
parts. Repair by an Authorized Toro Service Dealer is your sole
remedy under this warranty.
Neither The Toro Company nor Toro Warranty Company is
liable for indirect, incidental or consequential damages in
connection with the use of the Toro products covered by this
warranty, including any cost or expense of providing substitute equipment or service during reasonable periods of
malfunction or non-use pending completion of repairs under
this warranty.
Some states do not allow exclusions of incidental or
consequential damages, or limitations on how long an
implied warranty lasts, so the above exclusions and
limitations may not apply to you. This warranty gives you
specific legal rights, and you may also have other rights
which vary from state to state.
Owner Responsibilities
Items and Conditions Not Covered
General Conditions
Countries Other than the United States or Canada
Customers who have purchased Toro products exported from the United States or Canada should contact their Toro Distributor (Dealer)
to obtain guarantee policies for your country, province, or state. If for any reason you are dissatisfied with your Distributor’s service or
have difficulty obtaining guarantee information, contact the Toro importer. If all other remedies fail, you may contact us at Toro Warranty
Company.
*Normal residential purposes means use of the product on the same lot as your home. Use at more than one location is considered
commercial use, and the commercial use warranty would apply.
Part No. 374-0080 Rev. –
 Loading...