

Page 1
FormNo.3379-768RevA
Exit-SideLockoutKit
2024or4045DirectionalDrill
ModelNo.130-4452
Operator'sManual
FCCStatements
Introduction
15.19–TwoPartWarning
Theexit-sidelockouttransmitterandreceiveris
designedtoremotelystopandlockouttheusercontrols
ofadirectionaldrill.
Readthisinformationcarefullytolearnhowtooperateand
maintainyourmachineproperlyandtoavoidinjuryand
equipmentdamage.Youareresponsibleforoperatingthe
machineproperlyandsafely.
YoumaycontactT orodirectlyatwww .Toro.comforproduct
andaccessoryinformation,helpndingadealer,ortoregister
yourproduct.
Thismanualidentiespotentialhazardsandhassafety
messagesidentiedbythesafetyalertsymbol(
Figure1),
whichsignalsahazardthatmaycauseseriousinjuryordeath
ifyoudonotfollowtherecommendedprecautions.
Figure1
1.Safetyalertsymbol
ThisdevicecomplieswithPart15oftheFCCrules.Operation
issubjecttothefollowingtwoconditions:
(1)Thisdevicemaynotcauseharmfulinterferenceand
(2)Thisdevicemustacceptanyinterferencereceived,including
interferencethatmaycauseundesiredoperation.
15.21–UnauthorizedModication
NOTICE:Themanufacturerisnotresponsibleforany
unauthorizedmodicationstothisequipmentmadebytheuser .
Suchmodicationscouldvoidtheuser’sauthoritytooperate
theequipment.
15.105(b)–Note:
Thisequipmenthasbeentestedandfoundtocomplywith
thelimitsforaClassBdigitaldevice,pursuanttoPart15
oftheFCCRules.Theselimitsaredesignedtoprovide
reasonableprotectionagainstharmfulinterferenceina
residentialinstallation.Thisequipmentgenerates,usesand
canradiateradiofrequencyenergyand,ifnotinstalledand
usedinaccordancewiththeinstructions,maycauseharmful
interferencetoradiocommunications.However,thereis
noguaranteethatinterferencewillnotoccurinaparticular
installation.Ifthisequipmentdoescauseharmfulinterferenceto
radioortelevisionreception,whichcanbedeterminedbyturning
theequipmentoffandon,theuserisencouragedtotrytocorrect
theinterferencebyoneormoreofthefollowingmeasures:
Thismanualuses2wordstohighlightinformation.
Importantcallsattentiontospecialmechanicalinformation
andNoteemphasizesgeneralinformationworthyofspecial
attention.
ThisproductcomplieswithallrelevantEuropeandirectives.
Fordetails,seetheseparateproduct-specicDeclarationof
Conformity(DOC)sheet.
Thisproductmaycontainmaterialthatmaybehazardousto
humanhealthandtheenvironment.IncompliancewithEU
Directive2002/96/EConWasteElectricalandElectronic
Equipment(WEEE):
•Donotdisposeoftheproductasunsortedmunicipal
waste.
•Thisproductshouldberecycledinaccordancewith
localregulations.Contactlocalauthoritiesfordetailed
information.
•Thisproductmaybereturnabletothedistributorfor
recycling.Contactyourdistributor/dealerfordetails.
©2013—TheToro®Company
8111LyndaleAvenueSouth
Bloomington,MN55420
Registeratwww.T oro.com.
•Reorientorrelocatethereceivingantenna.
•Increasetheseparationbetweentheequipmentandreceiver.
•Connecttheequipmentintoanoutletonacircuitdifferentfrom
thattowhichthereceiverisconnected.
IndustryCanadaStatement
ThisdevicecomplieswithCanadianRSS-210.
Theinstallerofthisradioequipmentmustensurethatthe
antennaislocatedorpointedsuchthatitdoesnotemitRFeld
inexcessofHealthCanadalimitsforthegeneralpopulation;
consultSafetyCode6,obtainablefromHealthCanada’s
websitewww.hc-sc.gc-ca/rpb.
OriginalInstructions(EN)
PrintedintheUSA
AllRightsReserved
*3379-768*A
Page 2
Safety
ON
OFF
1
2
3
4
5
G022151
ProductOverview
Improperlyusingormaintainingthisequipmentcan
resultininjury.T oreducethepotentialforinjury,
complywiththesesafetyinstructions.Torotestedthis
equipmentforreasonablysafeservice;however,failureto
complywiththefollowinginstructionsmayresultinpersonal
injury.
Toensuremaximumsafety,bestperformance,and
togainknowledgeoftheproduct,itisessentialthat
youandanyotheroperatorreadandunderstandthe
contentsofthismanualbeforeusingthisproduct.Pay
particularattentiontothesafetyalertsymbol(
whichmeansCaution,Warning,orDanger—“personal
safetyinstruction.”Readandunderstandtheinstruction
becauseithastodowithsafety .Failuretocomplywith
theinstructionmayresultinpersonalinjury.
Figure1),
•Failuretoabidebytheseprecautionsmayresultin
equipmentfailureandpersonalinjury.
•Useandmaintainproperwiring.Improper,loose,and
frayedwiringcancausesystemfailure,equipmentdamage,
andintermittentoperation.
•Changesormodicationsmadetoequipmentnot
expresslyapprovedbythemanufacturerwillvoidthe
warranty.
Controls
Exit-Side-LockoutSystem
Theexit-side-lockoutsystemprovidestheindividualsworking
aroundthemachinewithameanstodisablethedrillpipe
fromrotatingandthrusting.
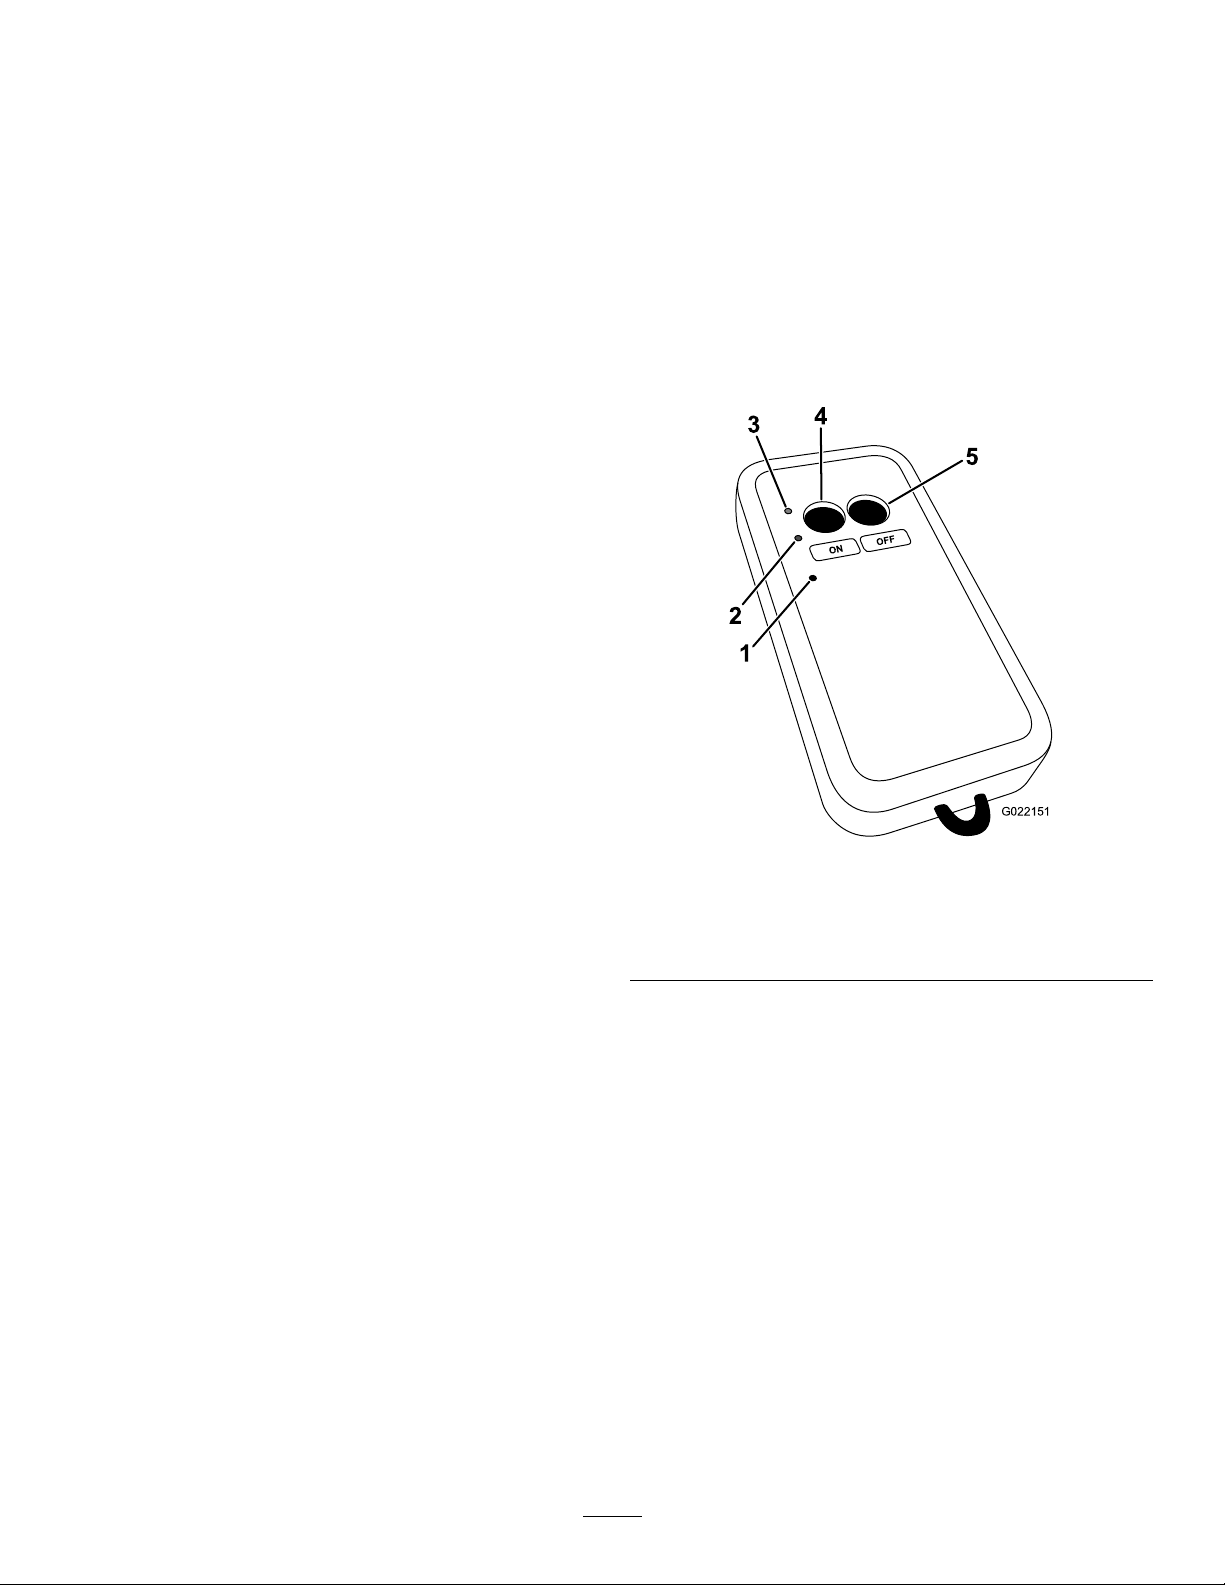
Thissystemconsistsofareceivermountedonthemachine
andatransmitter(Figure2)thatmustbeheldbyadesignated
individualworkingaroundthemachine.
•Owner/operatorsoftheequipmentmustabidebyall
applicableFederal,State,andLocallawsconcerning
installationandoperationoftheequipment.
•Makesurethatthemachineryandsurroundingareais
clearbeforeoperating.Donotactivatetheremotecontrol
systemuntilcertainthatitissafetodoso.
•Turnoffthehandheldremoteandremovepowerfrom
thebaseunitbeforeattemptinganymaintenance.This
willpreventaccidentaloperationofthecontrolled
machinery.
•PowerisremovedfromtheBaseUnitbydetachingthe
12-pincablefromthebaseunitconnectorP1,orby
removingthesourcepowerfromthecircuit.
1.Redindicatorlight
2.Yellowindicatorlight
3.Greenindicatorlight
TheindividualholdingthetransmittercanpushtheLock
Drill(Off)buttontostopthedrillrotationandthrust.This
isprimarilyusedtostop/lockoutthedrilloperationsinthe
followingsituations:
Figure2
4.Onbutton
5.Offbutton
•Useadampclothtokeepunitsclean.Removemud,
concrete,dirt,etc.afterusetopreventobstructingor
cloggingthebuttons,levers,wiring,andswitches.
•Donotallowliquidtoenterthehandheldorbaseunit
enclosures.Donotuseahighpressurewashertoclean
theequipment.
•Wheninstallingorremovingadrillheadorreamer
•Wheneversomeoneneedstoapproachthedrillpipeor
headanywhereinfrontofthemachine
•Placingawiperonthedrillpipe
•Whenthelocationreceiveroperatoridentiesaproblem
•Disconnecttheradiobaseunitbeforeweldingonthe
•Operateandstoreunitsonlywithinthespecied
machine.Failuretodisconnectthebaseunitmayresultin
destructionofordamagetothebaseunit.
operationandstoragetemperaturesdenedinthis
document.
requiringimmediateshutdownofdrilling
Whenitissafetoresumedrilling,theindividualholdingthe
transmittercanpresstheUnlockDrill(On)button.This
buttonsendsasignaltothereceiverthatallowsthemachine
operatortoresetthesystemandrestorethethrustandrotary
functions.
2
Page 3

Specications
ReplacingtheTransmitter
HandheldUnit
Batteries3AAA
Autoshutdown
Lowbatterywarning3.3Vandbelow
Lowbatteryshutdown3.1V
Operatingtemperature-20to55degreesC(-4to131
Storagetemperature-40to55degreesC(-40to
Radiofrequency
RadioRFpower
RadiolicenseNotrequired
Modulation
AntennaInternal
BaseUnit
Radiofrequency
RadioRFpower
RadiolicenseNotrequired
Modulation
AntennaInternal
Operatingtemperature-20to55degreesC(-4to131
Storagetemperature-40to55degreesC(-40to
After2hoursofinactivity
degreesF)
131degreesF)
2405to2480MHz
2mW(2.4GHz)
DSSS
2405to2480MHz
2mW(2.4GHz)
DSSS
degreesF)
131degreesF)
Batteries
1.Loosenthefourscrewssecuringthebatterycover
(Figure3).
Figure3
1.Handheldtransmitter
2.Batterycover
2.Removethecover(Figure4).
3.Screws
Operation
HandheldIndicatorLights
Thefollowingtableliststhevariousstatesoftheindicator
lightsonthehandheldtransmitter(Figure2)andtheir
meanings:
IndicatorLightState
Greenlightisblinkingrapidly
Greenlightisilluminated
withoutblinking
YellowlightisblinkingslowlyThebatteriesarelow;change
RedlightisblinkingThetransmitterisactively
Meaning
Thetransmitteristransmitting
tothebaseunit
Abuttononthetransmitteris
currentlypressed
thebatteries.Ifyoudonot
changethebatteriessoon,the
handheldwillpowerdown.
receivingmessagesfromthe
baseunit.
Figure4
1.Handheldtransmitter2.Batterycover
3.Removetheexistingbatteries.
4.Install3new,AAAbatteriesintheorientationshown
inFigure5.
Important:Ensurethatyouinstallthebatteries
inthecorrectpolarityorientationoryoucould
damagethetransmitter.
3
Page 4

Figure5
1.Handheldtransmitter2.AAAbatteries
5.Replacethecoverandsecureitwiththescrewremoved
previously.
Tightenthescrewsenoughtoensurethatthesealing
gasketiscompressed,butdonotovertightenthem.
beginsashing,andtheGreenlightilluminates.All
lightsremainasmentioneduntilyoureleasethebutton.
8.ReleasetheOnbutton.
TheRedlightturnsoffandtheGreenlightashesfor
afewseconds.
DisassociatingallHandheld TransmittersfromtheBase Unit
Important:Completingthisprocedurewilldisassociate
alltransmittersfromthebaseunit,whichwillneedtobe
associatedagainbeforetheywillfunction.
1.Ensurethatthemachineisturnedoff.
2.Ensurethatthehandheldtransmitterisnotactive(i.e.,
nolightsareon).
3.Standneartherearcontrolpanelofthemachine.
4.SimultaneouslypressandholdtheOnandOffbuttons.
TheGreenlightilluminates.
AssociatingtheHandheld TransmitterwiththeBaseUnit
Ifthehandheldtransmittereverstopscommunicatingwith
thebaseunit,orifyoureplaceitwithanewtransmitter,you
needtoassociatethetransmittertothebaseunitasfollows:
1.Ensurethatthemachineisturnedoff.
2.Ensurethatthehandheldtransmitterisnotactive(i.e.,
nolightsareon).
3.Standneartherearcontrolpanelofthemachine.
4.SimultaneouslypressandholdtheOnandOffbuttons.
TheGreenlightilluminates.
5.ContinueholdingthebuttonsuntiltheYellowlight
beginsashing,thenreleasethebuttons.
TheRedlightbeginsashingallowingyou2seconds
topressthenextbutton.
6.PressandholdtheOnbutton
TheRedlightturnsoffandtheGreenandY ellow
lightsilluminate.
5.ContinueholdingthebuttonsuntiltheYellowlight
beginsashing,thenreleasethebuttons.
TheRedlightbeginsashingallowingyou2seconds
topressthenextbutton.
6.PressandholdtheOffbutton
TheRedlightturnsoffandtheGreenandY ellow
lightsilluminate.
Important:Ifyoudonotpressthisbuttonwithin
2seconds,youwillhavetostartthisprocedure
overagain.
7.ContinueholdingtheOffbuttonandturnonthe
machinetopowerthebaseunit.
Thebaseunitandhandheldestablishacommunication
linkwhileyouholdthebutton.Oncetheprocessis
complete,theYellowlightturnsoff,theRedlight
beginsashing,andtheGreenlightilluminates.All
lightsremainasmentioneduntilyoureleasethebutton.
8.ReleasetheOffbutton.
TheRedlightturnsoffandtheGreenlightashesfor
afewseconds.
Important:Ifyoudonotpressthisbuttonwithin
2seconds,youwillhavetostartthisprocedure
overagain.
7.ContinueholdingtheOnbuttonandturnonthe
machinetopowerthebaseunit.
Thebaseunitandhandheldestablishacommunication
linkwhileyouholdthebutton.Oncetheprocessis
complete,theYellowlightturnsoff,theRedlight
4
 Loading...