

Page 1

FormNo.3394-377RevA
CEBaggerComplianceKit
for48in,52in,or60inZMaster
ModelNo.127-0336
ModelNo.127-0337
ModelNo.127-0338
Note:Determinetheleftandrightsidesofthemachinefromthenormaloperatingposition.
Note:Thiskitneedstobeinstalledonmodel78551,78552,78553,78562,78563,78566,or78567BlowerandDrive
KittocreateaCEbagger.
®
G3Mower
InstallationInstructions
Installation
LooseParts
Usethechartbelowtoverifythatallpartshavebeenshipped.
ProcedureDescription
1
2
3
4
5
6
Nopartsrequired
Warningdecal1
Covermissingdecal
Blowercover1
Bolt(1/4x3/4inch)
Washer(1/4inch)
Washer(5/16inch)
Plasticplug1
Pushnut(1/4inch)
Leftguard
Backguard1
Frontguard1
Lowerguard1
Bolt(5/16x3/4inch)
Flangenut(5/16inch)
Supportrod
Muferguard
Qty.
–
1
1
1
1
1
1
1
1
1Installthesupportrod.
1
Preparethemower.
Installthedecals.
Installthecovers.
Installtheguards.
Installthemuferguard.
Use
©2015—TheToro®Company
8111LyndaleAvenueSouth
Bloomington,MN55420
Registeratwww.T oro.com.
OriginalInstructions(EN)
PrintedintheUSA
AllRightsReserved
*3394-377*A
Page 2
1
g013161
3
PreparingtheMower
NoPartsRequired
Procedure
1.Thoroughlycleanmowerdeck.Alldebrismustbe
removedtoensurethekitwilltproperly .
2.Repairallbentordamagedareasandreplaceany
missingparts.
2
InstallingtheDecals
Partsneededforthisprocedure:
1Warningdecal
1
Covermissingdecal
InstallingtheCovers
Partsneededforthisprocedure:
1Blowercover
1
Bolt(1/4x3/4inch)
1
Washer(1/4inch)
1
Washer(5/16inch)
1Plasticplug
1
Pushnut(1/4inch)
Procedure
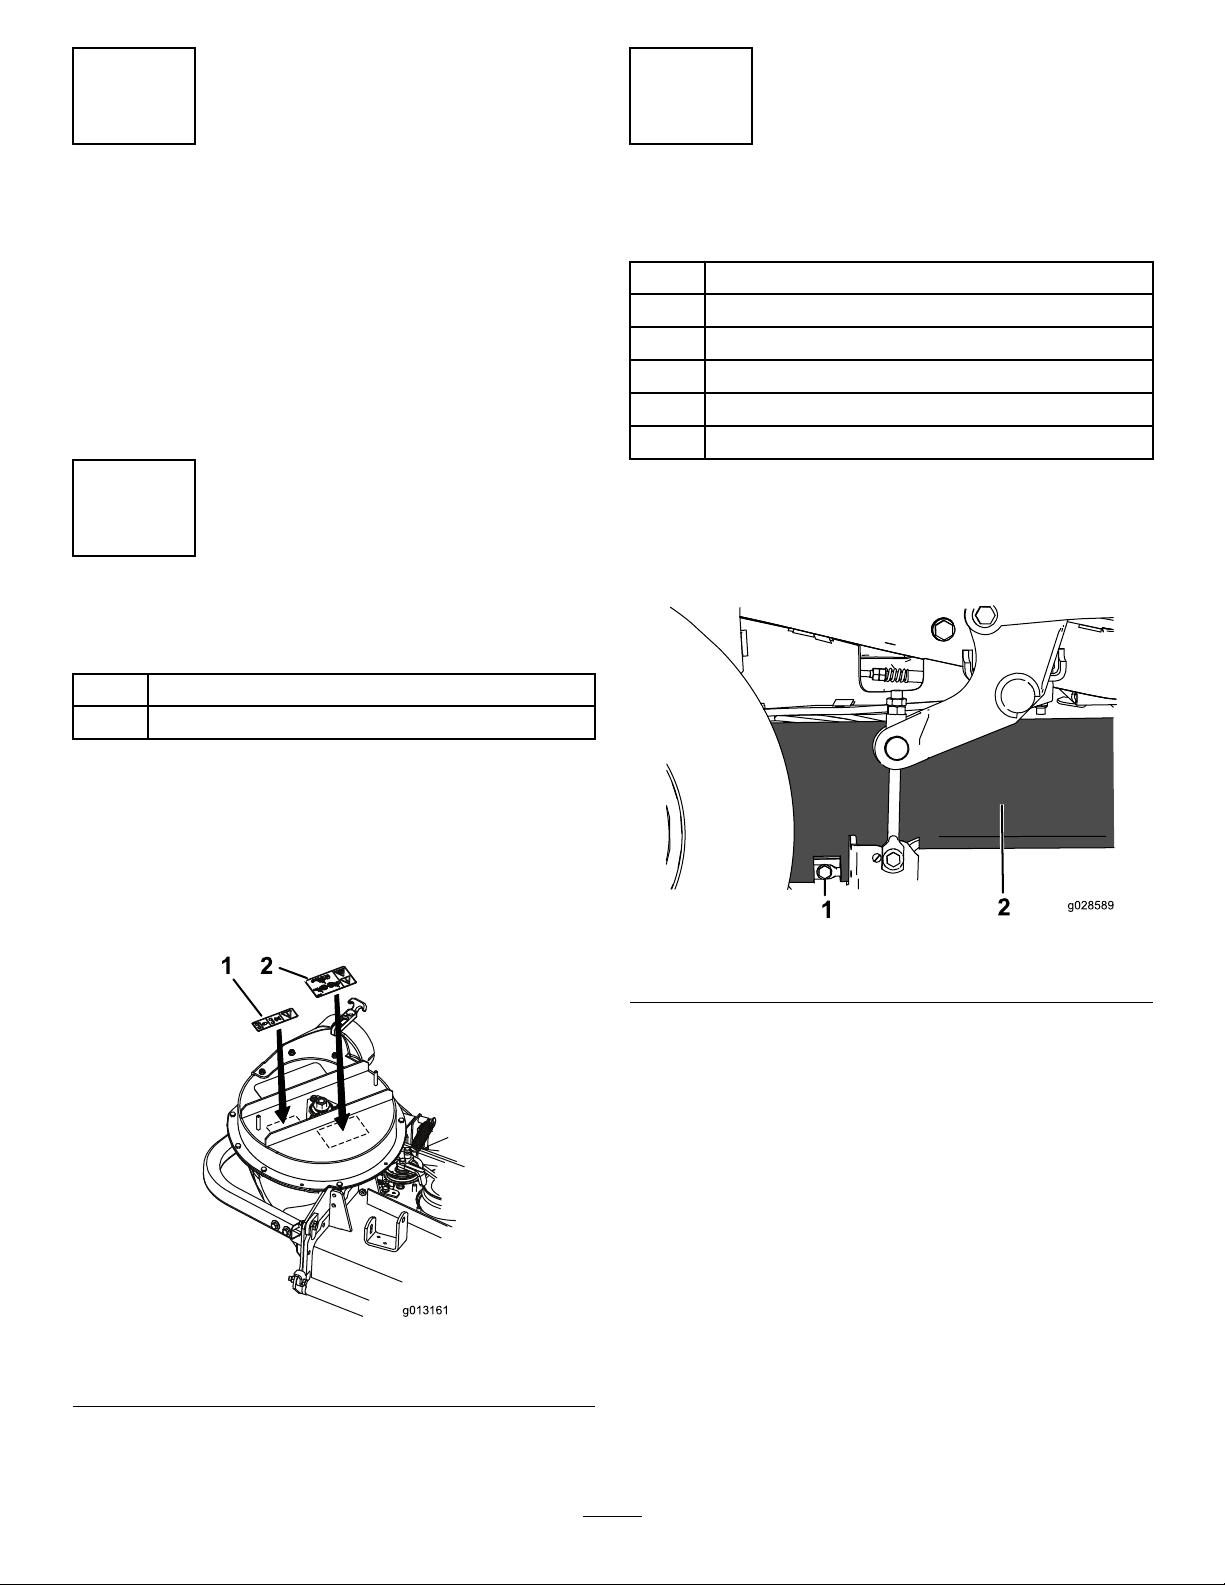
1.Loosenandremovethebottomboltofthemower-deck
curtaintoreleasethecurtain(Figure2).Retainthebolt.
Procedure
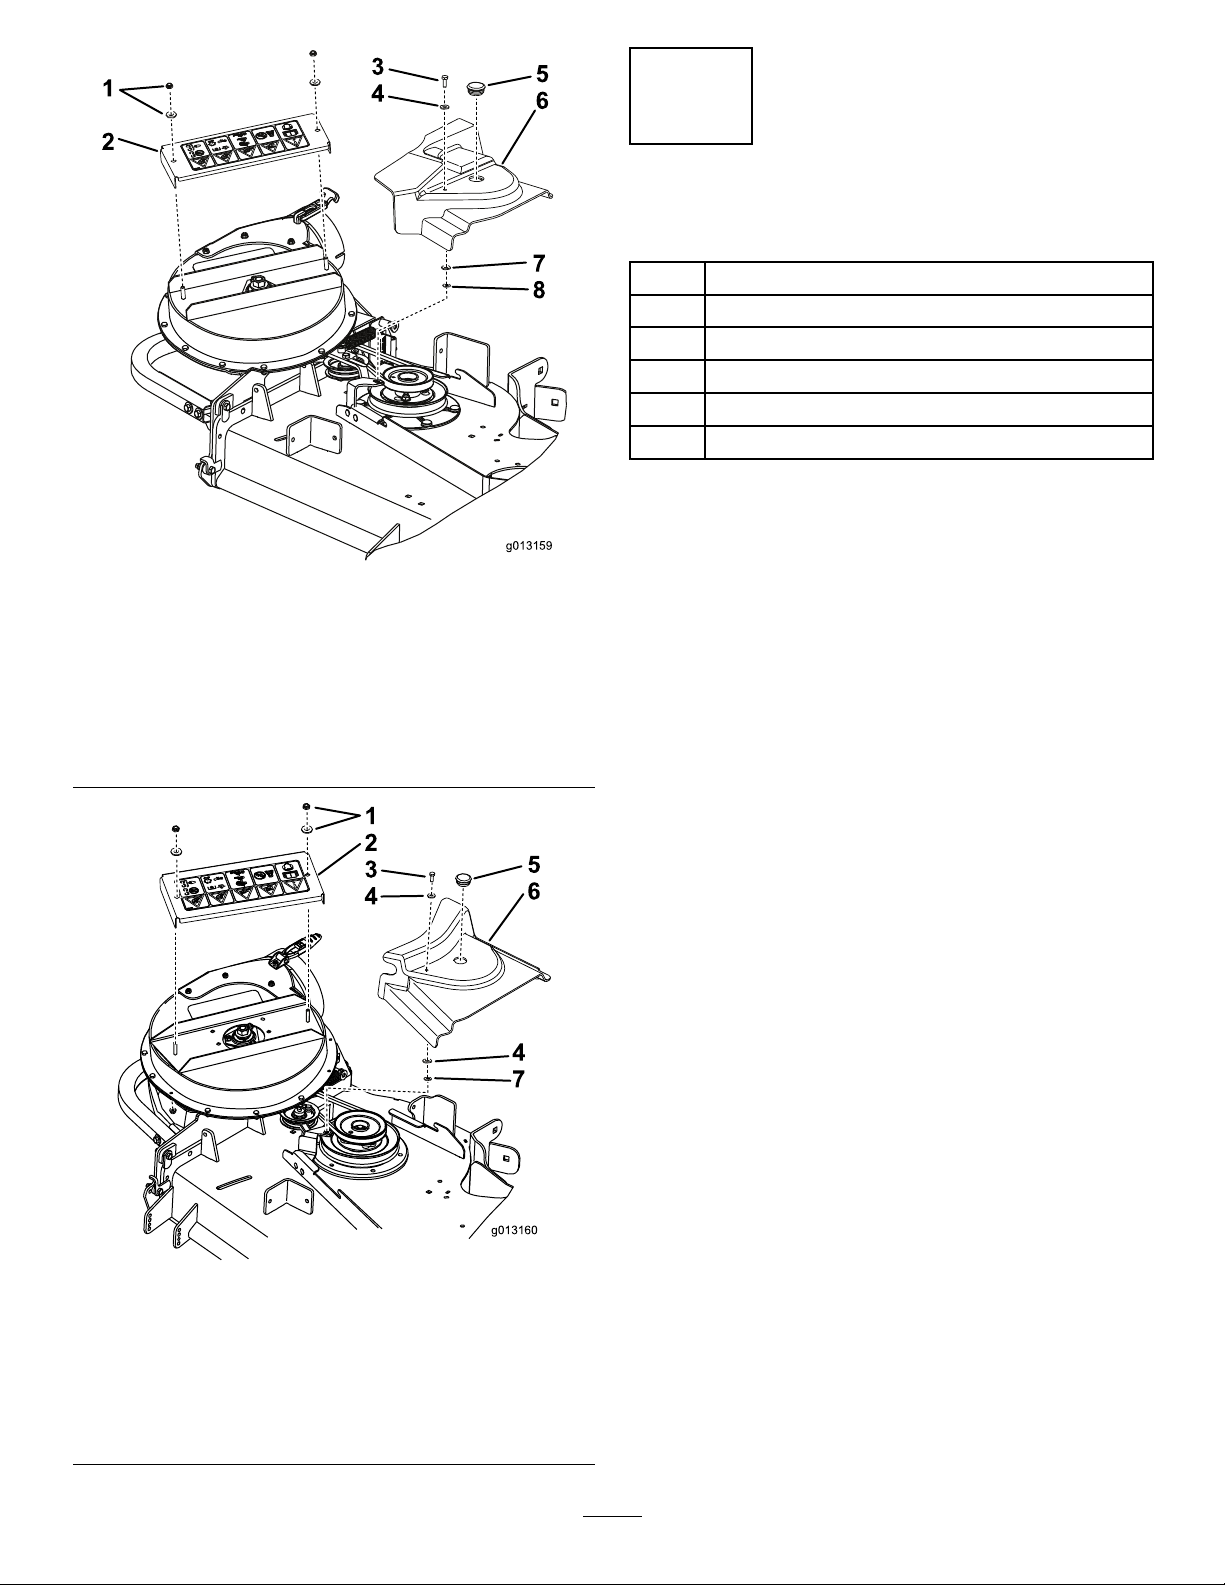
1.Removetheexistingblowercover(Figure3).Savethe
hardware.
2.Cleantheareawherethedecalswillgo(Figure1).
3.InstallthedecalsasshowninFigure1.
Figure1
1.Covermissingdecal
2.Warningdecal
Figure2
1.Bolt
2.Removetheexistingbeltcoverretainingknoband
discard.
3.Removetheexistingbeltcover(Figure3orFigure4).
4.Attachthebolt(1/4x3/4inch)andaatwasher(5/16
inch)tothebeltcoverwithaatwasher(1/4inch)and
pushnut(1/4inch)(Figure3orFigure4).
5.Installthebeltcoverandtightenthebolt(1/4x3/4
inch)(Figure3orFigure4).
6.Installthenewblowercoverusingtheexisting
hardwarepreviouslyremoved(Figure3orFigure4).
7.Installtheplasticplugintheexistingbeltcover(Figure
3orFigure4).
2.Curtain
2
Page 3
g013159
7
8
Figure3
g013160
4
7
Formodel78551,78552,78562,and78566(48-inch(122
cm)or52-inch(132cm))
1.Existinghardware5.Plasticplug
2.Newblowercover6.Existingbeltcover
3.Bolt(1/4x3/4inch)7.Washer(1/4inch)
4.Washer(5/16inch)8.Pushnut(1/4inch)
4
InstallingtheGuards
Partsneededforthisprocedure:
1
Leftguard
1Backguard
1Frontguard
1Lowerguard
1
Bolt(5/16x3/4inch)
1
Flangenut(5/16inch)
Procedure
1.Removetheexistinghardwarearoundtheblowerfor
theleftguard,lowerguardandbackguard(Figure5or
Figure6).Saveallexistinghardware
2.Installtheleftguardwithexistinghardware(Figure5
orFigure6).
3.Installthebackguardwithexistinghardware(Figure
5orFigure6).
4.Installthelowerguardwithexistinghardware(Figure
5orFigure6).
Figure4
Formodel78553,78563,and78567(60inch(152cm))
1.Existinghardware5.Plasticplug
2.Newblowercover6.Existingbeltcover
3.Bolt(1/4x3/4inch)7.Pushnut(1/4inch)
4.Washer(5/16inch)
5.Installthefrontguardwithabolt(5/16x3/4inch)
andaangenut(5/16inch)(Figure5orFigure6).
3
Page 4

g016066
1
9
Figure5
Formodel78551,78552,78562,and78566(48-inch(122
cm)or52-inch(132cm))
1.Existinghardware6.Frontguard
2.Leftguard
3.Backguard,52inch
(132cm)
4.Flangenut(5/16inch)
5.Bolt(5/16x3/4inch)
7.Lowerguard
8.Existingnuts
9.Backguard,48inch
(122cm)
Figure6
Formodel78553,78563,and78567(60inch(152cm))
1.Existinghardware
2.Leftguard
3.Backguard7.Lowerguard
4.Flangenut(5/16inch)
5.Bolt(5/16x3/4inch)
6.Frontguard
4
Page 5

5
6
InstallingtheSupportRod
Partsneededforthisprocedure:
1
Supportrod
Procedure
1.Slidetheexistingsupportrodoutofthemower-deck
curtain(Figure7);retaintherodforfutureuseofthe
machinewithoutthebagger.
InstallingtheMuferGuard
Partsneededforthisprocedure:
1
Muferguard
Procedure
1.Removetheexistingmuferguardandsavethe
hardware.Savetheexistingmuferguardforusewhen
thebaggerisremoved.
2.Installthenewmuferguardwiththepreviously
removedhardware(Figure9).
Figure7
1.Curtain2.Supportrod
2.Insertthenewsupportrodintothecurtain(Figure8).
Figure8
1.Curtain2.Supportrod
3.Securethesupportrodandmower-deckcurtainwith
theboltyouremovedin3InstallingtheCovers(page
2)(Figure2).
Figure9
1.Carriagebolt3.Newmuferguard
2.Flangenut
5
Page 6

Notes:
6
Page 7

Notes:
7
Page 8

 Loading...