

Page 1
48inRecycler
TITANZero-Turn-RadiusRidingMower
ModelNo.119-3320
Installation
LooseParts
Usethechartbelowtoverifythatallpartshavebeenshipped.
FormNo.3364-634RevA
®
Kit
InstallationInstructions
Description
Rightbafe
Leftbafe
Bafeguard
Locknut(5/16inch)
Carriagebolt(5/16x3/4inch)
Kickerbafes
Flangescrew(5/16x3/4inch)
Decal1
Mulchingblade3
Qty.
Use
1
1
1
8
4
2
4
InstalltheRecycler®Kit.
©2010—TheToro®Company
8111LyndaleAvenueSouth
Bloomington,MN55420
Registeratwww.T oro.com.
OriginalInstructions(EN)
PrintedintheUSA.
AllRightsReserved
Page 2
InstallingtheRecycler®Kit
G012800
1
2
3
4
1
2
3
G012805
G012806
1
2
3
4
3
2
1.Stoptheengineandremovetheignitionkey .
2.RemovethemowerasdescribedinyourOperator’ s
Manual.
3.Turnthemowerupsidedown.
4.Removetheexistingmowerbladesinstalledonyour
deck.RefertotheRemovingtheBladessectionin
theOperator’sManualformoreinformation.
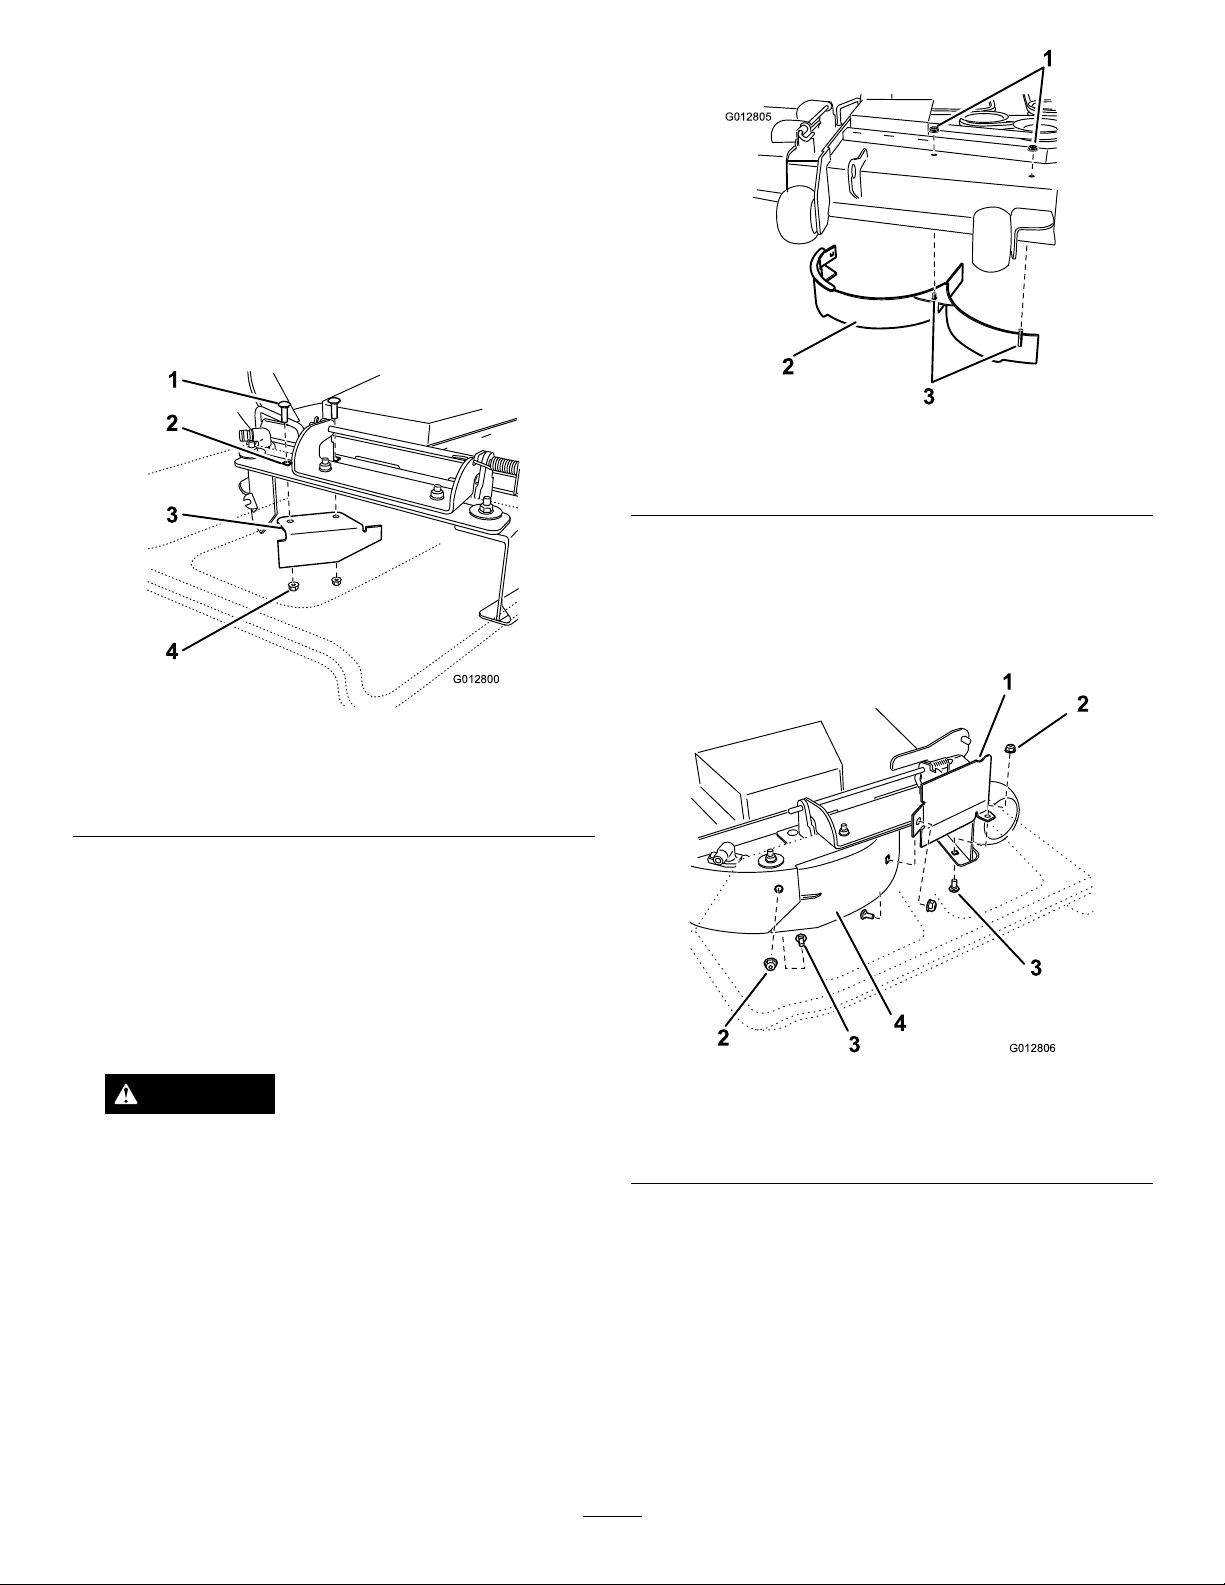
5.Locatethecutoffbafeatthesidedischarge
openingonthemowerdeck(Figure1).
Figure2
1.Locknut(5/16inch)
2.Rightbafe
3.Weldedposts
9.Locatethebafeguardinlooseparts.Usetwo
carriagebolts(5/16x3/4inch)andtwolocknuts
(5/16inch)tothedecktosecurethebafeguard
totherightbafeandthemowerdeckasshownin
Figure3.Handtightenthefasteners.
Figure1
1.Carriagebolt,existing3.Cutoffbafe,existing
2.Rearholesinthe
dischargeplate
4.Locknut,existing
6.Removethefastenerssecuringthecutoffbafeto
thedeckandremovethecutoffbafe.
Note:Savethecutoffbafeforconvertingbackto
sidedischarge.
7.Installthefastenersintothesameholesinthedeck
theywereoriginallyremovedfrom.Thisensureno
holesareleftopenwhenthedeckisoperated.
DANGER
Openholesinthemowerexposeyouandothers
tothrowndebris.Debristhrownoutofholesin
themowercancauseinjury.
•Neveroperatethemowerwithouthardware
mountedinallholesinthemower.
•Installhardwareinmountingholeswhenthe
bafeisremoved.
8.Installtherightbafetomowerdeckasshownin
Figure2.Usetwolocknuts(5/16inch)tosecure
theweldedpostsoftherightbafetothetopofthe
mowerdeckatcenterandrightofcenterpositions.
Handtightenthefasteners.
Figure3
1.Bafeguard3.Carriagebolts(5/16x3/4
inch)
2.Locknut(5/16inch)4.Rightbafe
10.Locateacarriagebolt(5/16x3/4inch)andlocknut
(5/16inch)fromlooseparts.Installthecarriagebolt
andlocknutthroughrearwallofthemowerdeck
andrightbafetosecurethebafetothedeck.
11.Tightenallfasteners.
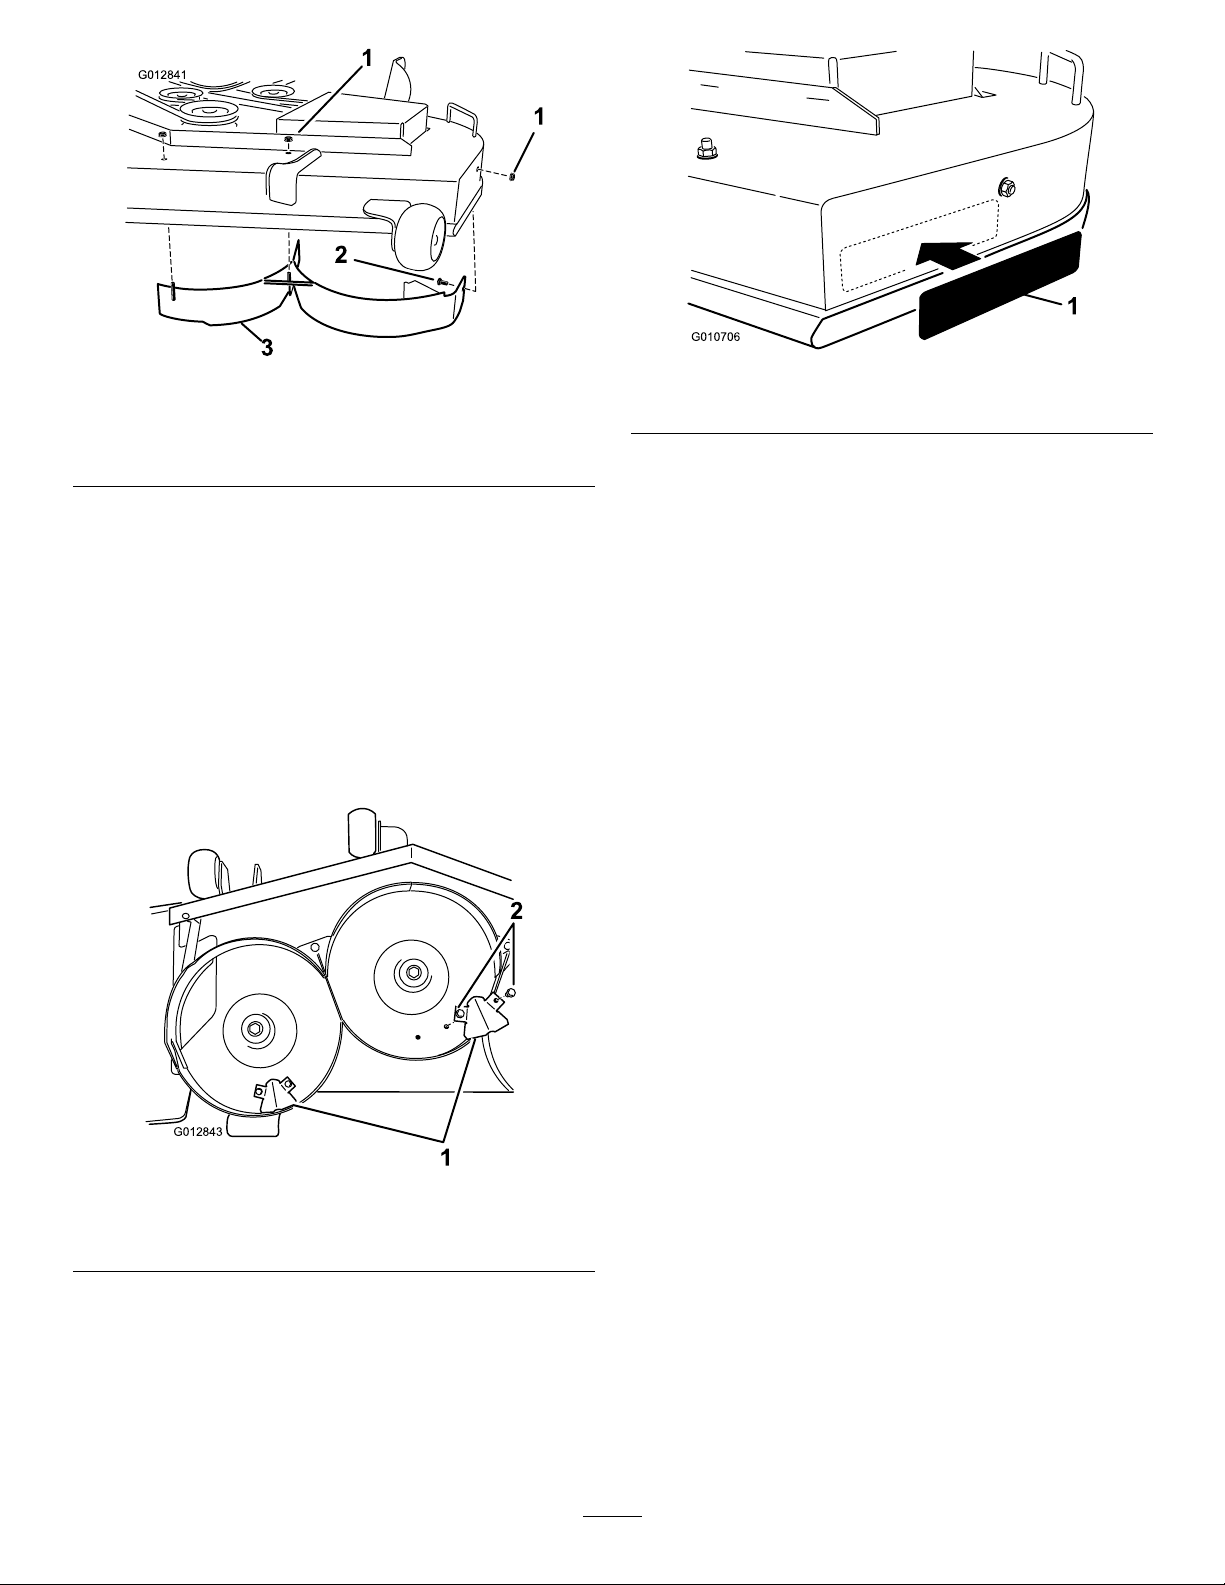
12.Installtheleftbafetothemowerdeckasshownin
Figure4.Usetwolocknuts(5/16inch)tosecure
theweldedpostsoftheleftbafetothetopofthe
mowerdeckatthecenterandleftpositions.Hand
tightenthefasteners.
2
Page 3
1
1
2
3
G012841
Figure4
G012843
1
2
1.Locknut(5/16inch)3.Leftbafe
2.Carriagebolt(5/16x3/4
inch)
13.Locateacarriagebolt(5/16x3/4inch)andalock
nut(5/16inch)fromlooseparts.Installthecarriage
boltandlocknutthroughsidewallofthemower
deckandleftbafetosecurethebafetothedeck.
14.Tightenallfasteners.
15.Locatethekickerbafesandfourangescrews
(5/16x3/4inch)fromlooseparts.Installthebafes
totheundersideofthedeckatthelocationsshown
Figure5.Securethebafestothedeckusingfour
in
angescrews(5/16x3/4inch).
Figure6
1.Decal
A.Thoroughlycleantheareawhereyouwillinstall
thedecal.
B.Dampentheareawithwaterormildlysoapy
water.
C.Peelthedecalfromthebackingandinstallitin
place.(
Figure6).
D.Squeegeeacrossthesurfaceofthedecal,starting
atthecenterofthedecalandworkingtowardthe
edges,usingoverlappingstrokes.
17.Installthemulchingmowerbladeslocatedinloose
parts.RefertotheInstallingtheBladessectioninthe
Operator’sManualformoreinformation.
Figure5
1.Kickerbafes2.Flangescrew(5/16x3/4
16.InstallthedecaltotheareashowninFigure6.
inch)
3
Page 4

Operation
OperatingTips
SelectingtheProperHeight-of-Cut
SettingtoSuittheConditions
Removeapproximatelyoneinchornomorethat1/3
ofthegrassbladewhencutting.Inexceptionallylush
anddensegrassyoumayhavetoraisetheheight-of-cut
settinganothernotchorconverttosidedischargeor
baggingoperations.
LongGrass
Ifthegrassiseverallowedtogrowslightlylongerthan
normal,orifitcontainsahighdegreeofmoisture,raise
thecuttingheighthigherthanusualandcutthegrassat
thissetting.Thencutthegrassagainusingthelower,
normalsetting.
CleaningAfterOperating
Toensureoptimumperformance,cleantheunderside
ofthemowerhousing.Ifresidueisallowedtobuildup
inmowerhousing,cuttingperformancewilldecrease.
MowinginExtremeConditions
Airisrequiredtocutandrecutgrassclippingsinthe
mowerhousing,sodonotsettheheight-of-cuttoolow
ortotallysurroundthehousingbyuncutgrass.Always
haveonesideofthemowerhousingfreefromuncut
grass,allowingairtobedrawnintohousing.When
makinganinitialcutthroughthecenteroftheuncut
area,operatethemachineataslowerspeedandback
upifthemowerstartstoclog.
MowingattheProperIntervals
Undernormalconditionsyou’llneedtomowevery
4-5days.However,grassgrowsatdifferentratesat
differenttimes.Thus,inordertomaintainthesame
height-of-cut,whichisagoodpractice,you’llneedto
cutmorefrequentlyinearlyspring;asthegrassgrowth
rateslowsinmidsummer,cutonlyevery8-10days.
Ifyouareunabletomowforanextendedperioddue
totheweatherconditionsorotherreasons,convertto
sidedischargeorbaggingoptionsormowrstwiththe
height-of-cutatahighlevel;thenmowagain2-3days
laterwithalowerheightsetting.
AlwaysMowwithSharpBlades
Asharpbladecutscleanlyandwithouttearingor
shreddingthegrassbladelikeadullblade.Tearingand
shreddingcausesthegrasstoturnbrownattheedges
whichimpairsgrowthandincreasessusceptibilityto
disease.
4
 Loading...