

Page 1

40inor48inRecycler
TURBOFORCE
ModelNo.110-2060
ModelNo.110-2070
Note:Determinetheleftandrightsidesofthemachinefromthenormaloperatingposition.
®
CuttingUnitforMid-SizeMowers
®
Kit
Safety
SideDischargeorMulchGrass
WARNING
Withoutthegrassdeector,dischargecover,or
completegrasscatcherassemblymountedin
place,youandothersareexposedtobladecontact
andthrowndebris.Contactwithrotatingmower
blade(s)andthrowndebriswillcauseinjuryor
death.
FormNo.3373-816RevA
InstallationInstructions
•Neverremovethegrassdeectorfromthemower
becausethegrassdeectorroutesmaterialdown
towardtheturf.Ifthegrassdeectorisever
damaged,replaceitimmediately.
•Neverputyourhandsorfeetunderthemower.
•Nevertrytoclearthedischargeareaormower
bladesunlessyoudisengagethepowertakeoff
(PTO)leverandturntheignitionkeytooff.
Alsoremovethekeyandpullthewireoffthe
sparkplug(s).
Ensurethemowerhasthehingedgrassdeectorthat
dispersesclippingstothesideanddowntowardtheturf,
whileinsidedischargemode.
Tomulchgrassclippings,thebafesmustbeinstalledinto
themowerasshowninthefollowingsteps.
©2012—TheToro®Company
8111LyndaleAvenueSouth
Bloomington,MN55420
Registeratwww.T oro.com.
OriginalInstructions(EN)
PrintedintheUSA.
AllRightsReserved
*3373-816*A
Page 2
Installation
LooseParts
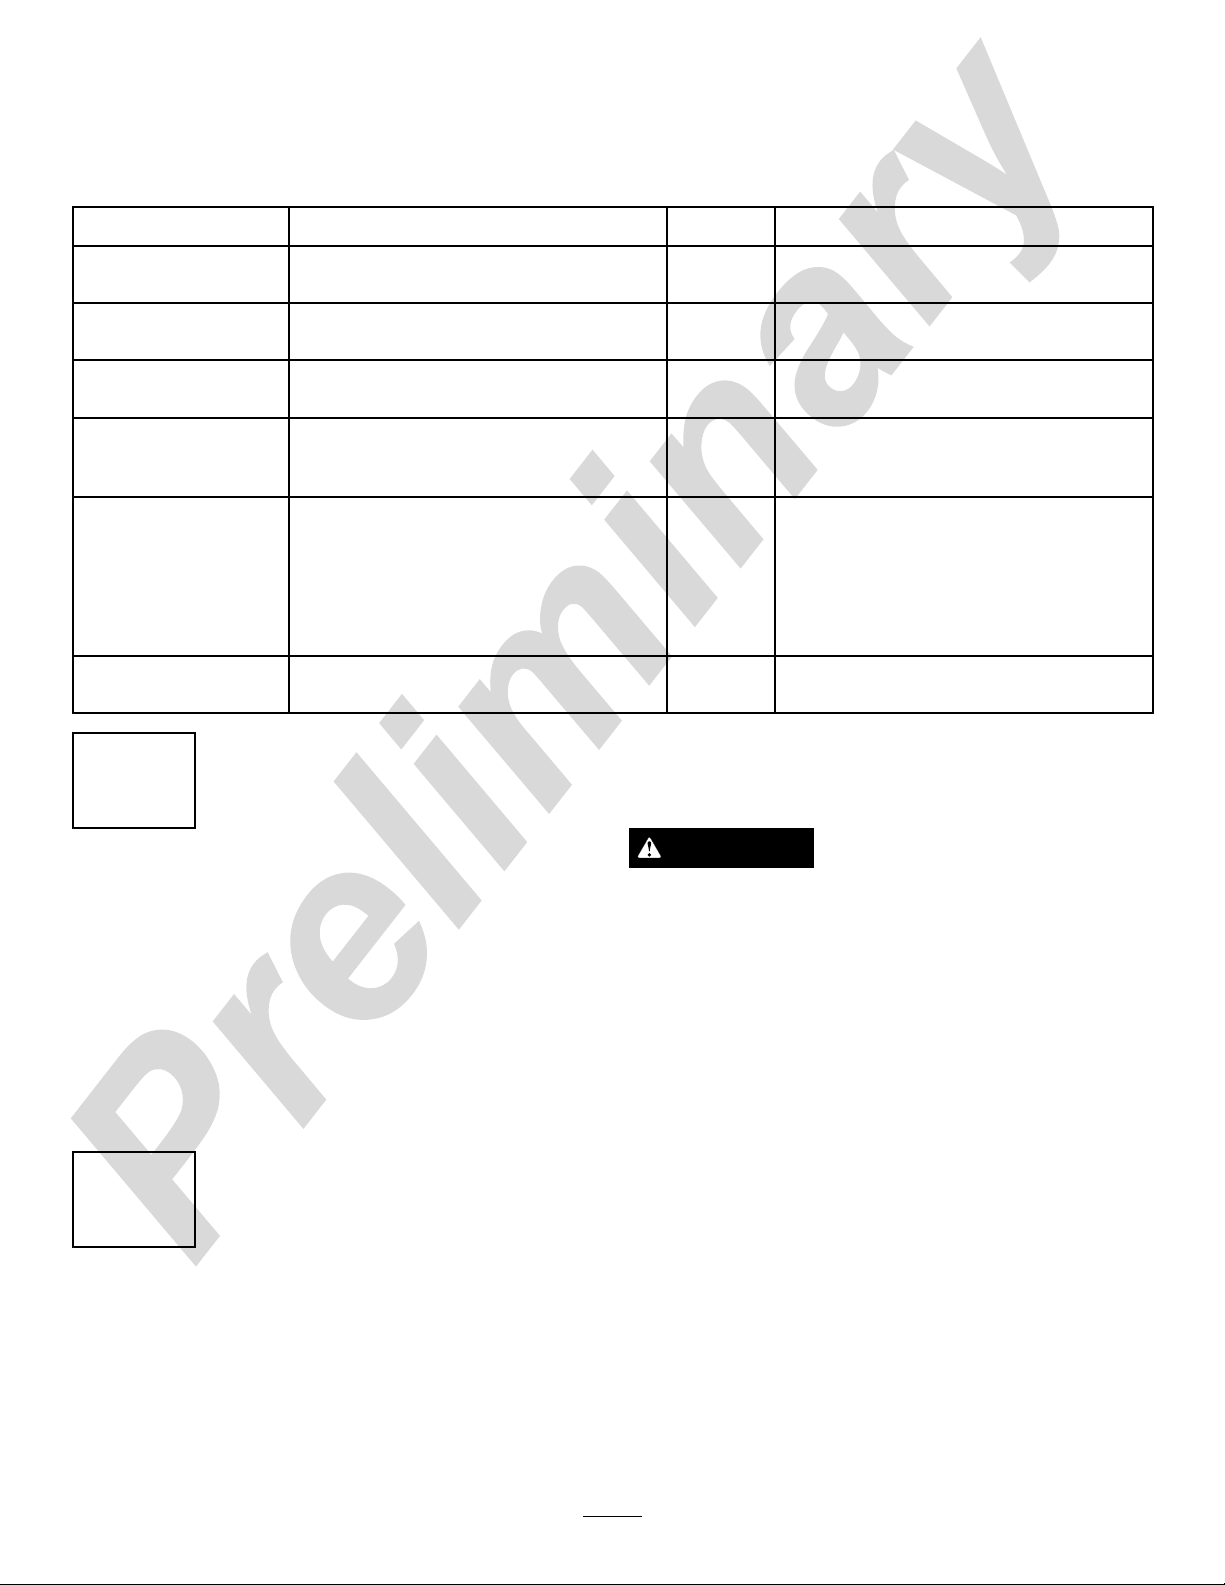
Usethechartbelowtoverifythatallpartshavebeenshipped.
ProcedureDescription
1
2
3
4
5
6
1
Qty.
Nopartsrequired
Nopartsrequired
Nopartsrequired
Dischargeplate1
Bolt(3/8x1inch)
Nut(3/8inch)
Leftbafe
Centerbafe
Rightbafe
Bolt(3/8x7/8inch)
Flangenut(3/8inch)
Carriagebolt(3/8x3/4inch)
Recyclerblades3Installthenewblades.
Note:Savethebladesforusewheninsidedischarging
mode.Usethebladeboltandwasherforinstallingthe
recyclerbladesinStep4.
–
–
–
2
2
1
1
1
8
9
1
Preparethemower.
Removetheexistingblades.
Removetheexistingbafes.
Installthedischargeplate.
Installthebafes.
Use
PreparingtheMower
NoPartsRequired
Procedure
1.Thoroughlycleanmowerdeck.Alldebrismustbe
removedtoensurebafeswilltproperlyagainst
mowerdeck.
2.Repairallbentordamagedareasofmowerdeckand
replaceanymissingparts.
2
RemovingtheExistingBlades
NoPartsRequired
Procedure
WARNING
Abladeissharp.Contactwithasharpbladecan
causeseriouspersonalinjury.
Wearglovesorwrapsharpedgesofthebladewith
arag.
Removetheexistingbladesfromthespindles(Figure1or
Figure2).
2
Page 3
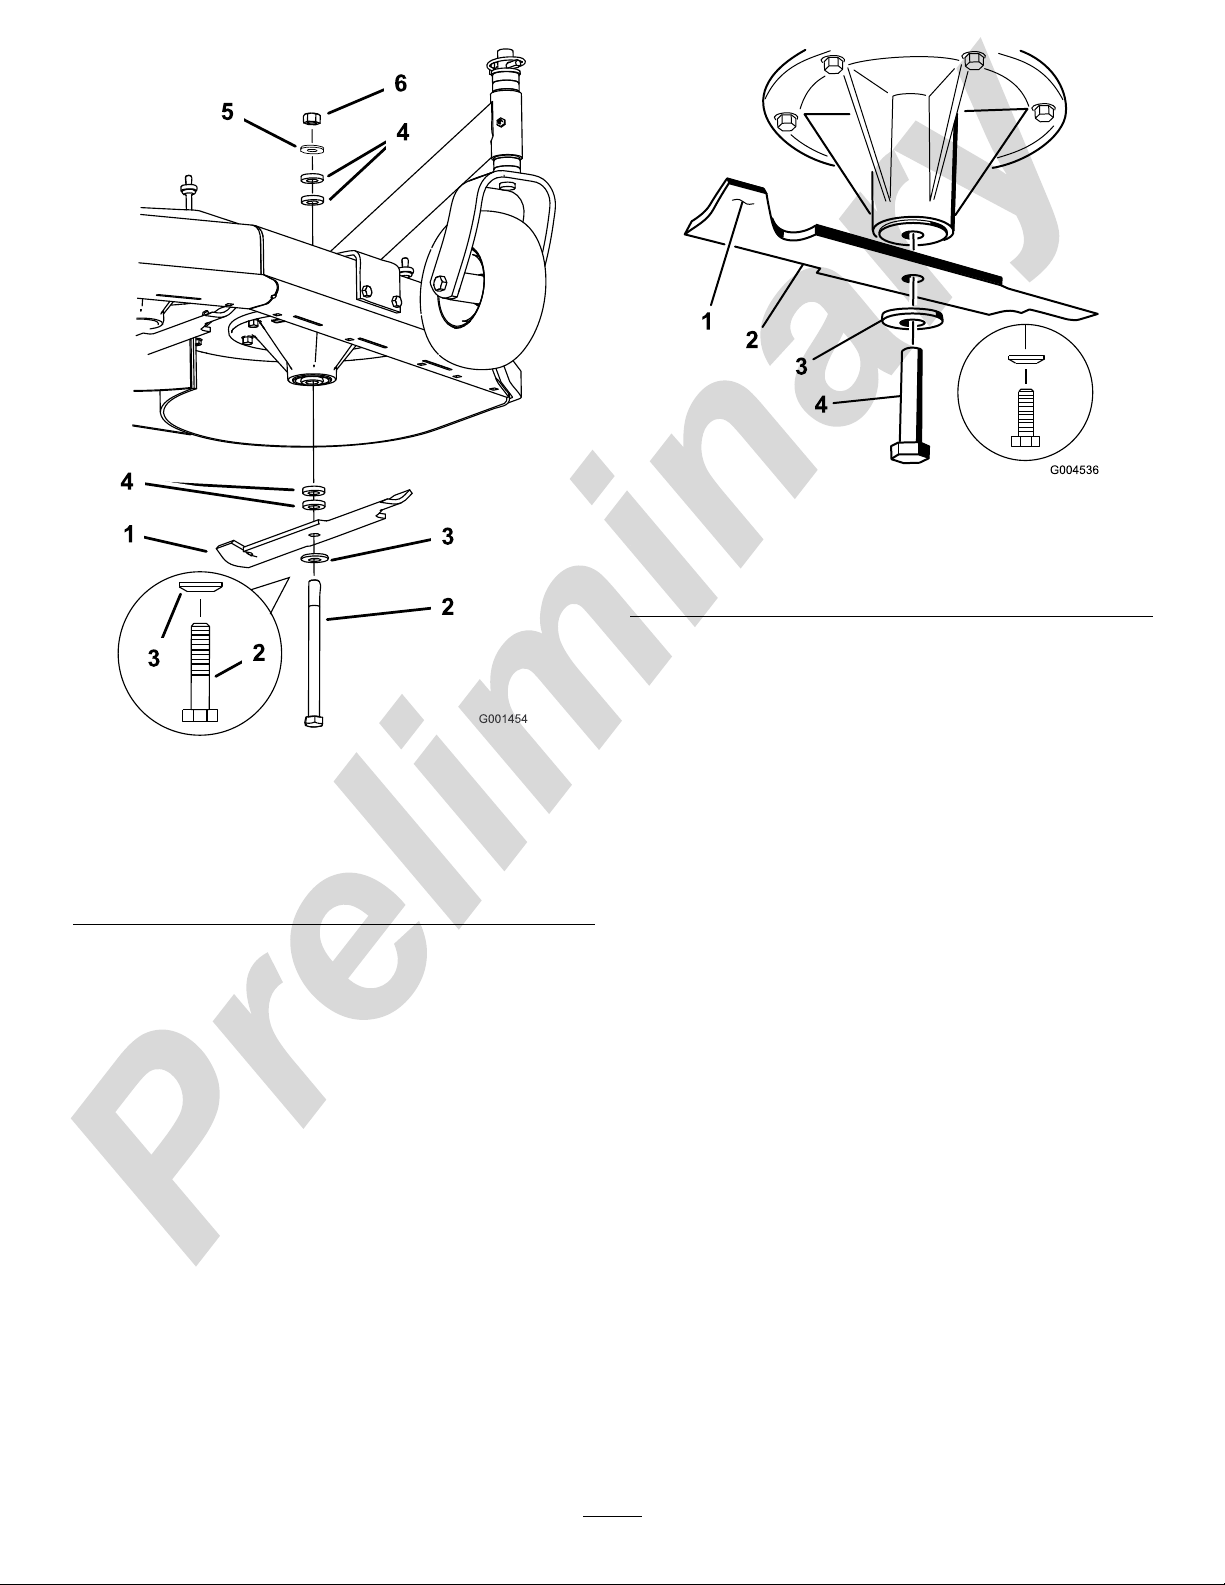
Figure1
FixedDeckMowerShown
Figure2
GrandStand
1.SailAreaofBlade3.Curvedwasher
2.Blade4.BladeBolt
®
MowerShown
.
1.Blade
2.Bladebolt5.Thinwasher
3.Curvedwasher
4.Spacer(xeddeckmower
only)
6.Nut
3
Page 4
3
g018641
6
7
4
8
8
1
g018642
1 2
3
4
RemovingtheExistingBafes
NoPartsRequired
Procedure
Note:Inthestepsbelow,theboltsarethreadedintothe
mowerdeck.Removethenutsrstbeforeremovingbolts.
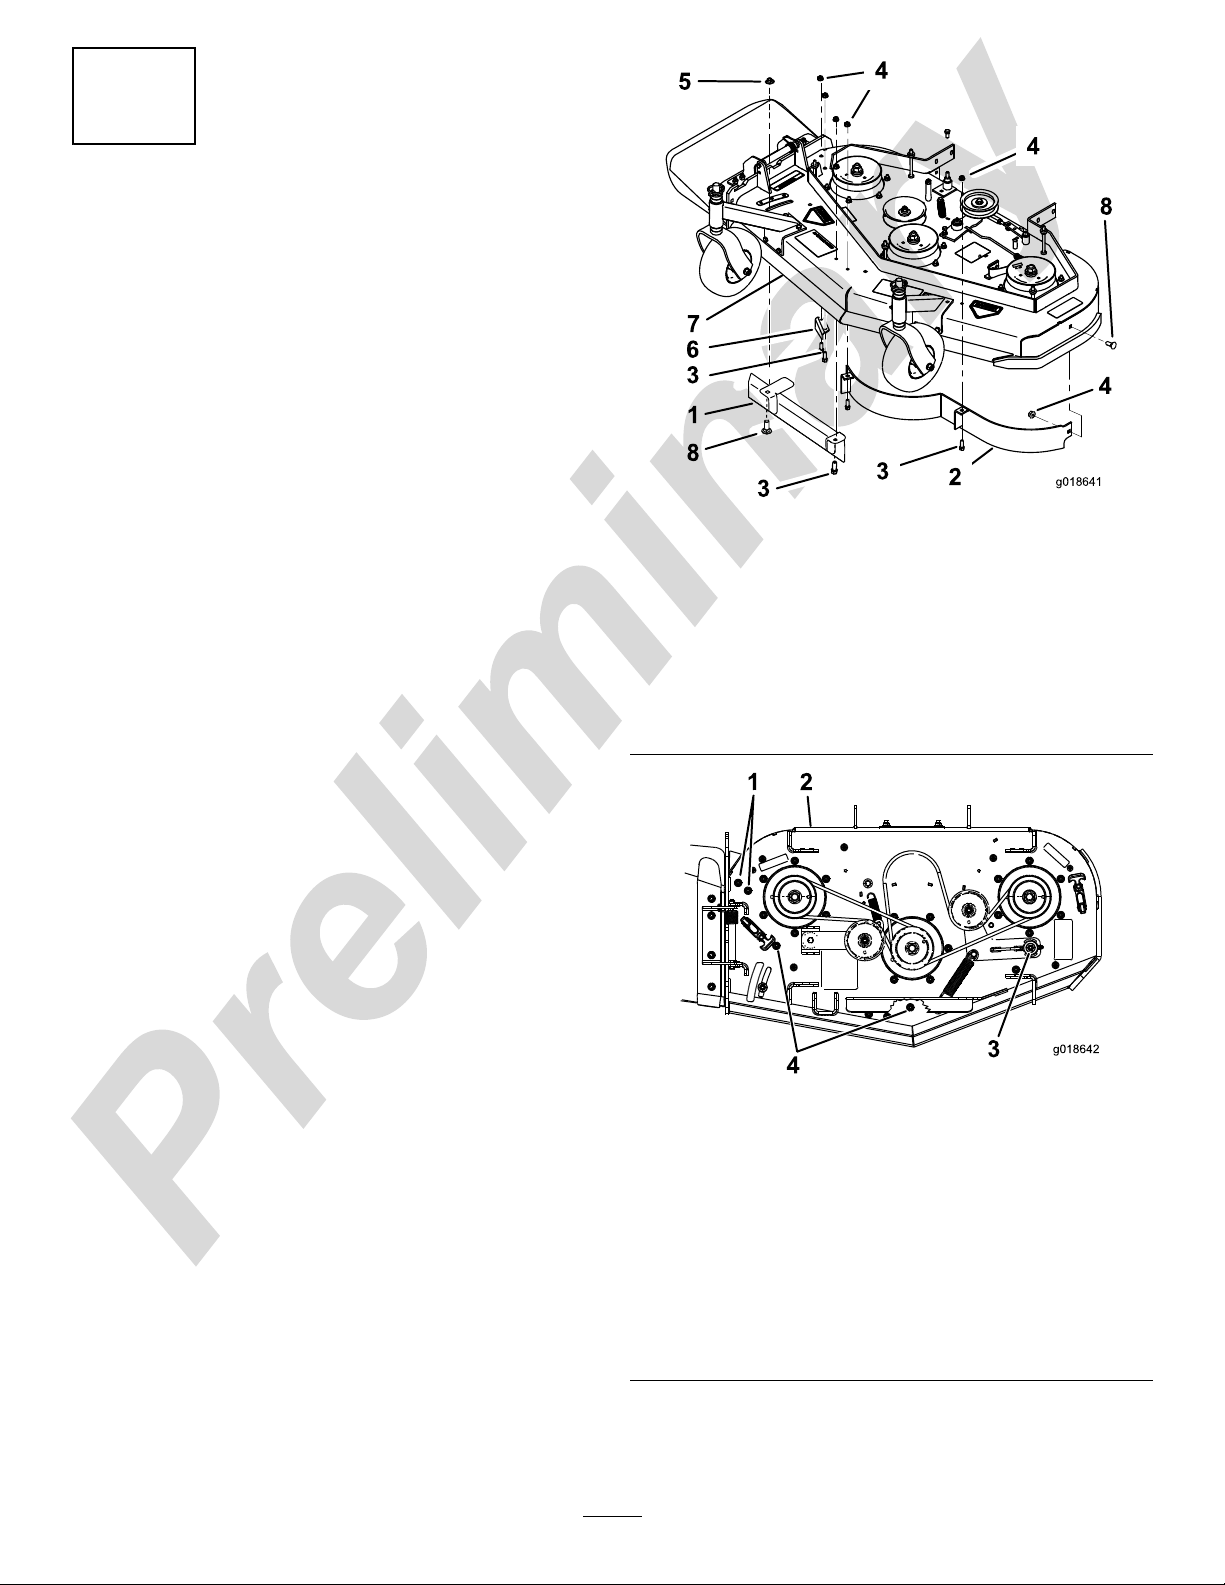
1.Removethenutsandboltsholdingtheleftfrontbafe
inplace(Figure3andFigure4).
For40inchGrandStandmowersonly,usetheexisting
hardwareusedfortheidlerpulleypivot.Removeand
retainthecurvedwasherforsidedischargemode.
2.Removethenutsandboltsholdingthedischargebafe
inplace(
boltstocovertheholesafterthebafeisremoved.
3.Removethelargeangednutandboltorcamlock
andwasherbyunscrewingitfromtheadjustableow
bafe(Figure3).
4.Removethenutandboltholdingtheadjustableow
bafeinplace(Figure3).
Figure3andFigure4).Installthenutsand
Figure3
FixedDeckMowerShown
1.AdjustableFlowBafe5.Largeangednut
2.Leftfrontbafe6.Dischargebafe,install
3.Bolt7.Mowerdeck
4.FlangeNut
thenutsandboltsafter
removingthedischarge
bafetocovertheholes
8.Carriagebolt
Note:Savethebafesandhardwareforusewhenchanging
tosidedischargingmode.
Figure4
40inchGrandStandmowershown
1.Tocovertheholes,install
thenutandboltafter
removingthedischarge
bafe
2.GrandStandmowerdeck4.Removeandretainfor
3.Idlerpulleypivot,use
existinghardwarefor
recyclerbafes(40inch
Grandstandmoweronly)
(removeandretainthe
curvedwasherforside
dischargemode)
conversionbacktoside
dischargemode
4
Page 5
4
5
InstallingtheDischargePlate
Partsneededforthisprocedure:
1Dischargeplate
2
Bolt(3/8x1inch)
2
Nut(3/8inch)
Procedure
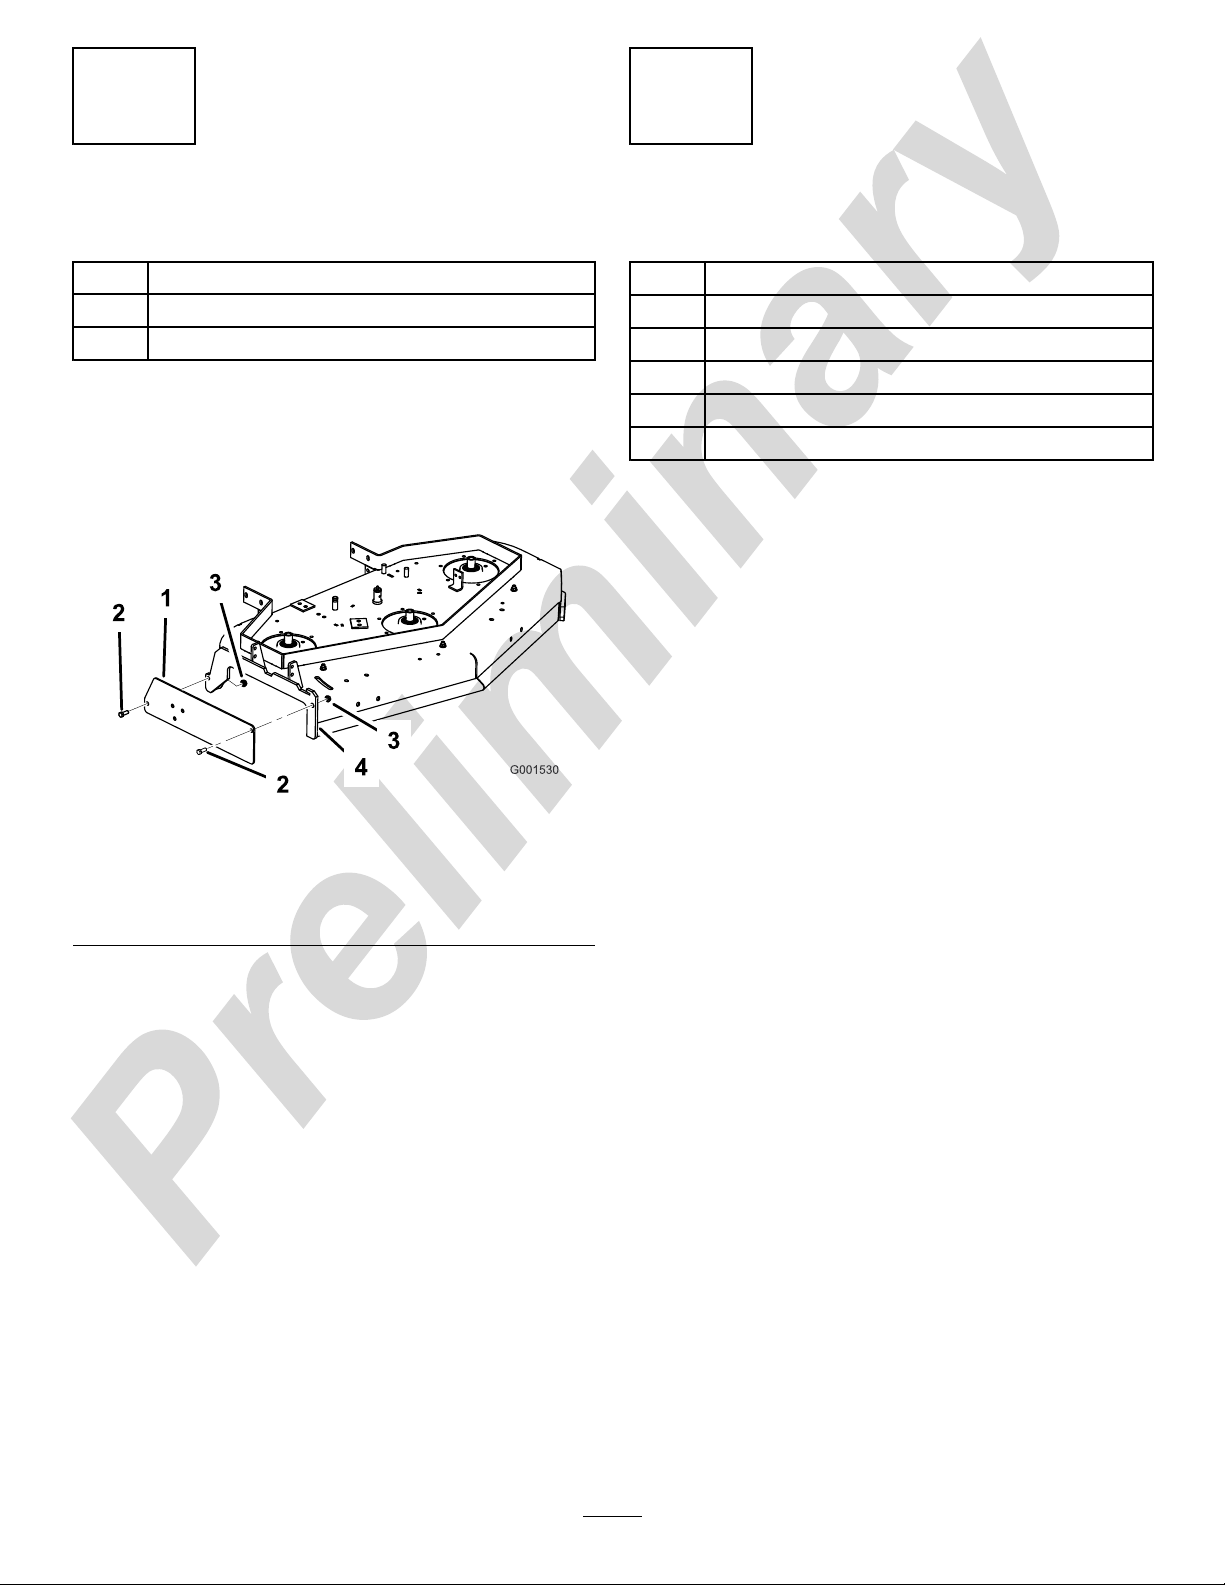
Installthedischargeplatetotheoutsideofthemounting
bracketwith2bolts(3/8x1inch)and2nuts(3/8inch)
(Figure5).
InstallingtheBafes
Partsneededforthisprocedure:
1
Leftbafe
1
Centerbafe
1
Rightbafe
8
Bolt(3/8x7/8inch)
9
Flangenut(3/8inch)
1
Carriagebolt(3/8x3/4inch)
Procedure
Note:Allholesexistinthemowerdeckforinstallingthe
newbafes.
Note:Looselyinstallthebafestoalignthebafeswithall
existingholesinthemower.
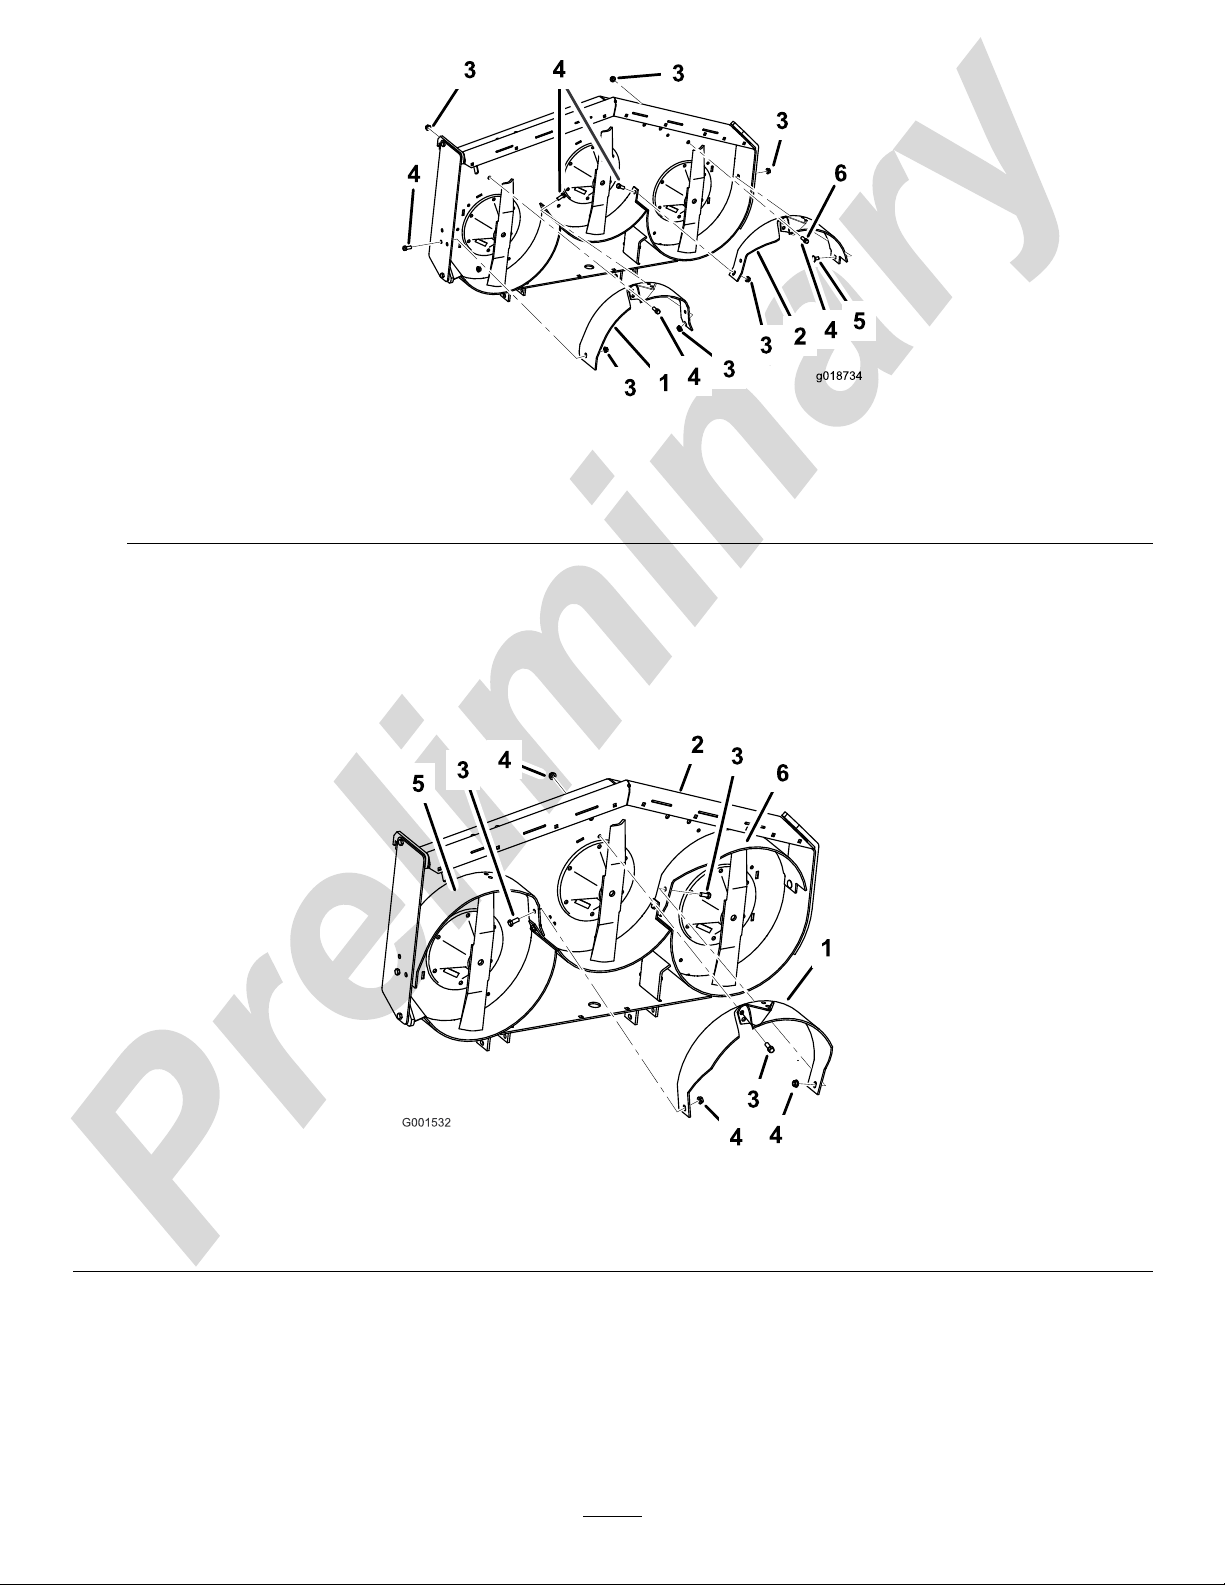
1.Installtherightbafeintothemower.
2.Looselyinstalltherightbafetothemowerdeckwith
2bolts(3/8x7/8inch)and2angenuts(3/8inch)
(Figure6).
Figure5
FixedDeckMowerShown
1.Discharge
plate
2.Bolt(3/8x
1inch)
3.Nut(3/8
inch)
4.Mounting
bracket
3.Looselyinstalltherightbafetothedischargeplate
with1bolt(3/8x7/8inch)and1angenut(3/8inch)
Figure6).
(
4.Installtheleftbafeintothemower.
5.Looselyinstalltheleftbafetothemowerdeckwith
2bolts(3/8x7/8inch)and2angenuts(3/8inch)
(Figure6).
6.Looselyinstalltheleftbafetotheleftsidewallofthe
mowerdeckwith1carriagebolt(3/8x3/4inch)and
1angenut(3/8inch)(Figure6).
5
Page 6
g018734
4
6
Figure6
1.Rightbafe3.Flangenut(3/8inch)5.Carriagebolt(3/8x3/4inch)
2.Leftbafe4.Bolt(3/8x7/8inch)6.Boltfor40inchGrandStandmowers.
Thisboltisfromtheidlerpulleyarm.
7.Installthecenterbafeintothemower.
8.Looselyinstallthecenterbafetotheleftbafewith
1bolt(3/8x7/8inch)and1angenut(3/8inch)
(Figure7).
9.Looselyinstallthecenterbafetotherightbafewith
1bolt(3/8x7/8inch)and1angenut(3/8inch)
(Figure7).
10.Looselyinstallthecenterbafetothetopofthemower
deckwith1bolt(3/8x7/8inch)and1angenut(3/8
inch)(Figure7).
Figure7
1.Centerbafe3.Bolt(3/8x7/8inch)5.Rightbafe
2.Mowerdeck
4.Flangenut(3/8inch)6.Leftbafe
6
Page 7
6
InstallingtheNewBlades
Partsneededforthisprocedure:
3Recyclerblades
Procedure
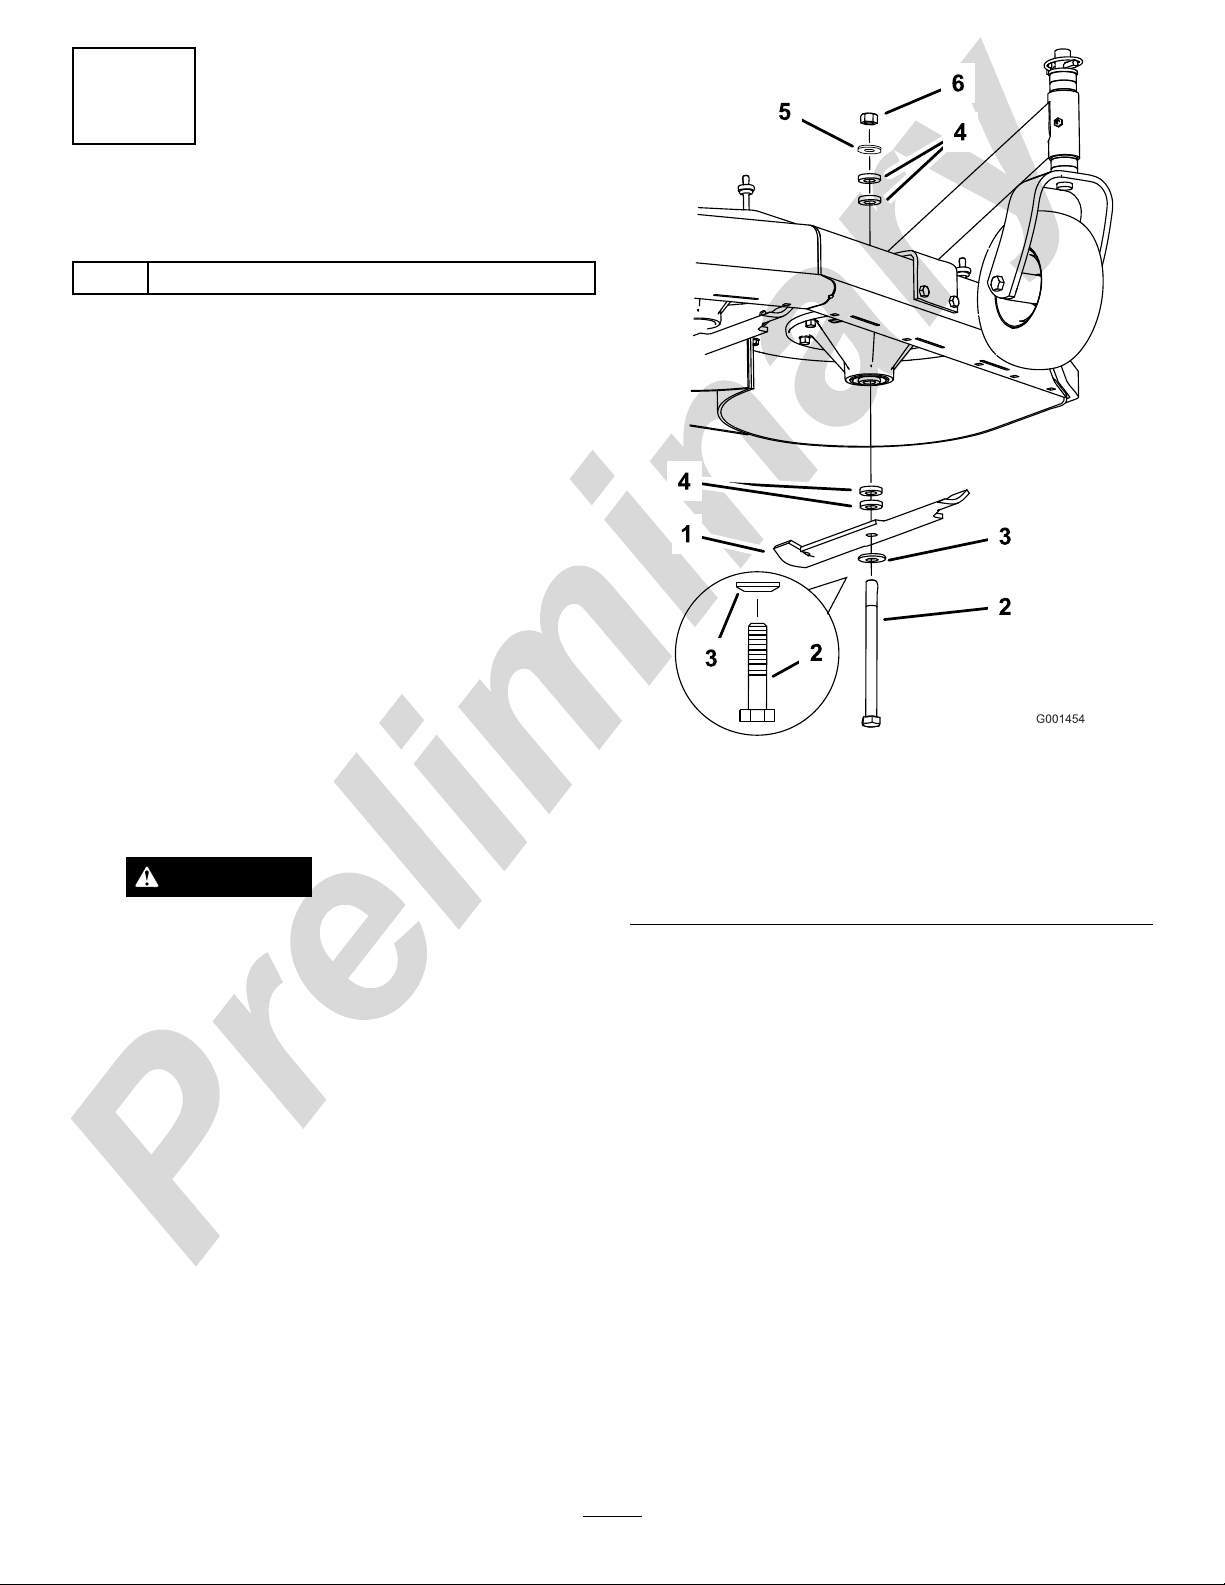
Important:Thesailpartoftheblade(i.e.,theturned
upsection)mustfacetheinsideofthemower(Figure8).
1.Forxeddeckmowersonly,adjustthebladesbyusing
the4spacers(1/4inch)onthebladespindlebolts;
refertotheOperator'sManual.
2.Installthenewbladestothespindleswithwashersand
bladeboltsthatwerepreviouslyremoved(Figure8or
Figure9).
3.Forxeddeckmowersonly,tightenthebladeboltto
75-80ft-lb(101-108N-m)(Figure8).
4.ForGrandStandmowersandoatingdeckmowers,
tightenthebladeboltto85-110ft-lb(115-150N-m)
(Figure9).
5.Rotatethebladesandensurethereisclearancebetween
thebladesandthebafes.
Figure8
FixedDeckMowerShown
6.Tightenallboltsandnutsforthebafes.
WARNING
Abladeissharp.Contactwithasharpblade
cancauseseriouspersonalinjury.
Wearglovesorwrapsharpedgesoftheblade
witharag.
1.Blade
2.Bladebolt5.Thinwasher
3.Curvedwasher
4.Spacer(xeddeckmower
only)
6.Nut
7
Page 8
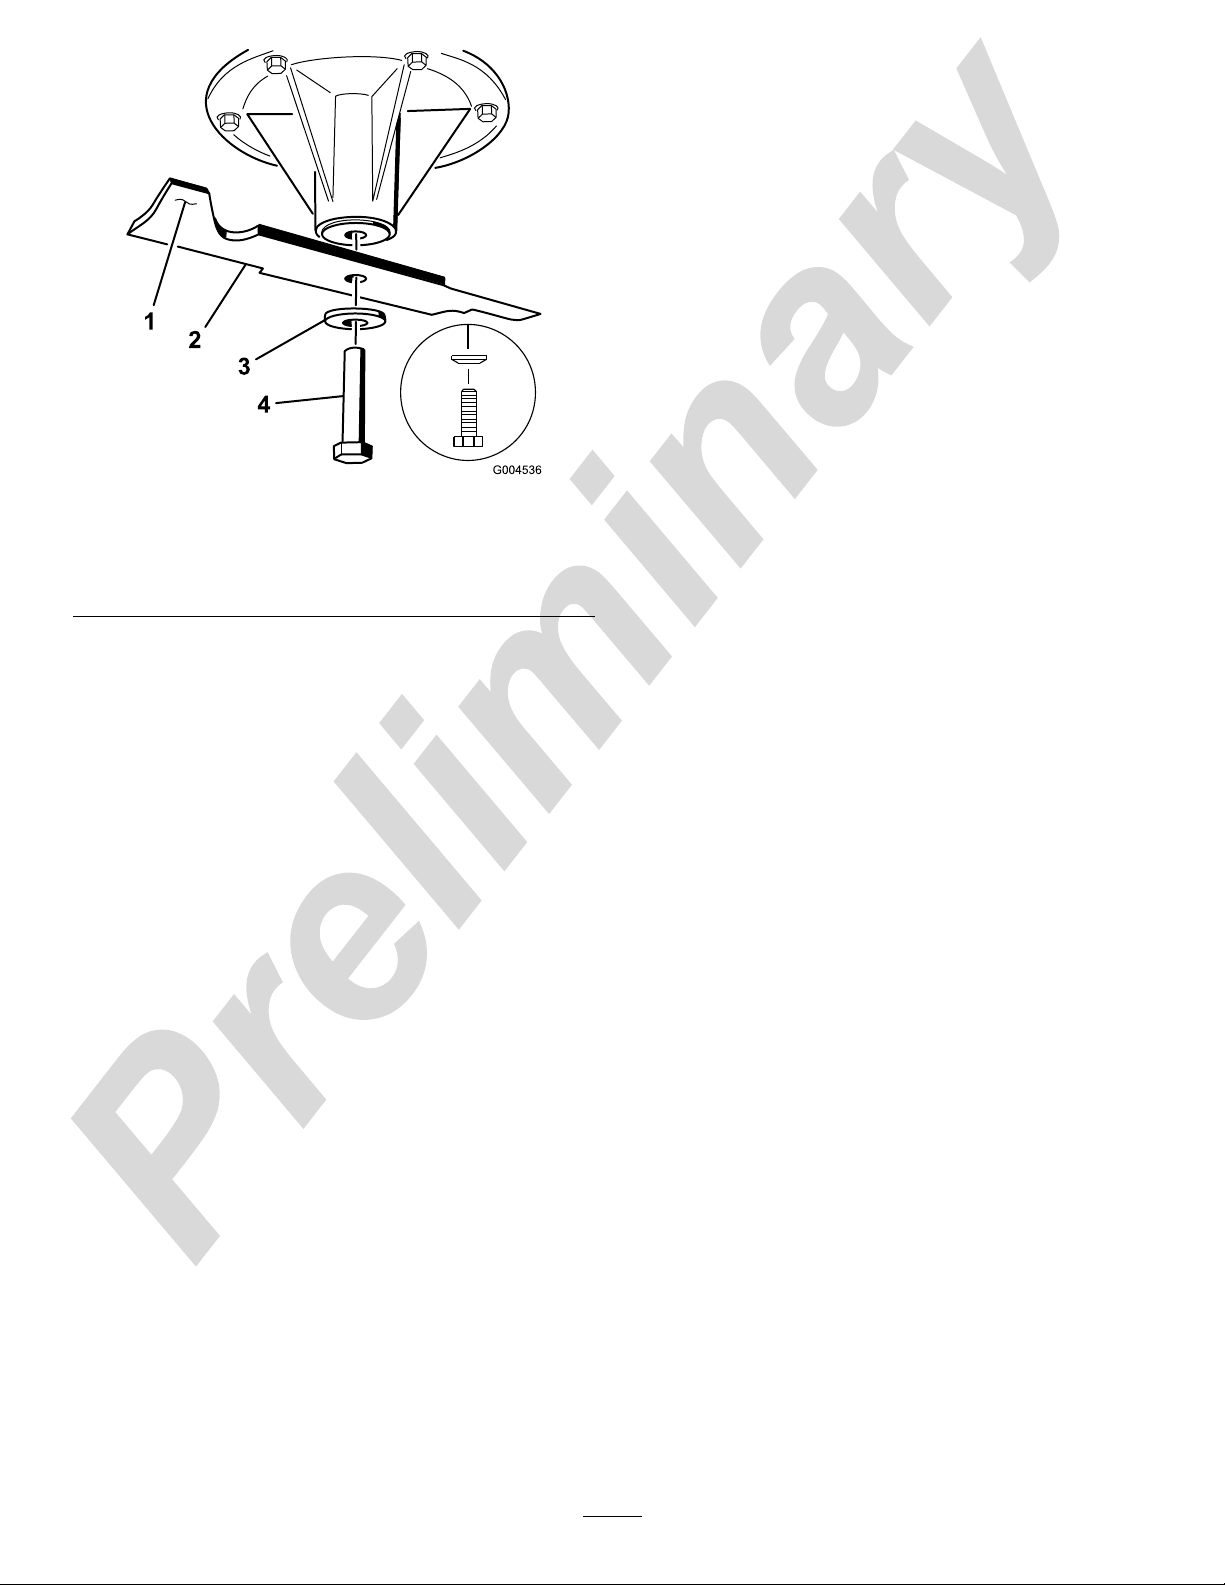
Figure9
GrandStand
1.SailAreaofBlade3.Curvedwasher
2.Blade4.BladeBolt
®
MowerShown
MowingwithSharpBlades
Asharpbladecutscleanlyandwithouttearingorshredding
thegrass.Adullbladewilltearandshredthegrass.Tearing
andshreddingcausesthegrasstoturnbrownattheedges
whichimpairsgrowthandincreasessusceptibilitytodisease.
AfterOperating
Toensureoptimumperformance,cleantheundersideofthe
mowerhousingaftereachuse.Ifresidueisallowedtobuild
upinthemowerhousing,cuttingperformancewilldecrease.
Operation
SelectingtheProper Height-of-Cut
Removeapproximatelyoneinchornomorethan1/3ofthe
grassbladewhencutting.Inexceptionallylushanddense
grassyoumayneedtoraisetheheight-of-cutsettingor
converttosidedischargeorbaggingoperations.
MowinginExtremeConditions
Airisrequiredtocutandrecutgrassclippingsinthemower
housing,sodonotsettheheight-of-cuttoolowortotally
surroundthehousingbyuncutgrass.Alwaystrytohaveone
sideofthemowerhousingfreefromuncutgrass,allowingair
tobedrawnintothehousing.Whenmakinganinitialcut
throughthecenterofanuncutarea,operatethemachine
slowerandbackupifthemowerstartstoclog.
MowingatProperIntervals
Undermostnormalconditionsyouwillneedtomowevery
4–5days.However,grassgrowsatdifferentratesatdifferent
times.Thus,inordertomaintainthesameheight-of-cut,
whichisagoodpractice,you'llneedtocutmorefrequentlyin
earlyspring;asthegrassgrowthrateslowsinmidsummer,
cutonlyevery8–10days.Ifyouareunabletomowforan
extendedperiodduetoweatherconditionsorotherreasons,
converttosidedischargeorbaggingoptionsormowrst
withtheheight-of-cutatahighlevel;thenmowagain2–3
dayslaterwithalowerheightsetting.
8
 Loading...