

Page 1

TORK EW101/EW103/EW120
7 DAY Digital Time Switch
READ INSTRUCTIONS CAREFULLY BEFORE SETTING UNIT
INSTALLATION
UNIT IS TO BE INSTALLED BY A LICENSED ELECTRICIAN
1. To remove unit from enclosure: Push tab on right to
swing unit to the left and remove.
2. Mount the enclosure at eye level using screws or other
suitable fastening device. Bring supply and load wires in
through bottom or side knockouts. DO NOT USE TOP.
3. Install 9 volt alkaline battery (not supplied) by sliding
battery cover in direction of arrow and removlng (located
above key pad) Pull out the battery connector and connect the battery. Reinstall battery cover
Note: Unit can be fully programed using battery power only.
4. Reinstall unit by reverslng step #1 above and connect
wires to unit as per suggested wiring diagrams See illustration on back page.
KEY FUNCTIONS
DAY: Press to select proper day of the week in the CLK
(clock) mode and the SCH (schedule) mode.
HOUR: Press to set the hours in the CLK mode and in
the SCH (schedule) mode.
MIN: Press to set the minutes in the CLK mode and in
the SCH mode.
OVERRIDE: Press to alter the current load status (operates in both AUTO and MAN modes).
MODE: Press to advance to next mode. Sequence is:
CLK, SCH, AUTO, MAN. In the CLK and SCH modes,
UNIT AUTOMATICALLY REVERTS TO THE AUTO
MODE IF NO ENTRIES ARE MADE FOR 5 MINUTES.
DELETE: Press to delete the displayed information when
in the SCH mode.
ON/OFF: Press to assign ON or OFF events.
ENTER: Press to store the displayed information into
memory. Information will not be stored until ENTER
key is pressed.
NOTE: During settings, each press of the key will
advance one number. For rapid advance, hold key in.
TO SET CLOCK
Press MODE key until display shows CLK.
Press DAY key to select current day. Press HOUR key
to select current hour. Check A (AM) or P (PM). Press
MIN key to select current minute. Press ENTER key and
the clock is set for current time and day.
TO SET SCHEDULE
For convenience, write out your desired schedule on a
separate paper.
If display does not show SCH, press mode key until dis-
play shows SCH.
The display will Indicate it is ready to receive SCH setpoint #1.
Press DAY key to set day(s).
Note: The following is a listing of the sets of days which can be set:
1. M, T, W, TH, F
2. S, SU (Saturday and Sunday only)
3. M, T, W, TH, F, S, SU
4. Individual days: M or T or W or TH or F or S or SU
Press HOUR and MIN keys (check for AM or PM). Press
ON/OFF key for appropriate event.
Press ENTER key to store the information and display
will indicate it is ready to receive SCH setpoint #2.
Proceed for up to 14 setpoints. Then press MODE
key and unit will go to the AUTO (run) mode.
In the AUTO mode, the unit will display current time and
day as well as load status (ON and OFF).
Note: When the unit is returned to the auto mode, check the
load status of the current setting. If it is showing OFF but should
be ON, press the override key. The unit will correct itself at the
next scheduled event and no further alteration will be necessary.
REVIEW/MODIFY
1. CLOCK - ALTER TIME
Press mode key until display shows CLK.
Press DAY, HOUR, and MIN keys to change to the cor-
rect time. Press ENTER.
2. SCHEDULE - REVIEW
Press mode key until display shows SCH.
Press ENTER key repeatedly to review all the scheduled
entries.
3. SCHEDULE - MODIFY
During the review (see previous section) any set point
can be modified or deleted. Use the HOUR, MIN and
DAY keys to modify. Use the DELETE key to eliminate
that event. Press ENTER key after each modification.
OVERRIDE - TEMPORARY
In order to temporarily change the current ON or OFF
status of a load, simply press the override key when the
unit is in the AUTO mode. The altered load status will
flash. Override is in effect until the next scheduled event.
In order to cancel the override, press override key again.
OVERRIDE - LONG TERM
Press mode key until display shows MAN (manual).
Normal schedule will not be executed and the load
status will remain unchanged as indicated. Press the
OVERRIDE key to obtain the correct status or to
alter the load status.
Page 2

TO SET SCHEDULE
For convenience, write out your desired schedule on a
separate paper.
If display does not show SCH, press mode key until display shows SCH.
The display will Indicate it is ready to receive SCH setpoint #1.
Press DAY key to set day(s).
Note: The following is a listing of the sets of days which can be set:
1. M, T, W, TH, F
2. S, SU (Saturday and Sunday only)
3. M, T, W, TH, F, S, SU
4. Individual days: M or T or W or TH or F or S or SU
Press HOUR and MIN keys (check for AM or PM). Press
ON/OFF key for appropriate event.
Press ENTER key to store the information and display
will indicate it is ready to receive SCH setpoint #2.
Proceed for up to 14 setpoints. Then press MODE
key and unit will go to the AUTO (run) mode.
In the AUTO mode, the unit will display current time and
day as well as load status (ON and OFF).
Note: When the unit is returned to the auto mode, check the
load status of the current setting. If it is showing OFF but should
be ON, press the override key. The unit will correct itself at the
next scheduled event and no further alteration will be necessary.
REVIEW/MODIFY
1. CLOCK - ALTER TIME
Press mode key until display shows CLK.
Press DAY, HOUR, and MIN keys to change to the cor-
rect time. Press ENTER.
2. SCHEDULE - REVIEW
Press mode key until display shows SCH.
Press ENTER key repeatedly to review all the scheduled
entries.
3. SCHEDULE - MODIFY
During the review (see previous section) any set point
can be modified or deleted. Use the HOUR, MIN and
DAY keys to modify. Use the DELETE key to eliminate
that event. Press ENTER key after each modification.
OVERRIDE - TEMPORARY
In order to temporarily change the current ON or OFF
status of a load, simply press the override key when the
unit is in the AUTO mode. The altered load status will
flash. Override is in effect until the next scheduled event.
In order to cancel the override, press override key again.
OVERRIDE - LONG TERM
Press mode key until display shows MAN (manual).
Normal schedule will not be executed and the load
status will remain unchanged as indicated. Press the
OVERRIDE key to obtain the correct status or to
alter the load status.
Page 3
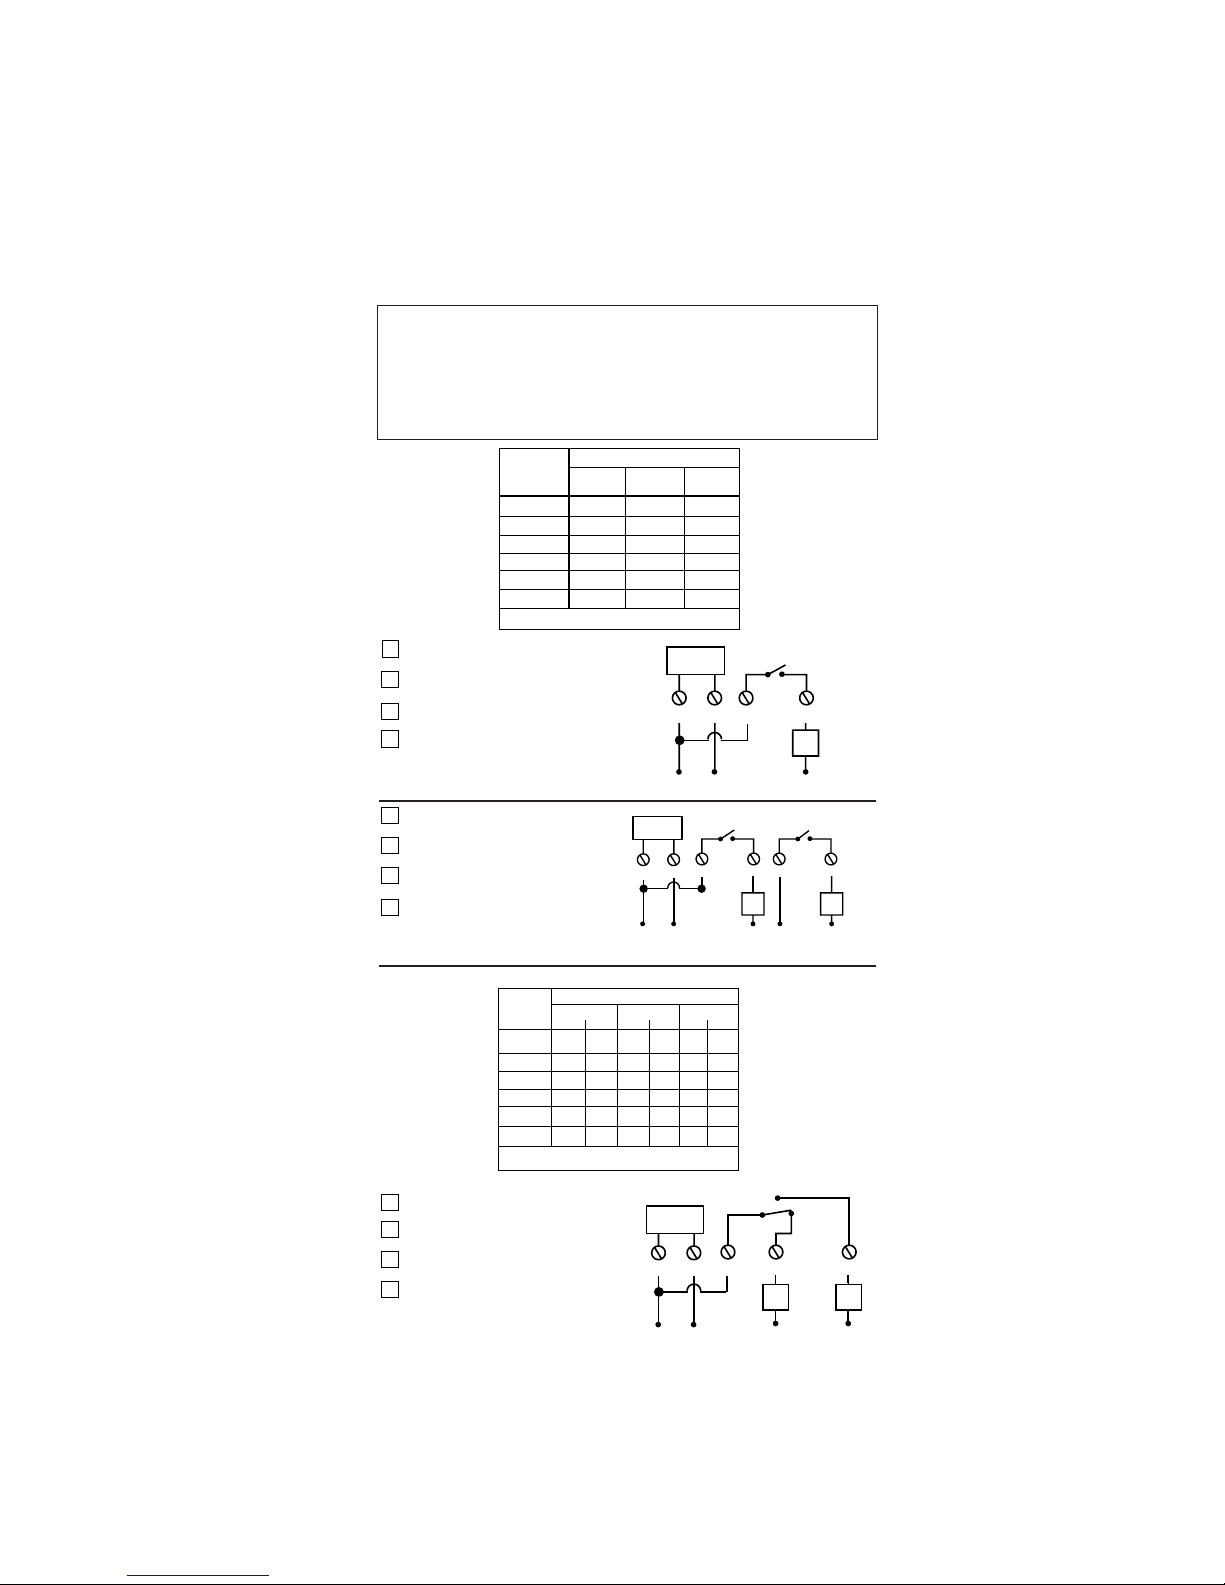
TORK
DIGITAL TIME SWITCH
DRY CONTACT RATINGS
30A
30A
6A
5A
470VA
2 HP
12A
12A
6A
5A
690VA
–
Type
of Load
120
VAC
240
VAC
277
VAC
20A Resistive @ 28VDC
Resistive
Inductive
Ballast
Tungsten
Pilot Duty
Motor
30A
30A
20A
5A
470VA
1 HP
3
SPST
4
LOAD
1 2
NLN
TIMER
SUPPLY
EW101 120VAC
EW101-2 240VAC
EW101-3 277VAC
EW101-24 24VAC
OUTPUT: SPST
DPST
TIMER
SUPPLY
356
4
LLN
1 2
LOAD
N
LOAD
N
EW103 120VAC
EW103-2 240VAC
EW103-3 277VAC
EW103-24 24VAC
OUTPUT: DPST
DRY CONTACT RATINGS
Resistive
Inductive
Ballast
Tungsten
Pilot Duty
Motor
20A
20A
6A
5A
1 HP
Type
of Load
120VAC
240VAC
277VAC
N.O. 20A Resistive @ 28VDC
N.O. N.C N.O. N.C
N.O. N.C
470
VA
10A
10A
3A
3A
275
VA
20A
20A
6A
5A
2 HP
470
VA
10A
10A
3A
3A
275
VA
6A
6A
6A
–
–
690
VA
3A
3A
3A
–
–
–
1/4
HP
1/2
HP
N.C. 10A Resistive @ 28VDC
TIMER
SUPPLY
34 5
SPDT
1 2
LN
LOAD LOAD
N N
EW120 120VAC
EW120-2 240VAC
EW120-3 277VAC
EW120-24 24VAC
OUTPUT: SPDT
TORK
®
MLI-140(B) 1 GROVE STREET, MT. VERNON, NY 10550 TEL: 914-664-3542
FAX: 914-664-5052
Disconnect power at main panel prior to installing or servicing this time
switch or the equipment connected to it.
Install and use in accordance with national and local electrical codes.
Supply Connections: Use gauge specified (AWG # 10-16) suitable for 75
degrees C (167 degrees F). Use copper wire only.
Replace insulator before turning on electricity.
 Loading...