

Page 1
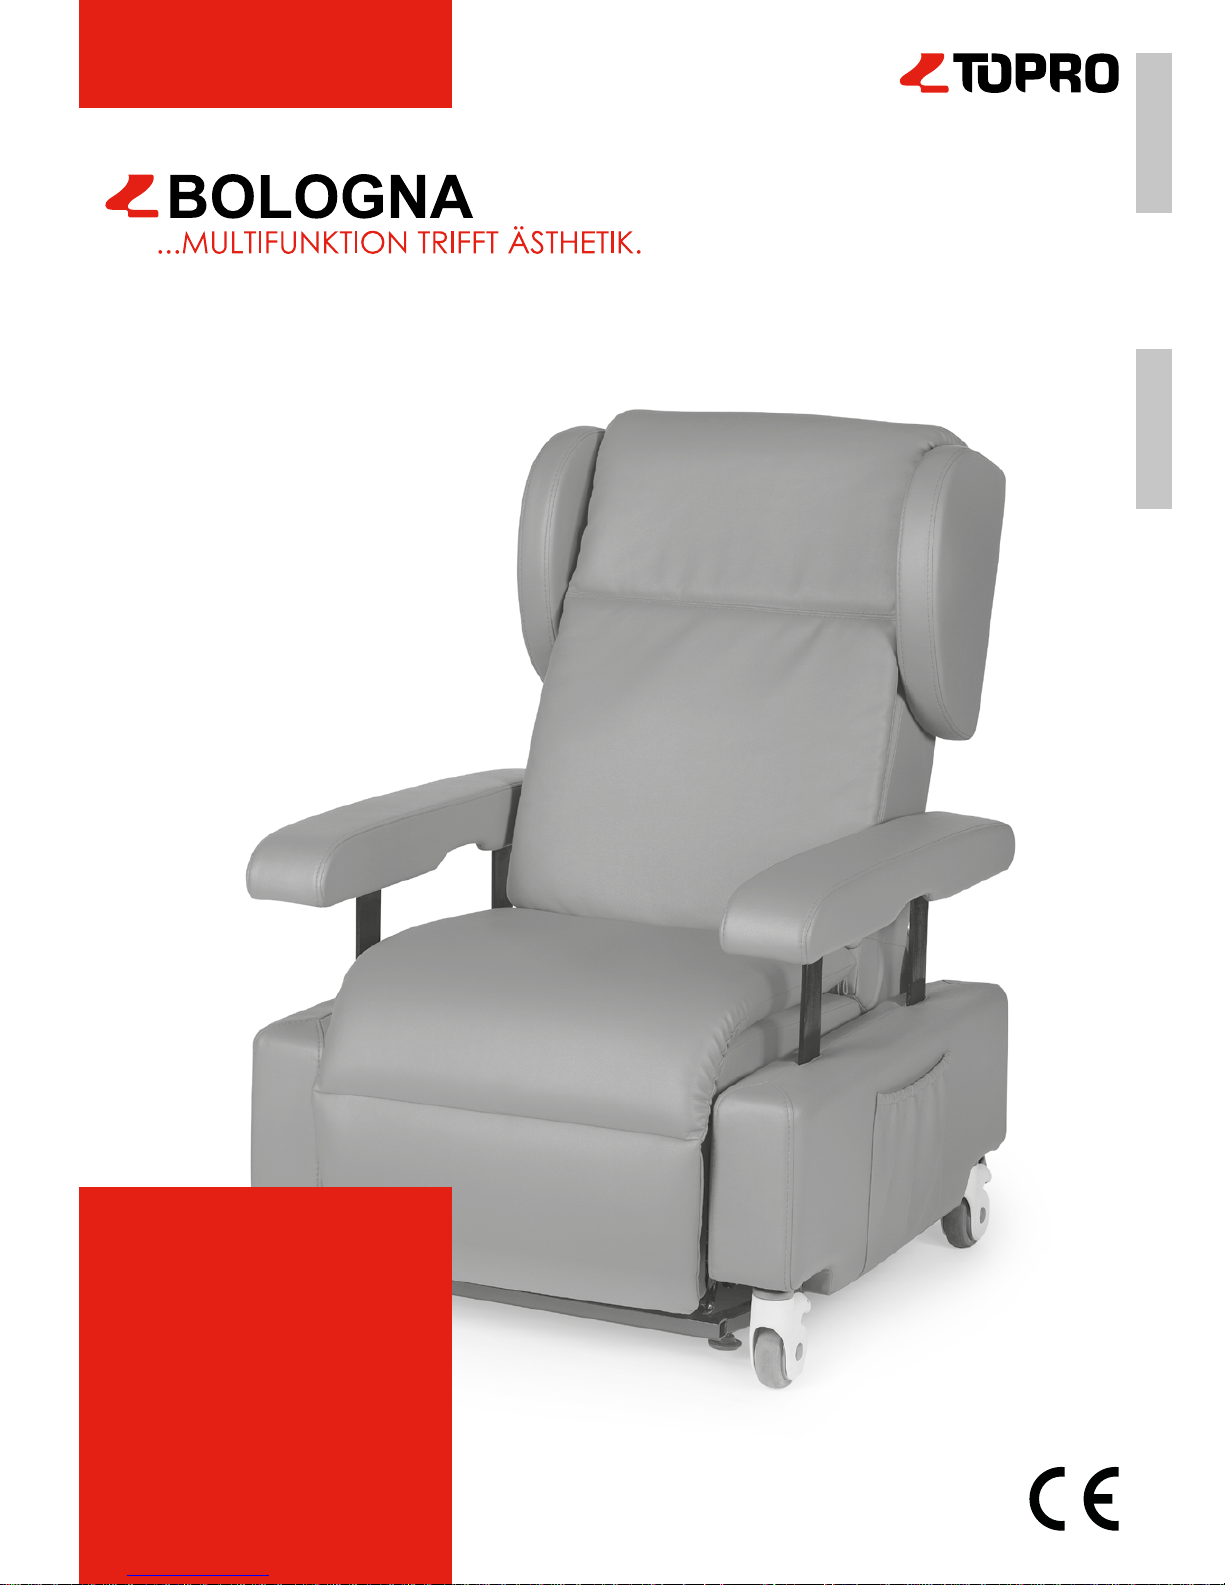
DEENFR
Operating instruction
Betriebsanleitung
Für künftige Verwendung aufbewahren!
Keep for future use!
Page 2
FR DE
2
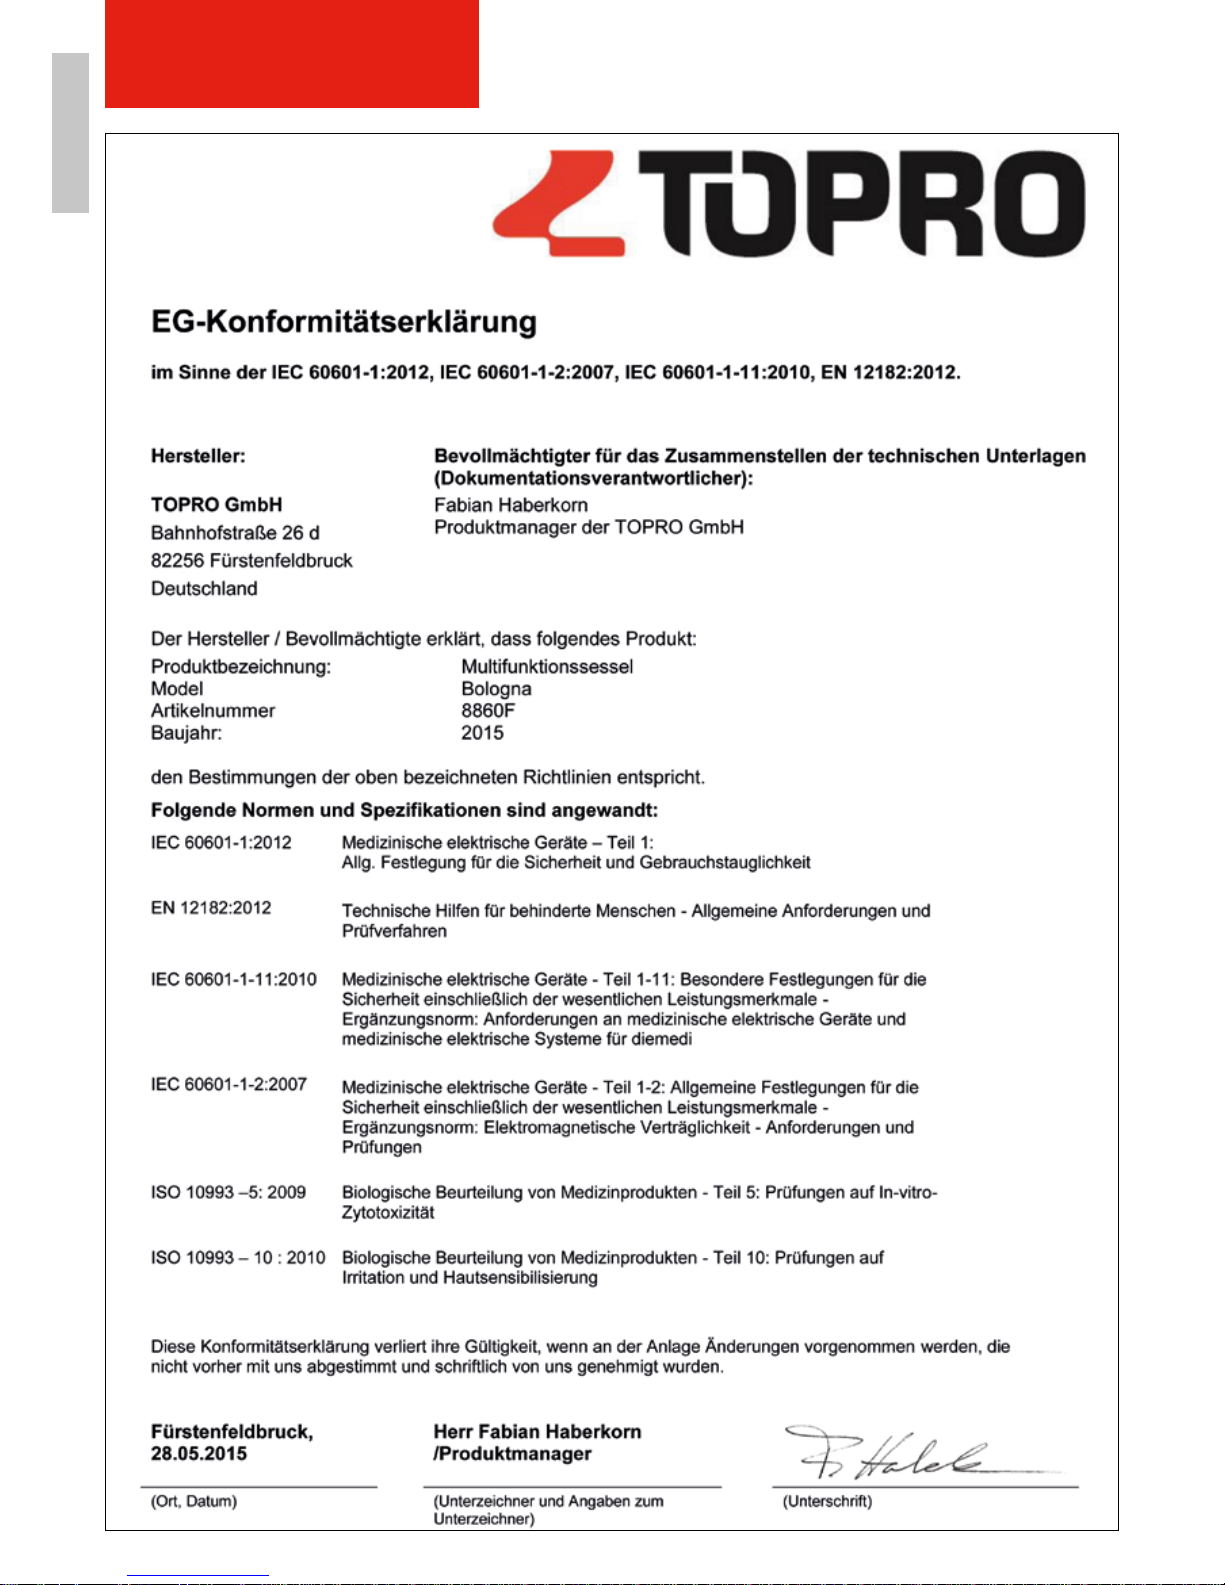
EG-KONFORMITÄTSERKLÄRUNG
Page 3

DEFR
3
INHALT
1. Identikation . . . . . . . . . . . . . . . . . . . . . . . . . . . . . . . . . .5
2. Benutzerhinweise . . . . . . . . . . . . . . . . . . . . . . . . . . . . . . .6
2.1 Zweck des Dokuments . . . . . . . . . . . . . . . . . . . . . . . . . . .6
2.2 Ortsangabe in der Betriebsanleitung . . . . . . . . . . . . . . . . . . . .6
2.3 Darstellung von Sicherheitshinweisen . . . . . . . . . . . . . . . . . . .7
3. Grundlegende Sicherheitshinweise . . . . . . . . . . . . . . . . . . . . .8
3.1 Bestimmungsgemäßer Gebrauch . . . . . . . . . . . . . . . . . . . . .8
3.2 Vorhersehbare Fehlanwendung . . . . . . . . . . . . . . . . . . . . . .9
3.3 Risiken im Umgang mit dem Sessel . . . . . . . . . . . . . . . . . . . 10
3.4 Restrisiken . . . . . . . . . . . . . . . . . . . . . . . . . . . . . . . . 10
3.5 Qualifikation Personal und Nutzer . . . . . . . . . . . . . . . . . . . . 11
3.6 Sesselkennzeichnung . . . . . . . . . . . . . . . . . . . . . . . . . . 11
4. Sesselbeschreibung. . . . . . . . . . . . . . . . . . . . . . . . . . . . .13
4.1 Einsatzbereiche. . . . . . . . . . . . . . . . . . . . . . . . . . . . . .13
4.2 Funktionsbeschreibung . . . . . . . . . . . . . . . . . . . . . . . . . .13
4.3 Aufbau des Sessels. . . . . . . . . . . . . . . . . . . . . . . . . . . .14
4.4 Baugruppen und Komponenten . . . . . . . . . . . . . . . . . . . . . 15
4.4.1 Rahmen und Motor . . . . . . . . . . . . . . . . . . . . . . . . . 15
4.4.2 Steuergerät . . . . . . . . . . . . . . . . . . . . . . . . . . . . . 15
4.4.3 Rollen . . . . . . . . . . . . . . . . . . . . . . . . . . . . . . . .15
4.4.4 Fernbedienung . . . . . . . . . . . . . . . . . . . . . . . . . . . 16
4.4.4.1 Erklärung der Symbole . . . . . . . . . . . . . . . . . . . 16
4.4.4.2 Position der Fernbedienung . . . . . . . . . . . . . . . . 18
4.4.4.3 Sperren von Tasten und Funktionen . . . . . . . . . . . . 18
4.4.5 Positionierungskissen. . . . . . . . . . . . . . . . . . . . . . . .19
4.4.5.1 Lumbalkissen . . . . . . . . . . . . . . . . . . . . . . . . 19
4.4.5.2 viereckiges Positionierungskissen (optional) . . . . . . . . 19
4.4.6 Batterie . . . . . . . . . . . . . . . . . . . . . . . . . . . . . . . 20
4.4.6.1 Technische Daten Batterie . . . . . . . . . . . . . . . . . 21
4.5 Technische Daten. . . . . . . . . . . . . . . . . . . . . . . . . . . . .22
5. Transport und Installation. . . . . . . . . . . . . . . . . . . . . . . . . .23
5.1 Sessel zum Aufstellort transportieren. . . . . . . . . . . . . . . . . . .23
5.1.1 Vor dem Transport . . . . . . . . . . . . . . . . . . . . . . . . . 23
5.1.2 Sessel transportieren . . . . . . . . . . . . . . . . . . . . . . . . 23
5.1.3 Sessel auspacken . . . . . . . . . . . . . . . . . . . . . . . . . 24
5.1.4 Sessel versetzen . . . . . . . . . . . . . . . . . . . . . . . . . . 24
5.2 Montage . . . . . . . . . . . . . . . . . . . . . . . . . . . . . . . . . 24
5.2.1 Verbindung der Sesselkomponenten . . . . . . . . . . . . . . . .24
5.2.2 Rückenteil montieren . . . . . . . . . . . . . . . . . . . . . . . . 25
INHALT
Page 4

FR DE
4
INHALT
INHALT
6. Inbetriebnahme . . . . . . . . . . . . . . . . . . . . . . . . . . . . . . . 26
6.1 Erstinbetriebnahme . . . . . . . . . . . . . . . . . . . . . . . . . . . .27
6.1.1 Sicher in den Sessel setzen . . . . . . . . . . . . . . . . . . . . 27
6.1.2 Ruhen im Liegen . . . . . . . . . . . . . . . . . . . . . . . . . . 28
6.1.3 Sicher in die Herz-Waage-Position . . . . . . . . . . . . . . . . . 28
6.1.4 Sicher aus dem Sessel aufstehen . . . . . . . . . . . . . . . . . 29
6.1.5 Individuelle Einstellung der Fußstütze . . . . . . . . . . . . . . . 29
6.1.6 Individuelle Einstellung der Rückenlehne. . . . . . . . . . . . . .30
6.1.7 Nackenstellung anpassen . . . . . . . . . . . . . . . . . . . . . 30
6.1.8 Höheneinstellung . . . . . . . . . . . . . . . . . . . . . . . . . . 31
6.1.9 Anpassen der Armlehnen . . . . . . . . . . . . . . . . . . . . . .31
6.1.10 Sessel verschieben mit Nutzer im Sessel sitzend. . . . . . . . .32
6.2 Stromversorgung herstellen . . . . . . . . . . . . . . . . . . . . . . . 32
7. Gewährleistung . . . . . . . . . . . . . . . . . . . . . . . . . . . . . . . 33
7.1 Gewährleistungsbestimmungen . . . . . . . . . . . . . . . . . . . . . 33
7.2 Von der Gewährleistung ausgeschlossen . . . . . . . . . . . . . . . . 33
7.3 Gewährleistung / Lebenszeit . . . . . . . . . . . . . . . . . . . . . . . 33
8 Instandhaltung und Wartung . . . . . . . . . . . . . . . . . . . . . . . . 34
8.1 Kundendienst . . . . . . . . . . . . . . . . . . . . . . . . . . . . . . .34
8.2 Wartungsempfehlung und Reinigung . . . . . . . . . . . . . . . . . . .35
8.2.1 Reinigung . . . . . . . . . . . . . . . . . . . . . . . . . . . . . .35
8.2.2 Wartung. . . . . . . . . . . . . . . . . . . . . . . . . . . . . . .35
8.3 Fehlersuche und Störungsbeseitigung . . . . . . . . . . . . . . . . . . 36
8.3.1 Liste der Warn- und Störmeldungen . . . . . . . . . . . . . . . . 36
9. Außerbetriebsetzung . . . . . . . . . . . . . . . . . . . . . . . . . . . . 37
9.1 Vorübergehende Stilllegung . . . . . . . . . . . . . . . . . . . . . . . 37
9.2 Lagerbedingungen . . . . . . . . . . . . . . . . . . . . . . . . . . . . 37
9.3 Vernichtung / Recycling. . . . . . . . . . . . . . . . . . . . . . . . . .37
10. Optionales Zubehör . . . . . . . . . . . . . . . . . . . . . . . . . . . . 38
11. Schaltkreise. . . . . . . . . . . . . . . . . . . . . . . . . . . . . . . . .39
11.1 Fernbedienung. . . . . . . . . . . . . . . . . . . . . . . . . . . . . .39
11.2 Kontrollbox. . . . . . . . . . . . . . . . . . . . . . . . . . . . . . . .40
11.3 Transformator . . . . . . . . . . . . . . . . . . . . . . . . . . . . . . 40
Page 5
DEFR
5
1. IDENTIFIKATION
IDENTIFIKATION
Identikationsdaten
Hersteller
TOPRO GmbH
Bahnhofstraße 26 D
82256 Fürstenfeldbruck
Tel.: +49 (0) 8141-888 939-0
Fax: +49 (0) 8141-888 939-22
[email protected]
www.topro.de
Formales zur Betriebsanleitung
© Copyright TOPRO 2015
Alle Rechte vorbehalten.
Nachdruck, auch auszugsweise, nur mit Genehmigung der Firma TOPRO GmbH gestattet.
Hersteller: TOPRO GmbH
Produkt: BOLOGNA
Typ: Pege- und Transfersessel
Artikelnummer
8860F-RE / Farbe: rot
8860F-BR / Farbe: braun
8860F-CR / Farbe: creme
Bezugsstoffe Kunstleder
Baujahr: 2015
Version/Revision: 2016.3
Erstelldatum: 30.04.2015
Letzte Änderung: 11.03.2016
Page 6
FR DE
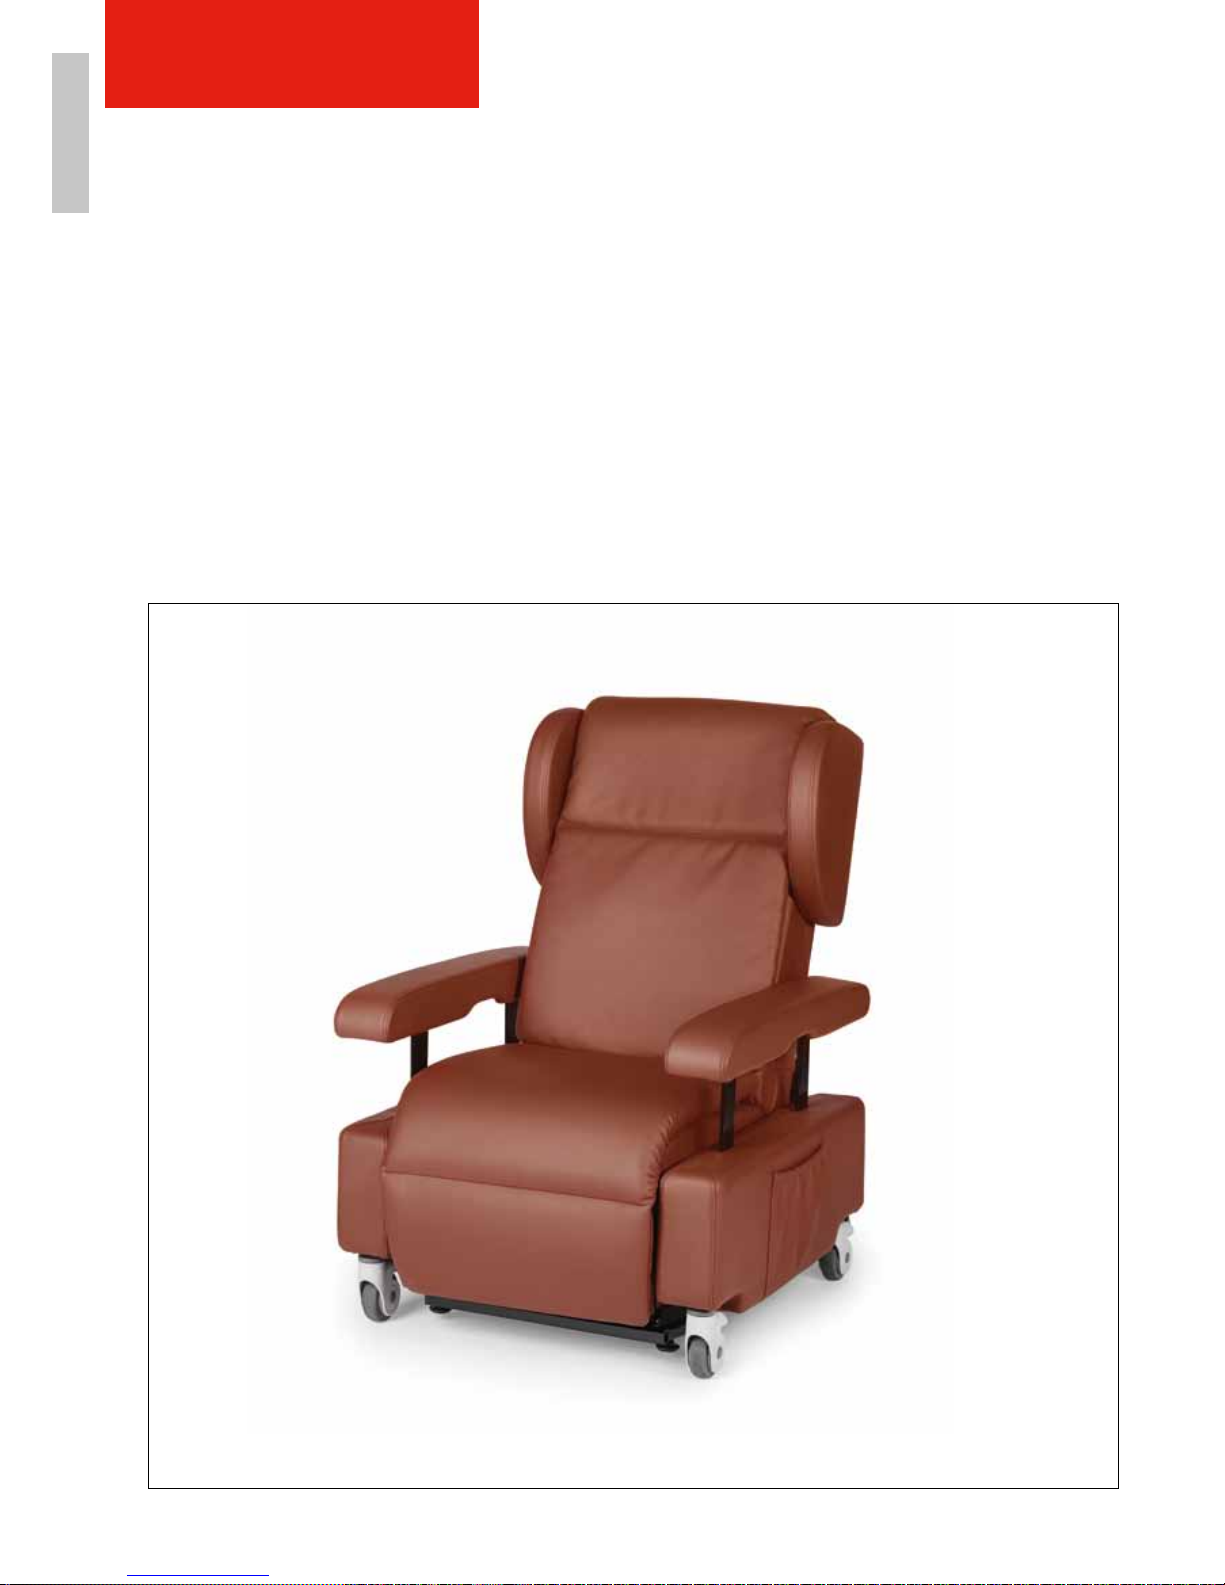
Abbildung 1: Ortsangaben in der Dokumentation
Rückseite des Sessels
linksrechts
Vorderseite des Sessels
6
BENUTZERHINWEISE
2. BENUTZERHINWEISE
2.1 Zweck des Dokuments
Die hier vorliegende Betriebsanleitung
• beschreibt die Arbeitsweise, die Bedienung und die Wartung des Sessels Bologna
• gibt wichtige Hinweise für einen sicherheitsgerechten und effizienten Umgang mit dem Sessel
• erläutert, wie das Produkt installiert und in Betrieb genommen werden muss
2.2 Ortsangaben in der Betriebsanleitung
Alle Richtungs- und Ortsangaben in dieser Anleitung dienen der Orientierung und beziehen sich
auf die Sicht des Nutzers.
Page 7
DEFR
7
BENUTZERHINWEISE
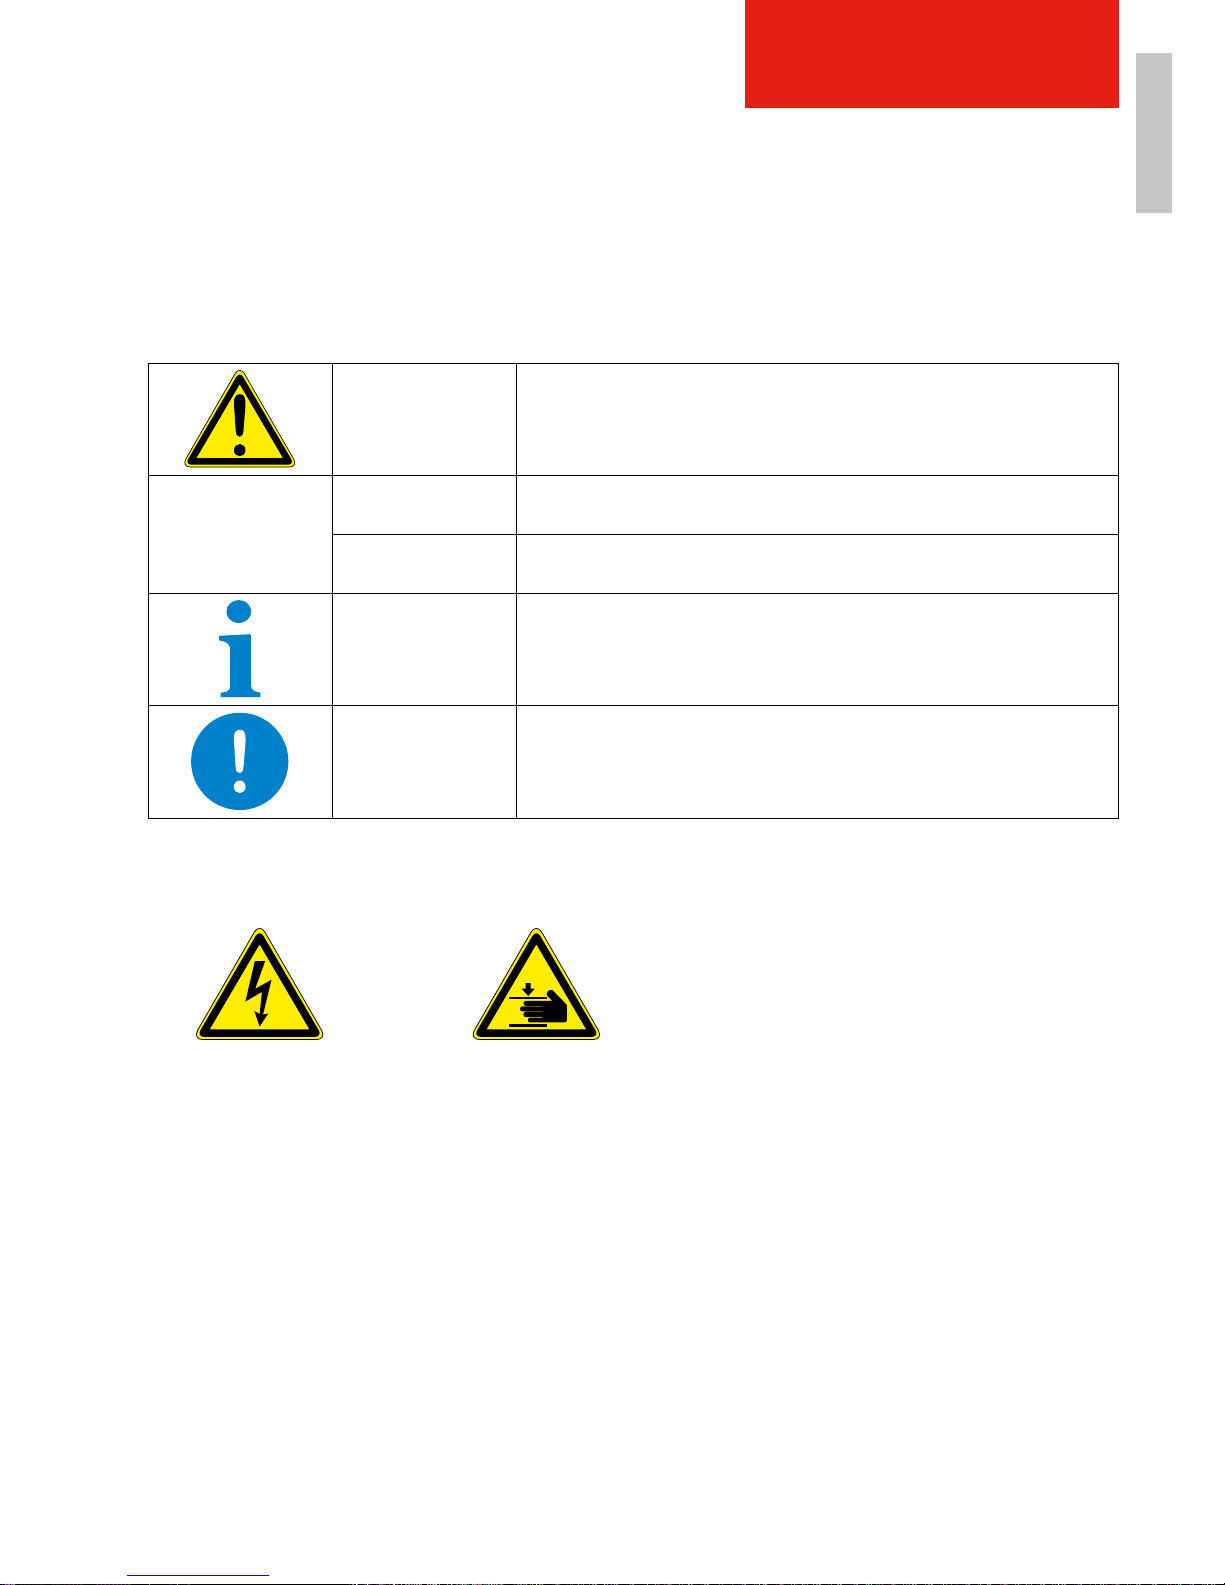
2.3 Darstellung von Sicherheitshinweisen
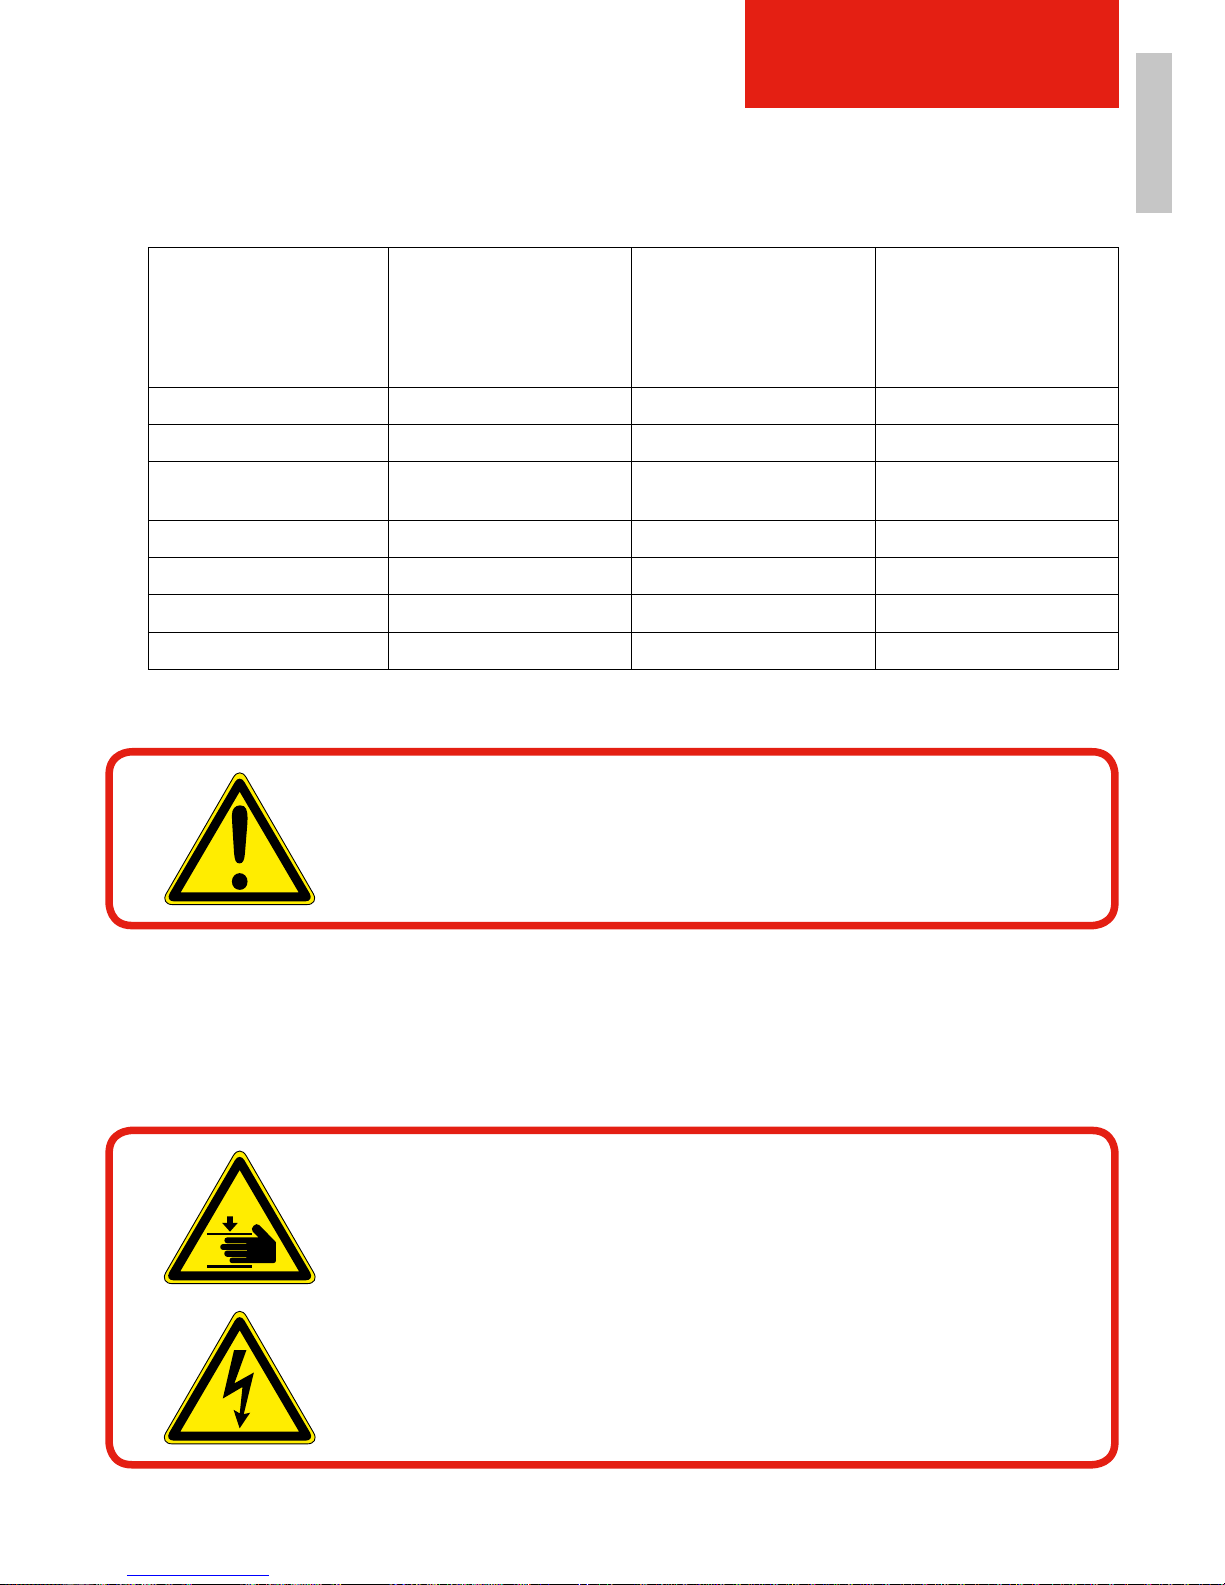
Sicherheitshinweise sind durch ein Piktogramm und ein Signalwort gekennzeichnet.
Das Signalwort beschreibt die Schwere des drohenden Risikos.
Warnung vor spezischen Risiken
GEFAHR
Unmittelbar drohendes Risiko für das Leben und die Gesundheit von Personen (schwere Verletzungen oder Tod).
WARNUNG
Möglicherweise drohendes Risiko für das Leben und die
Gesundheit von Personen (schwere Verletzungen oder Tod).
VORSICHT
Möglicherweise gefährliche Situation
(leichte Verletzungen oder Sachschäden)
HINWEIS Anwendungstipps und besonders nützliche Information.
WICHTIG
Verpichtung zu einem besonderen Verhalten oder einer
Tätigkeit für den sicherheitsgerechten Umgang mit dem
Sessel.
Risiko durch
elektrische Spannung
Risiko von
Handverletzungen
Page 8
FR DE
8
3. GRUNDLEGENDE SICHERHEITSHINWEISE
3.1 Bestimmungsgemäßer Gebrauch
Der Ruhe- und Aufstehsessel Bologna ist ausschließlich als Sitzmöbel im Innenbereich
durch maximal eine Person zu benutzen. Die Verstellung der Sitz-/Liegeposition wird
mittels Elektroantrieb gewährleistet.
Zum bestimmungsgemäßen Gebrauch gehören auch:
• das Beachten aller Hinweise dieser Betriebsanleitung,
• die Empfehlung der Einhaltung von Inspektions- und Wartungsarbeiten,
• das ausschließliche Verwenden von Originalteilen.
SICHERHEITSHINWEISE
WICHTIG!
Benutzen Sie den Ruhe- und Aufstehsessel Bologna ausschließlich
bestimmungsgemäß und in sicherheitstechnisch einwandfreiem Zustand!
Nur so ist die Betriebssicherheit des Sessels gewährleistet!
HINWEIS!
Dieser Sessel kann von Kindern ab 8 Jahren und darüber, sowie von
Personen mit verringerten physischen, sensorischen oder mentalen Fähigkeiten oder Mangel an Erfahrung und Wissen benutzt werden, wenn
sie beaufsichtigt oder bezüglich des sicheren Gebrauchs des Gerätes
unterwiesen wurden und die daraus resultierenden Gefahren verstehen.
Kinder dürfen nicht mit dem Sessel spielen.
HINWEIS!
Reinigung und Wartung dürfen nicht von Kindern ohne Beaufsichtigung
durchgeführt werden.
HINWEIS!
Wenn die Netzanschlussleitung dieses Gerätes beschädigt wird, muss
sie durch den Hersteller oder seinen Kundendienst oder eine ähnlich
qualizierte Person ersetzt werden, um Gefährdungen zu vermeiden.
HINWEIS!
Zur Vermeidung von Strangulierung sind Schnüre und Kabel vor Babies
und Kindern fernzuhalten.
HINWEIS!
Das Produkt beinhaltet Kleinstteile (z.B. einen Schlüssel),
diese können versehentlich verschluckt werden.
Bitte halten Sie kleine Teile von Kindern fern.
Page 9
DEFR
9
3.2 Vorhersehbare Fehlanwendung
Eine andere als die unter derm „bestimmungsgemäßen Gebrauch“ festgelegte oder über diese
hinausgehende Benutzung gilt als nicht bestimmungsgemäß!
Für Schäden aus nicht bestimmungsgemäßem Gebrauch
• trägt der Betreiber die alleinige Verantwortung,
• übernimmt der Hersteller keinerlei Haftung.
Umbauten oder Veränderungen
Bei eigenmächtigen Umbauten und Veränderungen des Sessels erlischt jegliche Haftung und
Gewährleistung durch den Hersteller! Dies gilt auch für das Schweißen und Bohren an tragenden
Teilen. Das elektromagnetische Verhalten des Sessels kann durch Ergänzungen oder Veränderungen jeglicher Art beeinträchtigt werden. Nehmen Sie deshalb keine Änderungen oder Ergänzungen am Sessel ohne die Rücksprache und schriftliche Zustimmung des Herstellers vor.
Ersatz- und Verschleißteile sowie Hilfsstoffe
Der Einsatz von Ersatz- und Verschleißteilen von Drittherstellern kann zu Risiken führen.
Verwenden Sie nur Originalteile oder vom Hersteller freigegebene Teile. Für Schäden aus der
Verwendung von nicht vom Hersteller freigegebenen Ersatz- und Verschleißteilen oder Hilfsstoffen übernimmt der Hersteller keine Haftung.
SICHERHEITSHINWEISE
WARNUNG!
Bei nicht bestimmungsgemäßem Gebrauch können Risiken auftreten.
Nicht bestimmungsgemäßer Gebrauch ist z. B.:
• Überschreiten der für den Normalbetrieb festgelegten technischen Werte.
• Entfernen der trennenden Schutzeinrichtungen und Inbetriebnehmen
des Sessel.
• Vornehmen von Wartungen, Störungsbeseitigungen, etc. am Sessel,
obwohl das Antriebssystem nicht spannungslos geschaltet wurde.
• Vornehmen von Verstellungen der Sitz-/Liegeposition, obwohl sich
andere Personen (insbesondere Kinder oder Haustiere) im Gefahren-
bereich benden.
• Nutzung des Sessels als Steighilfe oder sich auf den Sessel zu stellen
(insbesondere die Fußstütze).
• Sitzen auf der Armlehne auf Sitzächenhöhe, wenn die Person mehr
als 150 kg wiegt.
• Sitzen auf der Armlehne, wenn sich diese in ausgezogenem Zustand
bendet.
• Auf die Sitzäche setzen mit ungebremsten Hinterrädern.
• Unkontrolliert in den Sessel fallen lassen.
• Betreiben des Sessels in Nass- und Außenbereichen oder in einer
Umgebung von entzündlichen/explosiven Gasen oder Dämpfen
(z. B. Anästhetika).
• Öffnen, Entfernen oder Beschädigen von Abdeckungen oder Gehäuse
(Beschädigungen durch Haustiere).
• Aufstellen des Sessels mit geringem Abstand zu Wärmequellen wie
z. B. Heizungen oder offenem Feuer.
• Rauchen im Sessel.
• Als Bettersatz zu verwenden.
• Aufstehen bei ausgefahrener Fußstütze.
Page 10
FR DE
10
3.3 Risiken im Umgang mit dem Sessel
Bei der Verwendung des Sessels können Risiken und Beeinträchtigungen entstehen
• für Leib und Leben der Bediener oder Dritter,
• für den Sessel selbst,
• an anderen Sachwerten.
Grundlage für den sicherheitsgerechten Umgang und den störungsfreien Betrieb dieses Sessels
ist die Kenntnis der Sicherheits- und Benutzerhinweise in dieser Betriebsanleitung.
3.4 Restrisiken
Der Sessel ist nach dem Stand der Technik und den anerkannten sicherheitstechnischen
Regeln gebaut.
Drahtlose Kommunikationssysteme, wie drahtlose Heimnetzwerkgeräte, Handys, kabellose
Telefone und deren Basisstationen oder CB-Funk können das Produkt negativ beeinflussen und
sollten deshalb mindestens 10 Meter weg gestellt sein.
SICHERHEITSHINWEISE
WICHTIG!
Die Betriebsanleitung immer am Einsatzort des Sessels aufbewahren!
GEFAHR!
Nach dem Ausschalten des Sessels ist das Auftreten mechanischer und
elektrischer Restenergien zu beachten!
Page 11
DEFR
11
SICHERHEITSHINWEISE
3.5 Qualikation Personal und Nutzer
Der Patient ist bestimmungsgemäßer Nutzer.
Legende: X erlaubt -- nicht erlaubt
3.6 Sesselkennzeichnung
Am Sessel sind zur Warnung vor folgenden Restrisiken, die konstruktiv nicht zu beseitigen sind,
Warnschilder montiert:
Personen / Tätigkeit
Speziell
ausgebildetes
Personal
Unterwiesenes
Bedienpersonal
Unterwiesene
Personen mit fach-
spezischer Aus-
bildung (Mechanik/
Elektrotechnik)
Transport X -- -Inbetriebnahme X -- --
Störungssuche und
-beseitigung
-- -- X
Einrichten, Rüsten -- -- X
Betrieb -- X -Wartung -- -- X
Vernichtung/Recycling X -- --
VORSICHT!
Der Sessel ist ausschließlich für die Bedienung durch eine Person
vorgesehen.
VORSICHT!
Risiko durch Quetschung der Extremitäten an Beinschere und
Hinterseite des Sessels beim Verfahren des Sessels (nach oben/unten).
Bei Missachtung der Gefahrenstellen kann es zu Verletzungen
der Hand kommen.
WARNUNG!
Risiken durch elektrische Spannung. Arbeiten an den elektrischen
Motoren des Sessels nur durch Elektrofachkraft.
Page 12
FR DE
12
SICHERHEITSHINWEISE
Beachten Sie alle am Sessel angebrachten
• Warnungen und Sicherheitshinweise,
• sonstigen Kennzeichnungen, wie Dreh- oder Transportrichtungen.
Außerdem befinden sich folgende Kennzeichen am Sessel:
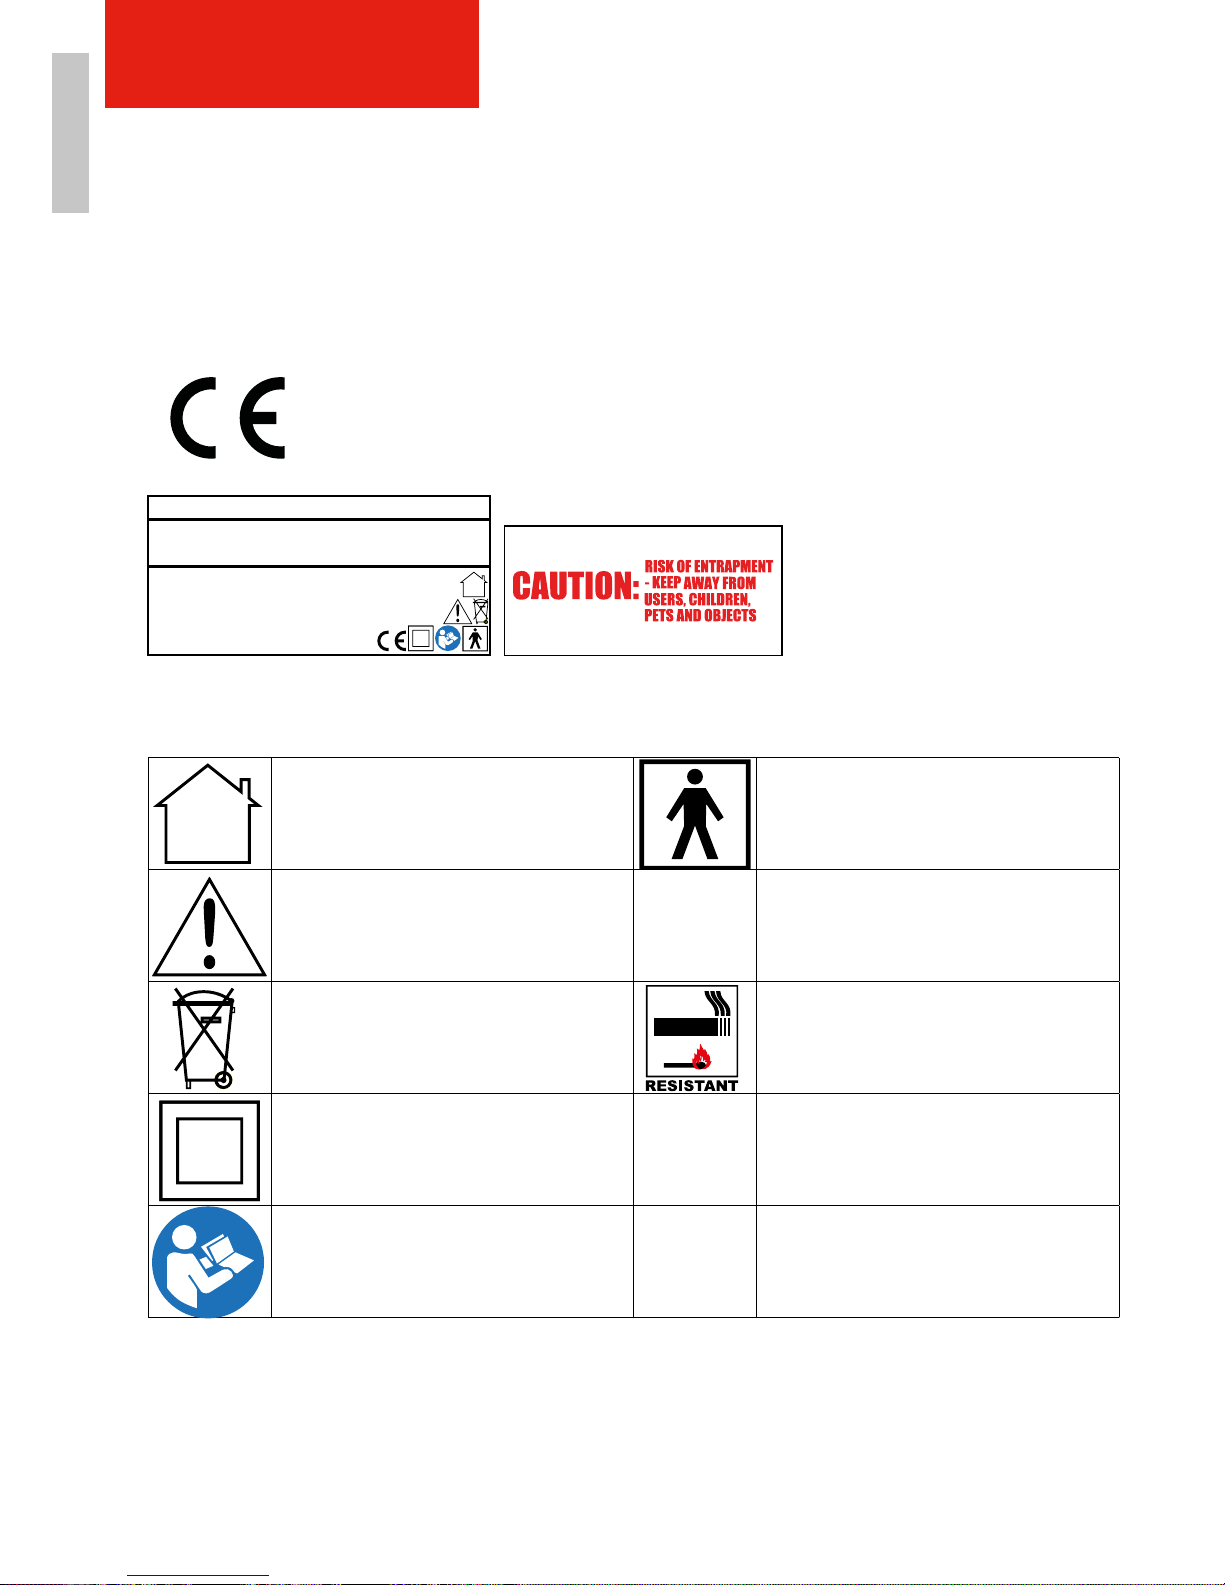
Erklärung Produktkennzeichnungs-Symbole
TOPRO GmbH - Bahnhofstraße 26 d - 82256 Fürstenfeldbruck
Ruhe- & Aufstehsessel / rise- & recline chair Model: Bologna
Produktionstag/date of construction:
Seriennr./Serialno.: 8860F-
Auslastung/duty cycle: max 10 % / -2 min On 18 min Off
Sichere Arbeitslast/safe working load 150kg IP21
Max. Nutzergewicht/user mass 150kg Klasse/Class II
Bemessungsspannung/rated voltage range 100-240V
˜
Bemessungsfrequenz/rated frequency 50/60Hz
Bemessungsaufnahme/rated input 280 VA
CE-Kennzeichnung
Kennzeichnet die Konformität mit gültigen EU-Richtlinien
• die das Produkt betreffen und
• die eine CE-Kennzeichnung vorschreiben.
Für den Gebrauch in Innenräumen
Basis Schutzgrad gegen
elektrischen Schlag
Warnung! - Gebrauchsanleitung
beachten
BF Typen
Schutzklasse
Schutzklasse gegen elektrischen
Stromschlag
Recyclebar
UNACHTSAMKEIT VERURSACHT FEUER!
Füllmaterial(-ien) und Bezugsstoff(-e) erfüllen
die Vorgaben zur Hemmung von Brandgefahr
durch Zigaretten und Streichhölzer nach den
Sicherheitsrichtlinien von 1988.
Klasse II Produkt
max 10%/-
2min On
18min Off
Maximale Auslastung Produkt darf
innerhalb von 18 Minuten bei Höchstbelastung nicht mehr als 2 Minuten
lang in Betrieb sein.
Betriebsanleitung lesen IP21
Schutz gegen Eindringen von festen
Fremdkörpern mit einem Durchmesser
> 12,5 mm. Schutz gegen senkrecht
tropfendes Wasser.
Page 13

DEFR
13
SESSELBESCHREIBUNG
4. SESSELBESCHREIBUNG
Dieses Kapitel gibt einen umfassenden Überblick über den Aufbau und die Funktion des Sessels.
Lesen Sie es möglichst am Sessel. So können Sie sich optimal mit dem Sessel vertraut machen.
4.1 Einsatzbereiche
Mit diesem sehr funktionalen, schönen und hochwertigen Sessel sitzen Sie jederzeit bequem,
ergonomisch gut und komfortabel. Mit der eingebauten Aufstehhilfe unterstützt der Sessel Ihre
Mobilität – er hebt Sie sanft und sicher in den Stand oder lässt Sie langsam in die gewünschte
Sitz- oder Liegeposition absinken.
Sitz und Rückenlehne bieten Ihrem Rücken und Ihren Beinen angenehme Unterstützung und
Halt. Mit der Fernbedienung bestimmen Sie selbst, wie weit Sie die Fußstütze und die Rückenlehne heben oder senken, und wie viel Hilfe Sie beim Aufstehen oder Setzen in Anspruch nehmen
wollen.
Sollten Sie einen Mangel oder Schaden an Ihrem TOPRO Sessel entdecken, wenden Sie sich
bitte umgehend an Ihren Fachhändler, Ihr Sanitätshaus oder direkt an TOPRO unter der EmailAdresse [email protected].
Wir wünschen Ihnen viel Freude mit Ihrem neuen Sessel!
Herzliche Grüße
TOPRO Produktmanagement
4.2 Funktionsbeschreibung
Sessel Bologna
Dieser komfortable Sessel ist der multifunktionalste Sessel, den TOPRO entwickelt hat. Zugleich
ist er vom Design sehr ansprechend und passt optimal in die Wohnumgebung. So kann der
Sessel von der Aufstehpositionen bis zu einer nahezu horizontalen Liegeposition, verstellt werden.
Zudem ist es mit dem Sessel möglich, die sogenannte Herz-Waage-Position einzunehmen, in der
die Füße höher als das Herz liegen und der Rückfluss in den Beinen angeregt wird. Ein Transfer
aus dem Sitzen auf ein anderes Sitzmöbel ist ebenso unproblematisch wie ein liegender Transfer
aus und ins Bett. Der Sessel bietet damit die meisten Verstellmöglichkeiten unter unseren Ruheund Aufsteh sesseln – und besonders viel Bequemlichkeit für Sie. Ermöglicht wird dies durch die
vier Motoren, die Lehne und Fußstütze bewegen und Sie selbstverständlich ebenso verlässlich
und sicher beim Hinsetzen, Liegen, Transfer und Aufstehen unterstützen. Es ist möglich, den
Nutzer im Sessel sitzend von A nach B zu fahren. Die Fernbedienung kann rechts und links montiert werden. Große, farblich gekennzeichnete Knöpfe der Fernbedienung erleichtern Ihnen die
Bedienung.
Page 14
FR DE
1
2
3
4
5
7
8
9
6
14
SESSELBESCHREIBUNG
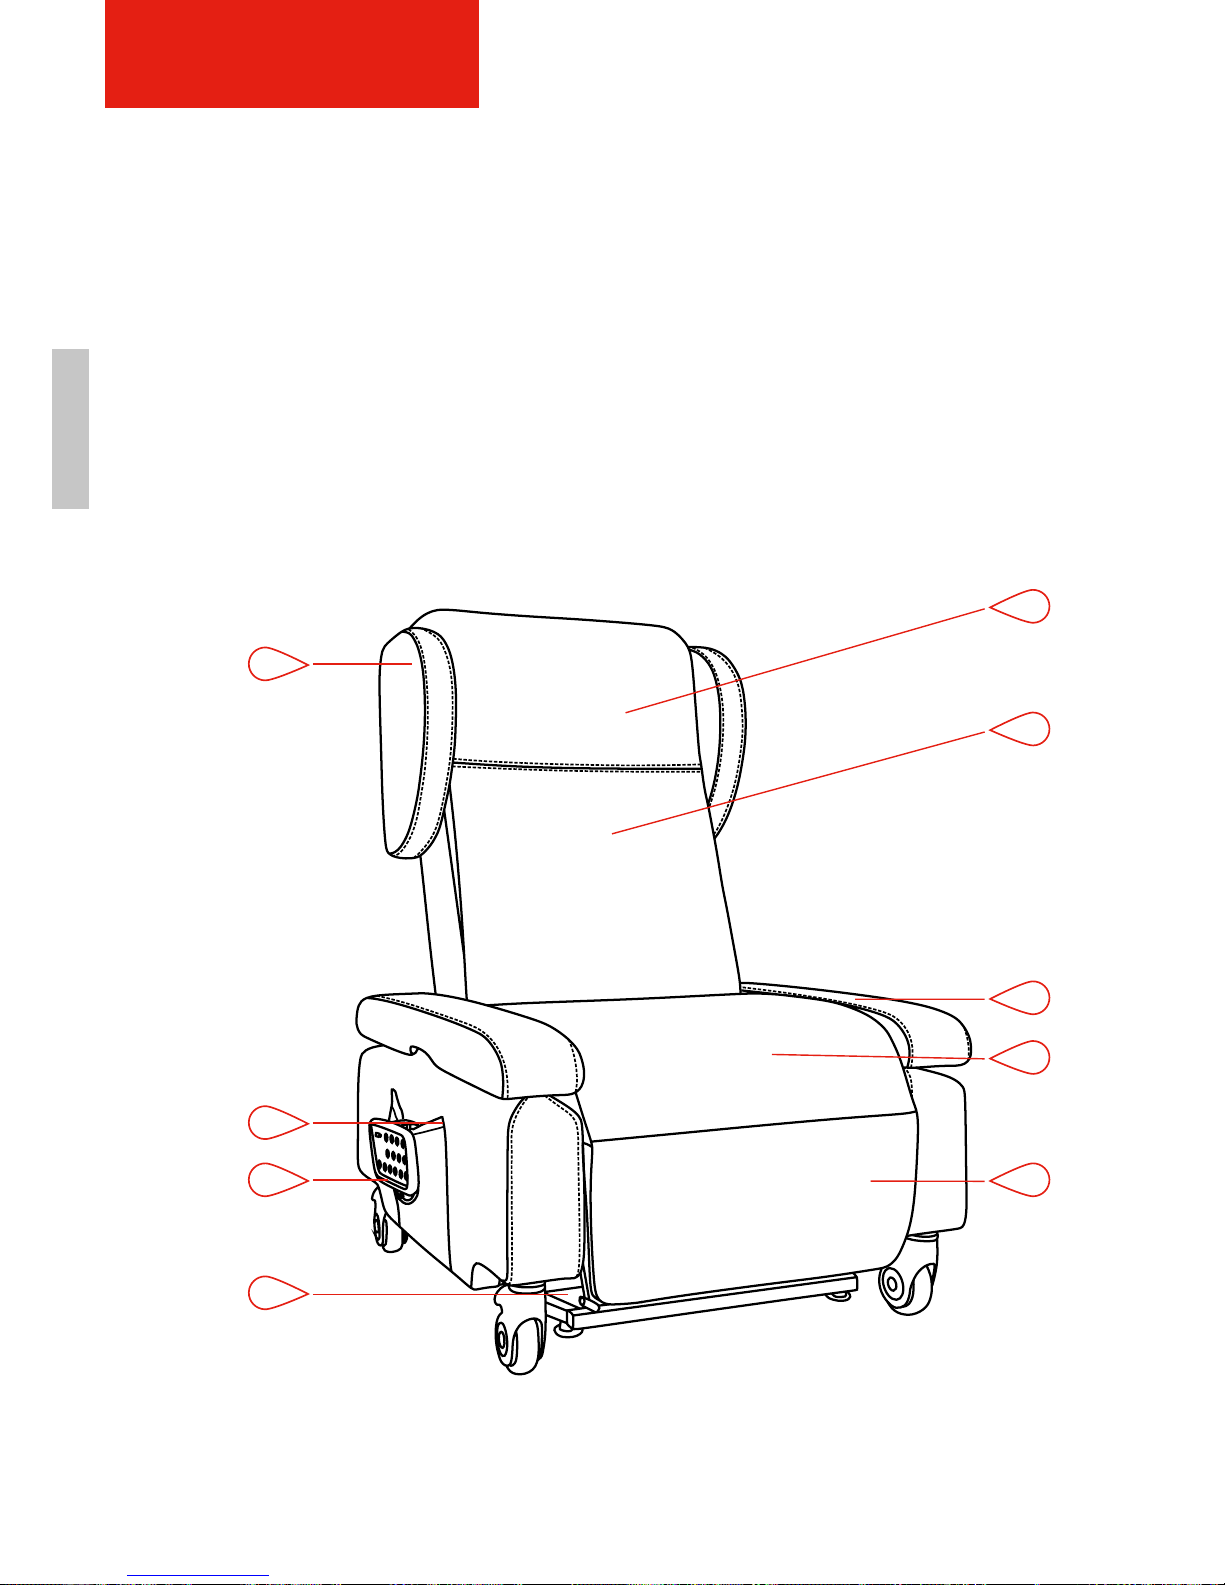
4.3 Aufbau des Sessels
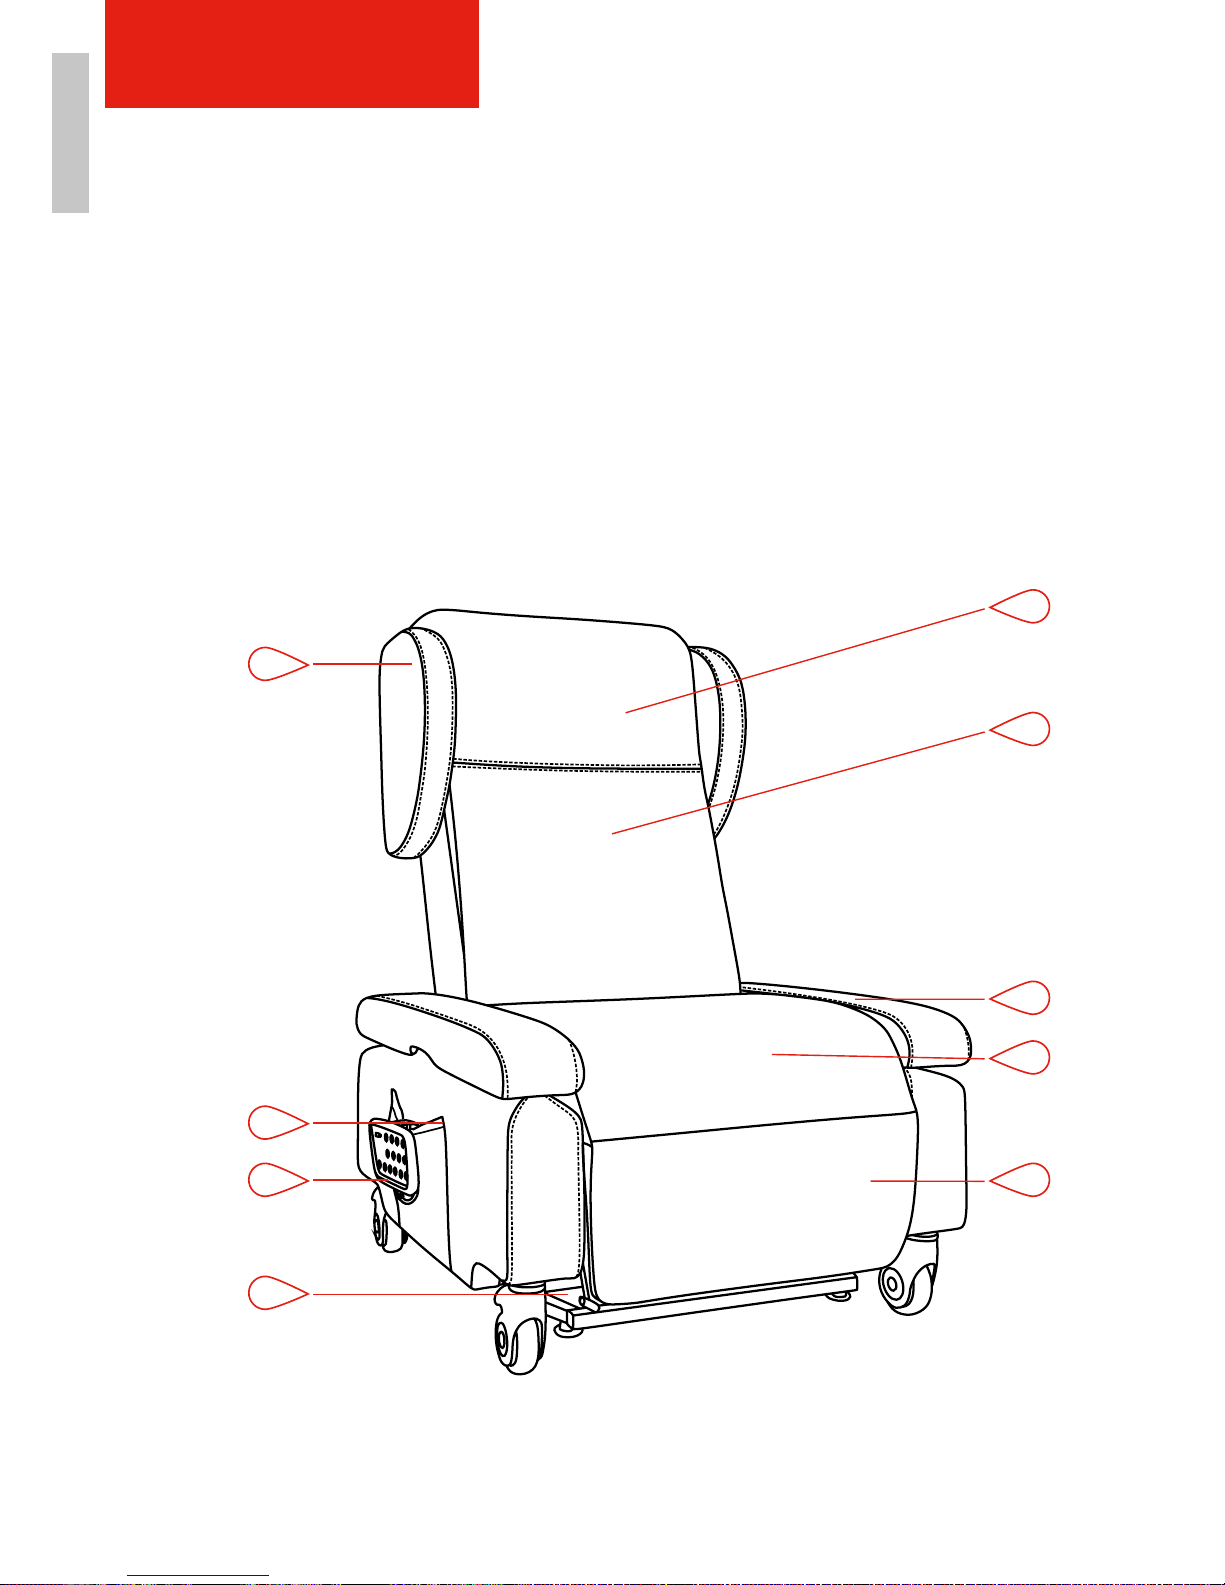
Abbildung 2 gibt einen Überblick über die wichtigsten Komponenten und Baugruppen und zeigt
deren Installationsort am Sessel:
1. Kopf-/Nackenbereich (verstellbar)
2. Rückenlehne (muss montiert werden, siehe Kapitel 5.5.2)
3. Armlehne (beidseitig, höheneinstellbar)
4. Sitzfläche
5. Fußstütze
6. Aufstehmechanismus (nicht sichtbar, da unter dem Sessel)
7. Fernbedienung (rechts vormontiert, auch links vom Fachhandel montierbar)
8. Seitentasche (beidseitig)
9. Tasche für Schlüssel (sicherer Aufbewahrungsort für den Schlüssel der Fernbedienung)
Abbildung 2: Aufbau und Komponenten
Page 15
DEFR
SESSELBESCHREIBUNG
15
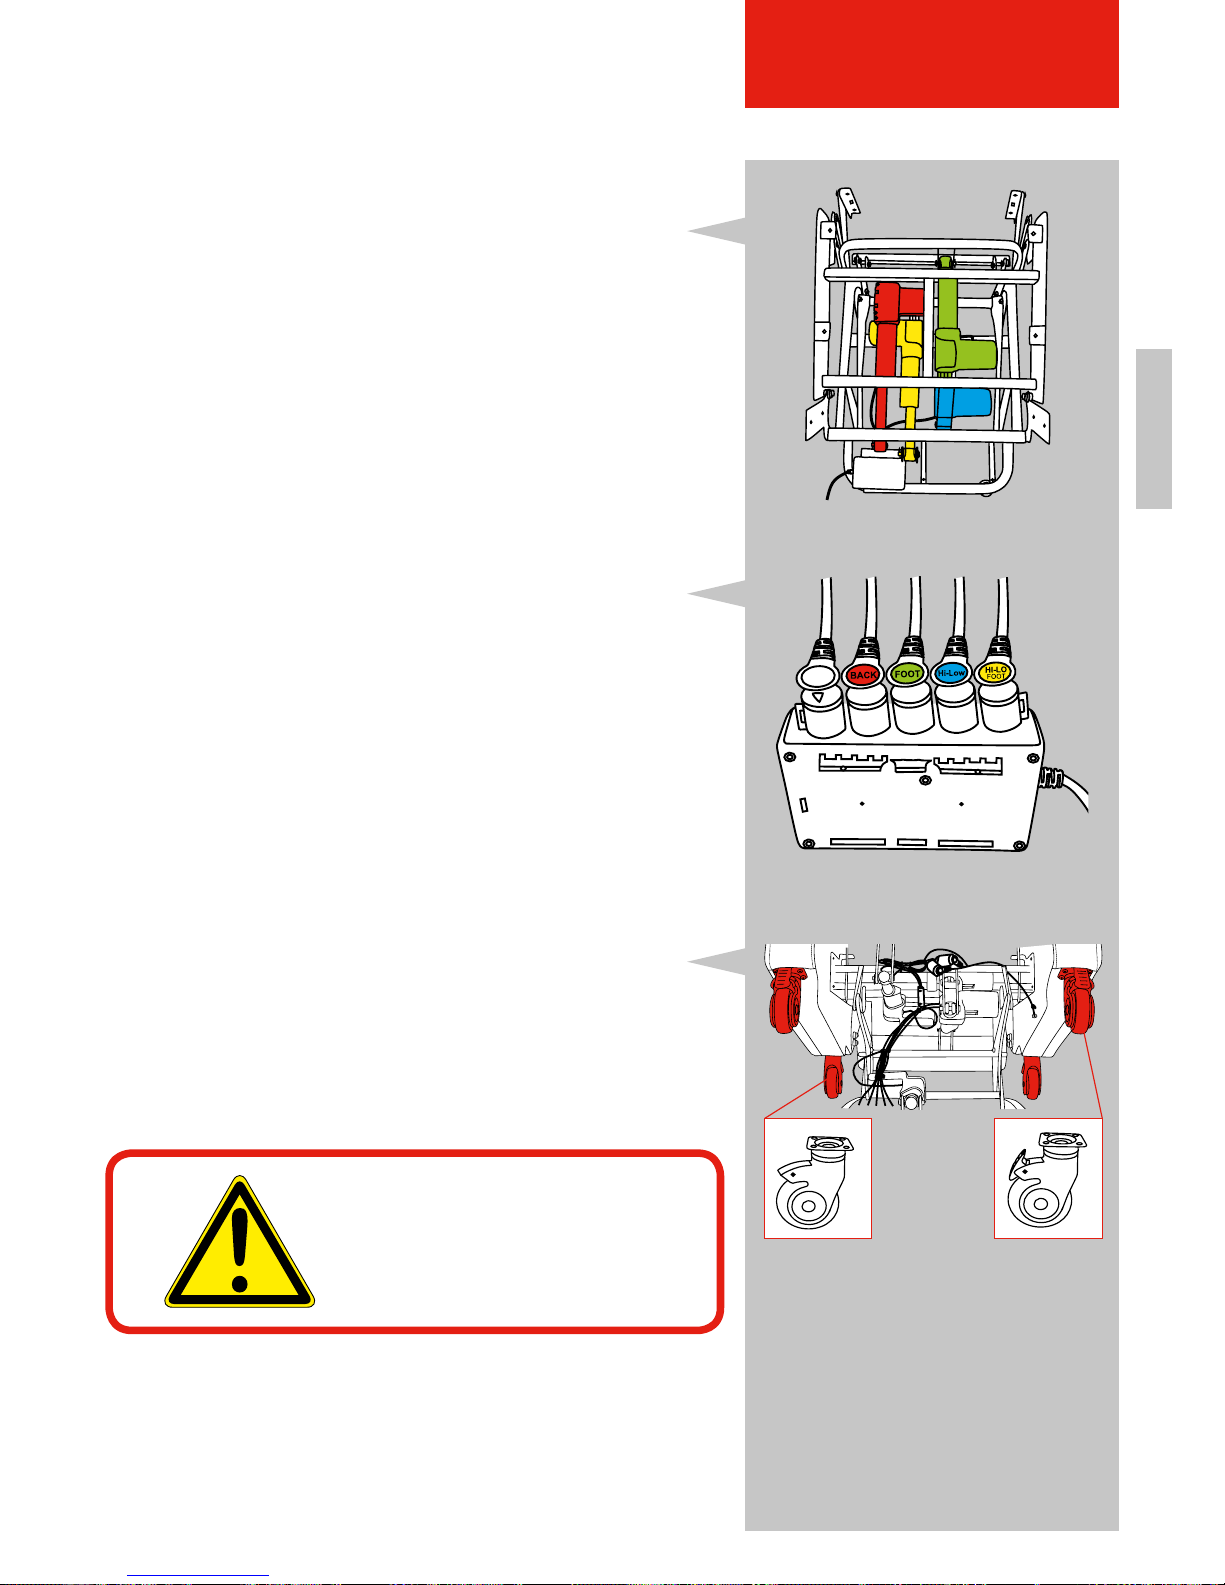
4.4 Baugruppen und Komponenten
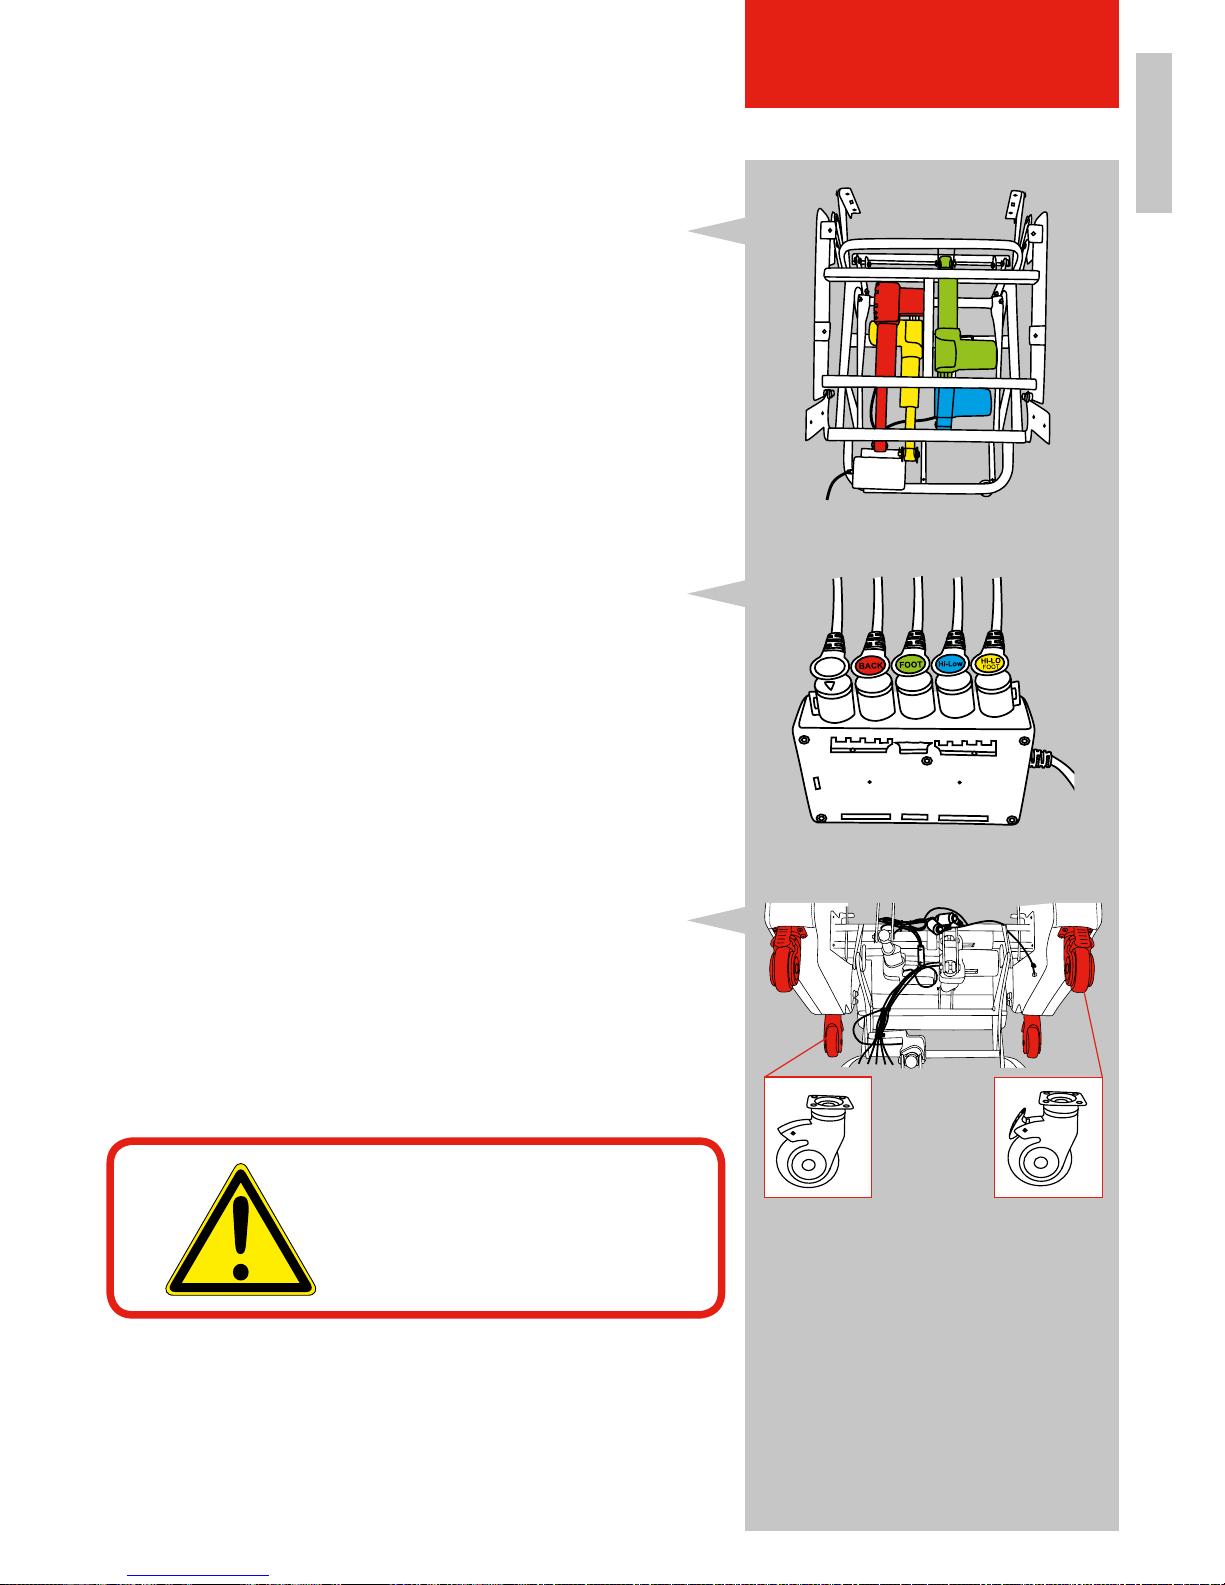
4.4.1 Rahmen und Motor
Motor I (rot markiert) steuert die Rückenlehne.
Motor II (grün markiert) steuert die Fußstütze.
Motor III & IV (gelb & blau markiert) steuern die Höhe
der Sitzfläche, die Aufstehfunktion und die Sitzkantelung (z.B. in die Herz-Waage-Position)
4.4.2 Steuergerät
Stecker der Fernbedienung und des Aufstehalarms
(weiß markiert). Ihre Fernbedienung ist vormontiert.
Sie müssen nichts einstecken.
• Back - betätigt die Rückenlehne (rot markiert)
• FOOT - betätigt die Fußstütze (grün markiert)
• HI-Low & HI-LO Foot - betätigen die Ruhefunktion,
Höheneinstellung und die Aufstehfunktion und die
Herz-Waage-Position (gelb & blau markiert)
4.4.3 Rollen
Mit Hilfe der vier integrierten Rollen können Sie den
Sessel Bologna bequem verschieben und ihn für das
Verschieben von im Sessel sitzenden Personen oder
den Patiententransport nutzen. Die hinteren Räder
sind um 360° Grad drehbar und verfügen über eine
Feststellbremse. Die vorderen Räder sind richtungs-
fest.
Abbildung 3: Rahmen und Motor
Abbildung 4: Steuergerät
Abbildung 5: Rollen
GEFAHR!
Die hinteren Feststellbremsen
müssen immer aktiviert sein!
(einzige Ausnahme bei Verschieben
des Sessels)
Page 16

DEFR
16
4.4.4. Fernbedienung
4.4.4.1 Erklärung der Symbole
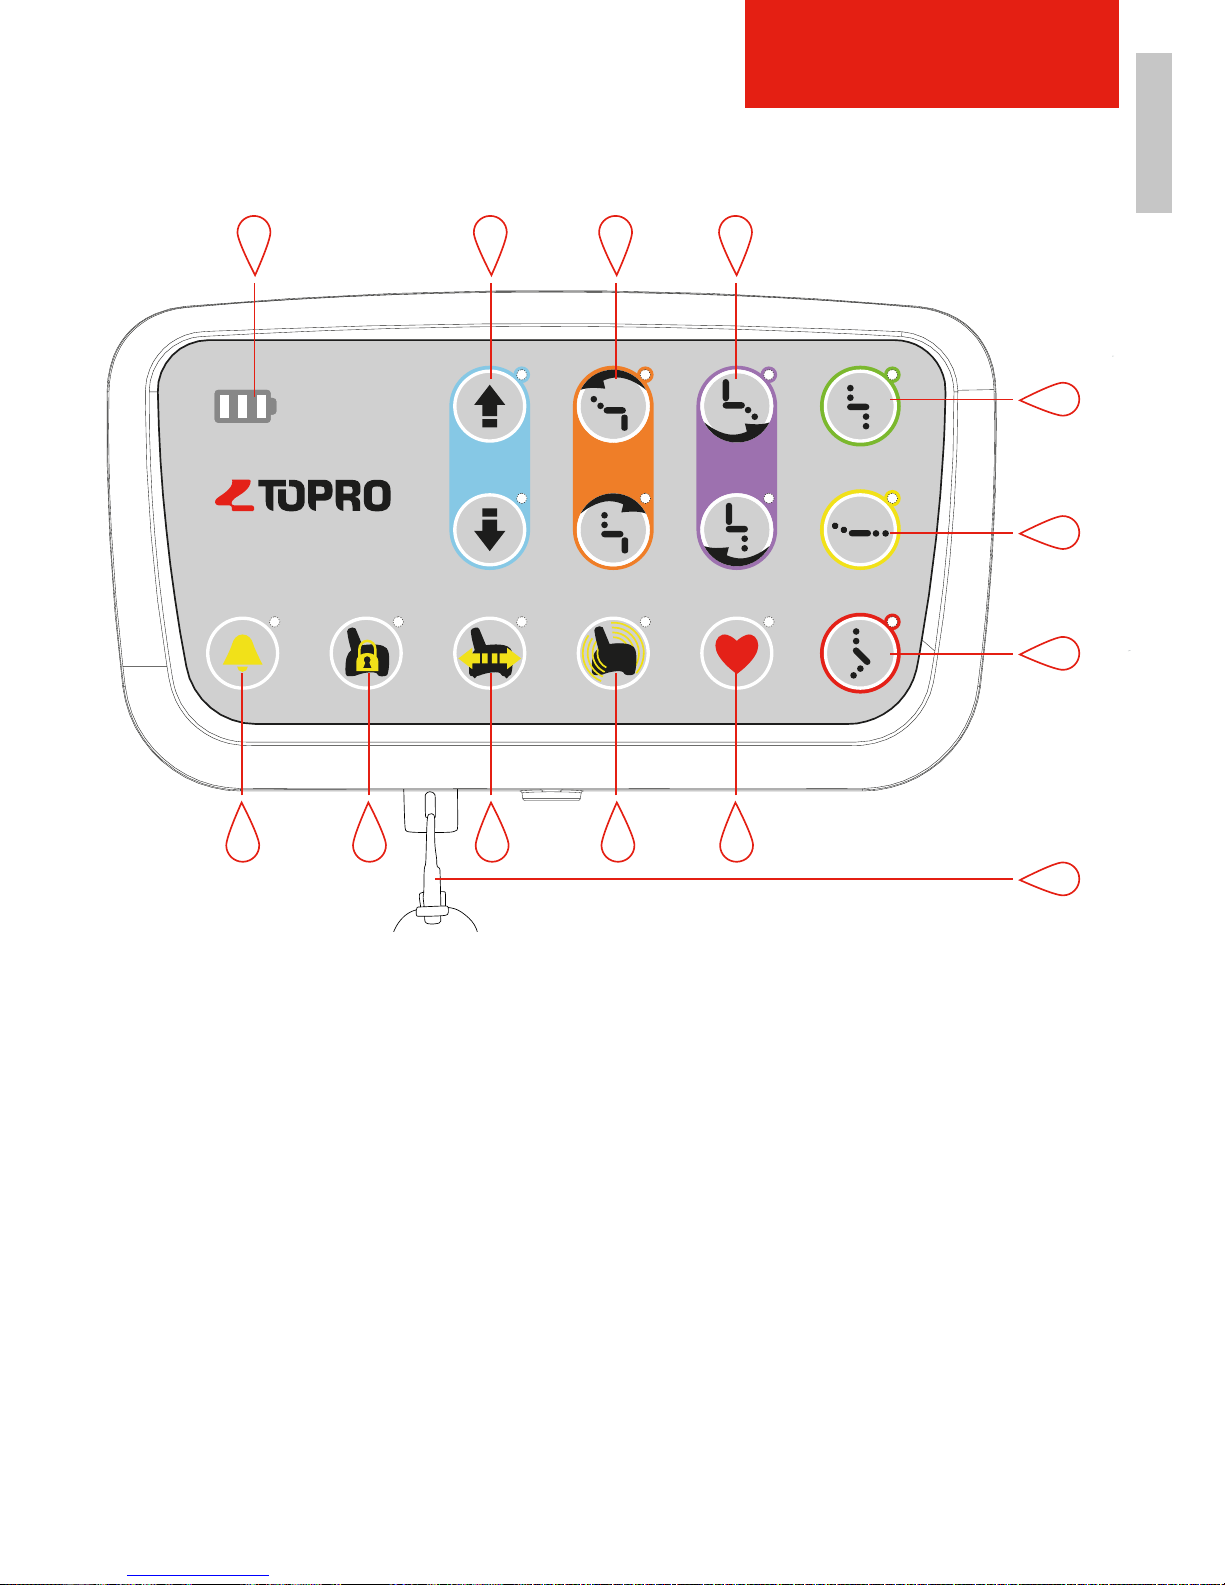
1. Batteriesymbol leuchtet, wenn der Sessel am Strom angeschlossen ist.
Das Licht blinkt wenn die Batterie geladen wird und zeigt gleichzeitig den Füllstand an.
2. Blaue Tasten:
Höhe individuell einstellen, Pfeil nach oben: Sessel fährt hoch,
Pfeil nach unten: Sessel fährt runter.
3. Orange Tasten:
Rückenlehne individuell einstellen, obere Taste: Rückenlehne bewegt sich nach hinten,
untere Taste: Rückenlehne bewegt sich nach vorne.
4. Violette Tasten:
Fusstütze individuell einstellen, obere Taste: Fußstütze bewegt sich nach oben,
untere Taste: Fußstütze bewegt sich nach unten.
5. Grüne Taste:
Aufrecht sitzen, mit dieser Taste gelangen Sie immer wieder in eine neutrale Sitzposition zurück.
6. Gelbe Taste:
Ruhen im Liegen, drücken Sie diese Taste, fährt der Sessel in eine Liegeposition
7. Rote Taste:
Sicher aufstehen /absetzen, der Sessel fährt in die Aufstehposition und kippt dabei die
Sitzfläche leicht nach vorne.
8. Herz Taste:
Herz-Waage-Position automatisch einstellen, in dieser Position werden Ihre Beine höher als
Ihr Herz gelagert.
9. Vibrations Taste:
Aktivierung des Aufstehalarms, erzeugt einen Piepton, wenn der Nutzer aus dem Sessel aufsteht; verhindert ein „unerlaubtes“ Aufstehen / Weggehen. Durch erneutes Drücken der Taste,
geht der Alarm aus.
10. Transport Taste:
Transport-Position automatisch einstellen, diese Taste fährt das Sesselgestell ein und hebt
die Fußstütze auf 35° Grad an.
11. Schloss Taste:
Zugang in das Tastenprogramm in Kombination mit dem Schlüssel (siehe Punkt 13, S.17).
12. Glocken Taste:
Rufalarm aktivieren, durch Drücken der Taste kann der Nutzer auf sich aufmerksam machen,
wenn er ein Bedürfnis hat. Durch erneutes Drücken der Taste, geht der Alarm aus.
13. Schlüssel:
Nur mit eingestecktem Schlüssel kann auch das Tastensperrprogramm (siehe Punkt 11,
S.17) bedient werden. Zudem lassen sich mit eingestecktem Schlüssel alle Funktion, trotz
Tastensperrung ausüben (siehe Kapitel 4.4.5.3).
SESSELBESCHREIBUNG
Page 17
DEFR
321 4
6
5
8
7
13
9101112
17
Abbildung 6: Fernbedienung
SESSELBESCHREIBUNG
Page 18
DEFR
18
SESSELBESCHREIBUNG
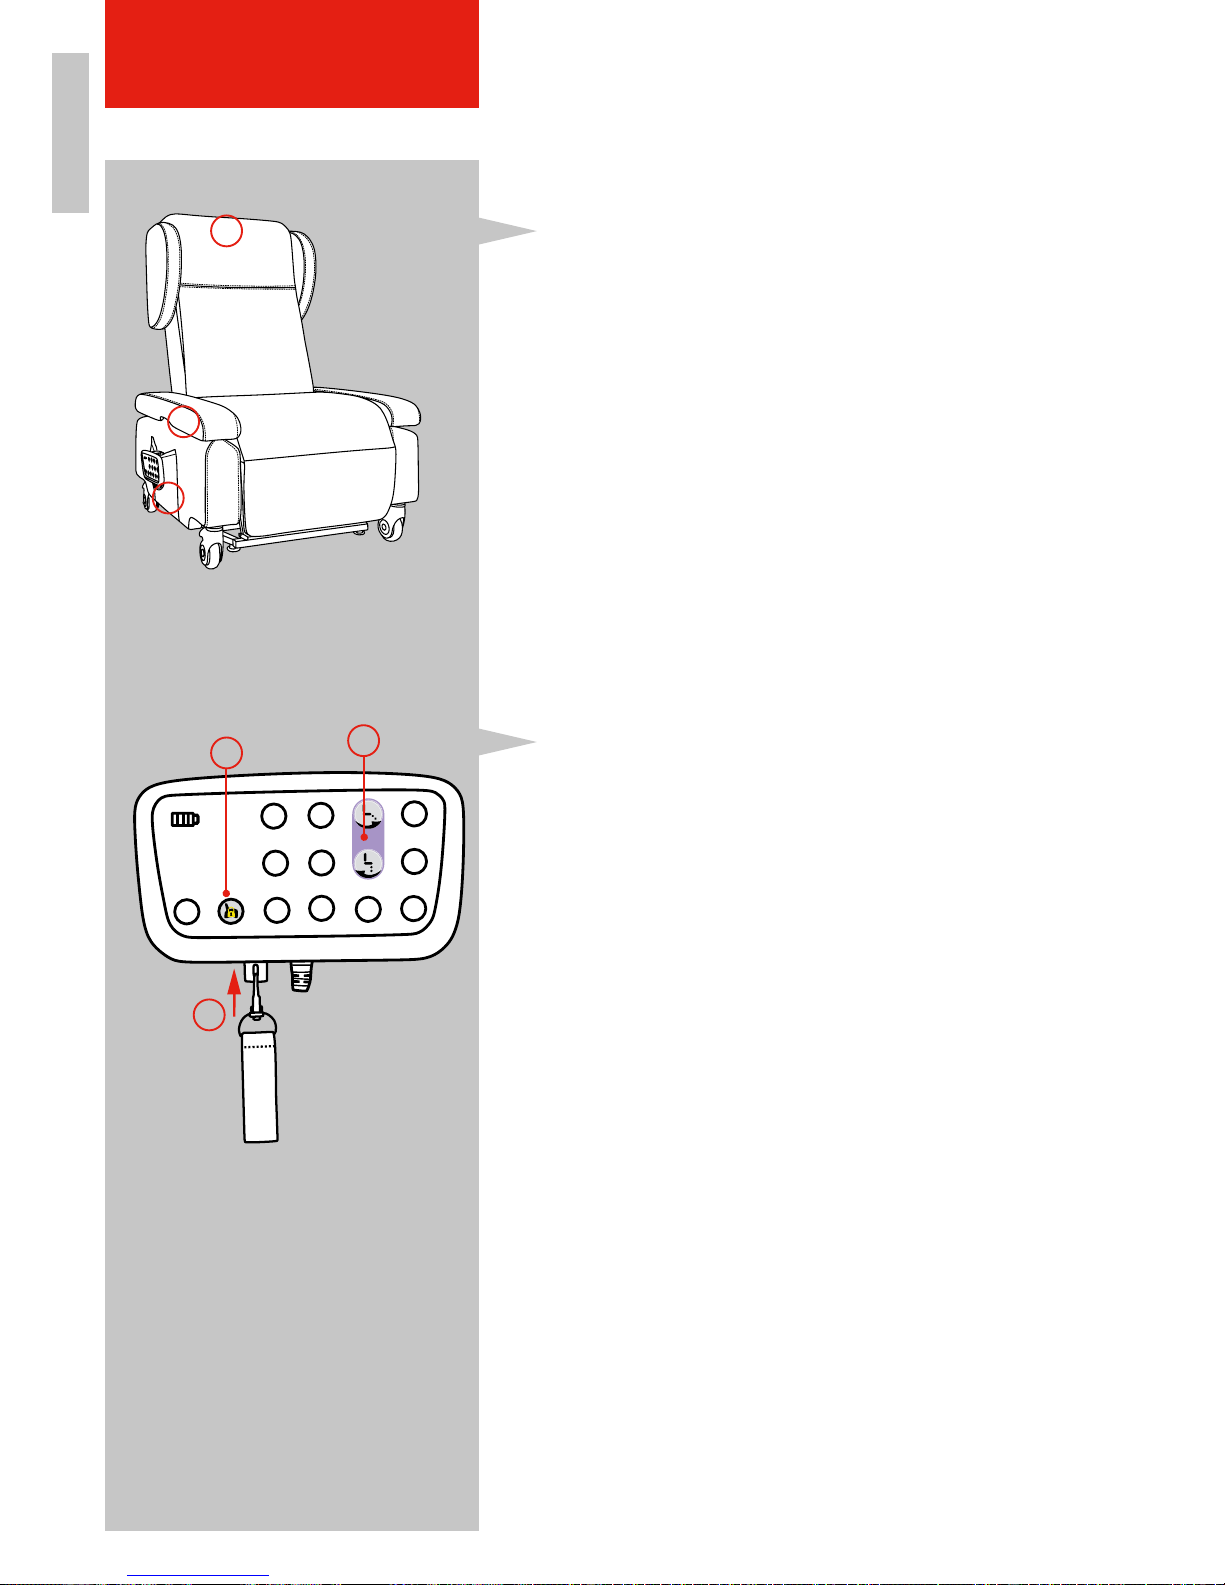
4.4.4.2 Positionierung der Fernbedienung
Die Fernbedienung kann an verschiedenen Stellen
des Sessels positioniert werden.
1. In den Seitentaschen des Sessels.
2. Die Halterung für die Fernbedienung ist an den
Armlehnen angeklettet und kann einfach abgenommen werden. Sie ist auf beiden Seiten der
Armlehne montierbar.
3. Mit der Halterung am oberen Rücken auf
der Rückseite des Sessels. Dazu den Klett
der Nackenstütze wieder schließen.
4.4.4.3 Sperren von Tasten und Funktionen
1. Schlüssel in das Loch schieben.
2. Taste mit dem Schloss drücken (siehe Punkt 11,
S.17). Diese leuchtet grün auf.
3. Funktionen, die der Nutzer nicht allein ausführen soll durch Drücken der jeweiligen Taste (z.B.
Beinstütze blockieren = violette Taste drücken)
blockieren. Die blockierten Tasten leuchten dann
ebenfalls grün. Zum Blockieren einer Funktion
reicht es aus, den oberen oder unteren Knopf der
Funktion zu drücken.
4. Schlüssel abziehen und sicher in der Tasche am
Rücken (siehe Kapitel 4.3) aufbewahren.
Um die Funktionen wieder zu aktivieren die Schritte
1-4 erneut ausführen.
Ein Deaktivieren der Alarmfunktion ist nicht möglich.
Abbildung 7: Positionen Fernbedienung
Abbildung 8: Tastensperre einrichten
1.
2.
2.
3.
3.
1.
Page 19
DEFR
19
SESSELBESCHREIBUNG
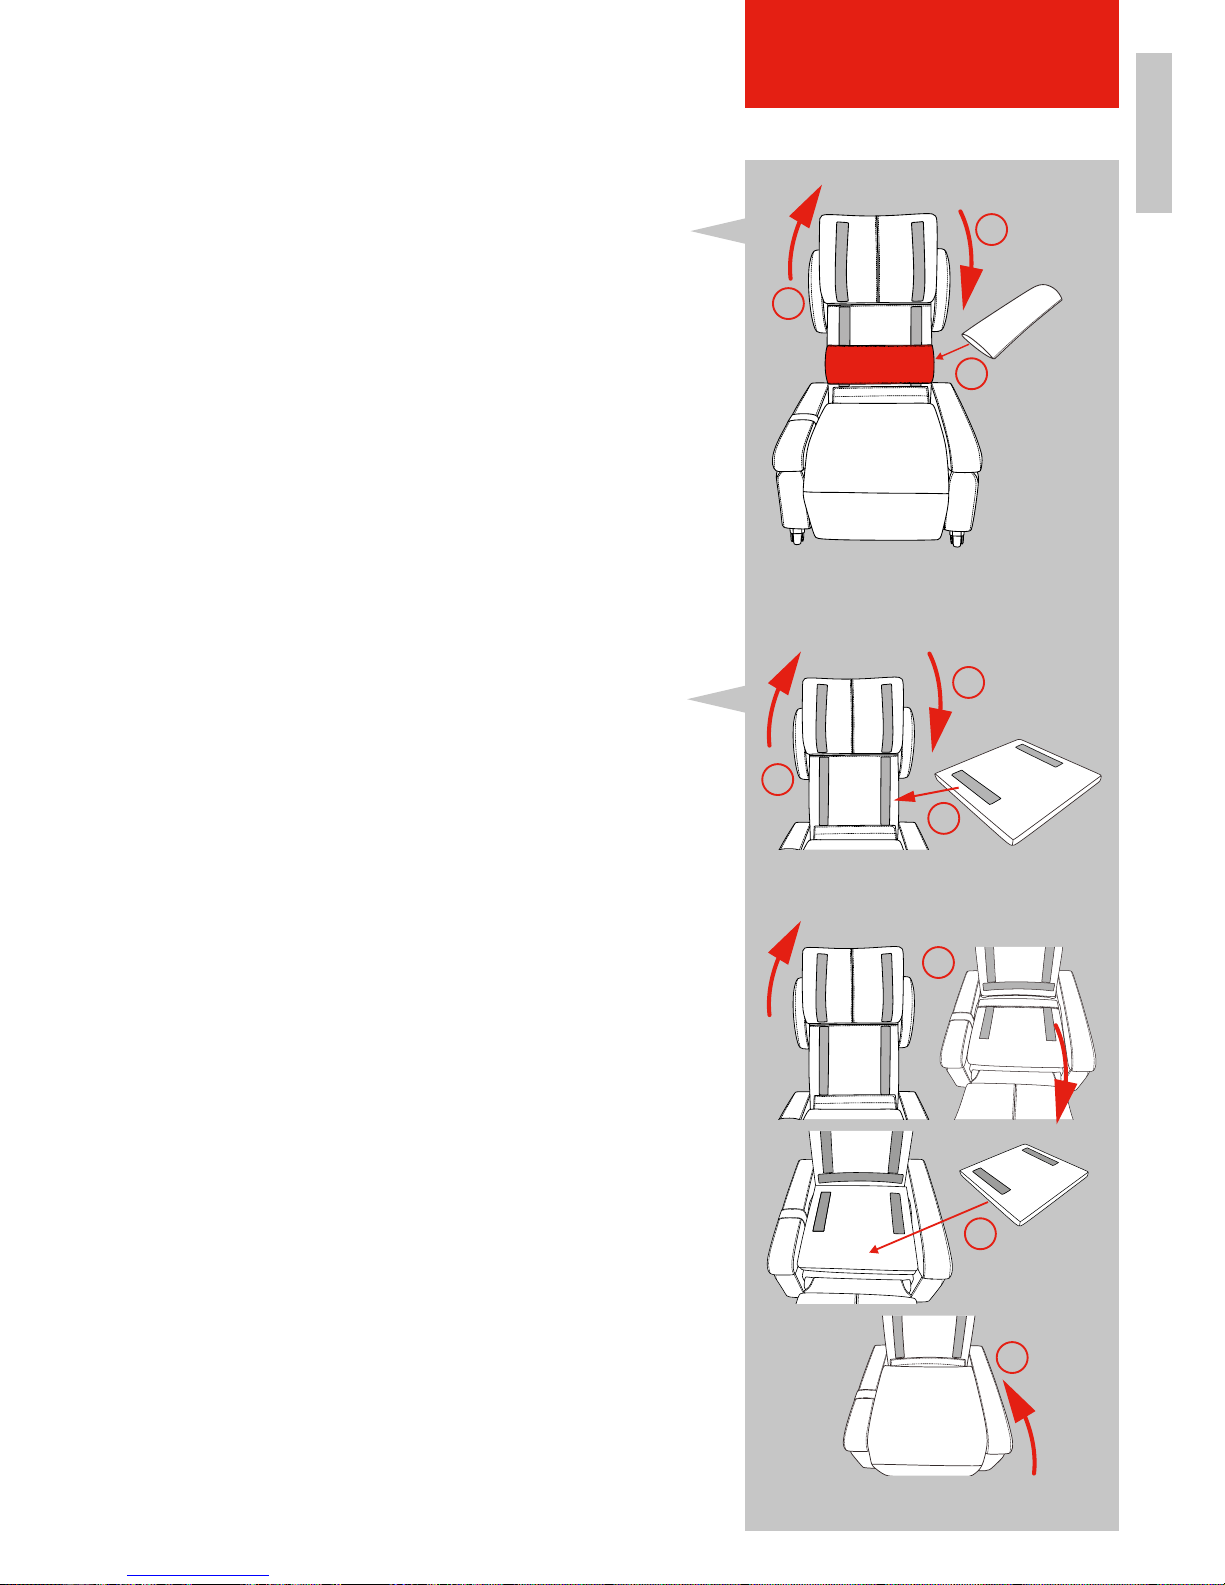
4.4.5 Positionierungskissen
Im Lieferumfang befindet sich ein ein Lumbalkissen.
4.4.5.1 Lumbalkissen
Das Kissen kann an verschiedenen Positionen im
Sessel eingesetzt werden.
1. Als Lendenkissen, um die Wirbelsäule zu entlasten:
das Rückenpolster vom Sessel abziehen (1.), das
Kissen entsprechend auf dem Klett unter dem
Rückenpolster anbringen (2.) und dann das Polster
wieder aufkletten (3.).
4.4.5.2 Viereckiges Positionierungskissen, optional
Das ca. 4 cm dicke Positionierungskissen kann
entweder zum Erreichen einer kürzeren Sitztiefe
oder einer höheren Sitzhöhe eingesetzt werden.
1. Kürzere Sitztiefe:
das Rückenpolster vom Sessel abziehen (1.), das
Kissen entsprechend auf dem Klett unter dem
Rückenpolster anbringen (2.) und dann das Polster
wieder aufkletten (3.).
2. Höhere Sitzhöhe:
das Rücken- und Sitzpolster vom Sessel abziehen
(1.), das Kissen entsprechend auf dem Klett des
Sitzes anbringen (2.) und dann das Sitz- und Rückenpolster wieder aufkletten (3.).1.
Abbildung 9: Lumbalkissen einsetzen
1.
2.
3.
Abbildung 10: Positionierungskissen für
kürzere Sitztiefe einsetzen
Abbildung 11: Positionierungskissen für
Höhere Sitzhöhe einsetzen
1.
1.
2.
2.
3.
3.
Page 20
DEFR
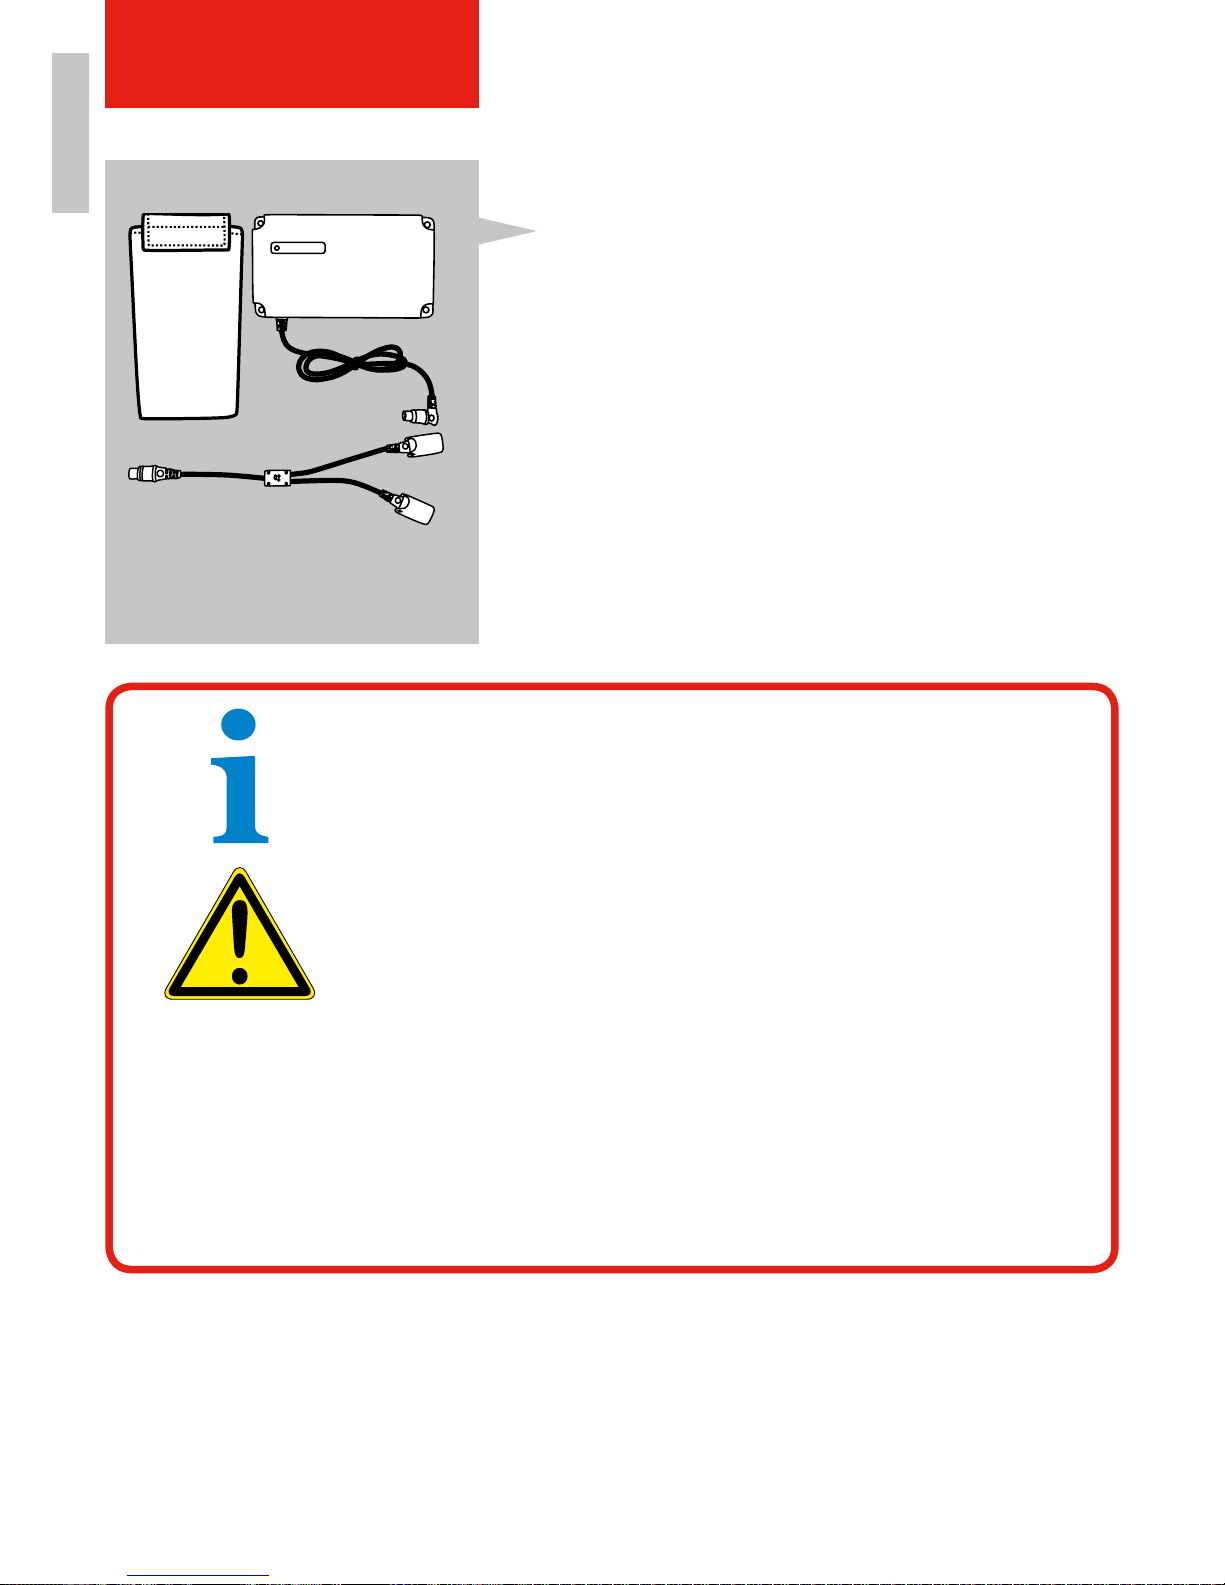
Abbildung 12: Batterie
20
SESSELBESCHREIBUNG
4.4.6 Batterie (optionales Zubehör)
Damit der Sessel auch während des Patiententrans-
ports oder im Notfall, wie z. B. bei einem Stromausfall
bedienbar bleibt, kann er mit einer leistungsstarken 2Ah
Batterie ausgestattet werden. Die nicht im Lieferumfang enthaltene Batterie ermöglicht es, den Sessel
in die gewünschte Position zu fahren. So hilft diese
Ihnen auch im häuslichen Bereich mobil zu bleiben.
Zum bestimmungsgemäßen Gebrauch der Batterie
gehört das Beachten aller Hinweise der BatterieBetriebsanleitung und der damit einhergehenden
Empfehlung, der Einhaltung von Ladeintervallen,
Inspektions- und Wartungsarbeiten. Der Einbau der
Batterie erfolgt über Ihren Fachhandelspartner. Die
Lebenserwartung der Batterie beläuft sich auf 1 Jahr.
HINWEIS!
Der Sessel kann während der Batterie-Ladung verfahren
werden. Ausgeschlossen ist der Patiententransport.
WARNUNG!
1. Von Hitze, Funken, offener Flamme, heißen Oberächen, Wasser
etc. fernhalten.
2. Die Batterie nie direkter Sonneneinstrahlung, einer starken Lichtquelle oder extremen Temperaturen aussetzen.
3. Lesen und verstehen Sie die Bedienungsanleitung.
4. Der Nennausgangsstrom des Batterie-Ladegerätes muss
eingehalten werden.
5. Setzen Sie die gebrauchte/alte Batterie keinem Feuer oder Wasser
aus. Gebrauchte Batterien sind Sondermüll! Entsorgen Sie sie nicht
in einer normalen Mülltonne. Wenden Sie sich an Ihren Händler.
Halten Sie bei der Entsorgung der Batterie und anderer Teile bitte
die vor Ort geltenden Rechtsvorschriften für Recycling ein.
6. Reparaturen müssen von authorisiertem Fachpersonal ausgeführt
werden.
Page 21
DEFR
21
SESSELBESCHREIBUNG
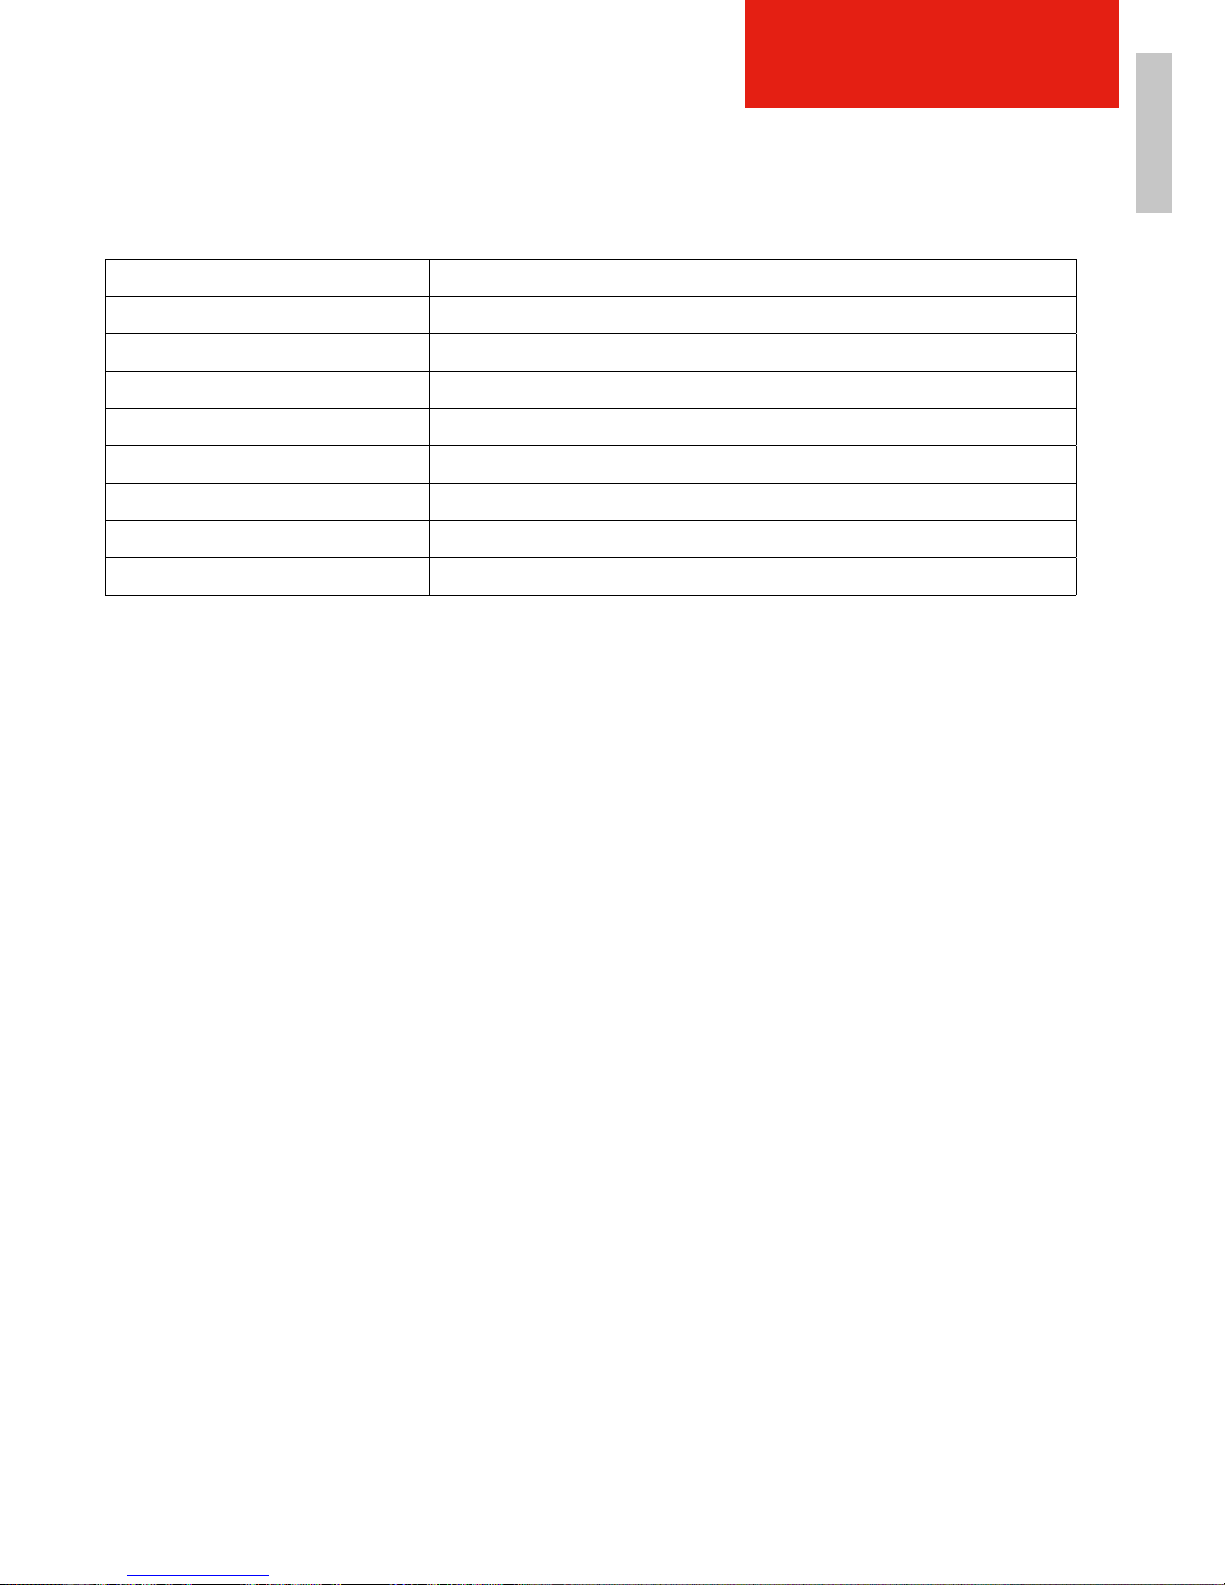
4.4.7.1 Technische Daten Batterie TBB
Modelnummer TBB
Eingang 30VDC (min. 29VDC, max. 45VDC
Ausgang 24VDC
Kapazität 2Ah (0.1C-Entladung mit 200mA)
Nennausgangsstrom 2A
Auslastungsgrad 10% (2 Min. ein / 18 Min. aus)
Arbeitsumgebungstemperatur 0-40°C
Produkt Maße 209 x 116 x 60 mm
Nettogewicht 2 kg / Stk.
Page 22

FR DE
22
SESSELBESCHREIBUNG
4.5 Technische Daten
1) Betriebsart = Aussetzbetrieb AB 2 min/18 min, d. h. maximal 2 Minuten unter Nennlast
fahren, danach muss eine Pause von 18 Minuten eingehalten werden. Andernfalls kann
es zu Funktions ausfall kommen!
2) Verstellgeschwindigkeit = Geschwindigkeit, mit der sich der Gabelkopf ohne Belastung
verfahren lässt (entsprechend der Belastung variiert die Verstellgeschwindigkeit).
Mechanische Daten Sitzbreite 530 mm
Sitzhöhe 508-697 mm
Sitztiefe 546 mm
Körpergröße ca. 1650-1850 mm
Höhe Rückenlehne 660 mm
Neigung Rückenlehne ca. 138º Grad
Sesselhöhe 1180 mm
Sesselbreite 781 mm
Sessellänge in Liegeposition 1790 mm
Maximale Belastung 150 kg
Platzbedarf 1790 x 781 mm
Gewicht 88 kg
Elektrische Daten Betriebsspannung 100 - 240 Volt
Steuerspannung 30 Volt
Leistungsaufnahme 6 Amp
Bemessungsspannung 100-240 V
Bemessungsfrequenz 50/60 Hz
Bemessungsaufnahme 280 VA
Schallleistungspegel < 140 Dezibel
Platzierung des Netzteils Ausserhalb
Betriebsart 1)
bei max. Nennlast
10 % / max. 5 Schaltzyklen
max.
Verstellgeschwindigkeit 2)
7,6 mm/s
Page 23
DEFR
23
TRANSPORT & INSTALLATION
5. TRANSPORT UND INSTALATION
5.1 Sessel zum Aufstellort transportieren
5.1.1 Vor dem Transport
• Die Versorgungsanschlüsse für den elektrischen Strom befinden sich an der Hinterseite des
Sessels.
• Genauen Aufstellort festlegen.
• Transportweg festlegen und mögliche Hindernisse entfernen.
5.1.2 Sessel transportieren
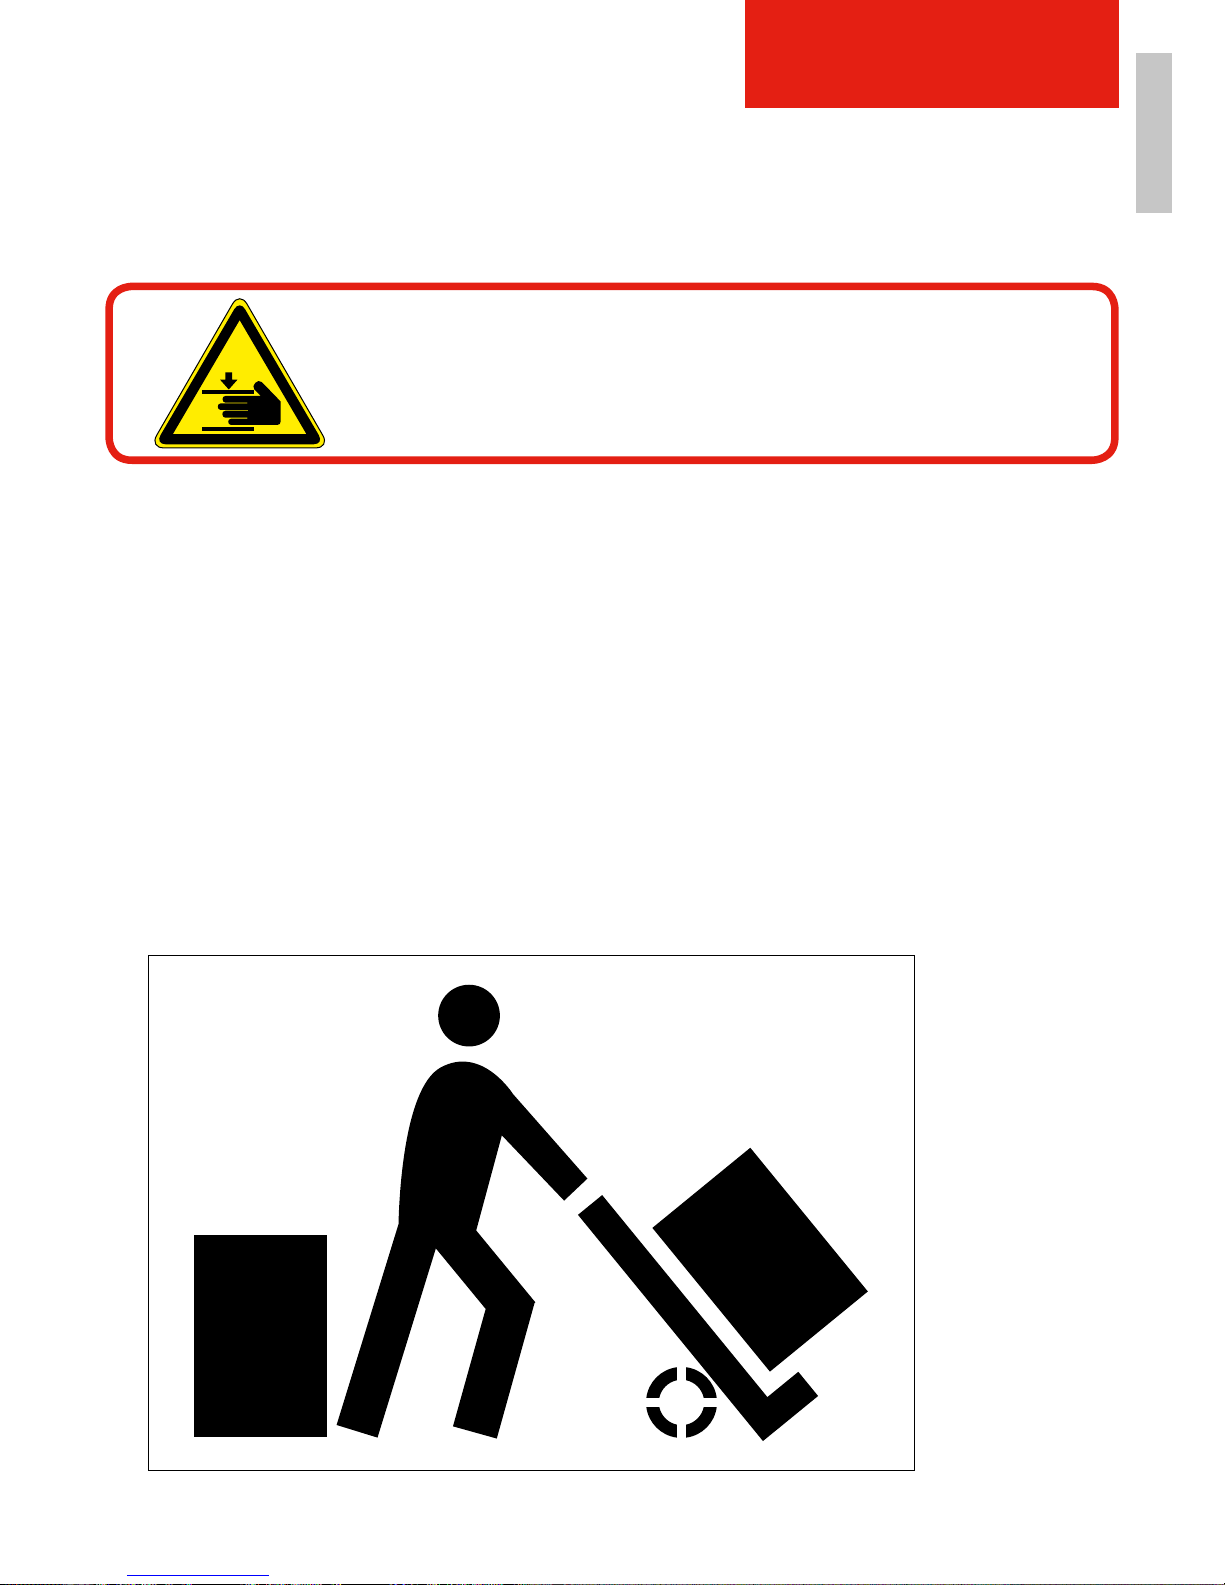
Für den Transport eignet sich am besten ein Hubwagen oder eine Sackkarre.
1. Den Sessel vorsichtig und nur wenig anheben. Auf Schwerpunktausgleich achten!
2. Den Sessel möglichst nahe über dem Boden an den Aufstellort transportieren.
3. Den Sessel vorsichtig und langsam absenken.
4. Die beiden Kartons aus Sicherheitsgründen separiert voneinander transportieren.
Abbildung 13: Transport des Sessels
WARNUNG!
Stoß- und Quetschgefahr beim Heben und Transportieren des Sessels.
Page 24
FR DE
24
5.1.3 Sessel auspacken
Durch unsachgemäßes Öffnen der Verpackung kann der Sessel beschädigt werden.
Gehen Sie zum Auspacken wie folgt vor:
1. Stellen Sie die große Kiste entsprechend der Beschreibung auf dem Boden ab.
2. Kippen Sie die Kiste seitlich an und öffnen Sie die Bodenteile der Kiste.
3. Klappen Sie die vier Bodenteile komplett nach außen.
4. Kippen Sie die Kiste samt Sessel langsam auf den Boden zurück.
5. Heben Sie die Kiste an, womit der Sessel nun frei liegt.
5.1.4 Sessel versetzen
Beachten Sie beim Verschieben des Sessels die Länge des Stromversorgungskabels. Trennen
Sie, wenn notwendig, das Stromversorgungskabel vom Stromnetz. Verstauen Sie beim Verschieben
des Sessels, wenn notwendig das Stromversorgungskabel in den seitlichen Taschen.
5.2 Montage
Der Sessel wird vom Fachhändler vor Ort montiert.
5.2.1 Verbindung der Sesselkomponenten
Elektrische Verbindungen
• Keine Stolperfallen durch lose verlegte Kabel schaffen.
• Die Kabel vor Beschädigung schützen.
• Bitte stellen Sie sicher, dass der Netzstecker als solches jederzeit ausgesteckt werden kann.
TRANSPORT & INSTALLATION
HINWEIS!
TOPRO beteiligt sich an der Rücknahme und Verwertung seiner
Verpackungen. Durch die Beteiligung in diesem Kreislauf schont TOPRO
Umweltressourcen und schränkt die Entstehung von Treibhausgasen ein.
HINWEIS!
Aus ergonomischen Gründen empfiehlt TOPRO,
die Montage mit zwei Personen.
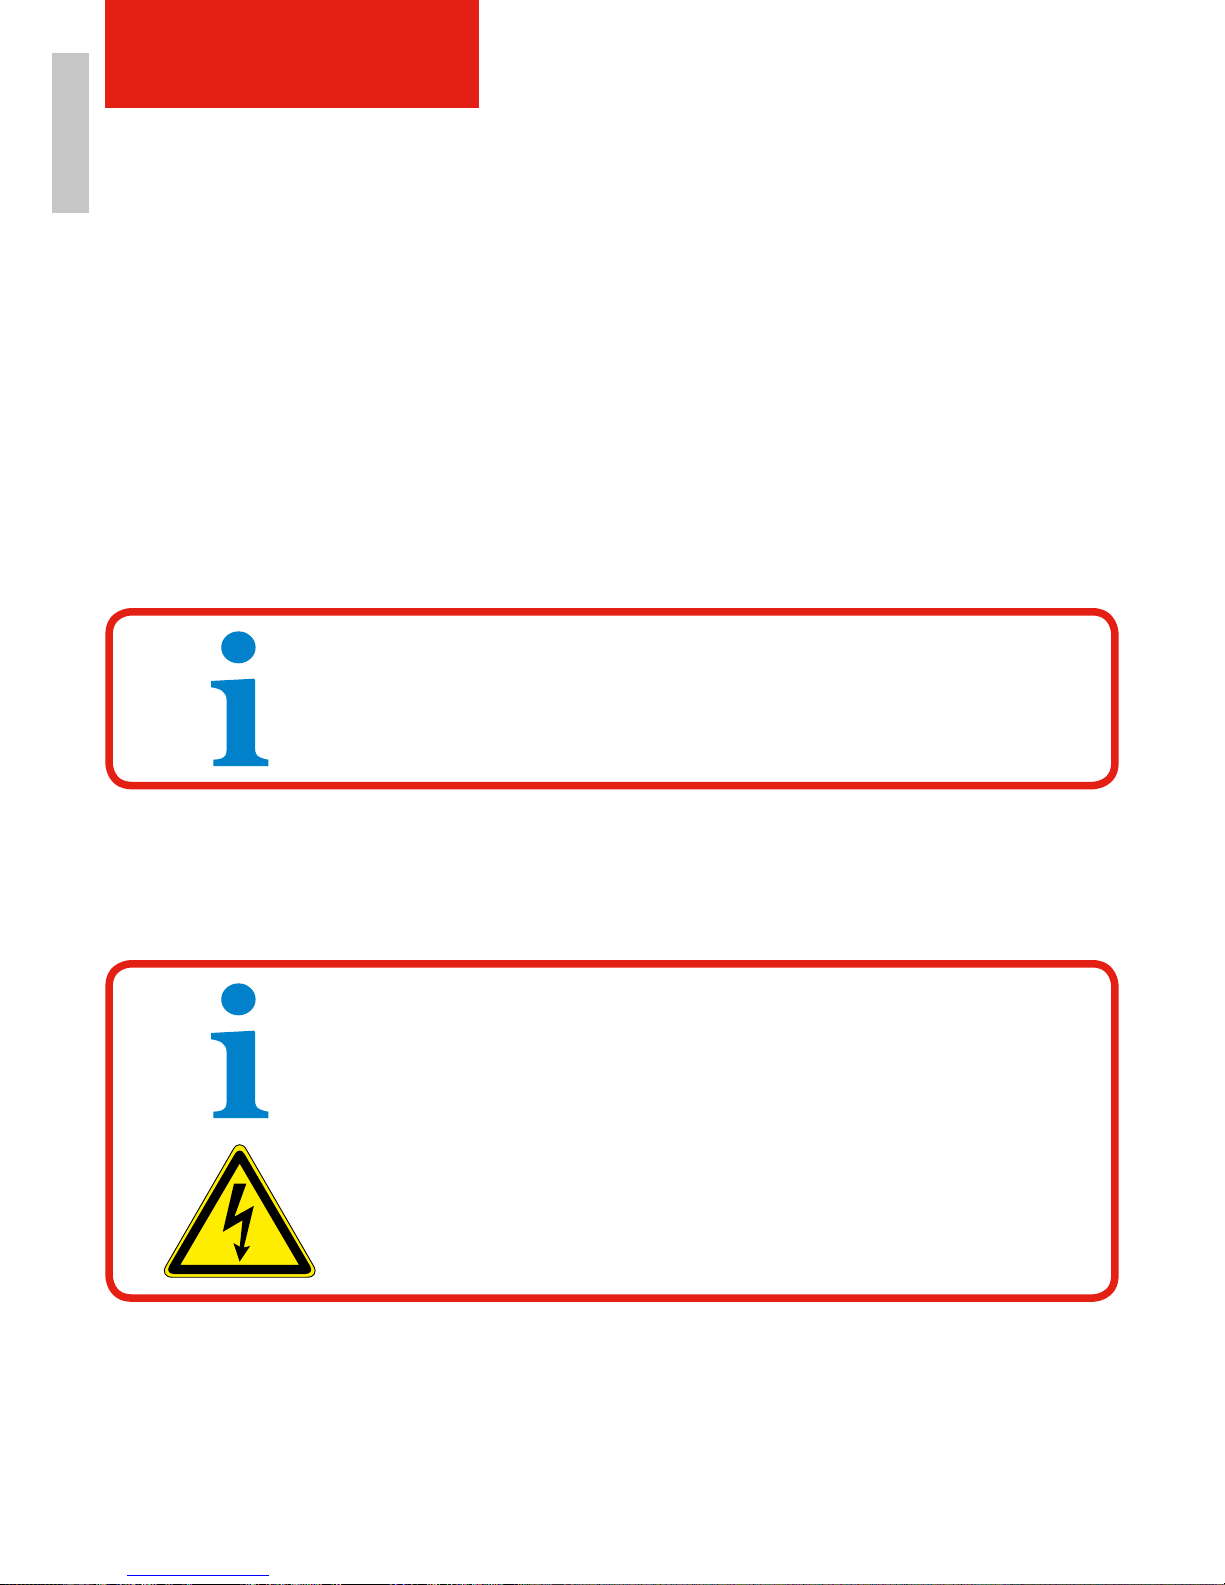
WARNUNG!
Lebensgefahr durch elektrischen Strom!
Gehäuse der Antriebs-Komponenten dürfen nicht geöffnet, entfernt
oder beschädigt werden. Während der Montage des Sessels muss
das Stromversorgungskabel vom Stromnetz abgezogen sein!
Page 25
DEENFR
1.
2.
4.
3.
25
TRANSPORT & INSTALLATION
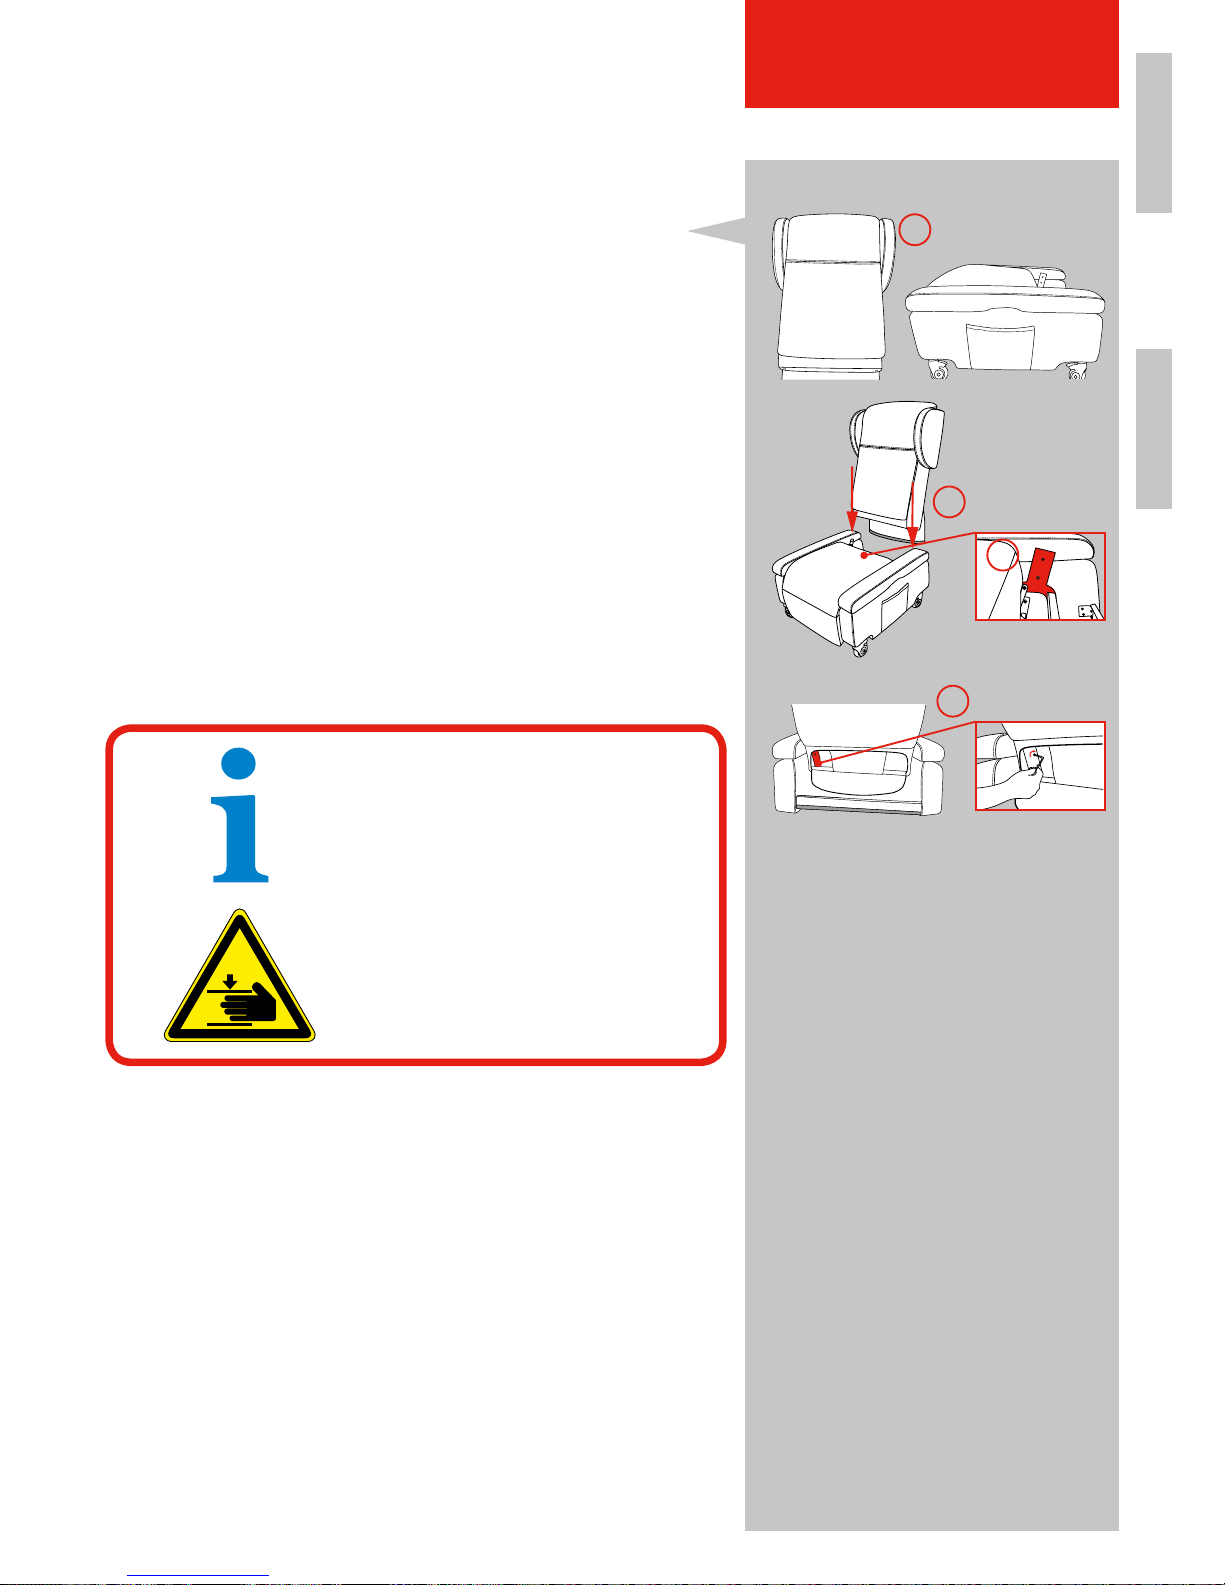
5.2.2 Rückenteil montieren
Falls der Aufbau von Ihrem Fachhändler nicht
geleistet wurde bitten wir Sie, wie folgt vorzugehen:
1. Ihr Sessel besteht aus zwei Teilen, einem Rückenund einem Sitzteil, die miteinander verbunden
werden müssen (1.).
2. Schieben Sie das Rückenteil (2.) auf den Sitz und
kontrollieren Sie, dass die zwei Halterungsplatten
(3.) des Sitzes in die Halterungsaufnahmen des
Rückenteils einfahren.
3. Schrauben Sie nun die vier separat beiliegenden
Imbusschrauben mit dem Werkzeug fest (4.).
HINWEIS!
Kontrollieren Sie regelmäßig die
Schrauben und ziehen Sie diese
bei Bedarf nach.
WARNUNG!
Stoß- und Quetschgefahr beim
Aufschieben des Rückenteils auf
den Sitz.
Abbildung 14: Montage Rückenteil
Page 26
FR DE
26
INBETRIEBNAHME
6. INBETRIEBNAHME
Zur Inbetriebnahme gehören jene Tätigkeiten, die erforderlich sind, damit der Sessel im vollen
Umfang verwendet werden kann. Voraussetzungen für die Inbetriebnahme sind:
• Das Rückenteil ist montiert.
• Die hinteren Räder sind festgestellt.
• Das Stromversorgungskabel ist angesteckt.
GEFAHR!
Es besteht Lebensgefahr durch Stromschlag bei unsachgemäßer Arbeit
an stromführenden Bauteilen!
Die Arbeiten an der elektrischen Ausrüstung dürfen nur von autorisierten
Elektrofachkräften ausgeführt werden. Der Sessel muss vor Instandsetzungsund Reinigungsarbeiten spannungsfrei geschaltet werden!
Trennen Sie das Stromversorgungskabel vom Stromnetz, bevor Sie
Arbeiten an dem Sessel durchführen.
WARNUNG!
Halten Sie Kinder und Haustiere von elektrischen Komponenten fern!
WARNUNG!
Die Gehäuse der Antriebs-Komponenten dürfen nicht geöffnet, entfernt
oder beschädigt werden.
HINWEIS!
Arbeitsbedingungen: • Temperaturbereich von +5° bis +40° C
• Relative Luftfeuchtigkeit von 15% bis 93%,
nicht kondensierend
Lagerbedingungen: • Von -25° bis +70° C
• Relative Luftfeuchtigkeit bis zu 93%,
nicht kondensierend
WICHTIG!
Benutzen Sie das Produkt in einer sauberen Umgebung, frei von
Schmutz, Staub, Haustieren und Haaren.
Page 27
DEFR
1.
2.
27
INBETRIEBNAHME
6.1 Erstinbetriebnahme
Zur Erstinbetriebnahme sind folgende Tätigkeiten notwendig:
• Energie-Versorgung prüfen.
• Auf vollständige Montage / Sicherheitseinrichtungen prüfen.
• Testlauf durchführen. Stellen Sie sicher, dass sich bewegte Bauteile ungehindert in den dafür
erforderlichen Freiräumen bewegen können.
• Drücken Sie die grüne Taste bis sich der Sessel in der neutralen Sitzposition befindet, somit
sind alle vier Motoren kalibriert. Wiederholen Sie diesen Vorgang bei jedem Wiederanschluss
an das Stromnetz.
WARNUNG!
Verweisen Sie Unbefugte vom Schwenkbereich des Sessels!
WICHTIG!
Führen Sie eine Sichtkontrolle durch!
Der Nutzer verpflichtet sich darauf zu achten, dass sich keine dritten
Personen, Kinder, Gegenstände und Tiere im Funktionsbereich
(Gefahrenbereich) des Sessels befinden.
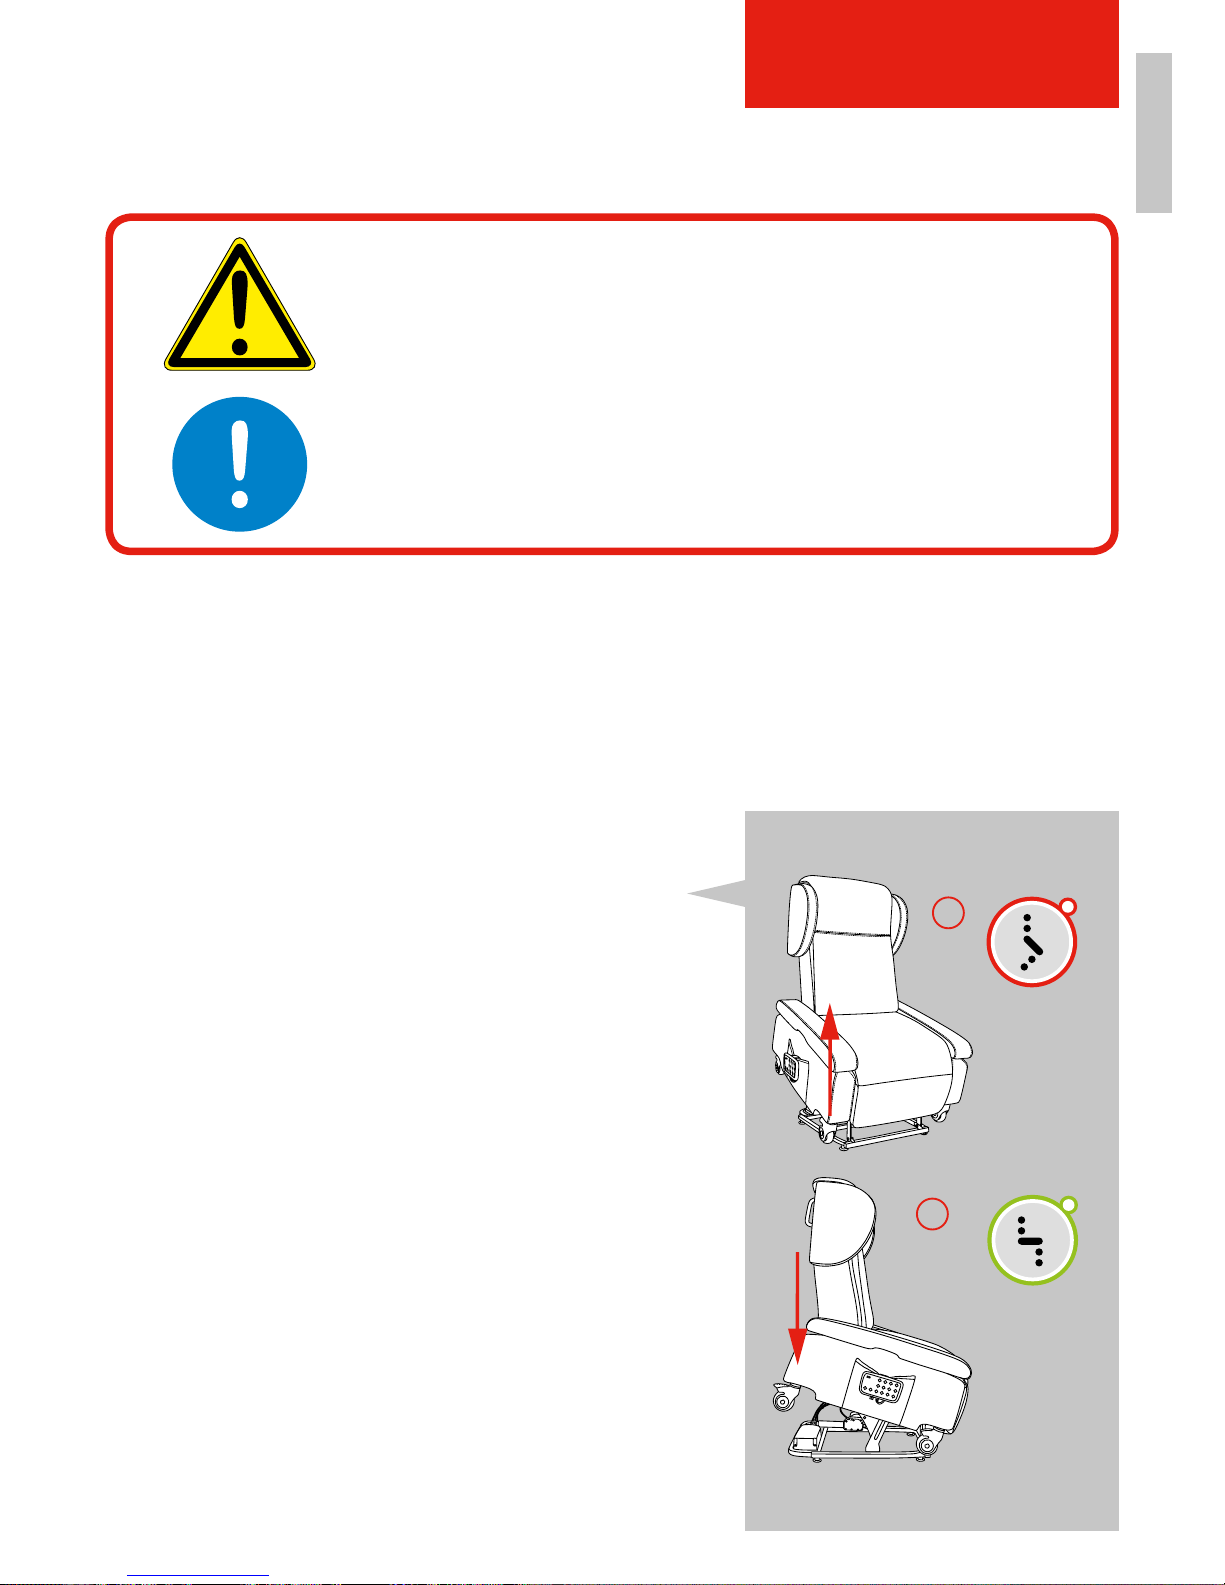
6.1.1 Sicher in den Sessel setzen
1. Stellen Sie sich vor den Sessel und drücken Sie
die rote Taste (1.) der Fernbedienung, bis die
Sitzfläche eine für Sie ideale Höhe erreicht hat, um
sich mit dem Gesäß anzulehnen.
2. Beim Anlehnen drücken Sie die grüne Taste (2.),
damit der Sessel Sie langsam nach unten in eine
aufrechte Sitzposition bringt. Die auf Sitzhöhe
versenkbaren Armlehnen (siehe Kapitel 6.1.9) in
Kombination mit der Höheneinstellung (siehe
Kapitel 6.1.8) erleichtert einen seitlichen Transfer
in oder auf eine andere Sitzgelegenheit.
Abbildung 15: In den Sessel setzen
Page 28
DEFR
2.
2.
1.
1.
28
INBETRIEBNAHME
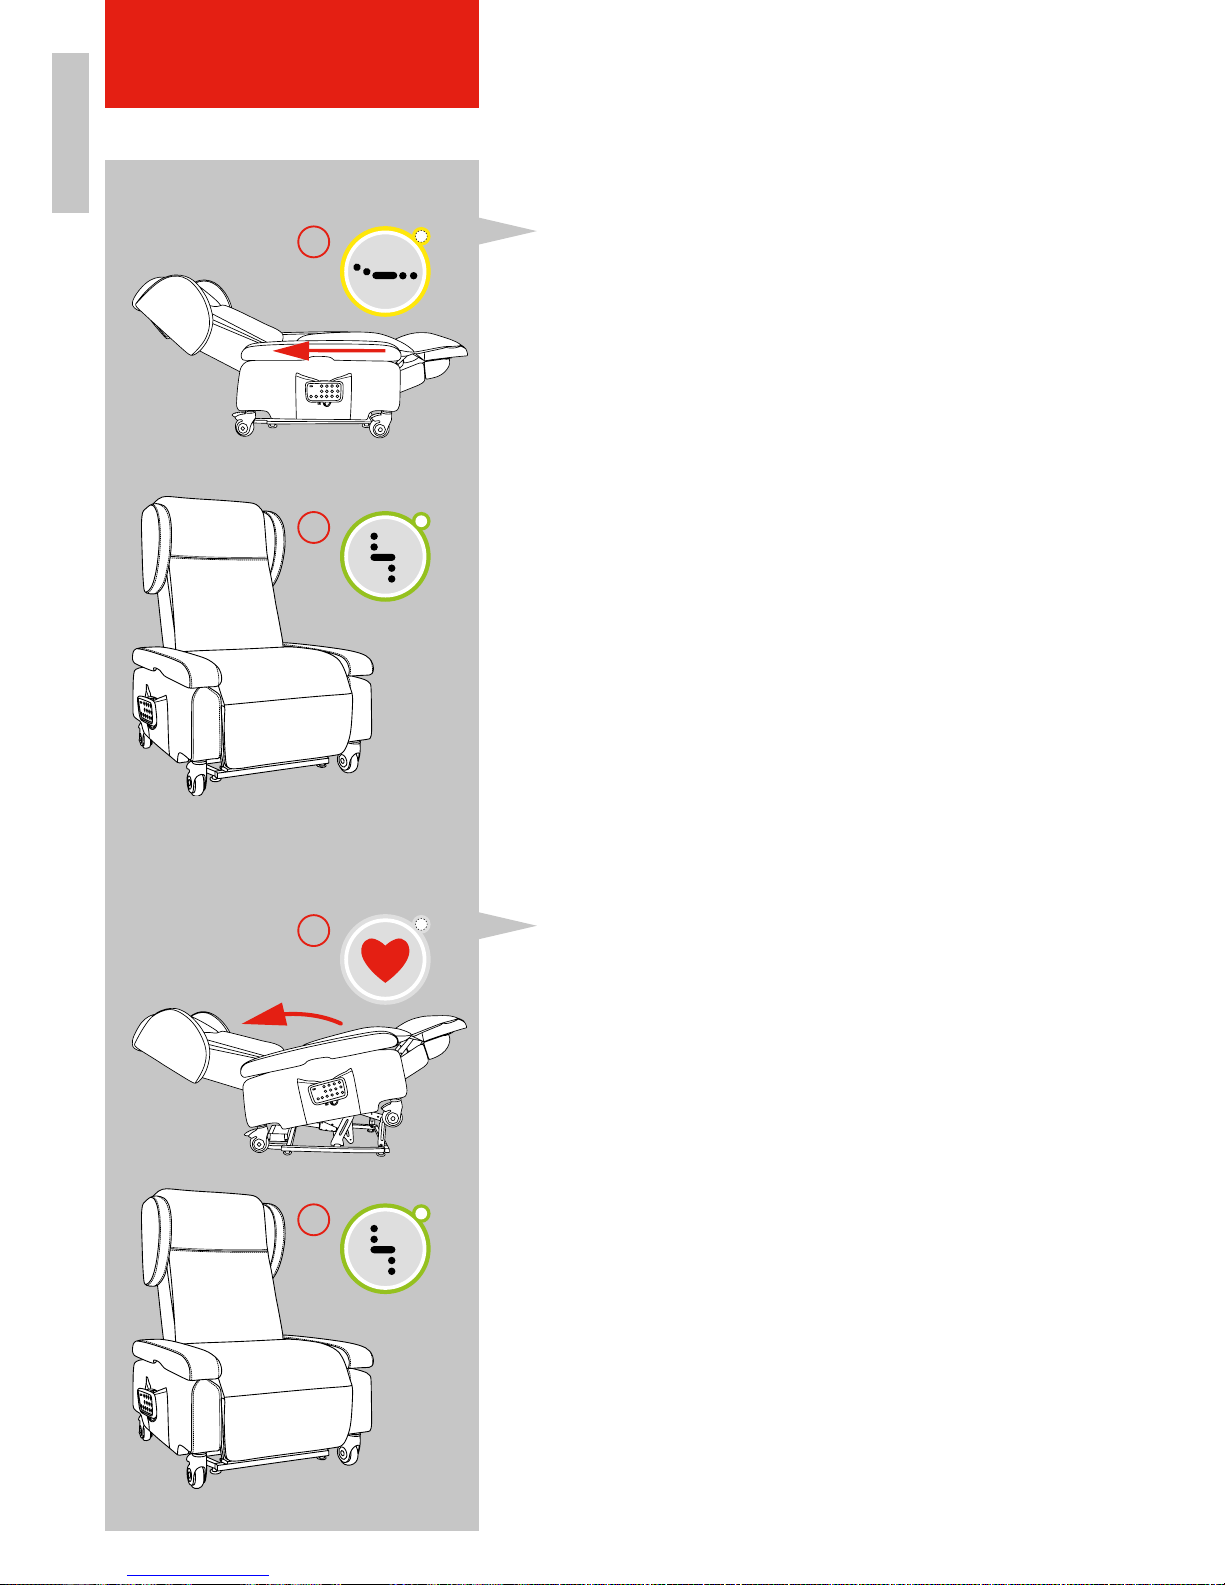
6.1.2 Ruhen im Liegen
Achten Sie darauf, dass die Räder des Sessels
gebremst sind und gerade nach hinten stehen sowie
auf ausreichend Platz zu Wänden, Gegenständen
und Personen.
1. Halten Sie die gelbe Taste (1.) gedrückt, bis sich
Ihr Sessel in der Liegeposition befindet.
2. Um aus der Liegeposition wieder in das aufrechte
Sitzen zu kommen halten Sie einfach die grüne
Taste (2.) gedrückt.
Die Liegeposition in Kombination mit den auf
Sitzhöhe versenkbaren Armlehnen (siehe Kapitel
6.1.9) und der Höheneinstellung (siehe Kapitel
6.1.8) erleichtern einen seitlichen liegend Transfer
aus / ins Bett.
6.1.3 Sicher in der Herz-Waage-Position
In der Herz-Waage-Position befinden sich Ihre Füße
über Herzhöhe. Diese Position führt u.a. zur Entlastung Ihres Kreislaufs und Ihrer Beine.
Achten Sie darauf, dass die Räder des Sessels
gebremst sind und gerade nach hinten stehen sowie
auf ausreichend Platz zu Wänden, Gegenständen
und Personen.
1. Halten Sie die Taste mit dem Herz (1.) gedrückt,
bis sich der Sessel in der Herz-Waage-Position
befindet.
2. Um aus der Herz-Waage-Position wieder in das
aufrechte Sitzen zu kommen halten Sie einfach
die grüne Taste (2.) gedrückt.
Abbildung 16: Im Sessel liegen
Abbildung 17: Herz-Waage-Position
Page 29
DEFR
1.
2.
1.
29
INBETRIEBNAHME
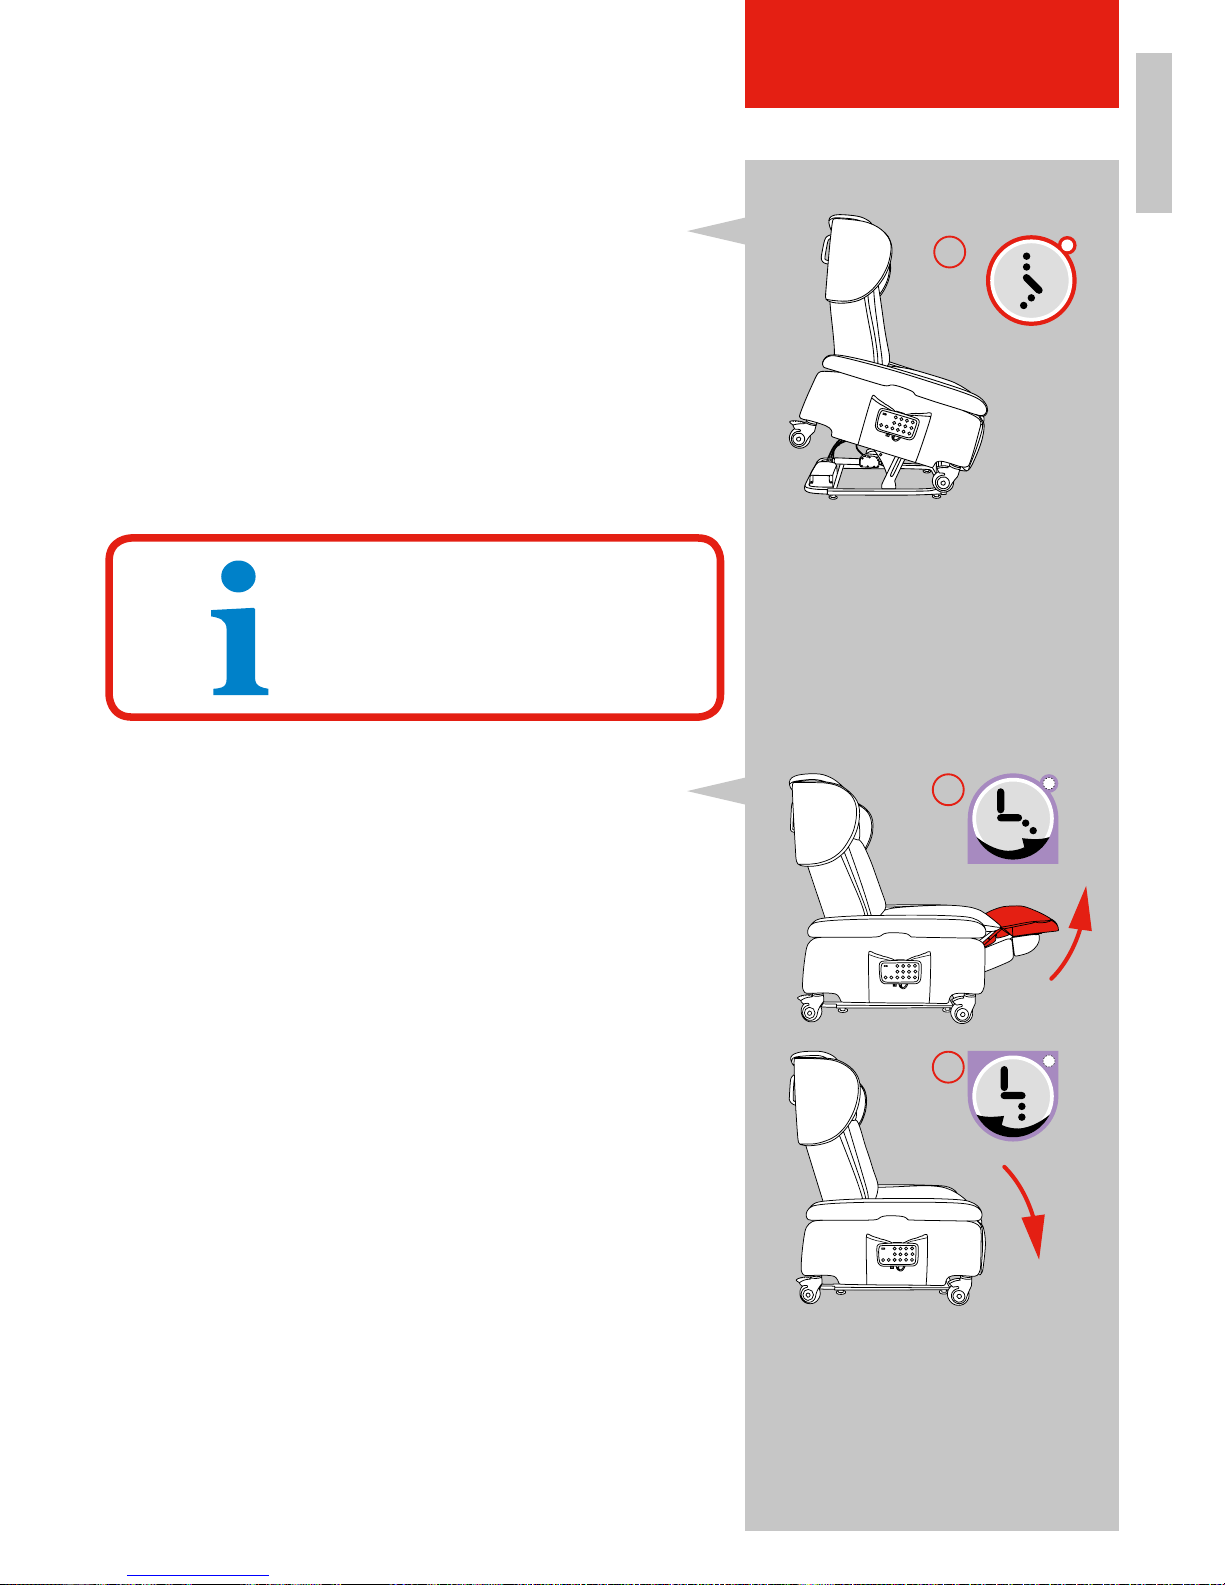
6.1.4 Sicher aus dem Sessel aufstehen
1. Halten Sie die rote Taste (1.) gedrückt. Auch aus
der Liegeposition fährt der Sessel zuerst in die
aufrechte Sitzposition und geht erst dann in das
sichere Aufstehen über. Während der Bewegung
nach oben können Sie sich zur Unterstützung links
und rechts an den Armlehnen festhalten.
2. Sobald der Sessel die optimale Höhe erreicht hat,
die Ihnen einen sicheren Stand ermöglicht, lassen
Sie die rote Taste (1.) los.
6.1.5 Individuelle Einstellung der Fußstütze
Mit Hilfe dieser zwei Tasten kann die Fußstütze je
nach Verlangen individuell eingestellt werden.
1. Drücken Sie die obere violette Taste, um die
Fußstütze nach oben zu fahren (1.).
2. Drücken Sie die untere violette Taste, um die
Fußstütze wieder nach unten zu fahren (2.).
Abbildung 18: Aufstehfunktion
HINWEIS!
TOPRO empfiehlt, den Sessel
in dieser optimalen Höhe stehen
zu lassen, damit Sie sich später
wieder bequem anlehnen und
setzen können.
Abbildung 19: Einstellung Fußstütze
Page 30
DEFR
2.
1.
1.
2.
30
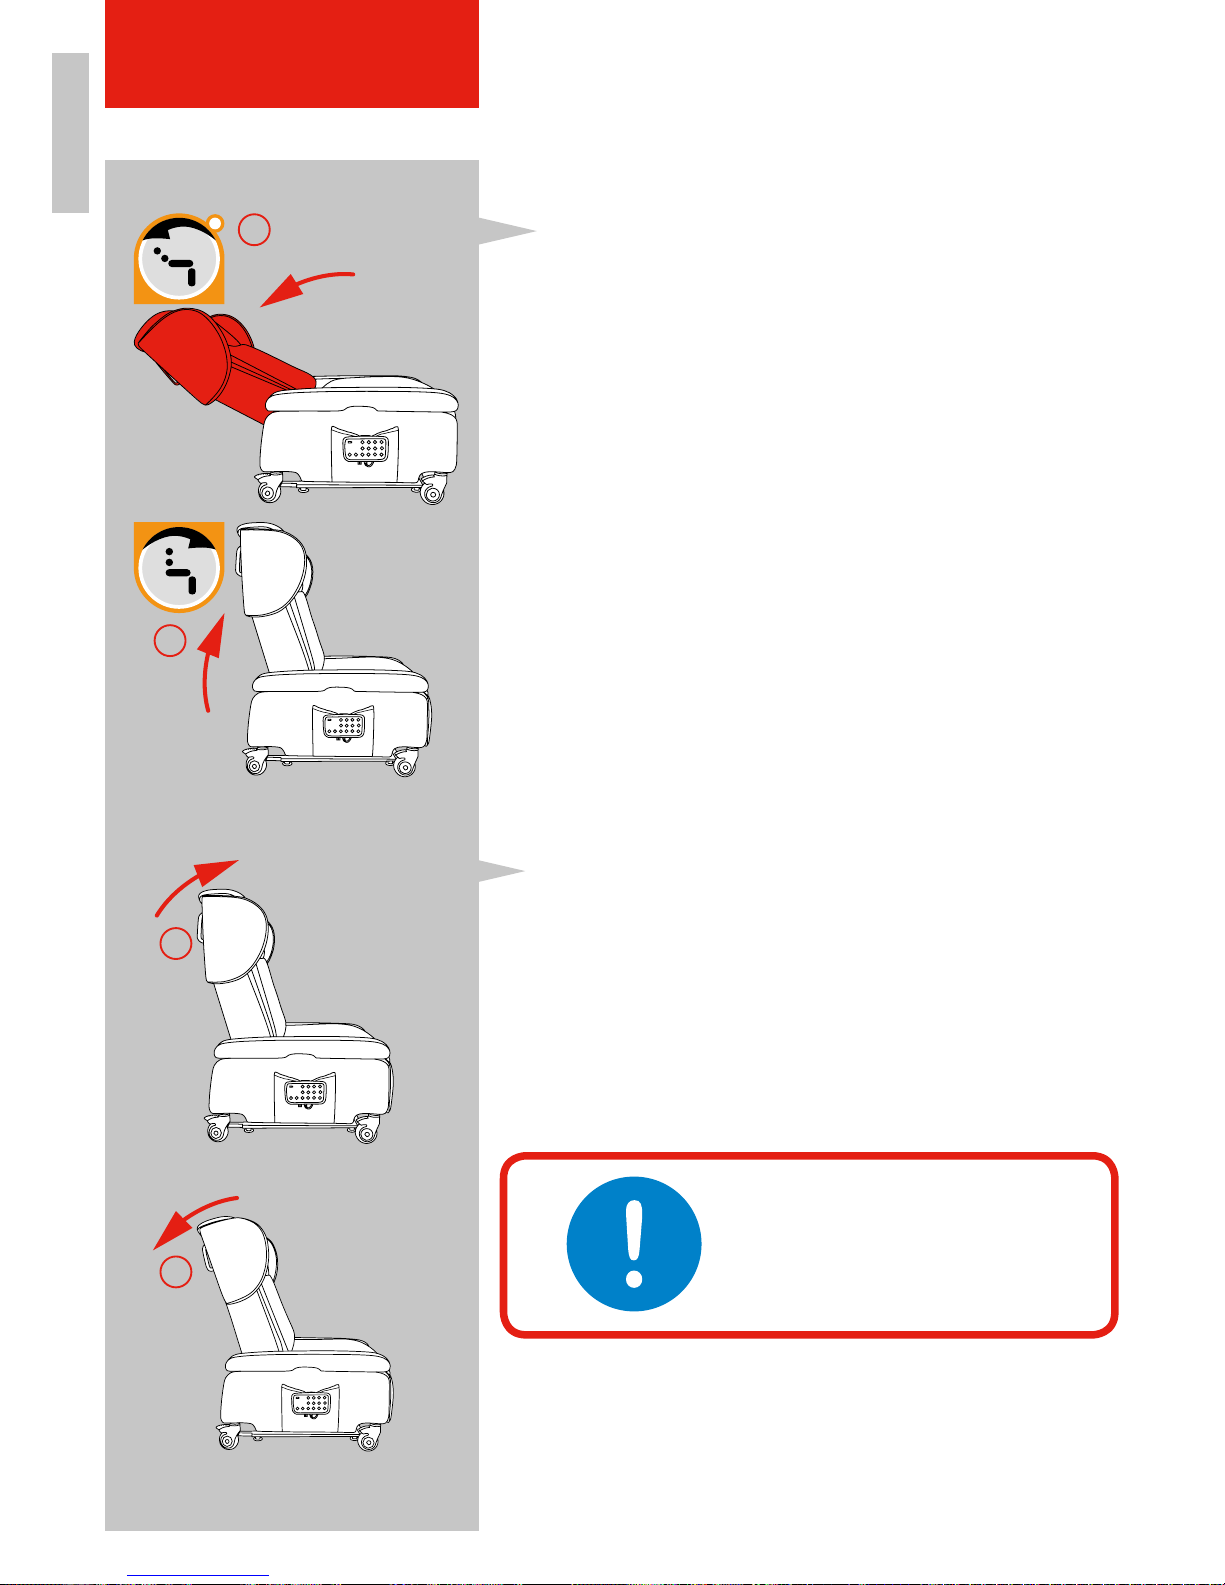
INBETRIEBNAHME
6.1.6 Individuelle Einstellung der Rückenlehne
Mit Hilfe dieser zwei Tasten kann die Rückenlehne
je nach Bedürfnis individuell eingestellt werden.
1. Drücken Sie die obere orange Taste, um die
Rückenlehne nach unten zu fahren (1.).
2. Drücken Sie die untere orange Taste, um die
Rückenlehne wieder nach oben zu fahren (2.).
6.1.7 Nackenstellung anpassen
Der obere Teil des Rückens kann in Winkel angepasst
werden. Hier kann entweder eine aktivere (nach vorne
gewinkelte) oder passivere (nach hinten geneigte)
Position eingestellt werden.
Dazu ist ein wenig Kraft von Nöten. Stellen Sie sich
dazu hinter den Sessel und drücken Sie den oberen
Teil des Rückens nach vorne (1.) oder hinten (2.),
je nachdem in welcher Position der Nutzer sitzen
möchte.
Abbildung 20: Einstellung Rückenlehne
Abbildung 21: Einstellung Nacken
WICHTIG!
Dieser Einstellung ist vorzunehmen, ohne dass der Nutzer im
Sessel sitzt. Achten Sie darauf,
dass die Bremsen des Sessels
fixiert sind.
Page 31
DEFR
2.
2.
1.
1.
1.
31
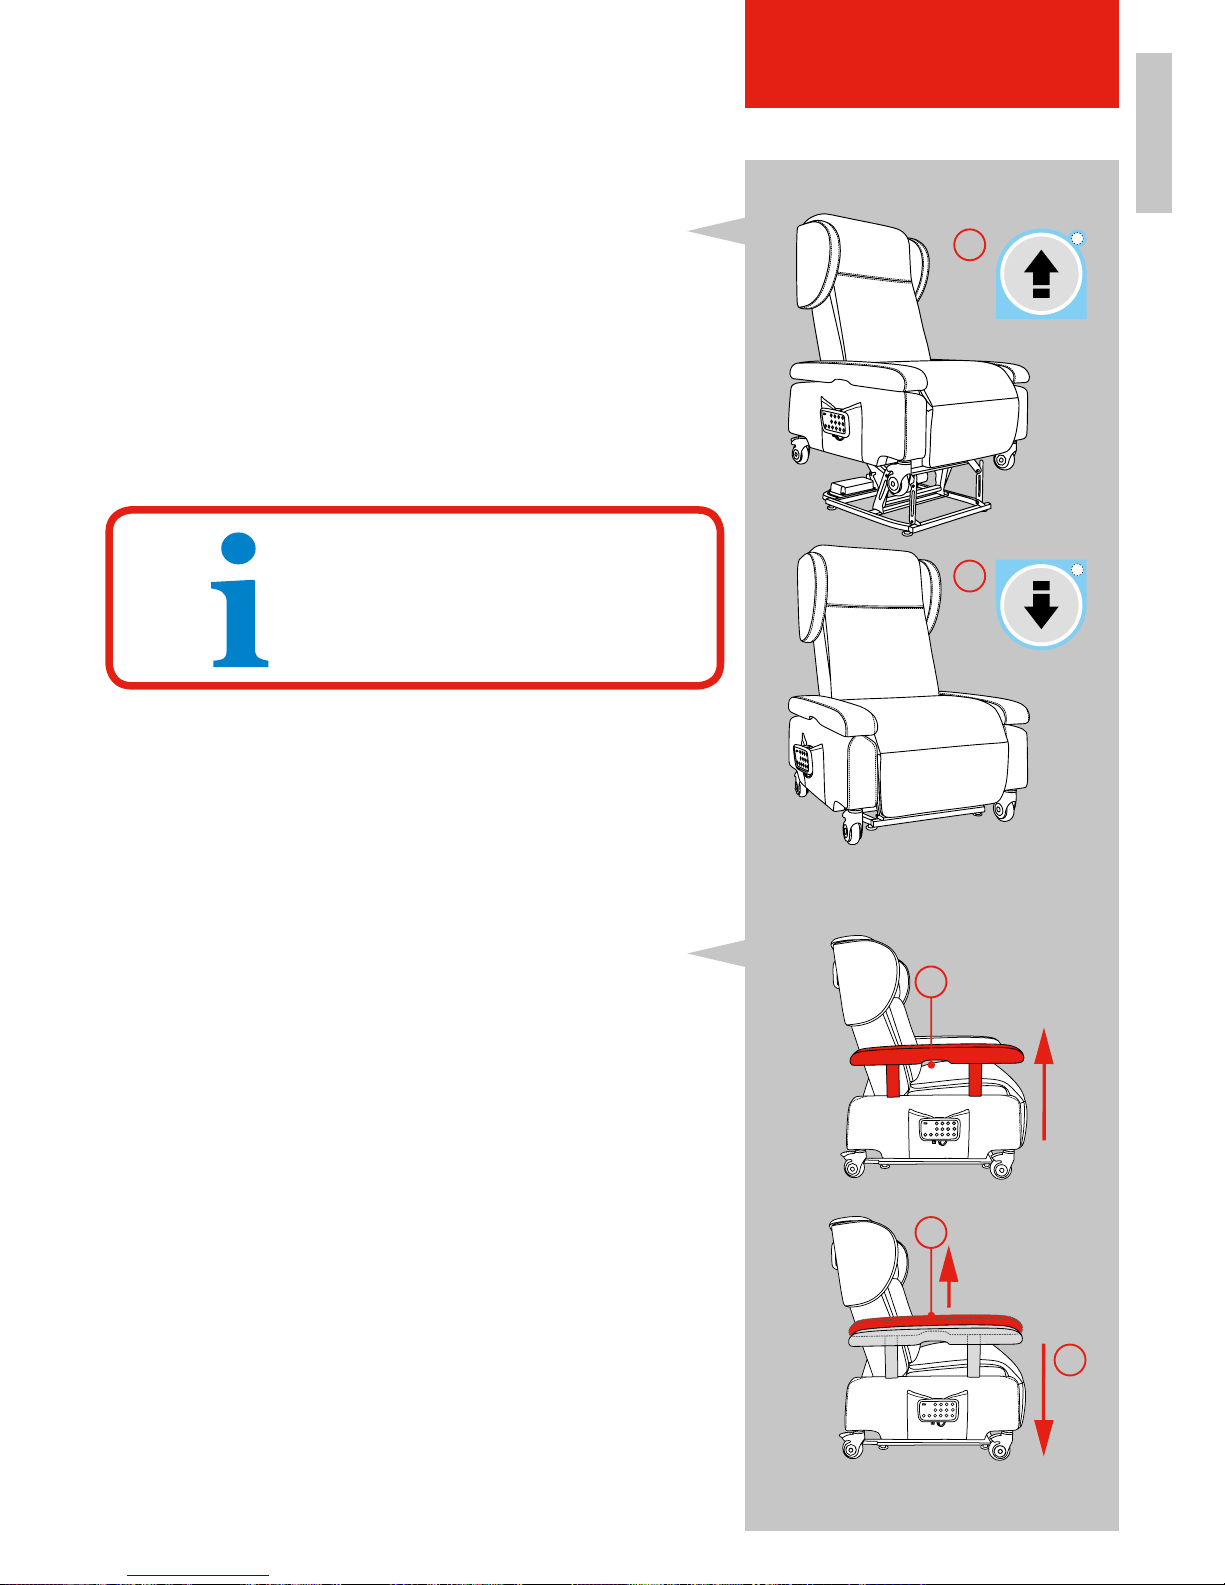
INBETRIEBNAHME
6.1.8 Höheneinstellung
Der Sessel kann in der Höhe verstellt werden.
1. Drücken Sie die obere Taste fährt der Sessel
hoch (1.).
2. Drücken Sie die untere Taste fährt der Sessel
runter (2.).
Sobald Sie die Taste loslassen, bleibt der Sessel
in der Höhe stehen, in der er sich gerade befindet.
6.1.9 Anpassen der Armlehnen
Für die Armlehnen gibt es zwei Positionen. Sie können
herausgezogen werden, um die Arme dort gut ablegen
zu können und sie können nach unten auf Höhe der
Sitzfläche geschoben werden.
1. Greifen Sie in die Griffmulde der Armlehnen (1.)
und ziehen Sie diese nach oben. Die Armlehne
ist nun in der höchsten Position, die Arme des
Nutzers können gut abgelegt werden.
2. Ziehen Sie die Armlehne weiter nach oben (1.),
löst sich der Feststellmechanismus und die Armlehne kann bis auf Sitzhöhe nach unten geschoben
werden (2.). Diese Position ist sehr hilfreich für
einen seitlich Transfer aus/ins Bett oder von/in
eine andere Sitzgelegenheit. Dies gilt insbesondere
in der Kombination mit der Höhenverstellung des
Sessels (siehe Kapitel 6.1.8) und der Sitzposition
(siehe Kapitel 6.1.1) sowie der Liegeposition (siehe
Kapitel 6.1.2).
HINWEIS!
Ein Verstellen der Höhe kann sinnvoll für einen Transfer vom / ins
Bett, von einem / auf ein anderes
Sitzmöbel und / oder auch für das
Unterfahren eines Tisches sein.
Abbildung 22: Höheneinstellung
Abbildung 23: Armlehnen verstellen
Page 32
DEFR
1.
32
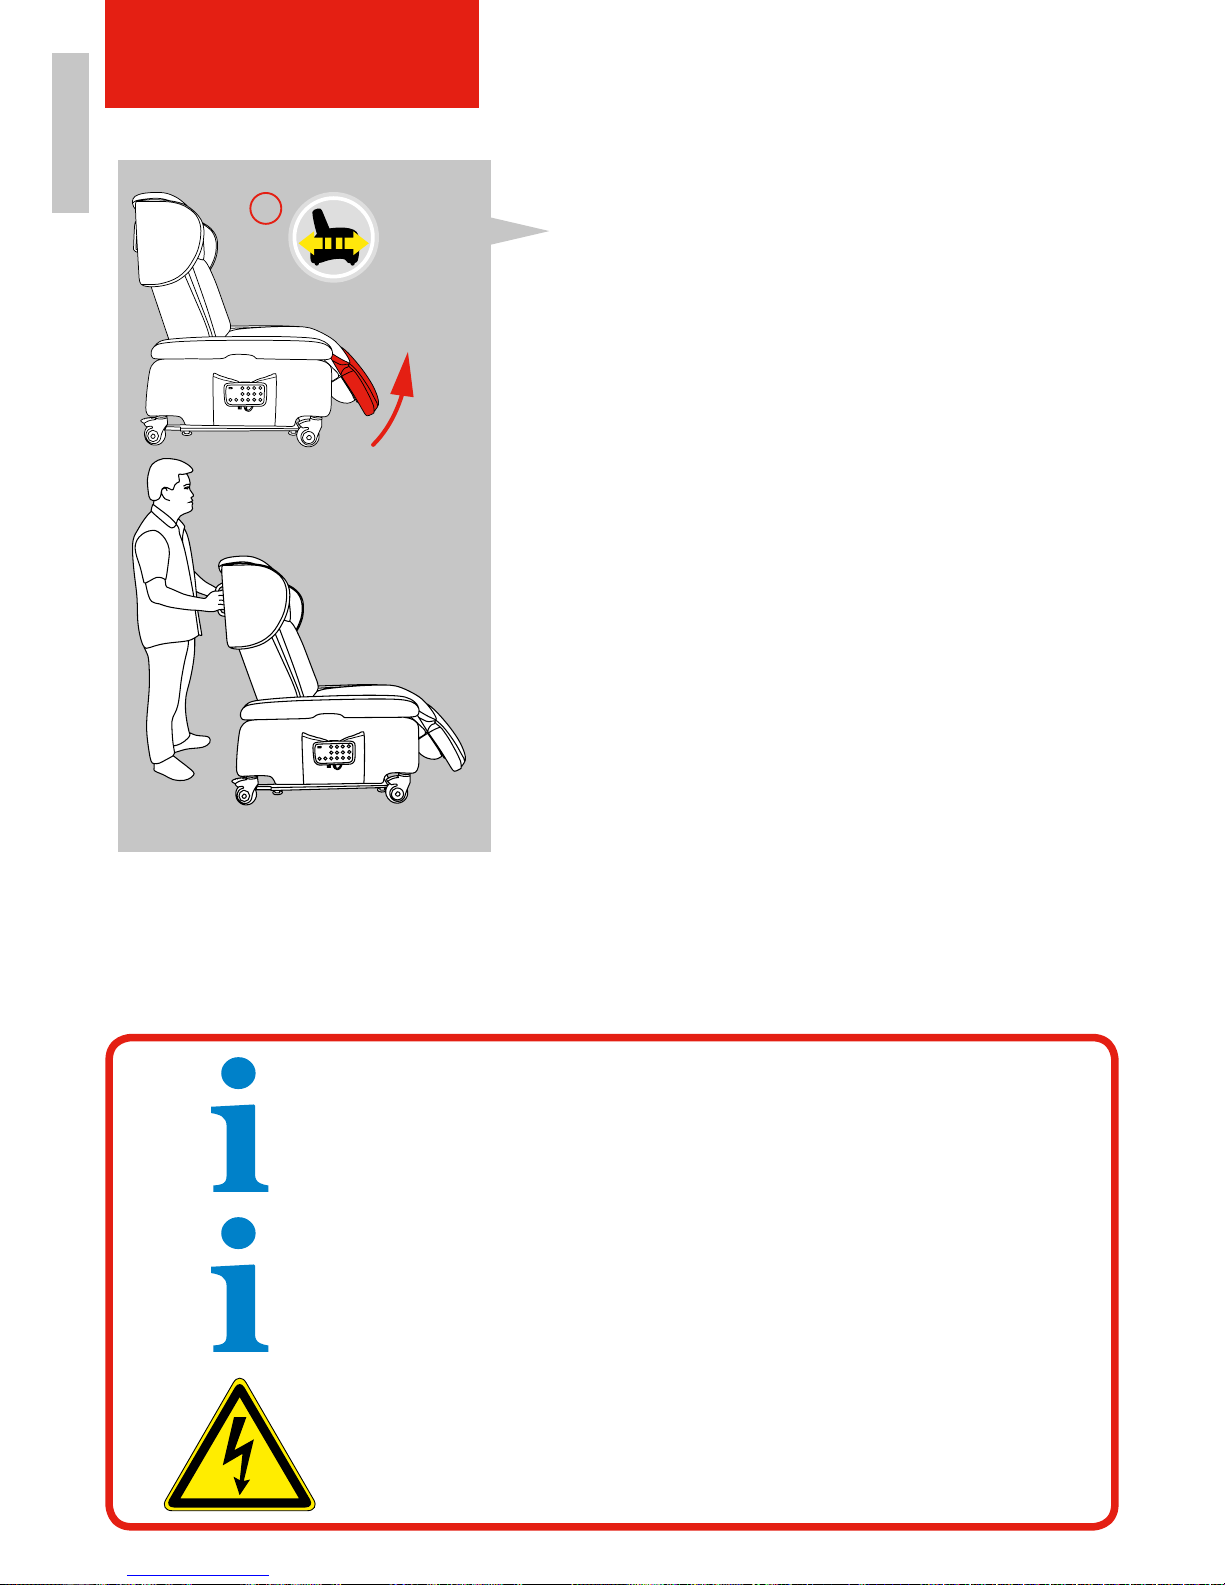
6.1.10. Sessel verschieben mit Nutzer im Sessel
sitzend
Ihr Bologna erlaubt es, den Sessel mit dem Nutzer
zusammen zu verschieben! Der Nutzer kann so vom
Schlaf- ins Wohnzimmer geschoben werden, am
Tisch essen und auch mal den Raum aus einer anderen
Perspektive erleben.
1. Entfernen Sie das Kabel aus der Steckdose und
positionieren Sie dieses sicher am Sessel. Weitere
Mobilität erhalten Sie, wenn Ihr Sessel mit der
optionalen Batterie versorgt wird.
2. Achten Sie darauf, dass Teppichkanten und andere
Unebenheiten aus dem Weg geräumt sind.
3. Drücken Sie die Transfer-Taste (1.). Der Sessel
fährt in die neutrale Position, um dann die Beinstütze ein wenig anzuheben. Die Füße des Nutzers
berühren nicht mehr den Boden.
4. Lösen Sie die Bremsen des Sessels.
5. Verschieben Sie den Sessel wie gewünscht. Achten
Sie darauf, dass die Bremsen nach dem Vorgang
wieder fixiert werden. Schließen Sie den Sessel
direkt wieder an den Strom an, wenn es die Umgebung erlaubt.
Abbildung 24: Transfer im Sessel
HINWEIS!
Nach dem Herstellen der Spannungsversorgung schaltet das Gerät verzögert ein. Warten
Sie vor der Inbetriebnahme mindestens 20 Sekunden. Drücken Sie die grüne Taste bis
sich der Sessel in der neutralen Sitzposition befindet, somit sind alle vier Motoren kalibriert. Wiederholen Sie diesen Vorgang bei jedem Wiederanschluss an das Stromnetz.
HINWEIS!
Sie können alle Sesselpositionen nutzen, wenn die grüne Betriebsleuchte
der Fernbedienung an ist. Haben Sie keine Batterie (siehe Kapitel 4.4.3),
sind Sie auf das Stromversorgungskabel angewiesen.
WARNUNG!
Achten Sie darauf, dass die Stromversorgungskabel nicht gequetscht,
geknickt oder beschädigt werden.
Achten Sie darauf, dass bei einer Kabelverlegung keine Stolperfallen
entstehen.
6.2 Stromversorgung herstellen
Die Einstellung der Sitzposition erfolgt durch einen am Gestell montierten Elektroantrieb.
Verbinden Sie hierzu den Sessel mittels Kabel mit einer Steckdose in Ihrem Haushalt.
Das Netzteil ist Bestandteil des Produktes.
INBETRIEBNAHME
Page 33
DEFR
33
GEWÄHRLEISTUNG
7. GEWÄHRLEISTUNG
7.1 Gewährleistungsbestimmungen
Gewährleistungen beziehen sich auf alle Mängel des Aufstehsessels,
die nachweislich auf Material- oder Herstellungsfehler zurückzuführen sind.
1. Die Gewährleistung ist nicht übertragbar.
2. Alle Reparaturen und Arbeiten am Sessel müssen von einem autorisierten Fachhändler
oder Möbeltechniker durchgeführt werden, da ansonsten die Gewährleistung erlischt.
3. Bei gerechtfertigter Reklamation erhalten Sie innerhalb der ersten 24 Monate nach Kauf des
Sessels die Ersatzteile für Reparaturen kostenlos von Ihrem Fachhändler oder Möbeltechniker.
4. Die Gewährleistung erlischt für den Sessel oder Teile des Sessels, wenn:
• die Wartung und Pflege des Sessels nicht den Vorgaben von TOPRO entspricht.
• andere als die Originalersatzteile am Sessel montiert werden.
• der Sessel unsachgemäß verwendet oder willentlich beschädigt wird.
• Reparaturen durch nicht-autorisierte Personen durchgeführt werden.
7.2 Von der Gewährleistung ausgeschlossen
• Die Nichtbeachtung der Betriebsanleitung sowie unsachgemäß durchgeführte Wartungsarbeiten
als auch insbesondere technische Änderungen und Ergänzungen führen zum Erlöschen sowohl
der Gewährleistung als auch der Produkthaftung allgemein.
• Vom Nutzer verursachte Schäden, die zum Beispiel durch Missbrauch oder zu hohe Belastung
entstehen.
• Das Verblassen der Farben; dies ist ein natürlicher Vorgang auf Grund von Zeit
und Sonnenlichteinwirkung.
• Schäden, die durch Flüssigkeiten entstehen.
• Stoßschäden, durch Reiben an der Wand, Möbeln o.ä.
• Beschädigungen durch Zigaretten oder offenes Feuer.
• Natürlicher Verschleiß und / oder Schäden, die durch unsachgemäßen Gebrauch entstanden
sind. Verschleißteile sind insbesondere: Räder, Polsterung, Bezug, Fernbedienung und Handgriffe.
7.3 Gewährleistung / Lebensdauer
• Gewährleistung des Sessels: 2 Jahre
Die Garantie erlischt, sobald keine Original-Ersatzteile oder Originalzubehör am Produkt verwendet
werden. Für Reparaturen innerhalb der Garantiezeit wenden Sie sich bitte an Ihren Fachhändler.
• Gewährleistung der Zubehörteile:
Funkalarm: 2 Jahre
Batterie: 1 Jahr
WICHTIG!
Bei Beanstandungen ist Ihr Fachhändler zu informieren.
Die Produktidentikation erfolgt über die Seriennummer,
diese ist auf dem Motor und Metallrahmen aufgeklebt.
Page 34
FR DE
34
INSTANDHALTUNG & WARTUNG
8. INSTANDHALTUNG UND WARTUNG
Die Lebensdauer des Sessels hängt von der bestimmungsgemäßen Verwendung und der
Einhaltung regelmäßiger Wartungsintervalle ab.
8.1 Kundendienst
Bei Störungen oder Defekten an ihrem Aufstehsessel ist dieser unverzüglich Ihrem Fachhändler
zur Instandsetzung zu übergeben. Dem Fachhändler werden auf Anfrage die notwendigen
Informationen, Unterlagen und Ersatzteile für die Reparatur zur Verfügung gestellt.
Für Fragen steht Ihnen der TOPRO Kundenservice unter der +49 (0) 8141-888939-0 oder
per E-Mail [email protected] zur Verfügung.
GEFAHR!
Wartungsarbeiten an elektrischen Anschlüssen des Sessels bzw. an
elektrischen Hilfs- / Steueranschlüssen dürfen nur Elektrofachkräfte
durchführen.
Vor Beginn der Störungsbeseitigung muss der Sessel spannungsfrei
geschaltet werden!
Trennen Sie das Stromversorgungskabel vom Stromnetz und sichern
Sie dieses gegen unbeabsichtigtes Wiedereinschalten.
WARNUNG!
Wartung- und Instandhaltungsarbeiten sind ausschließlich durch eingewiesenes Fachpersonal durchzuführen.
Das Gehäuse der Antriebs-Komponenten dürfen nicht geöffnet, entfernt
oder beschädigt werden.
Wartungsarbeiten nur im Stillstand des Sessels durchführen.
HINWEIS!
An dem Sessel können durch nicht ordnungsgemäße Demontage und
Montage Sachschäden oder Folgeschäden entstehen.
Es gilt daher bei allen Ausbau- und Zerlegearbeiten grundsätzlich:
• Teile in ihrer Zusammengehörigkeit kennzeichnen.
• Einbaulage und -ort kennzeichnen und notieren.
• Baugruppen getrennt ausbauen und aufbewahren.
Na ch Instandsetzungsarbeiten gilt grundsätzlich:
• Alle Schraubverbindungen auf festen Sitz kontrollieren.
• Alle Abdeckungen schließen und anschrauben.
Page 35
DEFR
35
INSTANDHALTUNG & WARTUNG
8.2 Wartungsempfehlung und Reinigung
Die betriebsgemäße Wartung hilft mit, einen reibungslosen Betrieb sicherzustellen.
Der Benutzer kann diese Aufgaben regelmäßig selbst durchführen.
8.2.1 Reinigung
Bezugstoffe: Gerne können Sie den Bezug absaugen. Eine regelmäßige Reinigung des Bezug-
stoffes ist wichtig, um Körperfette zu entfernen, die ein Aushärten des Bezugsstoffes zur Folge
haben können. Zur Reinigung, mit einem in milder Seifenlösung getauchtem Stofftuch oder
Schwamm den Stoff anfeuchten. Danach mit einem weichem sauberen Stück Stoff trockenen.
Die Oberfläche des Sessels kann mit einem Desinfektionsmittel abgewischt werden, das 70-80%
Ethanol enthält. Von dem Gebrauch eines chlor- und phenolhaltigen Desinfektionsmittels wird
abgeraten. Schäden und Verletzungen die durch unsachgemässe Handhabung von unautorisierten
Personen entstehen oder durch den Gebrauch von schädlichen Mitteln, unterliegen nicht der
Haftung des Herstellers.
8.2.2 Wartung
HINWEIS!
Einige der unten genannten Arbeiten sind stark von der Nutzung und den
Umgebungsbedingungen abhängig.
Die im Kapitel 8.2.2 genannten Zyklen sind Mindestangaben.
Im Einzelfall sind abweichende Wartungszyklen möglich.
WICHTIG!
Wartungsarbeiten gemäß der Tabelle auf Seite 34 und den darin
vermerkten Intervallen ausführen.
WARNUNG!
Benutzen Sie keine Möbelpolitur, kein Scheuermittel und keine Stahlwolle. Benutzen Sie keinesfalls einen Hochdruck- oder Dampfreiniger.
WICHTIG!
Verwenden Sie bei der Reinigung keine Lösungsmittel wie Benzin,
Alkohol oder ähnliches.
Page 36
FR DE
36
INSTANDHALTUNG & WARTUNG
Tätigkeit / Prüfung Wartungsintervall / Beschreibung
Sichtprüfen Mind. alle 6 Monate
Sessel reinigen Regelmäßig (nach Bedarf)
Funktionsprüfung Fernbedienung Mind. alle 6 Monate
8.3 Fehlersuche und Störungsmeldungen
Bitte unternehmen Sie im Störungsfall folgende Schritte:
• ausgebildetes Servicepersonal Ihres Fachhändlers verständigen,
• wenn notwendig den TOPRO Kundendienst benachrichtigen.
8.3.1 Liste der Warn- und Störmeldungen
WARNUNG!
Die Fehlersuche und -beseitigung sind ausschließlich durch
eingewiesenes Fachpersonal durchzuführen.
Sessel ohne Funktion Ursache und Abhilfe
Sessel ohne Funktion
1. Netzstecker an Steckdose angeschlossen?
2. Steckdose mit Strom?
Überprüfung durch Anschluss eines anderen
Geräts wie z.B. Staubsauger
3. Steckverbindungen überprüfen:
• Netzkabel zu Steuergerät
• Steuergerät zu Fernbedienung
• Motoren zu Fernbedienung
• Fernbedienung zu Steuergerät
Sessel mit Teilfunktion
(z.B. Rückenteil lässt sich verstellen,
jedoch nicht das Fußteil)
1. Steckverbindungen überprüfen:
• Antriebe zu Steuerung (Stecker müssen
eingerastet sein)
• Fernbedienung zu Steuerung (Stecker
muss eingerastet sein)
2. Ist beim Betätigen der Tasten ein Klicken in
der Steuerung wahrnehmbar?
3. Gegenprüfung / Ausschlussverfahren:
Umstecken der Antriebe und Überprüfen der
Funktionen.
Geräuschentwicklung der Polsterung
oder Bespannung
Je nach Raumklima - speziell bei Leder und
Mikrofaser - kann es zu einem erhöhten
Geräuschpegel kommen. Eine Lederpolitur
bzw. ein Talkpuder schaffen Abhilfe.
Ungewöhnliche Geräuschentwicklung
mechanischen Ursprungs
Sollte dies der Fall sein, so nehmen Sie den
Sessel außer Betrieb und kontaktieren Sie den
TOPRO Kundendienst.
Page 37
DEFR
37
AUßERBETRIEBSETZUNG
9. AUßERBETRIEBSETZUNG
Bei Außerbetriebnahme ist das Stromversorgungskabel vom Stromnetz zu trennen.
9.1 Vorübergehende Stilllegung
1. Sessel ausschalten und Stromversorgung entfernen.
9.2 Lagerbedingungen
Kurzfristige und mittelfristige Lagerung (bis 2 Jahre) sind ohne besondere Maßnahmen
bei den, in den technischen Daten spezifizierten Umgebungsbedingungen möglich.
Bei längerfristiger Lagerung sind Maßnahmen zum Schutz und Erhalt zu ergreifen:
• Schützen Sie den Sessel vor Sonnenlicht, um dem natürlichen Vorgang der Farbverblassung
entgegen zu wirken, indem Sie eine Abdeckung über den Sessel legen.
• Lagern Sie den Sessel in trockenen und gut durchlüfteten Räumen.
9.3 Vernichtung / Recycling
Vor Abtransport des Sessels, diesen gemäß Kapitel 9.1 stilllegen.
Zum Transport Hinweise in Kapitel 5.1 beachten!
HINWEIS!
Nach einer vorübergehenden Stilllegung muss eine erneute
Inbetriebnahme durchgeführt werden.
WICHTIG!
Alle Teile und Hilfs- und Betriebsstoffe:
• sortenrein trennen,
• nach örtlichen Vorschriften und Richtlinien entsorgen.
HINWEIS!
Die Motoren und das Steuergerät sind Sondermüll!
Bei offenen Fragen zur Vernichtung/Recycling wenden Sie sich bitte an
den Hersteller!
Page 38
FR DE
38
10. OPTIONALES ZUBEHÖR
OPTIONALES ZUBEHÖR
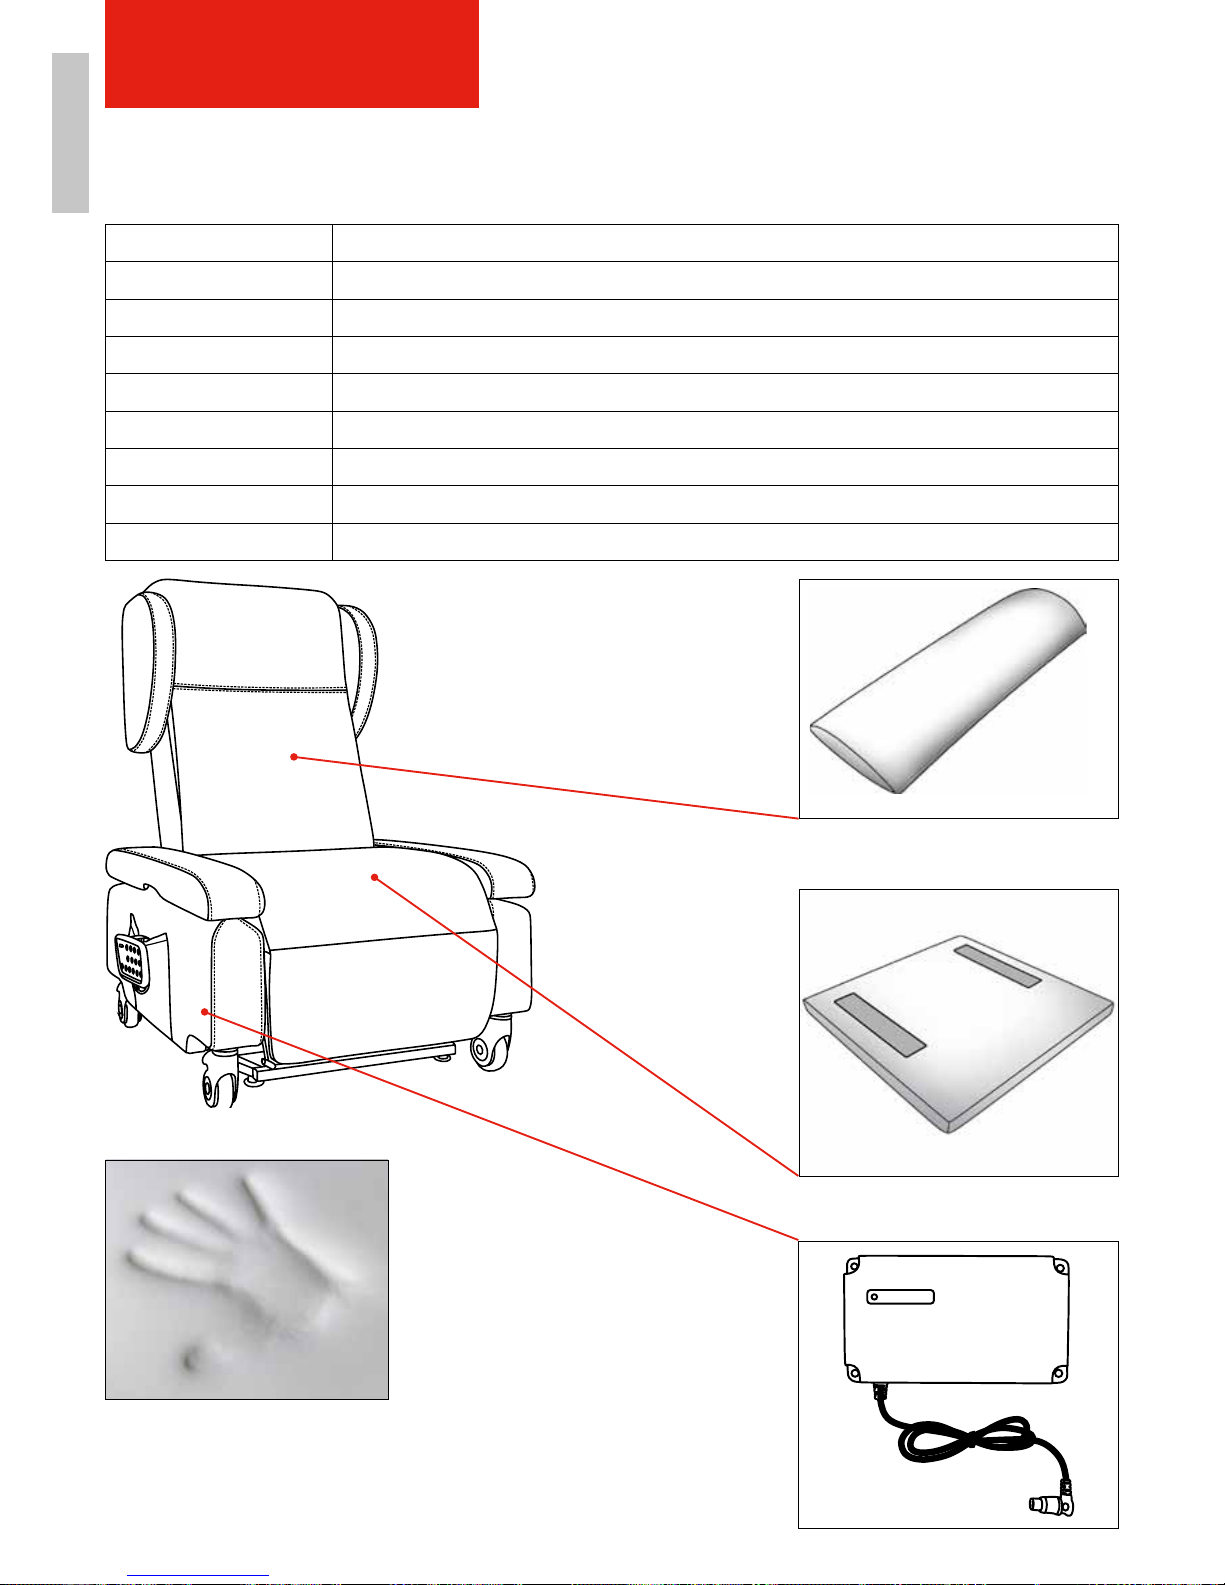
ComfortPlus ist ein spezieller
Schaumstoff, der sich dem
Körper anpasst. Er reflektiert
auf angenehme Weise die
eigene Körperwärme.
Artikelnummer Produktbezeichnung
0043-BR Lumbalkissen, Comfort Plus, Kunstleder braun, für Bologna
0043-CR Lumbalkissen, Comfort Plus, Kunstleder creme, für Bologna
0043-RE Lumbalkissen, Comfort Plus, Kunstleder rot, für Bologna
0041-BR Sitzkissen, Kunstleder braun, extra, abziehbar, für Bologna
0041-CR Sitzkissen, Kunstleder creme, extra, abziehbar, für Bologna
0041-RE Sitzkissen, Kunstleder rot, extra, abziehbar, für Bologna
HC13015-0042 Funkalarm für Bologna
HC13015-BAT Batterie für Bologna
Abbildung 27:
Batterie (wird im Gestell montiert)
Damit kann der Sessel auch während
des Patiententransports oder im Not-
fall, wie z.B. bei einem Stromausfall
bedienbar bleiben.
Abbildung 25:
Lumbalkissen - Comfort Plus
Abbildung 26:
Positionierungskissen optional
Page 39
DEFR
39
SCHALTKREISE
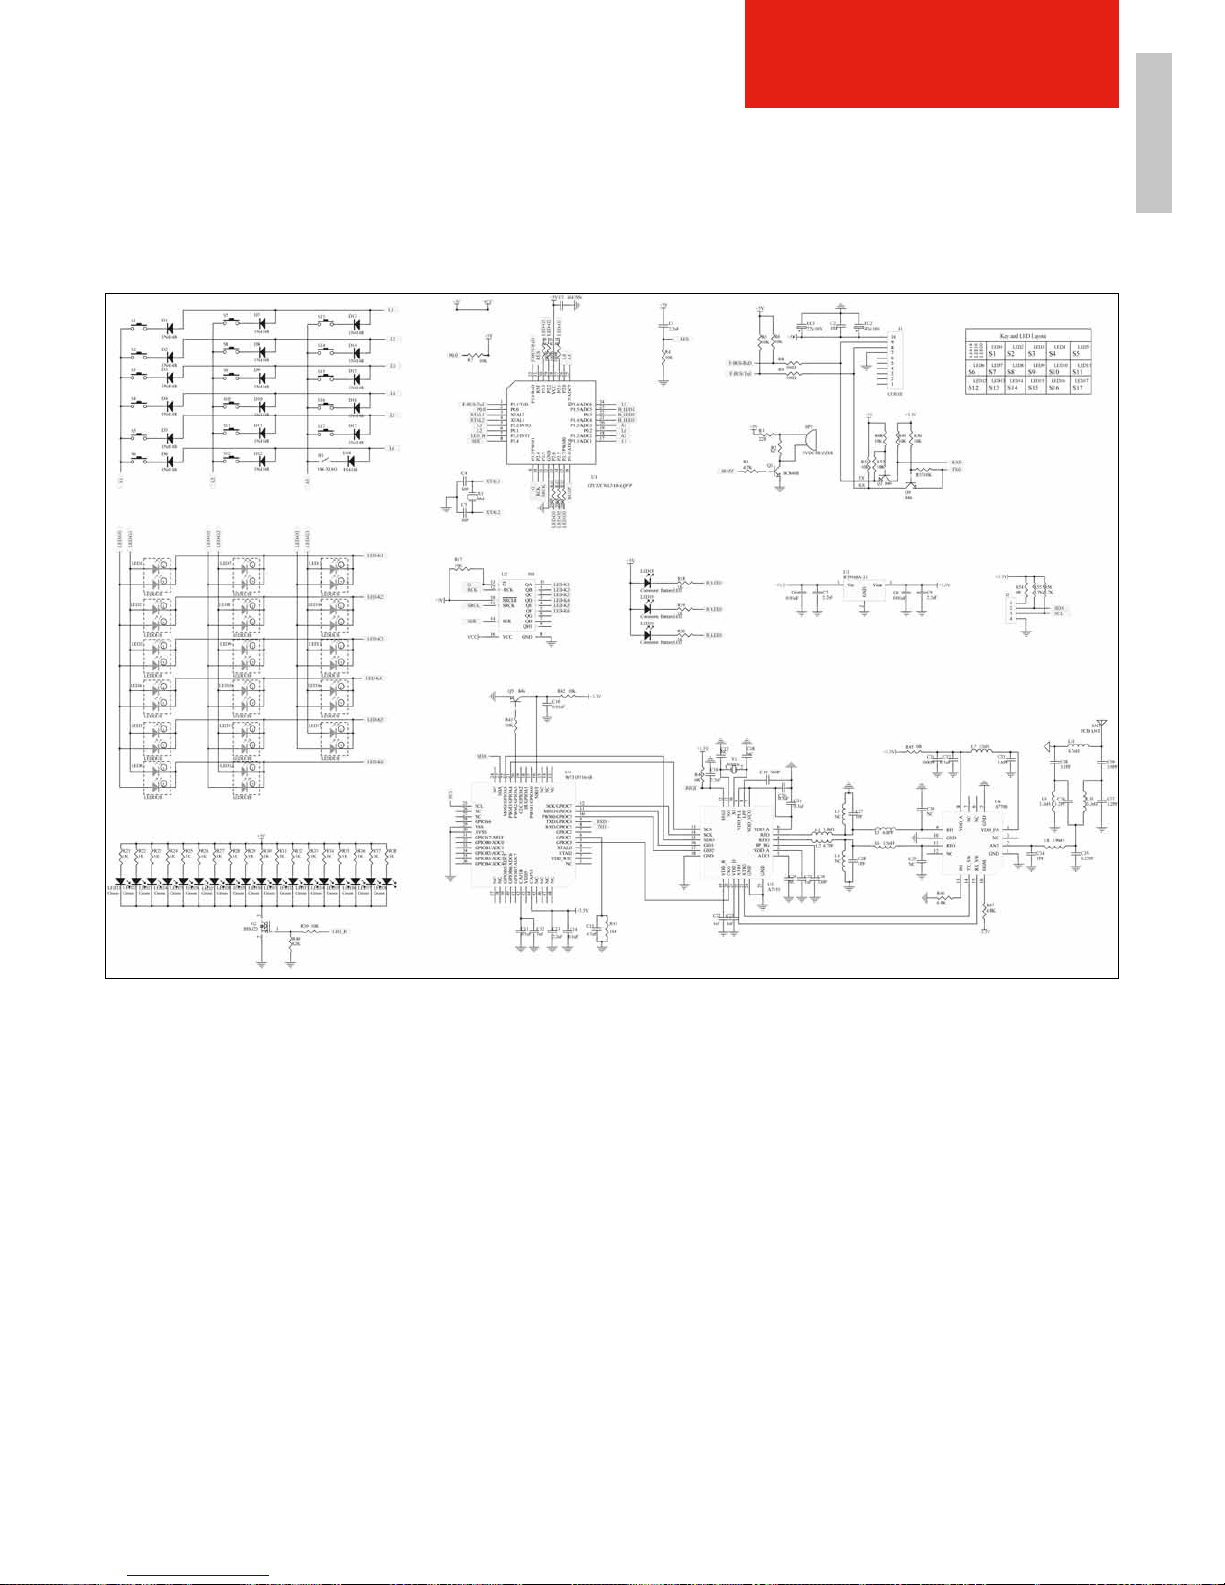
11. Schaltkreise
11.1 Fernbedienung
Abbildung 28:
Page 40
FR DE
40
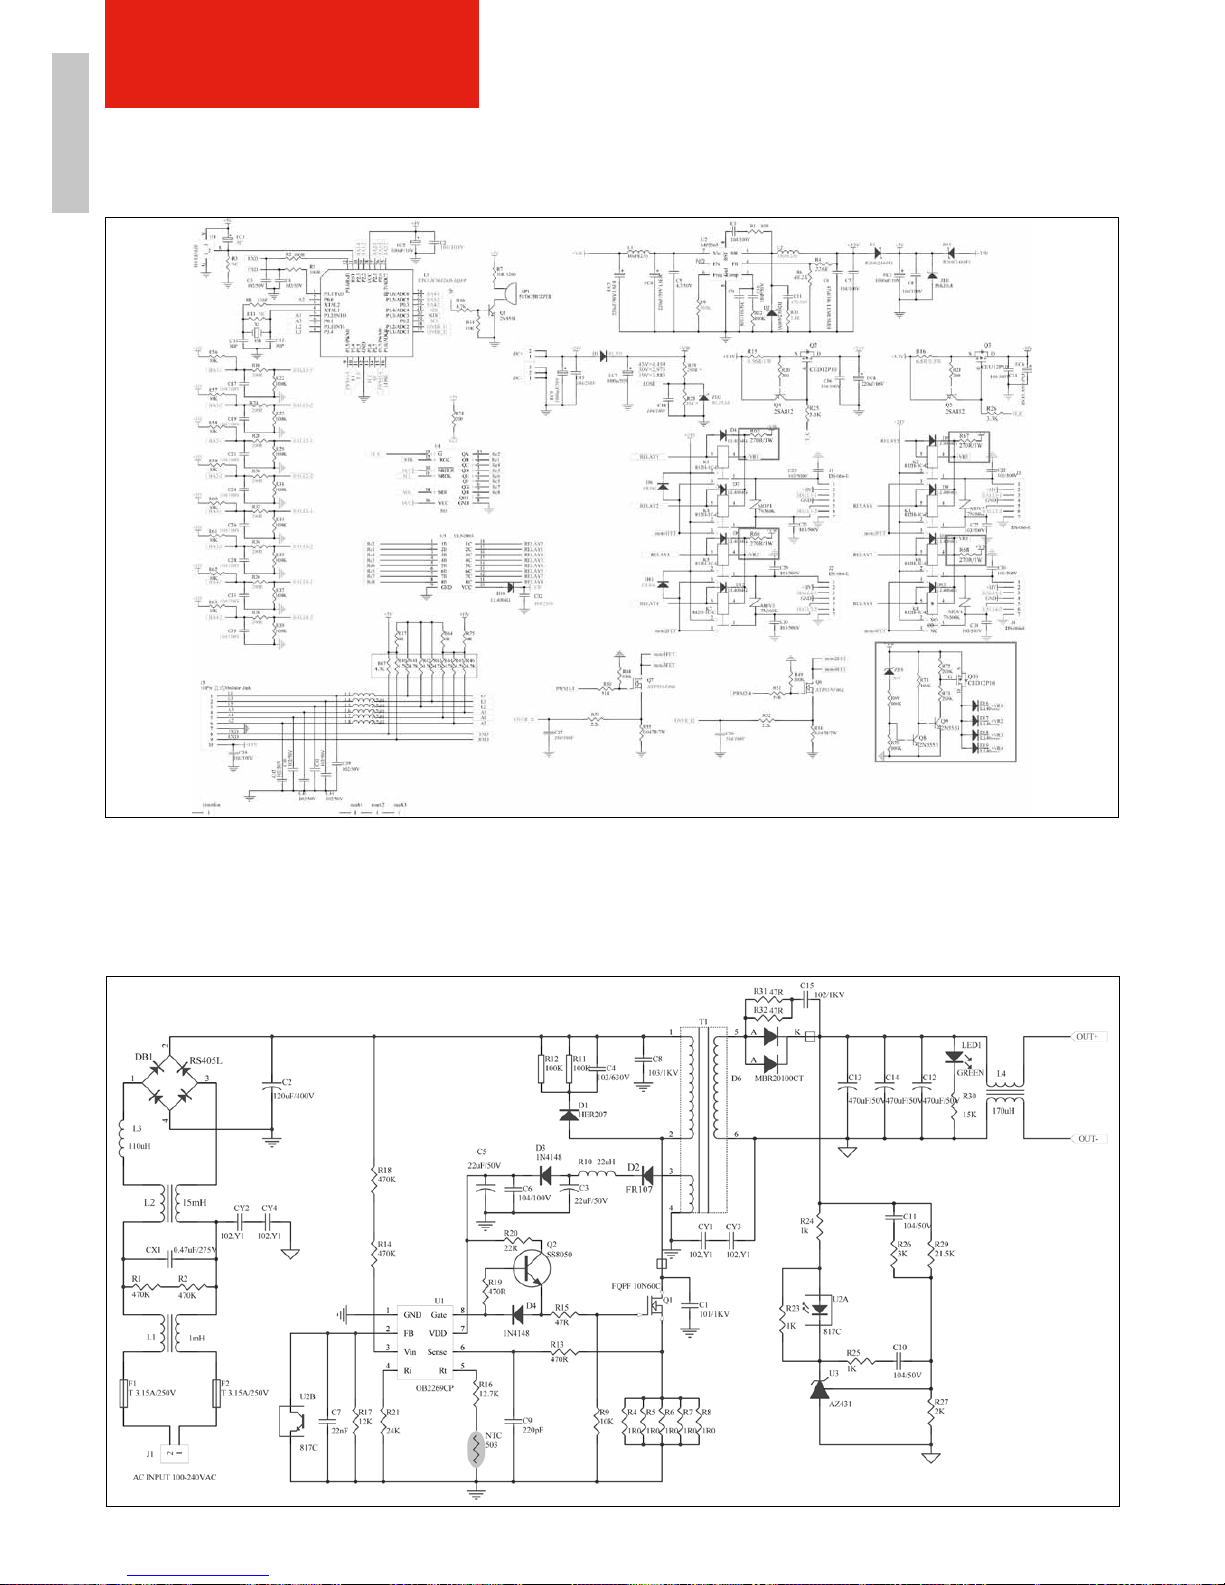
11.2 Kontrollbox
11.3 Transformator
SCHALTKREISE
Abbildung 29
Abbildung 30
Page 41

FR
41
Page 42
FR EN
42
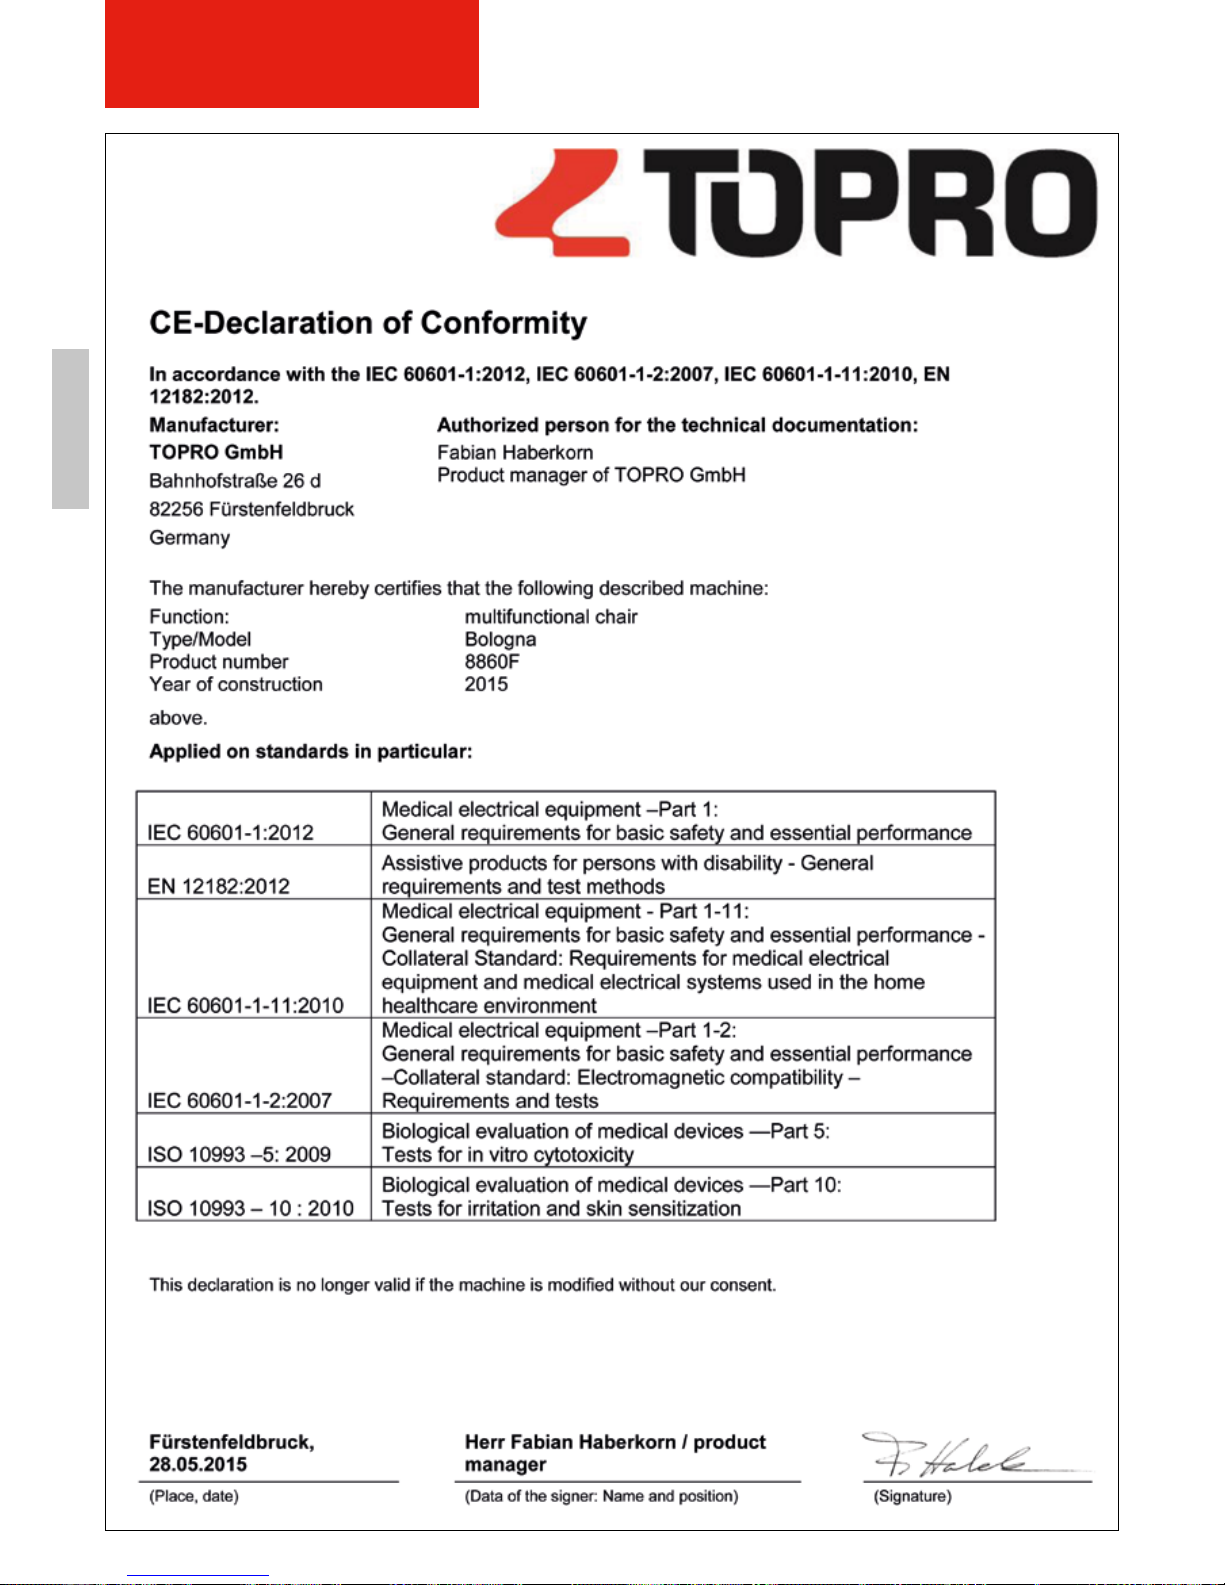
DECLARATION OF CONFORMITY
Page 43

ENFR
43
TABLE OF CONTENT
TABLE OF CONTENT
1. Identication . . . . . . . . . . . . . . . . . . . . . . . . . . . . . . . . . 45
2. User Guide . . . . . . . . . . . . . . . . . . . . . . . . . . . . . . . . . . 46
2.1 Purpose of the document . . . . . . . . . . . . . . . . . . . . . . . . .46
2.2 Information about directions in this operating manual . . . . . . . . . . 46
2.3 Display of safety notes . . . . . . . . . . . . . . . . . . . . . . . . . . 47
3. Fundamental Safety Notes . . . . . . . . . . . . . . . . . . . . . . . . . 48
3.1 Intended use . . . . . . . . . . . . . . . . . . . . . . . . . . . . . . . 48
3.2 Foreseeable misuse . . . . . . . . . . . . . . . . . . . . . . . . . . . 49
3.3 Risks associated with using the chair. . . . . . . . . . . . . . . . . . .50
3.4 Residual risks . . . . . . . . . . . . . . . . . . . . . . . . . . . . . . .50
3.5 Qualification of personal and users . . . . . . . . . . . . . . . . . . . .51
3.6 Warning symbols on the chair . . . . . . . . . . . . . . . . . . . . . . 51
4. Description of the chair . . . . . . . . . . . . . . . . . . . . . . . . . . . 53
4.1 Operational areas. . . . . . . . . . . . . . . . . . . . . . . . . . . . .53
4.2 Functional description . . . . . . . . . . . . . . . . . . . . . . . . . . 53
4.3 Components of the chair . . . . . . . . . . . . . . . . . . . . . . . . . 54
4.4 Assemblies and components . . . . . . . . . . . . . . . . . . . . . . . 55
4.4.1 Frame and motor . . . . . . . . . . . . . . . . . . . . . . . . . . 55
4.4.2 Control unit . . . . . . . . . . . . . . . . . . . . . . . . . . . . . 55
4.4.3 Wheels . . . . . . . . . . . . . . . . . . . . . . . . . . . . . . . 55
4.4.4 Remote control . . . . . . . . . . . . . . . . . . . . . . . . . . . 56
4.4.4.1 Explanation of the symbols . . . . . . . . . . . . . . . . . 56
4.4.4.2 Position of the remote control. . . . . . . . . . . . . . . .58
4.4.4.3 Blocking of buttons and functions. . . . . . . . . . . . . .58
4.4.5 Positioning cushion . . . . . . . . . . . . . . . . . . . . . . . . . 59
4.4.5.1 Lumbar cushion. . . . . . . . . . . . . . . . . . . . . . .59
4.4.5.2 Rectangular positioning cushion (optional) . . . . . . . . . 59
4.4.6 Battery . . . . . . . . . . . . . . . . . . . . . . . . . . . . . . . 60
4.4.6.1 Technical specifications battery . . . . . . . . . . . . . . .60
4.5 Technical specifications. . . . . . . . . . . . . . . . . . . . . . . . . .61
5. Transport and installation. . . . . . . . . . . . . . . . . . . . . . . . . .62
5.1 Transporting the chair to setup location . . . . . . . . . . . . . . . . . 62
5.1.1 Before transport. . . . . . . . . . . . . . . . . . . . . . . . . . .62
5.1.2 Transporting the chair. . . . . . . . . . . . . . . . . . . . . . . .62
5.1.3 Unpacking the chair. . . . . . . . . . . . . . . . . . . . . . . . .63
5.1.4 Moving the chair . . . . . . . . . . . . . . . . . . . . . . . . . . 63
5.2 Assembly . . . . . . . . . . . . . . . . . . . . . . . . . . . . . . . . . 63
5.2.1 Connecting the chair components . . . . . . . . . . . . . . . . . 63
5.2.2 Installing the backrest. . . . . . . . . . . . . . . . . . . . . . . .64
Page 44

FR EN
44
TABLE OF CONTENT
TABLE OF CONTENT
6. Startup . . . . . . . . . . . . . . . . . . . . . . . . . . . . . . . . . . . . 65
6.1 Initial startup . . . . . . . . . . . . . . . . . . . . . . . . . . . . . . . 66
6.1.1 Sitting down safely in the chair . . . . . . . . . . . . . . . . . . . 66
6.1.2 Relaxing while recumbent . . . . . . . . . . . . . . . . . . . . . 67
6.1.3 Safely into the heart-balance position . . . . . . . . . . . . . . . 67
6.1.4 Rising safely from the chair . . . . . . . . . . . . . . . . . . . . .68
6.1.5 Adjusting the footrest individually . . . . . . . . . . . . . . . . . .68
6.1.6 Adjusting the backrest individually . . . . . . . . . . . . . . . . . 69
6.1.7 Adapting the neck position . . . . . . . . . . . . . . . . . . . . . 69
6.1.8 Setting the height . . . . . . . . . . . . . . . . . . . . . . . . . . 70
6.1.9 Adapting the armrests. . . . . . . . . . . . . . . . . . . . . . . .70
6.1.10 Pushing the chair with the user sitting in it . . . . . . . . . . . . 71
6.2 Setting up the power supply system . . . . . . . . . . . . . . . . . . . 71
7. Warranty . . . . . . . . . . . . . . . . . . . . . . . . . . . . . . . . . . . 72
7.1 Terms and conditions of warranty. . . . . . . . . . . . . . . . . . . . .72
7.2 Exceptions of warranty . . . . . . . . . . . . . . . . . . . . . . . . . . 72
7.3 Warranty / Lifetime . . . . . . . . . . . . . . . . . . . . . . . . . . . . 72
8 Maintenance and servicing . . . . . . . . . . . . . . . . . . . . . . . . . 73
8.1 Customer service . . . . . . . . . . . . . . . . . . . . . . . . . . . . .73
8.2 Maintenance recommendations and cleaning . . . . . . . . . . . . . . 74
8.2.1 Cleaning . . . . . . . . . . . . . . . . . . . . . . . . . . . . . . 74
8.2.2 Servicing . . . . . . . . . . . . . . . . . . . . . . . . . . . . . . 74
8.3 Troubleshooting and fault messages . . . . . . . . . . . . . . . . . . . 75
8.3.1 List of warning and fault messages . . . . . . . . . . . . . . . . .75
9. Switching off . . . . . . . . . . . . . . . . . . . . . . . . . . . . . . . . .76
9.1 Temporary switchoff. . . . . . . . . . . . . . . . . . . . . . . . . . . .76
9.2 Storage conditions . . . . . . . . . . . . . . . . . . . . . . . . . . . . 76
9.3 Disposal / recycling . . . . . . . . . . . . . . . . . . . . . . . . . . . .76
10. Optional accessories. . . . . . . . . . . . . . . . . . . . . . . . . . . .77
11. Circuitry . . . . . . . . . . . . . . . . . . . . . . . . . . . . . . . . . . .78
11.1 Remote control . . . . . . . . . . . . . . . . . . . . . . . . . . . . . 78
11.2 Control box . . . . . . . . . . . . . . . . . . . . . . . . . . . . . . . 79
11.3 Transformer . . . . . . . . . . . . . . . . . . . . . . . . . . . . . . . 79
Page 45
ENFR
45
IDENTIFICATION
1. IDENTIFICATION
Identication data
Manufacturer
TOPRO GmbH
Bahnhofstraße 26 D
82256 Fürstenfeldbruck
Germany
Tel.: +49 (0) 8141-888 939-0
Fax: +49 (0) 8141-888 939-22
[email protected]
www.topro.de
Information on the operating manual
© Copyright TOPRO 2015
All rights reserved.
Any reprint, also extracts, permitted only with the approval of TOPRO GmbH.
Manufacturer: TOPRO GmbH
Product: BOLOGNA
Type: Care and transfer chair
Article number:
HC13015-1947 / color: red
HC13015-1992 / color: brown
HC13015-1902/ color: creme
Upholstery fabrics Articial leather
Manufacturing year: 2015
Version/Revision: 2016.3
Date created: 30.04.2015
Final change: 11.03.2016
Page 46
FR EN
Back side of the chair
LeftRight
Front side of the chair
46
USER GUIDE
Figure 1: Directions in the operating manual
2. USER GUIDE
2.1 Purpose of the document
This operating manual
• describes the functioning, operation, and maintenance of the Bologna chair
• provides important information about the safe and proper handling of the chair
• explains, how to install the product and put it into service
2.2 Information about directions in this operating manual
All statements concerning direction and location in this operating manual serve as orientation and
always refer to the viewpoint of the user.
Page 47
ENFR
47
USER GUIDE
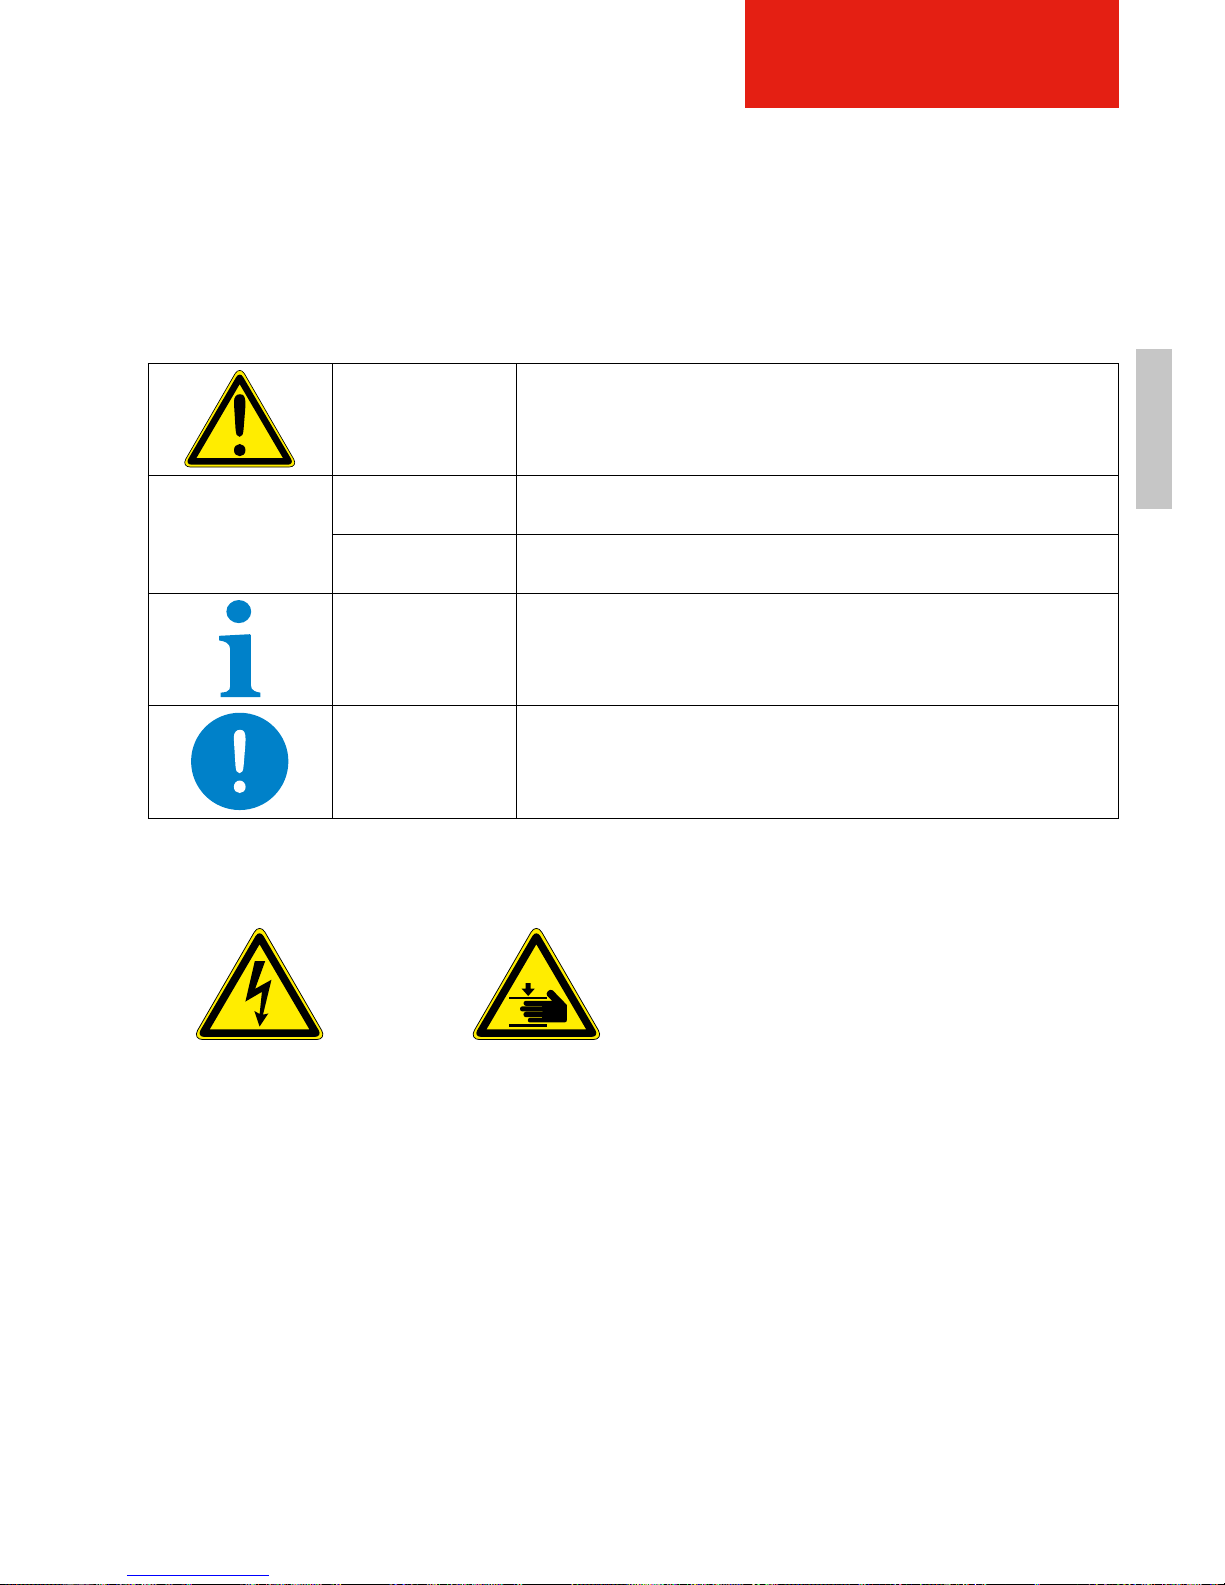
2.3 Display of safety notes
Safety notes are labeled with a pictogram and a signal word.
The signal word describes the severity of the risk threat.
Warning about specic risks:
DANGER
Imminent and serious threat to life and limb of persons
(severe injuries or death).
WARNING
Possible impending threat to life and limb of persons
(severe injuries or death).
CAUTION
Possible dangerous situation
(minor injuries or material damage)
NOTE Practical tips and especially useful information.
IMPORTANT
Obligation to special behavior or action
for the safe handling of the chair.
Risk through
electrical voltage
Risk of hand
injuries
Page 48
FR EN
48
SAFETY NOTES
3. FUNDAMENTAL SAFETY NOTES
3.1 Intended use
The riser / recliner Bologna chair is to be used exclusively as an indoor chair by only one person
at a time. The sitting/recumbent positions are adjusted by an electric drive.
The intended use also includes:
• the observation of all information in this operating manual,
• the recommendation to comply with inspection and maintenance work obligations,
• the exclusive usage of original parts.
IMPORTANT!
Use the riser/recliner Bologna chair exclusively for its intended purpose
and in good technical working order!
Only then is the operational safety of the chair ensured!
NOTE!
This chair can be used by children of 8 years and above, as well as by
persons with reduced physical, sensory, or mental capabilities or lack of
experience and sufcient knowledge, if they are under supervision
or have been instructed with respect to the safe use of the device and
understand the resulting risks. Children must not play with the chair.
NOTE!
Cleaning and maintenance must not be carried out by children
without supervision.
NOTE!
If the power supply cable of this device is damaged, it must be
replaced by the manufacturer or its customer service or a similarly
qualied person in order to avoid hazards.
NOTE!
To avoid danger of strangulation, keep the cord and cable away from
babies and children.
NOTE!
The device contains small pieces (lock key) that can be swallowed.
Keep them away from children.
Page 49
FR EN
49
SAFETY NOTES
3.2 Reasonably foreseeable misuse
Usage other than that specified under “Intended use” or usage exceeding this description is
considered improper use!
For any damage caused by improper use:
• the operator bears the sole responsibility.
• the manufacturer assumes no liability.
Rebuilding or modications
Unauthorized alterations or modifications to the chair terminate any liability and render the
warranty invalid on the part of the manufacturer! This also applies to welding and drilling on
supporting parts. The electromagnetic action of the chair can be impaired by additions or changes
of any kind. Therefore please do not modify the chair in any way without consultation with and
written consent from the manufacturer.
Replacement of wear parts and aids
The use of replacement and wear parts from third-party manufacturers can create risks. Only use
original parts or parts released by the manufacturer. The manufacturer assumes no liability for
damage caused by the use of replacement and wear parts or aids not released by the manufacturer.
WARNING!
Risks can occur from improper use.
The following examples are considred improper use:
• Exceeding the technical values specied for normal operation.
• Operating the chair after removing the separating safety guards.
• Conducting maintenance, troubleshooting and repair, etc. on the chair,
although the drive system was not disconnected from the power source.
• Adjusting the sitting/recumbent position although other persons
(especially children or pets) are within the danger zone.
• Standing on the chair or using it as a ladder (especially the footrest).
• Sitting on the armrest at seating surface height if the person weighs
more than 150 kg.
• Sitting on the armrest when it is in the extended state.
• Sitting on the seating surface with non-braked rear wheels.
• Falling unchecked into the chair.
• Operating the chair in wet and outdoor areas or in an inammatory /
explosive environment (gases or fumes, e.g. anesthetics).
• Opening, removing, or damaging the covers or housing (damage by pets).
• Placing the chair too close to heat sources such as heaters or an
open re.
• Smoking in the chair.
• Using the chair as a bed replacement.
• Rising from the chair when the footrest is extended.
Page 50
FR EN
50
SAFETY NOTES
3.3 Risks associated with using the chair
Risks and impairments can occur when using the chair
• to life and limb of the operator or third parties,
• to the chair itself,
• and to other elements.
The basis for safe handling and problem-free operation of this chair is knowledge of the safety
and user instructions in this operating manual.
3.4 Residual risks
The chair has been manufactured according to the state of the art and certied safety
regulations
The wireless communications equipment such as wireless home network devices, mobile phones,
cordless telephones and their base stations or walkie-talkies can affect this equipment and
should be kept at least a distance of 10m away from the equipment.
IMPORTANT!
Always keep this operating manual at the location of the chair!
DANGER!
After switching off of the chair observe the incidence of mechanic and
electric residual power!
Page 51
ENFR
51
SAFETY NOTES
3.5 Qualications of personnel and users
The patient is an intended operator.
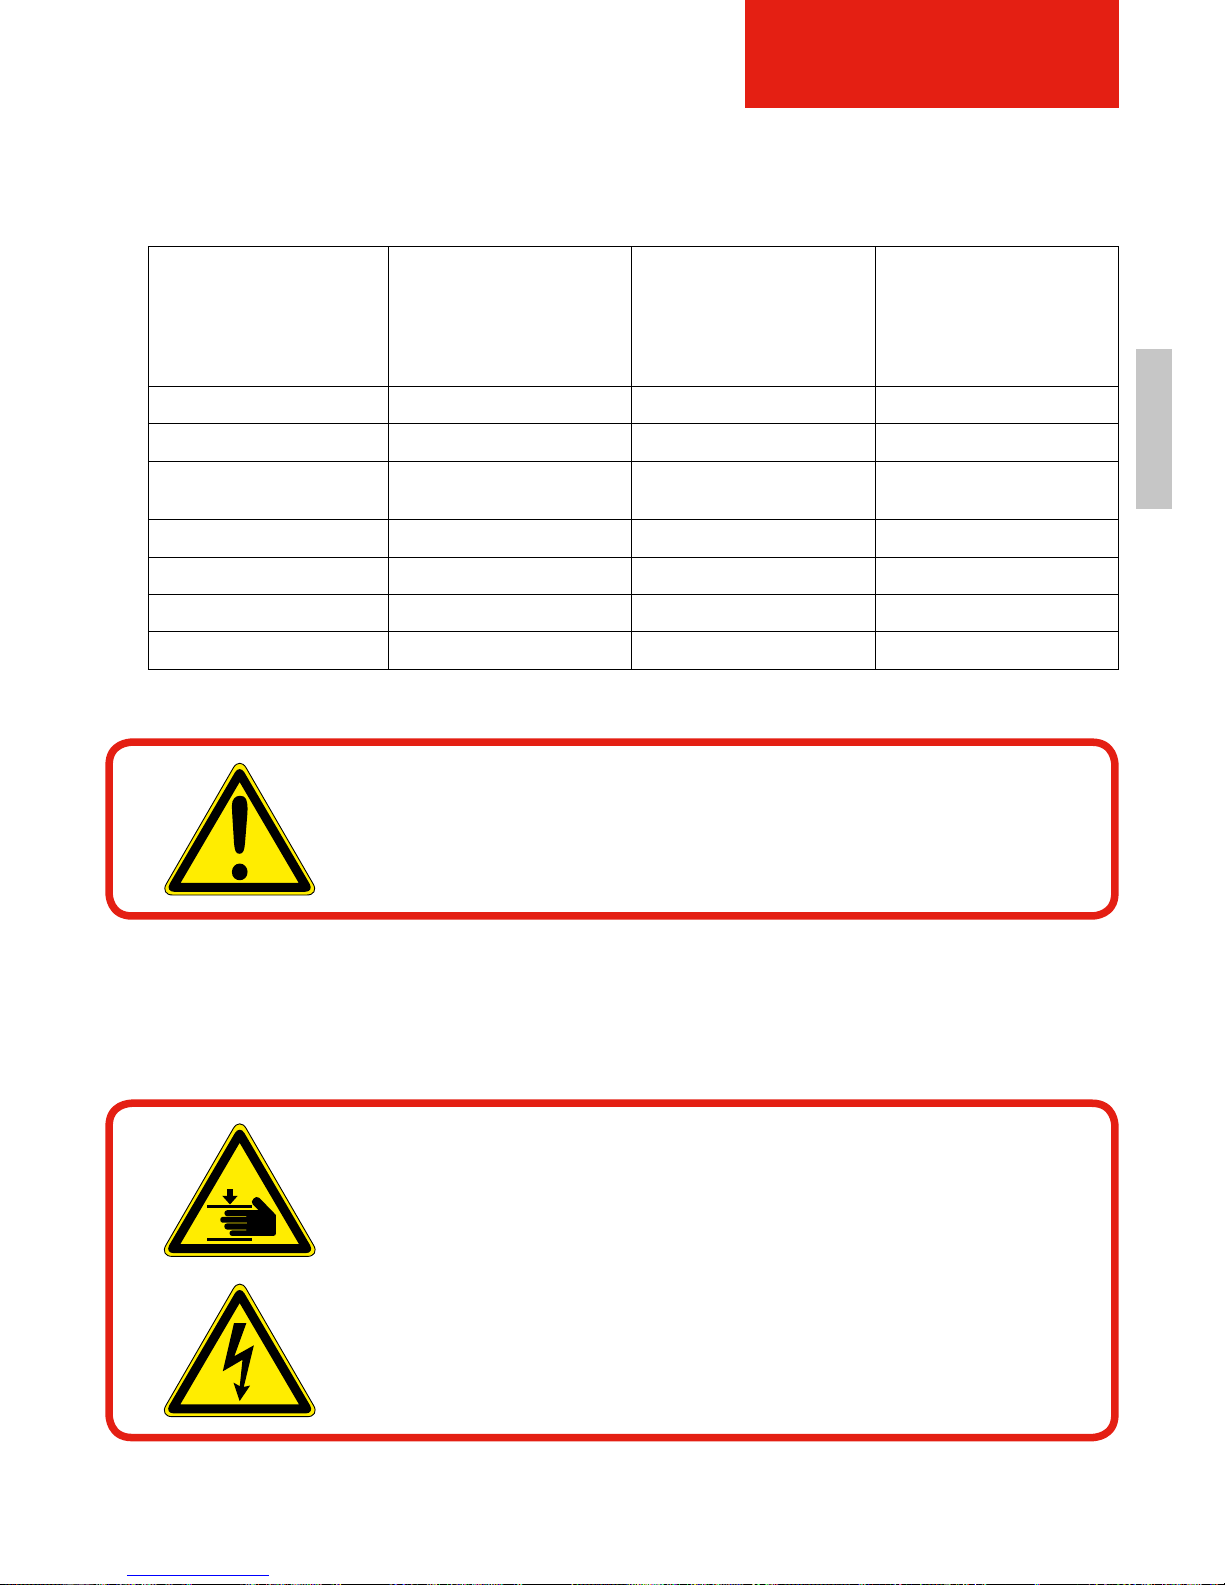
Legend: X allowed -- forbidden
3.6 Warning symbols on the chair
The chair is fitted with warning labels concerning the following residual risks that cannot be
eliminated due to the construction:
Persons / activity
Especially trained
personnel
Instructed
operating personnel
Instructed persons
with professionally
specialized training
(mechanics/electrical
engineering)
Transport X -- -Initial startup X -- --
Troubleshooting and
-removal
-- -- X
Set up, preparation -- -- X
Operation -- X -Maintenance -- -- X
Disposal / recycling X -- --
CAUTION!
The chair is intended exclusively for use by one person only.
CAUTION!
Risk of squeezing extremities in the moving parts of the lift mechanism
and rear side of the chair when the chair is moved (upwards/downwards).
Hand injuries when danger points are disregarded.
WARNING!
Risks through electrical voltage. Work on the electric motors
of the chair should only be carried out by a qualified electrician.
Page 52
FR EN
52
SAFETY NOTES
Observe all
• warnings and safety notes,
• other labels, such as rotation or transport directions, that are attached to the chair.
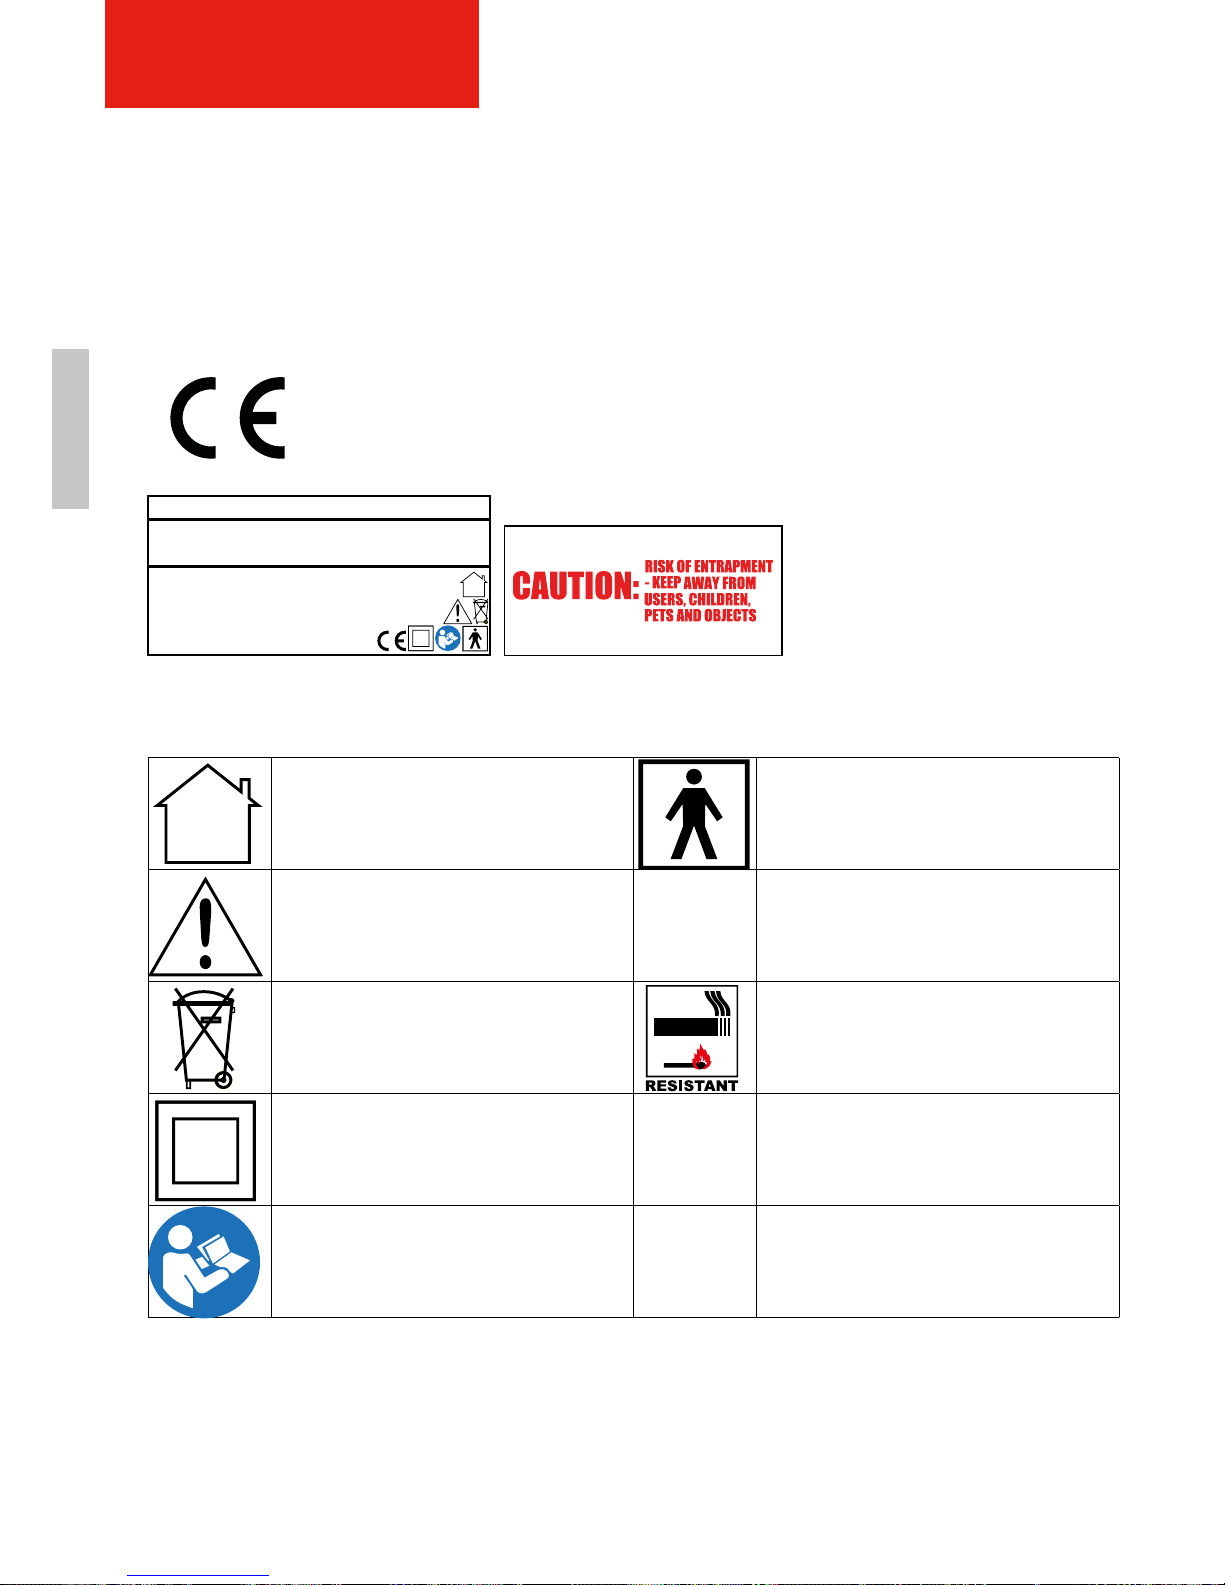
Furthermore, the chair bears the following label:
Explanation of product label symbols:
TOPRO GmbH - Bahnhofstraße 26 d - 82256 Fürstenfeldbruck
Ruhe- & Aufstehsessel / rise- & recline chair Model: Bologna
Produktionstag/date of construction:
Seriennr./Serialno.: 8860F-
Auslastung/duty cycle: max 10 % / -2 min On 18 min Off
Sichere Arbeitslast/safe working load 150kg IP21
Max. Nutzergewicht/user mass 150kg Klasse/Class II
Bemessungsspannung/rated voltage range 100-240V
˜
Bemessungsfrequenz/rated frequency 50/60Hz
Bemessungsaufnahme/rated input 280 VA
CE-marking
This identies the product‘s conformity with valid EU standard
• applicable to the product
• that require a CE marking.
For use in interior spaces
Basic degree of electrical protection
against electrical shocks
Warning! - Refer to operating
instructions
BF Typen
Schutzklasse
Protection class against electric
shock
Recyclable
CARELESSNESS CAUSES FIRE!
The padding material(s) and upholstery
fabric(s) satisfy the requirements for inhibiting
the risk of re from cigarettes and matches
according to the safety guidelines of 1988.
Class II equipment
max 10%/-
2min On
18min Off
The product must not be operated for
longer than 2 minutes under full load
within 18 minutes.
Read operating manual IP21
Protected against solid foreign
objects >12.5mm ø and against
vertically falling water drops.
Page 53

ENFR
53
DESCRIPTION OF THE CHAIR
4. DESCRIPTION OF THE CHAIR
This section provides an overview of the design and functioning of the chair.
If possible, read it while in the chair in order to become optimally acquainted with the product.
4.1 Operational areas
You will sit relaxed, ergonomically and comfortably at all times in this very functional, handsome,
high-quality chair. The chair supports your mobility with the integrated rising aid – it lifts you gently
and safely into a standing position or lets you slowly decline into the desired sitting or recumbent
position.
The seat and backrest offer your back and your legs pleasant support and foothold. With the
remote control, you can yourself define how far you want to raise or decline the footrest and
the backrest, and how much help you need for getting up or sitting down.
If you should discover a deficiency or any damage on your TOPRO chair, please apply promptly
to your specialist dealer or your medical supply dealer, or write directly to TOPRO at the
e-mail address [email protected].
We hope you enjoy your new chair!
Cordial greetings
TOPRO product management
4.2 Functional description
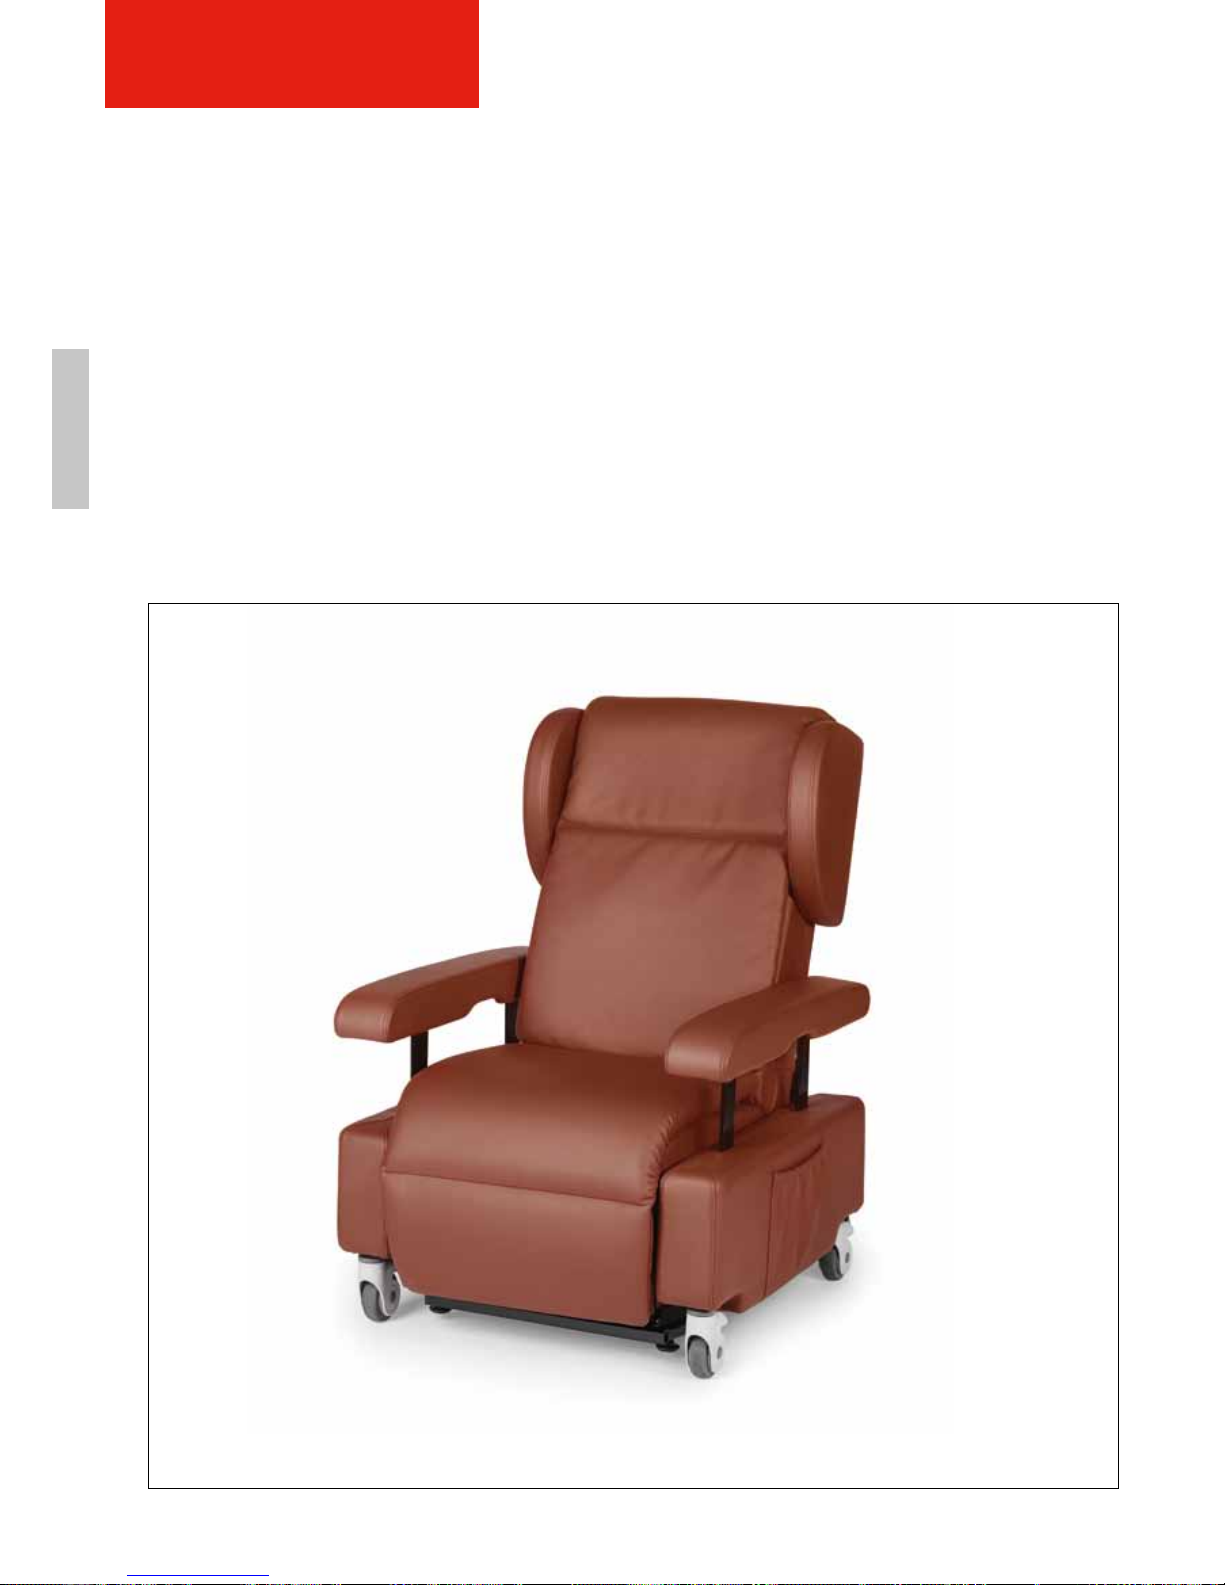
Bologna chair
This comfortable chair is the most multifunctional chair that TOPRO has developed. It simultaneously
has a very attractive design and fits optimally into the home environment. The chair can be adjusted
from the rising position to an almost horizontal recumbent position. In addition, it is possible to
assume the so-called heart-balance position with the chair, where the feet are higher than the
heart and reflux in the legs is stimulated. A transfer from the sitting position to another chair is
likewise as unproblematic as the recumbent transfer from and into a bed. The chair thus offers
the greatest adjustability among our relaxing and riser chairs – and provides you with the greatest
comfort. This is made possible by the four motors that move the backrest and footrest, and which
naturally support you reliably and safely when sitting down, lying down, transferring from chair to
another, and getting up. It is also possible to travel from A to B with the user sitting in the chair.
The remote control can be mounted on the right or the left. Large, color-marked buttons on the
remote control facilitate the operation.
Page 54
FR EN
1
2
3
4
5
7
8
9
6
54
DESCRIPTION OF THE CHAIR
4.3 Components of the chair
Figure 2 gives an overview of the most important components and assemblies and shows where
they are installed on the chair:
1. Head/neck area (adjustable)
2. Backrest (must be mounted, see Section 5.5.2)
3. Armrest (both sides, height-adjustable)
4. Seating area
5. Footrest
6. Rising mechanism (not visible, because located below the chair)
7. Remote control (installed on the right side, can be moved to the left side by authorized dealer)
8. Side pocket (on both sides)
9. Pocket for key (secure storage location for the key of the remote control)
Figure 2: Construction and components
Page 55
ENFR
Figure 5: Wheels
55
DESCRIPTION OF THE CHAIR
4.4 Assemblies and components
4.4.1 Frame and motor
Motor I (marked red) controls the backrest.
Motor II (marked green) controls the footrest.
Motors III & IV (marked yellow & blue) control the
height of the seating area, the rising function and the
seat angle (e.g. in the heart-balance position)
4.4.2 Control unit
Plug of the remote control and rising alarm (marked
white). Your remote control is already installed. You
do not have to plug it in.
• Back - activates the backrest (marked red)
• FOOT - activates the footrest (marked green)
• HI-Low & HI-LO Foot - actuate the relax function,
height setting, rising function and the heart-balance
position (marked yellow & blue)
4.4.3 Underframe with wheels
With the help of the four integrated rollers, the Bologna
chair can be comfortably pushed and used to move
the person sitting in the chair or for patient transport.
The rear wheels can rotate 360 degrees and have
a securing brake. The front wheels are set in a fixed
direction.
Figure 3: Frame and motor
Figure 4: Control unit
DANGER!
The rear securing brakes must
always be activated! (only
exception is when moving the
chair)
Page 56

ENFR
56
DESCRIPTION OF THE CHAIR
4.4.4 Remote control
4.4.4.1 Explanation of the symbols
1. Battery symbol lights up when the chair is connected to power.
The light blinks when the battery is charged and simultaneously shows the charging state.
2. Blue buttons:
Set height individually, arrow upwards: chair moves upward;
arrow downwards: chair moves downward.
3. Orange buttons:
Set backrest individually, upper button: backrest moves backwards;
lower button: backrest moves forwards.
4. Violet buttons:
Set foot support individually, upper button: footrest moves upwards;
lower button: footrest moves downwards.
5. Green button:
To sit upright, pressing this button returns you back to a neutral sitting position.
6. Yellow button:
To rest in a recumbent position, pressing this button moves the chair into a recumbent position.
7. Red button:
To safely get up or sit down, the chair moves to the rising position and tilts the seat surface
slightly forwards.
8. Heart button:
The heart-balance position is automatically set; in this position, your legs are higher than you heart.
9. Vibration button:
Activates the rising alarm, generates a beep tone whenever the user rises from the chair;
prevents “unpermitted” rising or leaving. Renewed pressing of the button turns the alarm off.
10. Transport button:
Transport position is set automatically; this button moves the chair frame in and lifts the
footrest to a 35-degree angle.
11. Lock button:
Provides access to the buttons program in combination with the key (see position 13, p. 17).
12. Bell button:
Activates the call alarm; by pressing this button the user can call attention to himself/herself if
he / she has needs. Press again to switch off the alarm.
13. Key:
The buttons of the blocking program can only be used with the key inserted (see position 11,
p. 17). In addition, with the key inserted, all functions can be implemented despite the button
block (see Section 4.4.5.3).
Page 57
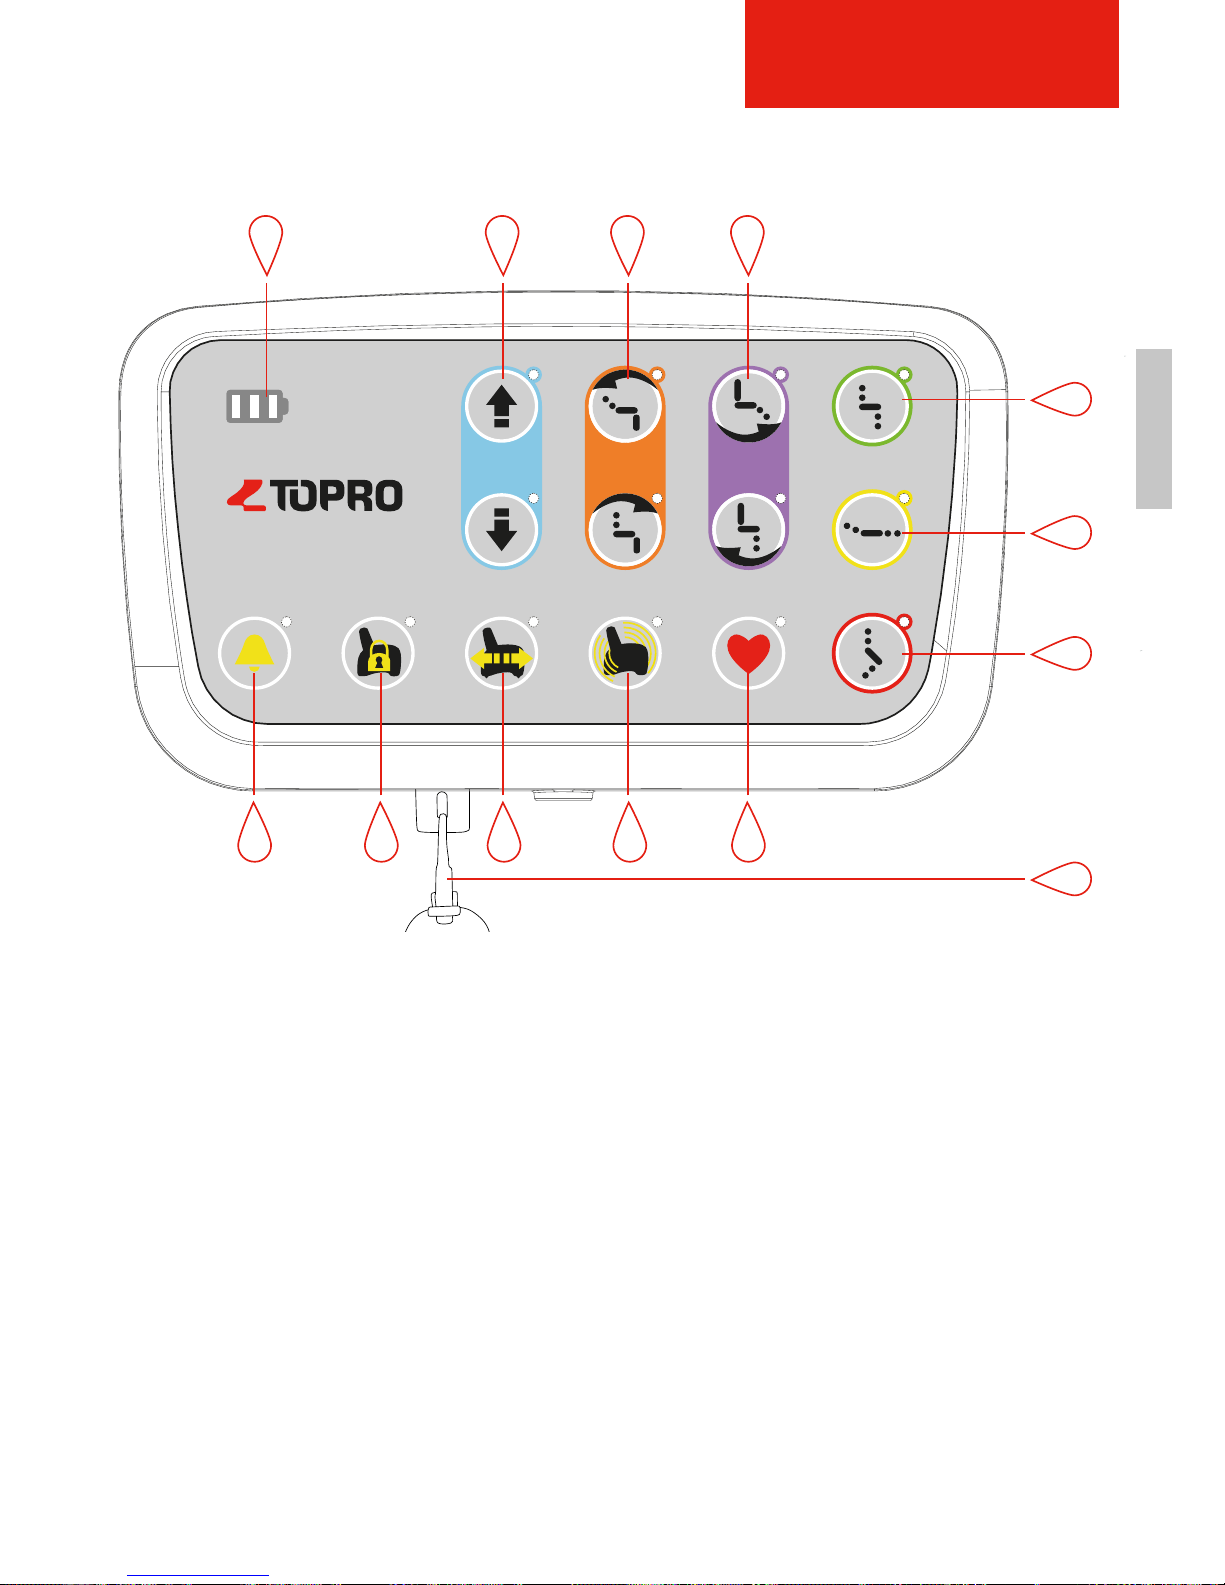
ENFR
57
DESCRIPTION OF THE CHAIR
321 4
6
5
8
7
13
9101112
Figure 6: Remote controle
Page 58
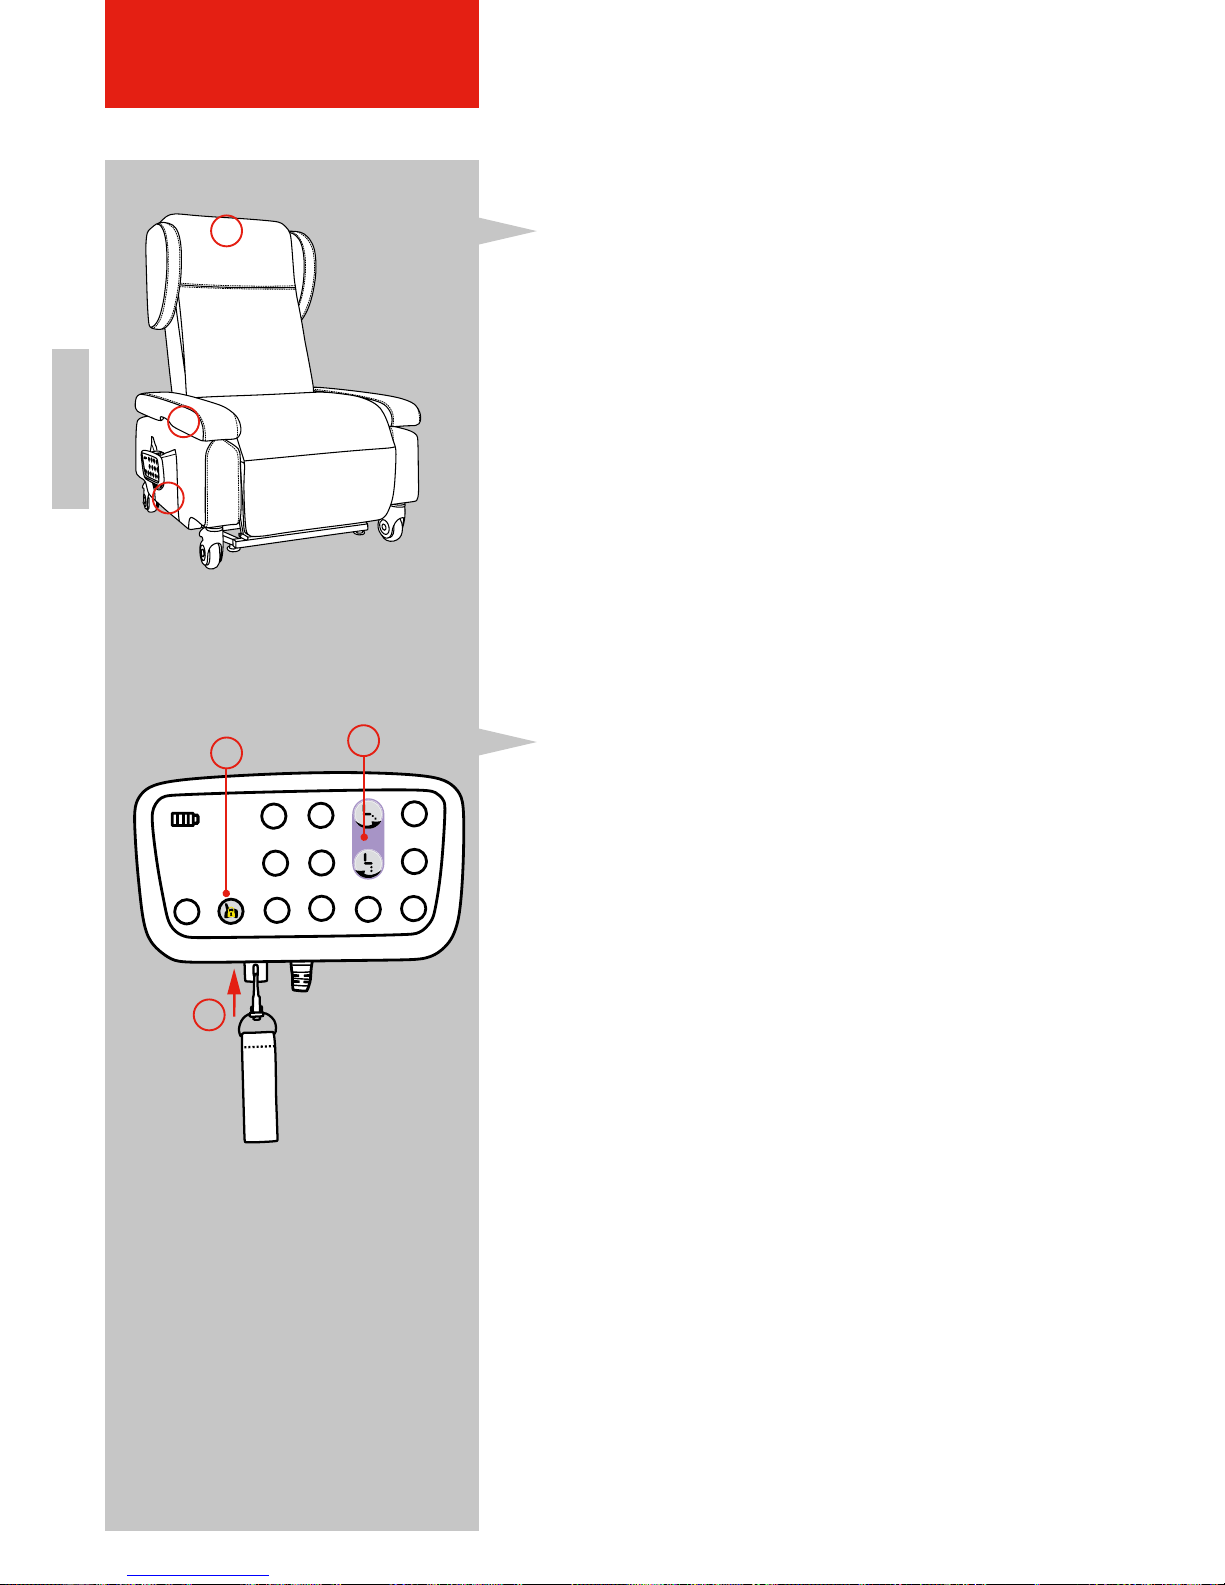
FR EN
58
DESCRIPTION OF THE CHAIR
4.4.4.2 Positioning of the remote control
The remote control can be positioned at various
places on the chair.
1. In the side pockets of the chair.
2. The holder for the remote control is attached with
Velcro to the armrests and can be easily removed.
It can be mounted on either side of the armrest.
3. With the holder on the upper backrest of the chair.
For this position, close the Velcro of the headrest
again.
4.4.4.3 Blocking of buttons and functions
1. Push key into the hole.
2. Press the button with the lock (see position 11,
p. 57). This lights up green.
3. Block functions which the user should not carry out
alone by pressing the respective button (e.g. leg
support block = press violet button). The blocked
buttons then likewise light up green. When blocking
a function, it is sufficient to press the upper or lower
button of the function.
4. Remove key and keep safe in the pocket on the
backrest (see Section 4.3).
In order to re-activate the functions, carry out steps
1-4 again.
It is not possible to deactivate the alarm function.
Figure 7: Positions of the remote control
Figure 8: Setting up button lock
1.
2.
2.
3.
3.
1.
Page 59
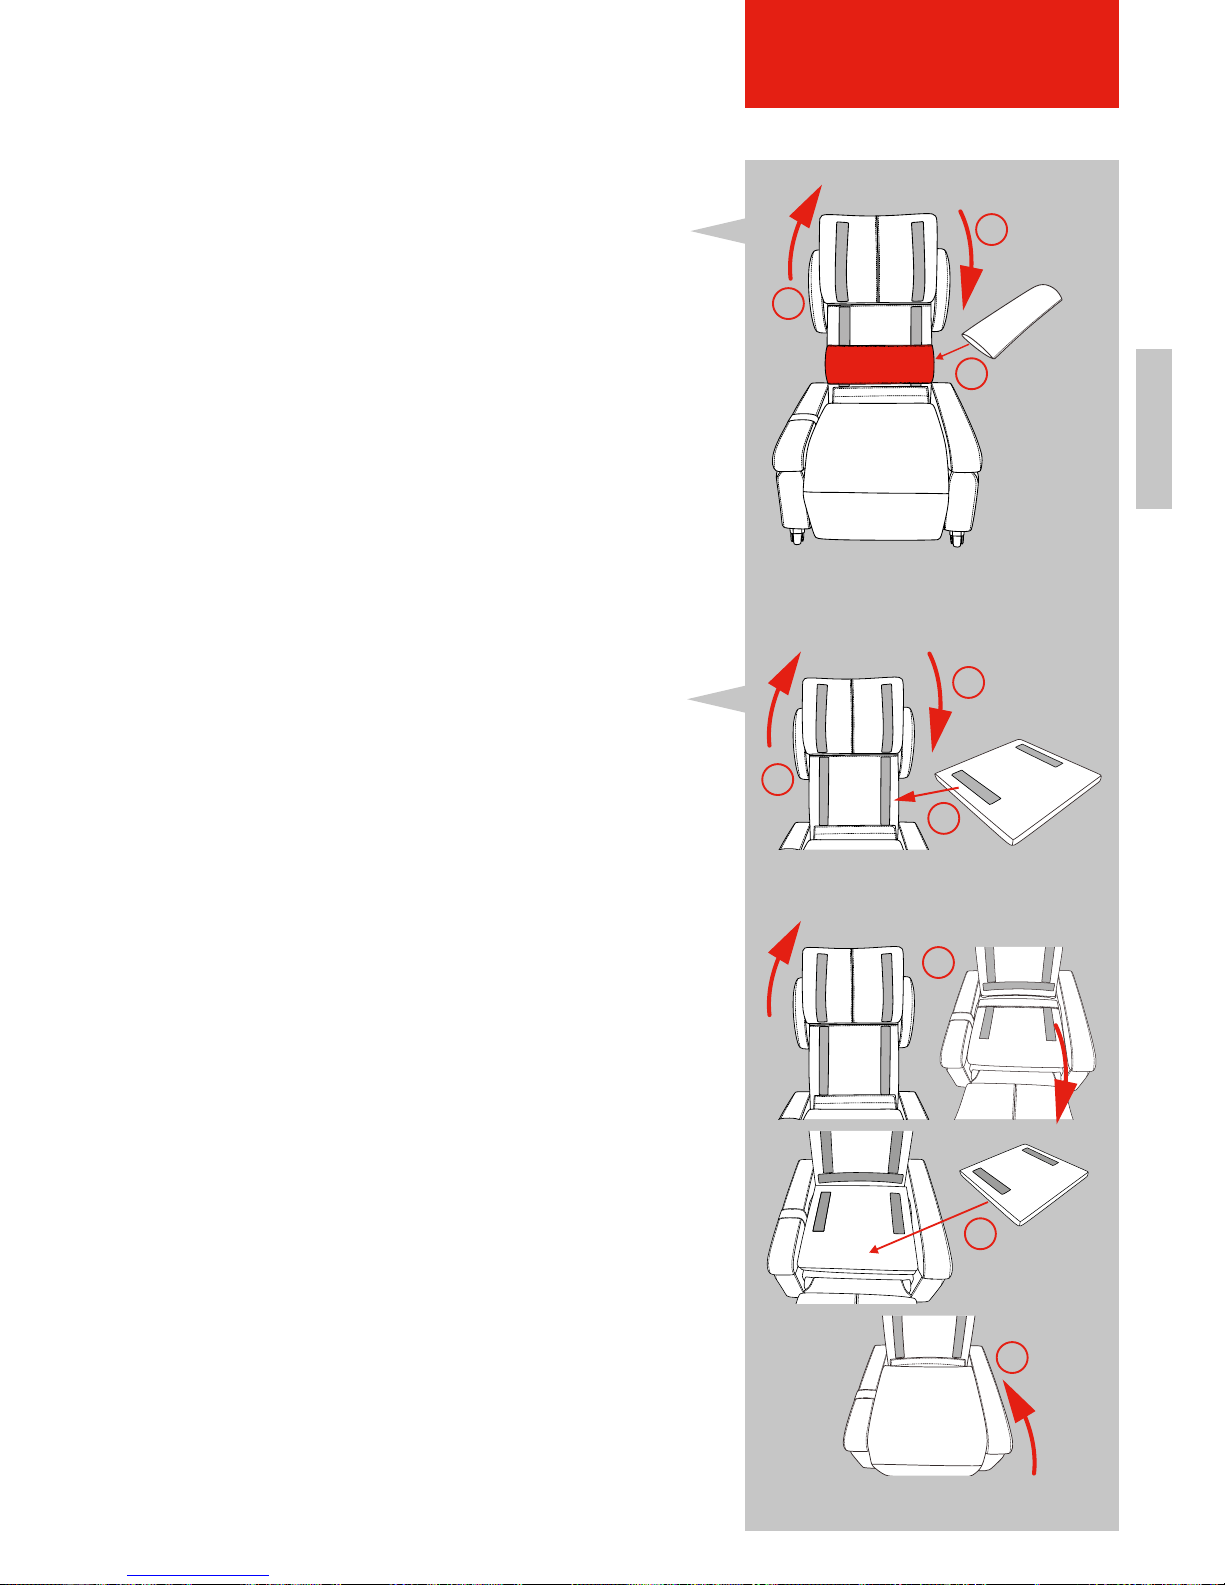
ENFR
59
DESCRIPTION OF THE CHAIR
4.4.5 Positioning cushion
A lumbar cushion is included in the scope of delivery.
4.4.5.1 Lumbar cushion
The cushion can be used at various positions in the
chair.
1. As a lumbar cushion to relieve the backbone:
remove the backrest upholstery from the chair (1),
Attach the cushion correspondingly to the Velcro
below the backrest upholstery (2), and then
reattach the upholstery with the Velcro (3).
4.4.5.2 Rectangular positioning cushion (optional)
The approx. 4 cm-thick positioning cushion can be
used to either achieve a shorter seat depth or a greater
seat height.
1. Shorter seat depth:
Remove the backrest upholstery from the chair (1),
attach the cushion correspondingly to the Velcro
under the backrest upholstery (2) and then attach
the upholstery once again with the Velcro (3).
2. Greater seat height:
Remove the backrest and seat upholstery from
the chair (1), attach the cushion accordingly to the
Velcro of the seat (2) and then attach the seat and
backrest upholstery once again with the Velcro (3).
4.5 Technical specifications
Figure 9: Use of the lumbar cushion
1.
2.
3.
Figure 10:Positioning cushion for
shorter seat depth
Figure 11: Positioning cushion for
greater seat height
1.
1.
2.
2.
3.
3.
Page 60
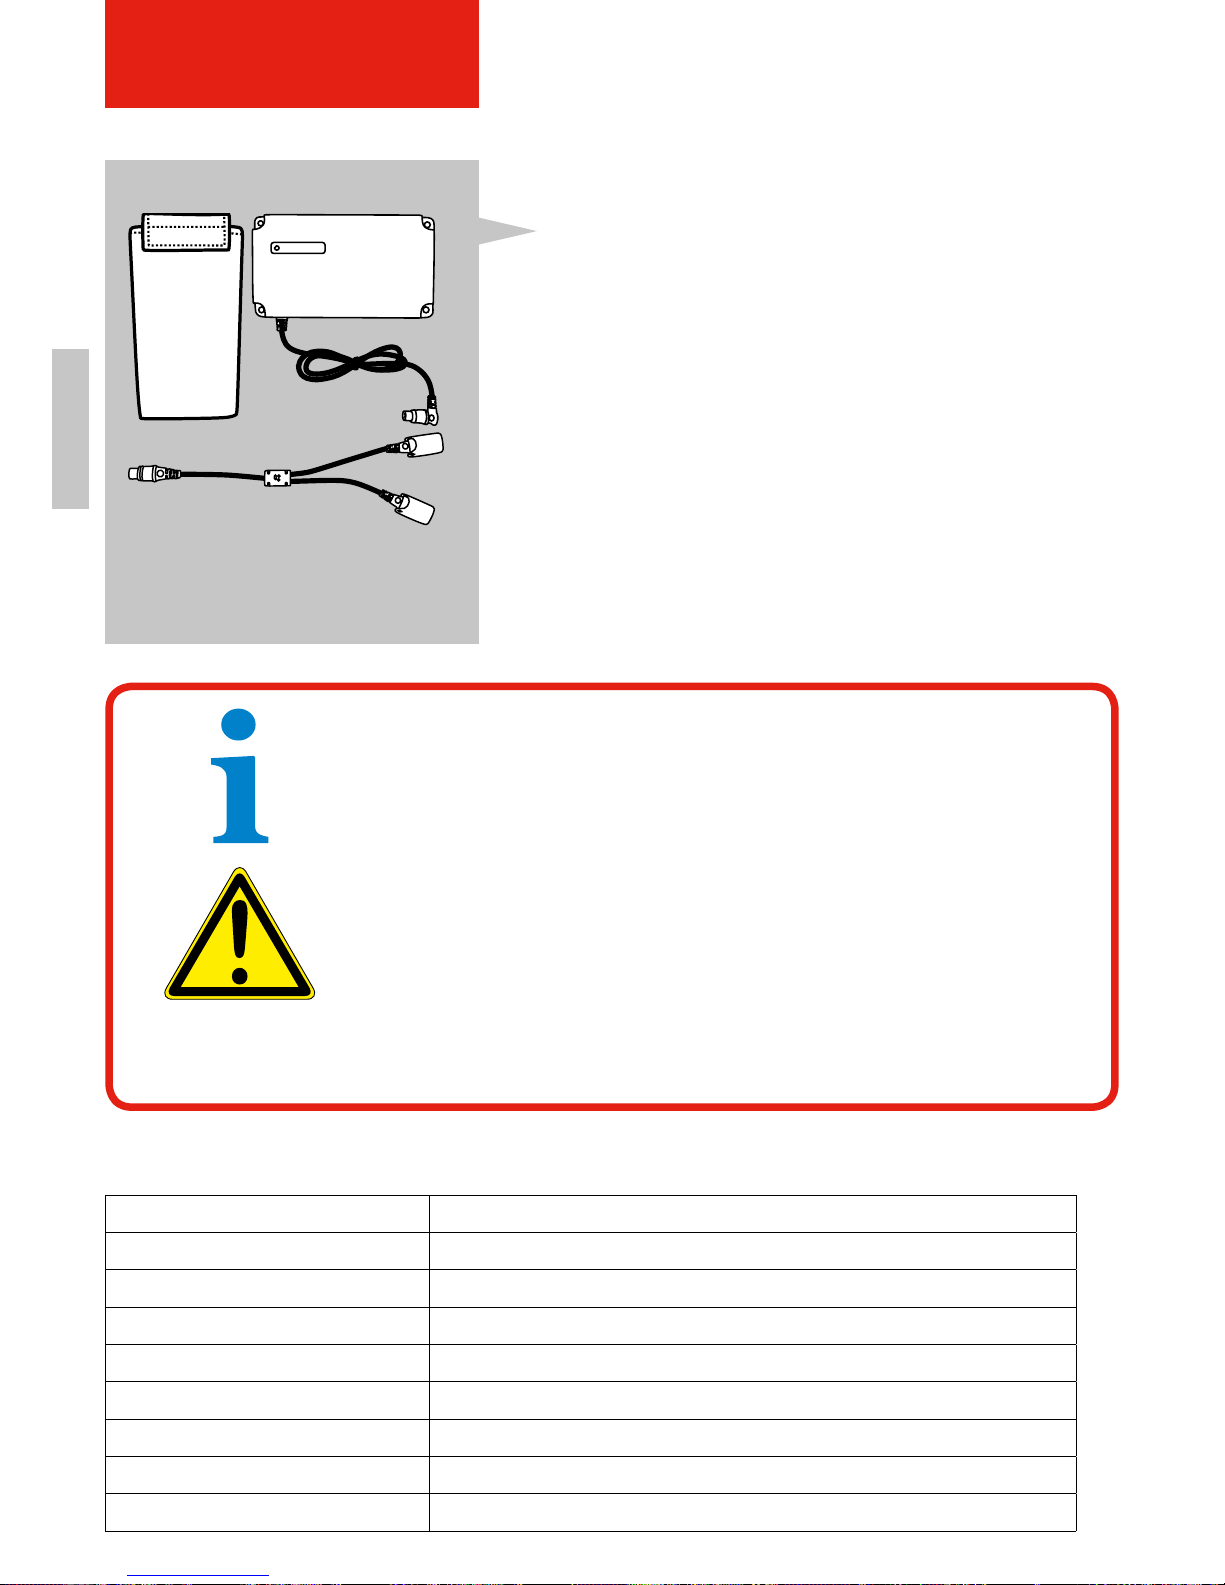
ENFR
Abbildung 12: Battery
60
4.4.6.1 Technical specications Battery TBB
DESCRIPTION OF THE CHAIR
4.4.6 Battery (optional accessory)
In order for the chair to remain operable also during
patient transport or in case of an emergency such as
a power outage, it can be furnished with a powerful
2Ah battery. The battery, which is not included in the
delivery, enables the chair to move into the desired
position. This feature also helps you to remain mobile
in your domestic area.
The intended use of the battery also includes the ob-
servance of all notes in the battery operating manual
and the associated recommendations concerning
the adherence to charging intervals, inspection and
maintenance work. The battery must be installed by
your specialist dealer partner. Battery age limit 1 year.
Model number TBB
Input 30VDC (min. 29VDC, max. 45VDC)
Output 24VDC
Capacity 2Ah (0.1C- discharge with 200mA)
Rated output current 2A
Duty Cycle 10% (2 min. on / 18 min. off)
Working ambient temperature 0-40°C
Product dimension 209 x 116 x 60 mm
Net weight 2 kg / pc.
NOTE!
The chair can be operated while the power source is charging.
WARNING!
• 1. Keep away from re, or water, or explosion.
• 2. Do not expose to strong sunshine, high / low temperature.
• 3. Read and understand the entire owner’s manual before using the
battery pack.
• 4. Rated input voltage is required for using the battery pack.
• 5. Do not abandon the used battery to re or water in case there is
re or explosion; have it recycled by professional recycling agencies.
• 6. Repairs must be carried out by the authorized agencies / person.
Page 61
ENFR
61
DESCRIPTION OF THE CHAIR
4.5 Technical specications
1) Operating mode = intermittent operation of 2 min/18 min, i.e. drive for maximum 2 minutes at
rated load, afterwards observe an interval of 18 minutes. Otherwise malfunction can result !
2) Adjustment speed = speed at which the clevis operates without load (the adjustment speed
varies according to load).
Mechanical specications Seat width 530 mm
Seat height 508-697 mm
Seat depth 546 mm
Body height about 1650-1850 mm
Height of backrest 660 mm
Backrest tilt angle about 138 degrees
Chair height 1180 mm
Chair width 781 mm
Chair length, recumbent 1790 mm
Maximum load 150 kg
Space requirements 1790 x 781 mm
Weight 88 kg
Electrical specications Operating voltage 100 - 240 volt
Control voltage 30 volt
Power consumption 6 Amp
Rated voltage range 100-240 V
Rated frequency 50/60 Hz
Rated power consumption 280 VA
Sound power level < 140 decibel
Placement of transformer Outside
Operation mode 1)
for max. rated load
10 % / max. 5 switching cycles
max. adjustment speed 2) 7.6 mm/s
Page 62
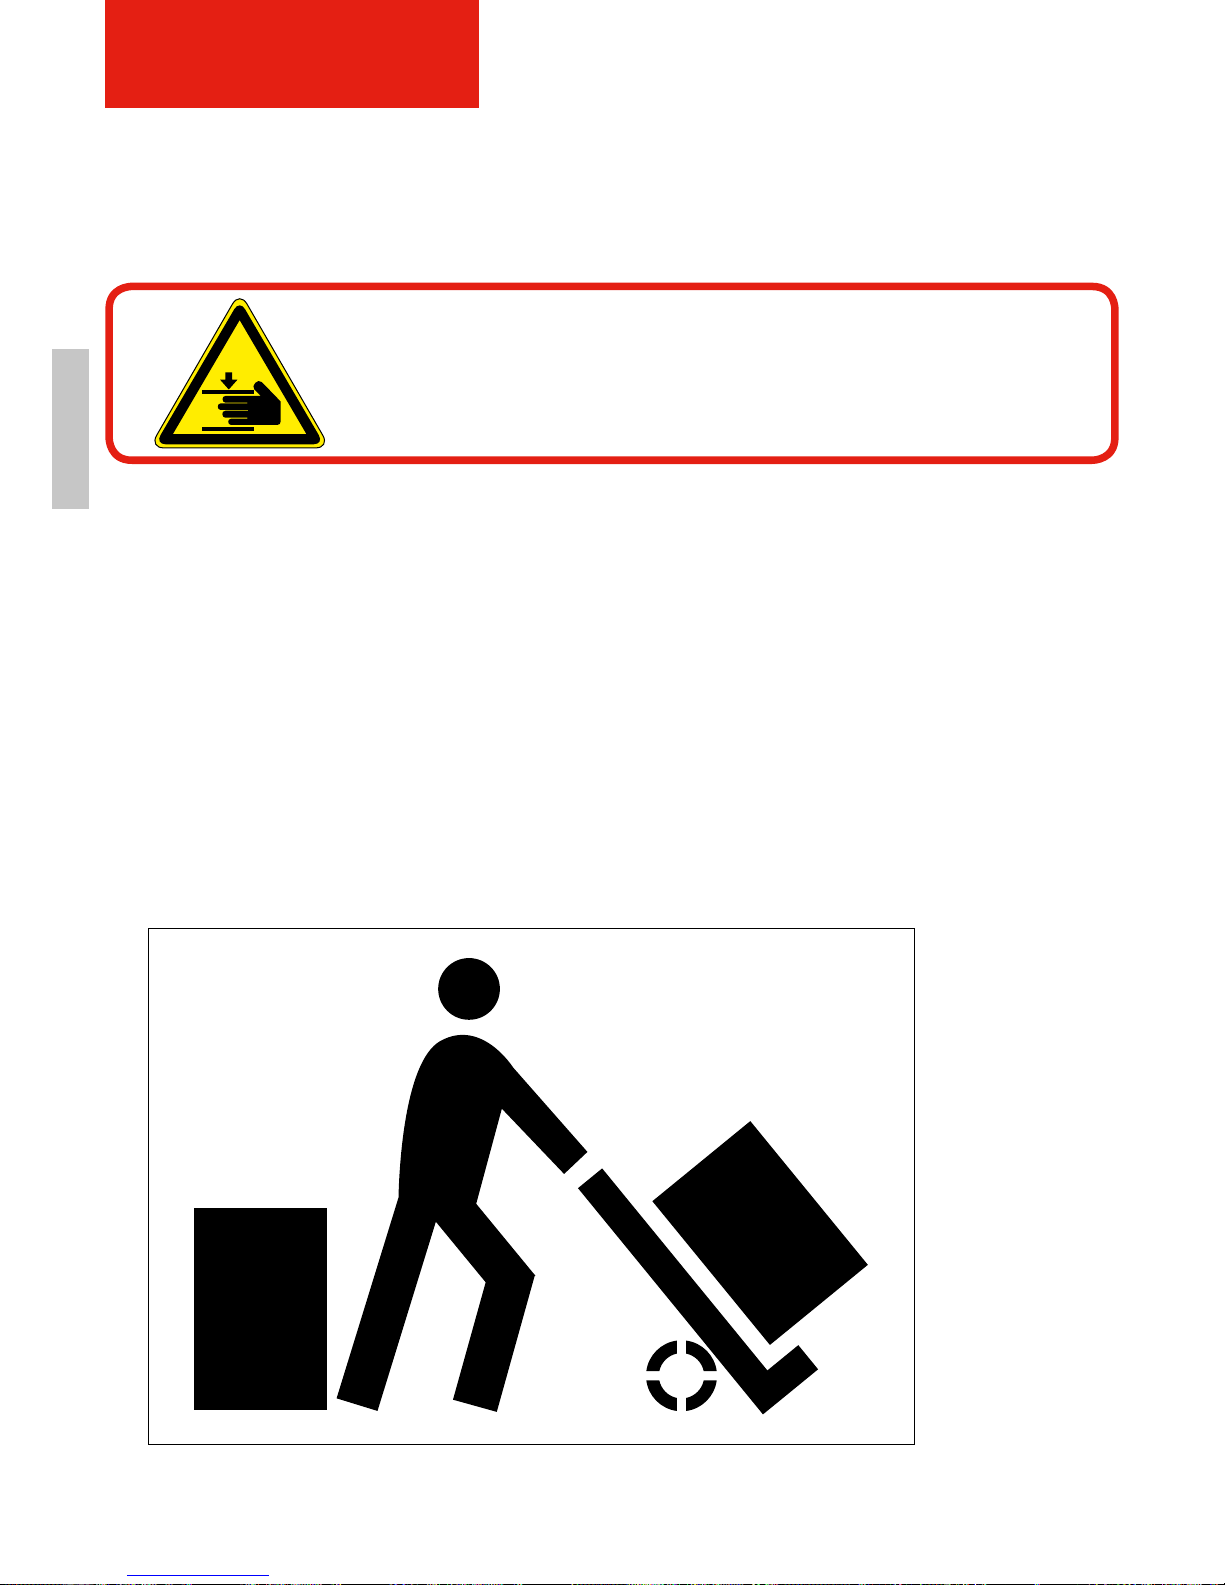
FR EN
62
TRANSPORT & INSTALLATION
5. TRANSPORT AND INSTALATION
5.1 Transporting the chair to setup location
5.1.1 Before transport
• The power supply connections for the electric current are located at the rear side of the chair.
• Determine precise setup location.
• Determine transport route and remove possible obstacles.
5.1.2 Transporting the chair
A lifting truck or sack trolley is most suitable for transportation.
1. Lift the chair carefully and only very little. Keep it balanced by compensating for center of gravity!
2. Move the chair to the desired setup location as close to the floor as possible.
3. Lower the chair carefully and slowly.
4. Transport the two boxes separately for safety reasons.
Figure 13: Transport of the chair
WARNING!
Risk of impact or crushing while lifting and transporting the chair.
There must not be any items or persons on the chair during transportation.
Page 63
ENFR
63
TRANSPORT & INSTALLATION
5.1.3 Unpacking the chair
The chair can be damaged by improper opening of the package. Proceed with unpacking as follows:
1. Place the large box on the ground as indicated in the description.
2. Tilt the box over to one side and open the bottom of the box.
3. Fold the four bottom parts completely to the outside.
4. Slowly tilt the box together with the chair back to the ground.
5. Lift the box up off the chair.
5.1.4 Moving the chair
When moving the chair, pay attention to the length of the electric cable. If necessary, disconnect
the cable from the power outlet. If necessary, stow the power supply cable in one of the side
pockets when moving the chair.
5.2 Assembly
The chair is mounted by the specialist dealer on site.
5.2.1 Connecting the chair components
Electrical components
• Avoid creating tripping hazards due to a loosely laid cable.
• Protect the cable from damage.
• Do not place the device to make it difficult to unplug the plug.
NOTE!
TOPRO participates in a system of returned goods and recycling of
packaging. This way TOPRO protects our environmental resources and
reduces the formation of greenhouse gases.
NOTE!
For ergonomic reasons, TOPRO recommends the assembly to be
carried out by two persons.
WARNING!
Risk of fatal injury from electric current!
The housing of the drive components must not be opened, removed or
damaged. During the installation, the chair must be disconnected from
the power supply!
Page 64
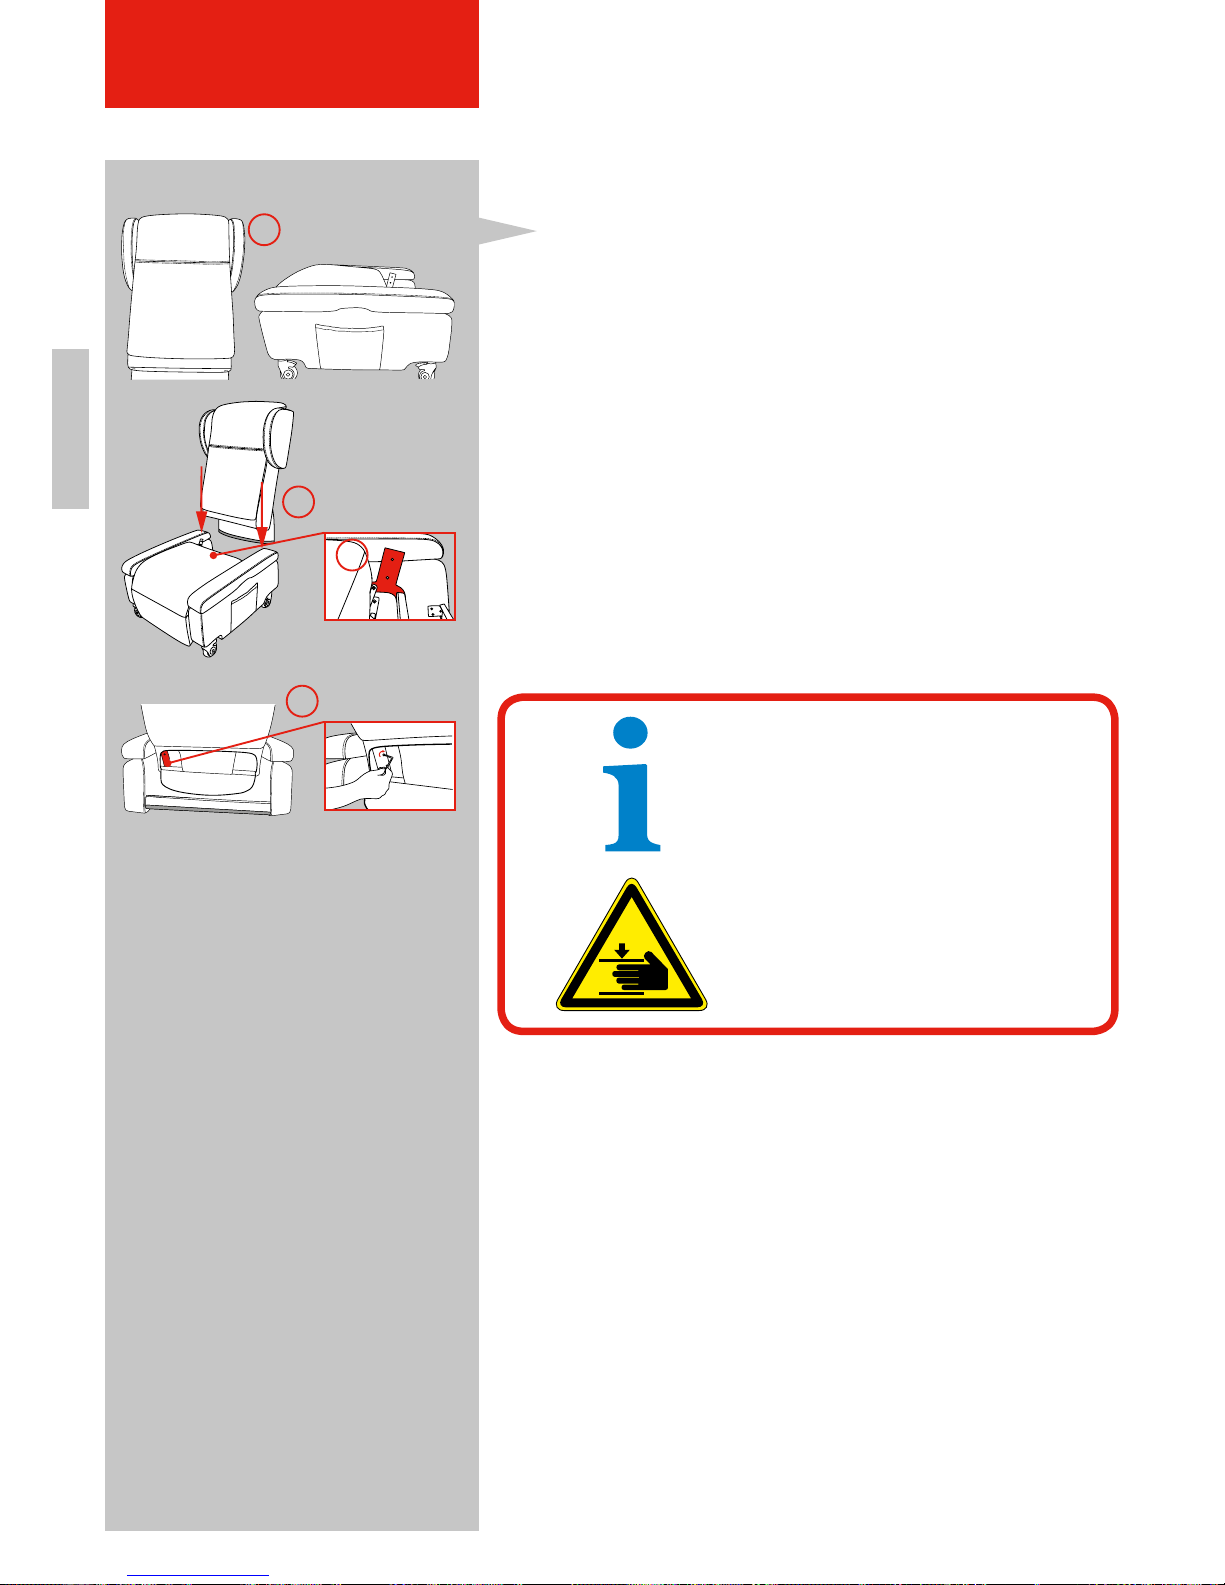
ENFR
64
TRANSPORT & INSTALLATION
5.2.2 Installing the backrest
In case the installation was not performed by your
specialist dealer, we request you to proceed as follows:
1. Your chair consists of two pieces, a back and a
seat part, which have to be connected with each
other (1).
2. Slide the backrest (2) onto the seat and make sure
the two mounting plates (3) of the seat slide into
the mounting retainers of the backrest.
3. Now firmly screw in the four separately enclosed
hex head screws with the tool (4).
NOTE!
Check the screws regularly and
tighten if loose.
WARNING!
Risk of impact and crushing during installation of backrest.
Figure 14: Installation of the backrest
1.
2.
4.
3.
Page 65
ENFR
65
STARTUP
6. STARTUP
Startup of the chair includes all those activities necessary for comprehensive use of the chair.
Prerequisites for putting into operation are:
• The backrest is installed.
• The rear wheels are fixed (brake engaged).
• The cable is connected to a power outlet.
DANGER!
Risk of fatal injury by electric shock in the event of improper work on live
components!
The work on the electric equipment must only be carried out by authorized
electrically qualified technicians. The chair must be switched off before
maintenance and cleaning jobs are carried out!
Disconnect the power cable from the power outlet before you carry out
any work on the chair.
WARNING!
Keep children and pets away from electric components!
WARNING!
The housing of the drive components must not be opened,
removed or damaged.
NOTE!
Working ambient conditions: • A temperature range of +5° to +40° C
• A relative humidity range of 15% to 93%,
non-condensing
Storage conditions: • From -25° to +70° C
• A relative humidity up to 93%,
non-condensing
IMPORTANT!
Use the device in a clean environment, the one that is free from dirt,
dust, pet, hair, ect.
Page 66
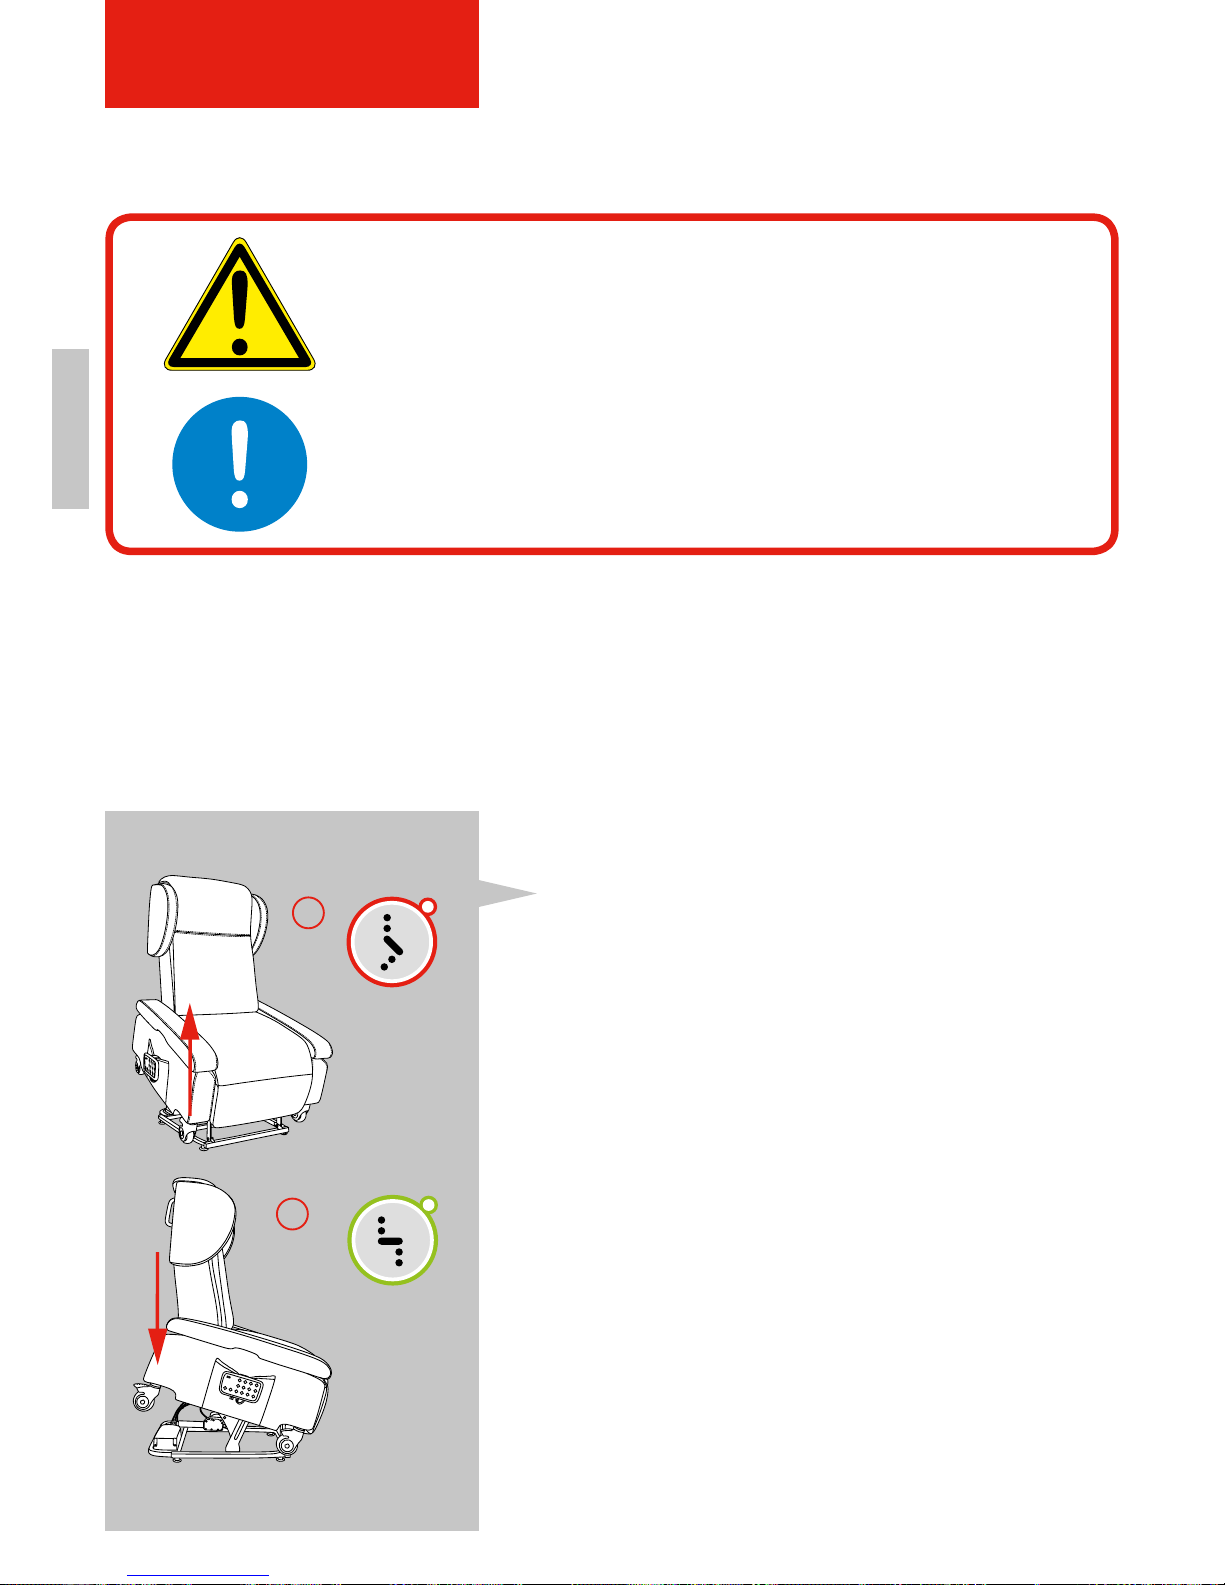
EN
1.
2.
66
6.1 Initial Startup
The following activities are necessary for the initial startup:
• Check power supply.
• Check for complete assembly / safety facilities.
• Carry out trial run. Ensure that all moving parts can move freely in the space required for them.
• For the initial startup after power cut off, press the green button for restoring the chair to fully
upright position, otherwise the chair might go to the opposite position.
STARTUP
WARNING!
Keep unauthorized persons away from the pivoting range of the chair!
IMPORTANT!
Conduct a visual inspection! The user is obligated to ensure that no third
persons, children, objects or animals are within the functional range
(hazardous area) of the chair.
6.1.1 Sitting down safely in the chair
1. Place yourself in front of the chair and press the
red button (1) of the remote control until the seat
surface reaches the ideal height for you to lean
against it with your buttocks.
2. While leaning on the seat, press the green button
(2), so that the chair brings you slowly downwards
into an upright sitting position. The armrests,
retractable to seat height (see Section 6.1.9), in
combination with the height setting (see Section
6.1.8) facilitate a side transfer into or onto another
seat.
Figure 15: Sitting down on the chair
Page 67
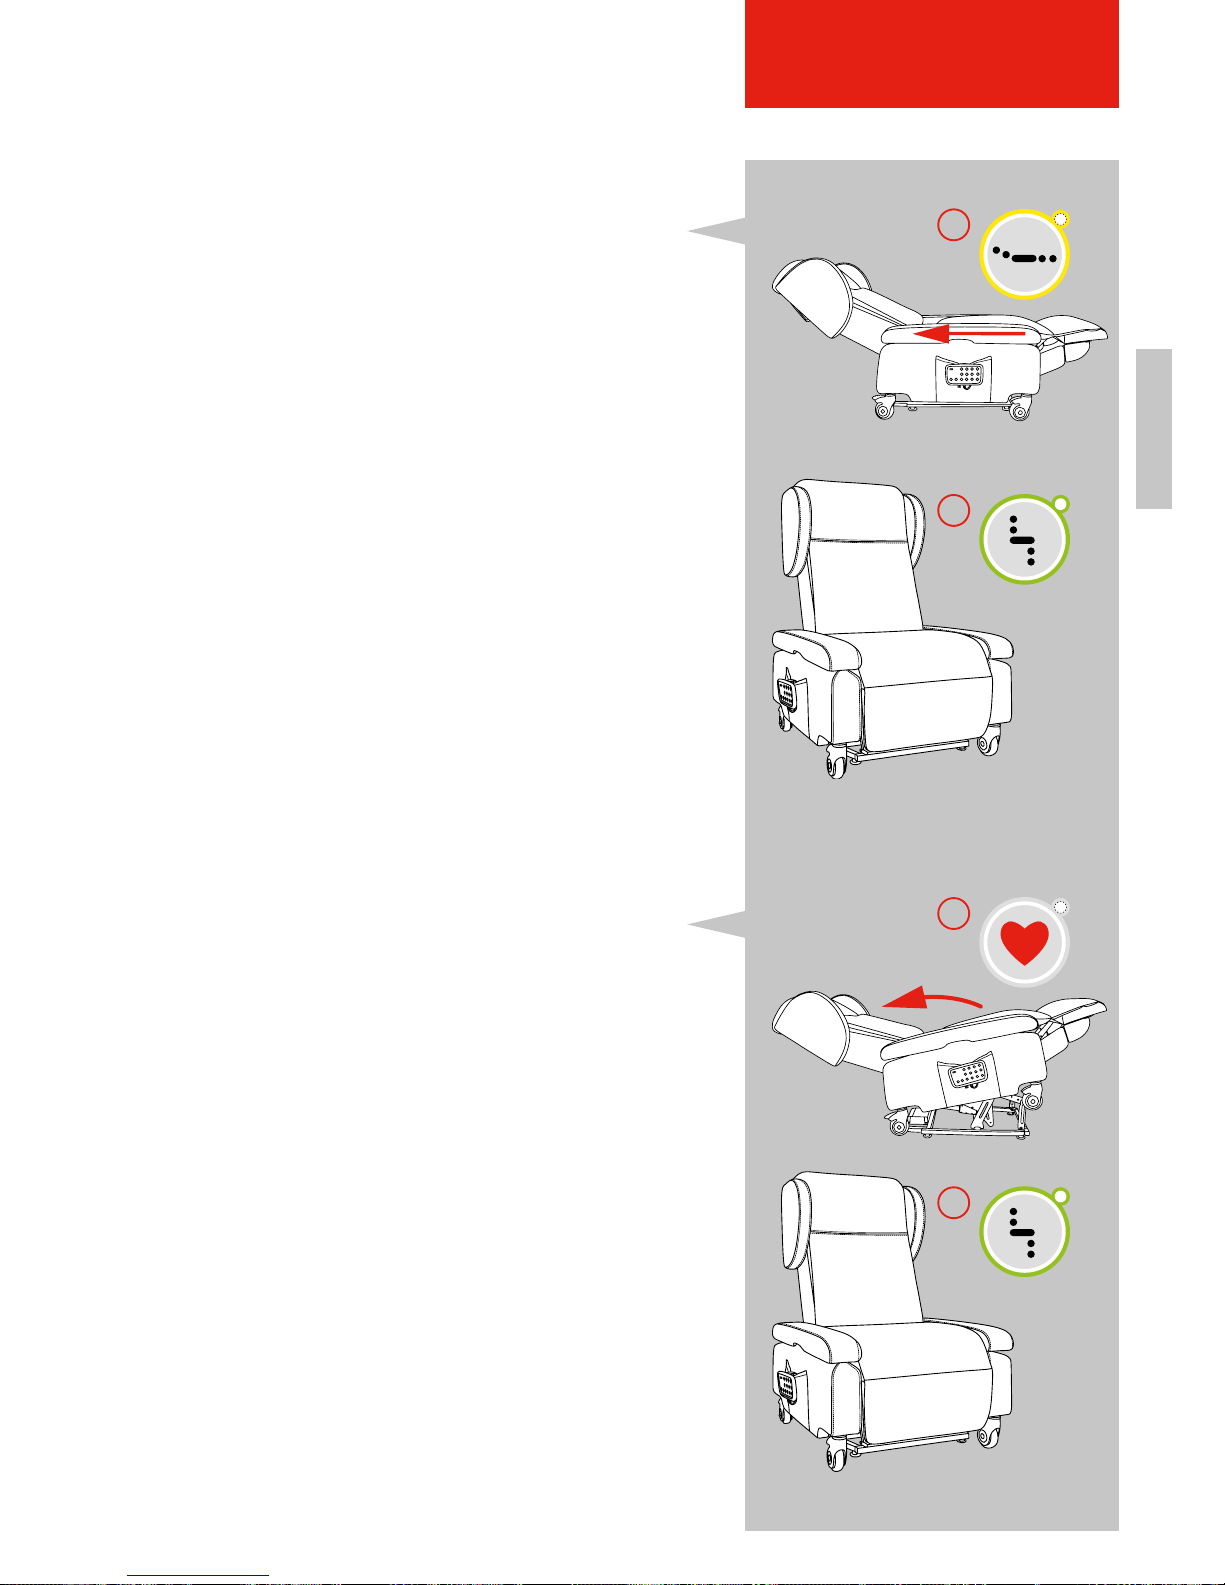
ENFR
1.
2.
2.
67
STARTUP
1.
Figure 16: Recumbent in the chair
Figure 17: Heart-balance position
6.1.2 Relaxing while recumbent
Be careful that the wheels of the chair are braked
and are facing straight towards the back, and ensure
there is sufficient space between the chair and walls,
physical objects or persons.
1. Keep the yellow button (1) pressed until your chair
is in the recumbent position.
2. In order to return from the recumbent to the upright
sitting position, simply keep the green button (2)
pressed. The recumbent position combined with
the armrests which are retractable to seat height
(see Section 6.1.9) and the height setting (see
Section 6.1.8) facilitate a side transfer from/into
bed while in a recumbent position.
6.1.3 Safely into the heart-balance position
Your feet are above your heart level in the heart-
balance position. Among other things, this position
relieves your circulation and your legs. Ensure that
the wheels of the chair are braked and are pointing
straight backwards, and that there is sufficient space
between the chair and walls, physical objects or persons.
1. Keep the button with the heart (1) pressed until the
chair is in the heart-balance position.
2. In order to return from the heart-balance position
into the upright sitting position, simply press the
green button (2).
Page 68
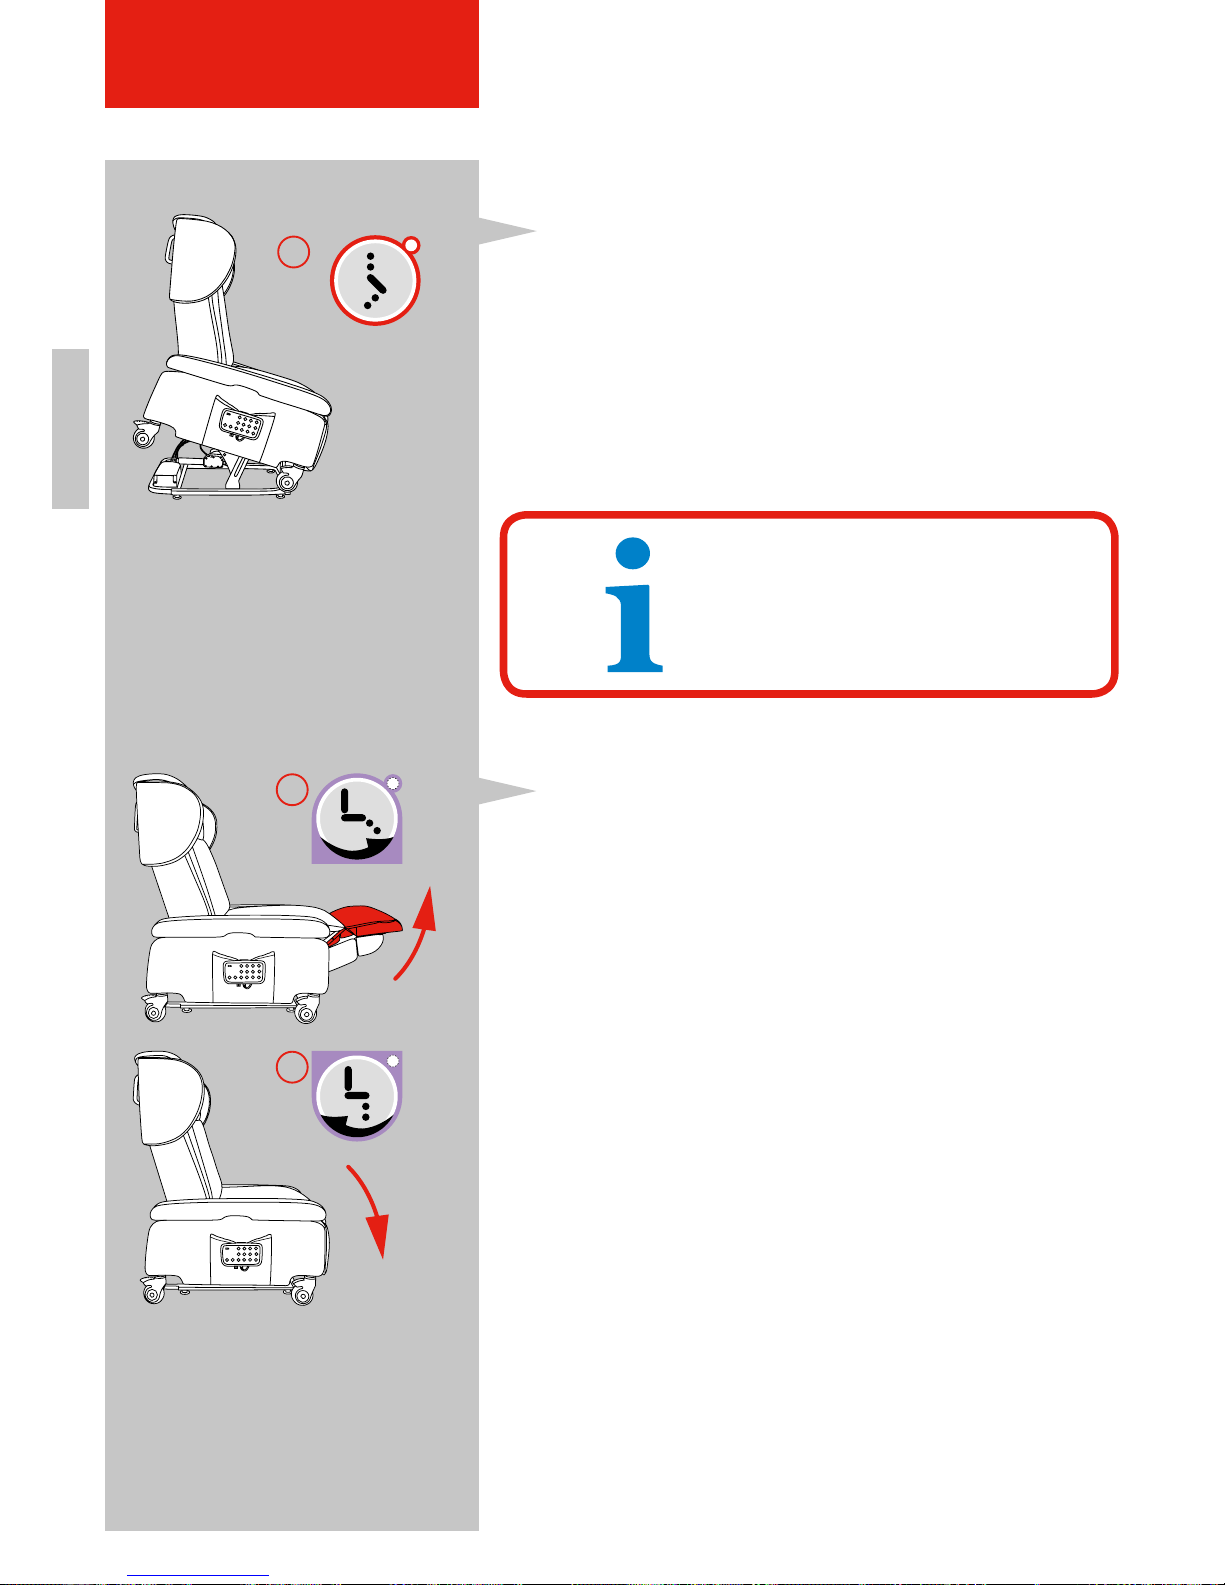
ENFR
68
STARTUP
1.
2.
1.
6.1.4 Rising safely from the chair
1. Keep the red button (1) pressed. Also from the
recumbent position, the chair at first moves into
the upright seating position and only then moves
to the safe rising position. During the movement
upwards, you can hold onto the armrests for
support on the left and right.
2. As soon as the chair has reached the optimal level
to permit safe standing, release the red button (1).
6.1.5 Adjusting the footrest individually
Depending on your preference, the footrest can be
individually adjusted using these two buttons.
1. Press the upper violet button to move the footrest
upwards (1).
2. Press the lower violet button to lower the footrest
(2).
Figure 18: Rising function
NOTE!
TOPRO recommends that you
keep the chair at this optimal
level, so that later on you can
comfortably lean into it again and
sit down.
Figure 19: Setting the footrest
Page 69
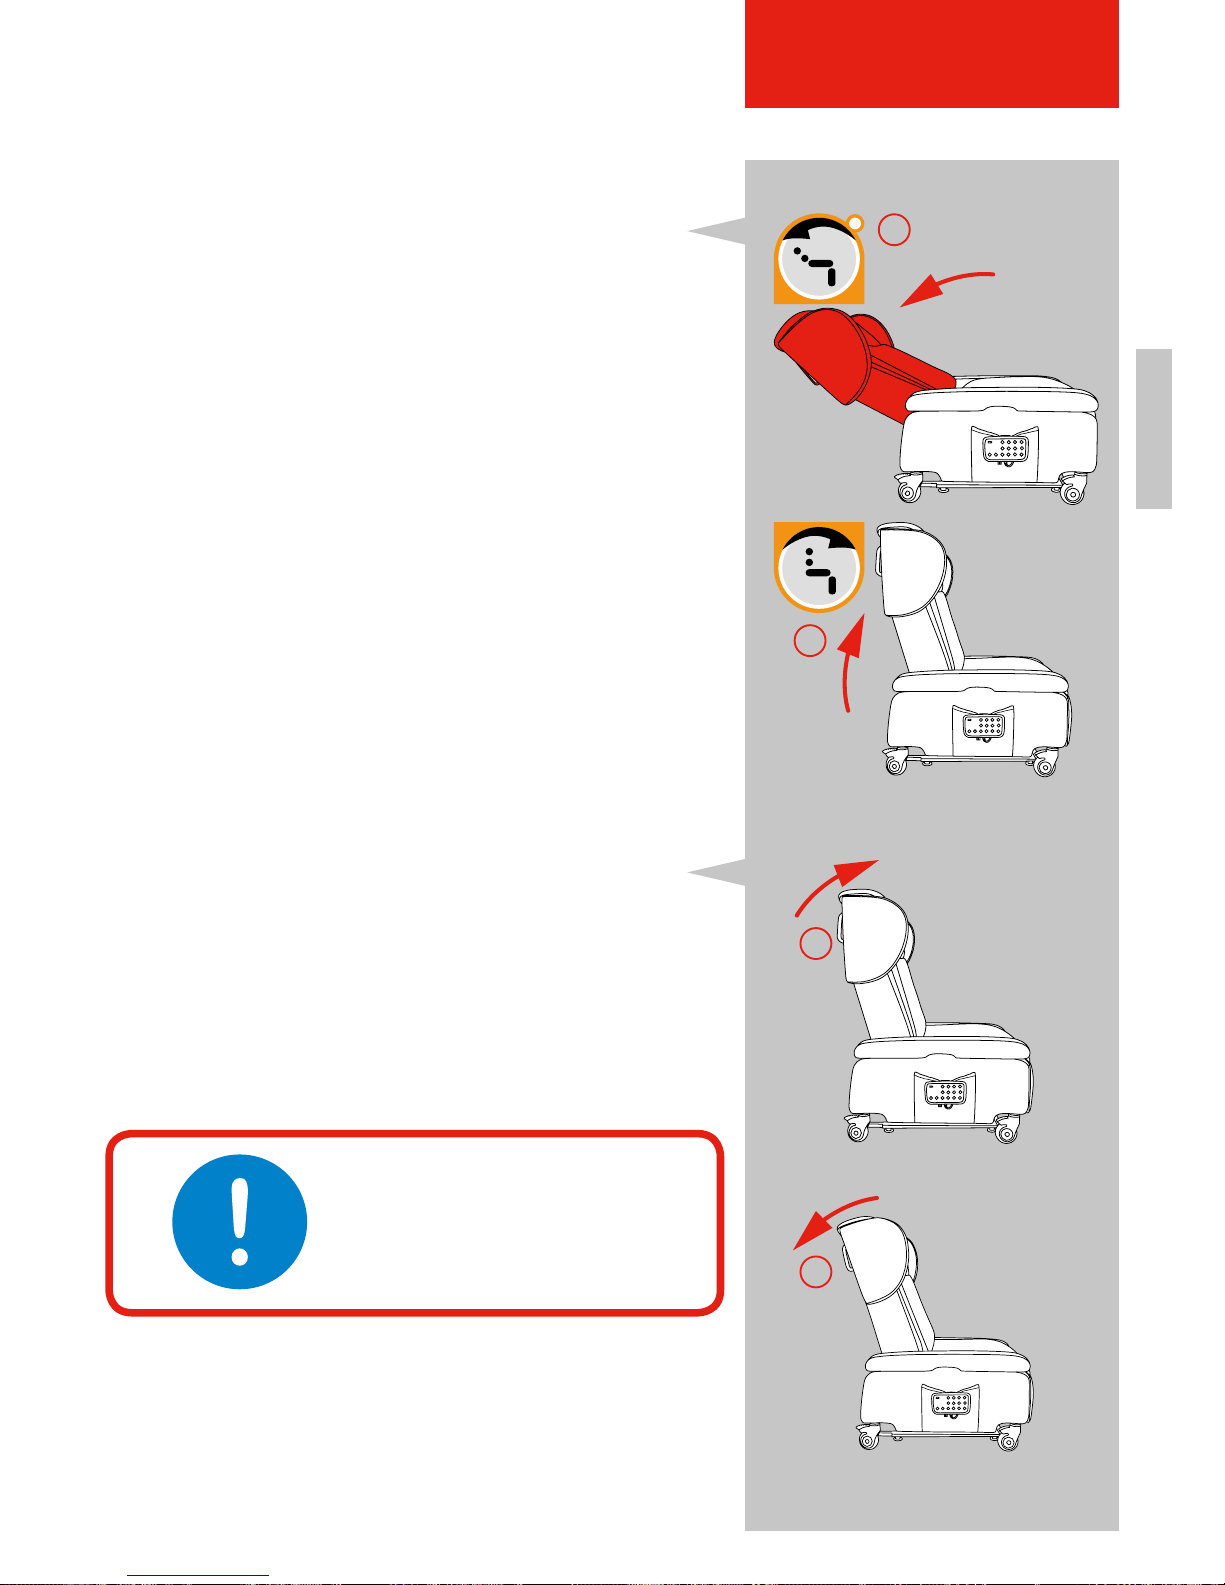
ENFR
2.
1.
69
STARTUP
6.1.6 Adjusting the backrest individually
Depending on your requirement, the backrest can
be individually adjusted using these two buttons.
1. Press the upper orange button to move the
backrest downwards (1).
2. Press the lower orange button to move the
backrest upwards again (2).
6.1.7 Adapting the neck position
The angle of the upper part of the backrest can be
adjusted. Either a more active (forward sloped) or
more passive (backwards sloped) position can be
adjusted.
A little force is necessary for this purpose. Place
yourself behind the chair and press the upper part of
the backrest forwards (1) or backwards (2), depending
on which position the user would like to sit.
IMPORTANT!
This setting should be carried
out when the user is NOT sitting
in the chair. Be careful that the
brakes of the chair are locked.
1.
2.
Figure 20 Setting backrest
Figure 21 Setting the neck position
Page 70
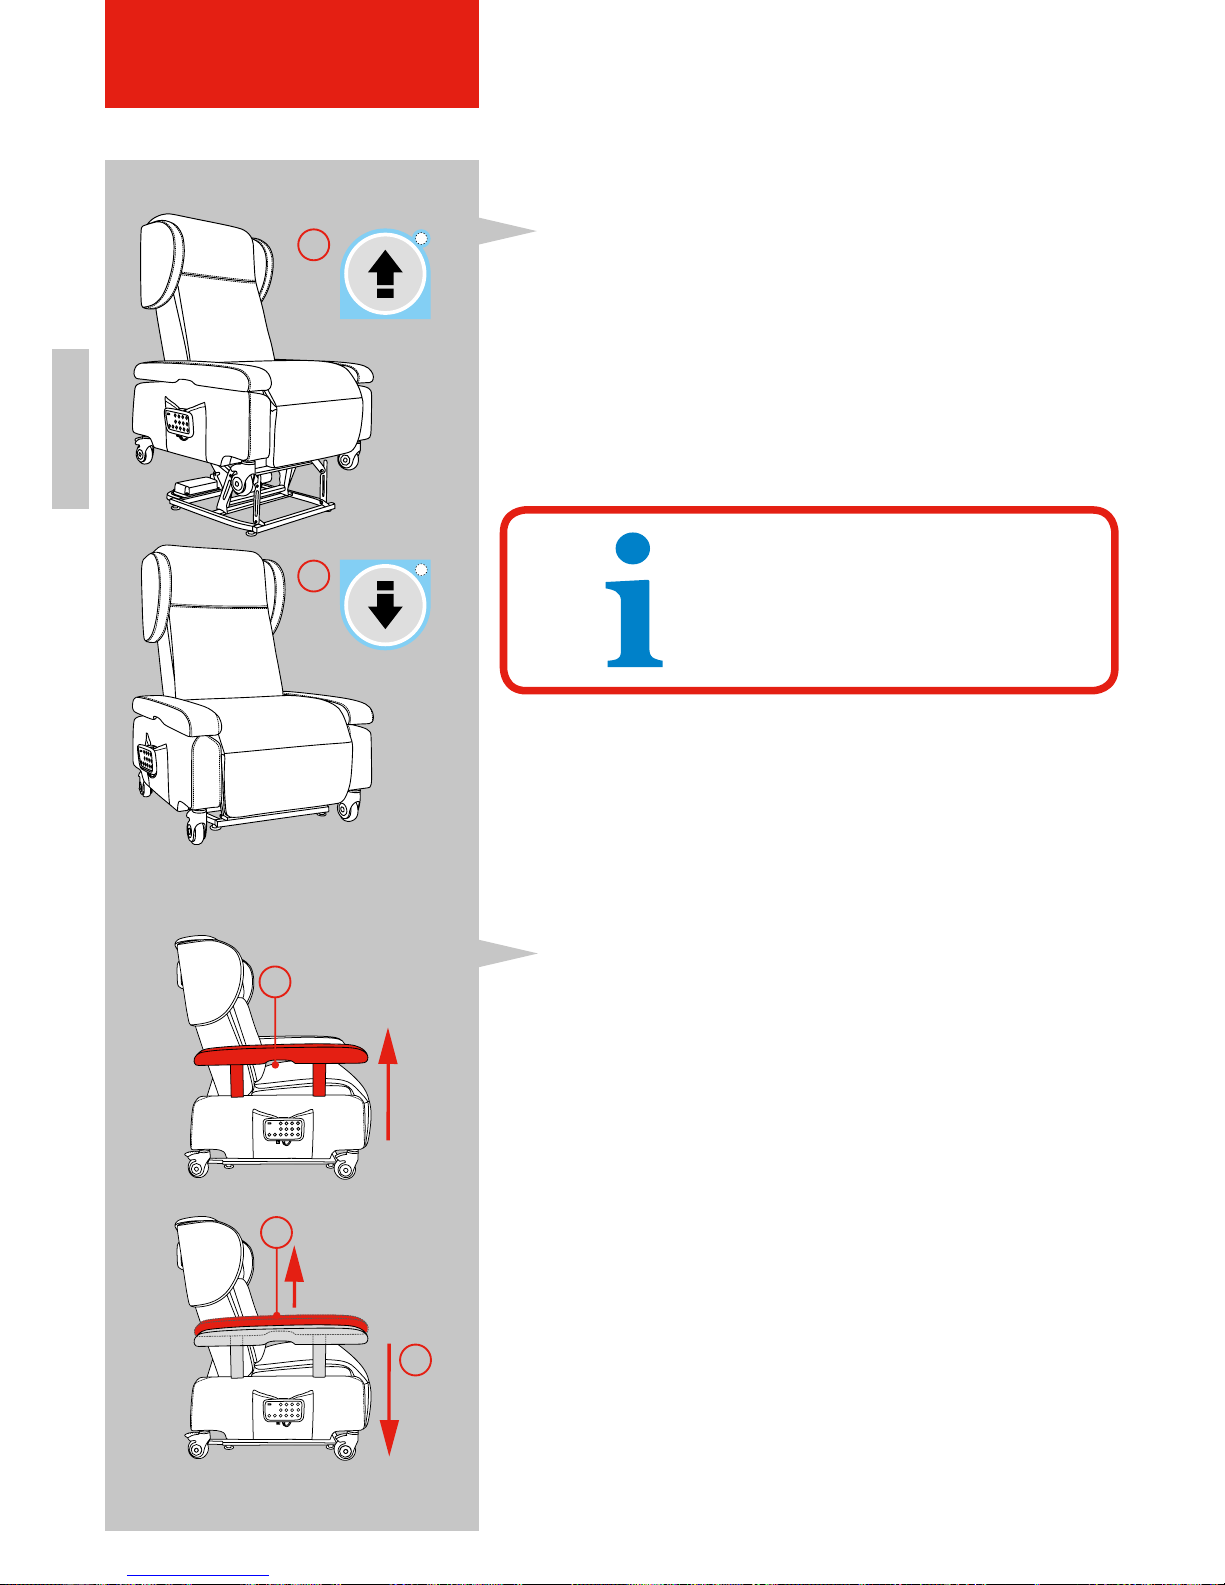
ENFR
2.
2.
1.
70
1.
1.
6.1.8 Setting the height
The chair can be adjusted in height.
1. Press the upper button to move the chair upwards
(1).
2. Press the lower button to move the chair downwards (2).
As soon as you release the button, the chair will
remain at this height.
6.1.9 Adapting the armrests
There are two positions for the armrests. They can
be pulled out in order to rest the arms on them, and
they can be pushed down flush with the seat surface.
1. Grasp the recessed grip of the armrests (1) and
pull it upwards. The armrest is now at the highest
position, and the user‘s arms can rest comfortably.
2. If you pull the armrest further up (1), the fixing
mecha nism releases and the armrest can be
pushed down to seat height (2). This position is
very helpful for a lateral transfer from/into bed or
from/into another seat. This applies especially in
combination with the height adjustment of the chair
(see chapter 6.1.8) and the sitting position (see
chapter 6.1.1) as well as the recumbent position
(see chapter 6.1.2).
NOTE!
An adjustment of the height
can be helpful when transferring
from/into bed, from one/to another chair and/or also for fitting
comfortably below a table.
Figure 22 Setting the height
Figure 23: Adjusting the armrests
STARTUP
Page 71
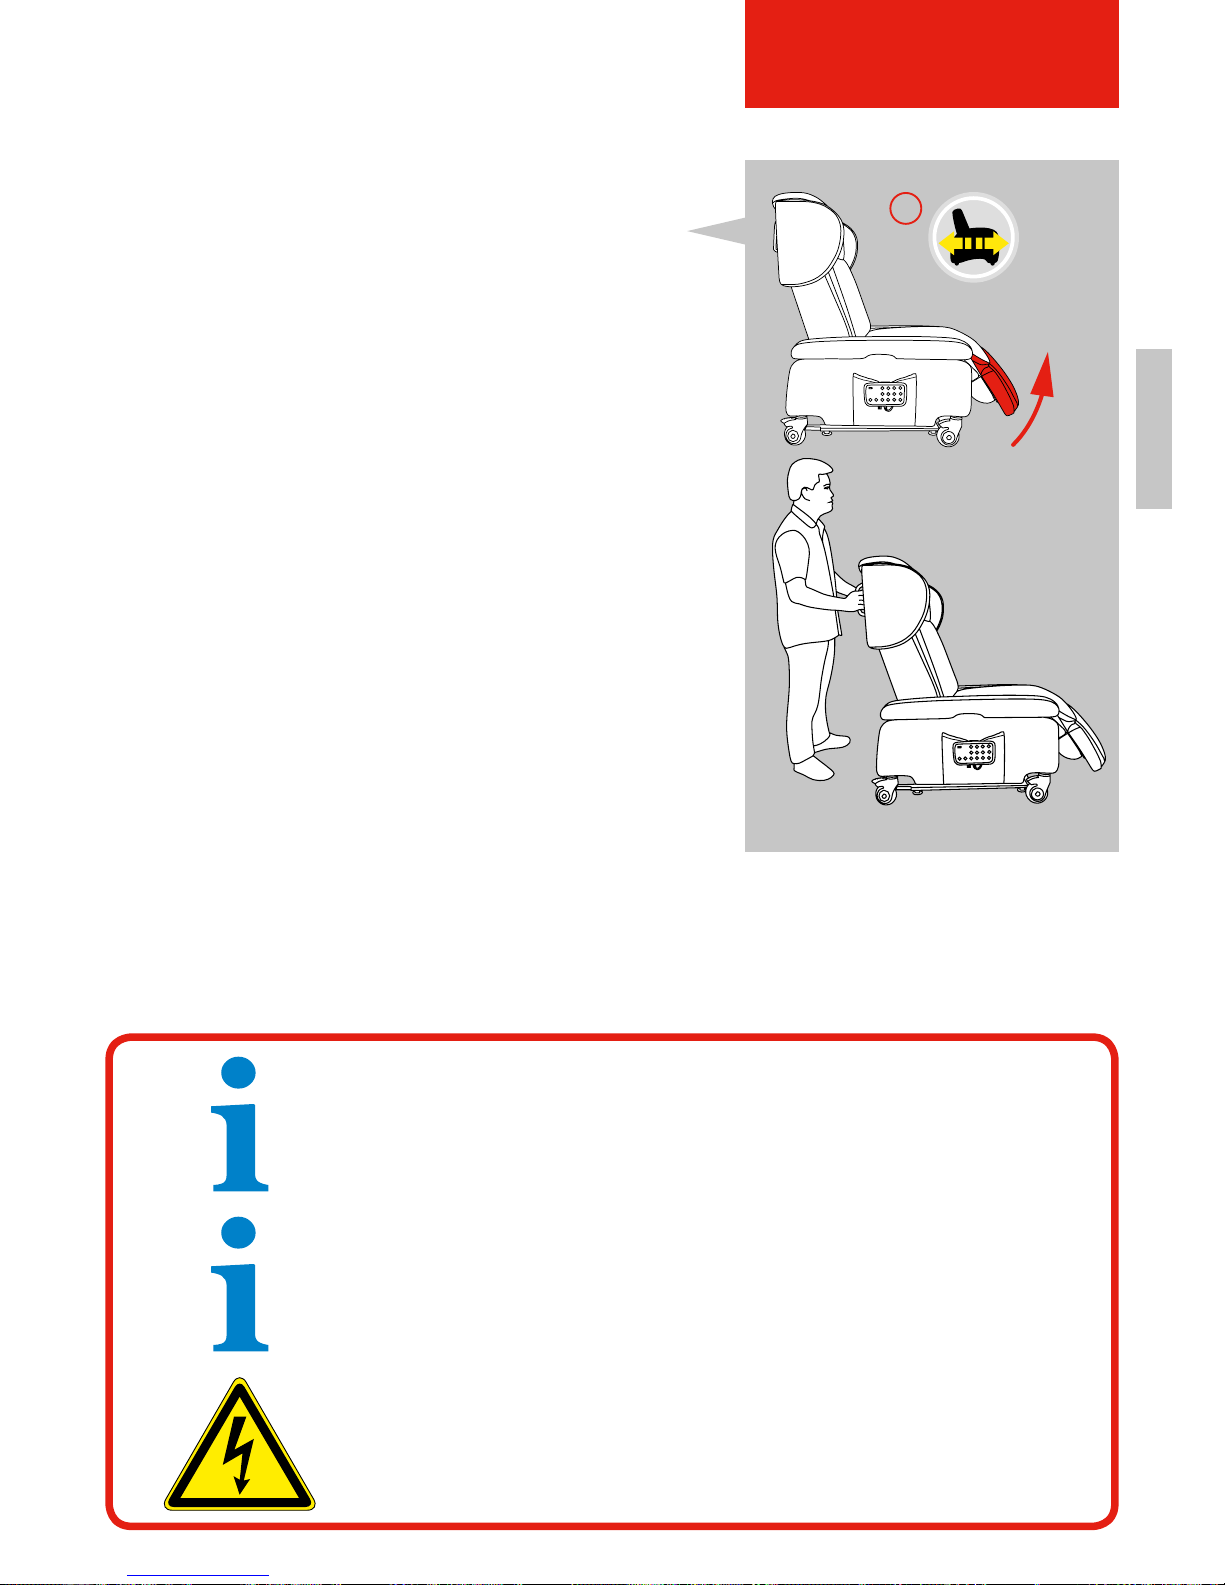
ENFR
71
STARTUP
1.
Figure 24: Transfer in the chair
6.1.10. Pushing the chair with the user sitting in it
Your Bologna chair can be moved together with the
user! This means that the user can be pushed from
the bedroom into the living room, can eat at the table,
and also experience the room from a different perspective.
1. Disconnect the cable from the wall socket and
place it securely in the chair. Additional mobility is
provided if your chair is supplied with the optional
battery.
2. Be careful that carpet edges and any other
unevenness are cleared from the path.
3. Press the transfer button (1). The chair moves into
the neutral position so that the leg support can be
raised a little. The user‘s feet no longer touch the
ground.
4. Release the brakes of the chair.
5. Move the chair as desired. Once at the desired
destination, be sure that the brakes are once again
securely fixed. If the environment permits, plug the
chair directly into the mains power supply once
again.
NOTE!
After connecting with the voltage supply, the unit switches on with a slight delay.
Before putting into operation, wait at least 20 seconds. For the initial startup
after power cut off, press the green button for restoring the chair to fully upright
position, otherwise the chair might go to the opposite position.
NOTE!
You can use all chair positions if the green operation indicator light of the
remote control is on. If you have no battery (see Section 4.4.3), then you
are dependent on the power cable.
WARNING!
Be careful that the power cable is not pinched, kinked or damaged.
Be careful that the cable poses no tripping or stumbling hazards.
6.2 Setting up the power supply system
The seat position is set by an electric drive mounted on the frame.
Plug the chair cable into a wall socket in your household.
Power supply is specified as a part of device.
Page 72
ENFR
72
WARRANTY
7. WARRANTY
7.1 Terms and conditions of warranty
The warranty covers all defects of the riser/recliner chair that demonstrably arise from material or
production defects.
1. The warranty is not transferable.
2. All repairs and work on the chair have to be carried out by a certified dealer or furniture
technician, otherwise the warranty expires.
3. In the event of justified complaints within the first 24 months after purchase of the chair, you
will receive the spare parts for repairs free of charge from your dealer or furniture technician.
4. The warranty expires for the chair or its parts if:
• the product has not been handled and serviced according to TOPRO guidelines;
• parts other than the original parts are mounted on the chair;
• the chair is improperly used or willfully damaged;
• repairs were carried out by non-authorized persons.
7.2 Exceptions of warranty
• Non-compliance with the operating manual as well as improper servicing or in particular technical
changes and additions to the product will void the warranty as well as the product liability in
general.
• Damage caused by the user, for example by misuse or overload.
• Fading of the colors; this is a natural process caused by time and exposure to sunlight.
• Damages caused by liquids.
• Damages caused by impacts or rubbing on walls, furniture, or the like
• Damages by cigarettes or open fire.
• Natural wear and tear / or damage caused by improper use.
Wear Parts in particular: Wheels, upholstery, respect, and remote control handles
7.3 Warranty lifetime
• Lifetime of the chair: 2 years
The warranty lifetime expires when no original spare parts or original accessories may be used
on the product. For repairs within the warranty period, please contact your dealer .
• Warranty lifetime of the spare parts:
Nursing bell: 2 years
Storage battery: 1 year
IMPORTANT!
In the event of complaints, inform your specialist dealer. The product is
identied by the serial number attached to the motor and metal frame.
Page 73
ENFR
73
MAINTENANCE & SERVICING
8. MAINTENANCE AND SERVICING
The life span of the chair depends on its being properly used for the intended purpose and the
observance of regular servicing intervals.
8.1 Customer service
Any defects or malfunctions of your riser/recliner chair must be reported immediately to your cer-
tified dealer. He will be provided with all the necessary information, documents and spare parts
for the repair.
For questions or further information, contact the TOPRO customer service at
+49 (0) 8141-888939-0 or by e-mail at [email protected].
DANGER!
Maintenance work on electric connections of the chair or on electric
auxiliary / control connections may only be carried out by qualied
electrical technicians.
The chair must be disconnected from any power source before starting
repairs!
Disconnect the power cable from the electric outlet and ensure against
subsequent unintentional switch-on.
WARNING!
Servicing and maintenance work must be carried out exclusively
by instructed specialists.
The housing of the drive components must not be opened, removed or
damaged.
Maintenance work may only be carried out when the chair is at a standstill.
NOTE!
The chair can be damaged by improper assembly or dismantling.
The refore it applies in principle, for all removal and disassembly work:
• Identifying parts in their relationship to each other.
• Identifying and noting installation position and location.
• Dismantling and storing the component groups separately.
In principle, after all maintenance work:
• Check all screw connections for a rm hold.
• Close and screw tight all covers.
Page 74
FR EN
74
MAINTENANCE & SERVICING
8.2 Maintenance recommendations and cleaning
Proper maintenance helps to ensure smooth operation. The user can regularly carry out these
tasks himself.
8.2.1 Cleaning
Cover fabrics: You can clean the fabrics with a vacuum cleaner. Regular cleaning of the cover fa-
bric is important in order to remove body fats that can harden the cover fabric as a consequence.
To remove stains, moisten the fabric with a cloth or sponge immersed in a mild soap solution.
Afterwards dry with a soft clean piece of cloth.
The surface of the chair can be wiped with a disinfectant that contains 70-80% ethanol. The use
of a chlorine and phenol disinfectant is not recommended. Damage and injuries caused by improper handling by unauthorized persons or by the use of damaging agents are not subject to the
liability of the manufacturer.
8.2.2 Servicing
NOTE!
Some of the tasks mentioned below are very dependent on the specic
utilization and prevailing conditions.
The maintenance cycles mentioned in Section 8.2.2 are minimum
specications. Other maintenance cycles are possible in individual cases.
IMPORTANT!
Carry out maintenance work according to the table on page 74 and at
the stated intervals.
WARNING!
Do not use furniture polish, scouring agents, or steel wool.
Never use a high pressure or steam cleaner.
IMPORTANT!
Do not use solvents such as benzine, alcohol or the like for cleaning.
Page 75
ENFR
75
MAINTENANCE & SERVICING
8.3 Troubleshooting and fault messages
In the event of a malfunction, please proceed as follows:
• Inform trained service personnel at your certified dealer,
• if necessary, notify TOPRO Customer Service.
8.3.1 List of warning and fault messages
Activity / examination Servicing interval / description
Visual inspection At least every 6 months
Cleaning the chair Regularly (as required)
Remote control function test At least every 6 months
WARNING!
Troubleshooting and repair must be carried out exclusively by instructed
professionals.
Chair without function Cause and solution
Chair without function
1. Power cable connected to wall socket?
2. Wall socket under current? Test by connecting
another appliance such as a vacuum cleaner
3. Ch eck connection of plugs:
• Power cable to control unit
• Control unit to remote control
• Motors to remote control
• Remote control to control unit
Chair with partial function
(e.g. backrest is adjustable, but not the footrest)
1. Examine connectors:
Drives to the control (plug must be engaged),
remote control to the control (plug must be
engaged)
2. Is there a clicking noise while pressing
buttons on the remote control?
3. Cross-check / process of elimination:
Switch the cables of the drives and retest
the functions.
Noise emissions from the padding or cover
fabric
Depending on the room climate, especially
for leather and microber, an increased noise
level can develop. Leather polish or talcum
powder can remedy this.
Unusual noise of mechanical origin
Should this be the case, then immediately
stop using the chair and contact the TOPRO
Customer Service.
Page 76
FR EN
76
9. SWITCHING OFF
To take the chair out of service, unplug the power supply cable from the mains power network.
9.1 Temporary switchoff
1. Switch off the chair and disconnect the cable from the power supply.
9.2 Storage conditions
Short-term and medium-term storage (up to two years) under prevailing conditions specified
in the technical data is possible without taking any special measures. For longer-term storage,
measures for protection and preservation should be taken:
• Protect the chair from sunlight to counteract the natural process of color fading by placing a
protective covering over the chair.
• Store the chair in a dry and well-ventilated room.
9.3 Disposal / recycling
Before removing the chair, shut it down according to Section 9.1.
Observe the transportation notes in Section 5.1!
NOTE!
After a temporary switchoff, the process of startup has to be repeated.
IMPORTANT!
All parts and auxiliary and operating materials:
• Separate into single types,
• Dispose of according to local regulations and guidelines.
NOTE!
The motors and the control box are special waste!
Please contact the manufacturer for open questions on disposal/recycling!
SWITCHING OFF
Page 77
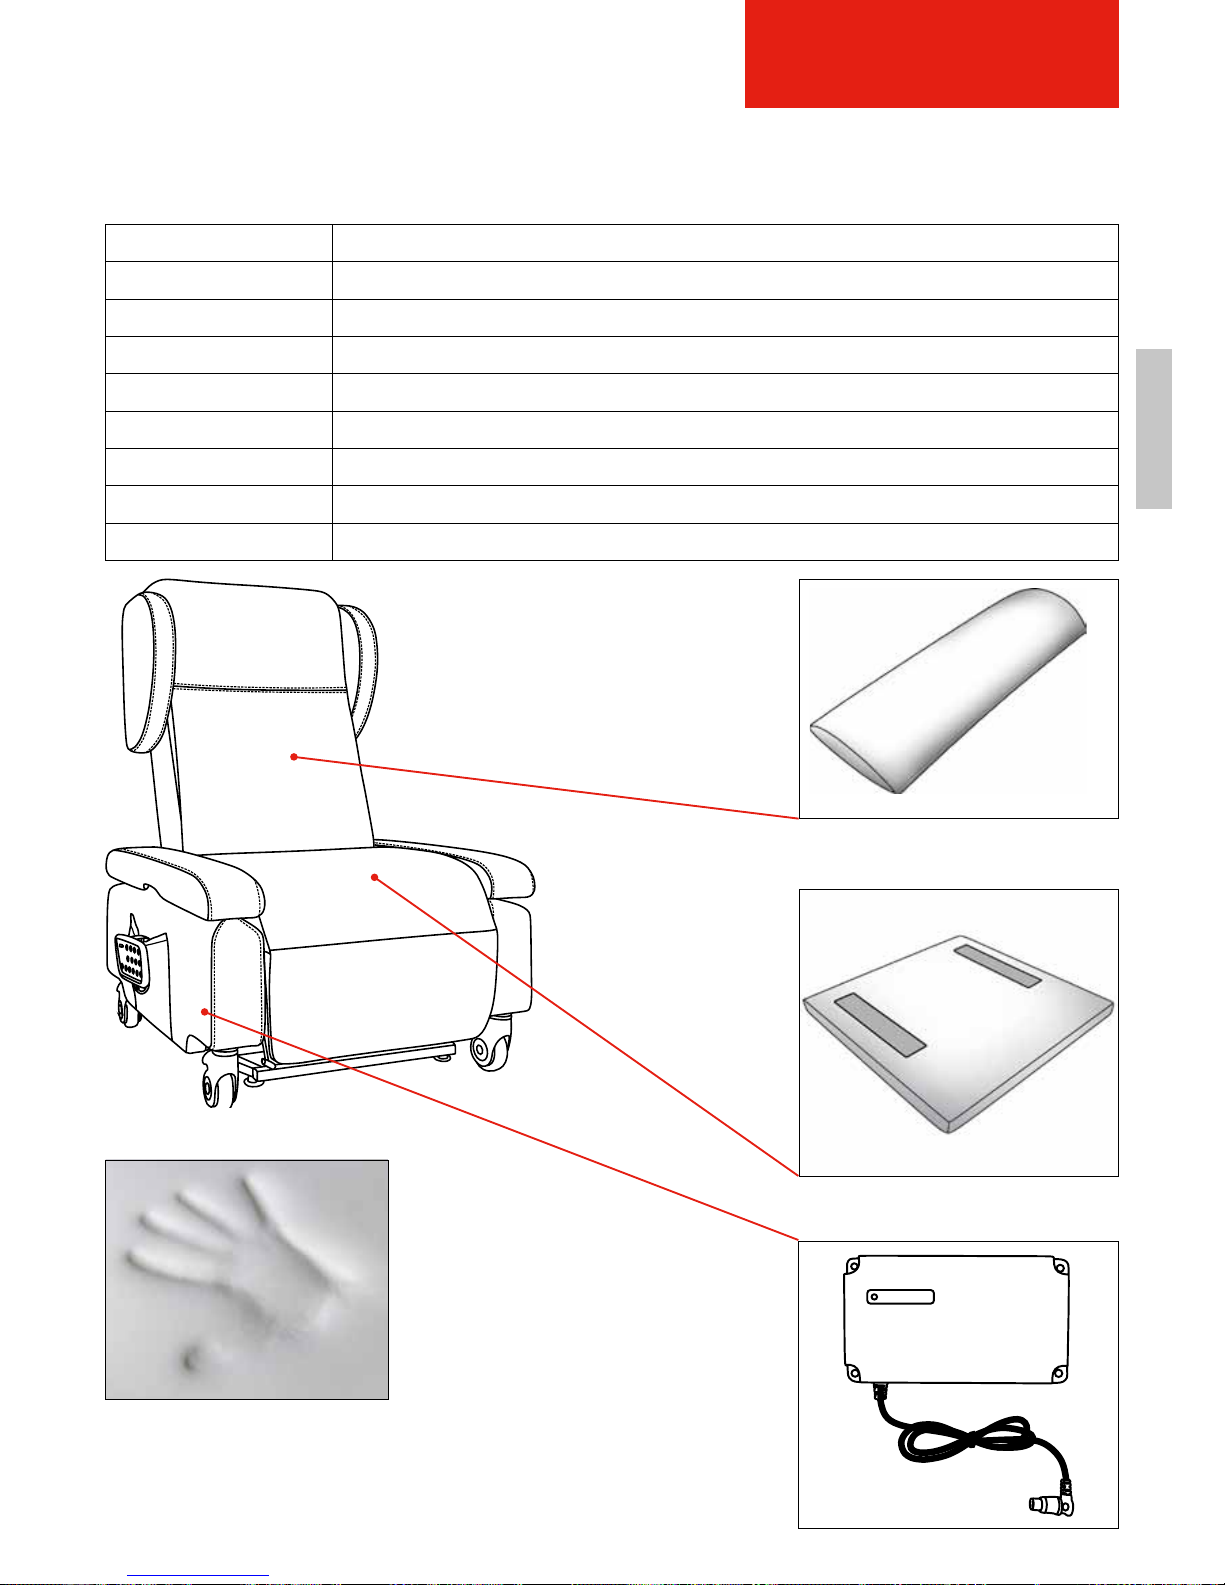
ENFR
77
OPTIONAL ACCESSORIES
10. OPTIONAL ACCESSORIES
ComfortPlus is a special
foam rubber which adapts to
the body. It reflects one‘s own
body heat in a pleasant manner.
Articlenumber Product name
0043-BR Lumbar cushion, Comfort Plus, articial leather brown, for Bologna
0043-CR Lumbar cushion, Comfort Plus, articial leather creme, for Bologna
0043-RE Lumbar cushion, Comfort Plus, articial leather red, for Bologna
0041-BR Seat cushion, articial leather brown, extra, removable, for Bologna
0041-CR Seat cushion, articial leather creme, extra, removable, for Bologna
0041-RE Seat cushion, articial leather red, extra, removable, for Bologna
HC13015-0042 Wireless alarm for Bologna
HC13015-BAT Battery for Bologna
Figure 27 Battery (installed in the
frame). The chair can also remain
operable during patient transport or
in case of an emergency, such as a
power outage.
Figure 25 Lumbar cushion
Figure 26 Positioning cushion optional
Page 78
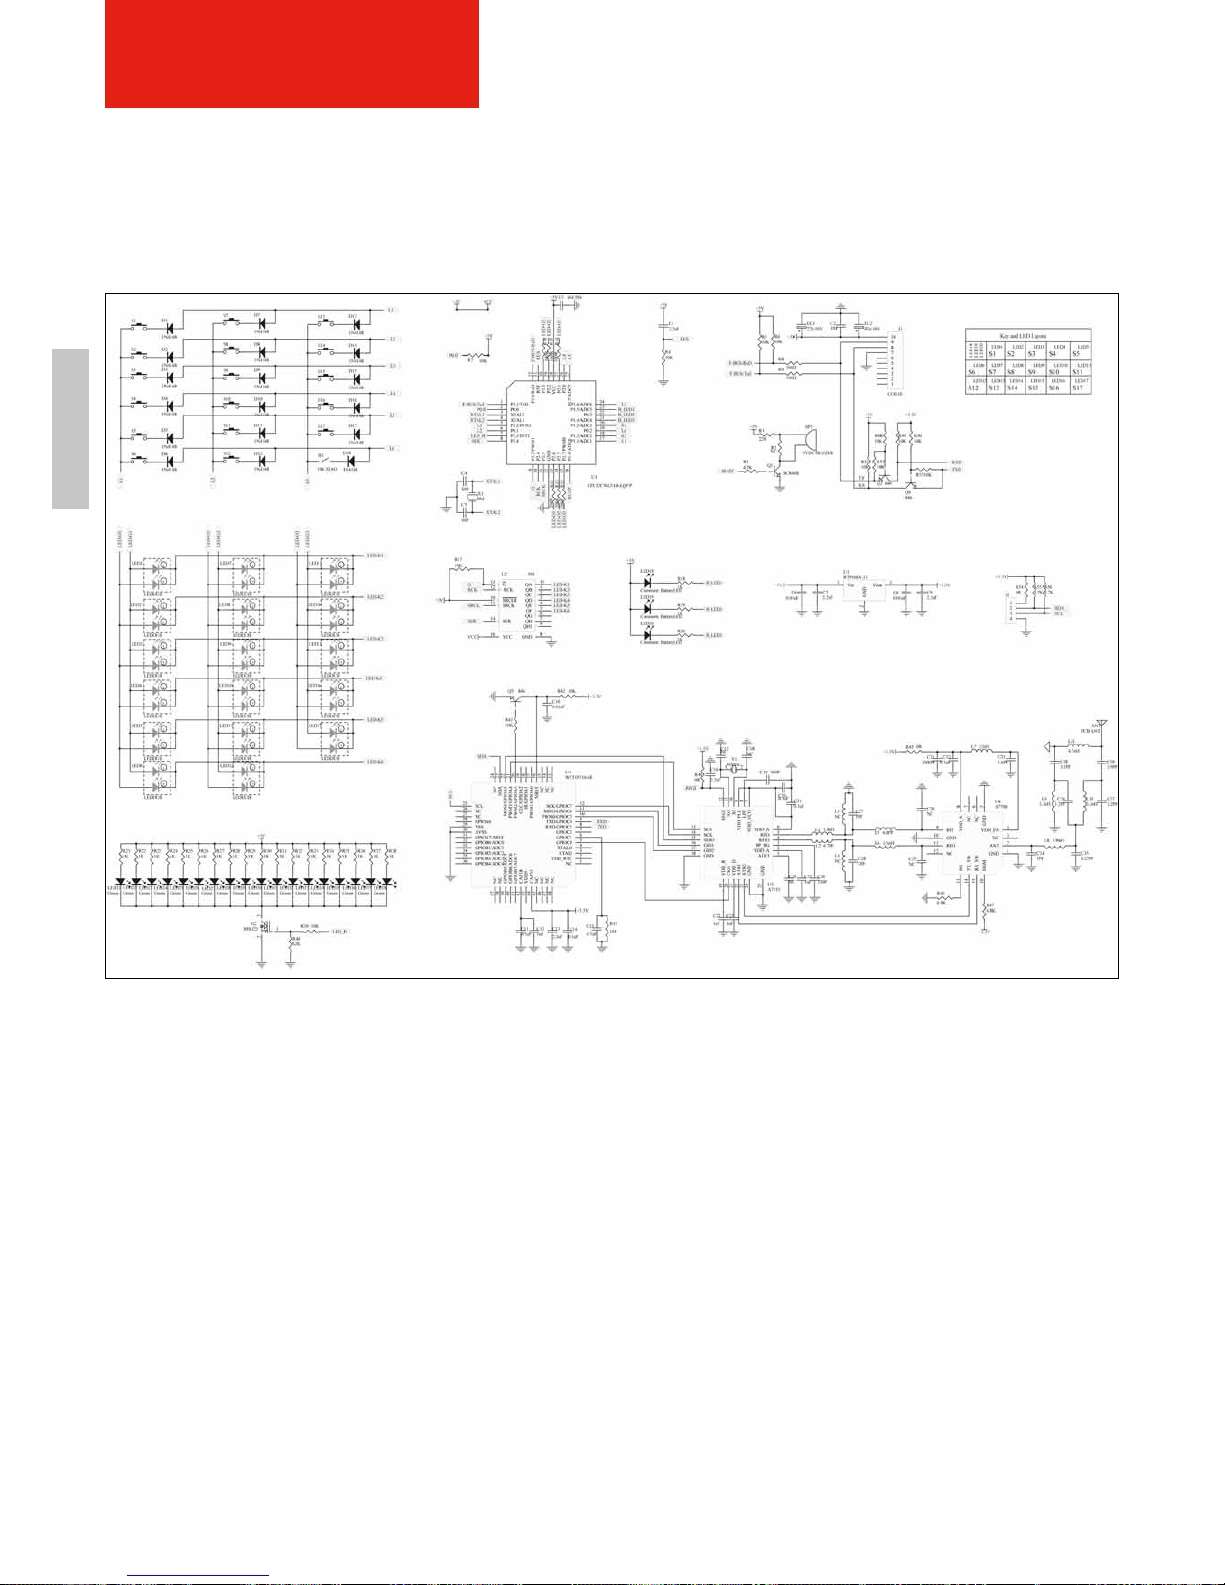
FR EN
78
CIRCUITRY
11. Circuitry
11.1 Remote control
Figure 28
Page 79
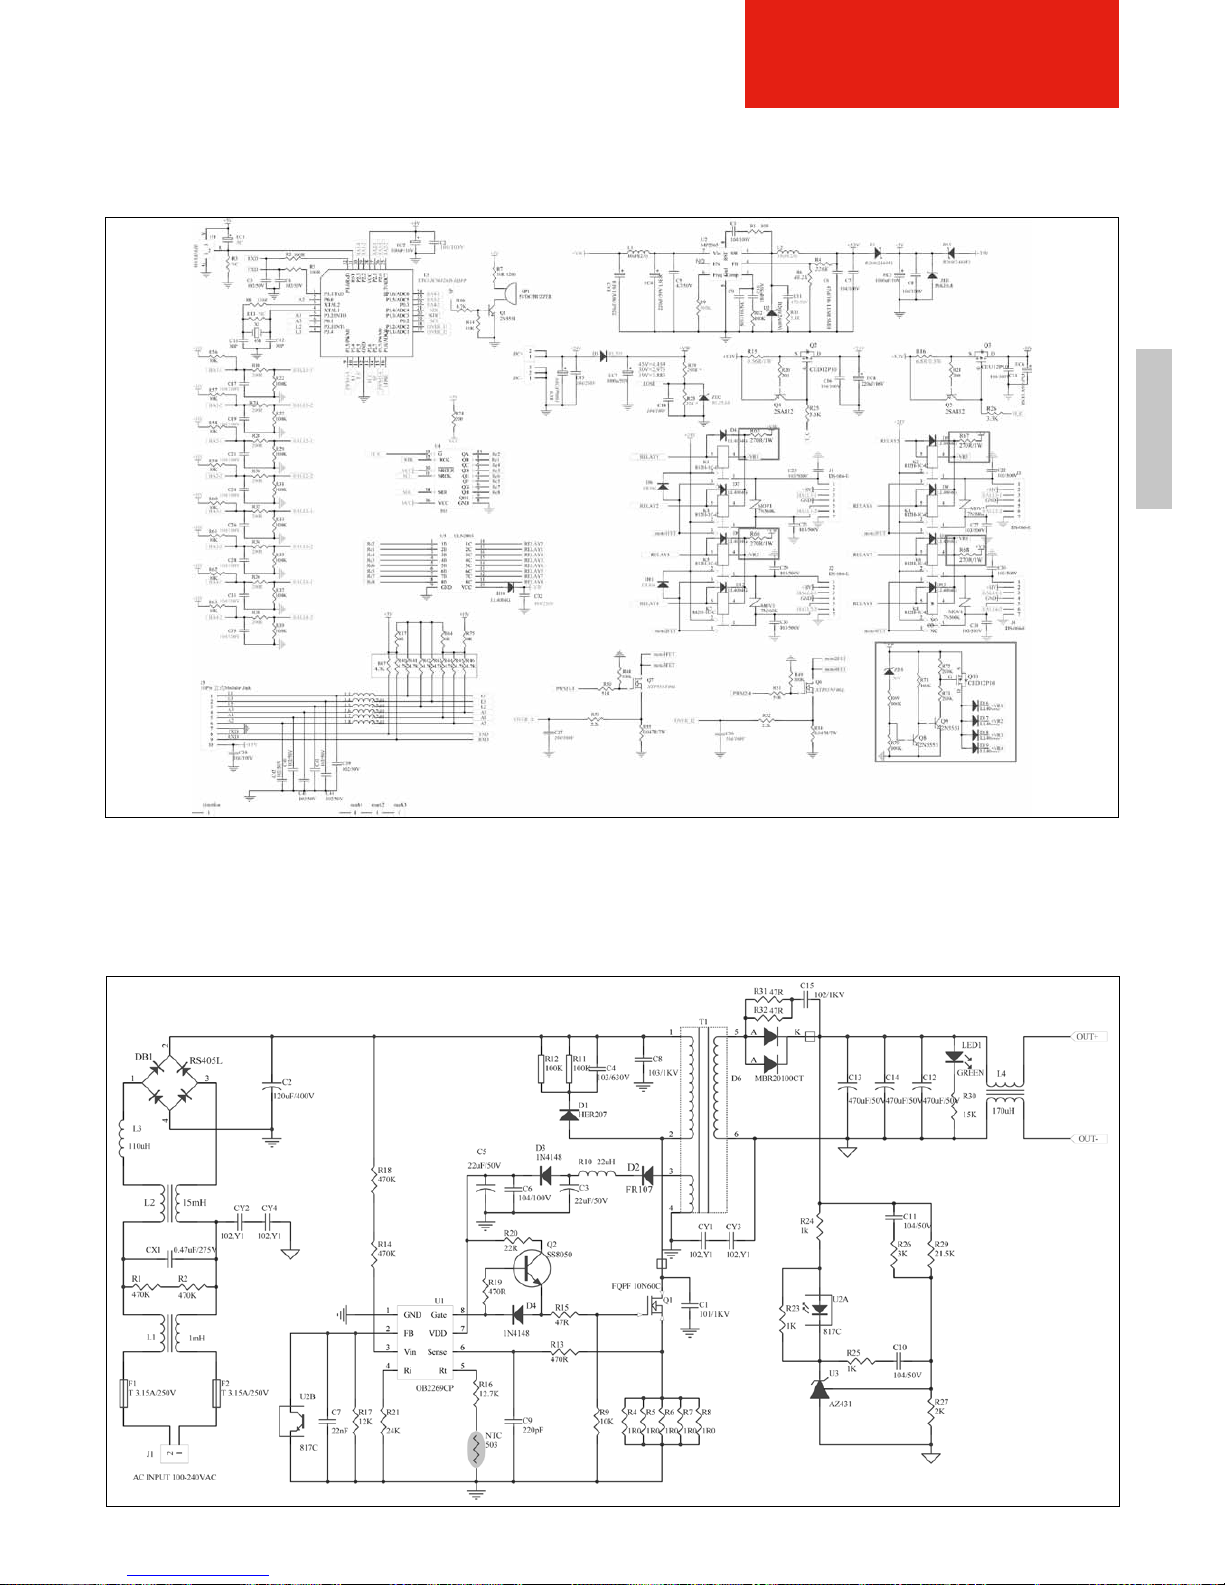
ENFR
79
CIRCUITRY
11.2 Control unit
11.2 Transformer
Figure 29
Figure 30
Page 80

Vertriebs- und Schulungszentrum
Deutschland
TOPRO GmbH
Bahnhofstraße 26 d
82256 Fürstenfeldbruck
Tel: +49 (0) 8141 88 89 39-0
Fax: +49 (0) 8141 88 89 39-22
[email protected]
www.topro.de
Sales- and training centre Germany
TOPRO GmbH
Bahnhofstraße 26 d
82256 Fürstenfeldbruck
Tel: +49 (0) 8141 88 89 39-0
Fax: +49 (0) 8141 88 89 39-22
[email protected]
www.topro.de
Hersteller
Manufacturer:
Version 2016/03/11
 Loading...