

Page 1

TOPFIELD
CBC-5150
User Guide
Digital Cable Receiver
IRDETO Embedded
Page 2

ii CONTENTS
Contents
Contents ii
1 Introduction 1
1.1 Features . . . . . . . . . . . . . . . . . . . . . . . . . . . . . . 1
1.2 Controlling the digital receiver . . . . . . . . . . . . . . . . . . 2
1.2.1 Front panel . . . . . . . . . . . . . . . . . . . . . . . . 2
1.2.2 Remote control . . . . . . . . . . . . . . . . . . . . . . 4
1.3 Subscription card information . . . . . . . . . . . . . . . . . . 6
2 Setup 7
2.1 Unpacking . . . . . . . . . . . . . . . . . . . . . . . . . . . . . 7
2.2 Safety precautions . . . . . . . . . . . . . . . . . . . . . . . . . 7
2.3 Rear panel connections . . . . . . . . . . . . . . . . . . . . . . 9
2.4 Connecting up your digital receiver . . . . . . . . . . . . . . . 10
2.4.1 Connecting to the broadcasting cable . . . . . . . . . . 10
2.4.2 Connecting to your television set . . . . . . . . . . . . 10
2.5 Switching on for the first time . . . . . . . . . . . . . . . . . . 11
3 Service Search 13
3.1 Searching for broadcasting services . . . . . . . . . . . . . . . 13
3.2 Resetting to factory settings . . . . . . . . . . . . . . . . . . . 14
4 Preference Settings 16
4.1 Language settings . . . . . . . . . . . . . . . . . . . . . . . . . 16
4.1.1 Menu language . . . . . . . . . . . . . . . . . . . . . . 16
Page 3

CONTENTS iii
4.1.2 Subtitle language . . . . . . . . . . . . . . . . . . . . . 17
4.1.3 Audio language . . . . . . . . . . . . . . . . . . . . . . 17
4.2 Video and audio settings . . . . . . . . . . . . . . . . . . . . . 17
4.2.1 Television standard . . . . . . . . . . . . . . . . . . . . 17
4.2.2 Television aspect ratio . . . . . . . . . . . . . . . . . . 18
4.2.3 Audio mode . . . . . . . . . . . . . . . . . . . . . . . . 19
4.2.4 Radio frequency output . . . . . . . . . . . . . . . . . 19
4.3 Local time setting . . . . . . . . . . . . . . . . . . . . . . . . . 20
4.4 Parental control . . . . . . . . . . . . . . . . . . . . . . . . . . 21
4.5 Adjusting the On-Screen Display . . . . . . . . . . . . . . . . 23
5 Every Day Use 24
5.1 Volume control . . . . . . . . . . . . . . . . . . . . . . . . . . 24
5.2 Watching television . . . . . . . . . . . . . . . . . . . . . . . . 24
5.2.1 The services list . . . . . . . . . . . . . . . . . . . . . . 24
5.2.2 The favourite service lists . . . . . . . . . . . . . . . . 26
5.2.3 Viewing programme information . . . . . . . . . . . . 27
5.2.4 Selecting audio tracks . . . . . . . . . . . . . . . . . . 28
5.2.5 Selecting subtitle tracks . . . . . . . . . . . . . . . . . 29
5.2.6 Viewing teletext . . . . . . . . . . . . . . . . . . . . . . 29
5.3 Viewing electronic programme guide . . . . . . . . . . . . . . 29
5.4 Making timer events . . . . . . . . . . . . . . . . . . . . . . . 31
6 Organising Services 33
6.1 Editing the services list . . . . . . . . . . . . . . . . . . . . . . 33
6.2 Editing the favourite lists . . . . . . . . . . . . . . . . . . . . . 35
6.3 How to use on-screen keyboard . . . . . . . . . . . . . . . . . 37
7 Firmware Update 38
A Universal Remote Control 39
A.1 TV . . . . . . . . . . . . . . . . . . . . . . . . . . . . . . . . . . 41
A.2 VCR . . . . . . . . . . . . . . . . . . . . . . . . . . . . . . . . . 46
A.3 DVD . . . . . . . . . . . . . . . . . . . . . . . . . . . . . . . . 48
Index 50
Page 4

Page 5

1
Chapter 1
Introduction
The CBC-5150 digital receiver is fully compliant with the international Digital Video Broadcasting (DVB) standard, and thus
is able to receive digital broadcasts of that standard.
NOTE
In general we equate a channel with a frequency. However,
unlike analogue broadcasts, digital broadcasts are not all
assigned to their own frequencies; instead, multiple television broadcasts are transmitted through a single frequency.
The frequency in digital broadcasting is usually called transponder or multiplex. To reduce confusion in this manual,
the word service is preferably used than channel as a term
to indicate one television or radio broadcast.
1.1 Features
This digital receiver has the following features:
• Can store up to 2,000 television and radio services.
• You can edit the services list.
• Can create lists of your favourite services.
Page 6

2 Introduction
• Can view information about the current television or radio programme.
• Has an electronic programme guide that provides an
overview of scheduled programmes.
1.2 Controlling the digital receiver
You can operate the digital receiver with the remote control or
the buttons on the front panel.
NOTE
When the digital receiver is off but plugged into a wall
socket, we say that it is in standby mode; on the other hand,
when it is on, it is in active mode. Even when you are not
using the digital receiver, you should keep it plugged into
a wall socket to be in standby mode so that it can run timer
events at any time.
1.2.1 Front panel
The front panel of the digital receiver has buttons to control
the digital receiver, specific lights and a display to indicate its
status. The following indicates what they mean.
button switches the digital receiver between standby mode
and active mode.
Front display shows the current time in standby mode, and
displays the current service in active mode.
STANDBY lightlights up while the digital receiveris in standby
mode.
Page 7

1.2 Controlling the digital receiver 3
lightblinks every time you press a button on the remote
control.
CHANNELc,
a
buttons switch to the previous or next ser-
vice.
You have to insert your subscription
card into the front slot to watch pay
services. When you insert the subscription card, the side on which the chip is
mounted must face downward.
Page 8

4 Introduction
1.2.2 Remote control
.
.
.
1
button switches the digital receiver between standby
mode and active mode.
.
.
.
2
INPUT selects an input to your
television.
.
.
.
3
TV switches the remote control
to television mode to operate
your television.
.
.
.
4
VCR switches the remote con-
trol to VCR mode to operate
your video recorder.
.
.
.
5
DVD switches the remote con-
trol to DVD mode to operate
your DVD player.
.
.
.
6
STB switches the remote con-
trol to receiver mode to operate
the digital receiver.
.
.
.
7
Numeric buttons are used to
enter a service number for service change or to specify values
for menu options.
.
.
.
8
switches over between the
current service and the previously viewed one.
.
.
.
9
FAV displays the favourite lists.
.
.
.
10
mutes the sound. Press again to switch it back on.
.
.
.
11
switches over between television services and radio
services.
.
.
.
12
, buttons decrease or increase the volume.
.
.
.
13
, buttons switch to the previous or next service.
Page 9

1.2 Controlling the digital receiver 5
.
.
.
14
Navigation buttons are used to navigate in menus or to
change values for menu options.
.
.
.
15
OK displays the services list. See §5.2.1 for more details.
It is also used to select a menu item.
.
.
.
16
MENU displays the main menu. It is also used to return to
the previous menu from a submenu.
.
.
.
17
EXIT is used to exit a menu or to hide on-screen informa-
tion.
.
.
.
18
GUIDE displays the electronic programme guide.
.
.
.
19
UHF displays the radio frequency setting menu. See §4.2.4
for more details.
.
.
.
20
AUX is not used in this model.
.
.
.
21
displays the service information box. It is also used to
display more information about a programme.
.
.
.
22
These buttons have different functions per menu. They
will be guided by on-screen help.
.
.
.
23
is used to select an audio track and a sound mode.
.
.
.
24
is used to select a subtitle track.
.
.
.
25
displays teletext.
.
.
.
26
is used to set a sleep timer in 10 minute increments.
.
.
.
27
is not used in this model.
.
.
.
28
pauses live television.
.
.
.
29
is not used in this model.
.
.
.
30
is not used in this model.
.
.
.
31
is not used in this model.
.
.
.
32
is not used in this model.
.
.
.
33
is not used in this model.
.
.
.
34
is not used in this model.
.
.
.
35
has different functions per menu.
.
.
.
36
is not used in this model.
Page 10

6 Introduction
.
.
.
37
is not used in this model.
.
.
.
38
SAT is not used in this model.
NOTE
When using the remote control, point it at the remote sensor
on the front panel of the digital receiver.
1.3 Subscription card information
With this digital receiver, you can view pay services scrambled
with the IRDETO conditional access system. Probably you
have a subscription card. If you would like to view information
in detail about your subscription card, select the Conditional
Access menu. There you can also check the messages from
the broadcasting operator.
Page 11

7
Chapter 2
Setup
2.1 Unpacking
Before going any further, check that you have received the following items with the digital receiver.
• Remote control unit
• Two batteries for the remote control (AAA 1.5 V)
• A copy of this user guide
NOTE
Accessories may vary according to your local area.
2.2 Safety precautions
Please read carefully the following safety precautions.
• The mains voltage must range between 90 and 250 volts.
Check it before plugging the digital receiver to the wall
socket. For the power consumption of the digital receiver, refer to Table 2.1.
• The wall socket should be near the equipment. Do not
run an extension lead to the unit.
Page 12

8 Setup
• The mains plug shall remain readily operable so that it
can be removed easily to disconnect the power.
• The digital receiver shall not be exposed to dripping or
splashing water, and no objects filled with liquids, such
as vases, shall be placed on it.
• Do not expose the digital receiver to any moisture. The
digital receiver is designed for indoor use only. Use dry
cloth to clean the digital receiver.
• Place the digital receiver on a firm and level surface.
• Do not place the digital receiver close to heat emitting
units or in direct sunlight, as this will impair cooling.
Do not lay any objects such as magazines on the digital receiver. When placed in a cabinet, make sure there
is a minimum space of 10 centimetres around it. For the
physical specification of the digital receiver, refer to Table 2.2.
• Protect the power cord from being walked on or pinched.
If the cord is damaged, do not use the digital receiver and
get the cord replaced.
• Never open the digital receiver casing under any circumstances, or the warranty will be void.
• Refer all servicing to a qualified service technician.
Table 2.1: Power specification
Input voltage 90 to 250 V AC, 50/60Hz
Power consumption 19 W at maximum in active
8 W in standby
Table 2.2: Physical specifications
Size 215× 46× 155 mm
Weight 1.2 kg
Operating temperature 0 to 45◦C
Storage relative humidity 5 to 90 %
Page 13

2.3 Rear panel connections 9
2.3 Rear panel connections
The CBC-5150 has the following connections on the back:
.
.
.
1
CABLE IN Cable broadcasting signal input socket
.
.
.
2
CABLE OUT Cable broadcasting signal output socket
through the CABLE IN socket for another
digital receiver
.
.
.
3
VIDEO Composite video output socket for the tele-
vision set (yellow)
.
.
.
4
AUDIO L/R Stereo audio output socket for the televi-
sion set or the audio-video receiver (white/red)
.
.
.
5
RF IN Analogue television input socket
.
.
.
6
RF OUT Analogue television output socket
Table 2.3: Connectors specifications
VIDEO Composite video (CVBS) output
AUDIO Left & right audio output
RF OUT NTSC, PAL
Page 14
10 Setup
2.4 Connecting up your digital receiver
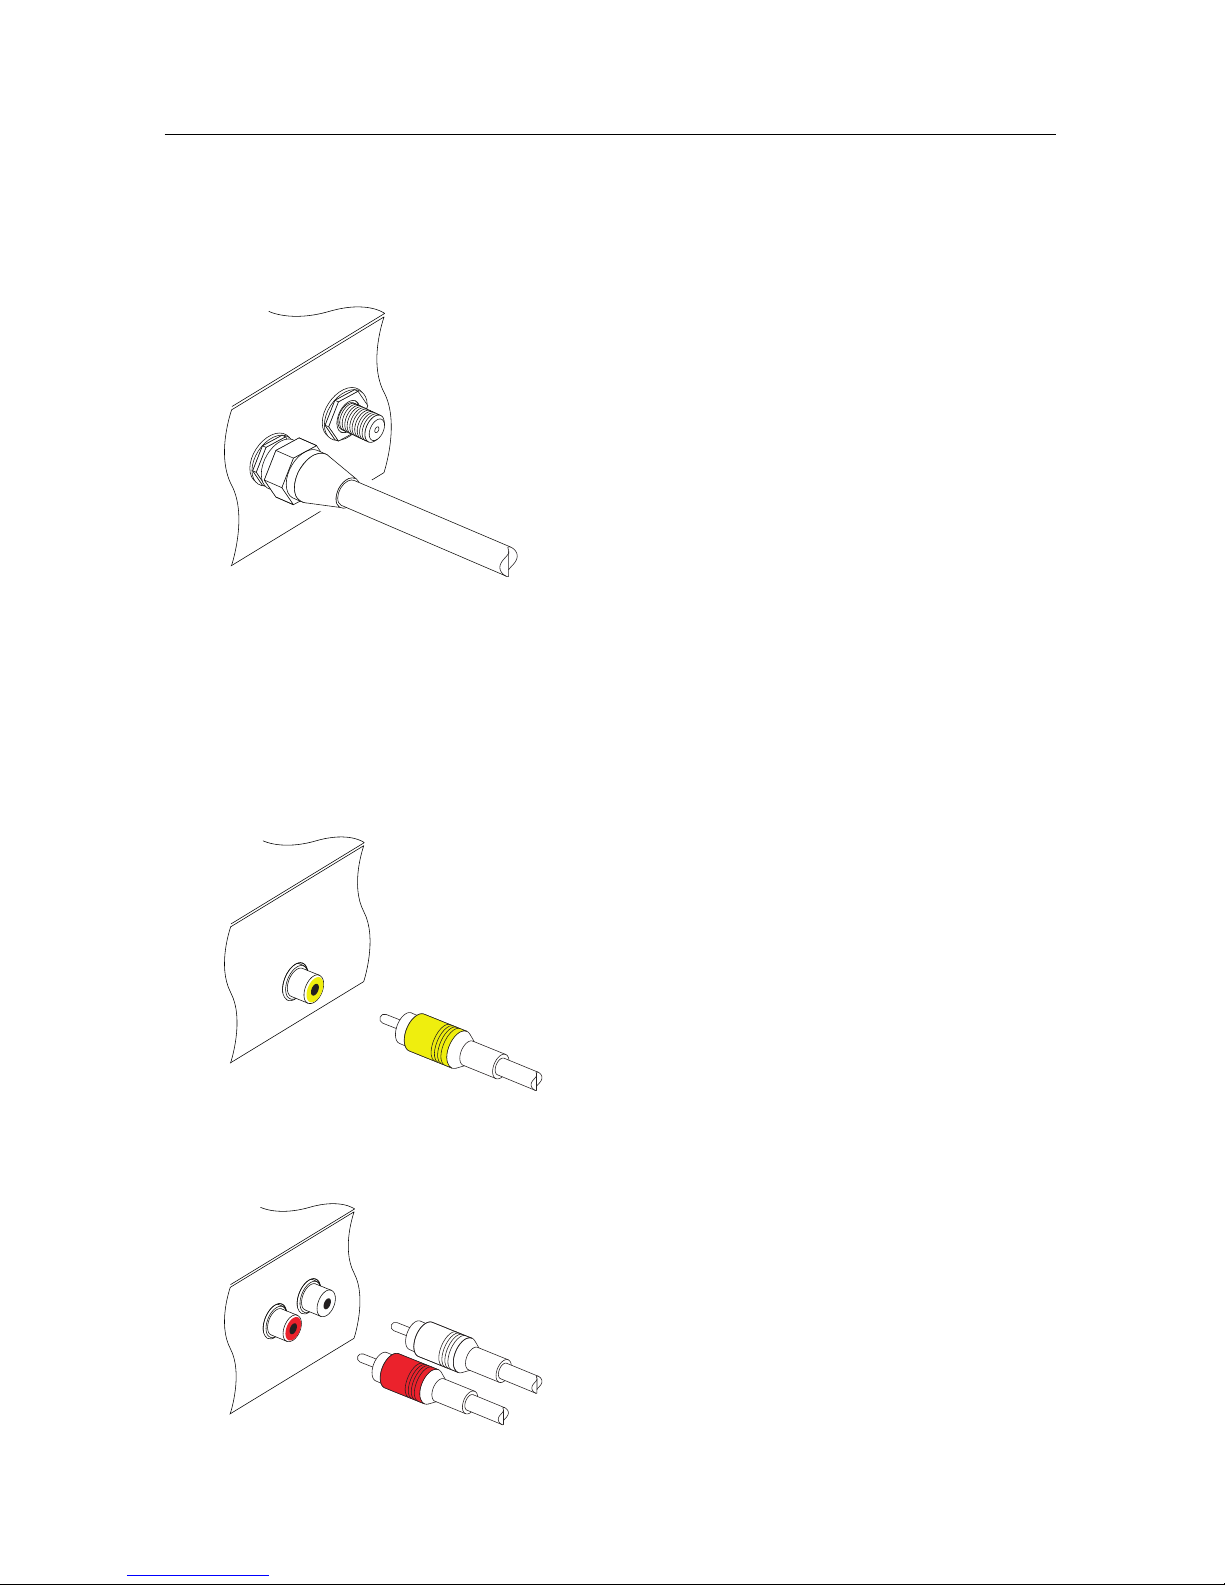
2.4.1 Connecting to the broadcasting cable
Whatever sort of connection you have between
the digital receiver and the television, you need
to connect the digital receiver to the broadcasting cable so that it can receive digital television
broadcasts. Connect the broadcasting cable to
the CABLE IN connector. If you have another
digital receiver, you may link it from the CA-
BLE OUT connector.
2.4.2 Connecting to your television set
You should configure audio and video settings after connecting up the digital receiver. See §4.2 for a detailed description.
To use the Composite video output
You need to obtain a Composite video cable
(RCA cable) to use the Composite video output. Plug one end of the cable into the VIDEO
(yellow) socket on the digital receiver, and
plug the other end into the matching socket
on your television.
To make the audio connection
You need to obtain an audio cable (RCA
cable) to link the audio connectors. Plug
one ends of the cable into the AUDIO L
(white) and AUDIO R (red) sockets on the
digital receiver, and plug the other ends into
the matching sockets on your television or
audio-video receiver.
Page 15

2.5 Switching on for the first time 11
To use the RF output
If your television does not have any video and audio input, you will need to use the radio frequency output
from the digital receiver.
In this case, you will need to connect a cable from the RF OUT socket to the antenna
connector on your television. To ensure your
television can also pick up existing analogue
channels as well, you will need to connect a
cable from your television antenna to the RF
IN connector.
Tune your television set to channel 4 so that
you can see the output from the digital receiver.
2.5 Switching on for the first time
Now that you have your digital receiver connected, you should
plug it into a wall socket. Ensure that your television set is
turned on and on the correct video channel so that you will be
able to see the display from the digital receiver.
Before switching on the digital receiver, you should insert batteries into the remote control. Open the battery compartment
by removing the lid, and then insert the batteries observing the
polarity, which is marked on the base of the battery compartment.
Press the button on the top left corner on the remote control. In a little time, you may see a picture displaying a menu.
If the picture is good, you can skip to §3.1 to search for available
television and radio services.
CAUTION
If the digital receiver no longer reacts properly to the remote
control commands, the batteries may be flat. Be sure to re-
Page 16

12 Setup
place only with 1.5 V AAA size batteries, and observe the
following precautions.
• Do not mix different types of batteries, or new and old
batteries.
• Do not use rechargeable batteries.
• Do not recharge the old batteries.
• In order to avoid any risk of explosion, observe the polarities indicated inside the battery compartment.
• Do not subject to excessive heat such as the sun and
fire.
• If you are not using the remote control for a long period of time, remove the batteries. The manufacturer
accepts no liability for the damage resulting from leaking batteries.
• Batteries, including those which contain no heavy
metals, may not be disposed with other household
wastes. Please dispose of used batteries in an environmentally sound manner. Find out the legal regulations
which apply in your area.
Page 17

13
Chapter 3
Service Search
After connecting up the digital receiver, you will need to perform a service search.
NOTE
If there is no service stored, you will be not able to access all
menus. A is another name for a .
3.1 Searching for broadcasting services
To perform service search, select the Installation > Service
Search menu. You should see a
screen like the left figure.
Page 18

14 Service Search
You should set the Search Mode option to Auto at the first
service search after installing the digital receiver. The digital
receiver will search all available services with the automatic
search mode within the frequency range from the frequency
of the Start Frequency option to the frequency of the End Fre-
quency option. Symbol Rate stands for data transfer rate, and
QAM is a form of modulation used in digital broadcasting.
Broadcasting operators send their services in a symbol rate by
a modulation method. Perhaps you do not have to specify the
Symbol Rate and QAM Mode options since they are seldom
changed. However, you should set the QAM Mode option to
Auto for more certainty. You can specify the Start Frequency,
End Frequency and Symbol Rate options with the numeric
buttons if you want to change them.
If the digital receiver has failed to find every service you want
in a service search, you should set the Search Mode option to
Network. With this option, the digital receiver will check up
the up-to-date channel information as searching services, but
it takes rather longer time.
To search only one frequency, set the Search Mode option to
Manual and specify your desired frequency at the Frequency
option with the numeric buttons. In this case, you had better
set the Network Search option to On.
To start service search, move down to the Start Search item,
and press the
OK button. The digital receiver will start to
search for services and display a list of television and radio
services as they are found. It is common for no channels to be
found until quite late in the process. When the scan is complete, you will see a message telling you how many services
have been found. Press the
OK button to save the list.
3.2 Resetting to factory settings
The digital receiver maintains the following data:
• Services list
Page 19

3.2 Resetting to factory settings 15
• Favourite list
• Timer list
• Preference settings
You can reset all data of the digital receiver. Select the Installa-
tion > Factory Setting menu, and then you get asked for confirmation. With the choice of Yes, the services list, favourite list
and timer list will all be cleared, and preference options will
be reset to the manufacturer’s factory settings.
Page 20

16 Preference Settings
Chapter 4
Preference Settings
4.1 Language settings
You can select the language in
which the menu will be displayed. In addition to that, you
can select the language of audio
track and of subtitle track. Select
the System Setting > Language
Setting menu. You should see a
screen like the left figure.
4.1.1 Menu language
The digital receiver provides menus in several different languages. Set the Menu Language option to your desired language. Once you select a language, the menu will be immediately displayed in the selected language.
Page 21

4.2 Video and audio settings 17
4.1.2 Subtitle language
Set the Subtitle Language option to your desired language.
When you watch a programme, the subtitle track of the selected language will be displayed if available.
Apart from this setting, you can select a subtitle track with the
button. See §5.2.5 for a detailed description.
4.1.3 Audio language
Set the Audio Language option to your desired language.
When you watch a programme, the audio track of the selected
language will be output if available.
Apart from this setting, you can select an audio track with the
button. See §5.2.4 for a detailed description.
4.2 Video and audio settings
You have to configure the video and
audio settings appropriately for your
television set and other devices. Select the System Setting > A/V Out-
put Setting menu. You should see a
screen like the left figure.
4.2.1 Television standard
The digital receiver supports two television standards. One
is PAL standard, and the other is NTSC standard. PAL was
adopted in European countries while NTSC is adopted in USA,
Canada, Mexico and so forth. Refer to Table 4.1 for the television standard of your local area.
Page 22

18 Preference Settings
If you have a PAL television, you have to set the TV Type option
to PAL. In this case, if you switch to a service of the NTSC standard, though it is unlikely to happen, the digital receiver will
display the pictures converted into the PAL standard. However, it is inevitable to lose a little picture quality. Likewise,
the contrary case brings about the same result.
The best thing is to watch PAL services with a PAL television
and to watch NTSC services with a NTSC television. However,
a multi television set is able to process both of them. So if you
have a multi television set, you should set the TV Type option
to Multi. Then the digital receiver will present pictures without
standard conversion.
4.2.2 Television aspect ratio
If you have a wide-screen television, set the TV Aspect Ratio
option to 16:9.
You can enjoy both wide-screen programmes and normalscreen programmes with your wide-screen television as the
above figures show. To watch normal-screen programmes
in full screen like the left figure, set the Display Format option
to Full. Normal-screen pictures then will be inflated to fit to
the width of the wide screen. Otherwise, to watch them in the
original ratio like the right figure, set it to Center. If you have
a normal-screen television, set the TV Aspect Ratio option to
4:3.
Page 23

4.2 Video and audio settings 19
You cannot fully enjoy wide-screen programmes with your
normal-screen television as the above figures show. The left
figure shows a normal picture displayed in the normal screen.
To watch wide-screen programmes in the shape like the centre figure, set the Display Format option to Letter Box. Widescreen pictures then will be reduced to fit to the width of the
normal screen. Otherwise, to watch them in the shape like the
right figure, set it to Center extract. Then wide-screen pictures
will be cut out on the left and right sides equally to fit to the
width of the normal screen.
4.2.3 Audio mode
Basically, there are two audio sources as you can find two audio
sockets on the back panel of the digital receiver. You can enjoy
only one source or both of them in either stereo or mono. Set
the Sound Mode option as you desire.
Apart from this setting, you can change the sound mode with
the button. See §5.2.4 for a detailed description.
4.2.4 Radio frequency output
If you have connected your television to the RF OUT socket of
the digital receiver, you should configure the radio frequency
output. The digital receiver can make analogue television from
digital television and output it via the RF OUT socket.
Table 4.1: Television standards by country
Page 24

20 Preference Settings
Signal type Country
PAL G Australia, Austria, Cyprus, Czech Republic, Egypt, Estonia, Finland, Ger-
many, Greece, Iceland, Iran, Israel, Italy, Kuwait, Latvia, Libya, Lithuania, Luxembourg, Netherlands, New Zealand, Norway, Portugal, Slovakia,
Slovenia, Spain, Sweden, Switzerland, Syria, Yugoslavia
PAL I Hong Kong, Macao, Republic of Ireland, South Africa, United Kingdom
PAL K Czech Republic, Hungary, Poland
NTSC M Bahamas, Belgium, Bolivia, Chile, Ecuador, Fiji, Guam, Jamaica, Mexico,
Panama, Peru, United States, Venezuela
Set the RF Channel option to your desired channel number.
Then you have to retune your television set to the new channel
number.
4.3 Local time setting
You should set your local time for timer events.
Select the System Setting > Time
Setting menu. You should see a
screen like the left figure. You can
set the clock manually or use the
time signal, Greenwich Mean Time
(GMT), carried as part of the digital
television broadcast. To use Greenwich Mean Time, take the following
steps:
1 Set the Mode option to Auto, then the Time Offset option be-
comes enabled.
2 Set the Time Offset option to the time difference between
your time zone and GMT referring to Table 4.2.
3 Make sure that your local time is correctly displayed on the
Local Time item.
To set the local time manually, set the Mode option to Man-
ual and enter your local time to the Local Time option with
the numeric buttons. The time format is day/month/year 24-
Page 25

4.4 Parental control 21
hour:minute. To change the time format to 12-hour format, set
the Time Format option to 12-hour.
Table 4.2: Time offset table
Time offset City
GMT − 12:00 Eniwetok, Kwajalein
GMT − 11:00 Midway Island, Samoa
GMT − 10:00 Hawaii
GMT − 09:00 Alaska
GMT − 08:00 Pacific Time US, Canada
GMT − 07:00 Mountain Time US, Canada
GMT − 06:00 Central Time US, Canada, Mexico City
GMT − 05:00 Eastern Time US, Canada, Bogota, Lima
GMT − 04:00 Atlantic Time Canada, La Paz
GMT − 03:30 Newfoundland
GMT − 03:00 Brazil, Georgetown, Buenos Aries
GMT − 02:00 Mid-Atlantic
GMT − 01:00 Azores, Cape Verde Islands
GMT London, Lisbon, Casablanca
GMT + 1:00 Paris, Brussels, Copenhagen, Madrid
GMT + 2:00 South Africa, Kaliningrad
GMT + 3:00 Baghdad, Riyadh, Moscow, St. Petersburg
GMT + 3:30 Tehran
GMT + 4:00 Abu Dhabi, Muscat, Baku, Tbilisi
GMT + 4:30 Kabul
GMT + 5:00 Ekaterinburg, Islamabad, Karachi, Tashkent
GMT + 5:30 Bombay, Calcutta, Madras, New Delhi
GMT + 6:00 Almaty, Dhaka, Colombo
GMT + 7:00 Bangkok, Hanoi, Jakarta
GMT + 8:00 Beijing, Perth, Singapore, Hong Kong
GMT + 9:00 Tokyo, Seoul, Osaka, Sapporo, Yakutsk
GMT + 9:30 Adelaide, Darwin
GMT + 10:00 Eastern Australia, Guam, Vladivostok
GMT + 11:00 Magadan, Solomon Islands, New Caledonia
GMT + 12:00 Fiji, Auckland, Wellington, Kamchatka
4.4 Parental control
In general, television programmes are classified according to
the level of violence, nudity and language of their content.
When you are watching a programme, you can check its
programme classification on the information box. For the
information box, see §5.2.3. You can prevent your children
Page 26

22 Preference Settings
from watching specific programmes by specifying a
maximum permissible level.
Select the System Setting >
Parental Control menu. You
should see a screen like the
left figure, and you will be
asked your Personal Identification Number (PIN). The number
is initially set to ‘0000’ as default.
If you wish to block programmes for viewers aged 15 or
above, set the Censorship option to 15 (age). Setting it to No
block blocks no programme; on the other hand, setting it to
Total block blocks every programme.
NOTE
If a programme has no rating information, your censorship
setting will not take effect.
If anyone is trying to watch a programme that is of or above
the censorship setting, the person has to enter the personal
identification number to override. To change the number,
select the Change PIN Code menu, then a box pops up,
asking a new PIN. Enter a desired number twice for
confirmation.
You can also restrict uses of some menus. Selecting the
Access Control menu displays a list of menus that you can
lock. If the Time Setting item is set to Locked, you have to
enter the PIN when accessing the Time Setting menu. If you
enter a wrong number, you cannot use the menu. To release a
locked item, set it to Unlocked.
Page 27

4.5 Adjusting the On-Screen Display 23
4.5 Adjusting the On-Screen Display
You can adjust the transparency level of the On-Screen
Display (OSD). Select the System Setting menu and set the
OSD Transparency option as you desire. Its available range is
0 to 50 percent.
You can adjust the display time of the information box. For
the information box, see §5.2.3. To adjust its display time,
select the System Setting menu and set the Info Box Display
Time option as you desire. Its available range is 1 to 30
seconds. If you set this option to No Info Box, the information
box will not be displayed when you switch services.
However, pressing the button will display the
information box. If you set this option to Never Hide, the
information box will always be displayed.
In addition, you can raise or lower the position of the
information box. Select the System Setting menu and set the
Info Box Position option as you desire. Its available range is
−10 to +3 lines. The higher you set the option, the lower the
information box will be positioned.
Page 28

24 Every Day Use
Chapter 5
Every Day Use
5.1 Volume control
Use the and buttons to alter the volume to a comfortable
level. You may need to adjust the volume on your television
set too. To temporarily switch off the sound, press the
button. Press it again to restore the sound to previous level.
5.2 Watching television
To change services, press the or button. Pressing the
button switches to the previously viewed service. In
addition, you can switch to your desired service by entering
its service number with the numeric buttons. You can also
select a service to watch in the services list.
5.2.1 The services list
To view the services list, press the
OK button.
Page 29

5.2 Watching television 25
On the services list, you can see
the service information as follows:
• Service number and name
• Multiplex information
A dollar sign ($) may be marked on some entries, indicating
pay service. To watch pay services, you need a subscription
card.
To select a desired service, put the highlight bar on its entry
with theaorcbutton and press the
OK button, then the
selected service will be presented.
Pressing thebordbutton skips over 10 entries up or down.
Entering a service number with the numeric buttons puts the
highlight bar on its entry.
You can switch between the television services list and the
radio services list by pressing the button.
Pressing the
x (yellow) button performs an alphabetic
browse. For instance, when the highlight bar is on an entry of
which initial is B, pressing the
x (yellow) button puts the
highlight bar on the first entry of which initial is C. To sort the
services list by service name, press the
x (green) button.
Pressing this button once more makes it sorted by service
number.
Pressing the
x (blue) button displays additional options,
with which you can do the following:
• By setting the Show Provider option to On, you can
view service entries by groups of broadcasters.
• To change the name of the highlighted service, select
the Rename option, then the on-screen keyboard
Page 30

26 Every Day Use
appears, with which you can enter a new name. See
§6.3 as to how to use the on-screen keyboard.
• You can prevent other family members from watching
the highlighted service by setting the Lock option to
Locked. You have to enter your personal identification
number to watch or unlock it.
• To add the highlighted service into a favourite group,
select the Add to Fav option, then the favourite groups
will be displayed. Put the highlight bar on a desired
group and press the
OK button.
• You can additionally sort the services list with the
Sorting option as follows:
Default by service number
Alphabetic by service name
FTA–CAS from free services to pay services
CAS–FTA from pay services to free services
Fav–NoFav from favourite services to unfavourite
services.
• To delete the highlighted service, select the Delete
option, then you get asked for confirmation. With the
choice of Yes, it will be deleted. If you want to restore it
as before, you have to perform service search again.
See §6.1 as to how to edit the services list.
5.2.2 The favourite service lists
You can select a service to watch on a favourite list as well as
on the services list.
Page 31

5.2 Watching television 27
To display the favourite lists,
press the
FAV button. You
should see a screen like the left
figure. As you move the highlight bar up or down on the
favourite group list at the left
box, favourite services belonging to the highlighted group are
listed on the right box.
As to how to edit the favourite lists, refer to §6.2.
To select a favourite service, put the hightlight bar on a
desired group and press thedbutton; a highlight bar
appears on its favourite services list. Once you select a
desired service with the
OK button, it will be presented.
Otherwise, to select other group, press thebbutton.
After you have selected a favourite service, if you then switch
to another service using theaorcbutton, it will be also
another favourite service of the selected group. The digital
receiver will remind you what group you have selected by
displaying its name at the top right of the screen whenever
you switch services. If you wish to get out of the current
group, select the All services group on the favourite group
list.
5.2.3 Viewing programme information
Pressing the button displays the information box, on
which you can see all of the following:
Page 32

28 Every Day Use
• Service number and name
• Transponder information
• Signal level and quality
• Programme name
• Programme classification sign
• Programme summary
• Broadcasting time
• Current time
In addition, you might see the following symbols:
• Subtitle symbol ( ) if subtitle tracks are provided on
the current programme.
• Teletext symbol ( ) if teletext pages are provided on
the current service.
• Lock symbol ( ) if the current service is locked.
• Dollar symbol ($) if the current service is a pay service.
If the electronic programme guide is provided on the current
service, you can see the information about the current and
next programmes with thebordbutton. To adjust the
sound volume at this time, hold down thebordbutton
until the sound bar appears and reaches your desired level.
Pressing the button once more displays detailed
information about the current programme. To hide the
information box, press the
EXIT button.
5.2.4 Selecting audio tracks
Some programmes are provided with audio tracks in one or
more languages. Pressing the button displays available
audio tracks. Once you select an audio track, that track will
be heard. In addition, you can enjoy audio tracks in four
sound modes: Stereo, Mono, Left or Right.
Page 33

5.3 Viewing electronic programme guide 29
5.2.5 Selecting subtitle tracks
Some programmes are provided with subtitle tracks in one or
more languages. If the current programme provides subtitle
tracks, the subtitle symbol ( ) will be marked on the
information box. Pressing the button displays available
subtitle tracks. Once you select a subtitle track, it will be
displayed.
5.2.6 Viewing teletext
On some services, such information as weather reports, news
or stock quotations is provided by means of teletext. If the
current service provides teletext, the teletext symbol ( ) will
be displayed on the information box. Press the button to
view teletext pages.
Select a page to view by entering its page number with the
numeric buttons. You can zoom into a teletext page with the
x (yellow) button, and adjust its transparency level with the
x (blue) button. To clear the teletext screen, press the
EXIT
button.
5.3 Viewing electronic programme guide
The Electronic Programme Guide (EPG) shows the current
and scheduled programmes that are or will be available on
each service with a short summary for each programme.
Page 34

30 Every Day Use
Pressing the
GUIDE button dis-
plays the electronic programme
guide, on which you can see the
following:
• Scheduled programmes
• programme summary
• Broadcasting date
• Broadcasting time
To see detailed information of a desired programme, put the
highlight bar on the programme with thecorabutton and
press the button. To switch to another service, press the
bord
button.
You can travel over previous days with the
x (green) button,
and can travel over next days with the
x (yellow) button.
To see the programme guide for radio broadcasts, press the
button. To switch it back, press the button again.
Pressing the
x (red) button will rearrange the form,
swapping the columns and rows. To switch it back, press the
x (red) button again.
You can make a timer event on the electronic programme
guide as follows:
1 Select a service you want.
2 Press the
GUIDE button to display its programme guide.
3 Select a programme you want with the
OK button, then P
is marked up on the entry. At the same time, a timer event
with the selected programme will be made in the timer list.
Refer to §5.4 for the timer list.
4 To remove the marking, press the
OK button once again.
Page 35

5.4 Making timer events 31
5.4 Making timer events
You can make your desired service to be presented at a
specific time. Even if the digital receiver is in standby mode,
it will switch into active mode at a specified time. And it will
switch back into standby mode again after the specified
duration.
Select the Timer Setting menu,
then the timer list will be displayed. To add a new timer
event, press the
x (red) but-
ton, then an option box pops up.
Take the following steps:
1 If you want a radio programme, set the Type option to
Radio; otherwise, set it to TV.
2 Set the Service option to the service that provides the
programme you want. Pressing the
OK button on this
option makes a services list pop up, in which you can select
your desired service.
3 There are five timer modes:
One Time means literally ‘one time.’
Every Day means literally ‘every day.’
Every Weekend means ‘Saturday and Sunday every week.’
Weekly means ‘one day every week.’
Every Weekday means ‘from Monday to Friday every
week.’
If your favourite programme is on the air at weekends and
you wish to watch every episode of the programme, set the
Mode option to Every Weekend.
Page 36

32 Every Day Use
4 Set the Date option to a desired date, on which the digital
receiver will turn on. The date format is
day/month/year—day of the week.
Set the Start Time option to a desired time, at which the
digital receiver will turn on. The time format is hour:minute.
5 Set the Duration option to a desired time, in which the
digital receiver will turn off.
6 To save with the above settings, select the OK item
You can also edit or delete timer events in the timer list. To
edit a timer entry, put the highlight bar on the entry you want
and press
OK button, then pops up the option box in which
you can change its settings in the same manner as making a
new one.
To delete a timer event, put the highlight bar on the entry you
want to remove and press the
x (green) button, then you get
asked for confirmation. With the choice of Yes, it will be
deleted.
If you’ve made timer events from the electronic programme
guide, they will be also displayed in the timer list. In that
case, you can edit or delete them in the same manner
described above.
NOTE
Do not operate the digital receiver while it is working on a
timer event. If you press any key on the remote control or
on the front panel, it will not turn off automatically even
after the timer event is complete.
Page 37

33
Chapter 6
Organising Services
6.1 Editing the services list
You would have got the services list after service search. You
can rename, move, lock or delete service entries on the
services list.
Select the Organizing Svc/Fav >
Organizing Services menu. You
should see a screen like the left
figure. There are editing options
on the left column and service
entries on the right column.
Once you put the highlight bar on a desired option on the left
column and press the
OK button, you can select a desired
service to edit on the right column. To go over to the other
column, press the
x (red) button.
To edit the radio services list, press the button, then radio
Page 38

34 Organising Services
service entries will be listed on the right column. To switch
back to the television services list, press it again.
To change the name of a service, select the Rename and select
a desired service; then the on-screen keyboard appears. See
§6.3 as to how to use the on-screen keyboard.
Unlike analogue broadcasts, each service does not have a
proper service number in digital broadcasts. Service numbers
are just assigned to services in the order that they were found
in service search. So you can reassign a service number by
moving a service entry. To move a service entry, select the
Move option and select a desired service; then the selected
service becomes darker. As you move it up or down, it gets
renumbered according to the position. Press the
OK button
to fix it.
You can lock some services to prevent your children from
watching them. To lock a service, select the Lock option and
select a desired service; then the selected service gets marked
with a lock symbol ( ) on it. If anyone tries to watch a locked
service, the person has to enter the personal identification
number that is set to the Change PIN Code option. See §4.4
for this option. Pressing the
OK button on a locked service
entry turns it back to be unlocked.
You can make some services hidden on the services list. To
hide a service entry, select the Skip option and select a
desired service entry; then the check symbol will be marked
on the selected service. To make a hidden service shown,
press the
OK button on it.
To delete a service, select the Delete option and select a
desired service with the
OK button, and then press the
EXIT
button; you get asked for confirmation. If you select Yes, the
selected service will be deleted. If you want to undo the
deleted service, there is nothing you can do but perform a
service search again.
Once you select the Sort option on the left column, sorting
options are displayed as follows:
Page 39

6.2 Editing the favourite lists 35
Default by service number
Alphabetic by service name
FTA–CAS from free services to pay services
CAS–FTA from pay services to free services
Fav–NoFav from favourite services to unfavourite services
6.2 Editing the favourite lists
You can make your own favourite service lists. In fact, you
can define multiple favourite service lists, each being a
‘group’ of chosen services.
Select the Organizing Svc/Fav >
Organizing Favorites menu. You
should see a screen like the left
figure. There are three columns:
• Group list (left)
• Favourites list (centre)
• Services list (right)
The services list contains all available services, whereas the
favourites list contains only chosen services that have been
added to the highlighted group. As you move the highlight
bar up or down on the group list, favourite services belonging
to the highlighted group get shown in the favourites list.
You can add up to 30 groups. To add a new group, select the
NEW item in the group list, then the on-screen keyboard
appears. See §6.3 as to how to use the on-screen keyboard.
To rename a group, put the highlight bar on the group entry
you want and press the
x (green) button, then the on-screen
keyboard likewise appears.
To delete a group, put the highlight bar on the group entry
you want and press the
x (yellow) button, then a message
Page 40

36 Organising Services
box appears, asking you for confirmation. With the choice of
Yes, it will be deleted.
You can add a favourite service to a group by taking the
following steps:
1 Put the highlight bar on a desired group entry in the group
list and press the
OK button to select it. The highlight bar
then moves to the services list.
2 To add a service to the selected group, put the highlight bar
on a desired service entry and press the
OK button. The
selected service entry gets added to the favourite list.
Repeat this step to add more entries.
3 Press the
x (red) button, and the highlight bar gets moved
to the favourite list. You can delete a favourite entry with
the
OK button.
4 To select another group, press the
x (red) button again,
then the highlight bar gets moved to each column.
Furthermore, you can rearrange a group’s favourites by
moving a favourite entry. To move a favourite entry, put the
highlight bar on the favourite entry you want and press the
x (green) button. Move it to a desired place and press the
OK button.
To add radio services, press the button, then radio service
entries get listed in the services list. To recall the television
services list after adding radio services, press the button
again.
As to how to use the favourite service lists you organised,
refer to §5.2.2.
Page 41

6.3 How to use on-screen keyboard 37
6.3 How to use on-screen keyboard
You can move the highlight key
horizontally with the
b
and
d
buttons and vertically with the
a
and
c
buttons. Pressing the
OK button on a key enters its let-
ter in the input line. To type a
space, select the Space key. To
type lower case letters or numerals, select the Other key.
To delete a letter, put the cursor to the right of the desired
letter on the input line and then select the Del key. You must
select the Save key to store the name; otherwise if you press
the
EXIT button, the name will not be stored.
Page 42

38 Firmware Update
Chapter 7
Firmware Update
It is possible to update the firmware to the latest version over
the air. If a new version is available at any time, then a
message box pops up, asking you whether to start firmware
update. With the choice of Yes, you will be moved to the
System Software Upgrade menu, and the firmware update
will be started.
Page 43

39
Appendix A
Universal Remote Control
The universal remote control allows you to operate the most
important functions such as power on/off and volume
control on your television, video recorder, or DVD player. To
be able to control the device, you must adapt the remote
control to the device first.
Take the following steps:
1 Turn on the device you want to operate.
2 Point the remote control at the remote sensor on the device.
3 Hold down the device button you want to control until its
light flashes on.
4 Find the manufacturer of the device from the codes list.
5 Enter the three-digits code you have found for your device
and press the
OK button, then the light blinks three times.
6 If you get no response to the remote control from the
device, repeat from the step 2.
If you cannot find a code for your device, do as follows:
1 Turn on the device you want to operate.
2 Point the remote control at the remote sensor on the device.
3 Hold down the device button you want to control until its
light flashes on.
Page 44

40 Universal Remote Control
4 Press theabutton until the device turns off.
5 Press the
OK button to save it, then the light blinks three
times.
Page 45

A.1 TV 41
A.1 TV
.
.
.
A
A MARK 000
ABEX 130 212
ADMIRAL 013 131 166 230 268
ADPECT 124
ADVENT 308
ADVENTURA 195
AIKO 009 248
AIWA 213 228 245 265
AKAI 014 198 292 341
ALLERON 056 282
AMARK 268
AMTRON 030
ANAM NATIONAL 015 030 205 311 322
AOC 016 017 187 204 018 019
051 140 141 169
APEX 181 215 229 291
ARCHER 268
AUDIOVOX 030
AXION 241 344
.
.
.
B
BELCOR 016 051
BELL & HOWELL 013 042 058 166 266 347
BENQ 283 284 315
BRADFORD 030
BROKSONIC 016 032 168 182 200 278
309 344
BROKWOOD 016 051
.
.
.
C
CANDLE 016 044 051 195
CAPEHART 140
CARVER 012
CELEBRITY 014 292
CELERA 181
CENTRIOS 262
CENTURION 051
CETRONIC 030
CHANGHONG 181 291
CITIZEN 009 010 016 018 030 042
044 051 086 096 139 166
168 173 210 248 264
CLAIRTONE 187
CLASSIC 030 181 291
CLP 190
CLP CLASSIC 051 188 196
COLOR VOICE 267
COLORTYME 011 016 018 051 267
CONCERTO 016 051
CONCIERGE 125
CONTEC 130 187
CONTEC/CONY 005 006 007 030
CORNEA 051
CORONADO 000
CRAIG 030
CROSLEY 012 294
CROWN 030
CTX 268
CURTIS MATHES 008 012 016 018 042 045
051 058 086 096 139 166
172 173 210 255 266 346
347
CXC 030
.
.
.
D
DAEWOO 000 001 009 016 017 018
030 051 116 139 151 167
201 204 247 248 251 257
258 267 272 312 340 341
344 346
DAYTRON 016 018 051 139
DELL 300 345
DIAMOND VISION 256 277 297
DIGISTAR 211 224 240 328 345
DIMENSIA 045 266 347
DISNEY 252
DUKANE 124 295
Page 46

42 Universal Remote Control
DUMONT 016 051 125
DURABRAND 121 168 198 239 244 264
344
DYNASTY 030
DYNATECH 016
.
.
.
E
ELECTROBAND 014 187 292
ELECTROHOME 002 003 311 014 015 016
018 051 198
ELEKTRA 166
ELITE VIDEO 242
EMERSON 000 004 005 016 018 020
021 022 023 024 025 026
027 028 029 030 031 032
033 034 035 036 037 038
039 042 051 056 058 114
139 142 143 167 168 178
188 198 205 206 207 216
231 233 245 258 263 264
269 270 278 280 281 282
325 344 346
ENVISION 016 018 051 191
.
.
.
F
FISHER 042 057 058 059 130 144
275
FUJITSU 056 242 282
FUNAI 030 056 231 245 264 282
FUTURETEC 030
.
.
.
G
GATEWAY 220 GE 003 008 015 016
018 045 051 060 061 062
078 132 147 148 149 174
188 189 235 237 266 293
307 311 337 347
GIBRALTER 016 051 125
GOLDSTAR 000 002 005 016 017 018
051 055 064 120 125 127
130 139 204 245 272
GPX 203
GRUNDY 030 056 282
GUESTVISION 349
.
.
.
H
HAIER 229 239 244 283
HALLMARK 016 018 051
HARSPER 184 185
HARVARD 030
HISENSE 229 303 314
HITACHI 000 005 006 007 016 018
051 067 068 069 100 101
102 103 104 105 106 107
108 109 119 123 124 130
143 161 166 171 179 245
261 263 271 285 295
.
.
.
I
ILO 254 334 353 354
IMA 030
INFINITY 012 294 335
INITIAL 353
INSIGNIA 168 224 231 240 244 264
317 319
INTEGRA 287
INTEQ 125
.
.
.
J
JANEIL 195
JBL 012 294
JC PENNEY 003 006 008 010 016 017
018 041 044 045 051 055
060 061 064 078 086 095
096 117 130 132 139 189
204 210 235 237 266 269
293 347
JCB 292
JENSEN 016 018 051 319
JVC 005 006 007 046 047 048
061 068 128 129 130 133
158 178 218 242 271 285
342
.
.
.
K
KAWASHO 014 016 018 051 292
Page 47

A.1 TV 43
KAYPANI 140
KEC 000 030
KENWOOD 002 016 018 051
KLH 181
KLOSS NOVABEAM 030 049 065 195
KMC 000
KONKA 030 217 222 234 279 317
352
KTV 030 066 139 142 187 280
KURAZAI 166
.
.
.
L
LASONIC 256 277
LG 017 051 063 125 130 204
245 272
LIQUIDVIDEO 241 253 344
LODGENET 166 266 305 347
LOEWE 289 294
LOGIK 013 166 266 347
LUCE 208
LUXMAN 016 018 051
LXI 008 012 018 040 041 042
045 051 058 086 132 237
245 266 294 347
.
.
.
M
MAGNASONIC 282
MAGNAVOX 000 002 010 012 016 018
043 044 046 049 050 051
065 079 110 111 112 230
231 285 294 335 349
MAJESTIC 013 166 266 347
MARANTZ 012 016 018 051 067 287
294
MEDION 252 254 324
MEGATRON 018 051 067 124
MEI 187
MEMOREX 013 017 018 042 051 056
058 166 168 200 266 278
282 347
MGA 002 003 016 017 018 051
052 053 059 130 204 275
282 285
MIDLAND 008 125 130 189 237 347
MIKEI 030
MINUTZ 293
MITSUBISHI 002 003 016 017 018 051
052 053 054 059 115 198
204 275 282 285 286
MONIVISION 219
MONTGOMERY WARD 013 166 266 347
MOTEVA 042
MOTOROLA 015 131 268 311
MTC 016 017 210 018 051 086
096 187 204
MULTITECH 030
MULTIVISION 076
MYRON & DAVIS 306
.
.
.
N
NAD 018 040 041 051 086 134
171 212
NEC 011 015 267 285 016 287
017 311 018 051 075 204
NET TV 194 220
NEXXTECH 240 333
NIKKO 009 018 051 248
NORCENT 221 229 312
NTC 248
.
.
.
O
OLEVIA 051
ONCOMMAND 349
ONKING 030
ONWA 030
OPTIMUS 134 138 171 199 212 290
OPTOMA 327
OPTONICA 075 131 268
ORION 032 125 168 206
.
.
.
P
PANASONIC 015 061 246 290 066 294
138 311 152 175 189 199
Page 48

44 Universal Remote Control
PHILCO 000 002 005 010 012 015
016 017 018 043 044 046
049 050 051 065 204 285
294 311 349
PHILIPS 000 002 044 046 079 196
285 294 005 049 214 311
010 051 231 335 012 065
235 338 015 070 243 344
016 077 264 345 043 078
276 349
PHILIPS-MAGNAVOX 230 243 294 335 338 349
PILOT 016 051
PIONEER 016 018 051 071 072 134
143 171 212 263 273 287
295
PIVA 326
POLAROID 303 319 321
PORTLAND 000 009 016 017 018 051
139 204 248 251 346
PRECISION 226
PRICE CLUB 096 210
PRIMA 211 224 240 328
PRINCETON GRAPHICS 260 268
PRISM 061 189
PROSCAN 008 045 132 237 266 301
336 347
PROTON 005 016 018 051 073 140
227 304 316
PROVIEW 354
PULSAR 016 051 125
.
.
.
Q
QUASAR 015 061 066 074 138 175
189 199 290 294 311
.
.
.
R
RADIO SHACK 042 051 058 138 245 266
281 307 337 347
RADIO SHACK/REALISTIC 005 016 018 030 042
045 058 075 130 139
RCA 002 008 015 016 017 018
019 045 051 090 091 092
093 094 099 118 132 135
136 143 148 153 162 167
172 176 180 189 192 204
237 263 266 288 301 307
311 336 337 347 351
REALISTIC 042 051 058 138 245 266
281 337 347
RHAPSODY 187
RUNCO 125 287
.
.
.
S
SAMPO 016 018 051 130 139 140
186 194 220
SAMSUNG 000 002 005 008 016 017
018 051 086 095 096 097
130 139 151 163 204 209
210 223 232 255 272 302
310 339 341
SAMSUX 051
SAMTRON 210
SANSUI 168 200 278
SANTECA 197
SANYO 016 042 051 053 057 058
085 098 130 137 144 236
250 275
SCOTCH 051
SCOTT 005 016 018 020 021 030
032 051 056 206 282
SEARS 000 002 006 007 008 012
016 018 040 041 042 045
047 051 056 057 058 059
086 087 130 132 144 160
200 210 231 237 259 264
266 275 282 294 298 347
SELECTRON 330 331 332
SHARP 000 005 016 018 023 026
033 051 075 080 088 089
113 131 139 230 259 268
299 313 318
SHOGUN 016 051
SIGNATURE 004 013 166 266 347
SIMPSON 044
SONIC 187
Page 49

A.1 TV 45
SONY 014 150 343 350 157 159
164 170 177 292
SOUNDESIGN 010 016 018 030 044 051
056 282
SPECTRAVISION 323
SQUAREVIEW 264
SSS 016 030 051
STARLITE 030
STARSIGHT 190
SUPERSCAN 231 259 298
SUPERSONIC 203
SUPRA 051 296
SUPREMACY 195
SUPREME 292
SVA 229
SYLVANIA 002 010 012 016 018 043
044 046 049 050 051 065
079 081 146 168 231 245
264 285 294 348 349
SYMPHONIC 020 030 056 160 231 245
264
SYNTAX 051
.
.
.
T
TANDY 131 268
TASHIKO 041
TATUNG 015 254 283 311
TECHNICS 061 189
TECHWOOD 016 018 051 061 189
TEKNIKA 000 005 016 017 096 130
210 248 006 018 138 266
007 030 139 282 009 044
166 347 010 051 175 012
056 195 013 086 204
TELECAPTION 082 238
TELERENT 166 266 347
TERA 016 051 227
TEVION 254
THOMSON 154
TMK 016 051
TOSHIBA 040 041 042 058 075 082
083 086 096 130 138 145
146 155 156 183 200 202
210 238 255 274 285 287
TOTEVISION 139
TRUTCH 329
.
.
.
U
UNIVERSAL 060 078 235 293
.
.
.
V
VICTOR 271
VIDIKRON 012
VIDTECH 016 051 204
VIEWSONIC 220 295
VIKING 195
VIZIO 283
.
.
.
W
WARDS 000 002 012 013 016 017
018 020 021 043 044 045
046 049 051 056 060 065
075 078 079 084 166 204
235 266 282 293 294 347
WESTINGHOUSE 193 320
WHITE WESTINGHOUSE 225 245 251 272 346
.
.
.
Y
YAMAHA 002 016 017 018 051 138
204
.
.
.
Z
ZENITH 004 013 125 126 245 248
344 016 140 251 033 165
255 051 166 258 121 168
278 122 190 335 124 230
342
Page 50

46 Universal Remote Control
A.2 VCR
.
.
.
A
AIWA 049
AKAI 061 063
AMPRO 044
ANAM 025 026 027 028
AUDIO DYNAMICS 000
.
.
.
C
CANON 028
CAPEHART 018
CRAIG 006 064
CURTIS MATHES 008 009 028
.
.
.
D
DAEWOO 010 013 016 017 018 019
020 021 022 023 024 026
033 075 077
DAYTRON 018
DBX 000
DYNATECH 053
.
.
.
E
ELECTROHOME 043
EMERSON 003 008 066 067 009 068
010 028 041 062 065
.
.
.
F
FISHER 075
.
.
.
G
GE 008 009 028 044
.
.
.
H
HARMAN KARDON 000 047 069
HITACHI 001 002 045 046 047 048
.
.
.
I
INSTANTREPLAY 028
.
.
.
J
JCL 028
JCPENNY 000 006 028 045 054
JVC 000 028 055 070 078
.
.
.
K
KENWOOD 048 055 055
.
.
.
L
LG 000 001 002 003 004 045
LXI 001 003 010 045
.
.
.
M
MAGIN 006
MAGNAVOX 008 009 028 057 068 072
MARANTZ 000 028 057 073 076
MARTA 003
MEI 028
MEMOREX 003 006 028 044 053 075
MGA 043 047 069
MINOLTA 001 002 045
MITSUBISHI 002 043 045 047 050 051
052 053
MTC 006
.
.
.
N
NEC 000 054 055
.
.
.
O
OPTONICA 053
.
.
.
P
PANASONIC 027 028 056
PENNEY 000 001 054
PENTAX 001 002 028 045
PHILCO 028 057
PHILIPS 003 028 057 058 059
PILOT 003
PIONEER 045 055 060
PORTLAND 018
PULSAR 044
Page 51

A.2 VCR 47
.
.
.
Q
QUASAR 028 074
.
.
.
R
RCA 001 002 006 008 009 028
045 071
REALISTIC 003 006 028 053 075
RICO 035
RUNCO 044
.
.
.
S
SAMSUNG 005 006 007 008 009 010
011 012 013 014 015 032
041 061
SANSUI 055 064
SANYO 006 017 075
SCOTT 010 013 041
SEARS 001 002 003 010 028 042
045 075
SHARP 028
SONY 028 030 037 038 031 039
032 040 033 034 035 036
STS 001 045
SYLVANIA 028 043 057
.
.
.
T
TAEKWANG 029
TANDY 075
TECHNICS 027 028
TEKNIKA 003 028
TMK 062
TOSHIBA 010 013 041 042 043 045
048
TOTEVISION 003 006
.
.
.
U
UNITECH 006
.
.
.
V
VECTOR RESEARCH 000 054
VICTOR 055
VIDEO CONCEPTS 000 054
VIDEOSONIC 006
.
.
.
W
WARDS 001 006 053 008 009 010
028 041 045
.
.
.
Y
YAMAHA 000
.
.
.
Z
ZENITH 003 030 033 035 044 055
Page 52

48 Universal Remote Control
A.3 DVD
.
.
.
A
AFREEY 068
AIWA 000 019
AKAI 117 119
ALLEGRO 099 100
ALPINE 001
AMES 023
AMW 139
APEX 004 006 125 008 009 084
105
.
.
.
B
BLAUPUNKT 003 041 084
BODYSONIC 068
BOSE 093
BROKSONIC 007 101 104 144
.
.
.
C
CINEVISION 030
CLARION 022
CLASSIC 023
COBY 006 108 130 131 142
CONCEPT 084
CRITERION 150
CYBERHOME 115
CYTRON 035 147
.
.
.
D
DAEWOO 010
DENON 005 011 036 037
DENZEL 148
DIAMOND VISION 128
DIGITREX 006
DIGIX 110
DISNEY 034
DUAL 035 103 133 138 148
DURABRAND 030 035
DVD 2000 015
.
.
.
E
ELTA 106 119
EMERSON 030 034 038 039 126
ESA 133
.
.
.
F
FISHER 020 040
FUNAI 034 039 126
.
.
.
G
GE 002 041 048 084
GO VIDEO 018 023 141 094 097 100
107
GOLDSTAR 030
GPX 049 111 132
GRADIENTE 056
GREENHILL 084
.
.
.
H
HAIER 121
HARMAN KARDON 136
HITACHI 018 042 043 050 051 148
HITEKER 006
.
.
.
I
ILO 084
INFINITY 068
INITIAL 084
INSIGNIA 030 084 126
INTEGRA 052
.
.
.
J
JBL 136
JVC 014 029 032 095 113
JWIN 120
.
.
.
K
KAWASAKI 122
KENWOOD 033 036
KISS 148
Page 53

A.3 DVD 49
KLH 084 129
KONKA 024 017
KOSS 056 147
KXD 108
.
.
.
L
LENOXX 119
LG 030
.
.
.
M
MAGNAVOX 013 026 034 126
MARANTZ 013 030
MEDION 035 128
MEMOREX 035
MERIDIAN 013
MICROSOFT 002
MINTEK 044 084
MITSUBISHI 015
MUSTEK 023
MYRON & DAVIS 010
.
.
.
N
NAD 030 038 086
NAKAMICHI 045
NESA 010 084
NEXXTECH 010 110 112 133
NORCENT 046 047 131 140
.
.
.
O
ONKYO 052 123
ORION 104
ORITRON 056 081
.
.
.
P
PACIFIC 035
PANASONIC 025 036 053 054 055 059
060 061 114 127 135 137
PHILIPS 013 026 031 034 056 126
PHILIPS-MAGNAVOX 013
PIONEER 016 057 145 058 077 078
134
POLAROID 116 143
POLK AUDIO 013
PROLINE 056
PROSCAN 002 079
PROSONIC 131
PYLE 080
.
.
.
Q
QWESTAR 080 081
.
.
.
R
RCA 002 003 067 084 092 096
ROTEL 014
.
.
.
S
SAMPO 068
SAMSUNG 018 069 070 071 097 107
SANSUI 072 104 144
SANYO 020 073 098
SEARS 104 126
SEG 148
SHARP 074 075
SHERWOOD 076 118
SHINCO 084
SHINSONIC 084
SONIC BLUE 141
SONY 012 021 027 062 063 064
065 066 124 146 147
SOUNDSTORM 080
SUPERSCAN 126
SUPERSONIC 111
SV2000 126
SYLVANIA 034 039 126
SYMPHONIC 034 126
.
.
.
T
TEAC 084
TECHNICS 036 085
TECHWOOD 086
TEVION 035 138 147 150
TOSHIBA 013 028 104 109 087 088
089 102
.
.
.
W
WHARFEDALE 068
WHITE WESTINGHOUSE 034
.
.
.
X
X-BOX 002
XENIUS 147
.
.
.
Y
YAMAHA 036 082 090 091
YAMAKAWA 046 148 149
.
.
.
Z
ZENITH 030 083 099
Page 54

50 INDEX
Index
4:3, 18
12-hour, 21
16:9, 18
A
A/V Output Setting, 17
Access Control, 22
Add to Fav, 26
Alphabetic, 26, 35
AUDIO L, 10
AUDIO L/R, 9
Audio Language, 17
AUDIO R, 10
Auto, 14
B
Button, 4
C
CABLE IN, 9, 10
CABLE OUT, 9, 10
CAS–FTA, 26, 35
Censorship, 22
Center, 18
Center extract, 19
Change PIN Code, 22
Conditional Access, 6
D
Date, 32
Default, 26, 35
Delete, 26, 34
Display Format, 18, 19
Duration, 32
DVB, 1
E
Electronic Programme Guide,
29
End Frequency, 14
EPG, 29
Every Day, 31
Every Weekday, 31
Every Weekend, 31
F
Factory Setting, 15
Fav–NoFav, 26, 35
Frequency, 14
FTA–CAS, 26, 35
Full, 18
G
GMT, 20
Page 55

INDEX 51
I
Info Box Display Time, 23
Info Box Position, 23
information box, 27
IRDETO, 6
K
keyboard, 37
L
Language Setting, 16
Letter Box, 19
Local Time, 20
Lock, 26, 34
M
Manual, 14
Menu Language, 16
Mode, 20, 31
mono, 19
Move, 34
multiplex, 1
N
Network, 14
Network Search, 14
NEW, 35
No block, 22
normal-screen television, 18
NTSC, 17
O
One Time, 31
Organizing Favorites, 35
Organizing Services, 33
OSD Transparency, 23
P
PAL, 17
Parental Control, 22
PIN, 22
Q
QAM, 14
QAM Mode, 14
R
Radio, 31
radio services list, 33
Rename, 25, 34
RF Channel, 20
RF IN, 9, 11
RF OUT, 9, 11, 19
S
Search Mode, 14
Service, 31
Service Search, 13
services list, 24
Show Provider, 25
Skip, 34
Sort, 34
Sorting, 26
Sound Mode, 19
Start Frequency, 14
Start Search, 14
Start Time, 32
stereo, 19
subtitle, 29
Subtitle Language, 17
Symbol Rate, 14
System Setting, 23
System Software Upgrade, 38
T
teletext, 29
television services list, 34
Page 56

52 INDEX
Time Format, 21
Time Offset, 20
Time Setting, 20, 22
timer list, 31
Timer Setting, 31
Total block, 22
transponder, 1
TV, 31
TV Aspect Ratio, 18
TV Type, 18
Type, 31
V
VIDEO, 9, 10
W
Weekly, 31
wide-screen television, 18
Page 57

Correct disposal of this product
This marking shown on the product or its literature indicates that
it should not be disposed with other household wastes at the end
of its working life. To prevent possible harm to the environment
or human health from uncontrolled waste disposal, please separate
this from other types of wastes and recycle it responsibly to promote
the sustainable reuse of material resources. Household users should
contact either the retailer where they purchased this product or their
local government office for details of where and how they can dis-
pose this product for environmentally safe recycling. Business users
should contact their supplier and check the terms and conditions of
the purchase contract. This product should not be mixed with other
commercial wastes for disposal.
At any time during the life of a product Topfield Co., Ltd. may change or modify the
hardware or software on any product to introduce new features or improve the
functionality of the product.
Copyright © 2010, Topfield Co., Ltd. All rights reserved. English version
http://www.i-topfield.com
 Loading...