

TBH-1400N
Rotary hammer drill
Bohrhammer
Users manual
Bedienungsanleitung
Art. No. HDM6014
02 Ferm
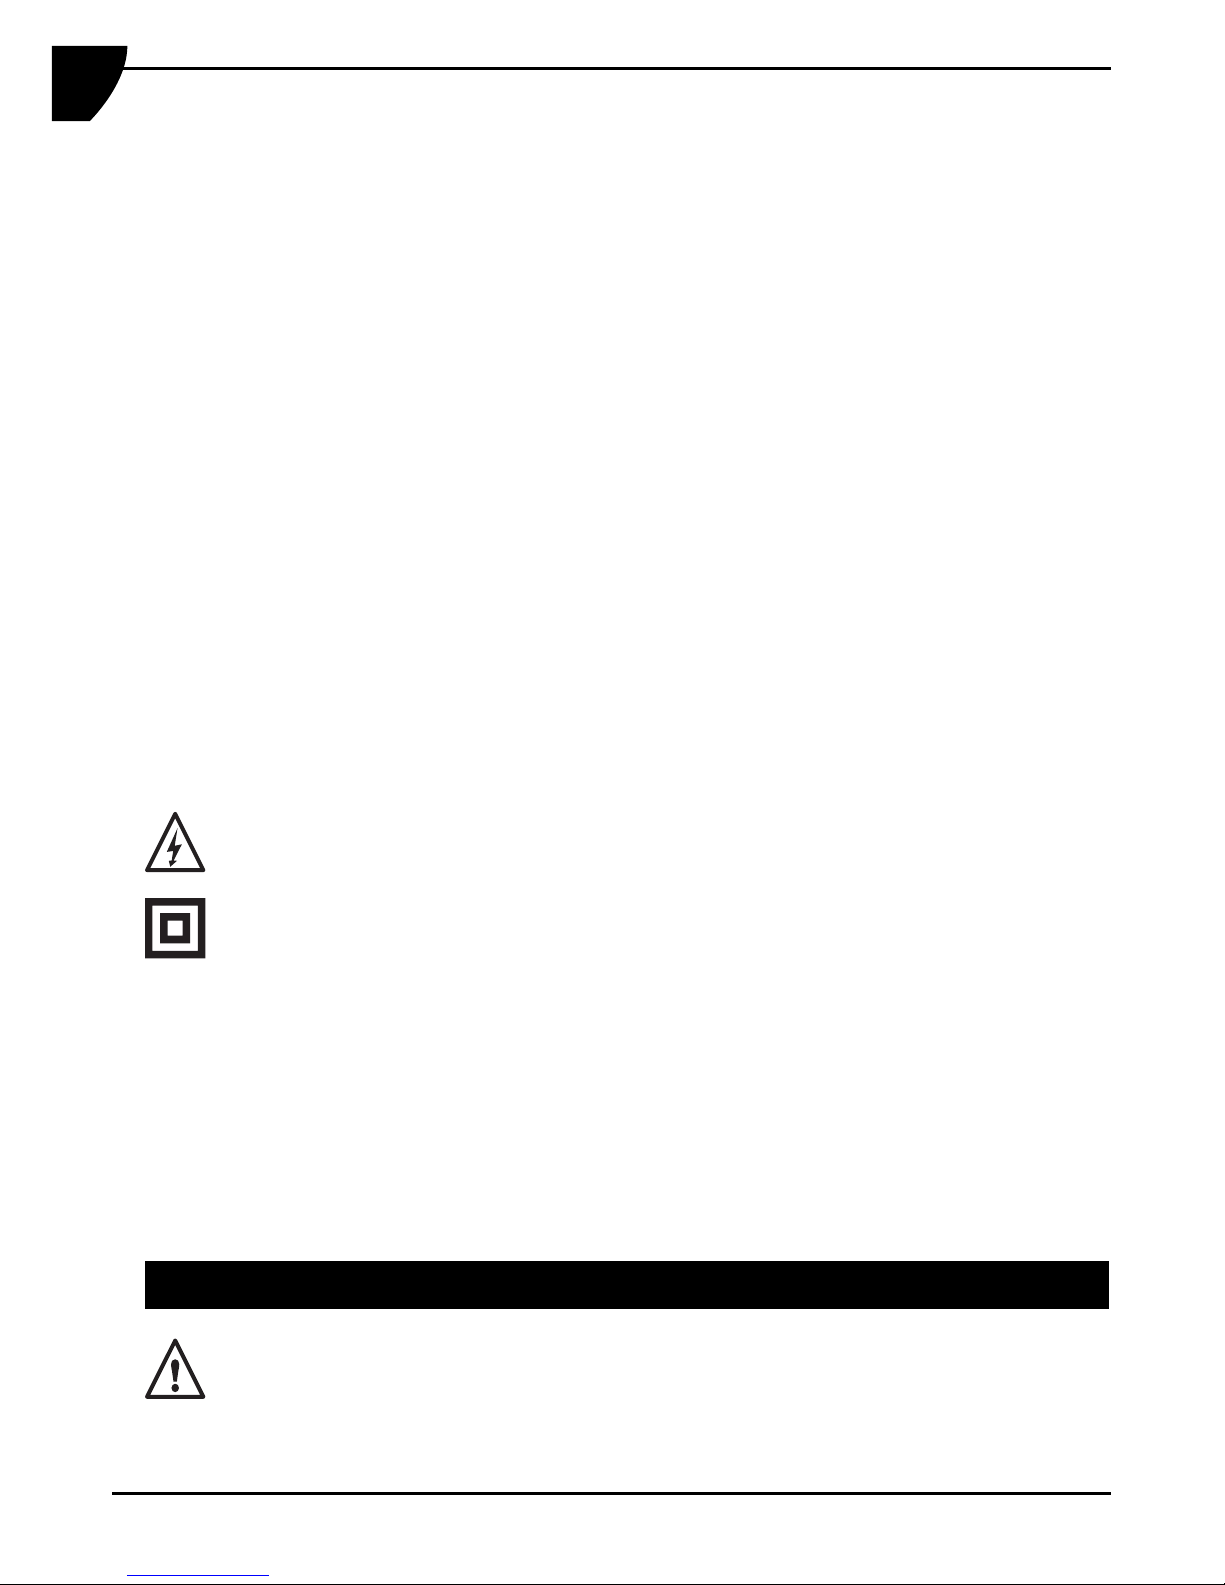
10
4
1
2
3
5
6
7
9
11
2
1
3
Fig.A / Abb.A
Fig.B / Abb.B
Fig.C / Abb.C
Ferm 03
8
10
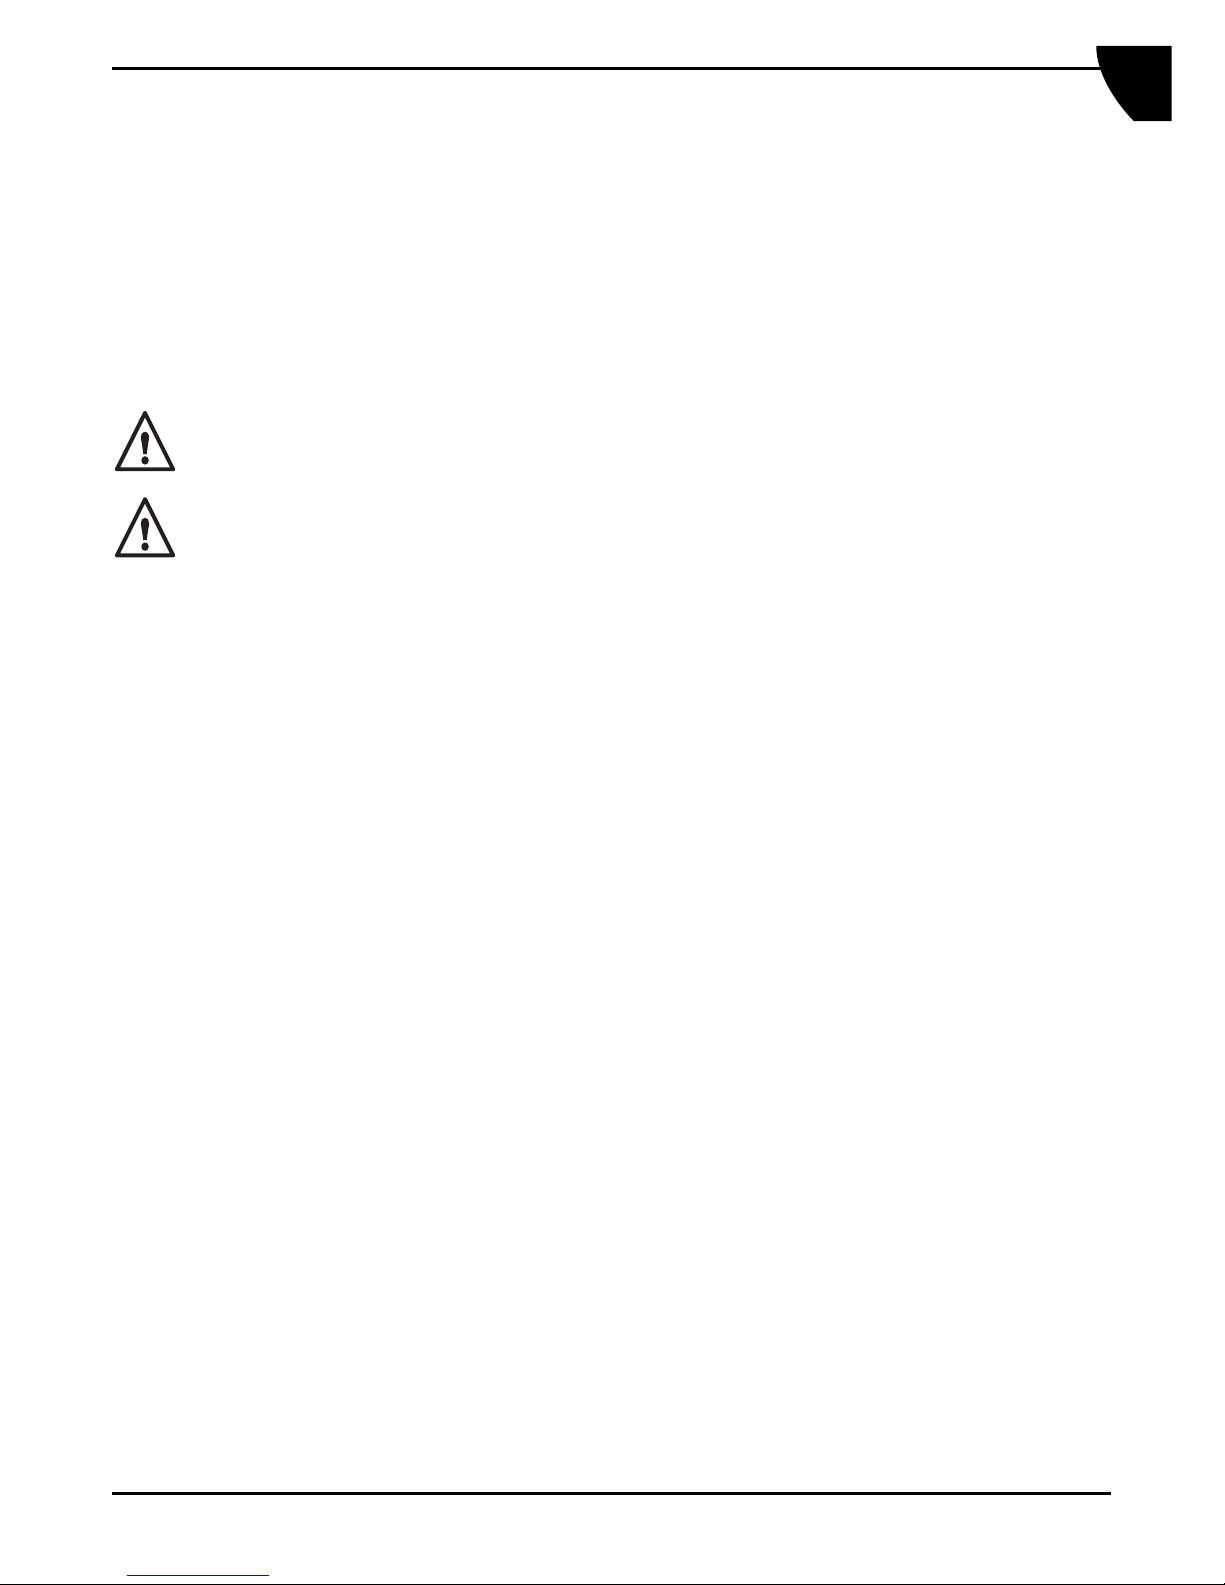
Fig.E / Abb.E
Regelschalter Drehzahl Umschaltung Betriebsart
1
2
3
Fig.D / Abb.D
ON
OFF
11
Fig.F / Abb.F

04 Ferm
ROTARY HAMMER DRILL
The numbers in the following text correspond with the pictures at page 2 - 3.
Read this manual carefully, before using the machine. Ensure that you know
how the machine works, and how it should be operated. Maintain the machine
in accordance with the instructions, and make certain that the machine
functions correctly. Store this manual and other enclosed documentation with
the machine.
Intended use
The FBH-1400N is intended for drilling holes in masonry such as brick, concrete and
similar materials. Furthermore, the machine can be used as a demolition hammer in
combination with the SDS cold chisels provided. The machine is on no account intended
for other purposes.
Please inspect the machine and accessories for transit damage.
Contents
1. Machine information
2. Safety instructions
3. Operating
4. Maintenance
1. MACHINE INFORMATION
Technical specifications
Voltage 230 V
Frequency 50 Hz
Power rating 1400 W
Rotational speed, not loaded 0-680/min
Impact rate 0-3600/min
Max. bit diameter
Concrete Ø 30 mm
Steel Ø 16 mm
Wood Ø 40 mm
Weight 6.5 kg
Hammer station:
Lpa (sound pressure level) 89 dB(A)
Lwa (sound power level) 105 dB(A)
Vibration main handle 9.58m/s
2
Hammer/drill station
Lpa (sound pressure level) 93 dB(A)
Lwa (sound power level) 107 dB(A)
Vibration main handle 11.38m/s
2
GB
Ferm 05
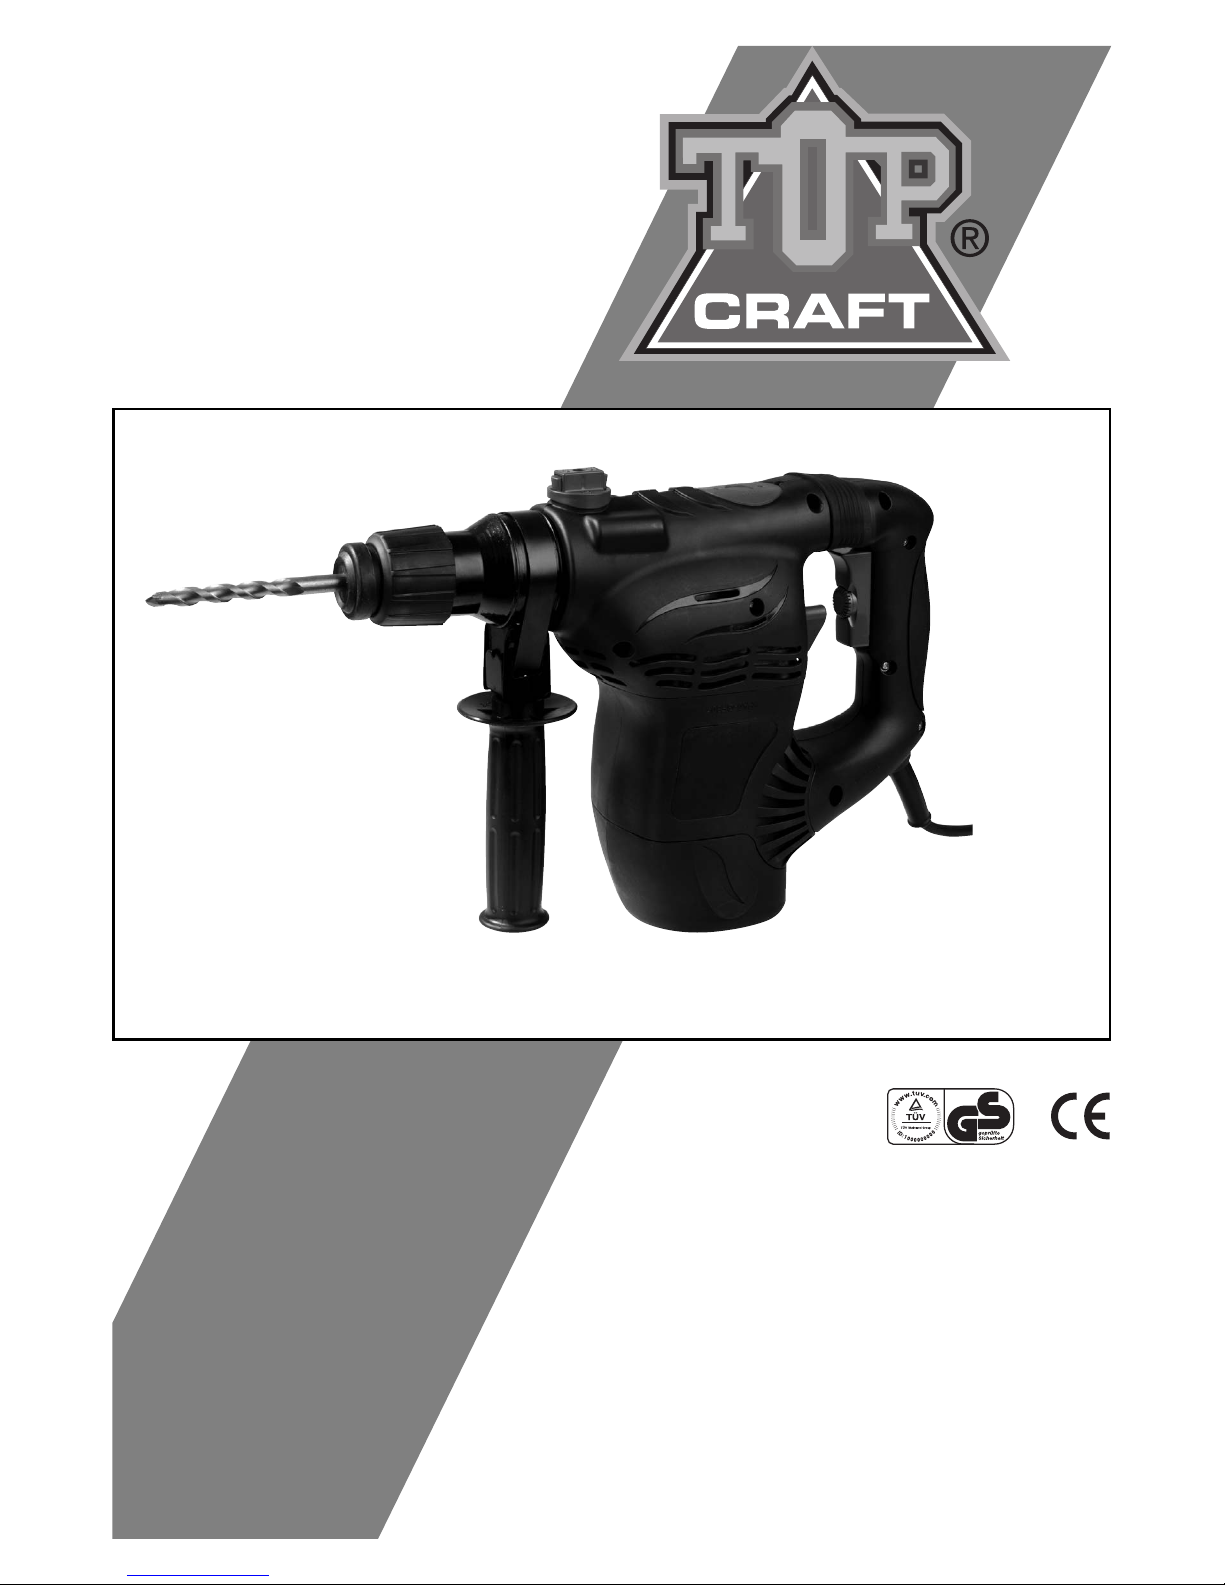
Product information
Fig. A + E
1. Function selection switch 1
2. On/Off switch
3. Main handle
4. Function selection switch 2
5. Electric cord
6. Auxiliary handle
7. Depth gauge
8. Dust catcher
9. Drill
10. Locking sleeve
11. Grease cap
Contents of packing
1 Rotary Hammer Drill
2 SDS chisels
3 SDS drills
1 SDS chuck + adapter + key
1 Depth gauge
1 Dust catcher
1 Cup with grease
1 Users manual
1 Warranty card
2. SAFETY INSTRUCTIONS
In this operator's guide the following symbols are used:
Read instructions carefully
In accordance with essential applicable safety standards of European
directives
Class II machine – Double insulation – You don’t need any earthed plug.
Denotes risk of personal injury, loss of life or damage to the tool in case of
non-observance of the instructions in this manual.
Indicates electrical shock hazard.
Immediately unplug the plug from the mains electricity in the case that the cord
gets damaged and during maintenance
GB

06 Ferm
Wear a dust mask
Wear ear and eye protection
Faulty and/or discarded electrical or electronic apparatus have to be collected
at the appropriate recycling locations.
General safety instructions
Warning! Read all instructions. Failure to follow all instructions listed below may result in
electric shock, fire and/or serious injury. The term “power tool” in all of the warnings listed
below refers to your mains operated (corded) power tool or battery operated (cordless) power
tool. Save these instructions!
1) Work area
a. Keep work area clean and well lit. Cluttered and dark areas invite accidents.
b. Do not operate power tools in explosive atmospheres, such as in the presence of
flammable liquids, gasses or dust. Power tools create sparks which may ignite the
dust of fumes.
c. Keep children and bystanders away while operating a power tool. Distractions can
cause you to lose control.
2) Electrical safety
a. Power tool plugs must match the outlet. Never modify the plug in any way. Do not use
any adapter plugs which earthed (grounded) power tools. Unmodified plugs and
matching outlets will reduce risk of electric shock.
b. Avoid body contact with earthed or grounded surfaces such as pipes, radiators,
ranges and refrigerators. There is an increased risk of electric shock if your body is
earthed or grounded.
c. Do not expose power tools to rain or wet conditions. Water entering a power tool will
increase the risk of electric shock.
d. Do not abuse the cord. Never use the cord for carrying, pulling or unplugging the
power tool. Keep cord away from heat, oil, sharp edges or moving parts. Damaged or
entangled cords increase the risk of electric shock.
e. When operating a power tool outdoors, use an extension cord suitable for outdoor
use. Use of a cord suitable for outdoor use reduces the risk of electric shock.
Always
use tool in conjunction with a residual circuit breaker device.
3) Personal safety
a. Stay alert, watch what you are doing and use common sense when operating a power
tool. Do not use a power tool while you are tired or under the influence of drugs,
alcohol or medication. A moment of inattention while operating power tools may
result in serious personal injury.
b. Use safety equipment. Always wear eye protection. Safety equipment such as dust
mask, non-skid safety shoes, hard hat, or hearing protection used for appropriate
conditions will reduce personal injuries.
GB

Ferm 07
c. Avoid accidental starting. Ensure the switch is in the off position before plugging in.
Carrying power tools with your finger on the switch or plugging in power tools that
have the switch on invites accidents.
d. Remove any adjusting key or wrench before turning the power tool on. A wrench or a
key left attached to a rotating part of the power tool may result in personal injury.
e. Do not overreach. Keep proper footing and balance at all times. This enables better
control of the power tool in unexpected situations.
f. Dress properly. Do not wear loose clothing or jewellery. Keep your hair, clothing and
gloves away from moving parts. Loose clothes, jewellery or long hair can be caught in
moving parts.
g. If devices are provided for the connection of dust extraction and collection facilities,
ensure these are connected and properly used. Use of these devices can reduce dust
related hazards.
h. Use clamps or a vice to hold work. It’s safer than using your hand and it frees both
hands to operate tool.
4) Power tool use and care
a. Do not force the power tool. Use the correct power tool for your application. The
correct power tool will do the job better and safer at the rate for which it was
designed.
b. Do not use the power tool if the switch does not turn it on and off. Any power tool that
cannot be controlled with the switch is dangerous and must be repaired.
c. Disconnect the plug from the power source before making any adjustments, changing
accessories, or storing power tools. Such preventive safety measures reduce the risk
of starting the power tool accidentally.
d. Store idle power tools out of the reach of children and do not allow persons unfamiliar
with the power tool or these instructions to operate the power tool. Power tools are
dangerous in the hands of untrained users.
e. Maintain power tools. Check for misalignment or binding of moving parts, breakage of
parts and any other condition that may affect the power tools operation. If damaged,
have the power tool repaired before use. Many accidents are caused by poorly
maintained power tools.
f. Keep cutting tools sharp and clean. Properly maintained cutting tools with sharp
cutting edges are less likely to bind and are easier to control.
g. Use the power tool, accessories and tool bits etc., in accordance with these
instructions and in the manner intended for the particular type of power tool, taking
into account the working conditions and the work to be performed. Use of the power
tool for operations different from intended could result in hazardous situation.
h. Damaged switches must be replaced at a customer service repair centre. Do not use
power tools that cannot be switched on and off.
i. Do not leave power tools unattended while they are switched on. Always switch off
the tool and wait until it has come to a full standstill before leaving.
j. If the mains cable has been damaged, it must be replaced with a special mains cable.
These can be obtained from the manufacturer or the manufacturer's customer service
department. The mains cable may only be replaced by the manufacturer, the
manufacturer's customer service department or equally qualified persons.
GB
08 Ferm
5) Service
a. Please use a qualified expert who uses original replacement parts to repair your power tool.
This will ensure proper functioning of the power tool.
b. Caution! The use of any accessories or additional tools other than those recommended in
this manual may lead to an increased risk of injury. Only use original replacement parts.
Specific safety instructions
• Wear ear protectors. Exposure to noise can cause hearing loss.
• Use auxiliary handles supplied with the tool. Loss of control can cause personal injury
For use of this machine/tool:
• Inspect the surface to be drilled for hidden electrical wiring, gas pipes or other
obstacles (for example, using a metal detector).
• Check the following points:
• Does the appliance’s voltage correspond with the mains power supply voltage?
• Are power cords, insulation and plug in good order: sound, not loose or
damaged?
• Is there a good, firm connection at the mains socket?
• Does the drill show any sign of abnormal running, overheating or excessive
sparking?
• Whenever any of the problems mentioned above appear, immediately cease
using the machine and have it repaired by an expert.
Electrical safety
Always check that the mains voltage is the same as on the type plate of the
machine.
The machine is double insulated; therefore, no earth connection is required.
Replacement of power cords or plugs
Immediately dispose of old cords and plugs once they have been replaced. It is
dangerous to plug a loose power cord into a mains power socket.
Use of extension leads
Only ever use approved extension leads that are suitable for the power rating of the
machine. The minimum core thickness is 1.5 mm
2
. Whenever using a reel extension lead,
always fully unroll the lead.
3. OPERATING
Hammer drills require very little operator pressure. Excessive pressure on the
tool can lead to unnecessary overheating of the motor, and burning of the
driven tool.
GB
Ferm 09
Auxiliary handgrip
The auxiliary handgrip can be rotated 360º around the drill head, enabling safe and
comfortable operation, for both left and right-handed users.
• Loosen the handgrip by turning it anticlockwise.
• Rotate the handgrip to the desire position.
• Retighten the handgrip in the new position.
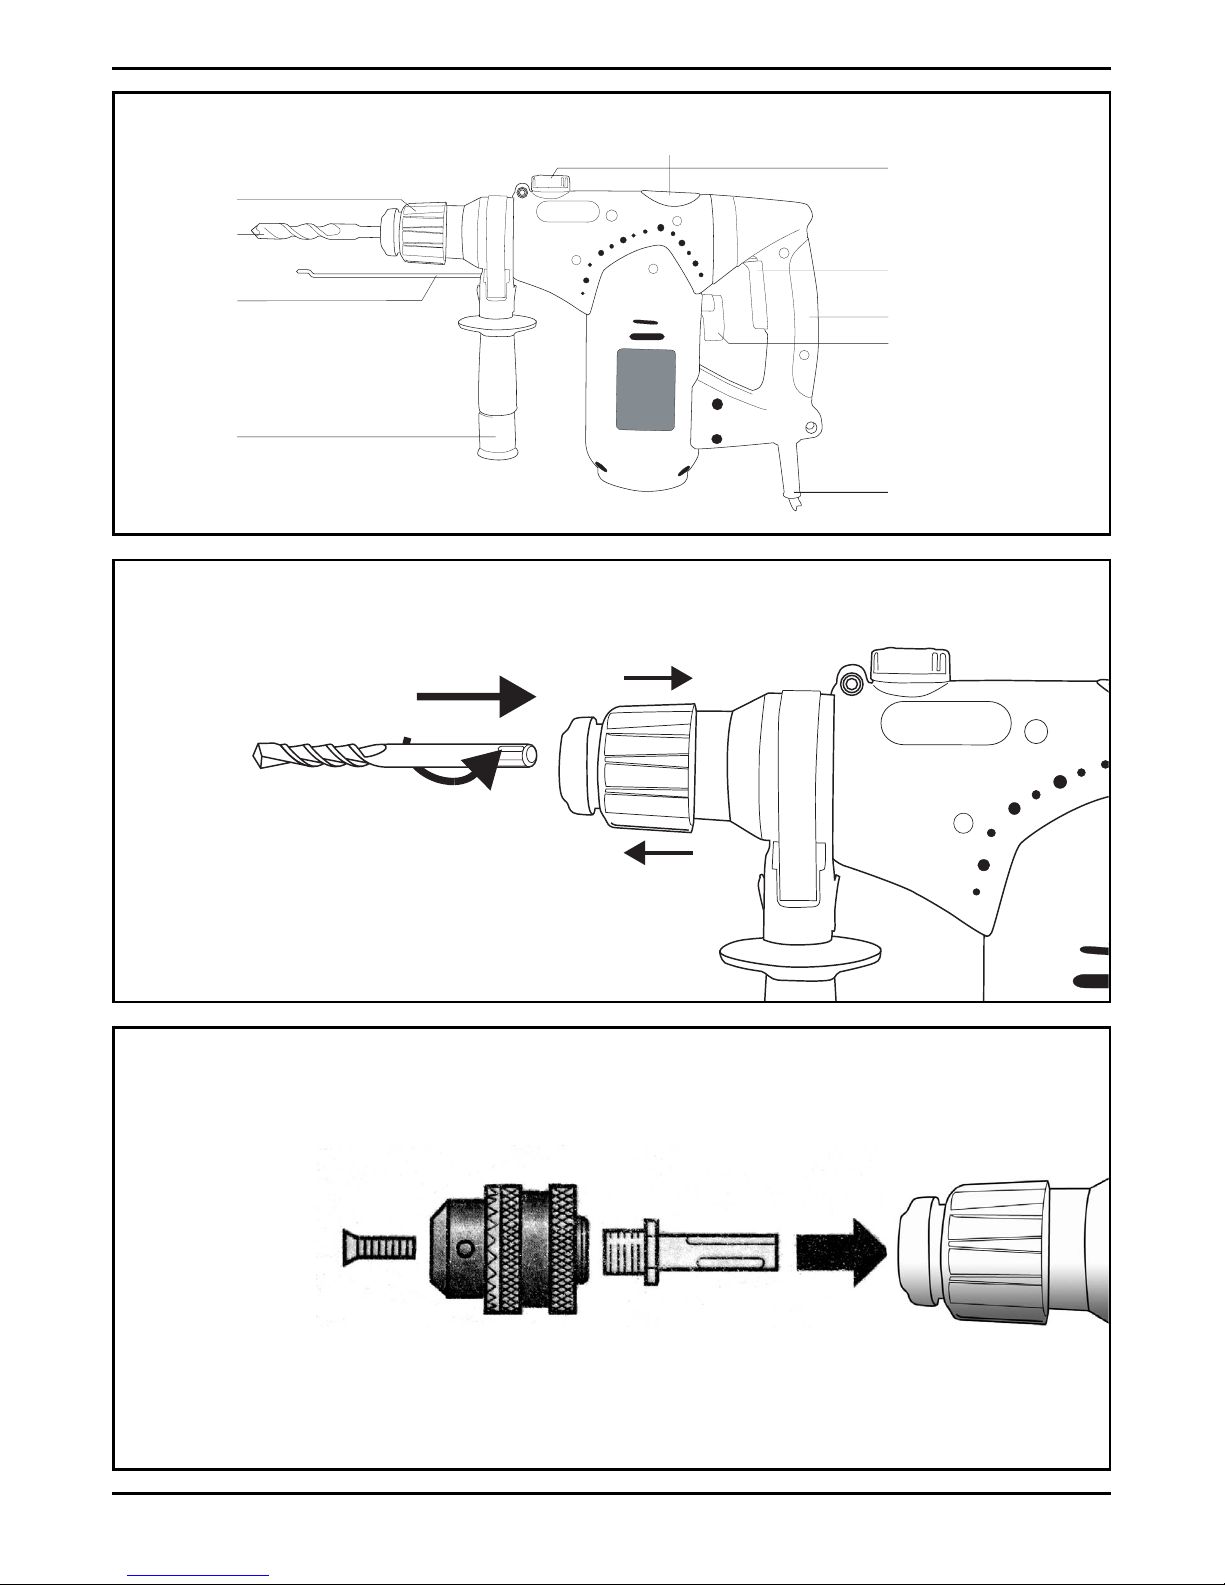
Exchanging and removing drill bits
Fig. A + B
Before exchanging bits, first remove the power plug from the wall socket.
Inspect bits regularly during use. Blunt bits should be re-sharpened or
replaced.
• Lightly oil the bit shaft before inserting it into the chuck.
• Slide the locking sleeve (11, Fig. A) to the rear, and insert the bit into the chuck
opening.
• Beware that the rubber disc stays in outer position (space between disc and locking
sleeve)
• Ensure that the keyway in the bit is seated properly in the chuck, by carefully turning
the bit until it clicks into place. Release the locking sleeve.
• To remove the bit, slide and hold the locking sleeve to the rear.
Chuck + adapter
Fig. C
• Use the enclosed chuck for drilling with common drills. Install chuck as indicated in
the picture.
Setting depth gauge
Fig. A
• Loosen the handgrip by turning it anticlockwise.
• Insert the depth gauge ruler through the hole in the auxiliary handgrip.
• Slide the ruler to the desired depth.
• Retighten the screw firmly.
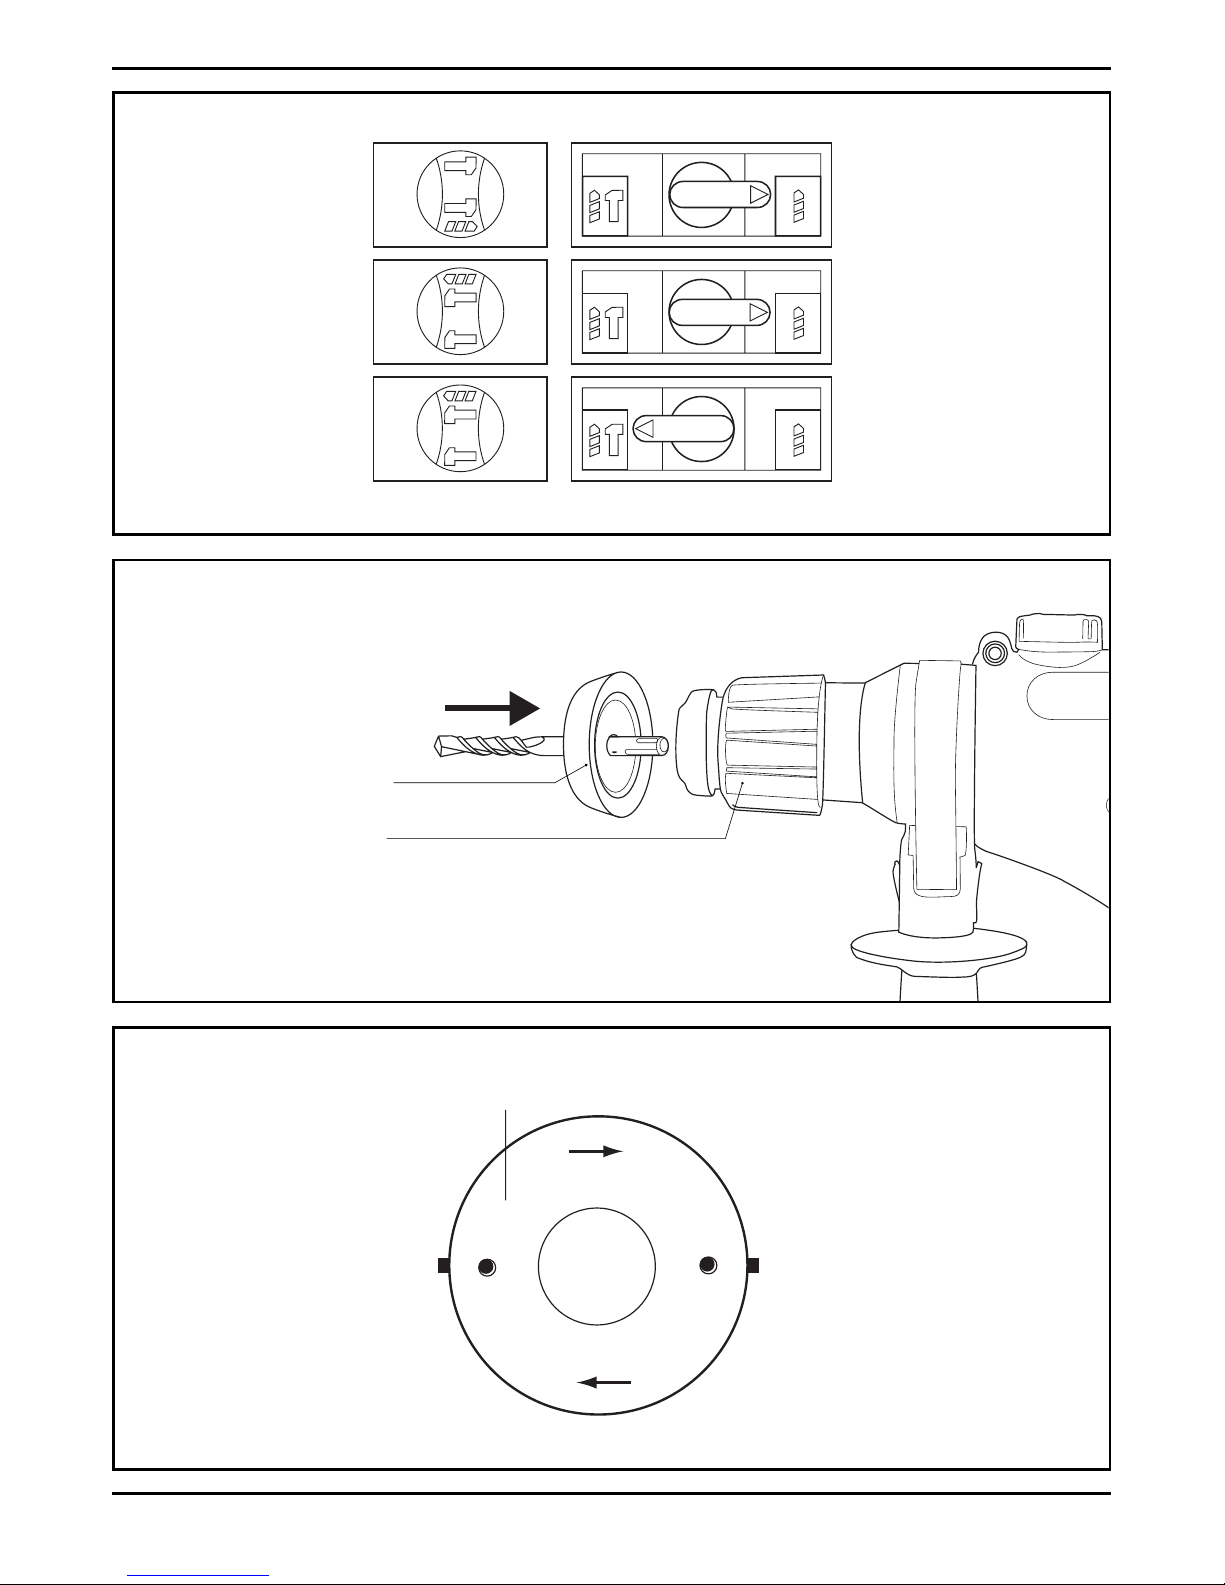
Function selection switch
Fig. D
The correct position of the selection switch for each machine function is given in the
diagram on page 3.
1 = Demolition hammer/chisel
2 = Rotary hammer drill
3 = Drilling
GB

10 Ferm
Switching On/Off
• To start the drill, squeeze the On/Off switch.
• To stop the drill, release the on/off switch.
Installing dust catcher
Fig.E
The dust catcher prevents large amounts of drilling dust entering the machine when
drilling into ceilings.
• Remove the drill bit.
• Slide the dust catcher over the shaft of the drill bit.
• Place the drill bit with catcher in the drill chuck.
• Always replace a damaged dust catcher immediately.
4. MAINTENANCE
Take care that the machine is not connected to power whenever maintenance
work on the mechanical parts is taking place.
Machines are designed to function problem-free for a long period with a minimum of
maintenance. Through regular cleaning and correct treatment, you help assure a long
working life for your machine.
Defects
The machine should be regularly inspected for the following possible defects, and
repaired if necessary.
• Damage to power cord
• Broken On/Off switch assembly.
• Short circuiting.
• Damaged moving parts.
Trouble shooting
• When switched on, the
motor does not turn.
• Failure in power supply.
• Poor contact in the
On/Off switch.
• Mains voltage too low.
• Damaged motor.
• Carbon brushes worn.
• Check the power supply.
• Repair or replace the
On/Off switch assembly.
• Extension lead too long,
or too light.
• Have your machine
repaired by an expert.
• Replace the carbon
brushes
GB

Ferm 11
Cleaning
Clean the machine casings regularly with a soft cloth, preferably after each use. Make
sure that the ventilation openings are free of dust and dirt. Remove very persistent dirt
using a soft cloth moistened with soapsuds. Do not use any solvents such as gasoline,
alcohol, ammonia, etc. Chemicals such as these will damage the synthetic components.
Lubrication
Fig.F
• Regularly grease the hammer drill shaft.
• Regularly check the grease-level inside the machine:
• Remove the grease cap (11) on top of the machine (Off)
• Remove also the second cap (with 4 notches)
• Now you can see the rotating parts inside the machine: there should be grease
on the moving parts.
• If necessary put some grease into the hole.
• Place the cap onto the hole and tighten it again.
• Mount the grease cap again (On)
Faults
Should a fault occur, e.g. after wear of a part, please contact the service address on the
warranty card. In the back of this manual you find an exploded view showing the parts
that can be ordered.
Environment
To prevent damage during transport, the appliance is delivered in a solid packaging which
consists largely of reusable material. Therefore please make use of options for recycling
the packaging.
• Motor generates
excessive noise, and
runs too slowly or not at
all.
• Overheating in the
transmission case.
• Heavy sparking from the
motor.
• Motor is overloaded due
to excessive pressure or
drilling depth.
• Damaged motor.
• Supply voltage too low.
• Carbon brushes worn.
• Overloading of machine,
or blunt drill bit
• Reduced voltage.
• Inspect the carbon
brushes for wear.
• Reduce the pressure or
drilling depth, reduce
power.
• Have your machine
repaired by an expert.
• Adjust the supply
voltage.
• Replace the carbon
brushes
• Reduce the loading, or
hone the drill bit.
• Adjust the supply
voltage.
GB

12 Ferm
Faulty and/or discarded electrical or electronic apparatus have to be collected
at the appropriate recycling locations.
Warranty
For the conditions of warranty, please refer to the separately provided warranty card.
CE DECLARATION OF CONFORMITY (GB)
We declare under our sole responsibility that this product,
TBH-1400N Rotary hammer drill
is in conformity with the following standards or standardized documents
EN60745-1: 2003 + A1, EN60745-2-6: 2003, EN55014-1, EN55014-2,
EN61000-3-2, EN61000-3-3
in accordance with the regulations.
98/37/EC, 2006/95/EC, 89/336/EEC, 2002/95/EC, 2002/96/EC
from 01-11-2006
ZWOLLE NL
J.A. Bakker - van Ingen J. Lodewijk
CEO Ferm BV Quality Manager Ferm Global
It is our policy to continuously improve our products and we therefore reserve the right to
change the product specification without prior notice.
Ferm BV • Lingenstraat 6 • 8028 PM Zwolle • The Netherlands
GB

Ferm 13
BOHRHAMMER
Die Nummern im nachfolgenden Text korrespondieren mit den Abbildungen auf
Seite 2 - 3.
Lesen Sie vor dem Gebrauch der Maschine diese Bedienungsanleitung
aufmerksam durch. Machen Sie sich unbedingt mit der Arbeitsweise der
Maschine und ihrer Bedienung vertraut. Warten Sie die Maschine gemäß der
Anweisungen und achten Sie darauf, dass die Maschine einwandfrei arbeitet.
Bewahren Sie die Bedienungsanleitung und andere zugehörige Unterlagen in
der Nähe der Maschine auf.
Verwendung
Der FBH-1400N eignet sich zum Bohren von Löchern in Mauerwerk aus Ziegel, Beton
und ähnlichen Materialien. Darüber hinaus kann die Maschine in Kombination mit den
mitgelieferten SDS-Meißeln auch als Meißelhammer verwendet werden. Die Maschine
wurde ausschließlich für diese Zwecke konzipiert.
Bitte überprüfen Sie Maschine und Zubehör auf mögliche Transportschäden.
Inhalt
1. Gerätedaten
2. Sicherheithinweise
3. Betrieb
4. Wartung
1. GERÄTEDATEN
Technische Daten
Spannung 230 V
Frequenz 50 Hz
Motorleistung 1400 W
Leerlaufdrehzahl 0-680U/min
Schlagzahl 0-3600/min
Max. Bohrerdurchmesser
Beton Ø 30 mm
Stahl Ø 16 mm
Holz Ø 40 mm
Gewicht 6.5 kg
Hammer-Funktion:
Lpa (Schalldruckpegel) 89 dB(A)
Lwa (Schallleistung) 105 dB(A)
Vibrationswert 9.58m/s
2
UK
D
NL
F
E
P
I
S
SF
N
DK

14 Ferm
Produktinformation
Abb. A + E
1. Funktionsschalter 1
2. Ein-/Aus-Schalter
3. Handgriff
4. Funktionsschalter 1
5. Netzkabel
6. Zusatzhandgriff
7. Bohrtiefenanschlag
8. Staubfänger
9. Bohrhammer
10. Verriegelung
11. Schmierdeckel
Packungsinhalt
1 Drehbohrhammer
2 SDS-Meißel
3 SDS-Bohrkronen
1 SDS-Bohrfutter + Adapter + Schlüssel
1 Tiefenanschlag
1 Staubfänger
1 Schmierfett
1 Benutzerhandbuch
1 Garantiekarte
2. SICHERHEITSHINWEISE
In dieser Bedienungsanleitung werden die folgenden Symbole verwendet:
Anweisungen sorgfältig lesen
Übereinstimmung mit den jeweils maßgeblichen EU-Sicherheitsrichtlinien
Gerät der Schutzklasse II – schutzisoliert – kein Schutzkontakt erforderlich
Lebens- und Verletzungsgefahr und Gefahr von Beschädigungen am Gerät bei
Nichteinhaltung der Sicherheitsvorschriften in dieser Anleitung.
Hammer/Bohr-Funktion
Lpa (Schalldruckpegel) 93 dB(A)
Lwa (Schallleistung) 107 dB(A)
Vibrationswert 11.38m/s
2
UK
D
NL
F
E
P
I
S
SF
N
DK

Ferm 15
Deutet das Vorhandensein elektrischer Spannung an.
Ziehen Sie, falls das Kabel beschädigt wird und auch während
Wartungsarbeiten,
sofort den Netzstecker.
Tragen Sie eine Staubschutzmaske
Schutzbrille und Gehörschutz tragen
Schadhafte und/oder alte elektrische oder elektronische Geräte müssen an
den dafür vorgesehenen Recycling-Stellen abgegeben werden.
Allgemeine Sicherhetshinweise
Achtung! Sämtliche Anweisungen sind zu lesen. Fehler bei der Einhaltung der
nachstehend aufgeführten Anweisungen können elektrischen Schlag, Brand und/oder
schwere Verletzungen verursachen. Der nachfolgend verwendete Begriff
„Elektrowerkzeug” bezieht sich auf netzbetriebene Elektrowerkzeuge (mit Netzkabel) und
auf akkubetriebene Elektrowerkzeuge (ohne Netzkabel). Bewahren Sie diese Hinweise
gut auf!
1) Arbeitsplatz
a. Halten Sie Ihren Arbeitsbereich sauber und aufgeräumt. Unordnung und
unbeleuchtete Arbeitsbereiche können zu Unfällen führen.
b. Arbeiten Sie mit dem Gerät nicht in explosionsgefährdeter Umgebung, in der sich
brennbare Flüssigkeiten, Gase oder Staub befinden. Elektrowerkzeuge erzeugen
Funken, die den Staub oder die Dämpfe entzünden können.
c. Halten Sie Kinder und andere Personen während der Benutzung des
Elektrowerkzeugs fern. Bei Ablenkung können Sie die Kontrolle über das Gerät
verlieren.
2) Elektrische Sicherheit
a. Der Anschlussstecker des Gerätes muss in die Steckdose passen. Der Netzstecker
darf in keiner Weise verändert werden. Verwenden Sie keine Adapterstecker
gemeinsam mit schutzgeerdeten Geräten. Unveränderte Netzstecker und passende
Steckdosen verringern das Risiko eines elektrischen Schlages.
b. Vermeiden Sie Körperkontakt mit geerdeten Oberflächen, wie von Rohren,
Heizungen, Herden und Kühlschränken. Es besteht ein erhöhtes Risiko durch
elektrischen Schlag, wenn Ihr Körper geerdet ist.
c. Halten Sie das Gerät von Regen oder Nässe fern. Das Eindringen von Wasser in ein
Elektrogerät erhöht das Risiko eines elektrischen Schlages.
d. Zweckentfremden Sie das Netzkabel nicht, um das Gerät zu tragen, aufzuhängen
oder um den Netzstecker aus der Steckdose zu ziehen.
UK
D
NL
F
E
P
I
S
SF
N
DK

16 Ferm
Halten Sie das Netzkabel fern von Hitze, Öl, scharfen Kanten oder sich bewegenden
Geräteteilen. Beschädigte oder verwickelte Netzkabel erhöhen das Risiko eines
elektrischen Schlages.
e. Wenn Sie mit einem Elektrowerkzeug im Freien arbeiten, verwenden Sie nur
Verlängerungskabel, die auch für den Außenbereich zugelassen sind. Die Anwendung
eines für den Außenbereich geeigneten Verlängerungskabels verringert das Risiko
eines elektrischen Schlages,
3) Sicherheit von Personen
a. Seien Sie aufmerksam. Achten Sie darauf, was Sie tun, und gehen Sie mit Vernunft
an die Arbeit mit einem Elektrowerkzeug. Benutzen Sie des Gerät nicht, wenn Sie
müde sind oder unter dem Einfluss von Drogen, Alkohol oder Medikamenten stehen.
Ein Moment der Unachtsamkeit beim Gebrauch des Gerätes kann zu ernsthaften
Verletzungen führen.
b. Tragen Sie persönliche Schutzausrüstung und immer eine Schutzbrille. Das Tragen
persönIicher Schutzausrüstung, wie Staubmaske, rutschfeste Sicherheitsschuhe,
Schutzhelm oder Gehörschutz, je nach Art und Einsatz des Elektrowerkzeuges,
verringert das Risiko von Verletzungen.
c. Vermeiden Sie eine unbeabsichtigte lnbetriebnahme. Vergewissern Sie sich, dass der
Schalter in der Position ,,AUS(0)” ist, bevor Sie den Netzstecker in die Steckdose
stecken. Wenn Sie beim Tragen des Geräts den Finger am Schalter haben oder das
Gerät eingeschaltet an die Stromversorgung anschließen, kann dies zu Unfällen
führen.
d. Entfernen Sie Einstellwerkzeuge oder Schraubenschlüssel, bevor Sie das Gerät
einschalten. Ein Werkzeug oder Schlüssel, der sich in einem drehenden Geräteteil
befindet, kann zu Verletzungen führen.
e. Überschätzen Sie sich nicht. Sorgen Sie für einen sicheren Stand und halten Sie
jederzeit das Gleichgewicht. Dadurch können Sie das Gerät in unerwarteten
Situationen besser kontrollieren.
f. Tragen Sie geeignete Kleidung. Tragen Sie keine weite Kleidung oder Schmuck.
Halten Sie Haare, Kleidung und Handschuhe fern von sich bewegenden Teilen.
Lockere Kleidung, Schmuck oder lange Haare können von sich bewegenden Teilen
erfasst werden.
g. Wenn Staubabsaug- und -auffangeinrichtungen montiert werden können,
vergewissern Sie sich, dass diese angeschlossen sind und richtig verwendet werden.
Das Verwenden dieser Einrichtungen verringert Gefährdungen durch Staub.
h. Sichern Sie das Werkstück. Ein mit Spannvorrichtungen oder Schraubstock
festgehaltenes Werkstück ist sicherer gehalten als mit Ihrer Hand.
4) Sorgfältiger Umgang und Gebrauch von Elektrowerkzeugen
a. Überlasten Sie das Gerät nicht. Verwenden Sie für lhre Arbeit das dafür bestimmte
Elektrowerkzeug. Mit dem passenden Elektrowerkzeug arbeiten Sie besser und
sicherer im angegebenen Leistungsbereich.
b. Benutzen Sie kein Elektrowerkzeug, dessen Schalter defekt ist. Ein Elektrowerkzeug,
das sich nicht mehr ein- oder ausschalten lässt, ist gefährlich und muss repariert
werden.
UK
D
NL
F
E
P
I
S
SF
N
DK

Ferm 17
c. Ziehen Sie den Netzstecker aus der Steckdose, bevor Sie Geräteeinstellungen
vornehmen, Zubehörteile wechseln oder das Gerät weglegen. Diese
Vorsichtsmaßnahme verhindert den unbeabsichtigten Start des Geräts.
d. Bewahren Sie unbenutzte Elektrowerkzeuge außerhalb der Reichweite von Kindern
auf. Lassen Sie Personen das Gerät nicht benutzen, die mit diesem nicht vertraut
sind oder diese Anweisungen nicht gelesen haben. Elektrowerkzeuge sind gefährlich,
wenn Sie von unerfahrenen Personen benutzt werden.
e. Pflegen Sie das Gerät mit Sorgfalt. Kontrollieren Sie, ob bewegliche Geräteteile
einwandfrei funktionieren und nicht klemmen, ob Teile gebrochen oder so beschädigt
sind, dass die Funktion des Gerätes beeinträchtigt ist. Lassen Sie beschädigte Teile
vor dem Einsatz des Gerätes reparieren. Viele Unfälle haben ihre Ursache in schlecht
gewarteten Elektrowerkzeugen.
f. Halten Sie Schneidwerkzeuge scharf und sauber. Sorgfältig gepflegte
Schneidwerkzeuge mit scharfen Schneidkanten verklemmen sich weniger und sind
leichter zu führen.
g. Verwenden Sie Elektrowerkzeug, Zubehör, Einsatzwerkzeuge usw. entsprechend
diesen Anweisungen und so, wie es für diesen speziellen Gerätetyp vorgeschrieben
ist. Berücksichtigen Sie dabei die Arbeitsbedingungen und die auszuführende
Tätigkeit. Der Gebrauch von Elektrowerkzeugen für andere als die vorgesehenen
Anwendungen kann zu gefährlichen Situationen führen.
h. Beschädigte Schalter müssen bei einer Kundendienstwerkstatt ersetzt werden.
Benutzen Sie keine Elektrowerkzeuge, bei denen sich der Schalter nicht ein- und
ausschalten lässt.
i. Elektrowerkzeuge nicht unbeaufsichtigt laufen lassen. Gerät immer ausschalten und
erst verlassen, wenn das Gerät völlig zum Stillstand gekommen ist.
j. Wenn die Anschlussleitung beschädigt wird, muss diese durch einde besondere
Anschlussleitung ersetzt werden. Diese erhalten Sie beim Hersteller oder seinem
Kundendienst. Das Auswechseln der Anschlussleitung darf nur den Hersteller, seinen
Kundendienst oder ähnlich qualifizierte Personen durchgeführt werden.
5) Service
a. Lassen Sie Ihr Elektrowerkzeug von einer qualifizierten Fachkraft unter Verwendung von
Originalersatzteilen reparieren. Dadurch wird die sichere Funktionsweise des
Elektrowerkzeuges gewährleistet.
b. Achtung! Der Gebrauch anderer als in dieser Bedienungsanleitung empfohlener
Zubehörteile oder Zusatzgeräte kann eine Verletzungsgefahr bedeuten. Verwenden Sie nur
Originalersatzteile.
Zusätzliche Sicherheitshinweise
• Tragen Sie Gehörschutz. Die Lärmbelastung kann zu Gehörschäden führen.
• Verwenden Sie die im Lieferumfang enthaltenen Zusatzgriffe. Durch Kontrollverlust
kann es zu Verletzungen kommen.
Für den Gebrauch dieses Elektrowerkzeuges:
• Kontrollieren Sie die zu bohrende Stelle auf versteckte Elektrokabel, Gasleitungen
oder andere Hindernisse (z. B. mit einem Metalldetektor).
• Überprüfen Sie folgendes:
• Entspricht die Spannung des Gerätes der Netzspannung?
D

18 Ferm
• Sind Netzkabel, Isolation und Netzstecker in einwandfreiem Zustand:
unbeschädigt, nicht lose oder defekt?
• Ist die Wandsteckdose in Ordnung?
• Läuft der Bohrhammer unrund, ist er überhitzt oder erzeugt übermäßige Funken?
• Sollte eines der genannten Probleme auftreten, unterbrechen Sie sofort die Arbeit
und lassen Sie die Maschine von einem Fachmann reparieren.
Elektrische Sicherheit
Kontrollieren Sie immer, ob die Netzspannung mit der auf dem Typenschild
angegebenen Spannung übereinstimmt.
Die Maschine ist schutzisoliert; Erdung ist somit nicht erforderlich.
Austausch von Netzkabel oder Netzstecker
Entsorgen Sie alte Kabel oder Stecker sofort, sobald diese durch neue ersetzt wurden. Es
ist gefährlich, ein Netzkabel mit lockerem Stecker in die Steckdose zu stecken.
Verwendung von Verlängerungskabeln
Benutzen Sie ausschließlich Verlängerungskabel, die für die Maschinenleistung ausgelegt
sind. Der Mindestaderquerschnitt muss 1,5 mm
2
betragen. Bei Verwendung einer
Kabeltrommel muss das Kabel immer vollständig abgerollt werden.
3. BETRIEB
Beim Betrieb eines Bohrhammers muss durch den Bediener nur sehr wenig
Druck ausgeübt werden. Übermäßiger Druck auf das Werkzeug kann zur
Überhitzung des Motors und Verbrennen des verwendeten Werkzeuges
führen.
Zusatzhandgriff
Der Zusatzhandgriff kann 360º um den Bohrkopf gedreht werden, was ein sicheres und
bequemes Arbeiten für Links- und Rechtshänder ermöglicht.
• Lösen Sie den Handgriff durch Drehen gegen den Uhrzeigersinn.
• Drehen Sie den Handgriff in die gewünschte Position.
• Ziehen Sie den Handgriff in der neuen Position wieder fest.
Bohrer austauschen und entfernen
Abb. A + B
Ziehen Sie zunächst den Netzstecker aus der Steckdose, bevor Sie Bohrer
austauschen.
D

Ferm 19
Kontrollieren Sie während des Gebrauchs regelmäßig die Bohrer. Stumpfe
Bohrer müssen geschärft oder ausgetauscht werden.
• Ölen Sie den Bohrerschaft leicht ein, bevor Sie ihn in das Bohrfutter einsetzen.
• Schieben Sie die Arretierhülse (11, Abb. A) zurück und setzen Sie den Bohrer in die
• Bitte achten Sie darauf, dass die Gummischeibe außen bleibt (zwischen Scheibe und
Verriegelungshülse).
• Bohrfutteröffnung ein. Stellen Sie sicher, dass die Keilnut des Bohrers richtig im
Bohrfutter sitzt, indem Sie den Bohrer vorsichtig drehen, bis dieser einrastet. Lassen
Sie die Arretierhülse los.
• Um den Bohrer zu entfernen, schieben Sie die Arretierhülse nach hinten und halten
sie in dieser Position fest.
Bohrfutter + Adapter
Abb. C
Verwenden Sie das beigefügte Bohrfutter für Bohrungen mit gewöhnlichen Bohrkronen.
Bringen Sie das Bohrfutter wie in der Abbildung gezeigt an.
Tiefenanschlag einstellen
Abb. A
• Lösen Sie den Handgriff durch Drehen gegen den Uhrzeigersinn.
• Schieben Sie den Tiefenanschlag (Lineal) durch die Öffnung des Zusatzhandgriffs.
• Stellen Sie das Lineal auf die gewünschte Tiefe ein.
• Ziehen Sie die Schraube gut fest.
Funktionsumschalter
Abb. D
Die richtige Position des Umschalters für die Maschinenfunktionen entnehmen Sie bitte
der Abbildung auf Seite 3.
1 = Meißelhammer/Meißel
2 = Bohrhammer
3 = Bohren
Ein-/Ausschalten
• Um die Bohrmaschine einzuschalten, betätigen Sie den Ein-/Aus-Schalter.
• Zum Ausschalten, lassen Sie den Ein-/Aus-Schalter los.
Montieren der Staubkappe
Abb.E
Die Staubkappe verhindert, dass Staub beim Bohren in Zimmerdecken in das Gerät
gelangt.
• Entfernen Sie den Bohrer.
• Schieben Sie die Staubkappe über den Bohrerschaft.
• Setzen Sie den Bohrer mit der Staubkappe in das Bohrfutter ein.
• Wechseln Sie eine beschädigte Staubkappe immer sofort aus.
D

20 Ferm
4. WARTUNG
Achten Sie darauf, dass die Maschine nicht an das Stromnetz angeschlossen
ist, wenn Wartungsarbeiten an den mechanischen Teilen durchgeführt werden.
Maschinen sind so konzipiert, dass sie lange Zeit bei minimalem Wartungsaufwand
problemlos funktionieren. Durch regelmäßiges Reinigen und sachgerechte Behandlung
verlängern Sie die Lebensdauer Ihrer Maschine.
Beschädigungen
Die Maschine sollte regelmäßig auf die nachfolgenden möglichen Beschädigungen
überprüft und ggf. repariert werden.
• Beschädigungen am Netzkabel
• Defekt des Ein/Aus-Schalters
• Kurzschlüsse
• Beschädigungen an beweglichen Teilen.
Störungsbeseitigung
• Der Motor läuft nicht,
obwohl die Maschine
eingeschaltet ist.
• Motor erzeugt laute
Geräusche und läuft zu
langsam oder gar nicht.
• Keine
Spannungsversorgung.
• Wackelkontakt im
Ein/Aus-Schalter
.
• Zu niedrige
Netzspannung.
• Motorschaden.
• Abgenutzte
Kohlebürsten.
• Motor durch zu starken
Druck oder zu große
Bohrtiefe überlastet.
• Motorschaden.
• Zu niedrige
Netzspannung.
• Abgenutzte
Kohlebürsten.
• Überprüfen Sie die
Spannungsversorgung.
• Reparieren oder
ersetzen Sie den
Schalter.
• Verlängerungskabel zu
lang oder
unterdimensioniert.
• Lassen Sie Ihre
Maschine von einem
Fachmann reparieren.
• Lassen Sie die
Kohlebürsten ersetzen.
• Verringern Sie den
Druck oder die
Bohrtiefe, reduzieren
Sie die Leistung.
• Lassen Sie Ihre
Maschine von einem
Fachmann reparieren.
• Netzspannung
regulieren.
• Ersetzen Sie die
Kohlebürsten.
D

Ferm 21
Reinigung
Reinigen Sie das Maschinengehäuse regelmäßig mit einem weichen Tuch, vorzugsweise
nach jedem Gebrauch. Achten Sie darauf, dass die Lüftungsschlitze staub- und
schmutzfrei sind. Verwenden Sie bei hartnäckigem Schmutz ein weiches mit Seifenwasser
angefeuchtetes Tuch. Verwenden Sie keine Reinigungsmittel wie Benzin, Alkohol,
Ammoniak, usw. Diese Substanzen greifen die Kunststoffteile an.
Schmierung
Abb. F
• Schmieren Sie das Bohrfutter des Bohrhammers regelmäßig.
• Der Schmiermittelstand in der Maschine muss regelmäßig überprüft werden:
• Entfernen Sie den Schmierdeckel (11) oben auf der Maschine (Off).
• Entfernen Sie auch den zweiten Deckel (mit 4 Nasen).
• Jetzt sind die rotierenden Teile im Maschineninneren sichtbar. Die bewegten Teile
sollten mit Fett bedeckt sein.
• Geben Sie wenn erforderlich etwas Fett in die Schmieröffnung.
• Setzen Sie den Deckel wieder auf die Öffnung und drehen Sie ihn fest.
• Bringen Sie den Schmierdeckel wieder an (On).
Fehler
Sollte beispielsweise nach Abnutzung eines Teils ein Fehler auftreten, dann setzen Sie
sich bitte mit der auf der Garantiekarte angegebenen Serviceadresse in Verbindung. Im
hinteren Teil dieser Anleitung befindet sich eine ausführliche Übersicht über die Teile, die
bestellt werden können.
Umwelt
Um Transportschäden zu verhindern, wird die Maschine in einer soliden Verpackung
geliefert. Die Verpackung besteht weitgehend aus verwertbarem Material.
Benutzen Sie also die Möglichkeit zum Recyclen der
Verpackung.
Schadhafte und/oder alte elektrische oder elektronische Geräte müssen an
den dafür vorgesehenen Recycling-Stellen abgegeben werden.
Garantie
Lesen Sie die Garantiebedingungen auf der separat beigefügten Garantiekarte.
• Überhitzung des
Getriebegehäuses.
• Starkes Funkensprühen
des Motors.
• Maschine überlastet
oder Bohrer stumpf.
• Verringerte
Netzspannung.
• Prüfen Sie, ob die
Kohlebürsten abgenutzt
sind.
• Verringern Sie die
Belastung und schleifen
Sie den Bohrer.
• Netzspannung
regulieren.
D

22 Ferm
CE KONFORMITÄTSERKLÄRUNG (D)
Wir erklären in alleiniger Verantwortung, daß dieses Produkt,
TBH-1400N Bohrhammer
mit den folgenden Normen oder normativen Dokumenten übereinstimmt:
EN60745-1: 2003 + A1, EN60745-2-6: 2003, EN55014-1, EN55014-2,
EN61000-3-2, EN61000-3-3
gemäß den Bestimmungen der Richtlinien:
98/37/EC, 2006/95/EC, 89/336/EEC, 2002/95/EC, 2002/96/EC
ab 01-11-2006
ZWOLLE NL
J.A. Bakker - van Ingen J. Lodewijk
CEO Ferm BV Quality Manager Ferm Global
Unsere Firmenpolitik ist auf ständige Verbesserung unserer Produkte ausgerichtet und wir
behalten uns das Recht vor, die Produktspezifikation ohne vorherige Benachrichtigung zu
ändern.
Ferm BV • Lingenstraat 6 • 8028 PM Zwolle • Niederlande
D

Ferm 23

24 Ferm

Ferm 25

26 Ferm
Spare parts list
No. Description Position
700171 Depth gauge 24
700172 Side handle 25 till 29
700393 Locking sleeve (set) 76 till 78
806001 Bearing 6001 ZZ 81
700394 Rotor 82
700395 Stator 89
700396 Carbon brush (set) 95
700397 Switch 107
800608 Bearing 608 ZZ 116
Ersatzteilliste
No. Bezeichnung Position
700171 Tiefenanschlag 24
700172 Seitenhandgriff 25 bis 29
700393 Verriegelung (Satz) 76 bis 78
806001 Kugellager 6001 ZZ 81
700394 Rotor 82
700395 Stator 89
700396 Kohlebürsten(Satz) 95
700397 Schalter 107
800608 Kugellager 608 ZZ 116

Ferm 27
Exploded view / Explosionszeichnung

www.ferm.com GB-D-0703-28
GB Subject to change
D Änderungen vorbehalten
 Loading...