

Page 1
OUTDOOR SPORTSWATCH 2000
USER GUIDE
HANDLEIDING
MANUEL D’UTILISATEUR
BEDIENUNGSANLEITUNG
MANUAL DE USUARIO
MANUAL DO UTILIZADOR
1.1
Page 2

UK The features described in this manual are published with reservation
to modifications.
NL De in deze handleiding beschreven mogelijkheden worden
gepubliceerd onder voorbehoud van wijzigingen.
FR Les possibilités décrites dans ce manuel sont publiées sous réserve
de modifications.
DE Die in dieser Bedienungsanleitung umschriebenen Möglichkeiten,
werden vorbehaltlich Änderungen publiziert.
ES Las características descritas en este manual pueden ser objeto de
futuras modificaciones.
PT As características descritas neste manual são publicadas sob reserva
de modificação.
UK The CE symbol indicates that the unit complies with the essential
requirements of the R&TTE directive.
NL Het toestel voldoet aan de basiseisen van de R&TTE-richtlijn. Dit wordt
bevestigd door de CE-markering.
FR La conformité de l’appareil avec les exigences fondamentales de la
directive européenne R&TTE relative aux terminaux, est confirmée par
le label CE.
DE Die Übereinstimmung des Gerätes mit den grundlegenden
Anforderungen der R&TTE-Directive ist durch das CE-Kennzeichen
bestätigt.
ES El sello CE corrobora la conformidad del equipo con los
requerimientos básicos de la directiva R&TTE.
PT O símbolo CE indica que esta unidade cumpre com os requisitos
essenciais da directiva R&TTE.
Page 3

3
ENGLISH
TOPCOM Outdoor Sportswatch 2000
1 INTRODUCTION
Thank you for purchasing of Outdoor Sports Watch 2000. This Watch
features electronic sensors which measures and shows the outdoor
conditions: weather forecast, temperature, pressure, altitude and compass
directions. Your Watch provides the essential information at the time during
hiking, wild camping or other outdoor activities especially for a prolonged
period.
2 SAFETY NOTES
Read the instruction before using the Watch.
Avoid exposing your Watch to extreme conditions for an unreasonable time.
Avoid rough usages or severe impacts to your Watch.
Do not open the Watch's case unless a certified service agency because it
contains precise electronic sensors and components.
3 CARE AND MAINTENANCE
Clean your Watch with a soft cloth occasionally that working for a longer use
life of your watch.
Keep your Watch away from magnets or the appliances which contains
magnetic objects such as mobile phones, speakers and motors.
Store your Watch in a dry place when it is not in use.
Page 4
4
TOPCOM Outdoor Sportswatch 2000
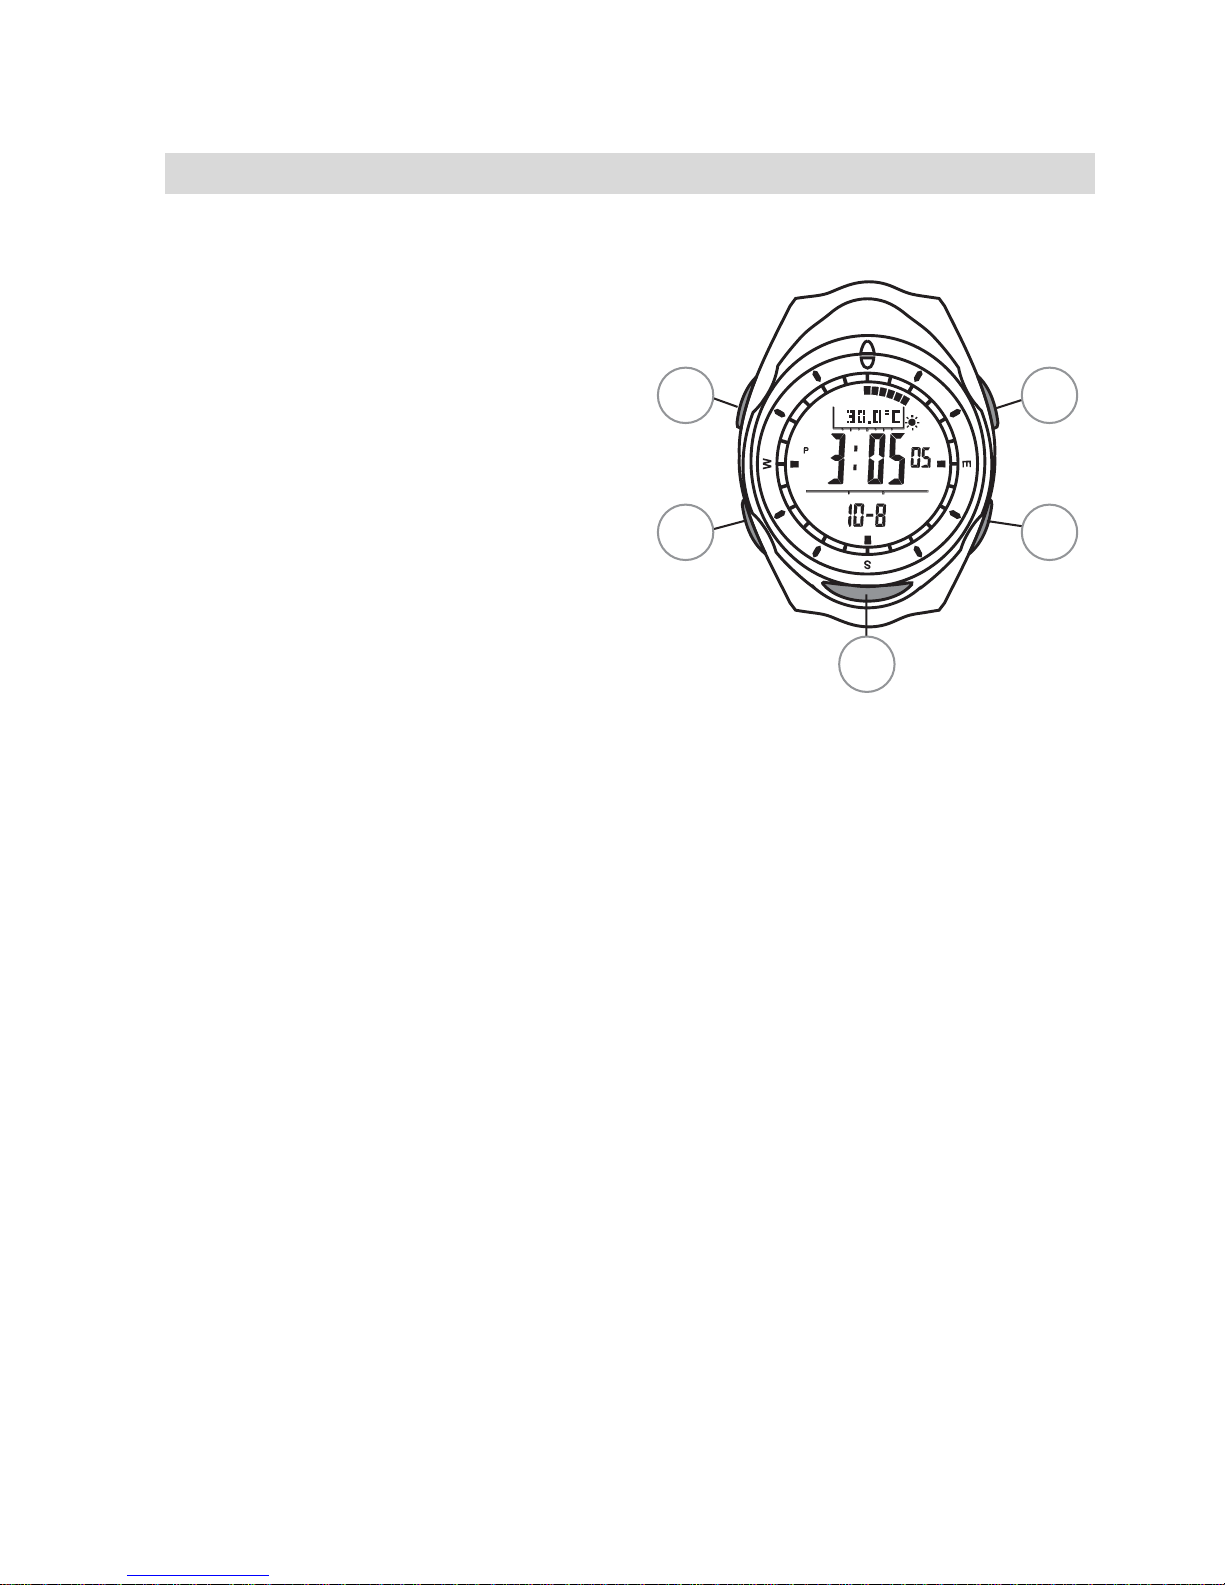
4 BUTTONS
A. START/STOP BUTTON [S/S]
• To 'start' or 'stop' the
chronograph function during
chronograph mode.
• To select between the
functional displays under the
same mode.
• To toggle Yes/No.
• To increase the digits during
setting display.
B. LAP/RESET BUTTON [L/R]
• To activate the 'lap' or 'reset'
the chronograph function
during chronograph mode.
• To move the cursor to left by one during history recalling.
• To decrease the digits under setting display.
• To toggle Yes/No.
C. SENSOR BUTTON [SR]
• To select among the Time, Altimeter, Barometer or Compass Mode.
D. MODE BUTTON [M]
• To select among the Current Time, Daily Alarm, Chronograph, Timer,
Pacer or Dual Time Mode.
• To select among the setting items during setting display.
E. LIGHT BUTTON [EL]
• To turn on the back light.
A
B
E
D
C
Page 5
5
ENGLISH
TOPCOM Outdoor Sportswatch 2000
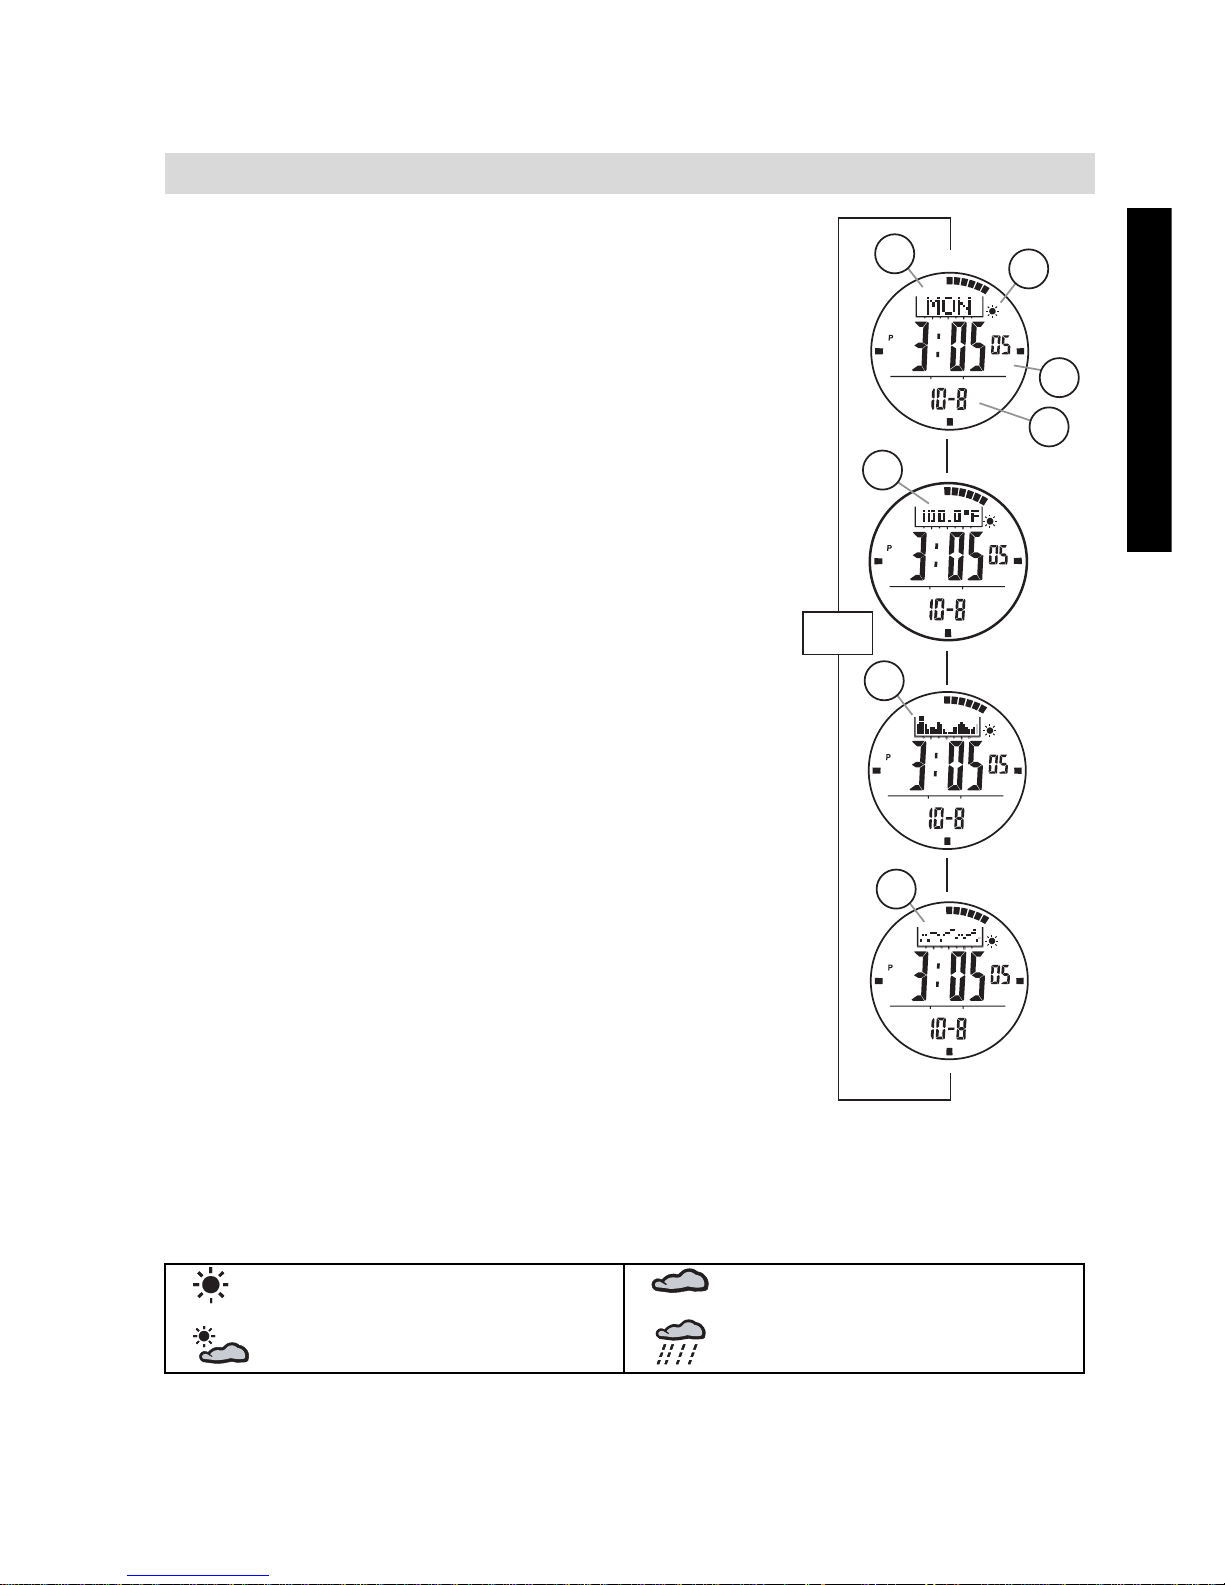
5 CURRENT TIME MODE
5.1 FUNCTIONAL DISPLAY
The Current Mode includes 4 kinds of functional
display:
• Day of Week Display
• Temperature Display
• Altitude Tendency Display
• Sea Level Pressure Tendency
Press button [S/S] following the adjacent
diagram.
5.2 DISPLAY INFORMATION
(See diagram)
a. Day of the week
b. Weather forecast
c. Current Time
d. Date
e. Temperature
f. Altitude tendency
g. Sea level pressure tendency
6 WEATHER FORECAST
A special feature of the Watch is the coming weather forecast function. It
works by analyzing the changes of the past air pressure.
The Watch provides 4 different symbols to indicate the weather forecast.
Sunny
Cloudy with Sun
Cloudy
Raining
b
c
d
e
f
g
[S/S]
[S/S]
[S/S]
[S/S]
a
Page 6

6
TOPCOM Outdoor Sportswatch 2000
IMPORTANT
The symbols will be shown only in Current Time and Dual Time Mode
Since the weatherprediction is based on the changes in the air pressure, it is highly recommended to stay at the same altitude for at least
24 hours for a higher accuracy predication.
The Watch predicts the weather by adopting general weather prediction principles, it is NOT capable to reflect the dramatic changing of
weather within a very short period of time.
6.1 HOW TO SET CURRENT TIME
• Press and hold the [M] button for about 2 seconds in
the Current Time Mode
. In setting display, the
flashing "SET" icon will appear.
• Press the [M] button to change the selection
following the adjacent Current Time Setting
Sequence.
• When the second digits are flashing (selected), press the [S/S] or
[L/R] button to reset the digits to "00".
• When the digits are flashing (selected), press the [S/S] or [L/R]
button to increase / decrease the number.(Hold down the button to
change the number at a higher speed).
• When month-day order setting is selected, press the [S/S] or [L/R]
button to select between month-day and day-month format.
• When 12/24 hour format setting is being selected, press the [S/S]
button to select between 12 and 24 hour format.
• When LCD contrast is selected, press the [S/S] or [L/R] button to
increase / decrease the contrast level (1 to 10).
• When key beep setting is selected, press the [S/S] or [L/R] button to
select between ON and OFF the beep.
• Press and hold the [M] button to exit the setting display.
1. Seconds
2. Minute
3. Hour
4. Year
5. Month
6. Day
7. Month/Day
8. 12/24h Format
9. LCD display contrast
10. Key Beep
SE
T
SE
T
Page 7
7
ENGLISH
TOPCOM Outdoor Sportswatch 2000
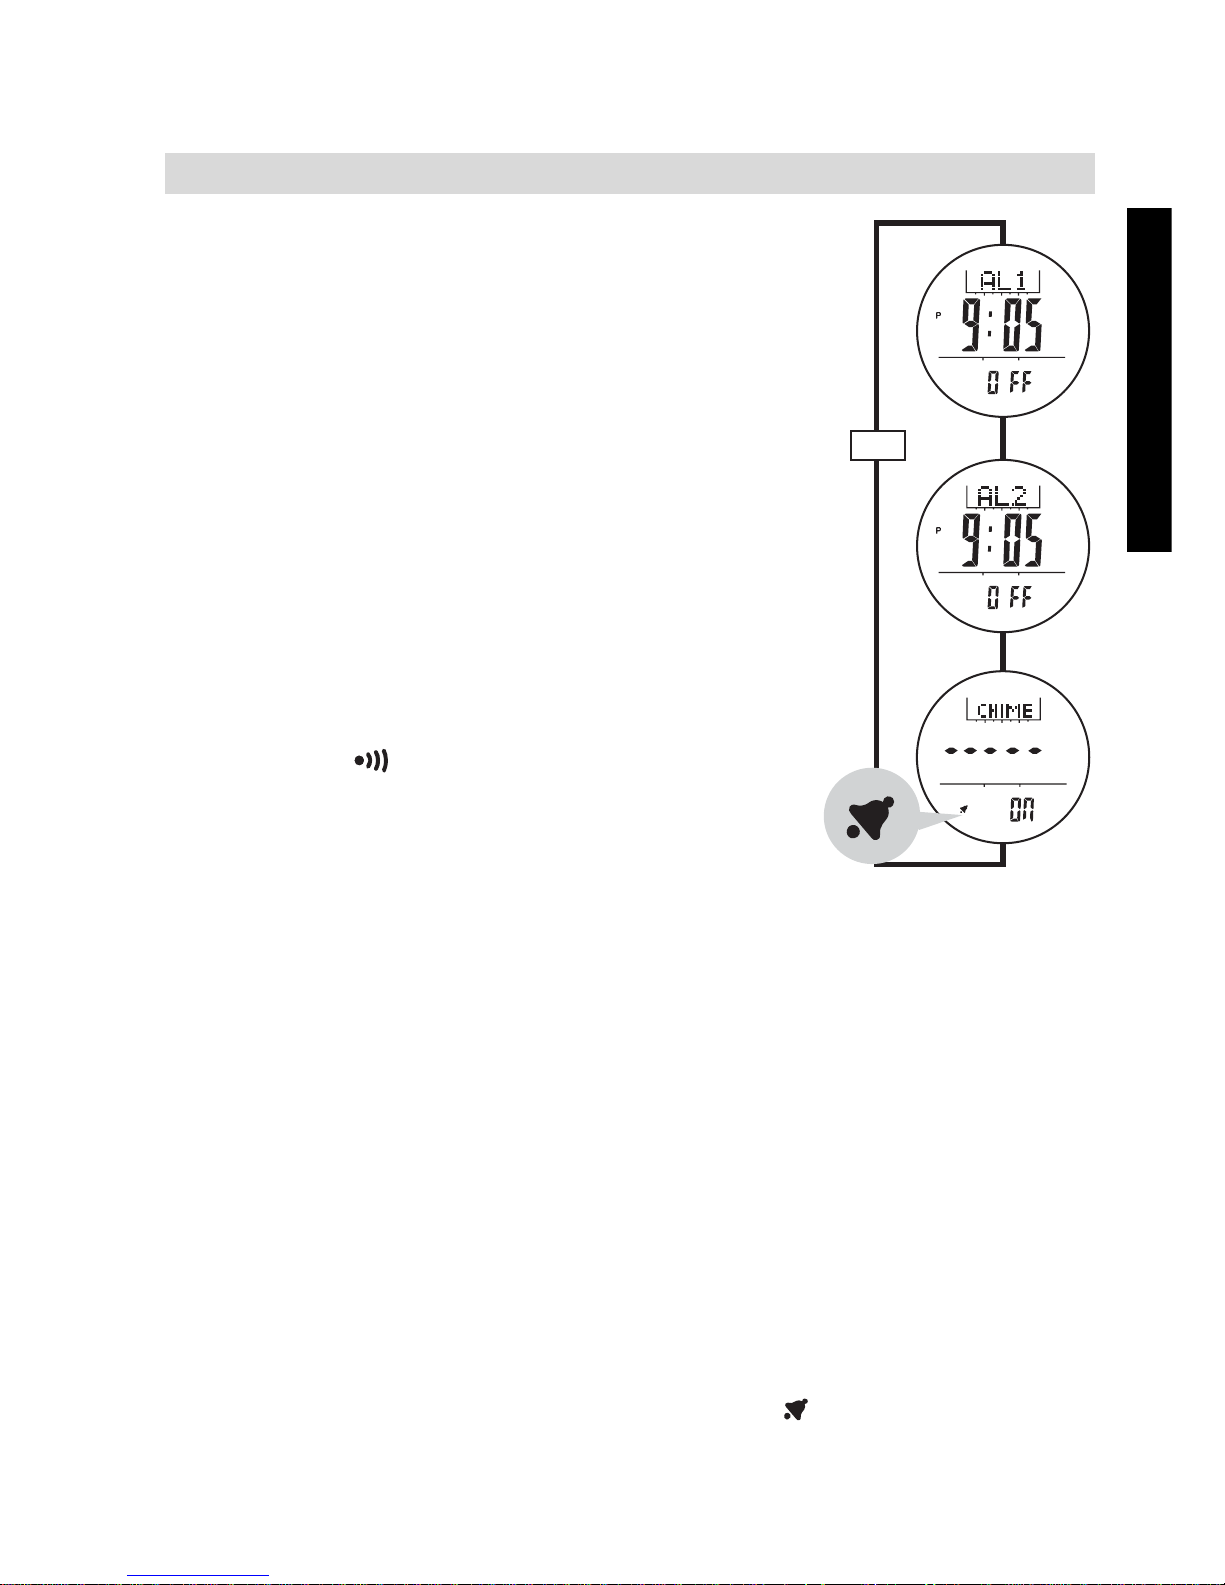
7 DAILY ALARM
7.1 DAILY ALARM 1 & 2
• The Watch includes two independent daily
alarms.
• In current time mode, press [M] briefly to
enter alarm mode.
• Press the [S/S] button to switch among the
Daily Alarm 1, Daily Alarm 2 and Chime. (See
adjacent diagram)
7.1.1 HOW TO TURN ON/OFF THE DAILY
ALARM
• In Daily Alarm ‘AL1’ or ‘AL2’ mode, press the
[L/R] button.
• When the Daily Alarm is ON, the alarm
indicator ' ' will appear.
• The Watch will sound every day at the preset
alarm time .
• When the alarm sounds, press any button to
stop the beep.
7.1.2 HOW TO SET THE ALARM 1 AND ALARM 2
• In Daily Alarm ‘AL1’ or ‘AL2’ mode, press and hold the [M] button for
about 2 seconds. The flashing "SET" icon will appear.
• In setting display, press the [M] button to switch between minutes and
hour.
• When the digits are flashing (selected), press the [S/S] or [L/R]
button to increase / decrease the number. (Hold down the button to
change the number at a higher speed).
• When the set is completed, press and hold the [M] button to exit the
setting display.
7.1.3 HOW TO TURN ON/OFF THE HOURLY CHIME
• In Chime mode, press the [L/R] button in Chime to turn ON/OFF the
Hourly Chime.
• When the chime is ON, the chime indicator ' ' will appear. If the
Chime indicator is displayed, the Watch will beep every hour.
[S/S]
[S/S]
[S/S]
Page 8
8
TOPCOM Outdoor Sportswatch 2000
8 CHRONOGRAPH MODE
The Watch includes a function to measure elapsed times, accumulative
elapsed time and lap times.
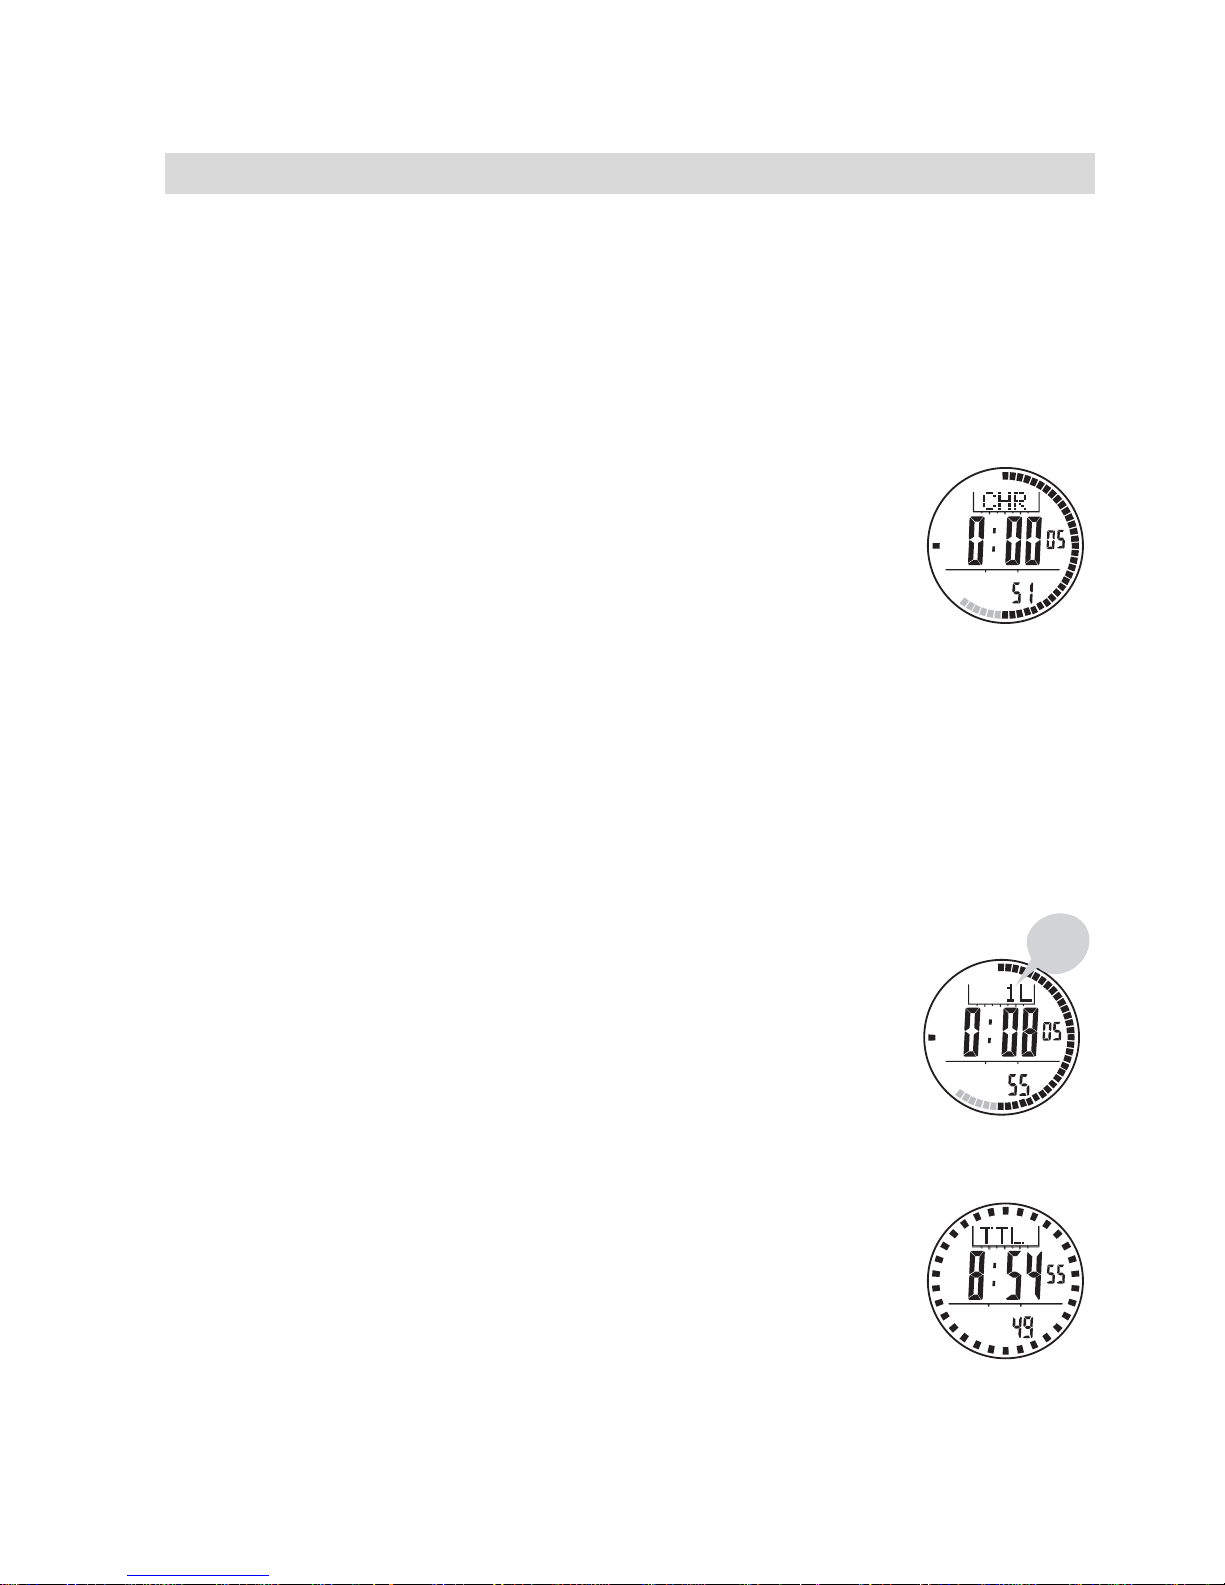
8.1 CHRONOGRAPH MODE
• In current time mode, press [M] twice to enter
Chronograph mode.
•To start the chronograph, press the [S/S] button
once.
•To stop the chronograph, press the [S/S] button once
again
• Repeat the above mentioned steps to get the
accumulative elapsed time of which the chronograph
is running.
•To reset the chronograph, hold the [L/R] button for 2 seconds.
8.2 LAP TIMES
The chronograph can measure elapsed time without stopping the counting
- lap time. (up to 100 laps)
• When the chronograph is counting, press the [L/R]
button once to record a lap time (this key operation
will not affect the counting).The lap number and lap
time will appear on the display for 10 seconds, and it
returns to the counting display automatically.
• Repeat the steps mentioned above to get another lap
time.
•To stop press the [S/S] button once again.
•To recall lap times, hold down the [M] button in the
Chronograph Stop Mode.
• When the Total Time (TTL) is displayed, press the
[S/S] or [L/R] button to check the next / previous lap
time.
• Hold down the [M] button any time to go back to the
Chronograph Display.
•To reset the lap times, hold the [L/R] button for 2 seconds in the
Chronograph Stop Display.
1e
Lap
Page 9
9
ENGLISH
TOPCOM Outdoor Sportswatch 2000
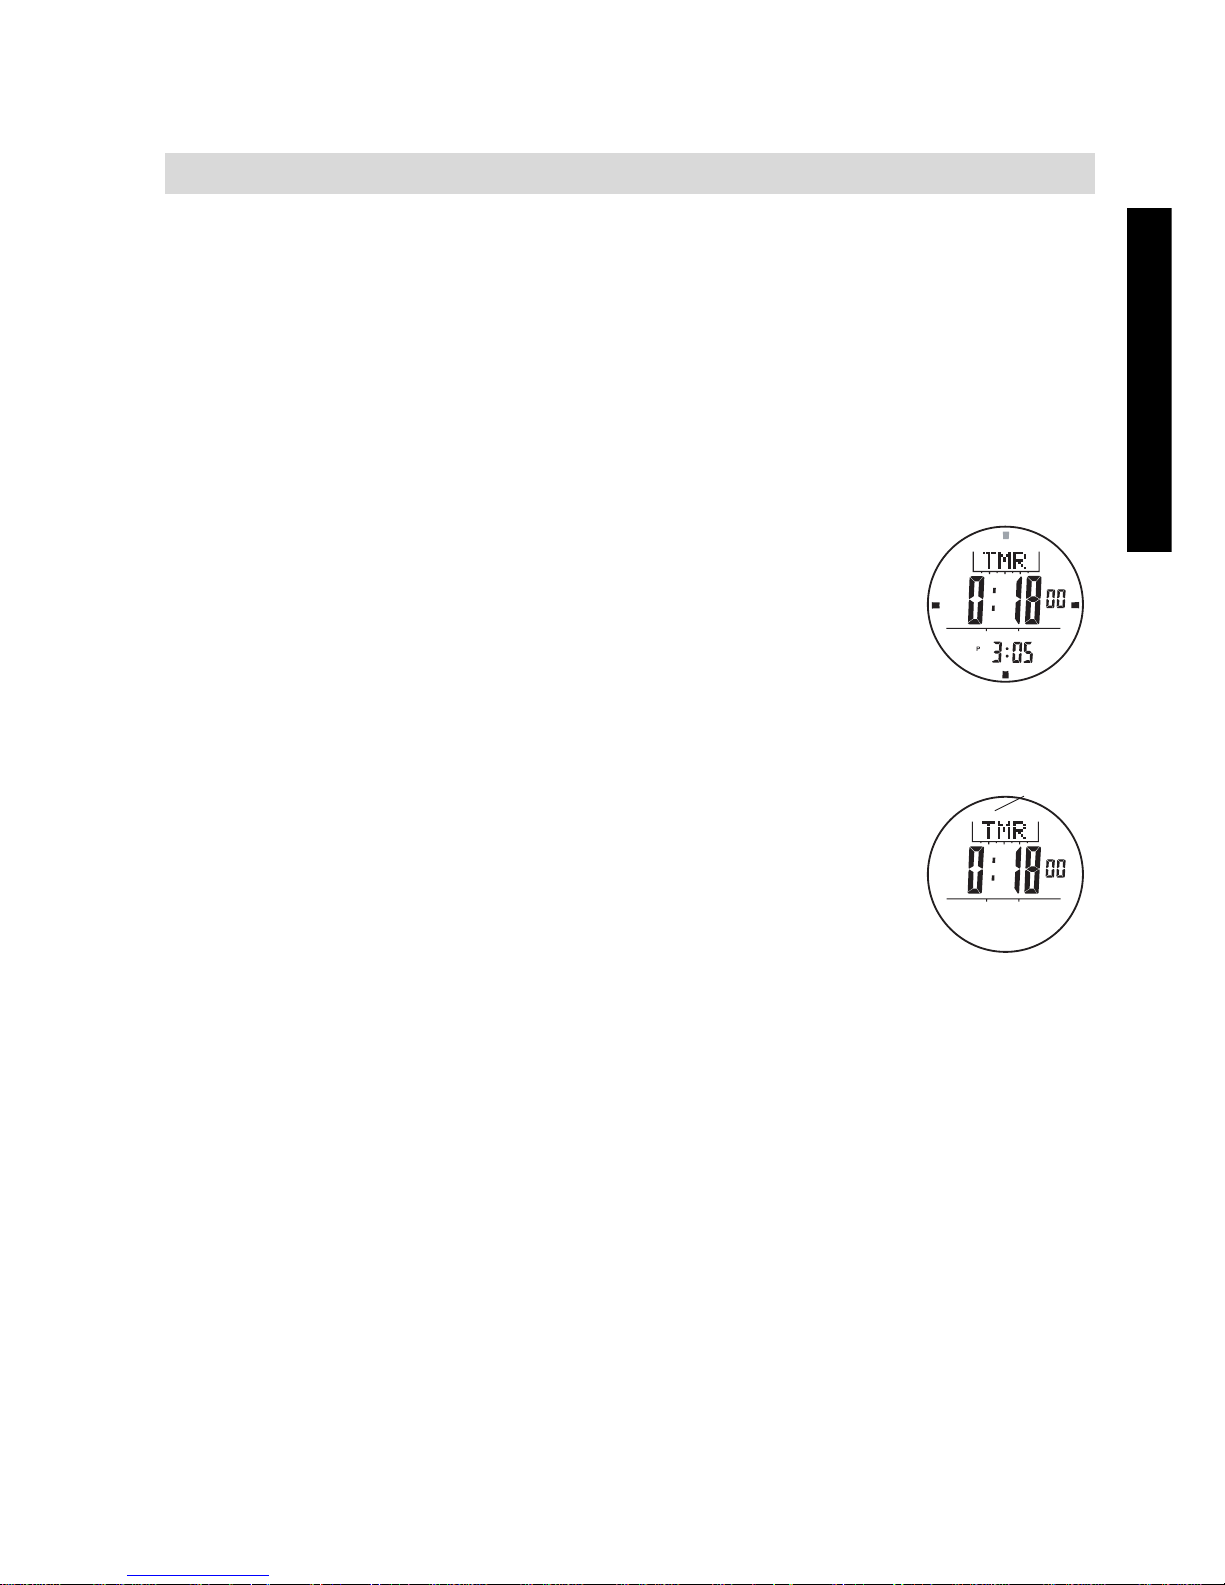
9 COUNTDOWN TIMER
The Timer counts down from the preset value to zero.
9.1 SETTING THE TIMER
There are 6 Quick-Preset-Values: 1, 3, 5, 10, 15 and 45 minutes and one
user defined time. The setting range is up to 99 hours 59 minutes 99
seconds.Once the User Preset Value has been set, such as 30 minutes,
that value is stored into the Watch for the user to recall next time.
• In current time mode, press [M] until TMR is
displayed.
• Press the [L/R] button to select a preset time or the
user defined time.
To set the user defined time.
• Hold the [M] button for 2 seconds. The flashing "SET"
icon will be displayed.
• Press the [M] button to switch between hour, minutes
and seconds.
• When the digits are flashing (selected), press the
[S/S] or [L/R] button to increase / decrease the
number (Hold down the button change the number at
a higher speed).
• When the setting is completed, hold the [M] button to
exit the setting display.
9.2 HOW TO USE THE TIMER.
• To start the timer, press the [S/S] button.
- In last 10 minutes, it will beep for every minute.
- In the last minute it will beep for every 10 seconds.
- in the last 5 seconds it will beep every second .
- As countdown time is reached, a beep sound which will last for 30
seconds.
• To stop the timer, press the [S/S] button once again .
• To reload the timer (existing preset counting time) for a new counting,
press the [L/R] button when the timer was stopped.
SET
SE
T
Page 10
10
TOPCOM Outdoor Sportswatch 2000
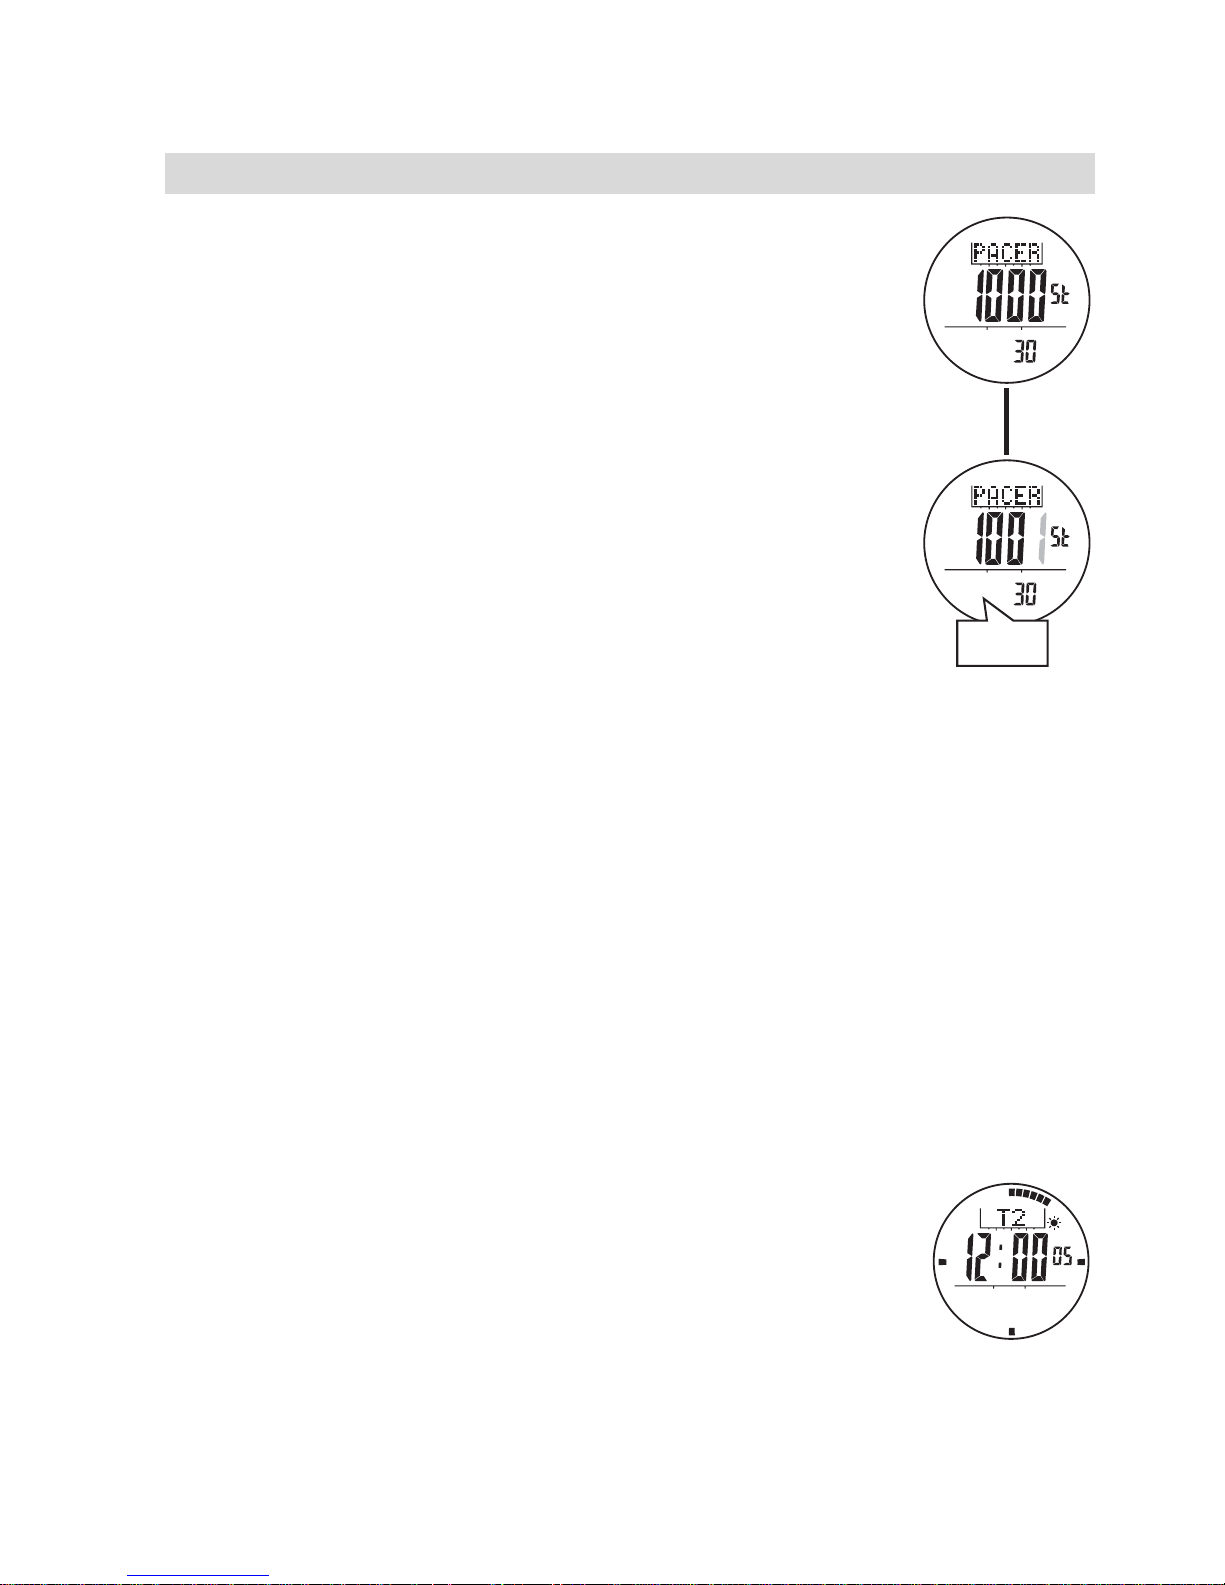
10 PACER MODE
The pacer will generate beeps at a pre-defined beeping
rate.The beeping rate can be set from 30 to 180 beats per
minute (BPM) in step of 5.
10.1 USING THE PACER
• In current time mode, press [M] until PACER is
displayed.
• Press the [S/S] button to start the pacer.
• The step counter “St” will run in the middle of the
display (max 99999 steps)
• Press the [S/S] button to stop the pacer.
• To reset the step counter, press and hold the [L/R]
button when the pacer was stopped.
10.2 HOW TO SET THE BEEPING RATE
• Press and hold the [M] button for 2 seconds in Pacer Mode.
• When the beeping rate digits start to flash, press the [S/S] or [L/R]
button to increase / decrease the number. (Hold down the button to
change the number at a higher speed).
• When the setting is completed, press and hold the [M] button to exit
the setting display.
11 DUAL TIME MODE
The Watch includes a function to show the time for a second time zone.
The second digit of the dual time synchronizes with the Current Time.
• In current time mode, press [M] until T2 is displayed.
• Hold the [M] button for 2 seconds. The flashing "SET"
icon will be displayed.
• Press the [M] button to switch between hour and
minutes.
• When the digits are flashing (selected), press the
[S/S] or [L/R] button to increase / decrease the
number (Hold down the button change the number at a higher speed).
• When the setting is completed, hold the [M] button to exit the setting
display.
[S/S]
beep-beep
Page 11
11
ENGLISH
TOPCOM Outdoor Sportswatch 2000
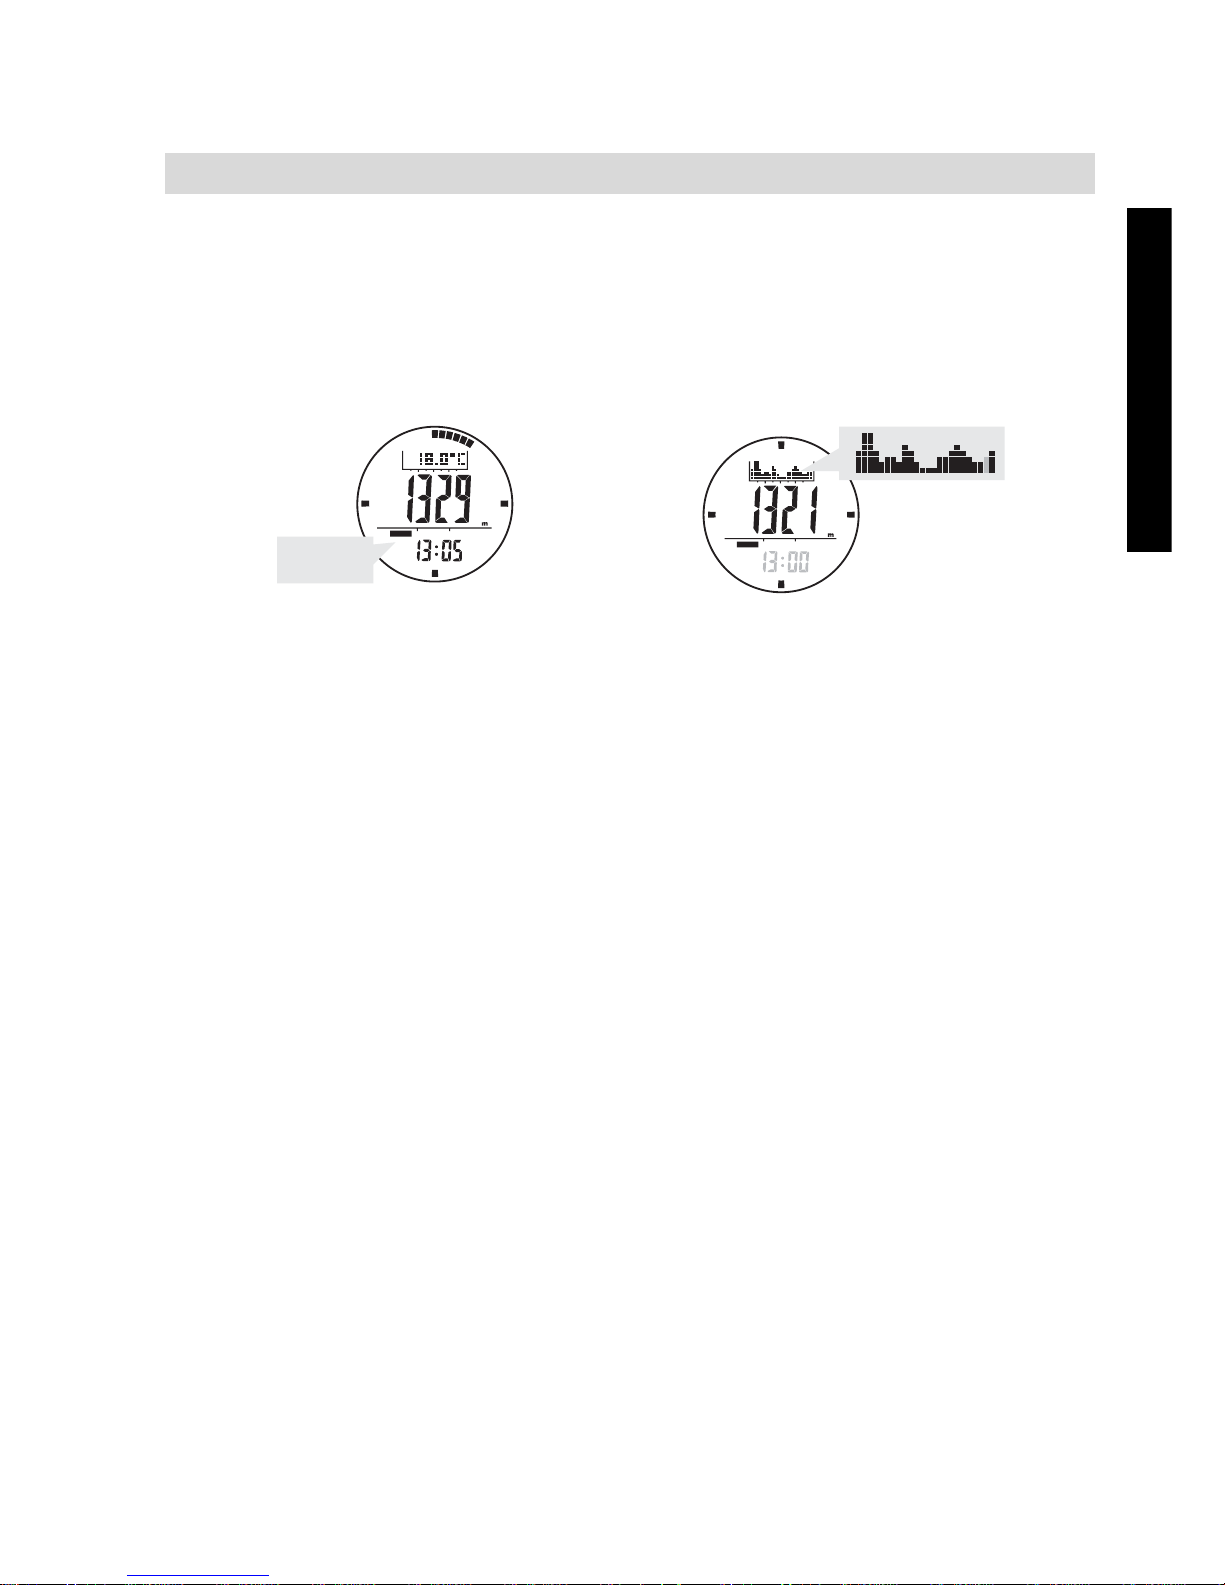
12 ALTIMETER MODE
12.1 DISPLAY
The Watch includes two Altimeter functional displays:
The current (history) altitude is displayed on the middle row.
The current (history) time is displayed on the bottom row
If you want to have an accurate reading of air temperature, you must
remove the watch from the wrist that allows no body temperature
effect on your watch.
12.2 ALTUDE AND TEMPERATURE UNIT
The Watch can display altitude in meter (m) or feet (ft) and can display the
temperature in degree Celsius (C) or degree Fahrenheit (F).
• To switch among different unit, hold down the [S/S] button to change
the units following the adjacent units select sequence.
12.3 ALTITUDE HISTORY
The Watch records the altitude reading automatically every hour at the
hour, i.e 1:00, 2:00, 3:00 and etc. These records will be plotted into a
altitude record graph. In History Display, the altitude record graph shows on
the top row of the display. To review the altitude records of the last 23
hours, press the [L/R] button to move cursor left cyclically, then the
respective altitude record and its recording time (flashing) will appear on the
display.
1. Temperature 2. Altitude History
ALTI
ALTI
ALTI
Page 12
12
TOPCOM Outdoor Sportswatch 2000
12.4 ALTIMETER CALIBRATION
To have an accurate reading, you have to calibrate your altimeter as much
as possible.
There are 4 kinds of calibration methods.
NOTE: The altitude is calibrated independently on each mode. For example, if absolute altitude is selected, effect of the sea level pressure
previous setting will be ignored
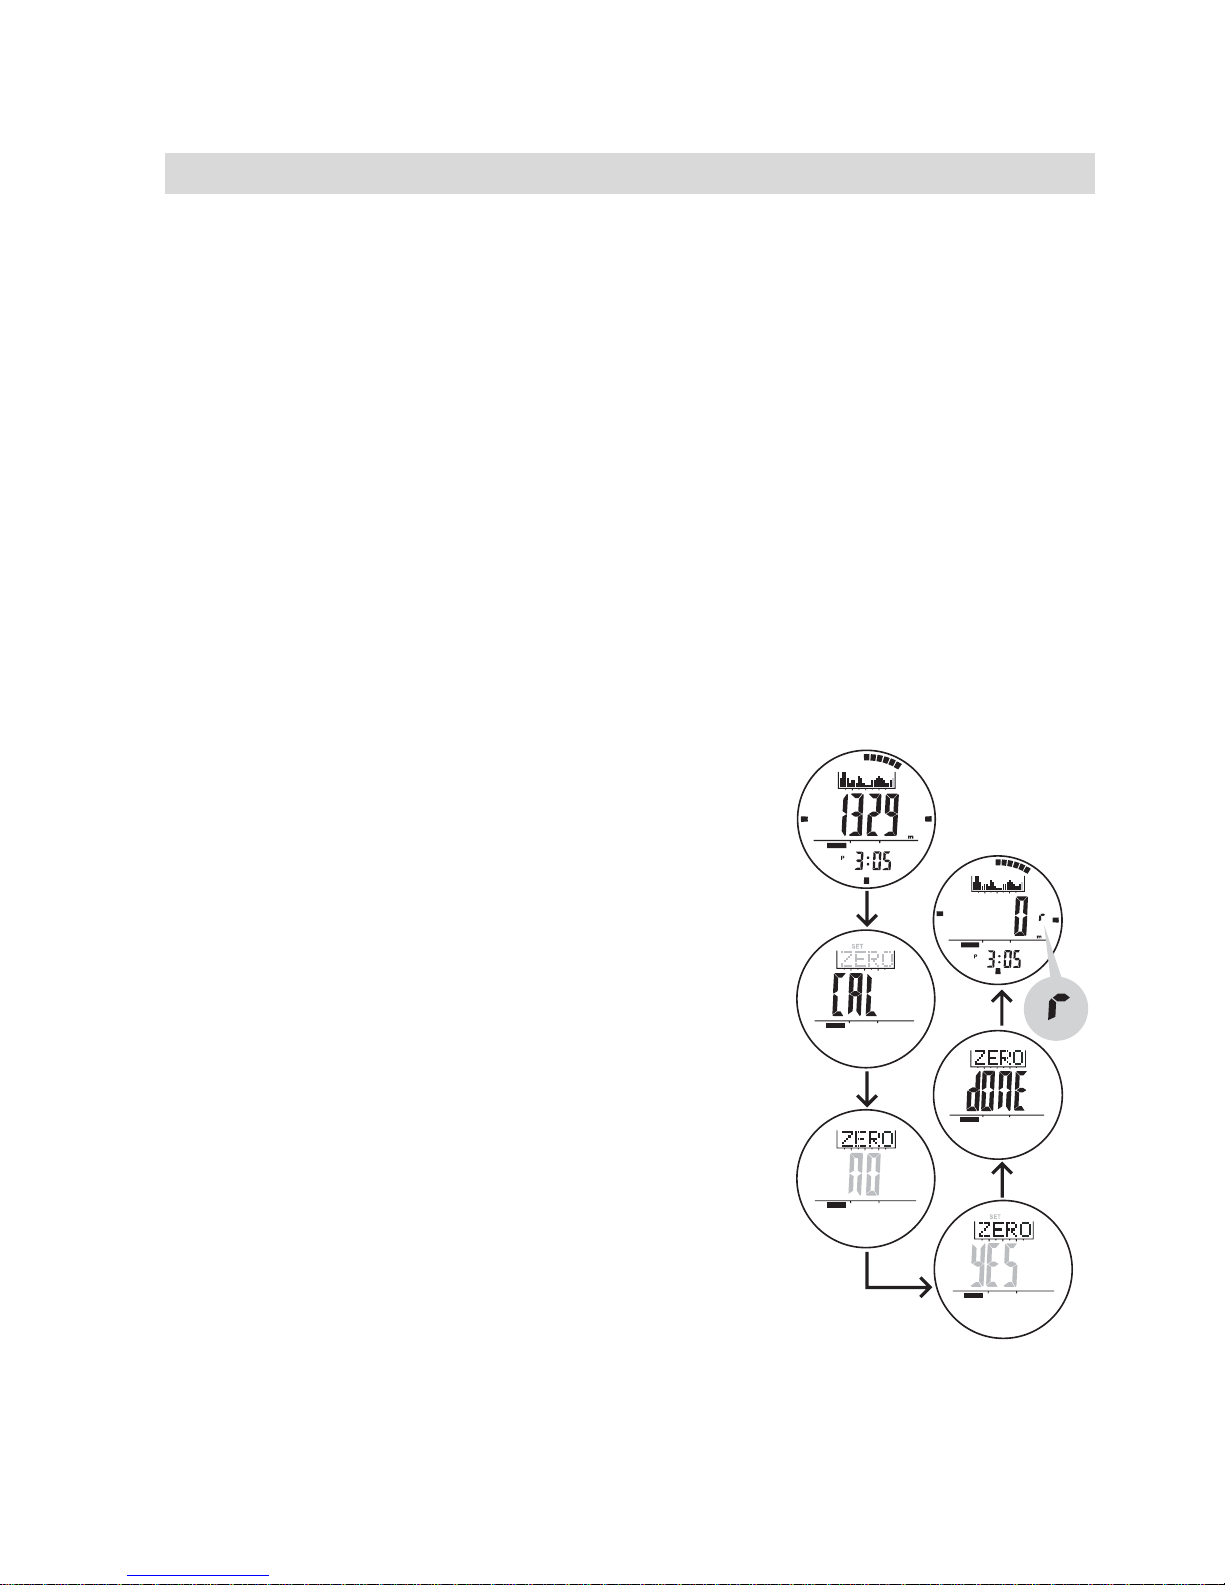
12.4.1 ZERO ALTITUDE ADJUSTMENT
The Watch can measure the relative altitude, for example, it can measure
the ascending or the descending altitude between the starting point and the
finish point of a trail.To measure this, the current altitude must be set to
'zero' at a reference point such as the starting point of a trail. An ‘r’ indicator
will be appeared on the display.
• In current time mode, press the [SR] button
until the altitude “ALTI” is displayed.
• Hold the [M] button for 2 seconds. The
flashing "SET" icon and “ZERO” will be
displayed.
• Press the [S/S] button in Display, "NO" is
displayed.
• Press the [S/S] button to select “YES”
• Hold the [M] button for 2 seconds to
confirm the setting and to exit Adjustment
Display.
• "DONE" will be displayed and the watch
will be back in Altitude Mode. The altitude is
0 meter.
ALTI
ALTI
ALTI
ALTI
SET
ALTI
ALTI
Page 13
13
ENGLISH
TOPCOM Outdoor Sportswatch 2000
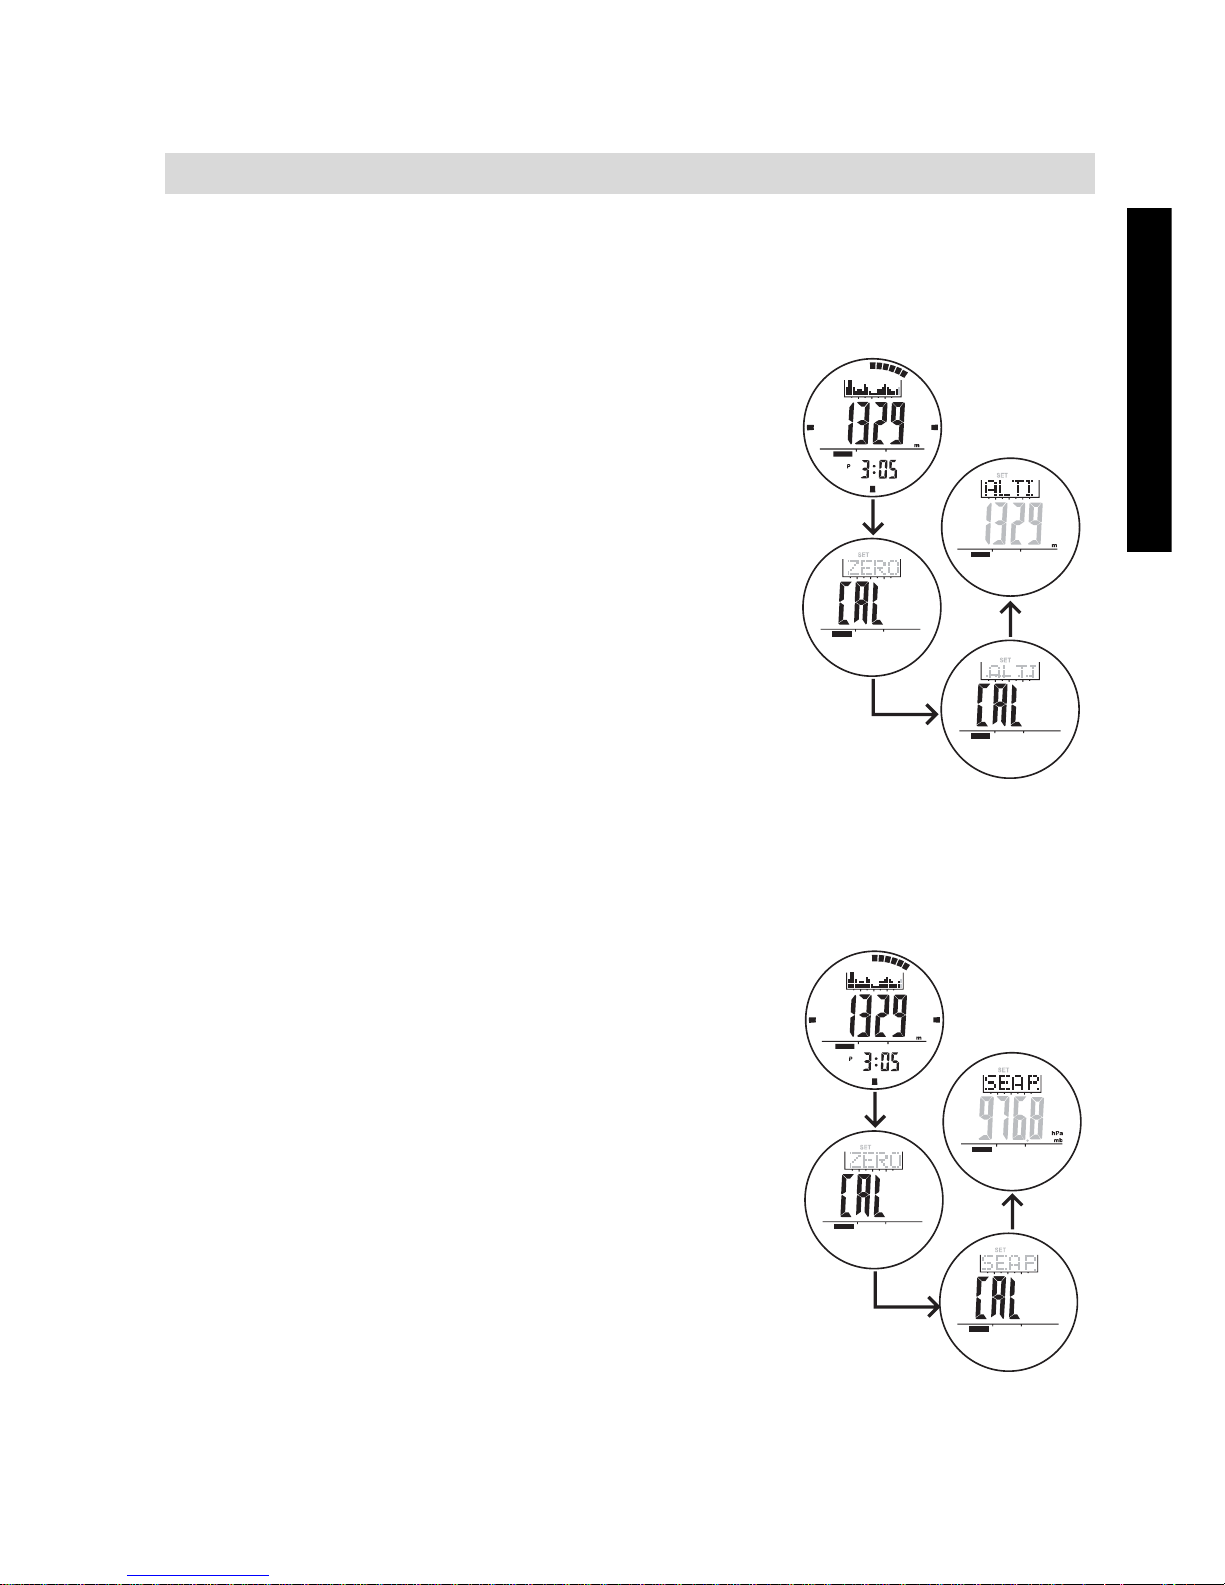
12.4.2 ABSOLUTE ALTITUDE CALIBRATION.
Instead of starting from zero altitude, you can set the absolute altitude
whenever you have reliable reference, such as a peak or a topographic
map, available.
• In current time mode, press [SR] until the
altitude is displayed.
• Hold the [M] button for 2 seconds. The
flashing "SET" icon and ‘ZERO’ will be
displayed.
• Press the [M] button until ‘ALTI’ is
displayed
• Press the [S/S] button. The absolute
altitude is flashing on the display.
• Press the [S/S] or [L/R] button to increase /
decrease the number (Hold down the
button to change the number at a higher
speed).
• Hold the [M] button to confirm the setting.
• To exit Adjustment Display, hold the [M]
button for 2 seconds. "DONE" will be displayed and the watch will be
back in Altitude Mode.
12.4.3 SEA LEVEL PRESSURE CALIBRATION
The altitude can be calculated by the difference
between current and sea level air pressure.
• In current time mode, press [SR] until the
altitude is displayed.
• Hold the [M] button for 2 seconds. The
flashing "SET" icon and ‘ZERO’ will be
displayed.
• Press the [M] button until ‘SEAP’ is
displayed.
• Press the [S/S] button. The actual Sea
Level Pressure is flashing on the display.
• Press the [S/S] or [L/R] button to increase /
decrease the number (Hold down the
button change the number at a higher
speed).
• Hold the [M] button to confirm the setting.
ALTI
ALTI
A
ALTI
ALTI
ALTI
ALTI
AL
ALTI
ALTI
Page 14
14
TOPCOM Outdoor Sportswatch 2000
Important:
This calibration method is less accurate, since the air pressure can
change because of atmosperic changes when moving further away
from the sea .
When calibrating the altimeter, the barometer is calibrated simultaneously.
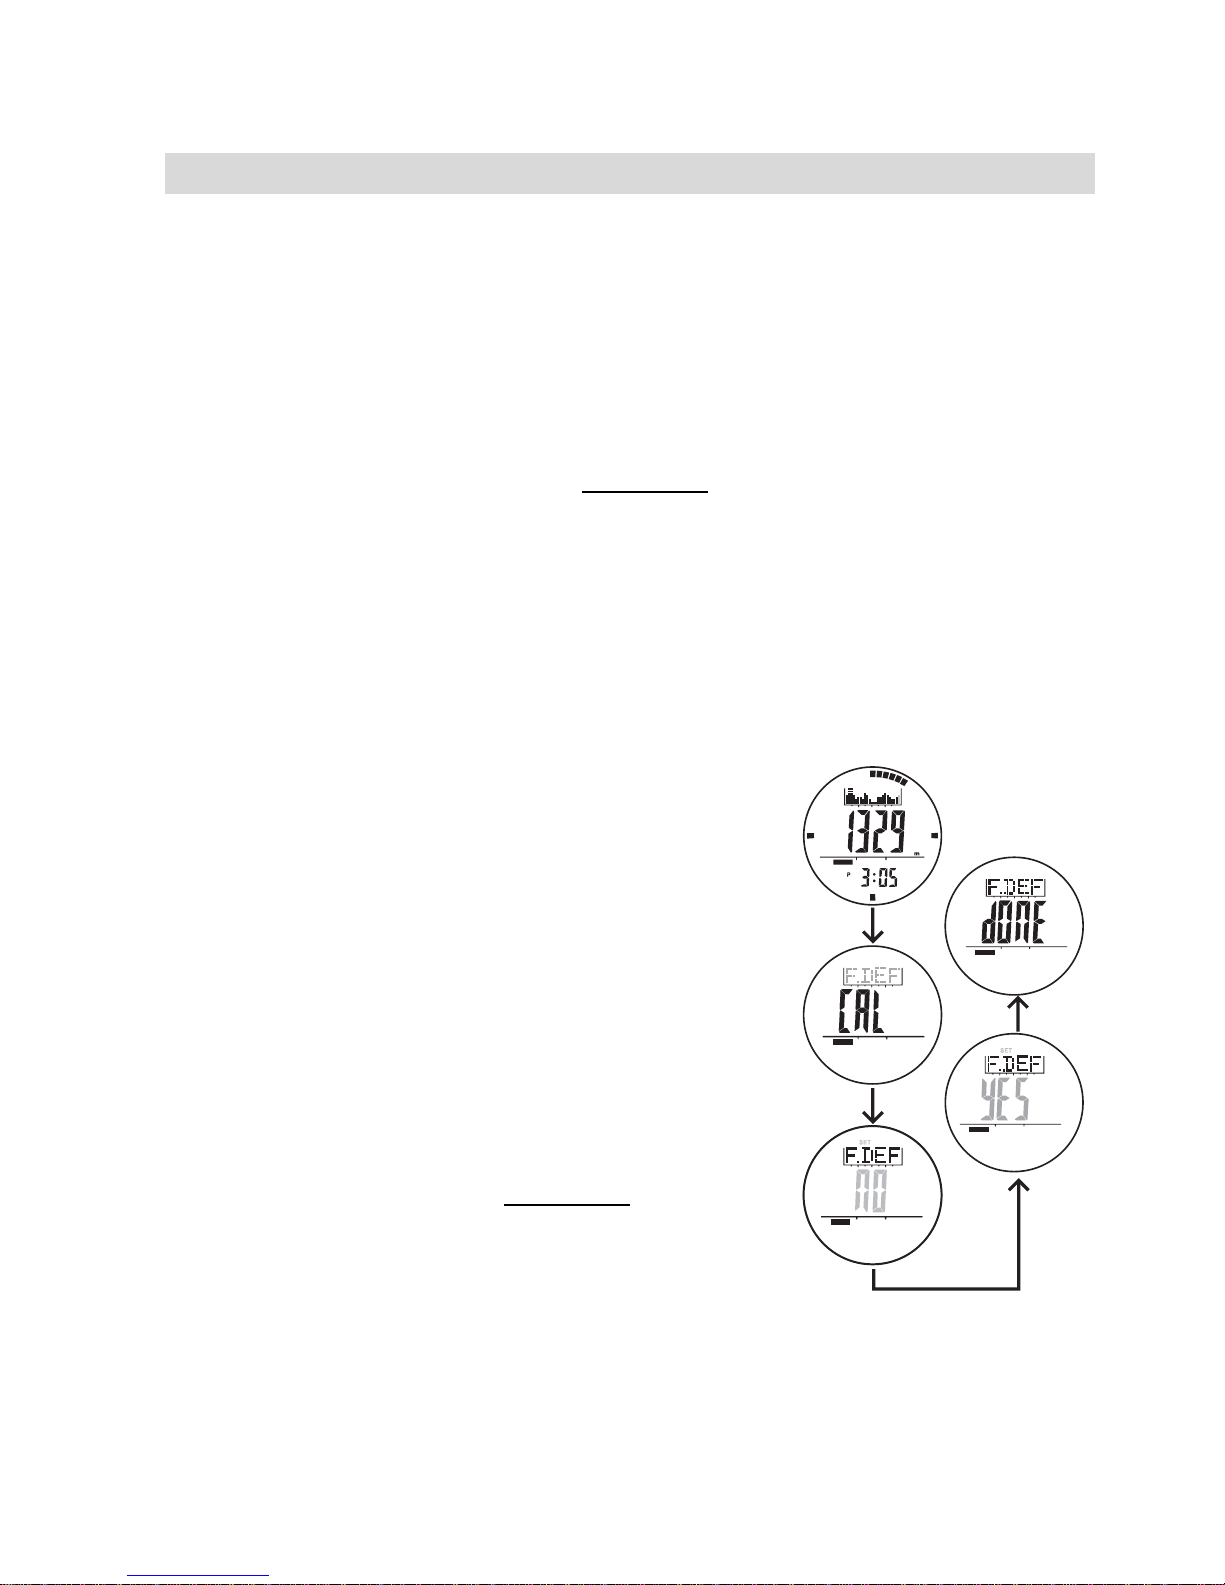
12.4.4 FACTORY DEFAULT CALIBRATION
The normal sea level pressure is 1013,2mb
.
This calibration method is only intresting when you are at higher altitude. Since the sea level pressure varies continously, the altitude is
inaccurate and gives only a rough indication.
To set the sea level pressure back to this standard level.
• In current time mode, press [SR] until the
altitude is displayed.
• Hold the [M] button for 2 seconds. The
flashing "SET" icon and “ZERO” will be
displayed.
• Press the [M] button until ‘F.DEF’ is
displayed.
• Press the [S/S] button in Display, "NO" is
displayed.
• Press the [S/S] button to select “YES”
• Hold the [M] button for 2 seconds to
confirm the setting and to exit Adjustment
Display.
• "DONE" will be displayed and sea level air
pressure will be set to 1013,2mb
.
• The altitude will be calculated by the
difference between current measured air
pressure and the normal sea level air
pressure.
ALTI
SET
ALTIALTI
ALTIALTI
ALTIALTI
BARO
ALTIALTI
Page 15
15
ENGLISH
TOPCOM Outdoor Sportswatch 2000
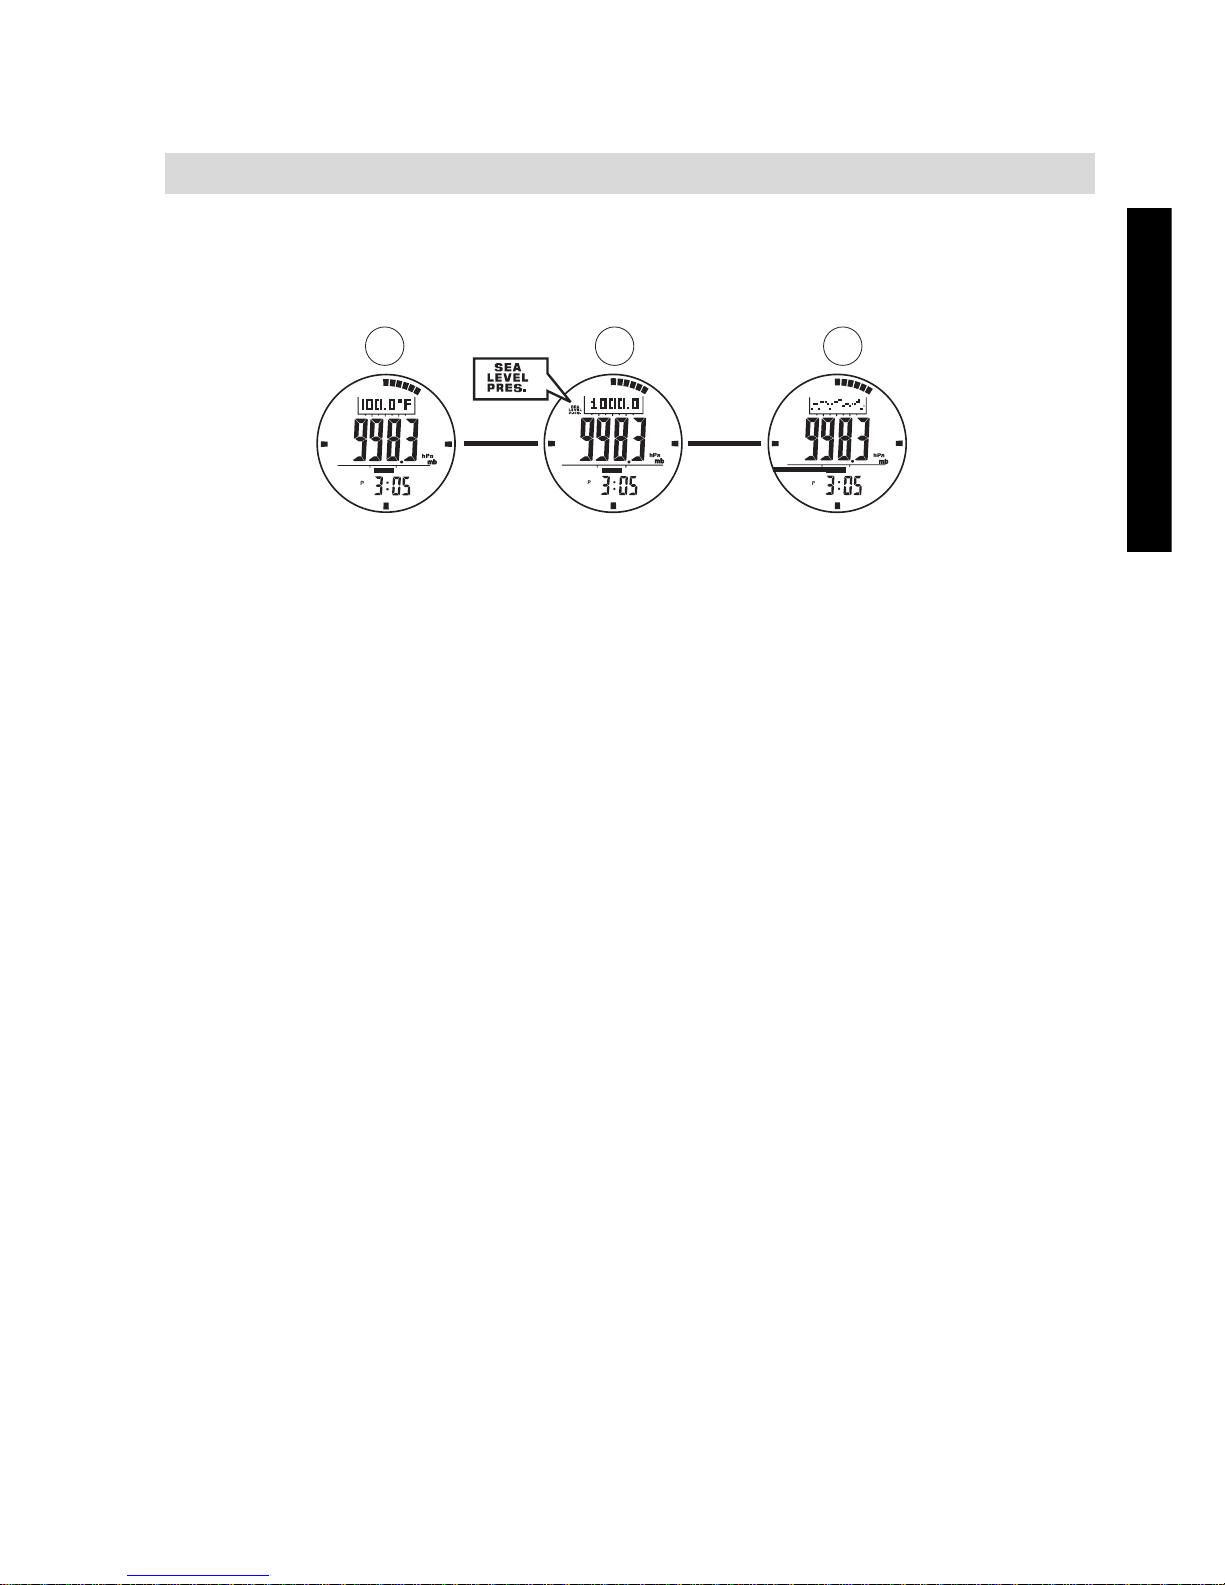
13 BAROMETER MODE
13.1 FUNCTIONAL DISPLAY
The Watch includes three Barometer functional displays.
1. Temperature Display
2. Sea Level Pressure Display
3. History Display
One of the three functional displays will be appeared on the top row of the
display.
• In current time mode, press [SR] until the barometer ’BARO’ is
displayed.
• Press the [S/S] button to switch between the diffent functional
displays.
The current (history) pressure and the current (history)
time shows on the middle row and bottom row of the display respectively.
If you want to have an accurate reading of the air temperature, you
must remove the Watch from the wrist for more than 20 minutes to
avoid that your body temperature as an effect on your watch.
BARO
BARO
BARO
[S/S]
[S/S]
123
Page 16
16
TOPCOM Outdoor Sportswatch 2000
13.2 PRESSURE AND TEMPERATURE UNIT
The Watch can display pressure in mb/hPa or inHg and can display
temperature in degree Celsius (°C) or degree Fahrenheit (°F).
To switch among different unit, hold down the [S/S] button to change the
units following the adjacent units selection sequence.
13.3 TEMPERATURE DISPLAY
In Temperature Display, the current temperature in degree Celsius (°C) or
degree Fahrenheit ( °F) shows on the top row of the display.
If you want to have an accurate reading of air temperature, you must
remove the Watch from the wrist (for 20 to 30 minutes) that allows no
body temperature effect on your watch.
13.4 PRESSURE HISTORY DISPLAY
The Watch records the level pressure reading automatically every hour.
These records will be plotted into a pressure record graph.
In Sea Level History Display, the pressure record graph shows on the top
row of the display.
To review the pressure records of the last 23 hours, press the [L/R] button
to move cursor left cyclically, then the respective pressure record and its
recording time (flashing) will appear on the display following the adjacent
diagram.
C (Celsius)
inHg
C (Celsius)
mb/hPa
F(Fahrenheit)
mb/hPa
F (Fahrenheit)
inHg
hold
[S/S]
hold
[S/S]
hold
[S/S]
hold
[S/S]
hold
[S/S ]
Page 17

17
ENGLISH
TOPCOM Outdoor Sportswatch 2000
13.5 SEA LEVEL PRESSURE DISPLAY
In Sea Level Pressure Display, the current sea level pressure shows on the
top row of the display.
The Watch records the sea level pressure reading automatically every hour
at the hour, i.e 1:00, 2:00, 3:00 and etc. These records will be plotted
into a pressure record graph.
13.6 SEA LEVEL PRESSURE HISTORY DISPLAY
In Sea Level History Display, the pressure record graph
shows on the top row of the display.
To review the pressure records of the last 23 hours, press
the [L/R] button to move cursor left cyclically, then the
respective pressure record and its recording time (flashing)
will appear on the display.
14 BAROMETER CALIBRATION
14.1 WHY THE BAROMETER NEED TO BE CALIBRATED
The Watch was calibrated for you in the factory. For normal use, you need
not to calibrate the Barometer. But for vigorous users, the Watch includes
a adjustment procedure.
BARO
Page 18

18
TOPCOM Outdoor Sportswatch 2000
14.2 BAROMETER ADJUSTMENT
There are 2 kinds of Barometer adjustment method:
1. Absolute Pressure: Input the known atmospheric pressure into the
Watch directly (AIRP)
2. Factory Default: Restore the Watch to factory default setting.For indepth information for each of the adjustment methods, it will be given
in the coming sections (FDEF)
To select the Adjustment Display;
• In current time mode, press the [SR] button until the altitude “BARO”
is displayed.
• Hold the [M] button in Barometer Mode.
• Press the [M] button to select between the Absolute Pressure
Calibration and Factory Default Calibration.
BARO
[S/S]
[M]
2 sec
"DONE" Display
Ba rom eter Mode
hold
M]
hold
[M]
hold
[M]
[S/S ] / [L/R]
BARO
SET
BARO
SET
BARO
BARO
BARO
BARO
[S/S ]
1
2
[
Page 19

19
ENGLISH
TOPCOM Outdoor Sportswatch 2000
14.3 ABSOLUTE PRESSURE CALIBRATION
The Watch can adjust the current pressure reading to an absolute pressure
value.
Before calibrating the Barometer, consult the nearest observatory station to get the ambient barometric pressure of your current position.
• Press the [S/S] button in Absolute Pressure Display. The pressure
reading will appear.
• Press the [S/S] or [L/R] button to increase / decrease the number.(
Hold down the button changes the number at a higher speed).
• Hold the [M] button to confirm setting and exit the adjustment display.
14.4 FACTORY DEFAULT CALIBRATION
The Watch can adjust the pressure reading calculation back to using factory
default value.
• Press the [S/S] button in Factory Default Display, and the indicator
"NO" will appear.
• Press the [S/S] or [L/R] button to select between "YES" (reset the
Watch to factory default) or "NO" (abort the resetting).
• To exit Adjustment Display, hold the [M] button for 2 seconds, and
then the Watch will go back to Altimeter Mode.
If "YES" is selected, "DONE" Display will appear for 2 seconds prior to
normal operation.
Page 20
20
TOPCOM Outdoor Sportswatch 2000
15 COMPASS MODE
15.1 IMPORTANT
• Keep your Watch away from magnets or the appliances which may
contain magnetic objects such as mobile phones, speakers, motors
and etc.
• The Watch, like most magnetic compass, points to the magnetic north
which is slightly different from the true north.
• Perform the compass calibration from time to time, because the
calibration reinforces the precision of the compass.
• To achieve a accurate result, you should avoid measuring direction on
the following conditions:
- The watch is placed close to a magnetic object
- The watch is placed close to a metal objects
- The watch is placed close to an electrica appliances
- The watch is placed inside a moving object or a ferroconcrete build-
ing.
15.2 COMPASS DIRECTIONS AND BEARING DIRECTIONS
15.2.1 THE DIRECTION OF AN OBJECT
• The direction of an object from a point can be specified in either
compass directions or bearing directions.
• The Watch includes both compass directions and bearing directions.
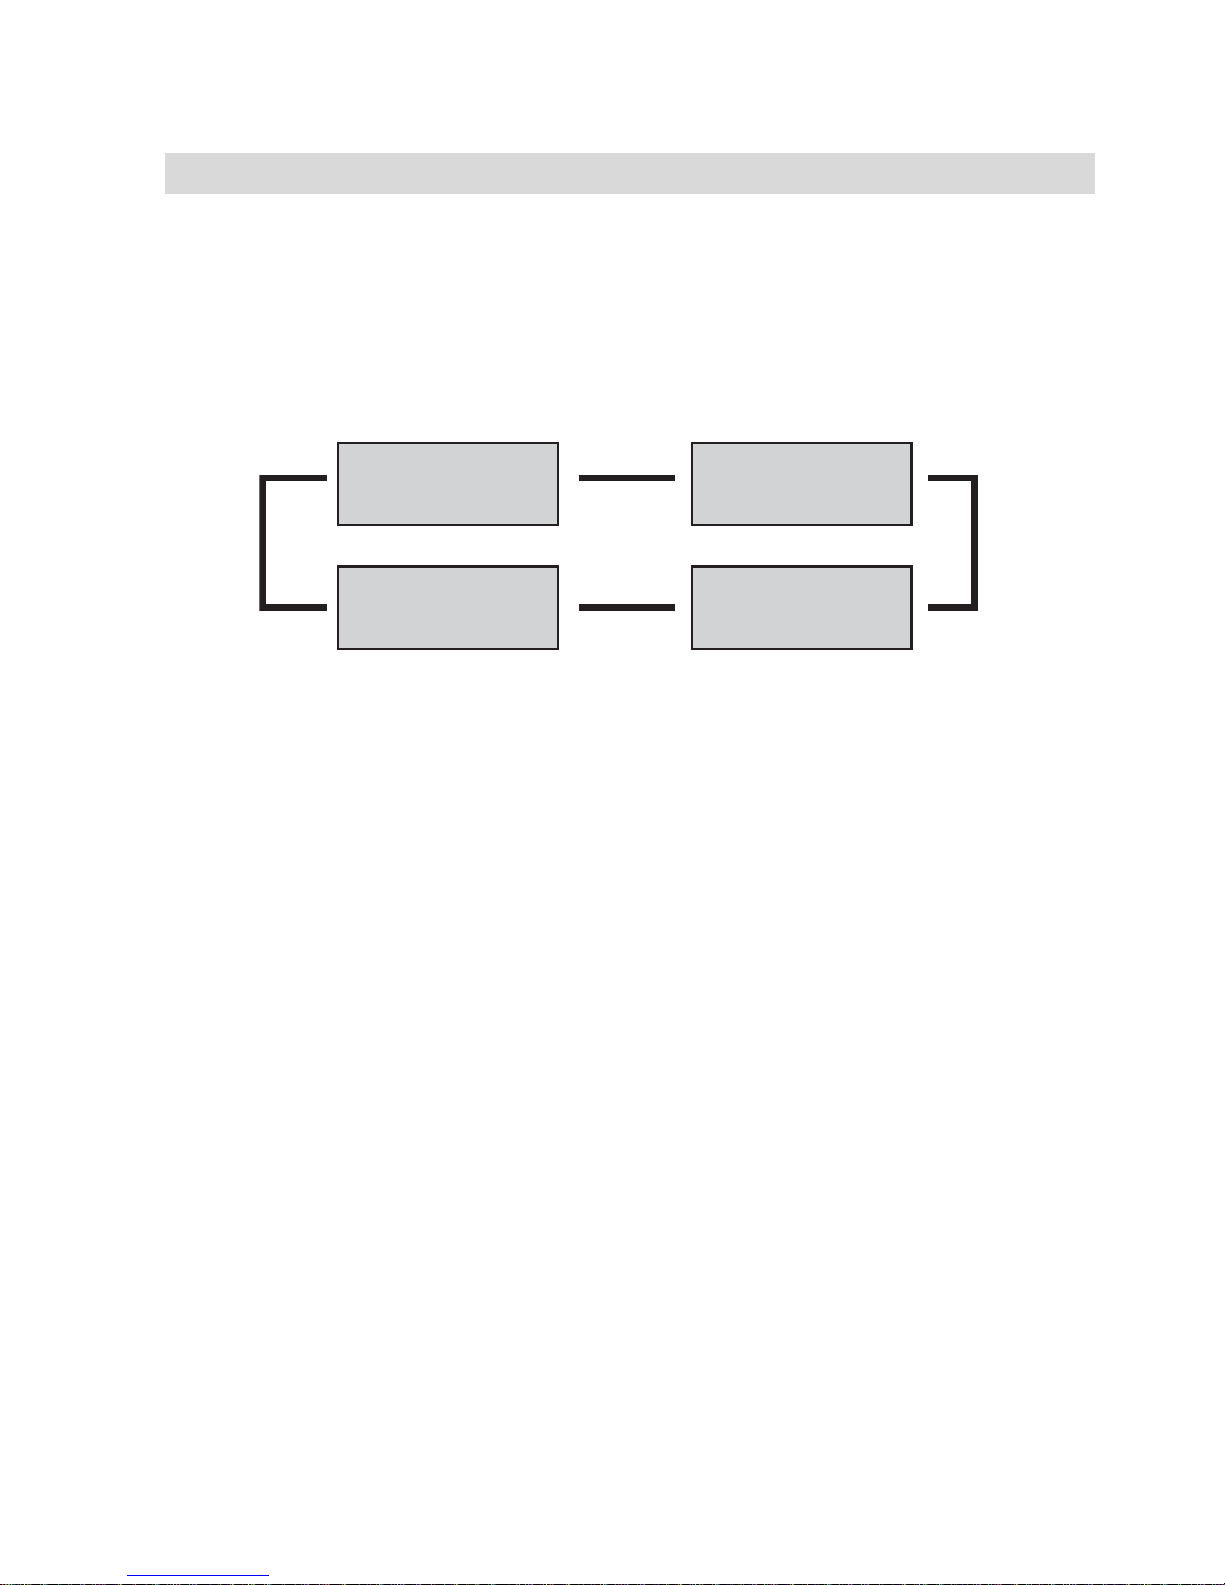
15.2.2 THE COMPASS DIRECTIONS
• The compass directions are shown on
the adjacent table.
• For example, in the figure on the right,
the compass direction of object B from
point A is East. The compass direction
of object C from point A is Southeast.
The compass direction of object D
from point A is Northwest.
object B
object C
object D
angula r
difference
90
135
315
point
A
0
0
Page 21
21
ENGLISH
TOPCOM Outdoor Sportswatch 2000
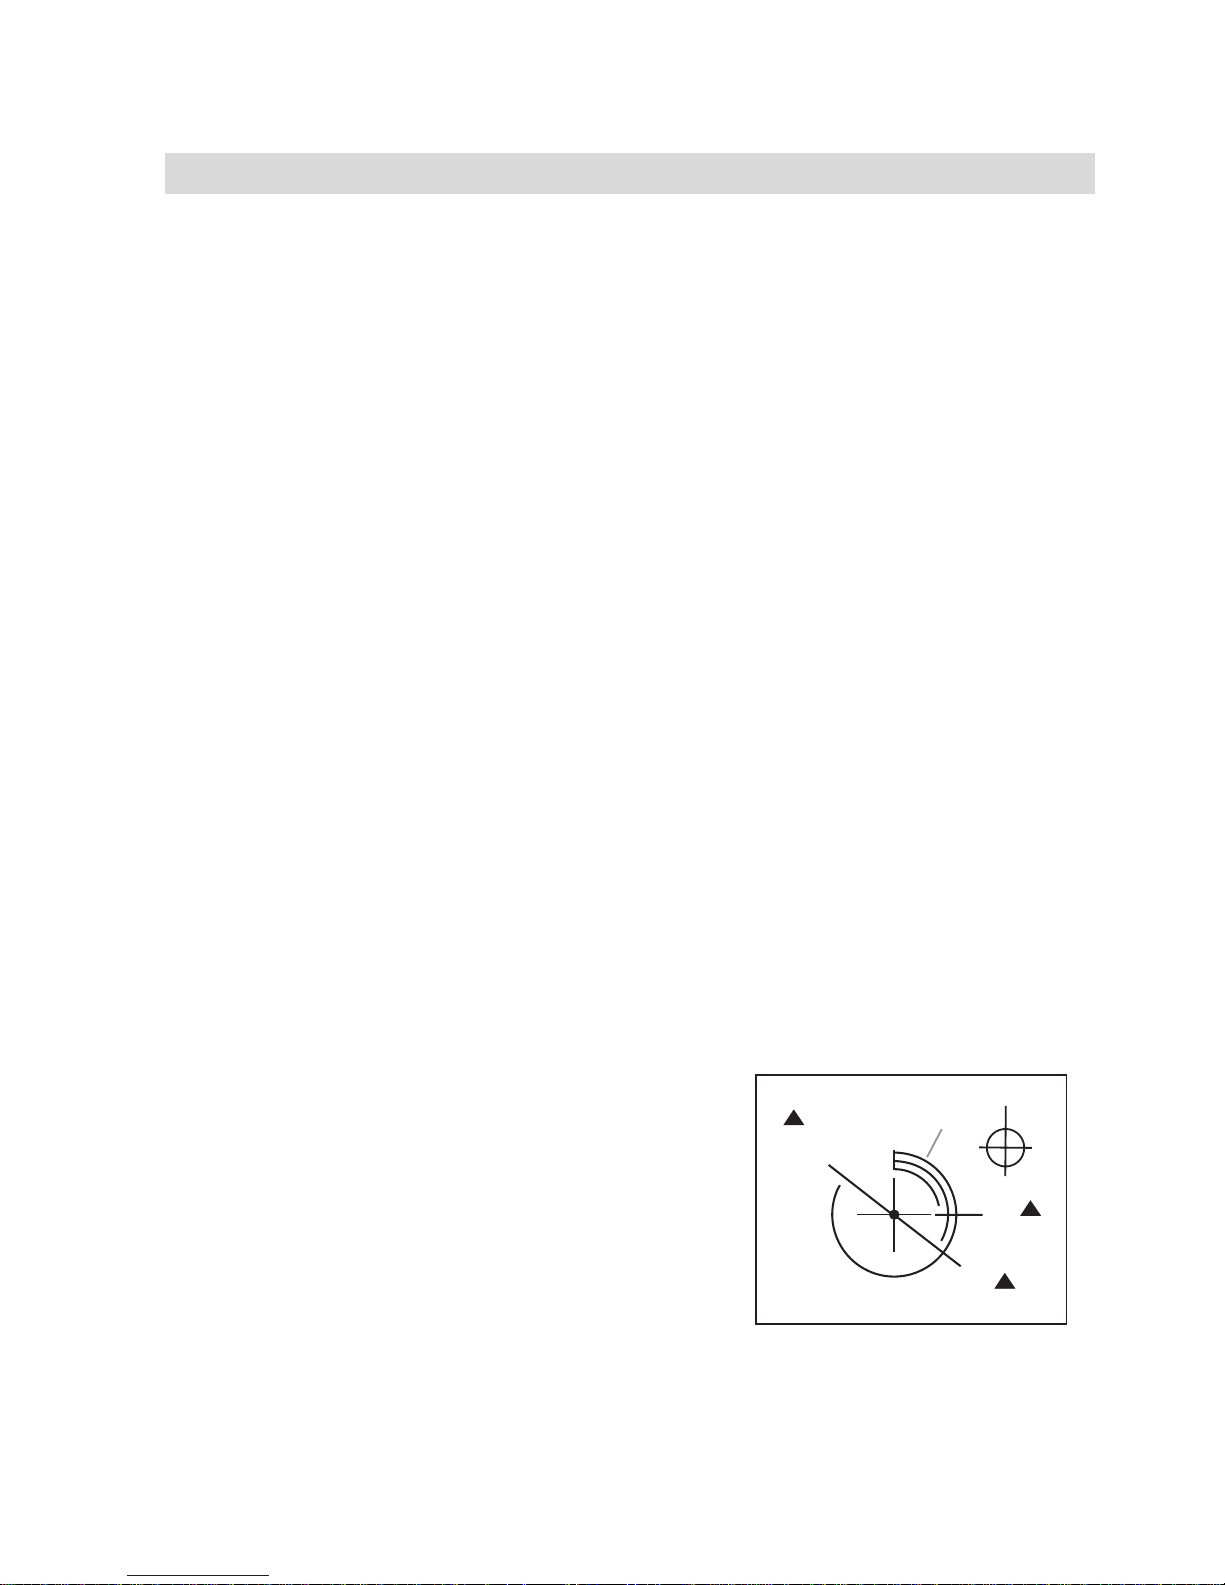
15.2.3 THE BEARING DIRECTIONS
• The Bearing direction of an object is
defined as the angular difference between
North and the object. (Assume 0° for
North, and the measuring range is from 0°
to 359°).
• For example, in the figure on the right, the
bearing direction of object B from point A
is 90°. The bearing direction of object C
from point A is 135°. The bearing direction
of object D from point A is 315°.
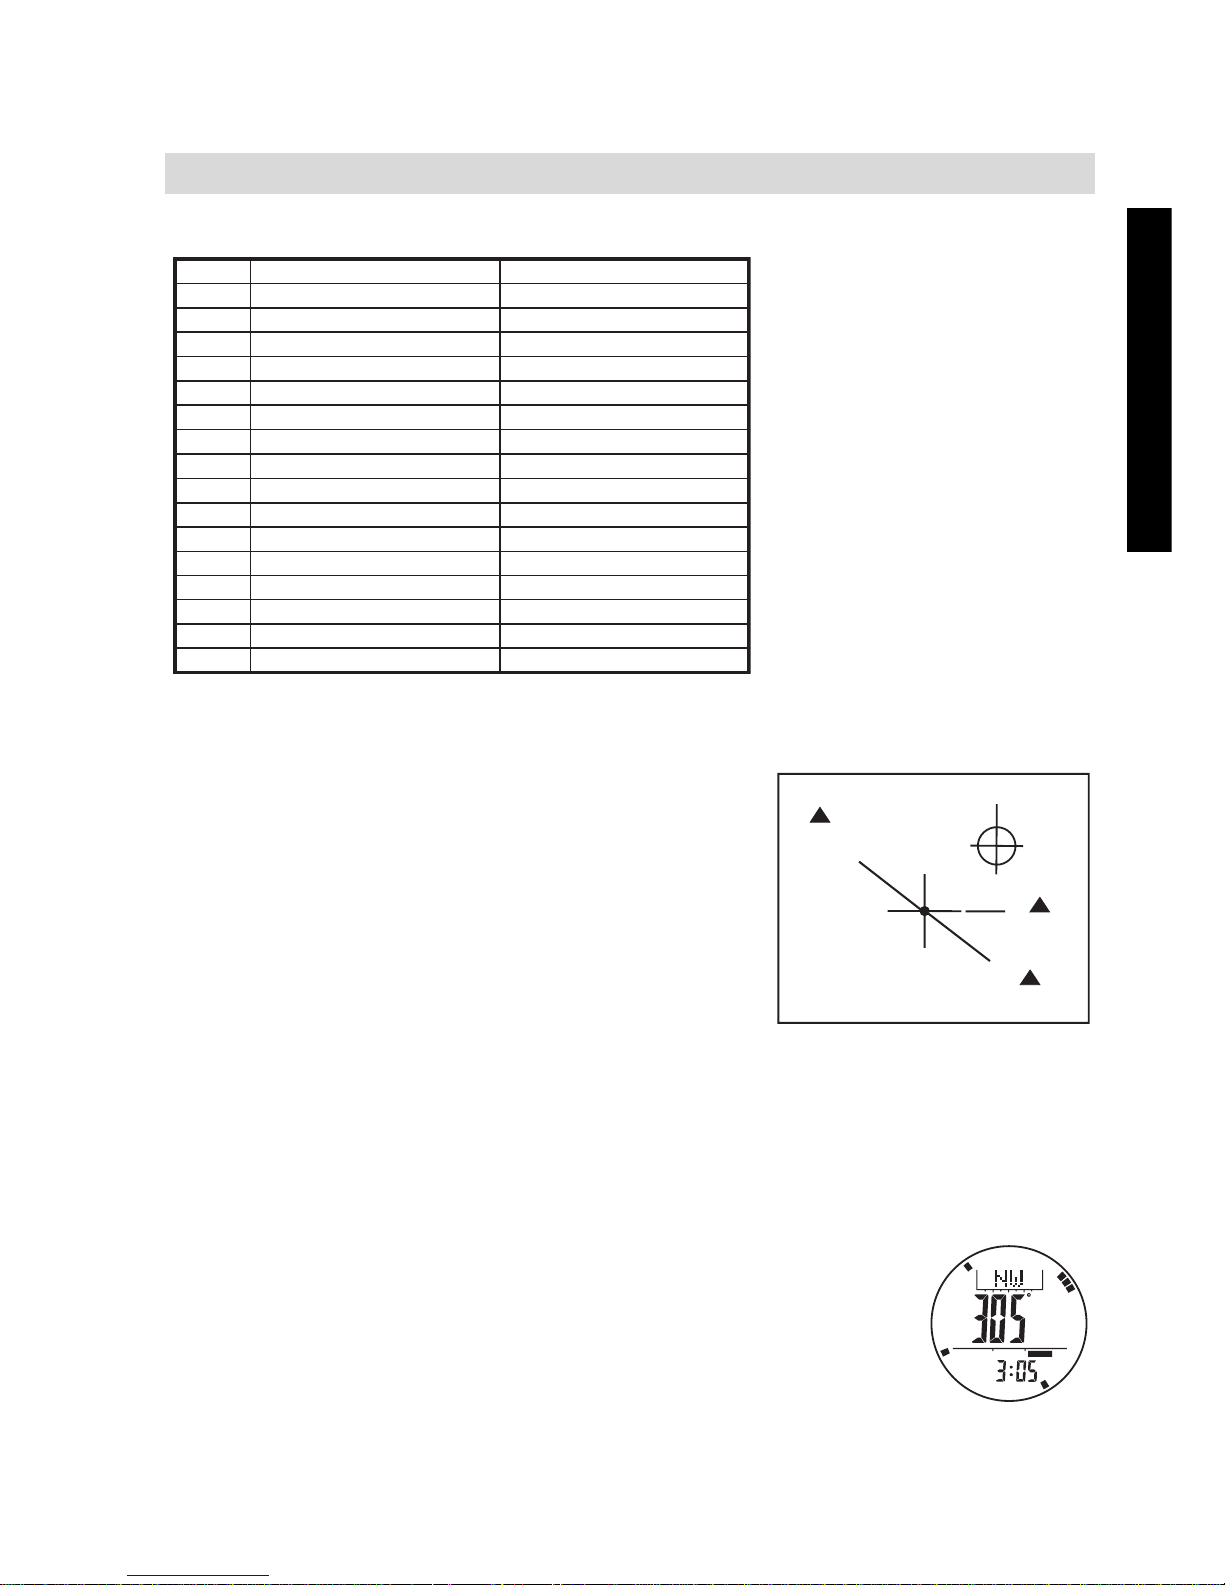
15.3 COMPASS MODE
15.3.1 COMPASS MODE
• In the Compass Mode, the top of the display shows
the compass direction.
• The middle display shows the bearing direction.
• The bottom display shows the current time in hour and
minute.
• The pointer encircled the display shows the direction
of magnetic North analogically.
Ma rks
N
NE
E
SE
SSE
SSW
WNW
NNW
Compa ss Directions Bearing Directions
North
349 - 11
Northeast
Ea st
Southeast
Ea st Southeast
South Southwest
North Northwest
S
SW
W
NW
South
Southwest
West
Northwest
ES E
ENE
WS W
NNE
West Northwest
West Southwest
South Southeast
Ea st Northeast
North Northeast
12 - 33
34 - 56
57 - 78
102 - 123
79 - 101
12 4 - 146
147 - 168
16 9 - 191
214 - 236
192 - 213
237 - 2 58
259 - 281
304 - 326
282 - 303
3
27 - 348
object B
object C
object D
point A
N
E
SE
NW
N
COMP
Page 22
22
TOPCOM Outdoor Sportswatch 2000
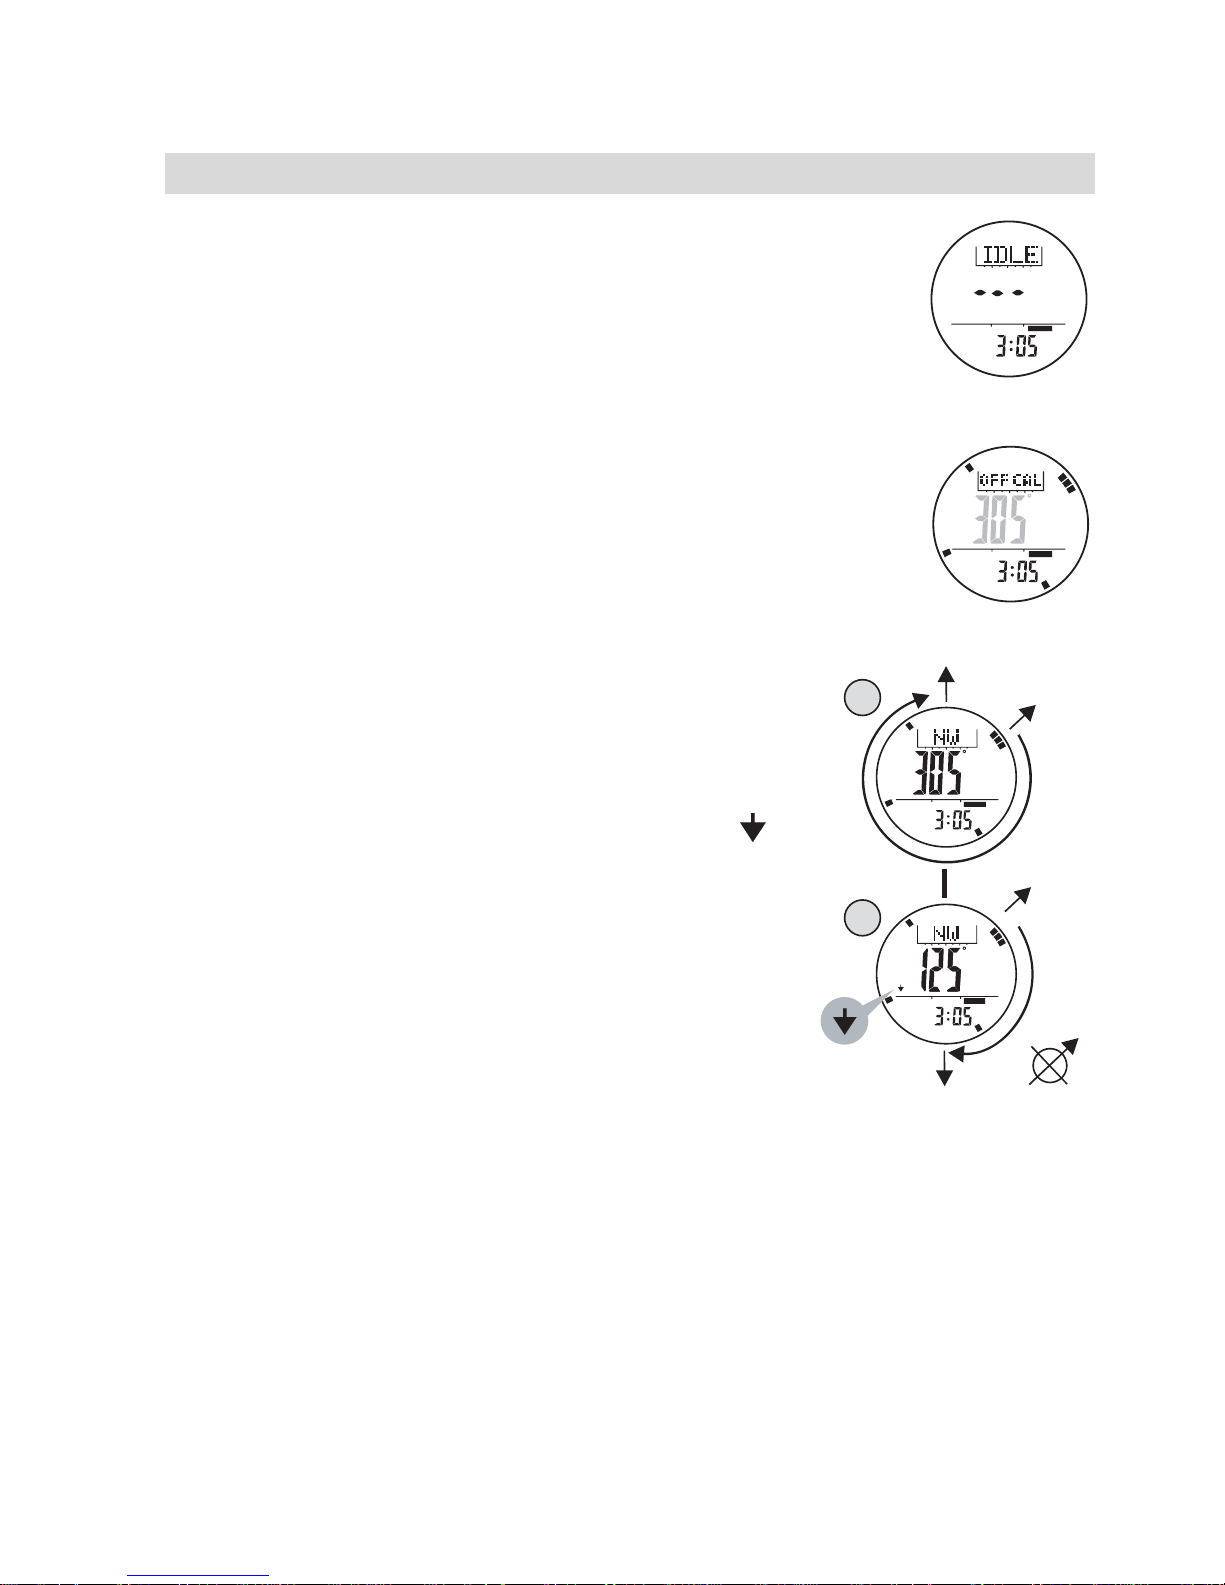
15.3.2 IDLE MODE
• If no button is pressed for about 1 minute, the Watch
will go to the IDLE Mode automatically.
• To activate the compass again, press any button
except the [EL] and [SR] button.
15.3.3 DISTORTION
• If distortion is detected, the indicator "OFF CALL" with
flashing direction digits will appear.
• Please refer to the coming chapter 14.8 - "Calibrating
the Compass" to restore the compass to normal
operation when distortion occur.
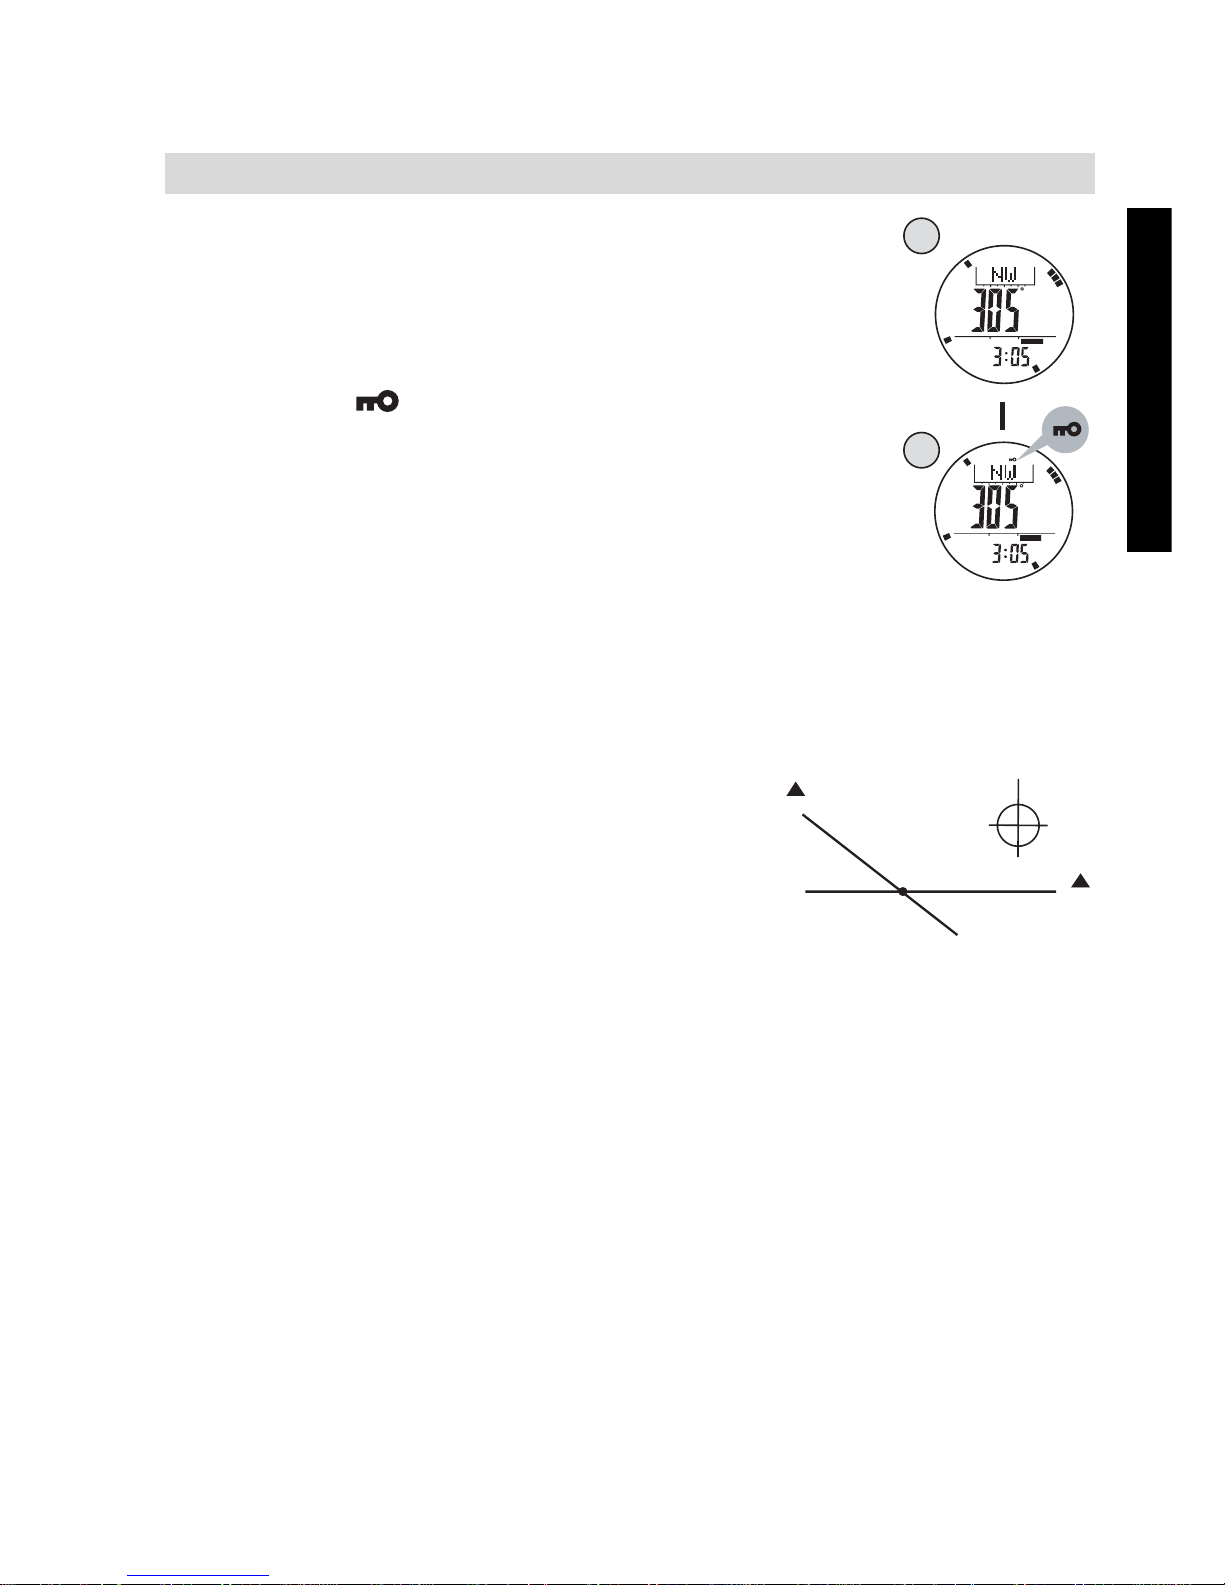
15.4 BACKWARD BEARING
The Watch includes a backward bearing function.
• The backward bearing direction is the
bearing direction that on the opposite
direction from normal bearing direction.
• When the 'Backward Bearing' indicator "
" is appeared, the Watch is showing the
backward bearing direction of the navigation
direction.
• In Compass Mode, press the [S/S] button to
select between normal and backward
bearing direction.
COMP
COMP
0
COMP
12 5
0
[S/S]
305
0
COMP
1
2
Page 23
23
ENGLISH
TOPCOM Outdoor Sportswatch 2000
15.5 DIRECTION COMPASS LOCK
• The Watch includes a compass lock function that
locks the important direction reading.
• In Compass Mode, press the [L/R] button to lock/
unlock the direction reading. When the "Lock"
indicator, " " is appeared, the compass direction,
bearing direction and the magnetic north pole
pointer are locked.
• Compass Lock will be released automatically when
the Watch enter IDLE Mode.
15.6 COMPASS APPLICATIONS
15.6.1 CHECK YOUR POSITION BY BACKWARD BEARING DIREC-
TIONS
• Spot two distant identifiable landmarks
such as mountains, light-house, fort and
building of your current position, for
example the mountain A and B.
• Check out the backward bearing
directions of mountain A and B of your
current position, such as 135° from
mountain A and 270° from mountain B.
• Use a ruler to draw the line 135° on the map which starting from the
mountain A. Draw the lines 270° on the map which starting from the
mountain B.
• Your current position on the map will be the intersection point (point
A) of the lines 135° and 270°
COMP
1
2
[L/R]
COMP
mounta in B
mountain A
270
135
point A
0
Page 24
24
TOPCOM Outdoor Sportswatch 2000
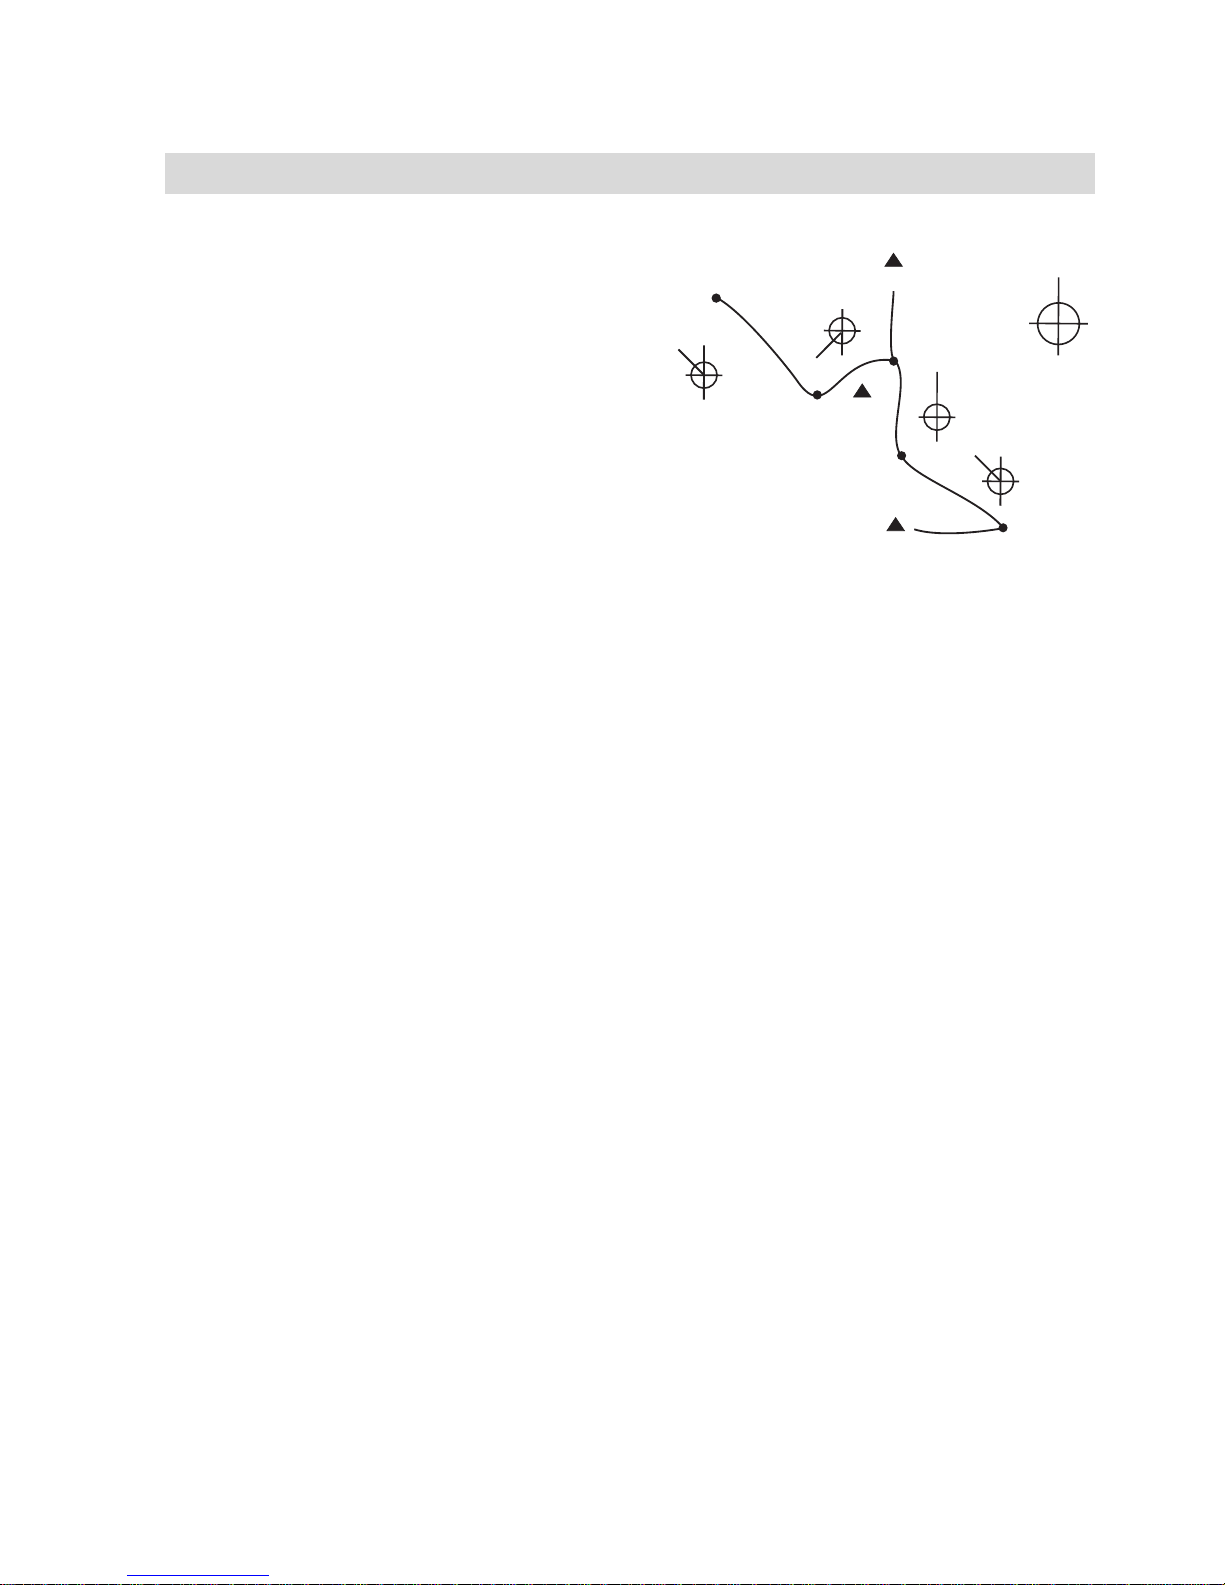
15.6.2 CHECK THE TREK COURSE CORRECT
• During trekking, the Watch can
keep your course correct. For
example, the correct trail starts
from point A and finishes at
point E as it is drawn on the
adjacent map.
• Mark the points (identifiable
landmarks) where the trail turns
its direction or the trail branches
its way, such as the point A, B,
C, D and E on the adjacent map.
• Find out the bearing directions of point B from point A (315°), point C
from point B (0°), point D from point C (225°), and then point E from
point D (315°).
• During the trekking, make sure that the heading direction is 315° from
point A to point B. Performing the similar checking in other sections of
the trail.
IMPORTANT:
If you are in doubt of the directions and positions of the trail, consulting the park administration office before starting the trekking.
15.7 MAGNETIC DECLINATION
15.7.1 WHAT IS MAGNETIC DECLINATION
• The Magnetic North Pole which is slightly different from the True North
Pole.
• The Outdoor Sports Watch 2000, like most magnetic compass, points
to the Magnetic North Pole. On the contrary, everything measure from
a map is related to the True North Pole.
• The angular difference between Magnetic North Pole and True North
Pole is called ‘magnetic declination’. Its amount (degrees and
minutes) and direction (easterly and westerly) depend on where you
are in the world.
• For serious compass user or who intends to perform accurate
navigation, compass must be adjusted for magnetic declination.
4110 m
2120 m
3120 m
point A
(starting )
point B
point D
point E
(finish )
point C
315
225
0
315
0
Page 25

25
ENGLISH
TOPCOM Outdoor Sportswatch 2000
• The Watch also includes a compensation setting for Magnetic
Declination. Check the coming section “Magnetic Declination
Compensation " for more detail.
15.7.2 MAGNETIC DECLINATION INFORMATION
• Most topographic maps include a small arrow which shown magnetic
north pole and or the magnetic declination information.
• For the benefit of the Outdoor Sports Watch 2000 user, this manual
includes the magnetic declination for some major cities.
• Check the coming section 'Magnetic Declination at Major Cities' for
more detail.For the cities are not included in the list, please refer to the
online magnetic declination information at:
- http://www.geolab.nrcan.gc.ca/geomag/e_cgrf.html
- http://www.ngdc.noaa.gov/cgi-bin/seg/gmag/fldsnth1.pl
15.7.3 MAGNETIC DECLINATION COMPENSATION
To compensate an object's bearing by subtract westerly (W) magnetic
declination or add easterly(E) magnetic declination with the magnetic
bearing.
1. Example 1: 23° Westerly magnetic declination and the compass needle points 323.
- TB = MB - W. While MB = 323; W =23
- TB = 323 - 23
- TB = 300
The true bearing will be 300.
2. Example 2: 22° Easterly magnetic declination and the compass needle points 278.
- TB = MB + E. While MB = 278; E = 22
- TB = 278+ 22
- TB = 300
The true bearing will be 300.
The Watch allows you compensate the compass bearing at a place where
the magnetic declination is either Westerly declination or Easterly
declination.
Check the coming section "Calibrating the Compass" for more detail of the
setting.
Page 26

26
TOPCOM Outdoor Sportswatch 2000
15.8 MAGNETIC DECLINATION AT MAJOR CITIES
15.9 WHEN CALIBRATING THE COMPASS
The Watch has to employ a compass calibration in one of the following
conditions:
1) The Watch is using for the first time;
2) The battery has been replaced;
3) The bearing direction digits are flashing, and the "" indicator appear;
4) The compass use in a location that is apart from the place in which the
compass had been calibrated;
5) The user intends to regulate the precision of the digital compass;
No. Country/Place Major City Dec lination
33 Netherlands Amsterdam 1-W
34 New Zealand Wellington 22-E
35 NorwayOslo 0
36 PakistanIslamabad 2-E
37 Philippines Manila 1-W
38 PortugalLisbon 5-W
39 Russia Moscow 9-E
40 S ingapore Singapore 0
41 S outh Africa Cape Town 23-
W
42Spain Madrid 3-W
43 Sweden Stockholm 3-E
44 Switz erland Bern 0
45 TaiwanTai-pei 3-W
46 Thailand Bangkok 0
47 UAE Abu Dhabi 1-E
48 United Kingdom London 3-W
49 United States Washington, DC 10-
W
50 Juneau 25-E
51 Phoenix 12-E
52 Little Rock2-E
53 Sacramento 16-E
54 Denver 10-E
55 Atlanta 4-W
56 Honolulu 10-E
57 Boston 16-
W
58 Saint Paul 2-E
59 Jackson 1-E
60 Santa Fe 10-E
61Oklahoma City 6-E
62 Salem 18-E
63Harrisburg 11-W
64 Salt Lake City 14-E
No. Country/Place Major City Declination
1 AfghanistanKabul 2-E
2Australia Canberra 12-E
3 AustriaVienna2-E
4Bahrain Manama 2-E
5Bangladesh Dhaka 0
6 Belgium Brussels 1-W
7 Brazil Brasilia 19-W
8Canada Ottawa 14-W
9 Chile Santiago5-E
10 Beijing6-W
11
12 Costa RicaSan Jose 0
13 Cuba Havana 3-W
14 Czech Republic Prague 2-E
15 Denmark Copenhagen 1-E
16 Egypt Cairo 3-E
17 Finland Helsinki 6 -E
18 France Paris 1-W
19 Germany Berlin 1-E
20Greece Athens 3-E
21Hungary Budapest 4-E
22 India Ne
w Delhi 1-E
23 Indonesia Jakarta 1-E
24Israel 3-E
25Italy Rome1-E
26 JapanTokyo 7 -W
27 Jordan Amman3-E
28Kenya Nairobi 1-E
29KoreaSeoul 7-W
30 Malaysia Kuala Lumpur 1-E
31 Mexico Mexico City 6 -E
32 NepalKathmandu 0
China Hong Kong2-W
China
Jerusalem
Page 27
27
ENGLISH
TOPCOM Outdoor Sportswatch 2000
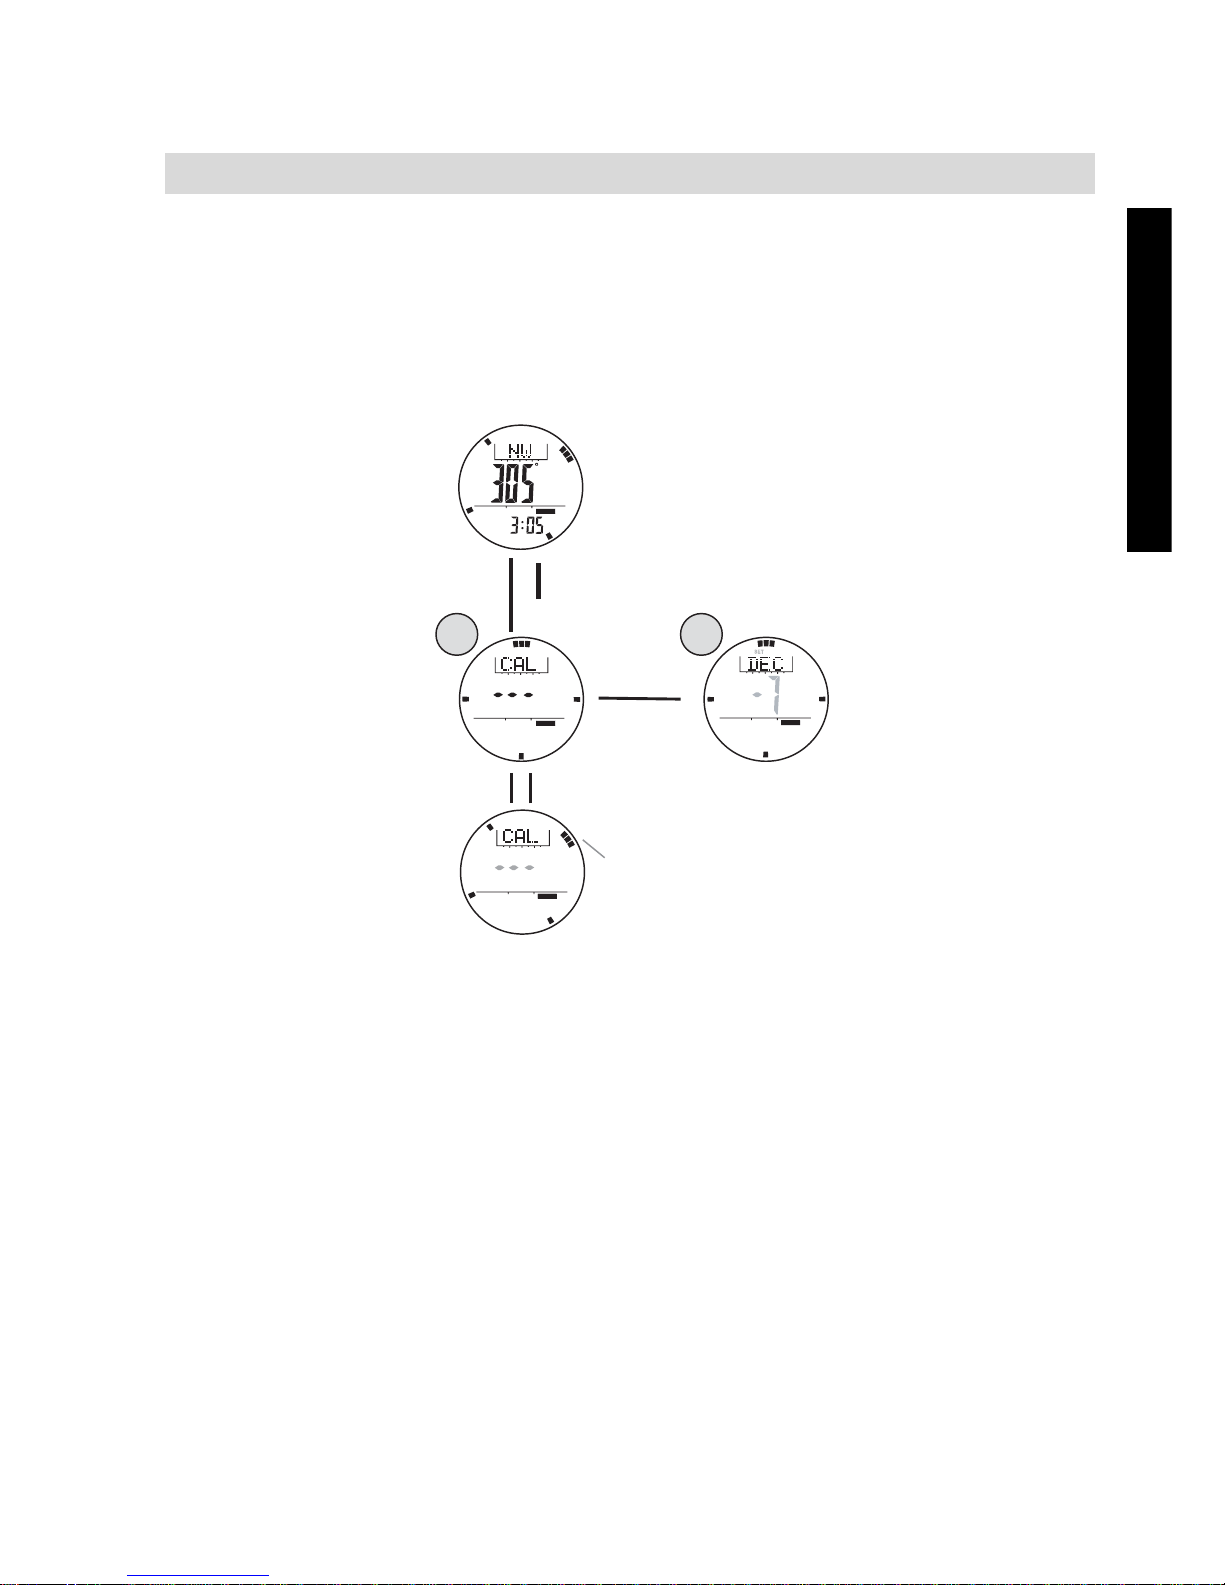
15.10 HOW TO CALIBRATE THE COMPASS
The compass calibration includes two different processes:
1. Rotation Calibration Mode
2. Magnetic Declination Setting.
It is advisable to carry out them both from time to time, that achieves a more
accurate reading.
IMPORTANT: If the Watch has not been calibrated, the direction made
by the Watch may be a inaccurate direction.
15.11 ROTATION CALIBRATION
• To select the Rotation Calibration Mode, hold the [M] button in
Compass Mode.
• To start rotation calibration, press [S/S] button once. The pointers will
start rotating, turning the watch (keep parallel to the horizon) in the
same direction of the rotating pointers for more than 2 turns.
• Press [S/S] or [L/R] button to stop the calibration when the 2-turn
rotation calibration is completed.
• When the pointer stop rotating, hold the [M] button to back to the
Compass Mode or press the [M] button once to set the magnetic
declination.
hold [M]
hold [M]
[M]
COMP
COMP
COMP
[S /S ] / [L/R]
/ [M ]
[S /S ]
COMPCOMP
1
2
15sec
Page 28
28
TOPCOM Outdoor Sportswatch 2000
15.12 MAGNETIC DECLINATION CALIBRATION
• Check chapter 14.8 "Magnetic Declination at Major Cities" to get the
magnetic declination of the city which is close to your current position.
That angle will be inputted into the Watch during the calibration.
• To select Magnetic Declination Display, press the [M] button in
Rotation Calibration Display.
• When the current magnetic declination is appeared, press the [S/S] or
[L/R] button to increase / decrease the number. (Hold down the button
changes the number at a higher speed).
• If the setting is completed, hold the [M] button to confirm setting and
exit the adjustment display.
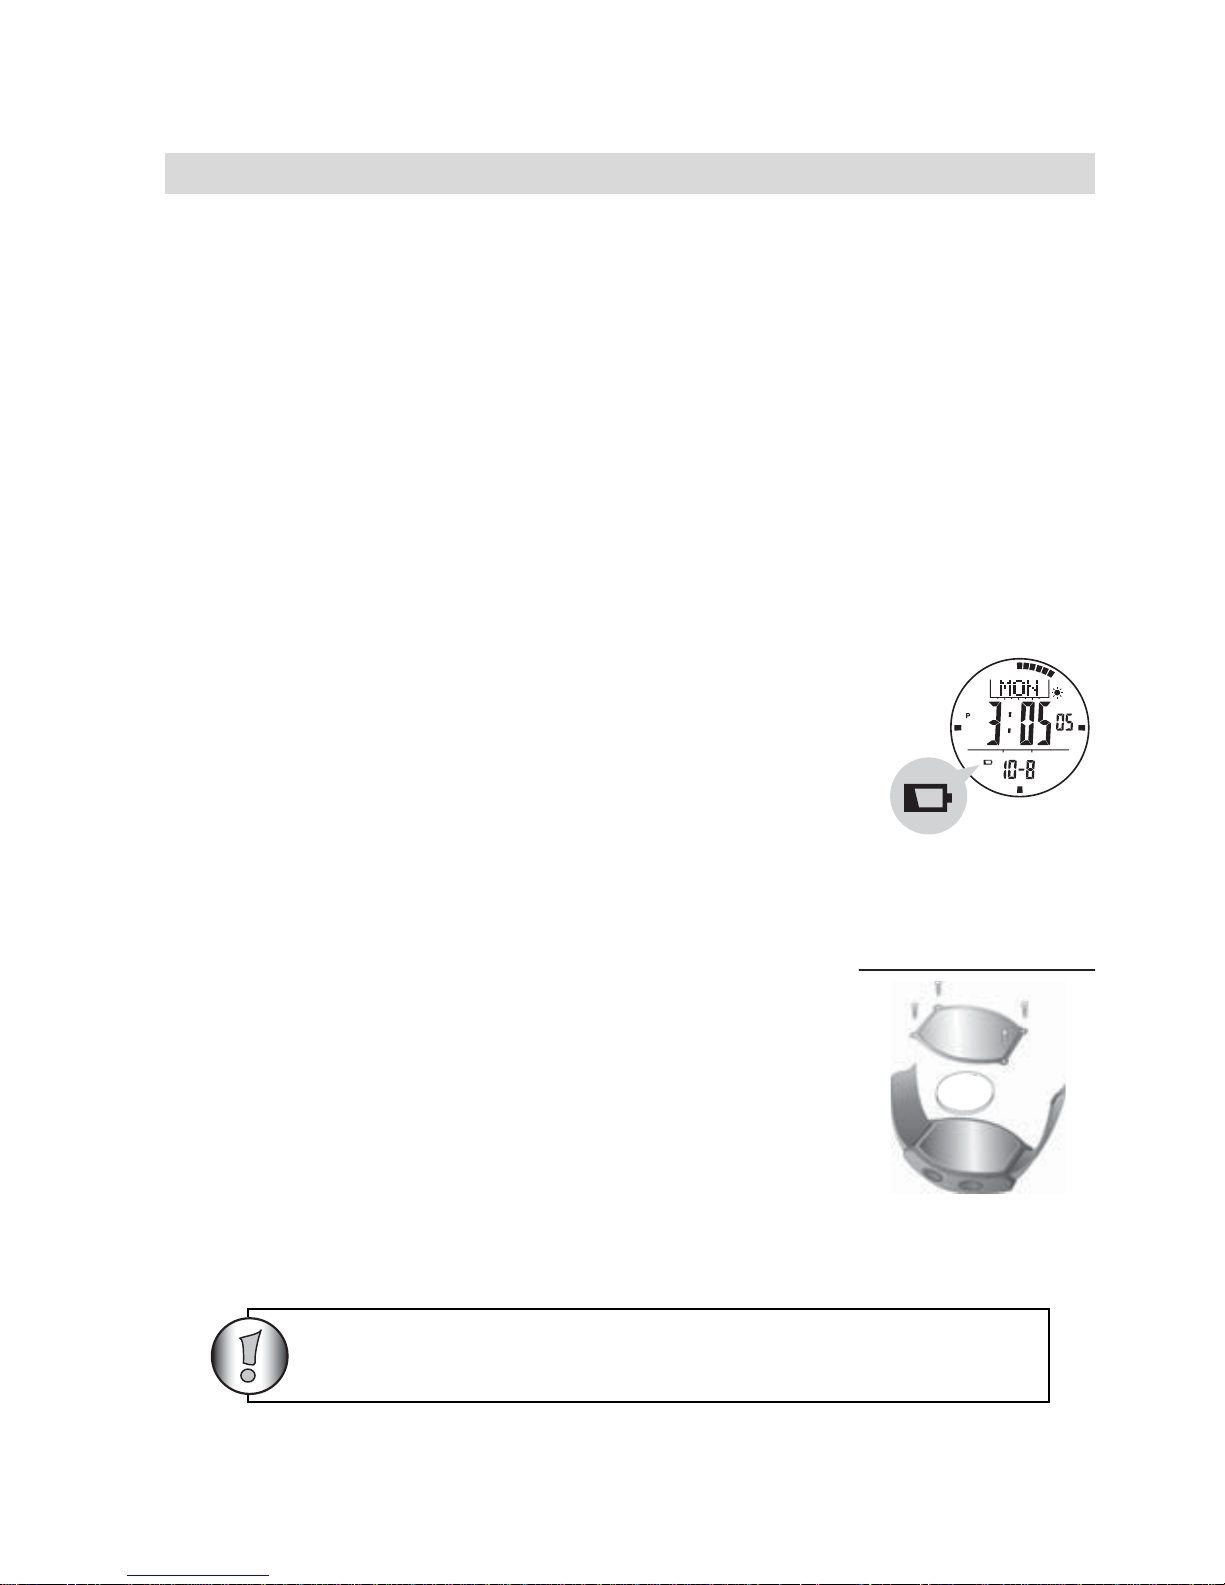
16 LOW BATTERY DETECTION
• When the battery-low indicator appears on the
display, it means that the capacity of the battery is
low. It is recommended to replace the battery with
a new CR2032.
• However, if the appearance of battery-low indicator
is caused by using the Watch under very cold
condition, the indicator will be disappeared when
normal temperature returns.
17 BATTERY INSTALLATION
If you are not confident with electronics, let change the
battery by a professional. Do not open the watch
yourself.
Remove the back cover of the watch with a small
screwdriver. Install the 3V(CR2032) battery with the
positive (+) pole facing up and replace the cover.
Remove the battery and reinsert it if the display shows
irregular figures.
3V - Lithium
CR2032
+
CR2032
3V
Do not short-circuit batteries & dispose of in fire.
Page 29
29
ENGLISH
TOPCOM Outdoor Sportswatch 2000
18 DISPOSAL OF THE DEVICE (ENVIRONMENT)
At the end of the product lifecycle, you should not throw this
product into the normal household garbage but bring the product
to a collection point for the recycling of electrical and electronic
equipments. The symbol on the product, user guide and/or box
indicate this.
Some of the product materials can be re-used if you bring them
to a recycling point. By re-using some parts or raw materials from used
products you make an important contribution to the protection of the
environment.
Please contact your local authorities in case you need more information on
the collection points in your area.
19 TOPCOM WARRANTY
19.1 WARRANTY PERIOD
The Topcom units have a 24-month warranty period. The warranty period
starts on the day the new unit is purchased. Consumables or defects
causing a negligible effect on operation or value of the equipment are not
covered.
The warranty has to be proven by presentation of the original purchase
receipt, on which the date of purchase and the unit-model are indicated.
19.2 WARRANTY HANDLING
A faulty unit needs to be returned to a Topcom service centre including a
valid purchase note.
If the unit develops a fault during the warranty period, Topcom or its officially
appointed service centre will repair any defects caused by material or
manufacturing faults free of charge.
Topcom will at its discretion fulfil its warranty obligations by either repairing
or exchanging the faulty units or parts of the faulty units. In case of
replacement, colour and model can be different from the original purchased
unit.
The initial purchase date shall determine the start of the warranty period.
The warranty period is not extended if the unit is exchanged or repaired by
Topcom or its appointed service centres.
Page 30

30
TOPCOM Outdoor Sportswatch 2000
19.3 WARRANTY EXCLUSIONS
Damage or defects caused by incorrect treatment or operation and damage
resulting from use of non-original parts or accessories not recommended by
Topcom are not covered by the warranty.
The warranty does not cover damage caused by outside factors, such as
lightning, water and fire, nor any damage caused during transportation.
No warranty can be claimed if the serial number on the units has been
changed, removed or rendered illegible.
Page 31

31
NEDERLANDS
TOPCOM Outdoor Sportswatch 2000
1 INLEIDING
We danken u voor uw aankoop van het Outdoor Sporthorloge 2000. Dit
horloge beschikt over elektronische sensoren die de omstandigheden
buiten meten en weergeven: weersvoorspelling, temperatuur, druk, hoogte
en kompasrichtingen. Uw horloge verschaft u actuele essentiële informatie
tijdens uw trektocht, bij het kamperen of andere buitenactiviteiten, vooral
over een langere periode.
2 VEILIGHEIDSINFORMATIE
Lees de gebruiksaanwijzing aandachtig vooraleer u het horloge gebruikt.
Stel uw horloge niet onredelijk lang bloot aan extreme omstandigheden.
Behandel het horloge met zorg en vermijd zware schokken.
Open het horloge niet zelf! Laat het alleen door een gecertificeerde
onderhoudsdienst openen, want het bevat precieze elektronische sensoren
en componenten.
3 VERZORGING EN ONDERHOUD
Reinig uw horloge nu en dan met een zachte doek voor een langere
levensduur.
Houd uw horloge uit de buurt van magneten of toestellen die magnetische
onderdelen bevatten zoals GSM’s, luidsprekers en motoren.
Bewaar het horloge op een droge plaats wanneer u het niet gebruikt.
Page 32

32
TOPCOM Outdoor Sportswatch 2000
4 KNOPPEN
A. START/STOP-knop [S/S]
• Om de chronofunctie te
’starten’ of ’stoppen’ in de
chronomodus.
• Om de functieschermen in de
betreffende modus te
selecteren.
• Om te switchen tussen Yes/No.
• Om de cijfers te verhogen op
het instelscherm.
B. LAP/RESET-knop [L/R]
• Om de rondetijd ("lap") te
activeren of de chronofunctie te
’resetten’ in de chronomodus.
• Om de cursor 1 plaats naar links te verplaatsen bij de weergave van
de historiek.
• Om de cijfers te verlagen op het instelscherm.
• Om te switchen tussen Yes/No.
C. SENSOR-knop [SR]
• Om de modi Tijd, Hoogtemeter, Barometer of Kompas te selecteren.
D. MODUS-knop [M]
• Om de modi Huidige Tijd, Dagelijks Alarm, Chronometer, Timer,
Pacer of Duale Tijdweergave te selecteren.
• Om de instelparameters op het instelscherm te selecteren.
E. LICHT-knop [EL]
• Om de achtergrondverlichting in te schakelen.
A
B
E
D
C
Page 33

33
NEDERLANDS
TOPCOM Outdoor Sportswatch 2000
5 MODUS "HUIDIGE TIJD"
5.1 FUNCTIESCHERM
De modus "Huidige Tijd" omvat 4
functieschermen:
• Weekdag
• Temperatuur
• Hoogte
• Druk op zeespiegelniveau
Druk op de knop [S/S] zoals hiernaast
geïllustreerd.
5.2 INFORMATIE DISPLAY
(Zie diagram)
a. Dag van de week
b. Weersvoorspelling
c. Huidige tijd
d. Datum
e. Temperatuur
f. Hoogte
g. Druk op zeespiegelniveau
6 WEERSVOORSPELLING
Speciaal aan dit horloge is de weersvoorspelling. Het horloge voorspelt het
weer door de veranderingen in de luchtdruk in de voorbije dagen te
analyseren.
Het horloge gebruikt 4 verschillende symbolen om de weersvoorspelling
aan te duiden.
Zonnig
Bewolkt met zon
Bewolkt
Regen
b
c
d
e
f
g
[S/S]
[S/S]
[S/S]
[S/S]
a
Page 34

34
TOPCOM Outdoor Sportswatch 2000
BELANGRIJK
De symbolen worden enkel weergegeven in de modi Huidige Tijd en
Duale Tijdweergave. Aangezien de weersvoorspelling gebaseerd is op
de veranderingen in de luchtdruk, raden we u ten zeerste aan om tenminste gedurende 24 uur op dezelfde hoogte te blijven voor een nauwkeurigere voorspelling.
Het horloge voorspelt het weer aan de hand van algemene weersvoorspellingsprincipes, het is NIET in staat om drastische weersveranderingen binnen in een erg korte periode weer te geven.
6.1 DE HUIDIGE TIJD INSTELLEN
• Houd de [M]-knop ongeveer 2 seconden ingedrukt in
de modus Current Time
(Huidige Tijd). Op het
instelscherm verschijnt het knipperend symbool
"SET".
• Druk op de [M]-knop om de geselecteerde
parameter te wijzigen zoals hiernaast geïllustreerd.
• Wanneer de secondecijfers knipperen (geselecteerd), drukt u op de
[S/S]-knop of de [L/R]-knop om de cijfers terug te zetten op "00".
• Wanneer de cijfers knipperen (geselecteerd), drukt u op de [S/S]-
knop of de [L/R]-knop om de cijfers te verhogen / verlagen. (Houd
de knop ingedrukt om het cijfer sneller te veranderen).
• Wanneer de parameter "maand-dag" is geselecteerd, drukt u op de
[S/S] of [L/R]-knop om te switchen tussen de opmaak maand-dag of
dag-maand.
• Wanneer de parameter 12/24-uurweergave is geselecteerd, drukt u
op de [S/S]-knop om te switchen tussen 12- en 24-uurweergave.
• Wanneer het LCD-contrast is geselecteerd, drukt u op de [S/S]- of [L/
R]-knop om het contrastniveau te verhogen / verlagen (1 tot 10).
• Wanneer de parameter "toetsbiep" is geselecteerd, drukt u op de [S/
S] of [L/R]-knop om de biep ON (aan) of OFF (uit) te schakelen.
• Houd de [M]-knop ingedrukt om het instelscherm te verlaten.
1. Seconden
2. Minuut
3. Uur
4. Jaar
5. Maand
6. Dag
7. Maand/Dag
8. 12/24h-tijdweergave
9. LCD-schermcontrast
10. Toetsbiep
SE
T
SE
T
Page 35

35
NEDERLANDS
TOPCOM Outdoor Sportswatch 2000
7 DAGELIJKS ALARM
7.1 DAGELIJKS ALARM 1 & 2
• Het horloge bevat twee onafhankelijke
dagelijkse alarmen.
• In de modus "Huidige tijd" drukt u kort op [M]
om naar de alarmmodus te gaan.
• Druk op de [S/S]-knop om te switchen tussen
Dagelijks Alarm 1, Dagelijks Alarm 2 en
Chime. (Zie afbeelding hiernaast)
7.1.1 HET DAGELIJKS ALARM ON (AAN) OF
OFF (UIT) SCHAKELEN
• In de modus Dagelijks Alarm ’AL1’ of ’AL2’
drukt u op de [L/R] -knop.
• Als het Dagelijks Alarm AAN staat, verschijnt
het alarmsymbool ’ ’ op de display.
• Het horloge zal elke dag afgaan op het vooraf
ingestelde tijdstip.
• Wanneer het alarm afgaat, drukt u op een
willekeurige knop om de pieptoon te stoppen.
7.1.2 ALARM 1 EN ALARM 2 INSTELLEN
• Houd de [M]-knop ongeveer 2 seconden ingedrukt in de modus
"Dagelijks Alarm" (AL1 of AL2). Het knipperend symbool "SET"
verschijnt op de display.
• Op het instelscherm drukt u op de [M]-knop om te switchen tussen
minuten en uur.
• Wanneer de cijfers knipperen (geselecteerd), drukt u op de [S/S]-
knop of op de [L/R]-knop om de cijfers te verhogen / verlagen. (Houd
de knop ingedrukt om het cijfer sneller te veranderen).
• Nadat u het tijdstip heeft ingesteld, houdt u de [M]-knop ingedrukt om
het instelscherm te verlaten.
7.1.3 HET UURALARM ON (AAN) OF OFF (UIT) SCHAKELEN
• Druk, in de Chime-modus, op de [L/R]-knop om het uuralarm AAN
(ON) of UIT (OFF) te zetten.
• Als het uuralarm AAN (ON) staat, verschijnt het kloksymbool ’ ’ op
de display. Als het kloksymbool zichtbaar is op de display, zal het
horloge elk uur piepen.
[S/S]
[S/S]
[S/S]
Page 36

36
TOPCOM Outdoor Sportswatch 2000
8 CHRONOMODUS
Het horloge kan ook de verstreken tijd, de totale verstreken tijd en de
rondetijd meten.
8.1 CHRONOMODUS
• In de modus "Huidige Tijd" drukt u twee keer op [M]
om naar de Chronomodus te gaan.
• Om de chronometer te starten, drukt u één keer op
de [S/S]-knop.
• Om de chronometer te stoppen, drukt u opnieuw één
keer op de [S/S]-knop.
• Herhaal de bovenstaande stappen voor de totale
verstreken tijd sinds de chrono werd gestart.
• Om de chronometer te resetten, houdt u de [L/R]-
knop gedurende 2 seconden ingedrukt.
8.2 RONDETIJDEN
De chronometer kan de verstreken tijd meten zonder de rondeteller te
stoppen. (max. 100 rondes)
• Terwijl de chronometer aan het tellen is, drukt u één
keer op de [L/R] -knop om een rondetijd te registreren
(dit heeft geen invloed op de teller).Het rondenummer
en de rondetijd verschijnen 10 seconden op de
display, daarna verschijnt weer automatisch het
tellerscherm.
• Herhaal de bovenstaande stappen om een andere
rondetijd op te vragen.
•Om te stoppen, drukt u opnieuw één keer op de [S/S]-knop.
• Om de rondetijden op te vragen, houdt u de [M]-
knop ingedrukt in de Chrono- Stop-Modus.
• Wanneer de Totale Tijd (TTL) verschijnt, drukt u op
de [S/S]-knop of op de [L/R]-knop om de volgende /
vorige rondetijd in te kijken.
• Om terug te keren naar het Chrono-scherm, drukt u
op om het even welk moment op de [M]-knop.
• Om de rondetijden te resetten, houdt u de [L/R]-knop 2 seconden
ingedrukt op het chrono-stop-scherm.
1e
Lap
Page 37

37
NEDERLANDS
TOPCOM Outdoor Sportswatch 2000
9AFTELTIMER
De timer telt af van de vooraf ingestelde waarde tot nul.
9.1 DE TIMER INSTELLEN
Er zijn 6 snelkieswaarden: 1, 3, 5, 10, 15 en 45 minuten en één door de
gebruiker gedefinieerde tijd. Het instelbereik gaat tot 99 uur 59 minuten 99
seconden. Eens een door de gebruiker gedefinieerde waarde is ingesteld,
zoals v.b. 30 minuten, wordt die waarde opgeslagen in het horloge zodat de
gebruiker die de volgende keer opnieuw kan opvragen.
• In de modus "Huidige Tijd", drukt u op [M] tot TMR op
de display verschijnt.
• Druk op de [L/R]-knop om een snelkieswaarde of de
door de gebruiker gedefinieerde tijd te selecteren
Gebruikerstijden instellen.
• Houd de [M]-knop 2 seconden ingedrukt. Het
knipperend symbool "SET" verschijnt op de display.
• Druk op de [M]-knop om te switchen tussen uur,
minuten en seconden.
• Wanneer de cijfers knipperen (geselecteerd), drukt u
op de [S/S]-knop of [L/R]-knop om de cijfers te
verhogen / verlagen. (Houd de knop ingedrukt om het
cijfer sneller te veranderen).
• Eens de tijd is ingesteld, houdt u de [M]-knop
ingedrukt om het instelscherm te verlaten.
9.2 DE TIMER GEBRUIKEN.
• Om de timer te starten, drukt u op de [S/S]-knop.
- De laatste 10 minuten zal het horloge om de minuut piepen.
- De laatste minuut zal het om de 10 seconden piepen.
- De laatste 5 seconden zal het elke seconde piepen.
- Eens de afteltimer nul bereikt, krijgt u 30 seconden lang een pieptoon te horen.
• Om de timer te stoppen, drukt u opnieuw één keer op de [S/S]-knop.
• Om de timer te herladen (bestaande geprogrammeerde afteltijd) voor
een nieuwe telling, drukt u op de [L/R]-knop wanneer de timer is
gestopt.
SET
SE
T
Page 38

38
TOPCOM Outdoor Sportswatch 2000
10 PACER-MODUS
De pacer piept tegen een vooraf gedefinieerde snelheid.
De snelheid kan worden ingesteld van 30 tot 180 slagen
per minuut (BPM) (waarde verhoogt of verlaagt per 5
slagen).
10.1 DE PACER GEBRUIKEN
• In de modus "Huidige Tijd", drukt u op [M] tot PACER
op de display verschijnt.
• Druk op de [S/S]-knop om de pacer te starten.
• De stappenteller "St" loopt in het midden van de
display (max. 99999 stappen)
• Druk op de [S/S]-knop om de pacer te stoppen.
• Om de stappenteller te resetten, houdt u de [L/R]-
knop ingedrukt nadat de pacer is gestopt.
10.2 DE PIEPSNELHEID INSTELLEN
• Houd de [M]-knop ongeveer 2 seconden ingedrukt in de Pacer-
modus.
• Wanneer de cijfers voor de piepsnelheid beginnen te knipperen, drukt
u op de [S/S]-knop of de [L/R]-knop om de cijfers te verhogen /
verlagen. (Houd de knop ingedrukt om het cijfer sneller te
veranderen).
• Eens de snelheid is ingesteld, houdt u de [M]-knop ingedrukt om het
instelscherm te verlaten.
11 MODUS DUALE TIJDWEERGAVE
Het horloge beschikt ook over een functie om de tijd voor een tweede
tijdzone weer te geven.
Het tweede cijfer van de duale tijd is gesynchroniseerd met de huidige tijd.
• In de modus "Huidige Tijd" drukt u op [M] tot T2 op de display
verschijnt.
• Houd de [M]-knop 2 seconden ingedrukt. Het
knipperende symbool "SET" verschijnt op de display.
• Druk op de [M]-knop om te switchen tussen uur en
minuten.
[S/S]
beep-beep
Page 39

39
NEDERLANDS
TOPCOM Outdoor Sportswatch 2000
• Wanneer de cijfers knipperen (geselecteerd), drukt u op de [S/S]-
knop of [L/R]-knop om de cijfers te verhogen / verlagen. (Houd de
knop ingedrukt om het cijfer sneller te veranderen).
• Eens de tijd is ingesteld, drukt u op de [M]-knop om het instelscherm
te verlaten.
12 HOOGTEMETER
12.1 DISPLAY
Het horloge heeft twee functieschermen in de Hoogtemeter-modus:
De huidige (historiek) hoogte wordt weergegeven op de middelste regel.
De huidige (historiek) tijd wordt weergegeven op de onderste regel.
Voor een precieze uitlezing van de luchttemperatuur moet u het horloge van uw pols nemen om te vermijden dat uw lichaamstemperatuur
uw horloge beïnvloedt.
12.2 EENHEID VOOR HOOGTE EN TEMPERATUUR
Het horloge kan de hoogte weergeven in meter (m) of voet (ft) en kan de
temperatuur weergeven in graden Celsius (C) of graden Fahrenheit (F).
• Om te switchen tussen verschillende eenheden, houdt u de [S/S]-
knop ingedrukt om van eenheid te veranderen zoals hiernaast
geïllustreerd.
12.3 HOOGTEHISTORIEK
Het horloge registreert de hoogte automatisch om het uur op het uur, m.a.w.
1:00, 2:00, 3:00 enz. Die data worden grafisch weergegeven in een
hoogtegrafiek. Op het Historiekscherm verschijnt de hoogtegrafiek op de
bovenste regel van de display. Om de hoogtedata van de laatste 23 uur in
te kijken, drukt u op de [L/R]-knop om de cursor cyclisch naar links te
verplaatsen. Dan verschijnen de hoogtewaarde resp. het tijdstip van
registratie op de display.
1. Temperatuur 2. Hoogtehistoriek
ALTI
ALTI
ALTI
Page 40

40
TOPCOM Outdoor Sportswatch 2000
12.4 DE HOOGTEMETER KALIBREREN
Voor een nauwkeurige uitlezing moet u uw hoogtemeter zo goed mogelijk
kalibreren.
U kunt de hoogtemeter op 4 manieren kalibreren.
OPMERKING: De hoogte wordt gekalibreerd onafhankelijk van de
modus. Bijvoorbeeld, als de absolute hoogte is geselecteerd, zal het
effect van de vorige instelling voor de druk op zeespiegelniveau
worden genegeerd.
12.4.1 NULHOOGTE INSTELLEN
Het horloge kan de relatieve hoogte meten, zo kan het bijvoorbeeld de
stijgende of dalende hoogte tussen het vertrekpunt en het eindpunt van een
traject meten. Om dit te meten, moet de huidige hoogte op 'zero' worden
gezet op een referentiepunt zoals het vertrekpunt van een traject. Een ’r’
verschijnt op de display.
• In de modus "Huidige Tijd" drukt u op de
[SR]-knop tot de hoogte "ALTI" op de
display verschijnt.
• Houd de [M]-knop 2 seconden ingedrukt.
Het knipperende symbool "SET" en
"ZERO" verschijnen op de display.
• Druk op de [S/S]-knop op het scherm,
"NO" verschijnt.
• Druk op de [S/S]-knop om "YES" te
selecteren
• Houd de [M]-knop 2 seconden ingedrukt
om de instelling te bevestigen en het
instelscherm te verlaten.
• "DONE" verschijnt op de display en het
horloge keert terug naar de Hoogte-modus.
De hoogte is 0 meter.
ALTI
ALTI
ALTI
ALTI
SET
ALTI
ALTI
Page 41

41
NEDERLANDS
TOPCOM Outdoor Sportswatch 2000
12.4.2 HOOGTEMETER KALIBREREN AAN DE HAND VAN DE ABSO-
LUTE HOOGTE.
In plaats van te beginnen van nul meter hoogte, kunt u de absolute hoogte
instellen wanneer u over een betrouwbare referentie beschikt, zoals een
piek of een topografische kaart.
• In de modus "Huidige Tijd" drukt u op de
[SR]-knop tot de hoogte op de display
verschijnt.
• Houd de [M]-knop 2 seconden ingedrukt.
Het knipperende symbool "SET " en
"ZERO" verschijnen op de display.
• Druk op de [M]-knop tot ’ALTI’ op de
display verschijnt.
•Druk op de [S/S]-knop. De absolute hoogte
knippert op de display.
• Druk op de [S/S]-knop of [L/R]-knop om de
cijfers te verhogen / verlagen. (Houd de
knop ingedrukt om het cijfer sneller te
veranderen).
• Houd de [M]-knop ingedrukt om de
instelling te bevestigen.
• Houd de [M]-knop 2 seconden ingedrukt om het instelscherm te
verlaten. "DONE" verschijnt op de display en het horloge keert terug
naar de Hoogte-modus.
ALTI
ALTI
A
ALTI
ALTI
Page 42

42
TOPCOM Outdoor Sportswatch 2000
12.4.3 DE HOOGTEMETER KALIBREREN AAN DE HAND VAN DE
DRUK OP ZEESPIEGELNIVEAU
De hoogte kan worden berekend aan de hand
van het verschil tussen de huidige luchtdruk en
de luchtdruk op zeespiegelniveau.
• In de modus "Huidige Tijd" drukt u op de
[SR]-knop tot de hoogte op de display
verschijnt.
• Houd de [M]-knop 2 seconden ingedrukt.
Het knipperende symbool " SET " en
"ZERO" verschijnen op de display.
• Druk op de [M]-knop tot ’SEAP’ op de
display verschijnt
• Druk op de [S/S]-knop. De reële druk op
zeespiegelniveau knippert op de display.
• Druk op de [S/S]-knop of [L/R]-knop om de
cijfers te verhogen / verlagen. (Houd de
knop ingedrukt om het cijfer sneller te veranderen).
• Houd de [M]-knop ingedrukt om de instelling te bevestigen.
Belangrijk:
Deze kalibreringsmethode is minder nauwkeurig, omdat de luchtdruk
kan veranderen door atmosferische wijzigingen naarmate u verder
weggaat van de zee.
Bij het kalibreren van de hoogtemeter, wordt de barometer tegelijkertijd gekalibreerd.
12.4.4 DE HOOGTEMETER KALIBREREN AAN DE HAND VAN DE
STANDAARD FABRIEKSINSTELLING
De normale druk op zeespiegelniveau is 1013,2mb
.
Deze kalibreringsmethode is enkel interessant wanneer u zich op een
hogere hoogte bevindt. Aangezien de ingestelde druk op zeespiegelniveau continu varieert, is de hoogte onnauwkeurig en enkel indicatief.
ALTI
ALTI
AL
ALTI
ALTI
Page 43

43
NEDERLANDS
TOPCOM Outdoor Sportswatch 2000
De druk op zeespiegelniveau opnieuw instellen op deze standaardwaarde
• In de Modus "Huidige Tijd", drukt u op de
[SR]-knop tot de hoogte op de display
verschijnt.
• Houd de [M]-knop 2 seconden ingedrukt.
Het knipperende symbool "SET" en
"ZERO" verschijnen op de display.
• Druk op de [M]-knop tot ’F.DEF’ op de
display verschijnt
• Druk op de [S/S]-knop op het scherm,
"NO" verschijnt.
• Druk op de [S/S]-knop om "YES" te
selecteren
• Houd de [M]-knop 2 seconden ingedrukt
om de instelling te bevestigen en het
instelscherm te verlaten.
• "DONE" verschijnt op de display en de
luchtdruk op zeespiegel is opnieuw
ingesteld op 1013,2mb
.
• De hoogte zal worden berekend aan de
hand van het verschil tussen de huidige
gemeten luchtdruk en de normale luchtdruk op zeespiegelniveau.
13 BAROMETER-MODUS
13.1 FUNCTIESCHERM
Het horloge heeft drie functieschermen in de Barometer-modus:
1. Temperatuur
2. Druk op zeespiegelniveau
3. Historiek
ALTI
SET
ALTIALTI
ALTIALTI
ALTIALTI
BARO
ALTIALTI
BARO
BARO
BARO
[S/S]
[S/S]
123
Page 44

44
TOPCOM Outdoor Sportswatch 2000
Één van de drie functieschermen verschijnt op de bovenste regel van de
display.
• In de Modus "Huidige Tijd", drukt u op de [SR]-knop tot de barometer
’BARO’ op de display verschijnt.
• Druk op de [S/S]-knop om te switchen tussen de verschillende
functieschermen.
De huidige (historiek) druk en de huidige (historiek)
tijd verschijnen resp. op de middelste en onderste regel van de display.
Voor een nauwkeurige uitlezing van de luchttemperatuur moet u het
horloge langer dan 20 minuten van uw pols nemen om te vermijden
dat uw lichaamstemperatuur uw horloge beïnvloedt.
13.2 EENHEID VOOR LUCHTDRUK EN TEMPERATUUR
Het horloge kan de druk weergeven in mb/hPa of in Hg en kan de
temperatuur weergeven in graden Celsius (C) of graden Fahrenheit (F).
Om te switchen tussen de verschillende eenheden, drukt u op de [S/S]-
knop om van eenheid te veranderen zoals hiernaast geïllustreerd.
13.3 TEMPERATUUR
Op het Temperatuur-scherm verschijnt de huidige temperatuur in graden
Celsius (°C) of graden Fahrenheit ( °F) op de bovenste regel van de display.
Voor een nauwkeurige uitlezing van de luchttemperatuur moet u het
horloge van uw pols nemen (gedurende 20 tot 30 minuten) om te
vermijden dat uw lichaamstemperatuur uw horloge beïnvloedt.
C (Celsius)
inHg
C (Celsius)
mb/hPa
F(Fahrenheit)
mb/hPa
F (Fahrenheit)
inHg
hold
[S/S]
hold
[S/S]
hold
[S/S]
hold
[S/S]
hold
[S/S ]
Page 45

45
NEDERLANDS
TOPCOM Outdoor Sportswatch 2000
13.4 DRUKHISTORIEK
Het horloge registreert de druk automatisch om het uur.
Die data worden grafisch weergegeven in een drukgrafiek.
Op het Drukhistoriekscherm verschijnt de drukgrafiek op de bovenste regel
van de display.
Om de drukdata van de laatste 23 uur in te kijken, drukt u op de [L/R]-knop
om de cursor cyclisch naar links te verplaatsen. Dan verschijnen de
drukwaarde resp. het tijdstip van registratie knipperend op de display, zoals
hiernaast geïllustreerd.
13.5 DRUK OP ZEESPIEGELNIVEAU
Op het scherm "Druk op Zeespiegelniveau" verschijnt de huidige druk op
zeespiegelniveau op de bovenste regel van de display.
Het horloge registreert de druk op zeespiegelniveau automatisch om het
uur op het uur, m.a.w. 1:00, 2:00, 3:00 enz. Die data worden grafisch
weergegeven
in een drukgrafiek.
13.6 ZEESPIEGELHISTORIEK
Op het scherm zeespiegelhistoriek verschijnt de
drukgrafiek op de bovenste regel van de display.
Om de drukdata van de laatste 23 uur in te kijken, drukt u
op de [L/R]-knop om de cursor cyclisch naar links te
verplaatsen. Dan verschijnen de drukwaarde resp. het
tijdstip van registratie knipperend op de display.
14 BAROMETER KALIBREREN
14.1 WAAROM MOET DE BAROMETER WORDEN
GEKALIBREERD?
Het horloge werd voor u in de fabriek gekalibreerd. Voor normaal gebruik
hoeft u de barometer niet meer te kalibreren. Maar voor intensief gebruik
beschikt het horloge over een afstelprocedure.
BARO
Page 46

46
TOPCOM Outdoor Sportswatch 2000
14.2 BAROMETER AFSTELLEN
U kunt de barometer op 2 manieren afstellen:
1. Absolute druk: Voer de bekende atmosferische druk direct in het horloge in (AIRP)
2. Standaard fabrieksinstelling: Herstel de standaard fabrieksinstellingen
van het horloge. Voor gedetailleerdere informatie voor elke afstelmethode, verwijzen we naar de volgende paragrafen (FDEF)
Het instelscherm selecteren:
• In de Modus "Huidige Tijd" drukt u op de [SR]-knop tot de hoogte
’BARO’ op de display verschijnt.
• Houd de [M]-knop ingedrukt in Barometer-modus.
• Druk op de [M]-knop om te kiezen tussen de kalibreringsmethode
"Absolute druk" of "Standaard fabrieksinstelling".
BARO
[S/S]
[M]
2 sec
"DONE" Display
Ba rom eter Mode
hold
M]
hold
[M]
hold
[M]
[S/S ] / [L/R]
BARO
SET
BARO
SET
BARO
BARO
BARO
BARO
[S/S ]
1
2
[
Page 47

47
NEDERLANDS
TOPCOM Outdoor Sportswatch 2000
14.3 KALIBRERING AAN DE HAND VAN DE ABSOLUTE
DRUK
Het horloge kan de huidige drukwaarde instellen op een absolute
drukwaarde.
Raadpleeg, alvorens de barometer te kalibreren, het dichtstbijzijnde
observatiestation voor de barometrische omgevingsdruk van uw huidige positie.
• Druk op de [S/S]-knop op het scherm Absolute Druk. De drukuitlezing
verschijnt.
•Druk op de [S/S]-knop of op de [L/R]-knop om de cijfers te verhogen
/ verlagen. (Houd de knop ingedrukt om het cijfer sneller te
veranderen).
• Houd de [M]-knop ingedrukt om de instelling te bevestigen en het
instelscherm te verlaten.
14.4 KALIBREREN AAN DE HAND VAN DE STANDAARD
FABRIEKSINSTELLING
Het horloge kan de drukuitlezing zo instellen dat bij de berekening opnieuw
de standaard fabriekswaarde wordt gebruikt.
• Druk op de [S/S]-knop op het scherm "Standaard fabrieksinstelling".
Op de display verschijnt "NO".
• Druk op de [S/S] of [L/R]-knop om te kiezen tussen "YES" (het
horloge opnieuw op de standaard fabrieksinstelling instellen) of "NO"
(resetten afbreken).
• Om het instelscherm te verlaten houdt u de [M]-knop 2 seconden
ingedrukt, daarna keert het horloge terug naar de Hoogtemetermodus.
Als u "YES" heeft geselecteerd, verschijnt"DONE" 2 seconden op de
display vooraleer terug te keren naar de normale modus.
Page 48

48
TOPCOM Outdoor Sportswatch 2000
15 KOMPASMODUS
15.1 BELANGRIJK
• Houd uw horloge uit de buurt van magneten of toestellen die
magnetische onderdelen kunnen bevatten zoals GSM’s, luidsprekers
en motoren enz..
• Het horloge wijst, zoals de meeste magnetische kompassen, naar het
magnetische noorden, wat lichtjes afwijkt van het echte noorden.
• Kalibreer het kompas regelmatig, zo verhoogt u de precisie van het
kompas.
• Voor een nauwkeurig resultaat meet u het best de richting niet in de
volgende omstandigheden:
- Het horloge bevindt zich op een magnetisch voorwerp
- Het horloge bevindt zich op een metalen voorwerp
- Het horloge bevindt zich op een elektrisch toestel
- Het horloge bevindt zich binnen een bewegend voorwerp of een
gebouw uit gewapend beton.
15.2 KOMPASRICHTINGEN EN PEILRICHTINGEN
15.2.1 DE RICHTING VAN EEN VOORWERP
• De richting van een voorwerp vanaf een punt kan worden opgegeven
in kompasrichtingen of peilrichtingen
• Het horloge beschikt over zowel kompasrichtingen als over
peilrichtingen
15.2.2 KOMPASRICHTINGEN
• De kompasrichtingen vindt u in de
tabel hiernaast.
• Bijvoorbeeld, op de afbeelding rechts,
is de kompasrichting van voorwerp B
ten opzichte van punt A oost. De
kompasrichting van voorwerp C ten
opzichte van punt A is zuid-oost. De
kompasrichting van voorwerp D ten
opzichte van punt A is noord-west.
object B
object C
object D
angula r
difference
90
135
315
point
A
0
0
Page 49

49
NEDERLANDS
TOPCOM Outdoor Sportswatch 2000
15.2.3 DE PEILRICHTINGEN
• De peilrichting van een voorwerp wordt
gedefinieerd als het hoekverschil tussen
het noorden en het voorwerp. (We gaan
uit van 0° voor het noorden, en het
meetbereik gaat van 0° tot 359°).
• Bijvoorbeeld, op de afbeelding rechts, is
de peilrichting van voorwerp B ten
opzichte van punt A 90°. De peilrichting
van voorwerp C ten opzichte van punt A is
135°. De peilrichting van voorwerp D ten opzichte van punt A is 315°.
15.3 KOMPASMODUS
15.3.1 KOMPASMODUS
• In de Kompasmodus verschijnt bovenaan op de
display de kompas- richting
• Het middelste scherm geeft de peilrichting weer.
• Onderaan op de display wordt de huidige tijd, in uur en
minuten, weergegeven.
• De omcirkelde wijzer op de display geeft analoog de
richting van het magnetische noorden weer.
Ma rks
N
NE
E
SE
SSE
SSW
WNW
NNW
Compa ss Directions Bearing Directions
North
349 - 11
Northeast
Ea st
Southeast
Ea st Southeast
South Southwest
North Northwest
S
SW
W
NW
South
Southwest
West
Northwest
ES E
ENE
WS W
NNE
West Northwest
West Southwest
South Southeast
Ea st Northeast
North Northeast
12 - 33
34 - 56
57 - 78
102 - 12 3
79 - 101
12 4 - 146
147 - 16 8
16 9 - 191
214 - 236
192 - 213
237 - 2 58
259 - 281
304 - 326
282 - 303
3
27 - 348
object B
object C
object D
point A
N
E
SE
NW
N
COMP
Page 50

50
TOPCOM Outdoor Sportswatch 2000
15.3.2 IDLE-MODUS
• Indien gedurende ongeveer 1 minuut geen enkele
knop wordt ingedrukt, gaat het horloge automatisch
naar de IDLE-modus.
• Om het kompas opnieuw te activeren, drukt u op een
willekeurige knop, uitgezonderd de knoppen [EL] ] en
[SR].
15.3.3 VERTEKENDE WEERGAVE
• Als een vertekende weergave wordt gedetecteerd,
verschijnt "OFF CALL" met knipperende
richtingcijfers.
• Zie het volgende Hoofdstuk 14.8 - "Het kompas
kalibreren" om de normale werking van het kompas te
herstellen wanneer vertekende resultaten zijn
vastgesteld.
15.4 ACHTERWAARTSE PEILING
Het horloge beschikt over een achterwaartse
peilfunctie.
• De achterwaartse peilrichting is de
peilrichting die tegenover de normale
peilrichting ligt.
• Wanneer het symbool voor 'Achterwaartse
peiling' " " verschijnt, geeft het horloge de
tegenovergestelde peilrichting van de
navigatierichting weer.
• Druk in Kompasmodus op de [S/S]-knop om
te kiezen tussen de normale en
achterwaartse peilrichting.
COMP
COMP
0
COMP
12 5
0
[S/S]
305
0
COMP
1
2
Page 51

51
NEDERLANDS
TOPCOM Outdoor Sportswatch 2000
15.5 KOMPASSLOT
• Het horloge beschikt over een kompasslotfunctie
dat de belangrijke richtinguitlezingen vergrendelt.
• Druk in Kompasmodus op de [L/R]-knop om de
richtinguitlezing te ver- of ontgrendelen. Wanneer
het symbool "Lock" , " " verschijnt, zijn de
kompasrichting, peilrichting en de magnetische
noordpoolaanwijzer vergrendeld.
• Het kompasslot wordt automatisch ontgrendeld
wanneer het horloge naar IDLE-modus gaat.
15.6 KOMPASTOEPASSINGEN
15.6.1 CONTROLEER UW POSITIE AAN DE HAND VAN DE OMGE-
KEERDE PEILRICHTINGEN
• Lokaliseer twee afgelegen
identificeerbare oriëntatiepunten zoals
bergen, vuur-toren, fort en gebouw vanaf
uw huidige positie, bijvoorbeeld berg A
en B.
• Controleer de omgekeerde peilrichtingen
van berg A en B vanaf uw huidige
positie, zoals 135° van berg A en 270°
van berg B.
• Gebruik een liniaal om de lijn 135° op de kaart te tekenen,
vertrekkend vanaf berg A. Teken de lijnen 270° op de kaart
vertrekkend vanaf berg B.
• Uw huidige positie op de kaart is dan het snijpunt (punt A) van de
lijnen 135° en 270°
COMP
1
2
[L/R]
COMP
mounta in B
mountain A
270
135
point A
0
Page 52

52
TOPCOM Outdoor Sportswatch 2000
15.6.2 CONTROLEER DE CORRECTE TREKKOERS
• Tijdens uw trektocht kan het
horloge u op de juiste koers
houden. Bijvoorbeeld, het juiste
traject begint bij punt A en
eindigt bij punt E, zoals getekend
op de kaart hiernaast.
• Markeer de punten
(identificeerbare
oriëntatiepunten) waar het traject
van richting verandert of waar de
weg zich vertakt, zoals de
punten A, B, C, D en E op de kaart hiernaast.
• Lokaliseer de peilrichtingen van punt B ten opzichte van punt A
(315°), punt C ten opzichte van punt B (0°), punt D ten opzichte van
punt C (225°), en dan punt E ten opzichte van punt D (315°).
• Zorg er, tijdens uw trektocht, voor dat de hoofdrichting 315° is van
punt A naar punt B. Soortgelijke controles uitvoeren in andere delen
van het traject.
BELANGRIJK:
Als u twijfelt aan de richtingen en posities van het traject, raadpleeg
dan het parkbeheer vooraleer uw trektocht aan te vangen.
15.7 MAGNETISCHE AFWIJKING
15.7.1 WAT IS EEN MAGNETISCHE AFWIJKING?
• Het magnetische noorden wijkt lichtjes af van de echte noordpool.
• Het Outdoor Sporthorloge 2000 wijst, zoals de meeste magnetische
kompassen, naar het magnetische noorden. Alles wat op een kaart
wordt gemeten daarentegen, wijst naar de echte noordpool.
• Het hoekverschil tussen het magnetische noorden en het echte
noorden wordt ’magnetische afwijking’ genoemd. De grootte (graden
en minuten) en richting (naar het oosten en het westen) hangen af
van waar u zich bevindt op de wereld.
4110 m
2120 m
3120 m
point A
(starting )
point B
point D
point E
(finish )
point C
315
225
0
315
0
Page 53

53
NEDERLANDS
TOPCOM Outdoor Sportswatch 2000
• Voor professionele kompasgebruikers of voor gebruikers die een
exacte navigatie wensen, moet het kompas worden ingesteld
rekening houdend met de magnetische afwijking.
• Het horloge beschikt ook over een compensatie-instelling voor de
magnetische afwijking. Zie het volgende hoofdstuk "Magnetische
afwijking compenseren " voor gedetailleerdere informatie.
15.7.2 INFORMATIE OVER DE MAGNETISCHE AFWIJKING
• Op de meeste topografische kaarten staat ook een kleine pijl die wijst
naar het magnetische noorden en/of informatie over de magnetische
afwijking.
• Voor de gebruiker van het Outdoor Sporthorloge 2000 hebben we in
deze handleiding ook de magnetische afwijking voor enkele
belangrijker steden opgenomen.
• Zie het volgende hoofdstuk 'Magnetische afwijking in belangrijke
steden" voor meer informatie. Voor de steden die niet in de lijst staat,
zie de on-line informatie over de magnetische afwijking op:
- http://www.geolab.nrcan.gc.ca/geomag/e_cgrf.html
- http://www.ngdc.noaa.gov/cgi-bin/seg/gmag/fldsnth1.pl
15.7.3 MAGNETISCHE AFWIJKING COMPENSEREN
De peilpositie van een voorwerp compenseren door de magnetische
afwijking naar het westen (W) af te trekken van of de magnetische afwijking
naar het oosten (O) op te tellen bij de magnetische peiling.
1. Voorbeeld 1: 23° magnetische afwijking naar het westen en de kom-
pasnaald wijst naar 323.
- TB = MB - W. Waarbij MB = 323; W =23
- TB = 323 - 23
- TB = 300
De reële peiling is 300.
2. Voorbeeld 2: 22° magnetische afwijking naar het oosten en de kom-
pasnaald wijst naar 278.
- TB = MB + O. Waarbij MB = 278; E = 22
- TB = 278+ 22
- TB = 300
De reële peiling is 300.
Page 54

54
TOPCOM Outdoor Sportswatch 2000
Het horloge laat u toe de kompaspeiling te compenseren op een plaats
waar de magnetische afwijking ofwel een afwijking naar het westen, ofwel
een afwijking naar het oosten is.
Zie het volgende hoofdstuk "Het kompas kalibreren voor gedetailleerdere
informatie over de instelling.
15.8 MAGNETISCHE AFWIJKING IN BELANGRIJKE
STEDEN
No. Country/Place Major City Dec lination
33 Netherlands Amsterdam 1-W
34 New Zealand Wellington 22-E
35 NorwayOslo 0
36 Pakistan Islamabad 2-E
37 Philippines Manila 1-W
38 PortugalLisbon 5-W
39 Russia Moscow 9-E
40 S ingapore Singapore 0
41 S outh Africa Cape Town 23-
W
42Spain Madrid 3-W
43 Sweden Stockholm 3-E
44 Switz erland Bern 0
45 TaiwanTai-pei 3-W
46 Thailand Bangkok 0
47 UAE Abu Dhabi 1-E
48 United Kingdom London 3-W
49 United States Washington, DC 10-
W
50 Juneau 25-E
51 Phoenix 12-E
52 Little Rock2-E
53 Sacramento 16-E
54 Denver 10-E
55 Atlanta 4-W
56 Honolulu 10-E
57 Boston 16-
W
58 Saint Paul 2-E
59 Jackson 1-E
60 Santa Fe 10-E
61Oklahoma City 6-E
62 Salem 18-E
63Harrisburg 11 -W
64 Salt Lake City 14-E
No. Country/Place Major City Declination
1 AfghanistanKabul 2-E
2Australia Canberra 12-E
3 AustriaVienna2-E
4Bahrain Manama 2-E
5Bangladesh Dhaka 0
6 Belgium Brussels 1-W
7 Brazil Brasilia 19-W
8Canada Ottawa 14-W
9 Chile Santiago5-E
10 Beijing6-W
11
12 Costa RicaSan Jose 0
13 Cuba Havana 3-W
14 Czech Republic Prague 2-E
15 Denmark Copenhagen 1-E
16 Egypt Cairo 3-E
17 Finland Helsinki 6 -E
18 France Paris 1-W
19 Germany Berlin 1-E
20Greece Athens 3-E
21Hungary Budapest 4-E
22 India Ne
w Delhi 1-E
23 Indonesia Jakarta 1-E
24Israel 3-E
25Italy Rome1-E
26 JapanTokyo 7 -W
27 Jordan Amman3-E
28Kenya Nairobi 1-E
29KoreaSeoul 7-W
30 Malaysia Kuala Lumpur 1-E
31 Mexico Mexico City 6 -E
32 NepalKathmandu 0
China Hong Kong2-W
China
Jerusalem
Page 55

55
NEDERLANDS
TOPCOM Outdoor Sportswatch 2000
15.9 WANNEER MOET U HET KOMPAS KALIBREREN?
Het kompas moet worden gekalibreerd in de volgende gevallen:
1) Het horloge wordt voor de eerste keer gebruikt;
2) De batterij werd vervangen;
3) De cijfers voor de peilrichting knipperen en het symbool "" verschijnt;
4) Het kompas wordt gebruikt op een andere plaats dan de plaats waar het
werd gekalibreerd;
5) De gebruiker is van plan om de precisie van het digitale kompas af te
stellen;
15.10 HET KOMPAS KALIBREREN
Het kalibreren van het kompas omvat twee stappen:
1. Rotatie kalibreren
2. Magnetische afwijking instellen.
We raden u aan om beide stappen regelmatig uit te voeren, zo krijgt u
nauwkeurigere uitlezingen.
BELANGRIJK: Als het horloge niet is gekalibreerd, kan het zijn dat de
richting die door het horloge wordt aangeduid niet accuraat is
hold [M]
hold [M]
[M]
COMP
COMP
COMP
[S /S ] / [L/R]
/ [M ]
[S /S ]
COMPCOMP
1
2
15sec
Page 56

56
TOPCOM Outdoor Sportswatch 2000
15.11 ROTATIE KALIBREREN
• Om de modus "Rotatie kalibreren" te selecteren, houdt u de [M]-knop
ingedrukt in de Kompasmodus.
• Om de rotatiekalibrering te starten, drukt u opnieuw op de [S/S]-
knop. De wijzers zullen beginnen te draaien, waarbij u het horloge
(houd het horizontaal) in dezelfde richting draait als de roterende
wijzers, en dit gedurende meer dan 2 omwentelingen.
•Druk op [S/S] of [L/R] om de kalibrering te stoppen nadat de
rotatiekalibrering met 2 omwentelingen is afgerond.
• Als de wijzer stopt met draaien, houdt u de [M]-knop ingedrukt om
terug te keren naar de Kompasmodus of drukt u opnieuw op de [M]-
knop om de magnetische afwijking in te stellen.
15.12 MAGNETISCHE AFWIJKING INSTELLEN
• Zie Hoofdstuk 14.8 "Magnetische afwijking in belangrijke steden" voor
de magnetische afwijking van de stad die dicht bij uw huidige positie
ligt. Die hoek zal worden ingevoerd in het horloge tijdens de
kalibrering.
• Om het scherm "Magnetische afwijking" te selecteren, drukt u op de
[M] -knop op het scherm Rotatiekalibrering.
• Wanneer de huidige magnetische afwijking verschijnt, drukt u op de
[S/S]-knop of op de [L/R]-knop om de cijfers te verhogen / verlagen.
(Houd de knop ingedrukt om het cijfer sneller te veranderen).
• Eens de waarde is ingesteld, houdt u de [M]-knop ingedrukt om de
instelling te bevestigen en het instelscherm te verlaten.
16 ZWAKKE BATTERIJ
• Wanneer het symbool voor zwakke batterij
verschijnt op de display, betekent dit dat het
batterijvermogen zwak is. We raden u aan de
batterij te vervangen door een nieuwe CR2032.
• Maar als het batterijsymbool verschijnt omdat het
horloge bij extreme koude wordt gebruikt, zal het
symbool opnieuw verdwijnen wanneer de
temperatuur opnieuw normaal is.
Page 57

57
NEDERLANDS
TOPCOM Outdoor Sportswatch 2000
17 BATTERIJ PLAATSEN
Als u niet vertrouwd met elektronica, laat de batterij
dan door een vakman vervangen. Open het horloge
niet zelf.
Verwijder de achterkant van het horloge met een
kleine schroevendraaier. Plaats de 3 V-batterij
(CR2032) met de positieve (+) pool naar boven en
plaats het klepje terug. Verwijder de batterij en plaats
ze terug wanneer op de display onregelmatige cijfers
verschijnen.
18 HET TOESTEL VERNIETIGEN (MILIEU)
Op het einde van de levenscyclus van het product mag u dit
product niet bij het normale huishoudelijke afval gooien, maar
moet u het naar een inzamelpunt brengen voor de recyclage van
elektrische en elektronische apparatuur. Dit wordt aangeduid
door het symbool op het product, in de handleiding en/of op de
verpakking.
Sommige materialen van het product kunnen worden hergebruikt als u ze
naar een inzamelpunt brengt. Door onderdelen of grondstoffen van
gebruikte producten te hergebruiken, levert u een belangrijke bijdrage tot
de bescherming van het milieu. Wend u tot uw lokale overheid voor meer
informatie over de inzamelpunten in uw buurt.
19 GARANTIE
19.1 GARANTIEPERIODE
Op de Topcom-toestellen wordt een garantie van 24 maanden verleend. De
garantieperiode begint op de dag waarop het nieuwe toestel wordt gekocht.
Kleine onderdelen of defecten die een verwaarloosbaar effect hebben op
de werking of waarde van het toestel zijn niet gedekt door de garantie.
De garantie moet worden bewezen door voorlegging van het
aankoopbewijs waarop de datum van aankoop en het toesteltype staan.
3V - Lithium
CR2032
+
CR2032
3V
Maak geen kortsluiting & gooi de batterijen niet in
vuur.
Page 58

58
TOPCOM Outdoor Sportswatch 2000
19.2 AFWIKKELING VAN GARANTIECLAIMS
Een defect toestel moet, samen met een geldig aankoopbewijs, worden
teruggestuurd naar een Topcom-hersteldienst.
Als het toestel tijdens de garantieperiode een defect vertoont, zal Topcom
of diens officieel erkende hersteldienst eventuele defecten te wijten aan
materiaal- of productiefouten gratis herstellen.
Topcom zal naar keuze haar garantieverplichtingen vervullen door defecte
toestellen of onderdelen van defecte toestellen ofwel te herstellen ofwel te
vervangen. In het geval dat het toestel wordt vervangen, kan de kleur en het
model verschillend zijn van het oorspronkelijk gekochte toestel.
De oorspronkelijke aankoopdatum is bepalend voor het begin van de
garantieperiode. De garantieperiode wordt niet verlengd als het toestel
wordt vervangen of hersteld door Topcom of diens officieel erkende
hersteldienst.
19.3 AFWIKKELING VAN GARANTIECLAIMS
Schade of defecten te wijten aan onoordeelkundig gebruik of bediening en
schade te wijten aan het gebruik van niet-originele onderdelen of
accessoires die niet zijn aanbevolen door Topcom, worden niet gedekt door
de garantie. De garantie dekt geen schade te wijten aan externe factoren,
zoals bliksem, water en brand, noch enige transportschade.Er kan geen
garantie worden ingeroepen als het serienummer op het toestel is
gewijzigd, verwijderd of onleesbaar gemaakt.
Garantieclaims zijn ongeldig indien het toestel hersteld, gewijzigd of
aangepast werd door de koper of door niet-gekwalificeerde, niet-officieel
erkende Topcom-hersteldienst.
Page 59

59
FRANÇAIS
TOPCOM Outdoor Sportswatch 2000
1 INTRODUCTION
Merci d’avoir acheté la montre Outdoor Sports Watch 2000. Cette montre
dispose de capteurs électroniques qui mesurent et affichent les conditions
extérieures : Prévisions météorologiques, température, pression, altitude et
compas. Votre montre vous fournit des informations essentielles lorsque
vous faites du hiking, du camping sauvage ou dans d’autres activités
extérieures, spécialement pour une période prolongée.
2 NOTES DE SÉCURITÉ
Lisez les instructions avant d’utiliser la montre.
Évitez d’exposer votre montre à des conditions extrêmes pendant un délai
déraisonnable.
Évitez les usages rudes ou les impacts sévères à votre montre.
N’ouvrez pas la montre parce qu’elle contient des capteurs et composants
électroniques de haute précision.
3 SOIN ET MAINTENANCE
Nettoyez occasionnellement votre montre avec un tissu sec pour lui
garantir une durée de vie plus longue.
Conservez votre montre loin des éléments ou des appareils contenant des
objets magnétiques tels que les téléphones mobiles, les haut-parleurs et
les moteurs.
Conservez votre montre dans un endroit sec lorsque vous ne l’utilisez pas.
Page 60

60
TOPCOM Outdoor Sportswatch 2000
4BOUTONS
A. Bouton START/STOP [S/S]
• Pour 'démarrer' ou 'arrêter' la
fonction chronographe pendant
le mode chronographe.
• Pour sélectionner les écrans
fonctionnels dans ce mode.
• Pour basculer entre Yes/No.
• Pour augmenter les chiffres
pendant le réglage de
l’affichage.
B. Bouton LAP/RESET [L/R]
• Pour activer la fonction
'intermédiaire' ou 'remise à
zéro' du chronographe en
mode chronographe.
• Pour déplacer le curseur vers la gauche pendant le rappel de
l’historique.
• Pour diminuer les chiffres pendant le réglage de l’affichage.
• Pour basculer entre Yes/No.
C. Bouton SENSOR [SR]
• Pour sélectionner les modes heure, altimètre, baromètre ou compas.
D. Bouton MODE [M]
• Pour sélectionner les modes Heure, Alarme, Chronographe, Compte
à rebours, Pacer ou Double fuseau (Dual time).
• Pour sélectionner les éléments pendant le réglage de l’affichage.
E. Bouton LIGHT [EL]
• Pour activer le rétroéclairage.
A
B
E
D
C
Page 61

61
FRANÇAIS
TOPCOM Outdoor Sportswatch 2000
5 MODE CURRENT TIME
(HEURE ACTUELLE)
5.1 AFFICHAGE FONCTIONNEL
Le mode Current Time comprend quatre types
d’affichages fonctionnels :
• Affichage du jour de la semaine
• Affichage de la température
• Affichage de l’altitude
• Tendances de la pression au niveau de la
mer
Appuyez sur le bouton [S/S] suivant le
diagramme ci-joint.
5.2 INFORMATIONS AFFICHÉES
(voir diagramme)
a. Jour de la semaine
b. Prévisions météorologiques
c. Heure actuelle
d. Date
e. Température
f. Altitude
g. Tendances de pression au niveau de la
mer
6 PRÉVISIONS
MÉTÉOROLOGIQUES
La fonction de prévision météorologique est une fonction spéciale de la
montre. Elle fonctionne en analysant les modifications de la pression
atmosphérique.
La montre fournit quatre symboles différents pour indiquer les prévisions
météorologiques.
Ensoleillé
Nuageux avec soleil
Nuageux
Pluvieux
b
c
d
e
f
g
[S/S]
[S/S]
[S/S]
[S/S]
a
Page 62

62
TOPCOM Outdoor Sportswatch 2000
IMPORTANT
Les symboles seront uniquement affichés en mode Current Time et
Dual Time
Étant donné que les prévisions météorologiques sont basées sur des
changements de la pression atmosphérique, il est hautement recommandé de rester à la même altitude pendant au moins 24 heures pour
une plus grande précision des prévisions.
La montre prédit le temps en adaptant les principes généraux des
prévisions météorologiques ; elle est incapable de refléter les changements importants du temps dans une brève période.
6.1 COMMENT RÉGLER L’HEURE
• Appuyez et maintenez enfoncé le bouton [M]
pendant environ 2 secondes en mode Current Time
.
L’icône clignotante "SET" apparaîtra.
• Appuyez sur le bouton [M] pour modifier la sélection
selon la séquence de réglage suivante.
• Lorsque les chiffres des secondes clignotent (sélectionnés), appuyez
sur le bouton [S/S] ou [L/R] pour réinitialiser les chiffres sur "00".
• Lorsque les chiffres clignotent (sélectionnés), appuyez sur le bouton
[S/S] ou [L/R] pour augmenter / diminuer le nombre.(Maintenez le
bouton enfoncé pour changer les chiffres plus rapidement).
• Lorsque vous avez sélectionné le réglage du format mois-jour,
appuyez sur le bouton [S/S] ou [L/R] pour sélectionner le format
mois-jour et jour-mois.
• Lorsque vous avez sélectionné le réglage du format 12/24 heures,
appuyez sur le bouton [S/S] pour sélectionner le format 12 ou 24
heures.
• Lorsque vous avez sélectionné le contraste LCD, appuyez sur le
bouton [S/S] ou [L/R] pour augmenter/diminuer le niveau de contraste
(1 à 10).
1. Secondes
2. Minutes
3. Heures
4. Année
5. Mois
6. Jour
7. Mois/Jour
8. Format 12/24h
9. Contraste de l’écran LCD
10. Bip de touche
SE
T
SE
T
Page 63

63
FRANÇAIS
TOPCOM Outdoor Sportswatch 2000
• Lorsque vous avez sélectionné le réglage du bip de touche, appuyez
sur le bouton [S/S] ou [L/R] pour sélectionner ON et OFF.
• Appuyez et maintenez enfoncé le bouton [M] pour quitter l’écran de
réglage.
7 DAILY ALARM (ALARME
QUOTIDIENNE)
7.1 ALARME QUOTIDIENNE 1 & 2
• La montre comprend deux alarmes
quotidiennes indépendantes.
• En mode current time, appuyez sur [M]
brièvement pour entrer en mode alarme.
• Appuyez sur le bouton [S/S] pour passer
entre Daily Alarm 1, Daily Alarm 2 et Chime
(carillon). (Voir diagramme ci-joint)
7.1.1 COMMENT ACTIVER/DÉSACTIVER
L’ALARME QUOTIDIENNE
• En mode Daily Alarm ’AL1’ ou ’AL2’, appuyez
sur le bouton [L/R] .
• Lorsque l’alarme quotidienne est activée,
l’indicateur d’alarme apparaît ' ' .
• La montre sonnera chaque jour à l’heure
préréglée.
• Lorsque l’alarme sonne, appuyez sur
n’importe quel bouton pour arrêter le bip.
7.1.2 COMMENT RÉGLER L’ALARME 1 ET L’ALARME 2
• En mode Daily Alarm ’AL1’ ou ’AL2’, appuyez et maintenez enfoncé le
bouton [M] pendant environ 2 secondes. L’icône clignotante "SET"
apparaîtra.
• Dans l’écran de réglage, appuyez sur le bouton [M] pour basculer
entre les minutes et les heures.
• Lorsque les chiffres clignotent (sélectionnés), appuyez sur le bouton
[S/S] ou [L/R] pour augmenter/diminuer le nombre. (Maintenez le
bouton enfoncé pour changer les chiffres plus rapidement).
• Lorsque le réglage est terminé, appuyez et maintenez enfoncé le
bouton [M] pour quitter l’écran de réglage.
[S/S]
[S/S]
[S/S]
Page 64

64
TOPCOM Outdoor Sportswatch 2000
7.1.3 COMMENT ACTIVER/DÉSACTIVER LE BIP HORAIRE
• En mode Chime, appuyez sur le bouton [L/R] pour activer/désactiver
le bip horaire.
• Lorsque le carillon est activé, l’indicateur suivant ' ' apparaît.
Lorsque l’indicateur est affiché, la montre sonne toutes les heures.
8 MODE CHRONOGRAPHE
La montre comprend une fonction permettant de mesurer le temps écoulé,
le temps écoulé cumulé et les temps intermédiaires.
8.1 MODE CHRONOGRAPHE
• En mode current time, appuyez sur [M] deux fois pour
entrer en mode Chronographe.
• Pour lancer le chronographe, appuyez sur le bouton
[S/S] une fois.
• Pour arrêter le chronographe, appuyez de nouveau
sur le bouton [S/S] une fois.
• Répétez les étapes susmentionnées pour obtenir le
temps écoulé cumulé du fonctionnement du
chronographe.
• Pour remettre à zéro le chronographe, maintenez enfoncé le bouton
[L/R] pendant 2 secondes.
8.2 TEMPS INTERMÉDIAIRES
Le chronographe permet de mesurer le temps intermédiaire sans arrêter le
compte - temps intermédiaire. (Jusque 100 temps intermédiaires)
• Lorsque le chronographe fonctionne, appuyez sur le
bouton [L/R] une fois pour enregistrer un temps
intermédiaire (cette opération n’affectera pas le
compte). Le numéro intermédiaire et le temps
intermédiaire apparaîtront à l’écran pendant 10
secondes, et la montre reviendra ensuite
automatiquement à l’écran de compte.
• Répétez les étapes susmentionnées pour obtenir un
autre temps intermédiaire.
• Pour arrêter appuyez de nouveau sur le bouton [S/S] une fois.
1e
Lap
Page 65

65
FRANÇAIS
TOPCOM Outdoor Sportswatch 2000
• Pour rappeler les temps intermédiaires, maintenez
enfoncé le bouton [M] en mode chronographe Stop.
• Lorsque le temps total (TTL) est affiché, appuyez sur
le bouton [S/S] ou [L/R] pour vérifier le temps
intermédiaire suivant/précédent.
• Maintenez enfoncé le bouton [M] à tout moment pour
revenir à l’affichage du chronographe.
• Pour remettre à zéro les temps intermédiaires, maintenez enfoncé le
bouton [L/R] pendant 2 secondes dans l’écran Chronograph Stop.
9 COMPTE À REBOURS
Le compte à rebours commence le décompte à partir de la valeur préréglée
jusque zéro.
9.1 RÉGLER LE COMPTE À REBOURS
Il y a six valeurs préréglées : 1, 3, 5, 10, 15 et 45 minutes et un temps défini
par l’utilisateur. La plage de réglage s’étale jusque 99 heures 59 minutes 99
secondes. Dès que la valeur réglée par l’utilisateur a été définie, comme par
exemple 30 minutes, cette valeur est enregistrée dans la montre pour que
l’utilisateur puisse la rappeler la prochaine fois.
• En mode current time, appuyez sur [M] jusqu’à ce
que TMR s’affiche.
• Appuyez sur le bouton [L/R] pour sélectionner un
temps préréglé ou le temps défini par l’utilisateur.
Pour régler le temps défini par l’utilisateur.
• Maintenez enfoncé le bouton [M] pendant 2
secondes. L’icône clignotante "SET" s’affiche.
• Appuyez sur le bouton [M] pour basculer entre
heures, minutes et secondes.
• Lorsque les chiffres clignotent (sélectionnés),
appuyez sur le bouton [S/S] ou [L/R] pour
augmenter/diminuer le nombre (Maintenez le bouton
enfoncé pour changer les chiffres plus rapidement).
• Lorsque le réglage est terminé, maintenez enfoncé le
bouton [M] pour quitter l’écran de réglage.
SET
SE
T
Page 66

66
TOPCOM Outdoor Sportswatch 2000
9.2 COMMENT UTILISER LE COMPTE À REBOURS.
• Pour lancer le compte à rebours, appuyez sur le bouton [S/S].
- Au cours des 10 dernières minutes, il émettra un bip toutes les
minutes.
- Au cours de la dernière minute, il émettra un bip toutes les 10
secondes.
- Au cours des cinq dernières secondes, il émettra un bip toutes les
secondes.
- Lorsque le temps final est atteint, le compte à rebours émet un bip
pendant 30 secondes.
• Pour arrêter le compte à rebours, appuyez de nouveau sur le bouton
[S/S] une fois.
• Pour réinitialiser le compte à rebours (le temps de décompte réglé
existant) pour un nouveau décompte, appuyez sur le bouton [L/R]
lorsque le compte à rebours a été arrêté.
10 MODE PACER
Le pacer (rythmeur) émet des bips à un rythme prédéfini.
Le rythme peut être réglé de 30 à 180 battements par
minute (BPM) par incrément de 5.
10.1 UTILISEZ LE MODE PACER
• En mode current time, appuyez sur [M] jusqu’à ce
que PACER s’affiche.
• Appuyez sur le bouton [S/S] pour lancer le pacer.
• Le compteur de pas "St" s’exécutera au milieu de
l’écran (max 99999 pas)
• Appuyez sur le bouton [S/S] pour arrêter le pacer.
• Pour réinitialiser le compteur de pas, appuyez et
maintenez enfoncé le bouton [L/R] lorsque le pacer a
été arrêté.
10.2 COMMENT RÉGLER LE RYTHME DES BATTEMENTS
• Appuyez et maintenez enfoncé le bouton [M] pendant 2 secondes en
mode Pacer.
• Lorsque les chiffres du rythme des battements commencent à
clignoter, appuyez sur le bouton [S/S] ou [L/R] pour augmenter/
diminuer le nombre. (Maintenez le bouton enfoncé pour changer les
chiffres plus rapidement).
[S/S]
beep-beep
Page 67

67
FRANÇAIS
TOPCOM Outdoor Sportswatch 2000
• Lorsque le réglage est terminé, appuyez et maintenez enfoncé le
bouton [M] pour quitter l’écran de réglage.
11 MODE DUAL TIME
La montre comprend une fonction permettant d’afficher l’heure d’un
deuxième fuseau horaire.
Le deuxième chiffre du dual time se synchronise avec l’heure actuelle.
• En mode current time, appuyez sur [M] jusqu’à ce que T2 s’affiche.
• Maintenez enfoncé le bouton [M] pendant 2
secondes. L’icône clignotante "SET" s’affiche.
• Appuyez sur le bouton [M] pour basculer entre les
heures et les minutes.
• Lorsque les chiffres clignotent (sélectionnés),
appuyez sur le bouton [S/S] ou [L/R] pour
augmenter/diminuer le nombre (Maintenez le bouton enfoncé pour
changer les chiffres plus rapidement).
• Lorsque le réglage est terminé, maintenez enfoncé le bouton [M] pour
quitter l’écran de réglage.
12 MODE ALTIMÈTRE
12.1 AFFICHAGE
La montre comprend deux affichages fonctionnels de l’altimètre :
L’altitude actuelle (historique) s’affiche sur la rangée du milieu.
L’heure actuelle (historique) s’affiche sur la rangée du bas
Si vous désirez avoir une lecture précise de la température de l’air,
vous devez retirer la montre de votre poignet de manière à ce que la
température du corps n’ait aucun effet sur la montre.
1. Température 2. Historique de l’altitude
ALTI
ALTI
ALTI
Page 68

68
TOPCOM Outdoor Sportswatch 2000
12.2 UNITÉS D’ALTITUDE ET DE TEMPÉRATURE
La montre peut afficher l’altitude en mètres (m) ou en pieds (ft) et peut
afficher la température en degrés Celsius (C) ou en degrés Fahrenheit (F).
• Pour basculer entre les différentes unités, maintenez enfoncé le
bouton [S/S] pour changer les unités selon la séquence suivante de
sélection des unités.
12.3 HISTORIQUE DE L’ALTITUDE
La montre enregistre automatiquement la lecture de l’altitude toutes les
heures à l’heure pile, c’est-à-dire 1:00, 2:00, 3:00 et ainsi de suite. Ces
enregistrements sont transcrits dans un graphique de représentation de
l’altitude. Dans l’affichage de l’historique, le graphique des altitudes
s’affiche dans la rangée supérieure de l’écran. Pour voir les
enregistrements d’altitude des 23 dernières heures, appuyez sur le bouton
[L/R] pour déplacer le curseur vers la gauche de manière cyclique ;
l’altitude respective et son heure d’enregistrement (clignotement)
apparaîtront ensuite à l’écran.
12.4 CALIBRAGE DE L’ALTIMÈTRE
Pour obtenir une lecture précise, vous devez calibrer votre altimètre autant
que possible.
Il existe quatre types de méthodes de calibrage.
NOTE : L’altitude est calibrée indépendamment dans chaque mode.
Par exemple, si l’altitude absolue est sélectionnée, le réglage
précédent de l’effet du niveau de la mer sera ignoré.
12.4.1 RÉGLAGE DE L’ALTITUDE ZÉRO
La montre peut mesurer l’altitude relative, par exemple, elle peut mesurer
l’ascension ou la descente par rapport au point de départ et le point
d’arrivée d’un parcours. Pour ce faire, l’altitude de départ doit être placée
sur 'zéro' comme point de référence pour le départ du parcours. Un
indicateur ’r’ apparaît à l’écran.
Page 69

69
FRANÇAIS
TOPCOM Outdoor Sportswatch 2000
• En mode current time, appuyez sur le
bouton [SR] jusqu’à ce que l’altitude
"ALTI" s’affiche.
• Maintenez enfoncé le bouton [M] pendant
2 secondes. Les icônes clignotantes "SET"
et "ZERO" s’affichent.
• Appuyez sur le bouton [S/S] à l’écran,
"NO" s’affiche.
• Appuyez sur le bouton [S/S] pour
sélectionner "YES"
• Maintenez enfoncé le bouton [M] pendant 2
secondes pour confirmer le réglage et pour
quitter l’écran des réglages.
• "DONE" s’affiche et la montre revient en
mode Altitude. L’altitude est de 0 mètre.
12.4.2 CALIBRAGE DE L’ALTITUDE
ABSOLUE
Au lieu de commencer à partir de l’altitude zéro,
vous pouvez régler l’altitude absolue lorsque
vous avez une référence fiable telle qu’un pic ou une carte topographique.
• En mode current time, appuyez sur [SR]
jusqu’à ce que l’altitude s’affiche.
• Maintenez enfoncé le bouton [M] pendant
2 secondes. L’icône clignotante "SET" et
’ZERO’ s’affichent.
• Appuyez sur le bouton [M] jusqu’à ce que
’ALTI’ s’affiche
• Appuyez sur le bouton [S/S]. L’altitude
absolue clignote à l’écran.
• Appuyez sur le bouton [S/S] ou [L/R] pour
augmenter/diminuer le nombre (Maintenez
le bouton enfoncé pour changer les chiffres
plus rapidement).
• Maintenez enfoncé le bouton [M] pour
confirmer le réglage.
• Pour quitter l’écran des réglages, maintenez enfoncé le bouton [M]
pendant 2 secondes. "DONE" s’affiche et la montre revient en mode
Altitude.
ALTI
ALTI
ALTI
ALTI
SET
ALTI
ALTI
ALTI
ALTI
A
ALTI
ALTI
Page 70

70
TOPCOM Outdoor Sportswatch 2000
12.4.3 CALIBRAGE DE LA PRESSION AU NIVEAU DE LA MER
L’altitude peut être calculée par la différence
entre la pression actuelle et au niveau de la mer.
• En mode current time, appuyez sur [SR]
jusqu’à ce que l’altitude s’affiche.
• Maintenez enfoncé le bouton [M] pendant
2 secondes. Les icônes clignotantes "SET"
et ’ZERO’ s’affichent.
• Appuyez sur le bouton [M] jusqu’à ce que
’SEAP’ s’affiche.
• Appuyez sur le bouton [S/S]. La pression
actuelle au niveau de la mer clignote à
l’écran.
• Appuyez sur le bouton [S/S] ou [L/R] pour
augmenter/diminuer le nombre (Maintenez
le bouton enfoncé pour changer les chiffres
plus rapidement).
• Maintenez enfoncé le bouton [M] pour confirmer le réglage.
Important :
Cette méthode de calibrage est moins précise, étant donné que la
pression de l’air peut varier à cause de modifications atmosphériques
lorsque vous vous éloignez de la mer.
Lorsque vous calibrez l’altimètre, le baromètre est calibré en même
temps.
12.4.4 PARAMÈTRES PAR DÉFAUT
La pression normale au niveau de la mer est de 1013,2mb
.
Cette méthode de calibrage est uniquement intéressante lorsque vous
êtes à une altitude plus élevée. Étant donné que la pression au niveau
de la mer varie continuellement, l’altitude n’est pas précise et fournit
seulement une indication grossière.
Pour remettre la pression au niveau de la mer à ce niveau standard.
ALTI
ALTI
AL
ALTI
ALTI
Page 71

71
FRANÇAIS
TOPCOM Outdoor Sportswatch 2000
• En mode current time, appuyez sur [SR]
jusqu’à ce que l’altitude s’affiche.
• Maintenez enfoncé le bouton [M] pendant 2
secondes. L’icône clignotante "SET" et
"ZERO" s’affichent.
• Appuyez sur le bouton [M] jusqu’à ce que
’F.DEF’ s’affiche.
• Appuyez sur le bouton [S/S] à l’écran,
"NO" s’affiche.
• Appuyez sur le bouton [S/S] pour
sélectionner "YES"
• Maintenez enfoncé le bouton [M] pendant 2
secondes pour confirmer le réglage et pour
quitter l’écran des réglages.
• "DONE" s’affiche et la pression au niveau
de la mer sera réglée à 1013,2mb
.
• L’altitude sera calculée par la différence
entre la pression actuellement mesurée et
la pression normale au niveau de la mer.
13 MODE BAROMÈTRE
13.1 AFFICHAGE FONCTIONNEL
La montre comprend trois affichages fonctionnels du baromètre.
1. Affichage de la température
2. Affichage de la pression au niveau de la mer
3. Affichage de l’historique
ALTI
SET
ALTIALTI
ALTIALTI
ALTIALTI
BARO
ALTIALTI
BARO
BARO
BARO
[S/S]
[S/S]
123
Page 72

72
TOPCOM Outdoor Sportswatch 2000
Un des trois affichages fonctionnels apparaîtra dans la rangée supérieure
de l’écran.
• En mode current time, appuyez sur [SR] jusqu’à ce que le baromètre
’BARO’ s’affiche.
• Appuyez sur le bouton [S/S] pour basculer entre les différents
affichages fonctionnels.
La pression actuelle (historique) et l’heure actuelle (historique)
apparaîtront respectivement dans la rangée du milieu et du bas de l’écran.
Si vous souhaitez avoir une lecture précise de la température de l’air,
vous devez retirer la montre de votre poignet pendant plus de 20 minutes pour éviter que la température de votre corps n’affecte celle de la
montre.
13.2 UNITÉS DE LA PRESSION ET DE LA TEMPÉRATURE
La montre peut afficher la pression en mb/hPa ou inHg et peut afficher la
température en degrés Celsius (°C) ou degrés Fahrenheit (°F).
Pour basculer entre les unités, maintenez enfoncé le bouton [S/S] pour
changer les unités selon la séquence de sélection suivante.
13.3 AFFICHAGE DE LA TEMPÉRATURE
Dans l’écran Température, la température actuelle en degrés Celsius (°C)
ou degrés Fahrenheit (°F) s’affiche dans la rangée supérieure de l’écran.
Si vous souhaitez avoir une lecture précise de la température de l’air,
vous devez retirer la montre de votre poignet pendant 20 à 30 minutes
pour éviter que la température de votre corps n’affecte celle de la
montre.
C (Celsius)
inHg
C (Celsius)
mb/hPa
F(Fahrenheit)
mb/hPa
F (Fahrenheit)
inHg
hold
[S/S]
hold
[S/S]
hold
[S/S]
hold
[S/S]
hold
[S/S ]
Page 73

73
FRANÇAIS
TOPCOM Outdoor Sportswatch 2000
13.4 AFFICHAGE DE L’HISTORIQUE DE PRESSION
La montre enregistre automatiquement la lecture de la pression chaque
heure.
Ces enregistrements sont traduits dans un graphique de pression.
Dans l’écran historique de la pression au niveau de la mer, le graphique
d’enregistrement de la pression s’affiche dans la rangée supérieure de
l’écran.
Pour consulter les enregistrements des dernières 23 heures, appuyez sur
le bouton [L/R] pour déplacer le curseur de manière cyclique, ensuite
l’enregistrement respectif et son heure (clignotante) apparaîtront à l’écran
selon le diagramme suivant.
13.5 AFFICHAGE DE LA PRESSION AU NIVEAU DE LA
MER
Dans l’écran de la Pression au niveau de la mer, la pression actuelle au
niveau de la mer s’affiche dans la rangée supérieure de l’écran.
La montre enregistre automatiquement la pression au niveau de la mer
toutes les heures à l’heure pile, à savoir 1:00, 2:00, 3:00, etc. Ces
enregistrements sont traduits
dans un graphique d’enregistrement de la pression.
13.6 HISTORIQUE DE LA PRESSION AU NIVEAU DE LA
MER
Dans l’écran de l’historique de la pression au niveau de la
mer, le graphique d’enregistrement de la pression s’affiche
dans la rangée supérieure de l’écran.
Pour consulter les enregistrements des dernières 23
heures, appuyez sur le bouton [L/R] pour déplacer le
curseur de manière cyclique, ensuite l’enregistrement
respectif et son heure (clignotante) apparaîtront à l’écran.
BARO
Page 74

74
TOPCOM Outdoor Sportswatch 2000
14 CALIBRAGE DU BAROMÈTRE
14.1 POURQUOI IL FAUT CALIBRER LE BAROMÈTRE
La montre a été calibrée pour vous en usine. Pour une utilisation normale,
il n’est pas nécessaire de calibrer le baromètre. Mais pour les utilisateurs
plus exigeants, la montre dispose d’une procédure de réglage.
14.2 RÉGLAGE DU BAROMÈTRE
Il y a deux types de réglage du baromètre :
1. Pression absolue : Saisissez directement la pression atmosphérique
connue dans la montre (AIRP)
2. Paramètres par défaut : Restaurez les paramètres par défaut de la
montre. Pour des informations détaillées sur les méthodes de réglage,
consultez les sections suivantes (FDEF)
BARO
[S/S]
[M]
2 sec
"DONE" Display
Ba rom eter Mode
hold
M]
hold
[M]
hold
[M]
[S/S ] / [L/R]
BARO
SET
BARO
SET
BARO
BARO
BARO
BARO
[S/S ]
1
2
[
Page 75

75
FRANÇAIS
TOPCOM Outdoor Sportswatch 2000
Pour sélectionner l’écran des réglages:
• En mode current time, appuyez sur le bouton [SR] jusqu’à ce que
l’altitude "BARO" s’affiche.
• Maintenez enfoncé le bouton [M] en mode baromètre.
• Appuyez sur le bouton [M] pour sélectionner le calibrage de la
pression absolue et le calibrage des paramètres par défaut.
14.3 CALIBRAGE DE LA PRESSION ABSOLUE
La montre peut régler la lecture de la pression actuelle à une valeur
absolue.
Avant de calibrer le baromètre, consultez la station d’observation la
plus proche pour obtenir la pression barométrique ambiante de votre
position.
• Appuyez sur le bouton [S/S] dans l’écran pression absolue (Absolute
Pressure). La lecture de la pression apparaîtra.
• Appuyez sur le bouton [S/S] ou [L/R] pour augmenter/diminuer le
nombre. ( Maintenir le bouton enfoncé permet de modifier les chiffres
plus rapidement).
• Maintenez enfoncé le bouton [M] pour confirmer le réglage et quitter
l’écran des réglages.
14.4 CALIBRAGE DES PARAMÈTRES PAR DÉFAUT
La montre peut réinitialiser le calcul de lecture de pression en utilisant les
paramètres par défaut.
• Appuyez sur le bouton [S/S] dans l’écran Paramètres par défaut, et
l’indicateur "NO" apparaîtra.
• Appuyez sur le bouton [S/S] ou [L/R] pour sélectionner "YES"
(réinitialiser la montre aux paramètres par défaut) ou "NO" (arrêter le
réglage).
• Pour quitter l’écran des réglages, maintenez enfoncé le bouton [M]
pendant 2 secondes, et la montre revient ensuite au mode Altimètre.
Si "YES" est sélectionné, "DONE" apparaîtra pendant 2 secondes avant
le fonctionnement normal.
Page 76

76
TOPCOM Outdoor Sportswatch 2000
15 MODE COMPAS
15.1 IMPORTANT
• Conservez votre montre loin des aimants ou des appareils contenant
des objets métalliques tels que les téléphones mobiles, des hautparleurs, des moteurs, etc.
• La montre, comme la plupart des compas magnétiques, indique le
Nord magnétique, qui est légèrement différent du Nord géographique.
• Effectuez de temps à autre un calibrage car le calibrage renforce la
précision du compas.
• Pour obtenir un résultat précis, vous devez éviter de mesurer la
direction dans les conditions suivantes :
- La montre est placée près d’un objet magnétique
- La montre est placée près d’un objet métallique
- La montre est placée près d’un appareil électrique
- La montre est placée dans un objet en mouvement ou dans un
bâtiment en béton armé.
15.2 DIRECTIONS AU COMPAS ET DIRECTIONS PAR
DEGRÉS
15.2.1 LA DIRECTION D’UN OBJET
• La direction d’un objet à partir d’un certain point peut être spécifiée
soit en direction au compas ou en direction par degrés.
• La montre comprend les fonctions direction au compas et direction
par degrés.
15.2.2 LES DIRECTIONS AU COMPAS
• Les directions au compas sont
indiquées dans le tableau ci-joint.
• Par exemple, dans le graphique sur la
droite, la direction au compas de l’objet
B à partir du point A est l’Est. La
direction au compas de l’objet C à
partir du point A est Sud-Est. La
direction au compas de l’objet D à
partir du point A est Nord-Ouest.
object B
object C
object D
angula r
difference
90
135
315
point
A
0
0
Page 77

77
FRANÇAIS
TOPCOM Outdoor Sportswatch 2000
15.2.3 LES DIRECTIONS PAR DEGRÉS
• La Direction par degrés d’un objet est
définie comme la différence angulaire
entre le Nord et l’objet. (Prenons 0° pour
le Nord et la plage de mesure s’étale de
0° à 359°).
• Par exemple, dans le graphique sur la
droite, la direction par degrés de l’objet B
à partir du point A est de 90°. La direction
par degrés de l’objet C à partir du point A
est de 135°. La direction par degrés de l’objet D à partir du point A est
de 315°.
15.3 MODE COMPAS
15.3.1 MODE COMPAS
• En mode Compas, le haut de l’écran affiche la
directionau compas.
• Le milieu de l’écran affiche la direction par degrés.
• Le bas de l’écran affiche l’heure en heures et minutes.
• Le pointeur autour de l’écran indique la direction du
Nord magnétique.
Ma rks
N
NE
E
SE
SSE
SSW
WNW
NNW
Compa ss Directions Bearing Directions
North
349 - 11
Northeast
Ea st
Southeast
Ea st Southeast
South Southwest
North Northwest
S
SW
W
NW
South
Southwest
West
Northwest
ES E
ENE
WS W
NNE
West Northwest
West Southwest
South Southeast
Ea st Northeast
North Northeast
12 - 33
34 - 56
57 - 78
102 - 12 3
79 - 101
12 4 - 146
147 - 16 8
16 9 - 191
214 - 236
192 - 213
237 - 2 58
259 - 281
304 - 326
282 - 303
3
27 - 348
object B
object C
object D
point A
N
E
SE
NW
N
COMP
Page 78

78
TOPCOM Outdoor Sportswatch 2000
15.3.2 MODE VEILLE
• Si vous n’appuyez sur aucun bouton pendant 1
minute, la montre passe automatiquement en mode
veille.
• Pour réactiver le compas, appuyez sur n’importe quel
bouton excepté les boutons [EL] et [SR].
15.3.3 DISTORSION
• Si une distorsion est détectée, l’indicateur "OFF
CALL" apparaîtra avec les chiffres clignotants de
direction.
• Veuillez consulter le chapitre 14.8 - "Calibrer le
compas" pour restaurer le fonctionnement normal du
compas en cas de distorsion.
15.4 POSITIONNEMENT INVERSÉ
(BACKWARD BEARING)
La montre comprend une fonction de
positionnement inversé.
• Le positionnement inversé par degrés est la
direction par degrés qui se trouve dans la
direction inverse de la direction normale par
degrés.
• Lorsque l’indicateur 'Backward Bearing' "
" s’affiche, la montre affiche le
positionnement inversé par degrés de la
direction de navigation.
• En mode Compas, appuyez sur le bouton [S/
S] pour sélectionner la direction normale ou
inversée par degrés.
COMP
COMP
0
COMP
12 5
0
[S/S]
305
0
COMP
1
2
Page 79

79
FRANÇAIS
TOPCOM Outdoor Sportswatch 2000
15.5 VERROUILLAGE DE DIRECTION DU
COMPAS
• La montre comprend une fonction de verrouillage de
compas qui verrouille la lecture de direction
importante.
• En mode Compas, appuyez sur le bouton [L/R] pour
verrouiller/déverrouiller la lecture de direction.
Lorsque l’indicateur "Lock" , " " s’affiche, la
direction au compas, la direction par degrés et le
pointeur de Nord magnétique sont verrouillés.
• Le verrouillage du compas est désactivé
automatiquement lorsque la montre passe en mode
veille.
15.6 APPLICATIONS DU COMPAS
15.6.1 VÉRIFIEZ VOTRE POSITION PAR LE POSITIONNEMENT
INVERSÉ PAR DEGRÉS
• Repérez deux marques distantes
identifiables comme des montagnes,
des phares,un fort et des bâtiments de
votre position actuelle, par exemple la
montagne A et la montagne B.
• Vérifiez les directions inversées par
degrés de la montagne A et B de votre
position actuelle, comme 135° à partir de
la montagne A et 270° à partir de la montagne B.
• Utilisez une règle pour tracer la ligne 135° sur la carte en
commençant à partir de la montagne A. Tracez la ligne 270° sur la
carte en commençant à partir de la montagne B.
• Votre position actuelle sur la carte sera le point d’intersection (point A)
des lignes 135° et 270°
COMP
1
2
[L/R]
COMP
mounta in B
mountain A
270
135
point A
0
Page 80

80
TOPCOM Outdoor Sportswatch 2000
15.6.2 VÉRIFIER L’EXACTITUDE DU PARCOURS
• Pendant la randonnée, la montre
peut vérifier l’exactitude de votre
parcours. Par exemple, le
chemin correct commence à
partir du point A et se termine au
point E comme dessiné sur la
carte ci-jointe.
• Marquez des points (repères
identifiables) lorsque le chemin
change de direction ou qu’il y a
un croisement, comme les points
A, B, C, D et E sur la carte.
• Repérez les directions par degrés du point B à partir du point A
(315°), du point C à partir du point B (0°), du point D à partir du point C
(225°), et ensuite du point E à partir du point D (315°).
• Pendant la randonnée, assurez-vous que la direction est de 315° à
partir du point A jusqu’au point B. Effectuez la même vérification dans
les autres secteurs du parcours.
IMPORTANT :
Si vous doutez de la direction et de la position du chemin, consultez
le bureau d’administration du parc avant de commencer la randonnée.
15.7 DÉCLINAISON MAGNÉTIQUE
15.7.1 QU’EST-CE QUE LA DÉCLINAISON MAGNÉTIQUE ?
• Le pôle Nord magnétique est légèrement différent du pôle Nord
géographique.
• La montre Outdoor Sports Watch 2000, comme la plupart des compas
magnétiques, indique le pôle Nord magnétique. En revanche, toute
mesure effectuée à partir d’une carte fait référence au pôle Nord
géographique.
• La différence angulaire entre le pôle Nord magnétique et le pôle Nord
géographique est appelée ’ déclinaison magnétique’. Son importance
(degrés et minutes) et sa direction (est et ouest) dépendent de
l’endroit où vous vous trouvez dans le monde.
4110 m
2120 m
3120 m
point A
(starting )
point B
point D
point E
(finish )
point C
315
225
0
315
0
Page 81

81
FRANÇAIS
TOPCOM Outdoor Sportswatch 2000
• Pour les utilisateurs de compas qui souhaitent une navigation précise,
le compas doit être réglé en fonction de la déclinaison magnétique.
• La montre comprend également un réglage de compensation pour la
déclinaison magnétique. Consultez la section suivante
"Compensation de la déclinaison magnétique" pour plus de détails.
15.7.2 INFORMATIONS SUR LA DÉCLINAISON MAGNÉTIQUE
• La plupart des cartes topographiques comprennent une petite flèche
qui indique le pôle Nord magnétique ou les informations de
déclinaison magnétique.
• Pour faciliter la tâche de l’utilisateur de la montre Outdoor Sports
Watch 2000, le présent manuel comprend la déclinaison magnétique
de quelques villes importantes.
• Consultez la section suivante 'Déclinaison magnétique des villes
importantes' pour plus de détails. Pour les villes qui ne sont pas
comprises dans la liste, veuillez vous reporter aux informations de
déclinaison magnétique en ligne à l’adresse :
- http://www.geolab.nrcan.gc.ca/geomag/e_cgrf.html
- http://www.ngdc.noaa.gov/cgi-bin/seg/gmag/fldsnth1.pl
15.7.3 COMPENSATION DE DÉCLINAISON MAGNÉTIQUE
Pour compenser la position d’un objet en soustrayant la déclinaison
magnétique ouest (W) ou en ajoutant la déclinaison magnétique est (E) au
positionnement magnétique.
1. Exemple 1 : 23° déclinaison magnétique ouest et l’aiguille du compas
indique 323.
- TB = MB - W. Alors que MB = 323 ; W =23
- TB = 323 - 23
- TB = 300
La véritable position sera 300.
2. Exemple 2 : 22° déclinaison magnétique est et l’aiguille du compas
indique 278.
- TB = MB + E. Alors que MB = 278 ; E = 22
- TB = 278+ 22
- TB = 300
La véritable position sera 300.
Page 82

82
TOPCOM Outdoor Sportswatch 2000
La montre vous permet de compenser le positionnement par compas à un
endroit avec la déclinaison magnétique Est ou une déclinaison Ouest.
Consultez la section suivante "Calibrer le Compas" pour plus de détails sur
le réglage.
15.8 DÉCLINAISON MAGNÉTIQUE DES VILLES
IMPORTANTES
No. Country/Place Major City Dec lination
33 Netherlands Amsterdam 1-W
34 New Zealand Wellington 22-E
35 NorwayOslo 0
36 Pakistan Islamabad 2-E
37 Philippines Manila 1-W
38 PortugalLisbon 5-W
39 Russia Moscow 9-E
40 S ingapore Singapore 0
41 S outh Africa Cape Town 23-
W
42Spain Madrid 3-W
43 Sweden Stockholm 3-E
44 Switz erland Bern 0
45 TaiwanTai-pei 3-W
46 Thailand Bangkok 0
47 UAE Abu Dhabi 1-E
48 United Kingdom London 3-W
49 United States Washington, DC 10-
W
50 Juneau 25-E
51 Phoenix 12-E
52 Little Rock2-E
53 Sacramento 16-E
54 Denver 10-E
55 Atlanta 4-W
56 Honolulu 10-E
57 Boston 16-
W
58 Saint Paul 2-E
59 Jackson 1-E
60 Santa Fe 10-E
61Oklahoma City 6-E
62 Salem 18-E
63Harrisburg 11 -W
64 Salt Lake City 14-E
No. Country/Place Major City Declination
1 AfghanistanKabul 2-E
2Australia Canberra 12-E
3 AustriaVienna2-E
4Bahrain Manama 2-E
5Bangladesh Dhaka 0
6 Belgium Brussels 1-W
7 Brazil Brasilia 19-W
8Canada Ottawa 14-W
9 Chile Santiago5-E
10 Beijing6-W
11
12 Costa RicaSan Jose 0
13 Cuba Havana 3-W
14 Czech Republic Prague 2-E
15 Denmark Copenhagen 1-E
16 Egypt Cairo 3-E
17 Finland Helsinki 6 -E
18 France Paris 1-W
19 Germany Berlin 1-E
20Greece Athens 3-E
21Hungary Budapest 4-E
22 India
New Delhi 1-E
23 Indonesia Jakarta 1-E
24Israel 3-E
25Italy Rome1-E
26 JapanTokyo 7 -W
27 Jordan Amman3-E
28Kenya Nairobi 1-E
29KoreaSeoul 7-W
30 Malaysia Kuala Lumpur 1-E
31 Mexico Mexico City 6 -E
32 NepalKathmandu 0
China Hong Kong2-W
China
Jerusalem
Page 83

83
FRANÇAIS
TOPCOM Outdoor Sportswatch 2000
15.9 QUAND CALIBRER LE COMPAS
Il faut calibrer le compas lorsque vous êtes dans l’une des conditions
suivantes :
1) La montre est utilisée pour la première fois ;
2) La pile a été remplacée ;
3) Les chiffres de la direction par degrés clignotent, et l’indicateur ""
apparaît ;
4) Vous utilisez le compas dans un endroit qui est très différent de l’endroit
dans lequel le compas a été calibré ;
5) L’utilisateur prévoit de régler la précision du compas numérique ;
15.10 COMMENT CALIBRER LE COMPAS
Le calibrage du compas comprend deux processus différents :
1. Mode de calibrage par rotation
2. Réglage de la déclinaison magnétique.
Il est conseillé d’effectuer les deux de temps à autre pour obtenir une
lecture plus précise.
IMPORTANT : Si la montre n’a pas été calibrée, la direction affichée
par la montre peut être une direction imprécise.
hold [M]
hold [M]
[M]
COMP
COMP
COMP
[S /S ] / [L/R]
/ [M ]
[S /S ]
COMPCOMP
1
2
15sec
Page 84

84
TOPCOM Outdoor Sportswatch 2000
15.11 CALIBRAGE PAR ROTATION
• Pour sélectionner le mode de calibrage par rotation, maintenez
enfoncé le bouton [M] en mode Compas.
• Pour lancer le calibrage par rotation, appuyez sur [S/S] une fois. Les
pointeurs commencent à tourner, faites tourner la montre (en la
maintenant parallèle à l’horizon) dans la même direction de rotation
que les pointeurs pendant plus de 2 tours.
• Appuyez sur [S/S] ou [L/R] pour arrêter le calibrage lorsque vous
avez effectué les deux tours.
• Lorsque le pointeur arrête de tourner, maintenez enfoncé le bouton
[M] pour revenir en mode Compas ou appuyez sur le bouton [M] une
fois pour régler la déclinaison magnétique.
15.12 CALIBRAGE DE LA DÉCLINAISON MAGNÉTIQUE
• Consultez le chapitre 14.8 "Déclinaison magnétique des villes
importantes" pour obtenir la déclinaison magnétique de la ville la plus
proche de votre position actuelle. Saisissez ensuite cette donnée
dans la montre pendant le calibrage.
• Pour sélectionner l’écran de déclinaison magnétique, appuyez sur le
bouton [M] dans l’écran de calibrage par rotation.
• Lorsque la déclinaison magnétique actuelle apparaît, appuyez sur le
bouton [S/S] ou [L/R] pour augmenter/diminuer le nombre.
(Maintenez le bouton enfoncé permet de changer les chiffres plus
rapidement).
• Si le réglage est terminé, maintenez enfoncé le bouton [M] pour
confirmer le réglage et quitter l’écran des réglages.
16 DÉTECTION DE NIVEAU FAIBLE DE LA PILE
• Lorsque l’indicateur de niveau faible apparaît à
l’écran, cela signifie que la capacité de la pile est
faible. Il est recommandé de remplacer la pile par
une nouvelle pile CR2032.
• Toutefois, si l’apparition de cet indicateur est due
au fait que la montre est utilisée dans des
conditions très froides, l’indicateur disparaîtra
lorsque la température reviendra à la normale.
Page 85

85
FRANÇAIS
TOPCOM Outdoor Sportswatch 2000
17 INSTALLATION DE LA PILE
Si vous n’êtes pas familiarisé avec l’électronique,
faites changer la pile par un professionnel. N’ouvrez
pas la montre vous-même.
Retirez le couvercle de la montre avec un petit
tournevis. Installez la pile 3V(CR2032) avec le pôle
positif (+) vers le haut et replacez le couvercle.
Enlevez la pile et réinsérez-la si l’écran affiche des
chiffres bizarres.
18 RECYCLAGE DE L’APPAREIL
(ENVIRONNEMENT)
Au terme du cycle de vie de ce produit, vous ne devez pas jeter
le produit dans les déchets ménagers ordinaires mais le déposer
dans un point de collecte pour le recyclage des équipements
électriques et électroniques. Le symbole sur ce produit, guide
d’utilisation et / ou l’emballage indique ceci.
Certains matériaux du produit peuvent être réutilisés si vous les
déposez dans un point de recyclage. En réutilisant certaines pièces ou
matières premières des produits usagés, vous apportez une contribution
importante à la protection de l’environnement.
Veuillez contacter vos autorités locales pour toute information
supplémentaire sur les points de collecte dans votre région.
19 GARANTIE
19.1 PÉRIODE DE GARANTIE
Les appareils de Topcom jouissent d’une période de garantie de 24 mois.
La période de garantie commence le jour d’achat du nouvel appareil. Les
accessoires ou défauts entraînant un effet négligeable sur le
fonctionnement de l’appareil ne sont pas couverts.
La garantie doit être prouvée par la présentation de la facture ou du reçu
original, sur lequel sont mentionnés la date de l’achat et le type de l’unité.
3V - Lithium
CR2032
+
CR2032
3V
Ne court-circuitez pas la pile & ne la jetez pas au feu.
Page 86

86
TOPCOM Outdoor Sportswatch 2000
19.2 TRAITEMENT DE LA GARANTIE
Un appareil défectueux doit être retourné à un centre de service Topcom
accompagné d’une note d’achat valide.
Si l’appareil tombe en panne pendant la période de garantie, Topcom ou
son centre de service officiel réparera gratuitement toute panne due à un
défaut matériel ou de fabrication.
Topcom assurera, à sa propre discrétion, ses obligations de garantie en
réparant ou en échangeant les unités ou les pièces défectueuses. En cas
de remplacement, la couleur et le modèle peuvent être différents de
l’appareil acheté initialement.
La date d’achat initiale détermine le début de la période de garantie. La
période de garantie n’est pas prolongée si l’appareil est échangé ou réparé
par Topcom et ses centres de service officiels.
19.3 EXCLUSIONS DE GARANTIE
Les dégâts ou pannes causés par un mauvais traitement ou une utilisation
incorrecte et les dégâts résultant de l’utilisation de pièces ou accessoires
non originaux non recommandés par Topcom ne sont pas couverts par la
garantie. La garantie ne couvre pas les dégâts causés par des facteurs
extérieurs, tels que la foudre, l’eau et le feu ni les dégâts causés par le
transport.
Aucune garantie ne peut être réclamée si le numéro de série sur les unités
a été modifié, enlevé ou rendu illisible. Toute demande de garantie sera
nulle si l’unité a été réparée, changée ou modifiée par l’acheteur ou par des
centres de service non qualifiés et non-officiels de Topcom.
Page 87

87
DEUTSCH
TOPCOM Outdoor Sportswatch 2000
1 EINFÜHRUNG
Wir danken Ihnen für den Kauf der Outdoor Sports Watch 2000. Diese Uhr
hat elektronische Sensoren, welche die Außenbedingungen messen und
anzeigen: Wettervorhersage, Temperatur, Luftdruck, Höhe und Kompass.
Ihre Uhr zeigt Ihnen alle wichtigen Informationen an, die Sie beim Wandern,
Campen oder anderen Freizeitbeschäftigungen im Freien über einen
längeren Zeitraum benötigen.
2 SICHERHEITSHINWEISE
Lesen Sie erst die Gebrauchsanweisung, bevor Sie die Uhr verwenden.
Setzen Sie die Uhr nicht länger als unbedingt notwendig extremen
Bedingungen aus.
Vermeiden Sie grobe Verwendung oder schwere Aufschläge auf Ihre Uhr.
Lassen Sie das Uhrengehäuse nur von einem anerkannten Kundendienst
öffnen, da es elektronische Präzisionssensoren und -teile enthält.
3 PFLEGE UND WARTUNG
Reinigen Sie die Uhr ab und zu mit einem weichen Tuch. So verlängern Sie
die Lebensdauer Ihrer Uhr.
Vermeiden Sie Kontakt mit Magneten oder Geräten, die magnetische Teile
enthalten, wie beispielsweise Mobiltelefone, Lautsprecher und Motoren.
Bewahren Sie Ihre Uhr an einem trockenen Platz auf, wenn Sie sie nicht
benutzen.
Page 88

88
TOPCOM Outdoor Sportswatch 2000
4TASTEN
A. START-/STOPP-TASTE [S/S]
• 'Startet' oder 'beendet' die
Chronometerfunktion im
Chronometermodus.
• Zur Auswahl der
Funktionsdisplays im selben
Modus.
• Zum Wechseln zwischen Ja/
Nein.
• Zum Erhöhen der Ziffern beim
Einstellen.
B. LAP/RESET-TASTE [L/R]
• Zum Aktivieren der
'Rundenzeit' oder
'Zurückstellen' der Chronometerfunktion im Chronometermodus.
• Bewegt den Cursor beim Aufrufen gespeicherter Daten nach links.
• Zum Vermindern der Ziffern beim Einstellen.
• Zum Wechseln zwischen Ja/Nein.
C. SENSOR-TASTE [SR]
• Zur Auswahl von Zeit, Höhenmesser, Barometer oder
Kompassmodus.
D. MODE-TASTE [M]
• Zur Auswahl von: aktueller Zeit, täglichem Alarm, Chronometer,
Timer, Schrittzähler oder dualem Zeitmodus.
• Zur Auswahl der einzustellenden Daten beim Einstellen.
E. LICHT-TASTE [EL]
• Zum Einschalten der Hintergrundbeleuchtung.
A
B
E
D
C
Page 89

89
DEUTSCH
TOPCOM Outdoor Sportswatch 2000
5 AKTUELLE ZEIT
5.1 FUNKTIONSANZEIGE
Der aktuelle Modus hat 4 verschiedene
Funktionsanzeigen:
• Wochentagsanzeige
• Temperaturanzeige
• Höhentendenzanzeige
• Meeresspiegel-Drucktendenz
Drücken Sie die Taste [S/S] entsprechend der
nebenstehenden Darstellung.
5.2 ANZEIGEN VON INFORMATIONEN
(Siehe Abbildung)
a. Wochentag
b. Wettervorhersage
c. Aktuelle Zeit
d. Datum
e. Temperatur
f. Höhentendenz
g. Meeresspiegel-Drucktendenz
6 WETTERVORHERSAGE
Eine besondere Funktion der Uhr ist die Wettervorhersage. Sie funktioniert
durch Analyse der Luftdruckänderungen.
Die Uhr zeigt 4 verschiedene Symbole an, welche das Wetter
symbolisieren.
Sonnig
Bewölkt und sonnig
Bewölkt
Regen
b
c
d
e
f
g
[S/S]
[S/S]
[S/S]
[S/S]
a
Page 90

90
TOPCOM Outdoor Sportswatch 2000
WICHTIG
Die Symbole werden nur im Modus aktuelle Zeit und Dualzeit angezeigt.
Da die Wettervorhersage auf den Luftdruckänderungen basiert, wird
empfohlen dass man sich mindestens 24 Stunden in derselben Höhe
aufhält um eine genauere Vorhersage zu erhalten.
Die Uhr berechnet das Wetter durch Anwendung allgemeiner Wettervorhersageprinzipien, sie kann KEINE drastischen Wetteränderungen
in einem kurzen Zeitraum vorhersagen.
6.1 EINSTELLEN DER AKTUELLEN ZEIT
• Drücken Sie ungefähr 2 Sekunden lang die [M]-
Taste im Modus aktuelle Zeit
. Im Einstelldisplay
erscheint das blinkende "SET"-Symbol.
• Drücken Sie die [M]-Taste, wenn Sie die Auswahl
entsprechend der nebenstehenden Reihenfolge
ändern möchten.
• Wenn die Sekunden blinken (ausgewählt), können Sie die Ziffern mit
der [S/S] oder [L/R]-Taste auf "00" zurückstellen.
• Wenn die Sekunden blinken (ausgewählt), können Sie die Zahl mit
der [S/S] oder [L/R]-Taste erhöhen/vermindern. (Drücken Sie die
Taste länger um die Zahl schneller zu ändern).
• Wenn die Einstellung von Monat-Tag ausgewählt ist, können Sie mit
der [S/S] oder [L/R]-Taste zwischen dem Anzeigeformat MonatTag oder Tag-Monat wechseln.
• Wenn die Einstellung 12/24-Stunden-Format ausgewählt wurde,
können Sie mit der [S/S]-Taste zwischen 12- und 24-Stundenformat
wechseln.
• Wenn der LCD-Kontrast ausgewählt wurde, können Sie den Kontrast
mit der [S/S] oder [L/R]-Taste erhöhen/vermindern (1 bis 10).
1. Sekunden
2. Minute
3. Stunde
4. Jahr
5. Monat
6. Tag
7. Monat/Tag
8. 12/24h-Format
9. LCD-Kontrast
10. Tastenton
SE
T
SE
T
Page 91

91
DEUTSCH
TOPCOM Outdoor Sportswatch 2000
• Wenn die Einstellung Tastenton ausgewählt ist, können Sie mit der
[S/S] oder [L/R]-Taste zwischen dem An- und Ausschalten des
Tastentons wählen.
• Drücken Sie die [M]-Taste eine längere Zeit um das Einstelldisplay zu
verlassen.
7 TÄGLICHER ALARM
7.1 TÄGLICHER ALARM 1 & 2
• Die Uhr hat zwei unabhängige tägliche
Alarme.
• Drücken Sie im Modus der aktuellen Zeit kurz
die [M]- Taste um den Alarm-Modus zu
öffnen.
• Drücken Sie die [S/S]-Taste, wenn Sie
zwischen täglichem Alarm 1, täglichem Alarm
2 und Klingeln wechseln möchten. (Siehe
nebenstehende Abbildung)
7.1.1 EIN- UND AUSSCHALTEN DES TÄGLI-
CHEN ALARMS
• Drücken Sie im Modus täglicher Alarm ’AL1’
oder ’AL2’ die Taste [L/R] .
• Wenn der tägliche Alarm eingeschaltet ist,
wird die Alarmanzeige ' ' angezeigt.
• Die Uhr ertönt täglich zur eingestellten
Alarmzeit.
• Wenn der Alarm ertönt, können Sie das Klingeln beenden, indem Sie
eine beliebige Taste drücken.
7.1.2 ALARM 1 UND ALARM 2 EINSTELLEN
• Drücken Sie im Modus täglicher Alarm ’AL1’ oder ’AL2’ ungefähr 2
Sekunden lang die Taste [M] . Es erscheint das blinkende "SET"-
Symbol.
• Drücken Sie in der Einstellanzeige die [M]-Taste um zwischen
Minuten und Stunden zu wechseln.
[S/S]
[S/S]
[S/S]
Page 92

92
TOPCOM Outdoor Sportswatch 2000
• Wenn die Ziffern blinken (ausgewählt), können Sie die Zahl mit der [S/
S] oder [L/R]-Taste vermindern/erhöhen. (Drücken Sie die Taste
länger, wenn Sie die Zahl schneller ändern möchten).
• Drücken Sie die [M]-Taste einen längeren Zeitraum um das
Einstelldisplay zu verlassen, wenn die Einstellung beendet ist.
7.1.3 EIN- UND AUSSCHALTEN DES STÜNDLICHEN KLINGELNS
• Drücken Sie im Klingelmodus die [L/R]-Taste um das stündliche
Klingeln ein- oder auszuschalten.
• Wenn das Klingeln eingeschaltet ist, wird die Klingelanzeige ' '
angezeigt. Wenn die Klingelanzeige erscheint, piept die Uhr stündlich.
8 CHRONOMETER
Die Uhr hat eine Funktion zum Messen der abgelaufenen Zeit, kumulativ
abgelaufenen Zeit und Rundenzeiten.
8.1 CHRONOMETER
• Drücken Sie im Modus der aktuellen Zeit zweimal die
[M]- Taste um den Chronometermodus zu öffnen.
• Um den Chronometer zu starten drücken Sie einmal
die [S/S]-Taste.
• Um den Chronometer anzuhalten drücken Sie erneut
die [S/S]-Taste.
• Wiederholen Sie die obigen Schritte um die kumulativ
abgelaufene Zeit des Chronometers zu erhalten.
• Um den Chronometer zurückzustellen drücken Sie 2
Sekunden lang die [L/R]-Taste.
Page 93

93
DEUTSCH
TOPCOM Outdoor Sportswatch 2000
8.2 RUNDENZEITEN
Der Chronometer kann die abgelaufene Zeit messen ohne das Zählen zu
unterbrechen - Rundenzeit. (bis zu 100 Runden)
• Wenn der Chronometer zählt, drücken Sie einmal die
[L/R] -Taste um eine Rundenzeit aufzuzeichnen
(diese Tastenbedienung beeinflusst das Zählen
nicht). Die Rundenzahl und die Rundenzeit erscheint
10 Sekunden lang im Display und wechselt dann
automatisch zurück zum Zähldisplay.
• Wiederholen Sie die obigen Schritte um eine andere
Rundenzeit zu erhalten.
•Zum Anhalten drücken Sie erneut einmal die [S/S]-Taste.
•Zum Abrufen der Rundenzeiten lassen Sie die [M]-
Taste im Chronometer- Stopp-Modus gedrückt.
• Wenn die Gesamtzeit (TTL) angezeigt wird, können
Sie die nächste / vorige Rundenzeit überprüfen,
indem Sie die [S/S] oder [L/R]-Taste drücken.
• Drücken Sie die [M]-Taste einen längeren Zeitraum,
wenn Sie zum Chronometerdisplay zurückkehren
möchten.
• Um die Rundenzeiten zurückzustellen drücken Sie im Chronometer-
Stopp-Display 2 Sekunden lang die [L/R]-Taste.
9 COUNTDOWN-TIMER
Der Timer zählt vom eingestellten Wert zurück bis Null.
9.1 EINSTELLEN DES TIMERS
Es gibt 6 schnell einzustellende Werte: 1, 3, 5, 10, 15 und 45 Minuten und
eine benutzerdefinierte Zeit. Der Einstellbereich ist 99 Stunden 59 Minuten
99 Sekunden. Wenn der benutzerdefinierte Wert eingestellt wurde (z.B. 30
Minuten), wird dieser Wert gespeichert und kann beim nächsten Mal
abgerufen werden.
• Drücken Sie im Modus der aktuellen Zeit die [M]-
Taste bis TMR erscheint.
• Drücken Sie die [L/R] Taste um eine
vorprogrammierte oder die benutzerdefinierte Zeit zu
selektieren.
1e
Lap
Page 94

94
TOPCOM Outdoor Sportswatch 2000
Zum Einstellen der benutzerdefinierten Zeit.
• Drücken Sie 2 Sekunden lang die [M]-Taste. Das
blinkende "SET"-Symbol wird angezeigt.
• Wechseln Sie mit der [M]-Taste zwischen Stunden,
Minuten und Sekunden.
• Wenn die Sekunden blinken (ausgewählt), können
Sie die Zahl mit der [S/S] oder [L/R]-Taste
erhöhen/vermindern. (Drücken Sie die Taste länger
um die Zahl schneller zu ändern).
• Drücken Sie die [M]-Taste um das Einstelldisplay zu
verlassen, wenn die Einstellung beendet ist.
9.2 VERWENDUNG DES TIMERS.
• Um den Timer zu starten, drücken Sie die [S/S]-Taste.
- Die letzten 10 Minuten piept die Uhr jede Minute.
- In der letzten Minute piept die Uhr alle 10 Sekunden.
- In den letzten 5 Sekunden piept die Uhr jede Sekunde.
- Wenn die Countdownzeit erreicht ist, ertönt ein 30-sekündiges Signal.
• Um den Timer zu stoppen, drücken Sie erneut einmal die [S/S]-Taste.
• Um den Timer erneut zu starten (bestehende vorprogrammierte Zeit),
drücken Sie die [L/R]-Taste, sobald der Timer gestoppt ist.
10 SCHRITTZÄHLERMODUS
Der Schrittzähler erzeugt Pieptöne mit eingestellter
Piepfrequenz. Die Piepfrequenz kann man in 5er Schritten
zwischen 30 bis 180 Pieptönen pro Minute (B/min.)
einstellen.
10.1 VERWENDUNG DES SCHRITTZÄHLERS
• Drücken Sie im Modus der aktuellen Zeit die [M]-
Taste bis PACER erscheint.
• Um den Schrittzähler zu starten, drücken Sie die [S/
S]-Taste.
• Der Schrittzähler "St" läuft in der Mitte der Anzeige
(max. 99999 Schritte)
SET
SE
T
[S/S]
beep-beep
Page 95

95
DEUTSCH
TOPCOM Outdoor Sportswatch 2000
• Um den Schrittzähler zu stoppen, drücken Sie die [S/S]-Taste.
• Zum Zurückstellen des Schrittzählers drücken Sie die [L/R] -Taste
solange, bis der Schrittzähler angehalten hat.
10.2 EINSTELLEN DER PIEPFREQUENZ
• Drücken Sie im Schrittzählermodus 2 Sekunden lang die [M]-Taste.
• Wenn die Ziffern der Piepfrequenz blinken, können Sie die Zahl mit
der [S/S] oder [L/R]-Taste vermindern/erhöhen. (Drücken Sie die
Taste länger, wenn Sie die Zahl schneller ändern möchten).
• Drücken Sie die [M]-Taste um das Einstelldisplay zu verlassen, wenn
die Einstellung beendet ist.
11 DUALZEITMODUS
Die Uhr kann die Zeit für eine zweite Zeitzone anzeigen.
Die zweite Zahl der Dualzeit läuft mit der aktuellen Zeit synchron.
• Drücken Sie im Modus der aktuellen Zeit die [M]-Taste bis T2
erscheint.
• Drücken Sie 2 Sekunden lang die [M]-Taste. Das
blinkende "SET"-Symbol wird angezeigt.
• Wechseln Sie mit der [M]-Taste zwischen Stunden
und Minuten.
• Wenn die Sekunden blinken (ausgewählt), können
Sie die Zahl mit der [S/S] oder [L/R]-Taste
erhöhen/vermindern. (Drücken Sie die Taste länger um die Zahl
schneller zu ändern).
• Drücken Sie die [M]-Taste um das Einstelldisplay zu verlassen, wenn
die Einstellung beendet ist.
Page 96

96
TOPCOM Outdoor Sportswatch 2000
12 HÖHENMESSER
12.1 DISPLAY
Die Uhr hat zwei Höhenmesser-Funktionsanzeigen:
Die aktuelle (gespeicherte) Höhe wird in der mittleren Zeile angezeigt.
Die aktuelle (gespeicherte) Zeit wird in der unteren Zeile angezeigt.
Wenn Sie einen genauen Messwert der Lufttemperatur haben
möchten, müssen Sie die Uhr vom Handgelenk nehmen, damit Ihre
Körpertemperatur die Uhr nicht beeinflussen kann.
12.2 HÖHEN- UND TEMPERATUREINHEIT
Die Uhr kann Höhen in Metern (m) oder Fuß (ft), sowie Temperatur in Grad
Celsius (C) oder Grad Fahrenheit (F) anzeigen.
• Um zwischen den verschiedenen Einheiten zu wechseln, drücken Sie
die [S/S]-Taste und ändern die Einheiten entsprechend der
angezeigten Reihenfolge.
12.3 GESPEICHERTE HÖHE
Die Uhr zeichnet die Höhenmessungen automatisch stündlich auf,
beispielsweise um 1:00, 2:00, 3:00 usw. Diese Aufzeichnungen werden in
einer Höhengrafik dargestellt. In der Anzeige der gespeicherten Werte
erscheint die Grafik der Messwerte in der oberen Zeile des Displays. Zum
Abrufen der Höhenaufzeichnung der letzten 23 Stunden, drücken Sie die
[L/R]-Taste um den Cursor periodisch zu bewegen. Die jeweilige
Höhenmessung und die aufgezeichnete Zeit (blinkt) wird im Display
angezeigt.
1. Temperatur 2. Gespeicherte Höhen
ALTI
ALTI
ALTI
Page 97

97
DEUTSCH
TOPCOM Outdoor Sportswatch 2000
12.4 KALIBRIERUNG DES HÖHENMESSERS
Für eine genaue Messung, müssen Sie Ihren Höhenmesser so oft wie
möglich kalibrieren.
Es gibt 4 Möglichkeiten der Kalibrierung.
ANMERKUNG: Die Höhe wird unabhängig in allen Modi kalibriert.
Wenn beispielsweise die absolute Höhe selektiert wird, wird der Einfluss des Drucks in Höhe des Meeresspiegels der vorigen Einstellung
ignoriert.
12.4.1 EINSTELLUNG DER NULLHÖHE
Die Uhr kann die relative Höhe messen. Sie kann beispielsweise die
zunehmende oder abnehmende Höhe zwischen Ausgangspunkt und
Endpunkt einer Wanderung messen. Dafür muss die aktuelle Höhe an
einem Referenzpunkt wie dem Ausgangspunkt einer Wanderung auf 'Null'
gestellt werden. Im Display erscheint eine Anzeige ’r’.
• Drücken Sie im Modus der aktuellen Zeit
die [SR]-Taste bis die Höhe "ALTI"
erscheint.
• Drücken Sie 2 Sekunden lang die [M]-
Taste. Das blinkende "SET"-Symbol und
"ZERO" werden angezeigt.
• Drücken Sie die [S/S]-Taste im Display, es
wird "NO" angezeigt.
• Drücken Sie die [S/S]-Taste um "YES" zu
selektieren.
• Drücken Sie 2 Sekunden lang die [M]-
Taste um die Einstellung zu bestätigen und
das Einstellungsdisplay zu verlassen.
• Es wird "DONE" angezeigt und die Uhr
kehrt in den Höhenmesser-Modus zurück.
Die Höhe ist 0 Meter.
ALTI
ALTI
ALTI
ALTI
SET
ALTI
ALTI
Page 98

98
TOPCOM Outdoor Sportswatch 2000
12.4.2 KALIBRIERUNG DER ABSOLUTEN HÖHE.
Anstatt bei einer Nullhöhe zu beginnen, können Sie die absolute Höhe
einstellen, wenn Sie eine zuverlässige Referenz, wie einen Gipfel oder eine
topografische Karte, haben.
• Drücken Sie im Modus der aktuellen Zeit
die [SR]-Taste bis die Höhe erscheint.
• Drücken Sie 2 Sekunden lang die [M]-
Taste. Das blinkende "SET"-Symbol und
’ZERO’ werden angezeigt.
• Drücken Sie die [M]-Taste, bis ’ALTI’
erscheint.
• Drücken Sie die [S/S]-Taste. Die absolute
Höhe blinkt im Display.
• Sie können die Zahl mit der [S/S] oder [L/
R]-Taste erhöhen/vermindern. (Drücken
Sie die Taste länger um die Zahl schneller
zu ändern).
• Drücken Sie die [M]-Taste um die
Einstellung zu bestätigen.
• Drücken Sie 2 Sekunden lang die [M]-Taste um das Einstelldisplay zu
verlassen. Es wird "DONE" angezeigt und die Uhr kehrt in den
Höhenmesser-Modus zurück.
12.4.3 KALIBRIERUNG DES MEERESSPIEGELDRUCKS
Die Höhe kann anhand der Differenz zwischen
aktuellem Druck und Druck in Höhe des
Meeresspiegels berechnet werden.
• Drücken Sie im Modus der aktuellen Zeit
die [SR]-Taste bis die Höhe erscheint.
• Drücken Sie 2 Sekunden lang die [M]-
Taste. Das blinkende "SET"-Symbol und
’ZERO’ werden angezeigt.
• Drücken Sie die [M]-Taste, bis ’SEAP’
erscheint.
• Drücken Sie die [S/S]-Taste. Der aktuelle
Druck in Höhe des Meeresspiegel blinkt im
Display.
ALTI
ALTI
A
ALTI
ALTI
ALTI
ALTI
AL
ALTI
ALTI
Page 99

99
DEUTSCH
TOPCOM Outdoor Sportswatch 2000
• Sie können die Zahl mit der [S/S] oder [L/R]-Taste erhöhen/
vermindern. (Drücken Sie die Taste länger um die Zahl schneller zu
ändern).
• Drücken Sie die [M]-Taste um die Einstellung zu bestätigen.
Wichtig:
Diese Kalibriermethode ist weniger genau, da sich der Luftdruck aufgrund atmosphärischer Schwankungen ändern kann, wenn man sich
weiter vom Meer weg bewegt.
Wenn Sie den Höhenmesser kalibrieren, wird gleichzeitig das Barometer kalibriert.
12.4.4 KALIBRIERUNG AUF DIE WERKSEINSTELLUNGEN
Der normale Druck in Höhe des Meeresspiegels ist 1013,2mb
.
Diese Kalibriermethode ist nur interessant, wenn Sie sich höher befinden. Da sich der Druck in Höhe des Meeresspiegels ständig ändert,
ist die Höhe ungenau und bietet nur eine grobe Orientierung.
Einstellung des Drucks in Höhe des Meeresspiegels auf diesen
Standardwert.
• Drücken Sie im Modus der aktuellen Zeit
die [SR]-Taste bis die Höhe erscheint.
• Drücken Sie 2 Sekunden lang die [M]-
Taste. Das blinkende "SET"-Symbol und
"ZERO" werden angezeigt.
• Drücken Sie die [M]-Taste, bis ’F.DEF’
erscheint.
• Drücken Sie die [S/S]-Taste im Display, es
wird "NO" angezeigt.
• Drücken Sie die [S/S]-Taste um "YES" zu
selektieren.
• Drücken Sie 2 Sekunden lang die [M]-
Taste um die Einstellung zu bestätigen und
das Einstellungsdisplay zu verlassen.
• Es wird "DONE" angezeigt und der
Luftdruck in Höhe des Meeresspiegels ist
auf 1013,2mb
eingestellt.
• Die Höhe wird anhand der Differenz
zwischen aktuell gemessenem Druck und normalem Druck in Höhe
des Meeresspiegels berechnet.
ALTI
SET
ALTIALTI
ALTIALTI
ALTIALTI
BARO
ALTIALTI
Page 100

100
TOPCOM Outdoor Sportswatch 2000
13 BAROMETER-MODUS
13.1 FUNKTIONSANZEIGE
Die Uhr hat drei Barometer-Funktionsanzeigen.
1. Temperaturanzeige
2. Meeresspiegel-Druckanzeige
3. Gespeicherte Anzeige
Eine der drei Funktionsanzeigen erscheint in der oberen Zeile des Displays.
• Drücken Sie im Modus der aktuellen Zeit die [SR]-Taste bis das
Barometer ’BARO’ erscheint.
• Um zwischen den verschiedenen Funktionsanzeigen zu wechseln,
drücken Sie die [S/S]-Taste.
Der aktuelle (gespeicherte) Druck und die aktuelle (gespeicherte)
Zeit erscheinen in der mittleren Zeile bzw. der unteren Zeile des Displays.
Wenn Sie einen genauen Messwert der Lufttemperatur haben
möchten, müssen Sie die Uhr länger als 20 Minuten vom Handgelenk
nehmen, damit Ihre Körpertemperatur die Uhr nicht beeinflussen
kann.
BARO
BARO
BARO
[S/S]
[S/S]
123
 Loading...