

Page 1

NG8060
1 Introduction
Thanks for buying this National GeographicTM digital photo frame which can show all your digital JPEG photos, play
your music files and show your videos.
Read and follow the instructions in this manual before starting to use your digital photo frame. You will find all
information you need.
2Features
2.1 Photo album
• Copy your photos onto your memory card. Plug it into your digital photo frame and display your photos in JPEG
format on the high quality 8" TFT LCD Panel.
• Display JPEG files up to 12 Mega pixel.
• Digital photos in the memory cards, USB stick or Built in memory will be directly displayed.
• Rotate photos 360 degrees and zoom in.
• Transfer photos from your computer to digital photo frame with a USB cable.
• Listen to music files during the photo slide show.
• Send photos from your mobile phone using Bluetooth and display them directly on the screen.
2.2 Music album
• Listen to music files stored in the internal memory, on a memory card or USB stick on the build in speakers.
• Control the sound with the enclosed remote control.
2.3 Video album
• Display MPG videos stored in the internal memory, on a memory card or USB stick.
• Controlled the video and audio with the enclosed remote control.
3 Safety precaution and maintenance
• Read and follow these instructions before using your digital photo frame.
• Keep this user manual for future reference.
• This product is not a toy, it contains fragile and swallowable glass parts and small parts. Do not permit children to
play with it.
• The product is intended for private use only.
• The LCD panel of digital photo frame is made of glass and fragile, so it is sensitive to abnormal force. Please do
not put excessive pressure on the LCD Panel. Please be careful while cleaning, handling and keep it away from
sharp edges.
• Unplug your digital photo frame if you are not going to use it for an extensive period of time.
• Your digital photo frame is a complicated electronic device and can be damaged from being dropped.
• Keep your digital photo frame dry. Exposing to liquid or moisture will damage your digital photo frame. To avoid
the risk of electric shock, do not expose it to rain or excessive moisture.
• Use only dry and soft cloth for cleaning LCD panel.
• Be sure that your photo frame is shut down when plugging in and out a memory card.
• Keep your digital photo frame out of direct sunlight, stoves or any other heat source.
• The back cabinet of your digital photo frame should only be opened by authorized service technicians. Never
open it by yourself.
• Be sure the stand of your digital photo frame is clear from cables to avoid that your digital photo frame is pulled to
the floor.
• Dangerous voltages are present inside the unit. Never open the housing or insert objects through the ventilation
holes.
ENGLISH
4 Gift box content
– Digital Photo Frame
– AC-DC Adaptor
– Frame Stand
– Quick User Guide
– Warranty Card
– Mini USB (male) to regular USB (female) convertor cable
– USB cable
– Support & Content CD (National Geographic Licensed Photos & Full User Manuals)
1
Page 2
NG8060
5Copyrights
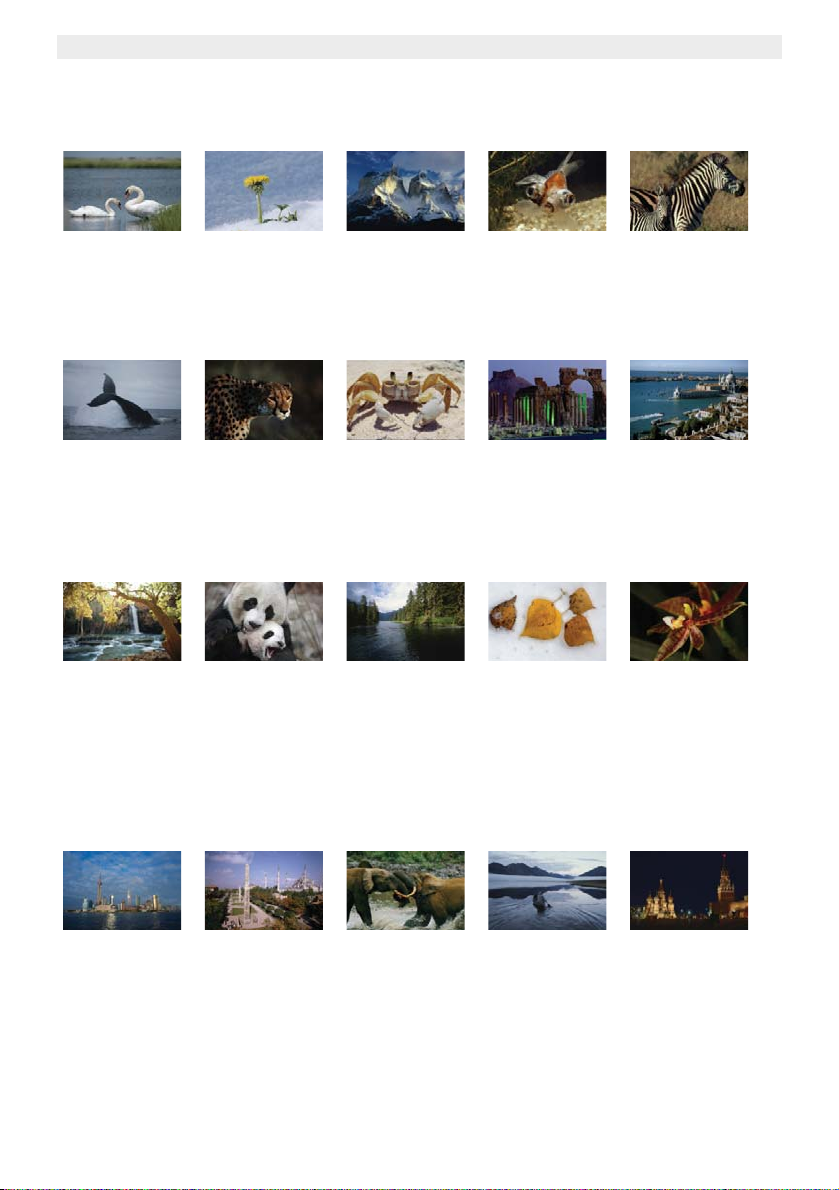
You will find 20 National Geographic licensed photo on the enclosed CD.
Photographs are the sole property of the National Geographic Society and may not be reprinted, copied or sold without
the express written permission of the National Geographic Society.
Photograph by JAMES L.
STANFIELD / National
Geographic Society
Mute swans (Cygnus olor)
gather in the grassy marshes
of Nantucket Sound,
Massachusetts, U.S.A.
Photograph by MICHAEL
NICHOLS / National
Geographic Society
A humpback whale
(Megaptera novaeangliae)
crashes back into the water
after breaching off the coast of
Gabon’s Loango National
Park.
Photograph by W.E.
GARRETT / National
Geographic Society
Awash in beams of golden
sunlight, a waterfall from
Havasu Creek falls over and
down red rock forming part of
the southern rim of the Grand
Canyon on Havasupai Indian
Reservation in Arizona,
U.S.A.
Photograph by GEORGE F.
MOBLEY/ National
Geographic Society
A dandelion bursts through
early spring snow cover to
bask in sunlight near
Appenzell, Switzerland.
Photograph by CHRIS
JOHNS / National
Geographic Society
On a wild plain in Africa, a
strikingly beautiful cheetah
(Acinonyx jubatus) gazes
intently beyond the frame of a
photographer’s scope.
Photograph by MICHAEL
NICHOLS / National
Geographic Society
Giant panda cub (Ailuropoda
melanoleuca) Tai Shan plays
with his mother, Mei Xiang. Tai
Shan was born in captivity at
the National Zoo in
Washington, D.C., U.S.A., in
July 2005.
Photograph by GEORGE F.
MOBLEY / National
Geographic Society
High in the Andes Mountains,
sunlight illuminates the peaks
of the Cordillera de Paine
range in Chile.
Photograph by JAMES L.
STANFIELD / National
Geographic Society
A ghost crab (Ocypode) in a
defensive posture reacts to an
intruder’s approach along a
beach on Samana Cay,
Bahamas.
Photograph by JAMES P.
BLAIR / National
Geographic Society
Time stands still along the
shoreline of Walker Cove in
Alaska’s Tongass National
Forest. Subsidised logging is
destroying much of the oldgrowth rain forest found in this
prized American woodland
region.
Photograph by PAUL ZAHL /
National Geographic
Society A goldfish (Carassius
auratus ) sporting bulging eye
sockets swims by — a surreal
reminder of nature’s diversity.
Photograph by JAMES L.
STANFIELD / National
Geographic Society
The Monumental Arch and
Great Colonnade in Palmyra,
Syria, stand silent testament
to the ancient cultures that
once thrived here.
Photograph by RAYMOND
GEHMAN / National
Geographic Society
Fallen aspen leaves lay
scattered across fresh
snowfall near Moraine Lake in
Canada’s Banff National Park.
Photograph by JAMES L.
STANFIELD / National
Geographic Society
A plains zebra (Equus
burchelli ) keeps close watch
over her young foal in
Hwange National Park,
Zimbabwe.
Photograph by JOHN
SCOFIELD / National
Geographic Society
Awash in hues of green and
blue, a normally brooding
Venice shines brightly in the
midday sun.
Photography b MICHAEL
NICHOLS / National
Geographic Society
A beautiful wild orchid
stretches like a yoga master.
This specimen was
photographed in Gabon.
Photograph by JODI COBB /
National Geograph ic
Society
Viewed from the Bund, the
city of Shanghai’s rapid
modernization is powerfully
illustrated. The city has long
been China’s cultural capital,
but thanks to recent financial
success, it is now
experiencing whirlwind
growth.
2
Photograph by JAMES P.
BLAIR / National
Geographic Society
First a seat of power for the
Byzantine Empire and then
converted to an imperial
mosque by a conquering
sultan, the glorious, centuriesold Hagia Sophia is now a
museum and World Heritage
site in Istanbul, Turkey .
Photograph by MICHAEL
NICHOLS / National
Geographic Society
Two young male forest
elephants (Loxodonta
cyclotis ) kick up muddy water
as they spar. These animals
struggle to survive a constant
onslaught from poachers even
within the protected confines
of Gabon’s Ivindo National
Park.
Photograph by GEORGE F.
MOBLEY / National
Geographic Society
A solitary canoer paddles
across the glassy surface of
Lake Schrader in Alaska’s
Arctic National Wildlife
Refuge, an area under
constant threat of habitat
degradation from oil
developers and other
industries wanting a piece of
its rich natural resources.
Photograph by DEAN
CONGER / National
Geographic Society
Iconic buildings shrouded in
shadows line Red Square in
Moscow under a still, night
sky. The square is rich with
Russian history, paying
homage to the many empires
that rose and fell within its
unblinking gaze.
Page 3
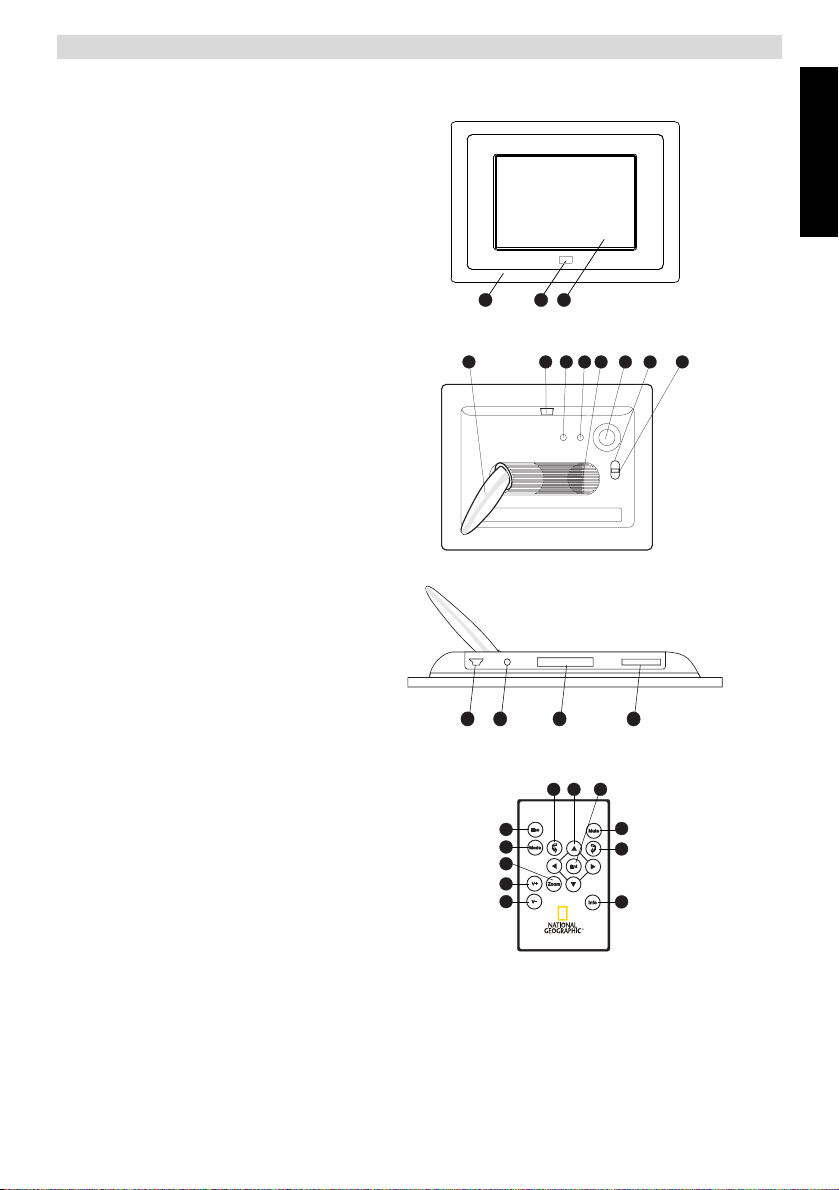
6 Description
6.1 Front panel
1. Removable frame
2. Remote control receiver
3. LCD - display
NG8060
ENGLISH
1 2 3
6.2 Back side
4. Stand
5. Removable frame lock
6. Escape button
7. Enter button
8. Speaker
9. Navigation button
10. Power indicator LED
11. Power Switch
6.3 Bottom
12. Mini USB - port
13. DC power jack (+5V DC)
14. CF card slot
15. SD/MMC/MS PRO - card slot
6.4 Remote control
16. Navigation buttons
17. Enter
18. Mute
19. Rotate picture clockwise
20. Info
21. Volume down
22. Volume up
23. Zoom button
24. Mode button
25. Escape
26. Rotate picture counter clockwise
4
© 2008 National Geographic Society
13
12
25
24
23
22
21
567
14
26
8 9
1716
11
10
15
18
19
20
3
Page 4

NG8060
7 Installation
7.1 Desktop placement
Install the enclosed stand at the back of the digital photo frame
(horizontal or vertical).
4
7.2 Power adapter connector
Only use the power adapter supplied (DC +5 V, 1,8 A). Do not
use other adapters, as this may damage the device.
The wall outlet for the power supply must be close and easy
accessible.
• Connect the small plug of the AC adaptor to the photo frame
adapter Jack and the other end of the adapter cable to
the electric socket (230V/50Hz).
13
8 Plugging in memory card
Your digital photo frame can work with these memory cards:
• Memory slot
• Memory slot
• Memory slot
– Secure Digital (SD-TM)
14
– Multi Media (MMC-TM)
– Memory StickTM & Memory Stick ProTM
– Compact Flash (CF)
15
– USB Flash Memory
12
Insert the memory card into the relevant slot on the digital photo frame. Be sure that the memory card is in the right
direction.
To connect a USB Flash Memory stick, first connect the Mini USB (male) to regular USB (female) convertor cable into
the Mini USB - port.
9 Menu navigation
At the backside of the unit, as well as on the remote control, you will find the ‘Enter’ / , ‘Esc’ button /
(Escape) and the navigation buttons (arrows) / . The function on both remote and unit are the same.
• Press ‘Enter’ / to confirm a selected item or enter a sub menu.
• Press ‘ESC’ / to leave a menu or setting.
• The next navigation buttons / can be used to navigate through the menu:
Up button
Down button
Left button
7
17
6
25
9
• Move the cursor up in the menu.
• Open brightness adjustment menu at playing mode.
• Switch picture control bar and music control bar (After use button "ENTER"
open the control bar in Image mode).
• Shift up when zooming in a picture.
• Page up at the first line of the 9-pictures thumbnail.
• Move the cursor down in the menu.
• Open volume adjustment menu at playing interface.
• Switch picture control bar and music control bar (After "ENTER" button open
control bar).
• Shift down when zooming in a picture.
• Page down at the last line of the 9-pictures thumbnail.
• Move the cursor left at the menu.
• Back to the previous folder in file list.
• Jump to the previous file at playing interface.
• Shift left when zooming in a picture (only when the control bar is closed).
• Page up at the first picture of 9-picture thumbnail.
9
16
16 16
7
17
6
25
4
Right button
• Move right the cursor at the menu.
• Open the selected folder in file list.
• Active the copy/delete function for selected files.
• Jump to the next file at playing interface.
• Shift right when zooming in a picture (only when the control bar is closed).
• Page down at the last picture of 9-picture thumbnail.
Page 5

10 Getting started (Preset mode)
After connecting the AC/DC adaptor:
• Set the Power Switch to ‘ON’, to turn the power on. When there is no memory
card installed, the clock and the calendar mode is displayed.
• Set the Power Switch to ‘ ’, to activate the frame lighting.
• Press ‘Enter’ to enter ‘Card select’ mode.
• Install, if necessary, a memory card (see ‘8 Plugging in memory card’).
• Select the memory card by using the navigation buttons and press ‘Enter’ to
enter the ‘Function select’ mode.
The startup mode can be changed (see ‘11.6 Settings’). If you change the startup
mode, the system will search files for the new setting. If the system can not find
the files, ‘card select’ mode will appear on the screen.
11
11
17
17
NG8060
ENGLISH
11 Functions
A
B
C D E
11.1 ‘Function select mode’ display
A. Image mode
B. Music mode
C. Video mode
D. File mode
E. Setup mode
11.2 Displaying photos
The photos can be displayed from the internal memory, a memory card or a USB Flash
Memory.
Only pictures in JPEG format can be displayed in your digital photo frame.
When ‘Function select mode’ is displayed:
• Press ‘Enter’ when the cursor is on the ‘Image’ icon to display the thumbnail
mode of the photos in your memory card.
• Use navigation buttons on the remote control to select the photo you want to
display.
• Press ‘Enter’ to see the picture in full size. The slide show will start
automatically.
• Press of the navigation buttons to display the previous photo.
• Press to display the next photo.
• Press the rotate button or to rotate the picture clock or counter clockwise.
• Press the zoom button to zoom in. During zoom, press the navigation keys to shift the picture.
11.2.1 Brightness
• Press to activate the brightness bar.
• Press or to change the brightness.
• Press ‘ESC’ to remove the brightness bar.
11. 2.2 Vo lum e
• Press of the navigation buttons to activate the volume bar.
• Press or to change the volume.
• Press ‘ESC’ to remove the volume bar.
17
16
17
16
16
19 26
23 16
16
16 16
25
16
16 16
25
5
Page 6

NG8060
11.2.3 Control bar
• Press ‘Enter’ to display the control bar.
• Use navigation buttons on the remote control to select one of the icons.
• Press ‘Enter’ to activate the function.
• Press ‘ESC’ to remove the control bar.
If no button is pressed, the control bar will automatically disappear in 10 seconds.
17
a. Status
b. Play/Pause
c. Stop
d. Rotate picture 90°
e. Zoom
f. Previous picture
g. Next picture
h. Show file info
i. View thumbnails 3 x 3
j. Picture resolution
25
16
17
a
c
d
b
11.3 Listening to music
When ‘Function select mode’ is displayed:
• Press ‘Enter’ when the cursor is on the ‘Music’ icon. The first song will play
automatically.
• Press the volume up button to increase the volume.
• Press the volume down button to decrease the volume.
• Press ‘Enter’ to display the control bar.
• Use navigation buttons on the remote control to select one of the icons.
• Press ‘Enter’ to activate the function.
• Press ‘ESC’ to remove the control bar.
If no button is pressed, the control bar will automatically disappear in 10 seconds.
17
17
a. Status
b. Play time
c. Play/Pause
d. Stop
e. Previous song
f. Fast backward
g. Fast forward
h. Next song
i. Show file info
j. ID3 Tag
k. Play mode
17
25
22
21
16
e
d
c
b
a
11.4 Watching video
When ‘Function select mode’ is displayed:
• Press ‘Enter’ when the cursor is on the ‘Video’ icon. The first video will play
automatically.
• Press the volume up button to increase the volume.
• Press the volume down button to decrease the volume.
• Press ‘Enter’ to display the control bar. Use navigation buttons on the
remote control to select one of the icons.
• Press ‘Enter’ to activate the function.
• Press ‘ESC’ to remove the control bar.
If no button is pressed, the control bar will automatically disappear in 10 seconds.
17
17
a. Status
b. Play time
c. Play/Pause
d. Stop
e. Previous video
f. Fast backward
g. Fast forward
h. Next video
i. Show file info
j. Zoom
k. Play mode
17
25
22
21
16
e
d
c
b
a
e
f
f
h
f
g
g
i
j
h
g
i
j
h
j
i
k
k
6
Page 7

11.5 File manager
When ‘Function select mode’ is displayed:
• Press ‘Enter’ when the cursor is on the ‘FILE’ icon.
• Use navigation buttons to move through the directories:
– / to scroll through the directory
– to enter the directory
– to exit the directory
• Select the target file and press . A sign will appear on the left of the
selected file's name.
• To unselect the file press again. You can select more that one files with the previous step.
• Press the info button to open the action menu.
To delete the selected files:
• Press to select the 'Trash' icon.
• Press ‘Enter’ to confirm.
• To turn back to the file menu, press ‘Enter’ again.
• Exit the current folder by pressing or ‘ESC’
To copy the selected files when the action menu is displayed:
• Exit the current folder by pressing or ‘ESC’ and enter to the target folder.
• Press ‘Info’ and move the cursor on to the 'Copy' icon by .
• Press ‘Enter’ to copy the selected files to the target folder.
• Press ‘Enter’ again to turn back to the file menu.
17
16
16
16
16
19 16
16
16
16
19
17
17
17
17
16
16
25
25
11.6 Settings
• Select the ‘Setup’ icon by using the navigation buttons in the ‘Function select mode’.
• Press ‘Enter’ , the setup menu is displayed.
Select on of the next settings by using the navigation buttons and press ‘Enter’ :
17
1. Language Setting
– Select the desired language (English, German, French, Italian,
Spanish, Dutch, Portuguese and Turkish) and press ‘Enter’
.
17
2. Picture Setting.
– Use navigation buttons to select ‘Slideshow Model’ or
‘Picture Play Mode’ and press ‘Enter’ .
– Select one of the settings and press ‘Enter’ to confirm.
3. Clock setting
– Use or to move the cursor on date and clock.
– Use and to change the date and the clock.
4. Alarm setting
– Move the cursor with or to select the item to be set
– Change the settings with and . There are three rings.
5. Start up mode
– Use and to select the start up mode (Calendar/
6. Video Setting:
– Use and to select Brightness, Contrast or Saturation.
– Use or to change the value (0 to 16).
7. Bluetooth Setting:
– Press ‘Enter’ to open the bluetooth setting menu.
– Use and to select ‘ON’ or ‘OFF’
8. Default Setting:
– Press ‘Enter’ to reset the digital photo frame to the factory
9. Version
– Press ‘Enter’ to see the software version.
16 16
16
(hour/date/number of rings and mode).
The mode can be set as OFF/once/day.
Picture/Music/Movie/Picture+Music).
setup.
16
16
16 16
17
16
17
17
16
17
17
17
16
16
NG8060
ENGLISH
7
Page 8

NG8060
12 PC connection
The digital photo frame can be connected to a computer to act as a card reader for file transfer from your computer's
hard drive to the internal memory, the installed memory cards or USB stick.
12.1 Windows® Vista™/XP/XP Pro/2000 SP3 users
No drivers are needed for Windows Vista, XP, XP Pro, Windows 2000 SP3. Your computer will recognize the digital
photo frame upon connection of the USB cable.
12.2 USB connection to computer
To connect the digital photo frame to your computer, you will need a standard USB cable, Type A Male to Type Mini B
5-pin Male (The USB cable is not included).
• Set the Power Switch to ‘ON’, to turn the power on.
• Press ‘Enter’ to enter 'card select' mode.
• Connect the small end of the USB cable to the mini USB port on the bottom of the digital photo frame.
• Connect the larger end of the USB cable to a USB port on your computer.
• The digital photo frame will display ‘Connecting PC’.
• Five drive letters entitled ‘Removable Disc’ will appear under the ‘My Computer’ icon in Windows; one for each of
the memory card slots and internal memory on the digital photo frame ‘Nand’.
• For files transfer, double-click the appropriate ‘Removable Disc’ icon to access for files copy and delete amongst
your computer, digital photo frame internal memory and all installed memory cards.
11
17
12
12.3 Disconnect the digital photo frame from your computer
• In the Windows task bar, right click the icon "Safely Remove Hardware".
•The ‘Safely Remove Hardware’ dialogue box will appear. Select "USB Mass Storage Device" and click ‘STOP’.
• On the next dialogue box, click ‘OK’ to remove the storage device.
• On the final dialogue box, select ‘CLOSE’ and disconnect the USB cable from your computer.
• The digital frame must be re-started.
13 Bluetooth communication
Files can be transferred from other built in Bluetooth devices such as mobile phones, PDA, PC etc. to NG8060.
The built-in Bluetooth module works at the mode ‘OPP (Object Pull Profile)’, so NG8060 just can receive files
by Bluetooth.
• Set the Power Switch to ‘ON’, to turn the power on.
• Press ‘Enter’ to enter 'card select' mode.
• If the icon of Bluetooth is highlight, it shows the module is active. If the icon is white, go to the settings menu and
under Bluetooth settings make it ‘ON’.
• Turn on your Bluetooth function of your device (mobile phone, PDA, PC etc.) and start searching.
• The Bluetooth name of your photo frame is ‘NG8060’, after finding it, pair the devices (it will ask a password, pls
input "0000").
• When the devices are paired, the files can be transmitted.
• After the transfer is finished, the picture is saved in the memory which was selected in the card select menu (if it is
Nand Flash, it will be saved in that internal memory) and displayed on the screen automatically.
• During transmission, the rate will be shown on the screen. If you would like to cancel it, press ‘Enter’ .
11
17
7
The maximum distance of the Bluetooth communication is 10m.
The name of files for transmitting must be Turkish, English, French, German, Italian, Spanish, Dutch or
Portuguese. A number, including some other characters will be transmitted.
When the transmission has failed, restart the product to use the Bluetooth again.
If the memory card is full or could not receive files, please match the two equipments over again.
8
Page 9

14 Technical specifications
Screen
– Screen Size
– Screen Display Size
– Resolution
– Dot gap
– Brightness
– Screen Mode:
– Life cycle of the LCD screen
– Display language
Photo
– Photo File Format:
– Maximum Photo Size
– Slide Show Interval
– Photo Edit
– Settings
Connections
– Memory Card Slot
– USB Connection
– Build in memory
– Built in Bluetooth
Music
– Music File Format :
– Background Music During Slide Show
– Built in Speaker :
Video
– Video formats
Others
– Dimensions
– Weight
– Power Consumption
– Operating Temperature
– Storage Temperature
8 inch
158 X 99 mm
800 X 480
Horizontal 0,107 mm; vertical 0,37 mm
300 cd/m2
16:9
20.000 hours
English/Turkish/German/French/Spanish/Italian/
Dutch/Portugues
JPEG
12 Mega pixel
Fast / Normal / Slow
Copy, Delete, Rotate, Pause, Zoom
Brightness, contrast, saturation
SD/MMC/MS
1
128 MB
Yes
MP3 / WMA
Yes
Yes
Mpeg1 / Mpeg2 / Mpeg4 / Mjpeg
246 x 178 x 85 mm.(With frame stand)
0.680 kg
7,5 W
0 °C ~ 40 °C
-20 °C ~ 60 °C
NG8060
ENGLISH
15 Cleaning the device
To clean the device, wipe with a soft cloth dampened with water. To clean dirty joints, use a non-scratching brush. Don’t
use a cleaner or solvents on the unit. They can damage the case and leak inside, causing permanent damage.
16 Disposal of the device (environment)
At the end of the product lifecycle, you should not throw this product into the normal household garbage
but bring the product to a collection point for the recycling of electrical and electronic equipments. The
symbol on the product, user guide and/or box indicate this.
Some of the product materials can be re-used if you bring them to a recycling point. By re-using some
parts or raw materials from used products you make an important contribution to the protection of the
environment. Please contact your local authorities in case you need more information on the collection
points in your area.
9
Page 10

NG8060
17 Warranty
17.1 Warranty period
The devices have a 24-month warranty period. The warranty period starts on the day the new unit is purchased.
Consumables or defects causing a negligible effect on operation or value of the equipment are not covered.
The warranty has to be proven by presentation of the original or copy of the purchase receipt, on which the date of
purchase and the unit-model are indicated.
17.2 Warranty handling
A faulty unit needs to be returned to an authorized service centre including a valid purchase note and a filled in service
card.
If the unit develops a fault during the warranty period, the service centre will repair any defects caused by material or
manufacturing faults free of charge, by either repairing or exchanging the faulty units or parts of the faulty units. In case
of replacement, colour and model can be different from the original purchased unit.
The initial purchase date shall determine the start of the warranty period. The warranty period is not extended if the unit
is exchanged or repaired by the service centre.
17.3 Warranty exclusions
Damage or defects caused by incorrect treatment or operation and damage resulting from use of non-original parts or
accessories are not covered by the warranty.
The warranty does not cover damage caused by outside factors, such as lightning, water and fire, nor any damage
caused during transportation.
No warranty can be claimed if the serial number on the units has been changed, removed or rendered illegible.
Any warranty claims will be invalid if the unit has been repaired, altered or modified by the buyer.
17.4 TFT-LCD defect policy
Despite the highest possible standards, the intricate manufacturing of thin-film transistor ( TFT) liquid crystal display
(LCD) screens may still produce slight visual imperfections. However, there will be provided a warranty service for your
NG8060's TFT LCD screen if there are :
– 3 bright dots or 5 dark dots or 8 bright and/or dark dots in total; or
– 2 adjacent bright dots or 2 adjacent dark dots; or
– 3 bright and/or dark dots inside an area of 15mm diameter
These TFT LCD screen warranty conditions are offered by theTFT LCD manufacturers. Therefore, at its option, the
product will be repaired or replaced. .
A bright dot is a white or sub-pixel that is always on. A dark dot is a black or sub-pixel that is always off.
This product is in compliance with the essential requirements and other relevant
provisions of the directive 2004/108/EC.
10
 Loading...