

Page 1
1
Q4AC
Manual V1.1
2022.08
www.toolkitrc.com
ToolkitRC Technology (Shenzhen) Co., Ltd
@ToolkitRC 2022
Page 2

2
Introduction
Tips
Important
Information
Thank you for purchasing the Q4AC balance
charger, please read this manual carefully before use.
Key Points
Further information
To ensure you have the best experience with this
product please scan the QR code below to stay up to
date with news, information and firmware updates for
your charger. Or visit www.toolkitrc.com.
@ToolkitRC 2022
Page 3

3
Safety
1. Q4AC allows the input voltage AC 100V-240V, DC
10-18V, to ensure that the power supply voltage is
consistent, pay attention to the positive and
negative polarity of the power supply when
connecting.
2. Do not use this product in the environment of heat,
humidity, flammable liquids or explosive gas.
Please do not use this charger without supervision.
3.
Never leave charging batteries unattended.
4. When not using this product, please unplug the
input power.
When using the charging function, please set a
5.
current that matches the battery. Do not set an
excessive current for charging to avoid damage to
the battery. Check the guidelines of your battery’s
manufacturer for correct charging instructions.
@ToolkitRC 2022
Page 4

4
Contents
Introduction........................................................................................ 1
Key Points............................................................................................2
Further information........................................................................... 2
Safety................................................................................................... 3
Contents.............................................................................................. 4
Q4AC Layout...................................................................................... 7
Quick start...........................................................................................8
Charging settings...............................................................................9
1,Battery type................................................................................... 9
2,Number of cells..........................................................................12
3,Work mode.................................................................................13
4,End voltage(TVC)................................................................. 13
5,Charging current....................................................................... 14
6,NiMH setting(PeakV)........................................................... 15
Charging work..................................................................................17
System settings................................................................................ 22
Other functions................................................................................ 24
Specification......................................................................................26
@ToolkitRC 2022
Page 5

5
Product description
The Q4AC is a four-channel balanced charger with
IPS display and wheel menu navigation, which is easy
and convenient to operate.
Charge, discharge and balance management of
LiPo, LiHV, LiFe, Lion LTO 1-4S, NiMh 1-10S, PB 1-8S
batteries.
AC and DC power supply modes: AC 100-240V
max 100W; DC 10-18V max 200W.
Charging power: Max 5A @MAX50W*4.
Discharging power MAX 2A@5W*4
Charging accuracy <0.005V.
Balancing current 240mA.
Lithium battery cut-off voltage can be set (TVC ).
Automatically allocate input power.
Multi-language system, can set any language.
The device connects to a PC like a USB drive,
simply copy and paste new firmware files for easy
updates.
Can record 5 commonly used batteries.
Can record 3 groups of commonly used power
sources, convenient and fast translation.
@ToolkitRC 2022
Page 6
6
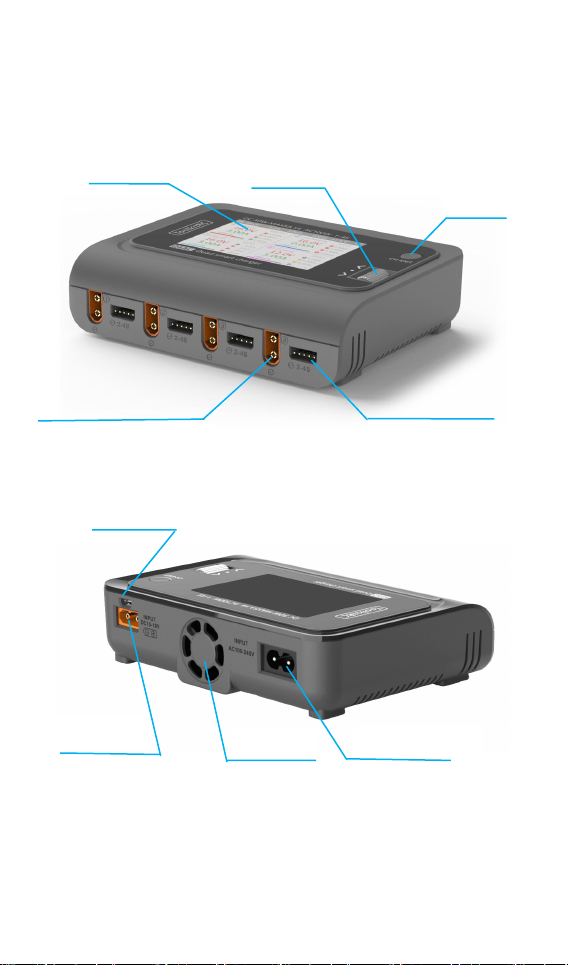
Q4AC Layout
Display
Scroll wheel
(Turn: Left or Right
Press: OK)
Output main port *4
Balance port*4
Cooling fan
DC Input port
AC Input port
Micro USB port
CH/ Exit
Front
Back
@ToolkitRC 2022
Page 7
7
Quick start
1,Connect the AC100-240V or DC10-18V power supply
to the corresponding input port on the back of the
Q4AC.
2,The screen shows the boot logo for 2 seconds.
3,At the same time, accompanied by the sound of di-di
startup.
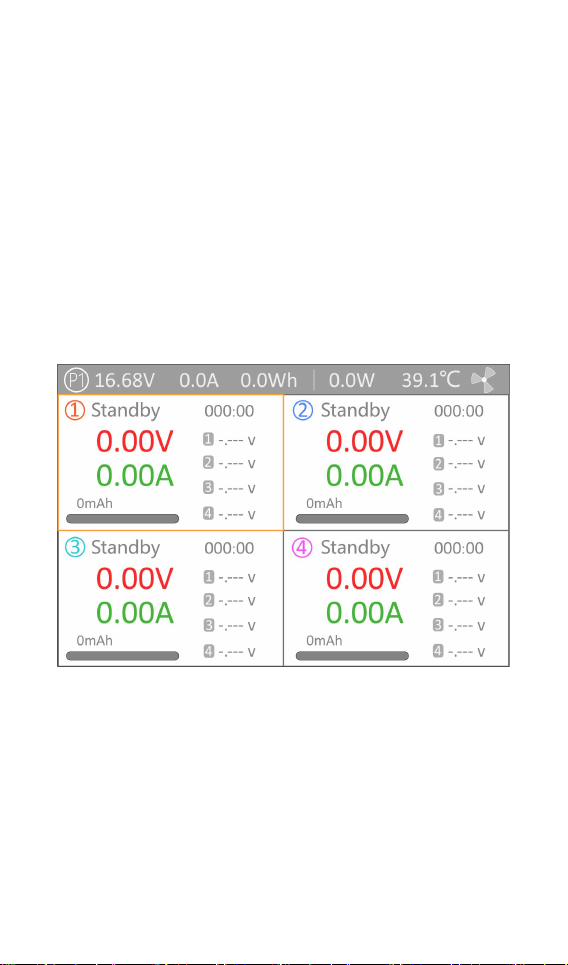
4,After booting up, the screen enters the main
interface as shown below:
5,short press [CH/Exit], the cursor will switch among
the four channels in sequence.
6,Scroll [Scroll Wheel] to switch to display the voltage
and internal resistance of the corresponding channel.
7,Short press [OK] to select the charging task when the
channel is idle. You can adjust and end the charge when
the channel is in progress.
8,Long press [OK] to enter the system setting interface
@ToolkitRC 2022
Page 8

8
when all four channels are free.
1. Short press [Scroll Wheel] once to confirm the
function.
2. Long press [Scroll Wheel] for 2 seconds, it is the
9,Press [CH/Exit] to end the modification or return to
the previous interface.
=================================
delete key function.
3. If any key is successfully operated, there will be a didi
sound.
=================================
@ToolkitRC 2022
Page 9
9
Charging settings
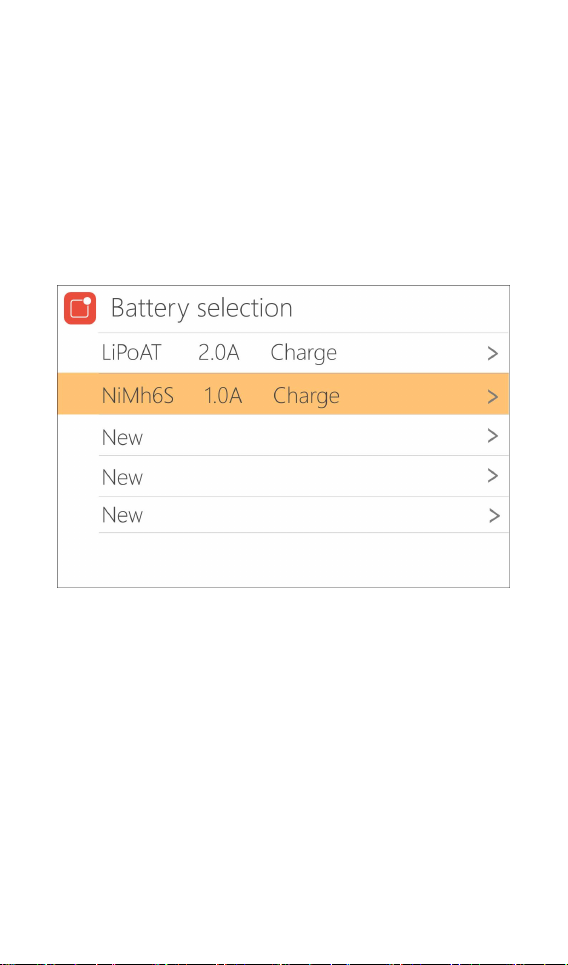
In the main interface, select and short press [OK] to
enter the charging function. If the battery selection is
turned on in the main setting interface, 5 battery records
can be saved, and the following interface is displayed.
Otherwise, it will default to the first battery record, skip
this step.
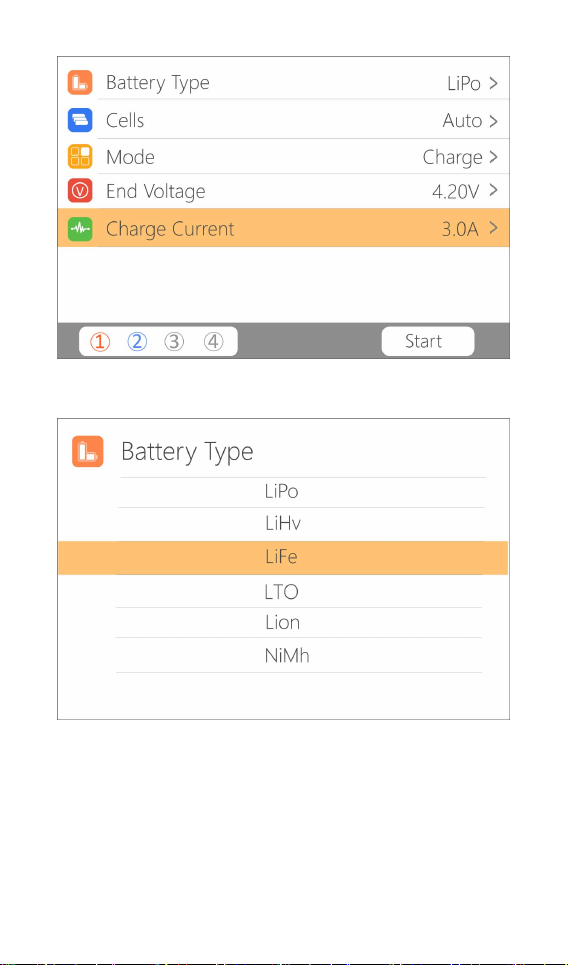
1,Battery type
Scroll [Scroll Wheel], move the cursor, select the
battery that has been set, or create a new battery, press
[OK] to enter the battery setting interface of this group,
the display is as follows:
@ToolkitRC 2022
Page 10
10
Move the cursor to “Battery Type” and press [OK] to
modify the battery type, the display is as follows:
The charger supports Lipo, LiHV, LiFe, Lion, NiMh,
PB, 6 kinds of batteries, after choosing the battery that
matches the actual battery. Short press [OK] and
[CH/Exit] to take effect, and return to the previous
interface.
@ToolkitRC 2022
Page 11

11
=================================================
Important
1. Choosing the wrong battery type to charge may
Vocabulary explanation
1, Lipo: Often called a lithium polymer battery, a
damage the battery, the charger, and cause fire and other
dangers. Please choose carefully.
2. Please do not use this product to charge the battery that is
not marked with the battery type. Always follow the charging
guidelines of your battery manufacturer
=================================
battery with a nominal voltage of 3.70V and 4.20V
when fully charged.
2, LiHV: Often referred to as a high-voltage lithium
battery, a battery with a nominal voltage of 3.85V and
4.35V when fully charged.
3, LiFe: Often referred to as a lithium iron battery, a
battery with a nominal voltage of 3.30V and 3.60V
when fully charged.
4, Lion: Often referred to as a lithium-ion battery, a
battery with a nominal voltage of 3.60V and 4.10V
when fully charged.
5, LTO: often referred to as a lithium-ion battery with a
nominal voltage of 2.40V and a fully charged battery
of 2.70V.
6, NiMh: often referred to as nickel-hydrogen battery,
nominal voltage 1.20V.
7, PB:often called lead-acid battery, nominal voltage
2.00V.
==================================================
@ToolkitRC 2022
Page 12
12
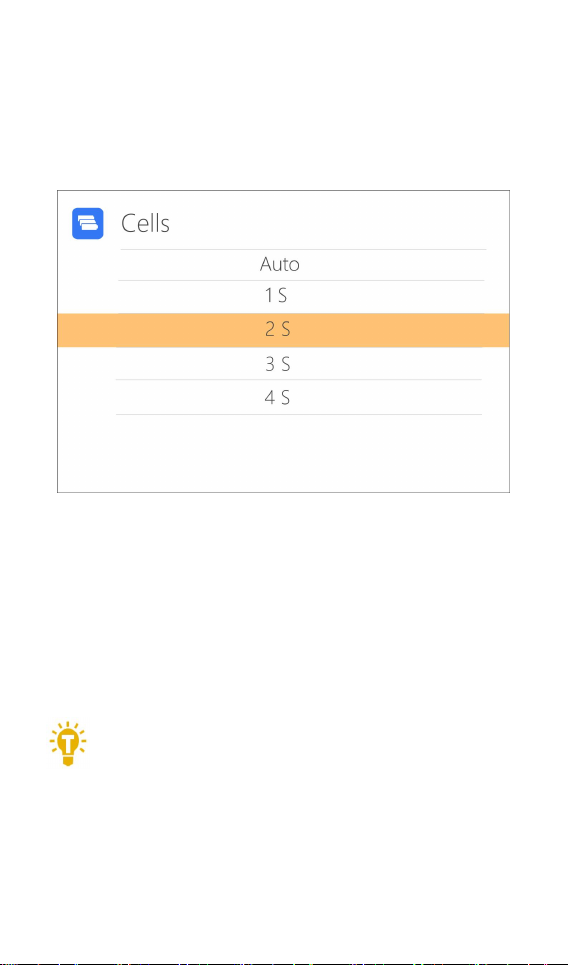
2,Number of cells
Tips: 1, Over discharge or overcharge of the connected
battery may cause battery cell identification errors.
2, If the cell number is set incorrectly, it may be
Move the cursor to the position of “Cells”, press [OK] to
modify the number of battery cells. The display is as
follows:
Scroll [Scroll Wheel] to adjust the value. When set
to ”Auto”, the charger will automatically identify the
number of cells connected to the battery according to
the battery voltage connected to the output port. Short
press [OK] and [CH/Exit] to take effect and return to the
previous interface.
=================================
insufficient to charge, or overcharge may damage the battery,
please set it carefully. 3, After Lixx batteries are connected to
the balance port, the number of battery strings can be more
accurately identified.
==================================================
@ToolkitRC 2022
Page 13
13
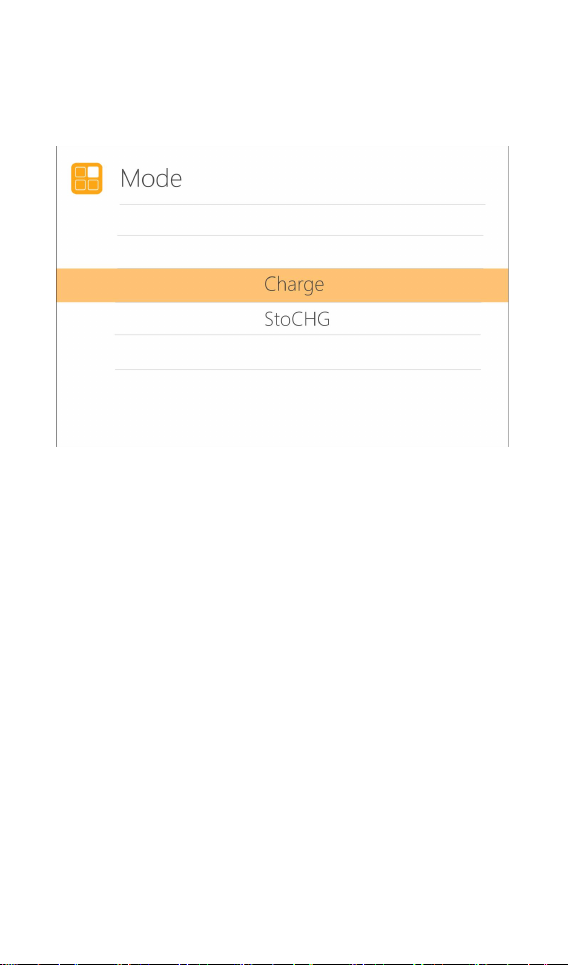
3,Mode
Move the cursor to “Mode” and press [OK] to
modify the work mode, as shown in the figure below.
Lipo, LiHV, LiFe, and Lion batteries can be charged
and stored. NiMh, battery and PB battery can choose to
charge. Short press [OK] and [CH/Exit] to take effect,
and return to the previous interface.
4,End voltage(TVC)
Move the cursor to “End Voltage” and press [OK] to
modify the end voltage of the single-cell battery. When
the working mode is charging, it is the charging cut-off
voltage, and the range is plus or minus 50mV of the full
voltage. When the working mode is discharge, it is the
discharge cut-off voltage. Scroll [Scroll Wheel] to adjust
the value, step 0.01V.
@ToolkitRC 2022
Page 14

14
=================================
1, Only LiPo, LiHV, LiFe batteries can set the cut-off
voltage.
2, Do not modify the cut-off voltage when you are not
familiar with the battery characteristics.
3, The charging cut-off voltage can be set to a range of
plus or minus 50mV of full voltage.
4, TVC: English abbreviation for terminal voltage
control.
==================================================
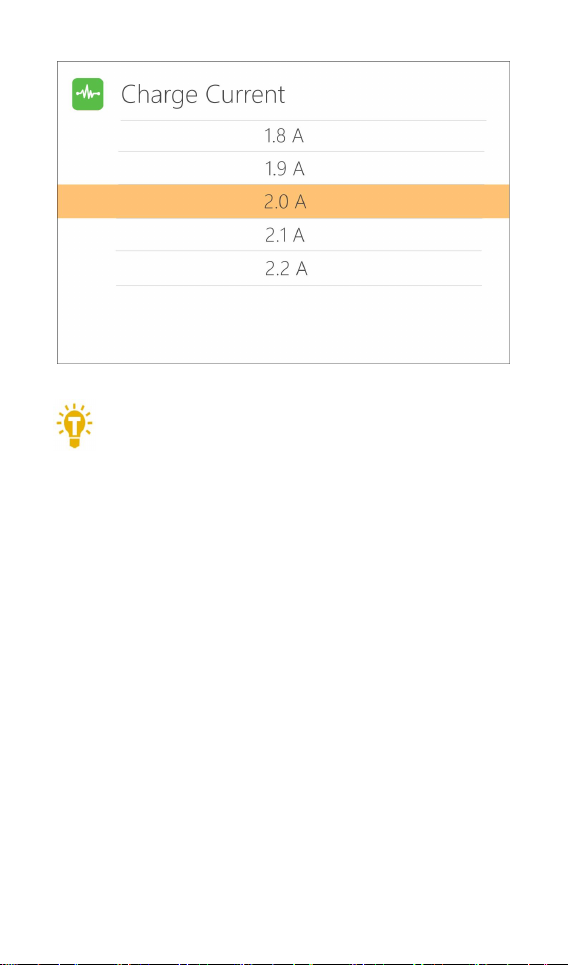
5,Charging current
Move the cursor to the Charging Current” position
and press [OK] to modify the current. Scroll [Scroll Wheel]
to adjust the value, step by 0.1A. Scroll [Scroll Wheel]
quickly to increase or decrease quickly. The charger
supports up to 5.0A.
@ToolkitRC 2022
Page 15
15
=================================================
Tips:
6. Please set the charging rate of 1-2C according to
the battery capacity. For example, if the battery capacity
is 2000mAh, please set the charging current to 2.0-4.0A.
Check the guidelines of your battery’s
manufacturer for correct charging instructions.
==================================================
6,NiMh setting (PeakV)
When the battery type is NiMh, the negative
pressure value when the battery is fully charged can be
set, and the setting range is 5mV-15mV, as shown below:
@ToolkitRC 2022
Page 16

16
=================================
Tips
1, Only NiMh battery can set the battery negative
pressure value.
2, Vocabulary explanation:
PeakV: When the NiMH battery is fully charged, the peak
voltage of each cell drops.
=================================
@ToolkitRC 2022
Page 17
17
Charging work
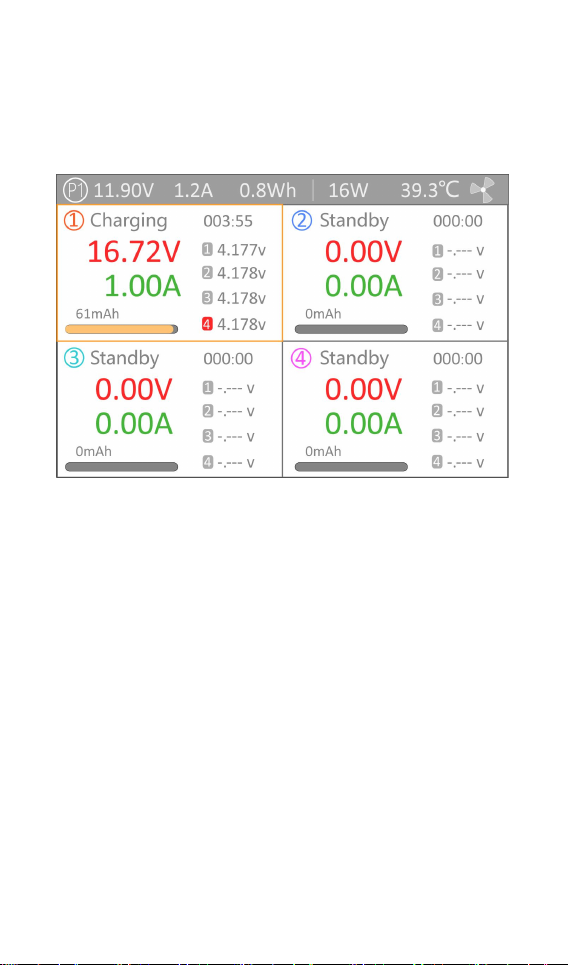
When charging starts, the charger enters the
working interface as shown below:
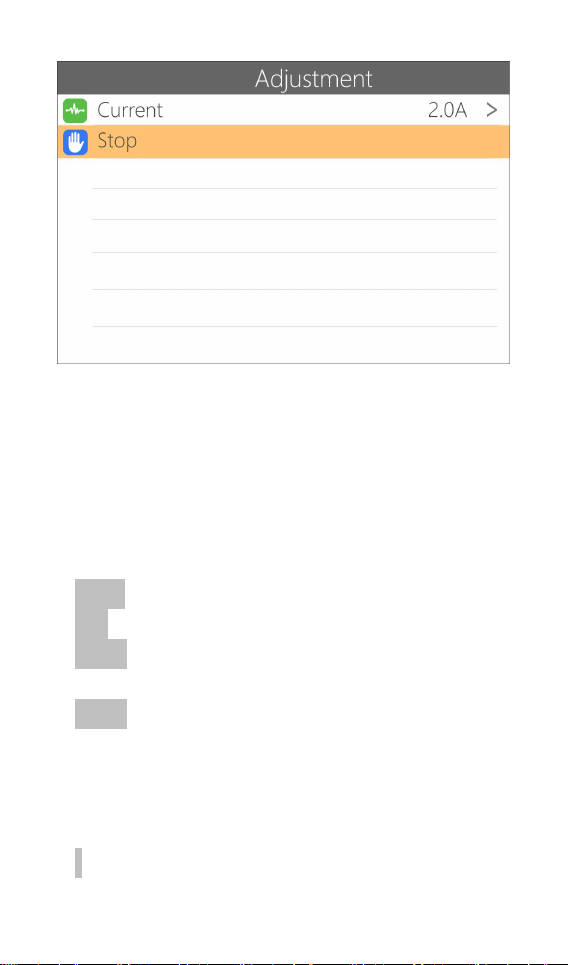
Scroll [Scroll Wheel] on this interface to switch the
display of the internal resistance voltage value of the
corresponding channel. Short press [OK] to dynamically
set the working current or stop working. As shown
below:
@ToolkitRC 2022
Page 18
18
To end the charging and discharging work, short press
[OK], move the cursor to [Stop], short press [OK], stop
working and return to the main interface.
When charging is complete or charging error occurs.
A prompt box will pop up with a prompt sound.
Display content description:
11.90V: Input power supply voltage.
1.2A: Input power current.
0.8Wh: The accumulated power consumption of the
input power.
39.3℃: The internal temperature of the charger.
16.72V: The main port voltage of the first channel.
1.00A: The main port current of the first channel.
003:55: Working time of the first channel.
61mAh: The cumulative capacity of the first channel.
1 4.177V: The first battery voltage
@ToolkitRC 2022
Page 19
19
.......
4 4.178V: The fourth battery voltage (this battery is
under balance management)
-.--V: No battery connected.
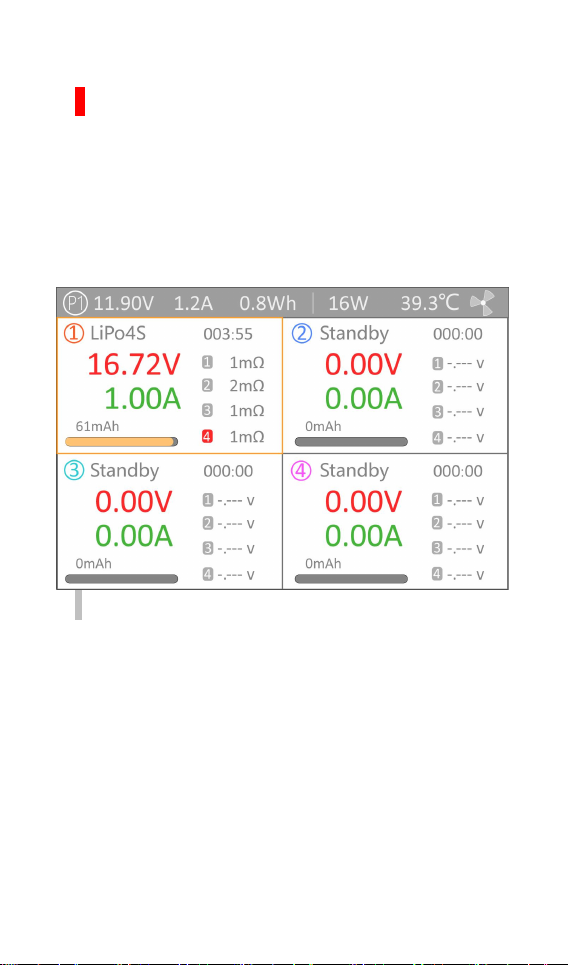
Use Scroll [Scroll Wheel] to switch to the second
column of the second channel, which is the internal
resistance information. As shown below:
1 1mΩ: Internal resistance of the first battery
@ToolkitRC 2022
Page 20

20
=================================
Tips:
1. When charging, please ensure someone is
supervising the charge throughout the process to deal
with abnormalities safely.
2. When charging a lithium battery, only connecting to
the main port will not perform balance management.
Please pay attention to the balance of the battery. After
connecting to the balance port, it will automatically
begin balance management.
3. After charging is completed, unplug the battery and
insert a new battery, it will automatically continue to
charge and discharge according to the set mode. When
set to a fixed number of cells, batteries with the same
number of cells need to be connected. When setting to
automatically detect the battery string number, please
pay attention to whether the detected cell number
matches the actual number.
=================================
@ToolkitRC 2022
Page 21
21
System settings
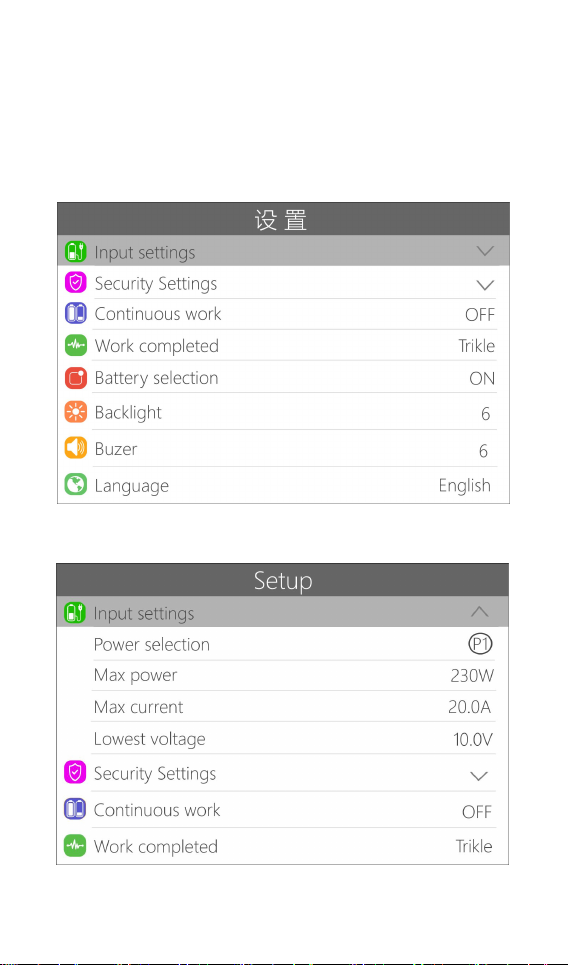
Long press [OK] on the main interface you will enter the
system setting interface only when all channels are not
in use, as shown in the figure below:
Input settings: Input power related settings, short press
to expand the settings. As shown below.
Power selection: When the AC power supply is
@ToolkitRC 2022
Page 22
22
connected, the power selection will be fixed to PI, power,
current, and voltage are also fixed values. P1 and P2 can
be selected when the input is DC. Users can set power,
current, voltage by themselves.
Max power: the maximum power absorbed from the
input port when charging.
Max current: the maximum current drawn from the input
port during charging.
Lowest voltage: is the lowest allowable input voltage.
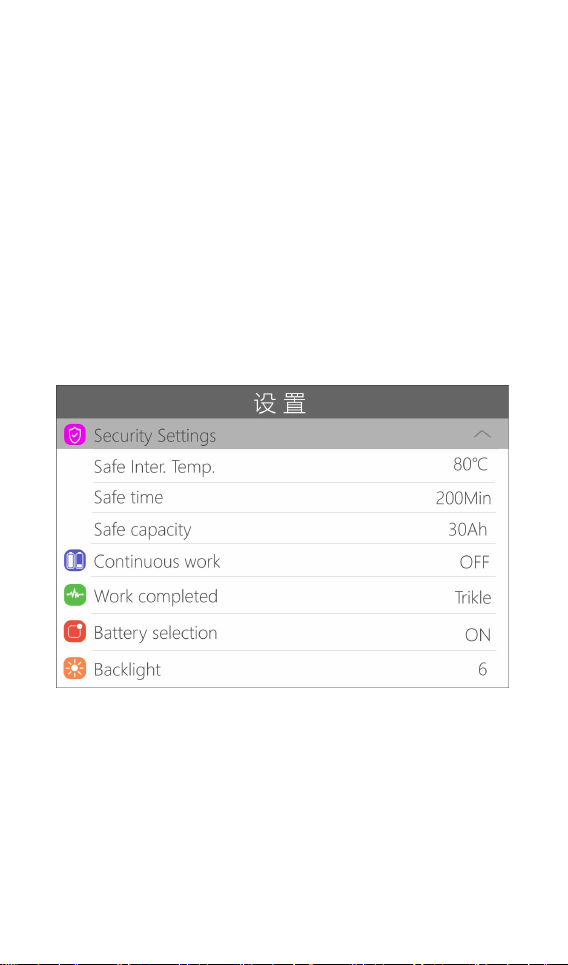
Charging safety settings: Short press to expand the
settings. As shown below.
Safe Inter. Temp.: above this temperature value, the
device will stop the main port output.
Safe time: the maximum time of continuous charging, it
will stop charging if it exceeds this.
Safe capacity: the maximum capacity for continuous
charging, and it will stop working if exceeded.
Continuous work: after charging, whether to continue
@ToolkitRC 2022
Page 23
23
charging after replacing the battery. Ensure the next
connected battery requires the same settings as the
previous battery that was being charged
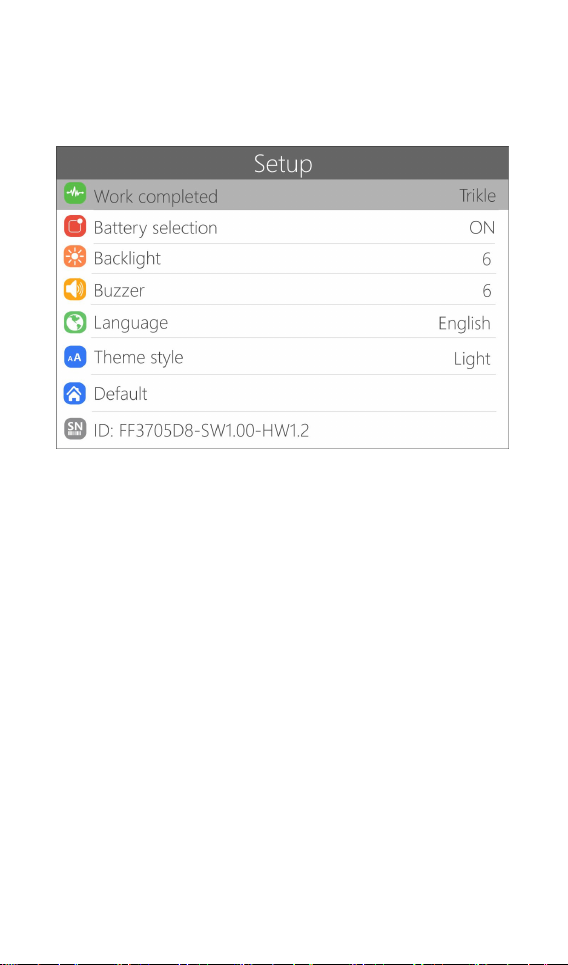
Work completed: whether to stop or trickle charge after
the charge is over.
Battery selection: whether to skip the battery selection
interface when selecting charging.
Backlight: the backlight brightness level of the display
can be set from 1 to 10 level.
Buzzer: the tone of the buzzer, which can be set to off.
Language: system display language. You can choose
English, Chinese, etc.
Theme style: two styles of Light and Dark can be
selected.
Default: restore all settings to factory values.
ID: the unique ID of the device factory settings.
@ToolkitRC 2022
Page 24

24
Other functions
1. Firmware upgrade
After connecting the Q4AC to the computer with the
USB data cable in the box, the computer will recognize a
USB drive named Toolkit. Download the upgrade file
app.upga on the official website. To update copy and
past the new file and overwrite the files in the USB to
upgrade the firmware.
2. Automatically continue charging
When a battery is fully charged, after unplugging the
battery for 2 seconds, connect to the next battery, the
device will automatically continue to charge, you can
start and stop this function in the settings menu.
3. Fan level
When the internal temperature of the device exceeds
42°C, the fan turns on half-speed air volume to reduce
noise. When the internal temperature exceeds 50°C, the
fan turns on full-speed air volume to enhance heat
dissipation.
6. Manually calibrate the voltage
In the shutdown state, press and hold the [Scroll
Wheel] without releasing, connect the power supply, and
the system will enter the manual voltage calibration
function. Use a voltmeter to measure the actual voltage
of each battery, move the cursor to the corresponding
voltage value, modify the voltage value to be consistent
with the voltmeter value, and achieve calibration. After
the calibration is completed, move the cursor to save,
short press once, the buzzer will beep for a long time,
and the save is successful. Just exit or shut down.
@ToolkitRC 2022
Page 25

25
7, Fully charged
When the lithium battery is fully charged, it will
prompt "Fast charging has ended". If the battery is not
removed, the constant voltage trickle charge will be
performed automatically to keep the battery full.
@ToolkitRC 2022
Page 26

26
Specification
Charging
Input
DC10-18V@MAX20A
Battery
Type
LiPo LiHV LiFe Lion LTO @1-4S
NiMh @1-10S Pb @1-8S
Bal Cur.
240mA @2-4S
Accuracy
<0.005V
Charge
Power
0.1-5A@50W*4 DC input
0.1-5A@50W*2 AC input
0.1-5A@25W*4 AC input
Discharge
Power
0.1-2A@5W*4
USB
upgrade@USB
Battery
Voltage
1.0V-5.0V @1-4S
Battery
Internal
Resistance
1-100mR @1-4S
Display
LCD
IPS 3.5 寸 480*320 Pixel
Product
Size
150mm*112mm*36.5mm
Weight
450g
Individual
Packing
Size
160mm*160mm*46mm
Weight
600g
@ToolkitRC 2022
 Loading...