

Page 1
1
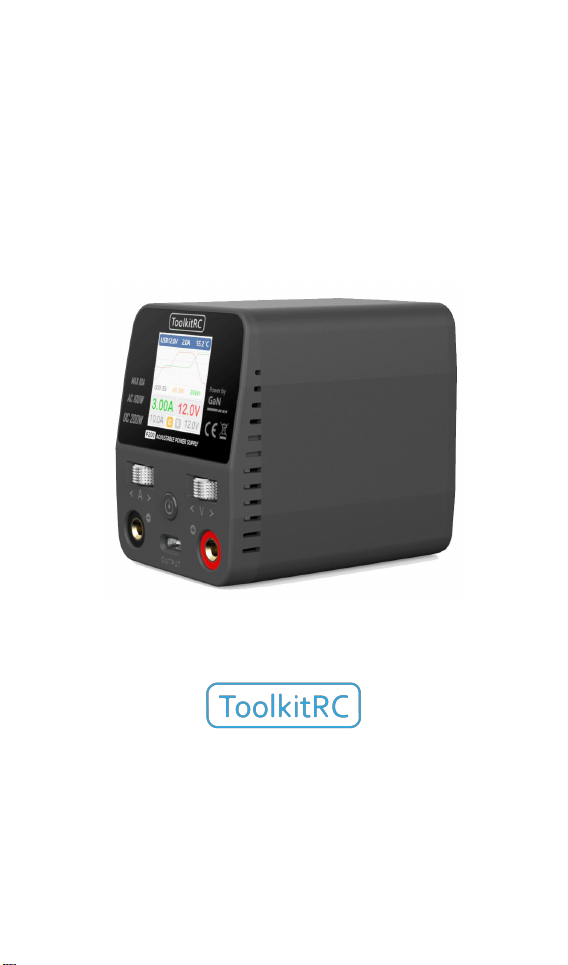
P200
Manual V1.0
2021.02
www.toolkitrc.com
ToolkitRC Technology (Shenzhen) Co., Ltd
@ToolkiRC 2021
Page 2
2
Introduction
Tips
Important
Information
Thank you for purchasing the M7 model tool chain
product, please read this manual carefully before using
it.
Key Points
Further information
To ensure you have the best experience with this
product please scan the QR code below to stay up to
date with news, information and firmware updates for
your charger. Or visit www.toolkitrc.com.
@ToolkiRC 2021
Page 3

3
Safety
1. P200 allows the input voltage of DC 7-28V or AC
100-240V to ensure that the power supply voltage
conforms to the power supply. Pay attention to the
positive and negative polarity of the power supply
when connecting.
2. Do not use this product in the environment of heat
source, humidity, flammable and explosive gas.
3. Please use this product when someone is guarded to
prevent accidents.
4. When not using this product, please unplug the input
power in time.
5. When using the charging function, please set a
current that matches the battery. Do not set an
excessive current for charging, so as not to damage
the battery.
@ToolkiRC 2021
Page 4

4
Contents
Introduction
Key Points
Further information
......................................................................
Safety
Contents
P200 Layout
Quick start
Output settings and display instructions
1. The main interface display description
2. Description of USB interface display
System settings
other functions
Specifications
..........................................................
.............................................................
.............................................
................................................................
..........................................................
.............................................................
..........
..................................................
...................................................
......................................................
.........
........
2
2
2
3
4
6
7
9
9
10
12
14
15
@ToolkiRC 2021
Page 5

5
Product description
P200 is a mini desktop adjustable power supply,
with AC or DC two input modes, built-in 100W GaN AC
power supply, IPS wide-angle display screen records and
curve display voltage and current, and other features.
Built-in gallium nitride (GaN) small AC power
supply.
AC/DC two input modes.
The conversion efficiency is as high as 95%.
AC input: the full output power is up to 100W.
DC input: the full output power is up to 200W.
TYPE-C MAX output 65W.
Fast charge full protocol:
PD3.0/PD2.0/PPS/QC4/QC3.0/QC2.0
/AFC/FCP/SCP/PE2.0/PE1.1/SFCP/VOOC.
1.0-30.0V adjustable output voltage.
1.0-10.0A adjustable constant current。
Over voltage, over current, over temperature, short
circuit, multiple protections.
Metal dial wheel, feels hard and good.
IPS 1.54" high-brightness high-definition display.
The device is simulated as a U disk, and the
upgrade file is copied to realize the product
firmware upgrade.
@ToolkiRC 2021
Page 6
6
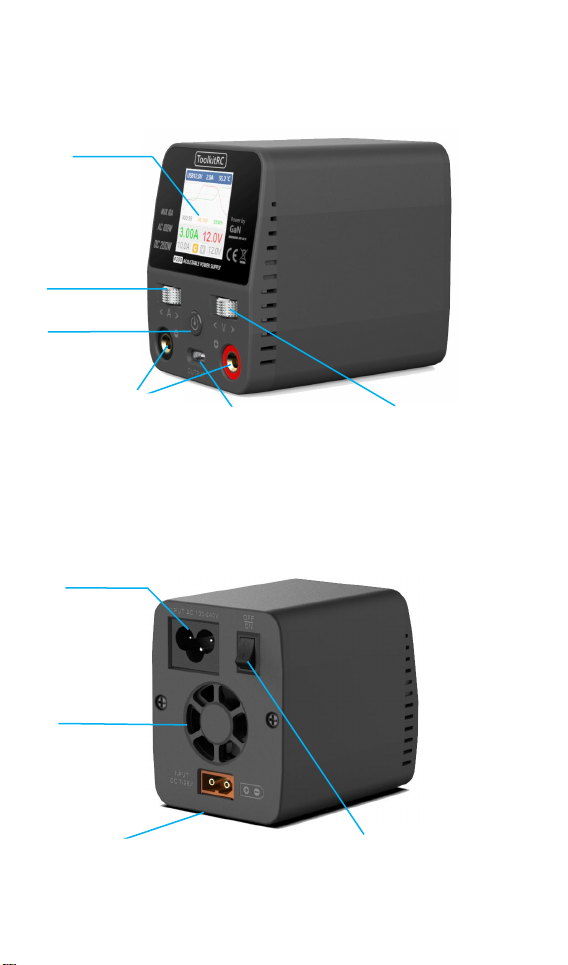
P200 Layout
Display
A Wheel
(Current
adjustment)
Output main port
AC power switch
AC Input port
DC Input port
Power button
Cooling fan
Type-C
fast charge output
V Wheel
(Voltage adjustment)
Front
Front
Back
@ToolkiRC 2021
Page 7
7
Quick start
1. Connect the 7-28V DC power supply to [DC input port]
on the back of the P200 or AC 100-240V to [AC power
port], and turn on [AC power switch].
2. Press the front [Power button] once, the display shows
the boot logo and stays for 2 seconds.
3. At the same time, it is accompanied by do-re-mi boot
sound.
4. After the boot is completed, the screen enters the
main interface and displays as follows::
5. Fluctuating [V dial], set the voltage to be output.
6. Fluctuation [A dial], set the output constant current.
7. Short press [V dial] to output the set voltage from the
main port.
8. Short press [A dial] to enter the TYPE-C information
interface.
9. Long press [V dial] to stop the output and enter the
system setting.
@ToolkiRC 2021
Page 8

8
10. Long press [A dial], the accumulated capacity and
Warning:
1. Inputting too high DC voltage may damage the
time information will be cleared.
===================================
product.
2. Do not connect to the input terminal if the
voltage value is not marked.
3. When the output is connected to the lithium
battery for charging, pay attention to the full voltage of
the battery.
===================================
@ToolkiRC 2021
Page 9
9
Output settings and display
instructions
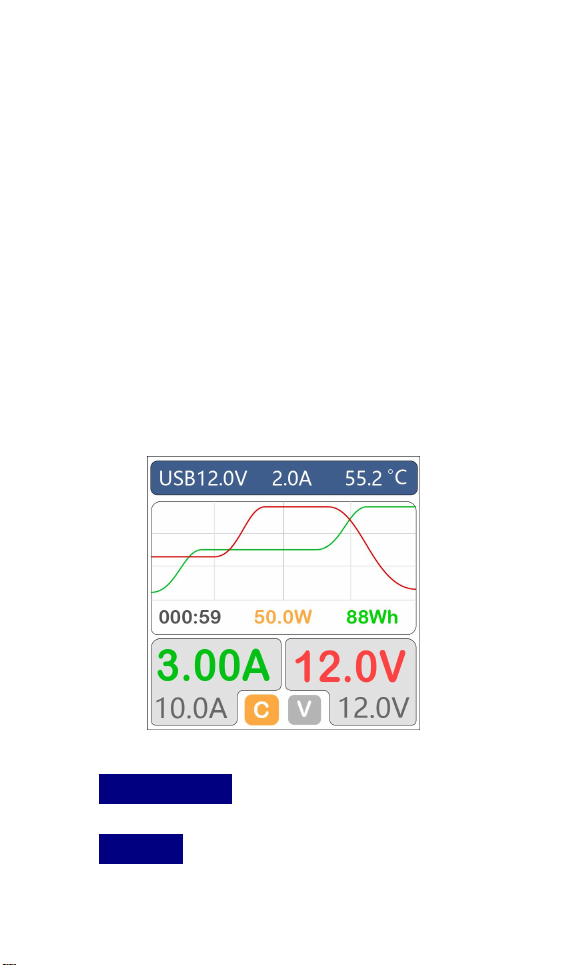
Turn the [V dial] on the main interface to set the
voltage to follow the adjustment. The step voltage can
be adjusted in the system menu. Turn the [V dial] to set
the maximum constant current value that requires
constant current. After setting the required voltage and
current, short press [V dial] once to output the set
voltage from the main port. At the same time, the
real-time monitoring value will be displayed in color, and
the following interface will be displayed:
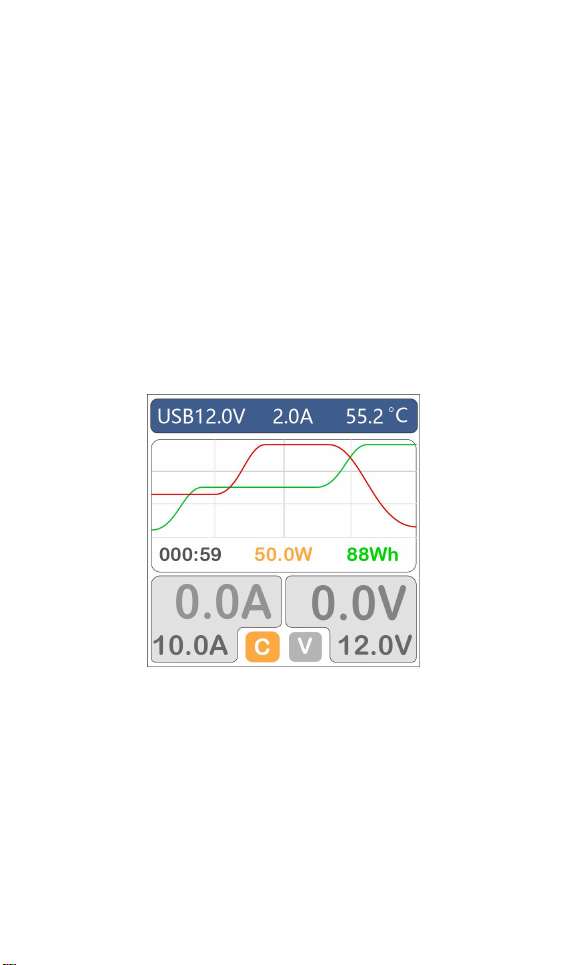
1. The main interface display description
USB 12.0V 2.0A: Output voltage and current of
TYPE-C port.
55.2 ℃ : Internal real-time monitoring of
temperature.
@ToolkiRC 2021
Page 10
10
Curve area: Real-time recording of the voltage and
current of the output main port.
000:59: The accumulation of the output time of the
main port.
50.0W: The current output power of the main port.
88Wh: Main port output power statistics.
3.00A: The real-time current value output by the
main port.
12.0V: The real-time voltage value output by the
main port.
10.0A: The set maximum constant current value.
12.0V: The set maximum constant voltage value.
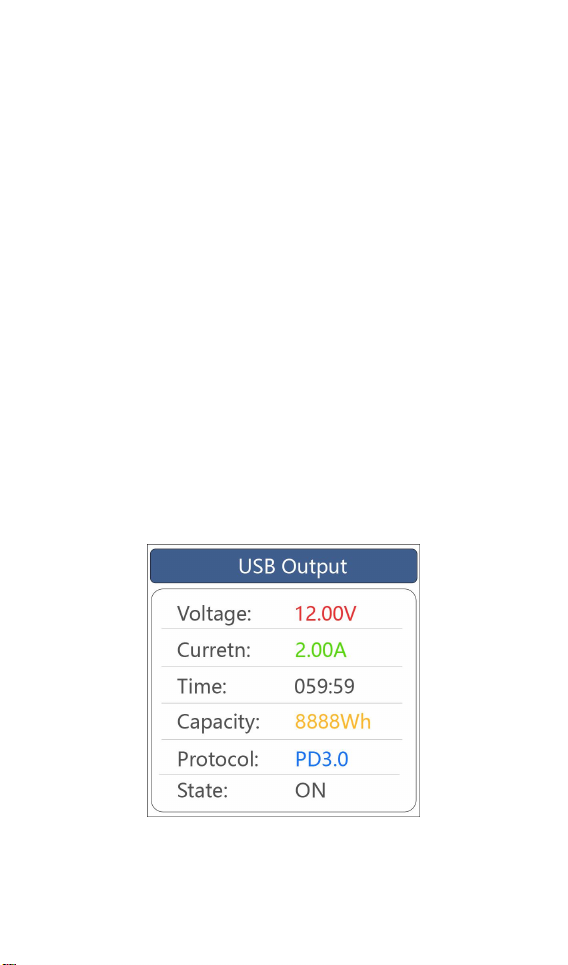
2. Description of USB interface display
In the main interface, short press [A dial] once to enter
the USB-TYPE-C output monitoring interface, as shown
in the figure below:
12.00V: TYPE-C port output voltage real-time value.
2.00A: TYPE-C port output current real-time value.
@ToolkiRC 2021
Page 11

11
059:59: Output the accumulated time.
Tips:
1. Long press [A dial] once to clear the
8888Wh: The accumulated value of output electric
energy.
PD3.0: The current device fast charging protocol.
ON: TYPE-C output status.
===================================
accumulated value.
2. Connect to the USB-C charging device, and the
USB port will output the corresponding voltage and
current according to the protocol.
===================================
@ToolkiRC 2021
Page 12
12
System settings
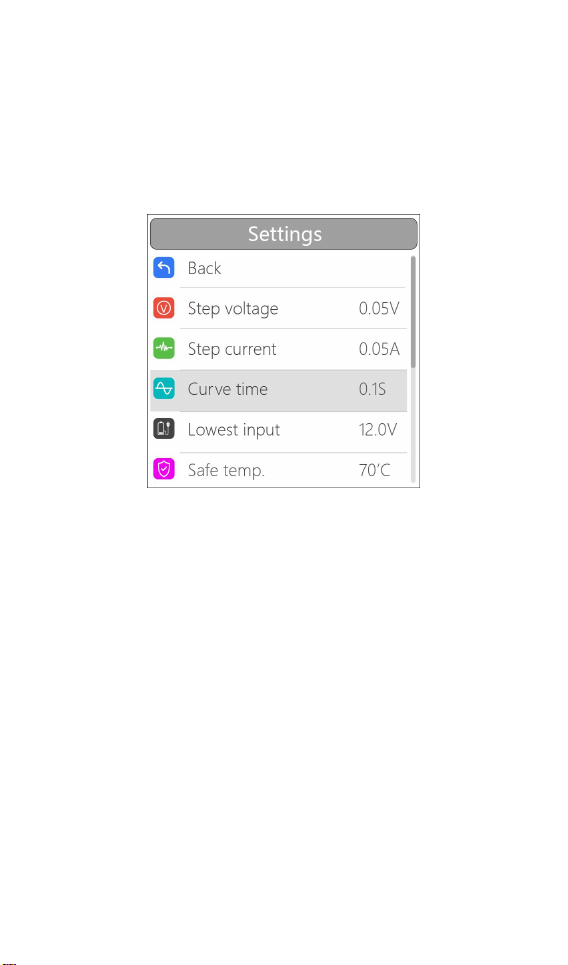
After selecting and long-pressing [V dial] on the
main interface, you will enter the system setting
interface, as shown in the figure below:
Back: Back to the main interface.
Step voltage: The step value of adding or subtracting
the output voltage by turning the voltage dial, the
setting range is 0.05-0.5V.
Step current: The current dial turns the step value of the
output current plus or minus one grid, the setting range
is 0.05-0.5A.
Curve Time: Record the curve period, you can set
0.1S-10S to record once.
Lowest input:When the DC input voltage is below this
value, the output will stop.
Safe temp.: The internal temperature protection value,
when the internal temperature is higher than this value,
the output will stop.
@ToolkiRC 2021
Page 13
13
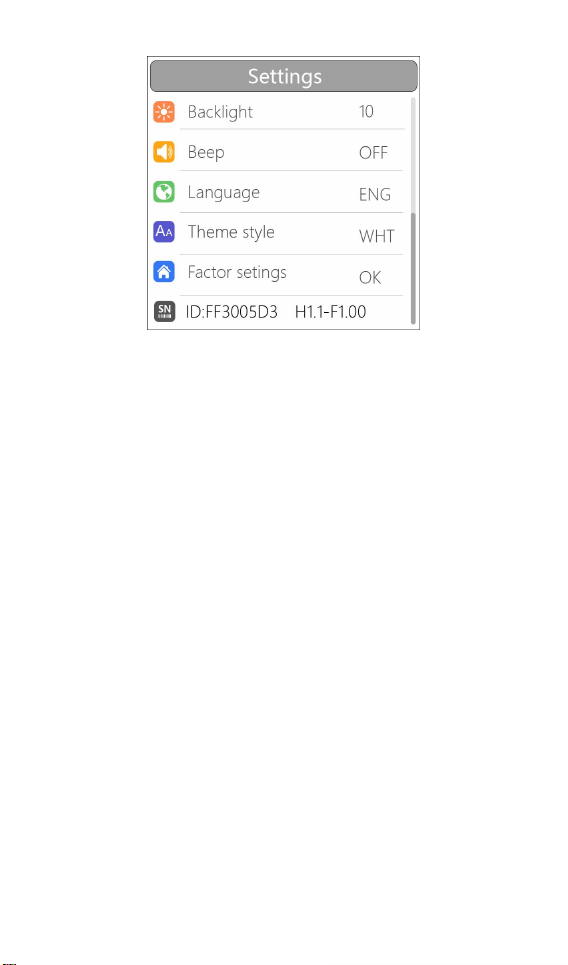
Backlight: Display backlight brightness value, can be set
to 1-10 levels.
Beep: The tone of the buzzer, which can be set to off.
Language: System display language. You can choose
English, Chinese, etc.
Theme style: Two themes of bright and dark colors can
be selected.
Factor settings: Restore all setting items to factory
values.
ID:An independent ID for each device.
@ToolkiRC 2021
Page 14

14
other functions
1. Firmware upgrade
After connecting the P200 to the computer with the
USB data cable in the box, the computer will recognize a
U disk named Toolkit. Download the upgrade file
app.upg on the official website to overwrite the files in
the U disk to upgrade the firmware.
2. Fan level
When the internal temperature of the device exceeds
45°C, the fan turns on half-speed air volume to reduce
noise. When the internal temperature exceeds 53°C, the
fan turns on full-speed air volume to enhance heat
dissipation.
3. Manually calibrate voltage and current
Press the power button, within 1 second,
simultaneously press and hold [A dial] + [V dial] without
releasing, the system will enter the manual voltage
calibration function. Use a voltmeter to measure the
actual input and output voltage, move the cursor to the
corresponding voltage value, modify the voltage value
to be consistent with the voltmeter value, and achieve
calibration. After the calibration is completed, move the
cursor to save, short press once, the buzzer will beep for
a long time, and the save is successful. Just exit or shut
down.
@ToolkiRC 2021
Page 15
15
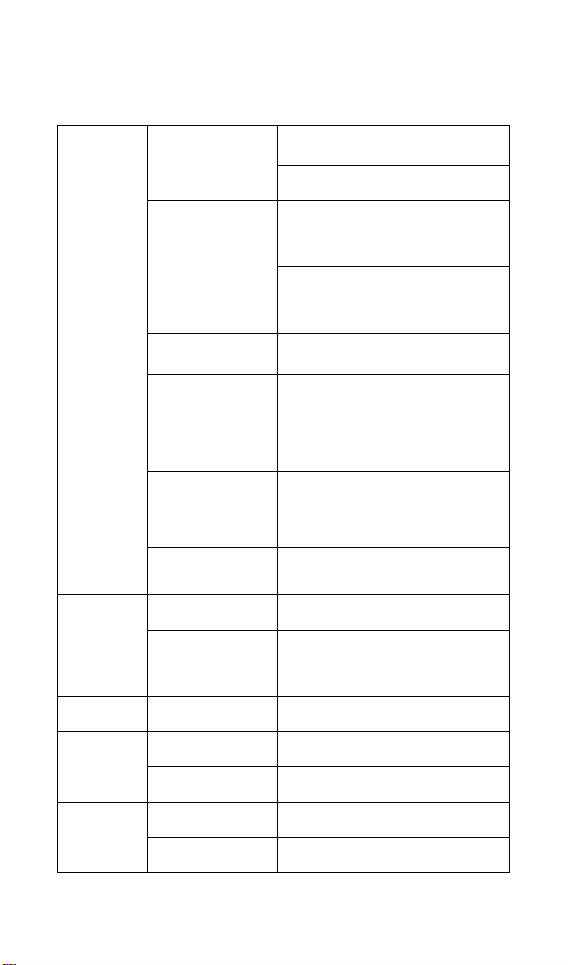
Specifications
Electric
Input voltage
AC 100-240V@MAX 100W
DC 7-28V@MAX 10A 200W
Main output
1.0-10.0A @MAX AC 100W / DC
200W
1.0-30.0V @MAX AC 100W / DC
200W
TYPE-C output
5.0-20.0V @MAX 65W
TYPE-C
protocol
PD3.0/PD2.0/PPS/QC4/QC3.0/QC2.0/
AFC/FCP/SCP/PE2.0/PE1.1/SFCP/VOO
C
Protection response
<1ms (Short circuit, over current,
over voltage)
Adjustment period
8ms
Interface
Main port
4.0mm Banana female
USB
TYPE-C Fast charge
Firmware upgrade
Display
LCD
IPS 1.54" 240*240 resolution
Product
Size
84*63*78 mm
Weight
360g
Individual
packing
Size
160*150*73 mm
Weight
670g
@ToolkiRC 2021
 Loading...