

Page 1
1
M7AC
Manual V1.0
2022.08
www.toolkitrc.com
ToolkitRC Technology (Shenzhen) Co., Ltd
@ToolkiRC 2022
Page 2

2
Introduction
Tips
Important
Information
Thank you for purchasing the M7AC balance
charger, please read this manual carefully before use.
Key Points
Further information
To ensure you have the best experience with this
product, please scan the QR code below to stay up to
date with news, information and firmware updates for
your charger; this information could be found at
www.toolkitrc.com
@ToolkiRC 2022
Page 3

3
Safety
1. allows input voltage of DC 7-28V or AC 100-240V.
Ensure the charger is only connected to a suitable power
source and correct polarity.
2. Do not use this product in hot, humid, flammable or
explosive environments.
3. Please do not use this charger without supervision.
Never leave charging batteries unattended.
4. When not using this product, please unplug the input
power.
5. When using the charging function, please set a
current that matches the battery. Do not set an excessive
current for charging to avoid damage to the battery.
Check the guidelines of your battery’s manufacturer for
correct charging instructions.
@ToolkiRC 2022
Page 4

4
Contents
Introduction......................................................... 2
Key Points.............................................................2
Further information............................................ 2
Safety
Contents............................................................... 4
M7AC Layout
Quick start
Charge and discharge settings
1. Battery type setting .........................................9
2. Cell Setting.....................................................12
3. Work Mode....................................................13
4. Discharge mode........................................... 14
5. Max input voltage .........................................15
6. End voltage setting (TVC) ........................... 16
7. Current setting
.....................................................................3
....................................................... 7
............................................................ 8
.........................9
.............................................. 17
@ToolkiRC 2022
Page 5

5
8. NiMH setting (PeakV)
...................................18
9. Cycle setting.................................................. 19
10. External load setting ................................... 21
11. Smart battery setting ...................................22
Charge and discharge work ............................24
Accessibility
3. Signal output
4. ESC test
5. Power
System settings
........................................................ 28
.................................................31
.......................................................... 35
..............................................................35
..................................................37
Customize function...........................................41
1, Boot image................................................. 41
2. Broadcast voice.............................................43
Other functions
................................................. 44
Specifications..................................................... 46
@ToolkiRC 2022
Page 6

6
Product description
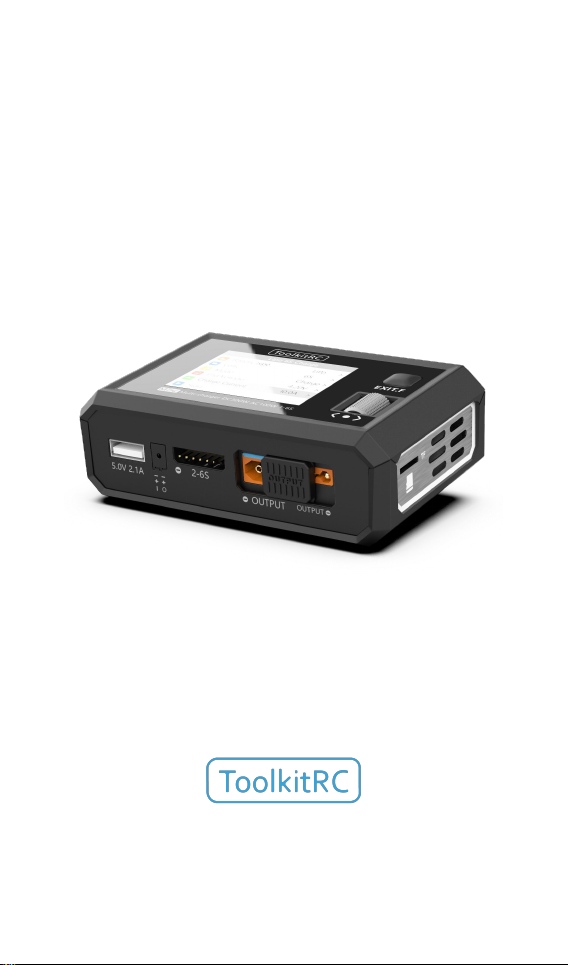
The M7AC is a multifunctional tool that integrates
functions such as a balance charger and discharge, a
signal measuring device, and a signal source.
Support AC100W or DC300W dual input。
Charges, discharges and balances (where
applicable) LiPo, LiHV, LiFe, Lion, LTO 1-6S, NiMh
1-16S, PB 1-10S batteries.
Charge current:MAX 15A @MAX300W.
Discharge current:
Recycle / External mode Max 15A @300W.
Internal mode Max 3A @15W.
Lithium battery cut-off voltage can be adjusted at
will (TVC function).
Measures battery voltage, battery internal
resistance, and balances lithium packs
automatically.
Measures / outputs PWM/PPM/SBUS standard
signals with an accuracy of 1 microsecond.
Constant current and constant voltage source
output, customizable 1-28V constant voltage,
0.5-15A constant current.
Can be adapted for charging consumer-grade
drone batteries.
Multi-language user interface.
Multi-language voice broadcast, with customizable
voice packs.
Easily upgradable via USB.
@ToolkiRC 2022
Page 7
7
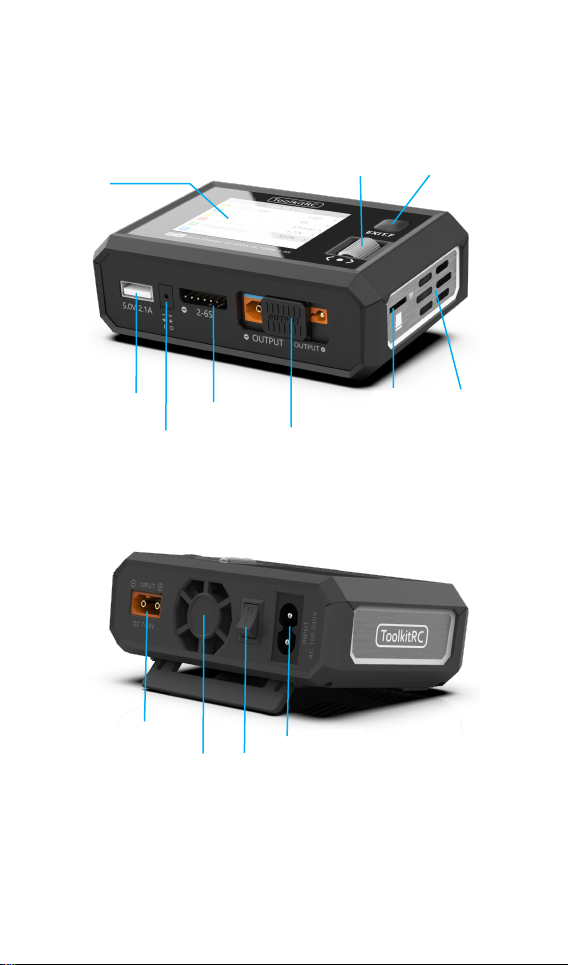
M7AC Layout
Display
Scroll wheel
Output port
Balance port
DC input
TF card
Exit
Cooling fan
Speaker
Signal port
USB
output
AC input
AC switch
Front
Back
@ToolkiRC 2022
Page 8
8
Quick start
1,Connect a 7-28V or AC 100-240V power supply or
input battery to the input port on the back of the M7AC.
2,The display shows the boot logo and stays for 2
seconds.
3,A welcome sound (voice pack dependent) is played
simultaneously.
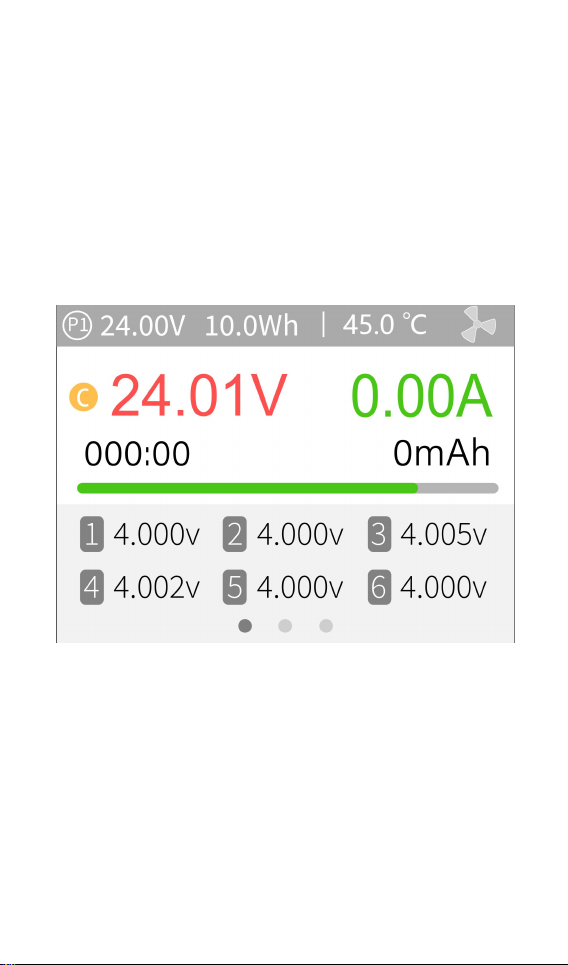
4,After booting up, the screen enters the main
interface as shown below:
5,Press and hold [Exit] to enter the auxiliary function
interface.
6,Scroll [Scroll Wheel] to switch between pages.
7,With the charger idle, short press [OK] to set the
charging parameters. Press [OK] during the charging
process to adjust the amperage or stop the charge
process.
8,With the charger idle, Press and hold [OK] to enter
the system setting interface.
9,Short press [Exit] or return to the previous interface.
@ToolkiRC 2022
Page 9
9
Charge and discharge settings
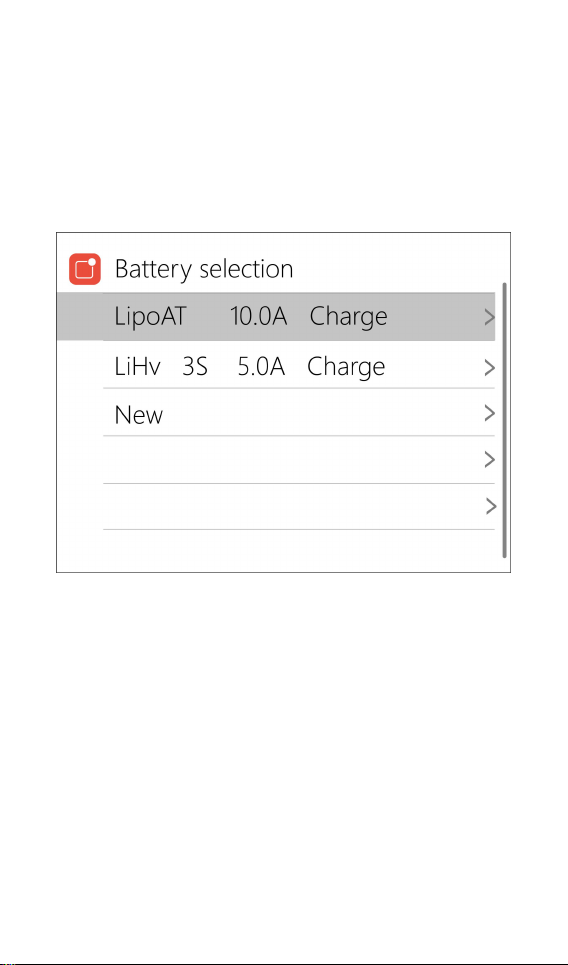
In the main interface, select and short press [OK] to
enter the charging function, open the battery selection
option in system settings, and the following interface will
be displayed.
1. Battery type setting
Scroll [Scroll Wheel], and select one of the presets,
or create a new battery. Up to 32 battery files can be
created. Press [Enter] to enter a specific battery setting,
the display is as follows:
@ToolkiRC 2022
Page 10
10
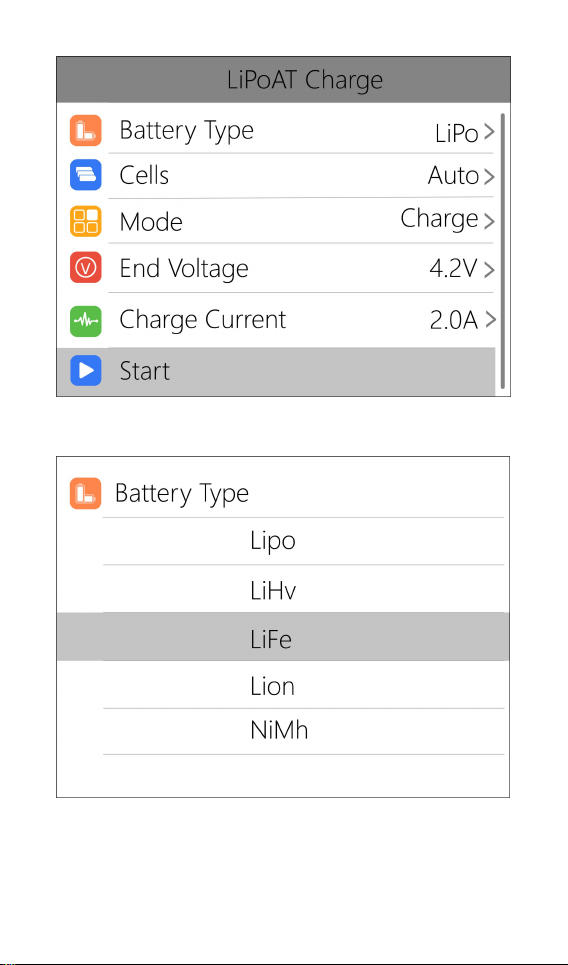
Move the cursor to [Battery Type] and press [OK] to
modify the battery type, the display is as follows:
The charger supports charging and discharging of 6
types of batteries: Lipo, LiHV, LiFe, Lion, LTO, NiMh, and
PB. There is also a smart battery mode to choose from.
@ToolkiRC 2022
Page 11

11
After selecting the battery type that matches the battery
Warning:
1. Ensure the correct battery type has been
Glossary of battery terms explanation:
1, Lipo: often referred to as a lithium
on charge, short press [OK] and [Exit] to save and return
to the previous interface.
=================================================
selected prior to charging. An incorrect choice may
damage the battery and/or become a fire hazard.
Please use caution.
2. Do not use this product to charge non-compatible
battery chemistries.
===================================
===================================
polymer battery with a nominal voltage of 3.70V
and a fully charged battery of 4.20V.
2, LiHV: often referred to as a high-voltage
lithium battery with a nominal voltage of 3.85V
and a fully charged battery of 4.35V.
3, LiFe: often referred to as iron-lithium battery,
with a nominal voltage of 3.30V and a fully
charged battery of 3.60V.
4, Lion: often referred to as a lithium-ion battery
with a nominal voltage of 3.60V and a fully
charged battery of 4.10V.
@ToolkiRC 2022
Page 12
12
5, LTO: often referred to as a lithium-ion battery
with a nominal voltage of 2.40V and a fully
charged battery of 2.70V.
6, NiMh: often called NiMH battery, nominal
voltage 1.20V.
7, PB: often called lead-acid battery, nominal
voltage 2.00V.
==================================================
2. Cell Setting
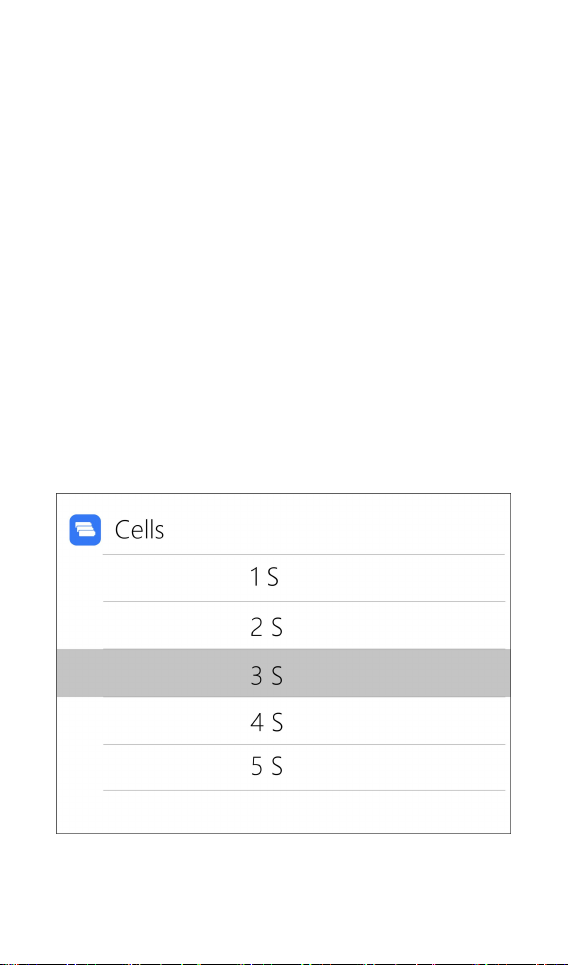
Move the cursor to [Battery Section], then press
[OK] to modify the number of cells. The display is as
follows:
Rotate the [Scroll wheel] to adjust the value. When
set to [Auto], the charger will automatically identify the
@ToolkiRC 2022
Page 13

13
number of cells by checking the total voltage against the
Tips:
1. If the connected battery is
balance port data. Short press [OK] and [Exit] to take
effect and return to the previous interface.
===================================
over-discharged or over-charged, this may cause
an incorrect cell-count, in which case the cell
number needs to be adjusted normally.
2. If the cell count is set incorrectly, it may lead to
overcharging, which can present itself as a fire risk.
3. The cell count can be more accurately
determined if the balance port is connected.
=================================
3. Work Mode
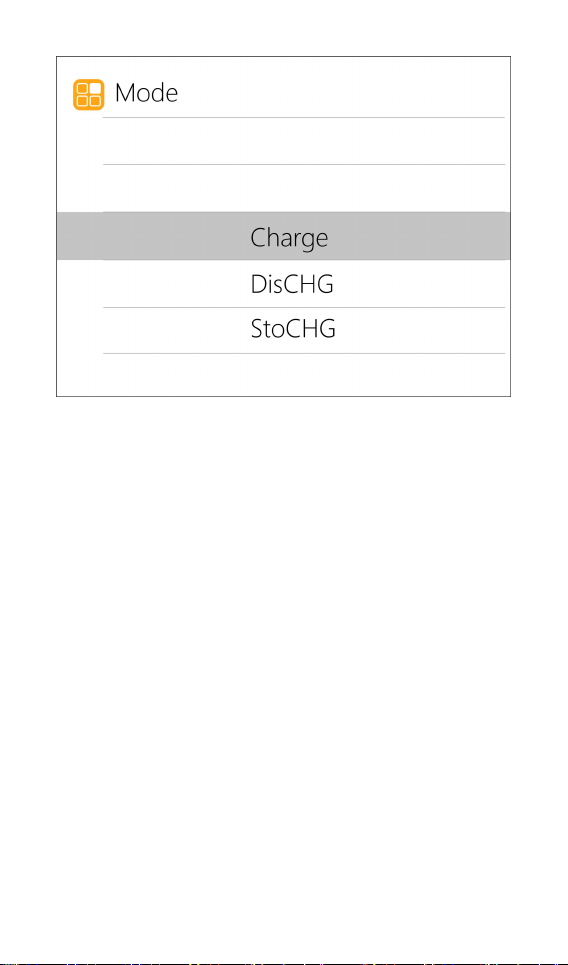
Move the cursor to [Mode] and press [OK] to
modify the work mode, as shown in the figure below:
@ToolkiRC 2022
Page 14
14
Lipo, LiHV, LiFe, Lion, LTO batteries can be charged,
discharged, and stored. NiMh battery can be charged,
discharged, or cycled. PB battery can be charged and
discharged. Short press [OK] and [Exit] to take effect and
return to the previous interface.
4. Discharge mode
Under discharge, storage, and cycle modes, the
option of discharging the battery will appear.
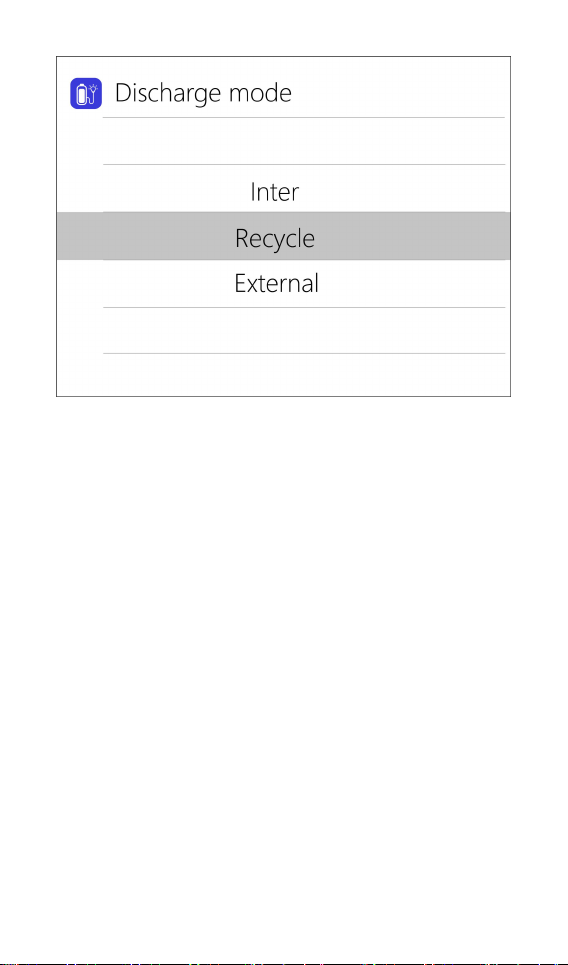
Move the cursor to [Discharge Mode] and press [OK]
to modify the discharge mode, as shown below:
@ToolkiRC 2022
Page 15
15
The charger supports three discharge modes.
1. Normal mode: discharge using internal heat
dissipation, maximum 3.0A@15W discharge.
2. Recycle mode: when a battery is used as the
input, the power is recovered to the input battery
through this function, max 15.0A@300W discharge.
External mode: when the input port is connected
3.
to a discharge load and the output port is connected to
the battery, it can be discharged through this function.
Max 15.0A@300W discharge.
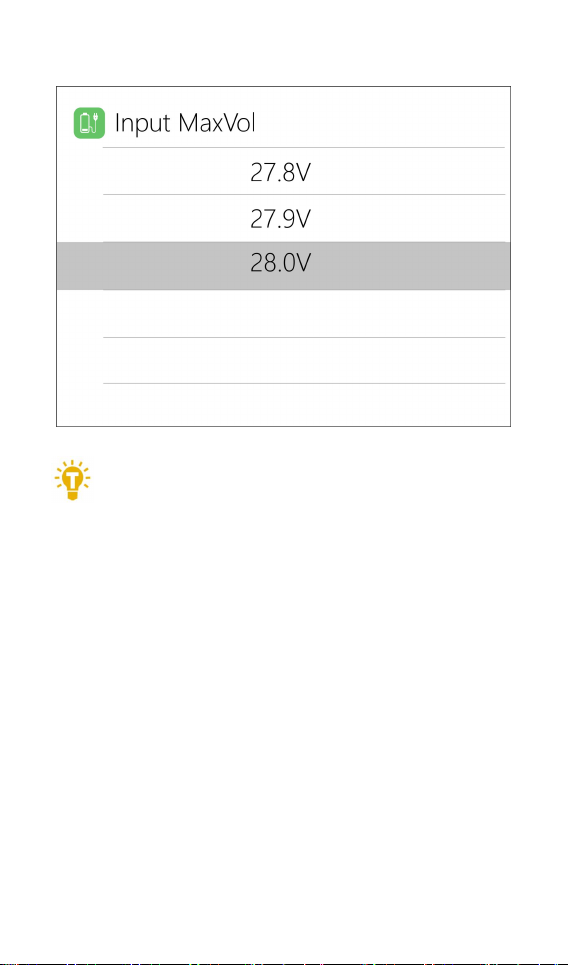
5. Max input voltage
When the discharge mode is selected to recycle, the
Max input voltage option will appear. Move the cursor to
[Max Input Vol.] and press [OK] to adjust. If the input
voltage reaches this voltage value during discharge, the
@ToolkiRC 2022
Page 16
16
discharge will stop. As shown below:
Tips:
Please set the Max input voltage to the highest
===================================
protection voltage of the power supply. After the voltage
is reached, the charger will automatically stop recycling
discharging. Setting high overvoltage may damage the
input power
===================================
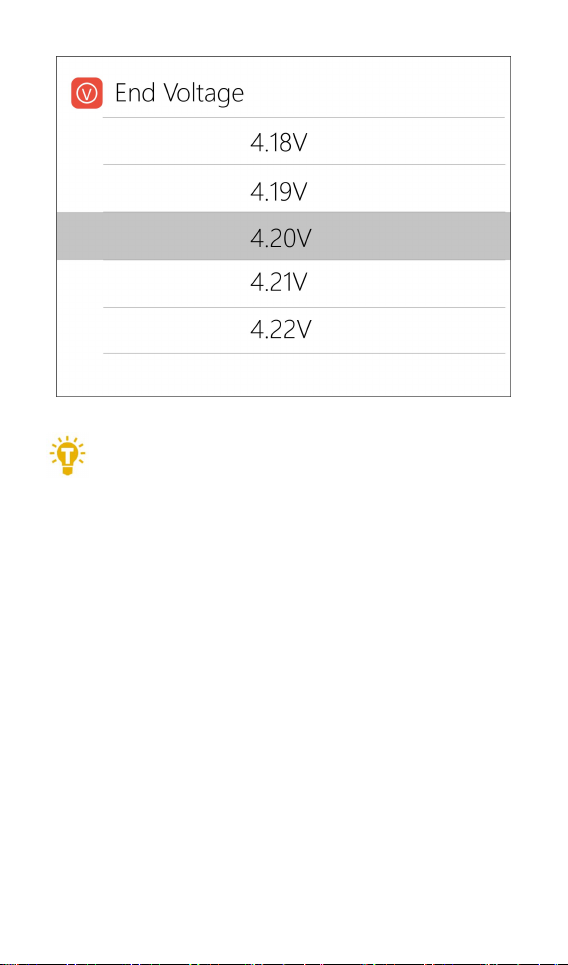
6. End voltage setting (TVC)
Move the cursor to [End Voltage] and press [OK] to
modify the end voltage for the individual cells.
When charging, it is the charge cut-off voltage, and
the range is plus or minus 50mV of the full voltage.
When discharging, it is the discharge cut-off voltage.
Scroll [Scroll wheel] to adjust the value, step 0.01V.
@ToolkiRC 2022
Page 17
17
===================================
1. Only LiPo, LiHV, LiFe batteries can set the
cut-off voltage.
2. Do not modify the cut-off voltage if you are not
familiar with the battery characteristics.
3. The charging cut-off voltage can be set to a range of
plus or minus 50mV of full voltage.
4. Nomenclature:
TVC: English abbreviation for terminal voltage control
=================================================
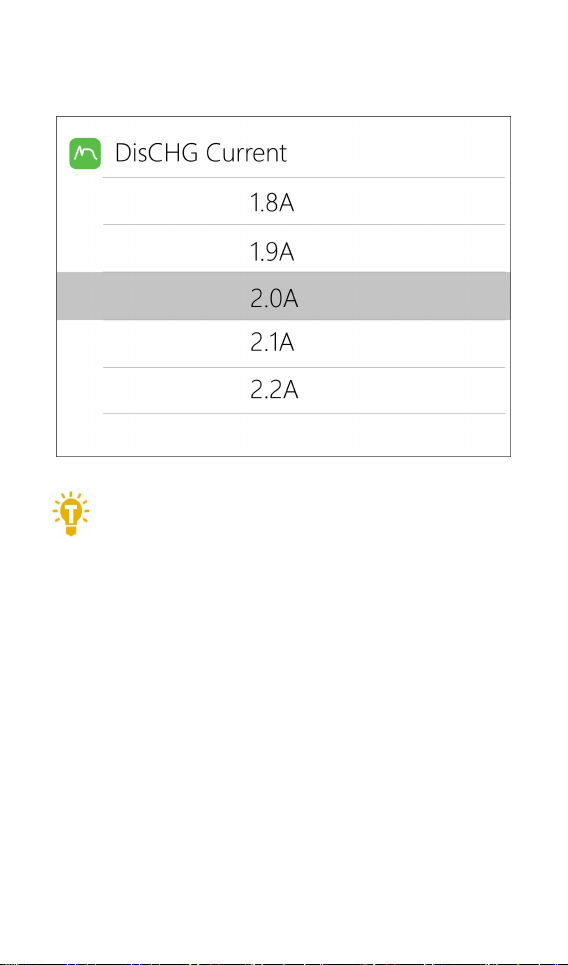
7. Current setting
Move the cursor to the [Charge Current] or [DisCHG
Current] position, and press [OK] to modify the current.
Rotate [Scroll Wheel] to adjust the value, step by 0.1A.
@ToolkiRC 2022
Page 18
18
Scroll [Scroll Wheel] quickly to increase or decrease. The
Tips:
1. Please set the charging rate of 1-2C according
charger supports up to 10.0A.
=================================================
to the battery capacity. For example, if the battery
capacity is 2000mAh, please set the charge current to
2.0-4.0A.
2. The charge /discharge current is only valid in
the corresponding work mode.
3. For the discharge mode setting, please refer to
the <System Settings> chapter of this manual.
==================================================
8. NiMH setting (PeakV)
When the battery type is NiMH, the peak voltage
value when the battery is fully charged can be set, the
range of which can be set is 5mV-15mV, as shown below:
@ToolkiRC 2022
Page 19

19
===================================
Tips:1, This function is only available on NiMH
cells
PeakV: The maximum voltage drop per cell, when the
nickel-metal hydride battery is fully charged
===================================
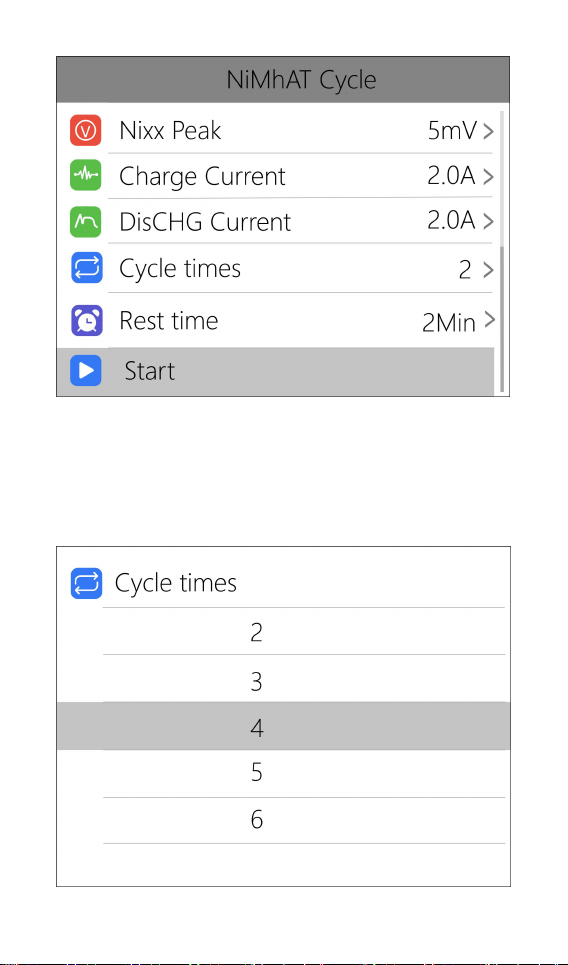
9. Cycle setting
When the battery type is NiMh, and under cycle
mode, the option of Cycle time and Rest time will appear,
as shown below:
@ToolkiRC 2022
Page 20
20
Move the cursor to [Cycle times] and press [OK] to
set the range of cycle times to 2-12.
The charger will follow the pattern:
discharge->charge->discharge->charge....
"Discharge -> charge" is 2 times.
@ToolkiRC 2022
Page 21
21
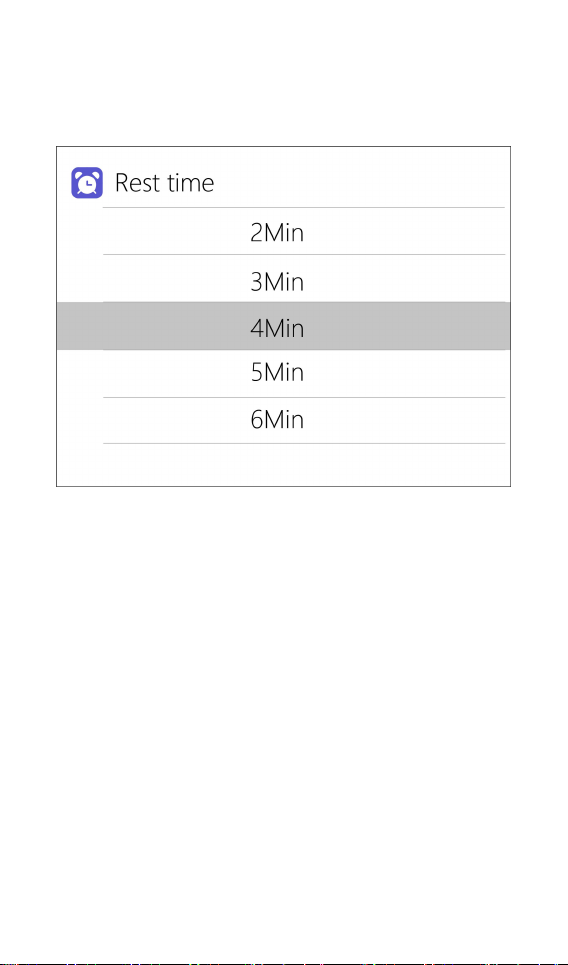
Move the cursor to [Rest time] and press [OK] to
set the rest time of cycle charge. The range is 2 minutes
to 10 minutes. As shown below:
10. External load setting
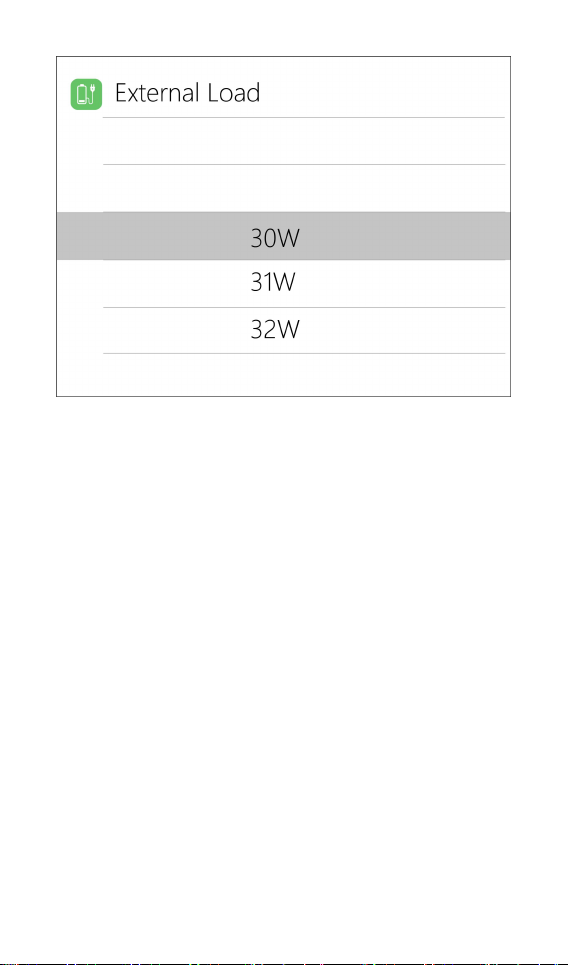
When external discharge is selected as the
discharge mode, the external load setting will appear.
Set the wattage according to the external load used. As
shown below:
@ToolkiRC 2022
Page 22
22
11. Smart battery setting
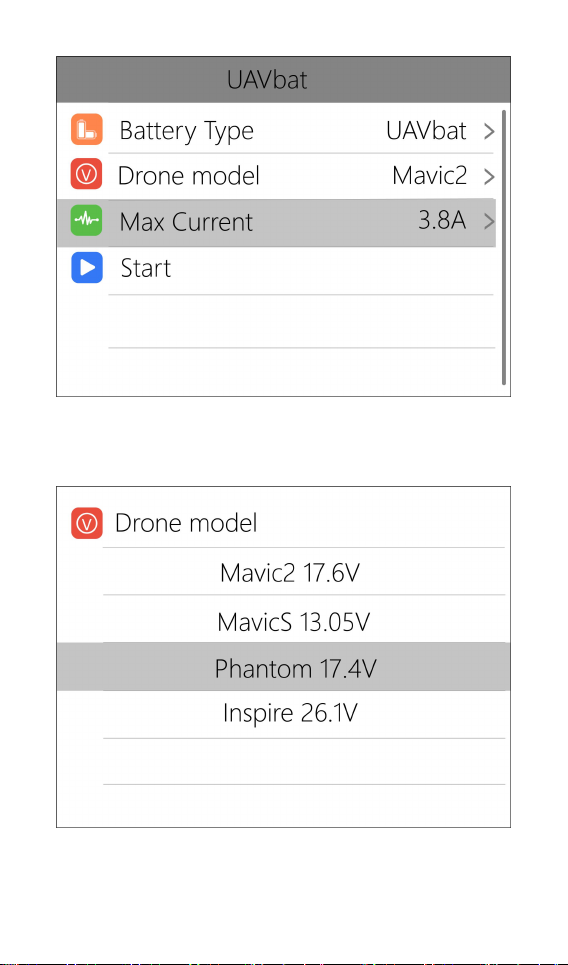
When UAV battery is selected as the battery type,
there are only two options for battery setting: drone
type and Max current. As shown below:
@ToolkiRC 2022
Page 23
23
Move the cursor to [Drone model] and press [OK]
to select between different drone models. As shown
below:
Move the cursor to [Max Current] and press [OK] to
set the charge current. The range is 0.5A to 15A.
@ToolkiRC 2022
Page 24
24
Charge and discharge work
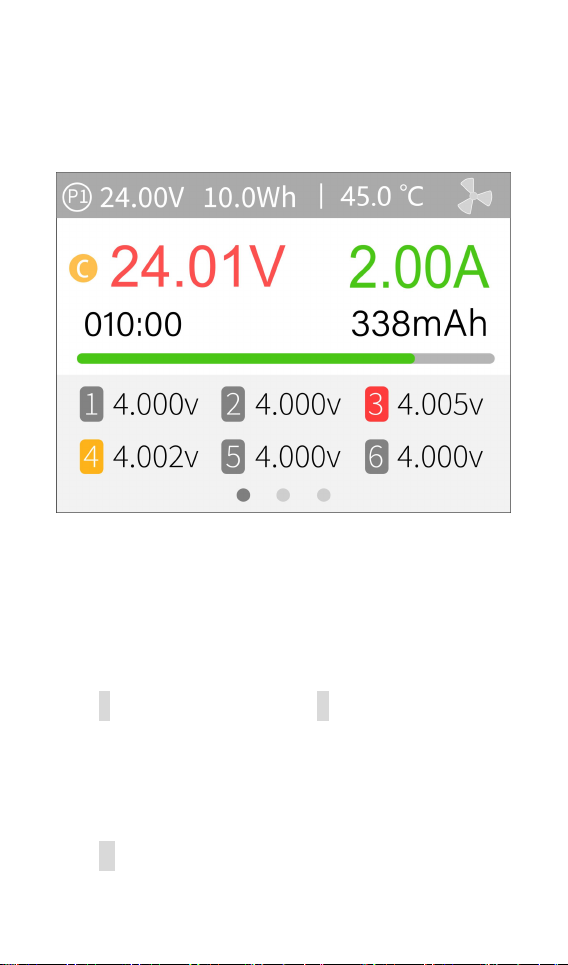
When charging and discharging starts, the charger
enters the following interface:
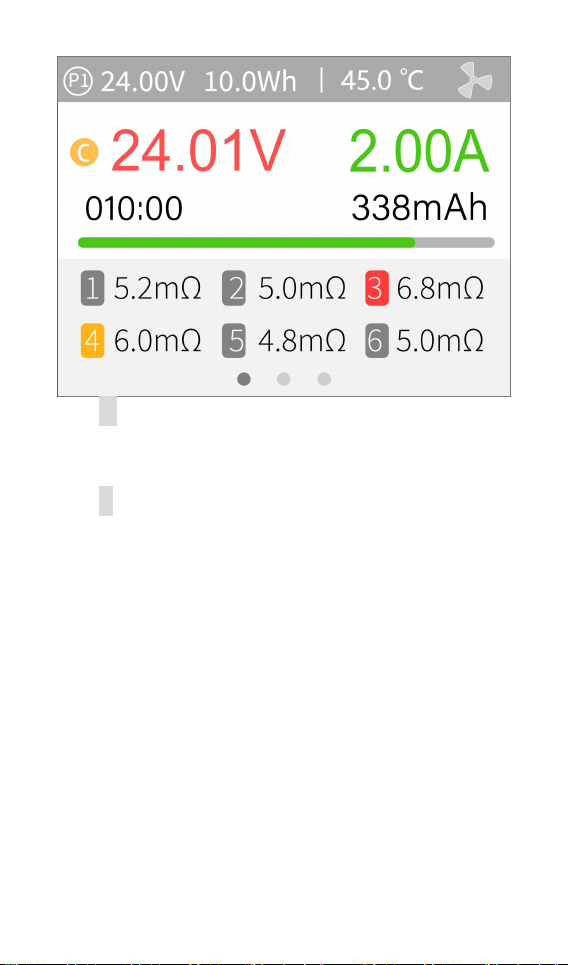
Rotate [Scroll Wheel] on this interface to toggle
between three different displays.
P1: Power selection in system settings
24.01V: Input voltage
0.0Wh: Accumulated power consumption
45.0℃: The internal temperature of the charger
V : Constant voltage sign C: Constant current sign
24.01V: Main port voltage
2.00A: Main port current
010:00: Working time
338mAh: Charged capacity
1 4.000V: Voltage for the first battery cell
.......
@ToolkiRC 2022
Page 25
25
-.---v : No battery connected
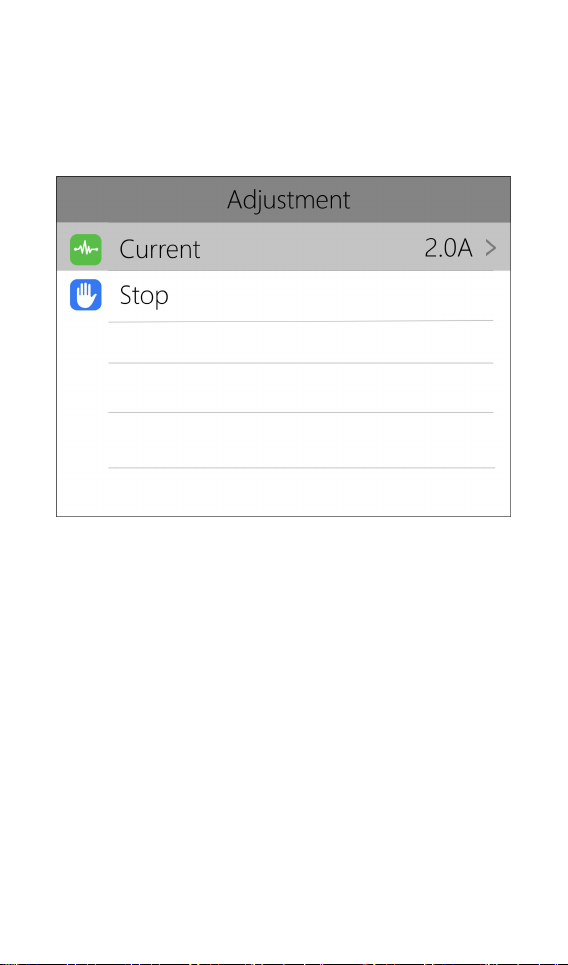
Short press [OK] to dynamically set the charge
current or stop charging. As shown below:
To end the charge and discharge process, short
press [OK], move the cursor to [Stop], short press [OK],
stop charging and return to the main interface.
When charging is complete or a charge error
occurs, a popup will appear along with an audible tone.
Scroll [Scroll Wheel] to switch to the second page,
which shows the internal resistance information. As
shown below:
@ToolkiRC 2022
Page 26
26
1 5.2m Ω : Internal resistance of the first battery
cell
......
T:32mΩ: Total of internal resistance.
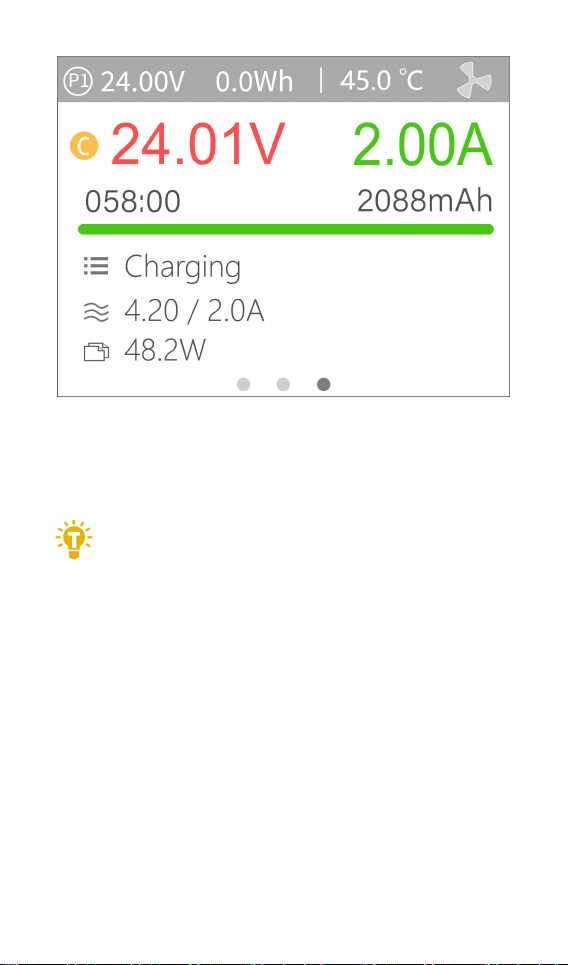
Scroll [Scroll Wheel] to switch to the third page,
which shows general information. As shown below:
@ToolkiRC 2022
Page 27
27
Charging: Indicates the current charging status
Tips:
1. When charging and discharging, never leave
4.20V/2.00A: end voltage/charge current
48.2W: The current charging power
===================================
the cells unattended.
2. When charging and discharging lithium
batteries, balancing only occurs if the balance
plug is connected. The charger will
automatically balance each cell if a balance
plug is detected.
3. Charging will automatically start for the next
battery if the initial battery is disconnected after
being fully charged. If a set number of cells is
set, ensure that the subsequent cell count
matches the cell count of the initial battery. If
@ToolkiRC 2022
Page 28
28
set to automatic, make sure that the cell count
matches what is detected.
===================================
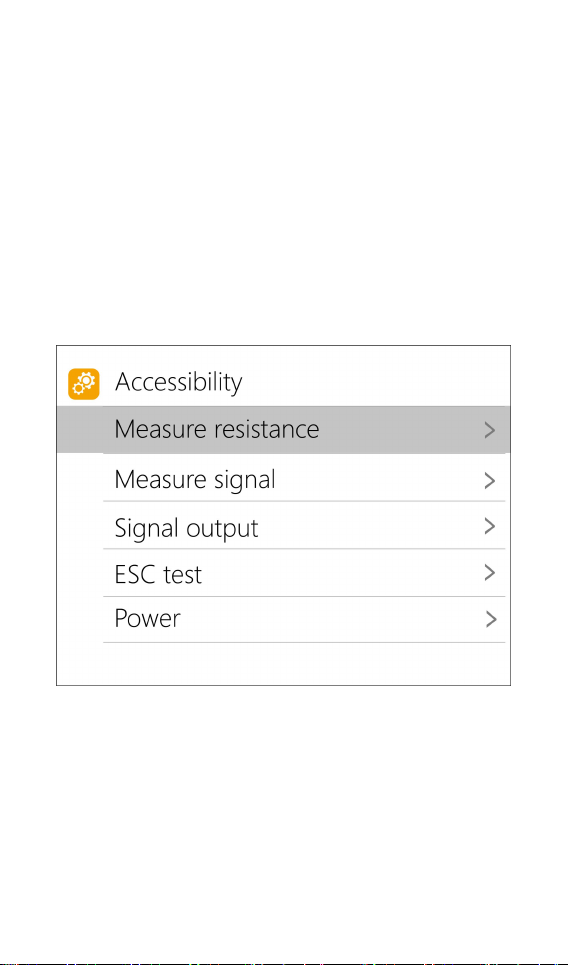
Accessibility
After selecting and long pressing [Exit] in the main
interface, you can enter the auxiliary function interface,
as shown below:
1. Measure resistance
Short press [OK] to test the internal resistance of
the connected battery and return to the main interface
display.
@ToolkiRC 2022
Page 29
29
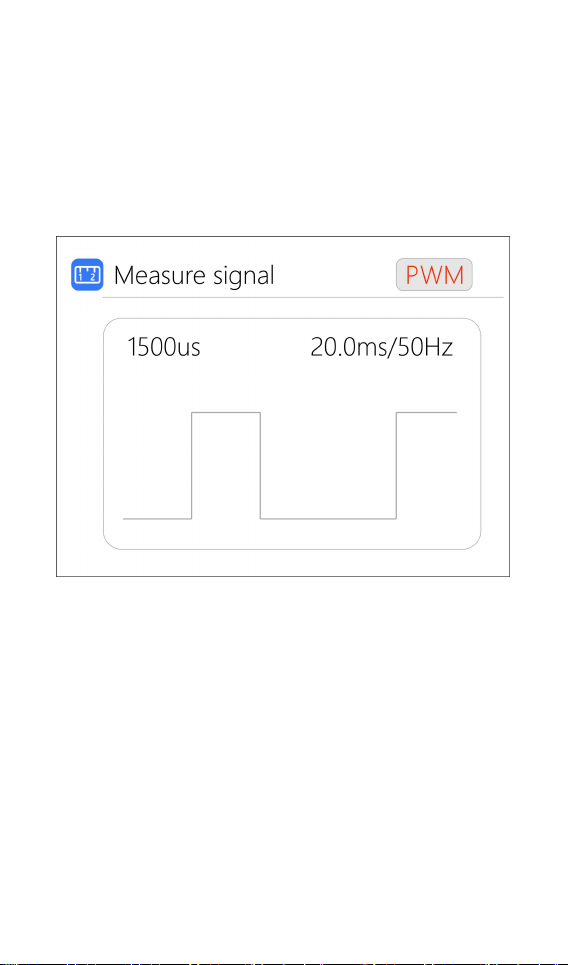
2. Measure signal
Move the cursor to measure signal, short press [OK]
to enter the signal test interface.
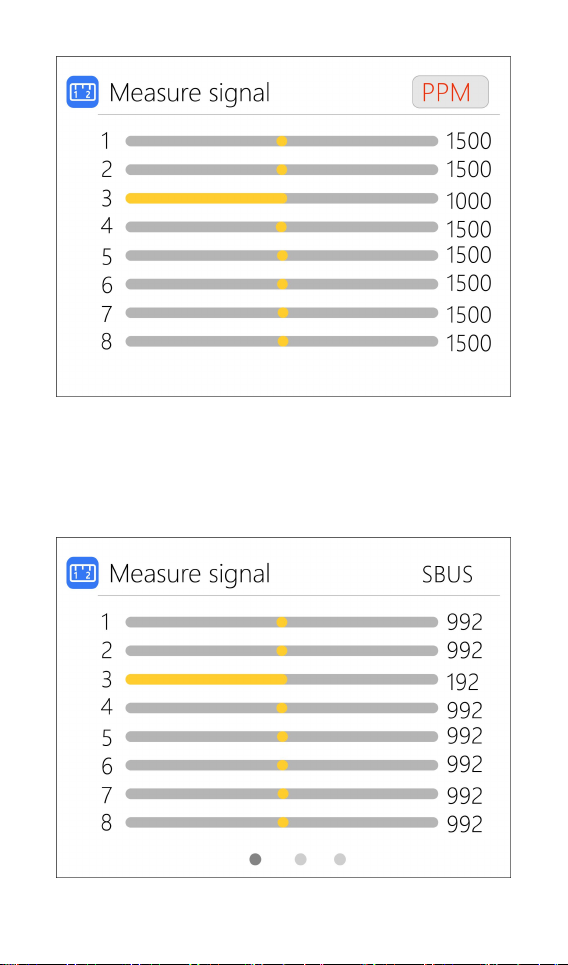
Scroll [Scroll wheel] to select the signal type. Select
PWM, as shown below:
Select PPM, as shown below:
@ToolkiRC 2022
Page 30
30
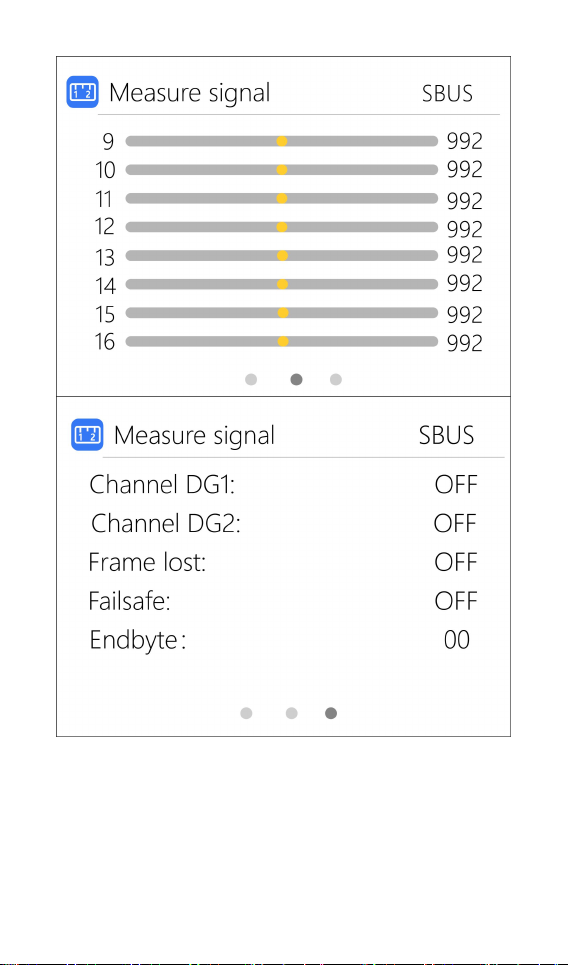
Select SBUS, scroll [Scroll wheel] to display
[channels 1-8], [channels 9-16], and overall status. As
shown below:
@ToolkiRC 2022
Page 31
31
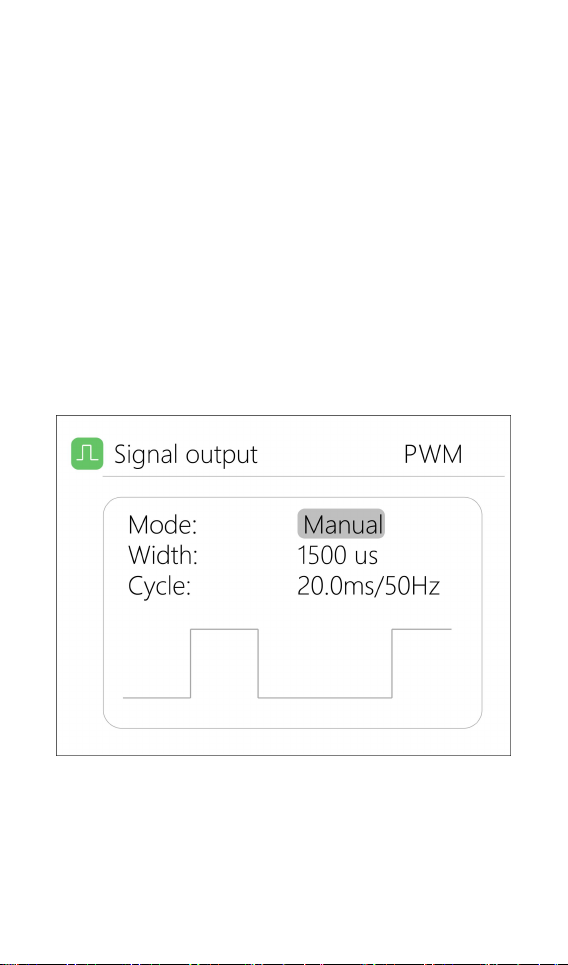
3. Signal output
Move the cursor to Signal Output, short press [OK]
to enter the Signal Output interface
Scroll [Scroll wheel] to select the type of signal to
@ToolkiRC 2022
Page 32
32
be tested. Choose PWM.
Scroll the [Scroll Wheel], move the cursor to
[Manual], press [OK] to set the output mode, which can
be set to manual, auto 1, auto 2, and auto 3.
In manual mode, you can change pulse width and
cycle values by using the cursor.
When set to auto 1, 2, 3, the pulse width value of
output PWM will automatically change at 3 different
speeds.
The width can be set from 800 to 2200us.
The cycle can be set between: 2.5ms (400hz) to
50.0ms (20hz). As shown below:
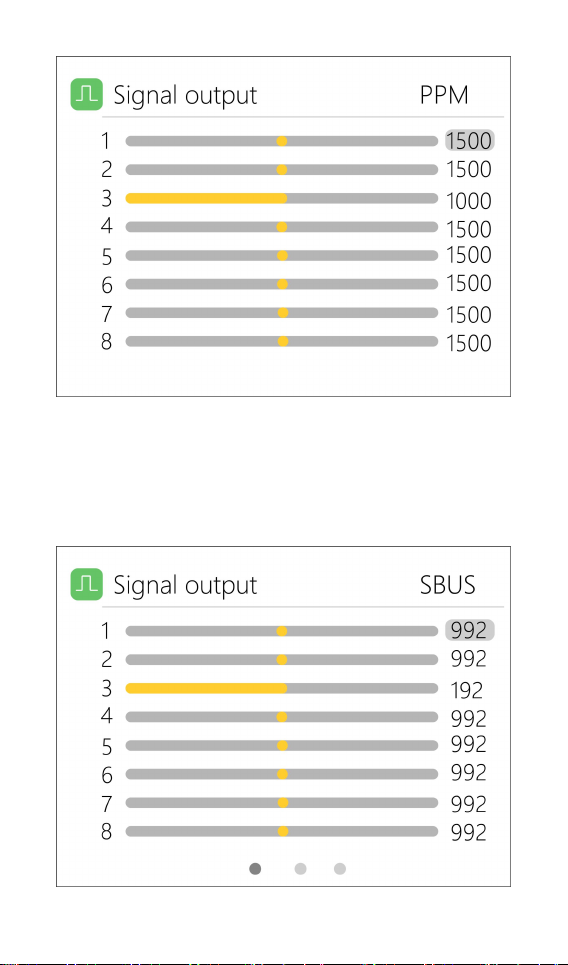
Select PPM, scroll [Scroll wheel] to move the cursor
to the value of the channel to be modified. Press [OK] to
modify the output pulse width value of this channel. As
shown below:
@ToolkiRC 2022
Page 33
33
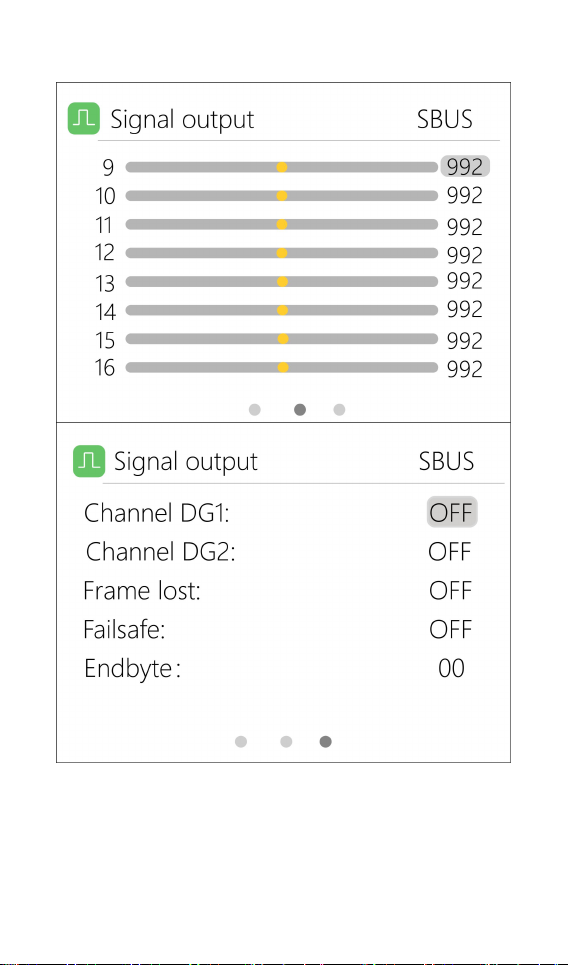
Select SBUS, scroll [Scroll wheel] to move the
cursor to the value of the channel to be modified. Press
[OK] to modify the output pulse width value of this
channel. As shown the following 3 pictures:
@ToolkiRC 2022
Page 34
34
@ToolkiRC 2022
Page 35
35
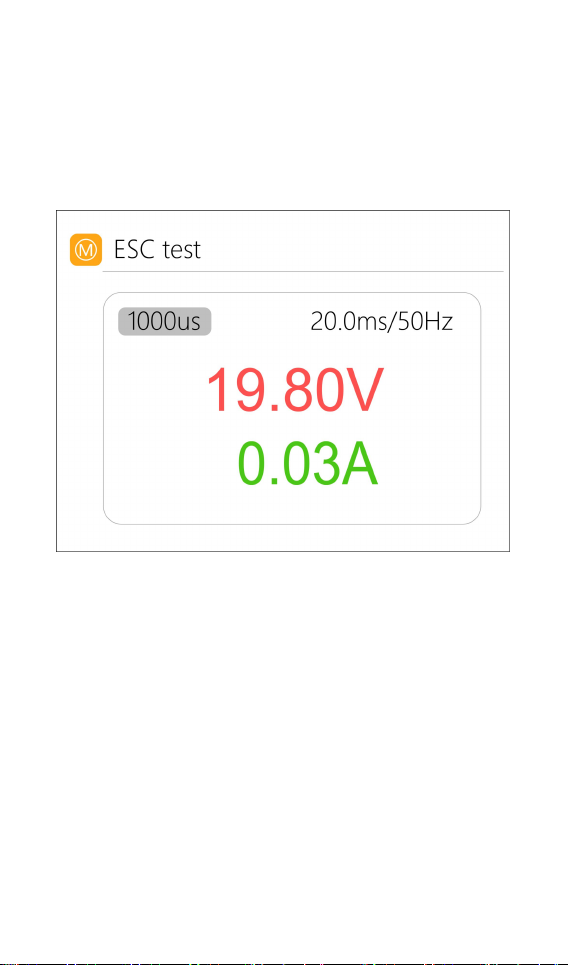
4. ESC test
Select ESC test with the cursor, short press [OK] to
enter the ESC test mode, scroll [Scroll wheel], move the
cursor to pulse width/ cycle, press [OK] to change the
corresponding value. As shown below:
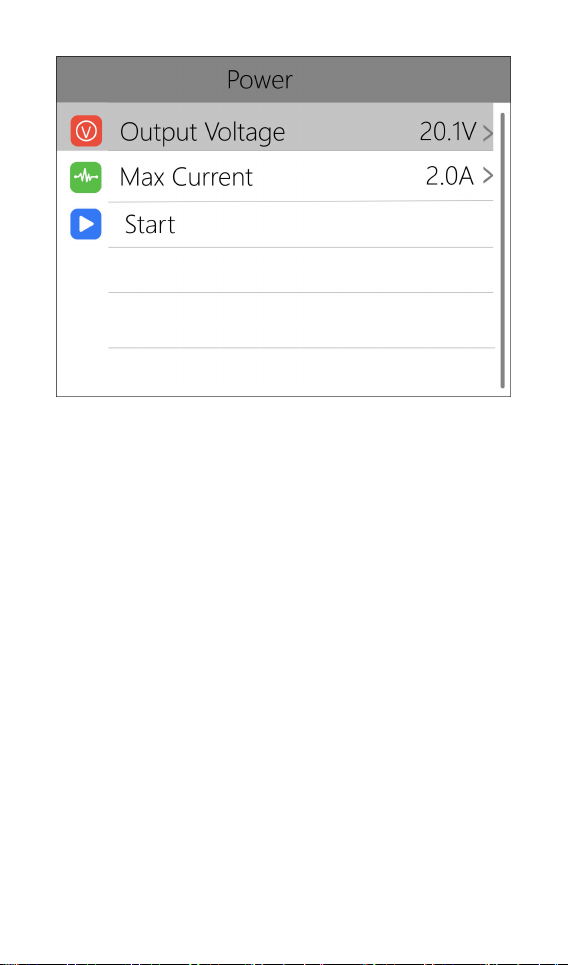
5. Power
Select the adjustable power supply with the cursor,
and short press [OK] to enter.
The voltage and current of the output power
supply can be set at will. Move the cursor to start, short
press [OK] to start power output and return to the main
interface. As shown below:
@ToolkiRC 2022
Page 36
36
@ToolkiRC 2022
Page 37
37
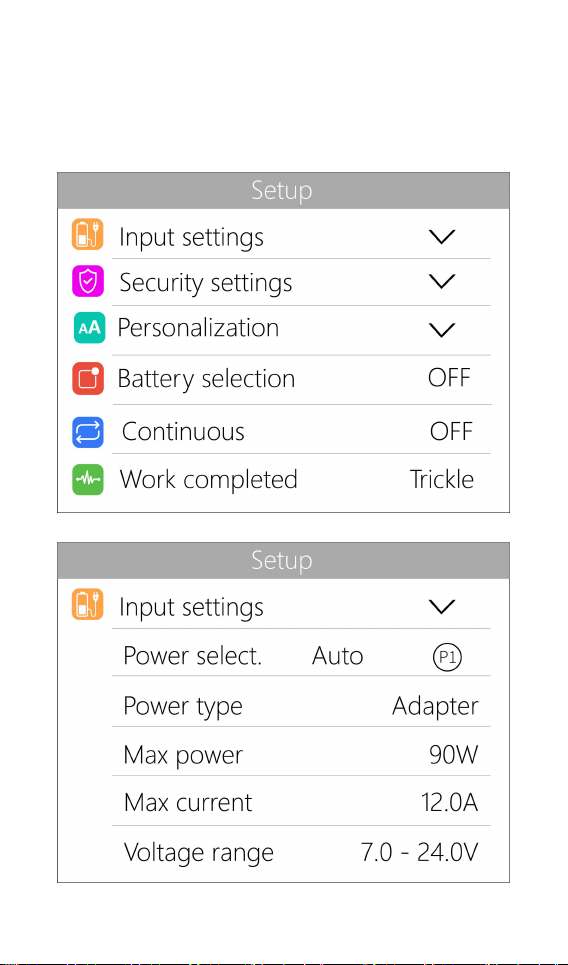
System settings
After long pressing [OK] in the main interface, you
can enter the system setting interface
Short press to expand the settings. As shown below:
@ToolkiRC 2022
Page 38
38
Input settings: Input power related settings,
Power selection: Preset power 1, power 2, power 3
Power type: Choose between battery pack and adapter.
For battery packs, recycle mode is enabled, for adapters,
recycle mode is disabled.
Max power: Maximum wattage allowed via the input
port during charging.
Max current: Maximum current allowed via the input
port during charging.
Voltage range: Input voltage range
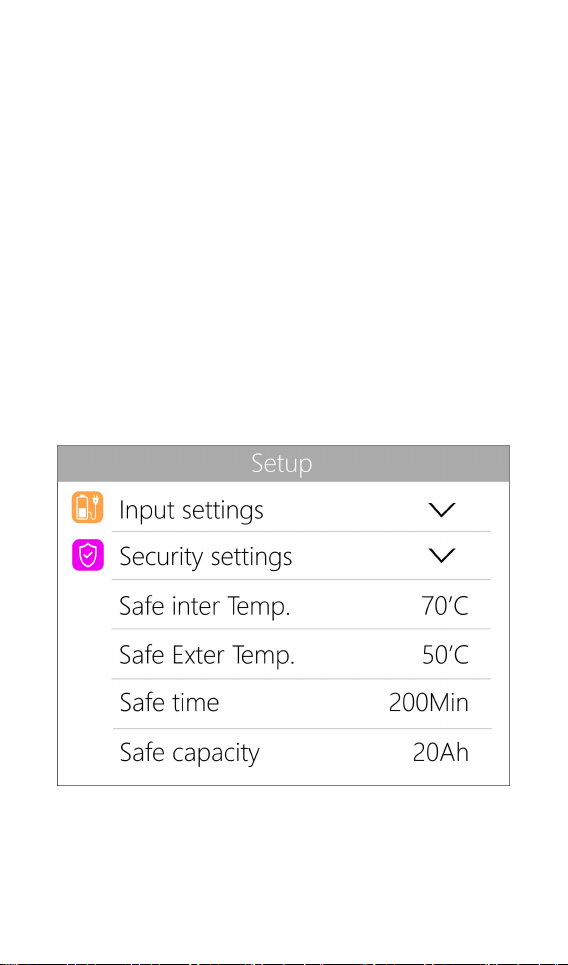
Security Settings: Short press to expand settings. As
shown below:
Safe Inter. Temp.: Charging will stop when the
temperature of the device exceeds this value.
Safe Exter. Temp.: Charging will stop when the
@ToolkiRC 2022
Page 39
39
temperature of the environment exceeds this value.
Safe time: The maximum time limit for continuous
charging/discharging operation.
Safe capacity: The maximum accumulated capacity for a
charging/discharging session.
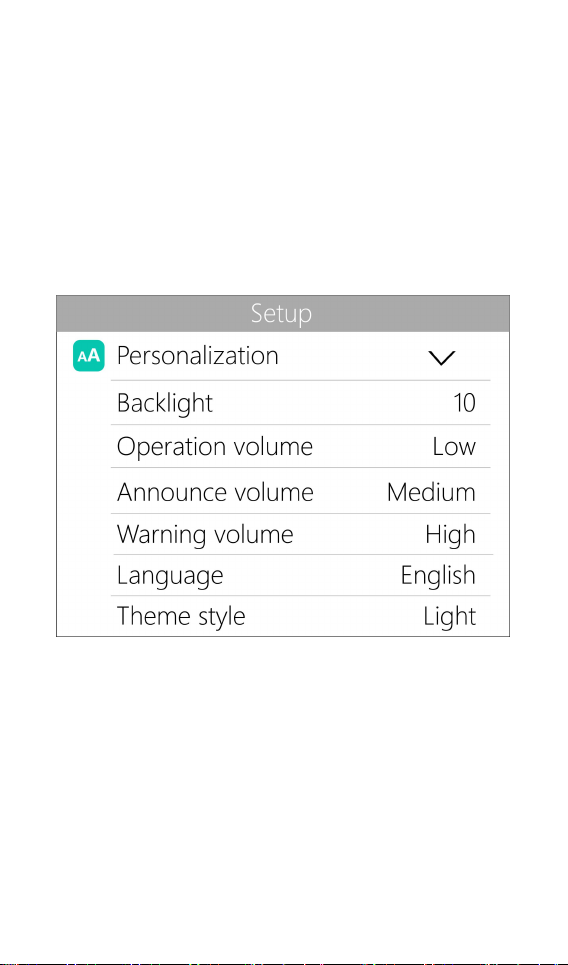
Personalization: Short press to expand settings. As
shown below:
Backlight: The backlight brightness level of the display,
can be set from 1-10
Operation volume: The volume of the scroll wheel, can
be set to off, low, medium, and high.
Announce volume: The menu readout volume, can be
set to off, low, medium, and high.
Warning volume: The warning tone volume, can be set
to off, low, medium, or high.
Language: System display language. English, Chinese,
@ToolkiRC 2022
Page 40
40
etc.
Theme style: Can be set to light and dark themes
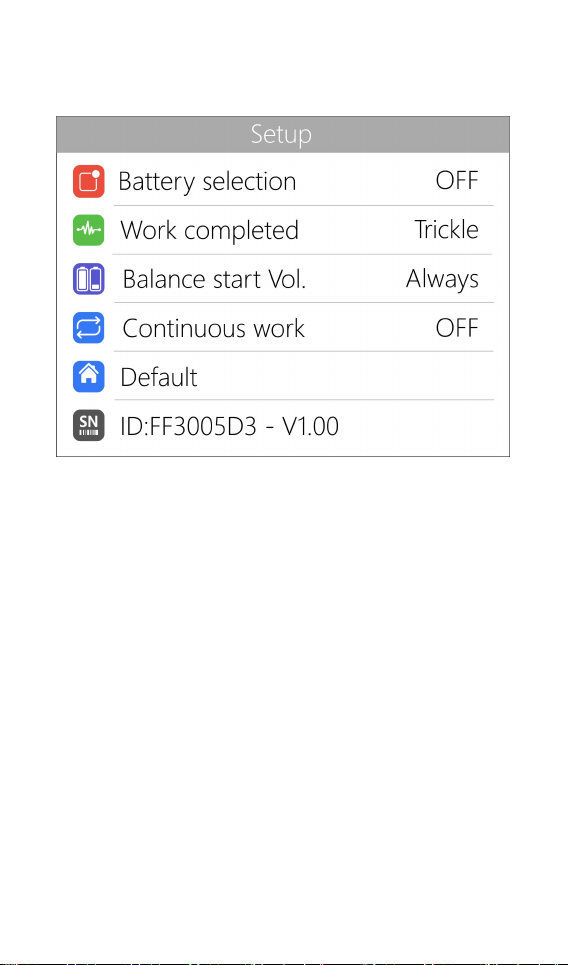
Battery selection: Option to show/hide frequently used
parameters.
Work completed: Whether to stop or trickle charge after
charge complete.
Balance start Vol: Balance cells prior to full current
charge.
Continuous work: Enables/disables continuous
charging/discharging after battery replacement.
Default:Restore factory settings.
ID:Independent ID for each device.
@ToolkiRC 2022
Page 41

41
Customize function
M7AC supports customizable boot image and voice
packs. Insert a TF card with a capacity of 128MB-16GB
into the TF card slot on the side of the M7AC,connect
the USB-A cable in the box to the computer. Two USB
drives will show on the computer. The Toolkit USB drive is
used for upgrading firmware, and the other USB drive is
used for storing customized files. The root directory
contains 2 folders: LOGO stores the boot images, and
SOUNDS stores voice files. The modification instructions
are as follows:
1,Boot image
When the M7AC is turned on, it will automatically
read the file named logo.bmp in the LOGO folder. If the
file is successfully read, the image will be displayed as
the startup page.
@ToolkiRC 2022
Page 42

42
===================================
Tips:
1. Only supports BMP file format with a resolution
of 240*320 pixels.
2. If the file with the same name cannot be read, the
default startup page will be displayed
===================================
@ToolkiRC 2022
Page 43

43
2. Broadcast voice
Tips:
1. Only supports Wav file format, Mono file.
Name
Description
Name
Description
CHI
Chinese
DEU
German
ENG
English
ESP
Spanish
FRA
French
ITA
Italian
JAP
Japanese
KOR
Korean
POR
Portuguese
TRA
Traditional
File name
File description
0000.wav-0090.wav
Number 0-90 voice
0100-0109.wav
Number 100-1000 voice
0167-0176.wav
Numbers .1-.9 Voice
Bootup.wav
Bootup sound
Warning.wav
Warning sound
Other
Menu broadcast Voice
When in use, the M7AC will read the voice files in the
SOUNDS folder. The voice files in each language are
classified into separate folders. The description of the
folders and files is as follows:
The voice file description is as follows:
===================================
===================================
@ToolkiRC 2022
Page 44

44
Other functions
1. Firmware upgrade
After connecting the M7AC to the computer with the
USB cable in the box, the computer will recognize a USB
drive named Toolkit. Download the upgrade file app.upg
from the official Toolkit RC website and overwrite the
files in the drive to upgrade the firmware.
2. USB output
TypeA USB supports 5.0V 2.0A output to charge
mobile devices.
3. Automatically continue charging/ discharging
When a battery is fully charged, connect the next
battery. The device will automatically continue to charge
and discharge, you can start and stop this function in the
settings menu
4. Fan level
When the internal temperature of the device exceeds
45°C, the fan turns at half speed to reduce noise. When
the internal temperature exceeds 53°C, the fan turns on
full-speed to enhance heat dissipation.
6. Manual voltage calibration
With the M7AC powered off, press and hold the
[roller]. without releasing the roller, connect the power
supply, and the system will enter the manual voltage
calibration mode. Use a voltmeter to measure the actual
voltage of each battery, move the cursor to the
@ToolkiRC 2022
Page 45

45
corresponding voltage value, modify the voltage value
to match the voltmeter value. After the calibration is
completed, move the cursor to save, short press once,
the buzzer will beep once, the save is successful. Exit or
shut down after calibration.
7, Full charge mode
When the lithium battery is fully charged, it will
prompt "Fast charge complete". If the battery is not
removed, the charger will trickle charge until the battery
is disconnected.
@ToolkiRC 2022
Page 46

46
Specifications
Charge
Input
AC 100-240V@MAX 100W
DC 7-35V@MAX20A
Battery type
LiPo LiHV LiFe Lion LTO@1-6S
NiMh @1-16S PB @1-10S
Balance
800mA @4.2V
Accuracy
<0.005V
Power
0.1-15A@300W
Discharge
power
0.1-15A@300W Rec/Ext Mode
0.1-3A@15W Internal Mode
USB A
5.0V@10W or
upgrade
Voltage
1.0V-5.0V @1-6S
Internal
resistance
0.1mΩ-99mΩ @1-6S
Measure
PWM
880us-2200us@20-400hz
PPM
880us-2200us*8 CH@20-50hz
SBUS
880us-2200us*16 CH@20-100hz
Output
PWM
500us-2500us@20-1000hz
PPM
880us-2200us*8 CH@50hz
SBUS
880us-2200us*16 CH@74hz
Power
0.5-15A@1-28V Mode: CC+CV
Display
LCD
IPS 2.4 inch 320*240 resolution
Accessor
TF Card
Support 128MB-16GB
Product
Size
112mm*73mm*38mm
Weight
245g
Individual
packing
Size
144mm*125mm*43mm
Weight
380g
@ToolkiRC 2022
 Loading...