

Page 1
UC-PW
SmartTouch®
PrePack Controller
User’s Guide
64057996 (R04)
Page 2

©Mettler-Toledo, Inc. 2008
No part of this manual may be reproduced or transmitted in any form or by any means, electronic or
mechanical, including photocopying and recording, for any purpose without the express written
permission of Mettler-Toledo, Inc.
U.S. Government Restricted Rights: This documentation is furnished with Restricted Rights.
Page 3
®
METTLER TOLEDO
Customer Feedback
If you have a problem with one of our products or publications, or just a
suggestion on how we can serve you better, please fill out this form and
send it to the address on the opposite side of this page (U.S. postage paid),
or fax it to us at (614) 438-4355. Your feedback will help us to improve
product performance, quality, and service.
Part / Product Name:
Part / Model Number: Date:
Provided By:
Customer Name:
Address:
Phone Number: Fax Number:
Your comments:
Attention: Retail Quality Manager - MTWR
Do not write in space below. For METTLER TOLEDO use only. Response (if appropriate) and corrective action taken.
METTLER TOLEDO Model UC-PW User's Guide 64057996
METTLER TOLEDO
1900 Polaris Parkway
Columbus, Ohio 43240
METTLER TOLEDO® is a registered trademark of Mettler-Toledo, Inc.
©2008 Mettler-Toledo, Inc.
Printed in USA
Page 4
Page 5
Publication Revision
History
Disposal
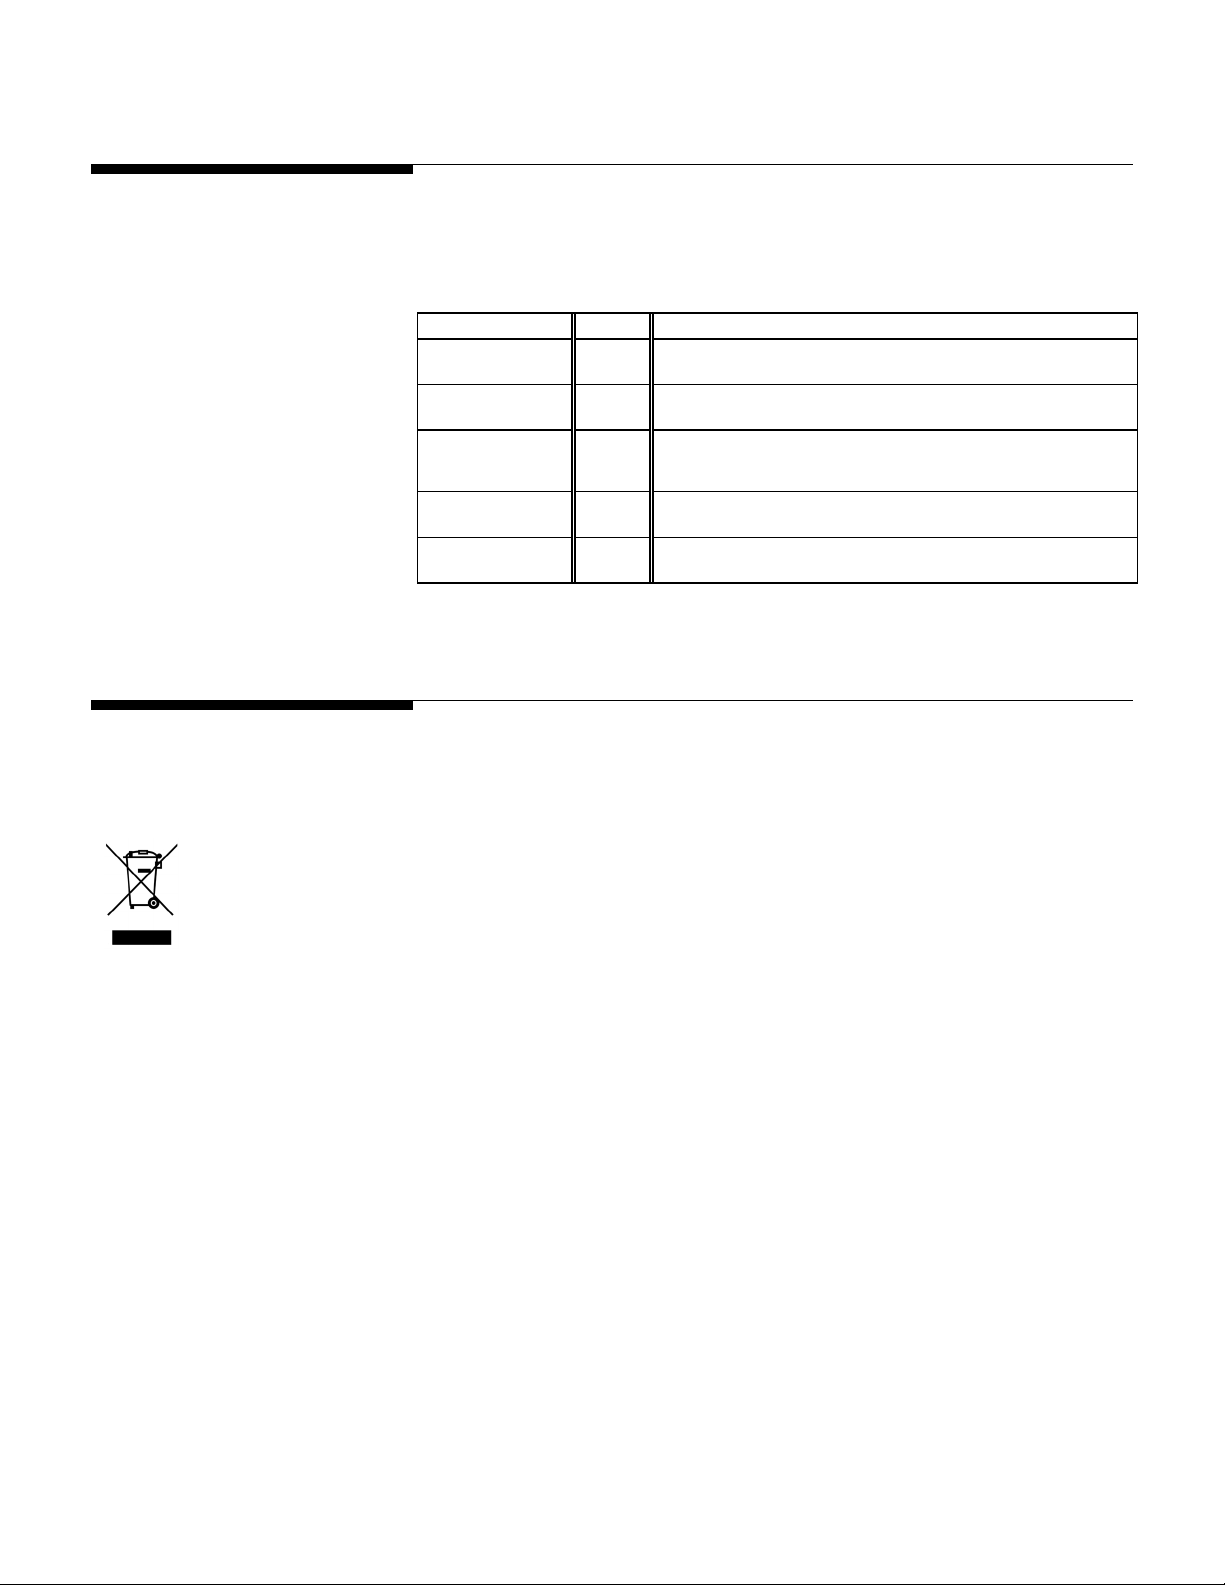
Part Number Date Revisions
64057996
Rev 00
64057996
Rev 01
64057996
Rev 02
64057996
Rev 03
64057996
Rev 04
05/06 New Manual
08/06 Chapter 5 added
10/07
317 USB info added, screens updated, new features
added
06/08 Chapter 6 added, Fusion screens added
09/08 Screens further updated.
In conformance with the European Directive 2002/96/EC on Waste Electrical and
Electronic Equipment (WEEE) this device may not be disposed of in domestic waste.
This also applies to countries outside the EU, per their specific requirements.
Please dispose of this product in accordance with local regulations at the collecting
point specified for electrical and electronic equipment.
If you have any questions, please contact the responsible authority or the distributor
from which you purchased this device.
Should this device be passed on to other parties (for private or professional use), the
content of this regulation must also be related.
Thank you for your contribution to environmental protection.
Page 6

CONTENTS
1 Introduction........................................................................................... 1-1
General Description ...................................................................................................1-1
Basic Operation – PLU Navigation................................................................................1-2
2
Setup.................................................................................................... 2-1
Setup Overview .........................................................................................................2-1
Unit Setup ................................................................................................................ 2-2
Choose Department................................................................................................................ 2-2
Scale Mode ...........................................................................................................................2-2
Price Settings......................................................................................................................... 2-3
Manual Mode Keys.................................................................................................................2-4
Tare to Use............................................................................................................................ 2-4
Void Available........................................................................................................................ 2-4
Enter License Key...................................................................................................................2-4
Accumulator Setup .................................................................................................................2-5
Scale Settings ........................................................................................................................ 2-6
Printer & Label Setup ................................................................................................. 2-8
Choose Store Logo ................................................................................................................. 2-8
Label Printer Setup .................................................................................................................2-9
Dayglo Printer Setup............................................................................................................. 2-11
Bottom Label Printer Setup ....................................................................................................2-12
Calibrate Printer Gap Sensor.................................................................................................. 2-13
Barcode Setup .....................................................................................................................2-14
Presets Setup.......................................................................................................... 2-16
Pages................................................................................................................................. 2-16
Keys................................................................................................................................... 2-22
Backroom Setup...................................................................................................... 2-31
Choose Indexer.................................................................................................................... 2-31
Date Forward Hour ...............................................................................................................2-31
Hardware Version Information................................................................................................ 2-31
Macros Setup.......................................................................................................................2-32
Macro Placement .................................................................................................................2-34
Retrieve Indexer Errors ..........................................................................................................2-35
Setup Passwords/Levels............................................................................................ 2-36
Service Scale Setup ................................................................................................. 2-37
Enable By-Count Auto Clear................................................................................................... 2-37
Enable Force Count ..............................................................................................................2-37
Enable Forced COOL............................................................................................................. 2-37
Auto Sense .......................................................................................................................... 2-38
PLU Transaction Timeout.......................................................................................................2-38
Search Screen Timeout.......................................................................................................... 2-38
Transaction Screen Overrides.................................................................................................2-38
Quick Edits............................................................................................................. 2-39
View Version Information ..........................................................................................2-39
View Logs ..............................................................................................................2-39
Minimize Application ...............................................................................................2-39
Page 7

Serial Devices Setup ................................................................................................ 2-39
Load Cell Setup....................................................................................................... 2-39
Launch External Program ......................................................................................... 2-40
Quit To Desktop ......................................................................................................2-40
Shutdown System.................................................................................................... 2-40
3
Operating Instructions ............................................................................. 3-1
Main Screen Elements................................................................................................3-1
Quit the Prepack Controller Application .........................................................................3-2
PLU Screen ..............................................................................................................3-3
Options Button....................................................................................................................... 3-4
Product Info. Button................................................................................................................ 3-6
PLU Pricing Modes ....................................................................................................3-6
By-Weight PLU.......................................................................................................................3-6
By-Count PLU ........................................................................................................................ 3-7
Standard Pack PLU ................................................................................................................3-7
PLU Search Modes ....................................................................................................3-7
Country of Origin Labeling (COOL)...............................................................................3-9
Preconfigured COOL Statements............................................................................................... 3-9
Custom COOL Statements...................................................................................................... 3-12
Forced COOL .......................................................................................................................3-13
COOL Pre-Text .....................................................................................................................3-13
Operations Menu.....................................................................................................3-14
Cutting Tests........................................................................................................................ 3-15
Void Transactions ................................................................................................................3-16
Verify Labels........................................................................................................................ 3-16
Launch User Applications...................................................................................................... 3-17
UC Production Reports Tool ......................................................................................3-18
Production Reports Main Screen.............................................................................................3-19
Daily Production Trend Report ...............................................................................................3-20
Price Override Report ............................................................................................................ 3-21
Detailed PLU Report.............................................................................................................. 3-22
Department Summary Report................................................................................................. 3-24
Custom Report Generation..................................................................................................... 3-25
View Version Information....................................................................................................... 3-26
4
Quick Edits............................................................................................ 4-1
Quick Edits................................................................................................................4-1
5
Maintenance.......................................................................................... 5-1
Cleaning..................................................................................................................5-1
Page 8

6 Peripheral Programs ............................................................................... 6-1
UCPW Task Manager .................................................................................................6-1
Overview:.................................................................................................................6-1
Requirements and Installation.................................................................................................. 6-2
Environment .......................................................................................................................... 6-2
Application Flow ....................................................................................................................6-2
Production Reports .................................................................................................. 6-18
Main Screen ........................................................................................................................6-18
Custom Production Report..................................................................................................... 6-19
Daily Production Report ........................................................................................................6-22
Price Override Report ............................................................................................................ 6-23
Detailed PLU Report.............................................................................................................. 6-24
Department Summary........................................................................................................... 6-26
Setup: Configuring Reports .................................................................................................... 6-27
Additional Controls...............................................................................................................6-34
Page 9
1 Introduction
General Description
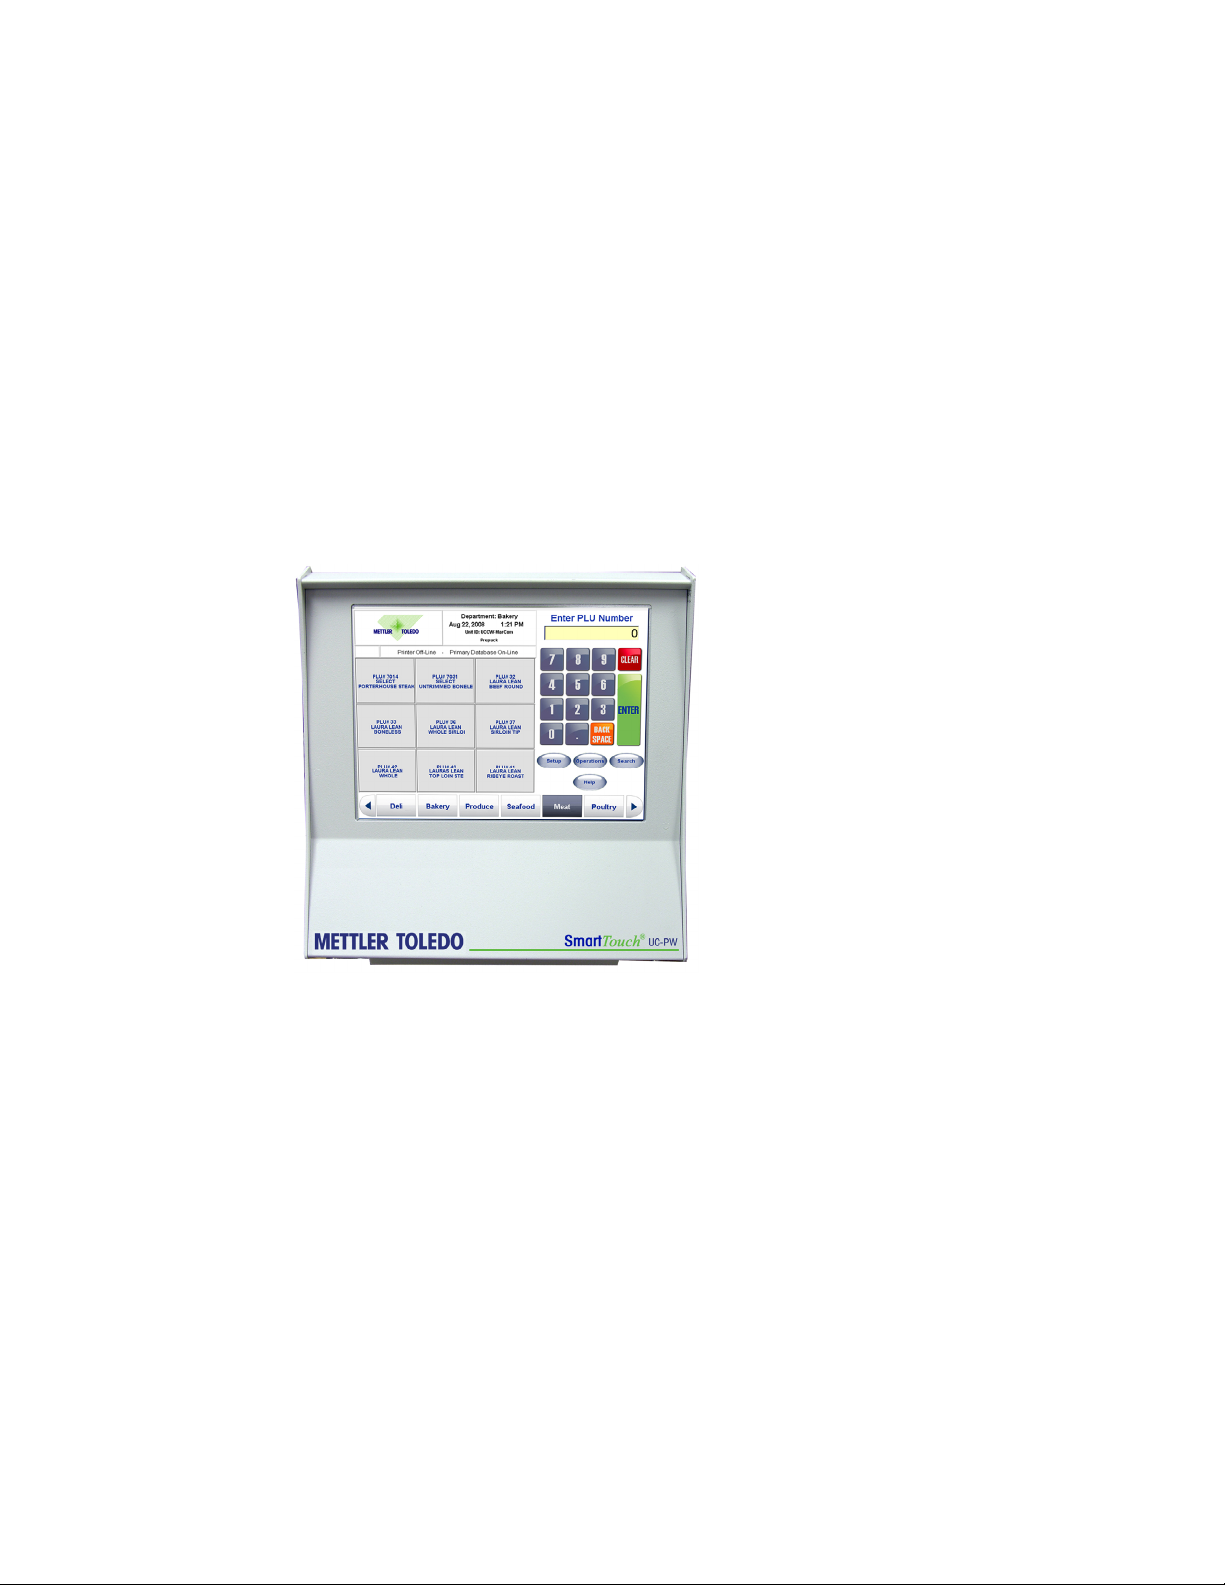
The METTLER TOLEDO® UC-PW PrePack Controller software is designed for use in a
PrePack Food Environment. This software product is designed for use in both automatic
and hand-applied label applications. The PrePack Controller is a part of a
programmable scale system that offers very flexible programming and formatting with
an easy-to-use user interface.
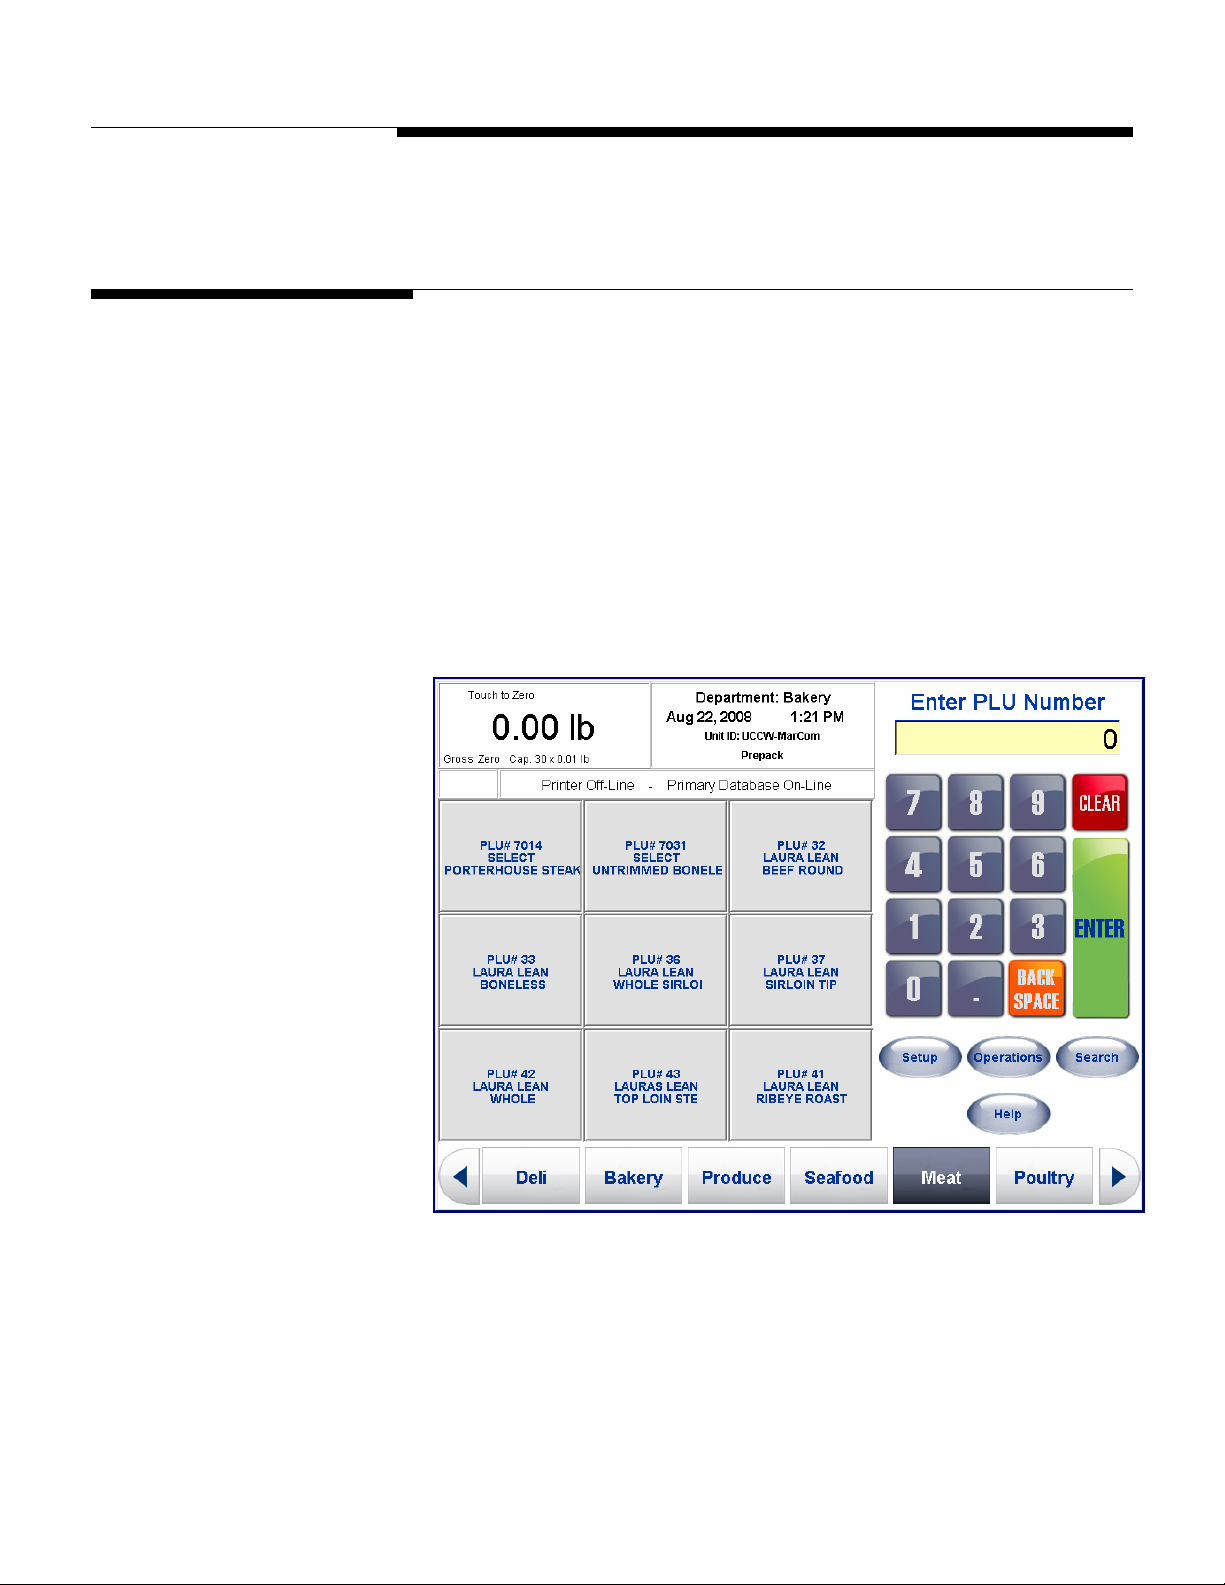
This is the Main Screen of the PrePack Controller software. The Main Screen is the
starting point to enter a PLU, chose a preset PLU, enter Setup mode, or perform
PrePack-specific operations.
The following sections will explain how to configure the PrePack Controller and operate
the software.
Chapter 1: Introduction
General Description
ISO9001
This product was developed, produced
and tested in a Mettler Toledo facility
that has been audited and registered
according to international (ISO 9001)
quality standards.
1-1
Page 10
METTLER TOLEDO Model UC-PW User's Guide
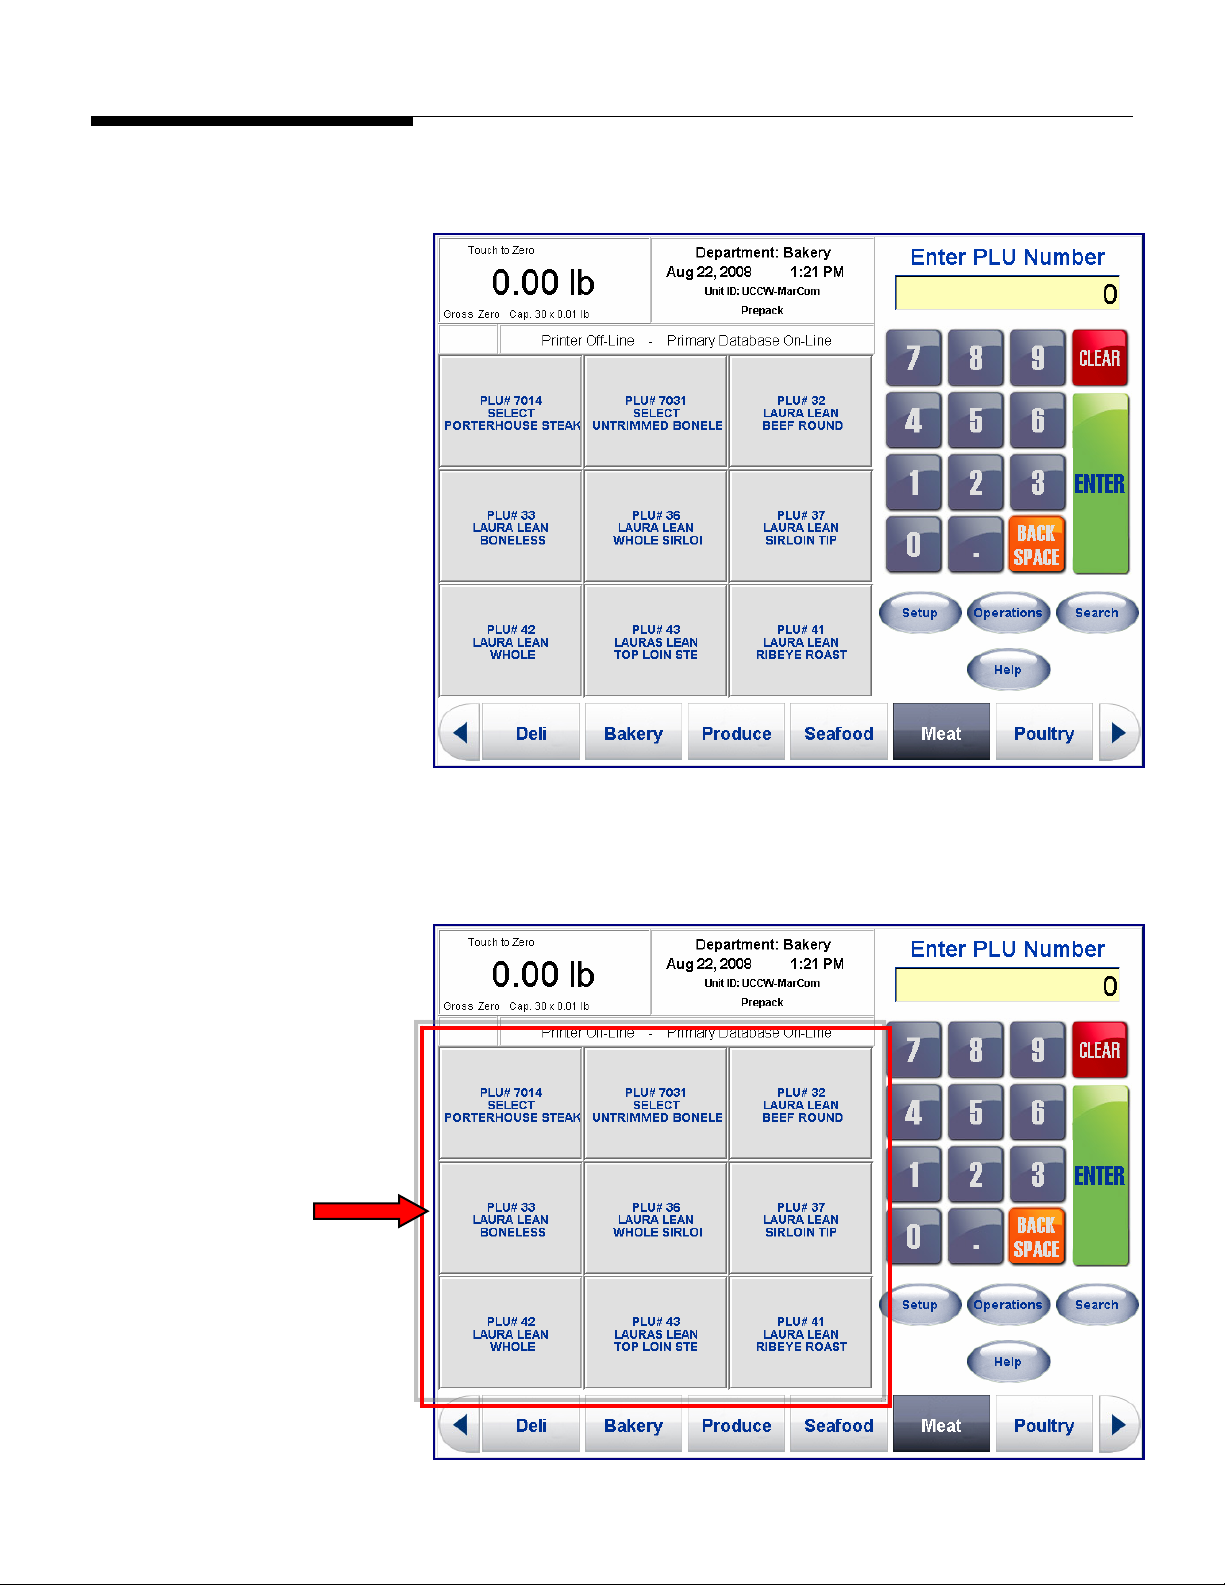
Basic Operation – PLU
Navigation
How do I call up PLUs?
There are three ways to call
PLUs: Preset Buttons, Numeric
Entry or by Searching.
These are Preset Buttons.
Presets can call PLUs directly or be
linked to other pages of PLUs.
1-2
Page 11
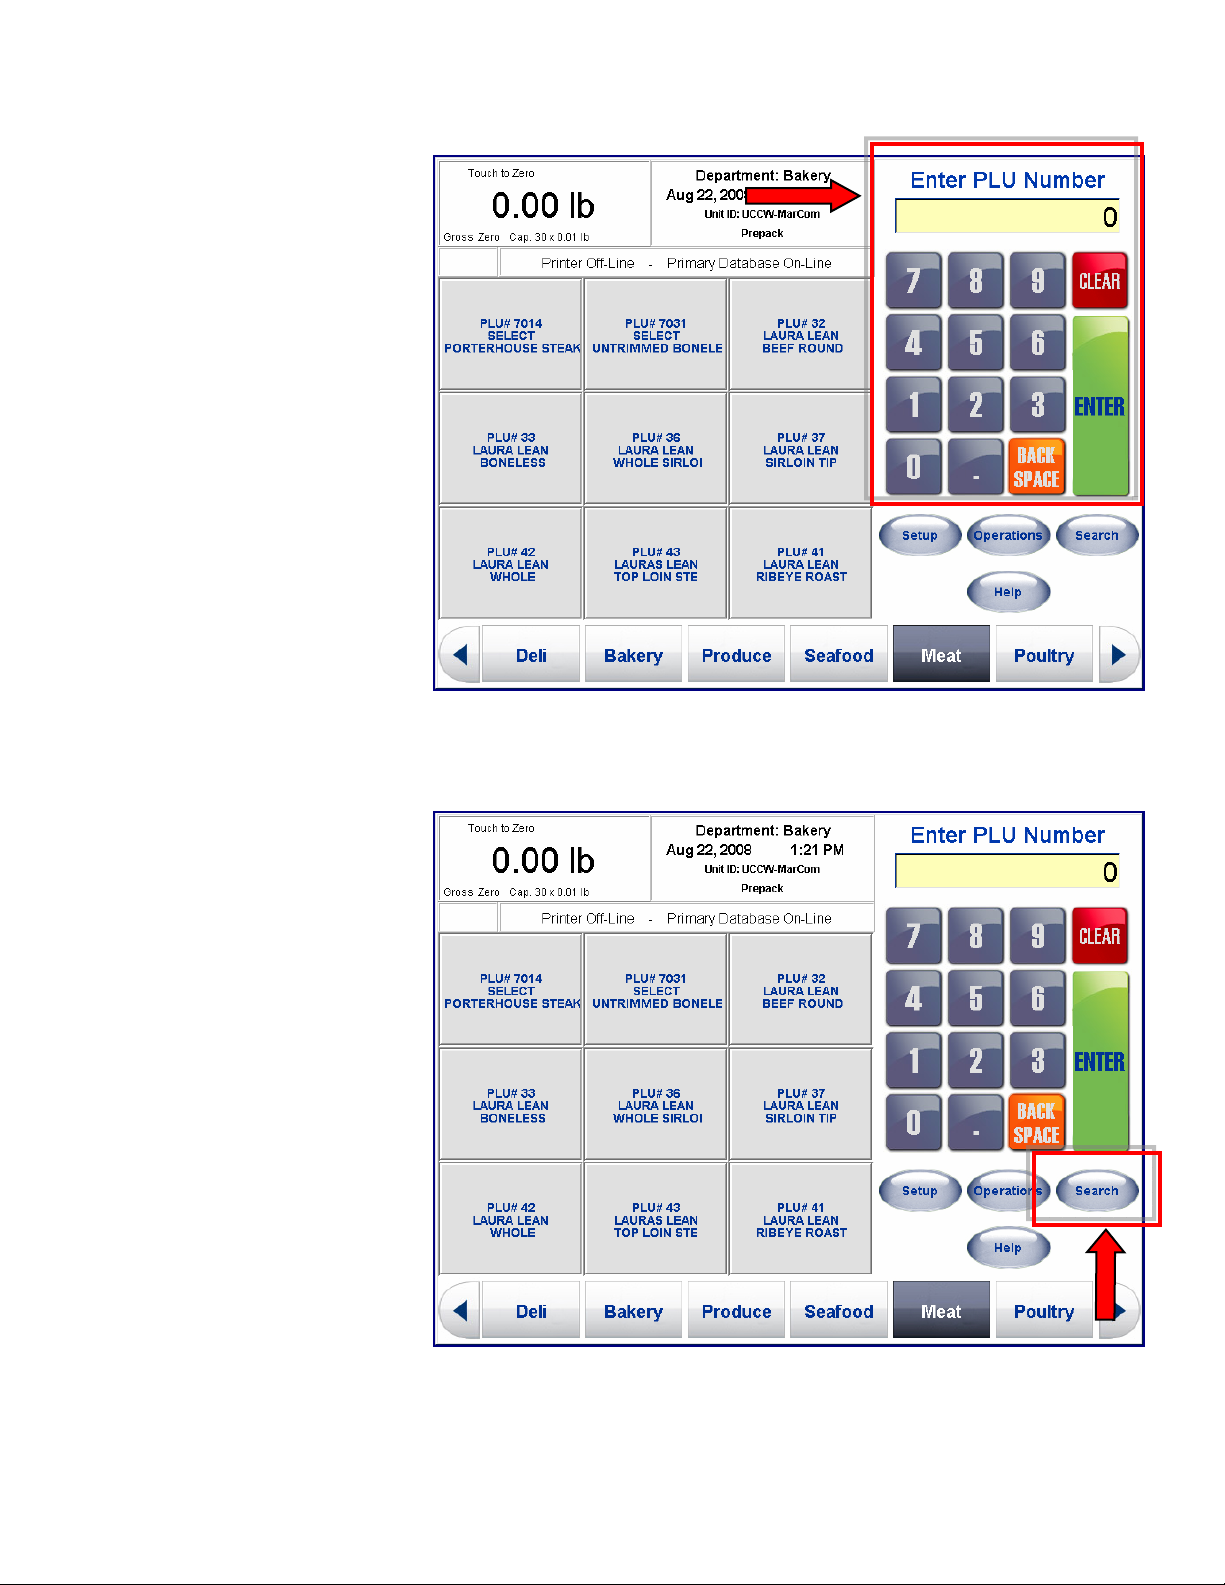
This is the Numeric Keypad.
Key in the PLU Number, and
then press ENTER.
Chapter 1: Introduction
Basic Operation – PLU Navigation
This is the Search Button.
By pressing the search button you
can locate the PLU based on its
name or part of its name.
1-3
Page 12
METTLER TOLEDO Model UC-PW User's Guide
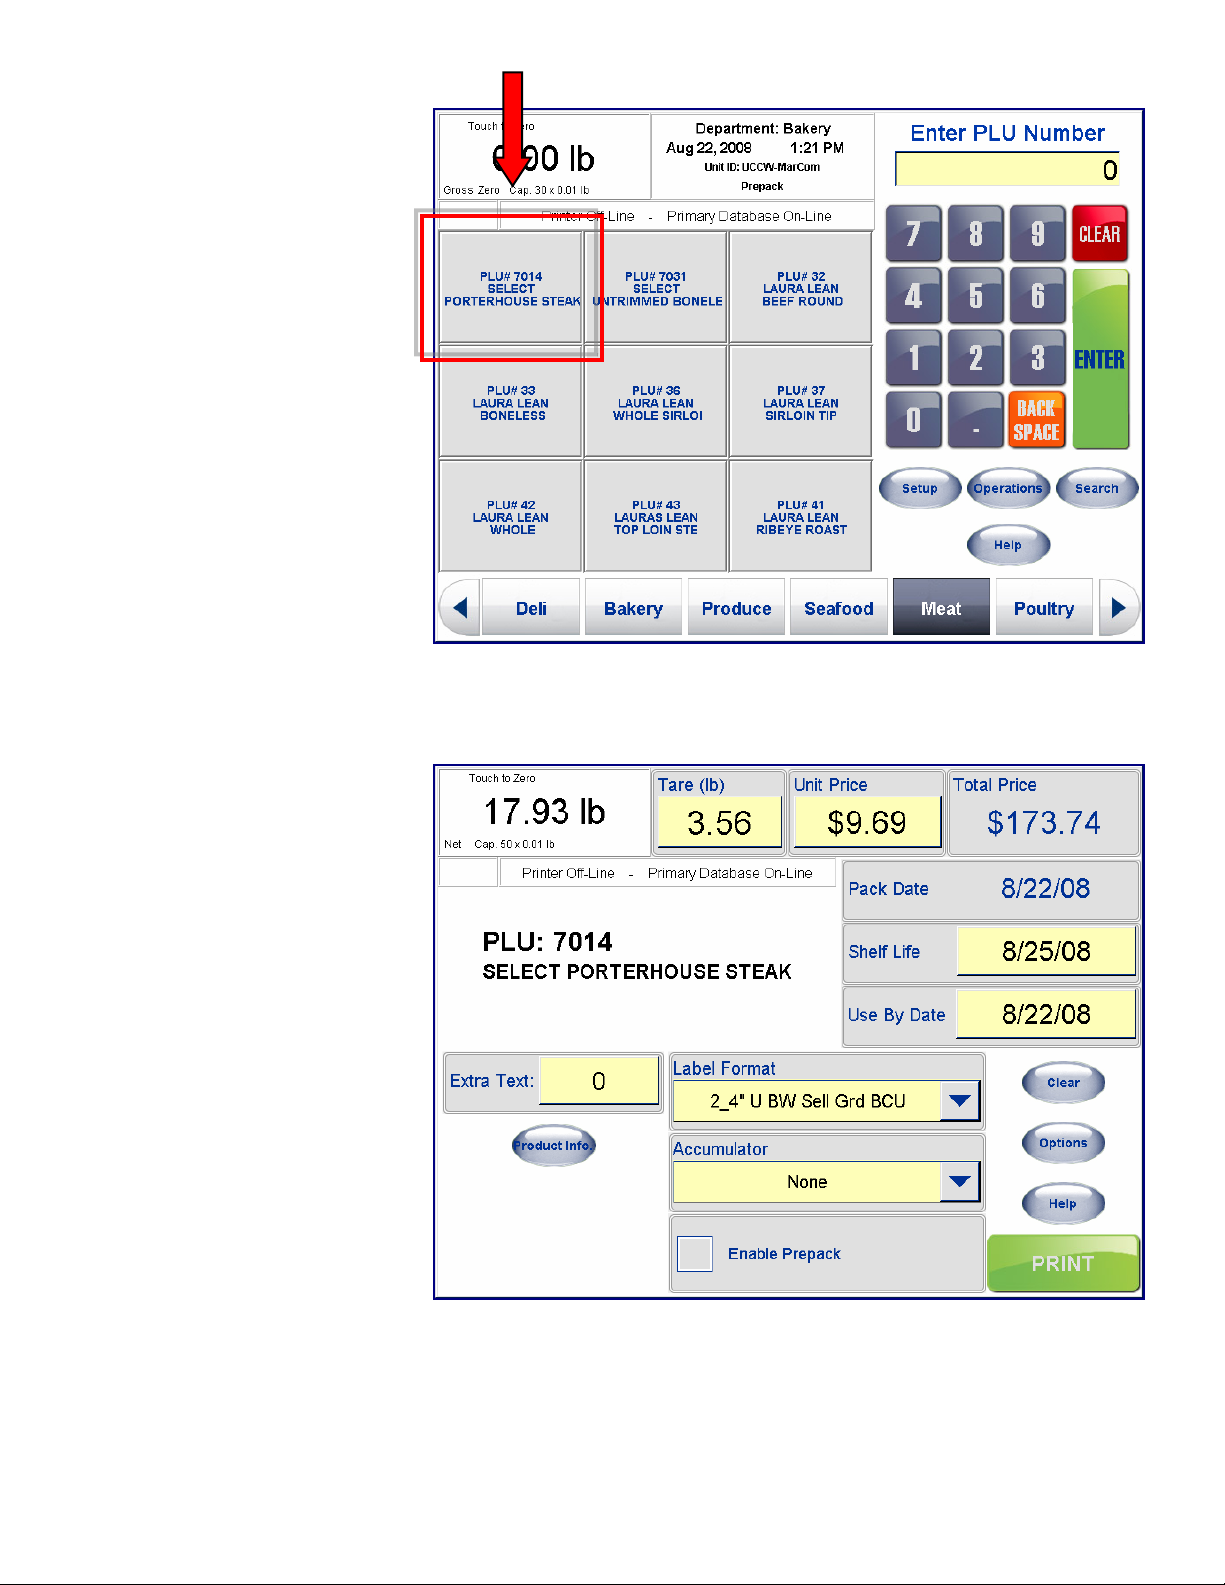
Press a Preset Key and see
what happens next.
This is the PLU Screen.
There are options on this screen
that can be changed before you
start weighing and labeling.
1-4
Page 13
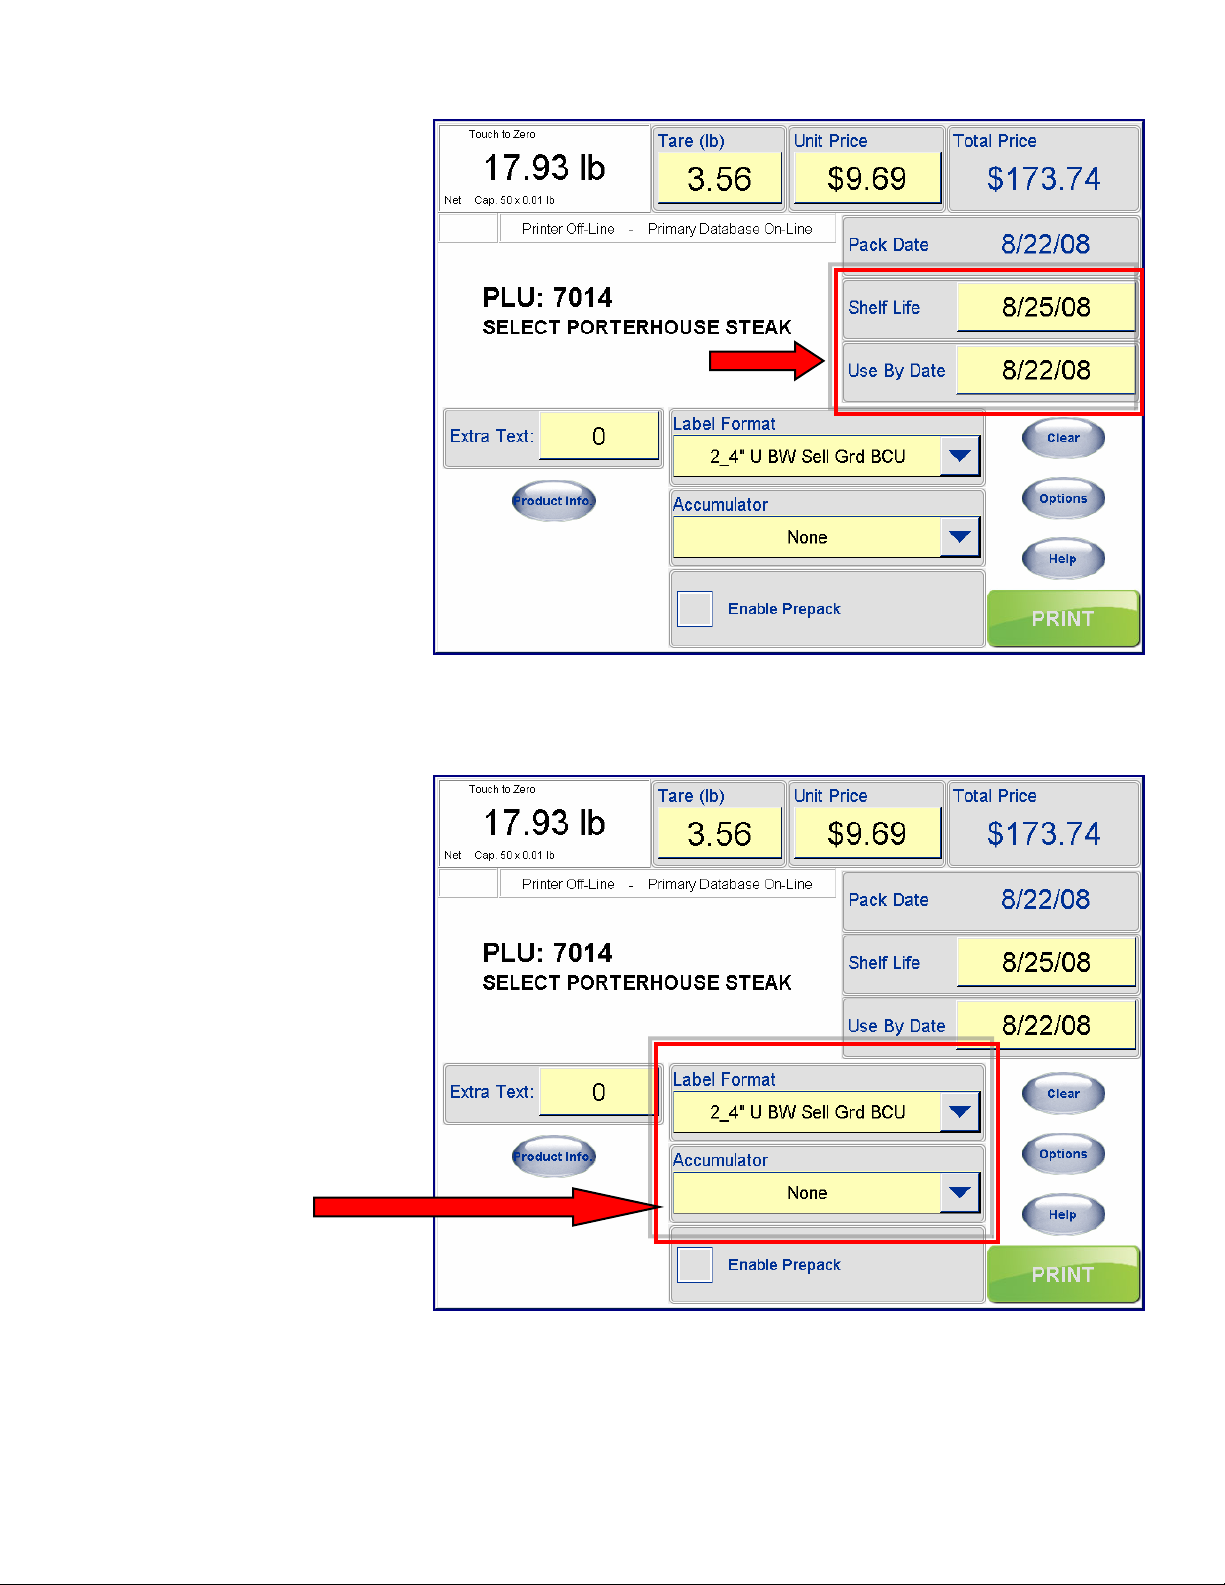
You can change items such as the
Shelf Life and Use By Date if they
are not prohibited in the Unit’s Setup.
Chapter 1: Introduction
Basic Operation – PLU Navigation
You can select an
Accumulator setting and
adjust the Label Format.
1-5
Page 14
METTLER TOLEDO Model UC-PW User's Guide
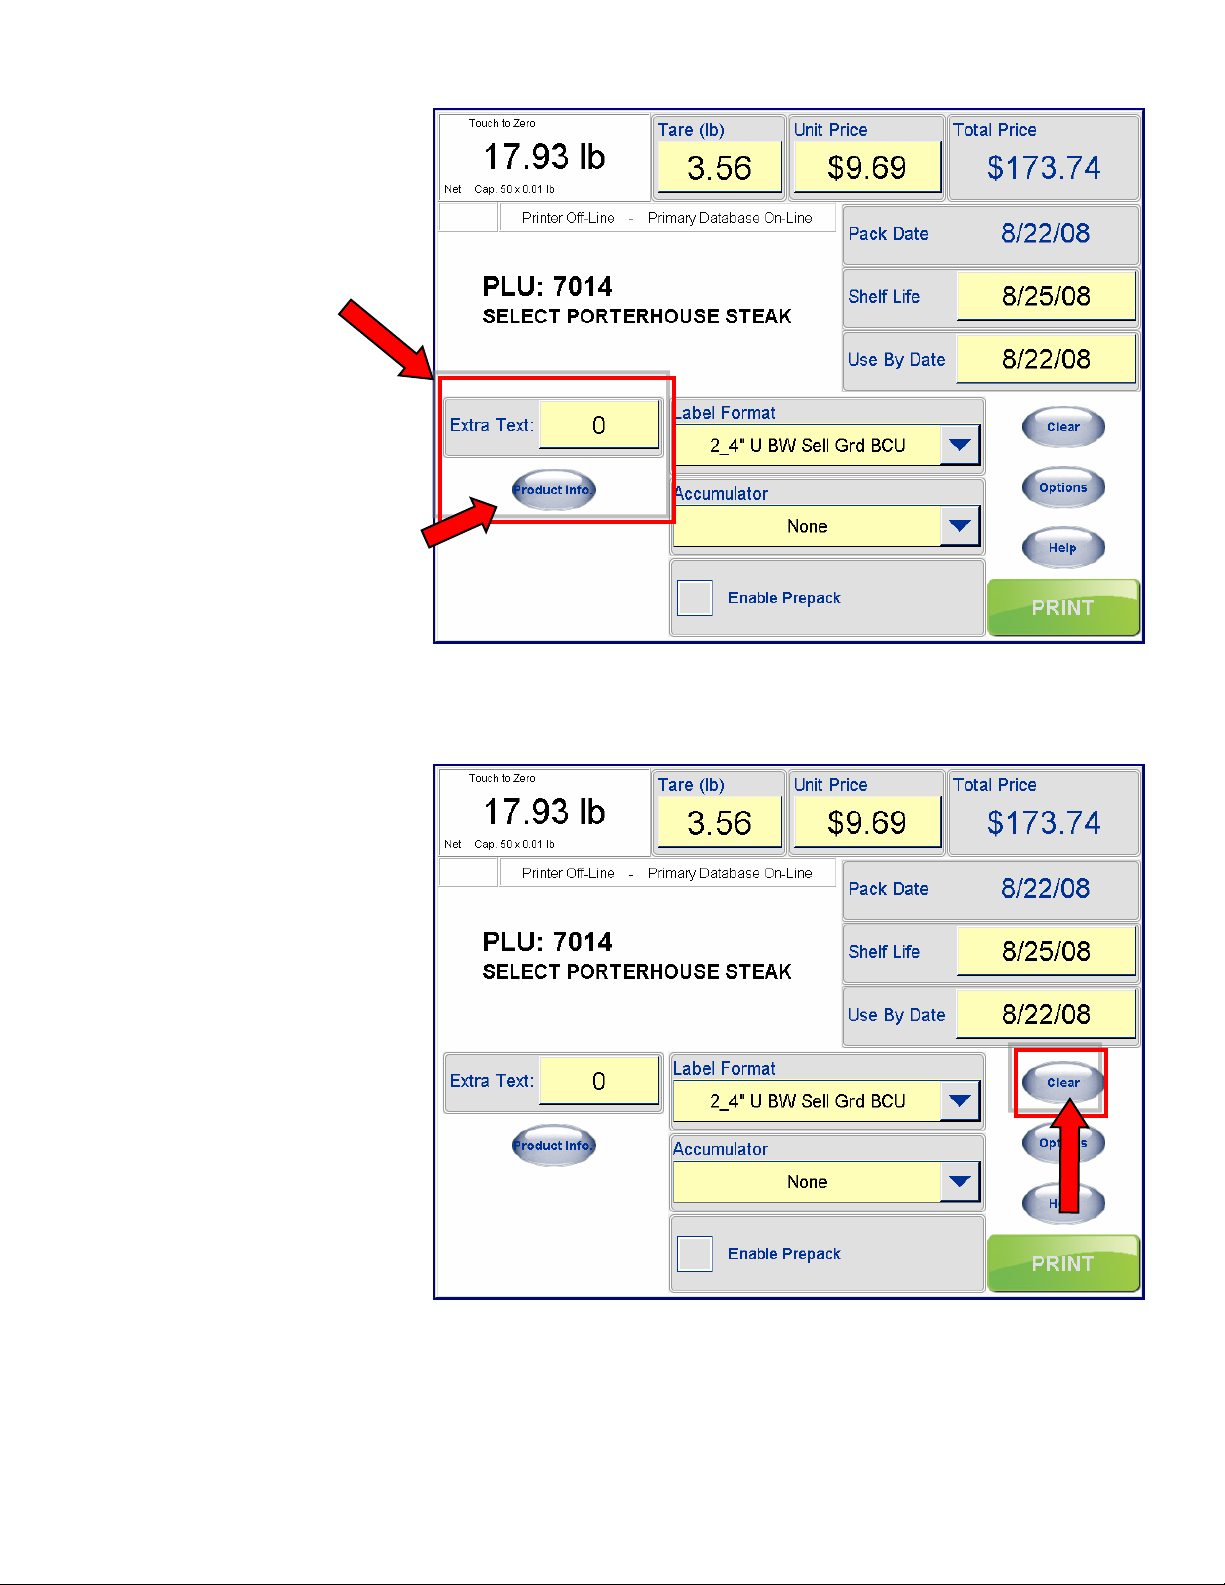
If you wish, you can change the
Extra Text.
You can view additional product
details with the PRODUCT INFO
button.
The Clear button is used
to navigate away from
this screen.
1-6
Page 15
Chapter 1: Introduction
Basic Operation – PLU Navigation
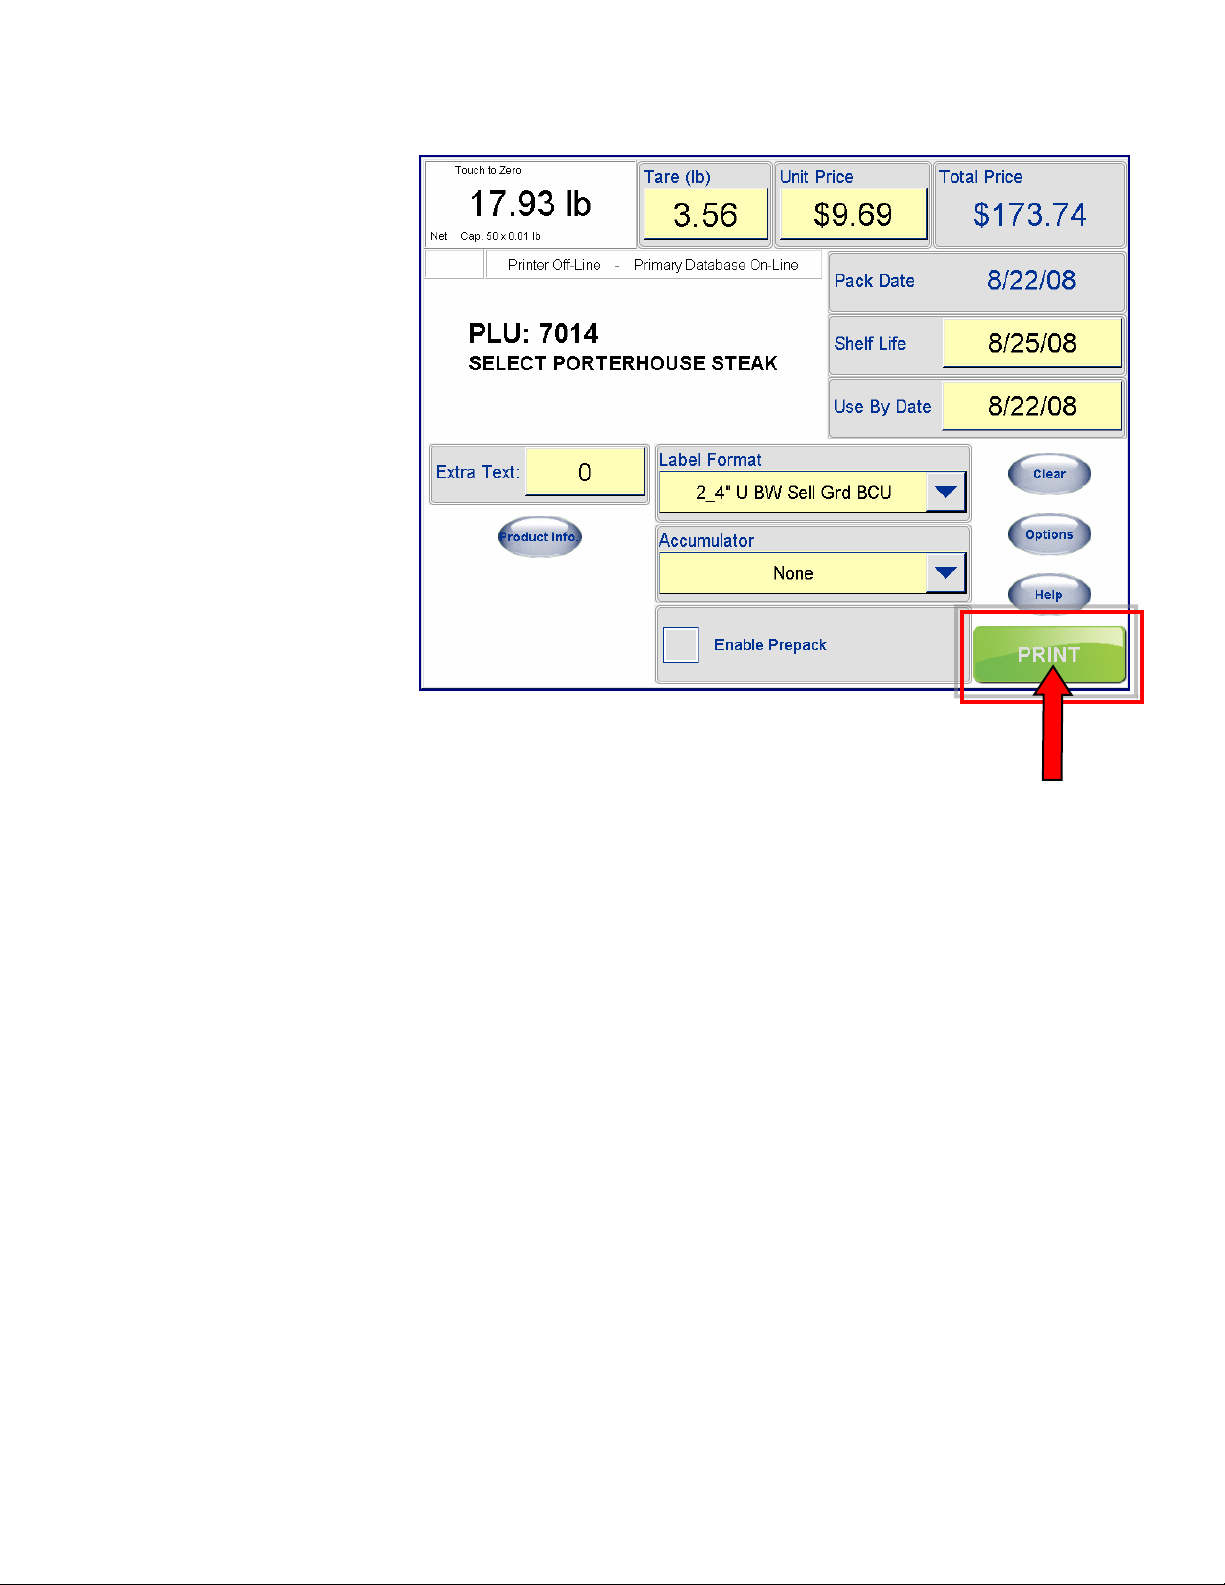
Hit the PRINT button to print the
label.
When you are done, press the
CLEAR button to exit.
1-7
Page 16

METTLER TOLEDO Model UC-PW User's Guide
For your notes
1-8
Page 17
2 Setup
Setup Overview
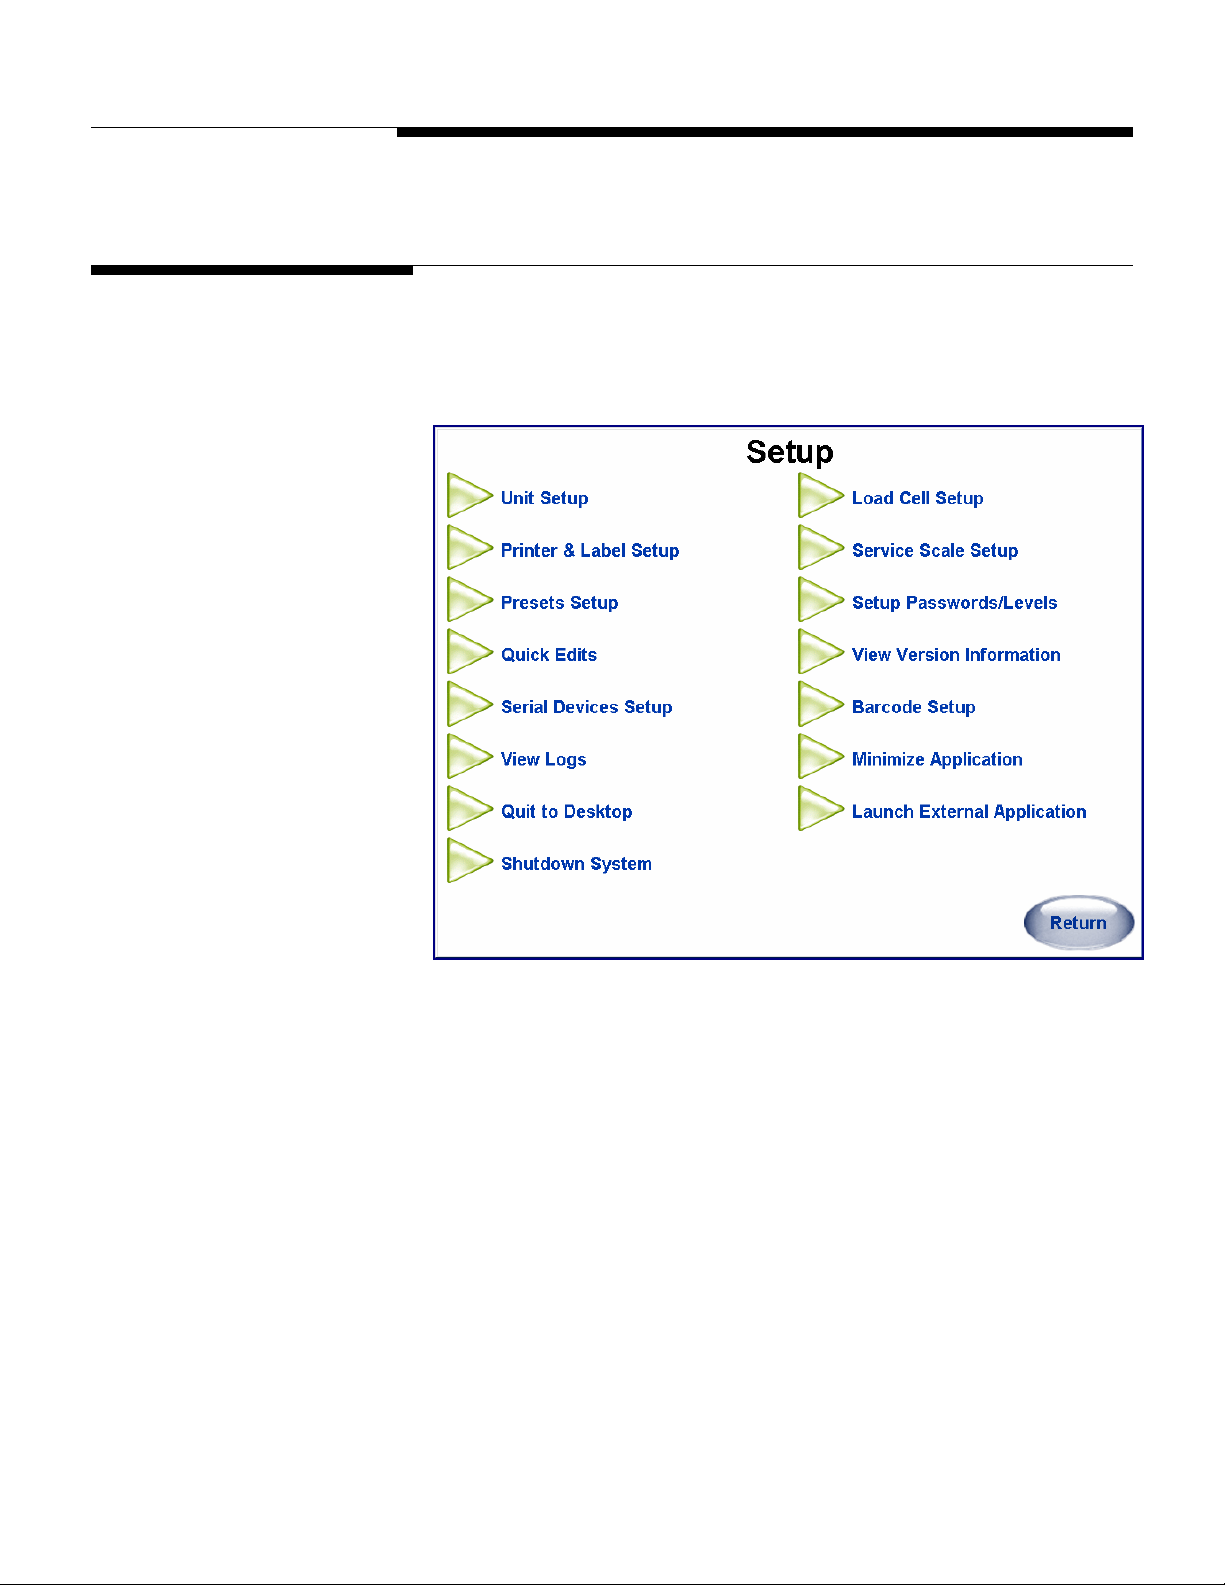
The Setup screens are accessed by pressing the Setup button on the Main screen. The
Setup screen is shown below. To return to the Main screen, press the Return button.
Touch the other buttons to enter into the desired setup topics.
NOTE: Exercise care
when changing any
machine configuration
settings. You could
accidentally disable a
printer, disable the PLU
database, etc.
NOTE: Pounds is used
as the weighing
designation throughout
this manual, however,
the setup utility can be
used to quickly and
easily change between
Standard and Metric
weighing systems.
The following sections detail common functions available to the operator on the Setup
screen. Your particular unit may be configured differently than outlined in this chapter. A
password may be required to access some of the setup options, so not all setup
features may be available to you.
Chapter 2: Setup
Setup Overview
2-1
Page 18
METTLER TOLEDO Model UC-PW User's Guide
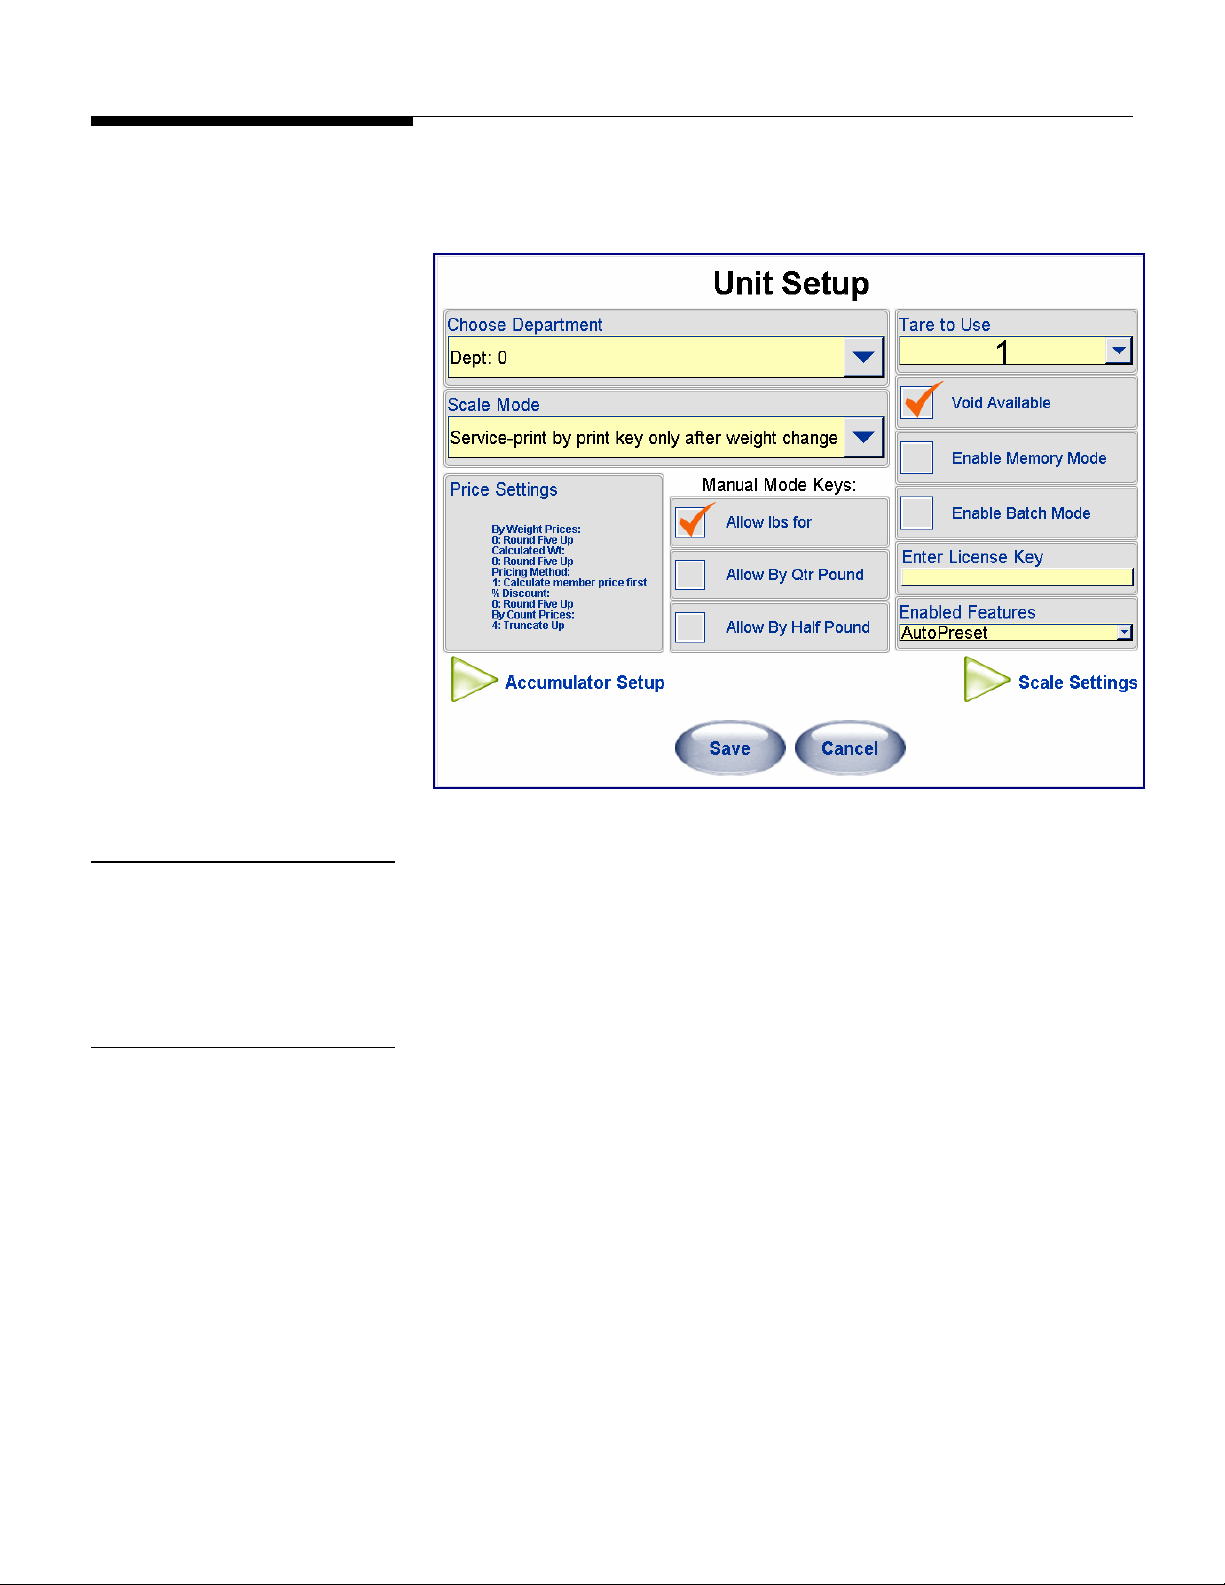
Unit Setup
Unit Setup is used to select the default department, configure Special Price settings,
customize the screens, and select other special options.
Choose Department
Scale Mode
This is the "home" department where this scale will be used. PLUs called from the
numeric keypad will be from this department.
Select from the following modes of operation:
PrePack – Print on weight change only.
PrePack – Print by weight change or print key.
2-2
Page 19

Price Settings
Chapter 2: Setup
Unit Setup
This selection defines the rules for rounding weight calculations, unit price, count, and
discounts.
By Weight Prices: Select Rounding Method 0-4 below.
NOTE: You will be asked to
press the calibration switch
before you will be allowed to
make changes in this area.
The calibration switch may be
protected by a Weights and
Measures Seal. If this seal is
broken, the scale may require
certification again before use.
By Weight Pricing Method: 0: Calculate Savings First and 1: Calculate Member Price
First. When selecting "0", the dollars/cents saved value is calculated first, and then the
member total price is calculated. When selecting "1", the member total price is
calculated first, and then the dollars/cents saved value is calculated. The calculations
apply only for the $/cents off the unit price for a By-Weight PLU.
By Weight Calculated Weight: Select Rounding Method 0-4 below.
Percentage Discount: Select Rounding Method 0-4 below.
By Count Prices: Select Rounding Method 0-4 below
Rounding Methods 0-4
0: FIVE UP (2.5350 ROUNDS TO 2.54)
1: FIVE DOWN (2.5350 ROUNDS TO 2.53)
2: IEEE ROUNDING (EVEN) (2.5350 ROUNDS TO 2.54, and 2.5450 ROUNDS TO 2.54)
3: TRUNCATE DOWN (2.5374 ROUNDS TO 2.53)
4: TRUNCATE UP (2.5315 ROUNDS TO 2.54)
2-3
Page 20

METTLER TOLEDO Model UC-PW User's Guide
Manual Mode Keys
A manual transaction allows the operator to manually price and label items if the unit is
NOTE: You will be asked to
press the calibration switch
before you will be allowed to
make changes in this area.
The calibration switch may
be protected by a Weights
and Measures Seal. If this
seal is broken, the scale may
require certification again
before use.
offline from the database. Use this tool any time you are experiencing label indexing or
feeding problems, in order to reset the printer calibration for your current labels.
Allow Lbs for
Checking this box will allow this pricing mode during a manual transaction. Example:
The price could be set at 5 pounds for $4.00.
Allow By Qtr Pound
Some locations allow pricing by quarter pound. If this is legal in your area, you can
check the box to enable this pricing mode during a manual transaction. When this is
allowed, pricing at $1.00 per quarter pound is equivalent to $4.00 per pound.
Allow By Half Pound
Some locations allow pricing by half pound. If this is legal in your area, you can check
the box to enable this pricing mode during a manual transaction. When this is allowed
pricing at $1.00 per half pound is equivalent to $2.00 per pound.
Tare to Use
Void Available
Enter License Key
Select Tare 1 or Tare 2 fields to use as the default tare for this unit.
Proportional Tare
If Proportional Tare is used, it is stored in the Tare 2 field.
By-Weight Tare
By-Weight tares are stored in the Tare 1 field.
NOTE: The Net Weight will be the gross weight minus the By-Weight Tare, minus ( the
proportional tare times (the Gross Weight, minus By-Weight Tare value)).
Net wt = gross wt – by weight tare – (proportional tare * (gross wt – by weight tare))
If you wish to allow the operator to void a previous transaction, check this box. Leaving
the box unchecked does not allow voids.
This function is used to turn on special functions that are not part of the standard application.
2-4
Page 21
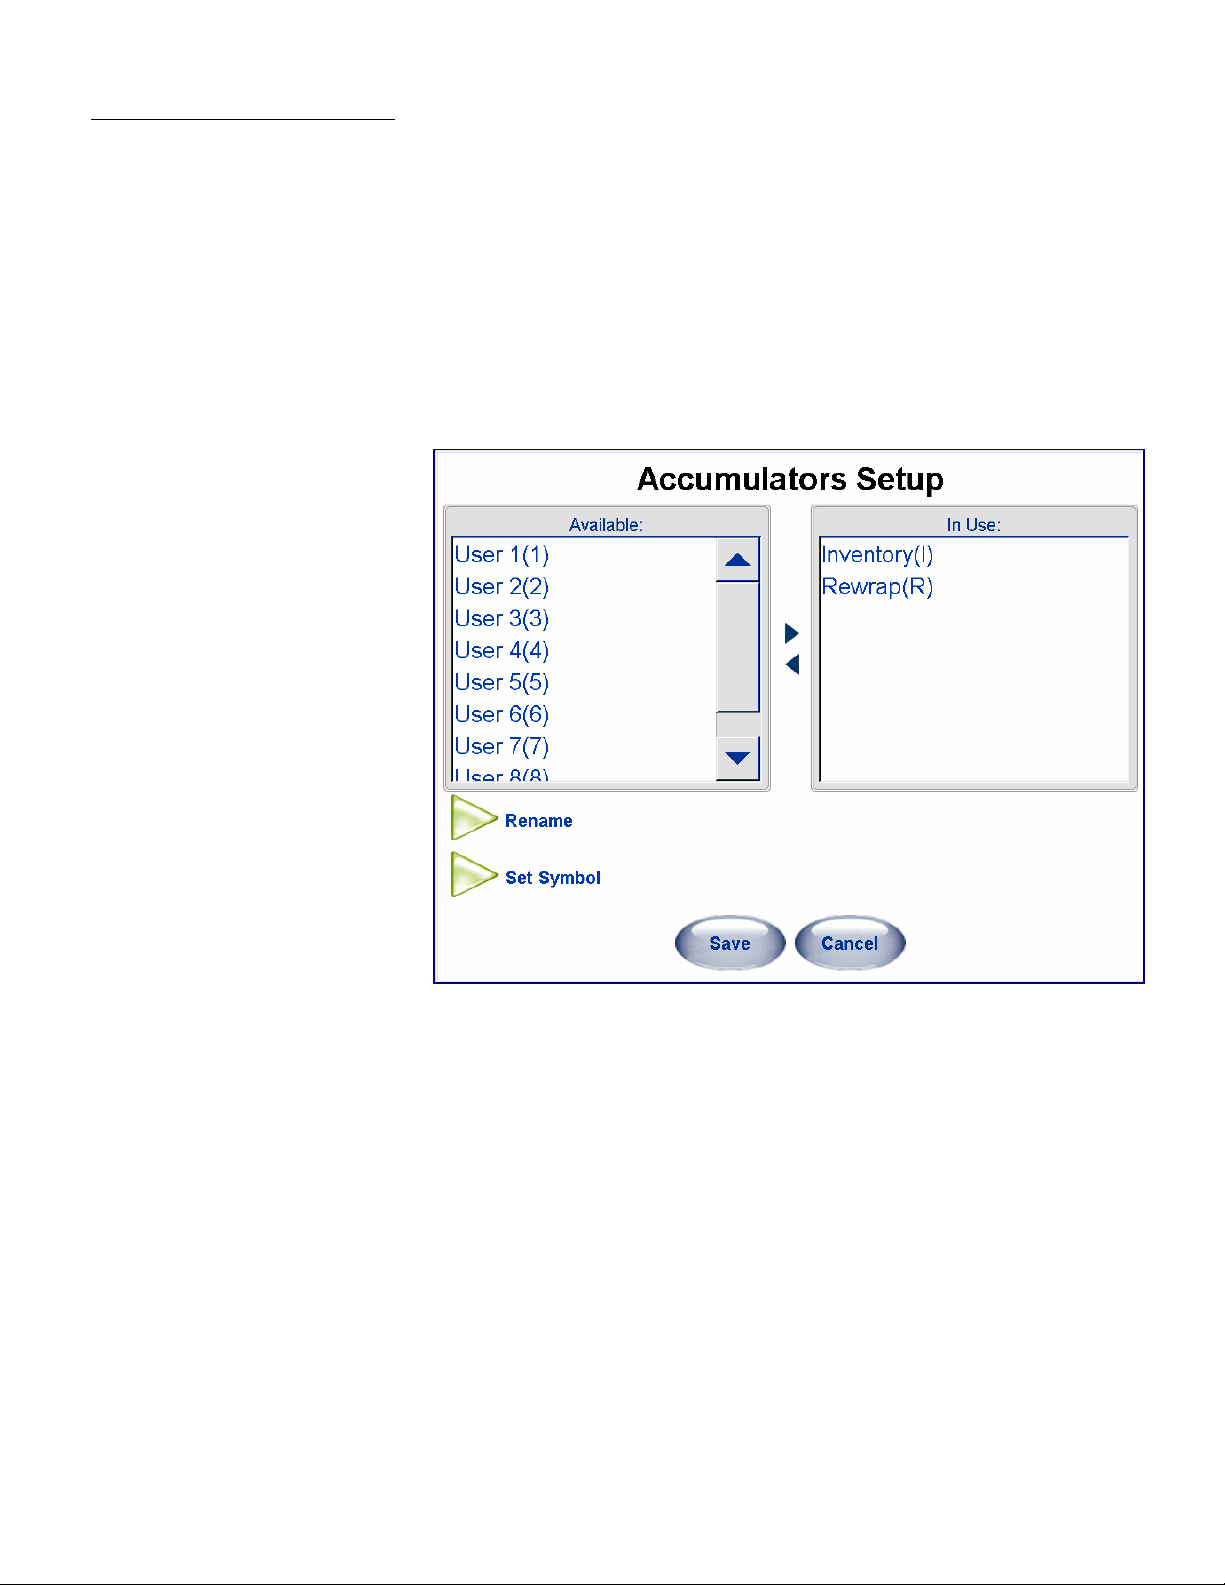
Accumulator Setup
Chapter 2: Setup
Unit Setup
Accumulators allow you to label a transaction as a specific type to allow for better
tracking of totals. This screen is used to select which accumulators to use, to Rename
the User accumulators, and to Set the Symbol that will print on the label when a user
accumulators is selected by the operator.
The “Rewrap(R)” and “Inventory(I)” are predefined and cannot be edited. However, you
can define three custom accumulators. When these accumulators are used, the symbol
in parentheses will print on the label as a flag. When creating custom labels, these
fields must be configured on the label. In addition, three custom accumulators can be
defined and the symbol used to flag these accumulators on the label and in the
database selected using the QWERTY keyboard (Set Symbol).
2-5
Page 22
METTLER TOLEDO Model UC-PW User's Guide
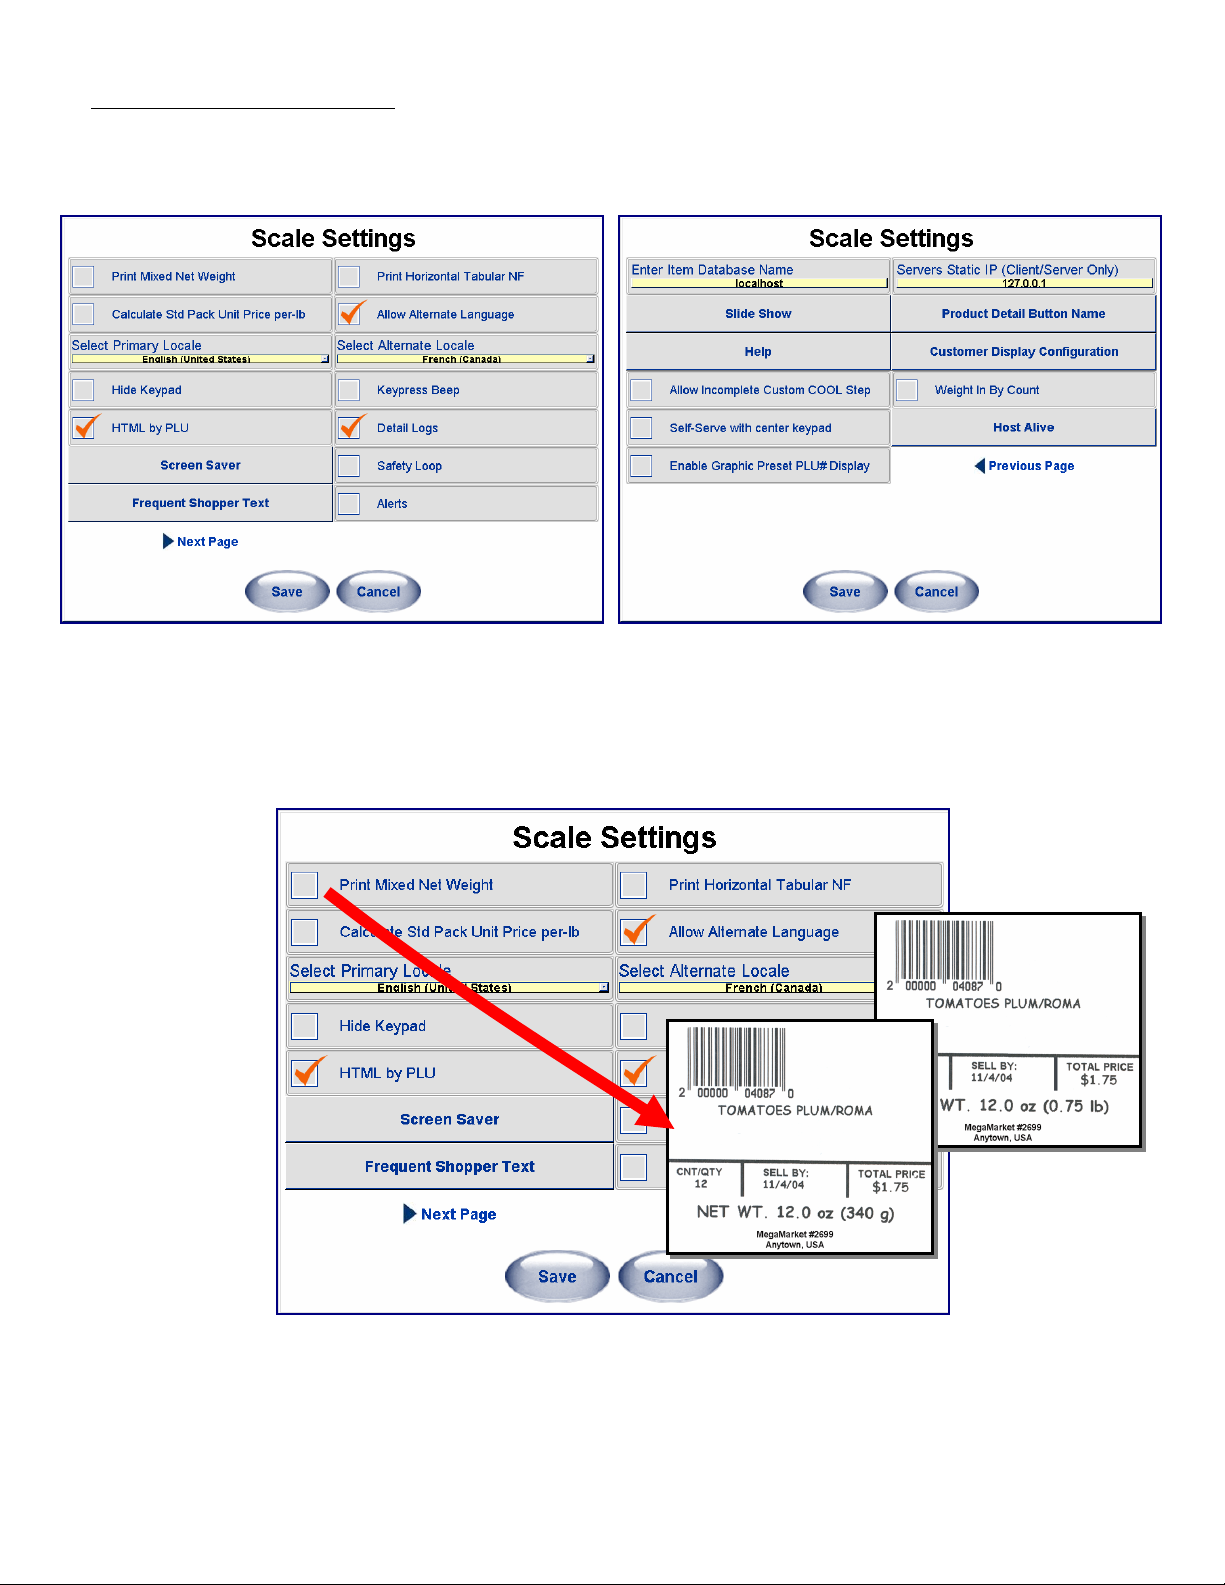
Scale Settings
The Scale Settings button has multiple pages of settings for the scale application.
Hit the Next Page button for further Scale Setting options. From the second page hit the
Previous Page button to return to the initial Scale Settings page.
Print Mixed Net Weight
When checked, the scale will print both avoirdupois (US Standard) and metric weight
on the label.
2-6
Page 23
Chapter 2: Setup
Unit Setup
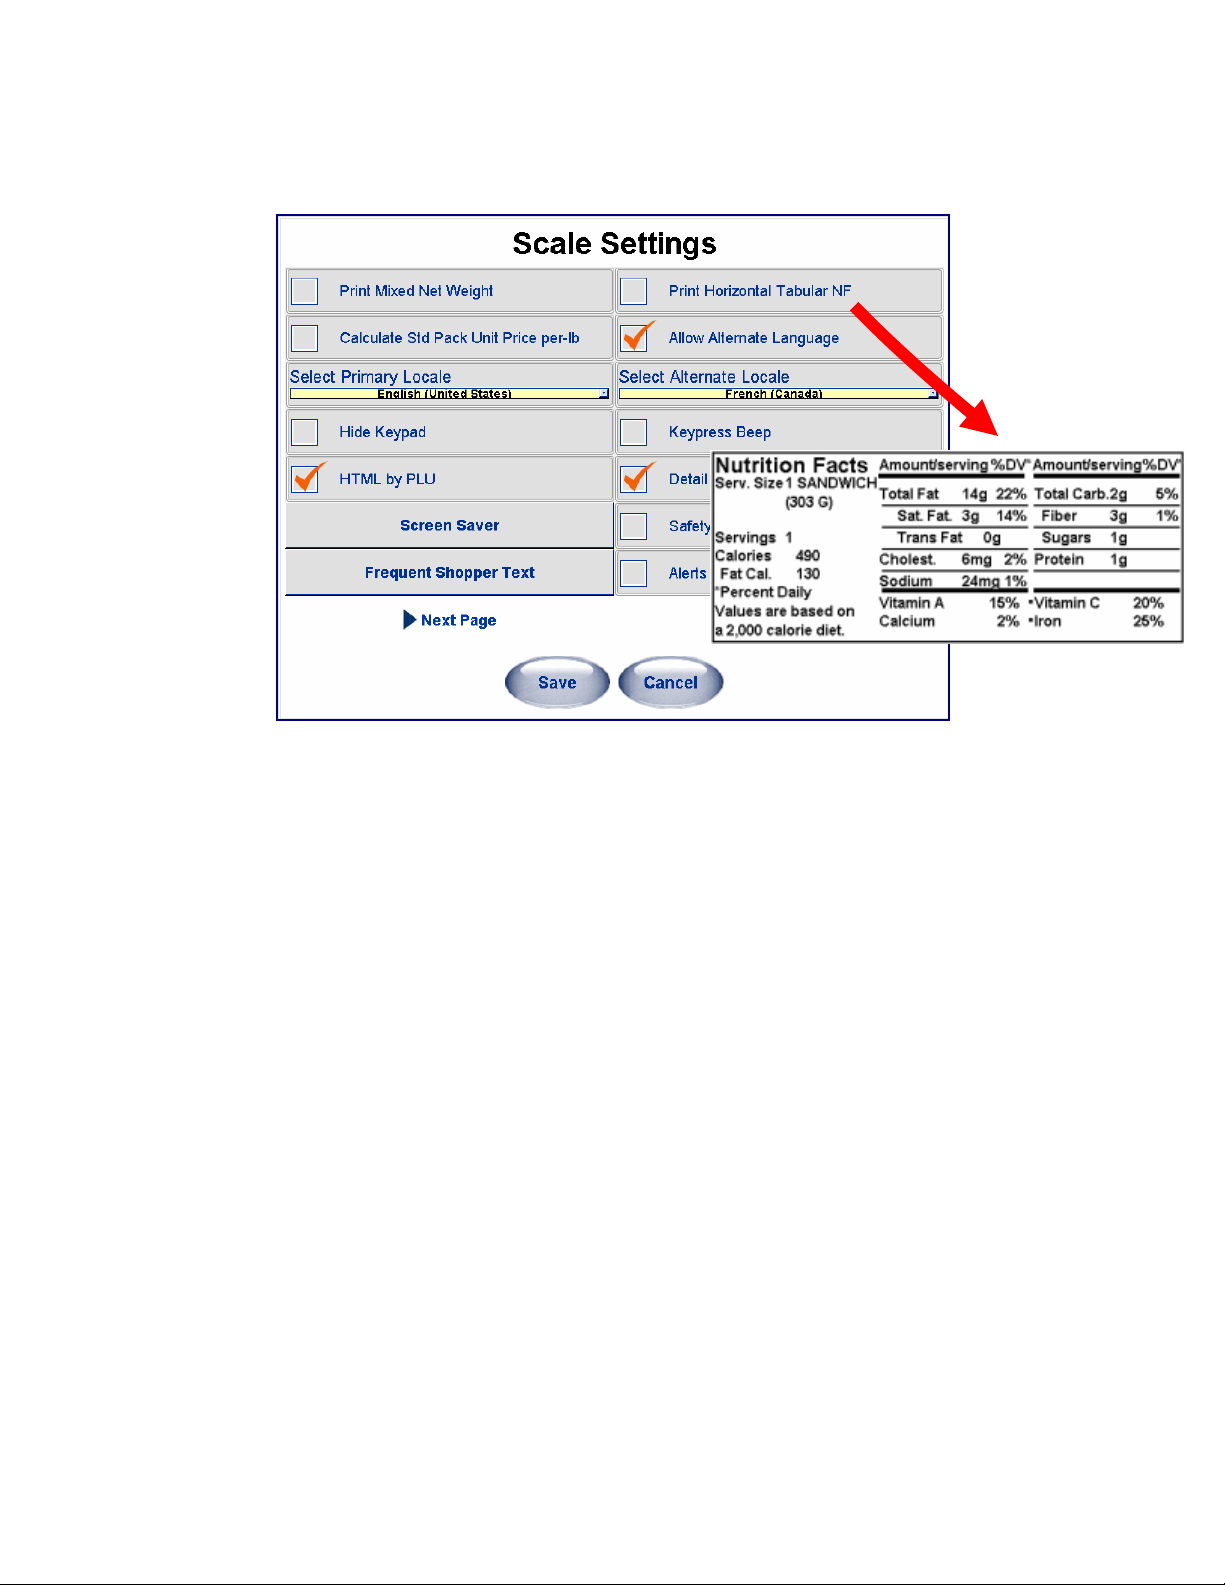
Print Horizontal Tabular NF
When this is checked, the scale will switch to print NF (NutriFact) in a horizontal,
tabular format, instead of a vertical, non-tabular format.
Calculate Std Pack Unit Price per-lb
When checked, the scale will calculate the unit price on a standard pack item as a per pound unit
price based on the net weight and the total price.
Hide Keypad
This function is not valid in the PrePack application.
HTML by PLU
When checked, this enables the Product Info button on the PLU screen to be used.
Allow Alternate Language
This function is not valid in the PrePack application.
Detail Logs
This setting is used for troubleshooting the scale. When checked, the scale application will
produce very detailed log files that are used to help troubleshoot issues.
Keypress Beep
When checked, the scale application will produce an audible “beep” when any button is touched.
Alerts
This function will allow Alert warnings to fire when certain situations occur or certain thresholds
have been hit.
Safety Loop
This function is not valid in the PrePack application.
Screen Saver
This function is not valid in the PrePack application.
Frequent Shopper Text
The user can configure the exact text used for the three Frequent Shopper price fields when
displayed.
2-7
Page 24
METTLER TOLEDO Model UC-PW User's Guide
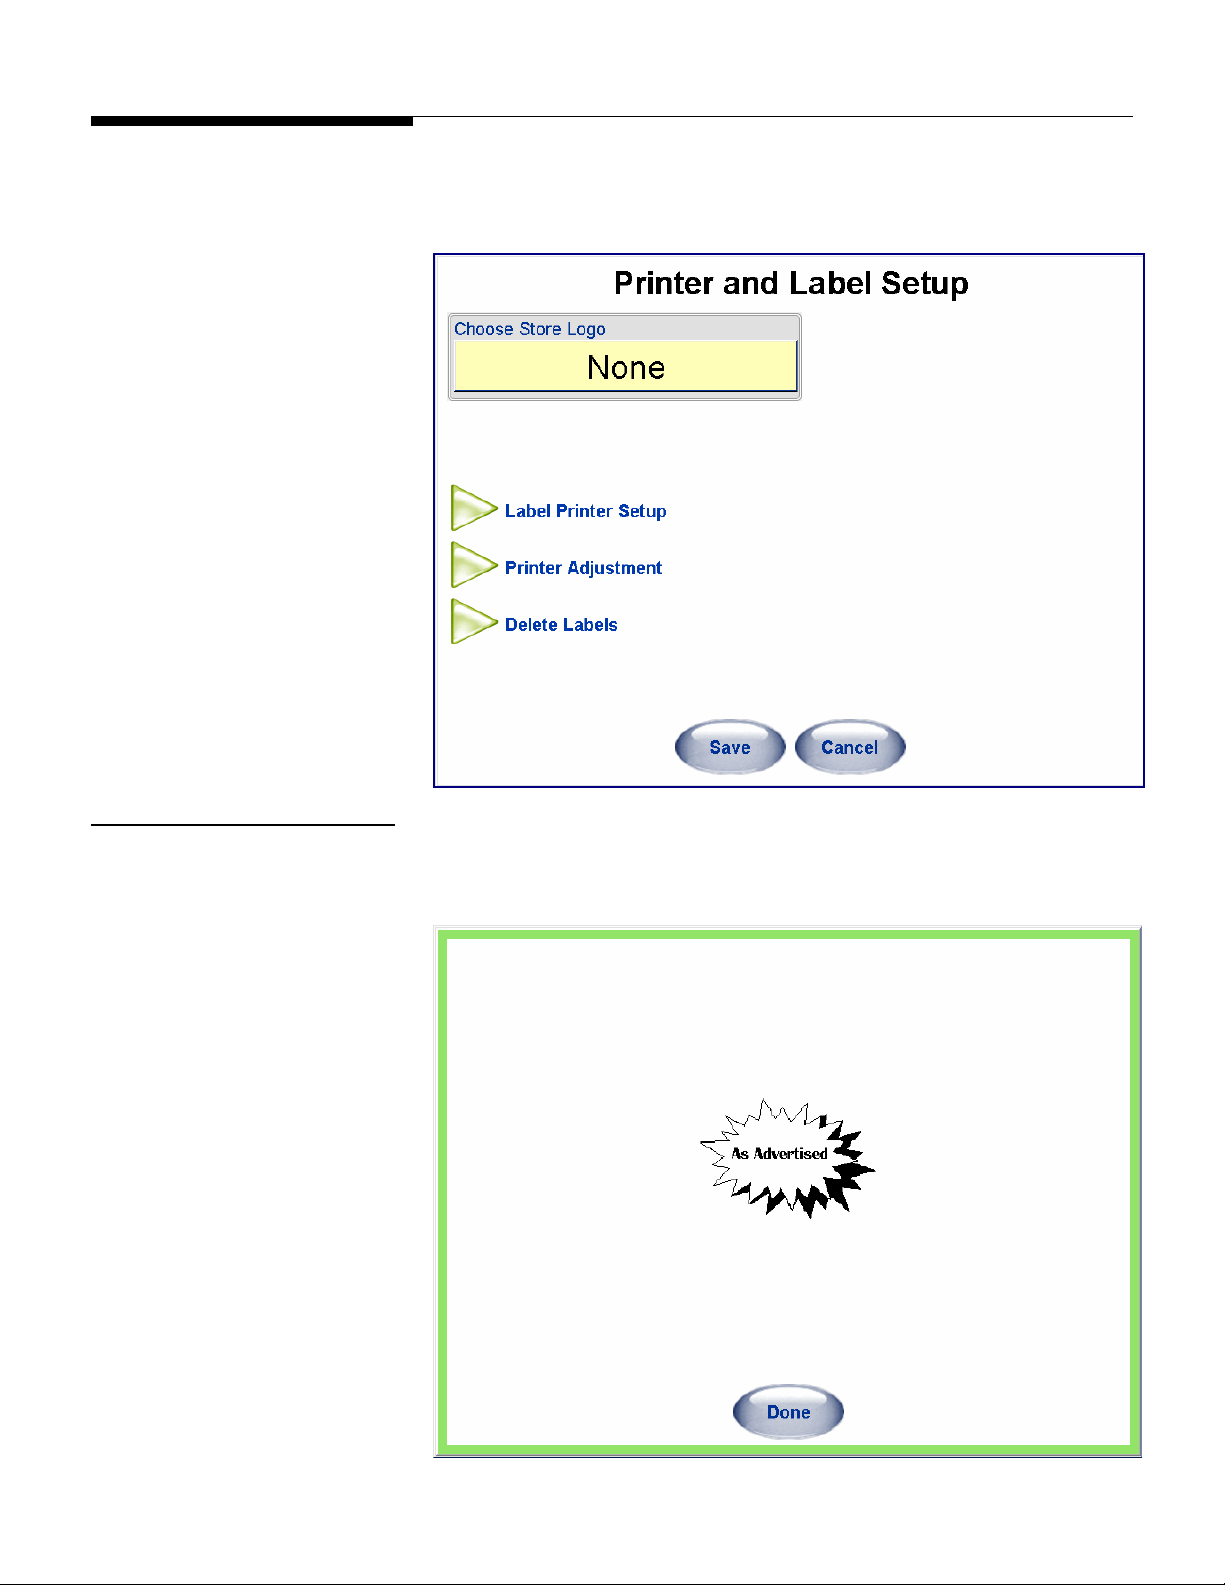
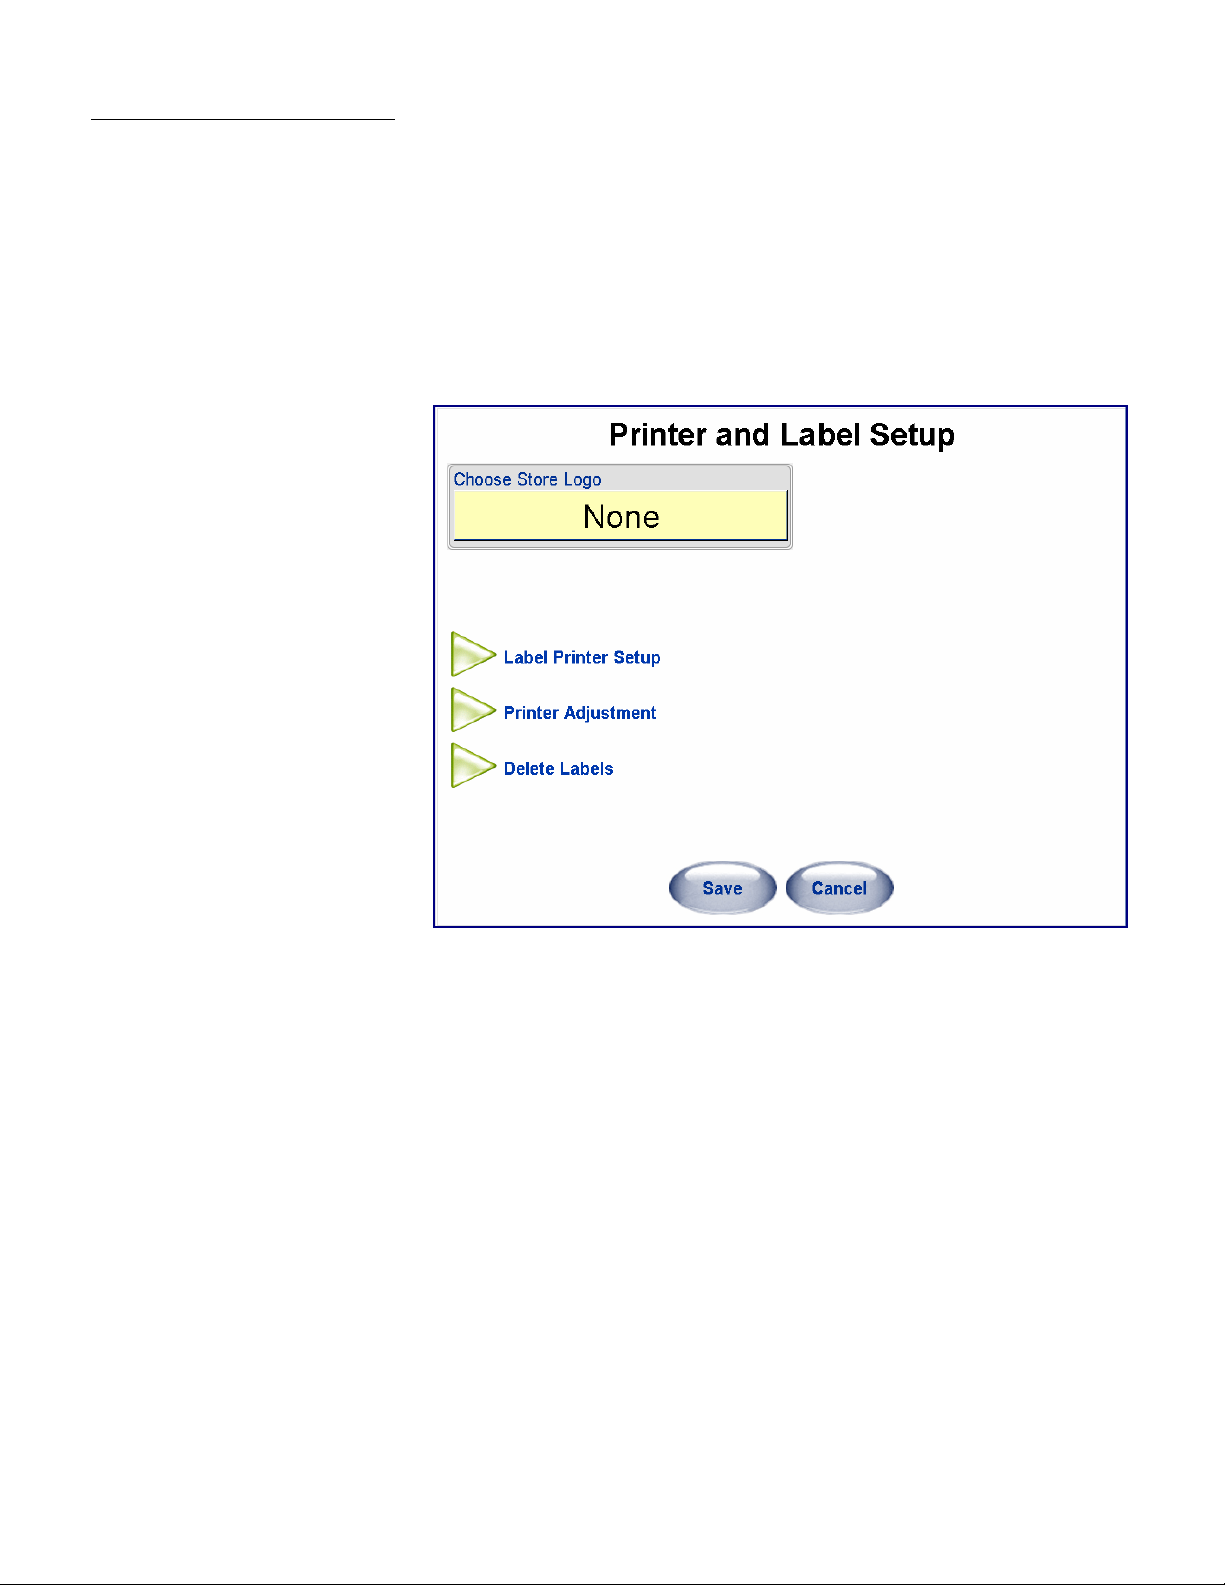
Printer & Label Setup
This screen is used to configure your printers, print verification labels, and to set up the
bar codes printed by the printer.
Choose Store Logo
Select the graphic that will print on all labels that have a store logo field defined.
2-8
Page 25
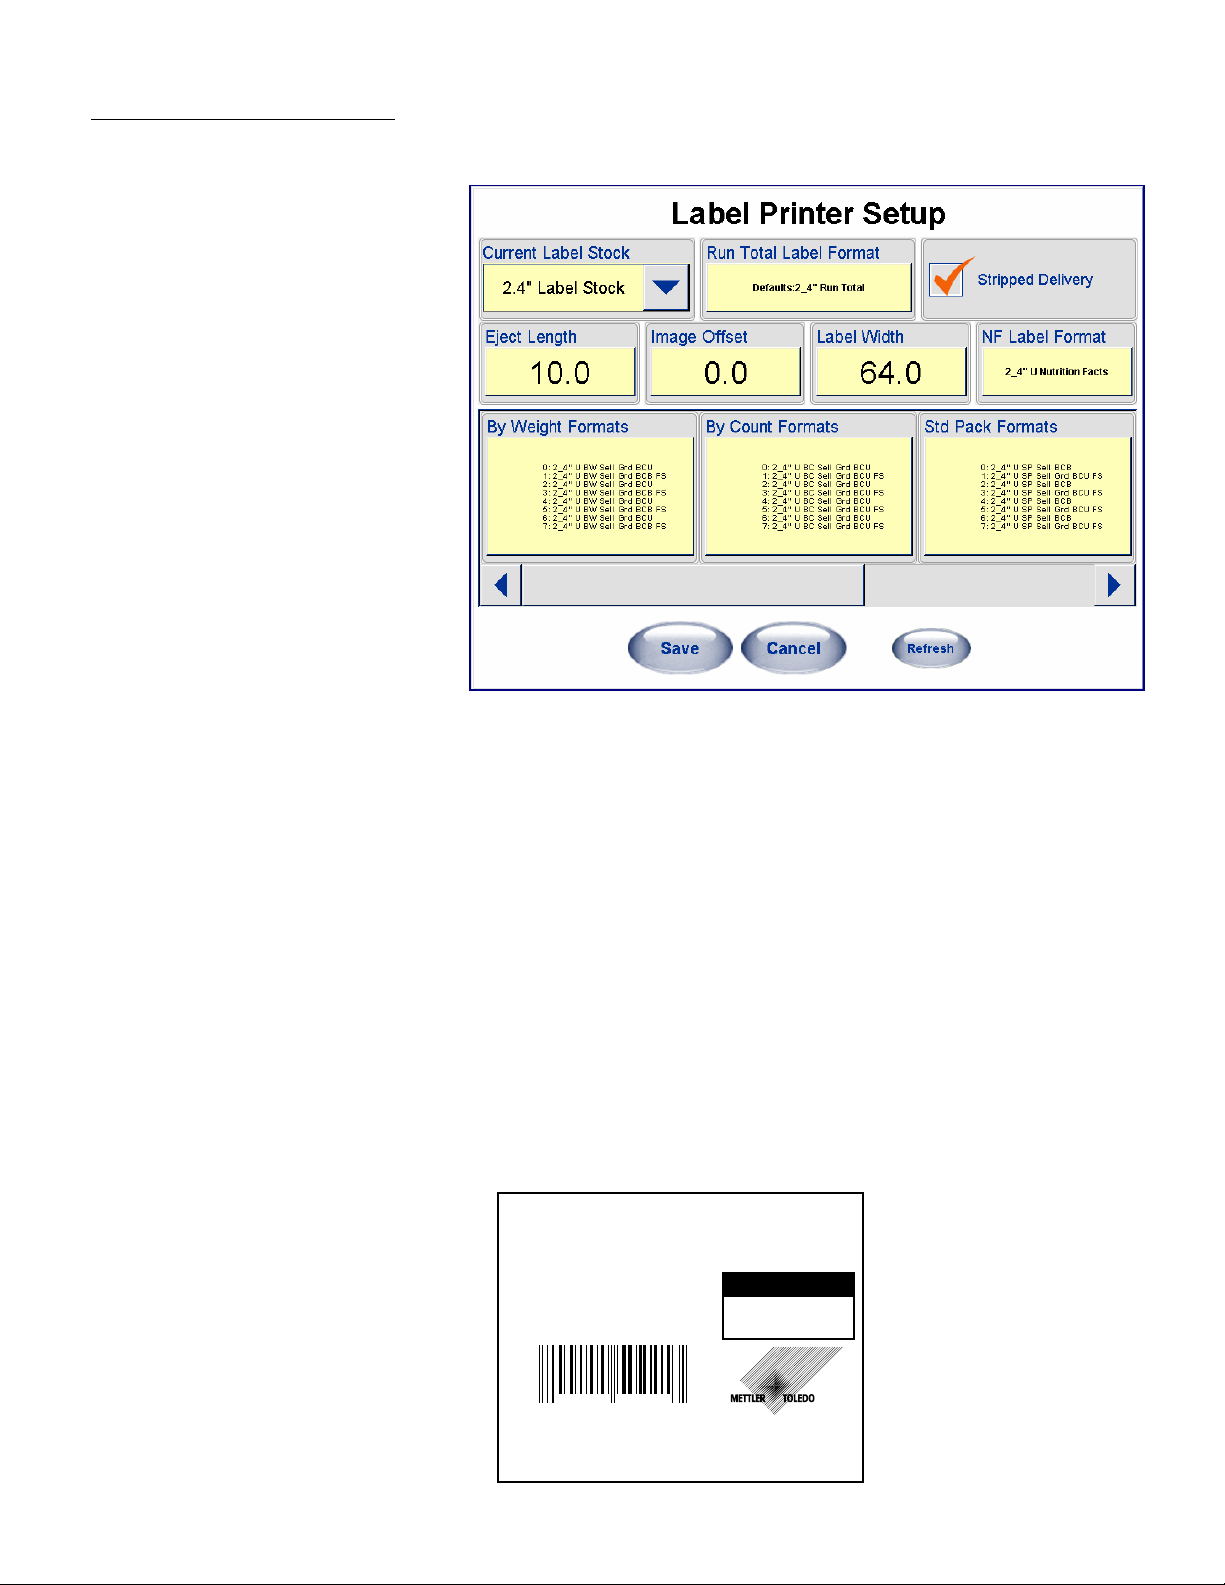
Label Printer Setup
NOTE: PLUs can be set to
print in MANUAL or
AUTOMATIC Mode. If the
printer is in AUTOMATIC
mode the 1.9” labels
cannot be used. Manual
Mode can be set from the
PLU Edit screen.
Chapter 2: Setup
Printer & Label Setup
Current Label Stock
The size of the labels listed must match the size of the labels that you will be using in
the data label printer “Printer 1” (the data label printer). Standard sizes available
include: 1.9”, 2.1”, 2.4”, 3.3”, 3.7”, 4.2”, 4.7”, 5.1”, and Continuous (roll stock).
Eject Length
This is the position the label will stop at after printing. This setting is used primarily with
an automatic applicator to compensate for variances in printers and labels. For
example, this setting can be used to make label pickup easier for an automatic labeler
by moving the stop position out if the labels are sticking to the liner, or to move the label
stop back if they are falling off the liner prematurely. To move the label stop position
farther out from the printer, increase this value. To move the stop position to stop
towards the printer, decrease this value. The default is 12.5 mm.
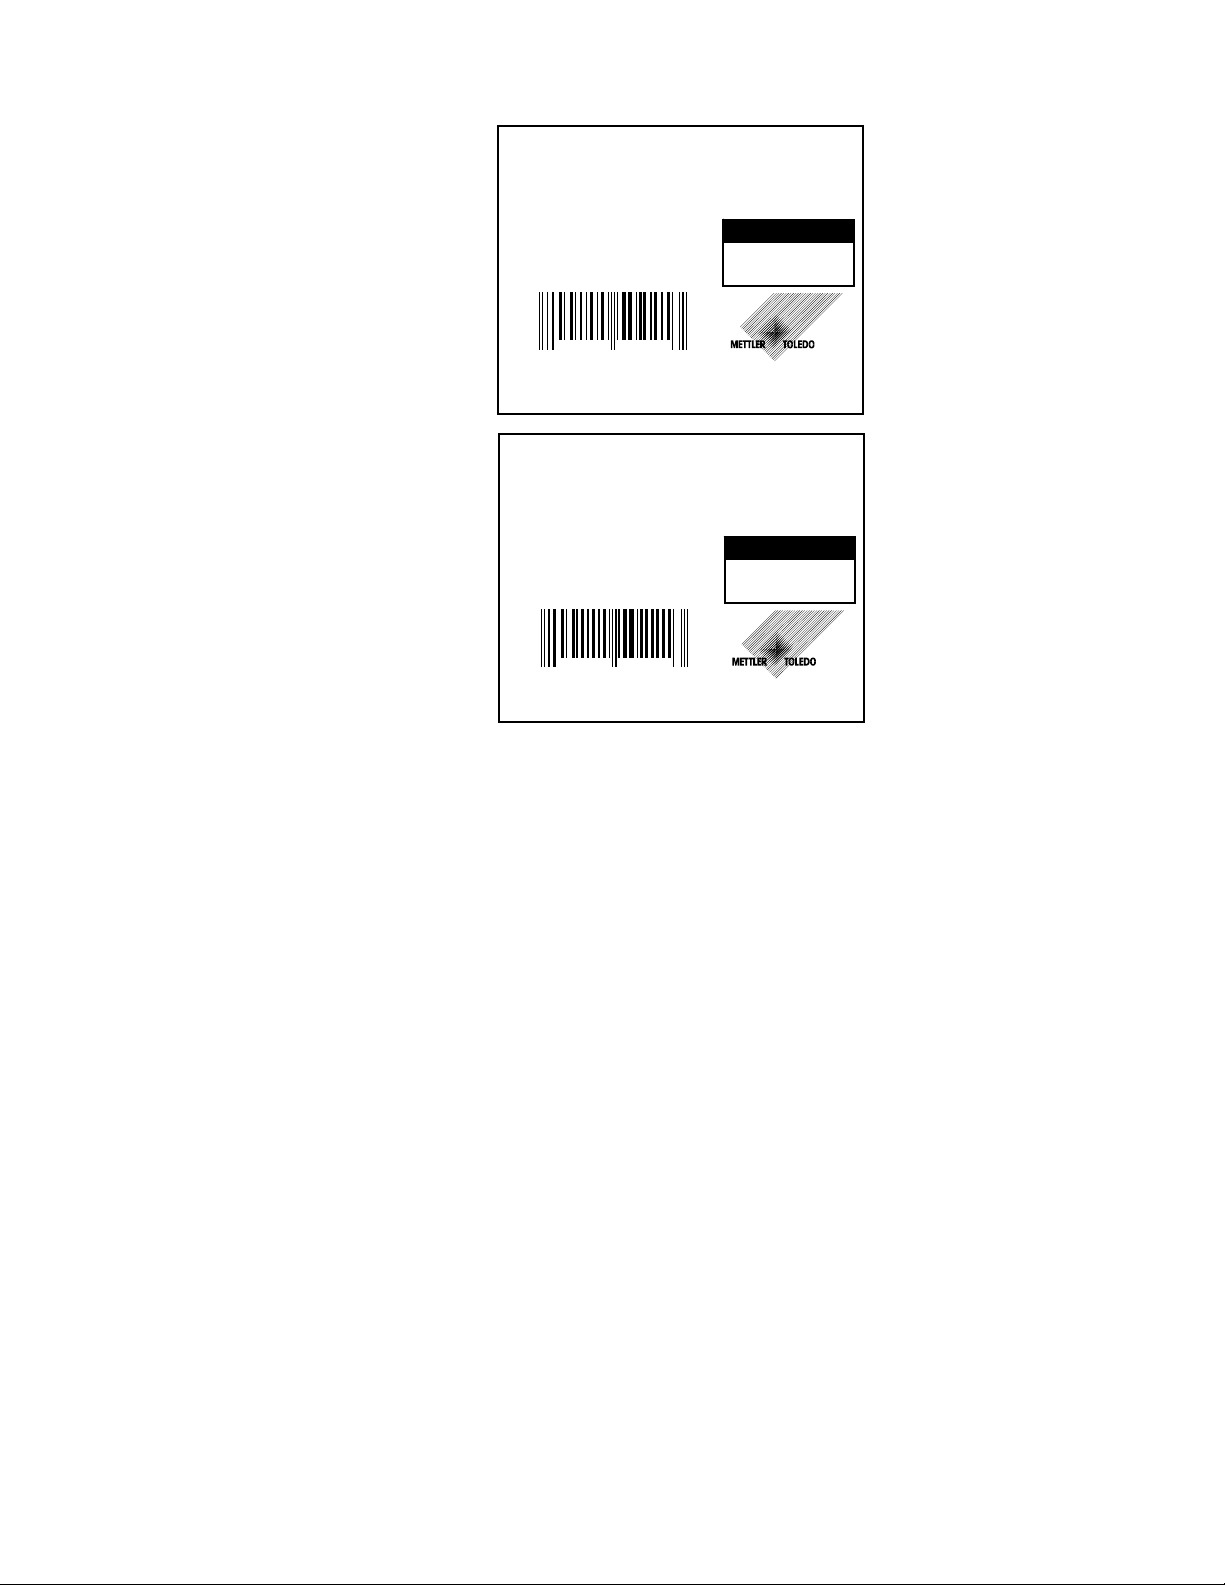
Image Offset
The Image Offset (in mm) is used to raise or lower the printed image on the label. The
factory default is 0.0 mm. To raise the image on a label, lower the value. To lower the
image on a label, increase the value.
GRADE 1 TEXT
NET WT UNIT
1.11 lb $1.99/lb
DESCRIPTION 1
DESCRIPTION 2
**TOTAL PRICE**
$2.21
23
00111 50221
ADDRESS 1
ADDRESS 2
The printing is too high
on the label. To lower
the printing so it is
centered vertically on the
label, increase the
Image Offset value.
For example, by entering
an offset value higher
than the default 0.0,
such as 3.0, will lower
the image position.
2-9
Page 26
METTLER TOLEDO Model UC-PW User's Guide
GRADE 1 TEXT
NET WT UNIT
1.11 lb $1.99/lb
23
DESCRIPTION 1
DESCRIPTION 2
00111 50221
ADDRESS 1
ADDRESS 2
**TOTAL PRICE**
$2.21
The printing is properly
centered on this label to
the left. No adjustment is
necessary.
NOTE: Unstripped mode (box
unchecked) means you could
print a batch of labels to be
applied at a later time.
DESCRIPTION 1
DESCRIPTION 2
GRADE 1 TEXT
NOTE: Exercise care
1.11 lb $1.99/lb
23
00111 50221
ADDRESS 1
ADDRESS 2
**TOTAL PRICE**
$2.21
The printing is too low
on this label. To raise
the printing so it is
centered vertically on the
label, decrease the
Image Offset value. If the
value is at 0.0 (the
minimum) increase the
Eject Offset to a higher
number (13.5).
Run Total Label Format
Select the style of the label to use when printing the “Totals” labels.
Label Width
The Label Width (in mm) is used to set the label parameters. The factory default is
64.0 mm.
Stripped Delivery
This entry is determined by how you install the labels in the Label Printer. Stripped
delivery means the label is delivered for application stripped from the liner. When this
box is checked, the labels will be stripped from the liner and the takeup motor will wind
up the used liner on the takeup spool. When this box is not checked, the takeup motor
is disabled and the labels are installed to deliver the label and liner.
2-10
NF Label Format
This entry defines whether a separate NF label will be generated and, if so, what format
to use.
By Weight Label Formats, By Count Label Formats, Std Pack Label
Formats
Select the default (0) format and alternate formats (1-7) to use for Printer 1. This
corresponds to the label format field in the PLU record. The setup screen is shown
below.
Page 27
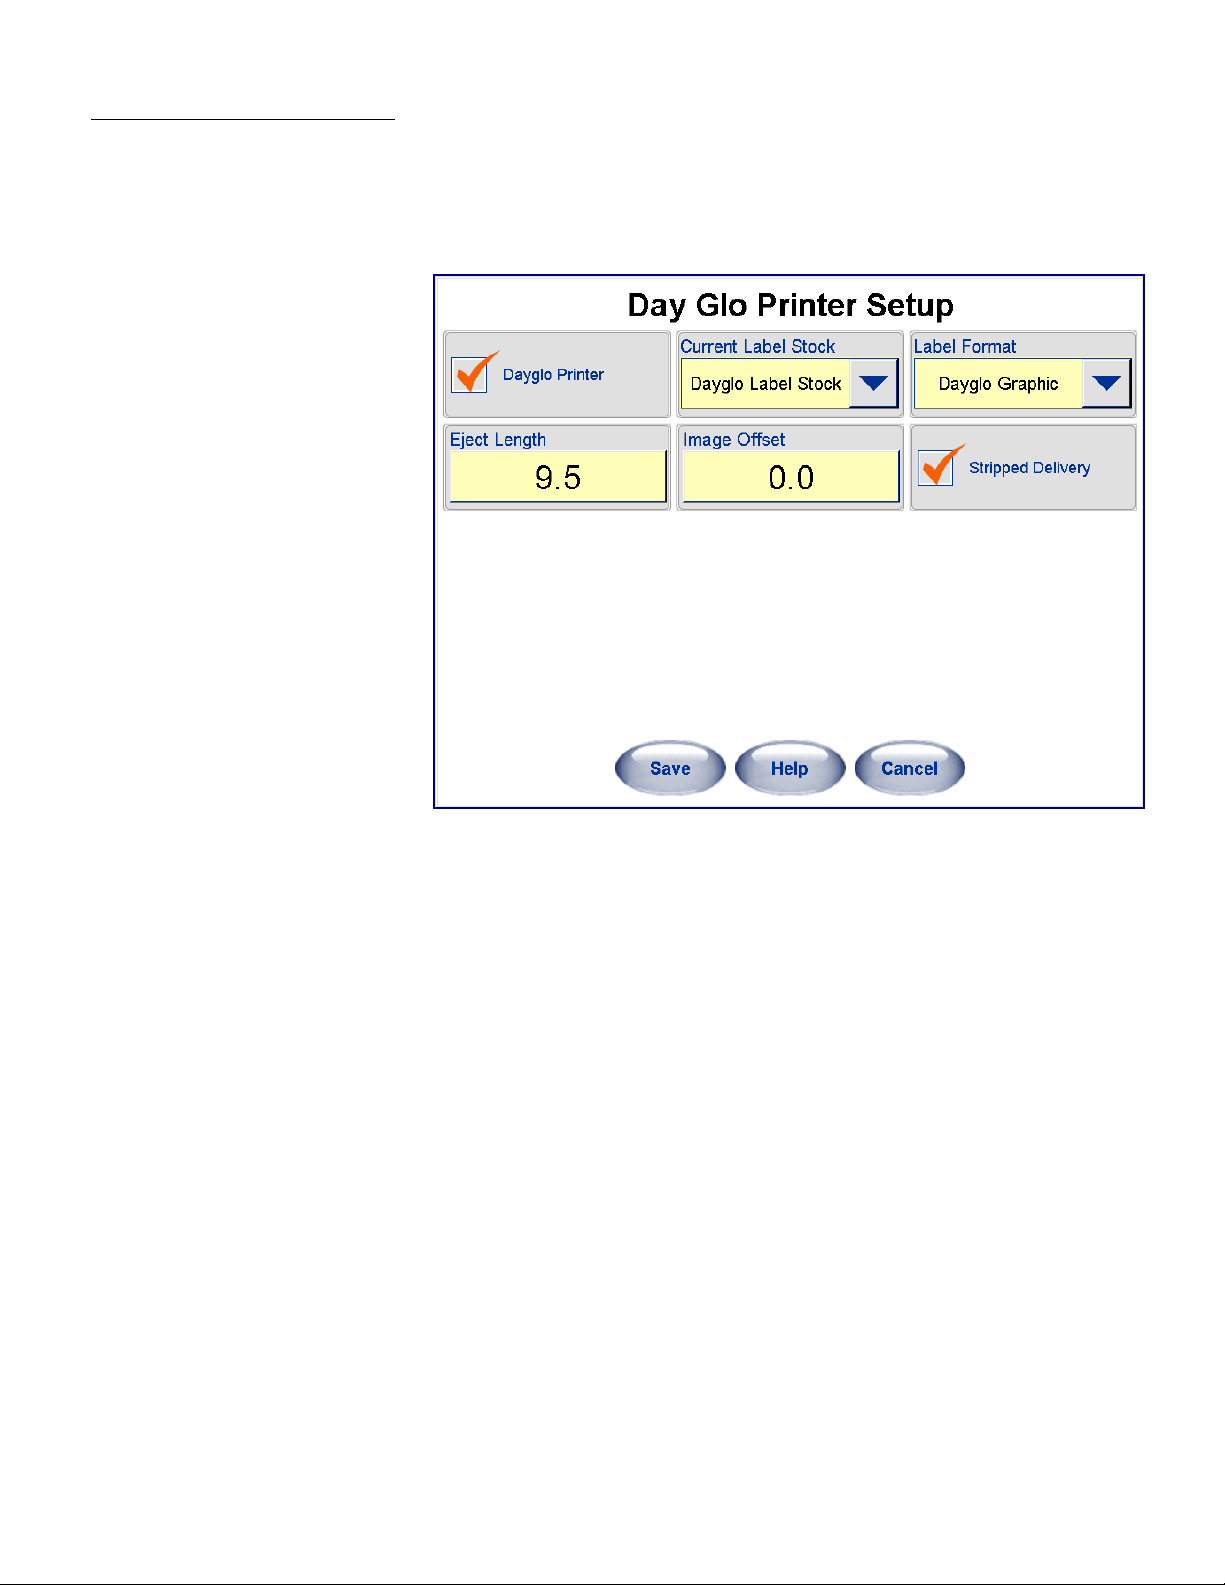
Dayglo Printer Setup
Chapter 2: Setup
Printer & Label Setup
DayGlo Printer
Click in the box to configure the DayGlo printer. Once selected the following options will
appear and can be configured.
Eject Length
This is the position the label will stop at after printing. To have the label stop farther out
from the printer, increase this value. The default is 12.5 mm.
Current Label Stock
This is the size of the labels you have installed in the DayGlo printer. Currently the only
selection is DayGlo labels.
Image Offset
The Image Offset (in mm) is used to raise or lower the printed image on the label. The
default is 0.0 mm. To raise the image on a label, lower the value. To lower the image
on a label, increase the value. For details, refer to Image Offset section in the Label
Printer setup.
Label Format
This is the format style of the labels in the DayGlo printer. Currently the only selection is
for DayGlo graphic. If NONE is selected, no DayGlo Label will be printed.
Stripped Delivery
This entry is determined by how you install the labels in the printer. Stripped delivery
means the label is delivered for application stripped from the liner. When this box is
checked (stripped mode), the labels will be stripped from the liner and the takeup motor
will wind up the used liner on the takeup spool.
When this box is not checked, (unstripped mode), the takeup motor is disabled and the
label taken sensor is ignored. In this mode, you could print a batch of labels to be applied
at a later time. Continuous stock should always be run with this unchecked (disabled).
2-11
Page 28
METTLER TOLEDO Model UC-PW User's Guide
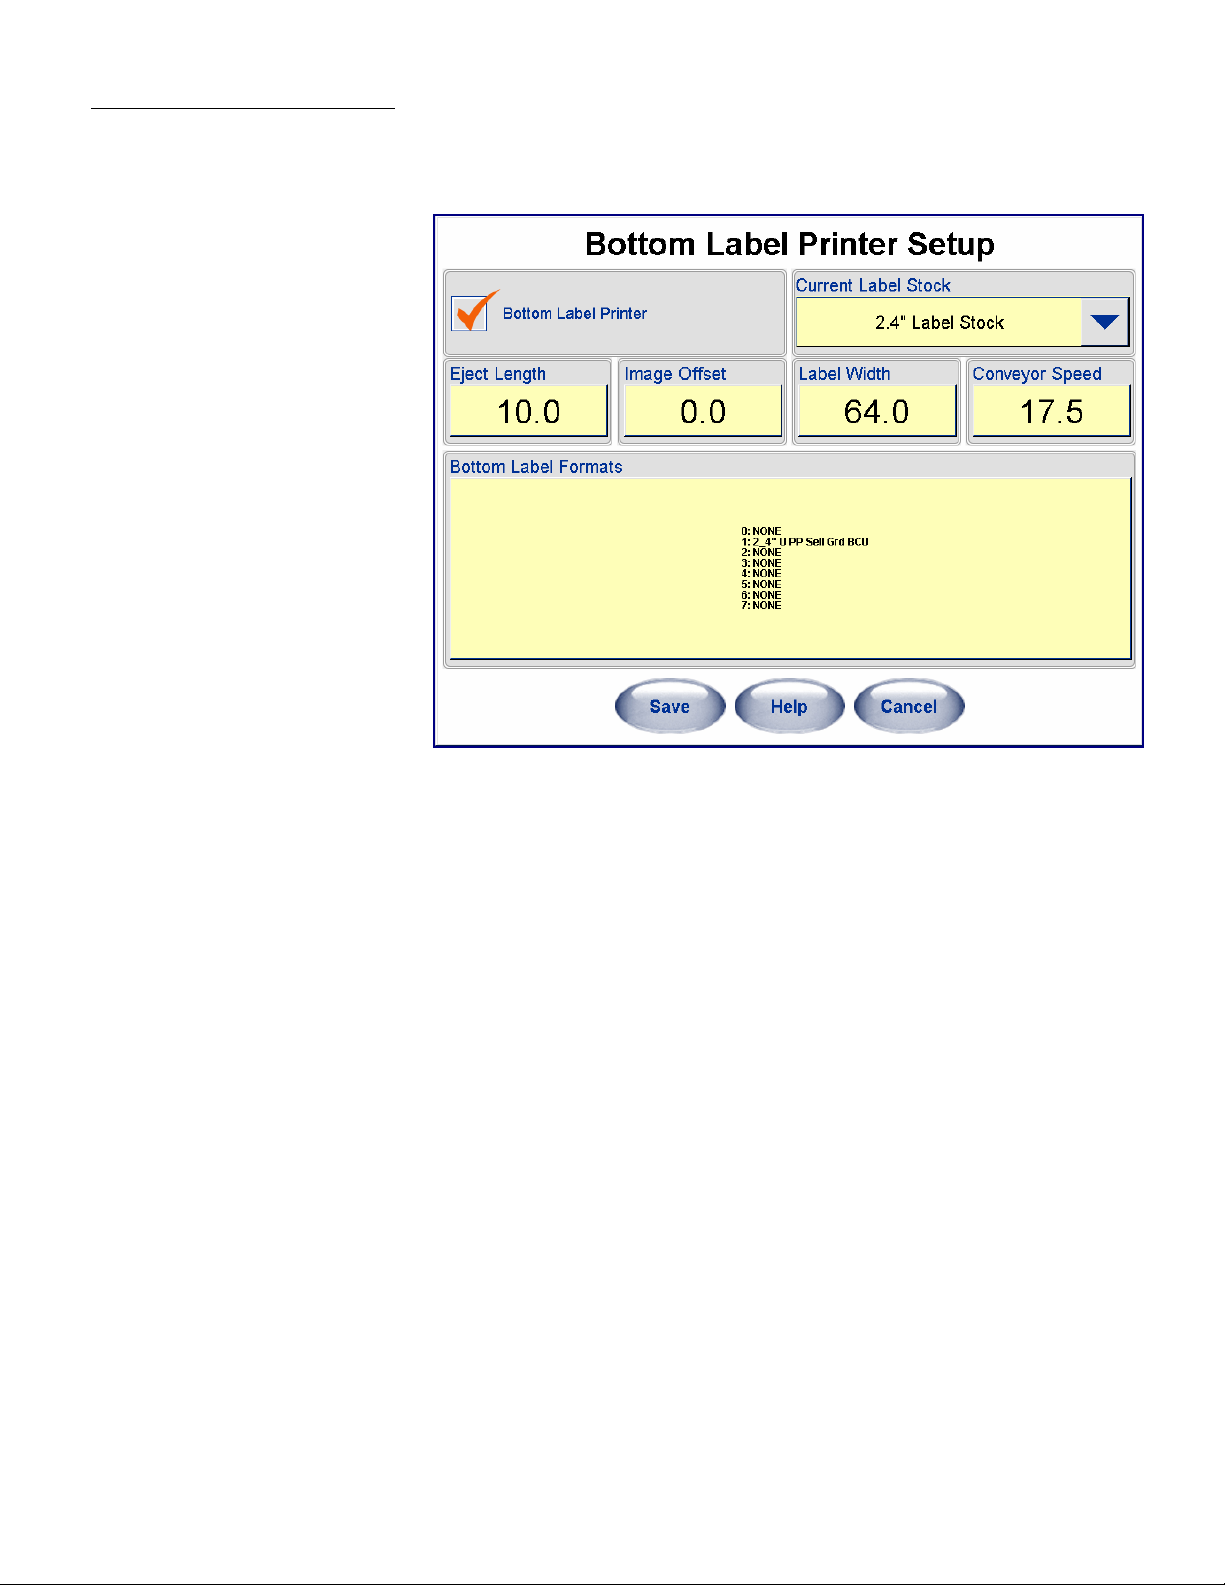
Bottom Label Printer
Setup
Bottom Label Printer
Click in the box to configure the Bottom Label printer. Once selected the following options will
appear and can be configured.
Eject Length
This is the position the label will stop at after printing. To have the label stop farther out from the
printer, increase this value. The default is 12.5 mm.
Current Label Stock
This is the size of the labels you have installed in the Bottom Label printer.
Image Offset
The Image Offset (in mm) is used to raise or lower the printed image on the label. The default is
0.0 mm. To raise the image on a label, lower the value. To lower the image on a label, increase
the value. For details, refer to Image Offset section in the Label Printer setup.
Label Width
The Label Width (in mm) is used to set the label parameters. The factory default is
64.0 mm.
Bottom Label Format
This is the format style of the labels in the Bottom Label printer.
2-12
Page 29
Calibrate Printer Gap
Sensor
Chapter 2: Setup
Printer & Label Setup
NOTE: Use this tool if you
are experiencing label
indexing or feeding
problems, in order to reset
the printer calibration for
your current labels.
NOTE: prior to selecting the
Calibrate Label Printer or
Calibrate DayGlo Printer
verify the settings, such as
width and length, are correct
by using the Label Printer
Setup or DayGlo Printer
Setup buttons (see previous
sections).
Pressing the Printer Gap Calibration function will rapidly print a series of blank labels to
insure that all parameters are within specification. This command should be executed
any time the labels are changed or whenever there is a feed or indexing issue with the
labels.
By selecting “Calibrate Label Printer” , “Calibrate DayGlo Printer” or “Calibrate
Bottom Printer” the gap sensor in the printer can be recalibrated if labels are not
ejecting properly (multiple labels or partial labels ejected).
2-13
Page 30
METTLER TOLEDO Model UC-PW User's Guide
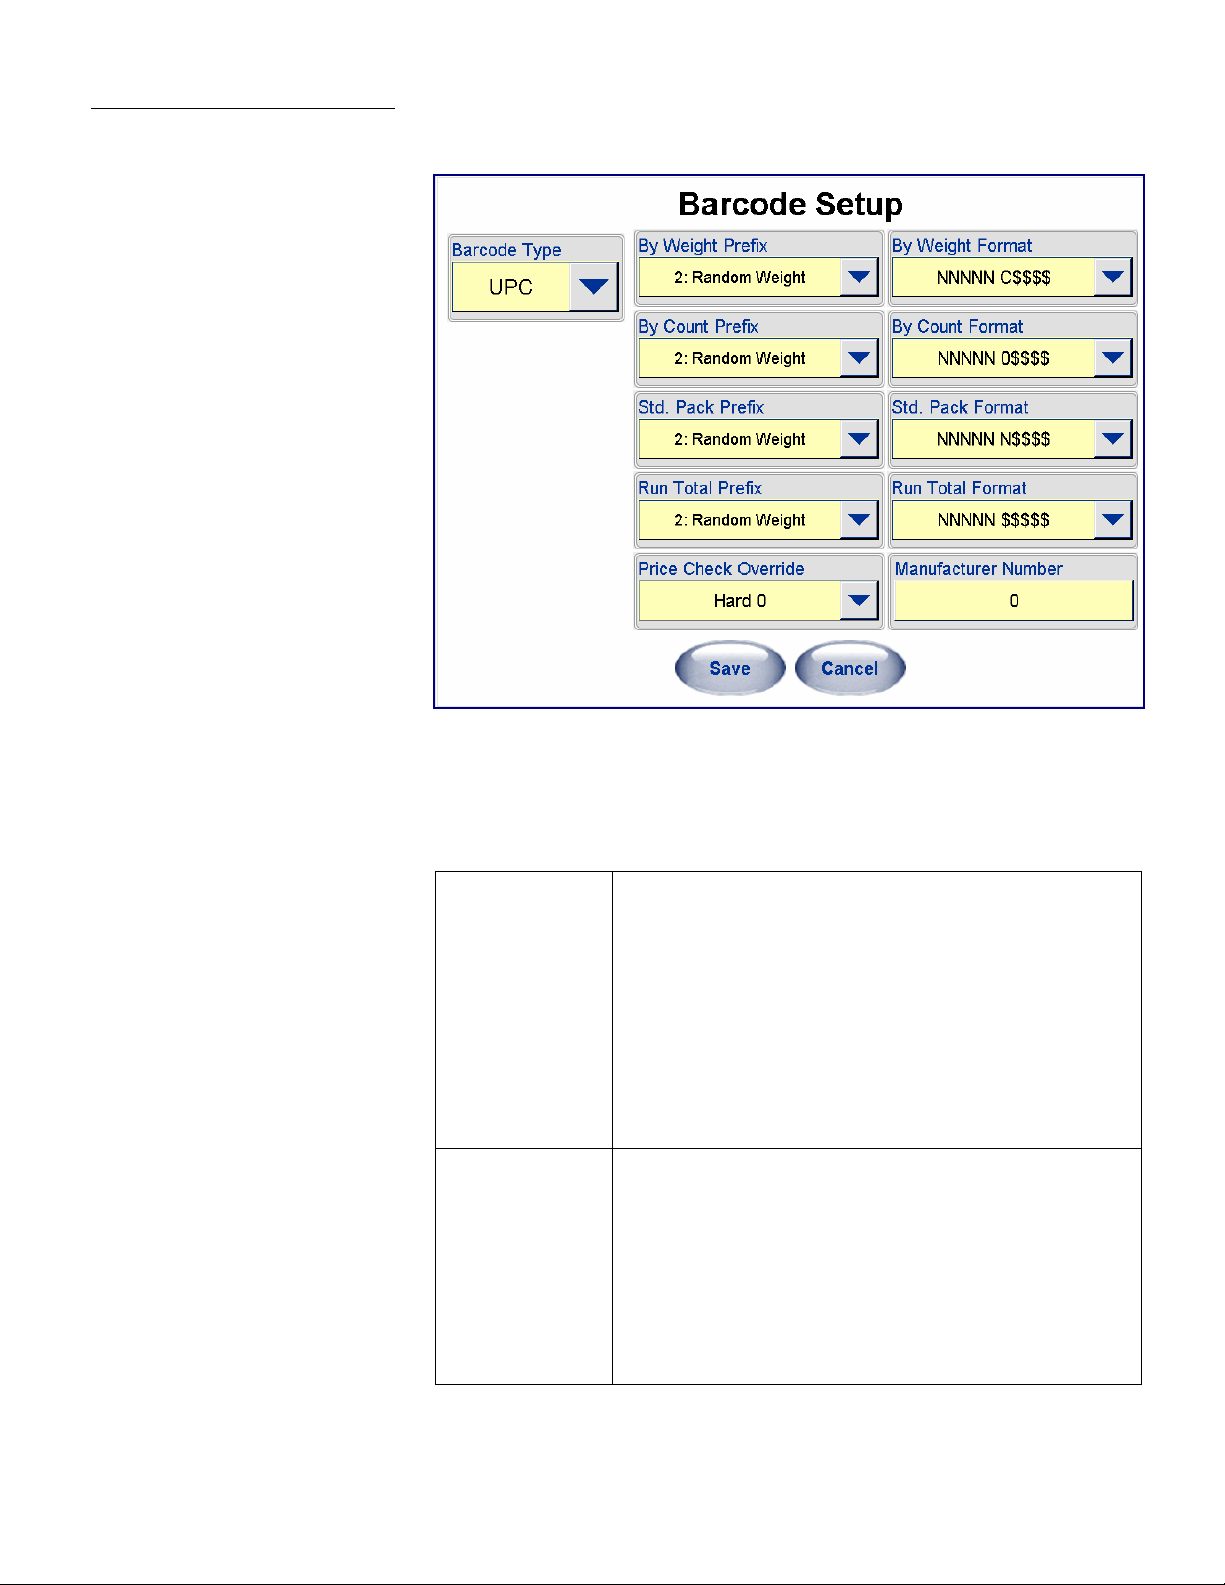
Barcode Setup
Bar Code Format Codes:
N Item number Digits.
C Check Digit.
0 The number zero.
$ Total Price Digits.
# Weight Digits.
X Symbol Check Digit.
D Digit.
Barcode Type
Select a Barcode Type of either UPC or EAN bar code symbols. When UPC is selected,
only valid UPC settings will display. When EAN-13 is selected, only valid EAN settings
will display.
When UPC Barcode is selected:
By-Weight Prefix
By-Count Prefix
Std. Pack Prefix
Run Total Prefix
By-Weight Format
By-Count Format
Std. Pack Format
Run Total Format
Select the bar code prefix. This is the bar code type and is the
first character of the bar code. The default is 2.
0 General Merchandise (No price is encoded)
1 Not identified
2 Random-Weight. Item number with total price encoded
3 National Drug and Health items. Similar to Type-0
4 In-Store Marking
5 Coupons
6 General Merchandise (No price is encoded)
7 General Merchandise (No price is encoded)
Refer to the code explanations on the left.
NNNNN ##### X (5-D Item/5-D Wgt)
NNNNN N#### X (6-D Item/4-D Wgt)
NNNNN 0#### X (5-D Item/0/4-D Wgt)
NNNNN C#### X (5-D Item/C/4-D Wgt)
NNNNN $$$$$ X (5-D Item/5-D Price)
NNNNN N$$$$ X (6-D Item/4-D Price)
NNNNN 0$$$$ X (5-D Item/0/4-D Price)
NNNNN C$$$$ X (5-D Item/C/4-D Price)
2-14
Page 31

Price Check
Override
Chapter 2: Setup
Printer & Label Setup
When a PLU contains a command to turn off the price check
digit, (Ex: Action Code 49), this selection determines what will
print in the price check digit space. A hard zero or a six-digit
item number can be selected.
Bar Code Format Codes:
N Item number Digits.
C Check Digit.
0 The number zero.
$ Total Price Digits.
# Weight Digit.
X Symbol Check Digit.
D Digit.
Manufacturer
Number
This selection allows for a default five-digit manufacturer
number, when used with type 0, 1, 3, 5, 6, or 7 bar codes,
replacing the first five MSD digits of the item number.
When EAN-13 Barcode is selected:
By-Weight Prefix
Enter the bar code prefix. The default is 21.
By-Count Prefix
Std. Pack Prefix
Run Total Prefix
By-Weight Format
By-Count Format
Std. Pack Format
Run Total Format
Refer to the code explanations on the left.
NNNNC ##### X (4-D Item/C/5-D Wgt)
NNNNN ##### X (5-D Item/5-D Wgt)
NNNNC $$$$$ X (4-D Item/C /5-D Price)
NNNNN C$$$$ X (5-D Item/C/4-D Price)
NNNN$ $$$$$ X (4-D Item/6-D Price)
NNNNN $$$$$ X (5-D Item/5-D Price)
NNNNN N$$$$ X (6-D Item/4-D Price)
2-15
Page 32

METTLER TOLEDO Model UC-PW User's Guide
Presets Setup
Presets are used for one-touch call up of PLU records. Instead of entering the PLU
number, the preset keys are assigned for a specific PLU number and department. Then,
when it the preset key is pressed, the PLU is automatically called up. There can be
many pages of presets and the PLUs can be called from any department. The pages are
selected using the Page Buttons at the bottom of the screen. You must configure the
pages before the preset keys for that page can be configured.
Pages
Here is an example screen that has been configured with various departments.
2-16
Pages are represented by the buttons along the bottom of the screen, usually different
departments. To setup preset pages, press the Pages button.
Page 33

Chapter 2: Setup
Presets Setup
Select one of the item pictures to explore the category represented or navigate by using the dropdown menu to the right of the PLU grid.
Select the action you want to perform: Add, Go to, Edit, or Remove a Page You can also Add or
Remove a Linked Page, as well as Remove All Pages or Swap Pages.
Add Page
To add new pages, press the Pages button then select Add Page from the dropdown menu.
This will give you an initial screen that you can select the overall look of the Page. Press the Page
Format box (1) and select either Text-based page or Graphical page. Press the Page Layout
(2) and select the number and size of the preset keys on the page
(4 x 3, 4 x 4, or 4 x 6).
2-17
Page 34

METTLER TOLEDO Model UC-PW User's Guide
If you wish the page to be accessed using a button on the bottom of the screen, select the check
box Show on Tab Bar? (3). If the page will be used as a link accessed by pressing one of the
preset keys, leave the box unchecked.
Hit the Next button to continue the Page setup.
You can add pages automatically by selecting By Department for the Page Type, or manually
create them using Custom.
If you select By Department, pages of preset keys for all of the PLUs in that department
will be created. To program the preset keys manually, select "Custom" from the drop
down menu. Select either "By Department" or "Custom" from the drop down list and
press Next> to continue.
2-18
Page 35

Chapter 2: Setup
Presets Setup
Adding Preset Pages By Department
If you are adding pages by department, next select the department from the drop down list and
press Next> to continue. Select the department page you wish to create from the menu.
NOTE: When you are all
done programming presets,
remember to press the Save
button before exiting the
Presets Menu to save your
settings.
Based on which department you selected, the number of pages automatically created
will correspond to all the PLUs from that selected department.
You can go back by pressing the <Back button, finish by pressing the Done button, or
cancel all by pressing Cancel.
2-19
Page 36

METTLER TOLEDO Model UC-PW User's Guide
Adding Pages using Custom
First select Custom from the dropdown menu, then press Next>.
This will give you a page where you can Rename the page (all new pages default to
“Page X”) and / or give the page an Alternate Name. An Alternate Name is used when
the Alternate Language button is pressed.
The exact same process is used to set or edit the Alternate Page Name and to Rename a
Page.
This will return you to the Add Preset Page screen.
You can go back at any time by pressing the <Back button, finish by pressing the Done
button or cancel all by pressing Cancel.
2-20
Page 37

Chapter 2: Setup
Presets Setup
Edit Page
Editing a page is similar to adding a page, only you are modifying an existing preset
page, rather than creating one.
Select the page you want to edit along the bottom bar, press the Pages button then
select Edit Page from the dropdown menu.
This will return the Edit Preset Page screen. From here you can edit the Page Name,
the Alternate Name and the Page Layout.
You can also modify the Show on Tab Bar option. When checked, the page will appear
along the bottom of all screens.
2-21
Page 38

METTLER TOLEDO Model UC-PW User's Guide
Keys
Edit Preset Keys
Use Edit Preset to add or modify a preset Key (PLU).
To Add a preset, select a blank (empty) preset key and then press the Keys button.
Finally, select Edit Preset from the dropdown menu.
To Edit an existing preset, follow the same instructions for adding a preset, but select an
existing key first.
Follow the below instructions to both Add and Edit a preset key. Press Choose PLU to
select a PLU for the key or Choose Page to have the key link to another preset page.
2-22
Page 39

Chapter 2: Setup
Presets Setup
CHOOSE PLU
To select a new PLU, touch the Choose PLU key. Press the Next> key to continue without
changing the PLU.
If you pressed the Choose PLU button, there are two methods to find PLU – List and Search.
List Method
Select the department where the PLU is located by touching the + button next to the department.
You can then scroll through the list of PLU numbers.
This will return you to the PLU number in the Configure Preset Wizard screen.
2-23
Page 40

METTLER TOLEDO Model UC-PW User's Guide
Search Method
If you use the Search key, you can find a PLU by both PLU number or PLU
description.
2-24
Page 41

Chapter 2: Setup
Presets Setup
Select by PLU Number if you know an individual PLU’s number. When prompted with a
keypad, enter the number by touching the screen.
After entering the number, hit Enter. If the number is valid it will return details on the
number for you to select on the page. If the number is not a valid PLU number, you will
receive a screen telling you it does not match.
2-25
Page 42

METTLER TOLEDO Model UC-PW User's Guide
Select the Search method, by PLU Description if you want to return a list of possible
PLUs.
This will give you a keyboard to type in a phrase (or part of a phrase) that will be
searched in the PLUs.
After typing in the description, hit Apply.
2-26
Page 43

Chapter 2: Setup
Presets Setup
For example, a search of the description “Cake” returned the following results:
Highlight the PLU you wish to use, then press the Select key. By pressing the Edit the
Description or Alternate Description key, you can modify those descriptions, or go
back to select a different PLU by pressing <Back, or complete the procedure by pressing
Done.
At this point, you can press Done to quit or program another preset. When you are finished,
remember to press the Save button to save and exit. To exit without saving any of the changes,
press the Cancel button.
2-27
Page 44

METTLER TOLEDO Model UC-PW User's Guide
Choose Page
If you want the preset key to link to another Preset Page (rather than a PLU), touch the
Choose Page button.
The returned list will have all available Preset Pages that you could assign to the Preset Key.
Touch the page you wish to assign to the key. Once highlighted, page details will appear on the
right.
2-28
Touch the Select button once you have made your selection.
Page 45

Chapter 2: Setup
Presets Setup
You will be returned to the Configure Preset Wizard, the Page Name and Page # lines
will reflect the Page you just selected. Hit the Next> button.
2-29
Page 46

METTLER TOLEDO Model UC-PW User's Guide
On the next Configure Preset Wizard screen you can edit the Description and the
Alternate Description of the Preset Page you just added.
NOTE: this is not a global Description name change. Any Description changes will only
apply to this instance where the Page has been added in as a Key.
PLU -
Preset Key
Page-
Preset Key
2-30
Page 47

Backroom Setup
Chapter 2: Setup
Backroom Setup
This selection is used to configure the Backroom Prepack Controller. Items such as
Indexer, Date Forward, Macros, Option Screen Overrides, and Indexing Errors. Backroom
Setup also provides a summary of Hardware Information for easy reference.
Choose Indexer
Date Forward Hour
Hardware Version
Information
Select 705 if the controller is installed on a Model 705/706 Autolabeler® or NONE
when using on a Step Saver®. This controller cannot be used on the 606 Autolabeler®.
From the Date Forward Hour field select which hour the shelf life / use by date
advances. This function can be used to advance the date one day for items packed late
in the day.
A summary of various hardware information regarding the Printer, Loadcell and Label
Printer, is provided.
2-31
Page 48

METTLER TOLEDO Model UC-PW User's Guide
Macros Setup
Macros allow you to program a button to perform tasks such as changing the tare,
discounting the price, etc. There are standard macros already installed. You can edit
these macros, delete any macros, and add new macros.
The macro can include the following items:
Macro Name – The name of the macro will be used on the button text.
Tare – The tare configured in the macro can temporarily override the PLU tare.
Discount Type – Select None, Unit Price Discount, or % (percentage) off Total Price.
Amount – If Unit Price Discount is selected, enter the amount that will be subtracted
from the PLU programmed price. If % off Total Price is selected, enter the percentage
you wish to discount the PLU total price (example: enter 10 for a 10% discount).
Accumulator – You can specify if you wish to have the transaction recorded in a
different accumulator that you specify. Select the Rewrap, Inventory, or a custom
accumulator you have created. NOTE: Accumulator options can be customized by using
the Accumulator Setup Screen (from the Unit Setup).
2-32
Page 49

ADD MACRO
To ADD a new macro, press the Add Macro button.
Chapter 2: Setup
Backroom Setup
Next, fill in details of the new macro:
Macro Name – touch the blank field to bring up the keyboard. Enter in the name of the
new macro.
Discount Type – using the drop down menu select Unit Price Discount or % Off Total
Price depending on what type of discount will be applied. If no discount is to be used,
select None.
Discount Amount – touch blank field to bring up a keypad. From here enter a fixed
amount that will be discounted. Hit Enter when finished.
Accumulator – using the drop down select an accumulator (totals) to apply to this
macro.
Tare – touch the blank field to bring up a keypad. From here enter a the Tare to be
assigned to this macro. Hit Enter when finished.
Press the Save button to save your new macro, or Cancel to exit without saving.
The new macro will be created and listed three times (four if fractional pricing is
enabled). The macro is duplicated for each of the pricing modes which are listed as
codes when you scroll to the right to view the PLU Type column. The codes are as
follows:
0 = By Weight Pricing
1 = By-Count Pricing
2 = Fractional Pricing (when enabled in setup)
3 = Standard Pack Pricing
2-33
Page 50

METTLER TOLEDO Model UC-PW User's Guide
EDIT MACRO
The macro can be configured different for each pricing mode using the Edit Macro
function. Highlight the macro to edit and then select Edit Macro.
Now the existing macro’s name, discount type, accumulator, tare, and discount amount
can all be edited. This process follows the exact same process as adding a new Macro.
Press the Save button to save your changes, or Cancel to exit without saving.
DELETE MACRO
A macro can be deleted entirely by Highlight the macro and then select Delete Macro.
Macro Placement
This feature allows you to customize which macro buttons and label placement
command buttons appear on the PLU screen. You can enable/disable any of the macros
from this screen. You can also swap positions, replace and remove the listed Macros.
2-34
Rewrap – Flags the item as being previously labeled.
Turn Label – When the PrePack controller is used with an automatic label applicator, selecting
this macro will turn the label 90º.
Family Pack – Discounts the item unit by $.10. This can be changed in Macros Setup.
Bottom Label – When a bottom label applicator is used, this will force the unit to apply a
bottom label to the package.
Inventory – The Inventory macro places the transaction into this accumulator.
Manually Apply Label – Selecting this macro will set up the system for the label to be applied
by hand.
Not Configured – There is available space for additional customized macros. When not in use,
these will appear as “Not Configured” macro buttons on this screen.
Page 51

Retrieve Indexer Errors
Chapter 2: Setup
Backroom Setup
If an Indexer is configured for your system (example 705), you can retrieve error log
files from the Retrieve Indexer Errors button.
From the Indexer Error Log you can view the results, print the results by selecting the
Print Button or go back to the Backroom Setup screen by selecting the Return button.
2-35
Page 52

METTLER TOLEDO Model UC-PW User's Guide
Setup
Passwords/Levels
The scale can support up to 9999 unique Operator IDs. Each Operator ID and
Supervisor can have different security settings, permissions, and all transactions can be
reportable. Passwords are used to limit access to various functions, both in Operator
setup security and for Operator transaction use.
To enable the use of passwords, the “Use Security” box must be checked. This will
protect the Operator ID during setup.
For Operator transaction security and tracking, the “Operator Password Required” box
must be checked. When this is checked the Operator will have to enter their password to
perform certain functions on the unit.
Both passwords can be up to 5 digits and must be numeric. The Supervisor defaults
with access to all functions.
Operator access can be restricted with the “Permissions Denied” and “Permissions
Granted” features. On creating a new Operator, the system defaults to all functions in
the “Denied” list. By moving functions from the “Denied” to “Granted” list, the Operator
will then have permission to perform those functions.
2-36
Page 53

Service Scale Setup
Chapter 2: Setup
Service Scale Setup
This selection is used to configure the Service Scale options.
Enable By-Count Auto
Clear
Enable Force Count
Enable Forced COOL
When the box is checked (feature enabled), the PLU is automatically cleared and the
scale will return to the home screen after a label is printed. When the box is unchecked,
the CLEAR button must be pressed to clear the PLU and return to the home screen.
When this box is checked (feature enabled), the quantity of any By Count PLU must be
entered before the transaction can be completed. When the box is unchecked, the
quantity programmed in the PLU record is used, but can be manually overridden (if
allowed in setup).
When this box is checked (feature enabled) and the proper flag is set on the PLU record,
the user will be forced to ensure a COOL statement is built for and able to be printed on
the label before allowing a label to be printed.
2-37
Page 54

METTLER TOLEDO Model UC-PW User's Guide
Auto Sense
Auto Sense can be set up to minimize the need to press the ENTER key. Values can be selected
from Disabled to 6 digits. The default is Disabled. For example, when set for 3 digits, if 103 is
entered, the scale will automatically call PLU 103 on the PLU Edit Screen without the need to
press the ENTER button. NOTE: In this example, PLUs greater than three digits cannot be called.
PLU Transaction
Timeout
When a value greater than zero is selected, if a PLU is entered, and no transaction takes place
within the selected time, the PLU is cleared and the scale returns to the home screen. The value
can be selected from 0 (disabled) to 120 seconds. The default is 0, (disabled).
Search Screen Timeout
This value will set the timeout when the search will start, if another keyboard indicator is not
pressed.
Transaction Screen
Overrides
Select the fields that can be changed by the Operator on the PLU Edit Screen.
Click the box to enable / disable. When the box is checked, the field/feature can be changed and
the box will be white. When it is unchecked, the field/feature cannot be changed and the box will
be a solid blue. Click the Save button when complete.
2-38
Page 55

Quick Edits
View Version
Information
View Logs
Chapter 2: Setup
Quick Edits
The Quick Edits selection is used to change some of the more common numeric data in
a PLU record. For further details see Chapter 4: Quick Edits.
This button will display the Prepack Controller software version and part number, as well
as the IP address.
Used for service to aid in troubleshooting problems. This includes a calibration and error
log, as well as this screen logs certain items that are required by Weights and Measures
NTEP regulations. The error log is a display of the current genx.log file.
Minimize Application
Serial Devices Setup
Load Cell Setup
Used to minimize the application (without exiting) to the task bar.
This function is used to setup the Serial Devices. See UC-PW Service Manual for
details.
This function is used to setup the Load Cells. See UC-PW Service Manual for details.
2-39
Page 56

METTLER TOLEDO Model UC-PW User's Guide
Launch External
Program
Use this function to access the UC Editor, UC Remote Setup, UC SmartLabel, the Report
Generator, and Touchscreen Calibrator; as well as any user loaded programs.
Please see the UC Software Tech Manual for details on using these external applications.
Quit To Desktop
Shutdown System
NOTE: Although not required, it is recommended that a wireless mouse and wireless
keyboard be available if the user is planning on activating Windows
®
functions,
including any external applications. If a wireless mouse and keyboard are not available,
any standard USB mouse and keyboard can be used.
This button will exit from the application and return to Windows®.
NOTE: Although not required, it is recommended that a wireless mouse and wireless
keyboard be available if the user is planning on activating Windows
®
functions.
This button will shutdown the scale and the Windows® operating system.
2-40
Page 57

3 Operating Instructions
Chapter 3: Operating Instructions
Main Screen Elements
Main Screen Elements
1
13
12
11
2 3
4
5
6
7
8
9
10
Weight Display. Touch to zero the scale.
1
Current Department, date, time, and network ID.
2
Price Look Up (PLU) number display.
3
CLEAR button clears values from the display.
4
ENTER accepts the displayed value.
5
BACKSPACE erases the last entry. When pressed again it erases digits to the left.
6
The Search button is used to search the Database for a PLU based on alpha-numeric input from the
7
operator.
The Operations Button is used to access the Cutting Test and Void Transactions functions
8
If the Help system is enabled, a Help button will appear on certain screens. When touched, this button will
9
launch the Help system. The arrow describes the area occupied by the button when it is enabled.
The Setup button is used to enter the controller's Setup Mode.
10
Preset Page Selector Buttons are used to select the preset page you wish to use to perform a transaction.
11
When there are more buttons than can be displayed on the screen, use the arrow left or arrow right buttons
to toggle through all of the pages. The current page will be highlighted. These buttons are configured in
Setup mode in Presets Setup.
Preset Buttons are used for one-touch call up of PLU records. A PLU number can be assigned to a certain
12
key. When this key is pressed, it calls up the record assigned to it.
Gross/Net indicator. When Net displays, this indicates a tare weight.
13
Main Screen Elements
3-1
Page 58

METTLER TOLEDO Model UC-PW User's Guide
Quit the Prepack
Controller Application
To exit the Prepack Controller application, press the Setup button, then the Quit to
Desktop button on the Setup Screen.
3-2
Page 59

PLU Screen
1
16
15
14
2 3
13 12 11
Chapter 3: Operating Instructions
PLU Screen
4
5
6
7
8
9
10
1
This is the weight of the item (less the tare) if the PLU is sold by weight. Touch to zero the scale.
2
The Tare is programmed into the PLU record. Touch this box to override the tare, if allowed in setup.
3
The Unit Price is programmed into the PLU record. Touch to override (if allowed in setup). This is used to
calculate the Total Price.
4
This value is the Total Price of the item. If the item is sold by weight, this is the unit price multiplied by the
weight of the item. The Total Price is never operator accessible.
5
The Pack Date uses the current date set in the controller. This will print on the label if it is included in the
label format.
6
The Shelf Life is programmed into the PLU record. This date is used to show the date when the item should
not be sold anymore. This date will print on the label if it is included in the label format. When the box is
white, this date can be changed.
7
The Use By Date programmed into the PLU record. This date is calculated based on the current Pack Date.
The item should not be consumed beyond this date. This date will print on the label if it is included in the
label format. When the box is white, this date can be changed.
8
Clear ends the transaction and returns the display to the Main Screen.
9
If the Help system is enabled, a Help button will appear on certain screens. When touched, this button will
launch the Help system. Again, the arrow describes the location of the help button should it be activated.
10
Print - prints the item label.
11
The Label Format button allows the user to select from a populated list of available label sizes and styles.
12
Pressing Accumulator adjusts or otherwise disables the accumulator function for the unit.
13
Enable PrePack puts the scale program into PrePack mode.
14
The Product Info (or Custom) key will display here. Touch for additional product information.
15
The Extra Text number is programmed into the PLU record so when the PLU is called, the associated Extra
Text is called. When the box is white, this can be changed.
16
Gross/Net indicator: when Net displays, this indicates a tare weight.
PLU Screen Elements
3-3
Page 60

METTLER TOLEDO Model UC-PW User's Guide
Options Button
The Options button on the PLU Screen is used for the following temporary overrides. The Options
screen below allows overrides on all of the items. The boxes are white, indicating overrides are
allowed. If the boxes are not white, no overrides are allowed.
The overrides can be enabled or disabled from the Transaction Screen Overrides screen in the
Service Scale Setup, as shown below. In order to allow the overrides, the boxes must be
checked.
Label Format
An alternate label format can be selected for this run using this override.
Grade
You can select another Grade for this run using the drop down menu.
Bottom Label Format
If configured, this is used to apply a bottom label to every package when used in an
automatic system with a bottom label applicator.
Satellite Graphic
If a Satellite Graphic is configured on the label, you can use this to override the graphic used
for this run, or disable it for this run.
Linked Graphic
If a linked graphic is configured on the label and in the PLU record, this can be used to select
another for this run.
DayGlo Graphic
If there is a DayGlo printer used, the programmed graphic can be changed for this run. Select
from a drop down list or using the Keypad enter the graphic’s corresponding number.
Accumulator
A different accumulator for the totals information can be selected using this function.
3-4
Page 61

Chapter 3: Operating Instructions
Run Total
Totals from the selected PLU’s current run are gathered based on weight, cost, and number
of packages. These are displayed on the PLU Edit Screen. They can be printed on a “Run
Totals” label if needed.
NOTE: the Run Totals label format is set up from the Label Printer Setup screen.
Print Inhibits
Select the Print Inhibits button from the Options screen to view what items you can refrain
from printing on a label for this transaction.
PLU Screen
3-5
Page 62

METTLER TOLEDO Model UC-PW User's Guide
Product Info. Button
The Product Info button on the PLU Screen can be used to call up additional product
information supplied by the customer. In each tab, the user will find information
pertaining to different product applications as placed by the programmer. If no
additional product information is programmed, pressing the Product Info button will
bring up a blank page.
Below is an example of a programmed Product Info page.
3-6
Page 63

PLU Pricing Modes
By-Weight PLU
Chapter 3: Operating Instructions
PLU Pricing Modes
PLU is an abbreviation for Price Look Up. The PLU is a reference number assigned to
access a product's record that includes fields such as the description, price, tare, etc.
Different PLU's will have different pricing modes. Meat is normally sold "By Weight" by
the pound or kilogram. Many bakery products are sold "By Count". Other products may
be sold in a standard package that all weighs the same (or assumes all weight is the
same or a minimum value). The different pricing modes are as follows:
Examples of products sold by weight are meats, cheese, poultry, and produce. ByWeight items can be priced in three ways:
• Priced "Per Pound" - Typically weighed items are priced per the pound. The weight
multiplied by the unit price equals the total price of the product to the customer.
• Priced "Per Fraction of a Pound" (fractional) - The item may also be priced by the
fraction of the pound (where legal and desired). Pricing per 1/4 pound and per 1/2
pound are available.
• "Pounds for" price - The PLU may be sold with a pounds for price (rather than price
per pound). (2 pounds for $1.00).
By-Count PLU
Standard Pack PLU
PLU Search Modes
Examples of items sold by the count are cookies, donuts, rolls, bread, etc. Example: 4
Apples for $0.69. The By-Count PLU allows the operator to use the wrapper for a
labeling operation. Pricing is entered as a certain quantity of items for a set price. If the
total weight for the items is needed, a weight field can be configured on the label to print
the weight of the items in addition to the By-Count information.
Examples of items sold by Standard Pack include whole chickens, sheet cakes, bread,
etc. The Standard Pack PLU is similar to By-Count and also allows the operator to use
the wrapper for a labeling operation. The labels indicate the net weight of the item and
total price of the item. These types of items all weigh the same (or are assumed to
weigh the same or of a minimum value).
The Search Function is allows you to search for a PLU by name or partial name. This is helpful if
the PLU number is unknown or if a list of choices is desired.
From the Main Screen, click on the Search button.
3-7
Page 64

METTLER TOLEDO Model UC-PW User's Guide
From here the Search screen will appear. Select the Department you want via a dropdown menu
(1). Then using the keyboard (2) type in the word, or portion of the word, you are looking for and
hit the Search button (3).
1
2
In Service Counter mode the “Next” and “Previous” buttons are not available; instead the
returned search list is browsed via a scroll bar.
3
3-8
Page 65

Chapter 3: Operating Instructions
PLU Search Modes
This will return a list of any PLU in the database which contains that word as part of a
keyword or description. Highlight the PLU by touching it.
This will return the PLU in the PLU Screen.
3-9
Page 66

METTLER TOLEDO Model UC-PW User's Guide
Country of Origin
Labeling (COOL)
Country of Origin Labeling (COOL) is information assigned to a specific PLU that
designates where a product came from and the processing it went through.
If a COOL is associated to a PLU, you will be prompted to choose a preconfigured COOL
statement or, in some cases, create custom COOL statements prior to going on to the
PLU transition screen.
COOL associations are set up from the UC Editor. For more information on the COOL
setup procedure see the UC Editor Manual or UC Software Technical Manual.
Preconfigured COOL
Statements
If a PLU is selected that has a forced COOL statement, the Preconfigured COOL Declaration
screen will appear. Preconfigured COOL Declaration screen consists of:
(1) Current COOL Text – will display the text which is selected from the bottom list and this text
will appear on the label if proceeding with the transaction.
(2) Default COOL Text – will display the defaulted COOL text which will be printed on the label if
nothing else is selected.
(3) Most Recently Used Text – the COOL text statement that was last used on a transaction and
printed on a label for the selected PLU.
(4) List of possible preconfigured text that can be applied to the selected PLU.
3-10
2
3
4
Page 67

Chapter 3: Operating Instructions
Country of Origin Labeling (COOL)
After selecting the text you wish to use, hit
Enter. You will continue onto the PLU screen
where the COOL text will be displayed (5).
If a COOL statement is configured to the PLU but it is not “forced” (meaning you are able to
complete a transaction without selecting a COOL statement to be printed on the label), a No
COOL button is available.
Select No COOL if you wish to complete the transaction and have the label printed without any
COOL statement.
5
This PLU does not have COOL Statements Enforced,
so a transaction can proceed without a COOL
statement by using No COOL
If the PLU selected has data that will allow the user to construct a custom COOL
statement, the Custom button is available as well.
This PLU does have COOL Statements Enforced,
so Preconfigured Text or Custom Text must be
selected before proceeding.
3-11
Page 68

METTLER TOLEDO Model UC-PW User's Guide
Custom COOL
Statements
Custom COOL statements are constructed from keywords or production steps and
country names. If a PLU record has custom COOL production steps and country names
associated with it, a Custom button will appear at the bottom of the Preconfigured
COOL Declaration screen.
NOTE: If there is no Preconfigured COOL text associated with the PLU, the user will be
immediately taken to the Custom COOL dialogs.
1. Select a
Production step
or Keyword
from this list
2. Select a
country from
this list (after
selecting a
production
step).
Select a Production Step (1) followed by a Country (2). Continue in that fashion until
satisfied with the new custom COOL declaration (view in the Custom COOL Text field
on the top of the screen).
Choose the Done button when complete.
The Undo button will undo the last entry and you may continue to “undo” until all
countries and production steps are removed.
The Clear button will completely clear the custom declaration allowing a new
declaration to be built.
3-12
Page 69

Forced COOL
Enable Forced COOL check
box. Together with forced
flag on the PLU, forces COOL
information in order to
complete the transaction
Chapter 3: Operating Instructions
Country of Origin Labeling (COOL)
There is a flag on the PLU record that indicates that COOL is to be forced on that PLU.
There is also a scale setting within Service Scale Setup that enables forced COOL on
the scale. When both of these are set, the scale will not allow a transaction to complete
without a COOL statement selected for printing on the label.
COOL Pre-Text
NOTE that the No COOL button is not
available when COOL is forced.
COOL Pre-Text is a single text record associated with the PLU in the PLU record. It is
not changeable and is always printed on the label. The most common use of it is to
identify if seafood is farm raised or caught in the wild.
Raised in the wild
COOL Pre-text
indicator
3-13
Page 70

METTLER TOLEDO Model UC-PW User's Guide
Operations Menu
When you press the Operations button, the Operations screen will display. In this
screen you can perform the following functions: Cutting Tests, Void Transactions, Verify
Labels and Launch User Applications.
3-14
Page 71

Cutting Tests
Chapter 3: Operating Instructions
Operations Menu
The Cutting Test allows the operator to enter the primal weight and cost of a product.
Data collected during a Cutting Test can be used produce a report detailing the saleable
yield of a primal cut. The operator can enter and exit the test at any time and resume at
a later date.
To include bone and fat in the tests, the following two By-Weight PLU records should be
created:
Bone - Enter unit price as zero.
Fat - Enter unit price as zero.
The controller will recognize the zero price non-saleable items and will split them from
the saleable items on the report. A third By-Weight PLU for miscellaneous trimmings can
also be created and included in the test.
After all of the items have been entered in the cutting test, everything should be weighed
and a label printed for each PLU. NOTE: the date is entered into the test only when the
PRINT key is touched.
NOTE: the Bone and Fat items run at zero price will appear below the saleable yield line
on the report.
The test is complete when all items from the test product are run.
3-15
Page 72

METTLER TOLEDO Model UC-PW User's Guide
Void Transactions
Use this feature to void previous transactions so your totals collection will remain
accurate. Highlight the transaction, and then click the Void button.
Verify Labels
A dialog screen will appear to verify voiding the transaction. Click OK to confirm.
This function is used if you wish to print labels of all or selected PLUs. The information
printed on the label is determined by the Verify Label Format selected.
3-16
Page 73

Launch User
Applications
Chapter 3: Operating Instructions
Operations Menu
This function allows you to start an external application that is user specific.
3-17
Page 74

METTLER TOLEDO Model UC-PW User's Guide
UC Production Reports
Tool
From the Setup screen, select Minimize Application. From the desktop, click on your
start menu and select the Programs tab. Follow the path outlined in the picture below,
selecting Mettler Toledo, the Production Reports folder and the Production Reports
program to launch the Production Reports Tool.
NOTE: See chapter 6 for a
more detailed look at the UC
Production Reports tool.
Once opened, the program will prompt you with a screen like the one below.
3-18
Page 75

Production Reports
Main Screen
Chapter 3: Operating Instructions
UC Production Reports Tool
There are five primary (or default) reports built into the reporting application. They are –
Daily Production Trend Report
This report displays the sales history of the period and can be sorted based on weight or
number of units sold.
Price Override Report
This report displays the history of any price overrides that occurred over the duration of
the selected period.
Detailed PLU Report
This report will display transactions dealing with a particular PLU over the selected time
period.
Department Summary Report
This report will return a succinct breakdown of a department’s sales activity over a
particular time period.
Custom Production Report
This report returns information based on a specific, operator-selected rubric of
parameters.
3-19
Page 76

METTLER TOLEDO Model UC-PW User's Guide
Daily Production Trend
Report
From the main screen, select Daily Production Trend Report to view one of the
preconfigured options available through the Production Reports utility.
Choose your desired start and end dates by typing within the boxes appearing in the
upper right-hand corner of the window. Depending on which sorting method you prefer,
select either Weight or Units. Lastly, select which day of the week you would like
reported, as the Daily Production Trend report will return sales information based only
upon the day of the week selected from the drop-down menu in the upper left. Data will
populate the table after you press the Run Report button in the lower right.
If connected to a network printer, you may print a copy of your report right from the UCPW by pressing the Print button in the lower center of the screen. To save the report for
your archives, press Save and select the location as normal. The Back button takes
you back to the main report screen.
3-20
Page 77

Price Override Report
Chapter 3: Operating Instructions
UC Production Reports Tool
The Price Override report looks and operates very similarly to the Daily Production
Trend report. With selectable beginning and ending dates – as well as identical printing
and saving buttons – a user should be able to make use of this form within seconds.
As per all of the screens in the reporting program, Run Report will initiate the report
compilation and Back will return you to the main menu screen from which you made
your choice.
3-21
Page 78

METTLER TOLEDO Model UC-PW User's Guide
Detailed PLU Report
This is the Detailed PLU report screen. It is divided into four tables which describe the
production data. Pressing Run Report implements your latest changes, so remember to
press it between each change.
Produced Units by Day
This window tracks how many units of the PLU were sold on a per-day and by-week
basis. This field is very useful for tracking trends associated with this PLU.
Produced Retail Value by Day
This window calculates the revenue generated by a particular PLU, both exactly on a
per-week basis and as an average for the given period.
Price Overrides
This window reports how many times the PLU was overridden on a per-day and byweek basis.
Items Produced by Value Range
Within this window you will be able to track the price ranges in which your product sells
over a period of time. For example: ground sirloin may be sold in packages that fall
between certain ranges (1.00-2.99lbs, 3.00-4.99lbs, etc.). This table will tell you
within what range your product is selling best, allowing you to restructure your product
distribution practices accordingly.
3-22
Page 79

Chapter 3: Operating Instructions
UC Production Reports Tool
Should the need arise, the user may search for a particular PLU within the Detailed PLU
report screen. Pressing the PLU Search button will bring up the following screen:
This is a by-text search protocol, so type in a product name or description and the list
will be populated with any results that match your inquiry. From the list, select the PLU
you require and press the OK button. If nothing useful is returned, select Cancel.
3-23
Page 80

METTLER TOLEDO Model UC-PW User's Guide
Department Summary
Report
Similar to the Detailed PLU report screen, the Department Summary report will give
you a comprehensive overview of goings-on within a particular department via the use
of four concurrent windows. Without specific PLU-driven data fields, this report is best
used as an indicator of departmental productivity over a period of time.
3-24
Page 81

Custom Report
Generation
Chapter 3: Operating Instructions
UC Production Reports Tool
Should a user desire, the UC-PW series scale enables you to configure your own report
log via the Custom Production report function.
The column headings can be moved and manipulated by sliding their edges back and
forth. In order to populate the columns with functional data, simply click on any of the
darker-blue tabs to bring up search protocols specific to the category. Clicking on the
lighter-blue tabs will sort the available data either least-to-greatest or vice-versa,
allowing you to select based on weight, count, value, etc.
3-25
Page 82

METTLER TOLEDO Model UC-PW User's Guide
View Version
Information
Select the View Version Information button from the Setup screen to view the UC-PW
reporter version number and copyright information.
3-26
Page 83

4 Quick Edits
Quick Edits
By using the Quick Edits selection, some of the more common numeric data in a PLU
record can be changed. The Quick Edit function changes the record in the database
immediately. Items that can be changed include the price, tare, shelf-life, and use-by
date. An external keyboard is not required to use Quick Edits.
Note: Quick Edits is not for adding new records or deleting PLU’s. See the UC Editor
section in the UC Software Tech manual for information on adding and deleting PLU’s.
Quick Edits are accessed by pressing the Setup button on the Main screen. The Setup
screen is shown below.
To return to the Main screen, press the Return button.
Chapter 4: Quick Edits
Quick Edits
Touch the Quick Edits button to enter the Quick Edits mode.
4-1
Page 84

METTLER TOLEDO Model UC-PW User's Guide
When selecting the Quick Edits function, you will first be asked to select the department
for the PLU data you wish to change.
Select the department, and then click Next to display the Quick Edit Wizard PLU Main
screen.
4-2
The main screen shows the current department and allows you to enter a PLU number
on the touchpad. Enter the PLU number and press the Enter key.
Page 85

Chapter 4: Quick Edits
The PLU data will be retrieved from the scale database. To change any of the displayed
fields, touch the yellow box that displays the data.
1
3
2
Quick Edits
1.) For instance, to change the Unit Price, touch the box displaying the Unit Price. You
will then be presented with a touchpad that can be used to change the price. Key in the
new price and press the Enter key. (Don’t forget to enter the decimal point).
2.) The PLU can also be converted to a Frequent Shopper price by touching the
Frequent Shopper Type and Value boxes.
3.) To change the Shelf Life or Use By dates by touching the appropriate boxes and
selecting a new date from the calendar.
Touch the new date, and then press the OK key to apply your changes.
Repeat this process for any other items that you would like to modify.
4-3
Page 86

METTLER TOLEDO Model UC-PW User's Guide
For your notes
4-4
Page 87

5 Maintenance
Cleaning
• Disconnect power.
DISCONNECT ALL POWER TO THIS UNIT BEFORE INSTALLING, SERVICING,
CLEANING, OR REMOVING THE FUSE. FAILURE TO DO SO COULD RESULT
IN BODILY HARM AND/OR PROPERTY DAMAGE. DO NOT SPRAY OR WASH
DOWN. HAZARD OF ELECTRICAL SHOCK OR BURN.
Chapter 5: Maintenance
Cleaning
WARNING
• Do not use solvents or commercial cleaners on the unit. They may harm the
surfaces or damage the touchscreen.
• Do not spray directly on or at the unit!
• Touchscreen - Only use a soft clean cloth dampened with mild detergent and
water to clean the Touchscreen. Do not scrape with sharp objects.
• Controller Covers – Clean using a soft clean cloth dampened with a mild
cleaner or detergent and water.
5-1
Page 88

METTLER TOLEDO Model UC-PW User's Guide
For your notes
5-2
Page 89

6 Peripheral Programs
UCPW Task Manager
Overview:
Task manager is an in-store scheduling and status verification program that is meant to
assist in the operation of the Meat room, or other departments, for better operational
efficiency and tracking of important activities. These activities include such tasks as:
Cleaning and sanitizing work surfaces, floors, etc
Activities related to processing
Chapter 6: Peripheral Programs
UCPW Task Manager
Maintenance of the equipment
Maintaining the inventory of supplies
Other activities related to hygiene of the environment.
Task manager will be located as an external application in a standalone UCPW
controller or UCCW scales. Since the UCPW controller or UCCW scales are a focal point
in the department, they provide an effective communication tool between the store front
office and the operator implementing the required work.
The Task Manager will be extremely valuable to the user in the event of any health
related advisory and other liability events. Personnel using the Task Manager are
identified by their login username and password.
Task manager is used to store tasks that are to be done on a regular basis. The Store
manager can create tasks at the controller. These tasks will then be displayed on the
day that they are scheduled. The operator can mark the tasks complete after the task is
done. If the task was not completed on the date assigned, it will show a “Overdue”
status. The operator can also select a status to show a task could not be completed,
due to outstanding circumstances, and then document the reason why (example:
correct part not available). Details of “Completed” tasks’ and tasks “not done” are stored
in databases.
6-1
Page 90

METTLER TOLEDO Model UC-PW User's Guide
Requirements and
Installation
Application requires JAVA Runtime v 1.5 or above to run. SYBASE version 9.0.2 or
above is also required. The Installation package will check for both JAVA and SYBASE
Database. The Installation package will check for both JAVA and SYBASE, but has the
capacity to install only the SYBASE Database. It expects that the JAVA language version
1.5 or above is already installed on the machine and the installation will be aborted
otherwise to allow the user to install JAVA 1.5 or above.
The SYBASE dbengine 9.0 needs to be installed specifically in the path C:\Program
Files\Mettler Toledo\Service\Sybase ASA 9.0\win32. The installation package will do this
if it does not find the SYBASE dbengine 9.0 in the required path (after confirmation from
the user).
The Installation package will then install the UCPW Task Manager in the Start Up folder
of the scale. This will make the application active when the scale is started.
Environment
Application Flow
The application is designed to work on the UCPW controller and UCCW scale. As such
the screen is sized to fit into the scale display. Entry of data can be done primarily
through a QWERTY keyboard that appears on the screen and secondarily through an
external keyboard connected to the scale.
When the application starts it tries to connect to the SYBASE Database through the
default port number. If this port is being used by any other application then SYBASE
returns an error that the port is in use. The user is requested to click on the OK button of
this dialog box.
The application is designed to also connect through an alternative port number to the
SYBASE database.
Initial screen: Login screen – The user logs in with his name and password. The default
user’s name is admin and the password is admin.
Note: Each user is assigned two sets of administrative rights – Task specific (Add task /
Delete task / Edit task / Complete task) and User Specific (Add user/ Delete user / Edit
user details). By default all users have the right to complete a task.
6-2
Page 91

Chapter 6: Peripheral Programs
Overview:
After successful login, the Task Manager displays the Active Task View screen. This
screen shows the list of tasks to be done for the day. All tasks for the day are shown
regardless of which operator has logged in. The details shown are:
Task name
Task Description
Status
Priority
Date
Time Scheduled for.
The tasks are retrieved from the Master Task database by comparing the scheduled date
of the task with the current date. The creation of the Active task list is done when the
application is started and also at 12:01 AM every day
.
6-3
Page 92

METTLER TOLEDO Model UC-PW User's Guide
The tasks are shown sorted by Date and then Time.
The buttons shown in this screen are:
Add
Edit
Complete (This button changes to the “To be done” button for an Undo feature)
Cancel (This button changes to the “Restore” button for an Undo feature)
Cannot Do
Report
Quit.
In the screen shown above, the Add, Report, and Quit buttons have their descriptions in
green showing an activate status. The Edit, Complete, Cancel, and the “Cannot Do”
buttons are grey showing an in-activate status. When a pending task is selected from
the Active Task view screen, the Edit, Complete, Cancel and Cannot Do buttons are then
activated.
6-4
If the wrong task is accidentally completed, there is an undo feature in the task
manager. When selecting an already “Completed” task or a task already designated as
“Cannot Do” from the Active Task View screen, the “Complete” description on the button
will change to the “To be Done” description. If this button is pressed, the Task will revert
back to a pending status. When selecting a task that has already been cancelled from
Page 93

Chapter 6: Peripheral Programs
Overview:
the Active Task View screen, the “Cancel description on the button will change to the Uncancel description. If this button is pressed, the task will be reactivated.
In addition to the buttons on the bottom of the page, there are two icons on the top
panel of the Active Task View screen. When “Admin” (with the face) is clicked, the user
database is opened. The options are to add a new user with corresponding password,
modify an existing user and password, or delete an existing user. When adding a new
user, the “rights” of the user is specified at this time. When a user logs on that has only
Task specific rights, than that user is only allowed to change his/her own password.
When the icon on the right side (“I” icon) is clicked, information about the Task
Manager Application is displayed including the version number.
If the user touches the description field of a task a pop up displays the complete
description. Touching the Close button will close the description pop up.
A.) Add task:
When the user clicks on / touches the Add task button a screen through which the user
can enter the details of a task is opened. In this Add task screen the User is asked to
enter the Task name, the Task description, the Priority of the task, the Schedule of the
task and the Time at which the task is to be done. By default the time specified for a
new task is 12:00. This is modifiable by the user by touching the time box.
6-5
Page 94

METTLER TOLEDO Model UC-PW User's Guide
The Task name and the Task description can be entered through the QWERTY keyboard
that appears on the screen and through an external keyboard (in the prototype version
the external keyboard refers to the keyboard attached to the PC).
While using the QWERTY keyboard entry in a particular field is completed by touching /
clicking on the ENTER key.
While using the PC keyboard the user can move from the Task name field to the Task
description field by using the TAB key. To move from the Task description to the Task
description type buttons the user is to use the Control and TAB keys.
The user can alternate between the QWERTY keyboard and the PC keyboard to enter
data in a field. After entering some data through the QWERTY keyboard the user should
press ENTER. The data will be shown in the corresponding field in the Add Task screen.
Now the user can enter data through the PC keyboard. If the user wishes to again enter
data through the QWERTY keyboard then the user is to touch / click in the field and the
application will show the QWERTY keyboard screen for further entry.
If the user does not want the entry through the QWERTY keyboard to be used the user
can press the CANCEL key and the application will close the QWERTY keyboard screen.
The Task name can be of 20 characters length, while the Task description can be of
2000 characters length.
The user can designate the priority level of the task to indicate to the operator what is the
most important items. The priority options are High, Medium or Normal. The default
priority is normal. The user can change the priority to Medium or High by clicking the
arrow. If a task is not completed in a set time frame, the priority level can be escalated.
See the Priority Escalation section for further details.
The User can choose the Schedule (periodicity) of the task by touching / clicking on the
triangular button provided next to the Schedule field. The options given are:
Once - The task is done only once. The date and time are specified for this task. The
date is specified by clicking / touching the ‘date’ field. A date chooser is displayed where
the user can select the year, month, and the date of the month. Similarly the time is
chosen by clicking / touching the ‘time’ field and selecting the hour, minute and the
second from a Time chooser that is displayed. This task will be shown in the Active
Task view screen for the day on which it is scheduled. If it is marked as completed on
the date it was scheduled, it will not be shown again. If the task is carried over to the
next day, it will be shown again each day with a Pending status (Overdue) until the
task is marked as Completed.
6-6
Page 95

Chapter 6: Peripheral Programs
Overview:
Daily - This has two options – Daily or on Weekdays.
Every day – The task is done every day, 7 days a week. The time is specified for this
task. The time is chosen by clicking or touching the ‘time’ field and selecting the hour,
minute and the second from a Time chooser that is displayed.
If a daily task is not completed on the scheduled date, it will be recorded directly to the
“Task not Done” database. Since the daily task is regenerated every day, the previous
day task that was incomplete will not be shown on the next day as pending. Thus the
same task will not be shown twice on one day.
Weekdays – The task is done on all weekdays. (Weekdays are taken as Monday to
Friday). This task is shown on all weekdays. As a new instance of this task is generated
for the next day, an incomplete task is never shown again marked with a status as
Pending. An incomplete task at the end of the day is added to the Task Not Done
Database. This applies to tasks scheduled for the last of the weekdays (Friday) also.
6-7
Page 96

METTLER TOLEDO Model UC-PW User's Guide
Weekly – This task is done once a week, every week. The day of the week and the time
of the task are specified by the user. The user chooses the particular day of the week by
touching / clicking the triangular button next to the day field. Time is chosen using the
time chooser.
6-8
Page 97

Chapter 6: Peripheral Programs
Overview:
When the scheduled day of the week arrives the task is shown in the Active Task list. If
the task is marked as completed then the task is added to the Completed task database.
If the task is not marked as completed on the scheduled day then the task will be shown
on the next day’s active task list with the status marked as Pending (Overdue). This will
continue until the task is marked complete, or marked “Can not Do” or the following
week’s same task gets scheduled. In the last case the task is moved to the Task Not
Done Database.
6-9
Page 98

METTLER TOLEDO Model UC-PW User's Guide
Monthly - This task is done once a month, every month. This can be scheduled as a
particular day of a particular week or as a particular date of the month.
In the first case, the user selects the Day of week option. The user first chooses the
particular day of the week by touching / clicking the triangular button next to the day
field. The user next chooses the week of the month by touching / clicking the triangular
button next to the week field. Time is chosen using the time chooser.
When the scheduled day of the week arrives the task is shown in the Active Task list. If
the task is marked as completed then the task is added to the Completed task database.
In the second case, the user selects the date option and then chooses the date of the
month using the date chooser that appears when the focus is brought to the date field.
Time is chosen using the time chooser.
When the scheduled date of the month arrives the task is shown in the Active Task list. If
the task is marked as completed then the task is added to the Completed task database.
6-10
Page 99

Chapter 6: Peripheral Programs
Overview:
.
In both the cases, if the task is not marked as “Completed” or “Cannot Do” on the
scheduled day then the task will be shown on the next day’s active task list with the
status marked as Pending (Overdue). This will continue until the task is marked
complete or the following month’s same task gets scheduled. In the latter case the task
is moved to the Task Not Done Database.
If the scheduled date of the Task that is added, is the current date then it is immediately
displayed in the Active Task List.
The user can add more than one task in a session. After entering the details of each task
the user is to click on / touch the OK button. This will save the details of the task to the
Master Task Database. If the user Clicks/ touches the Back button before the OK button it
will cancel the entry of details for the task and take the user back to the Active task view
screen. This is done after confirmation is received from the user that the task details
need not be saved.
6-11
Page 100

METTLER TOLEDO Model UC-PW User's Guide
B.) Edit task
:
If the user wishes to Edit a task, the task needs to be selected or highlighted on the
Active Task Viewer screen. After choosing the task, the user clicks on or touches the Edit
button. The task details are then shown and the user is allowed to change the details of
the task including the task name. Only a task that is currently scheduled, an active task,
can be edited. A completed, Cannot Do or Canceled task cannot be chosen for editing.
The edited task will be entered in the database on a new line similar to a new task.
6-12
 Loading...