

Page 1
Toledo ●P.O. Box 134 ● 8280 AC Genemuiden-NL ●E-mail: toledo@toledo.nl 0301-28
Jig saw
Stichsäge
Decoupeerzaag
Scie sauteuse
Sierra de calar
Serra de recortes
™¤Á·
Sticksåg
Pistosaha
Stiksav
Elektromos kézi fürész
(hobby célú használatra)
Přímočará pila
USERS MANUAL
GEBRAUCHSANLEITUNG
GEBRUIKSAANWIJZING
MODE D’EMPLOI
MODEO DE EMPLEO
INSTRUÇIÕES DE USO
O¢∏°π∂™ Ã∏™∂ø™
BRUKSANVISNING
KÄYTTÖOHJEET
BRUGER VEJLEDNING
HASZNÁLATI UTASÍTÁS
NÁVOD K POUŽITÍ
TÜV
Rheinland
Product Safety
TSS-60P • Art.nr. 826055
Page 2

SPARE PARTS FOR TSS-60P
REF. NR. DESCRIPTION
7 CARBON BRUSH 406770
9 SWITCH 406771
10 SPEED CONTROL PLATE 406772
13 DUST EXTRACTION FACILITY 406779
14 INDUCER
15 STATOR 406773
17 ROTOR 406774
19 CENTRAL SUPPORT
21 SLIDING PLATE 406769
22 BALANCE WEIGHT
23 GEAR WHEEL 406775
26 ROLLER
27 RECIPROCATING BAR
29 FIXED BAR
30 SLIDING BEARING A
32 BLADE HOLDER
35 SLIDING BEARING B
38 PENDULAR SPRING
40 GUIDE WHEEL
41 GUIDE WHEEL SUPPORT
45 GUIDE WHEEL PIN
53 SAFETY GUARD 406776
Toledo 39
Product: Toledo Jigsaw
Type TSS-60P, article number 826055
Toledo, Genemuiden, The Netherlands
Sound pressure level L
pa
85 dB(A)
Sound power level L
wa
98 dB(A)
Vibration (-a
w
) 2,5 m/s
2
SERIAL NUMBER
The serial number on the machine consists of the
following elements.
Serial nr.
CAREFULLY READ THE INSTRUCTIONS
BEFORE YOU USE THE JIGSAW!
1. KNOW YOUR TOOL
Observe the instructions for maintenance to ensure
your apparatus always operates properly. Before attempting to operate the apparatus, familiarise yourself
with the controls and make sure you know how to stop
it quickly in an emergency. Save this user’s manual and
the other documents supplied with this apparatus for
future reference.
2. SPECIAL SAFETY INSTRUCTIONS
1. CHECK THE FOLLOWING POINTS:
- Do the voltage of the engine and the engine safe
guard, if any, correspond to the mains voltage;
- Are the mains lead and the mains plug in a good condition: solid, without any loose ends or damage;
- If the saw blade is missing any teeth, or if it shows
any cracks, it must be replaced immediately.
- Is there enough space under the workpiece for
the up and down going sawblade, so the sawblade kan not reach the floor or worktable.
2. Never put sideward pressure on the blade. This
may cause the blade to break.
3. Be careful when cutting wood with knots, nails or
cracks in it and/or dirt on it, as these can cause the
blade to get stuck.
4. Never leave the jigsaw unattended.
5. Make sure the teeth of the saw blade point upwards.
Before connecting the tool to the power supply make sure the trigger switch is not locked
in the “ON” position.
USING THE MACHINE
1. Use clamps or a vice to hold the work.
2. Never remove wood chips and suchlike that are
close to the saw blade with your hands. When
wood chips get stuck between fixed and/or moving
parts, stop the tool before removing them.
3. Make sure the jigsaw runs without load (i.e. is not
in contact with the work) when you switch on the
tool.
4. The saw blade is one of the most important components of your jigsaw. Selecting the right material,
teeth, as well as correct fitting of the blade not only
prolongs the life of the blade, but also prevents it from breaking and cracking with all its consequences.
5. Be careful when cutting scrap wood. As the quality
of the cut is not important, the user tends to be less
concentrated, not to check the wood for nails,
knots or other irregularities, and to put undue
pressure on the saw.
6. Never cut wood that is thicker than the length of
the saw blade.
7. Do not touch metal parts on the jigsaw when cutting in walls or floors where wiring is located. Hold
the tool with both hands by its plastic handle to
avoid touching metal parts through which electricity may pass when you unintentionally cut through
wiring.
8. Switch off the tool and wait until the blade has stopped completely before moving the saw away from
the work or putting it down.
9. Avoid the use of long extension-cables.
10. This jigsaw is fitted with a plastic safety guard. Make
sure it is in place when cutting.
!
ORDER NUMBER/YEAR OF CONSTRUCTION
UK
English
2 Toledo
Art.nr.
0 - 45
o
VW/min Wood mm kg
mm
TSS-60P 826055 230(50 Hz) 500 500-3000 60 18 0 - 45° + 2,2
kg.
90°
MM
1'
Type
Page 3

38 Toledo
EXPLODED VIEW
SWITCH OFF THE MACHINE IMMEDIATELY
IN CASE OF:
1. defective mains plug, mains lead, without any loose
ends or damage;
2. defective switch;
3. excessive sparking of the brushes and verticiliosis
in the collector;
4. smoke or bad smell caused by scorched insulation.
3. ASSEMBLY INSTRUCTIONS
1. SELECTING THE SAW BLADE
- Select a saw blade that is right for the job.
- This jigsaw can be fitted with a wide range of saw
blades.
-A smooth blade is best for cutting soft wood. It
minimizes splintering.
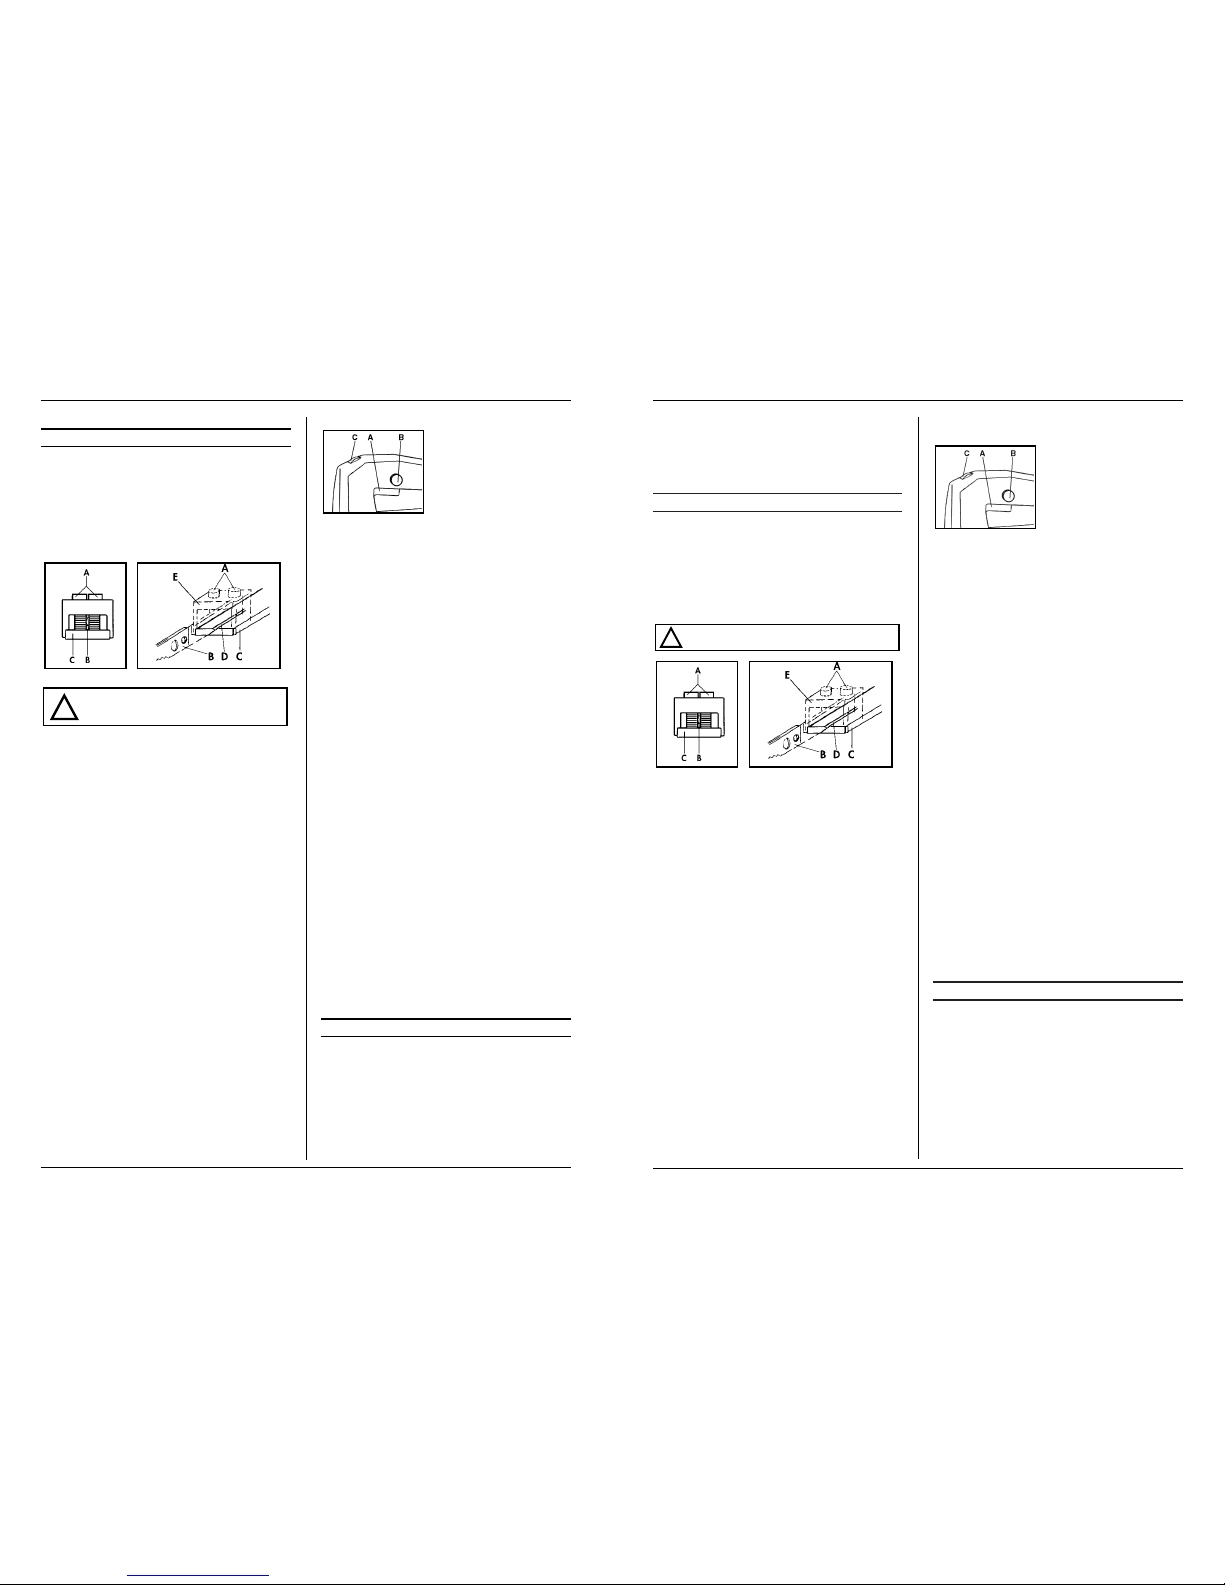
2. FITTING THE SAW BLADE
Before fitting the blade, make sure the tool is
disconnected.
- Loosen both bolts (A) with the hexagonal key provided.
- Insert the blade (B) into the holder (C) on the jigsaw.
- Make sure the blade is both in the groove (D) in the
holder and in the groove in the wheel.
- The blade must be placed between the holder (C)
and the clamping plate (F).
- Insert the blade into the holder as far as it will go.
- Secure the blade and the clamping plate by tightening both bolts with the hexagonal key.
- Slide the safety guard in the lowest position.
3. ADJUSTING THE ANGLE OF THE BOTTOM
PLATE
- Loosen the socket screw in the bottom plate with
the hexagonal key provided.
- Tilt the bottom plate to the right or the left until it
has reached the required angle (max. angle 45°).
- The angle set is indicated by the scale on the bottom plate.
- Tighten the socket screw in the bottom plate with
the hexagonal key provided.
4. SWITCH OPERATION
- By pressing the trigger switch
(A), the machine will operate.
- The switch can be locked by
means of button (B) in the side
of the handle. Press the trigger
switch and press the lock on
the knob. The tool will run continuously. Press the trigger switch to disengage the
lock.
- The maximum speed can be adjusted by means of
the rotary thumbwheel (C) on the top of the machine. This thumbwheel has numbers on it. Turn to a
high number for a high speed, turn to a low number
to reduce the speed.
5. REGULATION OF PENDULUM
For optimal cutting results it is necessary to adjust the
way in which the teeth of the blade grip the material.
Cutting soft material (wood, plastics etc.):
- use deep grip and set pendulum at level II
Cutting medium hard material (hard wood, aluminium
etc.):
- Adjust pendulum according to application.
Pendulum set at level I or 0: for getting a clear cut
in soft material and for thin material when working
with graters or knives.
Cutting hard material (steel etc.):
- set pendulum at level 0.
When sawing curves the pendulum should be at level 0.
Regulation and changing the level of the pendulum is
possible while the machine is in operation.
6. DUST COLLECTION
To keep the working surface clean, the jig saw is equipped with a connection for dust extraction. The jig saw
can be connected to an ordinary vacuum cleaner for
house-use.
4. OPERATION
MAKING CUTS
- Switch on the tool and place the bottom plate on
the work.
-
Slowly move the tool towards the previously drawn
cutting line and slowly press the tool forward.
- Firmly press the bottom plate on the work, other-
wise the jigsaw may start to vibrate, causing the blade to break more easily.
Let the tool do the job. Do not put undue
pressure on the jigsaw.
!
!
Toledo 3
Page 4
Toledo 37
POCKET CUTTING
If the starting position for
cutting is not in the side of
the work, or if no pilot hole
has been drilled in the work,
pocket cutting is the only alternative. Proceed as follows:
-Tip the tool forward so that the rounded tip of the
bottom plate rests on the work.
- Switch on the tool and slowly lower the rear of the
bottom plate until the blade touches the work.
- Let the blade do the job, allowing it to enter the
work slowly.
- Once the blade has completely entered the work,
tilt the bottom plate to rest flat on its surface and
move the saw forward along its cut.
Alternatively, you can start by drilling a hole in the
work that is big enough to stick the blade through.
Then proceed as indicated above.
For the best result make sure the blade is sharp.
5. MAINTENANCE
Before cleaning or carrying out maintenance operations always disconnect the tool.
Never use water or other liquids to clean
electrical components of the tool.
REGULAR MAINTENANCE OF YOUR MACHINE
PREVENTS UNNECESSARY PROBLEMS!
- Keep the bottom plate clean to avoid inaccurate
cuts.
-Keep the exterior of the tool clean to make sure all
moving parts move accurately and without wear.
-Keep the ventilating slots of the motor clean to
prevent the motor from overheating.
- If the carbon brushes have been worn down the
motor will stop.
- Oil the saw blade guide of your jigsaw regular.
6. TROUBLESHOOTING
Below we have listed a few probable causes and solutions to which you can refer if your jigsaw does not
function properly.
1. The temperature of the electric motor exceeds .
The motor has been overloaded by work that is
too big:
- Cut more slowly and allow the motor to cool
down.
The motor is defective:
- Contact your local Toledo dealer to have the tool
inspected and/or repaired.
2. The tool does not work when switched on.
Damaged cord and/or plug:
- Check cord and/or plug.
Defective switch:
- Contact your local Toledo dealer to have the
switch inspected and/or repaired.
3. When cutting it is very difficult to move the
work forward in a straight line and the cut is
not clean.
The blade is bent or dull:
- Replace the blade.
4. The work starts to vibrate violently when
cutting.
The blade is overheated or bent.
- Replace the blade.
5. The jigsaw makes a lot of noise and/or does
not run smoothly.
The carbon brushes are worn.
- Contact your local Toledo dealer to have your
tool inspected and/or repaired.
ClEl
■
DECLARATION OF CONFORMITY
(GB)
We declare under our sole responsability that this
product is in conformity with the following
standards or standardized documents
EN50144-2-10, EN50144-1
EN55014, EN61000-3-2, EN61000-3-3, EN55104
in accordance with the regulations:
89/392/EEC
73/23EEC
89/336/EEC
from 27-12-2002
GENEMUIDEN NL
W. Kamphof
Quality department
!
4 Toledo
Page 5
Na pilu příliš netlačte, vhodný tlak do
záběru se v průběhu práce ukáže sám.
ŘEZÁNÍ KAPSY
Pokud počáteční pozice řezání není na straně
obrobku a nebo nebyla vyvrtaná vodící díra,
řezání kapsy je jedinou alternativou. Postupujte
následovně:
- Skloňte nástroj dopředu a opřete zaoblený
konec spodní desky o obrobek.
- Zapněte nástroj a pomalu snižujte zadní
část spodní desky, až se list pily dotkne
obrobku.
- Nechejte pomalu vnikat
list pily do obrobku.
- Když list pily zcela vnikne do obrobku, skloňte
spodní desku tak, aby
ležela rovně celou svou
plochou na obrobku a
pohybujte pilou dopředu
podle žádaného řezu.
Další možností, jak začít řez, je vyvrtat díru v
obrobku takové velikosti, aby jí prošel pilový
plátek. Dále pokračujte tak, jak je uvedeno
výše.
Nejlepšího výsledku dosáhnete s ostrým listem
pily.
5. ÚDRŽBA
Než začnete s čistěním nebo údržbou
nástroje, vždy ho odpojte. Nikdy
nepoužívejte vodu nebo jiné tekutiny k
čištění elektrických dílů stroje.
PRAVIDELNOU ÚDRŽBOU VAŠEHO NÁSTROJE SE
VYHNETE ZBYTEČNÝM PROBLÉMŮM!
- Udržujte spodní desku čistou, abyste se
vyhnuli nepřesnému řezu.
- Udržujte vnější části nástroje čisté, aby se
všechny pohybující části pohybovaly přesně
a neopotřebovaly se.
- Udržujte ventilační štěrbiny motoru čisté,
abyste zabránili přehřátí motoru.
- Když se uhlíkové kartáčky opotřebují, motor
se zastaví.
- Pravidelně olejujte list pily.
6. VYHLEDÁVÁNÍ ZÁVAD
Pokud Vaše pilka dobře nepracuje, může Vám
pomoci níže uvedený seznam několika mož-
ných závad a jejich řešení.
1. Nadměrná teplota elektrického motoru.
Motor byl přetížen příliš velkým pracovním
zatížením.
- Řežte pomaleji a umožněte motoru vychladnout.
Motor je poruchový.
- Spojte se s Vaším TOLEDO dealerem, aby
Vám nástroj zkontroloval a opravil.
2. Zapnutý nástroj nepracuje.
Poškozená šňůra nebo zástrčka.
- Zkontrolujte šňůru a zástrčku.
Vadný vypínač:
- Spojte se s Vaším TOLEDO dealerem, aby
Vám nástroj zkontroloval a opravil.
3. Při řezání je velmi těžké posunovat nástroj v přímé linii dopředu a řez není čistý.
List pily je ohnutý nebo tupý.
- Vyměňte list pily.
4. Při řezání nástroj nadměrně vibruje.
List pily je přehřátý nebo ohnutý.
- Vyměňte list pily.
5. Pila je velmi hlučná a neběží hladce.
Uhlíkové kartáčky jsou opotřebované.
- Spojte se s Vaším TOLEDO dealerem, aby
Vám nástroj zkontroloval a opravil.
ClEl
n
PROHLÁŠENÍ O KONFORMNOSTI
(CZ)
Prohlašujeme, že tento výrobek splňuje
následující normy nebo normativní dokumenty.
EN50144-2-10, EN50144-1
EN55014, EN61000-3-2, EN61000-3-3, EN55104
v souladu s ustanoveními ve směrnicích:
89/392/EEC
73/23EEC
89/336/EEC
od 27-12-2002
GENEMUIDEN NL
W. Kamphof
Oddělení kontroly
!
!
36 Toledo
Produkt: Toledo Stichsäge
Typ TSS-60P, Artikelnummer 826055
Toledo, Genemuiden, Die Niederlände
Schalldruckpegel L
pa
85 dB(A)
Schalleistungpegel L
wa
98 dB(A)
Vibration (-a
w
) 2,5 m/s
2
SERIENNUMMER
Die Seriennummer auf dem Gerät setzt sich folgendermaßen zusammen:
Serial nr.
LESEN SIE DIESE GEBRAUCHSANWEISUNG
GUT DURCH, BEVOR SIE DIE STICHSÄGE
BENUTZEN.
1. LERNEN SIE DAS GERÄT KENNEN
Pflegen Sie das Gerät entsprechend den Instruktionen,
damit es immer gut funktioniert. Schalten Sie das Gerät
erst ein, wenn Sie gut wissen, wie es funktioniert, und
sorgen Sie vor allem dafür, daß Sie genau wissen, wie
Sie das Gerät in einem Notfall schnell abschalten können. Bewahren Sie diese Gebrauchsanweisung und andere Dokumente für das Gerät sorgfältig.
2. SPEZIELLE
SICHERHEITSVORSCHRIFTEN
BEVOR INGEBRAUCHNAHME DER MASCHINE
1. Kontrollieren Sie folgendes:
- Stimmt die Anschlussspannung des Motors mit
der Netzspannung überein.
- Sind Gerätekabel, Stecker und Dose in gutem
Zustande, sitzen sie fest, sind sieohne Knicke
oder Beschädigungen.
- Fehlen keine Zähne am Sägeblatt oder zeigt das
Blatt keine Risse oder Schlitze. Wenn dies ist
passiert, muß das Sägeblatt sofort ersetzt worden.
- Gibt es genug Raum unter das Werkstück für
das auf und ab gehende Sägeblatt, sodaß dem
Boden oder Werktisch nicht getroffen wird.
2. Üben Sie niemals seitlichen Druck auf das Sägeblatt
aus, es könnte hierdurch brechen.
3. Achten Sie beim Holz auf Astlöcher, Nägel, Risse
und/oder Schmutz. Das Sägen von solchem Holz
kann zu gefährlichem Festlaufen führen.
4. Lassen Sie die Stichsäge niemals unbeaufsichtigt.
5.
Die Zähne des Sägeblattes müssen nach oben zeigen.
Achten Sie darauf, daß sich der Zugschalter
nicht in der “AN” Position befindet, bevor
Sie den Stecker in die Steckdose stecken.
WÄHREND DES GEBRAUCHS DER MASCHINE:
1. Das Werkstück muß gut festgeklemmt werden.
2. Holzreste und ähnliches, die sich in der unmittelbaren Umgebung der Säge befinden, dürfen nicht mit
der Hand beseitigt werden. Wenn sich Holzreste
zwischen festen und/oder bewegenden Teilen verklemmt haben, muß das Gerät vor dem Entfernen
der Holzreste abgestellt werden.
3. Achten Sie darauf, daß die Stichsäge beim Einschalten unbelastet ist (also nicht mit dem Werkstück in
Berührung kommt).
4. Das Sägeblatt ist eines der wichtigsten Teile einer
Stichsäge. Die richtige Auswahl von Material und
Verzahnung, sowie eine ordnungsgemäße Montage
erhöhen nicht nur die Lebensdauer des Sägeblattes, sondern vermeiden auch Risse oder Brüche
und daraus entstehende Gefahren.
5. Sein Sie äußerst sorgfältig beim Sägen von Abfallholz. Da die Qualität des Sägeblattes hierbei nicht
so wichtig ist, gerät der Benutzer in Versuchung, unkontrolliert zu sägen, das Werkstück unzureichend
auf Nägel, Astlöcher und andere Unreinheiten zu
kontrollieren und die Säge kräftig durchzudrücken.
6. Sägen Sie keine Werkstücke, die dicker als die Länge des Sägeblattes sind.
7. Berühren Sie keine Metallteile der Stichsäge, wenn
Sie in Wände oder Böden sägen, in denen sich Elektrokabel befinden können. Halten Sie die Stichsäge
mit beiden Händen am Kunststoffgriff fest, so daß
Sie keine Teile berühren, die unter Spannung geraten können, wenn Sie aus Versehen ein Elektrokabel durchsägen.
8. Schalten Sie das Gerät erst aus und warten Sie, bis
die Stichsäge zum Stillstand gekommen ist, bevor
Sie sie vom Werkstück nehmen und ablegen.
10. Die Stichsäge ist mit einer Schutzkappe aus Kunststoff ausgestattet, die beim Sägen immer an ihrer
Stelle bleiben muß.
DAS GERÄT SOFORT AUSSCHALTEN BEI:
1. obermäßigen Funken der Kohlebürsten und Ringfeuer im Kollektor;
2. Störung im Netzstecker, dem Netzkabel oder
Schnurbeschädigung;
3. defektem Schalter;
4. Rauch oder Gestank verschmorter Isolation.
!
ORDERNUMMER/BAUJAHR
Deutsch
D
Toledo 5
Page 6
zdroje elektrického proudu.
2. Poškodí se vypínač.
3. Kartáče lamely kolektoru nadměrně jiskří.
4. Vyskytne se dým nebo zápach z poškozené
izolace.
3. MONTÁŽNÍ POKYNY
1. Volba pilového listu
- Zvolte pilový list vhodný pro danou práci.
- Do přímočaré pily je možné namontovat
celou škálu různých pilových listů.
- Hladký list je nejvhodnější na řezání měkkého dřeva, minimalizuje roztřepení hran řezu.
2. Upnutí pilového listu
Před upnutím pilového listu se přesvědčte, že zařízení je odpojeno od sítě.
- Uvolněte obě skrutky (A) přiloženým hexagonálním klíčem.
- Vložte pilový list (B) do držáku (C)
přímočaré pily.
- Přesvědčte se, že pilový list je jak v držáku
D, tak i v držáku opěrné kladky.
- Pilový list se musí nacházet mezi držákem
(C) a přidržovací destičkou F.
- Pilový list vložte do držáku co nejhlouběji.
- Zabezpečte pilový list a destičku přitažením
obou šroubů šestihranným klíčem.
- Posuňte bezpečnostní ochranný kryt do nejnižší polohy.
3. Nastavení úhlu základní desky
- Uvolněte zapuštěnou skrutku v základní
desce přiloženým hexagonálním klíčem.
- Natočte základní desku doprava nebo doleva, dokud nedosáhne požadovaný úhel –
maximální úhel je 45°.
- Nastavený úhel je vidět na stupnici na základní desce.
- Dotáhněte zapuštěnou skrutku v základové
desce přiloženým hexagonálním klíčem.
4. Činnost vypínače
- Stlačením tlačítka A se
stroj uvede do chodu.
- Vypínač možno uzamknout pomocí tlačítka B na
straně rukověti.
- Stlačte vypínač a současně stlačte uzamykací tlaŹít-
ko, pila bude pracovat trvale. StlaŹte tlačítko A, čímžsoučasně vyřadíte funkci uzamykacího tlačítka.
- Maximální rychlost možno nastavit prostřednictvím otočného kolečka C na horní
straně stroje, na kolečku jsou uvedená čísla, čím vyšší číslo, tím vyšší rychlost.
5. Nastavení vykyvného lůžka pilového listu
Abyste dosáhli optimálního výsledku řezání, je
nutné nastavit úhel, pod kterým zuby pilového
listu začínají řezat materiál.
Řezání měkkého materiálu (dřevo, umělá hmota, atd.):
- Používejte hluboko zasazený pilový list a
nastavte lůžko na úroveň II.
Řezání středně tvrdého materiálu (tvrdé dřevo,
hliník, atd.):
- Nastavte lůžko dle potřeby, nastavení lůžka
na úroveň I nebo 0, čímž získáte čistý řez u
měkkých a tenkých materiálů.
Řezání tvrdých materiálů (ocel, atd):
- Nastavte lůžko na úroveň 0.
Při řezání křivek lůžko má být na úrovni 0.
Nas-tavení úrovně lůžka je možné měnit v
průběhu provozu stroje.
6. Odvádění prachu
Aby byl pracovní povrch čistý, přímočará pila je
vybavena nátrubkem na odtah prachu.
Přímočarou pilu je možné připojit na běžný
vysavač určeny pro domácnost.
4. PROVOZ
ŘEZÁNÍ
- Zapněte pilu a základní desku umístěte na
obrobek.
- Pomalu pohybujte pilkou k předem nakreslené čáře řezu a pomalu tlačte nářadí dopředu.
- Pevně tlačte základní desku na obrobek,
jinak přímočará pila může začít vibrovat,
což může způsobit lehčí poškození pilového
listu.
!
Toledo 35
3. MONTAGEVORSCHRIFTEN
1. WAHL DER SÄGE
-Wählen Sie eine zum Werkstück passende Säge.
- Die Stichsäge kann mit verschiedenen Sägeblättern
benutzt werden.
- Ein Säge mit feiner Verzahnung eignet sich für weiches Holz und geringe Splitterbildung.
2. INSTALLIEREN DER SÄGE
Bevor Sie die Säge montieren, müssen Sie
erst kontrollieren, ob der Netzstecker aus
der Steckdose gezogen ist.
- Lösen Sie die zwei Schrauben (A) mit Hilfe des mitgelieferten Inbusschlüssels.
- Stecken Sie die Säge (B) in den Halter (C) der
Stichsäge.
-Achten Sie darauf, daß die Säge in der Nut (D) des
Halters und auch in der Nut des Rädchens liegt.
- Die Säge muß zwischen dem Halter (C) und der
Klemmplatte (E) angebracht werden.
- Drücken Sie die Säge so weit wie möglich in den Halter.
-Befestigen Sie die Säge und die Klemmplatte durch
,- Anziehen der zwei Schrauben mit Hilfe des Inbus-
schlüssels.
- Schieben Sie die Kunststoffkappe nach unten.
3. EINSTELLEN DES WINKELS DER BODEN-
PLATTE
- Lösen Sie die Inbusschraube in der Bodenplatte mit
Hilfe des mitgelieferten Inbusschlüssels.
- Drehen Sie die Bodenplatte nach links oder rechts
in den gewünschten Sägewinkel von maximal 45°.
- Sie können den eingestellten Winkel von der
Gradskale auf der Bodenplatte ablesen.
-Befestigen Sie die Bodenplatte wieder mit der Inbusschraube.
4. BEDIENUNG DES SCHALTERS
- Der An-/Ausschalter (A) befindet sich im Handgriff der
Stichsäge.
- Der Zugschalter kann mit
dem Knopf (B) an der Seite
der Stichsäge festgesetzt
werden. Drücken Sie den
Zugschalter ein und drücken Sie gleichzeitig den Sperrknopf ein. Das Gerät läuft jetzt weiter. Durch erneutes Drücken des Zugschalters wird die Sperre gelöst.
- Die maximale Geschwindigkeit kann mit dem
Drehknopf (C) oben auf der Maschine eingestellt
werden. Dieser Knopf ist versehen mit Nummern.
Wie höher das Nummer, wie höher die Geschwindigkeit.
5. EINSTELLUNG DES PENDELS
Um beim Sägen ein optimales Resultat zu erzielen,
ist es erforderlich, die Einstellung der Sägeblattzähne
in bezug auf den Eingriff ins Material zu regulieren.
Sägen von weichem Material (Holz, Kunststoffe
usw.):
- Wählen Sie den tiefen Eingriff und stellen Sie das
Pendel auf Stufe II ein.
Sägen von mittelhartem Material (Hartholz,
Aluminium usw.):
- Stellen Sie das Pendel je nach Anwendungsform
ein.
Pendel auf Stufe I oder 0: Tiefer Sägeschnitt in
weichem Material und bei dünnem Material,
wenn mit Raspeln oder Klingen gearbeitet wird.
Sägen von hartem Material (Stahl usw.):
- Stellen Sie das Pendel auf Stufe 0 ein.
Beim Sägen von Biegungen empfiehlt es sich, das
Pendel auf Stufe 0 einzustellen. Die Pendelstufe kann
reguliert oder geändert werden, während die
Maschine läuft.
6. STAUB ABSAUGEN
Zum Sauberhalten der Arbeitsfläche ist die Stichsäge
mit einem Absauganschluß versehen. An die
Stichsäge kann einfach ein Staubsauger angeschlossen werden.
4. INBETRIEBNAHME
SÄGEN
- Schalten Sie die Stichsäge ein und setzen Sie die Bodenplatte auf das Werkstück.
-Bewegen Sie die Säge langsam auf der vorher eingezeichneten Sägekante und drücken Sie die Stichsäge langsam nach vorn.
-Drücken Sie die Bodenplatte fest auf das Werkstück.
Tun Sie dies nicht, dann kann die Stichsäge vibrieren
und das Sägeblatt schnell brechen.
!
6 Toledo
Page 7

Výrobek: Přímočará pila Toledo
Typ: TSS-60P
Číslo výrobku: 826055
Toledo, Genemuiden, Nizozemí
Hladina zvukového tlaku L
pa
85 dB(A)
Hladina zvukového výkonu Lwa98 dB(A)
Vibrace (-a
w
) 2,5 m/s
2
SÉRIOVÉ ČÍSLO
Sériové číslo stroje se skládá z následujících
prvků:
Serial nr.
PŘED POUŽITÍM PŘÍMOČARÉ PILY SI POZORNĚ PŘEČTĚTE INSTRUKCE !
1. SEZNAMTE SE S VAŠÍM NÁŘADÍM
Dodržujte pokyny pro údržbu, čímž si zajistíte,
že váš stroj bude vždy pracovat správně.
Předtím, než se pokusíte uvést zařízení do provozu, seznamte se s ovládacími prvky, a ujistěte se, že víte, jak stroj v případě nutnosti rychle
zastavit. Pro budoucí potřebu si odložte tuto
uživatelskou příručku, stejně jako i další
dodané dokumenty.
2. ZVLÁŠTNÍ BEZPEČNOSTNÍ POKYNY
1. Zkontrolujte:
- Zda odpovídá elektrické napětí motoru a
pojistných součástí (jestli u vašeho stroje
jsou) napětí v síti (zařízení uzpůsobené k
napojení na 230 V může být připojeno i
na 220 V).
- Zda je elektrická šňůra a zástrčka v
pořádku, není šňůra roztřepená nebo
poškozená.
- V případě, že na pilovém listu chybí
zuby, jsou poškozené, nebo jsou na něm
trhliny, okamžitě list vyměňte.
- Zda je pod obrobkem dost místa na
vratný pohyb pilového listu, tak, aby
pilový list nezasáhl pracovní stůl nebo
podložku.
2. Nikdy netlačte na pilový list ze strany, mohl
by se zlomit.
3. Věnujte mimořádnou pozornost řezání
dřeva se suky, hřebíky, trhlinami nebo
nečistotami, protože pilový list se může
zablokovat.
4. Nikdy nenechejte přímočarou pilu bez dozoru.
5. Zuby na pilovém listu musí vždy směřovat
nahoru.
Před připojením stroje ke zdroji
elektrické energie se ujistěte, že vypínač není uzamčený v poloze on.
Použití stroje:
1. K upnutí obrobku používejte svorky nebo
svěrák.
2. Nikdy neodstraňujte piliny nebo podobné
věci, které jsou v blízkosti pilového listu,
rukama. Jestliže se třísky z opracovávaného dřeva dostanou mezi pevné a/nebo
pohyblivé součásti stroje, zastavte stroj
předtím, než se budete pokoušet je odstranit.
3. Při zapínání stroje dbejte na to, aby byl
mimo kontakt s obráběným předmětem.
4. Pilový list je jednou z nejdůležitějších
součástí vaší přímočaré pily. Volbou správného materiálu, zubů, stejně tak i správného upnutí pilového listu nejenom prodloužíte jeho životnost, ale také předejdete
jeho možnému poškození, zlomení nebo
prasknutí se všemi důsledky. Buťte
mimořádně opatrní při řezání odpadového
dřeva. U tohoto dřeva kvalita řezu není
důležitá a uživatel má tendenci být méně
soustředěný, nekontroluje dřevo, zda neobsahuje hřebíky, suky nebo jiné nepravidelnosti a nevhodně na pilu tlačí.
5. Nikdy neřežte dřevo, které je tlustší, než je
délka pilového listu.
6. Nedotýkejte se kovových částí přímočaré
pily při řezání stěn nebo podlah, ve kterých
jsou umístěné elektrické rozvody. Držte pilku oběma rukama za její plastickou rukověť.
Vyhnete se tak dotyku s kovovými částmi
pily, přes které může projít elektrický proud
při náhodném přeřezání elektrických vodičů.
7. Vypněte pilu a počkejte, až se pilový list
úplně zastaví. Teprve potom pilku z obrobku vytáhněte a odložte.
8. Vyhýbejte se používání dlouhých prodlužovacích kabelů.
9. Přímočará pila je vybavena ochranným krytem z plastické hmoty. Přesvědčte se, že
kryt je při řezání na svém místě.
Stroj okamžitě vypněte v případě, že:
1. Dojde k poškození přívodní šňůry, nebo
!
ČÍSLO OBJEDNÁVKY/ ROK VÝROBY
C
esky
CZ
ˇ
34 Toledo
Überlassen Sie der Säge die Arbeit. Drücken
Sie nicht zu fest auf die Stichsäge.
EINFALLSÄGEN
Wenn die Säge nicht an der
Seite des zu sägenden
Werkstückes angesetzt
wird oder wenn kein Loch
gebohrt wurde, müssen Sie
“Einfallsägen”. Das geschieht folgendermaßen:
- Setzen Sie die Stichsäge mit der abgerundeten Vorderseite der Bodenplatte an.
- Schalten Sie die Stichsäge ein und lassen Sie das Sägeblatt langsam nach unten gleiten, bis das Sägeblatt das Werkstück berührt.
- Überlassen Sie jetzt der Säge die Arbeit und lassen
Sie das Sägeblatt langsam in das Werkstück hineinsägen.
- Wenn Sie durch das Werkstück durchgesägt haben, können Sie die Stichsäge wieder in normaler
Position durch das gesägte Loch stecken und weitersägen.
Für diese Art des Sägens können Sie auch zuerst mit
der Bohrmaschine und einem Bohrer, der für das Sägeblatt der Stichsäge groß genug ist, ein Loch bohren. Anschließend handeln Sie entsprechend der obengenannten Schritte.
Für ein optimales Resultat muß das Sägeblatt scharf
sein.
5. UNTERHALT
Vor Wartung und Reinigung immer den
Netzstecker aus der Steckdose ziehen. Verwenden Sie niemals Wasser oder andere
Flüssigkeiten für die Reinigung von elektrischen Teilen der Säge.
REGELMÄßIGE WARTUNG DER SÄGE BEUGT
PROBLEME VOR!
- Halten Sie die Bodenplatte immer sauber, so daß
beim Sägen keine Ungenauigkeiten entstehen.
- Halten Sie die Außenseite der Säge sauber, so daß
sich alle bewegenden Teile immer genau und verschleißfest bewegen können.
- Halten Sie die Lüftungsnute des Motors sauber, so
daß der Motor nicht überhitzt wird.
- Wenn sich die Kohlebürsten abgenutzt haben geht
die Stichsäge aus. Bringen Sie dann die Säge zu Ihrem Toledo Händler.
- Schmieren Sie den Sägeblattführer regelmäßig.
6. STÖRUNGEN
Für den Fall, daß die Säge nicht ordnungsgemäß funktioniert, zeigen wir Ihnen hier einige mögliche Ursachen und die dazugehörigen Lösungen.
1. Der Elektromotor erhitzt sich auf mehr als
70°C.
Der Motor wird durch zu große Werkstücke überlastet:
- Sägen Sie mit niedrigerem Tempo und lassen Sie
den Motor abkühlen.
Der Motor ist defekt:
- Bringen Sie die Säge zur Kontrolle und/oder
Reparatur zu Ihrem Toledo Händler.
2. Die eingeschaltete Maschine funktioniert
nicht.
Unterbrechung im Netzanschluß:
- Netzanschluß auf möglichen Kabelbruch kontrol-
lieren.
Beschädigung des Schalters:
Bringen Sie die Säge zur Kontrolle und/oder
Reparatur zu Ihrem Toledo Händler.
3. Das Werkstück läßt sich sehr schwierig in einer geraden Linie am Sägeblatt entlang bewegen und der Sägeschnitt ist unregelmäßig.
Das Sägeblatt ist krumm oder stumpf:
- Wechseln Sie das Sägeblatt.
4. Das Werkstück beginnt beim Sägen heftig
zu vibrieren.
Das Sägeblatt überhitzt oder verformt sich:
- Wechseln Sie das Sägeblatt.
5. Die Stichsäge ist sehr laut und/oder arbeitet
sehr unregelmäßig.
Die Kohlebürsten sind verschlissen:
- Bringen Sie die Säge zur Kontrolle und/oder
Reparatur zu Ihrem Toledo Händler.
ClEl
■
KONFORMITÄTSERKLÄRUNG
(D)
Wir erklären in alleiniger Verantwortung, daß
dieses Produkt mit den folgende Normen oder
normativen Dokumenten übereinstimmt:
EN50144-2-10, EN50144-1
EN55014, EN61000-3-2, EN61000-3-3, EN55104
gemaß den Bestimmungen der Richtlinien:
89/392/EEC
73/23EEC
89/336/EEC
ab 27-12-2002
GENEMUIDEN NL
W. Kamphof
Quality department
!
!
Toledo 7
Page 8

- Engedje a fürészt dolgozni
és hagyja, hogy a fürész las
san a munkadarabba
ereszkedjen.
- Ha ezzel kész van akkor a
fürészt a kifürészelt résbe
illesztheti és folytathatja a
munkát.
Beesö fürészelést alkalmazhat abban az esetben is ha
elöször egy lyukat fúr, amely elég nagy ahhoz, hogy a
fürészt bele tudja helyezni, majd a fent leírt sorrendben folytathatja a munkát.
A megfelelö eredmény érdekében használjon mindig
éles fürészt.
5. KARBANTARTÁS
Karbantartás ill. tisztítás elött a gépet
mindig áramtalanítsa. Soha ne használjon
vizet vagy más folyadékot a fürész
elektromos részeinek tisztításához.
RENDSZERES KARBANTARTÁSSAL
MEGELÖZHETÖ AZ ESETLEGES MEGHIBÁSODÁS !
- A talpat tartsa mindig tisztán, hogy ne lépjen fel
pontatlanság a fürészelésnél.
- Tartsa a fürész külsö részét is tisztán, hogy min-
den mozgó alkatrész pontosan és kopás nélkül
müködhessen.
- Ügyeljen arra, hogy a szellözö nyilások ne dugul-
janak be és ezáltal a motor felforrósodjék.
- Ha szénkefék elkoptak akkor a fürész magától
leáll. Ez esetben adja be a Toledo szaküzletbe a
gépet csináltatni.
- Kenegesse rendszeresen a fürész-vezetöt.
6. ÜZEMZAVAR
Arra az esetre, ha a gép nem megfelelöen müködne,
adunk egy-két használható tanácsot a zavarok okaira
és arra, hogy hogyan lehet ezeket kiküszöbölni.
1. A motor felforrósodik
A motort túlságosan megterhelik a nagy méretü
munkadarabok.
- Vegye lassabbra a munkatempót és adjon lehetöséget a motornak a lehülésre.
A motor meghibásodott.
- Vigye el a kézifürészt a Toledo értékesítöhöz ellenörzésre és/vagy csináltatásra.
2. A bekapcsolt gép nem müködik
Nem megfelelö az elektromos csatlakozás.
- Ellenörizze a vezetékeket van-e bennük törés.
A kapcsoló meghibásodása.
- Vigye el a kézifürészt a Toledo értékesítöhöz ellenörzésre és/vagy csináltatásra.
3. A munkadarabot nehezen lehet egyenesen
mozgatni és a fürésznyom szabálytalan.
A fürész hajlott vagy életlen.
- Cserélje ki a fürészt.
4. A munkadarab erösen rezeg a fürészelés
alatt.
A fürész felforrósodik vagy deformálódik.
- Cserélje ki a fürészt.
5. A fürész nagy zajjal dolgozik és/vagy
szabálytalanul fürészel.
A szénkefék elkoptak.
- Vigye el a kézifürészt a Toledo értékesítöhöz ellenörzésre és/vagy csináltatásra.
ClEl
n
MEGFELELŐSÉG IGAZOLÁSA
(H)
Igazoljuk, hogy ez a termék eleget tesz a
következő szabványoknak, illetve műszaki
dokumentumoknak:
EN50144-2-10, EN50144-1
EN55014, EN61000-3-2, EN61000-3-3, EN55104
megegyezik a következő műszaki irányvonalak
előírásaival:
89/392/EEC
73/23EEC
89/336/EEC
27-12-2002-tól
GENEMUIDEN NL
W. Kamphof
minőségellenőrző
osztály
!
Toledo 33
Product: Toledo Decoupeerzaagmachine
Type TSS-60P
Art.nr.: 826055
Toledo, Genemuiden, Holland.
Geluidsdrukniveau L
pa
85 dB(A)
Geluidsvermogenniveau L
wa
98 dB(A)
Trillingen (-aw) 2,5 m/s
2
SERIE NUMMER
Het serienummer op de machine komt als volgt tot stand.
Serial nr.
LEES DEZE GEBRUIKSAANWIJZING GOED
DOOR VOORDAT U DE DECOUPEERZAAG
IN GEBRUIK NEEMT!
1. KEN UW MACHINE
Onderhoud uw machine volgens de instructies, zodat
hij altijd goed functioneert. Zet de machine pas aan als u
goed begrijpt hoe deze bediend moet worden en zorg
er vooral voor dat u precies weet hoe u de machine in
geval van nood snel kunt uitzetten. Bewaar deze handleiding en de andere documentatie over uw machine
zorgvuldig.
2. SPECIALE
VEILIGHEIDSVOORSCHRIFTEN
VOOR HET INGEBRUIKNEMEN VAN DE
MACHINE:
1. Controleer het volgende:
-Komt de aansluitspanning van de motor met de
netspanning overeen;
- Zijn het netsnoer en de netstekker in goede
staat: stevig, zonder rafels of beschadigingen;
- Mist het zaagblad geen tanden en vertoont het
geen scheuren of spleten. Een dergelijke zaag
dient onmiddellijk te worden vervangen;
- Is er voldoende ruimte onder het werkstuk
voor de op en neer gaande zaag zodat de zaag de
vloer of de werktafel niet kan raken.
2. Oefen nooit zijdelingse druk uit tegen het zaagblad.
Hierdoor kan het zaagblad breken.
3. Let bij het zagen van hout op knoesten, spijkers,
scheuren en/of vuilaanslag. Het zagen van dit hout
kan tot een gevaarlijk vastlopen leiden.
4. Laat de decoupeerzaag nooit onbewaakt achter.
5. De tanden van het zaagblad moeten naar boven
wijzen.
Controleer of de trekkerschakelaar niet
vergrendeld is in de “AAN”-stand voordat u
de stekker in het stopcontact (de wandcontactdoos) steekt.
TIJDENS HET GEBRUIK VAN DE MACHINE:
1. Het werkstuk moet stevig worden vastgeklemd.
2. Houtresten en dergelijke, die zich in de onmiddellijke omgeving van de zaag bevinden, mogen niet
met de hand worden verwijderd. Wanneer houtresten beklemd zitten tussen vaste en/of bewegende delen, moet de machine worden gestopt alvorens de houtresten te verwijderen.
3. Zorg ervoor dat de decoupeerzaag onbelast wordt
ingeschakeld (laat hem dus niet in aanraking komen
met het werkstuk wanneer de decoupeerzaag
wordt ingeschakeld).
4. Het zaagblad is één van de belangrijkste onderdelen van een decoupeerzaag. De juiste keuze van
materiaal, de vertanding, alsmede het op de juiste
wijze monteren verhoogt niet alleen de levensduur
van het zaagblad, doch voorkomt ook scheuren of
breuken en de daaruit voortvloeiende gevaren.
5. Het zagen van afvalhout moet zorgvuldig gebeuren.
Omdat de kwaliteit van de zaagsnede hierbij niet
van belang is, is de gebruiker eerder geneigd ongeconcentreerd te zagen, het werkstuk onvoldoende
op spijkers, knoesten en andere onregelmatigheden te controleren, en stevig door te duwen met
de zaag.
6. Zaag geen werkstukken die dikker zijn dan de lengte van de zaag.
7. Raak geen metalen delen van de decoupeerzaag
aan wanneer u in wanden of vloeren zaagt waarin
zich elektriciteitskabels kunnen bevinden. Houd de
decoupeerzaag met beide handen op het kunststof
handvat vast zodat u geen delen aanraakt die onder
spanning kunnen komen te staan wanneer u onverhoopt een elektriciteitskabel doorzaagt.
8. Schakel de machine eerst uit en wacht totdat de decoupeerzaag stil staat voordat u de machine van het
werkstuk af beweegt en de machine neerlegt.
9. Vermijd het gebruik van lange verlengkabels.
10. De decoupeerzaag is voorzien van een kunststof
beschermkap. Houd deze op zijn plaats tijdens het
zagen.
HET APPARAAT ONMIDDELLIJK UITZETTEN BIJ:
1. defecte netstekker, netsnoer of snoerbeschadiging;
2. defecte schakelaar;
3. vonkvorming in de koolborstels of ringvuur in de
collector;
4. rook of stank van verschroeide isolatie.
!
ORDERNUMMER/BOUWJAAR
Nederlands
NL
8 Toledo
Page 9

3. SZERELÉSI ELÖÍRÁSOK
1. A fürész kiválasztása
- A fürészt a megmunkálandó munkadarabhoz
válassza ki.
- Különbözö fajta fürészek helyezhetök a gépbe.
- A legfinomabb fogú fürész puhább fához használjuk, s ez okoz a legkevésbé szálkásodást.
2. A fürész beszerelése
A fürész behelyezése elött mindig ellenörizze, hogy a gép áramtalanítva van-e.
- A géphez tartozó imbuszkulccsal csavarozza ki a
két A-val jelölt csavart.
- Helyezze a fürészt (B) a fürészgép tartórészébe
(C).
- Gondoskodjon arról, hogy a fürész a tartórész
hasítékába (D) ill. a kerék hasítékába essen.
- A fürész a tartórész (C)és a rögzítölap (E) közé
helyezendö.
- Nyomja a fürészt amennyire lehetséges a tartórészbe.
- A fürészt és a rögzítölapot rögzítse a csavarok
imbuszkulccsal való becsavarásával.
- Húzza a müanyag védöburkot lefelé.
3. A talp szögének beállítása
- A géphez tartózó imbuszkulccsal csavarozza ki a
talpon található csavart.
- Forgassa el a talpat a kívánt szögben jobbra vagy
balra, a max. 45º-os szögig.
- A beállított szöget leolvashatja a talp szögméröjén.
- Rögzítse a talpat újra az imbuszcsavarra.
4. A kapcsoló kezelése
- A húzókapcsoló (A)
benyomásával lép müködésbe
a gép.
A kapcsoló rögzít
hetö a (B) nyomógomb
segítségével, amely a
fürészgép oldalán található.
Nyomja a kapcsolót a megfelelö pozicióba és
ugyanakkor nyomja be a nyomógombot is. A
fürészgép müködésben marad. A húzókapcsoló
újbóli benyomásával oldjuk fel a kapcsoló
rögzítését.
- A maximális sebesség a fürészgép tetején található koronggal (C) állítható. A korongot egy
magasabb szám felé forgatva növekszik a
sebesség, egy alacsonyabb szám felé forgatva
csökken.
5. A fürészelés minösége, a pendel (inga)
beállítása
Hogy a fürészelés minösége optimális legyen szükséges annak is a beállítása, hogy a fürész milyen
módon munkálja meg az anyagot.
Puha anyagok fürészelése ( fa, müanyag stb.)
- Fürészeljen mélyen, állítsa a pendelt a II-es szintre.
Közepesen kemény anyagok fürészelése (keményebb
fafajták, alumínium stb.)
- A pendelt a megmunkálástól függöen kell beállítani. Pendel az I-es vagy 0-ás szinten: éles fürésznyom puha anyagban; vékony anyagokhoz, ha
ráspollyal és késekkel dolgozunk.
Kemény anyagok fürészelése ( acél stb.)
- A pendelt a 0-ás szintre állítsuk be.
Fordulatok fürészelésekor a pendelt a 0-ás szintre
állítsuk be. A pendel szintjét szabályozhatjuk ill. megváltoztathatjuk munka közben is.
6. A hulladék gyüjtése
A munkahely tisztán tartása érdekében a fürész
rákapcsolható porelszívóra. A porelszívó egyszerüen
csatlakoztatható a gépre.
4. HASZNÁLATBA VÉTEL
Fürészelés
- Kapcsolja be a fürészt és helyezze a talpat a
munkadarabra.
- Mozgassa a fürészt lassan az elöre megrajzolt
vonalon és nyomja a gépet lassan elöre.
- Nyomja a talpat erösen a munkadarabra. Ennek
hiányában lehetséges hogy a fürészgép rezegni
kezd és a fürész eltörik.
Hagyja a fürész dolgozni, ne nyomja a
gépet túlságosan.
Beesö fürészelés
Ha a kiindulópont a fürészeléshez nem a munkadarab széle és nem is egy elöre kifúrt lyuk, akkor beesö fürészeléssel kell próbálkoznunk. Ez a következöképpen történik:
- Tegye a fürészgépet a talp lekerekített elejére.
- Kapcsolja be a fürészt és engedje a fürészt lefelé,
amíg az a munkadarabot meg nem érinti.
!
!
32 Toledo
3. MONTAGEVOORSCHRIFTEN
1. KEUZE VAN DE ZAAG
- Kies een zaag bij het te zagen werkstuk.
- Een verscheidenheid aan zagen kan in de decoupeerzaag worden geïnstalleerd.
- Een zaag met fijne vertanding is geschikt voor zacht
hout en geeft de minste splintervorming.
2. INSTALLEREN VAN DE ZAAG
Alvorens u de zaag gaat monteren, dient u
eerst te controleren, of de netstekker uit het
stopcontact is verwijderd.
- Draai de twee bouten (A) los met behulp van de
bijgeleverde inbussleutel.
- Plaats de zaag (B) in de houder (C) van de decoupeerzaag.
- Zorg ervoor dat de zaag in de gleuf (D) van de houder ligt en tevens in de gleuf van het wieltje.
- De zaag moet tussen de houder (C) en het klemplaatje (E) worden geplaatst.
- Druk de zaag zover mogelijk in de houder.
- Zet de zaag en het klemplaatje vast door de twee
bouten aan te draaien met behulp van de inbussleutel.
- Schuif de kunststof beschermkap naar beneden.
3. HOEK INSTELLEN VAN DE BODEMPLAAT
- Draai de inbusbout in de bodemplaat los met behulp van de bijgeleverde inbussleutel.
- Verdraai de bodemplaat in de gewenste zaaghoek
naar links of naar rechts tot een maximale hoek van
45°.
-U kunt de ingestelde hoek aflezen op de gradenboog van de bodemplaat.
- Zet de bodemplaat weer vast met de inbusbout.
4. BEDIENING VAN DE SCHAKELAAR
-
Door de trekkerschakelaar
(A) in te drukken zal de decoupeerzaag in werking treden.
- De schakelaar kan worden
vergrendeld met behulp van
de drukknop (B) aan de zij-
kant van de decoupeer-
zaag. Druk de schakelaar in de gewenste stand en
druk tegelijkertijd de vergrendelknop in. De de-
coupeerzaag blijft nu lopen. Door opnieuw indrukken van de trekkerschakelaar wordt de vergrendeling opgeheven.
- De maximum snelheid kan worden ingesteld met
behulp van het wieltje (C) boven op de decoupeerzaag. Door het wieltje naar een hoger cijfer te
draaien, zal ook de snelheid toenemen, door het
wieltje naar een lager getal te draaien, zal de snelheid weer afnemen.
5. REGELING VAN DE PENDEL
Voor een optimaal zaagresultaat is het nodig de wijze
waarop de tanden van het zaagblad het materiaal grijpen in te stellen.
Zagen van zacht materiaal (hout, kunststoffen enz.):
- Gebruik de diepe ingrijping en stel de pendel in op
niveau II.
Zagen van middelhard materiaal (hardhout, aluminium
enz.):
- Stel de pendel afhankelijk van de toepassing in.
Pendel op niveau I of 0: voor een scherpe zaagsnede in zacht materiaal en voor dun materiaal als er
wordt gewerkt met raspen of messen.
Zagen van hard materiaal (staal enz.):
- Stel de pendel in op niveau 0.
Voor het zagen van bochten kan de pendel het beste op
niveau 0 ingesteld worden.Regeling en verandering van
het niveau van de pendel is mogelijk terwijl de machine
in werking is.
6. STOFOPVANG
Voor het schoonhouden van het werkoppervlak is de
decoupeerzaag uitgevoerd met een aansluiting voor
stofafzuiging. U kunt eenvoudig een stofzuiger aansluiten op de decoupeerzaag.
4. INGEBRUIKNAME
ZAGEN
- Schakel de decoupeerzaag in en plaats de bodemplaat op het werkstuk.
- Beweeg langzaam naar de vooraf afgetekende zaaglijn en druk de decoupeerzaag langzaam vooruit.
- Druk de bodemplaat stevig tegen het werkstuk.
Doet u dit niet dan is de kans groot dat de decoupeerzaag mee gaat trillen en de zaag snel breekt.
Laat de zaag het werk doen. Druk niet te hard
tegen de decoupeerzaag.
INVALZAGEN
Als de startpositie van het te zagen werkstuk niet de zijkant is of als er geen gat is geboord, dan moet u “invalzagen”. Dit gaat als volgt:
- Zet de decoupeerzaag op de rondgebogen voorzij-
!
!
Toledo 9
Page 10

Termék: Toledo elektromos kézi fürész
Típus: TSS-60P
Termék szám: 826055
Toledo, Genemuiden, Holland
Zajnyomásszint L
pa
85 dB(A)
Teljesítményi zajszint L
wa
98 dB(A)
Rezgések (-a
w
) 2,5 m/s
2
SOROZATSZÁM:
A sorozatszám a következöképpen tevödik össze.
Sorozatszám:
KÉRJÜK OLVASSA EL FIGYELMESEN A
HASZNÁLATI UTASÍTÁST, MIELÖTT AZ
ELEKTROMOS KÉZIFÜRÉSZT HASZNÁLATBA VESZI.
1. ISMERJE MEG GÉPÉT
Gépét az elöírások szerint tartsa karban, hogy az
mindig megfelelöen müködjön. Csak akkor kezdje el
a munkát, ha pontosan tudja hogyan kell kezelnie
szerszámát és gondoskodjon róla, hogy veszély
esetén nyomban ki tudja kapcsolni a gépet. Örizze
meg a használati utasítást és a gép más dokumentációját.
2. KÜLÖNLEGES BIZTONSÁGI
ELÖÍRÁSOK
A gép használatba vétele elött:
1. Ellenörizze a következöket:
- a gép üzemeltetésére alkalmas feszültség
megegyezik-e a hálózati feszültséggel; azok a
gépek, amelyek 230 Voltos feszültséggel üzemeltethetök, minden további nélkül rákapcsolhatók 220 Voltos feszültségre.
- a vezetékek, a villás csatlakozó éppségben, jó
állapotban vannak-e, nincsenek-e megsérülve.
- meg van-e a fürésznek minden foga, és nincsen-e a fürészlapon repedés vagy törés. A
meghibásodott fürészt azonnal ki kell cserélni.
- van-e elegendö helye a fürésznek a munkadarab alatti mozgáshoz, nehogy a fürész a padlót vagy a munkaasztalt megsértse.
2. Soha ne nyomja oldalról a fürészlapot, ettöl a
fürészlap eltörhet.
3. A fürészelésnél ügyeljen az fürészelendö anyag-
ban található bütykökre, szögekre, repedésekre
és szennyezödésekre, ezekbe a fürészlap be is
ragadhat.
4. Soha ne hagyja a fürészt felügyelet nélkül.
5. A fürészlap fogai felfelé kell hogy mutassanak.
Ellenörizze, mielött a gépet csatlakoztatja a hálózati áramforráshoz, hogy a
húzókapcsoló az AAN pozicióban található-e.
A gép használata közben:
1. A munkadarabot megfelelöen rögzítsük.
2. A fürész közvetlen közelében található forgácsot
és fahulladékot nem szabad kézzel eltávolítani.
Ha fahulladék a fürész és a munkadarab közé
ékelödik, akkor a gépet elöször ki kell kapcsolni,
majd azután távolíthatók el a hulladékok.
3. A fürész bekapcsoláskor ne érintkezzen a munkadarabbal.
4. A fürészlap az egyik legfontosabb része a fürésznek, ezért a megfelelö kiválasztása az anyagnak, a
fogazatnak és persze a megfelelö beillesztés
nemcsak a fürészlap élettartamát hosszabbítja
meg, hanem megelözi a repedést, törést és az
ebböl kifolyó veszélyeket.
5. Hulladékfát is körültekintöen fürészeljen. Mivel
ennél a fürésznyom minösége kevésbé fontos,
ezért a hulladékfa gyakran nem megfelelöen van
átvizsgálva.
6. Ne fürészeljen a fürésznél hosszabb munkadarabokat.
7. Ne érintse a fürész fém részeit miközben padlórészekben vagy plafonrészekben fürészel, ahol
elektromos vezetékek találhatók. A fürészt
mindkét kézzel a müanyag fogantyúnál tartsa
meg, hogy veszély esetén nehogy feszültség alá
kerüljön.
8. Kapcsolja ki elöször a gépet, várjon amíg a gép
leáll s csak ekkor mozdítsa el a fürészt a munkadarabtól és tegye le a gépet.
9. Lehetöleg ne használjon túl hosszú hosszabbítózsinórt.
10. A fürész fel van szerelve egy müanyag védöburkolattal. Ez nem távolítható el a fürészelés alatt.
Azonnal kapcsolja ki a gépet:
1. A villás csatlakozó, a vezeték ill. a hálózati
vezeték sérülése, zárlata esetén.
2. A kapcsoló meghibásodása esetén.
3. Ha a szénkefék szikráznak és/vagy ha tüz keletkezik a kollektorban.
4. Ha a megperzselödött szigetelés büzlik vagy
füstöl.
!
rendelési szám/ gyártási szám
H
Magyar
Toledo 31
de van de bodemplaat.
- Schakel de decoupeerzaag in en laat de zaag langzaam naar beneden zakken totdat de zaag het
werkstuk raakt
.- Laat nu de zaag het werk
doen en laat de zaag zachtjes het werkstuk in zagen.
- Als u door het werkstuk
bent kunt u de decoupeerzaag weer in de normale
positie door het gezaagde
gat steken en de zaagsnede
vervolgen.
Invalzagen kan ook gedaan worden door eerst een gat
te boren met behulp van een boormachine met een
boor, die groot genoeg is om de zaag van de decoupeerzaag in te steken. Vervolgens kunnen de hierboven
genoemde stappen worden gevolgd.
Voor een optimaal resultaat moet het zaagblad scherp
zijn.
5. ONDERHOUD
Bij onderhoud en schoonmaak altijd de
netstekker uit het stopcontact halen. Gebruik nooit water of andere vloeistoffen bij
het schoonmaken van de elektrische delen
van de decoupeerzaag.
PERIODIEK ONDERHOUD AAN DE DECOUPEERZAAG VOORKOMT ONNODIGE PROBLEMEN!
- Houd de bodemplaat goed schoon zodat bij het zagen geen onnauwkeurigheden ontstaan.
- Houd de buitenkant van de decoupeerzaag schoon
zodat alle bewegende delen nauwkeurig en slijtagevrij kunnen blijven bewegen.
-Houd de ventilatiesleuven van de motor schoon
zodat de motor niet oververhit kan raken.
- Als de koolborstels zijn versleten zal de decoupeerzaag stoppen. Bied de decoupeerzaag daarvoor aan bij uw Toledo dealer.
- Smeer de zaagbladgeleider regelmatig.
6. STORINGEN
In het geval de decoupeerzaag niet naar behoren
functioneert, geven wij een aantal mogelijke oorzaken en de bijbehorende oplossingen.
1. De elektromotor wordt heet
De motor wordt overbelast door te grote werkstukken:
- Zaag in een lager tempo en geef de motor de
kans af te koelen.
De motor is defect:
- Bied de decoupeerzaag aan bij uw Toledo dealer
voor controle en/of reparatie.
2. Ingeschakelde machine werkt niet.
Onderbreking in de netaansluiting.
- Controleer de netaansluiting op breuk.
Beschadiging van de schakelaar:
- Bied de decoupeerzaag aan bij uw Toledo dealer
voor controle en/of reparatie.
3. Het werkstuk laat zich heel moeilijk in een
rechte lijn langs het zaagblad bewegen en de
zaagsnede is onregelmatig.
Het zaagblad is krom of stomp:
- Vervang het zaagblad.
4. Het werkstuk begint hevig te vibreren tijdens het zagen.
Het zaagblad raakt oververhit of vervormd.
- Vervang het zaagblad.
5. De decoupeerzaag maakt lawaai en/of loopt
heel onregelmatig.
De koolborstels zijn versleten.
- Bied de decoupeerzaag aan bij uw Toledo dealer
voor controle en/of reparatie.
ClEl
■
CONFORMITEITSVERKLARING
(NL)
Wij verklaren dat dit product
voldoet aan de volgende
normen of normatieve documenten
EN50144-2-10, EN50144-1
EN55014, EN61000-3-2, EN61000-3-3, EN55104
overeenkomstig de bepalingen in de richtlijnen
89/392/EEC
73/23EEC
89/336/EEC
vanaf 26-05-1998
GENEMUIDEN NL
W. Kamphof
Quality department
!
10 Toledo
Page 11

4. VEDLIGEHOLDELSE
Når stiksaven skal vedligeholdes eller
rengøres, skal stikket altid tages ud af stikkontakten. Brug ikke vand eller andre væsker til rengøring af stiksavens elektriske
dele.
HVIS STIKSAVEN JÆVNLIGT VEDLIGEHOLDES,
KAN MAN UNDGÅ UNØDIGE PROBLEMER!
- Hold bundpladen godt ren, så der ikke opstår unøjagtigheder under savningen.
-Hold stiksaven ren udvendigt, så alle bevægelige
dele kan bevæge sig præcist og uden slitage.
- Hold motorens ventilationsriller rene, så motoren
ikke overophedes.
- Hvis kullene er slidte, stopper stiksaven. Indlever
stiksaven hos Toledo forhandleren.
- Styreanordningerne til savklingen skal smøres regelmæssigt.
5. DRIFTSFEJL
Hvis stiksaven ikke funktionerer tilfredsstillende,
gives nedenfor eventuelle årsager og afhjælpning.
1. Elektromotoren bliver for varm.
Motoren overbelastes, fordi arbejdsstykket er for
stort:
- Sav ikke så hurtigt og giv motoren mulighed for
at afkøle.
Motoren er defekt:
- Indlever stiksaven hos Toledo forhandleren til
kon-trol og/eller reparation.
2. Maskinen starter ikke, mens der er tændt på
kontakten.
Tilslutningen til nettet afbrudt.
- Kontroller nettilslutningen for brud.
Beskadigelse af kontakten:
- Indlever stiksaven hos Toledo forhandleren til
kon-trol og/eller reparation.
3. Arbejdsstykket lader sig kun vanskeligt
bevæge i en lige linie langs savklingen, og
snittet er ujævnt.
Savklingen er krum eller sløv:
- Udskift savklingen.
4. Arbejsstykket begynder at vibrere kraftigt
under savningen.
Savklingen er overophedet eller deformeret.
- Udskift savklingen.
5 Stiksaven laver støj og/eller går meget
ujævnt.
Kullene er slidte.
- Indlever stiksaven hos Toledo forhandleren til
kon-trol og/eller reparation.
ClEl
■
KONFORMITETSERKLÆRING
(DK)
Vi erklærer at under almindeligt ansvar, at dette
produkt er i overenstemmelse med følgende
normer eller normative dokumenter
EN50144-2-10, EN50144-1
EN55014, EN61000-3-2, EN61000-3-3, EN55104
i henhold til bestemmelserne i direktiverne:
89/392/EEC
73/23EEC
89/336/EEC
frà 27-12-2002
GENEMUIDEN NL
W. Kamphof
Quality department
!
30 Toledo
Produit: Toledo scie sauteuse
Type TSS-60P
Numéro d’art. 826055
Toledo, Genemuiden, Pays-Bas.
Niveau de pression acoustique L
pa
85 dB(A)
Niveau de puissance acoustique L
wa
98 dB(A)
Vibration (-aw) 2,5 m/s
2
NUMERO DE SERIE
Le numéro de série sur la machine est formé de la façon
suivante.
Serial nr.
LISEZ ATTENTIVEMENT CETTE NOTICE
EXPLICATIVE AVANT LA MISE EN SERVICE DE LA SCIE SAUTEUSE!
1. FAMILIARISEZ-VOUS
AVEC VOTRE MACHINE
Entretenez votre machine conformément aux prescriptions pour assurer son bon fonctionnement. Ne
mettez la machine en marche qu’au moment où vous
vous êtes familiarisé avec la commande de la machine
et prenez surtout soin que vous sachez exactement
comment il faut l’arrêter en cas de danger. Gardez bien
cette notice explicative et les autres documents qui ont
trait à votre machine.
2. INSTRUCTIONS DE SÉCURITÉ
SPECIAL
1. CONTRÔLEZ LES POINTS SUIVANTS :
- Est-ce que la tension de raccordement du moteur correspond à la tension duréseau?
- Est-ce que le fil et la fiche-secteur sont en bon
état, solides, intacts et sanseffilures;
- Voyez si la lame de scie ne manque pas des dents
ou montre des crevasses. Cette scie doit être
remplacée immédiatement;
- Voyez s’il y a de l’espace sous la pièce pour la scie
qui va en haut et en bas, de sorte que la scie ne
peut pas toucher le carreau ou la table de travail.
2. Ne jamais exercer une pression latérale sur la lame
de scie. Cela peut provoquer la casse de celle-ci.
3. Faire attention aux noeuds, clous et fentes dans le
bois et/ou à un encrassement. Le sciage de ce bois
peut provoquer un coincement dangereux.
4.
Ne jamais laissez la scie sans surveillance derrière soi.
5. Les dents de la lame de scie doivent être dirigées
vers le haut.
Contrôlez que l'interrupteur à tirage ne
soit pas verrouillé par la situation "MARCHE" avant d'introduire la fiche dans la
prise de courant électrique (boîte de prise
de courant murale).
PENDANT L'UTILISATION DE LA MACHINE:
1. L'objet à scier doit être solidement bloqué.
2. Des restes de bois ou autres choses qui se trouvent à
portée immédiate de la scie, ne doivent pas être
éloignés à la main. Lorsque des restes de bois sont
coincés entre les parties fixes et/ou mobiles, il faut arrêter la machine avant d'éloigner les restes de bois.
3. Prenez soin que la scie sauteuse soit libre de toute
charge (donc, qu'elle ne soit pas en contact avec
l'objet à travailler) lorsque la scie sauteuse est mise
en marche.
4. La lame de scie est une des parties les plus importantes de la scie sauteuse. Le choix exact du matériau, des dents ainsi que le montage correct n'augmenteront pas seulement la durée de vie de la lame
à scier, mais évitera aussi les fêlures ou cassures et
les dangers qui en découlent.
5. Le sciage des déchets de bois doit être fait avec
soin. Comme la qualité de la fente de la scie n'est
pas important ici, l'utilisateur sera plus vite porté à
scier sans faire attention, sans veiller suffisamment
aux clous, noeuds et autres irrégularités dans la
pièce à travailler, et à appuyer sur la scie plus ou
moins fortement.
6. Ne pas sciez de pièces plus épaisses que la longueur
de la lame de la scie.
7. Ne touchez pas de pièces en métal de la scie
sauteuse lorsque vous sciez dans des murs ou sols
dans lesquels peuvent se trouver des câbles électriques. Tenez la scie sauteuse avec les deux mains sur
la poignée en matière synthétique de sorte que
vous ne toucherez pas de parties pouvant se trouver sous courant électrique dans le cas où vous
scieriez sans le savoir un câble électrique.
8 Mettez la machine d'abord à l'arrêt et attendez en-
suite l'arrêt total de la scie sauteuse, avant de bouger
la machine sur la pièce à travailler et de la poser.
ARRÉTEZ IMMÉDIATEMENT L'APPAREIL
EN CAS DE:
1. défectuosité de la fiche, du fil d’alimentation ou si le
fil a été endommagé;
2. l’interrupteur défectueux;
3. production excessive d’étincelles par les balais ou
ponts d’étincelles dans le collecteur;
4. fumeé ou mauvaise odeur causée par des matériaux isolants brûlés.
!
NUMERO D’ORDRE/ANNEE DE FABRICATION
F
Français
Toledo 11
Page 12

- Løsn de to bolte (A) ved hjælp af den medfølgende
unbrakonøgle.
- Sæt klingen (B) i holderen (C) på stiksaven.
- Sørg for, at klingen ligger i rillen (D) i holderen og
samtidig i rillen i det lille hjul.
- Klingen skal placeres mellem holderen (C) og
klempladen (E).
- Tryk klingen helt ind i holderen.
- Sæt klingen og klempladen fast ved at stramme de
to bolte til med unbrakonøglen.
- Skyd beskyttelseskappen af plast ned.
3. INDSTILLING AF BUNDPLADENS VINKEL
- Løsn unbrakoskruen i bundpladen ved hjælp af den
medfølgende unbrakonøgle.
- Drej bundpladen i den ønskede savevinkel til venstre eller højre (maks. 45∞).
- Den indstillede vinkel kan aflæses på gradbuen på
bundpladen.
- Sæt bundpladen fast igen med unbrakoskruen.
4. BETJENING AF KONTAKTEN
- Når kontakten (A) trykkes
ind, starter stiksaven.
- Kontakten kan blokeres ved
hjælp af trykknappen (B) på
siden af stiksaven. Tryk kontakten i den ønskede position og
tryk samtidig blokeringsknappen ind. Stiksaven bliver nu ved med at save. Ved igen
at trykke på kontakten (A) udløses blokeringen.
- Den maksimale hastighed kan indstilles ved hjælp af
det lille hjul (C) oven på stiksaven. Ved at dreje hjulet på et større tal, øges hastigheden, og når hjulet
drejes på et mindre tal, sænkes hastigheden.
5. REGULERING AF PENDULET
Hvis man vil opnå et optimalt resultat, er det nødvendigt at indstille den måde, hvorpå savklingens tænder
griber materialet.
Savning i blødt materiale (træ, plast etc.):
- Brug den dybe indgribning og indstil pendulet på ni-
veau II.
Savning i halvhårdt materiale (hårdt træ, aluminium
etc.):
- Indstil pendulet afhængigt af formålet. Pendul på ni-
veau I eller 0: for et skarpt snit i blødt materiale og
til tyndt materiale, hvis der arbejdes med rasp eller
kniv.
Savning af hårdt materiale (stål etc.):
- Sæt pendulet på niveau 0.
Når der saves i buer, er det bedst at indstille pendulet
på niveau 0. Man kan regulere og ændre pendulets niveau, mens der saves.
6. STØVSAMLING
Stiksaven er forsynet med en åbning til støvsamling, så
arbejdsoverfladen kan holdes ren. Det er let at tilkoble
en støvsuger til stiksaven.
3. IBRUGTAGNING
SAVNING
- Tænd for stiksaven og sæt bundpladen på arbejdsstykket.
-Bevæg langsomt mod den markerede savelinie og
tryk stiksaven langsomt frem.
- Tryk bundpladen godt mod arbejdsstykket. Hvis
man ikke gør det, er der stor risiko for, at stiksaven
begynder at vibrere med, så saven hurtigere går i
stykker.
Lad saven gøre arbejdet. Tryk ikke for hårdt
med stiksaven.
INDSAVNING
Hvis startpositionen på arbejdsstykket ikke er langs
kanten, eller hvis der ikke er boret et hul, skal der “indsaves”. Det gøres på følgende måde:
- Sæt stiksaven på bundpladens ombøjede forside.
- Tænd stiksaven og bevæg den langsomt nedad, indtil klingen berører arbejdsstykket;
.- Lad nu saven gøre arbejdet,
og lad klingen langsomt save
sig ind i arbejdsstykket.
- Når klingen er igennem arbejdsstykket, kan stiksaven
igen sættes i normal position
med klingen gennem det savede hul, og man kan save
normalt.
Indsavning kan også gøres ved først med en boremaskine at bore et hul, der er stort nok til at stikke stiksavens
klinge igennem. Derefter gøres som nævnt ovenfor.
Savklingen skal være skarp, hvis man vil opnå et optimalt resultat.
!
Toledo 29
3. INDICATIONS DE MONTAGE
1. CHOIX DE LA SCIE
- Choisir une scie en rapport avec la pièce à travailler.
- Une variété de scies peuvent être montées dans la
scie sauteuse.
- Une scie à dents fines est apte pour le bois mou et
provoque le moins d'échardes.
2. INSTALLATION DE LA SCIE
Avant de monter la scie, vous devez contrôler d'abord que la fiche électrique soit retirée de la prise.
- Dévissez les deux boulons (A) à l'aide de la clé à six
pans livrée avec la scie.
- Placez la scie (B) dans le porte-scie (C) de la machine sauteuse.
- Prendre soin que la lame de scie se trouve dans la
fente (D) du porte-scie et, en même temps que
dans la fente de la petite roue.
-La scie doit être placée entre le porte-scie (C) et la
plaquette de serrage (H).
- Pousser le plus possible la scie dans le porte-scie.
-Fixez la scie et la plaquette de serrage en serrant les
deux boulons à l'aide de la clé à six pans.
- Glisser le capuchon protecteur vers la position la
plus basse.
-La scie doit être placée entre le porte-scie (C) et la
plaquette de serrage (E).
- Poussez le plus possible la scie dans le porte-scie,
mais prenez soin de ne pas pousser trop loin, sinon
la scie se trouverait placée de travers contre l'axe
de sciage.
-Fixez la scie et la plaquette de serrage en serrant les
deux boulons à l'aide de la clé à six pans.
- Placez le capuchon en matière synthétique.
3. REGLAGE D'ANGLE DE LA PLAQUE DE
FOND
- Dévissez le boulon à six pans dans la plaque de fond
à l'aide la clé à six pans jointe à la livraison.
- Tournez la plaque fond vers la gauche ou la droite
jusqu'à l'obtention d'un angle de découpage désiré
de 45° au maximum.
- L'angle ainsi réglé est indiqué sur le rapporteur de
la plaque de fond.
- Refixez la plaque de fond à l'aide de boulon à six
pans.
4. FONCTIONNEMENT DE L'INTERRUPTEUR
- L'interrupteur de marche/arrêt (A) (interrupteur à tirage) se trouve dans la poignée
de la scie sauteuse.
- L'interrupteur à tirage peut
être verrouillé à l'aide d'un
bouton poussoir (B) sur le
côté de la scie sauteuse. Poussez l'interrupteur à tirage dans la position désirée et poussez en même
temps sur le bouton verrouilleur. La machine continue maintenant à fonctionner. En appuyant de nouveau sur l'interrupteur à tirage, le verrouillage est
supprimé.
-La vitesse de sciage maximale peut être réglée à l'aide du bouton tournant (C) qui se trouve dessus la
machine. Ce bouton tournant est muni de chiffres.
Plus haut le chiffre, le plus haute la vitesse. Plus bas le
chiffre, le plus bas la vitesse.
5. REGLAGE DU PIVOT
Pour un résultat optimal de sciage, il est nécessaire
de régler la manière de faire entamer le matériel par
les dents de la lame de scie.
Le sciage de matériel peu dur (bois, produits synthétiques etc.) :
- Utiliser la ligne de sciage profonde et régler le
pivot sur le niveau II.
Le sciage de matériel de dureté moyenne (bois dur,
aluminium etc.) :
- Régler le pivot en fonction de l’application. Pivot
en position I ou 0 : pour une ligne de sciage bien
nette dans un matériel peu dur et pour un matériel mince lorsqu’on utilise des râpes ou des couteaux.
Le sciage de matériel dur (acier etc.) :
- Régler le pivot sur le niveau 0.
Pour scier des courbes, il faut régler le pivot le meilleux sur le niveau 0. Le réglage et le changement du
niveau du pivot sont possibles pendant la marche de
la machine.
6. ASPIRATION DE POUSSIÈRE
Pour tener propre la surface de travail la scie sauteuse a
été fait avec une connection pour une installation de
dépoussiérage.
4. LA MISE EN MARCHE
SCIAGE
-Mettez la scie sauteuse en marche et placez la plaque de fond sur la pièce à travailler.
- Avancez lentement sur la ligne de sciage dessinée
auparavant en appuyant doucement sur la scie
sauteuse.
!
12 Toledo
Page 13

Produkt: Toledo Stiksav
Type TSS-60P
Art.nr.: 826055
Toledo, Genemuiden, Holland.
Lydtrykniveau L
pa
85 dB(A)
Lydtrykeffektniveau L
wa
98 dB(A)
Vibrationer (-aw) 2,5 m/s
2
SERIENUMMER
Maskinens serienummer er sat sammen som følger:
Serial nr.
BRUGSANVISNINGEN SKAL LÆSES OMHYGGELIGT, FØR STIKSAVEN TAGES I
BRUG!
1. SÆRLIGE
SIKKERHEDSFORSKRIFTER
FØR IBRUGTAGNING AF MASKINEN:
1. Kontroller følgende:
- Stemmer motorens tilslutningsspænding overens med netspændingen;
- Er netledning og netstik i korrekt stand: solide og
uden trevler eller beksadigelser;
- Mangler der tænder i savklingen, og er der revner
eller sprækker. Hvis det er tilfældet, skal klingen
udskiftes.
-Er der tilstrækkelig plads under arbejdsstykket til
den op- og nedadgående klinge, således at savklingen ikke rører gulvet eller arbejdsbordet.
2. Udøv ikke tryk fra siden på savklingen. Herved kan
savklingen brække.
3. Ved savning i træ skal man være opmærksom på
knaster, søm, revner og/eller snavs. Det kan være
farligt at save i den slags træ, fordi saven kan køre
fast.
4. Efterlad ikke stiksaven uden opsyn.
5. Klingens tænder skal vende opad.
Kontroller, at maskinen ikke er blokeret i
TÆNDT-position, før stikket sættes i stikkontakten (i væggen).
UNDER BRUG AF MASKINEN:
1. Arbejdsstykket skal klemmes godt fast.
2. Savsmuld og lignende, der er i nærheden af klingen,
må ikke fjernes med hånden. Hvis der kommer trærester i klemme mellem bevægelige og/eller faste
dele, skal maskinen stoppes, før de fjernes.
3. Sørg for, at stiksaven startes ubelastet (den må ikke
komme i berøring med arbejdsstykket, mens den
startes).
4. Savklingen er en af de vigtigste dele i en stiksav. Det
rette valg af materiale, fortanding samt korrekt
montage øger ikke kun savklingens holdbarhed,
hermed undgås også revner og brud med heraf følgende risici.
5. Savning af affaldstræ skal ske med forsigtighed. Da
kvaliteten af savsnittet her ikke er af betydning, er
brugeren tilbøjelig til at save ukoncentreret, og ikke i tilstrækkeligt omfang være opmærksom på
knaster, søm og andre uregelmæssigheder. Han saver bare løs med saven.
6. Sav ikke i arbejdsstykker, der er tykkere end savklingens længde.
7. Berør ikke stiksavens metaldele, mens der saves i
vægge eller gulve, hvori der kan være elektriske kabler. Hold fast i stiksaven med begge hænder i
håndtaget af plast, så De ikke kommer i berøring
med dele, der kan blive strømførende, hvis De ved
et uheld skulle komme til at save et elektrisk kabel
over.
8. Sluk først maskinen og vent, til stiksaven står stille,
før den tages ud af arbejdsstykket og lægges ned.
9. Undgå at bruge lange forlængerledninger.
10. Stiksaven har en beskyttelseskappe af plast. Den
skal holdes på plads, mens der saves.
MASKINEN SKAL ØJEBLIKKELIGT SLUKKES I TILFÆLDE AF:
1. defekt netstik, netledning eller beskadigelse af ledning;
2. defekt kontakt;
3. gnistdannelse i kullene eller ringild i kollektoren;
4. røg eller lugt fra sveden isolering.
2. MONTAGEFORSKRIFTER
1. VALG AF SAVKLINGE
- Vælg en savklinge, der passer til det arbejdsstykke,
der skal saves.
- Der kan sættes mange forskellige typer klinger i
stiksaven.
- En klinge med fin fortanding er egnet til blødt træ og
giver ikke så mange splinter.
2. MONTAGE AF SAVKLINGEN
Før klingen sættes i, skal man sørge for, at stikket er taget ud af stikkontakten.
!
!
ORDERNUMMER/BYGGEÅR
DK
Dansk
28 Toledo
- Poussez solidement la plaque de fond contre la pièce à travailler. Si cela n'est pas fait, on risque fort de
faire vibrer la scie sauteuse et de faire se casser rapidement la lame à scie.
Laisser faire le travail à la scie. Ne poussez
pas trop fort contre la scie sauteuse.
SCIAGE D'INCIDENCE
Lorsque la position de démarrage de la pièce à scier n'est
pas le bord, ou lorsqu'il n'y a pas de trou de percé, il vous
faudra 'scier en incidence'. Cela se fait comme suit:
- Placez la machine sauteuse
sur le côté arrondi de devant de la plaque de fond.
- Mettez la scie sauteuse en
marche et faire descendre
lentement la scie jusqu'à ce
qu'elle touche la matière à
scier.
- Laissez maintenant faire le travail à la scie en la laissant entamer lentement la matière.
- Lorsque la matière est percée, remettezla scie
sauteuse dans la position normale dans le trou scié
et continuez la découpe.
Le sciage en incidence peut aussi être effectué en
perçant d'abord un trou à l'aide d'une perceuse à
mèche suffisamment grande pour laisser passer la scie
de la machine sauteuse. Poursuivre ensuite comme indiqué ci-avant.
5. ENTRETIEN
Lors de l'entretien et du nettoyage, retirer
toujours la fiche de la prise de contact
électrique. Ne jamais utiliser de l'eau ou
d'autres liquides pour nettoyer les parties
électriques de la machine à scier.
UN ENTRETIEN PÉRIODIQUE DE LA MACHINE
À SCIER ÉVITE DES PROBLÈMES!
- Tenez la plaque de fond propre de sorte qu'il ne
se produise pas d'inexactitudes lors du sciage.
- Tenez propre l'extérieur de la machine à scier
de sorte que toutes les parties mouvantes puissent toujours bouger librement et sans usure.
- Tenez propres les fentes de ventilation du moteur,
de sorte que celui-ci ne soit pas surchauffé.
- Lorsque les balais en charbon sont usés la scie
sauteuse s'arrêtera. Pour cela, présenter la
machine à scier à votre dealer Toledo.
- Huilez regulièrement le guidage de lame de scie.
6. PANNES
Dans le cas où la machine à scier ne fonctionne pas convenablement, nous indiquons un nombre de raisons et
les solutions s'y reportant.
1. Le moteur électrique chauffe au-dessus.
Le moteur est surchargé par des pièces trop grandes:
- Sciez plus lentement et donner au moteur l'occa-
sion de refroidir.
Le moteur est en panne:
- Présentez la machine sauteuse à votre dealer
Toledo pour contrôle et/ou réparation.
2.
La machine mise en marche ne fonctionne pas.
Interruption dans le circuit électrique:
- Contrôlez le circuit électrique.
Détérioration de l'interrupteur:
- Présentez la machine à scier à votre dealer
Toledo pour contrôle et/ou réparation.
3. La pièce à travailler est très difficile à mouvoir en ligne droite le long de la lame à scier
et la ligne de sciure est irrégulière.
La lame à scier est courbe ou mal aiguisée:
- Remplacez la lame à scier.
4. La pièce à travailler se met à vibrer fortement durant le sciage.
La lame à scier est surchauffée ou déformée.
- Remplacez la lame à scier.
5. La scie sauteuse fait beaucoup de bruit et/ou
marche irrégulièrement.
Les balais à charbon sont usés:
- Présentez la machine à scier à votre dealer
Toledo pour contrôle et/ou réparation.
ClEl
■
DÉCLARATION DE CONFORMITÉ
(F)
Nous declarons sous notre propre responsabilité
que ce produit est en conformité avec les normes
ou documents normalisés suivants
EN50144-2-10, EN50144-1
EN55014, EN61000-3-2, EN61000-3-3, EN55104
conforme aux réglementations:
89/392/EEC
73/23EEC
89/336/EEC
dès 27-12-2002
GENEMUIDEN NL
W. Kamphof
Quality department
!
!
Toledo 13
Page 14

merkkiviivalle ja työnnä sitä hitaasti eteenpäin.
- Paina pistosahan pohjalevy kunnolla sahattavaa materiaalia vasten, jotta terä ei pääse tärisemään tai
katkeamaan.
Älä käytä voimaa. Kone tekee työn.
UPOTTAMINEN
Jos et voi aloittaa sahausta materiaalin reunasta alkaen
ja jos materiaalissa ei ole esiporattua reikää, voit upottaa terän seuraavalla tavalla.
- Pidä pistosahaa vinosti puun päällä (pohjalevyn
pyöristetty etureuna puun päällä).
- Käynnistä saha ja laske terää hitaasti, kunnes se osuu puuhun.
.- Älä työnnä, vaan anna terän
kaivautua puuhun.
- Kun se on kokonaan läpi,
voit palauttaa pistosahan
normaaliasentoon ja jatkaa.
Toinen mahdollisuus on po-
rata ensin reikä puuhun sopivalla poranterällä. Sen jälkeen teet yllämainitut toimenpiteet.
Upottaminen käy parhaiten, kun pistosahan terä on hyvin terävä.
4. HUOLTO
Ennen huollon aloittamista pistoke on aina irrotettava pistorasiasta. Älä koskaan
puhdista koneen sähköosia vedellä tai
muilla nesteillä.
MÄÄRÄAIKAISHUOLTO EHKÄISEE TARPEETTOMIEN ONGELMIEN SYNTYMISEN!
-Tarkka työ vaatii puhtautta. Pidä pistosahan poh-
jalevy sen tähden puhtaana.
- Pidä koko koneen ulkopinta puhtaana, jotta liik-
kuvat osat liikkuvat esteettömästi eivätkä kulu
tarpeettomasti.
- Pidä moottorin jäähdytysilmanottoaukot puhtai-
na. Näin vältät moottorin ylikuumenemisen.
- Kone sammuu, jos hiiliharjat ovat kuluneet. Vie
pistosaha jälleenmyyjällesi korjattavaksi.
- Voitele terän ohjain säännöllisesti.
5. HÄIRIÖT
Pistosahan toimintahäiriöt ja niiden mahdolliset syyt
sekä korjaukset.
1. Sähkömoottori kuumenee liikaa:
Moottori ylikuormittuu, kun sahataan liian suuria
kappaleita.
- Käytä alhaisempaa kierroslukua ja anna koneen
välillä jäähtyä.
Moottori on viallinen.
- Vie kone Toledo-jälleenmyyjälle tarkistettavaksi
tai korjattavaksi.
2. Kone ei toimi, vaikka se on päällä.
Virransyöttö on keskeytynyt.
- Tarkista johto ja pistoke.
Katkaisin on viallinen.
- Vie pistosaha Toledo-jälleenmyyjälle tarkistettavaksi tai korjattavaksi.
3. Jälki on epäsuora ja epäsiisti.
Terä on kiero tai tylsä.
- Vaihda terä.
4. Sahattava materiaali tärisee työn aikana.
Terä ylikuumenee tai kieroutuu.
- Vaihda terä.
5. Moottori käy meluisasti tai epäsäännöllisesti.
Hiiliharjat ovat kuluneet.
- Vie pistosaha Toledo-jälleenmyyjälle tarkistettavaksi tai korjattavaksi.
si tai korjattavaksi.
ClEl
■
TODISTUS STANDARDINMUKAISUUDESTA
(SF)
Todistamme täten ja vastaamme yksin siitä,
että tämä tuote on allalueteitujen standardien ja
standardoimisasiakirjojen vaatimusten mukainen:
EN50144-2-10, EN50144-1
EN55014, EN61000-3-2, EN61000-3-3, EN55104
seruaavien sääntöjen mukaisesti:
89/392/EEC
73/23EEC
89/336/EEC
27-12-2002
GENEMUIDEN NL
W. Kamphof
Quality department
!
!
Toledo 27
Producto: Sierra de calar Toledo
Tipo TSS-60P, núm. de articulo 826055
Toledo, Genemuiden, País Bajos
Nivel de presión acústica L
pa
85 dB(A)
Nivel de potencia acústica L
wa
98 dB(A)
Vibración (-a
w
) 2,5 m/s
2
NÚMERO DE SERIE
La número de serie al la máquina representa:
Serial nr.
¡LEA ATENTAMENTE EL MODO DE EMPLEO
ANTES DE USAR LA SIERRA DECALAR!
1. CONOZCA SU MAQUINA
Mantenga su máquina conforme a las instrucciones a fin
que funcione siempre correctamente. No ponga la máquina en marcha antes de haber bien entendido su funcionamiento y sobre todo tenga cuidado de saber precisamente cómo parar la máquina rápidamente en caso
de urgencia. Guarde bien este manual y los otros documentos referente a la máquina.
2. INSTRUCCIONES ESPECIALES DE
SEGURIDAD
ANTES DE USAR LA MAQUINA POR PRIMERA VEZ:
1. Controle lo siguiente:
-La tensión del motor corresponde a la tensión
existente en la red;
- El cable y la clavija están en buen estado: sólidos,
sin hilachos o averías.
- Controlar si a la hoja de sierra no le faltan dientes ni presenta grietas o rajas. En tal caso debe
ser repuesta esta sierra inmediatamente;
- Controlar si debajo del trabajo hay bastante espacio para el movimiento de arriba abajo de la
sierra, de manera que la sierra no pueda tocar el
suelo o la mesa de trabajo.
2. Nunca ejercer presión lateral contra la hoja de
sierra. De esa manera puede romperse.
3. Tener cuidado con nudos, clavos, grietas y/o adherencia de suciedad en la madera. Serrar esta clase de
madera puede conducir a un atascamiento peligroso.
4. Nunca dejar la sierra de calar descuidada.
5. Los dientes de la hoja de sierra deben apuntar hacia
arriba.
Antes de enchufar el aparato (en el enchufe
de pared), controlar si el interruptor de gatillo no está bloqueado en la posición ‘CONECTADO’.
AL PONER EN FUNCIONAMIENTO LA
MÁQUINA:
1. Hay que sujetar firmemente el trabajo.
2. Restos de madera o cosas semejantes que se encuentran en la cercanía directa de la sierra, no deben ser quitadas con la mano. Si hay restos de madera atrapados entre partes fijas y/o en movimiento, antes desconectar la máquina y después quitar
los restos de madera.
3. Procurar que la sierra de calar esté sin carga al conectarla (no la deje, pues, entrar en contacto con el
trabajo al ser conectada la sierra de calar).
4. La hoja de sierra es una de las piezas más importantes de una sierra de calar. La elección correcta del
material, los dientes, así como la manera correcta
de instalación, no sólo aumentan la vida útil de la
hoja de sierra, sino que también evitan grietas o
fracturas y los consiguientes peligros.
5. Al serrar desperdicios de madera, hay que trabajar
con cuidado. Como en tal caso no importa la calidad del corte, el usuario se tiende más a serrar sin
concentración, a no controlar suficientemente si
hay clavos, nudos y otras irregularidades, y a empujar fuerte con la sierra.
6. No serrar trabajos más gruesos que la longitud de
la sierra.
7. No tocar partes de metal de la sierra de calar al serrar en paredes o suelos donde pueden encontrarse
cables de electricidad. Sujetar la sierra de calar con
ambas manos en la empuñadura de plástico, de manera que no toque partes que puedan llegar a estar
bajo tensión si inesperadamente sierra algún cable
de electricidad.
8. Primero desconectar la máquina y esperar hasta
que se pare la sierra de calar, antes de alejar la máquina del trabajo y depositar la máquina.
9. Evitar el uso de cables de prolongación largos.
10. La sierra de calar está provista de una cubierta protectora. Hay que mantenerla en su lugar al serrar.
DESCONECTAR INMEDIATAMENTE EL
APARATO EN CASO DE :
1. Fallo en el enchufe, en el cable o avería del cable.
2. Interruptor averiado.
3. Sobrecalentamiento de la máquina.
4. Humo o mal humor de material aislante quemado.
!
NO. DE PEDIDO/AÑO DE FABRICACIÓN
E
Español
14 Toledo
Page 15
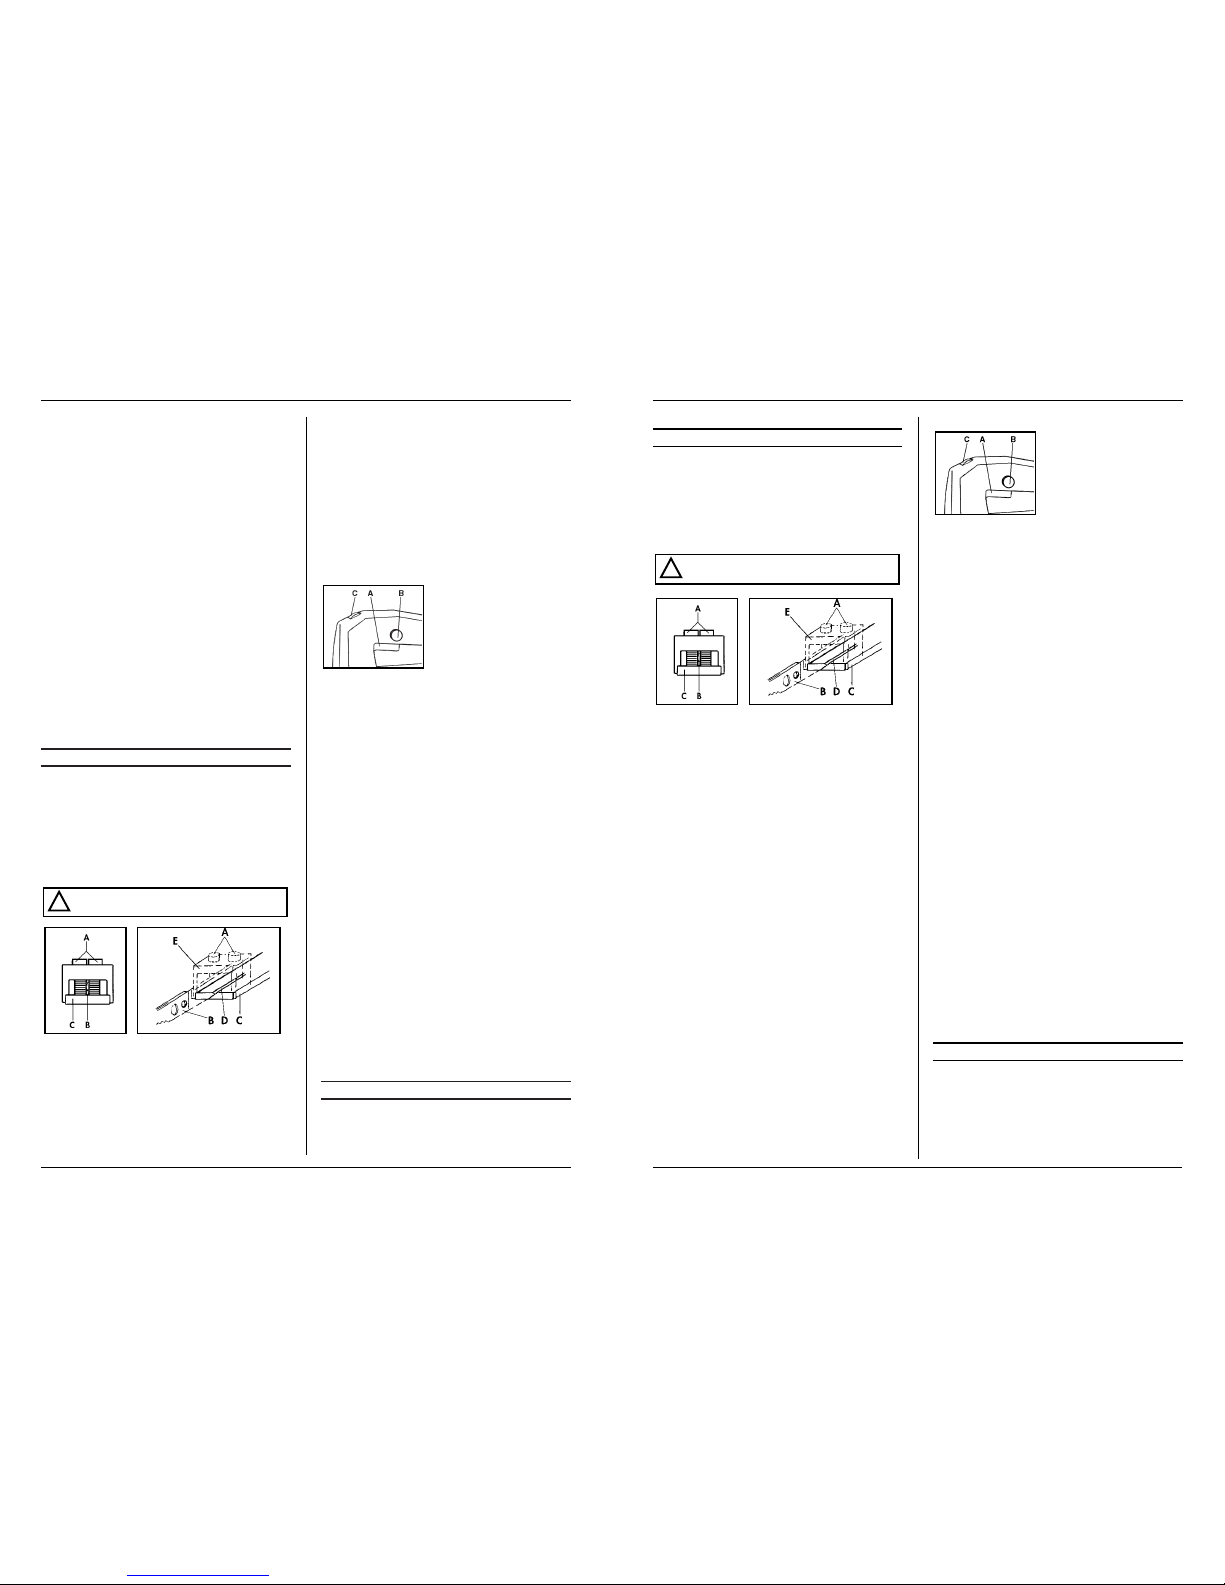
turvallisuustekijöitä, koska ne vähentävät terän rikkoutumisen vaaraa.
5. Ole varovainen sahatessasi romuja tai puujätettä.
Koska tässä työssä sahauksen jälki ei ole niin tärkeää, käyttäjän keskittyminen herpaantuu helposti.
Silloin unohdetaan myös varoa puussa olevia oksia
tai nauloja ja sahataan liian rajusti.
6. Älä sahaa puuta, jonka paksuus ylittää pistosahan
sahaussyvyyden.
7. Älä koske koneen metalliosiin, kun sahaat seinää tai
lattiaa, jossa saattaa kulkea sähköjohtoja. Pidä sen
tähden konetta molemmin käsin kiinni muoviosista.
8. Kytke kone pois päältä ja anna terän pysähtyä, ennen kuin otat sahan pois sahatusta puukappaleesta
ja ennen kuin lasket sen pöydälle.
9. Vältä käyttämästä pitkiä jatkojohtoja.
10. Pistosahaan kuuluu muovinen suoja. Älä poista sitä
käytön ajaksi!
PYSÄYTÄ KONE VÄLITTÖMÄSTI JOS:
1. pistoke tai sähköjohto on vaurioitunut,
2. katkaisin on viallinen,
3. hiiliharjat kipinöivät tai kollektorissa on tuli,
4. erittyy savua tai käryä.
2. ASENNUSOHJEET
1. TERÄN VALINTA
- Valitse sopiva terä ottaen huomioon sahattavan
kappaleen ominaisuudet.
- Pistosahassa voi käyttää laajaa valikoimaa erilaisia
teriä.
- Hienohampainen terä soveltuu pehmeän puun sahaamiseen ja tekee siistimmän jäljen.
2. TERÄN ASENNUS
Tarkista, että pistoke on vedetty pois pistorasiasta ennen terän asennusta.
- Löysää molemmat ruuvit (A) kuusiokoloavaimella
(pakkauksessa).
- Aseta terä (B) pidikkeeseen (C).
-Terän on oltava sekä pidikkeen (D) että pyörän
urassa.
- Terä on asennettava pidikkeen (C) ja puristuslevyn
(E) väliin.
- Työnnä terä mahdollisimman syvälle pidikkeeseen.
- Kiinnitä terä puristuslevyn alle kiristämällä molemmat ruuvit kuusiokoloavaimella.
- Työnnä muovinen suoja alas.
3. POHJALEVYN KULMAN SÄÄTÖ
Löysää pohjalevyn ruuvi kuusiokoloavaimella (pakkauksessa).
- Säädä pohjalevy vasemmalle tai oikealle haluttuun
sahauskulmaan (kulma säädettävissä 45°:een).
- Pohjalevyssä oleva asteikko näyttää sahauskulman.
- Kiristä pohjalevy kuusiokoloavaimella.
4. KATKAISIMEN KÄYTTÖ
- Kone kytketään päälle painamalla katkaisin alas (A) (liipaisin).
- Liipaisin lukitaan painamalla
koneen kyljessä olevaa painiketta (B). Paina liipaisin haluttuun
asentoon ja paina samalla paini-
ketta. Kone jää nyt päälle. Painamalla liipaisinta
uudestaan, kone pysähtyy.
- Käyntinopeus säädetään koneen päällä olevalla
pyörällä (C). Korkeampi luku vastaa korkeampaa
käyntinopeutta.
5. HEILURIN SÄÄTÖ
Paras jälki syntyy, kun terän hampaat purevat puuhun
oikealla tavalla. Säädä heiluri seuraavasti.
Pehmeä materiaali (puu, muovi jne.):
- Säädä heiluri asentoon II, jolloin terät purevat
syvälle.
Puolikova materiaali (kova puu, alumiini jne.):
-Säädä heiluri sopivaan asentoon: asento 1 tai 0 antaa siistin jäljen pehmeää materiaalia sahattaessa.
Tätä asentoa on myös käytettävä, kun materiaalia
työstetään raspilla tai veitsellä.
Kova materiaali (teräs jne.):
- Säädä heiluri 0-asentoon.
Kaarevia muotoja sahattaessa parasta on käyttää 0asentoa. Heilurin säätö on myös mahdollista sahaamisen aikana.
6. PÖLYN POISTO
Työpinnan puhtaana pitämistä varten pistosahaan
kuuluu pölynimurin liitäntä. Siihen voidaan kytkeä tavallinen pölynimuri.
3. KÄYTTÖÖNOTTO
SAHAAMINEN
- Kytke pistosaha päälle ja aseta pohjalevy työkappaleelle.
- Liikuta pistosaha hitaasti etukäteen merkitylle
!
26 Toledo
3. MONTAJE
ELECCIÓN DE LA SIERRA
- Elegir una sierra para el trabajo a serrar.
- Se pueden montar en la sierra de calar diferentes
hojas.
- Una hoja con dentadura fina es apropiada para madera suave y produce menos astillas.
INSTALACIÓN DE LA SIERRA
Antes de proceder al montaje de la sierra, primero controlar si ha quitado el enchufe.
- Destornillar el tornillo (A) con la llave macho hexagonal suministrada.
- Introducir la sierra (B) en el portador (C) de la sierra de calar.
- Procurar que la sierra se encuentre bien introducida en la corredera (D) de portador y, además, en la
corredera de la pequeña rueda sujetada.
- La sierra debe ser colocada entre el portador (C) y
la placa de sujeción (E).
- Introducir la sierra en el portador en lo posible.
- Fijar la sierra y la placa de sujeción, atornillando el
tornillo con ayuda de la llave macho hexagonal.
- Poner la cubierta protectora sintética.
AJUSTAR EL ANGULO DE LA PLACA INFERIOR
- Destornillar el tornillo de hexágono interior en la
placa inferior con ayuda de la llave macho hexagonal suministrada.
- Distorsionar la placa inferior hasta el ángulo de serrar deseado, hacia izquierda o derecha hasta un ángulo máximo de 45”.
- Puede leer el ángulo ajustado en el transportador
de la placa inferior.
- Fijar de nuevo la placa inferior con el tornillo de
hexágono interior.
MANEJO DEL INTERRUPTOR
- Pulsando el interruptor de gatillo (A), la sierra de calar se
pone en marcha.
- El interruptor puede ser bloqueado con el botón (B) en la
parte lateral de la sierra de calar. Pulsar el interruptor en
la posición deseada, pulsando a la vez el botón de bloqueo. La sierra de calar sigue ahora funcionando. Pulsando de nuevo el interruptor de gatillo, se suprime
el bloqueo.
- La velocidad máxima se ajusta mediante la pequeña
rueda (C) en la parte superior de la sierra de calar.
Girando la pequeña rueda a una cifra más alta, la velocidad aumentará, girando la pequeña rueda a una
cifra más baja, la velocidad disminuirá.
REGULACIÓN DEL PÉNDULO
Para obtener un resultado óptimo de la sierra es
necesario saber en que forma deben disponerse los
dientes de la misma para introducirse en el material.
Para serrar material flojo (madera, materiales sintéticos, etc.):
- Utilice la profundidad de calado y ajuste el péndulo en el nivel II.
Para serrar material medianamente duro (madera
dura, aluminio, etc.):
- Ajuste el péndulo dependiendo siempre de la
aplicación.
Nivel del péndulo I ó 0: para un corte de sierra
en material flojo y delgado igual que cuando se
trabaja con ralladura y cuchillos.
Para serrar material duro (acero, etc.):
- Ajuste el péndulo en el nivel 0.
Para serrar en curvas lo mejor es ajustar el péndulo
en el nivel 0. Existe la posibilidad de regular y cambiar el nivel del péndulo mientras la máquina está en
funcionamiento.
RECOGIDA DEL POLVO
Para mantener limpia la superficie de trabajo se ha
diseñado la sierra mecánica de calado con una conexión destinada a absorber el polvo. Simplemente se
trata de que usted conecte un aspirador a la sierra
mecánica de calado.
4. PUESTA EN SERVICIO
SERRAR
- Conectar la sierra de calar y colocar la placa inferior sobre el trabajo.
- Mover lentamente hacia la línea de serrar, previamente dibujada, y empujar la sierra de calar lentamente hacia adelante.
- Empujar la placa inferior fuertemente contra el tra-
!
Toledo 15
Page 16

6. AVBROTT
Om sticksågen inte fungerar som du vill, följer här
nedan ett antal möjliga orsaker med dithörande
åtgärder.
1. Elektromotorn blir het
Motorn blir överbelastad genom för stora
arbetsstycken:
- Såga med ett lägre tempo och ge motorn tillfälle
att svalna.
Motorn är defekt:
- Lämna in sticksågen till din Toledo-återförsäljare
för kontroll och/eller reparation.
2. Tillkopplad maskin går inte
Avbrott i nätanslutningen:
- Kontrollera nätanslutningen på brott.
Omkopplaren har gått sönder:
- Lämna in sticksågen till din Toledo-återförsäljare
för kontroll och/eller reparation.
3. Det går svårt att få arbetsstycket i en rak
linje utmed sågklingan och sågsnittet är
ojämnt
Sågklingan är krokig eller oskarp:
- Byt ut sågklingan.
4. Arbetsstycket börjar vibrera kraftigt under
sågningen
Sågklingan blir överhettad eller deformerad:
- Byt ut sågklingan.
5. Sticksågen orsakar oljud och/eller går
mycket oregelbundet
Kolborstarna är slitna:
- Lämna in sticksågen till din Toledo-återförsäljare
för kontroll och/eller reparation.
ClEl
■
FÖRSÄKRAN
(S)
Vi intygar och ansvarar för, att denna
produkt överensstammer med följande
norm och dokument
EN50144-2-10, EN50144-1
EN55014, EN61000-3-2, EN61000-3-3, EN55104
enl. bestämmelser och riktlinjema:
89/392/EEC
73/23EEC
89/336/EEC
fràn 27-12-2002
GENEMUIDEN NL
W. Kamphof
Quality department
Tuote: Toledo Pistosaha
Tyyppi: TSS-60P, Tuote no 826055
Toledo, Genemuiden, Hollanti
Äänenpainetaso L
pa
85 dB(A)
Äänentehotaso L
wa
98 dB(A)
Värähtely (-aw) 2,5 m/s
2
SARJANUMERO
Koneen sarjanumero muodostuu seuraavista tiedoista:
Serial nr.
LUE NÄMÄ KÄYTTÖOHJEET HUOLELLISESTI
ENNEN PISTOSAHAN KÄYTTÖÖNOTTOA!
1. ERIKOISTURVAOHJEET
ENNEN KÄYTTÖÖNOTTOA:
1. Kiinnitä huomiota seuraaviin asioihin:
- Tarkista, ovatko moottorin syöttöjännite ja verkkojännite yhteen sopivia;
- Tarkista, ovatko verkkojohto ja pistoke hyvässä
kunnossa, ilman vaurioita tai rispaantumia;
- Tarkista, puuttuuko terästä hampaita ja onko terä
ehjä sekä ilman halkeamia. Viallinen terä on välittömästi vaihdettava uuteen;
- Tarkista, että sahattavan materiaalin alla on riittävästi tilaa liikkuvalle terälle.
2. Älä koskaan kuormita pistosahan terää sivusuunnassa, sillä terä voi tällöin katketa.
3. Puuta sahatessasi varo oksia, nauloja, halkeamia
ja/tai epäpuhtauksia, koska silloin se voi leikata kiinni.
4. Älä jätä pistosahaa ilman valvontaa.
5. Terän hampaiden kuuluu osoittaa ylöspäin.
Ennen kuin työnnät pistokkeen pistorasiaan, varmista, että koneen pääkatkaisin on
pois päältä.
KÄYTÖN AIKANA:
1. Kiinnitä sahattava materiaali tukevasti.
2. Puulastuja tms. ei saa käsin poistaa terän läheltä. Jos
lastuja on jumiutunut kiinteiden ja/tai liikkuvien
osien väliin, kone on ensin pysäytettävä.
3. Terä ei saa olla kosketuksissa puun kanssa, kun kone kytketään päälle.
4. Sahan terä on yksi tärkeimpiä pistosahan osia. Oikea materiaalin valinta, terän hammastus ja oikea
asennus pidentävät terän käyttöikää ja ovat tärkeitä
!
TILAUSNUMERO/VALMISTUSVUOSI
SF
Suomi
Toledo 25
bajo. Si no lo hace, hay mucha posibilidad de que la
sierra de calar empiece a vibrar y de que la hoja se
rompa pronto.
Deje que la sierra trabaje. No empujar demasiado la sierra de calar!
SERRAR POR INCIDENCIA
Si la posición de inicio del trabajo a serrar no es el lateral, o si no se ha taladrado un agujero, deberá serrar ‘por
incidencia’. Eso se hace como sigue:
- Colocar la sierra de calar
sobre la parte delantera redondeada de la placa inferior.
- Conectar la sierra de calar y
bajar lentamente la hoja
hasta que toque el trabajo.
- Dejar que la sierra haga el
trabajo y dejar que la hoja entre suavemente en el
trabajo.
- Una vez perforado el trabajo, podrá introducir la
sierra de calar en la posición normal por el agujero
serrado y seguir el corte.
Serrar por incidencia también se puede hacer taladrando primero un agujero con una taladradora, con una
broca suficientemente gruesa como para poder introducir la hoja de la sierra de calar. A continuación podrá
seguir los pasos citados arriba.
Para un resultado óptimo, la hoja de sierra debe estar
afilada.
5. MANTENIMIENTO
El uso de accesorios y Antes de cualquier
trabajo de mantenimiento o limpieza saque siempre el enchufe de la caja de corriente (enchufe de pared). Nunca use aqua
o otros líquidos durante el limpieza de la
máquina. Cepille limpia la máquina con la
ayuda de un brocha.
UN MANTENIMIENTO PERIÓDICO DE LA
MÁQUINA EVITA PROBLEMAS INÚTILES!
- Mantener bien limpia la placa inferior, para que no
se produzcan inexactitudes al serrar.
- Mantener limpia la parte exterior de la sierra de calar, para que todas las partes móviles puedan seguir
moviendo con exactitud y sin desgaste.
- Mantener limpias las aberturas de ventilación del
motor, para que el motor no se sobrecaliente.
- Si las escobillas de carbón están gastadas la sierra
de calar parará. Si esto sucede, habrá que reponer
las dos escobillas de carbón. Entregar para ello su
sierra de calar a su distribuidor Toledo. No reponga usted mismo las escobillas de carbón.
-
Engrasar regularmente el guiador de la hoja de sierra.
6. AVERIAS
Cuando la Sierra de calar no funciona como debiera, le
indicamos abajo algunas causas posibles con las soluciones respectivas. Si no obstante no se puede solucionar
el problema, haga reparar la máquina por una empresa
de servicio autorizada o un especialista autorizado.
1. El electromotor se calienta más de 70˚Celsio.
Se sobrecarga el motor por trabajos demasiado
grandes:
- Serrar más lento y dejar que el motor enfríe.
2. La máquina funciona cuando está conectada.
Interrupción en el circuito eléctrico:
- Controle el cable y la clavija.
El interruptor está defectuoso:
- Entregar la sierra de calar a su distribuidor Toledo
para inspección y/o reparación.
3. El trabajo se deja mover con mucha dificultad en una línea recta a lo largo de la hoja de
sierra y el corte es irregular.
La hoja de sierra está torcida o desafilada:
- Reponer la hoja de sierra.
4. El trabajo empieza a vibrar violentamente
al serrar.
La hoja de sierra se sobrecalienta o se deforma:
- Reponer la hoja de sierra.
5. La sierra de calar hace ruido y/o funciona irregularmente.
Las escobillas de carbón están gastadas:
- Entregar la sierra de calar a su distribuidor Toledo
para inspección y/o reparación.
ClEl
■
DÉCLARACION DE CONFORMIDAD
(E)
Declaramos bajo nuestra sola responsabilidad que
este producto está en conformidad con las normas
o documentos normalizados siguientes
EN50144-2-10, EN50144-1
EN55014, EN61000-3-2, EN61000-3-3, EN55104
de acuerdo con las directivas:
89/392/EEC
73/23EEC
89/336/EEC
a partir de 27-12-2002
GENEMUIDEN NL
W. Kamphof
Quality department
!
!
16 Toledo
Page 17

- Lås fast bladet och spännplattan genom att dra åt
bultarna (A) med insexnyckeln. När insexnyckeln
inte används kan den förvaras i det lilla facket
baktill på sticksågen.
- Sätt tillbaka säkerhetsskyddet på plats.
3. JUSTERING AV BOTTENPLATTANS
VINKEL
- Lossa sockelskruvarna i bottenplattan med medföljande insexnyckel.
- Vrid plattan åt höger eller vänster till önskad vinkelposition (max 45°).
- Den inställda vinkeln indikeras på skalan som
finns på bottenplattan.
4. STRÖMBRYTARE / GASREGLAGE
- Strömbrytaren för av/på-gas
reglaget (C) sitter i stickså
gens handtag. Se figur.
- Såghastigheten bestäms av
hur långt in gasreglaget
trycks.
- Sågens maximala hastighet
kan justeras med hjälp av
tumskruven (B) i gasreglaget. Vrid skruven
medurs för att öka topphastigheten och moturs
för att minska den.
- Gasreglaget kan låsas vid önskad hastighet
genom att knappen (A) på gasreglagets sida
trycks in. Sågen håller därmed kontinuerligt den
inställda hastigheten. Tryck in gasreglaget för att
upphäva låsningen.
5. REGLERING AV PENDELN
För bästa tänkbara sågresultat är det sätt som kling-
ans sågtänder griper in materialet avgörande.
Att såga mjukt material (trä, plast etc.):
- Använd det djupa ingreppet och ställ in pendeln
på nivå II.
Att såga måttligt hårt material (tropiskt trä, alumini-
um etc.):
- Ställ in pendeln allt after tillämpningen.
Pendeln på nivå I eller O: för ett skarpt sågsnitt i
mjukt material och för tunt material om man
arbetar med raspar eller knivar.
Att såga hårt material (stål etc.):
- Ställ in pendeln på nivå 0.
För att såga knän kan pendeln bäst ställas in på nivå
0. Reglering och förändring av pendelns nivå är möj-
ligt medan maskinen är i gång.
6. DAMMSUG
För att hålla arbetsytan ren är sticksågen utförd med
en koppling till dammsugning. Det går lätt att koppla
dammsugaren till sticksågen.
4. HANDHAVANDE
SÅGNING
- Starta verktyget och placera bottenplattan på
arbetsstycket.
- För verktyget sakta mot den fördragna såglinjen.
Tryck verktyget sakta framåt.
- Tryck sågen mot arbetsstycket så att bottenplattan ligger stadigt an mot arbetsstycket. Sågen kan
annars börja vibrera, vilket bl a medför att sågbladet lättare går sönder.
Forcera inte sågningen genom att trycka på
för hårt utan låt verktyget göra jobbet!
INSTICKSÅGNING
Om startläget för sågningen i arbetsstycket inte ligger på sidokanten och det finns inget hål borrat, får
du börja med 'insticksågning'. Det går till så här:
-Sätt sticksågen på golvplattans rundböjda framsida.
- Koppla till sticksågen och låt den sjunka långsamt
nedåt, tills sågen når arbetsstycket.
-Låt nu sågen göra jobbet och
låt den såga in i arbetsstycket
mjukt.
-När du kommit igenom
arbetsstycket, kan du sticka
in sågen genom hålet till sitt
normala läge och fortsätta
figursågsnittet.
Sticksågning kan också genomföras genom att man
först borrar ett hål som är tillräckligt stort så att
man kan sticka in sågen genom det och sen fortsätta
med ovan nämnda steg.
För bästa tänkbara resultat bör sågklingan vara vass.
5. UNDERHÅLL
Vid underhåll och rengöring drar du alltid
ut stickkontakten ur vägguttaget. Använd
aldrig vatten eller andra vätskor för att
rengöra sågens elektriska delar.
REGELBUNDET UNDERHÅLL PÅ STICKSÅGEN
FÖREBYGGER ONÖDIGA PROBLEM!
- Håll golvplattan väl ren så att det inte uppstår
några ojämnheter under sågningen.
- Håll sticksågens yttersida ren så att det inte uppstår några ojämnheter under sågningen.
- Håll ventilationsöppningarna på motorn rena så
att motorn inte blir överhettad.
- Om kolborstarna är slitna kommer sticksågen
att stanna. Lämna då in den till din Toledo-återförsäljare.
- Smörj sågbladsstödet regelbundet.
!
!
24 Toledo
Produto: Serra de recortes Toledo
Tipo TSS-60P, nº de art. 826055
Toledo, Genemuiden, Países Baixos
Nivel da pressão acústica L
pa
85 dB(A)
Nivel da potència acústica L
wa
98 dB(A)
Vibração (-a
w
) 2,5 m/s
2
NÚMERO DE SÉRIE
O numero de série na máquina tem a seguinte estrutura.
Serial nr.
LEIA ATENTAMENTE AS INSTRUÇÕES,
ANTES DE UTILIZAR A SERRA DE RECORTES!
1.CONHEÇA O SEU APARELHO
A manutenção do aparelho deverá ser conforme as intruções dadas para assim poder garantir o seu bom funcionamento. Ligue o aparelho só quando souber ao
certo como usá-lo e trate de saber, principalmente, como desligá-lo no caso de necessidade. Guarde cuidadosamente estas instruções e outra documentação
respeitante ao seu aparelho.
2. INSTRUCCIONES ESPECIALES DE
SEGURIDAD
ANTES DE USAR LA MAQUINA POR PRIMERA VEZ:
1. Controle lo siguiente:
-La tensión del motor corresponde a la tensión
existente en la red;
- El cable y la clavija están en buen estado: sólidos,
sin hilachos o averías.
- Controlar si a la hoja de sierra no le faltan dientes ni presenta grietas o rajas. En tal caso debe
ser repuesta esta sierra inmediatamente;
- Controlar si debajo del trabajo hay bastante espacio para el movimiento de arriba abajo de la
sierra, de manera que la sierra no pueda tocar el
suelo o la mesa de trabajo.
2. Nunca ejercer presión lateral contra la hoja de
sierra. De esa manera puede romperse.
3. Tener cuidado con nudos, clavos, grietas y/o adherencia de suciedad en la madera. Serrar esta clase de
madera puede conducir a un atascamiento peligroso.
4. Nunca dejar la sierra de calar descuidada.
5. Los dientes de la hoja de sierra deben apuntar hacia
arriba.
Antes de enchufar el aparato (en el enchufe
de pared), controlar si el interruptor de gatillo no está bloqueado en la posición ‘CONECTADO’.
AL PONER EN FUNCIONAMIENTO LA
MÁQUINA:
1. Hay que sujetar firmemente el trabajo.
2. Restos de madera o cosas semejantes que se encuentran en la cercanía directa de la sierra, no deben ser quitadas con la mano. Si hay restos de madera atrapados entre partes fijas y/o en movimiento, antes desconectar la máquina y después quitar
los restos de madera.
3. Procurar que la sierra de calar esté sin carga al conectarla (no la deje, pues, entrar en contacto con el
trabajo al ser conectada la sierra de calar).
4. La hoja de sierra es una de las piezas más importantes de una sierra de calar. La elección correcta del
material, los dientes, así como la manera correcta
de instalación, no sólo aumentan la vida útil de la
hoja de sierra, sino que también evitan grietas o
fracturas y los consiguientes peligros.
5. Al serrar desperdicios de madera, hay que trabajar
con cuidado. Como en tal caso no importa la calidad del corte, el usuario se tiende más a serrar sin
concentración, a no controlar suficientemente si
hay clavos, nudos y otras irregularidades, y a empujar fuerte con la sierra.
6. No serrar trabajos más gruesos que la longitud de
la sierra.
7. No tocar partes de metal de la sierra de calar al serrar en paredes o suelos donde pueden encontrarse
cables de electricidad. Sujetar la sierra de calar con
ambas manos en la empuñadura de plástico, de manera que no toque partes que puedan llegar a estar
bajo tensión si inesperadamente sierra algún cable
de electricidad.
8. Primero desconectar la máquina y esperar hasta
que se pare la sierra de calar, antes de alejar la máquina del trabajo y depositar la máquina.
9. Evitar el uso de cables de prolongación largos.
10. La sierra de calar está provista de una cubierta protectora. Hay que mantenerla en su lugar al serrar.
DESCONECTAR INMEDIATAMENTE EL
APARATO EN CASO DE :
1. Fallo en el enchufe, en el cable o avería del cable.
2. Interruptor averiado.
3. Sobrecalentamiento de la máquina.
4. Humo o mal humor de material aislante quemado.
3. INSTRUÇÕES DE MONTAGEM
1. ESCOLHA DA SERRA
- Escolha a serra em função da peça que vai
serrar.
- Poderá instalar na serra de recortes toda uma série
de folhas de serra.
-Para uma madeira fina, a serra mais adequada é
!
NO. DE ENCOMENDA/ANO DE CONSTRUÇÃO
P
Português
Toledo 17
Page 18

Produkt: Toledo sticksåg
Modell TSS-60P, Art. nr. 826055
Toledo, Genemuiden , Holland
Lydtrykknivå L
pa
85 dB(A)
Lydeffektnivå L
wa
98 dB(A)
Vibrasjon (-aw) 2,5 m/s
2
SERIENUMMER
Serienumret på maskinen tillkommer på följande sätt.
Serial nr.
LÄS DENNA BRUKSANVISNING
NOGGRANT INNAN STICKSÅG TAS
I BRUK!
1. LÄR KÄNNA VERKTYGET
Det är viktigt att ni innan ni använder verktyget noggrant studerar denna bruksanvisning, särskilt säkerhetsföreskrifterna. Studera och följ också instruktionerna vad gäller verktygets underhåll, vilket bidrar
till att verktyget alltid fungerar som det ska.
Det är inte minst viktigt att ni före användning av
verktyget lär känna dess kontroller så att ni vid
behov vet hur man snabbt stannar verktyget. Spara
bruksanvisningen och övriga dokument för framtida
bruk.
2. SÄRSKILDA
SÄKERHETSFÖRESKRIFTER
FÖRE ANVÄNDNING
1. Kontrollera följande:
- kontrollera att nätspänningen håller 220-230 volt.
- kontrollera att alla elledningar är isolerade och
intakta utan övriga skador.
2. Undvik att använda långa förlängningskablar.
3. Spänn fast arbetsstycket med tvingar eller i ett
skruvstycke.
4. Ta aldrig bort träspill etc runt sågbladet med händerna. Stoppa alltid först verktyget när träspill
behöver avlägsnas från ytan runt sågbladet eller
när spill fastnar i verktyget.
5. Starta alltid sticksågen med obelastat sågblad, dvs
bladet får inte vara i kontakt med arbetsstycket.
6. Själva sågbladet är en av sticksågens viktigaste
komponenter. Rätt blad med avseende på bl a
material och tänder, och även fastsättning i verktyget, inte bara förlänger sågbladets livstid utan
minimerar också risken för att bladet ska spricka
eller gå sönder, med de konsekvenser som följer
på detta.
7. Var försiktig vid sågning av träspill. Eftersom kvaliteten på denna sågning är oviktig är det lätt att
tappa koncentrationen, vilket kan medföra att
kvistar, spikar och andra oegentligheter inte upptäcks. Det finns också en tendens att verktyget
överansträngs.
8. Såga aldrig i trä som är tjockare än sågbladets
längd.
9. Vidrör ej metalldelar på sticksågen vid sågning i
väggar och golv där kablage kan finnas. Håll verktyget med båda händerna i plasthandtaget ifall
sågbladet oavsiktligt kommer åt osynliga elledningar och därigenom blir strömförande.
10. Stäng av verktyget och vänta tills sågbladet har
stannat helt innan verktyget tas bort från
arbetsstycket eller läggs ner på arbetsbänken.
11. Undvik användning av långa förlängningskablar.
12.Denna sticksåg är försedd med ett säkerhetsskydd i plast. Se noga till att skyddet är på
plats före sågning.
STANNA OMEDELBART STICKSÅGEN
NÄR:
1. Elkabel eller kontakter uppvisar någon som helst
defekt, t ex skadad isolering.
2. Strömbrytaren inte fungerar som den ska.
3. Kollektorns borstar och kransar uppvisar onormal
gnistbildning.
4. Rökig eller dålig lukt indikerar bränd isolering.
3. MONTERING
1. VAL AV SÅGBLAD
- Välj rätt sågblad för rätt jobb.
- Denna sticksåg kan utrustas med ett stort antal olika sågblad.
- Ett fint blad är bäst för sågning i fint trä bl a genom
att det minimerar risken för att träet ska flisa sig.
2. MONTERING AV SÅGBLAD
Se noga till att verktyget inte är anslutet
till elnätet innan sågbladet monteras!
- Lossa båda bultarna (A), se figur, med den medföljande insexnyckeln.
- För in sågbladet (B) i hållaren (C). Kontrollera
att sågbladet sitter i spåret (D) i hållaren.
- Kontrollera att sågbladet är korrekt applicerat
mellan hållaren (C) och spännplattan (E).
- För in bladet i hållaren så långt som möjligt, men
dock ej så långt att bladet ligger an mot sågspindelskruven.
!
ORDERNUMMER/TILLVERKNINGSÅR
S
Svenska
Toledo 23
uma serra com dentes finos porque, deste
modo, a produção de cavacos é menor.
2. INSTALAÇÃO DA SERRA
ATENÇÃO! Antes de montar a serra, hà que
controlar prrimeiro se a ficha foi retirada
da tomada de ligação à rede
- Afrouxe os dois pernos (A) com a ajuda da chave para parafusos sextavados internos fornecida.
-Coloque a serra (B) no suporte (C) da serra de
recortes.
- Certifique-se de que a serra fica assente na ranhura (D) do suporte e ao mesmo tempo na ranhura da rodela.
-A serra deverá ser colocada entre o suporte (C)
e a placa de ajuste (E).
- Pressione a serra o mais possível no suporte.
- Fixe a serra e a placa de ajuste girando e apertpando o s dois pernos com a chave.
-Coloque nuovamente a cobertura de protecção
de material sintético.
3. AJUSTE DO ÂNGULO DA PLACA DO
FUNDO
- Solte o perno hexagonal existentes na placa do
fundo com a ajuda da chave para parafusos sextavados internos fornecida.
- Gire a placa do fundo situando-a no ângulo de
corte desejado para a esquerda ou cpara a direita, até um ângulo máximo de 45°.
- Poderá ler o ângulo a ajustar no arco de graus
existente na placa do fundo.
- Figxe outra vez a placa do fundo com o perno
hexagonal.
4. FUNCIONAMENTO DO INTERRUPTOR
- A serra de recortes pode
ser colocada em funcionamento premindo o interruptor de arranque
(A).
- Este interruptor pode ser
bloqueado com a ajuda
do botão de pressão (B) situado na parte lateral da
serra de recortes. Pressione o interruptor para a
posição desejada,Y premindo simultaneamente o
botão de bloqueio. A máquina continuará a funcio-
nar. Poderá eliminar o bloqueio, premindo novamente o interruptor de arranque.
- Pode regular a velocidade máxima com a ajuda da
rodela (C) situada na parte de cima da serra de recortes. Rodando a rodela para um número mais
elevoado, aumentará também a velocidade, se colocar a rodela num número mais baixo, a velocidade diminui novamente.
5. AJUSTAR A ALAVANCA
Para obter os melhores resultados de corte será
necessário seleccionar a maneira como os dentes da
lâmina agarram o material.
Serrar materiais macios (madeira, plásticos, etc.):
- Utilize o corte mais profundo e coloque a alavanca na posição II.
Serrar materiais semi-duros (madeira dura, alumínio,
etc.):
- Seleccione a suspensão conforme a aplicação.
Alavanca no nível I ou 0: para um corte preciso
em materiais macios e para materiais finos no
caso de trabalhar com limas ou facas.
Serrar materiais duros (aço, etc.):
- Coloque a alavanca no nível 0.
Para serrar curvas, a alavanca deverá ser colocada
na posição 0. É possível mudar ou ajustar o nível da
suspensão enquanto a serra estiver em funcionamento.
6. RECOLHA DE POEIRAS
Para manter a superfície de trabalho limpa, a serra
de recortes dispõe de um extractor de poeiras.
Assim poderá ligar facilmente a serra de recortes ao
seu aspirador.
4. COLOHCAÇÃO EM
FUNCIONAMENTO
PARA SERRAR
-- Coloque a serra de recortes em funcionamento
e coloque a placa do fundo sobre a peça.
- Manobre lentamente para a linha de corte, previamente desenhada, e pressione a serra de
recortes para que se desloque progressivamente
para a frente.
-- Pressione firmemente a placa do fundo contra a
peça. Caso contrário, existe uma grande probabilidade de a serra de recortes começar a vibrar
e se partir rapidamente.
ATENÇÃO! Deixe que seja a serra a realizar o corte. Não exerça muita força sobre a
serra de recortes.
CORTE COM PERFURAÇÃO
Quando a posbição para começar a trabalhar a peça
!
!
18 Toledo
Page 19

°И· ЩФ О·П‡ЩВЪФ ·ФЩ¤ПВЫМ· Л ПВ›‰·
ЩФ˘ ЪИФУИФ‡ Ъ¤ВИ У· В›У·И ·И¯МЛЪ‹.
¶ƒπ√¡π™ªA ™∆∏ ª∂™∏ ∂¡√™ A¡∆π∫∂πª∂¡√À
AУ Л ·Ъ¯ИО‹ ı¤ЫЛ ЩЛ˜ ЪИФУИ¿˜ ‰ВУ ‚Ъ›ЫОВЩ·И ЫВ М›·
·fi ЩИ˜ ¿ОЪВ˜ ЩФ˘ ·УЩИОВИМ¤УФ˘ ‹ ·У ‰ВУ ¤¯ВИ
ЩЪ˘ЛıВ› МИ· ЩЪ‡·, ЩfiЩВ Ъ¤ВИ У· ·ОФПФ˘ı‹ЫВЩВ
ЩЛУ ·ОfiПФ˘ıЛ ЩВ¯УИО‹:
- µ¿ПЩВ ЩЛ Ы¤Б· ЫЩЛУ О˘ЪЩ‹ МЪФЫЩИУ‹ ПВ˘Ъ¿ ЩФ˘
ВП¿ЫМ·ЩФ˜ ‚¿ЫЛ˜.
- £¤ЫЩВ ЩЛ Ы¤Б· ЫВ ПВИЩФ˘ЪБ›· О·И О·ЩВ‚¿ЫЩВ ·ЪБ¿
ЩФ ЪИfiУИ М¤¯ЪИ Ф˘ У· ·ОФ˘М‹ЫВИ ЩФ
·УЩИОВ›МВУФ.
- AК‹ЫЩВ ЩФ ЪИfiУИ У· О¿УВИ ЩЛ
‰Ф˘ПВИ¿ О·И ·К‹ЫЩВ ЩФ У·
‰И·ЩЪ˘‹ЫВИ ЩФ ·УЩИОВ›МВУФ.
- AУ ЩФ ЪИfiУИ ‰И·ЩЪ˘‹ЫВИ
ЩФ ·УЩИОВ›МВУФ МФЪВ›ЩВ У·
ВЪ¿ЫЩВ ЩФ ЪИfiУИ ЫЩЛУ
О·УФУИО‹ ı¤ЫЛ М¤Ы· ·fi ЩФ
¿УФИБМ· Ф˘ ЪИФУ›Ы·ЩВ О·И
У· Ы˘УВ¯›ЫВЩВ ЩЛУ ВБОФ‹.
ªÈ· ¿ÏÏË Ì¤ıÔ‰Ô˜ ÁÈ· Ó· ÚÈÔÓ›ÛÂÙ ÛÙË Ì¤ÛË ÂÓfi˜
·УЩИОВИМ¤УФ˘ В›У·И У· ЩЪ˘‹ЫВЩВ ЪТЩ· МИ· ЩЪ‡·
МВ ¤У· ЩЪ˘¿УИ, Л ФФ›· В›У·И ·ЪОВЩ¿ МВБ¿ПЛ
ТЫЩВ У· ¯ˆЪ¿ВИ ЩФ ЪИfiУИ ЩЛ˜ Ы¤Б·˜. ™ЩЛ
Ы˘У¤¯ВИ· МФЪВ›ЩВ У· ·ОФПФ˘ı‹ЫВЩВ ЩИ˜
·Ъ·¿Уˆ Ф‰ЛБ›В˜
5 ™À¡∆∏ƒ∏™∏
∫·Щ¿ ЩЛ ‰И¿ЪОВИ· ЩЛ˜ Ы˘УЩ‹ЪЛЫЛ˜ О·И
ЩФ˘ О·ı·ЪИЫМФ‡ ‚Б¿ПЩВ ¿УЩ· ЩФ
О·ПТ‰ИФ ·fi ЩЛУ Ъ›˙·. ¶ФЩ¤ МЛ
¯ЪЛЫИМФФИВ›ЩВ УВЪfi ‹ ¿ППВ˜ ˘БЪ¤˜
Ф˘Ы›В˜ БИ· ЩФУ О·ı·ЪИЫМfi ЩˆУ
ЛПВОЩЪИОТУ ЫЩФИ¯ВИТУ ЩЛ˜ Ы¤Б·˜.
∏ ∆A∫∆π∫∏ ™À¡∆∏ƒ∏™∏ ∆∏™ ™∂°A™ A¶√∆ƒ∂¶∂π
¶√§§A ¶∂ƒπ∆∆A ¶ƒ√µ§∏ªA∆A.
- ¢È·ÙËÚ›Ù ηı·Úfi ÙÔ ¤Ï·ÛÌ· ‚¿Û˘ ÒÛÙ ӷ ÌËÓ
·ÚÔ˘ÛÈ·ÛÙÔ‡Ó ·Ó·ÎÚ›‚ÂȘ ηٿ ÙË ‰È¿ÚÎÂÈ· ÙÔ˘
ÚÈÔÓ›ÛÌ·ÙÔ˜.
- ¢И·ЩЛЪВ›ЩВ О·ı·Ъfi ЩФ ВНˆЩВЪИОfi ЩЛ˜ Ы¤Б·˜ ТЫЩВ
fiП· Щ· ОИУЛЩ¿ ЫЩФИ¯В›· У· МФЪФ‡У У· ОИУФ‡УЩ·И
МВ ·ОЪ›‚ВИ· О·И ‰›¯ˆ˜ КıФЪ¤˜.
- ¢И·ЩЛЪВ›ЩВ О·ı·Ъ¿ Щ· ·УФ›БМ·Щ· ВН·ВЪИЫМФ‡ ЩЛ˜
МЛ¯·У‹˜ ТЫЩВ Л МЛ¯·У‹ У· МЛ МФЪВ› У·
˘ВЪıВЪМ·УıВ›.
AУ ¤¯Ф˘У Кı·ЪВ› ФИ ·УıЪ·ОИО¤˜ „‹ОЩЪВ˜ (fiЩ·У
¤¯Ф˘У О·В› ‹ Ы¿ЫВИ, ‹ fiЩ·У В›У·И ОФУЩ‡ЩВЪВ˜ ·fi
5 ¯ИПИФЫЩ¿), Л Ы¤Б· ı· ЫЩ·М·Щ‹ЫВИ У· ПВИЩФ˘ЪБВ›.
AУ ·ЪФ˘ЫИ·ЫЩВ› ·˘Щfi, ФИ ‰‡Ф ·УıЪ·ОИО¤˜
„‹ОЩЪВ˜ ı· Ъ¤ВИ У· ·УЩИО·Щ·ЫЩ·ıФ‡У. ¢ТЫЩВ
ЩЛ Ы¤Б· ЫЩФУ ·УЩИЪfiЫˆФ ЩЛ˜ Toledo БИ· ЩЛУ
·УЩИО·Щ¿ЫЩ·ЫЛ ·˘Щ‹.
ªЛУ ВОЩВПВ›ЩВ МfiУФИ Ы·˜ ·˘Щ‹ ЩЛУ
·ÓÙÈηٿÛÙ·ÛË.
- §И·›УВЩВ Щ·ОЩИО¿ ЩФУ Ф‰ЛБfi ЩЛ˜ ПВ›‰·˜ ЩФ˘
ЪИФУИФ‡.
6. µ§Aµ∂™
™В ВЪ›ЩˆЫЛ Ф˘ Л Ы¤Б· ‰ВУ ПВИЩФ˘ЪБВ› О·ıТ˜
Ъ¤ВИ, В‰Т ·ОФПФ˘ıФ‡У МВЪИО¤˜ ВУ‰В¯fiМВУВ˜ ·ИЩ›В˜
О·И ФИ ЪФЩВИУfiМВУВ˜ П‡ЫВИ˜.
1. ∏ ЛПВОЩЪИО‹ МЛ¯·У‹ ˘ВЪıВЪМ·›УВЩ·И,
КЩ¿УФУЩ·˜ ıВЪМФОЪ·Ы›В˜ ¿Уˆ ЩˆУ 70° ∫ÂÏÛ›Ô˘.
∏ МЛ¯·У‹ ВИ‚·Ъ‡УВЩ·И ˘¤ЪМВЩЪ·, ПfiБˆ
МВБ¿ПˆУ ·УЩИОВИМ¤УˆУ.
¶ЪИФУ›˙ВЩВ ЫВ ИФ ·ЪБfi Ъ˘ıМfi О·И ‰ТЫЩВ ЫЩЛ
МЛ¯·У‹ ЩЛУ В˘О·ИЪ›· У· ОЪ˘ТЫВИ.
∏ МЛ¯·У‹ ¤¯ВИ ‚П¿‚Л.
¢ТЫЩВ ЩЛ Ы¤Б· ЫЩФУ ·УЩИЪfiЫˆФ ЩЛ˜ Toledo БИ·
¤ПВБ¯Ф ‹/О·И ВИЫОВ˘‹.
2. ∏ МЛ¯·У‹ ‰ВУ ПВИЩФ˘ЪБВ› fiЩ·У ЩВıВ› ЫВ
ПВИЩФ˘ЪБ›·.
¢И·ОФ‹ ЫЩЛ Ы‡У‰ВЫЛ МВ ЩФ ЛПВОЩЪИОfi ‰›ОЩ˘Ф.
∂П¤БНЩВ ЩЛУ Ы‡У‰ВЫЛ БИ· ВУ‰В¯ФМ¤УВ˜ ‚П¿‚В˜.
µП¿‚Л ЫЩФ ‰И·ОfiЩЛ.
¢ТЫЩВ ЩЛ Ы¤Б· ЫЩФУ ·УЩИЪfiЫˆФ ЩЛ˜ Toledo БИ·
¤ПВБ¯Ф ‹/О·И ВИЫОВ˘‹.
3. ∆Ф ВВНВЪБ·˙fiМВУФ ·УЩИОВ›МВУФ ОИУВ›Щ·И МВ
МВБ¿ПЛ ‰˘ЫОФП›· ЫВ МИ· В˘ıВ›· БЪ·ММ‹ О·Щ¿
М‹ОФ˜ ЩЛ˜ ПВ›‰·˜ О·И Л ВБОФ‹ В›У·И ·УТМ·ПЛ.
∏ ПВ›‰· ЩФ˘ ЪИФУИФ‡ ¤¯ВИ ЫЩЪ·‚ТЫВИ ‹
ЫЩФМТЫВИ.
AУЩИО·Щ·ЫЩ‹ЫЩВ ЩЛ ПВ›‰·.
4. ∆Ф ВВНВЪБ·˙fiМВУФ ·УЩИОВ›МВУФ ‰ФУВ›Щ·И
˘¤ЪМВЩЪ· О·Щ¿ ЩЛ ‰И¿ЪОВИ· ЩФ˘ ЪИФУ›ЫМ·ЩФ˜.
∏ ПВ›‰· ЩФ˘ ЪИФУИФ‡ ˘ВЪıВЪМ·›УВЩ·И ‹
·Ъ·МФЪКТУВЩ·И.
AУЩИО·Щ·ЫЩ‹ЫЩВ ЩЛ ПВ›‰·.
5. ∏ Ы¤Б· О¿УВИ ıfiЪ˘‚Ф ‹/О·И ПВИЩФ˘ЪБВ› ФП‡
·ÓÒÌ·Ï·.
√È ·ÓıÚ·ÎÈΤ˜ „‹ÎÙÚ˜ ¤¯Ô˘Ó Êı·Ú›.
¢ÒÛÙ ÙË Û¤Á· ÛÙÔÓ ·ÓÙÈÚfiÛˆÔ Ù˘ Toledo ÁÈ·
¤ÏÂÁ¯Ô ‹/Î·È ÂÈÛ΢‹.
ClEl
■
¢∏§ø™∏ ™Àµ∞∆π∫√∆∏∆∞™
(GR)
¢ËÏԇ̠˘Â˘ı‡Óˆ˙ fiÙÈ ÙÔ ÚÔÈfiÓ ·ÓÙÔ Â›Ó·È
ηٷÛ΢·Ṳ̂ÓÔ Û‡Ìʈӷ Ì ÙÔÓ˙ ÂÍ‹˙
∫·УФУИЫМФ‡˙ ‹ ∫·Щ·ЫОВУ·ЫЩИОВ˙ ЫУЫЩ¿ЫВИ˙:
EN50144-2-10, EN50144-1
EN55014, EN61000-3-2, EN61000-3-3, EN55104
∫·Щ¿ ЩИ˙ ‰И·Щ¿НВИ˙ ЩˆУ ∫·УФУИЫМТУ ЩЛ˙ ∫ФИУ‹˙ ∞БФЪ¿˙:
89/392/EEC
73/23EEC
89/336/EEC
·fi
27-12-2002
GENEMUIDEN NL
W. Kamphof
Quality department
!
!
22 Toledo
não corresponde ao lado correcto ou quando não
há nenhuma abertura, deverá realizar um corte
"com perfuração". Proceda da seguinte maneira:
- Coloque a serra de recortes na parte da frente semicircular da placa do fundo.
- Coloque a serra de
recortes e deixe a serra
baixar lentamente, até
que esta toque na peça.
- Deixe então que a serra realize o corte, deixando-a cair
com suavidade sobre a peça que estiver a serrar.
- Assim que a peça tiver sido atravessada, volte a colocar a serra de recortes na posição normal atra
vessando a abertura feita e seguindo o corte da serra.
O corte com perfuração pode também realizar-se
perfurando primeiro uma abertura com a ajuda de
um berbequim, que seja suficientemente grande para
permitir a entrada da serra de recortes.
Seguidamente poderá prosseguir com os passos
indicados anteriormente.
Para obter um resultado óptimo a folha de serra
deve estar bem afiada.
5. MANUTENÇÃO
Para a manutenção e limpeza deve retirarse sempre a ficha da tomada. Nunca utilize
água ou outros líquidos para limpar as partes eléctricas da serra de recortes.
A MANUTENÇÃO REGULAR DA SERRA
DE RECORTES EVITARÁ PROBLEMAS
DESNECESSÁRIOS!
- Mantenha a placa do ofundo de forma bem limpa, para que ao serrar não surjam imperfeições.
- Mantenha a parte externa da serra de recortes
limpa, de forma a que todas as peças em movimento possam mover-se com exactidão e sem
fricção.
- Mantenha os respiradores de refrigeração do
motor limpos, de forma a evitar o seus sobreaquecimento.
- Quando as escovas ficarem gastas a serrJa de
recortes parará. Se isto suceder devem trocarse as escovas. Leve a serra de recoxrtees ao seu
distribuidor Toledo.
- Lubrifique regularmente o guia da folha da serra.
6. AVARIAS
Caso a serra de recortes não funcione correctamente, especificamos em seguida uma série de possíveis
causas e respectivas soluções.
1. O motor eléctrico aqueceu acima
O motor foi sobrecarregado com peças dema-
siado grandes:
-Serre a um ritmo mais reduzido e deixe o
motor arrefecer.
O motor não funciona
-Leve a máquina ao seu distribuidor Toledo para
que seja revista e reparada.
2. A máquina conectada não funciona
Interrupção da ligação à rede.
-Verifique se ocorreu uma interrupção na
ligação à rede.
Danificação do interruptor.
-Leve a máquina ao seu distribuidor Toledo para
que seja revista e reparada. 3.
3. A máquina trabalha com dificuldade e não
permite ser manobrada em linha recta, a
folha da serra desloca-se e o corte da serra é irregular.
A folha da serra está curvada ou abaulada:
- Substitua a folha da serra.
4. A serra de recortes começa a vibrar fortemente enquanto serra.
A folha da serra está excessivamente quente ou
deformada.
- Substitua a folha da serra.
5. As serra de recortes emite ruídos e/ou
funciona de forma muito irregular.
As escovas estão gastas.
-Leve a máquina ao seu distribuidor Toledo para
que seja revista e reparada.
ClEl
■
DÉCLARAÇÃO DE CONFORMIDADE
(P)
Declaramos, sob nossa exclusiva responsabilidade,
que este produto cumpre as seguintes normas
ou documentos normativos:
EN50144-2-10, EN50144-1
EN55014, EN61000-3-2, EN61000-3-3, EN55104
conforme as disposições das directivas:
89/392/EEC
73/23EEC
89/336/EEC
a partir de 27-12-2002
GENEMUIDEN NL
W. Kamphof
Quality department
!
Toledo 19
Page 20

3. ¶ƒ√¢πA°ƒAº∂™ ™À¡Aƒª√§√°∏™∏™
1. ∂¶π§√°∏ ∆√À ¶ƒπ√¡π√À
- ∂ИП¤НЩВ ¤У· ЪИfiУИ БИ· ЩФ ·УЩИОВ›МВУФ Ф˘ ¤¯ВЩВ
ЫОФfi У· ВВНВЪБ·ЫЩВ›ЩВ.
- ™ЩЛ Ы¤Б· МФЪВ› У· Ы˘У·ЪМФПФБЛıВ› МИ· МВБ¿ПЛ
ФИОИП›· ЪИФУИТУ.
- ∂У· ЪИfiУИ МВ МИ· „ИП‹ Ф‰fiУЩˆЫЛ В›У·И О·Щ¿ППЛПФ
БИ· М·П·Оfi Н‡ПФ О·И ·К‹УВИ ЩИ˜ ПИБfiЩВЪВ˜ Ы¯›˙В˜.
- AÓ ı¤ÏÂÙ ӷ ÚÈÔÓ›˙ÂÙ ÔÚı¤˜ ÁˆÓ›Â˜, ÙfiÙÂ
‰È·Ï¤ÍÙ ¤Ó· ÚÈfiÓÈ Ì ÌÈ· ¯ÔÓÙÚ‹ Ô‰fiÓÙˆÛË,
¤ÙÛÈ ÒÛÙÂ Ë ÂÁÎÔ‹ Ó· Á›ÓÂÈ Ï·ÙÈ¿ Î·È Ó·
˘¿Ú¯ÂÈ Â·Ú΋˜ ¯ÒÚÔ˜ ÁÈ· Ó· Ì·ÓÔ˘‚Ú¿ÚÂÙ ÙË
Û¤Á·.
2. ∆√¶√£∂∆∏™∏ ∆√À ¶ƒπ√¡π√À
¶ЪФЩФ‡ ЩФФıВЩ‹ЫЩВ ЩФ ЪИfiУИ, КЪФУЩ›ЫЩВ
ЩФ О·ПТ‰ИФ У· МЛУ ‚Ъ›ЫОВЩ·И ЫЩЛУ Ъ›˙·.
- •В‚И‰ТЫЩВ ЩИ˜ ‰‡Ф ‚›‰В˜ (A) ¯ЪЛЫИМФФИТУЩ·˜ ЩФ
ОПВИ‰› ¿ППВУ Ф˘ Ы·˜ ЪФМЛıВ‡ЩЛОВ.
- ∆ÔÔıÂÙ‹ÛÙ ÙÔ ÚÈfiÓÈ (µ) ÛÙËÓ ˘Ô‰Ô¯‹ (C) Ù˘
Û¤Á·˜.
- ºЪФУЩ›ЫЩВ ЩФ ЪИfiУИ У· ‚Ъ›ЫОВЩ·И ЫЩЛУ ВБОФ‹
(D) ЩЛ˜ ˘Ф‰Ф¯‹˜ О·И Ы˘Б¯ЪfiУˆ˜ ЫЩЛУ ВБОФ‹
ЩФ˘ ЩЪФ¯›ЫОФ˘ Ф˘ В›У·И ЫЩВЪВˆМ¤УФ˜ ЫЩФ
¤П·ЫМ· ‚¿ЫЛ˜.
- ∆Ф ЪИfiУИ Ъ¤ВИ У· ЩФФıВЩЛıВ› ·У¿МВЫ· ЫЩЛУ
˘Ф‰Ф¯‹ (C) О·И ЩЛУ П¿О· Ы‡ЫКИНЛ˜ (E).
- ™ЪТНЩВ ЩФ ЪИfiУИ fiЫФ ИФ ‚·ıИ¿ МФЪВ›ЩВ М¤Ы·
ЫЩЛУ ˘Ф‰Ф¯‹. ºЪФУЩ›ЫЩВ ˆЫЩfiЫФ У· МЛУ ЩФ
ЫЪТНЩВ ¿Ъ· ФП‡ ‚·ıИ¿, ·ППИТ˜ ЩФ ЪИfiУИ ı·
‚Ъ›ЫОВЩ·И ЫЩЪ·‚¿ ВУ·УЩ›ФУ ЩФ˘ ¿НФУ· ЩФ˘
ЪИФУИФ‡.
- ™К›НЩВ ЩФ ЪИfiУИ О·И ЩЛУ П¿О· Ы‡ЫКИНЛ˜
‚И‰ТУФУЩ·˜ Щ· ‰‡Ф ·НИМ¿‰И· МВ ЩФ ОПВИ‰› ¿ППВУ.
- ∆ÔÔıÂÙ‹ÛÙ ÙÔ Ï·ÛÙÈÎfi ÚÔÛٷ٢ÙÈÎfi
Î¿Ï˘ÌÌ·.
3. ƒÀ£ªπ™∏ ∆∏™ °ø¡πA™ ∆√À ∂§A™ªA∆√™
µA™∏™
- •В‚И‰ТЫЩВ Щ· ‰‡Ф ·НИМ¿‰И· ЫЩФ ¤П·ЫМ· ‚¿ЫЛ˜
¯ЪЛЫИМФФИТУЩ·˜ ЩФ ОПВИ‰› ¿ППВУ Ф˘ Ы·˜
ЪФМЛıВ‡ЩЛОВ.
- °˘Ú›ÛÙ ÙÔ ¤Ï·ÛÌ· ‚¿Û˘ ÚÔ˜ Ù· ‰ÂÍÈ¿ ‹
·ЪИЫЩВЪ¿, ЫЩЛУ БˆУ›· ЪИФУ›ЫМ·ЩФ˜ Ф˘
ВИı˘МВ›ЩВ, М¤¯ЪИ МИ· М¤БИЫЩЛ БˆУ›· ЩˆУ 45∞.
- ªФЪВ›ЩВ У· ВП¤БНВЩВ ЩЛУ БˆУ›· Ф˘ Ъ˘ıМ›Ы·ЩВ
ЫЩФ БˆУИfiМВЩЪФ ЩФ˘ ВП¿ЫМ·ЩФ˜.
- ™Ê›ÍÙ ͷӿ ÙÔ ¤Ï·ÛÌ· ‚¿Û˘ Ì ٷ ‰‡Ô
·ÍÈÌ¿‰È·.
4. Ã∂πƒπ™ª√™ ∆√À ¢πA∫√¶∆∏
-¶·ЩТУЩ·˜ ЩЛ ЫО·У‰¿ПЛ (A), Л
Ы¤Б· ı·ЩВıВ› ЫВПВИЩФ˘ЪБ›·.
√ ‰И·ОfiЩЛ˜ МФЪВ› У·
ВМП·ОВ› МВ ЩФ ОФ˘М› (µ), ЩФ
ФФ›Ф ‚Ъ›ЫОВЩ·И ЫЩФ П¿БИФ
М¤ЪФ˜ ЩЛ˜ Ы¤Б·˜. º¤ЪЩВ ЩЛ
ЫО·У‰¿ПЛ ЫЩЛУ ВИı˘МЛЩ‹
ı¤ЫЛ О·И ·Щ‹ЫЩВ Щ·˘Щfi¯ЪФУ·
ЩФ ОФ˘М› ВМПФО‹˜. ∏ Ы¤Б· ı· ВН·ОФПФ˘ı‹ЫВИ У·
ПВИЩФ˘ЪБВ›. AУ Н·У··Щ‹ЫВЩВ ЩЛ ЫО·У‰¿ПЛ, Л Ы¤Б· ı·
·ÂÌϷΛ.
- ∏ ·УТЩ·ЩЛ Щ·¯‡ЩЛЩ· ПВИЩФ˘ЪБ›·˜ МФЪВ› У·
Ъ˘ıМИЫЩВ› МВ ЩФУ ЩЪФ¯›ЫОФ (C) ¿Уˆ ЫЩЛ Ы¤Б·. ªВ
ЩЛ Ъ‡ıМИЫЛ ЩФ˘ ЩЪФ¯›ЫОФ˘ ЫВ ˘„ЛПfiЩВЪФ ·ЪИıМfi Л
Щ·¯‡ЩЛЩ· ı· ·˘НЛıВ›, МВ ЩЛ Ъ‡ıМИЫЛ ЩФ˘
ЩЪФ¯›ЫОФ˘ ЫВ ¯·МЛПfiЩВЪФ ·ЪИıМfi Л Щ·¯‡ЩЛЩ· ı·
МВИˆıВ›.
5. ƒÀ£ªπ™∏ ∆√À ∂∫∫∂¡∆ƒ√À
°È· ÙÔ Î·Ï‡ÙÂÚÔ ·ÔÙ¤ÏÂÛÌ·, ı· Ú¤ÂÈ Ó· Ú˘ıÌ›ÛÂÙÂ
ÙÔÓ ÙÚfiÔ Ì ÙÔÓ ÔÔ›Ô Ù· ‰fiÓÙÈ· Ù˘ Ï›‰·˜
ÂÌϤÎÔÓÙ·È Ì ÙÔ ˘ÏÈÎfi.
¶ЪИfiУИЫМ· М·П·ОТУ ˘ПИОТУ (Н‡ПФ, Ы˘УıВЩИО¤˜ ‡ПВ˜
ОП.):
- ГЪЛЫИМФФИ‹ЫЩВ ЩЛ ‚·ıИ¿ ВМПФО‹ ЩˆУ ‰ФУЩИТУ
О·И Ъ˘ıМ›ЫЩВ ЩФ ¤ООВУЩЪФ ЫЩЛ ı¤ЫЛ ππ.
¶ЪИfiУИЫМ· ˘ПИОТУ М¤ЫЛ˜ ЫОПЛЪfiЩЛЩ·˜ (ЫОПЛЪfi Н‡ПФ,
·ÏÔ˘Ì›ÓÈÔ ÎÏ.):
- ƒ˘ıМ›ЫЩВ ЩФ ¤ООВУЩЪФ ·У¿ПФБ· МВ ЩЛ ¯Ъ‹ЫЛ.
ƒ‡ıМИЫЛ ЩФ˘ ВОО¤УЩЪФ˘ ЫЩЛ ı¤ЫЛ π ‹ 0: БИ· МИ·
·И¯МЛЪ‹ ОФ‹ ЫВ М·П·Оfi ˘ПИОfi О·И БИ· ПВЩ¿ ˘ПИО¿
fiЩ·У ¯ЪЛЫИМФФИФ‡УЩ·И Ъ¿ЫВ˜ ‹ М·¯·›ЪИ·.
¶ЪИfiУИЫМ· ЫОПЛЪТУ ˘ПИОТУ (·ЩЫ¿ПИ ОП.):
- ƒ˘ıМ›ЫЩВ ЩФ ¤ООВУЩЪФ ЫЩЛ ı¤ЫЛ 0.
°И· ЩФ ЪИfiУИЫМ· О·М‡ПˆУ ı· ‹Щ·У ЪФЩИМfiЩВЪФ ЩФ
¤ООВУЩЪФ У· Ъ˘ıМИЫЩВ› ЫЩЛ ı¤ЫЛ 0. ∏ Ú‡ıÌÈÛË Î·È
·ÏÏ·Á‹ Ù˘ ı¤Û˘ ÙÔ˘ ÂÎΤÓÙÚÔ˘ Â›Ó·È ‰˘Ó·Ù‹ ·ÎfiÌË
О·И fiЩ·У ПВИЩФ˘ЪБВ› Л МЛ¯·У‹.
6. A¶√ªA∫ƒÀ¡™∏ ™∫√¡∏™
°И· У· ОЪ·Щ‹ЫВЩВ О·ı·Ъ‹ ЩЛУ ВИК¿УВИ· Ф˘
ВВНВЪБ¿˙ВЫЩВ, Л Ы¤Б· ¤¯ВИ ВНФПИЫЩВ› МВ ВИ‰ИО‹
Ы‡У‰ВЫЛ БИ· ЩЛУ ·ФЪЪfiКЛЫЛ ЩЛ˜ ЫОfiУЛ˜. ªФЪВ›ЩВ
У· Ы˘У‰¤ЫВЩВ В‡ОФП· МИ· ЛПВОЩЪИО‹ ЫОФ‡· ЫЩЛ
Ы¤Б·.
4. Ã∏™∏
¶ƒπ√¡π™ªA
- £¤ЫЩВ ЩЛ Ы¤Б· ЫВ ПВИЩФ˘ЪБ›· О·И ЩФФıВЩ‹ЫЩВ ЩФ
¤П·ЫМ· ‚¿ЫЛ˜ ЫЩФ ВВНВЪБ·˙fiМВУФ ·УЩИОВ›МВУФ.
- ∫ИУ‹ЫЩВ ЩФ ЪИfiУИ ·ЪБ¿ ЪФ˜ ЩЛУ БЪ·ММ‹
ЪИФУ›ЫМ·ЩФ˜, Ф˘ ¯·Ъ¿Н·ЩВ ЪФЩФ‡ ·Ъ¯›ЫВЩВ ЩФ
ЪИfiУИЫМ·, О·И ЫЪТНЩВ ЩФ ЪИfiУИ ·ЪБ¿ ЪФ˜ Щ·
МЪФЫЩ¿.
- ¶È¤ÛÙ ÙÔ ¤Ï·ÛÌ· ‚¿Û˘ ÛÙ·ıÂÚ¿ ÛÙÔ
·УЩИОВ›МВУФ. AУ ‰ВУ ЩФ О¿УВЩВ ·˘Щfi, ˘¿Ъ¯ВИ
МВБ¿ПФ˜ О›У‰˘УФ˜ Л Ы¤Б· У· ·Ъ¯›ЫВИ У· ‰ФУВ›Щ·И
О·И У· Ы¿ЫВИ ЩФ ЪИfiУИ.
!
Toledo 21
¶ÚÔ˚fiÓ: Toledo Û¤Á·.
TSS-60P, ·ÚÈıÌfi˜ ÚÔ˚fiÓÙÔ˜: 826055
Toledo, Genemuiden
∂›Â‰Ô ·ÎÔ˘ÛÙÈ΋˜ ›ÂÛ˘ L
pa
85 dB(A)
∂›Â‰Ô ·fi‰ÔÛ˘ ›ÂÛ˘ L
wa
98 dB(A)
¢fiÓËÛË (
-
aw) 2,5 m/s
2
∞ƒπ£ª√™ ™∂πƒ∞™
√ ·ÚÈıÌfi˜ ÛÂÈÚ¿˜ Ù˘ Ì˯·Ó‹˜ Û¯ËÌ·Ù›˙ÂÙ·È ˆ˜ ÂÍ‹˜:
Serial nr.
¢πAµA™∆∂ ∫A§A AÀ∆∂™ ∆π™ √¢∏°π∂™
Ã∏™∂ø™ ¶ƒ√∆√À Ã∏™πª√¶√π∏™∂∆∂ ∆∏
™∂°A.
1. ∂•√π∫∂πØ£∂π∆∂ ª∂ ∆∏ ª∏ÃA¡∏ ™A™
¢И·‚¿ЫЩВ ЪФЫВ¯ЩИО¿ ·˘Щ¤˜ ЩИ˜ Ф‰ЛБ›В˜ ¯Ъ‹ЫВˆ˜
ЪФЩФ‡ ¯ЪЛЫИМФФИ‹ЫВЩВ ЩЛ МЛ¯·У‹ О·И ‰ТЫЩВ
И‰И·›ЩВЪЛ ЫЛМ·Ы›· ЫЩИ˜ ЪФ‰И·БЪ·К¤˜ ·ЫК¿ПВИ·˜.
™˘УЩЛЪВ›ЩВ ЩЛ МЛ¯·У‹ Ы·˜ Ы‡МКˆУ· МВ ЩИ˜ Ф‰ЛБ›В˜,
БИ· У· ПВИЩФ˘ЪБВ› ¿УЩ· ЫˆЫЩ¿. £¤ЫЩВ ЩЛ МЛ¯·У‹
МfiУФ ЫВ ПВИЩФ˘ЪБ›· ·КФ‡ ¤¯ВЩВ О·Щ·П¿‚ВИ ˆ˜
Ъ¤ВИ У· ЩЛУ ¯ВИЪИЫЩВ›ЩВ О·И КЪФУЩ›ЫЩВ У· Н¤ЪВЩВ
·ÎÚÈ‚Ò˜ ˆ˜ ÌÔÚ›Ù ӷ ÙËÓ Û‚‹ÛÂÙ ÁÚ‹ÁÔÚ· ÛÂ
ÂÚ›ÙˆÛË Â›ÁÔ˘Û·˜ ·Ó¿Á΢. º˘Ï¿ÍÙ ηϿ ÙȘ
Ô‰ËÁ›Â˜ ·˘Ù¤˜, Ì·˙› Ì ٷ ˘fiÏÔÈ· ¤ÁÁÚ·Ê· Ô˘
·ÊÔÚÔ‡Ó ÙË Ì˯·Ó‹.
2. ∂π¢π∫∂™ ¶ƒ√¢πA°ƒAº∂™ A™ºA§∂πA™
£∂∆√¡∆A™ ∆∏ ª∏ÃA¡∏ ™∂ §∂π∆√Àƒ°πA:
1. ∂ϤÁÍÙ ٷ ÂÍ‹˜:
- ÂϤÁÍÙ ·Ó Ë Ù¿ÛË Û‡Ó‰ÂÛ˘ Ù˘ Ì˯·Ó‹˜
·УЩИЫЩФИ¯В› МВ ЩЛУ Щ¿ЫЛ ЩФ˘ ‰ИОЩ‡Ф˘.
- ¯ЪЛЫИМФФИ‹ЫЩВ ВУ‰В¯ФМ¤Уˆ˜ БВИˆМ¤УФ
ЪВ˘М·ЩФ‰fiЩЛ (Ъ›˙·).
- ÂϤÁÍÙ ÌËÓ Ù˘¯fiÓ ÏÂ›Ô˘Ó ‰fiÓÙÈ· ·fi ÙËÓ
Ï›‰· ‹ Ì‹ˆ˜ Ë Ï›‰· ÂÌÊ·Ó›˙ÂÈ ÚˆÁ̤˜ ‹
Û¯ÈṲ̂˜. ∆¤ÙÔȘ Ï›‰Â˜ Ú¤ÂÈ Ó·
·ÓÙÈηٷÛÙ·ıÔ‡Ó ·Ì¤Ûˆ˜.
- ВП¤БНЩВ ·У ˘¿Ъ¯ВИ В·ЪО‹˜ ¯ТЪФ˜ О¿Щˆ ·fi
ЩФ ВВНВЪБ·˙fiМВУФ ·УЩИОВ›МВУФ БИ· ЩФ ЪИfiУИ,
¤ЩЫИ ТЫЩВ ЩФ ЪИfiУИ У· МЛУ МФЪВ› У· ·ОФ˘М‹ЫВИ
ЩФ ‰¿В‰Ф ‹ ЩФУ ¿БОФ.
2. ¶ÔÙ¤ ÌËÓ ·ÛΛ٠ϿÁÈ· ›ÂÛË ÛÙË Ï›‰· Ù˘
Û¤Á·˜, ÌÔÚ› Ó· Û¿ÛÂÈ.
3. ¶ЪФЫ¤НВЩВ ЩФ Н‡ПФ У· МЛУ ¤¯ВИ Ъfi˙Ф˘˜, О·ЪКИ¿,
Ы¯ИЫМ¤˜ ‹/О·И О·Щ·О¿ıИ· ·О·ı·ЪЫИТУ. ∆Ф
ЪИfiУИЫМ· Щ¤ЩФИФ˘ Н‡ПФ˘ МФЪВ› У· ЪФО·П¤ЫВИ
ВИО›У‰˘У· МПФО·Ъ›ЫМ·Щ· ЩЛ˜ Ы¤Б·˜.
4. ¶ÔÙ¤ ÌËÓ ·Ê‹ÓÂÙ ÙË Û¤Á· ·Ê‡Ï·¯ÙË.
5. ∆· ‰fiÓÙÈ· Ù˘ Ï›‰·˜ Ù˘ Û¤Á·˜ Ú¤ÂÈ Ó·
‰Â›¯ÓÔ˘Ó ÚÔ˜ Ù· ¿ӈ
∂ϤÁÍÙ ̋ˆ˜ Ô ‰È·ÎfiÙ˘
ÛηӉ¿Ï˘ Â›Ó·È ·ÛÊ·ÏÈṲ̂ÓÔ˜ ÛÙË
ı¤ÛË "AAN" ÚÔÙÔ‡ ‚¿ÏÂÙ ÙÔ Î·ÏÒ‰ÈÔ
ÛÙËÓ Ú›˙· (ÚÂ˘Ì·ÙÔ‰fiÙË).
√∆A¡ Ã∏™πª√¶√π∂π∆∂ ∆∏ ª∏ÃA¡∏:
1. ∆Ф ВВНВЪБ·˙fiМВУФ ·УЩИОВ›МВУФ Ъ¤ВИ У· ¤¯ВИ
ЫЩВЪВˆıВ› О·П¿.
2. ∫·Щ¿ПФИ· Н‡ПФ˘ ОП., Щ· ФФ›· ‚Ъ›ЫОФУЩ·И ЫЩФ
¿МВЫФ ВЪИ‚¿ППФУ ЩФ˘ ЪИФУИФ‡, ‰ВУ ВИЩЪ¤ВЩ·И
У· ·К·ИЪВıФ‡У МВ ЩФ ¯¤ЪИ. AУ О¿ФИ· О·Щ¿ПФИ·
¤¯Ф˘У ЫКЛУТЫВИ ·У¿МВЫ· ЫВ ЫЩ·ıВЪ¿ ‹ ОИУЛЩ¿
ЫЩФИ¯В›· ЩЛ˜ МЛ¯·У‹˜, Л МЛ¯·У‹ Ъ¤ВИ У· ЩВıВ›
ВОЩfi˜ ПВИЩФ˘ЪБ›·˜ ЪФЩФ‡ ·К·ИЪВıФ‡У Щ·
О·Щ¿ПФИ·.
3. ºЪФУЩ›ЫЩВ Л Ы¤Б· У· Щ›ıВЩ·И ЫВ ПВИЩФ˘ЪБ›· ¯ˆЪ›˜
У· ВИ‚·Ъ‡УВЩ·И (‰ЛП·‰‹ МЛУ ·К‹УВЩВ ЩЛ Ы¤Б· У·
¤ЪıВИ ЫВ В·К‹ МВ ЩФ ВВНВЪБ·˙fiМВУФ
·УЩИОВ›МВУФ fiЩ·У Щ›ıВЩ·И ЫВ ПВИЩФ˘ЪБ›·).
4. ∏ Ï›‰· Â›Ó·È ¤Ó· ·fi Ù· ÈÔ ÛËÌ·ÓÙÈο ÛÙÔȯ›·
ÌÈ·˜ Û¤Á·˜. ∏ ÛˆÛÙ‹ ÂÈÏÔÁ‹ ÙÔ˘ ˘ÏÈÎÔ‡, Ù˘
Ô‰fiÓÙˆÛ˘ Î·È Â›Û˘ Ë ÛˆÛÙ‹ Û˘Ó·ÚÌÔÏfiÁËÛË
fi¯È ÌfiÓÔ ·˘Í¿ÓÔ˘Ó ÙÔÓ ‚›Ô Ù˘ Ï›‰·˜, ·ÏÏ¿
·ÔʇÁÔ˘Ó Î·È ÚˆÁ̤˜ ‹ ıÚ·‡ÛÂȘ Î·È ÙÔ˘˜
ÎÈÓ‰‡ÓÔ˘˜ Ô˘ ÚÔ¤Ú¯ÔÓÙ·È ·fi ·˘Ù¤˜.
5. ∆Ф ЪИfiУИЫМ· ¿¯ЪЛЫЩФ˘ Н‡ПФ˘ Ъ¤ВИ У· Б›УВЩ·И
ЪФЫВ¯ЩИО¿. ∂ВИ‰‹ Л ФИfiЩЛЩ· ЩЛ˜ ВБОФ‹˜ ‰ВУ
·›˙ВИ ЪfiПФ, Ф ¯Ъ‹ЫЩЛ˜ В‡ОФП· ЩВ›УВИ У·
ВЪБ¿˙ВЩ·И ¯ˆЪ›˜ ЪФЫФ¯‹, У· МЛУ ВП¤Б¯ВИ М‹ˆ˜
ЩФ ВВНВЪБ·˙fiМВУФ ·УЩИОВ›МВУФ ¤¯ВИ Ъfi˙Ф˘˜,
О·ЪКИ¿ О·И ¿ППВ˜ ·УˆМ·П›В˜, О·И У· ЫЪТ¯УВИ
ФП‡ ЩЛ Ы¤Б·.
6. ªЛУ ЪИФУ›˙ВЩВ ·УЩИОВ›МВУ· Щ· ФФ›· В›У·И ИФ
¯ФУЩЪ¿ ·fi ЩФ М¿ОЪФ˜ ЩФ˘ ЪИФУИФ‡.
7. ºЪФУЩ›ЫЩВ У· МЛУ ·ОФ˘М¿ЩВ Щ· МВЩ·ППИО¿
ЫЩФИ¯В›· ЩЛ˜ Ы¤Б·˜ fiЩ·У ЪИФУ›˙ВЩВ ЫВ ЩФ›¯Ф˘˜ ‹
‰¿В‰· ЫЩ· ФФ›· ВУ‰В¯ФМ¤Уˆ˜ ‚Ъ›ЫОФУЩ·И
ЛПВОЩЪИО¿ О·ПТ‰И·. ∫Ъ·Щ¿ЩВ ЩЛ Ы¤Б· МВ Щ· ‰‡Ф
¯¤ЪИ· ·fi ЩЛУ П·ЫЩИО‹ ¯ВИЪФП·‚‹ ТЫЩВ У· МЛУ
·ОФ˘М¿ЩВ ЫЩФИ¯В›· Щ· ФФ›· МФЪФ‡У У·
КФЪЩИЫЩФ‡У fiЩ·У ·ЪfiФЩ· ЪИФУ›ЫВЩВ ¤У·
ЛПВОЩЪИОfi О·ПТ‰ИФ.
8. £¤ЫЩВ ЪТЩ· ЩЛ МЛ¯·У‹ ВОЩfi˜ ПВИЩФ˘ЪБ›·˜ О·И
ВЪИМ¤УВЩВ ТЫФ˘ У· ЫЩ·М·Щ‹ЫВИ ЩФ ЪИfiУИ
ЪФЩФ‡ ·ФМ·ОЪ‡УВЩВ ЩЛ МЛ¯·У‹ ·fi ЩФ
ВВНВЪБ·˙fiМВУФ ·УЩИОВ›МВУФ О·И ЪФЩФ‡ ·К‹ЫЩВ
О¿Щˆ ЩЛ МЛ¯·У‹.
9. AФКВ‡БВЩВ ЩЛ ¯Ъ‹ЫЛ М·ОЪИТУ ЪФВОЩ¿ЫВˆУ
О·Пˆ‰›Ф˘.
10.∏ Û¤Á· Â›Ó·È ÂÍÔÏÈṲ̂ÓË Ì ¤Ó· Ï·ÛÙÈÎfi
ÚÔÛٷ٢ÙÈÎfi Î¿Ï˘ÌÌ·. ∫Ú·Ù‹ÛÙ ·˘Ùfi ÙÔ
Î¿Ï˘ÌÌ· ÛÙË ı¤ÛË ÙÔ˘ ηٿ ÙË ‰È¿ÚÎÂÈ· ÙÔ˘
ÚÈÔÓ›ÛÌ·ÙÔ˜.
™µ∏™∆∂ Aª∂™ø™ ∆∏ ª∏ÃA¡∏ ™∆π™
A∫√§√À£∂™ ¶∂ƒπ¶∆ø™∂π™:
1. А¤ЪМВЩЪФ ЫИУı‹ЪИЫМ· ЩˆУ ·УıЪ·ОИОТУ
„ЛОЩЪТУ О·И ЫЩЪФ‚ЛПТ‰Л˜ КПfiБ· М¤Ы· ЫЩФ
Ы˘ПП¤ОЩЛ.
2. µÏ¿‚Ë ÛÙË Ú›˙· ‹ ÛÙÔ Î·ÏÒ‰ÈÔ.
3. µÏ¿‚Ë ÛÙÔ ‰È·ÎfiÙË.
4. ∫·Ófi˜ ‹ Ì˘Úˆ‰È¿ η̤ÓÔ˘ ˘ÏÈÎÔ‡ ÌfiÓˆÛ˘.
!
∞ƒπ£ª√™ ¶∞ƒ∞°°∂§π∞™/∂∆√™ ∫∞∆∞™∫∂À∏™
GR
∂ППЛУИО¿
20 Toledo
 Loading...