

Page 1
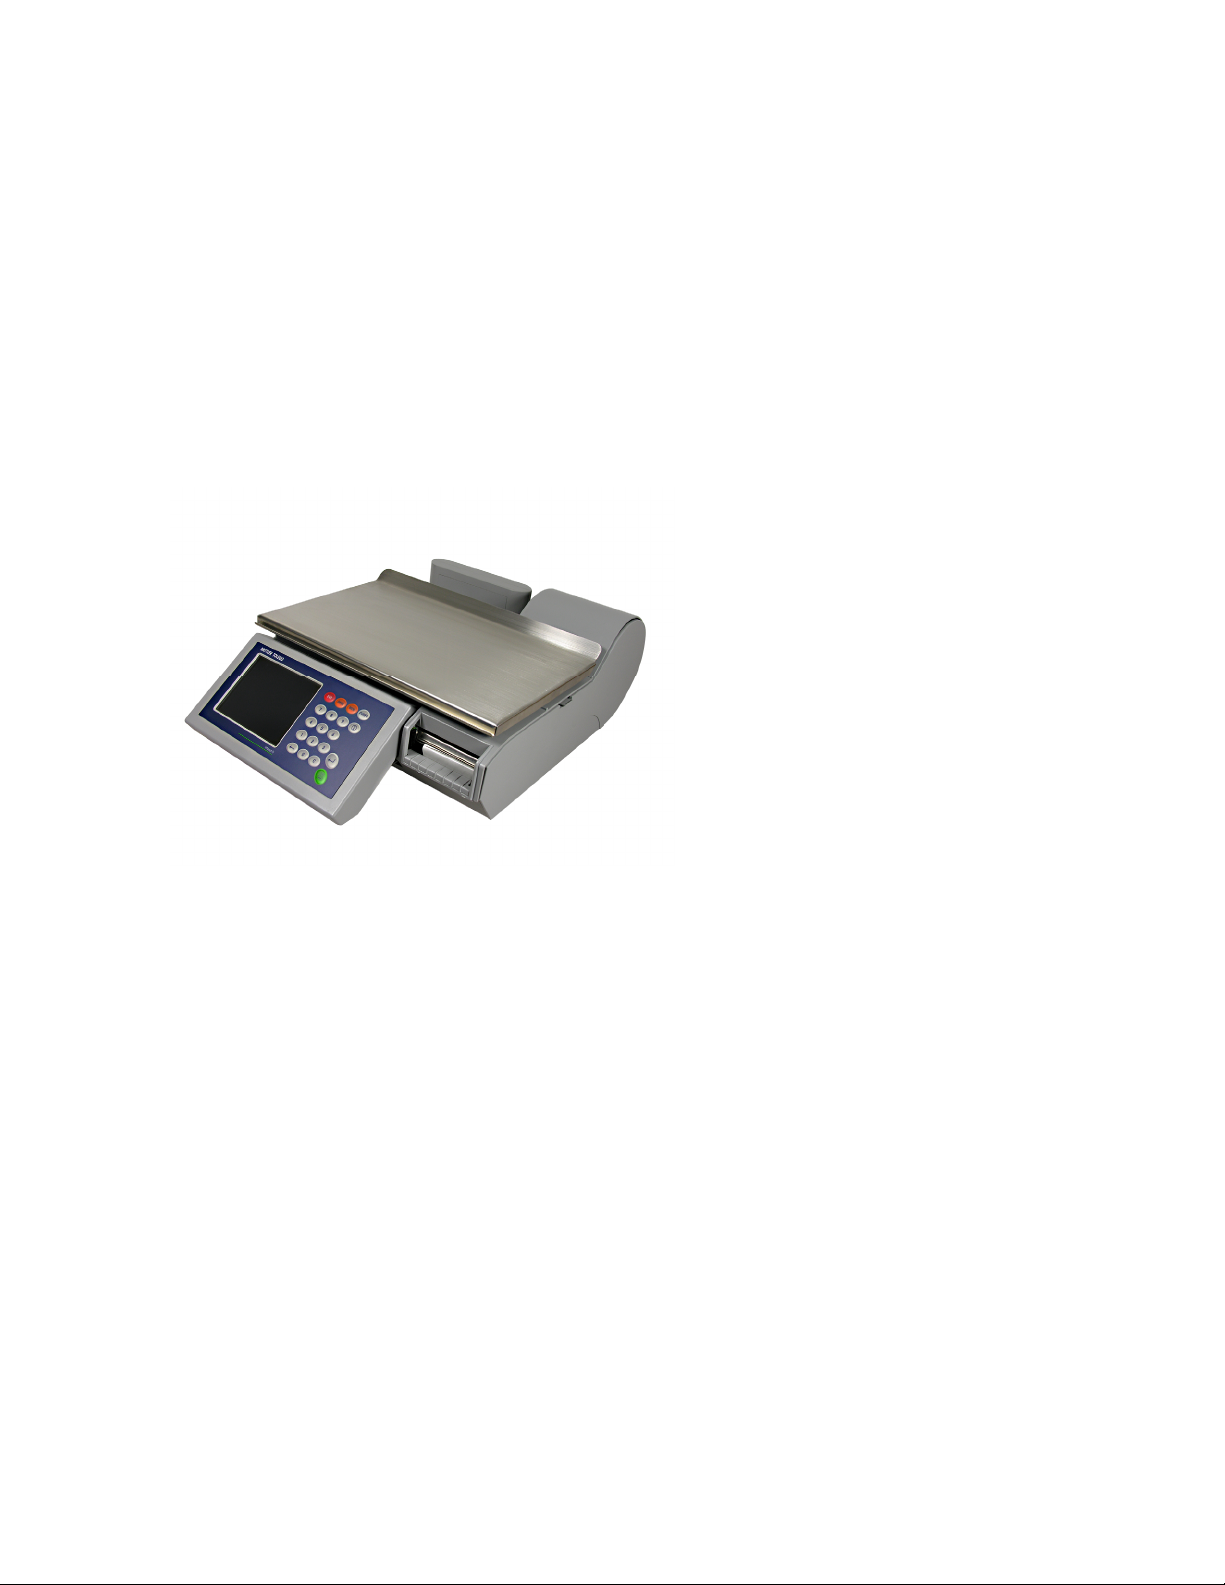
Impact S
Compact Scale
User’s Guide
®
64065336 R01
Page 2

©Mettler-Toledo, Inc. 2009
No part of this manual may be reproduced or transmitted in any form or by any means,
electronic or mechanical, including photocopying and recording, for any purpose without the
express written permission of Mettler-Toledo, Inc.
U.S. Government Restricted Rights: This documentation is furnished with Restricted Rights.
Page 3
Publication Revision
History
Trademarks
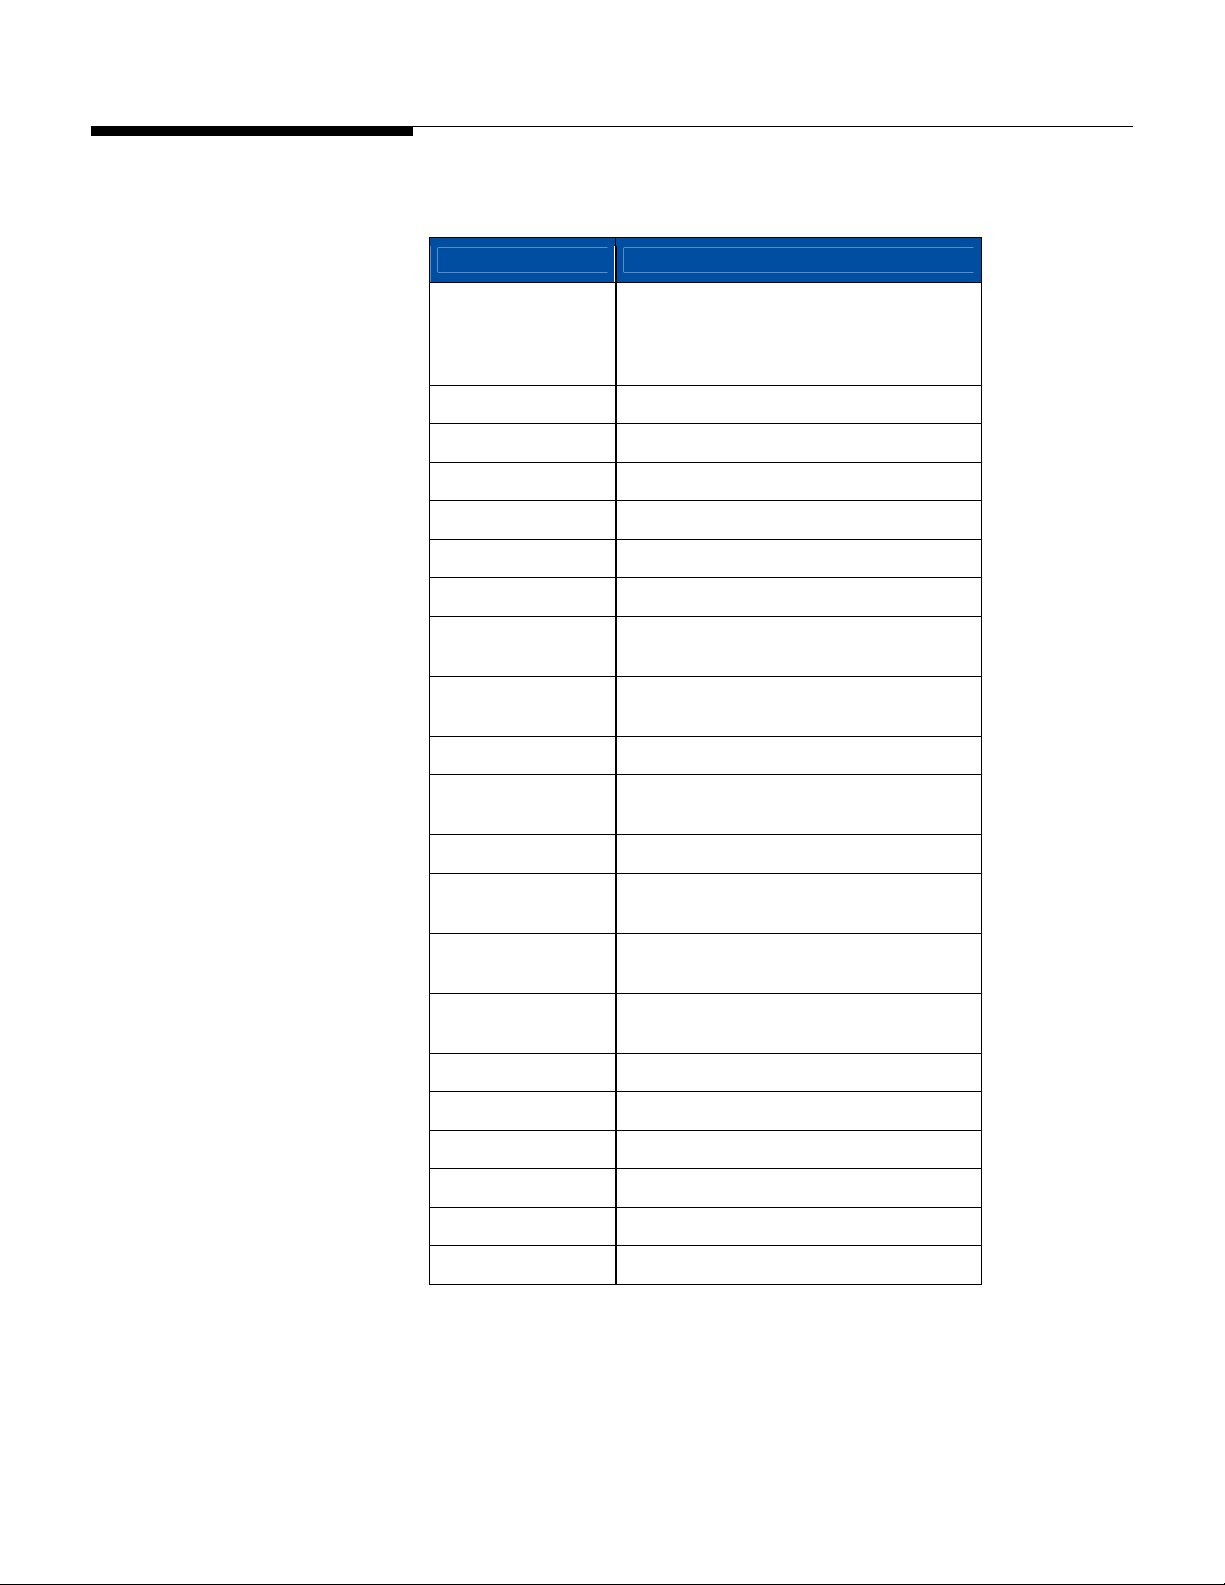
Part Number Date Revisions
64065336 P01
64065336 P02
64065336 P03
64065336 R00
64065336 R01
METTLER TOLEDO® and Impact S® are registered trademarks of Mettler-Toledo, Inc.,
Columbus, OH, USA.
12/08 New manual
01/09 New GUI added throughout
03/09 Final revision 1 complete
05/09 Chapter 4 modified, Chapter 6 tables reworked
12/10 Formatting, text style changes, corrected
capacity specs in Chap 1.
Page 4
PRECAUTIONS
READ this manual BEFORE
operating or servicing this
equipment.
FOLLOW these instructions
carefully.
SAVE this manual for future
reference.
DO NOT allow untrained
personnel to operate, clean,
inspect, maintain, service, or
tamper with this equipment.
ALWAYS DISCONNECT this
equipment from the power
source before cleaning or
performing maintenance.
CALL METTLER TOLEDO
parts, information, and service.
METTLER TOLEDO
right to make refinements or
changes without notice.
®
for
®
reserves the
WARNING
ONLY PERMIT QUALIFIED PERSONNEL TO SERVICE THIS
EQUIPMENT. EXERCISE CARE WHEN MAKING CHECKS, TESTS AND
ADJUSTMENTS THAT MUST BE MADE WITH POWER ON. FAILING
TO OBSERVE THESE PRECAUTIONS CAN RESULT IN BODILY HARM
AND/OR PROPERTY DAMAGE.
WARNING
POWER OUTLETS MUST BE EASILY ACCESSIBLE AND LOCATED NO
FURTHER THAN THE LENGTH OF THE POWER CORD SUPPLIED
WITH THE PRODUCT. FAILURE TO DO SO COULD RESULT IN
PERSONNEL INJURY AND/OR PROPERTY DAMAGE.
WARNING
FOR CONTINUED PROTECTION AGAINST SHOCK HAZARD CONNECT
TO PROPERLY GROUNDED OUTLET ONLY. DO NOT REMOVE THE
GROUND PRONG.
WARNING
DISCONNECT & LOCK OUT ALL POWER TO THIS UNIT BEFORE
REMOVING THE FUSE OR SERVICING.
CAUTION
BEFORE CONNECTING OR DISCONNECTING ANY INTERNAL ELECTRONIC
COMPONENTS OR INTERCONNECTING WIRING BETWEEN ELECTRONIC EQUIPMENT,
ALWAYS REMOVE POWER AND WAIT AT LEAST THIRTY (30) SECONDS BEFORE ANY
CONNECTIONS OR DISCONNECTIONS ARE MADE. FAILURE TO OBSERVE THESE
PRECAUTIONS COULD RESULT IN DAMAGE TO, OR DESTRUCTION OF THE EQUIPMENT
OR BODILY HARM.
CAUTION
OBSERVE PRECAUTIONS FOR HANDLING ELECTROSTATIC SENSITIVE DEVICES.
Page 5

CONTENTS
1 Introduction.................................................................................................... 1-1
General ..............................................................................................................................1-1
Specifications .....................................................................................................................1-2
Power Switch ......................................................................................................................1-3
Network Connection ............................................................................................................1-3
Leveling the Scale...............................................................................................................1-4
2 Operating Instructions..................................................................................... 2-1
Machine Configuration ........................................................................................................2-1
Keypad ...............................................................................................................................2-1
Operator Main Screen..........................................................................................................2-2
Customer Display Screen.....................................................................................................2-3
PLU Pricing Modes ..............................................................................................................2-4
By-Weight PLU....................................................................................................................... 2-4
By-Count PLU ........................................................................................................................ 2-4
Standard Pack PLU................................................................................................................. 2-4
PLU Screens .......................................................................................................................2-5
PLU Screen Details ................................................................................................................. 2-6
Calling Up PLUs ..................................................................................................................2-8
Printing Labels....................................................................................................................2-9
By Weight PLU....................................................................................................................... 2-9
By Count PLU ......................................................................................................................2-10
Standard Pack PLU...............................................................................................................2-10
Temporary Overrides .........................................................................................................2-11
Memory Mode...................................................................................................................2-12
3 Configuration ................................................................................................. 3-1
Introduction ........................................................................................................................3-1
Database ............................................................................................................................
PLUs..................................................................................................................................... 3-3
Extra Text .............................................................................................................................. 3-3
Nutrifacts............................................................................................................................... 3-4
COOL.................................................................................................................................... 3-5
Accumulators......................................................................................................................... 3-5
Clear..................................................................................................................................... 3-7
Reports ................................................................................................................................. 3-7
Action Code Text ....................................................................................................................3-8
Grade ...................................................................................................................................3-8
Group ................................................................................................................................... 3-9
Preset...............................................................................................................................
Select Page .........................................................................................................................3-11
Edit Page Name ................................................................................................................... 3-11
Swap Pages ........................................................................................................................ 3-12
Delete Pages .......................................................................................................................3-12
Program Preset .................................................................................................................... 3-12
Edit Preset Name.................................................................................................................. 3-14
Swap Preset ........................................................................................................................3-14
Delete Preset........................................................................................................................ 3-15
3-2
3-10
Page 6

Reaction.............................................................................................................................. 3-15
Edit Group Name.................................................................................................................. 3-15
Swap Groups....................................................................................................................... 3-15
Delete Groups......................................................................................................................3-15
Quick Edits........................................................................................................................3-16
Labels ..............................................................................................................................3-18
Assign Styles ....................................................................................................................... 3-18
Print Test Label .................................................................................................................... 3-19
Verify Labels........................................................................................................................3-19
Unit Setup.........................................................................................................................3-20
Time and Date ..................................................................................................................... 3-21
Language............................................................................................................................ 3-22
Backup/Restore.................................................................................................................... 3-23
Department.......................................................................................................................... 3-24
Scale Settings ...................................................................................................................... 3-25
Communication ...................................................................................................................3-29
Screen Calibration ................................................................................................................ 3-33
Set Home Screen.................................................................................................................. 3-34
Technician........................................................................................................................... 3-35
Printer Setup.....................................................................................................................3-39
Label Group......................................................................................................................... 3-40
Print Speed.......................................................................................................................... 3-40
Calibrate Gap Sensor, Calibrate Label Taken & Measure Label ................................................... 3-41
Type, Graphic format, Auto Size & Label Taken ........................................................................ 3-41
Label Length, Gap Length, Image Offset & Eject Length ............................................................. 3-41
Security............................................................................................................................3-42
Users.................................................................................................................................. 3-43
Security............................................................................................................................... 3-43
System Status ...................................................................................................................3-44
System Information............................................................................................................... 3-44
Log View............................................................................................................................. 3-45
Log Level ............................................................................................................................3-46
Marquee...........................................................................................................................3-47
Setup and Import Image........................................................................................................ 3-47
4 Labels............................................................................................................ 4-1
Loading Labels
Label Requirements.............................................................................................................4-4
Label Paper ...........................................................................................................................4-4
Label Stripping....................................................................................................................... 4-5
Finished Label Roll Requirements............................................................................................. 4-5
Finished Label and Roll Dimensional Requirements.................................................................... 4-7
Preprinted Labels
Special Shaped Labels ......................................................................................................4-10
Optical Densities...............................................................................................................4
Black Stripe Optical Density ................................................................................................... 4-11
....................................................................................................................4-1
................................................................................................................4-9
-10
5 Maintenance .................................................................................................. 5-1
Unit Cleaning......................................................................................................................
Printer Cleaning..................................................................................................................5-2
5-1
6 Appendix ....................................................................................................... 6-1
Page 7

Geo Index ...........................................................................................................................6-1
Country Currency Defaults
...................................................................................................6-3
Country Time Defaults .........................................................................................................6-4
Misc. Country Defaults
........................................................................................................6-5
`
Page 8

For your notes
Page 9
4
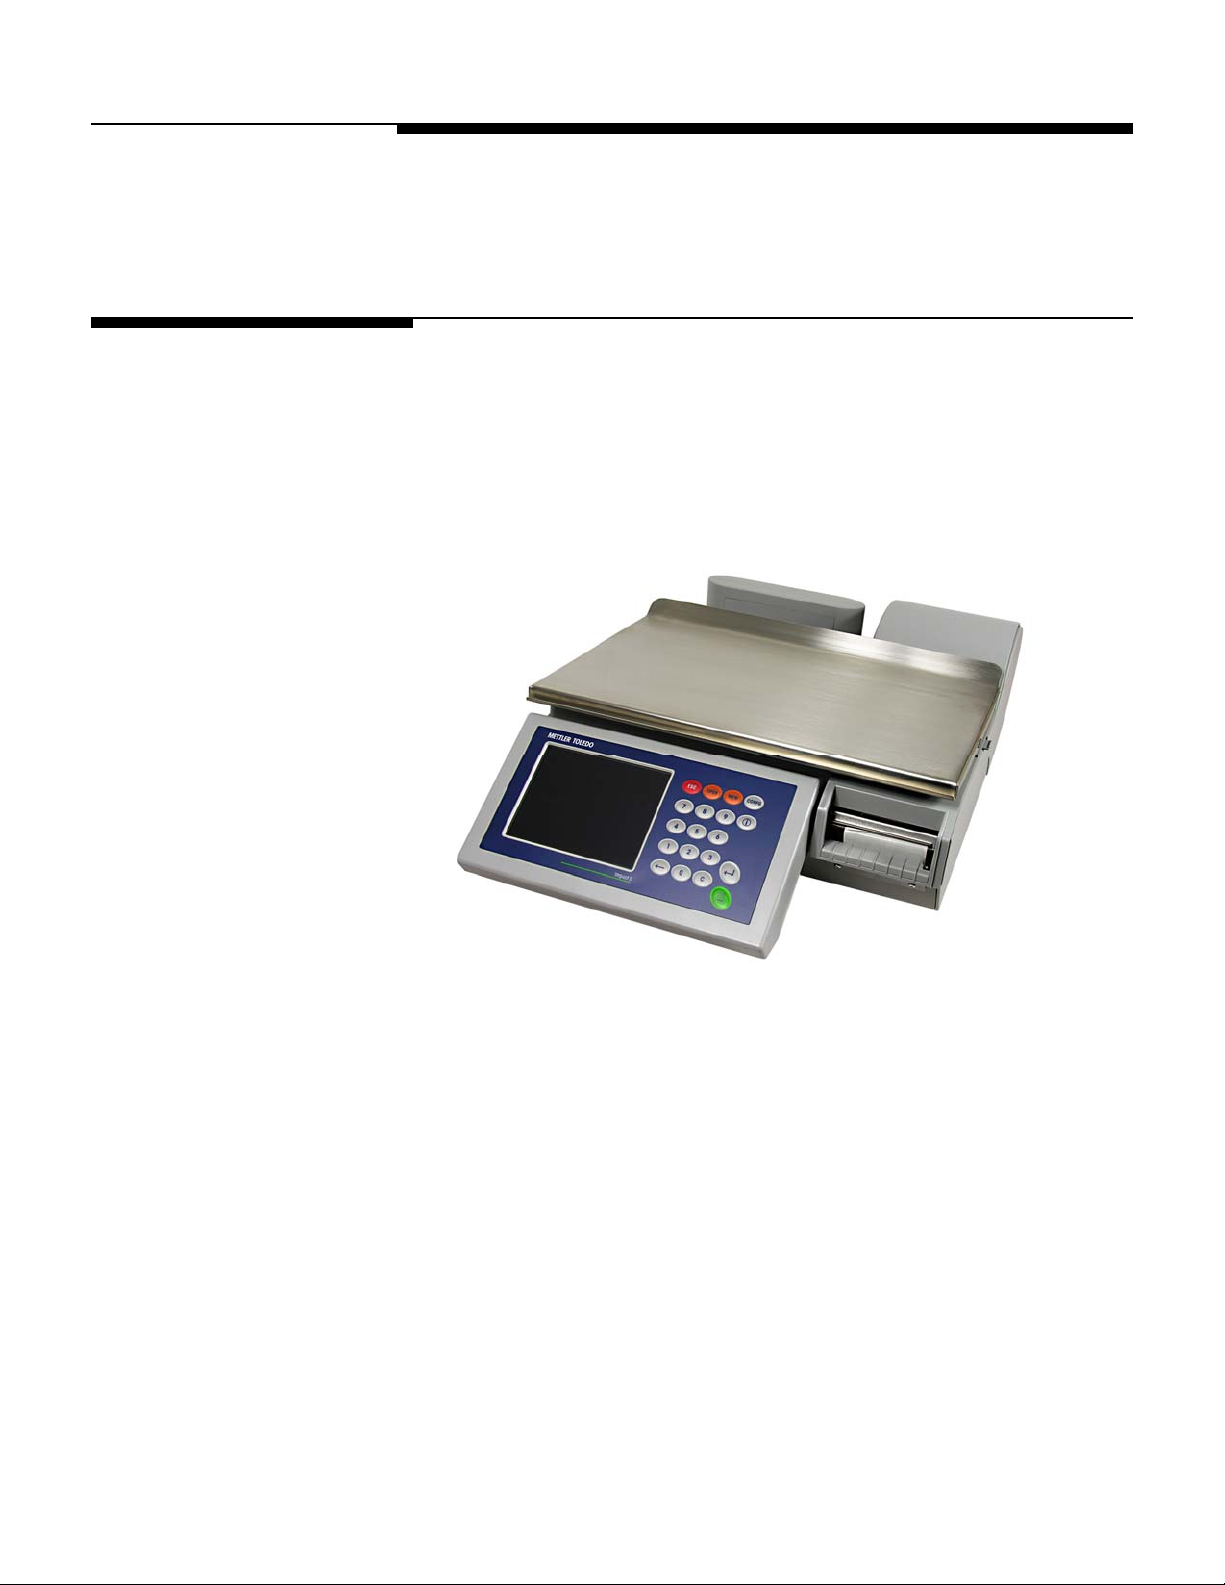
1 Introduction
General
Thank you for purchasing an Impact S® scale. Because Mettler Toledo designed the
Impact series for your current and future requirements, the Impact S
variety of operations and easily adapts to changing process and data requirements.
This flexibility protects your investment and helps you keep pace with rapidly changing
production and customer demands.
Chapter 1: Introduction
General
®
can handle a
METTLER TOLEDO
interface. All scales contain a built-in thermal label printer which is designed for quick
and easy roll changes. Also the Impact S
®
’s Impact S® scale offers very easy programming with a user friendly
®
provides touchscreen preset keys for easy
PLU look-up and a straightforward keypad for optimum operator control.
The Impact S
Impact S
and the highest impact in added value promotion, merchandizing, and cross-selling to
a consumer, the Impact S
®
is a low profile counter scale which provides unlimited connectivity. The
®
has an internal loadcell and customer rear display. Allowing easy readability
®
will change the way you do business!
1-1
Page 10
METTLER TOLEDO Impact S® User's Guide
Specifications
Specifications
Description Specifications – Impact S
30 x 0.01 lb
Capacity x Division
Weighing Modes lb , kg, (single and dual interval)
Dimensions H: 5.875”, W: 15.35”, D: 17.5”
Platter Dimension W: 15.25” x D: 9.25” (10.0” counting lip)
Weight of Unit 23.5 lb (10.7 kg)
Shipping Weight 30.0 lb (13.7 kg)
Base Construction Plastic upper shell with cast-metal bottom
15 x 0.005 kg
6/15 x 0.002/0.005 kg
15/30 x 0.005/0.01 lb
Operator Display
Operator Keyboard /
Touchscreen
Customer Display Monochrome 240 x 240 LCD
Printer
Power 100-240 VAC, 50/60 Hz, 0.5A
Operating Temperature
Storage Temperature
Network Interface
Processor XSCALE
Memory Minimum 64 Megabyte SDRAM
Mass Storage Minimum 512 MB Compact Flash
Available Serial port External load cell
5.7” backlit Monochrome QVGA display with
tactile keypad
4 wire resistive Touchscreen
3” (72 mm paper, 80mm path),
up to 5”/sec, thermal - 6” roll capacity
0º C to 40º C, humidity
5% to 95% non condensing
-20º C to 70º C with humidity from
5% to 95% non -condensing
Ethernet 802-3 10/100
RF optional 802.11B/G
1-2
RJ13 External load cell power
USB Port For mouse, keyboard, USB flash drive, etc.
Page 11
Power Switch
Power Switch
Chapter 1: Introduction
Power Switch
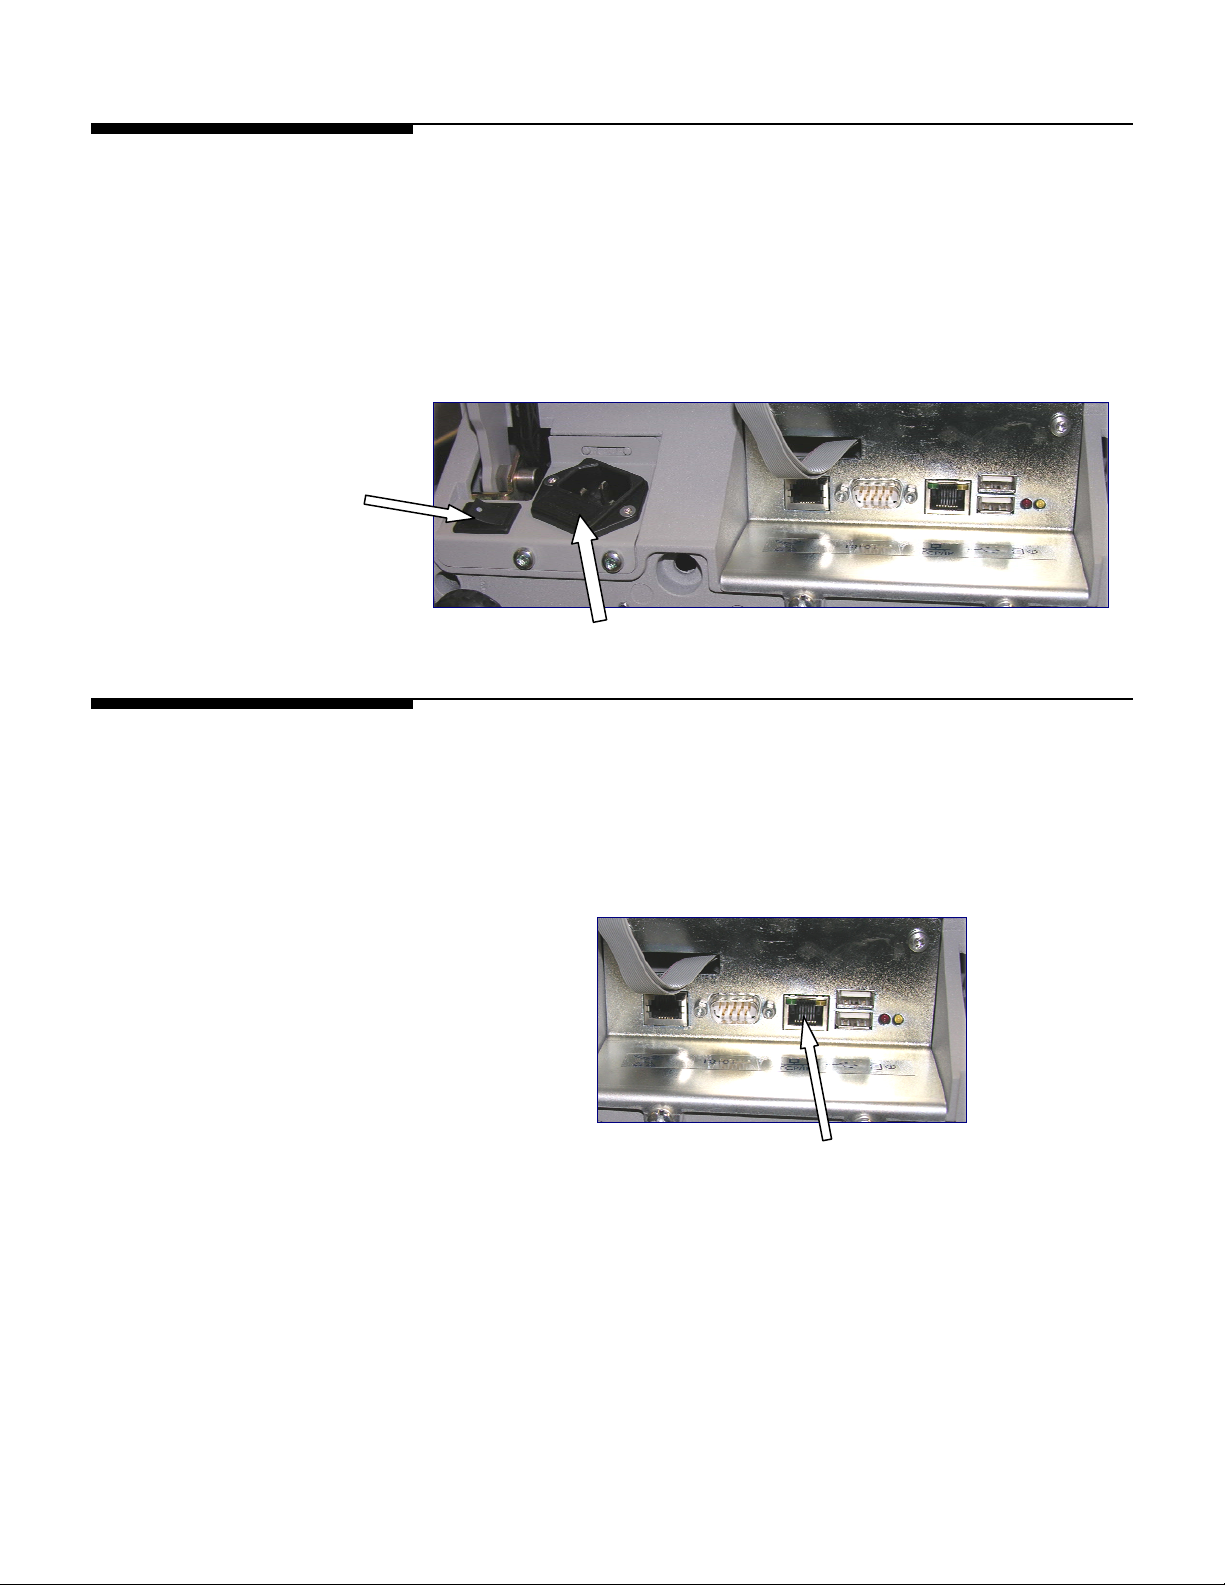
The power switch and power cord jack are located under the touchscreen on the left
front of the scale.
Press on the switch to turn the scale power to ON and again to turn the scale off (it is
a momentary switch, so don’t be alarmed when it doesn’t stay depressed – it’s not
supposed to). Always exit any editing screens before pressing the switch to turn power
OFF.
Always turn the scale off before cleaning.
Network Connection
Power Cord Jack
The Impact S® can connect to your Ethernet network using a cable or using a wireless
radio. If you use a wired network connection and experience connection problems,
make sure your Ethernet cable is connected and seated securely in the jack, located
under the touchscreen at the front of the scale.
Ethernet port
If you are using a wireless radio, it is built into the scale under an access panel situated
below the platter and spider on the left-hand side.
If the scale has a wireless card installed, do not connect an external Ethernet cable to
the Ethernet port. The wireless card will plug in to that slot instead.
1-3
Page 12
METTLER TOLEDO Impact S® User's Guide
Leveling the Scale
Leveling the Scale
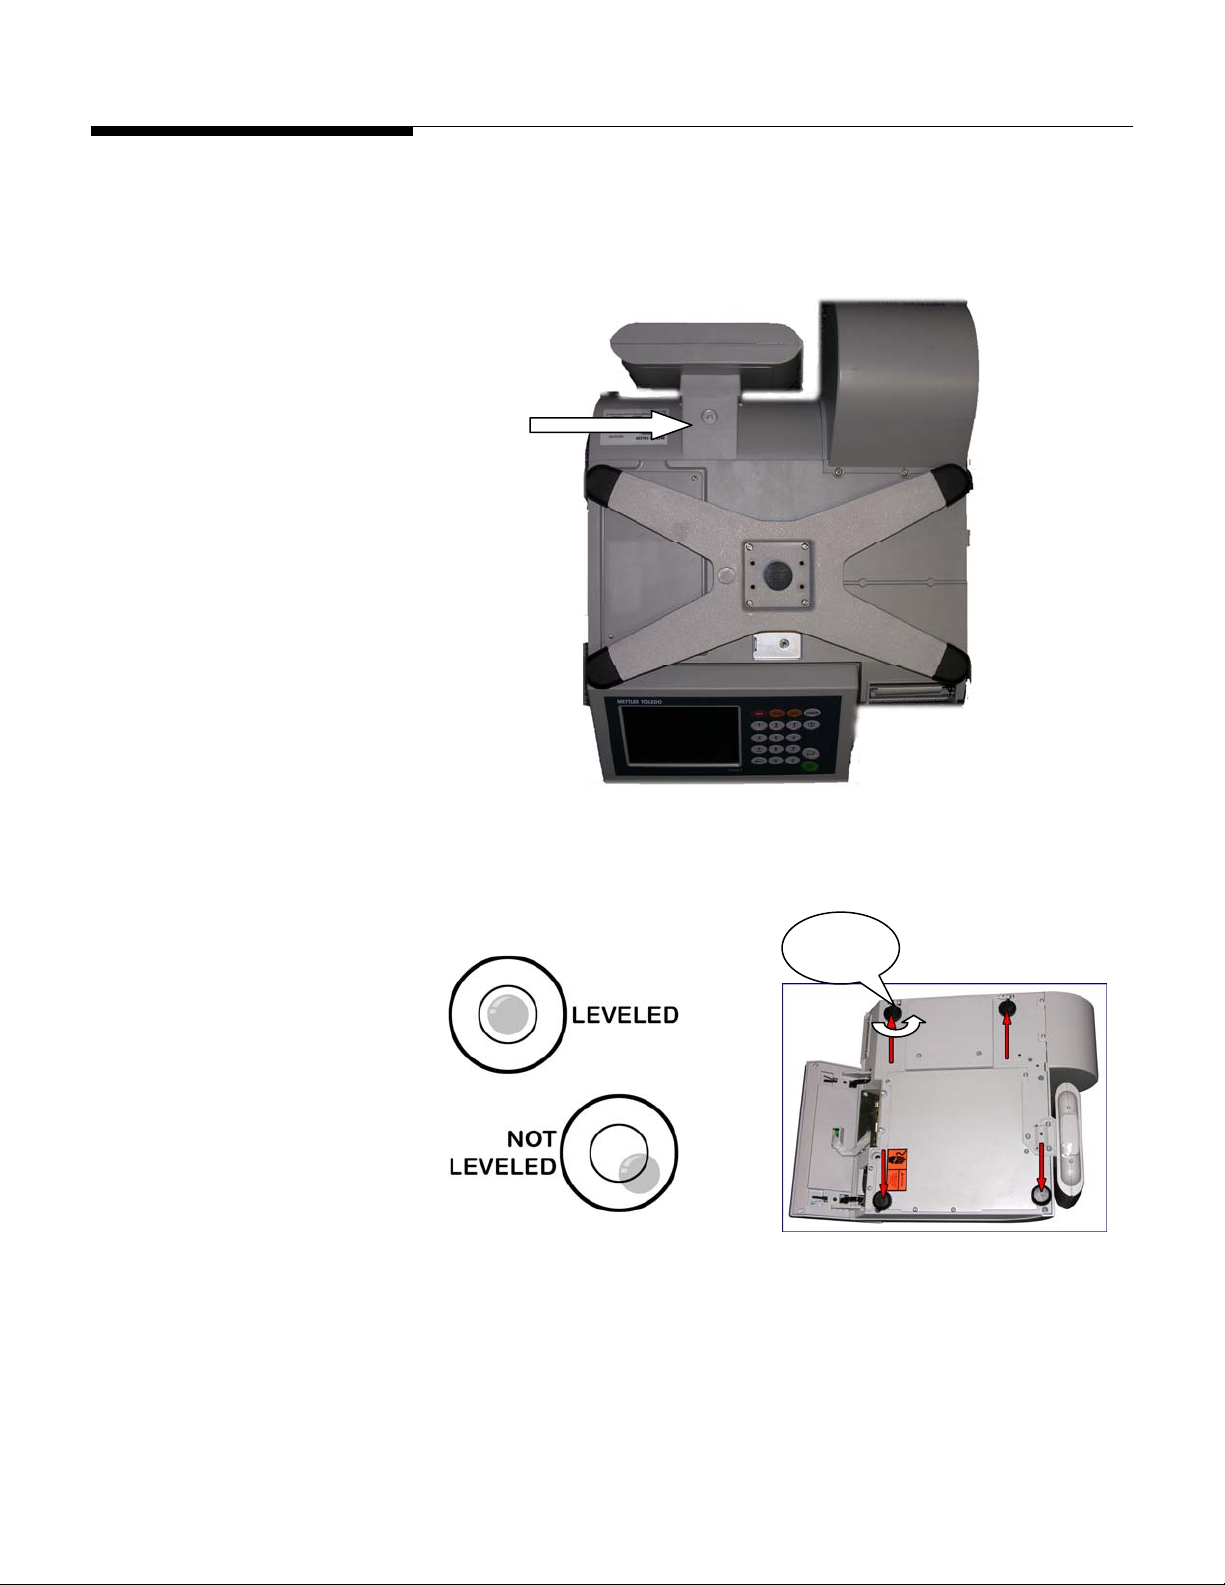
The Impact S
®
scale must be level and installed on a stable counter. The level indicator
is located behind the customer display, as shown below.
Level
Indicator
Level Indicator Location
The bubble in the indicator must be centered inside the circle. If the bubble is outside of
the circle on the indicator, use the four leveling feet to level the scale.
Leveling
Feet
The level indicator consists of
a bubble and two circles.
Center the bubble and the
scale will be level.
Rotate leveling feet clockwise
or counterclockwise to
determine a level platter.
1-4
Page 13
2 0BOperating Instructions
Machine Configuration
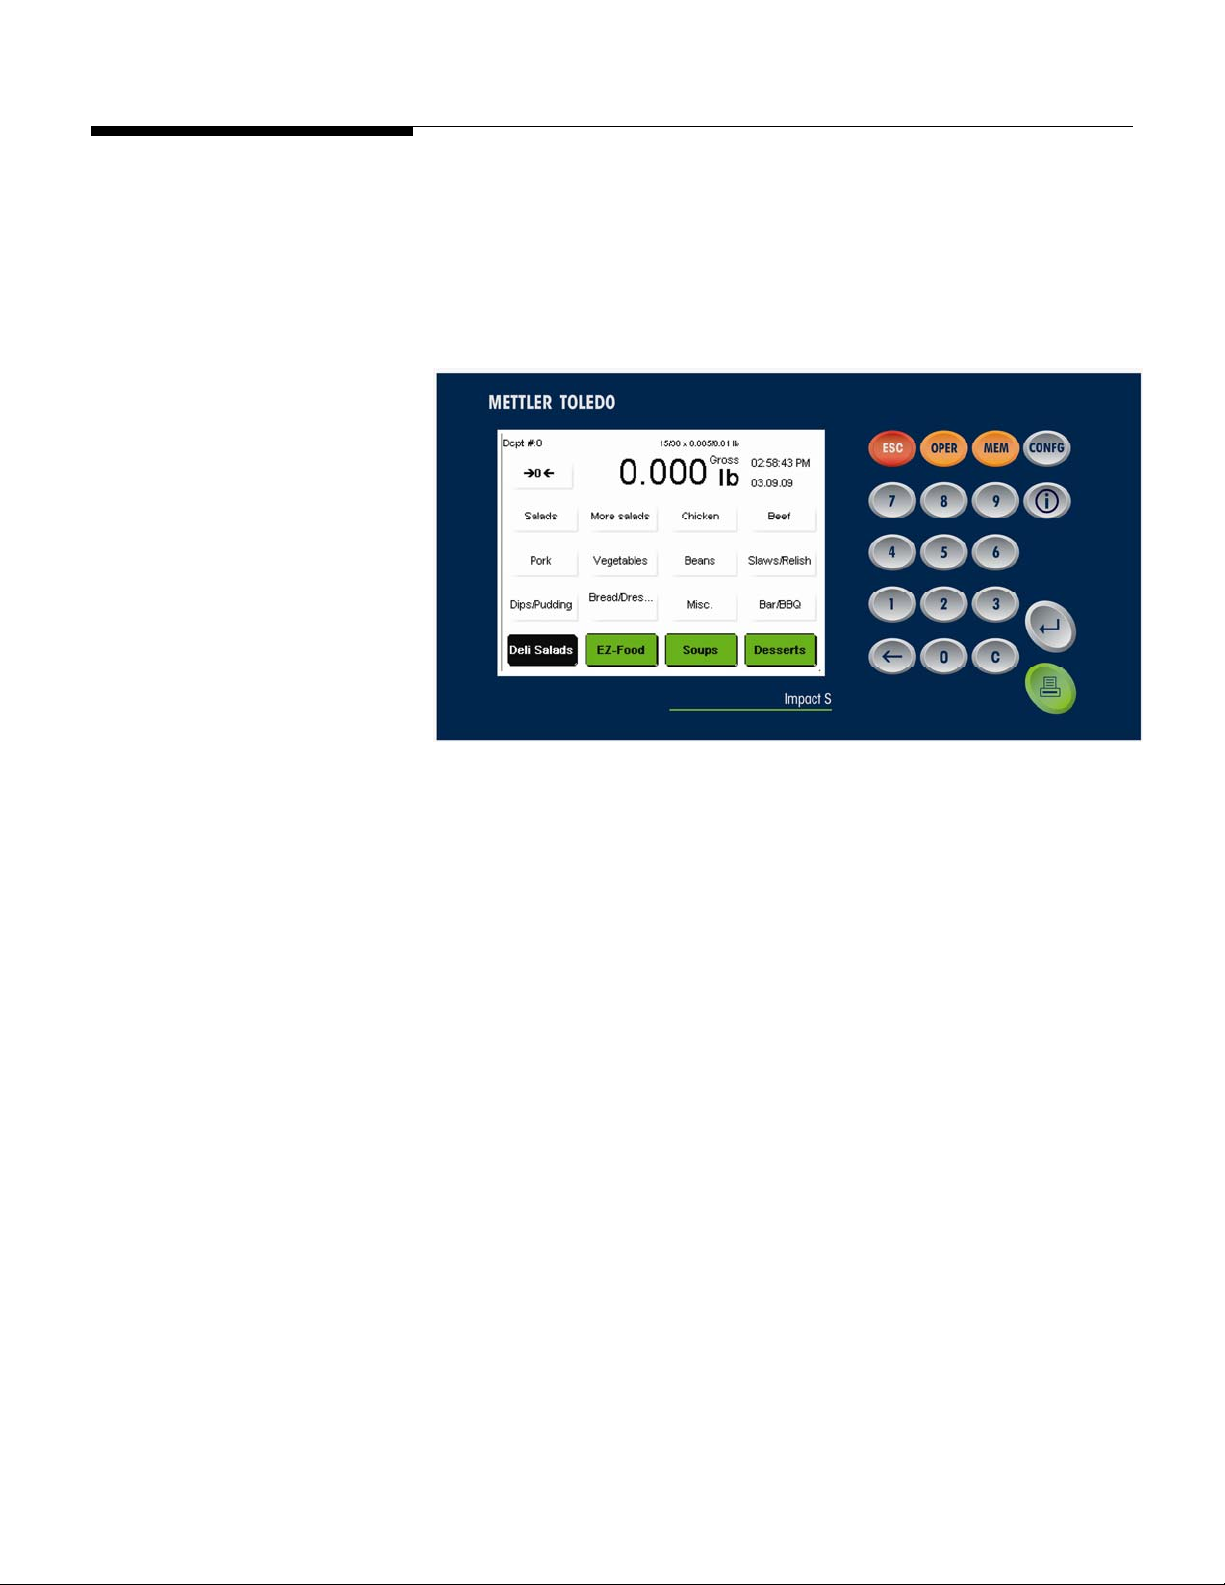
The main operator screen of the Impact S® consists of a keypad and display screen.
Chapter 2: Operating Instructions
Machine Configuration
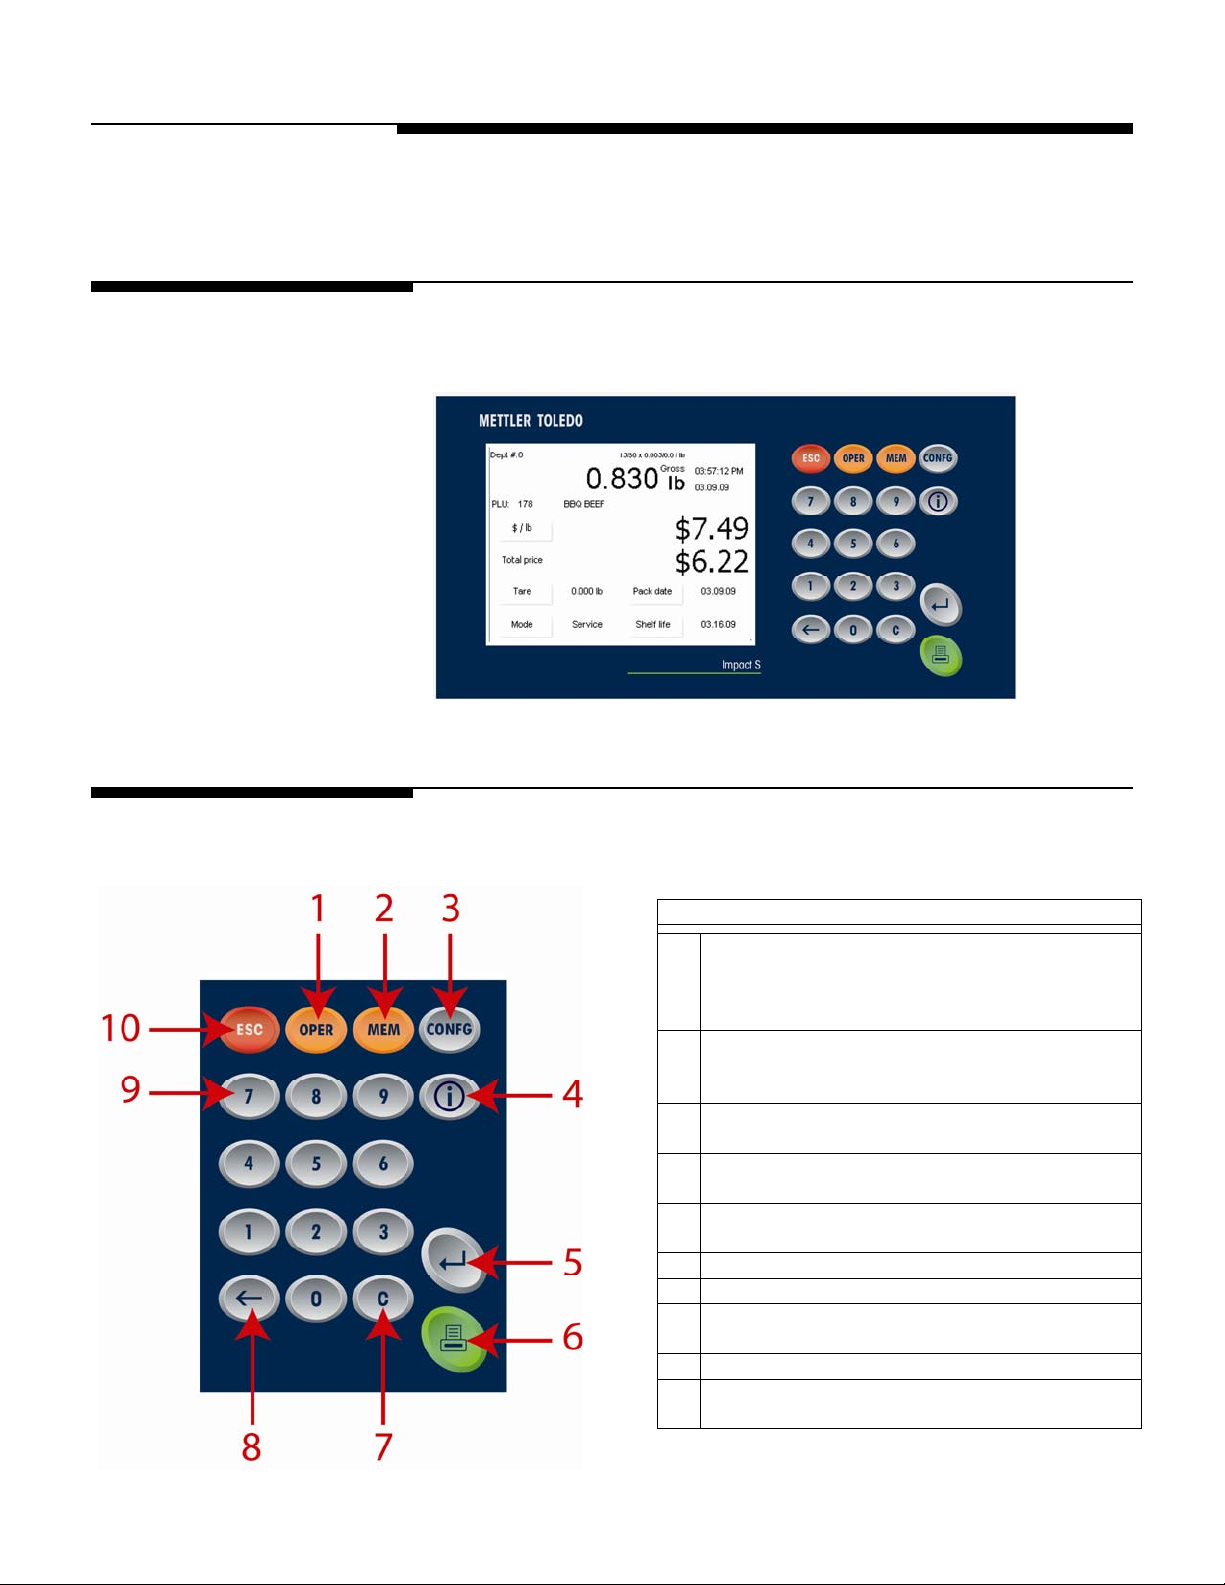
Keypad
The operator display screen will change based on what transaction is taking place.
1
OPER – Operator Key. Provides an operator menu
from the home screen for overrides. Also allows
edits to be made to the PLU by the Operator for the
current transaction ONLY.
2
MEM – Memory Mode Key. Places a transaction in
Memory Mode which collects multiple transactions
and prints them on one label.
3
CONFG – Configuration key. Access to the
Configuration screen allowing scale setup.
4
Help key (i). Activates the help system specific to
the displayed screen (if applicable).
5
Enter Key. Accepts changes and returns to the
previous screen.
6
Print Key. Prints the label (if applicable)
7
C – Clear Key. Clears all data in the entry field.
8
Backspace Key. Used to erase digit to the left of the
cursor.
9
Number Keypad. Used to enter PLU and other data.
10
ESC – Escape Key. Quits and returns to the previous
screen without saving changes
Keypad Components
2-1
Page 14
METTLER TOLEDO Impact S® User's Guide
2
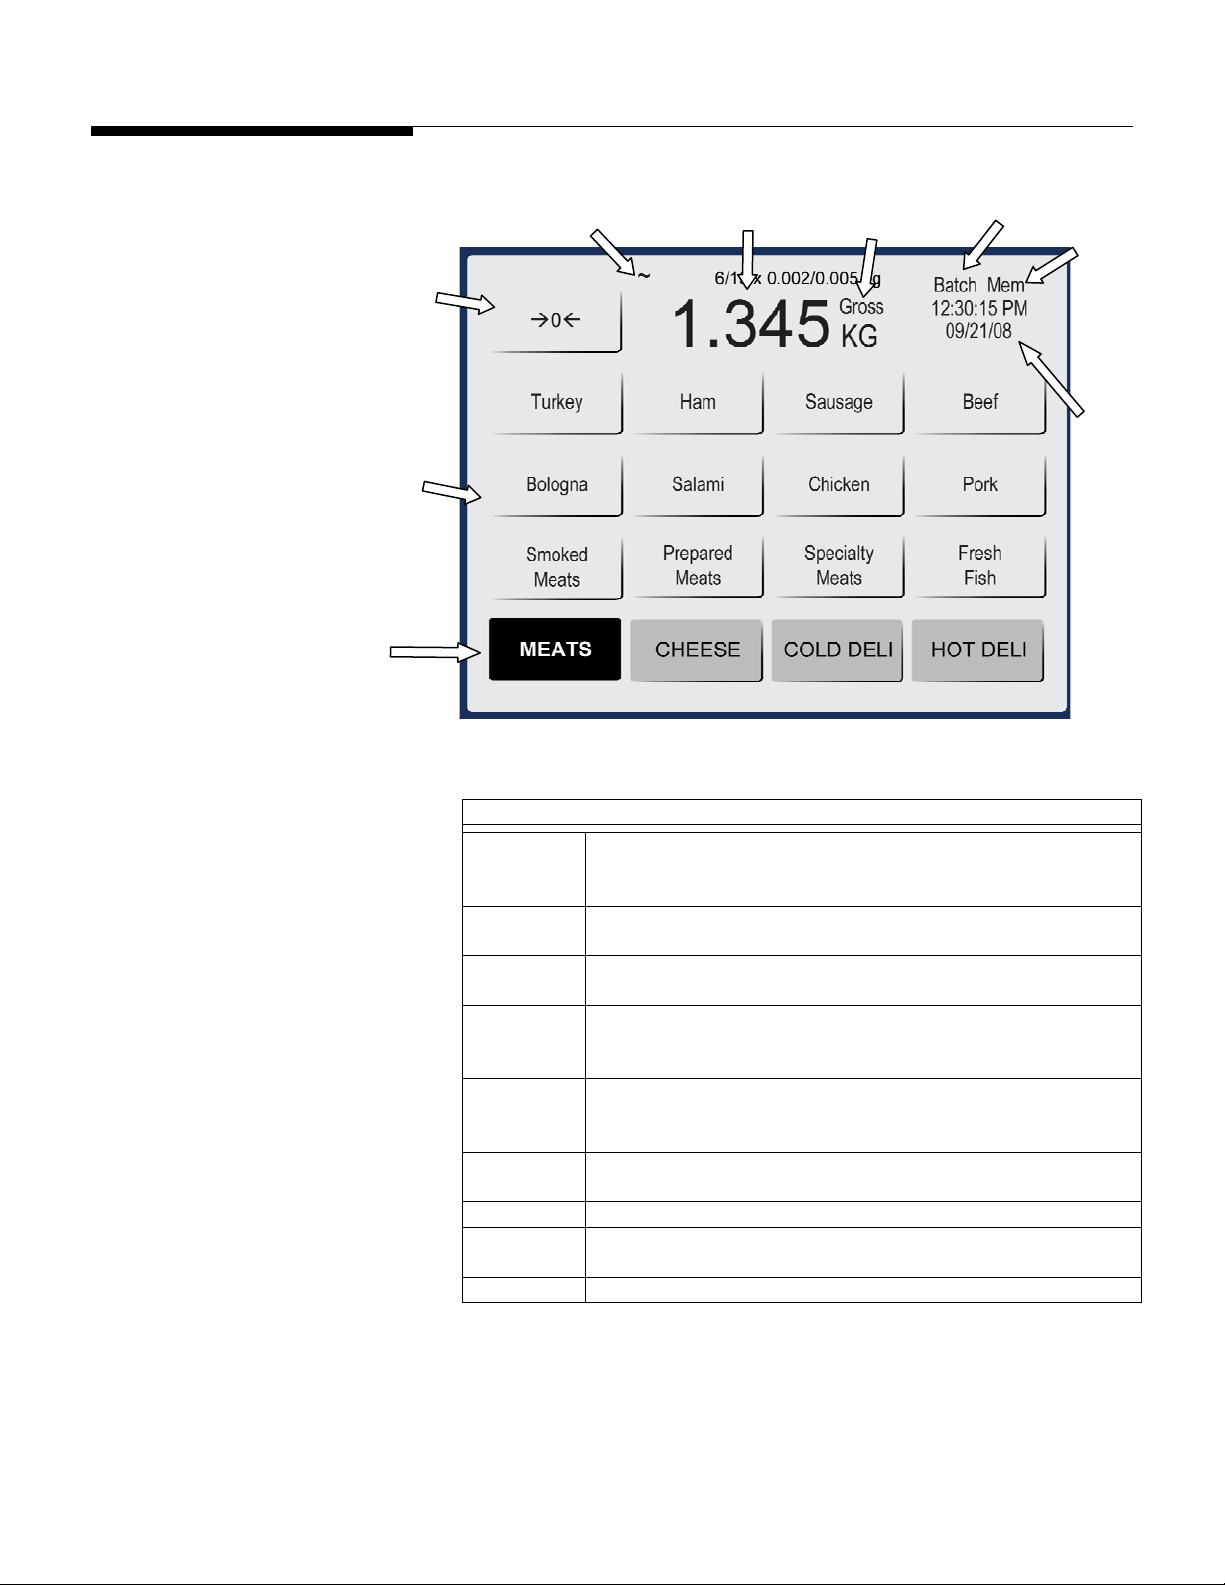
Operator Main Screen
Operator Main Screen
NOTE: the operator display is
a touchscreen. Simply press
the keys displayed on the
screen. But please, only use
fingertips to press on the keys.
DO NOT use any sharp
objects on the touchscreen.
This could cause permanent
damage to the touchscreen.
9
8
7
1
3
4
5
6
1
2
3
4
5
6
7
8
9
Motion/No motion. This symbol indicates that the weight on
the scale is fluctuating; when no symbol appears the weight on
the scale is stable.
Weight Display shows the current weight on the scale as well as
the unit of measure (kg/lb).
Net/Gross when NET displays, it indicates a tare weight has been
taken.
Batch is used to print multiple labels in one batch. When in this
mode, if any transactions are in queue, the word ‘Batch’ will
appear.
Memory (MEM) is used to store transactions for use in printing a
receipt-type label. When transactions are in memory, the word
MEM will appear.
Date and Time. Shows current date and time. The display format
can be set from Configuration.
Preset Page Buttons. Select the preset Page you wish to use.
Preset Keys. Used for one-touch calling of PLU records or, if the
key is linked to another page, touching will display that page.
Touch to Zero. Zeros out the scale.
Operator Main Screen Components
2-2
Page 15
Customer Display
Screen
Chapter 2: Operating Instructions
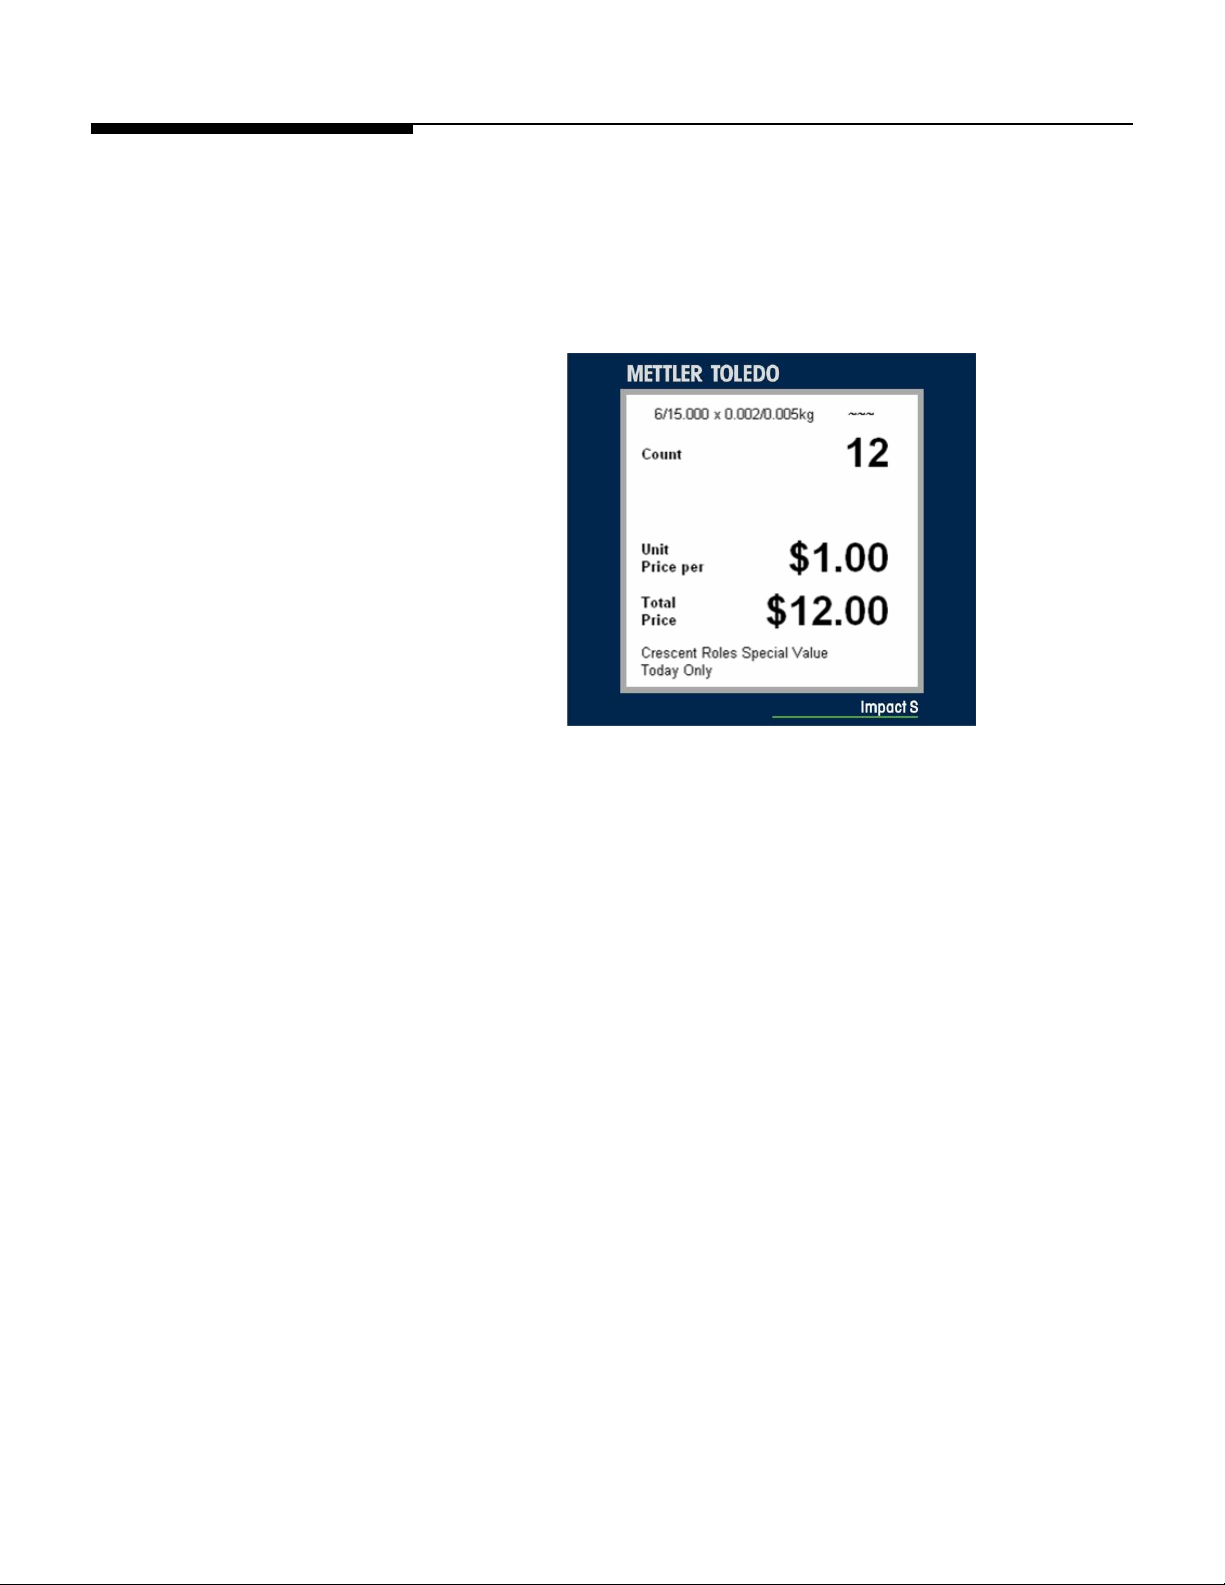
Customer Display Screen
The Customer Display can show different display screens based on the operation mode
the scale is in. The different options are By Weight PLU, By Count PLU, Standard Pack
PLU, Weight Displayed/Weight at Zero/No PLU and Weight at Zero/No PLU with a
marquee message.
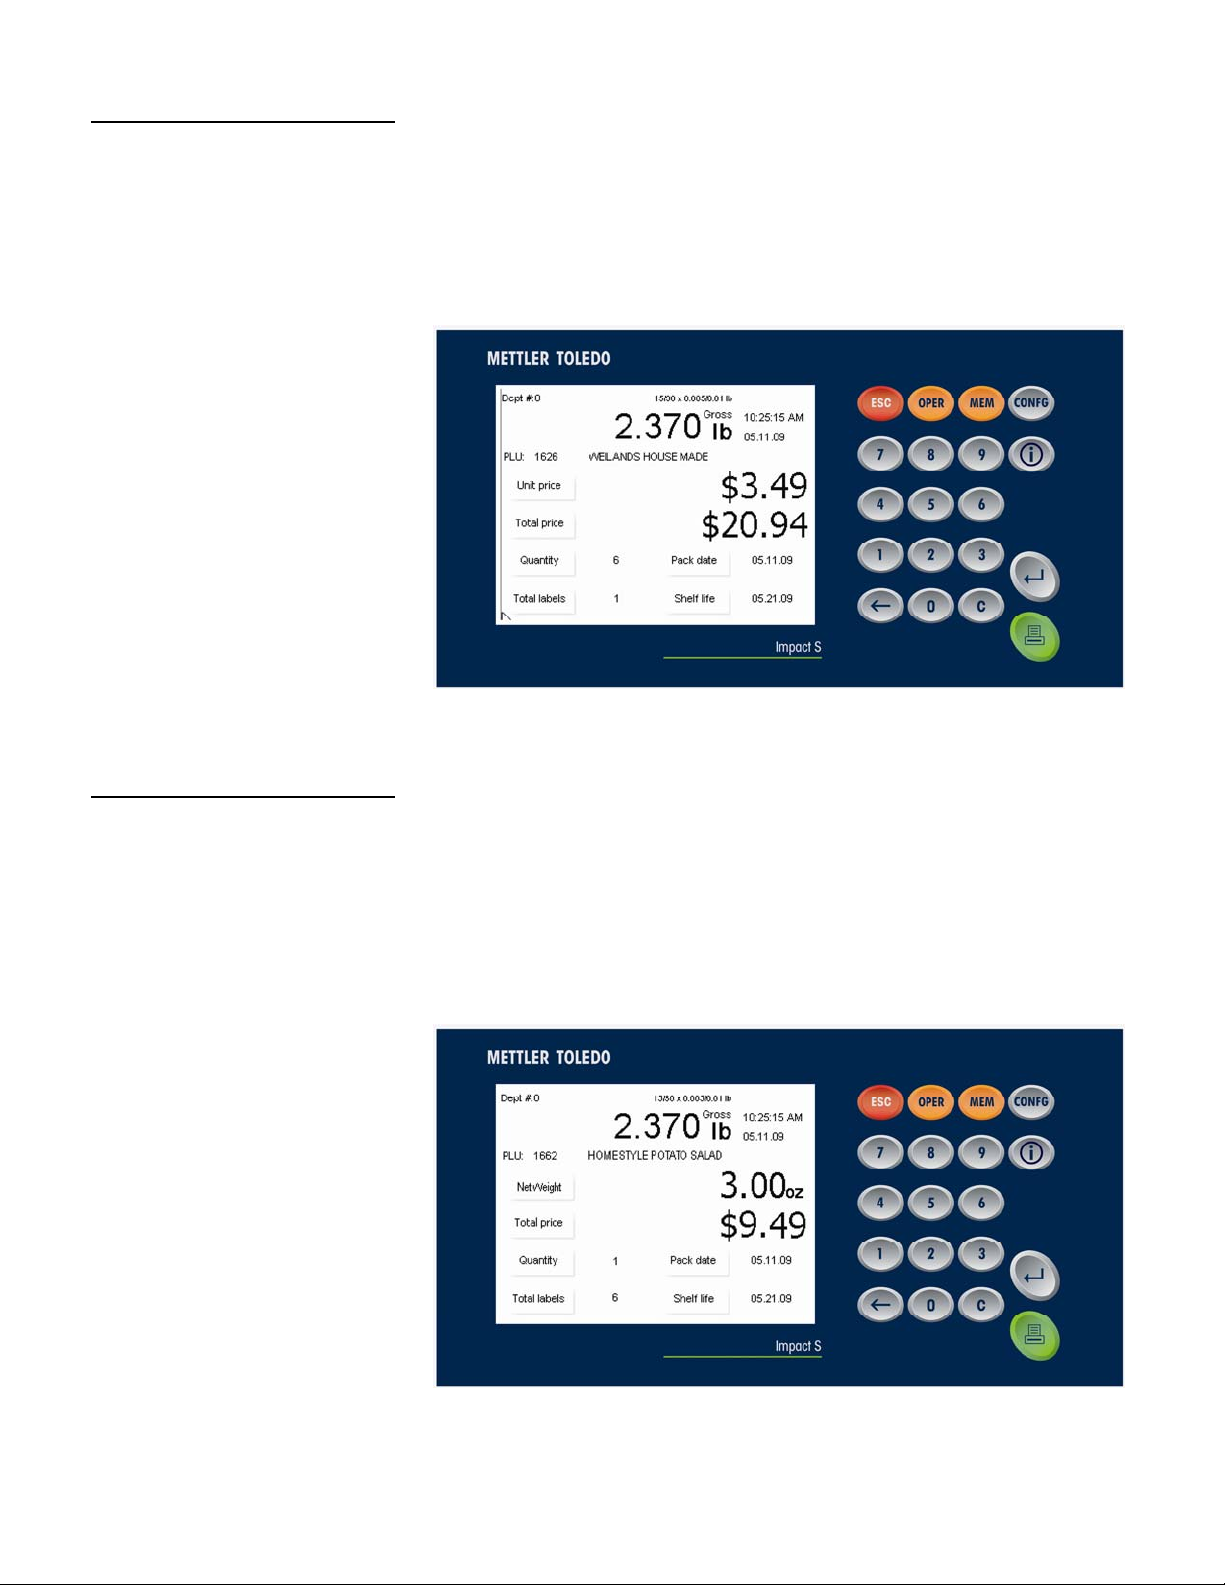
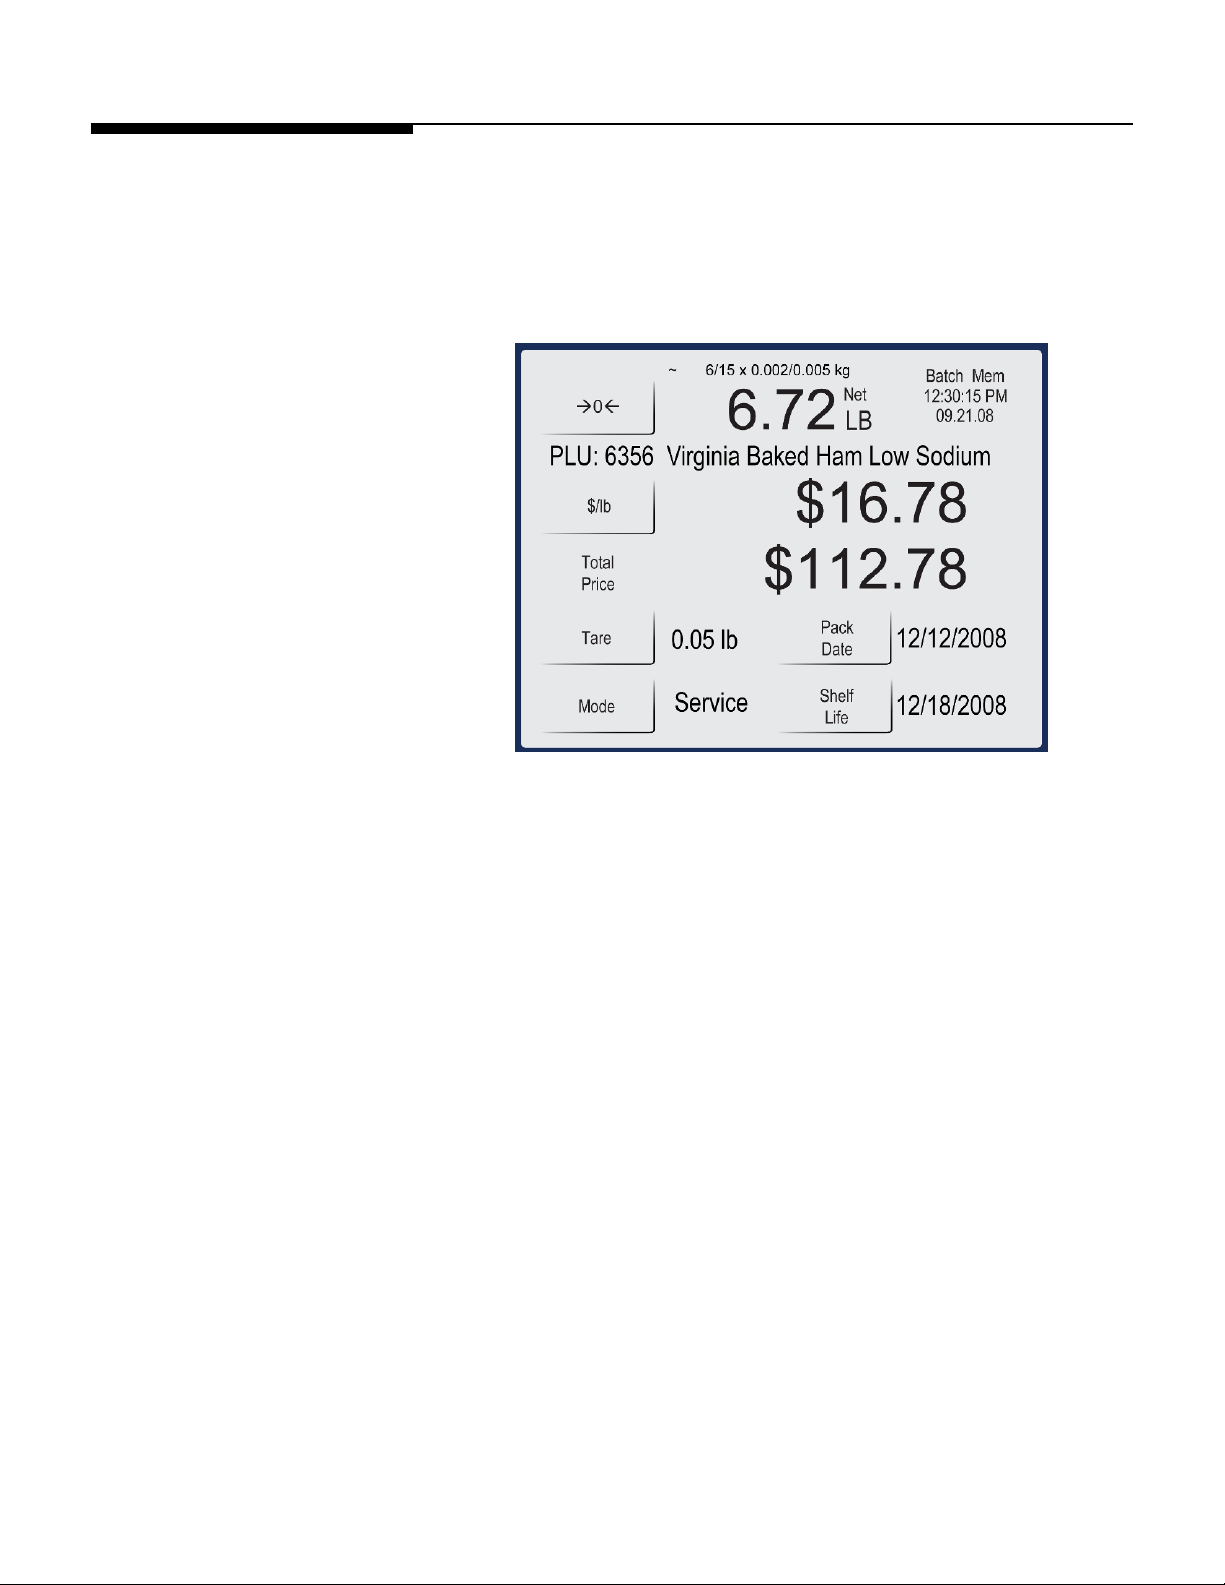
Customer Display – By Count PLU display
2-3
Page 16
METTLER TOLEDO Impact S® User's Guide
PLU Pricing Modes
PLU Pricing Modes
11BBy-Weight PLU
PLU is an abbreviation for Price Look Up. The PLU is a reference number assigned to a
product's record including fields such as the description, price, tare, etc.
Different PLU's will have different pricing modes. Meat is normally sold "By Weight" by
the pound or kilogram. Many bakery products are sold "By Count". Other products may
be sold in a standard package that all weigh the same (or assumes all weight is the
same or a minimum value). The different pricing modes are as follows –
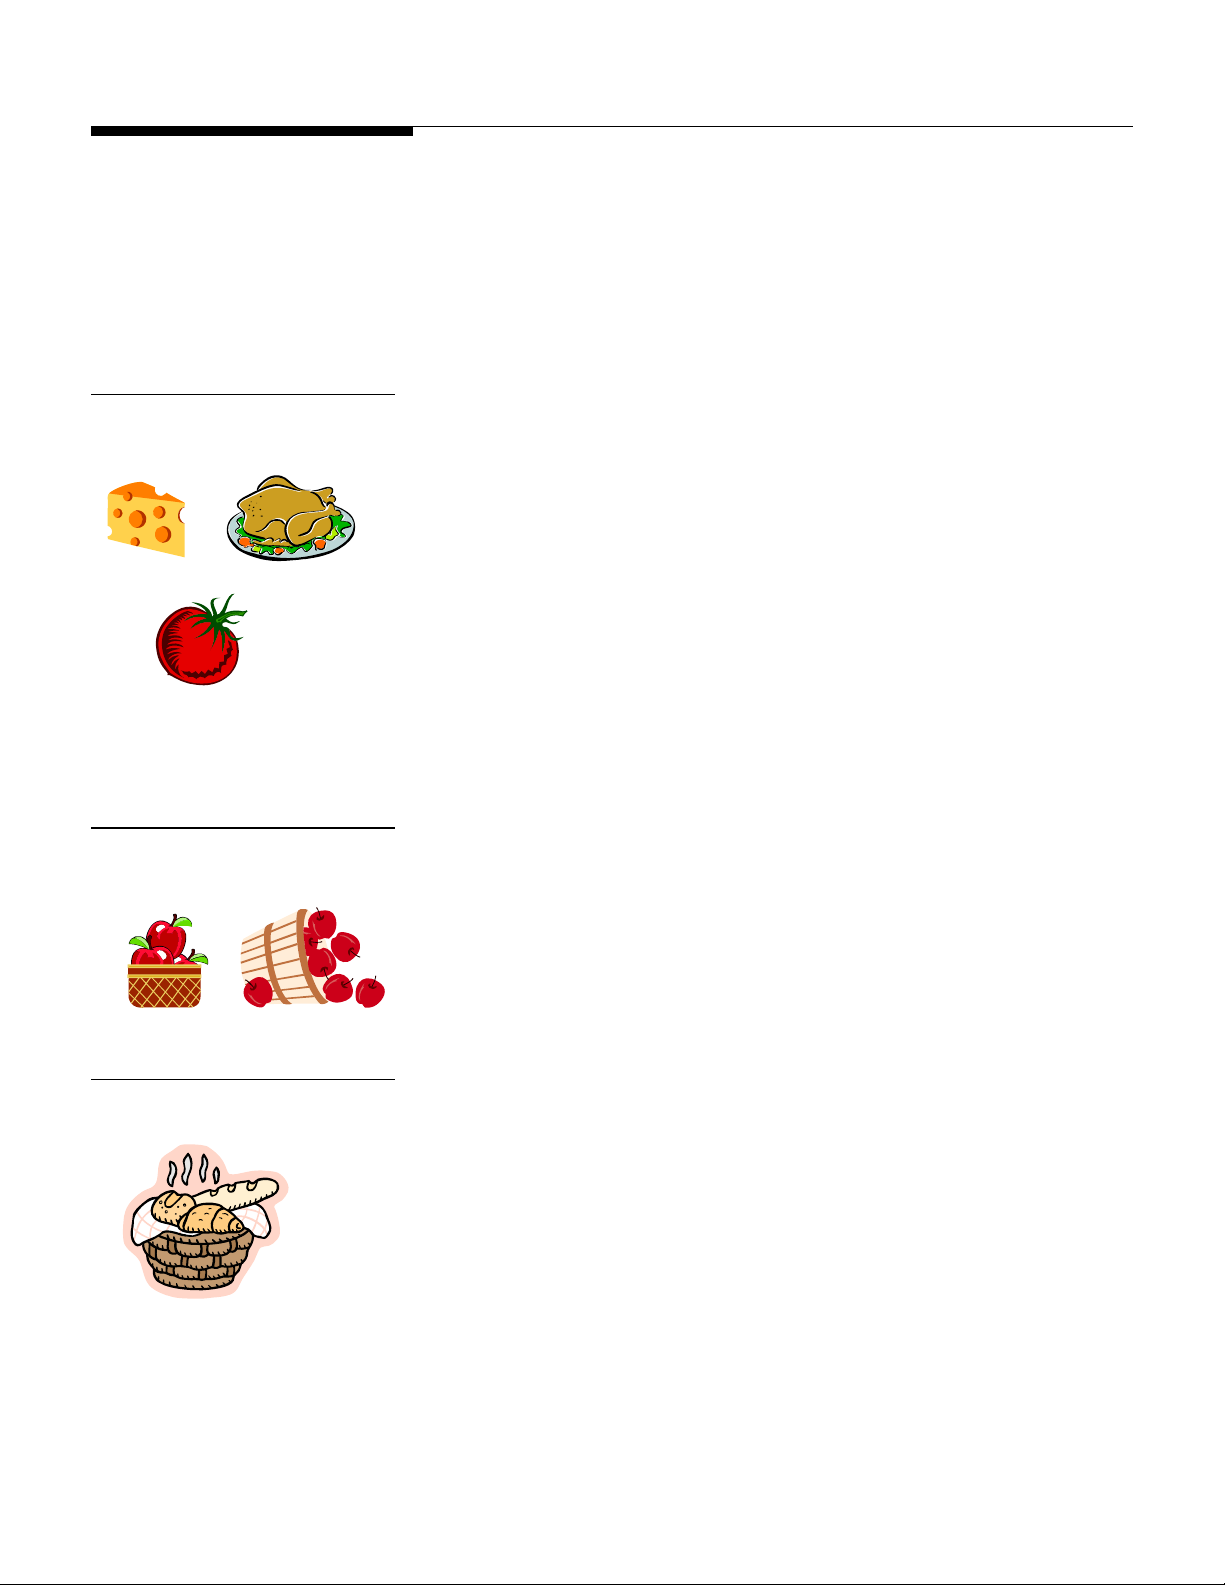
Examples of products sold By Weight are meats, cheese, poultry, and produce. ByWeight items can be priced in three ways:
Priced "Per Pound/kilo" - Typically weighed items are priced per pound. The weight
multiplied by the unit price equals the total price of the product.
Priced "Per Fraction of a Pound/100g" (fractional) - The item may also be priced
by the fraction of the pound (where legal and desired). Pricing per 1/4 pound and
per 1/2 pound are available. Kilos are not interchangeable for pounds in this
mode.
12BBy-Count PLU
13BStandard Pack PLU
"Pounds/kilos for price" - The PLU may be sold with a pounds-for-price (rather
than price per pound). For example, “2 pounds for $1.00” rather than
“$0.50/pound.”
Examples of items sold by the count are cookies, donuts, rolls, bread, etc. Example: 4
Apples for $0.69. The By-Count PLU allows the operator to use the scale to print labels.
Pricing is entered as a certain quantity of items for a set price. If the total weight for the
items is needed, a weight field can be configured on the label to print the weight of the
items in addition to the By-Count information.
Examples of items sold by Standard Pack include whole chickens, sheet cakes, bread,
etc. The Standard Pack PLU is similar to By-Count and also allows the operator to print
labels. These labels indicate the net weight and total price of the item. These types of
items all weigh the same (or are assumed to weigh the same or of a minimum value).
2-4
Page 17
PLU Screens
Chapter 2: Operating Instructions
PLU Screens
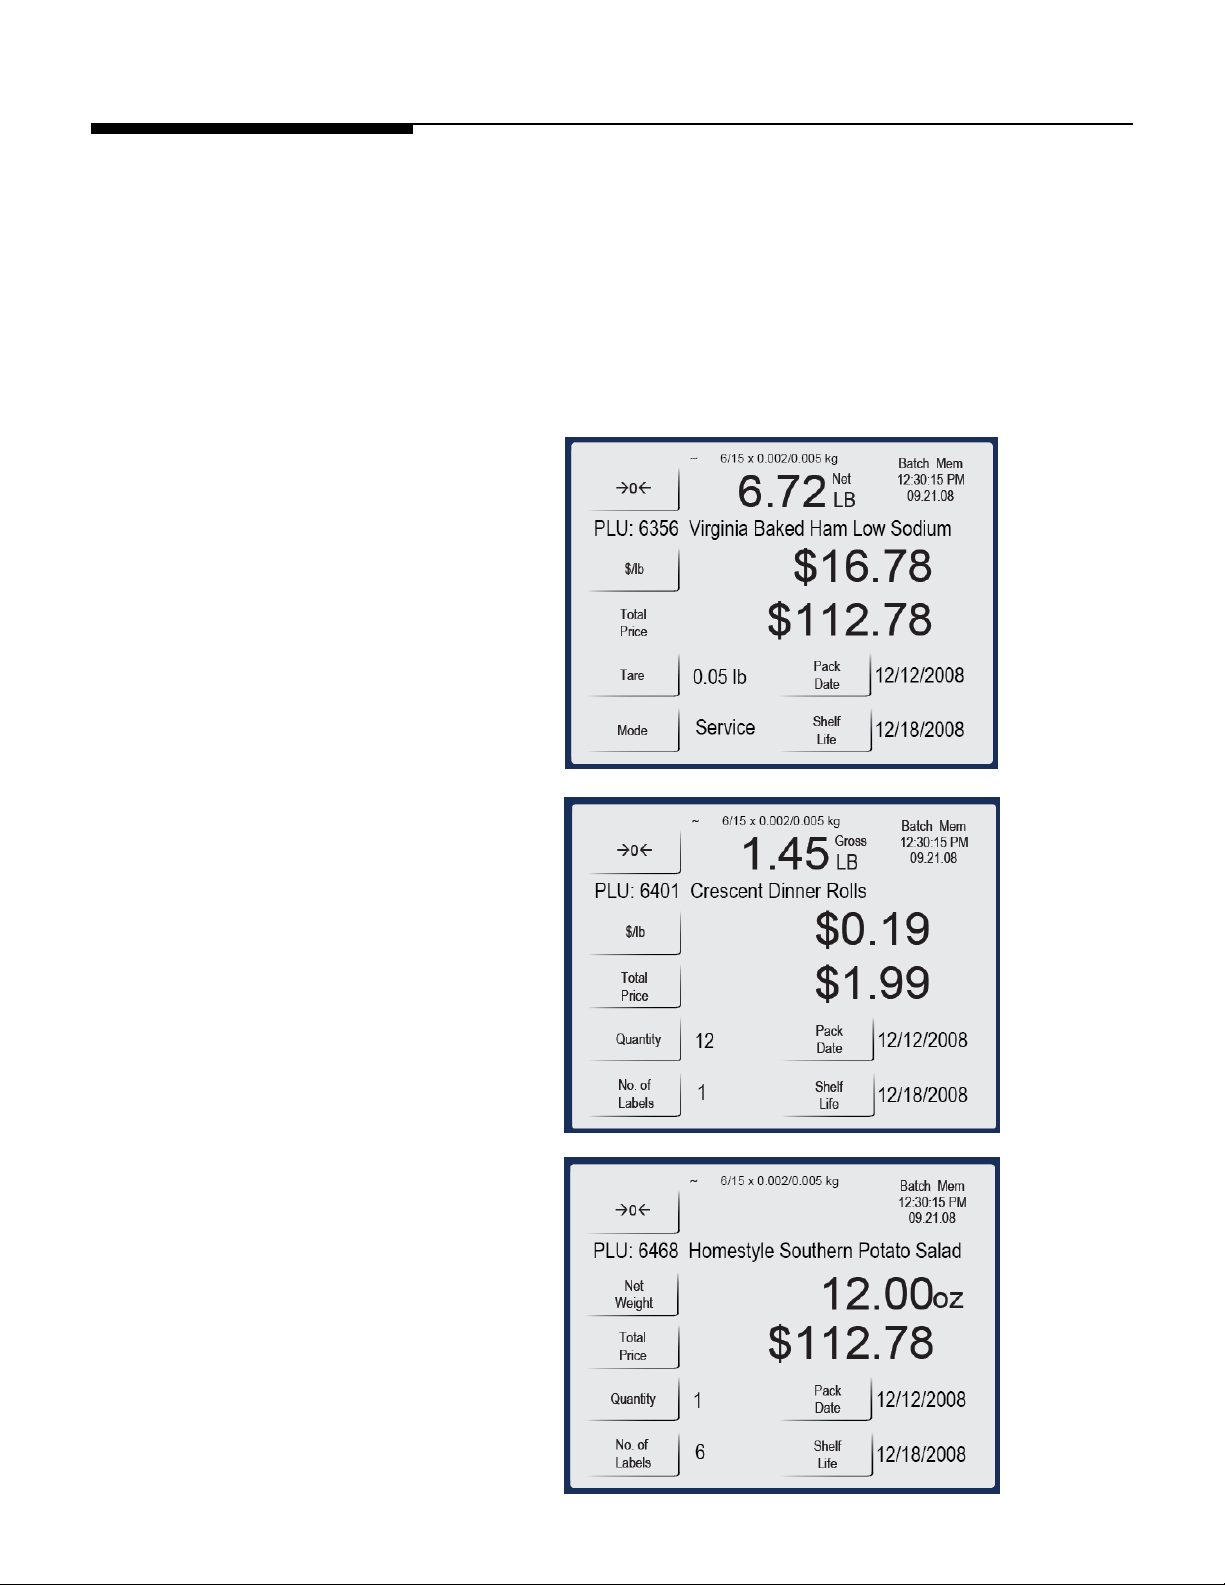
The PLU screen will vary based on the type of PLU that is being displayed: By Weight,
By Count or Standard Pack.
On the PLU screen, if a value field has a border it can be changed for that transaction.
Override the values by touching the box and selecting/entering new values. Note: this is
only a temporary override for this transaction only and the values will revert to the
original the next time the PLU is called.
If the field has no border the value cannot be changed, as determined by Setup
Configuration.
By Weight
By Count
Standard Pack
2-5
Page 18
METTLER TOLEDO Impact S® User's Guide
8
PLU Screens
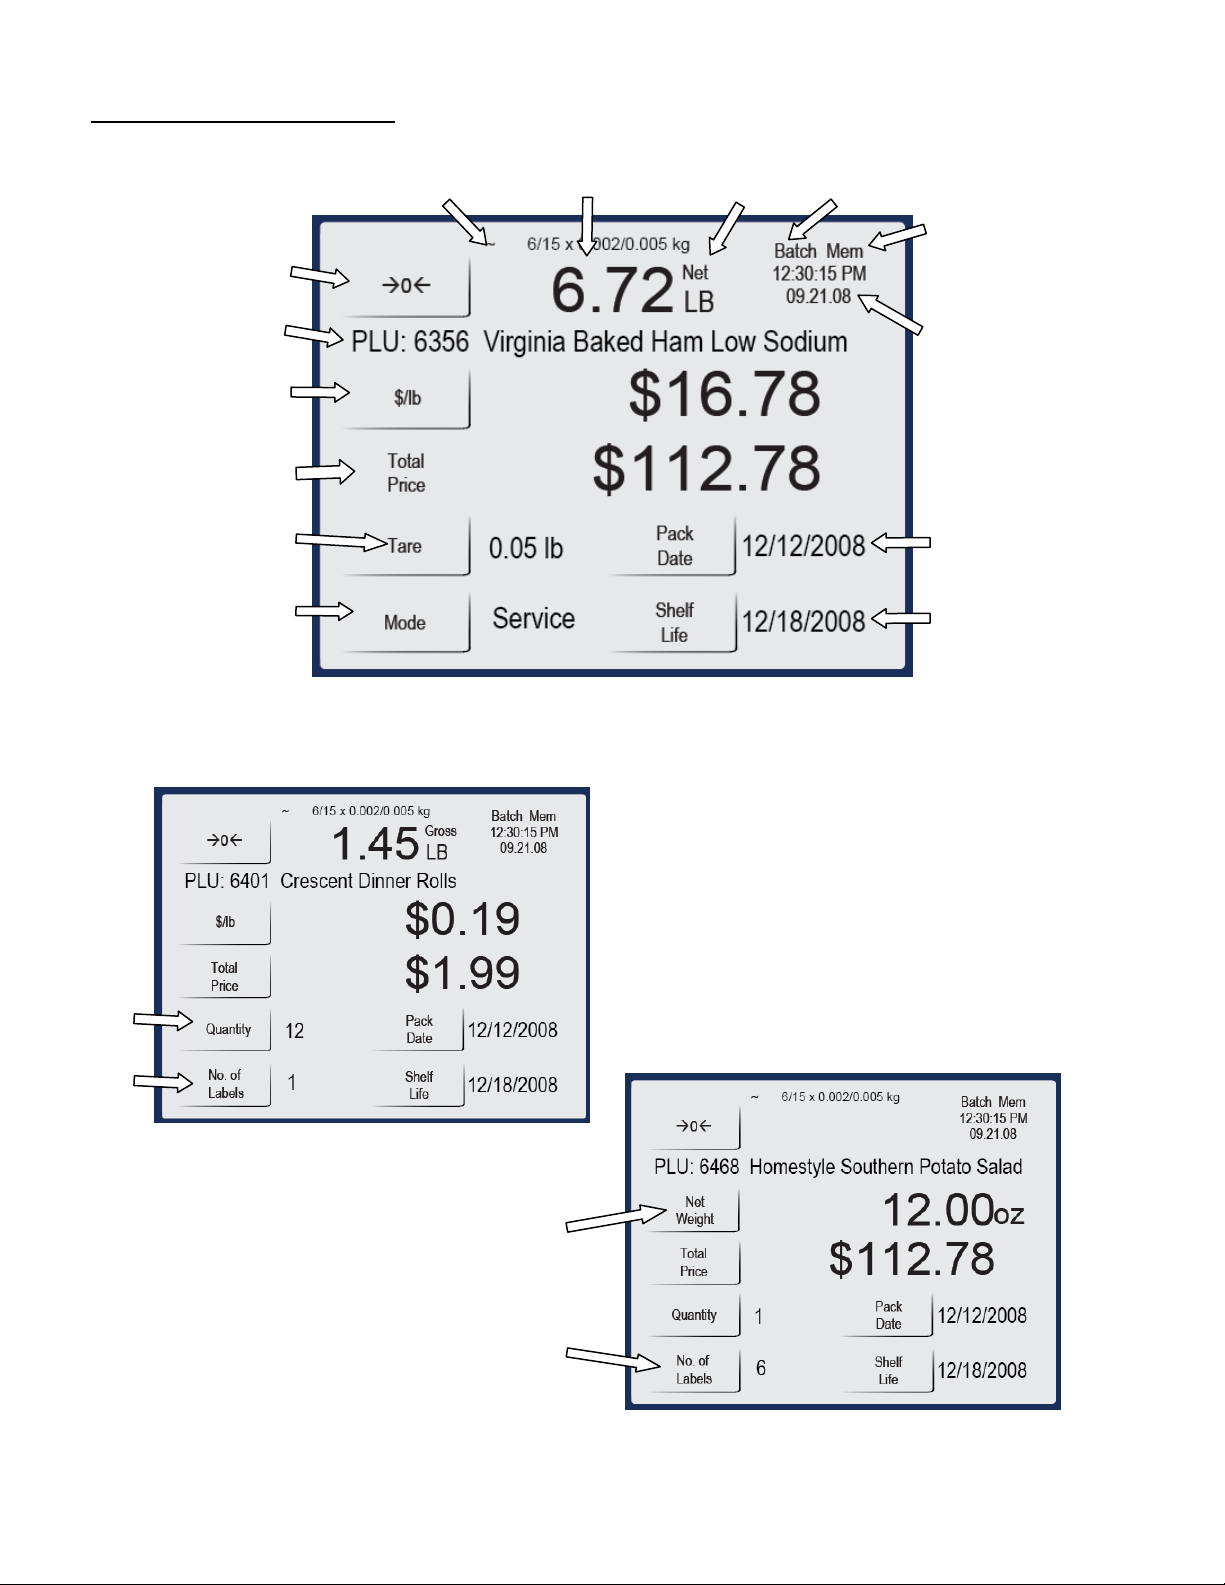
14BPLU Screen Details
1
2
3
4
14
13
5
6
12
11
10 7
9
PLU By-Count
PLU By-Weight
NOTE: you can find the corresponding chart on
the following page.
15
16
PLU Standard Pack
17
16
2-6
Page 19
Chapter 2: Operating Instructions
PLU Screens
1
Motion/No motion. When this symbol appears the weight on the scale is fluctuating; when no
symbol appears the weight on the scale is stable.
2
Weight Display shows the current weight on the scale as well as the unit of measure (kg/lb). This
is used to calculate the Total Price.
3
Net/Gross when NET displays, it indicates a tare weight has been taken.
4
Batch is used to print multiple labels in one batch When in Batch mode with transactions in queue,
the word Batch will appear.
5
Memory (Mem) is used to store transactions for use in printing a receipt-type label. When
transactions are in memory, Mem will appear.
6
Date and Time. Shows current date and time. The display format is set by the configuration.
7
Pack Date displays the current date.
8
Shelf Life displays the date programmed into the PLU. The item should NOT be consumed or sold
beyond this date.
9
Mode states the mode of Operation: Service, or PrePack.
10
Tare displays the tare value assigned to the PLU transaction.
11
Total Price of the item. If the item is sold by weight, this is the unit price multiplied by the weight of
the item. The Total Price is never operator accessible.
12
Unit Price is programmed into the PLU record. If allowed, touch to override. This is used to calculate
the Total Price.
13 PLU number and description.
14
Touch to Zero. Zeros out the scale.
15
Quantity shows how many is in the PLU’s count.
16
Number of Labels displays how many labels will be printed.
17
Net Weight the weight of actual goods, excluding packing materials. The scale will automatically
determine Kg or Lb or Count depending on the PLU item type.
PLU Screen Components
2-7
Page 20
METTLER TOLEDO Impact S® User's Guide
Calling Up PLUs
Calling Up PLUs
When the Impact S® is in Service Mode, the operator screen will display the active
department’s Preset Pages and Preset PLUs.
Note: “Service Mode” is normally the default on the PLU Edit screen. After the product
has been weighed, a label has been printed, and the item has been removed from the
scale, the PLU will clear and the scale will return to the home screen, ready for the next
item.
To begin a transaction, place the item on the weighing tray (can be done after a PLU is
called up).
Call up the PLU (Price Look Up) Record. To do this, find the Preset PLU related to the
product, it may be a By Weight, By Count or Standard Pack item(s). You may also
directly enter the PLU number in order to bring a particular PLU’s data to the screen.
Note: Remember some PLU buttons can link into another page of related items, so you
may need to drill down to find your item’s PLU. Or check that the scale is displaying the
right Preset Page or category for desired PLU. These Preset Page buttons are along the
bottom of the screen and represent PLUs grouped into categories or departments. The
current Preset Page shows a black button, along the bottom. Switch Preset Pages by
touching the desired button.
Once you locate the PLU button touch it to get a detailed PLU screen. The screen will
vary slightly in appearance depending on whether it is By Weight, By Count or Standard
Pack.
Depending on how the PLU has been set up you may be able to edit some of the values
for this current selection. If allowed change items such as Shelf Life, Tare, etc by using a
Temporary Override (see this chapter’s Temporary Override section for details).
2-8
Page 21
Printing Labels
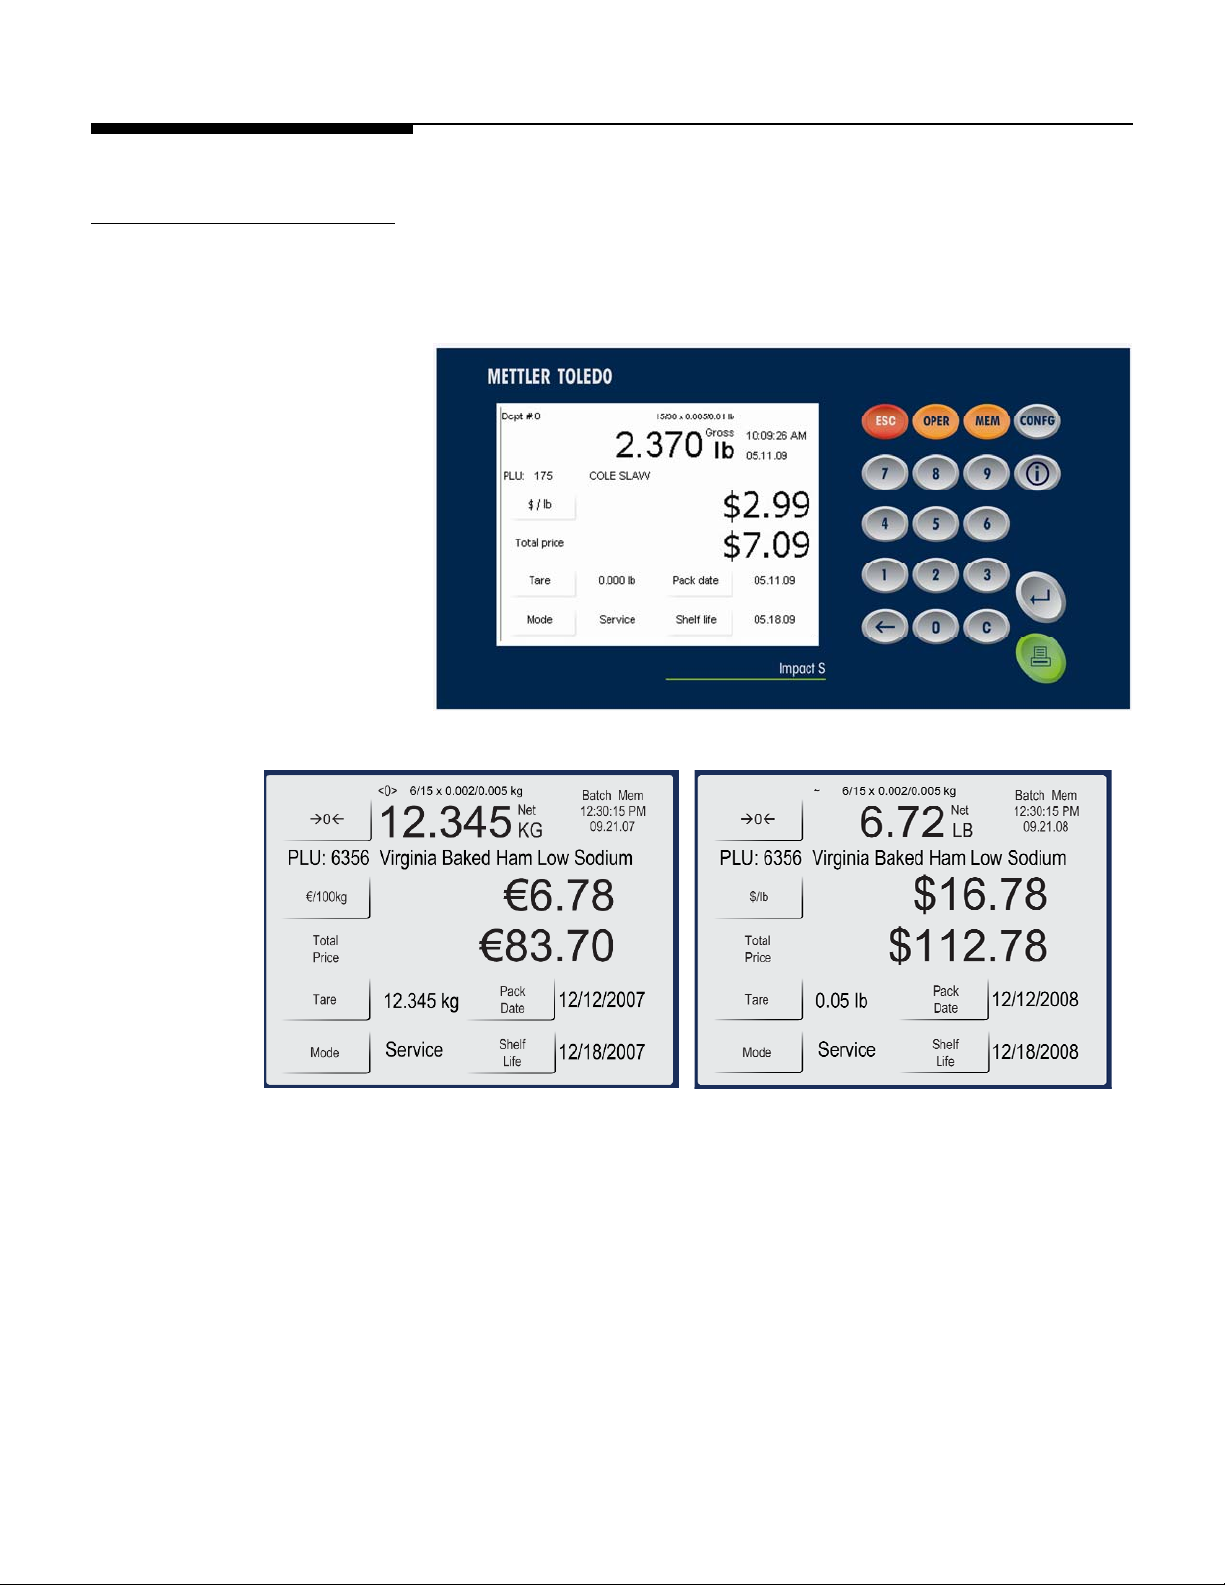
15BBy Weight PLU
Chapter 2: Operating Instructions
Printing Labels
Once the By Weight PLU has been called up, make any needed changes, and then
press the Print button on the keypad to print a label.
Take the label and remove the item from the scale to complete the transaction.
NOTE: the By Weight screen may also look different based on if the scale is set up for
weighing units in kilograms (kg) or in pounds (lb). Regardless of weighing standard,
the By Weight the label printing process is the same.
2-9
Page 22
METTLER TOLEDO Impact S® User's Guide
Printing Labels
16BBy Count PLU
Once the By Count PLU has been called up, make any needed changes, and then press
the Print button on the keypad to print a label.
Note: if the count is different than what is programmed into the PLU record, press the
Quantity box, change the quantity of the item using the keypad and press Enter, and
then press the Print key to print the label.
17BStandard Pack PLU
Take the label and remove the item from the scale to complete the transaction.
When a Standard Pack PLU has been called up, make any needed changes, enter the
number of labels needed, and then press the Print button on the keypad to print the
label(s).
Note: if the count is different than what is programmed into the PLU record, press the
Quantity box, change the quantity of the item using the keypad and press Enter, and
then press the Print key to print the label.
2-10
Take the label and remove the item from the scale to complete the transaction.
Page 23
Temporary Overrides
Chapter 2: Operating Instructions
Temporary Overrides
Temporary Overrides are certain values can be adjusted for the current transaction only
from within the PLU screen. The changes are temporary and will not be retained in the
original PLU.
If a value can be changed a button will appear around the value. This indicates that the
value can be changed during a transaction.
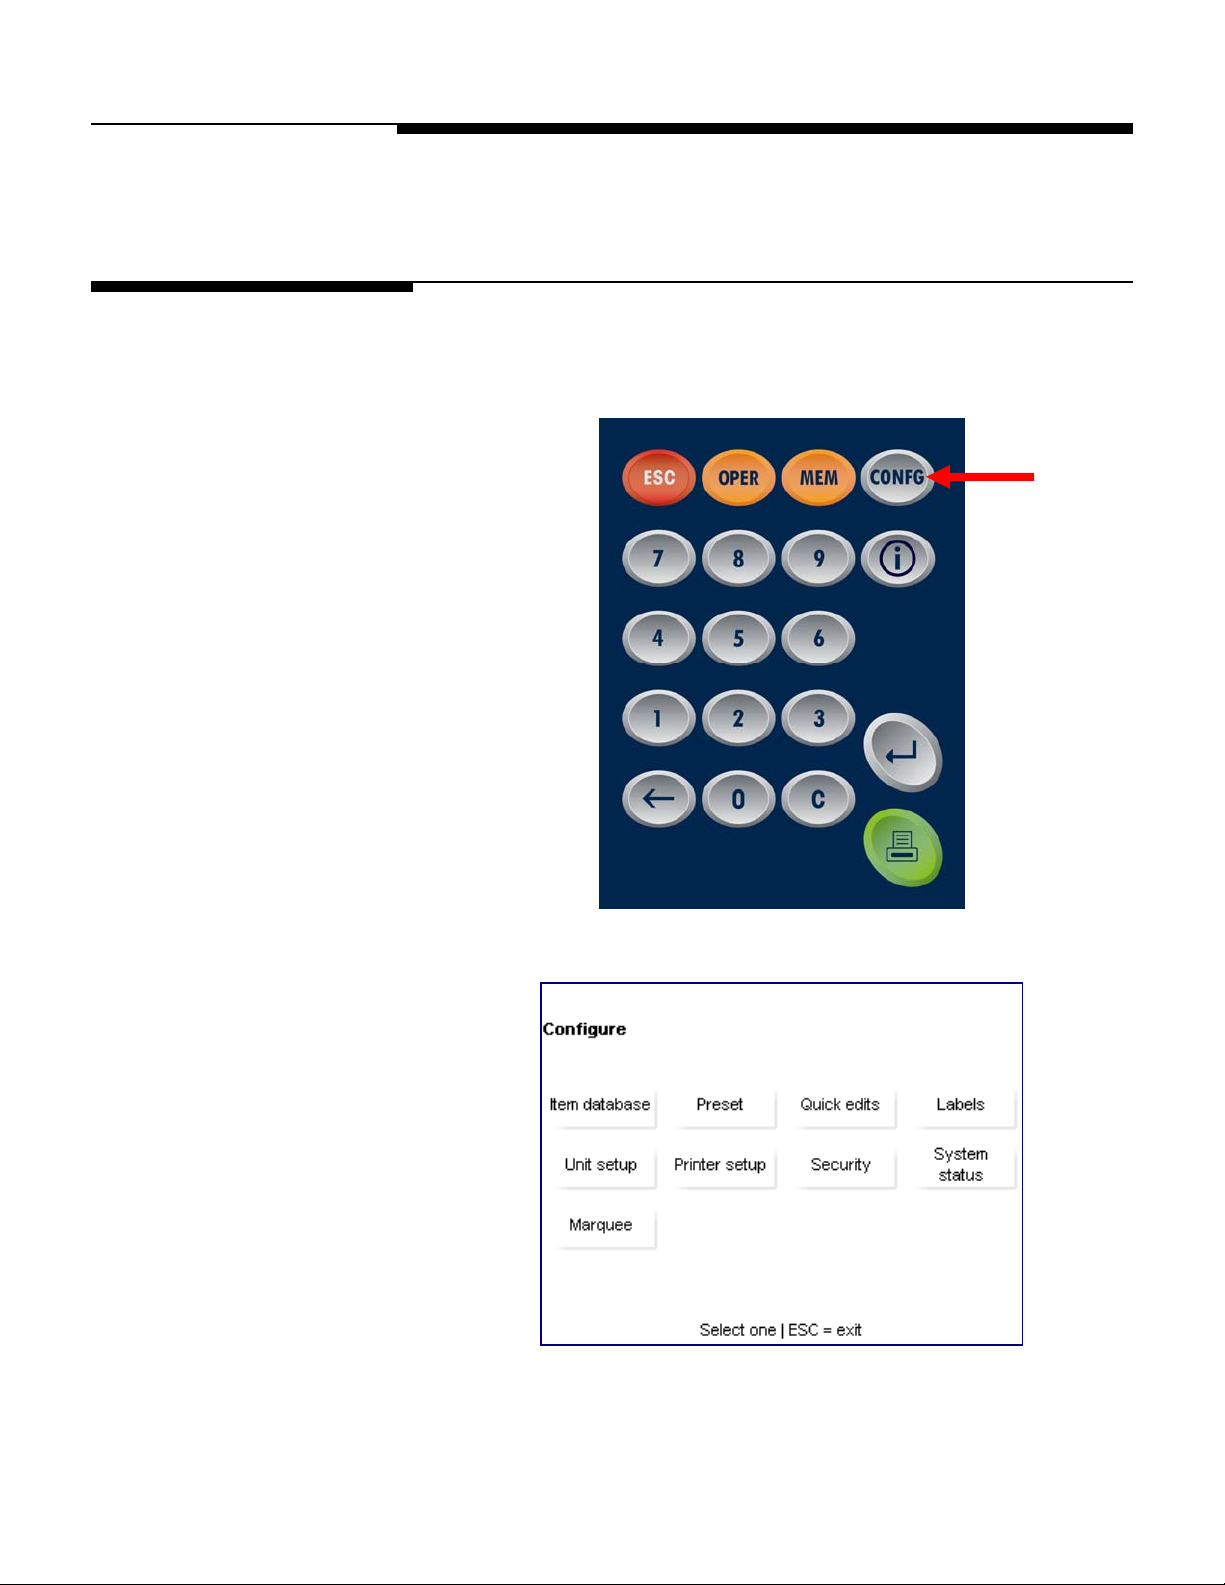
In the PLU screen above, the Unit Price ($/lb), Tare, Mode, Pack Date, and Shelf Life,
have buttons, indicating they can be changed. The Total Price field does not have a
button and cannot be changed. There is also a button graphic around the Touch to Zero
field, but that does not indicate a changeable field, but rather an interactive one.
To change a value, touch the field. Then depending on the field: enter a numeric value
in the pop-up window using the keypad, toggling to a different within the selected field,
or if there are multiple choices, a new screen will appear and a selection can be made
from that screen.
As always, additional overrides can be found by pressing the OPER button on the
keypad.
2-11
Page 24

METTLER TOLEDO Impact S® User's Guide
Memory Mode
Memory Mode
When the user processes a Memory Mode transaction, he presses the MEM key instead
of the Print key. This will store the transaction data into Memory Mode and return the
user to the Home screen.
If a PLU is added to MEMORY that already exists in MEMORY, it is treated as a separate
entry. This means that it is possible to have multiple transactions associated with the
same PLU.
Making use of items stored via Memory function is simple. Begin with the scale at the
home screen and press the MEM key to bring up a dedicated MEM array. The user will
find Subtotal, Remove Item and Clear MEM keys available.
In order to make use of data, the user will need to press the Subtotal key. From there,
they will select their MEM entry and press Print when ready.
NOTE: When a PLU is added to MEMORY, the word MEM will display on the main
screen alerting the operator to the presence of data in the MEMORY queue.
2-12
Page 25
3 Configuration
Introduction
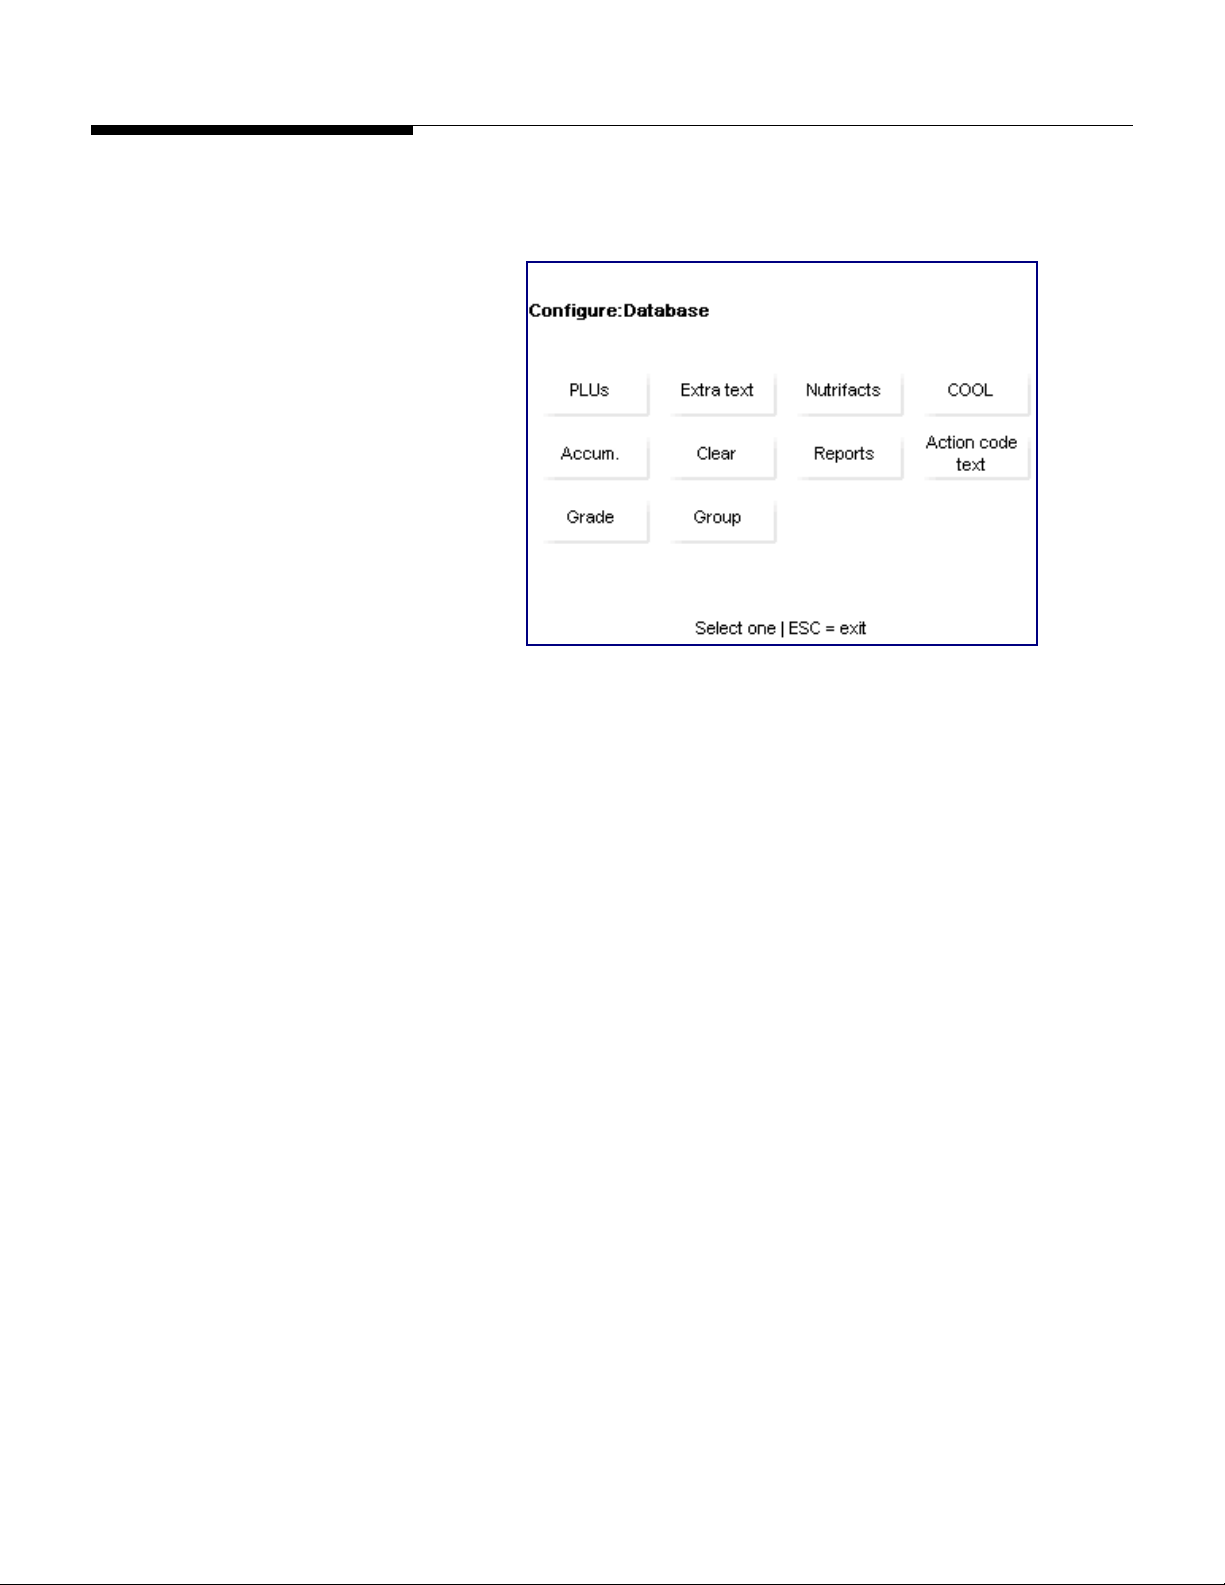
Setup for the Impact S® is controlled from the Configure screen. This is accessed by
pressing the gray CONFG button on the Operator keypad.
Chapter 3: Configuration
Introduction
From here the Item Database, Preset, Quick Edits, Labels, Unit Setup, Printer Setup,
Security, System Status and Marquee settings can be accessed and modified.
3-1
Page 26
METTLER TOLEDO Impact S® User's Guide
Database
There is extensive database support built into every Impact-S scale. The Database
menu allows for the viewing and editing of various item parameters.
This array of buttons allows the user to access data specific to the listed topics. Through
the use of this cascade, the operator may add, edit, view and delete many of the
parameters that differentiate PLUs as well as review the totals and transactions that have
occurred.
PLUs – this button takes the user to a very specific list of editable PLU features
Extra Text – used to view and edit the Extra Text displayed with a PLU
Nutrifacts – allows enabling/disabling of the embedded PLU nutrifacts
COOL – change, force or disable COOL data on a per-PLU basis
Accumulators – view and modify the accumulator lists
Clear – used to delete entries from various databanks
Reports – allows viewing of the various unit reports
Action Code Text – enable, disable, add or modify action text
Grade – used to edit or add grade information to PLU entries
Group – used to edit or add groups to the database
3-2
Page 27
PLUs
Chapter 3: Configuration
Database
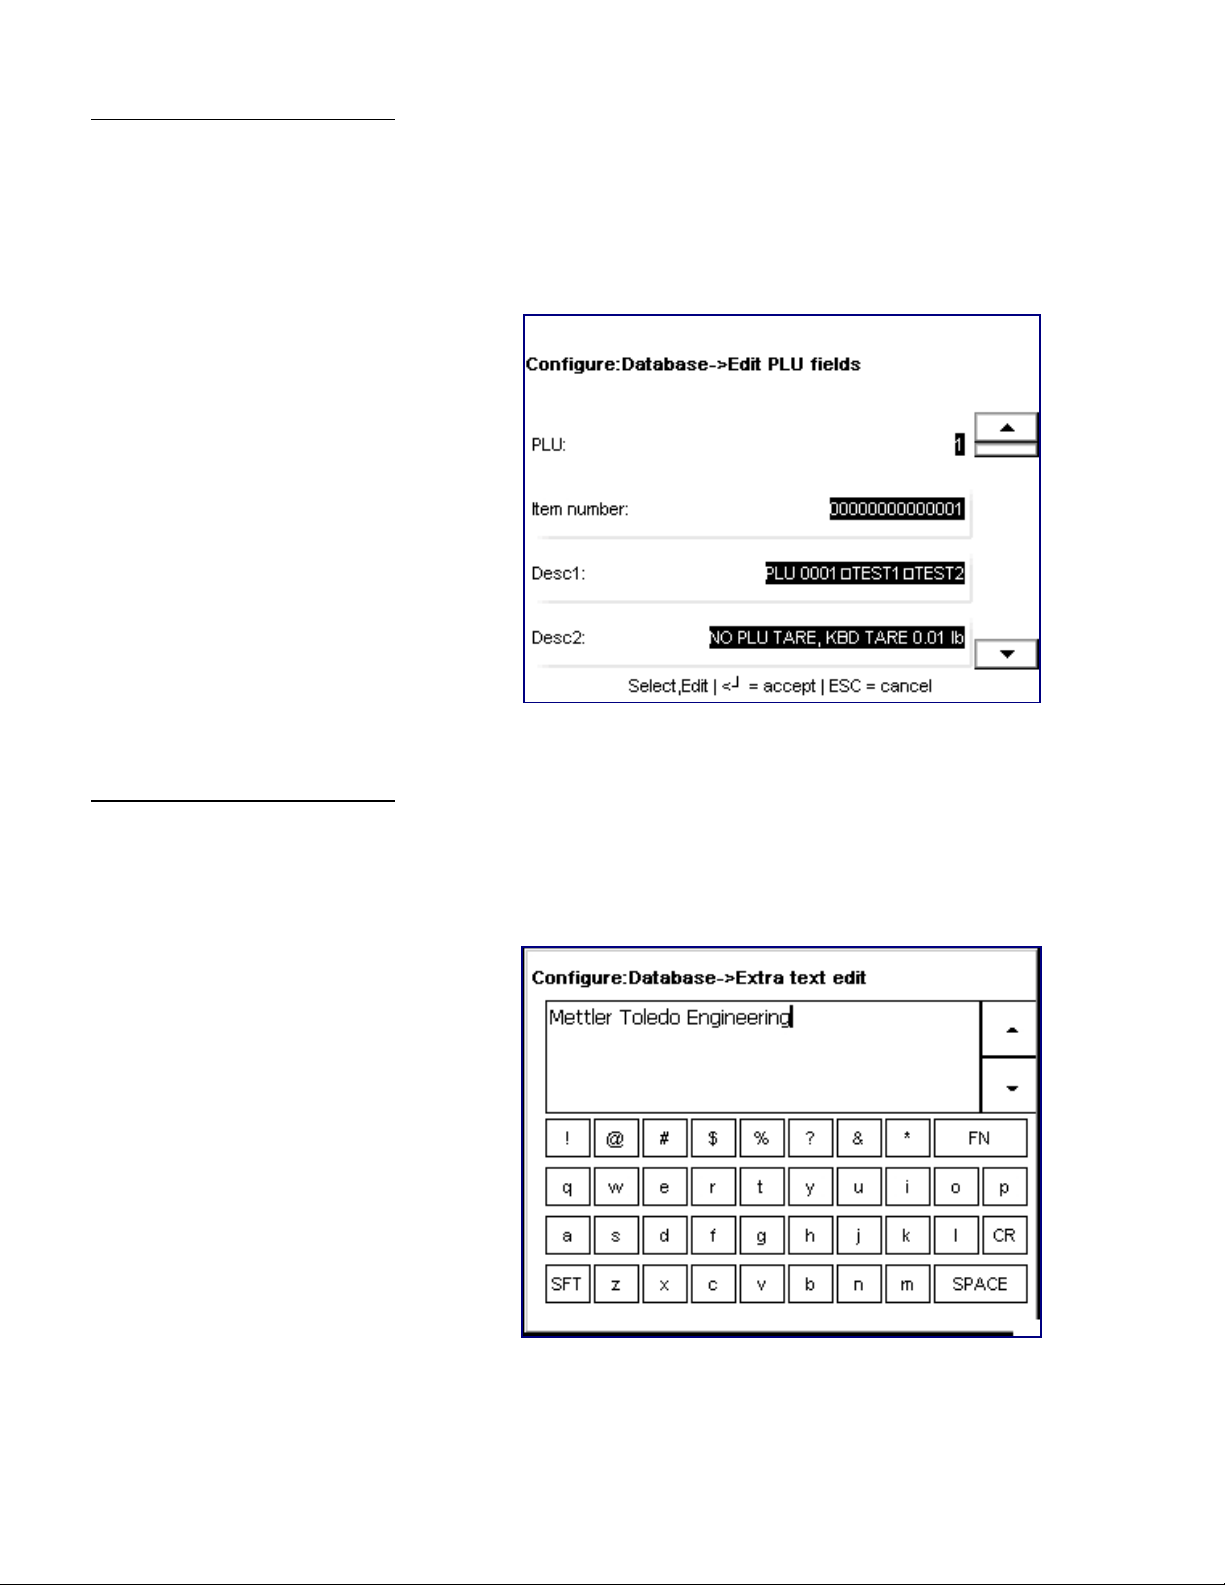
The PLUs tab is used to implement a more thorough edit of the less-common fields of a
particular PLU. The data is arranged in a scrollable list and can be modified simply by
touching the appropriate field and following the menu prompts. PLUs from any
department may be edited by choosing the desired department number at the DEPT.
NUMBER prompt.
Extra Text
Press Enter when satisfied with your changes.
The Extra Text function is rather straightforward, allowing the user to modify the
additional text displayed during a particular PLU transaction. There is a limit to the
number of characters that maybe displayed per line (selectable upon access).
Type out whatever product description you wish and hit Enter to return to the previous
screen. From there, you may further edit the text or return to the Database screen.
3-3
Page 28
METTLER TOLEDO Impact S® User's Guide
Nutrifacts
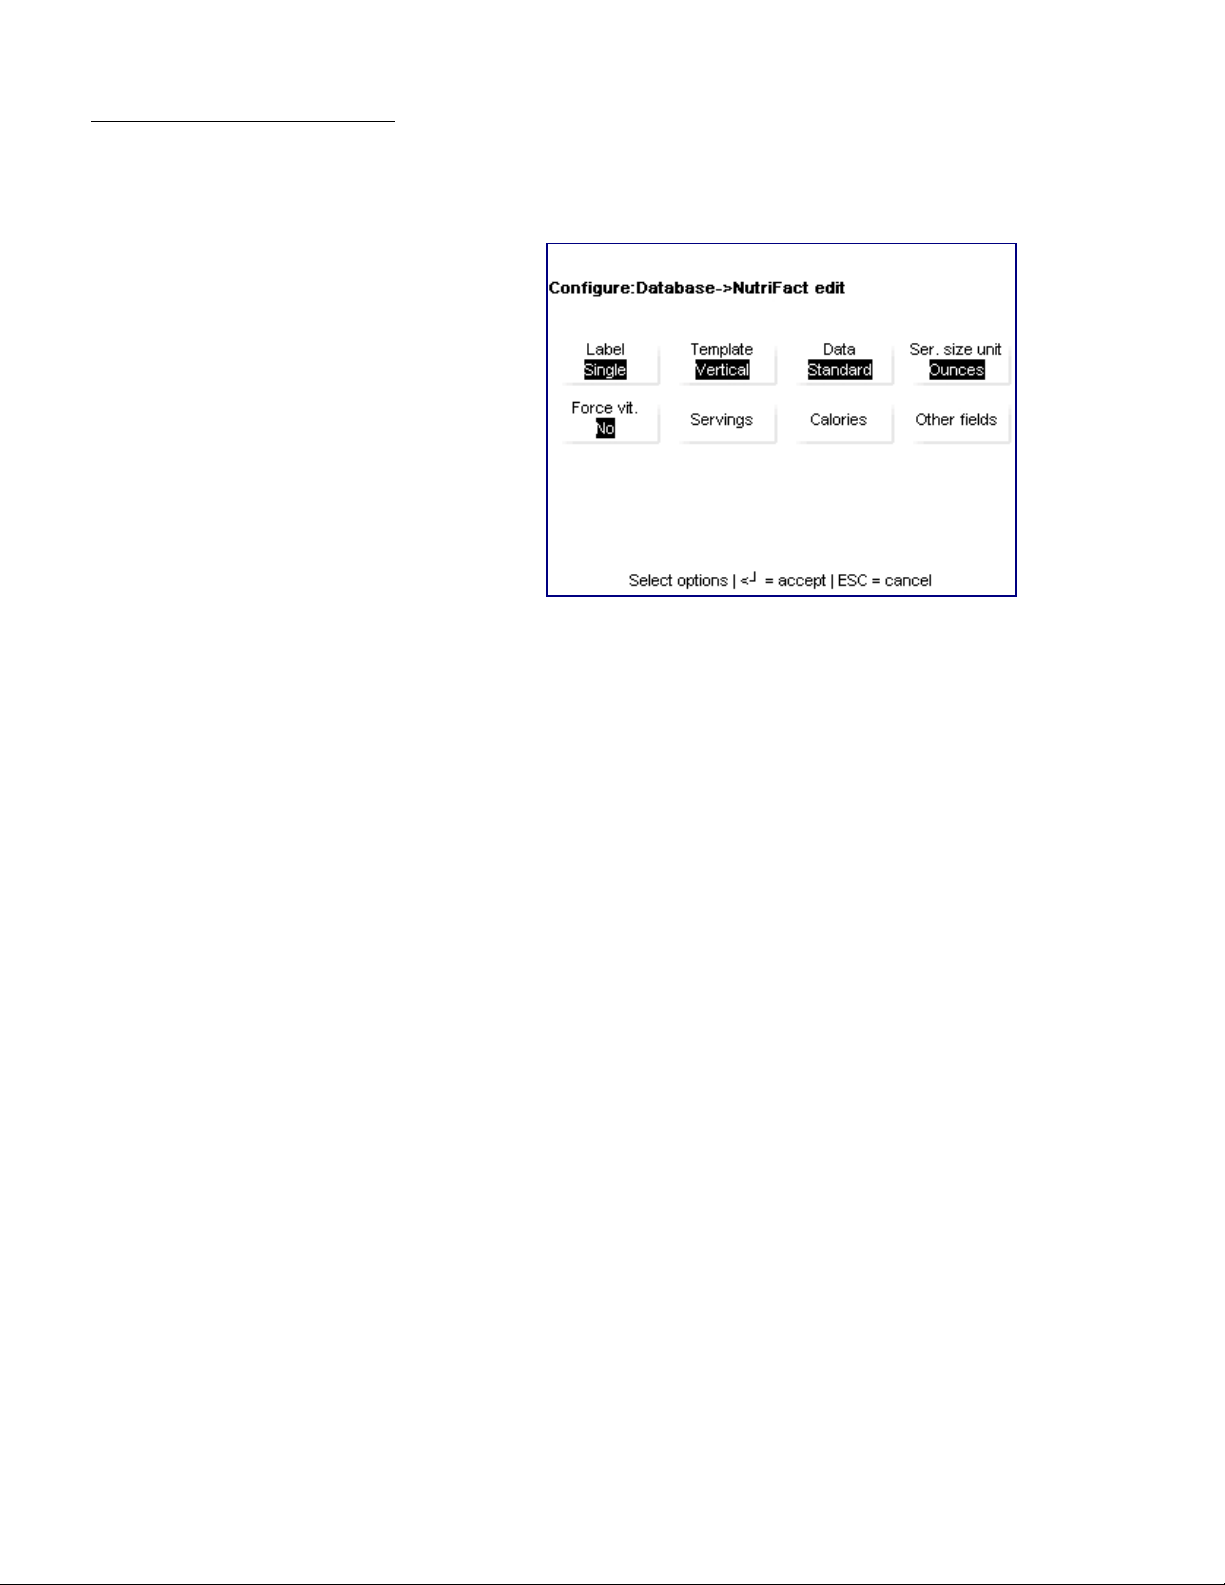
Selecting the Nutrifacts field will bring up a window that allows you to apply a Nutrifact
entry to a product by its database number.
If the number is not recognized you may select “add” on the next popup, or if you
simply wish to edit the Nutrifact entry, then you will be taken to this screen, where you
may further define your preferred data.
Label – allows the user to determine if the Nutrifact information will print on the main
label in its short-form or if it will print on a second label of its own. This menu also
allows the user to determine which of the two labels (if chosen) will be printed first.
Template – vertical, vertical simplified, tabular, tabular simplified, horizontal, etc.
These choices allow the user to orient the Nutrifacts in a particular direction so as to
make the best use of the label’s space. The simple modes only print the main box of a
Nutrifact entry, whereas the others will use all available label space to print data.
Data – this is where the user chooses between standard and simplified for the
Nutrifact information.
As always, touch the Enter key when finished making any changes.
3-4
Page 29
COOL
Chapter 3: Configuration
Database
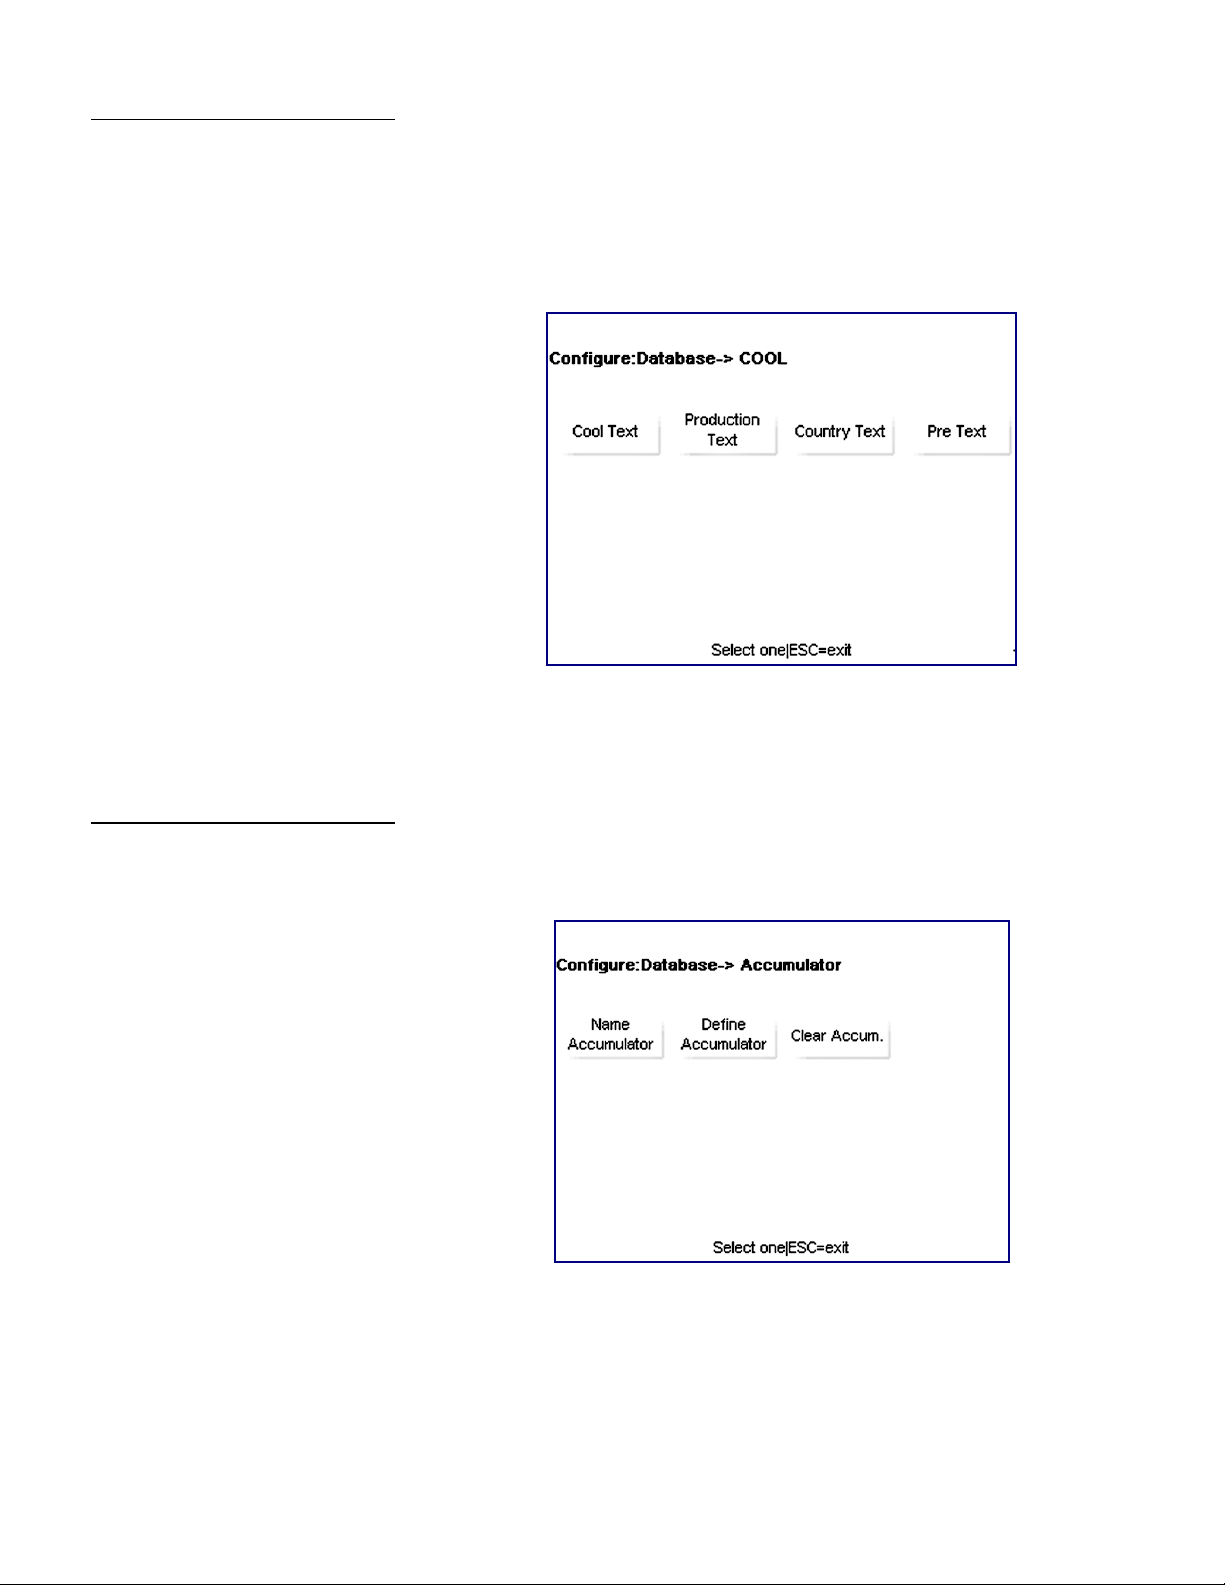
The COOL section of the Database cascade allows the user to change or apply specific
COOL parameters to a PLU. Selection of these categories prompts you for a number that
corresponds to database entries. Should you forget the number – or if there isn’t a COOL
entry for the PLU you’re using – you may also add a new COOL entry or edit an existing
one by following the menu prompts.
The buttons in this array are pretty self-explanatory, with each directing you to the COOL
sector of the same name. Type where necessary, use the database-given numbers
when you’re able and hit Enter when finished.
Accumulators
The Accumulator array allows the user to view and modify the accumulator settings.
3-5
Page 30

METTLER TOLEDO Impact S® User's Guide
Name Accumulator – this function allows you to rename the existing accumulators or
add new ones to the existing list.
Select the accumulator you would like to rename by touching the screen with the tip of
your finger. Press Enter when satisfied with your changes.
Define Accumulator – if you would like to enable or disable the existing accumulators,
this is the menu cascade to which you need refer.
3-6
Pressing the individual fields toggles the accumulators between yes and no. Set as
necessary and press Enter when finished.
Clear Accumulator – used for deleting specific PLUs and other bits of data. Follow the
menu prompts to make changes.
Page 31

Clear
Chapter 3: Configuration
Database
As the name suggests, the Clear branch of the Database menu allows for deletion of
data. Simply touch the category you’d like to clear and follow the menu prompts to
eliminate data.
Should you want to delete only select PLUs or bits of data, you will be prompted for a
number. When complete, you may press ESC to return to the Database main screen.
Reports
Pressing the Reports button at the Database screen will bring the user to this array.
Depending on which report they would like to view, simply press the corresponding
button and follow the menus (Department, hours, date, etc.) until the desired report is
reached.
Totals by Group – allows the user to view the weight and value (among other
categories) totals for all PLUs in a particular group. Simply key in the group number and
wait for the unit to scan.
Totals by Department – Same as Totals by Group but with all the PLUs in a particular
department. Key in the department number and wait for the unit to scan.
Department Voids – enables a report to be viewed containing the weight totals, value
totals and modified value totals (among others) of anything that has been voided out
on the unit.
3-7
Page 32

METTLER TOLEDO Impact S® User's Guide
Action Code Text
The Action Code Text menu allows for three different functions:
1.) Create or edit a message to the operator via the operator screen
2.) Change the store address line on the printed label
3.) Implement specific marquee action code (taken from the image database)
Insert the associated number when the pop-up appears and edit as normal.
Grade
Press Enter when finished making changes.
The Grade function allows for editing of the various, numerical grade entries in the
embedded database. Make your numerical selection in the first pop-up window and
then choose whether to change (edit) or delete (clear) that grade entry (below
screenshot).
3-8
Upon selection of the Edit command, you will be taken to a keyboard screen wherein
you may enter a string of text defining the grade selection. The Grade definition is
limited to 23 characters. Press Enter when finished.
Page 33

Group
Chapter 3: Configuration
Database
The Group function in this section allows for the groups (assigned during PLU entry
creation or modification) to be defined beyond their numerals. The user need only type
in the group number to access a keypad wherein they may name said group whatever
they wish – beef, pork, fresh fish, etc.
Press Enter when satisfied.
3-9
Page 34

METTLER TOLEDO Impact S® User's Guide
Preset
The Preset button allows the user to characterize and change how the PLUs in a
vendor’s database are arrayed and accessed. The menu allows many customizations
from creating preset pages to defining groups of PLUs
Included in this cascade are the following buttons –
Select Page – allows the user to select from the preconfigured preset pages
Edit Page Name – modify the preset page’s name
Swap Pages – used to pull pages from other preset cascades into the currently active
preset array
Delete Pages – permanently remove a preset page from the database
Program Preset – create a new preset page
Edit Preset Name – modify a preset button’s name
Swap Presets – used to pull single presets from other preset cascades into the currently
active array
Delete Preset – permanently remove a preset from the current preset array
Reaction – toggle between EDIT and PRINT
Edit Group Name – modify a group’s name
Swap Groups – used to pull PLUs from other groups into the currently selected group
Delete Group –permanently delete group information for all PLUs identified in the
selected group
3-10
Page 35

Select Page
Chapter 3: Configuration
Preset
Pressing the Select Page button will bring up the following screen –
To select a preset page, simply touch the button that describes your desire and press the
ENTER button. The user will be taken back to the main preset configuration screen.
Edit Page Name
Pressing the Select Page button will bring up the following screen –
Simply type in a new name for the preset and press ENTER when satisfied.
3-11
Page 36

METTLER TOLEDO Impact S® User's Guide
Swap Pages
Delete Pages
Program Preset
Should a user desire to do so, he may swap pages of preset information back and forth
between the established presets. They begin by pressing the button for the first of the two
presets they would like to swap. Press ENTER. Next, select a second Preset from which
to swap. Press ENTER. Confirm and the swap will be done.
The user will find the previously desired page under the name and/or heading of the
originally selected preset.
Simply put, this menu allows a user to select and permanently delete a preset page (or
pages) from the database. Simply select which page to delete, press ENTER and
confirm in the popup window.
This button takes the user to a series of screens wherein they may develop preset pages
of their own. In the following examples, I’ll use the page TESTMANUAL throughout as
the created preset title. Keep in mind that you will only be able to edit Preset groups and
buttons that correspond to the page you select in the beginning of the process.
First, select the group wherein the preset will be found. Select a blank button to represent
the new Preset page and press ENTER.
3-12
Page 37

Chapter 3: Configuration
Name the new Preset button by pressing the EDIT BUTTON NAME button and using the
popup keypad. In this case, I named the Preset TESTMANUAL.
To populate the new Preset, press the PROGRAM PRESET button and key in the
department and desired PLU numbers.
Name the new PLU –
3-13
Page 38

METTLER TOLEDO Impact S® User's Guide
And it will appear in the cascade the next time you desire to modify or otherwise edit
that menu.
Repeat this to populate the Preset until satisfied.
Edit Preset Name
Swap Preset
This button allows a user to rename a Preset page or button. Simply select the page or
PLU button to change and press ENTER. The popup keypad will display, allowing you to
key in a new name. Save the choices by pressing YES at the window prompt.
Consult this menu to change the positions of existing Preset buttons or pages. Simply
press the button or page to be moved and follow the directions at the bottom of the
screen to change its position. Be sure to press Enter before exiting to save the progress.
3-14
Page 39

Delete Preset
Reaction
Edit Group Name
Chapter 3: Configuration
As the name suggests, this button takes you to the same grid as does the Edit Preset
Name button. Here, however, you may select a button (Page or PLU) and press the C
button to delete it from the system. Be sure that the PLU or Preset Page chosen is the
one that needs to be deleted, as there is no UNDO function to cover a mistake.
This button toggles between EDIT and PRINT and controls what the unit does after the
user presses a PLU. If EDIT is selected, the unit will pause on the transaction screen so
they user may make changes to the transaction before the label prints. If PRINT is
selected, the unit will print the label straightaway.
Simply touch the group name you would like to change and key in the new name on the
popup keypad. Press ENTER when finished.
Swap Groups
Delete Groups
Swapping groups takes you to a screen that looks identical to the EDIT GROUP NAME
menu. Swapping these buttons simply changes their place in the cascade, so follow the
instructions by pressing the button to be moved and then the location to move it. It
should immediately relocate itself.
Before you leave the page, it will ask you to verify the move. Press YES to finalize.
Simply touch the group button you would like to delete and follow the verification
prompts through to the item’s deletion.
3-15
Page 40

METTLER TOLEDO Impact S® User's Guide
Quick Edits
Quick Edits is a menu cascade that allows the user to specify a PLU number to work
with before making any changes. This locks all changing information into that originally
selected PLU, so the user can modify it to be exactly what they need.
After keying in a PLU number, this screen will appear. Select the category you would like
to begin with and press the ENTER key.
Each selection will bring up either a single large window –
3-16
Page 41

Chapter 3: Configuration
Quick Edits
Or a separate cascade to select from –
Each section is meant to be the quickest method of modifying the PLU for a particular
parameter. With the use of simple touches or the right-hand keypad, adjusting
numerical data or defining field types is both simple and very, very fast.
The user may FORCE data usage for a particular PLU by selecting the field they wish
and pressing the FORCE button on the popup prompt. This will require the particular
data (GROUP, USE-BY, etc.) to be displayed whenever the PLU is accessed (see
below).
When finished with the edits, press the ENTER key and you will be taken back to the
main configuration screen.
3-17
Page 42

METTLER TOLEDO Impact S® User's Guide
Labels
The Labels menu allows a user to assign standard or custom label formats/styles to the
printed stock.
Assign Styles
Label Group –takes you to an array of keys representing available label sizes
Assign Styles – allows the user to modify the preset label formats
Print Test Label – prints a label of the selected size and style
Verify Labels – prints a sequence of labels representing a series of PLUs
This array of buttons deals specifically with the label parameters of the Impact-S unit.
Use the scroll bar to see the remainder of the below-detailed list of selection options.
3-18
ByWeight – select to assign label styles for By-Weight transactions
PrePack – select to assign label styles for PrePack transactions
ByCount – select to assign label styles for By-Count transactions
StdPack – select to assign label styles for Standard Pack transactions
Page 43

Print Test Label
Chapter 3: Configuration
Labels
Receipt – select to assign label styles and specific formatting to the printing of receipts
Verify – select label format to apply to Verify Label printings
Totals – select label format to apply to Totals Labels
NF Label Format – select label format to apply to Nutrifact Labels (done at NF
programming)
This menu is used to view labels as they are printed on label stock. The user would
benefit from this procedure should they be interested in exactly how the labels they’ve
set up will look on different label stock sizes.
Verify Labels
Simply select the label stock measurement of the current roll and press Enter.
To use the Verify Labels menu, a user simply needs to define the range of PLUs they
wish to see printed (using the first two fields) or select a department (with the third field)
before hitting the Begin Printing button. Once this process begins, it can be stopped by
pressing the ESC key on the keypad.
3-19
Page 44

METTLER TOLEDO Impact S® User's Guide
Unit Setup
Pressing the Unit Setup button will take you to this button array –
This cascade of buttons includes many of the parameters that will be integral to the
proper scale parameter setup, viewing of the screens and setup of the preferred
navigation paths.
Time and Date – select to change or format the unit’s time and date settings
Language – select to change the display and printed languages
Backup/Restore – select to backup or restore current scale data
Department – select to define or edit the department choices
Scale Settings – select to change the various base-settings of the scale
Communication – select to alter the communication settings (peripheral, Ethernet,
network and component)
Screen Calibration – select to calibrate the touchscreen and screen preferences
Set Home Screen – select to change the screen to which the unit boots
Technician – select to access the password-protected Technician cascade
3-20
Page 45

Time and Date
Chapter 3: Configuration
Unit Setup
The Time and Date menu allows you to format or set the scale’s date and time. Press
the Enter key after making any changes to apply your preferences.
Time/Date Format – select to format the unit’s time and date settings. Here you may
select parameters including adjustment for time zones and seasonal daylight savings,
as well as apply the particular date and time orders (i.e. month/day/year or 11:00pm
versus 23:00).
3-21
Page 46

METTLER TOLEDO Impact S® User's Guide
Language
Set Time/Date – select to set the time and date to match your region.
This menu enables you to toggle the display and keyboard languages between English,
French and Spanish. Simply tap the field to cycle through the choices.
Press the Enter key when finished to save your choices.
3-22
Page 47

Backup/Restore
Chapter 3: Configuration
Unit Setup
The Backup/Restore feature enables the user to save his settings to an external device
(internal, external USB flash drive, etc.) in case of corruption to the scale database. This
same menu cascade allows you to restore a previous saved image – or image fragment
– from a local or external storage device.
The Export Log feature enables you to move log files to \service\log directory for export.
Copy makes it possible to backup data from the compact flash card on an external USB
device.
Backup – allows you to choose which data you would like to back up in an a-la-carte
fashion. Simply click a category and then click to toggle the desired file groups until you
have everything you need selected. Hit Enter when finished making your selections and
press Backup (move slider to the bottom) to begin the transfer process.
The Restore function allows you to select an existing file from a storage source with
which you may repair or overwrite your current data. Simply select the file and follow the
prompts.
Copy and Export Log work in the opposite way, allowing you to select your image
pieces or log files and copy them to a particular location via a Windows-style browser
view.
3-23
Page 48

METTLER TOLEDO Impact S® User's Guide
Department
Pressing the Department button from Unit Setup will offer up a prompt in which you
must type in the department number you would like to modify. After typing in a number,
you will be asked whether you want to Edit the entry or Clear an existing entry. Make
your choice or press Cancel to exit to the Configuration Home screen.
Department Edit – Touch the fields you would like to edit and make your changes.
When complete, press the Enter key to implement your preferences.
The address of the default department is printed on the label when the format specifies.
3-24
Page 49

Scale Settings
Chapter 3: Configuration
Unit Setup
Entering the Scale Settings menu allows the user to change many of the most basic
usability and functionality settings of the unit.
Scale Mode – use to modify the settings of different keys depending on whether the
scale is in service or PrePack mode.
Operator Permissions – set permissions for a unit operator
Supervisor Permissions – set permissions for the unit supervisor
Transaction Overrides – choose which fields are editable at the transaction screen
PLU Access Parameters – defines how particular PLUs can be accessed
Barcode Settings – choose the printed barcode format from a preexisting list
COOL – activate, disable or modify the country of origin labeling for the unit
Store Logo – select a graphical logo by-number from the unit database
Screen Saver – select a series of graphic images to display as a time-out screen saver.
Scale Mode
The Scale Mode menu allows the user to specify both in which mode the scale will
operate and how the unit will deal with label-printing on a per-mode basis. Choose
between Service and Prepack modes and then set the appropriate print activities from
the corresponding menus. Press ENTER when finished.
3-25
Page 50

METTLER TOLEDO Impact S® User's Guide
Operator Permissions
The Operator Permissions menu allows items like Memory, different Total tracking,
Voids and formatting abilities to be enabled or disabled. Press the object with your
finger to toggle the fields to the right of the name.
Make your choices and press Enter.
Supervisor Permissions
Similar to the Operator Permissions menu, the Supervisor Permissions cascade
allows another supervisor (normal operators are denied access to this menu) or
technician to modify the fields and menus available to the unit supervisors. Toggle the
choices by pressing the appropriate line and press ENTER when satisfied.
Transaction Overrides
This menu allows a user to specify which fields will be modifiable within the transaction
process. Each field is set up with a YES/NO toggle that can be changed at the operator’s
whim. Press ENTER when finished making changes.
3-26
Page 51

Chapter 3: Configuration
Unit Setup
PLU Access Parameters
With this menu a user can toggle different PLU/item identification methods that may not
normally be used. Parameters such as timeouts, item number calling, merchandising
and world modes can also be enabled or disabled from this menu.
Press ENTER when finished.
Barcode Settings
This menu allows the user to select from several (total number depends on region)
barcode styles on a per-transaction-type basis. They are preprogrammed into the unit
database and, thus, a simple touch is all that’s required to change from one to another.
Using Windataback, it is also possible to create custom barcodes and import them into
the Impact S operating system for use on your networked scales.
Press ENTER when finished.
3-27
Page 52

METTLER TOLEDO Impact S® User's Guide
COOL
The COOL Options menu enables the various aspects of COOL (country of origin
labeling) for printing on labels. This is where you go to set whether or not embedded
COOL data is required or can be overridden, and if the tracking function will show up.
Touch to toggle, press Enter when satisfied with your setup.
Store Logo
Enables the user to type in the number of a store graphic already embedded in the unit
database. This necessitates knowledge of the graphic numbering, so be sure to check
them before making any changes.
Press ENTER to select.
Screen Saver
Allows the user to select the parameters that dictate when the screen saver will switch
on as well as the particular graphics that will be displayed in a slideshow-style viewing.
3-28
Page 53

Communication
Chapter 3: Configuration
Unit Setup
The Communications function allows the user freedom over many of the networking
parameters that enable the unit to network with other scales and devices.
The buttons in this array are designed for easy navigation of the discrete sections.
Simply touch and go.
Network Communications – adjust and view network settings
WiFi Communications – if the unit is equipped with a wireless transceiver, this button
takes you to its configuration menu
VPN Setup – possible addition to future software versions. Not currently implemented.
FTP – possible addition to future software versions. Not currently implemented.
Email (SMTP) – allows for the addition and editing of email contacts and messages
(not currently implemented)
Network Communications
Network Communications is a cascade that allows the user to adjust and view the
different network parameters currently implemented.
3-29
Page 54

METTLER TOLEDO Impact S® User's Guide
TCP/IP – within this cascade, the user may change the name and IP addresses of the
networked unit. This is also where you may enable or disable DHCP (the default setting
is Disabled).
Network Parameters – if you desire to change the parameters of the network’s
connectivity (like the Time Sync Server or Host Communications Port), use the
Network Parameters cascade.
3-30
Page 55

Chapter 3: Configuration
Unit Setup
Network Status – used to check the online status of other scales or devices on the
network. Press the Test Ping button with your finger, key in an IP address and press
Enter. A window will display with the results of the test.
WiFi Communications
You would use this cascade to modify the password and network settings for your unit’s
wireless controller, should it be so equipped.
The Mode and Rate fields are read-only, based on the radio option installed. Encryption
Mode toggles between standard methods as supported by the HW. Hit Enter to save
changes.
3-31
Page 56

METTLER TOLEDO Impact S® User's Guide
Wireless Network Configuration – works much the same as the broader category of
the same name, bringing up a cascade titled WEP Configuration that allows you to
adjust settings related to the unit’s selected wireless functionality. Encryption options
include none, WEP, WPA and WPA2.
Press Enter when finished making changes.
3-32
This functionality is expected to be unlocked in future versions of the system software.
Currently, there is no support for it.
Page 57

Screen Calibration
Chapter 3: Configuration
Unit Setup
It’s a good idea to calibrate the touchscreen once in a while to maintain precision in
your unit’s operation. There is a built-in timeout in case the function is accidentally
selected. When the timer counts to zero, the scale will return to the Configure main
screen.
Touch the center of the circular graphics as they appear, waiting until they shrink to a
small point and you are prompted to let them go. For added precision, you may want to
use the tip of a stylus.
When finished, you will be presented with the option of moving your finger around to
ensure realistic tracking of the on-screen pointer. Press Accept to complete calibration.
3-33
Page 58

METTLER TOLEDO Impact S® User's Guide
Set Home Screen
This menu allows the user to determine which screen will come up when the unit is first
booted. Any of the preset pages can be chosen, so long as the operator pressed Enter
after making his or her selection.
3-34
Page 59

Technician
NOTE: the Technician section
screens cannot be edited, but
are shown for review only.
Chapter 3: Configuration
Unit Setup
The password protected Technician cascade allows for various calibrations of the unit
and backup of the system data, as well as resetting of the unit.
This first window allows access to the password and user-ID input window.
This is the Technician Main screen
Load Cell Calibration – calibrate the unit’s load cell
Geo Calibration – adjust scale parameters in consideration of local gravity and time
Weight Management – adjust how weight is handled and displayed on your unit
Reset Unit – reset the various database sections to their original states
Backup/Restore – create an image of the current unit or replace the current image with
another. Able to use outside sources such as flash drives, CDs and direct networking
Price Management – specify currency, increments, separators and rounding
Service Log – view the service log
Serial Communication – view and/or adjust the specifics of unit serial communication
DB Maintenance – adjust parameters for database auto-maintenance
3-35
Page 60

METTLER TOLEDO Impact S® User's Guide
Weight Management
There are a few simple options contained within the Weight Management array. This is
where you will go to adjust the Tare limit, set particular Weight Options – such as
minimum print thresholds, weight separator symbols, price-by settings, etc. – and see
the Expanded Weight of an item, should pricing require.
Tare – This button allows you to change the weight limit of the tare function via a valueinput. Simply type in a number and press Enter when finished.
Minimum Print – Allows the user to key in a numeral denoting the minimum weight
required for the scale to print a label. 20, in the above example, stands for 0.20 lbs.
Weight Separator – Choose between “dot” and “comma” for the separation of large
integers.
Weight Options – This cascade includes options for specific pricing and weight
commands such as Price-By quarter/half pound, Pounds for, 100g and kg modes.
They are toggled as any other touchscreen menu bar, so simply tap lightly to cycle
through YES and NO until you have the configuration you desire.
3-36
Touch Enter when finished.
Page 61

Chapter 3: Configuration
Unit Setup
Expanded Weight – for anything that requires a very-specific weight measurement, this
button allows four-decimal places to be displayed. This is not a legal for trade display.
The unit will revert back to the legal display when this screen is exited.
Reset Unit
This menu is used to reset the various databases within the Impact-S unit.
Simply touch the database you would like to return to its original configuration and
follow the popup instructions (press OK or Cancel). Be mindful of the fact that this reset
cannot be reversed. It is suggested that the unit administrator makes a copy of the
current unit image before any of the databases are modified.
3-37
Page 62

METTLER TOLEDO Impact S® User's Guide
Price Management
This screen allows the user to adjust parameters such as the currency and how it is
displayed. Touching the individual areas will toggle the values or bring up a brick of
selectable options the user may choose from. The Rounding command allows the user
to adjust at what digit the unit will round a value.
Service Log
The Service Log button takes the user to a screen that, appropriately, displays the
entirety of the unit’s service log (as updated by the Technicians). Press ESC when
finished viewing.
3-38
Page 63

Printer Setup
Chapter 3: Configuration
Printer Setup
The Printer Setup menu is accessed from the main configuration screen and looks like
this –
This array of buttons deals specifically with the label parameters and printer sensor
calibration of the Impact S unit.
Label Group – press to select from a list of available label sizes
Print Speed – press to select from a list of print speeds
Calibrate Gap Sensor – press button to calibrate sensor. Multiple labels will print
Calibrate Take Label Sensor – press button to calibrate sensor. Multiple labels will
print
Label Delivery – toggle between “Stripped” and “Unstripped”
Graphic Format – this selection is for continuous label stock, toggle.
Auto Size – toggle between “Enabled” and “Disabled”. Enabling auto size matches a
label group to the current label stock after the unit measures it upon printing.
Label taken – toggle between “Enabled” and “Disabled”
Label Length – select to type in specific label lengths. Measure Label will override.
Gap length – select to type in specific gap lengths. Calibrate Gap Sensor will override.
Image Offset – select to type in specific offset to start label from top
Eject Length – select to type in specific eject length of label when complete
Measure Label – press to have the unit measure the existing label stock. Multiple labels
will print
Press Enter to accept changes to any fields.
3-39
Page 64

METTLER TOLEDO Impact S® User's Guide
Label Group
Selecting Label Group takes you to an array of keys representing available labels. Make
your choice by touching the desired field and press Enter to accept.
Print Speed
The Print Speed menu represents the possible speeds at which the unit can produce
labels. Make your selection and touch Enter to accept.
3-40
Page 65

Calibrate Gap Sensor, Calibrate Label Taken & Measure Label
Type, Graphic format, Auto Size & Label Taken
Chapter 3: Configuration
Printer Setup
These three functions are similar in that they discharge labels from the printer in order to
calibrate various printing parameters. Any time you change the label size or style, be sure to
calibrate both sensors and allow the photoeyes to measure the label stock by hitting the
appropriate keys.
The labels will likely collect on the lip of the printer discharge slot, making for easy removal
and disposal.
These four buttons are touch-toggled by the user to select between two choices each:
Type – changes between [stripped] and [unstripped] label delivery
Graphic Format – allows for flexibility in the printing of graphics on a per-label basis via
modification of the continuous label stock toggle.
Label Length, Gap Length, Image Offset & Eject Length
Auto Size – enables the auto setup of the “Label Size” selection after a label is measured
Label Taken – enables or disables the label taken sensor. Important for batch-processing of
labels.
It is necessary that the user press Enter when finished making changes to these toggles, else
his preferences will default to the unit standard.
These four parameters are directly user-editable. This cascade is used mainly to adjust the
printer for labels that fall beyond the parameters of normal label stock. The Image Offset
adjustment may need to be used to better print graphics or large amounts of text on normal
labels as well.
Label Length – allows the user to make dimensional provisions for labels that are not
categorized in the Label Size menu. Auto-updated or overwritten by Measure Label.
Gap length – specifies the gap, in millimeters, between two labels.
Image Offset – allows the user to fine-tune the start of the label text and graphics on the label
stock.
Eject Length – alongside label and gap length measurements, Eject Length tells the printer
how far to feed the stock so stripped labels are easily retrieved from the exit without falling to
the floor. Also insures all printed material is shown after tear-off of continuous.
Make sure to press the Enter key when finished making your selections.
3-41
Page 66

METTLER TOLEDO Impact S® User's Guide
Security
The Impact-S has various integrated security protocols that can be quickly modified by a
user with the proper clearances. Through the use of the Security cascade, new users
with different permissions may be added to the system.
The user will be presented with a login prompt to enter the menu.
It is STRONGLY recommended that the password and user ID be changed by the
technician servicing this scale. Contact your local Mettler Toledo service organization if
you would like to set up on-scale security features.
Most of the functionality of the Security menu exists within the first of the two buttons.
After making any changes, remember to press the Enter key to save.
Users – visit this button to add or edit the specifics of various user profiles. There are
four levels of user than can be defined:
1.) Operator – has access to transaction screens only. No permission to access
setup menu when security is enabled
2.) Supervisor – has access to transactions and item database setup menus.
No permission to access weights and measures significant parameters.
3.) Manager – has access to all supervisor-class screens/menus as well as
scale setup menus.
4.) Technician – has access to all screens, including full setup and calibration
menus.
Security – this field is a toggle that switches between “Enabled” and “Disabled” for the
scale. Only Managers and Technicians can change this state.
Users may take advantage of/edit/create at any level of the system that is equal to or
lower than their own. For example, a Technician can modify anything a Manager,
Supervisor or normal Operator can, but a Supervisor may only modify his own set of
screens and any of the Operator screens.
3-42
Page 67

Users
Chapter 3: Configuration
Security
The information made accessible by pressing the Users button constitutes more than
95% of the Security cascade, so familiarizing yourself with it is suggested. The basic
layout looks like this:
The pop-up menu is rather self-explanatory, with the Add, Modify and Delete functions
operating exactly as you’d expect them to. If you need to input a new employee or
scale-user into the system, press the Add button to bring up the following menu –
Once here, you will need to input an ID number, a user name and a password number.
These should be unique fields so as not to confuse anyone. Finally, you will select the
access level – operator, technician or supervisor – and hit Enter when finished.
1.) Operators have no access to setup menus (no password required, obviously)
2.) Supervisors cannot create/edit a technician’s permissions – just other supervisors and
operators. Password protected (passwords must be between 2 and 9 characters long)
3.) Managers can create/edit permissions for all but Technicians. Password protected.
4.) Technicians can alter anyone’s permissions. Password protected.
Security
The Security button is a simple toggle that activates and deactivates the security
parameters set in the Users cascade. To allow full access by all users, toggle this field
to Disabled.
3-43
Page 68

METTLER TOLEDO Impact S® User's Guide
System Status
The System Status menu is particularly useful for determining version information,
setting the comprehensiveness of the Log function and viewing the existing logged data.
System Information – brings up a list of current system versions and addresses
System Information
View Log – array gives user access to the various log lists
Log Level – allows user to choose between “Low,” “Mid” and “High” in regards to how
comprehensive the log function is
The System Information window is a read-only screen that displays various versions
and addresses for the unit.
3-44
As the screenshot shows, things like PLU, ET and NF record quantity are stored here
alongside user-editable (within other menus) content such as scale names and IP
addresses.
Page 69

Log View
Chapter 3: Configuration
System Status
This section allows the viewing of logged data. Touch your selection – Event or Error –
edit the filter parameters and press Display Log.
View Event Log – this menu displays a comprehensive list of the actions taken to
modify the parameters of the scale. Everything from on-and-off times to when specific
PLU display modes were modified can be listed here, assuming you have the Log Level
set high enough. This scrollable list can be limited by date or specific event type.
View Error Log – this menu displays any and all errors that have occurred within the
timeframe you choose.
3-45
Page 70

METTLER TOLEDO Impact S® User's Guide
Calibration and Configuration Counter – these read-only fields represent the following:
Log Level
Calibration Counter
– represents the number of times the load cell has been
calibrated.
Configuration Counter
– tallies the number of times a weights and measures
parameter edit has been performed by a technician. The number of edits
performed at any one time does not matter – an edit performed under any
single technician menu area is considered a single edit.
The Log Level cascade allows the user to select how comprehensive the log function is.
Simply touch a particular level and hit the Enter key.
3-46
Page 71

Marquee
Chapter 3: Configuration
Marquee
The Marquee functionality of the Impact-S is as user-friendly as the rest of the interface,
allowing for quick and precise alteration of the messages you and your customers see.
Setup – edit which graphics will appear in the marquee as well as their order
Setup and Import Image
Display Time (sec) – set the duration, in seconds, for which the marquee images will
display before changing
Import Image – import a new graphic from an outside source
The Setup and Import Image screens allow the user virtually unlimited flexibility in the
construction of graphical marquee functions.
Setup requires the user to select which files he or she would like scrolled through and
also the order in which they will appear on the customer display.
3-47
Page 72

METTLER TOLEDO Impact S® User's Guide
The Import Image menu allows for new graphics and images to be added to the
Impact-S’s database.
Imported images MUST MEET the following requirements to properly display on the
Impact S customer display screen:
1.) .BMP file format. It helps to open and re-save these in Microsoft Paint before
importing them, as many other programs use compression algorithms that are not
properly decoded by the Impact S software
2.) Black and white. The files must be converted to grayscale/black and white or they
will not display properly.
3.) Dimensions of 240 pixels wide by 189 pixels high.
3-48
Page 73

4 Labels
Loading Labels
The following section details the process of loading labels into the Impact S® thermal
printer.
Open the printer door by pressing down on the release tab.
NOTE: A label loading
diagram can be found
on the printer for quick
reference.
NOTE: when changing
a label roll, always
look for any buildup.
See Chapter 5 for
details in cleaning.
Pull the printer out using the green pull-tab on the printer.
Chapter 4: Labels
Loading Labels
Unlock and raise the printhead by pulling up on the latch.
4-1
Page 74

METTLER TOLEDO Impact S® User's Guide
Install the label roll on the supply spool and remove about 6 inches of labels from the
liner. Slide the labels under the guides and printhead as shown in the illustration.
Pull the liner back and route it under the bottom guide.
NOTE: The green knob does not
come all the way out! Do not
use excessive force to pull out
on the green knob! Using
excessive force to push the knob
in can result in broken locking
tabs on the green knob.
NOTE: Always remove all
spent liner from the take-up
roller before installing a new
roll and pushing the knob
back in. Manually rotate takeup roll to tighten liner.
Gently push in on the green knob to lock the liner into place, and then turn the roller
clockwise to take up some of the slack in the liner.
4-2
Page 75

Chapter 4: Labels
Loading Labels
Press down on the printhead latch until it locks down.
When the printer is properly installed with labels, as below, Push the printer back in and
close the door.
4-3
Page 76

METTLER TOLEDO Impact S® User's Guide
Label Requirements
Label Paper
The purpose of this section is to specify the requirements of thermal labels to be used in
Mettler Toledo retail scale and pre-pack thermal printers.
This document includes dimensional requirements for labels and label rolls, as well as
general requirements for label paper, thermal coatings, preprinting inks and adhesives.
Use of label materials and designs which meet with these requirements is necessary to
ensure operation of the printers in compliance with their respective functional specifications
and satisfactory performance of the label in the end-use environment. Labels which do not
comply with all of the requirements of this document may function with limitations, but
would need to be tested by the customer to insure adequate performance in their
application. Customer specified (COD) software is not covered under this specification.
DESCRIPTION, PRICE LABEL: Premium white color, black imaging, with protective
coating
DESCRIPTION, DAY-GLO LABEL: Red orange fluorescent, black imaging, with protective
coating
WEIGHT: 72 ± 7 grams/square meter
THICKNESS: 82 ± 14 μ meter (0.0032 inch)
ACTIVATION TEMPERATURE
• STANDARD: Initial 74°C (165°F); Optimum 83°C (181°F)
• HIGH SPEED: Initial 66°C (151°F); Optimum 77°C (170°F) – for highest
speed printing
• HOT BOX: Initial 83°C (181°F); Optimum 91°C (195°F) - for use on food
items which are kept warm
SURFACE SMOOTHNESS: The surface of the finished coated paper must be smooth to
prevent premature printhead failure. Smoothness must be 40 Sheffield units or
smoother.
ION CONTENT: Ions such as sodium (Na) and chlorine (Cl) can cause premature failure
of the glass overcoat of a thermal printhead. Paper manufactured specifically for thermal
printing with low ion content must be used.
STORAGE LIFE: 18 months minimum when stored at less than 85% relative humidity
and less than 35°C (95°F).
ADHESIVE
Permanent pressure sensitive – Nominal thickness 10 μ meter (0.0004 inch)
4-4
Label must adhere to product with a surface temperature of -15° C (5° F) minimum.
Bond strength must remain permanent over a temperature range of 2°C to 35°C (35°F
to 95° F).
Page 77

Chapter 4: Labels
Label Requirements
RELEASE LINER
DESCRIPTION: White semi-bleached supercalendered Kraft paper with silicone release
coating
BASIS WEIGHT: 68 ± 3 gram/square meter
THICKNESS: 67 ± 7 μ METER (0.0026 INCH)
TOTAL THICKNESS LABEL + ADHESIVE + LINER
159 ± 17 μ METER (0.0056 to 0.0069 inch)
LIGHT TRANSMISSION FOR GAP SENSOR OPERATION:
(SEE OPTICAL DENSITY DEFINITION)
Light transmission at a wavelength of 800 to 900 NM through the liner ONLY must be
at least three times the transmission through the liner and label together. This means
that the transmission optical density of the liner must be at least 0.48 less than the that
of the liner and label together
Light transmission at 800 to 900 NM wave length through the liner and label together
must be at least 2% of incident light. This corresponds to an optical density of 1.7.
Label Stripping
Finished Label Roll Requirements
Labels must strip from the liner over a temperature range of 2°C (26°F) at 50% RH to
43°C (110°F) at 85% RH.
CORE AND METHOD OF LABEL ATTACHMENT
The label stock must not be permanently attached to the cardboard core. The liner must
separate cleanly from the core with 1.0 pound pull tangent to the core as shown in Figure
1. No core material, tape, or adhesive is to remain on the label or liner after separation.
Material, especially hot-melt adhesive, remaining on the label can damage the printhead.
4-5
Page 78

METTLER TOLEDO Impact S® User's Guide
DIE CUTTING
Die cutting of the labels must not perforate the release liner.
FIGURE 2
SLITTING
The release liner must be slit cleanly and be made free of edge slivers and dust by
vacuuming or some equally effective process.
WINDING
The labels must be wound face out as shown in Figure 2. The finished roll must be made
free of paper dust and loose particles by vacuuming or some equally effective process.
LABEL CURL
Stripped labels must not curl more than 0.20 inch as specified in the figure below.
NOTE: Dimensions in
inches with millimeters
shown in ( ).
SPLICING
Each roll may contain one splice on non-label side of liner using 0.002 inch maximum
thickness tape as shown below.
4-6
Page 79

Finished Label and Roll Dimensional Requirements
C
Chapter 4: Labels
Label Requirements
A
D
A B
Item Description Range
A Liner Width
B Roll Diameter Max 6.0 152
Core Inside
C
D Label Width
E Gap Width Min/Max
F Label Length
G
H
Diameter
Effective Print
Width
Left side
Offset
Inches MM
Max 3.346 85
Min 1.575 40
Min 1.56 40
Max 2.635 66.9
Min 2.615 66.4
0.125 +/- .01
Max 7.0 177.8
Min 0.9 23
Min 2.835 72
Min 0.157 4
Impact S
3"
inches
E
F
H
G
4-7
Page 80

METTLER TOLEDO Impact S® User's Guide
6.0 [155]
Typical Dimensions – 3” Label Roll
max
0.9 min [23]
12 max [300]
0.9 min [23]
12 max [300]
1.575 min [40]
3.15 max [80]
Note: Dimensions in
inches with millimeters
shown in [ ].
4-8
Page 81

Preprinted Labels
Chapter 4: Labels
Preprinted Labels
To ensure trouble free operation of the printer gap sensor, and to achieve normal print
head life, no pre printing should be placed on the label in the gap sensor path or in
areas which will be printed by the scale printer. See Figure 7. However, since
preprinting is commonly used by many customers the following guidelines must be
followed.
1. Inks used for preprinting must be specially formulated for use in thermal printers. If
proper inks are not used they can adhere to the print head. This ink build up on the
print head will interfere with heat transfer from the print head to the paper and cause
printing elements to burn out. Another problem with inks not formulated for thermal
printing is that they can contain chemicals which will cause the glass overcoat to chip
off of the print head, causing failure to print in the chipped areas.
2. If black ink is used in preprinting in the gap sensor path shown in Figure 7, a dense
black stripe will have to be printed on the back of the liner, as shown in Figure 8, to
prevent the gap sensor from being affected by the black preprinting. (Colors other than
black might also be a problem and should be tested by the customer) The black stripe
must have gaps which correspond to the label gaps. The black stripe on the liner must
have a minimum transmission optical density of 2.3 and must be uniform. (see optical
density – page 8) In addition, the gap sensor circuit will need to be adjusted for
operation with the black stripe as explained in the product service manual. This
adjustment will need to be checked any time label paper is changed, for example when
labels are procured from a new supplier.
3. If an optical density of at least 2.3 cannot be achieved in the black stripe on the
back of the liner, the liner width should be increased (as shown in Figure 9) so that the
preprinted label is not in the gap sensor path. For the Impact S, the sensor path in the
center of the label must be free of black preprinting.
No Dark Preprinting in
this area
FIGURE 9
4-9
Page 82

METTLER TOLEDO Impact S® User's Guide
Special Shaped Labels
Some examples of oddly-shaped labels
that will require the black stripe for
optical measure.
Labels with shapes other than rectangular will cause gap detection errors if the gap
dimension (in the gap sensor path) is outside the limits given in this document, or if the
edge of the label shape crosses into and out of the sensor path as shown below. For
these cases the black stripe will have to be printed on the back of the liner as shown
previously. Tests will be needed to determine if the stripe will be adequate or if
additional liner width will be required. The safe approach is to use the black stripe
configuration shown previously on all odd shaped labels.
Optical Densities
Definition of Transmission of Optical Density
Transmission optical density is defined as:
Optical Density = log
transmission)
Transmission optical density can be measured with a transmission densitometer that
meets ANSI standards. Examples are the Macbeth model TD903 and TD932.
Optical density for 100% light transmission = log
Optical density for 0.1% light transmission = log
(incident light / transmitted light) = log10 (100 / % light
10
(100/100) = log10 (1) = 0
10
(100/0.1) = log10 (1000) =3
10
4-10
Page 83

Chapter 4: Labels
Optical Densities
Label and Liner Optical Density
If liner paper transmits 2% of the light which is incident on it, the optical density is log10
(100/2) = 1.7
If the light transmitted through the liner is 3 times the light transmitted through the liner
and label, the relative optical densities are:
Black Stripe Optical Density
Optical Density of Liner + Label = log
Optical Density of Liner Only = log
= log
= log
= log
(100 / X)
10
(100 / 3X)
10
(0.3333X)
10
0.3333 + log10 (X)
10
(X) – 0.48
10
Therefore, if the liner must transmit 3 times the light that the liner and label transmits,
the transmission optical density of the liner must be 0.48 less than the transmission
optical density of the liner and label.
If only 0.5 % of incident light is transmitted through the black stripe, the optical density
is:
log
(100 / 0.5) = log10 (200) = 2.3
10
The purpose of specifying a transmission optical density of at least 2.3 for the printed
black stripe on the back of the label is to minimize any variation in light transmission as
a result of black pre-printing on the front of the label. This variation due to black
preprinting can cause the gap sensor to give gap detection errors.
4-11
Page 84

METTLER TOLEDO Impact S® User's Guide
For your notes
4-12
Page 85

5 Maintenance
Unit Cleaning
Disconnect all power to this unit before installing,
servicing, cleaning, or removing the fuse. Failure to do so
could result in bodily harm and/or property damage. Do not
spray or wash down. Hazard of electrical shock or burn.
• Open the printer door by pressing down on the release tab.
• Disconnect Power
• Do not use solvents or commercial cleaners on the unit. They may harm the surfaces
or damage the touchscreen.
• Do not spray directly on or at the unit!
Chapter 5: Maintenance
Unit Cleaning
WARNING
• Touchscreen and Customer Displays - Only use a soft clean cloth dampened with
mild detergent and water to clean the Touchscreens and Customer display screen. Do
not scrape with sharp objects.
• Covers and Platter – Clean using a soft clean cloth dampened with a mild cleaner or
detergent and water.
5-1
Page 86

METTLER TOLEDO Impact S® User's Guide
Printer Cleaning
Clean the printhead anytime you notice the print quality has degraded.
Slide the printer out, lift the printhead, and clean the printhead where it contacts the
labels on the bottom using the cleaning pen or alcohol and a cotton swab to remove
any label debris or glue.
WARNING
Do not use any metal or sharp object to scrape the printhead. This may
cause serious damage.
Lift the latch to release and raise the printhead
Use the Cleaning Pen to clean any glue or debris from the black stripe area of the
printhead. A cotton swab and alcohol may also be used in place of the cleaning pen.
5-2
Page 87

Chapter 5: Maintenance
Printer Cleaning
When doing regular maintenance, or when changing a label roll, check for any buildup
on the Printer Roller (located under the tear strip).
When the printer is pulled out and before the new label roll is installed, rotate the labels.
And then use the Cleaning Pen to get rid of excess buildup.
If dirt and dust have gotten built up on the rubber portion of the printer roller, it also can
be cleaned with alcohol and a cotton swab.
Again use the Stage Label button to rotate the roller and wipe the Roller with an alcoholmoistened cotton swab. Rotate the roller again and repeat the above procedure until the
roller is clean.
WARNING
FOR SAFETY: Do NOT touch Rollers with your fingers while
the Rollers are in motion.
5-3
Page 88

METTLER TOLEDO Impact S® User's Guide
For your notes
5-4
Page 89

6 Appendix
Geo Index
The scale controller can compensate for variations caused by gravitational forces. The
geo index for the location where the scale is calibrated is programmed into the scale
controller at the factory. When the scale is moved to a new location, the geo index for
the new location should be entered in scale setup. Use the following table to determine
the geo index for a location.
Chapter 6: Appendix
Geo Index
Northern
and Southern
latitude in
degrees and
minutes
0° 0′ —5° 46′
5° 46′ — 9° 52′
9° 52′ — 12° 44′
12° 44′ — 15° 6′
15° 6′ — 17° 10′
17° 10′ — 19° 2′
19° 2′ — 20° 45′
20° 45′ — 22° 22′
22° 22′ — 23° 54′
23° 54′ — 25° 21′
25° 21′ — 26° 45′
26° 45′ — 28° 6′
28° 6′ — 29° 25′
29° 25′ — 30° 41′
30° 41′ — 31° 56′
31° 56′ — 33° 9′
33° 9′ — 34° 21′
34° 21′ — 35° 31′
35° 31′ — 36° 41′
36° 41′ — 37° 50′
37° 50′ — 38° 58′
38° 58′ — 40° 5′
40° 5′ — 41° 12′
41° 12′ — 42° 19′
42° 19′ — 43° 26′
43° 26′ — 44° 32′
44° 32′ — 45° 38′
45° 38′ — 46° 45′
46° 45′ — 47° 51′
47° 51′ — 48° 58′
48° 58′ — 50° 6′
Height above sea level in meters
0
325
325
650
650
975
975
1300
1300
1625
1625
1950
1950
2275
2275
2600
2600
2925
2925
3250
3250
3575
Height above sea level in feet
0
1060
1060
2130
5 4 4 3 3 2 2 1 1 0 0
5 5 4 4 3 3 2 2 1 1 0
6 5 5 4 4 3 3 2 2 1 1
6 6 5 5 4 4 3 3 2 2 1
7 6 6 5 5 4 4 3 3 2 2
7 7 6 6 5 5 4 4 3 3 2
8 7 7 6 6 5 5 4 4 3 3
8 8 7 7 6 6 5 5 4 4 3
9 8 8 7 7 6 6 5 5 4 3
9 9 8 8 7 7 6 6 5 5 4
10 9 9 8 8 7 7 6 6 5 5
10 10 9 9 8 8 7 7 6 6 5
11 10 10 9 9 8 8 7 7 6 6
11 11 10 10 9 9 8 8 7 7 6
12 11 11 10 10 9 9 8 8 7 7
12 12 11 11 10 10 9 9 8 8 7
13 12 12 11 11 10 10 9 9 8 8
13 13 12 12 11 11 10 10 9 9 8
14 13 13 12 12 11 11 10 10 9 9
14 14 13 13 12 12 11 11 10 10 9
15 14 14 13 13 12 12 11 11 10 10
15 15 14 14 13 13 12 12 11 11 10
16 15 15 14 14 13 13 12 12 11 11
16 16 15 15 14 14 13 13 12 12 11
17 16 16 15 15 14 14 13 13 12 12
17 17 16 16 15 15 14 14 13 13 12
18 17 17 16 16 15 15 14 14 13 13
18 18 17 17 16 16 15 15 14 14 13
19 18 18 17 17 16 16 15 15 14 14
19 19 18 18 17 17 16 16 15 15 14
20 19 19 18 18 17 17 16 16 15 15
2130
3200
3200
4260
4260
5330
5330
6400
6400
7460
7460
8530
8530
9600
9600
10660
10660
11730
6-1
Page 90

METTLER TOLEDO Impact S® User's Guide
0
Northern
and Southern latitude
in degrees and
minutes
1060
50° 6′ — 51° 13′
51° 13′ — 52° 22′
52° 22′ — 53° 31′
53° 31′ — 54° 41′
54° 41′ — 55° 52′
55° 52′ — 57° 4′
57° 4′ — 58° 17′
58° 17′ — 59° 32′
59° 32′ — 60° 49′
60° 49′ — 62° 9′
62° 9′ — 63° 30′
63° 30′ — 64° 55′
64° 55′ — 66° 24′
66° 24′ — 67° 57′
67° 57′ — 69° 35′
69° 35′ — 71° 21′
71° 21′ — 73° 16′
73° 16′ — 75° 24′
75° 24′ — 77° 52′
77° 52′ — 80° 56′
80° 56′ — 85° 45′
85° 45′ — 90° 00′
325
325
650
0
1060
2130
20 20 19 19 18 18 17 17 16 16 15
21 20 20 19 19 18 18 17 17 16 16
21 21 20 20 19 19 18 18 17 17 16
22 21 21 20 20 19 19 18 18 17 17
22 22 21 21 20 20 19 19 18 18 17
23 22 22 21 21 20 20 19 19 18 18
23 23 22 22 21 21 20 20 19 19 18
24 23 23 22 22 21 21 20 20 19 19
24 24 23 23 22 22 21 21 20 20 19
25 24 24 23 23 22 22 21 21 20 20
25 25 24 24 23 23 22 22 21 21 20
26 25 25 24 24 23 23 22 22 21 21
26 26 25 25 24 24 23 23 22 22 21
27 26 26 25 25 24 24 23 23 22 22
27 27 26 26 25 25 24 24 23 23 22
28 27 27 26 26 25 25 24 24 23 23
28 28 27 27 26 26 25 25 24 24 23
29 28 28 27 27 26 26 25 25 24 24
29 29 28 28 27 27 26 26 25 25 24
30 29 29 28 28 27 27 26 26 25 25
30 30 29 29 28 28 27 27 26 26 25
31 30 30 29 29 28 28 27 27 26 26
650
975
2130
3200
975
1300
3200
4260
Height above sea level in meters
1300
1625
4260
5330
1625
1950
Height above sea level in feet
5330
6400
1950
2275
6400
7460
2275
2600
7460
8530
2600
2925
8530
9600
2925
3250
9600
10660
3250
3575
10660
11730
6-2
Page 91

Country Currency Defaults
Country Symbol Total $ Format Cent Separator Cent Separator
Argentina $ 5.2 , comma
Belize BZ$ 5.2 . period
Bolivia $b 5.2 , comma
Brazil R$ 5.2 . period
Canada English $ 5.2 . period
Canada French $ 5.2 , comma
Caribbean $ 5.2 . period
Chile $ 5.2 , comma
Colombia $ 5.2 , comma
Costa Rica
Dominican Republic RD$ 5.2 . period
Ecuador $ 5.2 , comma
El Salvador $ 5.2 . period
Guatemala Q 5.2 . period
Honduras L. 5.2 . period
Jamaica J$ 5.2 . period
Mexico $ 5.2 . period
Nicaragua C$ 5.2 . period
Panama B/. 5.2 . period
Paraguay Gs 5.2 , comma
Peru S/. 5.2 . period
Puerto Rico $ 5.2 . period
Trinidad & Tobago TT$ 5.2 . period
Uruguay $U 5.2 , comma
US Virgin Islands $ 5.2 . period
USA $ 5.2 . period
Venezuela Bs 5.2 , comma
Chapter 6: Appendix
Country Currency Defaults
₡
5.2 , comma
6-3
Page 92

METTLER TOLEDO Impact S® User's Guide
Country Time Defaults
Country Default Time Time Format
Default Display
Date
Default Print
Date
Argentina 24 hr hh:mm:ss DD/MM/YY DD/MM/YYYY
Belize 12 hr hh:mm:ss DD/MM/YY DD/MM/YYYY
Bolivia 12 hr hh:mm:ss DD/MM/YY DD/MM/YYYY
Brazil 12 hr hh:mm:ss DD/MM/YY DD/MM/YYYY
Canada English 24 hr hh:mm:ss DD/MM/YY DD/MM/YYYY
Canada French 24 hr hh:mm:ss YY/MM/DD YYYY/MM/DD
Caribbean 12 hr hh:mm:ss MM/DD/YY MM/DD/YYYY
Chile 24 hr hh:mm:ss DD/MM/YY DD/MM/YYYY
Colombia 12 hr hh:mm:ss DD/MM/YY DD/MM/YYYY
Costa Rica 12 hr hh:mm:ss DD/MM/YY DD/MM/YYYY
Dominican Republic 12 hr hh:mm:ss DD/MM/YY DD/MM/YYYY
Ecuador 24 hr hh:mm:ss DD/MM/YY DD/MM/YYYY
El Salvador 12 hr hh:mm:ss DD/MM/YY DD/MM/YYYY
Guatemala 12 hr hh:mm:ss DD/MM/YY DD/MM/YYYY
Honduras 12 hr hh:mm:ss DD/MM/YY DD/MM/YYYY
Jamaica 12 hr hh:mm:ss DD/MM/YY DD/MM/YYYY
Mexico 12 hr hh:mm:ss DD/MM/YY DD/MM/YYYY
Nicaragua 12 hr hh:mm:ss DD/MM/YY DD/MM/YYYY
Panama 12 hr hh:mm:ss DD/MM/YY DD/MM/YYYY
Paraguay 12 hr hh:mm:ss DD/MM/YY DD/MM/YYYY
Peru 12 hr hh:mm:ss DD/MM/YY DD/MM/YYYY
Puerto Rico 12 hr hh:mm:ss DD/MM/YY DD/MM/YYYY
Trinidad & Tobago 12 hr hh:mm:ss DD/MM/YY DD/MM/YYYY
Uruguay 12 hr hh:mm:ss DD/MM/YY DD/MM/YYYY
US Virgin Islands 12 hr hh:mm:ss MM/DD/YY MM/DD/YYYY
USA 12 hr hh:mm:ss MM/DD/YY MM/DD/YYYY
Venezuela 12 hr hh:mm:ss DD/MM/YY DD/MM/YYYY
6-4
Page 93

Misc. Country Defaults
Country Retail Default Wt Accuracy Default Lang
Argentina kg Single ESP
Belize kg Single EN
Bolivia kg Single ESP
Canada English kg Single EN
Canada French kg multi FR
Caribbean kg Single EN
Chile kg Single ESP
Colombia kg Single ESP
Costa Rica kg Single ESP
Dominican Republic lb Single ESP
Ecuador kg Single ESP
El Salvador lb Single ESP
Guatemala lb Single ESP
Honduras lb Single ESP
Jamaica kg Single EN
Mexico kg Single ESP
Nicaragua kg Single ESP
Panama kg Single ESP
Paraguay kg Single ESP
Peru kg Single ESP
Puerto Rico lb Single ESP
Trinidad & Tobago kg Single EN
Uruguay kg Single ESP
US Virgin Islands lb Single EN
USA lb Single EN
Venezuela kg Single ESP
Chapter 6: Appendix
Misc. Country Defaults
6-5
Page 94

METTLER TOLEDO Impact S® User's Guide
For your notes
6-6
Page 95

Page 96

METTLER TOLEDO
1900 Polaris Parkway
Columbus, Ohio 43240
www.mt.com
METTLER TOLEDO
®
and Impact S®
are registered trademarks of Mettler-Toledo, Inc.
©2009 Mettler-Toledo, Inc.
Printed in USA
NQMMN
Quality Management System certification.
Development, production, and auditing in
accordance with ISO9001. Environmental
management system in accordance with
ISO14001.
Worldwide service. Our dense service
network, among the best in the world,
ensures the maximum availability and
lifespan of your product.
Conformité Européene. This label is your
guarantee that our products conform to the
latest guidelines.
On the Internet. You can find important
information about our products and
services, as well as our company, quickly
and easily at http://www.mt.com/support
 Loading...