

Page 1
Toledo • P.O. Box 30159 • 8003 CD Zwolle • NL • www.toledo.nl 0312-02
UK Subject to change
D Änderungen vorbehalten
NL Wijzigingen voorbehouden
F Sous réserve de modifications
S Ändringar förbehålles
SF Pidätämme oikeuden muutoksiin
N Rett till endringer forbeholdes
DK Ret til ændringer forbeholdes
E Reservado el derecho de
modificaciones technicas
I Con reserva di modifiche
H Változtatás jogát fenntartjuk
CZ Změny vyhrazeny
R дУПО‡МЛfl Ferm ФУТЪУflММУ ТУ‚В¯ВМТЪ‚Ы
ВЪ ‚˚ФЫТН‡ВПЫ ˛ В˛ ФУВ‰ЫНˆЛ˛.
иУБЪУПЫ ‚ ЪВıМЛ˜ВТЛВ ı‡‡НЪВЛТЪЛНЛ
ПУ„ЫЪ ‚МУТЛЪ¸Тfl ·ВБ ФВ‰‚‡ЛЪВО¸МУ„У
Ы‚В‰УПОВМЛfl.
TBS-800
Art.nr. BSM2002
Båndpudser
Lijadora de banda
Smerigliatrice a nastro
Szalagcsiszológép
Pásová bruska
гВМЪУ˜М‡fl¯ОЛЩП‡¯ЛМН‡
BRUGERVEJLEDNING 26
MODEO DE EMPLEO 30
MANUALE UTILIZZATI 33
HASZNÁLATI UTASÍTÁS 37
NÁVOD K POUŽITÍ 40
кмдйЗйСлнЗй ий щдлигмДнДсаа 44
USERS MANUAL 02
GEBRAUCHSANWEISUNG 05
GEBRUIKSAANWIJZING 09
MODE D’EMPLOI 12
BRUKSANVISNING 16
KÄYTTÖOHJE 19
BRUKSANVISNING 23
Belt sander
Bandschleifer
Bandschuurmachine
Ponceuse à bande
Bandputsmaskin
Nauhahiomakone
Båndsliper
Page 2
BELT SANDER
TECHNICAL SPECIFICATIONS
PRODUCTINFORMATION
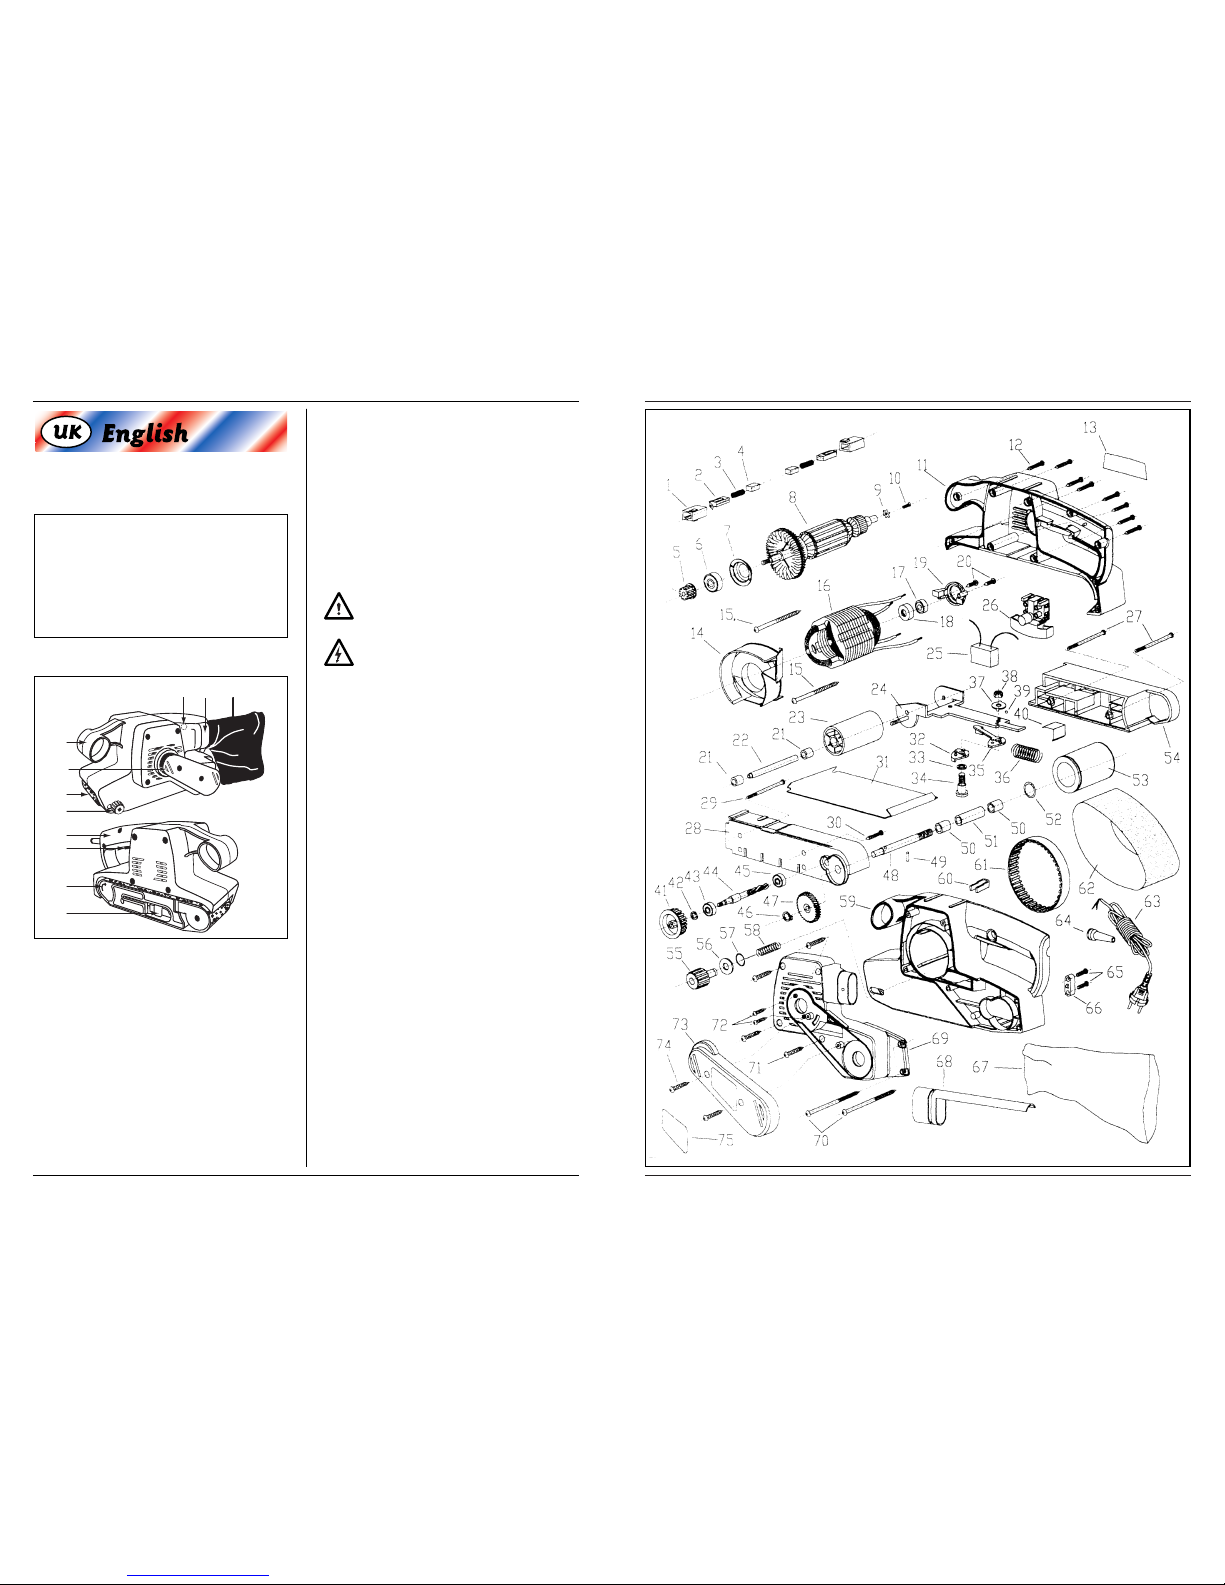
Fig. A
The belt sander is the perfect tool to sand wood and to
grind iron, plastic or similar materials.
The belt sander must be used for the rough work, for the
normal sanding work an orbital sander must be used.
1. On/off switch
2. Front handle
3. Rear handle
4. Blocking switch
5. Dust collection opening
6 Adjusting knob
7. Sanding belt fastener
8. Front belt roller
9. Direction indicator
10. Drive belt cover
11. Dust bag
PACKAGE CONTENTS
1 Belt sander
3 Sanding belts
1 Dust collection bag
1 Instruction manual
1 Safety instructions
1 Guarantee card
Check the machine, loose parts and accessories for
transport damage.
SAFETY INSTRUCTIONS
The following pictograms are used in these instructions
for use:
Denotes risk of personal injury, loss of life or
damage to the tool in case of non-observance of the
instructions in this manual.
Denotes risk of electric shock.
Carefully read this manual before using the machine.
Make sure that you know how the machine functions and
how to operate it. Maintain the machine in accordance
with the instructions to make sure it functions properly.
Keep this manual and the enclosed documentation with
the machine.
When using electric machines always observe the
safety regulations applicable in your country to
reduce the risk of fire, electric shock and personal
injury.
Read the following safety instructions and also the
enclosed safety instructions.
• If you are working with the sanding machine, wear
always ear protectors and dust mask.
• The sanding machine is not suitable for wet sanding.
• Check if the switch is not in position “ON”, before
you connect the mains plug to the mains voltage.
• Keep the mains lead always away from moving parts
of the tools.
• Use safety glasses, especially when you sand above
your head.
• Do not bring pressure to your machine, this will only
delay the sanding.
IMMEDIATELY SWITCH OFF THE MACHINE
WHEN:
• Excessive sparking of the carbon brushes and verticiliosis in the collector.
• Interruption of the mains plug, mains lead or mains
lead damage.
• Defect switch
• Smoke or stench of scorched isolation
2
3
8
10
6
9
1
7
4
115
Voltage | 230 V~
Frequency | 50 Hz
Power input | 800 W
No load sander paper speed | 280 m/min
Sanding belt size | 75 x 533 mm
Sanding pad size | 75 x 1360 mm
Weight | 3.0 kg
Lpa (Sound pressure) | 88.6 dB(A)
Lwa (Sound power level) | 101.6 dB(A)
Vibration value | 3.511 m/s
2
2 Toledo
Toledo 51
EXPLODED VIEW
Page 3
50 Toledo
SPARE PARTS LIST TBS-800
REF NR DESCRIPTION TOLEDO NR
01 +02 CARBON BRUSH HOLDER 409000
03 + 04 CARBON BRUSH SET 409001
05 BELT WHEEL 409002
06 BEARING 608-2Z 800608
08 ROTOR 409003
16 STATOR 409004
17 BEARING 626-2Z 800626
21 + 50 NEEDLE BEARING HK081210 801211
22 SPINDLE 409005
23 ROLL 409006
26 SWITCH 409007
31 BASE PLATE 409008
41 BELT WHEEL 409009
43 + 45 BEARING 627-2Z 800627
44 SPIRAL GEAR 409010
47 BIG GEAR 409011
53 DRUM 409012
55 ADJUSTING KNOB 409013
73 BELT COVER 409014
67 + 68 DUSTBAG COMPLETE 409015
61 DRIVING BELT 409016
ELECTRICAL SAFETY
Always check that the power supply corresponds
with the voltage on the rating plate.
The machine is double insulated in accordance with
EN-50144; therefore no earth wire is required.
Replacing cables or plugs
Immediately throw away old cables or plugs when they
have been replaced by new ones. It is dangerous to insert
the plug of a loose cable in the wall outlet.
Using extension cables
Only use an approved extension cable suitable for the
power input of the machine. The minimum conductor
size is 1.5 mm
2
. When using a cable reel always unwind
the reel completely.
OPERATION
Always observe the safety instructions and applicable regulations.
CHOICE OF THE SAND-PAPER
Coarse sand-paper (grain 50) removes in general the bigger part of the material and fine sand-paper is used for the
finishing. If the surface is not even, then start with rough
sand-paper. Further you use middle coarse sandpaper(grain 80) to remove the scratches left behind by
the coarse sand-paper and finally you take fine sandpaper (grain 120) for the finishing.
REMOVING AND INSTALLING THE SANDING BELT
Before assembly the sanding belt always remove
the plug from the mains.
• Put the machine on its side, with the drive belt cover
(10, Fig. A) down wards.
• Loosen the sanding belt fastener (7, Fig A).
• Remove the sanding belt from the machine
• Put a new sanding belt on the machine, make sure
that the direction arrows on the sanding belt are
pointing in the same direction as the direction indicator (9, Fig. A).
• Fasten the sanding belt fastener again (7, Fig. A).
ALIGNING THE SANDING BELT
If the sanding belt doesn’t run parallel with the outer
edge of the housing, the sanding belt must be aligned.
Move the sanding belt in the correct position with the
adjusting knob (6, Fig. A). By turning the adjusting knob
clockwise the sanding belt will move to the inside and by
turning anti-clockwise the sanding belt will move to the
outside.
SWITCHING ON AND OFF
• To switch the machine on press the on/off switch (1,
Fig. A).
• To switch the machine off release the on/off switch
(1, Fig. A).
If continuous operation is required the blocking
switch (4 fig. A) must be used:
• Switch the machine on to press the on/off switch.
• Press the blocking switch (4, Fig. A) and release the
on/off switch.
• To switch the machine off press the on/off switch
again and release the on/off switch.
MOUNTING DUST BAG
Use the dust bag to collect dust which is released during
sanding.
• Put the dust bag on the dust collection opening (5, Fig.
A).
• Empty the dust bag regularly in order to obtain an efficient dust extraction.
Toledo 3
Page 4

Toledo 49
GRIP
The use of the belt sander is made easier because of the
two grips one on the front side and one on the back.
Through that you can hold the machine with two hands,
you have a better control of the machine and there is less
risk to becoming in touch with the moving parts. Hold
the belt sander always with both hands.
OPERATING INSTRUCTIONS
Make sure that the machine has reached its full speed
before placing the machine on the work piece. This will
prevent an overload of the machine.
For sanding wood, place the machine approximately 15°
out of the grains of the wood. Move the belt sander continuous over the work piece.
TROUBLESHOOTING
In case the belt sander does not work well, we give you
some possible causes and solutions.
The electromotor gets hot
• The cool ventilation slots in the motor are stopped
up with dirt.
Clean the cool ventilation slots.
• The motor is defect.
Have your belt sander repaired or checked by your
local Toledo dealer.
The connected machine does not work
• Interruption in the mains connection.
Check mains connection for fracture.
Have your belt sander repaired or checked by your
local Toledo dealer.
The dust is not absorbed
• This can be caused by a stopped up dust extraction
Clean your dust collection opening
Repairing of electric appliances may be carried out
only by experts.
MAINTENANCE
Make sure that the machine is not live when carrying out maintenance work on the motor.
The Toledo machines have been designed to operate
over a long period of time with a minimum of maintenance. Continuous satisfactory operation depends upon
proper machine care and regular cleaning.
Cleaning
Keep the ventilation slots of the machine clean to prevent overheating of the motor.
Regularly clean the machine housing with a soft cloth,
preferably after each use. Keep the ventilation slots free
from dust and dirt.
If the dirt does not come off use a soft cloth moistened
with soapy water. Never use solvents such as petrol,
alcohol, ammonia water, etc. These solvents may
damage the plastic parts.
Lubrication
The machine requires no additional lubrication.
Faults
Should a fault occur, e.g. after wear of a part, please contact your local Toledo dealer.
In the back of this manual you find an exploded view
showing the parts that can be ordered.
ENVIRONMENT
In order to prevent the machine from damage during
transport, it is delivered in a sturdy packaging. Most of
the packaging materials can be recycled. Take these
materials to the appropriate recycling locations.
Take your unwanted machines to your local Toledodealer. Here they will be disposed of in an environmentally safe way.
4 Toledo
Page 5
GUARANTEE
The guarantee conditions can be found on the separately
enclosed guarantee card.
We declare under our sole responsibility that this
product is in conformity with the following
standards or standardized documents
EN50144-1, EN50144-2-4. EN55014-1,
EN55014-2, EN61000-3-2, EN61000-3-3
in accordance with the regulations.
98/37EEC
73/23/EEC
89/336EEC
from 18-09-2002
GENEMUIDEN NL
W. Kamphof
Quality department
BANDSCHLEIFER
TECHNISCHE DATEN
KENZEICHNEN
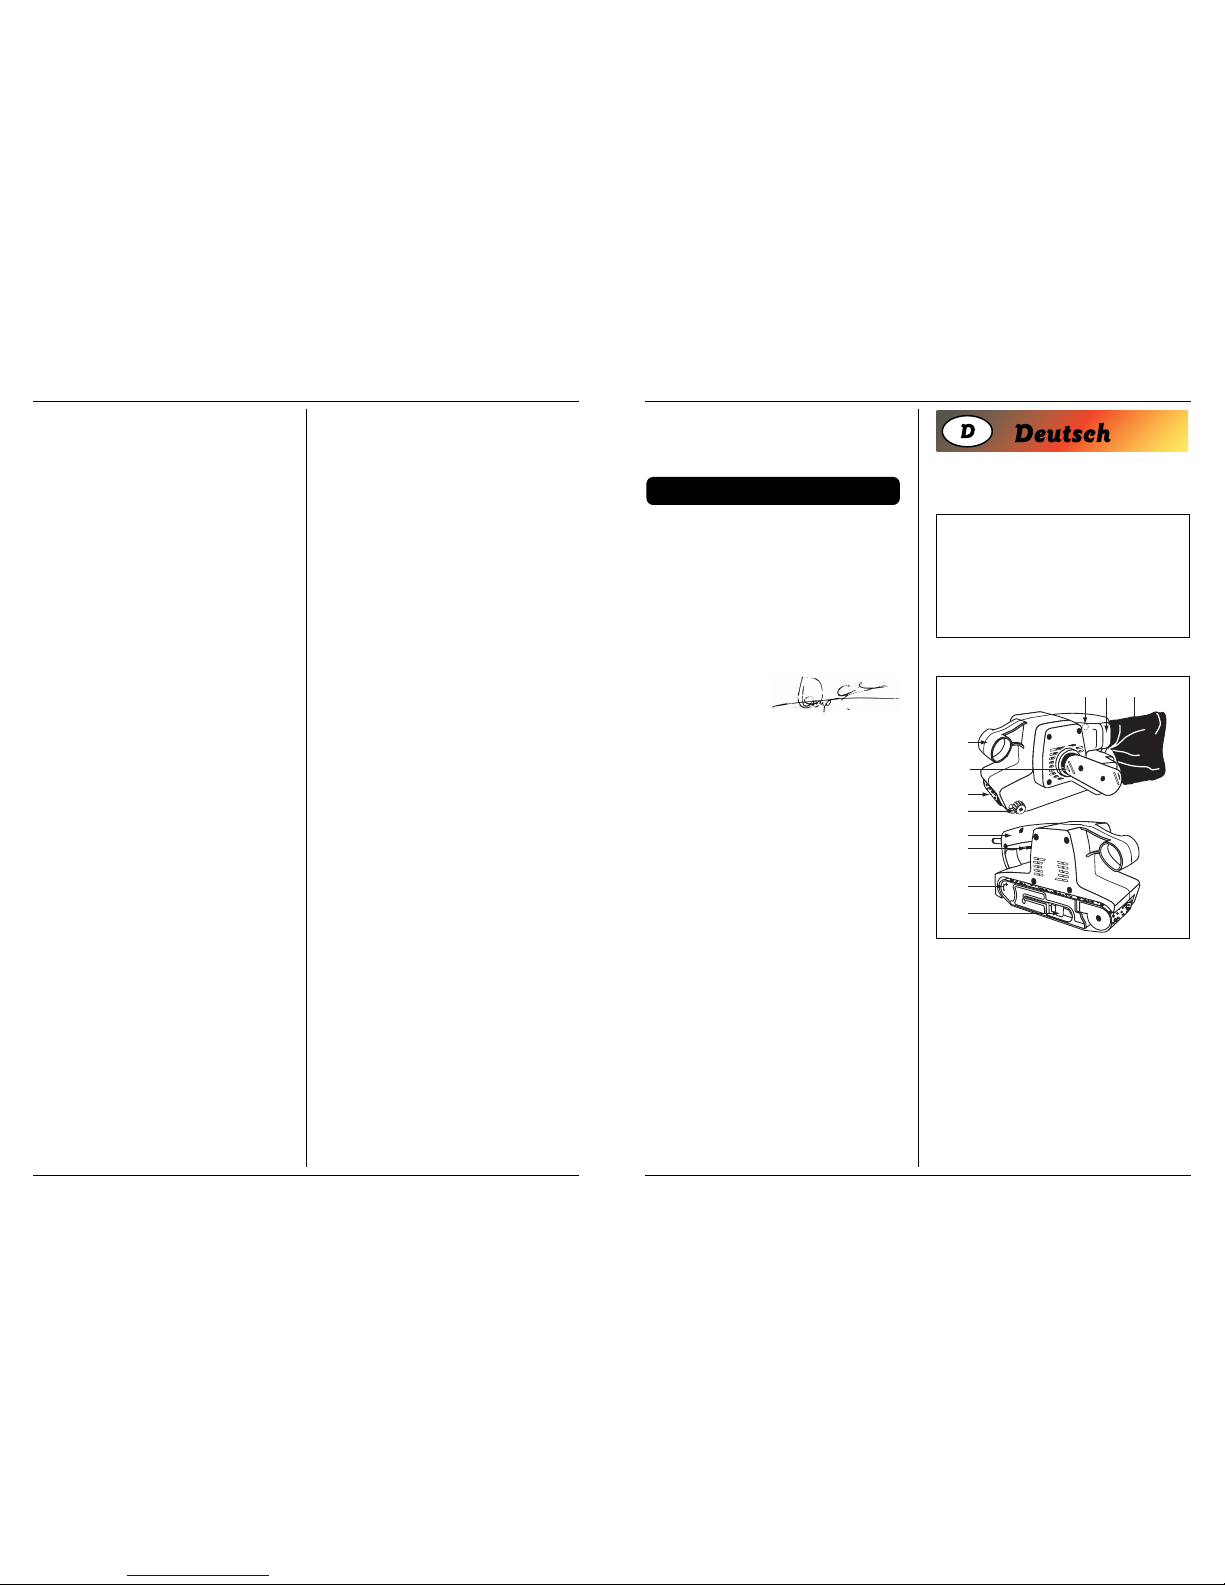
Abb. A
Der Bandschleifer ist das geeignete Werkzeug zum
Schleifen von Holz, Metall, Kunststoff und ähnlichen
Werkstoffen. Der Bandschleifer ist für grobe Schleifarbeiten vorgesehen. Für normale Flachschleifarbeiten
muss ein Schwingschleifer benutzt werden.
1. Betriebsschalter
2. Haltegriff vorne
3. Haltegriff hinten
4. Feststellknopf
5. Schleifstaubauswurf
6 Einstellknopf
7. Schleifbandbefestigung
8. Vordere Bandrolle
9. Richtungsanzeige
10. Schleifbandabdeckung
11. Staubsack
2
3
8
10
6
9
1
7
4
115
Spannung | 230 V~
Frequenz | 50 Hz
Aufgenommene Leistung | 800 W
Drehzahl unbelastet | 280 m/min
Schleifbandmaße | 75 x 533 mm
Schleifbandauflagefläche | 75 x 160 mm
Gewicht | 3.0 kg
Lpa (Schalldruckpegel) | 88.6 dB(A)
Lwa (Schallleistungspegel) | 101.6 dB(A)
Vibrationswert | 3.511 m/s
2
CE
ı
DECLARATION OF CONFORMITY
(UK)
Toledo 548 Toledo
Page 6
ЙДкДзнаь
Й‡‡МЪЛИМ˚В ЫТОУ‚Лfl ФЛ‚В‰ВМ˚ ‚ „‡‡МЪЛИМУП
Ъ‡ОУМВ, НУЪУ˚И ФЛО‡„‡ВЪТfl УЪ‰ВО¸МУ.
е˚ Б‡fl‚ОflВП Т В‰ЛМУОЛ˜МУИ УЪ‚ВЪТЪ‚ВММУТЪ¸˛,
˜ÚÓ ‰‡ÌÌÓ ËÁ‰ÂÎË ÒÓÓÚ‚ÂÚÒÚ‚ÛÂÚ
МЛКВТОВ‰Ы˛˘ЛП МУП‡П ЛОЛ
МУП‡ЪЛ‚М˚П ‰УНЫПВМЪ‡П:
EN50144-1, EN50144-2-4. EN55014-1,
EN55014-2, EN61000-3-2, EN61000-3-3
ТУ„О‡ТМУ ФУОУКВМЛflП ‰ЛВНЪЛ‚:
98/37EEC
73/23/EEC
89/336EEC
18-09-2002 „.
ЙЦзЦейвСЦз
çˉ·̉˚
W. Kamphof
CE
ı
ДЕКЛАРАЦИЯ О СООТВЕТСТВИИ ВЕЛИКОБРИТАНИЯ
(RU)
Toledo 47
VERPACKUNGSINHALT
1 Bandschleifer
3 Schleifbänder
1 Staubsack
1 Bedienungsanleitung
1 Sicherheitsvorschriften
1 Garantiekarte
Prüfen Sie die Maschine, die losen Teile und Zubehörteile auf Transportschäden.
SICHERHEITSVORSCHRIFTEN
In dieser Betriebsanleitung erscheinen folgende Piktogramme:
Verweist auf Verletzungsgefahr, Gefahr für Leben
und mögliche Beschädigung der Maschine, falls die
Anweisungen in dieser Betriebsanleitung nicht befolgt werden.
Deutet das Vorhandensein elektrischer Spannung
an.
Lesen Sie diese Betriebsanleitung aufmerksam, bevor Sie
die Maschine in Betrieb nehmen. Machen Sie sich vertraut mit der Funktionsweise und der Bedienung. Warten
Sie die Maschine entsprechend den Anweisungen, damit
sie immer einwandfrei funktioniert. Die Betriebsanleitung und die dazugehörende Dokumentation müssen in
der Nähe der Maschine aufbewahrt werden.
Beachten beim Benutzen von Elek tromaschinen
immer die örtlichen Sicherheitsvorschriften bezüglich Feuerrisiko, Elektroschock und Verletzung.
Lesen Sie außer den folgenden Hinweisen ebenfalls
die Sicherheitsvorschriften im einschlägigen Sonderteil.
Die Hinweise müssen sicher aufbewahrt werden!
• Tragen Sie immer Gehörschutz und Staubmaske
beim Arbeiten mit dem Bandschleifer.
• Der Bandschleifer ist nicht geeigenet für Naßschleifen.
• Kontrollieren Sie ob der Schalter nicht in ‘AN’-position ist geschaltet, bevor Sie den Netzstecker in der
Wandsteckdose stecken.
• Halten Sie immer das Schnur weg von bewegende
Teile des Gerätes.
Benützen Sie immer eine Sicherheitsbrille.
DAS GERÄT SOFORT AUSSCHALTEN BEI:
• Übermäßigen Funken der Kohlebürsten und Ringfeuer im Kollektor.
• Störung im Netzstecker, dem Netzkabel oder
Schnurbeschädigung.
• Defektem Schalter.
• Rauch oder Gestank verschmorter Isolation.
ELEKTRISCHE SICHERHEIT
Überprüfen Sie immer, ob Ihre Netzspannung der
des Typenschilds entspricht.
Die Maschine ist nach EN 50144 doppelisoliert;
daher ist Erdung nicht erforderlich.
Austauschen von Kabeln oder Steckern
Entsorgen Sie alte Kabel oder Stecker, unmittelbar nachdem Sie durch neue ersetzt sind. Das Anschließen eines
Steckers eines losen Kabels an eine Steckdose ist gefährlich.
Verwendung von Verlängerungskabeln
Benutzen Sie nur ein genehmigtes Verlängerungskabel,
das der Maschinenleistung entspricht. Die Ader müssen
einen Mindestquerschnitt von 1,5 mm2haben. Befindet
das Kabel sich auf einem Haspel. muß es völlig abgerollt
werden.
6 Toledo
Page 7
BEDIENUNG
Befolgen Sie stets die Sicherheitsanweisungen und
die gültigen Vorschriften.
AUSWAHL DES SANDPAPIERS
General gesprochen, wird mit einem grobkörnigen
Papier viel Material abgetragen und mit einem feinkörnigen Papier die Endbearbeitung vorgenommen. Ein ungeleichmäßige Oberfläche wird zunächst mit grobkörnigen
Papier abgeschliffen, bis sie nicht mehr rauh ist. Anschließend werden mit einem mittelkörnigen Papier die
Kratzer entfernt und dann mit einem feinkörnigen Papier
fertiggeschliffen. Schleifen Sie ab, bis die Oberfläche ganz
glatt ist.
ABNEHMEN UND EINSETZEN DES SCHLEIFBANDES
Ziehen Sie immer den Netzstecker, bevor Sie mit
dem Schleifband hantieren.
• Legen Sie die Maschine auf die Seite, so dass sich die
Schleifbandabdeckung unten befindet (10, Abb. A).
• Lösen Sie die Schleifbandbefestigung (7, Abb. A).
• Entfernen Sie das Schleifband
• Legen Sie ein neues Schleifband ein und vergewissern
Sie sich dabei, dass die Pfeile auf dem Schleifband in
die gleiche Richtung wie der Richtungspfeil zeigen, (9,
Abb. A).
• Schließen Sie die Schleifbandbefestigung wieder, (7,
Abb. A).
AUSRICHTEN DES SCHLEIFBANDES
Wenn das Schleifband nicht mit dem Außenrand des
Gehäuses parallel läuft, muss es ausrichtet werden.
Hierzu drehen Sie den Einstellknopf (6, Abb. A) nach
links oder rechts. Durch Drehen des Knopfes im Uhrzeigersinn wird das Schleifband nach innen und durch Drehen gegen den Uhrzeigersinn nach außen versetzt.
EINSCHALTEN UND AUSSCHALTEN
• Zum Einschalten drücken Sie den Betriebsschalter
(1, Abb. A) und halten ihn gedrückt.
• Zum Ausschalten lassen Sie den Betriebsschalter
wieder los, (1, Abb. A)
Zum Dauerbetrieb muss der Feststellknopf
(4, Abb. A) gedrückt werden.
• Schalten Sie die Maschine mit dem Betriebsschalter
ein.
• Drücken Sie den Feststellknopf (4, Abb. A) und lassen Sie den Betriebsschalter los.
• Zum Ausschalten der Maschinen drücken Sie wieder
den Betriebsschalter und lassen den Feststellknopf
los.
ANBRINGEN DES STAUBSACKS
Der Staubsack dient zum Auffangen des anfallenden Schleifstaubs.
• Stecken Sie den Staubsack auf den Staubausblasstutzen.
• Leeren Sie den Staubsack regelmäßig, um eine ordnungsgemäße Staubabsaugung zu gewährleisten.
HANDGRIFFE
Zur sicheren Handhabung des Bandschleifers dienen der
hintere und die beiden vorderen Handgriffe. Damit können Sie die Maschine richtig halten und führen und es besteht kaum die Gefahr, dass Sie versehentlich bewegende
Teile berühren. Halten Sie den Bandschleifer immer mit
beiden Händen fest.
BEDIENUNGSANLEITUNGEN
Bevor Sie die Maschine zum Schleifen ansetzen, muss sie
ihre volle Drehzahl erreicht haben. Dadurch wird eine
Überlastung der Maschine vermieden. Beim Schleifen
von Holz, führen Sie die Maschine im Winkel von etwa
15° zur Holzmaserung. Bewegen Sie den Bandschleifer
gleichmäßig über das Werkstück.
STÖRUNGEN
Im Fall das das Gerät nicht gut funktioniert, geben wir
jetzt einige mögliche Ursachen und Lösungen:
Erhitzen des Motors
• Die Entlüftungsschlitze sind verstopft mit Schmutz.
Saubern Sie die Entlüftungsschlitze.
• Der Motor ist defekt.
Bieten Sie das Gerät zur Reperation an bei Ihren
Toledo-Händler.
Das eingeschaltete Gerät funktioniert nicht
• Bruch im Netzanschluß.
Kontollieren Sie die Netzanschluß.
Bieten Sie das Gerät zur Reparation an bei Ihren
Toledo-Händler.
Das Staub wird nicht weggesogen
• Die Staubsauganlage ist verstopft.
Saubern Sie die Öfnung der Sauganlage.
Reparaturen dürfen nur von einer Elektrofachmann ausgeführt werden.
Toledo 7
млнДзйЗдД ихгЦлЕйкзйЙй еЦтдД
СОfl Т·У‡ У·‡БЫ˛˘ВИТfl ‚ ФУˆВТТВ ¯ОЛЩУ‚НЛ Ф˚ОЛ
ЛТФУО¸БЫИЪВ Ф˚ОВТ·УМ˚И ПВ¯УН.
• ÇÒÚ‡‚¸Ú Ô˚ÎÂÒ·ÓÌ˚È Ï¯ÓÍ ‚ Ô‡ÚÛ·ÓÍ ‰Îfl
ÓÚ‚Ó‰‡ Ô˚ÎË (5 -ËÒ.Ä).
• кВ„ЫОflМУ УФУУКМflИЪВ Ф˚ОВТ·УМ˚И ПВ¯УН,
˜ЪУ·˚ У·ВТФВ˜ЛЪ¸ МУП‡О¸МУВ Ы‰‡ОВМЛВ Ф˚ОЛ.
кмдйьнда
иВВ‰Мflfl Л Б‡‰Мflfl ЫНУflЪНЛ ТОЫК‡Ъ ‰Оfl Ы‚ВВММУ„У
ЫФ‡‚ОВМЛfl ОВМЪУ˜МУИ ¯ОЛЩП‡¯ЛМНУИ. ЕО‡„У‰‡fl
˝ЪУПЫ З˚ ПУКВЪВ М‡‰fiКМУ Вfi Ы‰ВКЛ‚‡Ъ¸, Л ‚fl‰ ОЛ
‚УБМЛНМВЪ УФ‡ТМУТЪ¸, ˜ЪУ З˚ ФУ МВУТЪУУКМУТЪЛ
ФЛНУТМВЪВТ¸ Н ‰‚ЛКЫ˘ЛПТfl ‰ВЪ‡ОflП. ЗТВ„‰‡ У·ВЛПЛ
ЫН‡ПЛ НВФНУ ‰ВКЛЪВ ОВМЪУ˜МЫ˛ ¯ОЛЩП‡¯ЛМНЫ.
мдДбДзаь ий щдлигмДнДсаа
иВВ‰ ЪВП, Н‡Н ФУПВТЪЛЪ¸ П‡¯ЛМНЫ М‡ Б‡„УЪУ‚НЫ ‰Оfl
¯ОЛЩУ‚НЛ, ВИ М‡‰У ‰‡Ъ¸ ‡Б‚ЛЪ¸ Т‚У˛ П‡НТЛП‡О¸МЫ˛
ТНУУТЪ¸ ‚‡˘ВМЛfl. ЕО‡„У‰‡fl ˝ЪУПЫ ПУКМУ
ЛБ·ВК‡Ъ¸ ФВВ„ЫБНЛ П‡¯ЛМНЛ. ЗУ ‚ВПfl ¯ОЛЩУ‚НЛ
‰ВВ‚‡ ‚В‰ЛЪВ П‡¯ЛМЫ ФЛПВМУ ФУ‰ Ы„ОУП 15° Н
ЪВНТЪЫВ ‰В‚ВТЛМ˚. ꇂМУПВМУ ФВВПВ˘‡ИЪВ
ОВМЪУ˜МЫ˛ ¯ОЛЩП‡¯ЛМНЫ ФУ ФУ‚ВıМУТЪЛ
Б‡„УЪУ‚НЛ.
ЗйбейЬзхЦ зЦийгДСда
з‡ ТОЫ˜‡И, ВТОЛ ФЛ·У МВ ‡·УЪ‡ВЪ ‰УОКМ˚П
У·‡БУП, ТЫ˘ВТЪ‚Ы˛Ъ ТОВ‰Ы˛˘ЛВ ‚УБПУКМ˚В
ФЛ˜ЛМ˚ Л ТФУТУ·˚ Лı ЫТЪ‡МВМЛfl:
è„‚ ‰‚Ë„‡ÚÂÎfl
• ЗВМЪЛОflˆЛУММ˚В УЪ‚ВТЪЛfl Б‡·ЛЪ˚ „flБ¸˛.
иУ˜ЛТЪЛЪВ ‚ВМЪЛОflˆЛУММ˚В УЪ‚ВТЪЛfl.
• С‚Л„‡ЪВО¸ МВЛТФ‡‚ВМ.
СУТЪ‡‚¸ЪВ ФЛ·У ‰Оfl ВПУМЪ‡ ‚ ЪУ„У‚Ы˛
У„‡МЛБ‡ˆЛ˛ Toledo, „‰В З˚ В„У ФЛУ·ВОЛ.
ÇÍβ˜ÂÌÌ˚È ÔË·Ó Ì ‡·ÓÚ‡ÂÚ
• é·˚‚ ‚ ÒÂÚ‚ÓÏ ÔÓ‰Íβ˜ÂÌËË
иУ‚В¸ЪВ ТВЪВ‚УВ ФУ‰НО˛˜ВМЛВ М‡ У·˚‚
СУТЪ‡‚¸ЪВ ФЛ·У ‰Оfl ВПУМЪ‡ ‚ ЪУ„У‚Ы˛
У„‡МЛБ‡ˆЛ˛ Toledo, „‰В З˚ В„У ФЛУ·ВОЛ.
è˚θ Ì ۉ‡ÎflÂÚÒfl
• и˚ОВТ·УМ‡fl ТЛТЪВП‡ Б‡ТУЛО‡Т¸.
иУ˜ЛТЪЛЪВ Ф‡ЪЫ·УН ТЛТЪВП˚ Ф˚ОВЫ‰‡ОВМЛfl.
к‡·УЪ˚ ФУ ВПУМЪЫ ˝ОВНЪУУ·УЫ‰У‚‡МЛfl
‡БВ¯‡ВЪТfl ФУ‚У‰ЛЪ¸ ЪУО¸НУ
Н‚‡ОЛЩЛˆЛУ‚‡ММУПЫ ТФВˆЛ‡ОЛТЪЫ-˝ОВНЪЛНЫ.
нЦпзауЦлдйЦ
йЕлгмЬаЗДзаЦ
йЪТУВ‰ЛМЛЪВ П‡¯ЛМЫ УЪ ТВЪЛ, ВТОЛ З‡П
МВУ·ıУ‰ЛПУ ФУЛБ‚ВТЪЛ ‡·УЪ˚ ФУ
ЪВıМЛ˜ВТНУПЫ У·ТОЫКЛ‚‡МЛ˛ ПВı‡МЛБП‡.
е‡¯ЛМ˚ НУПФ‡МЛЛ Toledo ТФУВНЪЛУ‚‡М˚ ‰Оfl
·ВБЫФВ˜МУИ ‡·УЪ˚ Л ФЛ ПЛМЛП‡О¸МУП
ЪВıМЛ˜ВТНУП У·ТОЫКЛ‚‡МЛЛ М‡ ФУЪflКВМЛЛ
ФУ‰УОКЛЪВО¸МУ„У ‚ВПВМЛ. кВ„ЫОflМУ У˜Л˘‡fl
П‡¯ЛМЫ Л У·‡˘‡flТ¸ Т МВИ ЪВıМЛ˜ВТНЛ „‡ПУЪМУ, З˚
ФУ‰ОЛЪВ ТУН Вfi ТОЫК·˚.
é˜ËÒÚ͇
кВ„ЫОflМУ, ФВ‰ФУ˜ЪЛЪВО¸МУ ФУТОВ Н‡К‰У„У
ЛТФУО¸БУ‚‡МЛfl, ФЛ ФУПУ˘Л Пfl„НУИ Т‡ОЩВЪНЛ
У˜Л˘‡ИЪВ НУФЫТ П‡¯ЛМ˚. ЗВМЪЛОflˆЛУММ˚В
УЪ‚ВТЪЛfl ‰УОКМ˚ ·˚Ъ¸ Т‚У·У‰М˚ УЪ Б‡„flБМВМЛИ Л
Ф˚ОЛ.
мТЪУИ˜Л‚˚В Б‡„flБМВМЛfl Ы‰‡ОflИЪВ Т ФУПУ˘¸˛
Пfl„НУИ Т‡ОЩВЪНЛ, ТПУ˜ВММУИ П˚О¸МУИ ‚У‰УИ. зВ
ЛТФУО¸БЫИЪВ Ъ‡НЛВ ‡ТЪ‚УЛЪВОЛ, Н‡Н ·ВМБЛМ, ТФЛЪ,
‡ППЛ‡˜М˚И ‡ТЪ‚У Л Ъ.Ф. иУ‰У·М˚В ‚В˘ВТЪ‚‡
М‡МУТflЪ Ы˘В· ‰ВЪ‡ОflП ЛБ ФО‡ТЪП‡ТТ˚.
ëχÁ͇
аМТЪЫПВМЪ МВ МЫК‰‡ВЪТfl ‚ ‰УФУОМЛЪВО¸МУИ ТП‡БНВ.
зВЛТФ‡‚МУТЪЛ
З ТОЫ˜‡В ‚УБМЛНМУ‚ВМЛfl Т·УВ‚ ‚ ‡·УЪВ, М‡ФЛПВ,
‚ТОВ‰ТЪ‚ЛВ ЛБМУТ‡ ‰ВЪ‡ОЛ, У·‡˘‡ИЪВТ¸ ‚ ЪУ„У‚Ы˛
У„‡МЛБ‡ˆЛ˛ Toledo, „‰В З˚ ФЛУ·ВОЛ З‡¯
ЛМТЪЫПВМЪ.
З НУМˆВ ˝ЪУ„У ЫНУ‚У‰ТЪ‚‡ ФУ ˝НТФОЫ‡Ъ‡ˆЛЛ З˚
М‡И‰ВЪВ ˜ВЪfiК Т ФВВ˜МВП ЛПВ˛˘ЛıТfl ‰Оfl Б‡Н‡Б‡
Б‡Ф˜‡ТЪВИ.
бДфанД йдкмЬДыфЦв лкЦСх
уЪУ·˚ ФВ‰УЪ‚‡ЪЛЪ¸ ФУ‚ВК‰ВМЛfl ФЛ
Ъ‡МТФУЪЛУ‚НВ, ЛМТЪЫПВМЪ ФУТЪ‡‚ОflВЪТfl ‚
ФУ˜МУИ ЫФ‡НУ‚НВ. мФ‡НУ‚Н‡ ТУТЪУЛЪ ‚ УТМУ‚МУП ЛБ
П‡ЪВЛ‡ОУ‚, ФЛ„У‰М˚ı ‰Оfl ‚ЪУЛ˜МУИ ФВВ‡·УЪНЛ.
иУ˝ЪУПЫ ЛТФУО¸БЫИЪВ ‚УБПУКМУТЪ¸ ‰Оfl Лı
‚ЪУЛ˜МУИ ФВВ‡·УЪНЛ. иЛ Б‡ПВМВ ‚˚¯В‰¯В„У ЛБ
ЫФУЪВ·ОВМЛfl ЛМТЪЫПВМЪ‡ ‰УТЪ‡‚¸ЪВ В„У ‚ ПВТЪМЫ˛
‡‚ЪУЛБУ‚‡ММЫ˛ ЪУ„У‚Ы˛ У„‡МЛБ‡ˆЛ˛ ЩЛП˚
Toledo. н‡П ФУБ‡·УЪflЪТfl У· ˝НУОУ„Л˜ВТНЛ ˜ЛТЪУИ
ФВВ‡·УЪНВ З‡¯В„У ТЪ‡У„У ЛМТЪЫПВМЪ‡.
46 Toledo
Page 8
зЦеЦСгЦззй Зхдгыуанъ еДтаздм
ика:
• уВБПВМУП ЛТНВМЛЛ Ы„УО¸М˚ı ˘ВЪУН ЛОЛ
НУО¸ˆВ‚Л‰МУП У„МВ ‚ НУООВНЪУВ.
• зВЛТФ‡‚МУТЪЛ ‚ ТВЪВ‚УИ ‚ЛОНВ, ТВЪВ‚УП ¯МЫВ
ЛОЛ ФУ‚ВК‰ВМЛЛ ¯МЫ‡.
• зВЛТФ‡‚МУП ‚˚НО˛˜‡ЪВОВ.
• иУfl‚ОВМЛЛ ‰˚П‡ ЛОЛ Б‡Ф‡ıВ „УВОУИ ЛБУОflˆЛЛ.
щгЦднкауЦлдДь ЕЦбйиДлзйлнъ
ЗТВ„‰‡ ФУ‚ВflИЪВ, ТУУЪ‚ВЪТЪ‚ЫВЪ ОЛ З‡¯В
ТВЪВ‚УВ М‡ФflКВМЛВ М‡ФflКВМЛ˛ М‡
Á‡‚Ó‰ÒÍÓÈ Ú‡·Î˘ÍÂ.
З ТУУЪ‚ВЪТЪ‚ЛЛ Т ЪВ·У‚‡МЛflПЛ EN 50144
П‡¯ЛМ‡ У·О‡‰‡ВЪ ‰‚УИМУИ ЛБУОflˆЛВИ;
ФУ˝ЪУПЫ Б‡БВПОВМЛfl МВ ЪВ·ЫВЪТfl.
á‡ÏÂ̇ ÒÂÚ‚˚ı ¯ÌÛÓ‚ Ë ¯ÚÂÍÂÌ˚ı ‚ËÎÓÍ
мЪЛОЛБЫИЪВ ТЪ‡˚В ¯МЫ˚ Л ¯ЪВНВМ˚В ‚ЛОНЛ
МВФУТВ‰ТЪ‚ВММУ ФУТОВ ЪУ„У, Н‡Н УМЛ Б‡ПВМВМ˚
МУ‚˚ПЛ. лОЫ˜‡ИМУВ ФУ‰НО˛˜ВМЛВ ¯ЪВНВМУИ ‚ЛОНЛ
МВФУ‰НО˛˜ВММУ„У ¯МЫ‡ Н ТВЪВ‚УИ УБВЪНВ УФ‡ТМУ.
аТФУО¸БУ‚‡МЛВ Ы‰ОЛМЛЪВО¸М˚ı Н‡·ВОВИ
аТФУО¸БЫИЪВ ЪУО¸НУ ‡БВ¯ВММ˚И Ы‰ОЛМЛЪВО¸М˚И
Н‡·ВО¸, НУЪУ˚И ТУУЪ‚ВЪТЪ‚ЫВЪ ПУ˘МУТЪЛ П‡¯ЛМ˚.
ЬЛО˚ ‰УОКМ˚ ЛПВЪ¸ ПЛМЛП‡О¸МУВ ФУФВВ˜МУВ
ТВ˜ВМЛВ 1,5 ПП2.
ЦТОЛ Н‡·ВО¸ М‡ıУ‰ЛЪТfl М‡ Н‡ЪЫ¯НВ, УМ ‰УОКВМ ·˚Ъ¸
ФУОМУТЪ¸˛ ‡БПУЪ‡М.
щдлигмДнДсаь
ÇÒ„‰‡ ÒΉÛÈÚ ËÌÒÚÛ͈ËflÏ Ë
‰ÂÈÒÚ‚Û˛˘ËÏ Û͇Á‡ÌËflÏ ÔÓ ÚÂıÌËÍÂ
·ВБУФ‡ТМУТЪЛ.
ЗхЕйк зДЬСДузйв ЕмеДЙа
й·˚˜МУ, Т ФУПУ˘¸˛ НЫФМУБВМЛТЪУИ (БВМУ 50)
М‡К‰‡˜МУИ ·ЫП‡„Л ТМЛП‡ВЪТfl БМ‡˜ЛЪВО¸М˚И ТОУИ
П‡ЪВЛ‡О‡, ‡ ФЛ ФУПУ˘Л ПВОНУБВМЛТЪУИ
М‡К‰‡˜МУИ ·ЫП‡„Л УТЫ˘ВТЪ‚ОflВЪТfl ˜ЛТЪУ‚‡fl
(ЩЛМЛ¯М‡fl) У·‡·УЪН‡. зВУ‚М‡fl ФУ‚ВıМУТЪ¸
ТМ‡˜‡О‡ ‚˚‡‚МЛ‚‡ВЪТfl НЫФМУБВМЛТЪУИ М‡К‰‡˜МУИ
·ЫП‡„УИ. ЗТОВ‰ Б‡ ˝ЪЛП, Т ФУПУ˘¸˛ ТВ‰МВБВМЛТЪУИ
М‡К‰‡˜МУИ ·ЫП‡„Л (БВМУ 80) Ы‰‡Оfl˛ЪТfl ˆ‡‡ФЛМ˚, ‡
Б‡ЪВП ПВОНУБВМЛТЪУИ ·ЫП‡„УИ (БВМУ 120)
УТЫ˘ВТЪ‚ОflВЪТfl ˜ЛТЪУ‚‡fl ¯ОЛЩУ‚Н‡.
щДеЦзД тгаойЗДгъзйв гЦзнх
З˚М¸ЪВ ‚ЛОНЫ ЛБ ТВЪВ‚УИ УБВЪНЛ, ФВК‰В
˜ВП М‡˜ЛМ‡Ъ¸ Б‡ПВМЫ ¯ОЛЩУ‚‡О¸МУИ ОВМЪ˚.
• иУОУКЛЪВ П‡¯ЛМНЫ М‡ ·УН Ъ‡Н, ˜ЪУ·˚ НУКЫı
¯ОЛЩУ‚‡О¸МУИ ОВМЪ˚ (10, кЛТ. Д) М‡ıУ‰ЛОТfl
‚МЛБЫ.
• йТО‡·¸ЪВ НВФОВМЛВ ¯ОЛЩУ‚‡О¸МУИ ОВМЪ˚
(7, кЛТ. Д).
• лМЛПЛЪВ ¯ОЛЩУ‚‡О¸МЫ˛ ОВМЪЫ.
• ЗТЪ‡‚¸ЪВ МУ‚Ы˛ ОВМЪЫ Ъ‡Н, ˜ЪУ·˚ ТЪВОН‡ М‡
¯ОЛЩУ‚‡О¸МУИ ОВМЪВ ЫН‡Б˚‚‡О‡ ‚ ЪЫ КВ ТЪУУМЫ,
˜ЪУ Л ТЪВОН‡-ЫН‡Б‡ЪВО¸ М‡Ф‡‚ОВМЛfl ‚‡˘ВМЛfl
(9, кЛТ. Д).
• б‡КПЛЪВ НВФОВМЛВ ¯ОЛЩУ‚‡О¸МУИ ОВМЪ˚
(7, кЛТ.Д).
кЦЙмгакйЗдД тгаойЗДгъзйв
гЦзнх
ЦТОЛ ¯ОЛЩУ‚‡О¸М‡fl ОВМЪ‡ ‰‚ЛКВЪТfl МВФ‡‡ООВО¸МУ
‚МВ¯МВИ НУПНВ НУФЫТ‡, ЪУ Вfi ЪВ·ЫВЪТfl М‡ТЪУЛЪ¸
(УЪˆВМЪУ‚‡Ъ¸). З МЫКМУВ ФУОУКВМЛВ ОВМЪ‡
ФВВПВ˘‡ВЪТfl ФУТВ‰ТЪ‚УП В„ЫОЛУ‚У˜МУИ Ы˜НЛ
(6, кЛТ.Д). иЛ ‚‡˘ВМЛЛ Ы˜НЛ ФУ ˜‡ТУ‚УИ ТЪВОНВ
ОВМЪ‡ ФВВПВ˘‡ВЪТfl ‚У‚МЫЪ¸, ФЛ ‚‡˘ВМЛЛ ФУЪЛ‚
˜‡ТУ‚УИ ТЪВОНЛ - М‡ЫКЫ.
ЗдгыуЦзаЦ а ЗхдгыуЦзаЦ
• СОfl ‚НО˛˜ВМЛfl М‡КПЛЪВ Л Ы‰ВКЛ‚‡ИЪВ
ФВВНО˛˜‡ЪВО¸ «Здг/Зхдг» (1, кЛТ. Д).
• СОfl ‚˚НО˛˜ВМЛfl УЪФЫТЪЛЪВ ФВВНО˛˜‡ЪВО¸
«Здг/Зхдг» (1, кЛТ. Д).
СОfl ВКЛП‡ ФУ‰УОКЛЪВО¸МУ„У ‚НО˛˜ВМЛfl
МВУ·ıУ‰ЛПУ М‡К‡Ъ¸ ·ОУНЛУ‚У˜МЫ˛ НМУФНЫ
(4, PЛТ. Д):
• ЗНО˛˜ЛЪВ П‡¯ЛМЫ ФЛ ФУПУ˘Л ФВВНО˛˜‡ЪВОfl
ВКЛПУ‚.
• з‡КПЛЪВ ·ОУНЛУ‚У˜МЫ˛ НМУФНЫ (4, кЛТ. Д) Л
УЪФЫТЪЛЪВ ФВВНО˛˜‡ЪВО¸ ВКЛПУ‚.
• СОfl УЪНО˛˜ВМЛfl П‡¯ЛМ˚ М‡КПЛЪВ ‚МУ‚¸
ФВВНО˛˜‡ЪВО¸ ВКЛПУ‚ ‡·УЪ Л УЪФЫТЪЛЪВ
·ОУНЛУ‚У˜МЫ˛ НМУФНЫ.
Toledo 45
WARTUNG
Trennen Sie die Maschine vom Netz, wenn Sie am
Mechanismus Wartungsarbeiten ausführen müssen.
Die Maschinen von Toledo sind entworfen, um während
einer langen Zeit problemlos und mit minimaler Wartung zu funktionieren. Sie Verlängern die Lebensdauer,
indem Sie die Maschine regelmäßig reinigen und fachgerecht behandeln.
Reinigen
Reinigen Sie das Maschinengehäuse regelmäßig mit
einem weichen Tuch, vorzugsweise nach jedem Einsatz.
Halten Sie die Lüfterschlitze frei von Staub und Schmutz
Entfernen Sie hartnäckigen Schmutz mit einem weichen
Tuch, angefeuchtet mit Seifenwasser. Verwenden Sie
keine Lösungsmittel wie Benzin, Alkohol, Ammonia,
usw. Derartige Stoffe beschädigen die Kunststoffteile.
Schmieren
Die Maschine braucht keine zusätzliche Schmierung.
Störungen
Wenden Sie sich in Störungsfällen, z.B. durch Verschleiß
eines Teils, an Ihren örtlichen Toledo-Vertragshändler.
Am Ende dieser Betriebsanleitung finden Sie eine Zeichnung der erhältlichen Ersatzteile.
UMWELT
Um Transportschäden zu verhinderen, wird die
Maschine in einer soliden Verpackung geliefert. Die Verpackung besteht weitgehend aus verwertbarem Material. Benutzen Sie also die Möglichkeit zum Recyclen der
Verpa-ckung.
Bringen Sie bei Ersatz die alten Maschinen zu Ihren örtlichen Toledo-Vertagshändler. Er wird sich um eine
umwelt-freundliche Verarbeitung ïhrer alten Maschine
bemühen.
GARANTIE
Lesen Sie die Garantiebedingungen auf der separat beigefügten Garantiekarte.
Wir erklären in alleiniger Verantwortung, daß
dieses Produkt mit den folgenden Normen oder
normativen Dokumenten übereinstimmt:
EN50144-1, EN50144-2-4. EN55014-1,
EN55014-2, EN61000-3-2, EN61000-3-3
gemäß den Bestimmungen der Richtlinien:
98/37/EWG
73/23/EWG
89/336/EWG
ab 18-09-2002
GENEMUIDEN NL
W. Kamphof
Quality department
CE
ı
KONFORMITÄTSERKLÄRUNG
(D)
8 Toledo
Page 9

BANDSCHUURMACHINE
TECHNISCHE SPECIFICATIES
PRODUCTINFORMATIE
Fig. A.
De bandschuurmachine is het ideale gereedschap voor
het schuren van hout, ijzer, plastic of ander dergelijk
materiaal.
De bandschuurmachine is voor het ruwe werk. Gebruik
voor normaal schuurwerk een vlakschuurmachine.
1. Aan/uitschakelaar
2. Voorste handgreep
3. Achterste handgreep
4. Blokkeerschakelaar
5. Opening voor de stofzak
6 Instelknop
7. Schuurbandbevestigingspal
8. Voorste bandrol
9. Richtingindicatie
10. Kap aandrijfriem
11. Stofzak
INHOUD VAN DE VERPAKKING
1 Bandschuurmachine
3 Schuurbanden
1 Stofzak
1 Handleiding
1 Veiligheidsvoorschriften
1 Garantiekaart
Controleer de machine, de losse onderdelen en de
accessoires op transportschade.
VEILIGHEIDSVOORSCHRIFTEN
In deze gebruiksaanwijzing worden de volgende pictogrammen gebruikt:
Duidt op mogelijk lichamelijk letsel, levensgevaar
of kans op beschadiging van de machine indien de
instructies in deze gebruiksaanwijzing worden genegeerd.
Geeft elektrische spanning aan.
Lees deze gebruiksaanwijzing aandachtig door voor u de
machine in gebruik neemt. Zorg dat u kennis heeft van de
werking van de machine en op de hoogte bent van de
bediening. Onderhoud de machine volgens de instructies opdat deze altijd goed functioneert. Bewaar deze
gebruiksaanwijzing en de bijgevoegde documentatie bij
de machine.
Neem bij het gebruik van elektrische machines altijd
de plaatselijk geldende veiligheidsvoorschriften in
acht in verband met brandgevaar, gevaar voor elektrische schokken en lichamelijk letsel. Lees behalve
onderstaande instructies ook de veiligheidsvoorschriften in het apart bijgevoegde veiligheidskatern
door.
Bewaar de instructies zorgvuldig!
• Draag tijdens het werken met de bandschuurmachine altijd gehoorbeschermers en stofmasker.
• De bandschuurmachine is niet geschikt voor natschuren.
• Controleer dat de schakelaar niet in de AAN-stand
staat vergrendeld voordat u de netstekker op de netspanning aansluit.
• Houd het netsnoer altijd uit de buurt van bewegende
delen van het gereedschap.
• Gebruik een veiligheidsbril, zeker als u boven het
hoofd schuurt.
• Oefen geen druk uit op uw machine, dit vertraagd het
schuren alleen maar.
HET APPARAAT ONMIDDELLIJK UITZETTEN BIJ:
• Overmatig vonken van de koolborstels en ringvuur in
de collector.
• Storing in de netstekker, netsnoer of snoerbeschadiging.
• Defecte schakelaar.
• Rook of stank van verschroeide isolatie.
2
3
8
10
6
9
1
7
4
115
Spanning | 230 V~
Frequentie | 50 Hz
Opgenomen vermogen | 800 W
Onbelaste schuurbandsnelheid | 280m/min
Afmetingen schuurband | 75 x 533 mm
Afmetingen schuurvlak | 75 x 160 mm
Gewicht | 3.0 kg
Lpa (geluidsdrukniveau) | 88.6 dB(A)
Lwa (Geluidsvermogensniveau) | 101.6 dB(A)
Vibratiewaarde | 3.511 m/s
2
Toledo 9
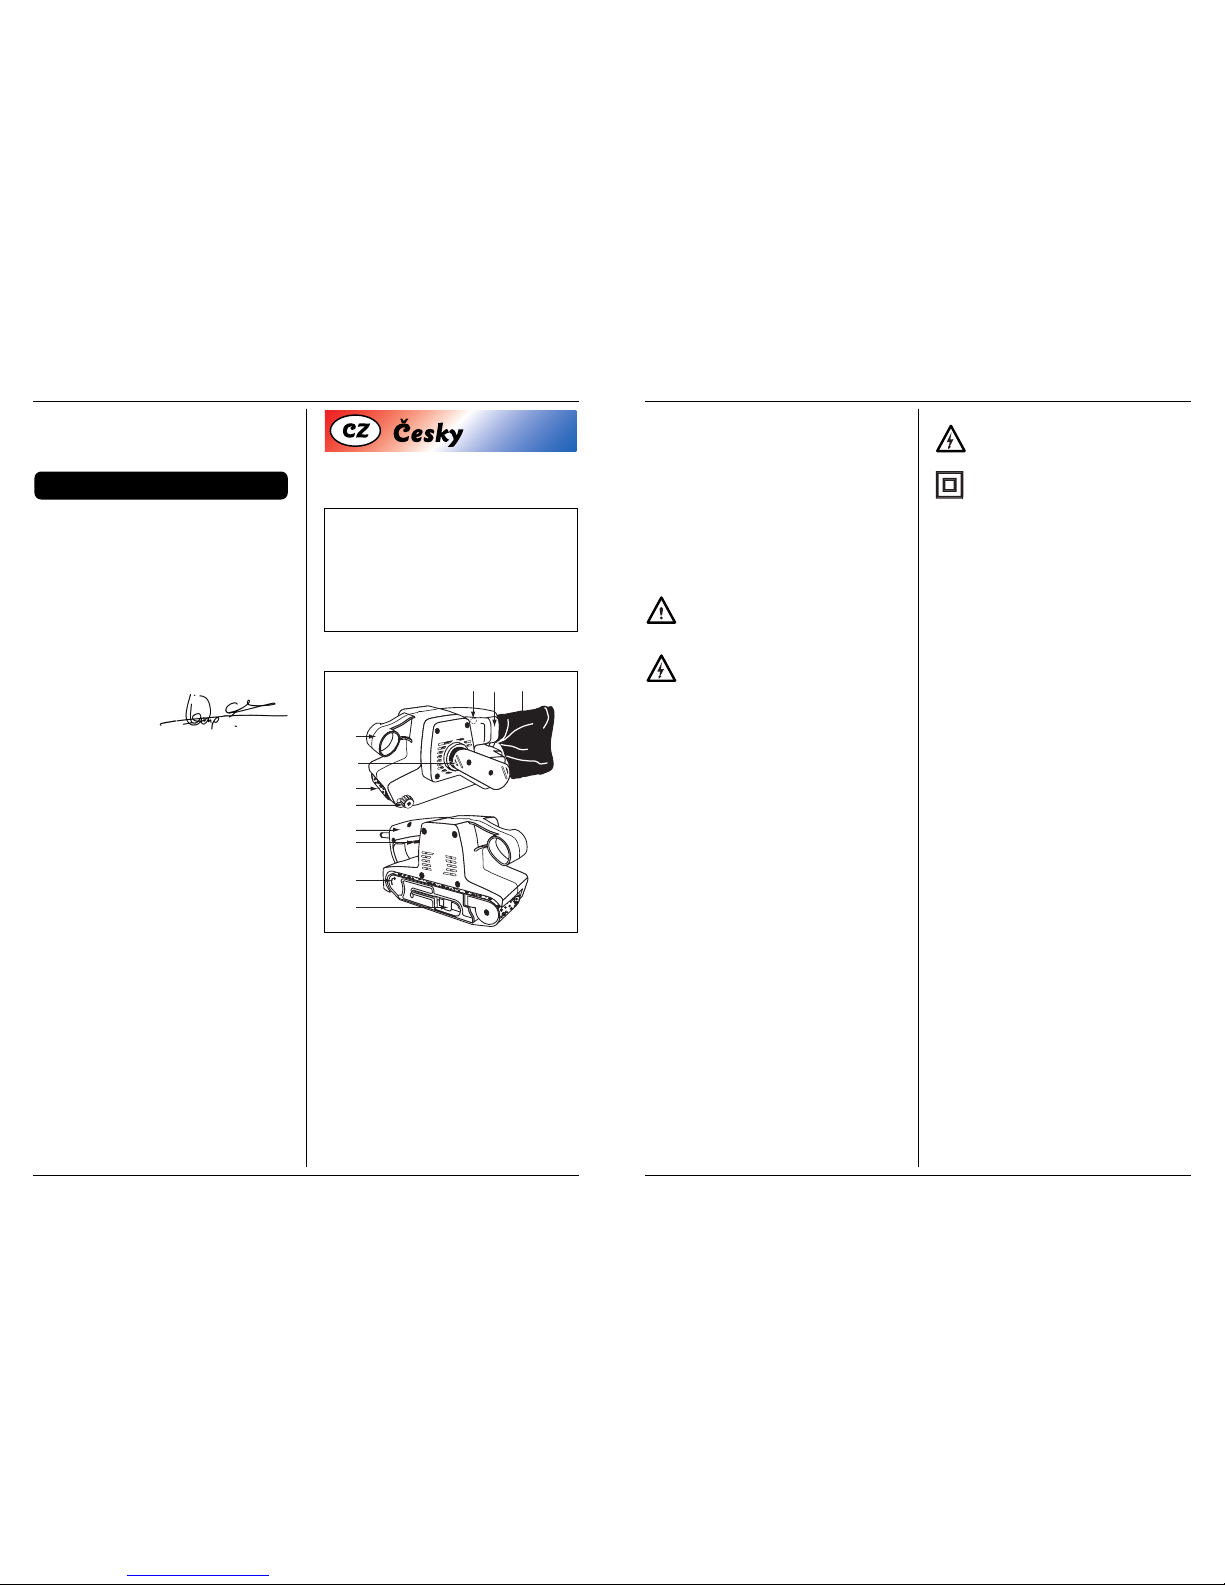
гЦзнйузДь тгаоеДтаздД
нЦпзауЦлдаЦ пДкДднЦкалнада
млнкйвлнЗй а йЕйбзДуЦзаь
êËÒ. A
гВМЪУ˜М‡fl ¯ОЛЩП‡¯ЛМН‡ fl‚ОflВЪТfl ЛМТЪЫПВМЪУП
‰Оfl ¯ОЛЩУ‚НЛ ‰ВВ‚‡, ПВЪ‡ОО‡, ФО‡ТЪП‡ТТ˚ Л
ФУ‰У·М˚ı П‡ЪВЛ‡ОУ‚.гВМЪУ˜М‡fl ¯ОЛЩП‡¯ЛМН‡
ФВ‰М‡БМ‡˜ВМ‡ ‰Оfl „Ы·УИ ¯ОЛЩУ‚НЛ. СОfl У·˚˜МУИ
¯ОЛЩУ‚НЛ У‚МУИ ФУ‚ВıМУТЪЛ ТОВ‰ЫВЪ
ЛТФУО¸БУ‚‡Ъ¸ ЩЛМЛ¯МЫ˛ ‚Л·У¯ОЛЩП‡¯ЛМНЫ.
1. èÂÂÍβ˜‡ÚÂθ «Çäã/Çõäã»
2. êÛÍÓflÚ͇ (Ô‰Ìflfl)
3. êÛÍÓflÚ͇ (Á‡‰Ìflfl)
4. ЕОУНЛУ‚У˜М‡fl НМУФН‡
5. йЪ‚ВТЪЛВ УЪ‚У‰‡ ‰В‚ВТМУИ Ф˚ОЛ
6. ê͇ۘ „ÛÎËÓ‚ÍË ÎÂÌÚ˚
7. дВФОВМЛВ ¯ОЛЩУ‚‡О¸МУИ ОВМЪ˚
8. иВВ‰МЛИ ОВМЪУ˜М˚И УОЛН
9. à̉Ë͇ˆËfl ̇ԇ‚ÎÂÌËfl
10. äÓÊÛı ¯ÎËÙÓ‚‡Î¸ÌÓÈ ÎÂÌÚ˚
11. è˚ÎÂÒ·ÓÌ˚È Ï¯ÓÍ
дйеигЦдн ийлнДЗда
1 гВМЪУ˜М‡fl ¯ОЛЩП‡¯ЛМН‡
3 тОЛЩУ‚‡О¸М˚В ОВМЪ˚
1 и˚ОВТ·УМ˚И ПВ¯УН
1 кЫНУ‚У‰ТЪ‚У ФУ ˝НТФОЫ‡Ъ‡ˆЛЛ
1 ЗНО‡‰˚¯ Т Ф‡‚ЛО‡ПЛ
1 ЪВıМЛНЛ ·ВБУФ‡ТМУТЪЛ
1 Й‡‡МЪЛИМ˚И Ъ‡ОУМ
иУ‚В¸ЪВ П‡¯ЛМЫ, МВБ‡НВФОВММ˚В ˝ОВПВМЪ˚ Л
НУПФОВНЪЫ˛˘ЛВ ЛБ‰ВОЛfl М‡ ФВ‰ПВЪ Ъ‡МТФУЪМ˚ı
ФУ‚ВК‰ВМЛИ.
икДЗагД нЦпзада
ЕЦбйиДлзйлна
З ‰‡ММУП ЫНУ‚У‰ТЪ‚В ФУ ˝НТФОЫ‡Ъ‡ˆЛЛ ФЛ‚У‰flЪТfl
ТОВ‰Ы˛˘ЛВ ФЛНЪУ„‡ПП˚:
мН‡Б˚‚‡ВЪ М‡ УФ‡ТМУТЪ¸, УФ‡ТМУТЪ¸ ‰Оfl
КЛБМЛ Л ‚УБПУКМ˚В ФУ‚ВК‰ВМЛfl П‡¯ЛМ˚ ФЛ
М‡Ы¯ВМЛЛ ЛМТЪЫНˆЛИ ‰‡ММУ„У ЫНУ‚У‰ТЪ‚‡ ФУ
˝НТФОЫ‡Ъ‡ˆЛЛ.
ì͇Á˚‚‡ÂÚ Ì‡ ̇΢ˠ˝ÎÂÍÚ˘ÂÒÍÓ„Ó
̇ÔflÊÂÌËfl.
иВВ‰ М‡˜‡ОУП ˝НТФОЫ‡Ъ‡ˆЛЛ П‡¯ЛМ˚ ‚МЛП‡ЪВО¸МУ
ФУ˜ЪЛЪВ ‰‡ММУВ ЫНУ‚У‰ТЪ‚У ФУ ˝НТФОЫ‡Ъ‡ˆЛЛ.
йБМ‡НУП¸ЪВТ¸ Т ФЛМˆЛФУП ‡·УЪ˚ Л ЫФ‡‚ОВМЛfl.
йТЫ˘ВТЪ‚ОflИЪВ ЪВıМЛ˜ВТНУВ У·ТОЫКЛ‚‡МЛВ П‡¯ЛМ˚
‚ ТУУЪ‚ВЪТЪ‚ЛЛ Т ‰‡ММ˚ПЛ ЛМТЪЫНˆЛflПЛ ‰Оfl Вfi
‰ОЛЪВО¸МУИ ·ВБЫФВ˜МУИ ˝НТФОЫ‡Ъ‡ˆЛЛ. з‡ТЪУfl˘ВВ
ЫНУ‚У‰ТЪ‚У Л ТУФЫЪТЪ‚Ы˛˘‡fl ‰УНЫПВМЪ‡ˆЛfl
‰УОКМ˚ ı‡МЛЪ¸Тfl ФУ·ОЛБУТЪЛ УЪ П‡¯ЛМ˚.
ЗТВ„‰‡ ТУ·О˛‰‡ИЪВ ФЛ ФУО¸БУ‚‡МЛЛ
˝ОВНЪУФЛ·У‡ПЛ ПВТЪМ˚В ЪВ·У‚‡МЛfl Н
ЪВıМЛНВ ·ВБУФ‡ТМУТЪЛ УЪМУТЛЪВО¸МУ ЛТН‡
‚УБМЛНМУ‚ВМЛfl ФУК‡‡, ФУОЫ˜ВМЛfl
˝ОВНЪУ¯УН‡ Л ЪВОВТМ˚ı ФУ‚ВК‰ВМЛИ. иУПЛПУ
ТОВ‰Ы˛˘Лı ЫН‡Б‡МЛИ, ФУ˜ЪЛЪВ Ъ‡НКВ
ЪВ·У‚‡МЛfl ФУ ЪВıМЛНВ ·ВБУФ‡ТМУТЪЛ ‚
ТУУЪ‚ВЪТЪ‚Ы˛˘ВИ УЪ‰ВО¸МУ ФЛО‡„‡ВПУИ
ОЛТЪУ‚НВ.
• ЗТВ„‰‡ ЛТФУО¸БЫИЪВ ТВ‰ТЪ‚‡ Б‡˘ЛЪ˚ У„‡МУ‚
ТОЫı‡ Л ‰˚ı‡МЛfl ФЛ ‡·УЪВ Т ОВМЪУ˜МУИ
¯ОЛЩП‡¯ЛМНУИ.
• гВМЪУ˜М‡fl ¯ОЛЩП‡¯ЛМН‡ МВ ‡ТТ˜ЛЪ‡М‡ М‡
‚·ÊÌÛ˛ ¯ÎËÙÓ‚ÍÛ.
• èӂ¸ÚÂ, Ì ̇ıÓ‰ËÚÒfl ÎË ‚˚Íβ˜‡ÚÂθ ‚
ФУОУКВМЛЛ “ON” (“Здг”), ФВК‰В ˜ВП ‚НО˛˜ЛЪ¸
¯ЪВНВМЫ˛ ‚ЛОНЫ ‚ УБВЪНЫ.
• м‰ВКЛ‚‡ИЪВ ¯МЫ ‚ТВ„‰‡ М‡ Ы‰‡ОВМЛЛ УЪ
ÔÓ‰‚ËÊÌ˚ı ˜‡ÒÚÂÈ ÔË·Ó‡.
• ЗТВ„‰‡ ФУО¸БЫИЪВТ¸ Б‡˘ЛЪМ˚ПЛ У˜Н‡ПЛ,
ÓÒÓ·ÂÌÌÓ ‡·ÓÚ‡fl ̇‰ „ÓÎÓ‚ÓÈ.
• ç ÒΉÛÂÚ ‰‡‚ËÚ¸ ̇ χ¯ËÌÍÛ, ˝ÚÓ Î˯¸ Á‡Ï‰ÎËÚ
Âfi ‡·ÓÚÛ.
2
3
8
10
6
9
1
7
4
115
з‡ФflКВМЛВ ФЛЪ‡МЛfl | 230 Ç~
ó‡ÒÚÓÚ‡ ÚÓ͇ | 50 Ɉ
èÓÚ·ÎflÂχfl ÏÓ˘ÌÓÒÚ¸ | 800 ÇÚ
ëÍÓÓÒÚ¸ ÎÂÌÚ˚ ·ÂÁ ̇„ÛÁÍË | 280 Ï/ÏËÌ
ê‡ÁÏ ¯ÎËÙÓ‚‡Î¸ÌÓÈ ÎÂÌÚ˚ | 75 x 533 ÏÏ
ꇷӘ‡fl ÔÓ‚ÂıÌÓÒÚ¸ ÎÂÌÚ˚ | 75 x 160 ÏÏ
å‡ÒÒ‡ | 3.0 Н„
С‡‚ОВМЛВ ¯ЫП‡ (Lpa ) | 88.6 ‰Å(A)
á‚ÛÍÓ‚‡fl ÏÓ˘ÌÓÒÚ¸ ¯Ûχ(Lwa ) | 101.6 ‰Å(A)
ìÓ‚Â̸ ‚Ë·‡ˆËË | 3.511 Ï/Ò2
44 Toledo
Page 10

ÚDRŽBA
Při provádní údržby motoru dbejte vždy na to, aby
přístroj nebyl pod naptím.
Přístroje značky Toledo jsou konstruovány pro dlouhodobé používání při minimální údržbě. Budou fungovat
bez problémů, pokud se jim bude věnovat náležitá péče a
pokud budou pravidelně čištěny.
iatní
Kryt přístroje pravidelně čistěte měkkým hadříkem
(nejlépe po každém použití). Odstraňujte prach a špínu z
otvorů ventilace.
Pokud se apínu nepodaří odstranit, použijte měkký
hadřík namočený v mýdlové vodě. Zásadně nepoužívejte
rozpouaštděla, jako jsou benzin, alkohol, čpavek apod.
Tato rozpouštědla by mohla poškodit umlěohmotné
součásti přístroje.
Mazání
Přístroj nevyžaduje žádné dodatečné mazání.
Poruchy
Jestliže dojde k poruše, např. v důsledku opotřebování
některé součásti, obraťte se na zástupce firmy Toledo.
Na konci této příručky se nachází nákres přístroje
rozloženého na jednotlivé díly, které je možné objednat.
ŽIVOTNģ PROSTŘEDÍ
Přístroj je dodáván v odolném balení, které zabraňuje
jeho poškození během přepravy. Většinu z materiálů,
které jsou na balení použity, lze recyklovat. Zbavujte se
jich proto pouze na místech určených pro odpad
příslušných látek.
Přístroje, které nepotřebujete, odneste k nejbližšímu
zástupci firmy Toledo ve vašem okolí. Zde dojde k jejich
likvidaci v souladu se zásadami ochrany životního
prostředí.
ZÁRUKA
Záruka je poskytována za podmínek, jež najdete na
samostatném záručním listu, který je přiložen k výrobku.
Prohlašujeme na vlastní odpovědnost, že
tento výrobek odpovídá následujícím
normám a standardizovaným dokumentům:
EN50144-1, EN50144-2-4. EN55014-1,
EN55014-2, EN61000-3-2, EN61000-3-3
v souladu se směrnicemi:
98/37/EEC
73/23/EEC
89/336/EEC
od 18-09-2002
GENEMUIDEN NL
W. Kamphof
Oddělení kvality
CE
ı
PROHLÁŠENÍ O SPLNĚNÍ NOREM
(CZ)
Toledo 43
ELEKTRISCHE VEILIGHEID
Controleer altijd of uw netspanning overeenkomt
met de waarde op het typeplaatje.
De machine is dubbel geïsoleerd overeenkomstig
EN 50144; een aardedraad is daarom niet nodig.
Bij vervanging van snoeren of stekkers
Gooi oude snoeren of stekkers direct weg zodra ze door
nieuwe exemplaren zijn vervangen. Het is gevaarlijk om
de stekker van een los snoer in het stopcontact te steken.
Bij gebruik van verlengsnoeren
Gebruik uitsluitend een goedgekeurd verlengsnoer, dat
geschikt is voor het vermogen van de machine. De aders
moeten een doorsnede hebben van minimaal 1,5 mm2.
Wanneer het verlengsnoer op een haspel zit, rol het
snoer dan helemaal af.
BEDIENING
Neem altijd de veiligheidsvoorschriften en andere
van toepassing zijnde voorschriften in acht.
KEUZE VAN HET SCHUURPAPIER
Grof schuurpapier (korrel 50) verwijdert over het algemeen het meeste materiaal en fijn schuurpapier wordt
gebruikt voor de afwerking. Als het oppervlak oneffen is,
begint u met grof schuurpapier. Vervolgens gebruikt u
middelgrof schuurpapier (korrel 80) om de krassen die
het eerste papier heeft achtergelaten te verwijderen en
tenslotte neemt u fijn schuurpapier (korrel 120) voor de
afwerking.
HET VERWIJDEREN EN AANBRENGEN VAN
DE SCHUURBAND
Haal voor het verwisselen van de schuurband altijd
eerst de stekker uit het stopcontact.
• Leg de machine op de zijkant, met de kap van de aan-
drijfriem (10, Fig. A) naar beneden.
• Maak de schuurbandbevestigingspal (7, Fig. A) los.
• Verwijder de oude schuurband van de machine.
• Breng een nieuwe schuurband op de machine aan. Let
er hierbij op, dat de richtingspijlen op de schuurband
in dezelfde richting wijzen als de richtingindicatie
(9, Fig. A).
• Maak de schuurbandbevestigingspal weer vast
(7, Fig. A).
HET IN LIJN BRENGEN VAN DE SCHUURBAND
Als de schuurband niet met de buitenrand van de behuizing parallel loopt, dan moet deze in lijn worden
gebracht. Verplaats de schuurband met de instelknop (6,
Fig. A) naar de juiste stand. De schuurband gaat naar binnen als u de instelknop met de klok mee draait, en hij gaat
naar buiten als u de instelknop tegen de klok in draait.
AAN- EN UITSCHAKELEN
• Druk op de aan/uitschakelaar (1, Fig. A) om de
machine aan te zetten.
• Als u de aan/uitschakelaar (1, Fig. A) loslaat, gaat de
machine weer uit.
Voor continu bedrijf kunt u de blokkeerschakelaar (4, Fig. A) gebruiken:
• Druk op de aan/uitschakelaar om de machine aan te
zetten.
• Druk vervolgens op de blokkeerschakelaar (4, Fig. A)
en laat de aan/uitschakelaar los.
• Als u de machine uit wilt zetten, dient u opnieuw op
de aan/uitschakelaar te drukken, waarna deze vrijkomt.
AANBRENGEN VAN DE STOFZAK
De stofzak dient om tijdens het schuren de vrijkomende
stof op te vangen.
• Duw de stofzak over de betreffende opening
(5, Fig. A).
• Maak voor doeltreffende stofafzuiging de stofzak
regelmatig leeg.
10 Toledo
Page 11

HANDGREPEN
De aanwezigheid van twee handgrepen (voor en achter)
maakt het gebruik van de bandschuurmachine gemakkelijker. U kunt de machine nu met beide handen vasthouden, waardoor u een betere beheersing over de machine
krijgt en het gevaar dat u met bewegende delen in aanraking zou komen, kleiner wordt. Houd de bandschuurmachine daarom altijd met beide handen vast.
AANWIJZINGEN VOOR GEBRUIK
Laat de machine altijd eerst volledig op toeren komen,
voordat u de machine op het werkstuk plaatst. Daarmee
voorkomt u dat de machine overbelast raakt.
Bij het schuren van hout dient u de machine ongeveer 15°
uit de richting van de houtnerf te houden. Beweeg de
bandschuurmachine zonder onderbrekingen over het
werkstuk.
STORINGEN
In het geval de machine niet naar behoren functioneert,
geven wij onderstaand een aantal mogelijke oorzaken en
de bijbehorende oplossingen.
De elektromotor wordt heet
• De koelluchtsleuven in de motor zijn verstopt met
vuil.
Reinig de koelluchtsleuven.
• De motor is defect.
Bied de machine aan bij uw Toledo-dealer voor controle en/of reparatie.
De ingeschakelde machine werkt niet
• Onderbreking in de netaansluiting.
Netaansluiting controleren op breuk.
Bied de machine aan bij uw Toledo-dealer voor controle en/of reparatie.
Het stof word niet opgezogen
• Dit is mogelijk te wijten aan een verstopte stofafzuiging.
Reinig de stofafzuig-opening.
Laat reparaties altijd uitvoeren door een erkend
installateur of reparatiebedrijf.
ONDERHOUD
Zorg dat de machine niet onder spanning staat
wanneer onderhoudswerkzaamheden aan het
mechaniek worden uitgevoerd.
De machines van Toledo zijn ontworpen om gedurende
lange tijd probleemloos te functioneren met een minimum aan onderhoud. Door de machine regelmatig te
reinigen en op de juiste wijze te behandelen, draagt u bij
aan een hoge levensduur van uw machine.
Reinigen
Reinig de machine-behuizing regelmatig met een zachte
doek, bij voorkeur iedere keer na gebruik. Zorg dat de
ventilatiesleuven vrij van stof en vuil zijn.
Gebruik bij hardnekkig vuil een zachte doek bevochtigd
met zeepwater. Gebruik geen oplosmiddelen als benzine, alcohol, ammonia, etc. Dergelijke stoffen beschadigen de kunststof onderdelen.
Smeren
De machine heeft geen extra smering nodig.
Storingen
Indien zich een storing voordoet als gevolg van bijvoorbeeld slijtage van een onderdeel, neem dan contact op
met uw plaatselijke Toledo-dealer.
Achterin deze gebruiksaanwijzing vindt u een onderdelentekening met de na te bestellen onderdelen.
MILIEU
Om transportbeschadiging te voorkomen, wordt de
machine in een stevige verpakking geleverd. De verpakking is zo veel mogelijk gemaakt van recyclebaar materiaal. Maak daarom gebruik van de mogelijkheid om de verpakking te recyclen.
Breng oude machines wanneer u ze vervangt naar uw
plaatselijke Toledo-dealer. Daar zal de machine op
milieuvriendelijke wijze worden verwerkt.
Toledo 11
POUŽITÍ
Řiďte se vždy bezpečnostními pokyny a dalšími
nařízeními, které se vztahují na konkrétní případ
používání přístroje.
ZVOLENÍ BRUSNÉHO PAPÍRU
Hrubý brusný papír (zrnitost 50) všeobecně odstraňuje
více materiálu a jemný brusný papír se používá pro
konečnou úpravu. Pokud je povrch nerovnoměrný
začněte práci s hrubým brusným papírem. Potom
použijte středné hrubý brusný papír (zrnitost 80) aby se
odstranili rýhy zanechané po použití hrubého brusného
papíru a pro konečnou úpravu povrchu použijte jemný
brusný papír (zrnitost 120).
ODEJMUTÍ A NASAZENÍ BRUSNÉHO PÁSU
Pred nasazováním brusného pásu vždy
vytáhněte zástrčku ze zásuvky.
• Položte přístroj na bok s krytem hnacího řemene
(10, Obr. A) směrem dolů.
• Uvolněte páčku na dotažení brusného pásu
(7, Obr A).
• Odejměte brusný pás z přístroje.
• Položte na přístroj nový brusný pás. Dejte přitom
pozor, aby směrové šipky na brusném pásu ukazovaly
ve stejném směru jako ukazatel směru (9, Obr. A).
• Páčku na dotažení brusného pásu opět utáhněte
(7, Obr. A).
VYROVNÁNÍ SMůRU BRUSNÉHO PÁSU
Jestliže se brusný pás neotáčí přesně rovnoběžně s vnější
hranou krytu přístroje, musí být směr pásu vyrovnán.
Posuňte brusný pás do správné pozice pomocí nastavovacího knoflíku (6, Obr. A). Otáčením nastavovacího
knoflíku ve směru hodinových ručiček se bude brusný
pás posunovat směrem dovnitř a otáčením proti směru
hodinových ručiček se bude brusný pás posunovat směrem ven.
ZAPNUTÍ A VYPNUTÍ PřÍSTROJE
•K tomu, abyste přístroj zapnuli, stiskněte vypínač
(1, Obr. A).
• Abyste přístroj vypnuli, vypínač uvolněte (1, Obr. A).
Je-li potřeba pracovat nepřetržite, pak se musí
použít aretační tlačítko (4, Obr. A):
• Zapněte přístroj stisknutím vypínače.
• Stiskněte aretační tlačítko (4, Obr. A) a uvolněte
vypínač.
• Abyste přístroj vypnuli, vypínač opět stiskněte a
uvolněte.
NAMONTOVÁNÍ PRACHOVÉHO SÁŐKU
Prachový sáček použijte k zachycení prachu, který se
uvolňuje během broušení.
• Nasaďte prachový sáček na otvor prachového
vývodu (5, Obr. A).
• Prachový sáček pravidelně vyprazdňujte, aby
odsávání prachu bylo účinné.
RUKOJEť
Používání pásové brusky je usnadněno pomocí dvou
rukojetí. Jedna z nich je umístěna na přední straně a druhá
na zadní straně přístroje. Tím, že můžete přístroj držet
oběma rukama, budete nad ním mít lepší kontrolu a
zmenšíte tak riziko, že se dotknete pohybujících se částí.
Pásovou brusku vždy držte oběma rukama.
NÁVOD K POUžITÍ
Ubezpečte se, že přístroj dosáhl maximálních otáček
dříve, než jej položíte na opracovávaný předmět. Tím se
vyhnete přetížení přístroje.
Dřevo obrušujte přibližně pod úhlem 15° vzhledem k
jeho vláknům. Pohybujte pásovou bruskou plynule po
opracovávaném předmětu.
VYHLEDÁVÁNÍ ZÁVAD
V případě, že Vaše bruska nepracuje dobře uvedeme
některé příčiny závad a jejich odstranění.
Elektromotor se zahřívá
• Větrací vzdušné štěrbiny na motoru jsou zablokovány nečistotou.
Vyčistěte větrací vzdušné štěrbiny
• Motor je poruchovy.
Nechejte brusku opravit nebo zkontrolovat místním
zástupcem firmy TOLEDO.
Zapnuty stroj nepracuje
• Porucha v přívodu el. proudu.
- Zkontrolujte, zda není přívod el. proudu přerušen;
- Nechejte brusku opravit/zkontrolovat místním
zástupcem firmy Toledo.
Prach není odsáván
• To může být způsobeno zanesením odsávače prachu.
Vyčistěte odsávací otvor
Opravy elektrického příslušenství mohou být
prováděny pouze odborníkem.
42 Toledo
Page 12

OBSAH BALENÍ
1 Pásová bruska
3 Brusné pásy
1 Prachový sáček
1 Návod k použití
1 Bezpečností pokyny
1 Záruční list
Zkontrolujte přistroj, volné části a příslušenství, zdali
nebyly poškozeny dopravou.
BEZPEČNOSTNĺ POKYNY
V příručce budou používány následující symboly:
Označuje nebezpečí (smrtelného) zranéní nebo
poškození nástroje, k nimž může dojít, pokud se
nebude dbát pokynů obsaženżých v této příručce
Označuje nebezpečí zasažení elektrickým proudem
Než začnete nástroj používat, pečlivě pročtěte tuto př
íručku. Seznamte se s tím, jak nástroj funguje a jaká je jeho
obsluha. K tomu, aby nástroj náležitě fungoval, je třeba
provádět jeho údržbu v souladu s pokyny obsaženými v
této příručce. Příručku i další dokumentaci mějte
uloženy v blízkosti nástroje.
Při používání elektrických přístrojů je vždy třeba
dodržovat bezpečnostní předpisy platné ve vašem
státě. Sníží se tím nebezpečí požáru, zasažení elektrickým proudem a zranní osob. Pročtěte zde uvedené bezpečnostní pokyny a seznamte se i s bezpečnostními pokyny přiloženými k nástroji. Uložte tyto
pokyny na bezpečném místě.
• Jestliže pracujete s brousícím strojem vždy
používejte chránič proti hluku a prachovou ochrannou masku.
• Brousící stroj není vhodný pro broušení za mokra.
• Zkontrolujte než zapojíte zástrčku do hlavního el.
přívodu jestli vypínač není v posici "ON" (Zapnuto).
• Držte přívodní kabel v bezpečné vzdálenosti od
pohybujících se části nástroje.
• Používejte bezpečnostní brýle, zvláště když brousíte
nad Vaší hlavou.
• Netlačte na Váš stroj, tím jenom zpomalíte broušení.
OKAMŽITŰ VYPNŰTE STROJ JESTLIŽE SE
OBJEVÍ:
• Nadměrné jiskření uhlíkových kartáčů v kolektoru.
• Porucha zástrčky hlavního el. přívodu, přívodního
kabelu a nebo poškození přívodního kabelu.
• Vadný vypínač.
• Kouř nebo zápach ze spálené izolace.
BEZPEŐNOST PřI PRÁCI S ELEKTřINOU
Vždy kontrolujte, jestli napájení odpovídá napětí na
typovém štítku.
Váš přístroj má v souladu s EN 50144 dvojitou izolaci; uzemňovací vodič proto není zapotřebí.
Výměna kabelů a zástrček
Staré kabely nebo zástrčky po výměně za nové okamžitě
vyhoďte. Je nebezpečné používat zástrčky s uvolnnými
kabely.
Používání prodlužovacích kabelů
Používejte pouze schválené prodlužovací kabely
odpovídající příkonu přístroje. Minimální průřez vodiče
je 1,5 mm2. Používáte-li kabelový naviják, vždy ho odviňte
celý.
Toledo 41
GARANTIE
Lees voor de garantievoorwaarden de apart bijgevoegde
garantiekaart.
Wij verklaren dat dit product
voldoet aan de volgende
normen of normatieve documenten
EN50144-1, EN50144-2-4. EN55014-1,
EN55014-2, EN61000-3-2, EN61000-3-3
overeenkomstig de bepalingen in de richtlijnen
98/37/EEG
73/23/EEG
89/336/EEG
vanaf 18-09-2002
GENEMUIDEN NL
GW. Kamphof
Quality department
PONCEUSE À BANDE
SPECIFICATIONS TECHNIQUES
DESCRIPTION
Fig. A.
La ponceuse à bande est l'outil idéal pour poncer le bois
et pour meuler le fer, le plastique et autres matériaux
similaires. Une ponceuse à bande sert aux travaux de
dégrossissage; pour le ponçage normal, utiliser de préférence une ponceuse excentrique.
1. Bouton marche/arrêt
2. Poignée avant
3. Poignée arrière
4. Bouton de verrouillage
5. Ouverture d'expulsion de la poussière
6 Molette de réglage
7. Fixation de la bande
8. Rouleau avant de la bande
9. Indicateur du sens de rotation
10. Capot de la courroie d'entraînement
11. Sac à poussière
2
3
8
10
6
9
1
7
4
115
Tension | 230 V~
Fréquence | 50 Hz
Puissance consommée | 800 W
Vitesse de la bande sans charge | 280 m/min
Dimension de la bande | 75 x 533 mm
Dimension du patin de ponçage | 75 x 160 mm
Poids | 3.0 kg
Lpa (pression sonore) | 88.6 dB(A)
Lwa (niveau sonore) | 101.6 dB(A)
Valeur vibratoire | 3.511 m/s
2
CE
ı
CONFORMITEITSVERKLARING
(NL)
12 Toledo
Page 13
CONTENU DE LA BOITE
1 Ponceuse à bande
3 Bandes de ponçage
1 Sac à poussière
1 Manuel d'utilisation
1 Consignes de sécurité
1 Bon de garantie
Vérifier la machine, les pièces et accessoires mobiles
pour détecter les dommages éventuels.
CONSIGNES DE SÉCURITÉ
Dans ce mode d’emploi, il est fait usage des pictogrammes suivants :
Indique un éventuel risque de lésion corporelle, un
danger de mort ou un risque d’endommagement
de la machine si les instructions de ce mode d’emploi ne sont
pas respectées.
Indique la présence de tension électrique.
Lisez attentivement ce mode d’emploi avant d’utiliser la
machine. Assurez-vous d’avoir bien pris connaissance du
fonctionnement de la machine et de son utilisation.
Entretenez la machine conformément aux instructions
afin qu’elle fonctionne toujours correctement. Conservez ce mode d’emploi et la documentation jointe à proximité de la machine.
Lors d’utilisation de machines électriques, observez
les consignes de sécurité locales en vigueur en
matière de risque d’incendie, de chocs électriques et
de lésion corporelle. En plus des instructions ci-dessous, lisez entièrement les consignes de sécurité contenues dans le cahier de sécurité fourni à part.
Conservez soigneusement ces instructions!
• Portez toujours des protecteurs pour l’ouïe si vous
travaillez avec la ponceuse à bande.
• La ponceuse à bande n’est pas facile pour poncer sous
liquide.
• Contrôlez si l’interrupteur n’est pas dans la postion
“MARCHE” avant de brancher la fiche-secteur sur la
tension du réseau.
• Tenez le fil d’alimentation toujours loin de parties
mouvantes des outils.
• Utilisez des lunettes de sécurité, surtout si vous pon-
cez au-dessus de la tête.
• N’exercez pas de la pression sur votre machine, ceci
seulement retard le poncer.
ARRÊTER IMMÉDIATEMENT L’APPAREIL EN
CAS DE :
• Étinceler démesurément des balais et feu annulaire
dans le collecteur.
• Court-circuit de la fiche-secteur ou du fil d’alimenta-
tion ou endommagement du fil d’alimentation.
• Interrupteur défectueux.
• Fumée ou odeur d’isolant brûlé.
SÉCURITÉ ÉLECTRIQUE
Vérifiez toujours si la tension de votre réseau correspond à la valeur mentionnée sur la plaque signalé-
tique.
La machine est doublement isolée conformément à
la norme EN 50144 ; un fil de mise à la terre n’est
pas donc pas nécessaire.
En cas de changement de câbles ou de fiches
Jetez immédiatement les câbles ou fiches usagés dès
qu’ils sont remplacés par de nouveaux exemplaires. Il est
dangereux de brancher la fiche d’un câble défait dans une
prise de courant.
En cas d’emploi de câbles prolongateurs
Employez exclusivement un câble pro longateur homologué, dont l’usage est approprié pour la puissance de la
machine. Les fils conducteurs doivent avoir une section
minimale de 1,5 mm2. Si le câble prolongateur se trouve
dans un dévidoir, déroulez entièrement le câble.
Toledo 13
GARANCIA
A garanciális feltételeket a kézikönyvhöz csatolt garanciakártya tartalmazza.
Igazoljuk, hogy ez a termék eleget tesz a
következő szabványoknak, illetve műszaki
dokumentumoknak:
EN50144-1, EN50144-2-4. EN55014-1,
EN55014-2, EN61000-3-2, EN61000-3-3
megegyezik a következő műszaki irányvonalak
előírásaival:
98/37/EEC
73/23/EEC
89/336/EEC
18-09-2002-tól
GENEMUIDEN NL
W. Kamphof
minőségellenőrző
osztály
PÁSOVÁ BRUSKA
TECHNICKÉ ÚDAJE
INFORMACE O VÝROBKU
Obr. A.
Pásová bruska je ideální přístroj k broušení dřeva a
leštění železa, plastických hmot a příbuzných materiálů.
Pásová bruska se musí používat pro hrubou brousící
práci. Pro běžné broušení slouží okružní bruska musí být
použita.
1. Vypínač
2. Přední rukojeť
3. Zadní rukojeť
4. Aretační tlačítko
5. Otvor pro prachový sáček
6 Knoflík nastavení polohy brusného pásu
7. Páčka dotažení brusného pásu
8. Přední válec pásové brusky
9. Ukazatel směru
10. Kryt hnacího řemene
11. Prachový sáček
2
3
8
10
6
9
1
7
4
115
Napětí | 230 V~
Kmitočet | 50 Hz
Příkon | 800 W
Počet otáček bez brusného papíru | 280m/min
Rozměry brusného pásu | 75x 533 mm
Rozměry brusné plochy | 75 x 160 mm
Poids | 3.0 kg
Lpa (akustický tlak) | 88.6 dB(A)
Lwa (hladina emise hluku) | 101.6 dB(A)
Vibrace | 3.511 m/s
2
CE
ı
MEGFELELŐSÉG IGAZOLÁSA
(H)
40 Toledo
Page 14

A GÉP TARTÁSA
A szalagcsiszológép az elülső és hátsó fogantyúk által
kényelmesen használható. Ezekkel a gépet két kézzel
tarthatjuk, biztosabban vezethetjük és a mozgó részek
érintésének veszélye csekély. A szalagcsiszológépet tartsuk mindig két kézzel.
HASZNÁLATI ÚTMUTATÓ
Ügyeljünk rá, hogy a gép elérje teljes sebességét mielőtt a
munkadarabra helyezzük. Ezzel elkerüljük a gép túlterhelését.
Fa megmunkálásakor a csiszolást az anyag szálirányához
képest kb.15°-os szögben végezzük. A szalagcsiszológépet mozgassuk egyenletesen a mintadarabon.
ÜZEMZAVAR
Megadunk néhány lehetséges okot és megoldást arra az
esetre, ha a szalagcsiszológép nem működne megfelelően.
A motor felforrósodik
•A szellözőnyílások eldugultak.
Tisztítsa ki a szellözőnyílásokat.
•A motor meghibásodott.
Adja át a gépet a Toledo-kereskedönek javításra.
A bekapcsolt gép nem müködik
• Törés a hálózatban.
Ellenörizze a vezetékeket.
Adja át a gépet a Toledo-kereskedönek javításra.
A por nem szívódik el
•A porelszívó eldugult.
Tisztítsa meg a porelszívó-csatlakozót.
A villamos gépek javítását mindig képzett elektro-
mos szakemberre bízza.
KARBANTARTÁS
A karbantartási munkák megkezdése előtt minden esetben győződjön meg róla, hogy a gép nincs-
e áram alatt.
A Toledo gépek megtervezésüknek és összeállításuknak
köszönhetően hosszú ideig és minimális karbantartással
üzemeltethetők. A folyamatos jó működés a gép helyes
kezelésével és rendszeres tisztításával biztosítható.
Tisztítás
A gép külső burkolatát puha kendővel rendszeresen –
lehetőleg minden használat után – törölje le. Ügyeljen
arra, hogy a szellőzőnyílásokat ne zárja el por vagy egyéb
szennyeződés!
Amennyiben a szennyeződés nem távolítható el azonnal,
használjon szappanos vízbe mártott puha kendőt! Soha
ne használjon oldószereket, mint például benzint, alkoholt, szalmiákszeszt stb. Ezek az oldószerek károsíthatják a műanyag részeket.
Olajozás
A gép külön olajozást nem igényel.
Meghibásodás
A gép - pl. egy alkatrész kopása miatt bekövetkező - meghibásodása esetén kérjük vegye fel a kapcsolatot a helyi
Toledo-forgalmazóval.
A kézikönyv hátulján található bontott részábrán valamennyi megrendelhető alkatrész és tartozék látható.
KÖRNYEZET
A szállítás során bekövetkező esetleges sérülések
elkerülése érdekében a gép meglehetősen erős csomagolásban kerül leszállításra. A csomagoláshoz felhasznált
anyagok nagy része újrafeldolgozható. Kérjük, hogy ezeket az anyagokat vigye a megfelelő szemétfeldolgozó
telepekre!
Amennyiben gépét nem kívánja tovább használni, kérjük
adja le a helyi Toledo-forgalmazónál. A gépek hulladékanyagként való eltávolítása itt minden esetben környezetkímélő módon történik.
Toledo 39
OPERATION
Toujours respecter les consignes de sécurité et les
réglementations en vigueur.
CHOIX DU PAPIER ABRASIF
Du papier abrasif gros (grain 50) éloigne généralement le
plus matérial et papier abrasif fin est utilisé pour le finissage. Si la surface est inégale, vous commencez avec du
papier abrasif gros. Ensuite vous utilisez du papier abrasif
gros à demi (grain 80) pour éloigner les rayures par le
premier papier et finalement vous prenez du papier abrasif fin ( grain 120) pour le finissage.
RETRAIT ET INSTALLATION DE LA BANDE
DE PONÇAGE
Avant de monter la bande, il faut toujours débrancher la machine.
• Poser la machine sur le côté, avec le capot de la courroie d'entraînement (repère 10, Fig. A) en bas.
• Desserrer la fixation de la bande de ponçage
(repère 7, Fig. A).
• Retirer la bande de ponçage de la machine.
• Mettre en place une bande neuve, vérifier que les
flèches du sens de rotation sur la bande pointent dans
le même sens que l'indicateur sur la machine.
• Resserrer la fixation de la bande de ponçage
(repère 7, Fig. A).
ALIGNEMENT DE LA BANDE DE PONÇAGE
Si la bande ne tourne pas parallèlement au bord extérieur
du boîtier, il faut l'aligner. Déplacer la bande de ponçage
jusqu'à la bonne position à l'aide de la molette de réglage
(repère 6, Fig. A). Tourner la molette de réglage dans le
sens horaire pour déplacer la bande vers l'intérieur et
tourner la molette dans le sens antihoraire pour
déplacer la bande vers l'extérieur.
MISE EN MARCHE ET ARRÊT
• Pour mettre la machine en marche, appuyer sur le
bouton marche/arrêt (repère 1, Fig. A).
• Pour arrêter la machine, appuyer de nouveau sur le
bouton marche/arrêt (repère 1, Fig. A).
Pour un fonctionnement en continu, utiliser le
bouton de verrouillage (repère 4, Fig. A) :
• Mettre la machine en marche en maintenant le bouton marche/arrêt enfoncé.
• Appuyer sur le bouton de verrouillage
(repère 4 fig. A) et relâcher le bouton marche/arrêt.
• Pour arrêter la machine, appuyer de nouveau sur le
bouton marche/arrêt et relâcher.
INSTALLATION DU SAC À POUSSIÈRE
Utiliser le sac à poussière pour recueillir la poussière
produite pendant le ponçage.
• Placer le sac sur l'ouverture d'expulsion de la poussière (repère 5, Fig. A).
• Vider le sac régulièrement pour conserver une
extraction efficace de la poussière.
POIGNÉES
L'utilisation de cette ponceuse est facilitée par les deux
poignées, l'une à l'avant et l'autre à l'arrière de la machine.
Cela permet de maintenir la machine à deux mains et
ainsi de mieux la contrôler tout en réduisant les risques
de toucher les parties en mouvement. Maintenir toujours la ponceuse à bande avec les deux mains.
INSTRUCTIONS D'UTILISATION
S'assurer que la machine à atteint sa vitesse maximale
avant de la poser sur la pièce à poncer. Cela évite de surcharger la machine.
Pour poncer du bois, positionner la machine à un angle de
15° environ par rapport au sens du bois. Déplacer la ponceuse de manière continue sur la pièce à travailler.
PANNES
Si la machine ne fonctionne pas bon, nous indiquons cidessous quelques possibles raisons et solutions assortis.
Le moteur électrique est chaud
• Les encoches d’air frais dans le moteur sont bouchés
avec du sale.
Nettoyez les encoches d’air frais.
• Le moteur est défectueux.
Donnez la ponceuse à réparer à votre distributeur
Toledo.
La machine branchée ne fonctionne pas
• Interruption dans le raccordement du réseau.
Contrôlez si le raccordement du réseau a une rupture.
Donnez la ponceuse à réparer ou à contrôler à votre
distributeur Toledo.
La poussière n’est pas aspirée
• Cela peut àtre dû à une aspiration dépoussière.
Nettoyez l’ouverture de l’aspiration dépoussière.
Toute réparation doit être faite par un spécialiste et
uniquement avec des pièces d’origine!
14 Toledo
Page 15

ELEKTROMOS BIZTONSÁG
Mindig ellenűrizze, hogy a gépre kapcsolt áram
feszültsége megegyezik-e a géptörzslapon feltünt-
etett adattal!
Gépe az EN 50144 normának megfelelően kettősen szigetelt; földelővezeték éppen ezért nem
szükséges.
A vezetékek és a dugaszok cseréje
A lecserélt vezetékeket és dugaszokat azonnal dobja el!
Nem csatlakoztatott illetve nem szigetelt végű vezeték
dugaszát fali konnektorba dugni rendkívül veszélyes!
Hosszabbítózsinór használata
Kizárólag jóváhagyott és a gép bemenőteljesítményének
megfelelő hosszabbítózsinórt használjon! A minimális
vezetékméret 1,5 mm2. Amennyiben kábeldobot
használ, mindig teljesen tekerje le.
HELYEZÉS
A biztonsági előírásokat és rendszabályokat mindenkor tartsuk be.
ÜZEMBE HELYEZÉS ELŐTT
Durva csiszolópapír (50-es szemcse) eltünteti a legtöbb
fajta anyagot, a finom csiszolópapírt finomcsiszolásra ill. a
befejezõ munkálatokra használják. Ha a munkadarab
felszíne szabálytalan, akkor durva csiszolópapírral
kezdjük a munkát. Ezután egy közepes csiszolópapírral
(80-as szemcse) eltüntetjük a durva csiszolópapír okozta
karcolásokat.
Majd ezután finom csiszolópapírral (120-as szemcse)
elvégezzük az utolsó simításokat.
A CSISZOLÓSZALAG LE- ÉS FELSZERELÉSE
Mielőtt a csiszolószalag szereléséhez kezdenénk,
a csatlakozót húzzuk ki a konnektorból.
• Helyezzük le a gépet az oldalára úgy, hogy a szíjhajtás
(A ábra, 10) fedele lefelé legyen
•A szalagfeszítőt lazítsuk meg (A ábra, 7)
•A csiszolószalagot emeljük le a gépről
• Helyezzük rá a gépre az új csiszolószalagot, ügyelve
arra, hogy a szalagon lévő nyilak az (A ábra, 9) irányjelzőnek megfelelően álljanak
•A , 7 szalagfeszítőt feszítsük meg újra (A ábra).
A CSISZOLÓSZALAG EGYENESBE
állítása
Ha a csiszolószalag a gép burkolatával nem fut párhuzamosan, akkor a szalagot egyenesbe kell állítani. A szalagot
az (A ábra, 6) szalagállító gombbal hozzuk megfelelő pozícióba). A szalagállító gombot az óra járásával egyező irányban forgatva a szalag befelé, ellenkező irányban forgatva pedig kifelé fog elmozdulni.
BE- ÉS KIKAPCSOLÁS
•A gép bekapcsolása az On/Off kapcsoló benyomásával történik (A ábra, 1).
•A gép kikapcsolása az On/Off kapcsoló kiengedésével történik (A ábra, 1).
Folyamatos csiszoláshoz a reteszelő kapcsolót
használjuk (A ábra (4)):
•A gépet bekapcsoljuk az On/off kapcsolóval
• Benyomjuk a reteszelő kapcsolót (A ábra, 4) és kiengedjük az On/Off kapcsolót.
•A gép kikapcsolásához nyomjuk meg újra majd
engedjük ki az On/off kapcsolót.
A PORZSÁK FELSZERELÉSE
A pozsák a csiszolás közben képződő por kiszűrésére
szolgál.
• Helyezzük a porzsákot a porgyűjtő nyílásra (A ábra, 5).
•A hatásos porszűrés érdekében a porzsákot ürítsük
rendszeresen.
38 Toledo
ENTRETIEN
Assurez-vous que la machine n’est pas sous tension
si vous allez procéder à des travaux d’entretien
dans son système mécanique.
Les machines de Toledo ont été conçues pour fonctionner longtemps sans problème avec un minimum d’entretien. En nettoyant régulièrement et correctement la
machine, vous contribuerez à une longue durée de vie de
votre machine.
Nettoyage
Nettoyez régulièrement le carter au moyen d’un chiffon
doux, de préférence à l’issue de chaque utilisation. Veillez à ce que les fentes d’aération soient indemnes de
poussière et de saletés.
En présence de saleté tenace, employez un chiffon doux
humecté d’eau savonneuse. Proscrivez l’emploi de solvants comme l’essence, l’alcool, l’ammoniaque etc. car
ces substances attaquent les pièces en plastique.
Graissage
Cette machine ne nécessite pas de graissage supplémentaire.
Pannes
En cas de panne survenue par exemple à la suite de l’usure d’une pièce, contactez votre distributeur Toledo
local.
Au dos de ce mode d’emploi, vous trouverez un dessin
des pièces avec les pièces dont vous pouvez renouveler
la commande.
ENVIRONNEMENT
Pour éviter les dommages liés au transport, la machine
est livré dans un emballage robuste. L’emballage est
autant que possible constitué de matériau recyclable.
Veuillez par conséquent destiner cet emballage au recyclage.
Si vous allez changer de machines, apportez les machines
usagées à votre distributeur Toledo local qui se chargera
de les traiter de la manière la plus écologique possible.
GARANTIE
Pour les conditions de garantie, lisez le certificat de
garantie joint à part.
Nous declarons sous notre propre responsabilité
que ce produit est en conformité avec les normes
ou documents normalisés suivants
EN50144-1, EN50144-2-4. EN55014-1,
EN55014-2, EN61000-3-2, EN61000-3-3
conforme aux réglementations:
98/37/CEE
73/23/CEE
89/336/CEE
le 18-09-2002
GENEMUIDEN NL
W. Kamphof
Quality department
CE
ı
DÉCLARATION DE CONFORMITÉ
(F)
Toledo 15
Page 16

SZALAGCSISZOLÓGÉP
MŰSZAKI ADATOK
TERMÉKISMERTETŐ
A. ábra
A szalagcsiszológép kiváló eszköz fa csiszolására, vas,
műanyag és egyéb anyagok köszörülésére. A szalagcsiszológépet a durva munkákra használjuk, a simító-csiszolásra lengőcsiszológépet használjunk.
1. On/off (be/ki)kapcsoló
2. Elülső fogantyú
3. Hátsó fogantyú
4. Reteszelő kapcsoló
5. Porgyűjtőnyílás
6 Szalagállító gomb
7. Csiszolószalag-feszítő
8. Elülső szalaggörgő
9. Irányjelző
10. Szíjhajtás fedele
11. Porzsák
A CSOMAG TARTALMA
1 Szalagcsiszológép
3 Csiszolószalagok
1 Porzsák
1 Használati útmutató
1 Biztonsági tájékoztató
1 Garancialevél
Ellenőrizze a gépet, tartozékait és kiegészítőit hogy a
szállítás közben nem sérültek-e meg.
BIZTONSÁGI UTASÍTÁSOK
A kézikönyv az alábbi szimbólumokat alkalmazza:
A kézikönyvben foglalt utasítások be nem tartása
esetén fenálló, esetleges személyi sérülést illetve a
gép károsodását okozó veszélyek jele.
Az áramütés veszélyének jele.
A gép használatát megelőzően figyelmesen olvassa el a
kézikönyvet. Fontos, hogy pontosan ismerje a gép
működésének illetve működtetésének feltételeit és
szabályait. A problémamentes működés biztosítása
érdekében a gép karbantartását mindig az utasításoknak
megfelelően végezze. A kézikönyvet és a hozzá tartozó
dokumentációt tartsa mindig a gép közelében.
Villamos gépek használatakor a tűzveszély illetve a
személyi sérülések és az áramütés veszélyének
elkerülése érdekében mindig pontosan tartsa be az
országában érvényben lévő biztonsági rendszabályokat! Figyelmesen olvassa el az alábbiakban felsorolt illetve a kézikönyvhöz csatolt biztonsági
utasításokat! Tárolja ezeket az utasításokat biztonságos helyen!
•A csiszológép használata közben mindig viseljen hallásvédőt és pormaszkot.
• Nedves csiszolásra nem alkalmas.
• Ellenőrizze, hogy a kapcsoló ne legyen bekapcsolva,
amikor a gépet áram alá helyezi.
•A vezetéket tartsa távol a gép mozgó részeitől.
• Használjon védőszemüveget, fõleg ha fej fölött dolgozik.
• Ne nyomja a gépet, az csak megnehezíti a csiszolást.
A GÉPET AZONNAL KAPCSOLJA KI, HA:
•A szénkefék túlságosan szikráznak ill. tüz keletkezne
a kollektorban.
• Zárlat vagy meghibásodás esetén a vezetékben, a
csatlakozó dugóban vagy hálózatban.
•A kapcsoló meghibásodása esetén.
•A megperzselődött szigetelés büzlik vagy füstöl.
2
3
8
10
6
9
1
7
4
115
Feszültség | 230 V~
Frekvencia | 50 Hz
Bemenőteljesítmény | 800 W
Csiszolószalag |
sebessége terheletlenül | 280 m/perc
Csiszolószalag mérete | 75 x 533 mm
Csiszolópárna mérete | 75 x 160 mm
Tömeg | 3.0 kg
Lpa (hangnyomás) | 88.6 dB(A)
Lwa (hangteljesítményszint) | 101.6 dB(A)
Rezgésérték | 3.511 m/s2
H
Magyar
Toledo 37
BANDPUTSMASKIN
TEKNISKA SPECIFIKATIONER
BESKRIVNING
Fig. A.
Bandputsmaskinen är det perfekta redskapet för polering av trä och slipning av järn, plast eller liknande material. Bandputsmaskinen måste användas för grovarbetet.
För vanligt putsningsarbete måste
en omloppsputsmaskin användas.
1. På/av-knapp
2. Främre handtag
3. Bakre handtag
4. Spärrbrytare
5. Damminsamlingsöppning
6 Justeringsknapp
7. Sandputsbandslås
8. Rulle, främre band
9. Riktningsindikator
10. Drivbandsskydd
11. Dammpåse
FÖRPACKNINGENS INNEHÅLL
1 Bandputsmaskin
3 Sandputsband
1 Damminsamlingspåse
1 Instruktionsbok
1 Säkerhetsinstruktioner
1 Garantibevis
Kontrollera maskinen, lösa delar och tillbehör så att de
inte skadats vid transport.
SÄKERHETSFÖRESKRIFTER
I denna bruksanvisning används följande symboler:
Anger att det föreligger risk för kroppsskada, livsfara eller risk för skador på maskinen om instruk-
tionerna i denna bruksanvisning inte efterlevs.
Anger elektrisk spänning.
Läs igenom denna bruksanvisning noggrant innan maskinen tas i bruk. Se till att du känner till hur maskinen fungerar och är insatt i hur den skall användas. Följ underhållsinstruktionerna för att maskinen alltid skall fungera på
bästa sätt. Förvara denna bruksanvisning och den bifogade dokumentationen vid maskinen.
Vid användning av elektriska maski ner, iaktta alltid
de säkerhetsföreskrifter som gäller lokalt i samband
med brandfara, fara för elektriska stötar och kroppsskada. Läs förutom nedanstående instruktioner
även igenom bladet med säkerhetsföreskrifter som
bifogas separat.
Förvara instruktionerna omsorgsfullt!
• Använd alltid hörselskydd och ansiktsmask vid arbete
med bandputsmaskinen.
• Observera att maskinen inte är avsedd för våtslipning.
• Kontrollera före anslutning till elnätet att verktygets
strömbrytare är frånslagen.
• Se noga till att elsladden inte kommer nära verktygets
rörliga delar.
• Använd skyddsglasögon. Detta är särskilt viktigt vid
slipning ovanför ert ansikte.
• Anbringa inte för stort tryck på maskinen, detta
fördröjer enbart slutresultatet.
STAN NA OMEDELBART MASKINEN NÄR:
• Kollektorns borstar och kransar uppvisar onormal
gnistbildning.
• Elkabel eller kontakter uppvisar någon som helst
defekt, t ex skadad isolering.
• Strömbrytaren inte fungerar som den ska.
• Rökig eller dålig lukt indikerar bränd isolering.
2
3
8
10
6
9
1
7
4
115
Spänning | 230 V~
Frekvens | 50 Hz
Effektförbrukning | 800 W
Bandputshastighet utan laddning | 280 m/min
Bandputsstorlek | 75 x 533 mm
Putsblocksstorlek | 75 x 160 mm
Vikt | 3.0 kg
Lpa (bullernivå) | 88.6 dB(A)
Lwa (Ljudeffektnivå) | 101.6 dB(A)
Vibrationsvärde | 3.511 m/s
2
16 Toledo
Page 17

ELEKTRISK SÄKERHET
Kontrollera alltid om din nätspänning överensstämmer med värdet på typplattan.
Maskinen är dubbelt isolerad i överensstämmelse
med EN 50144, vilket innebär att det inte behövs
någon jordledare.
Vid utbyte av kablar eller stickkontakter
Släng omedelbart bort gamla kablar eller stickkontakter
så fort de har ersatts av nya exemplar. Det är farligt att
sticka in stickkontakten till en lös kabel i vägguttaget.
Vid användning av förlängnings kablar
Använd uteslutande en godkänd förlängningskabel som
är lämplig för maskinens effekt. Ledarna måste ha en diameter på minst 1,5 mm2. Om förlängningskabeln sitter på
en haspel, rulla då ut den helt och hållet.
FÖRBEREDELSER
Uppmärksamma alltid säkerhetsinstruktionerna
och gällande föreskrifter.
VALAV SANDPAPPER
Grovt sandpapper används för att slipa ner det mesta av
ytmaterialet medan fint sandpapper används till putsning
och finish. Är ytan ojämn slipas ytan först jämn med ett
grovt sandpapper och därefter slipas repor och andra
spår efter det grova sandpapperet bort med ett mediumgrovt sandpapper. Den slutliga finishen erhålls sedan
med ett fint sandpapper.
AVLÄGSNA OCH
INSTALLESANDPUTSBANDET
Före montering av bandputsmaskinen måste
strömmen alltid kopplas bort.
• Placera maskinen på sidan med drivbandsskyddet
(10, Fig. A) nedåt.
• Lossa på sandputslåset (7, Fig. A).
• Avlägsna sandputsbandet från maskinen.
• Placera ett nytt sandputsband i maskinen och
försäkra dig om att riktningspilarna på sandputsbandet pekar i samma riktning som riktningsindikatorn
(9, Fig. A).
• Lås sandputsbandslåset igen (7, Fig. A).
ANPASSA SANDPUTSBANDET
Om sandputsbandet inte går parallellt med höljets yttre
kant måste sandputsbandet riktas in. Flytta sandputsbandet till korrekt position med hjälp av justeringsknappen
(6, Fig. A). Genom att vrida på justeringsknappen medurs
kommer sandputsbandet att röra sig inåt och genom att
vrida den moturs kommer sandputsbandet att röra sig
utåt.
SÄTTA PÅ OCH STÄNGA AV
• För att sätta på maskinen trycker du på på/av-knappen (1, Fig. A).
• För att stänga av maskinen frigör du på/av-knappen
(1, Fig. A).
Om kontinuerlig drift krävs måste spärrbrytaren
(4, Fig. A) användas:
• Sätt på maskinen genom att trycka på på/av-knappen
• Tryck på spärrbytaren (4, Fig. A) och frigör på/avknappen.
• Stäng av maskinen genom att åter igen trycka på
på/av-knappen och frigör därefter på/av-knappen.
MONTERA DAMMPÅSE
Använd dammpåsen för att samla in damm som lösgörs
under putsningsproceduren.
• Placera dammpåsen på damminsamlingsöppningen
(5, Fig. A).
• Töm dammpåsen regelbundet för att upprätthålla en
effektiv damminsamling.
Toledo 17
MANUTENZIONE
Assicurarsi che la macchina non sia in funzione
mentre si effettuano operazioni di manutenzione
sul motore.
Le macchine Toledo sono state progettate per funzionare per lunghi periodi di tempo, pur richiedendo interventi di manutenzione minimi. Un funzionamento continuo soddisfacente dipende dall'adeguata conservazione
della macchina e da una pulizia regolare.
Pulizia
Pulire regolarmente il corpo macchina con un panno
morbido, possibilmente dopo ogni uso. Eliminare polvere e sporco dalle ferritoie di ventilazione.
Se lo sporco non è asportabile, usare un panno morbido
inumidito con acqua saponata. Non usare mai solventi
come benzina, alcool, ammoniaca, ecc, perché potrebbero danneggiare i componenti in plastica.
Lubrificazione
La macchina non richiede lubrificazioni aggiuntive.
Guasti
In caso di guasti, ad esempio in segui to all'usura di un
componente, contattare il rivenditore Toledo a voi più
vicino.
Sul retro del presente manuale, è riportato un esploso
delle parti che è possibile ordinare.
AMBIENTE
Per evitare che si danneggi durante il trasporto, la
macchina è imballata in un contenitore resistente. La
maggior parte dei componenti dell'imballaggio sono riciclabili. Portare tali materiali presso gli appositi centri di
riciclaggio.
Consegnare gli elettroutensili da smaltire al vostro
rivenditore Toledo, che provvederà a portarle in un
centro di raccolta differenziata.
GARANZIA
Le condizioni di garanzia sono esposte nell'apposita
scheda allegata a parte.
Dichiariamo, assumendo la piena responsabilitá di
tale dichiarazione, che il prodotto è conforme alla
seguenti normative e ai relativi documenti
EN50144-1, EN50144-2-4. EN55014-1,
EN55014-2, EN61000-3-2, EN61000-3-3
in base alla prescrizioni delle direttive:
98/37/EEC
73/23/EEC
89/336/EEC
dal 18-09-2002
GENEMUIDEN NL
W. Kamphof
Quality department
CE
ı
DICHIARAZIONE DI CONFORMITA
(I)
36 Toledo
Page 18

PRIMA DELLA MESSA IN SERVIZIO
Attenersi sempre alle istruzioni di sicurezza e alle
norme in vigore.
CELTA DELLA CARTA ABRASIVA
La carta abrasiva grossa ( grana 50 ) generalmente leva la
parte più importante del materiale e la carta abrasiva fine è
utilizzata per le rifiniture. Se la superficie è omogenea,
cominciate con della carta abrasiva grossa. Inseguito utilizzate della carta abrasiva media ( 80 grani ) per levare così le
righe formate dalla prima carta abrasiva e infine prendete
della carta abrasiva fine ( 120 grani ) per le rifiniture.
RIMOZIONE ED INSTALLAZIONE DEL
NASTRO LEVIGANTE
Prima del montaggio del nastro levigante, staccare
sempre la spina dalla presa.
• Posizionare la macchina su di un fianco con la copertura del nastro guida (10, Fig. A) rivolta verso il basso.
• Allentare l'elemento di fissaggio del nastro levigante
(7, Fig. A).
• Rimuovere il nastro levigante dalla macchina.
• Porre un nuovo nastro levigante nella macchina, assicurarsi che le frecce di direzione sul nastro levigante
siano rivolte verso la stessa direzione dell'indicatore
di direzione (9, Fig. A).
• Serrare l'elemento di fissaggio del nastro levigante
(7, Fig. A).
ALLINEAMENTO DEL NASTRO LEVIGANTE
Se il nastro levigante non scorre in modo parallelo al
bordo esterno dell'alloggiamento, è necessario allinearlo. Portare il nastro levigante nella posizione corretta
utilizzando il pomello di regolazione (6, Fig. A). Ruotando
il pomello di regolazione in senso orario o antiorario, il
nastro levigante si sposterà rispettivamente verso l'interno o verso l'esterno.
ACCENSIONE E SPEGNIMENTO
• Per accendere la macchina premere l'interruttore di
accensione/spegnimento (1, Fig. A).
• Per spegnere la macchina rilasciare l'interruttore di
accensione/spegnimento (1, Fig. A).
In caso di necessità di utilizzo della macchina in
funzionamento continuo, utilizzare l'interruttore di funzionamento continuo (4, Fig. A):
• Accendere la macchina premendo l'interruttore di
accensione/spegnimento.
• Premere l'interruttore di funzionamento continuo
(4, Fig. A) e rilasciare l'interruttore di accensione/spegnimento.
• Per spegnere la macchina premere di nuovo l'interruttore di accensione/spegnimento e rilasciarlo.
MONTAGGIO DEL SACCHETTO
RACCOGLIPOLVERE
Utilizzare l'apposito sacchetto per raccogliere la polvere
prodotta durante la levigatura.
• Posizionare il sacchetto sull'apertura di raccolta della
polvere (5, Fig. A).
• Svuotare il sacchetto regolarmente per ottenere
un'ottimale aspirazione della polvere.
IMPUGNATURA
L'uso della smerigliatrice a nastro è facilitato dalla presenza delle due impugnature, collocate rispettivamente
sul lato anteriore e posteriore della macchina. Ciò permette di impugnare la macchina con due mani e di esercitare un maggiore controllo, riducendo i possibili rischi di
contatto con le parti in movimento. Impugnare la smerigliatrice a nastro sempre con entrambe le mani.
ISTRUZIONI OPERATIVE
Assicurarsi che la macchina abbia raggiunto la piena velocità prima di posizionarla sul pezzo da lavorare. In tal
modo si eviterà il sovraccarico della macchina.
Per levigare il legno, posizionare la macchina con inclinazione di ca. 15° dalla superficie del legno. Muovere la
smerigliatrice con moto continuo sul pezzo da lavorare.
SOLUZIONE AI PROBLEMI
In caso di malfunzionamento della smerigliatrice, fare
riferimento alle possibili cause e soluzioni indicate.
Li motore elettrico è caldo
• Le aperture per l’aria dentro il motore sono tappate
con dello sporco.
Pulite le aperture per l’aria.
• Il motore è difettoso.
Date la macchina al vostro distributore Toledo.
La macchina accesa non funziona
• Interruzione nel raccordo alla rete.
Controllate se il raccordo alla rete ha una rottura.
Date la macchina ad aggiustare o a controllare dal
vostro distributore Toledo.
La polvere non è aspirata
• Questo può essere dovuto all’aspiratore.
Pulite le aperture dell’aspiratore.
Ogni riparazione deve essere fatta da uno specialista e unicamente con pezzi originali.
Toledo 35
GREPP
Två grepp, ett på framsidan och ett på baksidan gör det
läggare att använda sandputsmaskinen. Genom att hålla
maskinen med två händer har du bättre kontroll över
maskinen och risken att du kommer i kontakt med rörliga delar minskar. Håll alltid fast sandputsmaskinen med
båda händerna.
DRIFTSINSTRUKTIONER
Försäkra dig om att maskinen har nått full hastighet före
den placeras på arbetsstycket. Detta förhindrar att maskinen överbelastas.
För putsning av trä placerar du maskinen ca. 15° utanför
träfibrerna. Förflytta sandputsmaskinen över arbetsstycket i en oavbruten sekvens.
FELSÖKNING
Nedan anges några problem som kan uppstå samt troliga
orsaker respektive lämpliga åtgärder.
Motorn överhettas
• Ventilationshålen är igentäppta.
Rengör ventilationshålen.
• Motorn är defekt.
Låt er återförsäljare se över verktyget och åtgärda
felet.
Verktyget startar inte
• Skadad kabel eller kontakt.
Kontrollera och låt vid behov er återförsäljare åtgärda
felet.
• Defekt strömställare.
Låt er återförsäljare se över verktyget och åtgärda
felet.
Dammet sugs inte upp
• Sugöppningen är igentäppt.
Rengör sugöppningen.
Reparation för endast utföras av behörig servicetekniker.
UNDERHÅLL
Tillse att maskinen inte är spänningsförande när
underhållsarbeten utförs på de mekaniska
delarna.
Ferms maskiner har konstruerats för att under lång tid
fungera problemfritt med ett minimalt underhåll. Genom
att regelbundet rengöra maskinen och hantera den på
rätt sätt bidrar du till en lång livslängd för din maskin.
Rengöring
Rengör maskinhöljet regelbundet med en mjuk duk,
företrädesvis efter varje användning. Tillse att ventilationsspringorna är fria från damm och smuts.
Använd en mjuk duk fuktad med tvålvatten vid svår
smuts. Använd inga lösningsmedel som bensin, alkohol,
ammoniak etc. Sådana ämnen skadar plastdelarna.
Smörjning
Maskinen behöver ingen extra smörjning.
Driftstörningar
Om en driftstörning uppträder till exempel till följd av att
en del har blivit sliten, kontakta då din lokala Toledoåterförsäljare.
Längst bak i denna bruksanvisning finns en ritning med de
delar som kan efterbeställas.
MILJÖ
För att undvika transportskador levereras maskinen i en
så stadig förpackning som möjligt. Förpackningen har så
långt det är möjligt tillverkats av återvinningsbart material. Ta därför tillvara möjligheten att återvinna förpackningen.
Återlämna gamla maskiner till din lokala Toledoåterförsäljare när du byter ut dem. Där kommer maskinen att tas om hand på ett miljövänligt sätt.
18 Toledo
Page 19

GARANTI
Garantivillkoren framgår av det separat bifogade garantikortet.
Vi intygar och ansvarar för, att denna
produkt överensstammer med följande
norm och dokument
EN50144-1, EN50144-2-4. EN55014-1,
EN55014-2, EN61000-3-2, EN61000-3-3
enl. bestämmelser och riktlinjema:
98/37/EEC,
3/23/EEC,
89/336/EEC
fràn 18-09-2002
GENEMUIDEN NL
W. Kamphof
Quality department
NAUHAHIOMAKONE
TEKNISET TIEDOT
VARUSTEIDEN ASENNUS
Kuva A.
Nauhahiomakone on ihannetyökalu puun sekä raudan,
muovin tai vastaavien materiaalien hiomiseen. Nauhahiomakonetta on käytettävä karkeistyöstöön, kun taas normaaliin hiontaan tulee käyttää tavallista hiomakonetta.
1. Käynnistyskytkin
2. Etukahva
3. Takakahva
4. Lukituskytkin
5. Pölynkeräysaukko
6 Säätönuppi
7. Hiomanauhan kiinnitin
8. Nauhan etupyörä
9. Suunnan osoitin
10. Käyttönauhan suojus
11. Pölypussi
2
3
8
10
6
9
1
7
4
115
Jännite | 230 V~
Taajuus | 50 Hz
Kulutettu teho | 800 W
Hiomapaperinopeus ilman |
kuormitusta | 280 m/min
Hiomanauhan koko | 75x 533 mm
Hiomatyynyn koko | 75 x 160 mm
Paino | 3.0 kg
Lpa (äänenpaine) | 88.6 dB(A)
Lwa (melutaso) | 101.6 dB (A)
Värähtelyarvo | 3.511 m/s
2
CE
ı
FÖRSÄKRAN
(S)
Toledo 19
10. Copertura nastro guida
11. Sacchetto raccoglipolvere
CONTENUTO DELLA CONFEZIONE
1 Smerigliatrice a nastro
3 Nastri leviganti
1 Sacchetto raccoglipolvere
1 Manuale di istruzioni
1 Istruzioni di sicurezza
1 Cedola di garanzia
Controllare che la macchina, i componenti sciolti e gli
accessori non siano stati danneggiati durante il trasporto.
ISTRUZIONI DI SICUREZZA
All'interno del presente manuale vengono usati i
seguenti simboli:
Indica il rischio di lesioni personali, pericolo di vita o
danno all'utensile in caso di mancata osservanza
delle istruzioni contenute nel presente manuale.
Indica il rischio di folgorazione.
Leggere attentamente il presente manuale prima di usare
la macchina. Assicurarsi di conoscere le funzioni della
macchina e come attivarle. Maneggiare la macchina rispettando le istruzioni per garantirne il funzionamento
corretto. Conservare il presente manuale e la documentazione allegata insieme alla macchina.
Nell'usare utensili elettrici osservare sempre le
norme di sicurezza vigenti nel proprio paese per limitare il rischio di incendio, folgorazione e lesioni personali. Leggere le presenti istruzioni di sicurezza,
nonché quelle allegate.
• Usate sempre degli occhiali protettivi se lavorate con
la smerigliatrice a nastro.
• La smerigliatrice a nastro non è agevole per levigare
sotto del liquido.
• Controllate che l’interruttore non sia nella posizione
MARCHE prima di introdurre la spina nella presa
elettrica.
• Tenete il filo dell’alimentazione sempre lontano dalle
parti mobili dell’utensile.
• Utilizzate gli occhiali di sicurezza, soprattutto se levigate al di sopra della vostra testa.
• Non esercitate pressione sulla vostra macchina,
questo ritarda solamente la levigatura
ARRESTO IMMEDIATO DEL’APPARECCHIO
IN CASO DI:
• Scintillare smisurato delle spazzole a fuoco anulare
nel collettore.
• Corto circuito della presa o del filo di alimentazione o
danneggiamento del filo di alimentazione.
• Interruttore difettoso.
• Fumo ed odore di isolante bruciato.
NORME ELETTRICHE DI SICUREZZA
Accertarsi sempre che l'alimentazione elettrica
corrisponda alla tensione indicata sulla targhetta
dei dati caratteristici.
La macchina presenta un doppio isolamento, ai
sensi della norma EN 50144; pertanto, non è
richiesto alcun filo di terra.
Sostituzione di cavi o spine
Gettare immediatamente i cavi o le spine vecchie una
volta sostituiti con elementI nuovi. Inserire la spina di un
cavo aperto nella presa a muro è pericoloso.
Uso di cavi di prolunga
L'affilatrice è equipaggiata di un filo di alimentazione a tre
conduttori e una presa con la messa a terra, Ecco perché
si deve sempre utilizzare una presa di corrente con la
messa a terra. Se avete bisogno di una prolunga si deve
utilizzare una prolunga a tre conduttori con messa a
terra provvista di una presa e di una spina femmina provviste di una messa a terra.
La misura minima del conduttore è di 1,5 mm2.
34 Toledo
Page 20

GARANTÍA
Lea atentamente las condiciones de garantía indicadas en
la tarjeta de garantía que aparece en este manual de instrucciones.
Declaramos bajo nuestra sola responsabilidad que
este producto está en conformidad con las normas
o documentos normalizados siguientes
EN50144-1, EN50144-2-4. EN55014-1,
EN55014-2, EN61000-3-2, EN61000-3-3
de acuerdo con las directivas:
98/37/EEC
73/23/EEC
89/336/EEC
a partir de 18-09-2002
GENEMUIDEN NL
W. Kamphof
Quality department
SMERIGLIATRICE A NASTRO
SPECIFICHE TECNICHE
DESCRIZIONE
Fig. A.
La smerigliatrice a nastro è uno strumento perfetto per
levigare il legno e molare il ferro, la plastica o materiali
equivalenti. Utilizzare la smerigliatrice a nastro per i
lavori di sgrossatura. Per gli ordinari lavori di levigatura
utilizzare una smerigliatrice orbitale.
1. Interruttore di accensione/spegnimento
2. Impugnatura anteriore
3. Impugnatura posteriore
4. Interruttore di funzionamento continuo
5. Apertura di raccolta della polvere
6 Pomello di regolazione
7. Elemento di fissaggio nastro levigante
8. Rullo trasportatore anteriore
9. Indicatore di direzione
2
3
8
10
6
9
1
7
4
115
Tensione | 230 V~
Frequenza | 50 Hz
Potenza assorbita | 800 W
Velocità senza carico |
del nastro della smerigliatrice | 280m/min
Dimensioni del nastro levigante | 75 x 533 mm
Dimensioni superficie levigante | 75 x 160 mm
Peso | 3.0 kg
Lpa (pressione sonora) | 88.6 dB(A)
Lwa (livello sonoro) | 101.6dB(A)
Vibrazioni | 3.511 m/s
2
CE
ı
DÉCLARACION DE CONFORMIDAD
(E)
Toledo 33
PAKKAUKSEN SISÄLTÖ
1 Nauhahiomakone
3 Hiomanauhaa
1 Pölynkeräyspussi
1 Käyttöohje
1 Turvaohje
1 Takuukortti
Tarkista kone, irralliset osat ja tarvikkeet kuljetusvaurioiden varalta.
TURVAOHJEET
Näissä ohjeissa käytetään seuraavia symboleja:
Käytetään, kun on olemassa loukkaantumisvaara,
hengenvaara tai koneen rikkoutumisvaara, mikäli
annettuja ohjeita ei noudateta.
Sähköjännite.
Lue nämä ohjeet huolellisesti ennen laitteen käyttöönottoa. Tutustu laitteen toimintaan ja käyttöön liittyviin tietoihin. Laitteen moitteettoman toiminnan varmistamiseksi laite on huollettava näiden ohjeiden mukaisesti. Säilytä nämä ohjeet ja muut tiedot myöhempää käyttöä varten.
Sähkölaitteita käytettäessä on aina noudatettava
paikallisia turvamääräyksiä tulipalon, sähköiskujen
ja loukkaantumisten välttämiseksi. Lue alla olevat
ohjeet ja erilliset turvaohjeet huolellisesti.
Säilytä nämä ohjeet!
• Käytä aina kuulon- ja hengityksensuojaimia.
• Tasohiomakone ei sovellu märkähiontaan.
• Tarkista, että laitteen kytkin ei ole lukittu PÄÄLLÄasentoon, ennen kuin työnnät pistokkeen pistorasiaan.
• Pidä verkkojohto aina poissa laitteen liikkuvista osista.
• Käytä suojalaseja, varsinkin jos käytät laitetta pään
yläpuolella.
• Älä paina laitetta tarpeettomasti hiottavaa pintaa vasten. Tämä vain hidastaa hiomista.
PYSÄYTÄ KONE VÄLITTÖMÄSTI, JOS:
• Hiiliharjat kipinöivät liikaa tai kollektori on tulessa.
• Pistoke tai johto on viallinen.
• Kytkin on viallinen.
• Savua tai käryä erittyy.
SÄHKÖTURVALLISUUS
Tarkista aina, ovatko verkkojännite ja koneen tyyppikilvessä ilmoitettu jännite yhteen sopivia.
Koneessa on kaksinkertainen eristys EN 50144:n
mukaan; maadoitusjohto ei ole tarpeellinen.
Johdon tai pistokkeen vaihtaminen
Heitä käytöstä poistetut johdot ja pistokkeet heti pois.
On vaarallista työntää irrotetun johdon pistoke pistorasiaan.
Jatkojohtojen käyttö
Käytä vain virallisesti hyväksyttyjä jatkojohtoja koneen
teho huomioon ottaen. Johdon ytimien on oltava
vähintään 1,5 mm2. Käytettäessä johtokelaa koko jatkojohto on vedettävä kelalta.
20 Toledo
Page 21

BRUGER
Noudata aina turvaohjeita ja soveltuvia määräyksiä.
HIOMAPAPERIN VALINTA
Karkeaa hiomapaperia (50) käytetään poistamaan suurin
osa materiaalista ja hienoa hiomapaperia viimeistelyyn.
Jos pinta on epätasainen, aloita karkealla hiomapaperilla.
Hio tämän jälkeen vähemmän karkealla hiomapaperilla
(80), joka poistaa juuri äsken syntyneet naarmut. Käytä
hienoa hiomapaperia (120) viimeistelyyn.
HIOMANAUHAN IRROTTAMINEN JA ASENTAMINEN
Irrota aina pistoke verkkovirrasta ennen hiomanauhan irrottamista tai asentamista.
• Aseta kone kyljelleen käyttönauhan suojus
(10, Kuvassa A) alaspäin.
• Löysää hiomanauhan kiinnitin (7, Kuvassa A).
• Irrota hiomanauha koneesta.
• Laita uusi hiomanauha koneeseen ja varmista, että
hiomanauhan suunnan näyttävät nuolet osoittavat
samaan suuntaan kuin suunnan osoitin (9, Kuvassa A).
• Kiristä hiomanauhan kiinnitin (7, Kuvassa A).
HIOMANAUHAN KOHDISTAMINEN
Jos hiomanauha ei kulje kotelon ulkoreunan kanssa
samansuuntaisesti, hiomanauha on kohdistettava uudelleen. Siirrä hiomanauha oikeaan asentoon säätönupin (6,
Kuvassa A) avulla. Kiertämällä säätönuppia
myötäpäivään hiomanauha siirtyy sisäänpäin ja
kiertämällä säätönuppia vastapäivään se siirtyy ulospäin.
KONEEN KÄYNNISTÄMINEN JA SAMMUTTAMINEN
• Käynnistä kone painamalla käynnistyskytkintä
(1, Kuvassa A).
• Sammuta kone vapauttamalla käynnistyskytkin
(1, Kuvassa A).
Käytä lukituskytkintä (4 Kuvassa A), jos haluat
koneen käyvän jatkuvasti:
• Kytke kone päälle painamalla käynnistyskytkintä
• Paina lukituskytkintä (4, Kuvassa A) ja vapauta käynnistyskytkin.
• Sammuta kone painamalla käynnistyskytkintä uudelleen ja vapauttamalla se.
PÖLYPUSSIN KIINNITTÄMINEN
Käytä pölypussia hiomisen aikana muodostuvan pölyn
keräämiseen.
• Aseta pölypussi pölynkeräysaukkoon (5, Kuvassa A).
• Tyhjennä pölypussi säännöllisesti, jotta pölynpoisto
toimii tehokkaasti.
KAHVAT
Nauhahiomakoneen käyttö on helpompaa kahden kahvan ansiosta, joista toinen on koneen etuosassa ja toinen
takaosassa. Siten voit pidellä konetta kahdella kädellä ja
hallita sitä paremmin, ja liikkuvien osien kosketusriski on
pienempi. Pidä hiomakoneesta kiinni aina molemmilla
käsillä.
KÄYTTÖOHJEET
Varmista, että kone on täydessä nopeudessa ennen sen
asettamista työstökappaleelle. Siten vältetään koneen
ylikuormittuminen.
Aseta kone puun hiomista varten noin 15°:seen puun
syistä. Liikuta nauhahiomakonetta jatkuvalla liikkeellä
työstökappaleen yli.
HÄIRIÖT
Nauhahiomakoneen toimintahäiriöt ja niiden mahdolliset syyt sekä korjaukset.
Sähkömoottori kuumenee liikaa
• Moottorin jäähdytysilmanottoaukot ovat tukossa.
Puhdista aukot.
• Moottori on viallinen.
Vie kone Toledo-jälleenmyyjälle tarkistettavaksi tai
korjattavaksi.
Kone ei toimi, vaikka se on päällä
• Virransyöttö on keskeytynyt.
Tarkista johto ja pistoke.
Vie moottori Toledo-jälleenmyyjälle tarkistettavaksi
tai korjattavaksi.
Pölynimurointi ei toimi
• Imuaukko on mahdollisesti tukossa.
Puhdista imuaukko.
Korjaukset on aina teetettävä valtuutetussa huoltoliikkeessä.
Toledo 21
EMPUÑADURA
Las dos empuñaduras, una frontal y otra trasera, facilitan
el uso de la lijadora de banda. Permite sujetar la máquina
con dos manos, aumenta el control de la máquina y
reduce el riesgo de entrar en contacto con las partes en
movimiento. Siempre debe sujetar la lijadora de banda
con ambas manos.
INSTRUCCIONES DE USO
Asegúrese de que la máquina ha alcanzado la velocidad
máxima antes de colocarla sobre la superficie que va a
lijar. Esto evitará la sobrecarga de la máquina.
Para el lijado de madera, coloque la máquina a unos 15º
fuera de la veta de la madera. Realice un movimiento continuo con la lijadora sobre la superficie trabajada.
AVERIAS
Cuando la lijadora de banda no funciona como debiera, le
indicamos abajo algunas causas posibles con las soluciones respectivas.
El motor eléctrico se pone caliente
• Las rajas de enfriamiento del motor están sucias yobtruidas.
Limpiélas.
• El motor está averiado
Consulte a su distribuidor Toledo para efectuar un
control o una reparación.
La máquina conectada no funciona
• Interrupción en la tensión de la red
Controle si no hay una ruptura.
Consulte a su distribuidor Toledo para efectuar un
control o una reparación.
El polvo no está aspirado
• Es posible que la aspiración no ocurre correctamente.
Limpie la abertura de aspiración del polvo.
Deje ejecutar las reparaciones por personal de servicio autorizado o una empresa de reparacion.
MANTENIMIENTO
Antes de cualquier trabajo de mantenimiento o limpieza saque siempre el enchufe de la caja de cor-
riente (enchufe de pared).
Los aparatos de Toledo han sido diseñados para funcionar correctamente durante un largo periodo de tiempo
necesitando un mantenimiento mínimo. Manteniendo
limpio el aparato y usándolo correctamente, conseguirá
alargar la vida útil de los aparatos.
Limpieza
Limpie regularmente el aparato con un paño, preferentemente después de cada uso. Asegúrese de que las rejillas
de ventilación no posean partículas de polvo ni suciedad.
Si hubiera suciedad incrustada, utilice un paño humedecido con agua y jabón. No utilice jamás materiales disolventes tales como gasolina, alcohol, amoniaco, etc.
Dichos productos podrían dañar el plástico de diferentes
piezas del aparato.
Engrasado
El aparato no necesita ser engrasado.
Anomalías
En caso de que presentara cualquier anomalía debido al
desgaste de una pieza, póngase en contacto con su distribuidor Toledo.
En la parte posterior de este manual de instrucciones
encontrará un dibujo de las piezas además de una lista de
piezas de recambio.
USO ECOLÓGICO
Para prevenir los daños durante el transporte, el aparato
ha sido embalado. Dicho embalaje está hecho, en la
medida de lo posible, de material reciclable. Le rogamos,
por lo tanto, que recicle dicho material.
Cuando vaya a reemplazar un aparato viejo por uno
nuevo, deposite su aparato viejo en su distribuidor
Toledo, el cual se encargará de reciclarlo.
32 Toledo
Page 22

SEGURIDAD ELÉCTRICA
Controle que la tensión de la red sea la misma que
la que aparece indicada en la placa.
La máquina posee doble aislamiento de acuerdo
con la norma EN 50144. No es necesario un cable
de conexión a masa.
Recambio de cables y enchufes
Cuando cambie los cables y enchufes viejos por nuevos,
deseche los viejos ya que es muy peligroso conectar un
enchufe cuyo cable está suelto.
Uso de cables de extensión
Utilice siempre cables de extensión autorizados que
sean aptos para la potencia del aparato. Los hilos deben
tener un diámetro de 1,5 mm2. Cuando el cable de extensión esté en un carrete, desenrolle el cable completamente.
UTILIZACIÓN
Observe siempre las instrucciones de seguridad y
las normas de seguridad vigentes en su país.
QUÉ PAPEL DE LYA ESCOGER
Un papel de lija grosero (grano 50) elimina generalmente
la mayoría de los materiales mientras se utiliza un papel
de lija fino para el acabado. Cuando la superficie es irregular, empiece con papel grosero y lije hasta. A continuación utilice un papel medio grosero (grano 80) para quitar los arañazos dejados por el primer papel y por último
tome el papel de lija fino (grano 120) para el acabado.
CAMBIO E INSTALACIÓN DE LA BANDA
Nunca cambie la banda sin desenchufar la
máquina.
• Ponga la máquina de lado, con la carcasa (10, Fig. A) de
la correa hacia abajo
• Afloje la sujeción de la banda (7, Fig. A)
• Retire la banda de la máquina
• Coloque una banda nueva en la máquina y asegúrese
de que las flechas de dirección de la banda apuntan en
la misma dirección que el indicador de dirección
(9, Fig. A)
• Apriete la sujeción de la banda (7, Fig. A).
ALINEACIÓN DE LA BANDA
Debe alinear la banda si no gira en paralelo al borde exterior de la carcasa. Corrija la posición de la banda con la
rueda de ajuste (6, Fig. A). Si gira la rueda de ajuste en la
dirección de las manillas del reloj, la banda se moverá
hacia el interior mientras que si la gira en sentido contrario, la banda se moverá hacia el exterior.
CONECTAR Y DESCONECTAR
• Para conectar la máquina mantenga pulsado el interruptor on/off (1, Fig. A).
• Para desconectar la máquina suelte el interruptor
on/off (1, Fig. A).
Si quiere que opere de forma continuada utilice
el bloqueo (4, Fig. A):
• Conecte la máquina con el interruptor on/off
• Pulse el botón de bloqueo (4, Fig. A) y suelte el interruptor on/off
• Para desconectar la máquina vuelva a pulsar el interruptor on/off y suéltelo.
MONTAJE DE LA BOLSA DEL ASPIRADOR
Utilice la bolsa para recoger el polvo que suelta la superficie durante el lijado.
• Coloque la bolsa del aspirador en la toma para la aspiración del polvo (5, Fig. A).
• Vacíe la bolsa del aspirador regularmente para conseguir una extracción de polvo eficaz.
Toledo 31
HUOLTO
Irrota aina kone virtalähteestä ennen huollon aloittamista.
Toledo-koneet on suunniteltu toimimaan pitkään ja
mahdollisimman pienellä huoltotarpeella.
Puhdistamalla ja käyttämällä sitä oikealla tavalla voit itsekin vaikuttaa koneen käyttöikään.
Puhdistaminen
Puhdista koneen ulkopinta säännöllisesti pehmeällä kankaalla. Parasta olisi puhdistaa se jokaisen käyttökerran
jälkeen. Pidä koneen jäähdytysaukot puhtaina.
Jos lika on pinttynyt, voit käyttää saippuavedellä kostutettua kangaspalaa. Älä kuitenkaan käytä liuottimia kuten
bensiiniä, alkoholia, ammoniakkia jne, koska ne vahingoittavat koneen muoviosia.
Voitelu
Konetta ei tarvitse voidella.
Häiriöt
Jos koneen toiminnassa ilmenee häiriö esim. jonkin osan
kulumisen johdosta, ota yhteyttä lähimpään Toledo-jälleenmyyjään.
Näiden käyttöohjeiden lopusta löydät kokoonpanopiirustuksen ja varaosalistan.
YMPÄRISTÖ
Kuljetusvaurioiden välttämiseksi kone on pakattu tukevaan laatikkoon. Tämä pakkaus on mahdollisimman
ympäristöystävällinen. Kierrätä se.
Jos vaihdat koneen uuteen, voit viedä vanhan koneen
Toledo-jälleenmyyjällesi, joka huolehtii ympäristöystävällisestä jätehuollosta.
TAKUU
Lue takuuehdot koneen mukaan liitetystä takuukortista.
Todistamme täten ja vastaamme yksin siitä,
että tämä tuote on allalueteitujen standardien ja
standardoimisasiakirjojen vaatimusten mukainen:
EN50144-1, EN50144-2-4. EN55014-1,
EN55014-2, EN61000-3-2, EN61000-3-3
seruaavien sääntöjen mukaisesti:
98/37/EEC,
73/23/EEC,
89/336/EEC
18-09-2002
GENEMUIDEN NL
W. Kamphof
Quality department
CE
ı
TODISTUS STANDARDINMUKAISUUDESTA
(SF)
22 Toledo
Page 23

BÅNDSLIPER
TEKNISKE SPESIFIKASJONER
MONTERING AV TILBEHØR
Figur A.
Båndsliperen er det perfekte verktøyet for sliping av tre,
jern, plast og lignende materialer. Båndsliperen brukes til
grovarbeidet. For normalt slipearbeid må en plansliper
brukes.
1. På/av-knapp
2. Fremre håndtak
3. Bakre håndtak
4. Blokkeringsbryter
5. Åpning for støvoppsamling
6 Justeringsknott
7. Strammer for slipebåndet
8. Fremre båndrulle
9. Retningsindikator
10. Bånddeksel
11. Støvpose
INNHOLDET I PAKKEN
1 Båndsliper
3 Slipebånd
1 Oppsamlingspose for støv
1 Brukerveiledning
1 Sikkerhetsforskrifter
1 Garantikort
Kontroller at det ikke er transportskader på maskin, løse
deler og tilbehør.
SIKKERHETSFORSKRIFTER
I denne bruksanvisningen benyttes følgende symboler:
Henviser til mulig personskade, livsfare eller fare
for skader på maskinen hvis instruksene i denne
bruksanvisningen ikke overholdes.
Viser til elektrisk spenning.
Les denne bruksanvisningen nøye før maskinen tas i
bruk. Sørg for å vite hvordan maskinen virker og hvordan
den skal betjenes. Vedlikehold maskinen i henhold til
instruksene, slik at den alltid virker som den skal. Oppbevar denne bruksanvisningen og den vedlagte dokumentasjonen ved maskinen.
Overhold ved bruk av elektriske maskiner alltid de
lokale sikkerhetsforskriftene. Dette for å unngå
brannfare, fare for elektrisk støt og personskade. Les
i tillegg til nedenstående instrukser også sikkerhetsforskriftene i det vedlagte separate sikkerhetsheftet.
Ta godt vare på instruksene!
• Bruk alltid hørselsvern og støvmaske under arbeid
med maskinen.
• Båndsliperen er ikke egnet til våtsliping.
• Kontroller at bryteren ikke står låst i stilling "PÅ" før
du setter støpselet i stikk-kontakten.
• Hold alltid nettkabelen borte fra redskapets bevegelige deler.
• Bruk vernebriller, særlig hvis du skal arbeide over
hodehøyde.
• Ikke press maskinen mot underlaget; det fører til at
slipingen tar lenger tid.
SLÅ ØYEBLIKKELIG AV MASKINEN VED:
• Uvanlig gnistring fra kullbørstene og flammer i kollektorringen.
• Feil på støpselet, nettkabelen eller ødelagte ledninger.
• Defekt bryter.
• Røyk eller lukt av svidd isoleringsmateriell.
2
3
8
10
6
9
1
7
4
115
Spenning | 230 V~
Frekvens | 50 Hz
Opptatt effekt | 800 W
Hastighet på slipebåndet |
uten belastning | 280 m/min
Størrelse på slipebånd | 75 x 533 mm
Størrelse på slipepute | 75x 160 mm
Vekt | 3.0 kg
Lpa (lydtrykk) | 88.6 dB(A)
Lwa (lydstyrkenivå) | 101.6 dB(A)
Vibrasjoner | 3.511 m/s
2
Toledo 23
LIJADORA DE BANDA
DATOS TÉCNICOS
PRODUCTINFORMATION
(Fig. A)
La lijadora de banda es la herramienta perfecta para lijar
madera, hierro, plástico u otros materiales parecidos.
La lijadora de banda debe utilizarse para el trabajo duro,
si es un lijado normal deberá utilizar una lijadora orbital.
1. Interruptor on/off
2. Empuñadura frontal
3. Empuñadura trasera
4. Botón de bloqueo
5. Toma para aspiración del polvo
6 Rueda de ajuste
7. Sujeción de la lijadora de banda
8. Rodillo frontal de la banda
9. Indicador de dirección
10. Carcasa para la correa
11. Bolsa del aspirador
CONTENIDO DEL PAQUETE
1 Lijadora de banda
3 Bandas de lijado
1 Bolsa del aspirador
1 Manual de instrucciones
1 Instrucciones de seguridad
1 Tarjeta de garantía
Compruebe que la máquina y los accesorios no han sufrido ningún daño durante el transporte.
NORMAS DE SEGURIDAD
The following pictograms are used in these instructions
for use:
Indica peligro de accidente, de muerte o riesgo de
provocar averías en la máquina en caso de no
seguir las instrucciones de este manual.
Indica peligro de sufrir descargas eléctricas.
Lea este manual de instrucciones atentamente antes de
empezar a usar la máquina. Asegúrese de que sabe cómo
funciona el amolador y cómo se maneja. Siga las instrucciones llevando a cabo las tareas de mantenimiento aquí
indicadas para así garantizar el óptimo funcionamiento
del aparato. Guarde este manual y la documentación adicional siempre junto a la máquina.
Tenga siempre presentes las normas de seguridad
locales con respecto al peligro de incendio, peligro
de sufrir descargas eléctricas y peligro de accidentes.
Lea, además de las instrucciones que siguen a continuación, las normas de seguridad que aparecen en el
cuadernillo anexo. Guarde cuidadosamente las instrucciones.
• Al trabajar con la lijadora lleve siempre unos protectores para los oídos y una máscarilla contra el polvo.
• La lijadora no conviene para lijar al mojado.
• Verifique que el interruptor no esté en la posición "
MARCHA" cuando se enchufa la clavija en la tensión
de red.
• Mantenga siempre el cable fuera de las partes en
movimiento de la herramienta.
• Utilice unas gafas de protección, especialmente si
está lijando encima de su cabeza.
• No ejerza ninguna presión en la máquina, esto no
hace más que retrasar la lijadura.
DESCONECTAR INMEDIATAMENTE EL
APARATO EN CASO DE:
• Chispas excesivas de las escobillas de carbón y fuego
circular en el colector.
• Fallo en el enchufe, en el cable o avería del cable.
• Interruptor averiado.
• Humo o mal humor de material aislante quemado.
2
3
8
10
6
9
1
7
4
115
Tensión | 230V~
Frecuencia | 50 Hz
Potencia nominal | 800 W
Velocidad de banda sin carga | 280m/min
Dimensiones de la banda | 75 x 533 mm
Tamaño del papel abrasivo | 75 x 160 mm
Peso | 3.0 kg
Lpa (nivel de presión sonora) | 88.6 dB(A)
Lwa (nivel potencia acústica) | 101.6 dB(A)
Valor de vibración | 3.511 m/s
2
30 Toledo
Page 24

VEDLIGEHOLDELSE
Sørg for at maskinen ikke står under strøm, når der
udføres vedligeholdelsesarbejder på mekanikken.
Maskinerne fra Toledo er udviklet til at fungere længe
uden problemer med et minimum af vedligeholdelse.
Ved at rengøre maskinen regelmæssigt og behandle den
korrekt, bidrager De til en længere levetid for maskinen.
Rengøring
Rengør regelmæssigt maskinkappen med en blød klud,
helst efter hvert brug. Sørg for at ventilationshullerne er
fri for støv og snavs. Brug en blød klud, der er vædet i
sæbevand til at fjerne hårdnakket snavs. Brug ingen
opløsningsmidler, så som benzin, alkohol, ammoniak,
osv. Den slags stoffer beskadiger kunststofdelene.
Smøring
Maskinen behøver ingen ekstra smøring.
Fejl
Kontakt Deres Toledo-forhandler, hvis der opstår fejl
som følge af slitage af en del.
Bagerst i denne brugsanvisning finder De en reservedelstegning med de reservedele, der kan bestilles.
MILJØ
For at undgå transportbeskadigelse leveres maskinen i
en solid emballage. Emballagen er så vidt muligt lavet af
genbrugsmateriale. Genbrug derfor emballagen.
Når de udskifter Deres maskinen bør De tage den gamle
maskine med til Deres lokale Toledo-forhandler. Der vil
maskinen blive bearbejdet på miljøvenlig vis.
GARANTI
Læs det separat vedlagte garantikort for garantibetingelserne.
Vi erklærer at under almindeligt ansvar, at dette
produkt er i overenstemmelse med følgende
normer eller normative dokumenter
EN50144-1, EN50144-2-4. EN55014-1,
EN55014-2, EN61000-3-2, EN61000-3-3
i henhold til bestemmelserne i direktiverne:
98/37/EØF,
73/23/EØF,
89/336/EØF
18-09-2002
GENEMUIDEN NL
W. Kamphof
Quality department
CE
ı
KONFORMITETSERKLÆRING
(DK)
Toledo 29
ELEKTRISK SIKKERHET
Kontroller alltid om nettspenningen er i overensstemmelse med verdien på typeskiltet.
Maskinen er dobbelt isolert i henhold til EN 50144;
det er derfor ikke nødvendig med jordledning.
Utskifting av ledninger og støpsler
Kast gamle ledninger og støpsler så snart de har blitt
erstattet av nye. Det er farlig å stikke støpselet på en løs
ledning i stikkontakter.
Bruk av skjøteledninger
Bruk utelukkende en godkjent skjøteledning som er
egnet til maskinens effekt. Ledningene må ha et tverrsnitt
på minst 1,5mm2. Hvis skjøteledningen sitter på en rull,
må den rulles helt ut.
BRUKS
Les alltid sikkerhetsinstruksjonene og gjeldende
bestemmelser.
VALG AV SLIPEPAPIR
Grovt slipepapir (50 korn) fjerner vanligvis mesteparten
av materialet, mens fint slipepapir brukes til finpussing.
Dersom overflaten er ujevn, lønner det seg å begynne
med grovt slipepapir. Deretter kan du bruke middels
grovt slipepapir (80 korn) for å fjerne de ripene som det
grove papiret etterlater seg. Til slutt kan du finslipe med
fint papir (120 korn).
FJERNE OG SETTE INN SLIPEBÅNDET
Før montering av slipebåndet, må støpselet alltid
trekkes ut.
• Legg maskinen på siden med bånddekselet
(10, Figur A) ned.
• Løsne strammeren for slipebåndet (7, Figur A)
• Fjern slipebåndet fra maskinen
• Sett inn et nytt slipebånd i maskinen. Kontroller at
retningspilen på slipebåndet peker i samme retning
som retningsindikatoren (9, Figur A)
• Stram til strammeren for slipebåndet igjen
(7, Figur A).
SENTRERE SLIPEBÅNDET
Hvis slipebåndet ikke går parallelt med den ytre kanten
på dekselet, må slipebåndet sentreres. Flytt slipebåndet
til riktig plassering med justeringsknotten (6, Figur A).
Hvis justeringsknotten vris med klokken, flyttes slipebåndet innover, og hvis den vris mot klokken, flyttes
slipebåndet utover.
SLÅ PÅ OG AV
• Hvis du vil slå maskinen på, trykker du inn på/av-knappen (1, Figur A).
• Hvis du vil slå maskinen av, slipper du ut på/av-knappen (1, Figur A).
Hvis det kreves kontinuerlig arbeid, må blokkeringsbryteren (4, Figur A) brukes:
• Slå maskinen på ved å trykke inn på/av-knappen
• Trykk inn blokkeringsbryteren (4, Figur A), og slipp
ut på/av-knappen.
• Hvis du vil slå maskinen av, trykker du inn på/av-knappen på nytt og slipper den ut igjen.
MONTERE STØVPOSE
Bruk støvposen til å samle støv som frigjøres under slipingen.
• Sett støvposen i åpningen for støvoppsamling
(5, Figur A).
• Tøm støvposen regelmessig for å få effektiv støvsuging.
24 Toledo
Page 25

HÅNDTAK
Det er blitt enklere å bruke båndsliperen på grunn av de
to håndtakene, ett foran og ett bak. Fordi du kan holde
maskinen med begge hender, har du bedre styring på
maskinen, og det er mindre fare for å komme borti deler
som er i bevegelse. Hold alltid båndsliperen med begge
hender.
BRUKSANVISNING
Pass på at maskinen går med full hastighet før du setter
den ned på materialet som skal slipes. Dette hindrer
overbelastning av maskinen.
For sliping av tre plasserer du maskinen i en vinkel på om
lag 15° i forhold til mønsteret i treet. Beveg båndsliperen
konstant over materialet som skal slipes.
FEIL
I tilfelle maskinen ikke virker som den skal, gjengir vi
nedenfor noen mulige årsaker og tilhørende løsninger:
Den elektriske motoren blir varm
• Motorens kjøleriller er tilstoppet av skitt.
Rengjør kjølerillene.
• Motoren er defekt.
Lever maskinen til kontroll og/eller reparasjon hos din
Toledo-forhandler.
Maskinen virker ikke etter at den er slått på
• Brudd i strømtilførselen
Kontroller nett-tilkoplingen for brudd.
Lever maskinen til kontroll og/eller reparasjon hos din
Toledo-forhandler.
Støvet suges ikke opp
• Det kan skyldes at støvavsuget er tilstoppet.
Rens åpningen til støvavsuget.
La alltid reparasjoner utføres av en anerkjent
installatør eller service-bedrift!
VEDLIKEHOLD
Sørg for at maskinen er spenningsløs når det skal utføres vedlikeholdsarbeid på de mekaniske delene.
Maskinene fra Toledo er konstruert slik at de kan fungere uten problemer med et minimum av vedlikehold.
Hvis maskinen rengjøres regelmessig og behandles på
riktig måte, bidrar dette til å gi maskinen en lang levetid.
Rengjøring
Rengjør maskinhuset regelmessig med en myk klut, helst
etter hver bruk. Sørg for at ventilasjonsåpningene er fri
for støv og skitt.
Hardnakket skitt fjernes med en myk klut som er fuktet
med såpevann. Bruk ikke løsemidler som bensin, alkohol,
ammoniakk o.kl. Slike stoffer skader kunststoffdelene.
Smøring
Maskinen trenger ikke ekstra smøring.
Feil
Hvis det skulle opptre en feil som følge av f.eks. slitasje på
en del, må man ta kontakt med den lokale Toledo-forhandleren.
Bakerst i denne bruksanvisningen finnes det en deltegning med de deler som kan bestilles.
MILJØ
For å unngå transportskader leveres maskinen i solid
emballasje. Emballasjen er i den grad dette er mulig fremstilt av resirkulerbart materiale. Benytt derfor anledningen til å resirkulere emballasjen.
Lever gamle maskiner som blir byttet ut til den lokale
Toledo-forhandleren. Maskinen blir da behandlet på en
miljøvennlig måte.
Toledo 25
BRUG
Sikkerhedsinstruktioner og gældende regler skal
altid overholdes.
VÆLG SANDPAPIR
Groft sandpapir (korn 50) fjerner almideligvis de fleste
materialer, og fint sandpapir bruges til efterbehandling.
Hvis overfladen er ujævn, skal man begynde med groft
sandpapir. Derefter bruges mellemgroft sandpapir (korn
80) for at fjerne ridserne fra det grove sandpapir. Til sidst
bruges fint (korn 120) sandpapir til efterbehandling.
PÅ- OG AFMONTERING AF SLIBEBÅND
Tag stikket ud af kontakten, før slibebåndet monteres.
• Læg maskinen på siden med båndafskærmningen
nedad (10, Figur A).
• Løsen spændearmen (7, Figur A).
• Afmonter slibebåndet fra maskinen.
• Monter det nye slibebånd på maskinen, og kontroller,
at pilene på slibebåndet peger i samme retning som
retningsviseren (9, Figur A).
• Stram spændearmen en gang til (7, Figur A).
INDSTILLING AF SLIBEBÅND
Hvis slibebåndet ikke løber parallelt med yderkanten af
afskærmningen, skal slibebåndet indstilles. Indstil slibebåndet i korrekt position ved hjælp af indstillingsknappen (6, Figur A). Når indstillingsknappen drejes med uret,
rykkes slibebåndet indad, og når den drejes mod uret
rykkes det udad.
TÆND OG SLUK
• Tryk på tænd-sluk-knappen for at tænde maskinen
(1, Figur A).
• Udløs tænd-sluk-knappen for at slukke maskinen
(1, Figur A).
Ved uafbrudt slibning benyttes låseanordningen
(4 figur A):
• Tryk på tænd-sluk-knappen for at tænde maskinen.
• Tryk på låseanordningen (4, Figur A) og udløs tændsluk-knappen.
• Tryk på tænd-sluk-knappen igen, og udløs tænd-slukknappen for at slukke for maskinen.
MONTERING AF STØVPOSE
Benyt støvposen til opsamling af støv fra slibningen.
• Tilslut støvposen til støvopsamlingsåbningen
(5, Figur A).
• Tøm støvposen jævnligt for hele tiden at sikre optimal støvopsamling.
GREB
Båndpudseren er nem at bruge på grund af de to håndtag,
der er placeret henholdsvis foran på siden af og bag på
maskinen. Derved kan du holde maskinen med to hænder, så du opnår en bedre kontrol med maskinen og
undgår kontakt med de bevægelige dele. Båndpudseren
skal altid betjenes med begge hænder.
BETJENING
Kontroller, at maskinen er oppe i fuld hastighed, før den
anbringes på det emne, der skal arbejdes på. Det forhindrer overbelastning af værktøjet.
Ved slibning af træ placeres maskinen ca. 15° fra træets
fiberretning. Før båndpudseren jævnt hen over det
emne, der skal arbejdes på.
DRIFTSFEJL
Hvis maskinen ikke funktionerer tilfredsstillende, gives
nedenfor eventuelle årsager og afhjælpning.
Udsædvanlig mange gnister
• Dette tyder næsten altid på tilstedeværelse af smuds i
motoren eller på opslidte kulbørster.
Få slibemaskinen kontrolleret hos Deres Toledo-forhandler.
Slibemaskinen bliver for varm
• Slibemaskinen belastes for meget.
Brug maskinen til det, den er beregnet til.
• Motoren er defekt.
Indlever slibemaskinen til reparation hos Deres
Toledo forhandler.
Støvet suges ikke op
• Dette kan eventuelt skyldes, at støvudsugningen er
tilstoppet.
Rens åbningen til udsugning af støv.
Indlever slibemaskinen til reparation altid hos
Deres Toledo forhandler.
28 Toledo
Page 26

KASSENS INDHOLD
1 Båndpudser
3 Slibebånd
1 Støvpose
1 Brugervejledning
1 Sikkerhedsinstruktioner
1 Garantibevis
Kontroller maskinen, løse dele og tilbehør for transportskader.
SIKKERHEDSFORSKRIFTER
I denne brugsanvisning anvendes de følgende piktogrammer :
Angiver risiko for legemensbe skadigelse, livsfare
eller maskinskade, hvis instruktionerne i denne
brugsanvisning tilsidesættes.
Angiver elektrisk spænding.
Læs denne brugsanvisning godt igennem før maskinen
tages i brug. Sørg for at De kender maskinens funktion og
betjening. Vedligehold maskinen i følge instruktionerne,
for at maskinen altid kan fungere optimalt. Bevar denne
brugsanvisning og den vedlagte dokumentation til maskinen.
Ved anvendelse af elektriske mas kiner skal man altid
følge de lokalt gældende sikkerhedsforskrifter i forbindelse med brandfare, fare for elektrisk stød og
legemensbeskadigelse. Læs udover de nedenstående
instruktioner også sikkerhedsforskrifterne i den
separat vedlagte sikkerhedsfolder.
Bevar instruktionerne godt!
• Når der arbejdes med båndpudseren, skal der altid
bæres høreværn og støvmaske.
• Båndpudserenen er ikke beregnet til våd slibning.
• Kontroller, at maskinen ikke er blokeret i TÆNDTposition, før stikket sættes i stikkontakten.
• Hold altid ledningen borte fra maskinens bevægelige
dele.
• Brug beskyttelsesbriller, især hvis der arbejdes over
hovedhøjde.
• Udøv ikke tryk på maskinen, det gør kun arbejdet
sværere.
MASKINEN SKAL ØJEBLIKKELIGT SLUKKES I
TIL FÆLDE AF:
• Defekt netstik, netledning eller beskadigelse af ledning.
• Defekt kontakt.
• Gnistdannelse i kullene eller ringild i kollektoren.
• Røg eller lugt fra sveden isolering.
ELEKTRISK SIKKERHED
Kontroller altid om netspændingen svarer til værdien på typeskiltet.
Maskinen er dobbeltisoleret i henhold til EN
50144; det er derfor ikke nødvendigt med en jord-
ledning.
Ved udskiftning af ledninger og stik
Kasser gamle ledninger og stik, så snart de er skiftet ud
med nye. Det er farligt at sætte et stik fra en løs ledning i
en stikkontakt.
Ved brug af forlængerledninger
Brug udelukkende godkendte forlæn gerledninger, der
er beregnede til maskinens effekt. Lederne skal have et
gennemsnit på mindst 1,5 mm2. Hvis forlængerledningen sidder på en tromle, rulles ledningen helt af.
Toledo 27
GARANTI
Garantibetingelsene er å finne på det vedlagte garantikortet.
Vi erklærer at det er under várt ansvar at
dette produkt er i overenstemmelse med følgende
standarder eller standard-dokumenter
EN50144-1, EN50144-2-4. EN55014-1,
EN55014-2, EN61000-3-2, EN61000-3-3
i samsvar med reguleringer:
98/37/EEC,
73/23/EEC,
89/336/EEC
frà 18-09-2002
GENEMUIDEN NL
W. Kamphof
Quality department
BÅNDPUDSER
TEKNISKE SPECIFIKATIONER
BESKRIVELSE
Fig. A.
Toledo båndpudseren er det perfekte værktøj til slibning
af træ-, metal- og plastikoverflader eller lignende materialer. Båndpudseren er velegent til grovere slibearbejde. Til lettere slibearbejde anvendes en rystepudser.
1. Tænd-sluk-knap
2. Forreste håndtag
3. Bagerste håndtag
4. Låseanordning
5. Støvopsamlingsåbning
6 Indstillingsknap
7. Spændearm til slibebånd
8. Forreste båndrulle
9. Retningsviser
10. Båndafskærmning
11. Støvpose
2
3
8
10
6
9
1
7
4
115
Spænding | 230 V~
Frekvens | 50 Hz
Optaget effekt | 800 W
Båndhastighed uden belastning| 280 m/min
Båndbredde og -længde | 75 x 533 mm
Slibeflade, mål | 75 x 135 mm
Vægt | 3.0 kg
Lpa (lydtryk) | 88.6 dB(A)
Lwa (støjniveau) | 101.6 dB(A)
Vibrationsværdi | 3.511 m/s
2
CE
ı
ERKLÆRING AV ANSVARSFORHOLD
(N)
26 Toledo
 Loading...