

Portable Printer
Operation Manual
(Full Version)
Please read this operation manual carefully before installing
and using this product

Declaration
Thank you for choosing TOEC products.
Please read the information included in the product package thoroughly
and carefully before using. TOEC will not be liable for any damages
caused by your failure to follow the instructions herein or by any
misoperation of this product due to your misunderstanding of the
content of this guide, but not including incorrect installation or damages
which occur during operation caused by our qualified maintenance
personnel.
TOEC has emended and checked this document carefully, but we do not
ensure that there is no error or oversight.
TOEC devotes itself to improving products and promoting service
quality. Thus, TOEC reserves the right to improve and modify the
description and the software program of this product without any future
notice.
This operation manual is aimed at helping you to use TOEC products
properly, but doesn’t intend to do any description for the software and
hardware configuration of this product. For the configuration, please
check the related contract (if you have) or consult your dealer. The
pictures in this document are for your reference purpose only. If any of
them are different from the actual product, please ignore the pictures.

Contents
Safety Guide .................................................................................... 1
NOTE .............................................................................................. 3
1. Brief Introduction .................................................................. 5
1.1. Packing List ................................................................. 5
1.2. Printer Appearance ....................................................... 6
1.3. Buttons ......................................................................... 7
1.4. Indicator Lights ............................................................ 8
1.5. USB Connection .......................................................... 8
1.6. WIFI Connection ......................................................... 9
1.7. Connect the Printer to External Power ......................... 9
1.8. Use the Li-ion Battery (Optional ) ............................... 9
2. Load Paper ............................................................................. 10
2.1. Paper Size and Type ................................................... 10
2.2. Load Paper ................................................................. 10
3. Install and Uninstall the Printer Driver .................................. 12
3.1. Install Local Printer Driver ........................................ 12
3.2. Install WIFI Printer Driver ......................................... 13
3.3. Change WIFI Print IP Address ................................... 14
3.4. Uninstall the Printer Driver ........................................ 15
3.5. Print from Mobile Device .......................................... 17
4. Use the Printer ....................................................................... 21
4.1. Start the Printer .......................................................... 21
4.2. Print via USB ............................................................. 22
4.3. Print via WIFI ............................................................ 23
5. Brief Description of WIFI Function ...................................... 24
6. Brief Introduction of Sleep Function ..................................... 26
7. Troubleshooting ..................................................................... 27
7.1. Printer Alarm Information ......................................... 27
7.2. Troubleshooting Guide .............................................. 28

8. Specifications ......................................................................... 30

Safety Guide
1. Please read all the instructions and keep this operation manual in a
handy place for future reference.
2. Before cleaning the printer, please unplug the power adaptor, take
out the battery and cut off the power.
3. Do not use the printer near the water.
4. Do not place the printer in the unstable vehicle, on the unstable
table or desk. Otherwise, the printer may not work normally or even fall,
which will cause serious damage.
5. The optional battery for this printer is the lithium ion polymer
rechargeable battery. Strictly prohibit putting the battery in high
temperature environments, such as heating, near the fire or exposure to
the sun. Putting the battery in the water, acid, alkaline or salty liquid is
strictly prohibited. Also keep away from the rain. The charge time of the
Li-ion battery should be no more than 12 hours. If the printer will not be
used for a long period of time, remove the battery and store it in a cool
place away from the direct sunlight.
6. This printer has been equipped with a three-core plug for power
adapter, which has a grounding pin. This plug is only suitable for
grounding type electrical outlet. This is a safety precaution. If the plug
fails to fit, contact your electrician to change it. Do not remove or alter
the grounding pin in any manner.
7. Do not put anything onto the power cord. Do not place the printer
in an area where people might step on the power cord
8. If you use an extension cord with the printer, make sure that the
1

total ampere rating of the devices plugged into the extension cord does
not exceed the cord's ampere rating.
9. Do not spill any liquid on the printer. Do not insert anything into
the printer through the groove of the printer shell. Otherwise, these
things may drop onto the circuit board and cause short-circuits. This
may lead to fire or electric shock.
10. Use only a slightly damp cloth to clean the external of the printer.
Do not clean the printer with benzene, alcohol, paint thinner or any
corrosive, alkaline solvents. These solvents could cause the damage of
the shell of printer.
11. Don’t try to fix the printer by yourself without any instructions.
Please send all the parts needed to repair to the professional
maintenance personnel
12. When the following conditions occur, please pull out the p lug from
socket, remove the battery, and send the printer to professional
maintenance personnel:
- The power cord is damaged or worn
- There is liquid in the printer
- The printer is exposed to the rain or water
- The printer falls off or the shell is damaged
2

NOTE
1. This device complies with Part 15 of the FCC Rules.Operation is
subject to the following two conditions:
(1) This device may not cause harmful interference, and
(2) This device must accept any interference received,14 including
interference that may cause undesired operation.
2. Changes or modifications not expressly approved by the party
responsible for compliance could void the user’s authority to operate the
equipment.
NOTE: This equipment has been tested and found to comply with the
limits for a Class B digital device, pursuant to Part 15 of the FCC Rules.
These limits are designed to provide
reasonable protection against harmful interference in a residential
installation. This equipment generates, uses and can radiate radio
frequency energy and, if not installed and used in accordance with the
instructions, may cause harmful interference to radio communications.
However, there is no guarantee that interference will not occur in a
particular installation. If this equipment does cause harmful interference
to radio or television reception, which can be determined by turning the
equipment off and on, the user is encouraged to try to correct the
interference by one or more of the following measures:
‐‐ Reorient or relocate the receiving antenna.
‐‐ Increase the separation between the equipment and receiver.
‐‐ Connect the equipment into an outlet on a circuit different from
that to which the receiver is connected.
3

‐‐ Consult the dealer or an experienced radio/TV technician for help.
Marking and instructions
We declares that this device is in compliance with the essential
requirements and other relevant provisions of Directive 1999/5/EC.
Opeation temperature -10°C and 40°C
4
1. Brief Introduction
This section will give you a brief introduction of the printer appearance
and the functions of every par t.
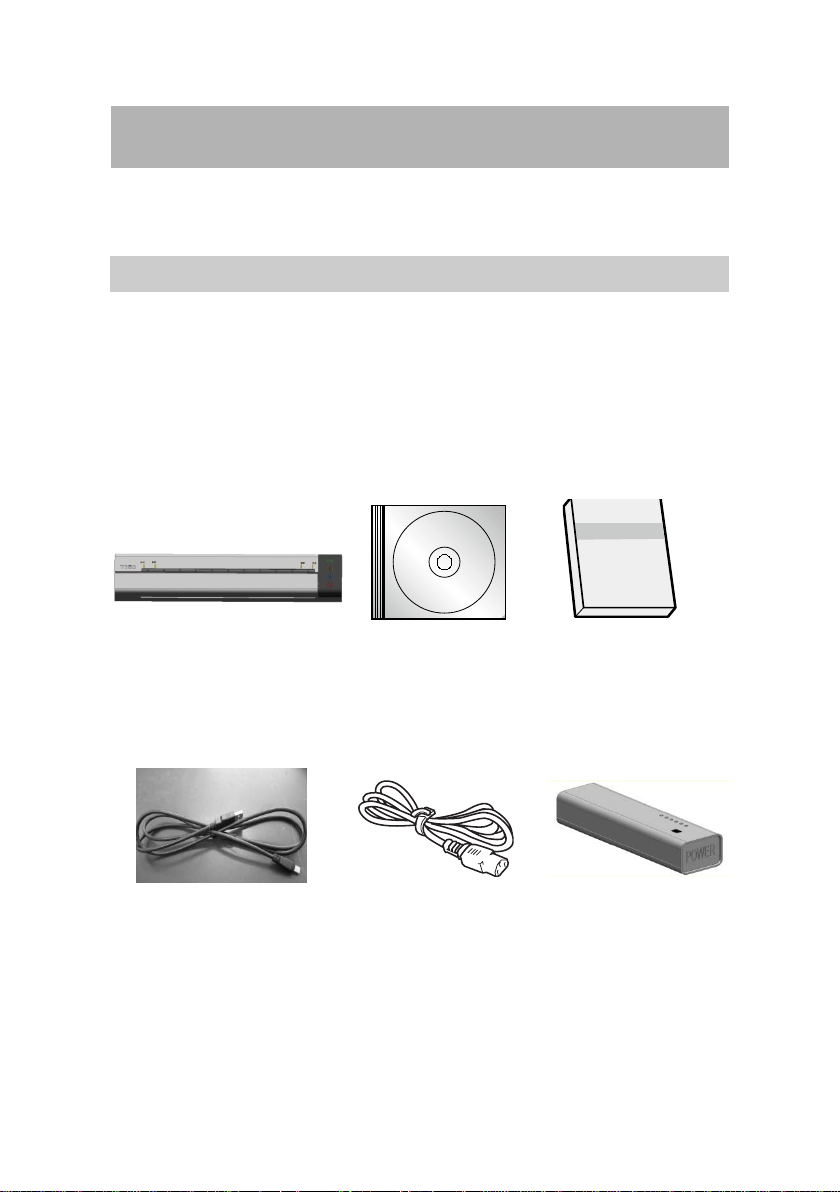
1.1. Packing List
When you open the box, please make sure that it contains all the
following items.
Printer Installation CD Operation manual
USB Cable Power Adapter Li-ion Battery(Optional)
5
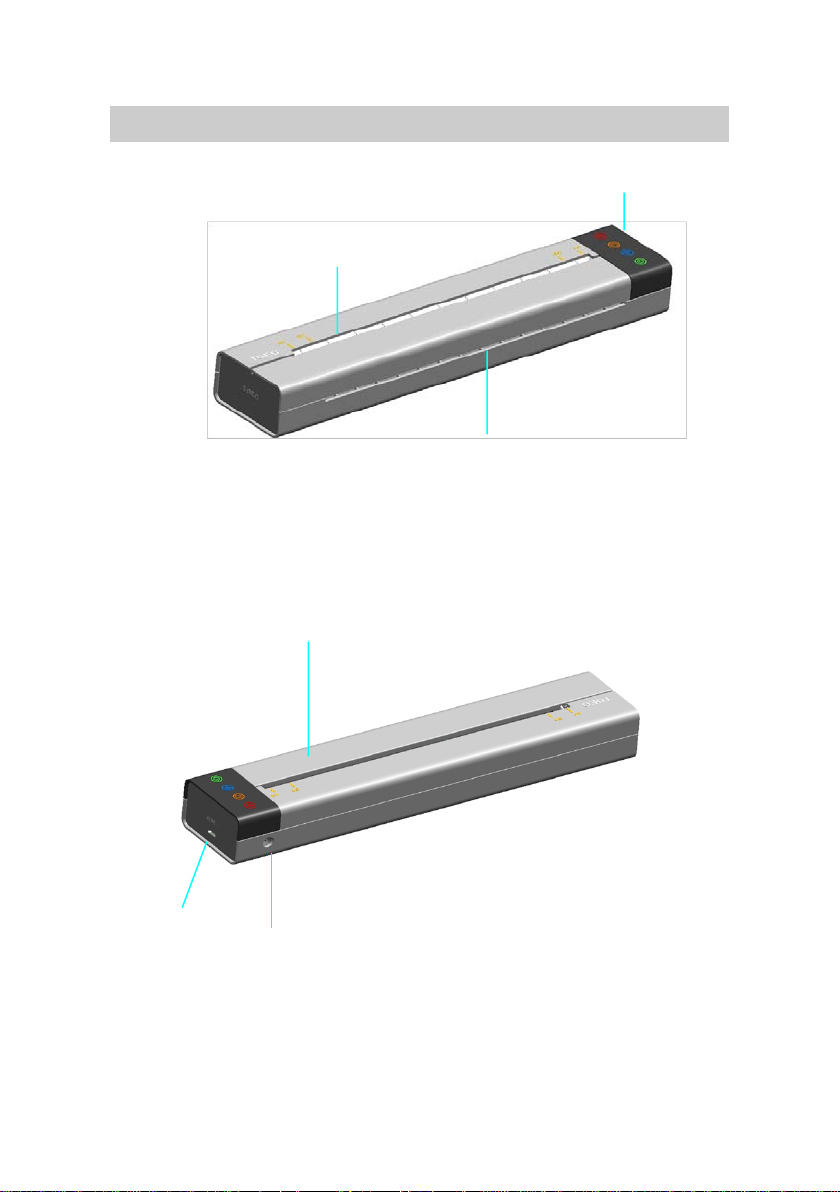
1.2. Printer Appearance
Flip Cover
Paper Input Slot
Operation Panel
Paper Output Slot
USB Port
Power Interface
6
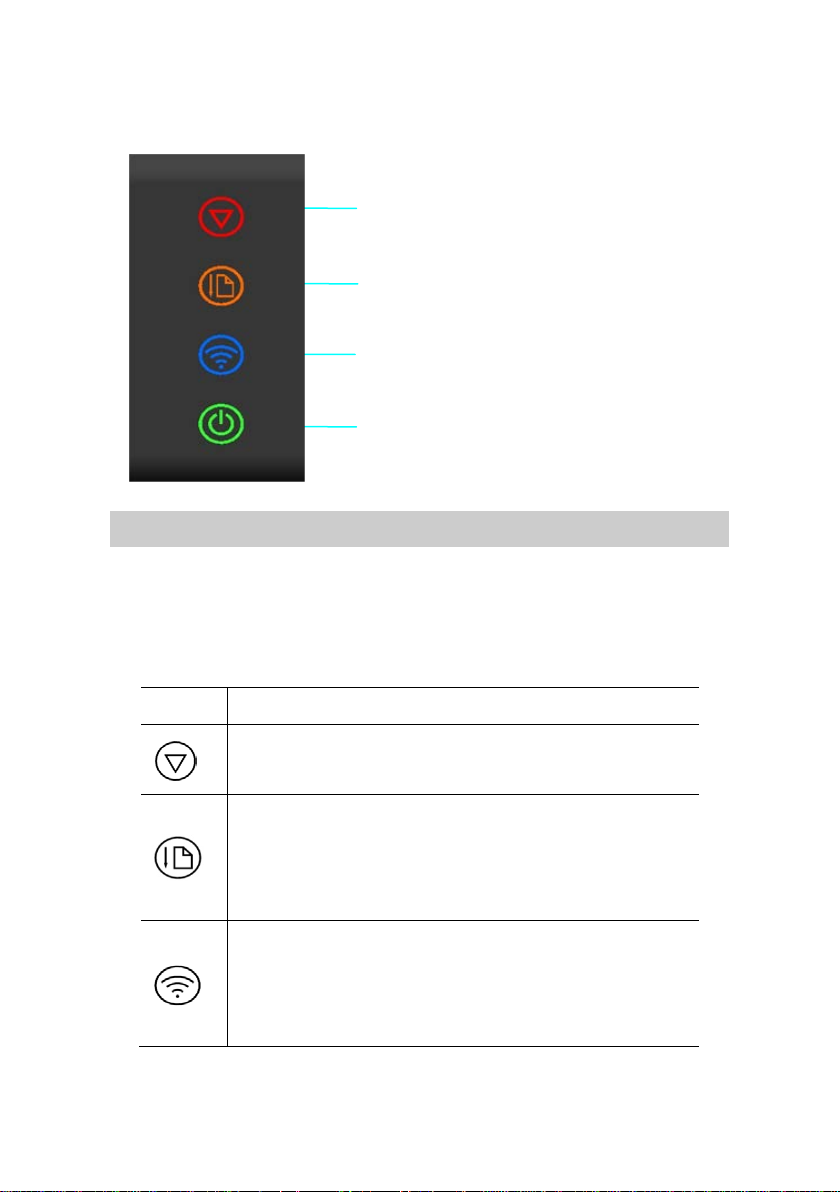
Symbol
Function
Operation Panel
Cancel Button (Indicator)
Feed Button (Indicator)
WIFI Button (Indicator)
Power Button (Indicator)
1.3. Buttons
The operation panel consists of four touch buttons (they are also
indicator lights). Please operate this printer according to the following
button functions.
Cancel the print job in printing mode
Clear the stored documents in standby mode
Press and hold the button, and the printer will keep
feeding paper till the button is released
Press the button, and the printer will stop feeding till
the paper is in place
Press and hold the button to turn on /turn off the
WIFI(See Section 5 for details)
Press the button, and the printer will switch to the
hotpot mode(See Section 5 for details)
7

Press and hold the button to turn on /turn off the
Red light : alarm
Blue light is off : WIFI function is turned off
printer
1.4. Indicator Lights
The indicators light and flash to indicate the status of the printer. Please
see the table below to recognize the status of printer according to the
indicator lights.
Symbol Status of Indicators
Light is lit : standby
Light is blinking : there is document stored or being
Green light : normal
Yellow light is lit : paper is being ejected
Yellow light is off : the ejecting of paper is completed
Blue light is lit : succeed to connect
Blue light is blinking : fail to connect
transmitted
Green light is lit : standby
Green light is blinking: sleep mode
After installing the printer driver, your computer will pop up more
detailed status of the printer and warning messages for your
convenience.
1.5. USB Connection
Using the USB cable provided with the printer, you can connect the
computer with printer.
8

USB Port of Printer USB Cable Connect to Computer
1.6. WIFI Connection
Please read Section 5 to find more details about WIFI connection
settings.
1.7. Connect the Printer to External Power
Using the power adapter provided with the printer to connect the printer
to a nearby electrical outlet, you can charge the printer or its battery.
1.8. Use the Li-ion Battery (Optional )
Connect the Li-ion battery to the power interface to charge your printer.
When the indicator light on the battery shows “Under voltage”, please
charge the battery with power adapter. When the battery is fully charged,
the color of the indicator light will change.
Charge the Li-ion battery immediately after purchase. It takes 3 hours to
charge the battery fully. The printer could print about 250 pages by
using a new and fully-charged battery.
If the printer is connected with battery and battery is being charged,
using the printer at this moment may shorten the service life of the
battery.
For other considerations for using the Li-ion battery, please check the
instructions sent with the battery.
9

2. Load Paper
This section will introduce the paper type and method of loading paper.
2.1. Paper Size and Type
Note: using unsuitable paper will cause problems like poor print quality,
paper jam or over wearing of the printer, even will damage the printer.
However, our warranty or service agreement doesn't cover damage like
this. To get the best performance of this printer, we suggest you to use
the type of paper described in this section.
Paper Type
Paper Size A4 and B5
Note: weight, ingredient, texture and humidity of the paper are all
important factors which will influence the performance of printer and
the output quality.
Tattoo Transfer Printing Paper and
Thermal Paper
2.2. Load Paper
Loading the paper properly will help you to prevent paper jam and make
sure that there is no fault of the printing.
When put the paper into the printer, make sure that the paper needed to
print faces down, and the printer will lead the paper to the right place
automatically. Please try to vertically load the paper into the center of
paper slot. Do not lead the paper to one side of slot or slant it. Be sure
that the bottom of the paper is parallel with input slot. Otherwise, it will
influence the printing result, and will cause damage to the paper.
10

Note: When storing paper, avoid high temperatures and humidity.
Before loading the paper, do not fold, crease or wrinkle it.
Before putting the tattoo transfer printing paper into the printer, please
reserve the adhesive tape on the top of the paper, and remove the cover
sheet below the adhesive tape (Do not tear the adhesive part on the top.
Otherwise, the paper will be loosened and cannot be printed).
11

3. Install and Uninstall the Printer Driver
This section will take Win10 a s an example to introduce how to install
and uninstall the printer driver, and how to change the IP address.
Installing the printer driver needs the administrator account. Please log
on as a user who has the administrator account. Terminate all running
applications, and we suggest you to close the antivirus software.
Before installing, use the matched USB cable to connect the printer with
your computer, and then turn on the printer. When installing the printer
driver, if the system automatically pops up the dialog box “Found the
new hardware wizard”, please click “Cancel”. If your computer shows
“A problem occurs during the hardware installation. Your new hardware
may not be able to run normally”, just close the prompt message.
Note: please try not to change the name of computer after installing the
printer driver. Otherwise, it will cause problems when installing and
reinstalling the driver.
3.1. Install Local Printer Driver
1. Insert the installation CD into
the CD-ROM drive.
2. Read the files in the Installation
CD. Double click “Setup.exe”.
When the “Install/uninstall
wizard” window pops up, click
“Next”.
12

4. Click “Next” after the sucessful
installation.
3. Check “Install the local printer
driver ” , and then click “Next”.
5. Click “Finish”, and the
installation is completed. (We
suggest you to restart the
computer. )
3.2. Install WIFI Printer Driver
1.Insert the installation CD into the
CD-ROM drive.
2.Read the files in the CD. Double
click “Setup.exe”.When the
“Install/uninstall wizard” Window
pops up, click “Next”.
13

4. Choose “Install WIFI printer
driver ” , and click “Next”.
3. Choose “Install ” , and then
click “Next”. If this window does
not appear, skip this step .
5. Click “Finish”, and the
installation is completed. (We
suggest you to restart the
computer.)
3.3. Change WIFI Print IP Address
If you want to change the IP address of the printer, please use the
IP_SET tool in the installation CD.
1. Insert the installation CD into
the CD-ROM drive.
2.Read the files in the installation
CD. Double click “IP_Set.exe”,
and the dialog box “Parameter
setting” pops up.
14

3.The WIFI printing supports two connecting modes: client mode and
Hotspot mode (see Section 5 for details). Click client mode or Hotspot
mode, and the corresponding informations will be shown.
If you have already installed WIFI driver and used WIFI printing, the
informations of user name, password, authentication mode and IP
address will be shown .
If the drive program has not been installed, the window “WIFI print
driver has not been installed” will pop up.
Client mode includes two types:
“Automatically obtain IP address”
and “Use IP address below”. For
the option of “Use IP address
below”, IP address of device can
be changed.
In Hotspot mode, the user name and
password of WIFI network can be
changed.
4. Input configuration information
defined by user and click “Apply”,
and the setting of WIFI print is
completed.
5.Click “Close”to exit.
3.4. Uninstall the Printer Driver
Uninstalling the printer driver needs the administrator account. Please
log on as a user who has the administrator account. Terminate all
15

running applications, and we suggest you to close the antivirus software.
1. Read the files in the CD .
Double click “Setup.exe”. When
the “Install/uninstall wizard”
window pops up, click “Next”.
2.Chosee “Uninstall local printer
driver”and “Uninstall WIFI print
driver”, and click “Next”.
3.When the uninstallation is
completed, click “Next” .
4. Click “Finish”, so the
uninstallation is completed. (We
suggest you to restart the
computer .)
16

3.5. Print from Mobile Device
If user uses peripheral equipment to print, the operating system of
mobile device (e.g. Smartphone or Tablet computer) should be iOS9 or
below , and Android 6.0 or below.
For Android operating system
User needs to download the corre sponding mobile printing application
“TOEC Printer” from the mobile device first. By connecting the printer
to the mobile device through WIFI, the documents, pictures and other
contents can be printed directly from the mobile device. Open “TOEC
Printer” on the mobile device, click the button “Search for the printer”,
select the corresponding printer to set the printing parameters, select the
content from the main interface, and then the printing can be realized.
For the whole process of printing, the operation is easy, convenient and
humanized. “TOEC Printer” is available on our website as free
download.
In the printing parameters settings, the setting for the printer is WIFI
connection mode setting.
17

Figure a Main interface Figure b Printing parameters settings
Figure c Print preview Figure d Printing
When select the hotspot mode, “TOEC Printer” will automatically
18

display the IP settings and WIFI hotspot settings of the selected printer.
Figure e Hotspot mode settings Figure f Client-side mode settings
When select the client-side mode, select the WIFI and then enter the
password. If the name of network can’t be found or want to set the
WIFI configuration manually, click the button of the advanced settings
and select the dynamic allocation IP and static allocation IP to do the
suitable setting.
19

Figure g Dynamic allocation IP Figure h Static allocation IP
20

4. Use the Printer
Before using this product to print the document, please read the Section
One to Section Four carefully and install the driver of the printer.
Taking the Word under Win10 operating system as an example, we will
introduce how to use the printer to print the document.
4.1. Start the Printer
1. Make sure that the power cord of the printer is connected correctly or
the lithium battery is used properly .
2. Start the computer.
3. Start the printer and the indicator lights are lit. Wait for the paper
feeding indicator light goes out, and then the printer is pr epar ed to print.
4. Confirm that the printer driver has been installed correctly and it
works normally.
5. Connect the printer to PC via USB or WIFI.
6. Put the paper into the printer till the printer automatically leads the
paper to the right place.
Note: please make sure to start the computer first, and then start the
printer (if print via WIFI, please connect to the network first), or it may
lead to the computer can’t recognize the printer. If the computer can’t
recognize the printer, please restart the printer or reinsert USB cable or
reconnect to WIFI.
21

4.2. Print via USB
1. Open the document needed to
print, and select “Print” in the
“File” menu.
2. In the “Print” dialog box, click
the “Name” in drop-do wn list box
and select “OEP103W”.
3. Click “Properties”, select
advanced option in the
“Paper/Quality” tab in the dialog
box, and select the brightness to
change the light or dark effect of
the printed document.
4. Set up the printing option and
the number of copies, and click
“OK” to confirm. The printer
begins to print and the window of
“OEP103W Status Monitor” pops
22

up on the computer.
5. If need to cancel the current print job, you can press the “Clear”
button on the printer or click “Cancel printing” to stop the current print
job in the window of “OEP103W Status Monitor”.
4.3. Print via WIFI
When print via WIFI, please make sure the printer has already been
connected successfully. Please select “OEP103W-WIFI” in the
drop-down list box in the “Name” in “Print” dialog box, and other
procedures are same with USB printing operation.
23

5. Brief Description of WIFI Function
For WIFI connecting of this printer, it can support two kinds of
operating modes: client-side and hotspot.
Client-side: the printer is connected
to the WIFI signal which is sent out
by other equipment (e.g. router).
Before connecting, need to use
WIFI-connect tool to configure the
user name and password of
connecting WIFI signal, and wait for
about 5 seconds to make sure that the printer has already been connected
to the designated WIFI signal.
After the connection is successful, WIFI indicator light will be lit, and
then connect the computer or mobile device to this WIFI signal. Then
connecting of the printer or external device to do WIFI printing through
client-side can be realized. If the printing is failed, please check that
whether WIFI connecting is normal or not.
Hotspot: WIFI signal is sent out by the printer. The name of WIFI is
toec. The password is 12345678 for default and it can be set by the
IP_SET tool in the installation CD (please see Section 3.3 for details).
If you want to use this mode to print, please make sure that the computer
or mobile device directly connects to the WIFI signal of printer.
To switch between the client-side mode and the hotspot mode, it can be
set by the IP_SET tool in the installation CD or the options in the TOEC
Printer.
Note: in hotspot mode, only can connect two(2) equipments. If try to
24

connect to the other equipment when two equipments are connected, the
error will occur.
For turning on or turning off WIFI function or configuring WIFI
information, it needs 5 seconds. At this moment, the WIFI indicator
light will go out, and WIFI-connect interface or IP_SET interface will
be in the waiting state. During this period, please do not carry out any
operations until the interface appears the information of successful
configuration or failing configuration.
During the period of WIFI indicator light going out, WIFI function will
become invalid.
25

6. Brief Introduction of Sleep Function
When there is no paper feeding, no data received and no operation in
three minutes, the printer will be in sleep mode to reduce the power
consumption. At this moment, only the indicator light of the power will
blink and other indicato r lights will go out. However, the printing data
can still be received if connecting to the printer via USB, the computer
will down send the print job to awake the printer automatically, and then
the printer begins to work.
In sleep mode, if need to use WIFI printing or configure IP address,
press any buttons on the operation panel to manually awake the printer
(the duration for pressing the power button can’t exceed one second,
otherwise the printer will be turned off), and wait for about 5 seconds till
the indicator light returns to normal, that is to say, the machine returns
to the state of preparing for printing.
The duration for sleeping can be configured by software. The methods
are shown as follows:
1.Click the operation panel in the start menu, select “Printer and other
hardware”, select the portable printer in the “Printer and fax” folder,
right click the printer attribute, and the dialog box of “OEP103W
attribute” will pop up.
2. Click the tab “Printer setup”, select
the suitable sleep time in the pull-down
list of “ Sleep time”, and click “ Save” .
26

7. Troubleshooting
This section will introduce the printer alarm information and the help
information for the troubleshooting.
7.1. Printer Alarm Information
Information on
PC
Low battery
level
No paper
Out of memory
Communication
error
Machine is
overheating
Reason Troubleshooting Method
- The battery level is too
The battery level is
too low
There is no paper
in the printer
The printer is full
of the stored
documents.
The printer is not
detected
The temperature in
the printer is too
high
low to print. Please
recharge it as soon as
possible or turn it off.
- Please put the paper in the
printer.
- Press the clear key to
empty the documents
- Print the stored documents
- Reinsert USB cable and
reconnect WIFI
- Restart the printer
- Restart the computer
- Wait for a few minutes to
print when the clear
indicator light turns from
red to green
Note: when use the printer at the high altitude, the machine
overheating may occur more frequently due to a lower air
density available to cool the printer.
27

7.2. Troubleshooting Guide
Trouble Troubleshooting methods
- Check that whether the power cord of the
printer is connected or not;
Breakdown of
machine and failure
of keys
The printer can’t
print documents
The printer is - Ditto;
- Check that whether the power switch of the
printer is turned on or not;
- Restart the printer after power off for 30
seconds
- Please contact the serviceman if the problem
still exists.
USB Print:
-Check the USB cable is connected correctly
or not;
- Check that whether the printer is in idle state
or not;
- Reinsert USB cable or restart the printer.
- Please contact the serviceman if the problem
still exists.
WIFI print:
- Check that whether the external device is on
the same network of the printer or not
- Check that whether the printer is in idle state
or not. If the clear indicator light is blinking
and green, maybe WIFI data is down
sending and hasn’t been completed. Pleas e
wait;
- Try to reconnect WIFI or restart printer;
- Please contact the serviceman if the problem
still exists.
28

off-line
The character on the
The showing of the
indicator light is
abnormal
The paper can’t be
led to the right place
The paper can’t
come out
printed paper is too
light
- Cut off the power and restart the printer.
- Please contact the serviceman if the problem
still exists.
- Reinsert the paper, and insert the paper to the
bottom;
- Check the size or thickness of paper is
suitable or not;
- Please contact the serviceman if the problem
still exists.
- If the paper jam occurs, please open the flip
cover to pull out the jammed paper;
- Check the size or thickness of paper is
suitable or not;
- Please contact the serviceman if the problem
still exists.
- Adjust it through the printing option.
29

8. Specifications
Item Description
Print method Thermal printing
Print speed 2ppm
Resolution 200dpi×200dpi
Printer port USB2.0
Control language of
printing
Paper feeding method Manual feeding
Paper size A4 and B5
Paper type
Consumables None
Operating system
Power supply
GDI
Tattoo transfer printing paper and
thermal paper
WinXP, Vista, Win7, Win8, Win10,
Android, and IOS
DC14V———6A
Power Maximum:150W
Noise
Dimension of machine 283mm×59mm×38.5mm
Net weight of machine 545g
Operating temperature 5℃ ~ 40℃
Operating humidity 40% ~ 60%
Storage temperature -40℃ ~ 80℃
Storage humidity 5% ~ 90%
Atmospheric pressure 86kPa ~ 106kPa
Maximum sound pressure
level≤58dB(A)
30

TOEC Technology Co., Ltd.
Address: No.6 Taishan Road Hexi District Tianjin China
P.O. Box: 300211
Hotline of Sales: 022-28268291/28262631
Hotline of After-sales Service: 022-28268471/28268478
Free Service Hotline: 800-818-8080
Fax: 022-28268440
E-mail Address of Sales: e100@toec.com
E-mail Address of After Sales Service: service@toecfax.com
Website: www.toec.com
Version: March of 2016, First Edition
31
 Loading...