

Page 1
OWNER’S MANUAL
Model No. GRP4PBWTMR
GRP4WBWTMR
GRP4BBWTMR
GEORGE FOREMAN
®
THE NEXT GRILLERATION
™
Page 2

IMPORTANT SAFEGUARDS
When using electrical appliances, basic safety precautions should
always be followed, including the following:
1. Read all instructions.
2. Do not touch hot surfaces. Use handles or knobs. Use oven mitts or
pot holders.
3. To protect against electric shock, do not immerse cord, plugs, or
appliance in water or other liquid.
4. Close supervision is necessary when any appliance is used by or
near children.
5. Unplug from outlet when not in use and before cleaning. Allow to
cool before putting on or taking off parts, and before cleaning the
appliance.
6. Do not operate any appliance with a damaged cord or plug or after
the appliance malfunctions, or has been damaged in any manner.
Contact Consumer Service for examination, repair or adjustment.
7. The use of accessory attachments not recommended by the appliance manufacturer may cause injuries.
8. Do not use outdoors.
9. Do not let cord hang over edge of table or counter, or touch hot surfaces.
10. Do not place on or near a hot gas or electric burner, or in a heated
oven.
11. Extreme caution must be used when moving an appliance containing
hot oil or other hot liquids. Allow liquid to cool before removing and
emptying drip tray.
12. To disconnect, press ON/OFF Power Button 'off', then remove plug
from wall outlet.
13. Do not use appliance for other than intended use.
SAVE THESE INSTRUCTIONS
For Household Use Only
Page 3

Additional Important Safeguards
CAUTION HOT SURFACES: This appliance generates heat and escaping steam during use. Proper precautions must be taken to prevent the
risk of burns, fires, or other injury to persons or damage to property.
CAUTION: This appliance is hot during operation and retains heat for
some time after turning off. Always use oven mitts when handling hot
materials and allow metal parts to cool before cleaning. Do not place
anything on top of the appliance while it is operating or while it is hot.
1. All users of this appliance must read and understand this Owner's
Manual before operating or cleaning this appliance.
2. The cord to this appliance should be plugged into a 120V AC electrical outlet only.
3. If this appliance begins to malfunction during use, immediately
unplug cord from outlet. Do not use or attempt to repair the malfunctioning appliance.
4. Do not leave this appliance unattended during use.
5. When using this appliance, provide adequate air space above and on
all sides for air circulation. Do not allow this appliance to touch curtains, wall coverings, clothing, dish towels or other flammable materials during use.
6. This appliance generates steam — do not operate in open position.
7. Using pot holder, hold the top cover (Lid) open while placing or
removing food on the cooking surface to prevent accidental closing
and injury.
3
Page 4

Polarized Plug
This appliance has a polarized plug (one blade is wider than the other).
To reduce the risk of electric shock, this plug is intended to fit into a
polarized outlet only one way. If the plug does not fit fully in the outlet,
reverse the plug. If it still does not fit, contact a qualified electrician. Do
not attempt to modify the plug in any way.
Short Cord Instructions
A short power-supply cord is provided to reduce the risk resulting from
becoming entangled in or tripping over a longer cord.
Do not use an extension cord with this product.
Electric Power
If the electrical circuit is overloaded with other appliances, your appliance may not operate properly. It should be operated on a separate
electrical circuit from other appliances.
Plasticizer Warning
CAUTION: To prevent Plasticizers from migrating from the finish of the
counter top or table top or other furniture, place NON-PLASTIC coasters
or placemats between the appliance and the finish of the counter top or
table top.
Failure to do so may cause the finish to darken, permanent blemishes
may occur or stains can appear.
4
Page 5
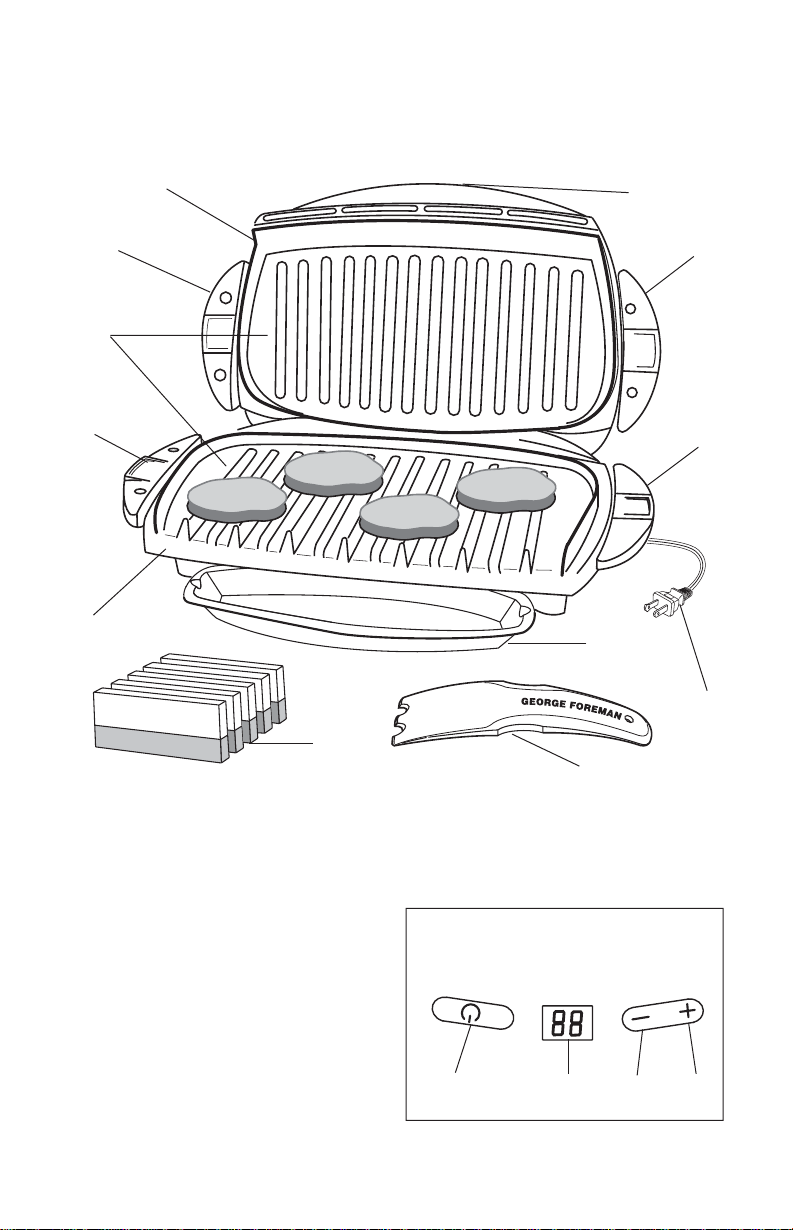
Getting To Know Your Grilling Machine
10
4
3
2
1
9
5
4
2
7
6
8
1. Grilling Machine Body
2. Lower Grilling Plate Release
Handles
3. Grilling Plates
Upper Grilling Plate (P/N 22618U)
Lower Grilling Plate (P/N 22618L)
4. Upper Grilling Plate Release
Handles
5. Control Panel
6. Power Cord
7. Drip Tray (P/N 22619)
8. Plastic Spatula (P/N 22545)
9. Sponge (GFSP1)
10. Bun Warmer Cover Location
See Page 7 for Details
11. ON/OFF Power Button
12. Timer Display (LED)
13. Timer Down Button
14. Timer Up Button
Control Panel
11
5
12
13
14
Page 6

How To Use George Foreman’s Lean Mean
Fat Reducing Grilling Machine
1. Before using the Grilling Machine for the first time,
Grilling Plates and wash them in warm soapy water. Rinse and dry
thoroughly. Make sure both Grilling Plates are firmly attached to the
appliance.
2. To preheat: Close the Lid and plug cord into a 120V AC polarized out-
let. The Timer display will show a "--". Press the ON/OFF Button. The
Timer Display will show a "5", indicating the start of the 5 minute preheat countdown. When the countdown is complete the unit will beep
4 times. The Timer Display will show "on" as a reminder that the
power is still on.
3. Use a potholder to carefully open the Lid.
4. Slide the Drip Tray under the front of the unit.
5. Carefully place the items to be cooked on the bottom cooking plate.
6. Close the Lid and press the Timer Up Button to set the desired
grilling time. You can adjust the time up to 20 minutes. The Timer
Display will show the set time. To adjust the Timer down, simply
press the Timer Down Button.
7. Allow the food to cook for the desired time. (Consult the Recipe
Section at the back of this book for some suggestions.) Do not leave
appliance unattended during use!
During grilling, the Timer Display will begin counting down. When the
set time has elapsed the unit will beep 4 times.
8. After the desired amount of time, the food should be done.
9. Press the ON/OFF Button to turn off the Grill. If the unit is not turned
off, it will automatically shut off after one hour. Disconnect the plug
from the wall outlet.
CAUTION: To avoid any sparks at the outlet while disconnecting
plug, make sure the ON/OFF Power Button is off "--" before disconnecting the plug from the outlet.
10. Use a potholder to carefully open the Lid.
11. Remove the food using the Plastic Spatula provided. Be sure to
always use either plastic or wooden utensils so as not to scratch the
non-stick surface. Never use metal tongs, forks or knives as these
can damage the coating on the cooking plates.
12. When cool, the Drip Tray may be removed and emptied. Be sure the
liquid is cooled before removing Drip Tray.
remove the
Page 7

Using the Bun Warmer
This model comes equipped with a Bun Warmer. You can use this feature
to warm various kinds of bread products (hamburger buns, breakfast biscuits, English muffins, tortillas, pita bread, sliced bagels, and mini croissants). For example, if you are cooking hamburgers, you can place your
hamburger buns inside the Bun Warmer to warm them while you cook
the hamburgers! REMEMBER: The Bun W
bread products only. It will not cook or grill any item. It is not intended
for defrosting. The Bun Warmer cannot hold very thick bread products. If
a bread product is too thick, you may have to cut it (butterfly) to fit.
1. Bun Warmer Cover (P/N 22656)
2. Lid Latch
To use the Bun Warmer:
1. Lift up the Lid Latch (where it says "LIFT
TO OPEN").
2. Place the bread product inside the Bun Warmer.
3. When bread is in place, close the Lid by lifting up on the Latch, lower-
ing the Lid, and latching it into place. NEVER FORCE THE LID CLOSED.
Press gently to close Lid.
4. Allow 2-3 minutes after the machine has warmed up to complete
heating. If you are placing bread products in the Bun Warmer that
have been refrigerated, they will take longer to warm up.
CAUTION: The Bun Warmer does not have a separate operation switch.
If you want to warm some bread, but do not want to cook anything on
the grill, please be aware that the grill will be on and will become very
hot.
WARNING: Do not keep cooked food (such as meat, vegetables, potatoes, etc.) warm in the Bun Warmer! THE BUN WARMER IS FOR BREAD
PRODUCTS ONLY!
NOTE: The Bun Warmer cover is specially designed for easy use. The lid is
removeable, you can take it off for
cleaning. To remove the cover, raise it to
an angle of 50 degrees and lift the cover
at the two hinge connections.
Reverse this procedure to reassemble.
armer should be used to warm
PULL
Page 8

Suggested Cooking Chart
Rare Medium Well
(145˚F)* (160˚F)* (170˚F)*
Salmon Filet (1 1/2" thick) 7 min. 8 min. 9 min.
Talapia Fish (3/4" thick) 3 min. 4 min. 5 min.
Tuna Steak (1" thick) 6 min. 7 min. 8 min.
White Fish (1" thick) 7 min. 8 min. 9 min.
Shrimp, split with shell 2 min. 2 1/2min.
4 oz. Turkey Burgers 6 1/2min.
8 oz. Turkey Burgers 7 1/2min.
Pork Loin (1/2" thick) 5 min. 7 min.
4 oz. Burgers 5 min. 6 min.
8 oz. Burgers 10 min. 11 min.
Chicken Breast 9 min.
(boneless/skinless)
Link Sausage 5 min. 6 min.
Sliced Sausage (1/2" thick) 5 min. 6 min.
Fajita Beef (1/2" thick slices) 1 min. 1 1/2min. 2 min.
Rib Eye (1/2" thick) 3 1/2min. 4 1/2min. 5 1/2min.
NY Strip (3/4" thick) 4 min. 5 min. 6 min.
Bratwurst 8 min. 10 min.
Frankfurter 5 min. 7 min.
Onions and Peppers 4 min. 5 min.
(1/2" thick, toss with olive oil)
NOTE: Most meats were 1" thick. These are recommended guidelines
only. Personal taste and thickness of cut may vary cooking times.
Always check for doneness and always use fresh, refrigerated foods.
PLEASE NOTE: The USDA recommends that meats such as beef and lamb,
etc. should be cooked to an internal temperature of 145˚F. Pork should be
cooked to an internal temperature of 160˚F and poultry products should be
cooked to an internal temperature of 170˚F - 180˚F to be sure any harmful
bacteria has been killed. When reheating meat/poultry products, they
should also be cooked to an internal temperature of 165˚F.
*Internal Food Temperatures
Page 9

User Maintenance Instructions
CAUTION: To avoid accidental burns, allow your Grilling Machine to
cool thoroughly before cleaning.
1. Before cleaning, unplug the appliance from the wall outlet and allow
to cool.
CAUTION: To avoid any sparks at the outlet while disconnecting plug,
make sure the ON/OFF Power Button is off "--" before disconnecting the
plug from the outlet.
2. Inside cleaning: Place the Drip Tray under the front of the Grilling
Machine. Using the specially designed Spatula, scrape off any
excess fat and food particles. Run-off will drip into the Drip Tray.
Wipe the plates with the George Foreman specially designed Grill
Sponge.
3. Empty the Drip Tray and wash with warm soapy water. The Grilling
Plates may be removed from the appliance by pulling out on the
Grilling Plate Release Handles. Wash in warm, soapy water, rinse
and dry thoroughly. Reinstall the Grilling Plates, making sure they are
securely attached to the appliance. The removable Grilling Plates are
also dishwasher safe. After washing the Plates in the dishwasher,
wipe the uncoated side with a dry towel to prevent discoloration.
Dishwasher detergent may cause oxidation on the uncoated side of
the cooking plate. This is not harmful and can be wiped off with a
damp towel.
4. Stubborn build-up: Use the scouring side of the Grill Sponge to clean
the plates.
5. Outside cleaning: Wipe with a warm, wet sponge and dry with a soft,
dry cloth.
6. To clean the Bun Warmer surface, simply wipe with a clean, damp
cloth or sponge. Do not use harsh or abrasive cleaners!
7. Do not use steel wool, scouring pads, or abrasive cleaners on any
part of the appliance.
8. DO NOT IMMERSE THE BODY OF THE APPLIANCE IN WATER OR
OTHER LIQUID.
9. Any servicing requiring disassembly other than the above cleaning
must be performed by a qualified electrician.
10. Make sure to hold the top cover (Lid) by hand while cleaning to prevent accidental closing and injury.
98
Page 10

Recipes
NOTE: For all recipes, please remember to place Drip Tray in front of the
Grilling Machine to catch drippings from the cooking process.
Mushroom Tenderloin Steaks
A tasty entrée for a busy weeknight.
2 8 oz. beef tenderloin steaks, 3/4 - inch thick
1 Tbsp. fresh parsley, finely minced
1 clove garlic, finely minced
1/8 tsp. salt
1/8 tsp. black pepper
4 oz. fresh or canned mushroom slices, drained
1 Tbsp. olive oil
Allow the grill to preheat. In a small bowl, combine the mushrooms and
olive oil. Remove any visible fat from the steaks. Sprinkle each steak with
the parsley, garlic, salt and pepper. Place the steaks on the grill and cook
for 2 minutes. Spoon the mushroom slices over the steaks and grill for an
additional 1 1/2 - 2 1/2 minutes.
Serves 2
Hawaiian Pineapple Beef
Flavorful and delicious!
1 lb. London broil beef steak, 1/2 - inch thick
2 Tbsp. green onion, finely minced
1 tsp. ground ginger
1 Tbsp. honey
1/2 cup fresh pineapple, cut into small pieces (or 1/2 cup canned
pineapple chunks, drained)
Remove any visible fat from the steak and cut into 4 equal pieces. In a
small bowl, combine the green onion, ginger and honey and mix well.
Allow the grill to preheat. Place the steak on the grill and spoon the
sauce over the steak.
Grill for 2 minutes, add the pineapple pieces on top of the steak and grill
for an additional 1-2 minutes. To serve, slice the steak thinly across the
grain and spoon the warm pineapple over the top.
Serves 4
10 7
Page 11

Quick and Easy Pork Tenderloin
A 15-minute entrée from start to finish!
2 8 oz. pork tenderlions, 1 - inch thick
1/4 cup low sodium soy sauce
2 tsps. ground ginger
4 green onions, chopped
1 clove garlic, chopped
1/2 tsp. black pepper
Remove all visible fat from the pork. Combine the soy sauce, ginger,
green onions, garlic and pepper in a flat glass pan. Allow the grill to preheat. Quickly dip each tenderloin into the soy ginger sauce and place on
the grill.
Spoon 1 tablespoon of sauce over each tenderloin. Grill for 8 minutes or
continue grilling according to your preference.
Serves 2
New Orleans Pork Ribs
These boneless ribs take less time and effort to prepare than traditional
ribs.
1 1/2 lb. boneless, country-style, pork ribs
1/4 cup tomato paste
1/4 cup cider vinegar
2 Tbsp. honey
2 Tbsp. water
1 Tbsp. extra virgin olive oil
2 tsp. dry mustard
1/2 tsp. Tabasco sauce
1 clove garlic, minced
1/4 cup yellow onion, finely chopped
Remove any visible fat from the ribs. Score the ribs with a knife to prevent the meat from curling as it grills. In a small saucepan, combine the
remaining ingredients and blend until thickened, about 5 minutes, and
keep warm.
Allow the grill to preheat. Place the ribs on the grill and cover each with
1 tablespoon of sauce. Grill for 5 minutes. Open the grill, turn the ribs and
baste each with 1 tablespoon of sauce. Grill for 2-4 minutes, or until
cooked through. Serve with the remaining warm sauce.
Serves 4
116
Page 12

Thai Salmon Steaks
Wonderfully vibrant, tangy flavors!
1 tsp. rice vinegar
2 Tbsp. low sodium soy sauce
1/4 cup honey
2 Tbsp. prepared Chinese mustard
2 Tbsp. fresh parsley, finely minced
2 7-8 oz. salmon steaks, 1 - inch thick
In a small saucepan, combine the vinegar, soy sauce, honey, mustard
and parsley. Simmer for 5 minutes.
Allow the grill to preheat. Place the steaks on the grill and cover each
with a tablespoon of the Thai sauce. Close the grill and cook for 6 minutes. Check the salmon and continue grilling if needed. Serve with any
remaining sauce.
Serves 2
Orange Roughy Primavera
Orange roughy is sweet, mild and very delicate.
1/2 small zucchini, cleaned
1/2 red pepper, cleaned
1/2 yellow onion
1/2 carrot, peeled
1 tsp. fresh rosemary, minced
1 tsp. fresh thyme, minced
1 tsp. black pepper, coarsely ground
2 Tbsp. extra virgin olive oil
4 4-5 oz. orange roughy fillets, 1/2 - inch thick
Thinly slice the zucchini, red pepper, onion and carrot. In a small bowl,
combine the rosemary, thyme, pepper and oil. Allow the grill to preheat.
Place the vegetables on the grill and drizzle one half of the herb oil over
them. Close the grill and cook for 5 minutes.
Remove the vegetables and add the fillets. Drizzle the remaining herb oil
over the fillets, and close the grill. Cook for 2-3 minutes.
Check the fish and continue grilling, if needed, until the fish flakes easily.
To serve, carefully remove the fillets from the grill and top with the vegetables.
Serves 4
12
Page 13

Tandoori Grilled Chicken
The yogurt-based marinade creates exotic, tender chicken!
8 oz. carton unflavored lowfat yogurt
1 Tbsp. lemon juice
2 tsps. ground paprika
2 cloves garlic, minced
1/2 tsp. salt
1/2 tsp. ground ginger
1/2 tsp. ground cumin
1/2 tsp. cayenne pepper
1/2 tsp. ground cinnamon
1 lb. boneless, skinless chicken breast tenders
In a small bowl, mix together the yogurt, lemon juice, paprika, garlic, salt,
ginger, cumin, cayenne pepper and cinnamon. Place the chicken tenders
in a shallow glass pan and pour the marinade over the pieces, turning to
coat thoroughly. Cover tightly and refrigerate for 1-8 hours, turning occasionally.
Allow the grill to preheat. Discard the marinade. Place half of the chicken on the grill and cook for 2 1/2 - 3 1/2 minutes. Check the chicken with
the tip of a knife. If the chicken is not cooked completely through, continue grilling for 1 minute. Repeat with the remaining chicken.
Serves 4
Ranchero Burgers
Made with beef, beans and spices, these are surprisingly good – and
good for you.
3/4 lb. extra lean ground round
1/2 cup canned kidney beans, drained and mashed
2 cloves garlic, minced
2 Tbsp. prepared barbeque sauce
1/2 tsp. salt
1/2 tsp. black pepper
4 sesame seed hamburger buns
Mix together thoroughly the beef, beans, garlic, barbeque sauce, salt
and pepper. Shape into 4 patties.
Allow the grill to preheat. Place the burgers on the grill and cook for 5-6
minutes. Check the burgers and continue grilling if desired. Place each
hamburger on a sesame bun and serve with your choice of condiments.
Serves 4
13
Page 14

Grilled Garden Vegetable Sandwiches
A healthy alternative to fast-food lunches
2 zucchini, thinly sliced
1/2 small purple or red onion, thinly sliced
1 red pepper, seeded and thinly sliced
10 shiitake mushrooms, thinly sliced
1 cup eggplant, diced
1/4 cup extra virgin olive oil
1 clove garlic, finely minced
1 tsp. black pepper, coarsely ground
1 tsp. salt
4 onion rolls, split and toasted
1/4 cup lowfat Parmesan cheese, grated
In a small bowl, combine the zucchini, onion, pepper, mushrooms, eggplant, olive oil, garlic, pepper and salt. Allow the grill to preheat.
Carefully open the grill and layer one-fourth of the zucchini, onion, red
pepper, mushrooms and eggplant on the grilling plate.
Close the grill and cook for 4-6 minutes. Remove and grill the remaining
vegetables as directed above. Top each roll with equal portions of the
vegetables and sprinkle Parmesan cheese over each sandwich.
Serves 4
Chicken Cheese Quesadillas
A simple "quick-fix" for any time of the day.
2 boneless, skinless chicken breast halves
4 large flour tortillas
1 cup lowfat shredded cheddar cheese
2 Tbsp. green onion, chopped
1/2 cup prepared mild tomato salsa
Allow the grill to preheat. Place the chicken on the grill and cook for 9
minutes. Check the chicken with the tip of a knife. If the chicken is not
cooked completely through, continue grilling for 1 to 2 minutes. Cool and
chop into small pieces.
On one half of one tortilla, place one-fourth of the chicken, cheese, onion
and salsa. Fold the top half over the cheese and chicken. Place the quesadilla on the grill. Cook for 2-3 minutes and grill until the quesadilla is
lightly browned and the cheese is melted. Remove and grill the remaining quesadillas as directed above.
Serves 4
14
Page 15

Frequently Asked Questions
Question
1. Can I cook frozen food on
my George Foreman Grill?
2. Can I cook kabobs on the
George Foreman Grill?
3. After cooking with garlic,
how can I remove the smell
of the garlic from the surface of my George Foreman
Grill?
4. How can I cook hot dogs
on my George Foreman
Grill?
5. Can hash browns be prepared on my George
Foreman Grill?
Response
It is preferable that food be defrosted before
placing on the George Foreman Grill. Make
sure that the Grill is preheated, see preheat
instructions, before placing food on the grilling
plate.
Yes. In order to protect the non-stick surface
use wooden skewers. We recommend that
you soak the skewers first in water for about
20 minutes. This will keep the skewers from
burning.
After cleaning your George Foreman Grill
according to the "User Maintenance
Instructions" make a paste of baking soda and
water and spread on the surface of the Grill.
Allow it to sit for a few minutes and then
remove and wash according to "User
Maintenance Instructions."
Preheat your Grill for 7 minutes. Place the hot
dogs lengthwise on the Grill. Close the Lid and
cook for 6 minutes or until desired browning is
achieved.
Yes, self-browning hash browns can be prepared by preheating the Grill for 7 minutes.
Add hash browns onto the Grill surface, close
the Lid, and cook for approximately half the
time stated on the package for oven preparation.
6. Any other cooking suggestions?
Brush green peppers with oil and slit on edges
to flatten. Grill for 10 minutes then steam in a
bag for 10 minutes before peeling.
Grilled cheese sandwiches can also be
cooked on your George Foreman Grill.
152
Page 16

LIMITED ONE-YEAR WARRANTY
Warranty Coverage: This product is warranted to be free from defects in materi-
als or workmanship for a period of one (1) year from the original purchase date.
This product warranty is extended only to the original consumer purchaser of the
product and is not transferable. For a period of one (1) year from the date of original purchase of the product, our Repair Center will, at its option, either (1) repair
the product or (2) replace the product with a reconditioned comparable model.
These remedies are the purchaser's exclusive remedies under this warranty.
Warranty Service: To obtain warranty service, you must call our warranty service
number at 1-800-233-9054 for return instructions on how to deliver the product, in
either the original packaging or packaging affording an equal degree of protection to the Repair Center specified below. You must enclose a copy of your sales
receipt or other proof of purchase to demonstrate eligibility for warranty coverage.
To return the appliance, ship to: To contact us, please write to, call, or email:
ATTN: Repair Center Consumer Relations Department
708 South Missouri Street PO Box 7366
Macon, MO 63552 USA Columbia MO 65205-7366 USA
1-800-233-9054
E-mail:
consumer_relations@toastmaster.com
What Is Not Covered: This warranty does not cover damage resulting from misuse, accident, commercial use, improper service or any other damage caused by
anything other than defects in material or workmanship during ordinary consumer
use. This warranty is invalid if the serial number has been altered or removed
from the product. This warranty is valid only in the United States and Canada.
LIMITATION ON DAMAGES: THERE SHALL BE NO LIABILITY FOR ANY INCIDENTAL OR CONSEQUENTIAL DAMAGES FOR BREACH OF ANY EXPRESS OR IMPLIED
WARRANTY OR CONDITION ON THIS PRODUCT.
DURATION OF IMPLIED WARRANTIES: EXCEPT TO THE EXTENT PROHIBITED BY
APPLICABLE LAW, ALL IMPLIED WARRANTIES AND CONDITIONS, INCLUDING,
WITHOUT LIMITATION, IMPLIED WARRANTIES AND CONDITIONS OF MERCHANTABILITY AND FITNESS FOR A PARTICULAR PURPOSE OR USE ON THIS
PRODUCT ARE LIMITED IN DURATION TO THE DURATION OF THIS WARRANTY.
Some jurisdictions do not allow the exclusion or limitation of incidental or consequential damages, or allow limitations on how long an implied warranty lasts, so
the above limitations or exclusions may not apply to you. This warranty gives you
specific legal rights and you may have other rights under the laws of your jurisdiction.
For more information on our products, visit our website: www.maxim-toastmaster.com
Printed in China
© 2005 Maxim®/Toastmaster®Inc. P/N 61662
 Loading...