

Page 1

Steam Station Iron
Use and Care Guide - Models 3348/3348MEX
IMPORTANT SAFETY
INSTRUCTIONS
When using electrical appliances, basic safety precautions should always
be followed to reduce the risk of fire, electric shock and injury to
persons, including the following:
• Read all instructions before using appliance.
• Close supervision is necessary when any appliance is used near children.
• This appliance is not for use by children.
• The Iron is designed to rest face down, on the heat resistant pad while
it is in use. Do not place the hot iron on an unprotected base, the water
supply cord or the power cord.
• Do not use or rest iron on an unstable surface. Always position iron
carefully on base on a stable ironing board or table to avoid it being
knocked over.
• Do not set hot iron on an unprotected surface—even if it is on its heel
rest.
• Always disconnect iron from electrical outlet when filling the tank with
water or emptying and when not in use.
• Do not fill the water tank with fabric conditioner, starches or any other
solution, as these will damage the steam mechanism. Do not use contaminated water.
• Do not leave iron unattended while hot or connected or while on an
ironing board.
• Do not immerse the iron, base, or cords in water or other liquid. See
instructions for cleaning.
• Do not use outdoors or while standing in a damp area.
• Do not aim iron at face, towards yourself, or anyone else while using
the iron or adjusting steam. Burns or serious injury may occur.
READ AND SAVE THESE INSTRUCTIONS
WARNING: A risk of fire and electrical shock exists in all electrical
appliances and may cause personal injury or death. Please follow all
safety instructions.
Page 2

• Burns can occur from touching hot metal parts, hot water or steam. Use
caution when turning the iron upside down as there may be hot water in
the system.
• Do not allow cords to touch hot surfaces. Let iron cool completely before
putting away. Loop cords loosely around iron when storing.
• Always store the iron face down on the heat resistant pad or on its heel
rest. This will allow air to circulate around the soleplate.
• Do not operate any damaged appliance. Do not operate with a dam-
aged cord or plug, or after the appliance malfunctions, or has been
dropped or damaged in any manner. Do not disassemble the iron.
Return appliance to the nearest authorized service center for examination, repair or mechanical adjustment.
• The iron should be set to MIN before plugging or unplugging from outlet.
Never yank cord to disconnect from outlet, instead, grasp plug and pull
to disconnect.
• Use iron only as indicated in these instructions.
SPECIAL INSTRUCTIONS
• This is a high wattage appliance. To avoid a circuit overload, do not
operate another appliance on the same circuit. If an extension cord is
absolutely necessary, a 13 ampre cord should be used. Cords rated for
less amperage may overheat. Care should be taken to arrange the cord
so that it cannot be pulled or tripped over.
•
This appliance has a polarized plug (one blade is wider than the other).
As a safety feature, this plug will fit in a polarized outlet only one way.
If the plug does not fit fully in the outlet, reverse the plug. If it still does
not fit, contact a qualified electrician. Do not attempt to defeat this safety
feature.
This product is for household use only.
SAVE THESE INSTRUCTIONS
2
Page 3
3
IRONING TIPS
CAUTION: AVOID COMING IN CONTACT WITH ESCAPING STEAM.
1. Sort clothing according to temperatures shown on sewn-in labels.
2. Iron items needing lowest temperatures first. This saves time waiting for
iron to cool down and heat up each time.
3. If you are unsure of the fiber content of a garment, test a small area
that will not show (a seam or inside hem) before ironing.
4. When in doubt, start with low heat. If wrinkle remains, gradually
increase heat to find the best setting for good results without damaging
the fabric.
5. Avoid ironing over zippers, rivets, etc. as they can scratch the Iron’s
Goldtone Non-Stick Soleplate.
6. When reducing the Temperature/Steam Control for delicate fabrics,
allow approximately 2 minutes for the iron to cool to the new setting.
7. Fabrics such as velour, wool, linen and silk are best ironed with an
ironing cloth to prevent shine marks.
8. Always remove garments from hangers before ironing.
9. We recommend using distilled water or water which has been
demineralized.
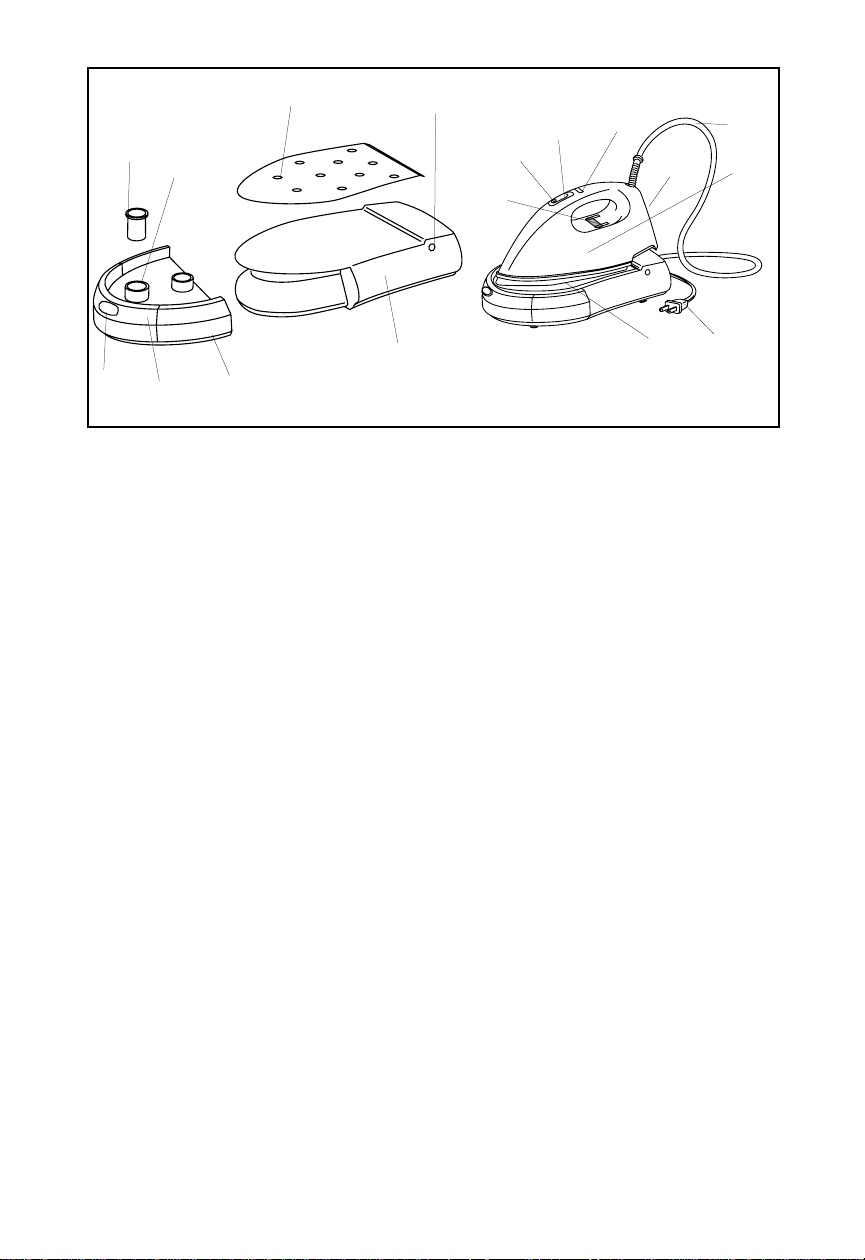
1
2
13
14
17
12
11
10
9
15
3
4
5
6
7
8
16
1. Base
2. Detachable Water Tank
3. Water “MAX” Line
4. Water Tank Lock Button
5. Filter
6. Water Hole/Filter Hole
7. Heat Resistant Pad
8. Power Light
9. Temperature/Steam Control
10. Steam Button Lock
11. Steam Button
12. Heating Light
13. Water Supply Hose
14. Iron
15. Heel Rest
16. Power Cord with Polarized
Plug
17. Goldtone Non-Stick Soleplate
FIGURE 1
Page 4

4
SELECTING IRON TEMPERATURE
Fabric
Synthetics
Delicates
Nylon
Acetate
Wool
Silk
Linen
Cotton
MAX
Vertical
Steam
Temperature/Steam
FIGURE 2 - Assembling
Heat Resistant Pad
FIGURE 5 - Filter
TOP VIEW
LOCK
LOCK
UNLOCK
FIGURE 3 - Iron Resting On
Base
FIGURE 4 - Removal of
Water Tank
BEFORE FIRST USE
1. Remove all packaging materials before using.
2. Place Iron on Heat Resistant Pad, and turn Temperature/Steam Control
to MIN. DO NOT PLACE HOT IRON DIRECTLY ON BASE. HEAT RESISTANT PAD MUST BE IN PLACE FIRST.
3. Remove any adhesive labels or stickers from the soleplate of the Iron.
Make sure that all adhesive is removed by rubbing the soleplate with
a damp cloth. Dry soleplate thoroughly.
Page 5

5
4. The unit may emit an odor and/or smoke during the first few uses due
to oils used in manufacturing. This is normal for newly manufactured
appliances.
5. Unwrap Power Cord and Water Supply Hose fully. Attach Heat
Resistant Pad onto Base (see Figure 2).
USE AS A DRY IRON/IRONING WITHOUT STEAM
1. Place the Base on a stable sur face.
2. Place Iron on Heat Resistant Pad and tur n Temperature/Steam control
to MIN and remain on as long as the iron is plugged in. The Heating
Light will continue to cycle on and off during use. DO NOT PLACE HOT
IRON DIRECTLY ON BASE. HEAT RESISTANT PAD MUST BE IN PLACE
FIRST.
3. Plug into 120V ~ 60Hz outlet. The Power Light will come on.
4. Align red arrow on Temperature/Steam Control to desired setting. The
Heating Light will come on.
5. Do not press the Steam Button while using as a dry iron.
6. When finished, move Temperature/Steam Control to MIN. Unplug
from outlet and allow Iron to cool completely before storing Steam
Station.
FILLING THE DETACHABLE WATER TANK
CAUTION: UNPLUG FROM OUTLET AND ALLOW TO COOL COMPLETELY
BEFORE FILLING WITH WATER.
1. Depress the Water Tank Lock Button and carefully pull out the
Detachable Water Tank. (see Figure 3).
2. Remove filter by tur ning it toward arrow and lifting up, (see Figure 5).
3. Fill Detachable Water Tank with fresh, cool water to MAX fill line as
marked on side of tank.
NOTE: Because of the special Filter, normal tap water can usually be
used for ironing. But if you live in a hard water area, we recommend
that you use distilled water to ensure optimum performance of your
iron.
4. Replace Filter back into Water Hole/Filter Hole. Turn Filter to the left or
right until it locks into position.
5. Carefully push Detachable Water Tank back into Base until it locks into
place.
NOTE: The Detachable Water Tank will hold 28 oz. of water and will provide continuous steam for up to one hour of use before the Detachable
Water Tank requires refilling.
IRONING WITH STEAM
1. Place the Base on a stable sur face. Place the Heat Resistant Pad on
Base.
2. Place Iron on Heat Resistant Pad, and turn Temperature/Steam Control
to MIN. DO NOT PLACE HOT IRON DIRECTLY ON BASE. HEAT
RESISTANT PAD MUST BE IN PLACE FIRST.
Page 6

6
3. Fill Detachable Water Tank, see “FILLING THE DETACHABLE WATER
TANK.”
4. Plug into a 120V ~ 60Hz outlet. The Power Light will turn on and
remain on as long as the Steam Station Iron is plugged in. The Heating
Light will continue to cycle on and off during use.
5. Adjust the Temperature/Steam Control to desired setting or MAX for
maximum steam.
6. When you press the Steam Button, the electric pump (located in the
Base) will supply water to the iron and steam will start to emerge.
7. If you require a constant flow of steam, push the Steam Button Lock
forw ard to hold the Steam Button in place. You can stop the flow of
steam either by releasing the Steam Button Lock and sliding it back or
by pressing the Steam Button. Note: The Steam Station will make a
humming sound when the Steam Button Lock is engaged.
NOTE: When the Steam Button is pressed for the first time, the electric
pump may make a noise. This is normal sound as the electric pump is
being primed with water. The noise will decrease and after 1-1
1
⁄2 min-
utes and steam will emerge.
8. The Iron will release steam in the horizontal and ver tical positions.
9. When finished, move the Temperature/Steam Control to MIN. Unplug
from outlet and allow to cool before storing Steam Station.
10. Remove Detachable Water Tank and Filter and empty completely.
Replace Filter into Detachable Water Tank. Replace Detachable Water
Tank into Base.
NOTE: Do not use the Steam Button Lock in the lock position for more than
20 minutes. Usage over 20 minutes may cause water leakage from the
soleplate.
VERTICAL STEAMING
1. To vertically steam fabrics, follow steps 1-4 in “IRONING WITH
STEAM.” Plug Steam Station into a 120V ~ 60Hz outlet. Adjust the
Temperature/Steam Control to MAX.
2. Once the iron has reached MAX setting, hold the iron horizontally and
press the Steam Button until steam begins to emerge. Then hold the
iron vertically with the iron facing the fabric to be steamed. The iron
should be kept 1 - 2 inches from the fabric.
3. If you require a constant flow of steam, push the Steam Button Lock
forw ard to hold the Steam Button in place. You can stop the flow of
steam either by releasing the Steam Button Lock and sliding it back or
by pressing the Steam Button.
4. While using the vertical steaming feature, be sure to keep an adequate
supply of water in the Detachable Water Tank.
5. Follow steps 9 and 10 in “IRONING WITH STEAM.”
MAINTENANCE
This Steam Station requires little maintenance. It contains no user serviceable parts inside the base.
Page 7

CLEANING
CAUTION: NEVER IMMERSE STEAM STATION IN WATER. THIS COULD
DAMAGE THE PRODUCT.
1. Move the Temperature/Steam Control to MIN.
2. Remove the Detachable Water Tank and empty completely.
NOTE: Do not put vinegar or other descaling agents into the
Detachable Water Tank. Regular Filter cleaning will prevent scale
build-up. See, “CLEANING THE FILTER.”
CAUTION: AVOID COMING IN CONTACT WITH STEAM.
3. Move Temperature/Steam Control to MIN and unplug Steam Station
from outlet and allow to cool completely.
4. Replace Detachable Water Tank to its correct position and then, press
the Steam Button until no more steam comes out of the Iron. This clears
any water from the Water Supply Hose.
5. Wipe the Goldtone Non-Stick Soleplate with a damp, soft cloth. Dry all
parts thoroughly. If starch or other residues cling to the soleplate, use
hot iron cleaner according to directions. Hot iron cleaner is available
at mass merchandise, discount or hardware stores.
CLEANING THE FILTER
The removable Filter should be cleaned for continuous protection against
scaling. We recommend cleaning the Filter system after ten uses. This will
keep the system clean and allow better performance.
1. Move the Temperature/Steam Control to MIN and unplug Steam
Station from outlet.
2. Always allow Steam Station to cool completely.
3. Depress the Water Tank Lock Button and carefully pull out the
Detachable Water Tank. (see Figure 4).
4. Remove Filter from water tank by turning Filter toward arrow and
lifting up (see Figure 5). Set Filter aside.
5. Make a salt-water solution of one par t salt to ten par ts water. Stir until
salt is dissolved.
6. Place Filter into salt-water solution for about 5 minutes.
7. Remove Filter and shake several times.
8. Repeat steps 6 and 7 three to four times.
9. Discard salt-water solution and place Filter into (or rinse with) clean
water for 5 minutes.
10. Replace filter in Detachable Water Tank. Turn to lock into place.
11. Replace Detachable Water Tank back into Base.
STORAGE
1. Unplug and allow to cool completely. Wipe appliance clean.
2. Store in original box or in a clean, dry place. Never store Steam
Station while it is hot or plugged in. Wrap cords loosely around
product, never wrap cords tightly around product as this could damage the cords.
7
Page 8

3. Always store Iron face down on Heat Resistant Pad or on Heel Rest. If
stored face down on a flat surface, even the smallest amount of moisture
will cause the Goldtone Non-Stick Soleplate to corrode and stain.
Any servicing requiring disassembly other than the above cleaning must
be performed by an authorized ser vice center.
SERVICE INFORMATION
Please refer to warranty statement to determine if in-warranty service
applies. This appliance must be serviced by a Toastmaster authorized
service center . Unauthorized service will void warranty . Consult your phone
directory under “Appliances-Household-Small-Ser vice and Repair,” or call
1-800-947-3744 in the U.S. and Canada, 52-5-397-2848 in Mexico.
If an authorized service center is not available locally, your appliance may
be returned postage prepaid to our National Service Center at the address
shown on the back of this book.
Products must be adequately protected to avoid shipping damage.
Surround your appliance with three inches of protective padding and
include a copy of your dated sales receipt and a note explaining the
problem you have experienced. We recommend insuring your package.
No CODs accepted.
KEEP DATED SALES RECEIPT FOR WARRANTY SERVICE.
Keep this booklet. Record the following for reference:
Date purchased
Model number
Date code (stamped on bottom)
8
Page 9

LIMITED ONE-YEAR GUARANTEE
Toastmaster Inc. warrants this product, to original purchaser, for one year from purchase date to be free of defects in material
and workmanship.
This warranty is the only written or express warranty given by Toastmaster Inc. This warranty gives you specific legal rights. You
may have other rights which vary from state to state. ANY OTHER RIGHT WHICH YOU MAY HAVE, INCLUDING ANY IMPLIED
WARRANTY OF MERCHANTABILITY OR FITNESS FOR A PARTICULAR PURPOSE IS LIMITED IN DURATION TO THE DURATION OF
THIS WARRANTY.
Defective product may be brought or sent (freight prepaid) to an authorized service center listed in the phone book, or to Service
Department, Toastmaster Inc., 708 South Missouri St., Macon, MO 63552, for free repair or replacement at our option.
Your remedy does not include: cost of inconvenience, damage due to product failure, transportation damages, misuse, abuse, accident or the like, or commercial use. IN NO EVENT SHALL TOASTMASTER INC. BE LIABLE FOR INCIDENTAL OR CONSEQUENTIAL
DAMAGES.
Some states do not allow limitations on how long an implied warranty lasts, or allow the exclusion or limitation of incidental
or consequential damages, so the above limitations or exclusions may not apply to you.
For information, write Consumer Claims Manager, at the Macon address. Send name, address, zip, telephone area code and
daytime number, model, serial number, and purchase date.
EVERYBODY EATS. It’s a fact of life.
But sometimes preparing
meals can become a chore.
That’s why TOASTMASTER has been invited
into millions of kitchens just like yours
so we can HELP YOU MASTER your
mixing, baking, grilling, toasting,
brewing, heating and serving
tasks WITH EASE AND STYLE.
The TOASTMASTER name stands for a
CELEBRATION of INNOVATION designed
to serve your life and keep you
COOKIN’ IN STYLE.
9
 Loading...