

Page 1

READ AND SAVE THESE INSTRUCTIONS
WARNING: A risk of fire and electrical shock exists in all electrical appliances
and may cause personal injury or death. Please follow all safety instructions.
Steam and Dry Iron
Use and Care Guide Model 3310X
I M P O RTANT SAFETY INSTRU C T I O N S
When using electrical appliances, basic safety precautions should always be
fo l l owed to reduce the risk of fire, electric shock and injury to persons, including
the following:
• Read all instructions before using appliance.
• Close supervision is necessary when appliance is used near children.
• This appliance is not for use by children.
• Do not operate any damaged appliance. Do not operate with a damaged
cord or plug, or after the appliance malfunctions or has been dropped or
damaged in any manner.Return appliance to the nearest authorized service
facility for examination, repair or mechanical adjustment.
• Do not immerse the iron in water or other liquid.See instructions for cleaning.
• Do not use outdoors or while standing in damp area.
• Use iron only for its intended use.
• The iron should be turned to MIN before plugging or unplugging from outlet.
N ever yank cord to disconnect from outlet; instead grasp plug and pull to
d i s c o n n e c t .
• Do not allow cord to touch hot surfaces. Let iron cool completely before
putting away. Loop cord loosely around iron when storing.
• A l ways disconnect iron from electrical outlet when filling with water or
e m p t y i n g and when not in use.
• B u rns can occur from touching hot metal part s, hot water or steam. U s e
caution when you turn a steam iron upside down — there may be hot water
in the reservoir.
• Do not leave iron unattended while hot or connected or on an ironing board.
• Position iron carefully on ironing board to avoid it from being knocked over.
SPECIAL INSTRUCTIONS
• This is a high wattage appliance.To avoid a circuit overload, do not operate
another high wattage appliance on the same circuit.
• If an extension cord is absolutely necessary, a 13 ampere cord should be
u s e d . Cords rated for less ampera g e may overheat.
• Care should be taken to arrange the cord so that it cannot be pulled or
tripped over.
• This appliance has a polarized plug (one blade is wider than the other).As a
safety feature, this plug will fit in a polarized outlet only one way. If the plug
does not fit fully in the outlet, reverse the plug. If it still does not fit, contact a
qualified electrician. Do not attempt to defeat this safety feature.
SAVE THESE INSTRUCTIONS
Page 2
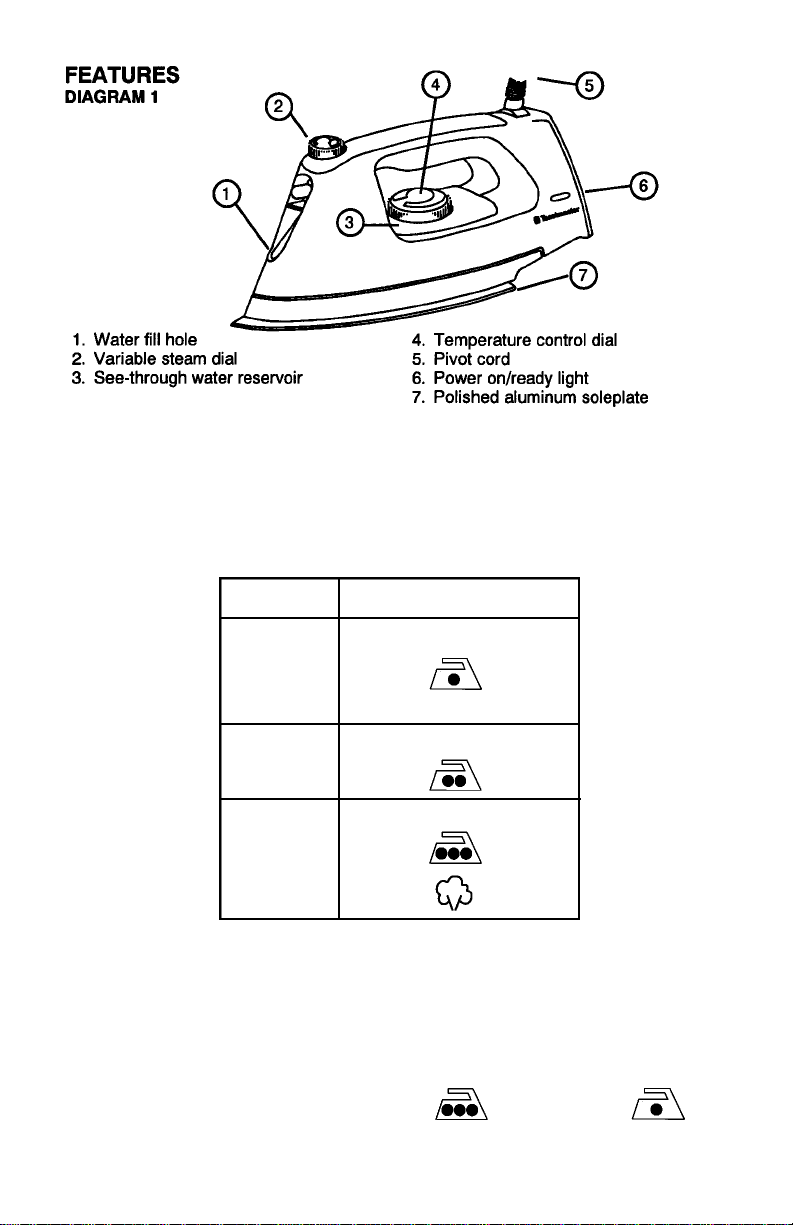
USING YOUR IRON
Note: Before you use your iron for the first time, you should flush the soleplate
steam vents to ensure that no stain is transferred onto fabric from residue possibly left in the vents from the manufacturing process. To do this, see SELFCLEANING/FLUSHING.
TEMPERATURE AND STEAM GUIDE
Fabric
Delicates
Nylon
Acetate
Silk
Polyester
Wool
Cotton
Linen
Temperature/Steam
Low
Medium
High
For best results, check garment labels for the temperature and steam setting
recommended by the fabric manufacturer, or consult the enclosed garment
care tips pamphlet for additional information.
To prevent damaging garments from too hot of an iron, it is best to first iron garments that require a low temperature. If you should need to switch from a high
setting to a lower temperature, for example Cotton/Linen to Nylon,
allow the iron about 5 minutes to reach the lower temperature.
2
Page 3
Tips: If you are unsure of a garment’s fabric content, start on a low setting and
test the iron on an area of the garment that does not show, such as a seam.
Gradually increase the heat setting until wrinkles remove without damaging the
fabric.
To freshen up garments made of velvet, felt, suede or velour, hold the steaming iron horizontally 2 inches above the fabric for a gentle steaming.Make sure
the iron does not come in contact with the fabric.
To prevent shine, iron dark garments or those made of silk, acetate or rayon
inside out.
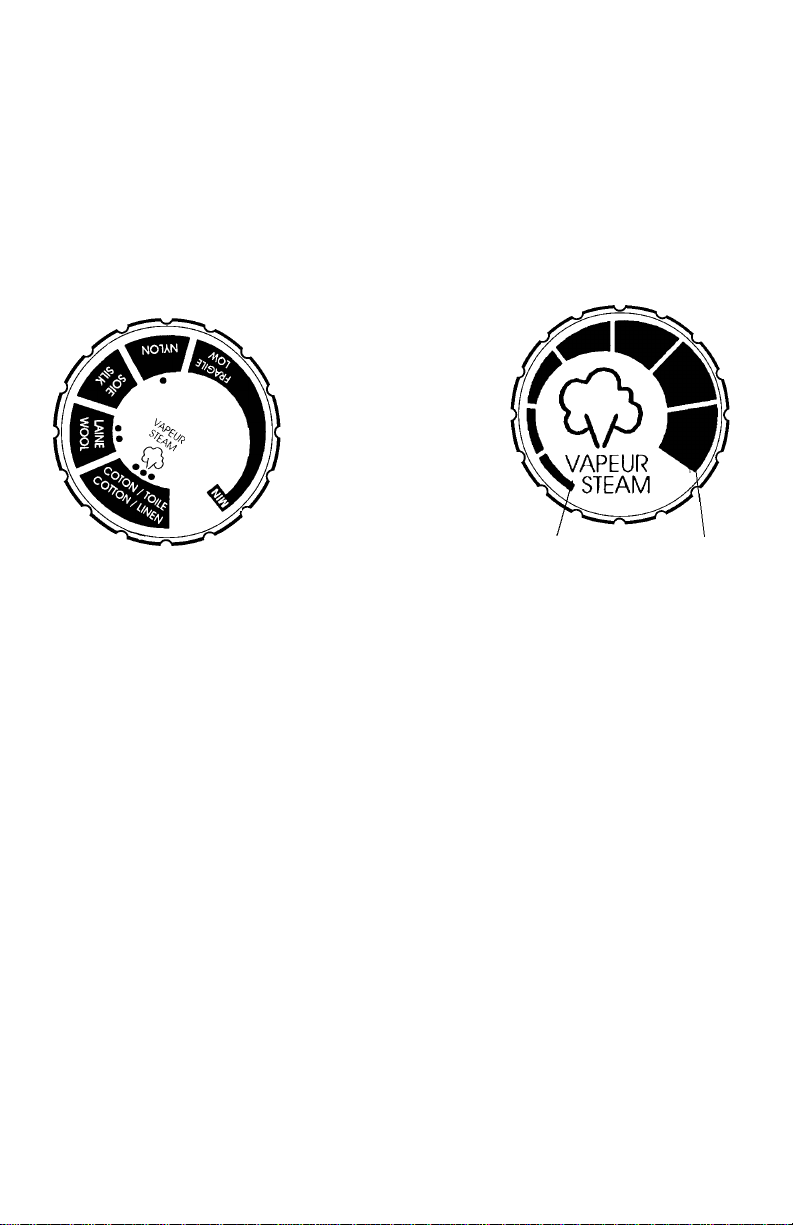
DIAGRAM 2
DIAGRAM 3
MINIMUM
MAXIMUM
USING AS A DRY IRON
The iron can be used on the dry setting with or without water in the tank, however it is best to avoid having the tank too full of water while dry ironing.
1. Position temperature control dial to MIN, lowest setting. Diagram 2.
2. Turn the variable steam dial to the lowest setting. Diagram 3.
3. Stand the iron on its heel in an upright position on an iron-safe surface and
plug it in.
4. Turn the temperature control dial to the desired setting. Diagram 2.
5. When the ready light turns off, the iron has reached the desired temperature.
6. When finished, turn temperature control dial to MIN, and unplug. Allow the
iron to cool before cleaning the exterior or storing.
NOTE: During ironing, the ready light may turn on again which indicates that
the iron is heating up to maintain the proper temperature.
CAUTION: If the iron has been used for a long time and is hot, DO NOT fill it
with water.
USING AS A STEAM IRON
When using as a steam iron, be sure the temperature setting on the control dial
is within the STEAM range to avoid water spotting on a garm e n t .
1. Position temperature control dial to MIN, lowest setting. Diagram 2.
2. Position the variable steam dial to lowest setting. Diagram 3.
3. With the unit UNPLUGGED, fill the iron with water. (See FILLING THE
WATER TANK instructions.)
4. Stand the iron on its heel in an upright position on an iron-safe surface and
plug in.
3
Page 4

5. Turn the temperature control dial to STEAM. Diagram 2.
6. Allow approximately 2 minutes for the iron to reach the desired tempera-
ture.(The ready light will turn off.)
7. Turn the variable steam dial counter clockwise to the desired amount of
steam. Diagram 3. As soon as the iron is held horizontally, steam will flow
through the vents. If the iron does not steam, gently tap the soleplate on
the ironing surface. Placing the iron on its heel in an upright position interrupts the flow of steam.
8. When finished, turn temperature control dial to MIN, lowest setting and
variable steam dial to lowest setting, and unplug. Allow to cool before
cleaning the exterior of the iron and storing.
CAUTION: Avoid coming in contact with escaping steam.
DIAGRAM 4
DIAGRAM 5
FILLING THE WATER TANK
1. Unplug the iron before filling.
2. Turn the variable steam dial to the lowest setting. Diagram 3.
3. Hold the iron upright but slightly tipped.
4. Using a measuring cup, slowly pour water into the water fill hole opening.
Diagram 4.
5. Check see-through water reser voir to see if iron is filled to maximum fill
line.Diagram 5.
Note: Your iron is designed to use tap water. DO NOT use water from home
water softening systems because such water may contain minerals that may
harm the iron.
EMPTYING THE WATER TANK
The water tank should be emptied after each use.To do so:
1. Unplug the iron from the electrical outlet.
2. While the iron is still warm, hold the iron over a sink and allow the iron to
drain by tipping the point of the iron down.
3. Gently shake the iron to loosen any water drops that may be trapped.The
warmth of the iron should dry out any remaining water.
Note: If you empty the water tank after the iron has cooled, set the iron in an
upright position on its heel, plug it in and set the temperature dial to maximum
heat for 2 minutes. Turn temperature control dial to MIN, lowest setting, and
variable steam dial to lowest setting, and unplug.Let iron cool before storing it.
4
Page 5

SELF-CLEANING/FLUSHING
Flushing the iron is advised after every 5 usages to prevent harmful mineral
build-up that can clog the iron and prevent it from heating and steaming
p r o p e rl y. To flush the iron:
1. Position temperature control dial to MIN, lowest setting. Diagram 2.
2. Turn variable steam dial to the lowest setting. Diagram 3.
3. Fill the iron’s water tank to its maximum fill line.Diagram 5.
4. Plug the iron in and set the temperature control dial to its highest
setting or cotton/linen. Let it heat for 2 minutes.
5. Turn the variable steam dial to the highest setting.
6. Place a hand towel over the ironing surface.
7. Hold the iron horizontally 2 inches above the towel allowing steam to flow
through the vents until the water tank is emptied.
8. Pass the iron over a damp cloth to clean the soleplate.
9. When finished, turn temperature control dial to MIN, lowest setting, and
variable steam dial to lowest setting, and unplug. Allow iron to cool before
cleaning the exterior of the iron or storing. Use a cloth to wipe off exterior
of iron before storing.
DIAGRAM 6
STORING THE IRON
Remove the cord from the outlet by grasping the plug rather than pulling the
cord, and allow iron to cool. EMPTY the water tank after each use, then wrap
the cord around the cooled iron as shown. Diagram 6. Allow the iron to COOL
COMPLETELY before putting it away.To protect the soleplate, place the iron in
an upright position on its heel.
CLEANING AND CARE
C AU T I O N : Unplug the iron from the electrical outlet before cleaning the ex t e ri o r
of the iron and storing. Never immerse an appliance in water.
To protect the soleplate from scratching, avoid ironing over snaps, zippers,
metal buttons, etc. Also, do not place the iron on metal or rough surfaces. If
starch or other residues cling to the soleplate, use hot iron cleaner according
to directions. Hot Iron Cleaner is available at mass merchandise, discount or
hardware stores.
A “home remedy” for cleaning starch or other material buildup on the soleplate
is as follows:
1. Unplug the iron and allow to cool completely.
5
Page 6

2. Mix together 4 tablespoons baking soda and 1 tablespoon water.
3. Apply mixture to the soleplate with a soft cloth.
4. Clean mixture off with a water dampened clean cloth, dry thoroughly.
Note: DO NOT put any chemical cleaning agents or solvents in the water tank.
IMPORTANT: Any servicing that requires disassembly must be performed by
an authorized service center.
SERVICE INFORMATION
Please refer to warranty statement to determine if in-warranty service applies.
This appliance must be serviced by a Toastmaster authorized service center.
Unauthorized service will void warranty. Consult your phone directory under
“Appliances-Household-Small-Service and Repair,” or call 1-800-947-3744 in
the U.S.and Canada, 52-5-397-2848 in Mexico.
If an authorized service center is not available locally, your appliance may be
returned postage prepaid to our National Service Center at the address shown
in the warranty statement.
Products must be adequately protected to avoid shipping damage. Surround
your appliance with three inches of protective padding and include a copy of
your dated sales receipt and a note explaining the problem you have experienced.We recommend insuring your package. No CODs accepted.
Toastmaster Inc. warrants this product, to original purchaser, for one year from purchase date to be free of defects in material and workmanship.
This warranty is the only written or express warranty given by Toastmaster Inc.This warranty gives you specific legal rights.You
may have other rights which vary from state to state.ANY OTHER RIGHT WHICH YOU MAY HAVE, INCLUDING ANY IMPLIED
WARRANTY OF MERCHANTABILITY OR FITNESS FOR A PARTICULAR PURPOSE IS LIMITED IN DURATION TO THE
DURATION OF THIS WARRANTY.
Defective product may be brought or sent (freight prepaid) to an authorized service center listed in the phone book, or to
Service Department, Toastmaster Inc., 708 South Missouri St., Macon, MO 63552,, for free repair or replacement at our option.
Your remedy does not include:cost of inconvenience, damage due to product failure, transportation damages, misuse, abuse,
accident or the like, or commercial use. IN NO EVENT SHALL TOASTMASTER INC. BE LIABLE FOR INCIDENTAL OR CONSEQUENTIAL DAMAGES.
Some states do not allow limitations on how long an implied warranty lasts, or allow the exclusion or limitation of incidental or
consequential damages, so the above limitations or exclusions may not apply to you.
For information, write Consumer Claims Manager, at the Macon address.Send name, address, zip, telephone area code and
daytime number, model, serial number, and purchase date.
ON E YEAR LIMITED WARRANTY
KEEP DATED SALES RECEIPT FOR WARRANTY SERVICE.
Keep this booklet. Record the following for reference:
Date purchased _ _ _ _ _ _ _ _ _ _ _ _ _ _ _ _ _ _ _ _ _ _ _ _ _ _ _ _ _ _ _ _ _ _ _ _ _ _ _ _ _ _ _ _ _ _ _ _ _ _ _ _ _
Model number (stamped on bottom) _ _ _ _ _ _ _ _ _ _ __ _ _ __ _ _ _ _ _ _ _ _ _ _ _ __ _ _ _ _ _ _ _
National Service Center
708 South MIssouri
Macon, MO 63552
In USA and Canada call:
Consumer Service 1-800-947-3744
Consumer Parts 1-800-947-3745
Hours:8:00 a.m.- 4:30 p.m.CST
Aux É.-U. et au Canada, veuillez appeler
Service consommateur :1-800-947-3744
Piéces détachées consommateur :1-800-947-3745
Heures ouvrables :8 h - 16 h 30 Heure Centrale
En México - 52-5-397-2848
Horario:8:00 a.m.hasta 4:30 p.m., hora del
Centro
Toastmaster de México, SA de CV
Cerrada de Recursos
Hidráulicos Numero 6
La Loma Industrial
Tlalnepantla de Baz, C.P. 54060
Estado de México
PA RT NO.3 3 4 9 1 P 0 1
7
Page 7

ESPECIFICACIONES TÉCHNICAS
Potencia nominal (Watts) 1232 W
Tensión de alimentación o tensión nominal (Volts) 127 V ~
Frencuencia de operación o frecuencia nominal (Hertz) 60 Hz
 Loading...