

Page 1
INSTRUCTION MANUAL
INTEGRATED AUDIO COLLABORATION SYSTEM
AM-CF1B, AM-CF1W
Thank you for purchasing TOA’s Integrated Audio Collaboration System.
Please carefully follow the instructions in this manual to ensure long, trouble-free use of your equipment.
Page 2

TABLE OF CONTENTS
1. SAFETY PRECAUTIONS
............................................................................. 3
2. GENERAL DESCRIPTION .......................................................................... 5
3. FEATURES ............................................................................................................ 5
4. NOMENCLATURE AND FUNCTIONS ................................................. 6
5. CONNECTION EXAMPLES ........................................................................ 8
6. INSTALLATION .................................................................................................. 8
7. CONNECTIONS ................................................................................................ 10
7.1. AC Adapter Connection ....................................................................................... 10
7.2. Network Connection ............................................................................................ 11
7.3. PC and USB Devices Connections ..................................................................... 11
7.4. AUX Input Connection ......................................................................................... 11
7.5. AUX Output Connection ...................................................................................... 12
7.6. Control Input and Output Connections ................................................................ 12
7.7. Codec Input and Output Connections ................................................................. 13
7.8. Removable Terminal Plug Connection ................................................................ 13
8. SYSTEM SETTINGS ..................................................................................... 14
8.1. Overview of System Settings .............................................................................. 14
8.2. System Requirements ......................................................................................... 14
8.3. Connections ........................................................................................................ 15
9. OPERATION ....................................................................................................... 16
9.1. Turning Power ON and OFF ................................................................................ 16
9.2. Switching between Power Standby and Normal Operation modes .................... 16
9.3. Turning Power OFF ............................................................................................. 16
9.4. Bluetooth Pairing ................................................................................................. 17
9.5. Volume Adjustment ............................................................................................. 17
9.6. Microphone Muting ............................................................................................. 18
10. CONTACT INPUT AND OUTPUT FUNCTIONS ........................ 18
10.1. Terminal Control Method (Momentary/Latch) .................................................... 18
10.2. Contact Input Settings ....................................................................................... 19
10.3. Contact Output Settings .................................................................................... 19
11. INITIALIZATION ............................................................................................. 20
11.1. Initializing All Settings ........................................................................................ 20
11.2. Initializing a Portion of the Settings ................................................................... 21
2
12. SOFTWARE LICENSE INFORMATION ......................................... 22
13. SPECIFICATIONS ........................................................................................ 23
• Accessories ............................................................................................................. 23
Page 3
1. SAFETY PRECAUTIONS
• Before installation or use, be sure to carefully read all the instructions in this section for correct and safe
operation.
• Be sure to follow all the precautionary instructions in this section, which contain important warnings and/or
cautions regarding safety.
• After reading, keep this manual handy for future reference.
Safety Symbol and Message Conventions
Safety symbols and messages described below are used in this manual to prevent bodily injury and property
damage which could result from mishandling. Before operating your product, read this manual rst and
understand the safety symbols and messages so you are thoroughly aware of the potential safety hazards.
WARNING
CAUTION
Indicates a potentially hazardous situation which, if mishandled, could
result in death or serious personal injury.
Indicates a potentially hazardous situation which, if mishandled, could
result in moderate or minor personal injury, and/or property damage.
WARNING
When Installing the Unit
• Do not expose the unit to rain or an environment
where it may be splashed by water or other liquids,
as doing so may result in re or electric shock.
• Use the unit only with the voltage specied on
the unit. Using a voltage higher than that which is
specied may result in re or electric shock.
• Do not cut, kink, otherwise damage nor modify
the power supply cord. In addition, avoid using the
power cord in close proximity to heaters, and never
place heavy objects -- including the unit itself -- on
the power cord, as doing so may result in re or
electric shock.
• Install the unit only in a location that can structurally
support the weight of the unit and the mounting
bracket. Doing otherwise may result in the unit
falling down and causing personal injury and/or
property damage.
• Since the unit is designed for indoor use, do not
install it outdoors. If installed outdoors, the aging of
parts causes the unit to fall off, resulting in personal
injury. Also, when it gets wet with rain, there is a
danger of electric shock.
and possible personal injury.
• Tighten each nut and bolt securely. Ensure that
the bracket has no loose joints after installation
to prevent accidents that could result in personal
injury.
• Use the specied mounting bracket in combination.
Doing otherwise may cause the unit or component
to fall off, resulting in personal injury.
• Do not mount the unit in locations exposed to
constant vibration. The mounting bracket can be
damaged by excessive vibration, potentially causing
the unit to fall, which could result in personal injury.
When the Unit is in Use
• Should the following irregularity be found during
use, immediately switch off the power, disconnect
the power supply plug from the AC outlet and
contact your nearest TOA dealer. Make no further
attempt to operate the unit in this condition as this
may cause re or electric shock.
· If you detect smoke or a strange smell coming
from the unit
· If water or any metallic object gets into the unit
· If the unit falls, or the unit case breaks
· If the power supply cord is damaged (exposure of
the core, disconnection, etc.)
· If it is malfunctioning (no tone sounds)
• Do not use other methods than specied to mount
the bracket. Extreme force is applied to the unit and
the unit could fall off, possibly resulting in personal
injuries.
• Use nuts and bolts that are appropriate for the wall’s
structure and composition. Failure to do so may
cause the unit to fall, resulting in material damage
• To prevent a re or electric shock, never open nor
remove the unit case as there are high voltage
components inside the unit.
• Do not place cups, bowls, or other containers of
liquid or metallic objects on top of the unit. If they
accidentally spill into the unit, this may cause a re
or electric shock.
3
Page 4

• Do not touch a power supply plug during thunder
and lightning, as this may result in electric shock.
• To prevent the electromagnetic wave from badly
inuencing medical equipment, make sure to switch
off the unit’s power when placing it in close proximity
to the medical equipment.
• Do not use the unit within 15 cm proximity to a
pacemaker implant. In such cases, be sure to turn
off the unit’s power. Electromagnetic signals emitted
by the unit could adversely affect pacemaker
operation.
heaters, or in locations generating sooty smoke
or steam as doing otherwise may result in re or
electric shock.
• Avoid touching the unit’s sharp metal edge to
prevent injury.
When the Unit is in Use
• Do not place heavy objects on the unit as this may
cause it to fall or break which may result in personal
injury and/or property damage. In addition, the
object itself may fall off and cause injury and/or
damage.
CAUTION
When Installing the Unit
• Never plug in nor remove the power supply plug
with wet hands, as doing so may cause electric
shock.
• When unplugging the power supply cord, be sure to
grasp the power supply plug; never pull on the cord
itself. Operating the unit with a damaged power
supply cord may cause a re or electric shock.
• When moving the unit, be sure to remove its power
supply cord from the wall outlet. Moving the unit
with the power cord connected to the outlet may
cause damage to the power cord, resulting in re or
electric shock. When removing the power cord, be
sure to hold its plug to pull.
• Avoid installing the unit in humid or dusty locations,
in locations exposed to the direct sunlight, near the
• Do not operate the unit for an extended period of
time with the sound distorting. Doing so may cause
the built-in speakers to heat, resulting in a re.
• Use the AC adapter with the designated specication
for the unit. Note that the use of other adapter may
cause a re.
• If dust accumulates on the power supply plug or
in the wall AC outlet, a re may result. Clean it
periodically. In addition, insert the plug in the wall
outlet securely.
• Switch off the power, and unplug the power supply
plug from the AC outlet for safety purposes when
cleaning or leaving the unit unused for 10 days or
more. Doing otherwise may cause a re or electric
shock.
• Do not stand or sit on, nor hang down from the unit
as this may cause it to fall down or drop, resulting in
personal injury and/or property damage.
FCC REQUIREMENTS
Note
This equipment has been tested and found to comply with the limits for a Class B digital device, pursuant
to part 15 of the FCC Rules. These limits are designed to provide reasonable protection against harmful
interference in a residential installation. This equipment generates, uses and can radiate radio frequency
energy, and if not installed and used in accordance with the instructions, may cause harmful interference
to radio communications. However, there is no guarantee that interference will not occur in a particular
installation. If this equipment does cause harmful interference to radio or television reception, which can be
determined by turning the equipment off and on, the user is encouraged to try to correct the interference by
one or more of the following measures:
• Reorient or relocate the receiving antenna
• Increase the separation between the equipment and receiver
• Connect the equipment into an outlet on a circuit different from that to which the receiver is connected
• Consult the dealer or an experienced radio/TV technician for help
Modications
Any modications made to this device that are not approved by TOA Corporation may void the authority
granted to the user by the FCC to operate this equipment.
4
Page 5

This device complies with Industry Canada’s license-exempt RSS standard(s). Operation is subject to the
following two conditions:
(1) this device may not cause interference, and
(2) this device must accept any interference, including interference that may cause undesired operation of
the device.
Le présent appareil est conforme aux CNR d’Industrie Canada applicables aux appareils radio exempts de
licence. L’exploitation est autorisée aux deux conditions suivantes :
(1) l’appareil ne doit pas produire de brouillage, et
(2) l’utilisateur de l’appareil doit accepter tout brouillage radioélectrique subi, même si le brouillage est
susceptible d’en compromettre le fonctionnement.
Under Industry Canada regulations, this radio transmitter may only operate using an antenna of a type
and maximum (or lesser) gain approved for the transmitter by Industry Canada. To reduce potential radio
interference to other users, the antenna type and its gain must be so chosen that the equivalent isotropically
radiated power (e.i.r.p.) is not more than that necessary for successful communication.
Conformément à la réglementation d’Industrie Canada, le présent émetteur radio peut fonctionner avec
une antenne d’un type et d’un gain maximal (ou inférieur) approuvé pour l’émetteur par Industrie Canada.
Dans le but de réduire les risques de brouillage radioélectrique à l’intention des autres utilisateurs, il faut
choisir le type d’antenne et son gain de sorte que la puissance isotrope rayonnée équivalente (p.i.r.e.) ne
dépasse pas l’intensité nécessaire à l’établissement d’une communication satisfaisante.
Warning: This equipment is compliant with Class A of CISPR32. In a residential environment this equipment
may cause radio interference.
注意 !
依據 低功率電波輻射性電機管理辦法
第十二條 經型式認證合格之低功率射頻電機,非經許可,公司、商號或使用者均不得擅自變更頻率、加大功率或
變 更 原 設 計 之特 性 及 功 能。
第十四條 低功率射頻電機之使用不得影響飛航安全及干擾合法通信;
經發現有干擾現象時,應立即停用,並改善至無干擾時方得繼續使用。
前項合法通信,指依電信規定作業之無線電信。
低功率射頻電機須忍受合法通信或工業、科學及醫療用電波輻射性電機設備之干擾。
2. GENERAL DESCRIPTION
The AM-CF1B and AM-CF1W Integrated Audio Collaboration Systems are designed to be used in huddle
rooms or workspaces.
Software web conferences can be carried out more effectively over laptops by connecting the AM-CF1 to the
PCs and web cameras. Even when the conference has multiple participants, not only can each participant’s
voice be accurately picked up, but each other party’s voice can also be reproduced clearly.
Note: The AM-CF1B and AM-CF1W are collectively referred to as "AM-CF1" in this manual.
3. FEATURES
• TOA’s unique algorithm detects the speaker’s position and controls the array microphone’s directivity in real
time, allowing the speaker’s voice to be more effectively picked up.
• The sound source direction detected by the microphone can be displayed on the front panel LED indicator to
inform the speaker that his or her voice is being picked up.
• A built-in USB hub allows connection to web cameras, etc.
• Various settings can be performed for echo cancellation, equalization and the like using a web app.
5
Page 6
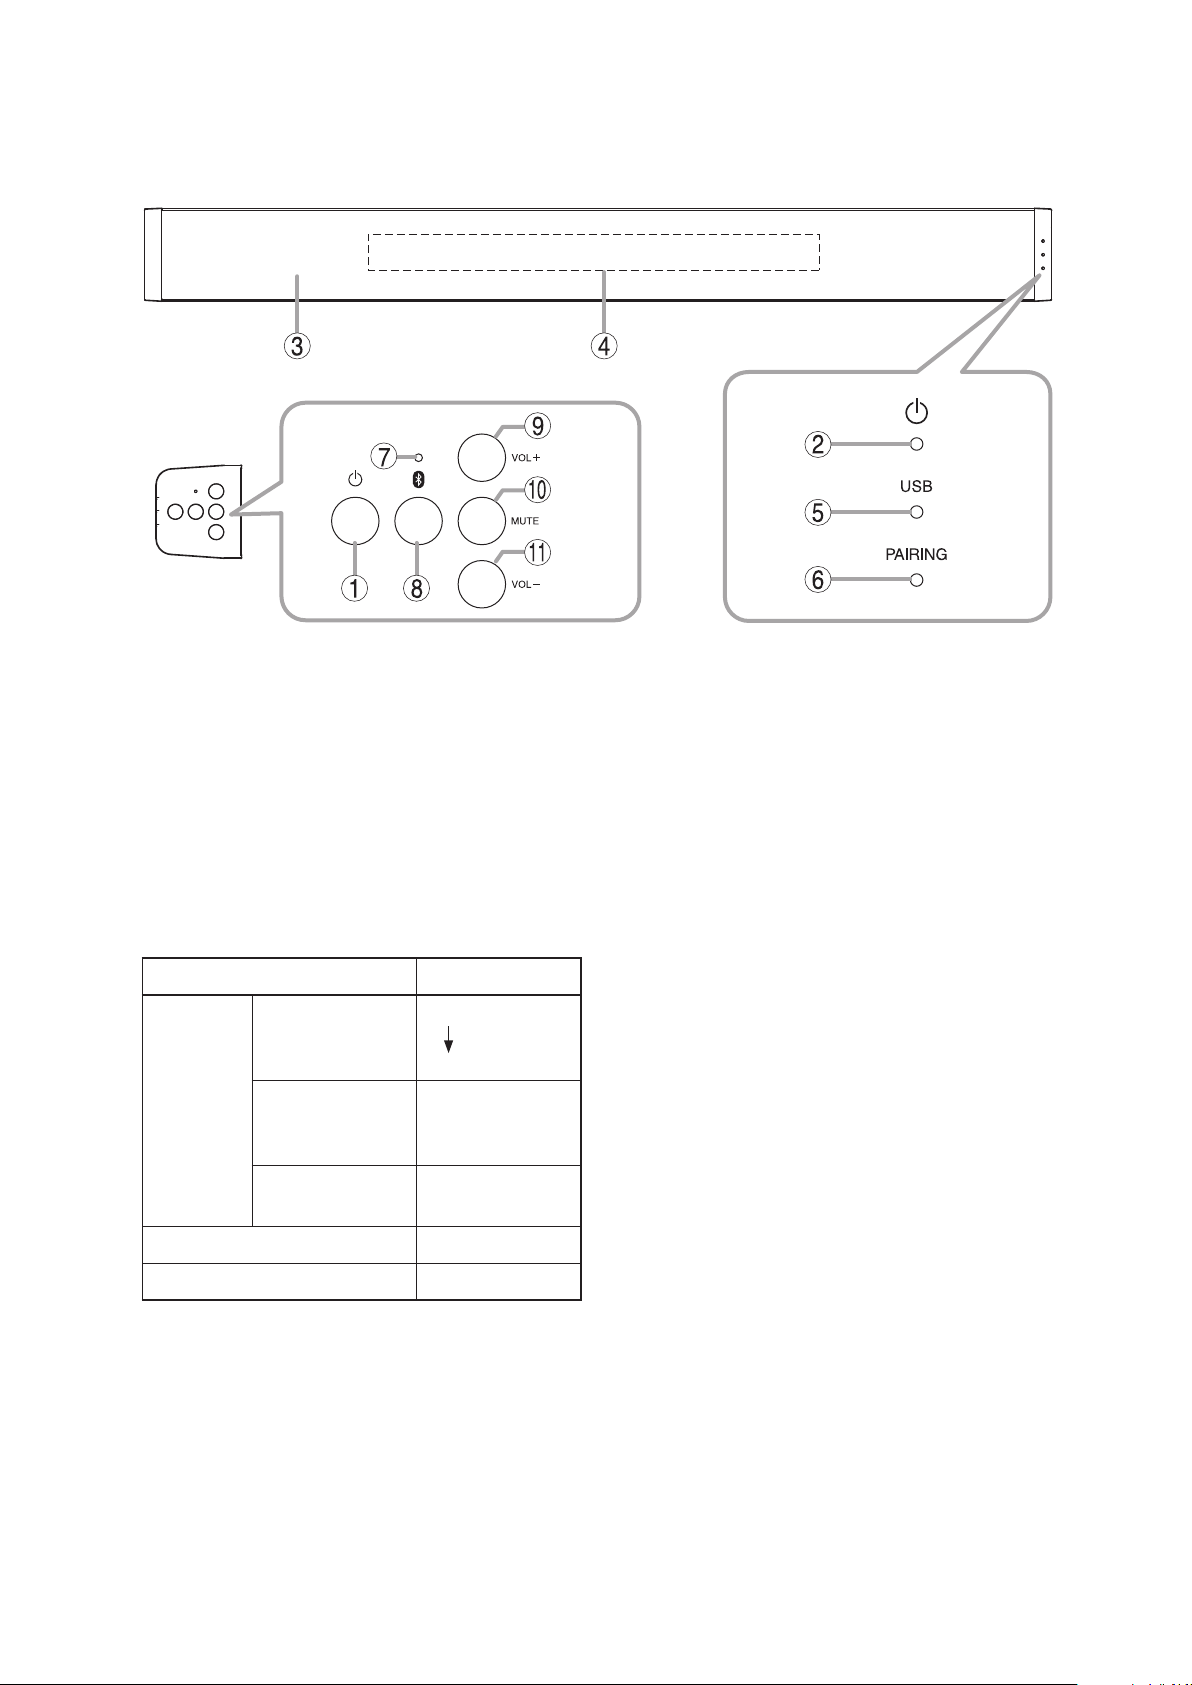
4. NOMENCLATURE AND FUNCTIONS
[Front]
[Side]
1. Powerswitch
When the unit is in normal operation mode, hold
down this switch for 2 seconds to switch the unit
to power standby mode. When in power standby
mode, hold down this switch for 1 second to
switch back to normal operation mode. To turn
OFF the AM-CF1, hold down this switch for over
10 seconds.
Power is always supplied regardless of the normal
operation/power standby/turn-OFF modes.
2. Powerindicator(blue/green/yellow/red)
Operating Status Lighting Status
Start
processing in
progress
[When
power is
ON]
Power standby mode Red
Power OFF Extinguished
3. Microphone&speakersection
An array microphone and a 2-way stereo speaker
are housed inside the front panel.
Preset data
review in
progress
Normal
operation mode
Blue
Green
Yellow
Green
4. Multifunctionindicator(green/red)
This indicator is housed inside the front panel and
provide 3 different displays using 7 LEDs. Lighting
operations differ depending on the contents being
displayed.
(1) When displaying the microphone input level:
When the AM-CF1 unit is in use at a web
conference, etc., only one LED facing in the
direction of the speaker’s voice lights green.
The LED’s brightness varies depending on
the microphone’s input level and the louder
the input level, the brighter it shines. The LED
remains unlit when the microphone input is
small or the microphone input level display
function is set to OFF.
(2) When the microphone is muted:
When the Mute switch (10) on the side panel is
pressed and the microphone output is muted,
the indicator lights red. Whether a single LED
or an LED bar light can be selected in the web
app settings. (See p. 14.)
(3) When adjusting the output volume:
The indicator lights green when changing the
output volume using the Volume Up (9) or
Down (11) switches located on the side panel.
Current output volume setting status is
displayed. (See p. 17.)
5. USBconnectionindicator(green/blue)
Lights green when a PC is connected to the PC
USB port (16).
Remains lit blue after ashing green when all
settings are initialized. (See p. 20.)
Remains lit blue after ashing blue whenever a
portion of the settings is initialized. (See p. 21.)
6
Page 7

6. BluetoothIndicator(Blue)
Remains lit while Bluetooth is connected.
Flashes during pairing registration.
9. VolumeUpSwitch
Increases the volume of the AM-CF1 unit’s internal
speaker when pressed.
7. ResetSwitch
Used to reset the AM-CF1 unit.
8. BluetoothPairingSwitch
Press this key when pairing with a Bluetoothcompatible device. Pressing this key while the
Bluetooth is connected cuts off the Bluetooth.
[Rear]
Terminals Terminals
10.MuteSwitch
Mutes sound picked up at the microphone.
11. VolumeDownSwitch
Decreases the volume of the AM-CF1 unit’s
internal speaker when pressed.
Appearance with a wall mounting bracket detached
12.Mountingbracketconnector
Used to mount the AM-CF1 unit to a wall in
combination with the supplied wall mounting
bracket.
13.USBports
USB devices such as a web camera or smart board
can be connected to these USB 3.0-compatible
ports.
14.Networkconnectionterminal
Connects to networks that support 10BASE-T or
100 BASE-T X .
When connecting the PoE extender, use the
following:
TPE-117GI (made by TRENDnet)
15.Powerinputterminal
Connect the specied AC adapter.
(See p. 10.)
16.PCUSBport
Connect a PC to this USB 3.0-compatible port.
17. AUXinputjacks
RCA pin jack x 2
−10 dB*1, 10 kΩ, unbalanced type, stereo
18.AUXoutputblock
Removable terminal block (6 pins)
+ 4 d B*2, 600 Ω, balanced (electronically-balanced)
type, stereo
19.Codecinputjack(monauralinput)
RCA pin jack, –10 dB*1, 10 kΩ, unbalanced type
20.Controloutputblock
Removable terminal block (6 pins). Make contact
output using a relay.
The relay’s contact rating is as follows:
Withstand voltage: 40 V DC
Control current: 2 – 300 mA
21.Controlinputblock
Removable terminal block (6 pins). No-voltage
make contact input.
Short-circuit current: 2 mA or less
Open-circuit voltage: 12 V DC or less
22.Codecoutputjacks(monaural)
RCA pin jack, −10 dB*1, 600 Ω, unbalanced type
*1 0 dB = 1 V
*2 0 dB = 0.775 V
7
Page 8
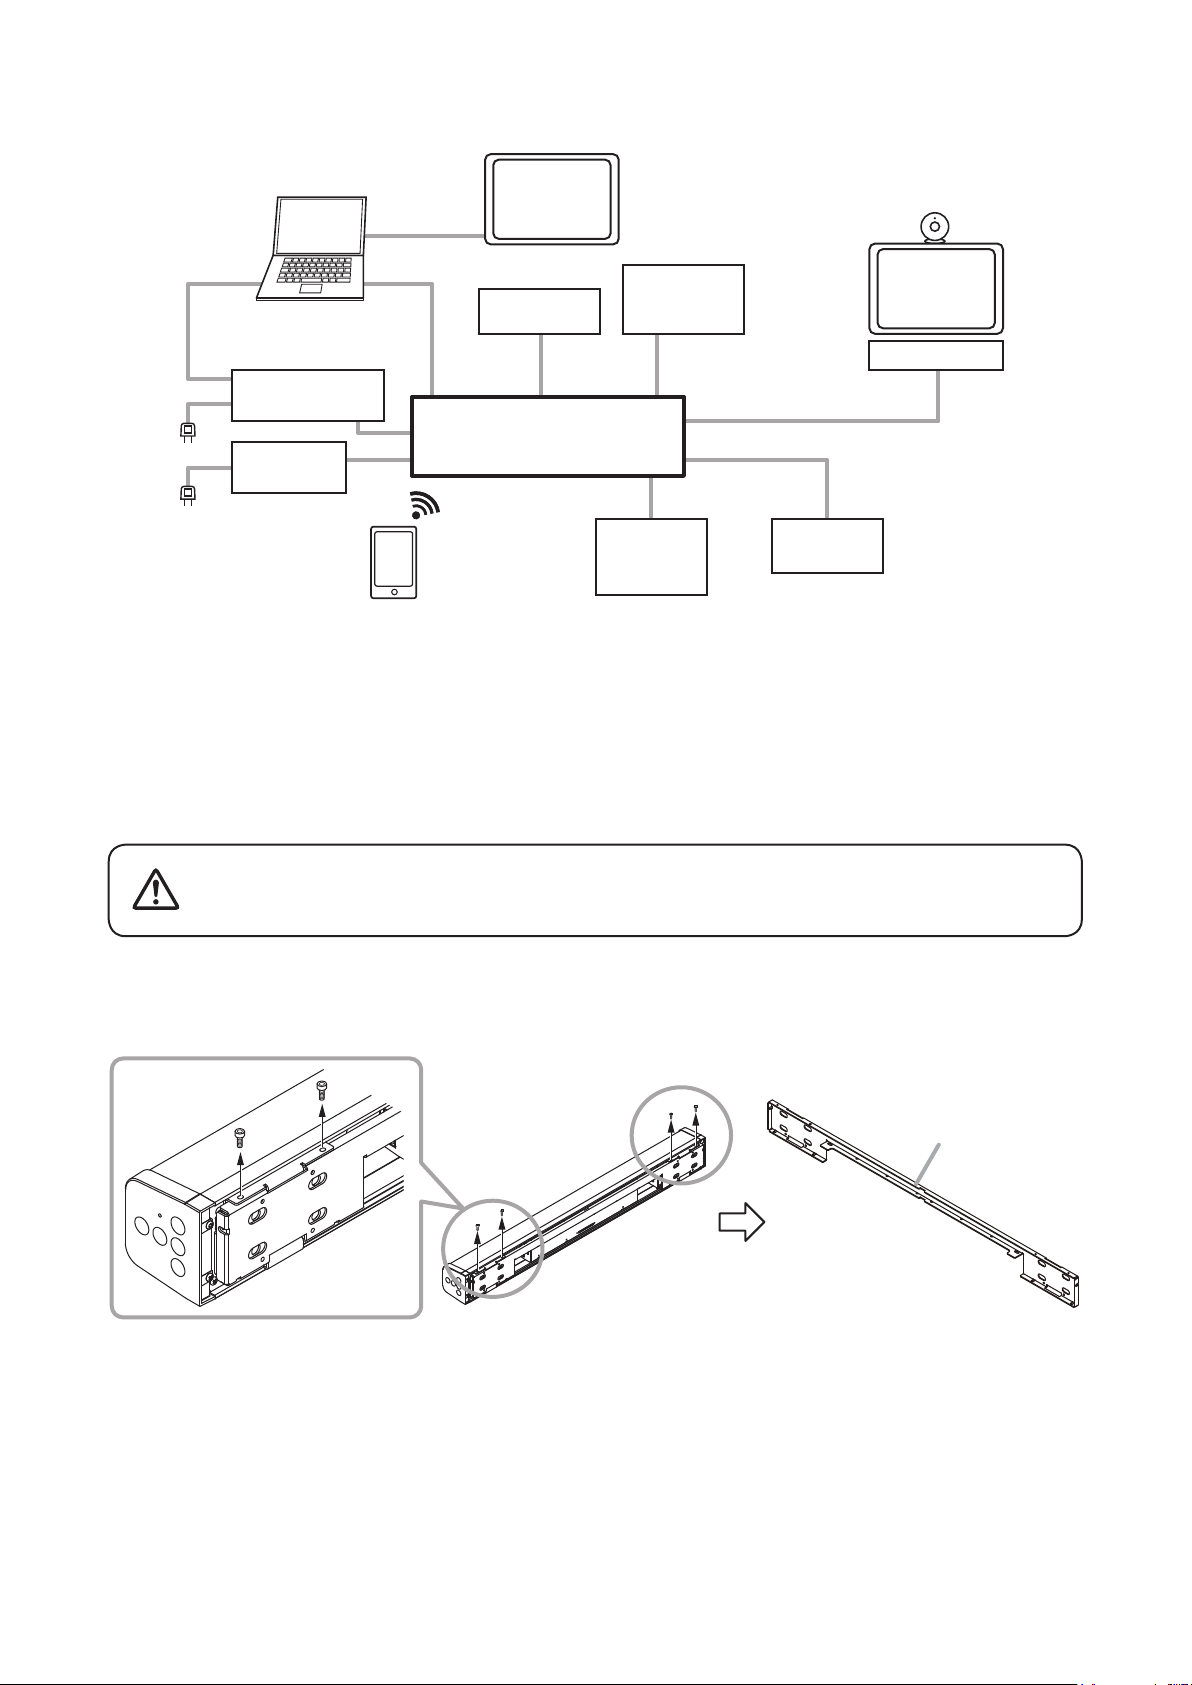
5. CONNECTION EXAMPLES
PC
HDMI
LCD
PoE Extender
(DC 52V)
or
AC Adapter
(DC 12V)
USBLAN
Webcam
USB
AM – CF1
AUX IN
Bluetooth
®
3rd party
controls
Sound
Source
Device
6. INSTALLATION
Follow the procedures below to mount the AM-CF1 unit to a wall:
Control In/Out
Codec In/Out
AUX OUT
Video
Conference
System
Polycom
Mixer/
Amplifier
Be sure to use the following wall mounting brackets and screws. If
WARNING
Step1.Remove the 4 screws xing the wall mounting bracket as illustrated below and detach the bracket from
the AM-CF1 unit.
hardware other than that mentioned below is used, the unit could fall
down, potentially resulting in damage and personal injury.
Wall mounting bracket
(accessory)
8
Page 9

Step2.Attach the supplied wall mounting bracket to a wall.
Failure to strictly observe the following instructions could cause the
AM-CF1 unit to fall, potentially resulting in personal injury.
• Install the unit only in a location that can structurally support the
WARNING
Separately prepare the anchor screws/bolts and other components needed for the construction work
required to attach the mounting bracket to the wall.
Ensure that the mounting height is under 2 m (6.5 ft).
Wall mounting bracket
(accessory)
Floor surface
weight of the unit and the mounting bracket.
• Use nuts and bolts that are appropriate for the wall’s structure and
composition.
Should be under 2 m (6.5 ft).
[Whenattachingtoawall]
Referring to the gure below, use at least four of the mounting bracket’s ø4 mm screw holes (
to rmly mount the bracket so that it does not come loose.
Recommended screws: 3.8 mm or #6 (0.138") drywall screws of over 30 mm or 1-3/16" in length
Note
Screw the bracket into place, positioning the screws where pillars are located.
If no pillars exist, use the appropriate anchor bolts for the wall material.
[WhenattachingtoaTVmountingbracketorthelike]
Referring to the gure below, use at least 4 of the oval holes (
the bracket so that it does not come loose.
Recommended screws: M6 or 1/4" binding head machine screws of over 15 mm or 5/8" in length
3
or 4) in the mounting bracket to attach
1
or 2)
9
Page 10

Step3.Hook the unit’s lower mounting tab (A in the gure at right)
into the mounting bracket mounted on the wall.
Step4.Make necessary connections.
For connection method, see p. 10.
Step5.Bind connected wires using a tying tool or the like.
Step6.After connection is completed, tilt the unit upward with the
tab hooked in Step3 as a supporting point.
Step7. If the upper tab (B in the gure at right) contacts the bracket on the
wall, shift the unit slightly upward and hook the upper tab to the
bracket on the wall.
Step8.Secure the unit to the bracket using the screws removed in Step1.
Note
Screws can be installed not only from the upward direction, but also
from the side or downward direction.
6
A
B
7. CONNECTIONS
7.1.ACAdapterConnection
Connect the specied AC adapter to the AM-CF1’s power input terminal.
NotesonACadapter
3CU or H version: Use the supplied AC adapter.
W version: Use the AD-5000-6 AC adapter or its equivalent. Usable AC Adapter is as follows;
Output: 12 V DC, 5 A, positive tip polarity
Note
Do not connect the AC adapter to the unit when the PoE extender is connected. Doing so may cause the unit
to fail.
CAUTION
For AC adapters, use the adapter with the
AC adapter
designated specication.
The use of other adapters could result in re or
other possible damage.
10
Page 11

7.2.NetworkConnection
The AM-CF1 automatically distinguishes between 10BASE-T and 100BASE-TX networks and establishes a
connection. For this connection, use a straight UTP Category 5 or greater LAN (Ethernet) cable terminated with
an RJ-45 connector.
Note
Do not connect the PoE extender to the
unit when the AC adapter is connected.
Doing so may cause the unit to fail.
From switching hub
7.3.PCandUSBDevicesConnections
From USB devices
To PC
NotesonPCPortConnection
(1) Handle connectors with care because excessive
external force may damage the connectors.
(2) To extract the plug, hold the plug body itself and
remove it straight away from the receptacle.
Do not pull on the cable to extract the plug as this
may damage the connector.
Do not pull on the cable.
7.4.AUXInputConnection
AUX input jacks are intended exclusively for stereo input (LINE level).
L channel R channel
NG
OK
Correct insertion
direction
[AUX input]
RCA pin jack x2
−10 dB*, 10 kΩ, unbalanced
* 0 dB = 1 V
From sound source device
11
Page 12

7.5.AUXOutputConnection
Use the supplied removable terminal plugs (6 pins) for connection.
AUX output is set to LINE level input.
For removable terminal plug connections, see p. 13.
L channel
To amplifier
[Using a 2-core shielded wire]
To amplifier
H
C
E
R channel
[AUX output]
Removable terminal block (6 pins)
+4 dB*, 600 Ω,
balanced (electronically-balanced)
* 0 dB = 0.775 V
[Using a single-core shielded wire]
To amplifier
7.6.ControlInputandOutputConnections
Use the supplied removable terminal plug (6 pins) for connection.
Connect the control input and output blocks using 2 control lines from external control devices.
For removable terminal plug connections, see p. 13.
For contact input and output functions, see p. 18.
[Control outputs 1-2]
Removable terminal block (6 pins)
Relay contact output
Withstand voltage: 40 V DC
Control current: 2 to 300 mA
[Control inputs 1-2]
Removable terminal block (6 pins)
No-voltage make contact input
Open-circuit voltage: 12 V DC or less
Short-circuit current: 2 mA or less
H
C
E
From control input
terminals of external
control devices
From control output
terminals of external
control devices
12
Page 13

7.7.CodecInputandOutputConnections
From Codec output
[Codec input (monaural)]
RCA pin jack,
−10 dB*, 10 kΩ, unbalanced
[Codec output (monaural)]
RCA pin jack,
−10 dB*, 600Ω, unbalanced
7.8.RemovableTerminalPlugConnection
Use the removable terminal plugs supplied with the AM-CFI unit to
connect the terminals by following the instructions below.
• Be sure to use shielded cables for audio signal lines.
• Avoid soldering cable conductor, as contact resistance may increase
when the cable is tightened and the solder is crushed, possibly
resulting in an excessive rise in joint temperatures.
• Use cables of AWG 12 – 24.
[Terminalplugconnections]
To Codec input
* 0 dB = 1 V
[Cable end treatment]
Shielded cable
20 mm
(0.79")
7 mm
(0.28")
Step1.Loosen the terminal screw, then insert the cable.
Step2.Retighten the terminal screw. (Pull on the cable
to ensure it is securely connected.)
Step3.Secure the plug and cable with a cable tie or
other appropriate band to prevent the cable from
coming loose.
Step4.Insert the plug into the audio output terminal.
Tip
Recommended slotted screwdriver type: Screwdriver
with blade that is 3 mm (0.12”) in width
Bit shape
3 mm (0.12")
2
1
Earth
Shielded cable
Tightens
3
Cold
Cable tie
Slotted screwdriver
Loosens
Terminal screw
Hot
1
Removable
terminal plug
13
Page 14

8. SYSTEM SETTINGS
8.1. Overview of System Settings
Connecting the AM-CF1 unit to a PC by way of a LAN cable allows the following function settings and
maintenance to be performed using the PC’s browser:
[Unit Settings]
• Network settings
• Clock settings
• User account settings
• Bluetooth® name settings
• Key lock setting
[OperationSettings]
• Volume adjustment and current value conrmation of various audio inputs and outputs
• EQ parameter adjustment
• Settings for microphone sound collection
• Echo and noise cancellation settings
• Operation settings for contact control input and output
• Operation setting for the multifunction indicators
• Saving and reading of the above setting data
[MaintenanceFunction]
• Firmware update
8.2.SystemRequirements
PC hardware requirements are as follows:
Display 1366 x 768 resolution or higher
Conrmed PC operation environments are as follows:
OS
Browser Google Chrome 72.0.3626.81, Safari 12.0.3
Windows 10, 64-bit
macOS 10.4.3 Mojave
14
Page 15

8.3.Connections
Step1.Start up the web browser and enter “Unit’s IP address” in the address eld.
E xamp le: 19 2.16 8.14.1
The login screen is displayed.
Tip:The IP address is factory-preset to “192.168.14.1”.
Step2.Enter a user name and a password.
The menu screen is displayed.
Note
Do not launch multiple web browsers at the same time.
Tip
Default user name and password are as follows:
User name: amcf1
Password: amcf1guest
For settings using a browser, see the separate AM-CF1 Setup manual.
The latest version of the AM-CF1 Setup manual is made available on the TOA product data download site
(https://www.toa-products.com/international/).
15
Page 16

9. OPERATION
9.1.TurningPowerONandOFF
Connecting an AC adapter or a PoE extender (p. 10) to the AM-CF1 unit turns ON the power. In about
approximately 90 seconds, the unit is set to “Normal Operation” mode and can be used. After use, switch the
unit to “Power Standby” mode. When using the unit again, switch back to “Normal Operation” mode.
Each state of operation is shown as follows by the Power indicator:
Power indicator
[When power
is ON]
Power standby mode Red
Power OFF Extinguished
Operating Status Lighting Status
Start processing in
progress
Preset data review in
progress
Normal operation mode Green
9.2.SwitchingbetweenPowerStandbyandNormalOperationmodes
[Wheninnormaloperationmode]
Step: Hold down this switch for 2 seconds to switch the unit to power
standby mode.
[Wheninpowerstandbymode]
Step: Hold down this switch for 1 second to switch back to normal
operation mode.
Blue
Green
Yellow
9.3.TurningPowerOFF
Detach the AC adapter or PoE extender from the unit when turning off the power.
16
Page 17

9.4.BluetoothPairing
Step1.Perform pairing operation on the connected peripheral device.
Step2.Hold down the Bluetooth Pairing switch for 3 seconds or more.
The Bluetooth indicator ashes.
Bluetooth indicator
Step3.Conrm that the unit’s name is displayed on the peripheral device screen.
Step4.Perform connection operation.
Note
To cut off the connection while making the Bluetooth connection, hold down the Bluetooth Paring switch for 3
seconds or more.
9.5.VolumeAdjustment
The volume of sound output from the front panel speaker can be adjusted when in Normal Operation mode.
While the volume is being adjusted, the current output volume setting state is displayed by the front panelmounted multifunction indicator.
LED Lighting Status
Multifunction indicator
: Lit : Unlit
Output Volume
Setting Status
0 dB
−3 dB
−6 dB
−9 dB
−12 dB
−18 dB
−24 dB
−∞ dB
Follow the procedure below to adjust the output to an easy-to-hear volume:
Step1.Press the Volume Up switch to increase the volume.
The number of lit Multifunction Indicator LEDs increases by one
with each depression of the switch.
Step2.Press the Volume Down switch to decrease the volume.
The number of lit Multifunction Indicator LEDs decreases by one
with each depression of the switch.
1
2
17
Page 18

9.6.MicrophoneMuting
Sound picked up at the microphone can be muted when in Normal Operation mode.
Step1.Press the Mute button.
Sound picked up by the microphone is silenced.
The Multifunction indicator continuously lights red during muting.
Multifunction indicator
Note: Whether all 7 LEDs or only 1 LED in the center light can be set using the web app. (See p. 14.)
Step2.To disable the mute, press the Mute button again.
10. CONTACT INPUT AND OUTPUT FUNCTIONS
Using a browser, the following contact input and output functions can be assigned to the control input and
output terminals. To permit external control by connected equipment, short terminals 1 – 2 to the C terminal. For
example, when terminals 1 – 2 have been allocated to Preset Memory Nos. 1 – 2 in the contact input settings
on the Control/Indicator setting screen, shorting individual terminals to the C terminal allows Preset Memory
Nos. 1 – 2 to be called up.
(1) Contact input functions
None (unused)
Mute (Momentary/Latch)
VOL. Up/Down
Preset Memory Load (Preset) 1, 2
(2) Contact output functions
None (unused)
Mute Status
Contact Through Out (Sync In) 1, 2
For details, see p. 14, "SYSTEM SETTINGS."
10.1.TerminalControlMethod(Momentary/Latch)
Both momentary type and latch type are available for the terminal control method.
Below is the operation diagram for each type of control method.
• Momentary type
Contact input status
Contact output status
Over 200 ms
Shorted
Over 100 ms
Make
Shorted
Opened Opened
Make
Break Break
18
• Latch type
Contact input status
Contact output status
Shorted Shorted Shorted Shorted
Opened
Make
Opened Opened Opened
Make
Break Break
Page 19

10.2.ContactInputSettings
The following functions can be set for each terminal:
[Mute(Momentary/Latch)]
Mutes sound collected at the microphone.
The mute/unmute control method differs depending on the settings.
Momentary: Between Mute and Unmute when the terminal is shorted to the C terminal.
Latch: Be set to Mute when the terminal is shorted to the C terminal, and to unmute when opened.
[VOL.Up/Down]
Used to increase or reduce the volume of the AM-CF1 unit’s internal speaker. Whenever a terminal is shorted
to the C terminal, its gain increases or decreases.
For details, see p. 17, "Volume Adjustment."
[Preset Memory Load]
Accesses the Preset Memory.
Set the Preset Memory (1 – 2) to terminals.
The Preset Memory is accessed when its corresponding terminal is shorted to the C terminal.
If different Preset Memories are assigned to multiple terminals, the last shorted terminal takes precedence.
10.3.ContactOutputSettings
The following functions can be set for each terminal:
[MuteStatus]
A contact output terminal is closed or opened depending on microphone mute status.
If the microphone is muted, the contact output terminal is closed.
If the microphone is not muted, the contact output terminal is opened.
[ContactThroughOut]
A contact output terminal is closed or opened depending on the selection status of the specied contact input
terminal.
Set the desired contact input terminal.
If the contact input terminal is closed, the contact output terminal is also closed.
If the contact input terminal is opened, then the contact output terminal is also opened.
19
Page 20

11. INITIALIZATION
11.1. Initializing All Settings
Follow the procedure below to restore the AM-CF1 unit to its default setting values:
Step1.Press the Reset switch.
The Power indicator lights blue.
Power indicator
Blue
Step2.Hold down the Power switch while conrming that the Power indicator
lights blue.
After approximately 60 seconds, the Power indicator will light green
and the USB connection indicator will light blue after ashing green.
Power indicator
Green
Green
USB connection indicator
Step3.After ensuring that the USB connection indicator is lit blue, release the
Power switch.
Initialization is complete, causing the unit to start.
Green
Blue
20
Page 21

11.2. Initializing a Portion of the Settings
Follow the procedure below to restore the following settings to their default setting values:
• Network settings (IP Address, Subnet Mask, Default Gateway)
• Administrator Setting (Account User Name, Password)
Step1.Press the Reset switch.
The Power indicator lights blue.
Power indicator
Blue
Step2.Hold down the Mute switch while conrming that the Power indicator
lights blue.
After approximately 60 seconds, the Power indicator will light green
and the USB connection indicator will light blue after ashing blue.
Power indicator
Green
Blue
USB connection indicator
Step3.After ensuring that the USB connection indicator is lit blue, release the
Mute switch.
The AM-CF1 unit will start after both Network and Administrator
settings are initialized.
Green
Blue
21
Page 22

12. SOFTWARE LICENSE INFORMATION
The AM-CF1 Integrated Audio Collaboration System employs software based on the following open-source
software licenses:
• GNU General Public License version 1 (GPL-1.0)
• GNU General Public License version 2 (GPL-2.0)
• GNU General Public License version 3 (GPL-3.0)
• GNU Affero General Public License version 3 (AGPL-3.0)
• GNU Lesser General Public License version 2 (LGPL-2.0)
• GNU Lesser General Public License version 2.1 (LGPL-2.1)
• GNU Lesser General Public License version 3 (LGPL-3.0)
• Mozilla Public License version 2.0 (MPL-2.0)
• IBM ICU License (ICU)
• Artistic License 1.0 (Artistic-1.0)
• Eclipse Distribution License 1.0 (EDL-1.0)
• The 4-Clause BSD License
• The 3-Clause BSD License
• The 2-Clause BSD License
• MIT License (MIT)
• Apache License 2.0 (Apache-2.0)
• Academic Free License version 2.0 (AFL-2.0)
• Eclipse Public License 1.0 (EPL-1.0)
• Freetype Project License (FTL)
• Iozone License version 3
• ISC License (ISC)
• libbzip2 License version 1.0.6
• libpng License version 1.2.6
• NTP License (NTP)
• OpenLDAP Public License version 2.8
• OpenSSL License
• PHP License version 3.01 (PHP-3.01)
• Python Software Foundation License version 2 (PSF-2.0)
• zlib License
• Others
We do not guarantee the operation of open-source software itself, but we do guarantee the functionality of such
software incorporated within the AM-CF1 according to the provision of each license.
ForSpecificOpen-SourceSoftwareInformation
Please contact your nearest TOA dealer if you require details about any of the open-source software incorporated
within the AM-CF1. However, we are unable to respond to inquiries about the contents of the open source.
22
Page 23

13. SPECIFICATIONS
Model Number AM - CF1B AM-CF1W
Power Source 12 V DC (supplied from the specied AC adapter) or 52 V DC (supplied from the
specied PoE extender)
Current Consumption 3.5 A or less
Input USB Audio: 2 channels, USB 3.0/USB 2.0/USB 1.1, 3.0 type-B port
Bluetooth: 2 channels (A2DP1.3 (stereo), HPF1.6)
Codec: 1 channel, −10 dB*
AUX: Stereo 1 channel, −10 dB*1, 10 kΩ, unbalanced, RCA pin jack
Output USB Audio: 2 channels, USB 3.0/USB 2.0/USB 1.1, 3.0 type-B port
Bluetooth: 1 channel (HPF1.6)
Codec: 1 channel, −10 dB*
AUX: Stereo 1 channel, 4 dB*2, 600 Ω, electronically-balanced,
removable terminal block (6 pins)
Internal speaker: 2-way (woofer × 2, tweeter × 1) x 2, 10 W x 2
USB Hub Port USB 3.0/USB 2.0/USB 1.1, type-A port
Control Input 2 channels, no-voltage make contact input, open voltage: 12 V DC, short-circuit
current: 2 mA or less, removable terminal block (6 pins)
Control Output
Network I/F 10BASE-T/100BASE-TX, RJ-45
Microphone Unidirectional electret condenser microphone
Frequency Response 20 Hz – 20 kHz (AUX IN – AUX OUT)
Operation Power switch, Bluetooth pairing switch, Mute switch, Volume Up/Down switch
Indicators Power indicator (blue/green/yellow/red), USB connection indicator (green/blue),
Operating Temperature 0 – 40˚C (32 – 104˚F)
Operating Humidity 90% RH or less (no condensation)
Finish Body Aluminum, black (RAL 9005 equivalent),
Punched net Surface-treated steel plate, black (RAL
Side cover ABS resin, black (RAL 9005 equivalent) ABS resin, white (RAL 9003 equivalent)
Dimensions 800 (w) x 83.2 (h) x 85.8 (d) mm (31.5" x 3.28" x 3.38")
Weight 4.6 kg (10.14 lb)
1
*
0 dB = 1 V
*2 0 dB = 0.775 V
2 channels, relay contact output, withstand voltage: 30 V DC, control current: max.
300 mA, removable terminal block (6 pins)
Bluetooth indicator (blue), Multifunction indicator (green/red)
30% glossy
9005 equivalent), 30% glossy
1
, 10 kΩ, unbalanced, RCA pin jack
1
, 600 Ω, unbalanced, RCA pin jack
Aluminum, white (RAL 9003 equivalent)
Surface-treated steel plate, white (RAL
9003 equivalent)
Notes
• The design and specications are subject to change without notice for improvement.
• The Bluetooth® word mark and logos are registered trademarks owned by Bluetooth SIG, Inc. and any use
of such marks by TOA corporation is under license. Other trademarks and trade names are those of their
respective owners.
•Accessories
[3CU version]
AC adapter (DC cord length: 1 m or 3.28 ft) ............. 1
AC Power cord (2 m or 6.56 ft) ................................. 1
USB cable (3 m or 9.84 ft) ........................................ 1
Removable terminal plug (6 pins) ............................. 2
Wall mounting bracket (preinstalled on the unit) ...... 1
Hex wrench (M3) ...................................................... 1
23
Page 24

[H version]
AC adapter (DC cord length: 1 m or 3.28 ft) ............. 1
AC Power cord (2 m or 6.56 ft) ................................. 2
USB cable (3 m or 9.84 ft) ........................................ 1
Removable terminal plug (6 pins) ............................. 2
Wall mounting bracket (preinstalled on the unit) ...... 1
Hex wrench (M3) ...................................................... 1
[W version]
USB cable (3 m or 9.84 ft) ........................................ 1
Removable terminal plug (6 pins) ............................. 2
Wall mounting bracket (preinstalled on the unit) ...... 1
Hex wrench (M3) ...................................................... 1
URL: https://www.toa.jp/
133-01-00245-02
 Loading...