

Page 1

OPERATION SECTION – CONTENTS
1. Introduction. Page Number 2
1.1 Input Channel Overview. 3
1.2 Master Section Overview. 4
1.3 Meterbridge. 5
1.4 Options. 5
1.5 Precautions. 6
2. Installation.
2.1 AC Mains Supply. 7
2.2 Mic Inputs. 8
2.3 Line Inputs. 8
2.4 Insertion Points. 9
2.5 Monitor Return Inputs. 9
2.6 Tape/Direct Outputs. 9 – 10
2.7 Meter Bridge Connection. 10
2.8 Group Insertion Points. 10
2.9 Group Outputs. 10
2.10 Aux Outputs. 11
2.11 Aux Returns. 11
2.12 Main Stereo Output. 11
2.13 Unbalanced Stereo Output. 11
2.14 Master Insertion Points. 12
2.15 Mix B Output. 12
2.16 Control Room , Studio and Alternate L/S Outputs. 12
2.17 Stereo 2T Returns (2TA and 2TB). 12 – 13
2.18 External Input. 13
2.19 Phones 1 and 2 Outputs. 13
2.20 Meter Bridge Connection. 13
3. Channel Module. 14
3.1 Input Stage. 14 – 15
3.2 Tape Return. 15
3.3 Insert Point. 15 – 16
3.4 Auxiliary Sends. 16 – 17
3.5 EQ Section. 18 – 19
3.6 Mix B Monitor Section. 20 – 22
3.7 Main Channel Output Stage. 23 – 25
4. Master Section.
4.1 Auxiliary Master Sends. 27
4.2 Stereo Return Channels. 27 – 28
4.3 Headphone Matrix. 28
4.4 Oscillator. 28
4.5 Mix B Master. 28 – 29
4.6 Talkback Section. 29
4.7 Control Room Monitor Section. 30 – 31
4.8 Studio Monitor Section. 31 – 32
4.9 Group Outputs. 32 – 33
4.10 Master Left/Right Outputs. 33
5. Specifications. 34
7
26
1
Page 2

1. INTRODUCTION
Congratulations on purchasing the TL Audio VTC (Valve Technology Console)!
The VTC is a fully modular in-line multitrack mixer that offers all the benefits of the compact 8buss/multiple tape output format but with the supreme advantage of TL Audio’s critically acclaimed
valve circuitry – which forms an integral part of the channel, monitor, group and master section
signal paths. Available in configurations from 16 channels to 56 channels, and with options including
patchbay, automation and comprehensive meterbridge, the VTC combines the classic warmth of
valves with the functional demands of modern music production.
There are hundreds of consoles on the market. But none that sound, feel or look like this one. Believe
us, the VTC simply has no competition!
VALVE STAGES
Sited within the VTC’s meter bridge section where they can stay cool, the VTC employs
ECC83/12AX7A valve stages at five key points in the signal path. In common with TL Audio’s
highly acclaimed Classic range, each valve stage in the VTC is run from a 250v DC stabilised power
source.
The valve stages are located as follows:
* In each channel preamp, between the mic preamp and EQ stages.
* In each channel tape return preamp.
* In each group mix amplifier.
* In the Mix B mix amplifier.
* In the main stereo L/R mix ampifier.
When recording to tape via a group the signal thus passes through two valve stages (channel preamp
and group mix amp), plus up to three more stages on mixdown (tape return preamp plus Mix B and
L/R mix amps) - giving a total of five valve stages in the signal path. Further sub-grouping of signals
will increase the number of valve stages that the audio passes through, and this can of course be used
for creative effect since the character of the sound will be enhanced by these extra stages.
SERIOUS DESIGN
The VTC’s modular design is based around separate 8 channel steel frame sections which are
interconnected to create the finished console. Each channel plugs into a ‘mother board’ ,which carries
power and audio connections via two multiway connectors per channel. Each console section has its
own onboard power regulation (sited in the meterbridge along with the valve pcbs) and audio is
connected between each section via fully balanced signal busses.
Please read this manual fully before installing or operating the VTC console.
2
Page 3

1.1 INPUT CHANNEL OVERVIEW
•
Uncluttered Channel Preamp section containing a high quality low noise mic amp that
combines an SSM 2017 solid state stage with an ECC83/12AX7A secondary valve stage,
variable input gain (16 to 60dB), useful 90Hz high pass filter (12dB/octave), and switches for
mic/line, phase reverse, and +48v phantom power.
•
A Tape Return Preamp featuring an ECC83/12AX7A valve stage, +/-20dB trim control,
internal -10/+4dB level matching link and channel/monitor flip switch.
•
Six mono Auxiliary Sends accessed via four level controls. While aux sends 1 & 2 have
dedicated level controls, aux sends 3/4 & 5/6 share a pair of level controls on each channel: a
single shift switch governs whether the controls feed sends 3/4 or sends 5/6. Auxiliary sends
1/2 are permanently set post fader, while 3/4 (and hence 5/6) are switchable ‘pre’ or ‘post’
fader. A dedicated stereo send (7/8) is switchable pre/post fader, making it the obvious choice
for feeding a headphone cue mix or a stereo effects unit. Sends 3/4, 5/6 & 7/8 can be assigned
to the Mix B signal path via a simple and flexible switching system.
•
Four Band EQ with LF/HF shelving and two superb fully parametric mids. The EQ can be
assigned in part or totally to either channel or Mix B signal paths. 15dB of boost/cut is
available on each EQ band, and the ‘Q’ is variable between 0.5 and 5 (this corresponds to a
bandwidth range of 0.2 to 2 octaves). The EQ also features an EQ ‘On’ switch with status
LED, allowing an easy comparison between flat and EQ’d signals.
•
Separate Mix B facility with a 60mm fader, Solo, Mute and Pan. EQ can also be reassigned
from the Channel to the Mix B signal path using the HF/LF and HM/LM buttons. Should a
third party automation system be fitted, the Stat and Auto switches are intended for local status
switching and VCA bypass respectively. In addition a Srce-Ch (Source channel) switch routes
the main channel fader signal into the Mix B section as well, allowing a separate mix of the
main channel signals to be set up on the Mix B faders.
•
Signal Present and Peak LEDs are provided on both channel and Mix B sections.
•
Main Channel with flexible and simple routing system fed from a 100mm Alps type fader.
Routing is provided to each of the eight groups (in pairs), direct outputs or stereo L/R mix. The
main channel also features Solo, Mute, Pan, Stat, and Auto facilities, much like the Mix B
section.
•
A versatile Tape/Direct Output system enables multitrack connection without re-patching by
using the Buss switch on the main channel. When the Buss switch is not depressed, the
channel signal is fed directly through to the tape output on that channel, thus acting as a direct
output. When the Buss switch is depressed, the tape output is then fed from the output of the
relevant group fader (group fader 1 feeding channels 1, 9, 17, 25 etc). This is explained in
greater detail in sections 3.7 and 4.9.
3
Page 4

1.2 MASTER SECTION OVERVIEW
The VTC Master Section is a triumph of intelligent, uncluttered design and contains:
•
Six Stereo Effects Returns on high quality Alps 60mm faders with control of Gain, AFL, and
Mute. Post fade individual routing paths to both headphone outputs are provided, complete
with an associated Level control for each headphone send.
•
A Headphone Matrix featuring two separate Phones outputs. Fed independently or in
combination from Control Room, Mix B, Aux 3/4, Aux 7/8 and External sources, this is a very
flexible and practical system with its own PFL.
•
Comprehensive Control Room section which allows the CR output to be fed from any
combination of L/R Mix, Mix B, 2TA, 2TB and Ext sources. It also features the easy-to-spot
Monitor Level control and a PFL trim control with +/-20dB of gain. Two Solo modes are
provided on the VTC: PFL or Solo In Place, with a switch in the CR section allowing Solo in
Place to be selected. A switch allows the Alternate Loudspeaker outputs to be monitored, and
the Control Room output can also be mono’d.
•
The Studio Output section – like the Control Room (CR) output – can be fed from the L/R
Mix, Mix B, 2TA, 2TB and Ext sources, along with a ‘Follow CR’ facility which allows the
Studio Output to automatically follow whatever source is feeding the CR output. The Studio
also has its own Level control along with Solo and On/Off switches.
•
The Oscillator is switchable between 1kHz or 10kHz and has its own Level control and On/
Off switch. The oscillator routes to both the groups and the L/R Mix.
•
The Talkback section can be fed to any combination of Tape (groups and L/R Mix), Studio
output and Phones 1&2. It has its own ‘Talk’ switch which can be internally set for nonlatching (the default) or latching operation, and activating this switch automatically dims the
Control Room output by 12dB.
•
Master control of Mix B. The Mix B signals always feed the separate Mix B stereo output, but
an assign switch also allows routing of these signals to the main L/R Mix, along with an
associated level control.
•
Group Section. Eight 100mm Alps group faders, each of which can be solo’d, fed to group
and tape outputs, or routed to the L/R mix, allowing both track laying and conventional sub
grouping on mixdown. When fed to the L/R mix, each group can be routed in mono equally to
both left and right busses , or routed in pairs hard left or right.
•
Master Fader (again a 100mm Alps type) allows control of the L/R Mix level, and like the
channel and Mix B faders is fitted with Stat and Auto switches for use with third party
automation systems.
4
Page 5

1.3 METERBRIDGE
The standard integral VU meterbridge allows metering of all eight group and master L/R mix
outputs. The standard calibration of these meters is such that 0VU corresponds to +4dBu of output,
although this calibration is adjustable (see 4.16 of Technical Section). Each meter has an associated
peak LED, which is calibrated to illuminate at +18dBu of output level: again this is adjustable (again,
see 4.16 of Technical Section).
1.4 OPTIONS
•
High quality internal or external bantam patchbay. The VTC patchbay is fully modular –
consisting of a series of 96 way 19” patchfields - handwired using individually screened cable
for maximum signal integrity. All console audio connections are brought up to the patchbay
(with the exception of the mic inputs) and an additional 96 tie lines are provided. The patchbay
i s l o c a t e d a t t h e r i g h t h a n d e n d o f t h e c o n s o l e .
•
Bar graph meterbridge. In addition to the standard VU meterbridge, an optional bridge is
available that provides 16 segment LED bargraph metering of every channel and the L/R Mix.
A switch in the central section of the bridge allows the channel meters to monitor the output
levels ‘to tape’ or the return levels ‘from tape’. The optional bridge is mounted on top of the
standard version, and connected to each console section via 25 way D-type ribbon connectors.
•
Fader and Mute automation. The VTC has been designed to allow easy integration of certain
third party automation systems, which can be factory fitted prior to shipment if required.
Contact your dealer for more details.
5
Page 6

1.5 PRECAUTIONS
The TL Audio VTC requires a modest amount of installation, and like all electrical equipment, care
must be taken to ensure safe, reliable operation. The following points should always be observed:
- All mains wiring should be installed and checked by a qualified electrician,
- Ensure the correct operating voltage is selected on the rear panel before connecting to the mains
supply,
- Never operate the unit with any cover removed,
- Do not expose to rain or moisture, as this may present an electric shock hazard,
- Replace the fuse with the correct type and rating only.
Warning: This equipment must be earthed.
6
Page 7

2. INSTALLATION
2.1 AC Mains Supply.
The mixer includes a separate T L Audio VR1000 power supply, and it is essential that only this
supply is used to power the mixer.
The power supply is fitted with an internationally approved 3 pin IEC connector. A mating socket
with power cord is provided with the unit, wired as follows:
Brown: Live.
Blue: Neutral.
Green/Yellow: Earth (Ground).
All mains wiring should be performed by a qualified electrician with all power switched off, and the
earth connection must be used.
The power supply generates a certain amount of heat during use, which must be allowed to dissipate
from the ventilation slots and heatsink. Never cover the power supply or locate it near a source of
heat, for example a radiator or power amplifier. The PSU is fitted with a slow moving cooling fan,
which may generate a very small amount of mechanical noise.
The power supply should be connected to the mixer with the armoured multi core cable supplied,
before connecting the supply to the mains. The connectors should be inserted and secured into place
by tightening the locking rings. The cable is specially selected for the high voltage and current
requirements. Do not substitute any other cable or attempt to extend the cable supplied.
The connectors on this cable are polarised, so can only be plugged in one way – please do not try to
force the connector in if resistance is felt, since it can cause damage to the connector itself.
Before connecting the power supply to the mains, check that the voltage selector switch on the front
panel is correctly set. The unit may be set for 115V (accepting voltages in the range 110V to 120V,
60Hz AC), or to 230V (for voltages in the range 220V to 240V, 50Hz AC). The fuse required is
20mm anti-surge, 5AT for 230V or 10AT for 115V.
Warning: attempted operation on the wrong voltage setting, or with an incorrect fuse, will
invalidate the warranty.
7
Page 8

AUDIO CONNECTIONS – CHANNEL
2.2 Mic Inputs.
Each channel has a female, 3 pin XLR connector for mic connection. It is compatible with either
balanced or unbalanced signals, when the mating connector is appropriately wired:
Balanced inputs:
- Pin 1 = Ground (screen).
- Pin 2 = Signal Phase (“+” or “hot”).
- Pin 3 = Signal Non-Phase (“-” or “cold”).
Unbalanced inputs:
- Pin 1 = Ground (screen)
- Pin 2 = Signal Phase (“+” or “hot”).
- Pin 3 = Signal Ground
When using unbalanced signals, the signal ground may be obtained by linking pins 1 and 3 in the
mating XLR connector. Good quality screened cable should be used, particularly for microphone or
low level sources, to prevent hum or noise pickup.
2.3 Line Inputs.
A 3 pin, 0.25” jack plug is required, which is also compatible with balanced or unbalanced sources,
when wired as follows:
Balanced inputs:
- Tip = Signal Phase (“+” or “hot”),
- Ring = Signal Non-Phase (“-” or “cold”),
- Screen = Ground.
If unbalanced signals are used, the screen and ring should both be connected to ground.
8
Page 9

2.4 Insertion Points.
The insertion points are also interfaced via a 3 pin, 0.25” switched jack socket on the rear of the unit.
The pin connections are:
- Sleeve = Ground,
- Tip = Send,
- Ring = Return.
The insertion point is unbalanced. If used as an additional send only (e.g. as a send to a tape machine
or monitor mixing desk), the Tip and Ring should be wired together, to preserve the signal path
through the insertion point.
2.5 Monitor Return Inputs.
A 3 pin, 0.25” jack plug is required, which is also compatible with balanced or unbalanced sources,
when wired as follows:
Balanced inputs:
- Tip = Signal Phase (“+” or “hot”),
- Ring = Signal Non-Phase (“-” or “cold”),
- Screen = Ground.
If unbalanced signals are used, the screen and ring should both be connected to ground.
The nominal operating level of the Monitor Return may be internally set for +4dBu (professional) or
-10dBu (semi-professional) nominal level. The outputs are factory set for +4dBu, but may be
changed by referring to part 3.6 of the Technical Section.
2.6 Tape/Direct Outputs.
The Direct Output connector is a 3 pin, 0.25” jack socket on the rear of the unit. The output
automatically adjusts for balanced or unbalanced connection, and may be internally set for +4dBu
(professional) or -10dBu (semi-professional) nominal level. The outputs are factory set for +4dBu,
but may be changed by referring to part 4.4 of the Technical Section.
The mating connector should be wired as follows:
Balanced outputs:
- Tip = Signal Phase (“+” or “hot”),
- Ring = Signal Non-Phase (“-” or “cold”),
9
Page 10

- Screen = Ground.
If unbalanced signals are used, the screen and ring should both be connected to ground.
2.7 Meter Bridge Connection
The optional bar graph meterbridge is connected to each section of the VTC via these 25 way D-type
connectors. See Technical Section 4.17 for more details.
AUDIO CONNECTIONS – MASTER SECTION
2.8 Group Insertion Points.
The group insertion points are interfaced via a 3 pin, 0.25” switched jack socket on the rear of the
unit. The pin connections are:
- Sleeve = Ground,
- Tip = Send,
- Ring = Return.
The insertion point is unbalanced. If used as an additional send only (e.g. as a send to a tape machine
or monitor mixing desk), the Tip and Ring should be wired together, to preserve the signal path
through the insertion point.
2.9 Group Outputs.
The monitor outputs are via balanced, 3 pin jack connectors. The mating connectors should be wired
as follows:
Balanced outputs:
- Tip = Signal Phase (“+” or “hot”),
- Ring = Signal Non-Phase (“-” or “cold”),
- Screen = Ground.
If unbalanced signals are used, the screen and ring should both be connected to ground.
The nominal operating level of the Group Outputs may be internally set for +4dBu (professional) or 10dBu (semi-professional) nominal level. The outputs are factory set for +4dBu, but may be changed
by referring to part 4.4 of the Technical Section.
10
Page 11

2.10 Aux Outputs.
The Aux outputs are provided on unbalanced, 2 pin jack connectors. The mating connectors should
be wired as follows:
- Sleeve = Ground (screen),
- Tip = Signal Phase (“+” or “hot”).
2.11 Aux Returns.
Six stereo inputs are provided, for effects returns or other line level sources. The connectors are 3 pin
jack sockets, and the mating connectors should be wired as follows:
- Sleeve = Ground (screen),
- Tip = Signal Phase (“+” or “hot”),
- Ring = Signal Non-Phase (“-” or “cold”).
If unbalanced signals are used, the screen and ring should both be connected to ground.
The aux returns are normalled so that if a mono signal is connected to the left input only, this signal
is fed equally to left and right return paths: thus enabling easy connection of mono effects devices or
line sources.
2.12 Main Stereo Output.
The main outputs are via balanced, 3 pin male XLR connectors operating at +4dBu. The mating
connectors should be wired as follows:
- Pin 1 = Ground (screen),
- Pin 2 = Signal Phase (“+” or “hot”),
- Pin 3 = Signal Non-Phase (“-” or “cold”).
If an unbalanced output is required, pins 1 and 3 should both be connected to ground.
2.13 Unbalanced Stereo Output.
The main stereo output is also duplicated on unbalanced mono jack connectors operating at –10dBu.
The mating connector should be wired as follows:
- Sleeve = Ground (screen),
- Tip = Signal Phase (“+” or “hot”).
11
Page 12

2.14 Master Insertion Points.
The master insertion points are interfaced via a 3 pin, 0.25” switched jack socket on the rear of the
unit. The pin connections are:
- Sleeve = Ground,
- Tip = Send,
- Ring = Return.
The insertion point is unbalanced. If used as an additional send only (e.g. as a send to a tape machine
or monitor mixing desk), the Tip and Ring should be wired together, to preserve the signal path
through the insertion point.
The master insertion point is active on both the balanced and unbalanced stereo outputs.
2.15 Mix B Output.
The Mix B outputs are via balanced, 3 pin jack connectors. The mating connectors should be wired
as follows:
Balanced outputs:
- Tip = Signal Phase (“+” or “hot”),
- Ring = Signal Non-Phase (“-” or “cold”),
- Screen = Ground.
If unbalanced signals are used, the screen and ring should both be connected to ground.
2.16 Control Room , Studio and Alternate L/S Outputs.
All three of these monitor outputs are via balanced, 3 pin jack connectors. The mating connectors
should be wired as follows:
- Sleeve = Ground (screen),
- Tip = Signal Phase (“+” or “hot”),
- Ring = Signal Non-Phase (“-” or “cold”).
If an unbalanced output is required, the screen and ring should both be connected to ground.
2.17 Stereo 2T Returns (2TA and 2TB).
12
Page 13

A stereo input is provided to the monitor section, to allow off-tape monitoring, etc.
The inputs are via balanced, 3 pin jack connectors. The mating connectors should be wired as
follows:
- Sleeve = Ground (screen),
- Tip = Signal Phase (“+” or “hot”),
- Ring = Signal Non-Phase (“-” or “cold”).
If an unbalanced signal is used, the screen and ring should both be connected to ground.
The nominal operating level of the 2T returns may be internally set for +4dBu (professional) or 10dBu (semi-professional) nominal level. The outputs are factory set for +4dBu, but may be changed
by referring to part 4.15 of the Technical Section.
2.18 External Input.
A stereo input is provided to the monitor section, to allow the connection of miscellaneous sources
such as click tracks, guide cassettes, CDs etc.
The inputs are via balanced, 3 pin jack connectors. The mating connectors should be wired as
follows:
- Sleeve = Ground (screen),
- Tip = Signal Phase (“+” or “hot”),
- Ring = Signal Non-Phase (“-” or “cold”).
If an unbalanced signal is used, the screen and ring should both be connected to ground.
The nominal operating level of the Group Outputs may be internally set for +4dBu (professional) or 10dBu (semi-professional) nominal level. The outputs are factory set for +4dBu, but may be changed
by referring to part 4.15 of the Technical Section.
2.19 Phones 1 and 2 Outputs.
Two rear panel sockets are provided, suitable for driving headphones of 32 ohms or higher
impedance. A standard 0.25” jack plug should be used.
2.20 Meter Bridge Connection.
The optional bar graph meterbridge is connected to each section of the VTC via these 25 way D-type
connectors. See Technical Section 4.17 for more details.
13
Page 14
+48V
LINE
PHASE
GAIN
4
6
9
10
12
13
15
16
17
26
27
28
35
FLIP
MON
AUX
1 On
2 On
3 On
4 On
5+6
AUX
3+4 PRE
STEREO AUX
PAN 7/8
LEVEL
On
PRE
MIX B
H - MID
+/-
Hz
Q
L - MID
+/-
Hz
Q
EQ ON
HF
PAN MIX
B
MUTE
+10
+5
0
-5
-10 SRCE-CH
-20
-30 HF/LF
EQ
-40
-50
-60
-70 EQ
-80
PAN
L R
MUTE
PK
SIG
SOLO
+10
STAT
+5
AUTO
0
BUSS
-5
1+2
-10
3+4
-20
5+6
-30
-40 7+8
-50
-60
-70 L+R
-80
TRIM
PK
SIG
SOLO
STAT
AUTO
LM/HM
1
2
3
5
7
8
11
14
18
19
20
24
25
21
22
23
29
30
31
32
33
34
40
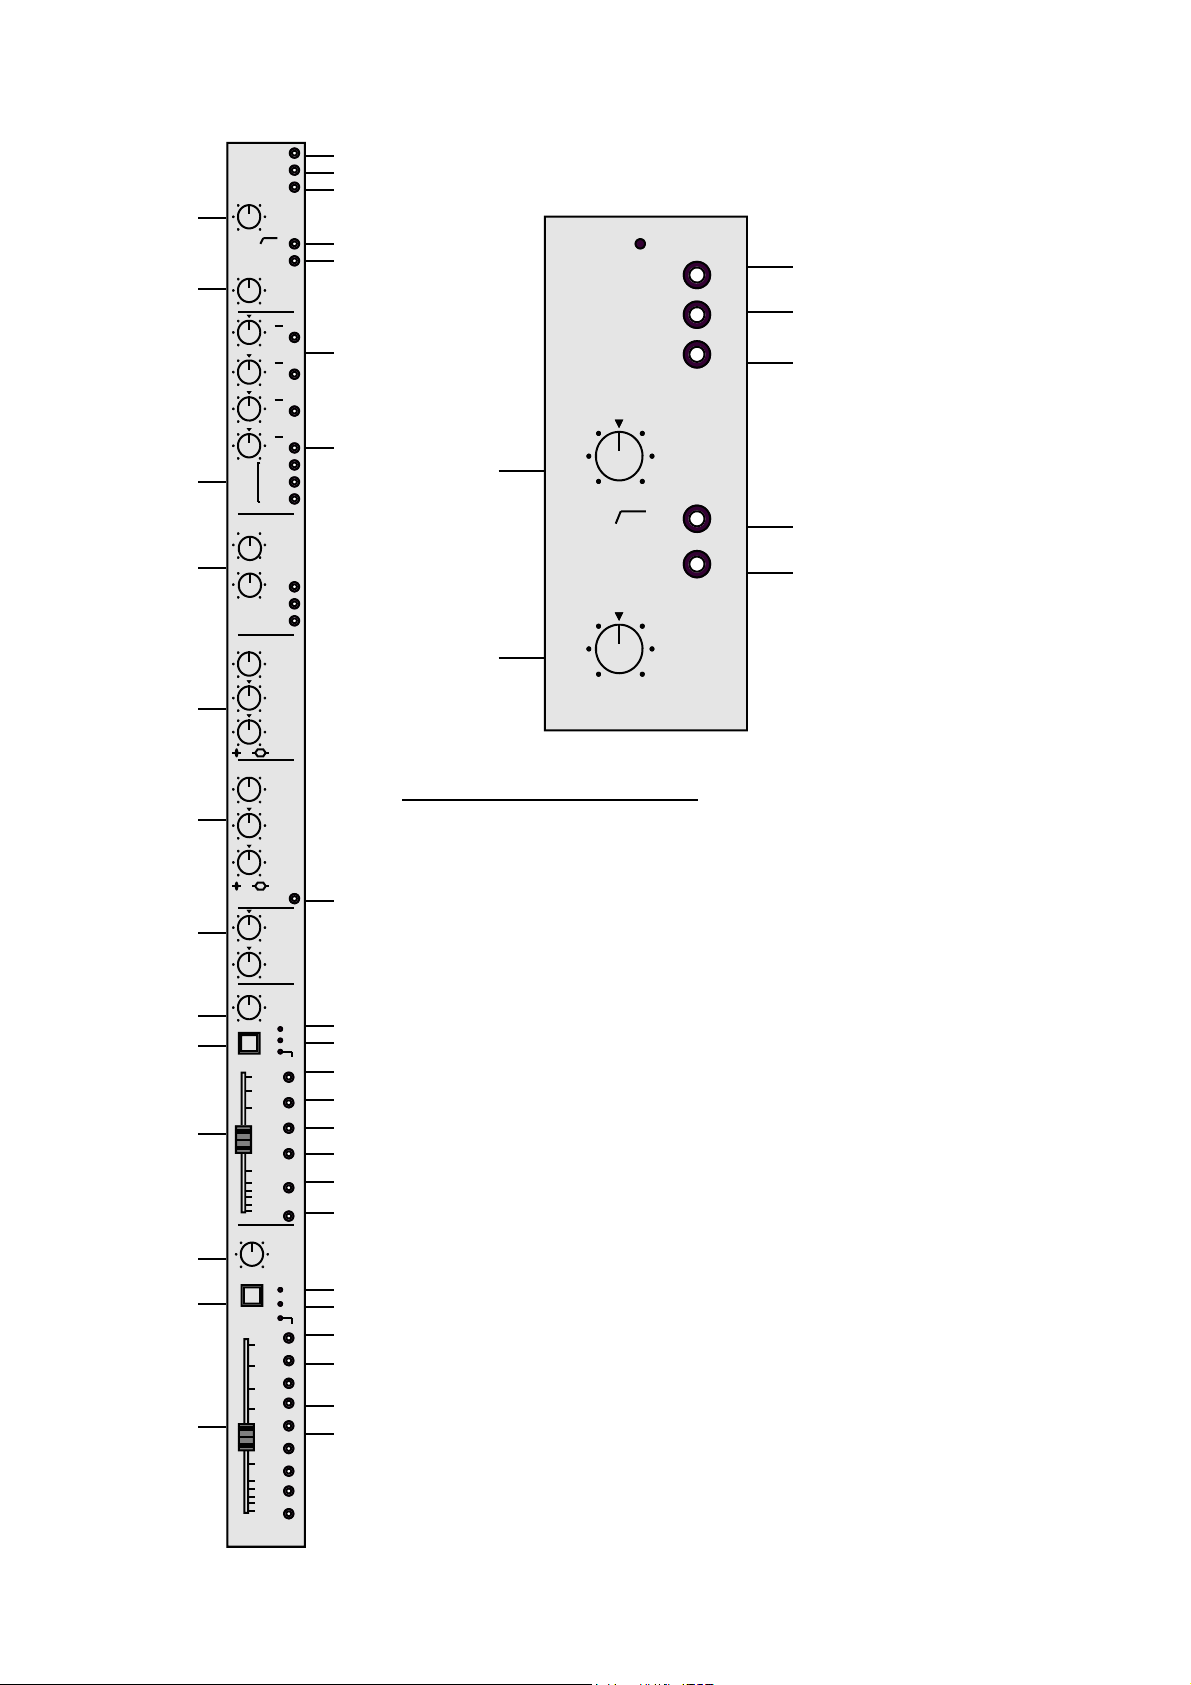
3. CHANNEL MODULE
4
6
+48V
LINE
PHASE
GAIN
LINE OdB
+16 +60
90Hz
FLIP
MON TRIM
-20 +20
3.1 Channel Input Stage
PHANTOM POWER (1)
Individual +48V phantom power switching is available on each channel.
This meets the power needs of condenser microphones and DI boxes
when required. To prevent clicks or thumps it is advisable to ensure that
the system gain is set to minimum when switching phantom power on,
or connecting a microphone when phantom power is applied.
MIC/LINE SWITCH (2)
Mic/Line preamp input switch. This selects which source signal is fed
through to the console preamp stage.
Valve Stage
The microphone pre amp stage is one of the key weaknesses on many
consoles but on the VTC it is one of its great strengths. Combining an
SSM 2017 solid state stage with an ECC83/12AX7A secondary valve
stage gives the VTC mic pre amp the ideal combination of low noise
performance (-127dBu) and rich valve warmth. The valve stage is ‘post’
the Gain, LF Cut, Phase and Flip switches, and ‘pre’ the channel insert
point.
PHASE REVERSE (3)
The Phase Reverse button operates on both the mic and line inputs, and
is designed principally to correct phase cancellation caused by multiple
1
2
3
5
7
14
Page 15
4
6
9
10
12
13
15
16
17
26
27
28
35
+48V
LINE
PHASE
GAIN
FLIP
MON
AUX
1 On
2 On
3 On
4 On
5+6
AUX
3+4 PRE
STEREO AUX
PAN 7/8
LEVEL
On
PRE
MIX B
H - MID
+/-
Hz
Q
L - MID
+/-
Hz
Q
EQ ON
HF
PAN MIX
B
MUTE
SIG
+10
+5
0
-5
-10 SRCE-CH
-20
-30 HF/LF
EQ
-40
-50
-60
-70 EQ
-80
PAN
L R
MUTE
PK
SIG
SOLO
+10
STAT
+5
AUTO
0
BUSS
-5
1+2
-10
3+4
-20
5+6
-30
-40 7+8
-50
-60
-70 L+R
-80
TRIM
PK
SOLO
STAT
AUTO
LM/HM
2
1
3
5
7
8
11
14
18
19
20
24
25
21
22
23
29
30
31
32
33
34
40
mic set-ups. It is ‘pre’ Flip in the signal path so off-tape signals can be
phase reversed if required by re-patching through the line input.
GAIN (4)
The Gain control affects both line or microphone input level, dependent
upon which is selected by the Mic/Line switch. The centre detent
corresponds to 0dB gain on the line input and the gain setting will affect
signal strength to the preamp valve stage, and therefore enhancement of
that signal. The variable input gain ranges from 16 to +60dB on the mic
input, and –10 to +35dB on the line input.
LOW CUT FILTER (5)
The low cut filter is designed to remove unwanted LF noise. The filter
has a slope of -12dB per octave and operates at 90Hz. It is active on
both mic and line inputs, whichever is selected.
3.2 Tape Return
MONITOR TRIM (6)
Monitor Trim adjusts the tape monitor input gain. With a very useful +/20dB range it can cope with most recording systems. In addition,
internal jumper links can allow operating levels to be set at +4dB or 10dB, as required (information on altering these jumper links can be
found in 3.6 of the technical section of the manual).
Valve stage
Like the channel preamp the Monitor input features an ECC83/12AX7A
valve stage. This is located ‘post’ Gain and Flip. There is no insert point
on the Mix B signal path.
FLIP (7)
The Flip switch swaps the Mic/Line and the Tape Monitor input signals.
When selected the Mic/Line signal is fed to the Mix B section, and the
Tape Monitor signal is fed through the main channel signal path. When
Flip is active the Gain, LF Cut and Phase Reverse switches remain tied
to the Mic/Line input, while the Monitor Trim control remains tied to
the Tape Monitor signal.
Flip is most likely to be used on mixdown so that the tape return signal
can have the full benefit of the main channel’s long throw faders,
equalisation and auxiliary send options.
3.3 Insert Point
Insert points are designed to allow external devices such as dynamics
processors to be patched into the signal path when recording or mixing.
15
Page 16
4
6
9
10
12
13
15
16
17
26
27
28
35
+48V
LINE
PHASE
GAIN
FLIP
MON
AUX
1 On
2 On
3 On
4 On
5+6
AUX
3+4 PRE
STEREO AUX
PAN 7/8
LEVEL
On
PRE
MIX B
H - MID
+/-
Hz
Q
L - MID
+/-
Hz
Q
EQ ON
HF
PAN MIX
B
MUTE
SIG
+10
+5
0
-5
-10 SRCE-CH
-20
-30 HF/LF
EQ
-40
-50
-60
-70 EQ
-80
PAN
L R
MUTE
PK
SIG
SOLO
+10
STAT
+5
AUTO
0
BUSS
-5
1+2
-10
3+4
-20
5+6
-30
-40 7+8
-50
-60
-70 L+R
-80
TRIM
PK
SOLO
STAT
AUTO
LM/HM
2
1
3
5
7
8
11
14
18
19
20
24
25
21
22
23
29
30
31
32
33
34
40
The insert point is located on the main channel signal path, ‘post’ Flip
and ‘pre’ EQ – and can therefore be used for processing the main
channel signal when tracking, and the tape monitor signals when they
are ‘Flipped’ through the main channel signal path during mixdown.
3.4 Auxiliary Sends
9
system of auxiliary sends, allowing both the main channel and Mix B
signal paths access to pre and post fade sends. Six mono auxiliary sends
are accessed via four level controls, and there is a separate stereo send.
AUX SENDS 1&2 (8)
These are mono sends, permanently set post fader and so are used
mainly for effects sends on the main channel signal path.
AUX SENDS 3&4 and 5&6 (9)
In this flexible configuration, mono sends 3&4 can be switched pre or
post fader, and assigned to main channel or mix B signal paths.
Used as effects sends
The aux switching system also allows sends 3&4 to be assigned to aux
busses 3&4 or 5&6. Thus a choice of six mono aux sends can be fed
from four controls, thus allowing a wide range of effects to
by each channel during recording and mixdown.
AUX
1
ON
2
ON
3
ON
4
ON
5+6
AUX 3/4 PRE
MIX B
8
11
The VTC has a flexible
be accessed
16
Page 17

4
6
9
10
12
13
15
16
17
26
27
28
35
+48V
LINE
PHASE
GAIN
FLIP
MON
AUX
1 On
2 On
3 On
4 On
5+6
AUX
3+4 PRE
STEREO AUX
PAN 7/8
LEVEL
On
PRE
MIX B
H - MID
+/-
Hz
Q
L - MID
+/-
Hz
Q
EQ ON
HF
PAN MIX
B
MUTE
SIG
+10
+5
0
-5
-10 SRCE-CH
-20
-30 HF/LF
EQ
-40
-50
-60
-70 EQ
-80
PAN
L R
MUTE
PK
SIG
SOLO
+10
STAT
+5
AUTO
0
BUSS
-5
1+2
-10
3+4
-20
5+6
-30
-40 7+8
-50
-60
-70 L+R
-80
TRIM
PK
SOLO
STAT
AUTO
LM/HM
2
1
3
5
7
8
11
14
18
19
20
24
25
21
22
23
29
30
31
32
33
34
40
Used for stereo foldback
Aux sends 3&4 can be routed to the Master Section’s two headphone
mixes (Phones 1&2). Here they can be used exclusively or mixed with
other signals, for example auxes 7&8, to create a headphone mix of both
channel and tape monitor signals.
AUX SENDS 7&8 (10)
STEREO AUX
PAN 7/8
ON
LEVEL
PRE
10
Sends 7&8 operate as a stereo pair using a single LEVEL and PAN
control. They can be assigned to the main channel or Mix B signal path,
and configured as ‘pre’ or ‘post’ fader.
Used as stereo foldback
Use of aux busses 7&8 is the simplest and quickest way to set up a
headphone mix, by switching the sends to be ‘pre’ fader. The signal can
be routed to the Master Section Phones mixes and used alone or in
addition to other signals.
AUX SEND MUTING (11)
Each send can be completely muted by individual on/off switches: thus
preventing any low level bleed-through of effects and allowing an
instant comparison of dry and processed signals.
3.5 Equalisation Section
17
Page 18

4
6
9
10
12
13
15
16
17
26
27
28
35
+48V
LINE
PHASE
GAIN
FLIP
MON
AUX
1 On
2 On
3 On
4 On
5+6
AUX
3+4 PRE
STEREO AUX
PAN 7/8
LEVEL
On
PRE
MIX B
H - MID
+/-
Hz
Q
L - MID
+/-
Hz
Q
EQ ON
HF
PAN MIX
B
MUTE
SIG
+10
+5
0
-5
-10 SRCE-CH
-20
-30 HF/LF
EQ
-40
-50
-60
-70 EQ
-80
PAN
L R
MUTE
PK
SIG
SOLO
+10
STAT
+5
AUTO
0
BUSS
-5
1+2
-10
3+4
-20
5+6
-30
-40 7+8
-50
-60
-70 L+R
-80
TRIM
PK
SOLO
STAT
AUTO
LM/HM
2
1
3
5
7
8
11
14
18
19
20
24
25
21
22
23
29
30
31
32
33
34
40
The VTC has been praised for its classic, ‘musical sounding’ EQ, capable
of overall contouring, creative shaping and corrective treatments. The EQ
stage shares the warmth, transparency and smoothness of the TL Audio’s
outboard EQ units. The four band EQ comprises three sections, all within
easy reach of the engineer: High Mid Parametric, Low Mid Parametric
and HF/ LF Shelving. In addition, part or all of the EQ is assignable to the
main channel or tape monitor signal paths making it a very practical and
flexible tool.
The EQ stage is post valve stage/insert point, and pre fader.
HIGH MID PARAMETRIC EQ (12)
Three pots control th e action of the HM
Parametric section:
Cut/ Boost: +/-15dB
Centre Frequency: 500Hz - 18kHz
Q: Variable from 0.8 - 7.0
(1.25 - 0.15 octaves)
When the Q control is turned fully clockwise to its minimum value the
filter’s notch is wide. At this setting it will have an effect on a wider range
of frequencies, thus providing a more broadband and musical effect.
When turned fully anti-clockwise the ‘notch’ of the filter is narrow and so
a more limited frequency range is affected. This setting provides a more
severe, corrective EQ action.
H-MID
+/-
-15 +15
2K 5K
Hz
500 18K
Q
LOW MID PARAMETRIC EQ (13)
18
Page 19

4
6
9
10
12
13
15
16
17
26
27
28
35
+48V
LINE
PHASE
GAIN
FLIP
MON
AUX
1 On
2 On
3 On
4 On
5+6
AUX
3+4 PRE
STEREO AUX
PAN 7/8
LEVEL
On
PRE
MIX B
H - MID
+/-
Hz
Q
L - MID
+/-
Hz
Q
EQ ON
HF
PAN MIX
B
MUTE
SIG
+10
+5
0
-5
-10 SRCE-CH
-20
-30 HF/LF
EQ
-40
-50
-60
-70 EQ
-80
PAN
L R
MUTE
PK
SIG
SOLO
+10
STAT
+5
AUTO
0
BUSS
-5
1+2
-10
3+4
-20
5+6
-30
-40 7+8
-50
-60
-70 L+R
-80
TRIM
PK
SOLO
STAT
AUTO
LM/HM
2
1
3
5
7
8
11
14
18
19
20
24
25
21
22
23
29
30
31
32
33
34
40
Cut/Boost +/-15dB
C e n t r e Frequency 50Hz 2kHz
Q 0.8 - 7.0
(1.25 - 0.15
octaves)
LM Parametric EQ works in the same way as the HM band. Note the
wide overlap of the two bands in the centre frequency range of 500Hz 2kHz, making the parametric section very useful for creative and
corrective manipulation of the many sound sources with energy in the
mid frequency band.
The lower frequency area of this parametric also substantially overlaps
with the LF shelving control, allowing even greater control of low
frequency, bass end material.
L-MID
+/-
-15 +15
200 500
Hz
50 2K
Q
EQ ON
13
EQ ON (14)
The EQ switch found at the base of the lower mid parametric section
switches the EQ ON for the main channel signal path only. When the
indicator LED is lit, the equaliser is active. Dedicated switches are used
to apply EQ to the monitor signal path (see Section 3.6).
HF and LF SHELVING (15)
———
HF
-15 +15
LF
-15 +15
T h e Baxendale shelving filters
operate at:
H F 12kHz (12dB/
octave)
LF 80Hz (12dB/octave)
Cut/Boost +/- 15dB
HF and LF shelving is normally in the main
channel path but can be switched to Mix B (see
Section 3.6).
15
3.6 Mix B – Monitor Section
19
Page 20

4
6
9
10
12
13
15
16
17
26
27
28
35
+48V
LINE
PHASE
GAIN
FLIP
MON
AUX
1 On
2 On
3 On
4 On
5+6
AUX
3+4 PRE
STEREO AUX
PAN 7/8
LEVEL
On
PRE
MIX B
H - MID
+/-
Hz
Q
L - MID
+/-
Hz
Q
EQ ON
HF
PAN MIX
B
MUTE
SIG
+10
+5
0
-5
-10 SRCE-CH
-20
-30 HF/LF
EQ
-40
-50
-60
-70 EQ
-80
PAN
L R
MUTE
PK
SIG
SOLO
+10
STAT
+5
AUTO
0
BUSS
-5
1+2
-10
3+4
-20
5+6
-30
-40 7+8
-50
-60
-70 L+R
-80
TRIM
PK
SOLO
STAT
AUTO
LM/HM
2
1
3
5
7
8
11
14
18
19
20
24
25
21
22
23
29
30
31
32
33
34
40
PAN (16)
The Monitor section is
labelled ‘Mix B’ and
comprises a Pan pot , Mute
switch, Signal Present and
Peak LEDs, a Solo LED,
EQ assign switches, Source,
Auto and Status switching,
and a high quality 60mm
Alps fader.
The Mix B signals are all
mixed and fed to a separate
pair of outputs in the
Master Section and can be
also be routed to the Stereo
Mix, Control Room, Studio
or Headphones outputs.
A dedicated pan pot with
16
17
26
PAN MIX B
L R
MUTE PK
SIG
SOLO
dB
STAT
AUTO
HF/LF E Q
+10
+5
0
-5
-10
-20
-30
-40
-50
-80
SRCE-CH
HM/LM
EQ
18
19
20
24
25
21
22
23
centre detent controls the
stereo imaging of signals in
the Mix B signal path.
ROUTING
There is no individual multitrack tape routing system for the Mix B
channels, since the group routing switches are not accessible from the
Mix B section. However, a completely separate mix can be processed
via the Mix B faders and fed to a recorder via the console’s dedicated
Mix B stereo outputs in the master section.
MUTE (17)
The large illuminating mute switch can be activated manually to cut the
signal on its monitor channel. It will also illuminate and mute the signal
for that channel if the SOLO IN PLACE function is activated elsewhere
on the console.
PEAK (18)
The peak indicator starts to illuminate when the signal is about to
overload the monitor channel input stage. In the absence of channel
meters (which can be purchased as an optional extra) the peak indicator
is a useful, quick guide to signal level.
20
Page 21

4
6
9
10
12
13
15
16
17
26
27
28
35
+48V
LINE
PHASE
GAIN
FLIP
MON
AUX
1 On
2 On
3 On
4 On
5+6
AUX
3+4 PRE
STEREO AUX
PAN 7/8
LEVEL
On
PRE
MIX B
H - MID
+/-
Hz
Q
L - MID
+/-
Hz
Q
EQ ON
HF
PAN MIX
B
MUTE
SIG
+10
+5
0
-5
-10 SRCE-CH
-20
-30 HF/LF
EQ
-40
-50
-60
-70 EQ
-80
PAN
L R
MUTE
PK
SIG
SOLO
+10
STAT
+5
AUTO
0
BUSS
-5
1+2
-10
3+4
-20
5+6
-30
-40 7+8
-50
-60
-70 L+R
-80
TRIM
PK
SOLO
STAT
AUTO
LM/HM
2
1
3
5
7
8
11
14
18
19
20
24
25
21
22
23
29
30
31
32
33
34
40
In practice the red peak light is activated at a level of +18dB or above,
allowing some advance warning when bringing up the monitor input
gain before the headroom limit of +26dB is reached.
SIGNAL PRESENT (19)
This is a green LED which illuminates to show that a signal is present
on the monitor channel path when it reaches a level of -30dB.
SOLO (20)
The solo button is found at the top of the function button array and in its
default mode acts as a mono PFL (pre fade listen). When the SOLO IN
PLACE function is activated on the Master Section, the monitor channel
solo button will activate the solo in place function instead of PFL. In the
latter mode the monitor channel solo button is linked to both main
channel and monitor channel mute status indicators.
SOURCE-CHANNEL (SRCE-CH) (21)
Routes the channel signal to the monitor, in place of the tape return
signal. Note that this is different from the Flip switch which reverses
channel and tape return signals.
In practice the Source-Channel button may be used to set up two
separate mixes running side by side - one on the main channel faders
and another on the Mix B faders. This can be useful for purposes of
comparison or later editing of separate mixes.
HF/ LF EQ (22)
This button assigns the channel high and low frequency EQ filters to the
Mix B section signal path.
LM/HM EQ (23)
This switch reassigns the channel parametric mid EQ filters to the Mix
B signal path.
Note: Both the above are dedicated monitor channel EQ status
switches
and independent of the main channel EQ On status switch. In practice
this means that even when the EQ switch located on the main channel is
in the ‘off’ position, EQ is still available for the monitor section should
the assign buttons be activated.
STATUS (24)
Although automation is an optional extra, both Status and Auto buttons
are provided for whatever third party system is used. With certain
21
Page 22

4
6
9
10
12
13
15
16
17
26
27
28
35
+48V
LINE
PHASE
GAIN
FLIP
MON
AUX
1 On
2 On
3 On
4 On
5+6
AUX
3+4 PRE
STEREO AUX
PAN 7/8
LEVEL
On
PRE
MIX B
H - MID
+/-
Hz
Q
L - MID
+/-
Hz
Q
EQ ON
HF
PAN MIX
B
MUTE
SIG
+10
+5
0
-5
-10 SRCE-CH
-20
-30 HF/LF
EQ
-40
-50
-60
-70 EQ
-80
PAN
L R
MUTE
PK
SIG
SOLO
+10
STAT
+5
AUTO
0
BUSS
-5
1+2
-10
3+4
-20
5+6
-30
-40 7+8
-50
-60
-70 L+R
-80
TRIM
PK
SOLO
STAT
AUTO
LM/HM
2
1
3
5
7
8
11
14
18
19
20
24
25
21
22
23
29
30
31
32
33
34
40
automation systems Status acts as a momentary switch intended to
identify the presence of a signal path to the automation system computer
- in effect, a ‘local status’ switch. If no automation is fitted then the
Status switch has no effect on the audio signal.
AUTO (25)
If automation is fitted, the Auto button allows a channel’s automation
stage to be bypassed if required, thus removing any unwanted VCA
stages from the signal path. Depressing the ‘Auto’ switch engages the
VCA.
Internal links are fitted such that this switch has no effect on a nonautomated console. If automation is fitted then the links should be
removed (see technical section, part 3.8).
MIX B FADER (26)
This high quality 60mm Alps fader has +10dB of gain at maximum and
controls the level of the monitor channel signal.
3.7 Main Channel Output
PAN (27)
22
Page 23

4
6
9
10
12
13
15
16
17
26
27
28
35
+48V
LINE
PHASE
GAIN
FLIP
MON
AUX
1 On
2 On
3 On
4 On
5+6
AUX
3+4 PRE
STEREO AUX
PAN 7/8
LEVEL
On
PRE
MIX B
H - MID
+/-
Hz
Q
L - MID
+/-
Hz
Q
EQ ON
HF
PAN MIX
B
MUTE
SIG
+10
+5
0
-5
-10 SRCE–CH
-20
-30 HF/LF
EQ
-40
-50
-60
-70 EQ
-80
PAN
L R
MUTE
PK
SIG
SOLO
+10
STAT
+5
AUTO
0
BUSS
-5
1+2
-10
3+4
-20
5+6
-30
-40 7+8
-50
-60
-70 L+R
-80
TRIM
PK
SOLO
STAT
AUTO
LM/HM
2
1
3
5
7
8
11
14
18
19
20
24
25
21
22
23
29
30
31
32
33
34
40
The pan knob controls the stereo imaging of the channel signal path
which may be fed to the
Left/Right mix buss and is
centre detented for accurate
positioning of central
images such as bass and
vocals.
Pan control and Routing
The signal output from the
pan pot can also be fed to
the group routing buttons
where it will act as an odd/
even signal feed. When
panned left the signal path is
fed to odd numbered groups
(1,3,5 & 7), and when
panned right feeds the even
numbered groups (2,4,6 &
8). Panning centrally will
feed equally to both even
and odd groups.
MUTE (28)
The large illuminated mute
switch can be activated
27
28
35
PAN MIX B
L R
MUTE PK
SIG
10
SOLO
dB
+10 STAT
+5 AUTO
0 BUSS
-5 1+2
-10 3+4
-20 5+6
29
30
31
32
33
34
-30 7+8
-40
-50 L+R
-80
manually to cut the signal
path. It will also illuminate
and mute the signal for that
channel if the Solo in Place function is activated elsewhere on the
console. All the main channel mute switches are numbered. If an
automation system has been installed on the VTC the internal LED will
illuminate to indicate the mute status of its channel.
PEAK (29)
The peak indicator illuminates red when the signal is about to overload
or is overloading the main channel input stage.
In practice the red peak light is activated at a level of +18dB or above,
allowing some advance warning when bringing up the monitor input
gain before the headroom limit of 26dB is reached
.
SIGNAL PRESENT (30)
This is a green LED which illuminates to show that a signal is present
on the main channel path when it reaches a level of -30dB.
SOLO (31)
23
Page 24

4
6
9
10
12
13
15
16
17
26
27
28
35
+48V
LINE
PHASE
GAIN
FLIP
MON
AUX
1 On
2 On
3 On
4 On
5+6
AUX
3+4 PRE
STEREO AUX
PAN 7/8
LEVEL
On
PRE
MIX B
H - MID
+/-
Hz
Q
L - MID
+/-
Hz
Q
EQ ON
HF
PAN MIX
B
MUTE
SIG
+10
+5
0
-5
-10 SRCE-CH
-20
-30 HF/LF
EQ
-40
-50
-60
-70 EQ
-80
PAN
L R
MUTE
PK
SIG
SOLO
+10
STAT
+5
AUTO
0
BUSS
-5
1+2
-10
3+4
-20
5+6
-30
-40 7+8
-50
-60
-70 L+R
-80
TRIM
PK
SOLO
STAT
AUTO
LM/HM
2
1
3
5
7
8
11
14
18
19
20
24
25
21
22
23
29
30
31
32
33
34
40
Each channel solo switch activates PFL or SOLO IN PLACE mode (see
Master Section for details of these two modes of operation, plus AFL –
which applies to certain master section signals).
In its default mode the solo switch will activate PFL mode (pre fade
listen). In this mode, the solo’d signal is fed to a separate PFL stereo
mix buss, which replaces the normal Control Room output signal of the
desk. All other outputs fro
m the console
remain unchanged in this
mode, so signals from the Left/Right outputs to a master recorder (for
example) will not be disrupted. The PFL signal is mono in the sense that
the solo’d signal is fed equally to both left and right outputs, and is ‘pre’
the channel pan control.
PFL/AFL active is signalled by a red LED adjacent to the active switch
and by a yellow LED on the Master Module VU meter panel.
However, if SOLO IN PLACE is activated on the Master Section, the
solo button will not function as a PFL, but as a Solo In Place. In this
mode any channel on which the solo switch is activated will cause all
the other channels and Mix B paths to be muted. Note that this will
affect outputs to the recorder so programme material may be lost if care
is not taken.
AUTO and STATUS (32)
If automation is fitted the Auto switch allows a channel’s automation
stage to be bypassed and the Status switch acts as a local status on/off
switch (see 24 and 25).
BUSS (33)
Each channel’s individual tape output (a balanced quarter inch jack
socket on the rear connector panel) works by default as a direct post
fader output to the recorder, with desk channels 1 - 24 feeding recorder
inputs 1 - 24, for instance.
However, when the Buss button is selected on any channel, the tape
output of that channel is fed from the output of one of the relevant group
faders. And this relationship between group outputs and channels is
defined in groups of eight:
Group 1 signal will appear at tape outputs of channels 1, 9, 17 etc.
Group 2 signal will appear at tape outputs of channels 2, 10, 18 etc.
and so on for groups 3 to 8.
(This will not
or Mix B stage of that particular desk channel. Only the tape output is
connected to the group fader signal.)
In effect the group becomes normalised to the tape outputs in a system
providing maximum flexibility for an eight group console. This enables
all the tracks on a multitrack tape machine to be accessed via the VTC’s
affect the signal running through either the main channel
24
Page 25

4
6
9
10
12
13
15
16
17
26
27
28
35
+48V
LINE
PHASE
GAIN
FLIP
MON
AUX
1 On
2 On
3 On
4 On
5+6
AUX
3+4 PRE
STEREO AUX
PAN 7/8
LEVEL
On
PRE
MIX B
H - MID
+/-
Hz
Q
L - MID
+/-
Hz
Q
EQ ON
HF
PAN MIX
B
MUTE
SIG
+10
+5
0
-5
-10 SRCE-CH
-20
-30 HF/LF
EQ
-40
-50
-60
-70 EQ
-80
PAN
L R
MUTE
PK
SIG
SOLO
+10
STAT
+5
AUTO
0
BUSS
-5
1+2
-10
3+4
-20
5+6
-30
-40 7+8
-50
-60
-70 L+R
-80
TRIM
PK
SOLO
STAT
AUTO
LM/HM
2
1
3
5
7
8
11
14
18
19
20
24
25
21
22
23
29
30
31
32
33
34
40
channel tape outputs without any need for re-patching.
ROUTING BUTTONS (34)
As previously mentioned (in 27) the pan pot acts as an odd/even signal
feed for the routing matrix. On selection of one of the group routing
buttons 1-2, 3-4, 5-6, 7-8, the post fade signal will be sent if panned left
to the odd number selected – and if panned right - to the even number of
your choice.
Selection of the L/R buss switch will route the post fade signal to the
main mix buss.
MAIN CHANNEL FADER (35)
The 100mm fader has +10dB of gain at maximum and controls the
level of the main channel signal that is fed to the selected busses or
sends.
25
Page 26

1
2
7
9
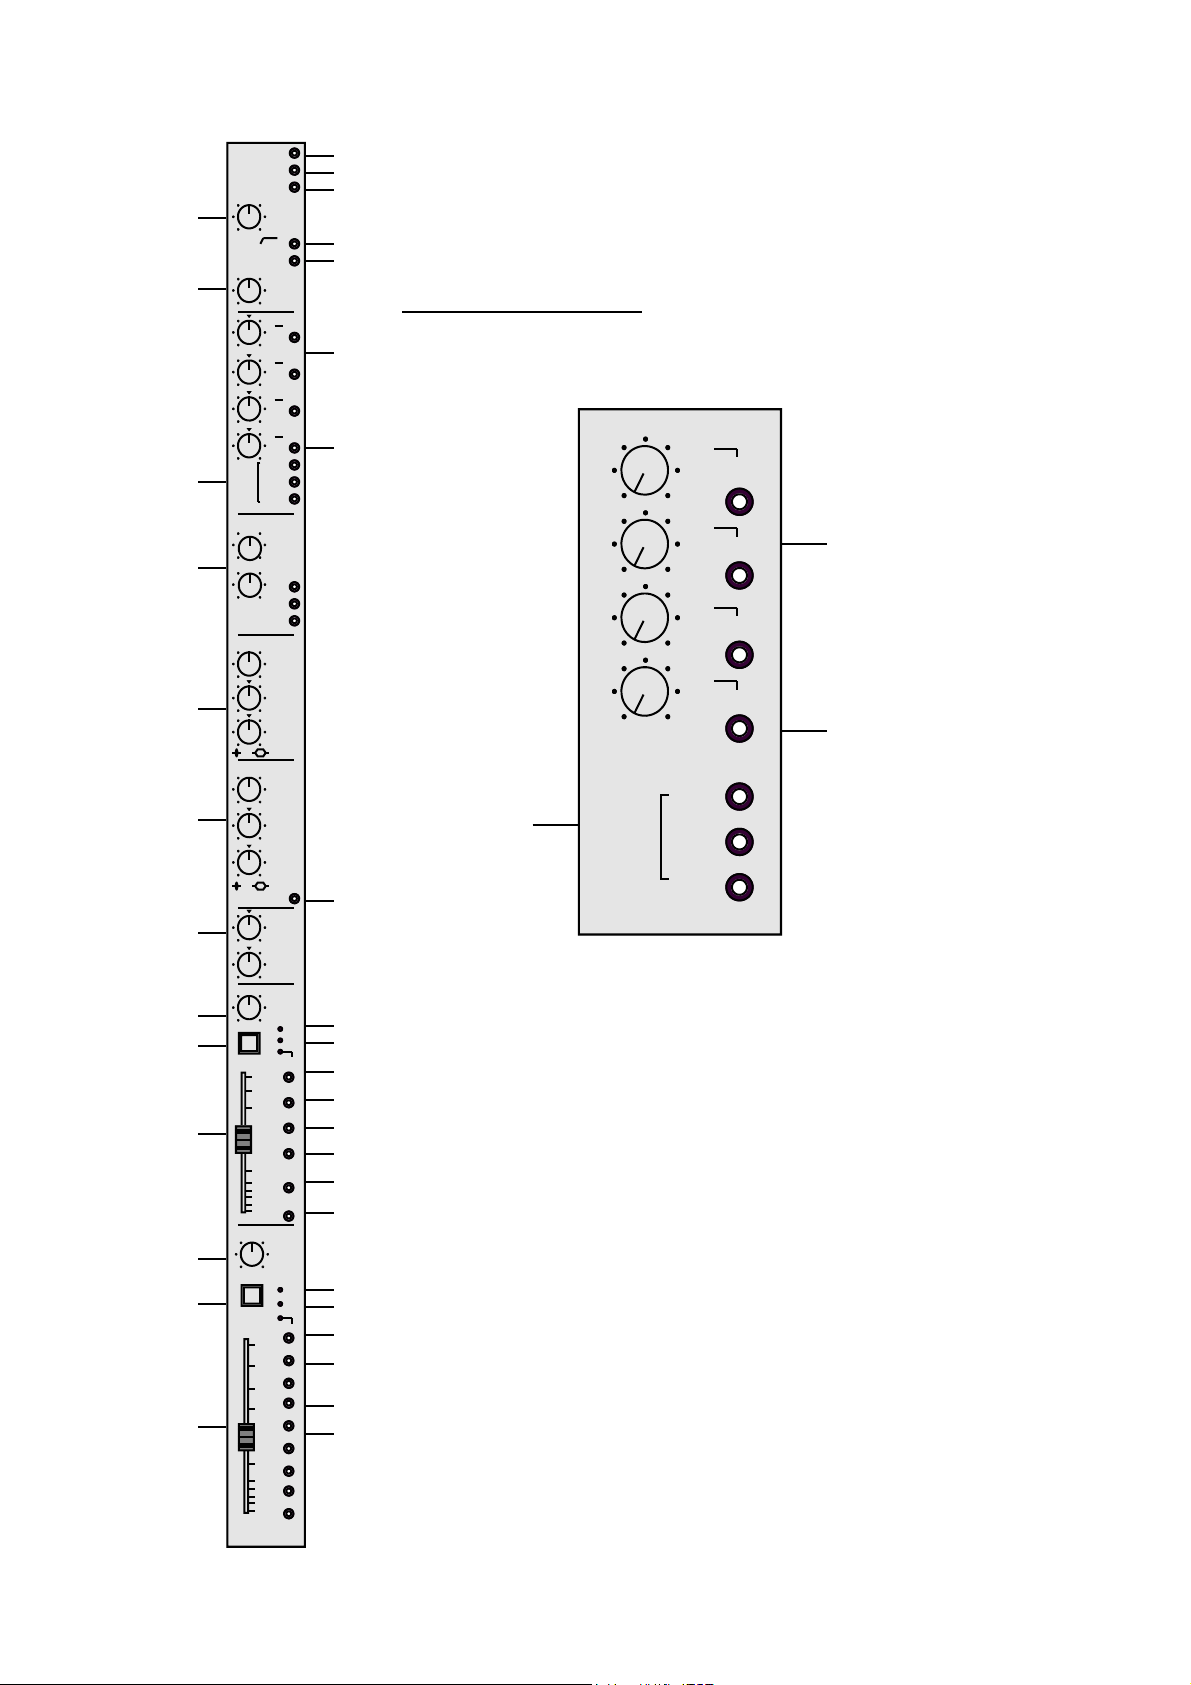
MASTER SECTION
AUX MASTERS PHONES 1
1 2 3 4 5 6 7/8
0 0 0 0 0 0 0
LEVEL
-00 +15 -00 +15 -00 +15 -00 +15 -00 +15 -00 +15 -00 +15
AFL AFL AFL AFL AFL AFL AFL
MUTE MUTE MUTE MUTE MUTE MUTE MUTE
OSC
PHONES PHONES PHONES PHONES PHONES PHONES LEVEL
1 1 1 1 1 1
ON
2 2 2 2 2 2 1kHz
10kHz
BALANCE BALANCE BALANCE BALANCE BALANCE BALANCE
MIXB
ASSIGN
L+ R LEVEL
0
L R L R L R L R L R L R
AFL AFL AFL AFL AFL AFL
MUTE MUTE MUTE MUTE MUTE MUTE TALKBACK PFL
LEVEL
RETURN 1 RETURN 2 RETURN 3 RETURN 4 RETURN 5 RETURN 6 C/ROOM
MIX B
+10
+5
TAPE AUX 3/4
0
STUDIO AUX 7/8
-5
-10
PHONES 1 EXT
-20
-30
-40
PHONES 2
-50
-60
-70
-80
LEVEL
PFL TRIM
LEVEL
0 TALKBACK
MIC
CONTROL ROOM STUDIO
FOLLOW
ALT/LS MONO SOLO IN PLACE CR SOLO ON
L+R MIX B 2TA 2TB EXT L+R MIX B 2TA 2TB EXT ON
L R L R L R L R
L +R L+R L+R L+R L+R L+R L+R L+R
STAT
ON ON ON ON ON ON ON ON AUTO
SOLO SOLO SOLO SO LO SOLO SOLO SO LO SOLO
+10
+5
0
-5
-10
-20
-30
-40
-50
-60
-70
-80
+10
+5
0
-5
-10
-20
-30
-40
-50
-60
-70
-80
+10
+5
0
-5
-10
-20
-30
-40
-50
-60
-70
-80
+10
+5
0
-5
-10
-20
-30
-40
-50
-60
-70
-80
+10
+5
0
-5
-10
-20
-30
-40
-50
-60
-70
-80
1 2 3 4 5 6 7 8 L+R
+10
+5
0
-5
-10
-20
-30
-40
-50
-60
-70
-80
+10
+5
0
-5
-10
-20
-30
-40
-50
-60
-70
-80
+10
+5
0
-5
-10
-20
-30
-40
-50
-60
-70
-80
+10
+5
0
-5
-10
-20
-30
-40
-50
-60
-70
-80
+10
+5
0
-5
-10
-20
-30
-40
-50
-60
-70
-80
+10
+5
0
-5
-10
-20
-30
-40
-50
-60
-70
-80
+10
+5
0
-5
-10
-20
-30
-40
-50
-60
-70
-80
+10
+5
0
-5
-10
-20
-30
-40
-50
-60
-70
-80
+10
+5
0
-5
-10
-20
-30
-40
-50
-60
-70
-80
C/ROOM
MIX B
AUX 3/4
AUX 7/8
EXT
PFL
PHONES 2
3
4
5
3
6
8
10
26
Page 27

4. MASTER SECTION
4.1 AUXILIARY MASTER SENDS
LEVEL
At the top of the Master Section are the six mono and single stereo auxiliary send masters. All feature
AFL and Mute switches, and a rotary fader which allows complete attenuation through to +15dB of
gain, allowing a wide range of effects units to be driven. The circuitry is entirely solid-state and the
auxiliary sends are provided on unbalanced 1/4 inch jack connections found on the rear panel master
section.
Remember that the individual channel effects send ‘On’ switches must be activated before signal will
appear at their respective auxiliary master sends.
SOLO
In the Master Auxiliary Send section the solo switches function in AFL mode, and have an associated
status LED that illuminates when the switch is activated. This puts the solo’d signal on to the
dedicated AFL stereo buss, which then replaces the control room output.
MUTE
The Mute button cuts the auxiliary send signal path just ahead of the level control. When a channel or
Mix B signal is solo’d with the Solo In Place function active, the aux sends and returns aren’t muted,
thus allowing the engineer to listen to channel or Mix B sound sources and their associated effects by
simply selecting a solo button on the relevant channel.
4.2 STEREO RETURN CHANNELS
STEREO RETURN FADERS
Six stereo returns are provided, with high quality 60mm Alps faders controlling the return level, with
up to +10dBu of gain available. Inputs are via balanced 1/4 inch jacks on the rear connection panel
and the sensitivity of the returns is +4dBu by default – but may be changed to -10dBu by fitting
internal jumpers (for details, see Technical Manual section 4.7). The returns mix directly into the
stereo L/R mix buss, and they can also be used as simple line inputs if they are not being used as
dedicated effects returns. The output of a mono effects unit may be plugged into the left hand input
only of the stereo return, in which case it will appear in mono in the centre of the L/R mix.
BALANCE CONTROL
The return balance control governs the left/right balance of the aux return signal, but operates as a
standard pan pot if a mono signal is connected to the associated left hand return input.
SOLO
In the Auxiliary Return section the solo switches function in AFL mode, and have an associated
status LED that illuminates when the switch is activated. This puts the solo’d signal on to the
dedicated AFL stereo buss, which then replaces the control room output.
MUTE
27
Page 28

The Mute button cuts the Stereo Return signal path but is not automatically muted when the SIP
function is in operation. This allows the engineer to listen to Channel and Mix B sound sources and
their effects by simply selecting a solo button on the input channel.
Note that none of the Stereo Returns will be automatically muted while in SIP mode, but if the
engineer wishes to monitor a source sound on the input channel with a single effect, a combination of
SIP and AFL is possible. For example, a vocal may be solo’d on one input channel and its reverb
signal AFL’d on the relevant Stereo Return.
HEADPHONE SENDS
The post fade signal from the effects returns may be sent to either or both Phones 1 and Phones 2
outputs. Once selected there is an individual gain control on each Stereo Effects return to govern the
amount of signal level fed to the Phones section.
4.3 HEADPHONE MATRIX
PHONES 1 & PHONES 2
The VTC offers a very versatile headphone mix section where stereo foldback can be sourced from
any or all of these signals: Control Room, Mix B, Aux 3/4, Aux 7/8 and External. The solo button
functions as a PFL, and it is assumed that Aux 3/4 and Aux 7/8 will be used for headphone cue mixes
as they are the main pre fade sends. In this case Aux 3 and 7 will appear on the left of stereo and Aux
4 and 8 on the right. The headphone mix can be checked in the control room by using the Solo (PFL)
on the Phones section.
The External input allows reference monitoring for performers from any external source such as a
click track, CD or cassette. Other 2-Track sources can be routed to the Phones section by using the
Control Room master section to select 2TA or 2TB, and then activating the ‘C/Room’ switch on
Phones 1 and/or Phones 2.
The External input, unlike the 2-Track inputs, is normalised for stereo or mono operation should a
mono source signal be required (simply plug into the left hand input). It could also be used as an
additional headphone mix from sources such as Auxes 1/2 or 5/6 (should the need arise) by patching
these sends to the External source input.
4.4 OSCILLATOR
The On switch activates the Oscillator, and a second switch allows you to choose between a 1kHz
and 10kHz line-up tone. Signal level from the oscillator is governed by a Level control and the tone
is routed to all the groups and the main stereo outputs, pre fader. The tone can then be fed to any or
all of channel tape outputs by activating the Buss buttons on the required channels.
4.5 MIX B
Mix B has its own dedicated outputs from the console, via balanced stereo 1/4 inch jack connections
on the rear master section connector panel. There are no insert points for Mix B.
VALVE STAGE
Both Mix B ‘Left’ and ‘Right’ signals pass through dedicated valve stages in the Mix B mix
amplifier before being routed to the Mix B master level control.
LEVEL
28
Page 29

Controls the output level of the Mix B signal. Up to +15dB of gain is available on the rotary master
fader. This will control the amount of signal fed to both the Mix B outputs and the stereo L/R buss,
should the Mix B signal be assigned to it (see below).
ASSIGN LEFT+RIGHT
If you wish to monitor Mix B and Main Channels simultaneously, signal from the Mix B buss may
be routed to the Left/Right Bus by pressing the ‘Assign L+R’ switch. Note also that Mix B may be
monitored in isolation by selecting the illuminated Mix B source switch in the Control Room section.
In practice you may be using Mix B for a number of reasons, such as:
•
Tape returns
•
Inputs (line, effects etc, with ‘Flip’ selected)
•
A combination of the above
•
An alternative Mix (‘Flip’ and ‘Srce-Ch’ selected on main channel, thus routing the tape
returns to both Main Channel and Mix B sections)
4.6 TALKBACK
TALKBACK INPUT
Input to the talkback section is via an XLR microphone socket on the front panel. The adjacent
switch is factory set for ‘non-latching’ mode (whereby talkback is only active while the switch is
pressed down), but can be changed for ‘latching’ mode (once pressed, the talkback remains active
until pressed again).
When the switch is pressed, the monitors are dimmed by -12dB and the Talkback Microphone signal
path is open.
TALKBACK SECTION
The Talkback level is governed by the ‘Level’ control, and the signal can be routed to:
•
Tape - whereby the signal will appear on the group and stereo busses, and this can be used for
tape identification (or creative recording) purposes.
•
Studio - whereby he signal will be routed to the Studio monitoring system.
•
Phones 1
•
Phones 2
The routing buttons can be selected individually, or used in combination. Note that both the routing
buttons and the On switch must be enabled to route talkback to the chosen output/s.
CONTROL ROOM DIM
Note that Talkback switch may be used as a Control Room ‘Dim’ switch if it is not routed to any
destination.
4.7 CONTROL ROOM MONITOR SECTION
The comprehensive control room section allows the engineer to quickly route signals to the Control
Room Monitor output and features a large Level control within easy reach of the operator.
STEREO INPUTS
29
Page 30

Five stereo inputs are available on illuminated switches and can be selected individually or in
combination:
•
L + R This routes the main mix left and right outputs (post L+R fader) to the Control
Room Monitor.
•
Mix B This routes the Mix B left and right outputs (post Mix B master level) to the
Control Room Monitor.
•
2TA This routes the 2TA left and right inputs to the Control Room Monitor.
•
2TB “ “ “ 2TB “ “ “ “ “ “ “ “ “
•
EXT “ “ “ EXT “ “ “ “ “ “ “ “ “
2 TK
The two track inputs A, B and External are connected via 1/4 inch stereo jacks on the rear connector
panel. Each of these inputs is set to +4dBu sensitivity by default, but may be changed to -10dBu by
fitting jumper links (see Technical Section, part 4.15).
EXTERNAL
This input allows reference monitoring for performers from any external source such as a click track,
CD or cassette via Phones 1 and 2 (see Headphone Matrix, section 4.3 of this manual) but can also be
routed to the Control Room Monitors.
The External inputs are located on the rear connector panel and are on balanced 1/4 inch stereo jacks.
However, the External input, unlike the two track inputs, is normalised for stereo or mono operation,
should a mono source signal be required. It is set to a sensitivity of +4dBu by default, but may be
changed to -10dBu by fitting jumper links (see Technical Section, part 4.15). It could also be used as
an additional headphone mix from sources such as auxes 1/2 or 5/6 (should the need arise) by
patching these sends to the External source input.
ALT L/S
When selected, this will switch the control room feed from the Control Room left and right outputs to
the Alternate L/S left and right outputs. This enables a second set of speakers to be permanently set
up for nearfield or comparative hi-fi monitoring. The outputs are found on the rear panel of the
console and are on stereo 1/4 inch jack connections.
MONO
The Mono check switch provides a mono sum of the left and right control room signals at the Control
Room and Alternate L/S left and right outputs.
SOLO IN PLACE
PFL
With the Solo In Place in the OFF position the solo buttons on the desk will function as PFL and
AFL switches as listed below:
•
PFL (Pre Fade Listen) The default mode for Channels and Mix B paths on the input
modules.
•
AFL (After Fade Listen) applies to Groups, Auxiliary Masters and Stereo Returns.
30
Page 31

PFL/AFL active is signalled by a red LED adjacent to the active switch, and by the yellow LED on
the Master Module VU meter panel. When one or more is selected a signal override will cut in to
replace the normal control room output with the dedicated PFL/AFL buss.
SOLO IN PLACE
When Solo In Place is selected in the Control Room Master Section, SIP replaces the PFL function of
Main Channel and Mix B signal paths, but will not affect the Groups, Auxiliary Masters and Stereo
Returns.
With SIP active on the Master, any channel that is solo’d will automatically cause all the other Main
Channel and Mix B channel signal paths to Mute, leaving only the solo’d channel signal present on
the main mix and/or group busses.
In practice – because SIP is post fade – more than one channel may be solo’d for comparative
reasons without disrupting individual levels when setting up a mix. For example, kick drum and
bass, and harmony vocals.
Note however that because SIP causes other signal paths to mute, their outputs to the recorder will be
cut – so it should not be used when actually recording during the mixdown or track laying process.
PFL TRIM
This rotary trim allows +/- 20dB of adjustment to be made to the level of the PFL/AFL signals sent to
the Control Room outputs via the PFL/AFL buss.
LEVEL
It is important to be able to operate the control room output level quickly and with ease. The large
control room rotary fader admirably fulfils these criteria by being highly visible and in reach of the
engineer. The Control Room outputs are found on the rear connector panel, on balanced stereo
quarter inch jack connections.
4.8 STUDIO MONITOR SECTION
ON
When activated the selected source signal/s will be routed to the console’s Studio outputs. These
outputs are found on the rear connector panel and are balanced stereo quarter inch jack connections.
LEVEL
Sets the level of signal sent to the Studio outputs.
STUDIO SOURCES
The Studio Section can derive the same five stereo sources as the Control Room:
•
L + R This routes the main mix left and right outputs (post L+R fader) to the Studio
Monitor.
•
Mix B This routes the Mix B left and right outputs (post Mix B master level) to the
Studio Monitor.
•
2TA This routes the 2TA left and right inputs to the Studio Monitor.
•
2TB This routes the 2TB left and right inputs to the Studio Monitor.
•
EXT “ “ “ EXT “ “ “ “ “ “ “ “
31
Page 32

FOLLOW CR
With this switch, the job of routing has been made even simpler for the engineer. When activated, the
Studio output will automatically follow the Control Room source selection.
SOLO
The Solo switch routes the pre fade signal onto the PFL/AFL left and right busses, and activates the
PFL/AFL override, or it will act as a Solo in Place switch if Solo Enable is selected in the Control
Room section.
4.9 GROUP OUTPUTS
There are eight groups each with a fader and switches for Solo, On, and routing to the main stereo
mix buss. Each group has an insert point located on the rear connector panel.
Group output level has a default value of +4dBu, but may be changed to -10dBu by altering the
internal jumper connections. For details, consult the Technical Section 4.4. The group outputs
themselves are balanced stereo 1/4 inch jack connections found on the rear connector panel.
CONNECTION TO MULTITRACK
In practice, unless a patchbay is being used, it is simpler to connect the console to the multitrack
recorder via the channel tape outputs and returns. ‘Buss’ switches on the Input Modules connect the
group faders to the channel tape outputs in the following arrangement:
Group 1 feeds Tape Outputs 1, 9, 17 when ‘Buss’ is selected on Input Modules 1, 9, 17.
Group 2 “ “ “ 2, 10, 18 “ “ “ “ “ “ “ 2, 10, 18.
Group 3 “ “ “ 3, 11, 19 “ “ “ “ “ “ “ 3, 11, 19.
Group 4 “ “ “ 4, 12, 20 “ “ “ “ “ “ “ 4, 12, 20.
Group 5 “ “ “ 5, 13, 21 “ “ “ “ “ “ “ 5, 13, 21.
Group 6 “ “ “ 6, 14, 22 “ “ “ “ “ “ “ 6, 14, 22.
Group 7 “ “ “ 7, 15, 23 “ “ “ “ “ “ “ 7, 15, 23.
Group 8 “ “ “ 8, 16, 24 “ “ “ “ “ “ “ 8, 16, 24.
In practice, for the many sessions where more than eight simultaneous inputs to the recorder are not
required the Buss switches are all likely to be left on. However for recording sessions requiring more
simultaneous outputs, the console ‘Direct Output’ option would be used (Buss ‘off’ on input
modules). In this way the console can be permanently wired to the multitrack without any need for
re-patching.
VALVE STAGE
Each group passes through its own dedicated ECC83/12AX7A valve stage, located pre-insert and
pre-fader in the signal path.
Note that if you want to take full advantage of the VTC’s valve capability during track laying, use the
Group route to tape as much as possible, thus utilising the extra valve stage in each group mix amp.
FADERS
The 100mm group faders have up to +10dB of gain, and control the level sent to their respective
group and tape outputs. The elegant retro Group Output Meters are found on the meter bridge and
32
Page 33

monitor their respective group output signals.
ON
The group ON switches work in tandem with the group left/right switches above them as indicated by
the desk legending. It enables the selected post fade group signal to be sent to the main mix outputs
for traditional sub-grouping of signals such as drums and backing vocals. There are two choices:
•
ON Post Fade group signal for odd numbered groups (1,3,5,7) is fed to main mix left.
Post Fade group signal for even numbered groups (2,4,6,8) is fed to main mix
right.
•
ON + L/R Post Fade group signal to main mix left and right outputs equally.
4.10 MASTER LEFT + RIGHT OUTPUTS
Balanced XLR sockets for the master left and right outputs are found on the rear connector panel at a
nominal level of +4dBu, and there are also unbalanced 1/4 inch jack outputs at a nominal level of 10dBu. Insert points are post the valve stage and pre fader, connected via stereo 1/4 inch jacks on the
rear connector panel. Output level is shown on the Left and Right VU meters on the meter bridge
above the Master Section.
VALVE STAGE
The L + R mix amplifiers use a combination of low noise balanced IC first stage followed by an
ECC83/12AX7A valve stage. The signal passes through this stage pre insert and pre fader.
FADER
The 100mm fader for the Left/Right output controls the main stereo mix level.
STATUS
Automation is an optional extra and when fitted ‘Status’ acts as a momentary switch intended to
identify the presence of a signal path to the automation system computer - in effect, a local status
switch.
AUTO
If automation is fitted, the Auto button allows a channel’s automation stage to be bypassed if
required, thus removing any unwanted VCA stages from the signal path. Depressing the ‘Auto’
switch engages the VCA.
Internal links are fitted such that this switch has no effect on a non-automated console. If automation
is fitted then the links should be removed (see Technical Section 3.8)
TECHNICAL SECTION
Contents. Page number
1. Power Supply Distribution. 36
1.1 Mechanical Construction. 36
1.2 Power Supply Fault Finding. 36 – 37
2. Valve PCBs. 37
2.1 Circuit Overview. 37 – 38
2.2 Valve Circuit Fault Finding. 38
33
Page 34

5. SPECIFICATIONS
Input Impedance (electronically balanced)
Mic input: 2.5 kohms
All other inputs: 10kohms minimum
Output Impedance
All balanced outputs: 100 ohms
All unbalanced outputs: 47 ohms
Maximum output levels
Direct, Group, L/R (balanced): +26dBu
L/R (unbalanced): +20dBu
Insert sends: +20dBu
Maximum Gain
Mic input to direct output: +70dB
Line input to direct output: +32dB
Frequency Response
Mic input @40dB gain to direct output: 20Hz to 20kHz +0, -1dB
Mix Noise
Main L/R output (reference to +4dBu nominal):
Master fader down: -97dBr
Master fader @ 0dB: -89dBr
With 32 channels routed, faders at 0dB, channels open: -75dBr
Group Noise
(reference to +4dBu nominal)
Fader down: -94dBr
Fader @ 0dB, no channels routed: -92dBr
with 32 channels routed, faders @ 0dB, channels open: -75dBr
Input Noise
Mic Input Equivalent (EIN): -127dBu
(22Hz to 22kHz, 150 ohm termination, 60dB gain)
THD+Noise
(From 10Hz to 40kHz @ 0dBu)
Direct output: 0.02%
Groups: 0.03%
L/R: 0.03%
Crosstalk
Line input to adjacent channel: -100dB @ 1kHz, -83dB @ 15kHz
Due to a policy of continuous development, the above specifications are subject to change
without notice. The figures represent typical values for signal paths stated. E & OE.
34
Page 35

2.3 Valve Replacement. 39
2.4 Valve Path Identification. 39
3. Input Bays. 40
3.1 Mechanical Construction. 40
3.2 Adding Modules to Sub-fitted Consoles. 40
3.3 Input Modules. 40 – 41
3.4 Replacing Mute Switches. 41
3.5 Input Circuit Description. 41
3.6 Input Stages. 41 – 42
3.7 Equaliser. 42
3.8 Faders and Routing. 42 – 43
3.9 Module Fault Finding. 43
4. Master Section. 43
4.1 Mechanical Construction. 43 – 44
4.2 Master Module Circuit Description. 44
4.3 Master L+R Outputs. 44 – 45
4.4 Group Outputs. 45
4.5 Mix B Outputs. 46
4.6 Aux Outputs. 46 – 47
4.7 Stereo Returns. 47
4.8 Oscillator. 47
4.9 Talkback. 47
4.10 Headphones. 48
4.11 Solo System. 48 – 49
4.12 Control Room Output. 49
4.13 Studio Output. 49
4.14 Logic Control. 49 – 50
4.15 External Monitor Inputs. 50 – 51
4.16 Metering. 51
4.17 Meter Bridge Option. 51
5. Calibration Procedure. 52
6. Signal Flow Diagrams. 53
1. Power Supply Distribution.
1.1. Mechanical Construction.
The VTC console mechanical construction consists of a number of “bays”, each of which houses 8
input channels, plus a further bay for the Master Section. Each bay operates as a sub-system with its
own grounding, PSU Regulators, and balanced audio signal connection between bays.
The external PSU provides rectified but unregulated DC which is connected via a heavy duty
multicore cable to the console. Inside the console frame, the raw DC is bussed to every bay where it
is separately fused and regulated.
1.2. Power Supply Fault Finding.
35
Page 36

CAUTION: THE POWER SUPPLY AND CONSOLE CONTAIN HIGH VOLTAGES (UP TO
250V DC) AND HIGH POWER CAPACITY, WITH A RISK OF PERSONAL INJURY AND
FIRE. SERVICE SHOULD BE PERFORMED BY COMPETENT QUALIFIED PERSONNEL, IN
ACCORDANCE WITH CORRECT ENGINEERING PRACTICE. IF IN ANY DOUBT, REFER
SERVICE TO THE RETAILER OR DISTRIBUTOR OF THE CONSOLE.
The external power supply contains a transformer with a number of secondary windings. These
secondaries are individually fused, rectified and smoothed. The fuse ratings and the power supply
rails to which they refer are marked on the chassis adjacent to each fuse.
CAUTION: FOR CONTINUED PROTECTION AGAINST FIRE, REPLACE FUSES WITH
CORRECT TYPE AND RATING ONLY. DISCONNECT THE POWER SUPPLY FROM THE
MAINS BEFORE REPLACING ANY FUSE.
Fig. 1 is the view of the power supply connector from the outside, with the multicore cable
disconnected. The voltages are approximate values, when operated from 230V AC mains supplies.
Note that the 16V heater supply is floating, and cannot be measured with respect to ground.
The power supply contains bleed resistors to discharge the capacitors when the console is not
connected, but may take several minutes to discharge fully. The power supply should only be
operated off load by a qualified technician. Never disconnect or reconnect the multicore cable whilst
the power supply is connected to the mains or there is any voltage present on the power supply
outputs.
The regulator module for each bay is located underneath the valve PCB (PC334), in the rear section
of the console. To access the regulator module the top cover should be removed, and PC334 removed
by disconnecting the two IDC cables at the front of the board, removing the fixing screws and gently
lifting the board upwards. The PSU connector that links PC334 to the regulator module should be
disconnected before PC334 is finally lifted clear of the console frame.
The regulator module will now be accessible. It consists of PC357 mounted onto an aluminium
heatsink. Refer to the circuit diagram CD1357. An 8 way plug and socket (CN3) brings the
unregulated DC onto the module, where the various rails are immediately fused and then regulated.
Failure of any fuse or regulator will normally affect only its own bay, however the loss of one power
rail may cause noise injection onto the busses, so all routing switches in the failed bay must be turned
off (or the input modules removed), should the remainder of the console be operated in this
condition.
The voltage regulators may be individually adjusted by carefully measuring at the output connectors
(CN1 and CN2) or the test points marked on PC357. The voltages should be adjusted to:
HT: +180V +/-1V.
Phantom Power: +48.0V +/-0.1V.
V+: +15.2V +/-0.1V.
V-: -15.2V +/-0.1V.
H+: +6.2V +/-0.1V.
36
Page 37

Note that adjustment of “H+” by RV5 will also cause a change in H-, as the supply is centre tapped
to 0V by R20 and R21. As the H- rail is bussed through the desk, some interaction of adjustment
between bays may occur if re-adjusted in the console. When on load, some regulation of the heater
supply may occur. This is acceptable as the valve circuits will continue to operate within their
specifications with the heater voltage (H+ to H-) as low as 9V.
Complete removal of the regulator modules requires the 4 fixing screws to be removed, CN2 and
CN3 to be disconnected and their mating cable assemblies to be carefully fed through the module
side cut-out as the module is lifted clear of the console. When re-fitting the regulator module, the
cables must be guided back through the module cut-out as it is lowered into the console. Take care to
leave the valve IDC cables accessible when re-fitting the module.
The regulated DC is taken from the module via CN1 (HT, H+ and H-) to the valve board PC334, and
via CN2 (V+, V- and 48V) to the input backplane, PC356. Note that in the Master Section, V+ and
V- power from CN2 is taken to PC355, and no connection is made to 48V.
2. Valve PCBs.
2.1. Circuit Overview.
The console valves are located on PC334 for the channel bays and PC345 for the Master Section.
Refer to CD1334 and CD1345 respectively. Note that the signal paths for the Master Section are
marked on PC345 component legend layer, and that 2 valves are intentionally not fitted.
Each valve stage consists of one half of an ECC83/12AX7A twin triode operating on an HT voltage
of approximately 175V after filtering. A pair of complementary high voltage discrete transistors in
the anode circuit act as voltage followers, providing higher current drive and power transfer from the
stage. The voltage gain is controlled by local feedback, and is individually trimmed at the NE5532
buffer stage which is inverting for the channel path Insertion Send and Master Section, and noninverting for the Monitor path. Refer to the Calibration Procedure for trimmer adjustment.
The HT and heater supplies are linked directly from the Regulator module (PC357), whilst all signal,
ground and +/-15V supplies are connected to the valve PCB’s via their two IDC cables.
CAUTION: THE REAR SECTION OF THE CONSOLE CONTAINING THE REGULATOR
MODULE AND VALVE PCBs CONTAINS HIGH VOLTAGES, UP TO +250V DC. THE
CONSOLE TOP COVERS SHOULD NOT BE REMOVED WHILST THE CONSOLE IS
CONNECTED TO THE POWER SUPPLY, EXCEPT FOR SERVICE BY A QUALIFIED
TECHNICIAN.
UNDER NORMAL OPERATING CONDITIONS, THE MAXIMUM VOLTAGES PRESENT ON
THE CHANNEL AND MASTER MODULES ARE +48V DC AND +/-15V DC. HOWEVER,
THESE SUPPLIES ARE CAPABLE OF PROVIDING HIGH CURRENTS AND ENERGY, AND
CARE MUST BE TAKEN NOT TO CAUSE A SHORT CIRCUIT.
2.2. Valve Circuit Fault Finding.
Fault finding on the valve circuits is generally straight-forward. The power supplies and IDC cable
connector seating should be checked, after which the signal paths may be followed through with an
37
Page 38

oscilloscope. Note that high impedance points such as the valve grids and anodes should not be
probed directly, as the probe impedance may cause a misleading change in operating conditions.
Some pointers to possible faults are listed in table 1 below:
Table 1: PSU / Valve PCB fault symptoms and causes.
Symptom.
Hum on one or more signal paths. Check HT filtering components.
A short circuit transistor (or open circuit
resistor in base circuit) may cause excessive
HT current drain, detectable by a higher
voltage drop across the filter resistors.
Signal asymmetric distortion. Check anode transistors for open or
short circuits.
(One half of waveform suffering
distortion at lower level). Check valve biasing (approximately 1V on
cathode and 130V on anode).
Faulty valve.
Intermittent noise or buzz. Poor connection of valve in socket.
Noisy trimmer in buffer circuit.
Low level signal. Faulty valve.
Loss of metallic deposit at the top of the
valve envelope indicates loss of vacuum,
requiring valve replacement.
Possible cause.
No heater supply to valves.
WARNING: DO NOT REMOVE OR REPLACE VALVES WITH THE POWER SUPPLY ON, AS
A HIGH VOLTAGE SPARK OR POTENTIALLY DAMAGING TRANSIENT MAY OCCUR.
2.3. Valve Replacement.
When removing a valve, use a straight pull to extract it from the socket. Do not rock the valve from
side to side, as this may strain the socket pins and cause intermittent connection or noise problems.
Similarly, when replacing a valve, ensure that the pins are all straight before inserting the valve into
the socket, with a straight push. Avoid unnecessary pressure, as this may mean that a pin is not
correctly aligned. If it is necessary to straighten a valve pin, apply gentle pressure only as the glass
envelope can easily be cracked, resulting in loss of vacuum and eventual failure of the valve.
Small signal valves such as the twin triodes used in the VTC console are usually very reliable. The
valve parameters are not highly critical as local feedback is used to control the circuit performance.
The valves should have a life of several years normal operation, and do not require regular
38
Page 39

replacement as they age. When replacements do become necessary, they should be obtained from the
console supplier. ECC83/12AX7A valves are quite commonly available, but the various
manufacturers differ greatly in quality and audio performance, and replacement with the same type as
originally supplied with the console will ensure consistency of performance. After replacing a valve,
the signal path gain should be checked as described in the Calibration Procedure, but no valve bias or
other adjustment is necessary.
2.4. Valve Path Identification.
The Master Valve paths are identified along the rear edge of the PCB (see above).
The channel valves are in line with their respective input modules, and when viewed from the rear of
the console the trimmer for the MONITOR (TAPE) PATH is on the LEFT, and the CHANNEL
PATH is on the RIGHT.
39
Page 40

3. Input Bays.
3.1. Mechanical Construction.
The input modules are carried in a steel cradle which is mounted between the console bulkheads. The
cradle provides mounting screw points for the modules, plus two rigid PCB backplanes into which
the input modules are plugged. All connections to the input modules are made via a two part
DIN41612 connector on each of the backplanes. To remove a module, the large black countersunk
screws at the top and bottom of the module should be taken out, after which the module can be
simply pulled clear of the console.
Note that consoles fitted with third party Automation Systems may be installed with additional flying
leads to the module and/or faders, and care must be taken not to damage these leads as the module is
withdrawn.
Both backplanes are passive, i.e. they contain connections only, with no active circuitry (refer to
CD1356 and CD1337). The upper backplane, PC356, (nearest the VU meters) carries the power
distribution to the input modules, as well as the inputs and outputs for the module, and balanced Aux
busses. The power connection may be checked by removing the middle two modules, and measuring
the voltage rails as marked on the rear of CN30.
The non-patchbay standard console has a separate 16 way IDC cable for each module, carrying the
Line Input, Insertion Send + Return, Monitor (Tape) Input and Direct Output to the small PCB
(PC335) onto which are mounted the rear panel jack sockets. These IDC cables are secured in place
in the console frame, and terminated onto PC356. Consoles with internal or external patchbays have
longer IDC cables, taking the above signals from PC356 either directly to the patchbay PCBs or to
multiway connectors.
Irrespective of any patchbay, the microphone input for each module is via a rear panel mounted XLR
connector with an individual screened cable terminated directly onto PC356, close to the module
connector. This ensures minimal PCB track length for the mic signal, to achieve good noise
immunity.
The lower backplane, PC337, carries the balanced buss signals along with PFL and Solo signals.
3.2. Adding Modules to Sub-fitted Consoles.
Each Input Bay is normally fitted with eight input modules, although some consoles may be subfitted with individual module blanks or full bay blank panels. When retrofitting modules to consoles
initially supplied part fitted, the new modules can be simply plugged into the backplanes. The valves
for the new channels will also need to be fitted to PC334, and the console calibration procedure
followed. Note that modules should be dedicated to particular positions in the console. If they are
moved to another position, the relevant valve stages should be recalibrated, and the engraved mute
buttons exchanged.
CAUTION: THE CONSOLE POWER SUPPLY MUST BE SWITCHED OFF BEFORE ANY
MODULES OR VALVES ARE PLUGGED IN OR OUT
.
3.3. Input Modules.
The channel modules consist of three PCBs mounted onto a reversed U-section sub-front plus front
panel:
40
Page 41

PC331 - Channel Module Input. CD1331 refers.
PC332 - Channel Module Equaliser. CD1332 refers.
PC333 - Channel Module Fader. CD1333 refers.
Channel Module Overall circuit diagram: CD1350.
See also the Channel Block Diagram in the specification section.
The PCBs are interconnected with short, flat jumper cables. The mute switches and faders are wired
to plug-in headers for ease of service replacement.
3.4. Replacing Mute switches.
When replacing mute switches or their internal LED, check the position of the LED locating tab. The
switch body should always be fitted so that the tab is at the top of the switch i.e. pointing away from
the fader. This orientation is important for correct LED polarity and secure fitting of the switch cap.
When replacing the LED, check that the pins are correctly aligned and push the LED fully down into
the switch to avoid intermittent operation. The cap should be fitted with the two small slots towards
the top and bottom of the switch body. Take care not to lose the small diffuser when removing or
changing switch caps.
3.5. Input Circuit Description.
The VTC console is a hybrid design, using valve technology where its inclusion is considered to
enhance the sound quality of the console. Valve stages are included in the mic/line inputs, the
monitor (tape) inputs, and the mix amplifiers for the groups, L+R and Mix B busses.
The valve stages for the channel inputs are located on PC334 at the rear of the console. The stages
are similar for the mic/line input and monitor path, consisting of a voltage amplifier with local
feedback to control the gain. The valve biasing and operating point have been chosen to introduce a
subtle warming of the sound, with very low distortion at normal operating levels, increasing to a
THD of about 1% prior to clipping. The distortion is predominantly low order harmonics. The signal
level can be monitored by the “signal” and “peak” LEDs on the channel strips, illuminating at
approximately -30dB and +18dB respectively.
The valve effect will be enhanced by routing the sound source through the mix amplifiers, whilst
retaining a high integrity signal path. The console has not been designed to offer “guitar amplifier”
extremes of distortion, for which an external effect will be required.
3.6. Input Stages (CD1331).
The line input is attenuated by R28,R29,R30 and R30, whilst phantom power is applied to the mic
input by SW1. Selection of mic or line is then by SW2, with first stage amplification by the low noise
pre-amplifier IC1 whose gain is controlled by RV1. If replacing SW2, note that it is a make-beforebreak switch, indicated by the blue plunger. The zener diodes D1,D2,D3 and D4 protect the input
stage from over-voltage transients, such as may be caused by plugging a microphone in or out with
phantom power switched on. The channel path offers High Pass filtering and Phase Reverse by SW4
and SW3 respectively, before the Flip switch SW5, and routing off the module to the valve stage and
insertion point.
41
Page 42

The monitor input is connected to the balanced input stage, IC5A, and then to the pre-set gain stage,
IC4B. The pre-set, RV11, is used to calibrate the module input by matching the monitor gain to the
line input 0dB gain. It is only necessary to recalibrate RV11 if the input gain controls RV1 or RV2
have been replaced, and should be performed by feeding a 0dBu signal into the line input, setting the
line and monitor gain pots to their centre detent, and noting the level at the insertion send. The signal
should then be moved to the monitor input, the Flip switch activated, and RV11 adjusted to obtain
the same insertion send level.
The module presets are only adjusted at the module test stage, and are independent of the frame
position in the console. Calibration of line and monitor path gain is achieved by adjusting the presets
on the valve PCB (refer to the calibration procedure) and must be reset after changing input modules.
The monitor input may be changed to -10dBu sensitivity by fitting the jumper link J2 on the module.
After the gain stages and Flip switch, the monitor signal is routed off the module to the valve stage.
The channel insertion return and monitor paths are returned from the valve stages to the module by
signals INS RTN (CN1-15C) and MON VOUT (CN1-14C) respectively.
PC331 also contains the Aux sends (see CD1331 sheet 3), and the Direct Output (sheet 4). The Direct
Output has trim controls for level, RV9, and balance, RV10. Fitting J1 reduces the nominal output
level to -10dBu.
3.7. Equaliser (CD1332).
The equaliser is divided into a high and low shelving pair, IC5, and two fully parametric bands,
IC1,IC2,IC3 and IC4.
The HF / LF and HM / LM bands may be separately switched into the monitor path on PC333, hence
PC332 contains two equaliser signal paths, plus a third path through the channel EQ on/off switch,
SW1.
3.8. Faders and Routing (CD1333).
PC333 contains the fader circuitry, routing and mute controls. The mute controls are of the
electronically operated “fast fade” type, with additional interaction with the solo-in-place system and
optional automation system.
The mute switches themselves are non-latching, and require toggling on and off by the flip-flops
IC10A and IC10B. These flip-flops are cleared at power on by the reset circuitry, and then clocked
by the mute switches via the debounce circuitry at IC11A and IC11D. The audio muting is effected
by signals CHAN MUTE and MIXB MUTE, at the outputs of IC11E and IC11B, controlling IC12B
and IC12A respectively. The mute circuitry may also be activated by the SOLO signal (CN5-32A),
provided that Solo-in-place is selected on the Master Module (causing SOLO EN~ at CN5-32C to be
logic low) and the path itself is not also soloed (SW7 and SW1).
The Mute LEDs are also controlled by CHAN MUTE and MIXB MUTE, but may additionally be
illuminated at half intensity when an Automation System mute is applied (via Q6 and Q7). This is an
optional feature, only supported by certain automation systems.
When fitted to the console, the Automation System VCA paths are selected by SW9 and SW3.
Operation of the Auto switch on consoles where no automation system is fitted appears to have no
affect, as bypass headers on the backplane, PC337, maintain the signal paths. Moving Fader
42
Page 43

automation systems may retain the module fader path - please refer to the automation system installer
for details.
The Stat (status) switches are also provided for use with certain automation systems only. They are
momentary switches intended for identifying a signal path to the automation system computer.
The channel and MixB paths may be routed to the equaliser section by switches SW5 and SW6. The
channel path also has an overall EQ in/out switch on PC332, via signals CHAN EQ OUT (JP2-15)
and CHAN POST EQ (JP2-2). The channel and MixB paths are phase corrected by IC7A and IC7B,
where the balanced PFL signals are also generated, and then routed via the mute circuitry, IC12 and
IC3, to the faders. The post fade signals are buffered by IC7A and IC9A respectively, and taken via
the Pan controls to the balanced drivers and routing switches. The post fade signals are also routed
back up the module to the Aux sends on PC331.
The signal source selection for the Direct Output is made by the Buss switch, SW10, selecting either
the channel post fade signal or the group mix from the backplane (BUSS IN at CN5-20C). The
backplane tracking routes group 1 to module position 1 (i.e. channels 1,9,17, etc), and group 2 to
position 2, etc.
3.9. Module Fault Finding.
The input modules may be removed from the frame for ease of fault finding. Two extender cables are
provided with the console, and should be used to re-connect the module to the two backplanes. The
module can be easily probed with an oscilloscope if it is laid on its side on top of the adjacent
modules, which should be protected with a sheet of cardboard or other insulating material.
4. Master Section.
4.1. Mechanical Construction.
The console master section is constructed in a similar manner to the input bays. A steel cradle
provides mechanical support for two backplanes, PC355 and PC336, whilst the regulator and valve
PCBs are located in the rear section. Two master module assemblies plug into the backplanes via
IDC cables.
When fault finding on the Master section, either or both modules may be propped open with the IDC
cables still connected.
CAUTION: Switch off the power before attempting to open the Master section. Care must be taken
not to damage the IDC cables or the talkback microphone screened cable as the modules are
removed.
Under normal operating conditions, only the +/-15V supplies are present on the Master modules and
backplanes. Note that the same regulator module, PC357, is used for the input bays and Master
section, but the 48V output is not used in the Master section.
The Valve PCB, however, is different to that used in the input bays. The Master Valve PCB is
PC345, which contains similar circuitry to PC334, but certain signal phases are different. The signal
path names are identified along the rear edge of PC345, in line with their valves and trimmers. If the
valve boards are fitted to the wrong bays, signal continuity will be preserved, but with phase reversal
43
Page 44

apparent on various paths. Two valve positions, along with their associated trimmers and IC’s, are
intentionally not fitted to PC345.
The master front backplane, PC336, is linked to the input bay backplanes, PC337, by short IDC
cables carrying the balanced busses. These cables plug into the underside of the PCBs, to avoid
fouling the input modules. It is unlikely that these cables will need to be removed, but if it should be
necessary, all of the input bay modules should be removed from the console, and the IDC cable
disconnected from the socket on the underside of PC337. The backplane can be lifted clear of the bay
after removing the six screws which secure it to the cradle. The IDC cable must be fed through the
bulkhead, and can then be removed. When refitting the cable, ensure that the plug is fully seated into
the socket on the underside of the PCB.
The majority of the Master section inputs and outputs are via IDC cables connected to the underside
of the upper backplane, PC355. The IDC cables are terminated on the jacksocket connector PCBs on
the rear panel, or taken to the patchbay. Note that the IDC cables are held in place with clips on the
console frame, and their function identified with labels on the cables themselves and the silk screen
of PC355 (e.g. “Groups”, “Inserts”).
4.2. Master Module Circuit Description.
Refer to the Master module block diagram in the specification section of this manual, the circuit
diagrams, and the expanded block diagrams in the following sections. The expanded block diagrams
include the locations of the various circuit blocks, and main signal names as used on the circuit
diagrams.
4.3. Master L+R Outputs.
Refer to the expanded block diagram, fig 3.
The L+R mix amplifiers are hybrid designs, using a low noise balanced IC first stage on PC336
followed by a valve stage on PC345. Due to the length of cabling that would otherwise be necessary,
a L+R sub-mix is formed on the upper Master section, consisting of the stereo return, MixB to L+R
path, talkback and oscillator. The sub-mix is buffered and balanced, and routed via the upper
backplane, PC355, into the main mix on PC336 by the signals ANC L and R.
The mix busses are connected to the mix amplifiers IC16 and IC17 (see CD1336 sheet 4), via the
IDC cables at CN4 and CN5 (from the input modules), CN6 from the group fader modules and CN2
from the ancillary sub-mix. The first stage mix amplifier outputs “L VIN” and “R VIN” are routed
via CN1 to the valve stages on PC345, from where they are returned on the same connector as “L
VOUT” and “R VOUT”. These signals are immediately routed out to the insertion points by the
signals “L SND” and “R SND”, via CN2 and PC355. The insertion returns “L RTN” and “R RTN”
are routed to the L+R master fader module, PC339, as signals “L FDR” and “R FDR” via the Master
module IDC cable fitted to CN4. The buffered post fade signals “L WPR” and “R WPR” are returned
on the same IDC cable to PC336, and thence to the output stages on PC355 as signals “L OUT” and
“R OUT”.
The output stages are shown on CD1355 sheets 2 and 3. There are separate buffered stages for the
balanced outputs at a nominal level of +4dBu and the unbalanced outputs at a nominal level of 10dBu. The balanced outputs have a trimmer for balance, RV5 and RV6. The L+R level trimmers are
located at the valve stages on PC345 - refer to the calibration procedure for setup instructions. The
output level is monitored by the meter controller as signals “MTR L” and “MTR R” on PC355.
44
Page 45

4.4. Group Outputs.
Refer to the expanded block diagram, fig 2. The Group mixes and outputs follow a similar path to the
L+R outputs described above.
The sub-mix for the groups consists of just the Talkback and Oscillator signals, routed onto PC336 as
“TAPE +” and “TAPE -”. The mix amplifier for Group 1 is formed by IC3 and IC4A (see CD1336
sheet 2), and the valve stage on PC345 (“G1 VIN”, returned as “G1 VOUT”). After the insertion
send, the return is routed to the Group 1 fader module, PC338A, as “G1 FDR” on CN4. The buffered
post fade signal “G1 WPR” is routed to the output stage on PC355, and also back along the PC337
backplanes for selection by the input modules’ “BUSS” switch. PC338A also contains switches for
routing the group signal to the L+R mix and AFL monitoring.
Groups 2 to 8 have similar circuitry, but note that the group fader modules, PC338, are not
interchangeable. They are identified as PC338A for Group 1, PC338B for Group 2, through to
PC338H for Group 8. The circuitry differs for the L/L+R or R/L+R routing on odd and even groups
respectively, and the pin numbers for the pre and post fade signals on the IDC cable.
The group output signals are monitored by the meter controller on PC355 (“MTR G1”, etc), and have
a jumper programmable nominal output level - see CD1335 sheet 2. The default output level is
+4dBu, but may be changed to -10dBu by fitting J14 for Group 1. The jumper identifications on
PC355 for all of the groups are shown in table 2:
Table 2: Group Output level jumpers.
Located on PC355. Fit jumper to convert to -10dBu.
Group 1 J14
Group 2 J10
Group 3 J13
Group 4 J9
Group 5 J12
Group 6 J8
Group 7 J11
Group 8 J7
45
Page 46

4.5. MixB Outputs.
The MixB output signal path is again similar to the L+R outputs described above, except they do not
have sub-mixes or insertion points. Refer to the expanded block diagram, fig 4.
The mix amplifiers consist of IC9, 10 and 11 on PC336, feeding the valve stages on PC345 via the
signals “MIXB L VIN” and “MIXB R VIN”. The outputs from the valve stages are routed to the
MixB master level controls on PC348 as signals “MIXB L PRE” and “MIXB R PRE”, via the upper
backplane, PC355.
Refer to CD1348 sheet 2 for the MixB master level controls and output stages. The pre fade signals
from PC336 appear on PC348 as signals “BMIX L” and “BMIX R”. The “0V REF” signal
accompanies these signals from PC336, where the 0V reference is converted to the local 0V by the
difference amplifiers IC11A and IC11B. The rotary master fader is followed by +15dB gain stages,
IC9A and IC9B, and output drivers IC3 and IC4 with balance trimmers RV6 and RV7 respectively.
The MixB outputs are routed back down the IDC cable to PC355, and then out to the jacksocket PCB
or patchbay.
The MixB Assign to L+R function is accomplished by SW4, feeding into the L+R sub-mix formed
by IC7 and IC8 (CD1348 sheet 3). The signals “MIXB L” and “MIXB R” are sent back to PC355 for
monitoring by the Control Room output.
4.6. Aux Outputs.
The Aux mix busses are balanced, and linked to the input modules via the upper backplanes PC356.
The Aux mix amplifiers are located on the upper Master Backplane, PC355, linked to the input bays
by 16 way IDC cables connected to CN4 and CN5. These connectors are on the underside of PC355
and PC356, and care should be taken to ensure that they are correctly plugged in if any backplane has
been replaced. The seating of the cables linking the input bay backplanes (PC356) should be checked
if there is an apparent break in the Aux busses between bays.
The Aux mix amplifiers are entirely solid-state, and are shown on CD1355 sheet 6. Their outputs are
taken via the IDC cable at CN6 to the Aux Master modules PC347 on the upper Master Module.
Note that as for the group fader modules, the PC347s are marked PC347A for Aux 1, etc. The
circuitry is similar for all of the Aux outputs, but different pin numbers apply to the IDC connector
(CN3 on PC347) for the outputs and stereo returns which are also on the modules, hence the PC347
boards are not inter-changeable. The Aux Outputs and Stereo Returns share a common IDC cable,
which links the PC347s to the jacksocket connector PCBs, or patchbay. The cable plugs directly to
CN3 on PC347, without passing through the upper backplane.
The master stages for the stereo Aux, 7/8, are located on PC348, but are connected by the same IDC
cables. See CD1348 sheet 2.
The third IDC cable used in the upper master section is a local link between the six PC347s, PC348
and PC349. It conveys the AFL signals from the Aux outputs and stereo returns to the AFL/PFL submix on PC349, as well as the headphone mixes which are also on PC349.
4.7. Stereo Returns.
The six Stereo Returns are brought into the console from the jacksocket board, PC343, to PC347 via
the Aux/Returns IDC cable. One of the returns is processed by each of the PC347 modules. Refer to
46
Page 47

CD1347.
Following the balanced receiver stages IC2A and IC2B, the return is taken to the balance control,
RV3, and buffered by IC4A and IC4B. The sensitivity of the returns is +4dBu by default, but may be
changed to -10dBu by fitting jumpers J1 and J2.
The stereo returns are controlled by a 60mm fader, followed by a +10dB buffer (IC3A and IC3B),
and routed to the L+R sub-mix. Additional switches on PC347 also provide AFL monitoring and
routing to the headphones.
4.8. Oscillator.
The oscillator circuit is contained on PC348. Refer to CD1348 sheet 3.
Two oscillators provide 1KHz and 10KHz waveforms. The 1KHz is generated by IC1B, with level
trimmed by RV3. Similarly, the 10KHz is generated by IC1A, with level trimmed by RV2. These
trimmers are located near the sub-front for PC348, but can be accessed and adjusted by propping
open the upper master front panel. The oscillators are routed to the groups and L+R mixes pre-fade
by the “On” switch SW5. The trimmers should be adjusted to give +10dBu at the outputs when the
faders are at their 0dB position. There is no provision for trimming the oscillator frequencies.
When the oscillator switch is in the “Off” position, the gain of the IC1A and IC1B stages is reduced
by the signals E1,E2,E3 and E4, causing the oscillators to shut down, to eliminate any risk of
crosstalk. The oscillators can therefore only be adjusted when SW5 is in the “On” position.
4.9. Talkback.
The talkback mic amplifier and routing is also located on PC348. Refer to CD1348 sheet 4.
The input from the microphone is on screened cable, directly from the socket on the lower master
module to CN1 on PC348. This connector carries a further connection from the logic controller,
PC351, which is the talkback on/off signal derived from the talkback “On” switch near the
microphone. Care must be taken when removing either master module to ensure that this cable is not
damaged.
The microphone signal is amplified by IC6, with gain controlled by RV8. The amplified signal is
only passed to the routing switches if the logic control signal is at 1 (+15V). A logic 0 (0V) will mute
the talkback signal. The talkback control logic may be either momentary or latching, depending on
jumper configuration on the logic PCB (see below).
Talkback can be routed to the groups plus L+R busses, studio and headphones. Both the routing
switches and “On” button must be enabled to route talkback through to the outputs.
4.10. Headphones.
There are two similar stereo headphone circuits, located on PC349. Refer to CD1349
.
Each headphone circuit has five sources selected by the push buttons on PC349. These sources are
Control Room, MixB, Aux 3/4, Aux 7/8 and the EXT input. The sources are additive, i.e. more than
one source may be selected and they will be mixed together. The mix points “PHONES 1L” etc. are
linked out onto the upper master module inter-connect IDC cable, to enable the headphone sends
from the stereo returns to also be added. The Aux 3/4 and 7/8 sources route the odd numbered Aux to
the headphone left output, and the even numbered Aux to the right output, to facilitate stereo
47
Page 48

foldback mixing from both channel and MixB paths on the input modules.
The sources for headphones 1 are mixed by IC2A and IC2B, and then controlled by the level pot
RV1. The headphone outputs are directly driven by the high drive TLE2062 at IC1A and IC1B.
These devices will directly drive headphones of 32ohms or higher impedance. The outputs are passed
down to PC355 and out via the jacksocket PCB or patchbay.
The headphone signals may also be monitored in the control room, by routing to the PFL sub-mix on
PC349 (SW1 for headphones 1). In this case, the Control Room source selector switch, SW2, is overridden to prevent a circular signal path being created.
The above description quotes circuit references for headphones 1, the circuit for headphones 2 is
similar.
4.11. Solo System.
The block diagram of the console solo system is shown in fig. 5.
The console has three modes of operation:
PFL (Pre-Fade Listen): The default mode for Channels and MixB paths on the
input modules.
AFL (After-Fade Listen): From the Groups, Aux Masters and Stereo Returns.
SOLO IN PLACE: Replaces PFL mode on Channels and MixB, when selected
on the Master Module. Channels and MixB paths not in solo
mode are muted.
There is a separate AFL/PFL stereo mix buss, which replaces the normal Control Room output when
any PFL or AFL switch is activated. All other outputs from the console remain unchanged in this
mode. PFL/AFL active is signalled by a red LED adjacent to the active switch, and by the yellow
LED on the Master Module VU meter panel.
If Solo In Place mode is selected by the switch on the lower master module, any Channel or MixB
path solo switch that is activated will cause all of the other Channel and MixB paths to be muted. In
this mode, the Control Room output does not switch over to the AFL/PFL buss, and the yellow LED
is not illuminated. Operators should be aware that Solo In Place causes other signal paths to mute,
thereby cutting the console outputs to the recorder, etc. and programme material may be lost.
A combination of Solo In Place and AFL is possible. This occurs if Solo In Place mode is selected,
and a Channel or MixB path solo switch is active, followed by activation of an AFL switch on a
Group, Aux Send or Stereo Return. Under these circumstances, the unselected Channel and MixB
paths will still be muted, but the Control Room output will switch to the AFL/PFL buss and the
yellow LED will illuminate. This combination of modes allows, for example, the aux send or effects
return contribution of a single channel to be listened to in the Control Room.
The PFL buss from the input modules is connected along the backplanes PC337 to the front Master
backplane, PC336. The PFL mix amplifiers are shown on CD1336 sheet 5. Connectors CN5 and CN6
link the PFL buss to the input bays, whilst CN4 connects to the Group Modules on the lower Master
Module front panel. Note that the input module section of the buss is routed via the switches IC22
and IC23, which prevent channel PFL signals reaching the Control Room output when in the
combined Solo In Place - AFL mode described above. The mixed signals “PFL L” and “PFL R” are
48
Page 49

routed via IDC cables and PC355 to the sub-mix on PC349 in the upper Master Module. The sub-mix
adds in the locally sourced AFL signals from the Aux Send Masters and Stereo Returns. The signal
“PFL L OUT” and “PFL R OUT” are routed back via PC355 to the Control Room and Studio output
PCB, PC352, located on the lower Master Module front panel.
4.12. Control Room Output.
The AFL/PFL mix has a +/-20dB gain trim stage at IC1A and IC1B (CD1352 sheet 3), before being
passed to the switch array that forms the Control Room source selector. The main sources available
to the Control Room are the L+R mix, MixB, and the external inputs 2TA, 2TB and EXT. Selection
of the main sources is additive (i.e. more than one may be selected at a time), but they are muted
when PFL is active or when the Studio output is soloed.
The Control Room source mix is formed at IC8B and IC8A (left and right respectively). These
amplifier stages have their gain modified by -3dB when Mono mode is selected, and are followed by
a -12dB gain reduction at IC4B and IC4A when the Talkback “On” button is active (even if talkback
is not routed to any destination - this enables a “Control Room Dim” function to be obtained, without
talkback).
The Control Room level is determined by RV2, followed by the +10dB buffers IC2A and IC2B. The
signals “CR L” and “CR R” are routed to the output driver stages on PC355, and the output jack
socket PCB or patchbay. Switching to alternative loudspeakers and power-on speaker thump
protection delay is achieved on PC355 by two relays, RL1 and RL2 (see CD1355 sheet 4). “ALT
LS~” is a logic control signal, whilst “PSU MON” is linked to +15V at CN11 on PC355. The
alternative loudspeaker outputs are located on the meter controller (see below), and remain on the
rear of the console when the patchbay option is specified.
The Control Room signal path switching is under logic control from PC351 - see below.
4.13. Studio Output.
The studio sources are selected in a similar manner to the control room outputs, in this case at IC23B
and IC23A. There is an additional Studio “On” switch controlling IC16, and talkback to the studio is
added at IC17B and IC17A. The Studio level is determined by RV3, followed by the +10dB buffers
IC3A and IC3B. The signals “STUDIO L” and “STUDIO R” are routed to the output driver stages on
PC355, and the output jacksocket PCB or patchbay.
4.14. Logic Control.
The Control Room, Studio, Talkback and Solo Modes are all controlled by the logic circuitry on
PC351. This PCB is mounted adjacent to the square push button switch array on the lower Master
Module front panel. Refer to CD1351.
The square push button switches are all momentary operation and are manufactured with a short
wiring loom and four way PCB header, enabling easy service replacement without soldering. All of
the switches are identical, and may be freely interchanged (but note cap colours!). The switch
functions are marked along the edge of PC351. Switch LEDs may be replaced from the front of the
panel by carefully pulling off the coloured cap and diffuser, and extracting the old LED with a pair of
small nosed pliers. The replacement LED should be carefully aligned with the locating tab in the
switch body, and pushed fully down into the switch. When replacing the switch cap, note the
orientation of the two small slots in the cap which must be aligned with the protrusions on the white
49
Page 50

switch inner. Failure to ensure correct alignment may result in the switch cap springing off suddenly
if the switch is operated quickly.
The push buttons are controlled by similar circuits. For example, the Control Room “L+R” push
button, SW2, is debounced by IC1B and toggled by the flip-flop IC2A (see CD1351 sheet 2). The
output from IC2A is used to turn on the LED via Q2. The flip-flop array is initialised to a predetermined state at power-on by the “RESET” signal from IC15A.
The toggled signals, “CR L+R~”, etc are active low (as identified by the label “~”), and are gated by
IC13C, etc (CD1351 sheet 4) to produce active high signals taken out on CN18 to PC352. The gating
at IC13C is determined by the state of signals “PFL” and “STD SOLO” i.e. if PFL is active or the
studio is soloed, the main Control Room sources are inhibited. Solo In Place or PFL mode is
controlled by IC7A (CD1351 sheet 2), generating the signals “SOLO MODE”, used to disconnect the
PFL buss on PC336 (see above) and “SOLO EN” which is routed out onto the input module
backplanes, PC337. Switching the Control Room and metering outputs over to the AFL/PFL buss is
controlled by the signals “PFL” and its compliment “PFL~” (CD1351 sheet 4). The gate IC14C
activates switch over only if Solo In Place is not selected, using the “SOLO” signal. “PFL SIG” and
“AFL SIG” are active high, diode OR’ed signals, activated from the various solo switches on the
console.
The Studio source selection operates similarly to the Control Room selection, but with an added logic
multiplexer to perform the Studio “Follow Control Room” function. “Follow CR” is generated by
IC6B (CD1351 sheet 3), and controls the gates IC17A/B, etc.
Talkback and Control Room dim are controlled by the signal “T/B ON” at CN18 pin 12. This signal
is either momentary if jumper J2 is fitted (the default setting), or latching if J1 is fitted. “T/B ON” is
also taken from PC351 on a flying wire loomed with the talkback microphone cable to PC348 on the
upper Master Module. If talkback does not appear on the outputs but the switch illuminates, check
that the talkback destination is selected on the upper Master Module and the output fader is open, and
that the flying cable is connected to PC348.
The logic power supplies on CD1351 are labelled VL+ and VL-. These voltage rails are derived from
the master section +15V and 0V respectively, but are decoupled from the audio circuit supplies by
R18, R19 and C28, etc.
4.15. External Monitoring Inputs.
The console has three stereo monitoring inputs: 2TA, 2TB and EXT. The inputs are on jack sockets
on the rear of the master section (or patchbay), with balanced receiver located on the upper master
backplane, PC355 (see CD1355 sheet 5). The two track returns are dedicated stereo inputs, but the
EXT input is normalled for stereo or mono operation.
Each of the external inputs is set to +4dBu nominal sensitivity by default, but may be changed to 10dBu by fitting jumper links to PC355. These jumpers may be accessed by propping open the upper
master module.
The links that should be fitted are:
2TA: J3 and J6,
2TB: J2 and J5,
EXT: J1 and J4.
50
Page 51

The external monitoring inputs are routed off PC355 by the IDC cable at CN7, to the Control Room
and Studio module, PC352.
4.16. Metering.
The console is fitted as standard with retro-style VU meters for the eight groups plus left and right
outputs. Each of these meters also has a peak LED adjacent to it. Control of the meters and LEDs is
from PC344, located on the master section rear panel and connected to the backplane, PC355, by an
IDC cable.
The circuit diagram for the meter controller is CD1334, which shows the meter trims accessible from
the rear panel, and the peak detect circuits. There is an overall peak threshold trim, also accessible
from the rear panel. The default calibration for the trimmers is 0VU = +4dBu and peak LED
threshold = +18dBu.
4.17. Meter Bridge Option.
The meter controller, PC344, and rear panel of each input section carry a 25 pin “D-type” connector
for connection of the optional LED bargraph meter bridge. The circuit diagrams for the meter bridge
are CD1353 (input sections) and CD1354 (master section). The master section of the bridge includes
“Send” and “Return” switching, which is bussed on 3 pin headers to all input sections, where it
selects between the tape send (Direct Out) or return (Monitor) input.
Power to the meter bridge is also conveyed on the D-type connector. There is a master calibration
trimmer on the rear of each meter bridge PCB, which should be used to set the 0VU point of the
bargraphs in that section, plus an individual bargraph offset trim which should be used to set the “on”
threshold of the lowest LED in the bargraph. The offset trim will need to be re-adjusted if the lowest
LED segment illuminates when there is no signal present. To access the trimmers, the relevant rear
section of the meter bridge needs to be removed - this is possible without removing the entire meter
bridge from the console.
51
Page 52

5. Calibration Procedure.
For the first channel installed:
1. +4dBu 1KHz tone to LINE input, Gain @ 0dB, Channel Fader @ 0dB.
BUSS switch off, EQ off.
Trim Channel Valve for +4dBu @ DIR OUT.
2. Route to all Groups and L/R. Group and L/R Faders to 0dB.
a): With Channel Pan fully left, trim Group 1/3/5/7 and L Valves for +4dB at
their respective OUTPUTS.
Trim 1/3/5/7 and L METERS for 0VU.
b): With Channel Pan fully right, trim Group 2/4/6/8 and R Valves for +4dB
at their respective OUTPUTS.
Trim 2/4/6/8 and R METERS for 0VU.
3. MIXB SOURCE to Channel, MIXB Master to 0dB, MIXB routed to L/R.
a): With MIXB Pan fully left, trim BL Valve for +4dBu at MIXB L OUT.
Check +4dB at L OUT.
b): With MIXB Pan fully right, trim BR Valve for +4dBu at MIXB R OUT.
Check +4dB at R OUT.
4. MIXB SOURCE to MON. Input to MON, Mon Gain @ 0dB.
Trim Mon Valve for +4dBu at MIXB R OUT.
Subsequent Channels:
1. +4dBu 1KHz tone to LINE input, Gain @ 0dB, Channel Fader @ 0dB.
Trim Channel Valve for +4dBu @ DIR OUT.
2. MIXB SOURCE to MON. Input to MON, Mon Gain @ 0dB, MIXB Pan fully
right,
Trim Mon Valve for +4dBu at MIXB R OUT.
52
 Loading...